

Page 1

LD1922D2
19” LCD TV
TV LCD 47 cm AVEC TUNER TNT INTEGRE
OPERATING INSTRUCTIONS
MANUEL D’UTILISATION
Page 2

English - 1 -
Contents
Install Menu ......................................................22
Source Menu ....................................................24
PC Mode Menu System........................................ 24
PC Position Menu ............................................. 24
Displaying TV Information .................................... 25
Mute Function ....................................................... 25
Picture Mode Selection......................................... 25
Freezing Picture ...................................................25
Zoom Modes......................................................... 25
Auto .................................................................. 25
16:9 ................................................................... 25
4:3 ..................................................................... 25
Panoramic.........................................................25
14:9 ................................................................... 25
Cinema ............................................................. 25
Subtitle .............................................................. 25
Zoom.................................................................25
T eletext ................................................................. 26
Tips .......................................................................26
Screen Care......................................................26
Image Persistence ............................................ 26
Appendix A: PC Input Typical Display Modes .......27
Appendix B: AV and HDMI Signal Compatibility
(Input Signal Types) .............................................. 28
Specifi cations ....................................................... 29
IMPORTANT DISPOSAL INSTRUCTIONS ...... 30
Safety information ............................................... 2
Accessories ............................................................ 4
Features ................................................................. 4
Introduction ............................................................. 4
Preparation ............................................................. 4
Safety Precautions .................................................4
Power Source ..................................................... 4
Power Cord ......................................................... 4
Moisture and Water ............................................4
Cleaning..............................................................5
Heat and Flames ................................................5
Lightning ............................................................. 5
Replacement Parts ............................................. 5
Servicing ............................................................. 5
Waste Disposal ................................................... 5
Disconnecting the Device ................................... 5
Headphone Volume ............................................ 5
Installation...........................................................5
LCD Screen ........................................................ 5
Warning ..............................................................5
Overview of the Remote Control ............................6
LCD TV and Operating Buttons .............................. 7
Back Connectors ................................................... 7
Side Connectors .................................................... 8
Power Connection .................................................. 8
Aerial Connection ................................................... 8
Connecting the LCD TV to a PC ............................. 9
Connecting to a DVD Player................................... 9
Using Side AV Connectors ...................................10
Connecting Other Equipment via Scart ................ 10
Inserting Batteries into the
Remote Control Handset .......................................11
Switching the TV On/Off ........................................11
To Switch the TV On ..........................................11
To Switch the TV Off ..........................................11
Input Selection .......................................................11
Basic Operations ...................................................11
Operation with the Buttons on the TV ................11
Initial Settings ....................................................... 12
General Operation ................................................ 12
Electronic Programme Guide (EPG) ....................13
Displaying Subtitles ..........................................13
Digital Teletext (** for UK only) .........................13
Analogue Teletext .............................................13
Widescreen ....................................................... 13
IDTV Menu System ..............................................14
Channel List ...................................................... 14
Timers ...............................................................15
Conditional Access ...........................................16
TV Setup ........................................................... 16
Setup ................................................................ 16
Analogue TV Menu System .................................. 20
Picture Menu.....................................................20
Sound Menu .....................................................20
Feature Menu ...................................................21
A01_[GB]_MB45_1055UK_PANEUIDTV_BRONZE11_19822_10065707_50156721.indd 1A01_[GB]_MB45_1055UK_PANEUIDTV_BRONZE11_19822_10065707_50156721.indd 1 27.10.2009 16:58:4927.10.2009 16:58:49
Page 3

English - 2 -
Safety information
Mains supply
This television is designed to operate from a 220-240 Volts 50 Hz AC mains supply. Other power sources
may damage it. Check that the rating (On the back of the unit) states 220-240V AC before you plug it in for
the fi rst time.
Mains plug
We have fi tted this television with a standard mains plug.
• If the mains cord becomes damaged, it must be replaced by the manufacturer, its service agent or similarly
qualifi ed person to avoid a hazard.
• If for any reason you cut off the mains plug, please destroy the old plug as it would be dangerous if inserted
into a live power outlet. Carefully follow the wiring instructions supplied with the new plug.
• If a fuse is fi tted to the plug, remove the fuse before throwing the plug away.
• Never use a fused mains plug without the fuse cover.
• The mains plug shall be the main disconnect device and shall be accessible at all times.
Mains plug wiring for the UK
In a re-wirable plug the wires in the mains lead of this television should be connected as follows.
• The wire-coloured brown must be connected to the terminal that is marked with the letter L.
• The wire-coloured blue must be connected to the terminal that is marked with the letter N.
• No wire must be connected to the earth terminal which is marked E or
• You must make sure the lead is fi rmly secured under the cordclamp.
Mains fuse
UK standard (BS1363) plugs must have a 5 amp (BS1362 type) fuse fi tted. Replace the plug or have the
power lead assembly replaced if the fuse cover is lost.
Symbols
Safe use and care of your television
We have designed and made this television to meet European safety standards, but as with any electronic
equipment you must take care to stay safe and get the best results. Here is some good advice to help you
do this.
Read these instructions carefully before you try to use the television.
If the mains lead becomes damaged, it must be replaced by the manufacturer, its service agent or similarly
qualifi ed person with a lead of the same type and rating to avoid a hazard.
Avoid harsh conditions such as wet or damp places, high humidity, strong vibration, extremely high or low
temperatures, strong sunlight and places that are very dusty.
Never fi t makeshift stands or legs to the television.
Don’t continue to use your television if you have spilt liquids in it, if it is damaged in any way or if it does not
work normally. Immediately unplug the television and get expert advice.
Switch off mains power or pull out the power plug when you leave the television unattended, unless the function
of the television requires a continuous power supply.
Dangerous voltage constituting a risk
of electric shock is present inside this
equipment.
This mark is applied to show the
equipmentconforms to European safety and
electro-magnetic compatibility standards.
There are important operating
andmaintenance instructions in
the literatureaccompanying this
equipment.
A01_[GB]_MB45_1055UK_PANEUIDTV_BRONZE11_19822_10065707_50156721.indd 2A01_[GB]_MB45_1055UK_PANEUIDTV_BRONZE11_19822_10065707_50156721.indd 2 27.10.2009 16:58:5027.10.2009 16:58:50
Page 4

English - 3 -
Protect the screen from fi ngerprints.
This product is intended for domestic use only, Commercial or any other use may invalidate the warranty and
might be dangerous.
Ventilation
Place the television on a hard fl at surface away from direct sunlight and heat sources. If it is in a cabinet,
allow at least a 10cm gap all around. Don’t obstruct the ventilation slots, including those underneath, with soft
furnishings. Overheating will shorten the life of the television and increase the risk of fi re.
Cleaning
Disconnect the mains supply and use only a lightly dampened soft cloth. Do not use chemical solvents or
strong detergents as these may damage the cabinet or screen.
Never allow water droplets to remain on the screen as moisture can cause permanent discolouration. Greasy
marks must only be removed with a commercial cleaner specifi cally recommended for LCD screens.
Batteries
Remove batteries when the television is not to be used for a long time. Batteries left in equipment may cause
damage through deterioration and corrosive leakage, invalidating the guarantee. To protect the environment,
use local recycling facilities for battery disposal.
Safe use and care of your LCD Television
We have designed and made this television to meet European safety standards, but as with any electronic
equipment you must take care to stay safe and get the best results. Here is some good advice to help you
do this.
Read these instructions carefully before you try to use the television.
Protect the mains lead. You must ensure the mains lead cannot be walked on, crushed, chafed, cut,
trapped.
Avoid harsh conditions such as wet or damp places, high humidity, strong vibration, extremely high or low
temperatures, strong sunlight, places which are very dusty.
Never fi t makeshift stands or legs to the television.
Never push objects into holes and ventilation slots.
Don’t touch the LCD display as it gets warm when operating, this is normal and is not a fault.
WARNINGS:
• To prevent electric shock, do not remove any cover.
• If anything goes wrong, don’t try and fi x it yourself, get a qualifi ed service agent to look at it.
• Do not expose this television to dripping or splashing or place any objects fi lled with liquids, such as vases,
on the television.
Never put a naked fl ame source such as lighted candles on or near the product.
• Pull the mains plug out of the wall socket and disconnect the aerial lead during thunderstorms.
• To prevent injury this television must be securely attached to the wall or it’s supplied stand in accordance
with the installation instructions.
Eye Fatigue
When using this product as a computer monitor, health and safety experts recommend short frequent breaks
rather than occasional, longer breaks, for example a 5-10 minute break after an hour of continuous screen
work is likely to be better than a 15 minute break every 2 hours.
Do not use the monitor against a bright background or where sunlight or other bright light source will shine
directly on the screen.
A01_[GB]_MB45_1055UK_PANEUIDTV_BRONZE11_19822_10065707_50156721.indd 3A01_[GB]_MB45_1055UK_PANEUIDTV_BRONZE11_19822_10065707_50156721.indd 3 27.10.2009 16:58:5127.10.2009 16:58:51
Page 5
English - 4 -
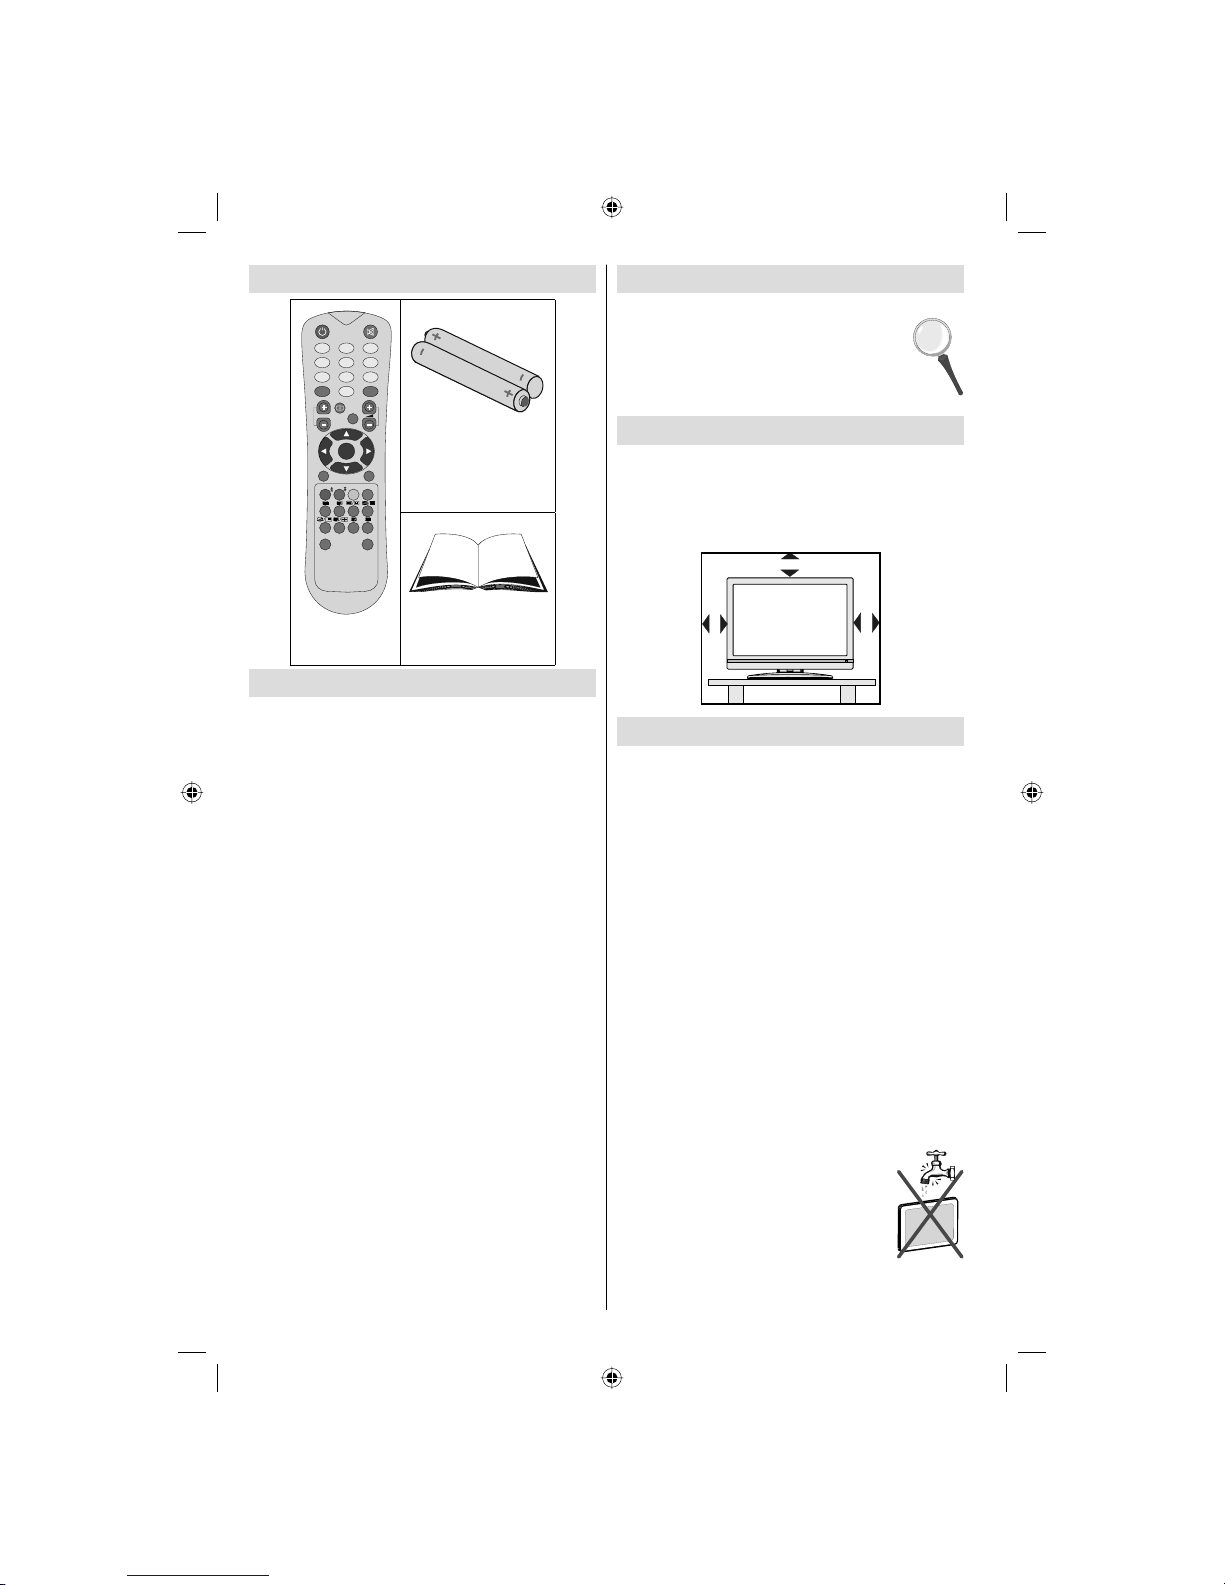
Accessories
ABC ABC
ABC
DEF DEF
DEF
GHI GHI
GHI
JKL JKL
JKL
MNO MNO
MNO
PQR PQR
PQR
STU STU
STU
VWX VWX
VWX
YZ YZ
YZ
1 2
3
4
5
6
7 8 9
0
AV
AV
SOURCE
SOURCE
EXIT EXIT
EXIT
-/--
-/--
INFO INFO
INFO
I-II
I-II
MENU
MENU
TV/DTVTV/DTV
TV/DTV
P/CH
P/CH
OK
OK
SELECT
SELECT
WIDE WIDE
WIDE
GUIDE GUIDE
GUIDE
PP
PP
P<P/SWAP
P<P/SWAP
Remote
Controller
Batteries
2 X AAA
Instruction Book
Features
• Remote controlled colour LCD TV.
• Fully integrated digital TV (DVB-T).
• HDMI connectors for digital video and audio. This
connection is also designed to accept high defi nition
signals.
•
200 programmes from VHF, UHF(analogue).
• 500 programmes for digital mode (IDTV).
• OSD menu system.
• Scart socket for external devices (such as video,
video games, audio set, etc.).
• Stereo sound syste
m.
• Teletext, fastext, TOP text.
• Headphone connection.
• Automatic programming system.
• Forward or backward manual tuning.
• Sleep timer.
• Child lock.
• Automatic sound mute when no transmission.
• NTSC playback.
• AVL (Automatic Volume Limiting).
• When no valid signal is detected, after 5 minutes the
TV switches automatically to standby mode.
• PLL (Frequency Search).
• PC input.
• Plug&Play for Windows 98,ME,2000,XP, V ista.
• Game Mode (optional).
Introduction
Thank you for choosing this product. This manual will
guide you for the proper operation of your
TV. Before operating the TV, please read
this manual thoroughly.
Please do keep this manual in a safe place
for future references.
Preparation
For ventilation, leave a free space of at least 10 cm
all around the set. To prevent any fault and unsafe
situations, please do not place any objects on top
of the set.
Use this device in moderate climates.
10 cm
10 cm
10 cm
Safety Precautions
Please read the following recommended
safety precautions carefully for your
safety.
Power Source
The TV set should be operated only from a 220-240
V AC, 50 Hz outlet. Ensure that you select the correct
voltage setting for your convenience.
Power Cord
Do not place the set, a piece of furniture, etc. on the power
cord (mains lead) or pinch the cord. Handle the power cord
by the plug. Do not unplug the appliance by pulling from the
power cord and never touch the power cord with wet hands
as this could cause a short circuit or electric shock. Never
make a knot in the cord or tie it with other cords. The power
cords should be placed in such a way that they are not likely
to be stepped on. A damaged power cord can cause fi re or
give you an electric shock. When it is damaged and needs
to be replaced, it should be done by qualifi ed personnel.
Moisture and Water
Do not use this device in a humid and
damp place (avoid the bathroom, the
sink in the kitchen, and near the washing
machine). Do not expose this device to
rain or water, as this may be dangerous
and do not place objects fi lled with liquids,
such as fl ower vases, on top. Avoid from
dripping or splashing.
A01_[GB]_MB45_1055UK_PANEUIDTV_BRONZE11_19822_10065707_50156721.indd 4A01_[GB]_MB45_1055UK_PANEUIDTV_BRONZE11_19822_10065707_50156721.indd 4 27.10.2009 16:58:5127.10.2009 16:58:51
Page 6

English - 5 -
Disconnecting the Device
The mains plug is used to disconnect TV set from
the mains and therefore it must remain readily
operable.
Headphone Volume
Excessive sound pressure from earphones
and headphones can cause hearing loss.
Installation
To prevent injury, this device must be securely
attached to the wall in accordance with the installation
instructions when mounted to the wall (if the option
is available).
LCD Screen
The LCD panel is a very high technology product with
about a million thin fi lm transistors, giving you fi ne
picture details. Occasionally, a few non-active pixels
may appear on the screen as a fi xed blue, green or
red point. Please note that this does not affect the
performance of your product.
Warning
Do not leave your TV in standby or operating mode
when you leave your house.
If any solid object or liquid falls into the cabinet, unplug
the TV and have it checked by qualifi ed personnel
before operating it any further.
Cleaning
Before cleaning, unplug the TV set
from the wall outlet. Do not use liquid or
aerosol cleaners. Use soft and dry cloth.
Ventilation
The slots and openings on the TV set are intended for
ventilation and to ensure reliable operation. T o prevent
overheating, these openings must not be blocked or
covered in anyway.
Heat and Flames
The set should not be placed near to open
fl ames and sources of intense heat such
as an electric heater. Ensure that no open
fl ame sources, such as lighted candles,
are placed on top of the TV. Batteries
should not be exposed to excessive heat
such as sunshine, fi re or the like.
Lightning
In case of storm and lightning or when
going on holiday, disconnect the power
cord from the wall outlet.
Replacement Parts
When replacement parts are required, make sure that
the service technician has used replacement parts,
which are specifi ed by the manufacturer or have the
same specifi cations as the original one. Unauthorized
substitutions may result in fi re, electrical shock or
other hazards.
Servicing
Please refer all servicing to qualified
personnel. Do not remove the cover
yourself as this may result in an electric
shock.
Waste Disposal
Instructions for waste disposal:
• Packaging and packaging aids are recyclable and
should principally be recycled. Packaging materials,
such as foil bag, must be kept away from children.
• Batteries, including those which are heavy metal-
free, should not be disposed of with household
waste. Please dispose of used battery in an
environment friendly manner. Find out about the
legal regulations which apply in your area.
• Cold cathode fluorescent lamp in LCD PANEL
contains a small amount of mercury; please follow
the local laws or regulations for disposal.
A01_[GB]_MB45_1055UK_PANEUIDTV_BRONZE11_19822_10065707_50156721.indd 5A01_[GB]_MB45_1055UK_PANEUIDTV_BRONZE11_19822_10065707_50156721.indd 5 27.10.2009 16:58:5227.10.2009 16:58:52
Page 7

English - 6 -
Overview of the Remote Control
Mute1.
No function / Exit (in DTV mode) 2.
Volume up / down3.
Mono / Stereo - Dual I-II4.
TV / Digital TV5.
Yellow / Feature menu / 6.
Current language (in DTV mode) (*)
Blue / Install menu7.
Hold (in TXT mode)8.
Update (in TXT mode)9.
Index page / Guide (in DTV mode)10.
Reveal (in TXT mode) / 11.
Switch from TV to PC
Picture mode selection12.
Swap / Previous program13.
Expand (in TXT mode) / Image Size14.
Mix (in TXT mode)15.
Teletext / PAT mode16.
Time / Subtitle on-off (**) (in DTV mode)17.
Red (Sound menu)18.
Green (Picture menu) / Subtitle on-off (*) (in 19.
DTV mode)
Menu20.
Navigations button21.
Okay (store) / Select (in DTV mode)22.
Programme up (Page down in DTV mode) / 23.
Programme down (Page up in DTV mode)
Info24.
AV / Source25.
Numeric buttons26.
Standby27.
(*) Only available for EU country options.
(**) Only available for UK.
Note: Buttons that are not indicated with a
number on the remote control illustration are
not functional in TV mode.
Remote range is approximately 7m/23ft
ABC ABC
ABC
DEF DEF
DEF
GHI GHI
GHI
JKL JKL
JKL
MNO MNO
MNO
PQR PQR
PQR
STU STU
STU
VWX VWX
VWX
YZ YZ
YZ
1 2
3
4
5
6
7
8 9
0
AV
AV
SOURCE
SOURCE
EXIT EXIT
EXIT
-/--
-/--
INFO INFO
INFO
I-II
I-II
MENU
MENU
TV/DTVTV/DTV
TV/DTV
P/CH
P/CH
OK
OK
SELEC T
SELEC T
WIDE WIDE
WIDE
GUIDE GUIDE
GUIDE
PP
PP
P<P/SWAP
P<P/SWAP
A01_[GB]_MB45_1055UK_PANEUIDTV_BRONZE11_19822_10065707_50156721.indd 6A01_[GB]_MB45_1055UK_PANEUIDTV_BRONZE11_19822_10065707_50156721.indd 6 27.10.2009 16:58:5227.10.2009 16:58:52
Page 8
English - 7 -
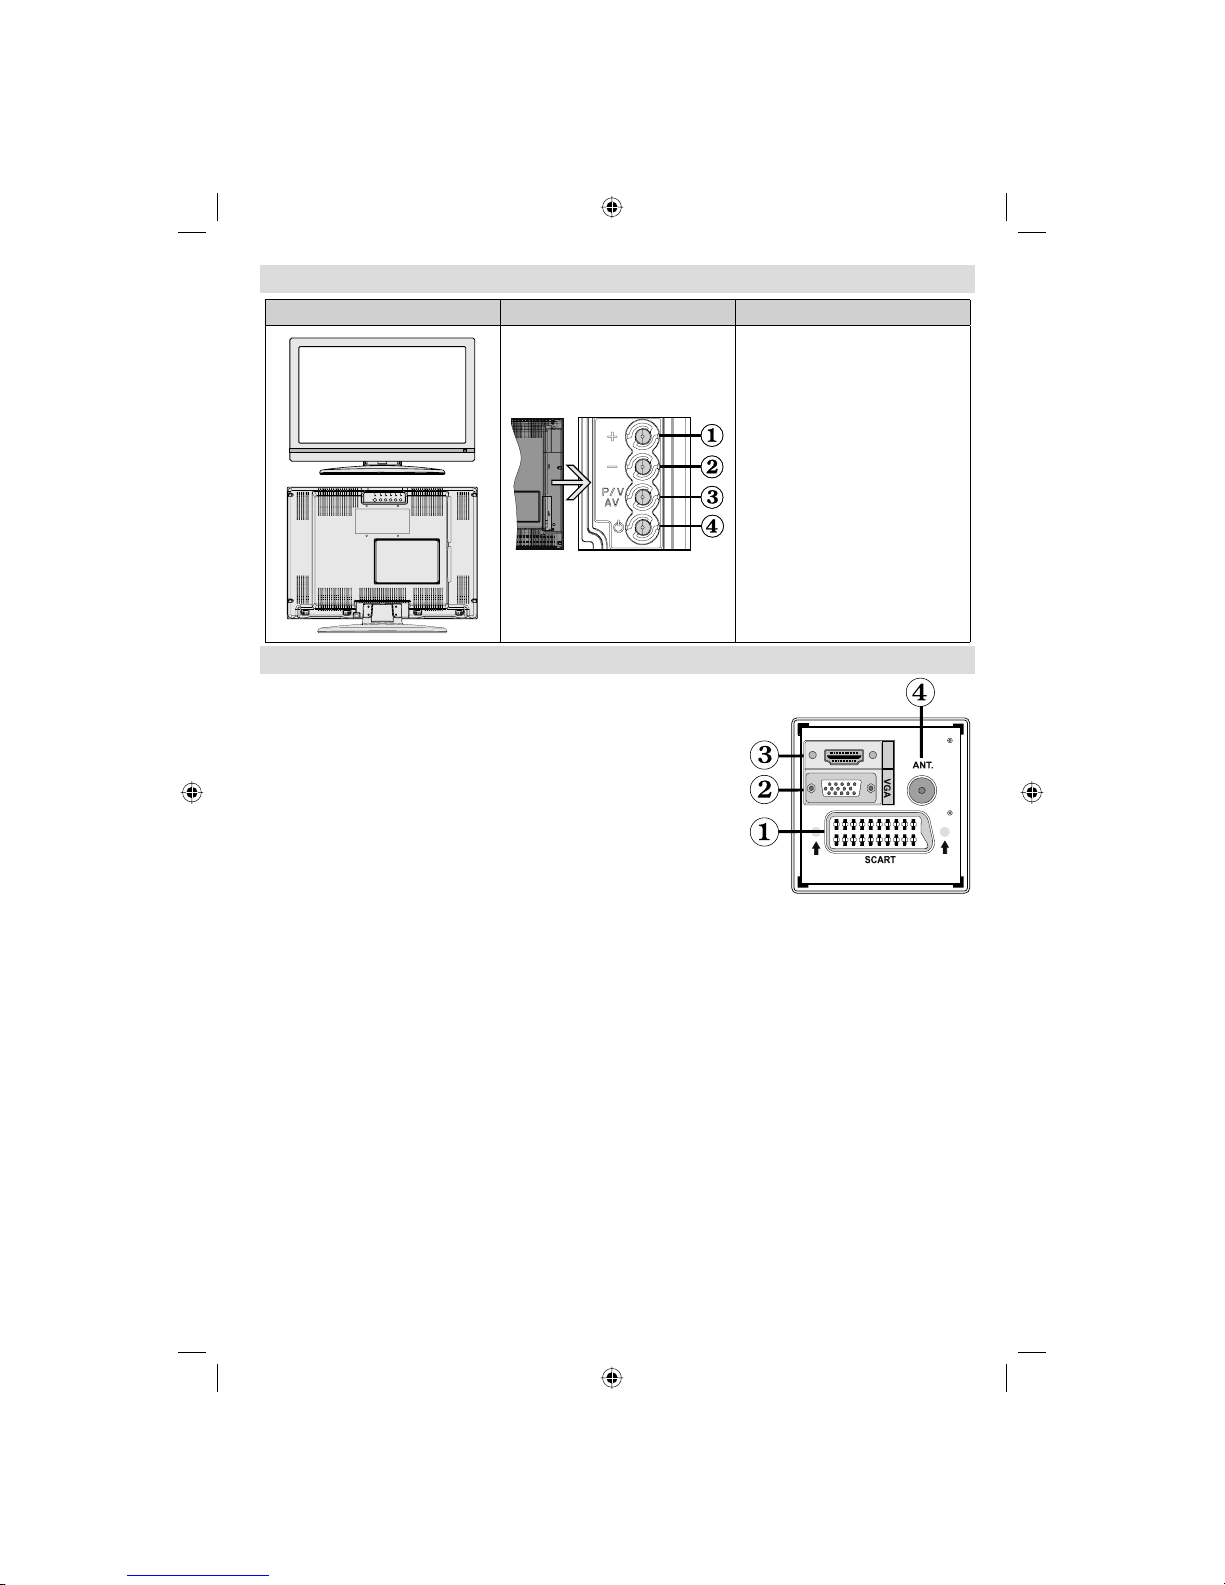
LCD TV and Operating Buttons
FRONT and REAR VIEW SIDE VIEW Control Buttons
Up button1.
Down button2.
Programme/Volume / AV 3.
selection button
Standby button4.
Note:You can use “+/-” buttons to
change volume. If you want to change
channels, press P/V/AV button once
and then use “+/-” buttons. If you hold
the P/V/AV button about a few seconds,
source OSD will be displayed. Main
menu OSD cannot be displayed via
control buttons.
Back Connectors
SCART socket inputs or outputs for external devices.1.
HDMI
Connect the SCART cable between SCART socket on TV and
SCART socket on your external device (such as a decoder, a VCR
or a DVD player).
Note: If an external device is connected via the SCART socket, the
TV will automatically switch to AV mode.
PC Input is for connecting a personal computer to the TV set. 2.
Connect the PC cable between the PC INPUT on the TV and the
PC output on your PC. Component Video Inputs (YPbPr) are used
for connecting component video.
You can use PC input to enable YPbPr signal sonnection with a
device that has component output. Connect the YPbPr to PC cable
between the PC INPUT on the TV and the component video outputs
of your device. (YPbPr cable is not supplied)
HDMI3. : HDMI input
HDMI Input is for connecting a device that has an HDMI socket.
Your LCD Television is capable of displaying High Defi nition pictures from devices such as a High
Defi nition Satellite Receiver or DVD Player. These devices must be connected via the HDMI sockets
or Component Socket. These sockets can accept either 480i, 480p, 576p, 576i, 720p, 1080i, 1080p
signals. No sound connection is needed for an HDMI to HDMI connection.
RF Input connects to an antenna or a cable.4.
Note that if you use a decoder or a media recorder, you should connect the aerial cable through the
device to the television with an appropriate antenna cable, as shown in the illustration in the following
pages.
When you use the wall mount kit (optional) with the LCD TV, we would defi nitely recommend to plug all your cables into the
back of the LCD before mounting to the wall.
A01_[GB]_MB45_1055UK_PANEUIDTV_BRONZE11_19822_10065707_50156721.indd 7A01_[GB]_MB45_1055UK_PANEUIDTV_BRONZE11_19822_10065707_50156721.indd 7 27.10.2009 16:58:5327.10.2009 16:58:53
Page 9
English - 8 -
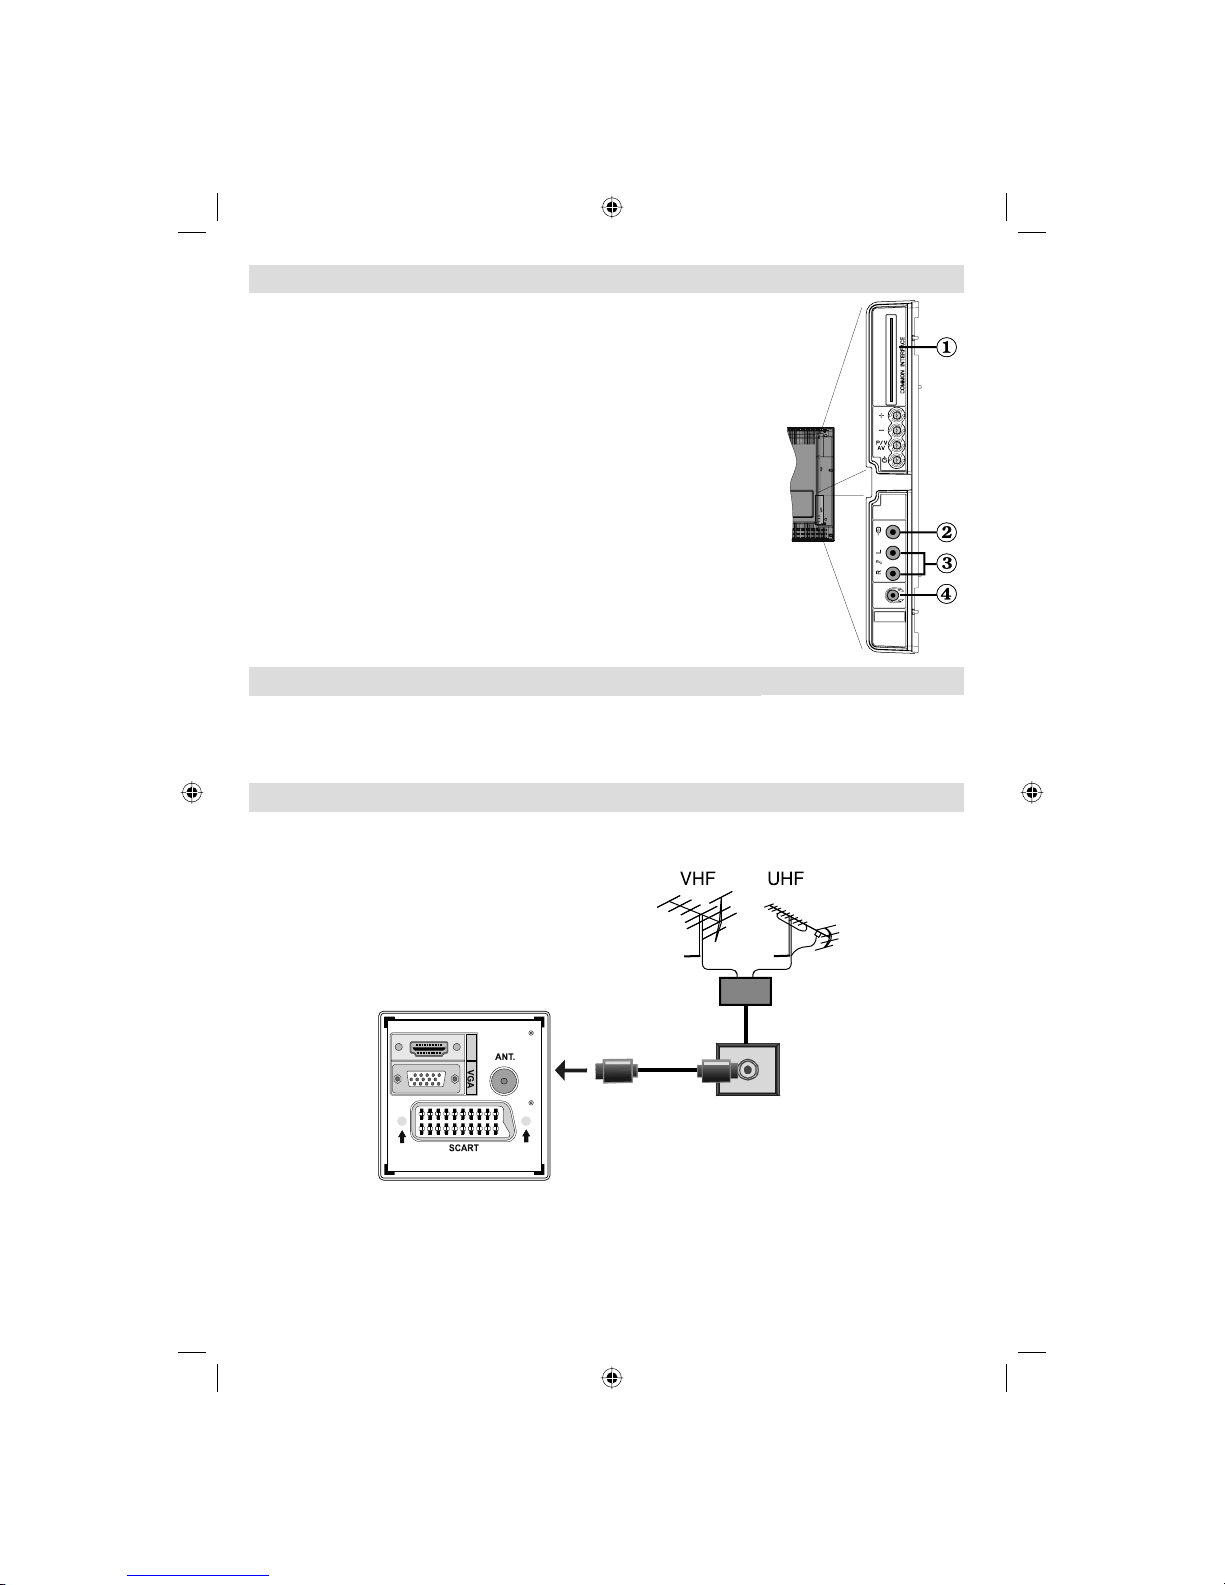
Side Connectors
CI Slot is used for inserting a CI card. A CI card allows you to view all the 1.
channels that you subscribe to. For more information, see “Conditional
Access” section.
Video Input is used for connecting video signals of external devices.2.
Connect the video cable between the VIDEO IN socket on the TV and
the VIDEO OUT jack on your device.
Audio Inputs are used for connecting audio signals of external devices. 3.
Connect the audio cable between the AUDIO INPUTS on the TV and the
AUDIO OUTPUT jacks on your device.
Also to enable PC/YPbPr sound connection in such a case, use an
appropriate audio cable between the connected device’s audio outputs
and the TV’s audio inputs
Note: If you connect a device to the TV via the VIDEO or PC/YPbPr
cable (YPbPr cable is not supplied) you should also connect your device
with an audio cable to the AUDIO INPUTS of the TV to enable audio.
Headphone jack is used for connecting an external headphone to the 4.
system. Connect to the HEADPHONE jack to listen to the TV from
headphones.
Power Connection
IMPORTANT : The TV set is designed to operate on 220-240V AC, 50 Hz.
• After unpacking, allow the TV set to reach the ambient room temperature before you connect the set to the
mains.
• Plug the power cable to the mains socket outlet.
Aerial Connection
• Connect the aerial or cable TV plug to the AERIAL INPUT socket located at the rear of the TV.
HDMI
A01_[GB]_MB45_1055UK_PANEUIDTV_BRONZE11_19822_10065707_50156721.indd 8A01_[GB]_MB45_1055UK_PANEUIDTV_BRONZE11_19822_10065707_50156721.indd 8 27.10.2009 16:58:5527.10.2009 16:58:55
Page 10

English - 9 -
Connecting the LCD TV to a
PC
For displaying your computer ’s screen image on
your LCD TV, you can connect your computer to the
TV set.
• Power off both computer and display before making
any connections.
• Use 15-pin D-sub display cable to connect a PC
to the LCD TV.Use an audio cable between audio
inputs of the TV (side) and audio output of your PC
to enable sound connection.
• When the connection is made, switch to PC source.
See “Input selection” section.
• Set the resolution that suits your viewing requirements.
Resolution information can be found in the appendix
parts.
HDMI
PC audio cable
(not supplied)
to AUDIO INPUTS
on the TV
PC RGB cable
(not supplied)
to PC input
Audio
Inputs
PC Input
Connecting to a DVD Player
If you want to connect a DVD player to your LCD
TV, you can use connectors of the TV set. DVD
players may have different connectors. Please refer
to your DVD player’s instruction book for additional
information. Power off both the TV and the device
before making any connections.
Note: Cables shown in the illustration are not supplied.
• If your DVD player has an HDMI socket, you can
connect via HDMI. When you connect to DVD player
as illustrated below, switch to HDMI source. See,
“Input Selection” section.
• Most DVD players are connected through
COMPONENT SOCKETS.
YPbPr can be use only
when you connect a device that has a YPbPr output
through the PC input with YPbPr to PC cable. To
enable sound connection, use AUDIO IN located
side of the TV
(YPbPr cable is not supplied).
. When the connection is made, switch to YPbPr
source. See, “Input selection” section.
• You may also connect through the SCART socket.
Use a SCART cable as shown below.
HDMI
input
Scart socket
Component
video
inputs
Component
audio
inputs
DVD Player
Note : These methods of connection perform the same
function but in different levels of quality. It is not necessary
to connect by all three methods.
A01_[GB]_MB45_1055UK_PANEUIDTV_BRONZE11_19822_10065707_50156721.indd 9A01_[GB]_MB45_1055UK_PANEUIDTV_BRONZE11_19822_10065707_50156721.indd 9 27.10.2009 16:58:5727.10.2009 16:58:57
Page 11
English - 10 -
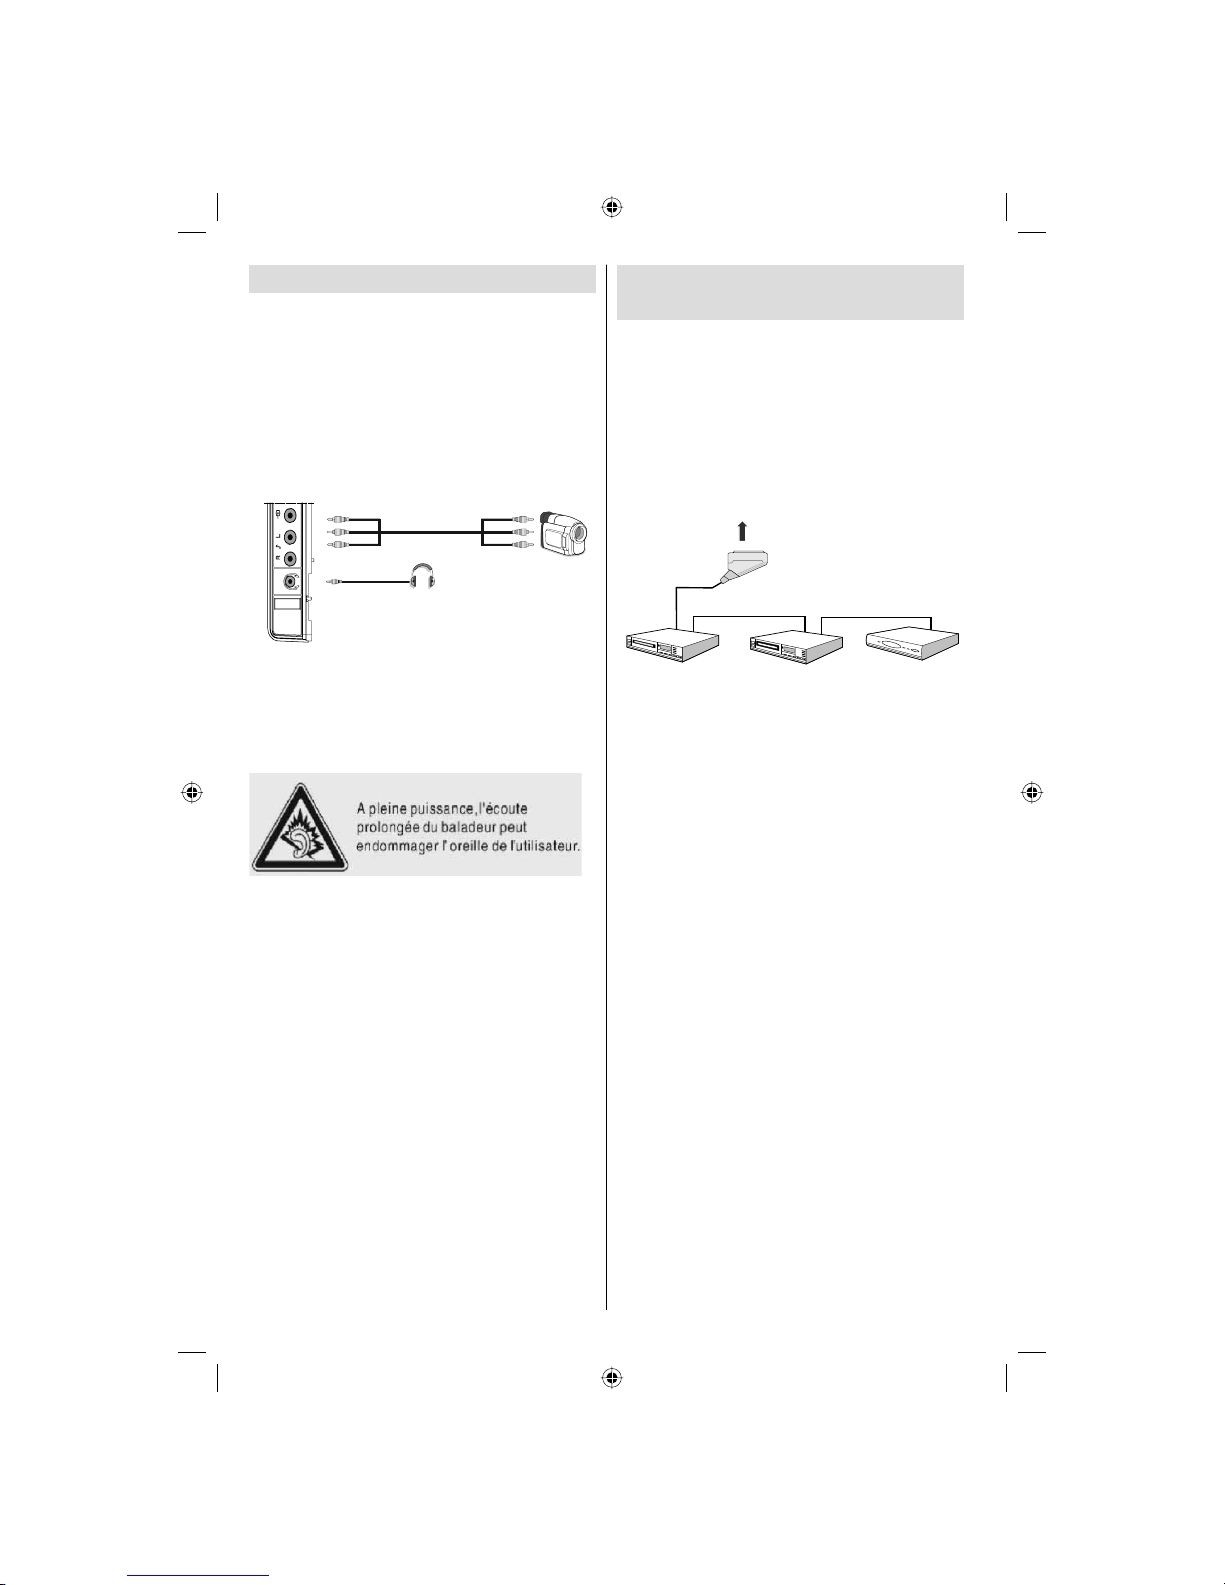
Using Side AV Connectors
You can connect a range of optional equipment
to your LCD TV. Possible connections are shown
below. Note that cables shown in the illustration are
not supplied.
• For connecting a camcorder, connect to the VIDEO
IN socket and the AUDIO SOCKETS. For selecting
the related source, see the section “Input selection”
in the following parts.
• To listen the TV sound from headphones, connect
to the HEADPHONE jack of theTV
Camcorder
Headphone
HEADPHONE VOLUME WARNING
Connect headphones with the volume set low and
increase it if required. Prolonged listening through
some headphones at high volume settings can result
in hearing damage.
Ecouteurs et casques audio doivent être en conformité
avec la directive EN 50332-2 afin d’assurer une
protection permanente contre les niveaux sonores
excessivement élevés.
Connecting Other Equipment
via Scart
Most devices support SCART connection. You can
connect a; DVD recorder, a VCR or a decoder to
your LCD TV by using the SCART socket. Note that
cables shown in the illustration are not supplied.
Power off both the TV and the devices before making
any connections.
For more information, refer to your device’s own
instruction book.
Scart socket
Decoder
DVD Recorder
Video Recorder
A01_[GB]_MB45_1055UK_PANEUIDTV_BRONZE11_19822_10065707_50156721.indd 10A01_[GB]_MB45_1055UK_PANEUIDTV_BRONZE11_19822_10065707_50156721.indd 10 27.10.2009 16:58:5827.10.2009 16:58:58
Page 12

English - 11 -
Inserting Batteries into the
Remote Control Handset
• Remove the battery cover located on the back of
the handset by gently pulling backwards from the
indicated part.
• Insert two AAA/R3 or equivalent type batteries
inside. Place the batteries in the remote observing
the polarity markings inside the battery compartment
then replace the battery cover.
Note: Remove the battery from remote control handset when
it is not to be used for a long period. Otherwise it can be
damaged due to corrosive leakage of the batteries invalidating
the warranty.
Switching the TV On/Off
To Switch the TV On
• Connect the power cord to the 220-240V AC ,50 Hz.
Then the standby LED lights up.
• To switch on the TV from standby mode either:
• Press the “
” button, P+ / P- or a numeric button
on the remote control.
• Press the “
” button, -P/CH or P/CH+ button on
the TV. The TV will then switch on.
Note : If you switch on your TV via PROGRAMME UP/DOWN
buttons on the remote control or on the TV set, the programme
that you were watching last will be reselected.
By either method the TV will switch on.
To Switch the TV Off
• Press the “ ” button on the remote control or press
the “
” switch on the TV, so the TV will switch to
standby mode.
Note : If you have switched off the TV set from the standby
button on the TV, next time you press the standby button, the
TV set will switch on without going to the standby mode.
• To power down the TV completely, unplug the
power cord from the mains socket.
Input Selection
Once you have connected external systems to your
TV, you can switch to different input sources.
• Press “
/SOURCE” button on your remote control
for directly changing sources.
or
• Select “Source” option from the TV Setup option in the
main menu by using “
” or “ ” button. Use then “ ” or
“ ” button to highlight an input and press “ ” button
to select.
Note : You can mark desired source options by pressing the
OK button. Therefore, when
“ /SOURCE” button is
pressed, only the marked source options will be available
(except for the TV source).
Note : YPbPr mode can be use only when you connect a
device that has a YPbPr output through the PC input with
YPbPr to PC cable (YPbPr cable is not supplied).
Basic Operations
You can operate your TV using both the remote
control and onset buttons.
Operation with the Buttons on the TV
Main menu OSD cannot be displayed via control
buttons. “+/-” buttons will function as volume up/down
as default. Even if you set other functions for these
buttons, “+/-” buttons will perform as default after a
short while.
Volume Setting
• Press “P/V/AV ” button once and then use “+/-” buttons
to increase or decrease volume, so a volume level
scale (slider) will be displayed on the screen.
Programme Selection
• Press “+/-” to select the next or previous programme.
AV Mode
• Hold the “P/V/AV ” button, source OSD will be
displayed.
Operation with the Remote Control
• The remote control of your TV is designed to control
all the functions of the TV. The functions will be
described in accordance with the menu system of
your TV .
A01_[GB]_MB45_1055UK_PANEUIDTV_BRONZE11_19822_10065707_50156721.indd 11A01_[GB]_MB45_1055UK_PANEUIDTV_BRONZE11_19822_10065707_50156721.indd 11 27.10.2009 16:58:5927.10.2009 16:58:59
Page 13

English - 12 -
• Functions of the menu system are described in the
following sections.
Volume Setting
• Press “V+” button to increase the volume. Press “V-”
button to decrease the volume. A volume level scale
(slider) will be displayed on the screen.
Programme Selection (Previous or Next
Programme)
• Press “ P - ” button to select the previous programme.
• Press “ P + ” button to select the next programme.
Programme Selection (Direct Access)
• Press numeric buttons on the remote control to select
programmes between 0 and 9. The TV will switch
to the selected programme. To select programmes
between 10-500 (for IDTV) or 10-199 (for analogue),
press the numeric buttons consecutively
• Press directly the programme number to reselect
single digit programmes
Initial Settings
When the TV is turned on for the fi rst time, the menu
for the language selection appears on the screen. The
message “Welcome please select your language!”
is displayed in all language options sequentially in
the OSD.
By pressing the “
” or “ ” buttons highlight the
language you want to set and press OK button. After
that the, “First time installation” OSD will appear on
the screen. By pressing “ ” or “ ” buttons, select
the country you want to set and press OK button (*
for EU countries).
Note: Country selection OSD will not be available for UK.
Press OK button on the remote control to continue
and the following message will be displayed on the
screen:
• To select the “Yes” or “No” option, highlight the item
by using “ ” or “ ” buttons and press the “OK”
button.
The IDTV will automatically tune to the UHF or VHF(*)
(* for EU countries) transmission channels, searching
for digital terrestrial TV broadcasts and displaying
the names of channels found. This process will take
about a few minutes.
After Automatic Search is completed, the following
message asking for analogue channel search appears
on the screen:
To search for analogue channels, select “Yes”. TV
switches to the analogue TV mode. The menu is
displayed to search for analogue channels.
Select your Country, Language and Text language
by using “
” or “ ” and “ ” or “ ” buttons. Press
OK or RED button to continue. To cancel, press the
BLUE button.
For more information on this process, see “Install Menu”
section.
Note : For proper functioning of digital teletext in DTV mode, you
should set country as UK in analogue AUTO PROGRAM (for
UK broadcasts only).
Do not turn off the TV while running fi rst time installation.
General Operation
Press the “ /SOURCE” button on the remote
control and select TV/DTV to switch the TV set to
digital terrestrial television broadcasting.
Information Banner
• Whenever you change channel, using the P- / P+
button or the numeric buttons, the TV displays the
broadcast picture along with an information banner
at the bottom of the screen (available only in DTV
mode). This will remain on the screen for a few
seconds.
• The information banner can also be displayed at
any time while watching TV by pressing the “INFO”
button on the remote control:
If the selected channel is locked, you must enter the
correct four numeric code to view the channel. “Enter
PIN” will be displayed on the screen in such a case:
A01_[GB]_MB45_1055UK_PANEUIDTV_BRONZE11_19822_10065707_50156721.indd 12A01_[GB]_MB45_1055UK_PANEUIDTV_BRONZE11_19822_10065707_50156721.indd 12 27.10.2009 16:59:0027.10.2009 16:59:00
Page 14

English - 13 -
Electronic Programme Guide (EPG)
• Some, but not all, channels send information about
the current and next events. Press GUIDE button to
view the EPG menu. EPG appears on the screen. It
is able to get Information of the channel - programs
weekly by means of 7-DAY-EPG. All programs of
channels are displayed. On the bottom of the screen;
info bar, showing all the available commands, will
be displayed.
RED button (Shrink) : makes the info boxes smaller.
GREEN button (Expand) : makes the info boxes larger.
YELLOW button (Prev. Day) : displays the programmes
of previous day.
BLUE button (Next day) : displays the programmes of
the next day.
INFO (Details): displays the programmes in detail.
Numeric buttons (Jump) : go to preferred channel
directly via numeric buttons.
OK : view for current broadcast/reminders for future
programs.
P<P : jumps to the current broadcast.
• Press “0” button on the remote control to view Guide
Search menu. Using this feature, you can search the
programme guide database in accordance with the
genre selected or with name match.
Displaying Subtitles
With digital terrestrial broadcasting (DVB-T), some
programmes are being broadcasted with subtitles.
Press the “ MENU ” button to display the main menu,
highlight the Setup and then Language menu using “
” or “ ” button and press the OK button to display the
“Language settings” menu.
Highlight the “Subtitle” item in “Language settings”
menu and use
” or “ button to set Subtitle to the
desired language.
T o display the subtitles, press the subtitle button, press
it again to turn subtitles off.
If “Subtitle” is on and a language option is set, pressing
the “
” button causes the following warning message
display on the screen (** for UK only):
Digital T eletext (** for UK only)
• Press the “ ” button.
• The digital teletext information appears.
• Operate it with the coloured buttons, cursor buttons
and OK button.
The operation method may differ depending on the
contents of the digital teletext.
Follow the instructions displayed on digital teletext screen.
• When Press “SELECT” button or similar message
appears on the screen, press the OK button.
• When the “
” button is pressed, the TV returns to
television broadcasting.
• With digital terrestrial broadcasting (DVB-T), in
addition to digital teletext broadcasting together with
the normal broadcasting, there are also channels
with just digital teletext broadcasting.
• The aspect ratio (picture shape) when watching a channel
with just digital teletext broadcasting is the same as the
aspect ratio of the picture viewed previously.
• When you press the “ ” button again, the digital
teletext screen will be displayed.
Analogue T eletext
Use of teletext and its functions are identical to
the analogue text system. Please do refer to the
“TELETEXT” explanations.
Widescreen
Depending on the type of the broadcast being
transmitted, programmes can be viewed in a number
of formats. Press the “WIDE” button repeatedly to
change screen format.
When Auto is selected, the format being displayed is
determined by the picture being broadcasted.
PLEASE NOTE : Menu size changes depending on the
chosen image size.
Notice !
AC3 audio type is not supported. In this case, Tv
sound will be muted. If the broadcast includes AC3
stream, the following warning message will be
displayed on the screen:
If there is no audio available, the following warning
message will be displayed on the screen:.
A01_[GB]_MB45_1055UK_PANEUIDTV_BRONZE11_19822_10065707_50156721.indd 13A01_[GB]_MB45_1055UK_PANEUIDTV_BRONZE11_19822_10065707_50156721.indd 13 27.10.2009 16:59:0127.10.2009 16:59:01
Page 15

English - 14 -
IDTV Menu System
Press the “ MENU ” button. Main menu will be
displayed.
Channel List
Using the “ ” or “ ” button on the remote control, make
sure that the fi rst item, Channel List, is highlighted and
press the “OK” button to display the Channel List.
Navigating the Entire Channel List
Press “ ” or “ ” button for selecting the previous or next
channel. You can press “RED” or “GREEN” button to
move page up or page down.
T o watch a specifi c channel, highlight it using “
” or “
” button and then press “ OK ” button, while the “Select”
item on Channel List menu is highlighted by using “
” or “ ” button.
Then the name and number of the selected channel will
be displayed in the top-left and top-right of the channel
display at the top-right of the screen, respectively.
Moving the channels in the channel list
• Press “ ” or “ ” buttons to select the channel that
will be moved.
• Press “
” or “ ” buttons to select the “ Move ” item on
Channel List menu.
Following OSD will be displayed next to “ OK ” item
to indicate that enter a number by using the numeric
buttons on the remote control and press “ OK ” to
confi rm.
Note: If you enter the same programme number of the channel
that you want to move, “.... channel services will be replaced.
Do you want to continue?” OSD will be displayed. Press OK
to confi rm or select “No” to cancel.
Deleting the Channels in the Channel List
• Press “ ” or “ ” button to select the channel that
will be deleted.
• Press “
” or “ ” button to select the “Delete’’ item
on Channel List menu.
• Press the “ OK ” button to delete the highlighted
channel in the channel list. Then the message below
appears on the screen:
• Press “ ” or “ ” button to highlight the desired
option. If “ OK ” button is pressed while “ Yes ” is
highlighted, the highlighted channel is deleted.
Selecting “ No ” cancels the deletion.
Renaming Channels
To rename a specifi c channel, the channel must
be highlighted by pressing “ ” or “ ” button. Then
highlight the Edit Name item by pressing “ ” or “ ”
button as illustrated below. Press the “OK” button to
activate the rename feature.
A01_[GB]_MB45_1055UK_PANEUIDTV_BRONZE11_19822_10065707_50156721.indd 14A01_[GB]_MB45_1055UK_PANEUIDTV_BRONZE11_19822_10065707_50156721.indd 14 27.10.2009 16:59:0127.10.2009 16:59:01
Page 16

English - 15 -
Now pressing “ ” or “ ” button moves to the previous/
next character. Pressing “ ” or “ ” button toggles
the current character, i.e., ‘b’ character becomes ‘a’
by “ ” and ‘c’ by “ ”. Pressing the numeric buttons
‘0...9’ replaces the highlighted character with the
characters printed above the button one by one as
the button is pressed.
Press the “MENU” button to cancel the editing or OK
button to save the new name.
Adding Locks to Channels
Channel locking provides a password-protected
access to channels selected by parents. In order to
lock a channel you should know the parental lock
password (default value is set to 0000 in the factory
and can only be changed from the Confi guration
menu).
Select the channel to be locked by highlighting it and
select the Lock option by pressing “
” or “ ” button.
When the “OK” button is pressed, a dialog OSD asking
for the password will be displayed.
Enter the password by using the numeric buttons on
the remote control. The lock icon “ ” will now be
displayed next to the selected channel. Repeat the
same operation to cancel the lock.
Setting Favourites
To set a favourite you should highlight the “Favourites”
item at the bottom of the Channel List menu. Then
press “OK” button and Edit Favourite List menu
appears on the screen.
How to Add a Channel to a Favourites List
• By pressing “ ” or “ ” buttons, highlight the channel
that you want to add to the favourite list.
• By pressing “OK” button, the highlighted channel is
added to the Favourite List.
• F icon indicates that a channel is added to Favourite
List.
Removing a Channel from Favourite List
• Highlight the channel that you want to remove from
the favourite list and press OK button to remove.Y ou
can press “OK” button again to re-add a channel.
• To activate Favourites, go to the Confi guration menu
and select Favourite mode. Use “
” / “ ” to set
Favourite mode as on. To cancel Favourites, set
Favourite Mode to Off.
On Screen Help
For all menus, press the INFO button to display the
help information about the menu functions.
Program Guide
This section is same with the instructions given in
the General Operations page. Please see Electronic
Programme Guide (EPG) section in the General
Operations part.
Timers
To display timers window, activate the item from the
main menu. T o add a timer , press the YELLOW button
on the remote control. Then “Add Timer” window
appears.
Channel : “
” or “ ” keys will navigate the user
through the TV or Radio list.
Date : Starting date is entered via the Left/Right or the
numeric buttons.
Start : Starting time is entered via the Left/Right or
the numeric buttons.
End : Ending time is entered via the Left/Right or the
numeric buttons.
Change/Delete : permits or prohibits any modifi cations
for other users.
Duration: Duration between Start and End time.
Repeat: Y ou can set a timer to be repeated as Once,
Daily or Weekly.
Y ou can save the adjustments by pressing the GREEN
key or cancel the process by pressing the RED button.
A01_[GB]_MB45_1055UK_PANEUIDTV_BRONZE11_19822_10065707_50156721.indd 15A01_[GB]_MB45_1055UK_PANEUIDTV_BRONZE11_19822_10065707_50156721.indd 15 27.10.2009 16:59:0327.10.2009 16:59:03
Page 17
English - 16 -
You can edit the list via GREEN key and delete with
the RED button.
Conditional Access
• Press the “ MENU ” button to display the main menu and
use the “ ” or “ ” button to highlight the “Conditional
Access” line and press the “ OK ” button:
Some Digital Terrestrial channels operate on a Pay
Per View basis. These require a subscription and a
hardware decoder.
Obtain the Conditional Access Module (CAM) and the
viewing card by subscribing to a pay channel company,
then insert those to the TV using the following procedure.
• Switch off the TV and unplug from the mains.
• The CAM should be correctly inserted, it is impossible
to insert fully if reversed. The CAM or the TV terminal
may be damaged if the CAM is forcefully inserted.
• Connect the TV to the mains supply , switch on and then
wait for few moments until the card is activated.
• Some CAMs may require the following set up. Please
set the CAM by entering the IDTV menu, Conditional
Access then pressing the “OK” button. (CAM set up
menu is not displayed when it is not required.)
• To see the viewing contract information: enter IDTV;
press the “ MENU ” button, then highlight Conditional
Access and press the “ OK ” button.
• When no module is inserted, “No Conditional Access
module detected” message appears on the screen.
• Refer to the module instruction manual for details of
the settings.
Note: Insert or remove the CI module only when the TV is
switched off or in standby mode.
TV Setup
You can use this item to display the TV functions.
The digital TV Setup menu screen is accessed from
the main menu. Press the “MENU” button to display
the main menu and use “
” or “ ” button to highlight
“TV Setup”, press the “ OK ” button to display TV Setup
menu screen.
You can fi nd detailed information for all menu items in
“Analogue TV Menu System” section.
Setup
The adjustments in this menu are given as the following:
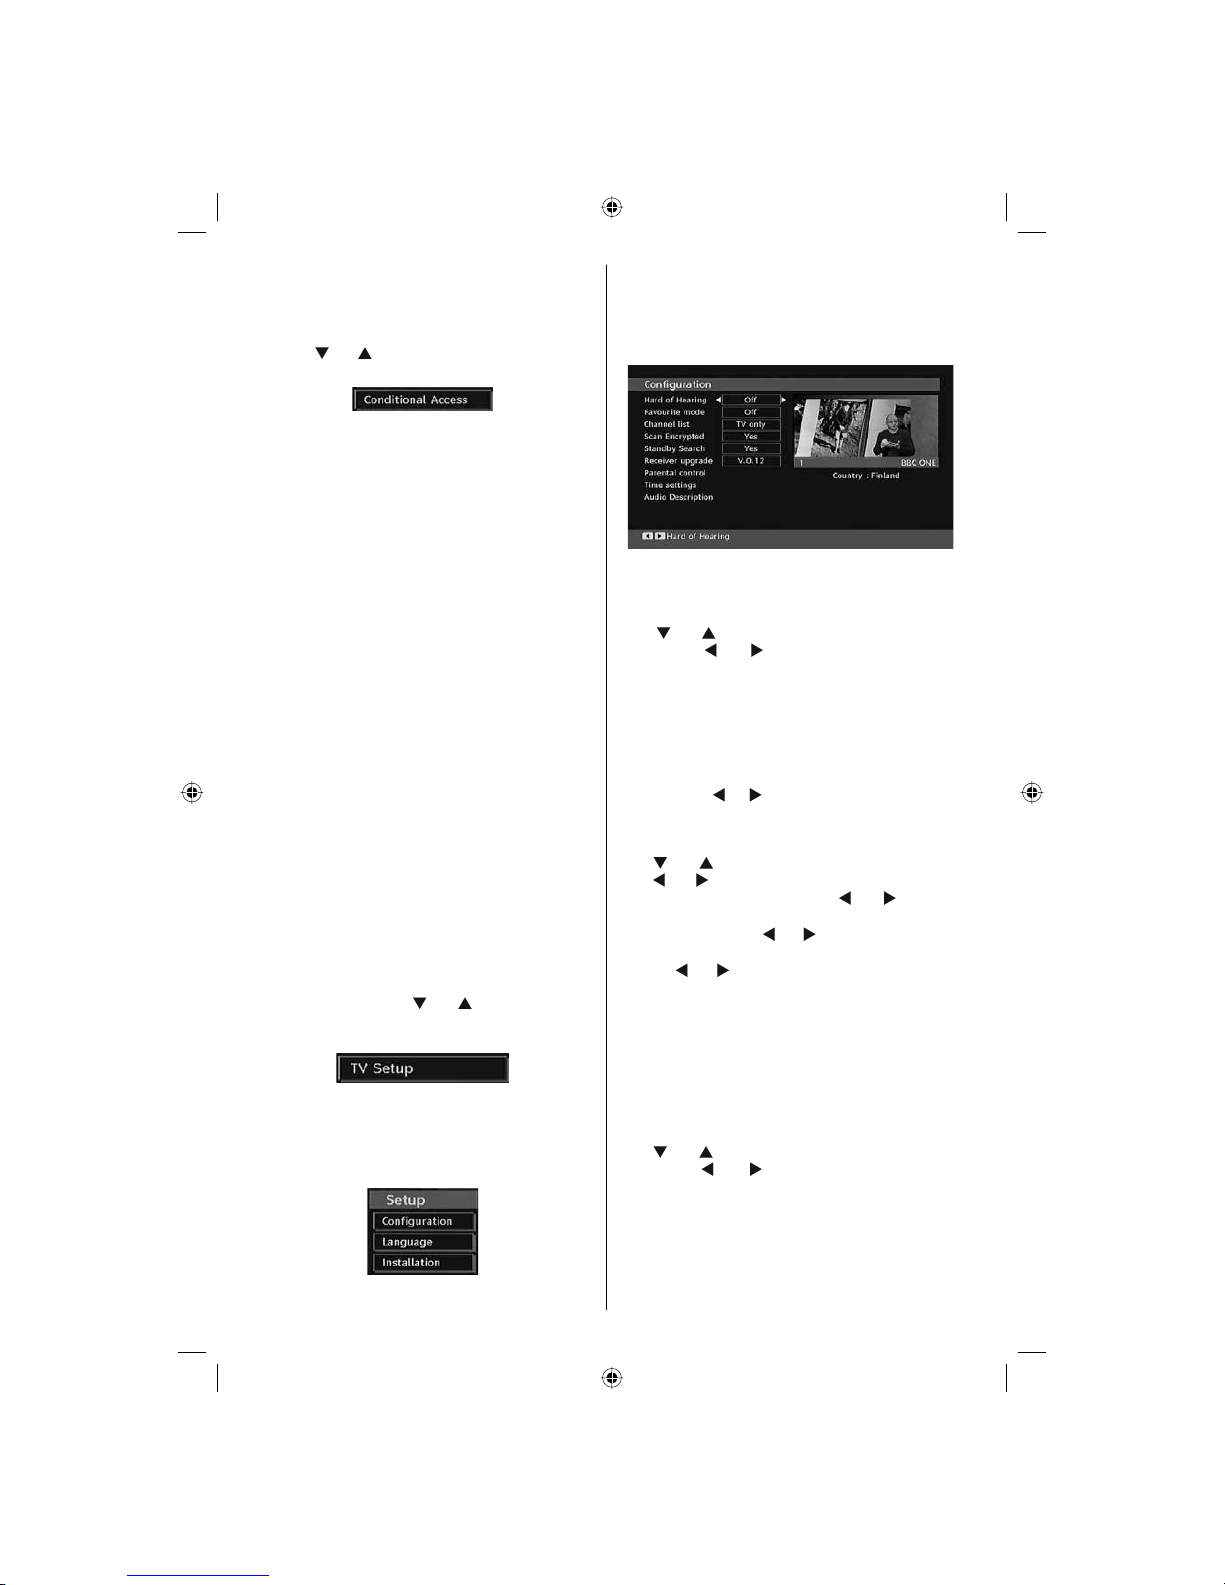
Confi guration
You can confi gure the settings of your TV. Select
Confi guration from Setup menu and press “ OK ” to
view this menu. Press the “EXIT” button on the remote
control to exit.
Note:This menu configuration may look different
according to the country setting selected.
Hard of Hearing (* for EU countries only)
Use “ ” or “ ” button to select Hard of Hearing and
then press “ ” or “ ” button to set this setting as
On or Off.
If the broadcaster enables any special signal
concerning the audio, you can set this setting as On
to receive such signals.
Favourite Mode
Use this function to enable or disable favourite
mode. Press “ ” / “ ” button to set this function as
on or off.
Channel List
Use “ ” or “ ” buttons to go to Channel List option.
Use “ ” or “ ” buttons to toggle Channel List Mode.
If you select “TV Only”, with the “ ” or “ ” buttons,
you navigate through only TV channels. If you select
“Radio Only”, with the “ ” or “ ” buttons, you navigate
through only radio channels. If you select “T ext Only”,
with the “ ” or “ ” buttons, you navigate through only
text channels.
Scan Encrypted
Scan Encrypted Channel feature will always be ON
after performing first time installation. When this
setting is on, search process will locate the encrypted
channels as well. If it is set as OFF manually, encrypted
channels will not be located while in automatic search
or manual search.
Use “
” or “ ” button to select Scan Encrypted and
then press “
” or “ ” button to set this setting as
On or Off.
Receiver Upgrade
Over Air Download (OAD)
This feature helps to keep your TV updated. It works
This feature helps to keep your TV updated. It works
automatically and searches for new information
automatically and searches for new information
when available. Note that this setting is inactive to be
when available. Note that this setting is inactive to be
A01_[GB]_MB45_1055UK_PANEUIDTV_BRONZE11_19822_10065707_50156721.indd 16A01_[GB]_MB45_1055UK_PANEUIDTV_BRONZE11_19822_10065707_50156721.indd 16 27.10.2009 16:59:0427.10.2009 16:59:04
Page 18

English - 17 -
modifi ed
modifi ed.. Please ensure that the TV is set to standby
mode. The TV automatically powers up at 3.00 A.M.
each day and searches for any new information which
may be broadcasted and will download this to your
receiver automatically. This operation will normally
take approximately 30 minutes.
Note: Your TV may start in First Time Installation mode after
OAD update.
Parental Control
Use “ ” or “ ” buttons to go to Parental Lock option.
Press OK button to enter the menu. A dialog box
asking for the lock key will be displayed. The key is set
to “0000” initially. Enter PIN. If it is incorrect, “Wrong
Pin” OSD will be displayed. If it is correct, the Parental
Control menu will be displayed:
Maturity Lock (*)
(*) If you set Country option as UK in the fi rst time
installation, Maturity Lock option will not be visible.
This setting is available only for EU countries.
When set, this option gets the maturity information
from the broadcast and if this maturity level is disabled,
does not show video-audio.
Menu Lock
In menu lock you can set locking for all menus, or the
Installation Menu to restrict access to these menus.
If the menu lock is disabled, there will be free access
to the menu system. Use “ ” or “ ” buttons to go to
Menu Lock option. Use “ ” or “ ” buttons to choose
Menu Lock Mode.
DISABLED : All menus are unlocked.
ALL MENUS : All Menus are accessible only with
the correct lock key. So the user cannot add, delete,
rename, channels, cannot set timers.
INSTALLATION MENU : Installation menu is locked.
So the user can’t add channels. Changes will be
updated after exiting ‘Confi guration Menu’.
Set PIN
Use “ ” or “ ” buttons to go to “Set PIN” option.
Press “OK” to display the “Set PIN” window. Use
numeric buttons to enter new pin number you will need
to input your new pin a second time for verifi cation
purposes.The factory default pin number is 0000, if
you change the pin number make sure you write it
down and keep it safe.
Time Settings
In the configuration menu, highlight the Time Settings
item by pressing “ ” or “ ” buttons.
Press “OK” and Time Settings sub menu will be
displayed on the screen. Current Time,Time Zone
Setting and Time Zone will be available.
Use “
” or “ ” buttons to highlight the Time Zone
Setting. Time Zone Setting is set using “
” or “ ”
buttons. It can be set to AUTO or MANUAL.
When AUTO is selected, Current Time and T ime Zone
options will not be available to be set. If MANUAL
option is selected as the Time Zone Setting, Time
Zone can be altered:
• By pressing “
” or “ ” buttons select Time Zone.
Use “
” or “ ” buttons to change the Time Zone
between GMT-12 or GMT+12. Current Time on the
top of the menu list will then change according to the
selected Time Zone.
Audio Description
Audio description refers to an additional narration
track for blind and visually impaired viewers of
visual media, including television and movies. The
description narrator talks through the presentation,
describing what is happening on the screen during the
natural pauses in the audio (and sometimes during
dialogue, if deemed necessary). You can use this
feature, only if the broadcaster supports that additional
narration track. Use “ ” or “ ” buttons to select an
item. Then use “ ” or “ ” buttons to set.
Audio Description
This function enables or disables the audio description
feature by pressing the “ ” or “ ” buttons.
Preferred Language
By pressing the “ ” or “ ” buttons the preferred audio
description language is being changed.
This setting can be used, only if it is available.
Relative Volume
Using this option, the Audio Description volume level
can be increased or decreased relatively, according
to the general volume.
Standby Search (*)
(*) This setting is visible only when the Country option
is set to Denmark, Sweden, Norway or Finland.
Use “
” or “ ” button to select Standby Search and
then press “
” or “ ” button to set this setting as On or
A01_[GB]_MB45_1055UK_PANEUIDTV_BRONZE11_19822_10065707_50156721.indd 17A01_[GB]_MB45_1055UK_PANEUIDTV_BRONZE11_19822_10065707_50156721.indd 17 27.10.2009 16:59:0527.10.2009 16:59:05
Page 19

English - 18 -
Off. If you change Standby Search to Off, this function
will be unavailable.
To use Standby search please make sure that
you select Standby Search as On.
Language
In this menu the user can adjust the preferred
language. Language is changed by pressing “OK”
button.
Menu : shows the language of the system
Preferred
These settings will be used if available. Otherwise the
current settings will be used.
• Audio : by pressing “ ” or “ ” keys change the
audio language.
• Subtitle : alter the subtitle language with “
” or “
” keys. The chosen language will be seen in
subtitles.
Movie Subtitle
• In order to display subtitles properly, use this setting
to select a movie subtitle language.
• By pressing “ ” or “ ” button, select the desired
language option.
• Guide : By pressing “
” or “ ” buttons change the
guide language.
Current
• Audio : if audio language is supported change the
audio language by pressing “ ” or “ ” buttons
• Subtitle : if subtitle is backed up, alter the subtitle
language with “
” or “ ” buttons. The chosen
language will be seen in subtitles.
Note: If the Country option is set to Denmark, Sweden,
Norway or Finland, the Language Settings menu will function
as described below:
Language Settings
In the confi guration menu, highlight the Language
Settings item by pressing “ ” or “ ” buttons. Press
“OK” and Language Settings submenu will be
displayed on the screen:
Use “
” or “ ” buttons to highlight the menu item
that will be adjusted and then press “ ” or “ ” button
to set.
Notes:
• System Language determines the on-screen menu
language.
• Audio Language is used for selecting the soundtrack
of a channels.
• Primary settings are the first priority when multiple
choices are available on a broadcast. Secondary
settings are the alternatives when the first options
are not available.
Installation
The Installation menu is mainly intended to help you
for creating a Channel T able in the most effi cient way .
Select Installation from the Confi guration menu by
pressing “ ” or “ ” buttons.
This menu includes the following items:
(*) For Denmark, Sweden, Norway or Finland.
Automatic Channel Scan
Automatic channel scan is started by pressing
“OK” button while Automatic channel scan item is
highlighted.
The following message appears on the screen:
A01_[GB]_MB45_1055UK_PANEUIDTV_BRONZE11_19822_10065707_50156721.indd 18A01_[GB]_MB45_1055UK_PANEUIDTV_BRONZE11_19822_10065707_50156721.indd 18 27.10.2009 16:59:0727.10.2009 16:59:07
Page 20

English - 19 -
Highlight Yes or No by using “ ” or “ ” buttons and
press “OK” button to confi rm.
If Yes is selected, automatic search starts.
Selecting No cancels automatic search.
After search is completed for digital channels, a
message asking whether to search for analogue
channels appears on the screen:
Press the “OK” button to search for analogue
channels. The following menu appears on the screen
for analogue channel search:
Select your Country , Language and Text language
by using “ ” or “ ” and “ ” or “ ” buttons. Press
“OK” or RED button to continue. To cancel, press
BLUE button. The following menu will be displayed
during the automatic tuning:
After APS is fi nalised, the programme table will appear
on the screen. In the programme table you will see
the programme numbers and names assigned to the
programmes.
Manual Channel Scan
In manual channel scan, the number of the multiplex is
entered manually and only that multiplex is searched
for the channels. For each valid channel number, signal
level and signal quality are shown on the screen.
In both manual and auto search any existing channel
in the database is not re-stored to avoid redundant
duplicates of that channel.
Clear Service List (*)
(*) This setting is visible only when the Country option
is set to Denmark, Sweden, Norway or Finland.
Use this setting to clear channels stored. Press “
” or “ ”
button to select Clear Service List and then press OK. The
following OSD message will be displayed on the screen:
Press OK to cancel. Select Y es by pressing “ ” or “ ”
button and press OK to delete all of the channels.
First Time Installation
The user can use this item to load default settings,
which were loaded to the receiver at the factory.
To install factory settings, highlight “First Time
Installation” menu item and press “OK” button,
then you will be asked whether or not to delete the
settings. Selecting “Yes” by pressing “OK” button
while the “Yes” is highlighted will delete the existing
channel table.
Then you will be asked to confi rm for deleting all
channels and settings:
By selecting Yes and pressing the “OK” button, the
existing channel table will be deleted. After factory
settings are loaded, “First Time Installation” menu
will be displayed.
The menu which is displayed for language selection
appears on the screen at fi rst. By using “
” or “ ”
buttons, select the desired language option, and press
OK button to activate.
After then, “First time installation” OSD will appear
on the screen. By pressing “
” or “ ” buttons, select
the Country you want to set and press “OK” button
(* only for EU countries).
Press the “OK” button to start installation. After search
is completed for digital channels, a message asking
whether to search for analogue channels appears
on the screen.This process is same as described in
Automatic Search section .
A01_[GB]_MB45_1055UK_PANEUIDTV_BRONZE11_19822_10065707_50156721.indd 19A01_[GB]_MB45_1055UK_PANEUIDTV_BRONZE11_19822_10065707_50156721.indd 19 27.10.2009 16:59:0827.10.2009 16:59:08
Page 21

English - 20 -
Analogue TV Menu System
Picture Menu
Mode
For your viewing requirements, you can set the related
mode option.
Press “
” or “ ” button to select Mode . Press
“ ” or “ ” button to choose from one of these options:
Cinema , Dynamic and Natural .
Brightness/Contrast/Colour/Sharpness/
Hue
Press “ ” or “ ” button to select the desired option.
Press “ ” or “ ” button to set the level.
Note : Hue option can only be visible when the TV receives
an NTSC signal.
Colour Temp
Press “ ” or “ ” button to select Colour Temp . Press
“ ” or “ ” to choose from one of these options: Cool ,
Normal and Warm .
Note :
• Setting Cool option gives white colours a slight blue
stress.
• Setting Warm option gives white colours a slight red
stress.
• For normal colours, select Normal option.
Noise Reduction
If the broadcast signal is weak and the picture is
noisy, use Noise Reduction setting to reduce the
noise amount.
Press “
” or “ ” button to select Noise Reduction.
Press “ ” or “ ” to choose from one of these options:
Low , Medium , High or Off .
Film Mode
Films are recorded at a different number of frames per
second to normal television programmes.
Press “
” or “ ” button to select Film Mode .
Press “
” or “ ” button to set this feature On or Off.
Turn this feature on when you are watching.
fi lms to see the fast motion scenes clearly.
Game Mode (Optional)
Select Game Mode by pressing “ ” or “ ” button.
Use “ ” or “ ” button to set Game Mode as On or
Off . When Game Mode is set to On, specifi c game
mode settings, which are optimized for better video
quality, will be loaded.
Also; Picture Mode, Contrast, Brightness, Sharpness,
Colour and Colour T emp settings will be invisible and
disabled while Game Mode is on.
Note :
Picture mode selection button on the remote control will have
no function while Game Mode is on.
Picture Zoom
Select Picture Zoom by pressing “ ” or “ ” button.
Use “
” or “ ” buttons, to change picture zoom to
Auto , 16:9 , 4:3 , Panoramic , 14:9 , Cinema , Subtitle
or Zoom .
Store
Press “ ” or “ ” button to select Store. Press “ ”
or OK button to store the settings. “ Stored... ” will be
displayed on the screen.
Reset
Press “ ” or “ ” button to select Reset . Press
“ ” or “ ” or OK button to reset the picture modes to
factory default settings.
Sound Menu
Volume
Press “ ” or “ ” button to select Volume . Press “ ”
or “ ” button to change the level of the Volume.
Equaliser
Press “ ” or “ ” button to select Equaliser . Press “
” button to view the Equaliser menu.
A01_[GB]_MB45_1055UK_PANEUIDTV_BRONZE11_19822_10065707_50156721.indd 20A01_[GB]_MB45_1055UK_PANEUIDTV_BRONZE11_19822_10065707_50156721.indd 20 27.10.2009 16:59:0927.10.2009 16:59:09
Page 22

English - 21 -
Press “ ” or “ ” button to change the preset. In
Equaliser menu, the preset can be changed to Music ,
Movie , Speech , Flat , Classic and User .
Select the desired frequency by pressing “
” or “ ”
button and increase or decrease the frequency gain
by pressing “
” or “ ” button.
Press the “ MENU ” button to return to the previous
menu.
Note : Equaliser menu settings can be changed only when
the Equaliser Mode is in User .
Balance
This setting is used for left and right speaker balance.
Press “
” or “ ” button to select Balance. Press “
” or “ ” button to change the level of the balance.
Balance level can be adjusted between -32 and +
32.
Headphone
Press “ ” or “ ” button to select Headphone . Press
“ ” button to view the headphone menu.
Headphone sub-menu options are described below:
Volume
Press “ ” or “ ” button to select Volume . Press “
” button to increase headphone volume level. Press
“ ” button to decrease headphone volume level.
Headphone volume level can be adjusted between
0 and 63 .
Sound Mode
Press “ ” or “ ” button to select Sound Mode . Using
“ ” or “ ” button, you can select Mono, Stereo, Dual I
or Dual II mode, only if the selected channel supports
that mode.
AVL
Automatic Volume Limiting (AVL) function adjusts the
sound to obtain fi xed output level between programmes
(For instance, volume level of advertisements tend to
be louder than programmes).
Press “
” or “ ” button to select AVL . Press “ ” or
“ ” button to set the AVL as On or Off .
Store
Press “ ” or “ ” button to select Store. Press “ ”
or OK button to store the settings. “ Stored... ” will be
displayed on the screen.
Feature Menu
Sleep Timer
Press “ ” or “ ” button to select Sleep Timer . Use
“ ” or “ ” button to set the Sleep Timer.
The timer can be programmed between Off and 120
minutes in steps of 10 minutes.
If Sleep Timer is activated, at the end of the selected
time, the TV goes automatically to standby mode.
Child Lock
Press “ ” or “ ” button to select Child Lock .
Use “
” or “ ” button to set the Child Lock On or Off .
When On is selected, the TV can only be controlled
by the remote control handset. In this case the control
panel buttons will not work.
Hence, if one of those buttons is pressed, Child Lock
On will be displayed on the screen when the menu
screen is not visible.
Language
Press “ ” or “ ” button to select Language . Use “
” or “ ” button to select the Language .
Default Zoom
While zoom mode is set as AUTO , the TV will set
the zoom mode in accordance with the signal of
the broadcast. If there is no WSS or aspect ratio
information, the TV will then use this setting to adopt.
Press “ ” or “ ” button to select Default Zoom . You
can set Default Zoom to Panoramic , 16:9 , 4:3 or
14:9 by pressing “
” or “ ” button.
Blue Background
If the signal is weak or absent, the TV will automatically
change to a blue screen. To enable this, set Blue
Background to On .
A01_[GB]_MB45_1055UK_PANEUIDTV_BRONZE11_19822_10065707_50156721.indd 21A01_[GB]_MB45_1055UK_PANEUIDTV_BRONZE11_19822_10065707_50156721.indd 21 27.10.2009 16:59:1127.10.2009 16:59:11
Page 23

English - 22 -
By pressing “ ” or “ ” button, select Blue
Background . Press “ ” or “ ” button to set Blue
Background as On or Off .
Menu Background
Press “ ” or “ ” button to select Menu Background .
You can set menu background level by pressing “
” or “ ” button.
Menu Timeout
To set a specifi c display timeout for menu screens,
set a value for this option.
Press “
” or “ ” button to select Menu Timeout . Use
“ ” or “ ” button to change menu timeout to 15 sec ,
30 sec or 60 sec .
Teletext Language
Press “ ” or “ ” button to select Teletext Language .
Use “ ” or “ ” button to change Teletext Language to
West, East , Turk/Gre , Cyrillic, Arabic or Persian .
HDMI PC Full Mode (Optional)
If you want to view PC screen in HDMI mode by using
external connection, HDMI PC FULL MODE option
should be On to adjust the screen ratio correctly. This
item might be inactive in some resolutions.
Note: If you connect an HDMI device and switch the
TV to HDMI mode, this feature will be visible (except for
1080i/1080P resolution).
Full Mode (Optional)
If you connect a device via HDMI or YPbPr connectors
and set 1080i/1080P resolutions, Full Mode item will
be visible.You can set Full Mode as 1:1 or Normal
by using “ ” or “ ”.If you select 1:1, screen ratio will
be adjusted correctly. If you set Normal, screen ratio
may expand.
Ext Out
Press “ ” or “ ” button to select Ext Out. Use “ ” or
“ ” button to set the Ext Out as On or Off.
Note :
For copying from a DVD or VCR device, you should choose
desired source from source menu and turn “On” to EXT Out
from feature menu.
Ext Out should be On in order to use Timers function in the
DTV mode.
Install Menu
Program
Press “ ” or “ ” button to select Program. Use “ ”
or “
” button to select the program number. You can
also enter a number using the numeric buttons on the
remote control. There are 200 programme storage
between 0 and 199.
Band
Band can be selected either C or S. Press “ ” or “
” button to set Band.
Channel
Channel can be changed by “ ” or “ ” button or
numeric buttons.
Colour System
Press “ ” or “ ” button to select Colour System. Use
“ ” or “ ” button to change the colour system to PAL,
PAL 60, SECAM or AUTO.
Sound System
Press “ ” or “ ” button to select Sound System.
Press “ ” or “ ” button to change the sound system
to BG,DK, I, L or L’.
Fine Tune
Press “ ” or “ ” button to select Fine Tune. Press “
” or “ ” button to adjust the tuning.
Search
Press “ ” or “ ” button to select Search. Use “ ”
or “ ” button to start programme searching. You can
also enter the desired frequency using the numeric
buttons while Search item is highlighted.
Store
Press “ ” or “ ” button to select Store. Press “ ”
or OK button to store the settings. “ Stored... ” will be
displayed on the screen.
A01_[GB]_MB45_1055UK_PANEUIDTV_BRONZE11_19822_10065707_50156721.indd 22A01_[GB]_MB45_1055UK_PANEUIDTV_BRONZE11_19822_10065707_50156721.indd 22 27.10.2009 16:59:1327.10.2009 16:59:13
Page 24

English - 23 -
Install Menu in AV Modes
The following screen appears in the install menu when
the TV is in AV modes. Note that limited options will
be available. Switch to TV mode for viewing complete
version of the Install menu.
Colour System
Press “ ” or “ ” button to select Colour System . Use
“ ” or “ ” button to change the colour system to PAL,
SECAM, PAL60, AUTO, NTSC 4,43 or NTSC 3,58.
Store
Press “ ” or “ ” button to select Store Program .
Press “ ” or “OK” button to store the settings.
“ Stored... ” will be displayed on the screen.
Program Table
Select Program T able by pressing “ ” or “ ” button.
Press “ ” to display Program Table:
By moving the cursor in four directions you can reach
20 programmes in the same page. Y ou can scroll the
pages up or down by pressing the navigation buttons
to see all the programmes in TV mode (except for the
AV modes). By cursor action, programme selection is
done automatically.
Name
To change the name of a programme, select the
programme and press the RED button.
The fi rst letter of the selected name will be highlighted.
Press “ ” or “ ” button to change that letter and “ ”
or “
” button to select the other letters. By pressing
the RED button, you can store the name.
Move
Select the programme which you want to move by
navigation buttons. Press the GREEN button. By
navigation buttons move the selected programme to
the decided programme space and press the GREEN
button again.
Delete
To delete a programme, press the YELLOW button.
Pressing the YELLOW button again erases the
selected programme from the programme list, and
the following programmes shift one line up.
APS (Auto Programming System)
When you press the BLUE button for starting
automatic tuning, Auto Programming System menu
will appear on the screen:
Press “ ” or “ ” button to select your country. If you
want to exit from A.P.S. function, press the BLUE button.
When you press OK or RED button for starting
automatic tuning, all stored programmes will be erased
and the TV will search for available channels. During
the search, the following OSD will be displayed:
Whenever you press the BLUE button, APS function
stops and Program Table appears on the screen.
If you wait until the end of APS, Program Table will be
displayed with the programmes found and located.
A01_[GB]_MB45_1055UK_PANEUIDTV_BRONZE11_19822_10065707_50156721.indd 23A01_[GB]_MB45_1055UK_PANEUIDTV_BRONZE11_19822_10065707_50156721.indd 23 27.10.2009 16:59:1527.10.2009 16:59:15
Page 25

English - 24 -
Source Menu
Press “ ” or “ ” button and select the sixth icon.
Then press “ ” or “OK” button. Source menu appears
on the screen:
In source menu, highlight a source by pressing “ ”
or “ ” button and switch to that mode by pressing “
” button. Source options are; TV , DTV , EXT-1 , FAV ,
HDMI , YPbPr and PC-VGA .
Note : Once you have connected optional equipment systems
to your TV, you should select the required input to view
pictures from that source.
Note: YPbPr mode can be use only when you connect a
device that has a YPbPr output through the PC input with
YPbPr to PC cable (YPbPr cable is not supplied).
PC Mode Menu System
See “Connecting the LCD TV to a PC” section for
connecting a PC to the TV set.
For switching to PC source, press “
/SOURCE”
button on your remote control and select PC input. Y ou
can also use “Source” menu to switch to PC mode.
Note that PC mode menu settings are available only while
the TV is in PC source.
PC Position Menu
Select the first icon by pressing “ ” or
“ ” button. PC Position menu appears on the screen:
Autoposition
If you shift the picture horizontally or vertically to an
unwanted position, use this item to put the picture
into correct place automatically. This setting therefore
automatically optimises the display.
Select Autoposition item by using “
” or “ ” buttons.
Press “OK” or “ ”, “ ” button.
Warning : Please ensure auto adjustment is performed
with a full screen image to ensure best results.
H (Horizontal) Position
This item shifts the image horizontally to right hand
side or left hand side of the screen.
Select H Position item by using “
” or “ ” button.
Use “ ” or “ ” button to adjust the value.
V (Vertical) Position
This item shifts the image vertically towards the top
or bottom of the screen.
Select V Position item by using “
” or “ ” button.
Use “ ” or “ ” button to adjust the value.
Phase
Depending on the resolution and scan frequency that
you input to the TV set, you may see a hazy or noisy
picture on the screen. In such a case you can use this
item to get a clear picture by trial and error method.
Select Phase item by using “
” or “ ” buttons. Use
“ ” or “ ” button to adjust the value.
Dot Clock
Dot Clock adjustments correct the interference
that appear as vertical banding in dot intensive
presentations like spreadsheets or paragraphs or
text in smaller fonts.
Select Dot Clock item by using “
” or “ ” buttons.
Use “ ” or “ ” button to adjust the value.
PC Picture Menu
For adjusting PC picture items, do the following:
Press “
” or “ ” button to select the second icon. PC
Picture menu appears on the screen.
Brightness, Contrast, Colour and Colour
Temperature settings in this menu are identical to
settings defi ned in TV picture menu under “Analogue
TV Menu System”.
Note : If you set Colour Temp as User, you can defi ne R, G,
B settings manually.
Sound,Feature and Source settings are identical to the
settings explained in Analog Tv menu system.
A01_[GB]_MB45_1055UK_PANEUIDTV_BRONZE11_19822_10065707_50156721.indd 24A01_[GB]_MB45_1055UK_PANEUIDTV_BRONZE11_19822_10065707_50156721.indd 24 27.10.2009 16:59:1627.10.2009 16:59:16
Page 26

English - 25 -
Displaying TV Information
Programme Number , Programme Name , Sound
Indicator and Zoom Mode information is displayed
on the screen when a new programme is entered or
“INFO” button is pressed.
Mute Function
Press “ ” button to disable sound. Mute indicator will
be displayed in the upper side of the screen.
To cancel mute, there are two alternatives; the fi rst
one is pressing the “
” button and the second one
is increasing the volume level.
Picture Mode Selection
By pressing PP button, you can change Picture
Mode settings in accordance with your viewing
requirements. Available options are Dynamic, Natural
and Cinema.
Note: This feature cannot be set while in PC mode.
Freezing Picture
You can freeze the picture on the screen by pressing
the “ OK ” button on the remote control. Press the
“ OK ” button to freeze picture. Press again to quit
freeze mode.
Note: This feature will not be available while in PC
mode or watched movie from DVI source .
Zoom Modes
You can change the aspect ratio (image size) of the TV
for viewing the picture in different zoom modes.
Press “WIDE” button to directly change the zoom
mode.
Available zoom modes are listed below.
Note:
In YPbPr and HDMI modes, while in 720p-1080i resolutions,
only 16:9 mode is available.
Zoom mode cannot be changed while in PC mode.
Auto
When a WSS (Wide Screen Signalling) signal, which
shows the aspect ratio of the picture, is included in
the broadcast signal or the signal from an external
device, the TV automatically changes the ZOOM
mode according to the WSS signal.
• When the AUTO mode does not function correctly
due to poor WSS signal quality or when you want to
change the ZOOM mode, change to another ZOOM
mode manually.
16:9
This uniformly stretches the left and right sides of a
normal picture (4:3 aspect ratio) to fi ll the wide TV
screen
.
• For 16:9 aspect ratio pictures that have been
squeezed into a normal picture (4:3 aspect ratio),
use the 16:9 mode to restore the picture to its
original shape.
4:3
Use to view a normal picture (4:3 aspect ratio) as this
is its original size
.
Panoramic
This stretches the left and right sides of a normal
picture (4:3 aspect ratio) to fi ll the screen, without
making the picture appear unnatural. The top and
bottom of the picture are slightly cut off.
14:9
This zooms up the wide picture (14:9 aspect ratio) to
the upper and lower limits of the screen.
Cinema
This zooms up the wide picture (16:9 aspect ratio) to
the full screen.
Subtitle
This zooms up the wide picture (16:9 aspect ratio)
with subtitles to the full screen.
Zoom
This option zooms to the picture.Note: You can shift
to screen up or down by pressing “ ” / “ ” buttons
while picture zoom is selected as panaromic, 14:9,
Cinema or Subtitle.
A01_[GB]_MB45_1055UK_PANEUIDTV_BRONZE11_19822_10065707_50156721.indd 25A01_[GB]_MB45_1055UK_PANEUIDTV_BRONZE11_19822_10065707_50156721.indd 25 27.10.2009 16:59:1827.10.2009 16:59:18
Page 27

English - 26 -
Teletext
Teletext system transmits information such as news,
sports and weather on your TV . Note that is the signal
degrades, for example in poor/adverse weather
conditions, some text errors may occur or the teletext
page may display strange symbols instead of text.
Teletext function buttons are listed below:
“ ” Teletext On-Off / PAT Mode
Activates teletext mode when pressed once. Pressing
this button again will split the screen into two windows,
one displaying the teletext and the other displaying
the current channel. Pressing again will quit the
teletext mode.
“ ” Index
Selects the teletext index page.
“ ” Mix
Places the teletext screen over the programme.
“ ” Expand
Press once to enlarge top half of the page, press again
to enlarge the bottom half of the page. Press again to
revert back to normal size.
“ ” Reveal
Shows hidden information (e.g. solutions of games).
“ ” Hold
Holds a text page when convenient. Press again to
resume.
“ ” Subcode Pages / Time
Selects subcode pages if available when the teletext
is activated. When the teletext is not activated,
displays time info if the programme has teletext
transmission.
P+ / P- and numbers (0-9)
Press to select a page.
Note : Most TV stations use code 100 for their index pages.
Coloured Buttons
(RED/GREEN/YELLOW/BLUE)
Your TV supports both FASTEXT and TOP text
systems. When these systems are available, the
pages are divided into groups or topics.
When FASTEXT system is available, sections in a
teletext page will become colour-coded and can be
selected by pressing the coloured buttons. Press
a coloured button that corresponds to with your
needs.
The coloured writings will appear, showing you which
coloured buttons to use when TOP text transmission
is present. Pressing P - or P+ commands will request
the next or previous page respec tively.
Tips
Screen Care
Clean the screen with a slightly damp, soft cloth. Do
not use abrasive solvents as they may damage the
coating layer of the TV screen.
For your safety, unplug the mains plug when cleaning
the set. When moving the TV, hold it properly from
the bottom part.
Image Persistence
Please note that ghosting may occur while displaying
a persistent image. LCD TVs’ image persistence may
disappear after a short time. Try turning off the TV
for a while.
To avoid this, do not leave the screen in still picture
for extended periods.
A01_[GB]_MB45_1055UK_PANEUIDTV_BRONZE11_19822_10065707_50156721.indd 26A01_[GB]_MB45_1055UK_PANEUIDTV_BRONZE11_19822_10065707_50156721.indd 26 27.10.2009 16:59:1927.10.2009 16:59:19
Page 28

English - 27 -
Appendix A: PC Input Typical Display Modes
The display has a maximum resolution of 1600 X 1200 . The following table is an illustration of some of the
typical video display modes.
Your TV may not support different resolutions. Supported resolution modes are listed below.
If you switch your PC to an unsupported mode, a warning OSD will appear on the screen.
Index
Resolution Frequency
Standard
Supported
Zoom Modes
Hor Ver Ver (Hz)
Hor
(KHz)
1 640 480 60 31.5 VESA 16:9, 4:3
2 640 480 72 37.9 VESA 16:9, 4:3
3 640 480 75 37.5 VESA 16:9, 4:3
4 800 600 56 35.2 VESA 16:9, 4:3
5 800 600 60 37.9 VESA 16:9, 4:3
6 800 600 70 43.8 16:9, 4:3
7 800 600 72 48.1 VESA 16:9, 4:3
8 800 600 75 46.9 VESA 16:9, 4:3
9 832 624 75 49.7 MAC 16:9, 4:3
10 1024 768 60 48.4 VESA 16:9, 4:3
11 1024 768 70 56.5 VESA 16:9, 4:3
12 1024 768 72 57.7 16:9, 4:3
13 1024 768 75 60.0 16:9, 4:3
14 1152 864 70 64.2 VESA 16:9, 4:3
15 1152 864 75 67.5 VESA 16:9, 4:3
16 1152 870 75 68.9 MAC 16:9, 4:3
17 1280 768 60 47.7 VESA 16:9, 4:3
18 1360 768 60 47.7 16:9, 4:3
19 1280 960 60 60.0 VESA 16:9, 4:3
20 1280 1024 60 64.0 VESA 16:9
21 1280 1024 75 80.0 VESA 16:9
22 1600 1200 60 75.0 VESA 16:9
A01_[GB]_MB45_1055UK_PANEUIDTV_BRONZE11_19822_10065707_50156721.indd 27A01_[GB]_MB45_1055UK_PANEUIDTV_BRONZE11_19822_10065707_50156721.indd 27 27.10.2009 16:59:1927.10.2009 16:59:19
Page 29

English - 28 -
Appendix B: AV and HDMI Signal Compatibility (Input Signal
Types)
Source Supported Signals Available
EXT-1
(SCART)
PAL 50/60 O
NTSC 60 O
RGB 50 O
RGB 60 O
FAV
PAL 50/60 O
NTSC 60 O
YPbPr
480I 60Hz O
480P 60Hz O
576I 50Hz O
576P 50Hz O
720P 50Hz O
720P 60Hz O
1080I 50Hz O
1080I 60Hz O
1080P 50Hz X
1080P 60Hz X
HDMI1
480I 60Hz O
480P 60Hz O
576I 50Hz O
576P 50Hz O
720P 50Hz O
720P 60Hz O
1080I 50Hz O
1080I 60Hz O
1080P 24Hz X
1080P 25Hz X
1080P 30HZ X
1080P 50HZ X
1080P 60HZ X
(X: Not Available, O: Available)
Note : In some cases a signal on the LCD TV may not be displayed properly. The problem may be an
inconsistency with standards from the source equipment (DVD, Set-top box, etc.). If you do experience such
a problem please contact your dealer and also the manufacturer of the source equipment.
A01_[GB]_MB45_1055UK_PANEUIDTV_BRONZE11_19822_10065707_50156721.indd 28A01_[GB]_MB45_1055UK_PANEUIDTV_BRONZE11_19822_10065707_50156721.indd 28 27.10.2009 16:59:2027.10.2009 16:59:20
Page 30

English - 29 -
TV BROADCASTING
PAL/SECAM B/G D/K K’ I/I’ L/L’
RECEIVING CHANNELS VHF (BAND I/III)
UHF (BAND U)
HYPERBAND
Digital
Reception
MHEG-5 ENGINE compliant with ISO/IEC 13522-5 UK engine Profi le 1
for UKObject carousel support compliant with ISO/IEC 135818-6 and UK DTT profi le
Frequency range: 474-850 MHz for UK models
170-862 MHz for EU models
Transmission standard: DVB-T. MPEG-2
Demodulation: COFDM with 2K/8K FFT mode
FEC: all DVB modes
Video: MP@ML, PAL, 4:3/16:9
Audio: MPEG Layer I&II 32/44.148kHz.
NUMBER OF PRESET CHANNELS 200
CHANNEL INDICATOR On Screen Display
RF AERIAL INPUT 75 Ohm (unbalanced)
OPERATING VOLTAGE 220-240V AC, 50 Hz.
AUDIO German+ Nicam Stereo
AUDIO OUTPUT POWER (W
RMS.
) (10% THD) 2 x 2,5
POWER CONSUMPTION (W) 45 W (max)
< 1 W (Standby)
PANEL 19” wide display
DIMENSIONS (mm)
DxLxH (With foot): 118 x 459 x 348
Weight (Kg): 5,05
DxLxH (Without foot): 63 x 459 x 312
Weight (Kg): 4,80
Specifi cations
A01_[GB]_MB45_1055UK_PANEUIDTV_BRONZE11_19822_10065707_50156721.indd 29A01_[GB]_MB45_1055UK_PANEUIDTV_BRONZE11_19822_10065707_50156721.indd 29 27.10.2009 16:59:2027.10.2009 16:59:20
Page 31

English - 30 -
IMPORTANT DISPOSAL INSTRUCTIONS
As a responsible retailer we care about the environment.
As such we urge you to follow the correct disposal procedure for your product, batteries and
packaging materials. This will help conserve natural recourses and ensure that it is recycled
in a manner that protects health and the environment.
You must dispose of this product and its packaging according to local laws and regulations.
Because this product contains electronic components and sometimes batteries, the product and its accessories
must be disposed of separately from household waste when the product reaches its end of life.
Contact your local authority to learn about disposal and recycling.
The product and if applicable, its batteries should be taken to your local collection point
for recycling. Some collection points accept products free of charge.
The battery type used in this product is 2 X 1.5V
AAA or equivalent.
These batteries are located in the remote control and is readily accessible.
These batteries must be disposed of at your local collection point.
We apologise for any inconvenience caused by minor inconsistencies in these instructions, which may occur
as a result of product improvement and development.
KESA U.K HU1 3AU
16 / 09 / 2009
A01_[GB]_MB45_1055UK_PANEUIDTV_BRONZE11_19822_10065707_50156721.indd 30A01_[GB]_MB45_1055UK_PANEUIDTV_BRONZE11_19822_10065707_50156721.indd 30 27.10.2009 16:59:2027.10.2009 16:59:20
Page 32

Français - 31 -
Table des matières
Consignes de sécurité .......................................... 32
Accessoires .......................................................... 35
Caractéristiques techniques ................................. 35
Introduction ........................................................... 35
Préparation ........................................................... 35
Précautions de sécurité ........................................ 35
Source d’alimentation ....................................... 35
Cordon d’alimentation ....................................... 35
Humidité et eau................................................. 36
Nettoyage ......................................................... 36
Chaleur et fl ammes........................................... 36
Foudre .............................................................. 36
Pièces de rechange .......................................... 36
Maintenance ..................................................... 36
Mise au rebut .................................................... 36
Débranchement de l’appareil ............................ 36
Volume du casque d’écoute ............................. 36
Installation......................................................... 36
Ecran LCD ........................................................ 36
Avertissement ................................................... 36
Aperçu général de la télécommandeVeille ........... 37
TV LCD et boutons de commande ....................... 38
Connecteurs arrière .............................................. 38
Prises latérales .................................................... 39
Alimentation électrique ......................................... 39
Branchement de l’antenne.................................... 39
Connexion du téléviseur LCD à un PC ................. 40
Connexion à un lecteur de DVD ........................... 40
Utilisation des prises AV latérales ......................... 41
Connexion d’un autre équipement via la péritel ... 41
Insertion des piles dans la télécommande ........... 42
Allumer/éteindre le téléviseur ............................... 42
Pour allumer le téléviseur ................................ 42
Pour éteindre le téléviseur ................................ 42
Sélection d’entrée ................................................. 42
Opérations de Base .............................................. 42
Fonctionnement avec les boutons sur la TV ..... 42
Réglages initiaux .................................................. 43
Fonctionnement général ....................................... 44
Bandeau d’information ...................................... 44
Guide de programme électronique EPG .............. 44
Affi chage des sous-titres .................................. 44
Télétexte numérique (** seulement pour le
Royaume-Uni)................................................... 44
Télétexte Analogique ........................................ 45
Grand écran ...................................................... 45
Système de menu IDTV (TNT) ............................. 45
Liste des chaînes .............................................. 45
Minuteurs .......................................................... 47
Accès conditionnel ............................................ 47
Réglage TV ....................................................... 47
Réglage ............................................................ 48
Système de menu TV analogique ........................ 52
Menu Image ...................................................... 52
Menu Audio ....................................................... 53
Menu fonctionnel .............................................. 54
Menu d’installation ............................................ 55
Menu Source .................................................... 56
Système de menu du mode PC............................ 57
Menu de position PC ........................................ 57
Affi chage des informations TV .............................. 57
Fonction Muet ....................................................... 57
Sélection du mode image ..................................... 57
Arrêt sur image ..................................................... 58
Modes Zoom......................................................... 58
Auto .................................................................. 58
16:9 ................................................................... 58
4:3 ..................................................................... 58
Panoramique .................................................... 58
14:9 ................................................................... 58
Cinéma ............................................................. 58
Sous-titrage ...................................................... 58
Zoom................................................................. 58
Télétexte ............................................................... 59
Conseils ................................................................ 59
Entretien de l’écran ........................................... 59
Persistance d’image ......................................... 59
Appendice A : Modes d’affi chage typiques de
l’entrée PC ............................................................ 60
Appendice B : Compatibilité du signal AV et
HDMI (types de signal d’entrée) ........................... 61
Caractéristiques techniques ................................. 62
INSTRUCTIONS IMPORTANTES DE MISE AU
REBUT .............................................................. 63
A02_[FR]_MB45_1055UK_PANEUIDTV_BRONZE11_19822_10065707_50156721.indd 31A02_[FR]_MB45_1055UK_PANEUIDTV_BRONZE11_19822_10065707_50156721.indd 31 27.10.2009 16:59:4127.10.2009 16:59:41
Page 33

Français - 32 -
Consignes de sécurité
Alimentation secteur
Ce téléviseur est conçu pour fonctionner à partir d’une alimentation en courant alternatif 220-240 volts 50 Hz.
D’autres sources d’alimentation peuvent l’endommager. Vérifi er que les caractéristiques (au dos de l’unité)
indiquent 220-240V AC avant de brancher pour la première fois.
Prise d’alimentation
Nous avons équipé ce téléviseur d’une prise d’alimentation standard.
• Si le câble d’alimentation est endommagé il doit être remplacé par un agent de maintenance qualifi é avec
un câble approuvé du même type et avec les mêmes caractéristiques pour éviter tout risque.
• Si pour une raison quelconque vous endommagez la prise d’alimentation, veuillez détruire l’ancienne prise
car elle pourrait s’avérer dangereuse si elle était insérée dans une prise de courant sous tension. Veuillez
suivre attentivement les instructions de câblage fournies avec la nouvelle prise.
• Si un fusible équipe la prise, retirez le fusible avant de jeter la prise.
• N’utilisez jamais une prise d’alimentation avec fusible sans le couvercle du fusible.
• La fi che de prise de courant sert de dispositif de sectionnement pour couper l’alimentation générale de
l’appareil et celle ci doit être accessible. La prise secteur sur laquelle votre appareil est branché doit donc
être accessible à tout moment pour vous permettre de débrancher l’appareil.
Câblage de la prise d’alimentation pour le Royaume-Uni
Dans une prise remplaçable les câbles du cordon d’alimentation de ce téléviseur doivent être connectés de
la façon suivante.
• Le câble de couleur marron doit être connecté au terminal marqué de la lettre L.
• Le câble de couleur bleue doit être connecté au terminal marqué de la lettre N.
• Aucun câble ne doit être connecté au terminal de terre marqué de la lettre E ou
• Vous devez vous assurer que le câble est fermement fi xé sous le serre-câble.
Fusible d’alimentation
Les prises standards du Royaume-Uni (BS1363) doivent être équipées d’un fusible de 5 ampères (type
BS1362). Remplacez le câble ou faîtes remplacer l’assemblage du cordon d’alimentation si le couvercle du
fusible est manquant.
Symboles
Utilisation et entretien de votre télévision en toute sécurité
Nous avons conçu et fabriqué ce téléviseur pour répondre aux normes de sécurité européennes, mais comme
avec n’importe quel équipement électronique
vous devez faire attention pour rester en sécurité et obtenir les meilleurs résultats. Voici quelques bons
conseils pour vous y aider.
Lisez attentivement ces instructions avant d’essayer d’utiliser le téléviseur.
Si le câble d’alimentation est endommagé il doit être remplacé par un agent de maintenance qualifi é avec un
câble approuvé du même type et avec les mêmes caractéristiques pour éviter tout risque.
Eviter les conditions rudes telles qu’emplacements mouillés ou moites, une humidité élevée, de fortes
vibrations, des températures extrêmement basses ou élevées, un fort rayonnement solaire ainsi que les
endroits poussiéreux.
Une tension dangereuse constituant un
risque de décharge électrique est présente
à l’intérieur de cet équipement.
Ce signe est appliqué pour indiquer que
l’équipement est conforme aux normes
de compatibilité électro-magnétique
européennes.
Il se trouve d’importantes instructions
d’utilisation et de maintenance dans
les documents accompagnant cet
équipement.
A02_[FR]_MB45_1055UK_PANEUIDTV_BRONZE11_19822_10065707_50156721.indd 32A02_[FR]_MB45_1055UK_PANEUIDTV_BRONZE11_19822_10065707_50156721.indd 32 27.10.2009 16:59:4227.10.2009 16:59:42
Page 34

Français - 33 -
Ne placez jamais le téléviseur sur un support ou sur des pieds improvisés.
Ne continuez pas à utilisez votre téléviseur si vous avez renversé du liquide à l’intérieur, s’il est endommagé
d’une façon quelconque ou s’il ne fonctionne pas normalement. Débranchez immédiatement le téléviseur
et obtenez un avis expert.
Coupez l’alimentation ou retirez la prise d’alimentation lorsque vous laissez le téléviseur sans surveillance,
à moins que la fonction du téléviseur ne requière une alimentation continue.
Protégez l’écran contre les traces de doigts.
Cet appareil n’est conçu que pour un usage domestique. Toute autre utilisation peut invalider la garantie et
pourrait s’avérer dangereuse.
Ventilation
Placez le téléviseur sur une surface dure et plate à l’écart du rayonnement solaire direct et de sources de
chaleur. S’il se trouve dans un placard, laissez un espace d’au moins 10 cm tout autour. N’obstruez pas les
fentes de ventilation, y compris celles du dessous, avec des garnitures moelleuses. Une surchauffe raccourcira
la durée de vie de votre téléviseur et augmentera le risque d’incendie.
Nettoyage
Déconnectez l’alimentation électrique et utilisez seulement un chiffon doux légèrement humecté. N’utilisez
pas de solvant chimique ou de détergent puissant car ceci risque d’endommager le boîtier ou l’écran.
Ne laissez jamais de gouttelettes d’eau stagner sur l’écran car l’humidité peut causer une décoloration
permanente. Les marques graisseuses ne doivent être retirées qu’avec un nettoyant commercial spécifi quement
recommandé pour écrans LCD.
N’utilisez jamais aucun type de nettoyant chimique.
Piles
Retirez les piles lorsque le téléviseur n’est pas utilisé durant une longue période. Les piles laissées dans
l’équipement peuvent causer des dommages par détérioration et fuite corrosive, invalidant la garantie. Pour
protéger l’environnement, utilisez l’installation locale de recyclage pour l’élimination des piles.
Utilisation et entretien de votre téléviseur LCD en toute sécurité
Nous avons conçu et fabriqué ce téléviseur pour répondre aux standards de sécurité européens, mais comme
avec n’importe quel équipement électronique vous devez faire attention pour rester en sécurité et obtenir les
meilleurs résultats. Voici quelques bons conseils pour vous y aider.
Lisez attentivement ces instructions avant d’essayer d’utiliser le téléviseur.
Protégez le cordon d’alimentation. Vous devez vous assurer que le cordon d’alimentation ne peut pas être
piétiné, écrasé, abimé, coupé, ni coincé.
Evitez les conditions rudes telles qu’emplacements mouillés ou moites, une humidité élevée, de fortes
vibrations, des températures extrêmement basses ou élevées, un fort rayonnement solaire ainsi que les
endroits très poussiéreux.
N’introduisez jamais d’objet dans les orifi ces ou les fentes de ventilation.
Vous devez principalement utiliser la fi che secteur pour effectuer tout débranchement, et celle-ci doit rester
accessible à tout moment.
Ne touchez pas l’écran LCD car il s’échauffe en cours d’utilisation, ceci est normal et ne constitue pas un
dysfonctionnement.
Ce téléviseur est uniquement conçu pour une utilisation à domicile ou un usage général similaire. Toute autre
utilisation peut invalider la garantie et pourrait s’avérer dangereuse.
AVERTISSEMENT : Branchez le casque avec un volume bas et augmentez-le ensuite au besoin. L’écoute
prolongée au casque à un volume élevé peut provoquer des problèmes auditifs.
A02_[FR]_MB45_1055UK_PANEUIDTV_BRONZE11_19822_10065707_50156721.indd 33A02_[FR]_MB45_1055UK_PANEUIDTV_BRONZE11_19822_10065707_50156721.indd 33 27.10.2009 16:59:4227.10.2009 16:59:42
Page 35

Français - 34 -
Avertissements importants à propos de la sécurité
• Pour éviter toute décharge électrique, n’ôtez aucun couvercle.
• En cas de dysfonctionnement, ne tentez pas de réparer par vous-même, demandez à un agent de maintenance
qualifi é de regarder.
• N’exposez pas ce téléviseur à des suintements ou à des éclaboussures ni ne placez d’objet remplis d’eau,
tels que des vases, sur le téléviseur.
• Ne placez jamais une source de fl amme vive sur le téléviseur ou à proximité comme une bougie.
• Débranchez le cordon d’alimentation de la prise murale et déconnectez le câble d’antenne hertzienne
durant un orage.
• Afi n de prévenir toute blessure, cet appareil doit être solidement fi xé au mur ou au support fourni conformément
aux instructions d’installation.
Fatigue visuelle
Lorsque vous utilisez cet appareil comme écran d’ordinateur, les spécialistes de santé et de prévention
recommandent de fréquentes pauses brèves plutôt que des pauses plus longues, par exemple une pause
de 5 à 10 minutes après une heure de travail continu sur écran vaut vraisemblablement mieux qu’une pause
de 15 minutes toutes les 2 heures.
N’utilisez pas le moniteur contre un arrière-plan lumineux ou lorsque le rayonnement solaire ou une autre
source de lumière vive brille directement sur l’écran.
A02_[FR]_MB45_1055UK_PANEUIDTV_BRONZE11_19822_10065707_50156721.indd 34A02_[FR]_MB45_1055UK_PANEUIDTV_BRONZE11_19822_10065707_50156721.indd 34 27.10.2009 16:59:4227.10.2009 16:59:42
Page 36

Français - 35 -
Accessoires
ABC ABC
ABC
DEF DEF
DEF
GHI GHI
GHI
JKL JKL
JKL
MNO MNO
MNO
PQR PQR
PQR
STU STU
STU
VWX VWX
VWX
YZ YZ
YZ
1 2
3
4
5
6
7 8 9
0
AV
AV
SOURCE
SOURCE
EXIT EXIT
EXIT
-/--
-/--
INFO INFO
INFO
I-II
I-II
MENU
MENU
TV/DTVTV/DTV
TV/DTV
P/CH
P/CH
OK
SELECT
SELECT
WIDE WIDE
WIDE
GUIDE GUIDE
GUIDE
PP
PP
P<P/SWAP
P<P/SWAP
Remote
Controller
Piles: 2 X AAA
Instruction Book
Caractéristiques techniques
• Téléviseur couleur LCD avec télécommande.
• TV digitale entièrement intégrée (TNT).
• Prise HDMI pour vidéo et audio numériques.
Ce branchement est également conçu pour accepter
des signaux haute défi nition.
•
200 programmes VHF, UHF (analogiques).
• 500 programmes pour le mode numérique (IDTV).
• Menu de paramétrage OSD.
• Prises Péritel pour périphériques externes (tels que
vidéo, jeux vidéo, appareil audio, etc. ).
• Système de son stéréo
.
• Télétexte, Fastext, TOP text.
• Prise casque.
• Système d’auto programmation.
• Réglage manuel vers l’avant ou vers l’arrière.
• Minuteur de mise en veille.
• Verrouillage parental.
• Coupure automatique du son en cas d’absence de
transmission.
• Lecture NTSC.
• Ajustement automatique du volume AVL.
• Lorsqu’aucun signal valide n’est détecté, le
téléviseur passe automatiquement en mode veille
après 5 minutes.
• PLL (Recherche de fréquence).
• Entrée PC.
• Plug&Play (branchement et utilisation instantanée)
pour Windows 98, ME, 2000, XP, Vista.
• Mode jeu (en option) .
Introduction
Merci d’avoir choisi cet appareil. Ce manuel vous
guidera pour une utilisation appropriée de
votre téléviseur. Avant d’utiliser le téléviseur,
lisez ce manuel minutieusement.
Veuillez conserver ce manuel dans un
endroit sûr pour future référence.
Préparation
Pour la ventilation, laissez un espace d’au moins
10 cm autour du poste. Pour éviter toute panne ou
situation périlleuse, ne placez aucun objet sur le haut
du poste.
Utilisez cet appareil sous des climats modérés.
10 cm
10 cm
10 cm
Précautions de sécurité
Lisez attentivement les consignes de
sécurité recommandées suivantes pour
votre protection.
Source d’alimentation
Ce téléviseur ne doit fonctionner qu’à partir d’une
prise de courant 220-240 V AC, 50 Hz . Assurezvous de sélectionner la tension correcte pour votre
convenance.
Cordon d’alimentation
Ne placez pas l’appareil, ou une pièce de mobilier,
etc. sur le cordon d’alimentation (alimentation
secteur); évitez tout pincement du cordon. Tenez le
cordon d’alimentation par sa fi che. Ne débranchez
pas l’appareil en tirant sur le cordon d’alimentation
et ne touchez jamais au cordon d’alimentation avec
des mains mouillées car ceci pourrait causer un
court-circuit ou une décharge électrique. Ne nouez
jamais le cordon ni ne l’attachez à d’autres cordons.
Les cordons d’alimentation doivent être placés de
façon à ne pas risquer d’être piétinés. Un cordon de
raccordement endommagé peut causer un incendie
ou vous infl iger une décharge électrique. Lorsque
endommagé le cordon doit être remplacé, ceci doit
être effectué par un personnel qualifi é.
A02_[FR]_MB45_1055UK_PANEUIDTV_BRONZE11_19822_10065707_50156721.indd 35A02_[FR]_MB45_1055UK_PANEUIDTV_BRONZE11_19822_10065707_50156721.indd 35 27.10.2009 16:59:4227.10.2009 16:59:42
Page 37

Français - 36 -
Mise au rebut
Instructions pour la mise au rebut :
• L’emballage et les éléments d’emballage sont
recyclables et doivent être essentiellement recyclés.
Les matériaux d’emballage, tels que le sac en feuille
d’aluminium, doivent être tenus hors de portée des
enfants.
• Les piles, même celles ne contenant pas de métal
lourd, ne doivent pas être jetées avec les déchets
ménagers. Veuillez éliminer les piles usagées de
manière écologique. Consultez la réglementation
applicable dans votre région.
• La lampe fl uorescente à cathode froide de l’ÉCRAN
LCD contient une petite quantité de mercure.
Veuillez suivre les lois ou réglementations locales
pour la mise au rebut.
Débranchement de l’appareil
Vous devez utiliser la fiche secteur pour couper
l’alimentation générale, et celle-ci doit donc rester
accessible à tout moment.
Volume du casque d’écoute
Une pression sonore excessive provenant
des écouteurs et du casque d’écoute peut
provoquer une perte auditive.
Installation
Pour prévenir toute blessure, cet appareil doit être
solidement fi xé au mur conformément aux instructions
d’installation lors d’un montage mural (si l’option est
disponible).
Ecran LCD
L’écran LCD est un produit de très haute technologie
avec un fi lm fi n d’environ un million de transistors, vous
offrant des détails d’image raffi nés. Occasionnellement,
quelques pixels non actifs peuvent apparaître à l’écran
comme un point fi xe bleu, vert ou rouge. Veuillez
noter que ceci n’affecte pas les performances de
votre appareil.
Avertissement
Ne laissez pas votre téléviseur en veille ou en
fonctionnement lorsque vous quittez votre domicile.
.
Humidité et eau
N’utilisez pas cet appareil dans un endroit
humide et moite (évitez la salle de bain,
l’évier de la cuisine, et à proximité de
la machine à laver). N’exposez pas cet
équipement à la pluie ou à l’eau, ceci
pouvant s’avérer dangereux, et ne placez
aucun objet empli de liquide, comme un
vase par exemple, au dessus. Ne pas
exposer à des suintements ou à des éclaboussures.
Si un objet solide ou un liquide tombe à l’intérieur
du poste, débranchez-le et faîtes-le vérifi er par un
personnel qualifi é avant de continuer à l’utiliser.
Nettoyage
Avant de nettoyer, débranchez le
poste TV de la prise murale. N’utilisez
pas de nettoyant liquide ou aérosol.
Utilisez un chiffon doux et sec.
Ventilation
Les fentes et les orifi ces du poste TV sont prévus pour
la ventilation et pour assurer un fonctionnement fi able.
Pour éviter la surchauffe, ces orifi ces ne doivent pas
être obstrués ni couverts de quelque façon.
Chaleur et fl ammes
L’appareil ne doit pas être placé à côté de
fl ammes nues ou de sources de chaleur,
comme un radiateur. Assurez-vous
qu’aucune source de fl amme vive, telle
que des bougies allumées, ne soit placée
sur le poste TV. Les piles ne doivent pas
être exposée à une chaleur excessive telle que le
rayonnement solaire ou similaire.
Foudre
En cas d’orage et de foudre ou lorsque
vous partez en vacances, débranchez
le cordon d’alimentation de la prise
murale.
Pièces de rechange
Lorsque des pièces de rechange sont requises,
assurez-vous que le technicien de maintenance
utilise les pièces de rechange qui sont préconisées
par le fabricant ou ayant les mêmes caractéristiques
techniques que les pièces originales. . Des substitutions
non autorisées peuvent causer un incendie, une
décharge électrique ou d’autres risques.
Maintenance
Veuillez confier toute la maintenance
à du personnel qualifi é. Ne retirez pas
le couvercle vous-même car ceci peut
résulter en une décharge électrique.
A02_[FR]_MB45_1055UK_PANEUIDTV_BRONZE11_19822_10065707_50156721.indd 36A02_[FR]_MB45_1055UK_PANEUIDTV_BRONZE11_19822_10065707_50156721.indd 36 27.10.2009 16:59:4327.10.2009 16:59:43
Page 38

Français - 37 -
Aperçu général de la télécommande Veille
Muet 1.
Aucune fonction / Quitter (en mode DTV)2.
Volume haut/bas3.
Mono/Stéréo - Mixte I-II 4.
(Mono/Stereo - Dual I-II)
TV / TV numérique 5.
Jaune / Menu Fonction / Langue en cours 6.
(en mode DTV) (*)
Bleu (Blue) / Menu Installation (Install menu)7.
Garder (en mode texte - Hold)8.
Actualiser (en mode texte -Update)9.
Page d’index / Guide (en mode DTV)10.
Révéler (en mode texte) / Basculer de TV à PC11.
Mode de sélection d’image12.
Echange / Programme précédent13.
Etendre (en mode TXT) / Taille de l’image14.
Mélanger (en mode texte)15.
Mode Télétexte / PAT16.
Heure / Sous-titrage activé-désactivé (**) 17.
(en mode DTV)
Rouge (Menu Son)18.
Vert / Menu Image / Sous-titre activé/ 19.
désactivé (*) (en mode DTV)
Menu20.
Boutons de direction21.
Ok (mémoriser) / Sélectionner (en mode DTV)22.
Programme précédent 23.
(Page suivante en mode DTV) /
Programme suivant
(Page précédente (en mode DTV)
Info24.
Source / AV 25.
Touches numériques26.
Veille (Standby)27.
(*) Disponible uniquement pour les options des
pays de l’UE.
(**) Disponible uniquement pour les options des
pays du RU.
Remarque : Les touches non indiquées avec un
numéro dans l’illustration de la télécommande ne
sont pas fonctionnelles en mode TV.
Prévoir un espace d’environ 14 m/23ft.
ABC ABC
ABC
DEF DEF
DEF
GHI GHI
GHI
JKL JKL
JKL
MNO MNO
MNO
PQR PQR
PQR
STU STU
STU
VWX VWX
VWX
YZ YZ
YZ
1 2
3
4
5
6
7
8 9
0
AV
AV
SOURCE
SOURCE
EXIT EXIT
EXIT
-/--
-/--
INFO INFO
INFO
I-II
I-II
MENU
MENU
TV/DTVTV/DTV
TV/DTV
P/CH
P/CH
OK
SEL ECT
SEL ECT
WIDE WIDE
WIDE
GUIDE GUIDE
GUIDE
PP
PP
P<P/SWAP
P<P/SWAP
A02_[FR]_MB45_1055UK_PANEUIDTV_BRONZE11_19822_10065707_50156721.indd 37A02_[FR]_MB45_1055UK_PANEUIDTV_BRONZE11_19822_10065707_50156721.indd 37 27.10.2009 16:59:4427.10.2009 16:59:44
Page 39

Français - 38 -
TV LCD et boutons de commande
VUE AVANT et ARRIÈRE VUE LATÉRALE Boutons de contrôle
Bouton Haut1.
Bouton Bas2.
Bouton Programme/Volume / 3.
Sélection AV
Bouton de mise en veille4.
Remarque:vous pouvez utiliser les
touches “+/-” pour augmenter ou
baisser le volume. Pour changer de
chaîne, appuyez une fois sur la touche
P/V/AV, puis utilisez les touches “+/-”
. Si vous maintenez la touche P/V/AV
enfoncée pendant quelques secondes,
le menu source restera affiché à
l’écran. Impossible d’affi cher le menu
principal à l’écran à l’aide des boutons
de commande.
C onnecteurs arrière
Entrées ou sorties de prise PÉRITEL pour périphériques externes.1.
HDMI
Connecter le câble Péritel entre la prise Péritel de la TV et la prise
Péritel de votre appareil externe (comme un décodeur, un
magnétoscope ou un lecteur DVD).
Remarque: Si un dispositif externe est branché à l’aide d’une prise
PERITEL , le téléviseur passera automatiquement au mode AV.
L’entrée PC sert à connecter un ordinateur personnel au poste TV. 2.
Branchez le câble de PC entre l’ENTRÉE PC sur la TV et la
sortie PC sur votre ordinateur. Les entrées vidéo en composantes
(YPbPr) sont utilisées pour connecter une vidéo en composantes.
Vous pouvez utiliser une entrée PC pour connecter YPbPr à un
appareil doté d’une sortie du composant. Connectez le câble YPbPr
sur celui du PC entre l’ENTREE PC du téléviseur et les sorties
vidéo composante de votre appareil (Le câble YPbPr n’est pas
fourni).
HDMI3. : Entrées HDMI
Les entrées HDMI servent à brancher un périphérique doté d’une prise HDMI .
Votre téléviseur LCD peut affi cher des images haute défi nition à partir de périphériques tels qu’un
récepteur de satellite haute défi nition ou un lecteur de DVD. Ces périphériques doivent être connectés
via les prises HDMI ou les prises en composantes. Ces prises peuvent accepter n’importe quels
signaux 480i, 480p, 576p, 576i, 720p, 1080i, ou 1080p. Aucun branchement audio n’est nécessaire
pour une connexion HDMI à HDMI.
L’entrée RF se branche à une antenne ou à un câble.4.
Remarquez que si vous utilisez un décodeur ou un enregistreur média, vous devez brancher un câble
aérien qui va de l’appareil au téléviseur, avec un câble d’antenne approprié, tel qu’illustré ci-dessous.
Lorsque vous utilisez le kit de montage mural (non fourni) avec le téléviseur LCD, nous vous recommanderons formellement
de brancher tous vos câbles à l’arrière du LCD avant tout montage mural.
A02_[FR]_MB45_1055UK_PANEUIDTV_BRONZE11_19822_10065707_50156721.indd 38A02_[FR]_MB45_1055UK_PANEUIDTV_BRONZE11_19822_10065707_50156721.indd 38 27.10.2009 16:59:4427.10.2009 16:59:44
Page 40

Français - 39 -
Prises latérales
La fente CI sert à insérer une carte CI. Une carte CI vous permet de 1.
regarder toutes les chaînes auxquelles vous êtes abonné (e). Pour plus
d’informations, référez-vous à la section « Accès conditionnel ».
L’entrée vidéo est utilisée pour connecter les signaux vidéo des 2.
périphériques externes. Branchez le câble vidéo entre l’ENTREE
VIDEO du téléviseur et la SORTIE Vidéo de votre appareil.
Les entrées audio servent à brancher les signaux audio de 3.
périphériques externes. Branchez le câble audio entre les ENTRÉES
AUDIO du téléviseur et les ports de SORTIE AUDIO de votre appareil.
Pour activer également la connexion sonore PC/YPbPr en pareille
situation, utilisez un câble audio approprié entre les sorties audio de
l’appareil et les entrées audio du téléviseur
Remarque: Si vous branchez un périphérique au téléviseur via
l’ENTRÉE VIDÉO ou le câble PC/YPbPr (câble YPbPr non fourni), vous
devez également brancher votre périphérique à l’aide d’un câble audio
aux ENTRÉES AUDIO du téléviseur pour activer le son.
La prise jack du casque s’utilise pour brancher au système un casque 4.
externe. Raccordez à la prise jack du CASQUE pour écouter la TV à
partir du casque.
Alimentation électrique
IMPORTANT : Le téléviseur a été conçu uniquement pour fonctionner en 220-240V AC, 50 Hz.
• Après avoir déballé la TV, laissez la atteindre la température ambiante avant de la brancher à la prise de
courant.
• Branchez le câble d’alimentation à la prise secteur.
Branchement de l’antenne
• Branchez l’antenne ou le câble du téléviseur à la prise d’ENTRÉE DE L’ANTENNE située à l’arrière du
téléviseur.
HDMI
A02_[FR]_MB45_1055UK_PANEUIDTV_BRONZE11_19822_10065707_50156721.indd 39A02_[FR]_MB45_1055UK_PANEUIDTV_BRONZE11_19822_10065707_50156721.indd 39 27.10.2009 16:59:4627.10.2009 16:59:46
Page 41

Français - 40 -
Connexion du téléviseur LCD
à un PC
Afi n d’affi cher l’image de l’écran de votre ordinateur
sur votre téléviseur LCD, vous pouvez connecter votre
ordinateur au poste de télévision.
• Débranchez l’ordinateur et le téléviseur avant de
faire les branchements.
• Utilisez un câble D-sub 15 broches pour connecter
un PC à un téléviseur LCD. Pour ce faire, utilisez
un câble audio branché entre les entrées audio du
téléviseur (sur le côté) et la sortie audio de votre PC
pour activer la connexion audio.
• Une fois le branchement effectué, passez à la source
du PC. Voir la section « Sélection d’entrée».
• Réglez la résolution qui correspond à vos besoins
d’affi chage. Pour les informations relatives à la
résolution, se reporter à l’annexe.
HDMI
Câble audio de PC
(non fourni)
sur les ENTREES AUDIO
du téléviseur
Câble RGB du
PC (non fourni)
à l'entrée du PC
Entrées
audio
Entrée PC
Connexion à un lecteur de
DVD
Si vous voulez brancher un lecteur de DVD à votre
téléviseur LCD, vous pouvez utiliser les branchements
qui se trouvent sur le téléviseur. Les lecteurs de
DVD peuvent disposer de différentes prises. Veuillez
consulter le manuel d’utilisation de votre lecteur
de DVD pour plus d’informations. Débranchez
le téléviseur et l’appareil avant d’effectuer les
branchements.
Remarque: Les câbles présentés dans l’illustration ne sont
pas fournis.
• Si votre lecteur de DVD est doté d’une prise HDMI,
vous pouvez le brancher via HDMI. Lorsque vous
connectez au lecteur DVD ainsi qu’illustré cidessous, passez en source HDMI. Voir la section «
Sélection d’entrée ».
• La plupart des lecteurs de DVD sont branchés via
des PRISES EN COMPOSANTES. Vous pouvez
recourir au mode YPbPr uniquement lorsque vous
raccordez un appareil doté d’une sortie YPbPr à
travers l’entrée PC avec le câble YPbPr pour PC.
Pour activer le signal sonore, utilisez l’entrée AUDIO
IN qui se trouve sur le côté du téléviseur (le câble
YPbPr n’est pas fourni)
.
. Une fois le branchement effectué, passez en source
YPbPr . Voir la section « Sélection d’entrée ».
• Vous pouvez également faire les branchements
par une prise PERITEL. Utilisez un câble PÉRİTEL
comme présenté dans l’illustration.
Entrées HDMI
Prises Péritel
Entrées
vidéo du
composant
Entrées
audio du
composant
Lecteur DVD
Remarque : Ces procédés de branchement réalisent la
même fonction mais à des niveaux de qualité différents. Il
n’est pas nécessaire d’effectuer la connexion par toutes les
trois méthodes.
A02_[FR]_MB45_1055UK_PANEUIDTV_BRONZE11_19822_10065707_50156721.indd 40A02_[FR]_MB45_1055UK_PANEUIDTV_BRONZE11_19822_10065707_50156721.indd 40 27.10.2009 16:59:4827.10.2009 16:59:48
Page 42

Français - 41 -
Utilisation des prises AV
latérales
Vous pouvez brancher une gamme d’équipement
optionnel à votre TV LCD. Les raccordements possibles
sont présentés ci-dessous: Notez que les câbles
présentés dans l’illustration ne sont pas fournis.
• Pour raccorder un caméscope, branchez à la
prise ENTRÉE VIDÉO et aux PRISES AUDIO.
Pour sélectionner la source correspondante, se
reporter à la section « Sélection d’entrée » dans les
paragraphes suivants.
• Pour écouter le son du téléviseur en provenance
des casques, branchez le port dudit CASQUE au
téléviseur.
Caméscope
Casque
AVERTISSEMENT A PROPOS DU VOLUME
SONORE DU CASQUE D’ÉCOUTE
Branchez le casque avec le volume réglé sur bas et
augmentez-le le cas échéant. L’écoute prolongée à
fort volume via certains casques peut entraîner des
troubles auditifs.
Ecouteurs et casques audio doivent être conformes
à la directive EN 50332-2 afin d’assurer une
protection permanente contre les niveaux sonores
excessivement élevés.
Connexion d’un autre
équipement via la péritel
La plupart des périphériques supportent la connexion
PÉRITEL. Vous avez la possibilité de brancher un
graveur de DVD, un magnétoscope ou un décodeur
à votre TV LCD par l’utilisation de la prise PÉRITEL.
Notez que les câbles présentés dans l’illustration
ne sont pas fournis. Eteignez le téléviseur et les
périphériques avant d’effectuer tout branchement.
Pour plus d’informations, reportez-vous au manuel
d’utilisation de votre périphérique.
Prise Péritel
Décodeur
Graveur de DVD
Enregistreur vidéo
A02_[FR]_MB45_1055UK_PANEUIDTV_BRONZE11_19822_10065707_50156721.indd 41A02_[FR]_MB45_1055UK_PANEUIDTV_BRONZE11_19822_10065707_50156721.indd 41 27.10.2009 16:59:5027.10.2009 16:59:50
Page 43

Français - 42 -
Insertion des piles dans la
télécommande
• Retirez le couvercle du compartiment des piles situé
au dos de la télécommande en poussant doucement
vers l’arrière à partir de la partie indiquée.
• Insérer à l’intérieur deux piles de type AAA/R3 ou
équivalent . Insérez les piles dans la télécommande
tout en respectant la polarité. Ensuite, refermez le
couvercle des piles.
Remarque : Retirez les piles de la télécommande lorsqu’elle
n’est pas utilisée durant une longue période. Sinon cette
dernière peut être endommagée par une fuite corrosive des
piles, ce qui invalidera la garantie.
Allumer/éteindre le téléviseur
Pour allumer le téléviseur
• Branchez le cordon d’alimentation à une prise de
courant alternatif 220-240V AC 50 Hz.
• Pour allumer le téléviseur à partir du mode veille,
vous pouvez soit:
• Appuyez sur la touche “ ” , P/CH+ / P/CH- ou une
touche numérique de la télécommande.
• Appuyez sur la touche “ ” ou -P/CH / P/CH+ du
téléviseur.
La TV s’allumera ensuite.
Remarque : Si vous allumez votre TV via les boutons
PROGRAMME HAUT/BAS sur la télécommande ou sur le
poste TV, le dernier programme que vous regardiez sera
re-sélectionné.
Quelle que soit la méthode, la TV s’allumera.
Pour éteindre le téléviseur
• Appuyez sur la touche “ ” de la télécommande ou sur
la touche MODE DE VEILLE du téléviseur ; ainsi, le
téléviseur basculera en mode de veille.
Remarque : Si vous avez éteint le téléviseur à partir du
bouton veille sur la TV, la prochaine fois que vous presserez
le bouton veille, le téléviseurs’allumera sans passer par le
mode veille.
• Pour éteindre complètement le téléviseur,
débranchez le cordon d’alimentation de la prise
murale.
Sélection d’entrée
Une fois les équipements externes connectés à votre
TV, vous pouvez commuter entre différentes sources
d’entrée.
• Appuyez sur la touche “
/SOURCE” de la
télécommande pour changer les sources en
direct.
ou
• Sélectionnez l’option “Source” à partir
du menu principal en utilisant le bouton “
” ou “ ” . Puis, utilisez les touches “ ” ou
“ ” pour mettre une entrée en surbrillance et
appuyez sur la touche “ ” pour la sélectionner.
Remarque : Vous pouvez marquer les options de source désirées
en pressant le bouton OK . Quand le bouton
“ /SOURCE”
est pressé, seules les options de la source sélectionnées
seront disponibles (en dehors de la source TV).
Remarque : Vous pouvez recourir au mode YPbPr uniquement
lorsque vous raccordez un appareil doté d’une sortie YPbPr à
travers l’entrée PC avec le câble YPbPr pour PC.
Opérations de Base
Vous pouvez commander votre TV en
utilisant indifféremment les boutons de la
télécommande ou du téléviseur.
Fonctionnement avec les boutons sur
la TV
Impossible d’affi cher le menu principal à l’écran à
l’aide des boutons de commande. Les touches “+/-”
serviront par défaut à augmenter / diminuer le volume.
Même si vous attribuez d’autres fonctions à ces
boutons, les touches “+/-” fonctionneront par défaut
après quelques instants.
Réglage du volume
• Appuyez une fois sur la touche “P/V/A V ”. Ensuite,
servez-vous des touches “+/-” pour hausser
ou baisser le volume. En procédant ainsi, une
échelle du niveau de volume (curseur) s’affi chera
à l’écran.
A02_[FR]_MB45_1055UK_PANEUIDTV_BRONZE11_19822_10065707_50156721.indd 42A02_[FR]_MB45_1055UK_PANEUIDTV_BRONZE11_19822_10065707_50156721.indd 42 27.10.2009 16:59:5027.10.2009 16:59:50
Page 44

Français - 43 -
Pressez le bouton OK sur la télécommande pour
continuer et le message suivant s’affichera à
l’écran:
• Pour sélectionner l’option “Oui” ou “Non”, placez
l’élément en surbrillance en utilisant les boutons “
” ou “ ”, puis pressez le bouton “OK”.
L’IDTV (TNT) passera automatiquement des chaînes
de transmission UHF ou VHF (* options réservées
aux pays de l’Europe continentale) en recherchant les
transmissions numériques terrestres et en affi chant
les noms des chaînes trouvées. Ce processus prendra
quelques minutes.
Une fois la recherche automatique terminée, le
message suivant proposant une recherche de chaînes
analogiques apparaît à l’écran:
Pour rechercher des chaînes analogiques,
sélectionnez “Oui”. Le téléviseur bascule en mode
TV analogique. Le menu apparaîtra pour effectuer la
recherche des chaînes analogiques.
Sélectionnez votre Sélectionnez votre Pays, Langue
et Langue de texte en utilisant les boutons “
” ou “ ”
et “ ” ou “ ” . Pressez le bouton OK ou ROUGE pour
continuer. Pour annuler, pressez le bouton BLEU.
Pour plus d’informations sur ce processus, consultez la
section “Menu d’installation”.
Remarque : Pour un bon fonctionnement du télétexte numérique
en mode DTV (TV digitale, TNT), vous devez sélectionner
UK comme pays en PROGRAMMATION AUTOMATIQUE
analogique (pour les diffusions du RU uniquement).
Ne pas éteindre le téléviseur lors de l’initialisation de la première
installation.
Sélection de programme
• Pressez le bouton “+/-” pour sélectionner le
programme suivant ou précédent.
Mode AV
• Maintenez la touche “P/V/AV ” pour faire affi cher le
menu source.
Fonctionnement avec la télécommande
• La télécommande de votre téléviseur est conçue pour
contrôler toutes les fonctions du modèle sélectionné.
Les fonctions seront décrites conformément au
système de menu de votre TV.
• Les fonctions du système de menu sont décrites
dans les sections suivantes.
Réglage du volume
• Appuyez sur le bouton “V+” pour augmenter le
volume. Appuyez sur la touche “V-” pour diminuer le
volume. Une échelle de niveau volumétrique (barre
de défi lement) s’affi chera à l’écran.
Sélection de programme (programme
précédent ou suivant)
• Pressez le bouton “ P - ” pour sélectionner le programme
précédent.
• Pressez le bouton “ P+ ” pour sélectionner le programme
suivant.
Sélection de programme (accès direct)
• Pressez les boutons numériques sur la télécommande
pour sélectionner les programmes compris entre 0 et
9. Le téléviseur passera au programme sélectionné.
Pour sélectionner des programmes entre 10 et 500
(pour l’IDTV) ou entre 10 et 199 (pour la télévision
analogique), appuyez consécutivement sur les
touches numériques.
• Appuyez directement sur le numéro de programme
pour sélectionner à nouveau les programmes à
un chiffre.
Réglages initiaux
Lorsque le téléviseur est mis en marche pour la
première fois, le menu de sélection de langue apparaît
à l’écran. Le message “Bienvenue, sélectionnez votre
langue!” apparaît dans toutes les langues sur le menu
de l’écran.
Sélectionnez la langue de votre choix avec les touches
“
” ou “ ”, puis appuyez sur la touche “ OK ”. Ensuite,
le menu “Première installation” s’affi che à l’écran. En
appuyant sur les boutons “
” ou “ ” , sélectionnez le
pays que vous voulez et appuyez sur le bouton “OK”.
(* Pour les pays de l’UE).
Remarque: L’OSD Sélection du pays (Country selection) ne
sera pas disponible pour le RU.
A02_[FR]_MB45_1055UK_PANEUIDTV_BRONZE11_19822_10065707_50156721.indd 43A02_[FR]_MB45_1055UK_PANEUIDTV_BRONZE11_19822_10065707_50156721.indd 43 27.10.2009 16:59:5127.10.2009 16:59:51
Page 45

Français - 44 -
Fonctionnement général
Appuyez sur la touche “ /SOURCE” de la
télécommande et sélectionnez TV/DTV pour faire
basculer le téléviseur en mode de diffusion numérique
terrestre.
Bandeau d’information
• Chaque fois que vous changez de chaîne en utilisant
le bouton P- / P+ ou les boutons numériques, la TV
affi che l’image de l’émission en même temps qu’un
bandeau d’information en bas de l’écran (disponible
uniquement en mode DTV). Ce message restera
quelques secondes sur l’écran.
• Le bandeau d’information peut aussi être affi ché à
tout moment tout en regardant la TV en pressant le
bouton “INFO” sur la télécommande:
Si la chaîne sélectionnée est verrouillée, vous devez
saisir le bon mot de passe numérique à 4 chiffres
pour voir la chaîne. “Saisissez le code PIN” s’affi che
à l’écran dans ce cas:
Guide de programme électronique
EPG
• Certaines chaînes, mais pas toutes, adressent des
informations sur l’émission en cours et l’émission
suivante. Appuyez sur le bouton GUIDE pour
accéder au menu EPG. L’EPG apparaît à l’écran. Ce
guide permet d’obtenir des informations relatives à la
chaîne, notamment des programmes hebdomadaires
au moyen de l’EPG HEBDOMADAIRE. Tous
les programmes s’affichent. Au bas de l’écran
s’affi chera une barre d’information indiquant toutes
les commandes disponibles.
Bouton ROUGE (rétrécir) : Réduit la taille des pavés
d’information.
Bouton VERT (Agrandir) : Augmente la taille des pavés
d’information.
Bouton JAUNE (Jour. Préc.) : affi che les programmes
du jour précédent.
Bouton BLEU (jour suivant) : affi che les programmes
du jour suivant.
INFO (Détails): affiche les programmes dans les
moindres détails.
Boutons numériques (Sauter) : aller directement à la
chaîne préférée via des boutons numériques.
OK : Affichage de diffusions en cours/rappel de
programmes à venir.
P<P : saute sur la diffusion en cours.
• Appuyez sur la touche “0” de la télécommande pour
affi cher le menu Recherche du guide. Vous pouvez,
à l’aide de cette fonctionnalité, rechercher la base
de données du guide de programme selon le genre
sélectionné ou le nom correspondant.
Affi chage des sous-titres
Avec la diffusion numérique terrestre (TNT), certains
programmes sont en train d’être diffusés avec des
sous-titres.
Pressez le bouton “ MENU ” pour afficher le menu
principal, sélectionnez la ligne Confi guration puis
Langues en utilisant le bouton “
” ou “ ” et pressez
le bouton OK pour affi cher le menu des « Paramètres
de langue ».
Sélectionnez « Sous-titre » dans le menu « Paramètres
de langue » et utilisez le bouton
” ou “ pour régler
le sous-titrage sur la langue voulue.
Pour affi cher les sous-titres, appuyez sur la touche
Sous-titre, appuyez à nouveau pour désactiver les
sous-titres.
Si l’option « Sous-titre » est activée et une option de
langue réglée, le fait d’appuyer sur la touche “
” amène
l’écran à affi cher le message d’avertissement suivant (**
pour le RU uniquement):
Télétexte numérique (** seulement pour
le Royaume-Uni)
• Appuyez sur le bouton “ ” .
• Les informations de télétexte numérique
apparaissent.
• Utilisez les touches colorées, les touches du curseur
et la touche OK.
La méthode de fonctionnement peut différer selon le
contenu télétexte numérique.
Suivez les instructions affi chées sur l’écran télétexte
numérique.
A02_[FR]_MB45_1055UK_PANEUIDTV_BRONZE11_19822_10065707_50156721.indd 44A02_[FR]_MB45_1055UK_PANEUIDTV_BRONZE11_19822_10065707_50156721.indd 44 27.10.2009 16:59:5227.10.2009 16:59:52
Page 46

Français - 45 -
• Quand la touche “SELECT” (Appuyez sur
sélectionner) ou un message similaire apparaît,
appuyez sur le bouton OK.
• Quand le bouton “ ” est pressé, la TV revient à la
diffusion télévisée.
• Avec la diffusion numérique terrestre (TNT), en
plus de la diffusion télétexte numérique ainsi que
de la diffusion normale, il existe également des
chaînes avec seulement de la diffusion télétexte
numérique.
• Le format de l’image (la forme de l’image) en
regardant une chaîne avec juste une diffusion
télétexte numérique est le même que le format de
l’image visualisée précédemment.
• Lorsque vous pressez à nouveau le bouton “
”,
l’écran télétexte numérique s’affi chera.
Télétexte Analogique
L’utilisation du télétexte et de ses fonctions est identique
au système de télétexte analogique. Veuillez vous
reporter aux explications relatives au « TELETEXTE».
Grand écran
Selon le type de l’émission retransmise, les
programmes peuvent être regardés dans nombre
de formats. Appuyez sans interruption sur la touche
“WIDE” pour modifi er le format de l’écran.
Lorsque l’option Auto est sélectionnée, le format
affi ché est déterminé par l’image diffusée.
VEUILLE NOTER : La taille du menu varie selon la taille de
l’image choisie.
Attention !
L’audio de type AC3 n’est pas pris en charge. Dans
ce cas, le son en provenance du téléviseur sera
coupé. Si la diffusion intègre le fl ux AC3, le message
d’avertissement ci-après s’affi chera à l’écran:
Si la diffusion intègre le flux AC3, le message
d’avertissement ci-après s’affi chera à l’écran:.
Système de menu IDTV (TNT)
Appuyez sur le bouton “ MENU ”. Le menu principal
s’affi chera.
Liste des chaînes
En utilisant le bouton “ ” ou “ ” de la télécommande,
assurez-vous que la première rubrique, Liste des
chaînes, est en surbrillance, puis pressez le bouton
“OK” pour affi cher la liste des chaînes.
Naviguer dans la liste entière des chaînes
Appuyez sur le bouton “ ” ou “ ” pour sélectionner la
chaîne précédente ou suivante. Vous pouvez appuyer
sur le bouton “ROUGE” ou “VERT” pour vous déplacer
vers le haut ou le bas de la page.
Pour regarder une chaîne particulière, sélectionnez-la
à l’aide des touches “
” ou “ ”, puis appuyez sur
la touche “ OK ” button, et sélectionnez la rubrique
“Sélectionner” (OK) dans le menu Liste des chaînes à
l’aide des touches “ ” ou “ ”.
Les nom et numéro de la chaîne sélectionnée
s’afficheront alors respectivement dans les coins
supérieurs gauche et droit de l’affi chage de la chaîne
en haut à droite de l’écran.
Déplacer les chaînes dans la liste des
chaînes
• Appuyez sur les touches “ ” ou “ ” pour sélectionner
la chaîne à déplacer.
• Appuyez sur les touches “
” ou “ ” pour sélectionner
la rubrique “ Déplacer ” dans le menu Tableau des
programmes.
L’OSD (menu écran) ci-après s’affi chera tout près de la
touche “ OK ” pour vous demander de saisir un numéro
en utilisant les touches numériques de la télécommande
et d’appuyer sur “ OK ” pour confi rmer.
Remarque : Si vous saisissez le même numéro de chaîne
que vous voulez déplacer, “…les services de chaîne
seront déplacés . “Voulez vous continuer?” Le menu écran
A02_[FR]_MB45_1055UK_PANEUIDTV_BRONZE11_19822_10065707_50156721.indd 45A02_[FR]_MB45_1055UK_PANEUIDTV_BRONZE11_19822_10065707_50156721.indd 45 27.10.2009 16:59:5227.10.2009 16:59:52
Page 47

Français - 46 -
s’affi chera. Appuyez sur OK pour confi rmer ou sélectionnez
« Non » pour annuler.
Supprimer les chaînes dans la liste des
chaînes
• Appuyez sur la touche “ ” ou “ ” pour sélectionner
la chaîne à supprimer.
• Appuyez sur la touche “ ” ou “ ” pour sélectionner
l’élément « Supprimer » dans le menu Tableau des
programmes.
• Appuyez sur “ OK ” pour supprimer la chaîne en
surbrillance du tableau des programmes. Le
message ci-dessous apparaît à l’écran:
• Appuyez sur les touches “ ” ou “ ” pour sélectionner
l’option désirée. Si le bouton “ OK ” est pressé tandis
que “ Oui ” est sélectionné, la chaîne en surbrillance
est supprimée. Sélectionner “ Non ” annule la
suppression.
Renommer des chaînes
Pour renommer une chaîne précise, celle-ci doit être
mise en surbrillance en appuyant sur les touches “
” ou “ ” . Ensuite, mettez en surbrillance l’élément
Modifi er le nom en appuyant sur les touches “ ” ou
“ ” tel qu’illustré ci-dessous. Pressez le bouton “OK”
pour activer la fonction de changement de nom.
En appuyant sur “ ” ou “ ” vous passez au caractère
précédent ou suivant. En appuyant sur les touches “
” ou “ ”, vous changez le caractère en surbrillance :
par exemple, le « b » devient un « a » “
” ou un « c »
“
”. En appuyant sur les touches numériques de 0 à
9, vous remplacez le caractère en surbrillance par les
caractères marqués au-dessus du bouton; ils défi lent
un par un quand vous appuyez sur le bouton.
Pressez le bouton “MENU” pour annuler l’édition ou le
bouton “OK” pour sauvegarder le nouveau nom.
Ajouter des verrous à des chaînes
Le verrouillage de chaîne apporte un accès protégé
par mot de passe aux chaînes sélectionnées par
les parents. Pour verrouiller une chaîne vous devez
connaître le mot de passe de contrôle parental (il est
réglé sur 0000 en confi guration d’usine et ne peut être
modifi é que dans le menu de Confi guration).
Sélectionnez la chaîne à verrouiller en la mettant en
surbrillance et sélectionnez l’option de Verrouillage en
appuyant sur le bouton “
” ou “ ” . Lorsque le bouton
“OK” est appuyé, une boîte de dialogue s’affi che à
l’écran, et vous invite à saisir votre mot de passe.
Saisissez le mot de passe à l’aide des touches
numériques de la télécommande. L’icône de
verrouillage “ ” s’affi che maintenant à côté de la
chaîne sélectionnée. Répétez la même opération
pour annuler le verrouillage.
Réglage des chaînes favorites
Pour défi nir une chaîne favorite, placez en surbrillance
la rubrique « Favorites » en bas du menu de la liste
des chaînes. Ensuite, appuyez sur le bouton “OK”, et
le menu Modifi er préférées apparaît à l’écran.
Comment ajouter une chaîne à une liste
favorite
• Appuyez sur les touches “ ” ou “ ” pour sélectionner
la chaîne à ajouter dans la liste des préférées.
• Par pression du bouton “OK” , la chaîne en
surbrillance est ajoutée à la liste favorite.
• L’icône F indique qu’une chaîne est ajoutée à la
liste favorite.
Suppression d’une chaîne d’une liste
favorite
• Placez en surbrillance la chaîne que vous voulez
enlever de la liste favorite et pressez le bouton OK
A02_[FR]_MB45_1055UK_PANEUIDTV_BRONZE11_19822_10065707_50156721.indd 46A02_[FR]_MB45_1055UK_PANEUIDTV_BRONZE11_19822_10065707_50156721.indd 46 27.10.2009 16:59:5327.10.2009 16:59:53
Page 48

Français - 47 -
pour supprimer. Vous pouvez presser le bouton “OK”
à nouveau pour ré-ajouter la chaîne.
• Pour activer les Favoris, allez dans le menu
Confi guration et sélectionnez le mode favori Utilisez
l’option “ ” / “ ” pour activer le mode Favori. Pour
annuler les favoris, réglez le mode Favoris sur
Désactivé.
Aide à l’écran
Pour tous les menus, pressez le bouton INFO pour
affi cher des informations d’aide à propos des fonctions
du menu.
Guide des programmes
Cette section est similaire aux instructions données
dans la page des Opérations générales. Veuillez
consulter la section sur le Guide électronique des
programmes (EPG) dans la partie Opérations
générales.
Minuteurs
Pour afficher la fenêtre des minuteries, activez
l’élément à partir du menu principal. Pour ajouter
un minuteur, pressez le bouton JAUNE sur la
télécommande. La fenêtre « Ajouter un minuteur »
s’affi che alors.
Chaîne : Les touches “
” ou “ ” permettront
à l‘utilisateur de naviguer dans le tableau des
programmes TV ou radio.
Date : La date de début est saisie via les boutons
gauche/droite ou via les boutons numériques.
Démarrage : L’heure de démarrage est saisie
via les boutons gauche/droite ou via les boutons
numériques.
Fin : L’heure de fi n est saisie via les boutons gauche/
droite ou via les boutons numériques.
Modifier / Supprimer : autorise ou interdit toute
modifi cation pour d’autres utilisateurs.
Durée: Durée entre l’heure de début et l’heure de
fi n.
Répétition: Vous pouvez régler une minuterie
suivant les options ci-après : Une fois, Quotidien, ou
Hebdomadaire.
Vous pouvez sauvegarder les réglages en pressant le
bouton VERT ou annuler le processus en pressant le
bouton ROUGE. Vous pouvez modifi er la liste avec le
bouton VERT et supprimer avec le bouton ROUGE.
Accès conditionnel
• Appuyez sur la touche “ MENU ” pour affi cher le menu
principal, puis utilisez la touche “
” ou “ ” pour
sélectionner la ligne “Accès conditionnel”, et appuyez
sur “ OK ” :
Certaines chaînes terrestres numériques fonctionnent à
la carte. Ces chaînes nécessitent un abonnement ainsi
qu’un décodeur.
Vous obtiendrez le module d’accès conditionnel CAM et
la carte de visualisation en vous abonnant à une société
de chaîne payante, puis insérez ces derniers dans la TV
en utilisant la procédure suivante.
• Eteignez la TV et débranchez la prise de courant.
• Le CAM doit être correctement inséré; il est impossible
de l’insérer entièrement s’il est inversé. Vous pouvez
endommager le module CAM ou le terminal TV si le
module CAM est inséré de force.
• Branchez le téléviseur à la prise de courant, allumez
et attendez quelques instants jusqu’à ce que la carte
soit activée.
• Certains modules CAM peuvent nécessiter le réglage
suivant. Réglez le CAM en entrant dans le menu DTV,
sélectionnez Accès conditionnel et appuyez sur “OK”.
(Le menu d’installation du module CAM ne s’affi che
que lorsqu’il est requis.)
• Pour affi cher les informations du contrat d’abonnement
: Ouvrez le menu IDTV, appuyez sur la touche “ MENU ”,
sélectionnez Accès conditionnel, puis appuyez sur
“ OK ” .
• Lorsque aucun module n’est inséré, le message «
Aucun module d’accès conditionnel détecté » apparaît
à l’écran.
• Consultez le manuel d’instruction du module pour le
détail des réglages.
Remarque: Insérez ou effacez le module CI uniquement lorsque
le téléviseur est en mode de veille ou lorsqu’il est éteint.
Réglage TV
Vous pouvez utiliser cette option pour afficher les
fonctions TV.
L’écran du menu de réglage TV numérique est accessible
à partir du menu principal. Pressez le bouton “MENU”
pour affi cher le menu principal et utilisez le bouton “
”
ou “
” ” pour placer en surbrillance « Installation TV » ,
A02_[FR]_MB45_1055UK_PANEUIDTV_BRONZE11_19822_10065707_50156721.indd 47A02_[FR]_MB45_1055UK_PANEUIDTV_BRONZE11_19822_10065707_50156721.indd 47 27.10.2009 16:59:5527.10.2009 16:59:55
Page 49

Français - 48 -
pressez ensuite le bouton “ OK ” pour affi cher l’écran du
menu « Réglage TV ».
Vous pouvez trouver des informations détaillées sur
tous les éléments de menu dans la section « Système
de menu TV analogique ».
Réglage
Les ajustements du présent menu se présentent ainsi
qu’il suit:
Confi guration
Vous pouvez confi gurer les paramètres de votre
TV. Sélectionnez Confi guration à partir du menu
Confi guration et pressez “ OK ” pour affi cher ce menu.
Pressez le bouton “QUITTER” sur la télécommande
pour sortir.
REMARQUE : Ce menu peut apparaître différemment
selon le pays séléctionné.
Faible son (* pour les pays de l’UE
uniquement)
Utilisez le bouton “ ” ou “ ” pour sélectionner
Malentendant et pressez ensuite le bouton “ ” ou “
” pour activer ou désactiver ce paramètre.
Si le diffuseur active un quelconque signal particulier
concernant le son, vous pouvez activer ce paramètre
afi n de recevoir de tels signaux.
Mode favori
Utilisez cette fonction pour activer ou désactiver le
mode favori. Appuyez sur le bouton “ ” / “ ” pour
activer ou désactiver cette fonction.
Liste des chaînes
Utilisez les boutons “ ” ou “ ” pour vous rendre
à l’option Tableau des programmes (Channel List).
Utilisez le bouton “ ” ou “ ” pour basculer en
mode de liste de chaînes. Si vous sélectionnez « TV
uniquement », à l’aide du bouton “ ” ou “ ”, vous
aurez à choisir uniquement parmi les chaînes TV
disponibles. Si vous sélectionnez « Radio uniquement
», à l’aide du bouton “
” ou “ ” , vous aurez à choisir
uniquement parmi les chaînes radio disponibles. Si
vous sélectionnez « Texte uniquement », à l’aide du
bouton “ ” ou “ ” , vous aurez à choisir uniquement
parmi les chaînes texte disponibles.
Balayage des chaînes cryptées
L’option de balayage des chaînes cryptées sera
toujours ACTIVÉE après avoir effectué une première
installation. Lorsque ce paramètre est activé, le
processus de recherche localisera également
les chaînes cryptées. Si le réglage est paramétré
manuellement sur DÉSACTIVÉ, les chaînes cryptées
ne seront pas localisées en recherche automatique
ou manuelle.
Utilisez le bouton “
” ou “ ” pour sélectionner Chaîne
cryptée et pressez ensuite le bouton “ ” ou “ ” pour
activer ou désactiver ce paramètre.
Mise à niveau du récepteur
Téléchargement hertzien OAD
Cette option vous aide à conserver la mise à jour de
Cette option vous aide à conserver la mise à jour de
votre téléviseur. Elle fonctionne automatiquement et
votre téléviseur. Elle fonctionne automatiquement et
recherche de nouvelles informations lorsque celles-ci
recherche de nouvelles informations lorsque celles-ci
sont disponibles. Veuillez remarquer que ce réglage
sont disponibles. Veuillez remarquer que ce réglage
est inactif pour être modifi é. Veuillez vous assurer que
est inactif pour être modifi é. Veuillez vous assurer que
le téléviseur est réglé sur Veille. Le téléviseur s’allume
le téléviseur est réglé sur Veille. Le téléviseur s’allume
automatiquement tous les jours à 3h00 du matin,
automatiquement tous les jours à 3h00 du matin,
recherche de nouvelles informations quelconques
recherche de nouvelles informations quelconques
pouvant être diffusées et les télécharge vers votre
pouvant être diffusées et les télécharge vers votre
récepteur. Cette opération prendra approximativement
récepteur. Cette opération prendra approximativement
30 minutes
30 minutes.
Remarque: Votre téléviseur peut commencer à fonctionner
en mode Première installation après la mise à jour du
téléchargement automatique.
Contrôle parental
Utilisez le bouton “ ” ou “ ” pour aller sur l’option
de verrouillage parental. Pressez le bouton OK pour
accéder au menu. Une boîte de dialogue réclamant
le code de verrouillage est affichée. La clé est
initialement réglée sur « 0000 ». Saisir le code PIN :
Si celle-ci est incorrecte, un message OSD « Code
PIN erroné » s’affi che à l’écran. Si cette dernière est
correcte, le menu de Contrôle parental s’affi che:
Verrouillage parental (*)
(*) Si vous réglez l’option de pays sur Royaume-Uni
lors de la première installation, l’option de verrouillage
parental ne sera pas visible. Cette option est
disponible uniquement pour les pays de l’UE.
A02_[FR]_MB45_1055UK_PANEUIDTV_BRONZE11_19822_10065707_50156721.indd 48A02_[FR]_MB45_1055UK_PANEUIDTV_BRONZE11_19822_10065707_50156721.indd 48 27.10.2009 16:59:5527.10.2009 16:59:55
Page 50

Français - 49 -
Après installation, cette option recherche l’information
relative aux émissions parentales et si ce niveau
parental a été inactivé, l’image et le son ne sont pas
activés.
Verrouillage du menu
Dans le verrouillage du menu vous pouvez paramétrer
le verrouillage de tous les menus ou du menu
d’installation pour restreindre l’accès à ces menus.
Si le verrouillage du menu est désactivé, l’accès au
système de menu sera libre. Utilisez les boutons “
” ou “ ” pour vous rendre à l’option Verrouillage du
menu. Utilisez le bouton “
” ou “ ” pour choisir le
mode de verrouillage du menu.
DÉSACTIVÉ : Tous les menus sont déverrouillés.
TOUS LES MENUS : Tous les menus sont accessibles
seulement avec la clé correcte de verrouillage. Ainsi,
l’utilisateur ne peut ajouter, supprimer, renommer ou
régler les minuteries.
MENU INSTALLATION : Le menu d’installation est
verrouillé, de sorte que l’utilisateur ne peut pas ajouter
des chaînes. Les changements seront mis à jour après
sortie du « menu de confi guration ».
Paramétrage du code PIN
Utilisez le bouton “ ” ou “ ” pour aller sur l’option
“Paramétrage du code PIN”. Pressez “OK” pour
afficher la fenêtre “Paramétrage du code PIN”.
Servez-vous des touches numériques pour saisir le
nouveau code PIN qu’il vous faut ultérieurement pour
ressaisir le nouveau code pour vérifi cation. À sa sortie
d’usine, l’appareil est confi guré par défaut à 0000 ;
assurez-vous de noter votre code et de le conserver
à un endroit où vous pourrez facilement le retrouver
lorsque vous en aurez besoin.
Réglages de l’heure (en option)
Dans le menu Confi guration, sélectionnez l’option «
réglages de l’heure » en appuyant sur la touche “
” ou “ ”.
Pressez “OK” et le sous-menu des Réglages horaires
sera
affi ché à l’écran. L’heure, le fuseau horaire, ainsi que
ses paramètres, seront disponibles.
Utilisez le bouton “
” ou “ ” pour sélectionner les
paramètres du fuseau horaire. Le Réglage du fuseau
horaire s’effectue à l’aide des touches “
” ou “ ” . Il
peut être paramétré sur AUTO ou MANUEL.
Lorsque AUTO est sélectionné, les options Heure et
Fuseau horaire ne seront pas disponibles pour être
réglées. Si l’option MANUEL est sélectionnée comme
paramètre de fuseau horaire, le fuseau horaire peut
être modifi é:
• En appuyant sur les boutons “
” ou “ ”, sélectionnez
Fuseau horaire.
Utilisez les boutons “
” ou “ ” pour changer le fuseau
horaire entre GMT-12 ou GMT+12. L’Heure Actuelle
située en haut de la liste de menu changera selon la
zone d’heure sélectionnée.
Description Audio (En option)
La description audio renvoie à une piste de narration
supplémentaire réservée aux déficients visuels
et malentendants. Le narrateur de la description
accompagne la présentation, décrivant ainsi ce qui
se passe à l’écran pendant les pauses naturelles (et
parfois pendant les dialogues, s’il le juge nécessaire).
Vous ne pouvez utiliser cette option que si le diffuseur
la prend en charge. Appuyez sur la touche “
” ou “
” pour sélectionner un élément. Utilisez ensuite les
boutons “ ” ou “ ” pour régler.
Description Audio (En option)
Cette fonction permet d’activer ou de désactiver
l’option Description audio en appuyant sur les touches
“ ” ou “ ” .
Langue préférée (En option)
En appuyant sur les touches “ ” ou “ ”, vous modifi ez
la langue préférée de la description audio.
Cette option ne peut être utilisée que si elle est
disponible.
Volume relatif (En option)
Vous pouvez utiliser cette option pour hausser ou
réduire le niveau de volume de la description audio,
selon les possibilités que vous offre l’option du
volume.
Recherche en mode de veille (*)
(*) Ce réglage est visible uniquement lorsque l’option
de pays est réglée sur Danemark, Suède, Norvège
ou Finlande.
Utilisez le bouton “
” ou “ ” pour sélectionner l’option
Recherche en mode de veille et pressez ensuite
le bouton “ ” ou “ ” pour activer ou désactiver
ce paramètre. Si vous faites passer l’option Veille
à l’option Désactivé, cette fonction ne sera pas
disponible.
Pour utiliser la recherche en mode de veille assurezvous d’activer la recherche en mode veille.
A02_[FR]_MB45_1055UK_PANEUIDTV_BRONZE11_19822_10065707_50156721.indd 49A02_[FR]_MB45_1055UK_PANEUIDTV_BRONZE11_19822_10065707_50156721.indd 49 27.10.2009 16:59:5727.10.2009 16:59:57
Page 51

Français - 50 -
Langue
Dans ce menu l’utilisateur peut régler la langue
préférée. La langue est changée en pressant le
bouton “OK”.
Menu : indique la langue du système
Préféré
Ces réglages seront utilisés s’ils sont disponibles.
Sinon, les réglages courants seront utilisés.
• Audio : le fait d’appuyer sur les boutons “ ” ou “ ”
change la langue audio.
• Sous-titrage : Changez la langue du sous-titre avec
les boutons “ ” ou “ ” . La langue choisie sera vue
dans les sous-titres.
Sous-titre Film
• Afi n d’affi cher correctement les sous-titres, utilisez
ce paramètre pour sélectionner une langue de
sous-titrage de fi lm.
• En appuyant sur le bouton “
” ou “ ”, sélectionnez
l’option linguistique désirée.
• Guide : Le fait d’appuyer sur les boutons “ ” ou “
” change la langue du guide.
En cours
• Audio : si la langue audio est prise en charge,
changez la en pressant le bouton “ ” ou “ ”.
• Sous-titrage : si le sous-titrage est supporté,
changez la langue des sous-titres avec le bouton
“
” ou “ ”. La langue choisie sera vue dans les
sous-titres.
Remarque: Si l’option Pays est réglée sur l’une des
options Danemark, Suède, Norvège ou Finlande, le Menu
“Paramètres linguistiques” fonctionnera comme suit:
Paramètres linguistiques
Dans le « Menu Confi guration », mettez en surbrillance
la rubrique Paramètres linguistiques en appuyant sur
les boutons “ ” ou “ ”. Appuyez sur “OK” et le
sous-menu « Paramètres linguistiques » sera affi ché
à l’écran:
Utilisez les boutons “
” ou “ ” pour sélectionner
l’élément de menu qui sera réglé, puis appuyez sur
le bouton “
” ou “ ” pour régler.
Remarques:
• La langue du système détermine la langue du menu
à l’écran.
• L’option Langue Audio est utilisée pour sélectionner
la piste sonore des chaînes.
• Les réglages initiaux constituent la première priorité
lorsque de nombreux choix sont disponibles.
Lorsque les premières options sont disponibles,
les réglages secondaires sont relégués au second
plan.
Installation
Le menu Installation vous permet essentiellement
d’élaborer un tableau des chaînes de la manière la
plus effi cace possible. Sélectionnez l’installation à
partir du menu Confi guration en appuyant sur les
boutons “ ” ou “ ”.
Ce menu inclut les éléments suivants:
(*) Pour Danemark, Suède, Norvège, ou Finlande.
Balayage de chaîne automatique
Le balayage de chaîne automatique démarre en
pressant le bouton “OK” lorsque « Balayage de chaîne
automatique » est en surbrillance.
Le message suivant apparaît à l’écran:
A02_[FR]_MB45_1055UK_PANEUIDTV_BRONZE11_19822_10065707_50156721.indd 50A02_[FR]_MB45_1055UK_PANEUIDTV_BRONZE11_19822_10065707_50156721.indd 50 27.10.2009 16:59:5827.10.2009 16:59:58
Page 52

Français - 51 -
Mettez « Oui » ou « Non » en surbrillance à l’aide
des touches “
” ou “ ”, puis appuyez sur “OK” pour
confi rmer.
Si « oui » a été sélectionné, la recherche automatique
démarre.
Sélectionner « Non » annule la recherche
automatique.
Une fois la recherche des chaînes numériques
terminée, un message vous invitant à rechercher des
chaînes analogiques s’affi che à l’écran:
Pressez le bouton “OK” pour rechercher des chaînes
analogiques. Le menu suivant apparaît à l’écran pour
la recherche des chaînes analogiques:
Sélectionnez votre Pays , Langue et Langue de texte
en utilisant les boutons “ ” ou “ ” et “ ” ou “ ”.
Pressez le bouton “OK” ou ROUGE pour continuer.
Pour annuler, pressez le bouton BLEU . Le menu
suivant sera affi ché durant le réglage automatique:
Une fois l’opération APS terminée, le tableau des
programmes apparaît à l’écran. Dans le tableau des
programmes, vous verrez les numéros et les noms
assignés à ces programmes.
Balayage de chaîne manuel
En balayage de chaîne manuel, le numéro de
multiplexage est saisi manuellement et seul ce
multiplexage de programmes est utilisé pour la
recherche de chaîne. Pour chaque numéro de chaîne
valide, le niveau du signal et la qualité du signal sont
affi chés à l’écran.
Tant en mode manuel qu’automatique, une chaîne
quelconque existant dans la base de données n’est
pas re-stockée une seconde fois afi n d’éviter les
duplications redondances de cette chaîne.
Effacer la liste des chaînes (*)
(*) Ce réglage est visible uniquement lorsque l’option
de pays est réglée sur Danemark, Suède, Norvège
ou Finlande.
Utilisez cette option pour effacer les chaînes mémorisées.
Appuyez sur la touche “
” ou “ ” pour sélectionner
l’option Effacer la liste des chaînes, puis appuyez sur
OK. L’OSD suivant s’affi chera à l’écran :
Appuyez sur la touche OK pour sélectionner.
Sélectionnez “Oui” en appuyant sur la touche “
” ou “ ” et appuyez sur OK pour supprimer toutes
les chaînes.
Première installation
Vous pouvez utiliser ce menu pour charger les
paramètres par défauts installés dans le récepteur
en confi guration d’usine.
Pour installer les paramètres d’usine, sélectionnez
la rubrique Première installation, puis appuyez sur
la touche “OK” pour poursuivre. Il vous sera alors
demandé si vous voulez supprimer les réglages ou
non. Le fait de sélectionner “Oui” en pressant le bouton
“OK” tandis que le“Oui” est placé en surbrillance
supprimera le tableau des chaînes existantes.
Il vous sera ensuite demandé de confirmer la
suppression de toutes les chaînes et de tous les
paramètres:
En sélectionnant Oui et en appuyant sur le bouton
“OK” , la liste des chaînes existantes sera supprimée.
Une fois les paramètres d’usine chargés, le menu «
Première installation » s’affi chera.
Le menu qui s’affi che pour la sélection de la langue
apparaît en premier. En appuyant sur les touches “
” ou “ ” , faites votre choix de langue, et appuyez
sur la touche OK pour activer la sélection.
Ensuite, le menu “Première installation” s’affi che
à l’écran. En appuyant sur les boutons “
” ou “ ”,
sélectionnez le pays que vous voulez et appuyez
sur le bouton “OK” . (* Pour les pays de l’UE
uniquement).
A02_[FR]_MB45_1055UK_PANEUIDTV_BRONZE11_19822_10065707_50156721.indd 51A02_[FR]_MB45_1055UK_PANEUIDTV_BRONZE11_19822_10065707_50156721.indd 51 27.10.2009 17:00:0027.10.2009 17:00:00
Page 53

Français - 52 -
Appuyez sur “OK” pour démarrer l’installation. Une
fois la recherche des chaînes numériques terminée,
un message vous invitant à rechercher les chaînes
analogiques apparaît à l’écran. Ce processus est
le même que celui qui a été décrit dans la section
Recherche automatique.
.
Système de menu TV
analogique
Menu Image
Mode
Pour vos besoins de visualisation, vous pouvez régler
l’option de Mode liée.
Appuyez sur le bouton “
” ou “ ” pour sélectionner
le Mode . Appuyez sur la touche “ ” ou sur le bouton
“ ” pour sélectionner à partir de l’une de ces options:
Cinéma , Dynamique et Naturel .
Luminosité/Contraste/Couleur/Défi nition/
Teinte
Appuyez sur les touches “ ” ou “ ” pour sélectionner
l’option désirée. Appuyez sur la touche “ ” ou “ ”
pour régler le niveau.
Remarque : L’option Teinte ne peut être visible que lorsque
le téléviseur reçoit un signal NTSC.
Température de couleur
Appuyez sur le bouton “ ” ou “ ” pour sélectionner
Temp. Couleur . Appuyez sur la touche “ ” ou sur le
bouton “
” pour sélectionner à partir de l’une de ces
options: Froid , normal et chaud .
Remarque :
• Le paramétrage sur l’option Froid donne aux couleurs
blanches une accentuation légèrement bleue.
• Le réglage sur l’option Chaud donne aux couleurs blanches
une accentuation légèrement rouge.
• Pour des couleurs normales, sélectionnez l’option
Normal .
Réduction du bruit
Si le signal de diffusion est faible et que l’image est
bruyante (perturbée), utilisez le réglage de Réduction
de bruit pour réduire le montant de bruit.
Appuyez sur le bouton “
” ou “ ” pour sélectionner
l’option Réduction de bruit. Appuyez sur la touche
“
” ou sur le bouton “ ” pour sélectionner à partir
de l’une de ces options: Faible , Moyen , Haut ou
Désactivé .
Mode Film
Les fi lms sont enregistrés à un nombre d’images
par seconde différent des programmes de télévision
normaux.
Appuyez sur le bouton “
” ou “ ” pour sélectionner
le Mode Film .
Appuyez sur la touche “
” ou “ ” pour activer ou
désactiver cette fonction.
Activez cette fonction lorsque vous regardez des fi lms
pour voir clairement les scènes accélérées.
Mode Jeux (en option)
Sélectionnez Mode Jeu en appuyant sur la touche “
” ou “ ”. Utilisez le bouton “ ” ou “ ” pour Activer
ou Désactiver le mode Jeu. Lorsque le mode Jeu est
réglé sur Activé, les réglages du mode jeu, qui sont
optimisés pour une meilleure qualité vidéo, seront
chargés.
De même, les paramètres Mode image, Contraste,
Luminosité, Netteté, Couleur et Température de
couleur seront invisibles et désactivés pendant que
le mode Jeu est activé.
Remarque :
Le bouton de sélection du mode Image qui se trouve sur
la télécommande n‘aura aucune fonction tant que le mode
Jeu est activé.
Zoom image
Sélectionnez Zoom d’image en appuyant sur la touche
“ ” ou “ ” .
Utilisez les boutons “
” ou “ ” pour changer le zoom
de l’image pour Auto , 16:9 , 4:3 , Panoramique , 14:9 ,
Cinéma , Sous-titrage ou Zoom .
Stocker
Appuyez sur le bouton “ ” ou “ ” pour sélectionner
l’option Mémoriser. Appuyez sur la touche “ ” ou sur
le bouton OK pour mémoriser les réglages. “ Stocké... ”
apparaîtra à l’écran.
A02_[FR]_MB45_1055UK_PANEUIDTV_BRONZE11_19822_10065707_50156721.indd 52A02_[FR]_MB45_1055UK_PANEUIDTV_BRONZE11_19822_10065707_50156721.indd 52 27.10.2009 17:00:0127.10.2009 17:00:01
Page 54

Français - 53 -
Réinitialisation
Appuyez sur le bouton “ ” ou “ ” pour sélectionner
l’option Réinitialiser . Pressez les boutons “ ” ou “
” ou OK pour réinitialiser les modes d’image à leurs
paramètres d’usine par défaut.
Menu Audio
Volume
Appuyez sur le bouton “ ” ou “ ” pour sélectionner
le Volume . Appuyez sur la touche “ ” ou “ ” pour
changer le niveau de volume.
Égaliseur
Appuyez sur le bouton “ ” ou “ ” pour sélectionner
l’égaliseur . Appuyez sur la touche “ ” pour affi cher
le menu de l’égaliseur.
Appuyez sur “ ” ou sur les touches “ ” pour modifi er
les paramètres. Dans le menu égaliseur, le préréglage
peut être changé pour Musique , Film , Voix , Plat ,
Classique et Utilisateur .
Sélectionnez la fréquence désirée en pressant le
bouton “
” ou “ ” et augmentez ou réduisez le gain
de fréquence en pressant le bouton “
” ou “ ”.
Appuyez sur la touche “ MENU ” pour retourner au
menu précédent.
Remarque : Les réglages du menu Egaliseur ne peuvent
être modifi és que lorsque le mode Egaliseur se trouve à
Utilisateur .
Balance
Ce paramètre s’utilise pour accentuer la balance des
haut-parleurs gauche ou droit.
Pressez le bouton “
” ou “ ” pour sélectionner
Balance. Appuyez sur la touche “
” ou “ ” pour
changer le niveau de balance. Le niveau de balance
peut être réglé entre -32 et + 32.
Casque d’écoute
Appuyez sur le bouton “ ” ou “ ” pour sélectionner
le Casque . Pressez le bouton “ ” pour affi cher le
menu Casque.
Les options du sous-menu Casque sont décrites
ci-dessous:
Volume
Appuyez sur le bouton “ ” ou “ ” pour sélectionner
le Volume . Appuyez sur la touche “ ” pour augmenter
le niveau de volume. Appuyez sur la touche “ ” pour
diminuer le niveau de volume. Le niveau de volume
du casque peut être réglé entre 0 et 63 .
Mode de son
Appuyez sur le bouton “ ” ou “ ” pour sélectionner le
Mode Son . À l’aide du bouton “ ” ou “ ”, vous pouvez
sélectionner le mode Mono, Stéréo, Mixte I ou Mixte
II, si la chaîne sélectionnée supporte ce mode.
AVL
La fonction de limitation automatique de volume AVL
ajuste le son dans le but d’obtenir un niveau de sortie
fi xe entre les programmes (par exemple, le niveau de
volume des publicités tend à être plus élevé que celui
des programmes).
Appuyez sur le bouton “
” ou “ ” pour sélectionner
le mode AVL . Appuyez sur la touche “ ” ou “ ” pour
activer ou désactiver cette fonction.
Stocker
Appuyez sur le bouton “ ” ou “ ” pour sélectionner
l’option Mémoriser. Appuyez sur la touche “ ” ou sur
le bouton OK pour mémoriser les réglages. “ Stocké... ”
apparaîtra à l’écran.
A02_[FR]_MB45_1055UK_PANEUIDTV_BRONZE11_19822_10065707_50156721.indd 53A02_[FR]_MB45_1055UK_PANEUIDTV_BRONZE11_19822_10065707_50156721.indd 53 27.10.2009 17:00:0227.10.2009 17:00:02
Page 55

Français - 54 -
Menu fonctionnel
Minuteur de mise en veille
Appuyez sur le bouton “ ” ou “ ” pour sélectionner
le Minuteur de mise en veille . Appuyez sur la touche
“
” ou “ ” pour régler la minuterie sommeil.
Le minuteur peut être programmé entre Désactivé et
120 minutes par intervalle de 10 minutes.
Si le minuteur de mise en veille est actif, à la fi n
du temps sélectionné, la TV passe automatiquement
en mode veille.
Verrouillage parental
Appuyez sur le bouton “ ” ou “ ” pour sélectionner
l’option Verrouillage parental .
Utilisez le bouton “
” ou “ ” pour sélectionner
l’activation ou la désactivation du verrouillage
parental. Lorsque Activé est sélectionné, le
téléviseur peut uniquement être contrôlé à l’aide
de la télécommande. Dans ce cas, les boutons du
panneau de contrôle ne fonctionneront pas.
Ainsi, si l’un de ces boutons est pressé, Verrouillage
parental activé s’affi che à l’écran lorsque la fenêtre
de menu n’est pas visible.
Langue
Appuyez sur le bouton “ ” ou “ ” pour sélectionner
l’option Langue . En appuyant sur le bouton “ ” ou “
”, sélectionnez l’option Langue .
Zoom par défaut
Lorsque le mode Zoom est réglé sur AUTO , le
téléviseur réglera le mode Zoom conformément
au signal de la diffusion. S’il n’existe pas de WSS
ou d’information de format d’image, le téléviseur
utilisera alors ce réglage. Appuyez sur le bouton “ ”
ou “
” pour sélectionner l’option Zoom par défaut .
Vous pouvez régler l’option Zoom par défaut à
Panoramique , 16:9 , 4:3 ou 14:9 en appuyant sur la
touche “ ” ou “ ”.
Fond bleu
Si le signal est faible ou absent, le téléviseur passera
automatiquement à un écran bleu. Pour activer ceci,
paramétrez Fond bleu sur Activé .
En appuyant sur “
” ou “ ”, sélectionnez l’option
Fond bleu . Appuyez sur la touche “ ” ou “ ” pour
activer ou désactiver cette fonction.
Arrière-plan du menu
Pressez le bouton “ ” ou “ ” pour sélectionner
l’option Arrière-plan du menu . Vous pouvez régler
le niveau du fond du menu en appuyant sur la touche
“ ” ou “ ”.
Rétroéclairage
Sélectionnez Lumière de fond en appuyant sur la
touche “ ” ou “ ”. Pressez le bouton “ ” ou “ ” pour
régler le Rétroéclairage sur Auto, Moyen , Maximum
ou Minimum .
Temporisation du menu
Afi n de régler une temporisation spécifi que pour les
écrans de menu, fi xez une valeur pour cette option.
Appuyez sur le bouton “
” ou “ ” pour sélectionner
l’option Temporisation du menu . Utilisez le bouton
“ ” ou “ ” pour régler Temporisation du menu sur 15
sec , 30 sec ou 60 sec .
Langue télétexte
Appuyez sur le bouton “ ” ou “ ” pour sélectionner
la Langue du télétexte . Appuyez sur la touche “ ”
ou “ ” pour régler la Langue du télétexte sur Ouest,
Est , Turc/Gre , Cyrillique, Arabe ou Perse .
HDMI PC Full Mode (en option)
Si vous voulez affi cher l’écran du PC en mode HDMI
grâce à une connexion externe, l’option HDMI PC FULL
MODE doit être activée pour ajuster correctement le
rapport d’aspect de l’écran. Cet élément peut être
inactive dans certaines résolutions.
Remarque: Si vous raccordez un appareil HDMI et faites
basculer le téléviseur en mode HDMI, cette option sera visible
(à l’exception de la résolution 1080i/1080P).
Mode complet (en option)
Si vous raccordez un appareil en vous servant des
prises HDMI ou YPbPr, et défi nissez les résolutions
1080i/1080P, la rubrique Mode plein sera visible. En
mode Plein écran, vous pouvez choisir l’option 1 :1 ou
Normal à l’aide de “ ” ou “ ”. Si vous sélectionnez
1 :1, l’aspect de l’écran sera ajusté correctement. Si
vous choisissez Normal ; le format de l’écran peut
s’agrandir.
Sortie Ext
Appuyez sur le bouton “ ” ou “ ” pour sélectionner
l’option Sortie Ext. Utilisez le bouton “ ” ou “ ” pour
régler la sortie Ext sur Activé ou Désactivé.
A02_[FR]_MB45_1055UK_PANEUIDTV_BRONZE11_19822_10065707_50156721.indd 54A02_[FR]_MB45_1055UK_PANEUIDTV_BRONZE11_19822_10065707_50156721.indd 54 27.10.2009 17:00:0427.10.2009 17:00:04
Page 56

Français - 55 -
Remarque :
Pour copier depuis un DVD ou un magnétoscope, vous
devez choisir la source désirée à partir du menu Source et
faire passer « Activé » à « Sortie EXT » à partir du menu
fonctionnel.
La Sortie Ext doit être activée afi n d’utiliser la fonction des
minuteurs en mode DTV.
Menu d’installation
Programme
Appuyez sur le bouton “ ” ou “ ” pour sélectionner
le Programme. Utilisez le bouton “ ” ou “ ” pour
sélectionner le numéro du programme. Vous pouvez
également saisir un numéro en utilisant les boutons
numériques sur la télécommande. Il existe 200
stockages de programme entre 0 et 199.
Bande
La bande C ou S peut être sélectionnée, en pressant
les boutons “ ” ou “ ” pour régler la bande.
Chaîne
Pour changer de chaîne, vous pouvez appuyer sur la
touche “ ” ou “ ” ou sur les boutons numériques.
Codage couleur
Appuyez sur le bouton “ ” ou “ ” pour sélectionner
Système de Couleur. Utilisez le bouton “ ” ou “ ”
pour faire passer le système de couleur à PAL, PAL
60, SECAM ou AUTO.
Système sonore
Appuyez sur le bouton “ ” ou “ ” pour sélectionner le
système Sonore. Pressez le bouton “ ” ou “ ” pour
changer le système sonore pour BG,DK, I, L ou L’.
Réglage de précision
Appuyez sur le bouton “ ” ou “ ” pour sélectionner
l’option Réglage de précision. Pressez le bouton “
”
ou “
” pour modifi er le réglage.
Recherche
Appuyez sur le bouton “ ” ou “ ” pour sélectionner
Recherche. Utilisez le bouton “
” ou “ ” pour
démarrer la recherche de programme. Vous pouvez
également saisir la fréquence désirée en utilisant
les boutons numériques lorsque Recherche est en
surbrillance.
Mémoriser
Appuyez sur le bouton “ ” ou “ ” pour sélectionner
l’option Mémoriser. Appuyez sur la touche “ ” ou sur
le bouton OK pour mémoriser les réglages. “ Stocké... ”
apparaîtra à l’écran.
Menu d’installation dans des modes AV
L’écran suivant apparaît dans le menu d’installation
lorsque le téléviseur est dans des modes AV.
Remarquez que des options limitées sont disponibles.
Activez le mode TV pour visualiser la version complète
du menu Installation .
Codage couleur
Appuyez sur le bouton “ ” ou “ ” pour sélectionner
Système de Couleur . Utilisez le bouton “ ” ou “
” pour faire passer le système de couleur à PAL,
SECAM, PAL60, AUTO, NTSC 4,43 ou NTSC 3,58.
Stocker
Appuyez sur le bouton “ ” ou “ ” pour sélectionner
l’option Mémoriser Programme . Appuyez sur la
touche “ ” ou sur le bouton “OK” pour mémoriser les
réglages. “ Stocké... ” apparaîtra à l’écran.
Tableau des programmes
Sélectionnez T ableau des Programmes en pressant
le bouton “ ” ou “ ” . Appuyez sur “ ” pour affi cher
le Tableau des Programmes:
A02_[FR]_MB45_1055UK_PANEUIDTV_BRONZE11_19822_10065707_50156721.indd 55A02_[FR]_MB45_1055UK_PANEUIDTV_BRONZE11_19822_10065707_50156721.indd 55 27.10.2009 17:00:0627.10.2009 17:00:06
Page 57

Français - 56 -
En déplaçant le curseur dans quatre directions, vous
pouvez atteindre 20 programmes sur la même page.
Vous pouvez défi ler les pages vers le haut ou vers le
bas en appuyant sur les touches de navigation pour
voir tous les programmes en mode TV (à l’exception
des modes AV). Par l’action du curseur, la sélection
du programme est faite automatiquement.
Nom
Pour changer le nom d’un programme, sélectionnez le
programme et appuyez sur le bouton ROUGE .
La première lettre du nom sélectionné sera placée en
surbrillance. Appuyez sur le bouton “
” ou “ ” pour
changer cette lettre et sur le bouton “ ” ou “ ” pour
sélectionner les autres lettres. En pressant le bouton
ROUGE , vous pouvez stocker le nom.
Déplacer
Sélectionnez le programme que vous voulez déplacer
avec les touches directionnelles. Appuyez sur la
touche VERTE . À l’aide des touches de navigation,
déplacez le programme sélectionné à l’emplacement
de votre choix et appuyez à nouveau sur le bouton
VERT .
Supprimer
Pour supprimer un programme, pressez le bouton
JAUNE . Presser à nouveau le bouton JAUNE efface
le programme sélectionné de la liste de programmes,
et les programmes suivants remontent d’une ligne.
Système d’auto-programmation APS
Quand vous pressez la touche BLEUE pour démarrer
le réglage automatique, le Menu du Système d’auto-
programmation APS apparaît à l’écran:
Appuyez sur la touche “ ” ou “ ” pour sélectionner
votre pays. Si vous voulez quitter la fonction A.P.S,
pressez le bouton BLEU .
Quand vous appuyez sur la touche OK ou ROUGE
pour lancer la recherche automatique, tous les
programmes mémorisés seront effacés et le téléviseur
recherchera les chaînes disponibles. Durant la
recherche, l’écran OSD suivant sera affi ché:
À chaque fois que vous Pressez le bouton BLEU , la
fonction APS s’arrête et le tableau des programmes
apparaît à l’écran.
Si vous patientez jusqu’à la fi n de l’APS, la liste des
chaînes s’affi chera avec les programmes trouvés et
repérés.
Menu Source
Sélectionnez la sixième icône en appuyant sur la
touche “ ” ou “ ”. Appuyez sur la touche “ ” ou sur
“OK” . Le menu source apparaît à l’écran:
Dans le menu source, sélectionnez une source en
appuyant sur le bouton “ ” ou “ ” et basculez à ce
mode en appuyant sur la touche “ ”. Les options de
source sont; TV , DTV , EXT-1 , FAV , HDMI YPbPr et
PC-VGA .
Remarque : Une fois que vous avez branché des systèmes en
option à votre télé, vous devez sélectionner l’entrée requise
pour visualiser les images à partir de cette source.
Remarque: Vous pouvez recourir au mode YPbPr uniquement
lorsque vous raccordez un appareil doté d’une sortie YPbPr
à travers l’entrée PC avec le câble YPbPr pour PC (câble
YPbPr non fourni).
A02_[FR]_MB45_1055UK_PANEUIDTV_BRONZE11_19822_10065707_50156721.indd 56A02_[FR]_MB45_1055UK_PANEUIDTV_BRONZE11_19822_10065707_50156721.indd 56 27.10.2009 17:00:0827.10.2009 17:00:08
Page 58

Français - 57 -
Système de menu du mode PC
Se reporter à la section “Connexion du téléviseur
LCD à un PC” pour brancher un PC au téléviseur.
Pour basculer vers la source PC, appuyez sur la
touche “
/SOURCE” de votre télécommande et
sélectionnez l’entrée PC. Vous pouvez également
utiliser le menu «Source» pour passer en mode
PC.
Notez que les paramètres de menu en mode PC sont
disponibles seulement quand le TV est en source PC.
Menu de position PC
Sélectionnez la première icône en pressant le bouton “ ” ou
“ ” . Le menu Position PC apparaît à l’écran:
Position automatique
Si vous changez l’image horizontalement ou
verticalement en une position indésirable, utilisez
cet élément pour remettre l’image à la bonne place
automatiquement. Ce réglage optimise donc de
manière automatique l’affi chage.
Sélectionnez Position Automatique en utilisant les
boutons “
” ou “ ” . Appuyez sur le bouton “OK”
ou “ ”, “ ” .
Avertissement : Veuillez vous assurer que le réglage
automatique s’effectue avec une image plein écran
pour assurer de meilleurs résultats.
Position H (Horizontale)
Cette rubrique change l’image horizontalement vers
le côté droit ou gauche de l’écran.
Sélectionnez la rubrique Position H en utilisant la
touche “
” ou “ ” . Utilisez le bouton “ ” ou “ ”
pour régler la valeur.
Position V (Verticale)
Cet élément déplace l’image verticalement vers le
haut ou le bas de l’écran.
Sélectionnez la rubrique Position V en utilisant la
touche “
” ou “ ” . Utilisez le bouton “ ” ou “ ”
pour régler la valeur.
Phase
Selon la résolution et la fréquence de balayage que
vous saisissez pour le téléviseur, vous pouvez voir
une image voilée ou bruitée à l’écran. Dans un tel
cas vous pouvez utiliser cet élément pour obtenir une
image claire par essais et erreurs.
Sélectionnez l’option Phase en utilisant les boutons
“
” ou “ ” . Utilisez le bouton “ ” ou “ ” pour régler
la valeur.
Fréquence pilote
Les réglages de la fréquence pilote corrigent les
interférences qui apparaissent comme des lignes
verticales dans l’image pour des présentations telles
que des feuilles de calcul ou des paragraphes ou des
textes dans des polices plus petites.
Sélectionnez l’option Fréquence pilote en utilisant
les boutons “
” ou “ ” . Utilisez le bouton “ ” ou “
” pour régler la valeur.
Menu image PC
Pour ajuster les éléments de l’image du PC, procédez
comme suit:
Appuyez sur “
” ou “ ” pour sélectionner la deuxième
icône. Le menu image PC apparaît à l’écran.
Les réglages du contraste, de la luminosité, de la
couleur et de la température de couleur dans ce
menu sont les mêmes que les réglages dans le menu
image TV du Système de Menu « TV analogique ».
Remarque : Si vous réglez la température de couleur sur Utilisateur,
vous pouvez défi nir les paramètres R, V, B manuellement.
Les options Son,Fonction et Source sont identiques à
celles expliquées dans le système de menu du téléviseur
analogique.
Affi chage des informations TV
Les informations relatives au numéro du programme ,
nom du programme , indicateur de son et mode
zoom sont affi chées à l’écran quand un nouveau
programme est saisi ou lorsque le bouton “INFO”
est pressé.
Fonction Muet
Pressez le bouton “ ” pour désactiver le son.
L’indicateur muet s’affi che dans la partie supérieure
de l’écran.
Pour annuler la coupure du son, il existe deux
alternatives ; la première est de presser le bouton “
”
et la seconde est d’augmenter le niveau de volume.
Sélection du mode image
En pressant le bouton PP , vous pouvez modifier les
paramètres du Mode Image selon vos besoins. Les options
disponibles sont Dynamique, Naturel, et Cinéma.
Remarque: Le mode zoom ne peut pas être changé en
mode PC.
A02_[FR]_MB45_1055UK_PANEUIDTV_BRONZE11_19822_10065707_50156721.indd 57A02_[FR]_MB45_1055UK_PANEUIDTV_BRONZE11_19822_10065707_50156721.indd 57 27.10.2009 17:00:0927.10.2009 17:00:09
Page 59

Français - 58 -
Arrêt sur image
Vous pouvez bloquer une image à l’écran en pressant
le bouton “ OK ” sur la télécommande. Pressez le
bouton “ OK ” pour un arrêt sur l’image. Pressez à
nouveau pour quitter le mode d’arrêt sur image.
Remarque: Cette option ne sera pas disponible en
mode PC et le fi lm ne pourra être vu à partir de la
source DVI .
Modes Zoom
Vous pouvez modifi er le format de l’image (la taille de
l’image) du téléviseur pour affi cher l’image dans des
modes zoom différents.
Appuyez sur la touche “WIDE” pour modifier
directement le mode zoom.
Les modes zoom disponibles sont listés ci-dessous.
Remarque:
En mode YPbPr et HDMI , résolutions 720p-1080i, seul le
mode 16:9 est disponible.
Le mode zoom ne peut pas être changé en mode PC.
Auto
Lorsqu’un signal WSS (Signalisation d’écran
large) qui indique le format de l’image, est inclus
dans le signal de l’émission ou dans le signal d’un
périphérique externe, la TV change automatiquement
le mode ZOOM selon le signal WSS .
• Lorsque le mode AUTO ne fonctionne pas
correctement à cause de la mauvaise qualité du
signal WSS , ou lorsque vous voulez changer le
mode ZOOM , changez manuellement pour un
autre ZOOM .
16:9
Ceci étend uniformément les côtés gauche et droit
d’une image normale (format d’image 4 :3) pour
remplir l’écran de Télévision.
.
• Pour les images de format 16 :9 qui ont été pressées
en une image normale (format d’image 4 :3), utilisez
le mode 16:9 pour restaurer l’image à sa forme
originale.
4:3
Utilisé pour visualiser une image normale (format
d’image 4:3) puisqu’il s’agit ici de sa taille originale.
.
Panoramique
Ceci étend les côtés gauche et droit d’une image
normale (format d’image 4 :3) pour remplir l’écran,
sans que l’image apparaisse dénaturée. Les parties
supérieure et inférieure de l’image sont légèrement
coupées.
14:9
Ceci agrandit l’image large (format d’image 14:9 ) vers
les limites supérieure et inférieure de l’écran.
Cinéma
Ceci agrandit l’image large (format d’image 16:9 ) à
l’écran entier.
Sous-titrage
Ceci agrandit l’image large (format d’image 16:9 )
avec sous-titrage vers l’écran entier.
Zoom
Cette option augmente le zoom de l’image. Remarque
: Vous pouvez passer à l’option Ecran Haut ou Bas en
appuyant sur les touches “ ” / “ ” tandis que Zoom
d’images est sélectionné ainsi qu’il suit: Panoramique,
14:9, Cinéma ou Sous-titres.
A02_[FR]_MB45_1055UK_PANEUIDTV_BRONZE11_19822_10065707_50156721.indd 58A02_[FR]_MB45_1055UK_PANEUIDTV_BRONZE11_19822_10065707_50156721.indd 58 27.10.2009 17:00:1127.10.2009 17:00:11
Page 60

Français - 59 -
Télétexte
Le télétexte transmet des informations telles que
actualités, sports et météo sur votre TV. Notez que si
le signal se dégrade, par exemple dans des conditions
météorologiques mauvaises ou adverses, certaines
erreurs textuelles peuvent se produire ou le mode
télétexte peut être interrompu.
Les boutons de la fonction Télétexte sont présentés
ci-dessous:
“ ” Télétexte active-Désactivé/Mode PAT
Active le mode Télétexte lorsqu’il est appuyé une fois.
Lorsque vous appuyez sur cette touche une nouvelle
fois, l’écran est divisé en deux fenêtres, l’une affi chant
le télétexte et l’autre la chaîne actuelle. En appuyant
à nouveau, vous quittez le mode Télétexte. .
“ ” Index
Sélectionne la page d’index télétexte.
“ ” Mélanger
Place l’écran télétexte par-dessus le programme.
“ ” Agrandir
Presser une fois pour élargir la moitié supérieure de
la page, appuyez à nouveau pour élargir la moitié
inférieure de la page. Pressez à nouveau pour
retourner à la taille normale.
“ ” Révéler
Révèle les informations cachées (par ex. solutions
de jeux).
“ ” Garder
Garde une page de texte selon convenance. Pressez
à nouveau pour reprendre.
“
” Pages / Heure de signaux d’affi chage
Sélectionne les pages de signaux d’affi chage quand
le télétexte est activé. Lorsque le télétexte n’est
pas activé, affi che des informations horaires si le
programme dispose d’une transmission télétexte.
P+ / P- et numéros de (0 à 9)
Pressez pour sélectionner une page.
Remarque : La plupart des stations TV utilisent le code 100
pour leurs pages d’index.
Boutons colorés
(ROUGE/VERT/JAUNE/BLEU)
Votre TV supporte à la fois les systèmes FASTEXT et
TOP text . Lorsque ces systèmes sont disponibles, les
pages sont divisées en groupes ou en sujets.
Lorsque le système FASTEXT est disponible,
certaines sections d’une page de télétexte prennent
un code de couleur et peuvent être sélectionnées
en pressant les boutons colorés. Pressez un bouton
de couleur qui correspond à vos besoins.Les textes
colorés apparaîtront, indiquant quels boutons
colorés utiliser lorsque la transmission TOP text est
présente. Presser les commandes P - ou P + sollicite
respectivement la page suivante ou précédente.
Conseils
Entretien de l’écran
Nettoyez l’écran avec un chiffon doux légèrement
humecté N’utilisez pas de solvants abrasifs parce
qu’ils peuvent endommager la couche de revêtement
de l’écran du téléviseur.
Pour votre sécurité, débranchez la prise d’alimentation
lors du nettoyage du poste. Quand vous déplacer
la TV, tenez-la de façon appropriée par la partie du
dessous.
Persistance d’image
Veuillez noter qu’une incrustation peut se produire
en affi chant une image persistante. La persistance
d’image d’une TV LCD peut disparaître dans un
bref délai. Essayer d’éteindre la TV durant quelque
temps.
Pour éviter ceci, ne laissez pas l’écran en image fi xe
pour des périodes prolongées.
A02_[FR]_MB45_1055UK_PANEUIDTV_BRONZE11_19822_10065707_50156721.indd 59A02_[FR]_MB45_1055UK_PANEUIDTV_BRONZE11_19822_10065707_50156721.indd 59 27.10.2009 17:00:1227.10.2009 17:00:12
Page 61

Français - 60 -
Appendice A : Modes d’affi chage typiques de l’entrée PC
L’écran dispose d’une résolution maximale de 1600 X 1200 . Le tableau suivant illustre certains modes
d’affi chage vidéo typiques.
Votre TV peut ne pas supporter différentes résolutions. Les modes de résolution supportés sont listés cidessous.
Si vous faites passer votre PC à un mode non pris en charge, un message d’avertissement apparaît à
l’écran.
Index
Résolution Fréquence
Norme
Modes Zoom
supportés
Hor Ver Ver (Hz)
Hor
(KHz)
1 640 480 60 31.5 VESA 16:9, 4:3
2 640 480 72 37.9 VESA 16:9, 4:3
3 640 480 75 37.5 VESA 16:9, 4:3
4 800 600 56 35.2 VESA 16:9, 4:3
5 800 600 60 37.9 VESA 16:9, 4:3
6 800 600 70 43.8 16:9, 4:3
7 800 600 72 48.1 VESA 16:9, 4:3
8 800 600 75 46.9 VESA 16:9, 4:3
9 832 624 75 49.7 MAC 16:9, 4:3
10 1024 768 60 48.4 VESA 16:9, 4:3
11 1024 768 70 56.5 VESA 16:9, 4:3
12 1024 768 72 57.7 16:9, 4:3
13 1024 768 75 60.0 16:9, 4:3
14 1152 864 70 64.2 VESA 16:9, 4:3
15 1152 864 75 67.5 VESA 16:9, 4:3
16 1152 870 75 68.9 MAC 16:9, 4:3
17 1280 768 60 47.7 VESA 16:9, 4:3
18 1360 768 60 47.7 16:9, 4:3
19 1280 960 60 60.0 VESA 16:9, 4:3
20 1280 1024 60 64.0 VESA 16:9
21 1280 1024 75 80.0 VESA 16:9
22 1600 1200 60 75.0 VESA 16:9
A02_[FR]_MB45_1055UK_PANEUIDTV_BRONZE11_19822_10065707_50156721.indd 60A02_[FR]_MB45_1055UK_PANEUIDTV_BRONZE11_19822_10065707_50156721.indd 60 27.10.2009 17:00:1227.10.2009 17:00:12
Page 62

Français - 61 -
Appendice B : Compatibilité du signal AV et HDMI (types de
signal d’entrée)
Source Signaux supportés Disponible
EXT-1
(SCART)
PAL 50/60 O
NTSC 60 O
RGB 50 O
RGB 60 O
FAV
PAL 50/60 O
NTSC 60 O
YPbPr
480I 60Hz O
480P 60Hz O
576I 50Hz O
576P 50Hz O
720P 50Hz O
720P 60Hz O
1080I 50Hz O
1080I 60Hz O
1080P 50Hz X
1080P 60Hz X
HDMI1
480I 60Hz O
480P 60Hz O
576I 50Hz O
576P 50Hz O
720P 50Hz O
720P 60Hz O
1080I 50Hz O
1080I 60Hz O
1080P 24Hz X
1080P 25Hz X
1080P 30HZ X
1080P 50HZ X
1080P 60HZ X
(X: Non disponible, O: Disponible)
Remarque : Dans certains cas, un signal sur l’écran de la TV LCD peut ne pas s’affi cher correctement. Le
problème peut être une incompatibilité avec les normes de l’équipement source (DVD, décodeur, etc.). Si vous
rencontrez un tel problème, veuillez contacter votre fournisseur et le fabricant de l’appareil source.
A02_[FR]_MB45_1055UK_PANEUIDTV_BRONZE11_19822_10065707_50156721.indd 61A02_[FR]_MB45_1055UK_PANEUIDTV_BRONZE11_19822_10065707_50156721.indd 61 27.10.2009 17:00:1227.10.2009 17:00:12
Page 63

Français - 62 -
TÉLÉDIFFUSION
PAL/SECAM B/G D/K K’ I/I’ L/L’
RÉCEPTION DE CANAUX VHF (BANDE I/III)
UHF (BANDE U)
HYPERBANDE
Réception
numérique
APPAREIL MHEG-5 conforme à l’ISO / IEC 13522-5 UK engine Profi le 1
Pour le
RUSupport conforme à l’ISO/IEC 135818-6 et au profi l UK DTT
Gamme de fréquence: 474-850 MHz pour les modèles du RU
170-862 MHz pour les modèles de l’UE.
Normes de transmission: DVB-T. MPEG-2
Démodulation: COFDM avec mode 2K/8K FFT
FEC: tous les modes DVB
Vidéo: MP@ML, PAL, 4:3/16:9
Audio: MPEG Layer I&II 32/44.148kHz.
NOMBRE DE CANAUX PRÉRÉGLÉS 200
INDICATEUR DE CHAÎNE Affi chage à l’écran
ENTRÉE D’ANTENNE RF (radio) 75 Ohms (Non équilibré)
TENSION D’EXPLOITATION 220-240V secteur, 50 Hz.
AUDIO German + Nicam Stéréo
PUISSANCE DE SORTIE AUDIO (W
RMS.
) (10% THD) 2 x 2,5
CONSOMMATION ÉLECTRIQUE (W) 45 W (max)
< 1 W (Veille)
PANNEAU Ecran large 19’’ pouces
DIMENSIONS (mm)
PxLxH (Avec pied): 118 x 459 x 348
Poids (en Kg): 5,05
PxLxH (Sans pied): 63 x 459 x 312
Poids (en Kg): 4,80
Caractéristiques techniques
A02_[FR]_MB45_1055UK_PANEUIDTV_BRONZE11_19822_10065707_50156721.indd 62A02_[FR]_MB45_1055UK_PANEUIDTV_BRONZE11_19822_10065707_50156721.indd 62 27.10.2009 17:00:1227.10.2009 17:00:12
Page 64

Français - 63 -
INSTRUCTIONS IMPORTANTES DE MISE AU REBUT
En tant que distributeur responsable nous prenons soin de
l’environnement.
Pour cette raison nous vous incitons à suivre la procédure correcte de mise au rebut
pour votre appareil, les piles et les matériaux d’emballage. Ceci aidera à préserver les
ressources naturelles et à assurer son recyclage de façon à protéger la santé ainsi que
l’environnement.
Vous devez éliminer cet appareil et son emballage selon les lois et les réglementations locales. Parce que
cet appareil contient des composants électroniques et parfois des piles, l’appareil et ses accessoires doivent
être éliminés séparément des déchets domestiques lorsque le produit atteint la fi n de son cycle de vie.
Contactez les autorités locales pour vous informer sur la mise au rebut et le recyclage.
L’appareil et, le cas échéant, les piles, doivent être déposées à votre point de collecte locale pour recyclage.
Certains centres de collecte acceptent des produits gratuitement.
Le type de pile utilisé pour cet appareil est 2 x
1.5V AAA (LR03) ou équivalent.
Ces piles sont insérées à l’arrière de la télécommande et sont facilement accessibles, elles
doivent être mises au rebut auprès de votre centre de collecte locale.
Nous présentons nos excuses pour les dérangements quelconques causés par des
contradictions mineures dans ces instructions, pouvant être occasionnées par l’amélioration
et le développement du produit.
KESA U.K HU1 3AU
16 / 09 / 2009
A02_[FR]_MB45_1055UK_PANEUIDTV_BRONZE11_19822_10065707_50156721.indd 63A02_[FR]_MB45_1055UK_PANEUIDTV_BRONZE11_19822_10065707_50156721.indd 63 27.10.2009 17:00:1227.10.2009 17:00:12
Page 65

50156721
 Loading...