

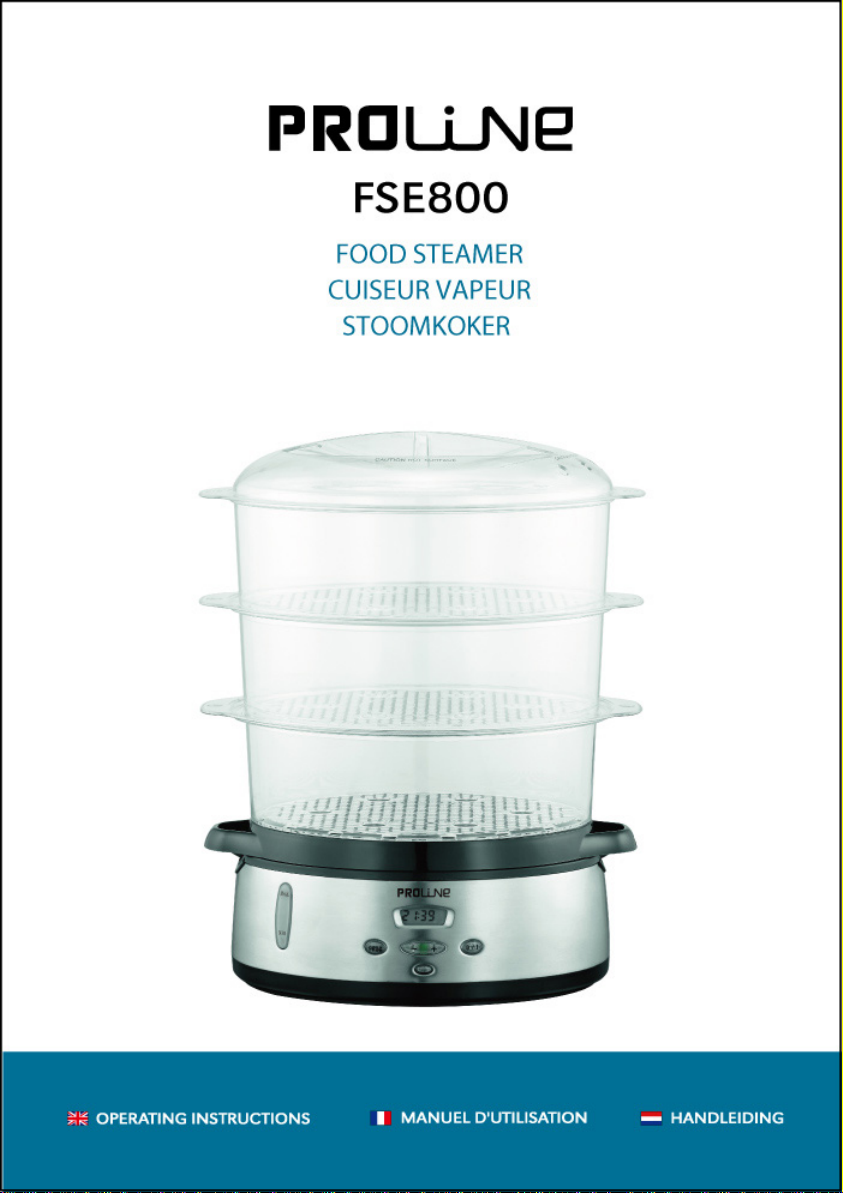
Page 1
Page 2

Catalogue
Language of introduction Page
English ------------------------------------------ GB1-GB8
French ------------------------------------------ FR9-FR17
Dutch ----------------------------------------- NL18-NL26
Page 3

1
WARNINGS
This appliance is intended to be used in
household and similar applications such as:
staff kitchen areas in shops, offices and other
working environments;
farm houses;
by clients in hotels, motels and other
residential type environments;
bed and breakfast type environments.
This appliance can be used by children aged
from 8 years and above if they have been
given supervision or instruction concerning
use of the appliance in a safe way and if they
understand the hazards involved. Cleaning
and user maintenance shall not be made by
children unless they are older than 8 and
supervised. Keep the appliance and its cord
out of reach of children aged less than 8
years.
If the supply cord is damaged, it must be
replaced by the manufacturer, its service
agent or similarly qualified persons in order
to avoid a hazard.
Page 4

2
Regarding the instructions for cleaning
surfaces in contact with food, refer to the
section “Cleaning and Maintenance” on page
7 of the manual.
The appliance must not be immersed.
Appliances can be used by persons with
reduced physical, sensory or mental
capabilities or lack of experience and
knowledge if they have been given
supervision or instruction concerning use of
the appliance in a safe way and understand
the hazards involved.
Children shall not play with the appliance.
The surfaces are liable to get hot
during use.
WARNING: Risks of injuries if you don't use
this appliance correctly.
The heating element surface is subject to
residual heat after use.
IMPORTANT SAFETY INSTRUCTIONS
Read all instructions before using the appliance and keep them for future reference.
Turn off and unplug the appliance from the mains socket when not in use and before cleaning.
Allow the appliance to cool before putting on or taking off parts and before cleaning.
Do not touch hot surfaces. Use handles or knobs.
Do not use outdoors.
Page 5
3
Do not let the power cord hang over the edge of a table or counter, or touch hot surfaces.
Do not operate the appliance while empty or without water in the reservoir.
Extreme caution must be used when moving the appliance containing hot food or water.
Always ensure the food steamer is properly assembled before use.
Do not leave the appliance unattended when in use.
Always lift the lid away from you when removing from the steamer basket to avoid steam escaping
from under the lid.
Carefully lift and remove the steamer basket and rice bowl by the handles to avoid scalding from
escaping steam. Use dry oven mitts to protect hands.
The use of attachments not recommended by the manufacturer may result in fire.
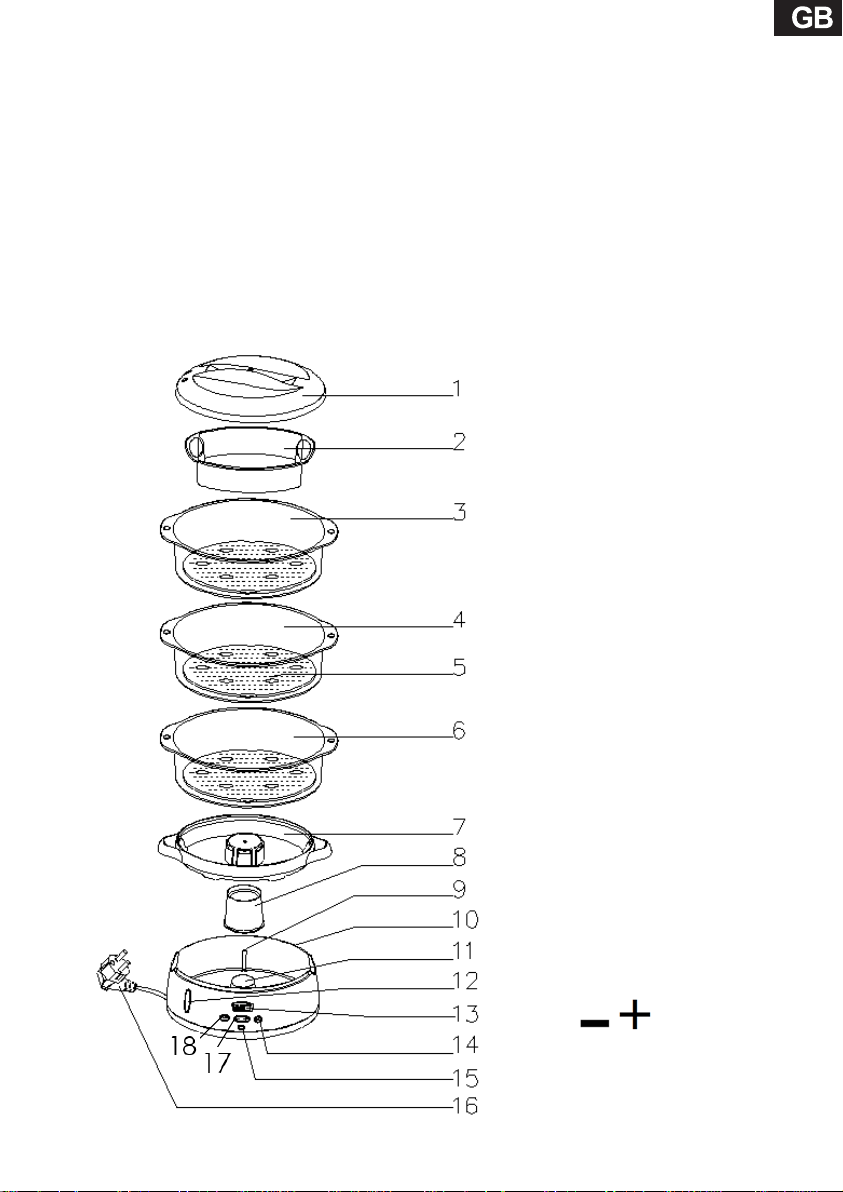
PART S
1. Steamer lid
2. Rice bowl
3. Steamer basket No. 3
4. Steamer basket No. 2
5. Egg holders
6. Steamer basket No. 1
7. Drip tray
8. Turbo ring
9. MAX and MIN water level
indicators
10. Steamer base with water
reservoir
11. Heating element
12. Water level window
13. Display
14. O/I (off/on) button
15. Indicator light
16. Power cord
/ time setting
17.
buttons
18. PROG button
Page 6
4
BEFORE USING YOUR APPLIANCE FOR THE FIRST TIME
Remove any packaging and labels from the food steamer.
Wash all removable parts except the water reservoir in warm soapy water. Rinse and dry thoroughly.
Wipe the surfaces of the steamer base with a damp cloth and dry thoroughly.
DO NOT IMMERSE THE STEAMER BASE IN WATER OR ANY OTHER LIQUID.
ASSEMBLING THE STEAMER
1. Place the steamer base with water reservoir on a flat stable surface.
2. Place the turbo ring over the heating element (the large end sits on the bottom of
the water reservoir).
3. Fit the drip tray on top of the water reservoir.
4. Stack the steamer baskets on top of the drip tray and cover with the lid.
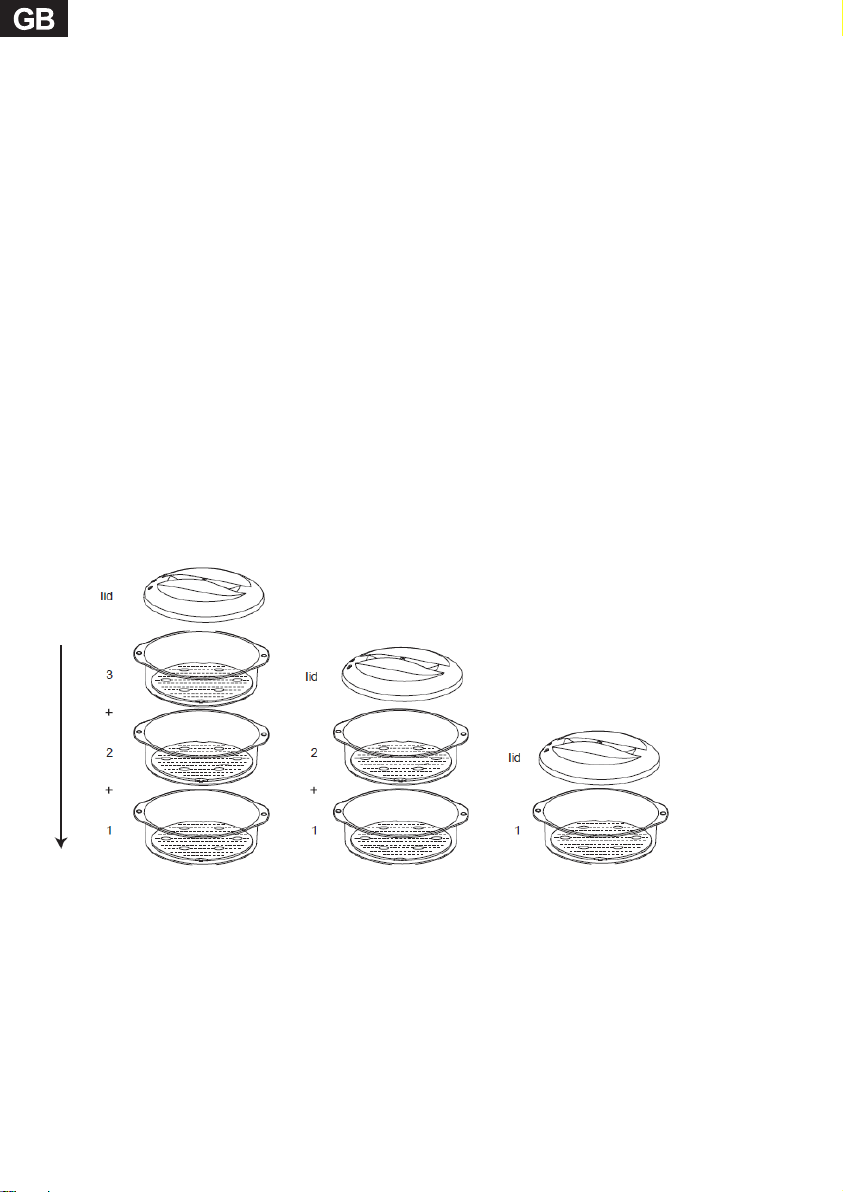
STACKING THE STEAMER BASKETS
The baskets can be stacked in various combinations, however they only stack in sequential order. This
means basket 3 fits on top of 2, and 2 on top of 1.
You can use all three baskets at a time, just two or only one.
You cannot fit basket 3 on top of basket 1.
Steamer baskets are marked with ①②③ on handles for easy stacking.
See diagram below for steamer basket stacking order and combinations:
Page 7

5
OPERATION
1. Place the steamer base on a stable, level surface away from any objects that may be
damaged by steam.
2. Fill the water reservoir with fresh, clean water
between the MIN and MAX levels inside the water
reservoir.
Ensure the water level does not fall below the MIN
level during operation. If cooking for long periods
of time, regularly check the water window and add
enough water.
DO NOT put anything or liquid other than water into the water reservoir.
3. Place the drip tray on the steamer base.
4. Place the food to be steamed into the steamer basket(s).
TIPS:
Food cut into similar sized portions will cook at a similar rate.
Foods that require gentle seaming or shorter cooking times should be placed
on the top steamer basket.
Foods that required longer cooking time should be placed on the lower
steamer basket.
5. Stack the steamer basket(s) on the drip tray.
6. Fit the lid on the top steamer basket.
7. Plug the appliance into the mains socket.
The display will show the time digits, indicating the appliance is in the clock mode.
Steaming Function
To begin steaming:
The food steamer is already preset to steam for 45 minutes.
1. In the clock mode, press
The number “45” will flash on the display.
2. After about 3 seconds, you will hear a beep, the number “45” will stop flashing and the indicator light
will illuminate red.
The food steamer is heating and time will start counting down.
3. The food steamer will begin steaming after a while and will continue for 45 minutes.
To adjust steaming time:
1. In the clock mode, press
The number “45” will flash on the display.
O/I.
O/I.
2. While “45” is flashing, repeatedly press
The steaming time can be set from 5 minutes to 90 minutes.
/ until the required steaming time is reached.
Page 8

6
Each time you press / , the steaming time will decrease or increase by 5 minutes.
3. When the steaming time is set, wait for about 3 seconds and the setting will be confirmed.
You will hear a beep and the red indicator light will illuminate.
The food steamer is heating and time will start counting down.
To cancel the steaming function, press O/I again. The red indicator light will go out.
Keep Warming Function
When the steaming process has completed, you will hear 2 beeps, the indicator light will turn green and the
symbol
The keep warming function will work for about 2 minutes every 10 minutes. This process will repeat until
there is insufficient water in the reservoir or the food steamer is switched off by pressing
will be displayed next to the clock time.
O/I.
After Use
1. Press O/I to turn off the appliance and unplug it from the mains socket.
2. Carefully remove the lid from the food steamer using oven mitts or a cloth (not supplied).
CAUTION: When steaming has completed, the food steamer will be hot. Take care when removing the lid
as steam will escape and the steamer baskets and rice bowl will be hot.
3. Remove the baskets and place them on a heat resistant surface.
4. Allow the food steamer to cool before cleaning.
Setting the Timer
You can use the timer function to set the desired time you want to steam food.
Before setting the timer, make sure that that the clock time is set.
Setting the clock
After plugging the food steamer into the mains socket, you will see the time digits on the display.
1. Press and hold
You will hear a beep.
2. Adjust the clock to the current time by repeatedly pressing
The time will increase in 10-minute intervals and decrease in 1-minute intervals.
PROG to confirm.
3. Press
Timing the steaming function
PROG until the time digits “00:00” and the text “PROG” will flash on the display.
4. Press
PROG and O/I at the same time.
/ .
5. Set the time by repeatedly pressing
The time will increase and decrease in 10-minute intervals.
/ .
Page 9
7
6. Press PROG until the display shows 45. Repeatedly press / to adjust the steaming time.
PROG to confirm.
7. Press
The display will show the current clock time and the text “PROG”, indicating the start of the timing
steam function.
If you want to cancel the timer
The display will return to the clock mode.
8. When the start time is reached, you will hear a beep, the indicator light will illuminate red and the food
steamer will begin to steam.
, press PROG and the text “PROG” will disappear from the display.
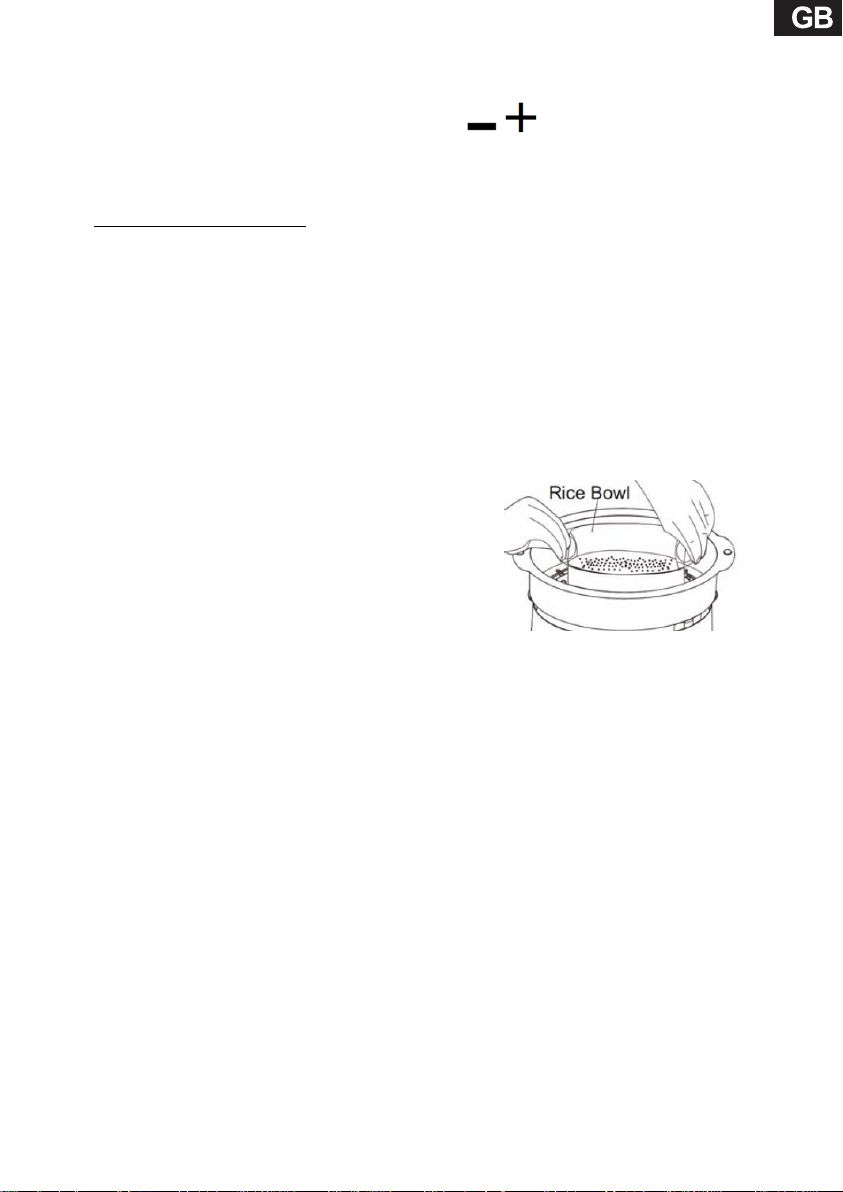
Using the Rice Bowl
1. Add rice and water into the rice bowl.
2. Place the rice bowl into the steamer basket.
NOTE: when using multiple steamer baskets, it is recommended to place the rice bowl into the top
steamer basket for best steaming results.
3. Cover the basket with the lid and set the timer.
4. When the rice is cooked, for best results, allow the rice to
stand for 5 to 10 minutes with the lid on.
5. Carefully open the lid, taking care to avoid escaping steam.
Carefully remove the rice bowl by the handles.
CLEANING AND MAINTENANCE
Turn off and unplug the appliance from the mains socket. Allow it to cool down before cleaning.
Empty the water reservoir and wipe with a clean damp cloth. Clean the exterior of the steamer base with
a damp cloth. Dry thoroughly.
DO NOT immerse the steamer base in water.
Remove all removable parts and wash them in warm soapy water or in the dishwasher. Rinse and dry
them thoroughly. Do not use chemical or abrasive cleaners.
The steamer baskets can be stacked for compact storage.
Descaling the appliance
1. Descale the appliance after every 8 uses.
2. Position the turbo ring upside down (largest part on top) around the heating element.
3. Fill the water reservoir with cold water up to the MAX level.
4. Fill the inside of the turbo ring with white vinegar to the same level.
CAUTION: DO NOT heat up (This will eliminate the descaling odour).
5. Leave overnight to descale.
6. Rinse out the inside of the water tank with warm water several times. Dry thoroughly before storing
away.
Page 10

8
SPECIFICATIONS
Ratings: 220-240V~, 50Hz
800W
DISPOSAL
As a responsible retailer we care about the environment.
As such we urge you to follow the correct disposal procedure for the appliance and packaging materials.
This will help conserve natural resources and ensure that it is recycled in a manner that protects health and
the environment.
You must dispose of this appliance and its packaging according to local laws and regulations.
Because this appliance contains electronic components, the appliance and its accessories must be disposed
of separately from household waste when the appliance reaches its end of life.
Contact your local authority to learn about disposal and recycling.
The appliance should be taken to your local collection point for recycling. Some collection points accept
appliance free of charge.
We apologise for any inconvenience caused by minor inconsistencies in these instructions, which may occur
as a result of product improvement and development.
Darty Holdings SAS © 14 route d’Aulnay 93140 Bondy, France 16 / 02 / 2016
Page 11

9
ATTENTION
Cet appareil est destiné à être utilisé dans
des applications domestiques et analogues
telles que:
des coins cuisines réservés au personnel
dans des magasins, bureaux et autres
environnements professionnels;
des fermes;
l’utilisation par les clients des hôtels, motels
et autres environnements à caractère
résidentiel;
des environnements du type chambres
d’hôtes.
Cet appareil peut être utilisé par des enfants
âgés d'au moins 8 ans, à condition qu'ils
bénéficient d'une surveillance ou qu'ils aient
reçu des instructions quant à l'utilisation de
l'appareil en toute sécurité et qu'ils
comprennent bien les dangers encourus. Le
nettoyage et l'entretien par l'utilisateur ne
doivent pas être effectués par des enfants, à
moins qu'ils ne soient âgés de plus de 8 ans
et qu'ils soient sous la surveillance d'un
adulte. Conserver l'appareil et son câble hors
Page 12

10
de portée des enfants âgés de moins de 8
ans.
Si le câble d'alimentation est endommagé, il
doit être remplacé par le fabricant, son
service après vente ou des personnes de
qualification similaire afin d'éviter un danger.
En ce qui concerne les informations
détaillées sur la manière de nettoyer les
surfaces en contact avec les aliments,
référez-vous dans la section “NETTOYAGE ET
ENTRETIEN” en page 16.
L'appareil ne doit pas être immergé.
Cet appareil peut être utilisé par des
personnes dont les capacités physiques,
sensorielles ou mentales sont réduites ou
dont l'expérience ou les connaissances ne
sont pas suffisantes, à condition qu'ils
bénéficient d'une surveillance ou qu'ils aient
reçu des instructions quant à l'utilisation de
l'appareil en toute sécurité et en
comprennent bien les dangers potentiels.
Les enfants ne doivent pas utiliser l'appareil
comme un jouet.
Page 13

11
Les surfaces sont de nature à chauffer
pendant l'utilisation.
MISE EN GARDE: Risques de blessures en cas
de mauvaise utilisation du produit.
La surface de l'élément chauffant présente
une chaleur résiduelle après utilisation.
MISES EN GARDE IMPORTANTES
Lisez le mode d'emploi dans son intégralité avant d'utiliser l'appareil et gardez-le afin de pouvoir
vous y référer ultérieurement.
Éteignez et débranchez toujours l'appareil de la prise électrique après usage et avant de le
nettoyer.
Laissez l’appareil refroidir avant d’ajouter ou d’enlever des accessoires et avant de le nettoyer.
Ne touchez pas les surfaces chaudes. Utilisez les poignées et les boutons.
Ne pas utiliser en extérieur.
Ne laissez pas le câble d’alimentation pendre du haut d'une table ou d'un plan de travail, ni
entrer en contact avec une surface chaude.
Ne faites pas fonctionner l'appareil à vide ou sans eau dans le réservoir.
Faites extrêmement attention si vous devez déplacer un appareil contenant des aliments
brûlants ou de l'eau bouillante.
Le cuiseur vapeur doit être monté correctement avant chaque utilisation.
Ne laissez pas l’appareil sans surveillance pendant qu'il fonctionne.
De la vapeur brûlante s'échappe du panier lorsque le couvercle est soulevé; pour cette raison,
soulevez toujours le couvercle en dirigeant la vapeur du côté opposé à vous.
Enlevez toujours les paniers et le bac à riz en les tenant prudemment par leurs poignées afin
d'éviter de vous brûler avec les jets de vapeur. Utilisez des maniques sèches pour vous
protéger les mains.
L'utilisation d'accessoires autres que ceux recommandés par le fabricant peut être à l'origine
d'un incendie.
Page 14

DESCRIPTION
12
1. Couvercle du cuiseur
2. Bac à riz
3. Panier de cuisson n°3
4. Panier de cuisson n°2
5. Supports à œufs
6. Panier de cuisson n°1
7. Bac d'écoulement
8. Bague turbo
9. Indicateurs de niveau d'eau
MAX et MIN
10. Base avec réservoir d'eau
11. Résistance
12. Indicateur de niveau d’eau
13. Écran
14. Bouton O/I (arrêt/marche)
15. Témoin lumineux
16. Câble d’alimentation
17.
/
Boutons de réglage de
minuterie /
18. Bouton PROG (programme)
AVANT LA PREMIÈRE UTILISATION DE L'APPAREIL
Enlevez tous les matériaux d'emballage et les étiquettes du cuiseur.
Nettoyez toutes les pièces amovibles (à l'exception du réservoir) dans de l'eau chaude
savonneuse. Rincez et séchez bien toutes les pièces.
Essuyez les surfaces de la base de l’appareil avec un chiffon légèrement imbibé d’eau, puis
séchez bien.
LA BASE NE DOIT PAS ÊTRE MISE DANS L'EAU NI DANS TOUT AUTRE LIQUIDE.
Page 15

四认定
13
MONTAGE DU CUISEUR
1. Placez la base avec le réservoir d'eau sur une surface plane et stable.
2. Placez la bague turbo sur la résistance (la partie évasée dirigée vers le fond du réservoir d'eau).
3. Montez le bac d'écoulement sur le réservoir.
4. Empilez les paniers de cuisson au-dessus du bac d'écoulement, et placez le couvercle au
sommet.
EMPILAGE DES PANIERS DE CUISSON
Différentes combinaisons de paniers sont possibles; en revanche, l'ordre d'empilage est
toujours le même. Ainsi, le panier 3 se place toujours sur le 2, qui lui-même se place toujours
sur le 1.
Il est possible d'utiliser les 3 paniers en même temps, ou 2 ou 1 seul.
Le panier 3 ne pas être posé sur le panier 1.
Les poignées des paniers portent les numéros ①②③ pour une reconnaissance plus facile.
L'illustration ci-dessous indique les différentes possibilités de combinaison et d'ordre
d'empilage :
UTILISATION
1. Placez la base sur une surface plane et stable, à distance de tous les objets susceptibles d’être
endommagés par la vapeur.
2. Remplissez le réservoir avec de l’eau douce propre ; le niveau doit être situé entre les traits
MIN et MAX sur la paroi intérieure.
Veillez à ce que le niveau d’eau ne descende jamais
en dessous de MIN pendant le fonctionnement.
Pendant une cuisson longue, vérifiez régulièrement
le niveau d’eau par le hublot et rajoutez de l’eau si
nécessaire.
Ne mettez EN AUCUN CAS un liquide autre que de
l’eau (ou quoi que ce soit d’autre) dans le réservoir.
Page 16

14
3. Placez le bac d’écoulement sur la base.
4. Placez les aliments à cuire dans le(s) panier(s) de cuisson.
CONSEILS :
Coupez les aliments en morceaux de même taille afin qu’ils cuisent à la même vitesse.
Les aliments nécessitant une cuisson moins intense ou plus courte doivent être placés
dans le panier du haut.
Les aliments nécessitant une cuisson plus longue doivent être placés dans le panier du
bas.
5. Empilez le(s) panier(s) sur le bac d’écoulement.
6. Placez le couvercle sur le panier du haut.
7. Branchez l’appareil à la prise électrique.
L’écran affiche les chiffres de l’heure, indiquant que l’appareil est en mode horloge.
Fonction cuisson à la vapeur
Avant de commencer la cuisson :
Le cuiseur est préréglé pour une cuisson à la vapeur de 45 minutes.
1. En mode horloge, appuyez sur le bouton O/I.
Le nombre « 45 » clignote à l’écran.
2. Au bout d’environ 3 secondes, un signal sonore retentit, le nombre 45 arrête de clignoter et le
témoin s’allume en rouge.
Le cuiseur chauffe et la minuterie commence le compte à rebours.
3. Quelques instants plus tard, le cuiseur commence à émettre de la vapeur en continu jusqu’à
l’écoulement des 45 minutes.
Pour ajuster la durée de la cuisson :
1. En mode horloge, appuyez sur O/I.
Le nombre « 45 » clignote à l’écran.
2. Pendant que « 45 » clignote, appuyez de manière répétée sur les touches / jusqu’à
ce que le temps de cuisson souhaité s’affiche.
Le temps de cuisson est réglable de 5 à 90 minutes.
Chaque pression sur les touches / , diminue ou augmente le temps de cuisson de
5 minutes.
3. Une fois le réglage terminé, attendez environ 3 secondes, le temps que le réglage soit
confirmé.
L’appareil émet un signal sonore, et le témoin rouge s’allume.
Le cuiseur chauffe et la minuterie commence le compte à rebours.
Pour annuler la fonction de cuisson à la vapeur, appuyez de nouveau sur le bouton O/I. Le
témoin rouge s’éteint.
Page 17

15
Fonction de maintien au chaud
Une fois terminée la cuisson à la vapeur, l’appareil émet 2 bips sonores, le témoin lumineux passe
au vert et l’icône
s’affiche à côté du temps de cuisson.
Par la suite, la fonction de maintien au chaud s’activera pendant environ 2 minutes toutes les 10
minutes. Le processus se répétera jusqu’à ce que l’eau vienne à manquer dans le réservoir, ou
jusqu’à ce que vous éteigniez l’appareil en appuyant sur le bouton O/I.
Après usage
1. Éteignez l’appareil en appuyant sur le bouton O/I , puis débranchez-le de la prise électrique.
2. Soulevez délicatement le couvercle du cuiseur en vous protégeant les mains avec un chiffon ou
avec des maniques (non fournis).
ATTENTION : Le cuiseur vapeur reste chaud même après la fin de la cuisson. Ôtez le couvercle
avec précaution pour éviter les jets de vapeur, et n’oubliez pas que les paniers et la cuve à riz
seront brûlants.
3. Ôtez les paniers et posez-les sur une surface résistant à la chaleur.
4. Attendez que le cuiseur ait refroidi pour le nettoyer.
Réglage de la minuterie
La fonction de minuterie vous permet de programmer l’heure à laquelle vous souhaitez cuire vos
aliments.
Avant d’utiliser la minuterie, vous devez d’abord régler l’horloge.
Réglage de l’horloge
Après avoir branché le cuiseur à la prise électrique, vous verrez les chiffres de l’heure clignoter à
l’écran.
1. Faites un appui long sur les touches PROG et O/I en même temps.
Un bip sonore retentit.
2. Réglez l’horloge sur l’heure actuelle à l’aide des touches / .
Les chiffres défilent par paliers de 10 minutes vers le haut et 1 minute vers le bas.
3. Appuyez sur le bouton PROG pour confirmer.
Programmation de la cuisson la vapeur
4. Appuyez sur le boutont PROG jusqu’à ce que les chiffres « 0 :00 » et le texte « PROG »
clignotent à l’écran.
5. Réglez l’heure à l’aide des touches / .
Les chiffres défilent par paliers de 10 minutes vers le haut comme vers le bas.
6. Appuyez sur le bouton PROG jusqu’à ce que l’écran affiche 45. Réglez le temps de cuisson à
l’aide des touches
/ .
Page 18

16
7. Appuyez sur le bouton PROG pour confirmer.
L’écran affiche l’heure actuelle et le mot « PROG », indiquant l’heure de début de la
cuisson à la vapeur.
Pour annuler la minuterie, appuyez sur le bouton PROG. Le mot « PROG » disparaît de
l’écran. L’heure actuelle s’affiche à nouveau.
8. Une fois arrivée l’heure de début, l’appareil émet un signal sonore, le témoin s’allume en rouge
et le cuiseur se met en marche.
Utilisation du bac à riz
1. Mettez le riz et l’eau dans le bac.
2. Placez le bac à riz dans le panier de cuisson.
REMARQUE : Si vous avez l’intention d’utiliser plusieurs paniers, il est conseillé de mettre
le bac à riz dans le panier du haut pour un meilleur résultat.
3. Mettez le couvercle sur le panier et réglez la minuterie.
4. Une fois la cuisson terminée, laissez le riz dans
l’appareil pendant 5 à 10 minutes sans ôter le
couvercle, pour un meilleur résultat.
5. Soulevez délicatement le couvercle en faisant attention
à éviter la vapeur brûlante.
Sortez prudemment le bac à riz en le tenant par ses
poignées.
NETTOYAGE ET ENTRETIEN
Éteignez l'appareil et débranchez-le de la prise électrique. Laissez-le refroidir complètement
avant de le nettoyer.
Videz le réservoir et frottez-le avec un chiffon propre légèrement imbibé d'eau. Nettoyez
l'extérieur de la base avec un chiffon humide. Séchez bien.
Ne mettez JAMAIS la base dans l’eau.
Enlevez toutes les pièces détachables et lavez-les au lave-vaisselle ou dans de l'eau chaude
savonneuse. Rincez-les et séchez-les bien. N'utilisez pas de produits de nettoyage chimiques ou
abrasifs.
Les paniers de cuisson peuvent s'empiler pour un rangement plus facile.
DÉTARTRAGE DE L’APPAREIL
1. L'appareil a besoin d'être détartré au bout de 8 utilisations.
2. Placez la bague turbo à l'envers autour de la résistance (c'est-à-dire avec la partie évasée vers
le haut).
3. Remplissez le réservoir avec de l'eau froide jusqu'au niveau MAX.
4. Remplissez l'intérieur de la bague turbo avec du vinaigre blanc jusqu'au même niveau.
ATTENTION: NE CHAUFFEZ PAS L'APPAREIL (cela éliminerait l'odeur détartrante).
5. Laissez agir pendant une nuit.
6. Rincez l'intérieur du réservoir avec de l'eau chaude à plusieurs reprises. Séchez-le bien avant
de le ranger.
bac à riz
Page 19

17
SPÉCIFICATIONS
Caractéristiques nominales: 220-240V~ 50Hz
800W
MISE AU REBUT
En tant que distributeur responsable, nous accordons une grande importance à la protection
de l’environnement.
Nous vous encourageons à respecter les procédures correctes de mise au rebut de votre appareil, des
piles et des éléments d’emballage. Cela aidera à préserver les ressources naturelles et à garantir qu’il soit
recyclé d’une manière respectueuse de la santé et de l’environnement.
Vous devez jeter ce produit et son emballage selon les lois et les règles locales.
Puisque ce produit contient des composants électroniques et parfois des piles, le produit et ses
accessoires doivent être jetés séparément des déchets domestiques lorsque le produit est en fin de vie.
Pour plus de renseignements sur les procédures de mise au rebut et de recyclage, contactez les autorités
de votre commune.
Apportez l’appareil à un point de collecte local pour qu’il soit recyclé. Certains centres acceptent les produits
gratuitement.
Hotline Darty France
Quels que soient votre panne et le lieu d'achat de votre produit en France, avant de vous déplacer en
magasin Darty, appelez le 0 978 970 970 (prix d'un appel local) 7j/7 et 24h/24.
Hotline Vanden Borre
Le service après-vente est joignable au +32 2 334 00 00, du lundi au vendredi de 8h à 18h et le samedi de 9h à 18h.
En raison des mises au point et améliorations constamment apportées à nos produits, de petites incohérences peuvent
apparaître dans ces instructions. Veuillez nous excuser pour la gêne occasionnée.
Darty Holdings SAS © 14 route d’Aulnay 93140 Bondy, France 16 / 02 / 2016
Page 20

18
WAARSCHUWINGEN
Dit apparaat is uitsluitend bedoeld voor
gebruik in huishoudelijke en gelijkaardige
toepassingen zoals:
in personeelskeukens in winkels, kantoren en
andere werkomgevingen;
in boerderijen;
door klanten in hotels, motels en andere
omgevingen van het residentiële type;
omgevingen van het type bed-en-breakfast.
Dit apparaat mag worden gebruikt door
kinderen vanaf 8 jaar en personen met een
beperkt lichamelijk, zintuiglijk of geestelijk
vermogen of een gebrek aan ervaring en
kennis op voorwaarde dat zij onder toezicht
staan of instructies betreffende het veilige
gebruik van dit apparaat hebben ontvangen
en zich bewust zijn van de gevaren die het
gebruik ervan kunnen inhouden. Kinderen
mogen niet met dit apparaat spelen. Reiniging
en gewoon onderhoud mogen niet worden
verricht door kinderen tenzij zij ouder zijn dan
8 jaar en onder toezicht staan.
Page 21

19
Een beschadigd netsnoer mag uitsluitend
worden vervangen door de fabrikant, een
erkende reparatieservice of personen met
gelijkwaardige kwalificaties om gevaar te
voorkomen.
Verwijs naar de paragraaf “Reinigen en
onderhoud” op pagina 25 van de
gebruiksaanwijzing voor informatie over het
reinigen van oppervlakken die in contact
komen met levensmiddelen.
Dit apparaat mag niet worden
ondergedompeld.
Dit apparaat mag worden gebruikt door
personen met een beperkt lichamelijk,
zintuiglijk of geestelijk vermogen of een
gebrek aan ervaring en kennis, op voorwaarde
dat zij onder toezicht staan of instructies
betreffende het veilige gebruik van dit
apparaat hebben ontvangen en zich bewust
zijn van de gevaren die het gebruik ervan kan
inhouden.
Kinderen mogen dit apparaat niet als
speelgoed gebruiken.
Page 22

20
De oppervlakken zullen warm worden
tijdens gebruik.
WAARSCHUWING: gevaar van verwonding als
dit apparaat niet correct wordt gebruikt.
Het oppervlak van het warmte-element blijft
na gebruik nog een tijdlang onderhevig aan
restwarmte.
BELANGRIJKE VEILIGHEIDSVOORZORGEN
Lees de volledige gebruiksaanwijzing voor ingebruikname van dit apparaat en bewaar voor
toekomstig gebruik.
Trek de stekker uit het stopcontact wanneer het apparaat niet wordt gebruikt en voordat u het
gaat schoonmaken.
Laat het apparaat afkoelen voordat u onderdelen gaat bevestigen of verwijderen en voor het
reinigen ervan.
Raak de warme oppervlakken niet aan. Raak het warme apparaat alleen aan bij de handgrepen
en knoppen.
Niet buitenhuis gebruiken.
Laat het voedingssnoer niet over de rand van een tafel of aanrecht hangen noch in contact
komen met warme oppervlakken.
Schakel dit apparaat niet in zonder water in het reservoir.
Extreme voorzichtigheid is raadzaam bij het verplaatsen van apparatuur die warm voedsel of
water bevat.
Controleer altijd of de stoomkoker correct is geassembleerd voordat u deze inschakelt.
Laat het ingeschakelde apparaat nooit onbeheerd achter.
Til het deksel altijd zo op dat de ontsnappende stoom uit de stoommand niet naar u toe komt.
Til de stoommand en de rijstkom voorzichtig bij de handgrepen uit het apparaat om
brandwonden door ontsnappende stoom te voorkomen. Gebruik te allen tijde droge
ovenwanten om de handen te beschermen.
Het gebruik van accessoires of hulpstukken die niet door de fabrikant zijn aanbevolen kan
brandgevaar inhouden.
Page 23

21
ONDERDELEN
1. Stoomdeksel
2. Rijstkom
3. Stoommand nr. 3
4. Stoommand nr. 2
5. Eierhouders
6. Stoommand nr. 1
7. Druipschaal
8. Turbo-ring
9. MAX en MIN
waterpeil-markeringen
10. Stomervoet met
waterreservoir
11. Warmte-element
12. Waterpeilvenster
13. Display
14. O/I knop
15. Stroomlampje
16. Voedingssnoer
17.
/ timerinstelling
knoppen
ORDAT U HET APPARAAT IN GEBRUIK NEEMT
VO
Verwijder alle verpakkingsmaterialen en stickers van
de stoomkoker.
Was alle afneembare onderdelen behalve het waterreservoir in een warm sopje. Spoel en droog
zorgvuldig.
Veeg het buitenoppervlak van de stomervoet schoon met een goed uitgewrongen doek en droog
zorgvuldig.
DOMPEL DE STOMERVOET NIET ONDER IN WATER OF ANDERE VLOEISTOF.
18. PROG knop
Page 24

22
DE STOOMKOKER MONTEREN
1. Zet de stomervoet met het waterreservoir neer op een vlakke, stabiele ondergrond.
2. Zet de turbo-ring bovenop het warmte-element (de grootste kant past in de bodem van het
waterreservoir).
3. Zet de druipschaal bovenop het waterreservoir.
4. Stapel de stoommanden bovenop de druipschaal en dek af met het deksel.
DE STOOMMANDEN STAPELEN
Er zijn verschillende combinaties mogelijk voor het stapelen van de stoommanden, doch ze
kunnen slechts in een vaste volgorde worden gestapeld. Dit betekent dat stoommand 3 past
bovenop 2 en 2 op 1.
U kunt alle drie de stoommanden tegelijk gebruiken, of slechts één of twee.
Stoommand nr. 3 past niet op stoommand nr. 1.
De stoommanden zijn gemerkt met ①②③ op de handgrepen om ze handig te kunnen
stapelen.
Verwijs naar de onderstaande diagram voor de stapelvolgorde van de stoommanden en de
mogelijke combinaties:
BEDIENING
1. Zet de stomervoet neer op een stabiele, vlakke ondergrond en uit de buurt van voorwerpen die
door stoom kunnen worden beschadigd.
2. Vul het waterreservoir met vers, schoon water tot
tussen het MIN en MAX waterpeil als aangegeven
binnenin het waterreservoir.
Let erop dat het water tijdens de werking niet onder
het MIN waterpeil reikt. Als u de stomer langdurig
gebruikt dient u het waterpeilvenster regelmatig te
controleren en zo nodig water toe te voegen.
DOE NIETS ANDERS dan water in het waterreservoir.
Page 25

23
3. Zet de druipschaal bovenop de stomervoet.
4. Leg het te stomen voedsel in de stoommand(en).
TIPS:
Snijd het voedsel in stukjes van gelijke grootte zodat alles gelijkmatig kan gaar worden.
Voedsel dat langzaam moet gestoomd worden of een kortere bereidingstijd nodig heeft
kan in de bovenste stoommand worden gelegd.
Voedsel dat een langere bereidingstijd nodig heeft kan het beste in de onderste
stoommand worden gelegd.
5. Stapel de stoommand(en) bovenop de druipschaal.
6. Zet het deksel op de bovenste stoommand.
7. Sluit het apparaat aan op het stopcontact.
De cijfers van de tijd verschijnen op de display, aangevend dat het apparaat in de
klokmodus is geschakeld.
De stoomfunctie
Om het stoomkoken te beginnen:
De stoomkoker is voorgeprogrammeerd om 45 minuten te stoomkoken.
1. Druk vanuit de klokmodus op O/I.
Het getal “45” gaat op de display knipperen.
2. U hoort na ongeveer 3 seconden een pieptoon, het cijfer “45” stopt met knipperen en het rode
stroomlampje gaat branden.
De stoomkoker warmt op en de tijd begint af te tellen.
3. Even later begint de stoomkoker te stomen en doet dit gedurende 45 minuten.
Om de stoomtijd te wijzigen:
1. Druk vanuit de klokmodus op O/I.
Het getal “45” gaat op de display knipperen.
2. Druk terwijl “45” knippert herhaaldelijk op / tot de gewenste stoomtijd op de display
is aangegeven.
De stoomtijd kan worden ingesteld tussen 5 minuten en 90 minuten.
Telkens wanneer u op / drukt wordt de stoomtijd met 5 minuten verminderd of
vermeerderd.
3. Wanneer de gewenste stoomtijd is ingesteld wacht u ongeveer 3 seconden tot de instelling
automatisch wordt bevestigd.
U hoort een pieptoon en het rode stroomlampje gaat branden.
De stoomkoker warmt op en de tijd begint af te tellen.
Druk opnieuw op O/I om de stoomfunctie te annuleren. Het rode stroomlampje dooft dan.
Page 26

24
De warmhoudfunctie
U hoort 2 pieptonen wanneer het stoomproces is voltooid, het stroomlampje kleurt dan groen en
het symbool
verschijnt naast de tijd op de display.
De warmhoudfunctie werkt om de 10 minuten gedurende ongeveer 2 minuten. Dit proces wordt
herhaald tot er onvoldoende water in het reservoir rest of de stoomkoker wordt uitgeschakeld
door te drukken op O/I.
Na gebruik
1. Druk op O/I om het apparaat uit te schakelen en haal de stekker uit het stopcontact.
2. Verwijder voorzichtig het deksel van de stoomkoker met behulp van ovenwanten of een doek
(niet meegeleverd).
OPGELET: de stoomkoker blijft nog een tijd warm nadat het stomen is gestopt. Verwijder het
deksel voorzichtig omdat stoom zal ontsnappen en de stoommanden en rijstkom zeer warm zijn.
3. Neem de manden van het apparaat en zet neer op een hittebestendige ondergrond.
4. Laat de stoomkoker volledig afkoelen voordat u begint met reinigen.
De timer instellen
U kunt de timerfunctie gebruiken om de gewenste tijdsduur voor het stomen van een gerecht in te
stellen.
Controleer voordat u de timer instelt of de klok correct is ingesteld.
De klok instellen
Nadat u de stoomkoker op de stroomvoeding heeft aangesloten ziet u de cijfers van de tijd op de
display.
1. Houd PROG en O/I tegelijkertijd ingedrukt.
U hoort een pieptoon.
2. Stel de tijd in door herhaaldelijk te drukken op / .
De tijd vermeerdert in stappen van 10 minuten en vermindert in stappen van 1 minuut.
3. Druk op PROG om te bevestigen.
De stoomfunctie timen
4. Druk op PROG tot de cijfers van de tijd “00:00” samen met de letters “PROG” op de display
knipperen.
5. Stel de tijd in door herhaaldelijk te drukken op / .
De tijd vermeerdert of vermindert in stappen van 10 minuten.
6. Druk op PROG tot 45 op de display verschijnt. Druk herhaaldelijk op / om de
stoomtijd in te stellen.
7. Druk op PROG om te bevestigen.
De huidige tijd en de letters “PROG” verschijnen op de display, aangevend dat de timer van
de stoomfunctie opstart.
Page 27

25
Om de timer te annuleren: druk op PROG zodat de letters “PROG” van de display
verdwijnen. De display keert dan terug naar de klokmodus.
8. Op de starttijd hoort u een pieptoon, gaat het rode stroomlampje branden en begint de
stoomkoker te stomen.
De rijstkom gebruiken
1. Doe rijst en water in de rijstkom.
2. Zet de rijstkom in een stoommand.
OPMERKING: wanneer u meerdere stoommanden gebruikt is het raadzaam de rijstkom in
de bovenste stoommand te zetten voor een optimaal resultaat.
3. Dek de mand of met het deksel en stel de timer in.
4. Wanneer de rijst gaar is laat u deze voor een optimaal
resultaat nog 5 tot 10 minuten met het deksel op staan.
5. Open het deksel voorzichtig, daarbij oplettend voor
ontsnappende stoom.
Verwijder de rijstkom voorzichtig door deze bij de
handgrepen vast te nemen.
REINIGEN EN ONDERHOUD
Haal de stekker van het apparaat uit het stopcontact en laat het afkoelen voordat u het gaat
reinigen.
Ledig het waterreservoir en veeg schoon met een goed uitgewrongen doek. Reinig de
buitenkant van de stomervoet met een goed uitgewrongen doek. Droog zorgvuldig.
Dompel de stomervoet NIET ONDER in water.
Verwijder alle afneembare onderdelen en was deze in een warm sopje of in de vaatwasser.
Spoel en droog zorgvuldig. Gebruik geen schurende of chemische reinigingsmiddelen.
De stoommanden kunnen worden gestapeld voor compact wegbergen.
Het apparaat ontkalken
1. Ontkalk het apparaat telkens na het ongeveer 8 keer te hebben gebruikt.
2. Zet de turbo-ring ondersteboven (met de grootste kant naar boven gericht) over het
warmte-element.
3. Vul het waterreservoir met koud water tot op het MAX waterpeil.
4. Vul de binnenkant van de turbo-ring met witte azijn tot op hetzelfde peil.
OPGELET: NIET verwarmen (hierdoor wordt de ontkalkende werking vernietigd).
5. Laat overnacht ontkalken.
6. Spoel de binnenzijde van het waterreservoir enkele keren met warm water. Spoel en droog
zorgvuldig voor het wegbergen.
Rijstkom
Page 28

26
TECHNISCHE GEGEVENS
Nominale waarden: 220-240V~, 50Hz
800W
VERWIJDERING
Als verantwoordelijke handelaar dragen we zorg voor het milieu.
We moedigen u aan om de juiste verwijderingsprocedure voor uw apparaat en verpakkingsmateriaal te
volgen. Dit draagt bij tot het behoud van de natuurlijke rijkdommen door deze te recyclen zodat zowel de
menselijke gezondheid en het milieu worden beschermd.
Gooi dit apparaat en de verpakking weg in overeenstemming met de geldende wetgeving en
voorschriften.
Aangezien dit apparaat elektronische componenten bevat moet het apparaat en toebehoren aan het
einde van hun levensduur afzonderlijk van het huisafval worden weggegooid.
Neem contact op met uw gemeente voor informatie over afdanking en recycling.
Lever het apparaat in bij het inzamelpunt van uw gemeente voor recycling. Bij sommige inzamelpunten kunt u het
apparaat gratis inleveren.
Hotline Vanden Borre
De dienst na verkoop is bereikbaar van maandag tot zaterdag op
+32 2 334 00 00
Hulplijn Nederland
Hiervoor kunt u contact opnemen met het BCC Service Center:
0900 0555 (lokaal tarief), geopend van maandag t/m vrijdag van
9.00 tot 17.00 uur.
We verontschuldigen ons voor enig ongemak veroorzaakt door kleine inconsistenties in deze
gebruikershandleiding, die kunnen ontstaan door productverbetering of –ontwikkeling.
Darty Holdings SAS © 14 route d’Aulnay 93140 Bondy, France 16 / 02 / 2016
 Loading...