

Page 1

GB OPERATING INSTRUCTIONS
I ISTRUZIONI OPERATIVE
CZ NÁVOD K OBSLUZE
E MANUAL DE INSTRUCCIONES
SK NÁVOD NA OBSLUHU
F MANUEL D'UTILISATION NL HANDLEIDING
DVDP292WX
9” ŠIROKOÚHLÝ PŘENOSNÝ DVD PŘEHRÁVAČ SE DVĚMA OBRAZOVKAMI A DivX® VIDEO
9” ŠIROKOUHLÝ PRENOSNÝ DVD PREHRÁVAČ S DVOMA DISPLEJMI A PODPOROU DivX® VIDEO
9" WIDESCREEN PORTABLE DVD PLAYER WITH DivX® VIDEO - TWIN SCREEN
LETTORE DVD PORTATILE CON SCHERMO WIDESCREEN 9"
CON DivX® VIDEO - DOPPIA IMMAGINE
9"BREEDBEELD PORTABLE DVD SPELER MET DivX® VIDEO - TWIN SCREEN
DVD PORTATIL 9"PANORAMICO DivX® VIDEO - DOBLE PANTALLA
LECTEUR DE DVD PORTABLE 16/9 COMPATIBLE DivX® VIDEO
AVEC 2 ECRANS DE 22.7cm
Page 2

1
Table of Contents
SAFETY INFORMATION ..................................................2
IDENTIFICATION OF CONTROLS.................................6
MAIN UNIT
M
ONITOR
.................................................................................................................6
................................................................................................................7
REMOTE CONTROL..................................................................................................... 8
GETTING STARTED ..........................................................9
INSTALLING DVD PLAYER TO CAR SEATS..................................................................9
CONNECTING POWER .................................................................................................9
CONNECTING AUDIO/VIDEO CABLE ........................................................................ 10
INSTALL REMOTE CONTROL BATTERY.....................................................................10
BASIC OPERATION..........................................................10
PLAYING A DVD.......................................................................................................10
PLAYING AN AUDIO CD OR MP3.............................................................................. 12
PLAYING A JPEG DISC ............................................................................................13
DIGITAL CARD AND USB PLAY ................................................................................14
SETUP MENU SETTING ..................................................14
GENERAL SETUP PAGE ............................................................................................14
VIDEO QUALITY SETUP .....................................................................................16
PASSWORD SETUP PAGE ..........................................................................................16
PREFERENCE PAGE...........................................................................................17
PARAMETERS AND MAINTENANCE .........................18
TROUBLESHOOTING......................................................19
IMPORTANT DISPOSAL INSTRUCTIONS .................20
Page 3

Safety Information
Mains supply
This equipment is designed to operate from a 100-240 Volt, 50/60Hz AC mains supply.
Other power sources may damage it.
Mains adapter
The power adapter supplied is compatible with a standard mains socket.
y If the power adapter or its lead gets damaged it must be replaced by a qualified
service agent with an approved adapter of the same type and rating.
Symbols
2
This equipment is double
insulated and an earth
connection is not
required.
Dangerous voltage constituting
a risk of electric shock is
present inside this equipment.
This mark is applied to show
the equipment conforms to
European safety and
electro-magnetic compatibility
standards.
There are important operating
and maintenance instructions
in the literature accompanying
this equipment.
TO REDUCE THE RISK OF BURNS, ELECTRIC SHOCK, FIRE OR INJURY TO PERSONS,
PLEASE CAREFULLY READ ALL SAFETY INSTRUCTIONS.
TO PREVENT ELECTRIC SHOCK, DO NOT REMOVE ANY
COVER.
Save these instructions for future reference.
We have designed and made this product to meet European safety standards, but as
with any electronic equipment you must take care.
Here is some good advice to help you stay safe and get the best results.
Install or locate this product only in accordance with the installation instructions.
Use this product only for its intended purpose as described in the operating
instructions.
Children and the infirm must be closely supervised by a competent person. If the
product includes small parts, do not let children play with it.
Examine the product thoroughly: if it is damaged in any way notify the retail store
Page 4

3
where you purchased it.
To save power: switch off mains power or pull out the power adapter when you are
not using the equipment.
The plug shall be the main disconnect device and should remain operable at all times.
Avoid harsh conditions such as wet or damp places, high humidity, strong vibration,
extremely high or low temperatures, strong sunlight and places that are very dusty.
Protect the power lead. You must ensure the power adapter lead cannot be walked
on, crushed, chafed or cut and routed in a way that reduces the risk of a tripping
hazard.
Never let anyone push objects into holes and ventilation slots.
Don’t continue to use this equipment if you have split liquids in it, if it is damaged in
any way or if it does not work as expected. Immediately unplug the equipment and get
expert advice.
Protect the screens from fingerprints and dirt.
This product is designed for domestic use only. Any other use may invalidate
the guarantee and might be dangerous.
DO NOT store this product outdoors or expose to rain or moisture.
DO NOT use this product near water, for example near a kitchen sink, in a bathroom or
near a swimming pool.
DO NOT remove outer panels or covers from the product. Repairs must only be
undertaken by a qualified service person.
DO NOT place the product or mains lead near a hot surface such as a gas or electric
cooker or fire.
DO NOT operate the product when room humidity is excessive.
Ventilation
Place the equipment on a hard flat surface away from direct sunlight and heat sources.
If it is in a cabinet, allow at least a 10cm gap all around. Don’t obstruct the ventilation
slots, including those underneath, with soft furnishings. Overheating will shorten the life
of the equipment and increase the risk of fire.
Cleaning
Disconnect the mains supply and use only a lightly dampened soft cloth. Do not use
chemical solvents or strong detergents as these may damage the cosmetic finish. Do
not leave any liquid drops on the screens.
Battery
Remove battery when the remote is not to be used for a long time. Battery left in the
remote may cause damage through deterioration and corrosive leakage, invalidating
the guarantee. To protect the environment please use local recycling facilities for
battery disposal. Do not dispose of the battery in a fire, danger of explosion!
Battery handling and usage
WARNING: Only adults should handle battery. Do not allow a child to use this product
unless the Battery Compartment Cover is securely attached to the
Battery Compartment in accordance with all product usage instructions.
• Follow the battery manufacturer’s safety and usage instructions.
Page 5

• Keep battery away from children and pets.
• Insert the battery observing the proper polarity (+/-) as indicated inside the battery
compartment. Failure to properly align the battery polarity can cause personal injury
and/or damage. The battery compartment is located on the bottom of the remote.
Important Safety Warnings
y If anything goes wrong, don't try and fix it yourself, get a qualified service agent to
carry out any repairs or maintenance.
y Do not expose this equipment to dripping or splashing or place any objects filled
with liquids, such as vases, on the product.
y Never put a naked flame source such as lighted candles on or near the product.
y Small parts. Do not let young children play with the equipment.
y Do not use the equipment for any purpose other than its intended use.
y Do not let the cord on the adapter hang over the edge of a table or counter top.
y Do not let the cord on the adapter touch any hot surface.
y Do not operate the equipment with a damaged adapter or after the equipment has
been dropped or damaged in any way.
y Do not immerse the equipment in water or any other liquid.
y Never operate the equipment and try to view video while driving a vehicle.
y To prevent injury, this equipment must be securely attached to the car seats as in
accordance with the installation instructions.
• Remove the battery when not using the remote for an extended period.
Class 1 laser product
This product contains a low power laser device. Invisible laser radiation
when open and interlocks defeated.
Avoid exposure to beam.
Warning: This digital video disc player employs a laser system. Use of
controls, adjustments, or the performance of procedures other than those
specified herein may result in hazardous radiation Exposure.
Warning: To prevent direct exposure to laser beam, do not open the
enclosure. Invisible laser radiation when opening.
Warning: Never stare directly into the laser beam.
Caution: Do not install this product in a confined space such as a book case
or similar unit.
4
Page 6

Notes on Copyrights:
z It is forbidden by law to copy, broadcast, show, broadcast via cable, play in public,
or rent copyrighted material without permission.
z This product features the copy protection function developed by Macrovision.
Copy protection signals are recorded on some discs. When recording and playing
the pictures of these discs picture noise will appear. This product incorporates
copyright protection technology that is protected by method claims of certain U.S.
Patents and other intellectual property rights owned by Macrovision Corporation
and other rights owners. Use of this copyright protection technology must be
authorised by Macrovision Corporation, and is intended for home and other
limited viewing uses only unless otherwise authorised by Macrovision Corporation.
Reverse engineering or disassembly is prohibited.
Notes on Discs
Handling Discs
Do not touch the play side of the disc. Hold the disc by the edges so that fingerprints
do not get on the surface. Never stick paper or tape on the disc.
Storing Discs
After playing, store the disc in its case. Do not expose the disc to direct sunlight or
source of heat and never leave it in a parked car exposed to direct sunlight.
Cleaning Discs
Fingerprints and dust on the disc can cause poor picture quality and sound distortion.
Before playing, clean the disc with a clean cloth. Wipe the disc from the centre out.
Do not use strong solvents such as alcohol, benzine, thinner, commercially available
cleaners, or anti-static spray intended for older vinyl records.
5
Page 7

Identification of Controls
Main Unit
1. Earphone Socket
2. Remote Sensor
3.
Press to go to the root menu of DVD,CD.
4.
5.
6.
Press to skip to the next chapter, track or scene during playback.
7.
Stop
8. USB Slot
9. Power Indicator
10. Power ON/OFF Switch
11. SD/ MMC Card Slot
12. AV OUT Jack
Use this jack to connect the AV and DC cable to connect the main unit
to the display.
13. DC OUT Jack
MENU button
Press to skip to the previous chapter, track or scene during playback.
/OK/up/down/left/right
Navigation controls
6
10
11
12
13
VOL
14
15
9
8
Page 8
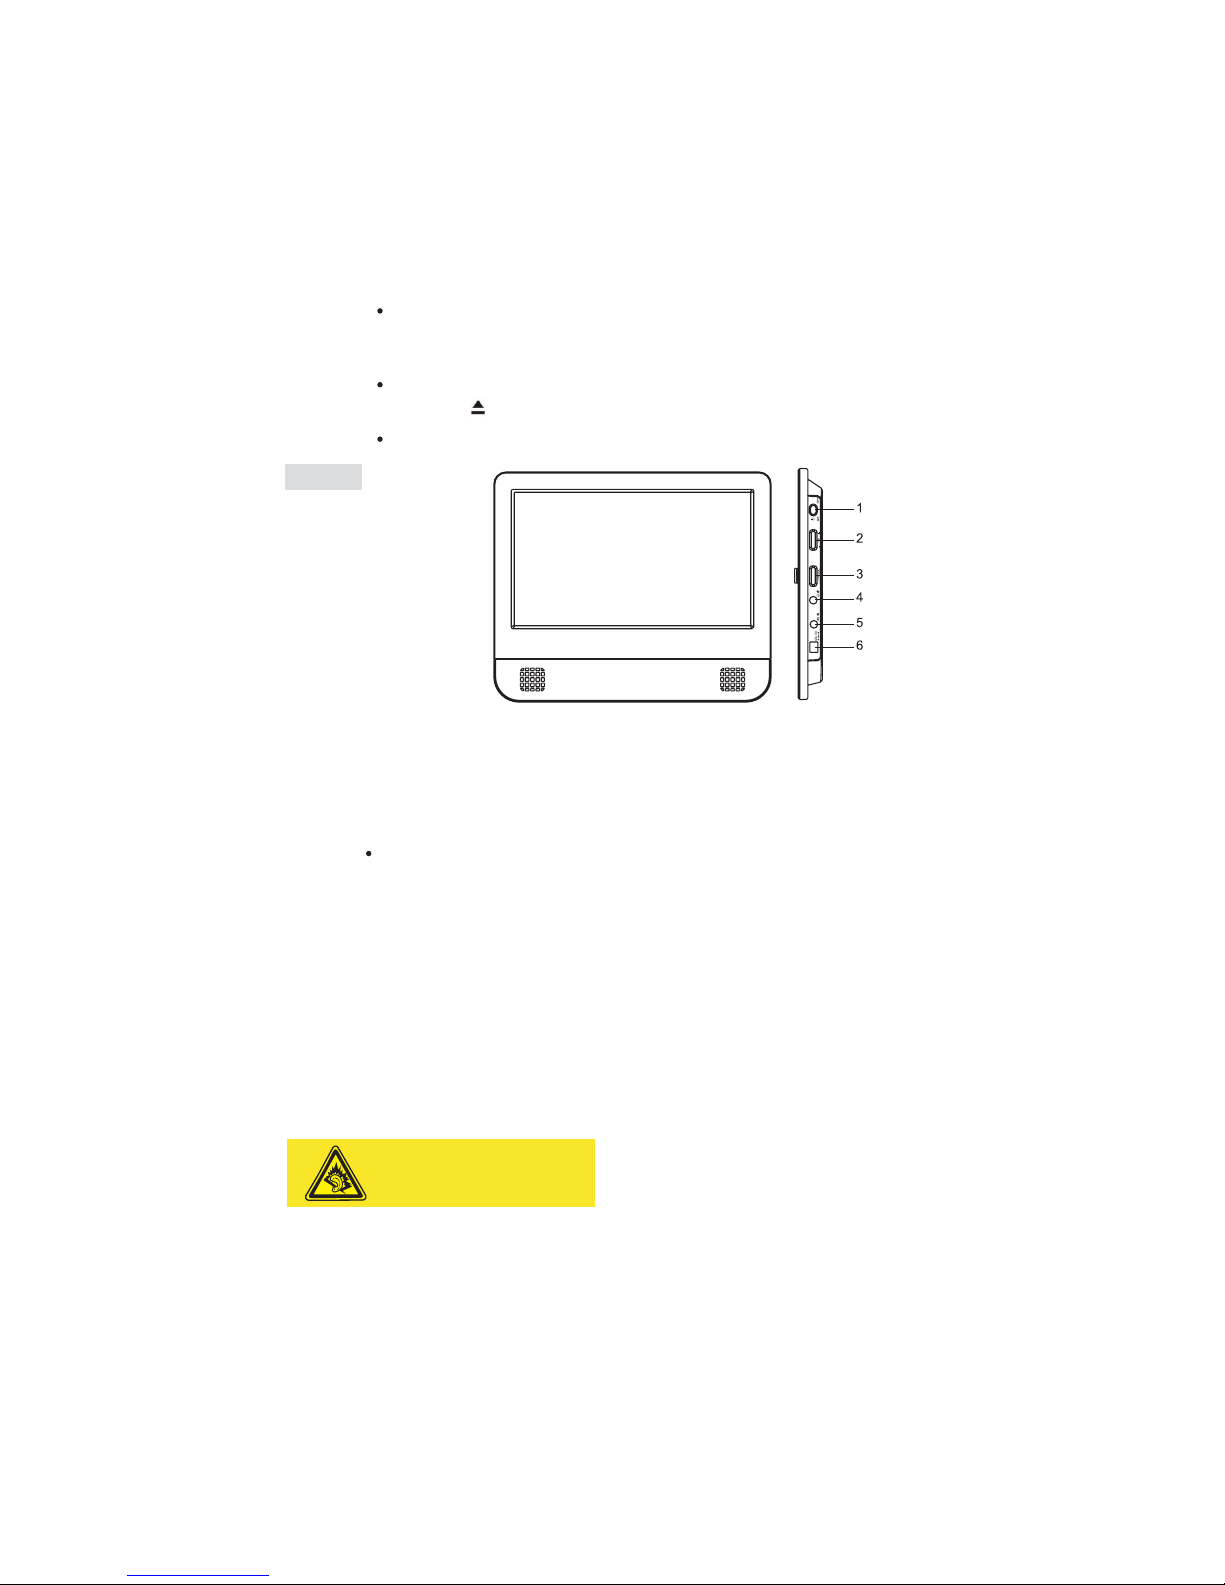
Connect to the display via the AV and CD cable.
14. Volume Button
15. DC IN Jack
Connect to the AC adapter or car cigarette lighter adapter.
16. Eject Button
Open the unit to insert a disc onto the tray.
Monitor
1. Power ON/OFF Switch
2. Brightness +/-
3. Volume +/-
4. Headphone Socket
5. AV IN Jack
Use this jack to connect the AV and DC cable to connect the display to
the main unit.
6. DC 9-12V Jack
Headphones: Insert a standard 3.5mm headphone into the headphone socket.
The speakers will be muted.
HEADPHONE VOLUME WARNING
Connect headphones with volume set low and
increase it if required. Prolonged listening
through some headphones at high volume
settings can result in hearing damage.
Earphones or headphones must comply with
EN 50332-1 / EN 50332-2 to ensure continued
protection from excessive sound presure.
7
At full power, prolonged listening to
the player can damage the ear of the
user.
WARNING: To protect your hearing, it is
important that any headphones or earphones
used in conjunction with this product are
compliant with French Decree of 8 November
2005 implementing Article L.5232-1.
This ensures that the sound level does not
exceed 100 dB SPL. The prolonged listening
at high volume for more than five hours a
week can damage your hearing.
Page 9

Remote Control
1. SETUP
y Enter or exit setup menu.
2. DISPLAY
y Accesses On-Screen display.
3. DVD / SD-USB
4. SUB
y Select a subtitle language (DVD).
5. AUDIO
y Select an audio language (DVD).
6. MENU
y Access menu on a DVD disc.
7. A-B
y Repeat play of a specific section.
8. REPEAT
y Repeat chapter, track or title.
9. ZOOM
y Press to zoom in an image.
10.
y Skip to previous chapter, track or
title.
11.
y Navigate the cursor up on the
screen.
12.
y Skip to the next chapter, track or
title.
13.
/
y Navigate the cursor left on the
screen or fast backward.
14. PLAY/PAUSE (
)
y Start / pause / resume play.
15.
/
y Navigate the cursor right on the
screen or fast forward.
16.
y Navigate the cursor down on the
screen.
8
Page 10
17. STOP ( )
y Stop play.
18. NUM
y Press to activate or deactivate the
0-9 numeric buttons.
Getting Started
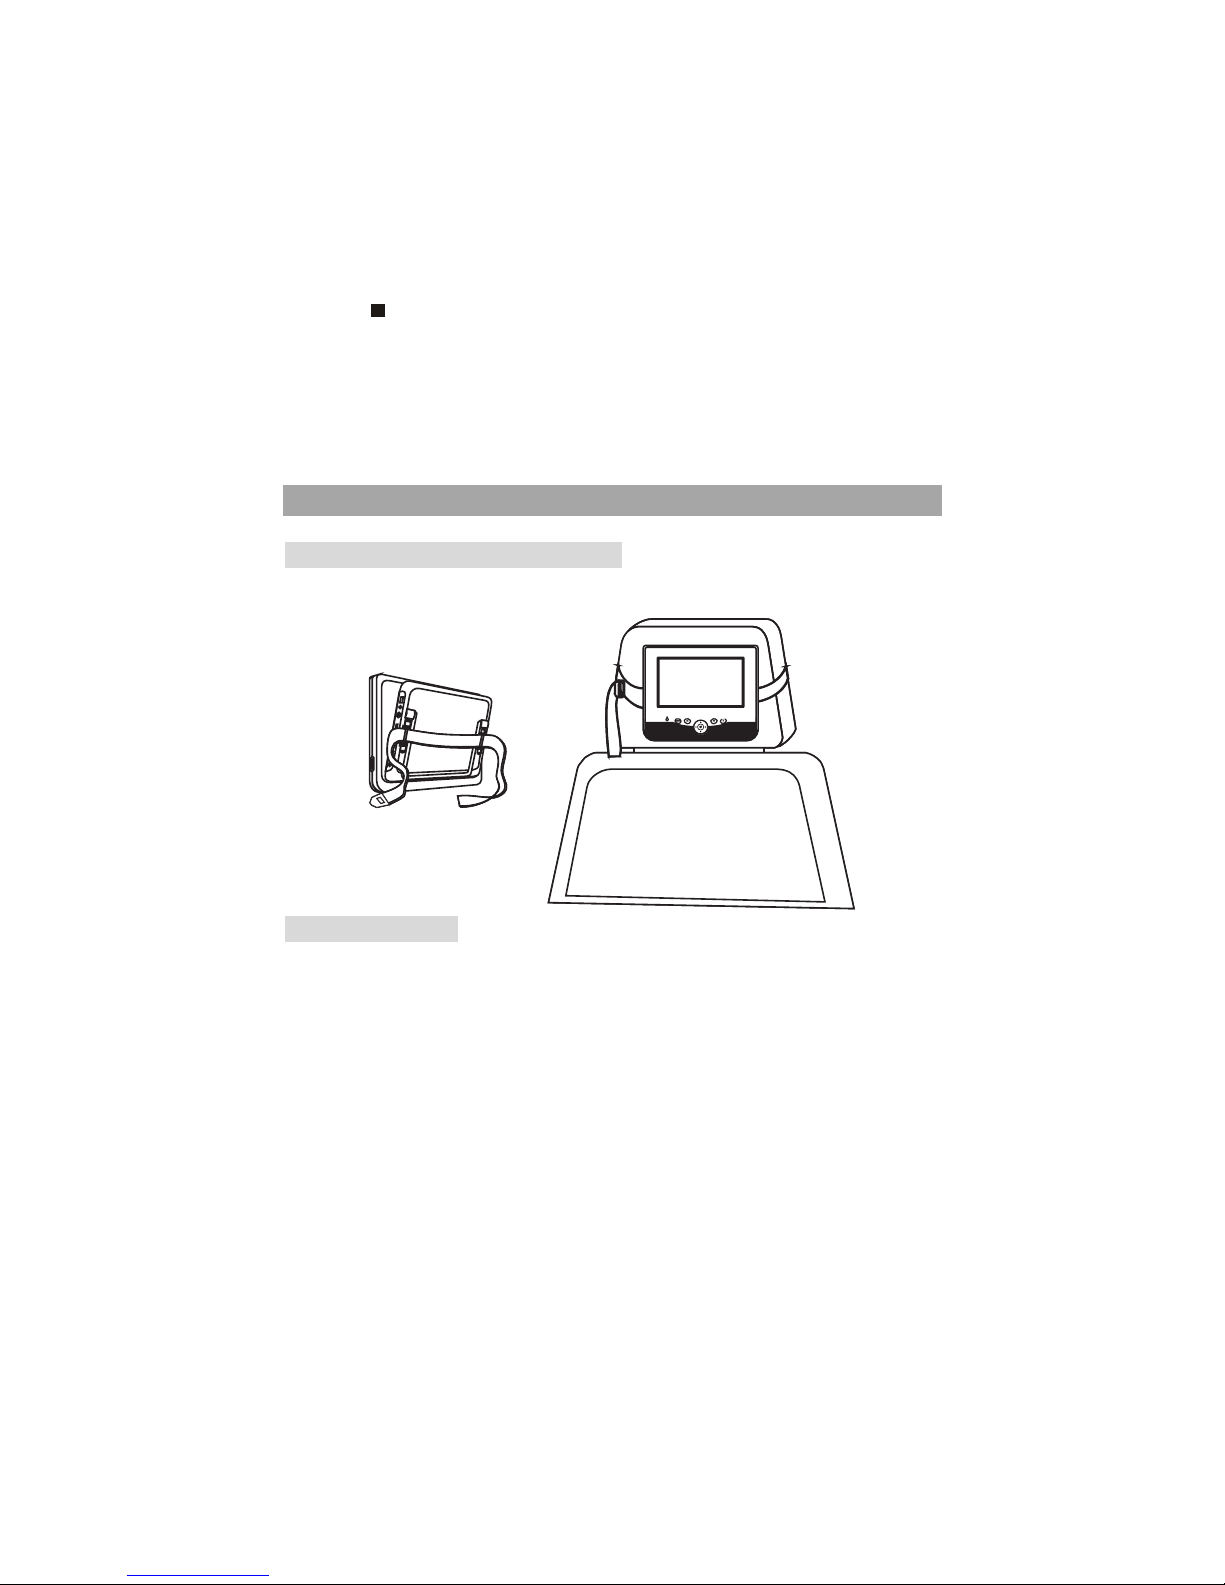
Installing DVD player to Car Seats
Use the supplied straps to fit the DVD player and the display tightly around the
headrests.
Connecting Power
y To connect power from inside a car, connect the supplied car power cord to the
DC IN jack of the main unit and to the car cigarette lighter socket.
y To connect power from household power sources: Connect the supplied adaptor
cable to the DC IN jack of the main unit and to the mains socket.
Caution!
y Check that the voltage marked on the adapter rating plate matches your local
supply.
y When you unplug the adaptor, always pull the plug from the mains socket. Never
pull the cord.
9
Page 11

Connecting Audio/Video Cable
Install Remote Control Battery
Before using the remote control, remove the plastic protective
spacer tab.
To replace the battery, remove the battery clip from the remote
control and insert one 3V CR2025 lithium battery in the battery
holder with the print face up, then replace the battery holder.
CAUTION:
y If the battery is placed incorrectly the remote control will not
work.
y Danger of damage or injury if the battery is replaced incorrectly.
y Replace only with the same or equivalent type.
Basic Operation
Playing a DVD
1. Slide the power switch on the DVD player to the ON position.
2. Press the eject button on the top of the main unit to open the
disc tray and insert your chosen disc in the tray, with the label
side facing up.
3. Close the tray. Play starts automatically.
4. Turn the Volume knob to adjust the desired volume.
5. To interrupt playing, press
. To resume playing, press again.
6. To stop playing, press
.
7. Press MENU to return to the menu screen. Some discs do not support menus and
start to play automatically.
10
A
V
O
U
T
ON
O
FF
DC
IN
D
C
OUT
US
B
S
D/ M
MS
P
O
W
E
R
Page 12

Notes:
1. If parental control is set and the disc isn’t fit for the rating setting you must input the
password. (See “Parental”).
2. DVDs may have a region code. Your player does not play discs that have a region
code different from your player.
ƽMoving to another CHAPTER/TRACK DVD
When a title on a disc has more than one chapter or a disc has more than one track,
you can move to another chapter/track as follows:
1. Press
or briefly during play to select the next or previous chapter/track.
2. To go directly to any chapter / track during DVD playback, press NUM to activate the
0-9 numeric buttons then input the chapter/track number.
ƽRepeat A-B
To repeat a sequence,
1. Press A-B at the chosen starting point. “
” appears on the screen.
2. Press A-B again at the chosen end point. “
” appears on the screen and the
repeat sequence begins.
3. Press A-B again to cancel.
ƽRepeat
Press REPEAT during play to select a desired repeat mode.
“ Repeat chapter / title / all”
CHAPTER: repeats the current chapter.
TITLE: repeats the current title.
ALL: repeats all the tracks on a disc.
ƽZoom
You can zoom in for video images or pictures.
Press ZOOM repeatedly to change the size in the following sequence.
2X size ė 3X size ė 4X size ė normal size
ƽMENU
1. Press MENU. If the current title has a menu, the menu appears on the screen.
Otherwise, the disc menu
will not appear.
2. The MENU offers features such as language, subtitle options and chapters for the
title.
ƽSelecting the Audio Language
For DVDs that contain two or more audio languages, during play press AUDIO
repeatedly until the desired language is selected.
11
A
AB
Page 13
ƽSelecting the Subtitle Language
For DVDs that contain two or more subtitle languages, during play press SUBTITLE
repeatedly until the desired language is selected.
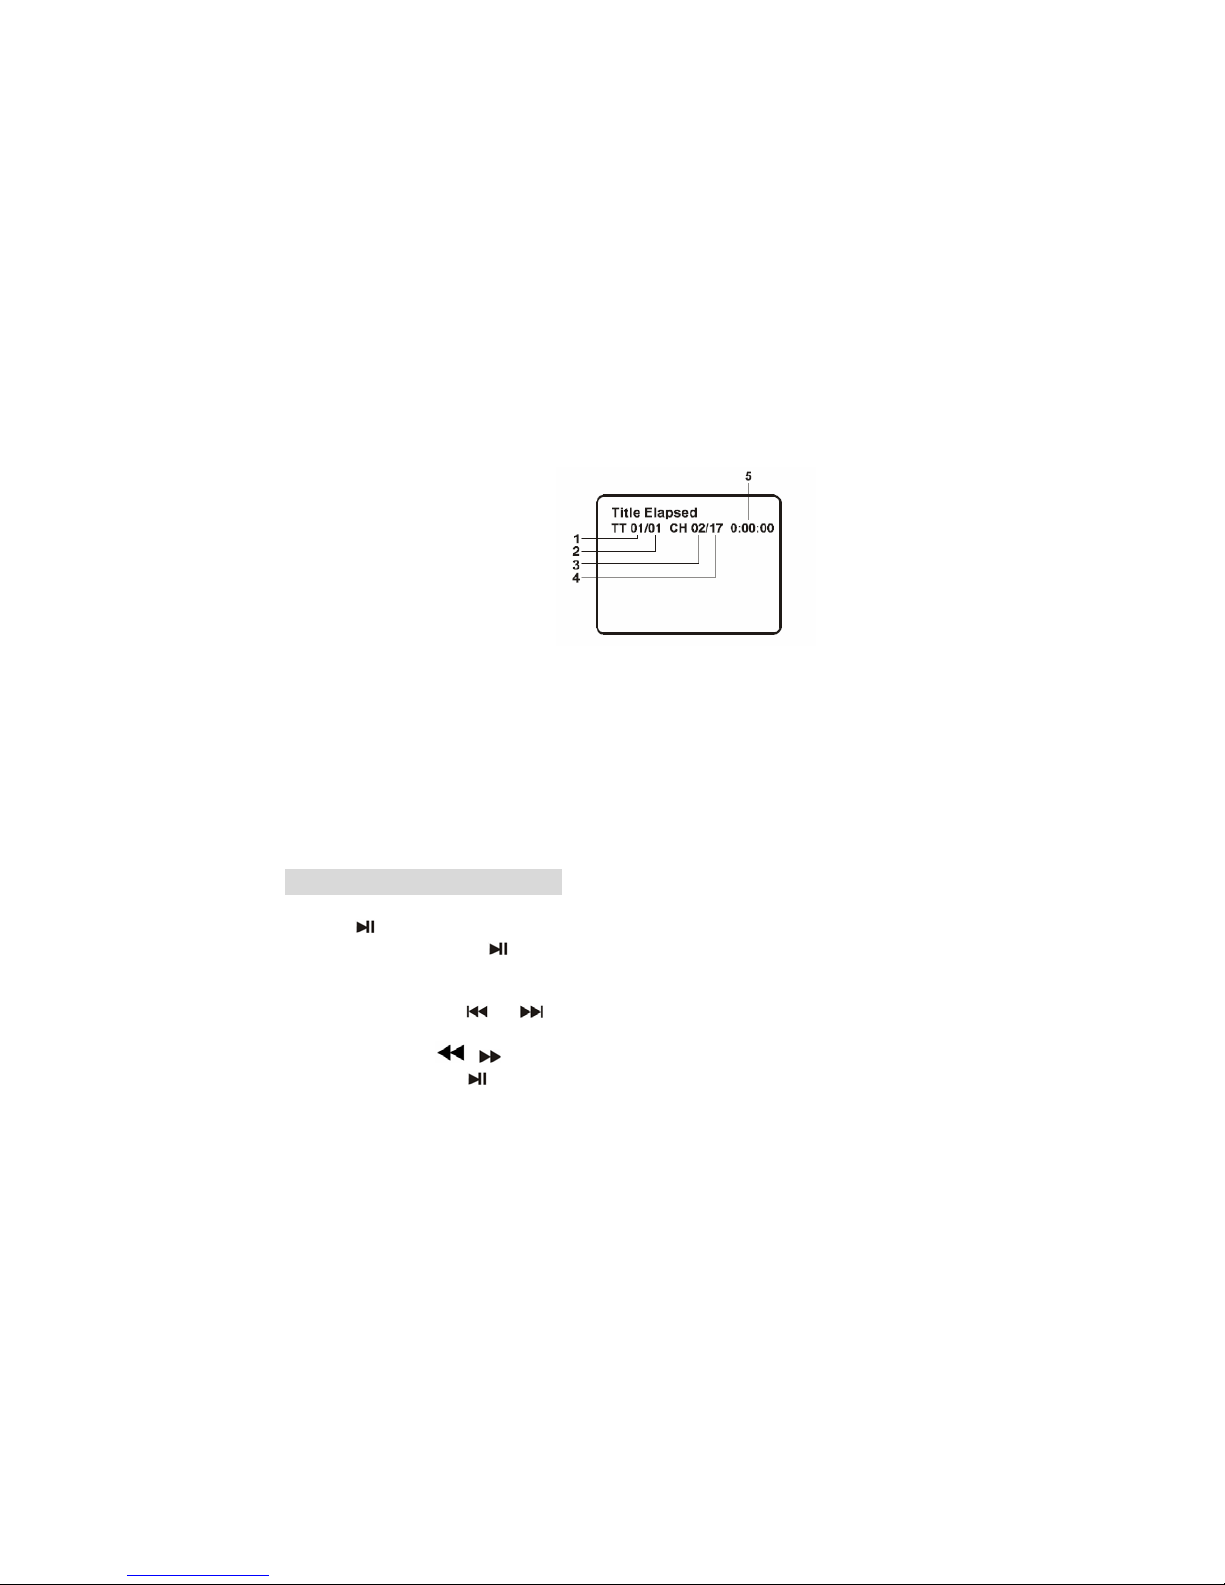
ƽDisplay Feature
a. When playing a DVD disc, press DISPLAY to display the following information.
1. Current Title Number
2. Total Number of Titles
3. Current Chapter Number
4. Total Number of Chapters
5. Elapsed Playing Time
b. Press DISPLAY repeatedly to cycle through the following options:
Title Elapsed: The elapsed time of the title.
Title Remain: The remaining time of the title.
Chapter Elapsed: The elapsed time of the chapter.
Chapter Remain: The remaining time of the chapter.
Display Off: The DVD time information will not be displayed.
Playing an Audio CD or MP3
ƽPause
1. Press
during play.
2. To return to play, press again.
ƽMoving to another Track
1. For audio CD, Press
or during play to go to the next or previous track or
move to the beginning of the current track.
For MP3, press , , Ʒ and during play to select the track you want to
play and then press to play.
2. You can play any track by inputting its number.
ƽRepeat
For audio CD, when REPEAT is pressed the repeat mode icon appears on the screen.
Track: repeats the current track.
All: repeats all the tracks on a disc.
12
Page 14
Off (No display): normal play.
For MP3, when REPEAT is pressed the repeat mode icon briefly appears on the
screen. Select the desired mode in the following modes.
REPEAT ONEėREPEAT FOLDERėREPEAT OFF
ƽRepeat A-B
1. To repeat a sequence during disc play press A-B at your chosen starting point.
“ ” appears on the screen.
2. Press A-B again at your chosen end point. “ ” appears on the screen and the
sequence begins to play repeatedly.
3. To exit the sequence and return to normal play, press A-B again. “ ” disappears
on the screen.
ƽDisplay Feature
When playing an audio CD, press DISPLAY repeatedly to view the following
information.
Single Elapsed: The current playing track and playing time of the track.
Single Remain: The current playing track and the amount of remaining time.
Total Remain: The current playing track and the amount of total remaining time on the
CD.
Display Off: The CD time information will not be displayed.
Playing a JPEG Disc
ƽViewing a JPEG Disc
1. Insert a JPEG disc and close the tray. The file menu appears on the screen.
2. Use to highlight the file you want to play and press .
Slide show starts from the selected file.
3. During playing JPEG disc, press MENU to enter the digest view.
4. During playing JPEG disc, press
to move to the next page, press to return
to previous page, and press
to return to the folder menu.
ƽStill Picture
1. Press
during slide show. The player will now go into PAUSE mode.
2. To return to the slide show, press again.
ƽZoom
1. Press ZOOM repeatedly to zoom in and out.
2. When the picture is enlarged, press , , Ʒ and to pan through it.
13
A
AB
AB
Page 15

ƽTo rotate a picture
Press
during play to rotate the picture clockwise.
Digital Card and USB Play
Digital cards (MMC/SD card) and USB with mp3&pictures (.jpg) may be played and
displayed through the main unit. MMC/SD cards may be directly inserted through
the card reader slot. The USB socket can be used to supply signals to the main unit
from USB sources.
Select digital USB/CARD to play
1. Turn the main unit on.
2. Insert a USB cable into the USB port or a card into the card reader slot on the unit’s
right.
3. Press DVD/SD-USB on the remote the units would automatically detect the
USB/CARD.
4. If USB/CARD is selected, the unit will begin to read the card or USB connected to it.
SETUP Menu Setting
General Setup Page
ƽGeneral Operation
1. Press SETUP to enter the setup menu.
2. Press or to enter the submenu or return to the previous menu.
3. Press Ÿź to highlight the desired menu.
4. Press to enter the next level of submenu or confirm your selection.
To exit from the menu
Press SETUP ĺThe settings will be stored in the player’s memory.
ƽGeneral Setup Page
The options included in General Setup page are:”TV Display”, “Angle Mark”, “OSD
language”, “Screen Saver”, “Last Memory” and "DivX(R) VOD".
1. Press SETUP to enter the setup menu.
2. Press or to select the “General Setup Page”.
ƽTV Display
Set the aspect ratio of the DVD Player according to the TV you have connected.
1. Press Ʒto highlight “TV Display”.
2. Enter its submenu by pressing
.
14
Page 16

3. Press Ʒto highlight the selected item.
4. Press
to confirm.
Normal/PS
ėIf you have a normal TV and want both sides of the picture to be trimmed or
formatted to fit your TV screen.
Normal/LB
ėIf you have a normal TV. In this case, a wide picture with black bands on the upper
and lower portions of the TV screen will be displayed.
Wide
ėIf you have a wide-screen TV.
ƽAngle Mark
1. Press Ʒto highlight “Angle Mark”.
2. Enter its submenu by pressing
.
3. Press Ʒto highlight the selected item.
ėOn:
Enable Angle Mark.
ėOff: Disable the current angle setting display.
4. Press
to confirm.
ƽOSD Lang
You can select your own preferred language settings. This DVD system will
automatically switch to the selected language whenever you load a disc. If the
language selected is not available on the disc, the disc’s default language will be used
instead. The OSD language in the system menu will remain once selected.
1. Press Ʒto highlight “OSD Lang”.
2. Enter its submenu by pressing
.
3. Press Ʒto highlight the selected language.
4. Press to confirm.
ƽScreen Saver
This function is used to turn the screen saver On or Off.
1. Press Ʒto highlight “Screen Saver”.
2. Enter its submenu by pressing
.
3. Press Ʒto highlight the selected item.
ėOn
: In STOP, PAUSE or No DISC mode, if no actions are performed about 5
minutes, the Screen Saver will be activated.
ėOff:
Screen Saver is disabled.
15
Page 17

4. Press to confirm.
ƽLast Memory (Effective only when opening the disc tray during playing)
1. Press Ʒto highlight "Last Memory".
2. Enter its submenu by pressing
.
3. Press Ʒto highlight the selected item.
ėOn
: The player resumes playing from the last location memorised on the disc.
ėOff: The player won't resume the last location memorised on the disc.
4. Press
to confirm.
ƽDivX(R) VOD
Choose it to display the DivX Video On Demand.
Video Quality Setup
The options included in Video Quality Setup are "Brightness", "Contrast", "Hue" and
"Saturation".
1. Press Ʒto highlight one option.
2. Enter its submenu by pressing
.
3. Press or to select the desired value.
4. Press
to confirm.
Password Setup Page
This feature is used for Parental Control. Enter your four digit password when a hint is
displayed on the screen. The default password is 3308.
1. Press Ʒto highlight “Password “
2. Enter its submenu by pressing
.
3. Press
to open the “Password Change” page.
4. Press NUM to switch the function buttons to 0-9 numeric buttons.
5. Enter the default password 4-digitcode.
6. Enter the new 4-digit code.
7. Enter the new 4-digit code again to confirm.
ėThe new 4 digit code will take effect.
8. Press OK to exit.
Helpful Hints:
- If the password has been changed, the parental and disc lock code will also be
changed.
- The default password (3308) is always active even though the password has been
16
Page 18

changed.
Preference Page (accessible when no disc is inserted)
ƽPreference Page
The options included in Preference page are: “Audio”, “Subtitle”, “Disc Menu”,
“Parental” and “Default”.
ƽAudio, Subtitle and Disc menu
These options set the Audio, Subtitle and Disc menu language for you
- “Audio” (disc’s soundtrack)
- “Subtitle” (disc’s subtitles)
- “Disc Menu” (disc’s menu)
1. Press Ʒto highlight “Audio”.
2. Enter its submenu by pressing
.
3. Press Ʒto highlight a selected language and press to confirm.
4. Repeat steps 1~3 for Subtitle and Disc menu language settings.
ƽParental
Some DVDs may have a parental level assigned to the complete disc or to certain
scenes on the disc. This feature lets you set a play limitation level. The rating levels are
from 1 to 8 and are country dependent. You can prohibit the playing of certain discs
that are not suitable for your children or have certain discs played with alternative
scenes.
1. PressƷto highlight “Parental” .
2. Enter its submenu by pressing
.
3. Use Ʒto highlight a rating level for the disc inserted.
4. Press
to confirm.
ėDVDs that are rated above the level you selected will not play unless you enter your
four-digit password or choose a higher level rating.
Helpful Hint:
Some DVDs are not encoded with a rating though the movie rating may be printed on
the Disc cover. The rating level feature does not work for such Discs.
Rating explanations
1. KID SAF
Kids material; recommended especially for children and viewers of all ages.
2. G
General Audience; recommended as acceptable for viewers of all ages.
17
Page 19

3. PG
Parental Guidance suggested.
4. PG13
Material is unsuitable for children under age 13.
5. PGR 6. R
Parental Guidance-Restricted; recommended that parents restrict children under 17
from viewing or allow to view only when supervised by a parent or adult guardian.
7. NC17
No children under age 17; not recommended viewing for children under age 17.
8. ADULT
Mature material; should be viewed only by adults due to graphic sexual material,
violence or language.
ƽDefault
Setting the “Default” function will reset all options and your personal settings to the
factory defaults and all your personal settings will be erased.
1. Press Ʒto highlight “Default”.
2. Highlight “Reset” by pressing
.
3. Press
to confirm selection.
Caution!
When this function is activated, all settings will be reset to factory defaults
except the parental setting.
Parameters and Maintenance
18
Power supply
100-240V~ 50-60Hz
Screen size
9 inches
Frequency response
20Hz to 20 kHz (1dB)
Signal-to-noise ratio
More than 60 dB
Dynamic range
More than 85 dB
Operating temperature
5~35ć
Weight
1.36 kg
Dimensions(W x D x H)
main unit: 230 x 192 x 39.5 mm
monitor: 230 x 192 x 26 mm
Compatible disc formats
DVD, CD, MP3 and DivX
Note: Design and specifications are subject to change without prior notice.
Maintenance and Service
ƽRefer to the information in this chapter before contacting a service technician.
Page 20

19
ƽWhen shipping the unit
Please save the original shipping carton and packing materials. If you need to ship the
unit, for maximum protection, re-pack the unit as it was originally packed at the factory.
ƽKeeping the exterior surfaces clean
Do not use volatile liquids such as insecticide spray near the unit. Do not leave rubber
or plastic products in contact with the unit for a long period of time since they leave
marks on the surface.
ƽCleaning the unit
To clean the player, use a soft, dry cloth. If the surfaces are extremely dirty, use a soft
cloth lightly moistened with a mild detergent solution. Do not use strong solvents such
as alcohol, benzine or thinner, as these might damage the surface of the unit.
ƽMaintaining the unit
The DVD player is a high-tech, precision device. If the optical pick-up lens and disc
drive parts are dirty or worn, the picture quality could be diminished. Depending on the
operating environment, regular inspection and maintenance are recommended after
every 1,000 hours of use. For details, please contact your nearest authorized service
center.
Troubleshooting
Before calling for service, you can check the following items on symptoms and
solutions.
No sound or distorted sound:
Ensure that the equipment is connected properly.
Ensure that the input settings for the TV and stereo system are proper.
No picture:
Ensure that the equipment is connected properly.
Ensure that the LCD is on.
No play:
Condensation has formed: wait about 1 to 2 hours to allow the player to dry out. This
player can’t play discs other than DVDs, MP3s and CDs.
The disc may be dirty and require cleaning.
Ensure that the disc is installed with the label side up.
No remote control:
Check the batteries are installed with the correct polarities (+&-).
The batteries are depleted: replace them with new ones.
Point the remote control at the remote control sensor and operate.
Remove the obstacles between the remote control and the remote control sensor.
Operate the remote control at a distance of not more than 8 meters from the remote
Page 21

control sensor.
No key operation (by the unit and/or the remote control) is effective:
Turn the unit off and then back to on. Alternatively, turn off the unit, disconnect the AC
power cord and the re-connect it. (The player may not be operating properly due to
lightning, static electricity or some other external factor.)
Battery does not work:
Check whether the batteryis out of power or in proper connection.
Play does not commence even when title is selected:
Confirm the “Rating” settings.
Audio soundtrack and/or subtitle language is not the one selected at the initial
settings:
If the audio soundtrack and/or subtitle language does not exist on the disc, the
language selected at the initial setting will not be seen/ heard.
No subtitles:
Subtitles appear only with discs which contain them.
Alternative audio soundtrack (or subtitle) language fails to be selected:
z An alternative language is not selected with discs which do not contain more than
one language.
z In the case of some discs, the alternative language cannot be selected by operating
AUDIO or SUBTITLE. Try selecting it from the DVD menu if one is available.
Angle cannot be changed:
This function is dependent on software availability. Even if a disc has a number of
angles recorded, these angles may be recorded for specific scenes only.
Important Disposal Instructions
As a responsible retailer we care about the environment.
As such we urge you to follow the correct disposal procedure
for your product, batteries and packaging materials. This will
help conserve natural resources and ensure that it is recycled
in a manner that protects health and the environment.
You must dispose of this product and its packaging according
to local laws and regulations. Because this product contains
electronic components and batteries, the product and its
accessories must be disposed of separately from household
20
Page 22

21
waste when the product reaches its end of life.
Contact your local authority to learn about disposal and
recycling.
The product and if applicable, its batteries should be taken to
your local collection point for recycling.
Some collection points accept products free of charge.
The battery type used in this product is one CR2025 Lithium battery in the remote. This
battery is located internally and is readily accessible.
Slide out the battery holder at the rear of the remote to remove the battery.
This battery must be disposed of at your local recycling point.
We apologise for any inconvenience caused by minor inconsistencies in these
instructions, which may occur as a result of product improvement and development.
Kesa Electricals UK, HU1 3AU 24 / 05 / 2011
c
Page 23

1
Sommaire
Informations sécurité importantes.............................................................................. 2
Identification des éléments de commande……………………..............................……6
Unité principale……………………………………………......................…………..……6
Écran.......................................... ................................................................................7
Télécommande………............................................................................................…8
Mise en route……….........................................................................................9
Installation du lecteur de DVD dans une voiture........................................................9
Branchement à une alimentation électrique...............................................................9
Connexion du câble audio/vidéo...............................................................................10
Installation de la pile dans la télécommande.............................................................10
Principales opérations..................................................................................10
Lecture d'un DVD......................................................................................................10
Lecture d'un CD audio ou MP3..................................................................................12
Lecture d'un disque JPEG.........................................................................................13
Lecture du contenu d'une carte mémoire ou d'un périphérique USB.........................14
Menu de configuration …..............................................................................14
Page de configuration générale............................................................................... 14
Configuration de la qualité vidéo...............................................................................16
Page de configuration du mot de passe....................................................................16
Page des préférences..............................................................................................17
Spécifications et entretien…………………………………………………………………19
Guide de dépannage...................................................................................................19
Instructions importantes de mise au rebut….............................................21
Page 24

2
Informations sécurité importantes
Alimentation électrique
Votre appareil a été conçu pour fonctionner à partir d'une prise secteur 100-240 V, 50-60
Hz ~ CA. Son branchement à une autre source de courant risque de l'endommager.
Adaptateur secteur
L'adaptateur fourni avec votre appareil est compatible avec toutes les prises secteurs
standards.
yEn cas de dommage de l'adaptateur ou de son cordon d'alimentation, demandez à
un technicien qualifié de le remplacer par un adaptateur agréé de même type.
POUR RÉDUIRE LES RISQUES DE BRÛLURE, D'ÉLECTROCUTION, D'INCENDIE ET DE
BLESSURE CORPORELLE, LISEZ ATTENTIVEMENT TOUTES LES INSTRUCTIONS
D'UTILISATION.
AFIN D'EVITER TOUTE ÉLECTROCUTION, N'OUVREZ
AUCUN COUVERCLE.
Conservez ces instructions pour référence ultérieure.
Nous avons conçu et fabriqué ce produit en accord avec toutes les exigences
européennes en matière de sécurité, mais, comme avec tout produit électronique, il vous
incombe d'en prendre soin.
Voici quelques conseils pour utiliser votre produit en toute sécurité et en tirer le
meilleur parti.
Installez ou posez votre produit conformément aux instructions fournies dans le guide
d'utilisation joint. Utilisez ce produit uniquement pour l'application qui lui a été affectée,
décrite dans le guide d'utilisation joint.
Ne laissez pas les enfants et les personnes handicapées utiliser ce produit
sans la
surveillance d'une personne compétente. Ne laissez aucun petit enfant jouer
avec un produit fabriqué avec de petites pièces.
Page 25

3
Examinez soigneusement le produit : si vous constatez un quelconque dommage,
rapportez-le à votre revendeur.
Économie d'énergie : éteignez votre appareil ou débranchez-le de la prise secteur
lorsque vous ne l'utilisez pas.
Débrancher le cordon d'alimentation du secteur est le seul moyen pour éliminer toute
tension à l'intérieur de l'appareil, aussi prévoyez une prise secteur accessible à tout
moment.
Ne posez pas votre appareil dans un environnement difficile, par exemple une
pièce humide, la pluie, un air fortement humide, des vibrations importantes, des
températures très élevées ou très basses, les rayons directs du soleil ou un endroit
excessivement poussiéreux.
Protéger le cordon d'alimentation secteur. Déployez le cordon d'alimentation de
manière qu'il ne puisse être écrasé, piétiné, arraché ou coupé et qu'il ne présente aucun
risque de trébuchement pour quiconque.
Ne permettez à personne d'introduire des objets par les trous et les ouvertures
d'aération.
N'utilisez pas votre appareil s'il a été en contact avec un liquide, a été endommagé
d'une manière ou d'une autre ou ne semble pas fonctionner normalement.
Débranchez-le immédiatement de la prise secteur et apportez-le à un technicien qualifié.
Protégez l'écran de la poussière et des traces de doigt.
CE PRODUIT EST DESTINÉ À UN USAGE DOMESTIQUE UNIQUEMENT. TOUTE
UTILISATION COMMERCIALE OU AUTRE QUE CELLE RECOMMANDÉE PEUT
ANNULER LA GARANTIE ET S'AVÉRER DANGEREUSE.
N'exposez pas ce produit à tout égouttage ou toute aspersion avec de l'eau, ni ne
placez d'objets remplis d'un liquide dessus, tel un vase.
N’utilisez pas votre appareil à proximité d’une source d’eau, par exemple près d'un
évier de cuisine, d'une baignoire ou d'une piscine.
Ne retirez aucun panneau ou couvercle extérieur du produit. Confiez toutes les réparations
uniquement à un technicien qualifié.
Ne placez pas le produit et/ou son cordon d'alimentation sur ou à proximité d'une surface
chaude, par exemple un réchaud à gaz, une plaque électrique ou un feu.
N'utilisez pas le produit dans une pièce excessivement humide.
Aération
Prévoyez un espace libre d'au moins 10 cm tout autour du produit. Veillez à ne pas
obstruer les ouvertures d'aération avec quoi que ce soit. Toute surchauffe risque
d'entraîner un début d'incendie.
Nettoyage
Débranchez le produit du secteur et essuyez-le avec un chiffon doux, légèrement
humide. N'utilisez ni solvant chimique ni détergent puissant afin de ne pas endommager
le revêtement extérieur.
Essuyez complètement l'écran pour ne laisser aucune goutte (l'humidité peut entraîner
une décoloration permanente de l'écran). Pour enlever les taches de graisse sur les
écrans LCD, utilisez un produit nettoyant spécial pour les écrans vendu dans le
Page 26

4
commerce.
Pile
Retirez la pile lorsque vous n’envisagez pas d’utiliser la télécommande avant longtemps.
Elle risque sinon de se détériorer et de fuir, et ce faisant d'endommager la
télécommande sans pouvoir recourir à la garantie. Déposez vos piles usagées auprès
d'installation de recyclage pour protéger votre environnement. Ne jetez pas les piles
dans le feu, elles risquent d'exploser.
Manipulation et utilisation des piles
AVERTISSEMENT : seules des personnes adultes sont autorisées à manipuler les piles.
Ne laissez pas les enfants utiliser ce produit lorsque le couvercle du compartiment de
pile n'est pas correctement en place, selon les instructions de ce guide.
• Observez scrupuleusement les instructions d'utilisation et de sécurité du constructeur.
• Conservez la pile hors d'atteinte des enfants et des animaux.
• Insérez la pile en respectant les polarités (+/-) indiquées à l'intérieur du compartiment
de pile. Le non-respect des polarités peut entraîner des blessures corporelles et/ou des
dommages matériels. Le compartiment de pile se trouve sous la télécommande.
Importantes Mesures de Sécurité
En cas de panne ou de mauvais fonctionnement, n’essayez pas d’y remédier
vous-même. Faites appel à un technicien qualifié.
Évitez tout contact de votre appareil avec un liquide et ne posez aucun récipient
contenant un liquide, par exemple un vase, sur votre appareil.
Ne placez jamais une flamme nue (comme une bougie) sur ou à proximité de votre
appareil.
Ne laissez pas de jeunes enfants s’amuser avec cet appareil. Contient des pièces
de petite taille pouvant être ingérées.
N'utilisez votre appareil pour aucune autre utilisation que celle prévue.
Veillez à ce que le cordon d'alimentation de l'adaptateur ne pende pas sur le bord
d'une table ou d'un comptoir.
Veillez à ce que le cordon d'alimentation de l'adaptateur ne touche aucune surface
chaude.
N'utilisez pas cet appareil lorsque l'adaptateur est endommagé, après qu'il est
tombé ou a été autrement endommagé.
Ne plongez pas votre appareil dans de l'eau ou tout autre liquide.
Ne manipulez pas les touches de commande de votre lecteur de DVD et ne
regardez aucune vidéo pendant que vous conduisez.
Vérifiez que votre appareil est solidement fixé sur le siège auto, conformément à
nos instructions d'installation, afin d'éviter des accidents et des blessures.
Retirez la pile si vous n'envisaqez pas d'utiliser la télécommande avant longtemps.
Page 27

utilisation des touches de commande, un réglage ou une opération non autorisée
par ce manuel vous expose à un risque de radiation.
Avertissement : Pour éviter toute exposition directe au rayon laser, n'ouvrez jamais
votre appareil. Rayon laser invisible lorsque l'appareil est ouvert.
Avertissement : Ne regardez jamais directement un rayon laser.
Attention : N'utilisez pas votre appareil dans un espace où l'aération est
insuffisante, par exemple une bibliothèque ou un meuble de rangement.
REMARQUE : débrancher le cordon d'alimentation du secteur est le seul moyen pour
éliminer toute tension à l'intérieur de l'appareil, aussi prévoyez une prise secteur accessible à
tout moment.
Avis de copyright :
Il est interdit de copier, diffuser, afficher, diffuser par câble, diffuser en public ou louer un
contenu protégé par copyright sans l'autorisation de son propriétaire.
Cet appareil intègre le dispositif de protection contre la copie développé par Macrovision.
Certains disques sont gravés avec des signaux de protection contre la copie illicite. Si
vous copiez puis écoutez ce contenu, un bruit se superpose au contenu. Votre appareil
intègre une technologie de protection du copyright renforcée par plusieurs brevets US et
autres droits de propriété intellectuelle appartenant à Macrovision Corporation et aux
autres propriétaires de droits. L'utilisation de cette technologie de protection est soumise à
autorisation de Macrovision Corporation, et n'est consentie que pour un usage domestique
ou autre application de visualisation limitée, sauf indication contraire expressément
rapportée par Macrovision Corporation. Toute tentative d'ingénierie inverse ou de
désassemblage est interdite.
Entretien de vos disques
Manipulation
Ne touchez pas la surface enregistrée du disque directement avec vos doigts. Ne collez rien
sur votre disque, ni étiquette ni toute autre chose.
Rangement
Lorsque vous ne voulez plus écouter un CD, rangez-le
immédiatement dans sa boîte. N'exposez pas vos disques aux rayons directs du soleil ou à
une autre source de chaleur, et ne les laissez pas à l'intérieur d'une voiture garée en plein
soleil.
Nettoyage
Les traces de doigt et les poussières dégradent la qualité sonore et visuelle des disques.
Avant toute lecture, essuyez le disque avec un chiffon propre et doux. Partez du centre et
poussez le chiffon vers le bord du disque.
5
Page 28

6
Identification des éléments de commande
Unité principale
1. Prise des écouteurs
2. Capteur de télécommande
Appuyez pour accéder au menu racine du DVD ou CD.
4.
5.
6.
Appuyez pour accéder au chapitre, à la plage ou à la scène suivante
durant la lecture.
7.
8. Port USB
9. Témoin d’alimentation
10. Interrupteur MARCHE/ARRET
11. Logement de carte SD/MMC
12. Prise AV OUT
Utilisez cette prise pour connecter le câble AV et CC pour connecter
l'unité principale à l'écran d'affichage.
3. Bouton MENU
Appuyez pour revenir au chapitre, à la plage ou à la scène précédente
durant la lecture.
Contrôles de navigation
OK Haut / Bas / Droite / Gauche
Arrêt
10
11
12
13
VOL
14
15
9
8
Page 29

7
13. Connecteur DC OUT (SORTIE CC)
Vous branchez sur ce connecteur le câble d'alimentation CC.
14. Bouton de volume
15. Connecteur DC IN (ENTRÉE CC)
reçoit le connecteur de l'adaptateur CA ou de l'adaptateur pour
allume-cigare.
16. Touche d'éjection
Ouvre le compartiment de disque.
Écran
1. Commutateur ON/OFF (marche/arrêt)
2. Brightness (Luminosité) +/-
3. Volume +/-
4. Connecteur pour des écouteurs
5. Connecteur AV IN (Entrée AV)
Vous branchez sur ce connecteur le câble AV pour relier l'écran à l'unité
principale.
6. Connecteur CC 9-12 V
Écouteurs : branchez le connecteur standard 3,5 mm de vos écouteurs à
l'emplacement prévu sur votre lecteur. La sortie sur les haut-parleurs est désactivée.
A pleine puissance,l’écoute prolongée du
baladeur peut endommager l’oreille de
l’utilisateur.
AVERTISSEMENTS SUR LE VOLUME DES ÉCOUTEURS
Baissez le volume avant deconnecter le casqueou les écouteurs, pour l'augmenter ensuite
si nécessaire. L'utilisation prolongée des écouteurs à un niveau sonore élevé risque
d'endommager votre capacité auditive.
Utilisez uniquement des écouteurs et
casques compatibles avec la norme
EN 50332-2 de protection
contre des
pressions sonores excessives.
EN 50332-1 /
AVERTISSEMENT:
pour protéger votre ouïe
ll est important que n
’importe quel casque ou
écouteurs utilisés en conjonction avec ce
produit soient conformes à la norme Français
Arrêté du 8 novembre 2005 portant application
de l
’article L. 5232-1 Ceci garantit que le niveau
sonore ne dépasse pas 100 dB SPL.
L
’écoute prolongée à volume élevé pendant
plus de cinq heures par semaine peut
endommager votre audition.
Page 30

8
Télécommande
1. SETUP (Configuration)
yAffiche ou ferme le menu de
configuration.
2. DISPLAY (Info)
yAffiche des informations à l'écran.
3. DVD/SD-USB
4. SUB (Sous-titre)
ySélectionne la langue des sous-titres
(DVD).
5. AUDIO
ySélectionne une langue audio (DVD).
6. MENU
yAffiche le menu du DVD lu.
7. A B
yRépète la lecture d'une section AB
spécifique.
8. REPEAT (Répéter)
yRépète la lecture du chapitre, de la
piste ou du titre.
9. ZOOM
yEffectue un zoom sur l'image.
10.
yRevient au chapitre à la piste ou au
titre précédent.
11.
yRemonte le curseur à l'écran.
12.
yPasse au chapitre, à la piste ou au
titre suivant.
13.
/
yDéplace le curseur vers la gauche
ou démarre un retour rapide.
14. PLAY/PAUSE (Lire/Pause) (
)
yDémarre/marque une
pause/reprend la lecture.
15. /
yDéplace le curseur vers la droite
ou démarre une avance rapide.
16.
yDescend le curseur à l'écran.
17. STOP ( )
yArrête la lecture.
18. NUM (Numérique)
yActive/désactive les touches 0-9
du bloc numérique.
Page 31

9
Mise en route
Installation du lecteur de DVD dans une voiture
Fixez le lecteur de DVD et l'écran sur les reposes-tête, à l'aide des sangles fournies.
Branchement à une alimentation électrique
Si vous utilisez votre lecteur en voiture, branchez une extrémité du cordon
d'alimentation fourni dans le connecteur DC IN de l'unité principale et l'autre
extrémité dans le connecteur de l'allume-cigare.
Si vous utilisez votre lecteur à la maison : branchez l'extrémité appropriée du
câble d'adaptateur fourni dans le connecteur DC IN de l'unité principale et l'autre
extrémité dans une prise secteur.
Attention !
Vérifiez que le voltage indiqué sur l'adaptateur correspond au voltage fourni par
l'alimentation électrique du secteur.
Pour débrancher le cordon d'alimentation de la prise secteur, saisissez la prise et
dégagez-la. Ne tirez jamais sur le cordon même.
Page 32

10
Connexion du câble audio/vidéo
1. Vers le connecteur AV OUTdu
lecteur de DVD
2. Vers le connecteur DC OUT
du lecteur de DVD
3. Vers le connecteur 9-12V de
l'écran
4. Vers le connecteur AV
IN de l'écran
5. Vers le connecteur DC
IN du lecteur de DVD
6. Vers l'allume-cigare de
la voiture
Installation de la pile dans la télécommande
Avant d'utiliser la télécommande, retirez la pellicule protectrice de la
pile.
Pour remplacer la pile, enlevez la pince bloquant le porte-pile de la
télécommande, dégagez le porte-pile, posez-y une pile au lithium 3 V
CR2025, le côté imprimé dirigé vers le haut, et remettez en place le
porte-pile.
ATTENTION :
yLa télécommande ne fonctionne pas si vous inversez les polarités
de la pile.
yLe non-respect des polarités de la pile risque d'endommager la télécommande, voire
entraîner des blessures.
yLe cas échéant, remplacez la pile uniquement par une pile de même type ou d'un
type équivalent.
Principales opérations
Lecture d'un DVD
1. Poussez le commutateur de marche/arrêt du lecteur de DVD sur la position marche
(ON).
2. Appuyez sur la touche d'éjection en haut de l'appareil pour ouvrir le compartiment
de disque et posez un disque sur le plateau, avec la face imprimée dirigée vers le
haut.
3. Fermez la porte du compartiment de disque. La lecture du DVD démarre
automatiquement.
4. Ajustez le niveau sonore à l'aide du bouton Volume.
5. Pour arrêter momentanément la lecture, appuyez sur
. Pour reprendre la lecture,
réappuyez sur
.
Page 33

11
6. Pour arrêter complètement la lecture, appuyez sur
.
REMARQUE : Certains disques ne prennent pas en charge la fonction Menu et la
lecture démarre alors automatiquement.
Utilisez les touches
pour sélectionner un titre ou un chapitre particulier et appuyez
sur
pour démarrer la lecture. Appuyez sur MENU pour réafficher le menu. Certains
disques ne prennent pas en charge la fonction Menu et la lecture démarre alors
automatiquement.
Remarques :
1. Si vous activez la fonction de contrôle parental et introduisez un disque qui ne satisfait
pas au niveau de contrôle que vous avez sélectionné, vous devez spécifier le mot de
passe pour pouvoir lire le disque. (Reportez-vous à la section “Parental (Contrôle
parental)”).
2. Les films sur DVD sont affectés d'un code de région. Ce code doit être identique à
celui affecté à votre lecteur en usine pour que le disque puisse être lu.
Ɣ Changement de CHAPITRE/PISTE pour un DVD
Pour passer d'un chapitre (d'une piste) à un autre, pour un titre contenant plusieurs
chapitres (ou pour un disque contenant plusieurs pistes), opérez comme suit :
1. Appuyez brièvement sur la touche ou pendant la lecture pour, respectivement,
revenir au chapitre (à la piste) précédent ou passer au chapitre (à la piste) suivant.
2. Pour vous positionner directement sur un chapitre ou une piste pendant la lecture d'un
DVD, appuyez sur la touche NUM pour activer le bloc numérique 0-9 et tapez le
numéro du chapitre ou de la piste.
Ɣ Répétition AB
Pour répéter la lecture d'une section particulière :
1. Positionnez-vous sur le point de départ de cette section et appuyez sur la touche A-B.
“ A'' apparaît sur l'écran.
2. Dès que la lecture atteint la fin de la section, réappuyez sur la touche A-B. “
"
apparaît sur l'écran et le lecteur répète la section que vous venez de délimiter.
3. Réappuyez sur la touche A-B pour revenir en mode de lecture normal.
Ɣ Mode répéter
Appuyez sur la touche REPEAT (Répéter) pendant une lecture et sélectionnez un mode
de répétition.
“ Répéter un chapitre/un titre/un disque
CHAPTER (Chapitre) : relecture du chapitre actuel.
TITLE (Titre) : relecture du titre actuel.
ALL (Tout) : relecture de tout le disque.
Ɣ Zoom
Vous pouvez agrandir les images de vos vidéos et vos photos.
Appuyez sur la touche ZOOM pour agrandir l'image, selon la séquence indiquée
ci-dessous.
2xtaille ĺ 3xtaille ĺ 4xtaille ĺ taille normale
AB
Page 34

12
Ɣ MENU
1. Appuyez sur MENU. Si un menu a été créé pour le titre actuel, il apparaît sur l'écran.
Sinon, rien n'apparaît.
2. Le MENU contient des fonctions spéciales telles que la sélection de la langue, l'accès
aux options de sous-titre et l'accès aux chapitres du titre.
Ɣ Sélection de la langue audio
Pour un DVD enregistré dans plusieurs langues audio, appuyez sur la touche AUDIO
pendant la lecture, autant de fois que nécessaire pour sélectionner la langue que vous
désirez.
Ɣ Sélection de la langue des sous-titres
Pour un DVD enregistré dans plusieurs langues de sous-titre, appuyez sur la touche
SUBTITLE pendant la lecture, autant de fois que nécessaire pour sélectionner la langue
de sous-titre que vous désirez.
Ɣ Fonction Info
a. Pendant la lecture d'un disque DVD, appuyez sur la touche DISPLAY pour afficher les
informations suivantes.
1. Numéro du titre actuel
2. Nombre total de titres
3. Numéro du chapitre actuel
4. Nombre total de chapitres
5. Temps de lecture écoulé
b. Appuyez sur la touche DISPLAY autant de fois que nécessaire pour sélectionner une
option parmi les suivantes :
Title Elapsed (Titre écoulé) : le temps de lecture écoulé pour le titre.
Title Remain (Titre restant) : le temps de lecture restant pour le titre.
Chapter Elapsed (Chapitre écoulé): le temps de lecture écoulé pour le chapitre.
Chapter Remain (Chapitre restant) : le temps de lecture restant pour le chapitre.
Display Off (Désactiver info) : désactive l'affichage des informations sur les temps.
Lecture d'un CD audio ou MP3
Ɣ Pause
1. Appuyez sur la touche
pour marquer une pause dans la lecture.
2. Réappuyez sur cette touche pour reprendre la lecture.
Ɣ Changement de piste
Page 35

13
1. Pour un CD audio , appuyez sur
ou pendant la lecture pour passer à la piste
suivante, revenir à la piste précédente ou revenir au début de la piste actuelle.
Pour un MP3, appuyez sur
, , Ÿ et ź pendant la lecture pour sélectionner la
piste que vous voulez écouter et appuyez sur pour démarrer la lecture.
2. Pour accéder directement à une piste, tapez le numéro associé.
Ɣ Mode répétition
Pour un audio CD uniquement, le mode répéter est indiqué par un symbole affiché sur
l'écran.
Track (Piste) : relecture de la piste actuelle.
All (Tout) : relecture de tout le disque.
Off (le symbole du mode répéter disparaît) : retour au mode de lecture normale.
Pour un disque MP3, le symbole du mode répéter apparaît brièvement sur l'écran
lorsque vous appuyez sur la touche REPEAT. Sélectionnez le mode que vous désirez,
selon la séquence suivante :
REPEAT ONE (Répéter un)ĺREPEAT FOLDER (Répéter dossier)ĺREPEAT OFF
(Ne pas répéter)
Ɣ Répétition A-B
1. Pour répéter une section particulière du disque, positionnez-vous sur le début de cette
section et appuyez sur la touche A-B. “
apparaît sur l'écran.
2. Dès que la lecture atteint la fin de la section, réappuyez sur la touche A-B. “ ”
apparaît sur l'écran et le lecteur répète la section que vous venez de délimiter.
3. Pour arrêter la répétition et revenir en mode de lecture normal, réappuyez sur A-B.
“ ” disparaît de l'écran.
Ɣ Fonction Info
Pendant la lecture d'un disque audio, appuyez sur la touche DISPLAY, autant de fois
que nécessaire pour afficher les informations suivantes :
Single Elapsed (Piste écoulé) : la piste lue et le temps de lecture écoulée pour cette
piste.
Single Remain (Titre restant) : la piste lue et le temps de lecture restant pour cette piste.
Total Remain (total restant) : la piste lue et le temps de lecture restant pour tout le disque
CD.
Display Off (Désactiver info) : désactive l'affichage des informations sur les temps.
Lecture d'un disque JPEG
Ɣ Affichage du contenu d'un disque JPEG
1. Posez un disque JPEG sur le plateau et fermez le compartiment de disque. La liste
des fichiers du disque apparaît sur l'écran.
2. Sélectionnez un fichier à l'aide des touches
et appuyez sur .
Le diaporama démarre depuis le fichier sélectionné.
AB
AB
Page 36

14
3. Pendant la lecture du disque JPEG, appuyez sur MENU pour passer en mode
miniature.
4. Appuyez sur la touche
pour passer à la page suivante, appuyez sur la touche
pour revenir à la page précédente et appuyez sur la touche
pour revenir à la liste
des fichiers.
Ɣ Pause dans un diaporama
1. Appuyez sur la touche alors que le diaporama défile. Le lecteur interrompt le
défilement des images.
2. Réappuyez sur la touche pour reprendre le diaporama.
ƔZoom
1. Appuyez sur la touche ZOOM, autant de fois que nécessaire pour agrandir ou
réduire l'image à la taille que vous désirez.
2. Appuyez sur
, , Ÿ et ź pour naviguer dans l'image si elle est trop grande
pour l'écran.
Ɣ Rotation d'une image
Appuyez sur
pour tourner l'image affichée dans le sens horaire.
Lecture du contenu d'une carte mémoire ou d'un périphérique USB
Votre lecteur de DVD lit les cartes mémoire (MMC/SD) et les périphériques USB
contenant des fichiers audio mp3 et des fichiers image .jpg. Pour les cartes mémoire
MMC/SD, introduisez-les simplement dans le lecteur de carte. Pour les
périphériques USB, branchez-les sur le connecteur USB de votre appareil.
Activation du mode USB/CARD
1. Allumez le lecteur de DVD.
2. Branchez un périphérique USB sur le port USB de votre lecteur ou introduisez une
carte mémoire dans l'emplacement approprié de votre lecteur.
3. Appuyez sur la touche DVD/SD-USB de la télécommande. Votre appareil détecte
automatiquement le périphérique USB ou la carte mémoire.
4. Il démarre la lecture de son contenu.
Menu de configuration (SETUP)
Page de configuration générale (General)
Ɣ Mode configuration
1. Appuyez sur la touche SETUP pour passer en mode configuration.
2. Appuyez sur la touche ou pour afficher le menu associé ou revenir au menu
précédent.
3. Appuyez sur Ÿź pour déplacer la surbrillance sur le menu que vous désirez.
4. Appuyez sur
pour accéder au sous-menu suivant ou pour confirmer votre choix.
Sortie du mode configuration
Page 37

15
Appuyez sur SETUP ĺVos réglages sont stockés dans la mémoire du lecteur.
Ɣ Page de configuration générale (General Setup Page)
La page de configuration générale vous donne accès aux options "TV Display (Affichage
TV)", "Angle Mark (Angle de prise de vue)", "OSD language (langue d'affichage)",
"Screen Saver (Économiseur d'écran)", “Last Memory (Dernière position)” et "DivX(R)
VOD"
1. Appuyez sur la touche SETUP pour passer en mode configuration.
2. Appuyez sur
or pour sélectionner "General Setup Page".
Ɣ Option TV Display (Affichage TV)
Permet d'ajuster la taille des images en fonction de l'écran de télévision que vous
utilisez.
1. Appuyez sur Ÿź jusqu'à mettre l'option "TV Display (Affichage TV)" en surbrillance.
2. Appuyez sur
pour afficher la liste des valeurs disponibles.
3. Sélectionnez une valeur à l'aide des touches Ÿź.
4. Appuyez sur pour valider votre choix.
Normal/PS
ĺ Sélectionnez cette valeur si vous utilisez un écran de télévision standard et voulez
que la taille de l'image soit coupée ou ajustée à la taille de l'écran.
Normal/LB
ĺ Sélectionnez cette valeur si vous utilisez un écran de télévision standard et voulez
que la taille de l'image soit complétée par des bandes noires en haut et en bas.
Wide (Large)
ĺ Sélectionnez cette valeur si vous utilisez un grand écran de télévision
Ɣ Option Angle Mark (Angle de prise de vue)
1. Appuyez sur Ÿź pour déplacer la surbrillance sur "Angle Mark".
2. Appuyez sur
pour afficher la liste des valeurs disponibles.
3. Sélectionnez une valeur à l'aide des touches Ÿź.
ĺ On
: Active l'affichage de l'angle de prise de vue.
ĺ Off :
Désactive l'affichage de l'angle de prise de vue.
4. Appuyez sur
pour valider votre choix.
Ɣ Option OSD Lang (Langue d'affichage)
Vous pouvez sélectionner la langue d'affichage des menus et des options à l'écran.
Cette langue est automatiquement activée dès lors que vous posez un disque sur le
plateau de votre lecteur. Si ce dernier ne la trouve pas sur le disque, il bascule sur la
langue par défaut. La langue que vous sélectionnez ici reste en vigueur jusqu'à ce que
vous la modifiez.
Page 38

16
1. Appuyez sur Ÿź jusqu'à mettre l'option "OSD Lang (Langue d'affichage)" en
surbrillance.
2. Appuyez sur
pour afficher la liste des valeurs disponibles.
3. Sélectionnez une valeur à l'aide des touches Ÿź.
4. Appuyez sur pour valider votre choix.
Ɣ Option Screen Saver (économiseur d'écran)
Cette fonction active (On) ou désactive (Off) l'économiseur d'écran.
1. Appuyez sur Ÿź pour déplacer la surbrillance sur 'Screen Saver'.
2. Appuyez sur
pour afficher la liste des valeurs disponibles.
3. Sélectionnez une valeur à l'aide des touches Ÿź.
ĺ On
: active l'économiseur d'écran après 5 minutes d'inactivité en mode STOP,
PAUSE ou No DISC.
ĺ Off :
désactive l'économiseur d'écran.
4. Appuyez sur
pour valider votre choix.
Ɣ Option Last Memory (elle est exécutée lorsque vous ouvrez le compartiment de
disque alors qu'une lecture est en cours)
1. Appuyez sur Ÿź pour déplacer la surbrillance sur "Last Memory (Dernière position)".
2. Appuyez sur
pour afficher la liste des valeurs disponibles.
3. Sélectionnez une valeur à l'aide des touches Ÿź.
ĺ On
: le lecteur retourne à la dernière position enregistrée avant l'arrêt du disque.
ĺ Off :
le lecteur ne retourne pas à la dernière position enregistrée avant l'arrêt du
disque.
4. Appuyez sur
pour valider votre choix.
Ɣ Option DivX(R) VOD
Choisissez cette option pour afficher une vidéo DivX à la demande.
Configuration de la qualité vidéo
Cette page vous donne accès aux options suivantes "Brightness" (Luminosité),
"Contrast" (Contraste), "Hue" (Teinte) et "Saturation".
1. Appuyez sur Ÿź pour déplacer la surbrillance sur une option.
2. Appuyez sur
pour afficher la liste des valeurs disponibles.
3. Appuyez sur les touches et jusqu'à sélectionner la valeur que vous désirez.
4. Appuyez sur
pour valider votre choix.
Page de configuration du mot de passe
Cette option vous permet de prévenir quiconque de modifier le contrôle parental. Tapez
Page 39

17
un code numérique sur quatre chiffres à la suite de l'invite affichée sur l'écran. Par défaut,
le mot de passe est égal à 3308.
1. Appuyez sur Ÿź pour déplacer la surbrillance sur "Password" (Mot de passe).
2. Appuyez sur
pour afficher la liste des valeurs disponibles.
3. Appuyez sur
pour ouvrir la page "Password Change" (Modification du mot de
passe).
4. Appuyez sur NUM pour activer le bloc de touches numériques 0-9.
5. Tapez le mot de passe par défaut sur 4 chiffres.
6. Tapez le nouveau mot de passe sur 4 chiffres.
7. Retapez-le pour confirmer.
ĺ Le nouveau mot de passe entre en vigueur immédiatement.
8. Appuyez sur OK pour quitter.
Conseils utiles :
- Toute modification du mot de passe entraîne la modification du code de contrôle
parental et du code de verrouillage du disque.
- Le mot de passe par défaut (3308) reste actif, même si vous spécifiez un nouveau mot
de passe.
Page des préférences (Preference Page - vous devez retirer tout disque de votre
lecteur pour accéder à cette page)
Ɣ Page de configuration des préférences
Cette page vous donne accès aux options suivantes : Audio, Subtitle (Sous-titre), Disc
Menu (Menu du disque), Parental (Contrôle parental) et Default (Réglages par défaut)
Ɣ Options Audio, Subtitle et Disc menu
Ces options vous permettent de sélectionner la langue pour l'audio, les sous-titres et le
menu des disques.
- “Audio” (piste son du disque)
-"Subtitle" (sous-titres du disque)
- "Disc Menu" (menu du disque)
1. Appuyez sur Ÿź pour déplacer la surbrillance sur "Audio".
2. Appuyez sur
pour afficher la liste des valeurs disponibles.
3. Appuyez sur Ÿź jusqu'à mettre en surbrillance la langue que vous désirez et
appuyez sur pour valider votre choix.
4. Recommencez les instructions 1 à 3 pour la langue des sous-titres et la langue du
menu.
ƔParental (Contrôle Parental )
Certains disques DVD, ou certaines scènes uniquement, sont protégés par un niveau de
contrôle parental. Huit niveaux (de 1 à 8) sont disponibles et ils peuvent varier d'un pays
à un autre. Vous pouvez interdire la lecture des disques que vous jugez inconvenants
pour vos enfants ou ne l'autoriser que si certaines scènes sont remplacées par d'autres.
Page 40

18
1. Appuyez sur Ÿź pour déplacer la surbrillance sur "Parental".
2. Appuyez sur
pour afficher la liste des valeurs disponibles.
3. Sélectionnez un niveau de contrôle parental à l'aide des touches Ÿź.
4. Appuyez sur pour valider votre choix.
ĺ Tous les DVD dont le niveau de contrôle est supérieur au niveau que vous avez choisi
sont refusés. Pour forcer leur lecture, vous devez taper le mot de passe ou choisir un
niveau de contrôle supérieur à celui du disque.
Conseil utile :
Le niveau de contrôle parental indiqué sur la pochette des DVD n'est pas toujours celui
effectivement enregistré sur le disque. La fonction de contrôle parental ne fonctionne
pas avec ces disques.
Descriptions des niveaux de contrôle parental
1. KID SAFE
Contenu spécialement destiné aux enfants ; convient pour tous les âges.
2. G
Contenu général, autorisé pour tous les âges.
3. PG
Présence des parents recommandée.
4. PG13
Le contenu ne convient pas aux enfants de moins de 13 ans.
5. PGR 6. R
Accord parental restreint interdisant le film aux enfants de moins de 17 ans, sauf s'ils
sont accompagnés d'un parent ou d'un adulte.
7. NC17
Contenu interdit aux jeunes de moins de 17 ans.
8. ADULT
Le contenu est réservé aux adultes à cause de son caractère sexuel, violent ou
linguistique.
ƔDefault
L'option "Default" (Défaut) restaure toutes les options et toutes les valeurs configurées
en usine. Tous vos réglages sont effacés.
1. Appuyez sur Ÿź pour déplacer la surbrillance sur "Default".
2. Mettez en surbrillance la valeur "Reset" à l'aide de la touche .
3. Appuyez sur
pour valider votre choix.
Attention !
Cette fonction rétablit tous les réglages effectués en usine, sauf le contrôle parental.
Page 41

19
Spécifications et entretien
Alimentation électrique
100-240 V~ 50-60 Hz
Taille de l'écran
9 pouces (23 cm)
Réponse en fréquence
20 Hz à 20 kHz (1 dB)
Rapport signal/bruit
supérieur à 60 dB
Dynamique
supérieur à 85 dB
Température de
fonctionnement
5 à 35 C
Poids
1,36 kg
Dimensions(L xP x H)
Unité principale : 230 x 192 x 39.5 mm
écran : 230 x 192 x 26 mm
Formats de disque
compatibles
DVD, CD, MP3 et DivX
Remarque : Le design et les spécifications sont sujets à modification sans notification
préalable.
Entretien et réparation
Ɣ Lisez attentivement cette section avant d'apporter votre appareil à réparer.
Ɣ Conservation des emballages d'origine
Conservez tous les emballages d'origine de votre appareil. Ils vous seront utiles pour
transporter votre appareil ou pour l'apporter à réparer.
Ɣ Nettoyage des surfaces extérieures
N'utilisez aucun produit volatil, tel un insecticide en vaporisateur, à proximité de votre
appareil. Ne laissez aucun élément en caoutchouc ou en plastique posé trop longtemps
sur votre appareil afin de ne pas laisser de marque sur le revêtement.
Ɣ Nettoyage de l'appareil
Essuyez votre appareil avec un chiffon sec et doux. Pour enlever les taches
récalcitrantes, trempez le chiffon dans une solution détergente douce. N'utilisez aucun
solvant (essence, alcool, etc.) pour ne pas abîmer le revêtement des surfaces
extérieures.
Ɣ Entretien de votre appareil
Votre lecteur de DVD est un appareil de précision intégrant de la haute technologie. Une
lentille de lecture ou une pièce de transmission sale ou défectueuse suffit pour affecter,
voire empêcher, son bon fonctionnement. Dans des conditions d'utilisation normales,
procédez à un contrôle et à un entretien de votre lecteur toutes les 1000 heures
d'utilisation. Demandez conseil auprès d'un centre de service agréé.
Guide de dépannage
Avant d'apporter votre appareil à réparer, consultez la liste suivante de symptômes et
solutions.
o
Page 42

20
Aucun son ou son déformé :
Vérifiez toutes les connexions.
Vérifiez que vous avez correctement configuré le mode d'entrée du poste de télévision et
du système stéréo.
Aucune image
Vérifiez toutes les connexions.
Vérifiez que vous avez allumé l'écran LCD.
La lecture ne démarre pas
De la condensation s'est formée à l'intérieur de l'appareil. Attendez 1 à 2 heures que
cette condensation sèche. Votre lecteur ne lit que les DVD, MP3 et CD audio.
Le disque est trop sale et doit être nettoyé.
Vérifiez que la face imprimée du disque est dirigée vers le haut.
La télécommande ne fonctionne pas
Vérifiez le sens des polarités (+ et –) de la pile.
La pile est déchargée : remplacez-la.
Dirigez la télécommande vers le détecteur du lecteur et réessayez.
Retirez tout ce qui peut gêner la transmission du signal entre la télécommande et le
détecteur. Vérifiez que vous opérez la télécommande à moins de 8 m du détecteur du
lecteur.
Les touches (du lecteur même et/ou de la télécommande) sont sans effet sur le
lecteur.
Éteignez puis rallumez votre appareil. Autre possibilité : éteignez l'appareil, débranchez
son cordon d'alimentation de la prise secteur et rebranchez le cordon. (La foudre,
l'électricité statique et d'autres facteurs électriques extérieurs peuvent perturber le bon
fonctionnement de votre appareil.)
La télécommande ne fonctionne pas
Vérifiez le niveau de charge de la pile et les connexions.
La lecture du titre sélectionné ne démarre pas
Vérifiez la compatibilité du contrôle parental.
La langue audio et/ou des sous-titres n'est pas celle qui est sélectionnée dans la
configuration.
Si la langue de la piste audio et/ou des sous-titres que vous avez sélectionnée dans le
menu Setup n'existe pas sur le disque, vous ne pouvez ni l'entendre ni la voir.
Aucun sous-titre n'apparaît.
Les sous-titres n'apparaissent que s'ils sont disponibles sur le disque.
Impossible de sélectionner une autre langue audio (ou une autre langue de
sous-titre).
zLe disque que vous avez chargé n'a été créé que pour une seule langue.
zCertains disques ne permettent pas de sélectionner une autre langue audio ou de
Page 43

21
sous-titre depuis les touches AUDIO ou SUBTITLE. Essayez de modifier la langue
depuis le menu du DVD, si un tel menu existe.
Impossible de modifier l'angle de prise de vue
Cette fonction dépend du logiciel. Même si la prise de vue a été réalisée selon plusieurs
angles, ces angles peuvent n'être disponibles que sur certaines sections du film
uniquement.
Instructions importantes de mise au rebut
En tant que distributeurs responsables, nous sommes
soucieux de l’environnement.
Nous vous prions donc de bien vouloir respecter la procédure
de mise au rebut de votre produit, des piles et de l’emballage,
afin de contribuer à la préservation des ressources naturelles et
de garantir le recyclage du produit d’une manière respectueuse
de la santé et de l’environnement.
Veuillez vous débarrasser de ce produit et de son emballage en
respectant les lois et réglementations locales. Le produit
contient des composants électroniques et des piles et ne doit
donc pas, en fin de vie, être jeté avec les ordures ménagères,
de même pour ses accessoires.
Contactez vos autorités locales pour connaître la marche à
suivre en matière de recyclage.
Le produit, et si applicable, les piles doivent être amenés dans
un centre de collecte adapté pour être recyclés. Certains
centres de collecte acceptent les produits gratuitement.
La télécommande de votre appareil fonctionne avec une pile lithium CR2025. Cette pile
se trouve à l'intérieur de l'appareil et est facilement accessible.
Ouvrez simplement le couvercle du compartiment de piles pour la remplacer.
Déposez la pile usagée au point de collecte pour recyclage le plus proche de chez vous.
Nous vous prions de bien vouloir nous excuser pour la gêne occasionnée par les petites
incohérences mineures du présent manuel, susceptibles d’apparaître du fait de
l’amélioration et de la mise à jour de nos produits.
Kesa Electricals UK, HU1 3AU 24 / 05 / 2011
c
Page 44

1
Inhoudstafel
BELANGRIJKE VEILIGHEIDSINFORMATIE ..........................................2
BEDIENINGEN...............................................................................6
HOOFDTOESTEL .............................................................................................6
MONITOR ………………………. ............................................................................8
AFSTANDSBEDIENING....................................................................................9
HOE TE BEGINNEN......................................................................10
DE DVD SPELER IN AUTOZETELS INSTALLEREN ---................................................ 10
DE VOEDING AANSLUITEN …. .............................................................................10
AUDIO/VIDEO-KABEL AANSLUITEN..... ................................................................. 10
DE BATTERIJEN VAN DE AFSTANDSBEDIENING INSTALLEREN...................................11
BASISBEDIENING...... ..................................................................11
EEN DVD AFSPELEN..........................................................................................11
EEN AUDIO CD OFMP3AFS PELEN .....................................................................13
EEN JPEG SCHIJF AFSPE LEN .............................................................................14
DIGITALE KAART EN USB WEERGAVE ..................................................................15
SETUP MENU-INSTELLING............................................................15
ALGEMENE INSTELLINGPAGINA ...........................................................................15
VIDEOKWALITEIT-INSTELLING ............................................................................. 17
WACHTWOORD-INSTELLINGPAGINA ..................................................................... 17
VOORKEURPAGINA (BESCHIKBAAR WANNEER GEEN SCHIJF IS GELADEN)................18
PARAMETERS EN ONDERHOUD ...................................................20
PROBLEEMGIDS..........................................................................21
BELANGRIJKE AFVALINSTRUCTIES............................................................23
Page 45

2
Belangrijke veiligheidsinformatie
Veiligheidsinformatie
Dit toestel is ontworpen om te werken op een netvoeding met 100-240 Volt, 50-60Hz
wisselstroom. Andere voedingsbronnen kunnen het toestel beschadigen.
Controleer of de spanning op het typeplaatje (aan de achterzijde van het toestel)
overeenkomt met het vermogen van de voedingsadapter.
Indien de netadapter of het snoer beschadigd is dient het vervangen te worden met
een goedgekeurde adapter van hetzelfde type door een gekwalificeerde
onderhoudsdienst.
Symbolen
WAARSCHUWINGEN
LEES ALLE VEILIGHEIDSINSTRUCTIES AANDACHTIG OM HET
RISICO OP BRANDWONDEN, ELECTROCUTIE, BRAND OF
VERWONDINGEN AAN PERSONEN TE VERMINDEREN
DE AFZONDERLIJKE GEBRUIKSAANWIJZING KAN BIJKOMENDE
VEILIGHEIDSINSTRUCTIES BEVATTEN
DIT PRODUCT IS UITSLUITEND ONTWORPEN VOOR
HUISHOUDELIJK GEBRUIK. COMMERCIEEL OF ELK ANDER
GEBRUIK KAN DE GARANTIE ONGELDIG VERKLAREN EN KAN
GEVAARLIJK ZIJN.
VERWIJDER GEEN ENKELE BEHUIZING OM ELEKTROCUTIE TE
VERMIJDEN.
Deze uitrusting is dubbel
geïsoleerd waardoor een
aardeaansluiting niet
vereist is.
Een gevaarlijk voltage dat een
risico voor elektrische
schokken inhoudt is binnenin
dit product aanwezig.
Deze markering is aangebracht
om aan te geven dat het
apparaat voldoet aan de
Europese normen voor veiligheid
en elektromagnetische
congruentie.
Belangrijke instructies voor het
gebruik en onderhoud zijn
ingesloten in de documentatie
die bij dit product werd
meegeleverd.
Page 46

3
Stel dit product niet bloot aan druppels of spatten en plaats nooit voorwerpen
gevuld met vloeistoffen, zoals vazen, op het product.
Plaats geen open vlammen, zoals aangestoken kaarsen, bovenop of nabij dit
product.
Trek de stekker uit het stopcontact en ontkoppel de externe antenne (indien
aanwezig) tijdens onweer.
Installeer of plaats dit toestel enkel overeenkomstig met de installatie-instructies.
Gebruik dit product enkel waarvoor het bedoeld is zoals beschreven in de
gebruiksaanwijzing.
Bewaar deze instructies voor raadpleging in de toekomst.
Dit product is ontworpen en vervaardigd om te voldoen aan de Europese
veiligheidsstandaarden, maar zoals met elk elektronisch toestel moet U altijd
voorzichtig zijn.
Hier volgt goed advies om uw veiligheid te bewaren en de beste resultaten te
verkrijgen.
Om energie te besparen: schakel de netvoeding uit of trek de stroomadapter uit het
stopcontact wanneer het apparaat niet wordt gebruikt.
Met de stroomstekker kan U het toestel volledig uitschakelen en deze moet dus altijd
bereikbaar zijn.
Vermijd harde omstandigheden zoals natte of vochtige plaatsen, regen, hoge
vochtigheid, sterke vibraties, extreem hoge of lage temperaturen, sterk zonlicht en
plaatsen met veel stof.
Bescherm het netsnoer. Zorg ervoor dat men niet op het netsnoer kan wandelen, dat
het niet geplet, geschaafd of gesneden kan worden en dat het op zo een manier is
geplaatst dat men er niet kan over struikelen.
Let erop dat niemand voorwerpen in de openingen en ventilatiesleuven van de
behuizing stopt.
Gebruik dit apparaat niet langer als er vloeistof op werd gemorst, het op de een of
andere manier beschadigd raakte of abnormaal lijkt te functioneren. Trek onmiddellijk
de stekker uit het stopcontact en neem contact op met een gespecialiseerde
reparateur.
Bescherm de schermen tegenvingerafdrukkenenvuil.
BEWAAR dit product NIET buitenshuis en stel niet bloot aan regen of vochtigheid.
GEBRUIK het product NIET nabij water- bijvoorbeeld, in de buurt van een aanrecht, in
een badkamer of nabij een zwembad.
VERWIJDER GEEN externe panelen of behuizing van het product. Herstellingen mogen
enkel uitgevoerd worden door een gekwalificeerde onderhoudsdienst.
PLAATS het product of het netsnoer NIET nabij een warm oppervlak zoals een gas- of
elektrisch fornuis of –vuur.
GEBRUIK het product NIET wanneer de vochtigheid in de kamer vele te hoog is.
Page 47

4
Ventilatie
Laat een ruimte van tenminste 10cm rondom het product. Blokkeer de
ventilatiegleuven niet met zachte stofferingen. Oververhitting zal het risico op brand
vergroten.
Schoonmaken
Trek de stekker uit het stopcontact en gebruik enkel een licht bevochtigde, zachte doek.
Gebruik geen chemische oplosmiddelen of sterke detergenten aangezien deze de
cosmetische afwerking kunnen beschadigen.
Laat waterdruppels nooit op het scherm hangen aangezien vocht een permanente
verkleuring kan veroorzaken. Vetplekken moeten verwijderd worden met een
commercieel verkrijgbaar schoonmaakmiddel voor LCD schermen.
Batterij
Verwijder de batterijen wanneer de afstandsbediening lange tijd niet zal worden
gebruikt. Een in de afstandsbediening achtergebleven batterij kan beginnen aftakelen
en de afstandsbediening door corrosie beschadigen. Gelieve aan het milieu te denken
en batterijen terug te brengen naar een inzamelpunt van waaruit zij kunnen
gerecycleerd worden. Werp de batterij nooit in een vuur. Gevaar op explosie!
Gebruik van en Omgaan met Batterijen
WAARSCHUWING: Enkel volwassenen mogen de batterij gebruiken. Laat een kind dit
toestel niet gebruiken tenzij het Deksel van het Batterijvak stevig op het Batterijvak zelf
is geplaatst, overeenkomstig met de instructies in de gebruiksaanwijzing.
Volg de veiligheid- en gebruiksinstructies van de batterijfabrikant.
Houd de batterij uit de buurt van kinderen en huisdieren.
Plaats de batterij volgens de juiste polariteit (+/-) zoals aangeduid aan de
binnenkant van het batterijvak. Indien de polariteit van de batterij niet juist is kan dit
persoonlijke letsels en/of beschadiging veroorzaken. Het batterijvak bevindt zich
onderaan, aan de achterzijde van het toestel.
BELANGRIJKE VEILIGHEIDSWAARSCHUWINGEN
Verwijder geen enkel deksel om elektrocutie te vermijden.
Indien iets verkeerd gaat, probeer dan niets zelf te herstellen, maar laat
een gekwalificeerde onderhoudsdienst het probleem bekijken.
Stel dit toestel niet bloot aan druppels of spatten en plaats nooit een voorwerp
gevuld met vloeistof op het toestel zoals een vaas.
Plaats nooit een naakte vuurbron op of nabij het toestel.
Gebruik het toestel niet voor iets anders dan het bedoelde gebruik.
Kleine onderdelen. Laat jonge kinderen niet met dit toestel spelen.
Gebruik het toestel nooit om een video te bekijken terwijl U een voertuig bestuurt.
Om letsels te voorkomen dient U dit toestel goed te bevestigen aan de autoz
-etels overeenkomstig met de installatie-instructies.
• Verwijder de batterij indien U het toestel gedurende lange tijd niet gebruikt.
Page 48

5
Klasse 1 laser toestel
Dit toestel bevat een lasertoestel met laag vermogen. Gevaarlijke
laserstraling wanneer geopend and veiligheidsgrendels uitgeschakeld.
Vermijd blootstelling aan straal.
Waarschuwing: Deze DVD-speler bevat een laser systeem. Het gebruik van
bedieningen, aanpassingen of uitvoering van procedures die anders zijn dan
vermeld in deze handleiding kunnen resulteren in blootstelling aan
gevaarlijke straling.
Waarschuwing: Open de behuizing niet om rechtstreekse blootstelling aan de
laserstraal te vermijden. Onzichtbare laserstraling wanneer geopend.
Waarschuwing: Kijk nooit rechtstreeks in de laserstraal.
Opgepast: Installeer dit toestel niet in een gesloten ruimte zoals een
boekenkast of een gelijkaardige plaats.
Opmerkingen bij Auteursrechten:
Het is bij wet verboden om auteursrechtelijk beschermde werken te
kopiëren, uit te zenden via kabel, in het openbaar te vertonen of te
verhuren zonder toestemming.
Dit toestel bevat een kopieerbeveiligingfunctie ontwikkeld door
Macrovision. Signalen voor kopieerbeveiliging worden op sommige
schijven opgenomen. Tijdens het opnemen en afspelen zal ruis op het
beeld van deze schijven verschijnen. Dit toestel bevat
copyrightbeveiliging-technologie die beschermd wordt door
methodeclaims van bepaalde Amerikaanse patenten en andere
intellectuele eigendomsrechten van Macrovision Corporation en andere
rechthebbenden. Het gebruik van deze copyrightbeveiliging-technologie
moet worden geautoriseerd door Macrovision Corporation en is
uitsluitend bedoeld voor vertoning in huiselijke kring, tenzij anders
aangegeven door Macrovision Corporation. Reverse engineering of
demontage is verboden.
GEVAAR OP ELECTROCUTIE
NIET OPENEN
Page 49

6
Schijven Opbergen
Na het afspelen bewaart U de schijf in het doosje. Stel de schijf nooit bloot aan
rechtstreeks zonlicht of warmtebron en laat nooit achter in een geparkeerde auto
blootgesteld aan rechtstreeks zonlicht.
Schijven Schoonmaken
Vingerafdrukken en stof op de schijf kunnen slechte beeldkwaliteit en
geluidvervorming veroorzaken. Vooraleer af te spelen maakt U de schijf schoon met
een nette doek. Veeg de schijf van binnen naar buiten.
Gebruik geen sterke oplosmiddelen zoals alcohol, benzine, verdunner, commercieel
beschikbare schoonmaakmiddelen of anti-statische spray bedoeld voor oude
vinylplaten.
Bedieningen
HOOFDTOESTEL
10
11
12
13
VOL
14
15
9
8
Page 50

7
7.
8. USB Ingang
9. Power Indicator
10. Power ON/OFF Schakelaar
11. SD/MMC Kaartgleuf
12. AV Uitgang:
Gebruik deze uitgang om het hoofdtoestel via de AV en DC kabel aan
te sluiten op de display.
13. DC Uitgang
Sluit de display aan via de AV en DC kabel.
14. Volumetoets
15. DC Ingang
Aan te sluiten op de AC adapter of sigaretaansteker-adapter van een
Auto.
16. Uitwerptoets
1. Koptelefooningang
2.
3.
Druk in om tijdens de weegave naar het vorige hoofdstuk, track of scene te
springen.
4
/OK/Up/Down/Left/Right--Navigation controls
.
5.
6.
Druk in om tijdens de weegave naar het volgende hoofdstuk, track of scene te
springen.
7.
Draadloze Sensor
MENU
Roep het menu op een DVD schijf
op.
Open het toestel om een schijf in de lader te plaatsen.
Page 51

8
Hoofdtelefoon: stop een standaard hoofdtelefoonstekker van 3,5 mm in
het hoofdtelefoontact. De luidsprekers zijn dan uitgeschakeld.
WAARSCHUWING BETREFFENDE
HOOFDTELEFOONS EN VOLUME
Zet het volume zacht voordat u een
hoofdtelefoon opzet en zet daarna pas
indien nodig harder. Langdurig luisteren
naar hoge volumes kan bij sommige
hoofdtelefoons tot permanente
gehoorstoornissen leiden.
Hoofdtelefoons en oortjes moeten
voldoen aan de normen EN
50332-1 / EN 50332-2 om een
ononderbroken bescherming tegen
overmatige geluidsdruk te waarborgen.
Langdurig op hoge volumes naar deze
speler luisteren kan het gehoor van de
luisteraar beschadigen.
WAARSCHUWING: om uw gehoor te
beschermen is het belangrijk dat
hoofdtelefoons of oortjes die in combinatie
met dit apparaat worden gebruikt conform
zijn het Franse Decreet van 8 november
2005 en artikel L.5232-1 werd toegepast.
Dit waarborgt dat het geluidsniveau niet
hoger is dan 100 dB SPL. Langdurig
gedurende meer dan vijf uur per week naar
hoge volumes luisteren kan het gehoor
beschadigen.
Monitor
1. Power ON/OFF Schakelaar
2. Helderheid +/-
3. Volume +/-
4. Koptelefooningang
5. DC Ingang
Gebruik deze ingang om de display via de AV en DC kabel aan te sluiten
op het hoofdtoestel.
6. DC 9-12V Bus
Page 52

9
Afstandsbediening
1. SETUP (INSTELLING)
Open of verlaat het instellingm enu.
2. DISPLAY
Roept On-Screen Display op.
3. DVD / SD-USB
4. SUB
Kies een ondertiteltaal (DVD).
5. AUDIO
Selecteer een audiotaal (DVD).
6. MENU
Roep het menu op een DVD schijf
op.
7. A-B
Herhaal weergave of een specifiek
gedeelte.
8. REPEAT (HERHAAL)
Herhaal hoofdstuk, track of titels.
9. ZOOM
Vergroot of verklein de beeldgrootte.
10.
Ga naar het vorige hoofdstuk, track
of titel.
11.
Navigeer de cursor omhoog op het
scherm.
12.
Ga naar het volgende hoofdstuk,
track of titel.
13.
/
Navigeer de cursor naar links op
het scherm of spoel terug.
14. PLAY/PAUSE (
)
Start / pauze / weergave
hernemen.
15.
/
Navigeer de cursor naar rechts op
het scherm of spoel vooruit.
16.
Navigeer de cursor omlaag op het
scherm.
17. STOP ( )
Weergave stoppen.
18. NUM
Druk in om numerieke 0-9 toetsen
in- of uit te schakelen.
Page 53

10
3. Naar het contact
9-12V van de monitor
4. Naar de AV-ingang
AV IN van de monitor
5. Naar de gelijkstroomuitgang
DC OUT van de dvd-speler
1.Naar de AV-uitgang AV
OUT van de dvd-speler
2. Naar de gelijkstroomuitgang
DC OUT van de dvd-speler
6. Naar het contact van de
sigarettenaansteker in de auto
Hoe te Beginnen
De DVD speler in Autozetels Installeren
Gebruik de meegeleverde riemen om de DVD speler en de display stevig rond de
hoofdsteunen te bevestigen.
De Voeding Aansluiten
Om voeding van binnenin de auto te gebruiken, sluit U het meegel everde
autostroomsnoer aan op de DC INGANG van het hoofdtoestel en op de
aansluiting van de autosigarettenaansteker.
Om voeding te gebruiken van huishoudelijke voedingsbronnen: Sluit de
meegeleverde adapterkabel aan op de DC INGANG van het hoofdtoestel
en op het stopcontact.
Opgepast!
Zorg ervoor dat de spanning aangeduid op het typeplaatje van het toestel
overeenkomt met uw netspanning.
Wanneer U de adapter ontkoppelt, trek dan altijd de stekker uit het
stopcontact. Trek nooit aan het snoer.
Audio/Video-Kabel Aansluiten
Page 54

11
De Batterijen van de Afstandsbediening Installeren
Verwijder de plastieken beschermingslip alvorens de
afstandsbediening te gebruiken.
Om de batterij te vervangen verwijdert U eerst de batterijhouder uit
de afstandsbediening en plaatst U vervolgens een 3V CR20235
lithiumbatterij in de batterijhouder met de gedrukte zijde naar
boven. Plaats de batterijhouder vervolgens terug.
OPGEPAST:
De afstandsbediening zal niet werken als de batterij verkeerd is
geplaatst.
Er bestaat gevaar op beschadiging of verwondingen wanneer
de batterij verkeerd is geplaatst.
Vervang enkel met eenzelfde of gelijkaardige type.
Basisbediening
Een DVD Afspelen
1. Schuif de voedingschakelaar van de DVD speler naar de ON
stand.
2. Druk de uitwerptoets bovenaan het hoofdtoestel in om de
schijflader te openen en plaats een schijf naar wens in de
lader met de bedrukte kant naar boven.
3. Sluit de lader. De weergave zal automatisch beginnen.
4. Draai aan de Volumeknop om het gewenste volume in te
stellen.
5. Druk
om de weergave te onderbreken. Druk opnieuw op om de
weergave te hernemen.
6. Druk
om de weergave te stoppen.
OPMERKING: Sommige schijven ondersteunen geen menu’s en beginnen
automatisch te spelen.
Gebruik de
toetsen om de titel/hoofdstuk naar keuze te selecteren en
druk vervolgens op
om te beginnen. Druk op MENU om terug te keren naar
het menuscherm. Sommige schijven ondersteunen geen menu’s en beginnen
automatisch te spelen.
Opmerkingen:
1. Indien het kinderslot is ingeschakeld en de schijf is niet geschikt voor het
ingestelde beveiligingsniveau dat moet U het wachtwoord invoeren. (Zie
“Kinderslot”)
2. DVD’s hebben een regiocode. Uw speler speelt geen schijven af die een andere
regiocode hebben dan de speler.
AV
OUT
ON
O
F
F
DC
IN
D
C
OUT
USB
SD/ MM
S
P
O
WE
R
Page 55

12
Ga naar een ander HOOFDSTUK/TRACK
Wanneer een titel op een schijf meer dan een hoofdstuk heeft of een schijf heeft
meer dan een spoor, dan kan U als volgt naar een ander hoofdstuk/spoor gaan:
1. Druk kort op
of tijdens de weergave om het volgende of vorige
hoofdstuk/spoor te kiezen.
2. Om tijdens DVD weergave rechtstreeks naar een hoofdstuk/spoor te gaan drukt
UopNUM om de numerieke 0-9 toetsen in te schakelen en voert U vervolgens
het nummer van het hoofdstuk/spoor in.
Repeat A-B
Een sequentie herhalen.
1. Druk A-B bij uw gekozen startpunt. “
” verschijnt op het scherm.
2. Druk opnieuw A-B bij uw gekozen eindpunt. “
”zal even op het scherm
verschijnen en de te herhalen sequentie begint.
3. Druk opnieuw op A-B om te annuleren.
Repeat (Herhaal)
Druk tijdens weergave op REPEAT (HERHAAL) om een gewenste herhaalmodus
te kiezen.
“
Herhaal hoofdstuk / titel / alle”
CHAPTER: Herhaalt het huidige hoofdstuk.
TITLE: Herhaalt de huidige titel.
ALL: herhaalt alle sporen op een schijf.
Zoom
U kan inzoomen op videobeelden of foto’s.
Druk herhaaldelijk op ZOOM om de grootte in de volgende sequentie te
veranderen.
2X grootte 3X grootte 4X grootte normale grootte
MENU
1. Druk op MENU. Indien de huidige titel een menu heeft zal dit menu op het
scherm verschijnen.
Anders zal het schijfmenu niet verschijnen.
2. Het MENU toont functies zoals taal- en ondertitelopties en hoofdstukken voor de
titel.
De Geluidstaal Selecteren
Bij DVD’s die twee of meer audiotalen bevatten drukt U herhaaldelijk op de AUDIO
toets tot de gewenste taal is geselecteerd.
De Ondertiteltaal Selecteren
Bij DVD’s die twee of meer ondertiteltalen bevatten drukt U herhaaldelijk op de
AB
A
Page 56

13
SUBTITLE toets tot de gewenste taal is geselecteerd.
Displayfunctie
a. Tijdens de weergave van een DVD schijf drukt U op DISPLAY om de volgende
informatie weer te geven.
Huidig Titelnummer
1. Totaal Aantal Titels
2. Huidig Hoofdstuknummer
3. Totaal Aantal Hoofdstukken
4. Vestreken Weergavetijd
b. Druk herhaaldelijk op DISPLAY om door de volgende opties te schakelen:
Verstreken Tijd: Verstreken tijd van de titel.
Resterende Tijd: Resterende weergavetijd van de titel.
Vestreken Hoofdstuk: De verstreken tijd van het hoofdstuk.
Resterend Hoofdstuk: Resterende weergavetijd van het hoofdstuk.
Display Off (Display Uit): De tijdsinformatie van de DVD zal niet weergegeven
worden.
EenAudioCDofMP3Afspelen
Pauze
1. Druk
tijdens weergave.
2. Druk opnieuw op om de weergave te hernemen.
Ga naar een ander Nummer
1. Bij een audio CD drukt U op
of tijdens weergave om naar het
volgende of vorige nummer te gaan of om naar het begin van het huidige
nummer te springen.
Bij een MP3 schijf drukt U op
, , en tijdens de weergave om het
nummer te selecteren dat U wenst af te spelen en drukt U vervolgens op
om de weergave te beginnen.
2. U kan elk nummer afspelen door het nummer in te voeren.
Repeat (Herhaal)
Bij een audio CD zal het icoon van de herhalingmodus verschijnen op het scherm
wanneer REPEAT wordt ingedrukt.
Track: Herhaalt het huidige spoor.
All: herhaalt alle sporen op een schijf.
Page 57

14
Off(Geen display): normale weergave.
Bij een MP3 schijf zal het icoon van de herhalingmodus kort op het scherm
verschijnen wanneer REPEAT wordt ingedrukt. Selecteer de gewenste modus uit
de volgende modi.
REPEAT ONE (HERHAAL EEN)
REPEAT FOLDER (HERHAAL MAP)
REPEAT OFF (HERHAAL UIT)
Repeat A-B
1. Om tijdens schijfweergave een sequentie te herhalen drukt U op A-B bij uw
gekozen startpunt. ““
” verschijnt op het scherm.
2. Druk opnieuw A-B bij uw gekozen eindpunt. ““
” zal op het scherm
verschijnen en de te herhalen sequentie begint.
3. Om de sequentie te verlaten en terug te keren naar normale weergave drukt U
opnieuw op A-B.““
” verdwijnt van het scherm.
Displayfunctie
Bij het afspelen van een audio CD drukt U herhaaldelijk of DISPLAY om de
volgende informatie weer te geven.
Vestreken Nummer: het huidig weergegeven nummer en de weergavetijd van het
nummer.
Resterend Nummer: het huidig weergegeven nummer en de resterende
weergavetijd van het nummer.
Totaal Resterend: het huidig weergegeven nummer en de totaal resterende
weergavetijd op de CD.
Display Off (Display Uit): De tijdsinformatie van de CD zal niet weergegeven
worden.
Een JPEG Schijf Afspelen
Een JPEG Schijf Bekijken
1. Plaats een JPEG schijf en sluit de lader. Het bestandmenu zal op het scherm
verschijnen.
2. Gebruik
om het bestand aan te klikken die U wenst weer te geven en druk
.
De Slide show begint vanaf het gekozen bestand.
3. Tijdens de weergave van een JPEG schijf drukt U op MENU om het
samenvattingsmenu op te roepen.
4. Tijdens de weergave van een JPEG schijf, drukt U op
om naar de volgende
pagina te gaan, op
om terug te keren naar de vorige pagina en op om
terug te keren naar het mapmenu.
AB
AB
A
Page 58

15
Foto’s
1. Druk
tijdens de slide show. De speler zal nu in PAUSE modus gaan.
2. Om terug te keren naar de slide show, druk opnieuw op .
Zoom
1. Druk herhaaldelijk op ZOOM om in en uit te zoomen.
2. Wanneer de foto is vergroot drukt U op , , en om er door te
pannen.
Eenfotoroteren
Druk
tijdens weergave om de foto rechtsom te roteren.
Digitale Kaart en USB Weergave
Digitale kaarten (MMC/SD kaart) en USB met mp3 & foto’s (.jpg) kunnen
afgespeeld en weergegeven worden via het hoofdtoestel. MMC/SD
kaarten
kunnen rechtstreeks in de kaartlezergleuf worden geplaatst. De USB poort kan
gebruikt worden om vanaf USB bronnen data the sturen naar het hoofdtoestel.
Selecteer digitale USB/CARD voor weergave.
1. Schakel het hoofdtoestel in.
2. Sluit een USB kabel aan op de USB poort of plaats een kaart in de kaartlezer
aan de rechterkant van het toestel.
3. Druk DVD/CARD/USB op de afstandsbediening. Het toestel zal de USB/CARD
automatisch detecteren.
4. Wanneer USB/CARD is geselecteerd zal het toestel de aangesloten kaart of
USB beginnen lezen.
SETUP Menu-Instelling
Algemene Instellingpagina
Algemene werking
1. Druk op SETUP om het Instellingmenu op te roepen.
2. Druk
of Enter om een submenu op te roepen of om terug te keren
naar het vorige menu.
3. Druk ▲▼ om het gewenste menu te selecteren.
4. Druk
om het volgende submenu-niveau in te gaan of om uw keuze te
bevestigen.
Het menu verlaten
Druk SETUP → De instellingen zullen bewaard worden in het geheugen van de
speler.
Page 59

16
Algemene Instellingpagina
De opties in de Algemene Instellingpagina zijn:”TV Display”, “Angle Mark”, “OSD
language”, “Screen Saver”, “Last Memory” en "DivX(R) VOD”.
1. Druk op SETUP om het Instellingmenu op te roepen.
2. Druk of om de Algemene Instellingpagina te selecteren.
TV Display
Stel de beeldverhouding van de DVD speler in op basis van de TV die U heeft
aangesloten.
1. Druk om “TV Display” te selecteren.
2. Open het submenu door
in te drukken.
3. Druk om het geselecteerde onderdeel te kiezen.
4. Druk
om te bevestigen
Normal/PS
Indien U een gewone TV heeft en U wenst dat beide zijden van het beeld uw
TV scherm volledig vullen.
Normal/LB
Indien U een gewone TV heeft. In dit geval zal een breder beeld met zwarte
banden aan de boven- en onderkant van het TV scherm verschijnen.
Wide (Breedbeeld)
Indien U een breedbeeld TV heeft.
Angle Mark (Hoekmarkering)
1. Druk om “Angle Mark” te selecteren.
2. Open het submenu door
in te drukken.
3. Druk om het geselecteerde onderdeel te kiezen.
On (Aan): Schakel Angle Mark (Hoekmarkering) in.
Off (Uit):
Schakel de huidige hoekinstelling uit.
4. Druk
om te bevestigen
OSD Lang
U kan uw taalinstellingen selecteren zoals U wenst. Deze DVD speler zal
automatisch naar de gekozen taal schakelen telkens U een schijf laadt. Indien de
gekozen taal niet beschikbaar is op de schijf dan zal de standaardtaal gekozen
worden. De OSD taal in het systeemmenu zal, eenmaal ingesteld, gekozen blijven.
1. Druk om “OSD Lang” te selecteren.
2. Open het submenu door
in te drukken.
3. Druk om de geselecteerde taal te kiezen.
Page 60

17
4. Druk om te bevestigen
Screen Saver (Schermbeveiliging)
Deze functie wordt gebruikt om de schermbeveiliging Aan of Uit te schakelen.
1. Druk om ‘Screen Saver’ te selecteren.
2. Open het submenu door in te drukken.
3. Druk om het geselecteerde onderdeel te kiezen.
On (Aan):
In STOP, PAUSE of No DISC (Geen Schijf) modus zal de
Screen Saver ingeschakeld worden indien gedurende 5 minuten geen
handeling wordt uitgevoerd.
Off (Uit):
Screen Saver is uitgeschakeld.
4. Druk
om te bevestigen
Last Memory (Laatste Geheugen) (Werkt enkel wanneer de schijflader
wordt geopend tijdens weergve)
1. Druk om “Last Memory” te selecteren.
2. Open het submenu door
in te drukken.
3. Druk om het geselecteerde onderdeel te kiezen.
On (Aan): De speler keert terug naar de laatst gememoriseerde locatie op
de schijf.
Off (Uit):
De speler zal de laatst gememoriseerde locatie op de schijf niet
hernemen.
4. Druk
om te bevestigen
DivX(R) VOD
Kies deze optie om de DivX Video On Demand op te roepen.
Videokwaliteit-Instelling
De opties beschikbaar in de Videokwaliteit-Instelling zijn “Brightness” (Helderheid),
“Contrast” (Contrast), “Hue” (Kleurtint) en “Saturation” (Saturatie).
1. Druk om een optie te selecteren.
2. Open het submenu door
in te drukken.
3. Druk
of om de gewenste waarde te selecteren.
4. Druk
om te bevestigen
Wachtwoord-Instellingpagina
Deze functie wordt gebruikt voor Parental Control (Kinderslot). Voer uw
Page 61

18
wachtwoord van vier cijfers in wanneer de mededeling op het scherm verschijnt.
Het standaardwachtwoord is 3308.
1. Druk om ‘Password’ te selecteren.
2. Open het submenu door
in te drukken.
3. Druk
om de ‘Password Change’ (Verander Wachtwoord) pagina te openen.
4. Druk NUM in om de functietoetsen om te schakelen naar 0-9 numerieke
toetsen.
5. Het standaardwachtwoord is 4-digitcode.
6. Voer de nieuw code van 4 cijfers in.
7. Voer de nieuw code van 4 cijfers opnieuw in om te bevestigen.
De nieuwe 4-cijfercode zal in werking treden.
8. Druk OK om te verlaten.
Handige Tips:
- Indien het wachtwoord is veranderd zal de code van het kinderslot en de
schijfvergrendeling ook veranderen.
- Het standaardwachtwoord (3308) is altijd actief, zelfs wanneer het wachtwoord is
veranderd.
Voorkeurpagina (beschikbaar wanneer geen schijf is
geladen)
Voorkeurpagina
De opties in de Voorkeurpagina zijn: “Audio” (Geluid), “Subtitle” (Ondertitel), “Disc
Menu” (Schijfmenu), “Parental” (Kinderslot) en “Default” (Standaard).
Audio, Subtitle en Disc menu
Deze opties stellen de taal in van het Audio, Subtitle en Schijfmenu.
- “Audio” (geluidspoor van de schijf)
- “Subtitle” (ondertitels van de schijf)
- ‘Disc Menu’ (Schijfmenu)
1. Druk om “Audio” te selecteren.
2. Open het submenu door
in te drukken.
3. Druk om de geselecteerde taal te kiezen en druk
om te bevestigen.
4. Herhaal stappen 1-3 voor het instellen van de Ondertitel en Schijftaal.
Parental (Kinderslot)
Sommige DVD’s hebben een kinderslot toegekend op de volledige schijf of op
bepaalde scènes van de schijf. Deze functie laat U een niveau instellen om de
weergave te beperken. De niveaus gaan van 1 tot 8 en zijn afhankelijk van land tot
land. U kan het afspelen verbieden van bepaalde schijven die niet geschikt zijn
voor uw kinderen of bepaalde schijven kunnen afgespeeld worden met
Page 62

19
alternatieve scènes.
1. Druk om ‘Parental’ te selecteren.
2. Open het submenu door
in te drukken.
3. Gebruik om een niveau te kiezen voor de geplaatste schijf.
4. Druk
om te bevestigen
DVD’s die een hogere rating hebben dan het door U geselecteerde niveau
zullen niet afgespeeld worden tenzij U uw vier-cijferig wachtwoord invult of een
hoger niveau kiest.
Handige Tip:
Sommige DVD’s zijn niet gecodeerd met een rating hoewel de film rating op de
hoes van de schijf is gedrukt. De niveaufunctie zal voor deze Schijven niet werken.
Rating-beschrijving
1. KID SAF
Materiaal voor kinderen; geschikt vooral voor kinderen en kijkers van alle
leeftijden.
2. G
Algemeen Publiek; geschikt voor kijkers van alle leeftijden.
3. PG
Begeleiding door Volwassenen aangeraden.
4. PG13
Materiaal is niet geschikt voor kinderen jonger dan 13.
5. PGR 6.R
Parental Guidance-Restricted; het is aan te raden dat ouders kinderen onder 17
beletten te kijken of hen enkel toestaan te kijken onder toezicht van een ouder of
een volwassen voogd.
7. NC17
Geen kinderen jonger dan 17; niet aan te raden beeldmateriaal voor kinderen
jonger dan 17.
8. ADULT
Volwassen materiaal; dient enkel bekeken te worden door volwassenen wegens
grafisch seksueel materiaal, geweld of taalgebruik.
Default (Standaard)
Door de ‘Default’ functie in te stellen zullen alle opties en uw persoonlijke
instellingen teruggezet worden naar de fabrieksinstellingen en al uw persoonlijke
instellingen zullen daarbij gewist worden.
1. Druk om ‘Default’ te selecteren.
2. Selecteer “Reset” door
in te drukken.
3. Druk
om de selectie te bevestigen
Opgepast!
Wanneer deze functie wordt geactiveerd worden alle instellingen behalve de
kinderslotinstelling teruggezet naar de fabrieksinstellingen.
Page 63

20
Parameters en Onderhoud
Voeding 100-240V~ 50-60Hz
Schermgrootte 9 inches (ca. 23 cm)
Frequentierespontie 20Hz tot 20 kHz(1dB)
Signaal/Ruisverhouding Hoger dan 60 dB
Dynamisch Bereik Hoger dan 85 dB
Werktemperatuur
5~35
Gewicht 1.36 kg
Afmetingen (B x H x D) hoofdtoestel: 230 x 192 x 39.5 mm
monitor: 230 x 192 x 26 mm
Compatibele
schijfformaten
DVD, CD, MP3 en DivX
Opmerking: Ontwerp en specificaties kunnen veranderen zonder voorafgaande
waarschuwing.
Onderhoud en Herstelling
Bekijk de informatie in dit hoofdstuk vooraleer U een onderhoudsdienst
contacteert.
Wanneer U het toestel verzendt
Gelieve de oorspronkelijk doos en het verpakkingsmateriaal te bewaren. Indien U
het toestel moet verzenden, pak het toestel dan opnieuw in zoals het
oorspronkelijk in de fabriek werd verpakt voor maximale bescherming.
De buitenste oppervlakken schoon houden
Gebruik geen vluchtige vloeistoffen zoals insecticide spray nabij het toestel. Zorg
dat rubberen en plastieken producten niet lang in aanraking komen met het toestel
aangezien deze sporen kunnen achterlaten op het oppervlak.
Het toestel schoonmaken.
Gebruik een zachte, droge doek om de speler schoon te maken. Indien de
oppervlakken heel vuil zijn gebruikt U een zachte doek die licht bevochtigd is met
een milde detergentoplossing. Gebruik geen sterke oplosmiddelen zoals alcohol,
benzeen of verdunner, aangezien deze het oppervlak van het toestel kunnen
beschadigen.
Het toestel onderhouden
De DVD speler is een high-tech toestel met hoge precisie. Indien de optische
pick-up lens en de onderdelen van de schijflader vuil of versleten zijn zal de
beeldkwaliteit verminderen. Afhankelijk van de werkomgeving is een regelmatige
inspectie en onderhoud aan te raden na elke 1000 uur gebruik. Contacteer de
geautoriseerde onderhoudsdienst nabij U voor meer informatie.
Page 64

21
Probleemgids
Vooraleer U een onderhoudsdienst belt, kan U de volgende onderdelen
controleren op symptomen en oplossingen.
Geen geluid of geluid is vervormd:
Zorg dat het materiaal goed is aangesloten.
Zorg dat de input-instellingen voor de TV en stereosysteem juist zijn.
Geen beeld:
Zorg dat het materiaal goed is aangesloten.
Zorg dat het LCD scherm is ingeschakeld.
Geen weergave:
Er heeft zich condensatie gevormd: wacht ongeveer 1 tot 2 uur tot de speler
volledig is gedroogd. Deze speler kan geen andere schijven afspelen dan DVD’s,
MP3’s en CD’s.
De schijf is mogelijks vuil en moet schoongemaakt worden.
Zorg dat de schijf is geinstalleerd met de bedrukte kant naar boven.
Geen Afstandsbediening:
Controleer of de batterijen zijn geinstalleerd met de juiste polariteiten (+&-).
De batterijen zijn leeg: vervang ze met nieuwe.
Richt de afstandsbediening naar de afstandsbedieningsensor en gebruik.
Verwijder obstakels tussen de afstandsbediening en de afstandsbedieningsensor.
Gebruik de afstandsbediening niet verder dan 8 meter van de
afstandsbedieningsensor.
Geen enkele toets (van het toestel en/of de afstandsbediening) werkt:
Schakel het toestel uit en vervolgens terug in. U kan het toestel ook uitschakelen,
het stroomsnoer ontkoppeln en vervolgens terug aansluiten. (De speler kan
mogelijks niet goed werken wegens bliksem, statische elektriciteit of andere
externe factoren.)
De batterij werkt niet:
Controleer of de batterijen niet leeg zijn en goed geinstalleerd zijn.
De weergave begint niet, zelfs wanneer een titel is geselecteerd:
Bevestig de ‘Rating’ instellingen.
Audio soundtrack en/of ondertiteltaal is niet degene geselecteerd bij de
aanvankelijke instellingen:
Indien de audio-soundtrack en/of ondertiteltaal niet op de schijf staat dan zal de
geselecteerde taal bij de aanvankelijke instelling niet gezien/ gehoord worden.
Geen ondertitels:
Ondertitels verschijnen enkel bij schijven die er bevatten.
Page 65

22
Alternatieve talen van audio soundtrack (of ondertitels) kunnen niet
geselecteerd worden:
Een alternatieve taal kan niet geselecteerd worden bij schijven die niet meer dan
een taal bevatten.
In het geval van sommige schijven kan de alternatieve taal niet geselecteerd
worden door de AUDIO of SUBTITLE toets te gebruiken. Probeer deze via het
DVD menu te selecteren indien beschikbaar.
Hoek kan niet veranderd worden:
Deze functie is afhankelijk van de software. Zelfs wanneer een schijf verschillende
hoeken beschikbaar heeft, dan kunnen deze hoeken enkel opgenomen zijn voor
bepaalde scènes.
Page 66

23
Belangrijke Afvalinstructies
Als een verantwoordelijke dealer hechten wij waarde
aan het milieu.
In dit opzicht dringen wij erop aan dat u de juiste
afvalprocedure voor uw product, batterijen en
verpakkingsmaterialen volgt. Dit draagt bij aan de
instandhouding van natuurlijke hulpbronnen en zorgt
ervoor dat het product gerecycled wordt op een manier
die de gezondheid en het milieu beschermt.
U moet dit product en haar verpakking volgens de
plaatselijke wetten en regels weggooien. Omdat dit
product elektronische componenten en batterijen bevat,
moeten dit product en haar accessoires gescheiden van
het huishoudafval worden weggegooid wanneer het
product het einde van haar levensduur bereikt.
Neem contact op met uw plaatselijke autoriteiten om meer
te weten te komen over het aanbieden van afval en
recycling.
Breng het product en haar batterijen naar uw plaatselijk
verzamelpunt voor recycling. Sommige verzamelpunten
accepteren producten gratis.
De batterij wordt gebruikt in dit product is een CR2025 Lithium batterij in
de afstandsbediening.
En een Li-polymer batterij ligt intern en is niet toegankelijk.
Open het batterijdeksel aan de achterzijde van de afstandsbediening en verwijder
de batterijen.
De batterijen moeten verwijderd worde bij uw plaatselijk recyclagepunt.
We bieden onze excuses aan voor elk ongemak dat veroorzaakt wordt door kleine
onregelmatigheden in deze instructies die zich kunnen voordoen als het gevolg
van productverbetering -en ontwikkeling.
Kesa Electricals UK, HU1 3AU 24 / 05 / 2011
c
Page 67

1
Indice
INFORMAZIONI RELATIVE ALLA SICUREZZA......................2
IDENTIFICAZIONE DEI COMANDI .............................................6
UNITÀ PRINCIPALE.. ........................................................................................6
Display....................................................................................................................7
TELECOMANDO..................................................................................................8
OPERAZIONI PRELIMINARI .........................................................9
INSTALLAZIONE DEL LETTORE DVD SUI SEDILI DELL’AUTO ..................................9
COLLEGAMENTO ALLA CORRENTE ELETTRICA........................................................9
COLLEGAMENTO DEL CAVO AUDIO/VIDEO............................................................10
INSTALLAZIONE DELLA BATTERIA DEL TELECOMANDO.........................................10
FUNZIONAMENTO BASE......................................................10
RIPRODUZIONE DI UN DVD...................................................................................10
LETTURA DI UN DISCO CD AUDIO/MP3.................................................................13
RIPRODUZIONE DI UN DISCO JPEG.......................................................................14
RIPRODUZIONE SCHEDA DIGITALE E USB ...........................................................14
CONFIGURAZIONE DEL MENU DI IMPOSTAZIONE ...........15
PAGINA IMPOSTAZIONE GENERALE.......................................................................15
IMPOSTAZIONE QUALITÀ VIDEO ............................................................................17
PAGINA IMPOSTAZIONE DELLA PASSWORD........................................................... 17
PAGINA DELLE PREFERENZE ...............................................................................17
PARAMETRI E MANUTENZIONE .............................................19
RISOLUZIONE DEI PROBLEMI ..................................................20
IMPORTANTI ISTRUZIONI PER LO SMALTIMENTO ..........22
Page 68

2
Informazioni relative alla sicurezza
Questo apparecchio è stato progettato per funzionare da 100-240 Volt, 50-60Hz AC.
Altri tipi di alimentazione lo possono danneggiare.
Controllare che l'etichetta di classificazione (sotto l'apparecchio) corrisponda
all’uscita del trasformatore
Se l’adattatore fosse danneggiato, farlo sostituire presso un centro di assistenza
tecnica autorizzato, con un adattatore equivalente.
Simboli
PER RIDURRE IL RISCHIO DI USTIONI, SCOSSE ELETTRICHE , INCENDI O
LESIONI A PERSONE
IL MANUALE OPERATIVO PUÒ CONTENERE ULTERIORI ISTRUZIONI RELATIVE ALLA
SICUREZZA.
QUESTO PRODOTTO È STATO PROGETTATO SOLO PER USO DOMESTICO.
UN USO DIVERSO PUÒ INVALIDARE LA GARANZIA E POTREBBE ESSERE
PERICOLOSO.
PER EVITARE SCOSSE ELETTRICHE NON RIMUOVERE ALCUNA PARTE
DELL'INVOLUCRO.
Conservare queste istruzioni per successive consultazioni.
Abbiamo progettato e realizzato questo prodotto in conformit à agli standard Europei
relativi alla sicurezza, ma occorre comunque prestare attenzione, come per
qualsiasi altra apparecchiatura elettronica.
Ecco alcuni suggerimenti che contribuiscono alla sicurezza ed al
raggiungimento dei migliori risultati.
Questo apparecchio è dotato
di doppio isolamento e non è
necessaria la messa a terra.
All'interno dell'apparecchio
c'è un voltaggio pericoloso
che può provocare scosse
elettriche.
Questo contrassegno indica
che l'apparecchio è conforme
agli standard europei di
sicurezza e di compatibilità
elettromagnetica
Nel materiale di
accompagnamento di questo
apparecchio ci sono
istruzioni importanti per il suo
funzionamento e la sua cura.
LEGGERE ATTENTAMENTE TUTTE LE ISTRUZIONI
RELATIVE ALLA SICUREZZA.
elettromagnetica
Page 69

3
Installare l’apparecchio attenendosi alle istruzioni del costruttore.
Utilizzare l’apparecchio esclusivamente per gli scopi previsti, descritto nel presente
manuale.
I bambini e gli infermi vanno supervisionati da una persona competente. Se il
prodotto ha componenti di piccole dimensioni non permettere che i bambini vi
giochino.
Esaminare con attenzione il prodotto : se ha un qualsiasi danno notificarlo al
rivenditore da cui è stato acquistato.
Per risparmiare corrente: spegnere la corrente o staccare l ’adattatore quando non
si usa l’apparecchio.
La spina è il principale punto di scollegamento, e deve rimanere sempre accessibile.
Evitare ambienti difficili come locali bagnati o umidi, alta umidit à e forti vibrazioni,
temperature estremamente alte o basse, forte luce solare e ambienti molto
polverosi.
Proteggere il cavo di alimentazione. Disporre il cavo dell ’adattatore in modo che
non venga calpestato, schiacciato, tagliato o danneggiato in altro modo;
posizionarlo in modo che non sia di intralcio ai passanti.
Mai permettere di inserire oggetti nei fori e nelle griglie di ventilazione.
Non continuare ad usare l’apparecchio se vi avete versato dei liquidi, se è
danneggiato o se non funziona normalmente. Scollegare immediatamente
l’apparecchio e chiedere consiglio ad un esperto.
Proteggere gli schermi dalle impronte digitali e dalla polvere.
This product is designed for domestic use only. Any other use may invalidate
the guarantee and might be dangerous.
DO NOT store this product outdoors or expose to rain or moisture.
Non utilizzare l’apparecchio in prossimità di acqua, lavabi, docce o piscine.
NON lasciare il prodotto incustodito durante il funzionamento a meno che sia stato
progettato a questo scopo.
NON riporre il prodotto all'aperto né esporlo a pioggia o condensa.
NON usare il prodotto vicino all'acqua, ad esempio vicino al lavandino in cucina, in
bagno o vicino a una piscina a meno che questo sia specificato nelle istruzioni operative.
NON rimuovere pannelli o coperture esterne dal prodotto. Le riparazioni vanno
effettuate da personale qualificato.
NON sistemare il prodotto o i cavi elettrici vicino a superfici bollenti come cucine a gas o
elettriche o vicino a fiamme vive.
NON usare il prodotto quando l'umidit à dell'ambiente è eccessiva.
Ventilazione
Lasciare almeno 10 cm di spazio tutt'intorno. Non ostruire i fori di
ventilazione con elementi di arredo morbidi. Il surriscaldamento aumenta il
pericolo d'incendio.
Page 70

4
Pulizia
Staccare dalla fonte di alimentazione e usare solo panni morbidi
leggermente umidi. Non usare solventi chimici o detergenti forti perché
possono danneggiare le finiture.
Non lasciare gocce d'acqua sullo schermo perché la condensa può
scolorire permanentemente il prodotto. I segni di grasso vanno tolti con i
prodotti per la pulizia disponibili in commercio adatti a schermi LCD.
Batteria
Rimuovere la batteria quando non si utilizza il telecomando per un lungo periodo di
tempo. Lasciare la batteria all’interno del telecomando può causare danni per via
del deterioramento o della perdita di liquido corrosivo, invalidando in questo molto la
garanzia. Per proteggere l’ambiente, usare le apposite strutture locali di riciclaggio
per lo smaltimento della batteria. Non gettare la batteria nel fuoco.
Maneggiare e usare la batteria
AVVERTENZA:Soltanto gli adulti dovrebbero maneggiare la batteria.Non lasciare
che i bambini utilizzino questo prodotto a meno che il coperchio del vano batteria sia
montato saldamente al vano batteria in conformit à con le istruzioni d’uso del
prodotto.
• Seguire le istruzioni di sicurezza e d’uso del produttore della batteria.
• Tenere la batteria lontano da bambini ed animali.
•
Inserire le batterie osservando la corretta polarit à (+/-) come indicato
all’interno del vano batteria.Un allineamento non corretto della polarit à
della batteria può causare lesioni fisiche e/o danniIl vano batteria si trova
sul fondo dell’apparecchio sul retro.
Importanti avvertenze relative alla sicurezza
• Per evitare scosse elettriche non rimuovere nessuna parte dell'involucro.
• Se qualcosa non funziona, non cercare di ripararla, fare controllare il
prodotto in un centro assistenza qualificato.
• Non esporre l'apparecchio a sgocciolamenti o spruzzi e non sistemarvi
sopra oggetti contenenti liquidi come vasi.
• Non mettere mai fiamme vive sopra o vicino all'apparecchio.
• Parti di piccole dimensioni! Non far giocare i bambini con l'apparecchio.
• Non utilizzare mai l'apparecchio e non cercare di vedere video durante la
guida.
• Per prevenire lesioni questo apparecchio deve essere fissato saldamente
ai sedili dell'auto seguendo le istruzioni d'installazione.
• Rimuovere la batteria quando non si usa l’apparecchio per un lungo periodo.
Page 71

5
Prodotto laser Classe 1
Avvertenza:Questo lettore di dischi video digitali impiega un sistema a
laser.L’uso di controlli, regolazioni o prestazioni di procedure diverse da
quelle specificate nel presente manuale pu ò provocare l’esposizione a
radiazioni pericolose.
Avvertenza:Per evitare l’esposizione diretta al raggio laser, non aprire
l’involucro.Radiazioni laser invisibili quando è aperto.
Avvertenza:Non guardare mai direttamente il raggio laser.
Attenzione: Non installare questo prodotto in uno spazio chiuso come una
libreria o simili.
Note sui dischi
Come trattare i dischi
Non toccare il lato registrato del disco. Tenere il disco per i margini in modo
da non lasciare impronte sulla superficie. Non attaccare mai al disco carta o
nastro adesivo.
Come riporre i dischi
Dopo la riproduzione riporre il disco nell'apposita custodia. Non esporre il
disco alla luce diretta del sole o a
fonti di calore e non lasciarlo mai in macchine parcheggiate esposto alla
luce diretta del sole.
Come pulire il disco
Impronte e polvere depositate sul disco possono peggiorare la qualità
dell'immagine e causare distorsioni el suono. Prima di riprodurlo pulire il
disco con un panno pulito. Pulire il disco dal centro verso l'esterno.
Non usare solventi come alcool, benzene, diluenti, prodotti per la pulizia
disponibili in commercio o spray
antistatici concepiti per i vecchi dischi in vinile.
Questo prodotto contiene un apparecchio laser a bassa potenza
Quando è aperto, se il dispositivo di blocco non funziona, sono
emesse radiazioni laser invisibili. Evitare l'esposizione al raggio.
Page 72

6
Identificazione dei comandi
Unità principale
1. Presa cuffie
2. Sensore telecomando
3.
y
y
Per selezionare il capitolo, il titolo o la traccia precedenti durante la
riproduzione.
4.
5.
yPer selezionare il capitolo, il titolo o la traccia successivi durante la
riproduzione.
7.
/OK/Up/Down/Left/Right--Navigation controls
Per accedere a un menu su un disco
MENU
6.
8. Porta USB
9.
Tasto ON/OFF (accensione/spegnimento)
10.
Luce spia
11. Slot per schede SD/ MMC
12. Presa AV OUT
Utilizzare la spina per collegare l’AV e il cavo DC per collegare l’unità
principale al display.
10
11
12
13
VOL
14
15
9
8
Page 73

7
13. Presa DC OUT
y Collegare al display tramite l'AV e il cavo CD.
14. Pulsante volume
15. Presa DC IN
y Collegare allÿadattatore AC o allÿadattatore dellÿaccendisigari.
16. Tasto espulsione
y Aprire lÿuniti per inserire un disco nel caricatore.
Display
1. Tasto accensione ON/OFF (accensione/spegnimento)
2. Luminositi +/-
3. Volume +/-
4. Presa cuffie
5. Presa AV IN
yUtilizzare questa spina per collegare l ÿAV e il cavo DC per collegare
lÿuniti principale al display.
6. Presa DC 9-12V
AVVERTENZA SUL VOLUME DELLE CUFFIE
Collegare le cuffie con il volume regolato sul minimo
ed aumentarlo se necessario. Un ascolto prolungato
con alcuni tipi di cuffie ad alto volume può provocare
danni all'udito.
Le cuffie devono essere a norma con
EN50332-1 / EN50332-2 per assicurare una protezione
continua da livelli eccessivi di pressione del suono.
AVVERTENZA: Per proteggere l'udito è importante
che le cuffie usate con questo prodotto siano a
norma con il decreto francese dell'8 novembre
2005 che implementa l'articolo L 5232-1.
Ciò assicura che il livello audio non superi i 100
dB SPL. L'ascolto prolungato ad alto volume per un
periodo di oltre cinque ore alla settimana può
danneggiare l'udito.
L'ascolto prolungato del lettore alla
massima potenza può danneggiare
l'udito dell'utente.
Cuffie: Inserire cuffie standard da 3,5mm nella apposita presa.
Le casse verranno silenziate.
Page 74

8
Telecomando
1. SETUP (impostazione)
Per accedere o abbandonare il menu
di configurazione.
2. DISPLAY
Per accedere al display su schermo.
3. DVD / SD-USB
4. SUB
Per selezionare una lingua sottotitoli
(DVD)
5. AUDIO
Per selezionare una lingua audio
(DVD)
6. MENU
Per accedere a un menu su un disco
DVD.
7. A-B
Riproduzione ripetuta di una sezione
specifica.
8. REPEAT (ripetizione)
Per ripetere il capitolo, la traccia o il
titolo.
9. ZOOM
Per allargare o ridurre le dimensioni
dell’immagine.
10.
Per saltare al capitolo, alla traccia o
al titolo precedenti.
11.
Per spostare il cursore verso l ’alto
sullo schermo.
12.
Per saltare al capitolo, alla traccia o
al titolo successivi.
13.
/
Per spostare il cursore verso
sinistra sullo schermo o
riavvolgimento rapido.
14. PLAY/PAUSE (
)
(riproduzione/pausa)
Per avviare / sospendere /
ripristinare la riproduzione.
15.
/
Per spostare il cursore verso
destra sullo schermo o
avanzamento rapido.
Page 75

9
16.
Per spostare il cursore verso il
basso sullo schermo.
17. STOP (
) (arresto)
Per interrompere la riproduzione.
18. NUM (tasti numerici)
Per attivare o disattivare i numeri.
Operazioni preliminari
Installazione del lettore DVD sui sedili dell’auto
Utilizzare le fibbie in dotazione per fissare il lettore di DVD e lo schermo sui
poggiatesta.
Collegamento alla corrente elettrica
Per collegare l’apparecchio alla corrente elettrica da dentro l ’auto, collegare il
cavo di alimentazione per auto in dotazione alla presa DC IN dell’unità principale
e alla presa dell’accendino dell’auto.
Per collegare l’apparecchio alla corrente elettrica in casa:collegare il cavo
dell’adattatore in dotazione alla presa DC IN dell’unità principale e alla presa di
corrente.
Avvertenza!
Controllare che la tensione contrassegnata sulla targa dati dell ’adattatore
corrisponda alla tensione della corrente domestica.
Quando si scollega l’adattatore, staccare sempre la spina dalla presa di corrente.
Non tirare mai il cavo.
Page 76

10
Collegamento del cavo Audio/Video
3. Alla presa 9-12 Alla
presa AV OUT sullo
schermo
4.Alla presa AV IN
sullo schermo
92/
5.Alla presa DC IN sul
lettore DVD schermo
6.Alla presa ccendisigarei del
veicolo
1.la presa DC OUT sul
lettore DVD
2.Alla presa DC OUT sul
lettore DVD
Installazione della batteria del telecomando
Prima di utilizzare il telecomando, eliminare la linguetta protettiva in
plastica.
Per sostituire la batteria, smontare il coperchio del vano batteria del
telecomando e inserire una batteria al litio 3V CR2025 nel vano
portabatteria, con il lato stampato rivolto verso l ’alto; rimontare il
coperchio.
AVVERTENZA:
Se la batteria non è montata correttamente, il telecomando non
si attiva.
Un inserimento non corretto della polarit à della batteria può
causare lesioni fisiche e/o danni.
Sostituire la batteria esausta con una batteria equivalente.
Funzionamento base
Riproduzione di un DVD
●
1. Far scorrere l’interruttore di alimentazione sul lettore DVD
alla posizione ON (acceso).
2. Premere il pulsante di apertura, posto sulla parte superiore
dell’apparecchio, per aprire il vassoio disco e inserire il disco
scelto nel vassoio con l’etichetta rivolta verso l’alto.
3. Chiudere il vassoio. La riproduzione inizia automaticamente.
4. Agire sul selettore Volume per regolare il volume al livello
desiderato.
AV
OUT
ON
O
F
F
DC
IN
D
C
OUT
USB
SD/ MM
S
P
O
WE
R
Page 77

11
5. Per interrompere la riproduzione, premere il tasto
.Per riprendere la
riproduzione, premere nuovamente il tasto
.
6. Per interrompere la riproduzione, premere il tasto
.
NOTA: Alcuni dischi non supportano i menu e avviano automaticamente la
riproduzione.
Usare i pulsanti
per selezionare il titolo/capitolo che si desidera guardare e
premere il pulsante per avviare.Premere il pulsante MENU per tornare alla
schermata del menu.Alcuni dischi non supportano i menu e avviano automaticamente
la riproduzione.
Note:
1. Se è stato impostato il controllo genitori e il disco non è adatto all’impostazione della
classificazione, sarà necessario inserire la password.Leggere “Controllo Genitori”).
2. I DVD possono avere un codice regionale.Il lettore non è in grado di riprodurre dischi
con codice regionale differente da quello codificato nel lettore stesso.
●Spostarsi ad un altro CAPITOLO/TRACCIADVD
Se un titolo su un disco ha più di un capitolo o un disco ha pi ù di una traccia, è
possibile spostarsi su un altro capitolo/traccia come segue:
1. Premere il pulsante
o brevemente durante la riproduzione per selezionare il
capitolo/traccia successivo o precedente.
2. Per selezionare direttamente un capitolo/traccia durante la riproduzione DVD,
premere il tasto NUM (tasti numerici) per attivare i tasti numerici, e quindi digitare il
numero del capitolo/traccia prescelto.
• Ripetizione A-B
Per ripetere una sequenza:
1. Premere il pulsante A-B al punto di inizio desiderato. “
“appare sullo
schermo.
2. Premere il pulsante A-B nuovamente al punto punto finale desiderato.
“
“ appare nuovamente sullo schermo.
3. Premere il pulsante A-B nuovamente per annullare la funzione.
• Ripetizione
Premere il pulsante REPEAT (ripetizione) durante la riproduzione per selezionare la
modalità di ripetizione desiderata.
“
Repeat chapter / title / all” (Ripetizione capitolo / titolo / tutto)
CAPITOLO:ripete il capitolo corrente.
TITOLO: ripete il titolo corrente.
TUTTO: ripete tutte le tracce su un disco.
● Zoom
La funzione ZOOM consente di modificare le dimensioni delle immagini video o
fotografiche.
A
AB
Page 78

12
Premere ripetutamente ZOOM per modificare le dimensioni dell’immagine come
segue:
2X → 3X → 4X → normale
●MENU
1. Premere il pulsante MENU. Se il titolo corrente ha un menu, il menu appare sullo
schermo.
Altrimenti, il menu del disco non appare.
2. Il MENU offre funzioni come la lingua, i sottotitoli e i capitoli per il titolo.
●Selezionare la lingua Audio
Per DVD che contengono due o più lingue audio, durante la riproduzione premere il
pulsante AUDIO ripetutamente finché non si seleziona la lingua desiderata.
●Selezionare la lingua dei sottotitoli
Per DVD che contengono due o più lingue dei sottotitoli, durante la riproduzione
premere il pulsante SUBTITLE (sottotitoli) ripetutamente finch é non si seleziona la
lingua desiderata.
●Funzione Display
a. Durante la riproduzione di un DVD, premere DISPLAY per visualizzare le seguenti
informazioni.
1. Numero titolo in ascolto
2. Numero totale titoli
3. Numero capitolo in visione
4. Numero totale capitoli
5. Tempo di riproduzione
trascorso
b. Premere ripetutamente DISPLAY per visualizzare le informazioni in sequenza.
Titolo trascorso Tempo trascorso del titolo
Tempo rimanenteTempo rimanente del titolo
Capitolo trascorsoTempo trascorso del capitolo
Capitolo rimanente: Tempo rimanente del capitolo
Display disattivato: Il tempo di riproduzione relativo al DVD non viene visualizzato.
Page 79

13
Lettura di un disco CD audio/MP3
● Pausa
1. Premere il pulsante
durante la riproduzione.
2. Per ripristinare la riproduzione, premere nuovamente il pulsante .
● Spostarsi ad un’altra traccia
1. Per i CD audio, premere il pulsante
o durante la riproduzione per andare
alla traccia successiva o precedente o per andare all ’inizio della traccia corrente.
Per gli MP3, premere i pulsanti , , ▲ e ▼ durante la riproduzione per
selezionare la traccia che si desidera riprodurre, quindi premere
per riprodurla
2. È possibile riprodurre una traccia immettendone il numero.
● Ripetizione
Per CD audio, quando si preme il pulsante REPEAT (ripetizione), sullo schermo
appare l’icona della modalità di ripetizione.
Traccia: ripete la traccia corrente.
Tutto: ripete tutte le tracce su un disco.
Off (nessuna visualizzazione): riproduzione normale.
Per gli MP3/WMA, quando si preme il pulsante REPEAT (ripetizione) sullo schermo
appare brevemente l’icona della modalit à di ripetizione. Selezionare la modalit à
desiderata tra le seguenti.
REPEAT ONE (RIPETIZIONE SINGOLO)→REPEAT FOLDER (RIPETIZIONE
CARTELLA.)→REPEAT OFF (RIPETIZIONE DISATTIVATA)
●Ripetizione A-B
1. Per ripetere una sequenza durante la riproduzione di un disco, premere il pulsante
A-B al punto di inizio desiderato. Sul display appare l ’icona “
A”.
2. Premere il pulsante A-B nuovamente al punto finale desiderato. Sul display appare
l’icona “ AB” e inizia la riproduzione ripetuta della sequenza.
3. Per uscire dalla sequenza e tornare alla riproduzione normale, premere nuovamente
il pulsante A-B. L’icona “ AB” scompare dallo schermo.
● Funzione Display
Durante la riproduzione di un CD audio, premere DISPLAY per visualizzare le seguenti
informazioni:
Singolo trascorso:Numero e tempo di ascolto trascorso del brano corrente.
Singolo rimanente:Numero e tempo di ascolto rimanente del brano corrente.
Tempo rimanente:Numero del brano corrente e tempo totale di ascolto rimanente del
CD.
Display disattivato:Il tempo di riproduzione relativo al CD non viene visualizzato.
Page 80

14
Riproduzione di un disco JPEG
●Visione di un disco JPEG
1. Inserire un disco JPEG e chiudere il vassoio. Sullo schermo appare il menu dei
file.
2. Usare i pulsanti
per evidenziare il file che si desidera riprodurre e premere
. La presentazione inizia dal file selezionato.
3. Durante la riproduzione di un disco JPEG, premere il pulsante MENU per
visualizzare il menu in fondo allo schermo.
4. Durante la riproduzione di un disco JPEG, premere il pulsante per spostarsi
alla pagina successiva, premere il pulsante per tornare alla pagina
precedente e premere il pulsante
per tornare al menu delle cartelle.
●Immagine fissa
1. Premere il pulsante
durante la presentazione. Il lettore entrerà in modalità
PAUSE (pausa).
2. Per tornare alla presentazione, premere nuovamente il pulsante .
●Zoom
1. Premere il pulsante ZOOM ripetutamente per ingrandire o ridurre l ’immagine.
2. Quando l’immagine è ingrandita, premere i pulsanti , , ▲ e ▼ per fare
una panoramica.
●Ruotare un’immagine
Premere il pulsante durante la riproduzione per ruotare l’immagine in senso orario.
Riproduzione Scheda Digitale e USB
Le schede digitali (scheda MMC/SD) e le chiavette USB con file mp3 e immagini
(.jpg) possono essere riprodotte e visualizzate tramite l ’unità principale. Le schede
MMC/SD possono essere inserite direttamente nell’ apposito slot per la lettura delle
schede. La presa USB può essere utilizzata per fornire segnali all ’unità principale dalle
sorgenti USB.
Selezionare l’USB / la SCHEDA digitale da riprodurre
1. Accendere l’unità principale.
2. Inserire un cavo USB nella porta USB o una scheda nell ’apposito slot sulla parte
destra dell’unità.
3. Premere il pulsante DVD/SD-USB sul telecomando, le unit à rileveranno
automaticamente l’USB / la SCHEDA.
4. Se si selezione USB/SCHEDA, l’unità inizierà a leggere la scheda o l’USB ad essa
collegato.
Page 81

15
Configurazione del Menu di IMPOSTAZIONE
Pagina Impostazione generale
● Funzionamento generale
1. Premere il pulsante SETUP per accedere al menu di impostazione.
2. Premere il pulsante
o per accedere al sottomenu o per tornare al menu
precedente.
3. Premere i pulsanti ▲▼ per evidenziare il menu desiderato.
4. Premere il pulsante
per accedere al livello successivo del sottomenu o per
confermare la selezione.
Per uscire dal menu
Premere il pulsante SETUP →Le impostazioni verranno memorizzate nella memoria
del lettore.
● Pagina Impostazione generale
The opzioni incluse nella pagina sono:”Schermo TV”, “Indicatore multiangolo ”, Lingua
OSD”, “Screen Saver”, “Ultima memoria” e "DivX(R) VOD".
1. Premere il pulsante SETUP per accedere al menu di impostazione
2. Premere o per selezionare l’opzione “Pagina Impostazione generale ”.
●Schermo TV
Impostare il rapporto d’aspetto del lettore DVD a seconda del televisore che è stato
collegato.
1. Premere i pulsanti ▲▼ per evidenziare l’opzione “Schermo TV”.
2. Accedere al sottomenu premendo il pulsante
.
3. Premere i pulsanti ▲▼ per evidenziare l’opzione scelta.
4. Premere il pulsante
per confermare.
Normale/PS
→ Se si ha un televisore normale e si desidera che i lati dell ’immagine siano tagliati o
formattati in modo da adattarsi allo schermo TV.
Normale/LB
→ Se si ha un televisore normale. In questo caso, verrà visualizzata un’immagine ad
ampio schermo con bande nere sulla porzione superiore e inferiore dello schermo TV.
Wide
→ Se si ha un televisore widescreen.
Page 82

16
● Indicatore multiangolo
1. Premere il pulsante ▲▼ per evidenziare l’opzione “Indicatore multiangolo”.
2. Accedere al sottomenu premendo il pulsante
.
3. Premere i pulsanti ▲▼ per evidenziare l’opzione scelta.
→ Attivo: Per attivare l’indicatore multiangolo.
→ Disattivo:
Per disattivare la visualizzazione
4. Premere il pulsante
per confermare.
● Lingua OSD
È possibile selezionare le impostazioni preferite della lingua. Questo sistema DVD
attiverà automaticamente la lingua selezionata quando si carica un disco. Se la lingua
selezionata non è disponibile sul disco, verrà utilizzata la lingua preimpostata del disco.
La lingua OSD nel menu di sistema rimarrà una volta selezionata.
1. Premere il pulsante ▲▼ per evidenziare l’opzione “Lingua OSD”.
2. Accedere al sottomenu premendo il pulsante
.
3. Premere i pulsanti ▲▼ per evidenziare l’opzione scelta.
4. Premere il pulsante per confermare.
● Screen Saver (salvaschermo)
Questa funzione serve per attivare o disattivare la funzione salvaschermo
1. Premere il pulsante ▲▼ per evidenziare l’opzione “Screen Saver”.
2. Accedere al sottomenu premendo il pulsante
.
3. Premere i pulsanti ▲▼ per evidenziare l’opzione scelta.
→ Attivo
: In modalità di ARRESTO, PAUSA o senza alcun disco inserito, se non
vengono effettuate azioni per circa 5 minuti, si attiver à il salvaschermo.
→ Disattivo:
Per disattivare il salvaschermo.
4. Premere il pulsante
per confermare.
● Ultima memoria (attivo solo quando si apre il vassoio disco durante la
riproduzione)
1. Premere il pulsante ▲▼ per evidenziare l’opzione "Ultima memoria".
2. Accedere al sottomenu premendo il pulsante
.
3. Premere i pulsanti ▲▼ per evidenziare l’opzione scelta.
→ Attivo
: Il lettore si riattiva dall’ultima posizione memorizzata del disco.
→ Disattivo:
Il lettore non si riattiva dall’ultima posizione memorizzata del disco.
4. Premere il pulsante
per confermare.
●DivX(R) VOD
Selezionare la funzione per visualizzare il DivX Video On Demand.
Page 83

17
Impostazione qualità video
Le opzioni disponibili sono "Luminosit à", "Contrasto", "Toni" e "Saturazione".
1. Premere il pulsante ▲▼ per evidenziare l’opzione.
2. Accedere al sottomenu premendo il pulsante
.
3. Premere i pulsanti ▲▼ per evidenziare l’opzione scelta.
4. Premere il pulsante per confermare.
Pagina Impostazione della Password
Questa funzione serve per il Controllo genitori. Inserire la password di quattro cifre
quando sullo schermo appare un suggerimento. La password predefinita è 3308.
1. Premere il pulsante ▲▼ per evidenziare l’opzione “Password”.
2. Accedere al sottomenu premendo il pulsante .
3. Premere il pulsante per aprire la pagina “Nuova Password”.
4. Premere NUM per attivare la funzione tasti numerici 0-9.
5. Inserire la password predefinita di 4 cifre.
6. Inserire la nuova password di 4 cifre.
7. Inserirla nuovamente la password di 4 cifre per confermare..
→ La nuova password di 4 cifre entrerà in vigore.
8. Premere il pulsante OK per uscire.
Consigli utili:
- Se si cambia la password, cambierà anche il codice del controllo genitori e del blocco
del disco.
- La password predefinita (3308) è sempre attiva anche se è stata cambiata la
password.
Pagina delle preferenze (accessibile quando non viene
inserito alcun disco)
● Pagina delle preferenze
Le opzioni incluse nella pagina delle preferenze sono: “Audio”, “Sottotitoli”, “Menu del
disco”, “Controllo genitori” e “Impostazioni predefinite”.
● Audio, Sottotitoli e Menu del disco
Queste opzioni permettono di impostare la lingua del menu Audio, dei sottotitoli e del
disco a propria discrezione.
- “Audio” (traccia audio del disco)
- “Sottotitoli” (sottotitoli del disco)
- “Menu del disco” (menu del disco)
1. Premere i pulsanti ▲▼per evidenziare “Audio”.
Page 84

18
2. Accedere al sottomenu premendo il pulsante .
3. Premere i pulsanti ▲▼ per evidenziare la lingua scelta e premere il pulsante
per confermare.
4. Ripetere i punti 1~3 per l’impostazione della lingua dei sottotitoli e del disco.
● Controllo genitori
Alcuni DVD possono avere un livello genitori assegnato a tutto il disco o ad alcune
scene del disco. Questa funzione permette di impostare un livello di limite della
riproduzione. I livelli di classificazione sono da 1 a 8 e dipendono
dalle normative del
Paese. Si può proibire la riproduzione di alcuni dischi non adatti per i bambini oppure
riprodurre dei dischi con alternative scene.
1. Premere i pulsanti ▲▼per evidenziare “Controllo genitori” .
2. Accedere al sottomenu premendo il pulsante
.
3. Premere i pulsanti ▲▼per evidenziare un livello di classificazione per il disco
inserito.
4. Premere il pulsante
per confermare.
→ I DVD aventi un livello superiore a quello selezionato non eseguiranno la
riproduzione a meno che non si inserisca nuovamente la password di quattro cifre
definita e non si scelga un livello di classificazione superiore.
Consigli utili:
Alcuni DVD non sono codificati con una classificazione sebbene la classificazione del
film è stampata sulla copertina del disco. La caratteristica del livello di classificazione
non funzione con tali dischi.
Spiegazione della classificazione
1. KID SAF
Adatto ai bambini; raccomandato soprattutto per i bambini e per un pubblico di tutte le
età.
2. G
Pubblico generico; raccomandato come accettabile per persone di tutte le et à.
3. PG
Si suggerisce Guida Parentale.
4. PG13
Il materiale non è adatto per bambini di et à inferiore ai 13 anni.
5. PGR 6. R
Guida Parentale - Vietato; si raccomanda che i genitori vietino la visione a bambini di
età inferiore ai 17 anni oppure ne permettano la visione soltanto sotto la loro
supervisione o quella di un altro adulto.
7. NC17
Nessun bambino inferiore ai 17 anni; visione non raccomandata ai bambini di et à
inferiore ai 17 anni.
8. ADULTI
Page 85

19
Materiale per adulti; deve essere visualizzato solamente da adulti a causa di materiale
sessuale grafico, violenza o linguaggio.
●Impostazioni predefinite
La funzione “Impostazioni predefinite” permette di riportare tutte le opzioni e le
impostazioni personali alle impostazioni di fabbrica. Tutte le impostazioni personali
andranno perdute.
1. Premere il pulsante ▲▼ per evidenziare l’opzione “Impostazioni predefinite”.
2. Evidenziare l’opzione “Ripristina” premendo il pulsante
.
3. Premere il pulsante ENTER per confermare la selezione
Attenzione!
Quando si attiva questa funzione, tutte le impostazioni, tranne il controllo
genitori, verranno reimpostate.
Parametri e manutenzione
Alimentazione
100-240V~ 50-60Hz
Dimensioni schermo
9 pollici
Risposta in frequenza
Da 20Hz a 20 kHz (1dB)
Rapporto segnale/rumore
Più di 60 dB
Gamma dinamica
Più di 85 dB
Temperatura di
funzionamento
5~35
Peso
1,36 kg
Dimensioni (L x P x H)
Unità principale: 230 x 192 x 39.5 mm
Schermo: 230 x 192 x 26 mm
Formati dischi compatibili
DVD, CD, MP3 e DivX
Nota: Il design e le specifiche sono soggetti a modifiche senza preavviso.
Manutenzione e assistenza
●Consultare le informazioni contenute in questo capitolo prima di contattare un tecnico
dell’assistenza.
●Quando si spedisce l’apparecchio
Conservare la confezione originale e il materiale di imballaggio. Se si deve spedire
l’apparecchio, per ottenere la massima protezione, riconfezionarlo com ’era in origine.
●Tenere le superfici esterne pulite
Non usare liquidi volatili, come spray insetticidi, vicino all ’apparecchio. Non lasciare
prodotti di gomma o plastica a contatto con l ’apparecchio per un lungo periodo di
tempo, in quanto lasciano segni sulla superficie.
Page 86

20
●Pulizia dell’apparecchio
Per pulire il lettore, usare un panno soffice e asciutto. Se le superfici sono molto
sporche, usare un panno soffice leggermente inumidito con una soluzione detergente
delicata. Non usare solventi forti come alcol, benzina o diluenti in quanto potrebbero
danneggiare la superficie dell’apparecchio.
●Mantenimento dell’apparecchio
Il lettore DVD è un dispositivo di precisione ad alta tecnologia. Se la lente del pickup
ottico e le parti dell’unità disco sono sporche o rovinate, la qualità dell’immagine
potrebbe risultare ridotta. A seconda dell’ambiente operativo, si consiglia un’ispezione
e una manutenzione regolari dopo ogni 1000 ore di utilizzo. Per maggiori dettagli,
contattare il centro di assistenza autorizzato pi ù vicino.
Risoluzione dei problemi
In caso di guasti, verificare innanzitutto i punti elencati di seguito, prima di chiamare
l’assistenza.
Manca l’audio o il suono è distorto:
Assicurarsi che l’apparecchio sia stato collegato correttamente.
Assicurarsi che le impostazioni degli ingressi del televisore e del sistema stereo siano
corrette.
Non appaiono immagini:
Assicurarsi che l’apparecchio sia stato collegato correttamente.
Assicurarsi che il display LCD sia acceso.
Non è possibile riprodurre:
Si è formata della condensa: attendere circa1o2oreperlasciare asciugare il lettore.
Questo apparecchio non è in grado di riprodurre dischi diversi dai DVD, MP3 e CD.
Il disco potrebbe essere sporco e richiedere la pulizia.
Assicurarsi che il disco sia installato con l ’etichetta rivolta verso l’alto.
Il telecomando non funziona:
Controllare che le batterie siano installate con le polarit à corrette (+ e -).
Le batterie sono esaurite: sostituirle con batterie nuove.
Puntare il telecomando sull’apposito sensore quando lo si utilizza.
Rimuovere gli ostacoli tra il telecomando e il sensore. Usare il telecomando ad una
distanza di non più di 8 metri dal sensore.
I tasti non funzionano (sull’apparecchio e/o sul telecomando):
Spegnere l’apparecchio e riaccenderlo. Oppure, spegnerlo e scollegare il cavo di
alimentazione AC e ricollegarlo. (Il lettore potrebbe non funzionare correttamente a
causa dell’illuminazione, dell’elettricità statica o per qualche altro fattore esterno).
Page 87

21
Le batterie non funzionano:
Controllare che le batterie non siano scariche e che siano state installate
correttamente.
La riproduzione non comincia anche quando è stato selezionato il titolo:
Confermare le impostazioni di “Classificazione”.
La lingua della traccia audio e/o dei sottotitoli non è quella selezionata nelle
impostazioni iniziali:
Se la lingua della traccia audio e/o dei sottotitoli non esiste sul disco, la lingua
selezionata nell’impostazione iniziale non sar à operativa.
Mancano in sottotitoli:
I sottotitoli appaiono soltanto con dischi che li contengono.
Non è possibile selezionare una lingua alternativa per la traccia audio (o per i
sottotitoli):
Non è possibile selezionare una lingua alternativa con dischi che non contengono
più di una lingua.
Nel caso di alcuni dischi, la lingua alternativa non può essere selezionata usando i
pulsanti AUDIO o SOTTOTITOLI. Provare a selezionala dal menu DVD se
disponibile.
Non è possibile cambiare l’angolo di visione:
Questa funzione dipende dalla disponibilit à del software. Anche se un disco presenta
più angolazioni di visione, queste potrebbero essere state registrate soltanto per
determinate scene.
Page 88

22
Importanti Istruzioni per lo Smaltimento
La nostra azienda si sente direttamente responsabile
della tutela dellÿambiente.
Pertanto, sollecitiamo i nostri clienti ad attenersi a una corretta
procedura di smaltimento del prodotto, delle batterie e dei
materiali da imballaggio. Cip consente di conservare le risorse
naturali e di fare in modo che quanto sopra sia riciclato con
modaliti che proteggono la salute e lÿambiente.
Questo prodotto e il suo imballaggio devono essere smaltiti in
conformiti alle leggi e ai regolamenti locali. Questo prodotto
contiene componenti elettronici e talvolta batterie, pertanto il
prodotto stesso, nonchl i relativi accessori, devono essere
smaltiti separatamente dai rifiuti domestici al termine del ciclo
di vita del prodotto.
Si invitano gli acquirenti a contattate lÿautoriti locale per
ottenere informazioni sullo smaltimento e il riciclaggio.
Il prodotto e, se applicabile, le sue batterie, devono essere
portati al punto locale di raccolta per il riciclaggio. Alcuni punti
di raccolta accettano i prodotti gratuitamente.
La batteria utilizzata in questo tipo di prodotto k una batteria CR2025 al litio
nel telecomando. E una batteria Li-polimero k situato internamente e non k
accessibile.
Aprire il coperchio del vano batterie sul retro del telecomando per rimuoverle.
Le batterie devono essere smaltite presso i punti di raccolta e riciclaggio locali.
Ci scusiamo per qualsiasi disagio provocato da lievi incongruenze in queste istruzioni,
che possono dipendere da miglioramenti e sviluppi del prodotto.
Kesa Electricals UK, HU1 3AU 24 / 05 / 2011
c
 Loading...