

Page 1
DH12SILENT
DEHUMIDIFIER
DESHUMIDIFICATEUR
ONTVOCHTIGER
OPERATING INSTRUCTIONS
MANUEL D'UTILISATION
HANDLEIDING
Page 2

Catalogue
Language of introduction Page
English --------------------------------------
French ---------------------------------------
Dutch ----------------------------------------
GB1_GB11
FR1_FR11
NL1
_
NL11
Page 3

GB
WARNINGS
This appliance is intended for domesc household use only and should not be
used for any other purpose or in any other applicaon, such as for non-domesc
use or in a commercial environment.
This appliance can be used by children aged from 8 years and above and persons
with reduced physical, sensory or mental capabilies or lack of experience and
knowledge if they have been given supervision or instrucon concerning use of
the appliance in a safe way and understand the hazards involved. Children shall
not play with the appliance. Cleaning and user maintenance shall not be made
by children without supervision.
If the supply cord is damaged, it must be replaced by the manufacturer, its
service agent or similarly qualified persons in order to avoid a hazard.
For the details concerning the method and frequency of cleaning, please see
secon “Cleaning and maintenance” on page 9.
1
Page 4
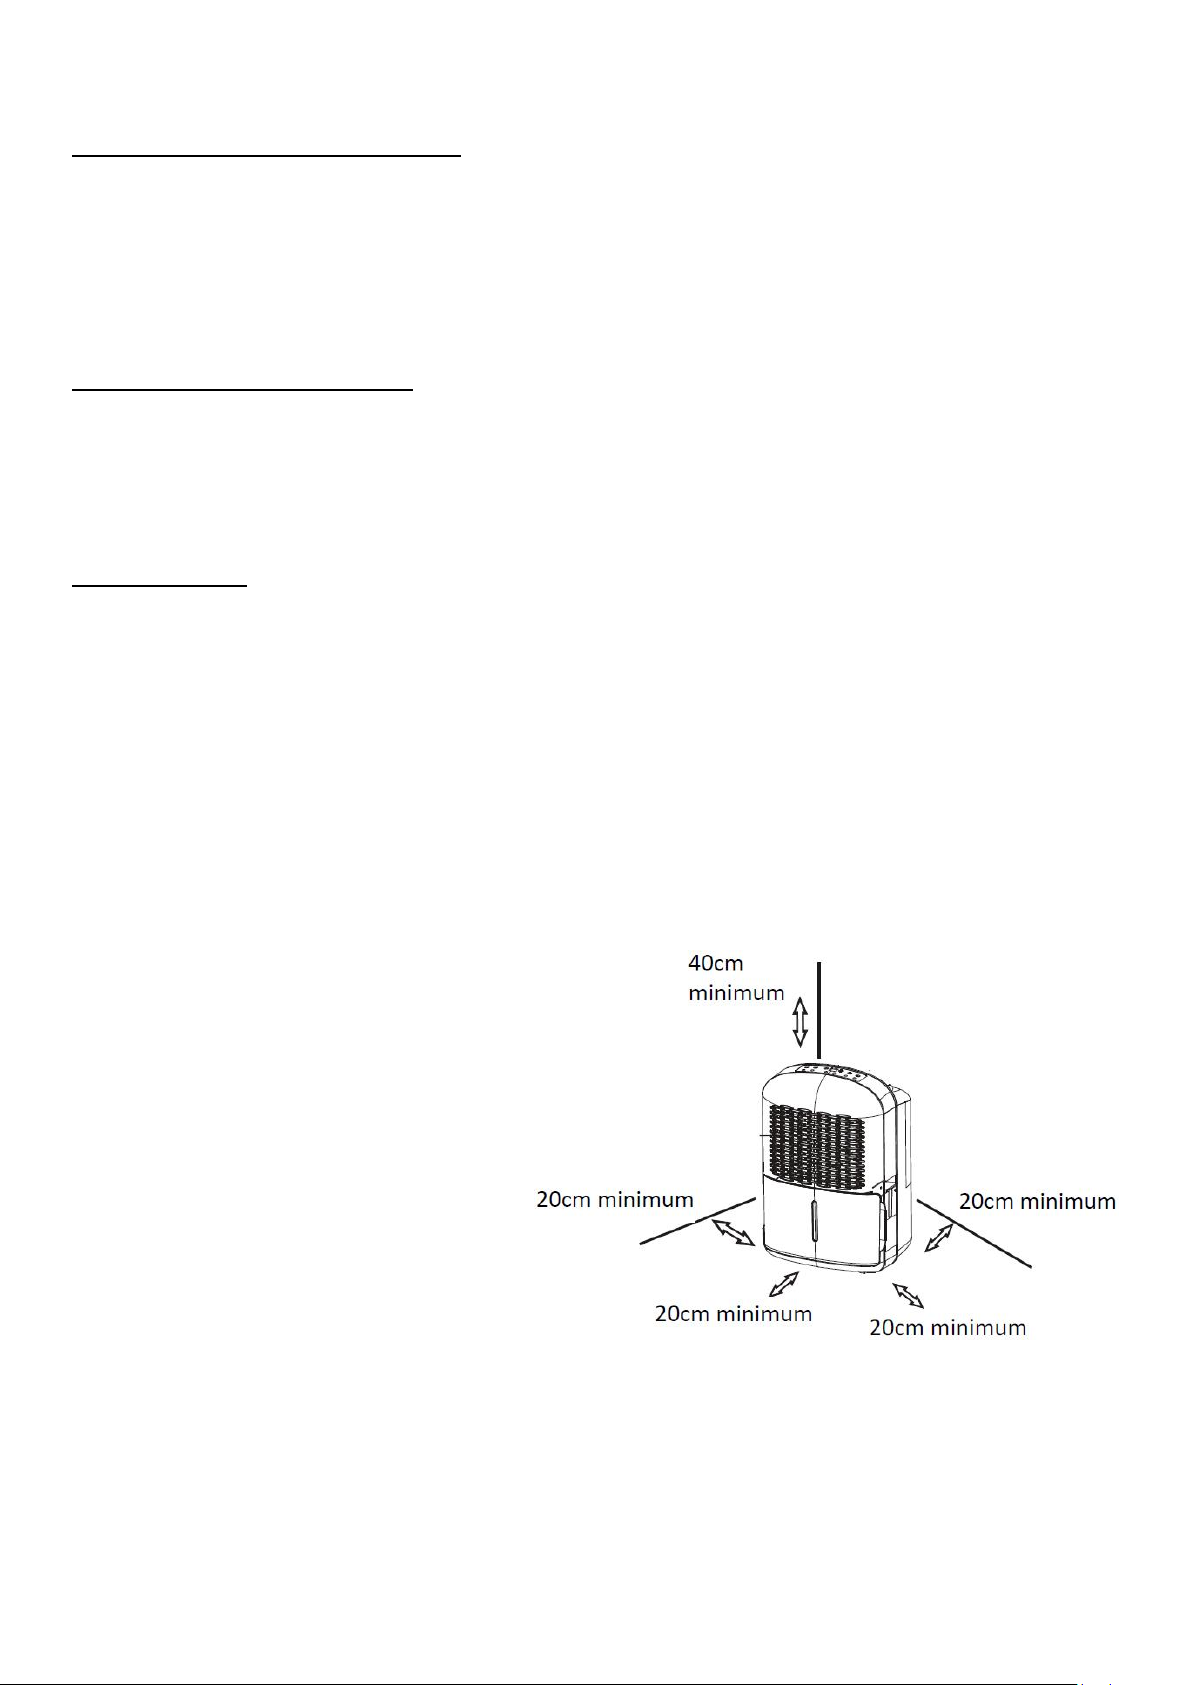
Allow at least 20cm of air space
on all sides of the appliance and
40cm above the appliance for
proper air circulation.
GB
For disposal of the appliance:
To prevent possible harm to the environment or human health from
uncontrolled waste disposal, recycle it responsibly to promote the sustainable
reuse of material resources. And the disposal should only be done through
public collection points.
For installation, servicing:
The appliance should be placed on a horizontal floor and keep the ventilation
freely. Don’t try to replace or repair any components by yourself, ask the service
agency for help if necessary.
For handling:
Always handle the appliance to avoid any damage.
The R-410A refrigerant used in this product contains a fluorinated greenhouse
gas under the Kyoto Protocol, which can be harmful to the environment and
may be responsible for global warming if it escapes into the atmosphere. Its
global warming potential is 2087.5.
The appliance shall be installed in accordance with national wiring regulations.
2
Page 5

GB
IMPORTANT SAFETY INSTRUCTIONS
To reduce electric shock, risk of fire or injury, please read all instructions
carefully before operating the appliance and keep them for future reference.
Never immerse the appliance in water or other liquids.
Do not repair the appliance yourself. Repairs should be carried out by a
qualified personal.
Do not operate the appliance outdoors or expose to rain or moisture.
Install your dehumidifier on a stable, level surface. Make sure the surface is
strong enough to support the weight of the dehumidifier with a full water tank.
Do not sit or stand on the dehumidifier.
Turn off and disconnect the appliance from the mains socket when not in use
and before cleaning.
Do not place any object on the appliance.
Do not drink or use the water collected in the water tank.
Do not operate the appliance near flammable gas or combustibles, such as
gasoline, benzene, thinner, etc.
Do not remove the water tank during operation.
Do not place aerosols or other hazardous materials in the vicinity. Also do not
place inflammable materials such as petrol or thinner nearby. These may
explode and cause fire.
Do not place the appliance near a heat source. This may cause the plastic parts
inside to melt and catch fire.
Operate the appliance only on level, stable surfaces.
Do not place any water container such as a vase on the appliance. Water
spillage may cause insulation failure and electrical shock or fire.
Do not stand or lean against the appliance. This may cause it to fall over,
resulting in personal injury.
Do not obstruct air inlets and outlets with clothing or anything else.
Obstruction of the airflow will cause overheating, malfunction or fire.
Do not operate the appliance without the filter in place.
3
Page 6
OVERVIEW
Front View
Rear View
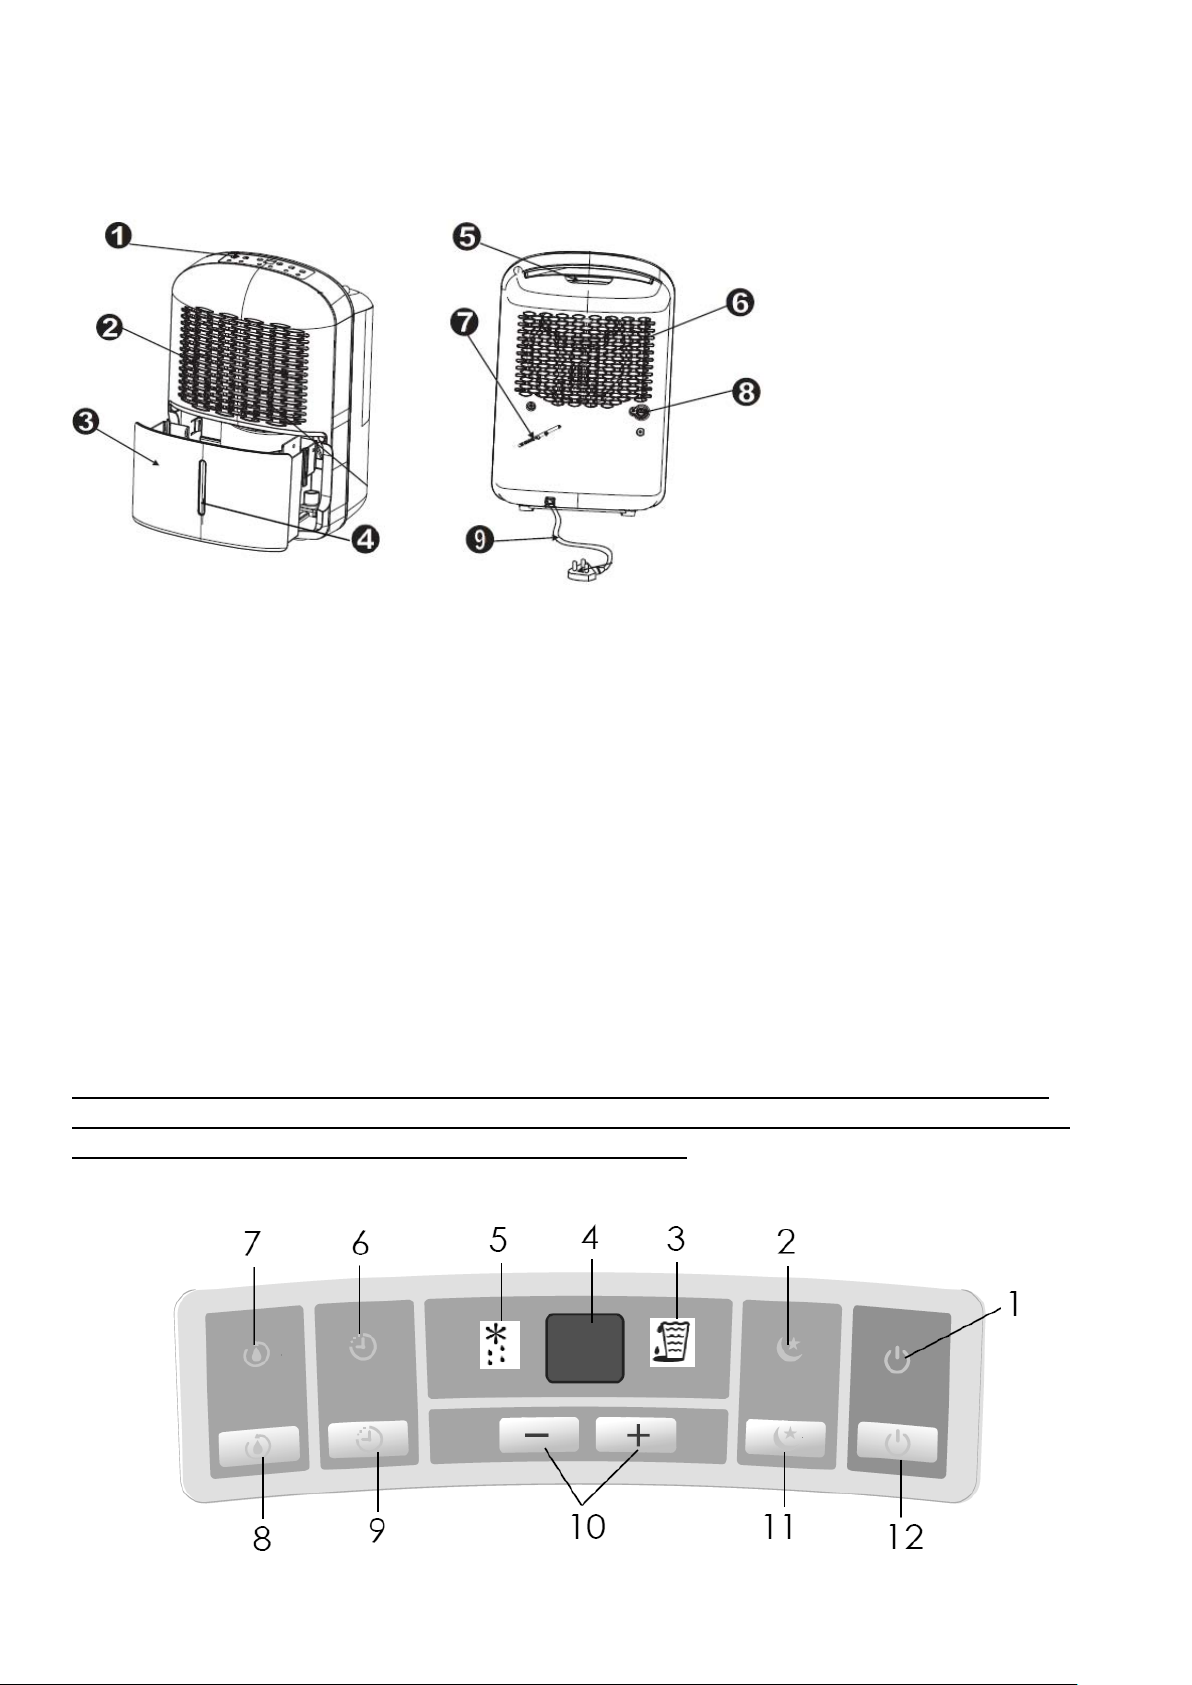
1. Control panel
2. Air inlet grille
3. Water tank
4. Water level window
5. Handle
6. Air outlet grille
7. Power cord band
8. Continuous drainage port
9. Power cord
GB
OPERATION
When first using the appliance, operate it for 24 hours continuously. This will help the refrigerant settle in
properly.
This appliance is designed to operate in an ambient temperature between 5°C and 35°C.
Select a suitable location, making sure you have easy access to the mains socket.
Do not connect the appliance to a multiple socket outlet.
Place the appliance away from the clothes dryer, heater or radiator.
You can use the appliance to prevent books or valuables from moisture damage.
You can use the appliance in a basement to help prevent moisture damage.
The appliance must be operated in an enclosed area to be most effective.
Close all doors, windows and other outside openings to the room.
Casters can let you move the appliance easily.
Make sure the water tank is correctly fitted.
NOTE: Always be careful when moving the appliance, especially as water gets higher in the tank; the
higher the water gets in the tank, the easier it is for the appliance to fall over when being moved. It is
recommended to empty the tank before moving the appliance.
Control Panel
4
Page 7

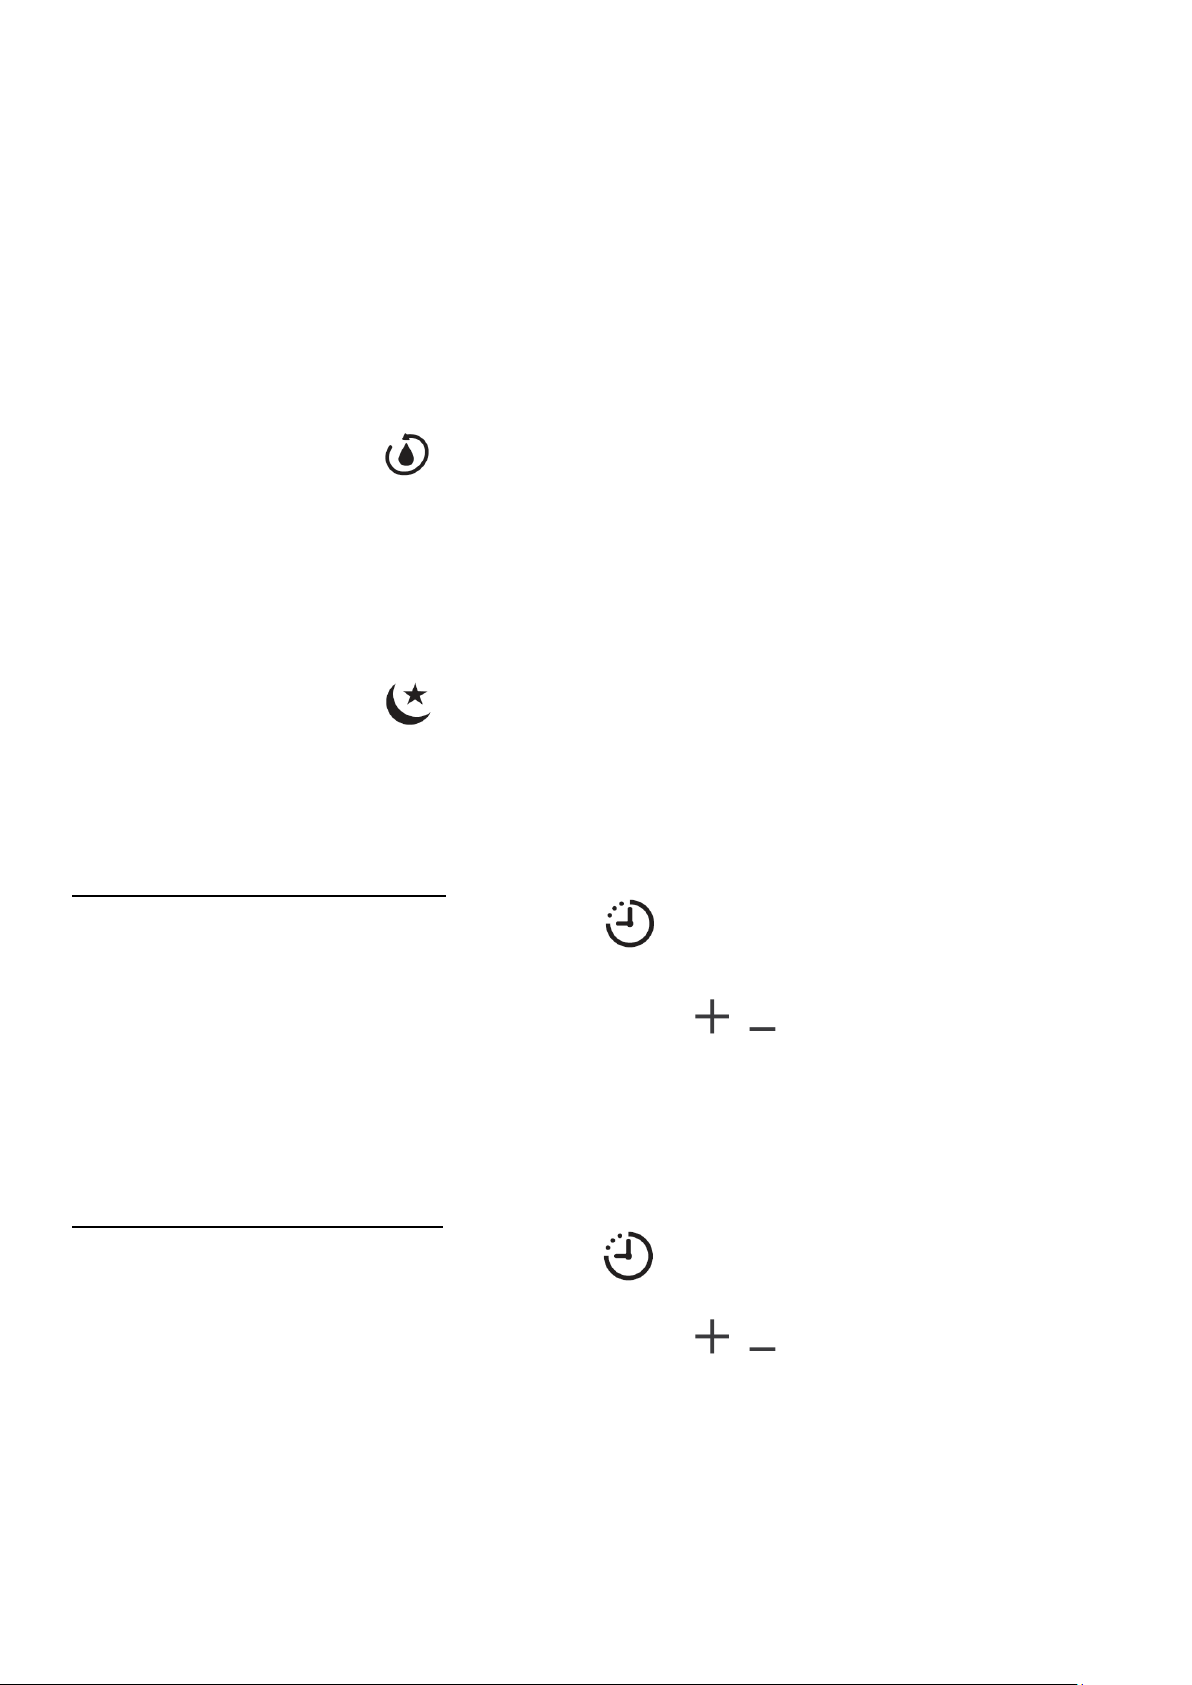
1. Power indicator light (green)
2. Silent function indicator light (green)
3. Tank full indicator light (red)
4. Display
To show the relative humidity percentage level, error codes, the delayed start or delayed stop time.
5. Auto defrosting operation (green)
6. Timer indicator light (green)
GB
7. Continuous dehumidifying mode indicator light (green)
8. Continuous dehumidifying mode button
9. Timer button
Press this button to select the delayed start or delayed stop function, in conjunction with / .
10. and buttons
11. Silent mode button
12. Power button
Power On and Off
Press to turn on the appliance.
The display will show the ambient humidity level.
To turn off the appliance, press again.
Wait for 3 minutes before resuming operation
If power is restored after a power failure, allow approximately 3 minutes for the appliance to continue to
operate at the selected settings.
Dehumidifying Mode
To operate the appliance in the dehumidifying mode, repeatedly press until the corresponding
indicator light goes out.
1. Repeatedly press / to set the desired humidity level in 5% increments.
5
Page 8
GB
The humidity level can be set within a range of 35%RH (Relative Humidity) to 85%RH (Relative
Humidity).
For drier air, set the humidity level for a lower percentage value.
For damper air, set the humidity level for a higher percent value.
2. After you have set the desired humidity level, the display will briefly show the set humidity level and
then return to actual ambient humidity level.
Continuous Dehumidifying Mode
You can use this mode to remove the excess moisture from the air all the time.
For continous operation, press to activate this function and the corresponding indicator light will
illuminate.
NOTE: You cannot set a desired humidity level when the appliance is in this mode.
Silent Mode
This mode allows the dehumidifier to operate quietly at a lower fan speed.
To activate this mode, press . The corresponding indicator light will illuminate.
To deactivate this mode, press again. The corresponding indicator light will go out. The fan will return to
the normal speed.
Timer
To programme the auto start function:
1. When the appliance is in the power off state, press .
The corresponding indicator light will illuminate and the display will show the hour.
2. While the hour is displaying, repeatedly press or press&hold / to set the desired hours.
The time will be changed by 0.5 hour increments up to 10 hours, and then by 1 hour increments up to
24 hours.
3. After about 5 seconds the set time will be confirmed and then disappear from the display.
4. When the set time has elapsed, the appliance will start working.
To programme the auto stop function:
1. When the appliance is in the power on state, press .
The corresponding indicator light will illuminate and the display will show the hour.
2. While the hour is displaying, repeatedly press or press&hold / to set the desired hours.
The time will be changed by 0.5-hour increments up to 10 hours, and then by 1-hour increments up to
24 hours.
3. After about 5 seconds the set time will be confirmed and then the display will return to the ambient
humidity level.
4. When the set time has elapsed, the appliance will stop working.
6
Page 9
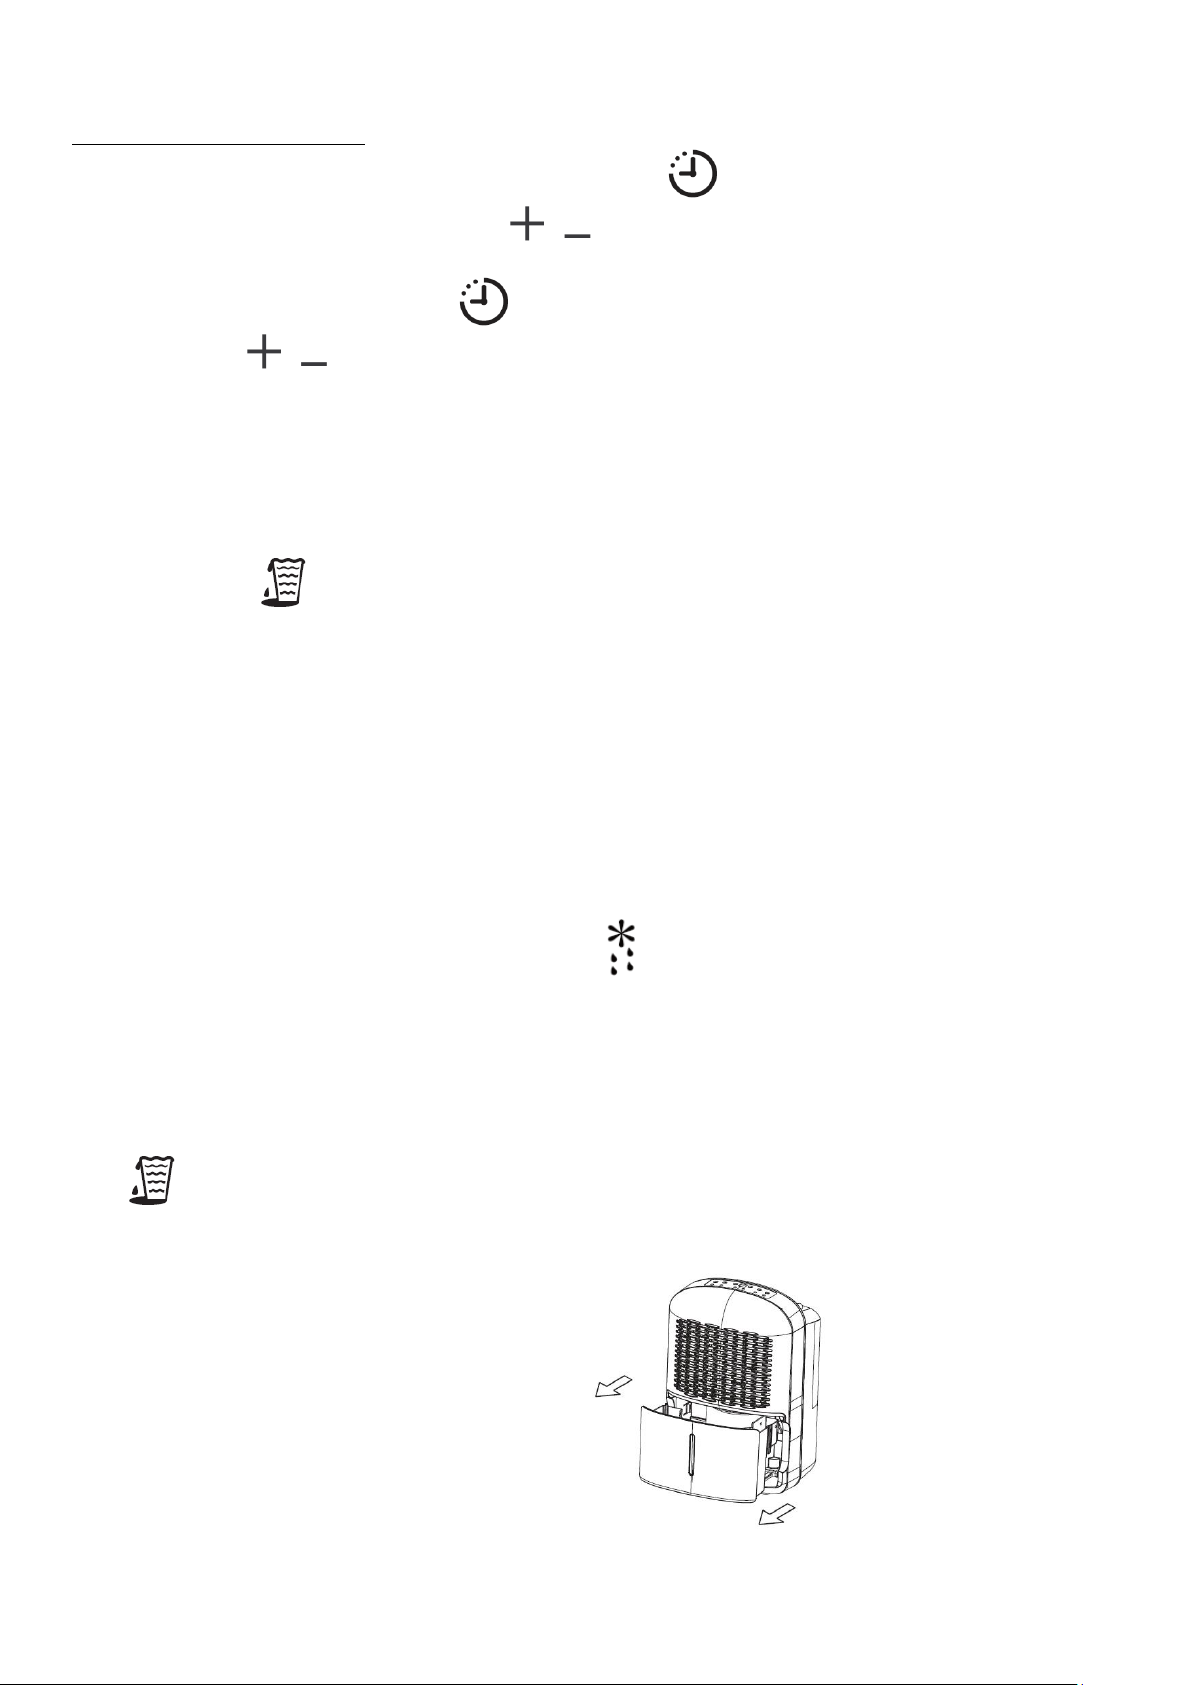
1. Slowly pull out the water tank.
Hold the appliance firmly and pull out the
tank, being careful not to spill any water.
GB
To modify or cancel the timer:
If you wish to modify the set auto start or stop time, press once and then while the hour is
displaying, repeatedly press or press&hold / until the desired time is selected.
If you wish to cancel the timer, press once and then while the hour is displaying repeatedly press
or press&hold / until “0.0” is selected. The timer will also be cancelled when the display shows
the error code “P2”.
Other Functions
Tank full
The indicator light will illuminate when the water tank is full or not in place. Please empty the tank
or replace it in the correct position and then this indicator light will go out.
Auto Shut Off
The dehumidifier will shut off when the water tank is full, or when the water tank is removed or not placed
in the proper position. It will also be shut off when the set dehumidty level is reached.
Auto Defrost
When frost builds up on the evaporator coils, the compressor will cycle off and the fan will continue to run
until the frost disappears.
When auto defrosting is operating, the indicator light will illuminate.
EMPTYING THE WATER TANK
The dehumidifier will stop working when the water tank is full. The display will show “P2” and the indicator
light will illumiante.
Please follow the steps below to empty the water tank and then continue using the appliance.
7
Page 10
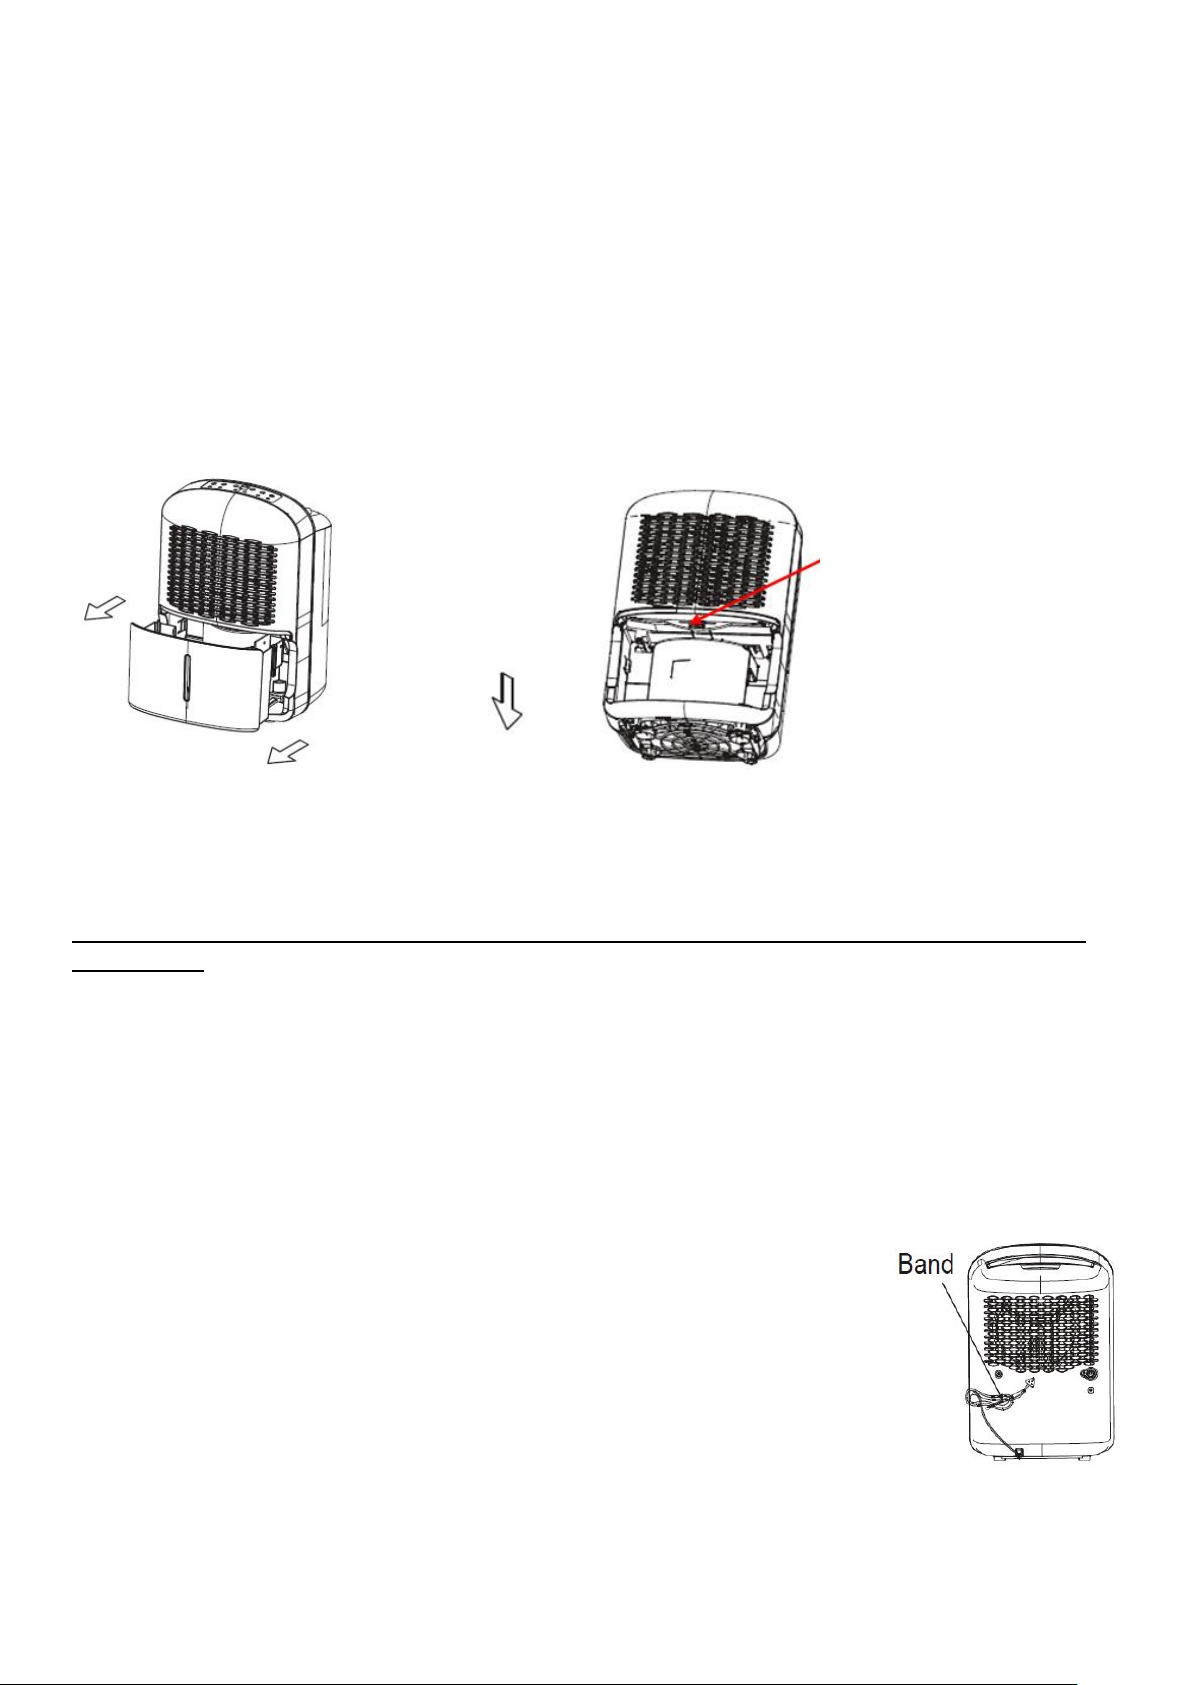
2. Pour out the water.
3. Push the water tank gently all the way in.
Failing to push the tank securely may cause
the appliance to stop operating.
GB
4. When the tank is put back, the appliance will start operating. The indicator light will go out
and “P2” will disappear from the display.
NOTE:
Never drink the water or use it to water plant.
After you remove the water tank, do not touch internal parts of the dehumidifier. It could damage the
appliance.
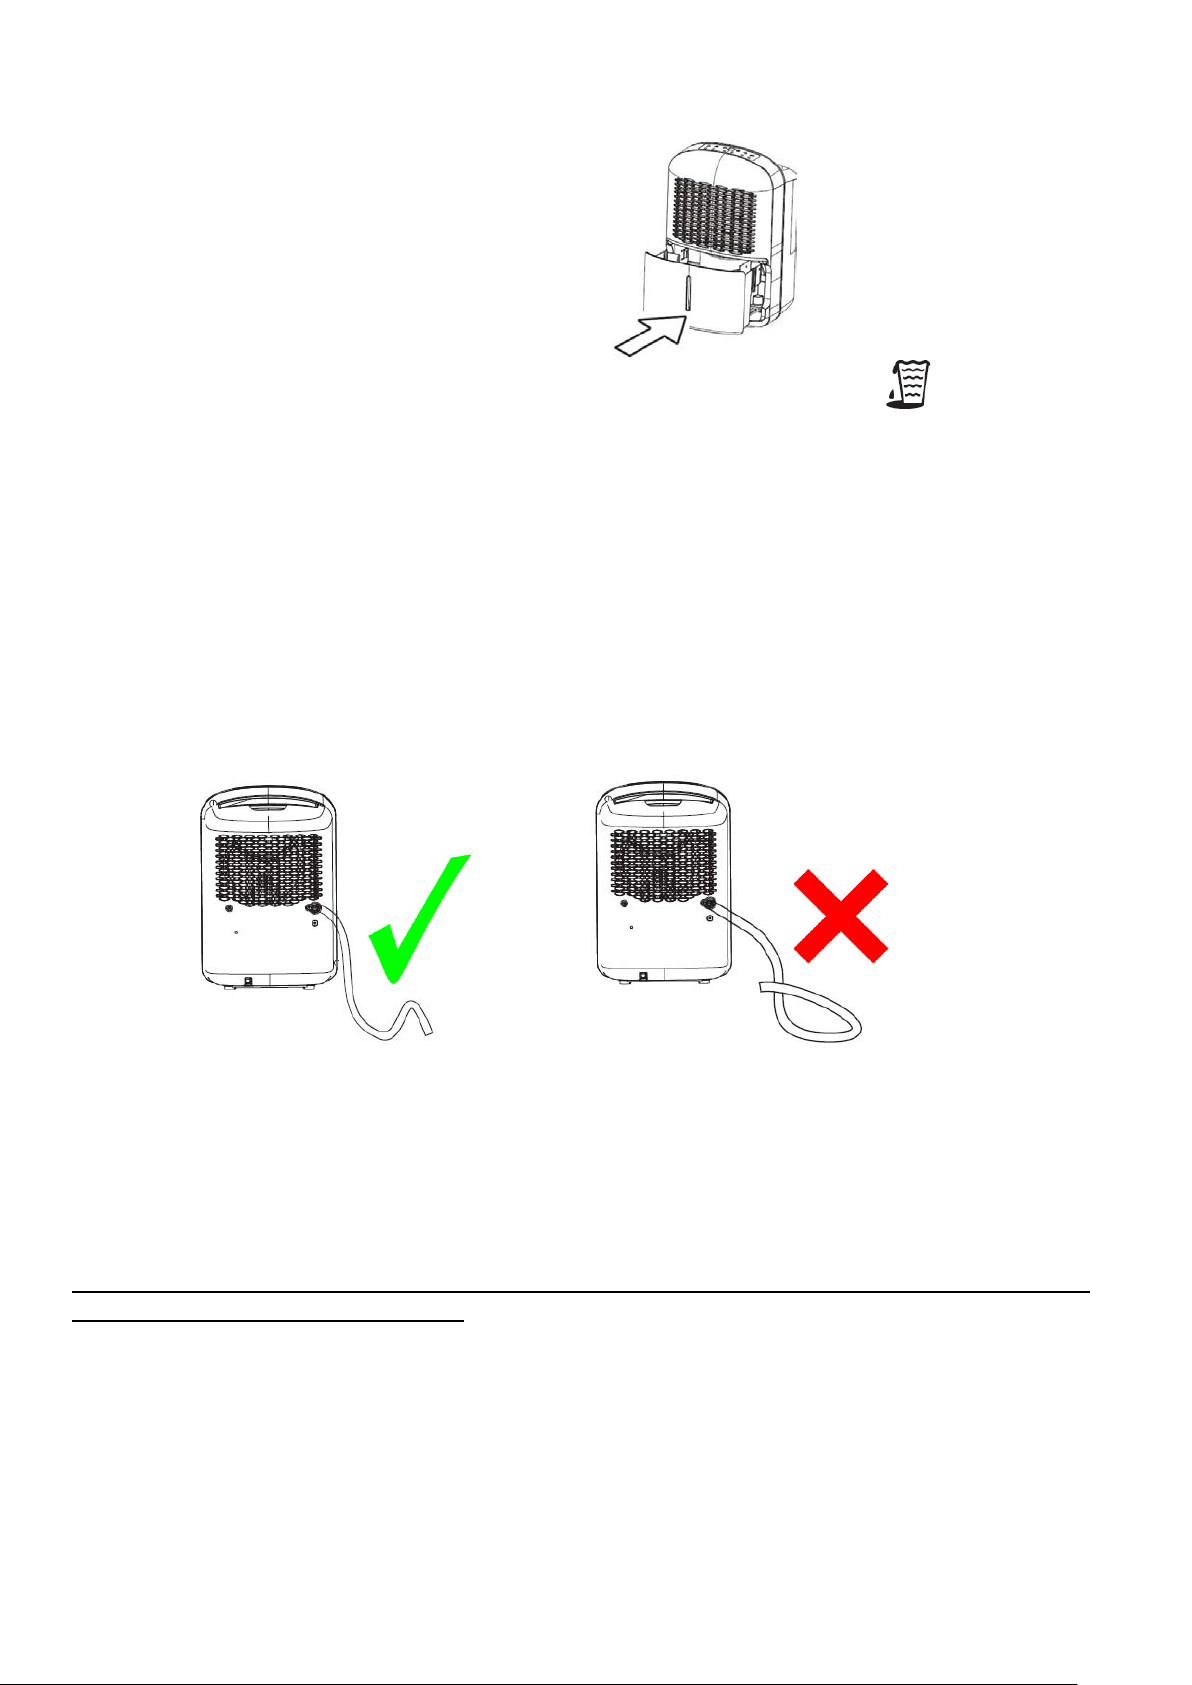
Continuous External Draining
If the appliance is to be operated for long periods but you are unable to empty the tank, it is recommended
to use the continuous drain facility.
1. Remove the rubber plug from the drain outlet.
2. Fasten a hose (not supplied) to the drain outlet.
Make sure that the hose is not higher than the outlet; otherwise water will remain in the tank. Also
check that the hose is not kinked.
3. Lead the water hose to the floor drain or a suitable drainage facility.
The drainage facility should be lower than the drain outlet.
NOTE: When the continuous drain facility is not being used, remove the hose from the outlet and attach
the rubber plug back to the drain outlet.
8
Page 11
Grip the tab on the filter
and then pull the filter
outwards.
CLEANING AND MAINTENANCE
Turn the appliance off and remove the plug from the mains socket before performing any cleaning or
maintenance operations.
Never immerse the appliance in water.
Cleaning the body
Clean the outside of the appliance with a slightly damp cloth. Dry thoroughly.
Do not use abrasive or chemical cleaning agents.
Cleaning the filter
Remove and clean the filter once a month.
GB
To remove the filter, first remove the water tank and then pull the filter outwards.
Clean it in warm soapy water. Rinse and dry it thoroughly before replacing it.
Attach the filter back to the rear of the dehumidifier.
CAUTION: DO NOT operate the dehumidifier without a filter because dirt and lint will clog it and reduce
performance.
Routine cleaning of the water tank (once a month)
Depending on where the dehumidifier is used, the inside of the water tank may become dirty as a result of
dirt and dust contained in the air. If this is the case, clean the tank in soapy water.
NOTE: Do not clean the tank in a dishwasher. After cleaning, the tank must be placed in place for the
dehumidifier to operate.
If the appliance is not used for long periods
After turning off and unplugging the appliance from the mains socket, empty the
tank.
Clean the outside of the appliance. Clean and reposition the tank and filter.
Cover the appliance to protect it from dust.
Store the appliance upright in a dry, well-ventilated place.
Wap the power cord and bundle it with the band at the rear of the dehumidifier.
9
Page 12

TROUBLESHOOTING
Problem
What to check
The appliance does not operate.
Check that the appliance is plugged into the mains socket.
Check the fuse/circuit breaker box.
Check if the water tank is full.
Check that the water tank is correctly fitted.
Check if the appliance is not turned on.
Dehumidifying capacity (moisture
removal) is low.
Check that all doors or windows are closed or not opened too
often.
Check that the room temperature is higher than 5°C.
Check that there is no kerosene heater or other device giving off
water vapour in the room.
The appliance is noisy.
Check that the filter is not clogged.
Check that the appliance is not tilted.
Check that the floor surface where the appliance is placed is
stable and level.
Code
Description
Possible Solution
AS
Humidity sensor error
Unplug the appliance and plug it back in. If this error
repeats, call for service.
ES
Temperature sensor error
EC
Refrigerant leakage detection
Call for service.
P2
Water tank is full or it is not
in right position.
Empty the water tank or replace it in place.
Capacity
(Under the following test conditions:
The ambient temperature DB=30°C,
the relativity humidity RH=80%)
12L / DAY
Excessive operating pressure
Discharge : 1.7 MPa
Suction: 0.7MPa
Weight
11 kg
Power source
220-240V~ 50Hz, 1Ph
Refrigerant
R410a / 80g
Rated current
2.0A
Rated input
290W
Before calling for service, check the following items yourself.
GB
Error and protection codes
SPECIFICATIONS
10
Page 13

DISPOSAL
As a responsible retailer we care about the environment.
As such we urge you to follow the correct disposal procedure for the appliance and
packaging materials. This will help conserve natural resources and ensure that it is recycled
in a manner that protects health and the environment.
You must dispose of this appliance and its packaging according to local laws and regulations.
Because this appliance contains electronic components, the appliance and its accessories
must be disposed of separately from household waste when the appliance reaches its end of
life.
Contact your local authority to learn about disposal and recycling.
The appliance should be taken to your local collection point for recycling. Some collection
points accept appliance free of charge.
We apologise for any inconvenience caused by minor inconsistencies in these instructions,
which may occur as a result of product improvement and development.
Darty Holdings SAS © 14 route d’Aulnay 93140 Bondy, France 02 / 11 / 2015
11
Page 14

FR
AVERTISSEMENTS
Cet appareil est desné à un usage domesque uniquement. Toute ulisaon
autre que celle prévue pour cet appareil, ou pour une autre applicaon que
celle prévue, par exemple une applicaon commerciale, est interdite.
Cet appareil peut être ulisé par des enfants âgés d'au moins 8 ans et par des
personnes ayant des capacités physiques, sensorielles ou mentales réduites ou
dénuées d’expérience ou de connaissance, s'ils (si elles) sont correctement
surveillé(e)s ou si des instrucons relaves à l'ulisaon de l'appareil en toute
sécurité leur ont été données et si les risques encourus ont été appréhendés.
Les enfants ne doivent pas jouer avec l’appareil. Le neoyage et l'entreen par
l'usager ne doivent pas être effectués par des enfants sans surveillance.
Si le câble d'alimentaon est endommagé, il doit être remplacé par le fabricant,
son service après vente ou des personnes de qualificaon similaire afin d'éviter
un danger.
En ce qui concerne la méthode et la fréquence du neoyage, référez-vous à la
secton “NETTOYAGE ET ENTRETIEN” en page
9.
Mise au rebut de l’appareil:
Pour éviter toute nuisance envers l’environnement ou la santé humaine causée
par la mise au rebut non contrôlée de déchets électriques, recyclez l’appareil de
façon responsable pour promouvoir la réulisaon des ressources matérielles.
La mise au rebut doit être faite de façon sûre dans des points de collecte publique
prévus à cet effet.
Installaon et mise en service:
L’appareil doit être installé sur le sol, sur une surface plane et horizontale en s’assurant que
les ouvertures d’aéraon sont correctement dégagées.
Ne jamais essayer de remplacer ou de réparer vous même une pare ou un composant de
l’appareil, demandez de l’aide à un personnel professionnel et qualifié, si besoin.
1
Page 15

Laissez au moins 20 cm d'espace
de tous les côtés de l'appareil et
40 cm au-dessus de l'appareil afin
de garantir une circulation d'air
suffisante.
FR
Manipulation:
Toujours manipuler l’appareil avec soin afin d’éviter d’endommager celui-ci.
Le R-410A utilisé dans cet appareil est un gaz à effet de serre fluoré relevant du
protocole de Kyoto, qui peut être nocif pour l’environnement et peut être
responsable du réchauffement global s’il s’échappe dans l’atmosphère. Son
potentiel de réchauffement global est 2087.5.
L’appareil doit être installé conformément aux réglementations nationales
concernant les câblages électriques.
INSTRUCTIONS DE SÉCURITÉ IMPORTANTES
Pour réduire les risques de choc électrique, d'incendie ou de blessure, veuillez
lire attentivement toutes les instructions avant d’utiliser l’appareil et
conservez-les pour toute consultation ultérieure.
L'appareil ne doit pas être immergé dans l'eau ni dans aucun autre liquide.
Ne réparez pas l’appareil vous-même. Toutes les réparations doivent être
effectuées par un électricien qualifié.
2
Page 16

FR
Ne faites pas fonctionner l'appareil à l'extérieur et ne l’exposez pas à la pluie ni
à l’humidité.
Installez votre déshumidificateur sur une surface plane et stable. Assurez-vous
que la surface est suffisamment solide pour supporter le poids du
déshumidificateur avec une cuve à eau pleine. Ne vous asseyez pas et ne montez
jamais sur le déshumidificateur.
Eteignez l'appareil et débranchez le câble d’alimentation de la prise murale
lorsque l’appareil n’est pas utilisé et avant de le nettoyer.
Ne posez aucun objet sur l’appareil.
Ne buvez pas et n'utilisez pas l'eau recueillie dans la cuve de l'appareil.
Ne faites pas fonctionner l'appareil à proximité de gaz ou de combustibles
inflammables, comme de l'essence, du benzène, un diluant, etc.
Ne retirez pas la cuve à eau lorsque l'appareil est en marche.
Ne placez pas d'aérosols ou d'autres matières dangereuses à proximité de
l'appareil, ni de matériaux inflammables tels que de l'essence ou du diluant. Ces
matériaux risqueraient d’exploser et de provoquer un incendie.
Ne placez pas l'appareil près d’une source de chaleur. Cela pourrait faire
fondre les pièces en plastique internes et provoquer un incendie.
Placez l’appareil exclusivement sur une surface plane et stable.
Ne placez aucun récipient rempli de liquide, comme un vase, sur l'appareil. Un
écoulement d’eau pourrait en effect entraîner un dysfonctionnement de
l'isolation et un choc électrique ou un incendie.
Ne vous tenez pas contre l'appareil et ne vous appuyez pas sur l'appareil. Il
risquerait de basculer et d’entraîner des blessures.
Veuillez à ne pas obstruer l'arrivée ou la sortie d'air avec des vêtements ou
tout autre objet. L'obstruction de la circulation de l'air provoquerait une
surchauffe, un dysfonctionnement ou un incendie.
Ne faites pas fonctionner l'appareil sans le filtre en place.
3
Page 17

Vue avant
Vue arrière
1. Panneau de contrôle
2. Grille d’entrée d’air
3. Réservoir d’eau
4. Indicateur du niveau d’eau
5. Poignée
6. Grille de sortie d'air
7. Attache du câble
d’alimentation
8. Orifice de vidange d'eau en
continu
9. Câble d’alimentation
FR
DESCRIPTION
FONCTIONNEMENT
Lors de la première utilisation de l'appareil, faites-le fonctionner pendant 24 heures sans interruption.
Cela permettra au réfrigérant de se régler correctement.
Cet appareil est conçu pour fonctionner sous une température ambiante entre 5°C et 35°C.
Choisissez un emplacement adapté, en vous assurant que la prise de courant est facilement accessible.
Ne branchez pas l'appareil à une prise électrique alimentant d'autres appareils.
Placez l'appareil dans un endroit éloigné du sèche-linge, du chauffe-eau ou des radiateurs.
Vous pouvez utiliser l'appareil pour empêcher que les livres ou les objets de valeur ne soient
endommagés par l'humidité.
Vous pouvez utiliser l'appareil dans un sous-sol pour aider à prévenir les dommages liés à l'humidité.
L'appareil doit être utilisé dans un espace clos pour être plus efficace.
Fermez toutes les portes, fenêtres et autres ouvertures de la pièce vers l'extérieur.
Les roulettes vous permettent de déplacer facilement l'appareil.
Assurez-vous que la cuve à eau est correctement installée.
REMARQUE : Déplacez toujours l'appareil avec prudence, surtout lorsqu'il y a beaucoup d'eau dans la cuve;
plus il y a d'eau dans la cuve, plus le risque est élevé de faire basculer l'appareil lorsqu'il est
déplacé. Il est recommandé de vider la cuve à eau avant de déplacer l'appareil.
Panneau de Contrôle
4
Page 18

1. Indicateur lumineux d’alimentation (vert)
2. Indicateur lumineux de fonctionnement silencieux (vert)
3. Indicateur lumineux de cuve pleine (rouge)
4. Écran d'affichage
Affiche le taux d'humidité relative, les codes d'erreur, le délai avant le départ différé ou l'arrêt différé.
5. Fonction de dégivrage automatique (vert)
6. Indicateur lumineux du minuteur (vert)
FR
7. Indicateur lumineux du mode de déshumidification en continu (vert)
8. Bouton du mode de déshumidification en continu
9. Bouton du minuteur
Appuyez sur ce bouton pour sélectionner la fonction de départ différé ou d’arrêt différé puis
effectuez le réglage souhaité à l’aide des boutons / .
10. Boutons et
11. Bouton du mode silencieux
12. Bouton d’alimentation
Mise en marche et arrêt
Appuyez sur pour mettre l'appareil en marche.
L'affichage indiquera le niveau d'humidité ambiant.
Pour éteindre l'appareil, appuyez de nouveau sur .
En cas de panne de courant
Si l'alimentation est rétablie après une panne de courant, attendez environ 3 minutes avant de remettre
l’appareil en marche pour qu’il continue à fonctionner avec les paramètres sélectionnés.
5
Page 19

FR
Mode de déshumidification
Pour faire fonctionner l'appareil en mode de déshumidification, appuyez plusieurs fois sur jusqu'à ce
que l'indicateur lumineux correspondant s'éteigne.
1. Appuyez plusieurs fois sur / pour régler le niveau d'humidité désiré par intervalles de 5%.
Le niveau d'humidité peut être réglé sur une échelle comprise entre 35%HR (Humidité Relative) et
85%HR.
Pour un air plus sec, réglez le niveau d'humidité sur un pourcentage plus faible.
Pour un air plus humide, réglez le niveau d'humidité sur un pourcentage plus élevé.
2. Après avoir réglé le niveau d'humidité désiré, l'affichage indiquera brièvement le niveau d'humidité
sélectionné, puis affichera de nouveau le niveau d'humidité ambiant de la pièce.
Mode de déshumidification continue
Vous pouvez utiliser ce mode afin que l'excès d'humidité de l'air soit absorbé en continu.
Pour un fonctionnement en continu, appuyez sur pour activer cette fonction et l'indicateur lumineux
correspondant s'allumera.
REMARQUE : Vous ne pouvez pas sélectionner le niveau d'humidité désiré lorsque l'appareil est réglé sur ce
mode.
Mode silencieux
Ce mode permet au déshumidificateur de fonctionner silencieusement à une vitesse de ventilation plus
faible.
Pour activer ce mode, appuyez sur . L'indicateur lumineux correspondant s'allumera.
Pour désactiver ce mode, appuyez à nouveau sur ce bouton. L'indicateur lumineux correspondant
s'éteindra. Le ventilateur fonctionnera de nouveau à la vitesse normale.
Minuteur
Pour programmer un départ différé :
1. Lorsque l'appareil est éteint, appuyez sur .
L'indicateur lumineux correspondant s'allumera et les chiffres des heures s’afficheront.
2. Lorsque les chiffres des heures sont affichés, appuyez plusieurs fois ou appuyez et maintenez les boutons
/ enfoncés pour régler la durée souhaitée avant le départ différé.
La durée avant le démarrage différé peut être modifiée par intervalles de 0,5 heures jusqu'à 10 heures,
puis par intervalles de 1 heure jusqu'à 24 heures.
3. Après environ 5 secondes, la durée réglée sera confirmée puis disparaîtra de l'affichage.
4. Lorsque la durée réglée sera écoulée, l'appareil commencera à fonctionner.
6
Page 20

FR
Pour programmer un arrêt différé :
1. Lorsque l'appareil est en marche, appuyez sur .
L'indicateur lumineux correspondant s'allumera et les chiffres des heures s’afficheront.
2. Lorsque les chiffres des heures sont affichés, appuyez plusieurs fois ou appuyez et maintenez les boutons
/ enfoncés pour régler la durée souhaitée avant l’arrêt différé.
La durée avant l'arrêt différé peut être modifiée par intervalles de 0,5 heures jusqu'à 10 heures, puis
par intervalles de 1 heure jusqu'à 24 heures.
3. Après environ 5 secondes, la durée réglée sera confirmée puis l'affichage indiquera de nouveau le niveau
d'humidité ambiant.
4. Lorsque la durée réglée sera écoulée, l'appareil s'arrêtera de fonctionner.
Pour modifier ou annuler le minuteur :
Si vous désirez modifier la durée avant le démarrage différé ou l'arrêt différé, appuyez une fois sur
et lorsque les heures s'affichent, appuyez plusieurs fois ou appuyez et maintenez les boutons /
enfoncés jusqu'à ce que la durée désirée soit sélectionnée.
Si vous désirez annuler le minuteur, appuyez une fois sur et lorsque les heures s'affichent,
appuyez plusieurs fois ou appuyez et maintenez les boutons / enfoncés jusqu'à ce que "0.0"
s'affiche. Le minuteur sera également annulé lorsque l'écran affichera le code d'erreur "P2".
Autres fonctions
Cuve à eau pleine
L'indicateur lumineux s'allume lorsque la cuve à eau est pleine ou qu'elle n'est pas correctement
mise en place. Veuillez vider la cuve ou la remettre correctement en position puis l'indicateur lumineux
s'éteindra.
Arrêt automatique
Le déshumidificateur s'éteint lorsque la cuve à eau est pleine, lorsque la cuve à eau est retirée ou n'est pas
placée correctement en position. Il s'arrêtera également de fonctionner lorsque le niveau du taux
d'humidité réglé est atteint.
Dégivrage automatique
Lorsque du givre s'accumule sur les bobines de l'évaporateur, le compresseur s'arrête et le ventilateur
continue de fonctionner jusqu'à ce que le givre disparaisse.
Lorsque le dégivrage automatique est en fonctionnement, l'indicateur lumineux s'allume.
7
Page 21

1. Retirez doucement la cuve à eau.
Maintenez fermement l'appareil et retirez
la cuve en prenant soin de ne pas renverser
d'eau.
2. Déversez l'eau pour vider la cuve.
3. Replacez doucement la cuve vide dans le
boîtier de l'appareil.
L'appareil ne démarrera pas si la cuve à eau
n'est pas replacée correctement dans le
boîtier.
FR
VIDAGE DE LA CUVE À EAU
Le déshumidificateur s'arrête de fonctionner lorsque la cuve à eau est pleine. "P2" s'affiche sur le panneau
de contrôle et l'indicateur lumineux s'allume.
Veuillez suivre les étapes ci-dessous pour vider la cuve à eau et continuer à utiliser l'appareil.
4. Une fois que la cuve est remise en place, l'appareil se remettra en marche. L'indicateur lumineux
s'éteindra et "P2" disparaîtra de l'affichage.
REMARQUE :
Ne buvez jamais l'eau de la cuve et ne l'utilisez pas pour arroser les plantes.
Lorsque vous retirez la cuve, ne touchez pas les pièces internes du déshumidificateur. Cela pourrait
endommager votre appareil.
Vidange externe en continu
Si l'appareil doit être utilisé pendant de longues périodes et que vous ne pouvez pas vider la cuve à chaque
fois qu'elle est pleine, il est recommandé d'utiliser la fonction de vidange d'eau en continu.
1. Retirez le bouchon en caoutchouc de l'orifice de vidange.
2. Fixez un tuyau (non fourni) à la sortie de vidange.
• Assurez-vous que le tuyau n'est pas placé plus haut que l'orifice de vidange, car dans ce cas l'eau
restera dans la cuve. Vérifiez également que le tuyau n'est pas tordu.
3. Dirigez le tuyau d'eau vers le lieu d'évacuation au sol ou vers une installation de vidange appropriée.
L'installation de vidange doit être à une hauteur inférieure à la sortie de vidange.
8
Page 22

Saisissez la patte du
filtre puis tirez le filtre
vers l'extérieur.
FR
REMARQUE : Lorsque la fonction de vidange de l'eau en continu n'est pas utilisée, détachez le tuyau de
l'orifice de vidange et replacez le bouchon en caoutchouc sur l'orifice.
NETTOYAGE ET ENTRETIEN
Éteignez l'appareil et débranchez la prise de la source d'alimentation avant d'effectuer toute opération de
nettoyage ou d'entretien.
N'immergez jamais l’appareil dans l’eau.
Nettoyage du boîtier de l'appareil
Nettoyez les surfaces extérieures de l’appareil avec un chiffon légèrement humide. Séchez soigneusement
le boîtier.
N’utilisez pas de nettoyant chimique ou abrasif.
Nettoyage du filtre
Enlevez et nettoyez le filtre une fois par mois.
Pour retirer le filtre, enlevez tout d'abord la cuve à eau puis tirez le filtre vers l'extérieur.
Nettoyez-le dans de l'eau chaude savonneuse. Rincez-le et séchez-le complètement avant de le remettre en
place.
Fixez de nouveau le filtre à l'arrière du déshumidificateur.
ATTENTION: NE faites PAS fonctionner le déshumidificateur sans filtre car la saleté et les peluches
pourraient boucher la grille et réduire la performance de l'appareil.
Nettoyage régulier de la cuve à eau (une fois par mois)
Selon l'endroit où le déshumidificateur est utilisé, l'intérieur de la cuve à eau peut s'encrasser en raison de
la saleté et des poussières contenues dans l'air. Si tel est le cas, nettoyez la cuve avec de l'eau savonneuse.
REMARQUE : Ne lavez pas la cuve au lave-vaisselle. Après le nettoyage, la cuve doit être replacée en
position pour que le déshumidificateur redémarre.
Si l'appareil n'est pas utilisé durant une longue période
Après avoir éteint l'appareil et débranché le câble d'alimentation, videz l'eau de la
Attache
cuve.
Nettoyez les surfaces externes de l’appareil. Nettoyez et repositionnez la cuve et
le filtre à air.
Protégez l’appareil des poussières en le couvrant.
Rangez l’appareil en position verticale dans un endroit sec et bien ventilé.
Enroulez le câble d'alimentation et attachez-le avec l’attache présente au dos de
l'appareil.
9
Page 23

GUIDE DE DÉPANNAGE
Problème
Vérification
L’appareil ne fonctionne pas.
Vérifiez que l'appareil est correctement branché à une prise de
courant.
Vérifiez le fusible/ le disjoncteur.
Vérifiez que la cuve à eau n’est pas pleine.
Assurez-vous que la cuve à eau est correctement installée.
Vérifiez que l'appareil est bien mis en marche.
La capacité de déshumidification
(absorption de l'humidité
ambiante) est faible.
Vérifiez que toutes les portes et fenêtres sont fermées et qu’elles
ne sont pas ouvertes trop souvent.
Vérifiez que la température ambiante est supérieure à 5°C.
Vérifiez qu'il n'y a pas de chauffage au kérosène ou un autre
appareil dégageant de la vapeur d'eau dans la pièce.
L'appareil est bruyant.
Vérifiez que le filtre n'est pas obstrué.
Vérifiez que l'appareil n'est pas incliné.
Vérifiez que la surface du sol où est placé l'appareil est plane et
stable.
Code
Description
Solution possible
AS
Erreur du capteur d'humidité
Débranchez l'appareil puis rebranchez le câble à la prise
murale. Si le problème persiste, consultez le service
après-vente.
ES
Erreur du capteur de
température
EC
Détection d'une fuite du
réfrigérant
Appelez le service après-vente.
P2
La cuve est pleine ou la cuve
n'est pas correctement
insérée.
Videz l'eau de la cuve ou remettez-la bien en place
Capacité
(Dans les conditions d'essai
suivantes: température ambiante =
30 °C, humidité relative HR = 80%)
12L / JOUR
Pression de fonctionnement
excessive
Décharge : 1,7 MPa
Aspiration: 0,7MPa
Poids
11 kg
Source d’alimentation
220-240V~ 50Hz, 1Ph
Réfrigérant
R410A/80g
Courant nominal
2,0A
Puissance d'entrée
290W
Avant de faire réparer l'appareil, vérifiez les éléments suivants vous-même.
FR
Codes d'erreurs et de protection
SPÉCIFICATIONS
10
Page 24

MISE AU REBUT
En tant que distributeur responsable, nous accordons une grande importance à
la protection de l’environnement.
Nous vous encourageons à respecter les procédures correctes de mise au rebut de votre
appareil, des piles et des éléments d’emballage. Cela aidera à préserver les ressources
naturelles et à garantir qu’il soit recyclé d’une manière respectueuse de la santé et de
l’environnement.
Vous devez jeter ce produit et son emballage selon les lois et les règles locales.
Puisque ce produit contient des composants électroniques et parfois des piles, le produit et
ses accessoires doivent être jetés séparément des déchets domestiques lorsque le produit
est en fin de vie.
Pour plus de renseignements sur les procédures de mise au rebut et de recyclage, contactez
les autorités de votre commune.
Apportez l’appareil à point de collecte local pour qu’il soit recyclé. Certains centres
acceptent les produits gratuitement.
Hotline Darty France
Quels que soient votre panne et le lieu d'achat de votre produit en France, avant de vous
déplacer en magasin Darty, appelez le 0 978 970 970 (prix d'un appel local) 7j/7 et 24h/24.
Le service après-vente est joignable au +32 2 334 00 00, du lundi au vendredi de 8h à 18h et
le samedi de 9h à 18h.
En raison des mises au point et améliorations constamment apportées à nos produits, de
petites incohérences peuvent apparaître dans ces instructions. Veuillez nous excuser pour la
gêne occasionnée.
Darty Holdings SAS © 14 route d’Aulnay 93140 Bondy, France 02 / 11 / 2015
11
Page 25

NL
WAARSCHUWINGEN
Dit apparaat is alleen bedoeld voor huishoudelijk gebruik en mag niet voor
andere doeleinden of toepassingen worden gebruikt, zoals niet-huishoudelijk
gebruik of in een commerciële omgeving.
Dit apparaat mag worden gebruikt door kinderen vanaf 8 jaar oud en personen
met beperkte fysische, visuele of mentale mogelijkheden, of die gebrek aan
ervaring en kennis hebben, indien ze onder toezicht staan of gepaste instruces
hebben gekregen zodat ze het apparaat op een veilige manier kunnen gebruiken
en op de hoogte zijn van de gevaren die het gebruik van het apparaat met zich
meebrengt. Laat kinderen niet met het apparaat spelen. Kinderen mogen het
apparaat niet zonder toezicht reinigen of onderhouden.
Als het snoer is beschadigd, moet het worden vervangen door de fabrikant,
een erkende reparateur of een ander gekwalificeerd persoon om elk gevaar
te vermijden.
Voor details over de reinigingsmethode en -frequene, zie de sece “Reiniging en
onderhoud” op pagina 8.
Het apparaat weggooien:
Om mogelijke schade aan het milieu of aan de menselijke gezondheid te
voorkomen door het ongecontroleerd verwijderen van afval, recycle het
apparaat op een verantwoordelijke wijze, om het duurzame hergebruik
van grondstoffen te bevorderen. Lever het apparaat in bij een inzamelpunt
in uw gemeente.
Installae en onderhoud:
Plaats het apparaat op een horizontaal oppervlak en zorg voor voldoende
venlae. Vervang of repareer de onderdelen niet zelf. Indien nodig, raadpleeg
het servicecentrum.
Hantering:
Hanteer het apparaat aljd met de nodige voorzichgheid om schade te
voorkomen.
1
Page 26

Laat minstens 20cm vrije ruimte
aan alle zijden en 40cm boven
het apparaat voor een goede
luchtcirculatie.
NL
Het R-410A koelmiddel dat in dit product wordt gebruikt is een gefluoreerd
broeikasgas onder het Kyoto protocol, dat zowel schadelijk voor het milieu als
verantwoordelijk voor de opwarming van de aarde kan zijn als deze in de
atmosfeer vrijkomt. Zijn aardopwarmingspotentieel is 2087,5.
Installeer het apparaat in overeenstemming met de nationale
bedradingsvoorschriften.
BELANGRIJKE VEILIGHEIDSINSTRUCTIES
Om het risico op elektrische schokken, brand of letsel te beperken, lees de
gebruiksaanwijzing zorgvuldig door voordat u het apparaat gebruikt en bewaar
deze voor latere raadpleging.
Dompel het apparaat nooit in water of een andere vloeistof.
Repareer het apparaat nooit zelf. Laat reparaties alleen door een
gekwalificeerde reparateur uitvoeren.
Berg het apparaat niet buitenshuis op of stel het niet bloot aan regen of vocht.
Plaats uw luchtontvochtiger op een stabiel en vlak oppervlak. Zorg dat het
oppervlak stevig genoeg is om het gewicht van de luchtontvochtiger met een vol
waterreservoir te kunnen dragen. Zit of sta niet op de luchtontvochtiger.
Schakel het apparaat uit en haal de stekker uit het stopcontact wanneer het
apparaat niet wordt gebruikt en voor reiniging.
Plaats geen voorwerpen op het apparaat.
Drink of gebruik het water dat in het waterreservoir wordt verzameld niet.
Gebruik het apparaat niet in de buurt van brandbare gassen of materialen,
zoals benzine, benzeen, verdunner, etc.
2
Page 27

Vooraanzicht
Achteraanzicht
1. Bedieningspaneel
2. Luchtinlaatrooster
3. Waterreservoir
4. Waterniveau-aanduiding
5. Handgreep
6. Luchtuitlaatrooster
7. Snoerhouder
8. Continue afvoeropening
9. Snoer
NL
Verwijder het waterreservoir niet wanneer het apparaat in werking is.
Plaats geen spuitbussen of andere gevaarlijke materialen in de nabijheid.
Plaats tevens geen ontvlambare materialen zoals benzine of verdunner in de
buurt. Deze kunnen exploderen en brand veroorzaken.
Plaats het apparaat niet in de buurt van een warmtebron. De plastic
onderdelen binnenin het apparaat kunnen smelten en vuur vatten.
Plaats het apparaat alleen op een stabiel en vlak oppervlak.
Plaats geen voorwerp gevuld met water, zoals een vaas, op het apparaat.
Gemors van water kan een isolatieprobleem, elektrische schok of brand
veroorzaken.
Sta of leun niet tegen het apparaat. Het apparaat kan omvallen en persoonlijk
letsel veroorzaken.
Belemmer de luchtinlaten en -uitlaten niet door kledingstukken of andere
voorwerpen. Een belemmering van de luchtstroom leidt tot oververhitting,
storing of brand.
Gebruik het apparaat niet zonder de filter op de juiste plaats.
OVERZICHT
BEDIENING
Bij ingebruikname van het apparaat dient u het 24 uur ononderbroken te gebruiken. Dit zorgt ervoor dat
het koelmiddel zich juist inwerkt.
Dit apparaat is ontworpen om te werken in een omgeving met een temperatuur tussen 5°C en 35°C.
Kies een geschikte locatie. Zorg dat het stopcontact eenvoudig bereikbaar is
Sluit het apparaat niet aan op een stopcontact waar ook andere apparaten op zijn aangesloten.
Plaats het apparaat uit de buurt van een droogtrommel, kachel of radiator.
3
Page 28

NL
Gebruik het apparaat om te voorkomen dat boeken of waardevolle zaken beschadigd raken door vocht.
U kunt het apparaat in een kelder gebruiken om mogelijke vochtschade te voorkomen.
Gebruik het apparaat in een besloten ruimte voor de meest doeltreffende werking.
Sluit alle deuren, vensters en andere openingen naar buiten in de kamer.
De wieltjes maken het mogelijk om het apparaat eenvoudig te verplaatsen.
Zorg dat het waterreservoir juist is geplaatst.
OPMERKING: Wees altijd voorzichtig wanneer u het apparaat verplaatst, voornamelijk wanneer er zich veel
water in het reservoir bevindt. Hoe hoger het waterniveau in het reservoir, hoe makkelijker
het apparaat tijdens het verplaatsen kan omvallen. Het is aanbevolen om het reservoir te
ledigen voordat u het apparaat verplaatst.
Bedieningspaneel
1. Aan/uit-controlelampje (groen)
2. Stille functie-controlelampje (groen)
3. Reservoir vol-controlelampje (rood)
4. Scherm
Om de relatieve vochtigheidsgraad, foutcodes, uitgestelde starttijd of uitgestelde stoptijd weer te
geven.
5. Automatisch ontdooien (groen)
6. Timer-controlelampje (groen)
7. Continue ontvochtigingsmodus-controlelampje (groen)
8. Continue ontvochtigingsmodus-knop
4
Page 29

9. Timerknop
Druk op deze knop, om in combinatie met / , de vertraagde startfunctie of vertraagde
stopfunctie te selecteren.
10. En knoppen
11. Stille modus-knop
12. Aan/uit-knop
In- en uitschakelen
Druk op om het apparaat in te schakelen.
Het apparaat geeft de omringende luchtvochtigheidsgraad in de ruimte weer.
NL
Om het apparaat uit te schakelen, druk nogmaals op .
Wacht 3 minuten alvorens de werking te hervatten
Als de voeding na een stroomonderbreking is hersteld, wacht 3 minuten voordat het apparaat opnieuw op
de geselecteerde instellingen werkt.
Ontvochtigingsmodus
Om het apparaat in de ontvochtigingsmodus te gebruiken, druk herhaaldelijk op totdat het
overeenkomstig controlelampje dooft.
1. Druk herhaaldelijk op / om de gewenste luchtvochtigheidsgraad in stappen van 5% in te stellen.
De luchtvochtigheidsgraad kan ingesteld worden binnen een bereik van 35%RH (relatieve vochtigheid)
tot 80%RH (relatieve vochtigheid).
Voor een drogere lucht, stel de luchtvochtigheidsgraad op een lager percentage in.
Voor een vochtigere lucht, stel de luchtvochtigheidsgraad op een hoger percentage in.
2. Eenmaal de gewenste luchtvochtigheidsgraad is ingesteld, geeft het scherm de ingestelde
luchtvochtigheidsgraad kort weer waarna de huidige luchtvochtigheidsgraad van de ruimte opnieuw wordt
weergegeven.
Continue ontvochtigingsmodus
Gebruik deze modus om doorlopend overtollig vocht uit de lucht te verwijderen.
Voor een continue werking, druk op om deze functie in te schakelen en het overeenkomstig
controlelampje brandt.
OPMERKING: In deze modus is het niet mogelijk om een gewenste luchtvochtigheidsgraad in te stellen.
5
Page 30

Stille modus
Deze modus schakelt de luchtontvochtiger op een lagere ventilatorsnelheid in zodat deze minder lawaai
maakt.
Om deze modus te activeren, druk op . Het overeenkomstig controlelampje brandt.
Om deze functie uit te schakelen, druk nogmaals op deze knop. Het overeenkomstig controlelampje
dooft. De ventilator wordt opnieuw op de normale snelheid ingesteld.
Timer
De automatische startfunctie programmeren:
1. Als het apparaat is uitgeschakeld, druk op .
Het overeenkomstig controlelampje brandt en het uur wordt op het scherm weergegeven.
2. Terwijl het uur wordt weergegeven, druk herhaaldelijk op / of houd ingedrukt om het gewenste
uur in te stellen.
De tijd worden in stappen van 0,5 uur (tot 10 uur) en vervolgens in stappen van 1 uur (tot 24 uur)
gewijzigd.
3. De ingestelde tijd wordt na circa 5 seconden bevestigd en verdwijnt vervolgens van het scherm.
4. Het apparaat wordt automatisch ingeschakeld eenmaal de ingestelde tijd is verstreken.
De automatische stopfunctie programmeren:
NL
1. Als het apparaat is ingeschakeld, druk op .
Het overeenkomstig controlelampje brandt en het uur wordt op het scherm weergegeven.
2. Terwijl het uur wordt weergegeven, druk herhaaldelijk op / of houd ingedrukt om het gewenste
uur in te stellen.
De tijd worden in stappen van 0,5 uur (tot 10 uur) en vervolgens in stappen van 1 uur (tot 24 uur)
gewijzigd.
3. De ingestelde tijd wordt na circa 5 seconden bevestigd en het scherm geeft vervolgens de
luchtvochtigheidsgraad in de kamer weer.
4. Het apparaat wordt automatisch uitgeschakeld eenmaal de ingestelde tijd is verstreken.
De timer aanpassen of annuleren:
Als u de ingestelde automatische start- of stoptijd wilt wijzigen, druk eenmaal op en, terwijl het
uur wordt weergegeven, druk vervolgens herhaaldelijk op / of houd ingedrukt totdat de gewenste
tijd is geselecteerd.
Als u de ingestelde uitgestelde start- of stoptijd wilt annuleren, druk eenmaal op . Wanneer het uur
wordt weergegeven, druk herhaaldelijk op / of houd ingedrukt totdat “0.0” is geselecteerd. De
timer wordt tevens geannuleerd wanneer het scherm de foutcode “P2” weergeeft.
6
Page 31

1. Trek het waterreservoir langzaam uit.
Houd het apparaat stevig vast en trek het
reservoir uit. Wees voorzichtig om morserij
te vermijden.
2. Giet het water weg.
3. Duw het waterreservoir voorzichtig en volledig
in het apparaat.
Het niet juist induwen van het reservoir kan
de juiste werking van het apparaat
hinderen.
Andere functies
NL
Vol reservoir
Het controlelampje brandt wanneer het waterreservoir vol is of niet (juist) is geplaatst. Ledig het
reservoir of plaats het op de juiste positie en het controlelampje dooft.
Automatische uitschakeling
De luchtontvochtiger wordt automatisch uitgeschakeld als het waterreservoir vol is of als het reservoir
verwijderd is of niet op zijn oorspronkelijke plaats is teruggezet. Het apparaat wordt ook uitgeschakeld
zodra de ingestelde luchtvochtigheidsgraad wordt bereikt.
Automatisch ontdooien
Wanneer er zich vorst vormt op de verdamperspiralen, zal de compressor uitschakelen en de ventilator
blijven werken totdat de vorst verdwenen is.
Het controlelampje brandt wanneer de automatische ontdooifunctie ingeschakeld is.
HET WATERRESERVOIR LEDIGEN
De luchtontvochtiger stopt met werken wanneer het waterreservoir vol is. Het scherm geeft “P2” weer en
het controlelampje brandt.
Volg onderstaande stappen om het waterreservoir te ledigen, en gebruik vervolgens het apparaat opnieuw.
4. Het apparaat wordt ingeschakeld eenmaal het reservoir juist is ingebracht. Het controlelampje
dooft en “P2” verdwijnt van het scherm.
OPMERKING:
Drink nooit het opgevangen water en gebruik het niet voor uw planten.
Als u het waterreservoir uithaalt, raak de interne delen van de luchtontvochtiger niet aan. Dit kan het
apparaat beschadigen.
7
Page 32

Neem het lipje op de
filter vast en trek de
filter uit.
NL
Continue externe afvoer
Als het apparaat gedurende een lange periode gebruikt zal worden maar u bent niet in staat om het
reservoir te ledigen, is het aanbevolen om de continue afvoervoorziening te gebruiken.
1. Haal de rubber plug uit de afvoeruitlaat.
2. Bevestig een slang (niet meegeleverd) op de afvoeruitlaat.
Zorg dat de slang zich niet boven de uitlaat bevindt, anders zal het water in het reservoir blijven. Zorg
er tevens voor dat de slang niet gebogen is.
3. Leid de waterslang naar een afvoer op de vloer of een gepaste afvoervoorziening.
De afvoervoorziening dient zich lager dan de afvoeruitlaat te bevinden.
OPMERKING: Als de continue afvoervoorziening niet wordt gebruikt, ontkoppel de slang van de uitlaat en
breng de rubber plug opnieuw in de afvoeruitlaat.
REINIGING EN ONDERHOUD
Schakel het apparaat uit en haal de stekker uit het stopcontact alvorens het apparaat schoon te maken of te
onderhouden.
Dompel het apparaat nooit in water.
De buitenkant reinigen
Maak de buitenkant van het apparaat schoon met een licht bevochtigde doek. Droog grondig.
Gebruik geen schurende of chemische schoonmaakmiddelen.
De filter reinigen
Verwijder en reinig de filter eenmaal per maand.
Om de filter te verwijderen, verwijder eerst het waterreservoir en trek vervolgens de filter uit.
Maak schoon in warm zeepwater. Spoel en droog grondig alvorens terug te plaatsen.
Maak de filter opnieuw vast aan de achterkant van de ontvochtiger.
8
Page 33

Probleem
Wat controleren
Het apparaat werkt niet.
Controleer of de stekker in het stopcontact steekt.
Controleer de zekering/stroomonderbreker.
Controleer of het waterreservoir vol is.
Controleer of het waterreservoir juist is geplaatst.
Controleer of het apparaat niet is ingeschakeld.
Laag ontvochtigingsvermogen
(langzame vochtverwijdering)
Controleer of alle deuren of vensters gesloten zijn of niet te vaak
worden geopend.
Controleer of de kamertemperatuur hoger dan 5°C is.
Controleer of er geen verwarmingstoestel op kerosine of ander
apparaat dat waterdamp afgeeft in de kamer aanwezig is.
Het apparaat maakt veel lawaai.
Controleer of de filter niet verstopt is.
Controleer of het apparaat niet scheef staat.
Controleer of het oppervlak waarop het apparaat is geplaatst
stabiel en effen is.
NL
OPGELET: Gebruik de luchtontvochtiger NIET zonder een filter, daar er zich vuil en pluis zou ophopen en tot
lagere prestaties zou leiden.
Regelmatige reiniging van het waterreservoir (eenmaal per maand)
Afhankelijk van waar de luchtontvochtiger wordt gebruikt, de binnenkant van het waterreservoir kan vuil
worden door het vuil en lucht dat zich in de lucht bevindt. Als dit het geval is, reinig het reservoir in
zeepwater.
OPMERKING: Was het reservoir niet in een vaatwasser. Na reiniging, plaats het reservoir op de juiste
positie terug alvorens de luchtontvochtiger te gebruiken.
Als het apparaat gedurende een lange periode niet gebruikt zal worden
Schakel het apparaat uit, haal de stekker uit het stopcontact en ledig het reservoir.
Snoerhouder
Maak de buitenkant van het apparaat schoon. Reinig het waterreservoir en de
filter en plaats vervolgens terug.
Dek het apparaat af om tegen stof te beschermen.
Berg het apparaat rechtop en in een droge, goed geventileerde ruimte op.
Wikkel het snoer op en maak aan de achterkant van de luchtontvochtiger vast
met behulp van de snoerhouder.
PROBLEEMOPLOSSING
Voordat u met het servicecentrum contact opneemt, controleer het volgende.
9
Page 34

Code
Beschrijving
Mogelijke oplossing
AS
Fout met vochtigheidssensor
Haal stekker uit stopcontact en steek vervolgens
opnieuw in. Indien fout nogmaals optreedt, neem
contact op met ons servicecentrum.
ES
Fout met temperatuursensor
EC
Detectie van het lekken van
koelmiddel
Neem contact op met een servicecentrum.
P2
waterreservoir is vol of is niet
juist geplaatst
Ledig het waterreservoir of plaats op de juiste positie.
Capaciteit
(Onder de volgende
testomstandigheden:
Kamertemperatuur DB=30°C,
relatieve vochtigheid RV=80%)
12L / DAG
Overmatige bedrijfsdruk
Ontlading: 1,7 MPa
Zuiging: 0,7 MPa
Gewicht
11 kg
Voedingsbron
220-240V~ 50Hz, 1Ph
Koelmiddel
R410a / 80g
Nominale stroom
2,0A
Nominale invoer
290W
Fout- en beveiligingscodes
SPECIFICATIES
NL
10
Page 35

VERWIJDERING
Als verantwoordelijke handelaar dragen we zorg voor het milieu.
We moedigen u aan om de juiste verwijderingsprocedure voor uw apparaat en
verpakkingsmateriaal te volgen. Dit draagt bij tot het behoud van de natuurlijke rijkdommen
door deze te recyclen zodat zowel de menselijke gezondheid en het milieu worden
beschermd.
Gooi dit apparaat en de verpakking weg in overeenstemming met de geldende wetgeving en
voorschriften.
Aangezien dit apparaat elektronische componenten bevat moet het apparaat en toebehoren
aan het einde van hun levensduur afzonderlijk van het huisafval worden weggegooid.
Neem contact op met uw gemeente voor informatie over afdanking en recycling.
Lever het apparaat in bij het inzamelpunt van uw gemeente voor recycling. Bij sommige
inzamelpunten kunt u het apparaat gratis inleveren.
De dienst na verkoop is bereikbaar van maandag tot zaterdag op
+32 2 334 00 00
Hulplijn Nederland
Hiervoor kunt u contact opnemen met het BCC Service Center:
0900 0555 (lokaal tarief), geopend van maandag t/m vrijdag van
9.00 tot 17.00 uur.
We verontschuldigen ons voor enig ongemak veroorzaakt door kleine inconsistenties in deze
gebruikershandleiding, die kunnen ontstaan door productverbetering of –ontwikkeling.
Darty Holdings SAS © 14 route d’Aulnay 93140 Bondy, France 02 / 11 / 2015
11
 Loading...