

Page 1
BVC Silentpro
BAGGED VACUUM CLEANER
ASPIRATEUR AVEC SAC
STOFZUIGER MET ZAK
Page 2

Catalogue
Page
English……………………………….………….. EG-1 – EG-09
French …………………………………………… FR-1 – FR-10
Netherlands …………………….………… NL-1 – NL-10
1
Page 3

EG
WARNINGS
This appliance is intended for domestic
household use only and should not be used
for any other purpose or in any other
application, such as for non‐domestic use or in
a commercial environment.
If the supply cord is damaged, it must be
replaced by the manufacturer, its service
agent or similarly qualified persons in order to
avoid a hazard.
Regarding the detailed instructions for the
method and frequency of cleaning and the
precautions during user maintenance, refer to
the section “Cleaning and Maintenance” on
page EG‐6–EG‐7 of
This appliance can be used
th
e manual.
by children aged
from 8 years and above and persons with
reduced physical, sensory or mental
capabilities or lack of experience and
knowledge if they have been given
supervision or instruction concerning use of
the appliance in a safe way and understand
the hazards involved. Children shall not play
with the appliance. Cleaning and user
EG-1
Page 4

maintenance shall not be made by children
without supervision.
The plug must be removed from the
socket‐outlet before cleaning or maintaining
the appliance.
Following objects are strictly banned,
otherwise the vacuum cleaner will be
damaged or fire calamity will be caused,
which bring such accidents as human body
injuries:
Don’t pick up large or sharp broken such as
glasses.
Don’t pick up harming or erodent liquids
(solvent, corrosive, detergent…).
Don’t pick up inflammable or explosive
substance such as gasoline or alcohol.
Don’t pick up/ vacuum burning or glowing
objects (cigarettes, matches, hot ashes).
EG-2
Page 5

IMPORTANT SAFETY INSTRUCTIONS
Carefully read the instructions before operating the appliance and keep
them for future reference.
Check that the voltage marked on the rating plate located on the appliance is the
same as your mains supply.
The manufacturer will not accept responsibility for damage or injury caused by
connecting to t he wrong voltage.
Use this appliance only for its intended purpose as laid out in these instructions.
Always switch off and disconnect the appliance from the power supply if it is left
unattended and before assembling, disassembling or cleaning.
Do not unplug by pulling on cord. To unplug, grasp the plug, not the cord.
Keep the appliance and the power cord away from direct radiant heat from the sun,
from damp, from sharp edges and other dangers.
Do not use the appliance with wet hands or feet.
Do not use the appliance or store it outdoors or expose the appliance to rain.
Use only original accessories recommended by the manufacturer.
Do not attempt to repair the appliance yourself, contact a qualified service agent
to carry out any repairs or maintenance or contact the store where you purchased
the appliance.
Never immerse the appliance in water or any other liquid when cleaning.
If the appliance should become wet or damp, remove plug from the power supply
immediately.
The plug shall be the main disconnect device and should remain operable at all
times.
Extreme care shall be taken when cleaning on stairs.
EG-3
Page 6
DESCRIPTION
13
14
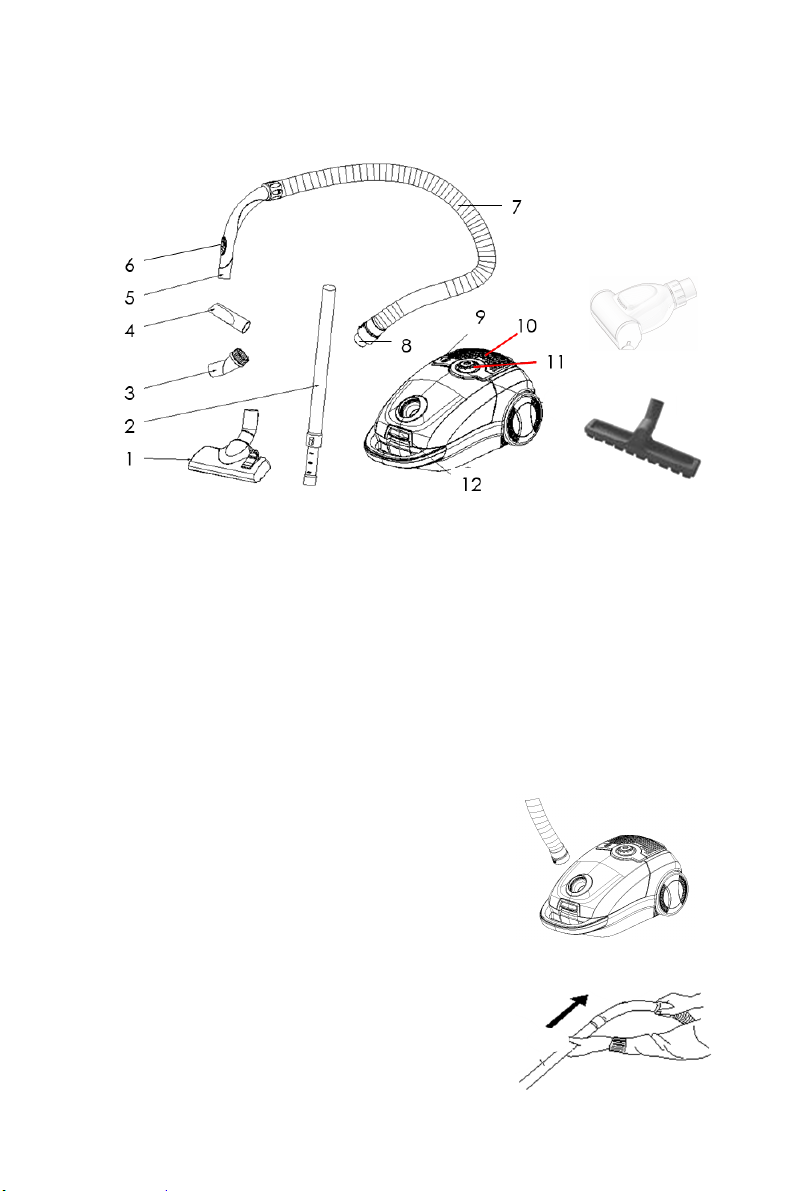
1. Floor brush
2. Telescopic tubes
3. Dusting brush
4. Crevice tool
5. Hose handle
6. Airflow regulator
7. Hose
8. Hose socket
9. Cord rewind button
10. Air outlet grille
11. Power button with variable suction
power knob
12. Front cover clamp
13. Pet brush
14. Parquet brush
ASSEMBLY
Always remove the plug from the mains socket before assembling or disassembling
accessories.
Hose
1. To fit the hose, push it firmly into the hose socket on
the front of the appliance until the hose clicks into
place.
2. To remove the hose, press the release tabs on the hose
sides and pull the hose out of the appliance.
Connecting tube and accessories
1. Attach the bigger end of the tubes into the hose handle.
2. Adjust the tubes to your desired length.
EG-4
Page 7
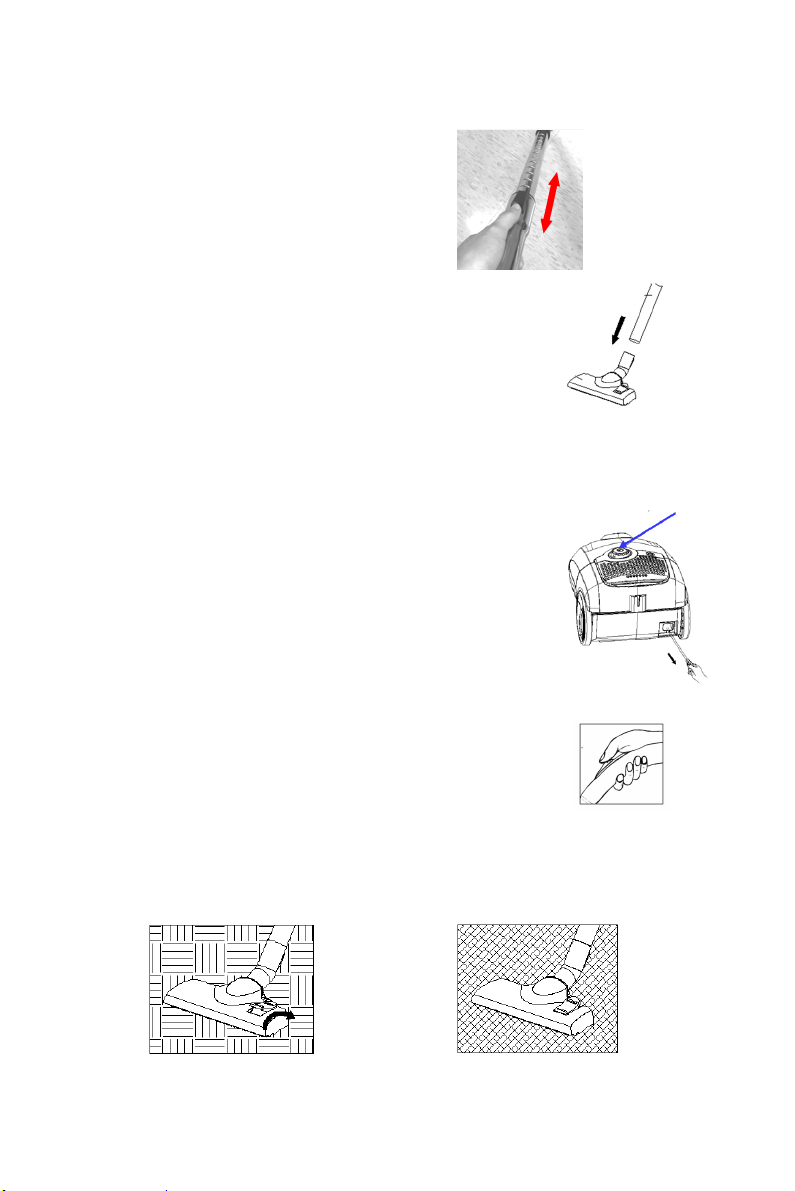
Push forward the switch on the tube then
adjust. Release the switch until the
desiredlengthisachieved.
3. Attach the desired cleaning accessory to the end of the tube.
To remove the tubes and accessory, hold each piece tightly and pull firmly apart.
OPERATION
1. Pull the power cord out of the appliance and insert the mains plug into the mains
socket.
A YELLOW mark on the power cord indicates the ideal cable
length. Do not extend the power cord beyond the RED
mark.
2. Press the power button on top of the appliance to switch on
the appliance.
Adjust the suction power by turning the variable suction
power knob.
3. You can quickly reduce the suction power by pushing the air flow regulator on the
hose handle. Push it forward, suction power will increase; push it
backward, suction power will reduce.
Using the Cleaning Accessories
Dual position carpet / floor brush (Drawings for reference only)
Position 1: Bristles extended
-
For hard floors
Position 2: Bristles retracted
-
For carpets
EG-5
Page 8
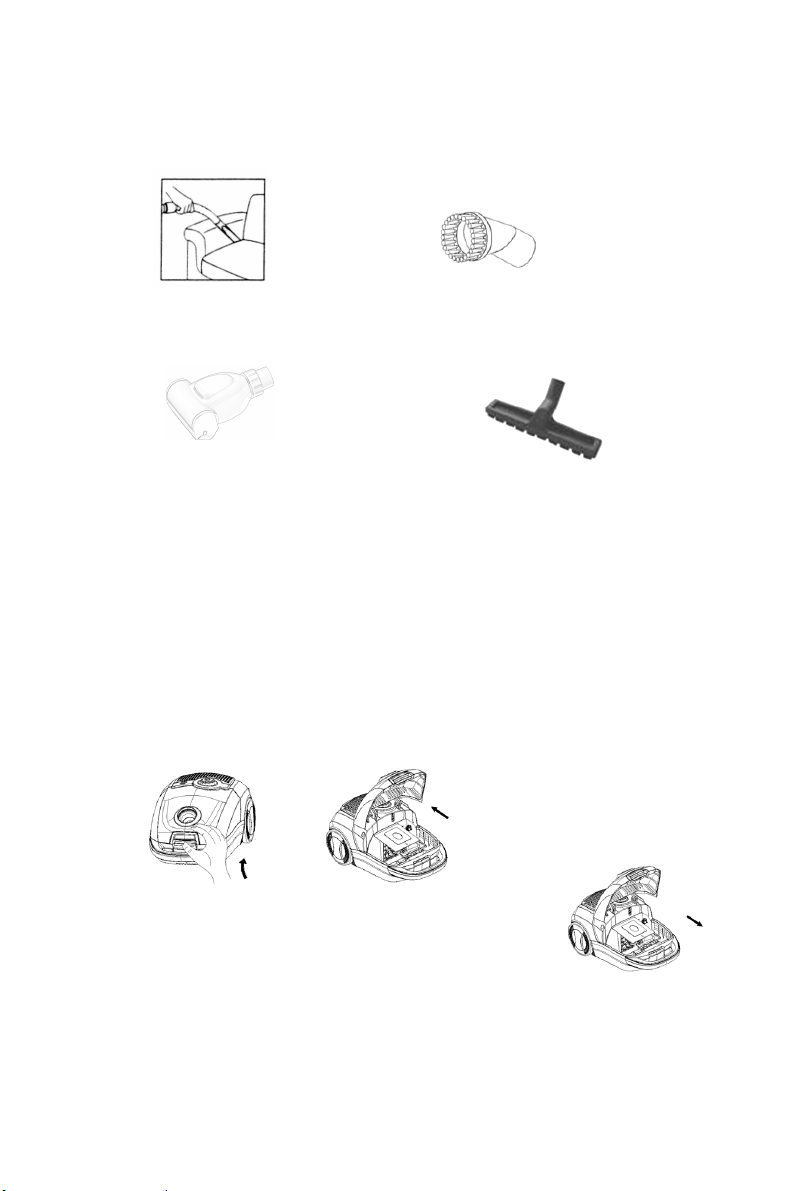
Crevice tool
For corners, edges or small spaces
Pet brush
For removing stubborn pet hair that
sticks to a surface
Dusting brush
For cleaning delicate surfaces such as
curtains, etc.
Parquet floor brush
For all wood and laminate floors
CLEANING AND MAINTENANCE
Always switch off and unplug the appliance from the mains socket before carrying
out any maintenance or cleaning.
Clean the outside of the appliance with a slightly damp cloth. Dry thoroughly.
Never immerse in water.
Do not use abrasive or chemical cleaning agents.
Emptying and Replacing the Dust Tank
When the indicator lights around the power button illuminate blue, please empty or
replace the dust bag. You need to clean the air filter if clogged.
1. Lift up the front cover clamp to open the dust tank.
2. Remove the dust bag from the dust bag holder.
3. Empty the dust bag or replace it with a new one.
4. Insert the bag back into the dust tank and close the front cover.
Filters Maintenance
It is very important to keep the filters clean to maintain maximum performance from
the vacuum.
EG-6
Page 9
Clean the filters regularly. We recommend you replace the filters once a year.
Cleaning the air inlet filter
1. Open the front cover to remove the air inlet filter
cover and then remove the filter.
2. Rinse them under running water then dry them in a
cool place.
3. Place the filter in the grille and then attach the grille
back to the appliance.
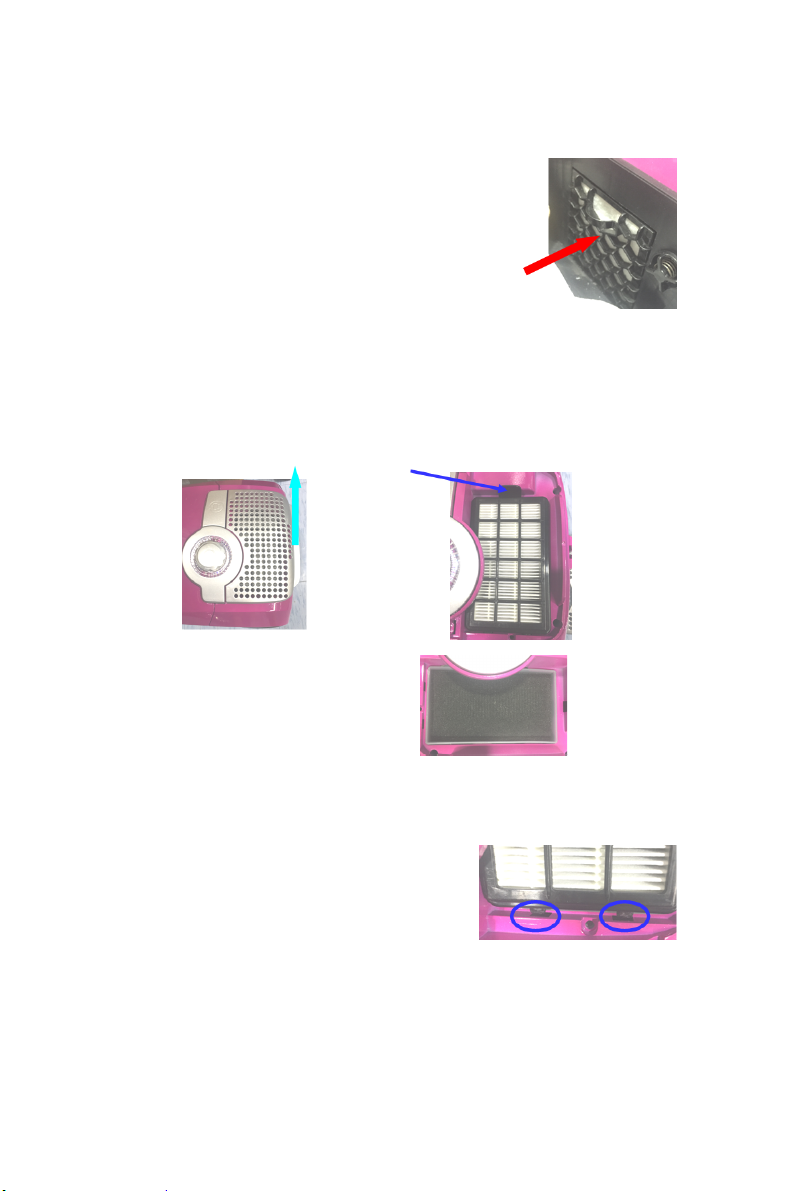
Cleaning HEPA filter
The high efficiency particulate air (HEPA) filter is an effective system in removing
almost all indoor pollutants, dust mites, pollen and mould spores.
1. Remove the air outlet filter grille by
lifting the outer rim upwards.
3. Remove the sponge from the
appliance.
4. Wash them under running water and allow them to dry thoroughly.
DO NOT USE DETERGENTS TO CLEAN THE FILTER.
5. After cleaning, replace the sponge and then attach the HEPA filter back until it
clicks into place.
First insert two tabs on one side of the HEPA
filter into the slots in the appliance and then
push down the other side until a click is
heard.
6. Attach the air outlet grille to the appliance until a click is heard.
2. Hold the tab on the HEPA filter and
pull this tab outwards to remove the
HEPA filter.
EG-7
Page 10
Power cord rewinding
When not in use, unplug from the power outlet and then press the cord rewind
button to feed back the power cord.
CAUTION: Take special care to rewind the mains cord by holding the plug to avoid
Storage
Insert the holder
back or on the rear of the appliance.
injury by a whipping action.
of the floor brush with telescopic tubes into the storage clip at the
TROUBLESHOOTING
Please check the following details before you have your appliance repaired by an
authorised servicing agent.
Problem Possible Cause Possible Solution
Vacuum cleaner
does not work.
Suction power
becomes weak.
Power cord will not
fully feedback.
Power cord cannot
be pulled out.
1. Check if the power plug is
firmly inserted into the
power outlet.
2. Check if the power button
of the appliance is pressed.
1. Check if the hose, brush or
tube is clogged or damaged.
2. Check if the dust tank is
full.
3. Check if the filter is
clogged, the tube is correctly
attached.
Check if the power cord is
twisted.
The power cord may be
twisted.
1. Insert the plug back into
the power outlet and
ensure it is switched on.
2. Press the power button
to turn on the vacuum
cleaner.
1. Immediately remove the
obstruction.
2. Empty the dust tank.
3. Clean the filter or
reassemble the tubes.
Pull out the power cord at
its optimal length and
rewind it.
Rewind or pull the cord in
and out several times by
pressing the cord rewind
button.
SPECIFICATIONS
Ratings:
220V‐240V,50‐60Hz 700 W
EG-8
Page 11

DISPOSAL
As a responsible retailer we care about the environment.
As such we urge you to follow the correct disposal procedure for the appliance and
packaging materials. This will help conserve natural resources and ensure that it is
recycled in a manner that protects health and the environment.
You must dispose of this appliance and its packaging according to local laws and
regulations.
Because this appliance contains electronic components, the appliance and its
accessories must be disposed of separately from household waste when the
appliance reaches its end of life.
Contact your local authority to learn about disposal and recycling.
The appliance should be taken to your local collection point for recycling. Some
collection points accept appliance free of charge.
We apologise for any inconvenience caused by minor inconsistencies in these
instructions, which may occur as a result of product improvement and development.
Darty Holdings SAS © 14 route d’Aulnay 93140 Bondy, France 27 / 07 / 2016
EG-9
Page 12

FR
AVERTISSEMENTS
Cet appareil est destiné à un usage
domestique uniquement. Toute utilisation
autre que celle prévue pour cet appareil, ou
pour une autre application que celle prévue,
par exemple une application commerciale, est
interdite.
Si le câble d'alimentation est endommagé, il
doit être remplacé par le fabricant, son
service après vente ou des personnes de
qualification similaire afin d'éviter un danger.
En ce qui concerne les informations détaillé es
sur la méthode et la fréquence du nettoyage
et des précautions d’entretien par l’usager,
référez‐vous à la section “NETTOYAGE ET
ENTRETIEN” en page FR
Cet
apparei
l peut être utilisé par des enfants
‐7
‐ FR
‐8
.
âgés d'au moins 8 ans et par des personnes
ayant des capacités physiques, sensorielles ou
mentales réduites ou dénuées d’expérience
ou de connaissance, s'ils (si elles) sont
correctement surveillé(e)s ou si des
instructions relatives à l'utilisation de
l'appareil en toute sécurité leur ont été
FR-1
Page 13

données et si les risques encourus ont été
appréhendés. Les enfants ne doivent pas
jouer avec l’appareil. Le nettoyage et
l'entretien par l'usager ne doivent pas être
effectués par des enfants sans surveillance.
La fiche de prise de courant du câble
d'alimentation doit être enlevée du socle
avant de nettoyer l'appareil ou
d'entreprendre les opérations d'entretien.
Les objets suivants sont strictement interdits,
sous peine d'abîmer l'aspirateur ou de causer
un incendie, et de provoquer des blessures
corporelles accidentelles:
N'aspirez pas les objets de taille importante,
affûtés ou brisés, tels que les verres.
N'aspirez pas les liquides dangereux ou
abrasifs (solvant, produit corrosif,
détergent...).
N'aspirez pas de substances inflammables ou
explosives, telles que l'essence ou l'alcool.
N'aspirezpaslesobjetsbrûlantsou
FR-2
Page 14

incandescents (cigarettes, allumettes,
cendres chaudes).
MISES EN GARDE IMPORTANTES
Lisez attentivement tout le mode d'emploi avant d’utiliser l'appareil et
conservez‐le pour toute consultation ultérieure.
Vérifiez que la tension indiquée sur la plaque signalétique de l'adaptateur secteur
est identique à celle des prises de votre domicile.
Le fabricant ne saurait être tenu responsable des dégâts matériels et corporels
résultant d'un branchement sur une prise de tension inadéquate.
Utilisez cet appareil uniquement à l'usage prévu tel que spécifié dans ce mode
d'emploi.
Éteignez et débranchez toujours l’appareil de la prise électrique avant de le laisser
sans surveillance, d’assembler ou de démonter l’une de ses pièces, ou de le
nettoyer.
Ne le débranchez pas en tirant sur le câble. Pour débrancher, saisissez la fiche et
non pas le câble.
Veillez à maintenir l’appareil et son câble d’alimentation à l'écart de la chaleur
directe des rayons du soleil, de l’humidité, des arêtes coupantes et autres sources
de détérioration.
Ne manipulez jamais l'appareil avec les mains ou les pieds mouillés.
N’utilisez pas le produit et ne le rangez pas en extérieur. Ne l’exposez pas à la pluie.
Utilisez exclusivement les accessoires d’origine recommandés par le fabricant.
Ne tentez pas de réparer l'appareil vous‐même ; contactez un réparateur qualifié
pour effectuer les réparations ou l'entretien ou contactez le magasin où vous avez
acheté l'appareil.
N’immergez jamais l'appareil dans l'eau ni dans un autre liquide pour le nettoyer.
Si l’appareil est mouillé ou humide, débranchez immédiatement sa fiche de la prise
de courant.
La déconnexion totale s’effectue en débranchant le câble de la prise de courant, qui
doit donc rester facilement accessible à tout moment.
Faites particulièrement attention en passant l'appareil dans les escaliers.
FR-3
Page 15

DESCRIPTION
1. Brosse pour les sols
2. Tubes télescopiques
3. Brosse à poussière
4. Suceur plat
5. Manche du tuyau
6. Régulateur du flux d'air
7. Tuyau
8. Orifice d’insertion du tuyau
9. Bouton de rembobinage du câble d’alimentation
10. Grille de sortie d'air
11. Bouton marche/arrêt avec réglage de puissance d'aspiration
12. Loquet d'ouverture du couvercle avant
13. Brosse à poils
Brosse à parquet
13
14
FR-4
Page 16

MONTAGE
Débranchez toujours l'appareil avant de monter ou démonter les accessoires.
Tuyau
1. Pour monter le tuyau, introduisez‐le dans l'orifice
d’insertion du tuyau situé sur l'avant de l'appareil et
poussez l'embout du tuyau jusqu'à ce qu'il s'enclenche
en position.
2. Pour démonter le tuyau, appuyez sur les boutons de
déverrouillage situés sur les côtés du tuyau, puis tirez le
tuyau hors de l'appareil.
Assemblage du tube et des accessoires
1. Attachez l'extrémité la plus large du tube à la poignée du tuyau.
2. Réglez les tubes à la longueur souhaitée.
Poussez l'interrupteur situé sur le tube
vers l'avant puis ajustez le tube. Relâchez
le bouton quand le tube est à la longueur
souhaitée.
3. Montez l'accessoire souhaité à l'extrémité du tube.
Pour démonter les tubes et les accessoires, tenez chaque
pièce solidement et séparez‐la en la tirant fermement.
UTILISATION
1. Sortez le câble d’alimentation de l'appareil et branchez
la prise mâle sur une prise de courant.
FR-5
Page 17

La marque JAUNE indique la longueur idéale pour le câble. Ne sortez pas le
câble au‐delà de la marque ROUGE.
2. Appuyez sur le bouton marche/arrêt sur le dessus de l'appareil pour l'allumer.
Réglez la puissance de l'aspirateur en tournant le bouton de réglage de
puissance.
3. Vous pouvez rapidement réduire la puissance d’aspiration en poussant le
régulateur de flux d'air situé sur le manche du tuyau. Poussez‐le
vers l'avant pour augmenter la puissance d'aspiration, et tirez‐le
vers l'arrière pour la réduire.
Utilisation des accessoires de nettoyage
Brosse 2 positions sol/moquette (illustrations fournies à titre indicatif)
Position 1 : Poils de brosse sortis
-
Pour les sols durs.
Suceur plat
Pour les coins, les rebords et les zones
étroites
Brosse à poils
Pour aspirer les poils d'animaux tenaces
collés aux surfaces
Position 2 : Poils de brosse rétractés
-
Pour les tapis et moquettes.
Brosse à poussière
Pour les surfaces délicates (rideaux
etc.)
Brosse à parquet
Pour les parquets et les planchers
stratifiés
FR-6
Page 18

NETTOYAGE ET ENTRETIEN
Éteignez et débranchez l'appareil avant toute manipulation de nettoyage ou
d'entretien.
Nettoyez les surfaces extérieures de l’appareil avec un chiffon légèrement humide.
Séchez bien.
N'immergez jamais l'appareil dans l’eau.
N'utilisez pas des produits de nettoyage chimiques ou abrasifs.
Vider et remplacer le sac à poussières
Lorsque le témoin lumineux autour du bouton marche/arrêt s'allume en bleu, le sac
à poussière doit être vidé ou changé. Si le filtre à air est obstrué, vous devez le
nettoyer.
1. Soulevez le loquet de fermeture du capot frontal, puis ouvrez le capot frontal.
2. Retirez le sac de son support.
3. Videz le sac à poussières ou remplacez‐le par un sac neuf.
4. Remettez le sac en place dans le bac et refermez le capot frontal.
Entretien des filtres
Il est très important de maintenir le filtre propre afin d'assurer un fonctionnement
optimal de l'aspirateur.
Les filtres doivent être nettoyés régulièrement. Nous vous recommandons de
changer les filtres une fois par an.
Nettoyage du filtre d'arrivée d'air
1. Ouvrez le capot frontal, enlevez le couvercle du filtre
d'arrivée d'air puis sortez le filtre.
2. Rincez‐les sous le robinet, puis laissez‐les sécher dans
un endroit frais.
3. Mettez le filtre dans la grille, puis remettez la grille en
place dans l'appareil.
Nettoyage du filtre HEPA
Le filtre HEPA (High Efficiency Particulate Air) est un filtre permettant d’éliminer
efficacement presque toutes les substances polluantes, les acariens, les pollens et
spores de moisissures.
1. Sortez la grille du filtre de sortie
d'air en tirant son bord extérieur
vers le haut.
2. Sortez le filtre HEPA en tirant sa
languette vers extérieur.
FR-7
Page 19

3. Sortez l'éponge de l'appareil.
4. Lavez‐lessouslerobinetpuislaissez‐les sécher complètement.
N’UTILISEZ PAS DE DÉTERGENT POUR NETTOYER LE FILTRE.
5. Après le nettoyage, remettez l'éponge en place
puis montez le filtre HEPA dans son emplacement
(vous devez l'entendre s'enclencher).
Pour cela, insérez d'abord les 2 languettes
du filtre HEPA dans les rainures prévues à cet
effet, puis insérez l'autre bord jusqu'à
entendre un déclic.
6. Remettez en place la grille de sortie d'air (vous devez entendre un déclic).
Rembobinage du câble
Quand vous n'utilisez pas l'appareil, débranchez‐le puis rembobinez le câble en
appuyant sur son bouton de rembobinage.
ATT E N T IO N : Pensez à toujours accompagner le mouvement de rembobinage du
Rangement
Insérez le support de la brosse de sol (assemblée sur les tubes) dans le clip de
rangement sur le côté ou à l’arrière de l’appareil.
câbleentenantlaprisemâle,afind'éviterquecelle‐ci ne heurte
quelqu'un au passage.
FR-8
Page 20

V
2. Vérifiez si le bouton
L'appareil aspire
moins bien.
Le câble
d’alimentation ne
se rembobine pas
complètement.
Impossible de sortir
le câble
d’alimentation.
1. Vérifiez que le tuyau, le
tube et la brosse ne sont pas
bouchés ni endommagés.
2.
poussière n’est pas plein.
3. Vérifiez que le filtre n’est
pas bouché et que le tube
est correctement assemblé.
Vérifiez si le câble n'est pas
entortillé.
Le câble est peut‐être
entortillé.
SPECIFICATIONS
Ratings:
220V‐240V,50‐60Hz 700W
d'alimentation a été pressé.
érifiez que le bac à
vérifiez que la prise est
bien sous tension.
2. Appuyez sur le bouton
marche/arrêt pour
démarrer l’aspirateur.
1. Enlevez immédiatement
les objets à l'origine de
l'obstruction.
2. Videz le bac à poussière.
3. Nettoyez le filtre ou
assemblez de nouveau les
tubes.
Sortez le câble à la longueur
adéquate, puis faites‐le
rentrer à nouveau.
Ressortez et rembobinez le
câble à plusieurs reprises en
appuyant sur le bouton,
jusqu'à ce qu'il se démêle.
FR-9
Page 21

MISE AU REBUT
importance à la protection de l’environnement.
Nous vous encourageons à respecter les procédures correctes de mise au rebut de
votre appareil, des piles et des éléments d’emballage. Cela aidera à préserver les
ressources naturelles et à garantir qu’il soit recyclé d’une manière respectueuse de
la santé et de l’environnement.
Vous devez jeter ce produit et son emballage selon les lois et les règles locales.
Puisque ce produit contient des composants électroniques et parfois des piles, le
produit et ses accessoires doivent être jetés séparément des déchets domestiques
lorsque le produit est en fin de vie.
Pour plus de renseignements sur les procédures de mise au rebut et de recyclage,
contactez les autorités de votre commune.
Apportez l’appareil à point de collecte local pour qu’il soit recyclé. Certains centres
acceptent les produits gratuitement.
Hotline Darty France
Quels que soient votre panne et le lieu d'achat de votre produit en France, avant de
vous déplacer en magasin Darty, appelez le 0 978 970 970 (prix d'un appel local)
7j/7 et 24h/24.
Hotline Vanden Borre
Le service après‐vente est joignable au +32 2 334 00 00, du lundi au vendredi de 8h à
18h et le samedi de 9h à 18h.
En raison des mises au point et améliorations constamment apportées à nos produits,
de petites incohérences peuvent apparaître dans ces instructions. Veuillez nous
excuserpourlagêneoccasionnée.
En tant que distributeur responsable, nous accordons une grande
Darty Holdings SAS © 14 route d’Aulnay 93140 Bondy, France 27 / 07 / 2016
FR-10
Page 22

NL
WAARSCHUWINGEN
Dit apparaat is alleen bestemd voor
huishoudelijk gebruik en mag niet voor
andere doeleinden of toepassingen worden
gebruikt, zoals niet‐huishoudelijk gebruik of in
een commerciële omgeving.
Als het snoer is beschadigd, moet het worden
vervangen door de fabrikant, een erkend
hersteller of een ander vakbekwaam persoon
om elk gevaar te vermijden.
Voor gedetailleerde instructies over de
reinigingsmethode en –frequentie en de
voorzorgsmaatregelen tijdens het onderhoud,
zie de rubriek "Reiniging en onderhoud” op
pagina NL‐6 ‐NL‐8 vand
Dit apparaat kan
worden gebruikt door
e handleiding.
kinderen vanaf 8 jaar en ouder of personen
met beperkte fysische, visuele of mentale
mogelijkheden, of die een gebrek hebben aan
ervaring en kennis, als ze onder toezicht staan
of instructies hebben gekregen over het veilig
gebruik van het apparaat en de gevaren die
het gebruik van het apparaat met zich
meebrengen begrijpen. Laat kinderen nooit
NL-1
Page 23

met het apparaat spelen. Kinderen mogen het
apparaat niet zonder toezicht reinigen of
onderhouden.
Haal de stekker uit het stopcontact voordat u
het apparaat reinigt of onderhoudt.
Onderstaande voorwerpen zijn ten strengste
verboden, deze kunnen de stofzuiger
beschadigen, brand veroorzaken of lichamelijk
letsel teweegbrengen:
Zuig geen grote o
f scherpe voorwerpen op,
zoals glas.
Zuig ge
en schadelijke o f bijtende vloeistoffen
op (oplosmiddel, bijtmiddel, detergent,...).
Zuig geen ontvlambare of explosieve stoffen
op, zoals benzine of alcohol.
Zuig geen brandende of gloeiende
voorwerpen op (sigaretten, lu
NL-2
cifers, hete as).
Page 24

BELANGRIJKE VEILIGHEIDSINSTRUCTIES
Lees de instructies zorgvuldig door voordat u dit apparaat gebruikt en
bewaar deze instructies voor latere raadpleging.
Controleer of de spanning vermeld op het typeplaatje van het apparaat met deze
van uw netvoeding overeenstemt.
De fabrikant is niet aansprakelijk voor schade of letsel veroorzaakt door een
aansluiting op een verkeerde voedingsspanning.
Gebruik dit apparaat alleen waarvoor het is bestemd zoals vermeld in deze
handleiding.
Schakel het apparaat altijd uit en trek de stekker uit het stopcontact alvorens de
kamer te verlaten en alvorens het apparaat te monteren, te demonteren of schoon
te maken.
Trek de stekker niet uit door aan het snoer te trekken. Haal de stekker uit het
stopcontact door aan de stekker zelf te trekken.
Houd het snoer uit de buurt van direct zonlicht, damp, scherpe randen en andere
gevaren.
Gebruik het apparaat niet met natte handen of voeten.
Gebruik of berg het apparaat niet buitenshuis op en stel het niet bloot aan regen.
Gebruik alleen originele accessoires die door de fabrikant worden aanbevolen.
Repareer dit product niet zelf. Laat reparaties of onderhoud altijd door een
vakbekwame reparateur uitvoeren of neem contact op met de winkel waar u het
apparaat hebt gekocht.
Dompel het apparaat nooit in water of een andere vloeistof om het te reinigen.
Als het apparaat nat of vochtig wordt, haal de stekker onmiddellijk uit het
stopcontact.
De stekker wordt gebruikt om het apparaat van de stroom te ontkoppelen en deze
moet steeds makkelijk bereikbaar zijn.
Wees extra voorzichtig wanneer u trappen schoonmaakt.
NL-3
Page 25

BESCHRIJVING
1. Vloerborstel
2. Telescoopbuizen
3. Stofborstel
4. Spleetmondstuk
5. Slanghandvat
6. Luchtstroomregelaar
7. Slang
8. Slangaansluitstuk
9. Snoeroprolknop
10. Luchtuitlaatrooster
11. Aan/uit‐knop met
zuigkrachtregelaar
12. Voorste dekselklem
13. Borstel voor dierenhaar
14. Parketborstel
13
14
MONTAGE
Haal altijd de stekker uit het stopcontact alvorens accessoires te installeren of af te
halen.
Slang
1. Om de slang te monteren, duw deze in het
slangaansluitstuk aan de voorkant van het apparaat
totdat u een klik hoort.
NL-4
Page 26

2. Om de slang af te halen, druk op de ontgrendelingsknoppen aan de zijkant van de
slang en trek de slang uit het apparaat.
De buis en accessoires aansluiten
1. Breng het breder uiteinde van de buizen in het slanghandvat.
2. Pas de buizen op uw gewenste lengte aan.
Duw de schakelaar op de buis naar voren
en pas vervolgens aan. Laat de schakelaar
los eenmaal de gewenste lengte wordt
bereikt.
3. Bevestig het gewenste schoonmaakaccessoire aan het
uiteinde van de buis.
Om de buizen en accessoires af te halen, houd elk onderdeel stevig vast en trek deze
uit elkaar.
WERKING
1. Trek het snoer uit het apparaat en steek de stekker in het
stopcontact.
Een GELE markering op het snoer geeft de ideale
snoerlengte aan. Trek het snoer niet verder dan de
RODE markering uit.
2. Druk op de aan/uit‐knop aan de bovenkant van het
apparaat om het in te schakelen.
Pas de zuigkracht aan door aan de zuigkrachtregelaar
te draaien.
3. U kunt de zuigkracht tevens op een snelle manier aanpassen
door op de luchtstroomregelaar op het slanghandvat te
duwen. Duw deze vooruit om de zuigkracht te verhogen en
achteruit om de zuigkracht te verlagen.
NL-5
Page 27

De schoonmaakaccessoires gebruiken
Tapijt‐/vloerborstel met dubbele positie (Tekeningen alleen ter referentie)
Positie 1: Borstels uitgeschoven
-
Voor harde vloeren
Spleetmondstuk
Voor hoeken, randen of nauwe
ruimten
Borstel voor dierenhaar
Voor het verwijderen van dierenhaar
dat aan een oppervlak kleeft
Positie 2: Borstels ingeschoven
-
Voor tapijt
Stofborstel
Voor het reinigen van delicate
oppervlakken zoals gordijnen, etc.
Parketvloerborstel
Voor alle houten en laminaatvloeren
REINIGING EN ONDERHOUD
Schakel het apparaat altijd uit en trek de stekker uit het stopcontact alvorens het
apparaat te onderhouden of schoon te maken.
Maak de buitenkant van het apparaat schoon met een licht bevochtigde doek. Droog
grondig.
Dompel het apparaat nooit in water.
Gebruik geen schurende of chemische schoonmaakmiddelen.
Het stofreservoir legen en de stofzak vervangen
Als de controlelampjes rond de aan/uit‐knop blauw branden, leeg of vervang de
stofzak. Maak de luchtfilter schoon als deze verstopt is.
1. Til de voorste dekselklem op om het stofreservoir te openen.
NL-6
Page 28

2. Haal de stofzak uit de stofzakhouder.
3. Leeg de stofzak of vervang deze door een nieuwe.
4. Breng de stofzak opnieuw in het stofreservoir aan en sluit het voorste
deksel.
De filters onderhouden
Het is van groot belang om de filter schoon te houden zodat de stofzuiger maximale
prestaties blijft leveren.
Maak de filters regelmatig schoon. We bevelen aan om de filters eenmaal per jaar te
vervangen.
De luchtinlaatfilter schoonmaken
1. Open het voorste deksel om het deksel van de
luchtinlaatfilter en vervolgens de filter te verwijderen.
2. Spoel ze onder stromend water en laat ze vervolgens
in een koele ruimte drogen.
3. Plaats de filter in het rooster en maak het rooster
vervolgens opnieuw aan het apparaat vast.
De HEPA‐filter schoonmaken
De HEPA (High Efficiency Particulate Air) filter is een doeltreffend systeem in het
verwijderen van zowat alle schadelijke stoffen, stofmijten, pollen, schimmels
binnenshuis.
Haal het rooster van de
luchtuitlaatfilter uit door de buitenste
rand omhoog te tillen.
2. Houd het lipje op de HEPA‐filter vast
en trek het naar buiten om de
HEPA‐filter te verwijderen.
NL-7
Page 29

3. Haal de spons van het
apparaat af.
4. Was ze onder stromend water en laat ze vervolgens grondig drogen.
GEBRUIK GEEN SCHOONMAAKMIDDELEN OM DE FILTER SCHOON TE MAKEN.
5. Na het reinigen, breng de spons opnieuw aan en maak de HEPA‐filter
vervolgens opnieuw vast totdat het op zijn plaats
klikt.
Breng eerst de twee lipjes aan één kant van
de HEPA‐filter in de gleuven van het
apparaat aan en duw de andere kant omlaag
totdat een klik wordt gehoord.
6. Maak het luchtuitlaatrooster aan het apparaat vast totdat een klik wordt
gehoord.
Het snoer oprollen
Wanneer niet in gebruik, haal de stekker uit het stopcontact en druk vervolgens op
de snoeroprolknop om het snoer op te rollen.
OPGELET: Wees voorzichtig wanneer u tijdens het oprollen van het snoer de stekker
vasthoudt zodat u geen letsel oploopt.
Opslag
Breng de houder van de vloerborstel met de telescoopbuis in de opbergclip aan de
onder‐ of achterkant van het apparaat.
NL-8
Page 30

beschadigd is.
2. Controleer of het
stofreservoir vol is.
3. Controleer of de filter
verstopt is en de buis juist is
vastgemaakt.
Het snoer kan niet
volledig worden
opgerold.
Het snoer kan niet
worden
uitgetrokken.
Controleer of het snoer niet
gedraaid is.
Het snoer kan gedraaid zijn Trek het snoer enkele keren
SPECIFICATIONS
Ratings:
220V‐240V,50‐60Hz 700W
2. Leeg het stofreservoir.
3. Maak de filter schoon of
zet de buizen opnieuw in
elkaar.
Trek het snoer opnieuw iets
uit en rol deze vervolgens
op.
uit en rol opnieuw op door
op de snoeroprolknop te
drukken.
NL-9
Page 31

VERWIJDERING
Als verantwoordelijke handelaar dragen we zorg voor het milieu.
We moedigen u aan om de juiste verwijderingsprocedure voor uw apparaat en
verpakkingsmateriaal te volgen. Dit draagt bij tot het behoud van de natuurlijke
rijkdommen door deze te recyclen zodat zowel de menselijke gezondheid en het
milieu worden beschermd.
Gooi dit apparaat en de verpakking weg in overeenstemming met de geldende
wetgeving en voorschriften.
Aangezien dit apparaat elektronische componenten bevat moet het apparaat en
toebehoren aan het einde van hun levensduur afzonderlijk van het huisafval
worden weggegooid.
Neem contact op met uw gemeente voor informatie over afdanking en recycling.
Lever het apparaat in bij het inzamelpunt van uw gemeente voor recycling. Bij
sommige inzamelpunten kunt u het apparaat gratis inleveren.
Hotline Vanden Borre
De dienst na verkoop is bereikbaar van maandag tot zaterdag op +32 2 334 00 00
Hulplijn Nederland
Hiervoor kunt u contact opnemen met het BCC Service Center: 0900 0555 (lokaal
tarief), geopend van maandag t/m vrijdag van 9.00 tot 17.00 uur.
We verontschuldigen ons voor enig ongemak veroorzaakt door kleine inconsistenties
in deze gebruikershandleiding, die kunnen ontstaan door productverbetering
of –ontwikkeling.
Darty Holdings SAS © 14 route d’Aulnay 93140 Bondy, France 27 / 07 / 2016
NL-10
Page 32

1
 Loading...