

Page 1
BOX602SS
BOX902SS
Hotte décorative
Range hood
Afzuigkap
MANUEL D’UTILISATION
OPERATING INSTRUCTIONS
HANDLEIDING
Page 2

MISES EN GARDE IMPORTANTES
Cet appareil est destiné à un usage domestique uniquement. Toute utilisation autre que
celle prévue pour cet appareil, ou pour une autre application que celle prévue, par
exemple une application commerciale, est interdite
Cet appareil peut être utilisé par des enfants âgés d'au moins 8 ans et par des personnes
ayant des capacités physiques, sensorielles ou mentales réduites ou dénuées
d’expérience ou de connaissance, s'ils (si elles) sont correctement surveillé(e)s ou si des
instructions relatives à l'utilisation de l'appareil en toute sécurité leur ont été données et
si les risques encourus ont été appréhendés. Les enfants ne doivent pas jouer avec
l’appareil. Le nettoyage et l'entretien par l'usager ne doivent pas être effectués par des
enfants sans surveillance.
Si le câble d'alimentation est endommagé, il doit être remplacé par le fabricant, son
service après-vente ou des personnes de qualification similaire afin d'éviter un danger.
Une ventilation convenable de la pièce doit être prévue lorsqu’une hotte de cuisine est
utilisée simultanément avec des appareils utilisant du gaz ou un autre combustible.
Il y a risque d'incendie si le nettoyage n'est pas effectué conformément aux instructions.
Ne pas flamber d'aliments sous la hotte de cuisine.
ATTENTION: Les parties accessibles de cet appareil peuvent devenir chaudes lorsqu’il est
utilisé avec des appareils de cuisson.
L'air ne doit pas être envoyé dans un conduit utilisé pour évacuer les fumées d’appareils
utilisant du gaz ou un autre combustible.
Les réglementations concernant l'évacuation de l'air doivent être respectées.
Lorsque la hotte de cuisine est placée au-dessus d'un appareil à gaz, la distance minimale
à respecter entre la surface support des récipients de cuisson de la table de cuisson et la
partie la plus basse de la hotte de cuisine, doit être d'au moins 65 cm.
Les détails concernant la méthode et la fréquence du nettoyage sont donnés en pages
13-14 dans la section “Nettoyage et entretien”.
1
Page 3

INSTRUCTIONS DE SÉCURITÉ GÉNÉRALES
• Lisez attentivement cette notice et conservez-la en lieu sûr pour pouvoir vous y reporter ultérieurement.
En cas de vente, de cession ou de déménagement, assurez-vous qu’elle reste avec le produit.
• Le constructeur décline toute responsabilité en cas d’inconvénient, dommage ou incendie provoqué à
l’appareil et dû au non-respect des instructions de la présente notice.
• Portez toujours des gants de travail avant d’effectuer toute opération d’installation ou d’entretien.
• Ne raccordez pas l’appareil au circuit électrique avant que le montage ne soit complètement terminé.
• N’effectuez aucune modification électrique ou mécanique sur le produit ou sur le conduit d’évacuation.
• N’essayez pas d’examiner les filtres pendant que la hotte est en fonctionnement.
• La friture d’aliments doit être réalisée sous contrôle pour éviter que l’huile surchauffée ne prenne feu.
• N’utilisez pas la hotte sans que les ampoules soient correctement placées pour éviter tout risque de
choc électrique.
• N’utilisez jamais la hotte sans que les filtres à graisse ne soient montés correctement.
• N’utilisez jamais la hotte comme plan de travail.
• La présence de flammes libres peut endommager les filtres et donner lieu à des incendies, il faut donc
les éviter à tout prix.
• Ne touchez pas les ampoules après avoir utilisé l’appareil, vous risquez de vous brûler.
• Avant toute opération de nettoyage ou d’entretien, débranchez la hotte du circuit électrique en retirant
la prise ou en coupant l’interrupteur général de l’habitation.
2
Page 4
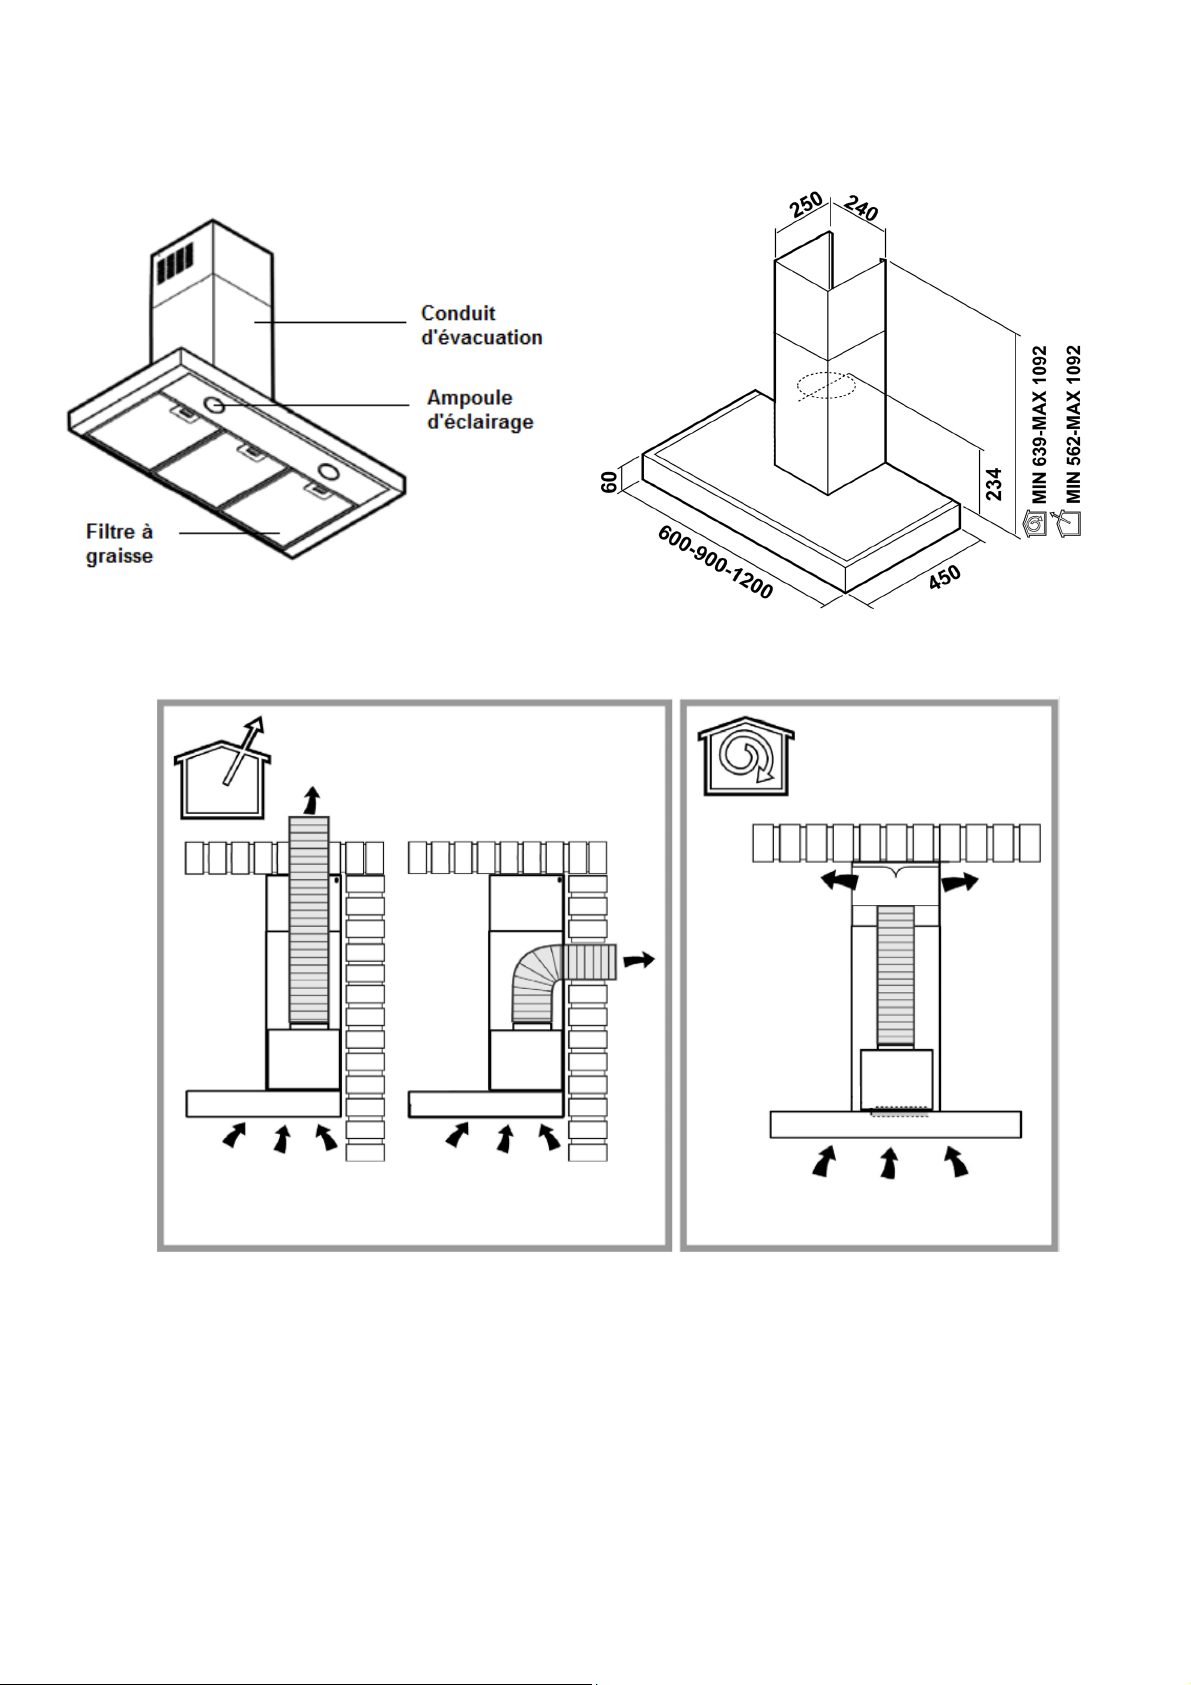
DESCRIPTION
La hotte peut être utilisée en version aspirante à évacuation extérieure, ou filtrante à recyclage
intérieur.
AVANT L’INSTALLATION
Avant d’installer votre appareil, vérifiez qu’il est en parfait état. S’il est endommagé, ne poursuivez pas
l’installation et contactez votre service après-vente.
Assurez-vous également que les dimensions de la hotte et de son conduit sont compatibles avec votre
cuisinière et hauteur de plafond.
3
Page 5
INSTALLATION
Cet appareil doit impérativement être installé par 2 personnes.
La hotte est équipée de chevilles de fixation convenant à la plupart des parois/plafonds. Il est cependant
nécessaire de s’adresser à un technicien qualifié afin de s’assurer que le matériel est approprié au type
de paroi/plafond. La paroi/plafond doit être suffisamment solide pour supporter le poids de la hotte.
Attention ! Le fait de ne pas suivre les instructions de cette notice peut entraîner des risques
électriques.
En cas de doute, consultez un centre après-vente agréé ou un technicien agréé.
Procédure d’installation détaillée :
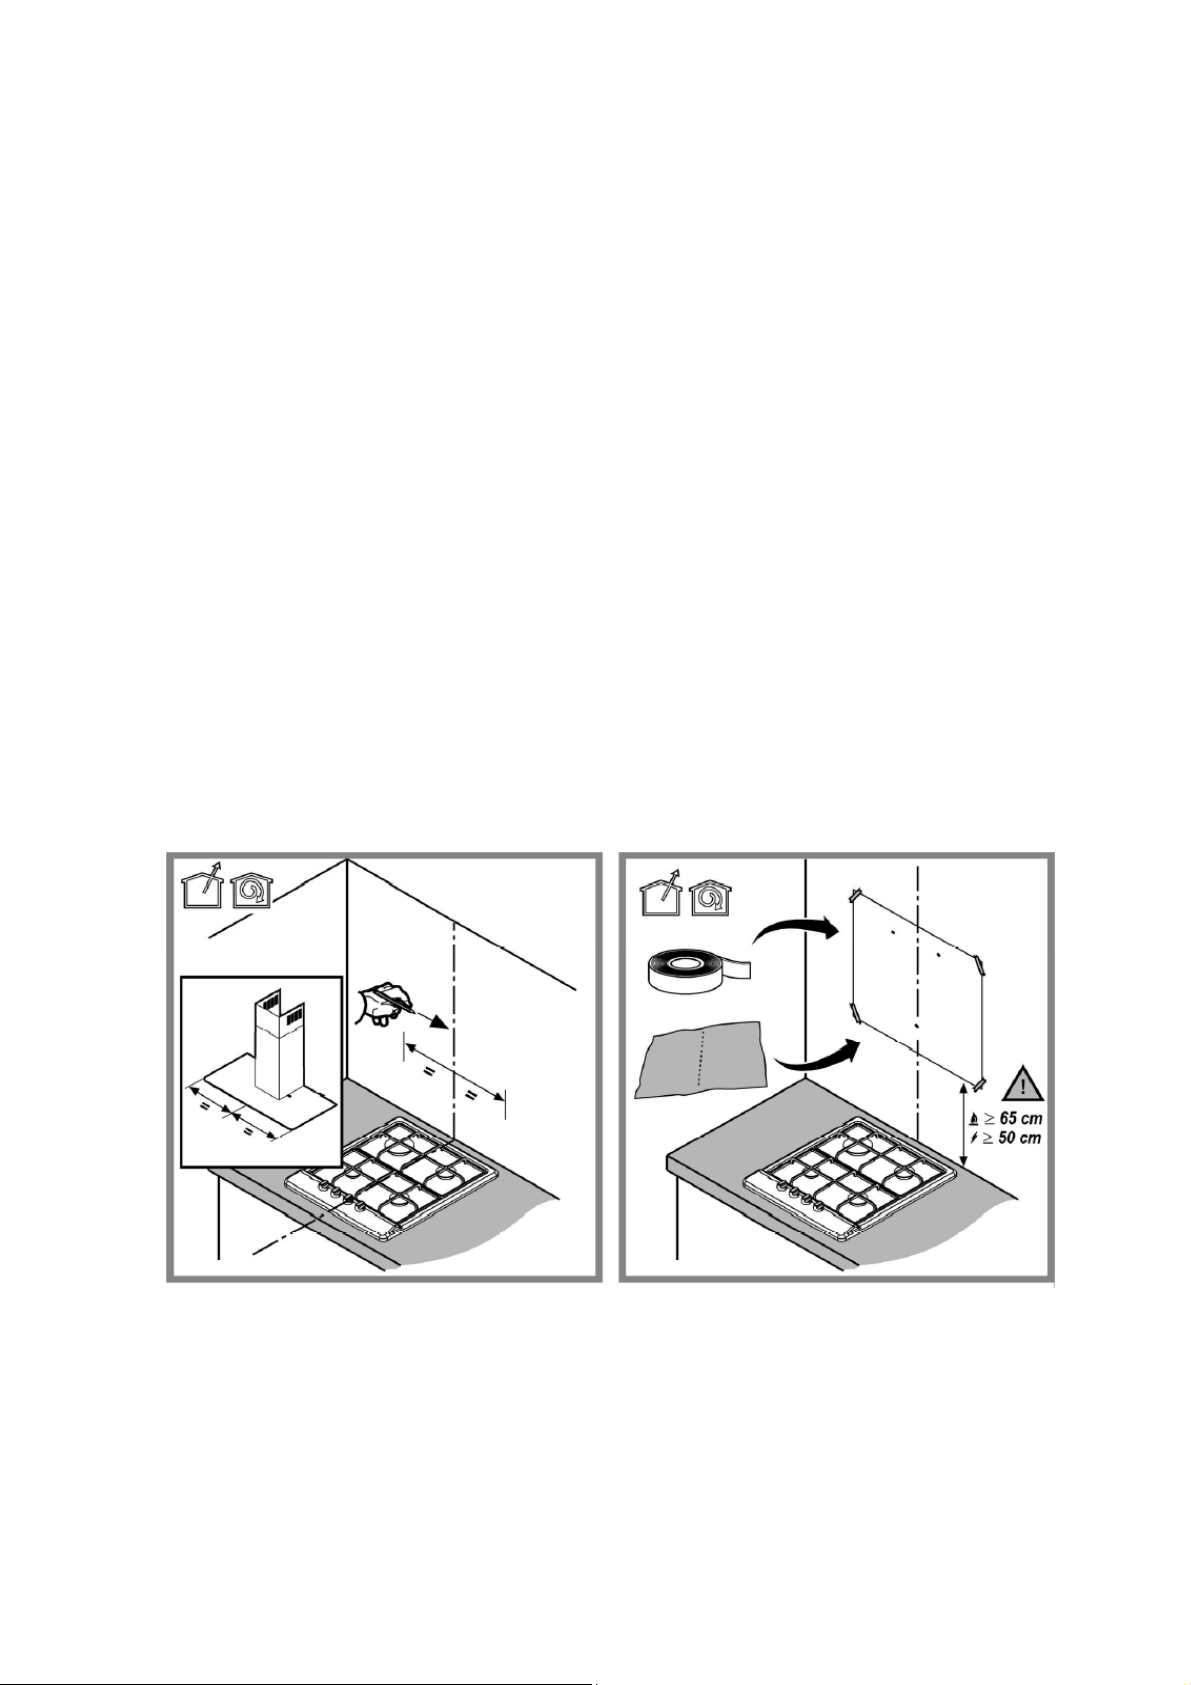
1. Prenez les mesures de votre cuisinière afin de centrer la hotte au-dessus de celle-ci. Collez le gabarit
d’installation et de perçage sur le mur au-dessus de votre cuisinière, en prenant garde à respecter les
distances minimales indiquées.
Remarque : La distance minimum entre la superficie de support des récipients sur le
dispositif de cuisson et la partie la plus basse de la hotte de cuisine ne doit pas être
inférieure à 50cm dans le cas de cuisinières électriques et de 65cm dans le cas de cuisinières
à gaz ou mixtes. Si les instructions d’installation du dispositif de cuisson au gaz spécifient une
plus grande distance, vous pouvez en tenir compte.
4
Page 6
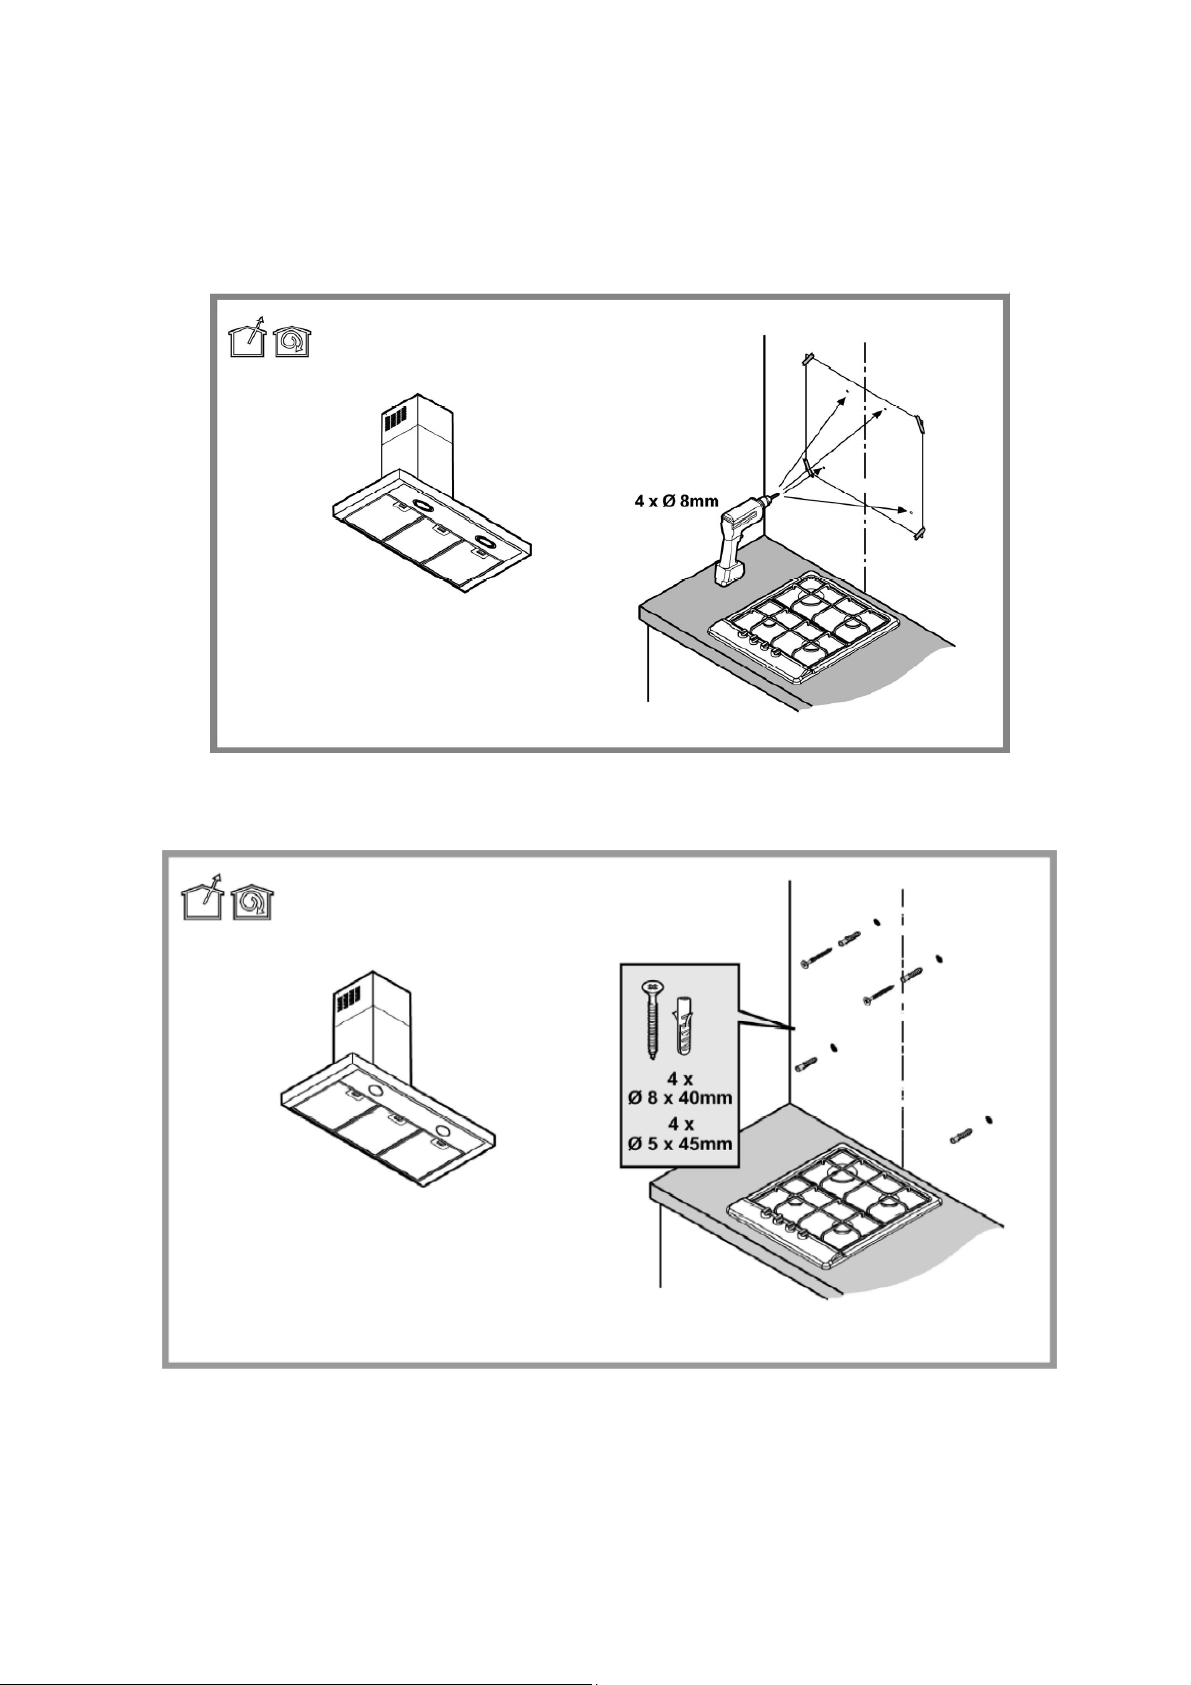
2. Marquez sur le mur l’emplacement des 4 trous figurant sur le gabarit, puis percez-les en utilisant une
mèche de 8mm de diamètre.
Attention : le gabarit est prévu pour 2 dimensions de hottes différentes, veillez à vous aligner sur les
dimensions de votre hotte.
3. Dans les trous que vous venez de percer, insérez les 4 chevilles (diamètre 8mm, profondeur 40mm) puis
les 4 vis (diamètre 5mm, profondeur 45mm) fournies.
5
Page 7
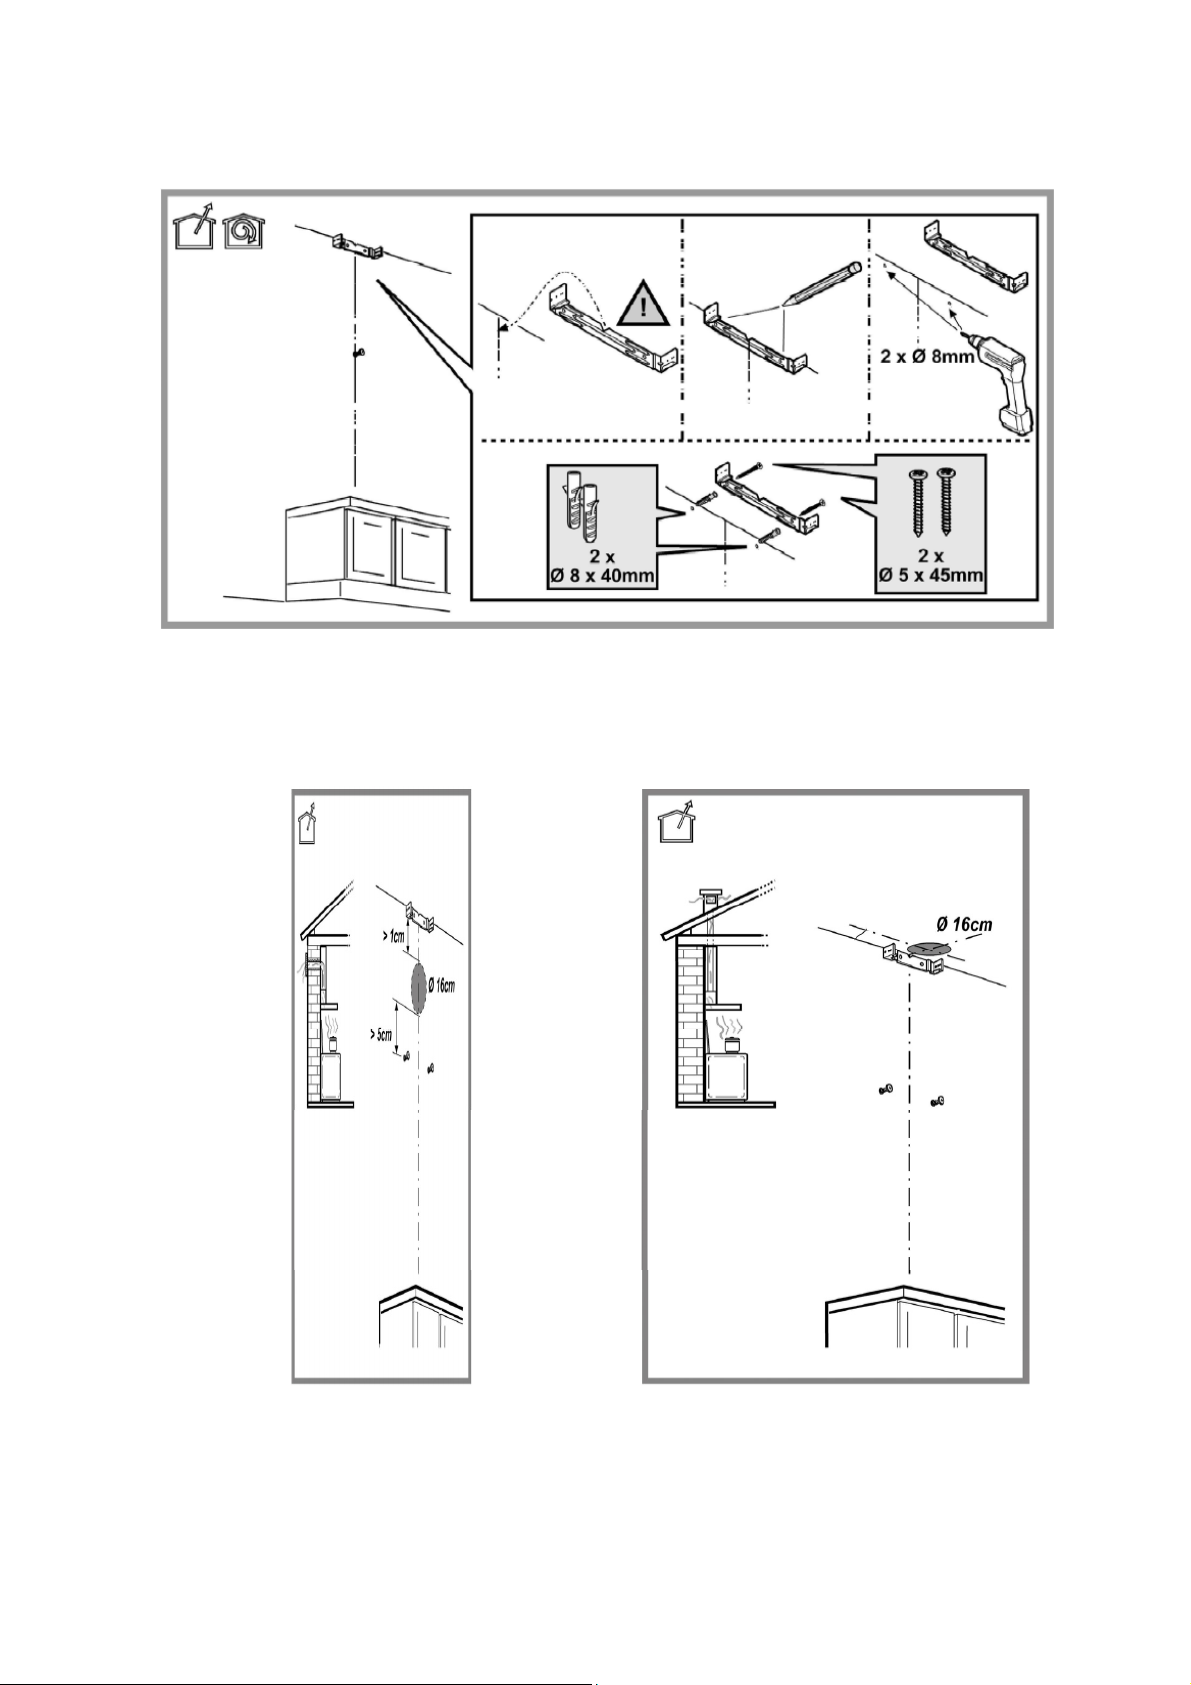
4. Marquez et percez 2 autres trous centrés tout en haut du mur, afin d’y fixer ensuite le conduit
d’évacuation. Vissez alors la patte de fixation.
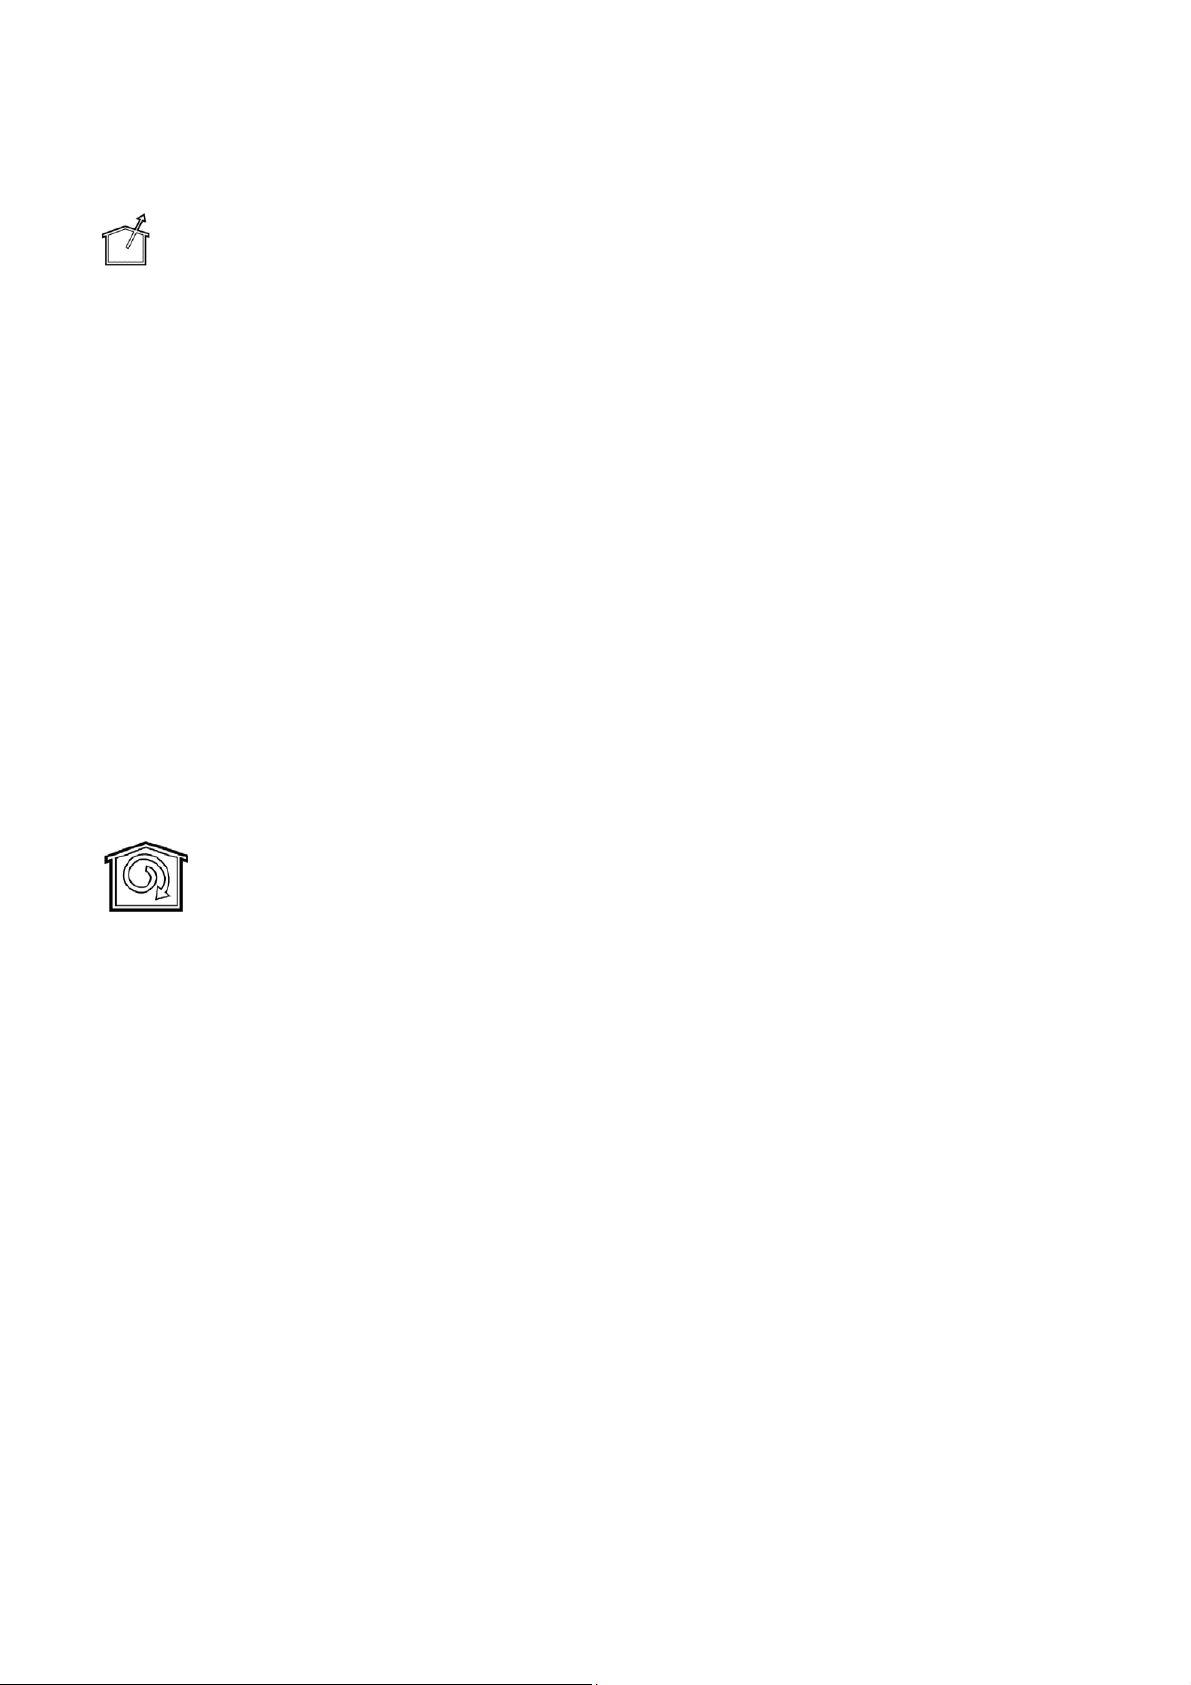
5. Selon le type d’évacuation existant dans votre logement, montez la cheminée.
¾ Évacuation murale ¾ Évacuation au plafond
6
Page 8
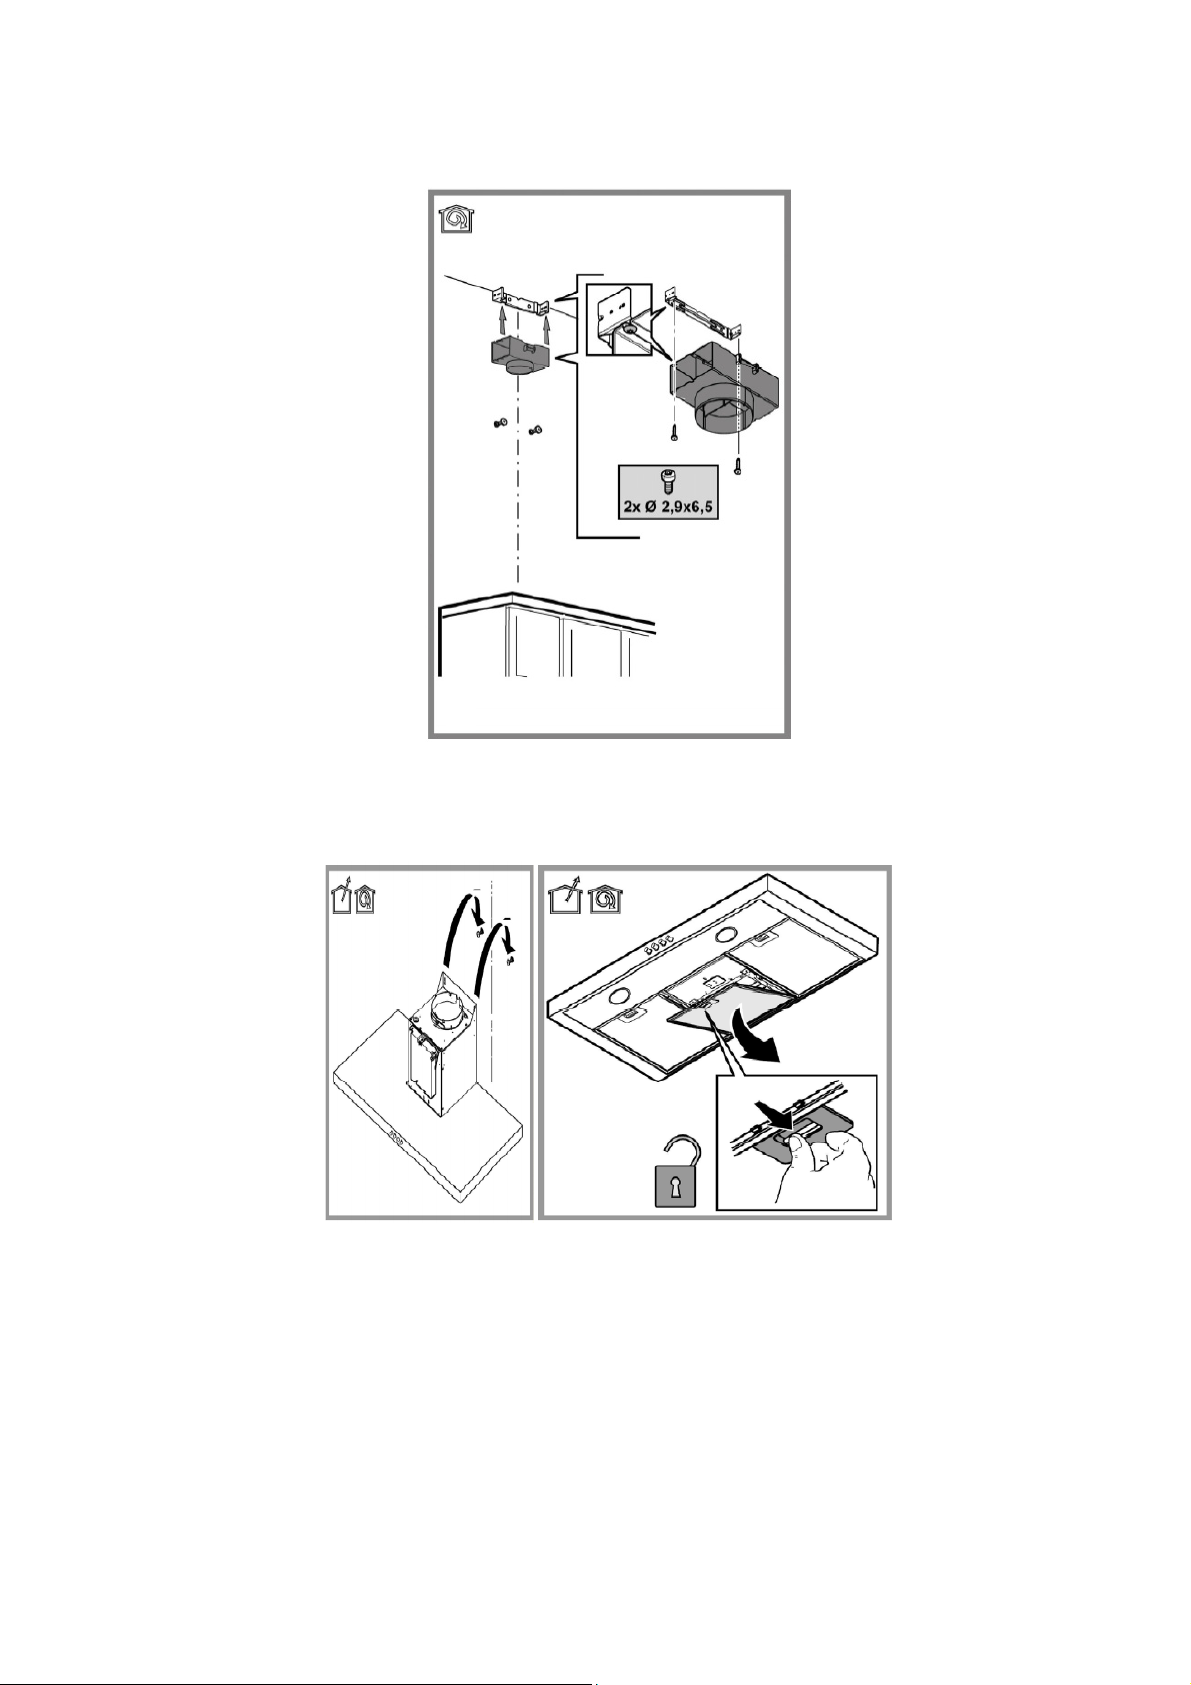
¾ Pour utiliser la hotte en mode recyclage, fixez le conduit de recyclage sur la patte en haut du mur
à l’aide des 2 vis fournies (diamètre 2,9mm, profondeur 6,5mm).
6. Positionnez la hotte sur les 2 vis du haut. Ouvrez la trappe des filtres à graisse afin d’accéder aux
fixations des 2 vis situées à l’intérieur, de chaque côté. Retirez les filtres à graisse, puis positionnez les 2
vis intérieures à l’aide des rondelles fournies.
7
Page 9

7. Assurez-vous que la hotte est d’aplomb à l’aide d’un niveau, puis serrez les vis.
8. Détachez le boîtier d’alimentation situé à l’avant de la hotte, et relevez-le puis fixez-le avec les 2 vis déjà
en position sur le dessus de la hotte. Serrez les vis.
8
Page 10
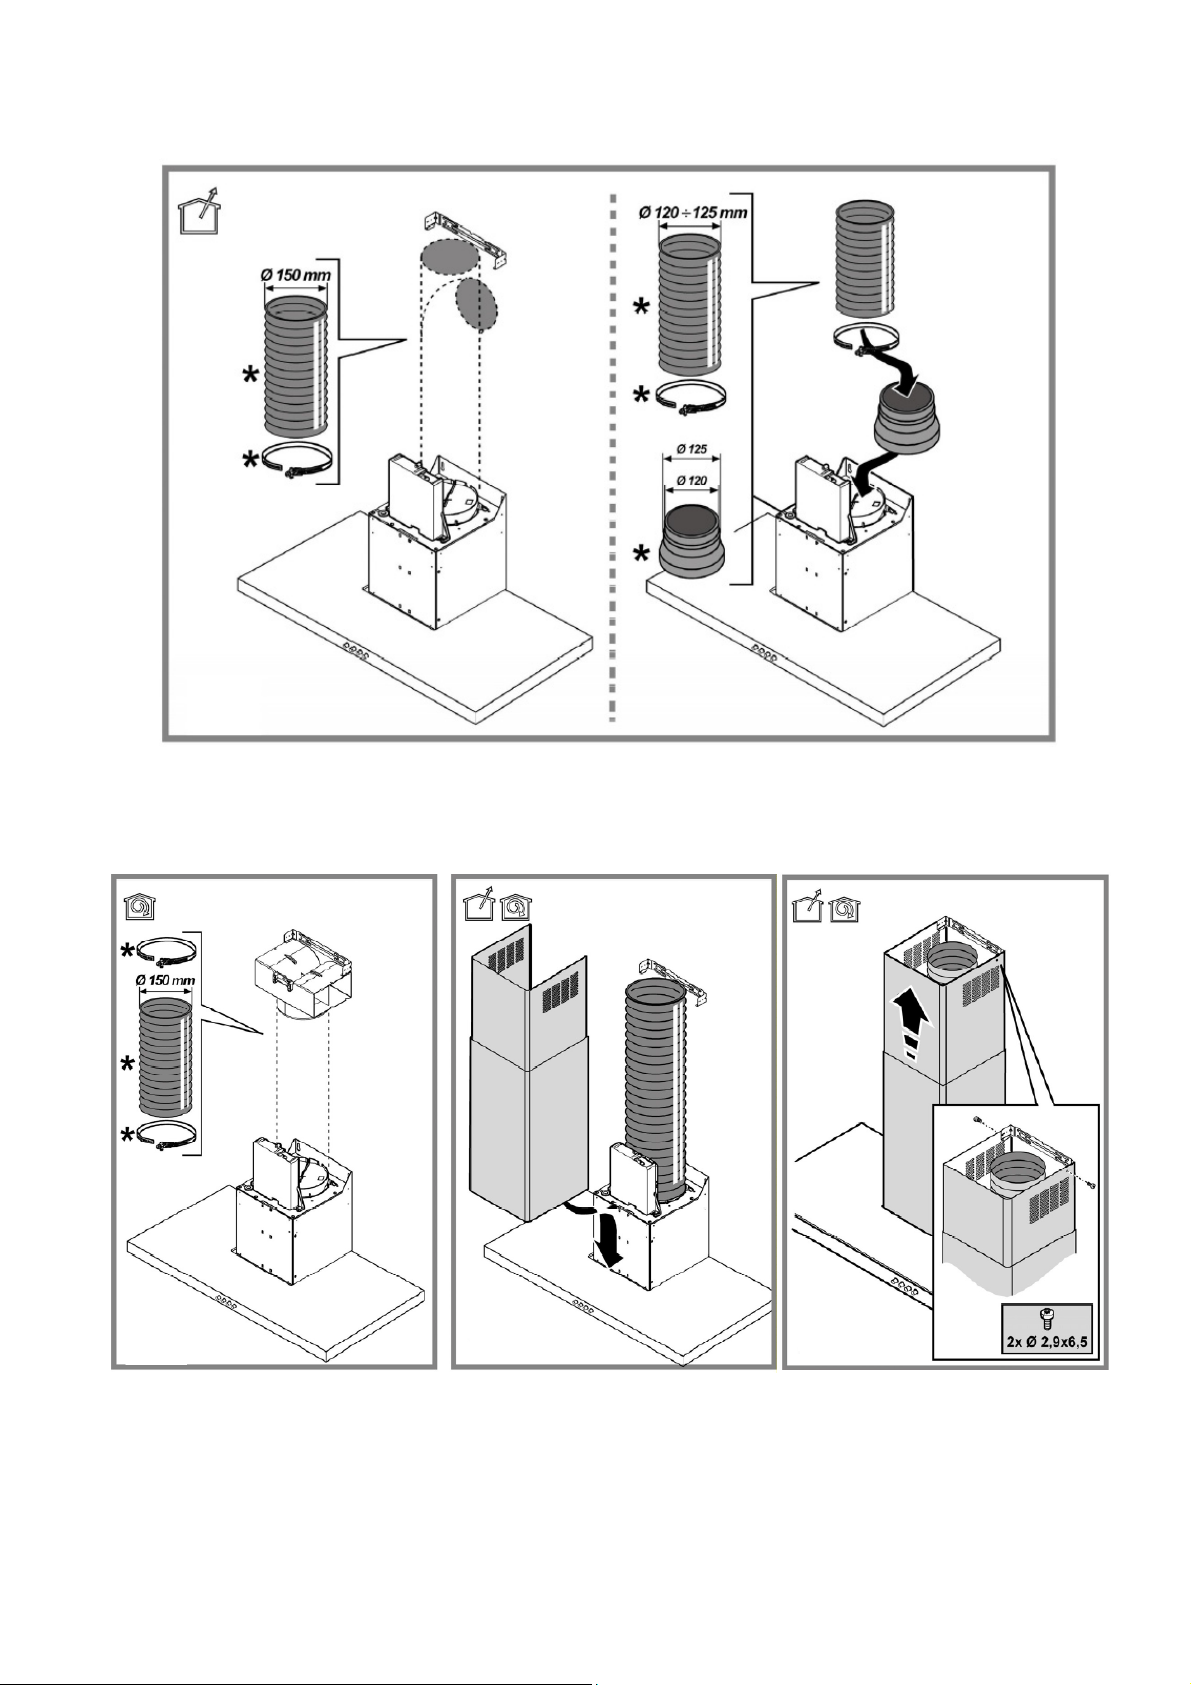
9. Installez une gaine (non fournie) de la bonne dimension.
10. Étirez puis fixez la gaine au conduit de recyclage, ou reliez-la à l’évacuation extérieure. Dans le cas d’une
évacuation extérieure, vous pouvez placer la valve anti-retour avant de positionner la gaine : cela évitera
les retours d’air.
11. Si vous souhaitez installer des filtres à charbon (non fournis) pour utilisation de la hotte en mode
recyclage, suivez les illustrations ci-dessous. Veillez à bien remettre les filtres à graisse en position après
avoir installé les filtres à charbon.
9
Page 11
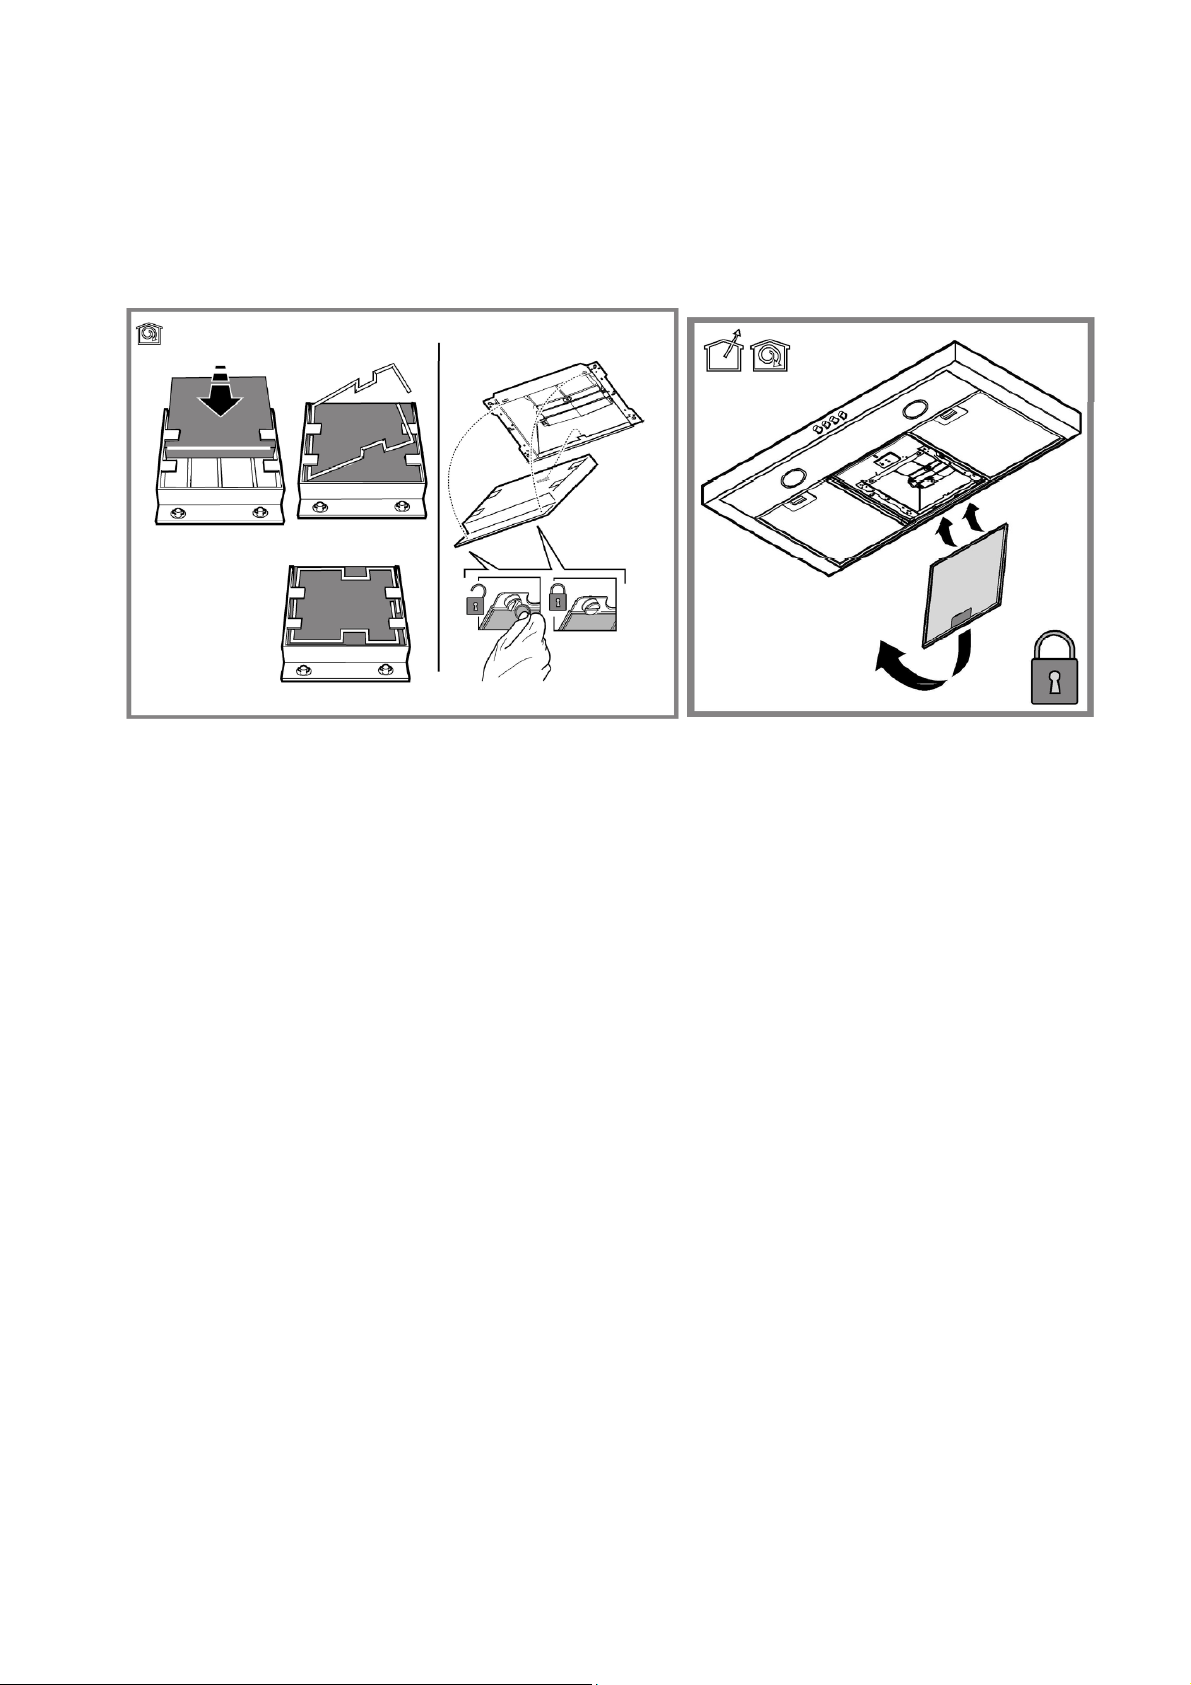
Montage
Accrochez le filtre à charbon actif d’abord à l’arrière de la languette métallique de la hotte, puis à
l’avant avec les deux pommeaux.
Démontage
Enlevez le filtre à charbon actif en tournant de 90° les pommeaux qui le fixent à la hotte.
Branchement électrique
Pour votre sécurité, demandez à un technicien qualifié d’effectuer l’installation électrique de votre
hotte.
La tension électrique doit correspondre à la tension reportée sur la plaque signalétique située à
l’intérieur de la hotte. Si une prise est présente, branchez la hotte dans une prise murale
conforme aux normes en vigueur et placée dans une zone accessible également après
l’installation. Si aucune prise n’est présente (raccordement direct au circuit électrique), ou si la
prise ne se trouve pas dans une zone accessible également après l’installation, appliquez un
disjoncteur normalisé pour assurer de débrancher complètement la hotte du circuit électrique en
conditions de catégorie surtension III, conformément aux règlementations de montage.
Attention ! Avant de rebrancher le circuit de la hotte à l’alimentation électrique et d’en vérifier le
fonctionnement correct, contrôlez toujours que le câble d’alimentation soit monté correctement.
10
Page 12
UTILISATION
Évacuation extérieure
Les vapeurs sont évacuées vers l'extérieur à travers un conduit d'évacuation fixé à la bride de raccord
qui se trouve au-dessus de la hotte.
Attention ! La gaine d’évacuation et le collier de fixation ne sont pas fournis et doivent être achetés à
part.
Le diamètre de la gaine d’évacuation doit être égal à celui de la bride de raccord.
Sur la partie horizontale, la gaine doit être légèrement inclinée vers le haut (10° environ) de façon à
convoyer plus facilement l’air vers l’extérieur.
Attention ! Si la hotte est équipée d’un filtre à charbon, ce dernier doit être enlevé.
Reliez la hotte aux tubes et trous d’évacuation de la paroi d’un diamètre équivalent à la sortie de l’air de
la gaine (collier et bride de raccord). L’utilisation de tubes et des trous d'évacuation à paroi avec un
diamètre inférieur entraînera une diminution des performances d’aspiration et une nette augmentation
du bruit.
• Utilisez une gaine de la longueur strictement nécessaire.
• Les coudes de la gaine doivent être en nombre minime (angle maxi du coude: 90°).
• Évitez les variations excessives de section de gaine.
• Utilisez une gaine la plus lisse possible sur sa partie interne.
• Le matériau de la gaine doit être aux normes.
Recyclage
L'air d'aspiration sera dégraissé et désodorisé avant d'être renvoyé dans la pièce.
Pour utiliser la hotte dans cette version, vous devez installer des filtres à charbon actif (pour plus
d’informations, reportez-vous à la section Installation).
11
Page 13
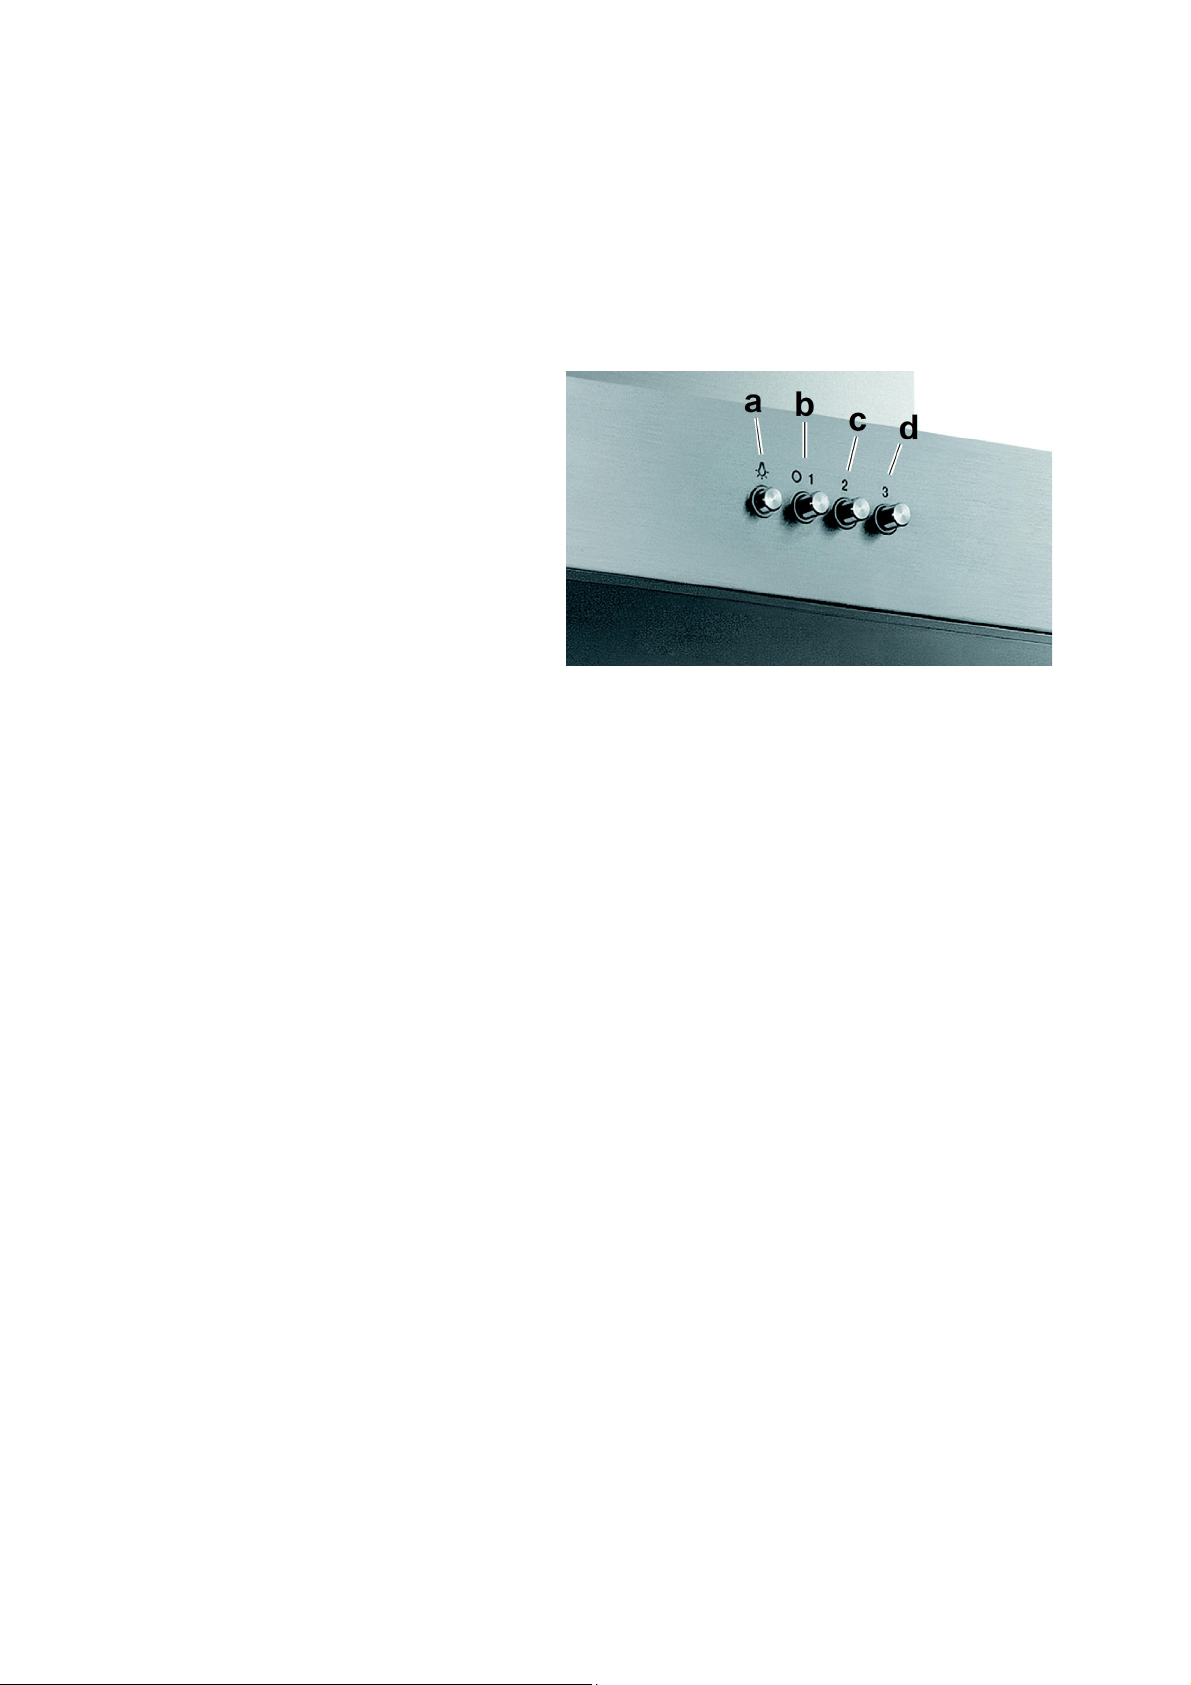
Fonctionnement
La hotte est équipée d’un panneau de contrôle doté d’une commande de vitesse d’aspiration et d’une
commande d’éclairage du plan de cuisson.
Utilisez la puissance d’aspiration maximum en cas de concentration très importante des vapeurs de
cuisson.
a. Interrupteur lumières ON/OFF.
b. Interrupteur OFF/vitesse 1
c. Sélection vitesse 2
d. Sélection vitesse 3
Note : le bouton b. correspond à la
vitesse 1 mais il sert également
d'interrupteur marche-arrêt. Par
conséquent, il doit être enfoncé si vous
souhaitez sélectionner la vitesse 2 ou 3.
Conseils d’économie d’énergie
Voici quelques suggestions d’utilisation pour vous permettre de réduire l’impact environnemental de
votre appareil :
Allumez la hotte à la vitesse minimum pendant la cuisson et laissez-la fonctionner pendant quelques
minutes après la fin de la cuisson. Augmentez la vitesse uniquement en présence d’une grande quantité
de fumée ou de vapeur et n’utilisez la/les vitesse(s) accélérées que dans les cas extrêmes. Remplacez
le(s) filtre(s) à charbon uniquement lorsque cela est nécessaire afin de maintenir une réduction efficace
des odeurs. Nettoyez les filtres à graisse lorsque cela est nécessaire afin de maintenir un filtrage efficace
des graisses.
12
Page 14

NETTOYAGE ET ENTRETIEN
Attention ! Avant toute opération de nettoyage ou d’entretien, débranchez la hotte du circuit électrique
en enlevant la prise ou en coupant l’interrupteur général de l’habitation.
L’intérieur et l’extérieur de la hotte doivent être nettoyés régulièrement (environ une fois par mois).
Pour cela, utilisez un chiffon humidifié avec un détergent liquide neutre. N’utilisez pas de produit
contenant des abrasifs. N’UTILISEZ PAS D'ALCOOL!
ATTENTION : Il y a risque d’incendie si vous ne respectez pas les instructions concernant le nettoyage de
l’appareil et le remplacement ou le nettoyage du filtre.
Nettoyage de la surface extérieure
• Pour protéger la surface extérieure de la hotte de la corrosion pouvant apparaître sur le long terme,
veillez à la nettoyer tous les deux mois avec de l’eau chaude et un détergent non abrasif.
• Le moteur et les autres pièces ne doivent pas entrer en contact avec de l’eau.
• Les filtres à charbon ne doivent pas être exposés à la chaleur.
Nettoyage des filtres à graisse
Les filtres à graisse retiennent les particules de graisses issues de la cuisson.
Ces filtres doivent être nettoyés une fois par mois avec des détergents non agressifs, à la main ou au
lave-vaisselle à faibles températures et cycle rapide.
Si vous passez un filtre à graisse métallique au lave-vaisselle, sachez néanmoins qu’il peut se décolorer.
Toutefois, les caractéristiques de filtrage ne seront en aucun cas modifiées.
Pour démonter les filtres à graisse, tirez la poignée de décrochement à ressort.
Nettoyage des filtres à charbon (en mode recyclage uniquement)
Les filtres à charbon actif retiennent les odeurs désagréables de cuisson.
Il existe deux types de filtres à charbon actif : lavables et non lavables.
Filtre à charbon actif lavable
Ce filtre peut être nettoyé tous les deux mois avec de l’eau chaude et au moyen de détergents
appropriés ou au lave-vaisselle à 65°C (dans le cas de lavage au lave-vaisselle, utilisez un cycle de lavage
complet sans autre vaisselle à l’intérieur).
Enlevez l’excédent d’eau en veillant à ne pas abîmer le filtre, ensuite enlevez le coussinet posé à
l’intérieur du châssis en plastique et mettez-le dans le four pendant 10 minutes à 100°C pour le sécher
complètement. Remplacez le coussinet tous les 3 ans et chaque fois que le filtre sera abîmé.
Filtre à charbon actif NON lavable
La saturation du charbon actif se constate après un emploi plus ou moins long, selon la fréquence
d'utilisation et la régularité du nettoyage des filtres à graisse. Quoi qu’il en soit, il est nécessaire de
changer le filtre après quatre mois d’utilisation au maximum.
IL NE PEUT PAS être nettoyé ou régénéré.
Remplacement des lampes
Débranchez l’appareil du réseau électrique.
Attention ! Avant de toucher les lampes, assurez-vous qu’elles soient froides.
13
Page 15
Remplacez l’ampoule défectueuse par le même type d’ampoule : utilisez uniquement des ampoules
halogènes à bougie Ø35mm E14 de 28W.
Dans l’éventualité où l’éclairage ne devait pas fonctionner, vérifier si les lampes ont été introduites et
vissées correctement dans leur logement, avant de contacter le service après-vente.
SPECIFICATIONS
Voici la fiche produit de votre hotte, conformément au règlement Européen No 65/2014.
Marque Proline
Référence BOX602SS, BOX902SS
Consommation d’énergie annuelle (AEC
Classe d’efficacité énergétique * D
Efficacité fluidodynamique (FDE
) 16.6 %
hotte
Classe d’efficacité fluidodynamique * D
Efficacité lumineuse (LE
) 3.0 lux/W
hotte
Classe d’efficacité lumineuse * G
Efficacité de filtration des graisses 66.0 %
Classe d’efficacité de filtration des graisses * D
Débit d’air
Vitesse minimale 240 m3/h
Vitesse maximale 581 m3/h
Vitesse minimale 46 dB Émissions
acoustiques de l’air
Consommation d’énergie en mode «arrêt» (P
Consommation d’énergie en mode «veille» (P
Vitesse maximale 67 dB
) 122.4 kWh/an
hotte
) N/A
O
) N/A
S
* A (le plus efficace) à G (le moins efficace)
MISE AU REBUT
C
e symbole indique que ce produit ne peut en aucun cas être traité comme
déchet ménager. Il doit par conséquent être remis à un centre de collecte des
déchets chargé du recyclage des équipements électriques et électroniques.
Pour la mise au rebut, respectez les normes relatives à l’élimination des
déchets en vigueur dans le pays d’installation.
Pour obtenir de plus amples détails au sujet du traitement, de la récupération
et du recyclage de cet appareil, veuillez vous adresser au bureau compétent de
votre commune, à la société de collecte des déchets ou directement à votre
revendeur.
Darty Holdings SNC © 14 route d'Aulnay, 93140 Bondy, France
22/07/2015
14
Page 16

Hotline Darty
Quels que soient votre panne et le lieu d'achat de votre produit en France,
avant de vous déplacer en magasin Darty, appelez le 0 978 970 970 7j/7 , 24h/24.
Darty France
129, avenue Galliéni
93140 BONDY
FRANCE
15
Page 17

WARNINGS
This appliance is intended for domestic household use only and should not be used for
any other purpose or in any other application, such as for non‐domestic use or in a
commercial environment.
This appliance can be used by children aged from 8 years and above and persons with
reduced physical, sensory or mental capabilities or lack of experience and knowledge if
they have been given supervision or instruction concerning use of the appliance in a safe
way and understand the hazards involved. Children shall not play with the appliance.
Cleaning and user maintenance shall not be made by children without supervision.
If the supply cord is damaged, it must be replaced by the manufacturer, its service agent
or similarly qualified persons in order to avoid a hazard.
There shall be adequate ventilation of the room when the range hood is used at the same
time as appliances burning gas or other fuels.
There is a fire risk if cleaning is not carried out in accordance with the instructions.
Do not flambé under the range hood.
CAUTION: Accessible parts may become hot when used with cooking appliances.
The air must not be discharged into a flue that is used for exhausting fumes from
appliances burning gas or other fuels.
Regulations concerning the discharge of air have to be fulfilled.
When the range hood is located above a gas appliance, the minimum distance between
the supporting surface for the cooking vessels on the hob and the lowest part of the
range hood shall be at least 65 cm.
For details concerning the method and frequency of cleaning, please see section
“Cleaning and maintenance” on pages 11‐12.
1
Page 18

IMPORTANT SAFETY INSTRUCTIONS
• Carefully read this instruction book and keep it in a safe place for future reference. In the case of
sale, cession or move, make sure it is kept together with the product.
• The manufacturer declines all responsibility, for any eventual inconveniences, damages or fires
caused by not complying with the instructions in this manual.
• Always wear work gloves for all installation and maintenance operations.
• Do not connect the appliance to the mains until the installation is fully complete.
• Do not carry out electrical or mechanical variations on the product or on the discharge conduit.
• Do not check the status of the filters while the range hood is operating.
• Any frying must be done with care in order to make sure that the oil does not overheat and ignite.
• Do not use the hood without the lamp correctly mounted due to the possible risk of electric shocks.
• Never use the hood without effectively mounted grease filters.
• The hood must NEVER be used as a support surface.
• The presence of exposed flames is detrimental to the filters and may cause a fire risk, and must
therefore be avoided in all circumstances.
• Do not touch the light bulbs after operating the appliance, you might get burnt.
• Before any cleaning or maintenance operation, disconnect hood from the mains by removing the
plug or disconnecting the mains electrical supply.
DESCRIPTION
2
Page 19

The hood is designed to be used either for ducting or filter version.
BEFORE INSTALLATION
Before proceeding with the installation of your appliance, check that it is not damaged. Otherwise, do
not proceed with the installation and contact your dealer.
You should also make sure that the dimensions of the appliance and its conduit are compatible with
your kitchen and ceiling height.
INSTALLATION
This appliance has to be installed by 2 people.
Expansion wall plugs are provided to secure the hood to most types of walls/ceilings. However, a
qualified technician must verify suitability of the materials in accordance with the type of wall/ceiling.
The wall/ceiling must be strong enough to take the weight of the hood.
WARNING! Failure to follow the instructions in this manual may result in electrical hazards.
In case of doubt, consult an authorised service assistance centre or similar qualified person.
3
Page 20

Detailed installation procedure
1. Take the dimensions of your cooker in order to have the range hood centred above it. Stick the
installation and drilling pattern on the wall above your cooker, taking care to comply with the required
minimum distance.
Note: The minimum distance between the supporting surface for the cooking equipment on
the hob and the lowest part of the range hood must be not less than 50cm from electric
cookers and 65cm from gas or mixed cookers. If the instructions for installation for the gas
hob specify a greater distance, this must be adhered to.
2. On the wall, mark the position of the 4 holes shown on the pattern and drill the holes by using drill bit
with an 8mm diameter.
Attention: the pattern is designed for 2 different range hood dimensions, therefore you must make sure
to conform to the dimensions of your appliance.
4
Page 21

3. In the holes that you just drilled, insert the 4 wall plugs (8mm diameter, 40mm depth) and the 4 screws
(5mm diameter, 45mm depth), all supplied.
4. Mark the position of 2 other holes at the top centre of the wall for installation of the discharge conduit.
Screw the bracket in place.
5
Page 22

5. Depending on the type of discharge in your home, mount the chimney.
¾ Ceiling discharge
¾ Wall discharge
¾ To use the appliance in filter version, fit the discharge conduit to the bracket at the top of the
wall with the supplied 2 screws (2.9mm diameter, 6.5mm depth).
6
Page 23

6. Position the range hood on the 2 upper screws. Open the grease filter door to access the 2 screws inside
the box, on each side. Remove the grease filters and position the 2 internal screws with the supplied
washers.
7. Make sure the appliance is level by using a spirit level, and tighten the screws.
8. Take off the power unit on the front of the hood and raise it up and then fasten it with the 2 screws
already positioned on the top of the hood. Tighten the screws.
7
Page 24

9. Install an exhaust pipe (not supplied) with correct dimension.
10. Stretch out the pipe and fit it to the filter conduit, or connect it to the external discharge point. In case
of discharging air to the outside, you can add the non‐return valve before putting the pipe in place: this
will help avoid backflow of air.
11. If you wish to install charcoal filters (not supplied), to use the appliance in filter mode, follow the
instructions below. After installing the charcoal filters, ensure to put the grease filters back in place.
8
Page 25

Assembly
Hook the charcoal filter at the back on the metal tongue of the hood first, then on the front with the
two knobs.
Disassembly
Remove the charcoal filter by turning the knobs fixing it to the hood by 90°.
Electrical connection
For your safety, ask a qualified technician to perform the electrical installation of the hood.
The mains power supply must correspond to the rating indicated on the plate situated inside the
hood. If provided with a plug connect the hood to a socket in compliance with current
regulations and positioned in an accessible area, after installation. If it not fitted with a plug
(direct mains connection) or if the plug is not located in an accessible area, after installation,
apply a double pole switch in accordance with standards which assures the complete
disconnection of the mains under conditions relating to over‐current category III, in accordance
with installation instructions.
Warning! Before re‐connecting the hood circuit to the mains supply and checking the efficient function,
always check that the mains cable is correctly assembled.
USING YOUR APPLIANCE
Ducting version
In this case the fumes are conveyed outside of the building by means of a special pipe connected with
the flange located on top of the hood.
Beware! The exhaust pipe and ring are not supplied and must be purchased apart.
Diameter of the exhausting pipe must be equal to that of the flange.
9
Page 26

In the horizontal runs the exhausting pipe must be slightly slanted (about 10°) and directed upwards to
vent the air easily from the room to the outside.
Beware! If the hood is supplied with active charcoal filter, then it must be removed.
Connect the hood and discharge holes on the walls with a diameter equivalent to the exhaust pipe
(flange and ring). Using tubes and discharge holes on walls with smaller dimensions will affect the
suction performance and drastically increase the noise.
• Use a duct of the minimum necessary length.
• Use a duct with as few elbows as possible (maximum elbow angle: 90°).
• Avoid drastic changes in the duct cross‐section.
• Use a duct as smooth as possible inside.
• The duct must be made of certified material.
Filter version
The aspirated air will be degreased and deodorised before being fed back into the room.
In order to use the hood in this version, you have to install a system of additional filtering based on
activated charcoal (for more information, please refer to Installation section of this manual).
Operation
The hood is fitted with a control panel with aspiration speed selection control and a light switch to
control cooking area lights. Use the high suction speed in cases of concentrated kitchen vapours.
a. ON/OFF light switch
b. Speed 1/OFF switch
c. 2‐speed selection
d. 3‐speed selection
Note: the switch b. is for 1‐speed
selection but it also acts as an on‐
off switch. As a result, it must be
pressed if you want to select
speed 2 or 3.
Tips on saving energy
Here are some suggestions to help you reduce the environmental impact of your appliance:
Switch on the hood at minimum speed when you start cooking and keep it running for a few minutes
after cooking is finished. Increase the speed only in case of a large amount of smoke and vapour and use
higher speed only in extreme situations. Replace the charcoal filters when necessary to maintain a good
odour reduction efficiency. Clean the grease filters when necessary to maintain a good grease filter
efficiency.
10
Page 27

CLEANING AND MAINTENANCE
Beware! Before performing any cleaning or maintenance operation, isolate the hood from the electrical
supply by switching off at the connector and removing the connector fuse. Or if the appliance has been
connected through a plug and socket, then the plug must be removed from the socket.
The cooker hood should be cleaned regularly internally and externally (about once a month). Clean using
the cloth dampened with neutral liquid detergent. Do not use abrasive products. DO NOT USE
ALCOHOL!
WARNING: Failure to carry out the basic cleaning recommendations of the cooker hood and
replacement of the filters may cause fire risks.
Cleaning the external surface
• To protect the external surface of the hood from corrosion over a long period of time, it should be
cleaned with hot water plus non corrosive detergent every two months.
• Keep the motor and other parts free from water, as this will cause damage to the appliance.
• The charcoal filters shall not be exposed to heat.
Cleaning the grease filter
The grease filters trap cooking grease particles.
It must be cleaned once a month using non aggressive detergents, either by hand or in the dishwasher,
which must be set to a low temperature and a short cycle.
When washed in a dishwasher, the grease filter may discolour slightly, but this does not affect its
filtering capacity. To remove the grease filter, pull the spring release handle.
Cleaning the charcoal filters (filter version only)
The charcoal filters absorb unpleasant odours caused by cooking.
There are 2 types of activated charcoal filters: washable and non‐washable activated charcoal filters.
Washable activated charcoal filter
The charcoal filter can be washed once every two months using hot water and a suitable detergent, or in
a dishwasher at 65°C (if the dishwasher is used, select the full cycle function and leave dishes out).
Eliminate excess water without damaging the filter, then remove the mattress located inside the plastic
frame and put it in the oven for 10 minutes at 100° C to dry completely.
Replace the mattress every 3 years and when the cloth is damaged.
NON-washable activated charcoal filter
The saturation of the charcoal filter occurs after more or less prolonged use, depending on the type of
cooking and how often you clean the grease filters. In any case, it is necessary to replace the filter at
least every four months.
The charcoal filter may NOT be washed or regenerated.
Replacing lamps
Disconnect the appliance from the mains.
Warning! Prior to touching the light bulbs, ensure they are cooled down.
11
Page 28

Replace the old light bulb with the one of the same type: use Ø35mm E14 28W halogen candle lamps
only.
If the lights do not work, make sure that the lamps are fitted properly into their housings before you call
for technical assistance.
SPECIFICATIONS
Below is the sheet of range hood according to EU regulation No 65/2014.
Brand Proline
Model number BOX602SS, BOX902SS
Annual energy consumption (AEC
Energy efficiency class * D
Fluid dynamic efficiency (FDE
Fluid dynamic efficiency class * D
Lighting efficiency (LE
Lighting efficiency class * G
Grease filtering efficiency 66.0 %
Grease filtering efficiency class * D
Air flow
Acoustic level
Power consumption in off mode (P
Power consumption in standby mode (P
hood
At minimum speed 240 m3/h
At maximum speed 581 m3/h
At minimum speed 46 dB
At maximum speed 67 dB
hood
) 3.0 lux/W
) 122.4 kWh/year
hood
) 16.6 %
) N/A
O
) N/A
S
* A (most efficient) to G (least efficient)
DISPOSAL
This symbol indicates that this appliance may not be treated as household
waste. Instead it should be taken to the appropriate collection point for the
recycling of electrical and electronic equipment. Disposal must be carried out
in accordance with local environmental regulations for waste disposal.
For further detailed information regarding the process, collection and recycling
of this product, please contact the appropriate department of your local
authorities or the local department for household waste or the shop where
you purchased this product.
Darty Holdings SNC © 14 route d'Aulnay, 93140 Bondy, France
22/07/2015
12
Page 29

WAARSCHUWINGEN
Dit apparaat is alleen bestemd voor huishoudelijk gebruik en mag niet voor
andere doeleinden of toepassingen worden gebruikt, zoals niethuishoudelijk gebruik of in een commerciële omgeving.
Dit apparaat mag worden gebruikt door kinderen vanaf 8 jaar oud en
personen met beperkte fysische, visuele of mentale mogelijkheden, of die
gebrek aan ervaring en kennis hebben, indien ze onder toezicht staan of
gepaste instructies hebben gekregen zodat ze het apparaat op een veilige
manier kunnen gebruiken en op de hoogte zijn van de gevaren die het
gebruik van het apparaat met zich meebrengt. Laat kinderen niet met het
apparaat spelen. Kinderen mogen het apparaat niet zonder toezicht
reinigen of onderhouden.
Als het snoer is beschadigd, moet het worden vervangen door de fabrikant,
een erkend hersteller of een ander gekwalificeerd persoon om elk gevaar te
vermijden.
Zorg dat de kamer voldoende gelucht wordt wanneer de afzuigkap samen
met andere apparaten die gas of een andere brandstof branden wordt
gebruikt.
Er bestaat brandgevaar als de reiniging niet volgens de instructies gebeurt.
Flambeer niet onder de afzuigkap.
OPGELET: De toegankelijke delen kunnen heet worden wanneer gebruikt
met kookapparatuur.
De lucht mag niet afgevoerd worden in een rookkanaal dat gebruikt wordt
om gassen af te voeren van apparaten die gas of andere brandstoffen
branden.
Leef de voorschriften betreffende het afvoeren van lucht na.
Als de afzuigkap boven een gastoestel wordt geïnstalleerd, moet de
minimum afstand tussen het kookoppervlak en het laagste deel van de
afzuigkap minstens 65 cm zijn.
Voor details over de reinigingsmethode en -frequentie, raadpleeg de sectie
"Reiniging en onderhoud” op pagina’s 13-14.
1
Page 30

BELANGRIJKE VEILIGHEIDSINSTRUCTIES
• Lees deze gebruiksaanwijzing zorgvuldig door en bewaar deze op in een veilige plaats voor latere
raadpleging. Bij verkoop, overdracht of een verhuis, zorg dat de gebruiksaanwijzing zich altijd bij het
product bevindt.
• De fabrikant is niet verantwoordelijk voor eventuele problemen, schade of brand in geval
de instructies in deze handleiding niet worden nageleefd.
• Draag altijd werkhandschoenen tijdens de installatie- en onderhoudswerkzaamheden.
• Sluit het apparaat pas op de netvoeding aan eenmaal de installatie volledig is voltooid.
• Voer geen elektrische of mechanische aanpassingen aan het product of de afvoerleiding uit.
• Controleer de status van de filters niet wanneer de afzuigkap in werking is.
• Let goed op tijdens het frituren zodat er geen olie oververhit raakt en vuur vat.
• Gebruik de afzuigkap niet zonder juist geïnstalleerde lamp om het risico op elektrische schokken te
vermijden.
• Gebruik de afzuigkap nooit zonder juist geplaatste vetfilters.
• Gebruik de afzuigkap NOOIT als steunoppervlak.
• De aanwezigheid van vrije vlammen is schadelijk voor de filters en kan brandgevaar doen ontstaan,
vermijd dit in alle omstandigheden.
• Raak de lampen na gebruik van het apparaat niet aan, u kunt brandwonden oplopen.
• Voordat u de afzuigkap schoonmaakt of onderhoudt, ontkoppel het apparaat van de netvoeding of
haal de stekker uit het stopcontact.
BESCHRIJVING
2
Page 31

De afzuigkap is ontworpen om zowel voor de leiding- als de filterversie te worden gebruikt.
VOOR INSTALLATIE
Controleer of uw apparaat niet beschadigd is voordat u met de installatie begint. Als schade wordt
waargenomen, voer de installatie niet uit en neem contact op met uw handelaar. Controleer tevens of
de afmetingen van het apparaat en de bijhorende afvoerleiding overeenstemmen met uw keuken en de
hoogte van het plafond.
3
Page 32

INSTALLATIE
Dit apparaat moet door 2 personen geïnstalleerd worden.
Muurpluggen zijn meegeleverd om de afzuigkap aan de meeste soorten muren/plafonds te bevestigen.
Een vakbekwame technicus moet echter controleren of de materialen geschikt zijn voor de
muur/plafond waarop u de afzuigkap wilt installeren. De muur/wand moet stevig genoeg zijn om het
gewicht van de afzuigkap te kunnen dragen.
WAARSCHUWING! Het negeren van de instructies in deze handleiding kan elektrische gevaren
veroorzaken.
In geval van twijfel, neem contact op met een erkend servicecentrum of gelijkwaardig vakbekwaam
persoon.
Gedetailleerde installatieprocedure
1. Neem de afmetingen van uw kookfornuis om de afzuigkap precies in het midden erboven te
plaatsen. Kleef de installatie- en boorsjabloon op de muur boven uw kookfornuis. Houd hierbij
rekening met de minimale vereiste afstanden.
Opmerking: De minimale afstand tussen het draagoppervlak voor de kookpotten op de
kookplaat en het onderste deel van de afzuigkap mag niet minder dan 50cm voor
elektrische fornuizen en niet minder dan 65cm voor gasfornuizen of gemengde fornuizen
bedragen. Als de installatie-instructies voor het gasfornuis een grotere afstand aangeeft,
respecteer deze afstand.
4
Page 33

2. Markeer op de muur de positie van de 4 gaten die op de sjabloon zijn aangegeven en boor de gaten
met behulp van een boorbit van 8 mm diameter.
Opgelet: De sjabloon is opgesteld voor de afmetingen van 2 verschillende afzuigkappen; zorg dat u de
afmetingen van uw apparaat volgt.
3. Breng de 4 meegeleverde muurpluggen (8 mm diameter, 40 mm diep) en de 4 meegeleverde
schroeven (5 mm diameter, 45 mm diep) in de gaten die u zonet hebt geboord.
5
Page 34

4. Markeer de positie van de 2 andere gaten in het midden aan de bovenkant van de muur om de
afvoerleiding te installeren. Schroef de beugel op zijn plaats vast.
5. Afhankelijk van het soort afvoer in uw woning, monteer het rookkanaal.
¾ Afvoer via de muur ¾ Afvoer via het plafond
6
Page 35

¾ Om het apparaat in de filterversie te gebruiken, bevestig de afvoerleiding aan de beugel aan
de bovenkant van de muur met de 2 meegeleverde schroeven (2,9 mm diameter, 6,5 mm
diep).
7
Page 36

6. Positioneer de afzuigkap op de 2 bovenste schroeven. Open het luikje van de vetfilter aan
weerskanten om bij de 2 schroeven in de behuizing te komen. Verwijder de vetfilters en plaats de 2
interne schroeven met de meegeleverde sluitringen op hun juiste positie.
7. Controleer of het apparaat waterpas staat met behulp van een waterpas en draai de schroeven
vervolgens vast.
8. Verwijder de voedingseenheid aan de voorkant van de afzuigkap, breng deze omhoog en zet vast met
behulp van de 2 schroeven die zich reeds aan de bovenkant van de afzuigkap bevinden. Draai de
schroeven vast.
8
Page 37

9
Page 38

9. Installeer een uitlaatpijp (niet meegeleverd) met de juiste afmetingen.
10. Trek de pijp uit en bevestig deze aan de filterleiding of verbind de pijp met het externe afvoerpunt.
In geval de lucht naar buiten wordt afgevoerd, kunt u een terugslagklep toevoegen voordat u de pijp op
zijn plaats aanbrengt: dit voorkomt het terugstromen van lucht.
10
Page 39

11. Als u koolstoffilters wilt installeren (niet meegeleverd) om het apparaat in de filtermodus te
gebruiken, volg onderstaande instructies. Na het installeren van de koolstoffilters, breng de vetfilters
opnieuw op de juiste plaats aan.
Plaatsen
Haak de koolstoffilter eerst vast aan de achterkant van het metalen lipje van de afzuigkap en vervolgens
aan de voorkant met de twee knoppen.
Verwijderen
Verwijder de koolstoffilter door de knoppen die de filter op de afzuigkap vasthouden 90° te draaien.
Elektrische aansluiting
Uit veiligheidsoverwegingen, laat het installeren van de afzuigkap door een vakbekwame elektricien
uitvoeren. De netvoeding moet overeenstemmen met de spanning die op het typeplaatje binnenin de
afzuigkap is aangegeven. Indien het apparaat van een stekker is voorzien, steek de stekker van de
afzuigkap in een stopcontact dat voldoet aan de geldende voorschriften en na installatie eenvoudig
bereikbaar is. Als het apparaat niet van een stekker is voorzien (directe aansluiting op de netvoeding) of
als de stekker na installatie niet eenvoudig bereikbaar is, plaats een tweepolige schakelaar conform de
richtlijnen die voor een volledige ontkoppeling van de netvoeding zorgt in geval van een overspanning
van categorie III en dit in overeenstemming met de installatie-instructies.
Waarschuwing! Voordat u de afzuigkap opnieuw op de netvoeding aansluit en op een juiste werking van
het apparaat controleert, controleer altijd of de stroomkabel juist is geïnstalleerd.
11
Page 40

UW APPARAAT GEBRUIKEN
Leidingversie In dit geval worden de dampen buiten het gebouw geleid door middel
van een speciale pijp die verbonden is met de flens aan de bovenkant van de afzuigkap.
Opgelet! De uitlaatpijp en de ring zijn niet meegeleverd en moeten afzonderlijk worden gekocht. De
diameter van de uitlaatpijp moet met de diameter van de flens overeenstemmen.
Zorg dat de uitlaatpijp in de horizontale trajecten lichtjes schuin loopt (circa 10°) en omhoog is gericht
om de lucht eenvoudig uit de kamer naar buiten te ventileren.
Opgelet! Als de afzuigkap met een actieve koolstoffilter is geleverd, verwijder deze. Sluit de afzuigkap en
de afvoergaten op de muur aan met een diameter die overeenstemt met de uitlaatpijp (flens en ring).
Wanneer u buizen en afvoergaten met een kleinere afmeting op de muur gebruikt, zal dit invloed
hebben op de aanzuigprestaties en het lawaai aanzienlijk doen toenemen.
• Gebruik een leiding van de minimale nodige lengte.
• Gebruik een leiding met zo weinig mogelijk bochten (maximale bochthoek: 90°).
• Vermijd grote wijzigingen in de doorsnede van de leiding.
• Gebruik een leiding met een zo glad mogelijke binnenkant.
• De leiding moet van een gecertificeerd materiaal zijn gemaakt.
Filterversie
De aangezogen lucht wordt ontvet en ontgeurd voordat de lucht opnieuw in de kamer wordt gebracht.
Om de afzuigkap in deze versie te gebruiken, installeer een extra filtersysteem op basis van actieve
koolstof (raadpleeg de sectie Installatie in deze handleiding voor meer informatie).
12
Page 41

Werking
De afzuigkap is voorzien van een bedieningspaneel met regelknoppen voor de aanzuigsnelheid en een
lichtknop om de lampen in of uit te schakelen. Gebruik de hoge aanzuigsnelheid in geval er een hoge
concentratie aan damp in de keuken aanwezig is.
a. AAN/UIT lampknop
b. Snelheid 1/Uit knop
c. Snelheid 2 knop
d. Snelheid 3 knop
Opmerking: Knop b dient zowel voor het
kiezen van snelheid 1 als voor het
uitschakelen van de afzuigkap. Deze knop
moet aldus worden ingedrukt als u snelheid
2 of 3 wilt selecteren.
Tips om energie te besparen
Hieronder vindt u enkele suggesties die u zullen helpen om de impact die uw apparaat op het milieu
heeft te verlagen. Schakel de afzuigkap in op laagste snelheid wanneer u begint te koken en houd de
afzuigkap nog enkele minuten ingeschakeld eenmaal u klaar bent met koken. Verhoog de snelheid
alleen wanneer er veel rook of damp is en gebruik een hogere snelheid alleen in extreme situaties.
Vervang de koolstoffilters indien nodig om een goede efficiëntie voor het wegnemen van geuren te
behouden. Reinig de vetfilters indien nodig om een goede werking te behouden.
13
Page 42

REINIGING EN ONDERHOUD
Opgelet! Voordat u de afzuigkap reinigt of onderhoudt, haal de afzuigkap van de stroom af door de
aansluiting te ontkoppelen en de zekering te verwijderen. Of als het apparaat via een stekker op de
voeding is aangesloten, haal de stekker uit het stopcontact.
Maak de binnen- en buitenkant van de afzuigkap regelmatig schoon (circa eenmaal per maand). Maak
het apparaat schoon met een doek geweekt in een mild vloeibaar reinigingsmiddel. Gebruik geen
schuurmiddelen. GEEN ALCOHOL GEBRUIKEN!
WAARSCHUWING: Het negeren van de basisaanbevelingen voor het reinigen van de afzuigkap en het
vervangen van de filters kan brandgevaar opleveren.
De buitenkant schoonmaken
• Om de buitenkant van de afzuigkap langdurig tegen corrosie te beschermen, maak deze om de twee
maanden schoon met warm water en een niet-corrosief reinigingsmiddel.
• Zorg dat de motor en andere onderdelen niet met water in aanraking komen, het apparaat zal worden
beschadigd.
• Stel de koolstoffilters niet bloot aan warmte.
De vetfilter reinigen
De vetfilters vangen vetdeeltjes uit de kookdampen op.
Maak de filter eenmaal per maand schoon met een mild reinigingsmiddel, dit met de hand of in de
vaatwasser die op een lage temperatuur en korte wascyclus is ingesteld.
De vetfilter kan lichtjes verkleuren wanneer deze in een vaatwasser wordt gewassen, dit heeft echter
geen invloed op het filtratievermogen van de filter. Trek aan de hendel om de veer los te maken en de
vetfilter te verwijderen.
De koolstoffilters reinigen (alleen bij filterversie)
De koolstoffilters absorberen onaangename geuren die tijdens het koken vrijkomen.
Er zijn 2 soorten actieve koolstoffilters: wasbare en niet-wasbare actieve koolstoffilters.
Wasbare actieve koolstoffilter Was de koolstoffilter slechts eenmaal om de twee maanden met warm
water en een geschikt reinigingsmiddel of in een vaatwasser op 65°C (indien u een vaatwasser gebruikt,
stel het apparaat op een volledige wascyslus in en plaats geen vaatwerk in de vaatwasser). Voer het
overtollige water af zonder de filter te beschadigen, verwijder vervolgens het matje binnenin het plastic
frame en leg het 10 minuten in de oven op 100°C om volledig te drogen. Vervang het matje om de 3 jaar
of wanneer het doek beschadigd is.
14
Page 43

NIET-wasbare actieve koolstoffilter De verzadiging van de koolstoffilter treedt na enige tijd op,
afhankelijk van het soort bereidingen en hoe vaak u de vetfilters reinigt. De filter moet echter minstens
om de vier maanden vervangen worden.
De koolstoffilter mag NIET gewassen of hersteld worden.
De lampen vervangen
Waarschuwing! Zorg dat de lampen volledig zijn afgekoeld voordat u ze aanraakt.
Vervang de oude lamp door een nieuwe van hetzelfde type. gebruik alleen Ø35mm E14 28W halogeen
kaarslampen. Als de lampen niet werken, controleer of de lampen juist in de fitting zijn aangebracht
voordat u met het servicecentrum contact opneemt.
Ontkoppel het apparaat van de voeding.
15
Page 44

SPECIFICATIES
Hieronder vindt u de technische fiche van de afzuigkap die in overeenstemming is met EUverordeningsnr. 65/2014
Merk Proline
Modelnummer BOX602SS, BOX902SS
Jaarlijks energieverbruik (AEC afzuigkap) 122,4 kWh/jaar
Energie-efficiëntieklasse * D
Hydrodynamische efficiëntie (FDE
Hydrodynamische efficiëntieklasse * D
Lichtefficiëntie (LE
Lichtefficiëntieklasse * G
Vetfiltreringsefficiëntie 66,0 %
Vetfiltreringsefficiëntieklasse * D
Geluidsniveau Bij maximum snelheid 46 dB
Bij minimum snelheid 67 dB
Stroomverbruik in uit-stand (P O) N.v.t.
Stroomverbruik in stand-by (P S) N.v.t.
* A (meest efficiënt) tot G (minst efficiënt)
) 3,0 lux/W
afzuigkap
) 16,6 %
afzuigkap
Bij maximum snelheid 240 m 3/u Luchtstroom
Bij minimum snelheid 581 m
3/u
VERWIJDERING
Dit symbool geeft aan dat dit apparaat niet met het huisafval weggegooid mag
worden. Lever het in bij een gepast inzamelpunt voor het recyclen van
elektrische en elektronische apparatuur. Gooi dit apparaat weg in
overeenstemming met de milieuvoorschriften inzake afvalverwijdering die in uw
gemeente gelden.
Voor meer informatie over het verwerken, inzamelen en recyclen van dit
product, neem contact op met uw gemeente, uw plaatselijk inzamelpunt of de
handelaar waar u dit product hebt gekocht.
Darty Holdings SNC © 14 route d'Aulnay, 93140 Bondy, Frankrijk
22/07/2015
16
Page 45

Hulplijn Nederland
Hiervoor kunt u contact opnemen met het BCC Service Center: 0900 0555 (12 cent p/m)
geopend van maandag t/m vrijdag van 8.30 tot 18.00 uur.
-
BCC elektro-speciaalzaken B.V.
Postbus 75513 ∙ 1118 ZN Schiphol
Bellsingel 61 ∙ 1119 NT Schiphol Rijk
17
Page 46

Page 47

Page 48

 Loading...