

Page 1

SS-611 HEAT GUN SET
User’s Manual
st
Edition, 2012
2
©2012 Copyright by Prokit’s Industries Co., Ltd.
Page 2

Contents
Introduction.....................................................................................1
Description of symbols …..............................................................1
Specifications..................................................................................2
Understand your product...............................................................2
Setting up and Operation...............................................................3
Safety instructions..........................................................................4
Special safety instruction for heat gun.........................................7
Maintenance.....................................................................................8
Clean.................................................................................................8
General inspection….......................................................................8
Introduction
CAUTION. Read through this entire Instruction Manual before
using your new Power Tool. Take special heed of cautions and
warnings.
Description of symbols
Symbols shown on product sticker represent important information
about usage.
Wear ears protection.
Wear eyes protection.
Wear breath protection.
Dual-insulated for additional protection.
1
Page 3
Specifications
SS-611A SS-611B SS-611H
Plug type
Nominal voltage 120V AC 60Hz 230V~240V AC 50Hz
Input power I: 750W / II: 1500W I: 750W / II: 1500W
Air volume I: 280 L/min II: 480 L/min I: 280 L/min II:480 L/min
Air temperature I: 300°C / II: 500°C I: 300°C / II: 500°C
Insulation class Double insulated
Overheat
Protection
A type
Please see page 7
I type
H type
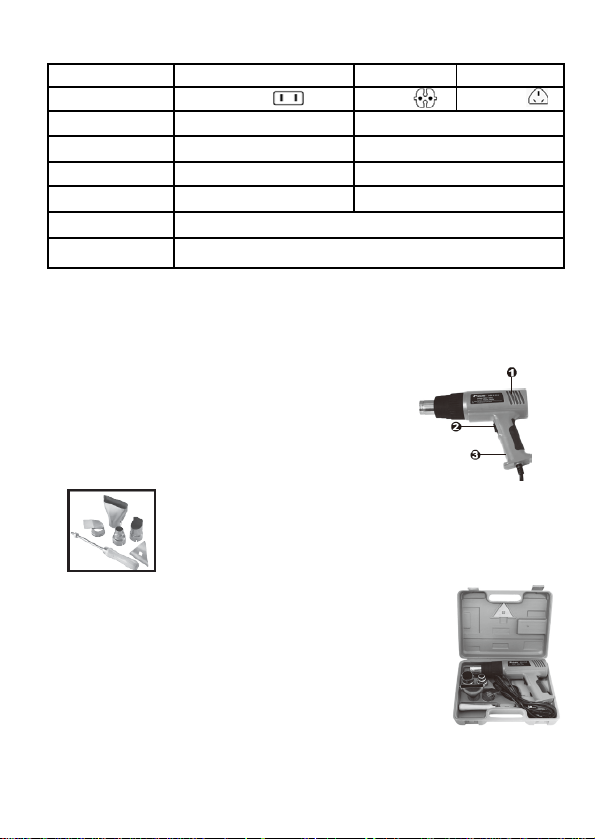
Understand your product
Study the operating features and safety requirements at first before
using the heat gun. Use the tool and accessories only for the
application intended. Use tools only following instructions, prohibit
any usage out of the range
1. Motor
2. On/Off switch and temperature switch
3. Handle
Accessories
Contains:
If you find anything wrong, do not use the tool until
the parts have been replaced or the faulty has
been rectified. Failure to do so could result in
serious personal injury.
If any product defectiveness or missing parts was
found, please do not use it until the parts have
been replaced or the faulty has been rectified. Failure to do so could
result in serious personal injury.
housing
2
Page 4

Setting up and operation
The switch contains function of power on/off, temperature low/high.
The low temperature is roughly 300°C, and high temperature is
roughly 500°C.
• Always ensure the power switch is at off position before plugging in.
• Set power switch to I or II to heat one minute to reach its operation
temperature. Always wear protective gloves and eyes protection
when working.
• Place the heat gun upright on a flat table carefully.
• When operating a power tool outdoors, use an outdoor extension
cord suitable for outdoor use to reduce the risk of electric shock.
Paint and varnish removal
Some test and technical training is required before removing
paint and varnish. Test on a small section of paint before
working on large areas.
Turn on the heat gun to reach the full heating temperature. Hold
the nozzle 7.5cm to 10cm away from the painting area. After
heating a short while, the paint will soften and begin blistering.
Do not overheat paint to avoid afire. Otherwise, this will cause
burning and make the finish more difficult to remove. When
striping paint on overhead, always wear eyes protection.
Begin scraping the paint off downward, use accessory scrapers.
Scrape with smooth, even strokes, warming the surface in the
front of the scraper by moving the gun slightly from side to side.
If the paint is warmed properly, even thick layers can be
removed at once.
Clean the paint from scraper as it is soft to prevent paint
building up on the blade, otherwise, it will quickly harden again.
Shaped or uneven surfaces, clean with brush after softening
with the hot air jet.
Cover the surfaces not to be cleaned with non-flammable
material. Never focalize tool’s heat on a window panel or other
glass surface.
NOTE: The Heat Gun Set is designed to remove both oil and
latex-based paint and vanish. It will not remove stains or primer
coats that have impregnated the surface of wood.
3
Page 5

CAUTION: LEAD PAINT FUMES ARE VERY HARMFUL. ALWAYS
PROVIDE ADEQUATE VENTILATION WHILE WORKING INDOORS.
Other functions of the heat gun set
1. Remove paint and varnish.
2. Remove self adhesive stickers and trim.
3. Loosen rusted or over tightened nuts and metal screws.
4. Thaw frozen pipes, frozen door locks, padlocks, etc.
WARNING: DO NOT ATTEMPT TO THAW PLASTIC PIPS!
5. Pre-heat the natural wood grain of wooden surfaces before
staining or varnishing.
6. Dry paints and varnishes fast, this is especially useful when
adding several coats of the paint or varnish together.
7. Soften old putty before remove and replacement.
8. Drying wet and damaged timber before filling with compound
and refinishing.
9. Shrinking PVC shrink-wrap sheeting for packaging protection.
10. Shrinking polyvinyl wire joints.
Safety instructions
The tool must be used only for the prescribed purpose. Any usage
other than those mentioned in this manual will be considered a
case of error operation. The user shall be liable for any damage or
injury resulted from such cases of misuse.
To use this tool properly, you must observe the safety regulations,
the assembly instructions and the operation instructions to be
found in this Manual. Every person who use and service the
machine has to be acquainted with this manual and be informed
about its potential hazards. Children and infirm people are
prohibited to use this tool.
Children in the working venue should be supervised at all time. It
is also imperative that you observe the accident prevention
regulations in force in your area. The same applies for general
rules of occupational health and safety.
The manufacturer shall not be liable for any changes made to the
tool nor for any damage resulting from such changes.
WARNING! Before connecting a tool to a power source (main power
point receptacle, outlet, etc.), ensure that the voltage supply is the
4
Page 6

same as that specified on the nameplate of the tool. A power source
with a voltage greater than that specified for the tool can result in
serious injury to the user, as well as damage to the. If in doubt, do not
plug in the tool. Using a power source with a voltage less than the
nameplate is harmful to the motor.
Even when the tool is used as prescribed; it is not possible to
eliminate all residual risk factors. The following hazards may arise in
connection with the tool’s construction and design.
WARNING! Read and understand all instructions. Failure to follow all
instructions listed below may result in electric shock, fire and /or
serious injury.
Relevant instructions
Work Area
1. Keep work area clean and in ordered. Cluttered and dark areas
invite accidents.
2. Do not operate power tools in explosive atmospheres, such as in
the presence of flammable liquids, gases or dust. Power tools
create sparks which may ignite the dust or fumes.
3. Keep children and bystanders away while operating a power tool.
Distractions can cause you to lose control.
Electrical Safety
1. Power tool plugs must match the outlet. Never modify the plug in
any way. Do not use any adapter plugs with earthed (grounded)
power tools. Unmodified outlets will reduce risks of electric shock.
2. Guard against electric shock Prevent body contact with grounded
surfaces (e.g. pipes, radiators, ranges, refrigerators, etc.).
3. Do not expose power tools under rain or wet conditions. Water
entering a power tool will increase the risk of electric shock.
4. Do not abuse cord Never carry tool by cord or yank it to
disconnect it from wall outlet. Keep cord from heat, oil and sharp
edges. Damaged or entangled cords increase the risk of electric
shock.
5. When operating a power tool outdoors, use an outdoor extension
cord suitable for outdoor use to reduce the risk of electric shock.
5
Page 7

Personal Safety
1. Stay alert, watch what you are doing when operating a power tool.
Do not use a power tool while you are tired or under the influence
of drugs, alcohol, or medication. A moment of inattention while
operating power tools may result in serious personal injury.
2. Use safety equipment. Always wear eye protection. Safety
equipment such as a dust mask, non-skid safety shoes, hard at, or
hearing protection used for appropriate condition will reduce
personal injuries.
3. Avoid accidental starting. Ensure the switch is in the off-position
before plugging in. Carrying power tools with your finger on the
switch or plugging in power tools that have the switch on invites
accidents.
4. Remove any adjusting key or wrench before turning the tool on. A
wrench or a key that is left attached to rotating part of the power
tool may result in personal injury.
5. Do not overreach. Keep proper footing and balance at all times.
This enables better control of the power tool in unexpected
situations.
6. Dress properly. Do not wear loose clothing or jewelry. Keep your
hairs, clothing and gloves away from moving parts .Loose cloths,
jewelry or long hairs can be caught in moving parts.
7. If devices are provided for the connection of dust extraction and
collection facilities ensure that these are connected and properly
used. Used of these devices can reduce dust-related hazards.
Power Tool Use and Care
1. Use the correct power tool under designed working range, it
makes your the job done better and safer.
2. Do not use the power tool if the switch is not functional. Any power
tool that cannot be controlled with the switch is dangerous and
must be repaired.
3. Disconnect the plug from the power source before making any
adjustments, changing accessories, or storing power tools. Such
preventive safety measures reduce the risk of starting the power
tool accidentally.
4. Store idle power tools out of the reach of children and do not allow
persons unfamiliar with the power tool or these instructions to
operate the power tool. Power tools are dangerous in the hands of
6
Page 8

untrained users.
5. Maintain power tools. Check for misalignment or binding of moving
parts, breakage of parts and any other condition that may affect
the power tool’s operation. If damaged, have the power tool
repaired before use. Many accidents are caused by poorly
maintained power tools.
6. Use the power tool, accessories and tool bits etc., in accordance
with these instruction and in the manner intended for the particular
type of power tool, taking into account the working condition and
the work to be performed .Use of the power tool for operations
different from intended could result in a hazardous situation.
Special safety instruction for heat gun
Overheat protection
If this product is overheating, the heater will stop heating up
automatically and cool air blowing constantly to reduce waiting time
from heater restarting
CAUTION:
Never put the appliance down on its air outlet nuzzle. Always keep its
outlet nuzzle upward or put it on one of its sides to prolong the service
lifetime.
WARNING! The use of accessories or attachment, other than those
recommended in this instruction manual, may present a risk of
personal injury.
Additional safety instruction for heat guns
1. Fully unwind cable drum extensions to avoid potential overheating.
2. Avoid instant switch between power and temperature to secure
the using life of heater and switch control. Heater is consumable
accessory.
3.
When an extension cable is required, you must ensure that it has
the right ampere rating for you power tool and is in safe electrical
7
Page 9

condition.
4. Always switch off before you put the heat gun down.
5. Do not let anyone under 18 years operate this tool.
6. Rags, cloths, cord, string and the li ke should never be left around
the work area.
7. If you are interrupted when operating the tool, complete the
process and switch off before looking up.
8. Do not block the air inlet or outlets.
9. Do not use in proximity to flammable materials.
Maintenance
There are no serviceable parts, no maintenance is required.
Power cord maintenance
If the supply cord needs to replace, the task must be carried out by
the manufacturer, the manufacturer’s agent, or an authorized service
centre in order to a safety hazard.
Cleaning
1. Keep the tool’s air vents unclogged and clean at all times.
2. Remove dust and dirt regularly .Cleaning is best done with a rag.
Wear safety goggles or an eye shield and gloves whist cleaning.
3. Never use caustic agents to clean plastic parts.
CAUTION. A mild detergent on a damp cloth is recommended.
Water must never come into contact with the tool.
General inspection
Regularly check that there is no damage to the heat gun.
8
Page 10

目錄
介紹.................................................................................................................9
符號涵義.........................................................................................................9
產品規格........................................................................................................10
瞭解產品........................................................................................................10
配置與使用....................................................................................................11
安全指示........................................................................................................12
專門針對熱風槍的安全指示......................................................................14
護保養/清潔/一般檢查.................................................................................15
介紹
注意!使用電動工具前請仔細閱讀整份使用說明書,嚴格遵循警示和注意
事項的說明。本工具有許多特性,這將使您的工作快捷、安全性、性能和
可靠性是本機設計製造中的首要問題,這使得產品易於操作和維護。
符號涵義
產品銘牌上可能出現的標誌,表示在產品使用中的一些重要資訊。
帶上耳塞保護聽力
帶上眼鏡保護眼睛
帶上口罩以免吸入有害氣體或粉塵
雙絕緣保護
9
Page 11

產品規格
SS-611A SS-611B SS-611H
插頭形式
額定電壓 交流AC 120V 60Hz 交流AC 230V~240V 50Hz
輸入功率 I檔: 750W / II 檔: 1500W I 檔: 750W / II 檔: 1500W
風量
溫度 I 檔: 300°C / II 檔: 500°C I 檔: 300°C / II 檔: 500°C
絕緣等級 雙迴路絕緣保證
過熱保護 請參考第14頁
A 插
I 檔: 280 公升/分鐘
II 檔: 480 公升/分鐘
I 插
I 檔: 280 公升/分鐘
II 檔: 480 公升/分鐘
H 插
了解產品
在使用產品前,先熟悉操作說明和安全則。只能按照規定的範圍使用產
品,禁止任何超範圍使用。
1. 馬達
2. 電源開關及溫度切換鍵
3. 手柄
附件: 風嘴
內部包裝︰產品出廠前均有嚴格檢查,產品不良或
配件缺失的情況鮮有發生,但如果您在開封後發現
任何不妥之處,請先不要使用工具,直至更換有問
題的零件和故障排除,貿然使用有可能會造成嚴重
人身傷害事故。
10
Page 12

配置與使用
熱風槍使用簡單,開關鍵兼具電源開關和高、低溫切換功能、低熱
風溫大約 300 攝氏度,高熱風溫大約 500 攝氏度。
將插頭插入插座前,確保開關處於關斷位置。
工作開始時,把開關設定在一檔或二檔位置,經過一分鐘左右,熱
風會達到其最佳工作溫度,工作中要配帶勞保手套和防護眼鏡。
小心將熱風槍直立于水準,平整的工作臺面上,風口向上,就可以
騰出雙手工作,比如烘彎 PVC 管子等。
清除油漆和塗料痕跡
在熟練清除油漆或油墨的工作前,需要做一些試驗,以及簡單的技
巧訓練,在大面積清除之前不妨先選擇一塊小面積油漆來試驗效果。
打開熱風槍,使風溫上升到設定的最高溫度,保持風咀距離作業面
7.5 釐米至 10 釐米的距離,過一小會兒,油漆就會軟化並且起泡。
切忌讓油漆過熱,否則會導致油漆燃燒,也會讓殘留物更難清除。
當剝除頭頂上的油漆時,一定要戴上眼罩。
自上至下刮除油漆,使用合適的刮刀,用刮刀平順地刮去油漆。烤
熱刮刀前的油漆,如果油漆加熱得當,即便是很厚也可一次刮去,
刮去的油漆可以等寬於刮刀刀片。
及時清除刮刀表面堆積的油漆,當油漆變軟要快速清除,否則油漆
會很快回硬。
凹凸不平和粗糙的表面不易清除,在加熱後要使用硬刷刷除。
非清除面要用阻燃材料遮覆,請不要將熱風對準玻璃。
注意!熱風槍只能清除油基或膠基的油漆或塗料,其他如油墨及表面塗
覆,而且浸入到木料內部的顏料是不能被清除的。
警告!含鉛油漆的煙霧是很有害的,在室內工作時,一定要保持通風,帶
上口罩將有助於防護。
11
Page 13

其他適用工作:
1. 清除油漆和塗料
2. 清除自黏膠貼
3. 弄鬆鏽蝕或咬緊的螺絲和螺帽
4. 加熱冰凍的水管等(警告!不可加熱塑膠水管)
5. 預先烤熱要塗裝的木質材料表面
6. 快速烘乾油漆和塗料,這在多道塗刷油漆的工作中尤其有用
7. 烤乾濕的,易損壞的木條,以便於修整
8. 包裝時收縮PVC熱縮膜
9. 收縮熱收縮套管
安全指示
該工具只能按指定目的工作,超出本說明書指定的範圍以外的工作均當
做誤操作,對此誤用之責任均由使用者承擔。要正確使用工具,您必須
仔細閱讀說明書中關於安全規範,安裝和使用的說明。所有使用者和服
務機構都要熟知和瞭解潛在的可能危害,兒童和身體不適者不得使用本
工具。在作業現場的兒童一定要得到監護,同時您也必須瞭解清楚在作
業區防止事故發生的有關強制性的規定。製造商對擅自改裝產品的行為
及其後果不負有責任。
警告!在連接電源之前,需確認電源電壓與工具銘牌上規定的電壓值相
符,若電源電壓超過使用標準,將會造成使用者嚴重受傷,以及損壞工
具。若有疑問,請不要把插頭插入,使用低於銘牌規定電壓範圍的電源
對電機有害。
即使按照規定使用工具,也未必能消除所有風險因素,下面的這些與產
品結構和設計有關的情況也會導致危害。
警告!閱讀和理解所有的指示,否則會導致觸電、著火或嚴重傷害。
請保留這些指示。
12
Page 14

作業區域
1. 保持作業區域清潔整齊,雜亂和陰暗的環境容易引發事故。
2. 不要在易燃易爆的環境中使用電動工具,比如在有易燃液體,氣體
和灰塵的地方,電動工具產生的電火花容易點燃粉塵和易燃物。
3. 使用電動工具時請勿讓兒童和旁觀者靠近,分散注意力會導致失控。
電氣安全
1. 插頭必須和插座原配,切勿改裝插頭,帶接地裝置的電動工具請不
要用轉換插頭。無改裝的插頭,適配的插座可降低觸電危險。
2. 避免身體與接地物的表面接觸,比如水管、散熱片、爐灶和冰箱等。
當您的身體處於接地狀態時會增加觸電的危險。
3. 切勿將工具暴露於雨中或潮濕環境中,水進入機器會導致觸電。
4. 不要濫用導線,不要用導線捆紮提拉工具,或直接拉拽導線拔下插
頭。導線要離開熱源、油、尖銳的物體和移動的物件。破損和打絞
的導線增加觸電危險。
5. 在戶外作業時,請使用符合室外作業的延長線,以減少觸電危險。
人身安全
1. 使用工具時保持頭腦清醒,切勿在疲憊,服藥、飲酒和生病後作業,
注意力不集中會導致事故發生。
2. 使用必要的安全防護裝置,時刻配戴眼鏡,其他安全用品如防塵口
罩、防滑鞋子,耳塞等有助於保護身體,減少傷害。
3. 避免啟動時的事故。確保插入前開啟處於關斷位置。手指不恰當地
放在開關上,或打開開關時插入電源都容易發生事故。
4. 在啟動前要拔除鎖緊鑰匙或扳手(如果有的話),否則工具在轉動中鑰
匙或扳手飛出會造成嚴重傷害。
5. 不要勉力而為。隨時站穩及保持身體平衡,這樣萬一發生意外時不
至於失去控制。
6. 穿著得當。不要穿過與寬鬆的服裝及配戴首飾,確保頭髮,衣物和
手套等離開轉的部件。
7. 如果操作現場中有排塵和集塵裝置,確保這些裝置安裝、運作良好,
這將有助於減少與粉塵相關的危害。
13
Page 15

電動工具使用和注意事項:
1. 不要超範圍使用。在設計範圍內使用電動工具會安全快捷。
2. 如開關失效請勿使用。無開關控制的電動工具很危險,一定要修理
後才能使用。
3. 在做任何調整,更換配件、存放等動作之前一定要斷開電源,以確
保再次啟動時的安全。
4. 妥善保管電動工具,不要讓兒童、不熟悉電動工具和操作說明的人
接觸。對未加訓練的人來說,電動工具是危險的。
5. 保養電動工具。檢查運轉部件是否無偏擺和靈活,零件是否有損壞,
以及其他任何影響工具工作的因素。若有損壞,先維修後使用。不
少事故都是疏於維護保養而引發的。
6. 保持切割類工具鋒利和清潔。正確保養、保持切割銳利可使工作快
捷而受控。
7. 不同的工作和不同的作業條件要選用正確的電動工具和附件。否則
容易引發事故。
警告!隨意使用不正確的附件會導致人身傷害。
專門針對熱風槍的安全指示
過熱保護︰當產品過熱時,會自動停止加熱,並且持續送風以加速冷卻
且縮短再度啟動熱源的時間。
注意! 熱風槍使用後關閉,吹風口不可朝下放置,必須平放或朝上放置,
避免發熱芯餘溫損壞產品。請正確操作以延長產品使用壽命。
1. 本機屬於大安培電流操作,電線座儘量鬆開不可捲曲,避免捲曲產
生高溫危險。
2. 開關和溫度切換應避免瞬間連續切換以確保發熱體和開關壽命,且
發熱體屬於消耗材料。
3. 當需要使用延長線時,要計算並選用符合安培要求的標準電線。
4. 放下熱風槍時,一定要關斷開關。
14
Page 16

5. 18歲以下人士禁用。
6. 抹布,衣物、繩子等物品請不要放在工作區,以免引燃。
7. 如果在工作時有被打斷,請最好完成手頭工作並關斷開關。
8. 切勿堵塞進/出風口
9. 切勿在易燃易爆環境中工作。
維護保養
無需要定期保養的零部件。
電線保養︰若電線需要更換,必須由製造商,製造商指定的機構或者有
授權的服務中心進行。
清潔
1. 隨時保持通風口通暢和清潔。
2. 定期擦拭,去除灰塵和污垢。擦拭要用乾淨的抹布,配戴護目鏡和
手套。
3. 勿用腐蝕性溶劑擦拭塑膠件。
注意!請用中性清潔劑和濕布擦拭。注意不要進水。
一般檢查︰定期檢查,確保工具一切正常。
http://www.prokits.com.tw E-mail : pk@mail.prokits.com.tw
PROKIT’S INDUSTRIES CO., LTD.
15
 Loading...