

Page 1
PT-5501
Variable Speed Rotary Tool Kit
User’s Manual
1st Edition, 2013
©2013 Copyright by Prokit’s Industries Co., Ltd.
Page 2

Thank you for buying PT-5501 Variable Speed Rotary Tool Kit. Please read this instruction
carefully before using the product.
Technical Specification
Model number PT-5501A PT-5501I
Available Voltages 120V, 60Hz 230V, 50Hz
Plug Type
Maximum Output 135 W
No Load Speed 10,000 - 32,000 rpm
Collet Chuck Capacity 3.2mm and 2.5mm
Carbon Brush Model No. 5PT-5501P3
Important! – Safety instructions for all tools
Warning: When using electric power tools, important safety precautions must always be
adhered to in order to reduce the risk of fire, electric shock and personal injury.
Please read the following carefully:
1. Keep work area clean. Untidy benches and work areas cause injuries.
2. Consider work area environment. Do not use power tools in damp or wet locations. Do
not expose power tools to rain. Keep work areas well lit.
3. Guard against electric shock. Prevent body contact with grounded surfaces. E.g.
radiators, pipes, refrigerator enclosures.
4. Keep children away. All visitors must be kept away from the work area. Do not let
visitors come into contact with the tool or extension cord.
5. Store idle tools. When not in use, tools must be stored in a dry place, out of reach of
children.
6. Do not force the tool. It will do the job at hand better and safer at the rate for which it
was intended.
7. Use the right tool. Do not force a small tool to do the job of a heavy duty power tool. Do
not use the tool for the purpose it is not intended for.
8. Dress properly. Do not wear loose clothing or jewellery, as these can be caught in
moving parts. Gloves and non-skid footwear are recommended when working outdoors.
Wear protective head cover to contain long hair.
9. Use safety glasses. Also use face and dust mask to guard against dust.
10. Do not abuse the cord. Never carry the tool by the cord or pull the cord to disconnect
the tool. Keep the cord away from heat, oil or sharp objects.
11. Secure your work. Use clamps or a vice to hold your work in position. It is much safer
than using your hand and it frees both hands to operate the tool.
12. Do not overreach. Keep proper footing and balance at all times.
13. Maintain tools with care. Keep tools clean for better and safer performance. Follow
instructions for lubricating and changing accessories. Keep hands dry, clean and free
from oil and grease.
14. Disconnect tools. When not in use, before servicing and when changing any
accessories.
15. Remove adjusting keys and wrenches. Have the habit to check and see that keys and
adjusting wrenches are removed from the tool before turning on.
1
Page 3

16. Avoid unintentional starting. Do not carry plugged-in tool with finger on switch. Be sure
that the switch is off when plugging in.
17. Outdoor extension cords. When the tool is used outdoors, only use extension cords
intended for use outdoors and so marked.
18. Stay alert. Watch what you are doing. Use common sense. Do not operate the
tool when you are tired.
19. Check damaged parts. Before using the tool, a guard or other part that is
damaged, these must be carefully checked to ensure that the tool will perform
properly the intended function. Check for alignment of moving parts, binding of
moving parts, breakage of parts, mounting and any other condition that may
affect the tool’s operation.
20. DO NOT OPERATE porta ble electric tools near flammable liquids or in
gaseous or explosive atmospheres. Motors in these tools normally spark, and
the sparks may ignite fumes.
Multifunction power tool use
This rotary tool can be used for drilling, grinding, sanding and polishing, as well as engraving,
cutting and removing rust in tight spaces or inaccessible places. The tool can be used on
most metals, glass, wood and ceramics. For best performance and results, please keep the
speed as even as possible without exercising too much pressure. As a guideline, use the
tool at low speed for all large accessories, such as polishing for example, and at high speed
for smaller accessories such as those used for engraving. For grinding and engraving, hold
the tool as if it were a pen.
Multifunction power tool start-up
Never start up or stop the tool when the accessory is in contact with the piece to be worked
on. Hold it firmly and press the ON/OFF switch. The tool will run continuously until the switch
is turned to OFF position. The speed can be adjusted while the tool is running.
Speed adjustment
The multifunction power tool is equipped with speed control. Do not change the speed while
the tool is working. The speed switch is located on the rear of the tool. Turn it to increase or
reduce speed. Use the tool at low speed for polishing and similar operations, but use higher
speed for drilling or cutting action.
Important general safety tips!
1. The tool should be unplugged when changing accessories.
2. If the tool stalled, switch the power off immediately.
3. Periodically check the tightness of your collet chuck, especially during prolonged
use of the same accessory
4. After use, always disconnect your power tool.
5. Do not undertake to repair the power tool by yourself.
6. Do not leave your tool unattended while switched on.
7. Do not use or store your tool in damp or wet conditions.
Useful hints & tips
1. Your rotary tool will become warm after prolonged use, please switch off and allow
to cool down after long term use
2. To ensure smooth running, the spindle should be oiled periodically.
2
Page 4
3. Do not apply too much radial pressure to the accessory bits while polishing, cleaning,
sanding or grinding. By doing this you will put a strain on the spindle and adversely
affect the precision of the tool.
4. Always work with a sensitive touch so as not to impede the efficiency of your mini tool.
5. When drilling metal, always mark the drilling point with a center punch first, so that
your rotary tool does not slip.
6. Always ensure that you have maximum contact between the accessory shaft and the
collet chuck.
Placing accessories into the tool
Always switch the tool off first. Hold the locking button at the front of the tool and undo the
collet chuck (anti-clockwise). Insert the collet that matches the shaft size of the accessory to
be used. Place the collet nut over the collet and then insert the accessory shaft into the collet
chuck ensuring maximum shaft contact. Then tighten up the collet nut. (DO NOT USE
PLIERS).
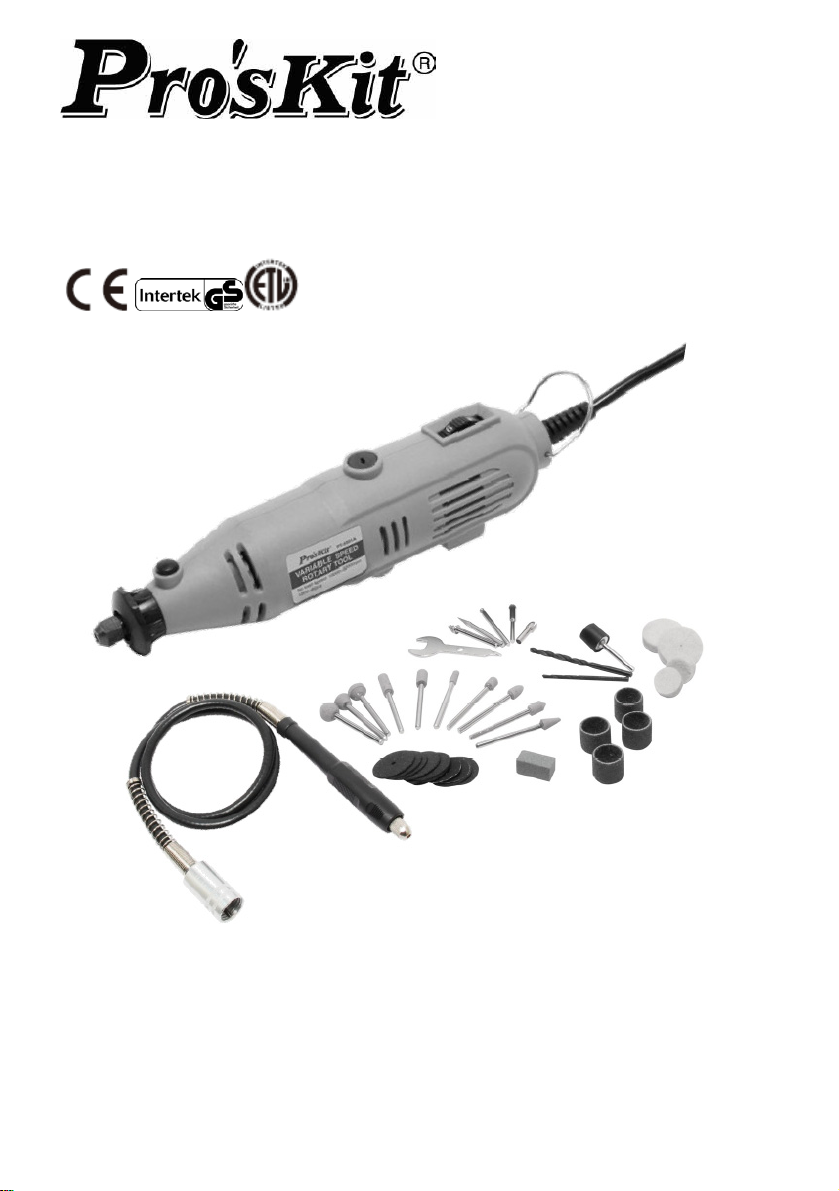
Assembling abrasive bands to accessory shaft 2
(figs. 1 )
1 Slide the abrasive band over the rubber section of the
accessory shaft 2.
2 Ensure the abrasive band fits straight and evenly over the
rubber portion of the shaft.
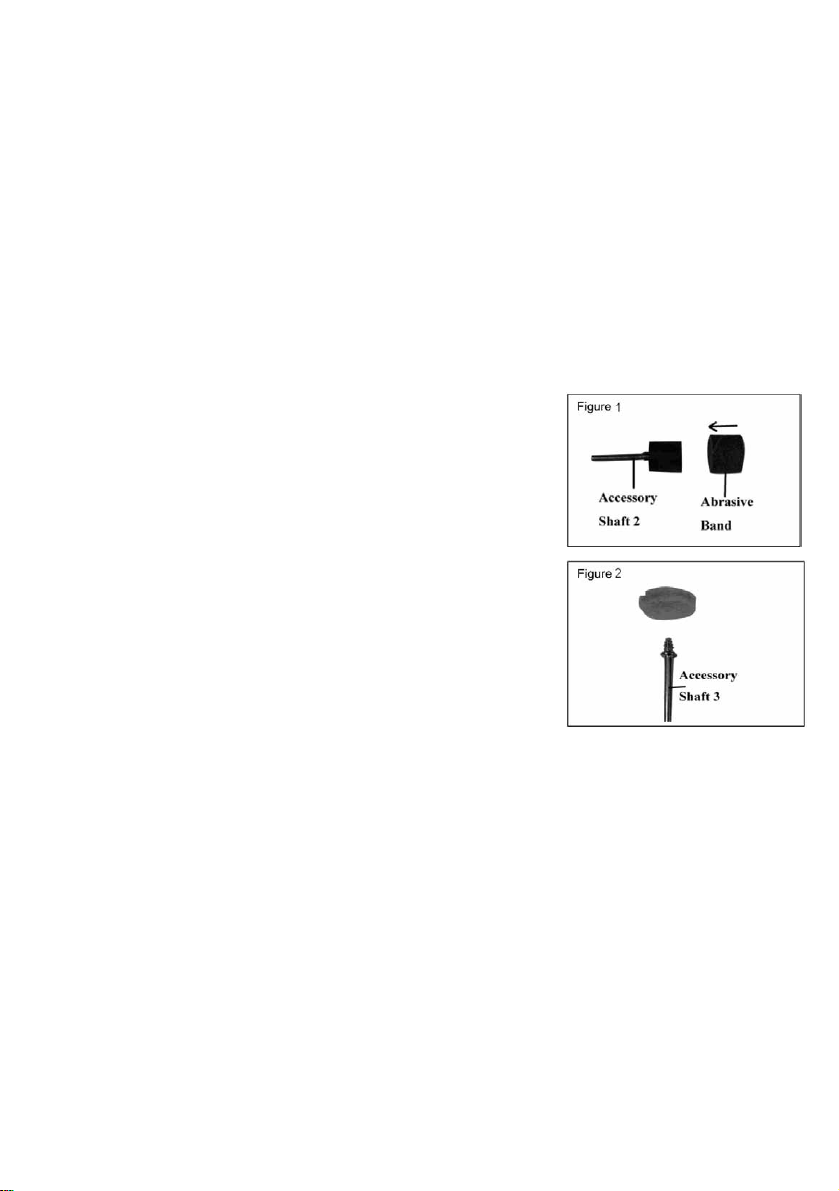
Asse
mbling polishing felts to accessory shaft 3
(figs. 2 )
1 Screw the polishing felt onto the tip of the accessory
shaft 3.
2 The tip of the shaft should not protrude through the felt.
Do not cover-screw the felt.
Assembling the flexible shaft assembly (figs. 3)
1. Switch off the tool and disconnect from the main power supply.
2. Unscrew and remove the securing ring.
3. Push the spindle lock and hold. Rotate the spring chuck so that it locks into place.
4. While the spindle lock is engaged, use the wrench (supplied) to loosen the spring
chuck.(Do not remove the spring chuck).
5. Fit the inner cable of the flexible shaft firmly through the spring chuck and into the
collet, ensuring that it is a firm fit.
6. Push the spindle lock and hold. Rotate the spring chuck so that it locks into place.
7. While the spindle lock is engaged, use the wrench (supplied) to tighten the spring
chuck.
8. Slide the outer cable of the flexible shaft over the spring chuck and tighten the securing
ring onto the flexible shaft.
3
Page 5

Figure3
Fitting the accessories to the flexible shaft (figs. 4 )
1 Switch off the tool and disconnect from the main power supply.
2 Pull back the protective sleeve and loosen the spring chuck.
3 Insert the required accessory and tighten the spring chuck.
Figure4
Switching On/Off (figs. 5 )
1 Hold the tool firmly and ensure your fingers
are well away from moving parts.
2 Switch on by pressing the on/off switch to
the “ I ” position.
3 Switch off by pressing the on/off switch to
the “ O” position.
Variable speed control (figs. 6 )
1 To adjust the speed, move the speed dial
forwards or backwards.
2 The greater the number displayed, the
faster the speed.
Note: The speeds quoted are for guidance
purposes only.
Important! Working on a high load whilst at low speed can cause motor burnout.
Overload The motor of this tool may be damaged if overloaded. Manual pressure on this
tool will not result in faster operation. Forcing the tool will only result in reduced efficiency
and could cause motor burnout, substandard work, shorter tool life and possible injury.
Avoiding Motor Damage: If you are running the tool continuously at low speed, it’s
important to occasionally take the tool off load. Running the tool off load at full speed for
approximately one minute creates a cooling air flow for the motor.
4
Page 6

Carbon Brushes (fig. 7)
The carbon brushes are an integral component in the
efficient running of the motor. These are consumable spare
parts that must be replaced when they are worn to 4mm.
NOTE: Worn carbon brushes should only be installed by an
authorized power tool repair agent.
NOTE: After replacing the carbon brushes there may be increased sparking. This is normal
and should pass after a short period of time.
NOTE: After new carbon brushes have been installed, run the Mini-Grinder off load for
several minutes to allow the new brushes to bed in before use.
How to replace motor carbon brush
1. Prepare a wrench and a pair
of new carbon brushes.
3. After taking out the cap, you
can see the carbon brush
inside of the hole, pull out the
carbon brush.
2. Loosen the cap of carbon brush by the bottom side of
wrench.
4. Put the new carbon
brush into the at same
location
5. Put the cap back on the hole
and tighten the cap. Please
replace carbon brushes for
both side at the same time.
General maintenance & care
1 Always clean the tool after each use.
2 Exercise due care to ensure the motor does not become damaged by oil or water.
3 Regularly inspect the tool for damage which may be caused from normal use. Ensure that
all parts are connected correctly and do not use this product should parts be damaged or
missing.
4 Keep the air vents clear of any obstructions.
5 Consult an authorized power tool repair agent in the event of damage or failure.
5
Page 7

PT-5501 可調速軟軸電磨組
感謝您購買可調速軟軸電磨組,使用前請詳讀說明書
產品規格
型號 PT-5501A PT-5501I
使用電壓 120V, 60Hz 230V, 50Hz
插頭型式
功率 135 W
無載轉速 10,000 - 32,000 rpm
夾頭規格 3.2mm and 2.5mm
碳刷型號 5PT-5501P3
警告: 當使用電動工具時,為了預防火災、電擊及個人傷害,使用時請僅遵守重要的安全規範。
請仔細閱讀並遵守列安全指示:
1. 保持工作環境整潔: 髒亂的環境容易導致人事傷害。
2. 考慮工作區環境: 不要在雨中使用電動工具;不要在潮濕的地方使用,保持工作區的乾燥;
不要在接近易燃氣體或者液體的地方使用。
3. 警惕觸電: 防止身體接觸接地物表面(如水管、散熱器、冰箱等)。
4. 遠離兒童: 不要讓無關者接觸工具及延長電源線,所有無關者應該遠離工作區。
5. 妥善儲存工具:不使用時,工具應當被放在乾燥,高處或者帶鎖的地方,避免兒童觸及。
5. 不要違規操作。
6. 根據機器本身的工作原理,以規定的速度操作時,機器使用更爲安全和自如。
7. 得當使用工具:不要使用小型工具去操作違背其使用範圍的工作,例如:不使用圓鋸切割樹枝
或圓木。
8. 穿著得體:不要穿著過於寬鬆或者佩戴首飾,在操作中可能被勾住。在戶外,推薦使用防滑類
鞋、橡膠手套及戴上束發頭罩。
9. 使用安全眼鏡:在操作中需佩戴除塵口罩和耳塞,如果噪音超出 70 分貝,保護耳朵是必須的。
測量噪音水準可以取決。
於工作環境及工作對象的質。
10. 使用除塵裝置: 如果在工具上裝有除塵或者收集裝置,必須確保這些裝置運用得當。
11. 不可用電源線來提工具:不可直接拉電源線把插頭插座上拔下,不可提拉電源線移動工具,
不要讓電源線接觸熱源、油和尖銳物。
12.安全作業: 將工件夾在臺鉗上,可以更安全,並騰出出雙手工作。
13.不要勉力而為:確保作業時站穩,保持身體平衡。
14.工具的維護及日常護理(參考最後一頁)
15. 斷開電源:停止使用或者更換配件,如刀片、批頭等時,要妥善切斷電源。
16. .取下鎖緊匙和扳手:在啟動開關前,要習慣檢查鎖緊匙和扳手等是否從工具上取下。
17. 避免無意中啟動:插座插入前,確保開關關閉,通電時不要把手指直接放在開關上。
18.戶外延長電線的使用:當工具在戶外被使用時,確保使用的外延長線應符合戶外工作的要求,
這類延長線應有戶外標誌。
19.保持警覺:工作期間,時刻保持清醒意識,不要在過度勞累時操作。
6
Page 8

20.檢查受損部件:進一步使用工具前,應當仔細檢查受損部件,必要時更換,確保其將正常運行
和發揮預定功能。檢查校對運動部件,易損件,固定以及其他狀況。說明書中沒有特別注明
如何修理的損壞部件,應妥善修理或與經授權服務中心進行更換。若開關按動後不工作,請
不要繼續嘗試使用工具。
20.警告: 擅自使用說明書介紹以外的任何配件,都可能造成人身傷害。
21.維修、維護:此電器是按照有關安全規則製造的,修理電器僅限於授權的專業人員進行,否則
會造成人身傷害。
操作原則
本產品可鑽孔、研磨、拋光、磨亮、雕刻、切割及除鏽在狹窄空間. 此工具可使用在金屬、玻
璃、木材及陶瓷等材料. 為了使用產品最佳的性能,請保持等速並且不可施加過大的壓力. 工作
原則為如使用拋光等大尺寸的配件請控制在低速檔,如雕刻、研磨等小尺寸配件使用高速檔。
啟動說明
不要在刀具接觸工作件時啟動或是停止運轉,請握緊本產品後按下 ON / OFF 開關。
工具將持續運行,直到開關轉到 OFF 位置。工具運行時,速度可以進行調整。
調整速度
本產品為可調整轉速。工作進行時不可調整速度. 轉速控制鈕位於產品的尾部上。轉動控制鈕
可加速或是減速。拋光等工作使用低速檔,鑽孔或是切割等工作使用高速檔。.
重要的一般性安全指示
1. 更換配件時,應拔下插頭
2. 如果產品有文法轉動或是轉速遲滯時,請立即拔掉插頭。
3. 請定期檢查夾頭的壁厚,特別是長時間使用相同的夾頭時。
4. 使用後,請務必拔掉電源插頭
5. 請勿自行維修的電動工具.
6. 無人員在現場,不可保持在運轉的狀態
7. 不要在潮濕的環境下使用或存放工具。
使用的指示與技巧
長時間使用後產品溫度會升高,此時必須關閉電源直到降溫後才能再使用。
為確保運轉的穩定性,主軸心應定期上油。.
拋光、清洗、打磨或研磨時不要施加過大的徑向壓力。如果對主軸施力過大會影響產品的精準
度。
在執行精細的工作時請保持敏瑞的觸覺。
在金屬材質鑽孔時,並且請先使用中心衝標記鑽孔點,可使你的鑽頭不偏移及不打滑。
請務必確認在組裝配件的軸心與夾頭時能有最大接觸的接觸面積。
裝置配件
務必先關閉工具的開關,首先按住產品前端的軸心鎖定按鈕,逆時針方向旋轉將夾頭螺母鬆開
取下,將夾頭螺母放置在夾頭和配件的中間插入筒夾夾頭相匹配的配件,確認在組裝配件的軸
心與夾頭時能有最大接觸的接觸面積,然後將夾頭螺母鎖緊,可使用配件中的小板手輔助鎖緊,
請不要使用鉗子鎖緊,可能會導致螺母變形。.
組裝砂布圈與砂布圈固定軸
1. 將砂布圈套進砂布圈固定軸
2. 確認砂布圈均勻的固定在軸上
(圖
1 )
7
Page 9

組裝拋光毛氈與拋光毛氈固定軸 (圖 2 )
1. 將拋光毛氈固定軸前端的螺紋旋轉進入拋光氈中心的固定
孔中。
2. 不要蓋擰的感覺,螺紋的前端不可感覺到突出毛氈外。
組裝軟軸(圖.3)
1. 關閉電源開關.
2. 旋鬆並卸下安全環.
3. 按下主軸鎖不要鬆開。旋轉軸心直到卡住定位無法轉動。
4. 在主軸鎖定後,使用附件扳手鬆開夾頭螺帽。(不要拆下夾頭螺帽)
5. 將軟軸之內纜線通過夾頭螺帽及夾頭後將夾頭固定於軸心內,並確認內纜線與夾頭牢固
的配合。
6. 再一次按下主軸鎖不要鬆開。旋轉軸心直到卡住定位無法轉動。
7. 在主軸鎖定後,使用附件扳手將夾頭螺帽鎖上並旋緊。
8. 將軟軸外纜固定螺帽鎖在原本鎖安全環的固定螺紋上並且旋緊。.
圖3
在軟軸上裝置配件(圖 4 及圖 5)
1. 關閉電源開關,並且拔除電源插頭。
2. 將 L 型軸心固定趕插入箭頭旁的軸心固定孔中。以與箭頭相反的方向旋轉夾頭螺帽,直
到型軸心固定趕到達定為點後軸心即無法再轉動(圖 4)
3. 軸心固定後,將夾頭螺帽以箭頭的方向旋轉鬆開後即可將配件插入,配置如圖 5
4. 組裝完成後將夾頭螺帽以與箭頭反方向鎖上,並且以配件板手鎖緊
8
Page 10

電源開關 On / Off (圖 6 )
1. 握緊本體,並且並確保您的手指遠離轉動部件。
2. 將開關切換到“I"的位置即打開電源。
3. 將開關切換到“O"的位置即關閉電源。
變速控制 (圖 7)
1. 要調整的速度,移動速度轉盤向前或向後
2. 顯示的數字越大,則速度越快。
注:顯示的數據只有指導作用.
重要!高負荷的工作使用低速時會導致電機燒毀。
如果過載電機可能會損壞,手動的力量不會使這個工具運行速度更快,強制轉動工具,只會導
致工作效率下降,並可能導致電機燒毀,不合規定的工作會降低工具壽命並且可能會傷害刀具。
避免電機損壞: 如果持續低速操作工具,偶爾使工具離開負載是很重要的,
操作工具偶爾離開負載,加到全速 1 分鐘使冷空氣冷卻電機。
碳刷 (圖 8)
碳刷是電機運行不可或缺的零件。碳刷是消耗品,當磨損到
4mm 時必須更換。
注意:碳刷磨損,請更換原廠電刷。
注意:更換碳刷後,在很短的一段時間有可能火花會增加。這
是正常的。
注意:安裝新的碳刷後,將產品無負載運行幾分鐘,讓新碳上
自動對位。
9
Page 11

更換碳刷的方法
1. 換碳刷的時候,需準備小扳手
1 把,1 對新的碳刷。
3. 把碳刷盒蓋取出,就能看到裏
面的碳刷了
2. 把小扳手的小頭那端,插入雕刻鑽一端的碳刷盒蓋的一字型槽
內,擰出碳刷盒蓋
4. 然後把新的碳刷放進去,插
進去的時候,注意看准裏面
槽。
5. 把碳刷盒蓋蓋上,擰緊,這樣就
完成了,一端碳刷的更換,另
一端的換法和這個相同。
一般的維修保養及維護
1. 每次使用後,請務必清潔工具
2. 請小心謹慎,不要讓水或油損害電機
3. 定期檢查工具,可發現正常使用時所造成的損壞。
4. 確保所有部件都連接正確。本產品的部件損壞或遺失時請不要使用。
5. 保持通風孔沒有任何障礙物。
10
Page 12

©2013 Prokit’s Industries Co., LTD. All rights reserved 2013001(C)
11
 Loading...