

Page 1

FB-1688 FIBER CLEAVER
Thanks for buying PRO’SKIT FB-1688 Fiber Cleaver.
Please read these instructions carefully before using the
product.
This product has been designed and manufactured to
assure personal safety.
Improper use can result in bodily injury and serious
damage to fiber cleaver.
Please read and observe all warning instructions given in
this operation annual.
1. Do not disassemble or lubricate any parts of cleaver.
Doing so could cause serious damage to the cleaver.
2. The FB-1688 is a precision tool. Do not impact the
cleaver by hitting or dropping it. Doing so may cause
personal injury and loss of cleaving performance.
3. Glass fiber fragments are extremely sharp. Handle
with care. Wear safety glasses at all times during
cleaving operation for protection from glass fiber.
4. Dispose of glass fiber fragments properly.
5. The blade of cleaver is extremely sharp. Do not touch
it with bare hands.
6. Do not impact the Clamp Cover. Doing so could
cause damage to cleaver and loss of cleaver
performance.
7. If cleaver is damaged or problem occurs, please
contact our maintenance service center.
Page 2
SPECIFICATION
Cladding Diameter 125 μm
Fiber Count Coating Diameter Single fiber 250μm &
900μm
Cleave length 5-20mm
Dimensions 62 x 60 x 56 mm
Cleaver Blade
(5FB-1688-BLAD)
16 points
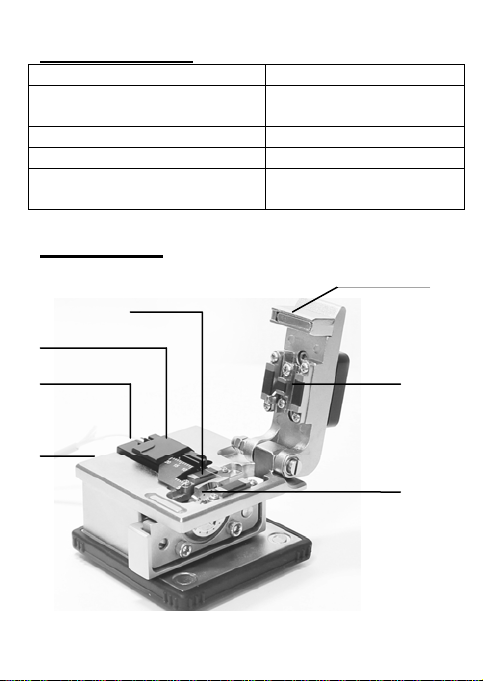
STRUCTURE
Blade carriage
Lip of the fiber holder
Clamp cover
Fiber holder
Body
Clamp
Blade
2
Page 3
OPERA TING PROCE DURE
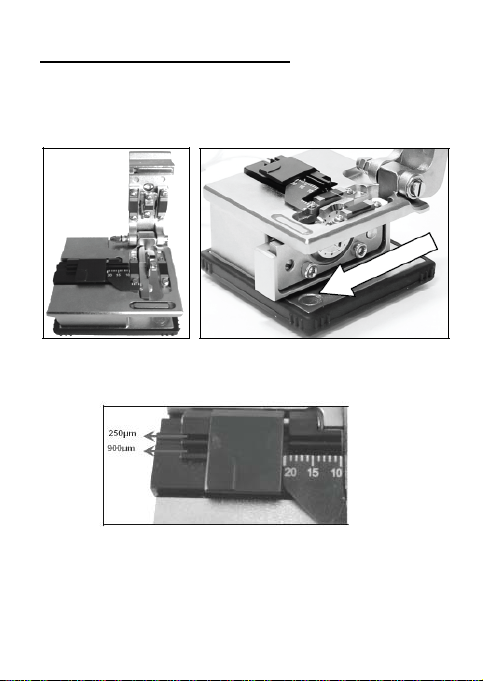
1. Open the Clamp Cover and lid of the fiber holder.
Please make sure the blade carriage is in the forward
position.
2.
Insert the fiber cable into the correct groove
depending on the fiber coating diameter.
3. Close the lid of the fiber holder and clamp cover.
4. Slide the blade carriage to the rear side of the cleaver.
The fiber will be cleaved.
3
Page 4
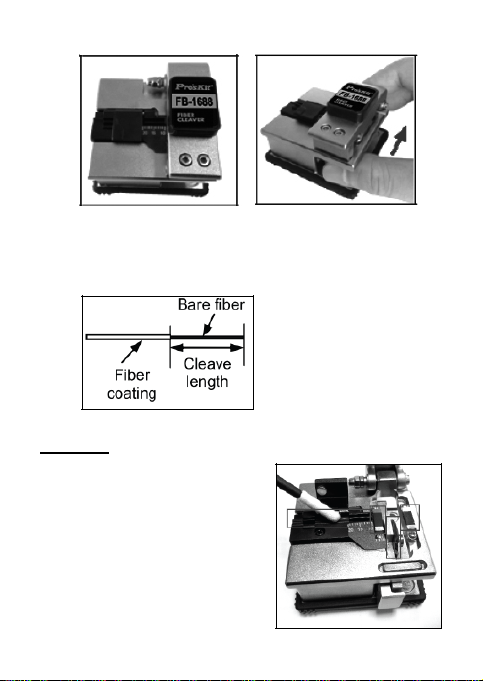
5. Open the Clamp Cover. Open the lid of fiber holder
and lift out the newly cleaved fiber. Lift the off-cut and
dispose of it properly.
CLEAN
To keep excellent cleaving
quality, please clean the fiber
cleaver a
USE a co
with isopropyl alcohol to clean
the blade edge, the rubber
pad
fiber holder and the grooves.
fter use.
tton swab moistened
of the clamp and anvil, the
4
Page 5
CAUTION
• Dust on the blade edge or clamp might cause loss
of cleaving performance or poor quality of fiber
end face.
• Do not clean them with any other kind of
chemicals.
• If the Clamp Cover is closed leaving an off-cut
fiber on the clamp, the rubber pad of clamp w
have a trace of fiber, causing loss of cleaving
performance or poor quality of fiber end face.
ill
BLADE POSITION CHANGE
n a symptom that
creases,As the number of the cleaving i
fiber cannot be cleaved or cracks will occur. If such
symptom continues to appear, th orn
out. Rotate the blade according t the following
procedures and use a new blade osition.
[Reference] approximately 1,000
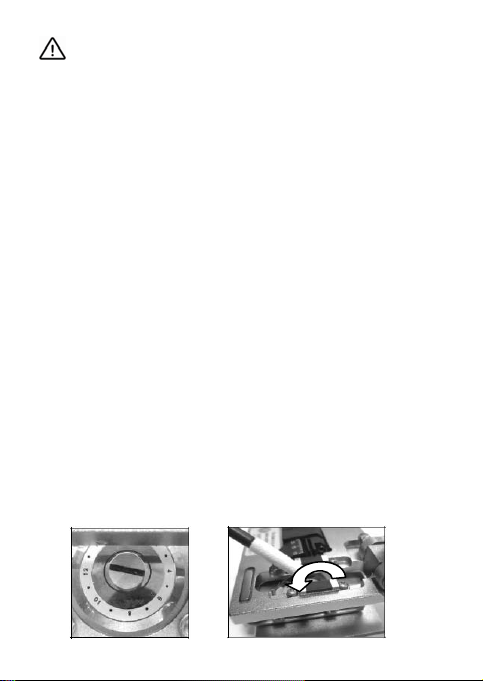
1. Loosen the blade set screw. (fig.1)
2. Rotate
the blade to the next position by pressing its
side or edge with cotto
Rotate the blade in the dir
arrow. (fig.2)
e blade position is w
o
p
fibers per position
ab.
n sw
ection indicated by the
Fig.1 Fig.2
5
Page 6

CAUTION
• Do not rotate the blade with hands.
Do not rotate the blade with metallic tweeze
• rs.
Doing so
T hten the blade set screw.
3. ig
y and cleave
4. Tr the fiber. Perform a visual check of the
fiber end face with splicer. If the fiber end face is poor
just the blade height. (Refer to “Blade height
ad
justment)
ad
may damage the blade.
B
LADE HEIGHT ADJUST MENT
1. Loosen the 2 Hex Screws with the a
(Fig3)
2. Turn the blade height adjustment slot screw (Fig4)
3. Tighten the 2 Hex Screws with the attached hex key
(Fig5).
4. Cut fiber to test the performance of cleav
quality, adjust the blade again until optimized.
ttached hex key.
er, if not good
Fig 3 Fig4 Fig5
,
6
Page 7

BL ACEMENT
ADE REPL
1.
Unscrew the blade set screw. (Fig6)
Remove the blade with tweezers (Fig.7).
2.
Fig.6 Fig.7
CAUTION
The edge of a blade is manufactured precisely. If
the edge is hit against metallic object, it will crack,
resulting in poor cleaving performance. Ha
care.
When using met llic tweezers, be
damage the blade.
Do not touch the blade with hands
Dispose of old blade properly.
3. Insert a new blade in the cleaver so that the num
“0” is in the top position. The hole of the blade should
be aligned with the hole of the blade receptacle.
4. Tighten the blade setscrew securely.
5. Adjust the blade height, referring to “ Blade height
adjustment”
a careful not to
ndle with
. Use gloves.
7
ber
Page 8

TROUBLESHOOTING
If the cleaving problems occur, the following are possible
are causes.
Situation Solution
The fiber is placed
obliquely in cleaver.
The blade position is too
high.
Dust or dirt remains on
the c
lamp.
Dust or dirt remains on
the blade.
Dust on
the fi
ber.
Make sure that the fiber is
placed straight in the
cleaver
Adjust the blade height.
Clean the clamp
Clean the blade.
Remove the fiber coating or dirt remains
and clean the blade fiber
again.
PROKIT’S INDUSTRIES CO., LTD.
http://www.prokits.com.tw
E-mail:pk@mail.prokits.com.tw
©2013 Copyright by Prokit’s Industries Co., Ltd(C).
8
Page 9

F
B-1688 使用說明
感 O’SKIT
謝您購買和使用 PR
前 閱讀後請
請仔細閱讀說明書,
FB-1688 光纖切斷刀,使用
妥善保存,以備查閱。
用方法和安全操作規
使 則
1 ,以
. 請不要自行拆解本產品
2 擊切割刀或跌落,以免成產品損壞或是影響切
. 切勿猛烈撞
割的精度
. 使用時請戴
3 被刀片
. 切勿弄濕切割刀。
3
切勿把切割
4. 刀放在潮濕或佈
5. 常溫下保存以免高溫引起變形。
6. 裸光纖留長約 12mm。
手套以避免
免造成產品損壞
或是光纖的利角割傷
滿灰塵的地方。
規格
裸光纖尺寸 125 μm
光纖披覆外徑 單芯 250 m & 900μm μ
長度 5-20mm 光纖切割
產品尺寸 62 x 60 x 56 mm
切割刀片
88-BLAD)
(5FB-16
16 點
9
Page 10

產品說明
壓纖板
光纖夾具
刀體
切割滑塊
蓋板
光纖壓墊
刀片
10
Page 11

操作步骤
1. 打開壓纖板及蓋板,將切割滑塊推至前端(如圖)
2. 將剝除好塗覆層的裸光纖放置於夾具內(250μm /
900μm), 根據使用者需要確定好切割長度。按下合上
壓纖板及蓋板固定光纖。
3. 關上蓋板後確保光纖處於水準線上。
4. 切割滑塊一次性向後推動,完成切割。
11
Page 12

5. 打開蓋板及壓纖板,取出光纖;光纖取出後光纖端面請
勿接觸任何物體,以免損壞光纖。
皮線光纖線的切割使用
1. 移除圖示固定光纖夾具的螺絲.
將適合皮線光纖使用的夾具(請依據需求自行購買)放置
2.
底座內。
12
Page 13

將剝除外皮的光纖線放置在夾具內, 設定好需要的長度,
3.
進行切割。
注 割後剩餘光纖的收集處理,
:光纖細小但尖硬, 請注意切
免造成意外傷害.
以
清潔
1. 切割完成後,請清理切
割後的斷纖,用棉花棒
沾酒精清潔壓纖板上的
污垢,切勿用丙酮或或
有腐蝕性的溶劑清理壓
纖板。切勿損壞刀片,
以備日後
2. 定期用棉花棒沾酒精清
潔壓纖板上的污垢,切勿用丙酮或有腐蝕性的溶劑清
理壓纖板。
3. 載纖槽要時常清潔,確保槽內無灰塵及油垢,以免影
響切割品質。
使用。
13
Page 14

刀片的更換及調整
1. 刀片上註明 0-15 個切割點。
2. 當切割刀不能正常使用時,請即時清理刀片及光纖夾具
(切勿使用酒精擦拭光纖壓墊)
3. 如果仍然不能正常切割,說明切割刀片切割點已經磨損
不能繼續使用。
4. 調整刀片位置時請根據以下步驟使用。
A. 調整刀片(按刀片上註明的 0-15 面依次轉
動)
1. 自備 “一”字型螺絲刀一把。
2. 首先用“一”字
3. 使用棉花棒轉動刀片調整刀片位置,每次轉動一個
面
,轉動方式依箭頭指示,如圖二。
完
4. 成後將刀片固定如仍然
下步驟調整刀片及切割滑
型螺絲刀將刀片上的螺絲轉鬆,如圖一
無法正常切割,需要按以
塊的高度。
圖一
圖二
B.調整刀片高度
1
. 採用內六角扳手,將刀片下方的兩顆內六角螺絲轉鬆,如
圖三
。
2 所示的螺絲。順時針方向調為升高刀片,反之為
. 微調右圖
降低刀片高度, 如圖四。
14
Page 15

3. 採用內六角扳手,將刀
圖五。
片下方的兩顆內六角螺絲鎖緊, 如
4. 打開壓纖板及蓋板,將剝除好塗覆層的裸光纖放置於夾具
內 板,來回推動切割刀
(125mm/900mm),按下合上壓纖
推塊,看切割刀刀片是否正好碰到光纖,如果末碰到,重
複 ,如果碰到太多,重複第 2 步,降低
第 2 步,調高刀片
刀片。 調整好最佳位置,用內六角擰緊第一步的
兩個內六角。
鬆開的
圖三 圖四 圖五
更換新刀片
C.
1. 首先用“一”字型螺絲刀將刀片上的螺絲拆下如圖六,將舊
刀片以鑷子夾起,並且裝上新刀片後將螺絲鎖上, 如圖
七。
2. 按調整刀片高度步驟進 刀片的高低。
行調節
圖六 圖七
15
Page 16

注:請不要用不合適的一字及內六角螺絲刀進行調節切割
刀。
易問題排除
簡
如
果切割刀發生問題,可能是以下的原因
問 題 排 除 方 法
光纖放置歪斜 確認光纖筆直放 進切割刀槽座中
刀片位置過高 調整刀片高度
光纖壓墊髒污 清潔光纖壓墊
切割刀片髒污 清潔切割刀片
光纖壓墊髒污 將光纖取下並且重新剝皮及清潔
光纖
PROKIT’S INDUSTRIES CO., LTD.
http://www.prokits.com.tw
E-mail:pk@mail.prokits.com.tw
©2013 Copyright by Prokit’s Industries Co., Ltd(C).
16
 Loading...