


spectra / radience
•User Guide
•Benutzerhandbuch
•Guide d’utilisateur
•Guia del usario
•Manuale d’uso
•Bruksanvisning
TABLE OF CONTENTS |
english |
|
INHALTSVERZEICHNIS |
|
|
deutsch |
|
|
|
TABLE DES MATIERES |
|
|
|
francais |
|
|
|
|
|
|
|
|
|
|
|
|
|
|
|
|
|
|
|
|
|
|
|
INTRODUCTION. . . . . . . . . . . . . . . . . . . . . . . . . . . . . . . . . . . . . . . . . |
. . . . . . 4. . . . . |
. . . . .EINLEITUNG. . . . . . . .. .. .. .. .. .. .. .. .. .. . . . . . . . . . . . . . . . . . . . . |
. . . . . . . |
. . . |
. . . . . . |
. |
. |
. 4. . . |
. . . . INTRODUCTION. . . . . . . . .. .. .. .. .. .. .. .. .. .. .. |
. . . . . . |
. . . . . . . . . . |
. . . . . . . . . . . . |
. |
. . . . . . |
. |
|
. 4. . . . . . |
|
SAFETY & WARNINGS. . . . . . . . . . . . . . . . . . . . . . . . . . . . . . . . . . . . . . |
. . . . . 6. . . . . . |
. . . . SICHERHEIT. . . . . . . UND. . . WARNHINWEISE. . . . . . . . . . . . . . . . . . . . . . . . |
. . . . . . . |
. . . |
. . . . . . . |
. |
. 6. . . |
. . . . SÉCURITÉ. . . . . . &. MISES. . . . EN. .GARD. . . . |
. . . . . . |
. . . . . . . . . . |
. . . . . . . . . . . . |
. |
. . . . . . |
|
. |
. 6. . . . . |
||
WARNING SYMBOLS ON THE PROJECTOR . . . . . . . . . . . . . . . . . . . . . . . . . |
. . . . . . 12. . . . . |
. . . . . . WARNSYMBOLE. . . . . . AUF DER PROJEKTOR. . . . . . . . . . . . . . . |
. . . . . . . |
. . . |
. . . . . . . |
|
. |
.12. . . |
. . . . . .SYMBOLES. . . . . . D’AVERTISSEMENT. . . . . . . . . |
. . . . . . . . . . |
. . . . . . . . . . . . |
. |
. . . . . . |
. .12. . . . . . |
||||
SUPPLIED MATERIAL. . . . . . . . . . . . . . . . . . . . . . . . . . . . . . . . . . . . . . |
. . . . . . 14. . . . . |
. . . . . LIEFERUMFANG. . . . . . . . . . .. .. .. .. .. . . . . . . . . . . . . . . . . . . . . . . |
. . . . . . . |
. . . |
. . . . . . . |
|
. |
. 14. . . |
. . . . .MATERIEL. . . . . FOURNIS. . . . . ... .. .. .. .. .. . . |
. . . . . . |
. . . . . . . . . . |
. . . . . . . . . . . . |
. |
. . . . . . |
. |
|
.14. . . . . . |
|
OVERVIEW. . . . . . . . . . . . . . . . . . . . . . . . . . . . . . . . . . . . . . . . . . . . |
. . . . . 16. . . . . . |
. . . . ÜBERSICHT. . . . . . . .. .. .. .. .. .. .. .. .. .. . . . . . . . . . . . . . . . . . . . . |
. . . . . . . |
. . . |
. . . . . . |
. |
. |
.16. . . |
. . . . VUE. . .D’ENSEMBLE. . . . . . . . .. .. .. .. .. .. .. .. . |
. . . . . . |
. . . . . . . . . . |
. . . . . . . . . . . . |
. |
. . . . . . |
|
. |
16. . . . . . |
|
KEYPAD . . . . . . . . . . . . . . . . . . . . . . . . . . . . . . . . . . . . . . . . . . . . |
. . . . . . 18. . . . . |
. . . . . TASTENFELD. . . . . . .. .. .. .. .. .. .. .. .. .. .. . . . . . . . . . . . . . . . . . . . |
. . . . . . . |
. . . |
. . . . . . . |
|
. |
. 18. . . |
. . . . .CLAVIER. . . . ... .. .. .. .. .. .. .. .. .. .. .. .. . |
. . . . . . |
. . . . . . . . . . |
. . . . . . . . . . . . |
. |
. . . . . . |
|
. |
.18. . . . . |
|
INDICATORS . . . . . . . . . . . . . . . . . . . . . . . . . . . . . . . . . . . . . . . . . . |
. . . . . . 20. . . . . |
. . . . . LEUCHTANZEIGEN. . . . . . . . . .. .. .. .. .. .. .. . . . . . . . . . . . . . . . . . . . . |
. . . . . . . |
. . . . |
. . . . . . |
. |
. |
20. . . . |
. . . . INDICATEURS. . . . . . . ... .. .. ... .. .. ... .. .. ... .. .. ... .. .. .. .. .. |
.. .. .. .. .. .. .. .. |
.. .. .. .. .. .. .. .. .. .. .. .. .. .. .. |
.. .. .. .. .. .. .. .. .. .. .. .. .. .. .. .. .. .. |
.. .. |
.. .. .. .. .. .. .. .. .. |
|
.. |
..20.. |
|
INDICATOR LIGHT . . . . . . . . . . . . . . . . . . . . . . . . . . . . . . . . . . . . . . |
. . . . . . 20. . . . . |
. . . . . . LEUCHTANZEIGEN. . . . . . . . . . ... .. .. . . . . . . . . . . . . . . . . . . . . . . |
. . . . . . . |
. . . |
. . . . . . . |
|
. |
. 20. . . |
. . . . . . INDICATEUR. . . . . . . . . . . . . . . . . . . . . . . . . |
. . . . . . |
. . . . . . . . . . |
. . . . . . . . . . . . |
. |
. . . . . . |
|
. |
20. . . . . . |
|
FLASHING BLUE LIGHT. . . . . . . . . . . . . . . . . . . . . . . . . . . . . . . . . . . . |
. . . . . 20. . . . . . |
. . . . . .BLINKENDES. . . . . . . BLAUES. . . . LICHT. . . . . . . . . . . . . . . . . . . . . |
. . . . . . . |
. . . |
. . . . . . |
. |
. |
.20. . . |
. . . . . .LUMIERE. . . . .BLEUE. . . .CLIGNOTANTE. . . . . . . . . |
. . . . . . . . . . |
. . . . . . . . . . . . |
. |
. . . . . . . |
.20. . . . . . |
||||
PERMANENT BLUE LIGHT . . . . . . . . . . . . . . . . . . . . . . . . . . . . . . . . . . |
. . . . . 20. . . . . . |
. . . . . .PERMANENT. . . . . . .BLAUES. . . LICHT. . . . . . . . . . . . . . . . . . . . . |
. . . . . . . |
. . . |
. . . . . . |
. |
. |
.20. . . |
. . . . . .LUMIERE. . . . .BLEUE. . . .PERMANENTE. . . . . . . . . |
. . . . . . . . . . |
. . . . . . . . . . . . |
. |
. . . . . . |
. .20. . . . . . |
||||
PERMANENT ORANGE LIGHT. . . . . . . . . . . . . . . . . . . . . . . . . . . . . . . . |
. . . . . . 20. . . . . . |
. . . . . PERMANENT. . . . . . . ORANGES. . . LICHT. . . . . . . . . . . . . . . . . . . |
. . . . . . . |
. . . . |
. . . . . . |
. |
. |
20. . . . |
. . . . . LUMIERE. . . . . ORANGE. . . . . .PERMANENTE. . . . . . |
. . . . . . . . . . |
. . . . . . . . . . . . |
. |
. . . . . . . |
|
. |
20. . . . . . |
||
FLASHING YELLOW LIGHT . . . . . . . . . . . . . . . . . . . . . . . . . . . . . . . . . . |
. . . . . 20. . . . . . |
. . . . . .BLINKENDES. . . . . . . GELBES. . . LICHT. . . . . . . . . . . . . . . . . . . . . |
. . . . . . . |
. . . |
. . . . . . |
. |
. |
.20. . . |
. . . . . .LUMIERE. . . . .JAUNE. . . .CLIGNOTANTE. . . . . . . . . |
. . . . . . . . . . |
. . . . . . . . . . . . |
. |
. . . . . . . |
.20. . . . . . |
||||
FLASHING RED LIGHT. . . . . . . . . . . . . . . . . . . . . . . . . . . . . . . . . . . . |
. . . . . . 20. . . . . |
. . . . . . BLINKENDES. . . . . . . .ROTES. . . .LICHT. . . . . . . . . . . . . . . . . . . . . |
. . . . . . . |
. . . . |
. . . . . . |
. |
. |
20. . . . |
. . . . . LUMIERE. . . . . ROUGE. . . . .CLIGNOTANTE. . . . . . . . . |
. . . . . . . . . . |
. . . . . . . . . . . . |
. |
. . . . . . |
. .20. . . . . . |
||||
PERMANENT RED LIGHT. . . . . . . . . . . . . . . . . . . . . . . . . . . . . . . . . . . |
. . . . . . 20. . . . . |
. . . . . . PERMANENT. . . . . . . ROTES. . . . LICHT. . . . . . . . . . . . . . . . . . . . . |
. . . . . . . |
. . . . |
. . . . . . |
. |
. |
20. . . . |
. . . . . LUMIERE. . . . . PERMANENTE. . . . . . . ROUGE. . |
. . . . . |
. . . . . . . . . . |
. . . . . . . . . . . . |
. |
. . . . . . |
. |
. |
20. . . . . . |
|
NO LIGHT. . . . . . . . . . . . . . . . . . . . . . . . . . . . . . . . . . . . . . . . . . . |
. . . . . . 20. . . . . |
. . . . . . KEIN. . .LICHT. . . .. . . . . . . . . . . . . . . . . . . . . . . . . . . . . . . . . . . . . |
. . . . . . . |
. . . . |
. . . . . . |
. |
. |
20. . . |
. . . . . . PAS. . .DE. LUMIERE. . . . . .. . . . . . . . . . . . . . . |
. . . . . . |
. . . . . . . . . . |
. . . . . . . . . . . . |
. |
. . . . . . |
. |
. |
20. . . . . . |
|
REMOTE CONTROL. . . . . . . . . . . . . . . . . . . . . . . . . . . . . . . . . . . . . . . |
. . . . . . 22. . . . . |
. . . . .FERNBEDIENUNG. . . . . . . . . .. . . . . . . . . . . . . . . . . . . . . . . . . . . . . . . |
. . . . . . . |
. . . . |
. . . . . . |
. |
. |
22. . . . |
. . . . TELECOMMANDE. . . . . . . . . . .. .. .. .. .. .. . . . |
. . . . . . |
. . . . . . . . . . |
. . . . . . . . . . . . |
. |
. . . . . . |
|
. |
22. . . . . . |
|
CONNECTOR PANEL. . . . . . . . . . . . . . . . . . . . . . . . . . . . . . . . . . . . . . |
. . . . . . 28. . . . . |
. . . . . ANSCHLUSSBEREICH. . . . . . . . . . . . .. . . . . . . . . . . . . . . . . . . . . . . . . . |
. . . . . . . |
. . . |
. . . . . . |
. |
. |
.28. . . |
. . . . PANNEAU. . . . . . DE. .RACCORDEMENT. . . . . . . . . . . . . . . |
. . . . . . . . . . |
. . . . . . . . . . . . |
. |
. . . . . . . |
. 28. . . . . . |
||||
SET UP. . . . . . . . . . . . . . . . . . . . . . . . . . . . . . . . . . . . . . . . . . . . . . |
. . . . . 30. . . . . . |
. . . . EINRICHTUNG. . . . . . . .. .. .. .. .. .. .. .. .. .. .. . . . . . . . . . . . . . . . . . . |
. . . . . . . |
. . . . |
. . . . . . |
. |
. |
30. . . |
. . . . . INSTALLATION. . . . . . . . .. . . . . . . . . . . . . . . . . . . |
. . . . . . |
. . . . . . . . . . |
. . . . . . . . . . . . |
. |
. . . . . . |
. |
. |
30. . . . . . |
|
VIDEO. . . . . . . . . . . . . . . . . . . . . . . . . . . . . . . . . . . . . . . . . . . . . |
. . . . . . 30. . . . . |
. . . . . . VIDEO. . . -.EINRICHTUNG. . . . . . . . . . . . . . . . . . . . . . . . . . . . . . . . . . . |
. . . . . . . |
. . . |
. . . . . . . |
|
. |
. 30. . . |
. . . . . . INSTALLATION. . . . . . . . VIDEO. . . ... .. .. .. .. .. .. .. .. .. |
.. .. .. .. .. .. .. .. |
.. .. .. .. .. .. .. .. .. .. .. .. .. .. .. |
.. .. .. .. .. .. .. .. .. .. .. .. .. .. .. .. .. .. |
.. .. |
.. .. .. .. .. .. .. .. .. |
|
.. .. |
30.. |
|
SETUP COMPUTER. . . . . . . . . . . . . . . . . . . . . . . . . . . . . . . . . . . . . . |
. . . . . 30. . . . . . |
. . . . . .EINRICHTEN. . . . . . DES. . . RECHNERS. . . . . . . . . . . . . . . . . . . . . . . |
. . . . . . . |
. . . |
. . . . . . . |
|
. |
. 30. . . |
. . . . . . INSTALLATION. . . . . . . . DE. .L’ORDINATEUR. |
. . . . . . |
. . . . . . . . . . |
. . . . . . . . . . . . |
. |
. . . . . . . |
. 30. . . . . . |
|||
IMAGE ADJUSTMENTS . . . . . . . . . . . . . . . . . . . . . . . . . . . . . . . . . . . . . |
. . . . . . 32. . . . . |
. . . . .BILDEINSTELLUNGEN. . . . . . . . . . . . . . . . . . . . . . . . . . . . . . . . . . . . . |
. . . . . . . |
. . . . |
. . . . . . |
. |
. |
32. . . . |
. . . . REGLAGES. . . . . . DE. . L’IMAGE. . . . . . . . . . . . . |
. . . . . . |
. . . . . . . . . . |
. . . . . . . . . . . . |
. |
. . . . . . |
. |
. |
32. . . . . . |
|
PIN CODE . . . . . . . . . . . . . . . . . . . . . . . . . . . . . . . . . . . . . . . . . . . . |
. . . . . 32. . . . . . |
. . . . PIN. . CODE. . . .. .. .. .. .. .. .. .. .. .. .. .. . . . . . . . . . . . . . . . . . . . |
. . . . . . . |
. . . . |
. . . . . . |
. |
. |
32. . . |
. . . . . CODE. . . PIN. . . .. .. .. .. .. .. .. .. .. .. .. .. . |
. . . . . . |
. . . . . . . . . . |
. . . . . . . . . . . . |
. |
. . . . . . |
|
. |
32. . . . . . |
|
CEILING MOUNT . . . . . . . . . . . . . . . . . . . . . . . . . . . . . . . . . . . . . . . . |
. . . . . . 34. . . . . |
. . . . . DECKENMONTAGE. . . . . . . . . . .. . . . . . . . . . . . . . . . . . . . . . . . . . . . . . . |
. . . . . . . |
. . . |
. . . . . . |
. |
. |
.34. . . |
. . . . MONTAGE. . . . . . AU. . PLAFOND. . . . . .. . . . . . . . . |
. . . . . . |
. . . . . . . . . |
. . . . . . . . . . . . |
. |
. . . . . . . |
|
. |
34. . . . . . |
|
OPERATION. . . . . . . . . . . . . . . . . . . . . . . . . . . . . . . . . . . . . . . . . . . |
. . . . . . 34. . . . . |
. . . . .BETRIEB. . . . ... .. .. ... .. .. ... .. .. ... .. .. ... .. .. ... .. .. .. .. .. .. .. .. .. .. .. .. .. .. .. .. .. .. .. .. .. .. .. .. .. .. .. .. .. .. .. .. |
.. .. .. .. .. .. .. .. .. .. |
.. .. .. .. .. |
.. .. .. .. .. .. .. .. .. .. |
.. |
.. |
..34.. |
UTILISATION. . . . . . . . . . . . . |
. . . . . . |
. . . . . . . . . . |
. . . . . . . . . . . . |
. |
. . . . . . |
|
. . |
34. . . . . . |
|
USING THE PROJECTOR. . . . . . . . . . . . . . . . . . . . . . . . . . . . . . . . . . . . . |
. . . . . 36. . . . . |
. . . . . EINSATZ. . . . .DES. . PROJEKTORS. . . . . . . . . . . . . . . . . . . . . . . . . . . . |
. . . . . . . |
. . . |
. . . . . . . |
|
. |
. 36. . . |
. . . . .UTILISATION. . . . . . .DU. PROJECTEUR. . . . . . . . . . . . . . |
. . . . . . . . . . |
. . . . . . . . . . . . |
. |
. . . . . . |
. .36. . . . . . |
||||
RS 232 AND LAN CONTROL . . . . . . . . . . . . . . . . . . . . . . . . . . . . . . . . . |
. . . . . . 38. . . . . |
. . . . . . RS. .232. . UND. . .LAN. . .STEUERUNG. . . . . . . . . . . . . . . . . . . |
. . . . . . . |
. . . . |
. . . . . . |
. |
. |
38. . . . |
. . . . . CONTRÔLE. . . . . . .RS. .232. . ET LAN. . . . |
. . . . . . |
. . . . . . . . . . |
. . . . . . . . . . . . |
. |
. . . . . . |
|
. |
38. . . . . . |
|
TIMER . . . . . . . . . . . . . . . . . . . . . . . . . . . . . . . . . . . . . . . . . . . . . |
. . . . . 40. . . . . |
. . . . . . TIMER. . . .. .. .. .. .. .. .. .. .. .. .. .. .. . . . . . . . . . . . . . . . . . . . |
. . . . . . . |
. . . |
. . . . . . . |
|
. |
. 40. . . |
. . . . . . HORLOGE. . . . . . .. .. .. .. .. .. .. .. .. .. .. . |
. . . . . . |
. . . . . . . . . |
. . . . . . . . . . . . |
. |
. . . . . . . |
|
. |
40. . . . . . |
|
IMAGE CALIBRATION AND CORRECTION. . . . . . . . . . . . . . . . . . . . . . . . . . . |
. . . . . 42. . . . . . |
. . . . . BILDKALIBRIERUNG. . . . . . . UND -KORREKTUR. . . . . . . . . . . . . . . |
. . . . . . . |
. . . |
. . . . . . . |
|
. |
.42. . . |
. . . . . .CALIBRAGE. . . . . . DE. . L’IMAGE ET CORRECTION. . |
. . . . . . . . . . |
. . . . . . . . . . . . |
. |
. . . . . . |
|
. |
42. . . . . . |
||
MENU SYSTEM . . . . . . . . . . . . . . . . . . . . . . . . . . . . . . . . . . . . . . . . . |
. . . . . . 44. . . . . |
. . . . .MENÜSYSTEM. . . . . . . .. . . . . . . . . . . . . . . . . . . . . . . . . . . . . . . . . . . . |
. . . . . . . |
. . . . |
. . . . . . |
. |
. |
44. . . |
. . . . . SYSTEME. . . . . MENU. . . . . .. .. .. .. .. .. .. .. . . |
. . . . . . |
. . . . . . . . . |
. . . . . . . . . . . . |
. |
. . . . . . . |
|
. |
44. . . . . . |
|
OVERVIEW. . . . . . . . . . . . . . . . . . . . . . . . . . . . . . . . . . . . . . . . . . . |
. . . . . 44. . . . . |
. . . . . . ÜBERSICHT. . . . . . . .. .. .. .. .. .. .. .. . . . . . . . . . . . . . . . . . . . . |
. . . . . . . |
. . . . |
. . . . . . |
. |
. |
44. . . |
. . . . . . APERÇU. . . . . GENERAL. . . . . . .. .. .. .. .. . . |
. . . . . . |
. . . . . . . . . . |
. . . . . . . . . . . . |
. |
. . . . . . |
|
. |
44. . . . . . |
|
TOP MENU. . . . . . . . . . . . . . . . . . . . . . . . . . . . . . . . . . . . . . . . . . . |
. . . . . 44. . . . . |
. . . . . . HAUPTMENÜ. . . . . . . .. . . . . . . . . . . . . . . . . . . . . . . . . . . . . . . . . . . . |
. . . . . . . |
. . . |
. . . . . . |
. |
. |
.44. . . |
. . . . . .MENU. . . SUPÉRIEUR. . . . . . . . . . . . . . . . . . . . |
. . . . . . |
. . . . . . . . . |
. . . . . . . . . . . . |
. |
. . . . . . . |
|
. |
44. . . . . . |
|
NAVIGATING THE MENU SYSTEM. . . . . . . . . . . . . . . . . . . . . . . . . . . . . . . |
. . . . . 44. . . . . . |
. . . . . NAVIGATING. . . . . . . IM. .MENÜSYSTEM. . . . . . . . . . . . . . . . . . . |
. . . . . . . |
. . . . |
. . . . . . |
. |
. |
44. . . . |
. . . . . NAVIGATION. . . . . . . PARMI. . . . LE SYSTÈME DE MENU. . |
. . . . . . . . . |
. . . . . . . . . . . . |
. |
. . . . . . . |
|
. |
44. . . . . . |
||
PICTURE MENU. . . . . . . . . . . . . . . . . . . . . . . . . . . . . . . . . . . . . . . . |
. . . . . 46. . . . . . |
. . . . . .UNTERMENÜ. . . . . . . BILD. . . . . . . . . . . . . . . . . . . . . . . . . . . . . . . |
. . . . . . . |
. . . |
. . . . . . . |
|
. |
. 46. . . |
. . . . . . SOUS. . . MENU. . . . IMAGE. . . . . . . . . . . . . . |
. . . . . . |
. . . . . . . . . . |
. . . . . . . . . . . . |
. |
. . . . . . |
|
. |
46. . . . . . |
|
REALCOLOR SUB MENU. . . . . . . . . . . . . . . . . . . . . . . . . . . . . . . . . . . |
. . . . . . 50. . . . . |
. . . . . . UNTERMENÜ. . . . . . . REALCOLOR. . . . . . . . . . . . . . . . . . . . . . . . . |
. . . . . . . |
. . . . |
. . . . . . . |
. |
50. . . . |
. . . . . SOUS. . . .MENU. . . REALCOLOR. . . . . . . . . . . . . . . |
. . . . . . . . . . |
. . . . . . . . . . . . |
. |
. . . . . . . |
. 50. . . . . . |
|||||
ADVANCED SUB MENU. . . . . . . . . . . . . . . . . . . . . . . . . . . . . . . . . . . . |
. . . . . 52. . . . . . |
. . . . . .UNTERMENÜ. . . . . . . ERWEITERT. . . . . . . . . . . . . . . . . . . . . . . . . . |
. . . . . . . |
. . . |
. . . . . . . |
|
. |
. 52. . . |
. . . . . . SOUS. . . MENU. . . . AVANCÉ. . . . . . . . . . . |
. . . . . . |
. . . . . . . . . |
. . . . . . . . . . . . |
. |
. . . . . . . |
|
. |
52. . . . . . |
|
ENHANCEMENTS SUB MENU. . . . . . . . . . . . . . . . . . . . . . . . . . . . . . . . . |
. . . . . 54. . . . . . |
. . . . . UNTERMENÜ. . . . . . . .VERBESSERUNG. . . . . . . . . . . . . . . . . . . . . |
. . . . . . . |
. . . . |
. . . . . . . |
. |
54. . . . |
. . . . . SOUS. . . .– .MENU. . . AMÉLIORATIONS. . . . . . . . . . |
. . . . . . . . . . |
. . . . . . . . . . . . |
. |
. . . . . . . |
.54. . . . . . |
|||||
INSTALLATION SUB MENU. . . . . . . . . . . . . . . . . . . . . . . . . . . . . . . . . . . |
. . . . . 56. . . . . . |
. . . . . UNTERMENÜ. . . . . . . .INSTALLATION. . . . . . . . . . . . . . . . . . . . . . . . |
. . . . . . . |
. . . |
. . . . . . . |
. |
.56. . . |
. . . . . .SOUS. . .–MENU. . . . INSTALLATION. . . . . . . . . . . . . |
. . . . . . . . . . |
. . . . . . . . . . . . |
. |
. . . . . . |
. .56. . . . . . |
|||||
LAMP SUB MENU . . . . . . . . . . . . . . . . . . . . . . . . . . . . . . . . . . . . . . . |
. . . . . 58. . . . . |
. . . . . . UNTERMENÜ. . . . . . . .LAMPE. . . .. . . . . . . . . . . . . . . . . . . . . . . . . . |
. . . . . . . |
. . . |
. . . . . . |
. |
. |
.58. . . |
. . . . . .SOUS. . .–MENU. . . . VOYANT. . . . .. . . . . . . . |
. . . . . . |
. . . . . . . . . |
. . . . . . . . . . . . |
. |
. . . . . . . |
|
. |
58. . . . . . |
|
SETTINGS SUB MENU. . . . . . . . . . . . . . . . . . . . . . . . . . . . . . . . . . . . . |
. . . . . 60. . . . . |
. . . . . . EINSTELLUNGEN. . . . . . . . . . . . . . . . . . . . . . . . . . . . . . . . . . . . . . |
. . . . . . . |
. . . |
. . . . . . |
. |
. |
.60. . . |
. . . . . .SOUS. . .-MENU. . . .PARAMÈTRES). . . . . . . . . . |
. . . . . . |
. . . . . . . . . . |
. . . . . . . . . . . . |
. |
. . . . . . |
. |
. |
60. . . . . . |
|
PROFILES SUB MENU. . . . . . . . . . . . . . . . . . . . . . . . . . . . . . . . . . . . . |
. . . . . 64. . . . . |
. . . . . . UNTERMENÜ. . . . . . . .PROFILE. . . . .. .. .. .. .. .. .. .. .. .. .. .. .. .. .. .. .. .. .. .. .. .. .. .. .. .. .. .. .. .. .. .. .. .. .. |
.. .. .. .. .. .. .. .. .. .. |
.. .. .. .. .. |
.. .. .. .. .. .. .. .. .. .. |
.. |
.. |
..64.. |
SOUS MENU PROFILS. . . . . . . |
. . . . . . |
. . . . . . . . . |
. . . . . . . . . . . . |
. |
. . . . . . . |
|
. |
64. . . . . . |
|
LANGUAGES SUB MENU. . . . . . . . . . . . . . . . . . . . . . . . . . . . . . . . . . . |
. . . . . . 64. . . . . |
. . . . . . SPRACHE. . . . . ... .. .. ... .. .. ... .. ... .. .. .. .. .. .. .. .. .. .. .. .. .. .. .. .. .. .. .. .. .. .. .. .. .. .. .. .. .. .. .. .. .. .. .. .. |
.. .. .. .. .. .. .. .. .. .. |
.. .. .. .. .. |
.. .. .. .. .. .. .. .. .. .. |
.. |
.. |
..64.. |
SOUS MENU LANGUES. . . . . . |
. . . . . . |
. . . . . . . . . . |
. . . . . . . . . . . . |
. |
. . . . . . |
|
. |
64. . . . . . |
|
STATUS SUB MENU. . . . . . . . . . . . . . . . . . . . . . . . . . . . . . . . . . . . . . |
. . . . . 66. . . . . . |
. . . . . .UNTERMENÜ. . . . . . . STATUS. . . . .. . . . . . . . . . . . . . . . . . . . . . . . |
. . . . . . . |
. . . |
. . . . . . . |
|
. |
. 66. . . |
. . . . . . SOUS. . . MENU. . . . ÉTAT. . . .. .. .. . . . . . |
. . . . . . |
. . . . . . . . . |
. . . . . . . . . . . . |
. |
. . . . . . . |
|
. |
66. . . . . . |
|
TROUBLE SHOOTING . . . . . . . . . . . . . . . . . . . . . . . . . . . . . . . . . . . . . . |
. . . . . 68. . . . . . |
. . . . PROBLEMBEHEBUNG. . . . . . . . . . . . . .. . . . . . . . . . . . . . . . . . . . . . . . |
. . . . . . . |
. . . |
. . . . . . |
. |
. |
.68. . . |
. . . . DÉPANNAGE. . . . . . . .. . . . . . . . . . . . . . . . . . . . |
. . . . . . |
. . . . . . . . . |
. . . . . . . . . . . . |
. |
. . . . . . . |
|
. |
68. . . . . . |
|
NO IMAGE. . . . . . . . . . . . . . . . . . . . . . . . . . . . . . . . . . . . . . . . . . . |
. . . . . 68. . . . . |
. . . . . . KEIN. . . BILD. . .. ... .. .. ... .. .. ... .. .. ... .. .. ... .. .. .. .. .. .. .. .. .. .. .. .. .. .. .. .. .. .. .. .. .. .. .. .. .. .. .. .. .. .. .. |
.. .. .. .. .. .. .. .. .. .. |
.. .. .. .. .. |
.. .. .. .. .. .. .. .. .. .. |
.. |
.. |
..68.. |
PAS D’IMAGE. . . . . . . . . . . |
. . . . . . |
. . . . . . . . . . |
. . . . . . . . . . . . |
. |
. . . . . . |
. |
. |
68. . . . . . |
|
DARK IMAGE. . . . . . . . . . . . . . . . . . . . . . . . . . . . . . . . . . . . . . . . . |
. . . . . . 68. . . . . |
. . . . . . DUNKLES. . . . . BILD. . . .. . . . . . . . . . . . . . . . . . . . . . . . . . . . . . . . |
. . . . . . . |
. . . . |
. . . . . . |
. |
. |
68. . . . |
. . . . . IMAGE. . . . SOMBRE. . . . . .. . . . . . . . . . . . . . |
. . . . . . |
. . . . . . . . . . |
. . . . . . . . . . . . |
. |
. . . . . . |
. |
. |
68. . . . . . |
|
FLICKERING IMAGE. . . . . . . . . . . . . . . . . . . . . . . . . . . . . . . . . . . . . . |
. . . . . 68. . . . . . |
. . . . . .FLIMMERNDES. . . . . . . . BILD. . . .. . . . . . . . . . . . . . . . . . . . . . . . |
. . . . . . . |
. . . |
. . . . . . |
. |
. |
.68. . . |
. . . . . .IMAGE. . . OSCILLANTE. . . . . . . . .. .. . . . . |
. . . . . . |
. . . . . . . . . . |
. . . . . . . . . . . . |
. |
. . . . . . |
. |
. |
68. . . . . . |
|
UNSHARP IMAGE. . . . . . . . . . . . . . . . . . . . . . . . . . . . . . . . . . . . . . . |
. . . . . . 68. . . . . |
. . . . . . UNSCHARFES. . . . . . . .BILD. . .. . . . . . . . . . . . . . . . . . . . . . . . . . . |
. . . . . . . |
. . . . |
. . . . . . |
. |
. |
68. . . . |
. . . . . IMAGE. . . . PAS. . .NETTE. . . . .. .. .. .. . . . . |
. . . . . . |
. . . . . . . . . |
. . . . . . . . . . . . |
. |
. . . . . . . |
|
. |
68. . . . . . |
|
MAINTENANCE . . . . . . . . . . . . . . . . . . . . . . . . . . . . . . . . . . . . . . . . . |
. . . . . . 70. . . . . |
. . . . .INSTANDHALTUNG. . . . . . . . . .. .. .. .. .. .. . . . . . . . . . . . . . . . . . . . . . |
. . . . . . . |
. . . |
. . . . . . |
. |
. |
.70. . . |
. . . . ENTRETIEN. . . . . . . .. .. .. .. .. .. .. .. .. . . . |
. . . . . . |
. . . . . . . . . . |
. . . . . . . . . . . . |
. |
. . . . . . |
|
. . |
70. . . . . . |
|
HEAVY DUTY AND CONTINOUS USE. . . . . . . . . . . . . . . . . . . . . . . . . . . . . |
. . . . . . 70. . . . . |
. . . . . . EINSATZ. . . . .UNTER. . . HOHER BEANSPRUCHUNG UND DAUERBETRIEB |
. . . . . . . |
. . . . |
. . . . . . |
. |
. |
70. . . |
. . . . . . USAGE. INDUSTRIEL ET USAGE CONTINU. . . |
. . . . . . . . . . |
. . . . . . . . . . . . |
. |
. . . . . . |
|
. |
70. . . . . . |
||
SERVICE INFORMATION . . . . . . . . . . . . . . . . . . . . . . . . . . . . . . . . . . . . . |
. . . . . 70. . . . . |
. . . . . WARTUNGSANGABEN. . . . . . . . . . . .. .. . . . . . . . . . . . . . . . . . . . . . . . |
. . . . . . . |
. . . . |
. . . . . . |
. |
. |
70. . . . |
. . . . INFORMATION. . . . . . . . SUR. . LE. . SERVICE. . . . . . . . . . . |
. . . . . . . . . . |
. . . . . . . . . . . . |
. |
. . . . . . . |
. 70. . . . . . |
||||
LAMP CHANGE . . . . . . . . . . . . . . . . . . . . . . . . . . . . . . . . . . . . . . . . . |
. . . . . . 72. . . . . |
. . . . .AUSTAUSCHEN. . . . . . . . DER. . .LAMPE. . . . . . . . . . . . . . . . . . . . . . . . . |
. . . . . . . |
. . . . |
. . . . . . |
. |
. |
72. . . . |
. . . . CHANGEMENT. . . . . . . . DE. . LAMPE. . . . . . . . . |
. . . . . . |
. . . . . . . . . . |
. . . . . . . . . . . . |
. |
. . . . . . |
|
. |
72. . . . . . |
|
TECHNICAL DATA . . . . . . . . . . . . . . . . . . . . . . . . . . . . . . . . . . . . . . . . |
. . . . . 74. . . . . . |
. . . . TECHNISCHE. . . . . . . .DATEN. . . .. . . . . . . . . . . . . . . . . . . . . . . . . . . . . |
. . . . . . . |
. . . |
. . . . . . . |
|
. |
. 74. . . |
. . . . .DONNÉES. . . . . TECHNIQUES. . . . . . . . .. .. . . . . |
. . . . . . |
. . . . . . . . . |
. . . . . . . . . . . . |
. |
. . . . . . . |
|
. |
74. . . . . . |
|
DECLARATIONS. . . . . . . . . . . . . . . . . . . . . . . . . . . . . . . . . . . . . . . . . |
. . . . . . 76. . . . . |
. . . . .ERKLÄRUNGEN. . . . . . . . . .. .. .. .. .. .. .. . . . . . . . . . . . . . . . . . . . . . |
. . . . . . . |
. . . |
. . . . . . |
. |
. |
.76. . . |
. . . . DÉCLARATIONS. . . . . . . . .. .. .. .. .. .. .. .. .. . . |
. . . . . . |
. . . . . . . . . . |
. . . . . . . . . . . . |
. |
. . . . . . |
. |
. |
76. . . . . . |
|
2

ÍNDICE DE CONTENIDOS |
español |
|
INDICE |
|
|
|
|
|
|
italiano |
|
|
|
INNHOLDSFORTEGNELSE |
|
|
|
|
norsk |
|
|
|
|
|
|
|
|
|
|
|
|
|
|
|
|
|
|
|
|
|
|
|
|
INTRODUCCIÓN. . . . . . . . . . . . . . . . . . . . . . . . . . . . . . . . . . . . . . . . . |
. . . . . . 5. . . . . |
. . . . .INTRODUZIONE. . . . . . . .. .. .. .. .. .. .. .. .. . |
|
. . . . . . . . . |
. . . . |
. . . . . . |
. . . . . . |
. |
. . . . . . . . . |
. |
. |
. 5. . . |
. . . . INTRODUKSJON. . . . . . . . . .. . . . . . . . . . . . . . . . . . |
. . . . . . |
. . . . . . . . . |
. . . . . . . . . . . . |
. |
. |
. . . . . . . 5. . . . . . . . . |
||
SEGURIDAD Y ADVERTENCIAS. . . . . . . . . . . . . . . . . . . . . . . . . . . . . . . . . |
. . . . . . 7. . . . . |
. . . . .SICUREZZA. . . . . . E. AVVERTENZE. . . . . . . . . . . . . . . . . . . . . . . . . . . . . . . . . . . . . . . . . . . . . . .7 . . |
. . . . .SIKKERHET. . . . . . OG. . ADVARSLER. . . . . . . . . . |
. . . . . . |
. . . . . . . . . |
. . . . . . . . . . . . |
. |
. |
. . . . . . . 7. . . . . . . . . |
||||||||||||
SÍMBOLOS DE ADVERTENCIA. . . . . . . . . . . . . . . . . . . . . . . . . . . . . . . . |
. . . . . . 12. . . . . . |
. . . . . SIMBOLI. . . . . DI. AVVERTENZA. . . . . . . . . . . . . . . . . . . . . . . . . . . . . . . . . . . . . . . . . . . . . 13. . . |
. . . . . . SYMBOLER. . . . . . PÅ. . PROJEKTOREN. . . . . . . . . . . |
. . . . . . . . . |
. . . . . . . . . . . . |
. |
. |
. . . . . . . . 13. . . . . . . . |
|||||||||||||
MATERIAL ENTREGADO . . . . . . . . . . . . . . . . . . . . . . . . . . . . . . . . . . . . |
. . . . . . 14. . . . . |
. . . . . MATERIALE. . . . . . IN. .DOTAZIONE. . . . . . . . . . . . . . . . . . . . . . . . . . . . . . . . . . . . . . . . . . . . . . .15. . . |
. . . . LEVERT. . . . .UTSTYR. . . . .. . . . . . . . . . . . . . |
. . . . . . |
. . . . . . . . . |
. . . . . . . . . . . . |
. |
. |
. . . . . . . 15. . . . . . . . . |
||||||||||||
DESCRIPCIÓN GENERAL. . . . . . . . . . . . . . . . . . . . . . . . . . . . . . . . . . . . |
. . . . . . 16. . . . . |
. . . . . PANORAMICA. . . . . . . . .. .. .. .. .. . . . . |
. |
. . . . . . . . . |
. . . . |
. . . . . . |
. . . . . . |
. |
. . . . . . . . . |
. |
. |
17. . . . |
. . . . OVERSIKT. . . . . . .. .. .. .. .. .. .. .. .. .. .. . |
. . . . . . |
. . . . . . . . . |
. . . . . . . . . . . . |
. |
. |
. . . . . . . 17. . . . . . . . . |
||
TECLADO. . . . . . . . . . . . . . . . . . . . . . . . . . . . . . . . . . . . . . . . . . . . |
. . . . . . 19. . . . . |
. . . . . TASTIERINO. . . . . . .. .. .. .. .. .. .. .. .. .. .. |
. |
. . . . . . . . . |
. . . |
. . . . . . |
. . . . . . |
. |
. . . . . . . . . . |
|
. |
. 19. . . |
. . . . .TASTATUR. . . . . .. . . . . . . . . . . . . . . . . . . . . . . . |
. . . . . . |
. . . . . . . . . |
. . . . . . . . . . . . |
. |
. |
. . . . . . . 19. . . . . . . . . |
||
INDICADORES. . . . . . . . . . . . . . . . . . . . . . . . . . . . . . . . . . . . . . . . . |
. . . . . . 20. . . . . . |
. . . . INDICATORI. . . . . . . .. .. .. .. .. .. .. .. .. . . |
|
. . . . . . . . . |
. . . . |
. . . . . . |
. . . . . . |
. |
. . . . . . . . . |
. |
. |
.21. . . |
. . . . INDIKATORER. . . . . . . . . .. .. .. .. .. .. .. .. .. .. |
. . . . . . |
. . . . . . . . . |
. . . . . . . . . . . . |
. |
. |
. . . . . . . 21. . . . . . . . . |
||
INDICADOR . . . . . . . . . . . . . . . . . . . . . . . . . . . . . . . . . . . . . . . . . |
. . . . . . 20. . . . . . |
. . . . . INDICATORE. . . . . . . ... .. .. .. .. .. .. .. . . |
|
. . . . . . . . . |
. . . . |
. . . . . . |
. . . . . . |
. |
. . . . . . . . . |
. |
. |
21. . . . |
. . . . . INDIKATOR. . . . . . . .. .. .. .. .. .. .. .. .. .. . |
. . . . . . |
. . . . . . . . . |
. . . . . . . . . . . . |
. |
. |
. . . . . . . 21. . . . . . . . |
||
LUZ AZUL INTERMITENTE. . . . . . . . . . . . . . . . . . . . . . . . . . . . . . . . . . |
. . . . . . 20. . . . . . |
. . . . . SPIA. . . BLU. . .LAMPEGGIANTE. . . . . . . . . . . . . . . . . |
. . . . |
. . . . . . |
. . . . . . |
. |
. . . . . . . . . . |
. |
21. . . . |
. . . . . BLINKENDE. . . . . . . BLÅTT. . . ... .. .. .. .. .. .. .. .. .. .. |
.. .. .. .. .. .. .. .. |
.. .. .. .. .. .. .. .. .. .. .. .. .. .. |
.. .. .. .. .. .. .. .. .. .. .. .. .. .. .. .. .. .. |
.. .. |
.. |
.. .. .. .. .. .. .. .. .. .. .. 21.... |
|||||
LUZ AZUL PERMANENTE. . . . . . . . . . . . . . . . . . . . . . . . . . . . . . . . . . . |
. . . . . . 20. . . . . |
. . . . . . SPIA. . .BLU. . FISSA. . . . . . . . . . . . . . |
|
. . . . . . . . . |
. . . . |
. . . . . . |
. . . . . . |
. |
. . . . . . . . . |
. |
. |
21. . . . |
. . . . . PERMANENT. . . . . . . BLÅTT. . . .. .. .. .. .. . . |
. . . . . . |
. . . . . . . . . |
. . . . . . . . . . . . |
. |
. |
. . . . . . . 21. . . . . . . . . |
||
LUZ NARANJA PERMANENTE. . . . . . . . . . . . . . . . . . . . . . . . . . . . . . . . |
. . . . . . 20. . . . . . |
. . . . . SPIA. . . ARANCIO. . . . . FISSA. . . . . . . . . . . . . . . . . |
. . . . |
. . . . . . |
. . . . . . |
. |
. . . . . . . . . . |
. |
.21. . . |
. . . . . .PERMANENT. . . . . . .GULT. . . . .. .. .. . . . |
. . . . . . |
. . . . . . . . . |
. . . . . . . . . . . . |
. |
. |
. . . . . . . 21. . . . . . . . . |
|||||
LUZ AMARILLA INTERMITENTE. . . . . . . . . . . . . . . . . . . . . . . . . . . . . . . |
. . . . . . 20. . . . . . |
. . . . . .SPIA. . ARANCIO. . . . . .LAMPEGGIANTE. |
. . . . . . . . . |
. . . . |
. . . . . . |
. . . . . . |
. |
. . . . . . . . . . |
. |
.21. . . |
. . . . . .BLINKENDE. . . . . . GULT. . . .. . . . . . . . |
. . . . . . |
. . . . . . . . . |
. . . . . . . . . . . . |
. |
. |
. . . . . . . 21. . . . . . . . . |
||||
LUZ ROJA INTERMITENTE. . . . . . . . . . . . . . . . . . . . . . . . . . . . . . . . . . |
. . . . . . 20. . . . . . |
. . . . . SPIA. . . ROSSA. . . . LAMPEGGIANTE. . . . . . . . . . . . . . . |
. . . |
. . . . . . |
. . . . . . |
. |
. . . . . . . . . . |
|
. |
. 21. . . |
. . . . . . BLINKENDE. . . . . . .RØDT. . .. .. . . . . . . |
. . . . . . |
. . . . . . . . . |
. . . . . . . . . . . . |
. |
. |
. . . . . . . 21. . . . . . . . . |
||||
LUZ ROJA FIJA. . . . . . . . . . . . . . . . . . . . . . . . . . . . . . . . . . . . . . . . |
. . . . . . 20. . . . . |
. . . . . . SPIA. . . ROSSA. . . . FISSA. . . . .. .. .. . . . |
|
. . . . . . . . . |
. . . . |
. . . . . . |
. . . . . . |
. |
. . . . . . . . . |
. |
. |
21. . . . |
. . . . . PERMANENT. . . . . . . RØDT. . . . .. .. .. . . . |
. . . . . . |
. . . . . . . . . |
. . . . . . . . . . . . |
. |
. |
. . . . . . . 21. . . . . . . . . |
||
NO HAY LUZ. . . . . . . . . . . . . . . . . . . . . . . . . . . . . . . . . . . . . . . . . |
. . . . . . 20. . . . . . |
. . . . . NESSUNA. . . . . . SPIA. . .. .. .. .. .. .. .. . . |
|
. . . . . . . . . |
. . . . |
. . . . . . |
. . . . . . |
. |
. . . . . . . . . |
. |
. |
21. . . . |
. . . . . INTET. . . .LYS. . . .. .. .. .. .. .. .. .. .. . . |
. . . . . . |
. . . . . . . . . |
. . . . . . . . . . . . |
. |
. |
. . . . . . . 21. . . . . . . . |
||
MANDO A DISTANCIA . . . . . . . . . . . . . . . . . . . . . . . . . . . . . . . . . . . . . . |
. . . . . 22. . . . . . |
. . . . TELECOMANDO. . . . . . . . .. .. .. .. .. .. . . . . |
. |
. . . . . . . . |
. . . . |
. . . . . . |
. . . . . . |
. |
. . . . . . . . . |
. |
. |
.23. . . |
. . . . FJERNKONTROLL. . . . . . . . . . . .. .. .. .. .. .. .. . |
. . . . . . |
. . . . . . . . . |
. . . . . . . . . . . . |
. |
. |
. . . . . . . 23. . . . . . . . . |
||
PANEL DE CONEXIONES. . . . . . . . . . . . . . . . . . . . . . . . . . . . . . . . . . . . |
. . . . . . 28. . . . . |
. . . . . PANNELLO. . . . . . DEI. . CONNETTORI. . . . . . . . . . . . . . . . . . . . . . . . . . . . . . . . . . . . . . . . . . . . . 29. . . . |
. . . . KONTAKTPANEL. . . . . . . . . . .. .. .. .. . . . . . |
. . . . . . |
. . . . . . . . . |
. . . . . . . . . . . . |
. |
. |
. . . . . . . 29. . . . . . . . . |
||||||||||||
INSTALACIÓN . . . . . . . . . . . . . . . . . . . . . . . . . . . . . . . . . . . . . . . . . . |
. . . . . 30. . . . . . |
. . . . CONFIGURAZIONE. . . . . . . . . . . .. .. .. .. .. .. . . |
|
. . . . . . . . . |
. . . . |
. . . . . . |
. . . . . . |
. |
. . . . . . . . . |
. |
. |
31. . . . |
. . . . OPPSETT. . . . . . .. .. .. .. .. .. .. .. .. .. .. . . |
. . . . . . |
. . . . . . . . . |
. . . . . . . . . . . . |
. |
. |
. . . . . . . 31. . . . . . . . |
||
INSTALACIÓN DEL VÍDEO . . . . . . . . . . . . . . . . . . . . . . . . . . . . . . . . . . |
. . . . . . 30. . . . . . |
. . . . . CONFIGURAZIONE. . . . . . . . . . DEL. VIDEO . |
|
. . . . . . . . . |
. . . . |
. . . . . . |
. . . . . . |
. |
. . . . . . . . . |
. |
. |
31. . . . |
. . . . . VIDEO. . . .-OPPSETT. . . . . .. . . . . . . . . . |
. . . . . . |
. . . . . . . . . |
. . . . . . . . . . . . |
. |
. |
. . . . . . . 31. . . . . . . . |
||
INSTALACIÓN DEL ORDENADOR. . . . . . . . . . . . . . . . . . . . . . . . . . . . . . . |
. . . . . . 30. . . . . |
. . . . . . CONFIGURAZIONE. . . . . . . . . DEL COMPUTER. . . . . . . |
. . . . |
. . . . . . |
. . . . . . |
. |
. . . . . . . . . |
. |
. |
.31. . . |
. . . . . .DATA. . -. OPPSETT. . . . . . .. . . . . . . . |
. . . . . . |
. . . . . . . . . |
. . . . . . . . . . . . |
. |
. |
. . . . . . . 31. . . . . . . . . |
||||
AJUSTES DE IMAGEN . . . . . . . . . . . . . . . . . . . . . . . . . . . . . . . . . . . . . . |
. . . . . 32. . . . . . |
. . . . REGOLAZIONI. . . . . . . . DELL’IMMAGINE. . . . . . . . . . . . . . . . . . . . . . . . . . . . . . . . . . . . . . . . . . . . . .33. . . |
. . . . BILDEINNSTILLINGER. . . . . . . . . . . . . .. . . . . . |
. . . . . . |
. . . . . . . . . |
. . . . . . . . . . . . |
. |
. |
. . . . . . . 33. . . . . . . . . |
||||||||||||
CÓDIGO PIN.. .. .. .. .. .. .. .. .. .. .. .. .. .. .. .. .. .. .. .. .. .. .. .. .. .. .. .. .. .. .. .. .. .. .. .. .. .. .. .. .. .. .. .. .. .. .. .. .. .. .. .. .. .. .. .. .. .. .. .. .. .. .. .. .. .. .. .. .. .. .. .. ..32.. |
CODICE PIN. . . . . . . . . . . . |
. |
. . . . . . . . |
. . . . |
. . . . . . |
. . . . . . |
. |
. . . . . . . . . |
. |
. |
.33. . . |
. . . . PIN. . KODE. . . . . . . . . . . . . . . . . . . . . . . . . . . . . |
. . . . . . |
. . . . . . . . . |
. . . . . . . . . . . . |
. |
. |
. . . . . . . 33. . . . . . . . |
|||
MONTAJE EN EL TECHO. . . . . . . . . . . . . . . . . . . . . . . . . . . . . . . . . . . . |
. . . . . . 34. . . . . |
. . . . . MONTAGGIO. . . . . . . A. SOFFITTO. . . . . . . . . . |
|
. . . . . . . . . |
. . . . |
. . . . . . |
. . . . . . |
. |
. . . . . . . . . |
. |
. |
35. . . . |
. . . . TAKMONTASJE. . . . . . . . .. . . . . . . . . . . . . . . . |
. . . . . . |
. . . . . . . . . |
. . . . . . . . . . . . |
. |
. |
. . . . . . . 35. . . . . . . . |
||
FUNCIONAMIENTO . . . . . . . . . . . . . . . . . . . . . . . . . . . . . . . . . . . . . . . |
. . . . . . 34. . . . . |
. . . . .FUNZIONAMENTO. . . . . . . . . .. . . . . . . . . . . . . |
|
. . . . . . . . . |
. . . . |
. . . . . . |
. . . . . . |
. |
. . . . . . . . . |
. |
. |
35. . . . |
. . . . PLASSERING. . . . . . . . .. .. .. .. .. .. .. .. .. . . |
. . . . . . |
. . . . . . . . . |
. . . . . . . . . . . . |
. |
. |
. . . . . . . 35. . . . . . . . |
||
UTILIZACIÓN DEL PROYECTOR. . . . . . . . . . . . . . . . . . . . . . . . . . . . . . . . . |
. . . . . . 37. . . . . |
. . . . .UTILIZZO. . . . .DEL. . PROIETTORE. . . . .. .. .. .. .. .. .. .. .. .. .. .. .. .. .. .. .. .. .. .. .. .. .. .. .. .. .. .. .. .. .. .. .. .. .. .. .. .. .. .. .. .. .. .. .. .. .. .. .. .. .. .. .. .. .. .. .. .. .. .. ..37.. |
BRUK AV PROJEKTOREN . . . . . |
. . . . . . |
. . . . . . . . . |
. . . . . . . . . . . . |
. |
. |
. . . . . . . 37. . . . . . . . . |
||||||||||||
CONTROL RS 232 y LAN. . . . . . . . . . . . . . . . . . . . . . . . . . . . . . . . . . . |
. . . . . . 38. . . . . |
. . . . . . CONTROLLO. . . . . . . LAN. . .ED. RS. . . . |
. |
. . . . . . . . |
. . . . |
. . . . . . |
. . . . . . |
. |
. . . . . . . . . |
. |
. |
.39. . . |
. . . . . .RS232. . . OG. . LAN. . . STYRING. . . . . . . . . |
. . . . . . |
. . . . . . . . . |
. . . . . . . . . . . . |
. |
. |
. . . . . . . 39. . . . . . . . |
||
TEMPORIZADOR . . . . . . . . . . . . . . . . . . . . . . . . . . . . . . . . . . . . . . . |
. . . . . . 40. . . . . |
. . . . . . TIMER. . . . .. .. .. .. .. .. .. .. .. . . . |
. |
. . . . . . . . . |
. . . |
. . . . . . |
. . . . . . |
. |
. . . . . . . . . . |
|
. |
. 41. . . |
. . . . . . TIMER. . . . .. .. .. .. .. .. .. .. .. .. .. .. .. |
. . . . . . |
. . . . . . . . . |
. . . . . . . . . . . . |
. |
. |
. . . . . . . 41. . . . . . . . |
||
CALIBRACIÓN Y CORRECCIÓN DE LA IMAGEN . . . . . . . . . . . . . . . . . . . . . . . |
. . . . . . 43. . . . . |
. . . . . . CALIBRAZIONE. . . . . E CORREZIONE DELL’IMMAGINE. |
. . . . |
. . . . . . |
. . . . . . |
. |
. . . . . . . . . |
. |
. |
43. . . |
. . . . . . KALIBRERING. . . . . . OG KORRIGERING AV BILDE . |
. . . . . . . . . |
. . . . . . . . . . . . |
. |
. |
. . . . . . . 43. . . . . . . . |
|||||
SISTEMA DE MENÚS. . . . . . . . . . . . . . . . . . . . . . . . . . . . . . . . . . . . . . |
. . . . . . 44. . . . . |
. . . . . SISTEMA. . . . . DEI. . MENU. . . . . . . . . . . . . . |
. |
. . . . . . . . |
. . . . |
. . . . . . |
. . . . . . |
. |
. . . . . . . . . |
. |
. |
.45. . . |
. . . . MENYSYSTEM. . . . . . . . . .. .. .. .. .. .. .. .. . . |
. . . . . . |
. . . . . . . . . |
. . . . . . . . . . . . |
. |
. |
. . . . . . . 45. . . . . . . . . |
||
VISTA GENERAL. . . . . . . . . . . . . . . . . . . . . . . . . . . . . . . . . . . . . . . . |
. . . . . 44. . . . . . |
. . . . . .PANORAMICA. . . . . . . .. . . . . . . . . . . . . . |
. |
. . . . . . . . . |
. . . |
. . . . . . |
. . . . . . |
. |
. . . . . . . . . . |
|
. |
. 45. . . |
. . . . . . OVERSIKT. . . . . . .. .. .. .. .. .. .. .. .. . . |
. . . . . . |
. . . . . . . . . |
. . . . . . . . . . . . |
. |
. |
. . . . . . . 45. . . . . . . . |
||
MENÚ PRINCIPAL . . . . . . . . . . . . . . . . . . . . . . . . . . . . . . . . . . . . . . |
. . . . . . 44. . . . . |
. . . . . . MENU. . . . INIZIALE. . . . ... .. .. .. .. . . . |
. |
. . . . . . . . . |
. . . |
. . . . . . |
. . . . . . |
. |
. . . . . . . . . . |
|
. |
. 45. . . |
. . . . . . HOVEDMENY. . . . . . . . .. .. .. .. .. .. .. .. . . |
. . . . . . |
. . . . . . . . . |
. . . . . . . . . . . . |
. |
. |
. . . . . . . 45. . . . . . . . |
||
NAVEGACIÓN POR EL SISTEMA DE MENÚS. . . . . . . . . . . . . . . . . . . . . . . . . |
. . . . . . 44. . . . . |
. . . . . . NAVIGAZIONE. . . . . . NEL SISTEMA DEI MENU . . . . . . |
. . . |
. . . . . . |
. . . . . . |
. |
. . . . . . . . . |
. |
. |
.45. . . |
. . . . . .NAVIGERING. . . . . . .I MENYSYSTEMET. |
. . . . . . |
. . . . . . . . . . |
. . . . . . . . . . . . |
. |
. |
. . . . . . . .45. . . . . . . |
||||
SUBMENÚ IMAGEN. . . . . . . . . . . . . . . . . . . . . . . . . . . . . . . . . . . . . . |
. . . . . 46. . . . . . |
. . . . . .SOTTOMENU. . . . . . . IMMAGINE. . . . . . . . . |
. |
. . . . . . . . . |
. . . |
. . . . . . |
. . . . . . |
. |
. . . . . . . . . |
. |
. |
.47. . . |
. . . . . .BILDE. . . UNDERMENY. . . . . . . . .. . . . . . |
. . . . . . |
. . . . . . . . . |
. . . . . . . . . . . . |
. |
. |
. . . . . . . 47. . . . . . . . |
||
SUBMENÚ REALCOLOR . . . . . . . . . . . . . . . . . . . . . . . . . . . . . . . . . . . |
. . . . . . 50. . . . . |
. . . . . . SOTTOMENU. . . . . . . REALCOLOR. . . . . . . . . . . . . . . . . . . . . . . . . . . . . . . . . . . . . . . . . . . . 51. . . . |
. . . . . REALCOLOR. . . . . . . UNDERMENY. . . . . . . . . . . . . . |
. . . . . . . . . |
. . . . . . . . . . . . |
. |
. |
. . . . . . . . 51. . . . . . . . |
|||||||||||||
SUBMENÚ AVANZADO. . . . . . . . . . . . . . . . . . . . . . . . . . . . . . . . . . . . |
. . . . . . 52. . . . . |
. . . . . . AVANZATO. . . . . . . .. .. .. .. .. .. . . . . |
. |
. . . . . . . . . |
. . . |
. . . . . . |
. . . . . . |
. |
. . . . . . . . . . |
|
. |
. 53. . . |
. . . . . . AVANSERT. . . . . . UNDERMENU. . . . . . . . .. .. .. . |
. . . . . . |
. . . . . . . . . |
. . . . . . . . . . . . |
. |
. |
. . . . . . . 53. . . . . . . . |
||
SUBMENÚ MEJORAS.. .. .. .. .. .. .. .. .. .. .. .. .. .. .. .. .. .. .. .. .. .. .. .. .. .. .. .. .. .. .. .. .. .. .. .. .. .. .. .. .. .. .. .. .. .. .. .. .. .. .. .. .. .. .. .. .. .. .. .. .. .. .. ..54.. |
SOTTOMENU ENHANCEMENT (MIGLIORAMENTI). |
. . . . |
. . . . . . |
. . . . . . |
. |
. . . . . . . . . |
. |
. |
55. . . |
. . . . . . UTVIDELSER. . . . . . UNDERMENYMENU . . . . . . |
. . . . . . . . . |
. . . . . . . . . . . . |
. |
. |
. . . . . . . 55. . . . . . . . . |
||||||
SUBMENÚ INSTALACIÓN. . . . . . . . . . . . . . . . . . . . . . . . . . . . . . . . . . . |
. . . . . . 56. . . . . |
. . . . . . SOTTOMENU. . . . . . . INSTALLAZIONE. . . . . . . . . . . . . . . . . . . . . . . . . . . . . . . . . . . . . . . . . . . 57. . . |
. . . . . . UNDERMENY. . . . . . . INNSTALLASJON. . . . . . . . . . . |
. . . . . . . . . |
. . . . . . . . . . . . |
. |
. |
. . . . . . . . 57. . . . . . . . |
|||||||||||||
SUBMENÚ BOMBILLA. . . . . . . . . . . . . . . . . . . . . . . . . . . . . . . . . . . . |
. . . . . . 58. . . . . |
. . . . . . SOTTOMENU. . . . . . . .LAMPADA. . . . . . . . . . . . . . . . . . . . . . . . . . . . . . . . . . . . . . . . . . . . . .59. . . |
. . . . . .LAMPE. . . .UNDERMENY. . . . . . .. .. . . . . . |
. . . . . . |
. . . . . . . . . |
. . . . . . . . . . . . |
. |
. |
. . . . . . . 59. . . . . . . . |
||||||||||||
SUBMENÚ AJUSTES. . . . . . . . . . . . . . . . . . . . . . . . . . . . . . . . . . . . . |
. . . . . . 60. . . . . |
. . . . . . SOTTOMENU. . . . . . . IMPOSTAZIONI. . . . . . . . . . . . . . . . . . . . . . . . . . . . . . . . . . . . . . . . . . . . .61. . . |
. . . . . .INNSTILLING. . . . . . .AV. UNDERMENY. . . . . . . . . . . |
. . . . . . . . . |
. . . . . . . . . . . . |
. |
. |
. . . . . . . . 61. . . . . . . . |
|||||||||||||
SUBMENÚ PERFILES. . . . . . . . . . . . . . . . . . . . . . . . . . . . . . . . . . . . . |
. . . . . . 64. . . . . |
. . . . . . SOTTOMENU. . . . . . . PROFILI. . . . . . . . . |
. |
. . . . . . . . . |
. . . |
. . . . . . |
. . . . . . |
. |
. . . . . . . . . . |
|
. |
. 65. . . |
. . . . . . PROFILER. . . . . .UNDERMENY. . . . . . . . . . . . |
. . . . . . |
. . . . . . . . . |
. . . . . . . . . . . . |
. |
. |
. . . . . . . 65. . . . . . . . |
||
SUBMENÚ IDIOMAS. . . . . . . . . . . . . . . . . . . . . . . . . . . . . . . . . . . . . . |
. . . . . 64. . . . . . |
. . . . . .SOTTOMENU. . . . . . . LINGUE. . . . .. . . . . |
. |
. . . . . . . . . |
. . . |
. . . . . . |
. . . . . . |
. |
. . . . . . . . . . |
|
. |
. 65. . . |
. . . . . . SPRÅK. . . . UNDERMENY. . . . . . . . .. .. . . . . |
. . . . . . |
. . . . . . . . . |
. . . . . . . . . . . . |
. |
. |
. . . . . . . 65. . . . . . . . |
||
SUBMENÚ ESTADO. . . . . . . . . . . . . . . . . . . . . . . . . . . . . . . . . . . . . . |
. . . . . 66. . . . . . |
. . . . . .SOTTOMENU. . . . . . . STATO. . . . .. . . . . |
. |
. . . . . . . . . |
. . . |
. . . . . . |
. . . . . . |
. |
. . . . . . . . . |
. |
. |
.67. . . |
. . . . . .STATUS. . . . UNDERMENY. . . . . . . .. . . . . . . |
. . . . . . |
. . . . . . . . . |
. . . . . . . . . . . . |
. |
. |
. . . . . . . 67. . . . . . . . . |
||
SOLUCIÓN DE PROBLEMAS. . . . . . . . . . . . . . . . . . . . . . . . . . . . . . . . . . |
. . . . . . 69. . . . . . |
. . . . RISOLUZIONE. . . . . . . .DEI. .PROBLEMI. . . . . . . . . . . . . . . . . . . . . . . . . . . . . . . . . . . . . . . . . . 69. . . . |
. . . . FEILFINNING. . . . . . . . .. .. .. .. .. .. . . . . . |
. . . . . . |
. . . . . . . . . |
. . . . . . . . . . . . |
. |
. |
. . . . . . . 69. . . . . . . . |
||||||||||||
NO HAY IMAGEN. . . . . . . . . . . . . . . . . . . . . . . . . . . . . . . . . . . . . . . |
. . . . . . 69. . . . . |
. . . . . . NESSUNA. . . . . .IMMAGINE. . . . . ... .. . . . |
. |
. . . . . . . . . |
. . . |
. . . . . . |
. . . . . . |
. |
. . . . . . . . . |
. |
. |
.69. . . |
. . . . . .INTET. . . BILDE. . . ... .. .. .. .. .. .. . . . |
. . . . . . |
. . . . . . . . . |
. . . . . . . . . . . . |
. |
. |
. . . . . . . 69. . . . . . . . . |
||
IMAGEN OSCURA . . . . . . . . . . . . . . . . . . . . . . . . . . . . . . . . . . . . . . |
. . . . . . 69. . . . . |
. . . . . . IMMAGINE. . . . . . SCURA. . . . . .. .. .. . . . |
. |
. . . . . . . . . |
. . . |
. . . . . . |
. . . . . . |
. |
. . . . . . . . . . |
|
. |
. 69. . . |
. . . . . . MØRKT. . . . BILDE. . . . .. .. .. .. .. .. . . . |
. . . . . . |
. . . . . . . . . |
. . . . . . . . . . . . |
. |
. |
. . . . . . . 69. . . . . . . . . |
||
PARPADEO DE IMAGEN. . . . . . . . . . . . . . . . . . . . . . . . . . . . . . . . . . . . |
. . . . . 69. . . . . . |
. . . . . .IMMAGINE. . . . . TREMOLANTE. . . . . . . . . . . . . . . . . . . . . . . . . . . . . . . . . . . . . . . . . . . . . . . 69. . . |
. . . . . . FLIMRENDE. . . . . . .BILDE. . .. .. .. . . . . . |
. . . . . . |
. . . . . . . . . |
. . . . . . . . . . . . |
. |
. |
. . . . . . . 69. . . . . . . . . |
||||||||||||
IMAGEN POCO NÍTIDA. . . . . . . . . . . . . . . . . . . . . . . . . . . . . . . . . . . . |
. . . . . . 69. . . . . |
. . . . . . IMMAGINE. . . . . . SFOCATA. . . . . .. . . . . . |
. |
. . . . . . . . . |
. . . |
. . . . . . |
. . . . . . |
. |
. . . . . . . . . |
. |
. |
.69. . . |
. . . . . .USKARPT. . . . . BILDE. . . . .. .. .. .. . . . . |
. . . . . . |
. . . . . . . . . |
. . . . . . . . . . . . |
. |
. |
. . . . . . . 69. . . . . . . . |
||
MANTENIMIENTO. . . . . . . . . . . . . . . . . . . . . . . . . . . . . . . . . . . . . . . . |
. . . . . . 71. . . . . |
. . . . . MANUTENZIONE. . . . . . . . .. .. .. .. .. .. .. . . |
. |
. . . . . . . . . |
. . . |
. . . . . . |
. . . . . . |
. |
. . . . . . . . . . |
|
. |
. 71. . . |
. . . . .VEDLIKEHOLD. . . . . . . .. . . . . . . . . . . . . . . . . . . |
. . . . . . |
. . . . . . . . . |
. . . . . . . . . . . . |
. |
. |
. . . . . . . 71. . . . . . . . . |
||
USO CONTINUO Y GRAN RENDIMIENTO. . . . . . . . . . . . . . . . . . . . . . . . . . . |
. . . . . . 71. . . . . |
. . . . . . SERVIZIO. . . . . GRAVOSO. . E USO COSTANTE. . . . . . |
. . . |
. . . . . . |
. . . . . . |
. |
. . . . . . . . . |
. |
. |
.71. . . |
. . . . . .TUNG. . . OG. . KONTINUERLIG. . . BRUK. . . . . . . |
. . . . . . . . . |
. . . . . . . . . . . . |
. |
. |
. . . . . . . 71. . . . . . . . |
|||||
INFORMACIÓN DE SERVICIO TÉCNICO. . . . . . . . . . . . . . . . . . . . . . . . . . . . . |
. . . . . . 71. . . . . |
. . . . .INFORMAZIONI. . . . . . . . SULL’ASSISTENZA. |
. . . . . . . . . . . . . . . . . . . . . . . . . . . . . . . . . . . . . .71. . . |
. . . . SERVICE. . . . . INFORMASJON. . . . . . . . . . . . . . . . . . . |
. . . . . . . . . |
. . . . . . . . . . . . |
. |
. |
. . . . . . . . 71. . . . . . . . |
||||||||||||
CAMBIO DE LÁMPARA . . . . . . . . . . . . . . . . . . . . . . . . . . . . . . . . . . . . . |
. . . . . . 72. . . . . |
. . . . .SOSTITUZIONE. . . . . . . . DELLE. . . .LAMPADE. |
. . . . . . . . . . |
. . . . |
. . . . . . |
. . . . . . |
. |
. . . . . . . . . . |
. |
73. . . . |
. . . . LAMPEBYTTE. . . . . . . ... .. .. .. .. . . . . . . |
. . . . . . |
. . . . . . . . . |
. . . . . . . . . . . . |
. |
. |
. . . . . . . 73. . . . . . . . |
||||
DATOS TÉCNICOS. . . . . . . . . . . . . . . . . . . . . . . . . . . . . . . . . . . . . . . . |
. . . . . 74. . . . . . |
. . . . DATI. . . TECNICI. . . . .. . . . . . . . . . . . . . . . . . |
. |
. . . . . . . . . |
. . . |
. . . . . . |
. . . . . . |
. |
. . . . . . . . . . |
|
. |
. 75. . . |
. . . . .TEKNISKE. . . . . DATA. . . . .. .. .. .. .. .. .. .. .. . |
. . . . . . |
. . . . . . . . . |
. . . . . . . . . . . . |
. |
. |
. . . . . . . 75. . . . . . . . |
||
DECLARAZIONES. . . . . . . . . . . . . . . . . . . . . . . . . . . . . . . . . . . . . . . . |
. . . . . . 77. . . . . |
. . . . . DICIARAZIONI. . . . . . . ... .. .. ... .. .. ... .. .. ... .. .. .. .. .. .. |
.. |
.. .. .. .. .. .. .. .. .. .. .. .. .. |
.. .. .. .. .. |
.. .. .. .. .. .. .. .. .. |
.. .. .. .. .. .. .. .. .. |
.. .. |
.. .. .. .. .. .. .. .. .. .. .. .. .. |
.. .. |
.. |
..77.. |
GODKJENNINGER. . . . . . . . . |
. . . . . . |
. . . . . . . . . |
. . . . . . . . . . . . |
. |
. |
. . . . . . . 77. . . . . . . . . |
||
3

INTRODUCTION |
english |
|
|
|
|
Thank you for purchasing this state-of-the art digital projector.. Featuring the latest technologies in illumination, image processing, optics, electronics, thermal and industrial design, it has been designed to serve traditional as well as novel imaging applications across a variety of markets, offering features such as:
•DLP® technology
•WUXGA, 1080p or SXGA+ resolution
•Single chip DMD™ with DarkChip™ technology by Texas Instruments®
•BrilliantColor™ technology for saturated and accurate colours
•10-bit colour resolution for perfect grey scale reproduction
•High contrast for vibrant colors and deep blacks
•High brightness for larger screens
•RealColor colour calibration for precise images
•Real time clock for timing control
•High bandwidth electronics for unprecedented compatibility and image quality
•Pixelworks DNX™ technology video de-interlacing and processing
•Long life lamp and eco mode for reduced power consumption and lower audible noise
•Variable lamp power for alignment of multi-screen configurations
•Rugged magenisum chassis for maximum durability
•Wide range of digital and analogue inputs and outputs
•HDMI ver.. 1..3a compatible
•LAN, RS232 and USB ports for control and monitoring
The specifications and functionality of the product may change without prior notice.
4
EINLEITUNG |
deutsch |
|
|
|
|
Herzlichen Glückwunsch zum Erwerb dieses fortschrittlichen Digitalprojektors.. Der Projektor ist hinsichtlich Beleuchtung, Bildbearbeitung, Optik, Elektronik sowie thermischer und industrieller Konstruktion mit modernster Technologie ausgestattet und eignet sich für herkömmliche und neuartige Bildanwendungen auf einer Vielzahl von Märkten.. Er bietet u..a.. folgende Merkmale:
•DLP® Technologie
•WUXGA-, 1080poder SXGA+-Auflösung
•DMD™-Einzelchip mit DarkChip™-Technologie von Texas Instruments®
•BrilliantColor™ Technologie für satte, naturgetreue Farben
•10-bit-Farbdarstellung für perfekte Graustufen
•Hoher Kontrast für brillante Farben und tiefe Schwarztöne
•Starke Helligkeit für große Bildschirme
•RealColor-Farbkalibrierung für präzise Bilddarstellung
•Echtzeituhr für die Zeitsteuerung
•Elektronik mit hoher Bandbreite für einzigartige Kompatibilität und Bildqualität
•Pixelworks DNX™-Technologie für Video-Deinterlacing und -Verarbeitung
•Verringerter Stromverbrauch und Geräuschdämpfung durch Lampe mit langer Lebensdauer und Eco-Modus
•Variable Lampenstärke für Einsätze mit Überblendtechnik
•Robustes, haltbares Magnesiumgehäuse
•Verschiedenste digitale und analoge Einund Ausgänge
•Kompatibel mit HDMI Ver.. 1..3
•LAN-, RS232und USB-Anschlüsse zur Steuerung und Überwachung
Spezifikationen und Funktionalität des Produkts können ohne Vorankündigung geändert werden.
INTRODUCTION |
francais |
|
|
|
|
Équipé de technologies de pointe en matière d’éclairage, d’imagerie, de construction optique, électronique, thermique et.. industrielle adaptées aux applications tant nouvelles que traditionnelles dans un grand nombre de marchés, ce projecteur numérique offre des caractéristiques telles que :
•La technologie DLP®
•Norme WUXGA, 1080p ou SXGA+
•Une puce DMD™ unique avec de technologie DarkChip™ (TexasInstruments®)
•La technologie BrilliantColor™
•La résolution couleur 10-bit
•Contraste élevé pour des couleurs vibrantes et des noirs profonds
•Haute luminosité sur grands écrans
•La technologie RealColor pour des images précises
•Une horloge temps réel (HTR / RTC)
•De l’électronique à large bande passante pour une incomparable compatibilité et qualité de l’image
•La technologie Pixelworks dnx® de désentrelacement et traitement de l’image
•Équilibrage des configurations à multi-écrans
•Puissance de lampe variable pour équilibrage des configurations à multi-écrans
•Un robuste boîtier en magnésium pour optimiser la durée de vie de l’appareil
•Un grand nombre d’E/S analogues et numériques
•La compatibilité avec la version 1..3 du HDMI
•Ports LAN, RS232 ET USB pour la commande et le contrôle de l’appareil
Les caractéristiques et la fonctionnalité de l’appareil peuvent être modifiées sans avis préalable.
INTRODUCCIÓN |
español |
|
|
|
|
Muchas gracias por adquirir este proyector digital de última tecnología que ha sido diseñado con las más avanzadas tecnologías en iluminación, imagen, óptica, electrónica, diseño térmico e industrial para que sirva tanto en aplicaciones de imagen tradicionales como noveles en una variedad de mercados, ofreciendo funciones como:
•Tecnología DLP®
•Resolución WUXGA, 1080p, o SXGA+
•Chip único DMD™ con tecnología DarkChip™ de Texas Instruments®
•BrillantColor™ tecnología para colores saturados y precisos
•10-bit resolución del color para reproducción perfecta de escala gris
•Alto contraste para colores vibrantes y negros profundos
•Alto nivel de brillo para pantallas más grandes
•Calibración del color RealColor para imágenes precisas
•Reloj en tiempo real para un control temporizado
•Electrónica de gran ancho de banda para compatibilidad y calidad de imagen superiores
•Procesado de vídeo y desentrelazado de Pixelworks DNX™ Technology
•Lámpara de larga duración en modo ECO de baja potencia y un ruido audible reducido
•Potencia variable de la lámpara para la alineación de configuraciones de múltiples pantallas
•Chásis de magnesio reforzado para mayor duración
•Amplia gama de entradas y salidas digitales y analógicas
•Compatible con HDMI ver.. 1..3a
•Puertos LAN, RS232 y USB para control y supervisión
Las especificaciones y funcionalidad del producto pueden variar sin previo aviso.
INTRODUZIONE |
italiano |
|
|
|
|
Grazie per aver acquistato questo proiettore digitale all’avanguardia.. Progettato con le tecnologie più moderne disponibili per illuminazione, acquisizione di immagini, ottica, elettronica, design termico e industriale, può essere utilizzato con le applicazioni d’immagini tradizionali, nonché quelle innovative, in una varietà di settori.. Offre funzioni quali:
•Tecnologia DLP®
•Risoluzione WUXGA, 1080p, e SXGA+
•Tecnologia single chip DMD™ con DarkChip™ di Texas Instruments®
•Tecnologia BrilliantColor™ per colori saturati e accurati
•Risoluzione dei colori 10-bit per una riproduzione perfetta della scala di grigio
•Elevato contrasto per colori vibranti e neri profondi
•Elevata luminosità per schermi più grandi
•Calibrazione RealColor per immagini definite
•Orologio in tempo reale per controllare il timing
•Elettronica in banda larga per una compatibilità e qualità d’immagine senza precedenti
•Disinterlacciamento ed elaborazione video con tecnologia Pixelworks DNX™
•Lampada a lunga durata e modalità ECO per ridurre il consumo di energia e diminuire il rumore percepito
•Lampada a potenza variabile per l’allineamento di configurazioni su più schermi
•Robusto telaio in magnesio per la massima durata
•Vasta gamma di ingressi e uscite analogici e digitali
•Compatibilità HDMI ver.. 1..3a
•Porte LAN, RS232 e USB per il controllo e il monitoraggio
Le caratteristiche tecniche e le funzionalità del prodotto sono soggette a variazioni senza preavviso.
INTRODUKSJON |
norsk |
|
|
|
|
Denne digitale projektoren er konstruert med de nyeste teknologiske løsninger innen belysning, bildebehandling, optikk, elektronikk, termikk og industridesign for å betjene både nye og tradisjonelle anvendelser i ulike markeder, med et vell av egenskaper som:
•DLP® teknologi
•WUXGA, 1080p eller SXGA+ oppløsning
•1-Chip DMD™ med DarkChip™ teknologi fra Texas instruments®
•BrilliantColor™ teknologi for øket fargemetning og fremstilling
•10-Bit fargeoppløsning for perfekt gråskala gjengivelse
•Høy kontrast for klare farver og godt svartnivå
•Høy lysstyrke for store skjermer
•RealColor fargekalibrering for presise bilder
•Realtidsklokke for tidsstyring
•Høy elektronikkbåndbredde for uovertruffen kompatibilitet og bildekvalitet
•Pixelworks DNX™ technology for video de-interlacing og prosessering
•Lang lampelevetid og Eco-modus for redusert strømforbruk og lavere lydnivå
•Variabel lampestyrke for tilpasning av flere projektorer i sømløse applikasjoner
•Røft magnesiumchassis for maksimal slitestyrke
•Mange digitale og analoge innganger/utganger
•HDMI ver.. 1..3a kompatibel
•LAN, RS232 og USB porter for styring og oppfølging
Produktets spesifikasjoner og ytelse kan endres uten forutgående varsel.
The specifications and functionality of this projector may change without prior notice. Please use the web to locate and/or download full instruction manual or find related infor mation .
5

SAFETY & WARNINGS |
english |
|
|
|
|
This user guide contains important information about safety precautions and the set-up and use of the projector.. Please read the manual carefully before you operate the projector..
SAFETY
This device complies with relevant safety regulations for data processing equipment for use in an office environment.. Before using the projector for the first time, please read the safety instructions thoroughly..
WARNING
Use only the cables and cords supplied with the projector or original replacement cables.. Using other cables or cords may lead to malfunction and permanent damage of the unit..
Always use 3-prong / grounded power cord to ensure proper grounding of the unit.. Never use 2-prong power cords, as this is dangerous and could lead to electrical shock..
Never open the unit.. The projector contains no user serviceable parts.. Refer all repairs to qualified personnel only.. Make sure that no objects enter into the vents and openings of the set..
Do not spill any liquids on the projector or into the vents or openings of the unit..
Always remove lens cap before switching on the projector.. If the lens cap is not removed, it may melt due to the high energy light emitted through the lens.. Melting the lens cap may permanently damage the surface of the projection lens..
Do not look into the projection lens when the projector is switched on.. The strong light may permanently damage sight.. Do not look into the laser beam when activated on the remote control.. Laser light may permanently damage sight..
Do not point laser beam on people..
Only place the projector on a stable surface, or mount it securely using an approved ceilingmount..
Do not drop the projector..
Always operate the projector horizontally, within the range of the adjustable rear feet.. Operating the unit in other positions may reduce lamp life significantly, and may lead to overheating, resulting in malfunctioning..
Always allow ample airflow through the projector.. Never block any of the air vents.. Never cover the unit in any way while running.. Allow for sufficient distance to walls and ceilings to avoid overheating..
Minimum safety distance to any side of the unit is 50 cm / 20” in any direction..
CAUTION! Hot air is exhausted from the side vent. Do not place objects that are sensitive to heat nearer than 50cm / 20” to the exhaust vent.
The projector is designed for indoor use only.. Never operate the unit outdoors..
6
SICHERHEIT UND WARNHINWEISE |
deutsch |
|
|
|
|
Dieses Benutzerhandbuch enthält wichtige Angaben zur Sicherheit und Vorsichtsmaßnahmen so wie die Einrichtung und Verwendung des Projektors.. Lesen Sie das Handbuch bitte aufmerksam, bevor Sie den Projektor in Betrieb nehmen..
SICHERHEIT
Dieses Gerät erfüllt die relevanten Sicherheitsbestimmungen für Datenverarbeitungsgeräte zum Einsatz in Büros.. Vor erstmaliger Verwendung des Projektors lesen Sie bitte die Sicherheitshinweise aufmerksam durch..
WARNUNG
Verwenden Sie ausschließlich Kabel, die mit dem Projektor geliefert wurden bzw.. Originalersatzkabel.. Die Verwendung von anderen Kabeln kann zu Funktionsfehlern oder dauerhafter Beschädigung des Geräts führen..
Verwenden Sie immer ein 3-poliges / geerdetes Stromkabel, um die sichere Erdung des Gerätes zu gewährleisten.. Verwenden Sie auf keinen Fall 2-polige Kabel, da diese gefährlich sind und einen Stromschlag verursachen können..
Öffnen Sie das Gerät niemals.. Der Projektor enthält keine Teile, die vom Benutzer gewartet werden müssen.. Reparaturarbeiten dürfen nur von qualifiziertem Personal vorgenommen werden.. Versichern Sie sich, dass keine Gegenstände in das Gebläse oder die Öffnungen des Geräts gelangen..
Schütten Sie keine Flüssigkeiten über den Projektor oder in das Gebläse bzw.. die Öffnungen des Geräts..
Nehmen Sie immer die Deckel von den Linsen, bevor Sie den Projektor einschalten.. Werden die Deckel nicht von den Linsen genommen, können sie auf Grund des durch die Linsen abgegebene Licht mit hohem Energiegehalt schmelzen.. Schmelzen die Deckel, kann die Oberfläche der Projektionslinsen dauerhaft beschädigt werden..
Schauen Sie nicht in die Projektionslinsen, wenn der Projektor eingeschaltet ist.. Das starke Licht könnte die Augen dauerhaft schädigen.. Schauen Sie nicht in den Laserstrahl, wenn die Fernbedienung betätigt wird.. Das Laserlicht könnte die Augen dauerhaft schädigen..
Richten Sie den Laserstrahl nicht auf Menschen..
Stellen Sie den Projektor nur auf einer stabilen Fläche auf oder hängen Sie ihn sicher unter Verwendung einer Deckenhalterung auf..
Lassen Sie den Projektor nicht herunterfallen..
Betreiben Sie den Projektor immer horizontal, innerhalb des Bereichs der regulierbaren Hinterfüße.. Wird das Gerät in einer anderen Stellung betrieben, kann die Lebensdauer der Lampe deutlich verkürzt werden, und es können Überhitzungen auftreten, die zu Betriebsstörungen führen..
Lassen Sie immer den Luftfluss durch den Projektor strömen.. Die Belüftungsöffnungen dürfen nie versperrt werden.. Decken Sie das Gerät nie ab, wenn es in Betrieb ist.. Halten Sie ausreichend Abstand zu Wänden und Decken, um zu vermieden, dass sich das Gerät überhitzen kann..
Der Mindestsicherheitsabstand an allen Seiten des Geräts beträgt 50 cm / 20 Zoll in jede Richtung..
VORSICHT! Aus den hinteren Belüftungsöffnungen strömt heiße Luft. Legen Sie keine wärmeempfindlichen Gegenstände näher als 50 cm / 20 Zoll an die Luftaustrittsöffnungen.
Der Projektor ist nur für die Verwendung in geschlossenen Räumen konzipiert.. Verwenden Sie das Gerät niemals im Freien..
SÉCURITÉ & MISES EN GARD |
francais |
|
|
|
|
Ce guide d’utilisation contient des informations importantes sur les précautions de sécurité, d’installation et d’utilisation du projecteur.. Veuillez lire attentivement le manuel avant de mettre en marche le projecteur..
SÉCURITÉ
Cet appareil est conforme aux normes de sécurité relatives à l’utilisation en bureaux des appareils de traitement de données.. Avant la première utilisation du projecteur, veuillez lire entièrement les consignes de sécurité..
MISE EN GARDE
Utilisez uniquement les câbles et les cordons fournis avec le projecteur ou des câbles de remplacement d’origine.. L’utilisation de câbles ou de cordons différents peut entraîner un mauvais fonctionnement et des dégâts irréversibles sur l’appareil..
Utilisez toujours un cordon d’alimentation 3 broches avec prise de terre pour garantir une mise à la terre correcte de l’appareil.. N’utilisez jamais des cordons d’alimentation 2 broches, ceci est dangereux et peut entraîner une décharge électrique..
N’ouvrez jamais l’appareil.. Le projecteur ne contient pas de pièces accessibles par l’utilisateur.. Adressez-vous à du personnel qualifié pour toutes les réparations.. Assurez-vous qu’aucun objet n’entre par les orifices et les ouvertures du poste..
Ne renversez aucun liquide sur le projecteur ou dans les orifices ou les ouvertures de l’appareil..
Enlevez toujours le cache-optique avant la mise en marche du projecteur.. Si le cache-optique n’est pas enlevé, il peut fondre à cause de la forte puissance de la lumière émise à travers la lentille.. La fonte du cache-optique peut endommager la surface de l’objectif de projection de façon irréversible..
Ne regardez pas dans l’objectif de projection quand le projecteur est en marche.. La puissance de la lumière peut endommager la vue de façon irréversible.. Ne regardez pas dans le faisceau laser lorsqu’il est activé sur la télécommande.. La lumière laser peut endommager la vue de façon irréversible..
Ne braquez pas le faisceau laser vers quelqu’un..
Placez-le projecteur uniquement sur une surface stable ou installez-le soigneusement en utilisant un montage plafond certifié..
Ne faites pas tomber le projecteur..
Faites toujours fonctionner le projecteur à l’horizontale, dans la limite des pieds arrière réglables.. Faire fonctionner l’appareil dans d’autres positions peut réduire la durée de vie de la lampe de façon significative, et peut entraîner une surchauffe résultant d’un mauvais fonctionnement..
Laissez toujours suffisamment de place autour du projecteur pour permettre la circulation de l’air.. Ne bouchez jamais les prises d’air.. Ne couvrez jamais l’appareil de quelque façon que ce soit pendant le fonctionnement.. Prévoyez une distance suffisante jusqu’aux murs et jusqu’au plafond pour éviter une surchauffe..
La distance minimale de sécurité de chaque côté de l’appareil est de 50 cm/20 pouces dans n’importe quelle direction..
ATTENTION! L’orifice arrière dégage de l’air chaud. Ne placez pas d’objets sensibles à la chaleur à moins de 50 cm/20» des orifices de ventilation.
Le projecteur est conçu pour un usage intérieur uniquement. Ne faites jamais fonctionner l’appareil en extérieur.

SEGURIDAD Y ADVERTENCIAS |
español |
|
|
|
|
Esta guía de usuario contiene información importante acerca de las precauciones de seguridad y la instalación y el uso del proyector.. Lea detenidamente el manual antes de poner en marcha el proyector..
SEGURIDAD
Este aparato cumple las normas de seguridad correspondientes a equipos de proceso de datos para su uso en un entorno de oficinas.. Antes de usar el proyector por primera vez, lea detenidamente las instrucciones de seguridad..
ADVERTENCIA
Utilice únicamente los cables y conectores suministrados con el proyector o piezas de recambio originales.. El uso de otros cables o conectores puede ocasionar un mal funcionamiento y el daño permanente del aparato..
Utilice siempre un cable de alimentación de 3 clavijas puesto a tierra para garantizar una correcta conexión a tierra del aparato.. No utilice nunca cables de alimentación de 2 clavijas ya que resulta peligroso y podría ocasionar una descarga eléctrica..
No abra nunca el aparato.. El proyector no contiene ninguna pieza que pueda ser reparada por el usuario.. Para cualquier reparación, diríjase a un servicio técnico cualificado.. Asegúrese de que no entren objetos por las ranuras de ventilación o las aberturas del aparato..
No derrame líquidos sobre el proyector ni en las ranuras de ventilación o las aberturas del aparato..
Antes de encender el proyector, quite siempre la tapa del objetivo.. En caso contrario, éste puede fundirse a causa de la gran energía de la luz emitida a través del objetivo.. Si la tapa se funde, la superficie del objetivo puede quedar dañada de forma permanente..
No mire al objetivo con el proyector encendido.. Una luz demasiado fuerte puede ocasionar daños permanentes a la vista.. No mire al rayo láser cuando lo active con el mando a distancia.. El rayo láser puede ocasionar daños permanentes a la vista..
No apunte el rayo láser hacia las personas..
Coloque el proyector únicamente sobre una superficie estable o sujételo firmemente mediante un montaje de techo homologado..
Evite la caída del proyector..
Utilice siempre el proyector en posición horizontal y dentro del radio de las patas traseras regulables.. La utilización del aparato en otras posiciones puede reducir significativamente la vida útil de la lámpara y producir un sobrecalentamiento que ocasione un mal funcionamiento..
Deje en todo momento un espacio amplio para que el aire fluya por el proyector.. No tape nunca ninguna de las ranuras de ventilación.. Tampoco debe cubrir en modo alguno el aparato mientras esté funcionando.. Deje una distancia suficiente con las paredes y el techo para evitar un sobrecalentamiento..
La distancia mínima de seguridad a los lados del aparato es de 50 cm (20 pulgadas) en cualquier dirección..
¡PRECAUCIÓN! De la ranura de ventilación trasera sale aire caliente. No coloque objetos sensibles al calor a menos de 50cm (20 pulgadas) de la ranura de escape.
El proyector está diseñado para uso exclusivo en interiores.. No utilice nunca el aparato en el exterior..
SICUREZZA E AVVERTENZE |
italiano |
|
|
|
|
La presente guida d’uso contiene informazioni importanti sulle precauzioni di sicurezza, l’impostazione e l’uso del proiettore e va letta con attenzione prima di utilizzare il dispositivo..
SICUREZZA
Il presente dispositivo è conforme alle norme di sicurezza per le apparecchiature di elaborazione dati uso ufficio.. Prima di adoperare il proiettore per la prima volta, leggere con attenzione le istruzioni sulla sicurezza..
AVVERTENZA
Usare solo i cavi e il cablaggio forniti con il proiettore oppure cavi di ricambio originali.. L’uso di cavi o cablaggio diversi può causare guasti e danneggiare l’unità in modo permanente..
Utilizzare sempre un cavo di alimentazione tripolare e con messa a terra, per garantire la corretta messa a terra dell’unità.. Non adoperare mai cavi di alimentazione bipolari onde evitare il rischio di scosse elettriche..
Non aprire mai l’unità.. Il proiettore non contiene componenti da sottoporre a manutenzione.. Affidare le riparazioni esclusivamente al personale qualificato.. Attenzione a non far penetrare alcun oggetto nelle prese d’aria e nelle aperture dell’apparecchio..
Non versare liquidi sul proiettore né nelle prese d’aria o aperture dell’unità..
Togliere sempre il copriobiettivo prima di accendere il proiettore, onde evitare il rischio che venga fuso dalle radiazioni luminose ad alta potenza che fuoriescono dall’obiettivo.. La fusione del copriobiettivo può danneggiare in modo permanente la superficie degli obiettivi..
Non guardare l’obiettivo quando il proiettore è acceso: la forte luce può causare danni permanenti alla vista.. Non fissare il raggio laser quando viene attivato sul telecomando.. I raggi laser possono causare danni permanenti alla vista..
Non dirigere il raggio laser sulle persone..
Collocare il proiettore su una superficie stabile oppure montarlo saldamente usando una staffa omologata per fissarlo al soffitto..
Non far cadere il proiettore..
Il proiettore va utilizzato sempre in orizzontale, entro il raggio d’azione dei piedi posteriori regolabili.. L’utilizzo dell’unità in posizioni diverse può ridurre sensibilmente la durata delle lampada e può causare il surriscaldamento, con conseguenti guasti..
Consentire sempre un flusso d’aria abbondante attraverso il proiettore.. Non ostruire mai le prese d’aria.. Non coprire mai l’unità mentre è in uso.. Per evitare il surriscaldamento, lasciare una distanza sufficiente da pareti e soffitto..
La distanza di sicurezza minima da qualsiasi lato dell’unità è di 50 cm / 20” in qualsiasi direzione..
ATTENZIONE: dallo sfiato posteriore fuoriesce aria bollente. Gli oggetti termosensibili vanno collocati a una distanza minima di 50 cm / 20” dallo sfiato.
Il proiettore può essere utilizzato esclusivamente in ambienti chiusi e non all’aperto..
SIKKERHET OG ADVARSLER |
norsk |
|
|
|
|
Denne bruksanvisningen inneholder viktig informasjon om sikkerhetsforanstaltninger, innstilling og bruk av projektoren.. Vennligst les bruksanvisningen nøye før du bruker projektoren..
SIKKERHET
Denne projektoren er testet og godkjent i forhold til gjeldende sikkerhetsregler for bruk innendørs i kontormiljø.. Vennligst les bruksanvisningen før du benytter projektoren første gang..
ADVARSEL
Benytt kun kabler og ledninger som leveres med projektoren eller originale erstatninger.. Bruk av uegnede eller feil kabler kan føre til feilsituasjoner og permanent skade på enheten..
Benytt alltid jordet strømledning.. Ujordet ledning skal ikke benyttes.. Bruk av ujordet nettledning er farlig og kan føre til elektrisk støt..
Enheten må aldri åpnes av bruker.. Den inneholder ingen deler som kan repareres av bruker.. All service skal utføres av kvalifisert personell..
Sørg for at fremmede objekter ikke kommer inn i ventilasjonsåpningene..
Ikke søl væsker på projektoren eller inn i ventilasjonsåpningene..
Linselokket skal alltid fjernes før projektoren skrus på.. Hvis linselokket ikke fjernes, kan det smelte på grunn av det sterke lyset.. Et smeltet linselokk kan skade projeksjonslinsen permanent..
Ikke se inn i projeksjonslinsen når projektoren er på.. Det sterke lyset kan skade synet permanent..
Ikke se inn i laserstrålen fra fjernkontrollen.. Laserlys kan skade synet permanent.. Ikke pek med laserlyset på andre mennesker..
Plasser projektoren på et stabilt underlag, eller monter den ved hjelp av et godkjent takfeste..
Ikke mist projektoren..
Anvend projektoren horisontalt, innenfor det justerbare området til føttene.. Dersom projektoren anvendes i andre vinkler, kan lampelevetiden reduseres kraftig, og enheten kan gå varm, noe som kan føre til feil..
Sørg alltid for tilstrekkelig lufttilførsel for å sikre god kjøling.. Ventilasjonsåpningene må ikke tildekkes.. Enheten må aldri dekkes til når den er på.. Sørg for tilstrekkelig avstand til vegger og tak.. Minimum anbefalt avstand er 50 cm i alle retninger..
FORSIKTIG! Varm luft blåses ut av ventilasjonsåpningen på siden. Ikke plasser varmefølsomme objekter i nærheten av åpningen. Minimum anbefalt avstand er 50 cm.
Projektoren er konstruert for innendørs bruk.. Enheten skal ikke brukes utendørs..
7

SAFETY & WARNINGS |
english |
|
SICHERHEIT UND WARNHINWEISE |
deutsch |
|
SÉCURITÉ & MISES EN GARD |
francais |
|
|
|
|
|
|
|
|
|
|
Do not operate the projector outside its temperature and humidity specifications, as this may result in overheating and malfunctioning..
Only connect the projector to signal sources and voltages as described in the technical specification.. Connecting to unspecified signal sources or voltages may lead to malfunction and permanent damage of the unit..
Allow the unit to cool down for 60 minutes before lamp change..
INFORMATION AND WARNING ABOUT POTENTIAL HEALTH ISSUES RELATED TO MERCURY VAPOR.
This projector uses a very powerful UHP™ lamp for illumination to produce an extremely bright image..
This technology is similar to other high-pressure discharge lamps that are extensively used in cars, street lights and other lighting appliances today.. These lamps, like fluorescent lighting, contain small amounts of mercury.. The amount of mercury present in a lamp is far below the limits of danger set by the authorities.. It is very important that lamps containing mercury are treated properly to minimize potential health hazards..
The UHP™ lamp, like any other high brightness projector lamp, is under high-pressure when operating.. While the lamp and the projector are carefully designed to minimize the probability of lamp rupture, the lamp may break while operating and small amounts of mercury vapor may be emitted from the projector.. The probability of rupture increases when the lamp reaches its
nominal life.. It is therefore highly recommended that the lamp is replaced when the rated lifetime is reached..
As a general precaution, secure good ventilation in the room when operating the projector.. If lamp rupture occurs, evacuate the room and secure good ventilation.. Children and pregnant women in particular should leave the room..
When replacing a worn lamp, dispose of the used lamp carefully by proper recycling..
Mercury is a naturally occurring, stable metallic element that may pose a safety risk to people under certain conditions.. According to the Public Health Statement for Mercury published by the Agency for Toxic Substances and Disease Registry (“ATSDR”, part of the United States Public Health Service), the brain, central nervous system and kidneys are sensitive to the effects of mercury, and permanent damage can occur at sufficiently high levels of exposure.. Acute exposure to high concentrations of mercury vapor can cause conditions such as lung and airway irritation, tightness in the chest, a burning sensation in the lungs, coughing, nausea, vomiting and diarrhea.. Children and fetuses are particularly sensitive to the harmful effects of metallic mercury to the nervous system..
Seek medical attention if any of the above symptoms are experienced or if other unusual conditions are experienced following lamp rupture..
8
Verwenden Sie den Projektor nie außerhalb der vorgegebenen Temperaturund Feuchtigkeitswerte, da dies zu einer Überhitzung und Betriebsstörung führen kann..
Schließen Sie den Projektor nur an Signalquellen und Spannungen an, wie in den technischen Daten angegeben.. Bei Anschluss an nicht geeignete Signalquellen oder Spannungen kann es zu Funktionsfehlern oder dauerhafter Beschädigung des Geräts kommen..
Lassen Sie das Gerät 60 Minuten lang abkühlen, bevor Sie die Lampe auswechseln..
ANGABEN UND WARNHINWEISE ZU EVENTUELLEN GESUNDHEITSGEFÄHRDUNGEN IM ZUSAMMENHANG MIT QUECKSILBERDAMPF.
In diesem Projektor wird eine leistungsstarke UHP™-Lampe zur Beleuchtung eingesetzt, die ein extrem helles Bild erzeugt..
Diese Technologie ist ähnlich wie andere Hochdruckentladungslampen, sie heute häufig in Pkws, Straßenlampen und anderen Leuchtkörpern verwendet werden.. Diese Lampen enthalten, gleich wie Neonröhren, geringe Quecksilbermengen.. Die in den Lampen vorhandenen Quecksilbermengen liegen weit unter den von den Behörden festgelegten Gefahrengrenzen.. Es ist von großer Wichtigkeit, dass Lampen mit Quecksilbergehalt
sachgemäß behandelt werden, um eventuelle gesundheitliche Gefährdungen zu minimieren..
Die UHP™-Lampe steht während dem Betrieb, ähnlich anderen sehr hellen Projektorlampen, unter hohem Druck.. Obwohl die Lampe und der Projektor sachgemäß konstruiert wurden, um die Wahrscheinlichkeit eines Lampenbruches zu minimieren, kann die Lampe während dem Betrieb zerbersten und geringe Mengen Quecksilberdampf aus dem Projektor strömen.. Die Wahrscheinlichkeit des Bruches nimmt mit Erreichen der Lebensdauer der Lampe zu.. Deshalb wird dringend empfohlen, die Lampe auszuwechseln, wenn sie das angegebenen Lebensalter erreicht hat..
Als allgemeine Vorsichtsmaßnahme ist während des Betriebs des Projektors eine gute Belüftung des Raumes sicher zu stellen.. Sollte die Lampe bersten, sollte der Raum geräumt und eine gute Belüftung sicher gestellt werden.. Insbesondere Kinder und Schwangere sollten den Raum verlassen..
Nach Auswechseln einer verbrauchten Lampe muss die verbrauchte Lampe sachgerecht entsorgt und wiederverwertet werden..
Quecksilber ist ein in der Natur vorkommendes, stabiles Metallelement, das unter bestimmten Umständen ein Sicherheitsrisiko für den Menschen darstellen kann.. Gemäß der Erklärung
zur öffentlichen Sicherheit des Quecksilbers, die von der Agentur für toxische Substanzen und Krankheitsregister („ATSDR“, als Bestandteil des öffentlichen Gesundheitssystems der USA) veröffentlicht wurde, reagieren das Gehirn, das zentrale Nervensystem und
die Nieren empfindlich auf die Belastung durch Quecksilber; so können bei ausreichend hohen Belastungsniveaus dauerhafte Schäden auftreten.. Bei akuter Belastung durch hohe Quecksilberdampfkonzentrationen können Zustände wie Reizung der Lungen und Atemwege, Brustdruck, Brenngefühle in den Lungen, Husten, Übelkeit, Erbrechen und Durchfall auftreten.. Kinder und Ungeborene sind besonders empfindlich auf die schädlichen Wirkungen des Quecksilbermetalls auf das Nervensystem..
Suchen Sie einen Arzt auf, wenn eines der o..g.. Symptome auftritt oder andere ungewöhnliche Zustände nach Bersten einer Lampe eintreten..
Ne faites pas fonctionner le projecteur en dehors de ses caractéristiques de température et d’humidité, ceci peut entraîner une surchauffe et un mauvais fonctionnement..
Raccordez juste le projecteur aux sources de signal et aux voltages comme indiqué dans les caractéristiques techniques.. Se connecter aux sources de signal ou aux voltages non indiqués peut entraîner un mauvais fonctionnement et des dégâts irréversibles sur l’appareil..
Laissez refroidir l’appareil 60 minutes avant de changer la lampe..
INFORMATION ET AVERTISSEMENT SUR LES QUESTIONS DE SANTÉ POTENTIELLES DUES AUX VAPEURS DE MERCURE.
Ce projecteur utilise une lampe UHP™ très puissante pour fournir un éclairage afin de produire une image extrêmement lumineuse..
Cette technologie est semblable à d’autres lampes à décharge haute pression énormément utilisées dans les voitures, les éclairages de rues et autres appareils d’éclairage aujourd’hui.. Ces lampes, comme les éclairages fluorescents, contiennent des petites quantités de mercure.. La quantité de mercure présente dans une lampe est bien au-dessous des limites de danger posées par les autorités.. Il est très important que les lampes contenant du mercure soient traitées correctement pour réduire au maximum les risques potentiels sur la santé..
La lampe UHP™ comme n’importe quelle autre lampe haute luminosité de projecteur, est sous haute tension en mode fonctionnement.. Bien que la lampe et le projecteur soient soigneusement conçus pour réduire au maximum les risques de rupture de la lampe, la lampe peut se briser pendant le fonctionnement et de petites quantités de mercure peuvent se dégager du projecteur.. Les risques de rupture augmentent quand la lampe atteint sa durée de vie théorique.. Il est donc vivement recommandé de remplacer la lampe quand la durée de vie estimée est atteinte..
Par précaution, assurez une bonne ventilation dans la salle pendant le fonctionnement du projecteur.. Si une rupture de la lampe se produit, évacuez la salle et assurez une bonne ventilation.. Les enfants et les femmes enceintes en particulier doivent quitter la salle..
Quand vous remplacez une lampe usagée, éliminez-la soigneusement via un circuit de recyclage adapté..
Le mercure est présent à l’état naturel, c’est un élément métallique stable qui peut présenter un risque pour des personnes dans certaines conditions.. Selon la Déclaration de Santé Publique relative au Mercure publiée par l’Agence des Substances Toxiques et du Registre de Maladie section du Service de Santé Publique des Etats-Unis), le cerveau, le système nerveux central et les reins sont sensibles aux effets du mercure, et une lésion irréversible peut apparaître à des taux d’exposition suffisamment élevés.. Une vive exposition à des concentrations élevées de vapeur de mercure peut entraîner des maladies comme une irritation des poumons et
des voies respiratoires, une oppression au niveau de la poitrine, des sensations de brûlure dans les poumons, toux, nausées, vomissements et diarrhée.. Les enfants et les fœtus sont particulièrement sensibles aux effets nocifs du mercure métallique sur le système nerveux..
Demandez une assistance médicale si vous ressentez un des symptômes énumérés ci-dessus ou si d’autres maladies inhabituelles sont ressenties suite à une rupture de la lampe..
SEGURIDAD Y ADVERTENCIAS |
español |
|
SICUREZZA E AVVERTENZE |
italiano |
|
SIKKERHET OG ADVARSLER |
norsk |
|
|
|
|
|
|
|
|
|
|
No haga funcionar el proyector fuera de sus especificaciones de temperatura y humedad, ya que podría producir un sobrecalentamiento y ocasionar un mal funcionamiento..
Conecte el proyector únicamente a las fuentes de señal y tensiones descritas en las especificaciones técnicas.. La conexión a fuentes de señal o tensiones distintas de las especificadas puede ocasionar un mal funcionamiento y el daño permanente del aparato..
Deje que el aparato se enfríe durante 60 minutos antes de cambiar la lámpara..
INFORMACIÓN Y ADVERTENCIAS SOBRE POSIBLES PROBLEMAS DE SALUD RELACIONADOS CON LOS VAPORES DE MERCURIO.
Este proyector utiliza una lámpara UHP™ muy potente para que la iluminación produzca una imagen extremadamente brillante..
Este tecnología es similar a la de otras lámparas de descarga luminosa de alta presión ampliamente utilizadas hoy en día en automóviles, farolas y otros dispositivos de alumbrado.. Estas lámparas, al igual que los tubos fluorescentes, contienen pequeñas cantidades de mercurio.. La cantidad de mercurio presente en una lámpara está muy por debajo de los límites de riesgo establecidos por las autoridades.. Es muy importante que las lámparas que contienen mercurio sean tratadas adecuadamente para minimizar posibles riesgos para la salud..
La lámpara UHP™, al igual que cualquier otra lámpara de proyector de gran luminosidad, funciona a alta presión.. Si bien la lámpara y el proyector han sido diseñados cuidadosamente para minimizar la probabilidad de rotura de la lámpara, ésta puede romperse durante el funcionamiento y el proyector puede emitir vapores de mercurio en pequeñas cantidades.. La probabilidad de ruptura aumenta a medida que la lámpara concluye su vida útil.. Por lo tanto, se recomienda especialmente sustituir la lámpara cuando se estime que ha concluido su vida útil..
Como precaución general, asegure una buena ventilación de la habitación cuando el proyector esté funcionando.. Si se produce una ruptura de la lámpara, evacue la habitación y procure una buena ventilación.. Particularmente, los niños y las mujeres embarazadas deben abandonar la habitación..
Cuando sustituya una lámpara gastada, deseche la lámpara usada siguiendo las indicaciones de reciclaje adecuadas..
El mercurio es un elemento metálico estable de origen natural que puede suponer un riesgo para la seguridad de las personas en determinadas circunstancias.. Según el resumen de salud pública sobre el mercurio publicado por la “ATSDR” (Agencia para Sustancias Tóxicas y el Registro de Enfermedades, que forma parte del Servicio de Salud Pública de los Estados Unidos), el cerebro, el sistema nervioso central y los riñones son sensibles a los efectos del mercurio, y la exposición a unos niveles suficientemente altos puede ocasionar lesiones permanentes.. La exposición intensa a altas concentraciones de vapor de mercurio puede producir irritación pulmonar y de las vías respiratorias, presión en el pecho, sensación de quemazón en los pulmones, tos, náusea, vómitos y diarrea.. Los niños y los nonatos son
especialmente sensibles a los efectos dañinos del mercurio metálico sobre el sistema nervioso..
Consulte a un médico si experimenta cualquiera de estos síntomas u otros síntomas no habituales tras la ruptura de una lámpara..
recogida de residuos de equipos eléctricos y electrónicos..
Per non causare surriscaldamenti e guasti, non utilizzare il proiettore se la temperatura e l’umidità sono difformi da quanto riportato nei dati tecnici..
Il proiettore va collegato solo alle tensioni e sorgenti di segnale descritte nei dati tecnici.. Il collegamento a sorgenti di segnale o tensioni diverse può causare guasti e danni permanenti all’unità..
Prima di sostituire le lampade, attendere 60 minuti per lasciare raffreddare l’unità..
INFORMAZIONI E AVVERTENZE SUI POTENZIALI RISCHI SANITARI CORRELATI AI VAPORI DI MERCURIO.
Per produrre immagini estremamente luminose, questo proiettore fa uso di una potentissima lampada UHP™..
Questa tecnologia è simile a quella di altre lampade a scarica ad alta tensione oggi molto diffuse su automobili, illuminazione stradale ed altre applicazioni.. Queste lampade, al pari delle luci fluorescenti, contengono esigue quantità di mercurio.. La quantità di mercurio presente in una lampada è di gran lunga al di sotto dei limiti minimi imposti dalle autorità.. Per ridurre al minimo i potenziali rischi per la salute, è fondamentale trattare correttamente le lampade che contengono mercurio..
La lampada UHP™, come qualsiasi altra lampada per proiettore ad alta luminosità, funziona ad alta pressione.. Sebbene lampada e proiettore siano stati progettati accuratamente per ridurre al minimo il rischio di rottura della lampada, ciò può accadere durante l’uso, causando la fuoriuscita di piccole quantità di vapori di mercurio dal proiettore.. Le probabilità di rottura aumentano quando la lampada raggiunge il termine della durata di servizio.. Pertanto si consiglia vivamente di sostituire la lampada quando raggiunge il termine della sua durata nominale..
Come precauzione generica, ventilare adeguatamente gli ambienti quando si utilizza il proiettore.. Se la lampada si rompe, allontanare tutti i presenti dall’ambiente e ventilarlo a fondo.. In particolare, allontanare bambini e donne in gravidanza..
Quando si sostituisce una lampada usata, questa va smaltita a norma di legge..
Il mercurio è un elemento metallico stabile che esiste in natura e che in talune condizioni può costituire un rischio per la sicurezza degli uomini.. Secondo la pubblicazione Public Health Statement for Mercury edita dall’agenzia per le sostanze tossiche ATSDR (Agency for Toxic Substances and Disease Registry, parte del servizio sanitario nazionale degli USA), il cervello, il sistema nervoso centrale e i reni sono sensibili agli effetti del mercurio e l’esposizione
a livelli sufficientemente alti, può causare lesioni permanenti.. L’esposizione acuta ad alte concentrazioni di vapori di mercurio può causare, ad esempio, irritazioni ai polmoni e alle vie respiratorie, senso di costrizione al petto, sensazione di bruciore ai polmoni, tosse, nausea, vomito e diarrea.. Bambini e feti sono particolarmente sensibili agli effetti dannosi del mercurio metallico sul sistema nervoso..
In caso di manifestazione di uno dei sintomi di cui sopra, o se si avvertono altri sintomi anomali in seguito alla rottura della lampada, consultare un medico..
Projektoren skal ikke benyttes utenfor de spesifiserte maksimumsverdier for tempeartur og fuktighet, siden dette kan føre til overoppheting og feilfunksjon..
Projektoren må kun tilkobles signalkilder og spenninger som beskrevet i den tekniske spesifikasjonen.. Forbindelse til ukjente signalkilder eller spenninger kan føre til feil og permanent skade på enheten..
La enheten kjøles ned i 60 minutter før lampeskifte..
INFORMASJON OG ADVARSEL OM MULIGE HELSESKADER I FORBINDELSE MED KVIKKSØLVDAMP
Projektoren benytter en meget sterk UHP™ lampe til belysning, noe som gir et ekstremt lyssterkt bilde..
Denne teknologien tilsvarer andre høytrykks utladningslamper som benyttes i biler, gatelys o..l.. Disse lampene, lik lysstoffrør og sparepærer, inneholder små mengder kvikksølv som ligger langt under de faregrenser som er satt av myndighetene.. Det er svært viktig at lamper som innehoder kvikksølv håndteres korrekt for å minimalisere mulig helsefare..
UHP™ lampen, som andre lyssterke projektorlamper, opererer under høyt trykk når de er i bruk.. Selv om både lampen og projektoren er konstruert for å minimere sannsynligheten for lampe-eksplosjon, kan det hende at lampen ryker når den er i bruk.. I så fall kan små mengder kvikksølvdamp lekke ut av projektoren.. Sannsynligheten for at lampen kan ryke øker etter hvert
som lampen eldes.. Det anbefales derfor sterkt å bytte lampen når lampen har nådd sin nominelle levetid..
Som en generell anbefaling bør rommet som projektoren benyttes i være godt ventilert.. Hvis lampen ryker, bør rommet evakueres og luftes.. Barn og gravide kvinner bør spesielt forlate rommet..
Når lampen byttes, må den brukte lampen resirkuleres som farlig avfall og ikke kastes i ordinær søppel..
Kvikksølv er et naturlig forekommende, stabilt metallisk stoff som kan medføre helserisiko under visse forhold.. I følge det offentlige utsagnet for kvikksølv, som er utgitt av ‘Agency for Toxic Substances and Disease Registry’ (“ATSDR”, en del av De Forente Staters folkehelsetjeneste), er hjernen, sentralnervesystemet og nyrene følsomme for kvikksølv, og de kan skades permanent dersom de eksponeres for større doser.. Akutt overeksponering kan føre til lungeog luftveisirritasjoner, brystsmerter, brennende følelse i lungene, hosting, kvalme, oppkast og diarré.. Barn og fostre er spesielt følsomme for skadelige følger av metallisk kvikksølv i nervesystemet..
Søk medisinsk støtte hvis man opplever noen av de ovennevnte symptomer, eller hvis man opplever andre uventede symptomer etter en lampe-eksplosjon..
9
SAFETY & WARNINGS |
english |
|
|
|
|
WEEE INFORMATION
This product conforms to all requirements of the EU Directive on waste electrical and electronic equipment (WEEE).. This product shall be recycled properly.. It can be disassembled to facilitate proper recycling of it’s individual parts.. This product is using projection lamps that shall be recycled properly.. Consult your dealer or relevant public authority regarding drop-off points for collection of WEEE..
WARNING
This product contains chemicals, including lead, known to the State of California to cause birth defects or other reproductive harm.. Recycle properly, do not dispose of in ordinary waste!
REMOTE CONTROL WARNING
Laser radiation class II product; wavelength 670nm; maximum output 1mW..
Remote control complies with applicable requirements of 21 CFR 1040..10 and 1040..11..
Remote control complies with applicable requirements of EN 60 825- 1: 1994 + A11
10
SICHERHEIT UND WARNHINWEISE deutsch
WEEE-ANGABEN
Dieses Produkt erfüllt alle Auflagen aus der EU-Richtlinie für Elektround Elektronik-Altgeräte (WEEE).. Dieses Produkt kann sachgemäß recycelt werden.. Es kann zerlegt werden, um die Einzelteile ordnungsgemäß zu recyceln.. Dieses Produkt verwendet Projektorlampen, die sachgemäß recycelt werden müssen.. Fragen Sie Ihren Händler oder die zuständigen Behörden nach Entsorgungsstellen für Elektround Elektronik-Altgeräte..
WARNUNG
Dieses Produkt kann Chemikalien, wie z.. B.. Blei, enthalten, von denen im Staat Kalifornien bekannt ist, dass sie angeborene Schäden oder andere Fortpflanzungsschäden verursachen.. Sachgemäß recyceln und nicht mit dem gewöhnlichen Abfall entsorgen!
WARNUNG ZUR FERNBEDIENUNG
Produkt mit Laserstrahlung der Klasse II; Wellenlänge 670 nm; maximale Leistungsabgabe 1 mW..
Die Fernbedienung erfüllt die zutreffenden Auflagen der Normen 21 CFR 1040..10 und 1040..11..
Die Fernbedienung erfüllt die zutreffenden Auflagen der EN 60..825- 1: 1994 + A11
SÉCURITÉ & MISES EN GARD |
francais |
|
|
|
|
INFORMATION WEEE
Cet appareil est conforme à la Directive EU relative au recyclage des équipements électriques et électroniques (WEEE).. Cet appareil doit être recyclé correctement.. Il peut être démonté pour faciliter le recyclage de chaque pièce séparément.. Cet appareil utilise des lampes de projection qui doivent être recyclées correctement.. Consultez votre revendeur ou les autorités publiques compétentes concernant les points de collecte WEEE..
MISE EN GARDE
Cet appareil contient des produits chimiques, câble compris, connus de l’Etat de Californie pour entraîner des malformations ou des maux reproductifs.. Recyclez correctement ; ne les jetez pas dans une déchetterie quelconque!
AVERTISSEMENT POUR LA TÉLÉCOMMANDE
Appareil de classe II à radiation laser; longueur d’onde 670 nm; sortie maximale 1mW..
La télécommande est conforme aux critères en vigueur des normes 21 CFR 1040..10 et 1040..11..
La télécommande est conforme aux critères en vigueur des normes EN 60 825-1: 1994 + A11
SEGURIDAD Y ADVERTENCIAS |
español |
|
|
|
|
INFORMACIÓN WEEE
Este producto cumple todos los requisitos de la Directiva de la UE sobre residuos de equipos eléctricos y electrónicos.. Este producto debe reciclarse adecuadamente.. Puede desmontarse para facilitar el adecuado reciclado de cada una de sus piezas.. Este producto usa lámparas de proyección que deben reciclarse adecuadamente..
Consulte a su distribuidor o al organismo público pertinente acerca de los puntos limpios para la recogida de residuos de equipos eléctricos y electrónicos..
ADVERTENCIA
Este producto contiene sustancias químicas, incluyendo plomo, que según le consta al Estado de California, ocasionan defectos de nacimiento u otros daños de índole reproductiva.. ¡Siga las
indicaciones de reciclado adecuadas, no deseche el producto con los residuos habituales!
ADVERTENCIA SOBRE EL MANDO A DISTANCIA
Producto con radiación lasérica de clase II; longitud de onda 670nm; potencia de salida máxima 1mW..
El mando a distancia cumple los requisitos aplicables de 21 CFR 1040..10 y 1040..11..
El mando a distancia cumple los requisitos aplicables de EN 60 825-1: 1994 + A11
SICUREZZA E AVVERTENZE |
italiano |
|
|
|
|
INFORMAZIONI SU WEEE
Questo dispositivo è conforme a tutti i requisiti della direttiva UE (WEEE) sullo smaltimento di apparecchiature elettriche ed elettroniche.. Questo prodotto deve essere riciclato correttamente e può essere smontato per agevolare il riciclaggio dei singoli componenti.. Anche le lampade di proiezione utilizzate su questo apparecchio devono essere riciclate correttamente.. Per informazioni sui punti di raccolta WEEE, consultare il rivenditore o l’autorità preposta..
AVVERTENZA
Questo prodotto contiene sostanze chimiche, incluso il piombo, che lo Stato della California riconosce all’origine di difetti prenatali o altre anomalie genetiche.. Riciclare correttamente, non buttare con i rifiuti ordinari..
AVVERTENZA PER IL TELECOMANDO
Prodotto laser di classe II, lunghezza d’onda di 670 nm; uscita massima di 1 mW..
Il telecomando è conforme ai pertinenti requisiti di legge 21 CFR 1040..10 e 1040..11..
Il telecomando è conforme ai pertinenti requisiti di legge EN 60 825-1: 1994 + A11
SIKKERHET OG ADVARSLER |
norsk |
|
|
|
|
WEEE INFORMASJON
Dette produktet tilfredsstiller alle krav i EU direktivet 2002/96/EC somgjelder brukt elektrisk og elektronisk utstyr.. Dette produktet skal resirkuleres forsvarlig.. Det kan demonteres slik at de enkelte deler kan resirkuleres forsvarlig.. Dette produktet benytter projeksjonslampe som skal resirkuleres forsvarlig..
ADVARSEL
Dette produktet inneholder kjemikalier, inkludert bly, som kan forårsake fødselsskader og andre forplantningsskader.. Sørg for korrekt resirkulering.. Kast ikke lamper eller andre deler i vanlig søppel..
ADVARSEL FJERNKONTROLL
Laser stråling klasse II med bølgelengde 670nm og maksimalt 1mW utstrålt effekt..
Fjernkontrollen er konform med relevante krav i 21 CFR 1040..10 og 1040..11..
Fjernkontrollen er konform med relevante krav i EN 60 825-1:1994 + A11..
11

SAFETY & WARNINGS |
english |
|
|
|
|
WARNING SYMBOLS ON THE PROJECTOR
READ USER GUIDE
Attention! Read the user guide for further information!
DANGEROUS VOLTAGE
Danger! High voltage inside the product!
HOT
Warning! Hot surfaces!
WAIT
Warning! Wait until cooled down!
MERCURY
Warning! Lamp contains mercury! Recycle properly, do not dispose of in ordinary waste!
UV
Warning! UV radiation inside the product!
RECYCLE
Warning! Recycle properly, do not dispose of in ordinary waste!
NO TELEPHONE
Warning! Do not connect to telephone lines!
12
SICHERHEIT UND WARNHINWEISE deutsch |
|
SÉCURITÉ & MISES EN GARD |
francais |
|
SEGURIDAD Y ADVERTENCIAS |
español |
|
|
|
|
|
|
|
|
|
WARNSYMBOLE AUF DER PROJEKTOR |
SYMBOLES D’AVERTISSEMENT |
|
|
SÍMBOLOS DE ADVERTENCIA |
|
|
|
LESEN SIE DAS BENUTZERHANDBUCH |
LISEZ LE GUIDE D’UTILISATION |
|
|
LEA LA GUÍA DEL USUARIO |
|
|
|
Vorsicht! Nähere Angaben finden Sie im Benutzerhandbuch! |
Attention! Lisez le guide d’utilisation pour plus d’information! |
¡Atención! ¡Lea la guía del usuario para obtener más información! |
|||||
GEFÄHRLICHE SPANNUNG |
VOLTAGE DANGEREUX |
|
|
TENSIÓN PELIGROSA |
|
|
|
Gefahr! Hohe Spannung im Inneren des Geräts! |
Danger! Voltage élevé dans l’appareil! |
|
|
¡Peligro! ¡Alta tensión en el interior del producto! |
|
|
|
HEISS |
CHAUD |
|
|
CALIENTE |
|
|
|
Warnung! Heiße Flächen! |
Avertissement Surfaces chaudes! |
|
|
¡Advertencia! ¡Superficies calientes! |
|
|
|
WARTEN |
ATTENDEZ |
|
|
ESPERE |
|
|
|
Warnung! Abkühlen lassen! |
Avertissement Attendez jusqu’au refroidissement! |
|
|
¡Advertencia! ¡Espere hasta que se enfríe! |
|
|
|
QUECKSILBER |
MERCURE |
|
|
MERCURIO |
|
|
|
Warnung! Die Lampe enthält Quecksilber! Sachgemäß recyceln, und |
Avertissement La lampe contient du mercure! Recyclez |
¡Advertencia! ¡La lámpara contiene mercurio! ¡Siga las indicaciones |
|||||
nicht mit dem gewöhnlichen Abfall entsorgen! |
correctement, n’éliminez pas dans une déchetterie quelconque! |
de reciclado adecuadas, no deseche el producto con los residuos |
|||||
|
|
|
|
|
habituales! |
|
|
UV |
UV |
|
|
UV |
|
|
|
Warnung! UV-Strahlung im Inneren des Geräts! |
Avertissement Radiation UV à l’intérieur de l’appareil! |
¡Advertencia! ¡Radiación UV en el interior del producto! |
|
|
|||
RECYCELN |
RECYCLEZ |
|
|
RECICLADO |
|
|
|
Warnung! Sachgemäß recyceln und nicht mit dem gewöhnlichen |
Avertissement Recy clez correctement, ne les jetez pas dans une |
¡Advertencia! ¡Siga las indicaciones de reciclado adecuadas, no |
|||||
Abfall entsorgen! |
déchetterie quelconque! |
|
|
deseche el producto con los residuos habituales! |
|
|
|
KEIN TELEFON |
PAS DE TELEPHONE |
|
|
NO USE EL TELÉFONO |
|
|
|
Warnung! Nicht an Telefonleitungen anschließen! |
Avertissement Ne vous connectez pas aux lignes téléphoniques! |
¡Advertencia! ¡No lo conecte a las líneas telefónicas! |
|
|
|||
SICUREZZA E AVVERTENZE |
italiano |
|
|
|
|
SIMBOLI DI AVVERTENZA
LEGGERE LA GUIDA D’USO
Attenzione! Per maggiori informazioni, leggere la guida d’uso..
TENSIONE PERICOLOSA
Pericolo.. Alta tensione all’int erno del prodotto..
CALDO
Avvertenza: superfici calde..
ATTENDERE
Avvertenza: attendere il raffreddamento..
MERCURIO
Avvertenza: la lampada contiene mercurio.. Riciclarla correttamente e non buttare tra i rifiuti ordinari..
UV
Avvertenza: radiazioni UV all’interno del prodotto..
RICICLAGGIO
Avvertenza: riciclare correttamente, non buttare con i rifiuti ordinari..
NESSUN TELEFONO
Avvertenza: non collegare alle linee telefoniche..
SIKKERHET OG ADVARSLER |
norsk |
|
|
|
|
SYMBOLER PÅ PROJEKTOREN
LES BRUKSANVISNINGEN
Les bruksanvisningen for mere informasjon!
HØYSPENNING
Fare! Høyspenning inne i enheten!
VARM
Advarsel! Varme flater!
VENT
Advarsel! Vent til enheten er avkjølt!
KVIKKSØLV
Advarsel! Lampen inneholder kvikksølv! Resirkuler som spesialavfall..
Må ikke kastes i vanlig avfall!
UV
Advarsel! Ultrafiolett (UV) stråling inne i enheten!
RESIRKULER
Advarsel! Resirkuler som spesialavfall.. Må ikke kastes i vanlig avfall!
IKKE TELEFON
Advarsel! Må ikke kobles til telefonlinje!
13

SUPPLIED MATERIAL |
english |
|
LIEFERUMFANG |
deutsch |
|
MATERIEL FOURNIS |
francais |
|
MATERIAL ENTREGADO |
español |
|
Projector |
|
|
Projektor |
|
|
Projecteur |
|
|
Proyector |
|
|
|
|
|
|
|
|
|
|
Remote control with batteries |
Fernbedienung mit Batterien |
Télécommande avec piles |
Mando a distancia con pilas |
Quick Start Guide |
Quick Start Guide |
Quick Start Guide |
Quick Start Guide |
Cables (optional) |
Kabel (optional) |
Câbles (optional) |
Cables (optional) |
Power Cord |
Stromkabel |
Cordon d’alimentation |
Cable de alimentación |
(country dependent) |
(je nach Land) |
(dépendant du pays) |
(en función del país) |
Before Set up and Use |
Vor der Einrichtung und Verwendung |
Avant toute installation et utilisation |
Antes de la instalación y el uso. |
Unpack the supplied parts and familiarise yourself with the |
Packen Sie die gelieferten Teile aus und lernen Sie die |
Déballez les pièces fournies et familiarisez-vous avec les |
Desembale las piezas entregadas y familiarícese con los |
various components.. |
verschiedenen Komponenten kennen.. |
différents composants |
distintos componentes.. |
14
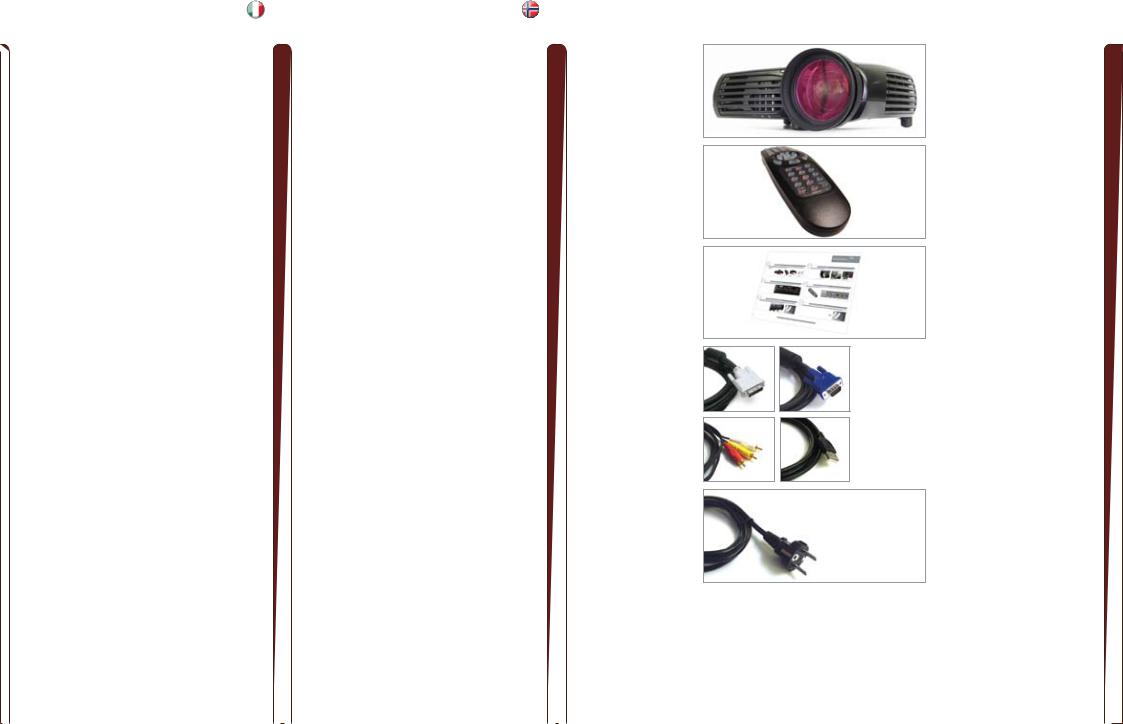
MATERIALE IN DOTAZIONE |
italiano |
|
|
|
|
Proiettore
Telecomando con batterie
Quick Start Guide
Cavi (optional)
Cavo di alimentazione
(in base al paese)
Preliminari all’impostazione e all’uso
Disimballare le parti fornite e prendere dimestichezza con i vari componenti..
LEVERT UTSTYR |
norsk |
|
|
|
|
Projektor
Fjernkontroll med batterier
Quick Start Guide
Kabler (modellavhengig)
Strømkabel
(avhengig av land)
Før oppkobling og bruk
Pakk ut og gjør deg kjent med alle deler før du kobler opp og bruker utstyret..
The lens alternative shown in this user guide may deviate from your projector set-up
DVI VGA
A-V USB
15

OVERVIEW |
english |
|
ÜBERSICHT |
deutsch |
|
VUE D’ENSEMBLE |
francais |
|
DESCRIPCIÓN GENERAL |
español |
|
A Lens |
|
|
A Linse |
|
|
A Lentille |
|
|
A Objetivo |
|
|
|
|
|
|
|
|
|
|
||||
B IR sensor |
|
|
B Infrarotsensor |
|
|
B Capteur IR |
|
|
B Sensor IR |
|
|
C Ventilation |
|
|
C Belüftung |
|
|
C Ventilation |
|
|
C Ventilación |
|
|
D Foot release |
|
|
D Fußfreigabe |
|
|
D Dégagement de pred |
|
|
D Disparador de pato |
|
|
E |
Power connector |
E |
Stromanschluss |
E |
Raccord d’alimentation |
E |
Conector de alimentación |
F |
Keypad |
F |
Tastenfeld |
F |
Clavier |
F |
Teclado |
G |
Connector panel |
G |
Anschlüsse |
G |
Panneau de raccordement |
G |
Panel de conexiones |
H |
Adjustable feet |
H |
Regulierbare Füße |
H |
Pieds réglables |
H |
Patas regulables |
|
|
I |
Sicherheitsverriegelung |
|
|
|
|
I |
Security lock (not shown) |
J Deckenmontage |
I |
Fermeture sécurisée |
I Cierre de seguridad |
J |
Ceiling mount |
|
J |
Montage au plafond |
J Montaje en el techo |
16

PANORAMICA |
italiano |
|
OVERSIKT |
norsk |
|
A Obiettivo |
|
|
A Linse |
|
|
|
|
|
|
||
B Sensore IR |
|
|
B IR mottaker |
|
|
C Ventilazione |
|
|
C Ventilasjon |
|
|
D Sbloccagio piedio |
|
|
D Fotutløser |
|
|
E |
Connettore di alimentazione |
E |
Strømkontakt |
F |
Tastierino |
F |
Tastatur |
G |
Pannello dei connettori |
G |
Kontaktpanel |
H |
Piedini di regolazione |
H |
Justerbare føtter |
I |
Blocco di sicurezza |
I |
Sikkerhetslås (ikke vist) |
J |
Montaggio a soffitto |
J |
Takfeste |
B A
C
D
F
G
C
H |
C
B
C
E
I
J |
C
17
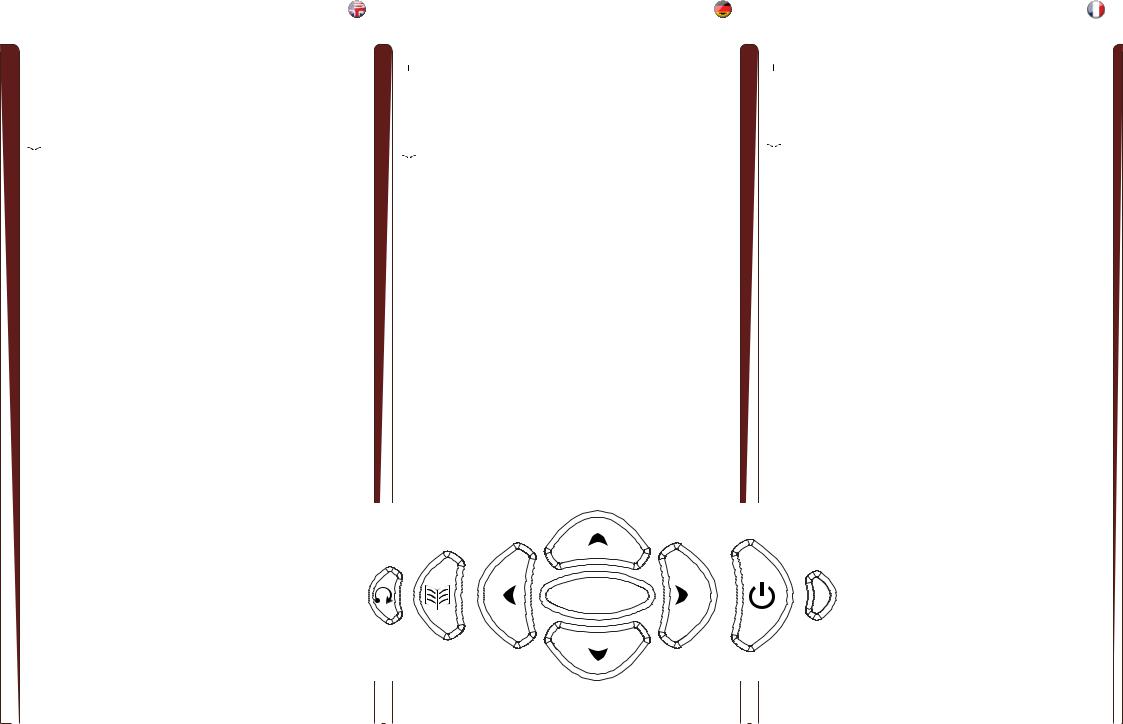
KEYPAD |
english |
|
TASTENFELD |
deutsch |
|
CLAVIER |
francais |
|
|
|
|
|
|
|
|
|
|
The keypad is illuminated for operation in dark environments.. Several keys have multiple functions..
 (POWER)
Switches the projector between on and standby modes.. Press firmly (1 sec) to switch on.. Press firmly (1 sec) twice to switch off (the second press confirms switching off)..

 (AUTO)
Adjusts the projector to display a correct image, including position, width, height and overall stability.. Only applicable to analogue input sources..
 (MENU)
Activates the menu system.. Use the four arrow keys to navigate and “OK” to activate..
ARROW KEYS
Use the arrow keys to navigate the menu system, control keystone setting (up / down), or select source (left / right)..
OK/KST
Confirm menu option when menu system is activated.. Activates keystone function..
0-9
These keys are used for PIN code entry..
SRC
Use these keys to select active source..
KST
Engage digital keystone correction when not in menu mode.. Use arrow keys to adjust..
Das Tastenfeld ist für seine Betätigung bei Dunkelheit beleuchtet.. Mehrere Tasten sind Mehrfachfunktionen zugewiesen..
 (STROMVERSORGUNG)
Schaltet den Projektor zwischen an und den Standby-Betriebsarten um.. Fest (1 Sek.. lang) drücken, um das Gerät einzuschalten.. Zweimal (1 Sek.. lang) drücken, um das Gerät auszuschalten..

 (AUTO)
Einstellung des Projektors, damit das Bild korrekt angezeigt wird; dazu gehören die Position,Breite, Höhe, Kontrast, Helligkeit und allgemeine Stabilität..
 (MENÜ)
Öffnet das Menüsystem.. Mit den vier Pfeiltasten können Sie die verschiedenen Elemente erreichen und «OK» bestätigen..
PFEILTASTEN
Mit Hilfe der Pfeiltasten können Sie sich durch das Menüsystem bewegen oder das Volumen der Lautsprecher steuern bzw.. die Auswahl der Quelle vornehmen, wenn Sie sich nicht im Menü befinden..
OK/KST
Bestätigt eine Menüoption, wenn das Menüsystem aktiviert ist..
0-9
Diese Tasten dienen zur Eingabe des PIN-Codes..
SRC
Mit diesen Tasten wird die aktive Quelle angewählt..
KST
Aktiviert die digitale Trapezentzerrung, wenn nicht das Menü aufgerufen wurde.. Die Einstellung erfolgt über die Pfeiltasten..
Le clavier est lumineux pour utilisation dans un lieu sombre.. Plusieurs touches ont des fonctions multiples..
 (PUISSANCE)
Alternez le projecteur entre les modes on et veille.. Appuyez fermement (1 sec) pour allumer.. Appuyez 2 fois fermement (1 sec) pour éteindre..

 (AUTO)
Réglage du projecteur pour donner une image correcte, en ce qui concerne la position, la largeur, la hauteur et la stabilité d’ensemble..
 (MENU)
Active le menu.. Utilisez les quatre touches flèche pour naviguer et OK pour activer..
TOUCHES FLECHE
Utilisez les touches flèches pour parcourir le menu, pour contrôler le volume sonore du hautparleur ou la source quand vous n’êtes pas dans le menu
OK/KST
Confirme l’option du menu quand le menu est activé..
0-9
Ces touches sont utilisées pour le code d’entrée PIN..
SRC
Utilisez ces touches pour sélectionner la source active..
KST
Lancez la correction digitale du trapèze quand vous n’êtes pas en mode menu.. Utilisez les touches flèches pour régler..
|
2 |
4 |
5 |
8 |
0 |
|
|
||
|
|
|
|
|
|
|
|
OK |
|
1 |
|
|
KST |
|
3 |
|
|
9 |
|
|
6 |
7 |
||
|
|
|
18

TECLADO |
español |
|
|
|
|
El teclado está iluminado para el funcionamiento en entornos oscuros.. Varias de las teclas tienen múltiples funciones..
 (POWER)
Conmuta el proyector entre los modos de encendido y espera.. Pulse firmemente (1 seg..) para encenderlo.. Pulse firmemente (1 seg..) dos veces para apagarlo..

 (AUTO)
Ajusta el proyector para mostrar una imagen correcta, incluyendo posición, anchura, altura y estabilidad general..
 (MENU)
Activa el sistema de menús.. Use las cuatro teclas de dirección para navegar y
«OK» para activarlas..
TECLAS DE DIRECCIÓN
Use las teclas de dirección para navegar por el sistema de menús, o para controlar el volumen de sonido del altavoz o la selección de fuente cuando no se encuentre en el menú..
OK/KST
Confirma la opción del menú cuando está activado el sistema de menús..
0-9
Estas teclas se utilizan para la introducción del código PIN..
SRC
Use estas teclas para seleccionar la fuente activa..
KST
Active la corrección de la distorsión trapezoidal digital cuando no se encuentre en el modo de menú.. Use las teclas de dirección para efectuar el ajuste..
TASTIERINO |
italiano |
|
|
|
|
Il tastierino è illuminato per consentirne l’uso in ambienti bui.. Diversi tasti hanno più funzioni..
 (ACCENSIONE)
Passa il proiettore dalla modalità di accensione a quella di standby.. Premere con fermezza (1 secondo) per accendere.. Premere due volte (1 sec) per spegnere..

 (AUTO)
Consente di regolare il proiettore per visualizzare l’immagine in modo corretto, incluso posizione, larghezza, altezza e stabilità generale..
 (MENU)
Attiva il sistema dei menu.. Utilizzare i quattro tasti con le frecce per navigare e “OK” per confermare..
TASTI FRECCIA
Usare i tasti freccia per navigare nel sistema dei menu o per controllare il volume dell’altoparlante o la selezione della sorgente quando non si è nel menu..
OK/KST
Consente di confermare l’opzione di menu quando è attivo il sistema dei menu..
0-9
Utilizzare questi tasti per inserire il codice PIN..
SRC
Utilizzare questi tasti per selezionare la sorgente attiva..
KST
Attiva la correzione digitale della deformazione trapezoidale quando non si è nella modalità menu.. Per regolare, utilizzare i tasti con le frecce..
|
2 |
4 |
5 |
8 |
0 |
|
|
||
|
|
|
|
|
|
|
|
OK |
|
1 |
|
|
KST |
|
3 |
|
|
9 |
|
|
6 |
7 |
||
|
|
|
TASTATUR |
norsk |
|
|
|
|
Tastaturet er belyst for å kunne benyttes i mørke.. De fleste tastene har flere funksjoner..
 (POWER)
Skrur projektoren på og av (stand-by).. Hold tasten inne en kort periode (1 sekund) for å skru på.. For å skru av må tasten trykkes inn to ganger..

 (AUTO)
Justerer projektoren slik at den viser et riktig bilde med hensyn til posisjon, bredde, høyde og bildestabilitet..
 (MENY)
Aktiviserer menysystemet.. Bruk de fire piltastene og ‘OK’ for å navigere..
PILTASTER
Bruk piltastene for å navigere i menyen, eller for å styre høyttalervolum eller kildevalg når du ikke er i menyen
OK/KST
Bekreft valg i meny eller gå tilbake i meny..
0-9
Tastene benyttes for PIN kode..
SRC
Trykk på disse tastene for å velge kilde..
KST
Trykk på denne tasten for å velge ’keystone’ korrigering når du ikke er i menyen.. Trykk deretter på piltastene for å korrigere bildet..
19

INDICATORS |
english |
|
|
|
|
INDICATOR LIGHT
The light next to the power key indicates the overall system status by blue, orange and red colors..
FLASHING BLUE LIGHT
The projector has been turned on, and is warming up..
PERMANENT BLUE LIGHT
The projector is turned on and in normal operation..
PERMANENT ORANGE LIGHT
The unit is in standby mode; no source(s) connected, or the source(s) connected are inactive or switched off, thereby activating the powersave function (DPMS).. You may enable or disable the power save function in the SET UP sub menu, DPMS on or off..
FLASHING YELLOW LIGHT
Please wait.. The yellow light will flash once after power cord is connected (4 - 5 sec..), and a period after going to standby mode while lamp is cooling down (approximately 45 sec..).. The projector may not be turned on again until the light has turned to permanent yellow..
FLASHING RED LIGHT
Projector is overheated.. Turn off immediately! Check if air inlets are covered or if ambient temperature is outside specifications.. The projector can not be restarted unless the power cord is disconnected and reconnected again.. If the projector continues to flash red, you will need to return the unit for service..
PERMANENT RED LIGHT
Lamp life has expired.. Please change projection lamp immediately.. Failing to change lamp may lead to lamp explosion..
NO LIGHT
Power is not connected to the projector..
20
LEUCHTANZEIGEN |
deutsch |
|
|
|
|
LEUCHTANZEIGEN
Die Leuchte neben dem Ein-Aus-Schalter zeigt in blau, orange bzw.. rot den allgemeinen Zustand des Geräts an..
BLINKENDES BLAUES LICHT
PERMANENT BLAUES LICHT
Der Projektor ist angeschaltet und befindet sich im normalen Betrieb..
PERMANENT ORANGES LICHT
Das Gerät befindet sich im Standby-Betrieb; es sind keine Quellen angeschlossen oder die angeschlossene Quelle bzw.. Quellen sind nicht aktiv oder ausgeschaltet, so dass die Stromsparfunktion (DPMS) aktiviert wurde.. Die Stromsparfunktion kann im SETUPUntermenü DPMS an oder aus aktiviert bzw.. deaktiviert werden..
BLINKENDES GELBES LICHT
Bitte warten.. Das gelbe Licht blinkt eine gewisse Zeit nachdem das Stromkabel angeschlossen wurde (4 - 5 Sek..), sowie eine gewisse Zeit nach dem Umschalten in den Standby-Betrieb, während die Lampe abkühlt (ungefähr 45 Sek..).. Der Projektor kann nicht wieder eingeschaltet werden, solange die Leuchtanzeige nicht wieder auf permanent gelb gewechselt hat..
BLINKENDES ROTES LICHT
Der Projektor ist überhitzt.. Sofort ausschalten! Prüfen Sie, ob die Belüftungsöffnungen verdeckt sind oder die Raumtemperatur die vorgegebenen Werte übersteigt.. Der Projektor kann nicht
eingeschaltet werden, außer das Stromkabel wird abgezogen und erneut eingesteckt.. Blinkt der Projektor immer noch rot, so muss er zur Reparatur gegeben werden..
PERMANENT ROTES LICHT
Die Lebensdauer der Lampe ist abgelaufen.. Tauschen Sie die Projektorlampe bitte umgehend aus.. Wird die Lampe nicht ausgetauscht, kann dies zu einer Explosion der Lampe führen..
KEIN LICHT
Die Stromversorgung des Projektors ist nicht hergestellt..
INDICATEURS |
francais |
|
|
|
|
INDICATEUR
Le voyant lumineux à coté de la touche power indique l’état général du système par des couleurs bleu, orange et rouge..
LUMIERE BLEUE CLIGNOTANTE
LUMIERE BLEUE PERMANENTE
Le projecteur est allumé et fonctionne normalement..
LUMIERE ORANGE PERMANENTE
L’appareil est en mode veille ; il n’y a pas de source connectée, ou la source connectée est inactive ou éteinte, activant ainsi la fonction économie d’énergie (DPMS).. Vous pouvez activer ou désactiver la fonction économie d’énergie dans le sous-menu SET UP, DPMS sur ON ou OFF..
LUMIERE JAUNE CLIGNOTANTE
Veuillez patienter.. La lumière jaune clignote pendant quelques secondes après avoir connecté le cordon d’alimentation (4
- 5 sec), et après la mise en veille tant que la lampe refroidi (approximativement 45 sec..).. Le projecteur ne peut pas être rallumé tant que la lumière jaune n’est pas permanente..
LUMIERE ROUGE CLIGNOTANTE
Le projecteur est en surchauffe.. Eteignez immédiatement Vérifiez si les arrivées d’air ne sont pas bouchées ou si la température ambiante est au-delà des caractéristiques.. Le projecteur ne peut être redémarré que si le cordon d’alimentation est débranché puis rebranché.. Si le projecteur continu de clignoter rouge, vous devez retourner l’appareil au service après-vente..
LUMIERE PERMANENTE ROUGE
La durée de vie de la lampe est dépassée.. Veuillez changer la lampe de projection immédiatement.. Ne pas changer la lampe peut entraîner l’explosion de la lampe..
PAS DE LUMIERE
Le projecteur n’est pas alimenté..
INDICADORES |
español |
|
|
|
|
INDICADOR
La luz junto a la tecla de encendido indica el estado general del sistema mediante los colores azul, naranja y rojo..
LUZ AZUL INTERMITENTE
LUZ AZUL PERMANENTE
El proyector está encendido y funciona con normalidad..
LUZ NARANJA PERMANENTE
El aparato está en modo de espera; no hay ninguna fuente conectada, o si la hay está inactiva o apagada y, por tanto, se activa la función
de ahorro de energía (DPMS).. Puede activar o desactivar la función de ahorro de energía en el submenú INSTALACIÓN, seleccionando DPMS On (activado) u Off (desactivado)..
LUZ AMARILLA INTERMITENTE
Por favor, espere.. La luz amarilla parpadeará durante 4 o 5 segundos tras conectarse el cable de alimentación y durante 45 segundos, aproximadamente, después de entrar en modo de espera mientras la lámpara se enfría.. No se puede encender el proyector de nuevo hasta que la luz amarilla se quede fija..
LUZ ROJA INTERMITENTE
El proyector se ha sobrecalentado.. ¡Apáguelo inmediatamente! Compruebe si las entradas de aire están tapadas o si la temperatura ambiente supera la especificada.. El proyector no puede encenderse de nuevo si no se desenchufa y se vuelve a enchufar el cable de alimentación.. Si la luz roja del proyector sigue parpadeando, tendrá que llevar el aparato para que lo reparen..
LUZ ROJA FIJA
La vida útil de la lámpara ha concluido.. Cambie la lámpara de proyección inmediatamente.. Si no se cambia la lámpara, podría estallar..
NO HAY LUZ
La alimentación no está conectada al proyector..
INDICATORI |
italiano |
|
|
|
|
INDICATORE
La spia accanto al tasto di accensione indica lo stato generale del sistema con il blu, l’arancio e il rosso..
SPIA BLU LAMPEGGIANTE
SPIA BLU FISSA
Proiettore acceso e in funzionamento normale..
SPIA ARANCIO FISSA
Unità in modalità standby; nessuna sorgente collegata, oppure le sorgenti collegate non sono attive o sono spente, attivando perciò la funzione di risparmio energetico (DPMS).. La funzione di risparmio energetico può essere attivata o disattivata nel sottomenu SET UP (Impostazione), DPMS on oppure off..
SPIA ARANCIO LAMPEGGIANTE
Attendere.. La spia arancio lampeggia per un certo periodo di tempo (4 -5 secondi) dopo il collegamento del cavo di alimentazione e, per circa 45 secondi dopo il passaggio alla modalità standby, mentre la lampada si raffredda.. Il proiettore può essere riacceso solo quando la spia arancio ritorna sul fisso..
SPIA ROSSA LAMPEGGIANTE
Il proiettore si è surriscaldato: spegnerlo immediatamente.. Controllare se le prese di aria sono ostruite o se la temperatura ambiente ha superato i valori di specifica.. Il proiettore può essere riacceso solo dopo avere scollegato e ricollegato il cavo di alimentazione.. Se la spia rossa del proiettore continua a lampeggiare, sarà necessario rendere l’unità perché venga sottoposta a manutenzione..
SPIA ROSSA FISSA
La lampada ha raggiunto il tempo limite.. Sostituire immediatamente la lampada di proiezione.. La mancata sostituzione della lampada può causarne l’esplosione..
NESSUNA SPIA
Il proiettore non è collegato all’alimentazione..
INDIKATORER |
norsk |
|
|
|
|
INDIKATOR
Lampen ved siden av av/på tasten viser overordnet status for projektoren med blå, gul og rød farge..
BLINKENDE BLÅTT
Projektoren er på og under oppvarming..
PERMANENT BLÅTT
Projektoren er på og i normal drift..
PERMANENT GULT
Enheten er av (i hvilemodus eller ‘stand-by’) fordi ingen kilder er tilkoblet, eller de tilkoblede kildene er ikke aktive eller de er skrudd av, slik at strømsparingsfunksjonen (DPMS) er aktivert.. Strømsparingsfunksjonen kan skrus av eller på gjennom menysystemet i OPPSETT undermenyen, DPMS av eller på..
BLINKENDE GULT
Vennligst vent.. Det gule lyset vil blinke én gang etter at nettledningen er koblet til (4 - 5 sekunder), og en periode etter at enheten skrus av, mens lampen kjøles ned (omtrent 45 sekunder).. Projektoren kan skrus på igjen når lyset skifter til permanent gult..
BLINKENDE RØDT
Projektoren er overopphetet! Skru av umiddelbart! Sjekk at ventilasjonsåpningene ikke er tildekket og at ikke
omgivelsestemperaturen er høyere enn spesifisert.. Projektoren kan ikke skrus på igjen før nettledningen kobles ut og inn igjen.. Hvis projektoren fortsetter å blinke rødt, må enheten sendes til reparasjon..
PERMANENT RØDT
Lampen er utbrukt eller tenner ikke, eller lampedøren er åpen.. Vennligst skift lampe.. Dersom lampen er utbrukt og ikke byttes, kan den eksplodere..
INTET LYS
Projektoren er ikke tilkoblet strøm
21
REMOTE CONTROL |
english |
|
|
|
|
The remote control allows flexible access to the projector settings, either through direct keys, or through the menu system.. The remote control is backlit for use in dark environments.. It also has a data-jack that allows for wired connection to the projector.. When the wire is connected, the IR (infra-red) beam and internal batteries are switched off..
The remote control can be operated either in ‘broadcast mode’, or ‘individual mode’.. When several projectors are in use in an installation, individual control may be convenient.. Individual control is available either by wired remote control, using the data-jack, or by using an individual number code.. For individual control, first set the individual RC ID code using the projector menu system, see the SETTINGS sub menu.. Then, to select a specific projector to control, first press the
‘*’ button in the lower keypad area, then the code as set in the target projector.. A code can be in the range ‘0’.. .’255’.. ‘0’ is reserved for broadcast.. To select another target, repeat the process by pressing ‘*’ and a new code.. To exit individual control, press ‘*’’*’ twice or press ‘*’ and ‘0’..
POWER
Switches the projector between on and standby modes..
AUTO
Adjusting the projector to display a correct image, including position, width, height and overall stability..
INFO
Displays source and projector status on screen..
BACKLIGHT
Switches the backlight on and off.. The backlight will switch off automatically after ten seconds..
BRIGHT
Adjusts image brightness..
CONTRAST
Adjusts image contrast..
COLOR
Adjusts color saturation of the image..
C-VIDEO
Selects the composite video input as signal source..
22
FERNBEDIENUNG |
deutsch |
|
|
|
|
Die Fernbedienung bietet einen flexiblen Zugriff auf die Projektoreinstellungen, entweder über die Direkttasten oder über das Menüsystem.. Die Fernbedienung ist für ihre Verwendung bei Dunkelheit beleuchtet.. Sie verfügt daneben über eine Datenbuchse, über die eine Kabelverbindung zum Projektor möglich ist.. Ist das Kabel angeschlossen, werden der IR-Strahl (Infrarot) und die internen Batterien abgeschaltet.. Die Fernbedienung kann auch
zur Steuerung von Präsentationen verwendet werden, wobei die Mausfunktionen nachgeahmt wird (links, rechts Tasten und Pfeiltasten)..
Die Fernbedienung kann im ‚Rundsende-‘ oder im ‚Einzelbetrieb‘ eingesetzt werden.. Werden in einer Montage mehrere Projektoren verwendet, ist möglicherweise die Einzelsteuerung angebrachter..
Die Einzelsteuerung erfolgt entweder über die über die Datenbuchse verkabelte Fernbedienung oder mit Hilfe eines individuellen Zahlencodes.. Zur Einzelsteuerung muss an erster Stelle im Menüsystem des Projektors, im Untermenü EINSTELLUNGEN,
der individuelle RC-ID-Code festgelegt werden.. Zur Auswahl eines konkreten Projektors wird zuerst die Taste ‚*‘ auf dem unteren Tastenfeld betätigt und dann der für den Zielprojektor festgelegte Code eingegeben.. Ein Code kann im Bereich von ‚0‘.. .‘255‘ liegen.. ‚0‘ ist für den Rundsendebetrieb reserviert.. Um ein anderes Ziel zu wählen, wiederholen Sie den Vorgang durch Betätigen der Taste ‚*‘ und Eingabe eines neuen Codes.. Um die Einzelsteuerung zu verlassen, drücken Sie zweimal auf ‚*‘‘*‘ oder auf ‚*‘ und ‚0‘..
POWER
Schaltet den Projektor zwischen an und den Standby-Betriebsarten um..
AUTO
Einstellung des Projektors, damit das Bild korrekt angezeigt wird; dazu gehören die Position, Breite, Höhe und allgemeine Stabilität..
INFO
Auf dem Display werden die Quelle und der Projektorstatus angezeigt..
BACKLIGHT
Schaltet die Hintergrundbeleuchtung an bzw.. aus.. Die Hintergrundbeleuchtung schaltet nach zehn Sekunden automatisch ab..
BRIGHT
Passt die Helligkeit des Bildes an..
CONTRAST
Passt den Kontrast des Bildes an..
COLOR
Passt die Farbsättigung des Bildes an..
C-VIDEO
Wählt den Videokomponenten-Eingang als aktive Signalquelle..
TELECOMMANDE |
francais |
|
|
|
|
La télécommande permet un accès flexible aux réglages du projecteur, avec une des touches directes ou avec le menu.. La télécommande est rétro-éclairée pour être utilisée dans un endroit sombre.. Elle possède aussi une prise jack qui prend en compte la connexion branchée du projecteur.. Quand le fil est connecté, le faisceau Infra Rouge et les piles internes sont
éteintes.. La télécommande peut aussi être utilisée pour contrôler des présentations en réduisant les fonctions de la souris (touches GAUCHE, DROITE et touches flèches)..
La télécommande peut fonctionner aussi bien en ‘mode diffusion générale’ qu’en ‘mode individuel’ Quand plusieurs projecteurs sont utilisés dans une installation, la commande individuelle peut être pratique La commande individuelle est disponible avec n’importe quelle télécommande reliée, en utilisant la prise jack ou un code individuel.. Pour la commande individuelle, installez d’abord le code individuel RC ID dans le menu du projecteur,
au sous-menu PARAMÈTRES.. Puis, pour choisir un projecteur précis à commander, appuyez d’abord sur le bouton ‘*’ dans le bas du clavier, puis reportez le code dans la cible du projecteur.. Un code peut être compris entre ‘0’ et ‘255’.. ’0’ est réservé à la diffusion générale Pour choisir une autre cible, répétez l’opération en appuyant sur ‘*’ et avec un nouveau code.. Pour sortir de la commande individuelle, appuyez ‘*’*’ 2 fois ou ‘*’ et ‘0’..
POWER
Alterne le projecteur entre les modes on et veille..
AUTO
Réglage du projecteur pour donner une image correcte, en ce qui concerne la position, la largeur, la hauteur et la stabilité d’ensemble..
INFO
Affiche sur l’écran les états de la source et du projecteur..
BACKLIGHT
Allume ou éteint le contre-jour.. Le contre-jour s’éteint automatiquement après 10 secondes
BRIGHT
Ajuste la luminosité de l’image..
CONTRAST
Ajuste le contraste de l’image..
COLOR
Ajuste la saturation de couleur de l’image..
C-VIDEO
Sélectionne l’entrée composite vidéo comme signal source..
MANDO A DISTANCIA |
español |
|
|
|
|
El mando a distancia permite un acceso flexible a los ajustes del proyector, bien a través de las teclas directas o del sistema de menús.. El mando a distancia tiene una luz de fondo para su uso en entornos oscuros.. También tiene un conector de datos para la conexión cableada al proyector.. Cuando el cable está conectado, el rayo IR (infrarrojo) y las pilas internas se desactivan.. El mando a distancia también se puede utilizar para controlar presentaciones imitando la funcionalidad del ratón (teclas IZQUIERDA, DERECHA y teclas de dirección)..
Elmandoadistanciapuedefuncionaren“mododeradiodifusión”, o en “modo individual”.. Cuando en una instalación hay varios proyectores en uso, el control individual puede resultar más cómodo.. El control individual está disponible bien mediante un mando a distancia con cable, utilizando el conector de datos, o mediante un código numérico individual.. Para el control individual, primero ajuste el código de ID del mando a distancia (RC ID) utilizando el sistema de menús del proyector, consulte el submenú AJUSTES.. Luego, para seleccionar un proyector concreto para controlarlo, primero pulse el botón ‘*’ en la parte inferior del teclado, luego introduzca el código fijado para el proyector elegido.. El código puede variar entre “0” y “255”.. El “0” está reservado para la radiodifusión.. Para seleccionar otro proyector, repita el proceso pulsando ‘*’ y un nuevo código.. Para salir del control individual, pulse ‘*’’*’ dos veces o pulse ‘*’ y “0”..
POWER
Conmuta el proyector entre los modos de encendido y espera..
AUTO
Ajusta el proyector para mostrar una imagen correcta, incluyendo posición, anchura, altura y estabilidad general..
INFO
Muestra el estado de la fuente y del proyector en la pantalla..
BACKLIGHT
Enciende y apaga la luz de fondo.. La luz de fondo se apagará automáticamente al cabo de diez segundos..
BRIGHT
Ajusta el brillo de la imagen..
CONTRAST
Ajusta el contraste de la imagen..
COLOR
Ajusta la saturación del color de la imagen..
C-VIDEO
Selecciona la entrada de vídeo compuesto como fuente de señales..
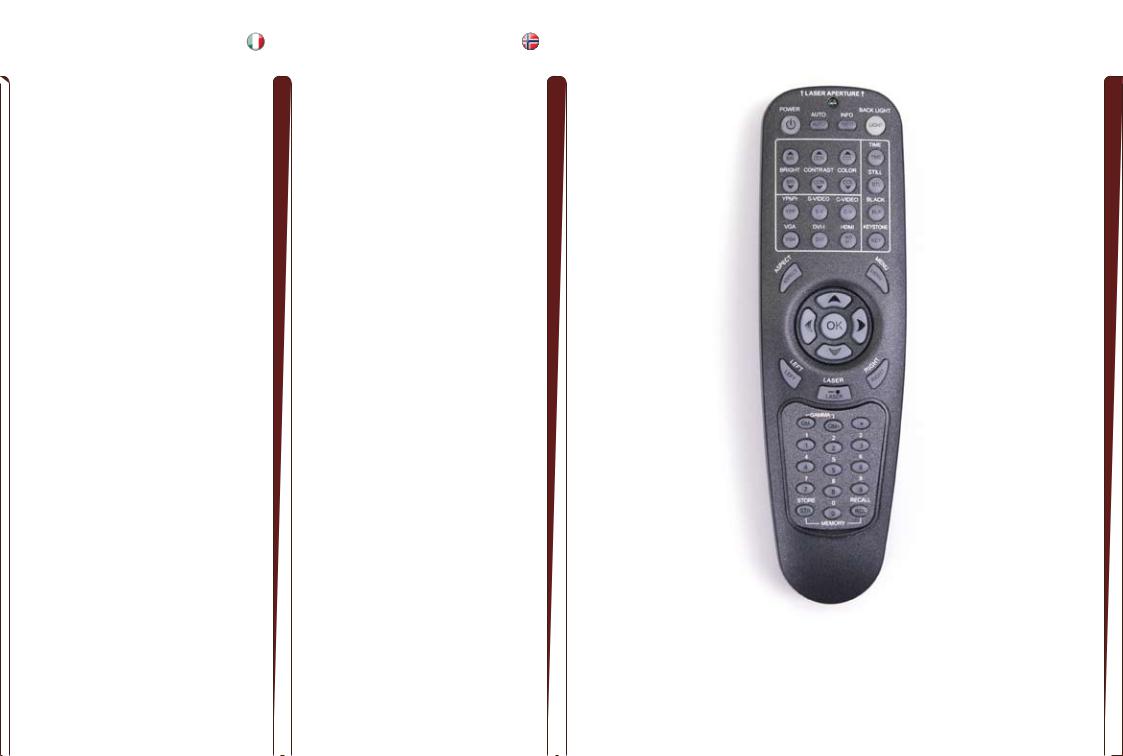
TELECOMANDO |
italiano |
|
|
|
|
Il telecomando consente l’accesso flessibile alle impostazioni del proiettore, tramite i tasti oppure il sistema dei menu.. Il telecomando è retroilluminato e può essere utilizzato in condizioni di scarsa
luminosità.. È provvisto anche di un jack dati che consente di collegarlo al proiettore mediante un filo.. Quando il filo è attaccato, il fascio IR (infrarossi) e le batterie interne sono spenti.. Il telecomando può essere utilizzato anche per controllare le presentazioni, e in questo caso va utilizzato come se fosse un mouse (tasti SINISTRA e DESTRA e tasti con le frecce)..
Il telecomando può essere azionato in “modalità trasmissione” oppure in “modalità singola”.. Quando si utilizzando diversi proiettori in un’installazione, può essere conveniente controllarli uno per uno.. Il controllo individuale è disponibile mediante telecomando col filo, tramite il jack dati oppure usando un codice numerico individuale..
Per il controllo individuale, impostare prima il codice ID RC individuale usando il sistema dei menu del proiettore; vedere il sottomenu IMPOSTAZIONI.. Poi, per selezionare uno specifico proiettore da controllare, premere prima il pulsante “*” nell’area inferiore del tastierino e poi il codice impostato nel proiettore di destinazione..
Il codice può essere compreso tra “0” e “255”.. “0” è riservato alle trasmissioni.. Per selezionare una destinazione diversa, ripetere il processo premendo “*” e un nuovo codice.. Per uscire dal controllo individuale, premere due volte “*””*” oppure premere “*” e “0”..
POWER
Passa il proiettore dalla modalità di accensione a quella di standby..
AUTO
Consente di regolare il proiettore per visualizzare l’immagine in modo corretto, incluso posizione, larghezza, altezza e stabilità generale..
INFO
Visualizza a schermo lo stato del proiettore e la sorgente..
BACKLIGHT
Accende e spegne la retroilluminazione.. La retroilluminazione si spegne automaticamente dopo dieci secondi..
BRIGHT
Regola la luminosità dell’immagine..
CONTRAST
Regola il contrasto dell’immagine..
COLOR
Regola la saturazione del colore dell’immagine..
C-VIDEO
Seleziona l’ingresso video composite come sorgente di segnale..
FJERNKONTROLL |
norsk |
|
|
|
|
Fjernkontrollen gir tilgang til projektorens innstillinger, enten gjennom direkte-taster eller via menysystemet.. Fjernkontrollen har baklys slik at tastene kan leses i mørke.. Den har også en kontakt som muliggjør tilkobling til projektoren ved hjelp av ledning.. Når ledningen er tilkoblet, vil IR (infrarød) strålen og batteriene bli koblet ut.. Fjernkontrollen kan også benyttes for å styre presentasjoner ved hjelp av LEFT, RIGHT og piltastene, gitt at projektor og PC er forbundet ved hjelp av USB kabel..
Fjernkontrollen kan benyttes for å styre alle projektorer innenfor rekkevidde samtidig, eller den kan styre individuelt valgte projektorer.. Når flere projektorer inngår i en installasjon kan det være hensiktsmessig å styre dem individuelt.. Individuell styring er mulig enten ved hjelp av ledning eller ved å benytte individuell fjernkontrollkode.. For styring med individuell fjernkontrollkode (RC ID kode) må RC ID koden settes i projektorens menysystem i INNSTILLINGER undermenyen.. Velg deretter projektor med fjernkontrollen ved å trykke på ‘*’ tasten på den nedre delen av
tastaturet, deretter koden som er satt i menyen.. Koden kan være i området ‘0’.. .’255’.. ‘0’ betyr ‘alle’.. For å styre en annen enhet, trykk ‘*’ igjen og deretter ny kode.. For å avslutte individuell styring, trykk ‘*’’*’ to ganger, eller trykk ‘*’ og ‘0’..
POWER
Skrur projektoren på og av (hvilemodus)..
AUTO
Justerer projektoren til å vise et korrekt bilde, inkludert posisjon, bredde, høyde, kontrast, lysstyrke og stabilitet..
INFO
Viser informasjon om projektoren og tilkoblet kilde..
BACKLIGHT
Skrur baklyset på og av.. Baklyset skrur seg av automatisk etter 10 sekunder..
BRIGHT
Justerer lysstyrken i bildet..
CONTRAST
Justerer kontrasten i bildet..
COLOR
Justerer fargemetningen i bildet..
C-VIDEO
Velger kompositt video som kilde..
23

REMOTE CONTROL |
english |
|
|
|
|
S-VIDEO
Selects the super video input as signal source..
YPbPr
Selects component video input..
DVI-D
Selects the DVI input..
HDMI
Selects the HDMI input..
VGA
Selects the VGA input..
BLACK
Toggles the projected image on and off.. The lamp is not shut off..
STILL
Toggle function, locking the projected image on and off..
TIME
Displays date and time.. Set the date and time in the MENU system, SETTINGS sub menu..
KEYSTONE
Press KEYSTONE to activate the electronic trapezoid correction, adjust with arrow keys..
NOTE: THIS FUNCTION DOES NOT APPLY FOR WUXGA PRODUCTS.
ASPECT
Cycles through the aspect ratios available with the current source..
MENU
Toggles the menu system on and off, and navigates one step backward in the menu system..
ARROW KEYS
Use the arrow keys to navigate in the menu system and other adjustments..
OK
Press OK to confirm selected option in menu..
LASER
Activates the built-in laser pointer.. CAUTION! Do not point laser beam at people.. Do not stare into laser beam..
24
FERNBEDIENUNG |
deutsch |
|
|
|
|
S-VIDEO
Wählt den Super-Video-Eingang als aktive Signalquelle..
YPbPr
Wählt den Signalkomponenten-Eingang..
DVI-D
Wählt den DVI-Eingang..
HDMI
Wählt den HDMI-Eingang..
VGA
Wählt den VGA-Eingang..
BLACK
Schaltet das Projektorbild an bzw.. aus.. Die Lampe wird nicht ausgeschaltet..
STILL
Umschaltfunktion; blendet das Projektorbild ein bzw.. aus..
TIME
Blendet das Datum und die Uhrzeit ein.. Die Einstellung von Datum und Uhrzeit erfolgt im MENÜ-System, im Untermenü EINSTELLUNGEN..
KEYSTONE
Drücken Sie KEYSTONE, um die elektronische Tonnenentzerrung einzuschalten.. Die Pfeiltasten dienen zum Einstellen..
HINWEIS: DIESE FUNKTION STEHT FÜR WUXGA-PRODUKTE NICHT ZUR VERFÜGUNG.
ASPECT
Durchläuft die verschiedenen verfügbaren Darstellungsverhältnisse für die gegenwärtige Quelle..
MENÜ
Öffnet bzw.. schließt das Menüsystem..
PFEILTASTEN
Mit Hilfe der Pfeiltasten können Sie sich durch das Menüsystem bewegen und andere Einstellungen vornehmen..
OK
Drücken Sie auf OK, um die gewählte Option in einem Menü zu bestätigen..
LASER
Schaltete den integrierten Laserpointer an.. VORSICHT! Nicht den Laserstrahl nicht auf Menschen richten.. Nicht in den Laserstrahl blicken
TELECOMMANDE |
francais |
|
|
|
|
S-VIDEO
Sélectionne l’entrée super vidéo comme signal source..
YPbPr
Sélectionne l’entrée composant vidéo..
DVI-D
Sélectionne l’entrée DVI
HDMI
Sélectionne l’entrée HDMI..
VGA
Sélectionne l’entrée VGA..
BLACK
Bascule l’image projetée sur on et off.. La lampe n’est pas éteinte..
STILL
Fonction bascule, pour verrouiller ou déverrouiller l’image projetée..
TIME
Affiche la date et l’heure.. Règle la date et l’heure dans le MENU système, sous-menu PARAMÈTRES..
KEYSTONE
Appuyez sur KEYSTONE pour activer la correction trapézoïdale électronique.. Ajustez à l’aide des touches fléchées..
NOTE : Cette fonction ne s’applique pas aux produits de norme wuxga
ASPECT
Parcourt les formats d’image disponibles avec la source courante.
MENU
Bascule le menu sur ON et OFF..
TOUCHES FLECHE
Utilisez les touches flèches pour parcourir le menu système et les autres réglages..
OK
Appuyez sur OK pour confirmer l’option sélectionnée dans le menu..
LASER
Active le pointeur laser intégré.. ATTENTION! Ne pas braquer le faisceau laser vers quelqu’un.. Ne pas regarder fixement dans le laser faisceau..
MANDO A DISTANCIA |
español |
|
|
|
|
S-VIDEO
Selecciona la entrada de súper vídeo como fuente de señales..
YPbPr
Selecciona la entrada de vídeo componente..
DVI-D
Selecciona la entrada DVI..
HDMI
Selecciona la entrada DVI..
VGA
Selecciona la entrada VGA..
BLACK
Activa la imagen proyectada.. La lámpara no se apaga..
STILL
Función de bloqueo y desbloqueo de la imagen proyectada..
TIME
Muestra la fecha y la hora.. Fije la fecha y la hora en el submenú AJUSTES del sistema de MENÚS..
KEYSTONE
Pulse KEYSTONE para activar la corrección trapezoidal electrónica; ajuste mediante las teclas de flecha..
OBSERVE: ESTA FUNCIÓN NO EXISTE EN LOS PRODUCTOS WUXGA.
ASPECT
Realiza un ciclo de las relaciones de anchura-altura disponibles con la fuente actual..
MENU
Activa y desactiva el sistema de menús..
TECLAS DE DIRECCIÓN
Use las teclas de dirección para navegar por el sistema de menús y otros ajustes..
OK
Pulse OK para confirmar la opción de menú seleccionada..
LASER
Activa el puntero láser integrado.. ¡PRECAUCIÓN! No apunte el rayo láser hacia las personas.. No mire al rayo láser..
 Loading...