Pro-ject Audio 6.1 Owners manual

INSTRUCTIONS FOR USE
PRO-JECT 6.1

2
PRO-JECT 6.1
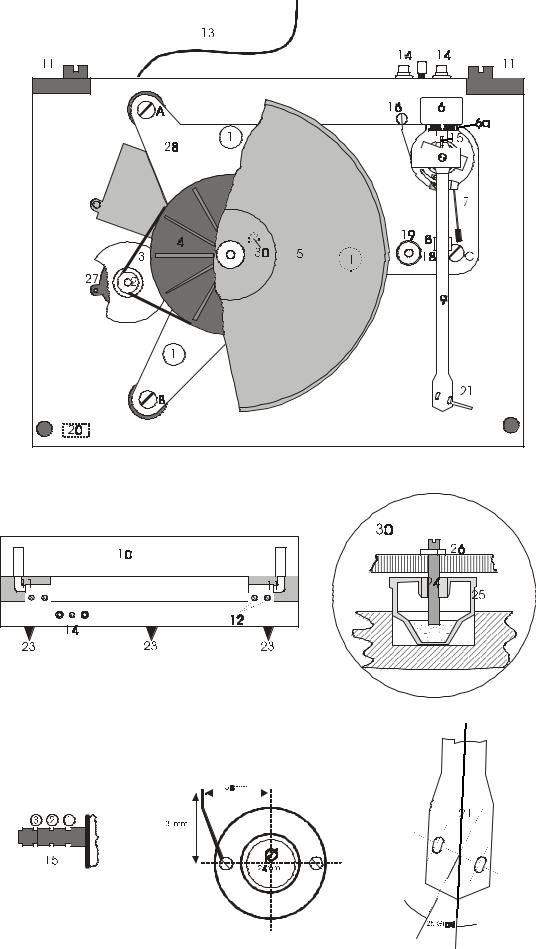
Controls, features and connections
1 Subchassis transport screw
2 Drive pulley
3 Drive belt *
4Hub
5Glass and metal platter with felt mat *
6 Tonearm counterweight * 6a Downforce scale
7 Tonearm lift lever
8/18 Tonearm rest and removable transport lock 9 Tonearm tube
10 Lid *
11 Lid hinges
12 Hinge fasteners
14 Phono output sockets and earth connection
15Anti-skating weight adjustment scale
16Anti-skating weight *
17Anti-skating weight support hoop
19Spirit level
20Mains switch
22Headshell with optional finger lift *
23Height-adjustable spike feet
24Subchassis damper screw *
25Subchassis damper assembly
26Subchassis damper screw counter nut *
27Motor
28Subchassis
30Dynamic subchassis damper assembly A, B, C Subchassis leveling screws Screw-down record clamp (not shown) *
Dear music lover,
thank you for purchasing a PRO-JECT AUDIO record player.
Our turntables set new standards and show how audiophile quality analogue reproduction may be achieved with simple and cost effective means. The success of PRO-JECT record players and many customer's comments have lead us to develop a mechanically more advanced model based on the PRO-JECT 2. The PRO-JECT 6.1 is characterized by its use of a low-resonance sandwich platter and subchassis for improved decoupling.
In order to achieve maximum performance and reliability with this record player you should study these instructions for use carefully.
During assembly and adjustment of the deck small parts could be lost if not carefully placed in a suitable receptacle.
Before starting assembly make yourself acquainted with the parts listed above and correspondingly numbered in the technical drawings above. Separately packed items are marked with an asterisk *.
3
 Loading...