

Page 1
1 progress
User manual
Istruzioni per l'uso
Instrucciones de uso
Built-in under
Cucina da incasso
Horno empotrado
PHN 1110
Page 2

2 progress
Contents
Warnings and important safety instructions ...................................................................... 3
Description of the appliance ............................................................................................. 5
Operation ......................................................................................................................... 6
Before using for the first time............................................................................................ 8
Using the oven ................................................................................................................. 9
Cooking tables ............................................................................................................... 12
Cleaning and maintenance ............................................................................................. 14
Troubleshooting ............................................................................................................. 19
Technical data ................................................................................................................ 20
Instructions for the installer............................................................................................. 21
Installation instructions ................................................................................................... 23
Customer service ........................................................................................................... 24
Applicable Directives
Safety information
Step-by-step instructions
)
Practical tips
Environmental information
This appliance conforms to the following EEC Directives:
- 2006/95 (Low-voltage Directive);
- 89/336 (EMC Directive);
- 93/68 (General Directive);
and subsequent amendments.
MANUFACTURER:
ELECTROLUX HOME PRODUCTS ITALY S.p.A.
Viale Bologna, 298
47100 FORLÌ (Italy)
Page 3

3 progress
Warnings and important safety instructions
Always keep these user instructions with the appliance. If the appliance is given
or sold to a third party, or if you move house and leave the appliance in a former
residence, it is extremely important that the new owner is provided with these user
instructions.
These warnings are provided for the safety of the users and co-residents. So
read them carefully before connecting and/or using the appliance.
Installation
· Installation must be undertaken by a
qualified engineer in compliance with the
current regulations. The individual steps
for installing the appliance are described
under the instructions for the installer.
· Installation and connection of the appli-
ance should only be carried out by a
qualified engineer who will be aware of
the currently applicable Directives.
· Any modifications to the power supply,
which may be necessary to install the ap-
pliance, must also be carried out by a
qualified engineer.
· Depending on the version, this oven has
been manufactured as a single appliance
or as a combination appliance with
electric hotplate for connection to 1, 2 or
3 phases (without groups) of a 230V
supply. Connection to multiple phases
without a neutral (400V) will lead to
destruction of the oven and the
connected hotplates.
Operation
· This oven is designed for food prepara-
tion; never use it for any other purpose.
· Use the oven with care. Owing to the ex-
treme heat generated by the heating ele-
ments, the oven shelf and other parts be-
come very hot.
· If, for any reason, aluminium foil is to be
used in food preparation, it should never
come into direct contact with the floor of
the oven.
· When cleaning the oven, proceed with
care: never spray anything onto the
grease filter (if fitted), the heating ele-
ments or the thermostat sensor.
· It is dangerous to modify this appliance or
any of its features.
· During baking, roasting and grilling the
oven window and other parts become
very hot. Children should therefore be
kept away from the appliance. When
connecting other electrical appliance to
sockets near the oven, ensure that the
cables do not come into contact with hot
cooking surfaces or become jammed in
the hot oven door.
· Always use oven gloves to remove fireresistant hot dishes and pans from the
oven.
· Regular cleaning prevents deterioration
of the surface materials.
· Before cleaning the oven, either switch
the power off or pull out the plug.
· Ensure that the oven is switched to the
“OFF” position when not in use.
· The appliance should never be cleaned
using a superheated steam or steam jet
cleaner.
· Never use abrasives or sharp metal
scrapers. You might scratch the door
panels and cause the glass to shatter.
People safety
· This appliance is intended for use by
adults. It is dangerous to allow children to
use or play with it.
· Keep children away from the oven while it
is in use. Even when you have switched
the oven off, the door remains hot for
some time.
· This appliance is not intended for use by
children or other persons whose physical,
Page 4

4 progress
sensory or mental capabilities or lack of
experience and knowledge prevents
them from using the appliance safely
without supervision or instruction by a
responsible person to ensure that they
can use the appliance safely.
Disposal
Packaging material
· The packaging materials are environmentally friendly and recyclable. The plastic
parts are coded, e. g. >PE>, >PS< etc.
Dispose of the packaging materials according to their code in the collection bins
provided at communal waste disposal
centres.
Old appliances
· The symbol
on the product or on its
packaging indicates that this product
may not be treated as household waste.
Instead it should be taken to the
appropriate collection point for the
recycling of electrical and electronic
equipment. By ensuring this product is
disposed of correctly, you will help
prevent potential negative consequences
for the environment and human health,
which could otherwise be caused by
inappropriate waste handling of this
product. For more detailed information
about recycling of this product, please
contact your local council, your
household waste disposal service or the
shop where you purchased the product.
Warning: Before disposing of an old
appliance, ensure it no longer represents any danger by making it unusable.
To do so, disconnect from the mains
and remove the power cable from the
appliance.
Customer service
· The appliance must only be serviced and/
or repaired by our authorised service
centres. Only original replacement parts
may be used.
· Never attempt to repair the appliance
yourself in the event of a malfunction or
damage. Repairs carried out by untrained
persons may cause damage or injury.
Page 5

Description of the appliance
5 progress
1
12
1. Control panel
2. Knob switch for front left hotplate
3. Knob for left rear hotplate
4. Temperature regulator indicator
5. Temperature regulator
6. Oven regulator
4
7
986532
10
11
7. Mains on indicator
8. Knob switch for right rear hotplate
9. Knob for right front hotplate
10. Ventilations slots for cooling fan
11. Interior light
12. Rating plate
Accessories
Baking tray
Oven shelf
Page 6

6 progress
Operation
Oven regulator
0 The oven is switched off
Top and bottom heating element
Top oven element
Bottom oven element
Mains on indicator
The mains on indicator illuminates when
the oven regulator is set.
Temperature regulator
Turn the temperature controller anticlockwise to select temperatures between
50°C and 250°C.
Temperature regulator indicator
This indicator illuminates when the temperature regulator is turned. The indicator will
remain illuminated until the required
temperature is reached. It then cycles on and
off to indicate that the temperature is being
maintained.
Control knobs for hob
The selector knobs for the four hob heating elements are located on the switch panel.
The hotplates are controlled by a 9-position
switch, from which the following working levels can be used:
0 = OFF
1 = Minimum
9 = Maximum
0
Page 7

Dual-circuit switching
(see list of appliances in the “Technical data”
section)
The two heating circuits are switched on
by turning the cooking zone knob from posi-
tion 9 to position
click is heard. Both heating circuits are now
switched on simultaneously. Then set the required level (turn the knob anti-clockwise).
Never leave the appliance unsupervised when preparing food
with oil or fat, like chips, for example, as oil and fat can easily
catch fire if overheated.
Safety thermostat
To prevent dangerous overheating
(through incorrect use of the appliance or
defective components), the oven is fitted with
a safety thermostat, which interrupts the
power supply. The oven switches back on
again automatically when the temperature
drops.
Should the safety thermostat trigger due
to incorrect use of the appliance, simply remedy the error after the oven has cooled down.
However, if the thermostat has been triggered by a faulty component, please contact
customer services.
Cooling fan
(clockwise); an audible
The oven is equipped with a cooling fan,
which cools the control panel, the operating
knobs and the oven door handle. The cooling
fan is activated automatically when the oven
is in use. The warm air is blown through the
opening next to the oven door handle. The
cooling fan shuts down when the oven
function switch is in the "
0" position.
7 progress
Page 8

8 progress
Before using for the first time
Remove all packaging materials in
and outside the oven before use.
Before using for the first time, the empty
oven should be heated up.
During this time, an unpleasant odour
may be emitted. This is absolutely normal. It
is caused by manufacturing residues.
Ensure that the kitchen is well
ventilated.
)
1. Turn the oven regulator to top and
bottom heating
2. Turn the temperature regulator to
250°C.
3. Open a window for ventilation.
4. Allow the oven to run empty for
approximately 45 minutes.
Then let the oven cool down. Now
dampen a soft cloth with warm water
and mild washing-up liquid and clean
the oven cavity.
Before using for the first time,
carefully wash the oven accessories
as well.
.
Always grasp the handle in the
middle to open the door.
Page 9

Using the oven
Important! - Do not line the oven with
aluminium foil and do not place a
baking tray etc. on the oven floor as
the oven enamel may be damaged by
the build up of heat. Always place
dishes and pans, heat-resistant dishes
and pans and aluminium sheets on
the shelf inserted in one of the shelf
runners. As food is heated, steam is
released as in a kettle. When the
steam comes into contact with the
glass in the oven door, it condenses
and creates water droplets.
To reduce condensation, always
preheat the empty oven for 10 minutes.
We recommend you wipe the water
droplets away after every cooking process.
The oven door must be closed
during cooking.
Open the oven door with care. Never
let the oven door ”fall open“, but use
the door handle until the door is
completely opened.
The oven has four shelf levels.
The shelf positions are counted from
the floor of the oven upwards, as
shown in the diagram.
It is essential that the shelves are
inserted properly (see diagram).
Never put dishes and pans directly on
the oven floor.
9 progress
4
3
2
1
Page 10

10 progress
Top and bottom heating element
1. Turn the oven regulator to the required
function
.
2. Turn the temperature regulator to the
required temperature.
- Heat circulates best around the middle
shelf level. If foods should be browned
underneath, simply select a lower shelf
level. If the food is to be browned on the
top, choose a higher shelf level.
- The material and finish of the baking tray
and the dishes used will affect the degree
of base browning. The bottom of dishes
cooked in enamelled, dark, heavy and
uncoated tins and cookware will brown
more than those in glass, shiny
aluminium or polished steel containers as
these reflect the heat and therefore
permit only minimum browning on the
underside.
- Place dishes in the middle shelf position
to get even browning.
- Always use baking trays of adequate size
so that no liquids can leak on to the oven
floor. This will also save on cleaning.
- Never put dishes, tins or trays directly on
to the oven floor as this becomes very hot
and damage may occur. On this setting,
heat is generated by the upper and lower
heating elements. You therefore only
require one shelf level for the cooking
process. This setting is particularly
suitable for dishes which must also be
browned underneath, like quiches and
pies.
This setting is also excellent for lasagne
and other dishes cooked au gratin, which
have to be browned on top.
Bottom oven element
1.1.
1. Turn the oven regulator to switch on the
1.1.
oven
.
2. Turn the temperature regulator to the required temperature.
This function is particularly useful when
pastry has to be baked blind. It can also be
used for quiches and pies because it guarantees that the pastry base is cooked through.
The temperature regulator LED lights
up until the correct temperature has
been reached. It then cycles on and off
to indicate that the temperature is being
maintained.
Top oven element
Use this function to brown off cooked
dishes, such as lasagnes or cauliflower
cheese.
Page 11

Practical tips
Baking:
Most baking is done at a medium
temperature (150°C - 200°C). The oven must
therefore be preheated for about 10 minutes.
Do not open the oven door before 3/4 of
the baking time has expired.
Short-crust pastry is baked in a springform tin or on a tray for up to 2/3 of the baking
time and then garnished before being fully
baked. This further baking time depends on
the type and amount of topping or filling.
Sponge mixtures must be of slow dropping
consistency. Too much liquid would prolong
the baking time unnecessarily.
If two baking trays with pastries or biscuits
are inserted into the oven at the same time,
there must be a gap of one shelf level between
the trays.
If two loaded baking trays are inserted in
the oven at the same time, the positions of the
top and bottom trays must be swapped and
turned about 2/3 through the baking time.
Roasting:
Do not roast joints weighing less than 1
kg. Smaller pieces could dry out when
roasting. Dark meat that should be well
cooked on the outside but remain medium to
rare on the inside must be roasted at a higher
temperature (200°C - 250°C).
White meat, poultry and fish, on the other
hand, require a lower temperature (150°C 175°C). For shorter cooking times, the
ingredients for sauces are added to the
roasting tin right at the beginning. Otherwise
add them in the last half hour.
You can use a spoon to test whether the
meat is cooked: If it makes no indent, the
meat is cooked through. Roast beef and fillet
of beef, which should remain pink inside,
must be roasted at a higher temperature for a
shorter time.
If meat is to be cooked directly on the
oven shelf, insert the roasting pan in the shelf
level below to catch the juices.
11 progress
Before carving, leave the joint to rest for
at least 15 minutes, so that the meat juices
do not run out.
To reduce the build up of smoke in the
oven, it is recommended to pour a little water
in the roasting pan. To prevent condensation
forming, add water several times. The plates
can be kept warm in the oven at minimum
temperature until required for serving.
Important!
Do not line the oven with
aluminium foil and do not place
baking trays, cookware, etc. on
the oven floor, as the heat that
builds up will damage the oven
enamel.
Cooking times
Cooking times may vary, depending on
the composition, ingredients and amount of
liquid in the individual dishes.
Make a note of the settings you used
during your first cooking and roasting
attempt so that you can record your
experiences for the next time you want to
prepare the same foods.
Based upon your own experiences, you
will be able to modify the values given in the
tables.
Page 12

12 progress
Baking charts
Top and bottom oven element
Timings do not include pre-heating.
Always pre-heat the empty oven for 10 minutes.
(g.)
Weight
TYPE OF DISH
Temperature °C
Shelf level
44
4
44
33
3
33
22
2
22
11
1
11
Cooking
time in min.
CAKES
Sponge mixture 170 1 45-60
Shortcrust pastry 170 2 20-30
Buttermilk cheesecakes 160 1 60-80
Apple cakes 180 1 40-60
Strudel 175 2 60-80
Jam tart 175 2 30-40
Sponge cakes 175 1 45-60
Biscuits 175 1 30-40
Stollen 170 1 40-60
Cake 170 1 50-60
Small cakes 175 2 25-35
Biscuits 160 3 20-30
Meringue 100 2 90-120
Small raised pastries 190 2 12-20
Cream puffs/eclairs 200 2 15-25
BREAD AND PIZZA
1000 White bread 190 1 40-60
500 Rye bread 190 2 30-45
500 Rolls 200 2 20-35
250 Pizza 210 1 15-30
BAKES
Pasta bake 200 2 40-50
Vegetable flan 200 2 45-60
Quiches 200 2 35-45
Lasagne 180 2 45-60
Cannelloni 200 2 40-55
The temperatures quoted are guidelines. and must be adjusted to personal requirements
where necessary.
Page 13

Top and bottom heat
Timings do not include pre-heating.
Always pre-heat the empty oven for 10 minutes.
13 progress
(g.)
Weight
TYPE OF DISH
Temperature °C
Shelf level
44
4
44
33
3
33
22
2
22
11
1
11
Cooking
time in min.
MEAT
1000 Beef 190 2 50-70
1200 Pork 180 2 100-130
1000 Veal 190 2 90-120
1500 Roast beef, medium 210 2 50-60
1500 English roast beef 210 2 60-70
1500 Roast beef, well done 210 2 70-80
2000 Shoulder of pork 180 2 120-150
1200 Lamb 190 2 110-130
1000 Chicken 190 2 60-80
5000 Turkey 180 2 210-240
1500 Duck 175 2 120-150
3000 Goose 175 2 150-200
1200 Hare 190 2 60-80
1200 Knuckle of pork 180 2 100-120
Meatloaf 180 2 40-60
GAME
1500 Saddle of hare 190 2 150-200
800 Pheasant 190 2 90-120
Fish
1200 River trout / bream 190 2 30-40
1500 Tuna/salmon 190 2 25-35
The temperatures quoted are guidelines. and must be adjusted to personal requirements
where necessary.
Page 14

14 progress
Cleaning and maintenance
Before cleaning, switch the oven
off and let it cool down.
The appliance must not be
cleaned with a superheated
steam cleaner or a steam jet
cleaner.
Important: Before cleaning the appliance
must be disconnected from the mains.
To prolong the service life of your
appliance, follow the cleaning procedure
below:
- Only perform when the oven has cooled
down.
- Clean the enamelled parts with soapy
water.
- Do not use abrasive cleaners.
- Dry the stainless steel parts and glass with
a soft cloth.
- If there are stubborn stains, use
commercially available cleaning agents for
stainless steel or warm vinegar.
The oven’s enamel is extremely durable
and stain-resistant. Nevertheless, hot fruit
juices (lemons, plums etc.) can leave dull,
rough stains if left on the surface of the
enamel. However, such marks in the brightly
polished surface of the enamel do not affect
the operation of the oven. Clean the oven
thoroughly after every use. Dirt is then easy to
clean off. It prevents dirt being burnt on.
External cleaning
Regularly wipe over the control panel,
oven door and door seal using a soft cloth
well wrung out in warm water to which a little
liquid detergent has been added.
To avoid damage to the oven glass door,
never use any of the following:
• Household cleaners and bleaches
• Impregnated cleaning pads that are
unsuitable for non-stick coated
saucepans.
• Brillo/Ajax pads or steel wool pads
• Chemical oven cleaners or aerosols
• Rust removers
• Stain removers for sinks / wash basins
Clean the outer and inner surfaces of the
glass door using warm soapy water. If the
inner surface of the glass door is very dirty, use
cleaning products such as “Hob Brite”. Do not
use paint scrapers to remove soilage.
Oven cavity
It is best to clean the enamelled floor of
the oven cavity while the oven is still warm.
Wipe the oven with a soft cloth which
should be washed in warm, soapy water
after every use. The oven must be cleaned
thoroughly from time to time. Use a
conventional oven cleaner for this.
Detergents
Before using any detergents, always
ensure that they are suitable for your oven
and recommended by the manufacturer.
Cleaners that contain bleach should not
be used as they may dull the surface finishes.
Harsh abrasives should also be avoided.
Page 15
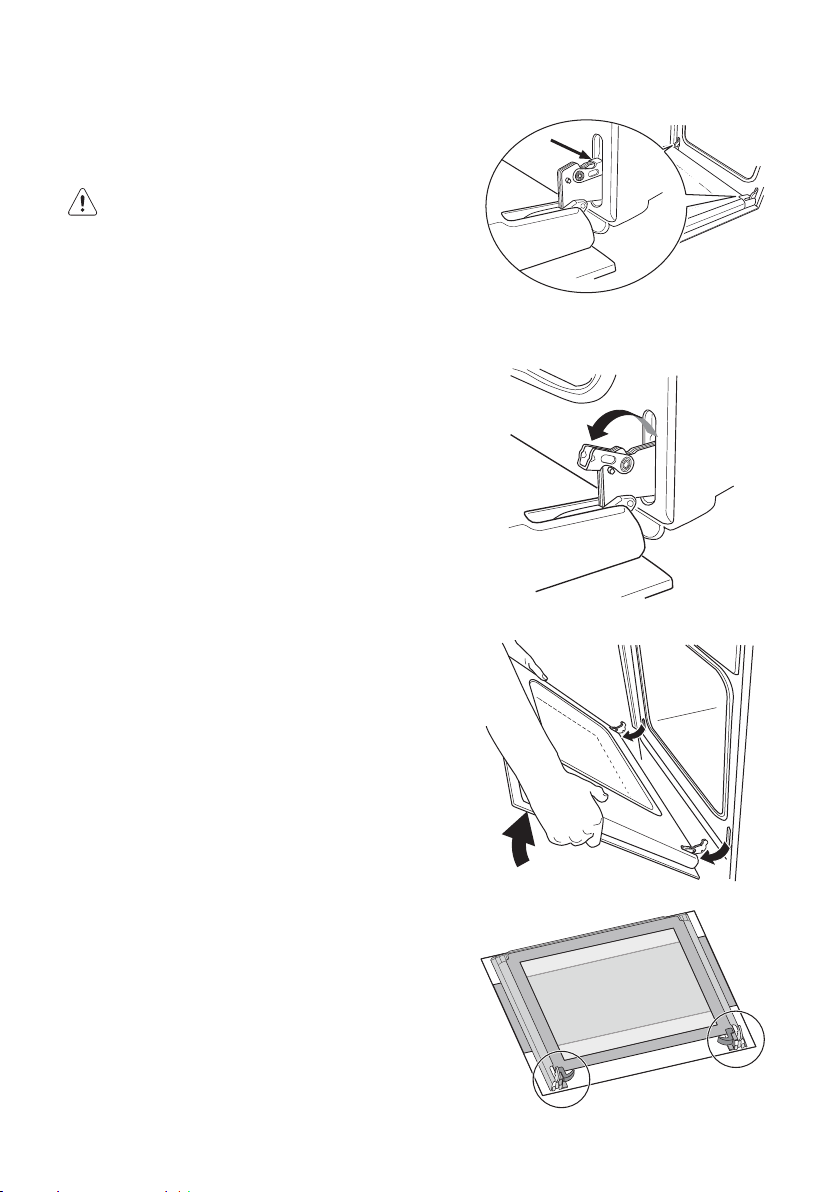
Oven door
The oven door comprises two glass panels.
For easy cleaning, the oven door can be
unhinged and the internal panels removed.
Caution: the oven door must be
disassembled before cleaning.
The oven door may suddenly
slam shut if you attempt to
remove the inner panels while
the oven door is still in position.
To remove the door, proceed as
)
follows:
1. Open the door completely.
2. Locate the two door hinges.
3. Lift the levers on the hinges and fold
them forwards.
4. Hold the door by the two outside edges
and close the door by about 45° only.
5. Pull the door forwards out of its seat.
6. Lie the door on a firm surface and protect
the surface of the handle with a soft
cloth.
15 progress
Page 16

16 progress
7. Use the bolts to remove the inner panels.
8. Turn both locking screws by 90° and
remove them.
9. Carefully lift the top panel slightly and
remove the panel which is framed on all 4
sides by an ornamental border.
Clean the oven door with luke-warm water
and a soft cloth. Do not use metal pads, metal
wool, abrasive pads or acids to clean the oven
door as they will damage the special heatreflective surfaces of the inner panels.
After cleaning the inner panels, re-insert them
in the door. Refit the oven door; to do so,
repeat the above sequence in reverse. Ensure
the panels are the right way round.
Then, proceed as follows:
)
The inner panel with the frame on 4 sides
must be inserted so that the printing on the
screen is facing to the outside of the oven.
You will know the panel is properly in place
if, when you touch the visible surface with
your fingers, it doesn’t feel rough where the
printing is.
The inner panel must be inserted in positionas
shown in the diagram. After inserting the
panel in the oven door, fix in position as
described under point 8.
Never clean the oven door when
it is warm as the panels might
shatter. If you can see scratches
or cracks in the glass panel, call
your nearest service centre
immediately to have the panel
replaced.
90°
1
2
Page 17

Models in stainless steel or aluminium:
Clean the oven door and operating panel in
stainless steel or aluminium with a damp
sponge and then dry carefully with a soft cloth.
Never use metal pads, metal wool, acids or
abrasives for cleaning because they may
scratch the surfaces.
Cleaning the oven door seal
A seal is attached around the opening of the
oven.
Regularly check the condition of
the seal. Clean the seal if necessary without using any abrasive
materials or objects. If you find
that the seal is damaged, call your
nearest service centre immediately. Do not use the oven until the
seal has been changed.
17 progress
Page 18
18 progress
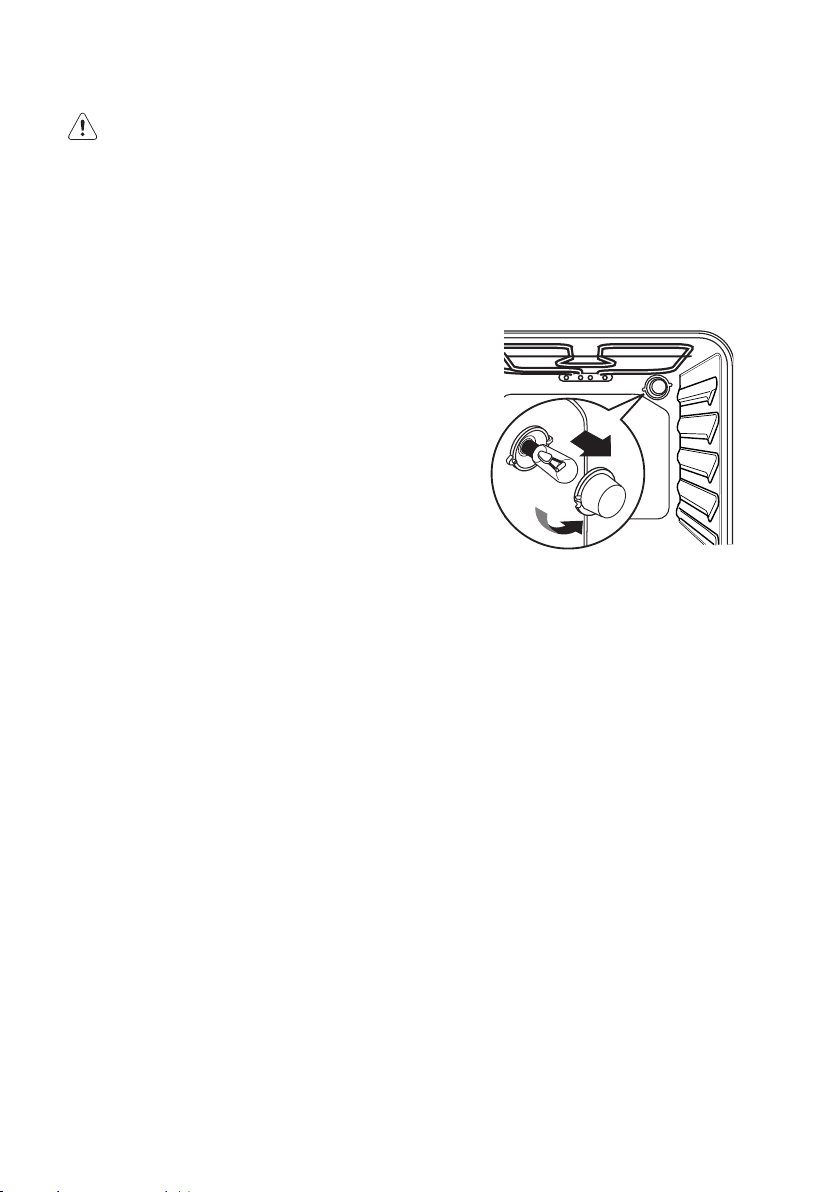
Changing the interior light bulb
Separate the appliance from the
power supply by switching off
the fuse.
If the oven light needs replacing, the new
bulb must have the following specifications:
- Electric power: 15 W / 25 W
- Electric voltage: 230 V (50 Hz)
- Heat resistance to 300 °C
- Type of connection: E14
These replacement bulbs can be
purchased from your dealer.
)
To change the oven light:
1. First ensure that the oven has cooled
down and has been disconnected from
the mains.
2. Turn the glass cover of the light counterclockwise.
3. Remove the used bulb and insert a new
one.
4. Replace the glass cover and reconnect the
oven to the mains.
Page 19

19 progress
Troubleshooting
If the appliance is not working properly, please check the following before contacting the
Electrolux service centre.
PROBLEM
The oven does not come on.
The LED for the oven tempera-
ture does not light up.
The interior oven light does not
come on.
The foods take too long to cook,
or are cooking too quickly.
Steam and condensation are
collecting on the foods and in the
oven cavity.
SOLUTION
Check whether a cooking function and tem-
perature have been selected
or
make sure the appliance is properly con-
nected and the plug switch or mains supply
to the oven is set to ON.
Select a temperature using the temperature
regulator,
or
select a function using the oven regulator.
select a function using the oven regulator.
or
check the light bulb and replace it if neces-
sary (see "Changing the interior light bulb").
Change the temperature if necessary,
or
consult the content of this user manual for
advice, especially the chapter “Using the
oven”.
Do not leave foods in the oven after the cook-
ing process for longer than 15 - 20 minutes.
Page 20

20 progress
Technical data
Heat output
Top oven element 800 W
Bottom oven element 1000 W
Top and bottom heating element 1800 W
Oven light 25 W
Cooling fan motor 25 W
Total power requirement 1850 W
Operating voltage (50 Hz)230 V-400 V 3N~
Dimensions of the recess
Height 600 mm
Width 560 mm
Depth 550 mm
Built-in oven
Height 335 mm
Width 405 mm
Depth 410 mm
Oven capacity 56 l
The appliance can be combined with the
following built-in hobs and built-in glass
ceramic hobs:
zz
z Glass ceramic hob types:
zz
PEM 6000 E
Total connected load 6000 W
Supply voltage(50 Hz) 230V
zz
z Glass ceramic hob types:
zz
PES 6000 E
Total connected load 5800 W
Supply voltage(50 Hz) 230V
zz
z Glass ceramic hob types:
zz
PES 6060 E
Total connected load 7600 W
Supply voltage(50 Hz) 230V
Maximum rated heating capacity
zz
z Oven + glass ceramic hob 9450 W
zz
Page 21

Instructions for the Installer
Installation and connection must
be done in strict compliance with
the regulations in force. Any
interventions must be carried out
when the appliance is switched
off. Repairs must only be carried
out by qualified service
engineers.
The manufacturer accepts no
liability if the safety measures are
not observed.
Connecting to the electrical supply
Please take note of the following require-
ments before connecting:
- The fuse or other protective device and
the domestic electrical installation must
be designed for the max. load of the appliance (see rating plate).
- The domestic electrical installation must
be equipped with a proper earth connection in accordance with the regulations in force.
- The socket or multi-pole off switch must
be easily accessible, even after completed installation of the appliance.
The appliance is shipped without a
mains cable, as - depending on the type of
supply available - a mains lead with a
standard plug designed for the load specified on the rating plate is required. Insert
the plug into a socket that satisfies the
regulations.
The following cable types are suitable for
use as mains cables, taking into account the
respective rated cross-section required:
H07RN-F, H05RN-F, H05RR-F, H05VV-
F, H05V2V2-F (T90), H05BB-F.
If the appliance is connected without a
plug, or if the plug is not accessible, a multipole off switch (e.g. fuses, circuit breaker)
with a minimum gap of 3 mm between the
contacts must be installed between the appliance and mains connection. The switch
must not interrupt the protective conductor
at any point. The yellow/green protective
conductor must be 2-3 cm longer than all
other cables.
In any case, the mains cable must be
designed in such a way that it never reaches
21 progress
Page 22

22 progress
50°C (above room temperature) at any point
along its length.
After the connection has been carried
out, the heating elements must be tested by
being operated for about. 3 minutes.
Terminal block
The appliance is fitted with an easily-ac-
cessible 6-way terminal block, with its links
already set for operation on a 400V supply
with neutral (see illustration).
In the case of a different supply voltage,
the terminal block links must be turned in
line with the schemes shown in the
illustration. The protective conductor is
connected to the
connection, secure the cable to the terminal
block with strain relief.
Electrical connection to the hob
Attention - observe the installation
instructions for hob, built-in cooker
or control box!
This appliance can be connected to the hob
models specified in the «Technical data» section. The socket for connecting the hob is located on the cooker housing. The connecting
cables of the heating elements and the protective conductor cable are brought out from the
built-in hob; these cables are fitted with plug
connections. Insert the plugs and connecting
cables in the appropriate sockets. This prevents any possible wrong connection.
The manufacturer accepts no liability if
the safety measures are not observed.
terminal. After
230V 3~
Ø 4x2,5 mm²
230V 1~
Ø 3x4 mm²
400V 2N~
Ø 4x2,5 mm²
400V 3N~
Ø 5x1,5 mm²
1 2 3 4 5
L1 L2 L3 PE
1 2 3 4 5
L1 N PE
1 2 3 4 5
L1 L2 N PE
1 2 3 4 5
L1 L2 L3 N PE
Page 23

Installation instructions
To ensure trouble-free operation of the
built-in appliance, the kitchen units or recess that the appliance is built into must
have suitable dimensions.
In accordance with the regulations in
force, all parts which ensure protection
against accidental contact with live parts
and parts with basic insulation must be secured in such a way that they cannot be removed without tools.
These also include the fixing of any end
panels at the beginning or end of a line of
built-in units.
In any case, the accidental contact pro-
tection must be ensured by the building in of
the appliance.
The appliance can be positioned with its
back or side wall against higher kitchen
units, appliances or walls. However, only
other appliances or units of the same height
as the appliance can be placed against the
other side wall.
Oven dimensions (see illustration)
Instructions for building in
To ensure trouble-free operation of the
built-in appliance, the kitchen units or recess that the appliance is built into must
have suitable dimensions.
IN
M
0
5
5
560 - 570
23 progress
0
0
6
1
÷
0
8
0
0
Securing in the unit
1. Open the oven door.
2. Secure the oven in the unit using the four
spacers (see illustration - A). These fit
exactly in the holes in the frame. Then
screw in the four woodscrews (supplied)
tightly (see illustration - B).
Page 24

24 progress
Customer service
If the problem persists after the checks
described, contact your nearest service
centre and describe the fault, appliance
model (Mod.), product number (Prod. No.)
and series number (Ser. No.) which you will
find on the oven rating plate.
Page 25

25 progress
Indice
Avvertenze e istruzioni di sicurezza ............................................................................... 26
Descrizione del prodotto ............................................................................................... 28
Funzionamento .............................................................................................................. 29
Prima di usare il forno per la prima volta...................................................................... 31
Cottura nel forno ............................................................................................................ 32
Tabelle di cottura .......................................................................................................... 35
Pulizia e manutenzione ................................................................................................. 37
Come comportarsi se qualcosa non funziona ............................................................... 42
Caratteristiche tecniche ................................................................................................. 43
Istruzioni per l’installatore ............................................................................................. 44
Istruzioni di montaggio ................................................................................................. 46
Assistenza tecnica ........................................................................................................ 47
Guida alle Istruzioni per l’uso
Avvertenze di sicurezza
Istruzioni “passo dopo passo”
)
Suggerimenti
Informazioni legate all’ambiente
Questo apparecchio è conforme alle seguenti direttive CEE:
- 2006/95 (Direttiva bassa tensione);
- 89/336 (direttiva EMC);
- 93/68 (direttiva generale);
e successive modifiche.
COSTRUTTORE:
ELECTROLUX HOME PRODUCTS ITALY S.p.A.
Viale Bologna, 298
47100 FORLÌ (Italia)
Page 26

26 progress
Avvertenze e istruzioni di sicurezza
Conservare sempre le Istruzioni per l’uso fornite in dotazione al presente
apparecchio. Qualora l’apparecchio debba essere ceduto a terzi o venduto,
oppure a seguito di un trasloco debba essere lasciato nel vecchio
appartamento, è estremamente importante che il nuovo utente(i) possa
disporre delle presenti Istruzioni per l’uso e delle avvertenze.
Tali avvertenze servono alla sicurezza dell’utente e dei suoi coinquilini.
Leggere quindi con estrema attenzione prima di procedere all’allacciamento
dell’apparecchio e/o al suo utilizzo.
Installazione
· L’installazione deve essere eseguita da
personale tecnico qualificato, nel rispetto delle disposizioni vigenti I singoli interventi di installazione sono descritti
nella sezione delle istruzioni per
l’installatore.
· L’installazione e l’allacciamento devono essere eseguiti da un tecnico qualificato, in conformità alle direttive a lui
note dalla sua esperienza tecnica.
· Anche eventuali modifiche, che si rendessero necessarie a seguito dell’installazione, devono essere eseguite da un
tecnico qualificato
· A seconda del modello, questo forno è
stato costruito come apparecchio singolo o apparecchio combinato con piastra elettrica per il collegamento a 1,2
fasi o trifase (o gruppi) a 230 V. Se viene effettuato un collegamento a più fasi
senza il neutro (400 V) il forno e le piastre di cottura collegate vengono
irrimediabilmente danneggiati.
Funzionamento
· Questo forno è concepito per la preparazione di alimenti; non deve essere utilizzato per uno scopo diverso da quello
previsto.
· Mentre il forno è in funzione procedere
con estrema attenzione. A causa del
calore intenso delle resistenze la griglia
e gli altri elementi sono molto caldi.
· Se, per un qualsiasi motivo, occorre utilizzare fogli di alluminio per la preparazione di alimenti in forno, evitare che
questi vengano a contatto diretto con il
fondo del forno.
· Prestare attenzione durante la pulizia
del forno: non spruzzare mai sul filtro
del grasso (se presente), sugli elementi
radianti e sul bulbo termostatico.
· È pericoloso apportare modifiche di
qualsiasi tipo a questo apparecchio o
alle sue caratteristiche.
· Durante la cottura al forno, arrosto e al
grill la finestra del forno e gli altri elementi dell’apparecchio diventano caldi,
pertanto tenere i bambini lontano dal
forno. Durante l’allacciamento degli apparecchi elettrici a prese nelle vicinanze
del forno, fare attenzione che i cavi di
collegamento non vengano a contatto
con zone di cottura calde o che rimangano incastrati nella porta del forno
calda.
· Utilizzare sempre manopole da forno
per togliere dall’apparecchio pentole o
terrine calde e resistenti al fuoco.
· Una pulizia regolare evita un deterioramento del materiale della superficie.
· Prima di procedere alla pulizia del forno disinserire la corrente elettrica oppure sfilare la spina di rete.
· Assicurarsi, che il forno sia in posizione
“OFF” , quando non è più utilizzato.
· L’apparecchio non deve essere pulito
con una pulitrice a vapore caldo o a
getto di vapore.
· Non utilizzare prodotti abrasivi o
raschietti di metallo appuntiti. Possono
graffiare i vetri della porta e provocare
quindi la rottura dei vetri.
Page 27

27 progress
Sicurezza delle persone
· Questo apparecchio è destinato ad essere utilizzato da adulti. È pericoloso
lasciare che i bambini lo usino o ci giochino.
· Tenere lontano i bambini, finché il forno
è in funzione Anche dopo aver spento il
forno, la porta rimane calda ancora per
molto tempo.
· L'apparecchiatura non può essere utilizzata dai bambini o da persone le cui
capacità sensoriali, mentali o fisiche o
la cui mancanza di esperienza e conoscenza dell'apparecchiatura impedisca
loro di utilizzarla in modo sicuro senza
la supervisione o le indicazioni di una
persona responsabile che assicuri l'utilizzo corretto dell'apparecchiatura
stessa.
Smaltimento
Materiale d’imballaggio
· I materiali d’imballaggio sono ecologici e riciclabili. Gli elementi in materiale
plastico sono contrassegnati ad es. con
>PE(polietilene)>, >PS(polistirolo espanso)< ecc. Smaltire i materiali di imballaggio a seconda del loro contrassegno conferendoli negli appositi contenitori sistemati presso le discariche comunali.
Apparecchio vecchio
Attenzione: Per evitare che gli ap-
parecchi da smaltire non siano sorgente di pericolo, si prega di renderli inutilizzabili prima del loro
smaltimento.
A tal fine staccare l’apparecchio
dall’alimentazione di rete togliendo
il cavo di alimentazione dall’apparecchio.
Assistenza
· Gli interventi di verifica e/o di riparazione devono essere eseguiti dal Servizio
Assistenza del costruttore o da un Servizio Assistenza autorizzato dal
costruttore ed è necessario utilizzare
solo pezzi di ricambio originali.
· Non tentare di riparare autonomamente l’apparecchio in caso di guasti al
funzionamento o di danni. Le riparazioni
eseguite da personale non qualificato
possono causare danni o lesioni.
· Il simbolo
sul prodotto o sulla
confezione indica che il prodotto non
deve essere considerato come un normale rifiuto domestico, ma deve essere
portato nel punto di raccolta appropriato per il riciclaggio di apparecchiature
elettriche ed elettroniche. Provvedendo
a smaltire questo prodotto in modo
appropriato, si contribuisce a evitare
potenziali conseguenze negative per
l’ambiente e per la salute, che potrebbero derivare da uno smaltimento inadeguato del prodotto. Per informazioni
più dettagliate sul riciclaggio di questo
prodotto, contattare l’ufficio comunale,
il servizio locale di smaltimento rifiuti o
il negozio in cui è stato acquistato il
prodotto.
Page 28

28 progress
Descrizione del prodotto
1
12
1. Pannello di comando
2. Comando per la zona di cottura
anteriore sinistra
3. Comando per la zona di cottura
posteriore sinistra
4. Termostato - Spia di controllo
5. Termostato
6. Regolatore forno
4
7
986532
10
11
7. Spia di funzionamento
8. Comando per la zona di cottura
posteriore destra
9. Comando per la zona di cottura
anteriore destra
10. Fessura di ventilazione per la ventola
di raffreddamento
11. Illuminazione interna
12. Targhetta identificativa
Accessori
Teglia
Griglia
Page 29

Funzionamento
Regolatore forno
0 Il forno è spento
Cottura tradizionale
Calore superiore
Calore inferiore
Spia di funzionamento
La spia di funzionamento si illumina,
quando è impostato il regolatore del forno.
Regolatore della temperatura
Ruotando la manopola in senso
antiorario è possibile regolare la
temperatura del forno tra 50 °C e 250 °C.
Termostato - Spia di controllo
Questa spia di controllo si accende,
quando viene ruotato il termostato. La spia
si illumina finché non viene raggiunta la
temperatura desiderata. Si accende e si
spegne ciclicamente ed indica quindi che la
temperatura viene mantenuta.
29 progress
0
Manopole di comando per il piano di
cottura
Nel pannello di comando sono presenti
le manopole di comando per le quattro resistenze del piano di cottura. Le zone di
cottura vengono regolate con una manopola a 9 posizioni:
0 = OFF
1 = Minimo
9 = Massimo
Page 30

30 progress
Accensione - Circuito doppio
(Vedere l’elenco degli apparecchi nel
capitolo “Dati tecnici”)
L’accensione di entrambi i circuiti di riscaldamento si effettua girando la manopola delle zone di cottura dalla posizione 9
alla posizione
verte un “clic”. Ora sono accesi entrambi i
circuiti di riscaldamento. Quindi si porta la
manopola nella posizione desiderata (girarla in senso orario).
La cottura di alimenti con olio o
grasso, come per esempio le
patate fritte, non deve essere
effettuata senza sorveglianza,
perché gli oli e i grassi quando
si surriscaldano si possono
infiammare facilmente.
Termostato di sicurezza
Per evitare un surriscaldamento pericoloso (in seguito ad un utilizzo non appropriato dell’apparecchio o a componenti difettosi), il forno è dotato di un termostato di sicurezza, che interrompe l’alimentazione di corrente elettrica. All’abbassamento della temperatura l’apparecchio si riaccende automaticamente. Se in
seguito ad un utilizzo non appropriato dell’apparecchio il termostato di sicurezza
dovesse intervenire, è sufficiente eliminare
la causa del guasto dopo il raffreddamento del forno, se invece il termostato interviene a causa di un componente difettoso,
contattare il Servizio Assistenza.
(in senso orario); si av-
Ventola di raffreddamento
Il forno è dotato di una ventola di raffreddamento che agisce sul pannello dei comandi,
sulle manopole di regolazione e sulla maniglia della porta. La ventola si attiva automaticamente durante il funzionamento del
forno. L'aria calda viene aspirata attraverso l'apertura posta vicino alla maniglia. La
ventola di raffreddamento si spegne quando l'interruttore del forno viene portato in posizione "
0".
Page 31

Prima di usare il forno per la prima volta
Prima di usare il forno, rimuovere
tutti i materiali di imballaggio sia
all’interno che all’esterno.
Prima di usare il forno la prima volta
si raccomanda di riscaldare l’apparecchio una volta senza che all’interno sia
presenti dei cibi.
Durante questa operazione è possibile
che l’apparecchio emetta un odore sgradevole. Questo fenomeno è del tutto naturale. La causa è da ricondurre a residui di
produzione.
Assicurarsi che la stanza sia ben
ventilata.
1. Ruotare il regolatore del forno su
)
cottura tradizionale
2. Ruotare il termostato su 250 °C.
3. Aprire una finestra per
l’aerazione.
4. Lasciare funzionare il forno a
vuoto per circa 45 minuti.
.
31 progress
Lasciare raffreddare il forno. Inumidire un panno morbido con acqua
calda e con un po’ di detergente delicato e pulire la camera di cottura.
Prima di utilizzarli per la prima volta, pulire accuratamente anche gli
accessori.
Per aprire la porta afferrare
sempre la maniglia al centro.
Page 32

32 progress
Cottura nel forno
Importante! - Non rivestire il forno
con fogli di alluminio e non appoggiare alcuna piastra da forno ecc.
sul fondo, per evitare che l’accumulo
di calore danneggi la smaltatura.
Appoggiare sempre padelle e pentole, padelle e pentole resistenti al calore e piastre di alluminio sul piano,
che è inserito in una delle guide di
scorrimento. Durante il riscaldamento degli alimenti viene generato vapore come in una caldaia. Se il vapore viene a contatto con la porta di
vetro del forno, si condensa e si formano goccioline d’acqua.
Per ridurre la condensazione,
preriscaldare sempre il forno per 10
minuti.
Vi suggeriamo di asciugare le
goccioline d’acqua dopo ogni processo di
cottura.
Durante la cottura la porta del
forno deve essere chiusa.
Durante l’apertura della porta del
forno procedere con la massima attenzione. Non lasciare che la
porta ”si apra cadendo”, ma utilizzare la maniglia della porta, finche
la porta non si apre completamente.
Il forno presenta quattro livelli di inserimento.
Le posizioni dei piani estraibili
sono contate a partire dal fondo
del forno, come indicato nella figura.
I piani estraibili devono essere inseriti correttamente (vedere figura).
Non appoggiare stoviglie e pentole
direttamente sul fondo del fo
rno.
4
3
2
1
Page 33

33 progress
Cottura tradizionale
1. Ruotare il regolatore del forno sulla fun-
zione desiderata
.
2. Ruotare il termostato sulla temperatu-
ra desiderata.
- Il calore si distribuisce in modo
ottimale in corrispondenza del piano
centrale. Se la parte inferiore delle pie-
tanze deve essere dorata con una mag-
giore intensità, utilizzare semplicemen-
te un piano inferiore. Se la parte supe-
riore deve essere dorata con una mag-
giore intensità, inserire il piano in una
posizione più in alto.
- Il materiale e il tipo di lavorazione delle
piastre e delle stoviglie influiscono sul
grado di doratura della parte inferiore
delle pietanze. Stampi e stoviglie
smaltate, scure, pesanti o senza rive-
stimento in teflon consentono una dora-
tura più intensa della parte inferiore,
mentre stampi in vetro o alluminio luci-
do o lamiera d’acciaio lucidata rifletto-
no il calore e consentono solo una lieve
doratura della parte inferiore.
- Posizionare i cibi sempre al centro del
piano, per garantire una doratura unifor-
me.
- Posizionare i cibi su piastre da forno di
grandezza adeguata, in modo che i li-
quidi non possano finire sul fondo del
forno. Questo consente anche di evitare
impegnativi lavori di pulizia.
- Non appoggiare mai cibi, barattoli o
piastre del forno direttamente sul fondo
del forno, poiché questo si surriscalda e
possono verificarsi dei danni. Con que-
sta impostazione il calore viene gene-
rato dalle resistenze in alto e in basso.
Per la cottura è quindi necessario un
unico livello di inserimento. Questa
impostazione è indicata in particolare
per cibi, che devono essere dorati an-
che dal basso, ad esempio quiche e pa-
sticci.
Gratin, lasagne e altre pietanze
gratinate, che devono essere dorati in particolare dall’alto, possono essere preparati
con buoni risultati grazie a questa
impostazione.
Calore inferiore
1. Ruotare il regolatore del forno per accendere il forno .
2. Ruotare il termostato sulla temperatura desiderata.
Questa funzione è particolarmente indi-
cata nella cottura cieca di pasta. Può essere utilizzata anche per quiche o pasticci
garantendo così che la pasta sul fondo sia
ben cotta.
La spia di controllo del termostato si illumina finché non viene
raggiunta la giusta temperatura.
Si accende e si spegne
ciclicamente e indica che la temperatura selezionata viene mantenuta.
Cottura superiore
Questa funzione è indicata per
gratinare pietanze pronte, ad esempio lasagne o cavolfiore gratinato ecc.
Page 34

34 progress
Suggerimenti
Cottura:
Gli alimenti da cuocere al forno richiedono di solito una temperatura media (150°C 200°C). È quindi necessario preriscaldare il
forno per ca. 10 minuti.
Non aprire la porta del forno, prima che
siano trascorsi 3/4 del tempo di cottura.
La pasta frolla è cotta nella tortiera
apribile o su una teglia fino a 2/3 del tempo
di cottura e quindi decorata, prima di concludere la cottura. Il tempo di cottura restante dipende dal tipo e dalla quantità di decorazioni. Le paste per stampi devono staccarsi a fatica dal cucchiaio. Una quantità eccessiva di liquido allungherebbe inutilmente il
tempo di cottura.
Se due piastre per dolci con biscotti vengono inserite contemporaneamente nel forno, fra le due piastre deve essere lasciato libero un livello di inserimento.
Se due piastre per dolci con biscotti vengono inserite contemporaneamente nel forno, dopo circa 2/3 del tempo di cottura le
piastre devono essere scambiate dall’alto in
basso e girate.
Arrosto:
Non cuocere arrosti del peso inferiore a
1 kg. Pezzi più piccoli potrebbero asciugarsi eccessivamente durante la cottura
arrosto. La carne scura, che deve essere
ben cotta all’esterno, ma che all’interno
deve rimanere rosa o addirittura al sangue,
deve essere cotta arrosto a temperature
superiori (200°C - 250°C).
Carni bianche, pollame e pesce richiedono invece una temperatura più bassa
(150°C - 175°C). Solo con tempi di cottura
brevi gli ingredienti per il sugo sono aggiunti subito all’inizio nel tegame di cottura, altrimenti vengono aggiunti nella mezzora finale.
Per controllare se la carne è cotta, è
possibile provare con un cucchiaio: se non
si lascia staccare pigiando, è cotta bene.
Roastbeef e filetto che devono rimanere
rosa, devono essere cotti a temperature
piuttosto elevate in tempi più brevi.
Nella cottura di piatti di carne direttamente sulla griglia, per raccogliere il sugo
inserire la leccarda nel livello sotto.
Prima di cominciare a tagliare lasciare
riposare l’arrosto almeno 15 minuti per evitare di spargere il sugo di carne.
Per evitare la formazione di fumo nel
forno, si raccomanda di versare un po’
d’acqua nella leccarda. Per evitare la formazione di condensa, aggiungere più volte
acqua. Prima di essere serviti, i piatti possono essere tenuti in caldo in forno ad una
temperatura minima.
Attenzione!
Non rivestire il forno con fogli
di alluminio e non appoggiare
sul fondo pentole, leccarde o
piastre per dolci, per evitare
che l’accumulo di calore
danneggi la smaltatura.
Tempi di cottura
I tempi di cottura possono essere differenti, in base alla diversa composizione,
alla quantità di ingredienti e di liquido dei
singoli cibi.
È importante annotarsi le impostazioni,
che sono state eseguite nelle prime prove
di cottura e cottura arrosto, per fare esperienza nel caso che si vogliano preparare
successivamente di nuovo le stesse pietanze.
Sulla base delle proprie esperienze è
possibile variare i valori indicati secondo le
esigenze personali.
Page 35

35 progress
Tabelle di cottura
Cottura tradizionale
Le indicazioni di tempo non comprendono il preriscaldamento.
Preriscaldate sempre il forno vuoto per 10 minuti.
Livello di
Peso
(g.)
Tipo di pietanza
Temperatura
inserimento
°C
44
4
44
33
3
33
22
2
22
11
1
11
DOLCI
Impasto per torta Margherita 170 1 45-60
Pasta frolla 170 2 20-30
Torta di formaggio 160 1 60-80
Torta di mele 180 1 40-60
Strudel 175 2 60-80
Torta di marmellata 175 2 30-40
Torta Margherita 175 1 45-60
Pan di Spagna 175 1 30-40
Dolci natalizi 170 1 40-60
Dolce in stampo a cassetta 170 1 50-60
Piccoli dolci 175 2 25-35
Biscotti 160 3 20-30
Meringa 100 2 90-120
Dolcetti di pasta lievitata 190 2 12-20
Bignè/eclair 200 2 15-25
PANE E PIZZA
1000 Pane bianco 190 1 40-60
500 Pane di segale 190 2 30-45
500 Panini 200 2 20-35
250 Pizza 210 1 15-30
FLAN
Flan di pasta 200 2 40-50
Flan di verdure 200 2 45-60
Quiche 200 2 35-45
Lasagne 180 2 45-60
Cannelloni 200 2 40-55
Tempo di
cottura in
min.
Le temperature riportate sono valori indicativi. Eventualmente, modificatele in
base alle vostre preferenze personali.
Page 36

36 progress
Cottura tradizionale
Le indicazioni di tempo non comprendono il preriscaldamento.
Preriscaldare sempre il forno vuoto per 10 minuti.
Livello di
Peso
Tipo di pietanza
(g.)
Temperatura
°C°C
°C
°C°C
inserimento
44
4
44
33
3
33
22
2
22
11
1
11
Tempo di
cottura in
min.
CARNE
1000 Manzo 190 2 50-70
1200 Maiale 180 2 100-130
1000 Vitello 190 2 90-120
1500 Roastbeef, al sangue 210 2 50-60
1500 Roastbeef, rosa 210 2 60-70
1500 Roastbeef, ben cotto 210 2 70-80
2000 Spalla di maiale 180 2 120-150
1200 Agnello 190 2 110-130
1000 Pollo 190 2 60-80
5000 Tacchino 180 2 210-240
1500 Anatra 175 2 120-150
3000 Oca 175 2 150-200
1200 Lepre 190 2 60-80
1200 Stinco di maiale 180 2 100-120
Polpettone 180 2 40-60
SELVAGGINA
1500 Dorso di lepre 190 2 150-200
800 Fagiano 190 2 90-120
PESCE
1200 Trota comune/Dentice 190 2 30-40
1500 Tonno/salmone 190 2 25-35
Le temperature indicate sono valori indicativi. Eventualmente adeguare le temperature alle esigenze personali.
Page 37

Pulizia e manutenzione
37 progress
Spegnere il forno prima della
pulizia e lasciarlo raffreddare.
L’apparecchio non deve essere
pulito con una pulitrice a vapore
caldo o a getto di vapore.
Importante: Prima di ogni intervento di
pulizia togliere assolutamente corrente all’apparecchio.
Per una lunga durata dell’apparecchio è
necessario eseguire regolarmente i seguenti
interventi di pulizia:
- Procedere solo con il forno raffreddato.
- Pulire le parti smaltate con acqua
saponata.
- Non utilizzare prodotti abrasivi.
- Asciugare le parti in acciaio inossidabile
e i vetri con un panno morbido.
- In presenza di macchie ostinate utilizza-
re un detergente comunemente in com-
mercio per acciaio inossidabile oppure
aceto caldo.
La smaltatura del forno è estremamente
resistente e ampiamente insensibile. Gli acidi di frutta caldi (limoni, prugne o simili)
possono però lasciare sulla superficie dello
smalto macchie opache e ruvide Queste
macchie sulla superficie lucida dello smalto
tuttavia non compromettono il funzionamento del forno. Pulire accuratamente il forno dopo ogni utilizzo. Questo consente di rimuovere lo sporco con estrema facilità e di
evitare che tale sporco bruci ulteriormente.
Prodotti per la pulizia
Prima di utilizzare sostanze detergenti
controllare che siano adatte e che il loro
impiego sia raccomandato dal fabbricante.
I detergenti contenenti candeggina NON
devono essere usati perchè potrebbero rendere opache le finiture di superficie. Evitare
abrasivi potenti.
Pulizia esterna
Pulire regolarmente il pannello comandi, la porta del forno e le guarnizioni della
porta con un panno morbido, precedentemente inumidito con acqua calda e un po’
di detergente liquido.
Per non danneggiare la porta di vetro
del forno, non utilizzare:
• detergenti e candeggina per impiego
domestico
• spugne per la pulizia impregnate, non
adatte per pentole con rivestimento
antiaderente
• spugne Brillo/Ajax o pagliette abrasive
• spugne o spray per il forno con sostan-
ze chimiche
• prodotti per la rimozione della ruggine
• smacchiatori per bagno/lavabi
Pulire il vetro internamente ed esternamente con acqua tiepida e sapone. In presenza di sporco ostinato sul lato interno della porta di vetro, utilizzare prodotti per pulizia come ‘Hob Brite’. Non utilizzare
raschietti per rimuovere lo sporco.
Camera di cottura
Il fondo smaltato della camera di cottura può essere pulito al meglio finché il forno è ancora caldo.
Asciugare il forno con un panno morbido, che deve essere sciacquato in acqua
tiepida con sapone dopo ogni utilizzo. Di
tanto in tanto è richiesta una pulizia più
accurata. A questo scopo utilizzare un detergente per forno normalmente in commercio.
Page 38

38 progress
Porta del forno
La porta del forno è costituita da due pannelli di vetro. Per facilitare le operazioni di
pulizia, è possibile sganciare la porta del
forno ed estrarre i pannelli interni.
Attenzione - La porta del forno
deve essere smontata prima della pulizia. La porta del forno potrebbe chiudersi improvvisamente sbattendo se si tenta di
togliere tirando i pannelli interni
dalla porta agganciata del forno.
Durante lo smontaggio procedere
)
come segue.
1. Aprire completamente la porta.
2. Passare alle due cerniere della porta.
3. Sollevare la leva sulle due cerniere e
ribaltarla in avanti.
4. Afferrare la porta per i due bordi esterni e
chiudere la porta solo a ca. 45°.
5. Tirare in avanti la porta togliendola dalla
propria sede.
6. Appoggiare la porta su un fondo solido e
proteggere la superficie della maniglia
con un panno morbido.
7. Azionare il sistema di bloccaggio per
rimuovere i pannelli interni.
Page 39

8. Ruotare i due fermi di 90° e toglierli dalle
proprie sedi.
9. Sollevare leggermente il pannello superiore facendo attenzione ed estrarre il
pannello, che è riconoscibile per la cornice ornamentale su tutti e quattro i lati.
Pulire la porta del forno con acqua tiepida e
un panno morbido. Per la pulizia non utilizzare spugnette metalliche, lana metallica, spugne abrasive o acidi, che possono danneggiare le superfici speciali termoriflettenti dei
vetri interni.
Dopo la pulizia inserire nuovamente i vetri
interni nella porta. Montare la porta nel forno;
procedere nell’ordine inverso rispetto allo
smontaggio. Prestare attenzione all’allineamento corretto dei vetri.
Procedere come indicato di seguito:
)
Il vetro interno con la cornice ornamenta-
le sui 4 lati deve essere montato in modo che
la serigrafia sia rivolta verso il lato esterno
del forno. Il vetro è inserito correttamente, se
toccando con le dita la superficie visibile non
si avverte alcuna ruvidità all’altezza della
serigrafia.
Il vetro interno deve essere inserito nella
propria sede come indicato in figura. Dopo
l’inserimento dei pannelli di vetro nella porta del forno, fissare i pannelli come descritto
al punto 8.
Non pulire mai la porta del forno
calda, poiché i pannelli possono frantumarsi. Se si osservano
graffi o incrinature sul pannello
di vetro, chiamare immediatamente il Servizio Assistenza e
fare sostituire i pannelli.
39 progress
90°
2
1
Page 40

40 progress
Modelli in acciaio inox o alluminio:
Pulire la porta del forno e il pannello comandi
in acciaio inossidabile o alluminio con una
spugna umida e asciugare accuratamente
con un panno morbido. Per la pulizia non
utilizzare spugnette metalliche, lana metallica, acidi o detergenti abrasivi, che possono
graffiare le superfici.
Pulizia della guarnizione della porta del
forno
Attorno all’apertura del forno è applicata una
guarnizione.
Controllare regolarmente lo stato della guarnizione. All’occorrenza pulire la guarnizione, senza
utilizzare oggetti o prodotti abrasivi. Se si osservano danni alla
guarnizione, chiamare immediatamente il Servizio Assistenza più
vicino. Non utilizzare il forno, finché la guarnizione non è stata
sostituita.
Page 41

Sostituzione dell’illuminazione interna
Assicurarsi che il forno sia
staccato dall’alimentazione di
di rete disinserendo l’interruttore automatico.
Staccare la spina.
In caso di sostituzione della lampadina
del forno la nuova lampadina deve presentare le caratteristiche seguenti:
- Potenza elettrica: 15 W / 25 W
- Tensione elettrica: 230 V (50 Hz)
- Resistenza al calore fino a 300 °C
- Tipo di connessione: E14
È possibile acquistare lampadine sosti-
tutive presso il proprio rivenditore di fiducia.
Come sostituire la lampadina del forno:
)
1. Assicurarsi prima che l’apparecchio si
sia raffreddato e che sia staccato dall’alimentazione di corrente.
2. Ruotare la calotta di vetro della lampadina in senso antiorario.
3. Rimuovere la lampadina bruciata e
metterne una nuova.
4. Applicare nuovamente la calotta di vetro e ricollegare l’apparecchio all’alimentazione di corrente.
41 progress
Page 42

42 progress
Come comportarsi se qualcosa non funziona
Se l’apparecchio non funziona correttamente, prima di richiedere un intervento del
centro di Assistenza Electrolux, controllare i punti seguenti.
PROBLEMA
Il forno non si accende.
La spia di controllo per la
temperatura del forno non
funziona.
L’illuminazione interna del forno
non funziona.
La preparazione dei cibi dura
troppo a lungo oppure la
cottura è troppo veloce.
Vapore e acqua di condensa si
depositano sui cibi e nella
camera di cottura.
SOLUZIONE
Controllare se è stata impostata la
funzione di cottura e una temperatura,
o
controllare se l’apparecchio è collegato
correttamente e se l’interruttore della presa
o l’alimentazione di rete al forno sono ON.
Con il termostato selezionare una
temperatura,
o
con il regolatore del forno selezionare una
funzione.
Con il regolatore del forno selezionare una
funzione,
o
controllare la lampadina e sostituirla, se
necessario (vedere “Sostituzione
dell’illuminazione interna”).
Può essere necessario modificare la
temperatura,
o
consultare il contenuto di questa Guida, in
particolare il capitolo „Cottura nel forno“.
Al termine della cottura, non lasciare le pie-
tanze nel forno per più di 15 - 20 minuti.
Page 43

Caratteristiche tecniche
Potenza termica
Cottura superiore 800 W
Cottura inferiore 1000 W
Cottura tradizionale 1800 W
Lampada forno 25 W
Motore della ventilazione di raffreddamento 25 W
Potenza assorbita totale 1850 W
Tensione d’esercizio (50 Hz)
Dimensioni minime del vano di incasso
Altezza 600 mm
Larghezza 560 mm
Profondità 550 mm
Dimensioni utili della cavità del forno
Altezza 335 mm
Larghezza 405 mm
Profondità 410 mm
Capacità del forno 56 l
230 V-400 V 3N~
43 progress
L’apparecchio può essere combinato ai seguenti
piani di cottura ad incasso o o piani di cottura ad
incasso in vetroceramica:
zz
z Tipi di piani di cottura in vetroceramica:
zz
PEM 6000 E
Potenza assorbita totale 6000 W
Tensione d’esercizio (50 Hz) 230 V
zz
z Tipi di piani di cottura in vetroceramica:
zz
PES 6000 E
Potenza assorbita totale 5800 W
Tensione d’esercizio (50 Hz) 230 V
zz
z Tipi di piani di cottura in vetroceramica:
zz
PES 6060 E
Potenza assorbita totale 7600 W
Tensione d’esercizio (50 Hz) 230 V
Massima potenza di riscaldamento nominale
zz
z Forno + piano di cottura in vetroceramica 9450 W
zz
Page 44

44 progress
Istruzioni per l’Installatore
Il montaggio e l’installazione
devono essere eseguiti
attenendosi scrupolosamente
alle disposizioni vigenti.
Qualsiasi intervento deve
essere eseguito con
l’apparecchio disinserito. Gli
interventi devono essere
eseguiti solo da personale
tecnico qualificato.
La ditta produttrice declina
qualsiasi responsabilità in caso
di mancata osservanza delle
misure di sicurezza.
Allacciamento elettrico
Prima di procedere all’allacciamento
osservare quanto indicato di seguito:
- Il fusibile e l’impianto domestico devono essere predisposti per il carico
massimo dell’apparecchio (vedere
targhetta identificativa).
- L’impianto domestico deve essere dotato di un collegamento a terra conforme alle norme e alle disposizioni vigenti.
- La presa o l’interruttore d’arresto
d’emergenza a più poli devono essere
facilmente raggiungibili anche ad installazione avvenuta.
L’apparecchio è fornito senza il cavo di
alimentazione, perché secondo il tipo di
alimentazione, è necessario un cavo di
collegamento con un connettore a norma,
che deve essere progettato per il carico indicato sulla targhetta identificativa. Inserire il connettore in una presa appropriata.
Considerando la sezione nominale ri-
chiesta, come cavi di collegamento sono
indicati i seguenti tipi:
H07RN-F, H05RN-F, H05RR-F, H05VV-F,
H05V2V2-F (T90), H05BB-F.
Se il collegamento viene eseguito sen-
za connettore o questo non è accessibile,
fra l’apparecchio e il cavo di rete deve essere previsto un interruttore a più poli (ad
es. fusibili, interruttori automatici) con una
distanza minima fra i contatti di 3 mm.
L’interruttore non deve interrompere in alcun punto il conduttore di protezione. Il
Page 45

conduttore di protezione verde-giallo dovrebbe essere 2-3 cm più lungo di tutti gli
altri cavi.
Il cavo di collegamento deve comun-
que essere predisposto in modo che in
nessun punto si raggiungano i 50 °C (oltre
la temperatura ambiente).
Una volta eseguito il collegamento, è
necessario provare le resistenze mettendole in funzione per circa 3 minuti.
Morsettiera
L’apparecchio è dotato di una
morsettiera a 6 poli facilmente accessibile, i cui ponticelli sono già predisposti per
il funzionamento a 400 V con conduttore
neutro (vedere figura).
In caso di tensione di rete diversa, i
ponticelli della morsettiera devono essere
spostati come indicato nello schema nella figura. Il conduttore di protezione arriva
al morsetto
alla morsettiera fissare i cavi con i
fermacavi.
Collegamento elettrico del piano di
cottura
Attenzione - Osservare le istruzioni di montaggio del piano di
cottura, della cucina da incasso
o della cassetta di derivazione!
L’apparecchio può essere collegato solo ai
modelli di piani di cottura indicati nel capitolo «Caratteristiche tecniche». La presa per
il collegamento del piano di cottura si trova sull’alloggiamento della cucina. Dal
piano di cottura ad incasso fuoriescono i
cavi di collegamento delle resistenze e il
conduttore di protezione; questi cavi sono
muniti di connettore. Inserire il connettore e
il cavo di collegamento nella rispettiva
presa della cucina. In questo modo si
esclude la possibilità di un collegamento
errato.
La ditta produttrice declina qualsiasi
responsabilità in caso di mancata osservanza delle misure di sicurezza.
. Dopo il collegamento
230V 3~
Ø 4x2,5 mm²
230V 1~
Ø 3x4 mm²
400V 2N~
Ø 4x2,5 mm²
400V 3N~
Ø 5x1,5 mm²
45 progress
1 2 3 4 5
L1 L2 L3 PE
1 2 3 4 5
L1 N PE
1 2 3 4 5
L1 L2 N PE
1 2 3 4 5
L1 L2 L3 N PE
Page 46

46 progress
Istruzioni di montaggio
Per assicurare un regolare funziona-
mento dell’apparecchio da incasso, i mobili della cucina o la nicchia in cui viene inserito l’apparecchio devono essere di dimensioni adeguate.
Secondo le disposizioni esistenti, tutti
gli elementi, che assicurano la protezione
contro le scariche dei componenti sotto
tensione e isolanti durante il funzionamento devono essere fissati in modo tale da
non poter essere staccati senza attrezzo.
Questo comprende anche il fissaggio
di eventuali lati di chiusura all’inizio o alla
fine della linea di montaggio.
La protezione contro le scariche deve
sempre essere assicurata durante i lavori
di montaggio.
L’apparecchio con il suo lato posterio-
re o con una parete laterale può essere appoggiato al mobile più alto della cucina,
ad apparecchi o a pareti. Sull’altra parete
laterale devono però essere appoggiati
solo altri apparecchi o mobili della stessa
altezza dell’apparecchio.
IN
M
0
5
5
560 - 570
600
80÷100
Dimensioni del forno (vedere figura)
Istruzioni di montaggio
Per assicurare il regolare funzionamen-
to dell’apparecchio da incasso, i mobili
della cucina o la nicchia in cui viene inserito l’apparecchio devono essere di dimensioni adeguate.
Fissaggio nel mobile
1. Aprire lo sportello del forno.
2. Fissare il forno nel mobile con l’aiuto
dei quattro distanziatori (vedere figura
- A). Questi entrano con precisione nei
fori del telaio. Quindi serrare le quattro
viti per legno in dotazione (vedere figura B).
Page 47

Assistenza tecnica
Se dopo i controlli descritti il problema non
può essere risolto, chiamare il Servizio
Assistenza più vicino del costruttore e comunicare il tipo di difetto, il modello dell’apparecchio (Mod.), il numero del prodotto ( N. prod.) e il numero di fabbrica-
zione (N. di serie), che si trova sulla
targhetta del forno.
47 progress
Page 48

48 progress
Índice
Advertencias e información importante sobre la seguridad ............................................. 49
Descripción del aparato ................................................................................................. 51
Manejo ........................................................................................................................... 52
Antes de utilizar el horno por primera vez ....................................................................... 54
Cocción en el horno ....................................................................................................... 55
Tablas de cocción .......................................................................................................... 58
Limpieza y mantenimiento .............................................................................................. 60
¿Que hacer cuando algo no funciona? ........................................................................... 65
Características técnicas ................................................................................................. 66
Instrucciones para el instalador ...................................................................................... 67
Instrucciones de montaje ............................................................................................... 69
Servicio técnico.............................................................................................................. 70
Guía para las instrucciones de uso
Indicaciones para la seguridad
Instrucciones “paso a paso”
)
Consejos y sugerencias
Información medioambiental
Este aparato cumple las siguientes directivas de la CEE:
- 2006/95 (directiva de baja tensión);
- 89/336 (directiva de compatibilidad electromagnética);
- 93/68 (directiva general);
y sus enmiendas futuras.
FABRICANTE:
ELECTROLUX HOME PRODUCTS ITALY S.p.A.
Viale Bologna, 298
47100 FORLÌ (Italy)
Page 49

49 progress
Advertencias e información importante sobre la seguridad
Guarde siempre las instrucciones de uso que se suministran con este aparato.
Si el aparato se vende o transfiere a terceros, o si deja el aparato en su antigua vivienda al mudarse, es muy importante que el nuevo usuario disponga de estas instrucciones de uso y advertencias.
Estas advertencias están hechas en interés de la seguridad del usuario y de las
personas que le rodean. Así pues, debe leerlas atentamente antes de conectar o
usar el aparato.
Instalación
· La instalación debe ser efectuada por
personal técnico especializado que siga
las normativas vigentes. Los diferentes
trabajos de instalación se describen después de las advertencias para el instalador.
· Encomiende la instalación y la conexión a
un especialista que disponga de conocimientos técnicos sobre las directrices
correspondientes que deben aplicarse.
· Dado el caso, también deberá encomendar a un especialista las modificaciones
que resulten necesarias en su instalación
eléctrica concreta.
· Este horno se ha fabricado como aparato
individual o combinado con placa
eléctrica, según la versión
correspondiente, para su conexión a un
suministro eléctrico monofásico, bifásico
o trifásico (o de grupo) de 230 V. La
conexión a un suministro de más fases
sin conductor neutro (400 V) origina la
destrucción del horno y de las placas de
cocción conectadas.
Funcionamiento
· Este horno está concebido para la preparación de alimentos; así pues, no lo utilice jamás para otros fines.
· Tome siempre las debidas precauciones
cuando utilice el horno. La parrilla y otras
piezas alcanzan una temperatura muy
alta debido al intenso calor de las resistencias de calentamiento.
· Si, por el motivo que sea, desea utilizar
papel de aluminio para cocinar alimentos, no deje nunca que éste entre en contacto directo con la base del horno.
· Cuando limpie el horno, proceda siempre
con cuidado: no rocíe nunca el filtro de
grasa (si está instalado), las resistencias
de calentamiento ni la sonda del termostato.
· Es peligroso alterar las características o
modificar el aparato en cualquier forma.
· Durante los procesos de cocción, asado
y grill, la puerta del horno y el resto de
piezas del aparato se calientan. Así pues,
mantenga a los niños alejados del mismo. Si conecta aparatos eléctricos a cajas de enchufe cercanas al horno, debe
comprobar que los cables de conexión
no entren en contacto con zonas calientes ni queden atascados en la puerta del
horno.
· Utilice siempre guantes adecuados para
retirar del horno las fuentes o recipientes
refractarios que estén calientes.
· Recuerde que una limpieza periódica evita el deterioro del material de superficie
exterior.
· Antes de limpiar el horno, desconecte la
corriente o desenchufe el aparato de la
red.
· Asegúrese de que el horno se encuentre
en la posición “OFF” si ya no va a utilizarlo.
· No limpie el aparato con un limpiador de
vapor caliente o chorro de vapor.
· No utilice productos abrasivos ni rascadores de metal afilados, pues éstos podrían arañar los cristales de la puerta y
provocar la rotura de los mismos.
Page 50

50 progress
Seguridad para las personas
· Este aparato ha sido diseñado para ser
utilizado por personas adultas. Es peligroso dejar que los niños lo manejen o
jueguen con él.
· Mantenga alejados a los niños mientras
el horno se encuentre en funcionamiento.
La puerta permanece caliente durante
bastante tiempo una vez desconectado
el horno.
· Este electrodoméstico no está destinado
a que lo usen niños u otras personas con
sus capacidades físicas, sensoriales o
mentales reducidas, o que no tengan la
experiencia y conocimientos necesarios
para utilizarlo de forma segura sin la
supervisión o instrucciones de una
persona responsable que garantice que
pueden utilizar el aparato de forma
segura.
Eliminación
Material de embalaje
· Los materiales de embalaje utilizados no
son contaminantes y sí reciclables. Los
componentes de plástico están identificados, p. ej. con >PE>, >PS< etc. Elimine los materiales de embalaje conforme a
su identificación a través de los servicios
municipales de eliminación de residuos y
utilizando los contenedores correspondientes.
Aparatos viejos
· El símbolo
que aparece en el aparato o en su embalaje, indica que este
producto no se puede tratar como un residuo normal del hogar. Se deberá entregar, sin coste para el poseedor, bien al
distribuidor, en el acto de la compra de
un nuevo producto similar al que se deshecha, bien a un punto municipal de recolección selectiva de equipos eléctricos
y electrónicos para su reciclaje. Al asegurarse de que este producto se desecha
correctamente, usted ayudará a evitar
posibles consecuencias negativas para
el medio ambiente y la salud pública, lo
cual podría ocurrir si este producto no se
gestionara de forma adecuada. Para obtener información más detallada sobre el
reciclaje de este producto, póngase en
contacto con el Ayuntamiento de su Municipio, ó con la tienda donde lo compró.
Atención: Para evitar que, al final de
su vida útil, el aparato pueda representar un peligro, deberá inutilizarlo
antes de su eliminación.
Para este fin, desconecte el aparato
de la alimentación eléctrica y quite el
cable de conexión a la red del aparato.
Servicio técnico
· Encomiende los trabajos de comprobación o las reparaciones al servicio técnico
del fabricante o a un servicio técnico autorizado por el fabricante y utilice sólo repuestos originales.
· En ningún caso debe reparar el aparato
por su cuenta cuando surjan daños o
averías. Recuerde que las reparaciones
por parte de personas no formadas pueden causar daños o lesiones.
Page 51

Descripción del aparato
1
12
51 progress
74
986532
10
11
1. Panel de mandos
2. Mando de la zona de cocción delantera
izquierda
3. Mando de la zona de cocción trasera
izquierda
4. Piloto de control del termostato
5. Termostato
6. Mando del horno
Accesorios
Bandeja para hornear
7. Indicador de alimentación
8. Mando de la zona de cocción trasera
derecha
9. Mando de la zona de cocción delantera
derecha
10. Ranuras de aireación para el ventilador
de refrigeración
11. Luz del horno
12. Placa de datos técnicos
Parrilla
Page 52

52 progress
Manejo
Mando del horno
0 El horno está apagado
Cocción convencional
Calor superior
Calor inferior
Indicador de alimentación
El indicador de alimentación se enciende
cuando se ajusta el regulador del horno.
Termostato
Gire el mando de control del termostato en
el sentido contrario a las agujas del reloj para
seleccionar temperaturas entre 50 °C y 250
°C.
Piloto de control del termostato
El piloto de control se enciende cuando
se gira el termostato. El piloto permanece
activado hasta que se alcanza la temperatura correcta. A partir de ese momento, se enciende y apaga para indicar que el horno se
mantiene a dicha temperatura.
Mando de la encimera
En el panel de mando se encuentran los
mandos de los cuatro elementos de calentamiento de la encimera. Las zonas de cocción
se regulan con un interruptor de 9 ciclos, de
los cuales se pueden utilizar los siguientes
niveles de trabajo:
0 = Apagado
1 = Mínimo
9 = Máximo
0
Page 53

Conexión de dos circuitos
(véase la lista de aparatos en el capítulo “Características técnicas”)
Los dos circuitos de calefacción se conectan girando el mando de la zona de coc-
ción del nivel 9 a la posición
tido de las agujas del reloj); entonces se es-
cucha un “clic”. Ahora están conectados simultáneamente los dos circuitos de calefacción. A continuación, se ajusta el nivel deseado (girando el mando en el sentido contrario
a las agujas del reloj).
No se deben cocinar nunca con
aceite o grasa alimentos como,
por ejemplo, patatas fritas, sin vigilancia, ya que los aceites y las
grasas se pueden inflamar fácilmente si se sobrecalientan.
Termostato de seguridad
Para evitar que se produzca un calentamiento excesivo peligroso, el horno cuenta
con un termostato de seguridad que interrumpe el suministro de energía eléctrica
cuando se realiza un uso incorrecto del aparato o cuando hay un componente defectuoso. El horno se vuelve a conectar
automáticamente cuando desciende la temperatura.
Si el termostato de seguridad se activa
debido a un uso indebido del aparato, basta
con eliminar la causa del error una vez enfriado el horno. En cambio, si el termostato
se activa debido a la existencia de un componente defectuoso, debe acudir al servicio
técnico.
Ventilador de refrigeración
El horno dispone de un ventilador de
refrigeración que mantiene fríos el panel
frontal, los mandos y la manilla de la puerta
del horno. El ventilador de refrigeración se
acciona automáticamente cuando el horno
se activa. El aire caliente se expulsa a través
de la abertura existente cerca de la manilla
de la puerta del horno. El ventilador se apaga
cuando el mando de control de la función de
horno se ajusta en la posición "
(en el sen-
0".
53 progress
Page 54

54 progress
Antes de utilizar el horno por primera vez
Retire todo el material de embalaje
del interior y el exterior del horno antes de utilizarlo.
Antes del primer uso, caliente el horno
sin colocar alimentos en su interior.
Durante este intervalo de tiempo, el horno puede despedir un olor desagradable.
Esto es totalmente normal y se debe a los
residuos de fabricación.
Asegúrese de que la habitación en la
que esté instalado el horno esté bien ventilada.
1. Sitúe el mando del horno en la fun-
)
ción de cocción convencional
2. Ajuste el termostato en 250 °C.
3. Abra una ventana para que se
ventile la cocina.
4. Deje el horno vacío en funcionamiento durante unos 45 minutos.
A continuación, deje enfriar el horno.
Humedezca un paño suave con agua
caliente y un poco de detergente
neutro y limpie el interior del horno.
Antes de utilizar el aparato por primera vez, también debe limpiar a fondo
los accesorios.
.
Para abrir la puerta del horno,
agarre siempre la manilla sobre la
parte central.
Page 55

Cocción en el horno
Importante: No revista el horno con
papel de aluminio y no coloque ninguna bandeja para hornear o similar
en su base, pues esto puede dañar el
esmalte calor debido a la acumulación de calor que surgiría. Así pues,
coloque las fuentes y recipientes
estándar, así como los recipientes refractarios y las bandejas de aluminio,
en uno de los niveles para bandejas.
Cuando se calientan alimentos, se
genera vapor de la misma manera
que en una cacerola. Cuando el vapor entra en contacto con el cristal de
la puerta del horno, se condensa y
aparecen gotas de agua.
Así pues, para reducir la condensación, precaliente siempre el horno vacío
durante 10 minutos.
Se recomienda que elimine las gotas de
agua después de cada proceso de cocción.
La puerta del horno debe estar
cerrada durante la cocción.
Tenga cuidado al abrir la puerta del
horno. Al abrir la puerta, no la deje
caer; sosténgala por su manilla hasta que esté completamente abierta.
El horno tiene cuatro niveles.
Las posiciones de los niveles se
cuentan desde la base del horno, tal
y como se indica en la figura.
Es imprescindible insertar siempre las
bandejas correctamente (ver imagen).
No coloque fuentes ni ollas directamente en la base del horno.
55 progress
4
3
2
1
Page 56

56 progress
Cocción convencional
1. Gire el mando del horno hasta la función
deseada .
2. Ajuste el termostato a la temperatura de-
seada.
- El calor se distribuye de forma óptima en
el nivel medio. Si desea que la parte infe-
rior del alimento se dore más que la su-
perior, inserte la bandeja en un nivel infe-
rior. Por el contrario, si es la parte supe-
rior la que debe estar más dorada, colo-
que la bandeja en una posición superior.
- El material y el acabado de la bandeja y
los platos influirán en el dorado de la base
de los alimentos. Los moldes y utensilios
de cocina esmaltados, oscuros, pesados
o no revestidos permiten obtener un do-
rado más intenso en la parte inferior,
mientras que los moldes y bandejas de
vidrio, de aluminio brillante o chapa de
acero pulido reflejan el calor y, por lo tan-
to, sólo logran un dorado ligero en la
base.
- Ponga siempre los recipientes en el cen-
tro de la bandeja para que los alimentos
se doren con uniformidad.
- Coloque los platos en fuentes o bandejas
del tamaño adecuado para evitar que se
derrame su contenido en la base del hor-
no y, de este modo, evitar también una
operación de limpieza costosa.
- No coloque los platos, los botes o las
bandejas de hornear directamente sobre
la base del horno, puesto que ésta alcan-
za una temperatura muy alta y pueden
producirse daños en el aparato. Con este
ajuste el calor se genera calor tanto des-
de las resistencias superiores e inferiores.
Por lo tanto, sólo necesita utilizar un úni-
co nivel de bandeja para cocinar los ali-
mentos. Este ajuste resulta especialmen-
te adecuado para platos que también
deben dorarse en la base, como son los
quiches y las empanadas.
No obstante, los gratinados, las lasañas y
otros platos que deben dorarse fundamentalmente por la parte superior también pueden
prepararse sin problemas con este ajuste.
Calor inferior
1. Gire el regulador del horno para encen-
derlo .
2. Ajuste el termostato a la temperatura deseada.
Esta función es especialmente útil para
prehornear masas que luego van a rellenarse. Por lo tanto, puede utilizarse en la cocción de quiches y empanadas para garantizar que la base de masa está bien hecha.
El piloto de control del termostato permanece activado hasta que se alcanza
la temperatura correcta. A partir de ese
momento, se enciende y apaga para
indicar que el horno se mantiene a dicha temperatura.
Calor superior
Esta función es adecuada para el acaba-
do de platos cocinados, como es la lasaña, el
pastel de carne, la coliflor gratinada con
queso, etc.
Page 57

Consejos y sugerencias
Cocción:
El alimento necesita por lo general una
temperatura moderada (150°C - 200°C). Por
lo tanto, el horno debe precalentarse durante
aprox. 10 minutos.
No abra la puerta del horno antes de que
transcurran 3/4 partes del tiempo de cocción.
La masa para empanadas, tartas, etc., se
hornea en un molde redondo o en una bandeja durante 2/3 del tiempo de cocción y,
después, se decora antes de terminar de
hornearse por completo. Este tiempo de cocción adicional depende del tipo y la cantidad
de aderezo o relleno. Las masas batidas se
tienen que desprender con dificultad de la
cuchara, pues el tiempo de cocción se prolongaría innecesariamente si se añade demasiado líquido.
Si introduce al mismo tiempo dos bandejas con repostería en el horno, deje libre un
nivel entre las bandejas.
Si se introducen al mismo tiempo dos
bandejas con repostería en el horno,
intercambie y gire las bandejas al cabo de
aproximadamente 2/3 del tiempo de cocción.
Asado:
No ase trozos de carne que tengan un
peso inferior a 1 kg, pues los trozos más pequeños se podrían secar al asarse. La carne
roja, que debe cocinarse bien por el exterior,
pero quedar poco hecha o en su punto en el
interior, se debe asar a una mayor temperatura (200°C a 250°C).
En cambio, la carne blanca, las aves y el
pescado requieren una temperatura inferior
(150°C a 175°C). Los ingredientes de la salsa se incorporan a la bandeja al principio si
el tiempo de cocción es corto. De lo contrario, se añaden en la última media hora.
Puede comprobar si la carne está hecha
con una cuchara: Si no puede introducir la
cuchara, significa que está asada. El rosbif y
los filetes, que deben quedar en su punto en
el interior, se deben asar a una mayor temperatura y en menos tiempo.
Cuando ase carnes directamente en la
parrilla, introduzca la bandeja recogedora de
grasa en la guía inferior para recoger el jugo
que suelte la carne.
57 progress
Antes de cortar un asado, déjelo reposar
durante como mínimo 15 minutos para que
no se salga el jugo de la carne.
Para reducir la formación de humo en el
horno, se recomienda verter un poco de
agua en la bandeja recogedora de grasa.
Asimismo, para evitar la formación de condensación, es recomendable añadir agua
varias veces. Los platos se pueden mantener
calientes en el horno a temperatura mínima
hasta que se sirvan.
Atención:
No forre el horno con papel de
aluminio y no coloque bandejas,
ollas, etc. en la base; de lo
contrario, el esmalte del horno
quedará dañado por la
acumulación de calor producida.
Tiempos de cocción
Los tiempos de cocción pueden variar
según la composición, ingredientes y cantidad de líquido de cada plato que se cocine.
Recuerde los ajustes que ha utilizado en
sus primeros intentos de cocción o asado,
pues le servirán de experiencia para cuando
tenga que preparar el mismo plato.
Además, podrá ir modificando individualmente los valores indicados basándose en
su propia experiencia.
Page 58

58 progress
Tablas de cocción
Cocción convencional
Los tiempos de cocción no incluyen el tiempo de precalentamiento.
Precalentar siempre el horno vacío durante 10 minutos.
Peso
(gramos)
Alimento
Temperatura °C
Nivel de bandeja
44
4
44
33
3
33
22
2
22
11
1
11
Tiempo de
cocción en
min.
REPOSTERÍA
Masa batida 170 1 45-60
Pastaflora 170 2 20-30
Tarta de queso o crema 160 1 60-80
Tarta de manzana 180 1 40-60
Strudel: 175 2 60-80
Bizcocho de frutas 175 2 30-40
Bizcocho esponjoso 175 1 45-60
Bizcocho normal 175 1 30-40
Bizcocho navideño: 170 1 40-60
Bizcocho cuadrado 170 1 50-60
Tarta pequeña 175 2 25-35
Galletas 160 3 20-30
Merengues 100 2 90-120
Galletas 190 2 12-20
Buñuelos/eclairs 200 2 15-25
PAN Y PIZZA
1000 Pan blanco 190 1 40-60
500 Pan de centeno 190 2 30-45
500 Bollos 200 2 20-35
250 Pizza 210 1 15-30
FLANES
Flan con pasta 200 2 40-50
Flan de verduras 200 2 45-60
Quiches 200 2 35-45
Lasaña 180 2 45-60
Canelones 200 2 40-55
Las temperaturas indicadas son valores orientativos. Dado el caso, las temperaturas se
tienen que adaptar a las necesidades de cada persona.
Page 59

Cocción convencional
Los tiempos de cocción no incluyen el tiempo de precalentamiento.
Precaliente siempre el horno vacío durante 10 minutos.
59 progress
Peso
(gramos)
Alimento
Temperatura
Nivel de bandeja
°C °C
°C
°C °C
44
4
44
33
3
33
22
2
22
11
1
11
Tiempo de
cocción en
min.
CARNES
1000 Vacuno 190 2 50-70
1200 Cerdo 180 2 100-130
1000 Ternera lechal 190 2 90-120
1500 Rosbif, poco hecho 210 2 50-60
1500 Rosbif, medio 210 2 60-70
1500 Rosbif, bien hecho 210 2 70-80
2000 Lacón 180 2 120-150
1200 Cordero 190 2 110-130
1000 Pollo 190 2 60-80
5000 Pavo 180 2 210-240
1500 Pato 175 2 120-150
3000 Ganso 175 2 150-200
1200 Liebre 190 2 60-80
1200 Codillo 180 2 100-120
Picadillo 180 2 40-60
CAZA
1500 Lomo de liebre 190 2 150-200
800 Faisán 190 2 90-120
PESCADO
1200 Trucha/Dentón 190 2 30-40
1500 Atún/Salmón 190 2 25-35
Las temperaturas indicadas son valores orientativos. Dado el caso, éstas se deberán
adaptar a las necesidades de cada momento.
Page 60

60 progress
Limpieza y mantenimiento
Antes de limpiar el horno,
apáguelo y deje que se enfríe.
El aparato no se debe limpiar con
un limpiador de vapor caliente o
chorro de vapor.
Importante: Antes de cada operación de
limpieza, es imprescindible que desconecte el
aparato.
Para que el aparato tenga una larga vida
útil, es necesario realizar las siguientes operaciones de limpieza con regularidad:
- Estos trabajos sólo se deben realizar con
el horno frío.
- Limpie las partes esmaltadas con lejía
jabonosa.
- No utilice productos abrasivos.
- Seque las piezas de acero inoxidable y los
cristales con un paño suave.
- En el caso de manchas difíciles, utilice
detergentes convencionales para acero
inoxidable o vinagre caliente.
El esmalte del horno es muy resistente e
insensible. Sin embargo, los ácidos calientes
de algunas frutas (limones, ciruelas, etc.) pueden dejar manchas ásperas y opacas en la
superficie brillante del esmalte No obstante,
dichas manchas no afectan al funcionamiento
del horno. Limpie siempre el horno después
de utilizarlo, pues es la manera más fácil de
eliminar la suciedad y, además, evita que la
suciedad se queme.
Para no causar daños ni desgaste en los
paneles de cristal de la puerta, evite el uso de
lo siguiente:
• Detergente de uso doméstico y lejía
• Estropajos impregnados que no sean
aptos para cacerolas antiadherentes.
• Estropajos abrillantadores (Ajax) o estro-
pajos de acero
• Estropajos o aerosoles químicos para
horno
• Desoxidantes
• Quitamanchas domésticos
Utilice agua templada con jabón para limpiar el cristal interior y exterior de la puerta. Si
el cristal interior está muy sucio, se recomienda emplear un producto de limpieza para placas de cerámica. No emplee rascadores para
eliminar la suciedad.
Interior del horno
La base esmaltada del interior del horno
se limpia mejor cuando el horno está aún
caliente.
Limpie el horno con un paño suave y
aclare dicho paño con agua tibia y jabón
después de cada uso. Además, de vez en
cuando es preciso realizar una limpieza más
profunda, en la que deberán utilizarse productos de limpieza convencionales para horno.
Productos de limpieza
Antes de aplicar un producto de limpieza
al horno, compruebe que es adecuado y que
el fabricante recomienda su uso.
El empleo de limpiadores que contengan
lejía podría opacificar el acabado de la superficie. Evite el uso de productos abrasivos o
agresivos.
Limpieza del exterior
Limpie periódicamente el panel de mandos, la puerta del horno y el cierre hermético
de la puerta con un paño suave empapado
en agua templada, a la que se haya añadido
un poco de detergente líquido.
Page 61

Puerta del horno
La puerta del horno incorpora dos cristales.
Con el fin de realizar la limpieza con más
comodidad, dicha puerta puede desencajarse y los cristales internos pueden extraerse.
Atención: la puerta del horno
debe desmontarse antes de proceder a su limpieza. De lo contrario, ésta podría cerrarse de golpe
mientras el usuario extrae los
cristales internos.
Para realizar el desmontaje, siga los
)
siguientes pasos:
1. Abra la puerta en su totalidad.
2. Localice las dos bisagras de la puerta.
3. Eleve la palanca de las bisagras y ábralas
hacia delante.
4. Sujete la puerta del horno por los laterales
con ambas manos y cierre la puerta parcialmente a un ángulo de aprox. 45°.
5. Tire de la puerta hacia delante para desencajarla.
6. Coloque la puerta sobre un suelo firme y
proteja la superficie de la manilla con un
paño suave.
7. Accione el sistema de bloqueo para retirar los cristales internos.
61 progress
Page 62

62 progress
8. Gire los dos topes 90° y extraiga éstos de
su asiento.
9. Levante ligeramente y con cuidado el
cristal superior y extraiga el cristal que
tiene un borde de adorno en los cuatro
lados.
Limpie la puerta del horno con agua templada
y un paño suave. No utilice estropajos de
acero o aluminio ni tampoco estropajos
abrasivos ni ácidos que pudieran dañar la
superficie especial termorreflectante de los
cristales internos.
Coloque de nuevo los cristales internos después de la limpieza. Vuelva a montar la puerta
en el horno, siguiendo para ello el orden
inverso al desmontaje. Asegúrese de que los
cristales estén bien alineados.
Siga los pasos que se indican a continuación:
)
El cristal interno que tiene el marco de
adorno en los cuatro lados debe montarse
de modo que la serigrafía quede orientada
hacia el lado exterior del horno. El cristal está
correctamente colocado cuando al tocar la
superficie visible con los dedos no se advierte
ninguna rugosidad a la altura de dicha
serigrafía.
El cristal interno debe estar colocado en
su asiento tal como se especifica en la
imagen. Tras colocar los cristales en la puerta
del horno, sujete los cristales tal como se ha
explicado en el punto 8.
No limpie la puerta del horno si
ésta está caliente, pues los cristales podrían estallar. Si detecta
arañazos o grietas en dicho cristal, llame de inmediato al servicio
técnico para que lo sustituya.
90°
2
1
Page 63

Modelos de acero inoxidable o de aluminio:
Limpie la puerta del horno y el panel de
mandos de acero inoxidable o aluminio con
una esponja húmeda y, a continuación, seque todo con cuidado con un paño suave. No
utilice estropajos de acero o aluminio ni tampoco ácidos o productos abrasivos que pudieran dañar o arañar las superficies.
Limpieza de la junta de la puerta del
horno
La abertura del horno incorpora una junta
en su contorno.
Revise periódicamente el estado
de la junta y limpie ésta siempre
que sea necesario, pero sin utilizar objetos puntiagudos o productos abrasivos. Si detecta daños en la junta, llame de inmediato
al servicio técnico. No utilice el
horno hasta que haya sustituido
dicha junta.
63 progress
Page 64

64 progress
Cambio de la bombilla del horno
Desconecte el aparato de la
alimentación eléctrica y quite el
interruptor protector.
Si es necesario cambiar la bombilla, utilice un repuesto con las siguientes especificaciones:
- Potencia eléctrica: 15 W / 25 W
- Especificación eléctrica: 230 V (50 Hz)
- Resistencia al calor hasta 300 °C
- Tipo de conexión: E14
Este tipo de bombillas se encuentra disponible en los centros de servicio locales.
Cómo cambiar la bombilla del horno:
)
1. En primer lugar asegúrese de que el horno
está frío y desconectado de la corriente
eléctrica.
2. A continuación, gire la cubierta de cristal
de la bombilla hacia la izquierda.
3. Quite la bombilla defectuosa y cámbiela
por otra nueva.
4. Vuelva a colocar la cubierta de cristal, cie-
rre el horno y restaure el suministro de
energía eléctrica.
Page 65

65 progress
¿Que hacer cuando algo no funciona?
Si el aparato no funciona correctamente, compruebe los siguientes puntos antes de
llamar al servicio técnico de Electrolux:
PROBLEMA
El horno no se enciende.
El piloto de control de la
temperatura del horno no se
enciende.
La luz del interior del horno no se
enciende.
Los alimentos tardan demasiado
tiempo en cocinarse o se
cocinan demasiado rápido.
Se acumula vapor y
condensación en los alimentos y
en la cavidad del horno.
SOLUCIÓN
Compruebe si se ha elegido una función de
cocción y se ha ajustado una temperatura.
o
compruebe si el aparato está conectado
correctamente y el interruptor de la caja de
enchufe o el suministro eléctrico de la red al
horno están en la posición ON.
Utilice el termostato para seleccionar una
temperatura
o
seleccione una función con el mando del
horno.
Seleccione una función con el mando del
horno
o
revise la bombilla y cámbiela si es necesario
(consulte “Cambio de la bombilla del horno“).
Si es necesario, modifique la temperatura de
cocción
o
consulte el contenido de estas instrucciones
y, en particular, el capítulo “Cocción en el
horno“.
Una vez cocinado un alimento, no deje éste
más de 15 o 20 minutos en el horno.
Page 66

66 progress
Características técnicas
Potencia calorífica
Calor superior 800 W
Calor inferior 1000 W
Cocción convencional 1800 W
Luz del horno 25 W
Motor del ventilador de refrigeración 25 W
Potencia total 1850 W
Tensión de utilización (50 Hz) 230 V-400 V 3N~
Dimensiones del hueco
Altura 600 mm
Anchura 560 mm
Profundidad 550 mm
Bandeja
Altura 335 mm
Anchura 405 mm
Profundidad 410 mm
Capacidad del horno 56 l
El aparato se puede combinar con las siguientes encimeras empotradas o
placas de vitrocerámica empotradas:
zz
z Modelos de encimera de vitrocerámica:
zz
PEM 6000 E
Potencia total 6000 W
Tensión de utilización (50 Hz) 230 V
zz
z Modelos de encimera de vitrocerámica:
zz
PES 6000 E
Potencia total 5800 W
Tensión de utilización (50 Hz) 230 V
zz
z Modelos de encimera de vitrocerámica:
zz
PES 6060 E
Potencia total 7600 W
Tensión de utilización (50 Hz) 230 V
Máxima potencia calorífica nominal
zz
z Horno + encimera de
zz
vitrocerámica 9450 W
Page 67

Instrucciones para el instalador
El montaje y la instalación se
deben realizar respetando
estrictamente las regulaciones
vigentes. Cualquier intervención
se debe llevar a cabo con el
aparato desconectado. Sólo
deben intervenir técnicos
reconocidos.
El fabricante declina toda
responsabilidad si no se
respetan las medidas de
seguridad.
Conexión eléctrica
Antes de conectar el aparato, tenga en
cuenta lo siguiente:
- El fusible y la instalación eléctrica do-
méstica deben estar diseñados para la
carga máxima del aparato (véase la pla-
ca de datos técnicos).
- La instalación doméstica debe disponer
de una puesta a tierra adecuada confor-
me a las regulaciones vigentes.
- La caja de enchufe o el interruptor de
desconexión multipolar también deben
ser fácilmente accesibles después de
instalar el aparato.
Este aparato se suministra sin cable de
alimentación eléctrica, ya que, según el tipo
de alimentación disponible, se necesita un
cable de conexión con enchufe normalizado
diseñado para la carga que se indica en la
placa de datos técnicos. Introduzca el
enchufe en una base de enchufe adecuada.
Los cables de conexión más adecuados, teniendo en cuenta la sección nominal
necesaria en cada caso, son de los siguientes tipos:
H07RN-F, H05RN-F, H05RR-F, H05VVF, H05V2V2-F (T90), H05BB-F.
Si la conexión se realiza sin enchufe o
éste no es accesible, se debe colocar entre
el aparato y el cable de red un interruptor de
desconexión multipolar (por ejemplo,
fusibles, interruptores automáticos) con una
distancia mínima entre los contactos de 3
mm. El interruptor no debe interrumpir el
conductor de puesta a tierra en ningún
punto. El conductor de puesta a tierra
amarillo-verde debe ser 2-3 cm más largo
que todos los demás cables.
67 progress
Page 68

68 progress
El cable de conexión debe estar diseñado de tal forma que no alcance 50°C (sobre
la temperatura ambiente) en ningún punto.
Una vez establecida la conexión, se deben comprobar los elementos de calentamiento poniéndolos en funcionamiento
durante aprox. 3 minutos.
Placa de bornes
El aparato está equipado con un bloque
de conexión de 6 polos fácilmente accesible, cuyos puentes se han previsto para el
funcionamiento con 400 V y un conductor
neutro (véase la figura).
Si la tensión de red es diferente, los
puentes del bloque de conexión se deben
cambiar según el esquema de la figura. El
conductor de puesta a tierra va en el borne
. Después de establecer la conexión, se
debe fijar el cable en el bloque de conexión
con descarga de tracción.
Conexión eléctrica con la encimera
Atención: ¡Se deben tener en cuenta las instrucciones de montaje de
la encimera, la cocina empotrada o
la caja de distribución!
Este aparato se puede conectar con los
modelos de encimera que se indican en el
capítulo «Características técnicas». La caja
de enchufe para conectar la encimera se
encuentra situada en la carcasa de la cocina.
Los cables de conexión de los elementos de
calentamiento y el cable del conductor de
puesta a tierra salen de la encimera
empotrada; estos cables están equipados
con una conexión por enchufe. Introduzca
los enchufes y los cables de conexión en la
caja de enchufe correspondiente de la
cocina. De este modo, se excluye la posibilidad de una conexión incorrecta.
El fabricante declina toda responsabilidad si no se respetan las medidas de
seguridad.
230V 3~
Ø 4x2,5 mm²
230V 1~
Ø 3x4 mm²
400V 2N~
Ø 4x2,5 mm²
400V 3N~
Ø 5x1,5 mm²
1 2 3 4 5
L1 L2 L3 PE
1 2 3 4 5
L1 N PE
1 2 3 4 5
L1 L2 N PE
1 2 3 4 5
L1 L2 L3 N PE
Page 69

Instrucciones de montaje
Para poder garantizar el funcionamiento
correcto del aparato empotrado, los módulos de cocina o el hueco en el que se empotra el aparato deben tener las siguientes dimensiones.
De acuerdo con las normas en vigor, todas las piezas que aseguran la protección
contra descargas eléctricas de componentes con corriente y aislados se deben fijar de
forma que no se puedan aflojar sin utilizar
herramientas.
Esto incluye también la fijación de posibles terminaciones al principio o al final de
una línea de montaje.
La protección contra el contacto tiene
que estar garantizada en cualquier caso a
través del montaje.
El aparato se puede instalar con la parte
posterior o una pared lateral contra módulos
de cocina, aparatos o paredes más altos.
No obstante, en la otra pared lateral sólo se
deben colocar otros aparatos o muebles
con la misma altura que el aparato.
Dimensiones del horno (véase la figura)
M
0
5
5
560 - 570
69 progress
IN
600
80÷100
Instrucciones de montaje
Para poder garantizar el funcionamiento
correcto del aparato empotrado, los módulos de cocina o el hueco en el que se empotra el aparato deben tener las siguientes dimensiones.
Fijación del horno al mueble
1. Abra la puerta del horno.
2. Fije el horno con la ayuda de los cuatro
distanciadores en el mueble (véase la fi-
gura - A). Éstos encajan exactamente
en los agujeros del marco. A continua-
ción, atornille los cuatro tornillos de ma-
dera suministrados (véase la figura - B).
Page 70

70 progress
Servicio técnico
Si, después de realizar las comprobaciones
descritas anteriormente, no se puede
resolver el problema, llame al servicio
técnico más cercano del fabricante indicando el tipo de defecto, el modelo del aparato
(Mod.), el número de producto (Prod. nº) y
el número de serie (Nº serie), que
encontrará en la placa de datos técnicos
del horno.
Page 71

Page 72

72 progress
www.progress-hausgeraete.de
35906-1701 07/08 R.B
 Loading...