

Page 1

PCS730
PCS730 PCS740
GB
Vacuum cle ane r O pe rating ins tructions
D
Bode ns taub s auge r Ge brauch sanw e isung
F
As pirate ur traîne au Mode d'e m ploi
I
As pirapolve re Instruzioni per l’us o
PCS740
•
•
•
•
•
•
•
•
•
•
•
•
w w w .progre s s-s tuttgart.com
w w w .progre s s-cle ane rs .com
72Sx 02 03 02
Page 2
English
9
14*
1
2
7
* De pe nding on th e m ode l
* Nur be stim m te Mode lle
* Suivant les m odèle s
* Solo pe r alcuni m ode lli
15*
10*
16*
11*
12
17
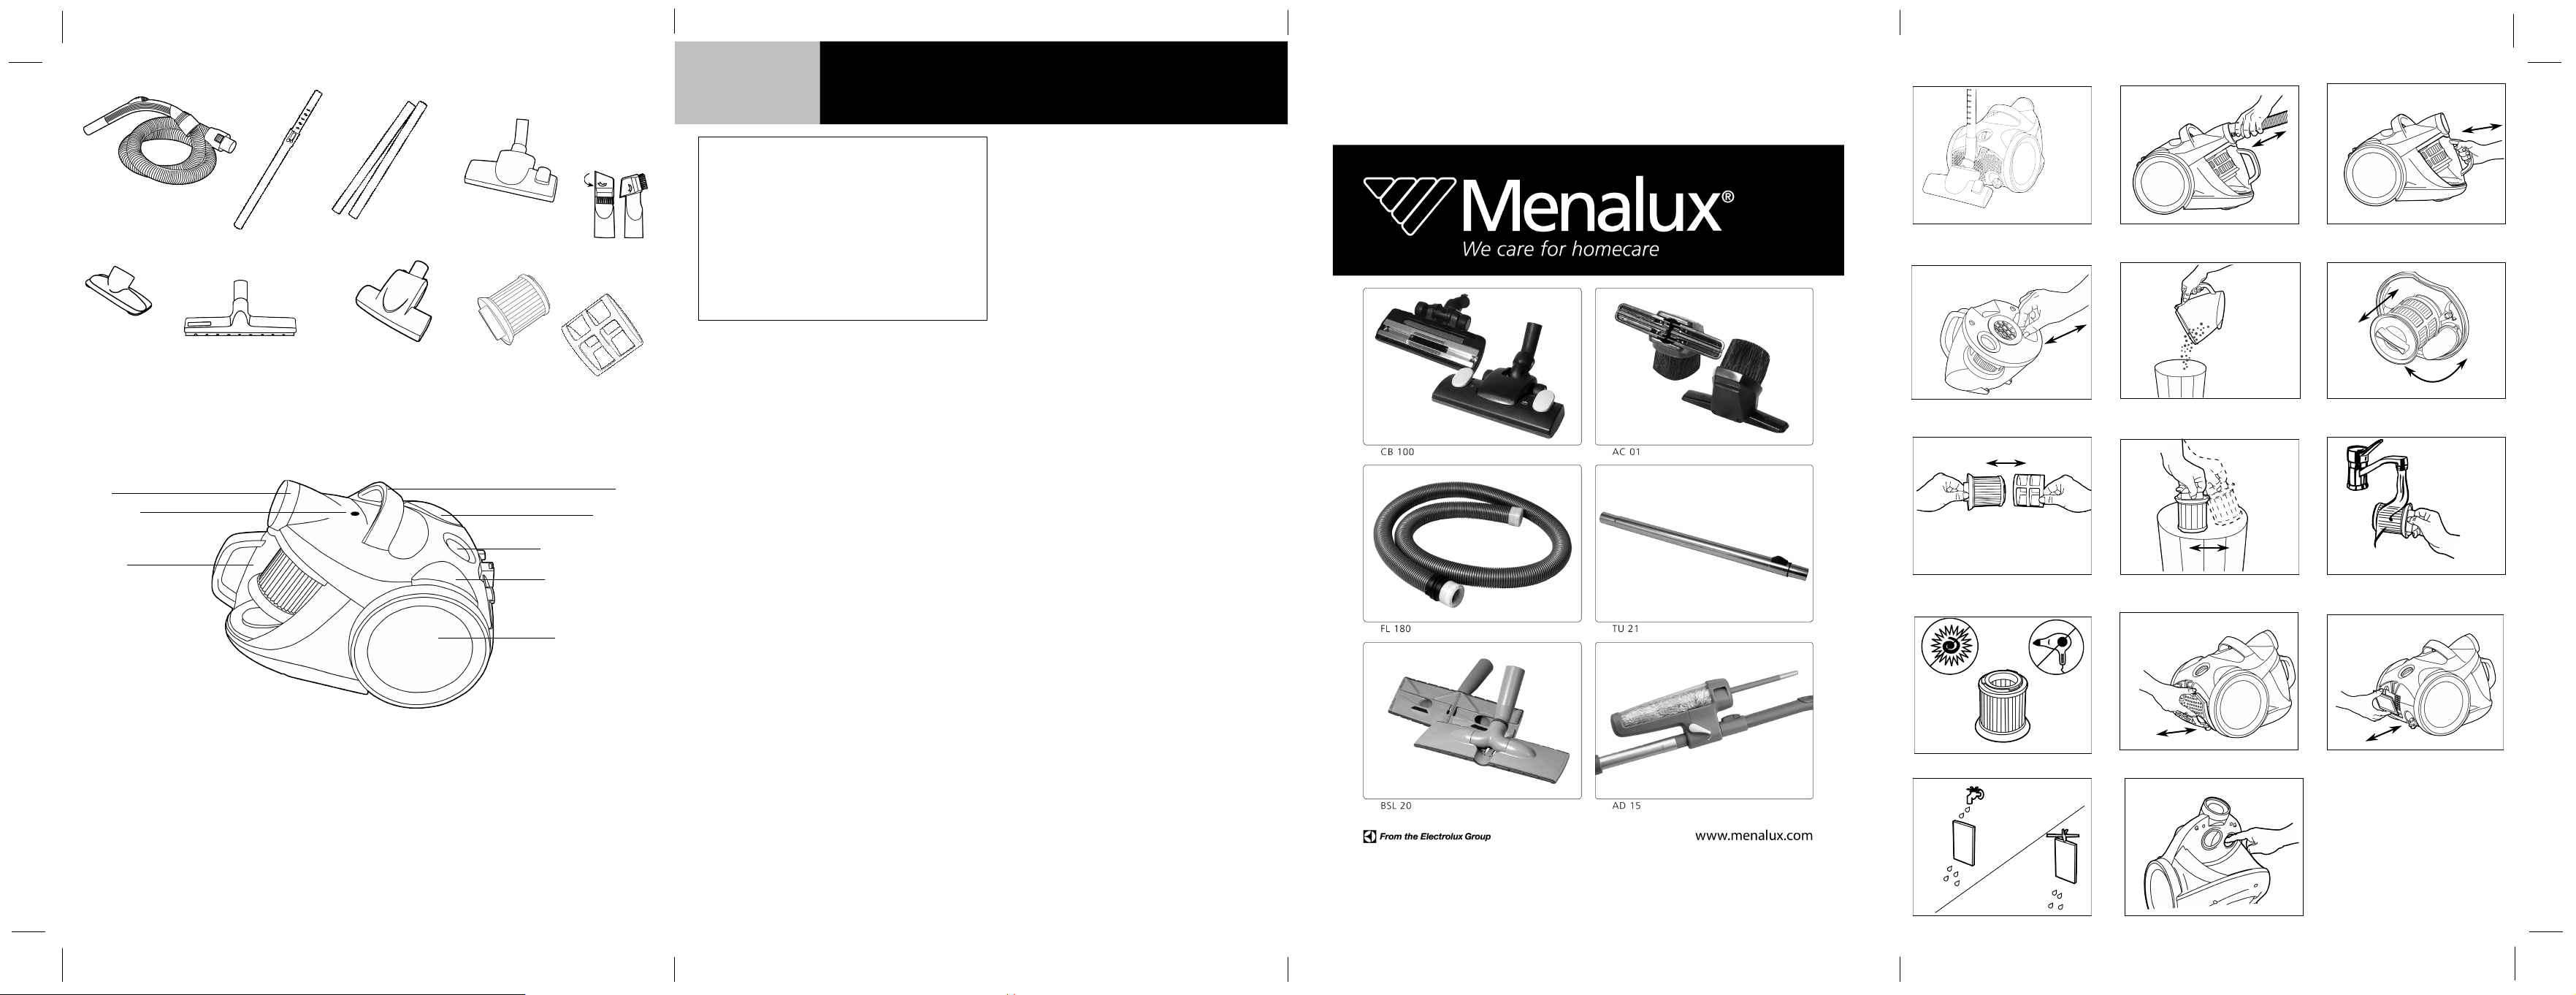
D ESCRIPTIO N O F PARTS
1. Suction inle t
2. D us t containe r indicator
3. Variable pow e r control
4. Cable rew ind button
5. O n/off sw itch
6. W h e el
7. D us t containe r
13*
18
8
4
3
5
6
8. Carrying h andle
9 . H ose
10. Te le scopic tub e *
IMPO RTANT SA FEGU ARD S
• Re ad th is instruction book le t care fully.
• Be fore u s ing th e appliance , ch eck th at th e m ains pow e r
voltage corres ponds to th e voltage sh ow n on th e rating
plate .
• D o not sw itch th e appliance on if it appe ars to be fau lty
in any w ay or it h as a dam age d cord or plug. D o not try
to re pair th e appliance by yourse lf. For re pairs and
acce ss orie s w e are at your se rvice from Monday to
Friday from 8am to 6pm
• Alw ays re m ove th e plu g from th e pow e r sock e t w h e n
th e appliance is not in us e and be fore carrying out any
cle aning or m ainte nance ope rations.
• Ne ve r le ave th e appliance unatte nde d w h e n it is
sw itch e d on. K e e p th e appliance out of re ach of
ch ildre n.
• Th is appliance is for dom e s tic us e only. U s e as
de scribe d in th is ins truction book le t.
• D o not pull th e appliance b y th e cord. Do not u nplug b y
pulling on th e cord. Do not us e th e cle ane r w ith a
dam age d cable . If th e cab le dam age d, it s h ould be
re place d at a se rvice ce nte r. Th is is not cove re d by th e
w arranty.
• D o not us e appliance on w et surfaces or to vacuum
liquids , m ud, ash and burning cigare tte butts . D o not
vacuum up any h igh ly flam m able or e xplosive
subs tance s or gase s.
Th e se m ate rials can cause se rious dam age to th e
m otor - a dam age w h ich is not cove re d b y th e
w arranty.
• D o not unplug th e vacu u m cle ane r w ith w e t h ands .
• D o not ope rate th e vacuu m cle ane r too close to h e ate rs
and radiators, stove s e tc.
• Be fore you s tart us ing th e vacu u m cle ane r, ple ase
re m ove large or sh arp obje cts from th e floor to preve nt
dam age to th e dus t containe r and h os e .
INSTRUCTIO NS FO R USE
• Be fore placing into ope ration m ak e ce rtain th at th e
filte rs are in th e prope r position.
20 To conne ct th e h os e into th e s uction inle t pus h it until it
click s.
20 To dis conne ct th e h ose from th e s uction inle t pus h th e
button at th e end of th e h ose .
11. Me tal tub e s *
12. Dual purpose floor
nozzle
13. Com bination cre vice
nozzle / brus h *
14. Uph ols te ry nozzle *
15. H ard floor nozzle *
16. Turbo nozzle *
17. Cartridge filte r
18. Prote ctor m e sh
19 . Park ing position
* De pe nding on th e m ode l
• Unw ind a s u fficie nt le ngth of cab le and ins e rt th e plu g
into th e pow e r s ock e t. A YELLO W m ark on th e pow er
cable s h ow s th e ide al cable le ngth . D o not e xte nd th e
cable b e yond th e RED m ark .
• Pres s th e O N/O FF b utton to sw itch th e appliance on.
O n initial start up full pow e r is re ach e d afte r
approxim ate ly 1-2 s e conds .
• To re w ind th e pow e r cable , pres s th e re w ind button w ith
foot, and guide th e cable w ith h and to e nsu re th at it
doe s not w h ip cau s ing dam age .
• By m oving th e variable pow e r control, th e su ction
pow e r can b e adjuste d.
MAINTENANCE
REMO VING TH E CO NTENTS O F TH E D U ST CO NTAINER
Neve r ope rate th e cle aner w ith out th e dus t containe r
installe d.
Th e dus t containe r m us t be em ptie d if th e w indow of th e
du s t containe r indicator ch ange s into re d w h e n th e
cle ane r is ope rating at m axim um pow e r and th e nozzle
is raise d from th e floor.
32 If th e dus tbin indicator is activate d th an firstly ch eck th e
air inle t ch anne l of th e appliance. If it is clogge d by big
pie ce s of pape r, dus t, h air or oth e r m ate rials th e n cle an
it. If afte r cle aning th e dus tbin indicator staye s
activate d ch e ck th e H EPA.
21 Re m ove th e dus t containe r from th e cle ane r.
22 Re m ove th e filte r se t from th e dus t containe r b y tak ing it
in th e w ay indicate d in th e icon.
23 Re m ove th e conte nts of th e dust containe r.
22 Put th e filte r se t b ack into th e dus t containe r.
21 Put th e dus t containe r b ack into th e cle ane r.
CLEANING TH E FILTERS
• Filte rs s h ou ld be re place d at le as t tw ice a ye ar or w h e n
th e y be com e visibly soile d.
• D is conne ct from e lectrical outle t be fore ch anging th e
filte rs .
Cle aning th e cartridge filte r
Alw ays ope rate th e cle ane r w ith th e cartridge filte r
installe d.
21 Re m ove th e dus t containe r from th e cle ane r.
22 Re m ove th e filte r se t from th e dus t containe r b y tak ing it
as indicate d in th e icon.
24 Re m ove th e cartridge filte r by turning it counte r -
clock w ise (A) and pull it out (B) as indicate d in th e icon.
25 Re m ove th e prote ctor m e sh from th e cartridge filte r.
26,27 Sh ak e th e dirt from th e filte r and th e m e sh into a bin,
if ne ces s ary th e filte r and m e s h can be rinse d, w ith cold
w ate r, unde r a tap.
31
19
22
25
28
29
32
20
23
26
30
21
B
A
24
27
1
Page 3

Page 4

28 Air dry for approxim ate ly 24 h ours, to e nsure it is
com plete ly dry be fore re us ing. Avoid dire ct sunligh t
and e xtre m e drying circum stance s (h air-drye r,e tc.).
If you w ish to u s e your appliance w h ile th e cartridge
filte r is drying, you m ay us e th e e xtra cartridge filte r
inse rte d in th e pack aging box *.
25 Ins e rt th e prote ctor m e sh into its place by pus h ing it
onto th e cartridge filte r.
24 Ins e rt th e cartridge filte r into its place (B) and turn it
clock w ise (A) as indicate d in th e icon.
22 Put th e filte r se t b ack into th e dus t containe r.
21 Put th e dus t containe r b ack into th e cle ane r.
Cartridge filte r re fe re nce nu m be r: F 133
CLEANING O F TH E W A SH ABLE MICRO EXH AU ST FILTER *
29 O pe n th e filte r grill to re m ove th e e xh aus t filte r.
30 Re m ove th e exh aus t filte r.
31 Rinse it unde r tap w ate r and dry it com plete ly.
30 Put th e filte r back into th e cle ane r.
29 Close th e filte r grill.
Exh aust m icro filte r re fe re nce nu m be r: F133.1
PRO TECTING TH E ENVIRO NMENT
• Atte m pt to re cycle pack aging m ate rial and old
appliance s.
• Th e cardb oard pack aging can be place d in th e w as te
pape r colle ction.
• D e posit th e plastic bag m ade of polye th yle ne (PE) at
th e PE colle ction point for re cycling.
• D e posit th e polystyre ne foam at th e PS colle ction point
for re cycling.
Re cycling th e Appliance at th e e nd of its life
• Th e plastic com pone nts all carry a m ate rial
ide ntification m ark ing so th at, lik e th e oth e r m ate rials ,
th e y can be recycle d at th e e nd of th e life of th e
appliance .
• Ple ase inq uire w ith your local auth ority.
Block e d air flow and dirty filte rs
• Th e cle ane r stops autom atically if a block age occurs in
th e nozzle /tube /h ose or if th e filte rs are block e d w ith
dirt.
32 If th e dus tbin indicator is activate d th an firstly ch e ck th e
air inle t ch anne l of th e appliance. If it is clogge d by big
pie ce s of pape r, dus t, h air or oth e r m ate rials th e n
cle an it. If afte r cle aning th e dustbin indicator s taye s
activate d ch e ck th e H EPA.
• D is conne ct from m ains and allow th e cle ane r to cool
for 20-30 m inute s . Re m ove block age and/or cle an
filte rs .
• Re s tart th e cle ane r.
Th is appliance conform s w ith th e follow ing EC
D ire ctive s:
• Low Voltage Dire ctive 2006/9 5/EC
• EMC D ire ctive 89 /336/EEC w ith am e ndm e nts
9 2/31/EEC and 9 3/68/EEC
Th e sym b ol on th e produ ct or on its pack aging
indicate s th at th is product m ay not be tre ate d as
h ous eh old w aste . Ins te ad it s h all b e h ande d ove r to th e
applicab le colle ction point for th e re cycling of e le ctrical
and e le ctronic e q u ipm e nt. By e ns uring th is product is
dis pose d of corre ctly, you w ill h elp pre ve nt pote ntial
ne gative conse que nce s for th e e nvironm e nt and
h um an h e alth , w h ich cou ld oth e rw is e be caus e d by
inappropriate w aste h andling of th is product. For m ore
de taile d inform ation about re cycling of th is product,
pleas e contact your local city office, your h ous e h old
w aste dispos al se rvice or th e sh op w h e re you
purch as e d th e produ ct.
* De pe nding on th e m ode l
2
Page 5

D e utsch
BESCH REIBU NG
1. Sch lauch ans ch lus
2. Staub b e h älte ranze ige
3. Le istungs re gulie rung
4. Tas te für
Kabe laufw ick lu ng
5. Ein-/Aus-Sch alte r
6. Rad
7. Staub b e h älte r
8. Trage griff
9 . Sch lauch
10. Te le sk oproh r *
11. Me tall— Ste ck roh r *
12. U m s ch altb are
Bode ndüs e
13. K om binie rte
Fu ge ndüs e / Bü rs te *
14. Polste rdüse *
15. H artbode ndüse *
16. Turbodüs e *
17. Cartridge Rundfilte r
18. Sch utzne tz
19 . Park position h orizontal
* Nu r be stim m te Mod e lle
FÜ R IH RE SICH ERH EIT
• Ge rät nich t m it W as se r re inige n.
• Le s e n Sie die se Be die nungs anle itu ng s orgfältig.
• Vor Inbe trie bnah m e des Ge räte s prüfe n Sie bitte , ob Ih re
Ne tzspannung de r auf de m Ge rät ange ge be ne n
Ne tzspannung e nts prich t.
• Ve rw e nde n Sie das Ge rät nich t m it b e sch ädigte m
Kabe l!
• Ste ck e n Sie das Ge rät im m e r aus , w e nn Sie e s nich t
ve rw e nde n und be vor Sie de n Filte r ausw e ch se ln.
• Lasse n Sie das Ge rät nich t unb e aufs ich tigt, w e nn e s in
Be trie b is t. K inde r von Ele ck troge räte n fe rnh alte n.
• D as Ge rät nur fü r de n norm ale n H au s h alts ge brauch
ve rw e nde n Sie e s nur w ie in die se r Anle itu ng
be sch rie be n.
• Ne tzs te ck e r nie am Kab e l au s de r Ste ck dos e zie h e n.
Kabe l nich t m it de m Ge rät ode r de n Sau gb ü rs te n
übe rfah re n.
• Nich t zum Aufsauge n von Flüs s igk e ite n, Sch lam m ,
h e iße r As ch e , glü h e nde r Z igarette n ve rw e nde n. Nich t in
de r Näh e e ntflam m bare r Gase ve rw e nde n.
D ie se Mate rialie n k önne n e rnste Be sch ädigung de s
Motors ve rursach e n, die durch die Garantie nich t
abge de ck t w ird.
• Ne tzs te ck e r nie m it nas s e n H ände n in die Ste ck dos e
ste ck e n ode r h e raus zie h en.
• Ge rät k e ine n W itte ru ngs einflü s se n, k e ine r Fe uch tigk e it
und k e ine r H itze q ue lle au s s etzen.
• Ve rm eide n Sie die Au fnah m e h arte r, s pitze r
Ge ge nstände , da die se de n Staubbe h älte r,
Saugs ch lauch und Motor be sch ädige n k önne n.
INBETRIEBNAH ME
• Prüfe n Sie , ob die Filte r/Staub b e h älte r rich tig e inge s e tzt
sind. Ve rw e nde n Sie das Ge rät nur m it rich tig
e inge se tzte m Staubbe h älte r und rich tig e inge s e tzte n
Filte rn.
20 Ste ck e n Sie de n Ansch lus s s tutze n de s Saugs ch lauch e s
bis zur Einrastung in die Saugöffnu ng.
20 Z um Abne h m e n de s Sau gs ch lau ch e s is t die
Entrie ge lungstaste zu drück e n und de r Ans ch lu s s stut ze n
h e raus zuzieh e n.
• Kab e l an die Strom ve rs orgung ansch lie ße n. Eine ge lbe
Mark ie rung am Ne tzk abe l ze igt die ide ale Kab e llänge .
Z ie h e n Sie das Kabe l nie länge r als b is zur rote n
Mark ie rung.
• Z um Einsch alte n de s Ge räts de n Ein-/Au s -Sch alte r
drück e n. Nach de m Eins ch alte n de s Ge räte s is t die
volle Le istung nach e tw a 1-3 Se k unde n e rre ich t.
• Z um Z urück s pule n de s Kabe ls de n K nopf m it de m Fuß
drück e n und das Kabe l m it de r H and füh re n, dam it e s
nich t ve rdre h t w ird.
• Z ur Erh öh ung /Re duzie rung de r Saugstärk e de n
Le istungsre gler ve rsch ie b e n.
VERW END UNG UND W ARTUNG
Ausle e re n de s Staubb e h älte rs
D e r Staubb e h älte r m us s e ntle e rt w e rde n, w enn die
Staubbe h älte ranzeige rot w ird w äh rend das Ge rät auf
Maxim alle istung läuft und die D ü s e de n Bode n nich t
be rüh rt.
Ne h m en Sie das Ge rät nich t in Ge b rauch oh ne Einsatz de s
Sch m utzbe h älte rs .
32 W e nn die Stau b füllanze ige ak tivie rt is t, prüfe n Sie
zunäch s t, de n Lufte inlass k anal de s Ge räte s .
Möglich e rw e ise ist e r durch Papie rs tück e n, Stau b ,
H aare ode r ande re Ge ge ns tände ve rs topft, säube rn s ie
ggf. die se n. Sollte die Anze ige w e ite rh in anzeige n,
übe rprüfe n Sie de n H e pa--Filte r auf Ve runre inigunge n.
21 Entfe rne n de s Staubbe h älte rs vom Ge rät.
22 Entfe rne n de s Filte r - Se ts vom Staubbe h älte r durch
Ab nah m e de r aufge zeigte n Sym bole .
23 Entle e rung de s Stau b b e h älte rs .
22 Einlage de s Filte r - Se ts zurück in de n Sch m u tzbe h älte r.
21 Se tze n Sie de n Sch m utzbe h älte r in das Ge rät zurück .
AUSW ECH SELN/REINIGEN D ER FILTER
• D ie Filte r m üs se n ge reinigt ode r ge w e ch se lt w e rde n,
w e nn die e le k trisch e Filte rw e ch se lanze ige aufle u ch te t,
w äh re nd das Ge rät au f Maxim alle istu ng läuft und die
D ü s e de n Bode n nich t be rüh rt.
• Um e ine Be sch ädigung de s G e räte s zu ve rm e id e n, nich t
oh ne Stau b b e h älte r ode r Filte r staub sauge n. D ie s k ann
zu s ch w e ren D e fe k te n am Ge rät füh re n.
3
Page 6
• Vor de m Aus w e ch s eln de r Filte r de n Ste ck e r aus de r
Ste ck d os e zie h e n.
• H inw e is: W ird das Ge rät zw e ck e ntfrem de t ode r falsch
be die nt, k ann k e ine H aftung für e ve ntue lle Sch äde n
übe rnom m e n w e rde n. Ve rs topfte Filte r k önne n nich t im
Rah m e n de r Garantie le istung in uns e re r W e rk s tatt
ge re inigt w e rde n.
Re inigung de r Filte rk asse tte
Be tre ibe n Sie das Ge rät nur, w e nn die Filte rk as s ette
e inge se tzt ist.
21 Entfe rne n de s Staubbe h älte rs aus de m G e rät.
22 Entfe rne n de s Filte r - Se ts .
24 Entfe rne n Sie de n Cartridge Rundfilte r inde m Sie ih n
e ntge ge n de n Uh rze ige rsinn (A) dre h e n und h e raus
zie h e n (B).
25 Z ieh e n Sie das Sch utzgitte r vom Kartus ch e nfilte r ab.
26,27 De n Sch m utz vom Filte r übe r e ine m Be h älte r
abs ch ütte ln. Falls notw e ndig, de n Filte r und das
Sch utzne tz unte r flie ßende m , k alte m W ass e r du rch
k lopfe n re inige n.
28 Lasse n Sie de n Cartridge Ru ndfilte r m inde ste ns 24
Stunde n lu fttrock ne n be vor Sie die s e n w ie de r
ve rw e nde n. Ve rm e ide n Sie dire k te Sonne neins trah lu ng
und e xtre m e Sch ne lltrock nung (z.B. H aartrock ner).
Falls Sie Ih r Ge rät w äh re nd de s Trock ne ns de s
Cartridge Rundfilte rs b e nütze n m öch te n, sollte de r in
de r Ve rpack ung zus ätzlich b e ige le gte Cartridge
Rundfilte rs ve rw e nde t w e rde n * .
25 Einsatz de s Sch utzne tze s an die vorge se h e ne Pos ition
du rch D rück e n auf de n Cartidge Filte r (B).
24 Se tzte n Sie de n ge trock ne te n Cartridge Rundfilte r
w ie de r e in (B) und arretie re n Sie die se n du rch D re h e n
im Uh rze ige rsinn (A).
22 Se tze n Sie die Abde ck ung de s Staub b e h älte rs w ie de r
e in.
21 D urch D rück e n de r Arre tie rungs taste se tze n Sie de n
Staub b e h älte r w ie de r in de n Staub sauge r e in.
Be ste llnum m e r de s Cartridge Rundfilte rs: F133
REINIGEN D ES ABLU FTFILTERS *
29 ,30 Öffne n Sie de n Filte rgrill. Entfe rne n Sie de n
Ab luftfilte r.
31 Spüle n Sie de n Filte r m it w arm e m W as s e r aus und
lass e n Sie de n Filte r k om ple tt trock ne n.
30,29 Se tze n Sie de n Abluftfilte r w ie de r e in. Sch lie ße n Sie
de n Filte rgrill.
Be ste llnum m e r de s Mik ro Ab lu ftfilte rs: F133.1
UMW ELTSCH UTZ
• W e rfe n Sie das Ve rpack ungs m ate rial und Altge räte
nich t e infach w e g.
32 W e nn die Stau b füllanze ige ak tivie rt is t, prüfe n Sie
zunäch s t, de n Lufte inlass k anal de s Ge räte s .
Möglich e rw e ise ist e r durch Papie rs tück e n, Stau b ,
H aare ode r ande re Ge ge ns tände ve rs topft, säube rn s ie
ggf. die se n. Sollte die Anze ige w e ite rh in anzeige n,
übe rprüfe n Sie de n H e pa--Filte r auf Ve runre inigunge n.
• D e r Ve rpack ungs k arton sollte m it de m Altpapie r
e ntsorgt w e rde n.
• Ku ns ts toffte ile aus PE s ind an de n PE-Sam m e ls te lle n
ode r ue be r de n grüne n Pu nk t zu e nts orge n.Ents orge n
Sie das Ge rät an se ine m Le be nse nde e ntspre ch e nd
de n ge s e tzlich e n Vors ch rifte n.
• Styroporte ile sind an de n Sam m e lste lle n in
Re cyclingh öfe n zu e nts orge n.
• D ie Plas tik te ile h abe n alle e ine
Inde ntifik ations m ark ierung, sodas s sie — w ie die
ande re n Mate rialie n — recyce lt w e rde n k önne n.
• Be ach te n Sie die ge se tzlich e n Vors ch rifte n.
D ie se s G e rät e rfüllt folge nde EC Norm e n:
• Nie drig-Spannu ngs -Norm 2006/9 5/EC
• EMC Norm 89 /336/EEC und Ergänzung 9 2/31/EEC
sow ie 9 3/68/EEC
D as Sym b ol auf de m Produ k t ode r se ine r
Ve rpack u ng w e is t darauf h in, dass die se s Produ k t nich t
als norm ale r H aus h alts ab fall zu b e h ande ln ist,
sonde rn an e ine m Sam m e lpunk t für das Re cycling von
e le k trisch e n und e le k tronis ch e n Ge räte n ab ge ge be n
w e rde n m us s. Durch Ih re n Be itrag zum k orre k te n
Entsorge n die se s Produ k ts sch ützen Sie die Um w e lt und
die Ge su ndh e it Ih re r Mitm e ns ch e n. Um w e lt und
Ge sundh e it w e rde n durch falsch e s Ents orge n
ge fäh rde t. W e ite re Inform atione n üb e r das Re cycling
die se s Produ k ts e rh alte n Sie von Ih re m Rath au s , Ih re r
Mü llab fu h r ode r de m Ge sch äft, in de m Sie das Produ k t
ge k au ft h abe n.
* Nu r be stim m te Mode lle
4
Page 7

Français
D ESCRIPTIO N DE VO TRE
ASPIRATEU R
1. Conne xion du fle xible
2. Indicate ur de
colm atage du filtre
3. Variate ur de pu is s ance
4. Pédale d’e nroule ur de
câble
5. Pédale m arch e /arrèt
6. Roue s
7. Conte ne ur à pous sière
8. Poignée de transport
9 . Fle xib le ave c réglage
de débit d ’air
CO NSIGNES D E SECURITE
• Lise z atte ntive m e nt ce m ode d’e m ploi
• Avant d’utilis e r ce t as pirate ur,contrôle z q ue la te nsion
du rése au corre sponde à la te nsion figurant sur la
plaque s ignalétiq u e se trouvant sou s l’appare il.
• Ne m e tte z pas e n m arch e l’as pirate u r s’il vou s s e m ble
q u’il com porte un défaut ou s i le cordon d’alim e ntation,
ou la prise sont e ndom m agés. N’e ss ayez e n aucun cas
de répare r l’appare il vous -m èm e . Le s réparations faite s
par de s pe rs onne s non qualifiée s ou ine xpérim e ntée s
pe uve nt donne r lie u à de s ble ss ure s e t/ou de s
panne s grave s.
• D éb ranch e z toujours l’appare il, avant tou te opération
d’entretie n ou lors q ue vou s le transporte z.
• Garde z tou jou rs l’appare il h ors de portée de s e nfants e t
ve ille z à ce q u’il ne s oit pas e n fonctionne m e nt s ans
surve illance .
• Ce t appare il e s t e xclusive m e nt de stiné à un us age
dom e stiq ue et pour uniq ue m e nt de s pous sière s s èch e s .
Pour l’utilis ation, ve uille z vous conform ez aux
instructions figurant s ur ce tte notice.
• Ne jam ais tire r l’appare il par le cordon d’alim e ntation.
Ne pas tirer su r le cordon pour le déb ranch e r. Pour
l’utilis ation, ve u illez vou s conform e z aux ins tructions
figurant su r ce tte notice . Ne pas utilis er l’aspirate u r si le
cordon d’alim e ntation e st e ndom m agé. Si c’e st le cas, il
doit ètre re m placé par un Ce ntre Se rvice Agréé. Ce tte
inte rve ntion n’e st pas couve rte par la garantie .
• N’aspire z pas de liq uide s. N’aspire z pas d’obje ts
pointu s . N’as pire z pas de braise s ch aude s ou de
m égots incande sce nts . N’aspire z jam ais à proxim ité de
gaz inflam m able s. Ne jam ais as pire r de pous s ière s
e xtrèm em e nt fine s te lle s q ue plâtre , cim e nt, ce ndre s
froide s, farine , e tc.
• Ne déb ranch e z pas l’appare il ave c le s m ains h um ide s.
• Ne pas utilise r trop prèt de ch auffage , radiate u r, poèle s
e tc.
• Avant de com m e nce r à aspire r,ass ure z vous q ue de
trop gros obje ts ne s e trouve nt pas sur la su rface à
aspire r e t ce ci pour évite r d’e ndom m age r le conte ne ur
à pous sière e t le fle xible.
10. Tu b e m étal
te le scopiq u e *
11. Tube s m étal *
12. Su ce u r com b iné pour
tapis e t s ols durs
13. Suceur long / bross e
com biné *
14. Pe tit suce u r *
15. Su ce u r spécial pour
sols durs *
16. Turbob ros s e *
17. Cartouch e filtrante
18. File t de prote ction
19 . Park ing h orizontal
* Suivant le s m odèle s
MO D E D’EMPLO I
• Avant toute utilisation, ass u re z vous q ue le s filtre s s ont
bie n e n place .
20 Pour conne cte r le fle xib le , pous se z le juq u'au click .
20 Pour e nle ve r le fle xib le , il s u ffit de pous se r le bouton s u r
le bout du fle xib le .
• D éroule z u ne longue ur de cordon d’alim e ntation
suffis ante e t branch e z l’appare il sur une pris e de
courant. U ne m arq ue JA U NE sur le câble indiq u e la
longue ur idéale du cordon. Ne jam ais tirer le cordon
au de là de la m arq u e RO UGE.
• Appuye z s ur la pédale March e /arrèt pour m e ttre e n
m arch e l’as pirate u r. Au dém arrage , la ple ine puis sance
e st atte inte après 1 à 2 se conde s e nviron.
• Pour e nroule r le cordon d’alim e ntation, il suffit
d’appuye r sur la pédale d’e nroule ur de câb le après
avoir débranch é l’appare il. Il es t cons e illé de te nir la
prise de courant pe ndant l’e nroule m e nt du câb le afin
d’évite r q u ’e lle ne vous h e urte ou ne h eurte le s m e ub le s.
• La puis s ance d’as piration pe ut ètre m odu lée e n
actionnant le variate ur éle ctroniq ue de puis s ance .
ENTRETIEN
CO MMENT VID ER LE CO NTENEUR À PO USSIÈRE
Ne jam ais utilise r l’as pirate u r sans le conte ne ur à
pouss ière .
Le conte ne u r a pous sie re doit e tre vidé lorsq ue le
voyant de l'indicate u r de colm atage du conte neur a
pouss ie re ch ange s a coule u r e n rouge .
32 Si l'indicate ur de re m pliss age du bac e st activé, il faut
e n pre m ie r contrôlé l'e ntrée d'air de l'appare il. Si e lle e s t
bouch ée par de gross e s particule s de papie r, de s
m outons , de s ch eve ux, il faut le s e nle ve r. Si après ce tte
opération de ne ttoyage , l'indicate u r e st tou jours activé,
il faudra alors contrôle r le filtre H EPA.
21 Enle ve z le conte ne ur à pous sière de l’as pirate ur.
22 Enle ve z le je u de filtre s du conte ne ur à pous sière e n
suivant la procédure indiq uée sur le s ch ém a.
23 Vide z le conte nu du conte neur à pous s ière .
22 Re m e tte z e n place le je u de filtre s dans le conte ne ur à
pouss ière .
21 Re m e tte z e n place le conte ne u r à pous sière dans
l’as pirate ur.
REMPLACEMENT ET NETTO YAGE D ES FILTRES
• Le s filtre s doive nt ètre ne ttoyés lors q u’ils sont s ales e t au
m oins de ux fois par an.
• D éb ranch e z toujours l’as pirate ur avant de ne ttoye r le s
filtre s .
5
Page 8

Ne ttoyage du filtre cartou ch e
Ne jam ais utilise z l’as pirate ur s i le filtre cartouch e n’e st
pas e n place .
21 Enle ve z le conte nau r à pous s ière de l’aspirate u r.
22 Enle ve z le je u de filtre s du conte naur à pous sière e n
suivant la procédure indiq uée sur le s ch ém a.
24 Enle ve z la cartouch e filtrante e n tournant dans le se ns
inve rse de s aigu ille s d'une m ont re (A) e t tire z de ss us (B).
25 Sortir la cartou ch e filtrante de la cage de prote ction.
26,27 Secoue r la pou s s ière s e trouvant sur la cartou ch e
filtrante e t la cage de prote ction. Si néces s aire la
cartou ch e filtrante e t la cage de prote ction pe u ve nt être
rincée s à l’eau froide du robine t.
28 Laiss e z la séch e r à l'air libre pe ndant e nviron 24 h eure s
afin qu’e lle s oit com pléte m e nt s èch e pour la proch aine
utilisation.
Si vous s ou h aite z u tilise r votre as pirate u r pe ndant q u e
le filtre type "autom obile" s éch e , vous de ve z m e ttre e n
place le filtre s upplém e ntaire q ue vou s trouve re z dans
l'e m ballage *.
Ne la laiss e z pas séch e r sous les rayons du sole il ou dans
d'aut re s conditions extrèm e s de séch age (sèch e -ch e ve ux,
sèch e linge ...)
25 Ins ére r la cage de prote ction dans s on loge m e nt e n le
pouss ant sur la cartou ch e filtrante .
24 Re m e tte z e n place la cartou ch e filtrante (B) e t tou rne z
dans le s e ns de s aiguille s d'une m ontre (A).
22 Ins e re z le je u de filtre s dans le conte ne ur à pous s ière .
21 Re m e tte z e n place le conte ne u r à pous sière e n
pouss ant ve rs le b as jus q u 'au click .
Référe nce de la cartou ch e filtrante : F133
Pour ne ttoye r le filtre de sortie d’air *
29 ,30 O uvre z la grille du filtre . Enle ve r le filtre de s ortie
d’air.
31 Rince z le filtre à l`e au tiède puis laiss ez le séch e r
com plète m e nt.
30,29 Re m e ttre le filtre de sortie d’air e n place . Re fe rm er la
grille du filtre.
Référe nce du m icro filtre de sortie d’air: F133.1
PO U R LE RESPECT D E L’ENVIRO NNEMENT
• Ne je te z pas l’e m ballage , ni le s appare ils us agés
n’im porte où !
• Le carton d’e m b allage peut ètre m is à la colle cte de s
vie ux papie rs .
• Le s ac e n polyéth ylène (PE) pe ut ètre rem is à un point
colle cte de PE pou r le recyclage .
• La m ous se de polystyre ne (PS) pe u t e tre re m is a un
point colle cte de PS pour le re cyclage .
• Rense ignez vous auprès des se rvice s adm inistratifs de votre
com m une pour connaître le ce ntre de re cyclage dont dépend
votre dom icile .
BLO CAGES ET FILTRES SA LES
• L'aspirate ur s'arrète autom atiq ue m ent e n cas
d'obs truction du flexible / tub e /s u ce u r ou s i le s filtre s
sont trop sale s .
32 Si l'indicate ur de re m pliss age du bac e st activé, il faut
e n pre m ie r contrôlé l'e ntrée d'air de l'appare il. Si e lle
e st bouch ée par de gros s e s particule s de papie r, de s
m outons , de s ch eve ux, il faut le s e nle ve r. Si après ce tte
opération de ne ttoyage , l'indicate u r e st tou jours activé,
il faudra alors contrôle r le filtre H EPA.
• D ans de te ls cas, le débranch e r du s e cte u r, et le lais s er
re froidir pe ndant 20 - 30 m inute s. Supprim e r la caus e
du blocage e t/ou ne ttoye r/re m place r le s filtre s .
• Pu is re dém arre z l'as pirate u r.
D ans le s ou ci d’u ne am élioration cons tante de nos
produits ,nou s nou s rése rvons le droit d’apporte r à le urs
caractéristiq u e s tou te s m odifications liée s à l’évolution
te ch niq ue . (décre t du 23.03.78).
Ce t appareil e s t conform e aux dire ctive s s u ivante s de la
C.E. :
• 2006/9 5/CE re lative a la “b ass e te nsion”
• 89 /336/CEE “D ire ctive CEM ” y com pris le s dire ctive s
de m odifications 9 2/31/CEE e t 9 3/68/CEE.
Le s ym b ole sur le produ it ou s on e m ballage
indiq ue q ue ce produ it ne pe ut ętre traité com m e
déch e t m énage r. Il doit plutôt ętre re m is au point de
ram ass age conce rné, se ch arge ant du re cyclage du
m atérie l électriq u e e t éle ctroniq ue . En vous as s urant
q ue ce produit e st élim iné corre cte m e nt, vous favorise z
la préve ntion de s cons éq ue nce s négative s pour
l’e nvironne m e nt e t la santé h um aine qui, sinon,
se raie nt le résultat d’un traite m e nt inapproprié de s
déch e ts de ce produit. Pou r obte nir plus de détails s u r
le re cyclage de ce produit, ve uillez pre ndre contact
ave c le bure au m unicipal de votre région, votre s e rvice
d’élim ination de s déch e ts m énage rs ou le m agas in oů
vous ave z ach e té le produit
* Suivant le s m odèle s.
6
Page 9

Italiano
D ESCRIZ IO NE
1. Foro di as pirazione
2. Indicatore di pie no de l
conte nitore de lla
polve re
3. Com ando pote nza
variabile
4. Inte rruttore O N/O FF
5. Tas to riavvolgim e nto
cavo
6. Ruota
7. Scom parto de l
conte nitore de lla
polve re
8. Maniglia pe r il trasporto
IMPO RTANTI IND ICAZ IO NI INERENTI LA SICUREZ Z A
• Le gge re atte ntam e nte il pre se nte Manuale di is truzioni.
• Prim a di utilizzare l'appare cch io, controllare ch e la
te nsione di alim e ntazione corrisponda al voltaggio
indicato sulla targh e tta di ide ntificazione .
• Non accende re l'appare cch io q ualora appaia dife ttoso
od e vide nzi u n cavo od una spina danne ggiati. Non ce r
care di ripararlo. Pe r le riparazioni o pe r rich ie de re gli
acce ss ori, rivolge rsi pre s so i ce ntri di as s iste nza te cnica
(sulle pagine b ianch e alla voce "Ele ctrolux As s iste nza
te cnica" oppure s ulle pagine gialle alla voce
"Ele ttrodom e stici Riparazioni e acce s sori" sotto "Z anus s i
Se rvizio Te cnico").
• Es trarre s e m pre la spina dalla pre s a q uando
l'as pirapolve re non è in us o e prim a di e se guire le
ope razioni di pulizia e di m anute nzione .
• Non las ciare m ai incus todito l'appare cch io q uando è in
funzione . Te ne rlo lontano dalla portata de i bam bini.
• Q u e sto appare cch io è de stinato e sclu s ivam e nte all'u s o
dom e stico e de ve e s se re utilizzato in conform ita alla
de scrizione fornita ne l pre s e nte Manuale di is truzioni.
• Non tirare il cavo de ll'appare cch io. Non staccare la
spina tirando il cavo. Non us i il pulitore con u n cavo
danne ggiato. Se q ue sto è il caso, il cavo dovre bb e
e ss e re s os tituito ad un ce ntro di se rvizio. Ciò non è
cope rta dalla garanzia.
• Non utilizzare l'as pirapolve re s ulle su pe rfici bagnate o
pe r as pirare liq u idi, fango, ce ne re e m ozziconi di
sigare tta acces i. Non as pirare s os tanze o gas altam e nte
infiam m ab ili od e s plos ivi.
Q ue sti m ate riali poss ono danne ggiare se rio il
m otore - danni ch e non s ono cope rti dalla garanzia.
• Non disins e rire la spina de ll'appare cch io con le m ani
bagnate .
• Non utilizzare l'as pirapolve re ne lle im m e diate vicinanze
di calorife ri, s tu fe ed altri ogge tti ch e ge ne rano calore .
• Prim a di iniziare ad u tilizzare l'as pirapolve re , s pos tare
gli ogge tti di grandi dim e nsioni od acum inati, al fine di
e vitare e ve ntu ali danni al te ss u to di cui è cos tituito il
sacch e tto polve re.
9 . Tubo fle ss ib ile
10. Tubo te le scopico in
m e tallo *
11. Tubi in m etallo *
12. U ge llo per pavim e nti a
doppio im pie go
13. U ge llo / inte rs zizi *
14. U ge llo per im bottitur *
15. Spazzola parq u e t *
16. Turbo s pazzola *
17. Filtro a cartu ccia
18. Maglia di prote zione
19 . Pos izionam e nto
* Solo pe r alcuni m ode lli
INSTRUZ IO NI PER L’U SO
• Prim a di m e tte re in e se rcizio l'appare cch io, ass icurarsi
ch e i filtri si trovino ne lla pos izione gius ta.
20 Ins e rire il tu b o fle s s ibile ne ll’appos ita conne ss ione fino
al click .
20 Pe r togliere il fle ss ib ile bas ta pre m e re il bottone alla
fine de l tubo.
• Prim a di utilizzare l'as pirapolve re, svolge re il cavo in
m odo ch e pre se nti una lungh e zza s ufficie nte e d inse rire
la s pina ne lla pre sa. Un s e gno GIALLO pos to sul cavo
indica la lungh e zza ide ale . Non te nde re il cavo oltre il
se gno RO SSO .
• Pe r acce nde re l'appare cch io pre m e re il tas to O N/O FF.
Si consiglia di im postare il controllo de lla corre nte al
MIN. prim a di com pie re tale ope razione .
• Pe r riavvolge re il cavo, azionare con il piede l'apposito
tas to e guidare il cavo con la m ano pe r ass icurarsi ch e
non si avvolga troppo ve loce m e nte caus ando e ve ntu ali
danni.
• La pote nza ass orbita puo e ss e re re golata s pos tando
l'appos ito tas to di com ando.
MANUTENZ IO NE
SVUO TARE IL CO NTENITO RE D ELLA PO LVERE
Mai utilizzare l’as pirapolve re s e nza il conte nitore de lla
polve re inse rito.Il conte nitore de lla polve re de ve e ss e re
svuotato s e la s pia e le ttronica de l filtro s i illu m ina
q uando l’as pirapolve re s ta fu nzionando alla m assim a
pote nza e la s pazzola e s ollevata dal pavim e nto.
32 Se l'indicatore s i attiva controllare prim a il canale di
acce ss o de ll'appare cch io.
Se e intasato da pe zzi di carta, polve re , cape lli o altri
m ate riali rim uove rli.
Se dopo tale pulizia l'indicatore rim ane attivo
controllare il filtro H EPA.
21 Rim uove re il conte nitore de lla polve re .
22 Rim uove re il s e t de i filtri dal conte nitore de lla polve re
se gue ndo la proce dura indicata ne llo sch em a.
23 Svuotare il conte nitore de lla polve re .
22 Ins e rite il s e t de i filtri ne l conte nitore de lla polve re .
21 Ins e rite il conte nitore de lla polve re ne ll’as pirapolve re .
7
Page 10

Pulizia de l filtro a cartu ccia
Non utilizzate l’as pirapolve re se il filtro a cartu ccia non
e ins e rito.
21 Rim uove re il conte nitore de lla polve re
dall’aspirapolve re .
22 Rim uove re il s e t de i filtri dal conte nitore de lla polve re
se gue ndo la proce dura indicata ne llo sch em a.
24 Rim uove re il filtro a cartu ccia girando in se nso anti-
orario (A) e tirate lo ve rs o l’alto (B) com e indicato ne lla
figura.
25 Rim uove re la griglia di prote zione dal filtro a cartu ccia.
26,27 Scuote re il filtro e la griglia di prote zione in un
ce stino al fine di e lim inare lo sporco, e s e ne ce s sario
risciacq uarli sotto acq ua fre dda.
28 Lasciate lo as ciugare pe r 24 ore , in m odo tale da
e ss e re s icuri ch e sia com ple tam e nte asciutto prim a di
riutilizzarlo. Evitate l’e s pos izione ai raggi s olari e d altre
fonti di calore (as ciugacape lli, e tc.).
Se vole te us are il vos tro appare cch io m e ntre il filtro in
carta s i s ta as ciugando, pote te us are un e xtra filtro in
carta ch e trovate all’inte rno de lla scatola *.
25 Ins e rire la griglia di prote zione prem e ndola su l filtro a
cartu ccia.
24 Ins e rire il filtro a cartu ccia (B) e girare in se nso orario
(A) com e indicato ne lla figura.
22 Ins e rire il se t de i filtri ne l conte nitore de lla polve re .
21 Ins e rire il conte nitore de lla polve re ne ll’as pirapolve re.
Re fe re nza filtro in carta: F133
SO STITUZ IO NE D EI FILTRI
I filtri de vono e s se re sos tituiti alm e no du e volte all'anno
oppure q uando s ono vis ib ilm e nte sporch i. Azionare
l'appare cch io s olo con i filtri installati, al fine di e vitare
una ridu zione de lla capacita di aspirazione . D isins e rire
la corre nte prim a di procede re alla s os tituzione de i filtri.
Pe r pu lire il filtro di scarico *
29 Aprite la griglia pos te riore e rim uove te il filtro.
30 Rim uove re il filtro di scarico.
31 Risciacq uate lo sotto il rubine tto e lasciate lo asciugare
com pletam e nte .
30 Riposizionare il filtro ne ll’appare cch iatura.
29 Ch iude re la griglia pos te riore .
Re fe re nza filtro in u s cita: F133.1
TUTELA AMBIENTALE
• Riciclare , pe r q uanto poss ib ile , i ve cch i appare cch i e gli
im ballaggi.
• L'im b allaggio in cartone può e ss e re s m altito ne l
raccoglitore de lla carta us ata.
• D e pos itare il s acch e tto in polie tile ne (PE) ne ll'appos ito
punto di raccolta, ai fini de l re lativo riciclaggio.
• D e pos itare la gom m a pium a de l polistirolo al punto
de ll'accum ulazione de l PS pe r riciclare .
Riciclaggio de ll'appare cch io:
• Tu tti i com pone nti in m ate ria plas tica sono dotati di
una m arcatura di ide ntificazione de l m ate riale , in
m odo da pote r es s e re tranq uillam e nte riciclati, com e
gli altri m ate riali, ne l m om e nto in cui l'appare cch io non
vie ne piů uti lizzato.
32 Se l'indicatore s i attiva controllare prim a il canale di
acce ss o de ll'appare cch io.
Se e intasato da pe zzi di carta, polve re , cape lli o altri
m ate riali rim uove rli.
Se dopo tale pulizia l'indicatore rim ane attivo
controllare il filtro H EPA.
• Rivolge rsi a tale s copo all'Autorità locale re s ponsabile
pe r la tu te la am bie ntale .
Flus so de ll'aria bloccato e filtri sporch i:
• L'aspirapolve re s i arre sta au tom aticam ente q ualora
l'uge llo/il tubo/il tu b o fle s s ibile risulti os truito, oppure
se i filtri sono intasati da im purità.
• D opo ave r dis ins e rito l'as pirapolve re dall'alim e ntazione
e le ttrica, las ciarlo raffre ddare pe r 20-30 m inuti.
Rim uove re l'e ve ntuale os truzione e /o pulire i filtri.
• Avviare nuovam e nte l'appare cch io.
Q ue sta appare cch iatura è conform e alle se gue nti
D ire ttive CE:
• D ire ttiva Bas s a te nsione 2006/9 5/CE
• D ire ttiva EMC 89 /336/EEC e s u cce ss ivi e m e ndam e nti
9 2/31/EEC e 9 3/68/EEC
Il sim b olo sul prodotto o s u lla confe zione indica
ch e il prodotto non de ve e s se re cons ide rato com e un
norm ale rifiuto dom e stico, m a de ve e s s ere portato ne l
punto di raccolta appropriato pe r il riciclaggio di
appare cch iature e le ttrich e e d e le ttronich e. Provve d e ndo
a sm altire q u e sto prodotto in m odo appropriato, s i
contribuis ce a e vitare pote nziali conse gue nze ne gative
pe r l’am b ie nte e pe r la salute , ch e potreb b e ro de rivare
da uno sm altim e nto inade guato de l prodotto. Pe r
inform azioni più de ttagliate su l riciclaggio di q ue sto
prodotto, contattare l’ufficio com unale , il se rvizio locale
di s m altim e nto rifiuti o il ne gozio in cu i è stato
acq uis tato il prodotto.
* Solo pe r alcuni m ode lli
8
72Sx 02 03 02
 Loading...