

Page 1

! WARNING
Read all precautions and instructions in this manual before using
this equipment. Save this manual
for future reference.
USER’S MANUAL
QUESTIONS ?
As a manufacturer, we are
committed to providing complete customer satisfaction. If
you have questions, or if there
are missing or damaged parts,
please call: :
08457 089 009
or write to :
ICON Health & Fitness, Ltd.
Customer Service Department
Unit 4
Revie Road Industrial Estate
Revie Road
Beeston
Leeds, LS118JG
UK
or
email: csuk@iconeurope.com
Serial Number decal behind the
product
Please visit our website for more information on the products
www.iconsupport.eu
Model No. PFICVRW34008.0.
Serial No. ___________
Page 2

IMPORTANT PRECAUTIONS
1. Read all instructions in this manual before
using the rowing machine. Use the rowing
machine only as described.
2. It is the responsibility of the owner to ensure
that all users of the rowing machine are adequately informed of all warnings.
3. Place the rowing machine on a level surface,
with a mat beneath it to protect the oor or
carpet. Keep the rowing machine indoors,
away from moisture and dust.
4. Inspect and properly tighten all parts of the
rowing machine regularly. Replace worn
parts immediately.
5. The rowing machine should not be used by
persons weighing more than 115 kg (250
lbs.).
6. Keep children under 12 and pets away from
the rowing machine at all times.
7. Wear appropriate clothes and athletic shoes
when using the rowing machine.
8. Keep your hands away from moving parts.
9. If you experience dizziness or pain whilst
exercising, stop immediately and cool down.
10. The rowing machine is intended for in-home
use only. Do not use the rowing machine in a
commercial, rental, or institutional setting.
11. A warning decal is found on the rowing
machine in the location shown on page 3. If
the decal is missing or illegible, call 08457
089 009 and order a free replacement decal.
Apply the decal in the location shown.
!
1
TABLE OF CONTENTS
IMPORTANT PRECAUTIONS. . . . . . . . . . . . . . . . . . . . . . . . . . . . . . . . . . . . . . . . . . . . . . . . . . . . . . . . . . . . .1
ASSEMBLY . . . . . . . . . . . . . . . . . . . . . . . . . . . . . . . . . . . . . . . . . . . . . . . . . . . . . . . . . . . . . . . . . . . . . . . . . . 3
FOLDING INSTRUCTIONS . . . . . . . . . . . . . . . . . . . . . . . . . . . . . . . . . . . . . . . . . . . . . . . . . . . . . . . . . 5
FUNCTION BUTTON . . . . . . . . . . . . . . . . . . . . . . . . . . . .
. . . . . . . . . . .
. . . . . . . . . . . . . . . . . . . . . . . . . . . 6
EXERCISE GUIDELINES . . . . . . . . . . . . . . . . . . . . . . . . . . . .
. . . . . . . . . . .
. . . . . . . . . . . . . . . . . . . . . . . . . . . 7
PART LIST
and
EXPLODED DRAWING
. . . . .
. . . . . . . . . . . . . . . . . . . . . . . . . . . . . . . . . . . . . . . . . . . . . . .9
ORDERING REPLACEMENT PARTS . . . . . . . . . . . . . . . . . . . . . . . . . . . . . . . . . . . . . . . . . . . . .Back Cover
! WARNING: Before beginning this or any exercise program, consult your physician. This is especially
important for persons over the age of 35 or persons with pre-existing health problems. Read all instructions before using. ICON assumes no responsibility for personal injury or property damage sustained by or
through the use of this product.
SAVE THESE INSTRUCTIONS
WARNING: To reduce the risk of serious injury, read the following important
precautions before using the rowing machine.
Page 3

2
BEFORE YOU BEGIN
Thank you for purchasing the new PROFORM® R500
rowing machine. Rowing is one of the most effective
exercises known for toning the body, strengthening
the muscles, and building the cardiovascular system.
The R500 rowing machine is designed to let you enjoy this effective exercise in the convenience of your
home.
For your safety and benet, read this manual
carefully before using the rowing machine. If you
have questions after reading this manual, please
call our Customer Service Department at 08457
089 009. To help us assist you, note the product
model number before calling. The model number is
PFICVRW34008.0.
Page 4
3
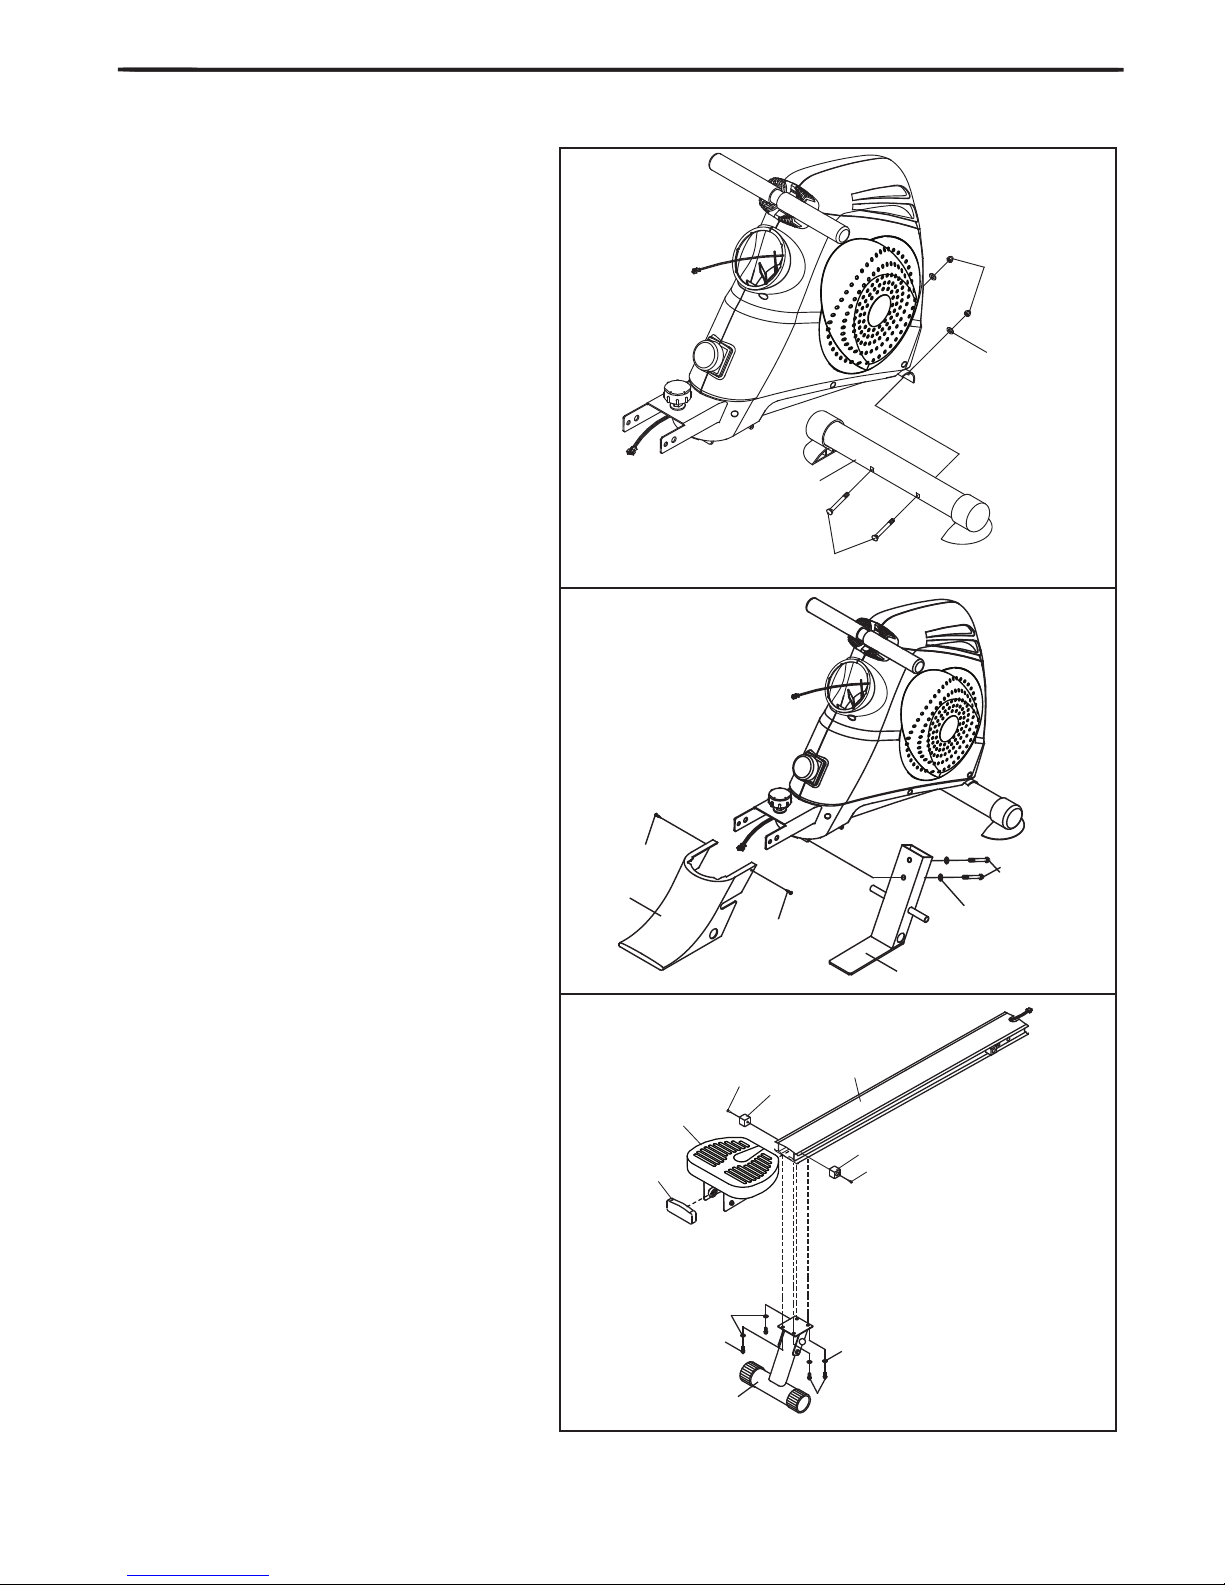
ASSEMBLY
1. Attach the front stabilizer onto the main
housing bracket using the two carriage bolts
(#21), 2 arc washers (#13) and the nylock nuts
(#12).
2. Attach the bracket (#3) to the Main
frame using two washers (#14) and two bolts
(#22). Ensuring to attach the bracket cover (#4)
when you tightened the screws (#23).
3. Slide the Seat Bracket (#6) to the Rail
(#5) then lock the stoppers (#19) to the Rail (#5)
using Screws (#24) as FIG 3 demonstrated.
Attached the Cap (#28) to the end of the Rail.
Connect the Aluminum Rail (#5) to the rear Stabilizer (#7) using the bracket provided.
Lock the bracket in place using bolts (#25) and
washers(#14)
12
13
21
2
22
4
23
23
3
14
25
25
7
14
14
28
6
24
19
19
24
5
Page 5

4
ASSEMBLY
4. Attach the Nylon Nut (#12) to the end of
the left hand side of the spindle bar (#8), and
then slide onto the bar from the right the washer
(#15), followed by the plastic bushing (#18) then
the footrest (#10). Then slot the part assembled
spindle bar through the hole in the main housing
(per FIG 4.).
Now start to assemble the right hand pedal onto
the spindle bar (#8). Slide the pedal (#10) onto
the right hand side of the pedal spindle bar followed by the plastic bushing (#18), the washer
(#15) and nally the M8 Nylon nut (#12).
Lock the pedals (#26) to the crank cover on main
housing (per FIG 4.)
Attached the Sponge (#20) to left side of the footrest shaft (#9), then slot the footrest shaft (#9)
through the hole in the holder bracket cover and
attached another Sponge(#20) to the other side
of the bar.
5. Connecing the sensor wires which are on
the Rail and Main housing together, then slide the
Aluminum Rail (#5) into the main housing (per
FIG 5) and bolt into place using the xing bolt
(#27), once the bolt is slotted through the nearest pre-drilled hole to the main housing attach the
washer (#16) and the thin Nylon nut (#17).
Using the second pre-drilled hole away from the
main housing slot through your Pull pin (#27).
Finally, Screw the xing knob into the Aluminum
Rail (#5) using the pre-drilled hole provided.
Connect the sensor wire and place the monitor
(#11) onto the main frame.
18
10
8
20
10
18
15
12
15
12
20
9
5
27
17
16
11
26
Page 6

5
FOLDING INSTRUCTIONS
1. Remove the locking pin (#26) and unscrew the xing pin.
2. Pull the Aluminum Rail (#5) in towards the main frame and replace the locking pin to keep the Rail in a
folded position;
3. Remove the pull pin located on the rear bracket of the rail.
4. Swing the Rear Stabilizer in towards the main frame and replace the pin to keep the Rear Stabilier in a
folded position.
26
2
4
3
1
Page 7

6
FUNCTION BUTTON
MODE 1. To select each function for presetting.
2. to enter and switch to the next function after presetting.
SET
To make upward adjustment of each function datas of time, count and calories.
RESET To reset each single function of count, Time and calories
TOTAL RESET To Clear all preset datas and restart the computer.
FUNCTIONS
SCAN Automatically scans throught each function in every 6 seconds.
TIME COUNT UP The monitor will count workout time from 00:00 up to 99:59.
COUNT DOWN If you have preset target time, the monitor will count down to 00:00 when you start training.
(COUNT) COUNT UP: Accumulates workout numbers from zero.
COUNT DOWN: If you have preset target count numbers, the monitor will count from
preset down to zero when you start training.
(TOTAL COUNT)
The monitor will accumulate total workout numbers of different training durantion after the
monitor is intalled with batteries. This data could be reset to zero only when you replace batteries.
CALORIES COUNT UP: Accumulates calories consumption during training.
COUNT DOWN: If you have preset target calories, the computer will count from preset
calories down to zero. This data is a rough guide only and should not be used as com parison over several exercice sessions.
NOTE :
Without any signal transmitted to the monitor for 4 minutes, the LCD will shut off automaticly and all function datas would be kept. The prevuious datas would display on the monitor when you come back training on the equipment or directly display by pressing any button.
The monitor starts beeping to remind you as soon as any preset target datas is achieved to zero.
Battery specication : 1.5 V AA (2pcs)
Page 8

7
EXERCISE GUIDELINES
WARNING: Before beginning this
or any exercise program, consult your physician. This is especially important for persons
over the age of 35 or persons with pre-existing
health problems.
The pulse sensor is not a medical device. Various factors may affect the accuracy of heart
rate readings. The pulse sensor is intended
only as an exercise aid in determining heart
rate trends in general.
These guidelines will help you to plan your exercise
program. For detailed exercise information, obtain a
reputable book or consult your physician. Remember,
proper nutrition and adequate rest are essential for
successful results.
EXERCISE INTENSITY
Whether your goal is to burn fat or to strengthen your
cardiovascular system, exercising at the proper intensity is the key to achieving results. You can use your
heart rate as a guide to nd the proper intensity level.
The chart below shows recommended heart rates for
fat burning and aerobic exercise.
To nd the proper intensity level, nd your age at the
bottom of the chart (ages are rounded off to the nearest ten years). The three numbers listed above your
age dene your “training zone.” The lowest number is
the heart rate for fat burning, the middle number is the
heart rate for maximum fat burning, and the highest
number is the heart rate for aerobic exercise.
Burning Fat—To burn fat effectively, you must exercise at a low intensity level for a sustained period of
time. During the rst few minutes of exercise, your
body uses carbohydrate calories for energy. Only after
the rst few minutes of exercise does your body begin
to use stored fat calories for energy. If your goal is to
burn fat, adjust the intensity of your exercise until your
heart rate is near the lowest number in your training
zone. For maximum fat burning, exercise with your
heart rate near the middle number in your training
zone.
Aerobic Exercise—If your goal is to strengthen your
cardiovascular system, you must perform aerobic
exercise, which is activity that requires large mounts
of oxygen for prolonged periods of time. For aerobic
exercise, adjust the intensity of your exercise until
your heart rate is near the highest number in your
training zone.
WORKOUT GUIDELINES
Warming up—Start with 5 to 10 minutes of stretch-
ing and light exercise. A warm-up increases your body
temperature, heart rate, and circulation in preparation
for exercise.
Training Zone Exercise—Exercise for 20 to 30 minutes with your heart rate in your training zone. (During
the rst few weeks of your exercise program, do not
keep your heart rate in your training zone for longer
than 20 minutes.) Breathe regularly and deeply as you
exercise–never hold your breath.
Cooling down—Finish with 5 to 10 minutes of
stretching. Stretching increases the exibility of your
muscles and helps to prevent post-exercise problems.
EXERCISE FREQUENCY
To maintain or improve your condition, complete three
workouts each week, with at least one day of rest
between workouts. After a few months of regular exer-
cise, you may complete up to ve workouts each
week, if desired. Remember, the key to success is to
make exercise a regular and enjoyable part of your
everyday life.
Page 9

8
SUGGESTED STRETCHES
The correct form for several basic stretches is shown at the
right. Move slowly as you stretch—never bounce.
1. Toe Touch Stretch
Stand with your knees bent slightly and slowly bend forward
from your hips. Allow your back and shoulders to relax as you
reach down toward your toes as far as possible. Hold for 15
counts, then relax. Repeat 3 times. Stretches: Hamstrings, back
of knees and back.
2. Hamstring Stretch
Sit with one leg extended. Bring the sole of the opposite foot
toward you and rest it against the inner thigh of your extended
leg. Reach toward your toes as far as possible. Hold for 15
counts, then relax. Repeat 3 times for each leg. Stretches:
Hamstrings, lower back and groin.
3. Calf/Achilles Stretch
With one leg in front of the other, reach forward and place your
hands against a wall. Keep your back leg straight and your back
foot at on the oor. Bend your front leg, lean forward and move
your hips toward the wall. Hold for 15 counts, then relax. Repeat
3 times for each leg. To cause further stretching of the achilles
tendons, bend your back leg as well. Stretches: Calves, achilles
tendons and ankles.
4. Quadriceps Stretch
With one hand against a wall for balance, reach back and grasp
one foot with your other hand. Bring your heel as close to your
buttocks as possible. Hold for 15 counts, then relax. Repeat 3
times for each leg. Stretches: Quadriceps and hip muscles.
5. Inner Thigh Stretch
Sit with the soles of your feet together and your knees outward.
Pull your feet toward your groin area as far as possible. Hold for
15 counts, then relax. Repeat 3 times. Stretches: Quadriceps
and hip muscles.
1
2
3
4
5
Page 10

9
EXPLODED DIAGRAM Model N° PFICVRW34008.0
1
7
9
8
10
2
3
4
5
6
11
12 13
14
15
16
17
18
19 20
21
22
23
24
25
26
27
28
Page 11

10
PART LIST Model N° PFICVRW34008.0
Key N°
1
2
3
4
5
6
7
8
9
10
11
12
13
14
Description
Main Housing
Front Stabilizer
Bracket
Bracket Cover
Aluminum Rail
Seat
Rear Stabilizer
Spindle Tube
Footrest Shaft
Footrest x 2
Computer
Nylon Nut (M8) x 4
Arc Washer x 2
Washer (M8x16) x 6
Key N°
15
16
17
18
19
20
21
22
23
24
25
26
27
28
Description
Washer (M8x23) x 2
Washer (M8x26) x 1
Thin Nylon Nut x 1
Plastic Bushing x 2
Stopper x 2
Sponge x 2
Carriage Bolt x 2
Hex Head Bolt (55mm) x 2
Screw (Short) x 2
Screw (Long) x 2
Hex Head Bolt (15mm) x 4
Pull Pin x 1
Hex Head Bolt (127mm) x 1
Rail End Cap x 1
Page 12

ORDERING REPLACEMENT PARTS
To order replacements parts, please see the front cover of this manual for contact information. To help us
assist you, be prepared to provide the following information when calling :
- Model number of the product (PFICVRW34008.0.)
- The Key number and description of the product of the desired parts ( see the part list)
- The proof of purchase
Printed in Taiwan © 2008 Icon Health & Fitness, Inc.
 Loading...