

Page 1
Model No. 831.297670
Serial No.
Write the serial number in the space
above for future reference.
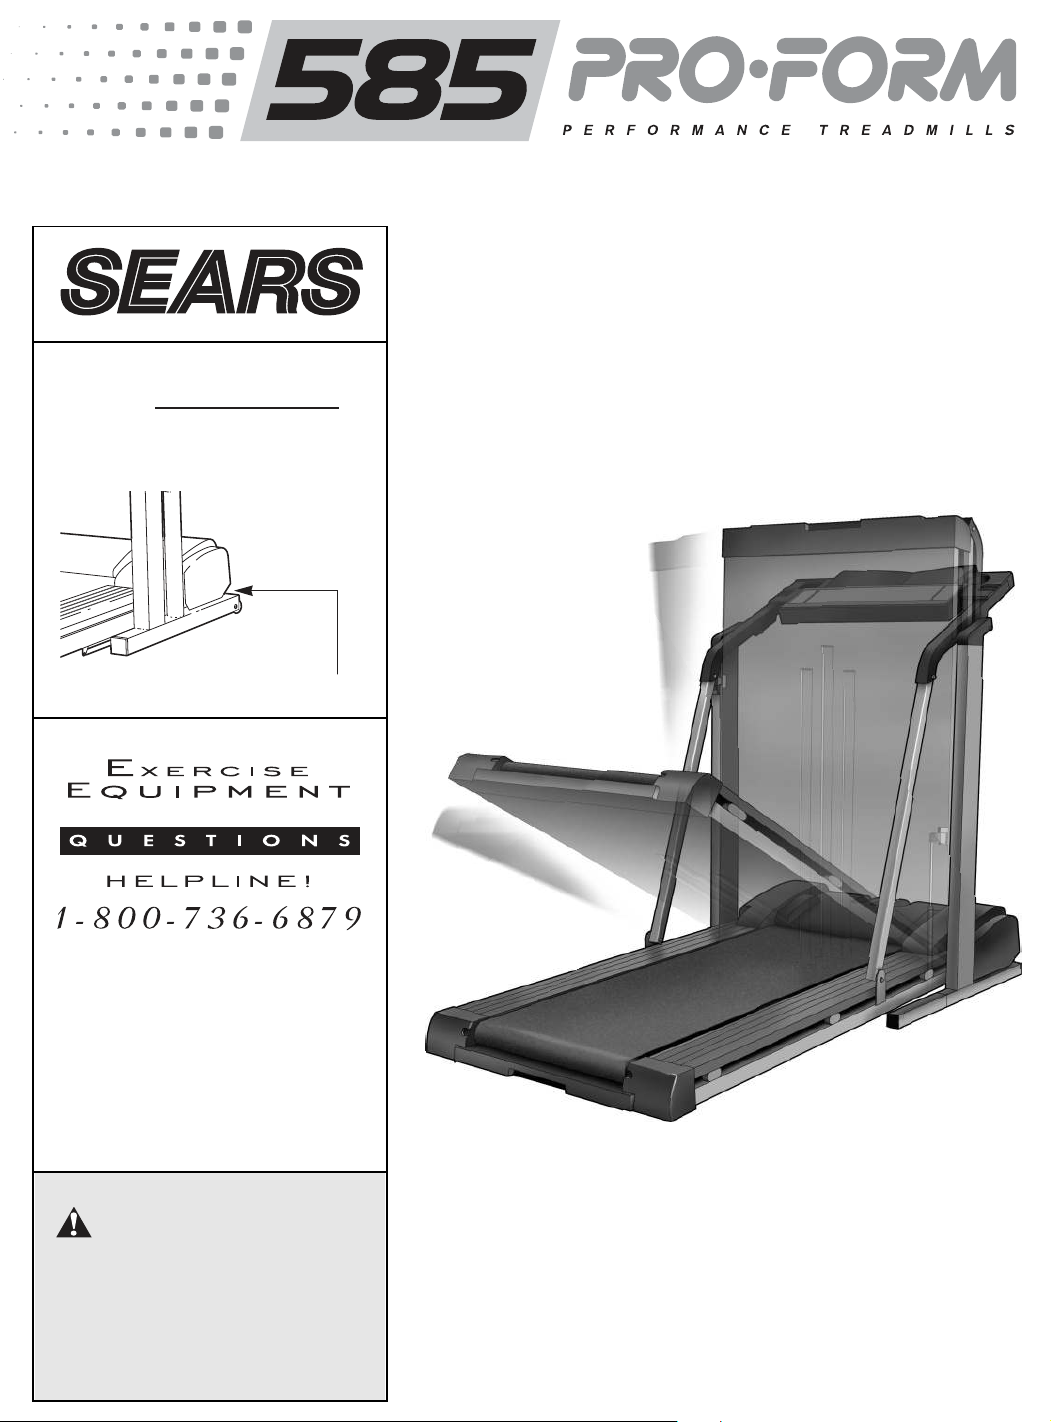
Serial Number Decal
CAUTION
Read all precautions and instructions in this manual before
using this equipment. Save this
manual for future reference.
USER'S MANUAL
SEARS, ROEBUCK AND CO., HOFFMAN ESTATES, IL 60179
Page 2

TABLE OF CONTENTS
IMPORTANT PRECAUTIONS . . . . . . . . . . . . . . . . . . . . . . . . . . . . . . . . . . . . . . . . . . . . . . . . . . . . . . . . . . . . . . . . .2
BEFORE YOU BEGIN . . . . . . . . . . . . . . . . . . . . . . . . . . . . . . . . . . . . . . . . . . . . . . . . . . . . . . . . . . . . . . . . . . . . . . .4
ASSEMBLY . . . . . . . . . . . . . . . . . . . . . . . . . . . . . . . . . . . . . . . . . . . . . . . . . . . . . . . . . . . . . . . . . . . . . . . . . . . . . . .5
OPERATION AND ADJUSTMENT . . . . . . . . . . . . . . . . . . . . . . . . . . . . . . . . . . . . . . . . . . . . . . . . . . . . . . . . . . . . .7
HOW TO FOLD AND MOVE THE TREADMILL . . . . . . . . . . . . . . . . . . . . . . . . . . . . . . . . . . . . . . . . . . . . . . . . . .10
MAINTENANCE AND TROUBLE-SHOOTING . . . . . . . . . . . . . . . . . . . . . . . . . . . . . . . . . . . . . . . . . . . . . . . . . . .12
CONDITIONING GUIDELINES . . . . . . . . . . . . . . . . . . . . . . . . . . . . . . . . . . . . . . . . . . . . . . . . . . . . . . . . . . . . . . .14
PART LIST . . . . . . . . . . . . . . . . . . . . . . . . . . . . . . . . . . . . . . . . . . . . . . . . . . . . . . . . . . . . . . . . . . . . . . . . . . . . . . .15
ORDERING REPLACEMENT PARTS . . . . . . . . . . . . . . . . . . . . . . . . . . . . . . . . . . . . . . . . . . . . . . . . . .Back Cover
FULL 90 DAY WARRANTY . . . . . . . . . . . . . . . . . . . . . . . . . . . . . . . . . . . . . . . . . . . . . . . . . . . . . . . . . . .Back Cover
Note: An EXPLODED DRAWING is attached in the center of this manual. Please save the EXPLODED DRAWING
for future reference.
IMPORTANT PRECAUTIONS
WARNING: To reduce the risk of burns, fire, electric shock, or injury to persons, read the
following important precautions and information before operating the treadmill.
1. It is the responsibility of the owner to ensure
that all users of this treadmill are adequately
informed of all warnings and precautions.
2. Use the treadmill only as described in this
manual.
3. Place the treadmill on a level surface, with
eight feet of clearance behind it. Do not place
the treadmill on any surface that blocks air
openings. To protect the floor or carpet from
damage, place a mat under the treadmill.
4. Keep the treadmill indoors, away from moisture and dust. Do not put the treadmill in a
garage or covered patio, or near water.
5. Do not operate the treadmill where aerosol
products are used or where oxygen is being
administered.
6. Keep children under the age of 12 and pets
away from the treadmill at all times.
7. The treadmill should not be used by persons
weighing more than 250 pounds.
8. Never allow more than one person on the
treadmill at a time.
both men and women.
shoes. Never use the treadmill with bare feet,
wearing only stockings, or in sandals.
10. When connecting the power cord (see page
7), plug the power cord into a surge suppressor and plug the surge suppressor into a
grounded circuit capable of carrying 15 or
more amps. No other appliance should be on
the same circuit. Do not use an extension cord.
11. Use only a single-outlet surge suppressor
that is UL 1449 listed as a transient voltage
surge suppressor (TVSS). The surge suppressor must have a UL suppressed voltage rating
of 400 volts or less and a minimum surge dissipation of 450 joules. The surge suppressor
must be electrically rated for 120 volts AC and
15 amps.
12. Keep the power cord and the surge suppressor away from heated surfaces.
13. Never move the walking belt while the power
is turned off. Do not operate the treadmill if
the power cord or plug is damaged, or if the
treadmill is not working properly. (See BEFORE YOU BEGIN on page 4 if the treadmill is
not working properly.)
Always wear athletic
9. Wear appropriate exercise clothing when
using the treadmill. Do not wear loose clothing that could become caught in the treadmill.
Athletic support clothes are recommended for
14. Never start the treadmill while you are standing on the walking belt. Always hold the
handrails while using the treadmill.
2
Page 3
15. The treadmill is capable of high speeds.
IMPORTANT: Incline must be set at
lowest level before
folding treadmill into
storage position.
Adjust the speed in small increments to avoid
sudden jumps in speed.
16. To reduce the possibility of the treadmill
overheating, do not operate the treadmill
continuously for longer than 1 hour.
17. The pulse sensor is not a medical device.
Various factors, including the user's movement, may affect the accuracy of heart rate
readings. The pulse sensor is intended only
as an exercise aid in determining heart rate
trends in general.
18. Never leave the treadmill unattended while it
is running. Always remove the key when the
treadmill is not in use.
19. Do not attempt to raise, lower, or move the
treadmill until it is properly assembled. (See
ASSEMBLY on page 5, and HOW TO MOVE
THE TREADMILL on page 10.) You must be
able to safely lift 45 pounds (20 kg) in order to
raise, lower, or move the treadmill.
20. When folding or moving the treadmill, make
sure that the storage latch is fully closed.
21. Inspect and tighten all parts of the treadmill
every three months.
22. Never insert any object into any opening.
23. Always unplug the power cord before performing the maintenance and adjustment
procedures described in this manual. Never
remove the motor hood unless instructed to
do so by an authorized service representative. Servicing other than the procedures in
this manual should be performed by an authorized service representative only.
24. This treadmill is intended for in-home use
only. Do not use this treadmill in any commercial, rental, or institutional setting.
WARNING: Before beginning this or any exercise program, consult your physician. This
is especially important for persons over the age of 35 or persons with pre-existing health problems.
Read all instructions before using. SEARS assumes no responsibility for personal injury or property
damage sustained by or through the use of this product.
SAVE THESE INSTRUCTIONS
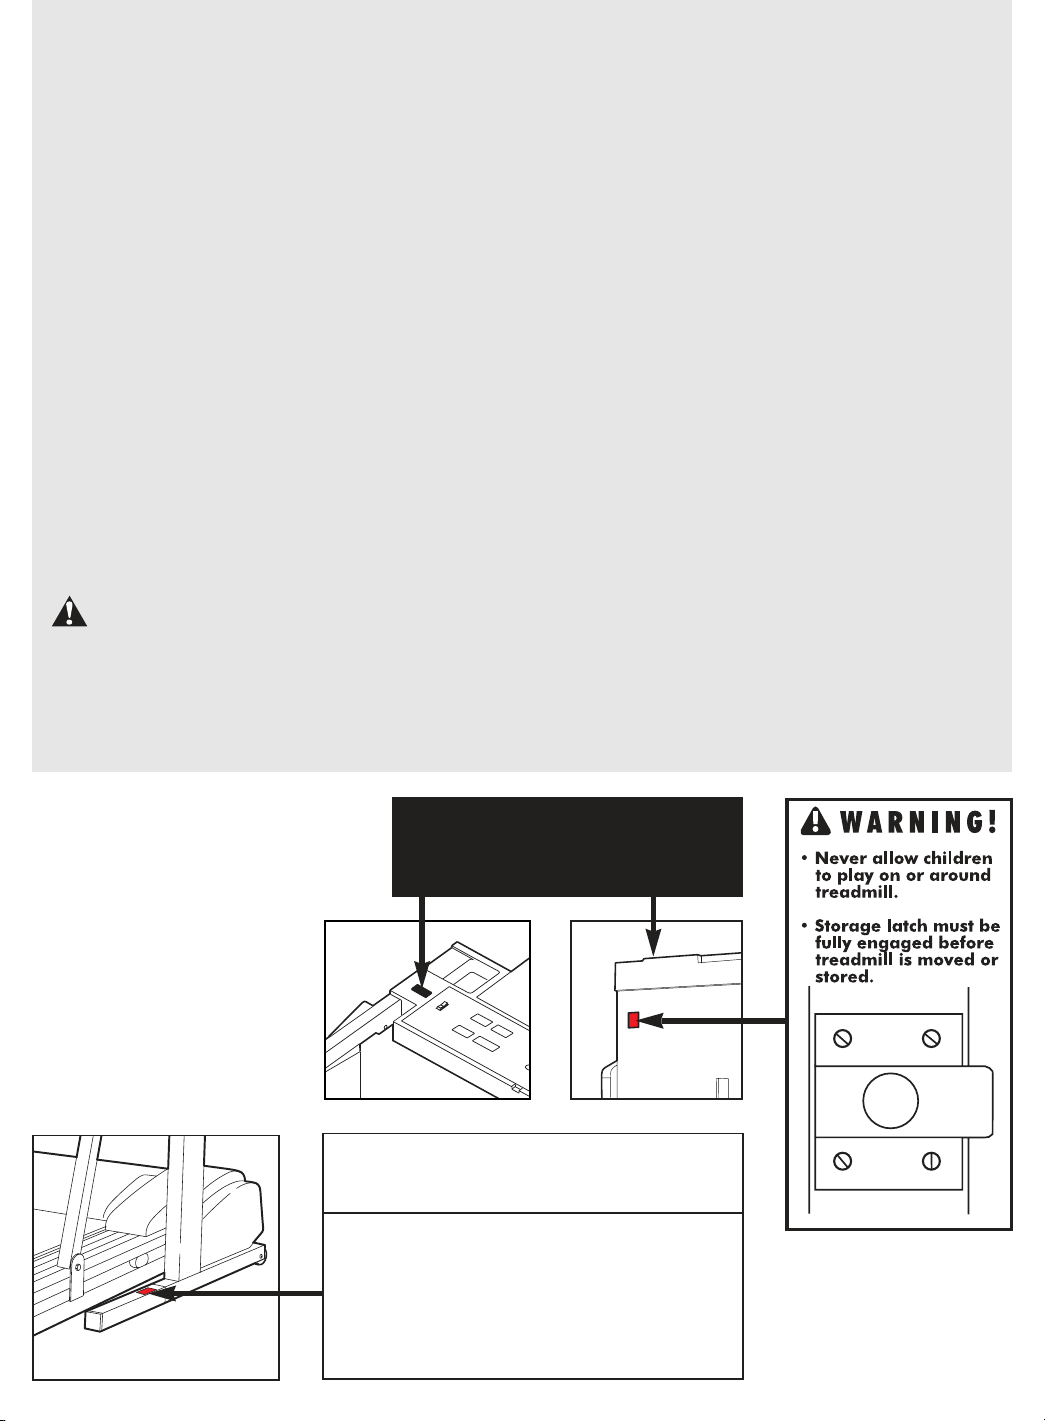
The decals shown have been
placed on your treadmill. If a
decal is missing, or if it is
not legible, please call our
toll-free HELPLINE to order a
free replacement decal (see
the back cover of this
manual). Apply the decal in
the location shown.
(There is one
decal on each side.)
CAUTION
Keep hands and feet away from
this area while the treadmill is
in operation.
3
Page 4
BEFORE YOU BEGIN
Thank you for selecting the innovative PROFORM
585 treadmill. The 585 treadmill blends advanced
technology with innovative design to let you enjoy an
excellent form of cardiovascular exercise in the convenience and privacy of your home.
For your benefit, read this manual carefully before
using the treadmill. If you have questions after read-
ing the manual, please call our toll-free HELPLINE at
1-800-736-6879, Monday through Saturday, 7 a.m.
Handrail
Storage Latch
¨
Accessory Tray
until 7 p.m. Central Time (excluding holidays). To help
us assist you, please note the product model number
and serial number before calling. The model number of
the treadmill is 831.297670. The serial number can be
found on a decal attached to the treadmill (see the
front cover of this manual for the location).
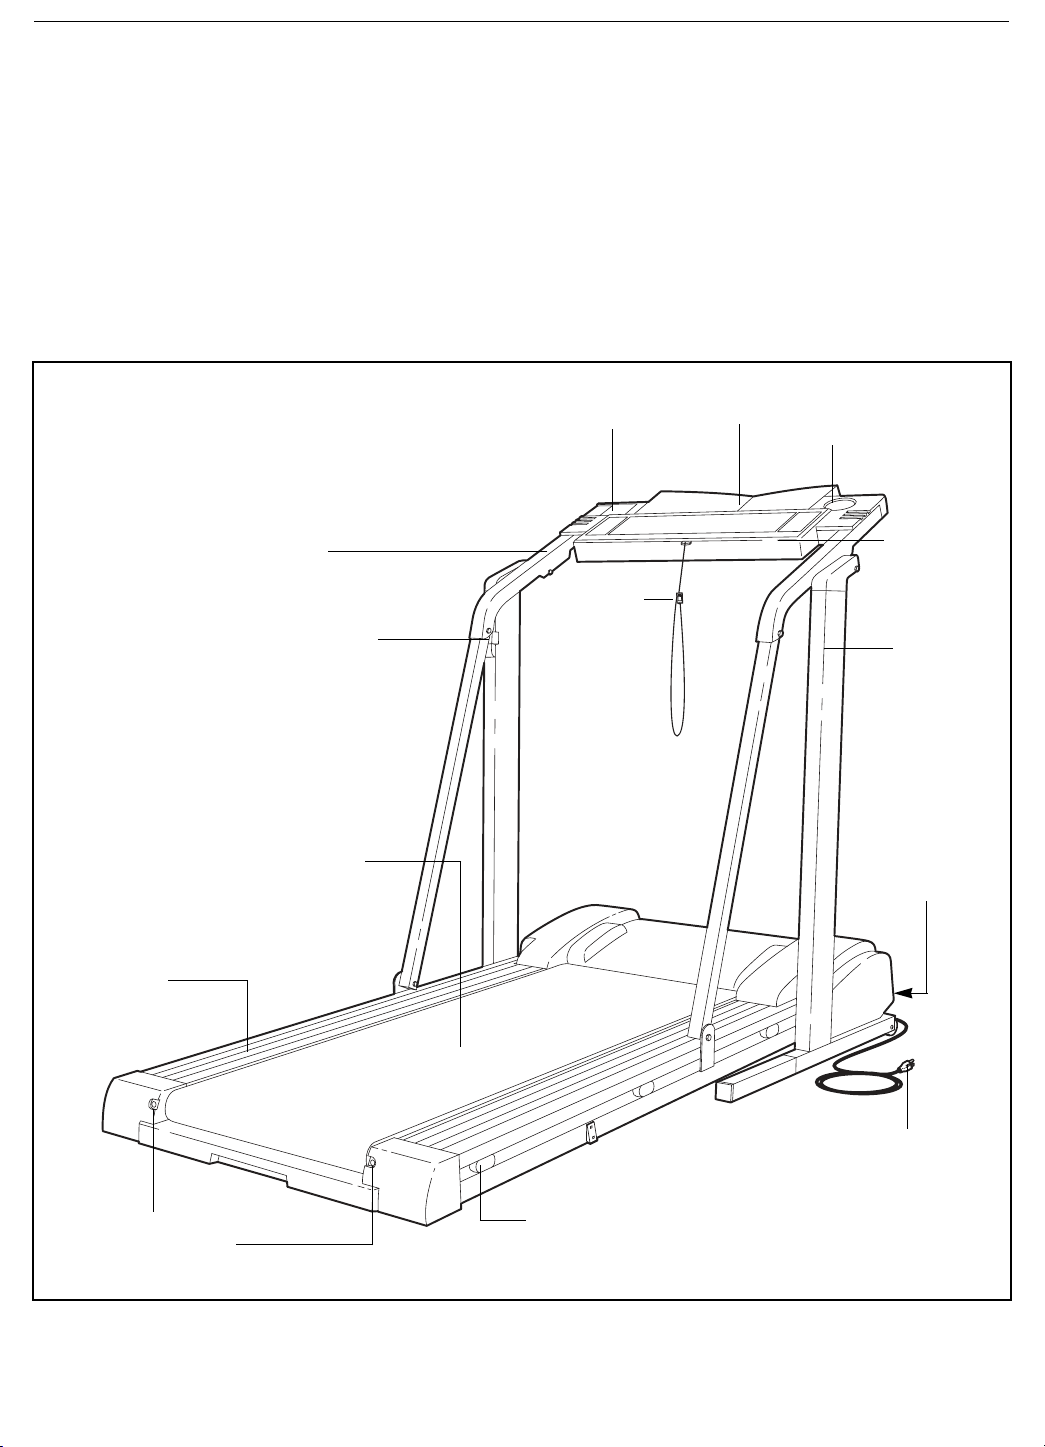
Before reading further, please review the drawing
below and familiarize yourself with the parts that are
labeled.
Book Rack
Key/Clip
Water Bottle Holder
(Bottle not included)
Console
Upright
Foot Rail
Rear Roller
Adjustment Bolts
LEFT
SIDE
Walking Belt
RIGHT
SIDE
Circuit
Breaker
Power Cord
Cushioned Walking
Platform
4
Page 5
ASSEMBLY
Assembly requires two people. Set the treadmill in a cleared area and remove the packing materials. Do not
dispose of the packing materials until assembly is completed.
Assembly requires the included allen wrench , and your own adjustable wrench , and a
phillips screwdriver .
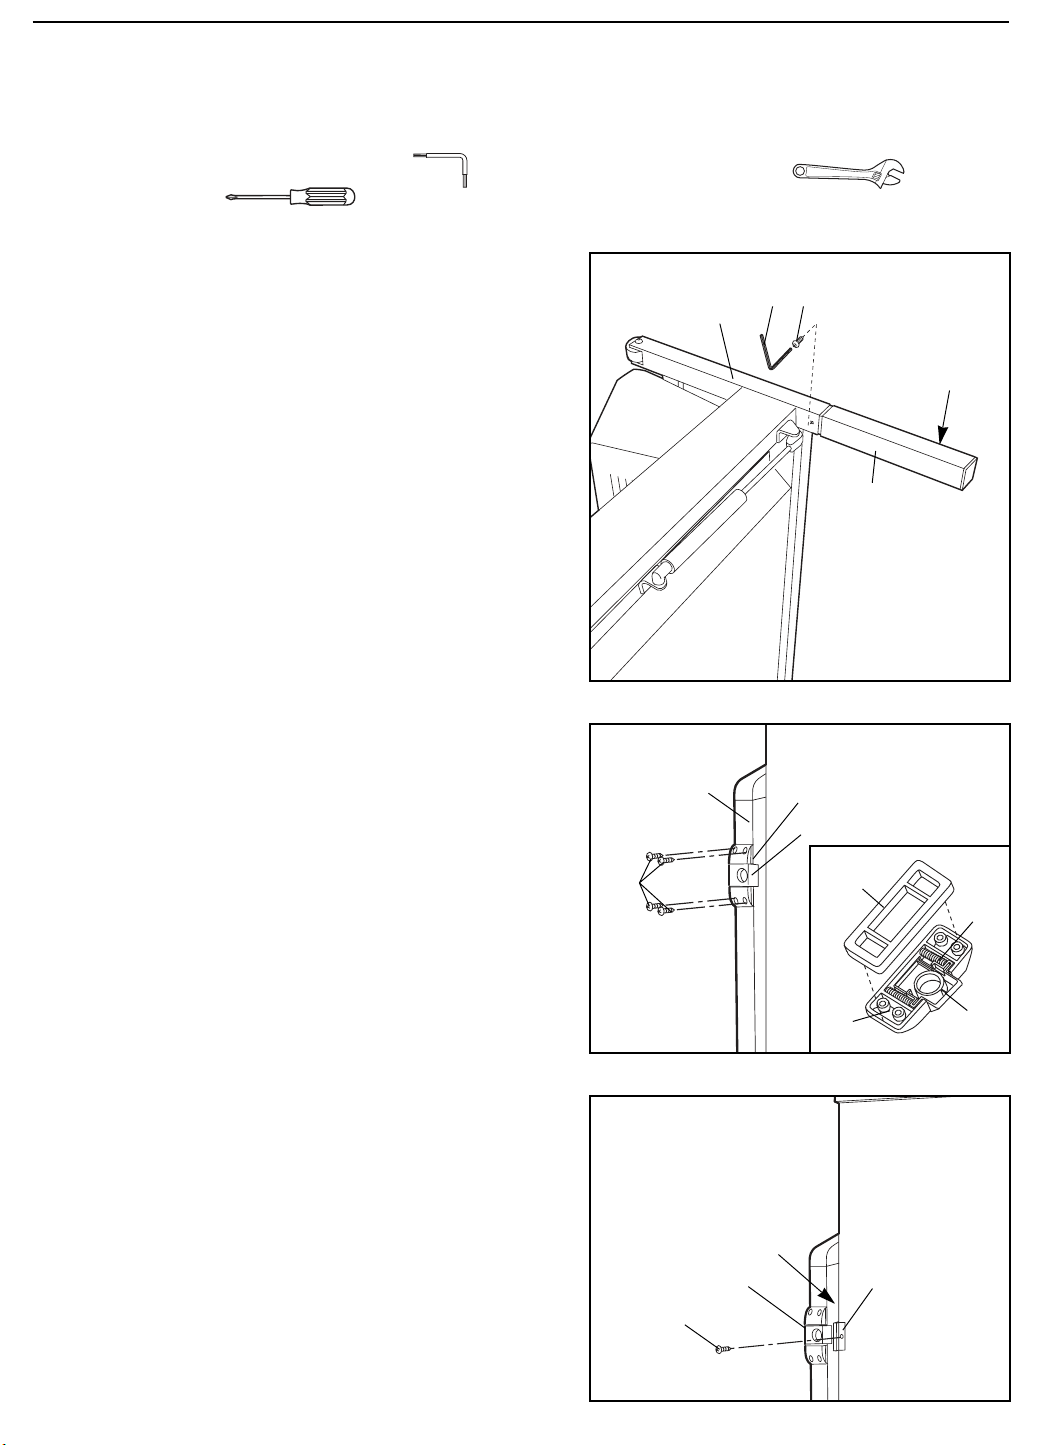
1. Refer to the drawing on page 4 and identify the left
side of the treadmill. With the help of a second person,
carefully lay the treadmill on its left side.
Firmly slide an Extension Leg (99) into the Base (70) as
shown. Make sure that the Extension Leg is turned so
the Base Pad (89) is on the indicated side. Using the included Allen Wrench (92), attach the Extension Leg with
an Extension Screw (93). While the treadmill is on its
side, attach the other Extension Leg (not shown) in the
same manner.
With the help of a second person, carefully raise the
treadmill to the vertical position so both Extension Legs
(99) are resting flat on the floor.
2. Remove the four Latch Screws (108) from the left
Upright (70).
Without removing the tape from the Latch Bracket (60)
and Latch Spacer (66), hold both parts against the left
Upright (70) as shown. Attach the Latch Bracket and
Latch Spacer with the four Latch Screws (108). Make
sure that the Screws are tight, but do not overtighten them; if the Screws are overtightened, the
Storage Latch (69) will not slide smoothly. After the
parts are attached, remove any visible tape.
1
2
108
70
70
92
93
89
99
60, 66
69
66
68
Note: The inset drawing shows how the Latch Bracket
(60), Latch Springs (68), Storage Latch (69), and Latch
Spacer (66) fit together.
3. Remove the indicated Screw (4) from the treadmill
Frame (1). Attach the plastic Catch (5) to the Frame with
the Screw. Note: It may be necessary to slide the
Storage Latch (69) to the left while attaching the Catch.
60
3
1
69
4
5
69
5
Page 6
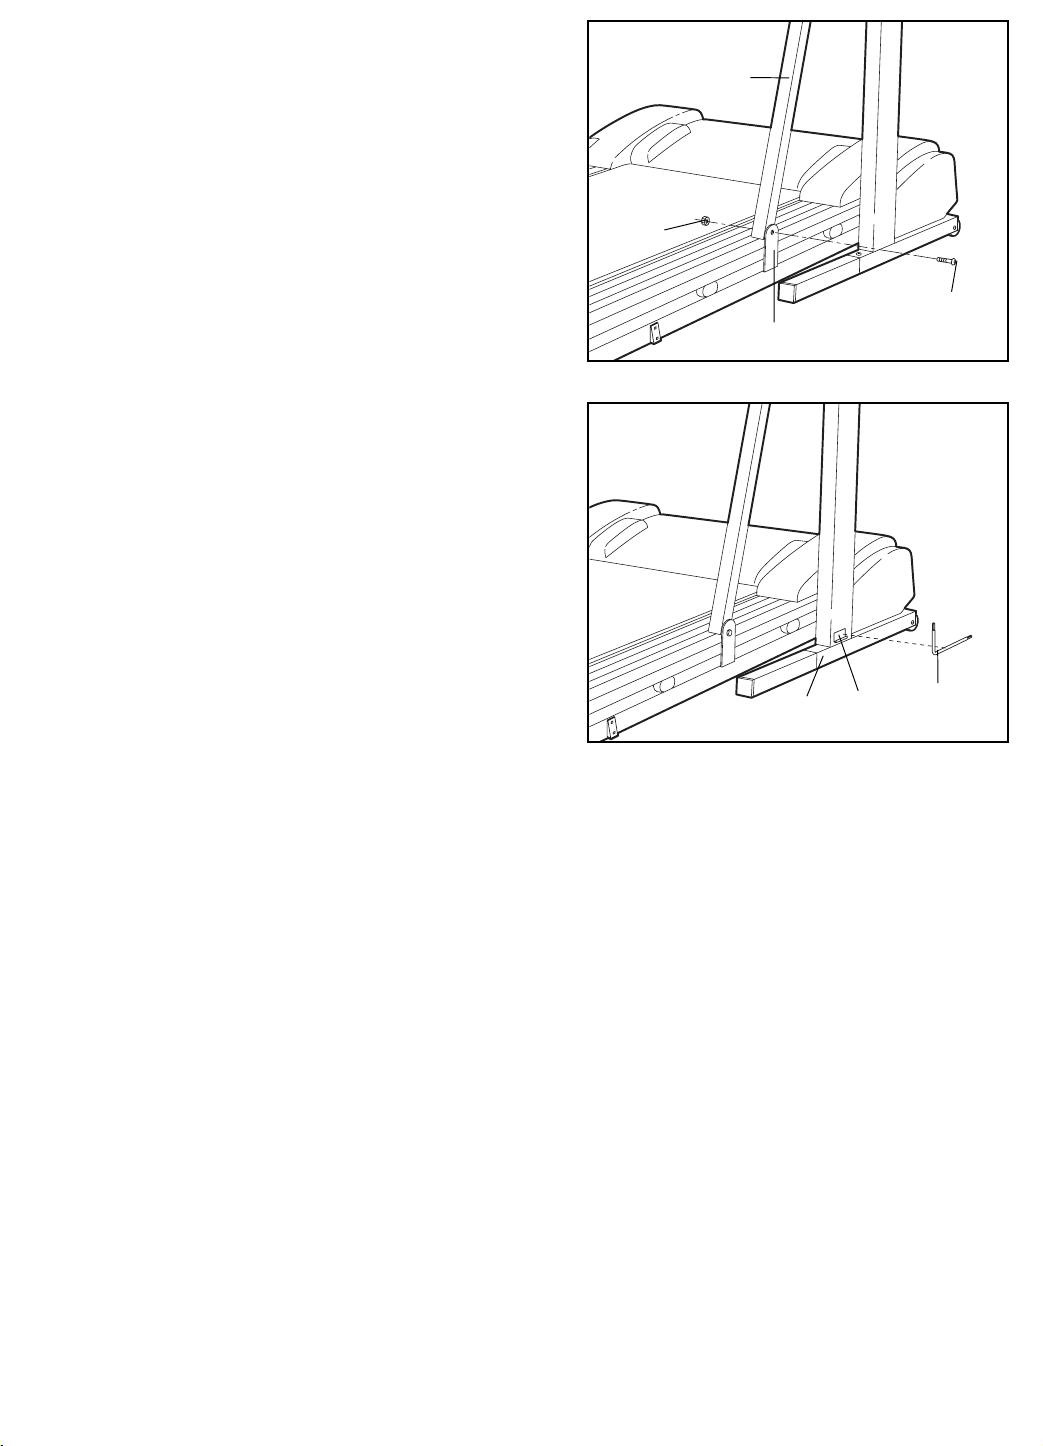
4. See HOW TO LOWER THE TREADMILL FOR USE on
page 11. Follow the instructions on page 11 to lower the
treadmill.
Align the hole in the lower end of the right Handrail Arm
(10) with the hole in the frame tab as shown. Attach the
Handrail Arm with a Handrail Bolt (7) and a Handrail Nut
(8).
4
10
Repeat this step on the left side.
5. Remove the backing from the Adhesive Clip (91). Press
the Adhesive Clip onto the Base (70) in the indicated
location. Press the Allen Wrench (92) into the Adhesive
Clip.
6. Make sure that all parts are tightened before you use the treadmill. To protect the floor or carpet, place a
mat under the treadmill. To order a mat, see the back cover of this manual.
8
7
Frame Tab
5
70
91
92
6
Page 7
OPERATION AND ADJUSTMENT
THE PERFORMANT LUBETMWALKING BELT
Your treadmill features a walking belt coated with
PERFORMANT LUBETM, a high-performance lubricant.
IMPORTANT: Never apply silicone spray or other
substances to the walking belt or the walking platform. Such substances will deteriorate the walking
belt and cause excessive wear.
HOW TO PLUG IN THE POWER CORD
DANGER: Improper connection
of the equipment-grounding conductor can
result in an increased risk of electric shock.
Check with a qualified electrician or serviceman if you are in doubt as to whether the
product is properly grounded. Do not modify
the plug provided with the productÑif it will
not fit the outlet, have a proper outlet
installed by a qualified electrician.
Your treadmill, like any other type of sophisticated
electronic equipment, can be seriously damaged by
sudden voltage changes in your homeÕs power.
Voltage surges, spikes, and noise interference can
result from weather conditions or from other appliances
being turned on or off. To decrease the possibility of
your treadmill being damaged, always use a surge
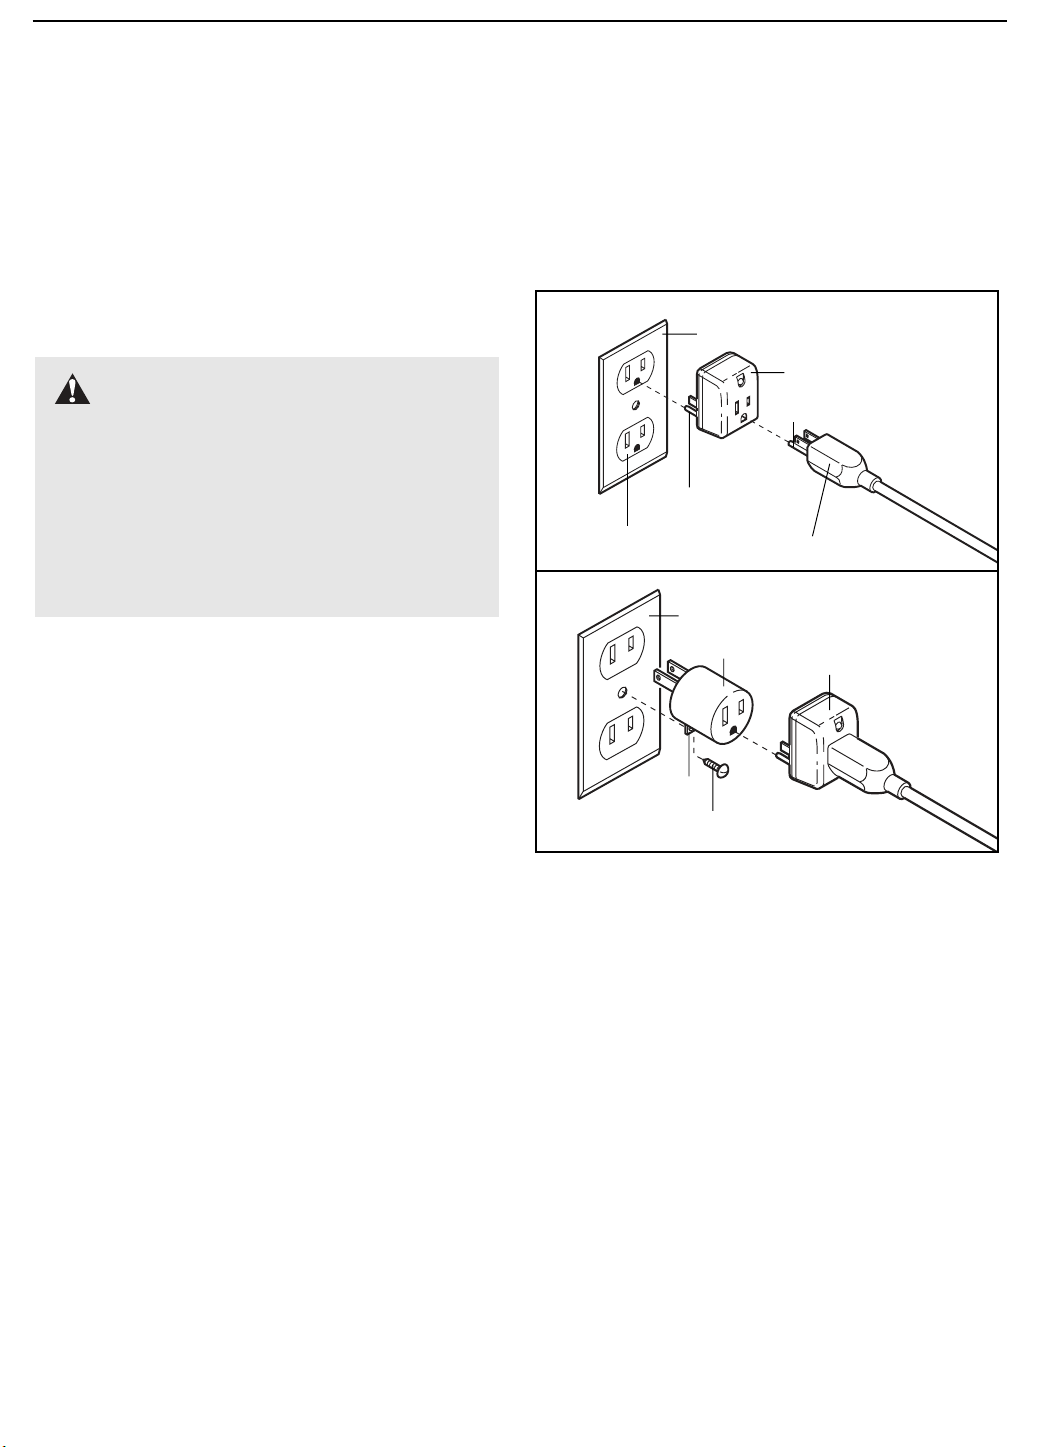
suppressor with your treadmill (see drawing 1 at
the right).
This product is for use on a nominal 120-volt circuit,
and has a grounding plug that looks like the plug illustrated in drawing 1 below. A temporary adapter that
looks like the adapter illustrated in drawing 2 may be
used to connect the surge suppressor to a 2-pole
receptacle as shown in drawing 2 if a properly
grounded outlet is not available.
1
Grounded Outlet Box
Surge Suppressor
Grounding Pin
Grounding Pin
Grounded Outlet
2
Grounded Outlet Box
Adapter
Lug
Metal Screw
Grounding Plug
Surge Suppressor
Surge suppressors are sold at most hardware stores
and department stores. Use only a single-outlet surge
suppressor that is UL 1449 listed as a transient voltage
surge suppressor (TVSS). The surge suppressor must
have a UL suppressed voltage rating of 400 volts or
less and a minimum surge dissipation of 450 joules.
The surge suppressor must be electrically rated for
120 volts AC and 15 amps.
This product must be grounded. If it should malfunction or break down, grounding provides a path of least
resistance for electric current to reduce the risk of electric shock. This product is equipped with a cord having
an equipment-grounding conductor and a grounding
plug. Plug the power cord into a surge suppressor,
and plug the surge suppressor into an appropriate
outlet that is properly installed and grounded in
accordance with all local codes and ordinances.
The temporary adapter should be used only until a
properly grounded outlet (drawing 1) can be installed
by a qualified electrician.
The green-colored rigid ear, lug, or the like extending
from the adapter must be connected to a permanent
ground such as a properly grounded outlet box cover.
Whenever the adapter is used it must be held in place
by a metal screw. Some 2-pole receptacle outlet box
covers are not grounded. Contact a qualified electrician to determine if the outlet box cover is
grounded before using an adapter.
7
Page 8
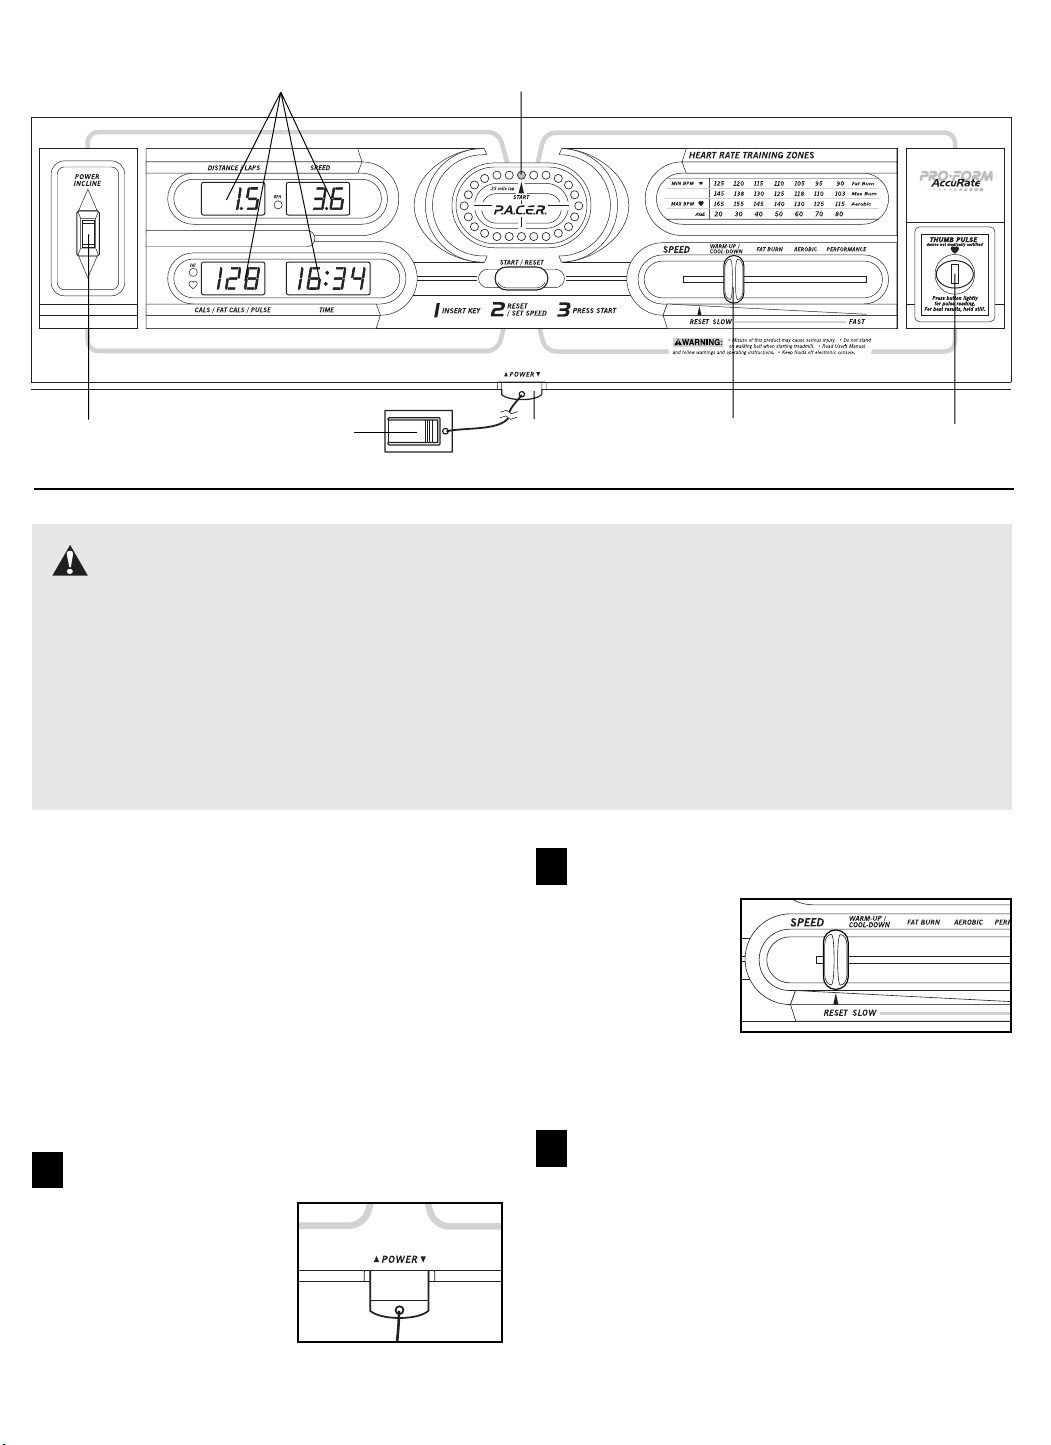
DIAGRAM OF THE CONSOLE
Monitor Displays
Incline Control
Clip
LED Track
CAUTION: Before operating the
console, read the following precautions.
¥ Do not stand on the walking belt when turning
on the power.
¥ Always wear the clip (see the drawing above)
while using the treadmill. When the key is
removed from the console, the walking belt
will stop.
Key
¥ Adjust the speed in small increments.
¥ The settings marked above the speed control
¥ To reduce the possibility of electric shock,
Speed Control
(warm-up/cool-down, fat burn, aerobic, and
performance) are general guidelines only. See
pages 14 and 15 for more information.
keep the console dry. Avoid spilling liquids on
the console and use only a sealed water bottle.
Pulse Sensor
STEP BY STEP CONSOLE OPERATION
If there is a thin sheet of clear plastic on the face of the
console, remove it. Next, make sure that the power
cord is properly plugged in (see HOW TO PLUG IN
THE POWER CORD on page 7).
Stand on the foot rails of the treadmill. Find the clip
attached to the key (see the drawing above), and
slide the clip onto the waistband of your clothing.
Follow the steps below to operate the console.
Insert the key fully into the power switch.
1
After a moment, the
four displays and one
indicator in the LED
track will light.
Reset the speed control.
2
Slide the speed
control to the
the RESET
position. Note:
Each time the
walking belt is
stopped, the
speed control must be moved to the RESET position before the walking belt can be restarted.
Start the walking belt.
3
Slowly slide the speed control to the right until the
walking belt begins to move at slow speed. Step
onto the walking belt and begin exercising. Change
the speed of the walking belt as desired by sliding
the speed control.
To stop the walking belt, step onto the foot rails
and slide the speed control to the RESET position. After a few seconds, the displays will pause.
8
Page 9
Follow your progress with the LED track and
4
the four displays.
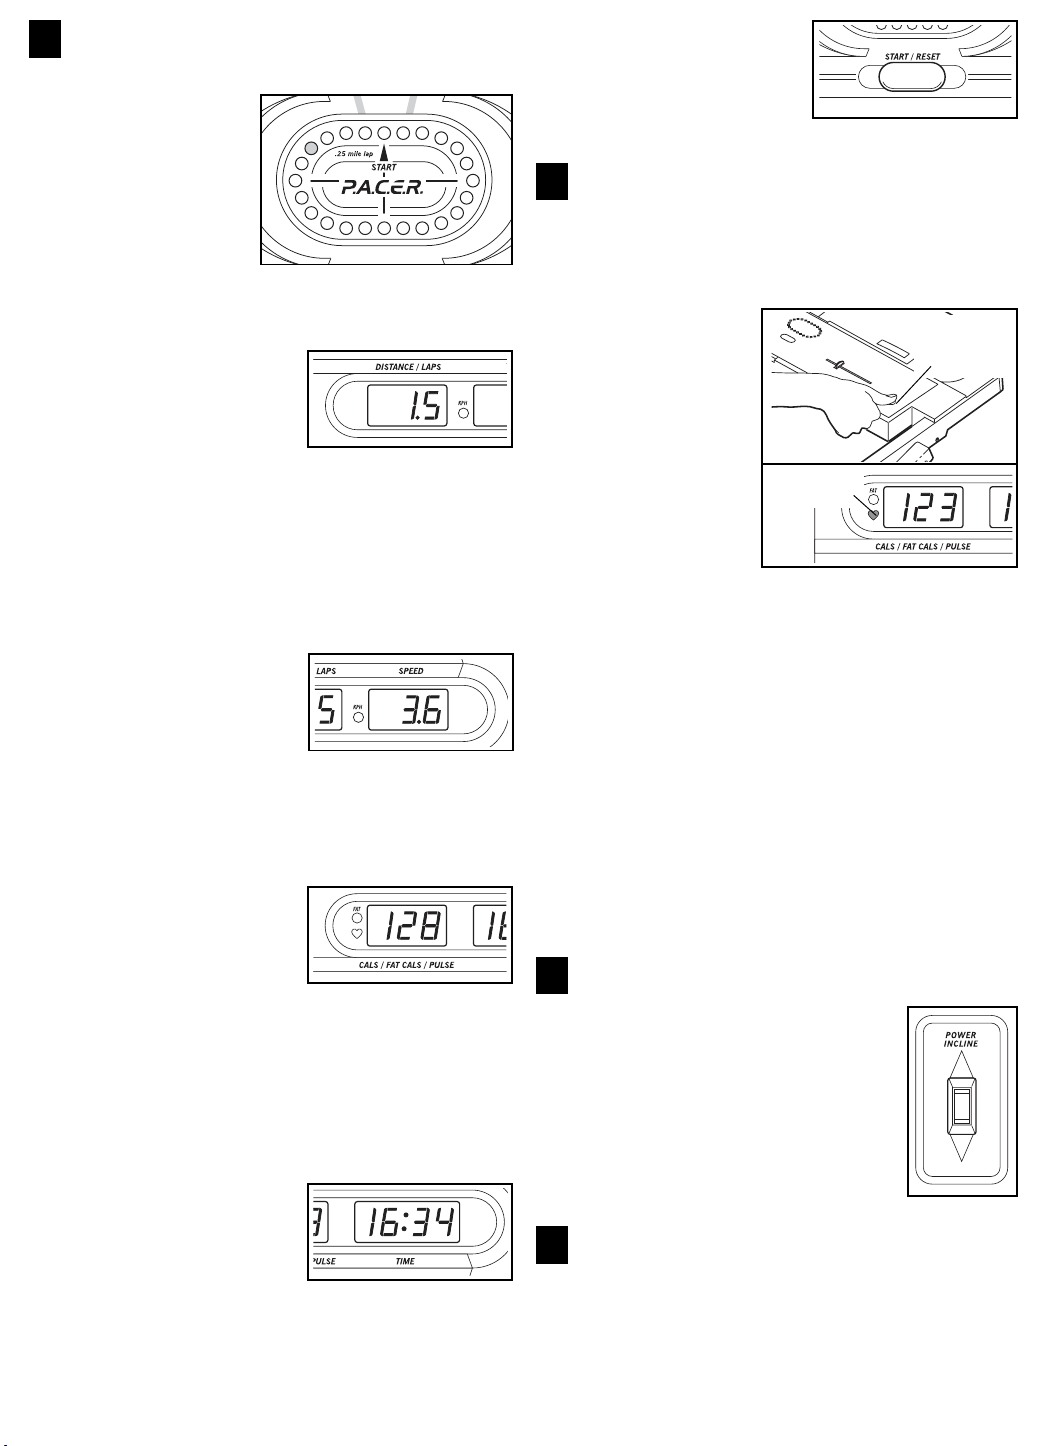
The LED
TrackÑThe LED
track represents
a distance of 1/4
mile. As you exercise, the indicators around the
track will light one
at a time until you
have completed 1/4 mile. A new lap will then begin.
DISTANCE/LAPS
displayÑThis display
shows the distance that
you have walked and
the number of laps you
have completed. The
display will change from one number to the other
every seven seconds. An ÒLÓ will appear in the display when the number of laps is shown. Note: If the
KPH indicator beside the SPEED display is lit, the
distance will be displayed in kilometers; if the indicator is not lit, the distance will be displayed in miles.
SPEED displayÑThis
display shows the speed
of the walking belt, in
miles per hour or kilometers per hour. If the KPH
indicator is lit, the speed
will be displayed in kilometers per hour. Note: To
change the unit of measurement, hold down the
START/RESET button for about seven seconds.
CALS/FAT CALS/
PULSE displayÑThis
display shows the approximate numbers of
calories and fat calories you have burned.
(See BURNING FAT on page 14 for an explanation
of fat calories.) Every seven seconds, the display
will change from one number to the other. The FAT
indicator will light when the number of fat calories is
shown. Note: This display also shows your pulse
when the pulse sensor is used.
To reset the displays,
press the START/
RESET button. The displays will darken for a
moment and then light.
Measure your pulse, if desired.
5
Stand on the foot rails and place your thumb on the
pulse sensor as shown. The pulse sensor is pressure-activatedÑfully press it down. (Do not press
too hard, or the
circulation in
your thumb will
be restricted,
and your pulse
will not be detected.) Next,
raise your thumb
slightly until the
heart-shaped
indicator by the
CALS/FAT CALS/
PULSE display
flashes steadily.
Hold your thumb at this level. After a few seconds,
three dashes will appear in the display and your
pulse will be shown. Hold your thumb on the sensor
for another 15 seconds for the most accurate reading. If the displayed pulse appears to be too high or
too low, or if your pulse is not displayed, lift your
thumb off the sensor and allow the display to reset.
Press down again on the sensor as described above.
Make sure that your thumb is positioned as shown,
and that you are applying the proper amount of pressure to the pulse sensor. Try the sensor several
times until you become familiar with it. Remember to
stand still while measuring your pulse.
Change the incline of the treadmill, if desired.
Indicator
6
To change the incline, hold down
the top or bottom of the incline control until the desired incline level is
reached. Important: Before fold-
ing the treadmill, adjust the incline to the lowest position.
Pulse
Sensor
TIME displayÑThis
display shows the total
time that you have
walked since the display
was reset.
Note: If the walking belt is stopped and no
console buttons are pressed for five minutes,
the displays will automatically turn off. To light
the displays, press the START/RESET button.
When you are finished exercising, stop the
7
walking belt and remove the key.
Step onto the foot rails, stop the walking belt, and
remove the key from the console. Store the key in a
secure place.
9
Page 10
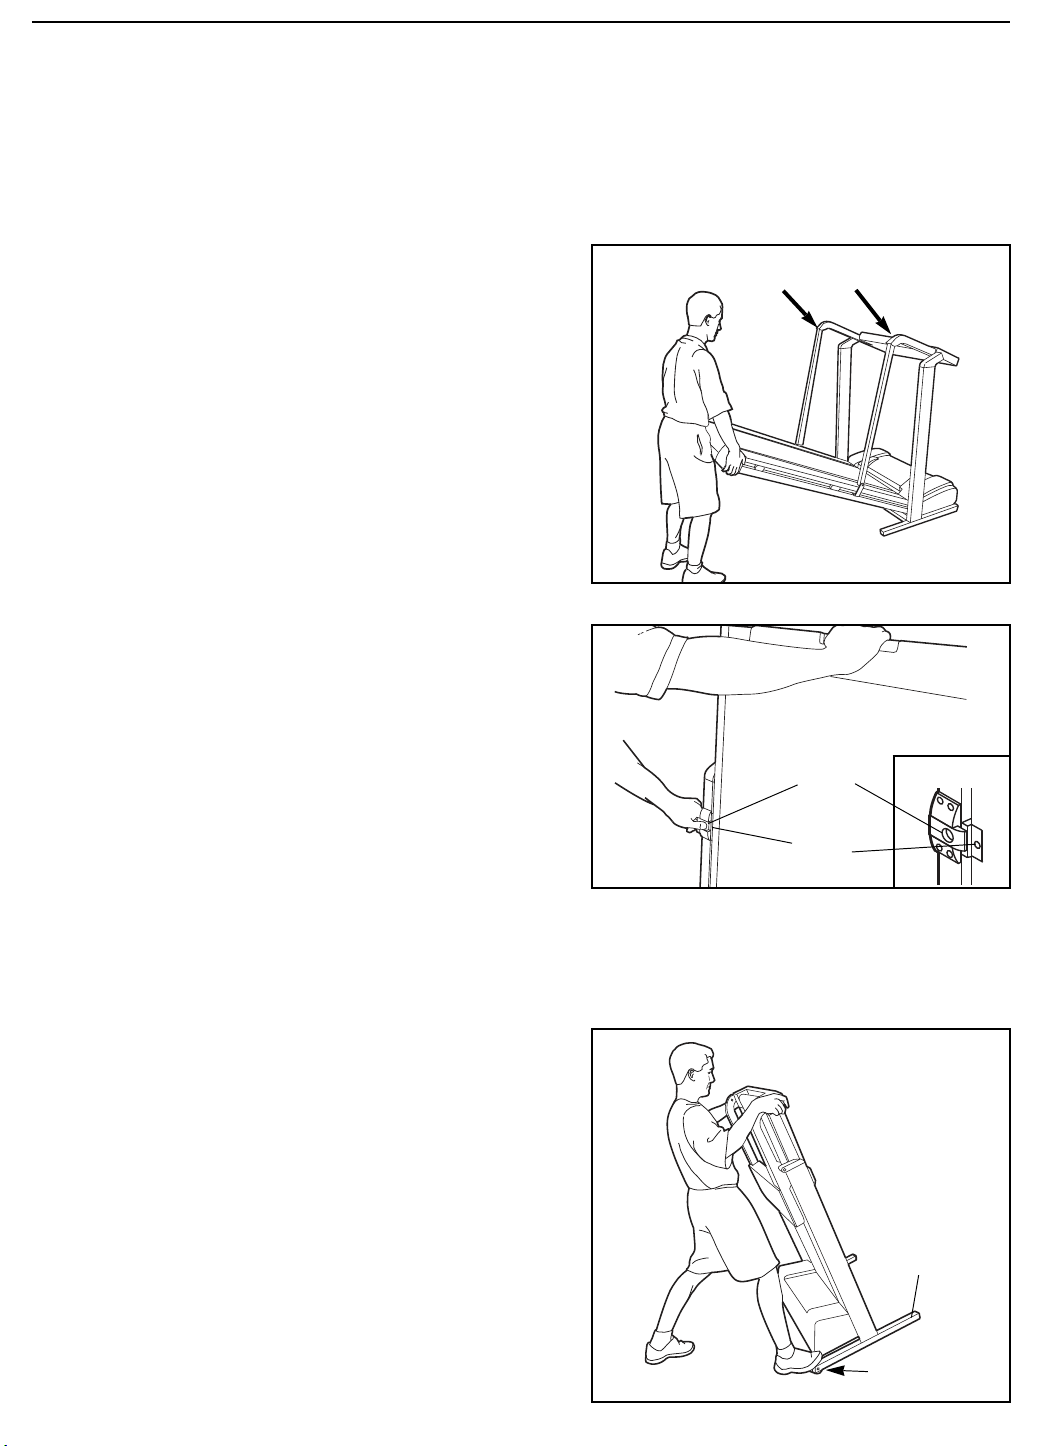
HOW TO FOLD AND MOVE THE TREADMILL
HOW TO FOLD THE TREADMILL FOR STORAGE
Before folding the treadmill, adjust the incline to the lowest position. If the incline is not at the lowest position,
the treadmill will be permanently damaged. Next, unplug the power cord. Caution: You must be able to
safely lift 45 pounds (20 kg) in order to raise, lower, or move the treadmill.
1. Hold the treadmill with your hands in the locations shown
at the right. Caution: To avoid pinching your hands, do
not hold the treadmill in the locations indicated by the
arrows. To decrease the possibility of injury, bend
your legs and keep your back straight. As you raise
the treadmill, make sure to lift with your legs rather
than your back. Raise the treadmill about halfway to the
vertical position.
Do not hold here
2. Move your right hand to the position shown and hold the
treadmill firmly. Raise the treadmill until the storage latch
closes over the latch catch. Make sure that the storage
latch closes fully over the latch catch.
To protect the floor or carpet from damage, place a
mat under the treadmill. Keep the treadmill out of direct sunlight. Do not leave the treadmill in the storage
position in temperatures above 85¡ Fahrenheit.
HOW TO MOVE THE TREADMILL
Before moving the treadmill, convert the treadmill to the storage position as described above. Make sure that the
storage latch is closed fully over the latch catch.
1. Hold the upper ends of the treadmill. Place one foot on
the base as shown.
2. Tilt the treadmill back until it rolls freely on the wheels.
Carefully move the treadmill to the desired location. To
reduce the risk of injury, use extreme caution while
moving the treadmill. Do not attempt to move the
treadmill over an uneven surface.
Storage
Latch
Latch
Catch
Closed
3. Place one foot on the base, and carefully lower the tread-
mill until it is resting in the storage position.
10
Base
Wheel
Page 11
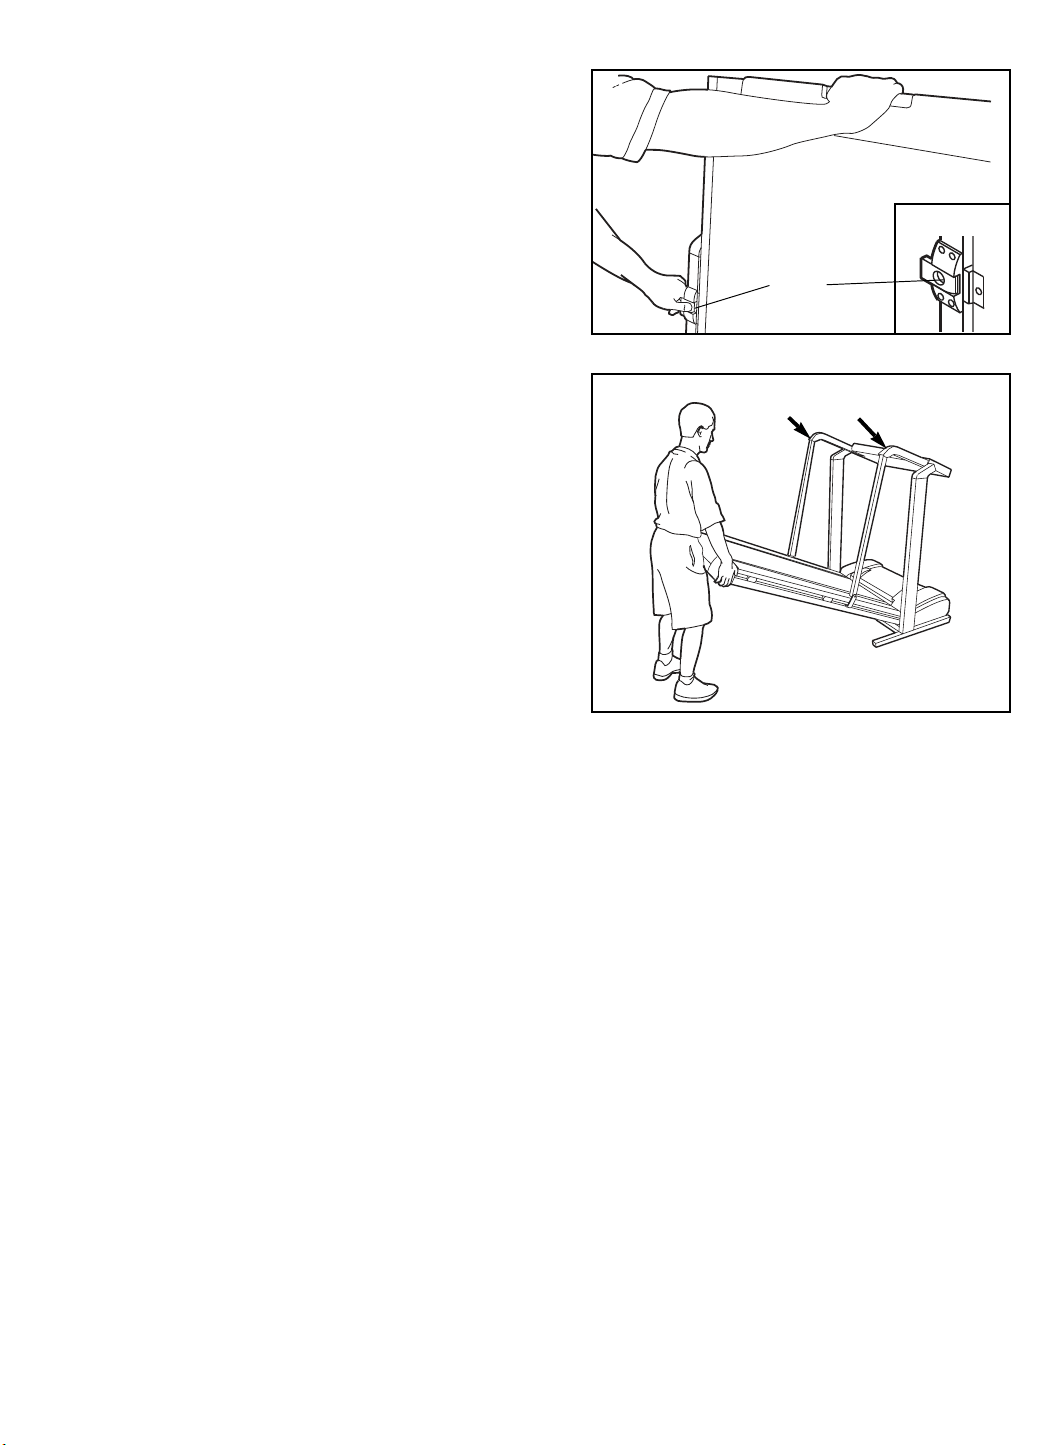
HOW TO LOWER THE TREADMILL FOR USE
1. Hold the upper end of the treadmill with your right hand as
shown. Using your left thumb, slide open the storage latch
and hold it open. Pivot the treadmill until the frame is past
the storage latch.
2. Hold the treadmill firmly with both hands, and lower the
treadmill to the floor. Caution: To avoid pinching your
hands, do not hold the treadmill in the locations indicated by the arrows. To decrease the possibility of injury, bend your legs and keep your back straight.
Opened
Storage
Latch
Do not hold here
11
Page 12
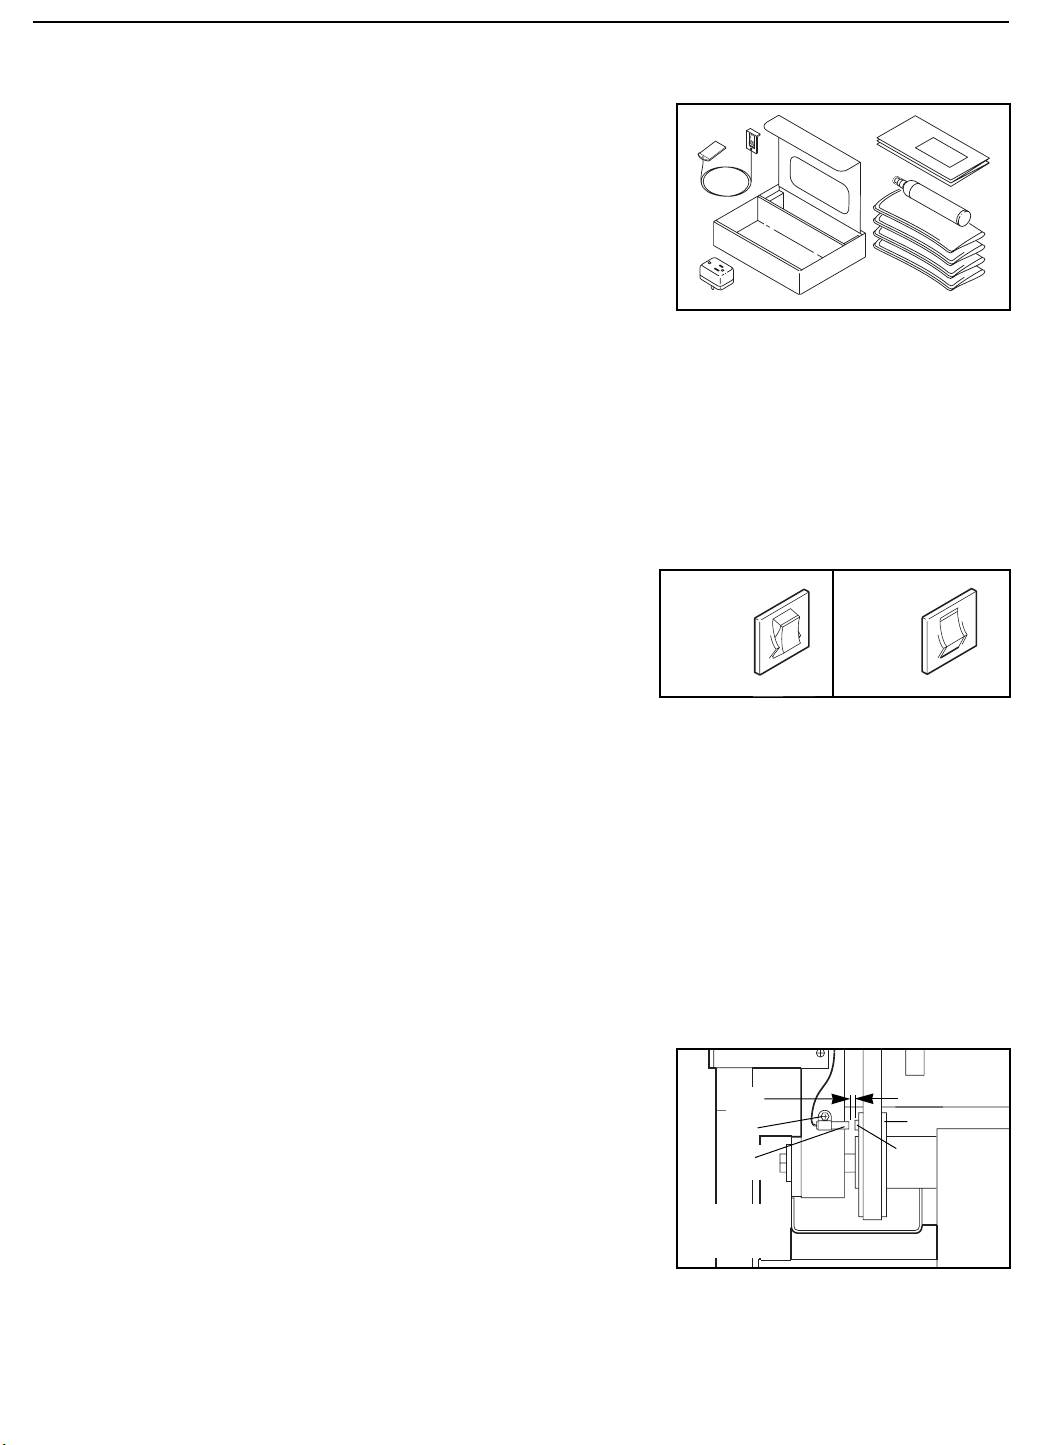
MAINTENANCE AND TROUBLE-SHOOTING
Tripped
For your convenience, a maintenance kit is included with this
treadmill. Read and follow the instructions included with the
maintenance kit to keep your treadmill in top condition.
Most treadmill problems can be solved by following the simple
steps below. If further assistance is needed, call our toll-free
HELPLINE at 1-800-736-6879, Monday through Saturday, 7 a.m.
until 7 p.m. Central Time (excluding holidays).
PROBLEM: The power does not turn on
SOLUTION: a. Make sure that the power cord is plugged into a surge suppressor, and that the surge suppressor
is plugged into a properly grounded outlet (see page 7). Use only a single-outlet surge suppressor
that is UL 1449 listed as a transient voltage surge suppressor (TVSS). The surge suppressor
must have a UL suppressed voltage rating of 400 volts or less and a minimum surge dissipation
of 450 joules. The surge suppressor must be electrically rated for 120 volts AC and 15 amps.
b. After the power cord has been plugged in, make sure that the key is fully inserted into the con-
sole. (See step 1 on page 8.)
c. Check the circuit breaker located on the treadmill
near the power cord. If the switch protrudes as
shown, the circuit breaker has tripped. To reset the
circuit breaker, wait for five minutes and then press
the switch back in.
PROBLEM: The power turns off during use
SOLUTION: a. Check the circuit breaker located on the treadmill frame near the power cord (see 1. c. above). If
the circuit breaker has tripped, wait for five minutes and then press the switch back in.
b. Make sure that the power cord is plugged in.
c. Remove the key from the console. Reinsert the key fully into the console. (See step 1 on page 8.)
d. If the treadmill still will not run, please call our toll-free HELPLINE.
PROBLEM: The displays of the console do not function properly
SOLUTION: a. Remove the screws from the hood. Carefully remove
the hood. Locate the Reed Switch (15) and the
Magnet (37) on the left side of the Pulley (16). Turn
the Pulley until the Magnet is aligned with the Reed
Switch. Make sure that the gap between the
Magnet and the Reed Switch is about 1/8Ó. If necessary, loosen the Screw (14) and move the Reed
Switch slightly. Retighten the Screw. Re-attach the
hood, and run the treadmill for a few minutes to check
for a correct speed reading.
c
Tripped Reset
1/8Ó
14
15
Top
View
Reset
16
37
12
Page 13
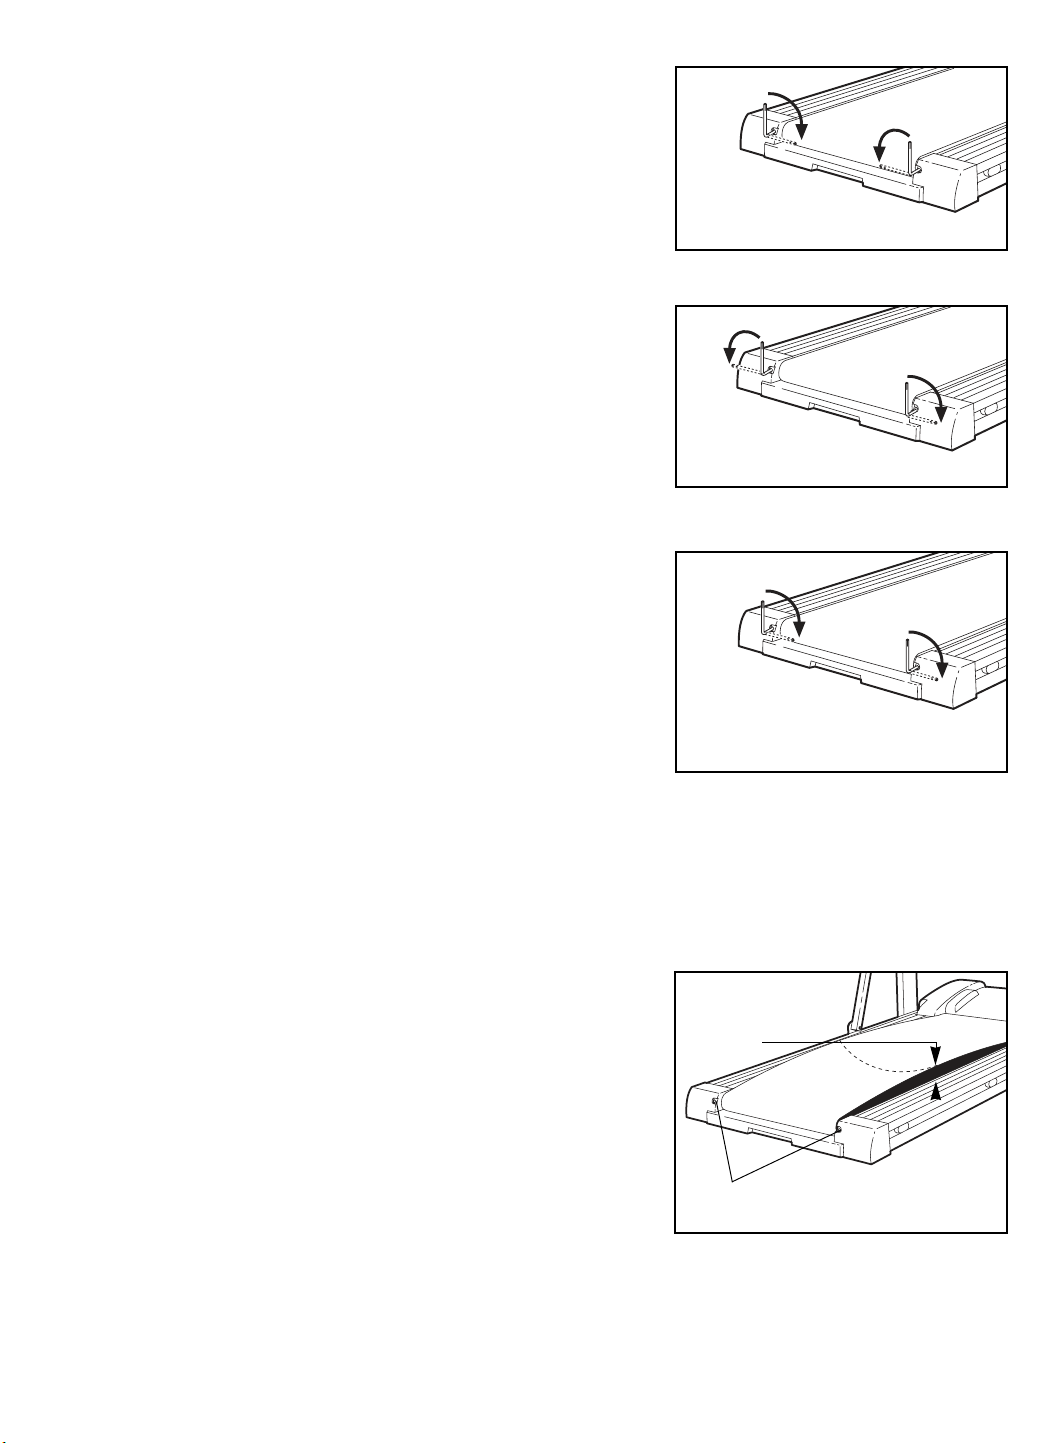
PROBLEM: The walking belt is off-center or slips when walked on
SOLUTION: a. If the walking belt has shifted to the left, first re-
move the key and UNPLUG THE POWER CORD.
Using the allen wrench, turn the left rear roller adjustment bolt clockwise, and the right bolt counterclockwise, 1/4 of a turn each. Be careful not to overtighten
the walking belt. Plug in the power cord, insert the key
and run the treadmill for a few minutes. Repeat until
the walking belt is centered.
b. If the walking belt has shifted to the right, first re-
move the key and UNPLUG THE POWER CORD.
Using the allen wrench, turn the left rear roller adjustment bolt counterclockwise, and the right bolt clockwise, 1/4 of a turn each. Be careful not to overtighten
the walking belt. Plug in the power cord, insert the
key and run the treadmill for a few minutes. Repeat
until the walking belt is centered.
c. If the walking belt slips when walked on, first re-
move the key and UNPLUG THE POWER CORD.
Using the allen wrench, turn both rear roller adjustment bolts clockwise, 1/4 of a turn. When the walking
belt is correctly tightened, you should be able to lift
each side of the walking belt 3 to 4 inches off the
walking platform. Be careful to keep the walking belt
centered. Plug in the power cord, insert the key and
run the treadmill for a few minutes. Repeat until the
walking belt is properly tightened.
a
b
c
PROBLEM: The walking belt slows when walked on
SOLUTION: a. Use only a single-outlet surge suppressor that is UL 1449 listed as a transient voltage surge sup-
pressor (TVSS). The surge suppressor must have a UL suppressed voltage rating of 400 volts or
less and a minimum surge dissipation of 450 joules. The surge suppressor must be electrically
rated for 120 volts AC and 15 amps.
b. If the walking belt is overtightened, treadmill perfor-
mance may decrease and the walking belt may be
permanently damaged. Remove the key and UN-
PLUG THE POWER CORD. Using the allen wrench,
turn both rear roller adjustment bolts counterclockwise, 1/4 of a turn. When the walking belt is properly
tightened, you should be able to lift each side of the
walking belt 3 to 4 inches off the walking platform. Be
careful to keep the walking belt centered. Plug in the
power cord, insert the key and run the treadmill for a
few minutes. Repeat until the walking belt is properly
tightened.
c. If the walking belt still slows when walked on, please call our toll-free HELPLINE.
b
3ÓÐ4Ó
Rear Roller Adjustment Bolts
13
Page 14
CONDITIONING GUIDELINES
WARNING: Before beginning
this or any exercise program, consult your
physician. This is especially important for individuals over the age of 35 or individuals
with pre-existing health problems.
The pulse sensor is not a medical device.
Various factors, including your movement,
may affect the accuracy of heart rate readings.
The sensor is intended only as an exercise aid
in determining heart rate trends in general.
The following guidelines will help you to plan your
exercise program. For more detailed exercise information, obtain a book or consult your physician.
EXERCISE INTENSITY
Whether your goal is to burn fat or to strengthen your
cardiovascular system, the key to achieving the desired
results is to exercise with the proper intensity. The
proper intensity level can be found by using your heart
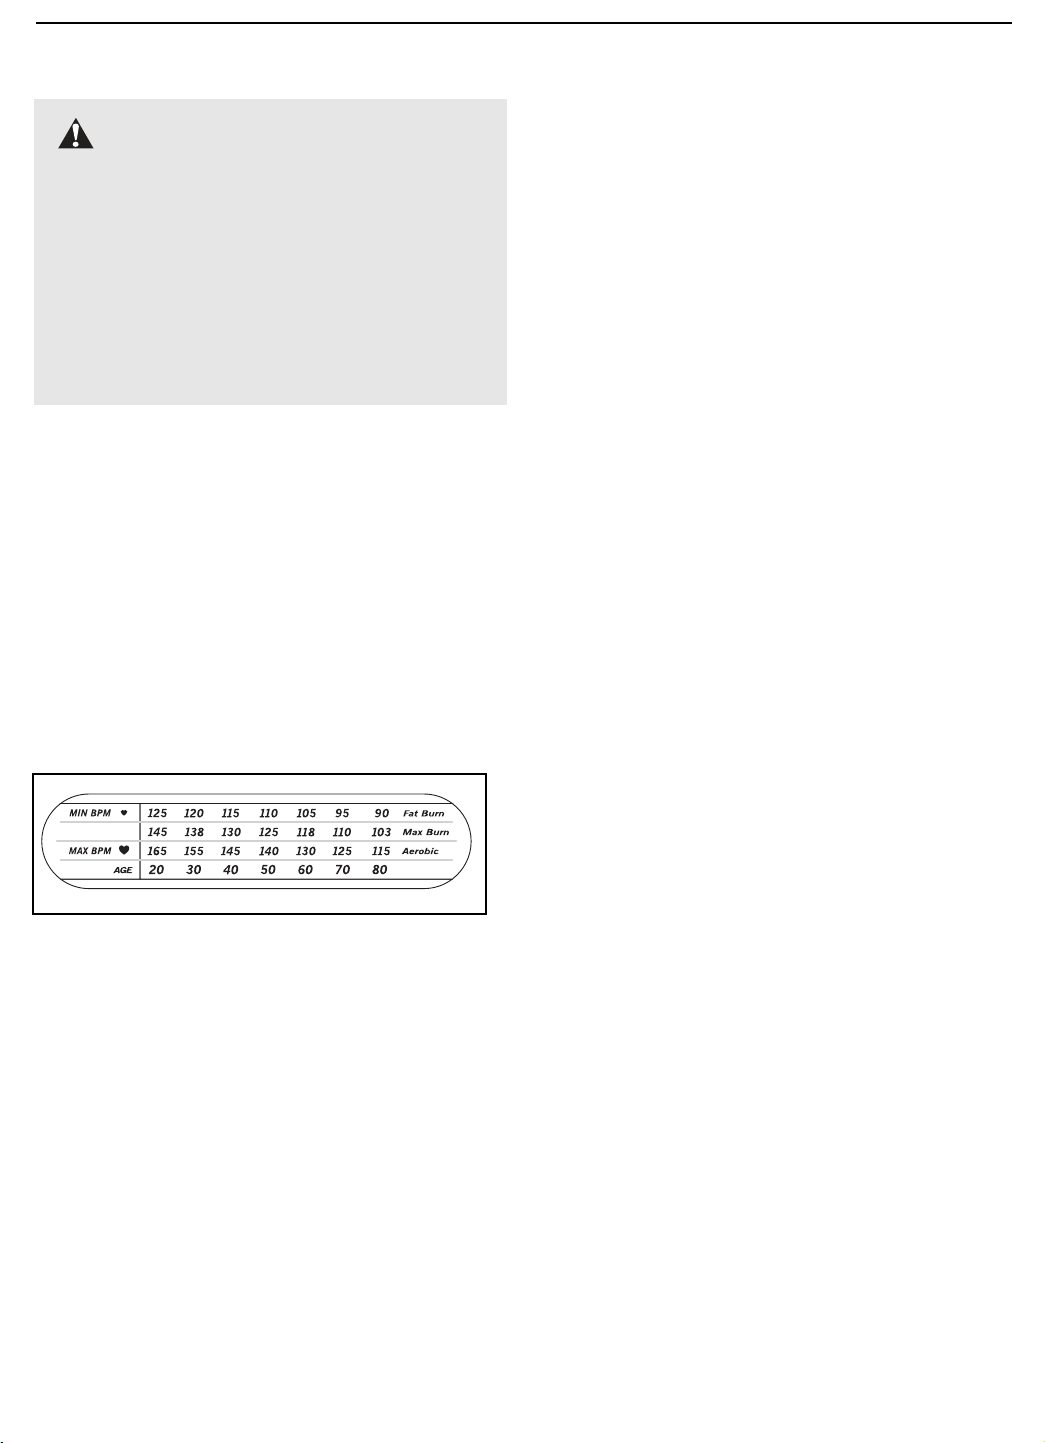
rate as a guide. The chart below shows recommended
heart rates for fat burning and aerobic exercise. (The
chart is also found on the treadmill console.)
adjust the speed and incline of the treadmill until your
heart rate is near one of the lower two numbers in your
training zone. It may also be helpful to set the speed
control on the console to FAT BURN to help you maintain the proper intensity level (see page 8).
Aerobic Exercise
If your goal is to strengthen your cardiovascular system, your exercise must be Òaerobic.Ó Aerobic exercise
is activity that requires large amounts of oxygen for
prolonged periods of time. This increases the demand
on the heart to pump blood to the muscles, and on the
lungs to oxygenate the blood. For aerobic exercise,
adjust the speed and incline of the treadmill until your
heart rate is near the higher number in your training
zone. It may also be helpful to set the speed control on
the console to AEROBIC to help you maintain the
proper intensity level (see page 8).
High Performance Athletic Conditioning
If your goal is high performance athletic conditioning,
set the speed control on the console to PERFORMANCE to help you maintain the proper intensity level
(see page 8). Note: During the first few weeks of your
exercise program, keep your heart rate near the low
end of your training zone.
To find the proper heart rate for you, first find your age
at the bottom of the chart (ages are rounded off to the
nearest ten years). Next, find the three numbers above
your age. These numbers are your Òtraining zone.Ó The
smaller two numbers are recommended heart rates for
fat burning; the larger number is the recommended
heart rate for aerobic exercise. To measure your heart
rate during exercise, use the pulse sensor on the console. (See page 9.) If your heart rate is too high or too
low, adjust the speed or incline of the treadmill.
Burning Fat
To burn fat effectively, you must exercise at a relatively
low intensity level for a sustained period of time. During
the first few minutes of exercise, your body uses easily
accessible carbohydrate calories for energy. Only after
the first few minutes does your body begin to use
stored fat calories for energy. If your goal is to burn fat,
WORKOUT GUIDELINES
Each workout should include the following three parts:
A Warm-upÑStart each workout with 5 to 10 minutes
of stretching and light exercise. A proper warm-up increases your body temperature, heart rate, and circulation in preparation for exercise.
Training Zone ExerciseÑAfter warming up, increase
the intensity of your exercise until your heart rate is in
your training zone for 20 to 60 minutes. (During the
first few weeks of your exercise program, do not keep
your heart rate in your training zone for longer than 20
minutes.)
A Cool-downÑFinish each workout with 5 to 10 minutes of stretching to cool down. This will increase the
flexibility of your muscles and will help to prevent postexercise problems.
To maintain or improve your condition, complete three
workouts each week, with at least one day of rest between workouts. After a few months of regular exercise, you may complete up to five workouts each week
if desired. The key to success is to make exercise a
regular and enjoyable part of your everyday life.
14
Page 15

PART LISTÑModel No. 831.297670 R0598A
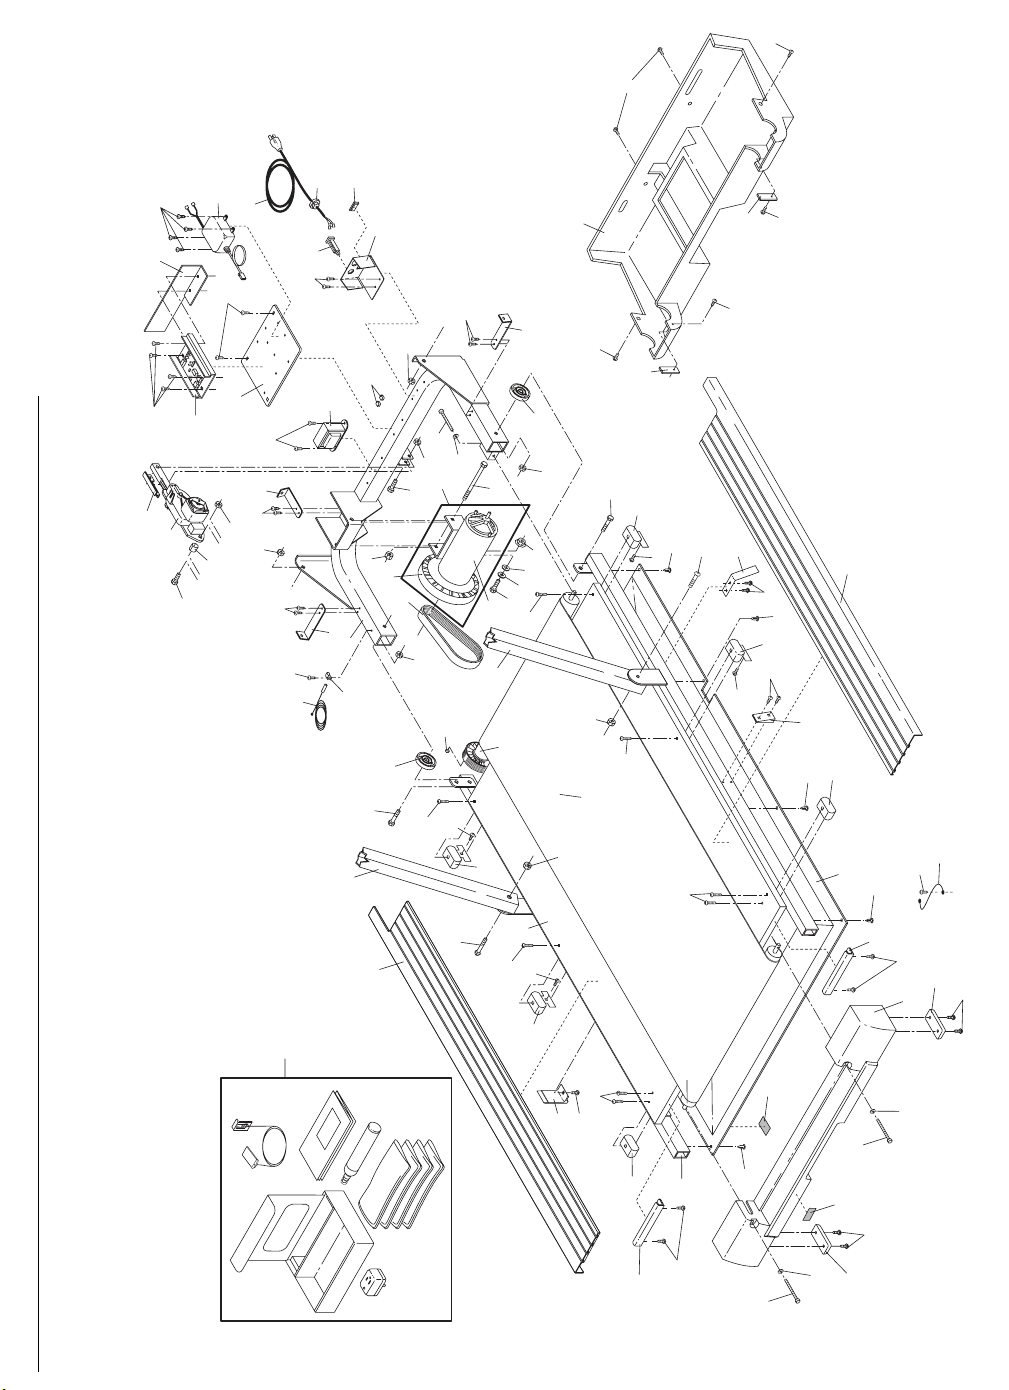
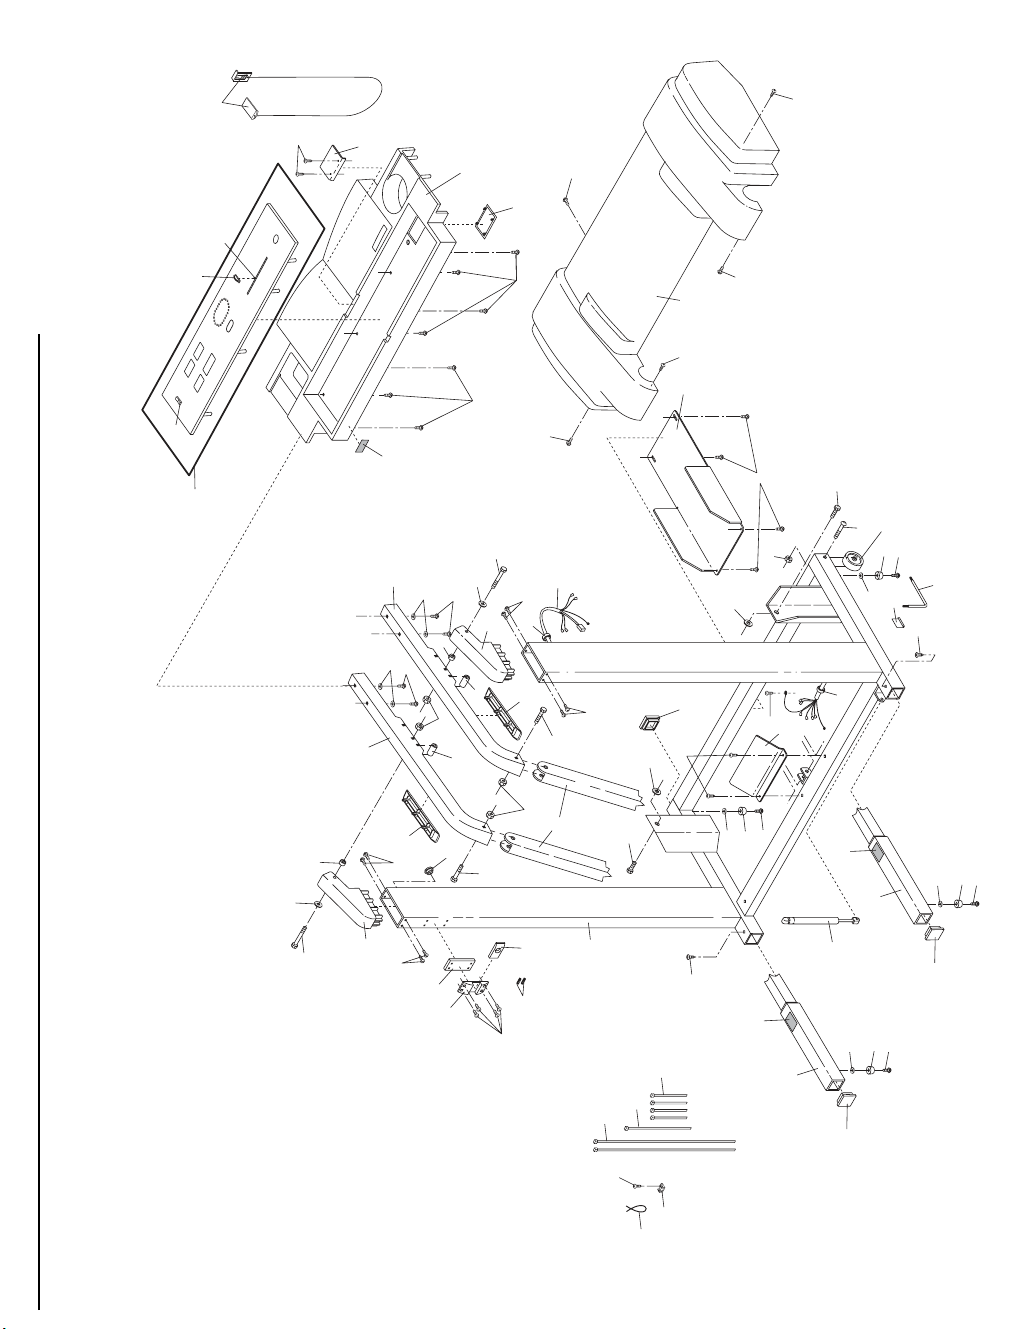
To identify the parts listed below, refer to the EXPLODED DRAWING attached in the center of this manual.
Key
No. Qty. Description
1 1 Frame
2 2 Rear Isolator
3 4 Rear Platform Screw
4 32 Screw
5 1 Catch
6 4 Isolator
7 4 Handrail Bolt
8 8 Handrail Arm Nut
9 2 Foot Rail
10 2 Handrail Arm
11 3 Incline Pivot Bolt
12 2 Incline Pivot Spacer
13 1 Reed Switch Clip
14 1 Reed Switch Screw
15 1 Reed Switch
16 1 Front Roller/Pulley
17 4 Platform Screw
18 2 Incline Warning Decal
19 1 Incline Frame
20 2 Hood Bracket
21 4 Hood Bracket Screw
22 8 Incline Nut
23 2 Base Endcap
24 1 Incline Motor Spacer
25 2 Incline Motor Bolt
26 1 Incline Motor
27 1 Controller
28 1 Electronics Plate
29 1 Choke
30 1 Transformer
31 1 Power Cord
32 1 Power Cord Grommet
33 1 Plug
34 1 Outlet Bracket
35 1 Circuit Breaker
36 11 Adjustment Washer
37 1 Magnet
38 1 Front Belly Pan
39 1 Motor Pivot Bolt
40 1 Motor Pivot Nut
41 1 Pulley/Flywheel/Fan
42 1 Motor Belt
43 1 Motor
44 2 Hood Bracket
45 1 Motor Tension Washer
46 1 Star Washer
47 22 Belly Pan Fastener
48 2 Belt Guide
49 2 Endcap Spacer
50 1 Frame Guide
Key
No. Qty. Description
51 1 Belly Pan
52 4 Handrail Washer
53 2 Rear Pad
54 1 Rear Endcap
55 1 Warning Decal
56 2 Rear Roller Adj. Bolt
57 1 Upright Plug
58* 1 Maintenance Kit
59 1 Walking Belt
60 1 Storage Latch Bracket
61 1 Front Roller Adj. Bolt
62 2 Handrail Bolt
63 2 Handrail Pivot Spacer
64 2 Handrail Pivot Cap
65 1 Key/Clip
66 1 Latch Spacer
67 1 Ground Wire
68 2 Latch Spring
69 1 Storage Latch
70 1 Upright/Base
71 1 Book Holder
72 1 Right Handrail
73 1 Left Handrail
74 4 Console Base Screw
75 2 Wire Harness Grommet
76 1 Upright Wire Harness
77 4 Endcap Spacer Screw
78 1 Console
79 1 Incline Control
80 1 Speed Control Knob
81 1 Speed Potentiometer
82 1 Console Base
83 2 Handrail Cover
84 1 Motor Hood
85 1 Incline Motor Plate
86 2 Plastic Spacer
87 4 Incline Frame Bolt
88 4 Handrail Nut
89 4 Base Pad
90 1 Rear Roller
91 1 Wrench Clip
92 1 Allen Wrench
93 2 Extension Screw
94 1 Ground Screw
95 1 Incline Motor Shield
96 2 Wheel Bolt
97 2 Wheel
98 2 Wire Clip
99 2 Extension Leg
100 1 Shock
Key
No. Qty. Description
101 1 8Ó Cable Tie
102 1 Cable Tie Clamp
103 1 Releasable Tie
104 1 Walking Platform
105 1 Front Hood Bracket
106* 1 Motor/Pulley/Fly./Fan
107 2 Handrail Spacer
108 8 Latch /Hood Screw
109 8 Endcap Screw
110 1 Motor Flange Nut
111 2 Caution Decal
112 2 23Ó Cable Tie
113 4 4Ó Cable Tie
114 1 Battery Cover
115 1 Incline Stop Bracket
116 1 Choke Bracket
# 1 8Ó White Wire, Pigtail
# 1 6Ó White Wire, 2 F/1M
# 1 8Ó Blue Wire, Pigtail
# 1 6Ó Blue Wire, Pigtail
# 1 UserÕs Manual
* Includes all parts in the box
# These parts are not illustrated
15
Page 16
9
12
1
2
56
36
4
53
56
4
53
36
54
47
47
51
2
55
47
9
4
6
4
47
7
47
17
8
6
11
4
11
7
8
4
6
5
3
104
59
4
6
14
15
13
16
22
10
42
17
11
45
46
110
40
39
22
12
25
41
22
20
4
20
19
22
4
4
105
22
36
61
25
24
22
26
10
3
43
4
35
31
32
33
34
4
29
4
4
4
4
4
50
17
17
38
48
18
37
77
49
77
49
94
67
90
98
106*
21
21
44
44
58*
30
4
4
4
28
27
116
115
EXPLODED DRAWINGÑModel No. 831.297670 R0598A
Page 17
108
68
36894
99
93
93
92
4
36
89
4
95
36
89
4
91
87
86
86
87
70
69
109
64
62
63
108
108
108
84
100
21
103
102
101
4
82
4
78*
79
80
81
4
85
75
75
76
94
109
109
109
66
60
23
65
52
23
18
71
21
62
64
63
52
10
7
88
7
88
74
74
73
72
36
36
107
107
96
22
97
36894
99
23
57
112
111
114
113
111
21
21
83
83
EXPLODED DRAWINGÑModel No. 831.297670 R0598A
Page 18
Model No. 831.297670
The model number and serial number of your PROFORM¨585
treadmill are listed on a decal attached to the frame. See the front
cover of this manual to find the location of the decal.
QUESTIONS?
If you find that:
¥ you need help assembling or
operating the PROFORM¨585
treadmill
¥ a part is missing
¥ or you need to schedule repair
service
call our toll-free HELPLINE
1-800-736-6879
MondayÐSaturday, 7 amÐ7 pm
Central Time (excluding holidays)
REPLACEMENT
PARTS
If parts become worn and need
to be replaced, call the following
toll-free number
All replacement parts are available for immediate purchase or
special order when you visit your nearest SEARS Service Center.
To request service or to order parts by telephone, call the toll-free
numbers listed at the left.
When requesting help or service, or ordering parts, please be prepared to provide the following information:
¥ The NAME OF THE PRODUCT (PROFORM¨585 treadmill)
¥ The MODEL NUMBER OF THE PRODUCT (831.297670)
¥ The KEY NUMBER AND DESCRIPTION OF THE PART (see the
PART LIST on page 15 and the EXPLODED DRAWING attached
in the center of this manual)
1-800-FON-PART
(1-800-366-7278)
FULL 90 DAY WARRANTY
For 90 days from the date of purchase, if failure occurs due to defect in material or workmanship in this
SEARS TREADMILL EXERCISER, contact the nearest SEARS Service Center throughout the United
States and SEARS will repair or replace the TREADMILL EXERCISER, free of charge.
This warranty does not apply when the TREADMILL EXERCISER is used commercially or for rental purposes.
This warranty gives you specific legal rights, and you may also have other rights which vary from state
to state.
SEARS, ROEBUCK AND CO., DEPT. 817WA, HOFFMAN ESTATES, IL 60179
Part No. 146190 H01269-C R0598A Printed in USA © 1998 Sears, Roebuck and Co.
 Loading...