

Page 1
Stereo Speaker Kit Model No. PFMC98680
Congratulations for purchasing high fidelity speakers for your PROFORM®985 CD treadmill. The patented
speakers are amplified and specially designed to boost bass at low volumes for optimal audio quality. To install
and operate the speakers, follow the step-by-step instructions in this guide.
Before installing the speakers, please read all precautions and instructions in this guide. If you have any
questions after reading this guide, or if there are any damaged parts, please call our toll-free Customer Hot Line
at 1-800-999-3756, Monday through Friday, 6 a.m. until 6 p.m. Mountain Time (excluding holidays).
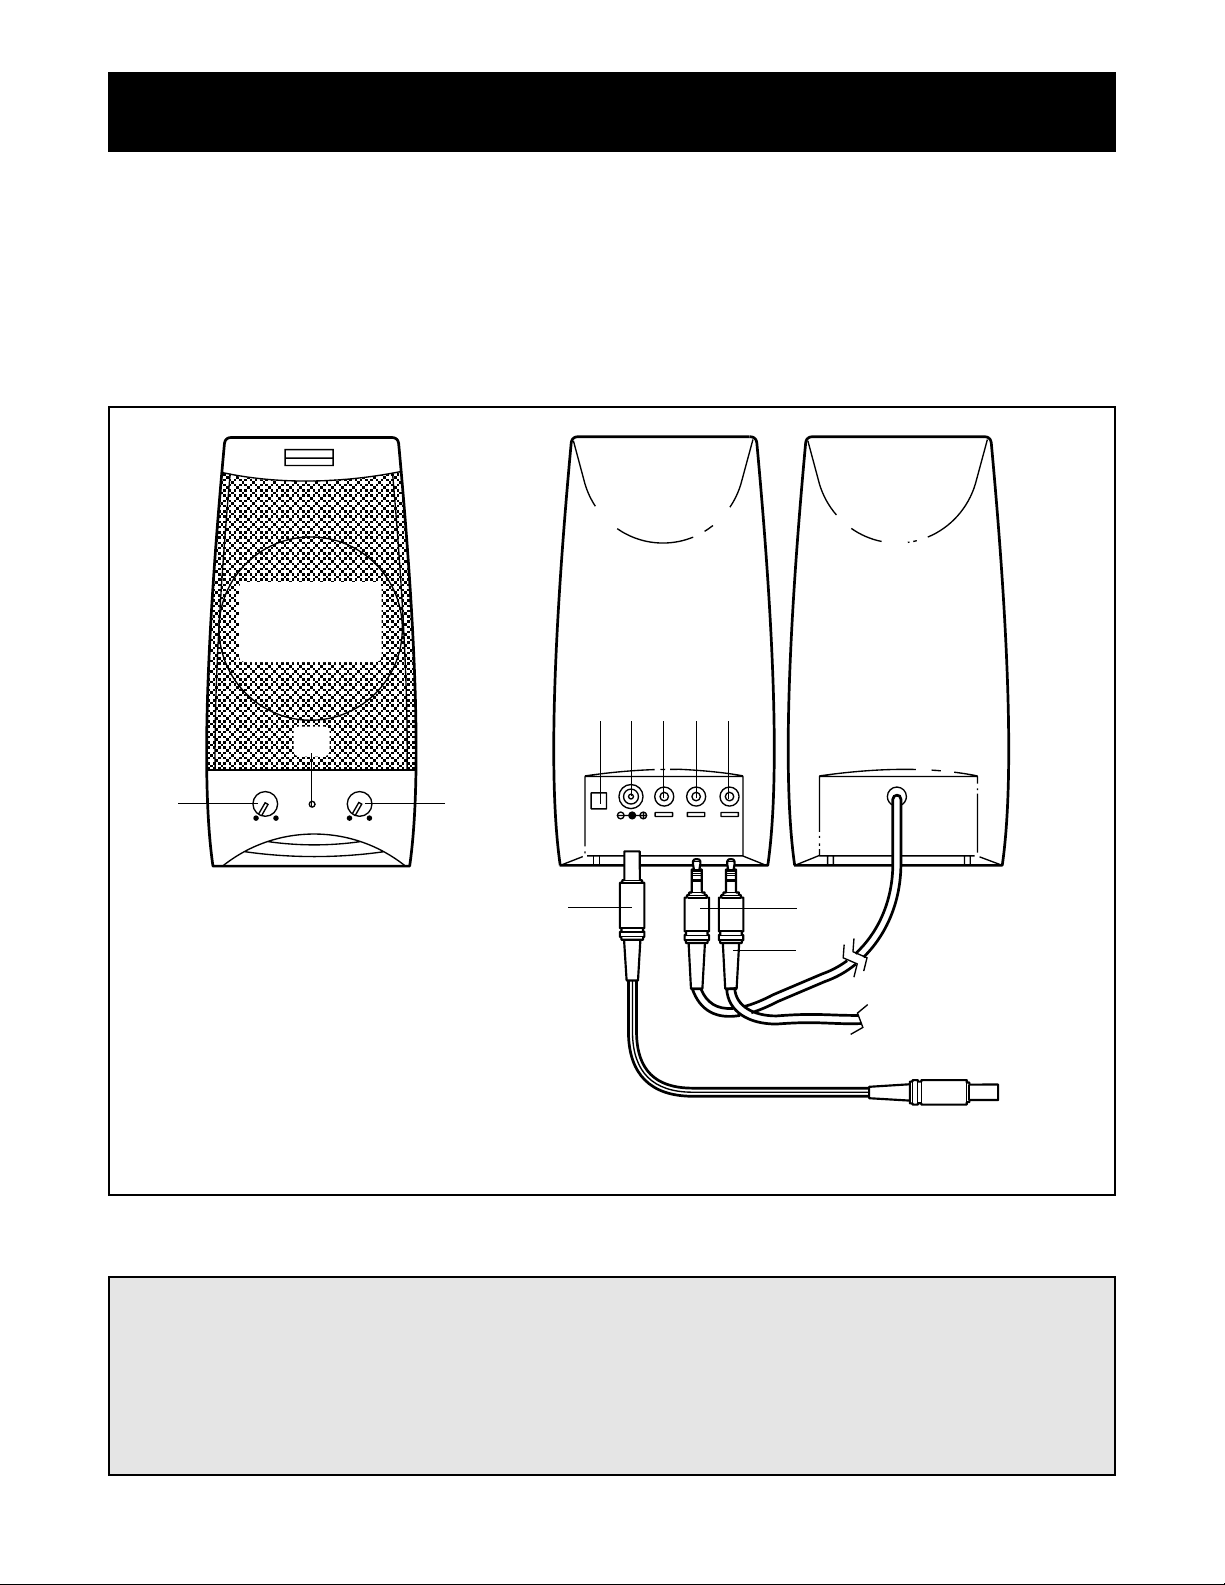
Right Speaker
Rear View
D
I
(To treadmill console)
A
C
J
K
E
F G H
Left Speaker
Rear View
A. Volume control
B. Power indicator
C. Treble control
D. Power button
E. DC IN 15VDC jack
F. SUB OUT jack (not used)
G. SPEAKER OUT jack (white)
H. INPUT jack (green)
I. Jumper wire
J. Speaker wire (white)
K. Audio wire (green)
1. Keep the power cord away from walkways and
heated surfaces.
2. Clean the speakers only with a soft, dry cloth.
Never use abrasives or solvents.
3. Keep liquids away from the speakers.
4. The speakers should be serviced by qualified
service personnel if : (a) the power cord is damaged, (b) liquid has been spilled into the speakers, (c) the speakers do not operate normally, or
(d) the speakers have been dropped or the enclosures damaged.
Right Speaker
Front View
IMPORTANT PRECAUTIONS
B
ALTEC
LANSING
VOLUME TREBLE
DC IN
SUB
SPKR
OUT
INPUT
POWER
15VDC
OUT
Page 2
Peel the backing off one of the included plastic anchors
(L). Press the plastic anchor onto the console plate (M)
in the indicated location.
Fold the speaker wire (J) as shown and secure it to the
plastic anchor (L) with a plastic tie (N).
4
J
M
N
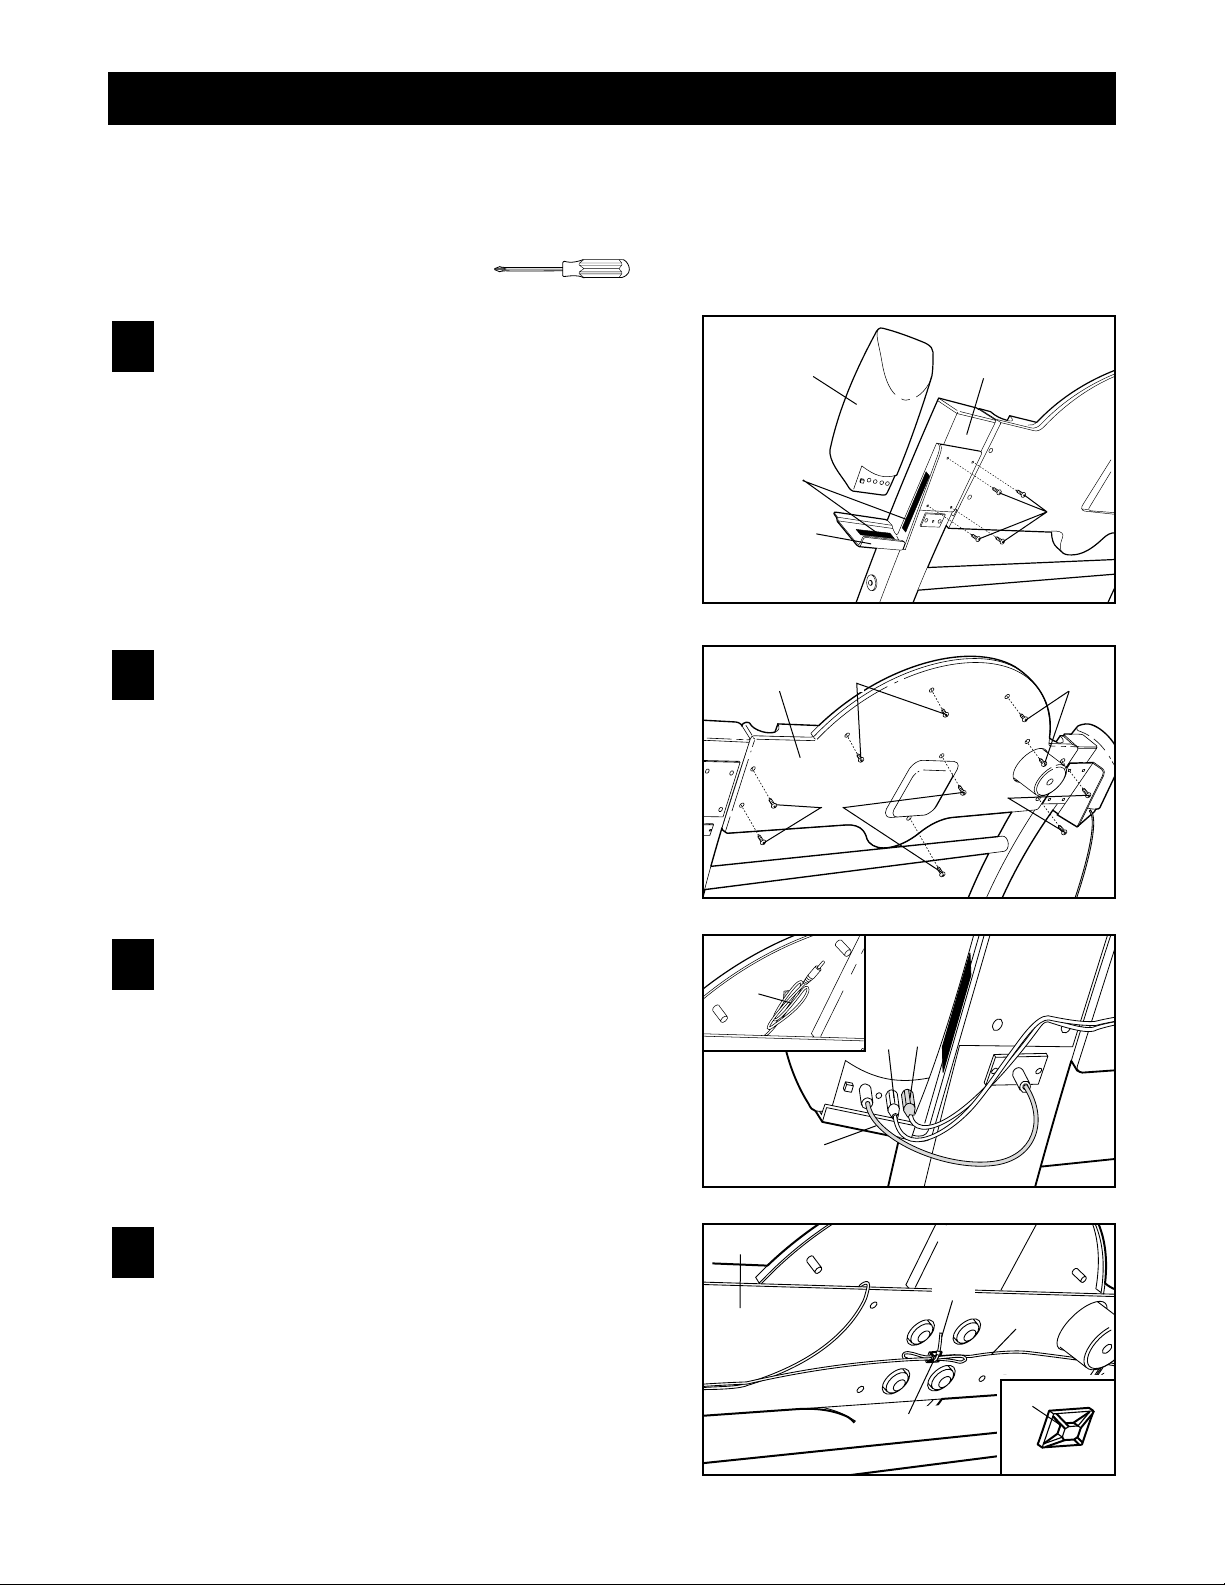
Before beginning installation, lay all parts in a cleared area and remove the packing materials. Do not dispose of
the packing materials until installation is completed. Included in this kit are ten 1/2” screws and eight long
screws. For your convenience, separate the screws into two piles before beginning installation.
Installation requires a phillips screwdriver .
How to Install the Speakers
Attach the right speaker bracket (A) to the right
upright (B) with four of the long screws (C). Next, peel
the backing off the fastener strips (D).
Identify the right speaker (E) (refer to the front of this
guide). Press the right speaker firmly onto the fastener
strips (D), with the back of the speaker resting against
the back of the speaker bracket (A).
Attach the left speaker bracket and the left speaker in
the same way (not shown).
1
Remove the four 1/2” screws (F) and the six 3/4”
screws (G) from the back of the console (H). Discard
the screws.
Remove the back of the console (H).
2
Locate the audio wire (I) beneath the console. Plug the
audio wire into the INPUT jack on the right speaker.
Locate the speaker wire (J) attached to the left speaker.
Plug the speaker wire into the SPEAKER OUT jack.
Next, plug one end of the jumper wire (K) into the DC
IN 15VDC jack. Plug the other end into the jack on the
right upright.
3
A
F
F
G
G
H
I
J
K
B
E
D
C
I
2
L
L
Page 3

Hold the back of the console (H) in place as shown.
Note: There is a small slot (O) in each side of the
console. Make sure that the audio wire (I) and the
speaker wire (J) are routed through the slots.
Attach the back of the console (H) with the ten
included 1/2” screws (P).
5
Plug the power cord (Q) into the jack near the bottom
of the right upright.
Plug the transformer (R) on the power cord into a
120-volt outlet.
Refer to the front of this guide and make sure that
all wires are fully plugged into the appropriate
jacks.
7
1. Unplug the headphones provided with the treadmill.
2. Press the POWER button on the back of the right speaker. The green indicator on the front of the speaker will light.
3. Rotate the VOLUME control on the right speaker to adjust the volume of both speakers. Note: The volume can
also be adjusted with the buttons on the console (see the user’s manual included with your treadmill).
4. Rotate the TREBLE control to adjust the treble response.
To use the headphones provided with the treadmill, first press the POWER button on the right speaker. The
green indicator on the speaker will darken. Next, remove the key from the console and plug the headphones fully
into the jack on the console. Important: Use only the headphones included with the treadmill.
P
P
Q
R
P
P
H
Attach the audio wire (I) and the speaker wire (J) to
the right speaker bracket with another plastic anchor
(L) and a plastic tie (N) as shown.
Attach the speaker wire (J) to the left speaker bracket
with another plastic anchor (L) and a plastic tie (N).
6
J
O
N
L
N
L
I, J
aHow to Operate the Speakers
3
I, J
Page 4

ICON Health & Fitness, Inc. (ICON), warrants this
product to be free from defects in workmanship and
material, under normal use and service conditions,
for a period of ninety (90) days from the date of purchase. This warranty extends only to the original
purchaser. ICON's obligation under this warranty is
limited to replacing or repairing, at ICON's option,
the product through one of its authorized service
centers. All repairs for which warranty claims are
made must be pre-authorized by ICON. This warranty does not extend to any product or damage to a
product caused by or attributable to freight damage,
abuse, misuse, improper or abnormal usage or repairs not provided by an ICON authorized service
center, products used for commercial or rental purposes, or products used as store display models. No
other warranty beyond that specifically set forth
above is authorized by ICON.
ICON is not responsible or liable for indirect, special
or consequential damages arising out of or in con-
nection with the use or performance of the product
or damages with respect to any economic loss, loss
of property, loss of revenues or profits, loss of enjoyment or use, costs of removal, installation or other
consequential damages of whatsoever nature. Some
states do not allow the exclusion or limitation of incidental or consequential damages. Accordingly, the
above limitation may not apply to you.
The warranty extended hereunder is in lieu of any
and all other warranties and any implied warranties
of merchantability or fitness for a particular purpose is limited in its scope and duration to the terms
set forth herein. Some states do not allow limitations on how long an implied warranty lasts.
Accordingly, the above limitation may not apply to
you.
This warranty gives you specific legal rights. You
may also have other rights which vary from state to
state.
Warranty
Part No. 152167 J00226AC R0299B Printed in USA © 1999 ICON Health & Fitness, Inc.
ICON Health & Fitness, Inc., 1500 S. 1000 W., Logan, UT 84321-9813
 Loading...