

Page 1
Page 2
INTRODUZIONE
Questo è un modello di centralina sequenziale dimmer a 4 canali, possiede 7 modalità di funzionamento
e 42 giochi programmati, back-up della memoria e dissolvenza del tempo sotto controllo. Di notevole
interesse la possibilità della regolazione manuale che ne fa una piccola regia.
CARATTERISTICHE TECNICHE
Input alimentazione AC 220\230V~50-60Hz (CE)
Input audio 100mV-1Vpp
Output canale 6.3A/CH., Totale 18A (CE)
Fusibile canale F6.3A 250V 5x20mm
Fusibile (interno) F0.5A 250V 5x20mm
Dimensioni (mm) 482.6x133x138mm
Peso 4.4 Kg
CONTROLLI E FUNZIONI
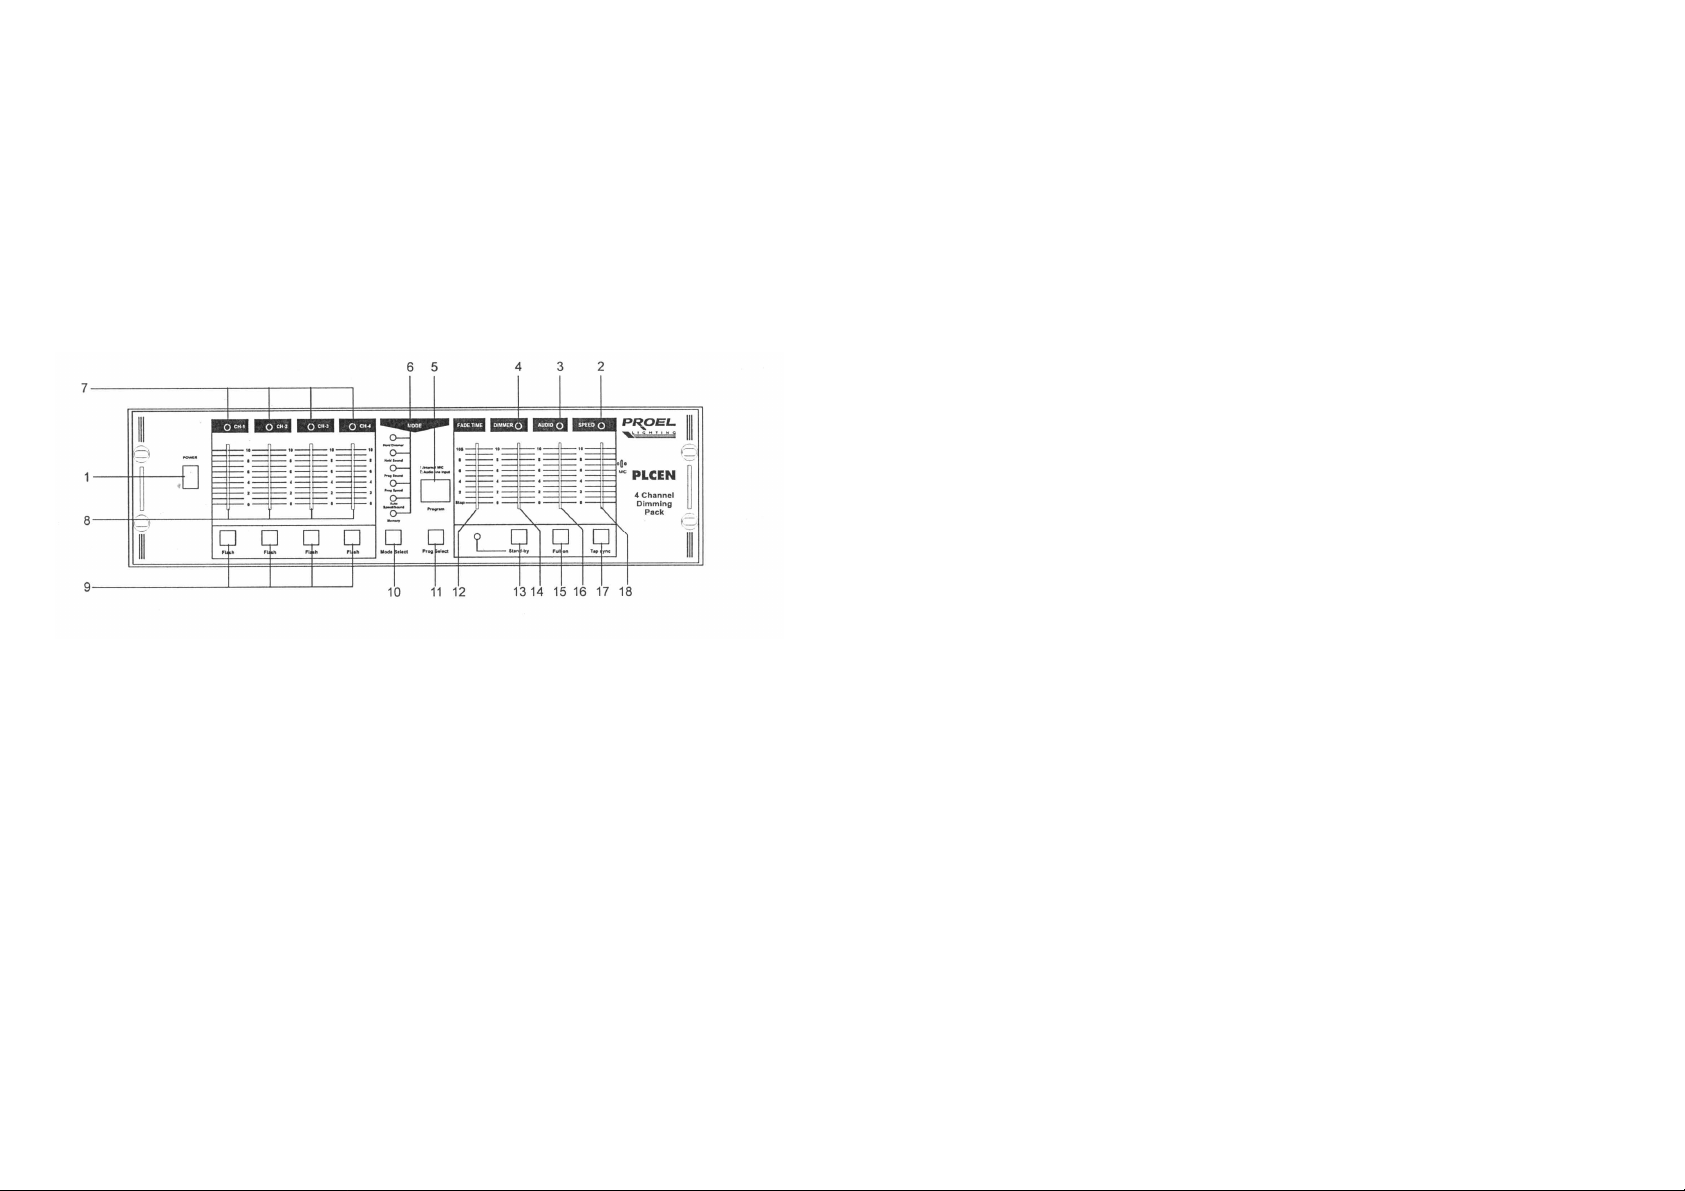
1. INTERRUTTORE POWER
2. INDICATORE SPEED. Indica la velocità di sequenza.
3. INDICATORE LIVELLO AUDIO. Indica la sensibilità dei ritmi musicali.
4. INDICATORE MASTER DIMMER. Indica il livello di master dimmer.
5. DISPLAY PROGRAM. Mostra le cifre del parametro pre-impostato desiderato.
6. INDICATORE PROGRAM. Indica la modalità che è stata eseguita.
7. INDICATORE CHANNEL DIMMER. Indica il livello dimmer del canale corrispondente.
8. CONTROLLO CHANNEL DIMMER. Questo controllo regola il livello di dimmer del canale corrispondente.
9. PULSANTE CHANNEL FLASH. Spingere per attivare la funzione del canale full on.
10. PULSANTE MODE SELECT. Spingere per selezionare la funzione desiderata da Hold Dimmer/Hold
Sound/Prog Sound/Prog Speed/Auto Speed/Auto Sound/Controllo memoria o musica da input linea/microfono interno.
11. PULSANTE PROGRAM SELECT. Premere per selezionare un programma desiderato dei 42 pro-
grammi pre-impostati in Prog Sound/Prog Speed/Auto Speed/Auto Sound. Nella modalità Memory,
si può premere per attivare la sub-modalità per selezionare la modalità di funzionamento desiderata da Program/Manual/Auto Sound/Auto Speed utilizzando STAND BY.
12. CONTROLLO FADE. Questo controllo regola il tempo di ritardo. Non è funzionante in Hold Sound e
Memory.
13. PULSANTE ED INDICATORE STAND-BY. Premere per mettere in pausa tutti gli output.
14. CONTROLLO MASTER DIMMER. Questo controllo regola il livello dimmer dell’intero output.
15. PULSANTE FULL ON. Premere per attivare la funzione FULL ON dell’intero output.
16. CONTROLLO LIVELLO AUDIO. Questo controllo regola la sensibilità dei ritmi della musica rilevati
dal microfono interno o line in.
Press and hold Prog Select, press Stand By once, PROGRAM DISPLAY will show present operating mode, press Stand By once more, next mode will be selected. Each pressing of Stand By corresponds to a new mode. Release Prog Select, the selected mode will be executed.
PR mode. Press Prog Select tili " Di " appears in PROGRAM DISPLAY. Adjust Master Dimmer control or Channel Dimmer controi to meet user's requirement, press Prog Select, PROGRAM DISPLAY
will flash 4 time continuously, which means it is memorized, and PROGRAM DISPLAY wili show "
02 ". You can make program in this way till " 32 " appears, now exit from Program and engage in
other mode. lf you fail lin certain step, you shouid restart programing, otherwise not effective.
ST mode. Press Prog Select once, program wili be executed one step, and PROGRAM DISPLAY
will show the information. You can refer to the way mentioned in Prog Sound to select desired step.
RS mode. Program is executed according Io the music rhythms and PROGRAM DISPLAY shows
the step.
RP mode. rogram is executed automatically and PROGRAM DISPLAY shows the step. You can adju-
st the chasing speed according to the way specified in Prog Speed.
4. FULL ON and FLASH. Press FULL ON button to activate FULL ON function of whole output, press
FLASH button to activate FULL ON function of channel. These two functions are effective in any
mode.
5. Stand By. Press this button once to turn off whole output, press it once more Io exit STAND BY,
and the indicator will change from “flash” to “off”.
6. AUDIO INPUT SELECT.You can select audio signal from internal MIC /Audio line Input. Press PROG
SELECT and turn off the power. Wait some seconds, turn the power on, now PROGRAM DISPLAY
shows “1” or “E”. Press MODE SELECT once, audio signal input wili be changed, and the indication will change accordingly. Press it once once more, audio signal input will be changed once more.
WARNING
1. This apparatus must be earthed.
2. Disconnect power cable before opening.
3. To prevent fire or shock hazard, do not expose this apparatus to rain or moisture.
4. Replace the fuse with the same type.
Page 3
16. AUDIO level control. This control adjusts the sensitivity of music rhythms detected by the built-in
microphone or line in.
17. TAP sync button. This button is effective only in Prog Speed and Auto Speed. It is used to define
chasing speed. When you press this button twice in 10 minutes, the interval between two pressing
will be assigned to chasing speed.
18. SPEED control. This control adjusts the chasing speed.
REAR PANEL
17. PULSANTE TAP SYNC. Questo pulsante è funzionante solo in Prog Speed e Auto Speed. Viene utilizzato per definire la velocità di sequenza. Quando viene premuto questo pulsante 2 volte nel giro
di 10 minuti, l’intervallo tra le due pressioni viene assegnato alla velocità di sequenza.
18. CONTROLLO SPEED. Questo controllo regola la velocità di sequenza.
PANNELLO POSTERIORE
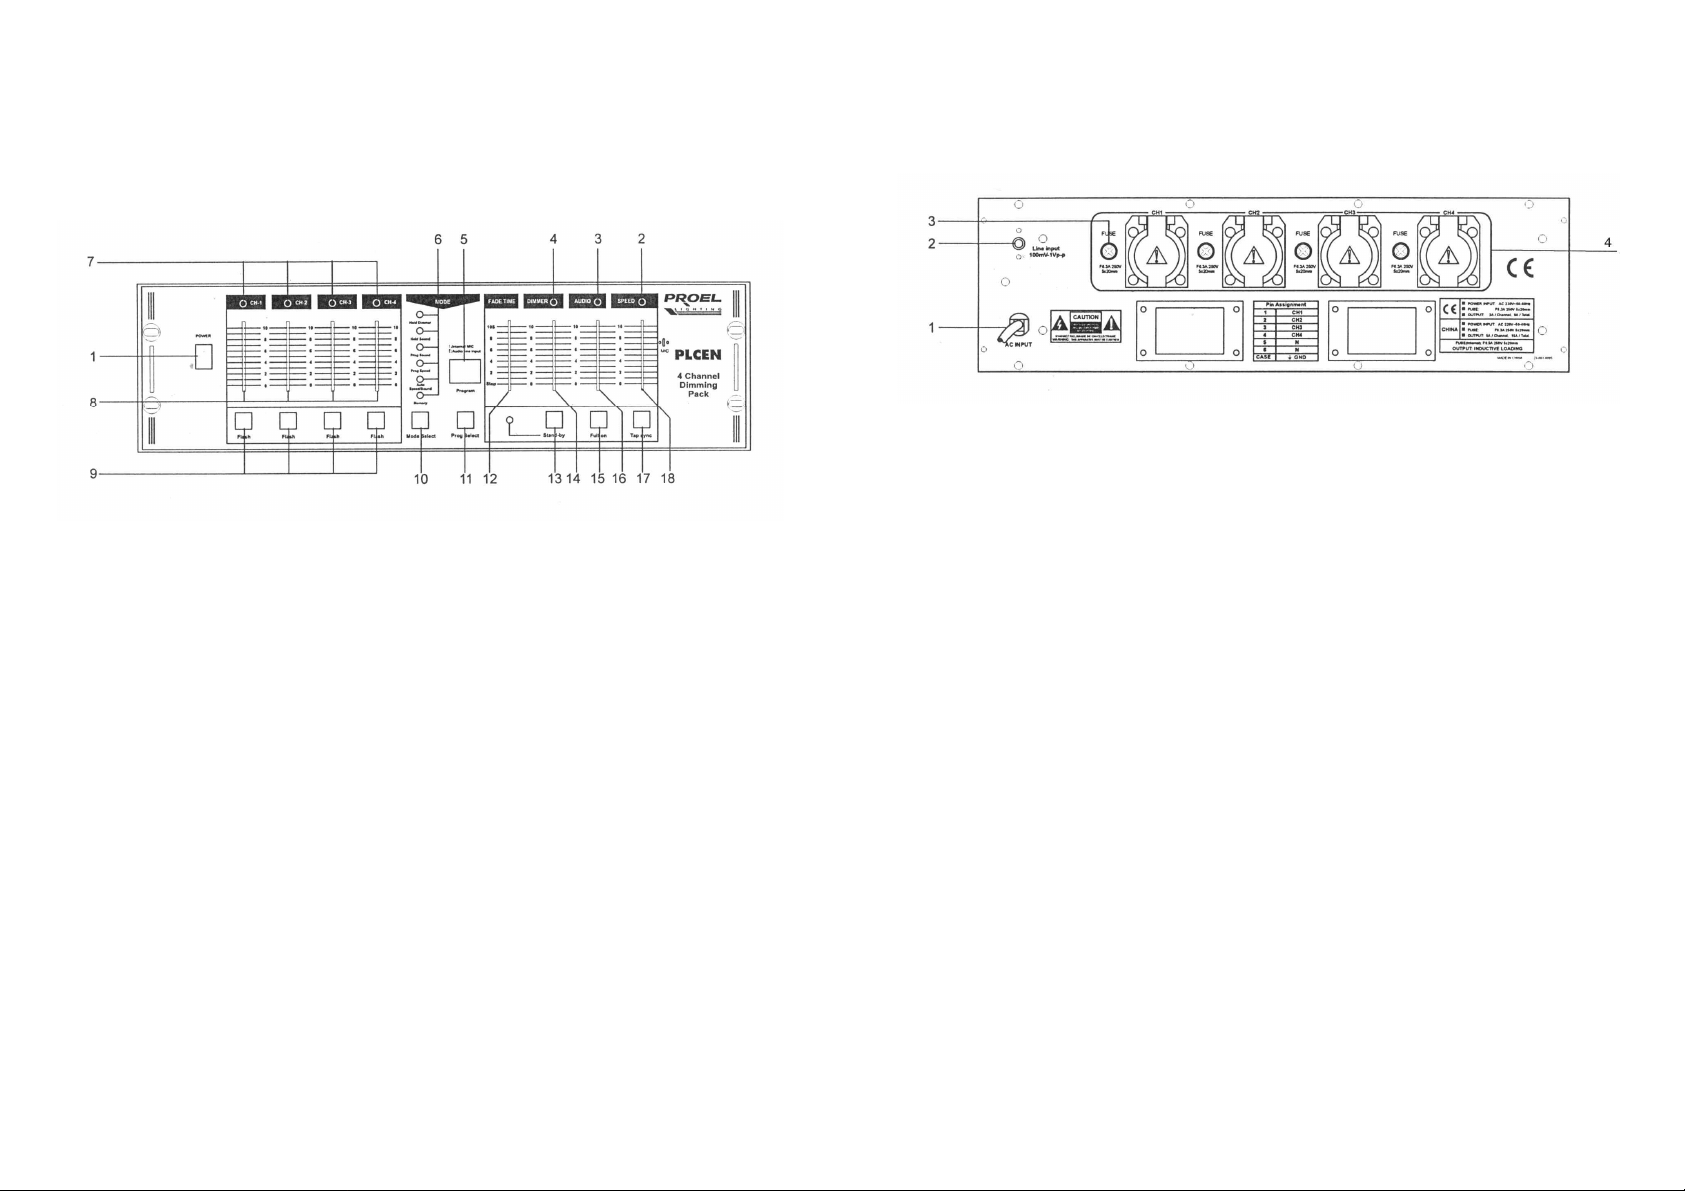
1. INPUT AC. Connettere un’appropriata fonte di alimentazione.
2. INPUT AUDIO. Linea in 100mV-1Vpp
3. FUSIBILE CANALE. F6.3A 250V 5x20mm
4. OUTPUT CANALE (PRESA IEC). 6.3A/CH., 16A/Totale (Ce).
1. AC input. Plug in appropriate power supply.
2. AUDIO input. Line in 100mV-1Vpp
3. CHANNEL fuse. F6.3A 250V 5x20mm
4. CHANNEL output (IEC socket). 2A /CH., 8A/Total (CE). 6.3A /CH., 16A /Total (CHINA).
OPERATING INSTRUCTIONS
1. Turn the power switch on.
2. Operating mode is controlled by MODE SELECT
3. You can select operating mode from Hold Dimmer / Hold Sound / Prog Sound / Prog Speed / Auto
Speed / Auto Sound / Memory.
Hold Dimmer Corresponding indicator lights. Channel output is controlied by Channel Dimmer
control or Master Dimmer control.
Hold Sound Corresponding indicator lights. Music sensitivity is adjusted by the Audio Level control.
Prog Sound Corresponding indicator lights. You can select desired program from 42 pre-set programs using Prog Select button. Press Prog Select button once, program will be increased or decreased by one. Press and hold it for 1 second, program wili be increased or decreased by 10 per
second. Press Prog Select + Mode Select, chasing direction will be reversed.
Prog SpeedCorresponding indicator lights. You can operate according to the way specified by Prog
Sound and you must always remember chasing speed is not controlled by audio signal but SPEED
CONTROL or TAP SYNC.
Auto Speed Corresponding indicator fiashes. You can operate according to the way specified by
Prog Speed. However, in this mode, each program will be executed eight times
continuously and then next program.
Auto SoundCorresponding indicator lights. You can operate according to the way specified by Prog
Sound. However, in this mode, each program will be executed eight times
continuously and then next program.
M e m o r yUp to 32 steps can be memorized. In this mode, you can select desire operating mode from
Program / Manual /Auto / Sound /Auto Speed corresponding to digit indication PR, ST, RS and RP.
ISTRUZIONI DI FUNZIONAMENTO
1. Accendere l’interruttore power.
2. La modalità funzionante è controllata da MODE SELECT
3. Si può selezionare la modalità funzionante da Hold Dimmer/Hold Sound/Prog Sound/Prog
Speed/Auto Speed/Auto Sound/Memory.
Hold Dimmer Il corrispondente indicatore si accende. L’output del canale è controllato dalla fun-
zione Channel Dimmer o Master Dimmer.
Hold Sound Il corrispondente indicatore si accende. La sensibilità della musica è regolata dal
controllo Audio Level.
Prog Sound Il corrispondente indicatore si accende. Si può selezionare il programma deside-
rato da 42 programmi pre-impostati utilizzando il pulsante Prog Select. Premere il
pulsante Prog Select una volta e il programma verrà aumentato o diminuito di una
unità. Premere e mantenere il pulsante per 1 secondo e il programma verrà aumentato o diminuito di 10 unità al secondo. Spingere Prog Select + Mode Select e
la direzione della sequenza verrà invertita.
Prog Speed Il corrispondente indicatore si accende. Si può far funzionare in base alla manie-
ra specificata da Prog Sound e bisogna sempre ricordare che la velocità di sequenza non è controllata dal segnale audio ma dal controllo SPEED o TAP SYNC.
Auto Speed Il corrispondente indicatore lampeggia. Si può far funzionare in base alla maniera
specificata da Prog Speed. In questa modalità, ogni programma verrà eseguito 8
volte ininterrottamente fino al passaggio al programma successivo.
Auto Sound Il corrispondente indicatore si accende. Si può far funzionare in base alla funzione
specificata da Prog Sound. Comunque, in questa modalità, ogni programma verrà
eseguito 8 volte ininterrottamente fino al passaggio al programma successivo.
Memory Possono essere memorizzati fino a 32 passi. In questa modalità si può selezionale
la modalità di funzionamento desiderata da Program/Manual/Auto Sound/Auto
Speed corrispondenti alle indicazioni PR, ST, AS e AP. Premere e mantenere Prog
Select, premere Stand By una volta e il DISPLAY PROGRAM mostrerà la modalità
di funzionamento corrente.Premendo Stand By ancora una volta, verrà seleziona-
Page 4
ta la seguente modalità. Ogni pressione di Stand By corrisponde ad una nuova modalità. Rilascianod Prog Select, la modalità selezionata verrà eseguita.
Modalità PR Premere Prog Select fino a quando “01” non apparirà sul DISPLAY PROGRAM. Re-
golare il controllo Master Dimmer o Channel Dimmer per soddisfare i requisiti dell’utente, premere Prog Select e il DISPLAY PROGRAM lampeggerà 4 volte ininterrottamente, il che significa che viene memorizzato, e il DISPLAY PROGRAM mostrerà “02”. Si può programmare in questa maniera fino a che non appaia “32”,
quindi si esce da Program e si impegna un’altra modalità. Se si commette un errore bisogna riiniziare la programmazione che se non completata non sarà effettiva.
Modalità ST Premere Prog Select una volta e il programma verrà eseguito di un passo, e il DI-
SPLAY PROGRAM mostrerà l’informazione. Si può fare riferimento al modo menzionato in Prog Sound per selezionare il passo desiderato.
Modalità AS Il programma viene seguito sulla base dei ritmi della musica e il DISPLAY PROGRAM
mostra il passo.
Modalità AP Il programma viene eseguito automaticamente e il DISPLAY PROGRAM mostra il
passo. Si può regolare la velocità di sequenza sulla base del modo specificato in
Prog Speed.
4. FULL ON E FLASH. Premere Il pulsante FULL ON per attivare la funzione FULL ON di output inte-
ro, premere il pulsante Flash per attivare la funzione FULL ON del canale. Queste due funzioni sono effettive in qualsiasi modalità.
5. STAND BY. PREMERE QUESTO PULSANTE UNA VOLTA PER DISATTIVARE L’INTERO OUTPUT, PREMERLO DI NUOVO PER USCIRE DA STAND BY, E L’INDICATORE CAMBIERÀ DA
“FLASH” A “OFF”.
6. AUDIO INPUT SELECT. Si può selezionare il segnale audio dal MIC interno/Input linea audio. Pre-
mere Prog Select e spegnere l’alimentazione dal pulsante power. Attendere qualche secondo, accendere di nuovo, ed ora il DISPLAY PROGRAM mostra “I” o “E”. Spingere Mode Select una volta,
l’input del segnale audio verrà cambiato, e l’indicazione cambierà di conseguenza. Premerlo ancora una volta e l’input del segnale audio verrà cambiato ancora una volta.
INTRODUCTION
This model is a 4 channel dimming chaser, has 7 operating modes and 42 chasing programs, memory
backup and fade time under control.
TECHNICAL SPECIFICATIONS
Power input AC 230V-50-60Hz (CE)
AC 220V-50-60Hz (CHINA)
Audio input 100mV-1Vpp
Channel output 2A/CH., Total 8A (CE)
5A/CH., Total 16A (CHINA)
Channel fuse F6.3A 250V 5x20mm
Fuse (internal) FO.5A 250V 5x20mm
Dimensions 482.6x1 33xl 38mm
Weight 4.4Kg
CONTROLS & FUNCTIONS
FRONT PANEL
ATTENZIONE
1. Questo dispositivo deve esserecollegato ad una sufficiente messa a terra.
2. Sconnettere il cavo di alimentazione prima di aprire. L’operazione dovrà essere fatta da personale
qualificato.
3. Allo scopo di prevenire un incendio o rischio di shock elettrico, non esporre questo dispositivo alla
pioggia o all’umidità.
4. Sostituire il fusibile con uno dello stesso tipo.
5. La manomissione prevede la decadenza della garanzia.
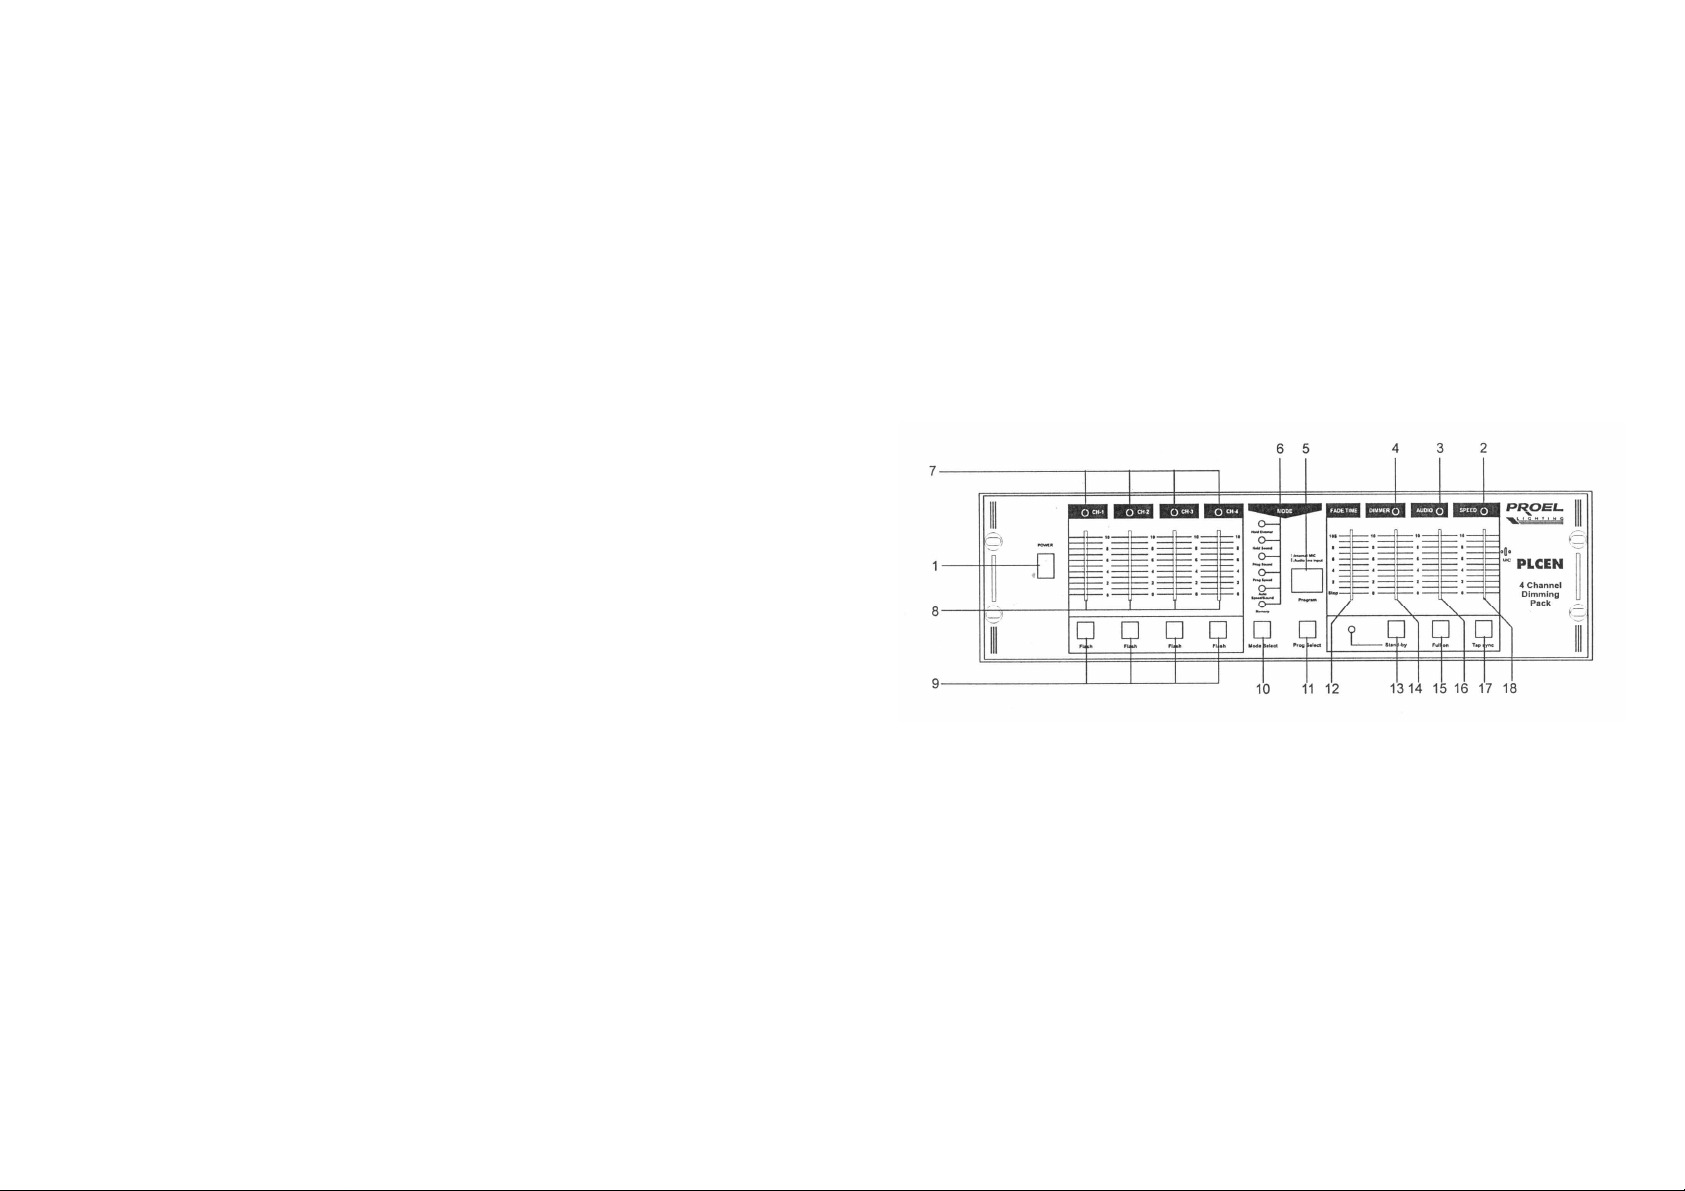
1. POWER switch.
2. SPEED indicator. This indicator indicates the chasing speed.
3. AUDIO level indicator. This indicator indicates the sensitivity of music rhythms.
4. MASTER dimmer indicator. This indicator indicates master dimming level.
5. PROGRAM display. Shows desired pre-set digit parameter.
6. PROGRAM indicator.This indicator indicate the operating mode being executed.
7. CHANNEL dimmer indicator. This indicator indicates the dimming level of corresponding channel.
8. CHANNEL dimmer control. This contro] adjusts the dimming level of corresponding channel.
9. CHANNEL flash button. Press to activate channel full on function.
10. MODE select button. Press to select desired operating mode from Hold Dimmer / Hold Sound / Prog
Sound / Prog Speed / Auto Speed / Auto Sound / Memory or music control from line input / builtin microphone.
11. PROGRAM select button. Press to select desired program from 42 pre-set programs in Prog Sound /
Prog Speed /Auto Speed / Auto Sound. In Memory mode, you can press to activate sub-mode to se-
lect desired operating mode from Program / Manual / Auto Sound / Auto Speed using STAND BY.
12. FADE control. This control adjusts the delay time. It is not effective in Hold Sound and Memory.
13. STAND-BY button & indicator. Press to pause all output.
14. MASTER dimmer control. This control adjusts the dimming level of whole output.
15. FULL ON button. Press to activate FULL ON function of whole output.
 Loading...