

Proel FREE10LT USER’S MANUAL
FREE10LT
Portable Sound System
USER’S MANUAL
96MAN00094-RE V.1 8/14
ENGLISH
ITALIANO

2
This page is intentionally left blank.

3
DISPOSAL OF OLD ELECTRICAL & ELECTRONIC EQUIPMENT 4
VRLA BATTERIES SAFETY INSTRUCTIONS 4
GENERAL SAFETY INSTRUCTIONS 4
IN CASE OF FAULT 4
PACKAGING, SHIPPING AND COMPLAINT 5
WARRANTY AND PRODUCTS RETURN 5
MAINTENANCE AND DISCLAIMER 5
POWER SUPPLY 5
USER’S WARNINGS AND CE CONFORMITY 6
INTRODUCTION 7
DESCRIPTION 7
MAIN PANEL OPERATIONS 7
WIRELESS MICROPHONE OPERATIONS 13
REMOTE CONTROL OPERATIONS 17
VRLA BATTERY OPERATIONS AND REPLACEMENT 18
OPTIONAL WIRELESS MIC INSTALLATION 19
FREE10LT - TECHNICAL SPECIFICATION 20
4
DISPOSAL OF OLD ELECTRICAL & ELECTRONIC EQUIPMENT
This marking shown on the product or its literature, indicates that it should not be disposed with
other household wastes at the end of its working life. To prevent possible harm to the enviroment
or human health from uncontrolled waste disposal, please separate this from other types of
wastes and recycle it responsibly to promote the sustainable reuse of material resources.
Household users should contact either the retailer where they purchased this product, or their
local government office, for details of where and how they can take this item for environmentally safe
recycling. Business users should contact their supplier and check the terms and conditions of the purchase
contract. This product should not be mixed with other commercial wastes for disposal.
This product contains an internal Valve Regulated Lead Acid (VRLA) battery: VRLA batteries
must be recycled at the end of life in accordance with local and national laws and regulation.
VRLA BATTERIES SAFETY INSTRUCTIONS
• CAUTION – Special safety precaution must be taken when using and replacing VRLA
batteries, including the following:
• The replacement should be made or supervised by professionals with suitable protection.
The batteries for replacement must be always same as the old ones in model and type.
• WARNING – Do not smoke or use fire near VRLA batteries.
• WARNING – Do not use any organic cleaner to clean VRLA batteries.
• WARNING – Do not put the VRLA batteries on fire, or they will explode.
• WARNING – Do not cut open the VRLA batteries, they contain electrolyte which is toxic to
skin and eyes.
• WARNING – VRLA batteries release hydrogen gas which can form explosive mixture in air, do
not place inside a sealed container.
• WARNING – VRLA batteries may cause shock and short. Please remove the watch and
jewellery as rings when replace the battery, also please operate with insulating tools.
GENERAL SAFETY INSTRUCTIONS
• CAUTION - Before using this product read carefully the following safety instructions. Take a look of this
manual entirely and preserve it for future reference. When using any electric product, basic precautions
should always be taken, including the following:
• To reduce the risk, close supervision is necessary when the product is used near children.
• Protect the apparatus from atmospheric agents and keep it away from water, rain and high humidity places.
• This product should be site away from heat sources such as radiators, lamps and any other device that generate heat.
• Care should be taken so that objects and liquids do not go inside the product.
• The product should be connected to a power supply only of the type described on the operating
instructions or as marked on the product.
IN CASE OF FAULT
• In case of fault or maintenance this product should be inspected only by qualified service personnel when:
• Liquids have spilled inside the product.
• The product has fallen and been damaged.
• The product does not appear to operate normally or exhibits a marked change in performance.
• Do not operate on the product, it has no user-serviceable parts inside.

5
• Refer servicing to an authorized maintenance centre.
PACKAGING, SHIPPING AND COMPLAINT
• This unit package has been submitted to ISTA 1A integrity tests. We suggest you control the unit
conditions immediately after unpacking it.
• If any damage is found, immediately advise the dealer. Keep all unit packaging parts to allow inspection.
• Proel is not responsible for any damage that occurs during shipment..
• Products are sold “delivered ex warehouse” and shipment is at charge and risk of the buyer.
• Possible damages to unit should be immediately notified to forwarder. Each complaint for manumitted
package should be done within eight days from product receipt.
WARRANTY AND PRODUCTS RETURN
• Proel products have operating warranty and comply their specifications, as stated by manufacturer..
• Proel warrants all materials, workmanship and proper operation of this product for a period of two years
from the original date of purchase. If any defects are found in the materials or workmanship or if the
product fails to function properly during the applicable warranty period, the owner should inform about
these defects the dealer or the distributor, providing receipt or invoice of date of purchase and defect
detailed description. This warranty does not extend to damage resulting from improper installation,
misuse, neglect or abuse. Proel S.p.A. will verify damage on returned units, and when the unit has been
properly used and warranty is still valid, then the unit will be replaced or repaired. Proel S.p.A. is not
responsible for any "direct damage" or "indirect damage" caused by product defectiveness.
MAINTENANCE AND DISCLAIMER
• Clean only with dry cloth.
• Proel products have been expressly designed for audio application, with signals in audio range (20Hz to
20kHz). Proel has no liability for damages caused in case of lack of maintenance, modifications, improper
use or improper installation non-applying safety instructions.
• Proel S.p.A. reserves the right to change these specifications at any time without notice.
• Proel S.p.A. declines any liability for damages to objects or persons caused by lacks of maintenance,
improper use, installation not performed with safety precautions and at the state of the art.
POWER SUPPLY
• This apparatus should only be connected to power source type specified in this owner’s manual or on the unit.
• If the supplied AC power cable plug is different from the wall socket, please contact an electrician to
change the AC power plug.
• Hold the plug and the wall outlet while disconnecting the unit from AC p o we r.
• If the unit will not be used for a long period of time, please unplug the power cord from AC power outlet.
• To avoid unit power cord damage, please do not strain the AC power cable and do not bundle it.
• In order to avoid damages, please ensure that the power cord is not stepped on or pinched by heavy objects.
6
USER’S WARNINGS AND CE CONFORMITY
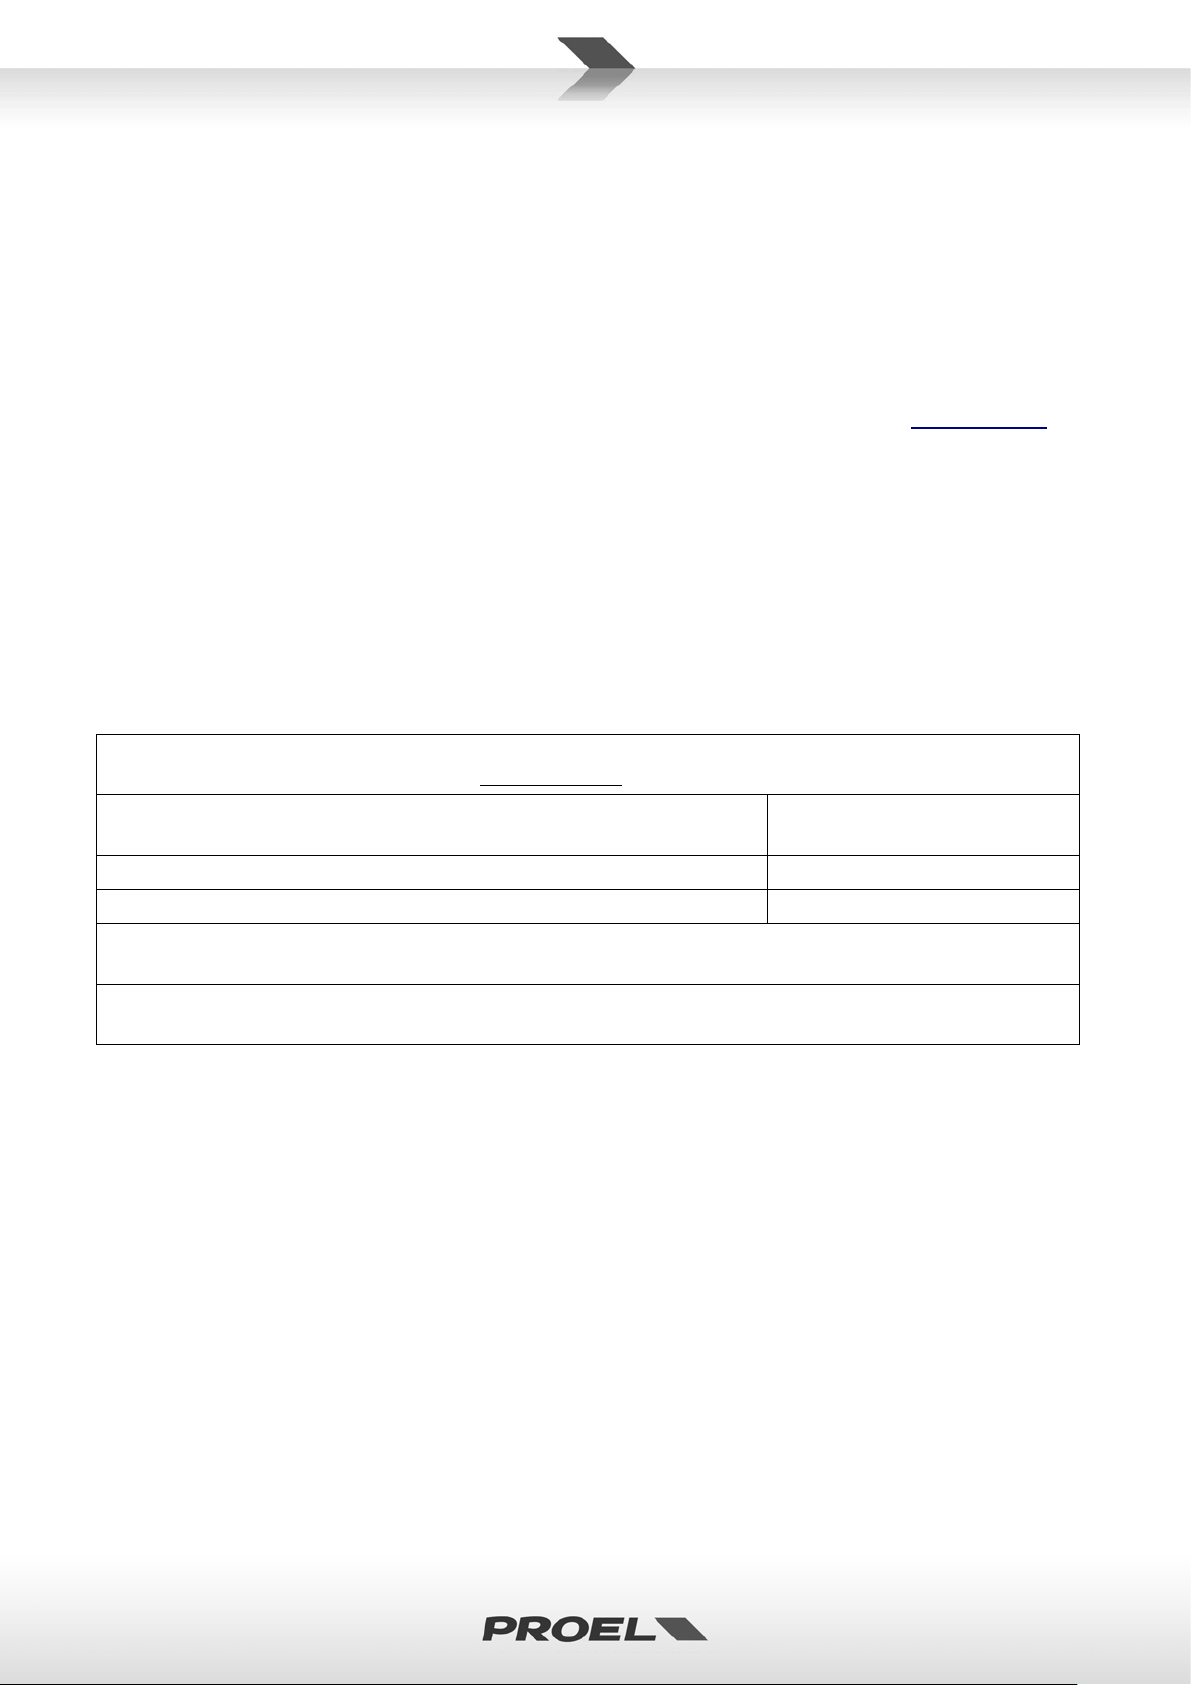
TABLE OF THE NATIONAL CODES WHERE THE FR2 WIRELESS MICROPHONE SYSTEM IS AUTHORIZED IN
AT BE CY CZ DK EE DE GR HU IT LV LT LU NL PL PT SK SI SE GB IS LI CH BG
authorized
HR
Individual license required
GE RU
NOT IMPLEMENTED
IN ALL COUNTRIES THE USE OF WIRELESS MICROPHONES SYSTEMS IS SUBJECT TO ANY TELEVISION AND
CONSULT LOCAL OR NATIONAL RADIO SPECTRUM AUTHORITIES FOR INFORMATION ON POSSIBLE
• The product is in compliance with Directive LVD 2006 / 95 / EC as stated in EN 60065 standard.
• PROEL S.p.A hereby, declares that this product (excluding the provided radio microphone system)
complies with the essential requirements and other relevant provisions of Directive 2004/108/EC (EMC),
as stated in EN 55103-1 and EN 55103-2 standards.
• PROEL S.p.A hereby, declares that the wireless microphone system (included with the product) complies
with the essential requirements and other relevant provisions of Directive R&TTE 1999 / 5 / EC as stated
in EN 300422-1; EN 300422-2; EN 301489-01; EN 300489-09 standard.
• The full and detailed declaration of conformity can be downloaded from the web site:
• LICENSING INFORMATION: The radio equipment operates in the 863-865 MHz harmonized European
band dedicated to SRD (short range devices) like wireless microphone and IEM personal monitor systems,
so in the countries specified in the below table no personal license is required for use it.
• The use of this wireless microphone equipment in some countries could be intended for professional use,
so the licensability depends on the country it operates. Proel suggests the user to contact the
appropriate telecommunications authority concerning proper licensing.
• This equipment may be capable of operating on some frequencies not authorized in your country. Please
contact your national authority to obtain information on authorized frequencies for wireless microphone
products in your region.
EUROPE, UPDATED WITH REFERENCE TO ERC-REC 70-03E DOCUMENT DATED FEBRUARY 7 2014
RO TR UA IE MT NO ES
BROADCAST TRANSMISSION
www.proel.com
RESTRICTIONS OR NECESSARY AUTHORIZATIONS BEFORE USING THIS SHORT RANGE DEVICE.
7
INTRODUCTION
Thank you for choosing this PROEL product and for your trust in our brand, synonymous of professionalism,
accuracy, high quality and reliability. All our products are CE approved and designed for continuous use in
professional applications.
DESCRIPTION
PROEL FREE systems gives you the freedom to perform your music or play your sound anywhere without
worrying about where to plug the power cord, how to connect your MP3 player or how to set your
microphone. FREE10LT is battery powered combo sound systems with a full set of features and the sound you
don’t expect from this kind of products. It includes a versatile MP3 player with USB port, SD slot and
BLUETOOTH connection, featuring a large LCD and remote control. FREE10LT is hosted in a compact and roadproof Polypropylene cabinet that provides maximum portability and protection, it includes a built-in
retractable handle and roller wheels, allowing the systems to be taken everywhere. It is also fitted with an
adapter for standard speaker stand. With a horn-loaded compression driver coupled to a 10” woofer and a
120W power amplifier, FREE10LT is an all-in-one multi-purpose mobile system for indoor and outdoor
applications requiring high quality sound and advanced features. The WIRELESS module included provides a
clean and hassle-free wireless connection with the included handheld microphones for the maximum
freedom of movement. An additional wireless module, with the choice of handheld (FREE10LTKITM) or
bodypack transmitter with headset microphone (FREE10LTKITH), is available as optional. The two
rechargeable 12V batteries provide up to 3-4 hours of mains-free continuous operation.
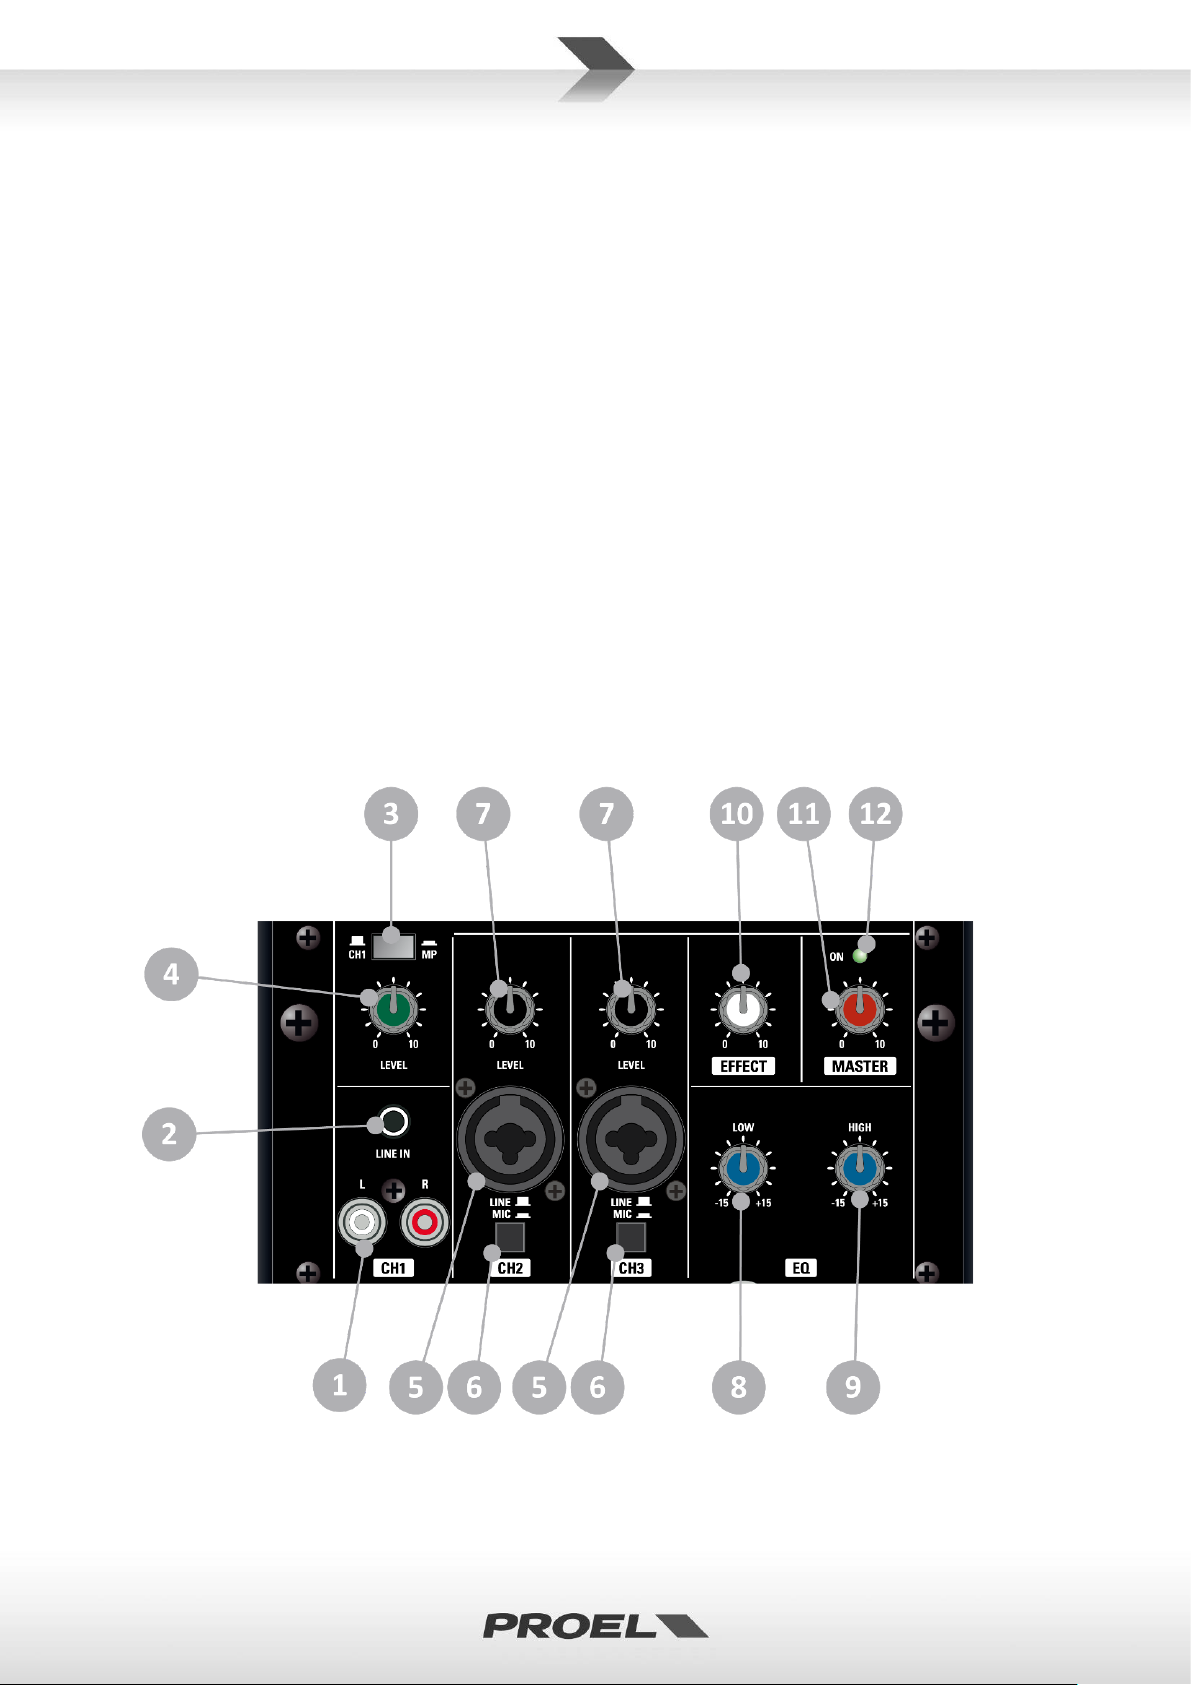
MAIN PANEL OPERATIONS
1. CH1 LINE IN (RCA)
These are two RCA female connectors that accept two RCA plug from LEFT and RIGHT channels of a line

8
level auxiliary source, each RCA input is wired as follows:
Tip = + positive or "hot"
Sleeve = shield or ground
2. CH1 LINE IN (MINI JACK)
This is a MINI JACK (3.5mm) female connector that accepts a STEREO MINI JACK plug from Computer /
CD / DVD / MP3 players. The MINI JACK is wired as follows:
Tip = positive signal of left channel
Ring = positive signal of right channel
Sleeve = shield or ground
3. CH1 LEVEL
This potentiometer sets the level of the CH1 LINE IN or the internal player.
4. CH1 / MP SWITCH
Use this switch to select the external player connected at RCA or MINI JACK connectors or the internal
Media Player as the source for the input channel 1.
5. CH2 / CH3 IN
This is a female combo connector that accepts a XLR or a JACK plug from any dynamic balanced or
unbalanced microphone or line signal. The XLR input is wired as follows:
Pin 1 = shield or ground
Pin 2 = + positive or "hot"
Pin 3 = - negative or "cold"
The balanced JACK input is wired as follows:
Tip = + positive or "hot"
Ring = - negative or "cold"
Sleeve = shield or ground
The unbalanced JACK input is wired as follows:
Tip = + positive or "hot"
Sleeve = shield or ground
6. CH2 / CH3 LINE/MIC SWITCH
This switch sets the sensitivity of the respective channel for microphone or line level equipment.
7. CH2 / CH3 LEVEL
This potentiometer sets the level of the respective channel input.
8. HIGH
This potentiometer sets the HIGH TONE level: if rotated clockwise it enhances the highs, if rotated
counter-clockwise it reduces the highs (in the centre position the response is flat).
9. LOW
This potentiometer sets the LOW TONE level: if rotated clockwise it enhances the lows, if rotated
counter-clockwise it reduces the lows (in the centre position the response is flat).
10. EFFECT
This potentiometer sets the level of the effect applied to the CH2, CH3 MIC inputs and wireless mic.
11. MASTER
This potentiometer sets the general level of all signals.
12. ON
GREEN LED that shows the “ON” status of the FREE10LT.
9
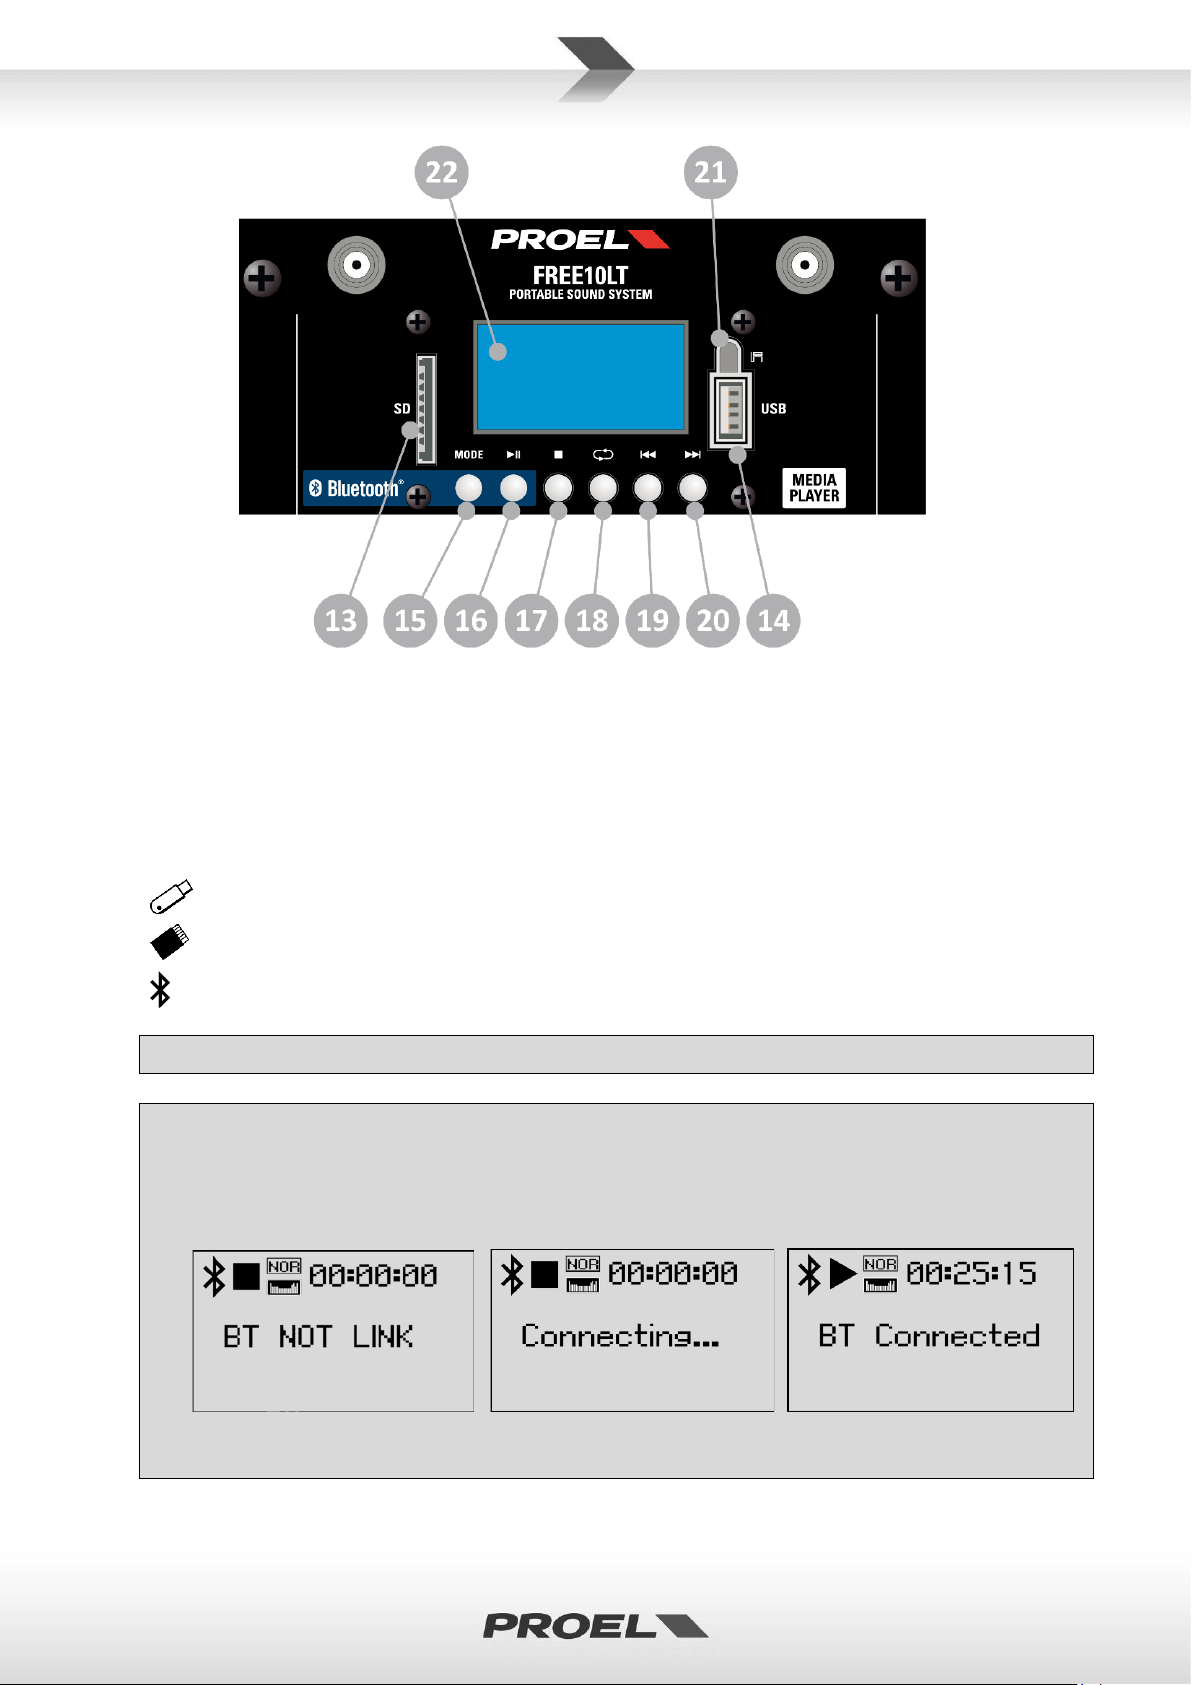
13. SD SLOT
Sandisk, Kingston, Lexar, Verbatim).
To connect a Bluetooth device follow the instructions for the device to be connected. Select
This slot is where you can insert a SD MEMORY CARD containing audio files.
14. USB SLOT
This slot is where you can insert an USB FLASH DRIVE containing audio files.
15. MODE SWITCH
Pressing this switch you can select the source containing audio files between SD, USB or external
Bluetooth player device. A small icon appears on the display that identify the memory currently used:
USB FLASH DRIVE
SD MEMORY CARD
BLUETOOTH DEVICE
Preferably use only reliable memories (suggested brands are:
BLUETOOTH DEVICE by pressing MODE button and, if the device is close enough, it is recognized
after few seconds. If this doesn’t happen, try again pressing the PLAY button and, at the same time,
restarting the search procedure in the external Bluetooth device.
Press MODE… Press PLAY to connect … BT device connected.
NOTE: the audio file types and quality playable with Bluetooth connection depends on the Bluetooth
device used.
10
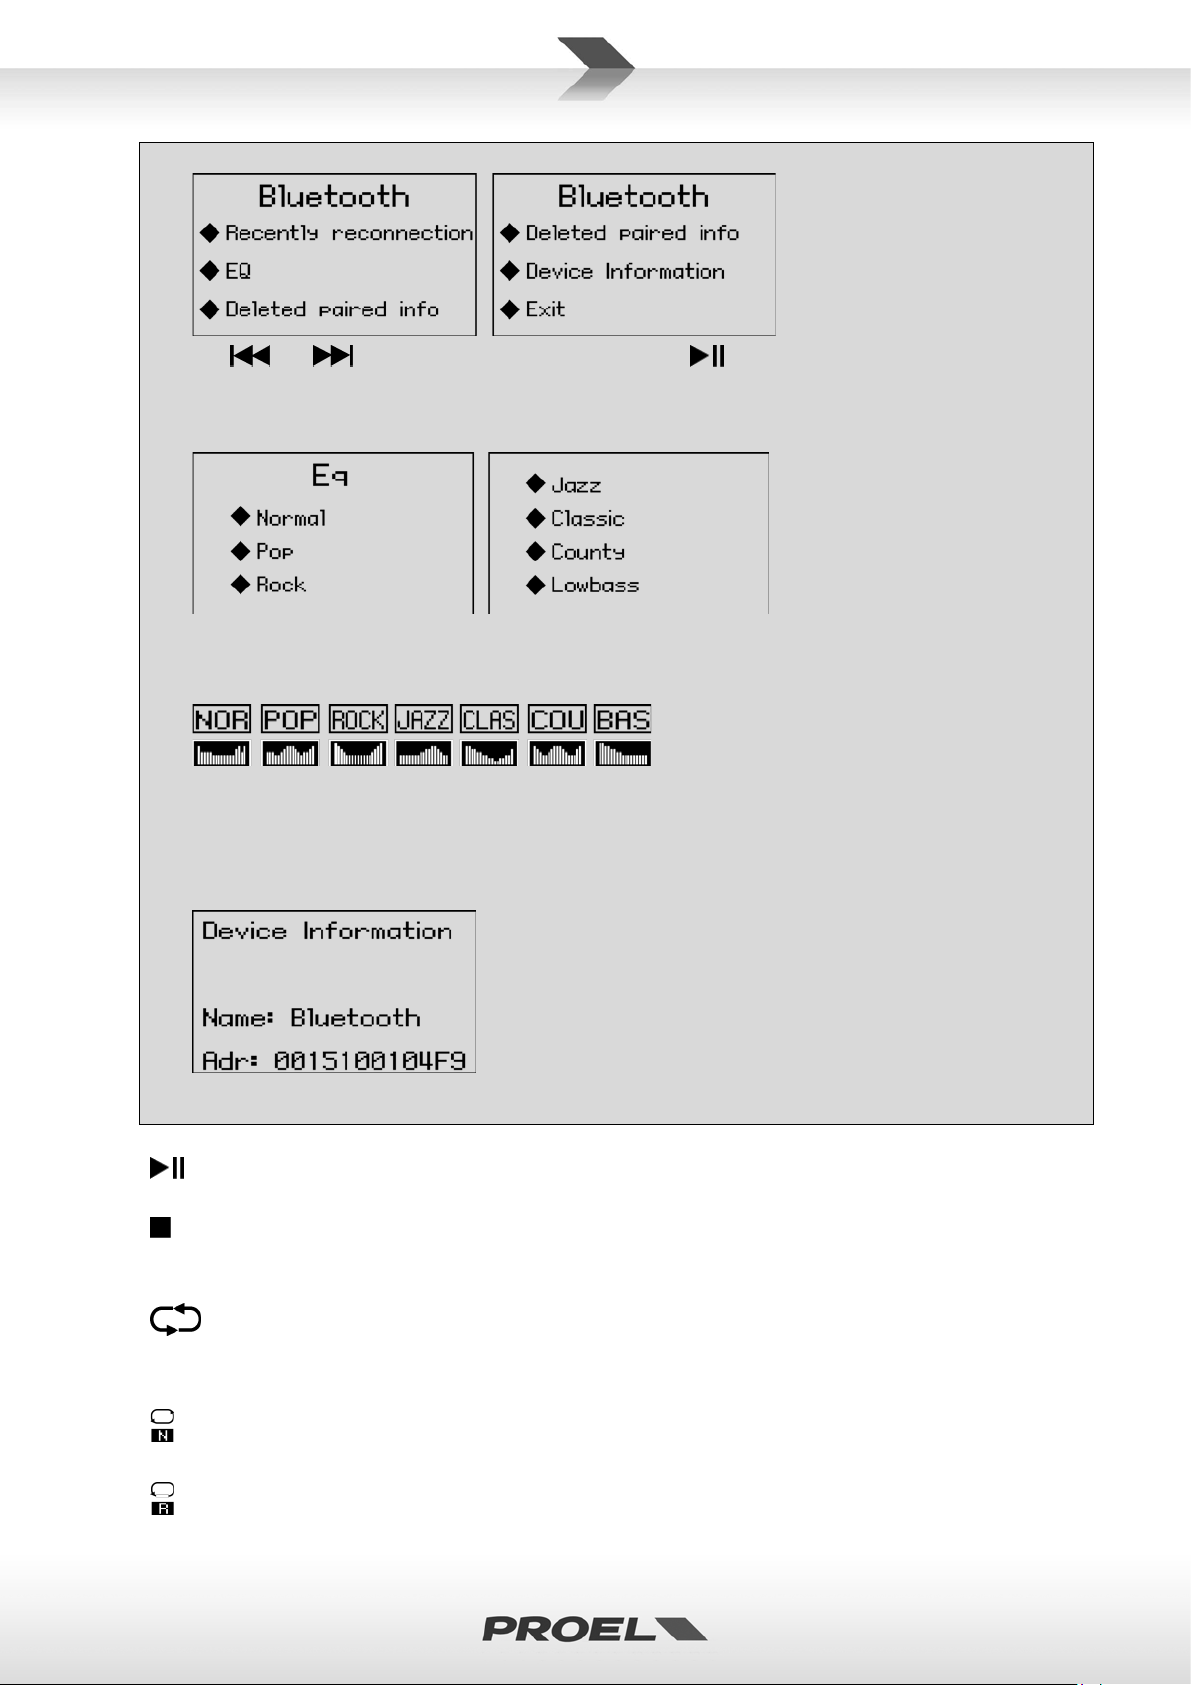
Press and hold MODE button and the following utility menu will appear:
Use and buttons to browse the options, press button to select an option.
Recently reconnection: selecting this option the media player tries to reconnect the latest
Bluetooth device connected.
EQ: selecting this option the following menu will appear.
In this menu you can choose an equalization for the audio files to be reproduced: Normal, Pop,
Rock, Jazz, Classic, Country, Bass enhance.
After an EQ setting has been chosen, a small icon in the main screen will show the choice.
Deleted paired info: selecting this option the information about any Bluetooth device previously
paired with the media player will be cancelled. Try this option if you have problems to set a new BT
connection.
Device Information: selecting this option the following info screen will appear, showing the name
and address of the FREE10LT Bluetooth receiver.
Exit: returns to the main screen.
16.
PLAY/PAUSE
This button plays or pauses the current audio file.
17.
STOP
This button stops the current audio file. If you press again the play button, the song will restart from the
beginning.
18.
PLAY MODE
This button changes the play mode of the audio files. A small icon on the display shows the current
mode.
NORMAL: normal forward play of all songs contained in all memories and all folders, when it reaches
the latest song it will stop playing.
RANDOM: it plays all songs contained in all memories and all folders randomly.
11
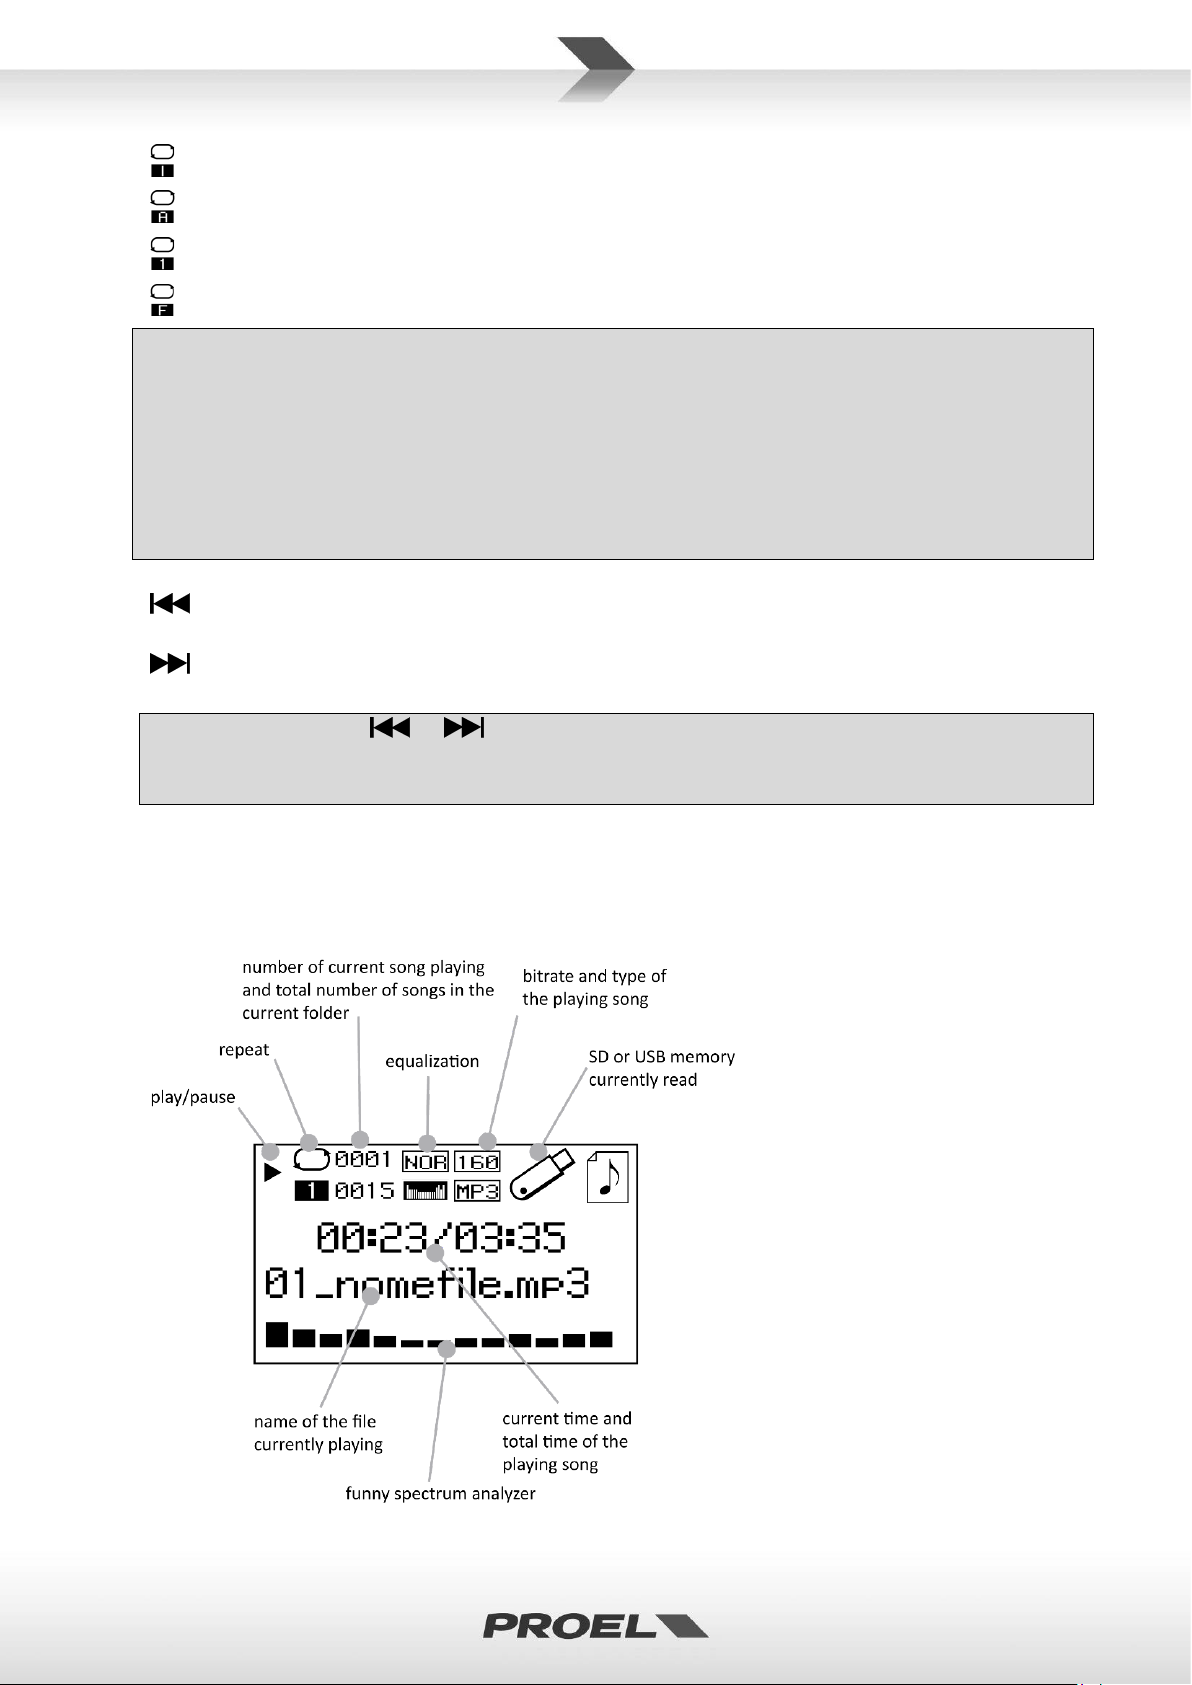
INTRO: it plays the first 10 seconds of each song contained in the current folder.
ALL: same as normal playing but when it reaches the latest song it restarts from the first.
SINGLE ONE: it plays only the current song then stops.
FOLDER: it plays all song contained in the current folder.
Brief explanation of how the player works. When you insert an SD memory card or USB flash drive
in the respective slot, the player scrolls the entire content of the memory locating all audio file that
can be played (files with .WAV .MP3 .WMA extensions). All files will be played in numerical and
alphabetical order, considering first the “name of the folder” and then the “name of the file”.
Example of use: insert a memory into a slot, the player starts playing the first song in numerical and
alphabetical order. Press PLAY MODE button to choose INTRO, then wait until you hear the song you
want to listen. Then press again the PLAY MODE button to choose FOLDER to play all songs contained
in that folder or SINGLE ONE to play only the selected song.
19.
20.
PREVIOUS SONG
Skip to previous song.
NEXT SONG
Skip to the next song.
Pressing and hold or you set the digital volume of the internal media player. We
suggest to let this volume always at the maximum and to adjust the level of the player using the
CH3/4 level potentiometer.
21. IR RECEIVER
This is the remote control IR receiver.
22. LCD DISPLAY
The LCD DISPLAY shows several data:
12
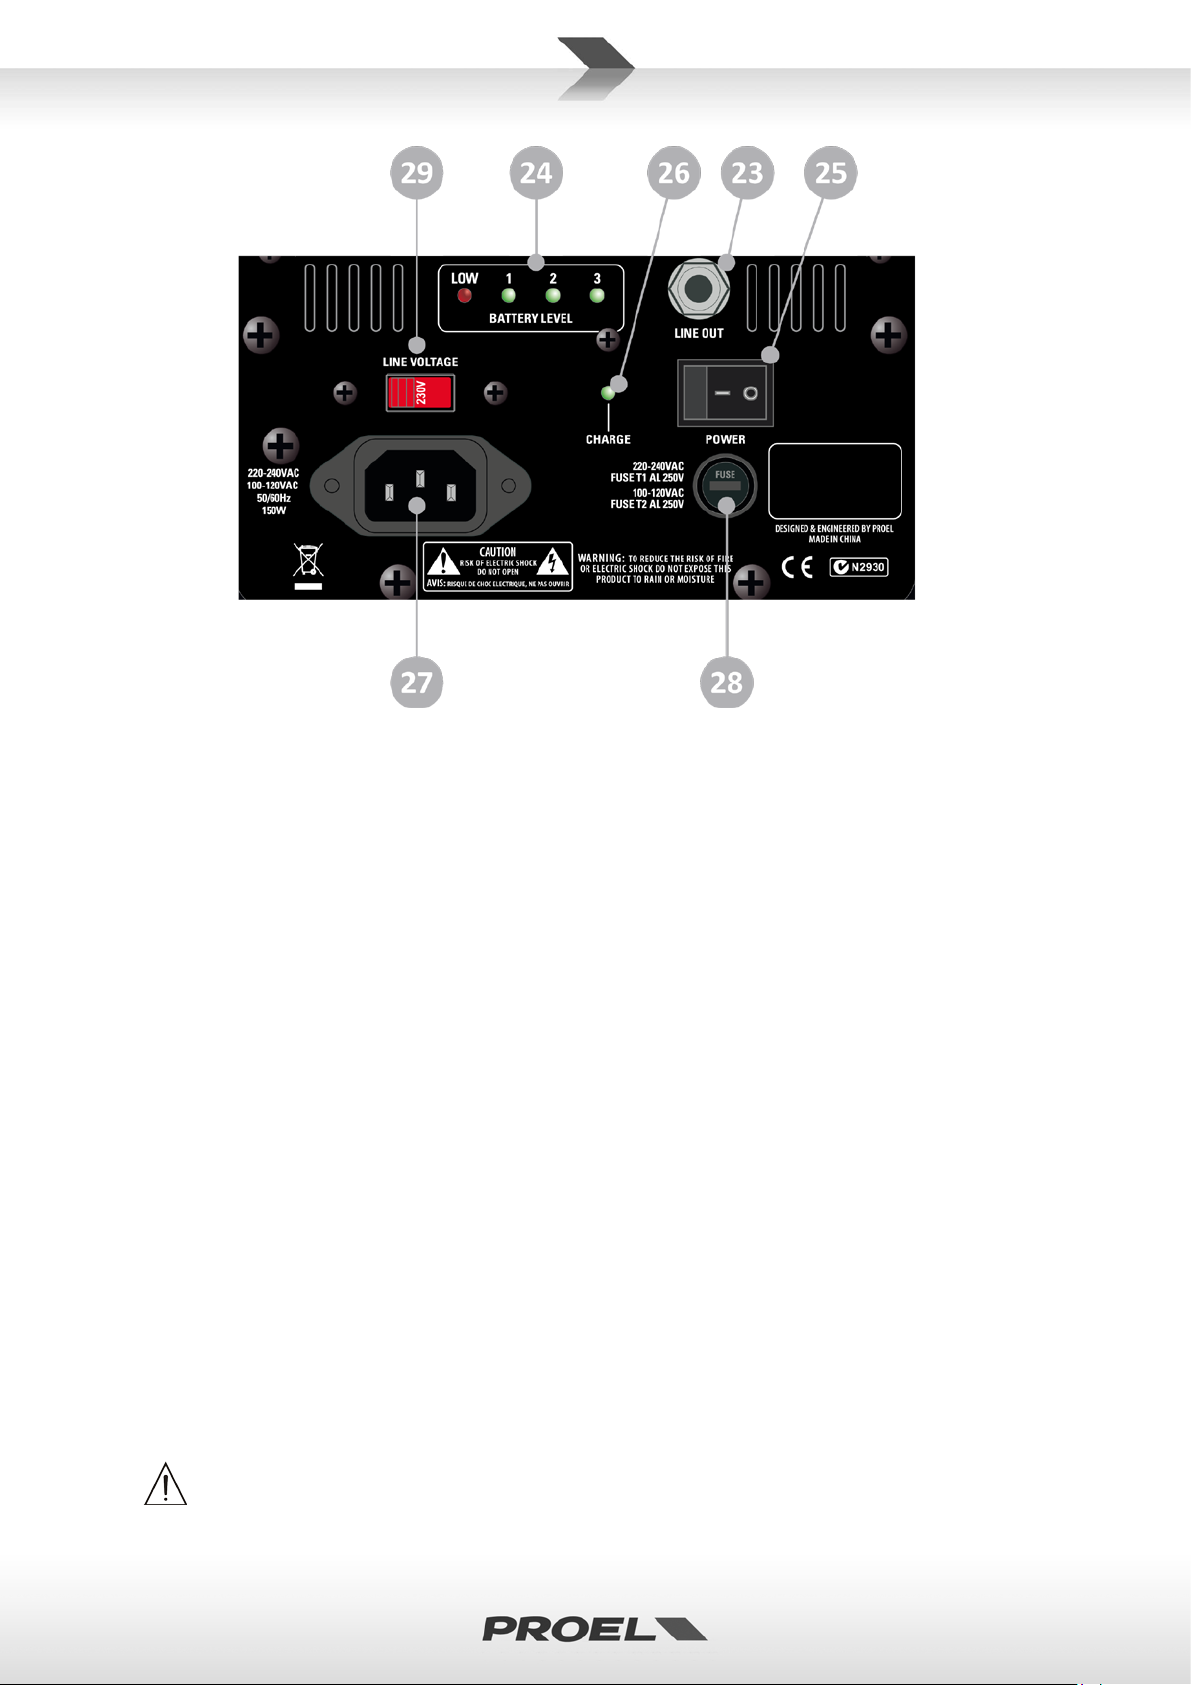
23. LINE OUT (balanced)
Balanced output with line level: connect it through a cable to the input of another device or active
speaker.
24. BATTERY LEVEL
This LED bar indicates the battery charging status as follows:
- 3 GREEN: the internal battery is fully charged.
- 2 GREEN: the internal battery is half charged.
- 1 GREEN: the internal battery is near to be exhaust, you have to re-charge it as soon as possible.
- LOW/RED: FREE10LT cannot be used disconnected from mains and you must re-charge the
battery.
- OFF: the internal battery is disconnected or not present.
25. POWER
Use this switch to power ON or OFF the FREE10LT. The FREE10LT is "ON" when the switch is in the "I"
position. NOTE: The internal battery is charging even if the FREE10LT is OF F.
26. CHARGE
This LED indicates the battery charging status as follows:
- GREEN: the internal battery is charging.
- OFF: the internal battery is charged
27. AC~ SOCKET
Here’s where you plug in your mains supply cord. You should always use the mains cord supplied with
the device. Be sure that your device is turned off before you plug the mains supply cord into an electrical
outlet.
28. FUSE holder
Here is where the mains protection fuse is placed.
REPLACE THE PROTECTION FUSE ONLY WITH THE SAME TYPE.
IF, AFTER THE REPLACEMENT, THE FUSE INTERRUPTS AGAIN, DO NOT TRY AGAIN THEN CONTACT
 Loading...