

Page 1
EIKON series
Studio Monitors
USER’S MANUAL
96MAN00118-R EV.30/1 5
ENGLISH
ITALIANO
Page 2

2
Page 3

3
INDEX
DISPOSAL OF OLD ELECTRICAL & ELECTRONIC EQUIPMENT .............................................................. 4
GENERAL SAFETY INSTRUCTIONS ..................................................................................................... 4
IN CASE OF FAULT ............................................................................................................................ 4
PACKAGING, SHIPPING AND COMPLAINT ......................................................................................... 4
WARRANTY AND PRODUCTS RETURN .............................................................................................. 4
MAINTENANCE AND DISCLAIMER .................................................................................................... 5
POWER SUPPLY ................................................................................................................................ 5
CE CONFORMITY .............................................................................................................................. 5
INTRODUCTION ............................................................................................................................... 6
DESCRIPTION ................................................................................................................................... 6
EIKON 5, 6 ,8 INPUT PANEL .............................................................................................................. 6
EIKON 10S INPUT PANEL .................................................................................................................. 7
EIKON MAINS PANEL ........................................................................................................................ 8
BASIC STEREO SETUP ....................................................................................................................... 9
STEREO SETUP WITH SUBWOOFER ................................................................................................. 10
5.1 SURROUND SETUP ................................................................................................................... 11
TECHNICAL SPECIFICATION ............................................................................................................ 14
DIMENSIONS .................................................................................................................................. 15
ACCESSORIES ................................................................................................................................. 16
Page 4
4
DISPOSAL OF OLD ELECTRICAL & ELECTRONIC EQUIPMENT
This marking shown on the product or its literature, indicates that it should not be disposed with
other household wastes at the end of its working life. To prevent possible harm to the enviroment
or human health from uncontrolled waste disposal, please separate this from other types of
wastes and recycle it responsibly to promote the sustainable reuse of material resources.
Household users should contact either the retailer where they purchased this product, or their
local government office, for details of where and how they can take this item for environmentally safe
recycling. Business users should contact their supplier and check the terms and conditions of the purchase
contract. This product should not be mixed with other commercial wastes for disposal.
GENERAL SAFETY INSTRUCTIONS
• CAUTION - Before using this product read carefully the following safety instructions. Take a look of this
manual entirely and preserve it for future reference. When using any electric product, basic precautions
should always be taken, including the following:
• To reduce the risk, close supervision is necessary when the product is used near children.
• Protect the apparatus from atmospheric agents and keep it away from water, rain and high humidity places.
• This product should be site away from heat sources such as radiators, lamps and any other device that generate heat.
• Care should be taken so that objects and liquids do not go inside the product.
• The product should be connected to a power supply only of the type described on the operating
instructions or as marked on the product.
IN CASE OF FAULT
• In case of fault or maintenance this product should be inspected only by qualified service personnel when:
• Liquids have spilled inside the product.
• The product has fallen and been damaged.
• The product does not appear to operate normally or exhibits a marked change in performance.
• Do not operate on the product, it has no user-serviceable parts inside.
• Refer servicing to an authorized maintenance centre.
PACKAGING, SHIPPING AND COMPLAINT
• This unit package has been submitted to ISTA 1A integrity tests. We suggest you control the unit
conditions immediately after unpacking it.
• If any damage is found, immediately advise the dealer. Keep all unit packaging parts to allow inspection.
• Proel is not responsible for any damage that occurs during shipment..
• Products are sold “delivered ex warehouse” and shipment is at charge and risk of the buyer.
• Possible damages to unit should be immediately notified to forwarder. Each complaint for manumitted
package should be done within eight days from product receipt.
WARRANTY AND PRODUCTS RETURN
• Proel products have operating warranty and comply their specifications, as stated by manufacturer..
• Proel warrants all materials, workmanship and proper operation of this product for a period of two years
from the original date of purchase. If any defects are found in the materials or workmanship or if the
product fails to function properly during the applicable warranty period, the owner should inform about
these defects the dealer or the distributor, providing receipt or invoice of date of purchase and defect
detailed description. This warranty does not extend to damage resulting from improper installation,
misuse, neglect or abuse. Proel S.p.A. will verify damage on returned units, and when the unit has been
properly used and warranty is still valid, then the unit will be replaced or repaired. Proel S.p.A. is not
Page 5

5
responsible for any "direct damage" or "indirect damage" caused by product defectiveness.
MAINTENANCE AND DISCLAIMER
• Clean only with dry cloth.
• Proel products have been expressly designed for audio application, with signals in audio range (20Hz to
20kHz). Proel has no liability for damages caused in case of lack of maintenance, modifications, improper
use or improper installation non-applying safety instructions.
• Proel S.p.A. reserves the right to change these specifications at any time without notice.
• Proel S.p.A. declines any liability for damages to objects or persons caused by lacks of maintenance,
improper use, installation not performed with safety precautions and at the state of the art.
POWER SUPPLY
• This apparatus should only be connected to power source type specified in this owner’s manual or on the unit.
• If the supplied AC power cable plug is different from the wall socket, please contact an electrician to
change the AC power plug.
• Hold the plug and the wall outlet while disconnecting the unit from AC power.
• If the unit will not be used for a long period of time, please unplug the power cord from AC power outlet.
• To avoid unit power cord damage, please do not strain the AC power cable and do not bundle it.
• In order to avoid damages, please ensure that the power cord is not stepped on or pinched by heavy objects.
CE CONFORMITY
• The product is in compliance with Directive LVD 2006 / 95 / EC as stated in EN 60065 standard.
• PROEL S.p.A hereby, declares that this product complies with the essential requirements and other
relevant provisions of Directive 2004/108/EC (EMC), as stated in EN 55103-1 and EN 55103-2 standards.
Page 6
6
INTRODUCTION
Thank you for choosing this PROEL product and for your trust in our brand, synonymous of professionalism,
accuracy, high quality and reliability. All our products are CE approved and designed for continuous use in
professional applications.
DESCRIPTION
EIKON is a series of nearfield studio monitors designed by PROEL R&D team in order to provide to your music
the most honest and accurate reference possible.
From the carefully selected transducers to the proprietary enhanced waveguides and to the low-resonance
cabinet design, everything has been tailored with hours of listening in order to offer the best accuracy over
the whole audio spectrum.
The perfectly optimized electronics, including high-headroom separate Class AB amplifiers for high and low
section, high-precision crossover networks and separate LIMITER circuits, provide maximum resolution and
minimum listening fatigue.
The lineup includes three models, featuring 5.25”, 6” and 8” woofers, and a 10” subwoofer, offering the ideal nearfield
monitor solution for any kind of music production applications: recording studios, home and project studios, broadcast
studios, post-production facilities, mobile production vehicles, home theater, multimedia installations.
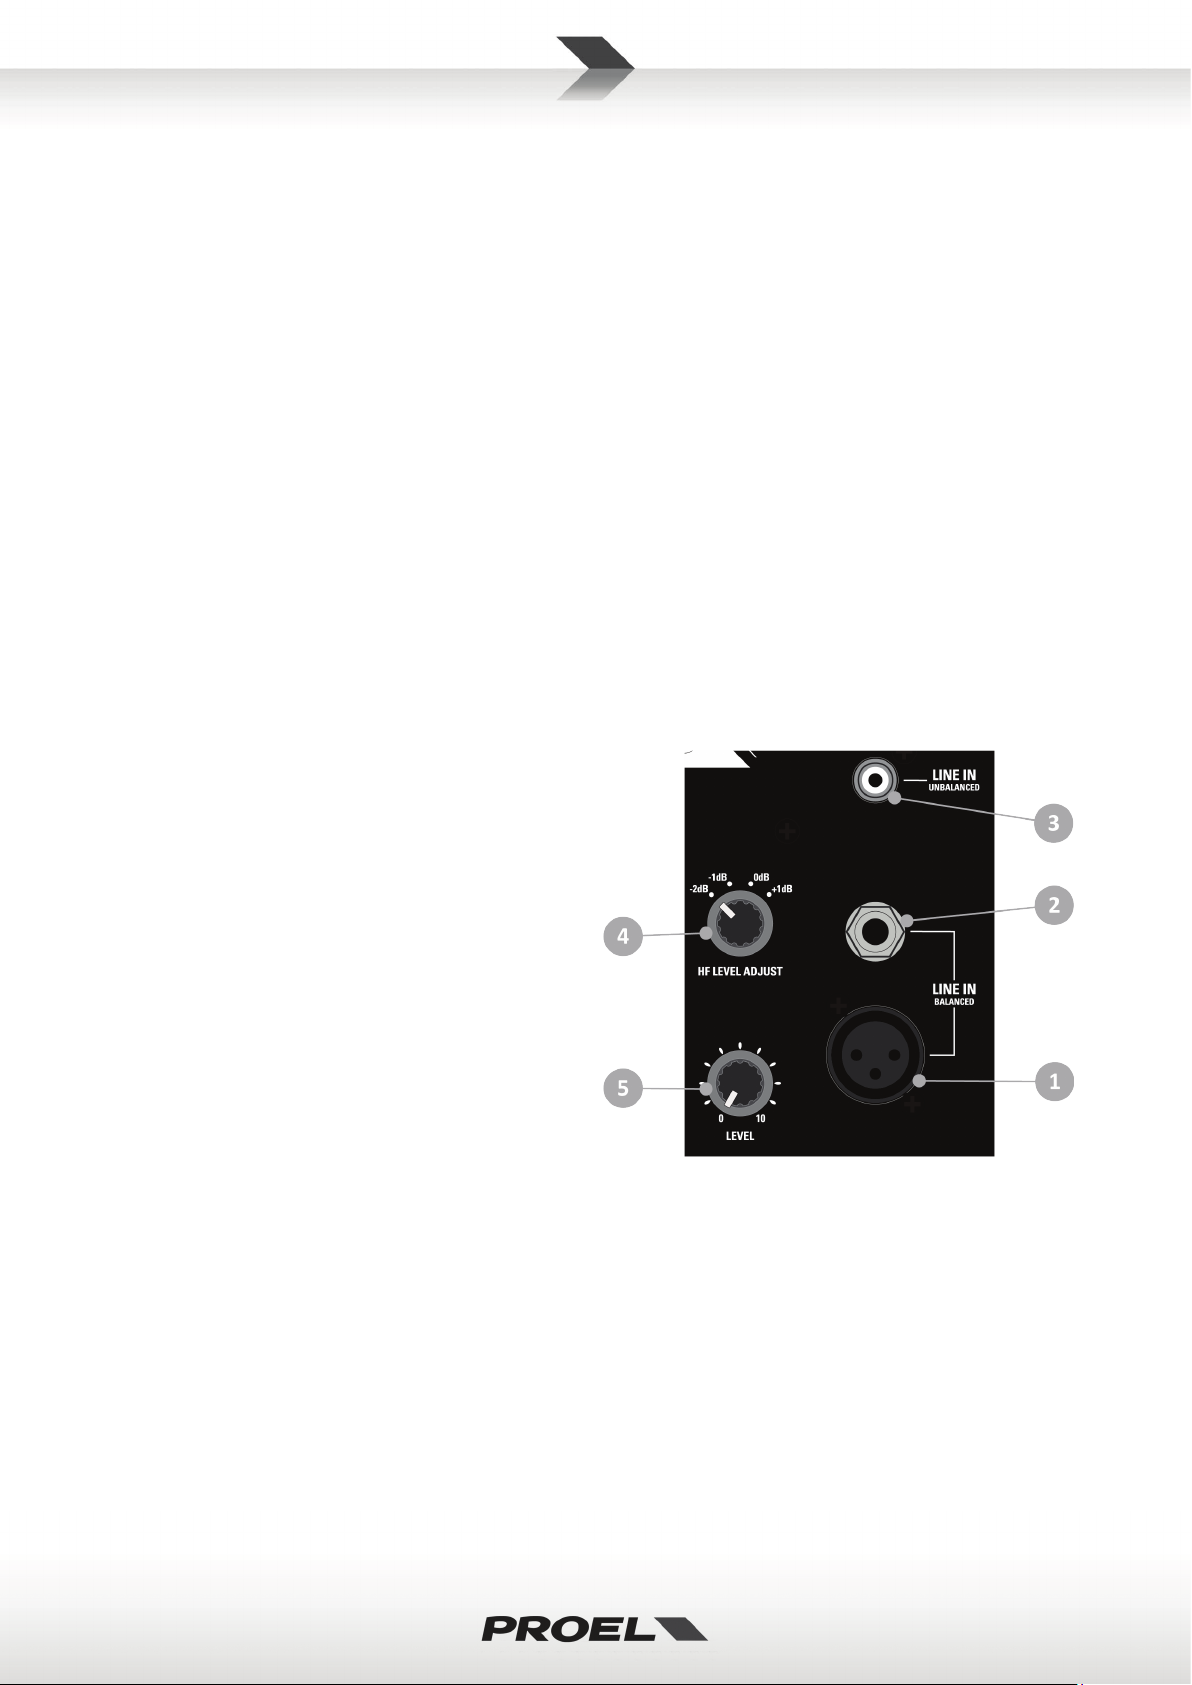
EIKON 5 / 6 / 8 INPUT PANEL
1. LINE IN (XLR)
This is a female XLR connector that accepts a
XLR plug from any balanced or unbalanced line
level device. The XLR input is wired as follows:
Pin 1 = shield or ground
Pin 2 = + positive or "hot"
Pin 3 = - negative or "cold"
2. LINE IN (JACK)
This is a female JACK connector that accepts a
JACK plug from any balanced or unbalanced line
level device. The balanced JACK input is wired
as follows:
Tip = + positive or "hot"
Ring = - negative or "cold"
Sleeve = shield or ground
The unbalanced JACK input is wired as follows:
Tip = + positive or "hot"
Sleeve = shield or ground
3. LINE IN (RCA)
This is a RCA female connectors that accept RCA plug from LEFT or RIGHT channel of a line level source.
Each RCA input is wired as follows:
Tip = + positive or "hot"
Sleeve = shield or ground
4. HF LEVEL ADJUST
HF adjustment for a fine control of high frequency response according to personal taste or room
characteristics.
Page 7
7
5. LEVEL
This potentiometer sets the level of the signal send to the monitor amplifier.
6. ON
WHITE LED on front panel that shows the “ON” status of the loudspeaker.
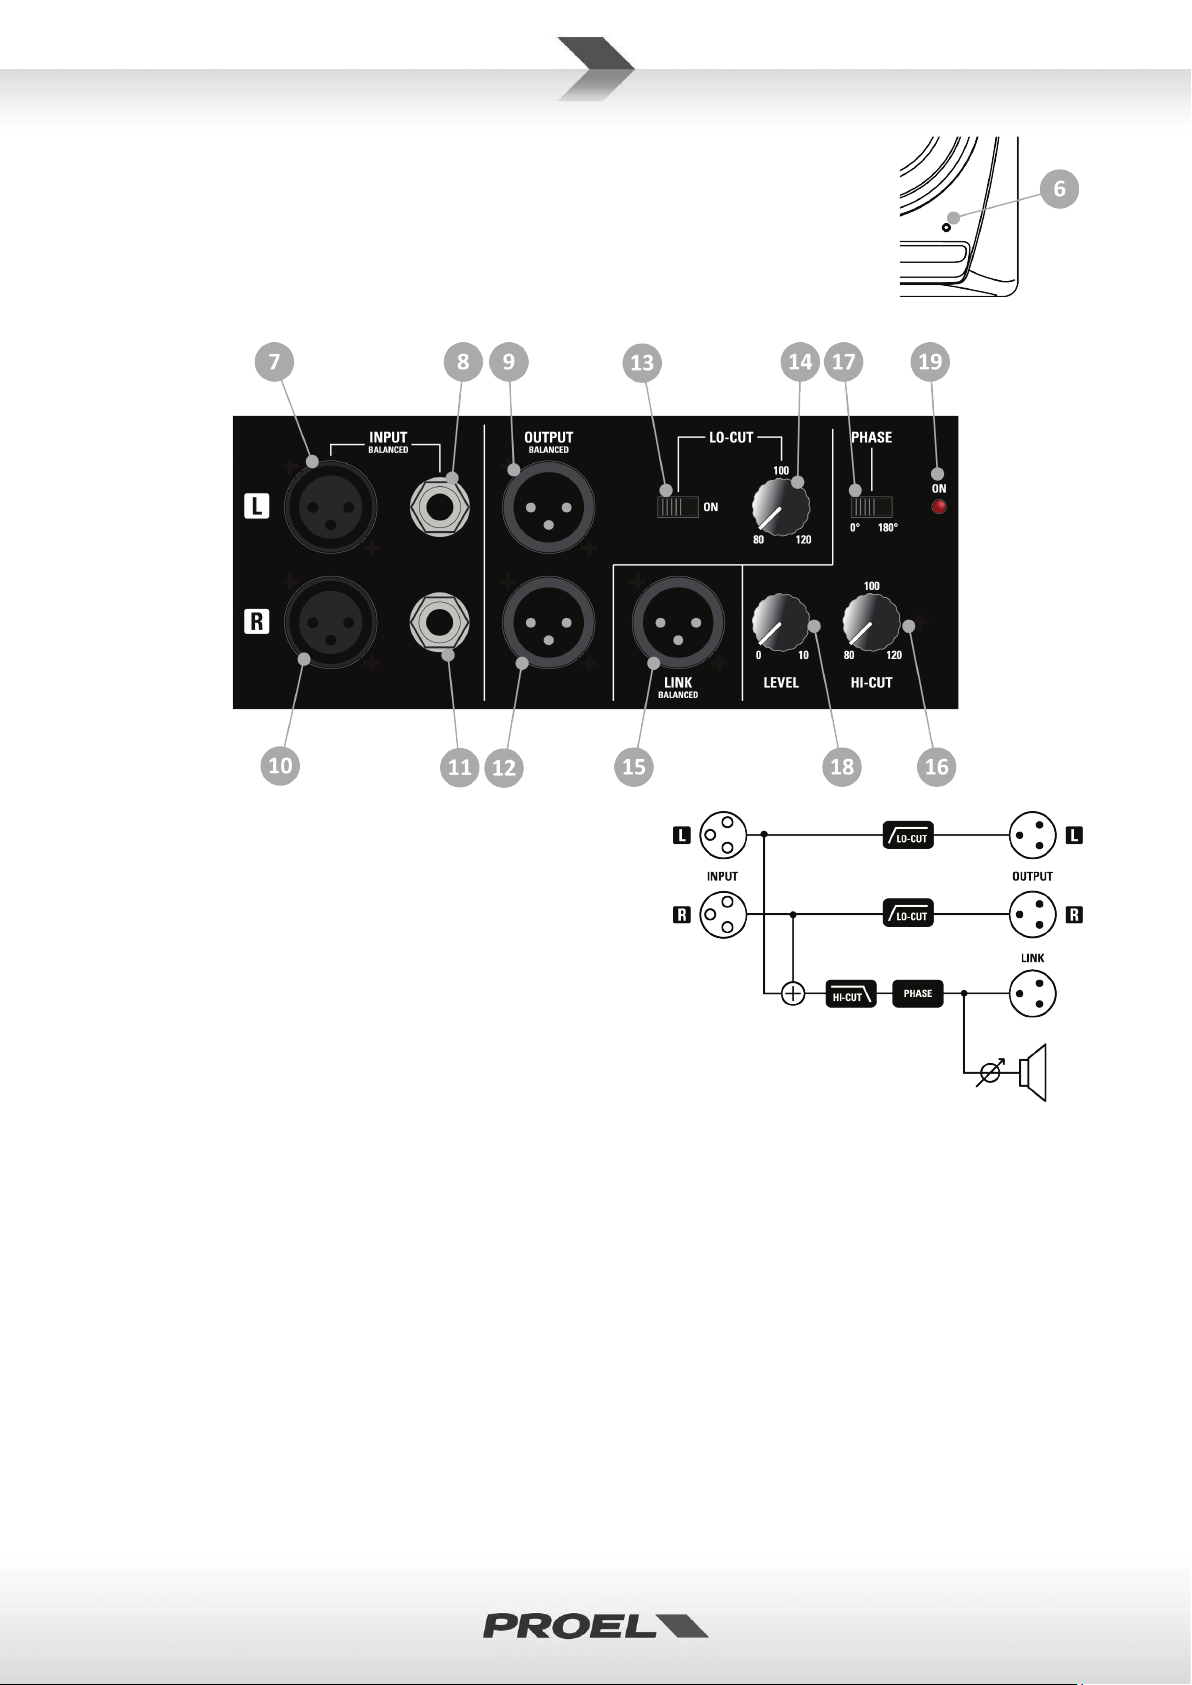
EIKON 10S INPUT PANEL
7. L INPUT (XLR)
This is a female XLR connector that accepts a XLR plug
from any balanced or unbalanced line level device.
8. L INPUT (JACK)
This is a female JACK connector that accepts a JACK plug
from any balanced or unbalanced line level device.
9. L OUTPUT (XLR)
This is a male XLR connector, that provides a balanced
line-level signal. This signal can be filtered with the LOCUT filter (also know as high-pass filter) to connect a sat
speaker. This output is wired as follows:
Pin 1 = shield or ground
Pin 2 = + positive or "hot"
Pin 3 = - negative or "cold"
10. R INPUT (XLR)
Same as above L INPUT. Use both inputs and outputs when connect a stereo system to a single
subwoofer (1 sub + 2 sat), which is the typical studio STEREO system. In the case of a mono system (1
sub + 1 sat for each channel) or in case of LFE channel (5.1 surround system) you can use either left or
right input without distinction.
11. R INPUT (JACK)
Same as above.
12. R OUTPUT (XLR)
Same as above. Use both inputs and outputs when connecting a stereo system to a single subwoofer (1
sub + 2 sat). In the case of a mono system (1 sub + 1 sat for each channel) you have to use the same
channel used for input: left or right.
Page 8
8
13. LO-CUT switch
Set this switch OFF to send at L and R OUTPUTs the same signal of L and R INPUTs respectively: typically
use this setting if the signal is sent to a speaker with built-in LO-CUT/HIGH PASS filter.
Set this switch ON to send at L and R OUTPUTs a LO-CUT/HIGH PASS filtered signal of L and R INPUTs
respectively: use this setting for a STEREO system with EIKON monitors.
14. LO-CUT potentiometer
With this control you set the frequency (80 – 120 Hz range) of the LO-CUT filter applied to the signal
sent to the main studio monitors (see examples for the most used settings with EIKON studio monitors).
15. LINK OUTPUT
Use this output to send the input signal to another subwoofer if you want to enhance the system’s lowfrequency response (see also the EIKON10S block diagram).
16. HI-CUT potentiometer
With this control you set the frequency (80 – 120 Hz range) of the HI-CUT filter applied to the signal sent
to the subwoofer (see examples for the most used settings with EIKON studio monitors).
17. PHASE
This switch reverses the polarity of the subwoofer. Depending on the placement of the subwoofer with
relation to the studio monitor, you can get a better low-frequency response in the room if you reverse
the polarity of the subwoofer’s signal (see examples for the most used settings with EIKON studio
monitors).
18. LEVEL
This potentiometer sets the level of the signal sent to the subwoofer amplifier.
19. ON
RED LED that shows the “ON” status of the subwoofer.
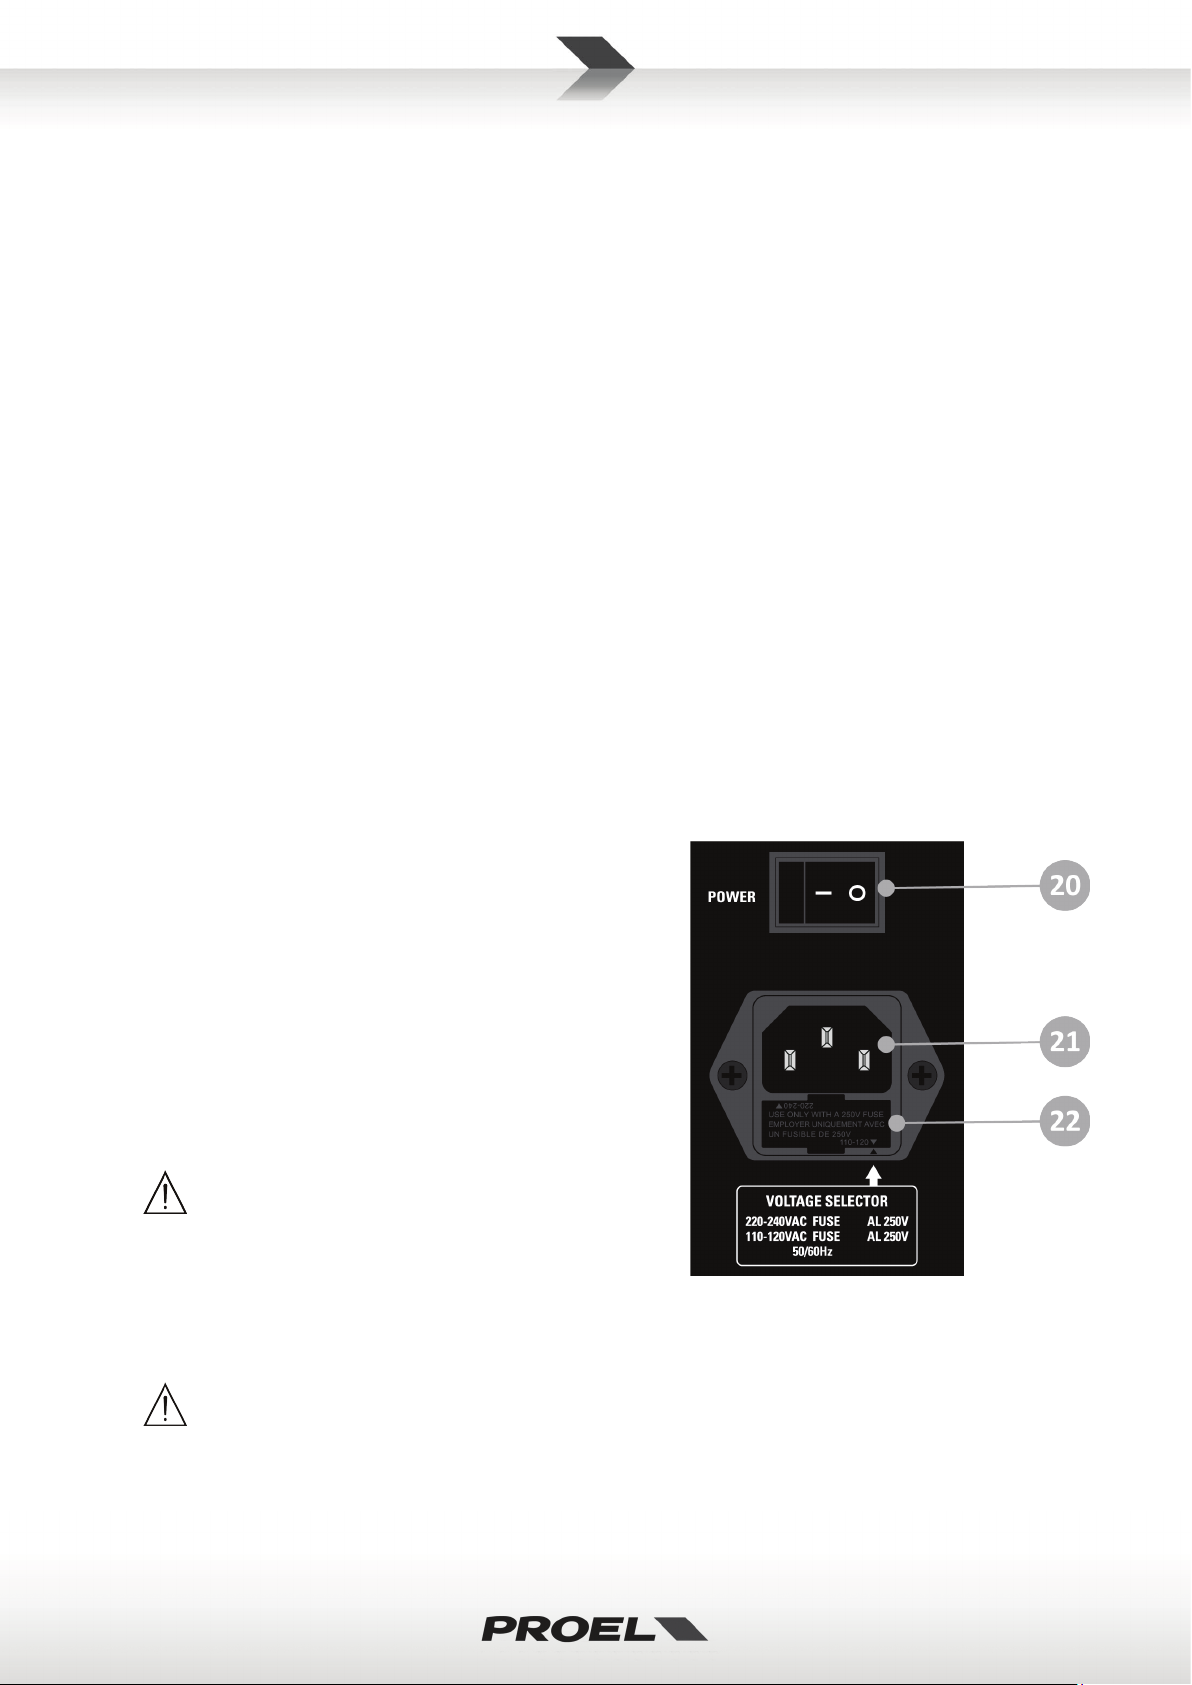
EIKON MAINS PANEL
20. POWER
Use this switch to power ON or OFF the loudspeaker. It is
"ON" when the switch is in the "I" position.
21. AC~ SOCKET
Here’s where you plug in your mains supply cord. You
should always use the mains cord supplied with the
device. Be sure that your device is turned off before you
plug the mains supply cord into an electrical outlet.
22. FUSE holder / VOLTAGE SELECTOR
Here is where the mains protection fuse is placed.
REPLACE THE PROTECTION FUSE ONLY WITH THE
SAME TYPE.
IF, AFTER THE REPLACEMENT, THE FUSE
INTERRUPTS AGAIN, DO NOT TRY AGAIN THEN CONTACT
THE PROEL SERVICE CENTER.
The fuse holder also behaves as switch to set the AC voltage line of your country (usually it is set by
factory and isn't necessary to change it).
WARNING: be careful to insert the voltage selector for the correct AC LINE VOLTAGE, an
incorrect setting of AC LINE VOLTAGE could damage seriously the internal electronics!
Page 9
9
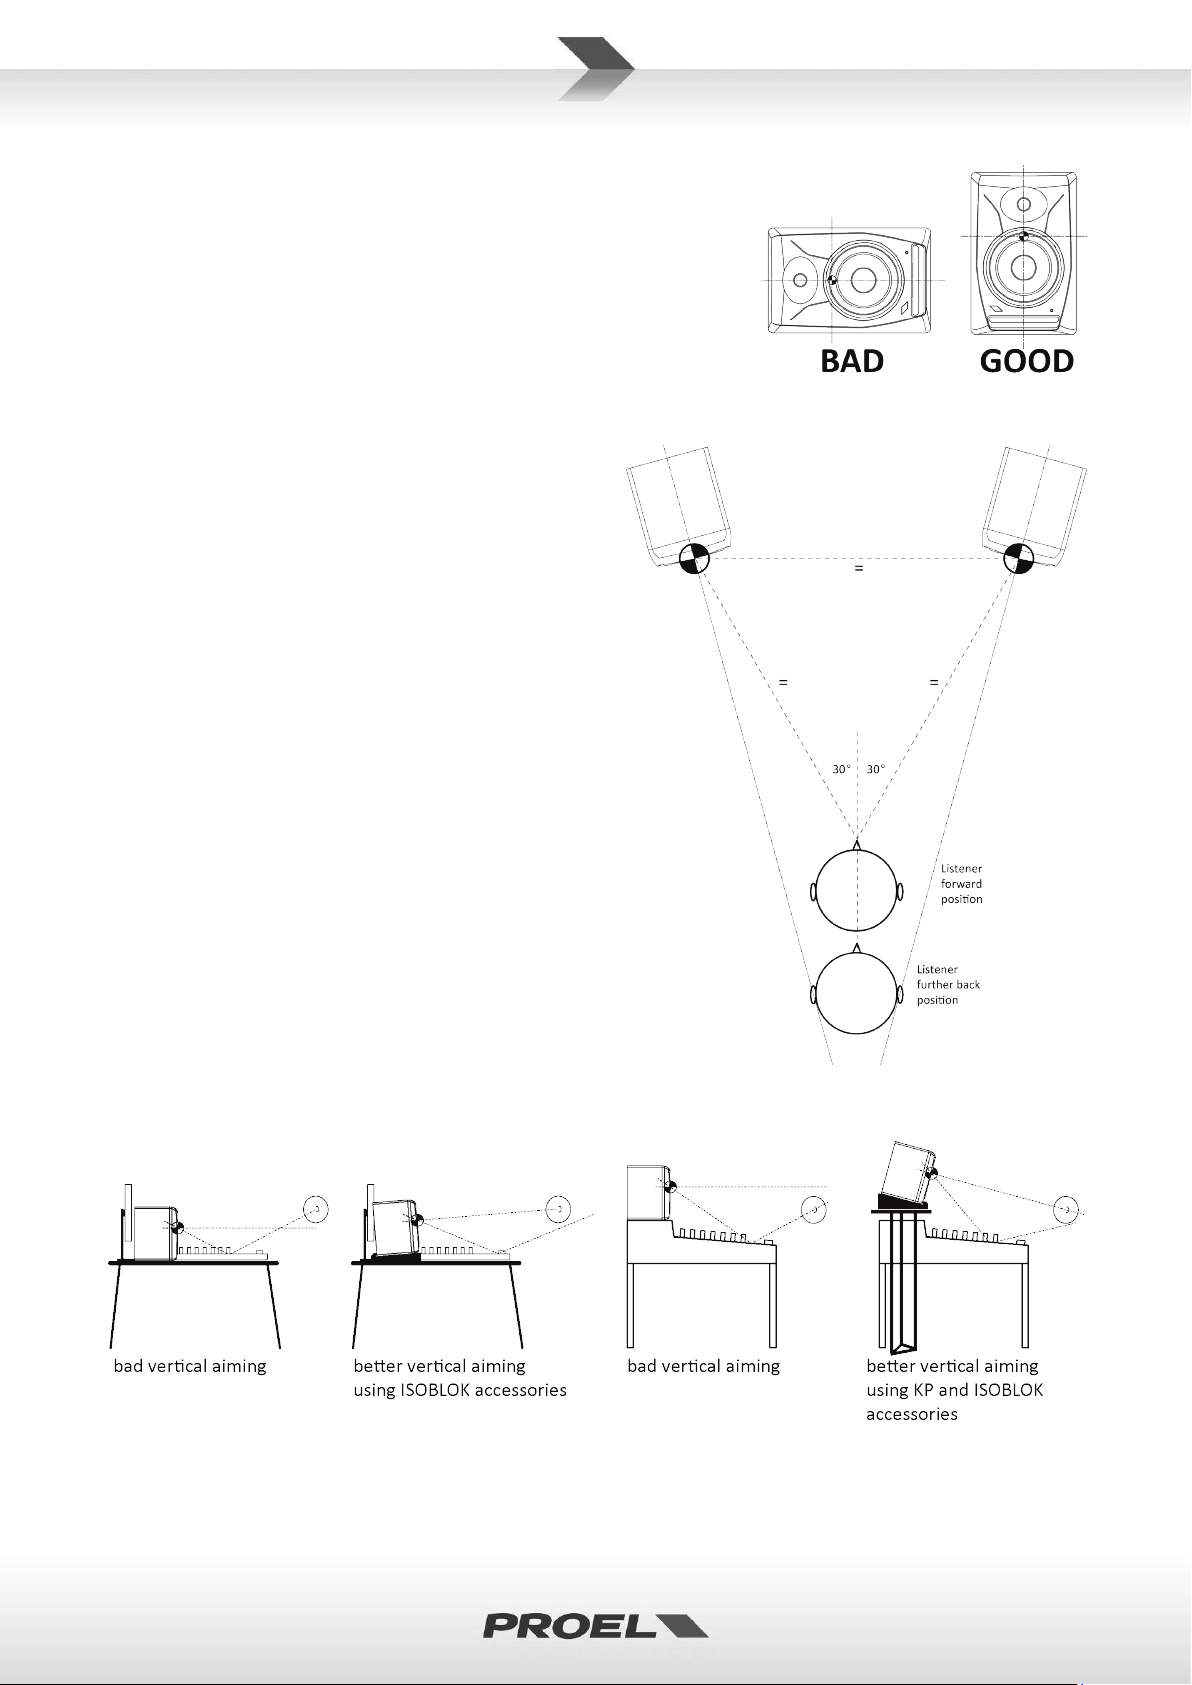
BASIC STEREO SETUP
Two way systems use a separate woofer and tweeter mounted
in a vertical line, so each device has a different distance to the
listening point. The effects of the driver offsets are increased by
the nearfield listening conditions, so when you are very close to
a speaker system, vertical head movements significantly affects
the sound. These problems are minimized if the woofer and
tweeter are stacked vertically, so we advise to put always EIKON
monitors in vertical position: in this way the mix
engineer can have the widest range of
movement in the horizontal plane without
significant changes in the acoustic response.
In order to obtain the smoothest and most
consistent sound with a good stereo image the
speakers should be placed so the position of the
listener and the two speakers form an
equilateral triangle. The distance between the
two monitors should be roughly the same as the
distance between one monitor and the listener.
The speaker axis (shown on the diagram) should
be aimed at the point of the furthest rearward
listening positions, as indicated by the two
heads on the diagram.
For the vertical axis you have to aim the
speakers at your ears level, trying to avoid the
first arrival reflection of the mixing console or
DAW desk: very practical in this case is the use
of nearfield monitor insulators (PROEL ISOBLOK)
and stands (PROEL KP MONITOR STAND).
Page 10
10
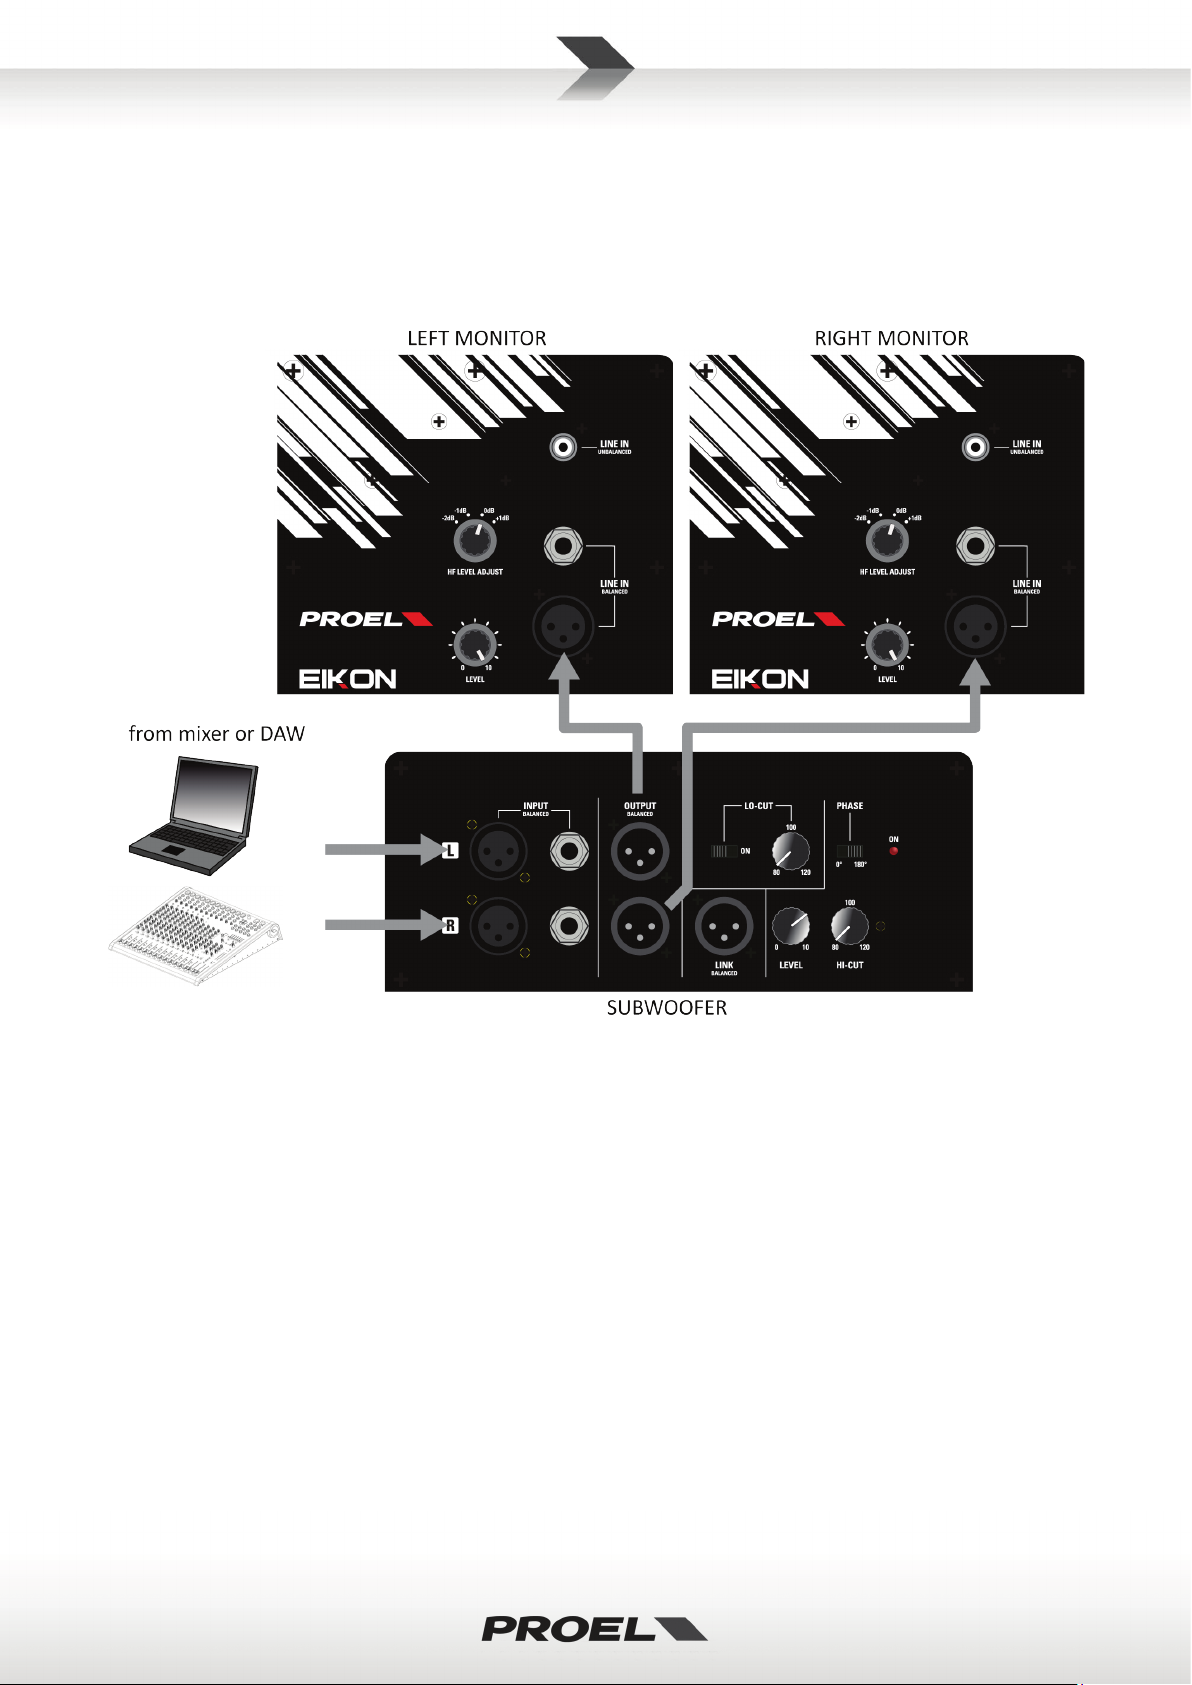
STEREO SETUP WITH SUBWOOFER
EIKON 10S subwoofer includes a built-in crossover and amplifier, so you only need the appropriate hook up
cables to integrate it into the nearfield monitor system.
In a STEREO setup we recommend the use of the built-in high-pass filter for filtering the full-range monitors:
hook the left and right XLR outputs of the subwoofer to the corresponding line-level inputs of your powered
full-range monitors.
A properly set up subwoofer system extends the bass response of the main monitors without exaggerating
the bass response in the room. Improper set up may cause an exaggeration of bass response, which in turn
may cause the engineer to mix in less bass energy than desired.
Bass frequencies are largely non-directional, nonetheless the subwoofer's placement in the room is very
important: for example, placing the subwoofer close to a wall or in a corner generally increases the amount
of bass heard in the room. We suggest to place the subwoofer always on the floor, keeping it away from the
walls: if it must be placed close to one wall consider to reduce its level. The distance of the subwoofer from
the listening position can be adjusted to produce the optimum balance of bass in the system.
Since the subwoofer's output will interact with the other monitor speakers in the room, it is important to
consider the subwoofer and nearfield speakers as a total system. The subwoofer’s crossover frequency and
level need to be matched with the nearfield monitors, so to simplify this operation the following table
suggests the best setting for a full EIKON system.
To check if the levels and other parameters are correctly set and if the sub-woofer is properly placed, turn on
the complete monitoring system and play well-known songs of different genres: a good setting often requires
a long time of listening. When your preferred songs all play well and the subwoofer placement produces the
best balance and quality of bass in the system, then probably that is the best setting for your room/speaker
combination.
Page 11

11
EIKON 10S setting:
with EIKON 5
with EIKON 6
with EIKON 8
LEVEL
PHASE
HI-CUT
LO-CUT
5.1 SURROUND SETUP
The 5.1 configuration has been standardised
for surround sound applications, including
cinema, television and other consumer
applications.
The front three channels are intended to be
used for a conventional three-channel stereo
sound image, while the rear/side channels
are only intended for generating supporting
ambience, effects or ‘room impression’. The
five channels are full-bandwidth, so they all
contain low frequencies.
The ‘.1’ component is a dedicated low
frequency effects (LFE) channel, a separate
sub-bass channel with an upper limit
extending to a maximum of 120 Hz. The LFE
channel is not the "subwoofer channel” and it
is not intended for conveying the low
frequency component of the main channel
signals, but it is intended to be used for
special low frequency content that requires
greater sound pressure levels and headroom
than cannot be handled by the main
channels.
Page 12

12
EIKON 10S setting:
with EIKON 5
with EIKON 6
with EIKON 8
LEVEL
PHASE
HI-CUT
LO-CUT
BASS MANAGEMENT
“Bass Management” is a term that refers to the practice of using a subwoofer to reproduce the bass
frequencies of the main channels. If you don't use large full-range speakers, which is the case of most of the
home theater systems, the Bass Management (usually enabled by selecting “Small Speakers” from a speaker
setup menu in home-theater receivers) can reroute the bass from the five full-range channels (typically
below 80Hz) and from LFE channel to the sub-woofer, where it can be reproduced best.
Bass management is used in practically every consumer home-theater system, therefore audio engineers
must be sure that their studio monitoring systems is able to reproduce sufficient low frequencies, so they can
avoid recording undesirable subsonic information, such as pops, air conditioner rumble, traffic noise,
footsteps, etc. These subsonic noises will be masked by the natural high-pass filter of near-field monitors with
a response that goes down only as low as 40 or 50Hz and they may not be heard in the studio. However,
(unused)
(unused)
(unused)
Page 13

13
since virtually all home-theatre systems use subwoofers with bass management, consumers will hear these
EIKON 10S setting:
with EIKON 5
with EIKON 6
with EIKON 8
infrasonic problems at high volume levels in their home.
Bass management effectively extends the low-frequency response of near-field monitors down well into the
25 to 40Hz range (depending on the subwoofer used), allowing the engineer to recognize infrasonic noises
and take evasive action in the studio in order to avoid them.
LEVEL
PHASE
HI-CUT
LO-CUT
set it at max or mid
set it to obtain max bass
usually controlled by bass management system, set it at max
(unused)
Page 14

14
EIKON 5
EIKON 6
EIKON 8
System type
2-way vented enclosure
2-way vented enclosure
2-way vented enclosure
High Frequency Device
0.75” dome tweeter on
elliptical waveguide
1” dome tweeter on
elliptical waveguide
1” dome tweeter on
elliptical waveguide
Low Frequency Device
5.25” woofer with
fiberglass reinforced cone
6.5” woofer with
fiberglass reinforced cone
8” woofer with fiberglass
reinforced cone
Angular Coverage
90° H x 60° V
90° H x 60° V
90° H x 60° V
HF Amplifier Cont. Power
15 W Class AB
20 W Class AB
20 W Class AB
LF Amplifier Cont. Power
30 W Class AB
50 W Class AB
70 W Class AB
Processing
Analog
Analog
Analog
Frequency Response
55 Hz - 20 kHz
50 Hz - 20 kHz
45 Hz - 20 kHz
Max SPL
104 dB
106 dB
109 dB
Connectors
1/4” JACK, XLR-F, RCA
1/4” JACK, XLR-F, RCA
1/4” JACK, XLR-F, RCA
Controls
LEVEL, HF ADJUST
LEVEL, HF ADJUST
LEVEL, HF ADJUST
Construction
Vinyl laminated MDF
cabinet with ABS front
Vinyl laminated MDF
cabinet with ABS front
Vinyl laminated MDF
cabinet with ABS front
Cabinet Colour
Black
Black
Black
Power Supply
230 V~ or 120 V~ 50/60
selector
230 V~ or 120 V~ 50/60
selector
230 V~ or 120 V~ 50/60
selector
Consumption
50 W
70 W
100 W
Dimensions (W x H x D)
185 x 285 x 230 mm
225 x 320 x 270 mm
265 x 380 x 305 mm
Weight
5 kg (11.0 lb)
8 kg (17.6 lb)
10 kg (22.0 lb)
EIKON 10S
System type
Vented subwoofer
Low Frequency Device
10” woofer with pp cone
Amplifier Cont. Power
150 W Class AB
Processing
Analog
Frequency Response
40 Hz - 150 Hz
Max SPL
110 dB
Connectors
1/4” JACK, XLR-F (stereo
OUTPUT), XLR-M (LINK)
Controls
LEVEL, HI-CUT & LO-CUT
frequency selector, PHASE
Construction
Vinyl laminated MDF
cabinet with MDF front
Cabinet Colour
Black
Power Supply
230 V~ or 120 V~ 50/60
selector
Consumption
180 W
Dimensions (W x H x D)
330 x 365 x 365 mm
Weight
33.7 kg (74.3 lb)
TECHNICAL SPECIFICATION
Hz with LINE VOLTAGE
INPUT), XLR-M (stereo
Hz with LINE VOLTAGE
Hz with LINE VOLTAGE
Hz with LINE VOLTAGE
Page 15

15
DIMENSIONS
Page 16

16
ACCESSORIES
Page 17

17
INDICE
TRATTAMENTO DEL DISPOSITIVO ELETTRICO OD ELETTRONICO A FINE VITA .................................. 18
AVVERTENZE PER LA SICUREZZA .................................................................................................... 18
IN CASO DI GUASTO ....................................................................................................................... 18
IMBALLAGGIO, TRASPORTO E RECLAMI ......................................................................................... 18
GARANZIE E RESI ............................................................................................................................ 18
MANUTENZIONE E LIMITAZIONI D’USO .......................................................................................... 19
ALIMENTAZIONE ............................................................................................................................ 19
CONFORMITÀ CE ............................................................................................................................ 19
INTRODUZIONE .............................................................................................................................. 20
DESCRIZIONE ................................................................................................................................. 20
EIKON 5, 6 ,8 PANNELLO INGRESSI ................................................................................................. 20
EIKON 10S PANNELLO INGRESSI ..................................................................................................... 21
EIKON PANNELLO RETE .................................................................................................................. 22
DISPOSIZIONE STEREO DI BASE ...................................................................................................... 23
IMPOSTAZIONE STEREO CON SUBWOOFER .................................................................................... 24
IMPOSTAZIONE SURROUND 5.1 ..................................................................................................... 25
SPECIFICHE TECNICHE .................................................................................................................... 28
DIMENSIONI .................................................................................................................................. 29
ACCESSORI ..................................................................................................................................... 30
Page 18

18
TRATTAMENTO DEL DISPOSITIVO ELETTRICO OD ELETTRONICO A FINE VITA
Il marchio riportato sul prodotto o sulla documentazione indica che il prodotto non deve essere
smaltito con altri rifiuti domestici al termine del ciclo di vita. Per evitare eventuali danni all’ambiente si
invita l’utente a separare questo prodotto da altri tipi di rifiuti e di riciclarlo in maniera responsabile
per favorire il riutilizzo sostenibile delle risorse materiali. Gli utenti domestici sono invitati a contattare
il rivenditore presso il quale è stato acquistato il prodotto o l’ufficio locale preposto per tutte le
informazioni relative alla raccolta differenziata e al riciclaggio per questo tipo di prodotto. Gli utenti aziendali sono
invitati a contattare il proprio fornitore e verificare i termini e le condizioni del contratto di acquisto. Questo
prodotto non deve essere smaltito unitamente ad altri rifiuti commerciali.
AVVERTENZE PER LA SICUREZZA
• ATTENZIONE – Prima di utilizzare il prodotto, si prega di leggere attentamente le seguenti istruzioni per la sicurezza.
Prendere visione del manuale d’uso e conservarlo per successive consultazioni. Durante l’uso di un prodotto
elettrico devono essere sempre prese precauzioni di base onde evitare danni a cose o persone, incluse le seguenti:
• In presenza di bambini, controllare che il prodotto non rappresenti un pericolo.
• Posizionare l’apparecchio al riparo dagli agenti atmosferici e a distanza di sicurezza dall’acqua, dalla
pioggia e dai luoghi ad alto grado di umidità.
• Collocare o posizionare il prodotto lontano da fonti di calore quali radiatori, griglie di riscaldamento e
ogni altro dispositivo che produca calore.
• Evitare che qualsiasi oggetto o sostanza liquida entri all’interno del prodotto.
• Il prodotto deve essere connesso esclusivamente alla alimentazione elettrica delle caratteristiche
descritte nel manuale d’uso o scritte sul prodotto.
IN CASO DI GUASTO
• In caso di guasto o manutenzione questo prodotto deve essere ispezionato da personale qualificato quando:
• Sostanze liquide sono penetrate all’interno del prodotto.
• Il prodotto è caduto e si è danneggiato.
• Il prodotto non funziona normalmente esibendo una marcato cambio di prestazioni.
• Non intervenire sul prodotto. Rivolgersi a un centro di assistenza autorizzato Proel.
IMBALLAGGIO, TRASPORTO E RECLAMI
• L’imballo è stato sottoposto a test di integrità secondo la procedura ISTA 1A. Si raccomanda di controllare
il prodotto subito dopo l’apertura dell’imballo.
• Se vengono riscontrati danni informare immediatamente il rivenditore. Conservare quindi l’imballo
completo per permetterne l’ispezione.
• Proel declina ogni responsabilità per danni causati dal trasporto.
• Le merci sono vendute “franco nostra sede” e viaggiano sempre a rischio e pericolo del distributore.
• Eventuali avarie e danni dovranno essere contestati al vettore. Ogni reclamo per imballi manomessi
dovrà essere inoltrato entro 8 giorni dal ricevimento della merce.
GARANZIE E RESI
• I Prodotti Proel sono provvisti della garanzia di funzionamento e di conformità alle proprie specifiche,
come dichiarate dal costruttore.
• La garanzia di funzionamento è di 24 mesi dopo la data di acquisto. I difetti rilevati entro il periodo di garanzia
sui prodotti venduti, attribuibili a materiali difettosi o difetti di costruzione, devono essere tempestivamente
segnalati al proprio rivenditore o distributore, allegando evidenza scritta della data di acquisto e descrizione
del tipo di difetto riscontrato. Sono esclusi dalla garanzia difetti causati da uso improprio o manomissione.
Proel SpA constata tramite verifica sui resi la difettosità dichiarata, correlata all’appropriato utilizzo, e l’effettiva
validità della garanzia; provvede quindi alla sostituzione o riparazione dei prodotti, declinando tuttavia ogni
Page 19

19
obbligo di risarcimento per danni diretti o indiretti eventualmente derivanti dalla difettosità.
MANUTENZIONE E LIMITAZIONI D’USO
• Pulire il prodotto unicamente con un panno asciutto.
• I Prodotti Proel sono destinati esclusivamente ad un utilizzo specifico di tipo sonoro: segnali di ingresso di
tipo audio (20Hz-20kHz). Proel declina ogni responsabilità per danni a terzi causati da mancata
manutenzione, manomissioni, uso improprio o installazione non eseguita secondo le norme di sicurezza.
• Proel S.p.A. si riserva di modificare il prodotto e le sue specifiche senza preavviso.
• Proel S.p.A. declina ogni responsabilità per danni a terzi causati da mancata manutenzione, manomissioni, uso
improprio o installazione non eseguita secondo le norme di sicurezza e a regola d'arte.
ALIMENTAZIONE
• Il prodotto deve essere connesso esclusivamente alla alimentazione elettrica delle caratteristiche
descritte nel manuale d’uso o scritte sul prodotto.
• Se la spina in dotazione non combacia con la presa, rivolgersi ad un elettricista per far installare una presa appropriata.
• Quando si scollega l’apparato alla rete tenere saldamente sia la spina che la presa.
• Quando l’unità non viene utilizzata per un periodo prolungato, interrompere l’alimentazione estraendo la
spina dalla presa dell’alimentazione.
• Per evitare danni alla linea d’alimentazione dell’apparato, non mettere in trazione il cavo d’alimentazione
e non utilizzare un cavo attorcigliato.
• Per evitare il danneggiamento del cavo d’alimentazione dell’apparato, assicurarsi che questo non venga
calpestato o schiacciato da oggetti pesanti.
CONFORMITÀ CE
• I Prodotti Proel sono conformi alla direttiva LVD 2006 / 95 / EC, secondo lo standard EN 60065.
• PROEL S.p.A dichiara che questo prodotto è conforme ai requisiti essenziali ed alle altre disposizioni
pertinenti stabilite dalla direttiva 2004/108/EC (EMC), secondo gli standard EN 55103-1 e EN 55103-2.
Page 20

20
INTRODUZIONE
Grazie per aver scelto un prodotto PROEL e della fiducia riposta nel nostro marchio, sinonimo di
professionalità, accuratezza, elevata qualità ed affidabilità. Tutti i nostri prodotti sono conformi alle
normative CE per utilizzazione continua in impianti di diffusione sonora.
DESCRIZIONE
EIKON è una serie di nearfield studio monitors progettata dal team di Ricerca e Sviluppo PROEL allo scopo di
fornire il riferimento più fedele ed accurato possibile per la vostra musica.
Dai trasduttori accuratamente selezionati alla guida d'onda proprietaria fino al progetto del cabinet a bassa
risonanza, ogni aspetto del progetto è stato affinato con ore di ascolto per offrire la massima precisione su
tutto lo spettro audio.
L'elettronica ottimizzata alla perfezione, che include amplificatori in Classe AB ad elevata dinamica separati
per le sezioni high e low, filtri di crossover ad alta precisione e circuiti di limiter indipendenti, fornisce la
massima risoluzione con il minimo affaticamento all'ascolto.
La serie include tre modelli con woofer da 5.25", 6" e 8", e un subwoofer da 10", offrendo così la soluzione
ideale di monitoraggio nearfield per qualsiasi applicazione di produzione musicale: studi di registrazione,
studi casalinghi, studi di produzione e post-produzione, veicoli per registrazioni mobili, sistemi home theater,
installazioni multimediali.
PANNELLO INGRESSI EIKON 5 / 6 / 8
1. LINE IN (XLR)
Connettore XLR femmina che accetta un XLR
maschio da qualsiasi apparato audio a livello
linea bilanciato o sbilanciato. Le terminazioni
dell' ingresso XLR sono le seguenti:
Pin 1 = schermo o massa
Pin 2 = + positivo o "caldo"
Pin 3 = - negativo o "freddo"
2. LINE IN (JACK)
Connettore JACK femmina che accetta un JACK
maschio da qualsiasi apparato audio a livello
linea bilanciato o sbilanciato. Le terminazioni
dell' ingresso JACK sono le seguenti:
Tip (punta) = + positivo o "caldo"
Ring (anello) = - negativo o "freddo"
Sleeve (manicotto) = schermo o massa
Quando si collega un segnale sbilanciato, le
terminazioni sono le seguenti :
Tip (punta) = + positivo o "caldo"
Sleeve (manicotto) = schermo o massa
3. LINE IN (RCA)
Due connettori femmina RCA che accettano due RCA maschio dai canali sinistro e destro di una sorgente
ausiliaria con livello linea. Ogni ingresso RCA è terminato come segue:
Tip (punta) = + positivo o "caldo"
Sleeve (manicotto) = schermo o massa
4. HF LEVEL ADJUST
Regolazione HF per un controllo accurato della risposta alle alte frequenze, in base al gusto personale o
alle caratteristiche della stanza.
Page 21

21
5. LEVEL
Potenziometro per la regolazione del livello del segnale inviato all’amplificatore
interno.
6. ON
LED BIANCO sul pannello frontale che indica l’accensione “ON” dell’altoparlante.
PANNELLO INGRESSI EIKON 10S
7. L INPUT (XLR)
Connettore XLR femmina che accetta un XLR maschio da
qualsiasi apparato audio a livello linea bilanciato o
sbilanciato.
8. L INPUT (JACK)
Connettore JACK femmina che accetta un JACK maschio
da qualsiasi apparato audio a livello linea bilanciato o
sbilanciato.
9. L OUTPUT (XLR)
Connettore XLR maschio che fornisce un segnale
bilanciato a livello linea. Questo segnale può essere
filtrato con il filtro LO-CUT (elimina bassi) per collegare un altoparlante satellite. Le terminazioni dell'
ingresso XLR sono le seguenti:
Pin 1 = schermo o massa
Pin 2 = + positivo o "caldo"
Pin 3 = - negativo o "freddo"
10. R INPUT (XLR)
Come sopra per l’ingresso L INPUT. Usate entrambe gli ingressi e le uscite quando collegate un sistema
stereo a un singolo subwoofer (1 sub + 2 sat), che è il tipico sistema STEREO da studio. Nel caso di un
sistema mono (1 sub + 1 sat per ogni canale) o in caso del canale LFE (sistemi surround 5.1) potete
utilizzare indistintamente l’ingresso sinistro (L) o destro (R).
11. R INPUT (JACK)
Come sopra.
12. R OUTPUT (XLR)
Vedi sopra. Usate entrambi gli ingressi e le uscite quando collegate un sistema stereo ad un singolo
Page 22

22
subwoofer (1sub + 2 sat). Nel caso di un sistema mono (1sub + 1 sat per ogni canale) dovete utilizzare la
stessa uscita impiegata per il segnale in ingresso LEFT (sinistro) o RIGHT (destro).
13. LO-CUT interruttore
Impostate questo interruttore su OFF per inviare alle uscite L e R lo stesso segnale degli ingressi L e R
rispettivamente. Usate questa impostazione se il segnale è inviato ad un altoparlante con il filtro LO-CUT
incorporato.
Impostate questo interruttore su ON per inviare alle uscite L e R il segnale filtrato passa alto (LO-CUT) degli
ingressi L e R rispettivamente. Usate questa impostazione con i monitor EIKON in un sistema STEREO.
14. LO-CUT potenziometro
Con questo controllo potete selezionare tra 80 e 120 Hz la frequenza del filtro LO-CUT (passa alto)
applicato ai segnali in uscita verso i monitors (vedi l’esempio per le impostazioni più usate con i studio
monitors EIKON).
15. LINK uscita
Usate questa uscita per inviare il segnale dell’ingresso a un secondo subwoofer (vedi anche il diagramma
a blocchi EIKON10S).
16. HI-CUT potenziometro
Con questo controllo potete selezionare tra 80 e 120 Hz la frequenza del filtro HI-CUT (passa basso) applicato
al segnale inviato al subwoofer (vedi l’esempio per le impostazioni più usate con i monitors EIKON).
17. PHASE
Questo interruttore inverte la polarità del subwoofer. A seconda della posizione del subwoofer rispetto
ai monitor, si può ottenere una migliore risposta in bassa frequenza se si inverte la polarità del segnale
che pilota il subwoofer. Ascoltando in differenti punti della stanza, sperimentate quale impostazione di
questo interruttore suona meglio (vedi gli esempi per le impostazioni da usare con i monitors EIKON).
18. LEVEL
Questo potenziometro imposta il livello del segnale inviato all’amplificatore del subwoof e r.
19. ON
LED rosso che indica che il subwoofer è acceso “ON”.
EIKON PANNELLO RETE
20. POWER
Il monitor è acceso "ON" quando l'interruttore è nella
posizione "I". Agite su questo tasto per accendere o
spegnere il monitor.
21. AC~ (presa alimentazione rete)
In questa presa va inserito il cavo di alimentazione di
rete del monitor. Si raccomanda di utilizzare
esclusivamente il cavo di alimentazione in dotazione.
Accertatevi che il monitor sia spento prima di inserire il
cavo di alimentazione nella presa di corrente.
22. FUSE (portafusibili) / SELETTORE DI VOLTAGGIO
In questo vano è inserito il fusibile di protezione
principale di rete.
ATTENZIONE: rimpiazzare il fusibile di protezione esclusivamente con un fusibile con le medesime
caratteristiche riportate sul prodotto. Se dopo la sostituzione, il fusibile interrompe nuovamente
il funzionamento dell'apparato, non insistere e contattare il servizio assistenza proel.
Il portafusibile funziona anche come selettore della tensione di rete: impostare la tensione di rete della
linea elettrica del vostro paese (tipicamente è già impostato di fabbrica e non è necessario cambiarlo).
ATTENZIONE: inserire il selettore di rete nella posizione corretta, una sbagliata impostazione
della linea elettrica AC LINE VOLTAGE può danneggiare seriamente l'amplificatore interno.
Page 23

23
DISPOSIZIONE STEREO DI BASE
I sistemi a due vie usano un woofer e un tweeter montati in linea
verticale, per cui esiste una differenza di distanza fra i centri
acustici di questi due dispositivi e il punto di ascolto. Inoltre le
condizioni di ascolto in campo ravvicinato (nearfield)
ingigantiscono gli effetti dovuti a queste differenze e, ascoltando
molto vicino agli altoparlanti, anche piccoli movimenti della testa
influenzano in modo significativo il suono. Disponendo il woofer e
il tweeter verticalmente si minimizza questo problema, per cui è
consigliabile installare i monitor sempre in posizione
verticale: in questo modo si ha, nella posizione di
ascolto, la massima libertà di movimento sul piano
orizzontale.
Per ottenere un suono costante e lineare con una
buona immagine stereo occorre orientare gli
altoparlanti seguendo la disposizione di un triangolo
equilatero. La distanza tra i due monitor deve essere
grosso modo la stessa distanza che c’è tra un monitor e
l’ascoltatore. L’asse degli altoparlanti (mostrato nella
figura) deve puntare verso la posizione più arretrata
dell’ascoltatore, come indicato dalle due teste nel
disegno.
Sull’asse verticale è necessario puntare i monitor al
livello delle orecchie, cercando di evitare le prime
riflessioni in arrivo dalla console del mixer o tavolo di
lavoro della DAW (computer): molto pratico a questo
scopo è l’uso di isolatori per monitor nearfield (PROEL
ISOBLOK) e supporti (PROEL KP MONITOR STAND).
Page 24

24
IMPOSTAZIONE STEREO CON SUBWOOFER
Il subwoofer EIKON 10S incorpora sia il crossover che l ’amplificatore e, di conseguenza, richiede solamente un
appropriato cablaggio per integrarlo nel sistema di monitor nearfield.
In un sistema STEREO si raccomanda l’uso del filtro passa alto interno al subwoofer per filtrare il segnale
inviato ai monitor full-range: collegate le uscite L e R del subwoofer ai corrispondenti ingressi LINE IN del
monitor full-range amplificato.
Un settaggio appropriato di un sistema con subwoofer deve raggiungere lo scopo di estendere la risposta in
basso dei monitors senza produrre una quantità esagerata di basse frequenze nella stanza. Un settaggio
improprio può causare una risposta esagerata alle frequenze basse e, di conseguenza, può determinare un
missaggio carente di bassi da parte dell’ingegnere del suono.
Anche se le frequenze basse sono prettamente non-direzionali, tuttavia ciò non significa che si può ignorare
la disposizione del subwoofer nella stanza: per esempio, posizionare il subwoofer vicino ad un muro o in un
angolo generalmente incrementa in modo considerevole la risposta alle frequenze basse. Il subwoofer deve
essere posizionato sul pavimento e lontano dai muri: nel caso debba essere posizionato vicino ad un muro si
consideri di ridurne il livello. La distanza tra il sub-woofer e la posizione di ascolto può essere modificata per
produrre il migliore bilanciamento delle basse frequenze nel sistema.
Dato che il suono prodotto dal subwoofer interagisce con gli altri monitors nella stanza, è molto importante
considerare il subwoofer ed i monitor nearfield come un sistema completo. La frequenza di crossover ed il
livello del sub-woofer devono essere impostati in modo diverso a seconda del monitor nearfield utilizzato:
per semplificare questa operazione, la tabella sotto riportata suggerisce le migliori impostazioni per i diversi
modelli EIKON.
Per verificare se il livello e gli altri parametri del sub sono corretti e se esso è collocato nella posizione
ottimale, attivate l’intero sistema di monitoraggio e riproducete una serie di brani conosciuti di generi diversi:
spesso una buona impostazione richiede lunghi tempi di ascolto. Quando tutti i brani preferiti suoneranno
Page 25

25
correttamente e la posizione del subwoofer produrrà il miglior bilanciamento e la migliore qualità dei bassi
Impostazione EIKON 10S:
con EIKON 5
con EIKON 6
con EIKON 8
nel sistema, probabilmente questa sarà la migliore impostazione per la propria combinazione di stanza /
altoparlanti.
LEVEL
PHASE
HI-CUT
LO-CUT
IMPOSTAZIONE SURROUND 5.1
La configurazione 5.1 è lo standard per
numerose applicazioni di suono in surround,
che includono cinema, televisione e altre
applicazioni consumer.
I tre canali frontali sono concepiti per essere
usati come un sistema convenzionale stereo a
tre canali, mentre i canali posteriori/laterali
sono destinati alla generazione di
ambientazioni ed effetti speciali. I cinque
canali sono tutti a gamma intera, con anche il
contenuto di frequenze basse.
Il componente ‘.1 ’ è un canale separato
dedicato ad effetti in bassa frequenza (LFE) ed
è diffuso da un subwoofer dedicato con la
risposta limitata 120 Hz. Il canale LFE non è
un "canale subwoofer” e non è destinato a
trasmettere le componenti in bassa
frequenza dei segnali dei canali principali, ma
a trasmettere speciali contenuti a bassa
frequenza che richiedono elevate pressioni
sonore ed una elevata dinamica, che non
possono essere gestite dai canali principali.
Page 26

26
Impostazioni EIKON 10S:
con EIKON 5
con EIKON 6
con EIKON 8
LEVEL
PHASE
HI-CUT
LO-CUT
BASS MANAGEMENT
“Bass Management” è un termine che si riferisce alla pratica di utilizzare un sub-woofer per riprodurre le
basse frequenze dei canali principali. Se non si dispone di monitor full-range di grandi dimensioni, come nella
maggior parte dei sistemi home-theater, il Bass Management (in genere attivabile selezionando “Small
Speakers” nel menù di setup altoparlanti dei ricevitori home-theater) reindirizza i bassi dei cinque canali fullrange (solitamente sotto 80 Hz) e del canale LFE al sub-woo fer, dove possono essere riprodotti al meglio.
Il Bass Management è usato in pratica in ogni impianto home-theater consumer, per cui l’ingegnere del
suono per mixare correttamente ha bisogno che il proprio sistema di studio monitoring sia in grado di
riprodurre adeguatamente le basse frequenze, in modo da evitare componenti subsoniche indesiderate come
scoppiettii, rumore di condizionatori, rumore di traffico, passi, etc. Questi rumori subsonici verrebbero
(non usato)
(non usato)
(non usato)
Page 27

27
mascherati dal naturale filtro passa-alto dei monitor nearfield, che hanno una risposta in frequenza che non
Impostazioni EIKON 10S:
con EIKON 5 LR
con EIKON 6 LR
con EIKON 8 LR
va al di sotto dei 40 o 50 Hz, e quindi non verrebbero rilevati in studio. Tuttavia, dal momento che
praticamente tutti i sistemi home-theater utilizzano subwoofer con il Bass Management, gli utilizzatori
sentirebbero questi disturbi infra-sonici ad alto volume nelle loro case.
Il Bass Management effettivamente estende la risposta in bassa frequenza dei monitor nearfield fino a 25 o
40 Hz (a seconda del subwoofer usato), permettendo all’ingegnere del suono di individuare i rumori subsonici ed evitarli con opportune azioni in studio.
.
LEVEL
PHASE
HI-CUT
LO-CUT
impostare al massimo o al centro
impostarlo al fine di ottenere più bassi
tipicamente controllato dal sistema “Bass Management”, impostarlo
al massimo
(non usato)
Page 28

28
SPECIFICHE TECNICHE
EIKON 5
EIKON 6
EIKON 8
Sistema
2 vie bass reflex
2 vie bass reflex
2 vie bass reflex
Altoparlante Alti
tweeter 0.75” a cupola su
guida d’onda ellittica
tweeter 1” a cupola su
guida d’onda ellittica
tweeter 1” a cupola su
guida d’onda ellittica
Altoparlante Bassi
woofer 5.25” con cono
rinforzato in fibra di vetro
woofer 6.5” con cono
rinforzato in fibra di vetro
woofer 8” con cono
rinforzato in fibra di vetro
Copertura Angolare
90° H x 60° V
90° H x 60° V
90° H x 60° V
Potenza Cont. Amp. Alti
15 W Classe AB
20 W Classe AB
20 W Classe AB
Potenza Cont. Amp. Bassi
30 W Classe AB
50 W Classe AB
70 W Classe AB
Processamento
Analogico
Analogico
Analogico
Risposta in Frequenza
55 Hz - 20 kHz
50 Hz - 20 kHz
45 Hz - 20 kHz
SPL max
104 dB
106 dB
109 dB
Connettori
1/4” JACK, XLR-F, RCA
1/4” JACK, XLR-F, RCA
1/4” JACK, XLR-F, RCA
Controlli
LEVEL, HF ADJUST
LEVEL, HF ADJUST
LEVEL, HF ADJUST
Costruzione
MDF laminato vinile con
frontale in ABS
MDF laminato vinile con
frontale in ABS
MDF laminato vinile con
frontale in ABS
Colore
Nero
Nero
Nero
Alimentazione
230 V~ o 120 V~ 50/60 Hz
rete
230 V~ o 120 V~ 50/60 Hz
rete
230 V~ o 120 V~ 50/60 Hz
rete
Consumo
50 W
70 W
100 W
Dimensioni (L x A x P)
185 x 285 x 230 mm
225 x 320 x 270 mm
265 x 380 x 305 mm
Peso
5 kg (11.0 lb)
8 kg (17.6 lb)
10 kg (22.0 lb)
EIKON 10S
Sistema
Bass reflex
Altoparlante
woofer 10” con cono pp
Potenza Cont. Amp.
150 W Classe AB
Processamento
Analogico
Risposta in Frequenza
40 Hz - 150 Hz
SPL max
110 dB
Connettori
1/4” JACK, XLR-F (stereo
OUTPUT), XLR-M (LINK)
Controls
LEVEL, HI-CUT & LO-CUT
frequency selector, PHASE
Costruzione
MDF laminato vinile con
frontale in MDF
Colore
Nero
Alimentazione
230 V~ o 120 V~ 50/60 Hz
rete
Consumo
180 W
Dimensioni (L x A x P)
330 x 365 x 365 mm
Peso
33.7 kg (74.3 lb)
con selettore tensione di
INPUT), XLR-M (stereo
con selettore tensione di
con selettore tensione di
con selettore tensione di
Page 29

29
DIMENSIONI
Page 30

30
ACCESSORI
Page 31

31
Page 32

32
PROEL S.p.A.
(World Headquarters - Factory)
Via alla Ruenia 37/43
64027 Sant’Omero (Te) – Italy
Tel: +39 0861 81241
Fax: +39 0861 887862
www.proel.com
 Loading...