

Page 1
840160900
Roaster Oven
English.......................................................................................... 2
USA: 1-800-851-8900
Visit proctorsilex.com for delicious recipes and to register your product online!
Français .............................................................................................. 9
Canada : 1-800-267-2826
Consulter proctorsilex.ca pour des recettes délicieuses et pour
enregistrer votre produit!
Español ...................................................................................... 17
México: 01 800 71 16 100
¡
Visite proctorsilex.com para recetas deliciosas y para
registro de su producto en línea!
Rôtissoire
Horno Asador
READ BEFORE USE
LIRE AVANT L’UTILISATION
LEA ANTES DE USAR
Le invitamos a leer cuidadosamente este
instructivo antes de usar su aparato.
840160900 Ev01.qxd 2/6/07 9:05 AM Page 1
Page 2

2
IMPORTANT SAFEGUARDS
SAVE THESE INSTRUCTIONS!
When using electrical appliances, basic safety
precautions should always be followed,
including the following:
1. Read all instructions.
2. Do not touch hot surfaces. Use handles
or knobs.
3. Use oven mitts to remove the Insert Pan
or Rack from the roaster oven; or to
remove a baking pan or cooked food
from the insert pan.
4. To protect against electrical shock do
not immerse roaster base, cord, or plug
in water or other liquid.
5. Close supervision is necessary when any
appliance is used by or near children.
6. Unplug from outlet when not in use and
before cleaning. Allow to cool before
putting on or taking off parts and before
cleaning.
7. Do not operate any appliance with a
damaged cord or plug, or after the
appliance malfunctions or has been
dropped or damaged in any manner.
Call our toll-free customer service number
for information on examination, repair, or
adjustment.
Other Consumer Safety Information
8. The use of accessory attachments
not recommended by the appliance
manufacturer may cause injuries.
9. Do not use outdoors.
10. Do not let cord hang over edge of table
or counter, or touch hot surfaces,
including the stove.
11. To disconnect, turn any control to “Off”
then remove plug from wall outlet.
12. Do not place on or near a hot gas or
electric burner, or in a heated oven.
13. Extreme caution must be used when
moving an appliance containing hot oil
or other hot liquids.
14. Steam escaping from under lid is hot
and can burn.
15. Do not use without the insert pan
specifically designed for this model.
16. Do not use appliance to melt wax or
any other non-food use.
17. Do not allow flammable materials such
as curtains, draperies, walls, cabinets,
backsplashes and the like to touch any
part of the roaster oven while it is in
operation.
18. Do not use appliance for other than
intended use.
This roaster oven is not intended for
commercial, professional, or industrialtype usage. This roaster oven is designed
only for cooking food. It should not be
used for heating non-food products such
as melting wax. This appliance is
designed, built, and intended for
household use only.
The length of the cord used on this appliance was selected to reduce the hazards
of becoming tangled in, or tripping over a
longer cord. If a longer cord is necessary an
approved extension cord may be used.
The electrical rating of the extension cord
must be equal to or greater than the rating
of the roaster oven. Care must be taken to
arrange the extension cord so that it will not
drape over the countertop or tabletop
where it can be pulled on by children or
accidentally tripped over.
wWARNING
Shock Hazard
• Do not immerse this appliance in water or other liquid.
• This appliance has a polarized plug (one wide blade) that reduces the risk of electrical shock. The plug
fits only one way into a polarized outlet. Do not defeat the safety purpose of the plug by modifying the
plug in any way or using an adaptor. If the plug does not fit, reverse the plug. If it still does not fit, have
an electrician replace the outlet.
840160900 Ev01.qxd 2/5/07 12:25 PM Page 2
Page 3
3
IMPORTANT! PLEASE READ THIS BOOK! THE ROASTER OVEN
COOKS SOME FOODS FASTER THAN A CONVENTIONAL OVEN.
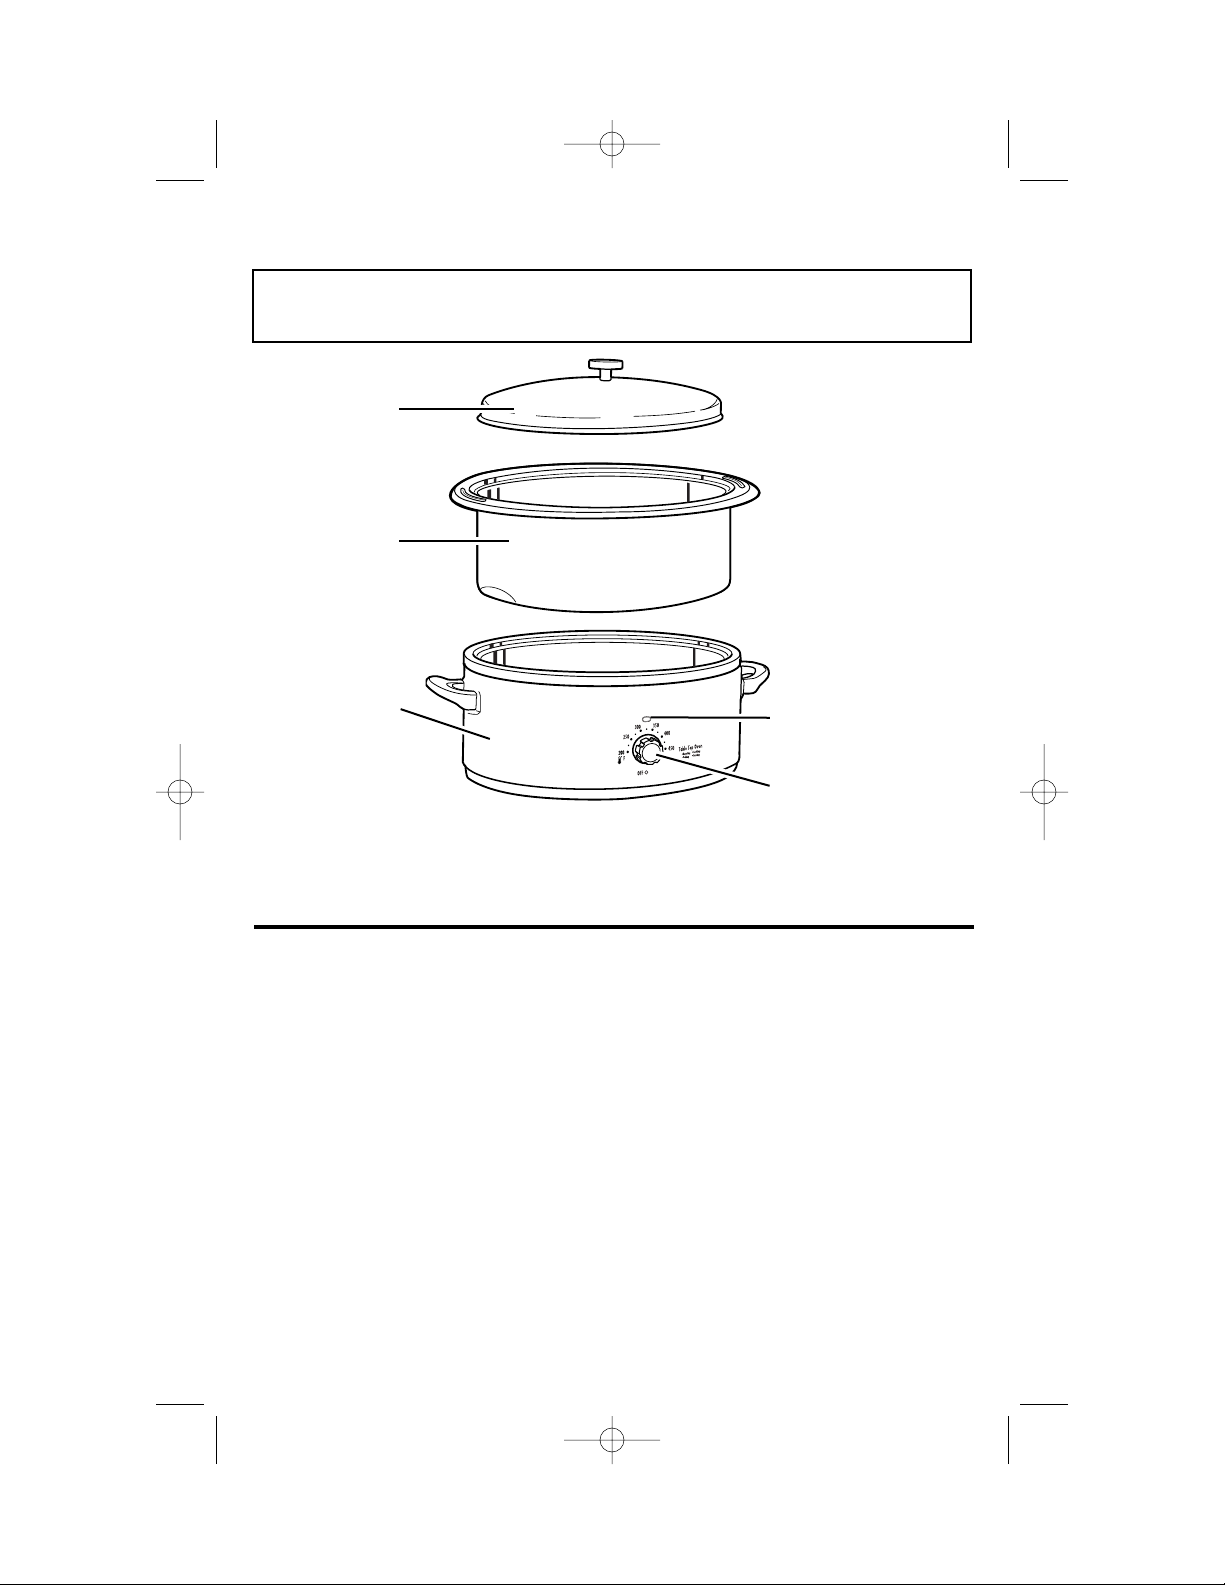
Parts & Features
Tips for Using
BEFORE FIRST USE: Wash the insert pan and lid before using. During the first
use of the roaster oven, some smoke and odor may be noticed. The smoke and
odor should not occur after this first heating of the oven.
• The insert pan should always be used
when cooking in the roaster oven. If
cooking large quantities of soups or
stews, the insert pan may be used
as the cooking pan in the roaster
base. It may also be used as a large
roasting pan in the roaster base.
• Do not use the insert pan as a baking
pan for cakes, breads, or casseroles.
A separate pan must be placed in the
insert pan when cooking these foods.
• Before baking or roasting in the
roaster oven, make sure the pan
or dish you plan to use will fit by
placing it in the insert pan.
• We do not recommend using oven
roasting bags in the roaster oven.
• Do not remove the cover of the
roaster oven unless necessary.
Removing the cover allows heat to
escape and affects the temperature
of the roaster oven.
• The indicator light will cycle on and
off when the oven is heating to
maintain set temperature.
Using Your Roaster Oven
Cover
Removable
Insert Pan
Base
Indicator Light
Temperature
Control
840160900 Ev01.qxd 2/5/07 12:25 PM Page 3
Page 4
Roasting Meats and Poultry
How to Use
4
wCAUTION
• Escaping steam may cause burns.
• Use hot mitts to protect hands
when removing insert pan, rack,
baking pan or cooked food.
1. Make sure temperature control is
turned to OFF. Plug cord into
120 volt AC outlet.
2. Place food to be cooked in a pan
(or directly in the insert pan) and
then place in the roaster oven and
replace the cover.
3. Set temperature control to desired
setting.
4. When finished cooking, remove
cover and then remove food.
5. Turn temperature control to OFF
and unplug roaster oven.
NOTES:
• The insert pan should always
be placed in the roaster base when
cooking.
• If your model has a nonstick insert
pan, do not preheat the roaster oven.
This will shorten the life of the nonstick coating.
• When preparing to roast, place the
meat or poultry in the insert pan.
Then place the insert pan in the
roaster oven and replace the cover.
• We recommend the use of a meat
thermometer to assure perfectly
cooked roasts and poultry every time.
If using a meat thermometer, the
meat or poultry should be removed
from the roaster oven when the thermometer reading is 5 to 10 degrees
below the desired temperature. The
internal temperature will continue to
rise after the meat has been removed
from the roaster oven.
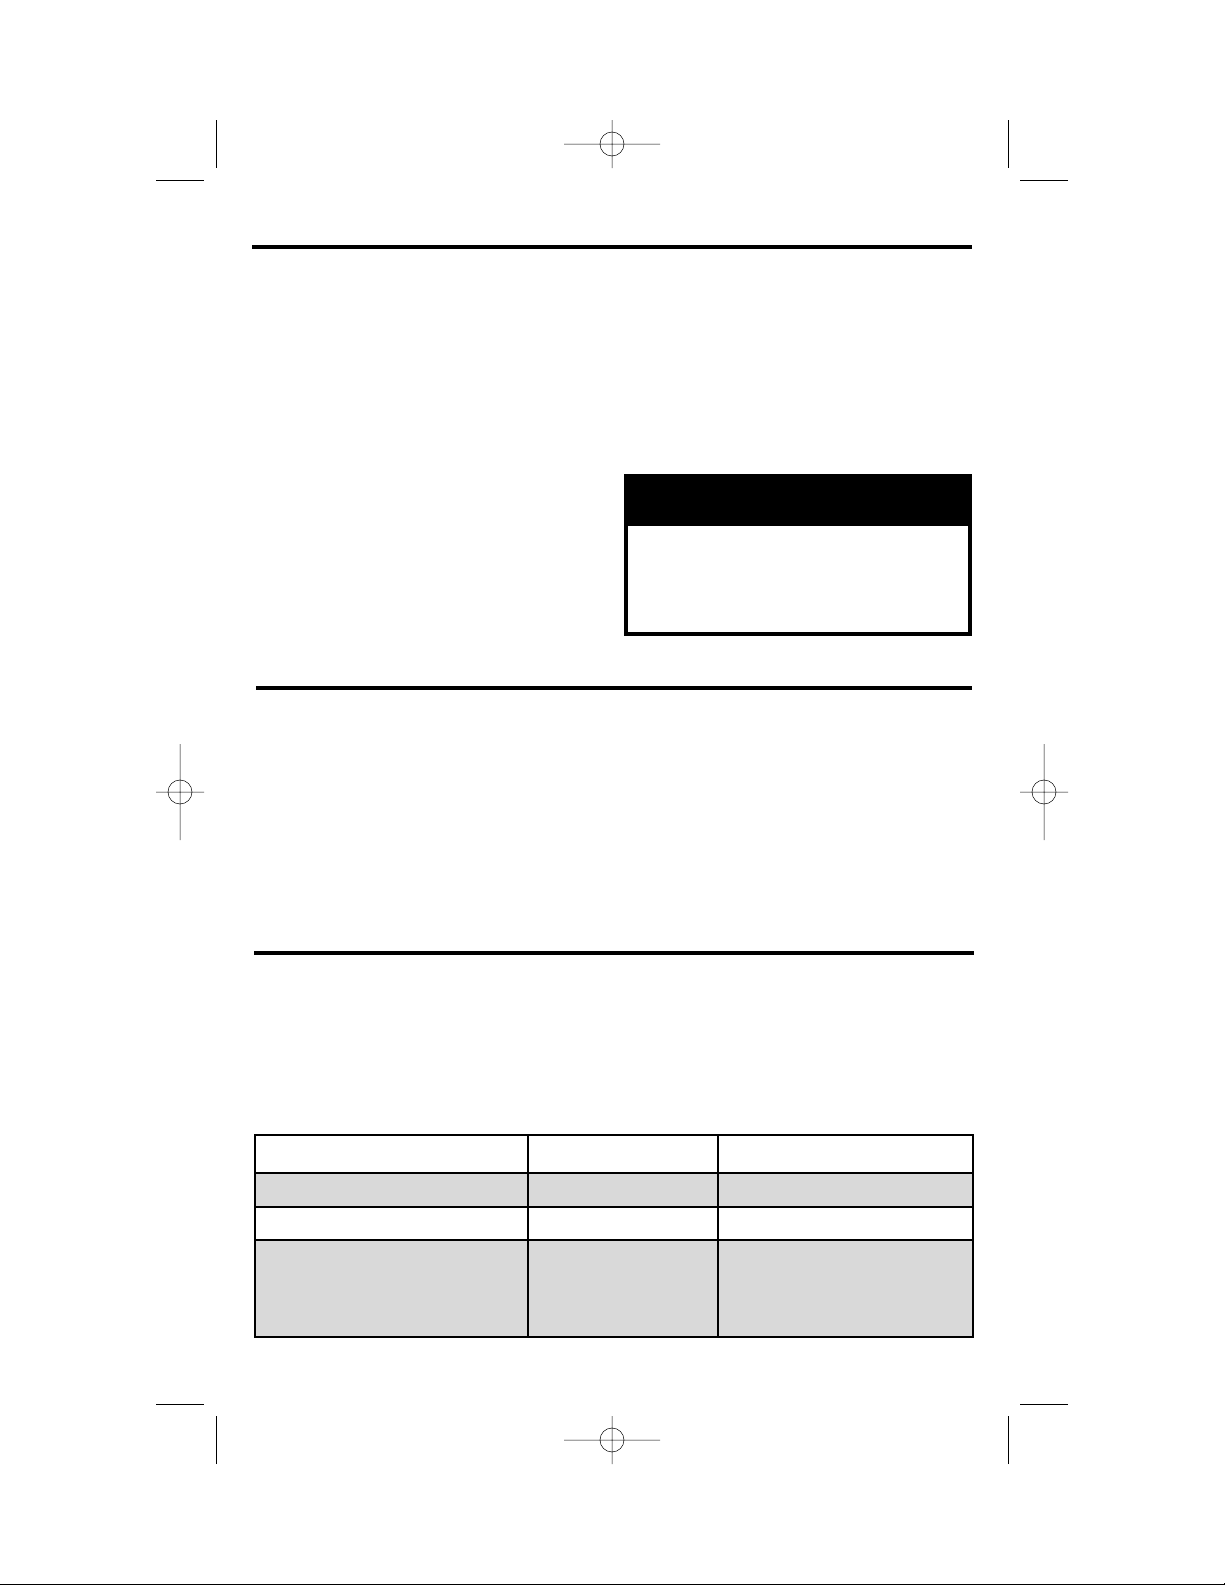
CUT TEMPERATURE MINUTES PER POUND
Beef roasts (4 lbs/1.8 kg) 325°F/160ºC 12 to 20
Pork roasts (3 lbs/1.35 kg) 325°F/160ºC 20 to 30
Smoked ham
Cook before eating 325°F/160ºC 15 to 30
Fully cooked 325°F/160ºC 12 to 25
Meat Roasting Chart
• The Roasting Chart lists cooking
times for tender cuts of meat that
are usually dry-roasted. These roasts
are from the rib or sirloin area. To
tenderize cuts from the leg (ham) or
shoulder/chuck area, cook in liquid
for a longer period of time.
• Roasting times indicated are
approximate and should be used
only as a general guideline. Individual
cuts of meat and personal preference may dictate longer or shorter
roasting times.
840160900 Ev01.qxd 2/5/07 12:25 PM Page 4
Page 5
5
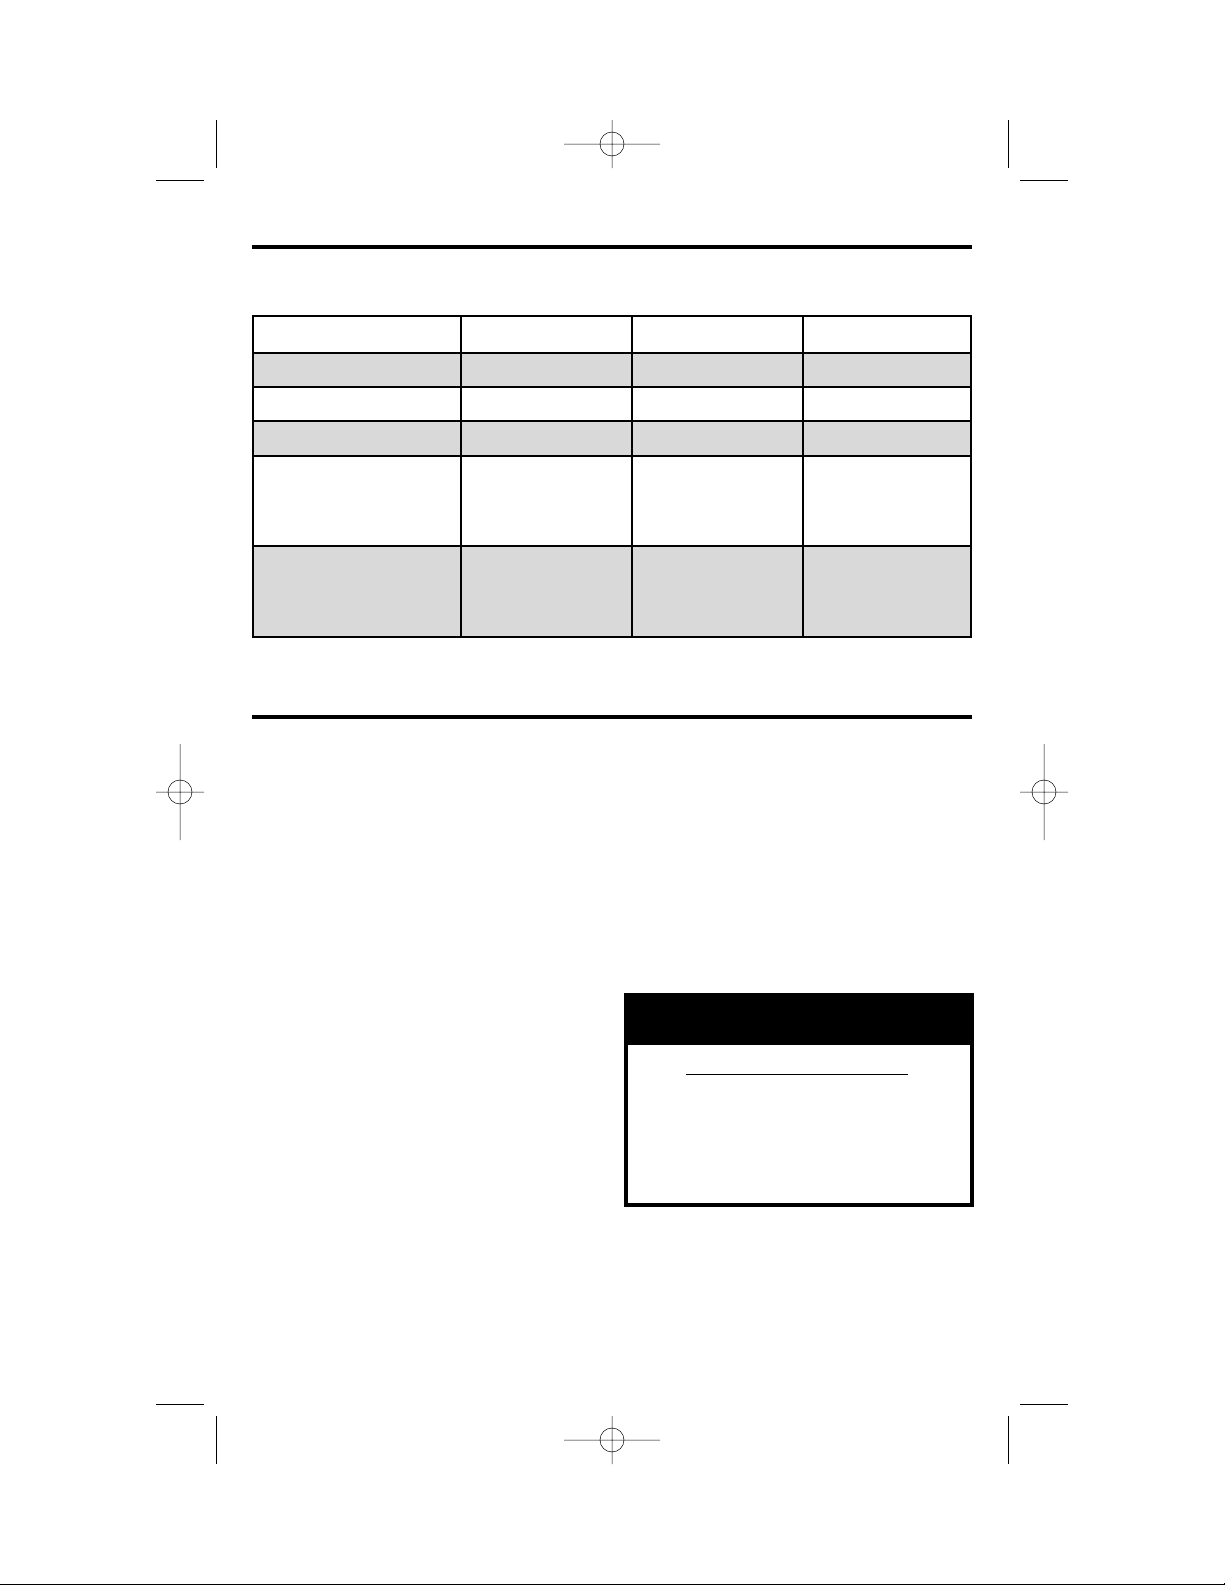
Final Meat Thermometer Readings
Cook to desired doneness by measuring the internal temperature of the meat with
a meat thermometer.
MEAT RARE MEDIUM WELL DONE
Beef 140°F/60ºC 160°F/70ºC 170°F/77ºC
Pork * 160°F/70ºC 170°F/77ºC
Lamb 140°F/60ºC 160°F/70ºC 170°F/77ºC
Smoked ham
Cook before eating 160°F/70ºC
Fully cooked 140°F/60ºC
Poultry
Roasting chicken 180°F/82ºC
Turkey 180°F/82ºC
Quantity Cooking
• The insert pan may be used as a
large cooking utensil when cooking
or heating large quantities, about
5 quarts (5 L). It may be used to
simmer sauces, soups, or stews,
or simply to heat or warm large
quantities.
• For example, set the temperature
control at 250°F (120ºC) and the
roaster oven will warm soup or
spaghetti sauce from refrigerated
temperature to serving temperature in
about one hour.
Cleaning
wWARNING
Electrical Shock Hazard
• Disconnect power before cleaning.
• Do not immerse cord, plug or base
in any liquid.
Failure to follow these instructions
can result in death or electrical shock.
1. Turn temperature control to OFF.
Unplug roaster oven from outlet and
let cool.
2. Wash cover and insert pan in hot,
soapy water. To remove burned-on
food, let soak, then scrub with a
nylon scouring pad. Rinse in hot
water, then dry.
3. Wipe the inside of the roaster base
with a damp cloth.
4. Wipe the outside of the roaster oven
with a damp, soapy cloth; then dry.
840160900 Ev01.qxd 2/5/07 12:36 PM Page 5
Page 6

6
Recipes Using Insert Pans
Baked Potatoes
3 to 4 pounds (1.35 to 1.8 kg) baking potatoes, about 5 to 8 potatoes
Scrub potatoes and pierce with a fork. Stack potatoes in the insert pan so that
they do not touch sides. Place cover on roaster and bake at 400°F (205ºC) for 1
hour and 15 minutes or until tender when pierced with a fork.
Honey Roasted Spareribs
For marinade:
1 teaspoon (5 ml) minced garlic
1 cup (250 ml) packed light brown sugar
1 cup (250 ml) honey
1
⁄4 cup (60 ml) cider vinegar
1
⁄4 cup (60 ml) Worcestershire sauce
1 tablespoon (15 ml) salt
2 teaspoons (10 ml) ground ginger
1 teaspoon (5 ml) Tabasco
4 racks pork spareribs (about 4 pounds [1.8 kg])
Combine garlic, brown sugar, honey, vinegar, Worcestershire, salt, ginger, and
Tabasco; mix well. Cut ribs to fit into insert pan without touching the sides. Coat
spareribs with marinade. Place spareribs in insert pan and pour 1 cup (250 ml) of
marinade over ribs. Roast at 350°F (180ºC) for one hour. Add remaining marinade
and roast an additional hour. Makes 4 servings.
Oven Roasted Beef Stew
2 pounds (900 g) beef chuck roast, cut into 1-inch (2.5 cm) cubes
1 pound (450 g) bag baby carrots
2 large potatoes, cubed
2 103⁄4 ounce (309 g) cans condensed cream of tomato soup
3 cups (750 ml) water
1.5 ounce (45 g) envelope beef stew seasoning mix
Place beef, carrots, and potatoes in insert pan. In a bowl, whisk together the
soup, water, and seasoning packet. Pour over beef and vegetables. Cover and
roast at 250°F (120ºC) for 3 hours or until beef is tender. Occasionally remove
cover and stir. Makes 4 to 6 servings.
840160900 Ev01.qxd 2/5/07 12:25 PM Page 6
Page 7

7
Recipes Using Other Pans or
Baking Dishes
Fruit Crisp
3 cups (750 ml) sliced apples (or frozen blueberries)
1 cup (250 ml) quick oats
2
⁄3 cup (150 ml) brown sugar
1
⁄2 cup (125 ml) flour
1 teaspoon (5 ml) cinnamon
1
⁄4 teaspoon (1.25 ml) salt
1
⁄4 teaspoon (1.25 ml) nutmeg
1
⁄2 cup (125 ml) butter melted
Place apples or berries in a greased 9x5-inch (23x13 cm) loaf pan. In a medium
bowl combine oats, brown sugar, flour, cinnamon, salt, and nutmeg. Stir to mix.
Add butter and stir until crumbly. Spoon the mixture on top of fruit. Place pan in
oven. Cover and bake at 400°F (205ºC) for 30 minutes or until bubbly. Makes 4
servings.
Old Fashioned Bread Pudding
6 slices bread
2 eggs
2 egg yolks
1
⁄2 cup (125 ml) sugar
1 cup (250 ml) milk
14-ounce (400 g) can sweetened condensed milk
1 teaspoon (5 ml) vanilla
Grease a 9x5-inch (23x13 cm) loaf pan. Cut bread slices into 1-inch (2.5 cm)
pieces. Dump into prepared loaf pan. Combine eggs, egg yolks, sugar, milk,
sweetened condensed milk, and vanilla. Beat with whisk until mixed. Pour over
bread in pan. Push bread down into mixture to completely coat. Pour 2 cups
(500 ml) hot tap water into insert pan. Carefully set filled loaf pan in water.
Cover and bake at 375°F (190ºC) for 45 minutes. Makes 4 servings.
840160900 Ev01.qxd 2/5/07 12:25 PM Page 7
Page 8

8
Customer Service
If you have a question about your roaster oven, call our toll-free customer service
number. Before calling, please note the model, type, and series numbers and fill in
that information below. These numbers can be found on the bottom of your roaster
oven. This information will help us answer your question much more quickly.
MODEL: ______________ TYPE: _______________ SERIES: _________________
This warranty applies to products purchased in the U.S. or Canada.
LIMITED WARRANTY
This product is warranted to be free from defects in material and workmanship for a period
of one hundred eighty (180) days from the date of original purchase, except as noted
below. During this period, we will repair or replace this product, at our option, at no cost.
THE FOREGOING WARRANTY IS IN LIEU OF ANY OTHER WARRANTY OR CONDITION,
WHETHER EXPRESS OR IMPLIED, WRITTEN OR ORAL INCLUDING, WITHOUT
LIMITATION, ANY STATUTORY WARRANTY OR CONDITION OF MERCHANTABILITY
OR FITNESS FOR A PARTICULAR PURPOSE. ANY LIABILITY IS EXPRESSLY LIMITED
TO AN AMOUNT EQUAL TO THE PURCHASE PRICE PAID, AND ALL CLAIMS FOR
SPECIAL, INCIDENTAL AND CONSEQUENTIAL DAMAGES ARE HEREBY EXCLUDED.
There is no warranty with respect to the following, which may be supplied with this
product, including without limitation: glass parts, glass containers, cutter/strainers, blades,
seals, gaskets, clutches, motor brushes, and/or agitators, etc. This warranty extends only
to the original consumer purchaser and does not cover a defect resulting from abuse,
misuse, neglect including failure to clean product regularly in accordance with
manufacturer’s instructions, use for commercial purposes, or any use not in conformity
with the printed directions. This warranty gives you specific legal rights, and you may also
have other legal rights which vary from state to state, or province to province. Some states
or provinces do not allow limitations on implied warranties or special, incidental or
consequential damages, so the foregoing limitations may not apply to you.
If you have a claim under this warranty, DO NOT RETURN THE APPLIANCE TO THE
STORE! Please call our CUSTOMER SERVICE NUMBER. (For faster service please have
model, series, and type numbers ready for operator to assist you.)
CUSTOMER SERVICE NUMBERS
In the U.S. 1-800-851-8900
In Canada 1-800-267-2826
proctorsilex.com
KEEP THESE NUMBERS FOR FUTURE REFERENCE!
840160900 Ev01.qxd 2/5/07 12:25 PM Page 8
Page 9

9
IMPORTANTES INSTRUCTIONS
CONSERVEZ CES INSTRUCTIONS !
Lors de l’utilisation d’appareils électroménagers, des
précautions fondamentales de sécurité doivent toujours être observées, y compris ce qui suit :
1. Lire toutes les instructions.
2. Ne pas toucher les surfaces chaudes. Utiliser les
poignées ou boutons.
3. Utiliser des gants de cuisine pour retirer le
contenant intérieur ou la grille de la rôtissoire ;
ou pour sortir un moule à gâteau ou des aliments
cuits du contenant intérieur.
4. Pour protéger contre le risque de choc électrique,
ne pas immerger la base de la rôtissoire, le cordon
ou la fiche dans l’eau ou autre liquide.
5. Une bonne surveillance est nécessaire pour tout
appareil utilisé par des enfants ou près d’eux.
6. Débrancher l’appareil de la prise de courant élec-
trique lorsqu’il n’est pas utilisé et avant un
nettoyage. Le laisser refroidir avant d’y placer ou
d’y enlever des pièces et avant un nettoyage.
7. Ne pas faire fonctionner un appareil électroménag-
er avec une fiche ou un cordon endommagé, ou
lorsque l’appareil ne fonctionne pas bien ou a été
échappé ou endommagé d’une manière quelconque.
Composer notre numéro de service aux clients,
sans frais d’interurbain, pour des renseignements
concernant l’examen, la réparation ou l’ajustement
8. L’utilisation d’accessoires non recommandés par le
fabricant de l’appareil ménager peut causer des
blessures.
Autres renseignements de sécurité aux consommateurs
9. Ne pas utiliser à l’extérieur.
10. Ne pas laisser le cordon pendre du bord d’une
table ou d’un comptoir, ni toucher des surfaces
chaudes, y compris la cuisinière.
11. Pour déconnecter, tourner la commande de
température sur « Off », puis débrancher la fiche
de la prise murale.
12. Ne pas placer l’appareil sur ou près d’un brûleur
à gaz chaud, ou d’un élément électrique, ou
dans un four chauffé.
13. Une grande précaution doit être prise lors de
l’utilisation d’un appareil électroménager
contenant de l’huile chaude ou autres liquides
chauds.
14. La vapeur s’échappant de dessous le couvercle
est chaude et peut causer des brûlures.
15. Ne pas utiliser sans le plat amovible conçu
spécialement pour ce modèle.
16. Ne pas utiliser cet appareil pour faire fondre de
la cire ou pour tout autre usage non alimentaire.
17. Veiller à ce que les matériaux inflammables tels
que les rideaux, tentures, murs, armoires,
dosserets, etc. ne touchent aucune partie de la
rôtissoire durant son utilisation.
18. Ne pas utiliser l’appareil électroménager à une
fin autre que l’utilisation prévue.
Cette rôtissoire n’est pas destinée à un usage
commercial, professionnel ou industriel. Elle est
conçue uniquement pour la cuisson d’aliments.
Elle ne doit pas être utilisée pour chauffer des
produits non alimentaires, comme faire fondre
de la cire. Cet appareil est conçu, fabriqué et
destiné à l’usage ménager seulement.
La longueur du cordon de cet appareil a été choisie
de façon à ce que l’on ne risque pas de trébucher
dessus. Si un cordon plus long est nécessaire, utiliser une rallonge appropriée. Le calibrage de la
rallonge doit être le même que celui de l’appareil ou
supérieur. Lorsqu’on utilise une rallonge, s’assurer
qu’elle ne traverse pas la zone de travail, que des
enfants ne puissent pas tirer dessus par inadvertance et qu’on ne puisse pas trébucher dessus.
wAVERTISSEMENT
Risque d’électrocution
• N’immergez pas cet appareil dans l’eau ou tout autre liquide.
• Cet appareil est muni d’une fiche polarisée (une lame plus large) qui réduit les risques
d’électrocution. La fiche s’introduit dans la prise polarisée dans un sens seulement. Ne nuisez pas
à la conception sécuritaire de la fiche en la modifiant de quelque façon que ce soit ou en utilisant
un adaptateur. Placez la fiche dans l’autre sens si elle refuse de s’introduire dans la prise. S’il est
encore impossible d’insérer la fiche, demandez à un électricien de remplacer la prise électrique.
840160900 Fv01.qxd 2/5/07 2:06 PM Page 9
Page 10

10
Pièces et caractéristiques
IMPORTANT : VEUILLEZ LIRE CE LIVRET ! LA RÔTISSOIRE CUIT CERTAINS
ALIMENTS PLUS RAPIDEMENT QU’UN FOUR CONVENTIONNEL.
Couvercle
Plat amovible
Base
Voyant lumineux
Commande de
température
Utilisation de la rôtissoire
AVANT L’UTILISATION INITIALE : Laver le plat et le couvercle. Lors de l’utilisation
initiale de la rôtissoire, on remarquera peut-être de la fumée et une odeur. On ne
devrait pas percevoir de fumée ou d’odeur après le premier chauffage de la rôtissoire.
Renseignements à propos de la rôtissoire
• Le plat amovible devrait toujours être
utilisé lors de la cuisson dans la
rôtissoire. Si l’on prépare de grandes
quantités de soupes ou de ragoûts,
le plat amovible peut être utilisé
comme plat de cuisson dans la base
de la rôtissoire. Il peut également
servir de grande rôtissoire dans la
base.
• Ne pas utiliser le plat amovible pour
la cuisson de gâteaux, pains ou mets
en sauce. Un plat distinct doit être
placé dans le plat amovible lors de la
cuisson de ces aliments.
• Avant de faire cuire ou de rôtir
dans la rôtissoire, s’assurer que
le plat que vous prévoyez utiliser
conviendra en le plaçant dans le
plat amovible.
• Nous ne recommandons pas
d’utiliser des sacs de rôtissage
au four dans la rôtissoire.
• Ne pas enlever le couvercle de
la rôtissoire inutilement. Enlever
le couvercle laisse la chaleur
s’échapper et affecte la température
de la rôtissoire.
• L’indicateur lumineux s’allume et
s’éteint pendant la cuisson pour
maintenir une température
constante.
840160900 Fv01.qxd 2/5/07 2:06 PM Page 10
Page 11

11
Mode d’emploi
1. S’assurer que la commande de
température est tournée à OFF.
Brancher le cordon dans une prise
de 120 V CA.
2. Placer la nourriture à faire cuire dans
un plat (ou directement dans le plat
amovible), puis le placer dans la
rôtissoire et replacer le couvercle.
3. Régler la température tel que désiré.
4. Une fois la cuisson terminée, enlever
le couvercle, puis retirer les aliments.
5. Tourner la commande de tempéra-
ture à OFF, puis débrancher la
rôtissoire.
REMARQUES :
• Le plat amovible devrait toujours être
placé dans la rôtissoire lors de la
cuisson.
• Si votre modèle comporte un plat
amovible antiadhérent, ne pas
préchauffer la rôtissoire. Cela raccourcirait la durée de vie du
revêtement anti-adhésif.
wATTENTION
• La vapeur qui s’échappe peut
causer des brûlures.
• Utilisez des gants de cuisine pour
vous protéger les mains quand
vous enlevez la grille, le plat amovible, les bacs ou des aliments cuits.
Rôtissage de viandes et volailles
• Lors de la préparation pour le
rôtissage, placer la viande ou la
volaille dans le plat amovible. Placer
ensuite le plat amovible dans la
rôtissoire et replacer le couvercle.
• Nous recommandons l’utilisation d’un
thermomètre à viande pour assurer
une cuisson parfaite des rôtis et de la
volaille à chaque fois.
• Si on utilise un thermomètre à viande,
la viande ou la volaille devrait être
retirée de la rôtissoire lorsque la
température sur le thermomètre
est de 5 à 10° en-dessous de la
température désirée. La température
interne continuera de s’élever après
que la viande a été retirée de la
rôtissoire.
840160900 Fv01.qxd 2/5/07 2:06 PM Page 11
Page 12

12
COUPE
TEMPÉRATURE MINUTES PAR LIVRE
Rôtis de boeuf 1,8 kg
(4 lb) 325°F/160ªC
12 à 20
Rôtis de porc 1,3 kg (3 lb)
325°F/160ªC 20à 30
Jambon fumé
À faire cuire avant de manger
325°F/160ªC 15à 30
Entièrement cuit
325°F/160ªC 12à 25
Tableau de rôtissage des viandes
•
Le tableau de rôtissage donne les
durées de cuisson pour les morceaux
de viande tendre qui sont habituellement rôtis à sec. Ces rôtis proviennent
des côtes ou de la surlonge. Pour
attendrir des morceaux provenant de
la cuisse (jambon) ou de l’épaule/bloc,
faire cuire dans un liquide pendant une
période plus longue.
• Les durées de rôtissage indiquées
sont approximatives et devraient
être utilisées simplement comme
directives générales. Les morceaux
individuels et les préférences
personnelles peuvent nécessiter
des durées de rôtissage plus longues
ou plus courtes.
Lectures finales sur un thermomètre
à viande
Faire cuire au degré de cuisson désiré en mesurant la température interne de la
viande avec un thermomètre à viande.
VIANDE SAIGNANT À POINT BIEN CUIT
Boeuf
140°F/60ºC 160°F/70ºC 170°F/77ºC
Porc * 160°F/70ºC 170°F/77ºC
Agneau 140°F60ºC 160°F/70ºC 170°F/77ºC
Jambon fumé
À faire cuire avant de manger
160°F/70ºC
Entièrement cuit
140°F60ºC
Poultry
Poulet
180°F/82ºC
Dinde
180°F/82ºC
840160900 Fv01.qxd 2/5/07 2:06 PM Page 12
Page 13

13
Cuisson de grandes quantités
• Le plat amovible peut être utilisé
comme ustensile de cuisson pour
faire cuire de grandes quantités,
environ 5-pintes (5 L). On peut s’en
servir pour faire mijoter des sauces,
soupes ou ragoûts ou simplement
pour chauffer ou réchauffer de
grandes quantités.
• Par exemple, régler la commande de
température à 250°F et la rôtissoire
réchauffera une soupe et de sauce à
spaghetti d’une température
réfrigérée à une température de
service en une heure environ.
Nettoyage de la rôtissoire
1.
Tourner la commande de température
à OFF. Débrancher la rôtissoire de la
prise et la laisser refroidir.
2. Laver le couvercle et le plat
amovible dans de l’eau chaude
savonneuse. Pour enlever les
aliments brûlés sur la surface, faire
tremper, puis frotter avec un tampon
de récurage en nylon. Rincer dans
de l’eau chaude, puis sécher.
3. Essuyer l’intérieur de la base de la
rôtissoire avec un linge humide.
4. Essuyer l’extérieur de la rôtissoire
avec un linge humide savonneux,
puis sécher.
w
AVERTISSEMENT
Risque d’électrocution
• Débrancher de la prise de courant
avant le nettoyage.
• Ne pas immerger le cordon, la fiche
ou la base dans quelque liquide que
ce soit.
Le non-respect de ces instructions
peut entraîner l’électrocution, voire le
décès.
840160900 Fv01.qxd 2/5/07 2:06 PM Page 13
Page 14

Recettes utilisant les
ustensiles inclus
Pommes de terre au four
3 à 4 livres (1.35 à 1.8 kg) de pommes de terre à cuire,
environ 5 à 8 pommes de terre
Frotter les pommes de terre pour les nettoyer et les percer à l’aide d’une
fourchette. Empiler les pommes de terre dans le plat amovible, de façon qu’elles
ne touchent pas les parois. Couvrir la rôtissoire et cuire au four à 400°F (205ºC)
pendant 1 heure et 15 minutes ou jusqu’à ce que les pommes de terre soient
tendres lorsque percées à l’aide d’une fourchette.
Petites côtes de porc rôties au miel
Pour la marinade :
1 cuillère à thé (5 ml) d’ail émincé
1 tasse (250 ml) de cassonade légèrement tassé
1 tasse (250 ml) de miel
1
⁄4 tasse (60 ml) de vinaigre de cidre
1
⁄4 tasse (60 ml) de sauce Worcestershire
1 cuillère à soupe (15 ml) de sel
2 cuillères à thé (10 ml) de gingembre moulu
1 cuillère à thé (5 ml) de Tabasco
4 rangées de petites côtes de porc (environ 4 livres [1.8 kg])
Bien mélanger ensemble l’ail, le cassonade, le miel, le vinaigre, la sauce
Worcestershire, le sel, le gingembre et le Tabasco. Couper les petites côtes pour
qu’elles rentrent dans le contenant intérieur sans toucher les parois. Recouvrir
les côtes de marinade. Les mettre dans le plat amovible et verser une tasse
de marinade dessus. Rôtir à 350°F (180ºC) pendant une heure. Verser le restant
de la marinade et rôtir une heure de plus. Donne 4 portions.
Ragoût de boeuf rôti au four
2 lb (900 g) de rôti de fin de palette, coupé en cubes de 1 po (2,5 cm)
1 lb (450 g) de mini-carottes
2 grosses pommes de terre, coupées en cubes
2 boîtes de 103⁄4 oz (309 g) de crème de tomate (soupe) condensée
3 tasses (750 ml) d’eau
1 sachet de 1,5 oz (45 g) de mélange d’assaisonnement pour ragoût de boeuf
Mettre le boeuf, les carottes et les pommes de terre dans le plat amovible.
Dans un bol, fouetter la soupe, l’eau et l’assaisonnement en sachet. Verser sur le
boeuf et les légumes. Couvrir et rôtir à 250°F (120ºC) pendant 3 heures ou jusqu’à
ce que le boeuf soit tendre. Découvrir occasionnellement pour remuer. Donne 4 à
6 portions.
14
840160900 Fv01.qxd 2/5/07 2:06 PM Page 14
Page 15

Recettes utilisant d’autres
ustensiles ou plats de cuisson
Croustade aux fruits
3 tasses (750 ml) de pommes en tranches (ou de bleuets congelés)
1 tasses (250 ml) d’avoine à cuisson rapide
2
⁄3 tasse (150 ml) de cassonade
1
⁄2 tasse (125 ml) de farine
1 cuillère à thé (5 ml) de cannelle
1
⁄4 cuillère à thé (1.25 ml) de sel
1
⁄4 cuillère à thé (1.25 ml) de noix de muscade
1
⁄2 tasse (125 ml) de beurre fondu
Mettre les pommes ou les baies dans un moule à pain graissé de 9x5 po (23x13
cm). Dans un bol moyen, mélanger l’avoine, le cassonade, la farine, la cannelle, le
sel et la noix de muscade. Bien mélanger. Ajouter le beurre et mélanger jusqu’à
consistance friable. Verser le mélange sur les fruits. Mettre le moule au four.
Couvrir et cuire à 400°F (205ºC) pendant 30 minutes ou jusqu’à ce que le mélange
bouillonne. Donne 4 portions.
Pudding de pain à l’ancienne
6 tranches de pain
2 oeufs
2 jaunes d’oeufs
1
⁄2 tasse (125 ml) de sucre
1 tasse (250 ml) de lait
1 boîte de 14 oz (400 g) de lait condensé sucré
1 cuillère à thé (5 ml) de vanille
Graisser un moule à pain de 9x5 po (23x13 cm). Couper les tranches de pain en
morceaux de 1 po (2.5 cm). Verser dans le moule à pain préparé. À l’aide d’un
fouet, mélanger les oeufs, les jaunes d’oeufs, le sucre, le lait, le lait condensé
sucré et la vanille. Verser sur le pain. Appuyer le pain dans le mélange jusqu’à ce
qu’il en soit recouvert. Verser 2 tasses (500 ml) d’eau chaude du robinet dans le
plat amovible. Placer délicatement le moule à pain rempli dans l’eau. Couvrir et
cuire au four à 375°F (190ºC) pendant 45 minutes. Donne 4 portions.
15
840160900 Fv01.qxd 2/5/07 2:06 PM Page 15
Page 16

16
Service aux clients
Si vous avez une question au sujet de votre rôtissoire, composer notre numéro
sans frais d’interurbain de service aux clients. Avant de faire un appel, veuillez
noter le modèle, le type et les numéros de série, et fournir ces renseignements
ci-dessous. Ces numéros se trouvent à la base de la rôtissoire. Ces renseignements nous aideront à répondre beaucoup plus vite à toute question.
MODÈLE : _______________TYPE : _________________ SÉRIE : _________________
Cette garantie s’applique aux produits achetés aux É.-U. ou au Canada.
GARANTIE LIMITÉE
Ce produit est garanti contre tout vice de main-d’œuvre ou de matériau pendant une
période cent quatre-vingt (180) jours à partir de la date de son achat original, à l’exception
des modalités suivantes. Pendant cette période, nous réparerons ou nous remplacerons
ce produit à notre choix, gratuitement. LA PRÉSENTE GARANTIE REMPLACE TOUTE
AUTRE GARANTIE OU CONDITION, QU’ELLE SOIT EXPRESSE OU IMPLICITE, ÉCRITE
OU ORALE, Y COMPRIS, SANS S’Y LIMITER, TOUTE GARANTIE STATUTAIRE OU DE
QUALITÉ MARCHANDE OU DE CONVENANCE À UN USAGE PARTICULIER. TOUTE
RESPONSABILITÉ EST EXPRESSÉMENT LIMITÉE À UN MONTANT ÉGAL AU PRIX
D’ACHAT PAYÉ, ET TOUTE RÉCLAMATION POUR DOMMAGE SPÉCIAL, INCIDENT ET
CONSÉQUENT EST PAR LA PRÉSENTE EXCLUE. Il n’y a pas de garantie à l’égard des
articles suivants qui sont sujet à usure, qui peuvent être fournis avec ce produit, y compris, sans s’y limiter : pièces en verre, contenants en verre, couteaux/tamis, lames, joints,
joints d'étanchéité, embrayages, brosses à moteur et/ou agitateurs, etc. Cette garantie ne
s’étend qu’au consommateur acheteur initial et ne couvre pas une panne due à une mauvaise utilisation, un mauvais traitement, de la négligence, y compris l’absence de nettoyer
le produit régulièrement conformément aux instructions du fabricant, utilisation à des fins
commerciales ou tout usage non conforme aux instructions imprimées. Cette garantie
vous donne des droits juridiques particuliers et vous pouvez avoir également d’autres
droits juridiques qui varient selon l’État ou selon la province. Certains États ou provinces
ne permettent pas de limite sur les garanties impliquées sur les dommages incidents, conséquents ou spéciaux et par conséquent les limites ci-dessus peuvent ne pas s’appliquer
à vous.
Si vous avez une réclamation sous cette garantie, NE RENVOYEZ PAS L’APPAREIL AU
MAGASIN. Veuillez appeler LE NUMÉRO DE SERVICE À LA CLIENTÈLE (pour un service
plus rapide, veuillez préparer les numéros de modèle, de série et de type pour permettre à
la standardiste de vous aider).
NUMÉROS DU SERVICE À LA CLIENTÈLE
Aux États-Unis 1-800-851-8900
Au Canada 1-800-267-2826
proctorsilex.com
CONSERVEZ CES NUMÉROS POUR RÉFÉRENCE ULTÉRIEURE !
840160900 Fv01.qxd 2/5/07 2:06 PM Page 16
Page 17

17
SALVAGUARDIAS IMPORTANTES
¡
GUARDE ESTAS INSTRUCCIONES!
Cuando use aparatos eléctricos, es importante seguir
todas las precauciones de seguridad que incluyen lo
siguiente:
1. Lea todas las instrucciones.
2. Verifique que el voltaje de su instalación
corresponda con el del producto.
3. No toque superficies calientes. Use las manijas
o las perillas.
4. Use guantes de cocina para sacar la asadera de
inserción o la rejilla del horno asador; o para
sacar una asadera o alimentos cocidos de la
asadera de inserción.
5. Para protegerse contra el riesgo de choque eléctrico, no sumerja la base del asador, el cordón ni
el enchufe en agua ni en ningún otro líquido.
6. Es necesario mantener una supervisión estricta
cuando aparatos eléctricos sean usados por niños
o en presencia de niños.
7. Desenchúfelo del tomacorriente cuando no lo esté
usando y antes de la limpieza. Deje que se enfríe
antes de colocar o sacar alguna pieza, y antes de
limpiarlo.
8. No opere ningún aparato electrodoméstico si el
cordón o el enchufe están averiados, después de
un mal funcionamiento del aparato, o si éste se
ha caído o averiado de alguna forma. Llame a
nuestro número gratuito de servicio al cliente,
para obtener información sobre el examen, la
reparación o la regulación del aparato.
Otra información para la seguridad del consumidor
9. El uso de accesorios no recomendados por el
fabricante del aparato puede causar lesiones.
10. No lo use al aire libre.
11. No deje que el cordón cuelgue sobre el borde de
una mesa o de un mostrador, o que toque alguna
superficie caliente, incluyendo la superficie de una
cocina.
12. Para desconectar, coloque el control en la posición
apagada Off/O y luego saque el enchufe del tomacorriente.
13. No coloque el aparato sobre o cerca de una fuente
de gas caliente o de un quemador eléctrico, ni
dentro de un horno caliente.
14. Es importante tener extremo cuidado cuando se
mueva un aparato electrodoméstico que contenga
aceite caliente u otros líquidos calientes.
15. El vapor que se escapa por debajo de la tapa es
caliente y puede causar quemaduras.
16. No lo use sin la bandeja de inserción especialmente diseñada para este modelo.
17. No use el aparato para derretir cera ni para
cualquier otra aplicación no relacionada con
alimentos.
18. No permita que materiales inflamables como
cortinas, colgaduras, paredes, armarios, placas
posteriores y otras superficies toquen ninguna
parte del horno asador mientras esté funcionando.
19.
No use el aparato electrodoméstico para ningún otro
fin que no sea el indicado.
No use este horno asador en aplicaciones de tipo
comercial, profesional o industrial. Este horno
asador ha sido diseñado solamente para cocinar
alimentos. No debe usarse para calentar productos
no comestibles, tales como la cera. Este aparato
ha sido diseñado y construido para aplicaciones
domésticas solamente y debe utilizarse con ese fin.
El largo del cordón que se usa en este aparato fue
seleccionado para reducir el peligro de que alguien se
enganche o tropiece con un cordón más largo. Si se
necesita un cordón más largo, se puede usar un
cordón de alargue aprobado. La calificación eléctrica
del cable de extensión debe ser igual o superior a la
calificación del horno asador. Se debe tener cuidado al
colocar el cable de extensión de manera que no
cuelgue por encima del mesón o superficie de la mesa
donde los niños lo puedan halar o se puedan tropezar
accidentalmente.
wADVERTENCIA
Peligro de choque eléctrico
• No sumerja este aparato en agua u otro líquido.
• Este aparato cuenta con un enchufe polarizado (una pata más ancha) que reduce el riesgo de choque
eléctrico. El enchufe calza únicamente en una dirección dentro del tomacorriente polarizado. No trate de
obviar el propósito de seguridad del enchufe al tratar de modificarlo de alguna manera o al usar un adaptador. Si el enchufe no calza, inviértalo. Si aún así no calza, llame a un electricista para que reemplace el
tomacorriente.
840160900 Sv01.qxd 2/5/07 2:07 PM Page 17
Page 18

18
Piezas y características
¡
ES IMPORTANTE LEER ESTE MANUAL! EL HORNO ASADOR COCINA ALGUNOS
PRODUCTOS CON MÁS RAPIDEZ QUE UN HORNO CONVENCIONAL.
Tapa
Asadera de
inserción
desmontable
Base
Luz indicadora
Control de
temperatura
Consejos de uso
ANTES DEL PRIMER USO: Lave la asadera de inserción y la tapa antes de usar.
Durante el primer uso del horno asador, puede notarse algo de humo y olor.
Después del primer uso del horno no deberían producirse más humo y olor.
• La asadera de inserción siempre
debe usarse cuando cocine con el
horno asador. Si va a cocinar
grandes cantidades de sopa o estofados, la asadera de inserción puede
utilizarse como la bandeja de cocción
en la base asadora. También puede
utilizarse como una bandeja de
asado grande en la base de asado.
• No utilice la asadera de inserción
como una bandeja para hornear
pasteles, panes o estofados. Debe
colocarse una bandeja separada en
la asadera de inserción cuando
quiera preparar estos alimentos.
• Antes de hornear o asar en el horno
asador, verifique que la bandeja o plato
que planea utilizar entre bien colocándolo en la asadera de inserción.
• No recomendamos el uso de bolsas
de cocción en el horno asador.
• No quite la tapa del horno asador a
menos que sea necesario. Al quitar
la tapa el calor se escapa y esto
afecta la temperatura del horno
asador.
• La luz indicadora se encenderá y
apagará cuando el horno se esté
calentando para mantener la
temperatura configurada.
Cómo usar el horno asador
840160900 Sv01.qxd 2/5/07 2:07 PM Page 18
Page 19

19
wPRECAUCIÓN
• El vapor que escapa puede
provocar quemaduras.
• Utilice guantes de cocina para
proteger sus manos cuando retire
la asadera de inserción, la rejilla, la
asadera común o alimentos cocidos.
Cómo asar carne vacuna y de ave
Cómo utilizarlo
1. Verifique que el control de
temperatura esté en OFF (apagado).
Enchufe el cable en un tomacorriente de 120 voltios AC.
2. Coloque el alimento a cocinar en
una bandeja (o directamente en una
asadera de inserción) y luego
deposítelo en el horno asador y
vuelva a colocar la tapa.
3. Programe el control de temperatura
en la configuración deseada.
4. Cuando termine de cocinar, quite la
tapa y luego saque los alimentos.
5. Gire el control de temperatura a OFF
(apagado) y desenchufe el horno
asador.
NOTAS:
• Cuando cocine, la asadera de
inserción siempre debe colocarse
en la base del asador.
• Si su modelo tiene una asadera de
inserción antiadherente, no
precaliente el horno asador. Esto
acortará la vida útil del revestimiento
antiadherente.
• Cuando se prepare para asar, coloque
la carne vacuna o de ave en la
asadera de inserción. Luego coloque
la asadera de inserción en el horno
asador y vuelva a colocar la tapa.
• Recomendamos el uso de un
termómetro de carne para garantizar
siempre asados y aves perfectamente
cocidos. Si usa un termómetro, la
carne o el ave debe quitarse del
horno asador cuando el termómetro
llegue a los 5 a 10 grados por debajo
de la temperatura deseada. La temperatura interna seguirá elevándose
después de que la carne se haya
quitado del horno asador.
CORTE TEMPERATURA MINUTOS POR LB/KG
Asados de carne (4 lbs/1.8 kg) 325°F/160ºC 12 a 20
Asados de cerdo (3 lbs/1.35 kg) 325°F/160ºC 20 a 30
Jamón ahumado
Cocinar antes de comer 325°F/160ºC 15 a 30
Completamente cocido 325°F/160ºC 12 a 25
Tabla de asado de carne
• La Tabla de asado indica los tiempos
de cocción para cortes de carne tiernos que generalmente se asan en
seco. Estos asados son del área de la
costilla o del cuarto trasero. Para
ablandar los cortes del área de la pata
(jamón) o de la paleta, cocine en líquido
durante un período de tiempo mayor.
• Los tiempos de asado indicados son
aproximados y deben usarse sólo
como una guía general. Los cortes
individuales de carne y las preferencias
personales pueden establecer tiempos
de asado menores y mayores.
840160900 Sv01.qxd 2/5/07 2:07 PM Page 19
Page 20

20
Lecturas finales de termómetro de carne
Prepare hasta alcanzar el punto de cocción deseado midiendo la temperatura
interna de la carne con un termómetro de carne.
CARNE JUGOSA MEDIA BIEN COCIDA
Carne 140°F/60ºC 160°F/70ºC 170°F/77ºC
Cerdo * 160°F/70ºC 170°F/77ºC
Cordero 140°F/60ºC 160°F/70ºC 170°F/77ºC
Jamón ahumado
Cocinar antes de comer 160°F/70ºC
Completamente cocido 140°F/60ºC
Carne de ave
Pollo para asar 180°F/82ºC
Pavo 180°F/82ºC
Cocción en grandes cantidades
• La asadera de inserción puede utilizarse como un recipiente de cocción
grande cuando cocine o caliente
grandes cantidades, alrededor de
5 cuartos de galón (5 L). Puede utilizarse para cocinar salsas o guisos a
fuego lento, o simplemente calentar o
entibiar grandes cantidades.
• Por ejemplo, configure el control de
temperatura en 250°F (120ºC) y el
horno asador calentará sopa o salsa
de espagueti de temperatura refrigerada a temperatura de servicio en
alrededor de una hora.
Limpieza
1. Gire el control de temperatura a OFF
(apagado). Desenchufe el horno
asador del tomacorriente y deje
enfriar.
2. Lave la tapa e introduzca la asadera
en agua caliente jabonosa. Para
quitar alimentos pegados, deje en
remojo, luego raspe con una esponjilla de nylon. Enjuague en agua
caliente, luego seque.
3. Limpie la parte interna de la base del
asador con un paño húmedo.
4. Limpie la parte externa del horno
asador con un paño húmedo
jabonoso, luego seque.
wADVERTENCIA
Peligro de choque eléctrico
• Desconecte el suministro
eléctrico antes de limpiar.
• No sumerja el cable, el enchufe
o la base en ningún líquido.
No seguir estas instrucciones podría
resultar en la muerte o choque eléctrico.
840160900 Sv01.qxd 2/5/07 2:07 PM Page 20
Page 21

21
Recetas para asaderas de
inserción
Papas al horno
3 a 4 libras (1,35 a 1,8 kg) de papas, alrededor de 5 a 8 papas
Lave las papas y perfore con un tenedor. Apile las papas en la asadera de inser-
ción de modo que no toquen los lados. Coloque la tapa sobre el horno asador y
hornee a 400°F (205ºC) durante 1 hora y 15 minutos o hasta que estén tiernas
cuando se las perfore con un tenedor.
Costillas asadas con miel
Para la marinada:
1 cucharadita (5 ml) de ajo picado
1 taza (250 ml) llena de azúcar moreno
1 taza (250 ml) de miel
1
⁄4 taza (60 ml) de vinagre de sidra
1
⁄4 taza (60 ml) de salsa Worcestershire
1 cucharada (15 ml) de sal
2 cucharaditas (10 ml) de jengibre molido
1 cucharadita (5 ml) de Tabasco
4 costillares de cerdo (alrededor de 4 libras [1,8 kg])
Mezcle bien el ajo, el azúcar moreno, miel, vinagre, Worcestershire, sal, jengibre y
Tabasco. Corte las costillas para que entren en la asadera de inserción sin tocar
los lados. Cubra las costillas con la marinada. Coloque las costillas en la asadera
de inserción y vierta una taza de marinada sobre las costillas. Ase a 350°F (180ºC)
durante una hora. Agregue la marinada restante y ase durante una hora más.
Alcanza para 4 porciones.
Estofado de carne asado al horno
2 libras (900 g) de carne vacuna de cuarto delantero, cortada en cubos
de 1 pulgada (2,5 cm)
1 bolsa de una libra (450 g) de zanahorias bebé
2 papas grandes, en cubos
2 latas de 103⁄4 onzas (309 g) de crema condensada de sopa de tomate
3 tazas (750 ml) de agua
Un sobre de 1,5 onzas (45 g) de mezcla de condimentos para estofado de carne
Coloque la carne, las zanahorias y las papas en la asadera de inserción. En un
tazón, bata la sopa, el agua y el paquete de condimento. Distribuya sobre la carne
y los vegetales. Cubra y cocine a 250°F (120ºC) durante 3 horas o hasta que la
carne esté tierna. De vez en cuando quite la tapa y mezcle. Alcanza para 4 a 6
porciones.
840160900 Sv01.qxd 2/5/07 2:07 PM Page 21
Page 22

22
Recetas para otras asaderas
o bandejas de horneado
Crocante de frutas
3 tazas (750 ml) de manzanas en rebanadas (o arándanos congelados)
1 taza (250 ml) de avena
2
⁄3 taza 150 ml) de azúcar moreno
1
⁄2 taza (125 ml) de harina
1 cucharadita (5 ml) de canela
1
⁄4 cucharadita (1,25 ml) de sal
1
⁄4 cucharadita (1,25 ml) de nuez moscada
1
⁄2 taza (125 ml) de manteca derretida
Coloque las manzanas o los arándanos en un molde para pan enmantecado de
9x5 pulgadas (23x13 cm). En un tazón mediano mezcle la avena, el azúcar
moreno, la harina, la canela, la sal y la nuez moscada. Revuelva. Agregue la
manteca y revuelva hasta que se desmenuce. Coloque la mezcla sobre la fruta.
Deposite la asadera en el horno. Cubra y hornee a 400°F (205ºC) durante 30
minutos o hasta que se desmenuce. Alcanza para 4 porciones.
Budín de pan tradicional
6 rebanadas de pan
2 huevos
2 yemas de huevo
1
⁄2 taza (125 ml) de azúcar
1 taza (250 ml) de leche
1 lata de 14 onzas (400 g) de leche condensada endulzada
1 cucharadita (5 ml) de vainilla
Enmanteque un molde para pan de 9x5 pulgadas (23x13 cm). Corte las
rebanadas de pan en piezas de 1 pulgada (2,5 cm). Coloque en el molde para pan
preparado. Mezcle los huevos, yemas de huevo, azúcar, leche, leche condensada
endulzada y vainilla. Mezcle hasta que quede bien mezclado. Vierta sobre el pan
en el molde. Presione el pan en la mezcla hasta lograr una capa. Vierta 2 tazas
(500 ml) de agua caliente en la asadera de inserción. Con cuidado coloque el
molde para pan en el agua. Cubra y hornee a 375°F (190ºC) durante 45 minutos.
Alcanza para 4 porciones.
840160900 Sv01.qxd 2/5/07 2:07 PM Page 22
Page 23

23
PROCEDIMIENTO PARA HACER EFECTIVA LA GARANTÍA
• Para hacer efectiva la garantía no deben exigirse mayores requisitos que la presentación del producto y la póliza
correspondiente, debidamente sellada por el establecimiento que lo vendió.
• Para hacer efectiva la garantía, lleve su aparato al Centro de Servicio Autorizado más cercano a su domicilio (consulte la
lista anexa).
• Si no existe Centro de Servicio Autorizado en su localidad siga las siguientes instrucciones:
1. Empaque su producto adecuadamente para que no se dañe durante el translado.
2. Anote claramente sus datos y los del Centro de Servicio al que está enviando el producto.
3. No incluya partes sueltas ni accesorios para evitar su pérdida.
• El tiempo de reparación, en ningún caso será mayor de 30 días naturales contados a partir de la fecha de recepción del
producto en nuestros Centros de Servicio Autorizados.
• En caso de que el producto haya sido reparado o sometido a mantenimiento y el mismo presente deficiencias imputables al autor de la reparación o del mantenimiento dentro de los treinta días naturales posteriores a la entrega del
producto al consumidor, éste tendrá derecho a que sea reparado o mantenido de nuevo sin costo alguno. Si el plazo de
la garantía es superior a los treinta días naturales, se estará a dicho plazo.
• El tiempo que duren las reparaciones efectuadas al amparo de la garantía no es computable dentro del plazo de la
misma. Cuando el bien haya sido reparado se iniciará la garantía respecto de las piezas repuestas y continuará con
relación al resto. En el caso de reposición del bien deberá renovarse el plazo de la garantía.
DÍA___ MES___ AÑO___
Si desea hacer comentarios o sugerencias con respecto a nuestro servicio o tiene
alguna queja derivada de la atención recibida en alguno de nuestros Centros de
Servicio Autorizados, por favor dirigirse a:
GERENCIA INTERNACIONAL DE SERVICIO
(DIMALSA)
Prol. Av. La Joya s/n. Esq. Av. San Antonio
Col. El Infiernillo C.P. 54878
Cuautitlán, Edo de México
Tel. (55) 58 99 62 42 • Fax. (55) 58 70 64 42
Centro de Atención al consumidor: 01 800 71 16 100
Grupo HB PS, S.A. de C.V.
Monte Elbruz No. 124 Int. 601
Col. Palmitas Polanco
México, D.F. C.P. 11560
Tel. 52 82 31 05 y 52 82 31 06
Fax. 52 82 3167
PRODUCTO:
MARCA:
Hamilton Beach: ❏
Proctor-Silex: ❏
MODELO:
Hamilton Beach/Proctor-Silex cuenta con una Red de Centros de Servicio Autorizada, por favor consulte en la
lista anexa el nombre y dirección de los establecimientos en la República Mexicana en donde usted podrá hacer
efectiva la garantía, obtener partes, componentes, consumibles y accesorios; así como también obtener servicio
para productos fuera de garantía.
Para mayor información llame sin costo: Centro de Atención al consumidor: 01 800 71 16 100
Grupo HB PS, S.A. de C.V. le otorga a partir de la fecha de compra:
GARANTÍA DE 1 AÑO.
• Esta garantía ampara, todas las piezas y componentes del producto que resulten con defecto de fabricación incluyendo la
mano de obra.
•
Grupo HB PS, S.A. de C.V. se obliga a reemplazar, reparar o reponer, cualquier pieza o componente defectuoso;
proporcionar la mano de obra necesaria para su diagnóstico y reparación, todo lo anterior sin costo adicional para el
consumidor.
• Esta garantía incluye los gastos de transportación del producto que deriven de su cumplimiento dentro de su red de servicio.
LIMITACIONES
• Esta garantía no ampara el reemplazo de piezas deterioradas por uso o por desgaste normal, como son: cuchillas,
vasos, jarras, filtros, etc.
• Grupo HB PS, S.A. de C.V. no se hace responsable por los accidentes producidos a consecuencia de una instalación
eléctrica defectuosa, ausencia de toma de tierra, clavija de enchufe en mal estado, etc.
COBERTURA
PÓLIZA DE GARANTÍA
EXCEPCIONES
Esta garantía no será efectiva en los siguientes casos:
a) Cuando el producto se hubiese utlizado en condiciones distintas a las normales. (Uso industrial, semi-industrial
o comercial.)
b) Cuando el producto no hubiese sido operado de acuerdo con el instructivo de uso.
c) Cuando el producto hubiese sido alterado o reparado por personas no autorizadas por Grupo HB PS, S.A. de C.V.
el fabricante nacional, importador o comercializador responsable respectivo.
El consumidor puede solicitar que se haga efectiva la garantía ante la propia casa comercial donde adquirió su producto,
siempre y cuando Grupo HB PS, S.A. de C.V. no cuente con talleres de servicio.
840160900 Sv01.qxd 2/5/07 2:07 PM Page 23
Page 24

24
2/07
840160900
HAMILTON BEACH PROCTOR-SILEX,INC.
P
ROCTOR-SILEX CANADA,INC.
263 Yadkin Road, Southern Pines, NC 28387
Picton, Ontario K0K 2T0
hamiltonbeach.com • proctorsilex.com
hamiltonbeach.com.mx • proctorsilex.com.mx
Modelos:
32180
32180DI
32181
32182
32182DI
32183
32183DI
32184
32221
Características Eléctricas:
120 V~ 60 Hz 1450 W
120 V~ 60 Hz 1450 W
120 V~ 60 Hz 1450 W
120 V~ 60 Hz 1450 W
120 V~ 60 Hz 1450 W
120 V~ 60 Hz 1450 W
120 V~ 60 Hz 1450 W
120 V~ 60 Hz 1450 W
120 V~ 60 Hz 1450 W
Tipo:
RO07
RO07
RO07
RO07
RO07
RO07
RO07
RO07
RO09
Los números de modelo también pueden estar seguidos del sufijo "MX".
RED DE CENTROS DE SERVICIO AUTORIZADA
GRUPO HB PS, S.A. DE C.V.
Distrito Federal
ELECTRODOMÉSTICOS
Av. Plutarco Elias Cailes No. 1499
Zacahuitzco MEXICO 09490 D.F.
Tel: 01 55 5235 2323
Fax: 01 55 5243 1397
CASA GARCIA
Av. Patriotismo No. 875-B
Mixcoac MEXICO 03910 D.F.
Tel: 01 55 5563 8723
Fax: 01 55 5615 1856
Nuevo Leon
FERNANDO SEPULVEDA REFACCIONES
Ruperto Martínez No. 238 Ote.
Centro MONTERREY, 64000 N.L.
Tel: 01 81 8343 6700
Fax: 01 81 8344 0486
Jalisco
REF. ECONÓMICAS DE OCCIDENTE,
S.A. DE C.V.
Garibaldi No. 1450
Ladrón de Guevara
GUADALAJARA 44660 Jal.
Tel: 01 33 3825 3480
Fax: 01 33 3826 1914
Chihuahua
DISTRIBUIDORA TURMIX
Av. Paseo Triunfo de la Rep. No. 5289 Local 2 A.
Int. Hipermart
Alamos de San Lorenzo
CD. JUAREZ 32340 Chih.
Tel: 01 656 617 8030
Fax: 01 656 617 8030
840160900 Sv01.qxd 2/5/07 2:07 PM Page 24
 Loading...