

Page 1

840107400
Coffeemakers ..............................................2
USA: 1-800-851-8900
Cafetières ..................................................11
Canada : 1-800-267-2826
840107400 ENv03.qxd 12/9/02 1:30 PM Page 1
Digitally signed by Elizabeth DeMerchant
cn=Elizabeth DeMerchant, o=Hamilton Beach / Proctor-Silex, c=US
Date: 2002.12.12 11:54:39 -05'00'
Reason: I am approving this document
4.25 X 5.5", 20 pages, English/French, Black Ink, No Bleeds, Map
Page 2

3
This appliance is intended for household use only.
This appliance is equipped with a polarized plug. This type of plug
has one blade wider than the other. The plug will fit into an electrical
outlet only one way. This is a safety feature intended to help reduce
the risk of electrical shock. If you are unable to insert the plug into
the outlet, try reversing the plug. If the plug should still fail to fit,
contact a qualified electrician to replace the obsolete outlet. Do
not attempt to defeat the safety purpose of the polarized plug by
modifying the plug in any way.
The length of the cord used on this appliance was selected to
reduce the hazards of becoming tangled in, or tripping over a longer
cord. If a longer cord is necessary an approved extension cord may
be used. The electrical rating of the extension cord must be equal
to or greater than the rating of the coffeemaker. Care must be
taken to arrange the extension cord so that it will not drape over
the countertop or tabletop where it can be pulled on by children or
accidentally tripped over.
To avoid an electrical circuit overload, do not use another high
wattage appliance on the same circuit with your coffeemaker.
15. Be certain carafe lid is securely in place during brew cycle and
when pouring coffee, do not use force when placing lid on carafe.
16. Do not place coffeemaker on or near a hot gas or electric burner
or in a heated oven.
17. To disconnect coffeemaker, turn controls to OFF, then remove
plug from wall outlet.
18. Warning: To reduce the risk of fire or electric shock, do not
remove the bottom cover. No user serviceable parts are inside.
Repair should be done by authorized service personnel only.
19. Do not use appliance for other than intended use.
SAVE THESE INSTRUCTIONS!
CONSUMER SAFETY INFORMATION
2
When using electrical appliances, basic safety precautions should
always be followed to reduce the risk of fire, electric shock, and/or
injury to persons, including the following:
1. Read all instructions.
2. Do not touch hot surfaces. Use handles or knobs. Care must be
taken, as burns can occur from touching hot parts or from
spilled, hot liquid.
3. To protect against electric shock, do not place cord, plug or
coffeemaker in water or other liquid.
4. Close supervision is necessary when any appliance is used by
or near children.
5. Unplug from outlet when either the coffeemaker or clock is not
in use and before cleaning. Allow to cool before putting on or
taking off parts and before cleaning the appliance.
6. Coffeemaker must be operated on a flat surface away from the
edge of counter to prevent accidental tipping.
7. Do not operate any appliance with a damaged cord or plug, or
after the appliance malfunctions or is dropped or damaged in
any manner. Call our toll-free customer service number for
information on examination, repair, or adjustment.
8. The use of accessory attachments not recommended by
Hamilton Beach/Proctor-Silex, Inc. may cause injuries.
9. Do not use outdoors.
10. Do not let cord hang over edge of table or counter or touch hot
surfaces, including stove.
11. The carafe is designed for use with this coffeemaker. It must
never be used on a range top or in a microwave oven.
12. Do not set a hot carafe on a wet or cold surface.
13. Do not use a cracked carafe or one with loose or weakened
handle.
14. Do not clean carafe with cleansers, steel wool pads, or other
abrasive materials.
IMPORTANT SAFEGUARDS
840107400 ENv03.qxd 12/9/02 1:30 PM Page 2
Page 3
4
5
To Make Coffee
4. Fill carafe with the desired amount of cold tap water.
5. Pour water from carafe into reservoir.
6. Place carafe, with carafe lid attached, on Keep-Hot Plate.
7. For models with Brew Selector, rotate knob to desired
strength. For clock models, see below for Automatic Brew
option.
8. Turn switch ON. Turn OFF and unplug when finished.
Optional Features (on selected models)
Pause ’N Serve
This feature allows you to pour a cup of coffee before the entire
brew cycle has completed. By removing the carafe, the flow
of coffee will temporarily stop. The flow of coffee will resume
when carafe is returned to the Keep-Hot Plate. Do not
remove carafe more than 20 seconds or brew basket
may overflow.
Automatic Shutoff
The Automatic Shutoff feature shuts of
f the Keep-Hot Plate
two hours after brew cycle begins. Always turn coffeemaker
OFF and unplug when finished.
Brew Strength Selector
This feature allows you to control the strength/flavor of the
coffee. You may select from mild to strong flavor.
Permanent Filter
The Permanent Filter takes the place of disposable paper filters.
Simply place the Permanent Filter in the filter basket. Rinse
the Permanent Filter in hot water before first use. Clean the
Permanent Filter under hot running water and let dry. Permanent Filter can be placed in top rack of automatic dishwasher.
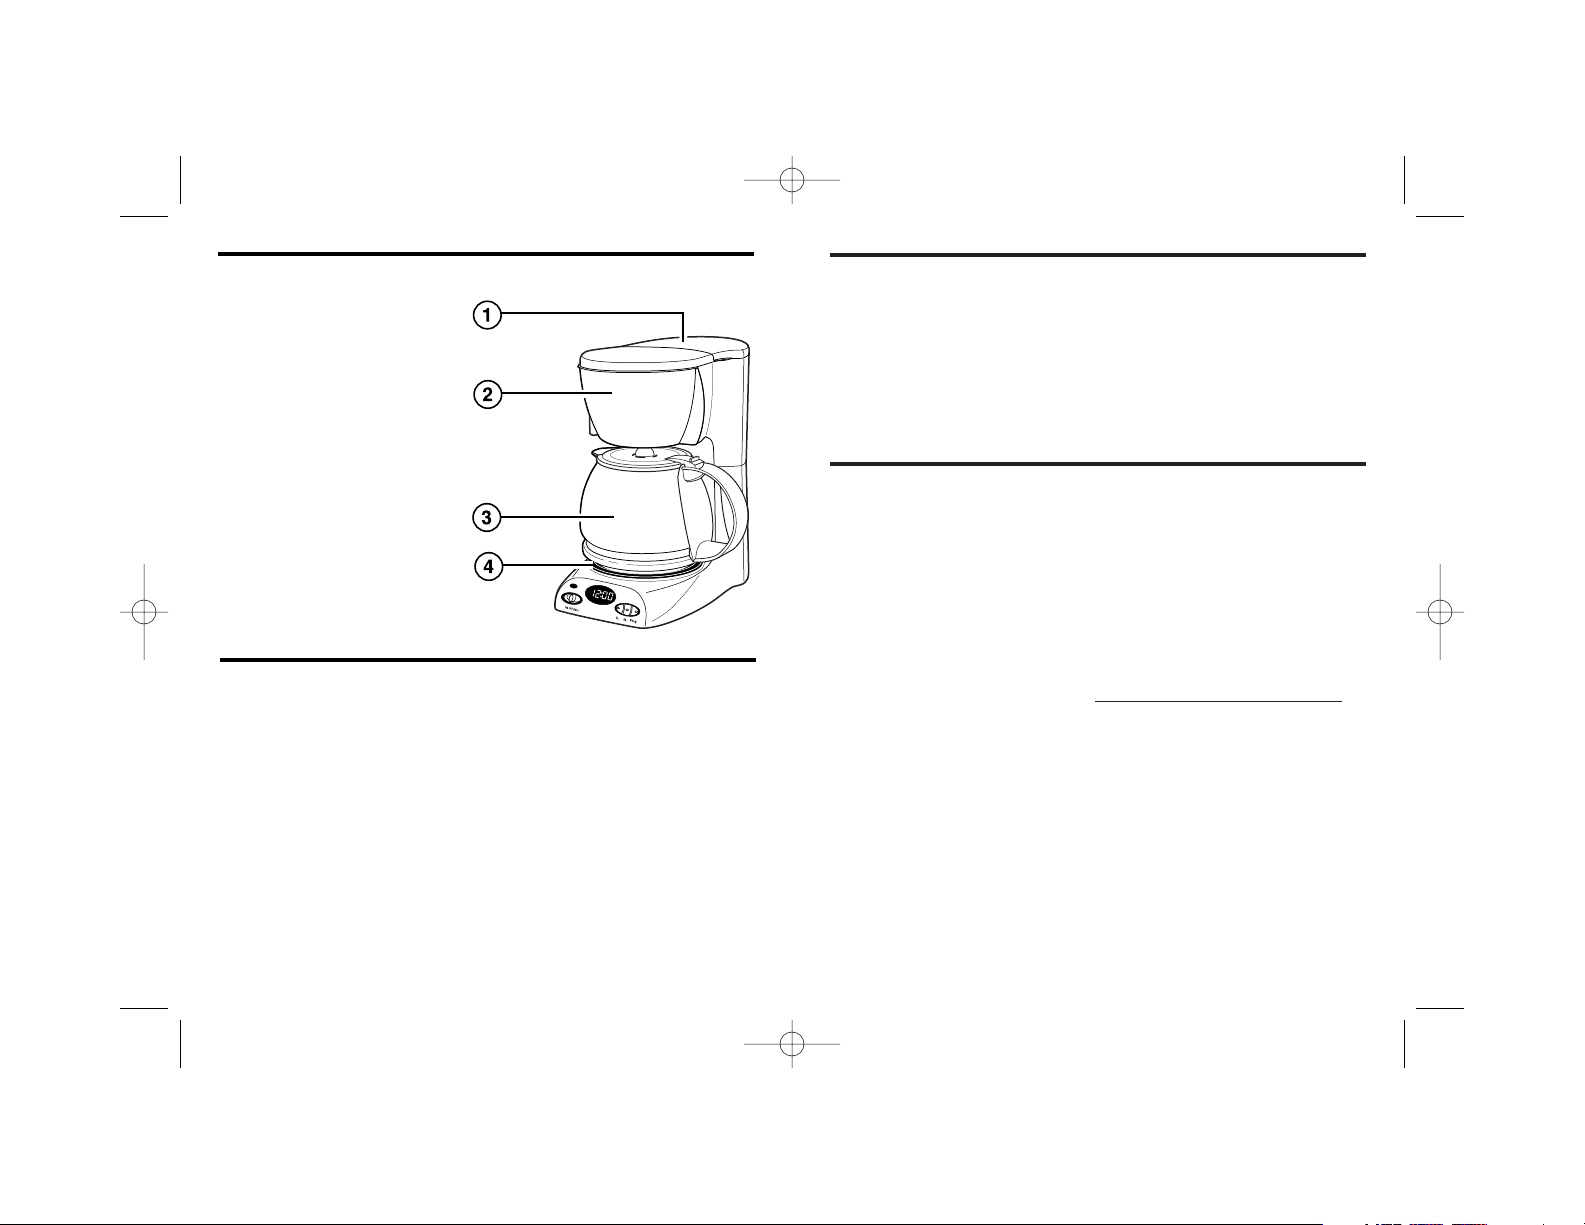
1. Reservoir
2. Brew Basket
3. Carafe
4. Keep-Hot Plate
NOTE: Picture references
major components for all
coffeemakers covered by
these instructions.
To Make Coffee
1. Before first use, clean coffeemaker by following steps
listed in “To Clean the Inside of the Coffeemaker.” Use either
clear water or vinegar. If clock model, read Digital Clock
Timer section.
2. Place a large, cupcake-style disposable paper filter in
brew basket.
3. For each cup of coffee being made, place one level
tablespoon of coffee into filter. Close brew basket, making
sure it is fully closed. IMPORTANT: Failure to properly
secure the brew basket may result in it swinging open,
allowing hot water and coffee grounds to escape and
resulting in serious burn injuries and/or damage to surrounding surfaces.
Parts and Features
840107400 ENv03.qxd 12/9/02 1:30 PM Page 4
Page 4
7
Cleaning
To maintain the performance of your coffeemaker, clean your
coffeemaker once a month.
To Clean the Inside of the Coffeemaker:
1. Place empty carafe on Keep-Hot Plate. Close empty brew
basket.
2. Pour one pint of plain white vinegar into the reservoir.
3. Plug unit into electrical outlet and turn ON.
4. After 30 seconds turn OFF.
5. Wait 30 minutes to allow the vinegar to clean. Then turn
ON again. When the brew cycle is finished, turn OFF.
6. Empty carafe and rinse. Pour one carafe of cold tap water
into the reservoir. Place carafe on Keep-Hot Plate.
7. Turn ON. When the brew cycle is finished, empty the carafe.
Repeat this process with one more carafe of cold tap water.
8. Turn OFF when complete.
9. Wash carafe and brew basket before making a beverage.
To Clean Carafe and Filter Basket:
Wash carafe by hand in hot, soapy water or in top rack of
dishwasher. To remove the carafe lid push the hinge part of
the lid to one side then gently but firmly twist the lid. The pin
will release from the hinge. To replace the lid, put one side of
the lid hinge on one of the pins, then snap onto the other pin.
To remove the brew basket, swing open and lift straight up.
The brew basket may be washed by hand or in top rack of
dishwasher.
6
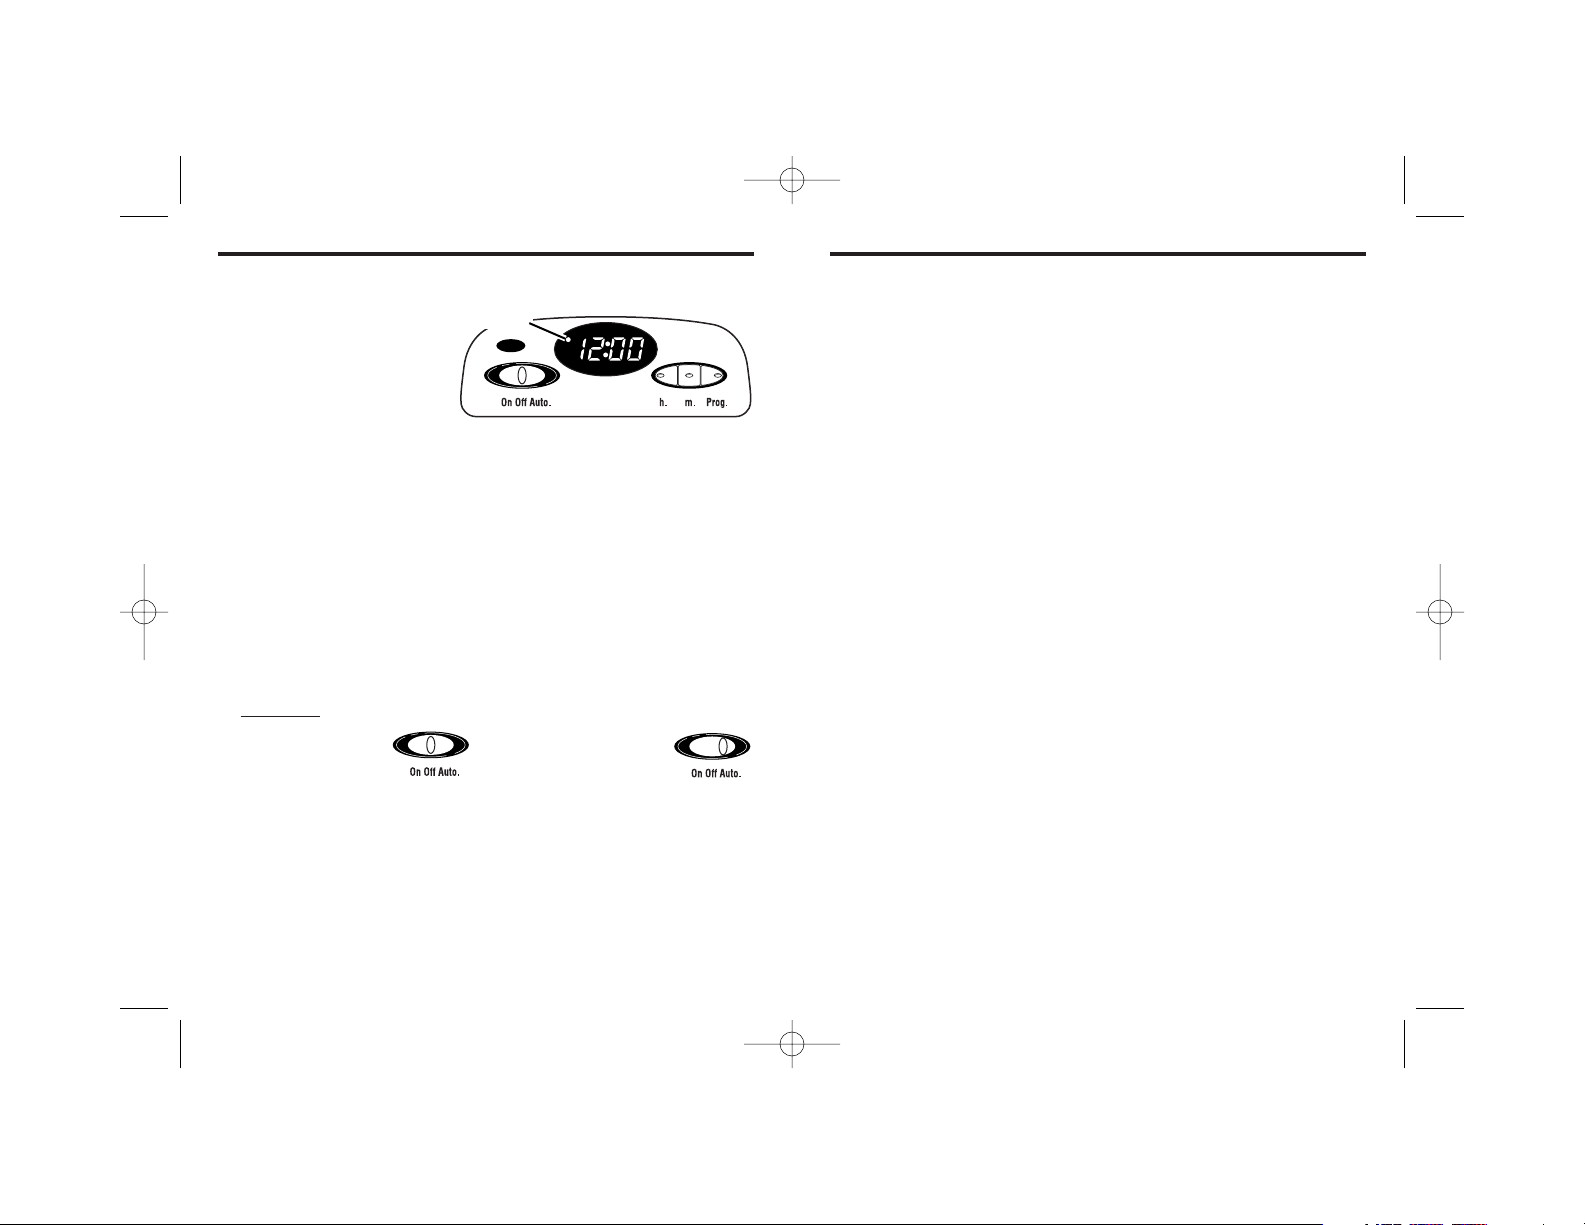
Digital Clock Timer (on selected models)
To Set Clock:
1. Plug in coffeemaker.
Numbers on the
clock will flash until
you set time of day.
2. To set time of day, press h. (hour) button to establish
current hour. A red dot will glow to indicate PM hours. If
this dot is not glowing, clock is set for an AM hour.
3. Press m. (minute) button until you reach the current time.
To Set and Use Automatic Brew:
1. Make sure clock is set for correct time of day.
2. Fill coffeemaker with desired amount of water and coffee.
Place carafe with lid on keep-hot plate.
3. While holding Prog. (program) button, press h. and m.
buttons until desired brewing time is reached.
4. Once brewing time has been set, follow this procedure
each day to reset the Automatic Brew:
A. Switch must
be in Off
position.
5. The Automatic Brew indicator dot on clock will glow.
6. Brew cycle will begin at set time.
PM Indicator
B. Then slide
to Auto.
840107400 ENv03.qxd 12/9/02 1:30 PM Page 6
Page 5

9
8
CARAFE SAFETY PRECAUTIONS
This symbol reminds you that glass is fragile and can
break which could result in personal injury.
This symbol alerts you to the potential danger for personal
injury if you fail to read and follow these safety precautions.
• Do not set empty carafe on a hot heating surface.
• Do not clean with steel wool pads, abrasive cleanser, or any other
materials that may scratch.
• Do not place hands inside carafe. When handling, be careful if
wearing any hand jewelry, especially diamond rings. Jewelry can
scratch the glass, which increases possibility of breakage.
• Do not bump, scratch, or boil dry.
• Discard carafe if it is cracked, scratched, or heated while empty
for an extended period of time.
• To avoid accidents, do not pour in the direction of people.
• If stirring in the carafe, use only wooden, plastic, or rubber
utensils. Do not use metal utensils.
• Follow the above safety precautions carefully to avoid serious
burn injuries which may result if breakage occurs while carafe
holds heated liquids.
Usage Tips
1. Always use a good quality filter to obtain the best results
possible.
2. Take care not to spill loose coffee grounds between paper
filter and filter basket.
3. Make sure the filter basket is securely in place.
4. The carafe lid must be properly attached to the carafe.
5. The carafe must be placed properly and level on the
Keep-Hot Plate before starting brew cycle.
6. When using the Pause ’N Serve feature, replace carafe
within 20 seconds to prevent the overflow of coffee
grounds and water from the filter basket.
• Do not use a cracked carafe or a carafe having a loose or
weakened handle.
• This carafe is designed to be used only on the Keep-Hot Plate of
your coffeemaker. Do not use on a gas or electric rangetop, or in a
microwave or conventional oven.
• To avoid breakage, handle carafe with care. Avoid impact. Glass
will break as a result of impact. Use care when filling with water to
avoid hitting faucet.
• Do not place hot carafe on cool or wet surface. Allow to cool
before washing or adding liquids.
Customer Service
If you have a question about your coffeemaker, call our
toll-free customer service number. Before calling, please note
the model, type, and series numbers and fill in that information
below. These numbers can be found on the bottom of your
coffeemaker. This information will help us answer your question
much more quickly.
MODEL:_____________ TYPE:_____________ SERIES: ______________
840107400 ENv03.qxd 12/9/02 1:30 PM Page 8
Page 6

10
LIMITED WARRANTY
This product is warranted to be free from defects in material and workmanship for a
period of one hundred eighty (180) days from the date of original purchase, except
as noted below. During this period, we will repair or replace this product, at our option,
at no cost. THE FOREGOING WARRANTY IS IN LIEU OF ANY OTHER WARRANTY,
WHETHER EXPRESS OR IMPLIED, WRITTEN OR ORAL INCLUDING ANY WARRANTY
OF MERCHANTABILITY OR FITNESS FOR A PARTICULAR PURPOSE. ANY LIABILITY
IS EXPRESSLY LIMITED TO AN AMOUNT EQUAL TO THE PURCHASE PRICE PAID,
AND ALL CLAIMS FOR SPECIAL, INCIDENTAL AND CONSEQUENTIAL DAMAGES
ARE HEREBY EXCLUDED. There is no warranty with respect to the following, which
may be supplied with this product: glass parts, glass containers, cutter/strainer, blades
and/or agitators. This warranty extends only to the original consumer purchaser and
does not cover a defect resulting from abuse, misuse, neglect, use for commercial
purposes, or any use not in conformity with the printed directions. This warranty gives
you specific legal rights, and you may also have other legal rights which vary from
state to state, or province to province. Some states or provinces do not allow limitations on implied warranties or special, incidental or consequential damages, so the
foregoing limitations may not apply to you.
If you have a claim under this warranty, DO NOT RETURN THE APPLIANCE TO THE
STORE! Please call our CUSTOMER SERVICE NUMBER. (For faster service please
have model, series, and type numbers ready for operator to assist you.)
CUSTOMER SERVICE NUMBERS
In the U.S. 1-800-851-8900
In Canada 1-800-267-2826
Web site address: www.proctorsilex.com
KEEP THESE NUMBERS FOR FUTURE REFERENCE!
840107400 ENv03.qxd 12/9/02 1:30 PM Page 10
Page 7

11
Lorsque vous utilisez des appareils électriques, vous devez toujours
prendre des précautions élémentaires afin de réduire les risques
d’incendie, de choc électrique et/ou de blessures corporelles. Voici
quelques instructions à suivre :
1. Lisez toutes les instructions.
2. Ne touchez pas aux surfaces chaudes. Utilisez les poignées
ou les boutons. Vous devez être très prudent car vous pourriez
vous brûler en touchant des pièces chaudes ou en renversant
un liquide chaud.
3. Afin de vous prémunir contre les chocs électriques, ne plongez
pas le cordon d’alimentation, la fiche ou la cafetière dans l’eau
ou tout autre liquide.
4. Surveillez attentivement les enfants lorsque ceux-ci utilisent
l’appareil ou lorsqu’il est utilisé à proximité d’eux.
5. Débranchez l’appareil de la prise de courant lorsque vous
ne vous servez pas de la cafetière ou de l’horloge ou avant de le
nettoyer. Laissez-le refroidir avant d’enlever ou de remettre en
place des pièces ou de nettoyer l’appareil.
6. Lorsque la cafetière est en marche, elle doit toujours se trouver
sur une surface plate et loin du bord du comptoir pour éviter
tout contact accidentel qui pourrait la renverser.
7. Ne faites pas fonctionner un appareil avec un cordon ou une
fiche endommagée, ou lorsque l’appareil ne fonctionne pas bien
ou a été échappé ou endommagé d’une manière quelconque.
Veuillez composer notre numéro d’assistance aux clients pour
des renseignements concernant un examen, une réparation ou
un réglage.
8. L’utilisation d’accessoires qui ne sont pas recommandés par
Hamilton Beach/Proctor-Silex Inc. peut causer des blessures.
9. N’utilisez pas la cafetière à l’extérieur.
10. Ne laissez pas le cordon pendre au bord d’une table ou
d’un comptoir ou entrer en contact avec une surface chaude,
y compris la cuisinière.
IMPORTANTES INSTRUCTIONS
840107400 FRv03.qxd 12/9/02 1:24 PM Page 11
Page 8

13
12
11. La verseuse est conçue pour être utilisée avec cette cafetière.
Elle ne doit jamais être utilisée sur la cuisinière ou dans un four
à micro-ondes.
12. Ne déposez pas une verseuse chaude sur une surface froide ou
humide.
13. N’utilisez pas une verseuse fêlée ou dont la poignée est desserrée.
14. Ne nettoyez pas la verseuse avec des nettoyants, des tampons
de laine d’acier ou d’autres matériaux abrasifs.
15. Assurez-vous que le couvercle est bien fermé durant la préparation
du café et lorsque vous le versez; ne forcez pas le couvercle
lorsque vous le posez sur la verseuse.
16. Ne placez pas la cafetière près d’un brûleur électrique ou à gaz,
chaud ou dans un four chaud.
17. Pour débrancher la cafetière, placez l’interrupteur à la position
ARRÊT (OFF), puis enlevez la fiche de la prise de courant.
18. Avertissement : afin de diminuer le risque d’incendie ou de choc
électrique, n’enlevez pas le couvercle du dessous. Il ne s’y trouve
aucune pièce réparable. Toute réparation ne devrait être effectuée
que par un technicien autorisé.
19. N’utilisez cet appareil qu’aux fins pour lesquelles il a été conçu.
CONSERVEZ CES INSTRUCTIONS
RENSEIGNEMENTS POUR LA SÉCURITÉ
DU CONSOMMATEUR
La longueur du cordon de cet appareil a été choisie de façon à ce
que l’on ne risque pas de trébucher dessus. Si un cordon plus long
est nécessaire, utiliser une rallonge appropriée. Le calibrage de la
rallonge doit être le même que celui du cafetière ou supérieur.
Lorsqu’on utilise une rallonge, s’assurer qu’elle ne traverse pas la
zone de travail, que des enfants ne puissent pas tirer dessus par
inadvertance et qu’on ne puisse pas trébucher dessus.
Afin d’éviter une surcharge électrique, évitez d’utiliser un autre appareil
à haute puissance sur le même circuit que la cafetière.
1. Réservoir
2. Panier-filtre
3. Verseuse
4. Plaque chauffante
REMARQUE : L’illustration
fait référence aux composants
principaux pour toutes les cafetières
couvertes par ces instructions.
Pièces et caractéristiques
Cet appareil est conçu uniquement pour l’usage domestique.
Cet appareil est muni d’une fiche polarisée. Ce type de fiche
présente une broche plus large que l’autre. La fiche peut être
introduite dans une prise dans un sens seulement. Il s’agit d’une
caractéristique de sécurité visant à réduire le risque de choc électrique. Si la fiche ne peut pas être insérée dans la prise, la tourner
dans l’autre sens. Si elle ne peut toujours pas être insérée dans la
prise, contacter un électricien pour qu’il remplace la prise désuète.
Ne pas essayer de contourner l’objectif de sécurité de la fiche
polarisée en la modifiant de quelque manière que ce soit.
RENSEIGNEMENTS POUR LA SÉCURITÉ
DU CONSOMMATEUR
(SUITE)
840107400 FRv03.qxd 12/9/02 1:24 PM Page 12
Page 9

15
14
Caractéristiques optionnelles (sur certains modèles)
Pause et service
Cette caractéristique vous permet de verser une tasse de
café avant l’achèvement du cycle d’infusion complet. Retirer
la verseuse interrompt momentanément l’écoulement du
café. L’écoulement continue une fois la verseuse replacée sur
la plaque chauffante. Ne pas retirer la verseuse plus de 20
secondes sinon le panier-filtre risque de déborder.
Arrêt automatique
L’option Arrêt automatique arrête la plaque chauffante 2
heures après que le cycle d’infusion a commencé. Éteignez
toujours la cafetière
(OFF)
une fois le café préparé et
débranchez-la.
Filtre Permanent
Le filtre permanent remplace les filtres jetables en papier.
Placez simplement le filtre permanent dans le panier-filtre.
Rincez le filtre permanent à l’eau chaude avant la première
utilisation. Nettoyez le filtre permanent à l’eau chaude.
Laissez-le sécher. Le filtre permanent peut être placé dans
le panier supérieur d’un lave-vaisselle automatique.
Sélecteur de saveur de l’infusion
Cette caractéristique vous permet de contrôler la force/saveur
du café. Vous pouvez choisir un café de saveur douce à
saveur forte.
Préparation du café
1. Avant l’utilisation initiale, nettoyez la cafetière en suivant
les étapes de la section «Pour nettoyer l’intérieur de la
cafetière». Utilisez de l’eau claire ou du vinaigre. Dans le
cas du modèle à horloge, lisez la section «Horloge
numérique».
2. Placez un grand filtre de papier jetable dans le panier-filtre.
3. Pour chaque tasse de café préparée, mettez une cuillerée
à soupe de café dans le filtre; fermez le panier-filtre,
assurez-vous qu’il est fermé complètement.
IMPORTANT : Si vous ne fixez pas correctement le
panier-filtre, celui-ci peut s’ouvrir et basculer, permettant
à l’eau chaude et au café moulu de s’échapper, ce qui
peut provoquer de sérieuses blessures par brûlures et/ou
endommager les surfaces environnantes.
4. Remplissez la verseuse avec la quantité d’eau froide
désirée.
5. Versez l’eau dans le réservoir.
6. Placez la verseuse, avec le couvercle, sur la plaque
chauffante.
7. Pour les modèles à sélecteur de saveur de l’infusion,
tournez le bouton à la force désirée. Pour les modèles
à horloge, consultez la section de l’option d’infusion
automatique ci-dessous.
8. Mettez le commutateur à marche (ON). Après
l’utilisation, tournez le commutateur à arrêt (OFF)
et débranchez la fiche.
840107400 FRv03.qxd 12/9/02 1:24 PM Page 14
Page 10

17
16
Nettoyage
Pour assurer le bon fonctionnement de votre cafetière,
nettoyez-la une fois par mois.
Pour nettoyer l’intérieur :
1. Placez la verseuse vide sur la plaque chauffante et fermez
le panier du filtre, vide également.
2. Versez un demi litre de vinaigre blanc normal dans le
réservoir.
3. Branchez la cafetière et mettez-la en marche
(ON)
.
4. Après 30 secondes, éteignez la cafetière
(OFF)
.
5. Attendez 30 minutes que le vinaigre agisse. Ensuite mettez
en marche
(ON)
. Quand le cycle d’infusion est terminé,
éteignez
(OFF)
.
6. Videz la verseuse et rincez-la. Versez dans le réservoir
l’équivalent d’une verseuse pleine d’eau froide du robinet.
Placez la verseuse sur la plaque chauffante.
7. Mettez la cafetière en marche
(ON)
. Quand le cycle est
terminé, videz la verseuse. Recommencez avec
l’équivalent d’une autre verseuse pleine d’eau.
8. Éteignez
(OFF)
quand tout est fini.
9. Lavez la verseuse et le panier-filtre avant de faire du café.
Pour nettoyer la verseuse et le panier-filtre :
Lavez la verseuse à la main dans de l’eau chaude
savonneuse ou dans le panier supérieur d’un lave-vaisselle.
Pour enlever le couvercle de la verseuse, poussez la partie de
la charnière du couvercle sur un côté, puis tordez doucement
mais fermement le couvercle. La goupille se dégagera de la
charnière. Pour réinstaller le couvercle, poussez un côté de
la charnière du couvercle sur l’une des goupilles, puis
emboîtez sur l’autre goupille.
Pour retirer le panier-filtre, ouvrez-le et soulevez-le tout droit.
Le panier-filtre peut être lavé à la main ou dans le panier
supérieur du lave-vaisselle.
Horloge numérique (sur certains modèles)
Réglage de l’horloge :
1. Branchez la cafetière.
Les chiffres de l’afficheur
clignoteront jusqu’au
réglage de l’heure.
2. Pour régler l’heure, appuyez sur le bouton h. (heure) pour
établir l’heure courante. Un témoin lumineux rouge indique
les heures PM. Si le témoin n’est pas allumé, l’horloge est
en mode AM.
3. Appuyez sur le bouton m. (minute) jusqu’à l’heure
courante.
Réglage et utilisation de l’infusion automatique :
1. Assurez-vous que l’horloge est réglée à l’heure juste.
2. Versez la quantité d’eau et de café désirée dans la
cafetière. Placez la verseuse et son couvercle sur la plaque
chauffante.
3. Tout en appuyant sur le bouton Prog. (programme),
appuyez sur les boutons h. et m. jusqu’à ce que l’heure
d’infusion désirée apparaisse.
4.
Une fois l’heure d’infusion réglée, suivez cette méthode
chaque jour pour remettre en fonction l’infusion automatique :
A. Le commutateur
doit se trouver
à la position
(OFF)
5. L’indicateur d’infusion automatique sur l’horloge s’allumera.
6. Le programme d’infusion du café commencera à l’heure
réglée.
Indicateur PM
B. Glissez-le
ensuite à la
position Auto.
840107400 FRv03.qxd 12/9/02 1:24 PM Page 16
Page 11

19
18
•
Ne placez pas la verseuse chaude sur une surface froide ou humide.
Laissez-la refroidir avant de la nettoyer ou d’y verser un liquide.
•
Ne laissez pas une verseuse vide sur une surface chauffante.
•
Évitez de nettoyer la verseuse avec des produits qui égratignent
comme les tampons en laine d’acier ou les produits nettoyants
abrasifs.
•
N’insérez pas les mains dans la verseuse. Manipulez celle-ci avec
soin si vous portez des bijoux, particulièrement des bagues avec diamants. Les bijoux peuvent égratigner le verre, ce qui augmente la
possibilité de casse.
•
Évitez de heurter, d’égratigner la cafetière ou de laisser l’eau
s’évaporer entièrement.
•
Jetez immédiatement la verseuse lorsque celle-ci est craquelée,
égratignée, ou chauffée à vide durant une longue période.
•
Afin d’éviter les accidents, ne versez pas le liquide en faisant face aux
gens.
•
Pour remuer le liquide dans la verseuse, n’utilisez que des ustensiles
en plastique, en bois ou en caoutchouc. N’utilisez pas d’ustensiles en
métal.
•
Veuillez suivre à la lettre ces précautions de sécurité pour éviter toute
brûlure grave qui pourrait être causée par le bris d’une verseuse remplie de liquide chaud.
Service aux clients
Si vous avez une question au sujet de votre cafetière,
composez le numéro d’appel sans frais de notre service à la
clientèle. Avant de faire un appel, veuillez noter le modèle, le
type et les numéros de série, et fournir ces renseignements
ci-dessous. Ces numéros se trouvent à la base de la
cafetière. Ces renseignements nous aideront à répondre
beaucoup plus vite à toute question.
MODÈLE :____________ TYPE :____________ SÉRIE : _____________
Conseils d’utilisation
1. Utilisez toujours un filtre de bonne qualité pour obtenir les
meilleurs résultats possibles.
2. Veillez à ne pas renverser du café moulu entre le filtre en
papier et le panier-filtre.
3. Assurez-vous que le panier-filtre est sécurisé en place.
4. Le couvercle de la verseuse doit être correctement attaché
à la verseuse.
5. La verseuse doit être placée correctement sur la plaque
chauffante avant de commencer un cycle d’infusion.
6. Lorsque vous utilisez la caractéristique Pause N’ Serve,
repositionner la verseuse dans les 20 secondes pour
éviter que le café moulu et l’eau ne débordent du
panier-filtre.
PRÉCAUTIONS À PRENDRE AVEC LA VERSEUSE
Ce symbole vous rappelle que le verre est fragile et qu’une
brisure peut entraîner des blessures corporelles.
Ce symbole vous indique les dangers possibles de
blessures corporelles si vous omettez de lire et de suivre
ces précautions de sécurité.
•
N’utilisez pas une verseuse fêlée ou dont la poignée est desserrée.
•
Cette verseuse est conçue pour être utilisée uniquement sur la
plaque chauffante de votre cafetière. Évitez de la faire fonctionner sur
le dessus d’une cuisinière électrique ou à gaz, ou dans un four à
micro-ondes ou conventionnel.
•
Pour éviter de la briser, manipulez la verseuse avec soin. Évitez
tout impact car le verre cassera. Lorsque vous la remplissez d’eau,
agissez avec précaution pour éviter de heurter un robinet.
840107400 FRv03.qxd 12/9/02 1:24 PM Page 18
Page 12

20
GARANTIE LIMITÉE
Ce produit est garanti exempt de vices de matériau et de fabrication pendant une
période de cent quatre-vingt (180) jours à partir de la date de l’achat original, excepté
ce qui est noté ci-dessous. Au cours de cette période, nous réparerons ou remplacerons ce produit sans frais, à notre discrétion. LA GARANTIE CI-DESSUS REMPLACE TOUTE AUTRE GARANTIE EXPRESSE OU IMPLICITE, ÉCRITE OU ORALE,
Y COMPRIS TOUTE GARANTIE DE QUALITÉ MARCHANDE OU DE CONFORMITÉ
À UNE FIN PARTICULIÈRE. TOUTE RESPONSABILITÉ EST EXPRESSÉMENT
LIMITÉE À UN MONTANT ÉGAL AU PRIX D’ACHAT PAYÉ ET TOUTES LES
RÉCLAMATIONS POUR DOMMAGES SPÉCIAUX ET INDIRECTS SONT PAR LES
PRÉSENTES EXCLUES. La garantie ne s’applique pas aux accessoires suivants qui
pourraient être vendus avec ce produit : pièces en verre, récipients en verre,
couteau/tamis, lames et/ou agitateurs. Cette garantie ne s’applique qu’à l’acheteur
d’origine et ne couvre pas un vice causé par l’abus, le mésusage, la négligence,
l’usage à des fins commerciales ou tout autre usage non prescrit dans le mode d’emploi. Cette garantie vous confère des droits juridiques spécifiques et vous pouvez
aussi jouir d’autres droits juridiques qui peuvent varier d’un État à un autre ou d’une
province à une autre. Certains États ou provinces ne permettent pas les limitations
sur les garanties implicites ou les dommages spéciaux ou indirects de telle sorte que
les limitations ci-dessus ne s’appliquent peut-être pas dans votre cas.
Si vous désirez procéder à une réclamation en vertu de cette garantie, NE
RETOURNEZ PAS L’APPAREIL AU MAGASIN! Veuillez téléphoner au NUMÉRO DU
SERVICE À LA CLIENTÈLE. (Pour un service plus rapide, ayez à portée de la main
les numéros de série, de modèle et de type de votre appareil lorsque vous
communiquez avec un représentant.)
NUMÉROS DU SERVICE À LA CLIENTÈLE
Aux États-Unis 1-800-851-8900
Au Canada 1-800-267-2826
Adresse du site Web : www.proctorsilex.com
CONSERVEZ CES NUMÉROS POUR RÉFÉRENCE ULTÉRIEURE!
12/02
H
AMILTONBEACHPROCTOR-SILEX,INC
.P
ROCTOR-SILEXCANADA,INC
.
263 Yadkin Road, Southern Pines, NC 28387
Picton, Ontario K0K 2T0
840107400
www.proctorsilex.com
840107400 FRv03.qxd 12/9/02 1:24 PM Page 20
 Loading...