

Page 1

840282100
aparato.
Mini Food Processor
Robot culinaire
miniature
Mini Procesador
de Alimentos
READ BEFORE USE
LIRE AVANT UTILISATION
LEA ANTES DE USAR
English....................................... 2
USA: 1-800-851-8900
www.proctorsilex.com
Français ................................... 15
Canada : 1-800-267-2826
www.proctorsilex.ca
Español ................................... 29
EE. UU.: 1-800-851-8900
México: 01 800 71 16 100
www.proctorsilex.com.mx
Le invitamos a leer cuidadosamente
este instructivo antes de usar su
Page 2

IMPORTANT SAFEGUARDS
When using electrical appliances, basic safety precautions should
always be followed to reduce the risk of fire, electric shock, and/or injury
to persons, including the following:
1. Read all instructions.
2. This appliance is not intended for use by persons (including
children) with reduced physical, sensory, or mental capabilities,
or lack of experience and knowledge, unless they are closely
supervised and instructed concerning use of the appliance by a
person responsible for their safety.
3. Close supervision is necessary when any appliance is used by or
near children. Children should be supervised to ensure that they do
not play with the appliance.
4. To protect against risk of electrical shock, do not put cord, plug, or
base in water or other liquid.
5. Unplug from outlet when not in use, before putting on or taking off
parts, and before cleaning.
6. Avoid contacting moving parts.
7. Do not operate any appliance with a damaged supply cord or
plug, or after the appliance malfunctions or has been dropped or
damaged in any manner. Supply cord replacement and repairs must
be conducted by the manufacturer, its service agent, or similarly
qualified persons in order to avoid a hazard. Call the provided
customer service number for information on examination, repair, or
adjustment.
8. The use of attachments not recommended or sold by the appliance
manufacturer may cause fire, electric shock, or injury.
9. Do not use outdoors.
10. Do not let cord hang over edge of table or counter, or touch hot
surface, including stove.
11. Keep hands and utensils away from cutting blades while chopping
food to reduce the risk of severe injury to persons or damage to
the food processor. A scraper may be used but must be used only
when the food processor is not running.
2
Page 3

12. Blades are sharp. Handle carefully.
13. This appliance is intended for processing small quantities of food for
immediate consumption. This appliance is not intended to prepare
large quantities of food at one time.
14. To reduce the risk of injury, never place cutting blade on base
without first putting bowl properly in place.
15. Be certain cover is securely locked in place before operating
appliance.
16. Do not attempt to defeat the cover interlock mechanism.
SAVE THESE INSTRUCTIONS
Other Consumer Safety Information
This appliance is intended for household use only.
w WARNING
with a polarized plug (one wide blade) to reduce the risk of electric
shock. The plug fits only one way into a polarized outlet. Do not defeat
the safety purpose of the plug by modifying the plug in any way or by
using an adapter. If the plug does not fit fully into the outlet, reverse the
plug. If it still does not fit, have an electrician replace the outlet.
The length of the cord used on this appliance was selected to reduce
the hazards of becoming tangled in or tripping over a longer cord. If a
longer cord is necessary, an approved extension cord may be used.
The electrical rating of the extension cord must be equal to or greater
than the rating of the appliance. Care must be taken to arrange the
extension cord so that it will not drape over the countertop or tabletop
where it can be pulled on by children or accidentally tripped over.
Electrical Shock Hazard: This appliance is provided
3
Page 4

Parts and Features
Before First Use: Wash cover, bowl, blade, bowl size adjuster,
and spatula in hot, soapy water. The blade is sharp; handle
carefully. Rinse and dry.
1. Cover With Oil Dispenser
2. Bowl Size Adjuster
3. Blade
4. Bowl
5. Spatula
6. Base
7. Pulse Button
4
Page 5

How to Use
1. Read “Processing Tips” on page 7.
2. Make sure processor is unplugged.
Lock bowl onto base by aligning bowl
handle on right side of the base.
Turn clockwise until bowl locks into
place with handle toward front.
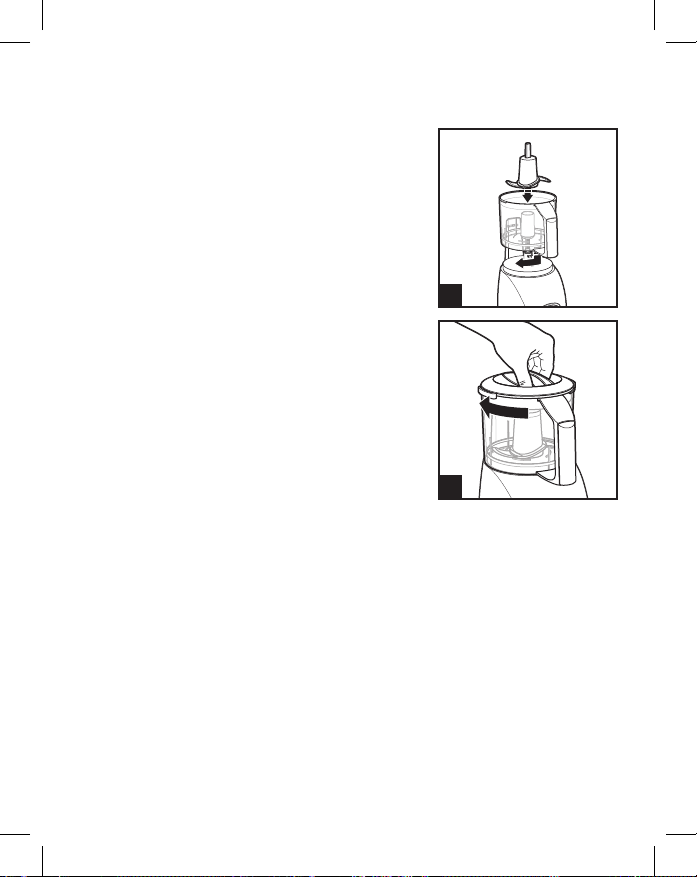
3. Place blade in bowl over center
shaft. Turn until blade slips down
to bottom of bowl. Blade is sharp;
handle carefully.
4. Place food in bowl.
5. Place cover on bowl and rotate
clockwise until cover is locked into
place.
6. Plug into outlet.
7. To turn on unit, press and hold
the Pulse button for continuous
operation. To pulse, press and
release the Pulse button.
8. Remove cover. Unlock bowl by turning counterclockwise.
Remove bowl from base. Carefully remove blade. Blade is
sharp; handle carefully.
9. Unplug.
IF PROCESSOR DOES NOT START: Review the steps in “How
to Use” to make sure the bowl and cover are both in the
locked positions.
2
5
5
Page 6

Features
Cord Storage
The base of the food processor is recessed
to provide cord storage. Remove bowl and
spatula from base. Turn the base upside
down and wind the cord.
Spatula
A custom spatula is provided for scraping
the sides of the bowl. It stores in the back
of the unit.
Bowl Size Adjuster
For improved chopping performance when
chopping small quantities, place the
bowl size adjuster on top of food before
processing.
Oil Dispenser
To make salad dressing, pour oil through
the dispenser slowly while processing.
Dispenser will slowly add oil to sauces and
dressings for emulsion of the ingredients.
NOTE: Maximum liquid quantity is 1 cup
(237 ml).
6
Page 7

Processing Tips
• The bowl has a capacity of 3 cups (710 ml). For liquid
ingredients, do not exceed 1 cup (237 ml).
• To chop carrots, celery, mushrooms, green pepper, or onion,
cut into 1-inch (2.5-cm) chunks and place in bowl. This will
result in more uniform consistency.
• Puree small amounts of cooked fruit or vegetables for baby
food or use as a base for sauces or soups.
• Do not process coffee beans, whole squares of baking
chocolate, or whole, hard spices in the food processor. This
could damage the processor.
7
Page 8

Processing Chart
*Bowl size adjuster is recommended.
TO MAKE INSTRUCTIONS
Bread, Crumbs Tear bread slices (max. 3) into 6 pieces.
Cheese,
Parmesan
Chocolate,
Baking
Cookie, Crumbs
Fruit, Chopped
Garlic, Minced Peel, then process 1 or more cloves at a time.
Graham Cracker,
Crumbs
Herbs, Chopped Place up to 1 cup (237 ml) in processor.
Meat, Ground
Nuts, Chopped Place up to 1 cup (237 ml) in processor.
Parsley, Chopped
or Minced Pinch off sprigs from bunch.
Vegetables,
Chopped, Minced
Cut in 1/2-inch (1.3-cm) cubes. Process 1/2 cup
(118 ml) of cubes at a time.
Cut in 1/2-inch (1.3-cm) cubes. Do not process
more than 4 oz (113 g) at a time.
Break into pieces. Use up to 2 cups (473 ml)
of pieces.
Cut fruit into large chunks. Place up to 2 cups
(473 ml) pieces into processor.
Break into 4 pieces. Place up to 6 crackers in
processor at a time.
Cut into 1/2-inch (1.3-cm) cubes. Process
8 ounces (227 g) of cubes at a time.
Cut into 1-inch (2.5-cm) chunks. Place up to
2 cups (473 ml) in processor at a time.
Adj. *
4
4
4
4
4
4
4
4
NOTE: Quantities listed above are the recommended maximum. Depending
on the food type, smaller amounts may improve chopping performance.
8
Page 9

How to Clean
w WARNING
Unplug unit before cleaning. Do not immerse base, plug, or
cord in water or other liquid.
1. Unplug.
2. Wash cover, bowl, spatula, bowl size adjuster, and blade in
hot, soapy water. Blade is sharp; handle carefully. Rinse
and dry. The cover, bowl, spatula, bowl size adjuster, and
blade may also be washed in top rack of dishwasher.
3. Reassemble for safe storage.
4. To clean the base, wipe with a damp cloth. Do not use
abrasive cleaners. Do not immerse base in water.
Electrical Shock Hazard.
Recipes
Pesto
Ingredients:
1 cup (237 ml) fresh basil leaves
1/4 cup (59 ml) pine nuts
1 garlic clove
1/4 cup (59 ml) olive oil
1/4 cup (59 ml) grated Parmesan cheese
Dash of salt
Directions:
Place basil, pine nuts and garlic in food processor bowl.
Process until almost a puree. Add oil, Parmesan cheese
and salt. Process until mixture is well blended. Toss with hot
pasta, spread on grilled chicken, or use as a sandwich spread.
Makes: 2/3 cup (158 ml)
9
Page 10

Recipes (cont.)
Brie With Apple Chutney
Ingredients:
1/4 cup (59 ml) pecans
2 Winesap or Granny Smith
apples, peeled, cored, and
cut in chunks
2 tablespoons (30 ml) butter
1/4 cup (59 ml) golden raisins
Directions:
Heat oven to 350ºF (177ºC). Chop pecans and set aside.
Place chunks of apple in food processor and pulse until coarsely
chopped. In a skillet over medium heat, melt butter and then add
apples. Cook about 5 minutes. Add the raisins, brown sugar and
vinegar to the apples in the skillet. Stir to mix; then cook 5 minutes
longer. Place the round of Brie on a lightly greased ovenproof plate.
Bake for 8 minutes or until soft. Remove from oven. Spoon apple
chutney over Brie; then sprinkle with pecans. Serve with crackers.
NOTE: Brie is covered with a flour-based rind. This should be left
on the Brie to bake and is edible. Serves: 16
Blue Cheese Dressing
Ingredients:
1 clove garlic
2 ounces (57 g) blue cheese
1 cup (237 ml) mayonnaise
Directions:
Place garlic clove in the processor bowl and pulse. Add
cheese and process for 10 seconds. Add mayonnaise, sour
cream, lemon juice and sugar. Process until smooth. Keep
refrigerated. Serves: 12
2 tablespoons (30 ml) brown
sugar
1 tablespoon (15 ml) cider
vinegar
13 -ounce (375 g) round of
Brie
1/4 cup (59 ml) sour cream
2 tablespoons (30 ml) fresh
lemon juice
1 tablespoon (15 ml) sugar
10
Page 11

Recipes (cont.)
Salsa
Ingredients:
Half of small onion
2 cloves garlic
1/4 cup (59 ml) cilantro leaves
1 mild banana pepper, seeded
Directions:
Add onion and garlic to the bowl. Pulse until minced. Add cilantro
and peppers to the bowl. Pulse until minced. Add to onion mixture.
Place tomatoes into bowl and pulse until coarsely chopped. Add to
onion mixture. Add lemon juice and mix thoroughly. Refrigerate for
an hour or more before serving. Serves: 4
Crispy Catfish Fillets
Ingredients:
2 1/2 ounces (71 g) Parmesan cheese (1/2 cup [118 ml]
grated)
20 buttery crackers
1/3 cup (79 ml) fresh parsley sprigs
1/4 cup (59 ml) butter, melted
4 (about 8 ounces [227 g] each) catfish fillets
Directions:
Heat oven to 400ºF (204ºC). Cut cheese into 1/2-inch
(1.3-cm) cubes. Place cheese cubes in processor and pulse
until finely grated. Put grated cheese in a shallow bowl. Place
crackers and parsley in processor. Process until finely ground.
Mix cracker mixture with cheese. Dip fillets in butter and then
place in cracker mixture to coat. Lay fillets on nonstick or
aluminum foil-lined baking sheet. Bake for 15 to 20 minutes
or until fish is cooked through. Serves: 4
1 chili or jalapeno pepper,
seeded
2 tomatoes, peeled
1 tablespoon (15 ml) lemon
juice
11
Page 12

Recipes (cont.)
Fettuccine With Spinach & Prosciutto
Ingredients:
2 1/2 ounces (71 g) Parmesan cheese (1/2 cup [118 ml]
grated)
8 ounces (227 g) uncooked fettuccine
1 clove garlic
1 tablespoon (15 ml) olive oil
4 to 6 ounces (113 to 170 g) thinly sliced prosciutto,
chopped
1 package (10 ounce [283 g]) fresh spinach
1 egg
1/8 teaspoon (.6 ml) black pepper
Directions:
Cut cheese into 1/2-inch (1.3-cm) cubes. Process until grated;
set aside. Cook pasta according to package directions,
omitting any salt. Drain pasta in a colander over a bowl,
reserving 1/2 cup (118 ml) of cooking liquid. Place garlic in
bowl and pulse until minced. Heat olive oil in a large
skillet over medium-high heat. Add garlic and cook for
15 seconds. Place prosciutto into bowl and process until
coarsely chopped. Add prosciutto and spinach to skillet. Cook
over medium-high heat for 3 minutes or until spinach has
wilted. Combine reserved 1/2 cup (118 ml) of cooking
liquid and egg in bowl and process until completely mixed.
Add pasta and egg mixture to skillet and stir well to mix. Cook
and stir over low heat for about 4 minutes or until egg mixture
is slightly thick. Stir in 1⁄4 cup (59 ml) cheese and pepper.
Serve immediately, sprinkling with remaining cheese.
Serves: 4
12
Page 13

Recipes (cont.)
Vegetarian Chili
Ingredients:
2 teaspoons (10 ml) vegetable oil
1 large onion, cut in chunks
1 red bell pepper, seeded and cut into chunks
1 green bell pepper, seeded and cut into chunks
1 clove garlic, peeled
1 tablespoon (15 ml) chili powder
1 teaspoon (5 ml) Italian seasoning
1 can (16 ounces [454 g]) Great Northern beans, drained
1 can (15 ounces [425 g]) kidney beans, drained
1 can (15 ounces [425 g]) black beans, drained
1 can (15 ounces [425 g]) tomato sauce
1 can (14.5 ounces [411 g]) diced tomatoes
1 can (15 ounces [425 g]) vegetable broth
Directions:
In a large saucepan over medium-high heat, heat the
oil. Place onions into the bowl and pulse until completely
chopped. Add the onion to the saucepan and let cook while
chopping peppers. Repeat process with peppers. Place garlic
clove in bowl and pulse until minced. Add garlic to onion
and peppers and cook 1 minute. Add chili powder, Italian
seasonings, beans, tomato sauce, diced tomatoes and
vegetable broth. Bring to a boil. Cover, reduce heat to low, and
simmer for 1 hour. Serves: 3
13
Page 14

LIMITED WARRANTY
This warranty applies to products purchased and used in the U.S. and
Canada. This is the only express warranty for this product and is in lieu
of any other warranty or condition.
This product is warranted to be free from defects in material and workmanship
for a period of one (1) year from the date of original purchase. During this
period, your exclusive remedy is repair or replacement of this product or
any component found to be defective, at our option; however, you are
responsible for all costs associated with returning the product to us and our
returning a product or component under this warranty to you. If the product or
component is no longer available, we will replace with a similar one of equal
or greater value.
This warranty does not cover glass, filters, wear from normal use, use
not in conformity with the printed directions, or damage to the product
resulting from accident, alteration, abuse, or misuse. This warranty extends
only to the original consumer purchaser or gift recipient. Keep the original
sales receipt, as proof of purchase is required to make a warranty claim. This
warranty is void if the product is used for other than single-family household
use or subjected to any voltage and waveform other than as specified on the
rating label (e.g., 120 V ~ 60 Hz).
We exclude all claims for special, incidental, and consequential damages
caused by breach of express or implied warranty. All liability is limited to
the amount of the purchase price. Every implied warranty, including any
statutory warranty or condition of merchantability or fitness for a
particular purpose, is disclaimed except to the extent prohibited by
law, in which case such warranty or condition is limited to the duration
of this written warranty. This warranty gives you specific legal rights. You
may have other legal rights that vary depending on where you live. Some
states or provinces do not allow limitations on implied warranties or special,
incidental, or consequential damages, so the foregoing limitations may not
apply to you.
To make a warranty claim, do not return this appliance to the store.
Please call 1.800.851.8900 in the U.S. or 1.800.267.2826 in Canada or
visit proctorsilex.com in the U.S. or proctorsilex.ca in Canada. For faster
service, locate the model, type, and series numbers on your appliance.
14
Page 15

PRÉCAUTIONS IMPORTANTES
Pour utiliser un appareil électroménager, vous devez toujours prendre
des mesures élémentaires de sécurité pour réduire le risque d’incendie,
d’électrocution et/ou de blessure corporelle, en particulier les mesures
suivantes :
1. Lire toutes les instructions.
2. Cet appareil n’est pas destiné à être utilisé par des personnes (y
compris les enfants) dont les capacités physiques, sensorielles ou
mentales sont réduites, ou manquant d’expérience et de connaissance,
sauf si elles sont étroitement surveillées et instruites sur l’utilisation de
l’appareil par une personne responsable de leur sécurité.
3. Une surveillance étroite est requise pour tout appareil utilisé par ou près
des enfants. Surveiller que les enfants ne jouent pas avec l’appareil.
4. Pour protéger contre le risque de choc électrique, ne pas immerger la
base, le cordon ou la fiche dans l’eau ou d’autre liquides.
5. Débrancher de la prise murale lorsque l’appareil ne sert pas, avant d’y
ajouter des pièces ou d’en retirer, ainsi qu’avant de procéder à son
nettoyage.
6. Éviter de toucher les pièces mobiles.
7. Ne pas faire fonctionner un appareil électroménager avec un cordon
ou une fiche endommagée, ou lorsque l’appareil ne fonctionne pas
bien ou a été échappé ou endommagé d’une manière quelconque.
Le remplacement et la réparation du cordon d’alimentation doivent
être faits par le fabricant, son agent de service ou toute personne
qualifiée de façon à éviter tout danger. Appeler le numéro de service
à la clientèle fourni pour des renseignements concernant l’examen, la
réparation ou l’ajustement.
8. L’utilisation d’accessoires non recommandés par le fabricant ou
vendus par le fabricant de l’appareil peut provoquer un incendie, une
électrocution ou des blessures.
9. Ne pas utiliser à l’extérieur.
10. Ne pas laisser le cordon pendre d’un bord de table ou d’un comptoir,
ou entrer en contact avec une surface chaude, y compris une
cuisinière.
15
Page 16

11. Garder les mains et les ustensiles à l’écart des lames coupantes
pendant le hachage des aliments pour réduire le risque de blessure
grave des personnes et de dommages de l’appareil. Un racloir peut être
utilisé mais uniquement lorsque l’appareil est à l’arrêt.
12. Les lames sont coupantes, les manipuler avec précaution.
13. Cet appareil est destiné au traitement de petites quantités de nourriture
pour consommation immédiate et non pas pour le traitement à l’avance
de grandes quantités.
14. Pour réduire le risque de blessures, ne jamais mettre les lames
tranchantes dans la base avant d’avoir d’abord bien mis le bol en place.
15. S’assurer que le couvercle est fermement mis en place avant de faire
fonctionner l’appareil.
16. Ne pas essayer de contourner le mécanisme de verrouillage du
couvercle.
CONSERVER CES INSTRUCTIONS
Autres renseignements de sécurité pour les consommateurs
Cet appareil est destiné à un usage domestique uniquement.
w AVERTISSEMENT
fourni avec une fiche polarisée (une broche large) pour réduire le risque
d’électrocution. Cette fiche n’entre que dans un seul sens dans une prise
polarisée. Ne contrecarrez pas l’objectif sécuritaire de cette fiche en la modifiant
de quelque manière que ce soit ou en utilisant un adaptateur. Si vous ne
pouvez pas insérer complètement la fiche dans la prise, inversez la fiche. Si elle
refuse toujours de s’insérer, faire remplacer la prise par un électricien.
La longueur du cordon installé sur cet appareil a été sélectionnée afin de
réduire les risques d’enchevêtrement ou de faux pas causés par un fil trop long.
L’utilisation d’une rallonge approuvée est permise si le cordon est trop court.
Les caractéristiques électriques de la rallonge doivent être équivalentes ou
supérieures aux caractéristiques de l’appareil. Prendre toutes les précautions
nécessaires pour installer la rallonge de manière à ne pas la faire courir sur
le comptoir ou sur une table pour éviter qu’un enfant ne tire sur le cordon ou
trébuche accidentellement.
Risque de choc électrique : Cet appareil est
16
Page 17

Pièces et caractéristiques
Avant le premier emploi : Laver le couvercle, le bol, la lame, le dispositif
de réglage de taille de bol et la spatule dans l’eau chaude savonneuse.
La lame est affûtée ; la manipuler avec soin. Rincer et sécher.
1. Couvercle avec distributeur d’huile
2. Dispositif de réglage de taille de bol
3. Lame
4. Bol
5. Spatule
6. Base
7. Bouton de commande
17
intermittente
Page 18

Mode d’emploi
1. Veuillez lire la section « Conseils pour le
traitement » en page 20.
2. Assurez-vous que le robot culinaire est
débranché. Verrouiller le bol dans la base,
en alignant la poignée du bol sur le côté
droit de la base. Tourner dans le sens des
aiguilles d’une montre jusqu’à ce que le bol
se bloque en place avec la poignée vers
l’avant.
3. Mettre la lame dans le bol au-dessus de
la tige centrale. Tourner jusqu’à ce que
la lame glisse dans le fond du bol. La
lame est coupante, manipulez-la avec
précaution.
4. Mettre les aliments dans le bol.
5. Placer le couvercle sur le bol et tourner
dans le sens des aiguilles d’une montre
jusqu’à ce que le couvercle soit verrouillé
en place.
6. Brancher sur une prise de courant.
7. Pour mettre l’appareil en marche, appuyer sur le bouton de
commande intermittente et maintenir-le appuyé pour un
fonctionnement continu. Pour un fonctionnement intermittent,
appuyer sur le bouton de commande intermittente et relâcher-le.
8. Retirer le couvercle. Déverrouiller le bol en le faisant tourner dans
le sens contraire des aiguilles d’une montre. Retirer le bol de la
base. Retirer la lame avec précaution. La lame est coupante ;
manipulez-la avec précaution.
9. Débrancher.
SI LE ROBOT CULINAIRE NE SE MET PAS EN MARCHE : Passer
en revue toutes les étapes de la section « Mode d’emploi », pour vous
assurer que le bol et le couvercle sont bien verrouillés.
18
2
5
Page 19

Caractéristiques
Stockage du cordon
La base du robot culinaire est encastrée de
manière à permettre de ranger le cordon. Retirer
le bol et la spatule de la base. Retourner la base
à l’envers et enrouler le cordon comme illustré.
Spatule
Une spatule adaptée est fournie afin de racler
les parois du bol. Cet accessoire se range
derrière l’appareil.
Dispositif de réglage de taille de bol
Pour une meilleure performance de hachage
et pour hacher de petites quantités, placer le
dispositif de réglage de taille de bol au-dessus
des aliments avant le hachage.
Distributeur d’huile
Pour faire une sauce à salade, verser l’huile
lentement dans le distributeur tout en
hachant. Le distributeur ajoutera lentement
de l’huile aux sauces et vinaigrettes pour
l’émulsion des ingrédients. REMARQUE : La
quantité maximum de liquide est de 1 tasse
(237 ml).
19
Page 20

Conseils pour le traitement
• La capacité du bol est de 3 tasses (710 ml). Dans le cas
d’ingrédients liquides, ne dépasser pas les 1 tasse (237 ml).
• Pour hacher les carottes, le céleri, les champignons, les
poivron verts ou les oignons, couper en morceaux de
1 po (2,5 cm) et mettre-les dans le bol. La consistance sera
plus uniforme.
• Écraser en purée de petites quantités de fruits ou de
légumes cuits, pour préparer de la nourriture de bébé ou
pour utiliser comme base de sauces ou soupes.
• Ne vous servez pas du robot culinaire pour le café en
grains, les morceaux entiers de chocolat à cuire, ni
pour des morceaux entiers d’épices dures, au risque de
l’endommager.
20
Page 21

Tableau de traitement
*Indique si le dispositif de réglage de taille de bol est recommandé.
POUR OBTENIR INSTRUCTIONS
Chapelure, miettes
Fromage
parmesan
Chocolat pour
la cuisson
Miettes de
biscuits
Fruits hachés
Ail émincé Peler puis traiter 1 gousse d’ail ou plus à la fois.
Miettes de biscuits
Graham
Herbes hachées
Viande hachée
Noix hachées
Persil haché
ou émincé Séparer les têtes des tiges.
Légumes hachés
ou émincés
Déchirer les tranches de pain (jusqu’à 3) en 6 morceaux.
Couper en cubes de 1/2 po (1,3 cm). Traiter
1/2 tasse (118 ml) de cubes à la fois.
Couper en cubes de 1/2 po (1,3 cm). Ne pas
traiter plus de 4 oz (113 g) à la fois.
Briser en morceaux. Utiliser jusqu’à 2 tasses
(473 ml) de morceaux.
Couper les fruits en gros morceaux. Placer jusqu’à 2
tasses (473 ml) de morceaux dans le robot culinaire.
Briser en 4 morceaux. Mettre jusqu’à 6 craquelins
en morceaux à la fois dans le robot culinaire.
Mettre jusqu’à 1 tasse (237 ml) dans le robot culinaire.
Couper en cubes de 1/2 po (1,3 cm). Hacher
8 onces (227 g) de cubes à la fois.
Mettre jusqu’à 1 tasse (237 ml) dans le robot culinaire.
Couper les légumes en morceaux de 1 po
(2,5 cm). Mettre jusqu’à 2 tasses (473 ml) à la
fois dans le robot culinaire.
Dis. *
4
4
4
4
4
4
4
4
REMARQUE : Les quantités sont les valeurs maximum recommandées.
Selon le type d’aliment, des quantités plus petites peuvent améliorer la
performance de hachage.
21
Page 22

Nettoyage
w AVERTISSEMENT
Débrancher avant le nettoyage. Ne pas immerger la base, la
fiche ou le cordon dans l’eau ou autre liquide.
1. Débrancher.
2. Laver le couvercle, le bol, la spatule, le dispositif de réglage de taille
de bol et la lame à l’eau chaude savonneuse. La lame est coupante ;
manipuler-la avec précaution. Rincer et sécher-la. Le couvercle, le bol,
la spatule, le dispositif de réglage de taille du bol et le couteau peuvent
également être passés au lave-vaisselle, dans le panier supérieur.
3. Réassembler l’appareil de façon à le ranger en toute sécurité.
4. Pour nettoyer la base, essuyer celle-ci à l’aide d’un linge humide. Ne
vous servez pas de nettoyants abrasifs. Ne plonger pas la base dans
l’eau.
Risque de choc électrique.
Recettes
Pesto
Ingrédients :
1 tasse (237 ml) de feuilles de basilic frais
1/4 tasse (59 ml) de noix de pin
1 gousse d’ail
1/4 tasse (59 ml) d’huile d’olive
1/4 tasse (59 ml) de fromage Parmesan râpé
Pincée de sel
Instructions :
Déposer le basilic, les noix de pin et l’ail dans le bol du robot
culinaire. Transformer jusqu’à consistance de purée. Ajouter
l’huile, le fromage parmesan et le sel. Transformer afin de bien
mélanger le tout. Incorporer à des pâtes chaudes, tartiner sur
du poulet grillé ou comme tartinade à sandwich.
Donne : 2/3 tasse (158 ml)
22
Page 23

Recettes (suite)
Brie garni de chutney aux pommes
Ingrédients :
1/ 4 tasse (59 ml) de noix de
pacane
2 pommes Winesap ou Granny
Smith, pelées, évidées et
coupées en gros morceaux
2 c. à soupe (30 ml) de beurre
Instructions :
Chauffer le four à 350 ºF (177 ºC). Hacher les pacanes et les mettre de côté.
Vider les pommes dans le robot culinaire et hacher grossièrement au réglage
Pulse. Dans une poêle, à feu moyen, faire fondre le beurre, puis ajouter les
pommes. Cuire pendant environ 5 minutes. Ajouter les raisins secs, le sucre
brun et le vinaigre dans la poêle. Mélanger, puis cuire encore 5 minutes.
Déposer la roue de Brie sur une assiette légèrement graissée allant au four.
Cuire pendant 8 minutes ou jusqu’à tendreté. Sortir du four. Verser le chutney
aux pommes sur le brie avec une cuillère et saupoudrer de pacanes. Servir
accompagné de craquelins. REMARQUE: Le Brie est recouvert d’une croûte à la
farine. Elle est comestible et devrait donc être laissée sur le fromage. Servir : 16
Vinaigrette au fromage bleu
Ingrédients :
1 gousse d’ail
2 oz (57 g) de fromage bleu
1 tasse (237 ml) de mayonnaise
Instructions :
Mettre la gousse d’ail dans le bol du robot culinaire et émincer au réglage
Pulse. Ajouter le fromage et laisser tourner pendant 10 secondes. Ajouter
la mayonnaise, la crème sure, le jus de citron et le sucre. Mélanger
jusqu’à consistance lisse. Garder au réfrigérateur. Servir : 12
1/ 4 tasse (59 ml) de raisins secs
jaunes
2 c. à soupe (30 ml) de sucre brun
1 c. à soupe (15 ml) de vinaigre
de cidre
Ro ue de brie de 13 oz (375 g)
1/ 4 tasse (59 ml) de crème sure
2 c. à soupe (30 ml) de jus de
citron frais
1 c. à soupe (15 ml) de sucre
23
Page 24

Recettes (suite)
Salsa
Ingrédients :
La moitié d’un petit oignon
2 gousses d’ail
1/ 4 tasse (59 ml) de feuilles de
coriandre
1 piment banane doux, égrainé
Instructions :
Mettre l’oignon et l’ail dans le bol. Hacher au réglage Pulse. Mettre la coriandre
et les poivrons dans le bol. Hacher au réglage Pulse. Ajouter au mélange
d’oignon. Mettre les tomates dans le bol et impulser jusqu’à ce qu’elles soient
grossièrement hachées. Ajouter au mélange d’oignon. Ajouter le jus de citron et
bien mélanger. Réfrigérer pendant une heure ou plus avant de servir. Serves: 4
Filets de poisson-chat croustillants
Ingrédients :
2 1/2 oz (71 g) de fromage Parmesan (1/2 tasse [118 ml] râpé)
20 craquelins au beurre
1/3 tasse (79 ml) de bouquets de persil frais
1/4 tasse (59 ml) de beurre, fondu
4 (about 8 oz [227 g] chaque) filets de poisson-chat d’environ
Instructions :
Chauffer le four à 400 ºF (204 ºC). Couper le fromage en cubes
de 1/2 po (1,3 cm). Verser les cubes de fromage dans le robot
culinaire et râper finement au réglage Pulse. Verser le fromage râpé
dans un plat peu profond. Mettre les craquelins et le persil dans le
robot culinaire. Moudre jusqu’à consistance fine et mélanger avec le
fromage. Tremper les filets dans le beurre, puis dans le mélange de
craquelins. Déposer les filets sur une plaque à pâtisserie à revêtement
non adhésif ou recouverte de papier d’aluminium. Cuire de 15 à 20
minutes ou jusqu’à ce que le poisson soit entièrement cuit. Servir : 4
1 piment (jalapeño ou autre
piment fort), égrainé
2 tomates, pelées
1 c. à soupe (15 ml) de jus de
citron
24
Page 25

Recettes (suite)
Fettuccini aux épinards et prosciutto
Ingrédients :
2 1/2 oz (71 g) de fromage Parmesan (1/2 tasse [118 ml]
râpé)
8 oz (227 g) de fettuccini secs
1 gousse d’ail
1 c. à soupe (15 ml) d’huile d’olive
4 à 6 oz (113 à 170 g) de prosciutto finement tranché, haché
1 sac de (10 oz [283 g]) d’épinards frais
1 oeuf
1/8 c. à thé (0,6 ml) de poivre noir
Instructions :
Couper le fromage en cubes de 1/2 po (1,3 cm). Râper.
Mettre de côté. Cuire les pâtes tel qu’indiqué sur l’emballage,
en omettant le sel. Égoutter les pâtes dans une passoire, sur
un plat, et réserver 1/2 tasse (118 ml) du liquide de cuisson.
Mettre l’ail dans le bol et impulser jusqu’à ce qu’il soit haché.
Réchauffer l’huile d’olive dans une grande poêle à feu moyen
à élevé. Ajouter l’ail et cuire pendant 15 secondes. Mettre
le prosciutto dans le bol et transformer jusqu’à ce qu’il soit
grossièrement haché. Ajouter le prosciutto et les épinards
dans la poêle. Cuire à feu moyen à élevé pendant 3 minutes,
ou jusqu’à ce que les épinards soient ramollis. Combiner
la quantité réservée de 1/2 tasse (118 ml) de liquide de
caisson et l’œuf dans le bol et transformer afin de mélanger
complètement. Verser les pâtes et le mélange d’oeuf dans la
poêle et bien mélanger. Cuire et brasser à feu doux pendant
environ 4 minutes ou jusqu’à ce que le mélange contenant
l’oeuf ait légèrement épaissi. Incorporer 1/4 tasse (59 ml)
du fromage et le poivre. Servir immédiatement après avoir
saupoudré du reste du fromage. Servir : 4
25
Page 26

Recettes (suite)
Chili végétarien
Ingrédients :
2 c. à thé (10 ml) d’huile végétale
1 gros oignon, coupé en morceaux
1 poivron rouge, égrainé et coupé en morceaux
1 poivron vert, égrainé et coupé en morceaux
1 gousse d’ail, pelée
1 c. à soupe (15 ml) de poudre de chili
1 c. à thé (5 ml) d’assaisonnement à l’italienne
1 boîte de (16 oz [454 g]) de haricots Great Northern,
égouttés
1 boîte de (15 oz [425 g]) de haricots rouges, égouttés
1 boîte de (15 oz [425 g]) de haricots noirs, égouttés
1 boîte de (15 oz [425 g]) de sauce tomate
1 boîte de (14.5 oz [411 g]) de tomates en dés
1 boîte de (15 oz [425 g]) de bouillon de légumes
Instructions :
Faire chauffer l’huile dans un grand poêlon sur un feu moyenélevé. Mettre les oignons dans le bol et impulser jusqu’à
ce que l’oignon soit complètement haché. Ajouter l’oignon
dans le poêlon et laisser cuire pendant la transformation
des poivrons. Répéter la procédure avec les poivrons. Mettre
la gousse d’ail dans le bol et impulsé jusqu’à ce qu’elle
soit complètement hachée. Ajouter l’ail dans la casserole
et cuire pendant 1 minute. Ajouter la poudre de chili,
l’assaisonnement à l’italienne, les haricots, la sauce tomate,
les tomates en dés et le bouillon de légumes. Porter à
ébullition. Couvrir, réduire à feu doux et laisser mijoter pendant
1 heure. Servir : 3
26
Page 27

Notes
27
Page 28

GARANTIE LIMITÉE
Cette garantie s’applique aux produits achetés et utilisées aux É.-U. et au
Canada. C’est la seule garantie expresse pour ce produit et est en lieu et place
de tout autre garantie ou condition.
Ce produit est garanti contre tout défaut de matériaux et de main-d’oeuvre pour
une période de un (1) an à compter de la date d’achat d’origine. Au cours de
cette période, votre seul recours est la réparation ou le remplacement de ce
produit ou tout composant s’avérant défectueux, à notre gré, mais vous êtes
responsable de tous les coûts liés à l’expédition du produit et le retour d’un
produit ou d’un composant dans le cadre de cette garantie. Si le produit ou un
composant n’est plus offert, nous le remplacerons par un produit similaire de
valeur égale ou supérieure.
Cette garantie ne couvre pas le verre, les filtres, l’usure d’un usage normal,
l’utilisation non conforme aux directives imprimées, ou des dommages au
produit résultant d’un accident, modification, utilisation abusive ou incorrecte.
Cette garantie s’applique seulement à l’acheteur original ou à la personne
l’ayant reçu en cadeau. La présentation du reçu de vente d’origine comme
preuve d’achat est nécessaire pour faire une réclamation au titre de cette
garantie. Cette garantie s’annule si le produit est utilisé autrement que par une
famille ou si l’appareil est soumis à toute tension ou forme d’onde différente des
caractéristiques nominales précisées sur l’étiquette (par ex. : 120 V ~ 60 Hz).
Nous excluons toutes les réclamations au titre de cette garantie pour les
dommages spéciaux, consécutifs et indirects causés par la violation de garantie
expresse ou implicite. Toute responsabilité est limitée au prix d’achat. Chaque
garantie implicite, y compris toute garantie ou condition de qualité
marchande ou d’adéquation à un usage particulier, est exonérée, sauf
dans la mesure interdite par la loi, auquel cas la garantie ou condition
est limitée à la durée de cette garantie écrite. Cette garantie vous donne
des droits légaux précis. Vous pouvez avoir d’autres droits qui varient selon
l’endroit où vous habitez. Certaines provinces ne permettent pas les limitations
sur les garanties implicites ou les dommages spéciaux ou indirects de telle sorte
que les limitations ci-dessus ne s’appliquent peut-être pas à votre cas.
Ne pas retourner cet appareil au magasin lors d’une réclamation au
titre de cette garantie. Téléphoner au 1.800.851.8900 aux É.-U. ou au
1.800.267.2826 au Canada ou visiter le site internet www.proctorsilex.com aux
É.-U. ou www.proctorsilex.ca au Canada. Pour un service plus rapide, trouvez le
numéro de modèle, le type d’appareil et les numéros de série sur votre appareil.
28
Page 29

SALVAGUARDIAS IMPORTANTES
Cuando utilice artefactos eléctricos, siempre deben seguirse precauciones de
seguridad básicas a fin de reducir el riesgo de incendio, descarga eléctrica, y/o
lesiones a personas, incluyendo las siguientes:
1. Lea todas las instrucciones.
2. Este aparato no se destina para utilizarse por personas (incluyendo niños)
cuyas capacidades físicas, sensoriales o mentales sean diferentes o
estén reducidas, o carezcan de experiencia o conocimiento, a menos
que dichas personas reciban una supervisión o capacitación para
el funcionamiento del aparato por una persona responsable de su
seguridad.
3. Se requiere de una estrecha supervisión cuando el aparato se use cerca
de niños. Los niños deben supervisarse para asegurar que ellos no
empleen los aparatos como juguete.
4. Verifique que el voltaje de su instalación corresponda con el del producto.
5. Para protegerse contra el riesgo de choque eléctrico, no sumerja el cable,
el enchufe ni la base en agua ni en algún otro líquido.
6. Desenchúfela del tomacorriente cuando no la esté usando, antes de
colocar o sacar alguna pieza y antes de la limpieza.
7. Evite todo contacto con piezas móviles.
8. No opere ningún aparato con cables o enchufe dañados o después
de que el aparato funcione mal o se caiga o dañe de cualquier
manera. El reemplazo del cable de suministro y las reparaciones deben
ser efectuadas por el fabricante, su agente de servicio, o personas
igualmente calificadas para poder evitar un peligro. Llame al número de
servicio al cliente proporcionado para información sobre examinación,
reparación o ajuste.
9. El uso de accesorios no recomendados o vendidos por fabricante de
electrodomésticos puede causar incendio, choque eléctrico o lesiones.
10. No lo use al aire libre.
11. No deje que el cable cuelgue sobre el borde de una mesa o mostrador ni
que toque alguna superficie caliente, incluyendo la estufa.
29
Page 30

12. Mantenga las manos y utensilios lejos de las cuchillas de corte mientras
pica alimentos para reducir el riesgo de lesiones serias a las personas o
daños a el procesador de alimentos. Se puede usar una pala raspadora o
espátula únicamente cuando el aparato no esté operando.
13. Las cuchillas son muy filosas, manéjelas con cuidado.
14. Este aparato está diseñado para procesar pequeñas cantidades de
alimentos para consumo inmediato. Este electrodoméstico no está
diseñado para preparar grandes cantidades de alimentos a la vez.
15. Para reducir el riesgo de lesiones, nunca coloque las cuchillas para cortar
en la base sin antes colocar adecuadamente el tazón en su lugar.
16. Asegúrese de que la cubierta esté trabada con seguridad en su lugar
antes de operar el electrodoméstico.
17. No intente anular el mecanismo de traba de la cubierta.
GUARDE ESTAS INSTRUCCIONES
Otra Información de Seguridad para el Cliente
Este aparato ha sido diseñado solamente para uso doméstico.
w ADVERTENCIA
provisto con un enchufe polarizado (una pata más ancha) para reducir
el riesgo de una descarga eléctrica. El enchufe embona únicamente en
una dirección dentro de un tomacorriente polarizado. No trate de obviar
el propósito de seguridad del enchufe modificándolo de alguna manera
o utilizando un adaptador. Si el enchufe no entra completamente en
la toma, invierta el enchufe. Si aún no entra, haga que un electricista
reemplace la toma.
El largo del cable que se usa en este aparato fue seleccionado para
reducir el peligro de que alguien se enganche o tropiece con un cable
más largo. Si es necesario usar un cable más largo, se podrá usar
un cable de extensión aprobado. La clasificación eléctrica nominal
del cable de extensión debe ser igual o mayor que la clasificación
nominal del aparato. Es importante tener cuidado de colocar el cable
de extensión para que no se pliegue sobre el mostrador o la mesera en
donde niños puedan tirar del mismo o tropezarse accidentalmente.
Peligro de Descarga Eléctrica: Este aparato es
30
Page 31

Piezas y Características
Antes del primer uso: Lave la tapa, tazón, cuchilla, ajustador
del tamaño del tazón y espátula en agua caliente jabonosa. La
cuchilla es filosa; manipule con cuidado. Enjuague y seque.
1. Tapa con dispensador de aceite
2. Ajustador del tamaño del tazón
3. Cuchilla
4. Tazón
31
5. Espátula
6. Base
7. Botón de pulso
Page 32
Cómo Usar
1. Lea “Consejos para Procesar” en la
página 34.
2. Asegúrese de que el procesador está
desenchufada. Trabe el tazón en la
base alineando la manija del tazón
en el lado derecho de la base. Gire
en el sentido de las manecillas del
reloj hasta que el tazón encaje en su
lugar con la manija hacia el frente.
3. Coloque la cuchilla en el tazón
sobre el eje central. Gire hasta que
la cuchilla se deslice hacia abajo,
hasta el fondo del tazón. La cuchilla
es filosa; manéjela con cuidado.
4. Coloque los alimentos en el tazón.
5. Coloque la cubierta sobre el tazón y
rote en el sentido de las manecillas
del reloj hasta que la tapa quede fija
en su lugar.
6. Enchufe en el tomacorriente.
7. Para encender la unidad, presione y sostenga el botón de
pulso para una operación continua. Para pulsar, presione y
libere el botón de pulso.
8. Quite la cubierta. Destrabe el tazón girando en el sentido
contrario a las manecillas del reloj. Quite el tazón de la
base. Quite la cuchilla con cuidado. La cuchilla es filosa;
manéjela con cuidado.
9. Desenchufe.
SI EL PROCESADOR NO SE PONE EN MARCHA: Revise los
pasos en “Cómo usar” para asegurarse de que el tazón y la
cubierta están en las posiciones de trabado.
2
5
32
Page 33

Características
Almacenamiento del cable
La base del procesador de alimentos tiene
un espacio para el almacenamiento del
cable. Retire el tazón y la espátula de la
base. Voltee la base y enrolle el cable
como se muestra.
Espátula
Se provee una espátula especial para
raspar los lados del tazón. La espátula se
almacena en la parte trasera de la unidad.
Ajustador del tamaño del tazón
Para un mejor desempeño de picado y
para picar cantidades pequeñas, coloque
el ajustador del tamaño del tazón encima
de los alimentos antes de procesar.
Dispensador de aceite
Para hacer aliño para ensalada,
vierta aceite a través del dispensador
lentamente mientras procesa. El
dispensador agregará aceite lentamente
a los tazones y aliño para emulsión de los
ingredientes. NOTA: La cantidad máxima
de líquido es 1 taza (237 ml).
33
Page 34

Consejos para Procesar
• El tazón tiene capacidad para 3 tazas (710 ml). Para
ingredientes líquidos, no exceda de 1 taza (237 ml).
• Para picar zanahorias, apio, champiñones, pimiento verde
o cebolla, corte en trozos de 1 pulgada (2.5 cm) y coloque
en el tazón. Esto dará como resultado una consistencia más
homogénea.
• Haga puré pequeñas cantidades de frutas o verduras
cocidas para comida para bebé o use como base para
salsas o sopas.
• No procese granos de café, chocolate para hornear, o
especies duras enteras en el procesador de alimentos. Esto
puede dañar el procesador.
34
Page 35

Tabla de Procesamiento
*Indica cuando se recomienda el ajustador del tamaño del tazón.
PARA PREPARAR INSTRUCCIONES
Migas de pan Parta las tajadas de pan (máx. 3) en 6 piezas
Queso
parmesano
Chocolate para
hornear
Migas de galleta
Fruta picada
Ajo picado
Migas de galletas
Graham
Hierbas picadas Coloque hasta 1 taza (237 ml) en el procesador.
Carne molida
Nueces picadas
Perejil picado Arranque los ramitos del ramillete.
Vegetales picados
NOTA: Las cantidades anteriores son el máximo recomendado.
Dependiendo del tipo de alimento, unas cantidades más pequeñas podrían
mejorar el desempeño del picado.
Corte en cubos de 1/2 pulgada (1.3 cm). Procese
1/2 taza (118 ml) de cubos a la vez.
Corte en cubos de 1/2 pulgada (1.3 cm). No
procese más de 4 oz. (113 g) a la vez.
Parta en pedazos. Use hasta 2 tazas (473 ml)
de pedazos.
Corte la fruta en porciones grandes. Coloque
hasta 2 tazas (473 ml) de fruta en el procesador.
Pele y luego procese 1 o más dientes de ajo
a la vez.
Parta en 4 pedazos. Coloque hasta 6 galletas
en el procesador a la vez.
Couper en cubes de 1/2 pulgada (1.3 cm).
Hacher 8 oz (227 g) de cubes à la fois.
Mettre jusqu’à 1 taza (237 ml) dans el procesador.
Corte vegetales en pedazos de 1 pulgada
(2.5 cm). Coloque hasta 2 tazas (473 ml) en el
procesador a la vez.
35
Adj. *
4
4
4
4
4
4
4
4
Page 36

Limpieza
w ADVERTENCIA
Desconecte la corriente antes de limpiar. No sumerja la base,
enchufe o cable en agua u otro líquido.
1. Desenchufe.
2. Lave la tapa, el tazón, la espátula, el ajustador del tamaño
del tazón y la cuchilla en agua caliente jabonosa. La
cuchilla es muy filosa; manéjela con cuidado. Enjuague
y seque. La cubierta, el tazón, la espátula, el ajustador del
tamaño del tazón y la cuchilla también se pueden lavar en
la canasta superior del lavavajillas automático.
3. Ensamble de nuevo para un mejor almacenaje.
4. Limpie la base con un paño húmedo. No use limpiadores
abrasivos. No sumerja la base en agua.
Peligro de Descarga Eléctrica.
Recetas
Pesto
Ingredientes:
1 taza (237 ml) de hojas de albahaca fresca
1/4 taza (59 ml) de piñones
1 diente de ajo
1/4 taza (59 ml) de aceite de oliva
1/4 taza (59 ml) de queso Parmesano rallado
Una pizca de sal
Instrucciones:
Coloque la albahaca, los piñones y el ajo en el tazón del procesador
de alimentos. Procese hasta que quede casi un puré. Agregue el
aceite, el queso Parmesano y la sal. Procese hasta que quede bien
mezclado. Mezcle con pastas calientes, unte sobre pollo asado o
utilícelo para untar sándwiches. Rendimiento: 2/3 taza (158 ml)
36
Page 37

Recetas (cont.)
Brie con chutney de manzana
Ingredientes:
1/4 taza (59 ml) de pecanas
2 manzanas Winesap o Granny Smith
peladas, sin centro y cortadas en
trozos
2 cucharadas (30 ml) de mantequilla
1/ 4 taza (59 ml) de pasas de uva rubias
Instrucciones:
Caliente el horno a 350ºF (177ºC). Pique las pecanas y sepárelas. Coloque los trozos
de manzana en el procesador de alimentos y pulse hasta alcanzar un picado grueso.
En una sartén a fuego medio derrita la mantequilla y luego agregue las manzanas.
Cocine por alrededor de 5 minutos. Agregue las pasas, el azúcar moreno y el vinagre
a las manzanas de la sartén. Mezcle; luego cocine por 5 minutos más. Coloque
la horma de Brie en un plato apto para horno ligeramente enmantecado. Hornee
durante 8 minutos o hasta que quede blando. Quite del horno. Con una cuchara,
coloque el chutney de manzana sobre el Brie; luego espolvoree con pecanas. Sirva
con galletas. NOTA: El Brie está cubierto con una cáscara con base de harina. Esta
debe dejarse en el Brie durante el horneado y es comestible. Rendimiento: 16
Aderezo de queso azul
Ingredientes:
1 diente de ajo
2 onzas (57 g) de queso azul
1 taza (237 ml) de mayonesa
Instrucciones:
Coloque el diente de ajo en el tazón del procesador y pulse. Agregue
el queso y procese durante 10 segundos. Agregue la mayonesa, la
crema agria, el jugo de limón y el azúcar. Procese hasta lograr una
consistencia suave. Mantener refrigerado. Rendimiento: 12
2 cucharadas (30 ml) de azúcar
moreno
1 cucharada (15 ml) de vinagre de sidra
1 horma de queso Brie de 13 onzas
(375 g)
1/4 taza (59 ml) de crema agria
2 cucharadas (30 ml) de jugo
de limón fresco
1 cucharada (15 ml) de azúcar
37
Page 38

Recetas (cont.)
Salsa
Ingredientes:
Media cebolla pequeña
2 dientes de ajo
1/4 taza (59 ml) de hojas de cilantro
1 pimiento amarillo banana suave
sin semillas
Instrucciones:
Agregue la cebolla y el ajo al tazón. Pulse hasta que quede picado. Agregue el
cilantro y los pimientos al tazón. Pulse hasta que quede picado. Agregue a la mezcla
de cebolla. Coloque los tomates en el tazón y presione el botón de pulso hasta
alcanzar un picado grueso. Agregue a la mezcla de cebolla. Agregue el jugo de limón
y mezcle bien. Refrigere por una hora o más antes de servir. Rendimiento: 4
Filetes crocantes de bagre
Ingredientes:
2 1/2 onzas (71 g) de queso Parmesano (1/2 taza [118 ml] rallado)
20 galletas tipo cracker de mantequilla
1/3 taza (79 ml) de ramitas de perejil fresco
1/4 taza (59 ml) de mantequilla derretida
4 filetes de bagre (alrededor de 8 onzas [227 g] cada uno)
Instrucciones:
Caliente el horno a 400ºF (204ºC). Corte el queso en cubos de
1/2 pulgada (1.3 cm). Coloque los cubos de queso en el procesador y pulse
hasta que quede bien rallado. Coloque el queso rallado en un tazón poco
profundo. Ponga las galletas y el perejil en el procesador. Procese hasta que
queden bien picados. Combine la mezcla de galletas con el queso. Pase los
filetes por la mantequilla y luego colóquelos en la mezcla de galletas para
recubrir. Coloque los filetes sobre una bandeja para hornear antiadherente o
recubierta con papel de aluminio. Hornee de 15 a 20 minutos o hasta que
el pescado esté completamente cocido. Rendimiento: 4
1 pimiento chile o jalapeño sin
semillas
2 tomates pelados
1 cucharada (15 ml) de jugo de
limón
38
Page 39

Recetas (cont.)
Fettuccine con espinaca y prosciutto
Ingredientes:
2 1/2 onzas (71 g) de queso Parmesano (1/2 taza [118 ml]
rallado)
8 onzas (227 g) de fettuccine sin cocer
1 diente de ajo
1 cucharada (15 ml) de aceite de oliva
4 a 6 onzas (113 a 170 g) de prosciutto en rebanadas finas
y picado
1 paquete (10 onzas [283 g]) de espinaca fresca
1 huevo
1/8 cucharadita (0.6 ml) de pimienta negra
Instrucciones:
Corte el queso en cubos de 1/2 pulgada (1.3 cm). Procese
hasta rallar; separe. Cocine la pasta de acuerdo con las
instrucciones del paquete, sin colocar sal. Escurra la pasta
con un colador sobre un tazón, reservando 1/2 taza (118 ml)
del líquido de cocción. Coloque el ajo en un tazón y pulse
hasta que quede bien picado. Caliente el aceite de oliva en
una sartén grande a fuego medio-alto. Agregue el ajo y cocine
por 15 segundos. Coloque el prosciutto en el tazón y procese
hasta alcanzar un picado grueso. Agregue el prosciutto y la
espinaca a la sartén. Cocine a fuego medio-alto por 3 minutos
o hasta que se ablande la espinaca. Combine la 1/2 taza
(118 ml) reservada de líquido de cocción y el huevo en el
tazón y procese hasta que se haya mezclado por completo.
Agregue la pasta y la mezcla de huevo a la sartén y mezcle
bien. Cocine y mezcle a fuego bajo por 4 minutos o hasta que
la mezcla de los huevos quede ligeramente espesa. Vierta
1/4 taza (59 ml) de queso y la pimienta. Sirva de inmediato,
espolvoreando el queso restante. Rendimiento: 4
39
Page 40

Recetas (cont.)
Chile vegetariano
Ingredientes:
2 cucharaditas (10 ml) de aceite vegetal
1 cebolla grande cortada en trozos
1 pimiento rojo bell sin semillas cortado en trozos
1 pimiento verde bell sin semillas cortado en trozos
1 diente de ajo pelado
1 cucharada (15 ml) de chile en polvo
1 cucharadita (5 ml) de aderezo italiano
1 lata (16 onzas [454 g]) de frijoles norteños escurridos
1 lata (15 onzas [425 g]) de frijoles rojos escurridos
1 lata (15 onzas [425 g]) de frijoles negros escurridos
1 lata (15 onzas [425 g]) de salsa de tomate
1 lata (14.5 onzas [411 g]) de tomates en cubos
1 lata (15 onzas [425 g]) de caldo de verduras
Instrucciones:
En una sartén grande a fuego medio-alto, caliente el aceite.
Coloque las cebollas en el tazón y pulse hasta que queden
picadas por completo. Agregue la cebolla a la sartén y deje
cocinar mientras pica los pimientos. Repita el proceso con
los pimientos. Coloque el diente de ajo en el tazón y pulse
hasta que quede picado. Agregue el ajo a la cebolla y a los
pimientos y cocine por 1 minuto. Agregue el polvo de chile, el
aderezo italiano, los frijoles, la salsa de tomate, los tomates
en cubos y el caldo de vegetales. Lleve a hervor. Cubra,
reduzca el fuego a bajo y cocine a fuego lento por 1 hora.
Rendimiento: 3
40
Page 41

Notas
41
Page 42

Grupo HB PS, S.A. de C.V.
Monte Elbruz No. 124 - 401
Col. Polanco V Sección, Miguel Hidalgo
Ciudad de México, C.P. 11560
01 800 71 16 100
PÓLIZA DE GARANTÍA
PRODUCTO:
Grupo HB PS, S.A. de C.V. cuenta con una Red de Centros de Servicio Autorizada, por
favor consulte en la lista anexa el nombre y dirección de los establecimientos en la
República Mexicana en donde usted podrá hacer efectiva la garantía, obtener partes,
componentes, consumibles y accesorios; así como también obtener servicio para
productos fuera de garantía. Para mayor información llame sin costo:
Centro de Atención al consumidor: 01 800 71 16 100
MARCA:
Grupo HB PS, S.A. de C.V. le otorga a partir de la fecha de compra:
GARANTÍA DE 1 AÑO.
COBERTURA
• Esta garantía ampara, todas las piezas y componentes del producto que resulten con
defecto de fabricación incluyendo la mano de obra.
Grupo HB PS,
•
componente defectuoso; proporcionar la mano de obra necesaria para su diagnóstico y
reparación, todo lo anterior sin costo adicional para el consumidor.
• Esta garantía incluye los gastos de transportación del producto que deriven de su
cumplimiento dentro de su red de servicio.
S.A. de C.V. se obliga a reemplazar, reparar o reponer, cualquier pieza o
LIMITACIONES
• Esta garantía no ampara el reemplazo de piezas deterioradas por uso o por desgaste
normal, como son: cuchillas, vasos, jarras, filtros, etc.
• Grupo HB PS, S.A. de C.V. no se hace responsable por los accidentes producidos a
consecuencia de una instalación eléctrica defectuosa, ausencia de toma de tierra, clavija
de enchufe en mal estado, etc.
EXCEPCIONES
Esta garantía no será efectiva en los siguientes casos:
a) Cuando el producto se hubiese utlizado en condiciones distintas a las normales.
(Uso industrial, semi-industrial o comercial.)
MODELO:
42
Page 43

EXCEPCIONES (continuación)
b) Cuando el producto no hubiese sido operado de acuerdo con el instructivo de uso.
c) Cuando el producto hubiese sido alterado o reparado por personas no autorizadas
por Grupo HB PS, S.A. de C.V. el fabricante nacional, importador o comercializador
responsable respectivo.
El consumidor puede solicitar que se haga efectiva la garantía ante la propia casa comercial
donde adquirió su producto, siempre y cuando Grupo HB PS, S.A. de C.V. no cuente con
talleres de servicio.
PROCEDIMIENTO PARA HACER EFECTIVA LA GARANTÍA
• Para hacer efectiva la garantía no deben exigirse mayores requisitos que la presentación
del producto y la póliza correspondiente, debidamente sellada por el establecimiento que
lo vendió.
• Para hacer efectiva la garantía, lleve su aparato al Centro de Servicio Autorizado más
cercano a su domicilio (consulte la lista anexa).
• Si no existe Centro de Servicio Autorizado en su localidad llame a nuestro Centro de
Atención al Consumidor para recibir instrucciones de como hacer efectiva su garantía.
• El tiempo de reparación, en ningún caso será mayor de 30 días naturales contados a
partir de la fecha de recepción del producto en nuestros Centros de Servicio Autorizados.
• En caso de que el producto haya sido reparado o sometido a mantenimiento y el mismo
presente deficiencias imputables al autor de la reparación o del mantenimiento dentro de
los treinta días naturales posteriores a la entrega del producto al consumidor, éste tendrá
derecho a que sea reparado o mantenido de nuevo sin costo alguno. Si el plazo de la
garantía es superior a los treinta días naturales, se estará a dicho plazo.
• El tiempo que duren las reparaciones efectuadas al amparo de la garantía no es
computable dentro del plazo de la misma. Cuando el bien haya sido reparado se iniciará la
garantía respecto de las piezas repuestas y continuará con relación al resto. En el caso de
reposición del bien deberá renovarse el plazo de la garantía.
FECHA DE
ENTREGA
DÍA___ MES___ AÑO___
SELLO DEL
VENDEDOR
QUEJAS Y SUGERENCIAS
Si desea hacer comentarios o sugerencias con
respecto a nuestro servicio o tiene alguna queja
derivada de la atención recibida en alguno de
nuestros Centros de Servicio Autorizados, por favor
dirigirse a:
GERENCIA INTERNACIONAL DE SERVICIO
Email: mexico.service@proctorsilex.com.mx
01 800 71 16 100
43
Page 44

RED DE CENTROS DE SERVICIO AUTORIZADA GRUPO
HB PS, S.A. DE C.V.
Distrito Federal
ELECTRODOMÉSTICOS
Av. Plutarco Elias Cailes
No. 1499
Zacahuitzco MEXICO 09490 D.F.
Tel: 01 55 5235 2323
Fax: 01 55 5243 1397
CASA GARCIA
Av. Patriotismo No. 875-B
Mixcoac MEXICO 03910 D.F.
Tel: 01 55 5563 8723
Fax: 01 55 5615 1856
Modelo:
72706
Los modelos incluídos en el instructivo de Uso y Cuidado
pueden ir seguidos o no por un sufijo correspondiente a una
o varias letras del alfabeto y sus combinaciones, separadas o
no por un espacio, coma, diagonal, o guión. Como ejemplos los
sufijos pueden ser: “Y” y/o “MX” y/o “MXY” y/o “Z”.
Tipo:
FC07
Jalisco
SERVICIOS DE MANTENIMIENTO
CASTILLO
Garibaldi No. 1450
Ladrón de Guevara
GUADALAJARA 44660 Jal.
Tel: 01 33 3825 3480
Fax: 01 33 3826 1914
Nuevo Leon
FERNANDO SEPULVEDA
REFACCIONES
Ruperto Martínez No. 238 Ote.
Centro MONTERREY, 64000 N.L.
Tel: 01 81 8343 6700
Fax: 01 81 8344 0486
Características Eléctricas:
120 V~ 60 Hz 175 W
840282100
3/17
 Loading...