

Page 1

840270400
Breakfast Sandwich Maker
Grille-sandwich pour le déjeuner
Máquina para Preparar
Sándwiches de Desayuno
READ BEFORE USE
LIRE AVANT UTILISATION
LEA ANTES DE USAR
English....................................... 2
USA: 1-800-851-8900
www.proctorsilex.com
Français ................................... 18
Canada : 1-800-267-2826
www.proctorsilex.ca
Español ................................... 34
México: 01 800 71 16 100
www.proctorsilex.com.mx
Le invitamos a leer cuidadosamente
este instructivo antes de usar su
aparato.
Page 2

IMPORTANT SAFEGUARDS
When using electrical appliances, basic safety precautions should
always be followed to reduce the risk of fire, electric shock, and/or
injury to persons, including the following:
1. Read all instructions.
2. This appliance is not intended for use by persons (including
children) with reduced physical, sensory, or mental capabilities,
or lack of experience and knowledge, unless they are closely
supervised and instructed concerning use of the appliance by a
person responsible for their safety.
3. Close supervision is necessary when any appliance is used by or
near children. Children should be supervised to ensure that they
do not play with the appliance.
4. Do not touch hot surfaces. Use handles or knobs.
5. To protect against risk of electrical shock, do not immerse cord,
plug, or cooking unit in water or other liquid.
6. Unplug from outlet when not in use and before cleaning. Allow to
cool before putting on or taking off parts and before cleaning.
7. Do not operate any appliance with a damaged supply cord or
plug, or after the appliance malfunctions or has been dropped
or damaged in any manner. Supply cord replacement and
repairs must be conducted by the manufacturer, its service
agent, or similarly qualified persons in order to avoid a hazard.
Call the provided customer service number for information on
examination, repair, or adjustment.
8. The use of accessory attachments not recommended by the
appliance manufacturer may cause injuries.
9. Do not use outdoors.
10. Do not let cord hang over edge of table or counter or touch hot
surfaces, including the stove.
11. Do not place on or near a hot gas or electric burner, or in a
heated oven.
12. Extreme caution must be used when moving an appliance
containing hot oil or other hot liquids.
2
Page 3

13. Do not use appliance for other than intended use.
14. Do not use appliance unattended.
15. During use, provide 4 to 6 inches air space above, behind, and
on both sides for air circulation.
16. Never remove the food with any kind of cutting device or other
metallic kitchen utensil.
17. Always allow the appliance to cool before putting it away, and
never wrap the cord around the appliance while it is still hot.
SAVE THESE INSTRUCTIONS
Other Consumer Safety Information
This appliance is intended for household use only.
w WARNING
with either a polarized (one wide blade) or grounded (3-prong) plug
to reduce the risk of electric shock. The plug fits only one way into a
polarized or grounded outlet. Do not defeat the safety purpose of the
plug by modifying the plug in any way or by using an adapter. If the plug
does not fit fully into the outlet, reverse the plug. If it still does not fit,
have an electrician replace the outlet.
The length of the cord used on this appliance was selected to reduce
the hazards of becoming tangled in or tripping over a longer cord. If a
longer cord is necessary, an approved extension cord may be used.
The electrical rating of the extension cord must be equal to or greater
than the rating of the appliance. If the appliance is of the grounding
type, the extension cord should be a grounding-type, 3-wire cord. Care
must be taken to arrange the extension cord so that it will not drape
over the countertop or tabletop where it can be pulled on by children or
accidentally tripped over.
To avoid an electrical circuit overload, do not use another high-wattage
appliance on the same circuit with this appliance.
Electrical Shock Hazard: This appliance is provided
3
Page 4
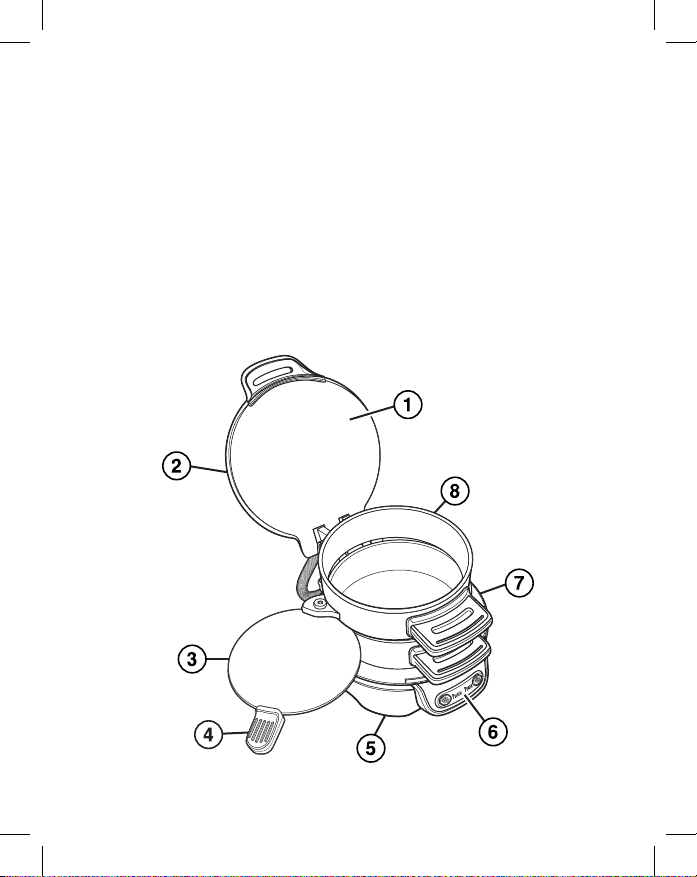
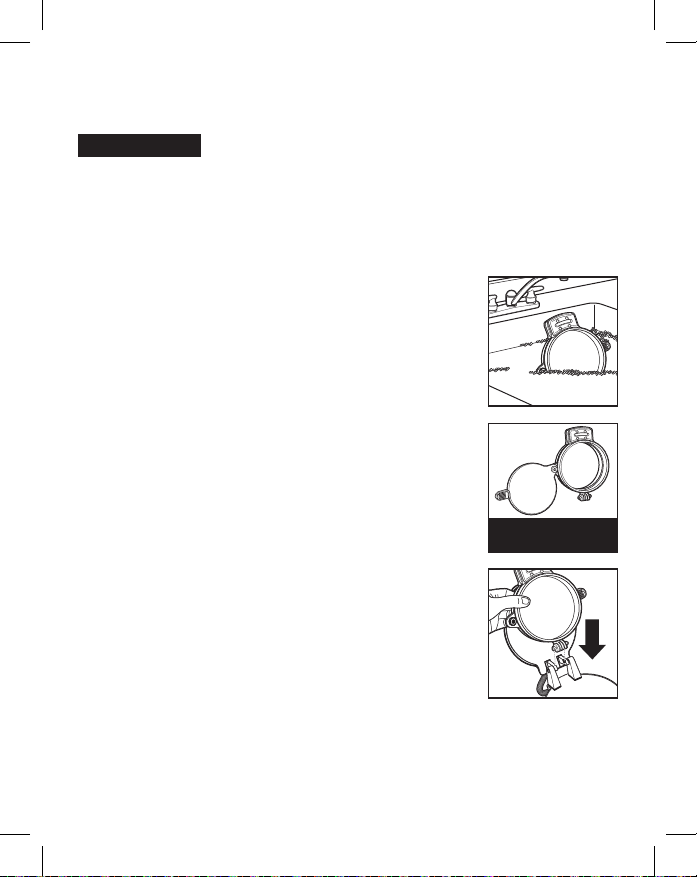
Parts and Features
*To order parts:
US: 1.800.851.8900
www.proctorsilex.com
Canada: 1.800.267.2826
Mexico: 01 800 71 16 100
BEFORE FIRST USE: Lift cover
to remove ring assembly. Wash
removable ring assembly in
dishwasher or in hot, soapy water.
Rinse and dry. Wipe top and bottom
heating plates with a damp, soapy
cloth. Remove soap with a damp
cloth; dry thoroughly. Spray rings
with nonstick cooking spray or wipe
or brush with vegetable oil.
4
Page 5
Parts and Features (cont.)
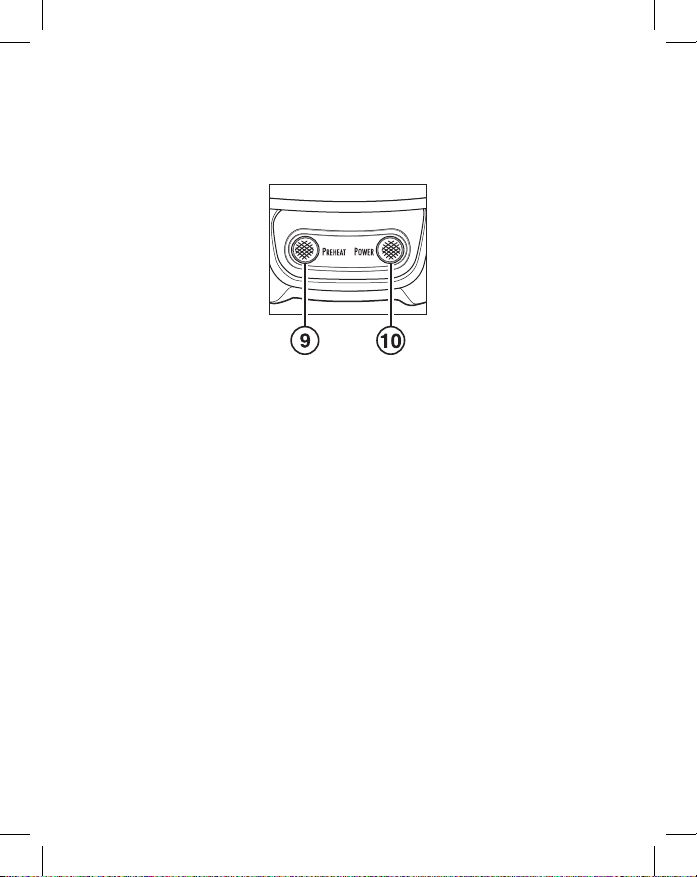
Indicator Lights
1. Top Heating Plate
2. Cover
3. Cooking Plate
4. Cooking Plate Handle
5. Base
6. Indicator Lights
7. Bottom Heating Plate
8. Removable Ring
Assembly
9. Green PREHEAT Light
10. Red POWER Light
5
Page 6
How to Use
w WARNING
Burn Hazard.
Always use an oven mitt to protect hand when opening cover.
Hot surfaces and escaping steam can burn.
1. Plug into outlet. The red POWER light will glow. Lightly
spray rings with nonstick cooking spray before each use.
2. Let unit preheat with cover closed and cooking plate
rotated in between rings.
NOTE: Green PREHEAT light will come on when unit is
heated to the correct temperature and will cycle on and
off during cooking. It is NOT an indicator when sandwich is
ready. Red POWER light stays on.
3. Use handles to lift cover, top ring, and cooking plate.
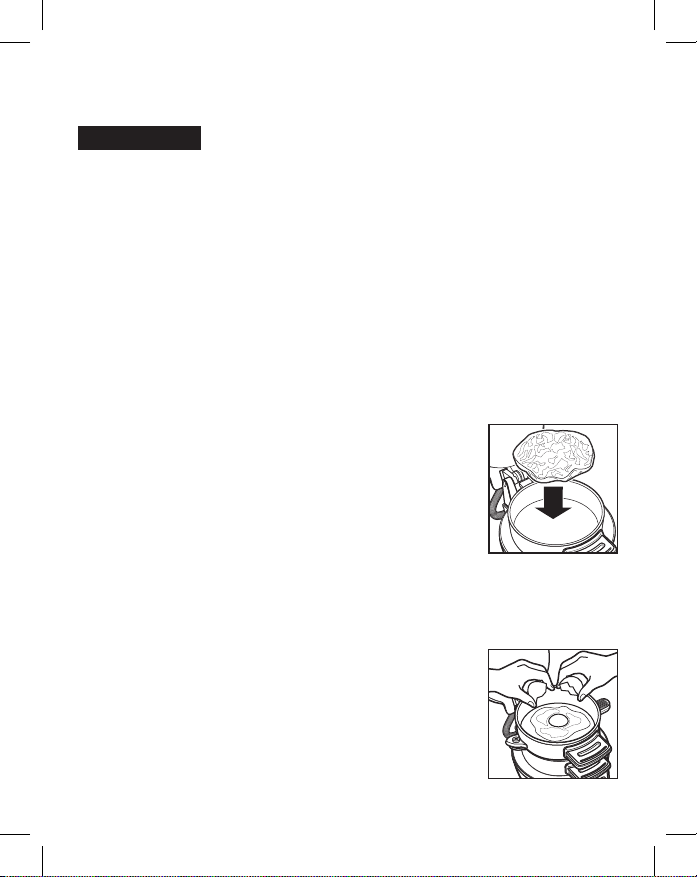
4. Place bottom half of bread (such as an English muffin,
small bagel, or biscuit) onto bottom plate.
5. Top bread with ingredients such as
precooked meats, vegetables, and
cheese. Do not overfill breakfast sandwich
maker. Overfilling willl cause food to spill
over rings and get stuck in the hinges.
6. Move top ring and cooking plate down.
Make sure cooking plate is rotated
securely to back of ring as far as it will go to prevent
leaking of egg.
7. Crack an egg onto cooking plate. Pierce yolk with a fork or
toothpick. (You can use a whole large egg,
egg white, or a scrambled egg.)
8. Top with the other half of bread.
6
Page 7
How to Use (cont.)
9. Close cover. Cook sandwich for 4 to 5 minutes. NOTE: Do
not push lid all the way down when loaded with ingredients
or when using a jumbo egg. Lid may rise as scrambled egg
cooks.
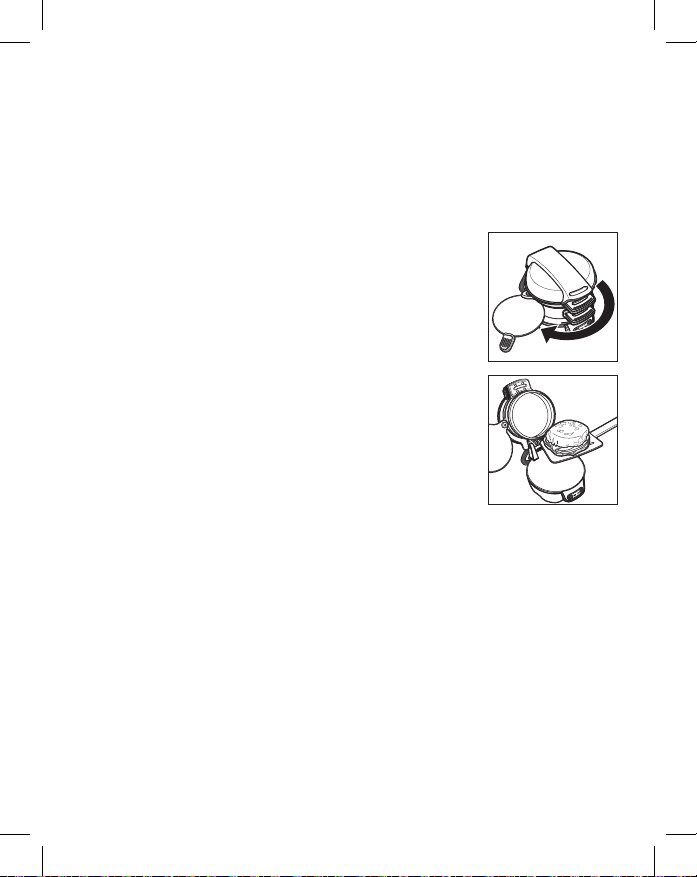
10. When finished cooking, rotate cooking plate handle
clockwise until it stops.
11. Using an oven mitt, lift ring assembly
and cover with bottom handle. Some
sandwiches are easier to remove if rings
are lifted individually.
12. Remove breakfast sandwich with plastic or
wooden utensil. Never use metal.
Always wait 2 minutes between cooking
sandwiches to ensure the breakfast
sandwich maker is heated to the correct
temperature.
13. Unplug when through cooking. Let cool.
TIPS:
• Get your ingredients together before cooking your sandwich.
• Always keep cover closed with rings and cooking plate in
place when preheating.
• Check to make sure the cooking plate is in place before
preheating and when adding food.
7
Page 8
Care and Cleaning
w WARNING
Electrical Shock Hazard.
Disconnect power before cleaning. Do not immerse cord, plug,
or base in any liquid.
1. Unplug unit when through cooking. Let cool.
2. To remove ring assembly for cleaning, hold bottom handle
to open, and then lift straight up.
3. Do not use steel wool, scouring pads, or
abrasive cleansers on any part of the unit.
Never use sharp or pointed objects for
cleaning.
Removable Ring
Assembly
4. DO NOT use the “SANI” setting when
washing in the dishwasher. “SANI” cycle
temperatures could damage your product.
5. Wipe top and bottom heating plates with
a damp, soapy cloth. Remove soap with a
damp cloth; dry thoroughly.
6. To replace ring assembly, align tabs on the
TOP-RACK
DISHWASHER-SAFE
ring assembly with the openings on the
hinge of the base, and lower.
7. Wipe outside of unit with a damp, soapy
cloth.
8
Page 9

Troubleshooting
PROBLEM PROBABLE CAUSE/SOLUTION
Low, poor, or slow
heating.
Egg undercooked,
bread not done.
Egg overcooked. • Cooking time is about 5 minutes. Cooking
Ingredients
stick to rings or
nonstick cooking
plate.
• Breakfast sandwich maker wasn’t preheated
until PREHEAT light was illuminated. Green
PREHEAT light will come on in about 5 to
7 minutes indicating unit is heated to the
correct temperature. Light will cycle and does
not indicate sandwich is ready.
• Allow 2 minutes between making sandwiches
for breakfast sandwich maker to heat to the
correct temperature.
• Overfilled. Reduce amount of ingredients in
your sandwich.
• Unit needs to be preheated with the cover
closed with rings and cooking plate in place.
• Make sure cooking plate is rotated securely
to back of ring as far as it will go, to prevent
leaking of egg, and cover Is closed when
preheating.
• Extra large eggs, frozen, or very cold
ingredients may lengthen cooking time. Add
additional cooking time.
time may vary if you are using small eggs,
scrambled or egg whites. Reduce cooking
time for future recipes.
• Use a plastic or wooden utensil to loosen
any baked-on ingredients. Lightly spray with
nonstick cooking spray before preheating for
next use.
9
Page 10

Troubleshooting (cont.)
PROBLEM PROBABLE CAUSE/SOLUTION
Eggs leak out of
rings.
Cover rises when
cooking my
sandwich
Bread too brown. • Higher fat contents and sugars may cause
• Unit is overfilled. Only use large eggs and
reduce amount or size of ingredients. Do not
press down on the cover.
• Cooking plate may not have been in the
correct position. Make sure cooking plate is
rotated securely to back of ring as far as it will
go to prevent leaking of egg.
• Used very thin purchased egg whites. Use
fresh egg whites or try a different brand of egg
whites.
• The air whisked into a large scrambled egg
may cause the cover to rise while the egg is
cooking. Do not press down on the cover.
breads to darken. Cook egg for several
minutes without bread and cover down. Then
add bread to finish cooking your sandwich.
10
Page 11

Recipes
Egg, Ham, and Cheese Breakfast Sandwich
Ingredients:
1 English muffin, split
1 slice American cheese
1 slice precooked Canadian bacon or ham
1 large egg
Directions:
1. Preheat Breakfast Sandwich Maker until green PREHEAT
light comes on. Lift cover, top ring, and cooking plate.
2. Place half of muffin, split-side up, in bottom ring of
Breakfast Sandwich Maker. Top with cheese and Canadian
bacon.
3. Lower cooking plate and top ring. Add egg to cooking plate.
Pierce yolk with a fork or toothpick.
4. Top with remaining muffin half, split-side down.
5. Close cover. Cook 4 to 5 minutes. Rotate cooking plate
handle clockwise until it stops. Lift cover and rings and
carefully remove sandwich with plastic spatula.
Serves: 1
11
Page 12

Recipes (cont.)
Pancakes and Sausage Sandwich
Ingredients:
2 (4-inch) frozen pancakes
1 precooked thin sausage patty
1 large egg
Maple syrup
Directions:
1. Preheat Breakfast Sandwich Maker until green PREHEAT
light comes on. Lift cover, top ring, and cooking plate.
2. Place one frozen pancake in bottom ring of Breakfast
Sandwich Maker. Top with sausage.
3. Lower cooking plate and top ring. Add egg to cooking plate.
Pierce yolk with a fork or toothpick.
4. Top with remaining pancake.
5. Close cover. Cook 4 to 5 minutes. Rotate cooking plate
handle clockwise until it stops. Lift cover and rings and
carefully remove sandwich with plastic spatula. Serve with
syrup.
Serves: 1
12
Page 13

Recipes (cont.)
Cheddar, Apple, Bacon, and Egg Croissant Sandwich
Ingredients:
1 small croissant, halved
2 tablespoons (30 ml) shredded Cheddar cheese
4 thin slices Granny Smith apple
1 slice precooked bacon, cut in half
1 large egg
Directions:
1. Preheat Breakfast Sandwich Maker until green PREHEAT
light comes on. Lift cover, top ring, and cooking plate.
2. Place half of croissant, cut-side up, in bottom ring of
Breakfast Sandwich Maker. Top with cheese, apple slices
and bacon.
3. Lower cooking plate and top ring. Add egg to cooking plate.
Pierce yolk with a fork or toothpick.
4. Top with remaining croissant half, cut-side down.
5. Close cover. Cook 4 to 5 minutes. Rotate cooking plate
handle clockwise until it stops. Lift cover and rings and
carefully remove sandwich with plastic spatula.
Serves: 1
13
Page 14

Recipes (cont.)
Southwestern Breakfast Muffin
Ingredients:
1 whole wheat English muffin, split
1 slice Monterey Jack cheese
3 thin slices avocado
1 large egg white
1 tablespoon (15 ml) salsa
Directions:
1. Preheat Breakfast Sandwich Maker until green PREHEAT
light comes on. Lift cover, top ring, and cooking plate.
2. Place half of muffin, split-side up, in bottom ring of
Breakfast Sandwich Maker. Top with cheese and avocado.
3. Lower cooking plate and top ring. Add egg white to cooking
plate.
4. Top with remaining muffin half, split-side down.
5. Close cover. Cook 4 to 5 minutes. Rotate cooking plate
handle clockwise until it stops. Lift cover and rings and
carefully remove sandwich with plastic spatula. Serve with
salsa.
Serves: 1
14
Page 15

Recipes (cont.)
Cheesy Egg and Sausage Bagel
Ingredients:
1 small bagel, halved
1 slice Jarlsberg cheese
1 precooked thin sausage patty
1 thin slice red pepper ring
1 large egg
Directions:
1. Preheat Breakfast Sandwich Maker until green PREHEAT
light comes on. Lift cover, top ring, and cooking plate.
2. Place half of bagel, split-side up, in bottom ring of Breakfast
Sandwich Maker. Top with cheese, sausage and red pepper
ring.
3. Lower cooking plate and top ring. Add egg to cooking plate.
Pierce yolk with a fork or toothpick.
4. Top with remaining bagel half, split-side down.
5. Close cover. Cook 4 to 5 minutes. Rotate cooking plate
handle clockwise until it stops. Lift cover and rings and
carefully remove sandwich with plastic spatula.
Serves: 1
15
Page 16

Recipes (cont.)
Herb Goat Cheese, Spinach, and Tomato Egg Muffin
Ingredients:
1 whole wheat English muffin, split
1 tablespoon (15 ml) herb goat cheese
1 thin slice tomato
4 spinach leaves
1 thin slice red pepper ring
1 large egg white
Directions:
1. Preheat Breakfast Sandwich Maker until green PREHEAT
light comes on. Spread goat cheese over bottom half of
muffin. Lift cover, top ring, and cooking plate.
2. Place half of muffin, goat cheese side up, in bottom of
Breakfast Sandwich Maker. Top with tomato, spinach and
red pepper ring.
3. Lower cooking plate and top ring. Add egg white to cooking
plate.
4. Top with remaining muffin half, split-side down.
5. Close cover. Cook 4 to 5 minutes. Move cooking plate
handle clockwise until it stops. Lift cover and rings and
carefully remove sandwich with plastic spatula.
Serves: 1
16
Page 17

LIMITED WARRANTY
This warranty applies to products purchased and used in the U.S. and
Canada. This is the only express warranty for this product and is in lieu
of any other warranty or condition.
This product is warranted to be free from defects in material and workmanship
for a period of one (1) year from the date of original purchase. During this
period, your exclusive remedy is repair or replacement of this product or
any component found to be defective, at our option; however, you are
responsible for all costs associated with returning the product to us and our
returning a product or component under this warranty to you. If the product or
component is no longer available, we will replace with a similar one of equal
or greater value.
This warranty does not cover glass, filters, wear from normal use, use
not in conformity with the printed directions, or damage to the product
resulting from accident, alteration, abuse, or misuse. This warranty extends
only to the original consumer purchaser or gift recipient. Keep the original
sales receipt, as proof of purchase is required to make a warranty claim. This
warranty is void if the product is used for other than single-family household
use or subjected to any voltage and waveform other than as specified on the
rating label (e.g., 120V ~ 60 Hz).
We exclude all claims for special, incidental, and consequential damages
caused by breach of express or implied warranty. All liability is limited to
the amount of the purchase price. Every implied warranty, including any
statutory warranty or condition of merchantability or fitness for a
particular purpose, is disclaimed except to the extent prohibited by
law, in which case such warranty or condition is limited to the duration
of this written warranty. This warranty gives you specific legal rights. You
may have other legal rights that vary depending on where you live. Some
states or provinces do not allow limitations on implied warranties or special,
incidental, or consequential damages, so the foregoing limitations may not
apply to you.
To make a warranty claim, do not return this appliance to the store.
Please call 1.800.851.8900 in the U.S. or 1.800.267.2826 in Canada or
visit proctorsilex.com in the U.S. or proctorsilex.ca in Canada. For faster
service, locate the model, type, and series numbers on your appliance.
17
Page 18

PRÉCAUTIONS IMPORTANTES
Pour utiliser un appareil électroménager, vous devez toujours prendre
des mesures élémentaires de sécurité pour réduire le risque d’incendie,
d’électrocution et/ou de blessure corporelle, en particulier les mesures
suivantes :
1. Lire toutes les instructions.
2. Cet appareil n’est pas destiné à être utilisé par des personnes (y compris
les enfants) dont les capacités physiques, sensorielles ou mentales sont
réduites, ou manquant d’expérience et de connaissance, sauf si elles sont
étroitement surveillées et instruites sur l’utilisation de l’appareil par une
personne responsable de leur sécurité.
3. Une surveillance étroite est requise pour tout appareil utilisé par ou près
des enfants. Surveiller que les enfants ne jouent pas avec l’appareil.
4. Ne pas toucher aux surfaces chaudes. Utiliser les poignées ou les boutons.
5. Pour éviter les risques d’électrocution, ne pas immerger le cordon, la fiche
ou l’unité de cuisson dans l’eau ou tout autre liquide.
6. Débrancher de la prise dès la fin de l’utilisation et avant le nettoyage.
Laisser refroidir l’appareil avant d’installer ou de retirer des pièces et avant
de le nettoyer.
7. Ne pas faire fonctionner un appareil électroménager avec un cordon
ou une fiche endommagée, ou lorsque l’appareil ne fonctionne pas
bien ou a été échappé ou endommagé d’une manière quelconque. Le
remplacement et la réparation du cordon d’alimentation doivent être faits
par le fabricant, son agent de service ou toute personne qualifiée de façon
à éviter tout danger. Appeler le numéro de service à la clientèle fourni pour
des renseignements concernant l’examen, la réparation ou l’ajustement.
8. L’utilisation de tout accessoire auxiliaire contre-indiqué par le fabricant de
l’appareil peut causer des blessures.
9. Ne pas utiliser à l’extérieur.
10. Ne pas laisser pendre le cordon de la table ou du comptoir et éviter que
le cordon n’entre en contact avec des surfaces chaudes, y compris la
cuisinière.
11. Ne pas placer sur ou près d’un brûleur à gaz ou electrique chaud ou dans
un four chauffé.
18
Page 19

12. Une très grande prudence doit être exercée lors du déplacement de tout
appareil contenant des huiles ou des liquides chauds.
13. N’utiliser cet appareil que pour les fonctions auxquelles il est destiné.
14. Ne pas laisser l’appareil sans surveillance pendant le fonctionnement.
15. Pendant le fonctionnement, prévoir de 4 à 6 po (10 à 15 cm) d’espace
tout autour de l’appareil.
16. Ne jamais retirer les aliments à l’aide d’ustensiles de cuisine métalliques
ou tout autre dispositif de coupe.
17. Toujours permettre le refroidissement de l’appareil avant de le ranger et ne
jamais enrouler le cordon autour de l’appareil pendant qu’il est chaud.
CONSERVER CES INSTRUCTIONS
Autres consignes de sécurité pour le consommateur
Cet appareil est destiné à un usage domestique uniquement.
w AVERTISSEMENT
avec une fiche polarisée (lame plus large) ou d’une fiche (3 lames et mise
à la terre) pour réduire le risque d’électrocution. Cette fiche s’insère d’une
seule manière dans une prise polarisée ou prise avec mise à la terre. Ne
pas transformer le dispositif de sécurité de la fiche en modifiant celle-ci
de quelconque façon ou en utilisant un adaptateur. Si vous ne pouvez pas
insérer complètement la fiche dans la prise, inversez la fiche. Si elle refuse
toujours de s’insérer, faire remplacer la prise par un électricien.
La longueur du cordon installé sur cet appareil a été sélectionnée afin
de réduire les risques d’enchevêtrement ou de faux pas causés par un fil
trop long. L’utilisation d’une rallonge approuvée est permise, si le cordon
est trop court. Les caractéristiques électriques de la rallonge doivent être
équivalentes ou supérieures aux caractéristiques de l’appareil. Si cet
appareil est du type à mise à la terre, la rallonge doit être du type à mise à
la terre, à 3 fils. Prendre toutes les précautions nécessaires pour installer la
rallonge de manière à ne pas la faire courir sur le comptoir ou sur une table
pour éviter qu’un enfant ne tire sur le cordon ou trébuche accidentellement.
Pour éviter la surcharge du circuit électrique, ne pas utiliser un autre
appareil à haute puissance sur le même circuit que cet appareil.
Risque de choc électrique : Cet appareil est fourni
19
Page 20

Pièces et caractéristiques
*Pour commander des pièces :
Canada : 1.800.267.2826
AVANT LA PREMIÈRE UTILISATION :
Soulever le couvercle pour retirer
l’anneau. Laver l’anneau amovible
dans au lave-vaiselle ou l’eau chaude
savonneuse. Rincer et sécher. Essuyer
les plaques supérieure et inférieure
à l’aide d’un chiffon imbibé d’eau
savonneuse. Enlever le savon avec un
chiffon humide. Sécher soigneusement.
Vaporiser les anneaux avec un enduit
pour cuisson antiadhésif
ou l’huile végétale.
20
Page 21

Pièces et caractéristiques (suite)
Témoins lumineux
1. Plaque de chauffage
supérieure
2. Couvercle
3. Plaque de cuisson
4. Poignée de la plaque de
cuisson
5. Base
6. Témoins lumineux
7. Plaque de chauffage
inférieure
8. Anneau amovible
9. Témoin de PREHEAT
(préchauffage) vert
10. Témoin de POWER
(alimentation) rouge
21
Page 22

Utilisation
w AVERTISSEMENT
Risque de brûlures.
Toujours utiliser un gant de cuisinier pour protéger les mains au moment de
l’ouverture d’un couvercle. Les surfaces chaudes et la vapeur qui s’échappe
peuvent causer des brûlures.
1. Brancher dans la prise de courant. Le témoin d’alimentation rouge
POWER (alimentation) s’illuminera. Vaporiser légèrement les anneaux
avec un enduit pour cuisson antiadhésif avant chaque utilisation.
2. Laisser l’appareil se réchauffer avec couvercle fermé et plaque de
cuisson placée entre les anneaux. REMARQUE : Le témoin vert
PREHEAT (préchauffage) s’allumera lorsque la température adéquate
est atteinte puis s’allumera et s’éteindra pendant la cuisson. Ce
voyant n’indique PAS que le sandwich est prêt à manger. Le voyant
d’alimentation rouge POWER (alimentation) reste allumé.
3. Utiliser les poignées pour lever le couvercle, l’anneau supérieur et la
plaque de cuisson.
4. Placer la partie inférieure du pain (il peut s’agir
d’un muffin anglais, d’un bagel petit ou d’une
galette) sur la plaque inférieure.
5. Garnir le pain avec des ingrédients tels que viande
précuite, légume et fromage. Ne pas trop remplir
le grille-sandwich pour le déjeuner. Un remplissage
excessif provoquera un débordement au-delà des
anneaux et se collera aux charnières.
6. Déplacer l’anneau supérieur et la plaque de cuisson vers le bas.
S’assurer que la plaque de cuisson est complètement tournée vers
l’arrière de l’anneau afin de prévenir la fuite de l’œuf.
22
Page 23

Utilisation (suite)
7. Craquer un œuf sur la plaque de cuisson. Percer
le jaune d’œuf avec une fourchette ou un curedents. (Vous pouvez prendre un œuf entier, un
blanc d’oeuf ou un œuf brouillé.)
8. Recouvrir de l’autre moitié du pain.
9. Fermer le couvercle. Cuire le sandwich pendant
4 à 5 minutes. REMARQUE : Ne pas pousser
le couvercle jusqu’en bas lorsque l’appareil est
chargé d’ingrédients ou d’un œuf de très grand format. Le couvercle
peut se soulever pendant la cuisson d’un œuf brouillé.
10. Une fois la cuisson terminée, tirer la poignée de la
plaque de cuisson jusqu’au bout dans le sens des
aiguilles d’une montre.
11. En portant des gants isolants, lever l’anneau et
le couvercle avec la poignée inférieure. Certains
sandwichs sont plus faciles à retirer si les anneaux
sont soulevés individuellement.
12. Retirer le sandwich à l’aide d’un ustensile de
plastique ou de bois. Ne jamais utiliser un
ustensile en métal.
Toujours attendre 2 minutes entre chaque cuisson
de sandwich pour s’assurer que la température
adéquate du grille-sandwich pour le déjeuner est
atteinte.
13. Débrancher l’appareil dès que vous avez terminé.
Laisser refroidir.
CONSEILS :
• Réunir tous les ingrédients avant de commercer la cuisson du sandwich.
• Toujours garder le couvercle fermé et installer les anneaux et la plaque
de cuisson pendant le préchauffage.
• Vérifier et s’assurer que la plaque de cuisson est installée avant de
préchauffer et au moment d’ajouter les aliments.
23
Page 24

Entretien et nettoyage
w AVERTISSEMENT
Risque de choc électrique.
Débrancher l’appareil avant le nettoyage. Ne pas immerger le
cordon, la fiche ou la base dans quelconque liquide.
1. Débrancher l’appareil dès que vous avez terminé. Laisser
refroidir.
2. Pour retirer l’anneau en vue de le nettoyer, tenir la poignée
inférieure pour ouvrir, puis soulever en ligne droite.
3. Ne pas utiliser de tampon métallique
à récurer ou de poudre à nettoyer sur
aucune pièce de l’appareil. Ne jamais
utiliser d’objets affûtés ou pointus pour les
besoins de nettoyage.
4. PANIER SUPÉRIEUR SEULEMENT. NE
Anneau amovible
PAS utiliser le réglage « SANI » du lavevaisselle. Les températures du cycle
« SANI » peuvent endommager le produit.
5. Essuyer les plaques supérieure et
inférieure à l’aide d’un chiffon imbibé
d’eau savonneuse. Enlever le savon
LAVABLES AU
LAVE-VAISSELLE
avec un chiffon humide. Sécher
soigneusement.
6. Pour replacer l’anneau, aligner les
languettes de l’anneau sur les ouvertures
des charnières de la base puis abaisser.
7. Essuyer l’extérieur de l’appareil avec un
linge imbibé d’eau savonneuse.
24
Page 25

Dépannage
PROBLÈME CAUSE POSSIBLE/SOLUTION
Chauffage bas,
faible ou lent.
Œuf ou pain
insuffisamment
cuit.
• Le grille-sandwich pour le déjeuner n’a pas
atteint la température de préchauffage tant
que le témoin préchauffage n’est pas allumé.
Le témoin vert PREHEAT (préchauffage)
s’allume après 5 à 7 minutes pour indiquer
que la température est atteinte. Le témoin
qui s’allume puis s’éteint n’indique pas que le
sandwich est prêt.
• Attendre 2 minutes entre chaque cuisson de
sandwich pour s’assurer que la température
adéquate du grille-sandwich pour le déjeuner
est atteinte.
• Remplissage excessif. Réduire la quantité
d’ingrédients insérés dans le sandwich.
• Le couvercle doit être fermé et les anneaux
et la plaque de cuisson doivent être installés
lors du préchauffage de l’appareil.
• S’assurer que la plaque de cuisson est
complètement tournée vers l’arrière de
l’anneau afin de prévenir la fuite de l’œuf
et que le couvercle est fermé pendant le
préchauffage.
• Les œufs extra larges, les ingrédients
congelés ou très froids peuvent exiger de
prolonger le temps de cuisson. Augmenter le
temps de cuisson.
25
Page 26

Dépannage (suite)
PROBLÈME CAUSE POSSIBLE/SOLUTION
Œuf trop cuit. • Le temps de cuisson est d’environ 5 minutes.
Le temps de cuisson peut varier si l’on utilise
de petits œufs, des œufs brouillés ou des
blancs d’œufs. Réduire le temps de cuisson
pour les prochaines recettes.
Les ingrédients
collent aux
anneaux ou à
la plaque de
cuisson.
Les œufs
débordent des
anneaux.
Le couvercle se
soulève pendant
la cuisson du
sandwich.
Le pain est trop
grillé.
• Utiliser un ustensile en plastique ou en bois
pour dégager les ingrédients qui ont adhéré.
Vaporiser légèrement une huile de cuisson
antiadhésif avant le préchauffage lors de la
prochaine utilisation.
• Appareil trop plein. Utiliser uniquement de gros
œufs et réduire la quantité ou le format des
ingrédients. Ne pas appuyer sur le couvercle.
• La plaque de cuisson est mal installée.
S’assurer que la plaque de cuisson est
complètement tournée vers l’arrière de
l’anneau afin de prévenir la fuite de l’œuf.
• Utiliser une marque des blancs d’œufs très
liquides. Utiliser un blanc d’œuf frais ou une
autre marque de blancs d’œufs.
• L’air incorporé à un gros œuf brouillé peut
occasionner le soulèvement du couvercle
pendant la cuisson de l’œuf. Ne pas appuyer
sur le couvercle.
• Les quantités élevées de gras et de sucre
facilitent le rôtissage des pains. Cuire l’œuf
sans le pain pendant plusieurs minutes et
couvrir. Ajouter ensuite le pain et terminer la
cuisson du sandwich.
26
Page 27

Recettes
Sandwich-déjeuner à l’œuf, jambon et fromage
Ingrédients :
1 muffin anglais, coupé en deux
1 tranche de fromage américain
1 tranche de bacon ou jambon précuit canadien
1 œuf large
Instructions :
1. Préchauffer le grille-sandwich jusqu’à ce que le voyant vert
PREHEAT (préchauffage) s’allume. Soulever le couvercle,
l’anneau supérieur et la plaque de cuisson.
2. Placer la moitié du muffin, côté tranché vers le haut, dans
l’anneau inférieur du grille-sandwich. Garnir de fromage et
de bacon canadien.
3. Abaisser la plaque de cuisson et l’anneau supérieur. Ajouter
l’œuf sur la plaque de cuisson. Percer le jaune d’œuf avec
une fourchette ou un cure-dents.
4. Recouvrir de l’autre moitié du muffin, côté tranché vers
le bas.
5. Fermer le couvercle. Cuire pendant 4 à 5 minutes.
Tourner la poignée de la plaque de cuisson dans le sens
des aiguilles jusqu’au bout. Soulever le couvercle et les
anneaux, puis retirer délicatement le sandwich à l’aide
d’une spatule de plastique. Servir avec de la salsa.
Servir : 1
27
Page 28

Recettes (suite)
Sandwich aux crêpes et saucisse
Ingrédients :
2 crêpes congelées (4 pouces)
1 saucisse en galette mince, précuite
1 gros œuf
Sirop d’érable
Instructions :
1. Préchauffer le grille-sandwich jusqu’à ce que le voyant vert
PREHEAT (préchauffage) s’allume. Soulever le couvercle,
l’anneau supérieur et la plaque de cuisson.
2. Placer une crêpe congelée dans l’anneau inférieur du grille-
sandwich. Garnir de la saucisse.
3. Abaisser la plaque de cuisson et l’anneau supérieur. Ajouter
l’œuf sur la plaque de cuisson. Percer le jaune d’œuf avec
une fourchette ou un cure-dents.
4. Garnir de l’autre crêpe.
5. Fermer le couvercle. Cuire pendant 4 à 5 minutes.
Tourner la poignée de la plaque de cuisson dans le sens
des aiguilles jusqu’au bout. Soulever le couvercle et les
anneaux, puis retirer délicatement le sandwich à l’aide
d’une spatule de plastique. Servir avec du sirop.
Servir : 1
28
Page 29

Recettes (suite)
Sandwich-croissant au cheddard, pomme, bacon et oeuf
Ingrédients :
1 petit croissant, coupé en deux
2 cuillerées à table (30 ml) de fromage cheddar râpé
4 minces tranches de pomme Granny Smith
1 tranche de bacon précuit, coupée en deux
1 gros œuf
Instructions :
1. Préchauffer le grille-sandwich jusqu’à ce que le voyant vert
PREHEAT (préchauffage) s’allume. Soulever le couvercle,
l’anneau supérieur et la plaque de cuisson.
2. Placer la moitié du croissant, côté tranché vers le haut,
dans l’anneau inférieur du grille-sandwich. Garnir de
fromage, de tranches de pomme et de bacon.
3. Abaisser la plaque de cuisson et l’anneau supérieur. Ajouter
l’œuf sur la plaque de cuisson. Percer le jaune d’œuf avec
une fourchette ou un cure-dents.
4. Recouvrir de l’autre moitié du croissant, côté tranché vers
le bas.
5. Fermer le couvercle. Cuire pendant 4 à 5 minutes.
Tourner la poignée de la plaque de cuisson dans le sens
des aiguilles jusqu’au bout. Soulever le couvercle et les
anneaux, puis retirer délicatement le sandwich à l’aide
d’une spatule de plastique.
Servir : 1
29
Page 30

Recettes (suite)
Muffin déjeuner du Sud-ouest
Ingrédients :
1 muffin anglais au blé entier, coupé en deux
1 tranche de fromage Monterey Jack
3 minces tranches d’avocat
1 blanc d’œuf gros
1 cuillerée à table (15 ml) de salsa
Instructions :
1. Préchauffer le grille-sandwich jusqu’à ce que le voyant vert
PREHEAT (préchauffage) s’allume. Soulever le couvercle,
l’anneau supérieur et la plaque de cuisson.
2. Placer la moitié du muffin, côté tranché vers le haut, dans
l’anneau inférieur du grille-sandwich. Garnir de fromage et
d’avocat.
3. Abaisser la plaque de cuisson et l’anneau supérieur. Ajouter
le blanc d’œuf sur la plaque de cuisson.
4. Recouvrir de l’autre moitié du muffin, côté tranché vers le
bas.
5. Fermer le couvercle. Cuire pendant 4 à 5 minutes.
Tourner la poignée de la plaque de cuisson dans le sens
des aiguilles jusqu’au bout. Soulever le couvercle et les
anneaux, puis retirer délicatement le sandwich à l’aide
d’une spatule de plastique. Servir avec de la salsa.
Servir : 1
30
Page 31

Recettes (suite)
Bagel à l’œuf, saucisse et fromage
Ingrédients :
1 petit bagel, coupé en deux
1 tranche de fromage Jarlsberg
1 saucisse précuite en galette, mince
1 mince tranche de piment de Cayenne
1 gros œuf
Instructions :
1. Préchauffer le grille-sandwich jusqu’à ce que le voyant vert
PREHEAT (préchauffage) s’allume. Soulever le couvercle,
l’anneau supérieur et la plaque de cuisson.
2. Placer la moitié du bagel, côté tranché vers le haut, dans
l’anneau inférieur. Garnir de fromage, saucisse et piment de
Cayenne.
3. Abaisser la plaque de cuisson et l’anneau supérieur. Ajouter
l’œuf sur la plaque de cuisson. Percer le jaune d’œuf avec
une fourchette ou un cure-dents.
4. Recouvrir de l’autre moitié du bagel, côté tranché vers
le bas.
5. Fermer le couvercle. Cuire pendant 4 à 5 minutes.
Tourner la poignée de la plaque de cuisson dans le sens
des aiguilles jusqu’au bout. Soulever le couvercle et les
anneaux, puis retirer délicatement le sandwich à l’aide
d’une spatule de plastique.
Servir : 1
31
Page 32

Recettes (suite)
Muffin au fromage de chèvre aux herbes, épinards,
tomate et œuf
Ingrédients :
1 muffin anglais au blé entier, coupé en deux
1 cuillerée à table (15 ml) de fromage de chèvre aux herbes
1 mince tranche de tomate
4 feuilles d’épinard
1 mince tranche de piment de Cayenne
1 blanc d’œuf gros
Instructions :
1. Préchauffer le grille-sandwich jusqu’à ce que le voyant
vert PREHEAT (préchauffage) s’allume. Tartiner la moitié
inférieure du muffin de fromage de chèvre. Soulever le
couvercle, l’anneau supérieur et la plaque de cuisson.
2. Placer la moitié du muffin, côté fromage de chèvre vers
le haut, dans le bas du grille-sandwich. Garnir de tomate,
épinard et piment de Cayenne.
3. Abaisser la plaque de cuisson et l’anneau supérieur. Ajouter
le blanc d’œuf sur la plaque de cuisson.
4. Recouvrir de l’autre moitié du muffin, côté tranché vers
le bas.
5. Fermer le couvercle. Cuire pendant 4 à 5 minutes.
Tourner la poignée de la plaque de cuisson dans le sens
des aiguilles jusqu’au bout. Soulever le couvercle et les
anneaux, puis retirer délicatement le sandwich à l’aide
d’une spatule de plastique.
Servir : 1
32
Page 33

GARANTIE LIMITÉE
Cette garantie s’applique aux produits achetés et utilisées aux É.-U. et au
Canada. C’est la seule garantie expresse pour ce produit et est en lieu et place
de tout autre garantie ou condition.
Ce produit est garanti contre tout défaut de matériaux et de main-d’oeuvre pour
une période de un (1) an à compter de la date d’achat d’origine. Au cours de
cette période, votre seul recours est la réparation ou le remplacement de ce
produit ou tout composant s’avérant défectueux, à notre gré, mais vous êtes
responsable de tous les coûts liés à l’expédition du produit et le retour d’un
produit ou d’un composant dans le cadre de cette garantie. Si le produit ou un
composant n’est plus offert, nous le remplacerons par un produit similaire de
valeur égale ou supérieure.
Cette garantie ne couvre pas le verre, les filtres, l’usure d’un usage normal,
l’utilisation non conforme aux directives imprimées, ou des dommages au produit
résultant d’un accident, modification, utilisation abusive ou incorrecte. Cette
garantie s’applique seulement à l’acheteur original ou à la personne l’ayant reçu
en cadeau. La présentation du reçu de vente d’origine comme preuve d’achat est
nécessaire pour faire une réclamation au titre de cette garantie. Cette garantie
s’annule si le produit est utilisé autrement que par une famille ou si l’appareil est
soumis à toute tension ou forme d’onde différente des caractéristiques nominales
précisées sur l’étiquette (par ex. : 120 V ~ 60 Hz).
Nous excluons toutes les réclamations au titre de cette garantie pour les
dommages spéciaux, consécutifs et indirects causés par la violation de garantie
expresse ou implicite. Toute responsabilité est limitée au prix d’achat. Chaque
garantie implicite, y compris toute garantie ou condition de qualité
marchande ou d’adéquation à un usage particulier, est exonérée, sauf
dans la mesure interdite par la loi, auquel cas la garantie ou condition est
limitée à la durée de cette garantie écrite. Cette garantie vous donne des
droits légaux précis. Vous pouvez avoir d’autres droits qui varient selon l’endroit
où vous habitez. Certaines provinces ne permettent pas les limitations sur les
garanties implicites ou les dommages spéciaux ou indirects de telle sorte que les
limitations ci-dessus ne s’appliquent peut-être pas à votre cas.
Ne pas retourner cet appareil au magasin lors d’une réclamation au titre de cette
garantie. Téléphoner au 1.800.851.8900 aux É.-U. ou au 1.800.267.2826
au Canada ou visiter le site internet www.proctorsilex.com aux É.-U. ou
www.proctorsilex.ca au Canada. Pour un service plus rapide, trouvez le numéro
de modèle, le type d’appareil et les numéros de série sur votre appareil.
33
Page 34

SALVAGUARDIAS IMPORTANTES
Cuando utilice artefactos eléctricos, siempre deben seguirse precauciones de
seguridad básicas a fin de reducir el riesgo de incendio, descarga eléctrica, y/o
lesiones a personas, incluyendo las siguientes:
1. Lea todas las instrucciones.
2. Este aparato no se destina para utilizarse por personas (incluyendo niños)
cuyas capacidades físicas, sensoriales o mentales sean diferentes o
estén reducidas, o carezcan de experiencia o conocimiento, a menos
que dichas personas reciban una supervisión o capacitación para
el funcionamiento del aparato por una persona responsable de su
seguridad.
3. Se requiere de una estrecha supervisión cuando el aparato se use cerca
de niños. Los niños deben supervisarse para asegurar que ellos no
empleen los aparatos como juguete.
4. Verifique que el voltaje de su instalación corresponda con el del producto.
5. No toque superficies calientes. Use las manijas o perillas.
6. Para protegerse contra riesgos por descarga eléctrica, no sumerja el
cable, enchufe o el cocinar unidad en agua u otro líquido.
7. Desconecte de la toma cuando no esté en uso o antes de limpiar. Deje
que se enfríe antes de poner o quitar partes o antes de limpiar.
8. No opere ningún aparato con cables o enchufe dañados o después
de que el aparato funcione mal o se caiga o dañe de cualquier
manera. El reemplazo del cable de suministro y las reparaciones deben
ser efectuadas por el fabricante, su agente de servicio, o personas
igualmente calificadas para poder evitar un peligro. Llame al número de
servicio al cliente proporcionado para información sobre examinación,
reparación o ajuste.
9. El uso de aditamentos de accesorio no recomendados por el fabricante
del aparato puede causar lesiones.
10. No lo use en exteriores.
11. No deje que el cable cuelgue del borde de la mesa o cubierta, o que
toque superficies calientes, incluyendo la estufa.
12. No coloque sobre o cerca de quemadores de gas o eléctricos calientes o
en un horno calentado.
34
Page 35

13. Se debe tener extrema precaución cuando se mueva un aparato que
contenga aceite caliente u otros líquidos calientes.
14. No use el aparato para otro uso que no sea para el que fue hecho.
15. No use el aparato sin atenderlo.
16. Durante su uso, deje un espacio de 4 a 6 pulgadas por encima, por
detrás y a ambos lados para circulación del aire.
17. Nunca remueva el alimento con ningún tipo de dispositivo de corte u otro
utensilio de cocina metálico.
18. Siempre deje que el aparato se enfríe antes de guardarlo y nunca enrolle
el cable alrededor del aparato mientras esté caliente.
GUARDE ESTAS INSTRUCCIONES
Otra Información de Seguridad para el Cliente
Este aparato ha sido diseñado solamente para uso doméstico.
w ADVERTENCIA
provisto con un enchufe ya sea polarizado (con un cuchilla ancha) o aterrizado
(3-clavija) para reducir el riesgo de descarga eléctrica. El enchufe entra sólo de
una manera en una toma polarizada o aterrizada. No elimine el propósito de
seguridad del enchufe modificando el enchufe de ninguna manera o usando
un adaptador. Si el enchufe no entra completamente en la toma, invierta el
enchufe. Si aún no entra, haga que un electricista reemplace la toma.
La longitud del cable usado para este aparato fue seleccionado para
reducir los riesgos de enredarse o tropezarse con un cable más largo. Si se
necesita un cable más largo, se puede usar un cable extensión aprobado.
La clasificación eléctrica de la cable extensión debe ser igual o mayor que
la clasificación del aparato. Si el aparato es del tipo de conexión a tierra,
el cable de extensión debe ser del tipo de conexión a tierra con 3 cables.
Es importante tener cuidado de colocar el cable de extensión para que no
se pliegue sobre el mostrador o la mesera en donde niños puedan tirar del
mismo o tropezarse accidentalmente.
Para evitar una sobrecarga eléctrica del circuito, no use otro aparato de alto
voltaje en el mismo circuito con este aparato.
Peligro de Descarga Eléctrica: Este aparato es
35
Page 36

Piezas y Características
*Para ordenar partes:
EE. UU.: 1.800.851.8900
www.hamiltonbeach.com
México: 01 800 71 16 100
ANTES DEL PRIMER USO: Levante
la tapa para quitar el montaje del
anillo. Lave el montaje del anillo
desmontable en el lavavajillas o en
agua caliente jabonosa. Enjuague
y seque. Limpie las placas de
calentamiento superior e inferior
con un paño húmedo jabonoso.
Remueva el jabón con un paño
húmedo. Seque a fondo. Rocíe
los anillos con esprái de cocina
antiadherente o aceite vegetal.
36
Page 37

Piezas y Características (cont.)
Luces Indicadoras
1. Placa de Calentamiento
Superior
2. Tapa
3. Placa de Cocción
4. Manija de la Placa de
Cocción
5. Base
6. Luces Indicadoras
7. Placa de Calentamiento
Inferior
8. Montaje del Anillo
Desmontable
9. Luz de PREHEAT
(precalentar) Verde
10. Luz de POWER
(encendido) Roja
37
Page 38

Como Usarlo
w ADVERTENCIA
Peligro de Quemaduras.
Siempre use unos guantes de cocina para proteger las manos cuando
abra la tapa de contacto caliente. Las superficies calientes y el vapor que
escapa pueden quemar.
1. Enchufe en el tomacorriente. La luz de POWER (encendido) roja se
encenderá. Antes de cada uso, rocíe levemente los anillos con esprái
de cocina antiadherente.
2. Permita que la unidad se precaliente con la tapa cerrada y la placa de
cocción girada entre los anillos.
NOTA: La luz verde de PREHEAT (precalentar) se encenderá cuando
la unidad sea calentada en la temperatura correcta y realizará
ciclos de encendido y apagado durante la cocción. NO indica que
el sandwich está listo. La luz roja POWER (encendido) se mantiene
encendida.
3. Utilice las manijas para levantar la tapa, el anillo superior y la placa de
cocción.
4. Coloque la mitad inferior del pan (como un muffin
inglés, bagel pequeño o panecillo) en la placa
inferior.
5. Coloque sobre el pan ingredientes tales como
carnes precocidas, vegetales y queso. No
sobrecargue la máquina para preparar sándwiches
de desayuno. La sobrecarga hará que la comida
se derrame sobre los anillos y que quede
atascada en las bisagras.
6. Desplace el anillo superior y la placa de cocción hacia abajo.
Asegúrese de que la placa de cocción sea rotada de forma segura
hacia la parte trasera del anillo tanto como sea posible, a fin de
prevenir derrames de huevo.
38
Page 39

Como Usarlo (cont.)
7. Rompa un huevo sobre la placa de cocción.
Perfore la yema con un tenedor o escarbadientes.
(Usted puede usar un huevo entero, una clara de
huevo o un huevo revuelto).
8. Coloque por encima la otra mitad del pan.
9. Cierre la tapa. Cocine el sándwich durante 4 a
5 minutos. NOTA: No presione la tapa hasta
la posición cerrada cuando la unidad se halla
cargada de ingredientes o cuando utilice un huevo extra grande. La
tapa se podrá elevar durante la cocción de huevos revueltos.
10. Cuando haya terminado la cocción, gire la manija
de la placa de cocción en sentido de las agujas
del reloj hasta que se detenga.
11. Utilizando un guante de cocina, levante el montaje
del anillo y cubra con la manija inferior. Es más
fácil retirar algunos sándwiches si los anillos son
levantados de forma individual.
12. Quite el sándwich de desayuno con un utensilio
de plástico o de madera. Nunca utilice metal.
Siempre espere 2 minutos entre la cocción de un
sándwich y otro, para asegurar que la máquina
de preparar sándwiches de desayuno alcance la
temperatura correcta.
13. Desconecte la unidad cuando acabe de cocinar.
Deje enfriar.
CONSEJOS:
• Reúna todos los ingredientes antes de cocinar el sándwich.
• Siempre mantenga la tapa cerrada con los anillos y la placa de cocción
en sus ubicaciones correspondientes al precalentar.
• Asegúrese de que la placa de cocción esté en su ubicación
correspondiente antes de precalentar y al agregar comida.
39
Page 40

Cuidado y Limpieza
w ADVERTENCIA
Peligro de Descarga Eléctrica.
Desconecte de la toma antes de limpiar. No sumerja
el cable, enchufe o base en agua u otro líquido.
1. Desconecte la unidad cuando acabe de cocinar. Deje
enfriar.
2. Para quitar el montaje del anillo para efectuar la limpieza,
sostenga la manija inferior en la posición abierta y luego
levante hacia arriba.
3. No use estropajos de fibra de acero, o
limpiadores abrasivos sobre cualquier
parte de la unidad. Nunca use objetos
afilados o picudos con propósitos de
limpieza.
4. SÓLO BANDEJA SUPERIOR. No utilice la
Montaje del Anillo
Desmontable
configuración “SANI” cuando la lave en
el lavavajillas. Las temperaturas del ciclo
“SANI” pueden dañar su producto.
5. Limpie las placas de calentamiento
superior e inferior con un paño húmedo
jabonoso. Remueva el jabón con un paño
RESISTENTE AL
LAVAVAJILLAS
húmedo. Seque a fondo.
6. Para volver a colocar el montaje del anillo,
alinee las lengüetas del montaje del anillo
con las aberturas de la bisagra de la base
y baje.
7. Limpie el exterior de la unidad con un
trapo húmedo y jabonoso.
40
Page 41

Resolviendo Problemas
PROBLEMA CAUSA PROBABLE/SOLUCIÓN
Calor bajo, pobre
o lento.
El huevo está
poco cocido o el
pan no está listo.
• La Máquina de Preparar Sándwiches de
Desayuno no se precalentó hasta que luz
de PREHEAT (precalentar) se iluminó. La luz
verde PREHEAT (precalentar) se encenderá
en aproximadamente entre 5 y 7 minutos,
indicando que la unidad es calentada en la
temperatura correcta. La luz realiza ciclos y
no indica que el sándwich está preparado.
• Espere 2 minutos entre el preparado de un
sándwich y otro, a fin de que la máquina de
preparar sándwiches de desayuno alcance la
temperatura correcta.
• Sobrecargado. Reduzca la cantidad de
ingredientes en su sándwich.
• Es necesario que la unidad sea precalentada
con la tapa cerrada y los anillos y la placa de
cocción en sus ubicaciones correspondientes.
• Asegúrese de que la placa de cocción sea
rotada de forma segura hacia la parte trasera
del anillo tanto como sea posible para
prevenir derrames de huevo y que la tapa
esté cerrada al precalentar.
• Los huevos extra grandes, o ingredientes
congelados o muy fríos pueden prolongar
el tiempo de cocción. Agregue tiempo de
cocción adicional.
41
Page 42

Resolviendo Problemas (cont.)
PROBLEMA CAUSA PROBABLE/SOLUCIÓN
El huevo está
muy cocido.
Los ingredientes
se pegan a los
anillos o a la
placa de cocción.
Los huevos se
derraman fuera
de los anillos.
La tapa se
levanta al cocinar
el sándwich.
El pan está
demasiado
dorado.
• El tiempo de cocción es de aproximadamente
5 minutos. El tiempo de cocción podrá variar
si está usando huevos pequeños, revueltos o
claras de huevo. Reduzca el tiempo de cocción
en recetas futuras.
• Utilice un utensilio de plástico o de madera para
aflojar ingredientes pegados. Rocíe ligeramente
con aerosol para cocción antiadherente antes
de precalentar en el siguiente uso.
• La unidad está sobrecargada. Use sólo huevos
grandes y reduzca la cantidad o el tamaño de los
ingredientes. No ejerza preción sobre la tapa.
• Es posible que la placa de cocción no se
encuentre en la posición correcta. Asegúrese
de que la placa de cocción sea rotada de forma
segura hacia la parte trasera del anillo tanto como
sea posible, a fin de prevenir derrames de huevo.
• Se usaron claras de huevo muy delgadas. Use
clara de huevo fresca o intente usar una marca
diferente de clara de huevo.
• El aire batido en el huevo revuelto grande podrá
hacer que la tapa se levante durante la cocción
del huevo. No ejerza preción sobre la tapa.
• Los altos contenidos de grasa y azúcares
podrán hacer que los panes se oscurezcan
demasiado. Cocine el huevo durante varios
minutos sin pan y cúbralo. Luego agregue el
huevo para finalizar la cocción de su sándwich.
42
Page 43

Recetas
Sándwich de Desayuno de Huevo, Jamón y Queso
Ingredientes:
1 muffin inglés cortado al medio
1 rebanada de queso americano
1 rebanada de tocino canadiense o jamón
1 huevo grande
Instrucciones:
1. Precaliente la máquina para preparar sándwiches de
desayuno hasta que la luz verde PREHEAT (precalentar) se
encienda. Levante la tapa, el anillo superior y la placa de
cocción.
2. Coloque medio muffin, con el lado cortado hacia arriba, en
el anillo inferior de la máquina para preparar sándwiches
de desayuno. Por encima coloque queso y el tocino
canadiense.
3. Baje la placa de calentamiento y el anillo superior. Agregue
el huevo a la placa de cocción. Perfore la yema con un
tenedor o escarbadientes.
4. Coloque la otra mitad del muffin, con el lado cortado hacia
abajo.
5. Cierre la tapa. Cocine de 4 a 5 minutos. Gire la manija de
la placa de cocción en sentido de las agujas del reloj hasta
que se detenga. Levante la tapa y los anillos y con cuidado
quite el sándwich con una espátula plástica. Sirva con
salsa.
Rendimiento: 1
43
Page 44

Recetas (cont.)
Sándwich de Panqueques y Salchicha
Ingredientes:
2 panqueques congelados (4 pulgadas)
1 patty de salchicha fino precocido
1 huevo grande
Jarabe de arce
Instrucciones:
1. Precaliente la máquina para preparar sándwiches de
desayuno hasta que la luz verde PREHEAT (precalentar) se
encienda. Levante la tapa, el anillo superior y la placa de
cocción.
2. Coloque un panqueque congelado en el anillo inferior de la
máquina para preparar sándwiches de desayuno. Coloque
la salchicha por encima.
3. Baje la placa de calentamiento y el anillo superior. Agregue
el huevo a la placa de cocción. Perfore la yema con un
tenedor o escarbadientes.
4. Coloque por encima el panqueque restante.
5. Cierre la tapa. Cocine de 4 a 5 minutos. Gire la manija de
la placa de cocción en sentido de las agujas del reloj hasta
que se detenga. Levante la tapa y los anillos y con cuidado
quite el sándwich con una espátula plástica. Sirva con
jarabe.
Rendimiento: 1
44
Page 45

Recetas (cont.)
Sándwich de Croissant de Cheddar, Manzana,
Tocino y Huevo
Ingredientes:
1 croissant pequeño cortado al medio
2 cucharadas (30 ml) de queso cheddar en hebras
4 rebanadas finas de manzana Granny Smith
1 rebanada de tocino precocido cortado al medio
1 huevo grande
Instrucciones:
1. Precaliente la máquina para preparar sándwiches de
desayuno hasta que la luz verde PREHEAT (precalentar) se
encienda. Levante la tapa, el anillo superior y la placa de
cocción.
2. Coloque medio croissant, con el lado cortado hacia
arriba, en el anillo inferior de la máquina para preparar
sándwiches. Por encima coloque el queso, las rebanadas
de manzana y el tocino.
3. Baje la placa de calentamiento y el anillo superior. Agregue
el huevo a la placa de cocción. Perfore la yema con un
tenedor o escarbadientes.
4. Coloque la otra mitad del croissant, con el lado cortado
hacia abajo.
5. Cierre la tapa. Cocine de 4 a 5 minutos. Gire la manija de
la placa de cocción en sentido de las agujas del reloj hasta
que se detenga. Levante la tapa y los anillos y con cuidado
quite el sándwich con una espátula plástica.
Rendimiento: 1
45
Page 46

Recetas (cont.)
Muffin de Desayuno Estilo Southwestern
Ingredientes:
1 muffin inglés integral cortado al medio
1 rebanada de queso Monterey Jack
3 rebanadas finas de aguacate
1 clara de huevo grande
1 cucharada (15 ml) de salsa
Instrucciones:
1. Precaliente la máquina para preparar sándwiches de
desayuno hasta que la luz verde PREHEAT (precalentar) se
encienda. Levante la tapa, el anillo superior y la placa de
cocción.
2. Coloque medio muffin, con el lado cortado hacia arriba, en
el anillo inferior de la máquina para preparar sándwiches de
desayuno.Coloque el queso y el aguacate por encima.
3. Baje la placa de calentamiento y el anillo superior. Agregue
la clara de huevo a la placa de cocción.
4. Coloque la otra mitad del muffin, con el lado cortado hacia
abajo.
5. Cierre la tapa. Cocine de 4 a 5 minutos. Gire la manija de
la placa de cocción en sentido de las agujas del reloj hasta
que se detenga. Levante la tapa y los anillos y con cuidado
quite el sándwich con una espátula plástica. Sirva con
salsa.
Rendimiento: 1
46
Page 47

Recetas (cont.)
Bagel de Queso, Huevo y Salchicha
Ingredientes:
1 bagel pequeño cortado al medio
1 rebanada de queso Jarlsberg
1 patty de salchicha fino precocido
1 anillo fino de pimiento rojo
1 huevo grande
Instrucciones:
1. Precaliente la máquina para preparar sándwiches de
desayuno hasta que la luz verde PREHEAT (precalentar) se
encienda. Levante la tapa, el anillo superior y la placa de
cocción.
2. Coloque medio bagel, con el lado cortado hacia arriba, en
el anillo inferior de la máquina para preparar sándwiches de
desayuno. Por encima coloque el queso, la salchicha y el
anillo de pimiento rojo.
3. Baje la placa de calentamiento y el anillo superior. Agregue
el huevo a la placa de cocción. Perfore la yema con un
tenedor o escarbadientes.
4. Coloque la otra mitad del bagel, con el lado cortado hacia
abajo.
5. Cierre la tapa. Cocine de 4 a 5 minutos. Gire la manija de
la placa de cocción en sentido de las agujas del reloj hasta
que se detenga. Levante la tapa y los anillos y con cuidado
quite el sándwich con una espátula plástica.
Rendimiento: 1
47
Page 48

Recetas (cont.)
Muffin de Huevo con Queso de Cabra con Hierbas,
Espinaca y Tomate
Ingredientes:
1 muffin inglés integral cortado al medio
1 cucharada (15 ml) de queso de cabra con hierbas
1 rebanada fina de tomate
4 hojas de espinaca
1 anillo fino de pimiento rojo
1 clara de huevo grande
Instrucciones:
1. Precaliente la máquina para preparar sándwiches de
desayuno hasta que la luz verde PREHEAT (precalentar) se
encienda. Unte el queso de cabra sobre la mitad inferior
del muffin. Levante la tapa, el anillo superior y la placa de
cocción.
2. Coloque medio muffin, con el lado del queso de cabra
hacia arriba, en el anillo inferior de la máquina para
preparar sándwiches de desayuno. Por encima coloque el
tomate, la espinaca y el anillo de pimiento rojo.
3. Baje la placa de calentamiento y el anillo superior. Agregue
la clara de huevo a la placa de cocción.
4. Coloque la otra mitad del muffin, con el lado cortado hacia
abajo.
5. Cierre la tapa. Cocine de 4 a 5 minutos. Gire la manija de
la placa de cocción en sentido de las agujas del reloj hasta
que se detenga. Levante la tapa y los anillos y con cuidado
quite el sándwich con una espátula plástica.
Rendimiento: 1
48
Page 49

Notas
49
Page 50

Grupo HB PS, S.A. de C.V.
Monte Elbruz 124-401
Colonia Palmitas, Delegación Miguel
Hidalgo
C.P. 11560, Ciudad de México
01 800 71 16 100
PÓLIZA DE GARANTÍA
PRODUCTO:
Grupo HB PS, S.A. de C.V. cuenta con una Red de Centros de Servicio Autorizada, por
favor consulte en la lista anexa el nombre y dirección de los establecimientos en la
República Mexicana en donde usted podrá hacer efectiva la garantía, obtener partes,
componentes, consumibles y accesorios; así como también obtener servicio para
productos fuera de garantía. Para mayor información llame sin costo:
Centro de Atención al consumidor: 01 800 71 16 100
MARCA:
Grupo HB PS, S.A. de C.V. le otorga a partir de la fecha de compra:
GARANTÍA DE 1 AÑO.
COBERTURA
• Esta garantía ampara, todas las piezas y componentes del producto que resulten con defecto
de fabricación incluyendo la mano de obra.
Grupo HB PS,
•
componente defectuoso; proporcionar la mano de obra necesaria para su diagnóstico y
reparación, todo lo anterior sin costo adicional para el consumidor.
• Esta garantía incluye los gastos de transportación del producto que deriven de su
cumplimiento dentro de su red de servicio.
S.A. de C.V. se obliga a reemplazar, reparar o reponer, cualquier pieza o
LIMITACIONES
• Esta garantía no ampara el reemplazo de piezas deterioradas por uso o por desgaste
normal, como son: cuchillas, vasos, jarras, filtros, etc.
• Grupo HB PS, S.A. de C.V. no se hace responsable por los accidentes producidos a
consecuencia de una instalación eléctrica defectuosa, ausencia de toma de tierra, clavija
de enchufe en mal estado, etc.
EXCEPCIONES
Esta garantía no será efectiva en los siguientes casos:
a) Cuando el producto se hubiese utlizado en condiciones distintas a las normales.
(Uso industrial, semi-industrial o comercial.)
MODELO:
50
Page 51

RED DE CENTROS DE SERVICIO AUTORIZADA GRUPO
HB PS, S.A. DE C.V.
Distrito Federal
ELECTRODOMÉSTICOS
Av. Plutarco Elias Cailes
No. 1499
Zacahuitzco MEXICO 09490 D.F.
Tel: 01 55 5235 2323
Fax: 01 55 5243 1397
CASA GARCIA
Av. Patriotismo No. 875-B
Mixcoac MEXICO 03910 D.F.
Tel: 01 55 5563 8723
Fax: 01 55 5615 1856
Jalisco
SERVICIOS DE MANTENIMIENTO
CASTILLO
Garibaldi No. 1450
Ladrón de Guevara
GUADALAJARA 44660 Jal.
Tel: 01 33 3825 3480
Fax: 01 33 3826 1914
Chihuahua
DISTRIBUIDORA TURMIX
Av. Paseo Triunfo de la Rep.
No. 5289 Local 2 A.
Int. Hipermart
Alamos de San Lorenzo
CD. JUAREZ 32340 Chih.
Tel: 01 656 617 8030
Fax: 01 656 617 8030
Nuevo Leon
FERNANDO SEPULVEDA
REFACCIONES
Ruperto Martínez No. 238 Ote.
Centro MONTERREY, 64000 N.L.
Tel: 01 81 8343 6700
Fax: 01 81 8344 0486
51
Page 52

Modelo:
25481C
Los modelos incluídos en el instructivo de Uso y Cuidado
pueden ir seguidos o no por un sufijo correspondiente a una
o varias letras del alfabeto y sus combinaciones, separadas o
no por un espacio, coma, diagonal, o guión. Como ejemplos los
sufijos pueden ser: “Y” y/o “MX” y/o “MXY” y/o “Z”.
Tipo:
ST29
Características Eléctricas:
120 V~ 60 Hz 600 W
840270400
5/16
 Loading...