

Page 1
Page 2

TABLE OF CONTENTS
SAFETY WARNINGS AND GUIDELINES ........................................................................... 3
INTRODUCTION .............................................................................................................. 4
PACKAGE CONTENTS .................................................................................................... 4
FEATURES ....................................................................................................................... 4
MENU SYSTEM ............................................................................................................... 5
MASTER/SLAVE MODE ................................................................................................... 5
DMX Control .................................................................................................................... 6
1CH Mode .................................................................................................................... 6
2CH Mode .................................................................................................................... 6
3CH Mode .................................................................................................................... 6
6CH Mode .................................................................................................................... 7
DMX TERMINATION ......................................................................................................... 7
SAMPLE WIRING DIAGRAM ............................................................................................ 8
DIMENSIONS DIAGRAM .................................................................................................. 8
TECHNICAL SUPPORT .................................................................................................... 9
TROUBLESHOOTING ...................................................................................................... 9
SPECIFICATIONS .......................................................................................................... 10
2
Page 3

SAFETY WARNINGS AND GUIDELINES
Do not expose this device to water or moisture of any kind. Do not place drinks or other
containers with moisture on or near the device. If moisture does get in or on the device,
immediately unplug it from the power outlet.
This device is intended for indoor use only.
This device uses a grounded power cord and requires a ground connection for safe
operation. Ensure that the power source has a proper ground connection. Do not modify the
plug or use a "cheater" plug to bypass the ground connection.
Disconnect the unit from the power source when replacing the fuse. Replace the fuse only
with the same type.
Do not bypass the purpose of the fuse by shorting the contacts or by any other means.
Ensure that the power outlet used to connect this device does not exceed the rated
maximum voltage, listed on the back panel of the device.
Ensure that power is turned off and disconnected before making any electrical connections.
Disconnect from the power source during lightning storms or when not in use.
Take care to prevent damage to the power cord. Do not allow it to become crimpled,
pinched, walked on, or become tangled with other cords.
When disconnecting the power cord do not pull on the cord itself. Instead, grasp the plug
connector head to disconnect it from the power socket.
The power cord uses the US standard color coding with green for ground.
This device has no user serviceable parts. Do not attempt to open, service, or modify this
device.
Do not use chemical cleaners or solvents to clean the cabinet. Use only a soft dry cloth. For
stubborn dirt, moisten the cloth with warm water.
This device ventilates excessive heat through the slots and openings in the case. Do not
block or cover these openings. Ensure that the device is in an open area where it can get
sufficient airflow to keep from overheating.
3
Page 4

INTRODUCTION
Thank you for purchasing the Monoprice 612710 Flat PAR UV Black Light! Please read this
manual before attempting to operate the light.
This light accepts 110 ~ 240 VAC and features a NEMA 5-15 power pass-through
connector, so you can install multiple lights on a single circuit. It features a sound activation
mode, so it can automatically respond to musical content, as well as flashing and fading
programs. It uses 1, 2, 3, and 6-channel DMX modes.
PACKAGE CONTENTS
After receiving the product, please inventory the contents to ensure you have all the proper
parts, as listed below. If anything is missing or damaged, please contact Monoprice
Customer Service for a replacement.
1x Flat PAR UV black light with 144 LEDs
1x AC power cable (IEC 60320 C13 to NEMA 5-15)
1x User's manual
FEATURES
• 144 ultraviolet black light LEDs
• 1, 2, 3, or 6-channel DMX modes
• Built in dimming, fade, and strobe modes
• Includes pass-through power and DMX connectors
• Uses US standard AC power cord (IEC 60320 C13 to NEMA 5-15)
• Pass through power connector is compatible with the following other plug types:
o BS 546 Type D
o BS 4573 (UK Shaver)
o CEE 7/16 "Europlug" (Type C)
o Danish Section 107-2-D1 Earthed (Type K)
4
Page 5
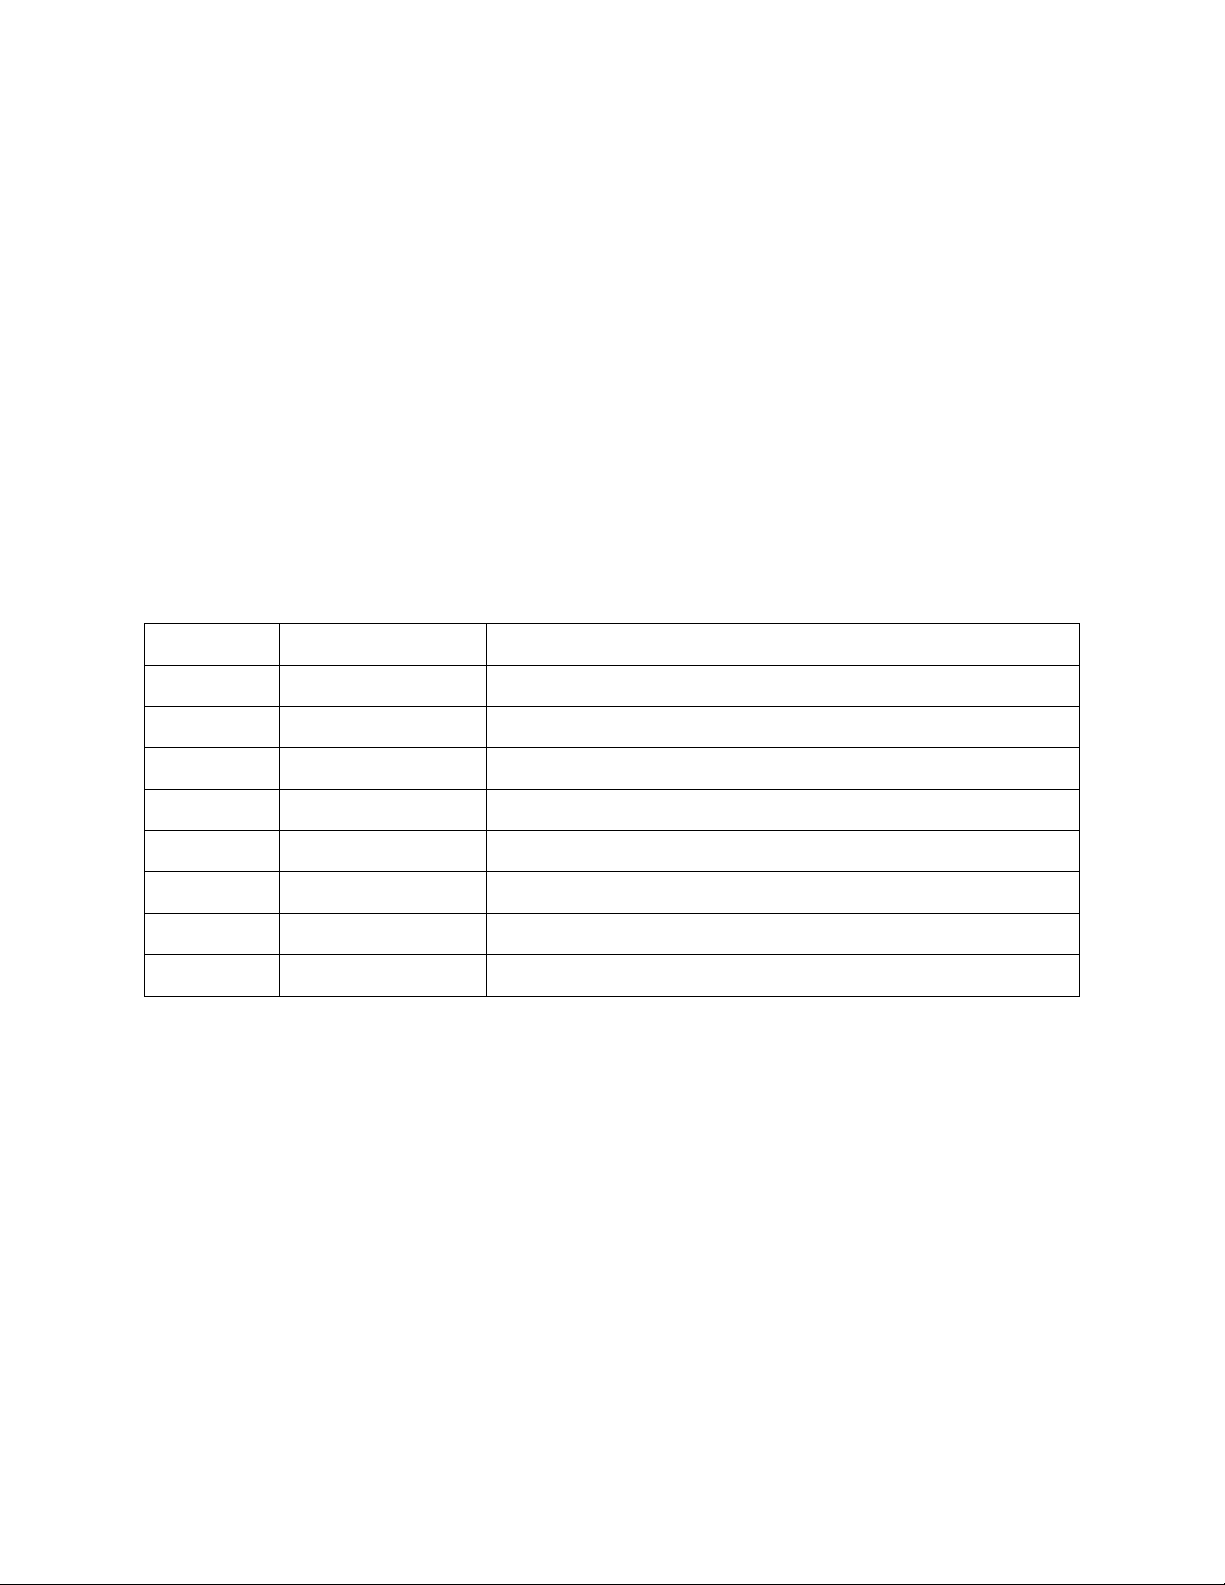
MENU SYSTEM
MENU:
UP:
DOWN:
ENTER:
Entry
Values
Remarks
Addr
d001-d512
DMX address
LEd
on/oFF
Turns the LEDs on/off
UL-
U.000-U.255
Dimming mode (fast to slow)
FLAS
FL00-FL15
Strobe mode (fast to slow)
FAdE
FA00-FA15
Fade mode (fast to slow)
SouF
So.uF
Sound activated reaction mode
SLAU
SL.AU
Slave mode
CHnd
1/2/3/6CH
Selects the number of DMX channels to use
Use the four buttons under the LED display on the back to set the mode in which the light
will operate. The buttons perform the following functions:
The following table shows the eight menu options, their possible values, and what they
mean.
Accesses the menu system or backs out of editing an entry.
Selects the previous mode or increases the value of the selected mode.
Selects the next mode or decreases the value of the selected mode.
Selects the currently displayed mode for editing or accepts the edited value.
MASTER/SLAVE MODE
Whenever the light is set to a mode other than a DMX address or Slave mode, it is
considered to be in Master mode. For example, when set to the Sound Activated operation,
it is in a Master mode.
When the light is the Master, it will send DMX instructions to other connected lights. Those
other lights must be set to Slave mode (SLAU) to receive and execute the instructions sent
by the Master light.
5
Page 6
DMX Control
Channel
DMX Value
Function
Priority
Remarks
1
0-255
UV Dimming 0-100%
Channel
DMX Value
Function
Priority
Remarks
1
0-255
UV Dimming 0-100%
2 0-14
Not used
15-255
Strobe (slow-fast)
Channel
DMX Value
Function
Priority
Remarks
Segment 1 UV Dimming
Segment 2 UV Dimming
Segment 3 UV Dimming
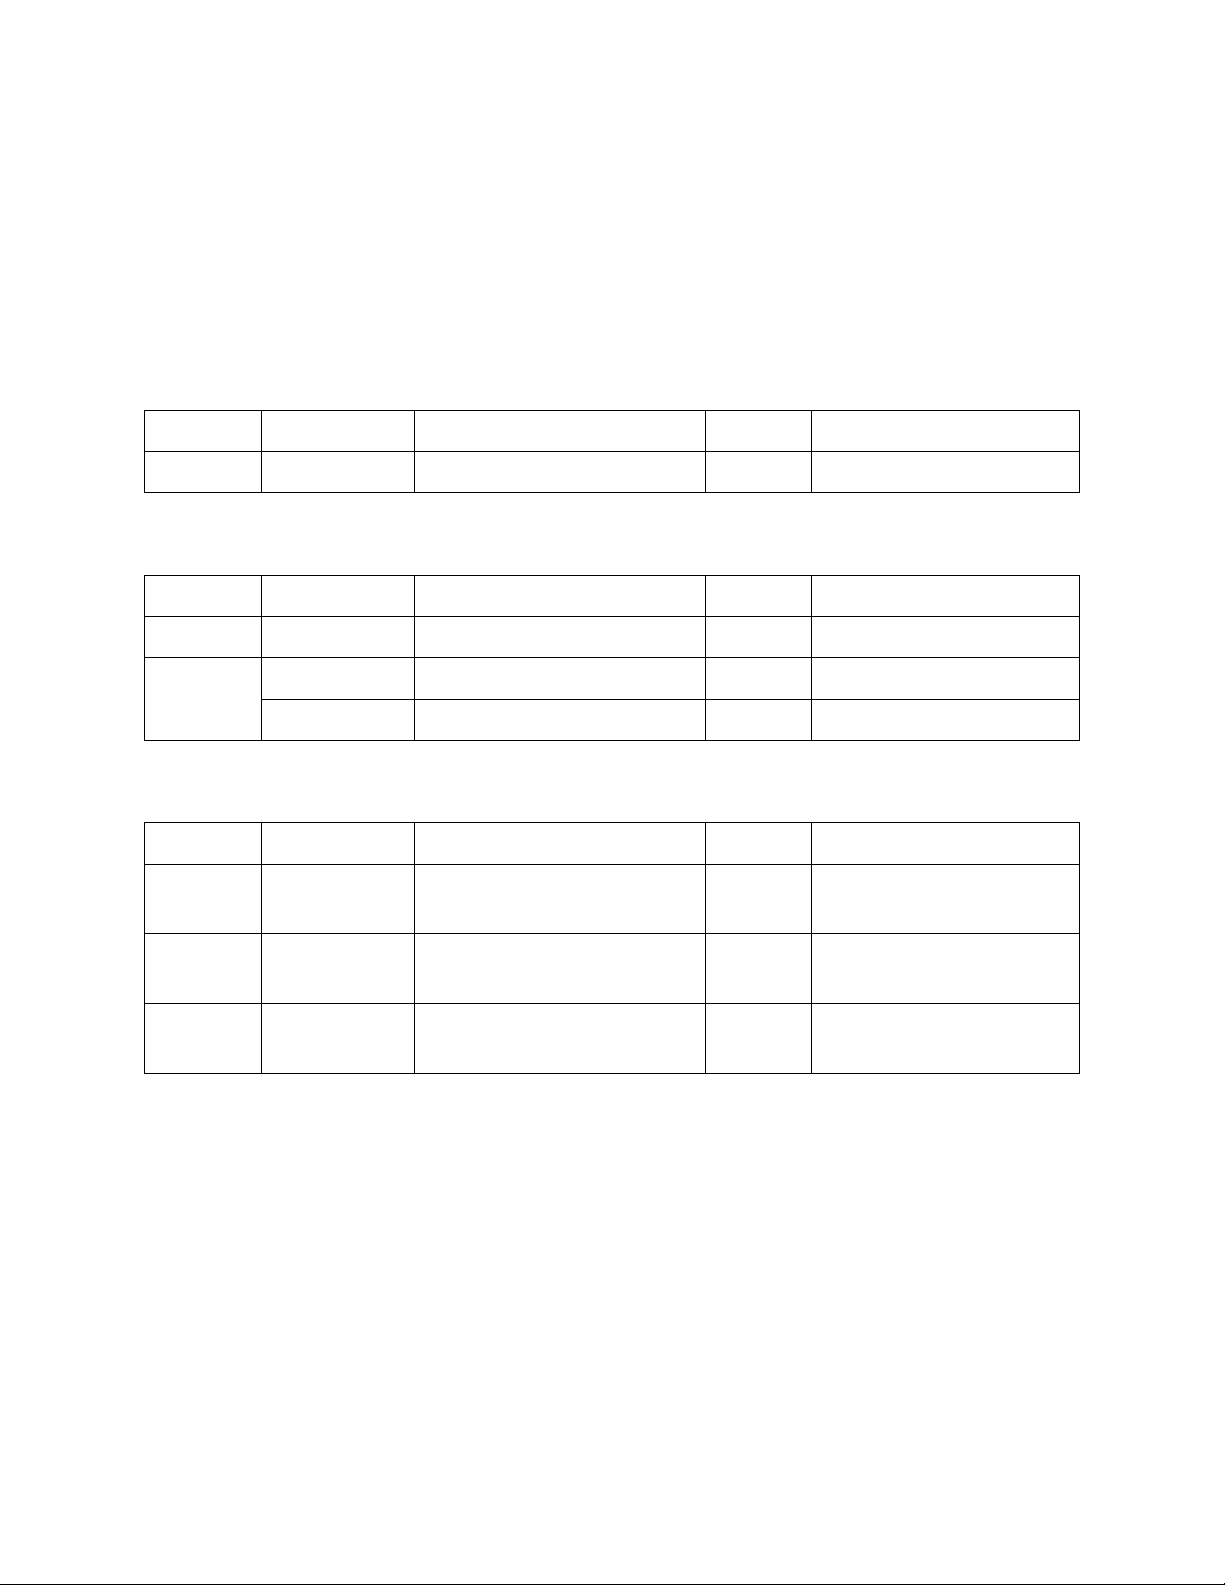
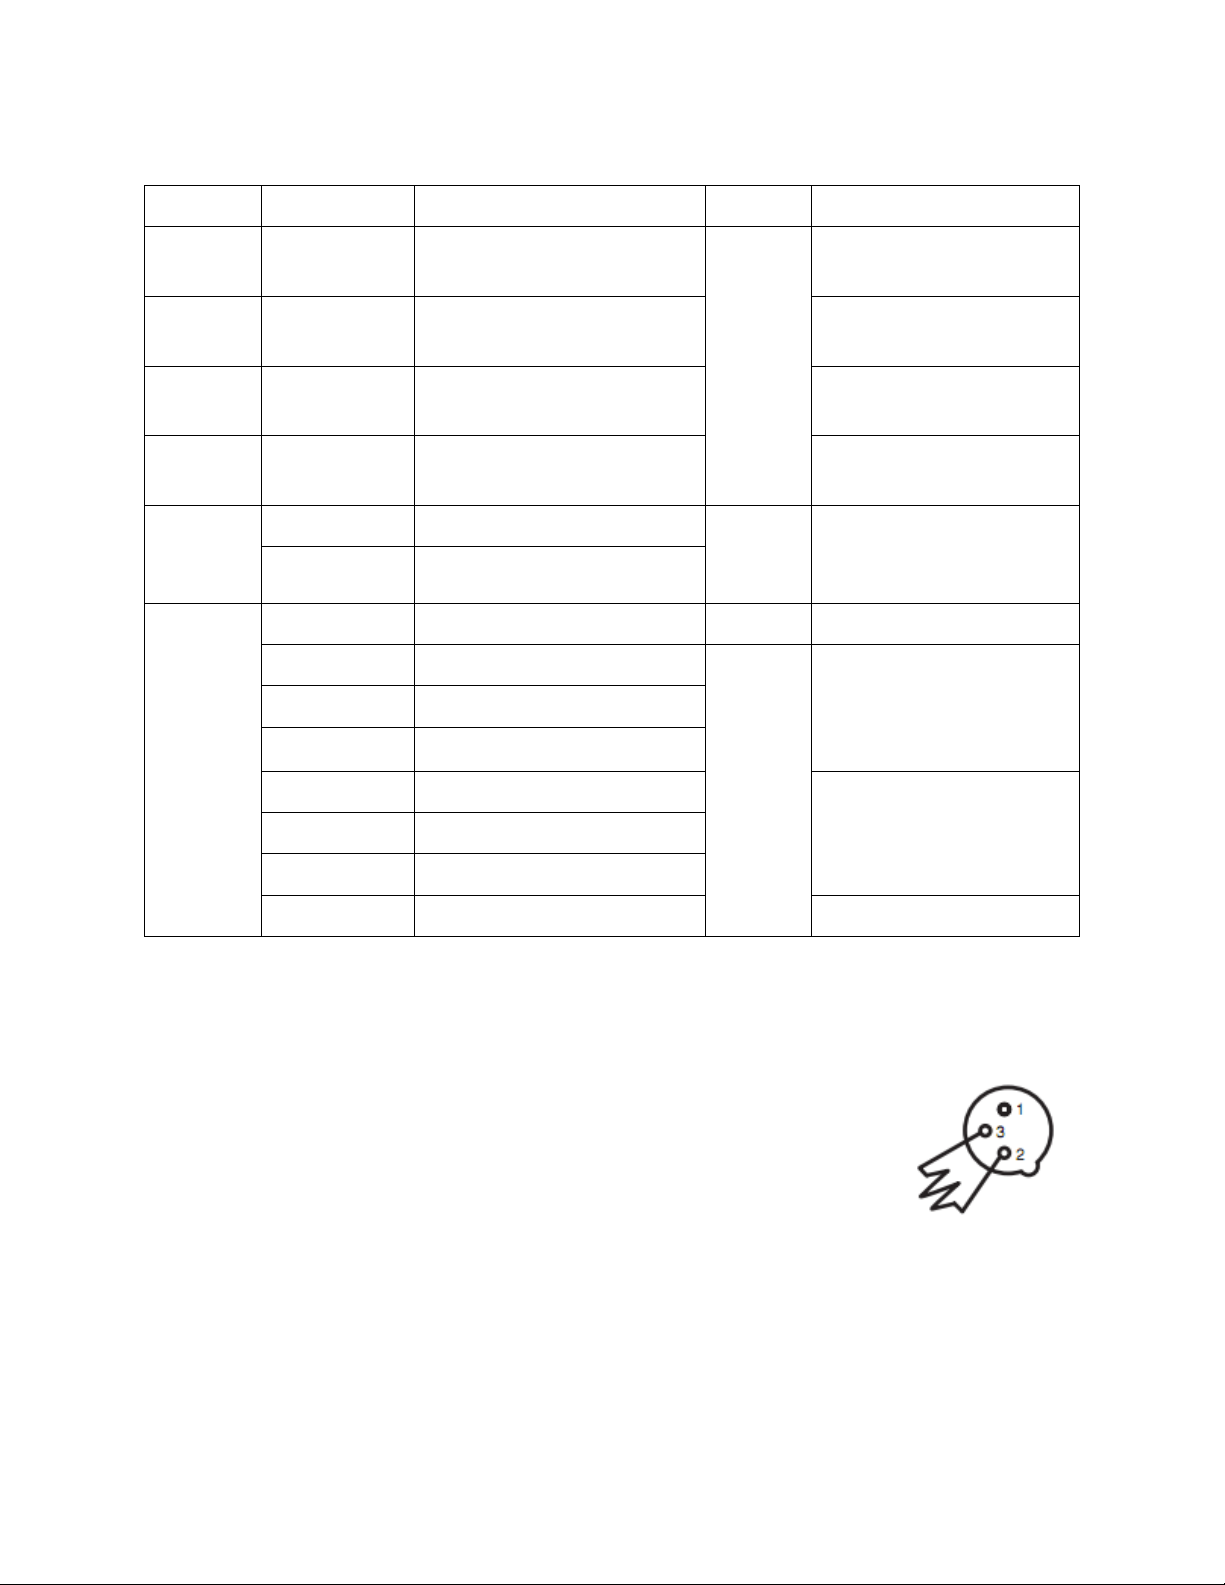
When the light is set to a DMX address it will respond to signals from a DMX controller. The
number and complexity of the signals it can respond to correspond directly to the number of
channels selected. The following tables show the functions and values for each channel in
the four different channel modes (1, 2, 3, or 6).
1CH Mode
2CH Mode
3CH Mode
1 0-255
2 0-255
3 0-255
0-100%
0-100%
0-100%
6
Page 7
6CH Mode
Channel
DMX Value
Function
Priority
Remarks
General UV Dimming
Segment 1 UV Dimming
Segment 2 UV Dimming
Segment 3 UV Dimming
0-14
Dimming
When channel 6 is set
0-31
Not used
32-63
Dark-Bright
Channels 1-4 must be
64-95
Bright-Dark
128-160
Fade
161-191
Fade In, Fade Out
192-223
Flash Change
224-255
Sound Activated Strobe
1 0-255
2 0-255
3 0-255
4 0-255
5
15-255 Strobe Speed (slow-fast)
96-127 Dark-Bright-Dark
6
0-100%
0-100%
0-100%
0-100%
1
2
3
to 32-223, this channel
is speed adjustment.
used to set the light
level. Channel 5 is
speed adjustment.
Channels 1-4 are
ignored. Channel 5 is
speed adjustment.
DMX TERMINATION
As with all DMX devices, the last unit in any chain must have a DMX
terminator connected to the DMX output. If using just a single light,
connect a DMX terminator to the DMX output.
A DMX terminator is a DMX plug with a 120-ohm, 1/4-watt resistor
soldered between pins 2 and 3.
7
Page 8
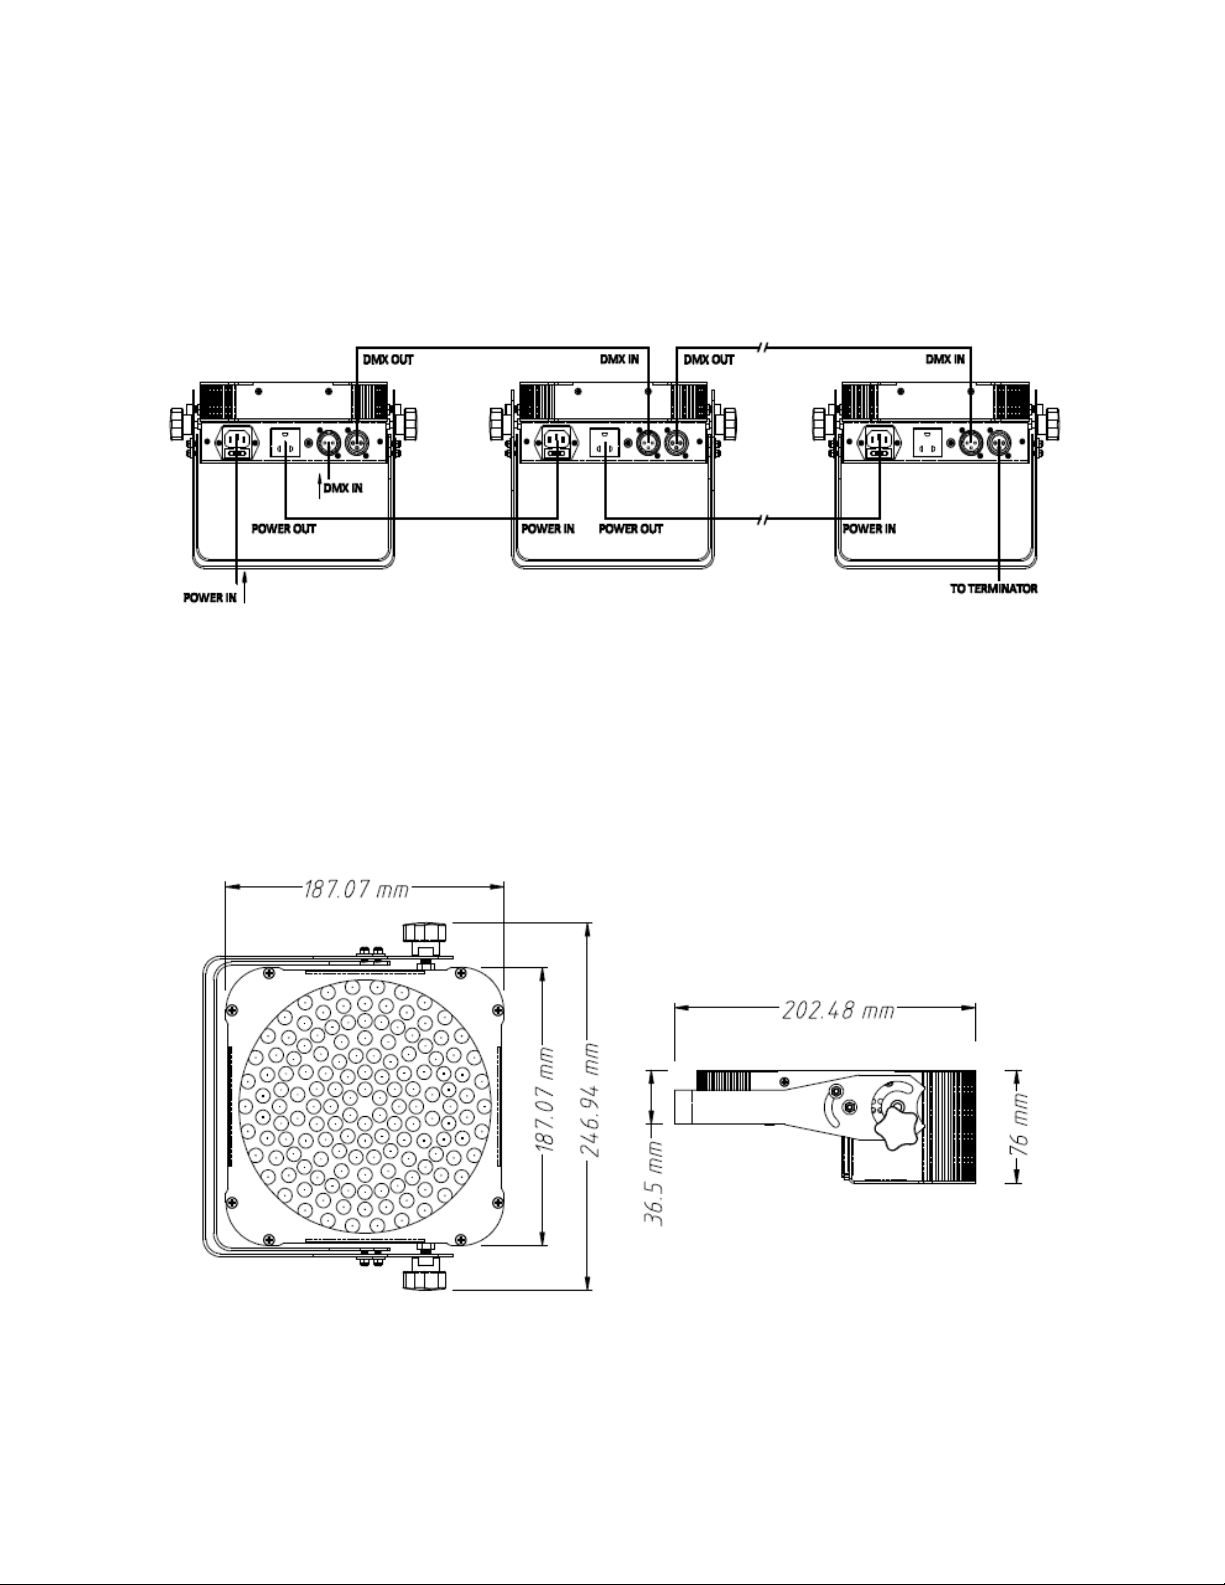
SAMPLE WIRING DIAGRAM
The following diagram shows a sample wiring chain using multiple lights. Note that as with
all DMX chains, the last unit must have a DMX terminator connected to the DMX output.
DIMENSIONS DIAGRAM
The following diagram shows the various dimensions of the light fixture.
8
Page 9

TECHNICAL SUPPORT
www.monoprice.com
Monoprice is pleased to provide free, live, online technical support to assist you with any
questions you may have about installation, setup, troubleshooting, or product
recommendations. If you ever need assistance with your new product, please come online
to talk to one of our friendly and knowledgeable Tech Support Associates. Technical
support is available through the online chat button on our website (
during regular business hours, 7 days a week. You can also get assistance through email by
sending a message to
)
TROUBLESHOOTING
Following are some sample problems and potential solutions to those problems.
Q1: The light does not turn on and the menu will not display.
A1: Check the power cable to ensure it is properly plugged in. Check the source power
outlet by plugging in a different device. Check to ensure that the fuse has not blown.
Q2: The light will not turn on, but the menu does display.
A2: Using the menu, select the LED mode and set the value to on.
Q3: The light does not respond to DMX commands.
A3: Ensure that the light is set to DMX mode with a valid DMX address. Check for address
conflicts with other devices. Check the cabling to ensure that there is continuity between the
light and the DMX controller. Verify that there is a terminator at the end of the chain. Verify
that the DMX controller is operating properly with another DMX device.
9
Page 10
SPECIFICATIONS
Model
612710
LEDs
144 high-brightness 10mm UV LEDs
Control Signal
DMX512, Master/Slave
Control Modes
Stand-alone, DMX, Master/Slave, Sound Activated
# of DMX Channels
1, 2, 3, or 6
Beam Angle
25°
315 lux at 1m
Built-in Programs
Dimmer, Strobe, Gradual Change, Sound Activated
Cooling Mode
Natural convection
Ingress Protection
IP20
Input Voltage
100 ~ 264 VAC, 47 ~ 63 Hz
NEMA 5-15
Anti-Electricity Intension
1.5 kV
Insulation Resistance
> 2 megohms
Dimensions
9.7" x 8.0" x 3.0" (247 x 203 x 76 mm)
Weight
3.7 lbs. (1.7kg)
Brightness
41 lux at 3m
13.8 lux at 5m
7.6 lux at 7m
Power Consumption 12 watts maximum
BS 546 Type D
Compatible Pass-through
Power Plug Types
BS 4573 (UK Shaver)
CEE 7/16 "Europlug" (Type C)
Danish Section 107-2-D1 Earthed (Type K)
10
 Loading...