

Page 1
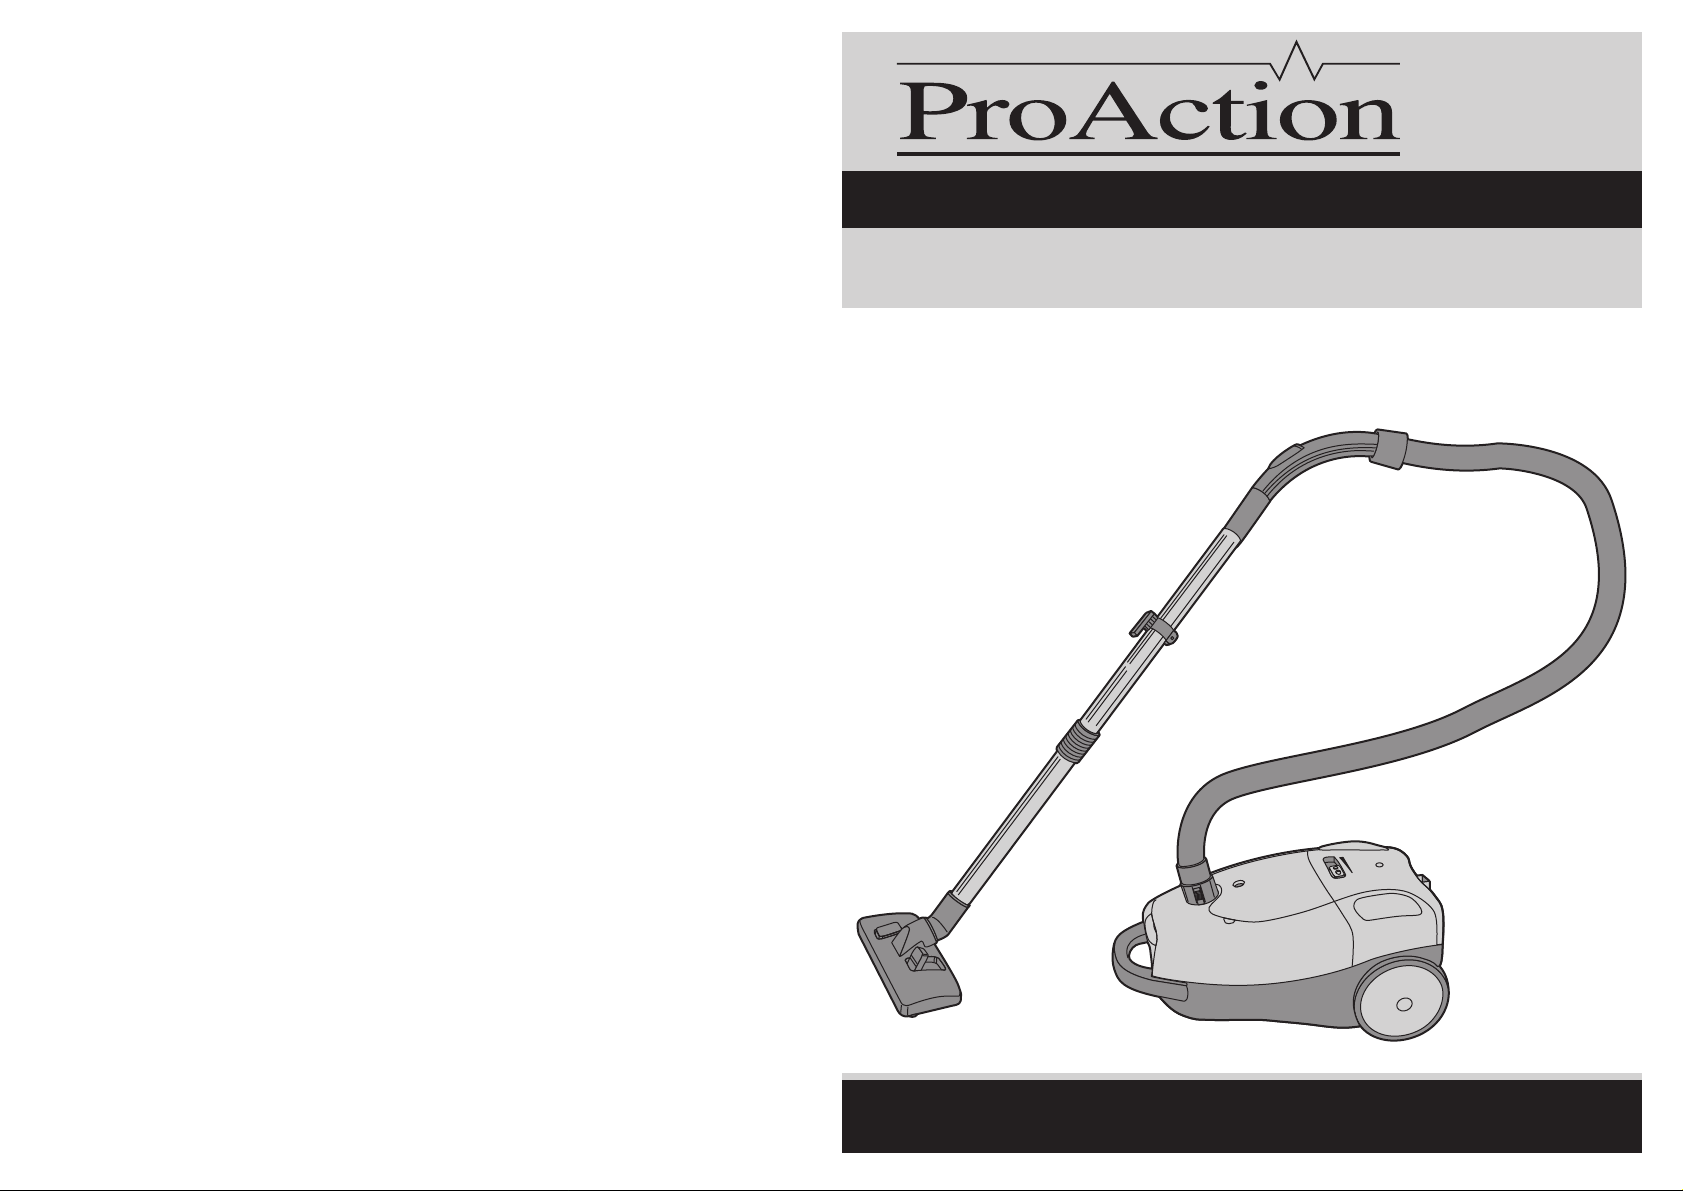
Instruction Manual - Please keep for future reference
Proaction 1600W Cylinder Vacuum
8-04
CJ021
Page 2
IMPORTANT SAFETY INSTRUCTIONS
"Read all instruction before use" and keep for future reference.
Location
• Do not use or keep the item outside.
• Do not store the appliance near hot ovens or heating appliances.
• Store the appliance inside in a dry environment away from accidental damage.
Mains lead
• Do not allow the mains lead to become strained or run this appliance over it.
• If the electrical cable becomes damaged, stop using the machine immediately. The
unit must be returned to a qualified service engineer for repair.
Children
• Children do not understand the dangers associated with operating electrical
appliances. Never allow children to use this appliance.
Other safety considerations
• Never use the appliance without the filter installed.
• Never use the appliance to vacuum hot ashes, broken glass, sharp objects or liquids.
• Never use in the presence of explosive liquids or vapours.
• Never pick up inflammable or poisonous liquids such as petrol, copier toner, or other
volatile substances. Never pick up acids, asbestos or asbestos dust.
• Always disconnect the appliance from the mains supply after use or prior to cleaning
or replacing dust bags.
• The appliance should never be left running unsupervised.
• Never modify the cleaner in any way.
• Repairs to electrical appliances are only to be undertaken by trained personnel.
• Unprofessional repairs can be dangerous.
• Use only genuine Proaction spare parts and accessories.
• Never handle electrical appliances with wet hands.
Electrical requirements
Check that the voltage on the rating plate of your appliance corresponds with your
house electricity supply which must be A.C. (Alternating Current).
If the socket outlets in your home are not suitable for the plug supplied with this
appliance, check with a qualified electrician for replacement.
WARNING: If the plug is removed or the mains cable is severed this unit must
be destroyed as it creates a hazard.
Should the fuse in the 13 amp plug require replacement, a BS1362 13 amp fuse must
be fitted.
Overheating safety device
Your vacuum cleaner is fitted with a safety device that switches off the vacuum cleaner
in the event of overheating. Should the vacuum cleaner stop working, turn the vacuum
cleaner off and inspect for blockage of the air inlet or outlet. Wait at least 15 minutes
for the protection system to reset before attempting to restart the vacuum cleaner. If
the vacuum cleaner fails to operate or the safety device switches the vacuum cleaner
off again, return it to your nearest service center for examination or repair.
1
Page 3
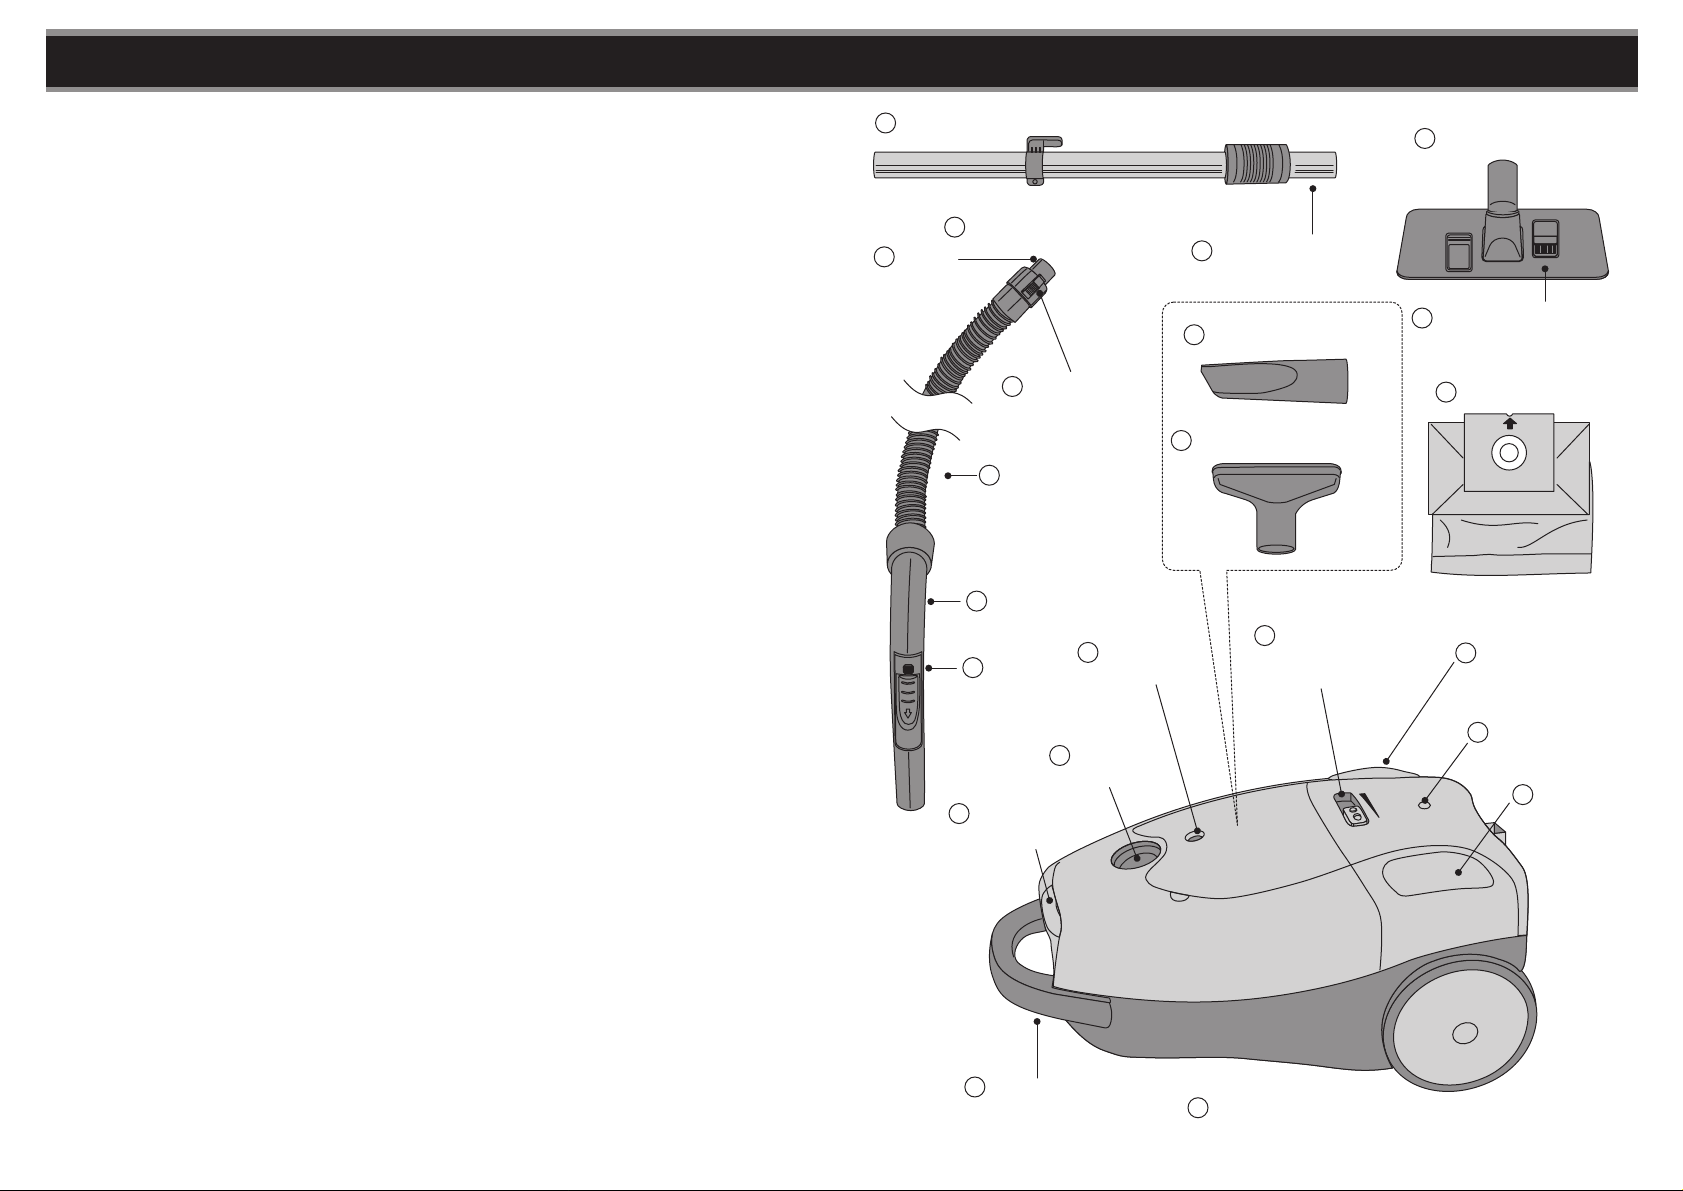
CONTENTS KNOW YOUR MACHINE
A
1 x Suction Tube
Know Your Machine ..........................................................................................3
Assembly ...........................................................................................................4
1 x Vacuum Hose
Operation ...........................................................................................................6
Changing the Dust Bag ....................................................................................8
C
B
Hose
Connector
Extension Tube
H
1 x Floor Head
I
Cleaning the Filter .............................................................................................9
Nozzle Accessories ..........................................................................................11
Trouble Shooting ..............................................................................................11
Specifications ....................................................................................................12
G
T
E
Hose
F
Handle
Handle
Suction
Control
Cover
Button
Fitting Hook
D
Flexible
Hose
S
Dustbag
R
Indicator
Hose
Inlet
1 x Crevice Nozzle
K
1 x Upholstery Head
L
Power
Q
Regulator
Button
Floor Type Selector
J
2 x Dust Bag
M
Cable Rewind
P
Button
Power
O
Indicator
On/Off
N
Button
Carry Handle
U
2
1 x Vacuum Cleaner
V
3
Page 4
ASSEMBLY
IMPORTANT:
ASSEMBLY
Please read the important safety
instructions before use.
NOTE: Always remove the plug
from the mains power before
fitting or removing accessories.
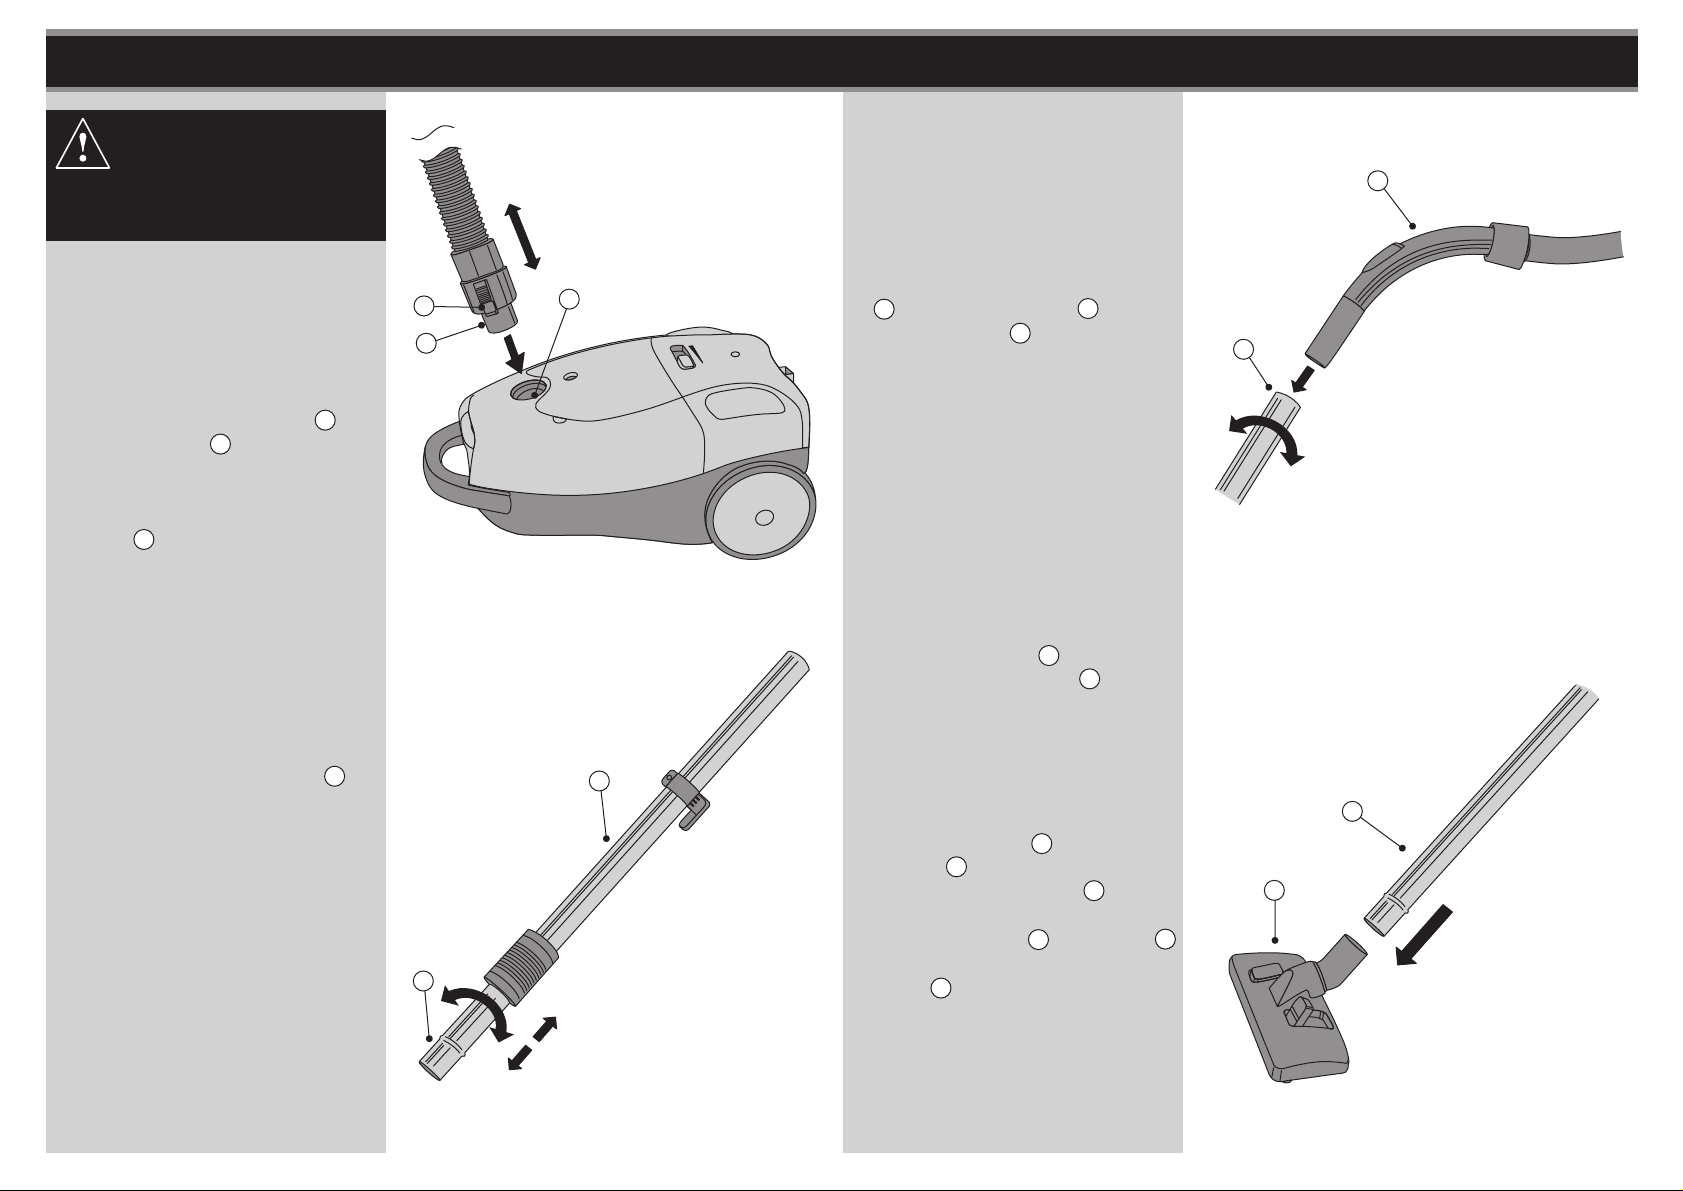
1. Insert the Hose Connector C into
the Hose Inlet S until it clips
securely into position. (To remove
the Vacuum Hose from the
Vacuum Cleaner, press the Fitting
Hook D then pull upwards.)
See fig. 1.
F
D
C
S
fig. 1
3. Attach the end of the Suction Tube
A to the Hose Handle F of the
Vacuum Hose B.
See fig. 3.
Fitting the Heads
4. Fit the Floor Head I onto the end
of the Extension Tube H.
See fig. 4.
A
fig. 3
2. Rotate the Extension Tube H
clockwise and pull out to desired
length. Lock it by rotate anticlockwise ensuring it is securely
located.
See fig. 2.
4
A
H
5. Upholstery Head L and Crevice
Nozzle K are stored inside the
Vacuum Cleaner Body V.
fig. 2
H
Depending on the cleaning task,
Upholstery Head L and Nozzle K
can either be fitted to the Extension
Tube H or directly onto the
Handle.
I
fig. 4
5
Page 5
OPERATION OPERATION
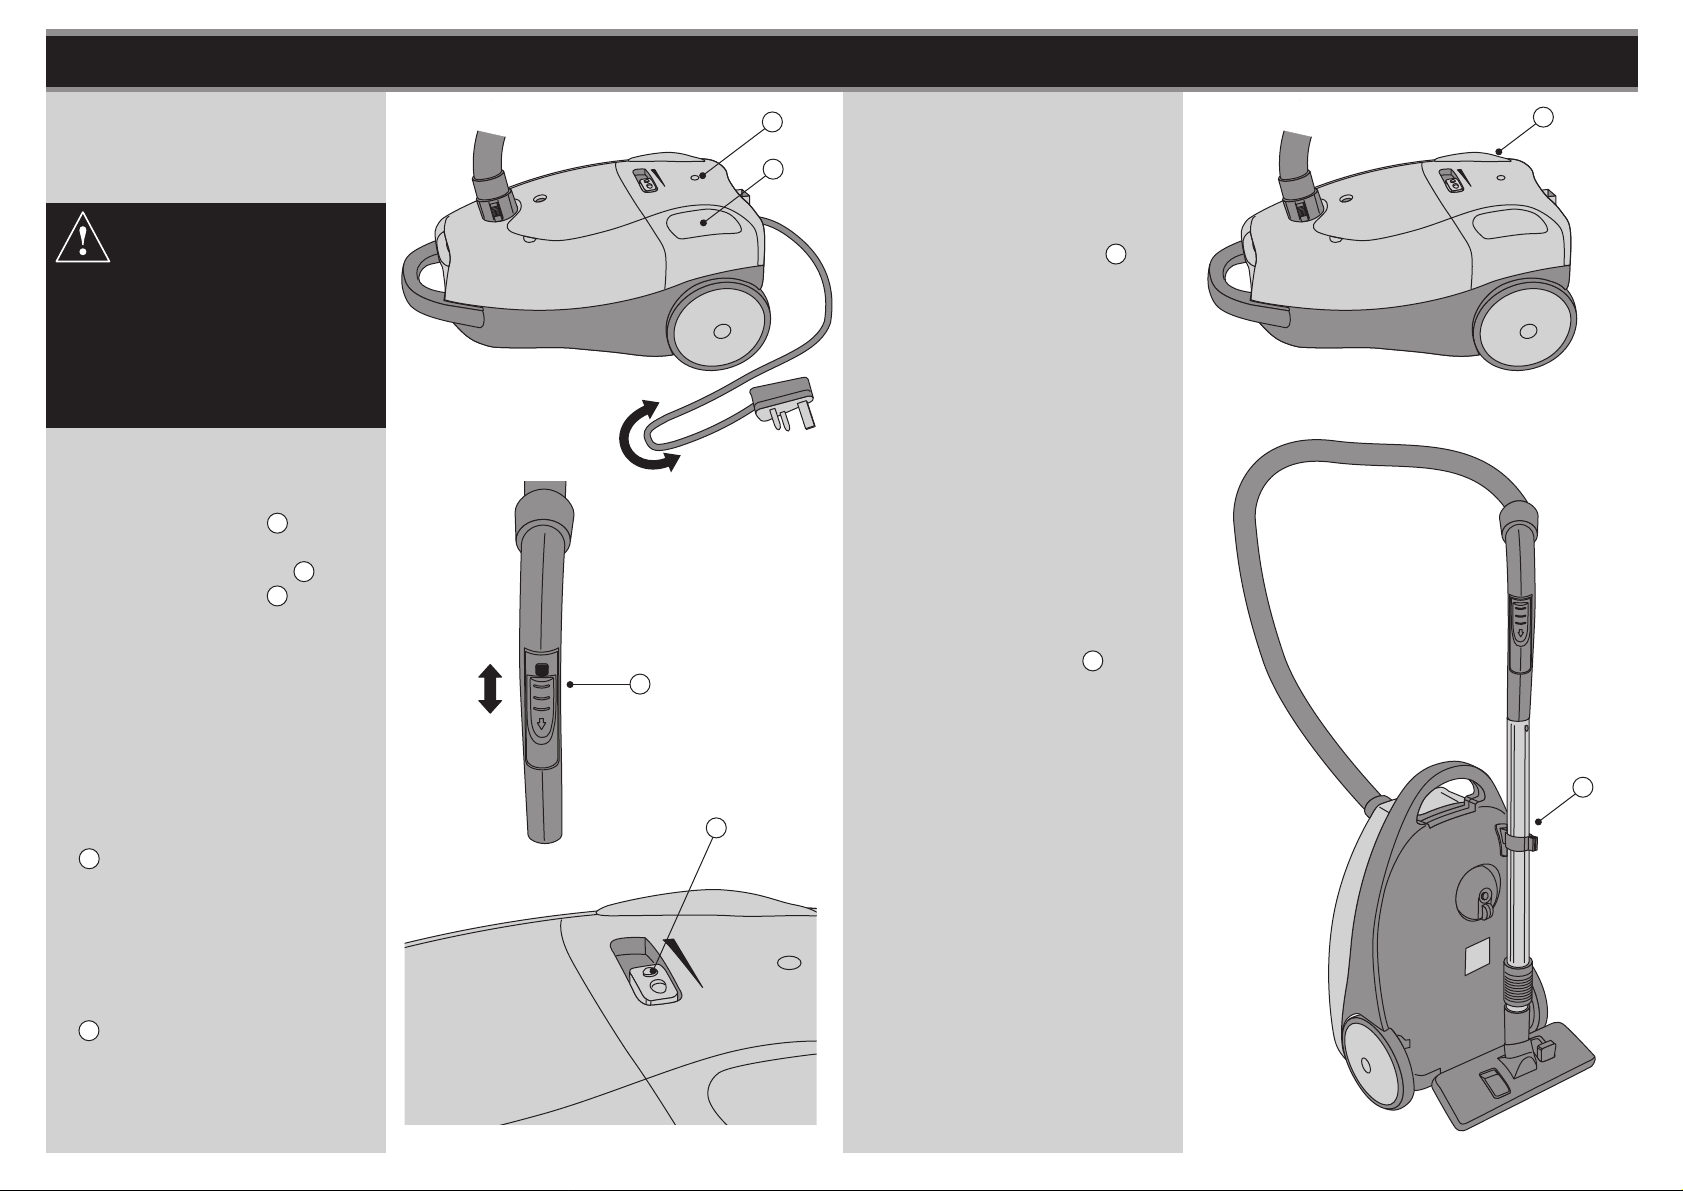
1. Pull out the cable to the desired
length. Do not over extend.
CAUTION:
Pull out the cable to the
maximum length indicated with
the yellow mark. Never pull the
cable out to the red mark as the
cable winding mechanism can
be damaged.
2. Plug into the mains socket.
3. Press On/Off Button N to start
the vacuum cleaner. To stop it
press the On/Off Button N again.
The Power Indicator O will
illuminate when the power is on.
See fig. 5.
fig. 6
fig. 5
O
N
Storage
P
1. When you have switched off and
unplugged the appliance, press
the Cable Rewind Button P to
automatically rewind the cable.
See fig. 8.
fig. 8
2. Hook the Suction Tube A into the
G
slot provided at the base of the
Cleaner.
See fig. 9.
Controlling Suction Power
1 Suction Power can be adjusted
using the Handle Suction Control
G. Keep it closed for full suction
and open for reduced suction.
See fig. 6.
2. Slide the Power Regulator Button
Q to adjust the power of the unit.
See fig. 7.
fig. 7
A
Q
3. Store according to the Safety
Instructions.
fig. 9
76
Page 6
CHANGING THE DUST BAG CLEANING THE FILTER
Replacing the Dust Bag
NOTE:
To obtain the best result from
your cleaner the dust bag needs
to be replaced regularly,
otherwise the airflow and
cleaning power will be reduced.
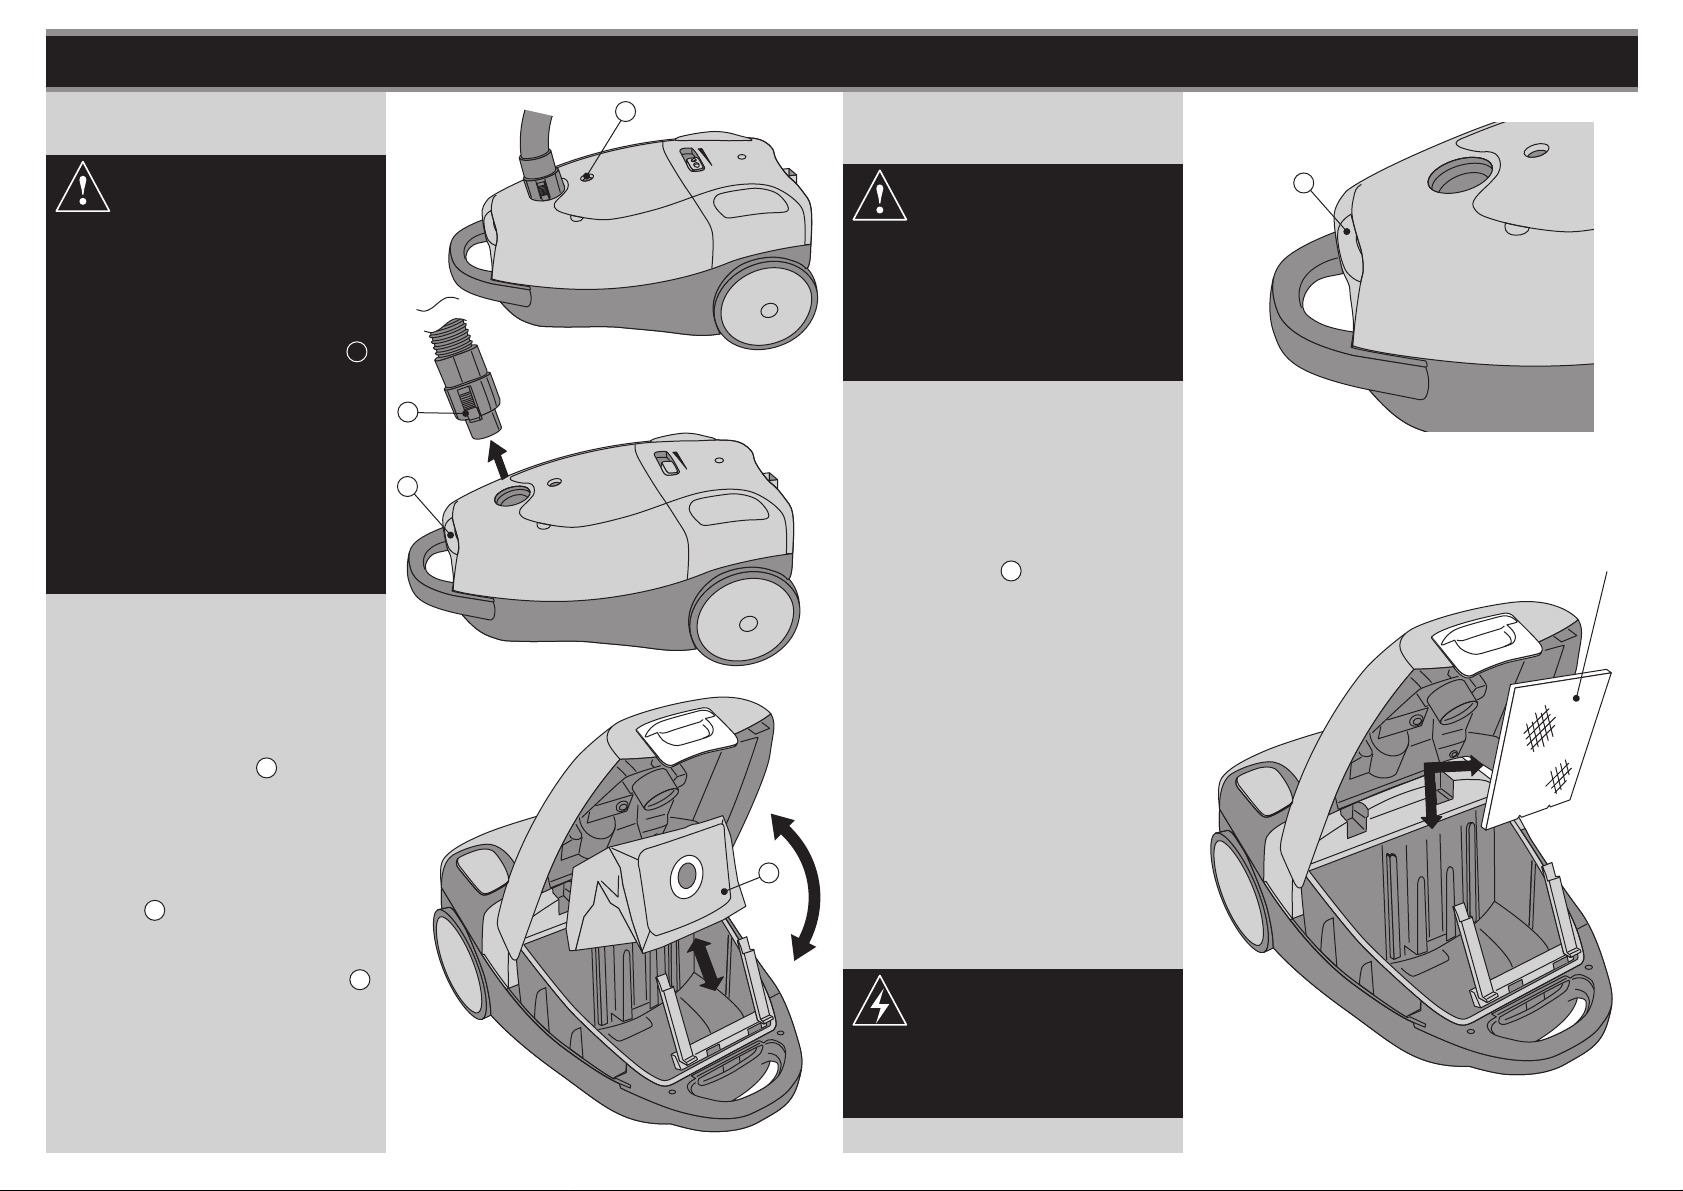
When the Dustbag Indicator R
shows fully red and
performance deteriorates it is
necessary to replace the dust
bag. Always check if there are
any blockages in the
accessories or tubes and follow
the filter cleaning instructions
for optimum performance.
See fig. 10.
1. Unplug the Cleaner from the mains
socket.
2. Remove the Vacuum Hose from
the Vacuum Cleaner by pressing
on the Fitting Hook D then pull
upwards.
See fig. 11.
3. Open the lid of the dust bag
compartment by pressing the Cover
Button T.
See fig. 11.
R
fig. 10
D
T
fig. 11
M
Cleaning the Motor Filter
IMPORTANT:
Never use the appliance without
the motor filter protection and
exhaust filter installed, otherwise
damage to the product may
occur which would not be
covered by the guarantee.
NOTE: Failure to keep the filters
clean, will result in a loss of
performance.
1. Open the lid of the dust bag
compartment by pressing the
Cover Button T.
See fig. 13.
2. Remove the Bag. See CHANGING
THE DUST BAG on previous page.
See fig. 12.
3. Remove the Motor Filter and clean
in warm soapy water. Ensure the
Exhaust Filter is totally dry before
assembly.
See fig. 14.
4. Replace the Motor Filter in the
same way.
T
fig. 13
Motor Filter
4. Carefully remove the Dust Bag M.
Re-insert a new bag and close the
lid so that it locks in place. Ensure
the Dust Bag is securely fitted
inplace.
See fig. 12.
fig. 12
NOTE:
fig. 14
Never replace wet filters in the
machine as this will create an
electrical hazard.
98
Page 7
CLEANING THE FILTER
NOZZLE ACCESSORIES
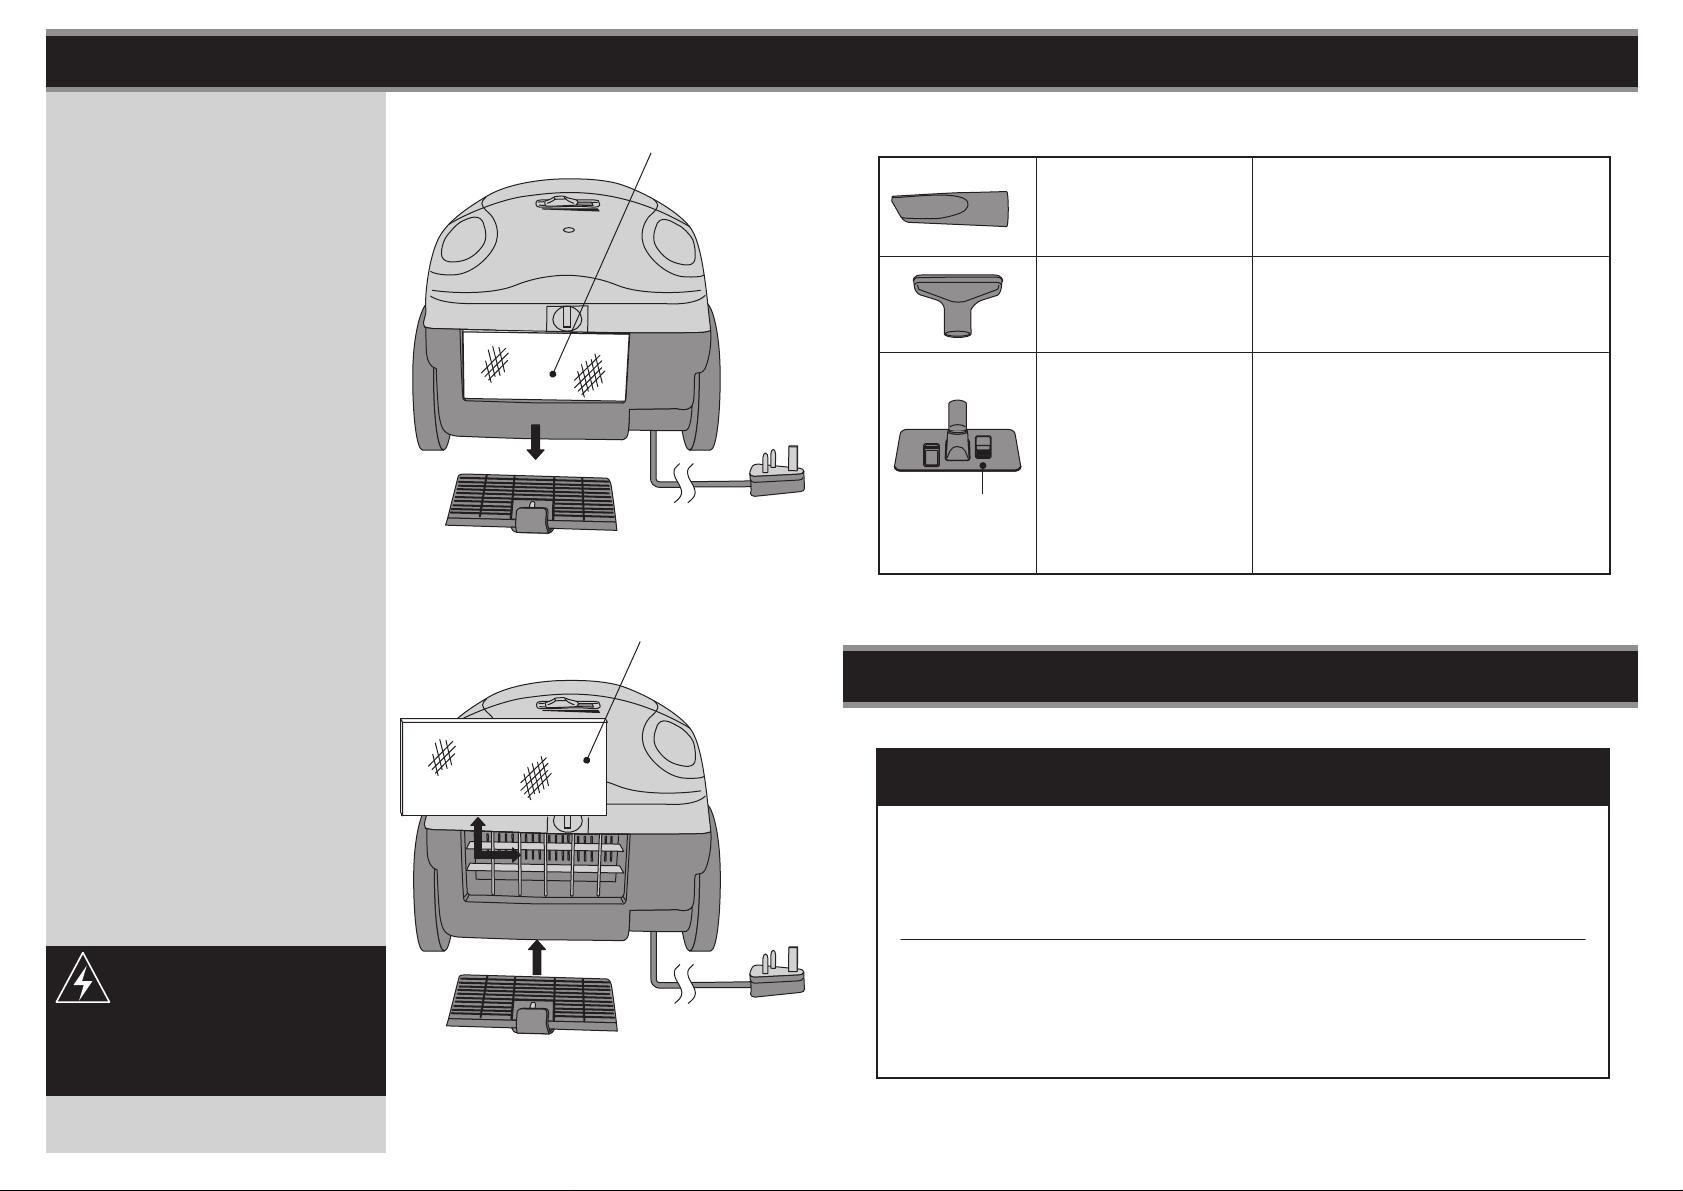
Cleaning the Exhaust Filter
1. Remove the Exhaust Filter and
clean in warm soapy water. Ensure
the Exhaust Filter is totally dry
before assembly.
See fig. 15.
2. Replace the Exhaust Filter in the
same way.
See fig. 16.
Exhaust Filter
Exhaust Filter
fig. 15
Fit the accessories to match your cleaning requirements
Crevice Nozzle
Upholstery Head
Floor Head
Floor Type
Selector
To vacuum corners and slots.
To clean upholstery, curtains, etc.
Adjust the selectors to fit your
requirement:
Carpet or rug position:
To clean carpets, rug or smooth
surfaces.
Hard floor position:
To clean tiles, parquet or hard floor.
TROUBLE SHOOTING
NOTE: We recommend cleaning
the Motor Filter and Exhaust
Filter at the same time at regular
periods.
NOTE:
Never replace wet filters in the
machine as this will create an
electrical hazard.
fig. 16
PROBLEM CORRECTION
Machine does not work.
The Suction performance is
reduced.
- Check that the appliance is correctly
plugged in and that the electrical socket
is working.
- Check fuse or breaker switch.
- Take it to the authorized service centre.
- Stop the appliance and unplug it.
- Check the Tubes, Hose and Cleaning
tools are not blocked.
- Check the Dust Bag is not full.
- Check the Filters and clean them.
1110
Page 8
SPECIFICATIONS
Technical Data
Model no. CJ021
Voltage 230VAC-50Hz
Power Consumption 1400W nom, 1600W max
Connecting to Power
Check that the voltage marked on the product corresponds with your supply voltage.
This product is fitted with a 13A plug complying with BS1363. If this plug is unsuitable
or needs to be replaced, please note the following :
Plug Replacement
If you need to replace the fitted plug.
PRODUCT GUARANTEE
This product is guaranteed against manufacturing defects for a period of
WARNING :
Never connect live or neutral wires to the earth terminal of the plug.
Only fit an approved 13 Amp BS1363/A plug and the correct rated fuse.
If in doubt, consult a qualified electrician.
IMPORTANT
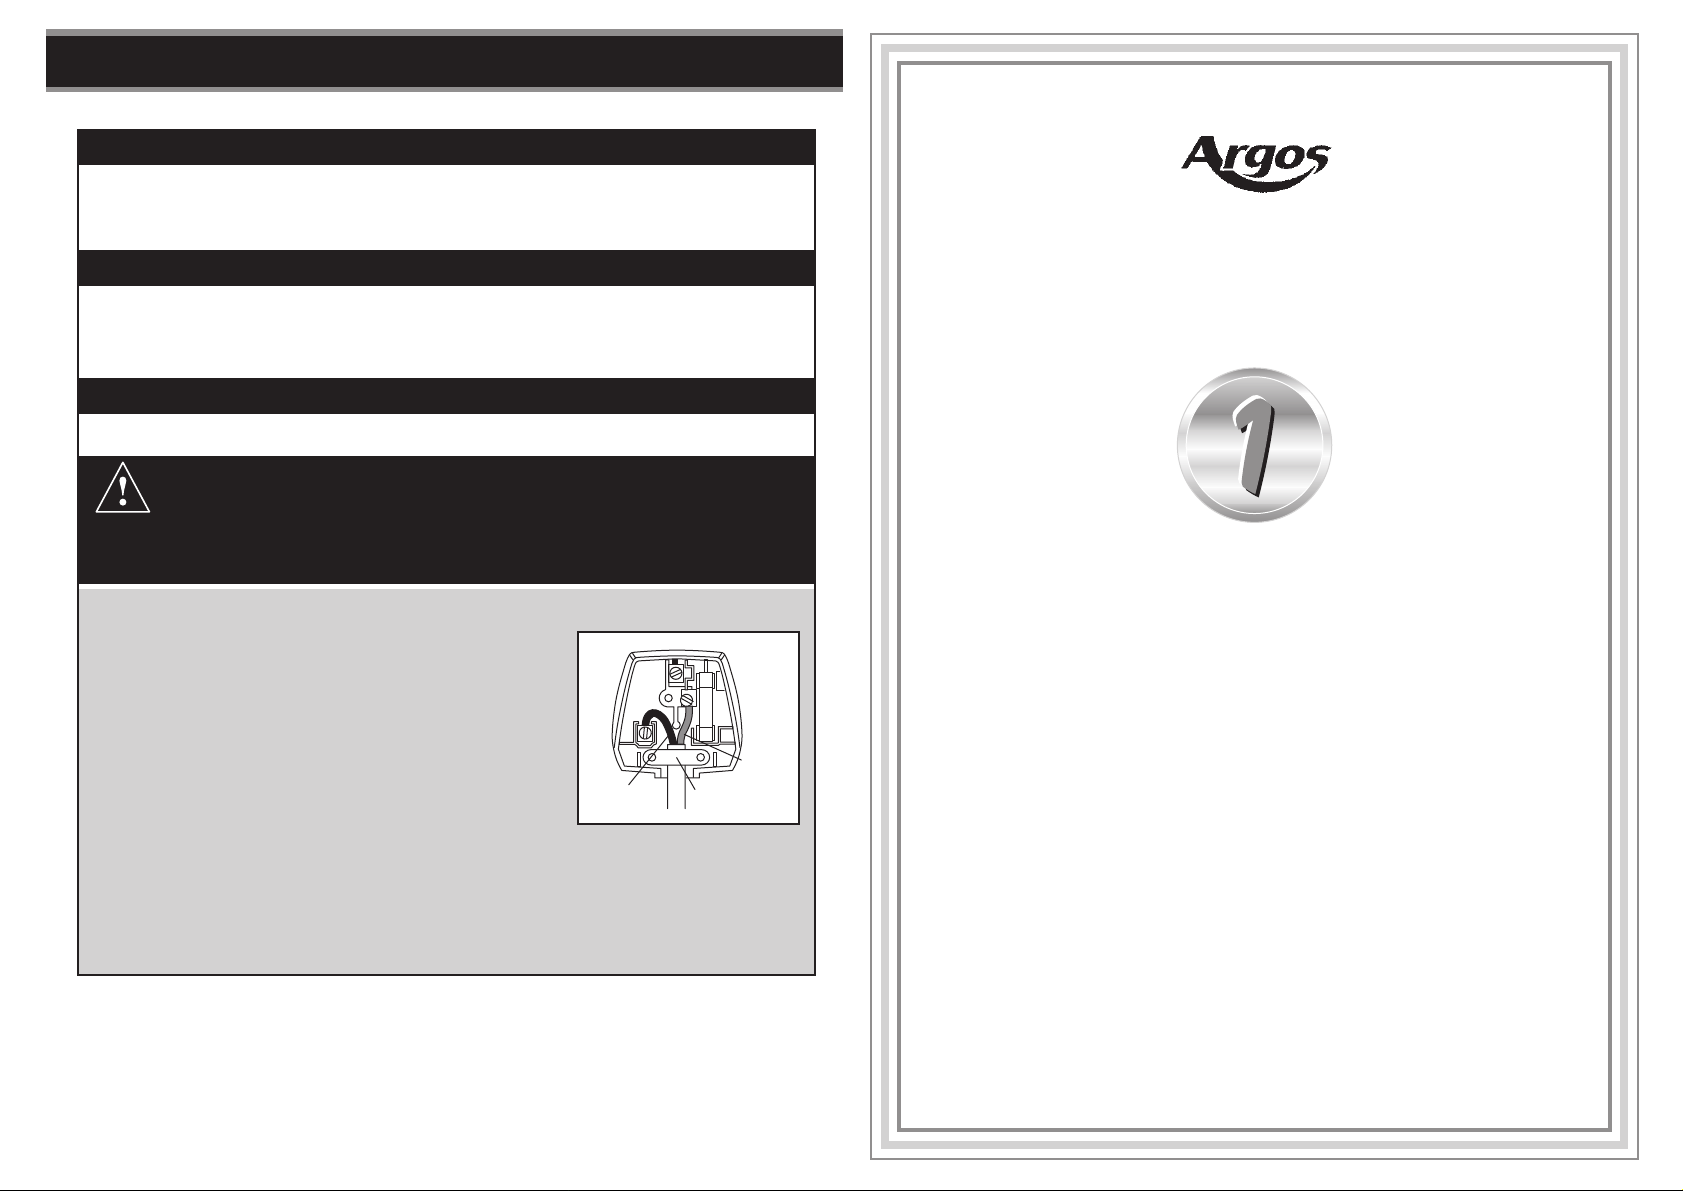
The wires in this mains lead are coloured as follows:
Blue-Neutral
Brown-Live
As the colours of the wires in the mains lead of this
apparatus may not correspond with the coloured
markings identifying the terminals in your plug,
proceed as follows:
BLUE
(NEUTRAL)
The wire which is coloured blue must be connected
to the terminal, which is marked with N or coloured blue. The wire which is coloured
brown must be connected to the terminal which is marked L or coloured brown.
Always ensure that the plug cord grip is fastened correctly. If a 13A (BS1363)
fused plug is used it must be fitted with a 13A fuse conforming to BS1362 and
be ASTA approved. If in doubt contact a qualified electrician.
CABLE
GRIP
BROWN
(LIVE)
Year
This product is guaranteed for twelve months from the date of original purchase. Any
defect that arises due to faulty materials or workmanship will either be replaced,
refunded or repaired free of charge where possible during this period by the dealer
from whom you purchased the unit.
The guarantee is subject to the following provisions:
- The guarantee does not cover accidental damage, misuse, cabinet parts, knobs
or consumable items.
- The product must be correctly installed and operated in accordance with the
instructions contained in this manual.
- It must be used solely for domestic purpose.
- The guarantee will be rendered invalided if the product is re-sold or has been
damaged by inexpert repair.
- Specifications are subject to change without notice.
- The manufacturer disclaims any liability for the incidental or consequential damages.
- The guarantee is in addition to, and does not diminish your statutory or legal rights.
Guarantor: Argos Ltd
489 - 499 Avebury Boulevard
Central Milton Keynes
MK9 2NW
12
 Loading...