

Page 1

Gebrauchsanweisung
Instructions for use
Mode d’emploi
Gebruiksaanwijzing
Istruzioni per l’uso
Brugsanvisning
Bruksanvisning
Käyttöohje
Manual de utilização
Instrucciones para el uso
Instrukcje użytkowania
Használati utasítás
ИнструкциЯ за употреба
Návod k použití
Návod na použitie
Instruc∑iuni de utilizare
Инструкции по эксплуатации
Page 2

Page 3

3
DEUTSCH Gebrauchsanweisung Seite 4
ENGLISH Instructions for use Page 20
FRANÇAIS Mode d’emploi Page 36
NEDERLANDS Gebruiksaanwijzing Pagina 52
ITALIANO Istruzioni per l’uso Pagina 68
Page 4

4
Sehr geehrter Kunde,
Sie haben ein Produkt aus unserer neuen Elektroherdserie gekauft. Wir möchten, dass Sie mit Ihrem Gerät
zufrieden sind. Deshalb empfehlen wir Ihnen, diese Gebrauchsanweisungen sorgfältig zu lesen und das
Produkt den Informationen entsprechend zu bedienen.
WICHTIGE INFORMATIONEN,
HINWEISE UND TIPPS
• Überprüfen Sie, ob die Angaben zur Stromspannung auf dem Typenschild den Werten Ihrer
Stromversorgung entsprechen.
• Die Kochmulde muss dem Schaltplan entsprechend an die Stromversorgung angeschlossen werden.
• Die Installation, sämtliche Reparaturen, Änderungen und Eingriffe am Gerät dürfen ausschließlich durch
autorisiertes Fachpersonal erfolgen (siehe Garantieschein).
• Die Durchführung von derartigen Arbeiten muss im Garantieschein des Geräts vermerkt werden.
• Vor dem Gerät muss als Hauptschalter ein allpoliger Trennschalter mit einer
Mindestkontaktöffnungsweite von 3 mm installiert werden.
• Das Gerät ist ausschließlich zur Nahrungszubereitung bestimmt. Das Gerät darf nicht zum Beheizen
von Räumen genutzt werden. Es wäre damit überlastet und könnte Schaden nehmen. Defekte, die
durch eine bestimmungsfremde Nutzung des Gerätes entstehen, sind von der Garantie ausgenommen.
• Es ist nicht erlaubt, entflammbare Mittel in der Nähe der Kochzonen, der Heizelemente des Backofens
oder im Ablagefach des Geräts aufzubewahren.
• Vergewissern Sie sich, dass die Netzkabel der anderen Geräte nicht mit der Kochmulde oder anderen
heißen Teilen des Gerätes in Kontakt kommen können.
• Achten Sie darauf, dass alle Schalter ausgeschaltet sind, wenn das Gerät nicht im Betrieb ist. Wir
empfehlen Ihnen, das Gerät alle zwei Jahre vom Kundendienst überprüfen und warten zu lassen.
• Sie vermeiden so eventuelle Störungen und verlängern die Lebensdauer Ihres Geräts. Der
Hauptnetzschalter muss bei der Reinigung und Reparatur ausgeschaltet werden.
• Reparieren Sie das Gerät im Falle einer elektrischen Störung nicht selbst, sondern schalten Sie das
Gerät aus und rufen Sie den Kundendienst.
• Der Hersteller haftet nicht bei durch Missachtung der verbindlichen Anweisungen und Hinweise in
diesem Handbuch entstandenen Schäden.
• Verwenden Sie keine abgenutzten oder schadhaften Zubehörteile.
• Dampfreiniger dürfen nicht zur Reinigung des Geräts verwendet werden.
Page 5

5
1. Knebel der linken vorderen Kochzone
2. Knebel der linken hinteren Kochzone
3. Knebel der rechten hinteren Kochzone
4. Knebel der rechten vorderen Kochzone
5. Backofenthermostatschalter
6. Backofenfunktionswahlschalter
7. Kontrollleuchte Backofenthermostat
8. Kontrollleuchte Gerät EIN
9. Timer
10. Bedientasten Timer
VOR DER ERSTEN INBETRIEBNAHME
DES GERÄTS
Vor der ersten Inbetriebnahme muss sämtliches Verpackungsmaterial aus dem Gerät entfernt werden.
Einige Teile der Verpackung sind wieder verwertbar. Entsorgen Sie diese den geltenden Gesetzen und
nationalen Vorschriften entsprechend.
Wir empfehlen, das Gerät und das Zubehör vor der ersten Benutzung zu reinigen.
Schalten Sie nach dem Trocknen der gereinigten Oberflächen den Hauptschalter ein und führen Sie die
folgenden Anweisungen aus. Wir weisen darauf hin, dass ausschließlich die im Abschnitt Reinigung
genannten Teile gereinigt oder abgenommen werden dürfen.
BACKOFEN
Schalten Sie den Backofenfunktionswahlschalter auf die Funktion “Ober- und Unterhitze”. Stellen Sie den
Thermostatschalter auf 250° C und lassen Sie den Ofen bei geschlossener Tür 1 Stunde lang laufen. Sorgen
Sie für eine ausreichende Belüftung des Raumes. Durch diesen Vorgang werden Konservierungsstoffe und
Geruch vor dem ersten Backen eliminiert.
BEDIENFELD DER KOCHMULDE
Page 6
6
BENUTZEN DER KOCHMULDE
• Das Gerät darf ausschließlich von Erwachsenen und der Bedienungsanweisung entsprechend
verwendet werden. Lassen Sie keine Kinder unbeaufsichtigt in der Nähe des Geräts spielen.
• Der Betrieb eines Elektrogeräts erfordert ständige Aufsicht.
• Dieses Gerät darf durch Kinder oder Personen mit eingeschränkten körperlichen, sensorischen oder
mentalen Fähigkeiten, die durch Unerfahrenheit und Unkenntnis des Gerätes den Backofen nicht sicher
nutzen könnten, nur unter Aufsicht und nach Einweisung in die Handhabung benutzt werden.
Beaufsichtigen Sie Kinder, um sicher zu gehen, dass sie nicht mit dem Gerät spielen
GLASKERAMIK-KOCHMULDE MIT KOCHZONEN
• Die Standard-Kochzonen lassen sich auf sechs Leistungsstufen regeln. Die höchste Leistung entspricht
der Stufe 6, die niedrigste der Stufe 1.
• Benutzen Sie die Kochzonen zum Kochen, Braten usw. Wir empfehlen, dafür ausschließlich
Kochgeschirr mit ebenem Boden zu verwenden.
• Die Überhitzung der Kochzone wird durch einen in der Kochmulde eingebauten Überhitzungsschutz
vermieden.
• Die Restwärmeanzeigen im vorderen Teil der Kochmulde zeigen durch Aufleuchten an, dass die
Temperatur der Kochzonenoberfläche erhöht ist, auch wenn das Heizelement schon ausgeschaltet ist.
• Die heiße Kochzone kann noch energiesparend benützt werden. Die Restwärmeanzeige erlischt erst,
wenn die Temperatur auf ein ungefährliches Niveau abgesunken ist.
• Die Leistung der “Hi-light“-Kochzonen und der doppelten Kochzone lässt sich durch einen Gleitregler
stufenlos regeln.
ZWEIKREISKOCHZONE
Der mittlere Teil der 120 mm-Durchmesser-Kochzone lässt sich durch Drehen des Leistungsreglers nach
rechts steuern. Die Leistung lässt sich stufenlos von 0 bis 700W regeln. Durch Drehen des Reglers nach
rechts auf die maximale Leistung wird die 180 mm-Durchmesser-Kochzone zugeschaltet, die je nach
gewählter Leistungsstufe von 1 (min.) bis 9 (max.) mit maximal 1700 W aufheizt. Durch Drehen des
Reglers in die Null-Stellung werden beide Teile der Kochzone abgeschaltet. Die Überhitzung der Kochzone
wird durch einen in der Kochmulde eingebauten Überhitzungsschutz vermieden. Die Restwärmeanzeigen
im vorderen Teil der Glaskeramik zeigen durch Aufleuchten an, dass die Temperatur der
Kochzonenoberfläche erhöht ist, auch wenn das Heizelement schon ausgeschaltet ist.
Die heiße Kochzone kann noch energiesparend genutzt werden. Die Restwärmeanzeige
erlischt erst, wenn die Temperatur auf ein ungefährliches Niveau abgesunken ist.
HINWEIS:
Ø 180 / 120 mm - 1700 / 700 kW
Ø 145 / 250 mm - 2000 / 1200 kW
Page 7

7
ALLGEMEINE TIPPS ZUR BENUTZUNG VON GLASKERAMIK-KOCHFELDERN:
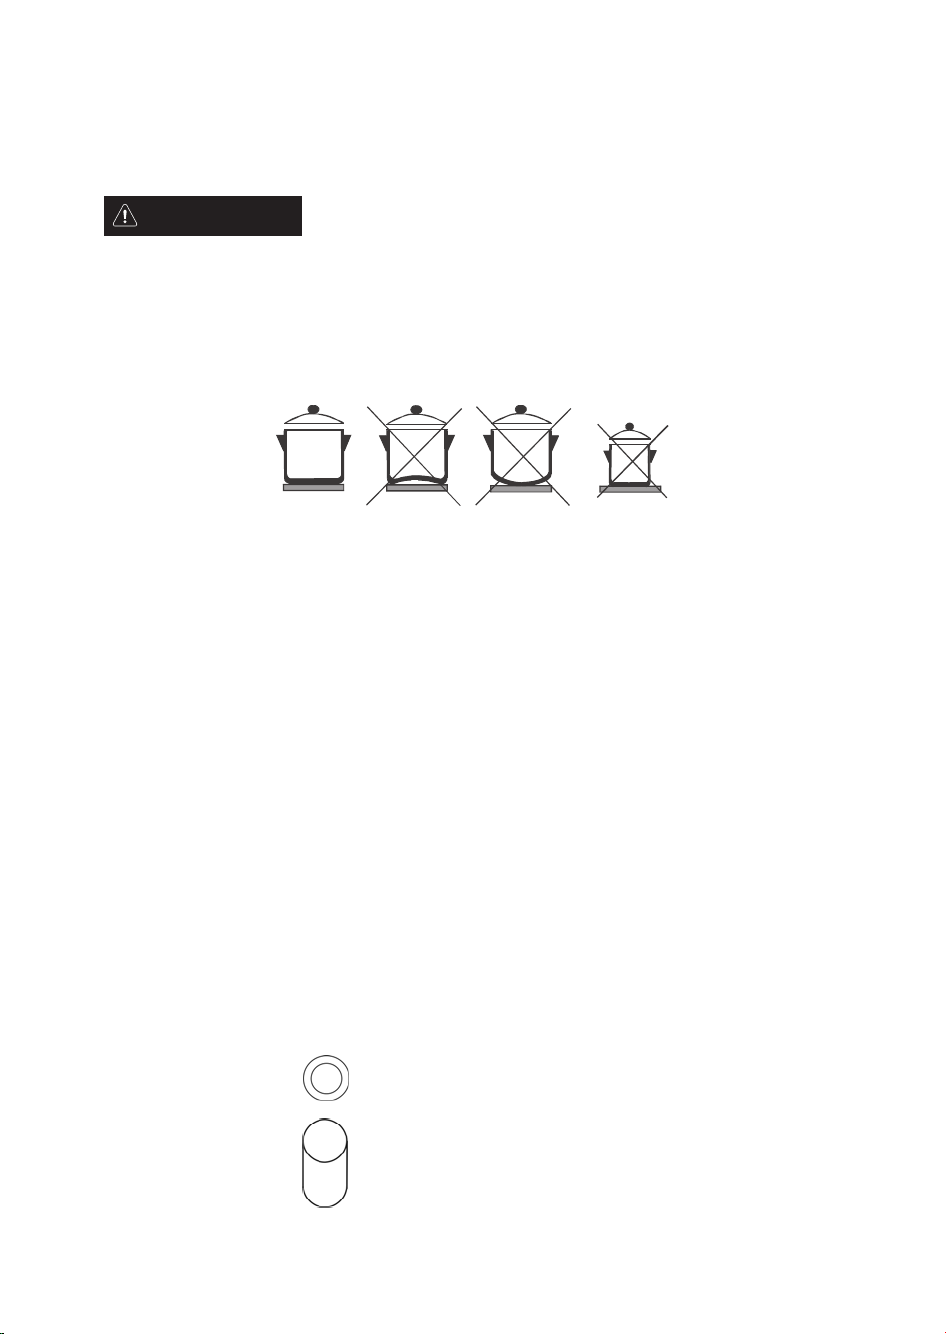
• Verwenden Sie Kochgeschirr mit ebenem Boden, ohne Verunreinigungen, die Kratzer verursachen
können.
• Um zu vermeiden, dass der Überhitzungsschutz die Kochzone während des Kochvorgangs abschaltet,
sollte der Topfboden mindestens denselben Durchmesser wie die Kochzone haben.
• Bedecken Sie den Topf beim Kochen mit einem Topfdeckel und regeln Sie die Leistungszufuhr so, dass
Sie den Deckel nicht abnehmen müssen.
• Das Glaskeramik-Kochfeld darf nicht zum Heizen von Räumen verwendet werden.
• Entfernen Sie beim Kochen entstandene Verunreinigungen sofort von der Kochmulde und reinigen Sie
diese nach dem Kochen. Entfernen Sie zuckerhaltige Speisereste besonders sorgfältig, da diese bei
längerer Einwirkung die Struktur der Glaskeramik-Kochmulde beeinträchtigen.
• Glänzende Flecken entstehen durch die Verwendung von Aluminium-Geschirr oder von ungeeigneten
Reinigungsmitteln. Diese Flecken lassen sich selbst durch wiederholtes Reinigen nur mühsam entfernen.
• Kratzer auf der Glaskeramik-Kochmulde können z. B. durch Sandkörner im Gemüse, Reste von
ungeeignetem Scheuermittel oder Scheuerschwämmchen entstehen.
• Wischen Sie die mit Lehm, Sand oder ähnlich scheuernden Mitteln verunreinigte Kochmulde vorsichtig
mit einem feuchten Lappen ab und reinigen Sie sie anschließend mit flüssigem Glaskeramikreiniger.
• Verwenden Sie keine Topfkratzer, Scheuerschwämmchen oder andere Reinigungsmittel mit rauer
Oberfläche. Ebenso raten wir von der Verwendung korrosiver Reinigungsmittel wie Backofenspray
oder Fleckenentferner ab.
• Das Kochgeschirr sollte während des Kochens den Rahmen der Glaskeramik-Kochmulde nicht
berühren und nicht auf den Rahmen gestellt werden.
BACKOFEN
BACKOFENINNENRAUM
Der Backofen verfügt über flache Seitenwände mit einer Vorrichtung zum Einschieben von Zubehörteilen
(Backofengitter, Backblech). Im Backofeninnenraum befindet sich das obere Heizelement mit Grillelement.
Das untere Heizelement befindet sich unter dem Backofenboden. Im rückwärtigen Teil des Ofens befinden
sich unter dem Verteilungsblech das kreisförmige Heizelement und das Umluftgebläse.
EIN- UND AUSSCHALTEN DES BACKOFENS
Mit dem Funktionswahlschalter des Backofens wählen Sie die gewünschte Backofenfunktion. Mit diesem
Schalter können Sie in beide Richtungen drehen. Die Temperatureinstellung kann im Bereich 50° C - 250°
C durch Drehen des Thermostatschalters nach rechts geändert werden.
Durch Zurückdrehen des Schalters wird die Temperatur verringert.
Der Thermostat wird durch gewaltsames Überdrehen der Nullstellung beschädigt!
• Ein eingeschobenes Backblech darf mit maximal 3 kg belastet werden. Ein Rost mit eingesetzter
Fettpfanne oder eingesetztem Backblech darf mit maximal 7 kg belastet werden.
• Backbleche und Fettpfannen sind nicht für die längerfristige Lagerung von Speisen bestimmt (weniger
als 48 Stunden). Für eine längere Lagerung geben Sie die Speisen bitte in ein geeignetes Behältnis.
HINWEIS:
Page 8
8
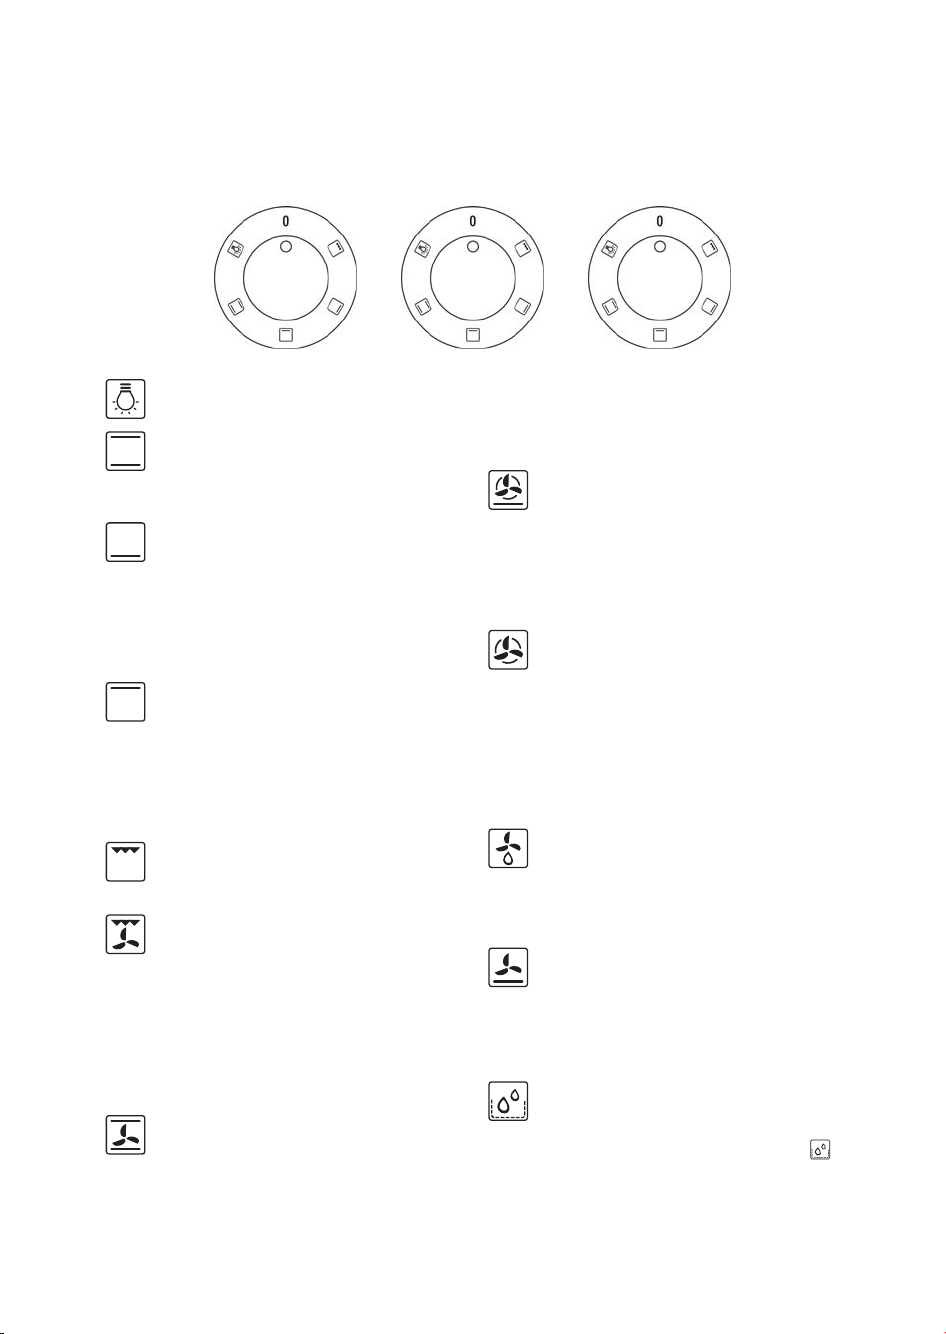
Backofenbeleuchtung, leuchtet beim
Einschalten einer Backofenfunktion.
Ober- und Unterhitze. Der Thermostat
kann auf eine Temperatur im Bereich von
50 - 250° C eingestellt werden.
Unterhitze. Die Wärme wird konventionell
verteilt, der Thermostat kann auf eine
Temperatur im Bereich von 50 - 250° C
eingestellt werden.
Tipp: Diese Funktion eignet sich besonders
für den Abschluss des Backvorgangs bei
stärkerer Unterhitze.
Oberhitze. Die Wärme wird konventionell
verteilt, der Thermostat kann auf eine
Temperatur im Bereich von 50 - 250° C
eingestellt werden.
Tipp: Diese Funktion eignet sich besonders
für den Abschluss des Backvorgangs bei
stärkerer Oberhitze oder zum
Überkrusten.
Grillen mit Infrarotstrahlen. Der
Thermostat ist auf maximale Temperatur
eingestellt.
Grillen bei Umluft. Die
Backofentemperatur ist aufgrund der
Luftumwälzung im oberen Bereich des
Ofens (über dem Rost oder der Fettpfanne)
höher. Der Thermostat kann auf eine
Temperatur im Bereich von 150 - 250° C
eingestellt werden.
Tipp: Diese Funktion eignet sich zum
Grillen oder Braten von größeren
Fleischstücken bei höherer Temperatur. Die
Ofentür bleibt geschlossen.
Ober- und Unterhitze mit Umluft. Der
Luftstrom sorgt für gleichmäßige Hitze im
Backofeninnenraum. Der Thermostat kann
auf eine Temperatur im Bereich von 50 –
250° C eingestellt werden.
Tipp: Diese Funktion eignet sich zum
Backen auf zwei Ebenen, wenn die Speisen
dieselbe Gartemperatur haben.
Unterhitze mit Umluft. Die Temperatur
kann mit dem Thermostat eingestellt
werden.
Tipp: Die Funktion ist zum schnellen
Vorheizen des Backofens geeignet. Schalten
Sie nach dem Erreichen der gewünschten
Temperatur in die gewünschte
Backofenfunktion um.
Umluftgaren. Die Luftumwälzung sorgt für
eine gleichmäßige Temperatur im
Backofeninnenraum. Der Thermostat kann
auf eine Temperatur im Bereich von 50 250° C eingestellt werden.
Tipp: Diese Funktion eignet sich auch zum
Backen auf zwei Ebenen gleichzeitig
(Backen von hoch aufgehendem Backgut
oder einer größeren Menge).
Diese Backofenfunktion eignet sich
besonders zum schonenden Trocken und
Auftauen von Speisen.
Tipp: Die Funktion ist zum Auftauen von
Speisen oder Fertiggaren von
Halbfertigprodukten geeignet.
Die mit unterem Heizungselement
erzeugte Wärme ist mit dem Ventilator
verteilt. Die Luftzirkulation dann bildet
eine, in dem ganzen Volumen des Ofens
gleichmäßig verteilte Temperatur.
Der Thermostat kann in dem Bereich 50 250 °C eingestellt werden.
Unterhitze - Aqua clean lässt sich auch zur
Reinigung des Backofens verwenden.
Einzelheiten zu diesem Thema finden Sie
im Abschnitt "Reinigen und Wartung",
AQUA Clean (siehe Abschnitt
“Reinigen”).
BACKOFENFUNKTIONEN
Page 9

9
TIPPS UND EMPFEHLUNGEN
Zu Ihrer Übersicht finden Sie hier empfohlene Gartemperaturen für typische Zubereitungsarten.
50-70° C Trocknen
80-100° C Einmachen
130-150° C Schmoren
180-220° C Backen
220-250° C Fleisch braten
• Passen Sie die in der Tabelle empfohlenen Richtwerte für jede Speise und Garart an Ihren persönlichen
Geschmack an.
• In einigen Fällen sollte der Backofen vorgeheizt werden.
Die Kontrollleuchte für den Backofenthermostat leuchtet bis zum Erreichen der gewählten Temperatur.
Sobald die gewählte Temperatur erreicht wird, erlischt die Kontrollleuchte.
• Schieben Sie den Backofenrost mit Backblech oder Fettpfanne am besten auf die zweite Einschubebene
von unten.
• Öffnen Sie die Ofentür während des Backvorgangs möglichst nicht. Die Wärmefunktion des Backofens
wird dadurch gestört, die Gardauer kann sich verlängern und das Gargut anbrennen.
GRILLEN AUF DEM ROST
• Legen Sie das vorbereitete Grillgut auf den Rost.
• Schieben Sie den Rost in die Führungsschienen des Backofens.
• Zum Auffangen des Bratensafts schieben Sie darunter ein
Backblech ein oder stellen Sie die Fettpfanne auf den
Backofenboden.
• Halten Sie die Backofentür beim Grillen geschlossen.
Die erreichbaren Teile (Ofentür usw.) können beim Grillen sehr heiß
werden, halten Sie deshalb Kinder vom Ofen fern.
VORSICHT
Page 10
10
Der Timer (die Zeitschaltuhr) dient zum Ausschalten des Backofens zum eingestellten Zeitpunkt. Das Einund Ausschalten des Timers wird durch das Aufleuchten des Topfsymbols in der Displaymitte angezeigt.
Das die Uhrzeit anzeigende Display ist ständig beleuchtet. Der Timer wird aus dem Netz gespeist, bei
Stromausfall bleibt das Display auch nach der Widerherstellung der Stromzufuhr aus (die Ziffern 0.00 +
das Symbol 6 blinken) und die Zeit muss neu eingestellt werden.
1. Einstelltaste Signalton
2. Einstelltaste Gardauer
3. Einstelltaste Garende
4. Einstelltaste (-)
5. Einstelltaste (+)
6. Symbol “A” - leuchtet während der gesamten Gardauer und
blinkt am Ende des Garvorgangs
7. Symbol Kurzzeitwecker
8. Symbol leuchtet, wenn der Backofen in Betrieb ist
DER BACKOFEN HAT ZWEI FUNKTIONSWEISEN
• Betrieb ohne Timer (in diesem Fall muss das Topfsymbol (8) leuchten - falls es nicht leuchtet, drücken
Sie gleichzeitig die Tasten 2 und 3, anderenfalls lässt sich der Backofen nicht einschalten). Das Gerät
wird mit Hilfe von Thermostat- und Funktionswahlschalter bedient.
• Betrieb mit Timer (zur Einstellung des Timers siehe unten). Die Temperatur sowie die gewünschte
Funktion lassen sich mit Hilfe der Backofenknebel einstellen
EINSTELLEN DER UHRZEIT FÜR DEN TIMER
Nach der Inbetriebnahme des Geräts blinkt die Anzeige 0.00 auf dem Display. Zum Einstellen der genauen
Uhrzeit drücken Sie gleichzeitig die Tasten 2 und 3 (das Symbol 0.00 und das Symbol 8 leuchten). Jetzt
können Sie die Uhrzeit mit Hilfe der Tasten 4 und 5 einstellen.
MANUELLER BETRIEB DES OFENS
Falls Sie den Ofen ohne Zeitprogrammierung benutzen möchten, darf das Symbol 6 nicht leuchten.
Kontrollieren Sie deshalb immer den Timer: Falls das Symbol 6 leuchtet, drücken Sie gleichzeitig die
Tasten 4 und 5. Erst nach Erlöschen des Symbols 6 kann der Backofen ohne Timer benutzt werden!
Der Backofen lässt sich mit dem Timer auf zwei Arten benutzen:
HALBAUTOMATISCH
- Der Ofen schaltet sofort ein und schaltet nach Ablauf der eingestellten Zeit automatisch aus
AUTOMATISCH
- Das Ein- und Ausschalten des Backofens erfolgt automatisch.
HALBAUTOMATISCHER BETRIEB
Bei dieser Programmierart stellen Sie die Gardauer ein (Betriebsdauer). Die maximale mögliche Einstellung
beträgt 23 Stunden und 59 Minuten!
NUTZUNG DES BACKOFENS IM HALBAUTOMATISCHEN BETRIEB
Das folgende Beispiel soll Ihnen das Verständnis erleichtern:
Die Gardauer beträgt 1 Stunde 20 Minuten (1.20).
• Einstellung der Gardauer:
Drücken Sie die Taste 2 (0.00, und das Symbol 8 leuchten) und halten Sie die Taste 5 gedrückt, bis der
Wert 1.20 erreicht ist. Während des Einstellens leuchtet auch das Symbol 6. Nach 5 Sekunden werden
auf dem Display die Uhrzeit und das Symbol 6 angezeigt. Schalten Sie den Ofen ein: mit dem
Funktionswahlschalter stellen Sie die Backofenfunktion und die Gartemperatur ein. Der Garvorgang
beginnt direkt nach dem Einschalten des Geräts; während des Backens leuchten die Symbole 6 und 8.
BENUTZUNG DES BACKOFENS MIT HILFE
DES TIMERS
Page 11

11
Nach Ablauf der eingestellten Zeitdauer - in unserem Beispiel nach 1 Stunde und 20 Minuten
- schaltet der Backofen automatisch ab (der Garvorgang ist beendet),
- ertönt ein Signal, das sich durch Drücken der Tasten 1, 2 oder 3 ausschalten lässt. Nach 2 Minuten
endet das akustische Signal automatisch,
- erlischt das Symbol 8,
- blinkt das Symbol 6.
Zum Ausschalten des Symbols 6 schalten Sie den Backofen aus und drücken Sie gleichzeitig die Tasten 2
und 3. Sobald das Symbol 6 erloschen ist, lässt sich der Backofen manuell benutzen.
AUTOMATIKFUNKTION
Bei dieser Programmierart stellen Sie die Gardauer (Betriebsdauer) und das Garende (Betriebsende) ein.
Die maximal mögliche Einstellung und das Garende beträgt 23 Stunden und 59 Minuten (Einstellung des
Garendes = aktuelle Uhrzeit + 23 Stunden und 59 Minuten).
Wird der Backofen nicht mit den entsprechenden Schaltern aktiviert, so
schaltet er
sich nicht automatisch ein!
ENDE DES AUTOMATIKBETRIEBS
Das folgende Beispiel soll Ihnen das Verständnis erleichtern:
Die Gardauer beträgt 1 Stunde 20 Minuten (1.20), das Garende ist um 13.52.
• Kontrollieren Sie, dass die aktuelle Uhrzeit korrekt eingestellt ist.
Einstellen der Gardauer: Drücken Sie die Taste 2 (0.00, und das Symbol 8 leuchten) und halten Sie die
Taste 5 so lange gedrückt, bis 1.20 erreicht ist (während der Einstellung wird auch das Symbol 6
gezeigt). Nach 5 Sekunden werden auf dem Display die Uhrzeit und die Symbole 6 und 8 angezeigt.
• Einstellen des Garendes:
Drücken Sie die Taste 3 – die frühest mögliche Zeit für das Garende wird angezeigt (aktuelle Uhrzeit
+ die eingestellte Gardauer). Stellen Sie jetzt mit Hilfe der Tasten 4 und 5 die Zeit 13.52 ein – um
diese Zeit schaltet der Backofen ab. Nach 5 Sekunden werden auf dem Display die Uhrzeit und das
Symbol 6 angezeigt. Das Symbol 8 erlischt (es leuchtet wieder, wenn der Backofen einschaltet).
• Schalten Sie den Backofen ein. Stellen Sie mit Hilfe der entsprechenden Knöpfe die Backfunktion und
die Gartemperatur ein.
• Der Backofen schaltet (in unserem Beispiel um 12.32) automatisch ein (Garbeginn) und nach 1 Stunde
und 20 Minuten Betrieb um 13.52 wieder ab. Während des Betriebs leuchtet das Symbol 8.
• Nach dem Abschalten des Backofens
- ertönt ein Signal, das sich durch Drücken der Tasten 1, 2 oder 3 ausschalten lässt. Nach 2 Minuten
endet das akustische Signal automatisch,
- erlischt das Symbol 8,
- blinkt das Symbol 6.
Zum Ausschalten des Symbols 6 schalten Sie den Backofen aus und drücken Sie gleichzeitig die Tasten 2
und 3. Sobald das Symbol 6 erloschen ist, lässt sich der Backofen manuell benutzen.
KURZZEITWECKER
Der Kurzzeitwecker ist eine weitere Timerfunktion, sie wird durch Drücken der Taste 1 aktiviert. Auf
dem Display wird 0.00 angezeigt. Mit Hilfe der Tasten 4 und 5 lässt sich die gewünschte Betriebsdauer
einstellen. Auf dem Display leuchtet das Symbol 7. Die im Kurzzeitwecker eingestellte Zeit lässt sich durch
Drücken der Taste 1 überprüfen. Nach Ablauf der eingestellten Zeit ertönt ein akustisches Signal, das sich
durch Drücken der Tasten 1, 2 oder 3 ausschalten lässt.
EINSTELLUNG DER TONHÖHE:
• Der Timer muss die aktuelle Uhrzeit anzeigen.
• Drücken Sie die linke Taste 4. Nun können Sie unter drei möglichen Tonhöhen wählen.
• Die eingestellte Tonhöhe wird bis zur nächsten Änderung gespeichert, bei Unterbrechung der
Stromzufuhr kehrt die Einstellung automatisch zum höchsten Ton zurück.
Warten Sie nach jeder Änderung bitte 5 Sekunden lang, bis die Änderungen
gespeichert sind.
HINWEIS:
ACHTUNG
Page 12

12
AUSZIEHBARE SCHIENEN
Beachten Sie bei der Reinigung und Pflege bitte folgende Grundsätze:
• Stellen Sie alle Knöpfe in Position 0.
• Auch der Hauptschalter muss sich in Position 0 befinden.
• Warten Sie, bis die Kochmulde abkühlt ist.
GLASKERAMIKOBERFLÄCHE
Reinigen Sie die Oberfläche der Kochmulde mit einem feuchten Lappen oder einem Schwamm und reiben
Sie sie trocken. Bei stärkerer Verunreinigung verwenden Sie bitte geeignete Reinigungsmittel. Reinigen Sie
die abgekühlte Kochmulde nach jedem Benutzen. Auch die kleinste Verunreinigung brennt bei der
nächsten Erwärmung an. Benützen Sie keine Reinigungsmittel mit Schleifwirkung, Stahlwolle,
Putzschwämme, Reinigungspaste und auch keine Schwämme oder Lappen, die Sie auch für andere
Zwecke benutzen, weil dadurch Kratzer auf der Glaskeramikplatte entstehen können. Verwenden Sie
ausschließlich spezielle Reinigungsmittel für Glaskeramik.
GLASKERAMIK-KOCHMULDE
Die Glaskeramik-Kochmulde ist optisch ansprechend und bedienungsfreundlich. Die folgenden Tipps und
Vorschläge können Ihnen helfen, Ihre Kochmulde lange in einem guten Zustand zu erhalten.
Hinweise zur Benutzung von Glaskeramik-Kochmulden:
• Verwenden Sie Kochgeschirr mit ebenem Boden, ohne Verunreinigungen, die Kratzer verursachen
können.
• Um zu vermeiden, dass der Überhitzungsschutz die Kochzone während des Kochvorgangs abschaltet,
sollte der Topfboden mindestens denselben Durchmesser wie die Kochzone haben.
• Bedecken Sie den Topf beim Kochen mit einem Topfdeckel und regeln Sie die Leistungszufuhr so, dass
Sie den Deckel nicht abnehmen müssen.
• Das Glaskeramik-Kochfeld darf nicht zum Heizen von Räumen verwendet werden.
• Entfernen Sie beim Kochen entstandene Verunreinigungen sofort von der Kochmulde und reinigen Sie
diese nach dem Kochen. Entfernen Sie zuckerhaltige Speisereste besonders sorgfältig, da diese bei
längerer Einwirkung die Struktur der Glaskeramik-Kochmulde beeinträchtigen.
• Glänzende Flecken entstehen durch die Verwendung von Aluminium-Geschirr oder von ungeeigneten
Reinigungsmitteln. Diese Flecken lassen sich selbst durch wiederholtes Reinigen nur mühsam entfernen.
HINWEIS:
REINIGUNG UND PFLEGE DES GERÄTS
Page 13

• Kratzer auf der Glaskeramik-Kochmulde können z. B. durch Sandkörner im Gemüse, Reste von
ungeeignetem Scheuermittel oder Scheuerschwämmchen entstehen.
• Wischen Sie die mit Lehm, Sand oder ähnlich scheuernden Mitteln verunreinigte Kochmulde vorsichtig
mit einem feuchten Lappen ab und reinigen Sie sie anschließend mit flüssigem Glaskeramikreiniger.
• Verwenden Sie keine Topfkratzer, Scheuerschwämmchen oder andere Reinigungsmittel mit rauer
Oberfläche. Ebenso raten wir von der Verwendung korrosiver Reinigungsmittel wie Backofenspray
oder Fleckenentferner ab.
• Das Kochgeschirr sollte während des Kochens den Rahmen der Glaskeramik-Kochmulde nicht
berühren und nicht auf den Rahmen gestellt werden.
Der Hersteller haftet nicht bei Schäden durch unsachgemäßen
Gebrauch von Kochgeschirr sowie durch mangelnde oder
unsachgemäße Pflege der Glaskeramik-Kochmulde.
GLÄNZENDE FLECKEN
Glänzende Flecken entstehen durch die Verwendung von Aluminium-Geschirr oder von ungeeigneten
Reinigungsmitteln. Diese Flecken lassen sich selbst durch wiederholtes Reinigen nur mühsam entfernen.
Verfärbungen auf der Glaskeramik-Kochmulde entstehen meistens durch angebrannte Speisereste. Die
Funktionsweise des Kochfeldes wird durch Flecken jedoch nicht beeinträchtigt, es handelt sich nicht um
Veränderungen am Material.
Eingebrannte zuckerhaltige Speisereste können Ihr Glaskeramikkochfeld irreparabel beschädigen
ABNUTZUNG DER GLASKERAMIKPLATTE
Die Verwendung von Scheuermitteln sowie anhaltendes Reiben der Topfböden auf der Glaskeramikfläche
können zur Abnutzung der Oberfläche führen. Dann bildet sich ein dunkler Fleck
REINIGEN DES OFENS
Reinigen Sie den Ofen mit Backofenreiniger. Feuchten Sie Verunreinigungen an, bearbeiten Sie sie mit
einer Bürste und wischen Sie anschließend mit einem Tuch nach. Verwenden Sie zum Entfernen von
angebrannten Resten keine spitzen Metallgegenstände.
Reinigen Sie die Backofenzubehörteile mit einem Schwamm und Reinigungsmittel oder geben Sie sie in die
Spülmaschine (Rost, Fettpfanne usw.).
AQUA CLEAN
Für die tägliche Reinigung des Backofens (nach jedem Gebrauch) empfehlen wir folgende Methode:
Lassen Sie den Backofen abkühlen. Drehen Sie den Funktionswahlschalter auf Position . Stellen Sie den
Thermostatknopf auf 50° C. Füllen Sie 0,4 l Wasser in die Fettpfanne und schieben Sie diese in die unterste
Einschubebene.
Die eingebrannten Speisereste weichen auf und lassen sich nach etwa 30 Minuten mit einem feuchten Tuch
abwischen
AUSWECHSELN DER BACKOFENBELEUCHTUNG
• Schalten Sie alle Knebel in Position 0 und trennen Sie das Gerät vom Netz, indem Sie den Stecker aus
der Steckdose ziehen oder den Hauptschalter ausschalten.
• Drehen Sie die Glasabdeckung der Glühlampe im Innenraum nach links heraus.
• Ersetzen Sie die defekte Glühlampe durch eine neue.
• Setzen Sie die Glasabdeckung wieder ein.
Für die Beleuchtung dürfen ausschließlich Lampen vom Typ T 300° C,
E 14, 230 V~, 25 W verwendet werden.
1. Glasabdeckung
2. Glühlampe
3. Anschluss
4. Rückwärtige Backofenwand
HINWEIS:
13
Page 14

14
REKLAMATIONEN
Sollte während der Garantiezeit eine Störung an Ihrem Gerät auftreten, so beheben Sie diese auf keinen Fall
selbst. Wenden Sie sich an den Händler, bei dem Sie das Gerät gekauft haben, an eine autorisierte
Kundendienststelle oder an eine in den Garantiebedingungen genannte Vertragsservicestelle. Beachten Sie für
Ihre Reklamation die Garantiebedingungen. Ohne Vorlage des Garantiescheins sind Garantieleistungen nicht
möglich.
WEITERVERWENDUNG UND
ENTSORGUNG DER VERPACKUNG
Karton, Verpackungspapier: - Abgabe an Sammelstellen - Entsorgung im Altpapiercontainer
Holzpaletten: - an der entsprechenden Stelle der Abfallentsorgung - andere Verwendung
Verpackungsfolien und PE-Tüten: - Entsorgung in Sammelcontainern
ENTSORGEN VON ALTGERÄTEN
Elektronikgeräten (Waste of Electrical and Electronic Equipment - WEEE) entsprechend gekennzeichnet,
welche die einheitlichen EU-Rahmenbedingungen für die Rücknahme und Wiederverwendung von Altgeräten
regelt.
Das Gerät enthält wertvolle Materialien, die weiter verwendet werden können.
INSTALLATION UND EINSTELLUNGEN
Die Installation ist den geltenden nationalen Vorschriften entsprechend auszuführen. Die
folgenden Installationsanweisungen müssen durch Fachpersonal vorgenommen werden.
ANSCHLUSS DES GERÄTS AN DAS STROMNETZ:
Die Installation ist den geltenden nationalen Vorschriften entsprechend auszuführen. Der Anschluss des
Geräts an das Stromnetz muss durch Fachpersonal vorgenommen werden. Vor das Gerät ist ein allpoliger
Trennschalter mit einer Kontaktöffnungsweite von mindestens 3 mm zu montieren. Es wird ein dreiphasiger
Anschluss mit Hilfe eines Netzkabels vom Typ H05RR-F5G-1,5 empfohlen, das Kabel ist wie in Abb.9
dargestellt vorzubereiten. Die Kabelenden müssen gegen Zerfasern gesichert befestigt werden. Für einen
einphasigen Anschluss verwenden Sie ein Netzkabel vom Typ H05RR-F3G-4, das Kabel ist wie in Abb. 5
dargestellt vorzubereiten. Für den Anschluss der Kabelenden unter den Schraubenköpfen im Klemmbrett
legen Sie das Kabel in das Klemmbrett ein und sichern es mit einer Klemme (Abb. 5). Dann schließen Sie den
Deckel des Klemmbrettes.
Für den Anschluss wird ein Kabel mit folgenden Eigenschaften empfohlen:
- Cu 3 x 4 mm2 min. bei Einphasenanschluss (Schutzschalter 35 - 38 A, je nach Art)
- Cu 5 x 1,5 mm2 min. bei Dreiphasenanschluss (Schutzschalter 3 x 16 A)
Page 15

15
Das Gerät muss, abgesehen vom täglichen Gebrauch, bei jedem Ein- und Ausbau ausgeschaltet und
vom Stromnetz getrennt werden
Um den einwandfreien Betrieb des Geräts zu gewährleisten, sind bei der Installation folgende
Vorgänge durchzuführen:
• Überprüfen Sie den elektrischen Anschluss.
• Vergewissern Sie sich, dass die Heizelemente sowie die Funktionswahl- und Reglerknöpfe einwandfrei
funktionieren.
• Führen Sie dem Kunden alle Gerätefunktionen vor und machen Sie ihn mit der Bedienung und Pflege des
Geräts vertraut.
WICHTIGER HINWEIS
Dieses Elektrogerät gehört seinem Schutzgrad gegen Elektrounfälle entsprechend der Klasse I an
und muss korrekt geerdet werden.
HINWEIS:
Page 16

16
INSTALLATIONSORT
Dieses Elektroküchengerät ist für den Gebrauch im
Haushalt konzipiert und kann ohne seitlichen Abstand
in eine Küchenzeile eingebaut werden (Mindestbreite
500 mm). Die angrenzenden Küchenschränke sollten
aus bis 100° C hitzebeständigem Material bestehen
oder mit einer Wärmeisolation geschützt werden.
Das Gerät darf nicht auf einen Sockel gestellt werden.
"X" = entspricht dem vom Hersteller empfohlenen
Mindestabstand von 650 mm zur Dunstabzugshaube.
NIVELLIERUNG DES GERÄTS
Das Gerät verfügt über 4 Stellschrauben zur
waagrechten Nivellierung oder Höhenregulierung der
Kochmulde.
GEHEN SIE WIE FOLGT VOR:
• Kippen Sie das Gerät auf die Seitenkante.
• Schrauben Sie die Kunststoffschrauben auf einer
Seite von unten in die vordere und hintere Öffnung der Querlatte.
• Kippen Sie das Gerät auf die andere Seite und schrauben Sie die Schrauben in die Öffnungen auf der
anderen Seite ein.
• Die Nivellierung und andere Einstellungen lassen sich mit dem mitgelieferten Schraubendreher
ausführen.
Die Montage der Stellschrauben kann entfallen, falls sich die Höhe und Ausrichtung des Geräts auch
ohne diese als zufriedenstellend erweisen.
Der Hersteller behält sich das Recht auf kleine Änderungen der Installationsanweisungen aufgrund
innovativer oder technologischer Änderungen am Gerät vor..
HINWEIS:
HINWEIS:
Page 17

17
Gartabelle - BACKOFEN
Speisen Funktion Vorheizen
Einschubebene
(von unten)
Temperatur
(°C)
Gardauer
(Minuten)
FLEISCH
Rinder-, Schweine- oder
Kalbsbraten (1 kg)
Ober- und Unterhitze X 2 180 - 210 70 - 90
Umluft - 2 170 - 190 70 - 90
Huhn, Kaninchen, Ente
(~1 kg)
Ober- und Unterhitze X 2 180 - 210 55 - 75
Umluft - 2 170 - 190 55 - 75
Hammelfleisch, Ziege,
Lamm (~1 kg)
Ober- und Unterhitze X 2 180 - 210 70 - 90
Umluft - 2 170 - 190 70 - 90
Gans (~2 kg)
Ober- und Unterhitze X 1 190 - 210 100 - 120
Umluft - 1 170 - 190 100 - 120
GANZE FISCHE (ab ~ 0,8 bis 1 kg)
Brasse, Forelle, Lachs
Ober- und Unterhitze X 2 170 - 180 45 - 55
Umluft - 2 160 - 170 45 - 55
FISCHFILETS (ab ~ 0,5 bis 0,7 kg)
Schwertfisch, Tunfisch,
Dorsch
Ober- und Unterhitze X 2 170 - 180 35 - 45
Umluft - 2 160 - 170 35 - 45
GEMÜSE (ab ~ 0,5 bis 0,7 kg)
Gefüllte Paprika
Ober- und Unterhitze X 2 160 - 170 40 - 50
Umluft - 2 150 - 160 40 - 50
Gefüllte Kartoffeln
Ober- und Unterhitze X 2 160 - 170 55 - 65
Umluft - 2 150 - 160 55 - 60
Bratkartoffeln
Ober- und Unterhitze X 2 200 - 210 55 - 65
Umluft - 2 190 - 200 50 - 60
KUCHEN usw.
Hefekuchen
(trockene Kuchen)
Ober- und Unterhitze X 2 150 - 170 35 - 45
Umluft - 2 150 - 160 30 - 40
Kuchen mit Füllung
(Käsekuchen)
Ober- und Unterhitze X 2 165 - 175 60 - 70
Umluft - 2 150 - 160 60 - 70
Mehrschichtige Torten
Ober- und Unterhitze X 2 170 - 180 35 - 45
Umluft - 2 160 - 170 35 - 45
Strudel
Ober- und Unterhitze X 2 170 - 180 35 - 45
Umluft - 2 160 - 170 30 - 40
Plätzchen
Ober- und Unterhitze X 2 160 - 170 15 - 25
Umluft - 2 150 - 160 15 - 20
Süße Kuchen
Ober- und Unterhitze X 2 160 - 170 30 - 40
Umluft - 2 150 - 160 25 - 35
Pikante Kuchen
(Quiche Lorraine)
Ober- und Unterhitze X 2 170 - 180 40 - 50
Umluft - 1 160 - 170 40 - 50
Lasagne
Ober- und Unterhitze X 2 170 - 180 40 - 50
Umluft - 2 160 - 170 40 - 50
Pizza
Ober- und Unterhitze X 2 220 - 250 15 - 20
Umluft - 2 200 - 225 15 - 20
Obstkuchen
(Ananas, Pfirsiche)
Ober- und Unterhitze X 2 160 - 170 30 - 40
Umluft - 2 160 - 170 30 - 40
Baiser
Ober- und Unterhitze X 2 80 - 100 60 - 90
Umluft - 2 50 - 75 60 - 90
Soufflé
Ober- und Unterhitze X 2 160 - 180 55 - 65
Umluft - 2 150 - 160 50 - 60
Hinweis: Diese Gartemperaturen und -zeiten sind lediglich Richtwerte.
Page 18

18
Gartabelle - GRILL
Speisen Funktion Vorheizen
Einschubebene
(von unten)
Temperatur
(°C)
Gardauer
(Minuten)
FLEISCH
Rostbraten Grill X 3 Maximum 20 - 30
Schweinekoteletts
Grill X 3 Maximum 15 - 20
Würstchen Grill X 3 Maximum 20 - 30
Fisch
Grill X 3 Maximum 15 - 25
Hähnchenschlegel Grill X 3 Maximum 20 - 30
Kebab
Grill X 3 Maximum 20 - 30
Schweinerippchen Grill X 3 Maximum 30 - 40
Hähnchenviertel
Grill X 3 Maximum 40 - 50
Hinweis: Diese Gartemperaturen und -zeiten sind lediglich Richtwerte.
TECHNISCHE DATEN
KOCHMULDE
PCCF 30201050 W
PCCF 30201050 X
PCCF 50201250 W
PCCF 50201250 X
PCCF 80211250 W
PCCF 80211250 X
Abmessungen Höhe / Breite / Tiefe 850 / 500 / 605 850 / 500 / 605 850 / 500 / 605
Kochmulde - Elektrische Kochzonen
Links hinten Ø 145 mm (kW) 1,2 1,2 1,2
Links vorne Ø 180/120 mm (kW)
1,7 1,7 / 0,7 1,7 / 0,7
Rechts hinten Ø 145 / 250 mm (kW)
1,7 2,0 / 1,2 2,0 / 1,2
Rechts vorne Ø 145 mm (kW)
1,2 1,2 1,2
Backofen
Oberes Heizelement (kW)
0,75 0,75 0,75
Unteres Heizelement (kW)
1,10 1,10 1,10
Grill-Heizelement (kW)
1,85 1,85 1,85
Kreisförmiges Heizelement (kW)
- - 2,00
Umluftgebläse (W)
- 30 (35) 30 (35)
Beleuchtung (W)
25 25 25
Min. / Max. Backofentemperatur
50 / 250° C 50 / 250° C 50 / 250° C
Elektrische Spannung
230 / 400 V ~ 230 / 400 V ~ 230 / 400 V ~
Gesamtleistungsbedarf (kW)
7,7 8,1 9,3
ZUBEHÖR
Rost + + +
Fettpfanne + + +
Backblech + + +
Schaber + + +
Ausziehbare Führungsschienen +
Page 19
19
INFORMATIONSBLATT
Modell
PCCF 30201050 W
PCCF 30201050 X
PCCF 50201250 W
PCCF 50201250 X
PCCF 80211250 W
PCCF 80211250 X
A - sparsamer
B
C
D
E
F
G - weniger sparsam
A A A
Energieverbrauch (kW/h)
0,79 0,79
Backdauer bei Normallast (Min.)
52,3 53,1
Energieverbrauch (kW/h)
079 0,79
Backdauer bei Normallast (Min.)
47 44,3
Nutzvolumen des Backofens
49 45 42
Nutzvolumen
KLEIN
MITTEL
GROSS
Geräuschpegel (dB)
46 46
Min. Energieverbrauch (Standby) (W)
Fläche größtes Backblech (cm2)
1230 1230 1230
Page 20

20
Dear customer,
the appliance you have purchased belongs to our new range of electric cookers. We hope this product will
serve you well for many years to come. Please read the user instructions carefully and operate this
product according to instructions.
IMPORTANT INFORMATION,
INSTRUCTIONS AND
RECOMMENDATIONS
• Check that the power supply voltage indicated on the appliance data plate corresponds to the
domestic supply voltage.
• The cooker must be connected to the mains in accordance with the connection diagram.
• Installation of the appliance, as well as any adjustments, repairs or alterations, must be carried out by a
qualified technician (see warranty).
• The above operations must be detailed on the appliance’s warranty document.
• The appliance must be connected to the electricity supply by means of an all-pole disconnect switch
(hereinafter referred to as “main switch”) with a minimum contact gap of 3 mm, fitted upline of the
appliance.
• The cooker is designed solely for cooking and heating foodstuffs. It must not be used for any other
purpose such as heating rooms, as this could overload the cooker and easily result in damage. Any
faults deriving from improper use of the appliance will not be covered by the warranty.
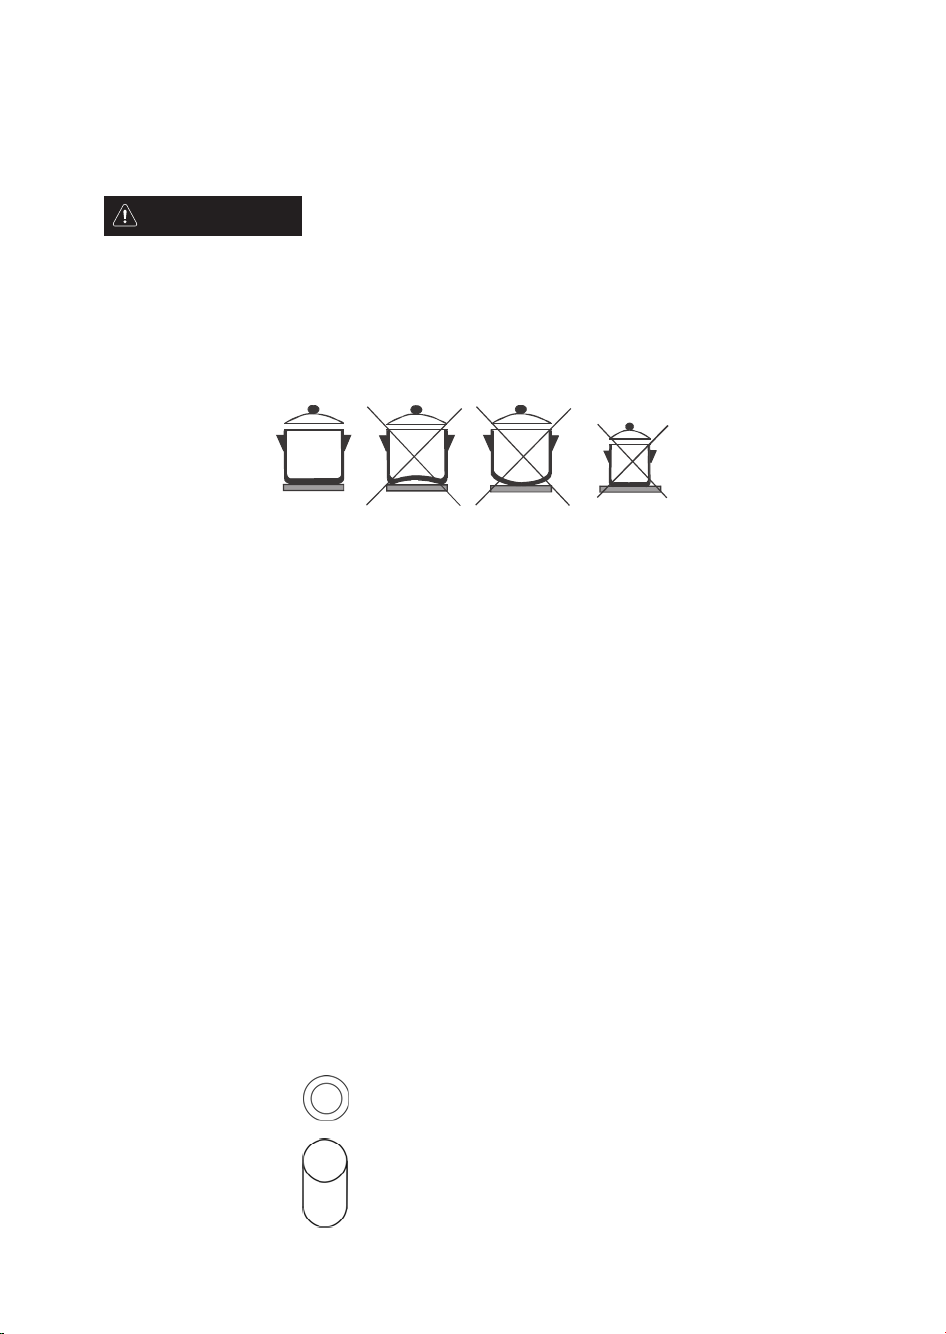
• Do not close the lid while the hotplates are still hot.
• Do not keep any flammable materials near the hotplates, the oven heating elements or the storage
area of the cooker.
• Make sure that the power supply cables of other appliances cannot come into contact with the
cooktop or other hot parts of the cooker.
• Make sure that all switches are switched off when the cooker is not in use.
• We recommend having the appliance serviced every two years by a qualified technician in order to
check that it is in perfect working order. This maintenance can prevent faults and malfunctions and
prolong the working life of your cooker.
• Before any cleaning or maintenance operation, switch the appliance off at the mains.
• In the event of any electrical fault, do not attempt to repair the appliance yourself: disconnect it from
the power supply and contact a fully qualified technician for the repair.
• The manufacturer declines any liability for injury or damage resulting from failure to observe the
instructions and recommendations provided in this user instructions handbook.
• Do not use any cooking utensils or accessories which might scratch or damage the surface of the
appliance.
• Do not use steam cleaners to clean the cooker.
Page 21

21
1. Control knob for the front left cooking zone
2. Control knob for the rear left cooking zone
3. Control knob for the rear right cooking zone
4. Control knob for the front right cooking zone
5. Oven thermostat knob
6. Oven function knob
7. Thermostat indicator light
8. "Power ON" indicator light
9. Digital timer
10. Digital timer control buttons
BEFORE INITIAL USE
Before using the appliance for the first time, remove all packaging materials and protection pieces from
the cooker.
Various parts and components of the packaging are recyclable. Disposal must be carried out in accordance
with national regulations governing waste disposal.
Before using it for the first time, clean the cooker and all the accessories thoroughly.
Once all the surfaces are dry, switch on the main switch and follow the instructions for use.
It is prohibited to clean or remove any parts not expressly mentioned in the chapter on cleaning.
OVEN
Turn the function knob to the top and bottom heating position. Set the temperature selector to 250°C and
leave the oven on with the door shut for 1 hour.
Ensure the room has sufficient ventilation. This process will eliminate the smell of protective grease and
insulating materials before cooking.
CONTROL PANEL
Page 22
22
USING THE COOKTOP
• This appliance must be used by adults only and in compliance with the user handbook. Do not leave
children unsupervised in the room where the appliance is installed.
• This electric cooker should not be left unattended when in use.
• The appliance is not intended for use by children or persons with restricted physical, sensory or mental
abilities or without experience and knowledge of the appliance, unless they are under the supervision
or instruction of a person responsible for their safety.
• Keep children away from the appliance to ensure that they do not play with it.
GLASS CERAMIC COOKTOP WITH COOKING ZONES
• The cooking zones on a standard cooktop have 6 available power settings.
The highest power setting corresponds to number "6"; the lowest setting is number "1".
• Your electric cooktop can be used for cooking, frying, etc. Use flat-bottomed pots and pans only.
A power regulator located below the glass ceramic cooktop prevents overheating of the appliance.
A residual heat indicator positioned at the front of the glass ceramic cooktop lights up to warn that the
cooking zone is hot.
• Even when the cooktop is switched off, the residual heat can be used to keep food warm. The residual
heat indicator only switches off once the temperature falls to within the safety limit, meaning there is
no risk of burns.
• "Hi-light" cooktops and double cooktops have stepless power adjustment with a power regulator.
DUAL CIRCUIT COOKTOP
The central part of the cooktop Ø 120mm is controlled by turning the regulator knob clockwise. The
power can be set from 0 up to 700W.
Turning the knob clockwise to the maximum power setting switches on the Ø 180 mm cooking zone. This
cooking zone can operate at a maximum power of 1700W depending on the selected power setting: from
1 (minimum) up to 9 (maximum). To switch off both parts of the cooking zone, turn the knob to 0. A
power regulator located below the glass ceramic cooktop prevents overheating of the appliance. A
residual heat indicator positioned at the front of the glass ceramic cooktop lights up to warn that the
cooking zone is hot.
Even when the cooktop is switched off, the residual heat can be used to keep food warm. The residual
heat indicator only switches off once the temperature falls to within the safety limit, meaning there is no
risk of burns.
WARNINGS:
Ø 180 / 120 mm - 1700 / 700 kW
Ø 145 / 250 mm - 2000 / 1200 kW
Page 23

23
TIPS FOR USING GLASS CERAMIC COOKTOPS
• Use flat-bottomed pots without any rough parts which might scratch the glass ceramic surface.
• Use pots with a diameter which is proportionate in size to that of the cooking zones so that the power
regulator does not switch off the cooking zones because of overheating.
• When cooking, cover pots with lids whenever possible, adjusting the temperature so that you do not
need to adjust or remove pot lids.
• Do not use the glass ceramic cooktop for room heating.
• Clean the cooktop immediately after cooking, removing any food residue. Use the scraper to remove
any foods with a high sugar content (jam, jelly, etc.) immediately, as they can leave permanent marks on
the cooktop surface.
• Shiny metal marks may appear on the cooktop with the use of aluminium cooking receptacles or
unsuitable cleaning products. These can be removed with repeated cleaning.
• Scratches on the hob can be caused by grains of sand from vegetables which have not been washed
properly, or by abrasive cleaning powder or scourers.
• If the cooktop is dirty with soil, sand or similar abrasive substances, wipe it clean gently with a soft
cloth and a liquid detergent suitable for use on glass ceramic cooktops.
• Do not use metal scourers or other abrasive sponges or detergents. Also, avoid the use of corrosive
cleaning products such as oven sprays or spot removers.
• During cooking, make sure the edges of hot pots do not rest on or touch the edges of the glass
ceramic cooktop.
OVEN
THE OVEN CHAMBER
The oven chamber comprises flat oven walls fitted with removable side runners designed to accommodate
oven accessories (wire shelf, baking tray). The oven features an upper heating element with grill and a
lower heating element located below the floor of the oven. On the rear wall of the oven, behind a
distribution grille, is a circular heating element and fan.
OPERATING THE OVEN
Turn the oven function selector knob to the desired function. The knob can be turned in both directions.
To adjust the temperature, turn the temperature selector knob (clockwise to increase the temperature,
anti-clockwise to lower the temperature). The available temperature range is 50°C - 250°C.
Forcibly turning the temperature selector past the 0 position will damage the thermostat!
• The maximum load permitted on the baking tray inserted on the side runners is 3 kg. The wire shelf
with a pan or oven tray has a maximum load of 7kg.
• The baking trays and drip trays are not designed for long-term storage of foodstuffs (over 48 hours).
To keep food for 48 hours or more, place it in a suitable storage container.
NOTE:
Page 24
24
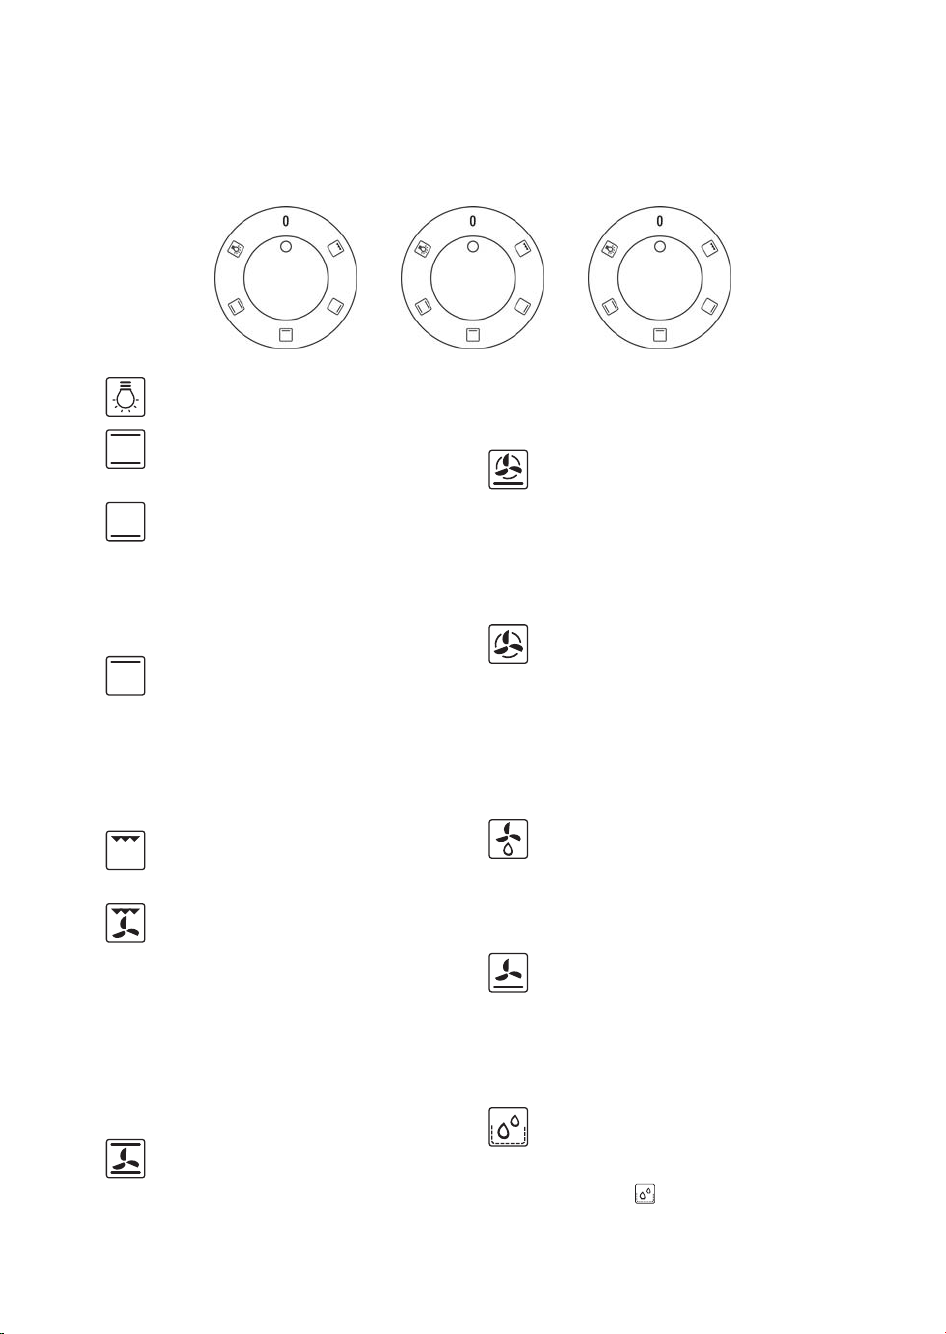
The oven light remains on for the duration
of all functions.
Conventional oven heating with the top and
bottom elements. The temperature
selector can be set anywhere between
50°C and 250° C.
Oven heating with the bottom element
only. Heat is circulated by means of natural
convection. The temperature selector can
be set anywhere between 50°C and 250°C.
Tip: This function is ideal for completing
the cooking of dishes which require more
heat from below.
Oven heating with the top element only.
Heat is circulated by means of natural
convection. The temperature selector can
be set anywhere between 50°C and 250°C.
Tip: This function is ideal for completing
the cooking of dishes which require more
heat from above and for browning.
Grill with infrared radiation. The
temperature selector must be turned to
the maximum setting.
Grill + fan. Due to the circulation of hot
air, the temperature is higher in the top
part of the oven (above the wire shelf or
drip tray). The temperature selector can be
set from 150°C to 250 °C.
Tip: This function is ideal for grilling or
cooking large pieces of meat which require
higher temperatures. The oven door must
be kept closed.
Top and bottom heating elements + fan.
The oven is heated by the top and bottom
elements and the air is circulated uniformly
throughout the chamber by the fan.
The temperature selector can be set
anywhere from 50°C - 250° C.
Tip: This function is ideal for cooking two
dishes which require the same heat from
above and below on two separate shelves
at the same time.
Bottom heating element + circular heating
element + fan. The temperature can be set
with the temperature selector.
Tip: This function is ideal for preheating
the oven before cooking. Once the set
temperature has been reached, select the
desired oven function.
Circular heating element + fan. The fanassisted air circulation creates a uniform
temperature throughout the oven. The
temperature selector can be set anywhere
from 50°C - 250° C.
Tip: This function is ideal for cooking
dishes on two separate shelves at the same
time (for baking bread or bulky goods or
for a large volume of food).
This function is designed for very delicate
drying or defrosting of food.
Tip: This function is ideal for defrosting
pre-cooked food or ready meals before
final cooking.
Lower heating element + fan. The heat
from the bottom element is distributed by
the fan, creating a uniform temperature
throughout the oven. The temperature
selector can be set anywhere from 50°C 250° C.
Lower heating element + Aqua clean. Aqua
Clean can be used for routine oven
cleaning. For details on cleaning, see the
section on "Cleaning and Maintenance"
(see AQUA Clean - section "Cleaning")
OVEN FUNCTIONS
Page 25

25
TIPS AND ADVICE
For your guidance, below are some recommended temperatures for the preparation of typical dishes
50-70° C Drying
80-100° C Sterilizing
130-150° C Stewing
180-220° C Baking of leavened goods
220-250° C Roasting meat
• The temperature and cooking function used for each type of food and dish should be adapted to suit
individual preferences.
• In some cases, the oven must be preheated before food is inserted. The thermostat indicator light
remains lit during preheating, only switching off once the set temperature is reached.
• Place the wire shelf with the baking tray or drip tray preferably on the second level from the bottom.
• Avoid opening the oven door during cooking, as door opening has a negative impact on the
temperature regime, meaning cooking time may have to be prolonged and food may be burnt.
GRILLING ON THE WIRE SHELF
• Arrange the food on the wire shelf.
• Insert the wire shelf in the runners on the side walls of the oven.
• Insert the baking tray below the wire shelf to catch any drips or
spatters, or else place the drip tray on the bottom of the oven.
• Grill food with the oven door closed.
During grilling, accessible parts (oven door, etc.) may become very hot, so
make sure that children are supervised and kept well away from the oven.
ATTENTION:
Page 26

26
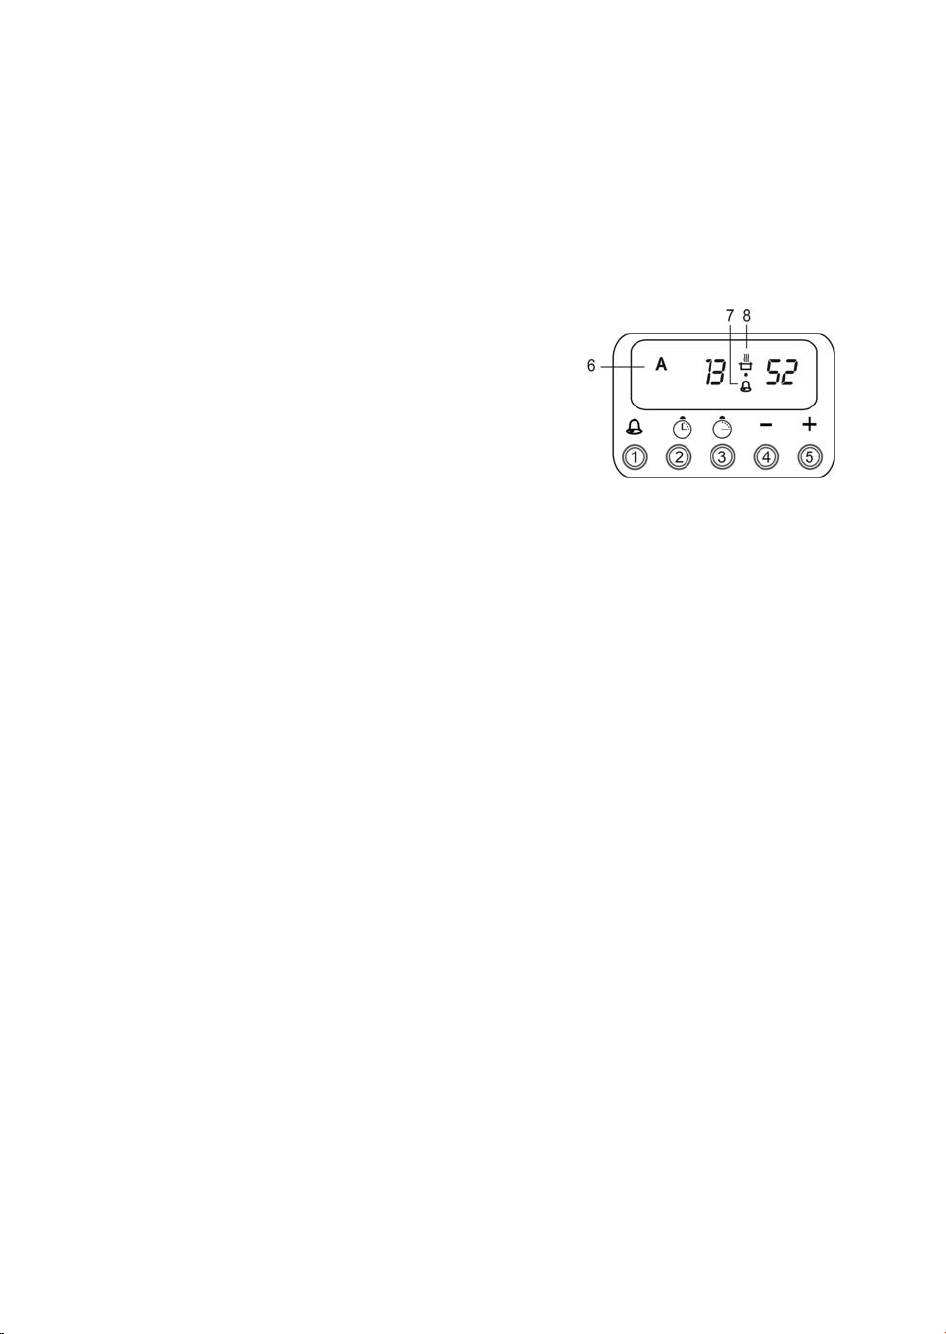
The digital timer is designed to switch the oven off once the set cooking time has elapsed. A symbol (8 pots) lights up in the centre of the display to confirm activation or switching off of the timer. The time
display remains lit throughout.
The digital timer is mains powered only, so in the event of a power cut, when power is restored the timer
remains switched off (the digits 0.00 + symbol 6 flash) and the time will have to be set again.
1. Button for setting the acoustic signal
2. Button for setting cooking time
3. Button for setting end of cooking time
4. Decrease button (-)
5. Increase button (+)
6. Symbol “A” – remains lit from start to end of cooking. At the
end of cooking, the symbol “A” flashes.
7. Timer symbol
8. Symbol lights up when the oven is in use.
THE OVEN HAS TWO OPERATING MODES
• Without the use of the digital timer (in this case the pot symbol (8) should be lit: if it is not, press
buttons 2 and 3 at the same time, otherwise the oven will not switch on). In addition, the oven is
operated with two control knobs - the temperature selector and the oven function selector.
• With the help of the digital timer (for timer use, see paragraph below). The temperature and cooking
function must be selected using the oven control knobs.
SETTING THE TIME FOR THE DIGITAL TIMER
When the appliance is connected to the mains, the symbol 0.00 flashes on the display. Press buttons 2 and
3 at the same time to set the correct time of day (the digits 0.00 and the symbol 8 light up). At this point,
use buttons 4 and 5 to set the correct time on the display.
MANUAL OVEN USE
If you wish to use the oven manually without setting the timer, the symbol 6 must not be lit.
Check the timer clock: if the symbol 6 is lit, press buttons 4 and 5 at the same time. Only once the
symbol 6 has switched off can the oven be used manually without the timer.
The digital timer lets you programme oven operation, choosing one of two modes:
SEMI-AUTOMATIC
- the oven switches on immediately and switches off automatically after the set cooking time has elapsed
AUTOMATIC
- the oven is programmed to switch on and off automatically.
SEMIAUTOMATIC FUNCTION
This function lets you set the oven cooking time (duration). The maximum programmable cooking time is
23 hours and 59 minutes!
SEMIAUTOMATIC FUNCTION
Example for easier understanding:
The required cooking time is 1 hour and 20 minutes (1.20).
• Setting duration: Press button 2 (0.00 and the symbol 8 light up on the display) then press button 5
until the value 1.20 is shown. During setting the symbol 6 also lights up. After 5 seconds the time of
day and the symbol 6 light up.
Switch on the oven: using the control knobs, select the desired oven function and temperature.
The oven switches on immediately (cooking starts); the symbols 6 and 8 remains lit during cooking.
USING THE OVEN WITH THE DIGITAL
TIMER
Page 27

27
After the set cooking time has elapsed
- 1 hour and 20 minutes in our example
- the oven switches off automatically (cooking is finished)
- an acoustic signal sounds (to mute it, press either of buttons 1, 2 or 3. Otherwise the acoustic signal
switches off automatically after 2 minutes.
- the symbol 8 switches off
- the symbol 6 flashes.
Switch off the oven and press buttons 2 and 3 at the same time to switch off the symbol 6.
The oven is ready for manual use when the symbol 6 is no longer displayed.
AUTOMATIC FUNCTION
This programming mode sets both oven cooking time (duration of operation) and the cooking end time
(end of operation).
The maximum programmable cooking time is 23 hours and 59 minutes (end of cooking time = current
time + 23 hours and 59 minutes).
The oven will only work automatically if switched on with the correct
procedure and buttons!
AUTOMATIC FUNCTION
Example for easier understanding:
The required cooking time is 1 hour and 20 minutes (1.20); the end of cooking time is 13.52 (on 24 hour
clock, or 01.52 p.m.)
Check that the clock is set to the correct time of day.
1. Setting duration:
Press button 2 (the display shows 0.00 and the symbol 8), then press button 5 until the value 1.20 is
displayed. (The symbol 6 is lit during setting.) After 5 seconds the time of day and the symbols 6 and 8
appear on the display.
2. Setting end of cooking time (switch-off):
Press button 3 – the display shows the soonest possible switch-off time (current time + set cooking
time). Using buttons 4 and 5, set 13.52 - the desired end of cooking time, when the oven must switch
off. 5 seconds after setting, the display shows the time of day + the symbol 6. The symbol 8 switches
off (and switches on again when the oven switches on).
3. Switch on the oven: using the control knobs, select the desired oven function and temperature.
4. The oven will switch on automatically (in our example, at 12.32) (start of cooking), and will remain on
for 1 hour and 20 minutes, switching off automatically at 13.52. The symbol 8 will remain lit
throughout cooking.
5. When the oven switches off:
- an acoustic signal sounds (to mute it, press either of buttons 1, 2 or 3. Otherwise the acoustic signal
switches off automatically after 2 minutes,
- the symbol 8 switches off
- the symbol 6 flashes.
Switch off the oven press buttons 2 and 3 at the same time to switch off the symbol 6. The oven is ready
for manual use when the symbol 6 is no longer displayed.
MINUTE MINDER
The minute minder is another function of the digital programmer, which can be activated by pressing
button 1. The display will show 0.00. Using buttons 4 and 5, set the required time. The symbol 7 lights up
on the display. The set time can be checked at any moment by simply pressing button 1. Once the set
time has elapsed, an acoustic signal sounds. To mute the acoustic signal, press either of buttons 1, 2 or 3
.
ADJUSTING THE VOLUME OF THE ACOUSTIC SIGNAL:
• The digital timer must be set with the clock at the correct time of day
• Press the left button 4 to select one of three possible volume levels.
• This selected volume level is stored until further modification, or until there is an interruption in the
power supply, upon which it reverts to the highest volume level.
After making any changes to settings, wait 5 seconds for the new selection
to be stored.
NOTE:
ATTENTION!
Page 28

28
TELESCOPIC PULL-OUT RUNNERS
Observe the following instructions when carrying out cooker cleaning or maintenance
operations:
• Set all knobs to OFF.
• Turn the appliance off at the main switch.
• Wait until the cooker is cool.
GLASS CERAMIC COOKTOP
After each use, allow the cooktop to cool before cleaning with a damp cloth and drying thoroughly. Use
recommended detergents to remove more stubborn stains and food residue, which otherwise will
become baked onto the surface the next time the cooktop is used. Do not use abrasive detergents,
sponges or scourers, which will scratch the cooktop. For cleaning, use only proprietary detergents
specifically formulated for glass ceramic hobs.
GLASS CERAMIC COOKTOP
The glass ceramic cooktop offers stylish design and is easy to operate. The following tips and
recommendations will help you to get the best out of your cooktop and keep in it tip-top condition for
many years to come.
Advice for using glass ceramic cooktops:
• Use flat-bottomed pots without any rough parts which might scratch the glass ceramic surface.
• Use pots with a diameter which is proportionate in size to that of the cooking zones so that the power
regulator does not switch off the cooking zones because of overheating.
• When cooking, cover pots with lids whenever possible, adjusting the temperature so that you do not
need to adjust or remove pot lids.
• Do not use the glass ceramic cooktop for room heating.
• Clean the cooktop immediately after cooking, removing any food residue. Use the scraper to remove
any foods with a high sugar content (jam, jelly, etc.) immediately, as they can leave permanent marks on
the cooktop surfaces.
• Shiny metal marks may appear on the cooktop with the use of aluminium cooking receptacles or
unsuitable cleaning products. These can be removed with repeated cleaning.
WARNINGS
CLEANING AND MAINTENANCE
OF THE COOKER
Page 29

• Scratches on the hob can be caused by grains of sand from vegetables which have not been washed
properly, or by abrasive cleaning powder or scourers.
• If the cooktop is dirty with soil, sand or similar abrasive substances, wipe it clean gently with a soft
cloth and a liquid detergent suitable for use on glass ceramic cooktops.
• Do not use metal scourers or other abrasive sponges or detergents. Also, avoid the use of corrosive
cleaning products such as oven sprays or spot removers.
• During cooking, make sure the edges of hot pots do not rest on or touch the edges of the glass
ceramic cooktop.
The manufacturer declines all liability for defects of glass
ceramic cooktops resulting from use of unsuitable cooking
receptacles or utensils or from inadequate or improper
maintenance.
SHINY METAL STAINS
Shiny metal marks may appear on the cooktop with the use of aluminium cooking receptacles or
unsuitable cleaning products. These can be removed with repeated cleaning. Changes in the colour of the
glass ceramic cooktop are generally caused by burnt-on food residues. These have no impact on cooktop
operation and are not indicative of any functional defect.
Marks caused by foodstuffs with a high sugar content which are not promptly removed can leave the glass
ceramic cooktop permanently damaged.
SURFACE SCRATCHES
The surface of the glass ceramic cooktop can be scratched by abrasive cleaning products or pots with
rough bottoms. These can leave dark marks on the cooktop surface.
OVEN
Clean the oven chamber with a damp sponge and a little detergent or proprietary oven cleaner. Use the
damp sponge to soften the baked-on residue, then scrub with a washing-up brush and wipe clean with a
soft cloth. Do not attempt to remove stubborn residue by using sharp or pointed metal utensils. Wash the
oven accessories with a sponge and detergent or place them in the dishwasher (wire shelf, drip tray, etc.).
AQUA CLEAN
We recommend the following procedure for routine cleaning of the oven (after each use): Once the oven
is cool, turn the oven function knob to . Set the thermostat knob to 50° C. Pour 0.4 l of water into the
drip tray and insert it on the lowest shelf. After 30 minutes, any food residue on the enamel surfaces of
the oven will be soft enough to wipe away with a damp cloth
REPLACING THE OVEN LAMP
• Turn all the control knobs to "off" and unplug the appliance or switch off at the main switch.
• Unscrew the glass lamp cover in an anti-clockwise direction.
• Unscrew the burnt-out bulb and replace it with a new one.
• Refit the glass lamp cover.
Replace the oven lamp with a T300°C, E14, 230-240 V, 25 W bulb only.
1. Glass cover
2. Lamp
3. Lamp holder
4. Oven rear wall
NOTE:
29
Page 30

30
REPORTING FAULTS
Should the appliance develop a malfunction or defect of any kind during the warranty period, do not attempt
to repair it yourself: report the problem to the shop where you purchased the appliance, or to an authorized
service centre or after-sales service indicated on the warranty document. When reporting the defect, follow
all instructions given on the warranty document. Please note that you must be in possession of a completed
warranty document in order to make a claim, which will otherwise be rejected.
RECYCLING AND DISPOSAL OF
PACKAGING MATERIALS
Cardboard & packing paper: – take to collection centre for recyclable waste, dispose of in paper & card
recycling bins.
Wooden pallets: – take to a designated recycling centre.
Packaging film and PE bags: – dispose in plastic materials recycling bins.
APPLIANCE SCRAPPING
This appliance is marked in compliance with European Directive 2002/96/EC on Waste Electrical and
Electronic Equipment - WEEE. This directive establishes a single European framework (CE) for the collection
and recycling of used electrical and electronic appliances.
The appliance contains valuable materials which can be recycled.
INSTRUCTIONS FOR INSTALLATION AND
ADJUSTMENT
The appliance must be installed by a qualified technician and in compliance with standards and
regulations in force in the country of installation. The following installation and adjustment
instructions must be observed by the installer.
CONNECTING THE APPLIANCE TO THE MAINS:
The appliance must be connected to the electricity supply by means of an all-pole disconnect switch (hereinafter
referred to as “main switch”) with a minimum contact gap of 3 mm, fitted upline of the appliance. The
manufacturer recommends the use of a three-phase mains connection utilizing an H05RR-1.5 type cable, the
conductors arranged as shown in figure 9. Gently twist the ends of the conductors before inserting in the
terminal blocks in order to prevent fraying. For single-phase connection use an H05RR-F3G-4 type cable,
inserting the conductors in the terminal blocks as shown in figure 5. To secure the conductors beneath the
terminal board screws, insert the wires in the terminal block and tighten the cable clamp provided (see figure 5)
Finally, close the terminal block cover.
For electrical connection of the appliance, use the following connection cable:
- Cu 3 x 4 mm2 as minimum for single-phase connection (circuit breaker 35 - 38 A depending on type)
- Cu 5 x 1.5 mm2 as minimum - for three-phase connection (circuit breaker 3x16A)
Page 31

31
Besides everyday use, any assembly or disassembly operations on the appliance must be carried out with the
appliance switched off and unplugged from the mains.
During appliance installation, it is essential to observe the following steps in order to ensure
correct functioning:
• Ensure the appliance is properly connected to the mains.
• Check the heating elements and all the appliance controls are in proper working order.
Instruct the customer on the use of the appliance and all its functions, as well as on appliance maintenance.
IMPORTANT WARNING
Your electric cooker is a Class I appliance on the basis of the degree of protection afforded against
electric shock and it must be provided with a suitable earth connection.
NOTE:
Page 32

32
POSITIONING
Your electric cooker is designed for standard household
use. The cooker can be installed in housing units
without gaps at the sides (minimum width 500 mm).
Adjacent units must be heat-resistant to 100°C or
covered with heat-insulating panels.
The cooker must not be installed on a plinth. The
manufacturer recommends that after installation, there
be a minimum distance of 650 mm between the cooker
and any cooker hood.
LEVELLING THE APPLIANCE
The cooker is equipped with 4 adjustable screws which
enable the cooktop to be fixed at the desired height or
the appliance to be levelled.
PROCEDURE:
• Remove any oven accessories;
• Tilt the cooker onto its side;
• Screw the plastic screws into the front and rear
holes on the underside of the bottom crossbar on one side;
• Tilt the cooker onto the opposite side and insert the screws into the openings there;
• Level the cooker using a screwdriver, gaining access from the storage area, or using an Allen key.
Levelling screws need not be fitted if the height of the appliance is acceptable and it is also level.
The manufacturer reserves the right to make minor modifications to the instructions due to
technological or innovative changes to the appliance, which do not impact the functioning of the
latter.
NOTE:
NOTE:
Page 33

33
Cooking tables - OVEN
Food II Function Preheating
Runner position
(from bottom)
Temperature
(°C)
Cooking time
(minutes)
MEAT
Roast beef, pork, veal (1kg)
Conventional X 2 180 - 210 70 - 90
Fan - 2 170 - 190 70 - 90
Chicken, rabbit, duck
(~1kg)
Conventional X 2 180 - 210 55 - 75
Fan - 2 170 - 190 55 - 75
Mutton, goat, lamb (~1kg)
Conventional X 2 180 - 210 70 - 90
Fan - 2 170 - 190 70 - 90
Goose (~2kg)
Conventional X 1 190 - 210 100 - 120
Fan - 1 170 - 190 100 - 120
WHOLE FISH (from ~ 0.8 to 1kg)
Gilthead, trout, salmon
Conventional X 2 170 - 180 45 - 55
Fan - 2 160 - 170 45 - 55
FISH FILLETS (from ~ 0.5 to 0.7kg)
Swordfish, tuna, cod
Conventional X 2 170 - 180 35 - 45
Fan - 2 160 - 170 35 - 45
VEGETABLES (from ~ 0.5 to 0.7kg)
Stuffed peppers
Conventional X 2 160 - 170 40 - 50
Fan - 2 150 - 160 40 - 50
Stuffed tomatoes
Conventional X 2 160 - 170 55 - 65
Fan - 2 150 - 160 55 - 60
Roast potatoes
Conventional X 2 200 - 210 55 - 65
Fan - 2 190 - 200 50 - 60
CAKES etc.
Sponge cake
(Angel food cake)
Conventional X 2 150 - 170 35 - 45
Fan - 2 150 - 160 30 - 40
Cake with filling (cheese)
Conventional X 2 165 - 175 60 - 70
Fan - 2 150 - 160 60 - 70
Large jam tart
Conventional X 2 170 - 180 35 - 45
Fan - 2 160 - 170 35 - 45
Strudel
Conventional X 2 170 - 180 35 - 45
Fan - 2 160 - 170 30 - 40
Biscuits
Conventional X 2 160 - 170 15 - 25
Fan - 2 150 - 160 15 - 20
Choux pastry
Conventional X 2 160 - 170 30 - 40
Fan - 2 150 - 160 25 - 35
Savoury pies
(Quiche Lorraine)
Conventional X 2 170 - 180 40 - 50
Fan - 1 160 - 170 40 - 50
Lasagne
Conventional X 2 170 - 180 40 - 50
Fan - 2 160 - 170 40 - 50
Pizza
Conventional X 2 220 - 250 15 - 20
Fan - 2 200 - 225 15 - 20
Filled pies (pineapple, peach)
Conventional X 2 160 - 170 30 - 40
Fan - 2 160 - 170 30 - 40
Meringues
Conventional X 2 80 - 100 60 - 90
Fan - 2 50 - 75 60 - 90
Soufflé
Conventional X 2 160 - 180 55 - 65
Fan - 2 150 - 160 50 - 60
Note: Cooking temperatures and times are merely for guidance
Page 34

34
Cooking tables - GRILL
Type of food Function
Preheating
(5 minutes)
Runner position
(from bottom)
Temperature
(°C)
Cooking time
(minutes)
MEAT
Rib eye steaks Grill X 3 Maximum 20 - 30
Pork chops
Grill X 3 Maximum 15 - 20
Sausage Grill X 3 Maximum 20 - 30
Fish
Grill X 3 Maximum 15 - 25
Chicken thighs Grill X 3 Maximum 20 - 30
Kebabs
Grill X 3 Maximum 20 - 30
Spare ribs Grill X 3 Maximum 30 - 40
1/4 chicken
Grill X 3 Maximum 40 - 50
Note: Cooking temperatures and times are merely for guidance
TECHNICAL DATA
ELECTRIC COOKER
PCCF 30201050 W
PCCF 30201050 X
PCCF 50201250 W
PCCF 50201250 X
PCCF 80211250 W
PCCF 80211250 X
Dimensions: Height / Depth / Weight (mm) 850 / 500 / 605 850 / 500 / 605 850 / 500 / 605
Cooktop - Electric cooking zones
Back left Ø 145 mm (kW) 1,2 1,2 1,2
Front left Ø 180/120 mm (kW)
1,7 1,7 / 0,7 1,7 / 0,7
Back right Ø 145 / 250 mm (kW)
1,7 2,0 / 1,2 2,0 / 1,2
Front right Ø 145 mm (kW)
1,2 1,2 1,2
Oven
Top heating element (kW)
0,75 0,75 0,75
Bottom heating element (kW)
1,10 1,10 1,10
Grill element (kW)
1,85 1,85 1,85
Circular heating element (kW)
- - 2,00
Oven fan (W)
- 30 (35) 30 (35)
Oven light (W)
25 25 25
Min. / max oven temperature
50 / 250° C 50 / 250° C 50 / 250° C
Nominal power supply voltage
230 / 400 V ~ 230 / 400 V ~ 230 / 400 V ~
Total power of the appliance (kW)
7,7 8,1 9,3
ACCESSORIES
Wire shelf + + +
Drip tray + + +
Baking try + + +
Scraper + + +
Telescopic runners on 2 levels +
Page 35

35
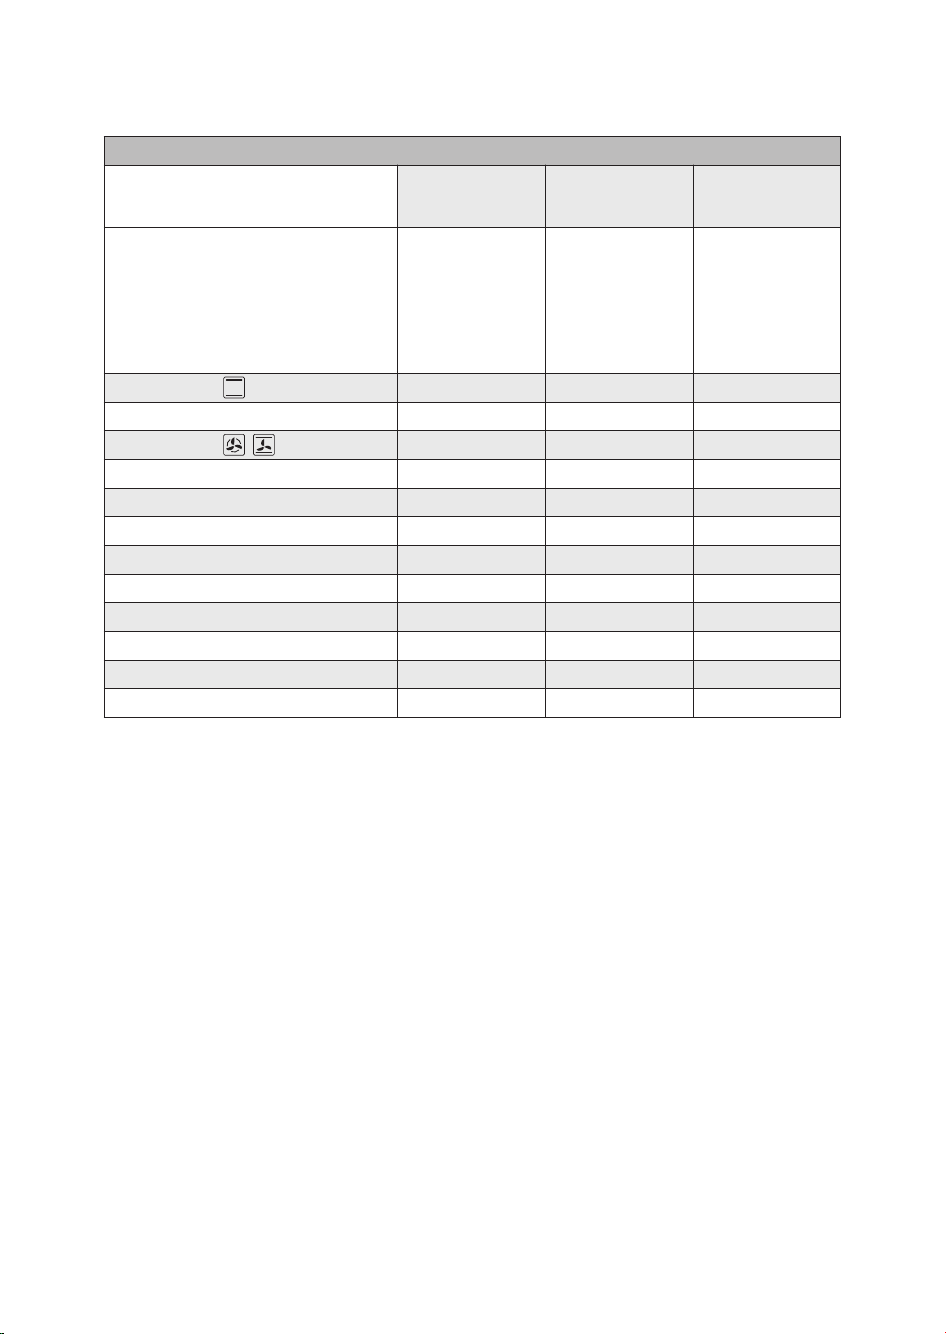
INFORMATION TABLE
Model
PCCF 30201050 W
PCCF 30201050 X
PCCF 50201250 W
PCCF 50201250 X
PCCF 80211250 W
PCCF 80211250 X
A - Most efficient
B
C
D
E
F
G - Less efficient
A A A
Energy consumption (kW/h)
0,79 0,79
Ti me to cook standard load (min)
52,3 53,1
Energy consumption (kW/h)
079 0,79
Time to cook standard load (min)
47 44,3
Working volume (litres)
49 45 42
Working volume:
SMALL
MEDIUM
LARGE
Noise (dB)
46 46
Min. Energy consumption (standby) (W)
Area of largest baking tray (cm2)
1230 1230 1230
Page 36

36
Cher client,
vous avez acheté un appareil électroménager de notre nouvelle ligne de cuisinières électriques. Nous
espérons que vous l’utiliserez longtemps. Nous vous recommandons d'étudier ce mode d'emploi et de
suivre les instructions que vous y trouverez.
INFORMATIONS IMPORTANTES,
INSTRUCTIONS ET RECOMMANDATIONS
• Contrôlez que les caractéristiques de la tension nominale d'alimentation indiquées sur la plaquette
correspondent à celles de votre réseau électrique.
• La cuisinière doit être reliée au réseau électrique conformément au schéma de raccordement.
• L’installation, les réglages, les réparations et les modifications à effectuer sur l’appareil doivent être
réalisés par un professionnel qualifié (voir certificat de garantie).
• Ces opérations doivent être mentionnées sur le certificat de garantie de l’appareil.
• Il est nécessaire d’installer sur l’alimentation avant l’appareil un dispositif permettant de le déconnecter
du réseau, avec une ouverture minimale des contacts de 3 mm (ci-dessous interrupteur principal).
• La cuisinière est conçue uniquement pour la cuisson des aliments.
Il est interdit de l'utiliser comme chauffage car la surcharge pourrait l’endommager.
• Les pannes causées par une mauvaise utilisation ne sont pas couvertes par la garantie.
• Il est interdit d’entreposer des matières inflammables à proximité des foyers de cuisson, des corps de
chauffe du four et dans le compartiment de rangement de la cuisinière.
• Assurez-vous que les cordons d’alimentation des autres appareils ne peuvent pas entrer en contact avec
la table de cuisson ou les parties chaudes des foyers.
• Assurez-vous que les interrupteurs sont éteints quand la cuisinière ne fonctionne pas.
• Il est recommandé de contacter tous les deux ans une société spécialisée pour contrôler le
fonctionnement de la cuisinière et réaliser les opérations d’entretien qualifiées. Cette précaution vous
permettra d’éviter les pannes et d’assurer la longévité de votre appareil.
• Pendant le nettoyage et les réparations, l'interrupteur principal doit être fermé.
• Si VOUS découvrez une panne sur le circuit électrique de l'appareil, ne cherchez pas à la réparer.
Débranchez-leet confiez la réparation à un professionnel qualifié.
• Le fabricant décline toute responsabilité si les instructions et les recommandations données dans ce
mode d'emploi ne sont pas respectées.
• N’utilisez pas les accessoires qui semblent usés, dont le revêtement est endommagé OU qui présentent
d’autres défauts.
• N’utilisez pas d’appareils à vapeur pour le nettoyage.
Page 37

37
1. Bouton de commande foyer de cuisson avant
gauche
2. Bouton de commande foyer de cuisson arrière
gauche
3. Bouton de commande foyer de cuisson arrière
droit
4. Bouton de commande foyer de cuisson avant
droit
5. Thermostat du four
6. Sélecteur de fonctions du four
7. Voyant fonctionnement thermostat
8. Voyant fonctionnement général
9. Minuterie numérique
10. Boutons de commande de la minuterie
numérique
PREMIÈRE UTILISATION
• Avant de mettre la cuisinière en service, enlevez tous les matériaux d’emballage.
• Certains éléments et composants de l'emballage sont recyclables. Ils doivent être traités conformément
à la législation et à la réglementation nationale en vigueur.
• Avant de mettre l'appareil en service, il est recommandé de le nettoyer ainsi que les accessoires.
• Quand il est sec, ouvrez l'interrupteur principal et suivez les instructions du mode d’emploi.
• Il est interdit de nettoyer et d’enlever les pièces de la cuisinière électrique qui ne sont pas mentionnées
dans le chapitre consacré au nettoyage.
FOUR
Placez le sélecteur de fonction du four en position de chauffe supérieure et inférieure. Réglez le
thermostat sur 250 °C et laissez le four fonctionner 1 heure porte fermée. Assurez une ventilation
suffisante de la pièce. Cela permet d'éliminer les odeurs du four avant la première cuisson
BANDEAU DE COMMANDE
Page 38

38
MODE D’EMPLOI DES FOYERS
• La cuisinière ne doit être manipulée que par des adultes et en suivant les indications du mode d’emploi.
Ne laissez pas les enfants sans surveillance dans la pièce où est installé l'appareil.
• La cuisinière électrique est un appareil qui exige une surveillance constante.
• L'appareil ne doit pas être confié à des enfants ou des personnes dépourvues des capacités physiques,
sensorielles ou mentales permettant de l’utiliser en toute sécurité OU sans expérience ni formation, à
moins qu’elles ne soient sous la surveillance d’une personne responsable ou qu’elles n’aient reçu les
instructions nécessaires.
• Surveillez les enfants et empêchez-les de jouer avec l'appareil.
TABLE DE CUISSON VITROCÉRAMIQUE AVEC FOYERS DE CUISSON
• Les tables de cuisson standard disposent de six positions pour le réglage de la puissance : "6"
correspond à la puissance maximale, "1" à la puissance minimale.
• Les foyers de cuisson électriques servent pour la cuisson, la friture, etc. Il est recommandé d'utiliser
des récipients à fond plat. Un limiteur de température situé sous la table vitrocéramique, empêche la
surchauffe des foyers de cuisson. Le témoin de chaleur résiduelle situé à l’avant de la table
vitrocéramique signale les surtempératures même quand l’appareil est éteint.
• Il est possible de récupérer la chaleur du foyer de cuisson. Le voyant s'éteint quand la table de cuisson
a refroidi et qu’il n’y a plus de risque de brûlure.
• Les foyers de cuisson Hi-light et les tables de cuisson doubles ont un réglage fluide de la puissance.
FOYER DE CUISSON A DOUBLE CIRCUIT
Pour régler la température au centre de la table de cuisson Ø 120 mm entre 0 et 700 W, tournez le
bouton du régulateur de puissance vers la droite.
Pour activer la table de cuisson Ø 180 mm, tournez le bouton vers la droite sur la puissance maximale.
Elle chauffe à 1700 W maximum, selon la valeur sélectionnée : 1 (min), 9 (max). Pour éteindre les deux
circuits tournez le bouton sur zéro. Le limiteur de température, situé sous la table vitrocéramique,
empêche la surchauffe du foyer. Le témoin de chaleur résiduelle, situé à l’avant de la table vitrocéramique
signale les surtempératures même quand l’appareil est éteint.
Il est possible de récupérer la chaleur du foyer de cuisson. Le voyant s'éteint quand la table a refroidi et
qu’il n'y a plus de risque de brûlure.
AVERTISSEMENT
Ø 180 / 120 mm - 1700 / 700 kW
Ø 145 / 250 mm - 2000 / 1200 kW
Page 39

39
CONSEILS POUR L’UTILISATION DE LA TABLE VITROCÉRAMIQUE :
• Utilisez des récipients à fond plat sans impuretés susceptibles de la rayer.
• Le diamètre des récipients doit être au moins égal à celui du foyer de cuisson sinon le limiteur de
température risque d’arrêter la cuisson pour éviter la surchauffe du foyer.
• Mettez un couvercle sur la casserole pendant la cuisson, réglez la température de façon à ne pas devoir
la déplacer ou l’enlever.
• Il est interdit d'utiliser la table vitrocéramique comme chauffage.
• Éliminez les restes d’aliments pendant la cuisson et achevez le nettoyage ensuite. Veillez en particulier à
enlever les résidus sucrés qui peuvent à long terme détériorer votre table.
• Les traces métalliques brillantes sont causées par les récipients en aluminium ou les détergents
inadaptés. Il est possible d'éliminer ces traces par des nettoyages répétés.
• Les rayures sur la table vitrocéramique peuvent être causées par des grains de sable, des résidus
végétaux ou des détergents en poudre inadaptés.
• Nettoyez la table délicatement avec un chiffon doux humide et un détergent liquide adapté aux foyers
en vitrocéramique si elle a été salie par de la terre, du sable ou d’autres produits abrasifs. Pour
terminer le nettoyage, utilisez un détergent liquide pour surfaces en vitrocéramique.
• N’utilisez pas de paille de fer, d'éponge ni d’autres produits abrasifs. Il est également déconseillé
d'utiliser des produits corrosifs comme les aérosols pour four ou les détachants.
• Pendant la cuisson, le bord des casseroles ne doit pas toucher le bord de la table en vitrocéramique ni
y être posé.
FOUR
INTÉRIEUR DU FOUR
Les parois du four sont droites avec des guides coulissants latéraux qui permettent d’y introduire les
accessoires (grille, plaque). À l'intérieur du four, se trouve un corps de chauffe supérieur avec un gril. Le
corps de chauffe inférieur se trouve sur la sole du four. À l’arrière du four - sous le capot de distribution se trouvent un corps de chauffe rond et un ventilateur.
MISE EN MARCHE ET ARRÊT DU FOUR
Tournez le sélecteur du four sur la fonction désirée. Vous pouvez le tourner dans les deux sens. Pour
régler la température, tournez le bouton du thermostat dans le sens des aiguilles d’une montre entre 50°C
et 250°C.
Tournez-le dans l'autre sens pour réduire la température.
Ne forcez pas la rotation en position zéro, sous peine d’endommager le thermostat !
• la charge maximale de la plaque introduite dans les guides du four est de 3 kg. La charge maximale de
la grille avec le plat ou la plaque du four est de 7 kg.
• Les plaques du four et les lèchefrites ne sont pas adaptées à la conservation des aliments (plus de 48
heures). Pour un stockage plus long, placez les aliments dans un récipient adapté.
REMARQUE:
Page 40

40
Éclairage du four restant allumé avec toutes
les fonctions.
Chauffe statique du four avec les corps de
chauffe supérieur et inférieur.
Le thermostat peut être réglé entre 50 °C
et 250 °C.
Chauffe du four uniquement à avec le corps
de chauffe inférieur. La chaleur est
transmise par convection naturelle. Le
thermostat peut être réglé entre 50 °C et
250 °C.
Recommandation : cette fonction sert à
terminer la cuisson des plats qui demandent
plus de chaleur par dessous.
Chauffe du four uniquement avec le corps
de chauffe supérieur. La chaleur est
transmise par convection naturelle.
Le thermostat peut être réglé entre 50 °C
et 250 °C.
Recommandation : cette fonction sert à
terminer la cuisson des plats qui demandent
plus de chaleur au dessus OU pour former
une croûte.
Gril à rayonnement infrarouge. Le
thermostat est réglé sur la température
maximale.
Gril ventilé. La ventilation augmente la
température en haut du four (au-dessus de
la grille ou de la lèchefrite). Le thermostat
peut être réglé entre 150 °C et 250 °C.
Recommandation : cette fonction sert à
griller ou rôtir les gros morceaux de viande
avec plus de chaleur au dessus. La porte du
four est fermée.
La ventilation distribue la chaleur émanant
des corps de chauffe supérieur et inférieur.
Elle rend la température homogène à
l’intérieur du four.
Le thermostat peut être réglé entre 50 °C
et 250 °C.
Recommandation : cette fonction sert à
cuire en même temps deux plats sur deux
niveaux différents avec la même
température des deux côtés.
Le corps de chauffe inférieur fonctionne
avec le corps de chauffe rond et le
ventilateur. Le thermostat permet de régler
la température.
Recommandation : cette fonction permet
de préchauffer le four avant la cuisson.
Quand il a atteint la température désirée,
sélectionnez la fonction
Chauffe du four avec le corps de chauffe
rond en fonction du thermostat. La
ventilation rend la température homogène
à l’intérieur du four. Le thermostat peut
être réglé entre 50 °C et 250 °C.
Recommandation : cette fonction permet
de cuisiner en même temps deux plats
installés sur deux niveaux (cuisson d'un gros
pain et OU de plusieurs plats).
Cette fonction permet de sécher
délicatement des aliments ou de les
décongeler.
Recommandation : cette fonction permet
de décongeler des plats ou des aliments
précuits avant la cuisson finale.
La ventilation distribue la chaleur produite
par le corps de chauffe inférieur. La
ventilation rend la température homogène
à l’intérieur du four. Le thermostat peut
être réglé entre 50 °C et 250 °C.
Le corps de chauffe inférieur - Aqua clean
sert aussi au nettoyage du four. Voir cidessous le chapitre consacré au nettoyage
et à l’entretien. AQUA Clean (voir
chapitre entretien).
FONCTIONS DU FOUR
Page 41

41
RECOMMANDATIONS ET CONSEILS
À titre indicatif, nous indiquons ici les températures recommandées pour la cuisson habituelle des plats.
50-70° C séchage
80-100° C stérilisation
130-150° C étuvée
180-220° C cuisson des pâtes à pain
220-250° C cuisson viande
• La température idéale pour chaque type de plat et le mode de cuisson doivent être adaptés à vos goûts
personnels.
• Dans certains cas, il est nécessaire de préchauffer le four avant la cuisson. Tant que la température
sélectionnée n'est pas atteinte, la lampe du thermostat reste allumée.Quand le four atteint la
température choisie, la lampe du thermostat s'éteint.
• Si possible, introduisez la grille avec la plaque ou la lèchefrite sur le deuxième guide de la paroi latérale
du four en partant du bas.
• Toutes les cuissons doivent être réalisées avec la porte fermée pour ne pas perturber le régime
thermique du four, prolonger la cuisson inutilement et risquer de brûler le plat.
FONCTION GRIL AVEC PLAT SUR LA GRILLE
• Installez le plat sur la grille.
• Introduisez la grille dans les guides des parois latérales du four.
• Pour récupérer les jus, introduisez une plaque du four dans les
guides inférieurs des parois latérales ou placez la lèchefrite sur le
fond.
• Grillez les aliments avec la porte du four fermée.
avec le gril les parties accessibles du four (porte, etc.) peuvent atteindre une
température très élevée. Tenez les enfants à distance pour leur sécurité.
ATTENTION :
Page 42

42
Le programmateur numérique arrête le four à la fin du temps de cuisson prédéfini. L'arrêt et la marche du
programmateur numérique sont signalés par le symbole (8 - casserole) allumé au centre de l’afficheur.
L’affichage du temps de cuisson est continu. Le programmateur numérique n'est alimenté que par le
réseau. S’il reste éteint après une coupure d’électricité (l0.00 + symbole 6 clignotants), refaites le réglage
du temps de cuisson.
1. Bouton de réglage du signal sonore
2. Bouton de réglage du temps de cuisson
3. Bouton de réglage de l’arrêt du four
4. Bouton de réglage (-)
5. Bouton de réglage (+)
6. Le symbole "A" reste allumé du début à la fin de la cuisson. Le
symbole "A"- clignote, quand la cuisson est terminée.
7. Symbole - minuterie
8. Le symbole est allumé quand le four est en marche.
LES DEUX MODES DE FONCTIONNEMENT DU FOUR
• Sans le programmateur numérique (dans ce cas, l’afficheur doit être allumé avec le symbole de la
casserole (8). S'il n'est pas allumé, appuyez en même temps sur les boutons 2 et 3 pour activer le four).
La cuisinière possède en plus deux boutons de commande : le thermostat et le sélecteur de fonction
du four.
• Avec le programmateur numérique (voir procédure ci-dessous). Réglez la température et le mode de
fonctionnement avec les boutons de commande du four.
RÉGLAGE DE L'HEURE DU PROGRAMMATEUR NUMÉRIQUE
Dès que l'appareil est connecté au réseau électrique, le symbole 0.00 clignote sur l'afficheur. Appuyez en
même temps sur les boutons 2 et 3 pour régler l'heure (0.00 et le symbole 8 s'allument). Réglez l’heure
avec les boutons 4 et 5.
COMMANDE MANUELLE DU FOUR
Si vous voulez utiliser le four sans programmation, le symbole 6 ne doit pas être allumé. Vérifiez toujours
l'heure du programmateur : si le symbole 6 est allumé, appuyez en même temps sur les boutons 4 et 5.
Lorsque le symbole 6 s’éteint, il est possible d’utiliser l’appareil sans le programmateur.
La programmation numérique permet de sélectionner deux modes de fonctionnement du four :
SEMI-AUTOMATIQUE
- le four s’allume immédiatement et s'arrête automatiquement à la fin de la cuisson
AUTOMATIQUE
- réglage automatique de la mise en marche et de l’arrêt du four.
FONCTION SEMI-AUTOMATIQUE
Ce mode permet de définir le temps de cuisson pour le four. La valeur maximale qu’il est possible de
programmer est 23 heures et 59 minutes.
PROCÉDURE DE FONCTIONNEMENT SEMI-AUTOMATIQUE
Un exemple simple :
temps de cuisson : 1 heure 20 minutes (1.20).
• Réglage du temps de cuisson : appuyez sur le bouton 2 (0.00 et le symbole 8 s’allument) et sur le
bouton 5, jusqu’à ce que 1.20. s’affiche.
Pendant le réglage, le symbole 6 s’affiche également. Au bout de 5 secondes, l'heure apparaît sur
l’afficheur avec le symbole 6.
• Mettez le four en marche : avec le bouton spécial, réglez le mode de chauffe et la température de
cuisson.
• Le four s’allume immédiatement (la cuisson commence) ; les symboles 6 et 8 restent allumés pendant la
cuisson.
COMMANDE DU FOUR AVEC LE
PROGRAMMATEUR NUMERIQUE
Page 43

43
• À la fin de la cuisson prédéfinie
- dans ce cas,1 heure 20 minutes
- le four s'arrête automatiquement (la cuisson est terminée),
- le signal sonore se déclenche (pour l’arrêter, appuyez sur les boutons 1, 2 OU 3, il s’arrête
automatiquement au bout de 2 minutes)
- le symbole 8 s’éteint
- le symbole 6 clignote.
• Arrêtez le four et appuyez en même temps sur les boutons 2 et 3 pour éteindre le symbole 6.
Lorsque le symbole 6 s’éteint, le four est prêt pour la commande manuelle.
FONCTIONNEMENT AUTOMATIQUE
Ce mode de fonctionnement définit le temps de cuisson du four et l’heure de fin de cuisson. La valeur
maximale qu’il est possible de sélectionner pour la mise en marche et l’arrêt de la cuisson est de 23 heures
et 59 minutes, (arrêt du four = heure + 23 heures et 59 minutes)
Si le four n'est pas mis en marche avec les bons boutons, il ne peut pas
fonctionner en mode automatique !
PROCÉDURE DE FONCTIONNEMENT EN MODE AUTOMATIQUE
Un exemple simple :
temps de cuisson : 1 heure 20 minutes (1.20) ; arrêt du four : 13.52.
1. Assurez-vous que l’heure enregistrée est bien l’heure exacte.
• 1.Réglage du temps de cuisson
• Appuyez sur le bouton 2 (0.00 et le symbole 8 s’allument) ; appuyez sur le bouton 5 jusqu’à ce que
1.20 s’affiche. Pendant le réglage, le symbole 6 s’affiche également. Au bout de 5 secondes, l'heure
apparaît sur l’afficheur et les symboles 6 et 8 s'allument.
2. Réglage de l’arrêt du four.
• Appuyez sur le bouton 3 :
l'heure d’arrêt la plus proche s’allume (heure courante + temps de cuisson).
Réglez l'heure 13.52 - heure d’arrêt du four - avec les boutons 4 et 5. 5 secondes après la fin du
réglage, l'heure courante et le symbole 6 s’affichent. Le symbole 8 s’éteint (il se rallume quand le four
est en marche).
3. Mise en marche du four : avec les boutons spéciaux, réglez le mode de chauffe et la température de
cuisson.
4. Le four s’allume automatiquement (dans ce cas à 12.32, début de cuisson), il fonctionne pendant 1
heure et 20 minutes et s’éteint à 13.52. Le symbole 8 reste allumé pendant la cuisson.
5. Lorsque le four s'arrête :
- le signal sonore se déclenche (pour l ‘arrêter, appuyez sur les boutons 1, 2 et 3 ; il s’arrête
automatiquement au bout de 2 minutes)
- le symbole 8 s’éteint
- le symbole 6 clignote.
Arrêtez le four et appuyez en même temps sur les boutons 2 et 3 pour éteindre le symbole 6. Lorsque le
symbole 6 s’éteint, le four est prêt pour la commande manuelle.
MINUTERIE
Le programmateur numérique dispose aussi d'une fonction de minuterie qu’on peut activer en appuyant
sur le bouton 1. 0.00 apparaît sur l’afficheur. Sélectionnez l’heure avec les boutons 4 et 5. Le symbole
7
s'allume sur l'afficheur. Pour vérifiez l’heure prédéfinie, appuyez sur le bouton 1. À la fin du temps
prédéfini, le signal sonore se déclenche. Pour l’arrêter, appuyez sur les boutons 1, 2 OU 3.
RÉGLAGE DU NIVEAU DU SIGNAL :
• Le programmateur numérique doit être réglé sur l’heure courante
• Le bouton gauche 4 permet de sélectionner trois niveaux pour le signal.
• Le réglage sélectionné est enregistré jusqu’au prochain réglage ou à une coupure d’électricité, dans ce
cas, le signal revient au son le plus haut.
avant toute modification, attendez 5 secondes, délai nécessaire à la
mémorisation.
REMARQUE :
ATTENTION !
Page 44

44
GUIDES COULISSANTS
Pour le nettoyage et l'entretien, respectez les instructions suivantes.
• Placez tous les boutons sur arrêt
• Placez l'interrupteur principal sur arrêt.
• Attendez que les foyers aient refroidi.
TABLE VITROCÉRAMIQUE
Pour nettoyer la table de cuisson, utilisez un torchon OU une éponge humide puis séchez-la
soigneusement. Pour éliminer les traces résistantes, utilisez les détergents recommandés. Attendez que la
table vitrocéramique ait refroidi et nettoyez-la après chaque utilisation. Le plus petit résidu brûlera à la
prochaine cuisson. N’utilisez pas de produits abrasifs, d’éponges à récurer, de pâtes à nettoyer, ni même
d’éponges ou de gants ayant déjà servi à un autre usage. Ces produits pourraient rayer la table. Utilisez
uniquement des détergents spéciaux pour le nettoyage des tables vitrocéramique.
TABLE VITROCÉRAMIQUE
La table vitrocéramique est très agréable et facile à utiliser. Les recommandations et les conseils suivants
VOUS aideront à l'entretenir et à la conserver longtemps en bon état.
Conseils pour l’utilisation des tables en vitrocéramique :
• Utilisez des récipients à fond plat sans impuretés qui pourraient rayer la table.
• Le diamètre des récipients doit être au moins égal à celui du foyer de cuisson sinon le limiteur de
température risque d’arrêter la cuisson pour éviter la surchauffe du foyer.
• Mettez un couvercle sur la casserole pendant la cuisson, réglez la température de façon à ne pas devoir
la déplacer ou l’enlever.
• Il est interdit d'utiliser la table vitrocéramique comme chauffage.
• Éliminez les restes d’aliments pendant la cuisson, et achevez le nettoyage ensuite. Veillez en particulier
à enlever les résidus sucrés qui peuvent à long terme détériorer votre table.
• Les traces métalliques brillantes sont provoquées par les récipients en aluminium ou les détergents
inadaptés.
Il est possible d'éliminer ces traces par des nettoyages répétés
• Les rayures sur la table vitrocéramique peuvent être causées par des grains de sable, des résidus
végétaux, des détergents en poudre inadaptés ou des éponges à récurer.
AVERTISSEMENT
NETTOYAGE ETENTRETIEN
DE LA CUISINIÈRE
Page 45
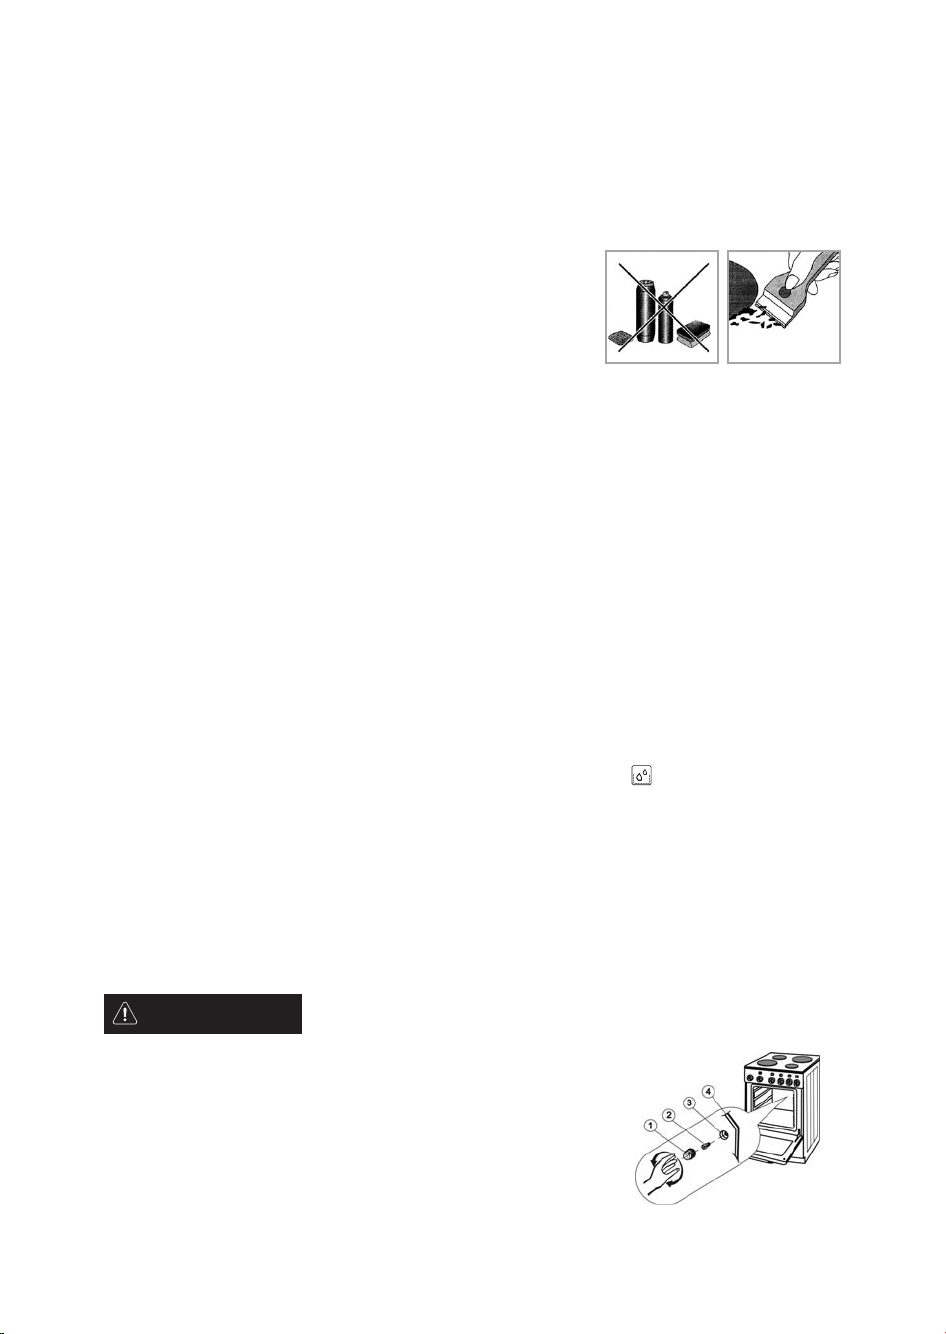
• Nettoyez la table délicatement avec un chiffon doux humide et un détergent liquide adapté aux tables
en vitrocéramique si elle a été salie par de la terre, du sable ou autres matériaux abrasifs.
• N’utilisez pas de paille de fer, d'éponge ou autres produits abrasifs. Il est également déconseillé d'utiliser
des produits corrosifs comme les aérosols pour four ou les détachants.
• Pendant la cuisson, le bord des casseroles ne doit pas toucher le bord de la table en vitrocéramique ni
y être posé.
Le fabricant décline toute responsabilité concernant les défauts
de la table vitrocéramique causés par l'utilisation de récipients
inadaptés ou par une mauvaise manipulation.
TRACES MÉTALLIQUES BRILLANTES
Les traces métalliques sont provoquées par les récipients en aluminium ou les détergents inadaptés. Il est
possible d’éliminer ces traces par des nettoyages répétés. Les changements de couleur de la table
vitrocéramique sont dus essentiellement à la combustion de résidus non nettoyés. Ils n'ont aucune
influence sur le fonctionnement de la table vitrocéramique et n’indiquent pas de modification des
matériaux.
Les résidus sucrés non nettoyés peuvent endommager définitivement la table vitrocéramique.
ABRASION DU REVÊTEMENT
Elle peut être causée par des matériaux abrasifs ou par le fond des casseroles posées sur la table
vitrocéramique qui forment une tache sombre.
FOUR
Nettoyez le four avec un détergent OU un produit spécial four. Humidifiez les impuretés, nettoyez-les
avec une brosse et frottez avec un chiffon. N’utilisez pas d’objets métalliques pointus pour éliminer les
trace résistantes.
Lavez les accessoires du four avec une éponge et du détergent OU au lave-vaisselle (grille, lèchefrite, etc.).
AQUA CLEAN
Pour le nettoyage quotidien du four (après chaque utilisation), nous VOUS recommandons la procédure
suivante :
positionnez le bouton des fonctions du four, après l’avoir laissé refroidir, sur .
Réglez le bouton du thermostat sur 50° C. Versez 0,4 l d'eau dans la lèchefrite et introduisez-la dans les
guides inférieurs. Au bout de 30 minutes, les résidus déposés sur l’émail du four sont ramollis, vous
pouvez les nettoyer avec un chiffon humide.
REMPLACEMENT DE LA LAMPE DU FOUR
• Placez tous les boutons de commande sur arrêt et déconnectez l'appareil du réseau électrique en
débranchant la prise ou en coupant l'interrupteur principal.
• Dévisser le capot de l’ampoule en verre en le tournant vers la gauche
• Dévisser l’ampoule grillée et vissez la nouvelle ampoule
• Remontez le capot en verre.
pour l'éclairage, utilisez exclusivement une ampoule T 300 °C, E 14,
230 V~, 25 W.
1. capot de verre
2. ampoule
3. douille
4. paroi arrière du four
REMARQUE :
45
Page 46
46
RECLAMATION
Si une panne survient pendant le délai de garantie, ne tentez pas de la réparer. Transmettez la réclamation au
magasin où vous avez acheté l'appareil, à un service après-vente agréé ou aux services mentionnés dans les
Conditions de garantie. Présentez la réclamation en suivant les dispositions du certificat de garantie et des
conditions de garantie. Si le certificat de garantie n’est pas rempli correctement, la demande sera rejetée.
RÉCUPÉRATION ET MISE AU REBUT DE
L’EMBALLAGE
Cartons, papier d'emballage: - dépôt dans les centres de tri sélectif – dans les bidons de tri sélectif pour
papier.
Palettes en bois: – décharge spécifique pour l’élimination des déchets – autre utilisation.
Films d’emballage et sachets PE: – containers de récupération des matières plastiques
MISE AU REBUT DE L'APPAREIL
Cet appareil est certifié conforme à la directive européenne 2002/96/CEE sur le traitement des déchets
d'équipements électriques et électroniques (waste electrical and electronic equipment -WEEE). Cette
directive définit un cadre européen unique (UE) pour la récupération et le recyclage des appareils usagés.
L'appareil contient des matériaux utiles qui peuvent être recyclés
INSTRUCTIONS POUR L'INSTALLATION ET
LE RÉGLAGE
L'appareil doit être installé conformément aux normes et à la réglementation nationales en
vigueur. L’installation et le réglage doivent être réalisés conformément aux consignes ci-dessous et
confiés à des professionnels qualifiés.
RACCORDEMNENT DE L'APPAREIL AU RÉSEAU ÉLECTRIQUE
L'appareil doit être installé conformément aux normes et à la réglementation nationales en vigueur. Le
branchement électrique au réseau doit être réalisé par un professionnel qualifié. Il est nécessaire d'installer sur
l’alimentation de l’appareil un dispositif permettant de le débrancher complètement du réseau électrique,
avec une distance minimale d’ouverture des contacts de 3 mm (ci-dessous interrupteur principal). Il est
recommandé d'utiliser pour le branchement de la cuisinière un câble triphasé de type H05RR-F5G-1,5 modifié
comme le montre la figure 9. Il est nécessaire de renforcer les extrémités des conducteurs par des embouts
sertis. Pour le branchement monophasé, modifiez les extrémités selon la figure 5. Pour fixer les extrémités
des fils sous la tête des vis dans le bornier, introduisez-les dans le bornier et bloquez-les avec une griffe
(dessin 5). Refermez le couvercle du bornier
Pour raccorder la cuisinière, il est recommandé d'utiliser un câble de :
- Cu 3 x 4 mm2 min. pour le raccordement monophasé (interrupteur de sécurité 35 - 38 A selon le type)
- Cu 5 x 1,5 mm2 min. pour le raccordement triphasé (interrupteur de sécurité 3x16 A)
Page 47

47
Pendant le montage ou le démontage de la cuisinière, débranchez l’appareil du réseau et vérifiez qu’il est
éteint.
Pendant l'installation de l'appareil, réalisez impérativement les opérations suivantes pour assurer
le bon fonctionnement de l'installation :
• contrôle de la conformité du raccordement au réseau électrique,
• contrôle du fonctionnement des corps de chauffe, des éléments de commande et de réglage,
• avant la vente, présentation au client de toutes les fonctions de l'appareil et formation à la gestion et à
l'entretien.
AVERTISSEMENT IMPORTANT
la cuisinière électrique est un appareil de classe 1 pour l’indice de protection contre les accidents
électriques et doit être relié à la terre .
AVERTISSEMENT
Page 48
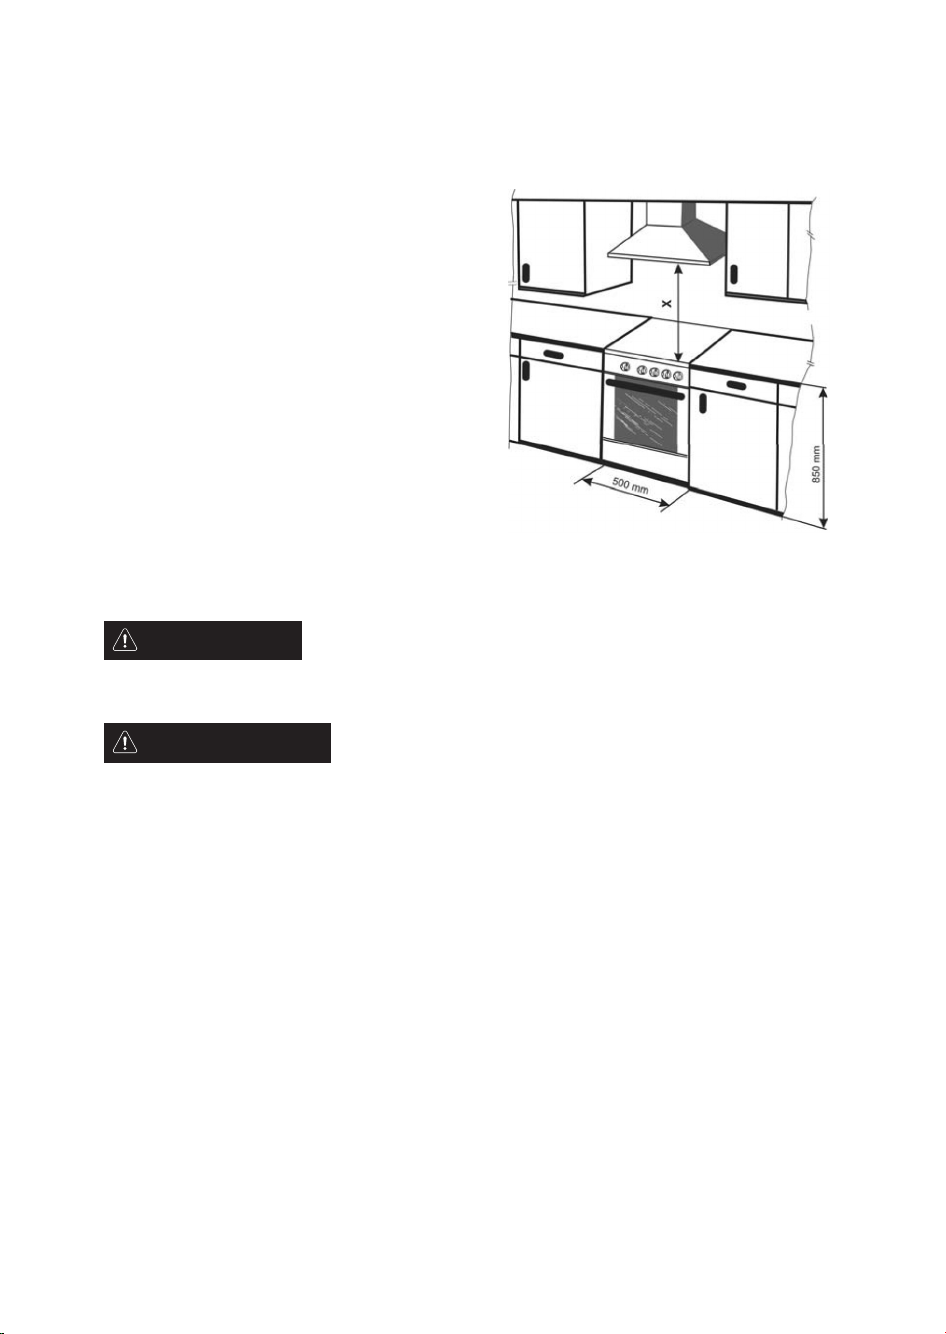
48
POSITIONNEMMENT
La cuisinière électrique est conçue pour le milieu
courant. Il est possible de l'installer dans le bloc-cuisine
sans espace latéral (largeur minimale 500 mm). On peut
insérer la cuisinière entre des placards ayant une
résistance thermique de 100 °C ou recouverts d’un
isolant.
Il est interdit de placer la cuisinière sur un support.
« X », la distance minimale recommandée par le
fabricant de hottes d’aspiration, est de 650 mm.
MISE À NIVEAU DE LA CUISINIÈRE
La cuisinière est munie de 4 vis qui permettent de la
régler pour fixer la table de cuisson à l’horizontale et
d’ajuster sa hauteur.
PROCÉDURE :
• inclinez la cuisinière sur le côté
• serrez les vis en plastique dans les trous avant et
arrière en bas de la traverse de ce côté
• inclinez la cuisinière de l'autre côté et serrez les vis dans les trous de ce côté
• effectuez la mise à niveau et les autres réglages avec le tournevis du compartiment de rangement.
Le réglage de la hauteur (vis) n'est pas nécessaire si la hauteur et le positionnement de l'appareil sont
conformes sans les vis plastiques.
Le fabricant se réserve le droit d’apporter des modifications mineures au mode d'emploi suite à des
innovations technologiques sans impact sur le fonctionnement de l’appareil.
AVERTISSEMENT :
REMARQUE :
Page 49

49
Tableau de cuisson - FOUR
Préparation Fonction Préchauffage
Position des guides
de bas en haut
Température
(°C)
Temps de cuisson
(minutes)
VIANDE
Boeuf, porc, filet de veau
(1 kg)
Statique X 2 180 - 210 70 - 90
Ventilée - 2 170 - 190 70 - 90
Poulet, lapin, canard
(~1 kg)
Statique X 2 180 - 210 55 - 75
Ventilée - 2 170 - 190 55 - 75
Mouton, chèvre, agneau
(~1 kg)
Statique X 2 180 - 210 70 - 90
Ventilée - 2 170 - 190 70 - 90
Oie (~2 kg)
Statique X 1 190 - 210 100 - 120
Ventilée - 1 170 - 190 100 - 120
POISSON ENTIER (0.8 à 1 kg)
Dorade, truite, saumon
Statique X 2 170 - 180 45 - 55
Ventilée - 2 160 - 170 45 - 55
FILETS DE POISSON (de ~ 0.5 à 0.7 kg)
Espadon, thon, morue
Statique X 2 170 - 180 35 - 45
Ventilée - 2 160 - 170 35 - 45
LÉGUMES (0,5 à 0,7 kg)
Poivrons farcis
Statique X 2 160 - 170 40 - 50
Ventilée - 2 150 - 160 40 - 50
Pommes de terre facies
Statique X 2 160 - 170 55 - 65
Ventilée - 2 150 - 160 55 - 60
Pommes de terre rôties
Statique X 2 200 - 210 55 - 65
Ventilée - 2 190 - 200 50 - 60
GÂTEAUX, etc.
Gâteau levé (moelleux)
Statique X 2 150 - 170 35 - 45
Ventilée - 2 150 - 160 30 - 40
Gâteau garni (fromage)
Statique X 2 165 - 175 60 - 70
Ventilée - 2 150 - 160 60 - 70
Grande tarte
Statique X 2 170 - 180 35 - 45
Ventilée - 2 160 - 170 35 - 45
Strudel
Statique X 2 170 - 180 35 - 45
Ventilée - 2 160 - 170 30 - 40
Biscuits
Statique X 2 160 - 170 15 - 25
Ventilée - 2 150 - 160 15 - 20
Millefeuille
Statique X 2 160 - 170 30 - 40
Ventilée - 2 150 - 160 25 - 35
Tartes salées
(Quiche Lorraine)
Statique X 2 170 - 180 40 - 50
Ventilée - 1 160 - 170 40 - 50
Lasagnes
Statique X 2 170 - 180 40 - 50
Ventilée - 2 160 - 170 40 - 50
Pizza
Statique X 2 220 - 250 15 - 20
Ventilée - 2 200 - 225 15 - 20
Gâteaux garnis (ananas,
pêche)
Statique X 2 160 - 170 30 - 40
Ventilée - 2 160 - 170 30 - 40
Meringues
Statique X 2 80 - 100 60 - 90
Ventilée - 2 50 - 75 60 - 90
Flan
Statique X 2 160 - 180 55 - 65
Ventilée - 2 150 - 160 50 - 60
Note : la température et le temps de cuisson sont donnés à titre indicatif
Page 50

50
Tableau de cuisson - GRIL
Préparation Fonction
Préchauffage
(5 minutes)
Position des guides
(de bas en haut)
Température
(°C)
Temps de cuisson
(minutes)
VIANDE
Rosbeef Gril X 3 Maximum 20 - 30
Côtes de porc
Gril X 3 Maximum 15 - 20
Saucisses Gril X 3 Maximum 20 - 30
Poisson
Gril X 3 Maximum 15 - 25
Cuisses de poulet Gril X 3 Maximum 20 - 30
Brochettes
Gril X 3 Maximum 20 - 30
Travers de porc Gril X 3 Maximum 30 - 40
1/4 poulet
Gril X 3 Maximum 40 - 50
Note : la température et le temps de cuisson sont donnés à titre indicatif
DONNES TECHNIQUES
CUISINIERE ELECTRIQUE
PCCF 30201050 W
PCCF 30201050 X
PCCF 50201250 W
PCCF 50201250 X
PCCF 80211250 W
PCCF 80211250 X
Dimension: Hauteur / largeur / profondeur 850 / 500 / 605 850 / 500 / 605 850 / 500 / 605
Table de cuisson - Foyers de cuisson électriques
Gauche derrière Ø 145 mm (kW) 1,2 1,2 1,2
Gauche avant Ø 180/120 mm (kW)
1,7 1,7 / 0,7 1,7 / 0,7
Droite derrière Ø 145 / 250 mm (kW)
1,7 2,0 / 1,2 2,0 / 1,2
Droite avant Ø 145 mm (kW)
1,2 1,2 1,2
Four
Corps de chauffe supérieur (kW)
0,75 0,75 0,75
Corps de chauffe inférieur (kw)
1,10 1,10 1,10
Corps de chauffe gril (kw)
1,85 1,85 1,85
Corps de chauffe rond (kw)
- - 2,00
Ventilateur (w)
- 30 (35) 30 (35)
Eclairage (w)
25 25 25
Température min. / max dans le four
50 / 250° C 50 / 250° C 50 / 250° C
Tension électrique
230 / 400 V ~ 230 / 400 V ~ 230 / 400 V ~
Total puissance électrique (kw)
7,7 8,1 9,3
EQUIPEMENT
Grille + + +
Plat rectangulaire + + +
Table de four + + +
Gratto ir + + +
Grilles coulissantes +
Page 51

51
FICHE INFORMATIONS
Modèle
PCCF 30201050 W
PCCF 30201050 X
PCCF 50201250 W
PCCF 50201250 X
PCCF 80211250 W
PCCF 80211250 X
A -Economique
B
C
D
E
F
G - Moins économique
A A A
Consommation énergie (kW/h)
0,79 0,79
Temps de cuisson charge standard (min)
52,3 53,1
Consommation d’énergie (kW/h)
079 0,79
Temps de cuisson charge standard (min)
47 44,3
Volume du four à utiliser
49 45 42
Taille du four
PETIT
MOYEN
GRAND
Niveau de bruit (dB)
46 46
Consommation minimale d'énergie (stanby) (W)
Surface de la plus grande table de four (cm2)
1230 1230 1230
Page 52

52
Geachte klant,
u heeft een nieuw product uit onze nieuwe serie elektrische fornuizen gekocht. Wij hopen dat ons
product aan uw verwachtingen zal voldoen. Wij adviseren u deze handleiding door te lezen en het
apparaat volgens de aanwijzingen te gebruiken.
BELANGRIJKE INFORMATIE,
AANWIJZINGEN EN AANBEVELINGEN
• Controleer of de gegevens van de nominale spanning, die op het typenplaatje zijn vermeld,
overeenkomen met die van uw elektriciteitsnet
• Het fornuis moet aangesloten worden op het elektriciteitsnet volgens het bijgevoegde aansluitschema.
• De installatie, instellingen, reparaties en wijzigingen van het apparaat moeten altijd door erkende
vakman uitgevoerd worden (zie Garantiebewijs).
• De uitgevoerde werkzaamheden moeten in het Garantiebewijs van het apparaat vermeld worden.
• Voor de elektrische aansluiting moet voor het apparaat een voorziening worden aangebracht waarmee
het apparaat losgekoppeld kan worden van het elektriciteitsnet. De afstand tussen de contacten van
deze voorziening moet minstens 3 mm bedragen (verder in de tekst als hoofdschakelaar genoemd).
• Het fornuis is uitsluitend bedoeld voor het bereiden met warmte van levensmiddelen. Het mag niet
gebruikt worden om een ruimte te verwarmen, dit leidt tot oververhitting en dus tot beschadiging van
het apparaat. De garantie geldt niet voor defecten die ontstaan zijn door verkeerd gebruik van het
apparaat.
• Het is verboden brandstoffen vlakbij de kookzones, de verwarmingselementen van de oven en in de
opbergruimte van het fornuis te bewaren.
• Verzeker u ervan dat de voedingskabels van andere apparaten niet in contact komen met de kookplaat
of met andere hete delen van het fornuis.
• Als het fornuis niet in werking is, moet u ervoor zorgen dat alle schakelaars uitgeschakeld zijn.
• Wij adviseren om elke twee jaar een onderhoudsbedrijf te vragen de werking van het apparaat te
controleren en het deskundige onderhoud uit te voeren.
• Daardoor voorkomt u eventuele storingen en wordt de levensduur van het fornuis verlengd.
• Tijdens reinigings- en reparatiewerkzaamheden moet de hoofdschakelaar uitgeschakeld worden.
• Wanneer zich een storing voordoet in het elektrische deel van het apparaat, dan mag deze niet zelf
repareren. Schakel het apparaat uit en vraag een erkende elektricien om de reparatie uit te voeren.
• De fabrikant kan niet aansprakelijk gesteld worden voor eventuele schade, als de in deze
gebruiksaanwijzing vermelde bindende aanwijzingen en aanbevelingen niet opgevolgd zijn.
• Gebruik accesoires die tekenen van slijtage of beschadiging niet meer.
• Gebruik voor de reiniging van het apparaat geen stoomreiniger.
Page 53

53
1. Bedieningsknop kookzone linksvoor
2. Bedieningsknop kookzone linksachter
3. Bedieningsknop kookzone rechtsachter
4. Bedieningsknop kookzone rechtsvoor
5. Oventhermostaat
6. Functiekeuzetoets oven
7. Controlelampje thermostaat
8. Controlelampje algemene werking
9. Digitale timer
10. Bedieningstoetsen timer
AANWIJZINGEN VOOR DE
INGEBRUIKNEMING VAN HET FORNUIS
Voordat u het apparaat kunt gebruiken moeten alle verpakkingsmaterialen verwijderd worden.
Verschillende onderdelen van de verpakking kunnen gerecycled worden.
Houdt u aan de landelijk geldende voorschriften.
Het wordt aanbevolen het fornuis en de accessoires vóór het gebruik schoon te maken.
Schakel het apparaat pas in, met de hoofdschakelaar, nadat alle oppervlakken goed droog geworden zijn
en volg de aanwijzingen voor het gebruik op.
Wij maken u erop attent dat het niet toegestaan is de elektrische delen van het fornuis te reinigen en te
verwijderen, tenzij dit vermeld is in het hoofdstuk over de reiniging.
OVEN
Zet de functieschakelaar van de oven in de stand voor boven- en onderwarmte. Zet de thermostaat op
250 °C en laat de oven met gesloten deur gedurende 1 uur werken. Verzeker u ervan dat de ruimte goed
geventileerd is. Op die manier worden de luchtjes die de oven verspreidt, verwijderd.
BEDIENINGSPANEEL
Page 54

54
BEDIENING VAN DE BRANDERS
• Het apparaat mag, in overeenstemming met deze handleiding, uitsluitend gebruikt worden door
volwassenen. Laat kinderen niet zonder toezicht aanwezig zijn in de ruimte waarin het fornuis
geïnstalleerd wordt.
• Het elektrische fornuisvereist voortdurend toezicht.
• Dit apparaat is niet bedoeld voor gebruik door personen (inclusief kinderen) met beperkte lichamelijke,
zintuiglijke of verstandelijke beperkingen of die onvoldoende ervaring en kennis van het apparaat
hebben om het op veilige wijze te gebruiken, tenzij zij onder toezicht staan van iemand die
verantwoordelijk is voor hun veiligheid.
• Zorg ervoor dat kinderen niet met het apparaat gaan spelen.
GLASKERAMISCHE KOOKPLAAT MET KOOKZONES
• De kookplaten van het fornuis hebben een regelknop met zes standen. De hoogste stand is "6", de
laagste is stand "1".
• De elektrische kookplaten zijn bedoeld voor de bereiding van levensmiddelen. Het gebruik van pannen
met een platte bodem wordt aanbevolen.
• Bij oververhitting van de kookzone onder de gaskeramische kookplaat wordt deze door een
temperatuurregelaar uitgeschakeld. Het controlelampje van de restwarmte, dat op het voorste deel
van de kookplaat zit, geeft de verhoogde temperatuur aan, ook als het apparaat uitgeschakeld is.
FOYER DE CUISSON A DOUBLE CIRCUIT
Het middelste deel van de kookplaat Ø 120mm wordt
geregeld door de regelknop naar rechts te draaien, van 0 naar 700W.
Als u de knop helemaal naar rechts draait, wordt de kookplaat Ø 180mm ingeschakeld. Deze wordt dan
tot het maximumvermogen van 1700W verhit,afhankelijk van het gekozen niveau van 1 (laag) tot 9
(maximum). Als u de knop op de stand 0 zet, worden beide delen van de kookzone uitgeschakeld.
Bij oververhitting van de Het controlelampje van de restwarmte, dat op het voorste deel van de kookplaat
zit, signaleert de verhoogde temperatuur van de oppervlakte vande kookzone, ook als het apparaat is
uitgeschakeld.
Om energie te besparen kunt u gebruikmaken van de restwarmte van de kookzone. Het controlelampje
gaat pas uit als de kookplaat zodanig is afgekoeld, dat er geen gevaar voor brandwonden meer is.
kookzone onder de gaskeramische kookplaat wordt de kookplaat door een temperatuurregelaar
uitgeschakeld.
WAARSCHUWING:
Ø 180 / 120 mm - 1700 / 700 kW
Ø 145 / 250 mm - 2000 / 1200 kW
Page 55

55
ENKELE ADVIEZEN VOOR HET GEBRUIK VAN GLASKERAMISCHE PLATEN:
• Gebruik pannen met vlakke bodem zonder verontreinigingen die krassen zouden kunnen veroorzaken.
• De bodem van de pan dient minstens even groot te zijn als de doorsnede van de kookzone, om te
voorkomen dat de temperatuurregelaar de kookplaat uitschakelt vanwege oververhitting.
• Gebruik tijdens de bereiding een deksel op de pan, regel de temperatuur zodanig, dat u het deksel niet
hoeft te verschuiven of verwijderen.
• De glaskeramische kookplaat mag niet gebruikt worden om de ruimte te verwarmen.
• Verwijder gemorste levensmiddelen onmiddellijk tijdens de bereiding. Maak de kookplaat meteen na
gebruik schoon.
• Besteed met name aandacht aan aangekoekte resten van levensmiddelen met een hoog suikergehalte,
deze kunnen ma verloop van tijd de structuur van de kookplaat aantasten.
• Metaalachtig glanzende verkleuringen onstaan door het gebruik van aluminium pannen of het gebruik
van een ongeschikt reinigingsmiddel, de vlekken kunnen door herhaalde reiniging verwijderd worden.
• Krassen op de kookplaat kunnen veroorzaakt zijn door zandkorrels van schoongemaakte groente, of
resten ongeschikte reinigingsmiddelen in poedervorm of ruwe doekjes.
• Als de plaat vervuild is met aarde, zand of andere schuurmiddelen, veeg deze dan weg met een zacht
vochtig doekje en reinig de plaat met een vloeibaar reinigingsmiddel dat geschikt is voor glaskeramische
oppervlakken. Gebruik geen schuursponsjes of andere schurende producten.
OVEN
BINNENRUIMTE VAN OVEN
De oven heeft rechte wanden en geleiders aan de zijkant voor het plaatsen van de accessoires (rooster
van oven, bakblik). In de oven zit bovenin een grillelement. Onder de bodem van de oven zit het onderste
verwarmingselement. In de achterwand van de oven - onder het distributiedeksel - zitten het ronde
verwarmingselement en de ventilator.
Door de knop weer terug te draaien wordt de ingestelde temperatuur verlaagd.
IN- EN UITSCHAKELEN VAN DE OVEN
Draai de ovenfunctieknop op de gewenste functie. De knop kan in beide richtingen gedraaid worden. De
temperatuur kan ingesteld worden door de de knop van de thermostaat naar rechts te draaien van 50 °C 250 °C.
Als u de knop verderdraait dan de nulstand kan de thermostaat beschadigd raken!
• Het bakblik dat in de geleiders is geplaatst mag met max. 3 kg belast worden. Het rooster met
braadpan of bakblik mag met max. 7 kg belast worden.
• De bakblikken en braadpannen zijn niet geschikt om levensmiddelen langdurig te bewaren (langer dan
48 uur). Als u de levensmiddelen langer wilt bewaren, doe ze dan in een geschikte houder.
OPMERKING:
Page 56

56
Verlichting van de oven die bij de instelling
van alle ovenfuncties brandt.
Statische verwarming van de oven met het
bovenste en onderste verwarmingselement.
De thermostaat kan ingesteld worden op de
temperatuur van 50 - 250 °C.
Verwarming van de oven met alleen het
onderste verwarmingselement. De warmte
wordt door een natuurlijke convectie
verspreid, de thermostaat kan ingesteld
worden op de temperatuur van 50 -250 °C.
Aanbeveling: Deze functie is geschikt voor
de slotfase van de bereiding van gerechten die
een hogere temperatuur van onderaf vereisen
Verwarming van de oven met alleen het
bovenste verwarmingselement. De warmte
wordt door een natuurlijke convectie
versrpeid, de thermostaat kan ingesteld
worden op de temperatuur van 50 -250 °C.
Aanbeveling: Deze functie is geschikt voor
de laatste bereidingsfase van gerechten die
een hogere temperatuur voor de bovenkant
of een bruin korstje vereisen.
Grill met infraroodfunctie. De thermostaat
moet ingesteld worden op de hoogste
ttemperatuur.
Grill met ventilator. De temperatuur in het
bovenste deel van de oven is hoger door de
luchtcirculatie (boven het rooster of de
opvangbak). De thermostaat kan ingesteld
worden op de temperatuur van 150-250°C.
Aanbeveling: Deze functie is geschikt voor
het grillen of braden van grote stukken vlees
bij hogere temperatuur. De deur van de oven
moet gesloten blijven.
De warmte afkomstig van het bovenste en
onderste verwarmingselement wordt door
een ventilator verdeeld. De luchtcirculatie
zorgt voor een gelijkmatige temperatuur in de
hele oven. De thermostaat kan ingesteld
worden op de temperatuur van 50 - 250°C.
Aanbeveling: Deze functie is ook geschikt
ook voor het gelijktijdig bereiden van twee
gerechten op verschillende steunhoogtes, op
dezelfde temperatuur.
Het onderste verwarmingselement verwarmt
samen met het ronde verwarmingselement en
de ventilator. De temperatuur kan met de
thermostaat ingesteld worden.
Aanbeveling: De functie is geschikt voor een
snelle voorverwarming van de oven. Na het
bereiken van de gewenste temperatuur de
oven instellen op de gewenste functie.
Verwarming van de oven met het ronde
verwarmingselement en de ventilator. De
luchtcirculatie zorgt voor een gelijkmatige
temperatuur in de hele oven. De thermostaat
kan ingesteld worden opdetemperatuur van
50 - 250 °C.
Aanbeveling: De functie is geschikt voor de
gelijktijdige bereiding van twee gerechten op
verschillende steunhoogtes. (geschikt voor het
bakken van een groot brood of van grotere
hoeveelheden van een gerecht).
Deze functie kan gebruikt worden door het
voorzichtig drogen en ontdooien van
levensmiddelen.
Aanbeveling: De functie is geschikt voor het
ontdooien van gerechten of kant-en-klare
maaltijden.
De warmte afkomstig van het onderste
verwarmingselement wordt door de
ventilator verdeeld. De luchtcirculatie zorgt
voor een gelijkmatige temperatuur in de hele
oven. De thermostaat kan ingesteld worden
tussen 50 - 250 °C.
Het onderste verwarmingselement - Aqua
clean kan ook gebruikt worden voor de
reiniging van de oven. Details over de
reiniging vindt u in het hoofdstuk "Reiniging en
onderhoud".
AQUA Clean (zie hoofdstuk „Reiniging").
OVEN- FUNCTIES
Page 57

57
AANBEVELINGEN EN ADVIEZEN
Ter informatie zijn de aanbevolen temperaturen voor typische bereiding van gerechten vermeld.
50-70° C drogen
80-100° C steriliseren
130-150° C stoven
180-220° C deeg bakken
220-250° C vlees braden
• Ideale temperaturen voor alle soorten gerechten kunnen aangepast worden aan persoonlijke
voorkeuren.
• In sommige gevallen wordt aanbevolen de oven voor de bereiding voor te verwarmen. Tijdens het
voorverwarmen blijft het thermostaatlampje branden. Bij het bereiken van de ingestelde temperatuur
gaat het lampje van de thermostaat uit.
• Schuif het rooster met het bakblik of de opvangbak bij voorkeur in de tweede geleider van onderen.
• Alle bereidingen moetenmet gesloten deur uitgevoerd worden om de temperatuur in de oven niet te
verstoren. Het openen van de deur leidt tot langere bereidingsduur of de gerechten zouden kunnen
aanbranden.
GRILLEN OP ROOSTER
• Leg het gerecht op het rooster.
• Schuif het rooster in de geleiders in de zijwanden van de oven.
• Om de jus op te vangen kunt u een opvangbak op een lagere
steunhoogte zetten of op de bodem van de oven.
• Tijdens het grillen moet de ovendeur gesloten blijven.
Bij het gebruik van de grill worden de toegankelijke delen (deur van oven
enz.) erg heet. Houd kinderen op veilige afstand.
LETOP:
Page 58

58
De digitale tijdprogrammaregelaar is bedoeld voor het uitschakelen van de oven na verloop van een van te
voren ingestelde tijdsduur. Het in- en uitschakelen van de digitale programmaregelaar wordt aangegeven
door het aangaan van het symbool (8 - pan) in het het midden van het display. Op het display wordt de tijd
continu weergegeven. De digitale programmaregelaar wordt alleen elektrisch gevoed, als de stroom
wordt onderbroken en als deze weer wordt hersteld blijft de regelaar uitgeschakeld (de cijfers 0.00 +
symbool 6 knipperen) en de tijd moet opnieuw ingesteld worden.
1. Knop voor instelling van geluidssignaal
2. Knop voor instelling van bereidingsduur
3. Knop voor instelling van uitschakeling
4. Knop voor instelling (-)
5. Knop voor instelling (+)
6. Symbool “A” - blijft branden vanaf het begin tot het einde van de
bereiding. Symbool “A”- knippert als de bereiding voltooid is.
7. Symbool - kookwekker
8. Symbool brandt als de oven in werking is
OVEN WERKT MET TWEE FUNCTIES
• Zonder het gebruik van de digitale programmaregelaar (in dat geval moet op het display het symbool
van de pan (8) branden - als dat niet het geval is, druk dan tegelijkertijd op de knoppen 2 en 3, anders
wordt de oven niet ingeschakeld). De functies van de oven kunnen met twee knoppen - thermostaat
en ovenfunctieknop geregeld worden.
• Met gebruik van de digitale programmaregelaar (zie de volgende procedure voor het gebruik). Stel de
temperatuur en de werking in met de bedieningsknoppen van de oven.
INSTELLING TIJDSTIP VAN DIGITALE PROGRAMMAREGELAAR
Na de aansluiting van het apparaat op het elektriciteitsnet knipperen op het scherm de cijfers 0.00. Druk
gelijktijdig op de toetsen 2 en 3 om het tijdstip in te stellen (0.00 en symbool 8 gaan branden). Stel
vervolgens het tijdstip in met de toetsen 4 en 5.
HANDMATIGE BEDIENING VAN DE OVEN
Als u de oven zonder programmering wilt gebruiken, dan moet symbool 6 gedoofd zijn.
Controleer dus altijd het programmeeruur: als symbool 6 brandt, druk dan gelijktijdig op de toetsen 4 en
5. Pas nadat het symbool 6 gedoofd is, kunt u de oven zonder programmering gebruiken!
Met behulp van de digitale programmeerregelaar kunt u de werking van de oven op twee manieren
programmeren:
HALFAUTOMATISCH
- de oven wordt onmiddellijk ingeschakeld en gaat na afloop van de bereiding automatisch uit.
AUTOMATISCH
- instelling voor automatisch inschakelen en uitschakelen van de oven.
HALFAUTOMATISCHE WERKING
Met deze programmeringswijze kunt u de werkingstijd van de oven instellen (duur). Maximale instelling is
23 uur en 59 minuten!
PROCEDURE HALFAUTOMATISCHE WERKING
Verklarend voorbeeld:
Duur 1 uur 20 minuten (1.20).
• Instelling tijdsduur:
Druk op toets 2 (0.00 en symbool 8 gaan branden) en druk op toets 5 tot 1.20 wordt weergegeven.
Tijdens de instelling gaat ook symbool 6 branden. Na 5 seconden gaan op het display het tijdstip en
symbool 6 branden.
• Schakel de oven in: stel met de betreffende knop het verwarmingssysteem en de
bereidingstemperatuur in.
BEDIENING VAN DE OVEN MET DIGITALE
PROGRAMMA-REGELAAR
Page 59

59
• De oven wordt onmiddellijk ingeschakeld (de bereiding begint); tijdens de bereiding blijven de
symbolen 6 en 8 branden.
• Na afloop van de ingestelde bereidingstijd in dit geval over 1 uur en 20 minuten de oven wordt
automatisch uitgeschakeld (bereiding is voltooid), er klinkt een geluidssignaal dat u uit kunt schakelen
door op de toetsen 1, 2 of 3 te drukken.
- Na 2 minuten wordt het geluidssignaal automatisch uitgeschakeld.
- symbool 8 dooft
- symbool 6 knippert.
Schakel de oven uit en druk gelijktijdig op de toetsen 2 en 3 om symbool 6 uit te schakelen.
Zodra symbool 6 gedoofd is, kan de oven handmatig bediend worden.
AUTOMATISCHE WERKING
Bij deze programmeringswijze kan de werkingstijd van de oven (werkingsduur) en het eindtijdstip van de
werking worden ingesteld. Maximale instelling in- en uitschakeling is 23 uur en 59 minuten (instelling
uitschakeling = uur + 23 uur en 59 minuten).
Als de oven niet met de speciale knoppen worden ingeschakeld, zal hij
niet automatisch werken!
PROCEDURE AUTOMATISCHE WERKING
Verklarend voorbeeld:
Bereidingsduur is 1 uur 20 minuten (1.20), uitschakeling om 13.52 uur.
• Controleer of het ingestelde tijdstip overeenkomt met het exacte tijdstip.
• Instelling werkingsduur:
Druk op toets 2 (0.00 en symbool 8 gaan branden), druk op toets 5 tot 1.20 verschijnt (tijdens de
instelling gaat ook symbool 6 branden). Na 5 seconden gaan op het display het tijdstip en de symbolen 6
en 8 branden.
• Instelling uitschakeling:
Druk op toets 3 - het eerst mogelijke tijdstiip van uitschakeling gaat branden (tijdstip + ingestelde
bereidingstijd). Stel met de toetsen 4 en 5 de tijd 3.52 in - het gewenste tijdstip van uitschakeling. Na
voltooiing van de instelling gaan na 5 seconden op het display het tijdstip en symbool 6 branden.
Symbool 8 dooft (gaat weer branden als de oven weer wordt ingeschakeld).
• Schakel de oven in. Stel met de betreffende knoppen het verwarmingssysteem en de
bereidingstemperatuur in.
• De oven wordt automatisch ingeschakeld (in dit geval om 12.32) (aanvang bereiding, hij blijft 1 uur en
20 minuten werken en wordt om 13.52 uitgeschakeld. Tijdens de bereiding blijft symbool 8 branden.
- Als de oven uitgeschakeld wordt: klinkt er een geluidssignaal dat u uit kunt schakelen door op de
toetsen 1, 2 of 3 te drukken. Na 2 minuten wordt het geluidssignaal automatisch uitgeschakeld,
- symbool 8 dooft
- symbool 6 knippert.
Schakel de oven uit en druk tegelijkertijd op de toetsen 2 en 3 om symbool 6 uit te schakelen. Als
symbool 6 gedoofd is, kan de oven handmatig gebruikt worden.
KOOKWEKKER
Een andere functie van de digitale programmaregelaar is de kookwekker, deze kunt u inschakelen door op
toets 1 te drukken. Op het display gaat 0.00 branden. Stel het gewenste tijdstip in met de toetsen 4 en 5.
Op het display gaat symbool 7 branden. De ingestelde tijd kan voortdurende gecontroleerd worden door
op toets 1 te drukken. Na afloop van de ingestelde tijd klinkt er een geluidssignaal, dat u met toets 1,
2 of
3 uit kunt schakelen.
INSTELLEN VAN TOONHOOGTE
• De digitale programmaregelaar moet ingesteld worden op basis van het huidige tijdstip
• Door op de linker toets 4 te drukken kan de toonhoogte van het signaal op 3 mogelijke niveaus
gekozen worden.
• De ingestelde toonhoogte wordt opgeslagen in de digitale programmeerregelaar tot de volgende
wijziging of tot de voeding wordt onderbroken, daarna staat de toonhoogte weer op het hoogste
niveau.
Om wijzigingen aan te kunnen brengen moet altijd 5 seconden gewacht
worden om de wijziging op te slaan.a
OPMERKING:
WAARSCHUWING:
Page 60

60
UITSCHUIFBARE GELEIDERS
Volg voor de reiniging en het onderhoud de volgende aanwijzingen op:
• Draai alle knoppen op de stand "uit".
• De hoofdschakelaar moet in de stand "uit" staan.
• Wacht tot de kookplaten zijn afgekoeld.
GLASKERAMISCHE PLAAT
Reinig de oppervlakte van de kookplaat met een vochtig doekje of spons en maak hem zorgvuldig droog.
Gebruik, om hardnekkig vuil te verwijderen aanbevolen reinigingsmiddelen. Maak de kookplaat, nadat deze
is afgekoeld, na ieder gebruik schoon. Ook kleine verontreinigingen kunnen bij het volgende gebruik
inbranden. Gebruik schuurmiddelen, staalwol, pannensponsjes ruwe kant, reinigingspasta's en evenmin
sponzen en washandjes die u voor andere doeleinden gebruikt. Deze middelen kunnen krassen
veroorzaken op het glaskeramische oppervlak. Gebruik voor het schoonmaken uitsluitend speciale
reinigingsmiddelen voor glaskeramische kookplaten.
GLASKERAMISCHE PLAAT
De glaskeramische plaat ziet er mooi uit en is makkelijk in gebruik. De volgende adviezen en aanbevelingen
zullen u helpen de kookplaat in goede staat te houden zodat u er lang van zult kunnen genieten.
Aanwijzingen voor het gebruik van glaskeramische kookplaten:
• Gebruik pannen met vlakke bodem zonder onzuiverheden die krassen kunnen veroorzaken.
• De bodem van de pan dient minstens zo groot te zijn als de doorsnede van de kookzone, om te
voorkomen dat de temperatuurregelaar de plaat tijdens de bereiding uitschakelt vanwege oververhitting.
• Gebruik tijdens de bereiding een deksel, regel de temperatuur zodanig dat u deze niet hoeft te
verschuiven of verwijderen.
• De glaskeramische kookplaat mag niet gebruikt worden om de ruimte te verwarmen.
• Verwijder tijdens de bereiding onmiddellijk eventuele etensresten van de kookplaat, en maak de plaat
meteen na gebruik schoon.
• Zorg er in ieder geval voor dat u etensresten met een hoog suikergehalte zo snel mogelijk verwijderd,
deze kunnen de structuur van de kookplaat mettertijd aantasten.
• Metaalachtig glanzende verkleuringen onstaan door het gebruik van aluminium pannen of door het
gebruik van ongeschikte reinigingsmiddelen, de vlekken kunnen door herhaalde reiniging verwijderd
worden.
WAARSCHUWING!
REINIGING EN ONDERHOUD VAN
FORNUIS
Page 61

• Krassen op de kookplaat kunnen veroorzaakt zijn door zandkorrels van schoongemaakte groente, of
resten ongeschikte reinigingsmiddelen in poedervorm of ruwe doekjes.
• Als de plaat vervuild is met aarde, zand of andere schuurmiddelen, veeg deze dan weg met een zacht
vochtig doekje en reinig de plaat met een vloeibaar reinigingsmiddel dat geschikt is voor glaskeramische
oppervlakken. Gebruik geen schuursponsjes of andere schurende producten.
• Wij ontraden het gebruik van corrosieve ovenreinigingsspuitbussen of vlekkenverwijderaars.
• Tijdens het koken mogen de randen van de pannen niet tegen de rand van de glaskeramische kookplaat
aankomen, laat hier ook geen pannen op staan.
De fabrikant kan niet aansprakelijk gesteld worden voor
defecten van de glaskeramische plaat die veroorzaakt zijn door
het gebruik van ongeschikte pannen of door ongeschikt of
onjuist onderhoud.
METAALACHTIG GLANZENDE VERKLEURINGEN
Deze ontstaan door het gebruik van aluminium pannen of door het gebruik van ongeschikte
reinigingsmiddellen.
Deze vlekken kunnen door herhaaldelijk schoonmaken verdwijnen.
Kleurveranderingen van de glaskeramische kookplaat zijn vooral te wijten aan ingebrande etensresten die
niet tijdig werden verwijderd. Zij hebben geen invloed op de werking van de glaskeramische kookplaat, er
is geen sprake van aantasting van het materiaal.
Vlekken van gerechten met een hoog suikergehalte die niet onmiddellijk verwijderd worden kunnen leiden
tot onherstelbare schade aan de glaskeramische kookplaat.
SLIJTAGE VAN DE DECORATIE
Kan veroorzaakt worden door agressieve reinigingsmiddelen, door het langdurig schuiven met pannen over
het oppervlak van de kookplaat, hierdoor ontstaat een donkere plek.
OVEN
Reinig de oven met een wasmiddel of een speciaal middel voor ovenreiniging. Maak het vuil vochtig, borstel
ze weg en veeg ze af met een doekje. Verwijder de aangebrande resten niet met scherpe metalen
voorwerpen.
Reinig de accessoires van de oven met een spons met afwasmiddel of was ze af in de afwasmaschine
(rooster, opvangbak enz.).
AQUA CLEAN
Wij adviseren u voor een dagelijkse reiniging van de oven (na ieder gebruik) de volgende procedure uit te
voeren: draai de functiekeuzeknop van de afgekoelde oven op de stand
.
Zet de knop van de
thermostaat op 50° C. Giet in de opvangbak 0,4 l water en zet deze op de onderste geleiders. Na 30
minuten worden de resten van gerechten die op het emaille van de ovenwanden zitten zacht en kunt u
deze met een vochtig doekje afvegen.
VERVANGEN VAN HET LAMPJE IN DE OVEN
• Zet alle bedieningsknoppen op “uitgeschakeld” en trek de stekker uit het stopcontact of schakel de
hoofdschakelaar uit.
• draai het glazen kapje van het lampje naar links
• schroef het defecte lampje los en schroef het nieuwe lampje erin
• zet het glazen kapje terug
Gebruik voor de verlichting uitsluitend een lampje van T 300 °C, E 14,
230 V~, 25 W.
1. Glazen kapje
2. Lampje
3. Fitting
4. Achterwand van de oven
OPMERKING:
61
Page 62

62
KLACHTEN
Wanneer zich een storing voordoet bij het apparaat tijdens de garantieperiode, repareer deze niet zelf. Stel
de winkel waar u het apparaat gekocht hebt op de hoogte van de klacht, of de geautoriseerde klantenservice
of een andere technische dienst in de Garantievoorwaarden is vermeld. Volg de aanwijzingen op die vermeld
zijn in het Garantiebewijs en de Garantievoorwaarden. Zonder correct ingevuld Garantiebewijs wordt de
klacht niet in behandeling genomen.
VERWERKING EN RECYCLING VAN DE
VERPAKKING
Karton, verpakkinspapier: - inleveren bij centra voor gescheiden inzameling - in containers voor papier
gooien
Houten pallet: - centrum voor afvalverwerking - andere verwerking
Verpakkingsfolies en PE-zakjes: - containers voor kunststof
VERWERKING VAN
AFGEDANKT APPARAAT
Dit apparaat is voorzien van het merkteken volgens de Europese richtlijn 2002/96/EG inzake Afgedankte
Elektrische en Elektronische apparatuur (Waste Electrical and Electronic Equipment - WEEE). Deze richtlijn
voorziet in een enkel Europees (CE) kader voor de verwerking en recycling van afgedankte apparaten.
Het apparaat bevat waardevolle stoffen die hergebruikt kunnen worden.
AANWIJZINGEN VOOR DE INSTALLATIE EN
AFSTELLING
De installatie dient uitgevoerd te worden overeenkomstig geldende plaatselijke normen en
voorschriften. De installatie van het fornuis moet uitgevoerd worden door een gekwalificeerde
technicus.
AANSLUITING VAN HET APPARAAT OP HET ELEKTRICITEITSNET:
De installatie dient uitgevoerd te worden in overeenstemming met de geldende plaatselijke normen en
voorschriften. De aansluiting van het apparaat op het elektriciteitsnet dient uitgevoerd te worden door een
gekwalificeerd technicus. Voor de aansluting van het apparaat op het elektriciteitsnet moet een voorziening
worden aangebracht met een afstand van de losgekoppelde contacten van minstens 3 mm. Aanbevolen wordt
een aansluiting van het fornuis is een 3 fase aansluiting met netsnoer type H05RR-F5G-1,5, die aangepast is
volgens afb. 9. De uiteinden van de draden moeten bestand zijn tegen uitrafelen met geperste eindstukken.
Voor de 1-fase-aansluiting gebruik maken van een netsnoer van het type H05RR-F3G-4, de uiteinden van de
geleiders moeten bevestigd worden volgens afb. 5. Om de uiteinden van de draden aan te sluiten onder de
koppen van de schroeven in het klemmenbord de draden in het klemmenbord plaatsen en blokkeren met
een klem (afb. 5). Sluit het deksel van het klemmenbord.
Voor de aansluiting van het fornuis adviseren wij het gebruik van de voedingskabel:
- Cu 3 x 4 mm2 min. voor 1-fase-aansluiting (beveiligingsschakelaar 35 - 38 A vafhankelijk van het type)
- Cu 5 x 1,5 mm2 min. voor driefase-aansluiting (beveiligingsschakelaar 3x16 A)
Page 63

63
Tijdens elke demontage en montage van het elektrische fornuis, behalve het dagelijks gebruik, moet de
stekker van het apparaat altijd uit het stopcontact gehaald worden. Verzeker u ervan dat het apparaat uit
staat.
Voor de installatie van het apparaat moeten, voor de goede werking, de volgende handelingen
verricht worden:
• controle van de correcte aansluiting op het elektriciteitsnet,
• controle van de juiste werking van de verwarmingselementen, bedienings- en regelelementen,
demonstratie voor de klant van alle functies van het apparaat en het gebruik en het onderhoud.
BELANGRIJKE AANWIJZING
Het elektrische fornuis is een apparaat van klasse I volgens de beschermingsgraad tegen ongevallen
veroorzaakt door elektrische stroom en dient met een veiligheidsschakelaar aan het elektriciteitsnet
gekoppeld te zijn.
WAARSCHUWING:
Page 64

64
PLAATSING
Het elektrische fornuis is bedoeld voor huishoudelijk
gebruik. Het kan in ingebouwd worden in een keuken
zonder zijtussenruimten (minimale breedte 500 mm).
Het fornuis kan tussen kasten met die bestand zijn
tegen een temperatuur van 100 °C geplaatst worden of
met warmteisolerend materiaal bekleed zijn het is
verboden om het fornuis op een sokkel te plaatsen. "X"
is de minimumafstand 650 mm tot de afzuigkap,
volgens aanbeveling van de fabrikant.
IN HOOGTE VERSTELLEN VAN HET FORNUIS
Het fornuis is voorzien van 4 stelschroeven waarmee
het waterpas gezet kan worden of in hoogte versteld
kan worden.
PROCEDURE:
• kantel het fornuis op zijn zijkant
• draai de plastic schroeven in de voorste en
achterste gaten op de onderkant
• kantel het fornuis op de andere kant en draai de schroeven in de openingen aan de andere kant van
het fornuis
• stel et fornuis verder af met een schroevendraaier vanuit de opbergruimte van het fornuis.
De afstelling in hoogte (met de schroeven) is niet nodig als de hoogte en de afstelling van het
apparaat zonder plastic schroeven goed zijn.
De fabrikant behoudt zich het recht voor om kleine wijzigingen in de gebruiksaanwijzing aan te
brengen die uit innovatieve of technologische wijzigingen van het product voortvloeien en die geen
invloed hebben op de werking van het apparaat.
WAARSCHUWING:
OPMERKING:
Page 65

65
Tijdentabel - OVEN
Gerecht Functie Voorverwarming
Inzethoogte
(vanaf de bodem)
Temperatuur
(°C)
Bereidingstijd
(minuten)
VLEES
rund-, varkens- en kalfsvlees
(1 kg)
Statisch X 2 180 - 210 70 - 90
Ventilator - 2 170 - 190 70 - 90
kip, konijn, eend (~1 kg)
Statisch X 2 180 - 210 55 - 75
Ventilator - 2 170 - 190 55 - 75
schapen-, geiten-, lamsvlees
(~1 kg)
Statisch X 2 180 - 210 70 - 90
Ventilator - 2 170 - 190 70 - 90
gans (~2 kg)
Statisch X 1 190 - 210 100 - 120
Ventilator - 1 170 - 190 100 - 120
VIS HEEL (van ~ 0,8 tot 1 kg)
brasem, forel, zalm
Statisch X 2 170 - 180 45 - 55
Ventilator - 2 160 - 170 45 - 55
VISFILET (van ~ 0,5 tot 0,7 kg)
zwaardvis, tonijn, kabeljauw
Statisch X 2 170 - 180 35 - 45
Ventilator - 2 160 - 170 35 - 45
GROENTE (van ~ 0,5 tot 0,7 kg)
gevulde paprika
Statisch X 2 160 - 170 40 - 50
Ventilator - 2 150 - 160 40 - 50
gevulde aardappelen
Statisch X 2 160 - 170 55 - 65
Ventilator - 2 150 - 160 55 - 60
gebakken aardappelen
Statisch X 2 200 - 210 55 - 65
Ventilator - 2 190 - 200 50 - 60
TAARTEN enz.
gerezen taart (broze taart)
Statisch X 2 150 - 170 35 - 45
Ventilator - 2 150 - 160 30 - 40
Hartige taart met vulling (kaas)
Statisch X 2 165 - 175 60 - 70
Ventilator - 2 150 - 160 60 - 70
grote taart met lagen
Statisch X 2 170 - 180 35 - 45
Ventilator - 2 160 - 170 35 - 45
strudel
Statisch X 2 170 - 180 35 - 45
Ventilator - 2 160 - 170 30 - 40
koekjes
Statisch X 2 160 - 170 15 - 25
Ventilator - 2 150 - 160 15 - 20
zoet gebak
Statisch X 2 160 - 170 30 - 40
Ventilator - 2 150 - 160 25 - 35
hartige taarten
(Quiche Lorraine)
Statisch X 2 170 - 180 40 - 50
Ventilator - 1 160 - 170 40 - 50
lasagne
Statisch X 2 170 - 180 40 - 50
Ventilator - 2 160 - 170 40 - 50
pizza
Statisch X 2 220 - 250 15 - 20
Ventilator - 2 200 - 225 15 - 20
taarten met vulling
(ananas, perzik)
Statisch X 2 160 - 170 30 - 40
Ventilator - 2 160 - 170 30 - 40
schuimpjes
Statisch X 2 80 - 100 60 - 90
Ventilator - 2 50 - 75 60 - 90
soufflé
Statisch X 2 160 - 180 55 - 65
Ventilator - 2 150 - 160 50 - 60
Opmerking: De bereidingstijden en -temperaturen zijn indicatief
Page 66

66
Tijdentabel - GRILL
Levensmiddel Functie
Voorverwarming
(5 minuten)
Inzethoogte
(vanaf de bodem)
Temperatuur
(°C)
Bereidingstijd
(minuten)
VLEES
klapstuk Grill X 3 Maximum 20 - 30
varkenskoteletten
Grill X 3 Maximum 15 - 20
saucijsjes Grill X 3 Maximum 20 - 30
vis
Grill X 3 Maximum 15 - 25
kippenboutjes Grill X 3 Maximum 20 - 30
kebab
Grill X 3 Maximum 20 - 30
varkensribstuk Grill X 3 Maximum 30 - 40
1/2 kip
Grill X 3 Maximum 40 - 50
Opmerking: De bereidingstemperaturen en -tijden zijn indicatief
TECHNISCHE GEGEVENS
ELEKTRISCH FORNUIS
PCCF 30201050 W
PCCF 30201050 X
PCCF 50201250 W
PCCF 50201250 X
PCCF 80211250 W
PCCF 80211250 X
Afmetingen: hoogte / breedte / diepte 850 / 500 / 605 850 / 500 / 605 850 / 500 / 605
Kookplaat - elektrische kookzones
Linksachter Ø 145 mm (kW) 1,2 1,2 1,2
Linksvoor Ø 180/120 mm (kW)
1,7 1,7 / 0,7 1,7 / 0,7
Rechtsachter Ø 145 / 250 mm (kW)
1,7 2,0 / 1,2 2,0 / 1,2
Rechtsvoor Ø 145 mm (kW)
1,2 1,2 1,2
Oven
Bovenste verwarmingselement (kw)
0,75 0,75 0,75
Onderste verwarmingselement (kw)
1,10 1,10 1,10
Grillverwarmingselement (kw)
1,85 1,85 1,85
Rond verwarmingselement (kw)
- - 2,00
Ventilator (w)
- 30 (35) 30 (35)
Verlichting (w)
25 25 25
Min. / Max temperatuur in oven
50 / 250° C 50 / 250° C 50 / 250° C
Voedingsspanning
230 / 400 V ~ 230 / 400 V ~ 230 / 400 V ~
Totaal vermogen apparaat (kw)
7,7 8,1 9,3
TOEBEHOREN
Rooster + + +
Opvangbak + + +
Bakblik + + +
Schrapertje + + +
Uitschuifbare geleiders +
Page 67

67
INFORMATIEBLAD
Model
PCCF 30201050 W
PCCF 30201050 X
PCCF 50201250 W
PCCF 50201250 X
PCCF 80211250 W
PCCF 80211250 X
A - Het meest efficiënt
B
C
D
E
F
G - Het minst efficiënt
A A A
Energieverbruik (kW/h)
0,79 0,79
Bereidingstijd bij standaardbelasting (min)
52,3 53,1
Energieverbruik (kW/h)
079 0,79
Bereidingstijd bij standaardbelasting (min)
47 44,3
Bruikbare inhoud van de oven
49 45 42
Afmetingen van de oven
KLEIN
MIDDELGROOT
GROOT
Geluidsemissie (dB)
46 46
Laagste energieverbruik (stand-by) (W)
Oppervlakte grootste bakblik (cm2)
1230 1230 1230
Page 68

68
Gentile cliente,
ha acquistato un prodotto della nostra nuova linea di cucine elettriche. Ci auguriamo che possa offrirLe
una lunga durata d'utilizzo. La invitiamo a leggere attentamente le istruzioni per l'uso e ad attenersi
scrupolosamente ad esse durante l'utilizzo del prodotto.
INFORMAZIONI IMPORTANTI,
ISTRUZIONI E RACCOMANDAZIONI
• Verificare che i dati della tensione di alimentazione nominale riportati sulla targhetta corrispondano alla
tensione dell'alimentazione di rete.
• La cucina si collega alla rete elettrica conformemente allo schema di collegamento.
• L'installazione, tutte le regolazioni, riparazioni e modifiche all'apparecchio devono essere eseguite da
personale qualificato (vedere il Certificato di garanzia).
• Tali operazioni devono essere riportate sul Certificato di garanzia dell'apparecchio.
• È necessario installare nel circuito della rete di alimentazione principale un dispositivo di interruzione
(interruttore principale) che consenta di scollegare l'apparecchio dalla rete principale, con una distanza
di apertura minima dei contatti di 3 mm.
• La cucina è destinata al solo trattamento termico degli alimenti. E' vietato utilizzarla per riscaldare
l'ambiente. In caso contrario l'apparecchio potrebbe surriscaldarsi e danneggiarsi. La garanzia non copre
i danni causati da uso improprio.
• Non abbassare il coperchio del piano cottura quando le piastre di cottura sono ancora calde.
• Non collocare materiali infiammabili o combustibili vicino alle piastre di cottura, agli elementi riscaldanti
del forno e ai vani contenitori.
• Assicurarsi che i cavi d'alimentazione degli altri apparecchi non possano venire a contatto con il piano di
cottura o con altre parti del forno.
• Assicurarsi che tutti gli interruttori siano spenti quando l'apparecchio non è in uso.
• Una volta ogni due anni è consigliabile richiedere al personale dell'assistenza di eseguire un'ispezione del
corretto funzionamento dell'apparecchio ed eventuali interventi di manutenzione, al fine di prevenire
guasti e allungare la durata del prodotto.
• Spegnere sempre l'interruttore principale durante la pulizia o gli interventi di riparazione.
• In caso di guasti all'impianto elettrico dell'apparecchio, scollegarlo dall'alimentazione di rete e rivolgersi a
personale qualificato. Non tentare di riparare l'apparecchio da soli.
• Il produttore non è responsabile di eventuali danni causati dall'inosservanza delle istruzioni e delle
raccomandazioni fornite nel presente manuale.
• Non utilizzare accessori che mostrano segni di usura o sono danneggiati.
• Non utilizzare apparecchi a vapore per pulire il prodotto.
Page 69

69
1. Manopola di comando della zona di cottura
sinistra anteriore
2. Manopola di comando della zona di cottura
sinistra posteriore
3. Manopola di comando della zona di cottura
destra posteriore
4. Manopola di comando della zona di cottura
destra anteriore
5. Termostato del forno
6. Selettore delle funzioni del forno
7. Spia di funzionamento termostato
8. Spia di funzionamento generale
9. Tasti di comando del timer digitale
10. Interruttore del timer digitale
COME COMPORTARSI AL PRIMO UTILIZZO
Prima dell'utilizzo rimuovere dall'apparecchio tutti i materiali d'imballaggio. Varie parti e componenti
dell'imballaggio sono riciclabili. Smaltirli in conformità alle norme locali in vigore.
È consigliato pulire l'apparecchio e i suoi accessori prima dell'utilizzo. Quando la superficie si è asciugata,
accendere l'interruttore principale e seguire le istruzioni per l'uso.
Non rimuovere né pulire parti che non sono citate nella sezione dedicata alla pulizia.
FORNO
Portare il selettore delle funzioni del forno in posizione "riscaldamento superiore e inferiore". Regolare il
termostato a 250 °C e lasciare il forno a porta chiusa per 1 ora. Assicurare un'adeguata ventilazione
dell'ambiente. In questo modo si eliminano gli odori e gli eventuali residui delle sostanze di trattamento
utilizzate in fabbrica.
PANNELLO COMANDI
Page 70

70
USO DEI FORNELLI
• L'utilizzo dell'apparecchio è destinato esclusivamente a persone adulte e in conformità al presente
manuale di istruzioni. Non lasciare bambini piccoli non sorvegliati nella stanza in cui è installato
l'elettrodomestico.
• L'apparecchio non deve essere utilizzato da bambini o da persone con ridotte capacità fisiche, sensoriali
o mentali, o la cui mancanza d'esperienza e conoscenza dell'apparecchio impedisca loro di utilizzarlo in
modo sicuro, senza la supervisione o le indicazioni di una persona responsabile della loro sicurezza che
ne garantisca l'utilizzo corretto.
• I bambini devono essere sorvegliati per assicurare che non giochino con l'elettrodomestico.
• La cucina elettrica è un apparecchio che deve essere utilizzato sotto la supervisione di una persona
responsabile.
PIANO DI COTTURA IN VETROCERAMICA A ZONE DI COTTURA
• I piani di cottura standard hanno la regolazione di potenza a 6 posizioni, in cui 6 corrisponde alla
potenza massima e 1 alla potenza minima.
• I piani di cottura elettrici consentono di cuocere, arrostire ecc. Si consiglia l’uso di recipienti con fondo
piatto. Il surriscaldamento della zona di cottura sotto il fornello in vetroceramica viene impedito dal
regolatore di temperatura.
• La spia di controllo del calore residuo, posizionata nella parte anteriore del piano cottura, ne segnala la
temperatura elevata anche ad apparecchio spento.
• Si può sfruttare il calore residuo, ad esempio, per riscaldare o tenere in caldo i cibi.
• La spia si spegne quando il piano di cottura si è raffreddato al punto di non provocare ustioni.
• La potenza dei piani di cottura Hi-light e dei piani di cottura doppi viene regolata da un comando non
graduale.
PIANO DI COTTURA A DUE CIRCUITI
Per accendere la parte centrale del piano cottura da 120 mm Ø , ruotare la manopola del regolatore di
potenza verso destra, impostandola da 0 a 700 W.
Quando si ruota la manopola verso destra in posizione di massima potenza, si attiva il piano cottura da 180
mm Ø , che si riscalda alla massima potenza di 1700 W a seconda del livello scelto, da 1 (minimo) a 9
(massimo).
Ruotando la manopola in posizione 0 si spengono entrambe le sezioni. Il surriscaldamento della zona di
cottura sotto il fornello in vetroceramica viene impedito dal regolatore di temperatura.
La spia di controllo del calore residuo, posizionata nella parte anteriore del piano cottura, ne segnala la
temperatura elevata anche ad apparecchio spento.
Si può sfruttare il calore residuo, ad esempio, per riscaldare o tenere in caldo i cibi.
La spia si spegne quando il piano di cottura si è raffreddato al punto di non provocare ustioni.
AVVERTENZE:
Ø 180 / 120 mm - 1700 / 700 kW
Ø 145 / 250 mm - 2000 / 1200 kW
Page 71

71
CONSIGLI PER L’USO DEI PIANI DI COTTURA IN VETROCERAMICA:
• Usare recipienti a fondo piatto, privi di impurità che potrebbero graffiarli.
• Usare recipienti di dimensioni adatte alla piastra per evitare che il regolatore di temperatura possa
spegnerla a causa del riscaldamento del piano di cottura.
• Durante la cottura coprire la pentola con il coperchio, regolare la temperatura in modo da non doverla
spostare o rimuovere.
• Il piano di cottura in vetroceramica non va usato per il riscaldamento dell’ambiente.
• Rimuovere residui di cibo durante la cottura e, al termine, eseguire la pulizia. Rimuovere
immediatamente macchie di zucchero o sostanze zuccherine, quali la marmellata, con l'apposito
raschietto, per evitare che si formino macchie permanenti.
• Le macchie metalliche lucide provengono dall’uso di recipienti in alluminio o dall’uso dei detersivi non
adatti, le macchie si eliminano ripetendo più volte le operazioni di pulizia.
• I graffi sul piano cottura possono essere causati, ad esempio, da granelli di sabbia, da residui vegetali,
detersivi abrasivi, o superfici taglienti, ad esempio il diamante di un anello.
• Per eliminare sabbia o materiali abrasivi, utilizzare un panno morbido inumidito. Quindi lavarle il piano
con detersivo liquido specifico per superfici in vetroceramica.
• Non utilizzare pagliette metalliche, spugne o altri prodotti abrasivi. Non usare prodotti corrosivi, quali
ad esempio i prodotti spray per il forno.
• Durante la cottura i bordi dei recipienti non devono toccare o poggiare sul bordo esterno del piano di
cottura in vetroceramica.
FORNO
L’INTERNO DEL FORNO
Il forno è dotato di tre serie di scanalature laterali (guide) per inserire le griglie.
All'interno del forno, sul soffitto, è installato l'elemento riscaldante superiore con funzione di grill.
L'elemento riscaldante inferiore si trova sotto il piano inferiore del forno.
Sul fondo, dietro la parete di distribuzione del calore, sono inseriti l'elemento riscaldante circolare e la
ventola.
ACCENSIONE E SPEGNIMENTO DEL FORNO
Ruotare il selettore delle funzioni del forno sulla funzione desiderata. La manopola può ruotare in
entrambe le direzioni.
La temperatura può essere regolata da 50°C a 250°C ruotando in senso orario o antiorario la manopola
del termostato.
Non forzare la rotazione della manopola oltre il segno 0 per non danneggiare il termostato!
• La leccarda inserita nelle guide del forno può essere caricata fino a un massimo di 3 kg.
La griglia con un tegame o una teglia può sopportare fino a 7 kg.
• Le leccarde e le teglie non sono adatte per conservare a lungo gli alimenti (oltre le 48 ore).
Trasferire gli alimenti da conservare in contenitori appositi.
ATTENZIONE:
Page 72

72
Illuminazione del forno, la lampada rimane
accesa durante tutte le operazioni di
regolazione del forno.
Riscaldamento statico del forno tramite gli
elementi superiore e inferiore. Il termostato
può essere regolato da 50°C a 250°C.
Elemento riscaldante inferiore in funzione. Il
selettore di temperatura può essere
impostato da 50°C a 250°C.
Suggerimento: questa funzione si utilizza
per cotture che richiedono una temperatura
alta nella parte inferiore.
Elemento riscaldante superiore in funzione.
Il selettore di temperatura può essere
impostato da 50°C a 250°C.
Suggerimento: questa funzione si utilizza
per cotture che richiedono una temperatura
alta nella parte superiore, ad esempio per
grigliare.
Grill mediante radiazione a infrarossi.
Impostare la temperatura sul valore
massimo.
Grill con funzionamento della ventola. La
temperatura nel forno è più elevata nella
parte superiore per effetto della ventilazione
(sopra la griglia o leccarda). Il termostato
può essere impostato dai 150 ai 250 °C.
Raccomandazione: questa funzione è
adatta per cuocere, in teglia o alla griglia,
pezzi di carne voluminosi che richiedono più
calore in alto. La porta del forno deve
restare chiusa.
Elementi superiore e inferiore in funzione
con l'ausilio della ventola.
La temperatura interna viene distribuita
uniformemente in tutto il forno. Il selettore
della temperatura può essere impostato alla
temperatura desiderata tra i 50 e i 250°C.
Suggerimento: questa funzione è indicata
per cuocere su due livelli
contemporaneamente, specialmente quando
occorre avere la stessa temperatura su
entrambi i livelli.
Elemento riscaldante inferiore, elemento
circolare e ventola in funzione. Impostare le
temperatura desiderata.
Suggerimento: questa funzione consente di
scaldare rapidamente il forno prima della
cottura nella modalità scelta. Al
raggiungimento della temperatura impostata,
selezionare la funzione di cottura desiderata.
Riscaldamento del forno con elemento
circolare e ventola in funzione. La
circolazione dell'aria crea una temperatura
omogenea in tutto il volume del forno. La
temperatura può essere impostata da 50 a
250 °C.
Suggerimento: questa funzione è indicata
per cuocere alimenti contemporaneamente
su due ripiani (adatto per la cottura di dolci
più alti o voluminosi o per grandi quantità).
Questa funzione va utilizzata per
l’essiccazione molto delicata o per
scongelare gli alimenti.
Suggerimento: questa funzione è indicata
per lo scongelamento di pietanze o cibi
precotti prima della cottura finale.
Il calore proveniente dall'elemento
riscaldante inferiore viene fatto circolare
dalla ventola. La circolazione dell'aria crea
calore uniforme in tutto il volume del forno.
Il termostato può essere impostato da 50 °C
a 250 °C.
Elemento riscaldante inferiore in funzione
per la modalità Aqua clean.
Questa funzione può essere utilizzata per
pulire il forno. Per i dettagli sulla pulizia
consultare la sezione "Pulizia e
manutenzione". Per la modalità AQUA Clean
, consultare la sezione "Aqua Clean".
FUNZIONI DEL FORNO E APPLICAZIONI
Page 73

73
TABELLA DELLE TEMPERATURE DI COTTURA
Di seguito vengono riportate le temperature indicative tipiche consigliate per la cottura degli alimenti.
50-70° C essiccazione
80-100° C sterilizzazione
130-150° C stufati
180-220° C cottura di impasti
220-250° C carni
• Il valore di temperatura ideale per ogni tipo di pietanza e il metodo di cottura dovranno essere adattati
alle esigenze personali.
• Prima di iniziare la cottura, in alcuni casi, è necessario preriscaldare il forno. Durante il riscaldamento la
spia del termostato rimane accesa. Al raggiungimento della temperatura selezionata, si spegne.
• Sistemare la griglia con la teglia, o la leccarda, preferibilmente nella seconda serie di guide partendo dal
basso.
• Tutte le cotture vanno eseguite a porta chiusa per non abbassare la temperatura del forno acceso, per
non prolungare i tempi di cottura e per consentire una cottura uniforme delle pietanze.
COTTURA ALLA GRIGLIA
• Sistemare le pietanze sulla griglia.
• Inserire la griglia nelle guide delle pareti laterali del forno.
• Per raccogliere il sugo, inserire la leccarda nelle guide laterali
sottostanti oppure una teglia sulla base del forno.
• Tenere chiuso lo sportello del forno durante la cottura.
Durante la grigliatura le parti accessibili (porta del forno, ecc.) possono
raggiungere temperature molto elevate. Accertarsi di tenere i bambini a
distanza di sicurezza.
ATTENZIONE:
Page 74

74
Il programmatore digitale, o timer, consente di spegnere automaticamente il forno dopo un tempo
prestabilito.
Lo stato di acceso o spento del programmatore digitale è indicato dal simbolo della pentola (8) acceso al
centro del display.
L'indicazione dell'ora è sempre illuminata.
Il programmatore digitale è alimentato dalla rete principale, si spegne se viene interrotta l'alimentazione e
al ripristino dell'alimentazione è necessario impostare nuovamente l'ora (le cifre 0.00 e il simbolo A (6)
lampeggiano).
1. Tasto di impostazione del segnale acustico
2. Tasto di impostazione del tempo di cottura
3. Tasto di impostazione di spegnimento
4. Tasto di impostazione (-)
5. Tasto di impostazione (+)
6. Simbolo "A": rimane acceso dall’inizio fino al termine della cottura.
Al termine della cottura lampeggia.
7. Simbolo - timer
8. Questo simbolo si accende quando il forno è in funzione.
IL FORNO PUÒ FUNZIONARE IN DUE MODALITÀ
• Senza il programmatore digitale: in questo caso il simbolo della pentola (8) è acceso, qualora non lo
fosse premere contemporaneamente i tasti 2 e 3, altrimenti il forno non entra in funzione. Il forno è
inoltre comandato dalle due manopole del termostato e del selettore di funzione.
• Con il programmatore digitale (l'impostazione del programmatore è descritta di seguito).
La temperatura e la modalità di funzionamento possono essere impostate con i tasti di impostazione
del forno.
IMPOSTAZIONE DELL'ORA NEL PROGRAMMATORE DIGITALE
Dopo il collegamento dell’apparecchio alla rete elettrica, sul quadrante lampeggiano le cifre 0.00. Premere
contemporaneamente i tasti 2 e 3 per impostare l’ora esatta. Si illuminerà il simbolo 8. Utilizzare i tasti 4 e
5 per impostare l'ora.
COMANDO MANUALE DEL FORNO
Il forno può essere utilizzato senza programmazione quando il simbolo A (6) è spento. Verificare sempre
l'ora di programmazione. Se il simbolo A (6) è acceso, premere contemporaneamente i tasti 4 e 5 per
spegnerlo. A questo punto è possibile utilizzare i comandi manuali.
Il programmatore digitale consente di programmare il funzionamento del forno in due modalità:
SEMIAUTOMATICA
- Il forno si accende subito e si spegne automaticamente al termine della cottura
AUTOMATICA
- Il forno si accende e si spegne automaticamente in base all'orario impostato.
FUNZIONE SEMIAUTOMATICA
Questa modalità di programmazione permette di impostare il tempo di cottura delle pietanze (durata).
L’impostazione massima è di 23 ore e 59 minuti.
IMPOSTAZIONE DELLA FUNZIONE SEMIAUTOMATICA
Esempio di programmazione:
Durata di cottura: 1 ora 20 minuti (1.20).
• Impostazione della durata:
Premere il tasto 2: si illuminano 0.00 e il simbolo 8. Premere il tasto 5 fino a visualizzare 1.20. Durante
l’impostazione si illumina il simbolo 6. Dopo 5 secondi si illuminano sul display l’ora ed il simbolo 6.
• Accendere il forno impostando la temperatura con la manopola del termostato e il selettore della
funzione.
PROGRAMMAZIONE DEL FORNO
CON I COMANDI DIGITALI
Page 75

75
• Il forno si accende immediatamente e inizia la cottura; durante la cottura rimangono illuminati i simboli
6 e 8.
• Al termine della cottura impostata, in questo caso 1 ora e 20 minuti, il forno si spegne
automaticamente (la cottura è terminata).
- Viene emesso un segnale acustico, per spegnerlo premere i tasti 1, 2 o 3.
Il segnale acustico si interrompe automaticamente dopo 2 minuti.
- il simbolo 8 si spegne.
- il simbolo 6 lampeggia.
• Spegnere il forno e premere contemporaneamente i tasti 2 e 3 per spegnere il simbolo 6.
Quando il simbolo 6 è spento, il forno è pronto per l'uso manuale.
MODALITÀ AUTOMATICA
Questa modalità di programmazione imposta il tempo di cottura delle pietanze (durata) e il suo termine
(fine cottura).
La durata massima di funzionamento, dall'accensione allo spegnimento, è di 23 ore e 59 minuti
(impostazione di spegnimento = ora + 23 ore e 59 minuti).
Se il forno non viene acceso con i tasti appositi, non funzionerà
automaticamente!
IMPOSTAZIONE DELLA MODALITÀ AUTOMATICA
Esempio di programmazione:
Durata di cottura 1 ora e 20 minuti (1.20), spegnimento alle ore 13.52.
• Assicurarsi che l’ora impostata corrisponda all’ora esatta.
1. Impostazione della durata:
Premere il tasto 2: si illuminano 0.00 e il simbolo 8. Premere il tasto 5 fino alla visualizzazione di
1.20 (durante l’impostazione il simbolo 6 è acceso). Dopo 5 secondi si illuminano sul display l’ora e i
simboli 6 e 8.
2. Impostazione dello spegnimento:
Premere il tasto 3: si illumina l’ora di spegnimento più prossima (l’ora attuale + il tempo di cottura
impostato). Con i tasti 4 e 5 impostare 13.52, ovvero l’ora di spegnimento desiderata. Al termine
dell'impostazione dopo 5 secondi sul display si illuminano l’ora attuale e il simbolo 6. Il simbolo 8 si
spegne, si riaccenderà al momento di messa in funzione del forno.
3. Accendere il forno. Con le apposite manopole impostare la funzione e la temperatura.
4. Il forno si accenderà automaticamente, in questo caso alle 12.32 (inizio cottura), rimarrà acceso per
1 ora e 20 minuti e si spegnerà alle 13.52. Durante la cottura rimane acceso il simbolo 8.
Viene emesso un segnale acustico, per spegnerlo premere i tasti 1, 2 o 3.
Il segnale acustico si interrompe automaticamente dopo 2 minuti.
- Il simbolo 8 si spegne.
- Il simbolo 6 lampeggia.
• Spegnere il forno e premere contemporaneamente i tasti 2 e 3 per spegnere il simbolo 6.
Quando il simbolo 6 è spento, il forno è pronto per l'uso manuale.
TIMER
Nel programmatore digitale è disponibile anche la funzione di timer, che si attiva premendo il tasto 1. Sul
display si illumina 0.00. Con i tasti 4 e 5 impostare l’ora richiesta. Sul display si accende il simbolo 7
.
L’orario impostato può essere controllato premendo il tasto 1. Al termine dell’orario impostato verrà
emesso un segnale acustico, che si può spegnere con i tasti 1, 2 o 3.
IMPOSTAZIONE DELL’ALTEZZA DEL SEGNALE:
• Il programmatore digitale deve trovarsi in modalità di impostazione dell'ora.
• Premere il tasto sinistro 4 per selezionare l’altezza del segnale in 3 possibili livelli.
• L’altezza del segnale impostata viene memorizzata fino ad una nuova impostazione o fino al distacco
dall’alimentazione, quando il segnale ritorna al livello più alto.
Per poter eseguire qualsiasi modifica alle impostazioni, attendere 5 secondi,
necessari perché la modifica venga memorizzata.
NOTA:
ATTENZIONE!
Page 76

76
GUIDE TELESCOPICHE
Durante le operazioni di pulizia e manutenzione seguire le seguenti raccomandazioni:
• Portare tutte le manopole in posizione di "spento".
• Portare l'interruttore principale in posizione di "spento".
• Attendere che le piastre siano raffreddate.
PIANO IN VETROCERAMICA
Per la pulizia della superficie in vetroceramica utilizzare un panno o una spugna bagnati con acqua, quindi
asciugare accuratamente. Per rimuovere lo sporco più resistente utilizzare detergenti specifici. Pulire il
piano dopo ogni utilizzo, quando si è raffreddato.
In caso contrario i residui di cottura bruceranno alla prossima accensione dei fuochi. Non utilizzare
prodotti abrasivi, spugne ruvide, paste per pulire o spugne e panni utilizzati per altri scopi.
Questi prodotti potrebbero graffiare il piano. Per la pulizia utilizzare esclusivamente detergenti specifici
per superfici in vetroceramica.
PIANO DI COTTURA IN VETROCERAMICA
Il piano di cottura è esteticamente molto gradevole e pratico da utilizzare. I seguenti consigli e
raccomandazioni vi aiuteranno a mantenerlo in buone condizioni affinché possa offrirvi una lunga durata
d’utilizzo.
Consigli per l’uso dei piani di cottura in vetroceramica:
• Usare recipienti a fondo piatto privi di impurità che potrebbero graffiarli.
• Usar recipienti di dimensioni idonee alla piastra per evitare che il regolatore di temperatura possa
spegnerla a causa del riscaldamento del piano cottura.
• Durante la cottura coprire la pentola con il coperchio, regolare la temperatura in modo da non doverla
spostare o rimuovere.
• Il piano cottura in vetroceramica non va usato per il riscaldamento dell’ambiente.
• Rimuovere i residui di cibo durante la cottura e, al termine, eseguire la pulizia.
• Rimuovere immediatamente macchie di zucchero o sostanze zuccherine, quali la marmellata, con
l'apposito raschietto per evitare che si formino macchie permanenti.
• Le macchie metalliche lucide sono dovute all’uso di recipienti in alluminio o all’uso dei detersivi non
idonei, le macchie si eliminano ripetendo più volte le operazioni di pulizia.
• I graffi sul piano cottura possono essere causati, ad esempio, da granelli di sabbia, da residui vegetali,
detersivi abrasivi, o superfici taglienti, ad esempio il diamante di un anello.
AVVERTENZE
PULIZIA E MANUTENZIONE
DEL PIANO DI COTTURA
Page 77
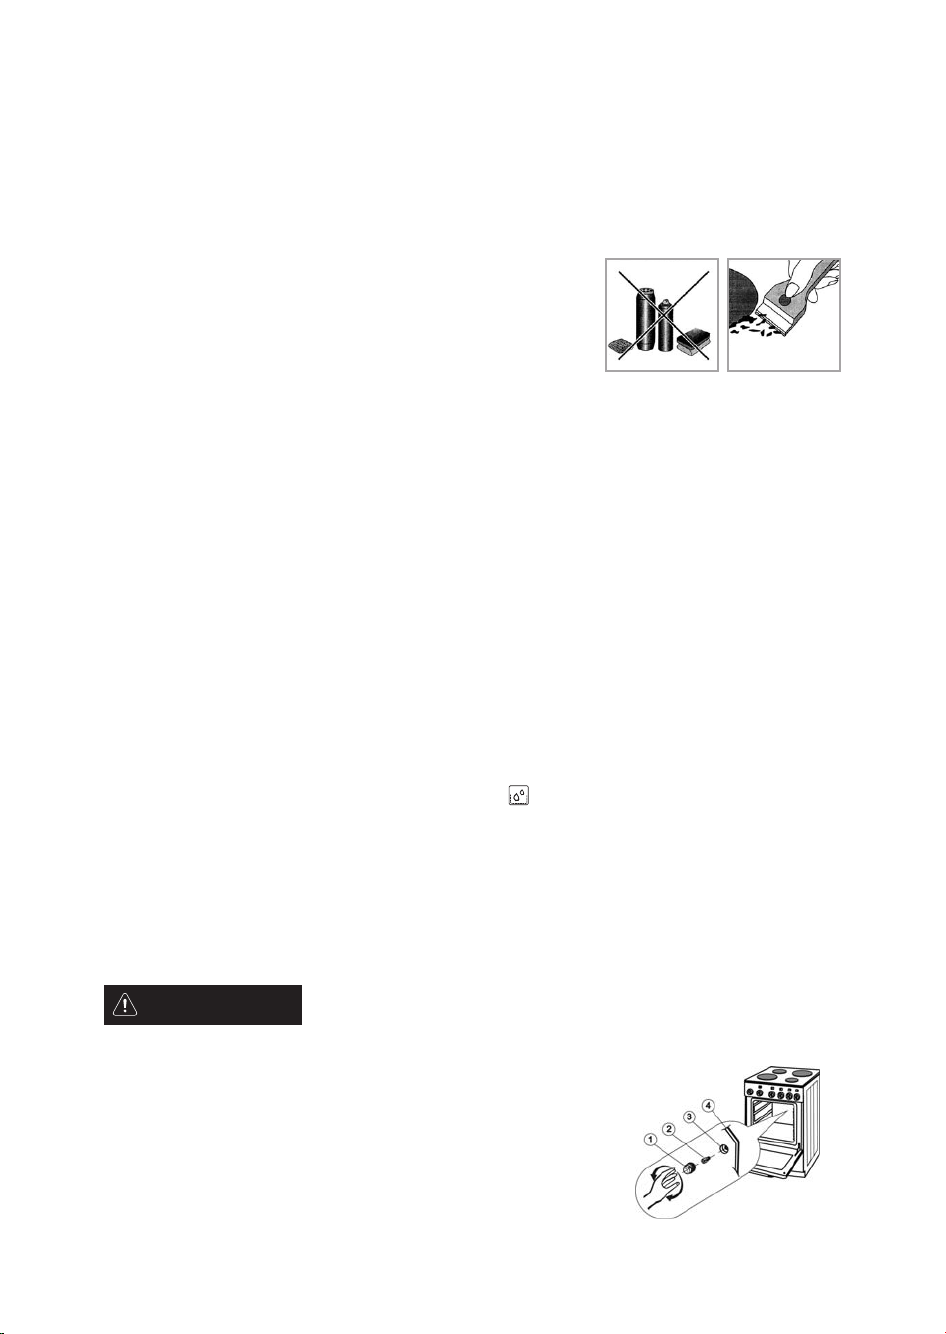
• Per eliminare sabbia o materiali abrasivi, utilizzare un panno morbido inumidito, quindi lavare il piano
con detersivo liquido specifico per superfici in vetroceramica.
• Non utilizzare pagliette metalliche, spugne o altri prodotti abrasivi. Non usare prodotti corrosivi, quali
ad esempio i prodotti spray per il forno.
• Durante la cottura i bordi delle pentole non devono toccare o poggiare sulla bordo esterno del piano di
cottura in vetroceramica.
Il produttore non si assume responsabilità per difetti del piano
di cottura in vetroceramica causati dall’uso improprio dei
recipienti o per difetti causati da una manutenzione non
adeguata o non corretta.
MACCHIE METALLICHE LUCIDE
Provengono dall’uso di recipienti in alluminio o dall’uso di detersivi non adatti. Le macchie si possono
rimuovere dopo diverse puliture. Modifiche del colore sul piano di cottura in vetroceramica sono dovute
sopratutto ai residui non rimossi che si sono bruciati. Non hanno alcuna influenza sul corretto
funzionamento del piano, in quanto non si tratta di un'alterazione del materiale.
Le macchie di cibi ricchi di zucchero che non vengono pulite per un lungo periodo possono causare danni
irreparabili sulla vetroceramica del piano di cottura
ABRASIONE DEI DECORI DELLA SUPERFICIE
Può essere causata da prodotti abrasivi oppure dal fondo dei recipienti sulla superficie del piano cottura in
vetroceramica, su cui si forma una macchia scura.
FORNO
Per la pulizia delle pareti interne del forno utilizzare una spugna e detergente. In caso di incrostazioni
bruciate utilizzare un detergente specifico per superfici smaltate. Dopo la pulizia asciugare accuratamente.
Pulire il forno solo quando è freddo. Non usare mai detergenti abrasivi per non graffiare lo smalto.
Lavare gli accessori (griglia, leccarda) a mano o in lavastoviglie, utilizzando detergenti appositi per
rimuovere sporco resistente o bruciato.
AQUA CLEAN
Per la pulizia giornaliera del forno (o dopo ogni utilizzo) si consiglia la seguente procedura: portare la
manopola delle funzioni del forno raffreddato in posizione . Impostare la temperatura su 50° C. Versare
nella leccarda 0,4 litri d’acqua e inserirla nelle guide inferiori. Dopo 30 minuti i residui di
cibo sullo smalto del forno si saranno ammorbiditi e si potranno rimuovere con un panno umido.
SOSTITUZIONE DELLA LAMPADA DEL FORNO
• Portare tutte le manopole di comando in posizione "spento" e disinserire l'apparecchio dalla rete
elettrica estraendo la spina dalla presa di corrente, oppure spegnendo l'interruttore principale.
• Svitare la protezione in vetro della lampada ruotando a sinistra.
• Svitare la vecchia lampada, inserire e avvitare la nuova.
• Rimontare la protezione in vetro.
Per l'illuminazione utilizzare esclusivamente una lampada T 300 °C, E 14, 230 V~,25 W.
1. Protezione in vetro
2. Lampada
3. Attacco
4. Parete posteriore del forno
NOTA
77
Page 78

78
RECLAMI
Se nel periodo di garanzia si verifica un guasto all'apparecchio, non tentare di ripararlo di persona. Il reclamo
va inoltrato al negozio d'acquisto, a centri assistenza autorizzati o agli appositi servizi assistenza elencati nelle
Condizioni di garanzia. Alla presentazione della richiesta di reclamo seguire le indicazioni riportate nel
Certificato di garanzia e nelle Condizioni di garanzia.
Senza il Certificato di garanzia debitamente compilato la richiesta viene respinta.
RECUPERO E SMALTIMENTO DEGLI
IMBALLAGGI
Cartoni, carta da imballo: - Ritiro nei centri di raccolta differenziata - Nei contenitori per la raccolta
differenziata della carta
Pallet di legno: - Isola ecologica - Altro utilizzo
Pellicole d'imballaggio e sacchetti PE: - Nei contenitori per la raccolta della plastica
SMALTIMENTO DELL’APPARECCHIO
Questo apparecchio è contrassegnato in conformità con la Direttiva Europea 2002/96/CE sui rifiuti di
apparecchiature elettroniche ed elettriche (waste electrical and electronic equipment - WEEE).
Questa direttiva prevede un solo quadro europeo (CE) per il ritiro e il riciclo degli apparecchi utilizzati.
L'apparecchio contiene materiali che possono essere riutilizzati.
ISTRUZIONI PER L’INSTALLAZIONE E
LA REGOLAZIONE
L’apparecchio deve essere installato in conformità alle norme e alle disposizioni di legge nazionali
in vigore.
Le seguenti istruzioni relative all’installazione ed alla regolazione devono essere eseguite da
personale qualificato.
COLLEGAMENTO DELL’APPARECCHIO ALLA RETE ELETTRICA:
L'apparecchio deve essere installato in conformità alle norme e alle disposizioni di legge nazionali in vigore.
Il collegamento alla rete elettrica deve essere eseguito da personale qualificato. Per il collegamento alla rete
fissa è necessario interporre un dispositivo interruzione con distanza di apertura dei contatti uguale o
superiore a 3 mm.
Il collegamento della cucina consigliato è trifase, tramite il cavo di connessione H05RR-F5G-1,5 che deve
essere modificato secondo la figura n. 9. Le estremità dei fili devono essere fissate contro la sfrangiatura con
le punte compresse. Per il collegamento monofase utilizzare il cavo di connessione H05RRF3G4, le estremità del cavo vanno modificate secondo la figura n. 5.
Per fissare le estremità dei fili sotto le teste delle viti nella morsettiera inserire i fili nella scatola morsettiera e
bloccarli con un fermo (fig. 5). Infine chiudere il coperchio della morsettiera.
Per il collegamento della cucina si consiglia di usare il cavo di connessione:
- Cu 3 x 4 mm2 min. - per connessione monofase (interruttore di protezione 35 - 38 A secondo il tipo)
- Cu 5 x 1,5 mm2 min. - per connessione trifase (interruttore di protezione 3x16 A)
Page 79
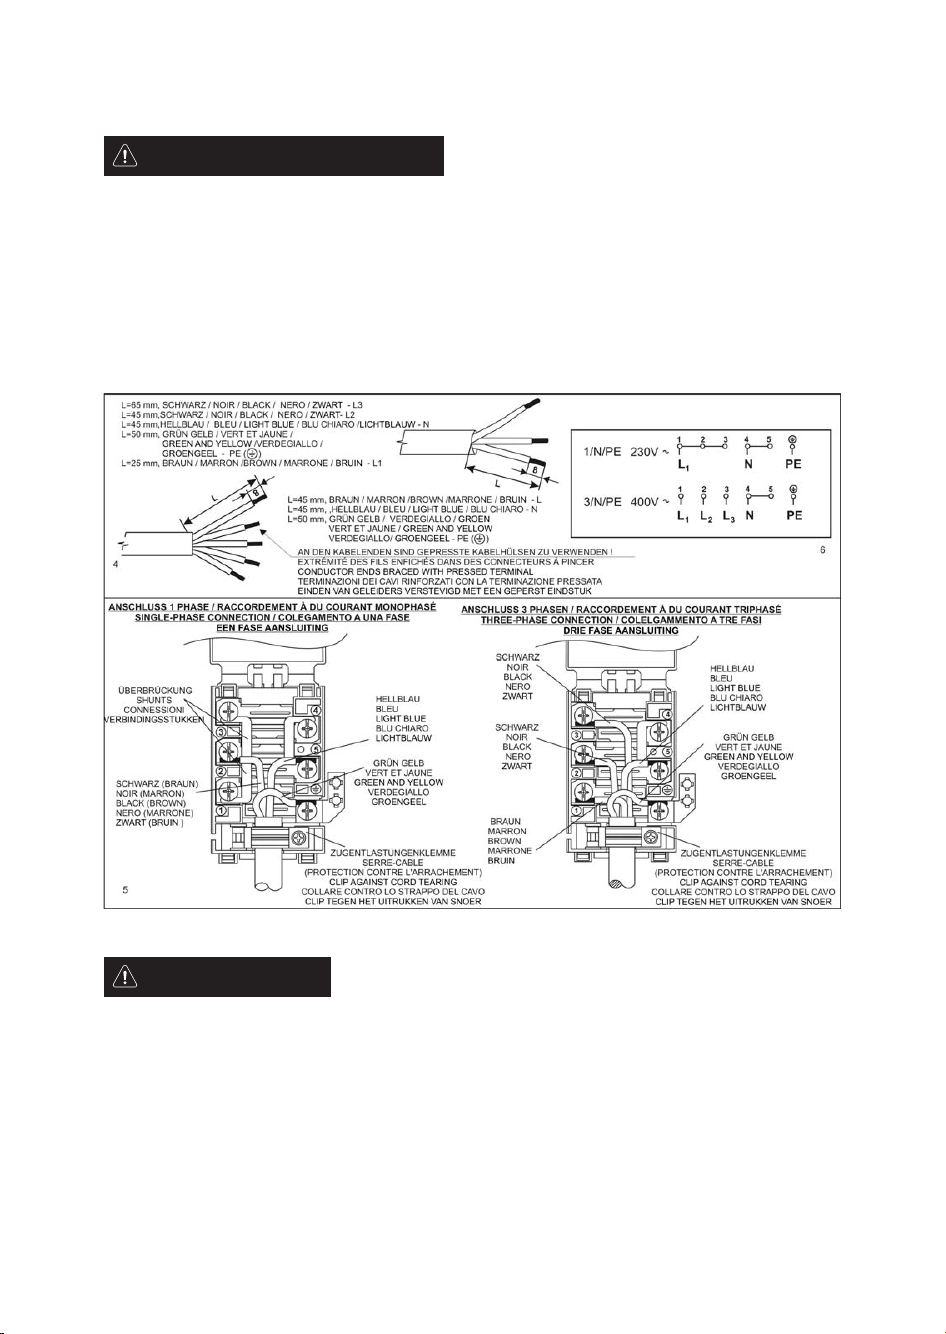
79
Durante tutte le operazioni di montaggio o smontaggio della cucina elettrica, al di fuori dell'uso giornaliero,
disconnettere l'apparecchio dalla rete di alimentazione e verificare che sia spento.
Durante l’installazione dell’apparecchio è indispensabile effettuare le seguenti operazioni per
assicurarne il corretto funzionamento:
• controllo del corretto allacciamento alla rete elettrica,
• controllo della funzione degli elementi riscaldanti, degli elementi di comando e di regolazione,
• mostrare al cliente di tutte le funzioni dell'apparecchio, dell'uso e della manutenzione
AVVERTENZA IMPORTANTE
La cucina elettrica è un apparecchiatura di classe I secondo il grado di protezione contro gli infortuni
dovuti alla corrente elettrica e deve essere collegata ad un conduttore di protezione della rete
elettrica.
AVVERTENZA:
Page 80

80
POSIZIONAMENTO
La cucina elettrica è progettata per l'uso in ambiente
domestico. Può essere installata in cucina senza gli spazi
laterali (larghezza minima 500 mm), tra due armadietti
con resistenza a calore 100 °C oppure rivestiti con
materiale termoisolante.
La cucina non deve poggiare su uno zoccolo.
X = distanza minima: 650 mm raccomandata dal
produttore degli aspiratori
LIVELLAMENTO DELLA CUCINA
La cucina è provvista di 4 viti regolabili che permettono
la regolazione della cucina per metterla in piano
orizzontalmente oppure per regolare l'altezza.
PROCEDIMENTO:
• Inclinare lateralmente la cucina.
• Stringere le viti di plastica nei fori anteriori e
posteriori nella parte inferiore della traversa laterale.
• Inclinare la cucina sul lato opposto e stringere le viti
nei fori dell'altro lato.
• Per livellare la cucina utilizzare un cacciavite dal vano portaoggetti, oppure una chiave esagonale.
La regolazione dell'altezza (vite) non è necessaria se altezza e livellamento dell'apparecchio sono
conformi senza utilizzare le viti di plastica.
Il produttore si riserva il diritto di apportare piccole modifiche alle istruzioni a seguito di
cambiamenti innovativi e tecnologici che non hanno effetto sul funzionamento del prodotto.
AVVERTENZA:
NOTA:
Page 81

81
Tabella di cottura - FORNO
Alimenti Funzione Preriscaldamento
Posizione delle guide
telescopiche (dal basso)
Temperatura
(°C)
Tempo di cottura
(minuti)
CARNE
Manzo, maiale, vitello
(1 kg)
Statico X 2 180 - 210 70 - 90
Ventilato - 2 170 - 190 70 - 90
Pollo, coniglio, anatra
(~1 kg)
Statico X 2 180 - 210 55 - 75
Ventilato - 2 170 - 190 55 - 75
Castrato, capra, agnello
(~1 kg)
Statico X 2 180 - 210 70 - 90
Ventilato - 2 170 - 190 70 - 90
Oca (~2 kg)
Statico X 1 190 - 210 100 - 120
Ventilato - 1 170 - 190 100 - 120
PESCE INTERO (da ~ 0,8 a 1 kg)
Orata, trota, salmone
Statico X 2 170 - 180 45 - 55
Ventilato - 2 160 - 170 45 - 55
FILETTO DI PESCE (da ~ 0,5 a 0,7 kg)
Pesce spada, tonno,
merluzzo
Statico X 2 170 - 180 35 - 45
Ventilato - 2 160 - 170 35 - 45
VERDURA (da ~ 0,5 a 0,7 kg)
Peperoni ripieni
Statico X 2 160 - 170 40 - 50
Ventilato - 2 150 - 160 40 - 50
Patate ripiene
Statico X 2 160 - 170 55 - 65
Ventilato - 2 150 - 160 55 - 60
Patate al forno
Statico X 2 200 - 210 55 - 65
Ventilato - 2 190 - 200 50 - 60
DOLCI, ecc.
Torte lievitate
Statico X 2 150 - 170 35 - 45
Ventilato - 2 150 - 160 30 - 40
Torte ripiene (formaggio)
Statico X 2 165 - 175 60 - 70
Ventilato - 2 150 - 160 60 - 70
Torta grande
Statico X 2 170 - 180 35 - 45
Ventilato - 2 160 - 170 35 - 45
Strudel
Statico X 2 170 - 180 35 - 45
Ventilato - 2 160 - 170 30 - 40
Biscotti
Statico X 2 160 - 170 15 - 25
Ventilato - 2 150 - 160 15 - 20
Millefoglie
Statico X 2 160 - 170 30 - 40
Ventilato - 2 150 - 160 25 - 35
Torte salate
(Quiche Lorraine)
Statico X 2 170 - 180 40 - 50
Ventilato - 1 160 - 170 40 - 50
Lasagne
Statico X 2 170 - 180 40 - 50
Ventilato - 2 160 - 170 40 - 50
Pizza
Statico X 2 220 - 250 15 - 20
Ventilato - 2 200 - 225 15 - 20
Crostate ripiene
(ananas, pesca)
Statico X 2 160 - 170 30 - 40
Ventilato - 2 160 - 170 30 - 40
Dolci di meringa
Statico X 2 80 - 100 60 - 90
Ventilato - 2 50 - 75 60 - 90
Budino
Statico X 2 160 - 180 55 - 65
Ventilato - 2 150 - 160 50 - 60
Nota: le temperature ed i tempi di cottura sono puramente indicativi
Page 82

82
Tabella di cottura - GRILL
Alimenti Funzione
Preriscaldamento
(5 minuti)
Posizione delle guide
mobili (dal basso)
Temperatura
(°C)
Tempo di cottura
(minuti)
CARNE
Rosbif Grill X 3 massima 20 - 30
Cotolette di maiale
Grill X 3 massima 15 - 20
Salsicce Grill X 3 massima 20 - 30
Pesce
Grill X 3 massima 15 - 25
Cosce di pollo Grill X 3 massima 20 - 30
Spiedini
Grill X 3 massima 20 - 30
Costine di maiale Grill X 3 massima 30 - 40
1/4 di pollo
Grill X 3 massima 40 - 50
Nota: le temperature ed i tempi di cottura sono puramente indicativi.
DATI TECNICI
CUCINA ELETTRICA
PCCF 30201050 W
PCCF 30201050 X
PCCF 50201250 W
PCCF 50201250 X
PCCF 80211250 W
PCCF 80211250 X
Dimensioni: Altezza/ larghezza / profondità 850 / 500 / 605 850 / 500 / 605 850 / 500 / 605
Piano di cottura – Zone di cottura elettriche
Sinistra posteriore Ø 145 mm (kW) 1,2 1,2 1,2
Sinistra anteriore Ø 180/120 mm (kW)
1,7 1,7 / 0,7 1,7 / 0,7
Destra posteriore Ø 145 / 250 mm (kW)
1,7 2,0 / 1,2 2,0 / 1,2
Destra anteriore Ø 145 mm (kW)
1,2 1,2 1,2
FORNO
Elemento riscaldante superiore (kw)
0,75 0,75 0,75
Elemento riscaldante inferiore (kw)
1,10 1,10 1,10
Elemento riscaldante grill (kw)
1,85 1,85 1,85
Elemento riscaldante circolare (kw)
- - 2,00
Ventola (W)
- 30 (35) 30 (35)
Lampada (W)
25 25 25
Temperatura forno Min. / Max.
50 / 250° C 50 / 250° C 50 / 250° C
Tensione di alimentazione
230 / 400 V ~ 230 / 400 V ~ 230 / 400 V ~
Potenza totale dell'apparecchio
7,7 8,1 9,3
ACCESSORI
Griglia + + +
Leccarda + + +
Teglia da forno + + +
Raschietto + + +
Guide telescopiche +
Page 83

83
Tabella informativa
Modello
PCCF 30201050 W
PCCF 30201050 X
PCCF 50201250 W
PCCF 50201250 X
PCCF 80211250 W
PCCF 80211250 X
A – Maggiore efficienza
B
C
D
E
F
G – Minore efficienza
A A A
Consumo di energia (kW/h)
0,79 0,79
Tempo di cottura con carico normale (min.)
52,3 53,1
Consumo di energia (kW/h)
079 0,79
Tempo di cottura con carico normale (min.)
47 44,3
Volume utile del forno
49 45 42
Dimensioni del forno
PICCOLA
MEDIA
GRANDE
Rumorosità (dB)
46 46
Consumo minimo di energia (standby) (W)
Superficie della leccarda grande (cm2)
1230 1230 1230
Page 84

Page 85

Page 86

Page 87

Page 88

GB F NL I
D
n
04/11
 Loading...