

Page 1
MtP300 Quick Setup Instructions
Important:
1. You must charge the battery for at least 2½ hours prior to the first use.
2. Maximum battery capacity is first reached after completing three complete charge and discharge cycles.
3. Always use Genuine Printek Media to ensure optimal performance.
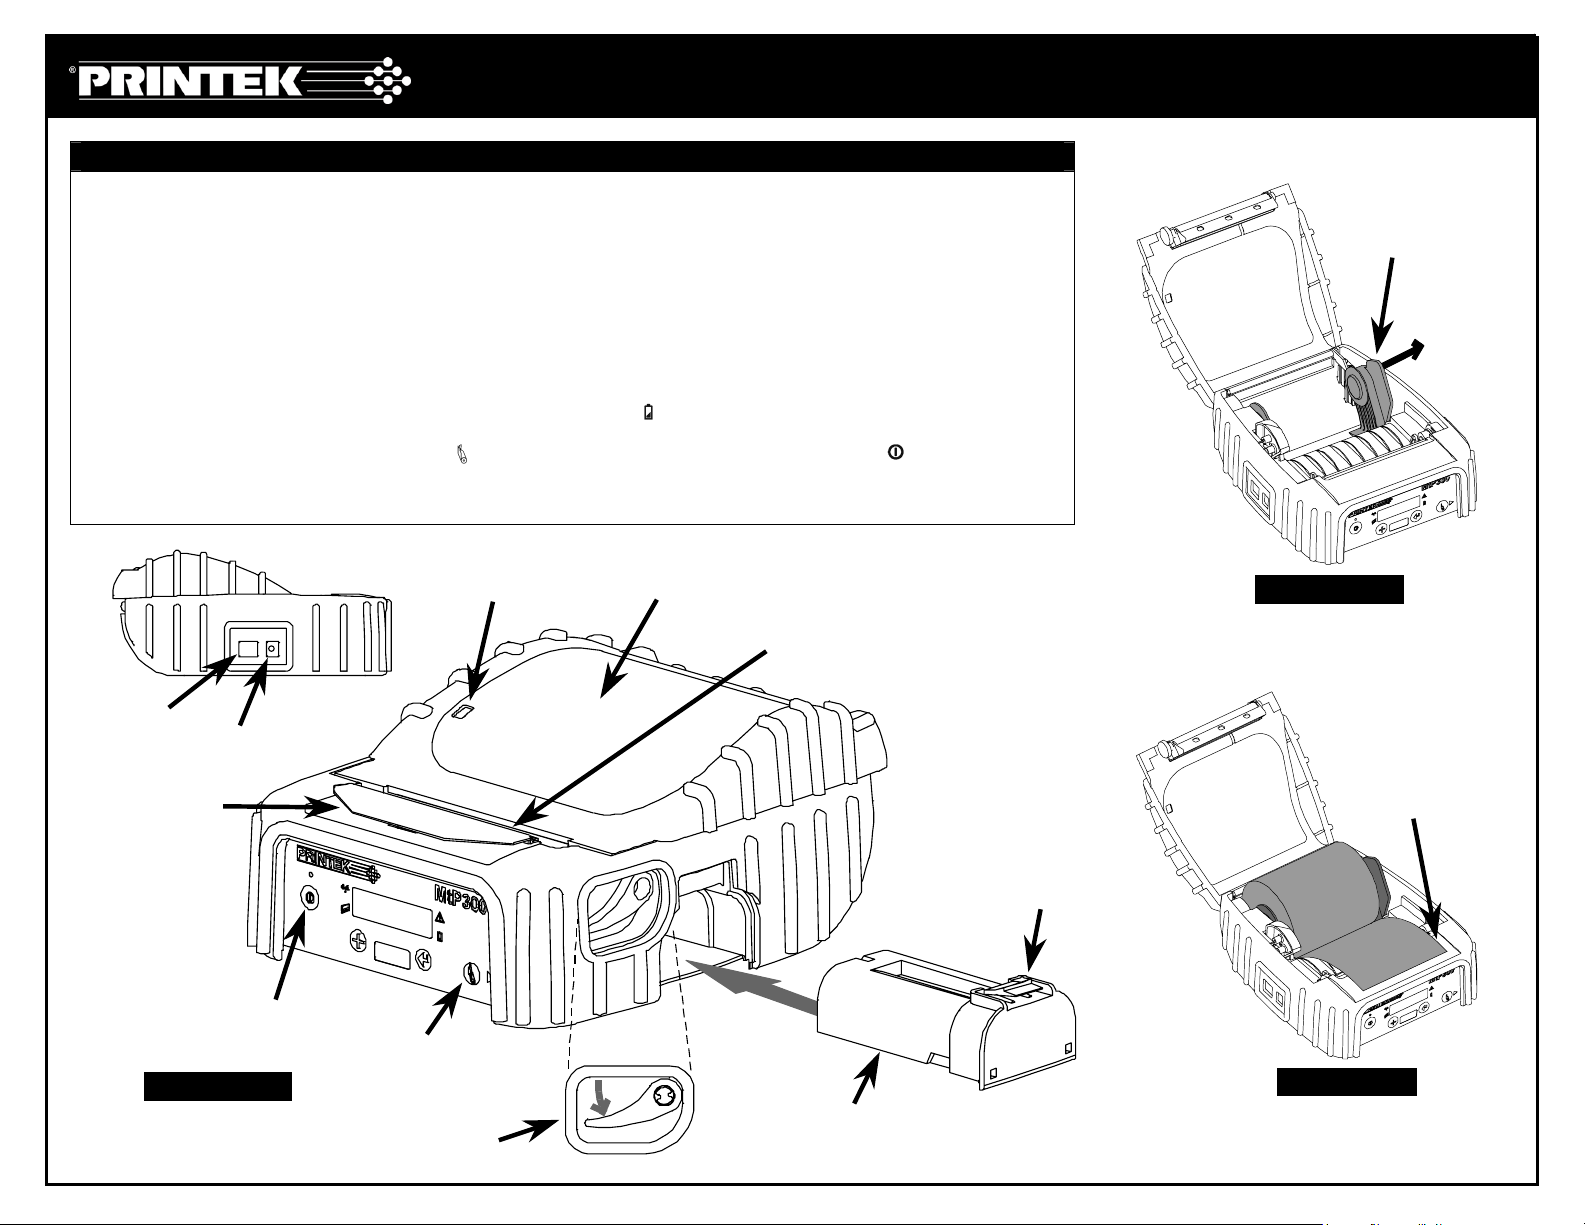
• To load media:
• Move the Paper Door Release in the direction indicated in Figure A and open the Paper Door.
• Move the media support as shown in Figure B and place the roll between the supports. Make sure the media rotates
freely. Lay the leading edge of the media through the print head as shown in Figure C, and close the door.
• To install the battery: Slide the battery into the battery compartment until the release lever on the battery snaps into place.
You may remove the battery by pressing the release lever toward the bottom of the printer and pulling the battery out of the
battery compartment.
• To charge the battery, connect a power adapter (sold separately) to the appropriate power source and plug the output
cable into the printer’s Power Connector as shown in Figure A. The
is being charged.
• To perform a self test, press and hold the
Note: For more information, refer to the MtP300 Series Operator’s Manual. You may download this manual at www.printek.com.
Paper Feed Button while turning on the printer with the Power Button.
Battery Indicator will turn on indicating that the battery
Serial I/O
Connector
Paper Supply Gauge
Power
Connector
Paper Door
Tear Bar
Media Support
Figure B
Magnetic Card
Reader
Figure A
Power
Paper Feed
/Advance
Paper Door Release
Battery
Release Lever
Paper Leading Edge
Figure C
Page 2
Printer Setup
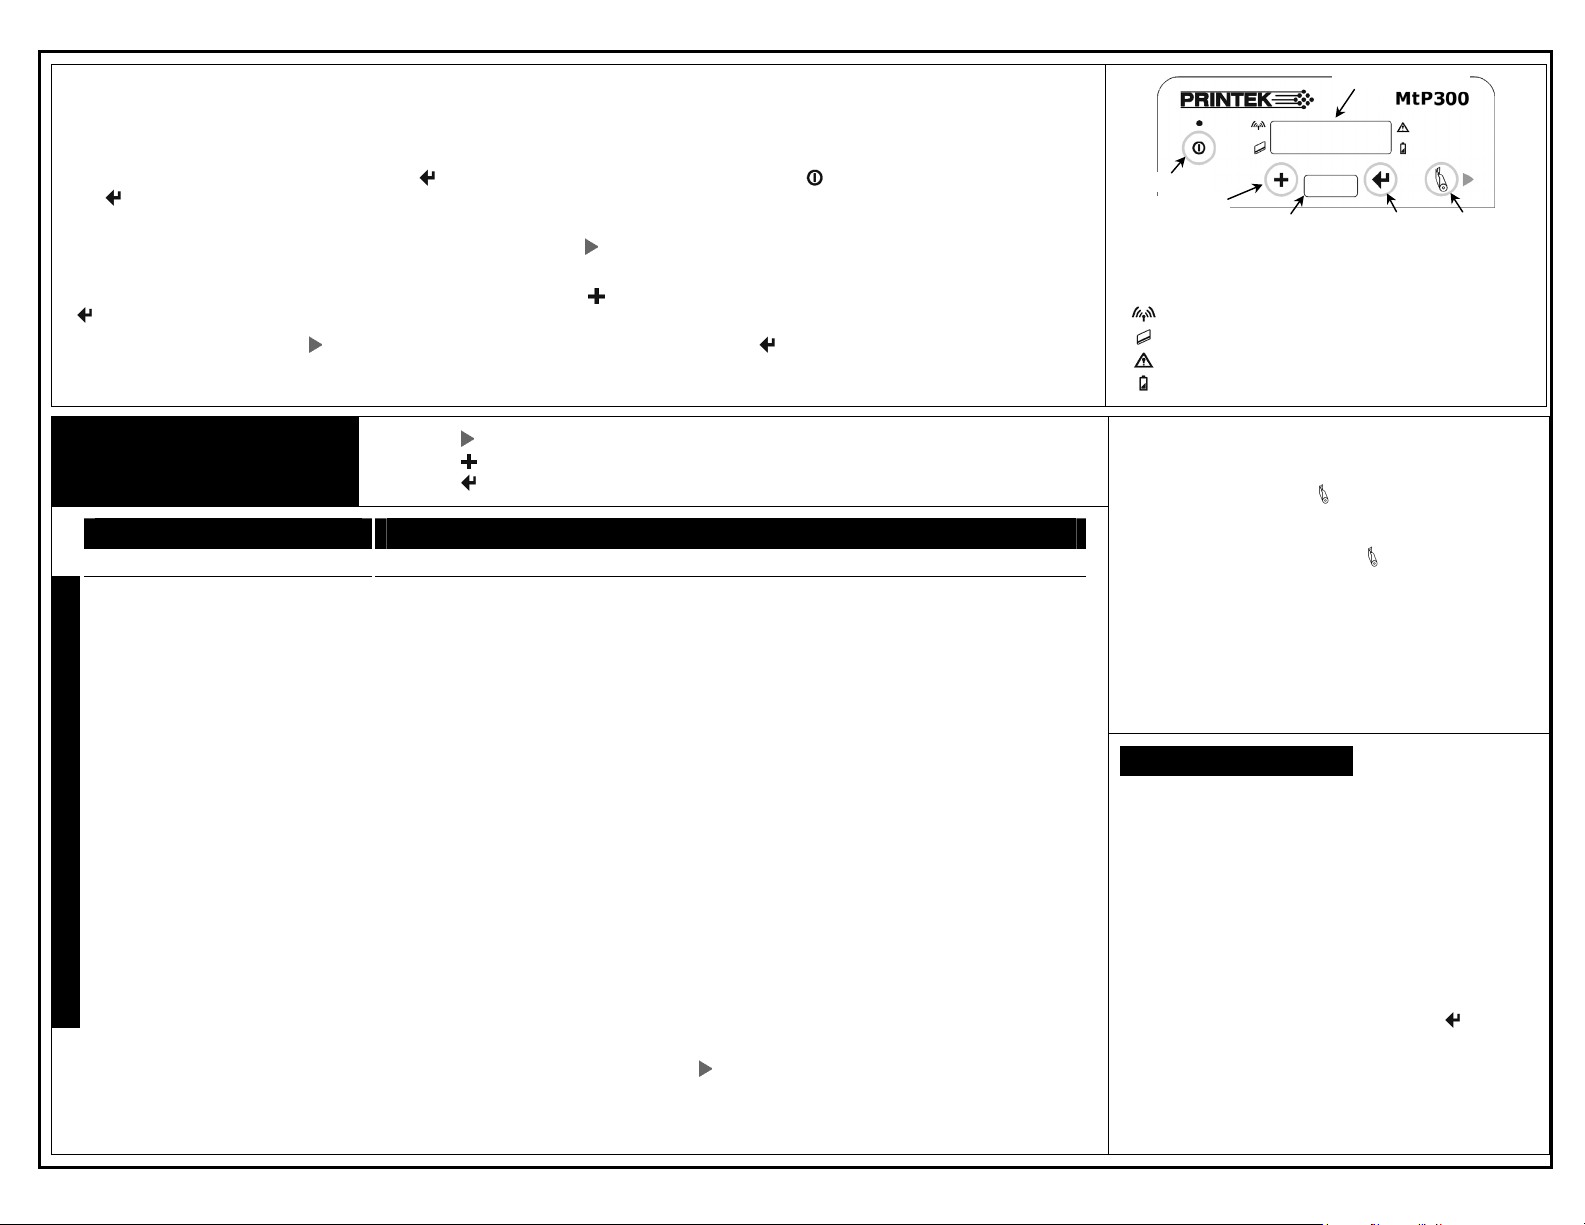
Message Window
Many of the printer’s features may be set using menus available on the front panel of the printer.
For complete details, please refer to the MtP300 Series Operator’s Manual.
To enter the Setup Mode, press and hold the Enter Button while turning on the printer with the Power Button. Continue to hold
Enter Button until “Menus Active” is displayed.
the
While in Setup Mode, the power indicator will blink slowly. Upon entering Setup Mode, the FORMAT MENU is shown first. To
advance to the INTERFACE MENU or OPTIONS MENU, press the
Advance Button.
When in Setup Mode, the current menu item is shown on the top line, and its corresponding value is shown on the bottom line. To
increment the value on the bottom line to the next setting, press the
Increment Button. To advance to the next menu item, press the
Enter Button.
To exit Setup Mode, press the
return to normal printer operation.
Printer Setup Menus
Advance Button until “Exit Setup” is displayed. Press the Enter Button to save the changes and
• Use the Advance Button to access the next menu. (Also see + note below)
• Use the Increment Button to increment the value displayed on the bottom line.
• Use the
Enter Button to accept the value displayed and advance to the next feature.
Power
Increment
IrDA Window
Enter
Indicators:
Power On = Ready to print, Slow Flash = Setup Mode,
Short Flash = Power Saving Stand By Mode.
Wireless I/O Enabled and Connected.
Magnetic Card Reader: Ready for swipe.
Error: See messages, below.
Battery: On = Charging, Flashing = Battery Low.
Paper Feed
/Advance
Paper Related Messages:
Paper Door Open - Close paper door and press
the Paper Feed Button to
continue.
FORMAT MENU
Up to 5 formats can be stored
Format Name
Up to 16 Characters
M
Font
E
SansSerifA
N
4.2, 5.5, 10.2, 10.7, 16.9,18.5, 20.3;
Courier
U
12.7, 13.5, 14.5, 15.6, 16.9*,
18.5, 20.3, 22.6, 25.4
I
Spacing
T
0 - 10, 3*
E
Left Margin
0* - 1.0244”
M
Right Margin
S
0* - 1.2608”
Print Contrast
-75 to +125, 0*~
Max Paper Speed
0.32 to 3.30*~ ips
Form Feed Distance
0 – 2.5216”, 1.2608*~
Mark Sensing
Front*, Back~, Gap
Mark Sensitivity
-10 to +10, 0*
Gap Sensitivity
-10 to +10, 0*
Tear to Mark Dst
-0.7092” to 1.7927”, 0*
Present Distance
0.0000”* to 1.2911”
Note: Based on Firmware Revision 2.9 Printek Part Number 6038 Rev. C
+
INTERFACE MENU (IrDA, Bluetooth, or Wi-Fi are only available if that option is installed)
Serial IrDA Bluetooth Wi-Fi
Emulation
Printek*, O’Neil,
ZPL-II, Mt3, CPCL
Hex Dump
Baud Rate
9600, 19200,
38400, 57600*
Data Bits
7, 8*
Stop Bits
1*, 2
Parity
None*, Even, Odd
XON/XOFF
Off*, On
ETX/ACK
Off*, On
RTS/CTS
Off, On*
* Factory default value.
+
When changing value for this feature, use Advance Button to advance to the next
character/field in value.
~ LP Model Defaults: Print Contrast = +35, Max Paper Speed = 2.30ips,
Form Feed Distance = Mark Sensing, Mark Sensing = Back.
Emulation
Printek*,
O’Neil,
ZPL-II, Mt3,
CPCL,
Hex Dump
Emulation
Printek*, O’Neil,
ZPL-II, Mt3, CPCL,
Hex Dump
Pairing Mode
Paired*, Unpaired
Role Policy
Defer*, Master
Discoverability
On*/Off
Pin
0*, Up to 16
Numeric Chars.
Security
Off*, On
Local Name
MtP300-Serial#*
Address
(Displayed Only)
Emulation
Printek*, O’Neil, ZPL-II,
Mt3, CPCL, Hex Dump
WLAN Type
Infrastructure*, Peer-to-Peer
WLAN Channel
1* – 14
WLAN SSID
+
any*
WLAN WEP Bits
0*, 64, 128
WEP Key 1-4
+
10 or 26 Char. Hex String
WLAN Auth
Auto*, Open, Shared
IP Address Assign
+
DHCP*, Static
IP Address
0.0.0.0*
IP Subnet Mask
0.0.0.0*
IP Gateway
0.0.0.0*
Tunnel Port#
08023*
+
+
+
+
+
Paper Fault - Insert paper or correct jam and
press the Paper Feed Button
to continue.
Magnetic Card Reader Messages:
Swipe Card Now - Magnetic Card Reader is ready
for card to be swiped.
Card Read Ok - Card read successfully.
Card Not Read - Card not read correctly.
OPTIONS MENU
Max Format #
1* – 5
Auto Power Down
Off*, 1 – 15 Minutes
User Language
English*, French, German
Truncate Lines
No*, Yes
Print Promo
No*, Yes
Note: After exiting Setup, you may print the current
Interface settings by pressing and holding the
Button until “Printing Setup” is displayed.
Enter
 Loading...