

Prince Tennis BALL MACHINE #1, BALL MACHINE #2, BALL MACHINE #3, BALL MACHINE #4 User Manual
Page 1
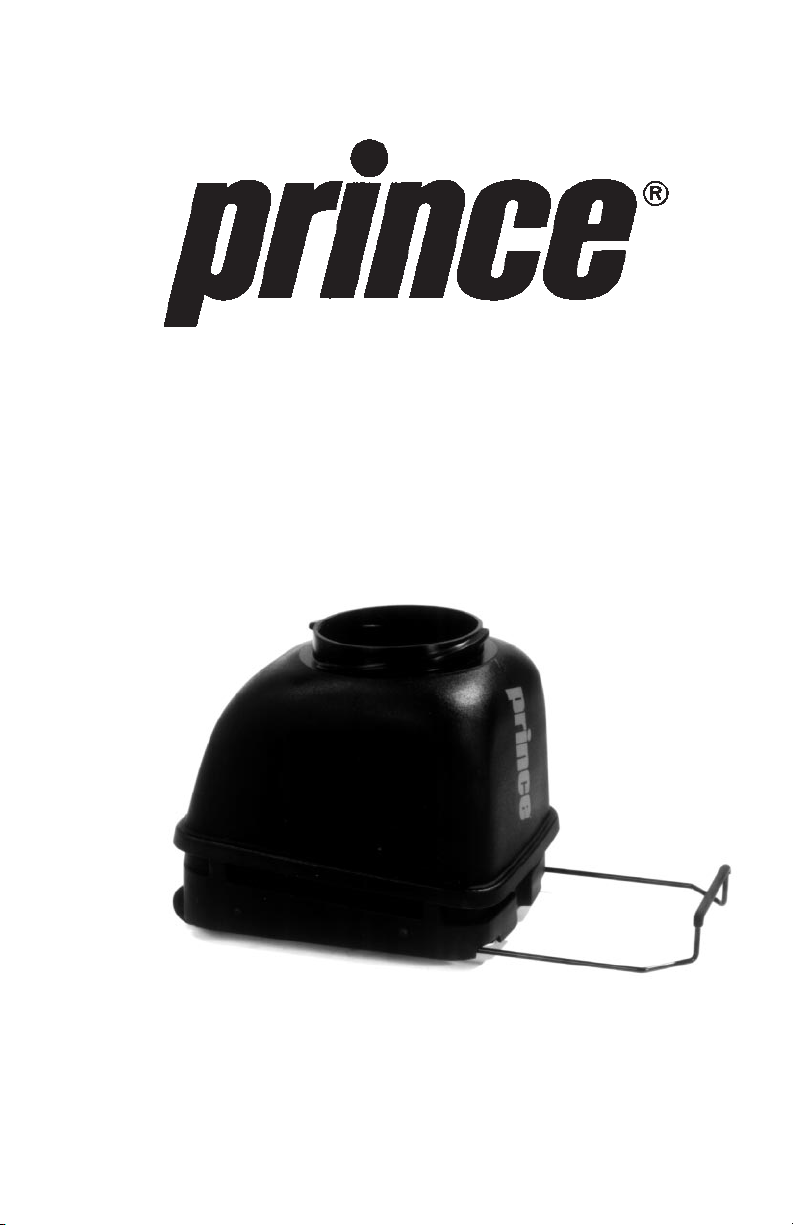
Portable Tennis Ball Machine
Owner’s Manual
Page 2

OWNER’S MANUAL FOR YOUR
PRINCE®TENNIS BALL MACHINE
Table of Contents
General Overview.......................................................................1
Important Safety Information .....................................................1
Important Instructions Before First Use......................................2
Battery Preparation .................................................2
Ball Hopper Preparation..........................................2
Alignment................................................................3
Ball Feed Instructions..............................................3
Operation (Model #1).................................................................4
Operation (Model #2).................................................................5
Operation (Model #3).................................................................6
Operation (Model #4).................................................................7
Battery Instructions.....................................................................8
Practice Settings.........................................................................8
Transporting ...............................................................................9
Storage.......................................................................................9
Maintenance...............................................................................9
Troubleshooting .......................................................................10
Optional Accessories................................................................11
Court Equipment......................................................................12
Warranty Registration...............................................................13
Warranty Information................................................................13
Page 3
GENERAL
OVERVIEW OF THE
PRINCE®TENNIS
BALL MACHINE
The Prince®ball machine manufactured
by Master Sports is a portable, compact,
self-contained unit designed to be
easily handled, transported and stored.
Manufactured from the same material
used in high grade luggage, the Prince
®
ball machine is virtually indestructible. The
exterior is weather and corrosion resistant.
Scientifically engineered and designed,
the Prince
®
ball machine was developed
and tested through the combined efforts
of some of the worlds foremost international tennis authorities.
TESTING PROCEDURES:
To ensure customer satisfaction every
Prince
®
Tennis Ball Machine is tested as
follows:
• Battery is checked and tested to
ensure superior quality.
• Three hoppers of balls are run through
the machine.
• The machine is cleaned and boxed.
Note:
There may be some residual ball
fuzz in your machine as a result of testing.
IMPORTANT
SAFETY
INFORMATION
The Prince®ball machine is specifically
designed to throw tennis balls at a high
rate of speed. To avoid any bodily harm,
please observe the following precautions
at all times:
!
WARNING:
Do not reach or look into
the ball throwing opening without first
turning main power off and only after
all wheels come to a complete stop.
!
WARNING:
Do not place hands or
foreign objects into the ball hopper
while power is on.
!
WARNING:
Never stand closer than
35 feet in front of the ball machine when
power is on. Balls exit at various angles,
0-45 degrees vertical, 14 degrees left,
and 14 degrees right.
!
WARNING:
Use caution with small
children in the area.
!
WARNING:
Only use regulation-sized
tennis balls with this unit. Do not use
oversized tennis balls.
!
WARNING:
Do not use this machine in
the rain or standing water on the court.
1
Page 4
IMPORTANT INSTRUCTIONS BEFORE
FIRST USE
Battery Preparation
Before first use, the internal battery should be fully charged. Please refer to page 8 for
battery charging instructions.
Ball Hopper Preparation
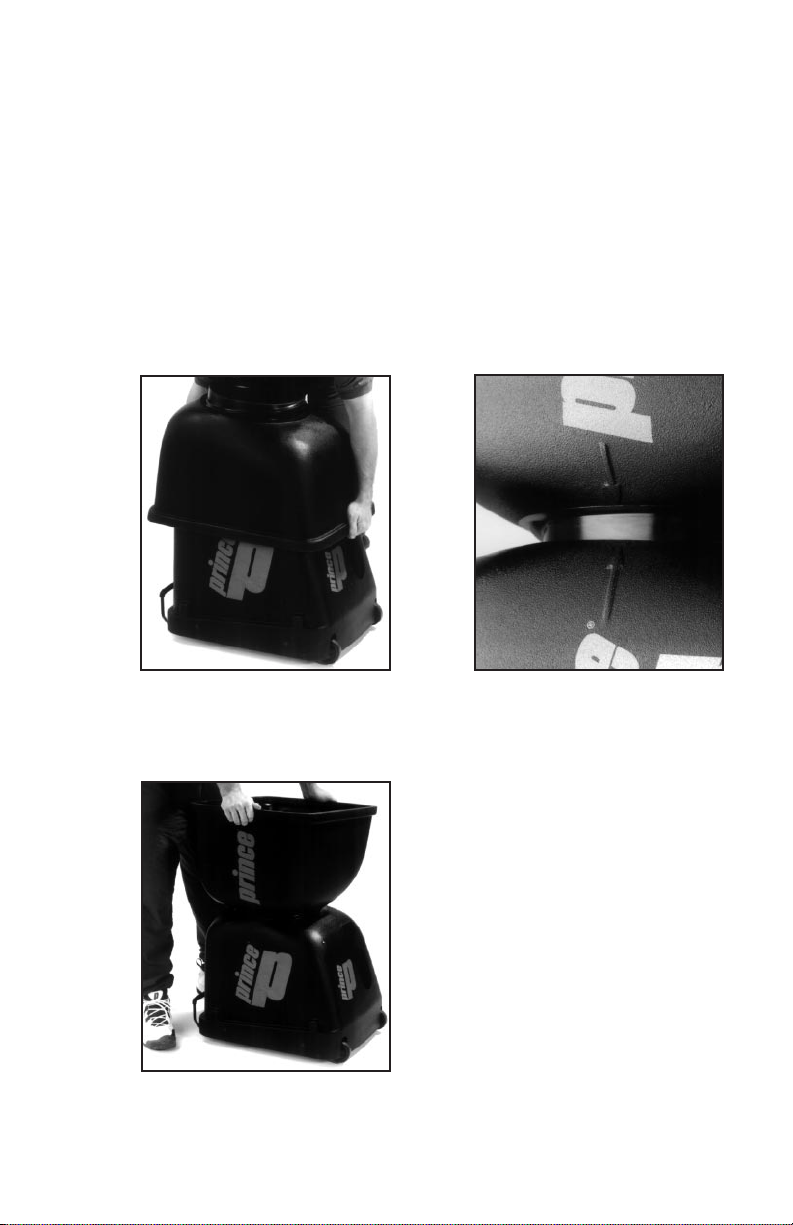
The ball hopper slides over the machine for compact storage. Follow these steps to
prepare the Prince
®
ball machine for play.
Remove the hopper.
1.
3. 4.
Turn the hopper over and
engage threads. Align arrow
on hopper with arrow on base.
2.
Fill the Prince® ball machine with
tennis balls. Making sure no
one is standing in front of the
machine, press the power switch
on. Adjust the feed, elevation,
sweep or spin to the desired
positions (see your Model
operation instructions for more
information).
Turn hopper 90° to lock in place
(clockwise).
2
Page 5

Alignment
To align machine so that it is centered
to shoot equal distance to forehand
and backhand:
• Lift handle and look on underside
of machine.
• Turn sweep on until lines match.
• Set machine in position on serving
line with ball exit hole directly over
center line.
Ball Feed Instructions
For safety reasons the ball feed will
not activate when the machine is first
powered on.
MODEL #1, 2, & 3:
After the
machine is powered up for 15 seconds,
the feed control knob must be turned to
the O (off) position and then back on to
the desired feed rate (the ball feed will
start immediately).
These lines need to be matched up.
3
NOTE:
There is a chain beneath
the machine which helps prevent
static electricity build up. If machine is
operated on carpeting or wood floors
for an extended period of time, static
build up is probable and could cause
the machine to not operate properly.
Incorrect Correct
MODEL #4:
Has a built in delay that
starts the ball feed ten seconds after
turning the feed switch on (to allow the
operator to reach the opposite side of
the court).
Page 6
OPERATION
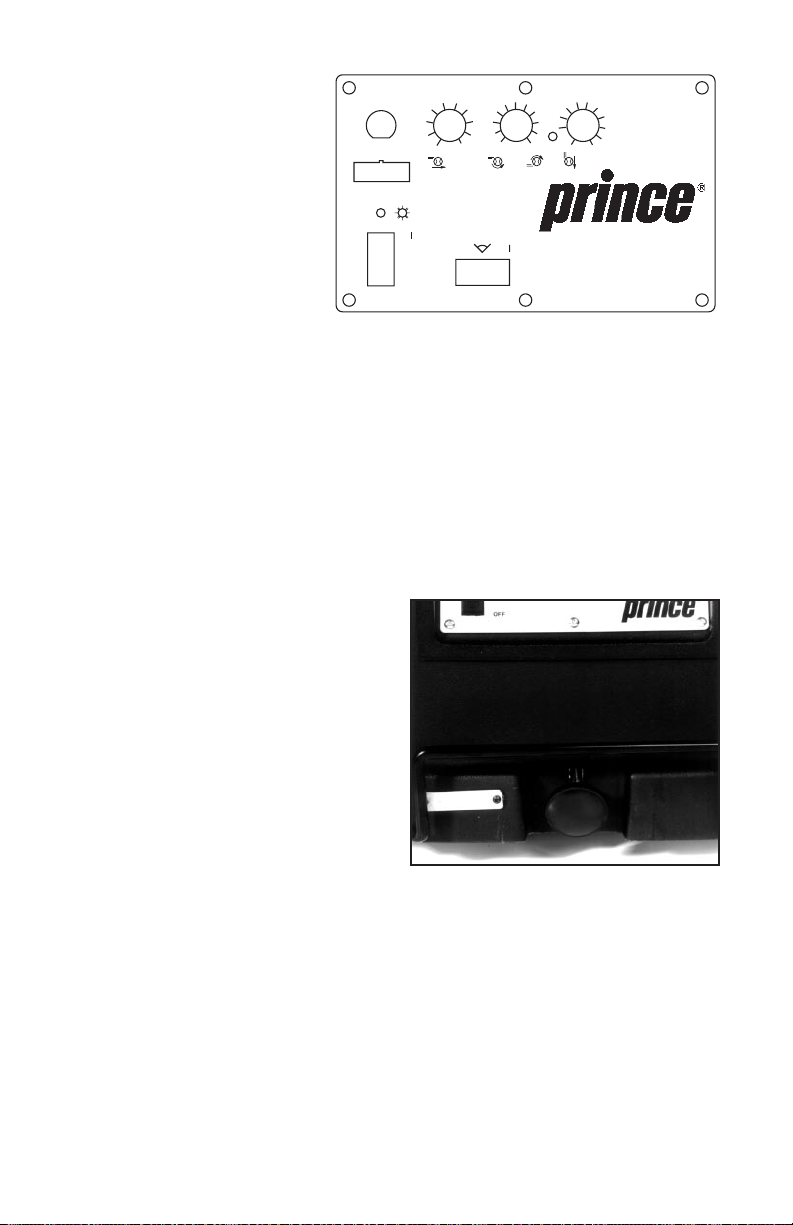
Control Panel:
Model #1
POWER:
The power switch
turns on the unit and enables
the other functions.
SPEED:
The speed control knob
regulates the ball velocity from
10 to 70 m.p.h.
SPIN:
The spin control knob adds topspin (clockwise adjustment) or backspin
(counterclockwise adjustment) to the
ejected ball.
FEED:
The feed control knob regulates
the time between balls from 2 to 13 seconds. Important: After the machine has
been on for 15 seconds, this control
must be reset by turning it to the 0
(off) position and then back on to begin
feeding balls.
SWEEP:
The sweep switch turns the
unit’s side-to-side motion on and off.
Ball delivery will be random, depending
on how fast the feed is set.
SWEEP ADJUSTMENT:
The sweep
width is pre-set at the factory on the
Model #1.
STATUS INDICATOR:
This light
will indicate the reason for an automatic
shutdown should one occur. It will flash
approximately once per second for
shutdown due to “low battery”. This
light can either remain on or off during
normal machine operation.
RESET:
The reset switch protects the
internal controls and motors. When activated, this switch pops out about
1
⁄4 of
an
inch. In the event the reset is activated,
turn off the main power, depress the reset
switch, turn on the main power, and
resume operation. If the switch is activated shortly thereafter, check for balls
jammed inside machine. If this does not
solve problem, follow directions outlined
in the maintenance section (page 9).
ELEVATION:
The elevation control
knob adjusts the ball trajectory height
from a ground stroke to a lob. Turning
the knob clockwise will raise the height
of the ball over the net.
BATTERY OPERATION PLUG:
For proper machine operation, this plug
must
be inserted into the accessory recep-
tacle
located just above the control panel.
The plug
is attached to the control panel
via a chain.
FEEDSPINSPEED
RESET
EXTERNAL 12 VOC
OR CHARGER
0
0
SWEEPPOWER
1
2
3
4567
8
9
10
5
4
3
2
101
2
3
4
5
0
1
2
3456
7
8
9
10
4
Page 7
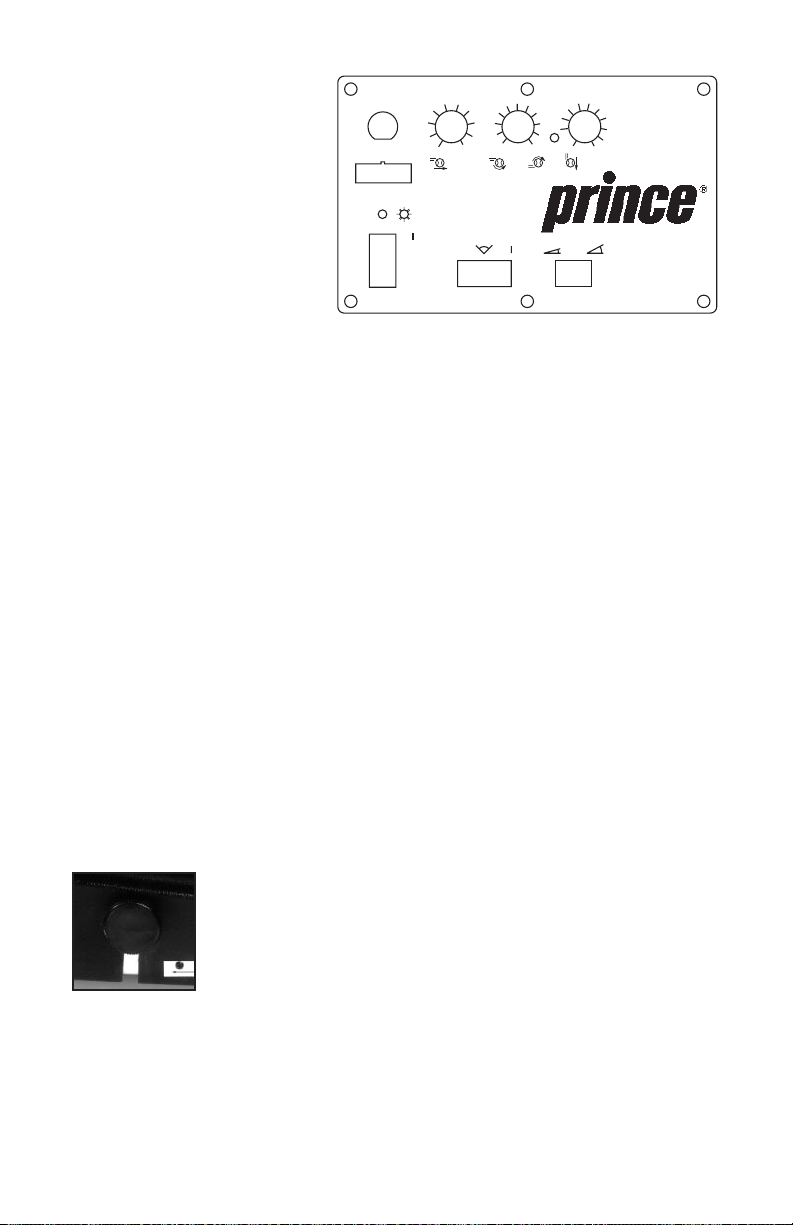
OPERATION
Control Panel:
Model #2
POWER:
The power switch
turns on the unit and enables
the other functions.
SPEED:
The speed control knob
regulates the ball velocity from
10 to 70 m.p.h.
SPIN:
The spin control knob adds topspin (clockwise adjustment) or backspin
(counterclockwise adjustment) to the
ejected ball.
FEED:
The feed control knob regulates
the time between balls from 2 to 13 seconds.
Important: After the power is on
for 15 seconds, this control must be
reset by turning it to the 0 (off) position
and then back on to begin feeding balls.
SWEEP:
The sweep switch turns the
unit’s side-to-side motion on and off. Ball
delivery will be random, depending on
how fast the feed is set.
ELEVATION ADJUSTMENT:
The
elevation switch adjusts the height of the
ball delivery from a ground stroke to a
lob. To adjust, depress switch and hold
until desired height is reached.
SWEEP ADJUSTMENT:
The sweep
adjustment knob controls the width of
the sweep. This unit
has a manual adjustment for the sweep
width. The sweep
adjustment knob is on
the side of the unit.
Simply turn the knob clockwise to widen
or counterclockwise to narrow the sweep
range. It takes forty complete turns to go
from wide to narrow. The knob will stop
turning once you have achieved the limit.
STATUS INDICATOR:
This light will
indicate the reason for an automatic
shutdown should one occur. It will flash
approximately once per second for shutdown due to “low battery”. This light
can either remain on or off during normal
machine operation.
RESET:
The reset switch protects the
internal controls and motors. When
activated, this switch pops out about
1
⁄4
of an inch. In the event the reset is activated,
turn off the main power, depress
the reset
switch, turn on the main power,
and resume operation. If the switch is
activated shortly thereafter, check for balls
jammed inside machine. If this does not
solve problem, follow directions outlined
in the maintenance section (page 9).
BATTERY OPERATION PLUG:
For proper machine operation, this plug
must
be inserted into the accessory recep-
tacle
located just above the control panel.
The plug
is attached to the control panel
via a chain.
FEEDSPINSPEED
RESET
EXTERNAL 12 VOC
OR CHARGER
0
0
SWEEPPOWER
1
2
3
4567
8
9
10
5
4
3
2
101
2
3
4
5
0
1
2
3456
7
8
9
10
ELEVATION
5
Page 8
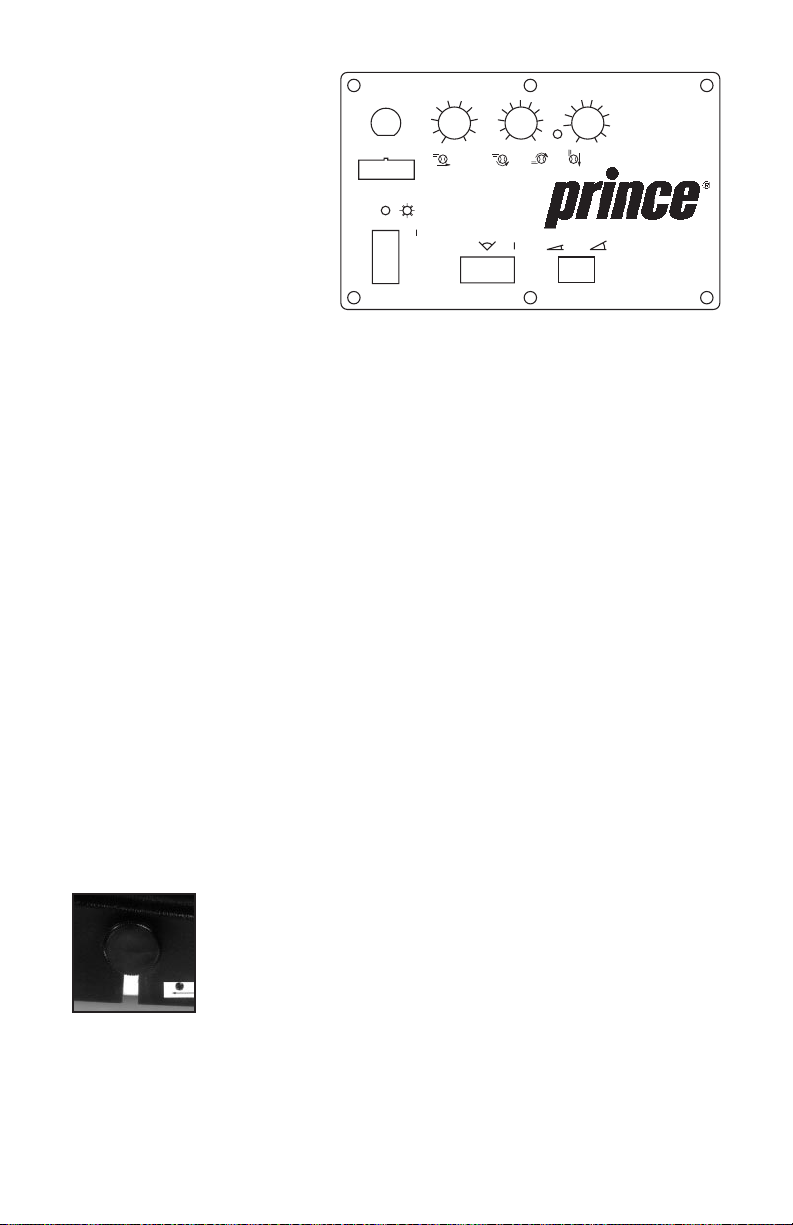
OPERATION
Control Panel:
Model #3
POWER:
The power switch turns
on the unit and enables the other
functions.
SPEED:
The speed control knob
regulates the ball velocity from 10
to 70 m.p.h.
SPIN:
The spin control knob adds
topspin (clockwise adjustment) or backspin (counterclockwise adjustment) to the
ejected ball.
FEED:
The feed control knob regulates
the time between balls from 2 to 13 seconds. Important: After the power is
on for 15 seconds, this control must
be reset by turning it to the 0 (off)
position and then back on to begin
feeding balls.
SWEEP:
The sweep switch turns the
unit’s side-to-side motion on and off. Ball
delivery will be random, depending on
how fast the feed is set.
ELEVATION ADJUSTMENT:
The
elevation switch adjusts the height of the
ball delivery from a ground stroke to a
lob. To adjust, depress switch and hold
until desired height is reached.
SWEEP ADJUSTMENT:
The sweep
adjustment knob controls the width of the
sweep. This unit has a
manual adjustment for
the sweep width. The
sweep adjustment knob
is on the side of the
wheel base. Simply
turn the knob clockwise to widen or counterclockwise to narrow the sweep range.
It takes forty complete turns to go from
full wide to full narrow. The knob will stop
turning once you have achieved the limit.
STATUS INDICATOR:
This light
will indicate the reason for an automatic
shutdown should one occur. It will flash
approximately once per second for shutdown due to “low battery”. This light can
either remain on or off during normal
machine operation.
RESET:
The reset switch protects the
internal controls and motors. When activated, this switch pops out about
1
⁄4 of an
inch. In the event the reset is activated,
turn off the main power, depress the reset
switch, turn on the main power, and
resume operation. If the switch is activated shortly thereafter, check for balls
jammed inside machine. If this does not
solve problem, follow directions outlined
in the maintenance section (page 9).
REMOTE CONTROL:
The single
function remote control for this model
allows the operator to turn the ball feed
system on and off. An audible alarm will
indicate a transition of the feed system.
See feed section above for initial start up
of the ball-feed as the remote will not
function until feed control has been reset.
BATTERY OPERATION PLUG:
For
proper machine operation, this plug must
be
inserted into the accessory receptacle
locat-
ed just above the control panel. The plug
is
attached to the control panel via a chain.
FEEDSPINSPEED
RESET
EXTERNAL 12 VOC
OR CHARGER
0
0
SWEEPPOWER
1
2
3
4567
8
9
10
5
4
3
2
101
2
3
4
5
0
1
2
3456
7
8
9
10
ELEVATION
6
Page 9
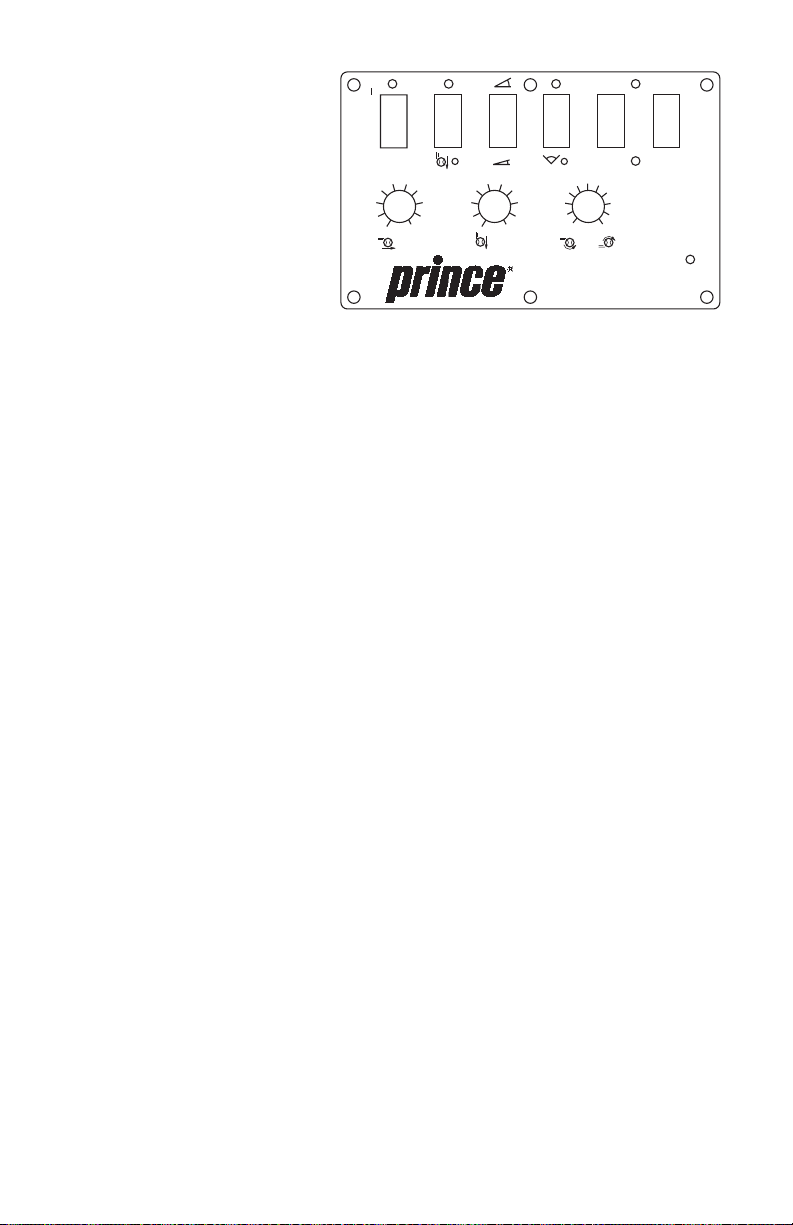
O
PERATION
Control Panel:
Model #4
POWER:
The power switch turns
on the unit and enables the other
functions.
SPEED ADJUSTMENT:
The
speed control knob regulates the
ball velocity from 10 to 70 m.p.h.
FEED:
The feed switch turns on the rotor
that dispenses balls to the drive wheels.
Note: The feed will start 10 seconds after
the switch is turned on to allow the operator to reach the opposite side of the court.
FEED ADJUSTMENT:
The feed control knob regulates the time between balls
from 2 to 13 seconds.
ELEVATION:
The elevation switch
adjusts the height of the ball delivery from
a ground stroke to a lob. To adjust, depress
switch and hold until desired height is
reached.
SPIN ADJUSTMENT:
The spin
control knob adds topspin (clockwise
adjustment) or backspin (counterclockwise
adjustment) to the ejected ball.
SWEEP:
The sweep switch varies the
position of delivery by turning on the unit’s
side-to-side motion. Ball delivery will be
random, depending on how fast the feed
is set. Random is the default position.
TWO LINE DRILL:
The machine
moves from side-to-side in a pre-programmed setting, delivering balls to two
specific points on the court. This allows for
the placement of two lines of students or two
students hitting balls. The two positions can
be adjusted by changing the width of the
sweep. There is a six second delay between
shots, to allow coaching between shots. This
feature will only work at ball speeds above
setting #6. The unit senses when a ball is
shot, and then moves to the other side.
WIDE & NARROW ADJUSTMENT
:
The wide and narrow switch controls the
width of the sweep. To adjust depress and
hold until desired width is reached.
STATUS INDICATOR:
The low battery light will illuminate when the battery is
in need of charging.
RESET:
If your model #4 does not have a
reset switch, all resets are internal and
are
automatically triggered. If your machine
is
equipped with a reset switch, it will pop
out about
1
⁄4of an inch when activated. In
the event the reset is activated, turn off the
main power, depress the reset switch, turn
on the main power, and resume operation.
If the switch is activated shortly thereafter,
check for balls jammed inside machine. If
this does not solve problems, follow directions outlined in the maintenance section.
REMOTE:
The remote for this model
is a ten function remote that controls the
sweep (on/off, wide/narrow, and random/
two-line), elevation (up/down), speed (fast/
slow), feed (fast/slow, on/off and one shot),
pause, and the spin (back/top). Pause will
stop all motors at point of play. When pause
is pressed a second time, the machine will
start up again at the same point at which it
was paused. The most efficient way to use
the remote is to adjust the settings on the
control panel as close to the settings desired
and then use the remote control to make
minor adjustments. Once the remote is used
the settings changed are held in memory
and are kept there until a setting is changed
directly on the control panel and then all settings go back to the control panel settings.
BATTERY OPERATION PLUG:
For
proper machine operation, this plug must
be
inserted into the accessory receptacle
locat-
ed just above the control panel. The plug
is
attached to the control panel via a chain.
7
P
O
W
E
R
0
4567
3
2
1
10 1
SPEED
E
L
E
V
A
T
I
O
N
4567
FEED
S
W
E
E
P
8
9
10
F
E
E
D
8
3
9
2
RANDOM
S
W
E
E
P
2 LINE
101
2
2
33
4
5
5
SPIN
WIDE
S
W
E
E
P
NARROW
4
LOW BATTERY
Page 10

BATTERY
INSTRUCTIONS
One can expect to get approximately
four hours of continuous use (no breaks).
However by using lower speeds and
turning the machine off during reloading
tennis balls, playing time may be extended to as much as six hours. Please see
accessories for options to extend playing
time.
The following are requirements to ensure
proper performance of sealed lead acid
batteries and should be followed precisely
:
• Charge battery as soon as possible
after use.
• Do not store battery in discharged
state.
• Do not store for longer than 30 days
without charging.
BATTERY REPLACEMENT:
After
removing housing (please refer to page
9 for housing removal), remove battery
wires, strap screws, and the battery. When
reinstalling the battery, connect the red
battery wire to the red battery terminal,
and the white battery wire to the opposite battery terminal. Disposal: See
instructions on battery.
STANDARD CHARGER:
To charge
the battery, insert the charger plug into
the receptacle labeled “charger receptacle” on the control panel (insert into the
“Accessories Plug” on the Model #4). The
power switch must be off at this time. Be
sure to plug the charger into the machine
first and then into the outlet. If the standard charger is plugged in for longer than
48 hours the charger will cause permanent damage to the battery.
FLOAT CHARGER (OPTIONAL):
The optional float charger can be purchased as an accessory. The float charger
is designed to allow continuous charging
without causing damage to the battery.
A red light will illuminate on the charger
indicating that it is charging. A green light
will come on when the battery is 100%
charged. At this point, the charger enters
a float charge, to prevent the possibility
of overcharging. It is recommended to
leave the charger plugged into the
machine and plugged into the outlet
when the machine is not in use.
PRACTICE
SETTINGS
Ground Strokes
or Volleys:
BEGINNER:
To practice the proper
form for ground strokes or volleys, raise
the elevation height three feet above the
net. Turn speed and feed knobs to “4”
with spin dial in the “0” position. To practice forehand and backhand, turn sweep
switch to the “On” position.
INTERMEDIATE:
For intermediate
play, raise the elevation height approximately two feet above the net. Turn on
the speed and feed knobs to “5” with the
spin dial turned to “3” either way (backspin or topspin). To practice forehand or
backhand, turn sweep switch to the “On”
position.
ADVANCED:
For deep and hard ground
strokes or volley, raise the elevation height
six to twelve inches above the net. Turn the
speed and spin dial fully clockwise. At full
speed you will have to bring the machine
back a couple of feet past the baseline
similar to the positioning of a higher level
player. For intense workout, turn sweep
switch to the “On” position.
OVERHEADS:
Position the ball machine
to throw balls down the center of court.
Adjust the elevation height up for lobs
(or use attachable lob enhancer) and turn
down the ball feed. Practice hitting lobs
at each corner.
8
Page 11
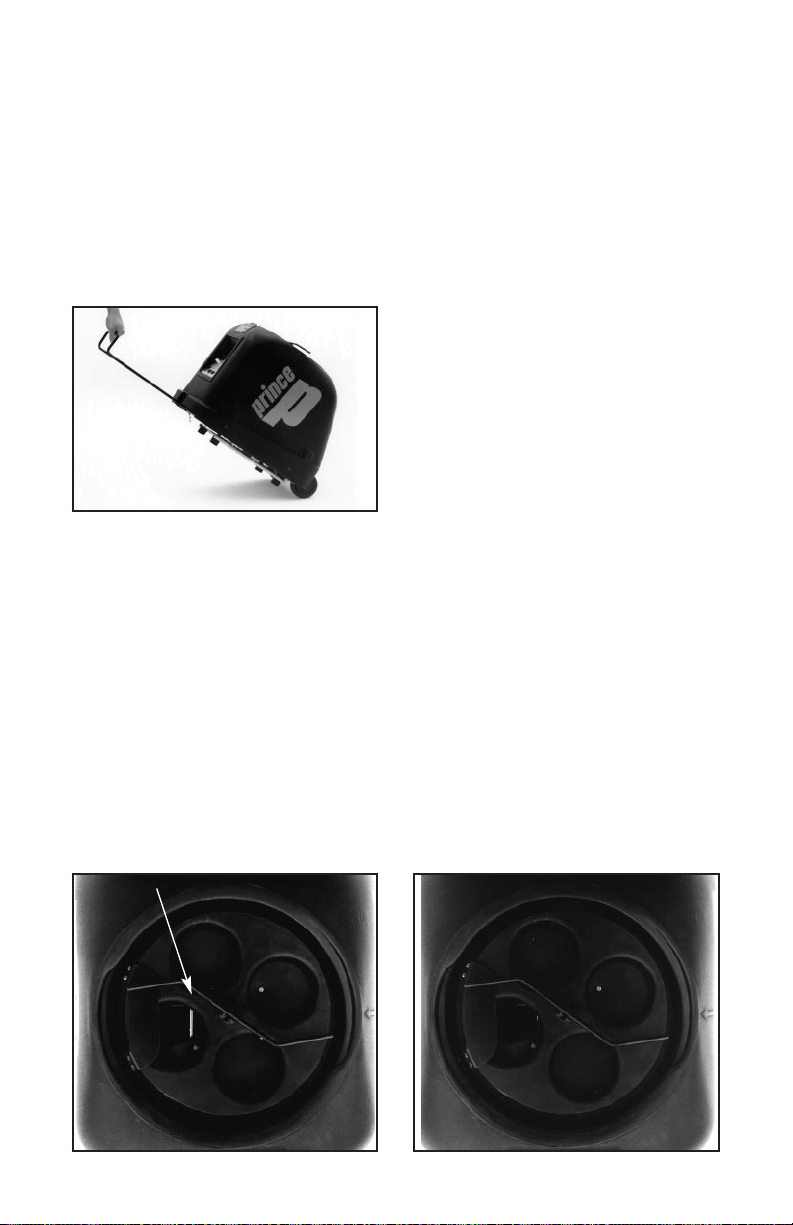
TRANSPORTING
For ease of transport, the Prince®Portable
Ball Machine has a handle that pulls out,
and wheels on the front of the machine
that are durable enough to handle almost
any terrain. It is not a good
idea to try to
pull the machine up or down
stairs as the
base plate can be bent and cause the
machine to be unable to roll.
STORAGE
Store the Prince®Portable Ball Machine
in a clean dry place. Charge the battery
before storage. Be sure to read the battery
section for more information about long
term storage. Avoid extreme temperatures.
MAINTENANCE
HOUSING REMOVAL:
Using a 5⁄32”
Allen wrench, remove the four Allen screws,
two on each side of housing. Carefully lift
and tip housing towards control panel side
of machine. You cannot lift the housing
straight up due to wires that are attached
,
but you can tilt it backwards. This gives
you plenty of access to look inside the
machine. When putting the housing back
on, be sure the motor support column is
behind the alignment screw (see picture
below). You should be able to feel the tip
of the alignment screw with
your finger
and the support column behind
it. If you
can’t feel the alignment screw, pick the
housing up 3 inches and realign.
PERIODIC INTERNAL
CLEANING:
The frequency of cleaning
will depend on the use of the machine.
For casual use (less than once a week),
the cleaning procedure should be performed once every six months. For
extensive use (more than twice a week),
the cleaning procedure should be performed every three months.
INTERNAL CLEANING
PROCEDURE:
Step 1: Remove housing following steps in Housing Removal
section. Step 2: Brush or vacuum off ball
felt and any other foreign materials that
have accumulated on the unit’s interior.
Step 3
:
Complete,
in reverse order, the
Housing
Removal steps. Caution: Be
sure to connect the red battery wire to
the red battery terminal and the white
battery wire to the opposite battery
terminal.
Incorrect
Correct
9
Page 12
Q.
Every once in a while the
machine shoots out two to
three balls at a time. What
is the problem?
A.
If the wheels are unable to handle
a ball, the balls back up and push
the errant ball through. This
causes all balls that have dropped
through the hopper to exit back to
back. First, check for any foreign
material in the ball chute that
would cause a ball jam. Second,
check the surface of the throwing
wheels. If they appear dirty or
have a wax build-up, remove the
housing and clean the wheels with
a wire brush. With the machine in
the off position (and unplugged),
clean the wheels with a side to
side motion. Occasionally wet tennis balls may cause this problem
as well. Extra felt or heavy duty
tennis balls are slightly larger than
normal tennis balls and multiple
firing may occur more frequently
when these types of balls are used.
Q.
The machine turns on, but
instantly shuts down or gives
low battery indication. What
is wrong?
A.
This could mean that either the
battery is low or something is prohibiting the machine from going
through its normal power up procedure. With machine off, check
behind ball throwing wheels to
make sure there is no ball jam. If
wheels turn freely, recharge battery
.
Q.
The machine is only shooting to
the right or left of the court
when it is adjusted to the
widest oscillation angle. What
is the problem?
A.
The oscillation base must be
facing forward for the machine
to oscillate properly. Be sure
to align lines (see alignment
on page 3).
Q.
My remote is not working.
What do I do?
A.
Check the batteries in the remote.
If this does not help, follow the
Housing Removal steps on page
9. Then locate the receiver and
make sure that all wires are connected and clean with soft brush
or vacuum.
10
TROUBLESHOOTING GUIDE
To order any
replacement parts,
or for customer service
contact Master Sports at
1-800-837-1002 ext. 3307
Page 13

OPTIONAL ACCESSORIES
Converter:
The converter comes in either 110v or
220v capabilities. The converter enables
the machine to be run from any standard
electrical outlet. The converter also
works
as a fast charger when the machine
is off.
Note: The converter utilizes the battery
to assist in the start up of the machine.
It is recommended to leave the converter
plugged into the machine while the
machine is not in use. The converter is
silver in color. This is a great option for
anyone interested in using the machine
for hours at a time.
Cover:
The cover is designed specifically for
the machine. To cover the machine for
storage with balls in the hopper, use
cover fully unfolded. To cover the
machine for storage with the hopper in
storage position (see photo #1 on pg. 2),
fold the bottom of the cover and attach
to the inside via Velcro.
Lob Enhancer:
This attachment produces game perfect
lobs. This attaches to the two holes
located on the front of the housing. To
use, raise the elevation so that the ball
deflects off the top of the lob enhancer.
11
Extended Life Battery:
The extended life battery is an option
that allows the machine to run an additional eight to ten hours. It weighs 30
lbs., comes with a custom carrying case,
fast charger, and connecting cable. To
charge
the extended life battery, plug the
charger
into the plastic receptacle on the
battery and plug the other end of the
charger into an electrical outlet. The red
light on the charger will show that it is
charging, and the green light will illuminate when the battery is 90% charged.
The time required for a full charge on the
extended life battery is approximately 8
hours.
To use the extended life battery, unplug
the charger and plug one end of the battery cable into the extended life battery
and the other end into the machine.
When attaching the cable on the Model
#4, please verify that the proper ends of
the cable are attached to the correct
receptacle. The cables are color coded
for your convenience.
To order any of the
accessories,
contact Master Sports
at 1-800-837-1002
or contact your
local dealer.
Page 14
For these and other exciting products, you may visit us online at
www.mastersports.com. For more information, write us at
6206 Discount Drive, Ft. Wayne, IN 46818 or call (800) 837-1002.
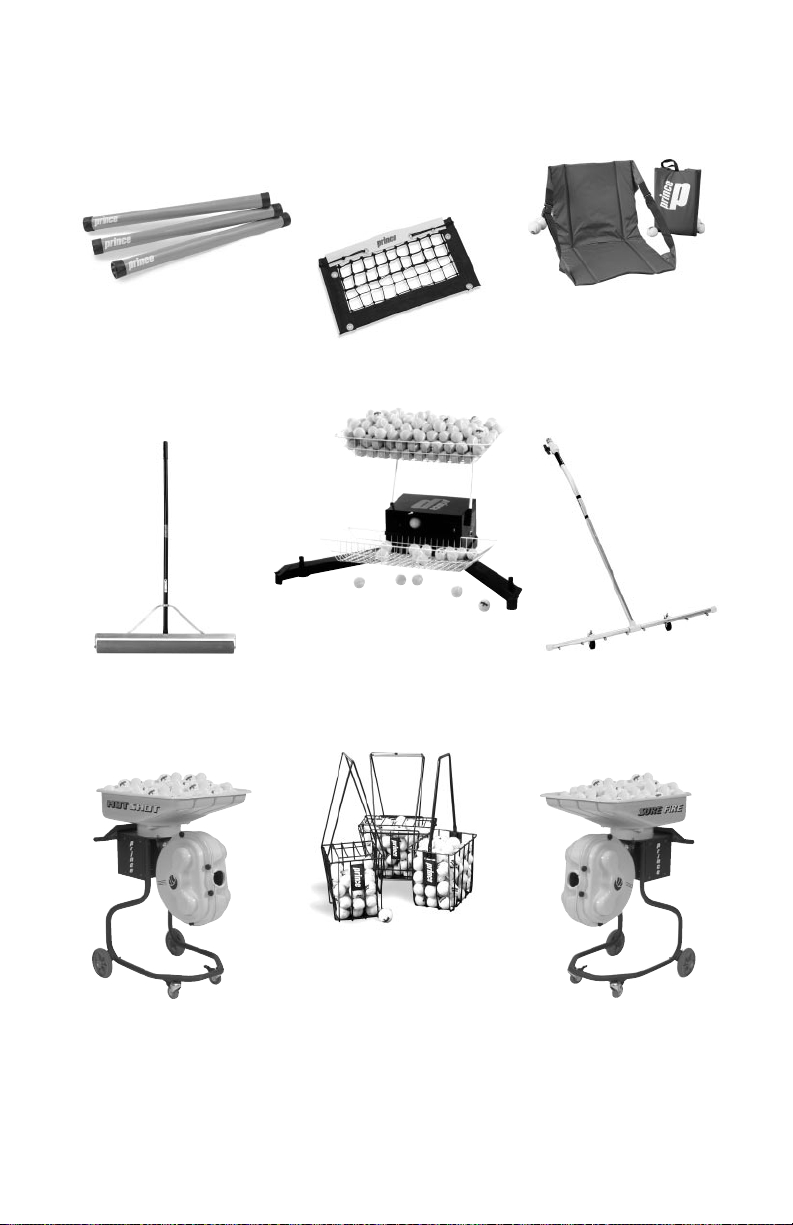
COURT EQUIPMENT
12
Prince®Sure FirePrince®Hot Shot
Water Broom
CS 100
Sponge Roller
PCA 400
Baskets
(L to R) PCA 075/101/085
Ball Tubes
PCA 018
Stadium Seat
PCA 102
Net
PCA 110/112
Prince®Ball Retriever
PCA 100
Page 15

WARRANTY REGISTRATION
Date of Purchase__________________________________________________________
Model/Serial Number _____________________________________________________
Source of Original Information______________________________________________
Purchased from (name of dealer, rep, pro, etc.) _______________________________
_________________________________________________________________________
Your Name _______________________________________________________________
Address__________________________________________________________________
City ____________________________________State __________Zip ______________
Phone __________________________________Fax______________________________
LIMITED WARRANTY
Master Sports warrants its products to be free from defect in materials and workman
ship
for a period of one year from date of original purchase except for the battery, which is
warranted for 6 months. Master Sports will repair or replace defective products at its
option, without charge. Evidence showing the date of purchase and serial number
must be submitted at the time any warranty claim is made. This warranty is void if the
serial number has been altered or removed and shall not apply to damage caused by
unauthorized repairs or alterations.
If any defect should occur, contact Master Sports Technical Assistance at 1-800-837-1002
ext 3307,
please have your serial number ready. It is found next to the sweep knob on
the Model #2 & 3 and below the control panel on the Model #1 & 4. Newer machines
have the serial number on the bottom of the machine. If we are unable to resolve
the
problem by telephone, an R.A. number will be issued and must be clearly evidenced
on
the outside of the box in order to be received at Master Sports. Return the unit in
its
original carton & packing, freight prepaid. Master Sports will pay the freight to return the
repaired merchandise to the customer. No C.O.D. shipments will be accepted.
This warranty gives you specific legal rights, and you may also have other rights which
vary from state to state.
THE FOREGOING WARRANTY IS EXCLUSIVE AND IN LIEU OF ALL OTHER WARRANTIES
OF QUALITY AND PERFORMANCE WRITTEN, ORAL OR IMPLIED, AND ALL OTHER
WARRANTIES INCLUDING ANY IMPLIED WARRANTIES OF MERCHANTABILITY OR
FITNESS FOR A PARTICULAR PURPOSE ARE HEREBY DISCLAIMED. IN NO EVENT
SHALL MASTER SPORTS BE LIABLE FOR SPECIAL, INDIRECT, INCIDENTAL OR CONSEQUENTIAL DAMAGES WHETHER IN CONTRACT, TORT, NEGLIGENCE, STRICT
LIABILITY OR OTHERWISE. Some states do not allow limitations on how long an
implied warranty lasts and/or the exclusion or limitation of incidental or consequential
damages, so the above limitation and exclusion may not apply to you.
Page 16

Place
Stamp
Here
Portable Tennis Ball Machines
6206 Discount Drive
Fort Wayne, IN 46818
6206 Discount Drive
Fort Wayne, IN 46818
800-837-1002
www.mastersports.com
 Loading...