

Princess 222021 Instructions For Use Manual

TYPE 222021
SILVER TURBO MIXER
Gebruiksaanwijzing
Instructions for use
Mode d’emploi
Anleitung
Instrucciones de Uso
Istruzioni d’uso
Bruksanvisning
Brugsanvisning
Bruksanvisning
Käyttöohje

2
Gebruiksaanwijzing . . . . . . . . . . . . . . . . . . . . . . . . . . . . . . . . . . 4
Instructions for use . . . . . . . . . . . . . . . . . . . . . . . . . . . . . . . . . . . 6
Mode d’emploi . . . . . . . . . . . . . . . . . . . . . . . . . . . . . . . . . . . . . . . 9
Anleitung . . . . . . . . . . . . . . . . . . . . . . . . . . . . . . . . . . . . . . . . . . . . 11
Instrucciones de Uso . . . . . . . . . . . . . . . . . . . . . . . . . . . . . . . . 13
Istruzioni d’uso . . . . . . . . . . . . . . . . . . . . . . . . . . . . . . . . . . . . . . 16
Bruksanvisning . . . . . . . . . . . . . . . . . . . . . . . . . . . . . . . . . . . . . . 18
Brugsanvisning . . . . . . . . . . . . . . . . . . . . . . . . . . . . . . . . . . . . . . 20
Bruksanvisning . . . . . . . . . . . . . . . . . . . . . . . . . . . . . . . . . . . . . . 23
Käyttöohje . . . . . . . . . . . . . . . . . . . . . . . . . . . . . . . . . . . . . . . . . . . 25
. . . . . . . . . . . . . . . . . . . . . . . . . . . . . . . . . . . . . . . . . . . . . . . . . . . . . . 27
APRIL 2008 V2
NL
UK
F
D
E
I
S
DK
N
SF
GR
4
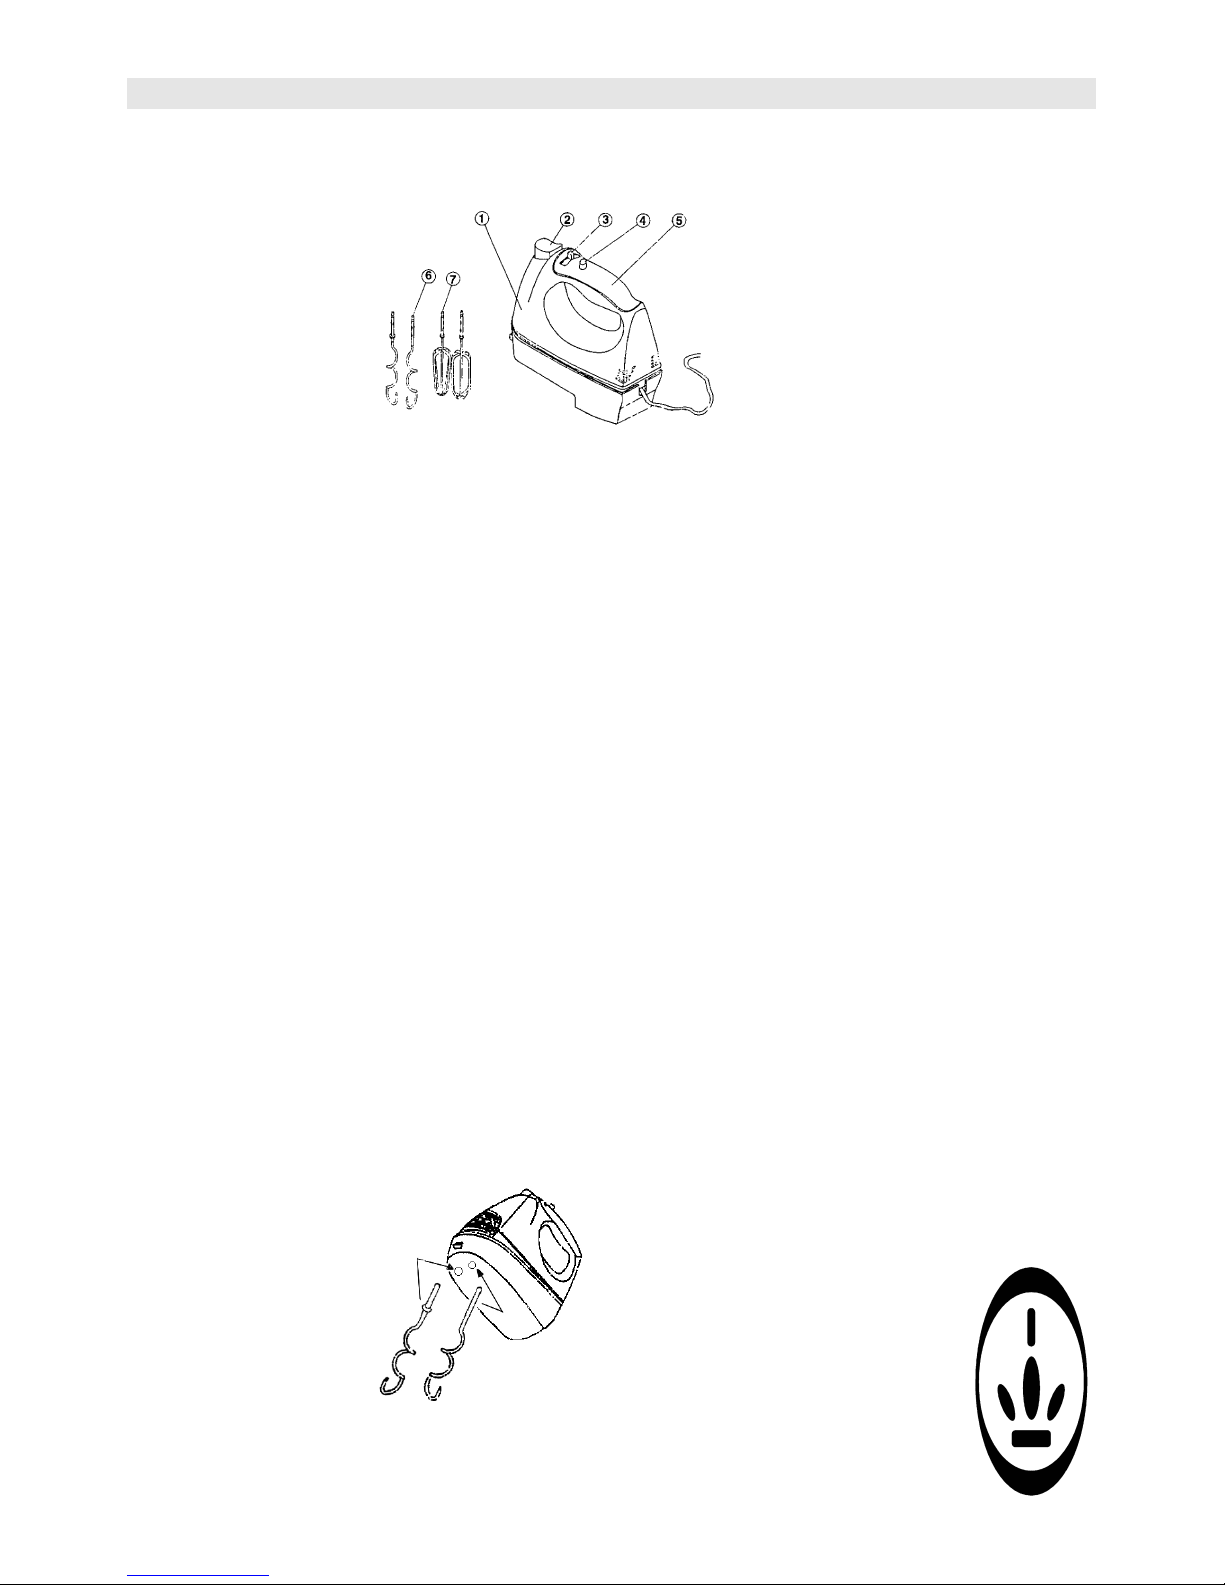
PRINCESS SILVER TURBO MIXER ART. 222021
Lees deze gebruiksaanwijzing zorgvuldig door voordat u de mixer gaat gebruiken en bewaar deze om
hem later nog eens te kunnen raadplegen. Controleer of de netspanning in uw woning overeenkomt met
wat op het apparaat is aangegeven. Deze mixer heeft de volgende bedieningsknoppen:
01. mixer
02. ejectknop
03. snelheidsknop
04. turboknop
05. handvat
06. deeghaken
07. gardes
Let op:
Als u de mixer voor het eerst gebruikt, kan de motor enigszins vreemd ruiken. Dit is normaal. De geur
wordt veroorzaakt door het opwarmen van de motorisolatie en de geurontwikkeling zal verdwijnen als de
motor eenmaal is ingelopen.
PRODUCTKENMERKEN
1. Veilige aan-uitschakelaar:
Met één enkele schakelaar kunt u de mixer volledig in- en uitschakelen.
2. 300 Watt vermogen:
Krachtig genoeg voor het zwaarste koekdeeg of boter direct uit de koelkast.
3. Handige ejectknop:
U verwijdert de gardes met één hand.
4. Vormvast en robuust huis:
De sterke constructie zorgt voor extra stabiliteit en minder trillingen bij het mixen van zwaar deeg.
5. Gemakkelijk te reinigen:
De gladde en gestroomlijnde vormen zijn gemakkelijk schoon te maken. Minder hoekjes waar
ingrediënten zich kunnen ophopen.
6. Handige netsnoerinvoer:
U kunt de netsnoeren met een kleine beweging 180 graden draaien.
VOORBEREIDINGEN
Als u de mixer voor het eerst gebruikt, was dan de gardes en de deeghaken eerst een keer in warm water
met afwasmiddel. Daarna goed spoelen en afdrogen.
AANBRENGEN VAN DE GARDES EN DEEGHAKEN
Zet de aan-uitschakelaar op "UIT" en trek de stekker uit het stopcontact.
De garde met de zeshoekige kraag past alleen in de zeskantopening en de garde met de ronde kraag past
alleen de ronde opening. De symbolen aan de onderzijde van de mixer geven aan welke garde u in welke
opening moet steken. Plaats de gardes door de as in de opening te duwen en eventueel een beetje te draaien
tot ze vastklikken. Verwissel de gardes niet want ze passen maar in één opening. De deeghaken brengt u op
dezelfde manier aan als hierboven staat beschreven voor de gardes, maar schakel wel altijd eerst de mixer
uit en trek de stekker uit het stopcontact.
HET MIXEN
Begin altijd op de laagste stand met mixen. De snelheid neemt toe als u de snelheidsschakelaar verschuift van Min. naar Max. Selecteer een snelheid die geschikt is voor de
gebruikte ingrediënten. Raadpleeg de snelheidstabel voor de juiste keuze.
zeshoekig
rond

5
Voeg langzaam ingrediënten toe aan uw mengsel.
Gebruik de mixer nooit met de combinatie van één deeghaak en één garde, dit beschadigt de mixer.
Stop de mixer wanneer u de zijkanten en de bodem van de mengkom wilt afschrapen met een plastic spatel.
GEBRUIK
1. Trek altijd eerst de stekker uit het stopcontact en zet de snelheidsknop op "UIT" voordat u de gardes/
deeghaken aanraakt. Breng de gardes aan door met één hand het handvat van de mixer vast te pakken,
en met uw andere hand de as van de garde. Zorg ervoor dat u de gardeopeningen kunt zien. Druk de
gardes één voor één in de juiste opening en draai ze eventueel voorzichtig rond tot ze vastklikken.
2. Steek de stekker in een stopcontact.
3. Kies de juiste mengsnelheid voor uw ingrediënten.
4. Laat de mixer nooit langer dan 10 minuten continu draaien, en laat de mixer daarna altijd 15 minuten
afkoelen.
5. Zet na het mixen de snelheidsknop op "UIT" en trek de stekker uit het stopcontact.
6. Druk op de ejectknop om de gardes of deeghaken te verwijderen.
KIEZEN VAN DE SNELHEID
Snelheid Mengfunctie Voorbeeld
1 KNEDEN Deeg kneden.
1 DOOR ELKAAR Gebruik deze stand voor het mengen van droge ingrediënten of als
SCHEPPEN in het recept staat dat u twee delen door elkaar moet scheppen, zoals
opgeklopt eiwit door het beslag. En wanneer het recept mengen op
LAGE snelheid (stand LOW) vereist.
2 ROEREN Voor het roeren van vloeistoffen en voor het geleidelijk toevoegen
van droge ingrediënten aan een vloeistof.
2 MENGEN Voor instant-brooddeeg: net snel genoeg om te mengen zonder een
volledig gladde massa te creëren.
3 TOEVOEGEN Gebruik deze stand als in het recept staat dat ingrediënten moeten
worden toegevoegd.
3 CAKEMIX Voor kant-en-klare cakemix en wanneer het recept mengen op
GEMIDDELDE snelheid (stand MEDIUM) vereist.
4 ROMIG Romig kloppen van boter en suiker.
4 GLAZUUR Voor het kloppen van lichte en luchtige glazuur- en snoepmengsels.
5 SLAGROOM Voor het luchtig kloppen van slagroom of andere ingrediënten.
5 EIWIT Opkloppen van ei en eiwit. En wanneer het recept mengen op
HOGE snelheid (de stand HIGH) vereist.
TURBOSTAND De mixer gaat meteen naar de hoogste snelheid
NA GEBRUIK
1. Bent u klaar met mixen, zet dan de aan-uitschakelaar op "UIT" en trek de stekker uit het stopcontact.
2. Houd de gardes of deeghaken vast en druk de ejectknop in om ze uit de mixer te verwijderen. Let op:
behandel de gardes en de deeghaken altijd met de nodige voorzichtigheid!
REINIGING
DOMPEL DE MIXER NOOIT IN WATER OF EEN ANDERE VLOEISTOF!
1. Verwijder na gebruik de gardes of de deeghaken uit de mixer, en veeg daarna de mixer eerst met een
vochtige doek schoon, en vervolgens met een droge doek droog.
2. Was de gebruikte gardes en deeghaken in een warm sopje, spoel ze en droog ze af. De
gardes en deeghaken zijn vaatwasmachinebestendig.
3. Voorkom krassen. Gebruik daarom nooit de schurende kant van schuursponsjes en reinig
de gardes en deeghaken nooit met schuurmiddelen. Ook zijn de gardes en deeghaken
NIET geschikt om langere tijd (een aantal uren of een nacht) te laten weken in water,
dat kan de afwerking van het metaal aantasten.
PRINCESS TIPS
- Gebruik deze mixer alleen voor huishoudelijk gebruik.
- Dompel de mixer nooit in water of in een andere vloeistof. Goed toezicht is noodzakelijk
bij het gebruik van de mixer door kinderen, of in de buurt van kinderen.
6
- Trek de stekker uit het stopcontact wanneer het apparaat niet wordt gebruikt, na gebruik, wanneer de
gardes/deeghaken worden aangebracht of verwijderd en wanneer het wordt gereinigd.
- Vermijd contact met de bewegende delen. Houd handen, haren, kleding, kookattributen en dergelijke uit
de buurt van de draaiende mixer, om persoonlijk letsel en beschadiging van de mixer te voorkomen.
- Bij beschadiging van de stekker of het netsnoer, of als de mixer is gevallen of op andere wijze is
beschadigd, raden wij u aan het apparaat niet meer te gebruiken. Breng het terug naar de winkel of naar
een erkend service werkplaats voor reparatie.
- Het gebruik van andere dan de meegeleverde originele accessoires kan brand, elektrische schokken en
letsel veroorzaken.
- Gebruik deze mixer niet buitenshuis.
- Laat het netsnoer niet over de rand van de tafel of het aanrecht hangen, en laat het netsnoer nooit in
contact komen met hete oppervlakken zoals het fornuis.
- Houd de mixer uit de buurt van hete kookplaten, gaspitten en hete ovens.
- Gebruik de mixer alleen voor het doel waarvoor hij bestemd is.
- Laat de mixer niet zonder toezicht draaien.
- Verwijder de gardes en deeghaken uit de mixer voordat u deze reinigt.
- Controleer voor gebruik of alle onderdelen correct zijn aangebracht.
- Zorg ervoor dat kinderen niet met dit apparaat spelen.
- Het is niet zonder gevaar om dit apparaat te laten gebruiken door kinderen of personen met een geestelijke
of lichamelijke handicap, of met te weinig ervaring of deskundigheid. De voor de veiligheid van deze
gebruikers verantwoordelijke persoon dient ze duidelijke instructies te geven voor of ze te begeleiden
bij het gebruik van dit apparaat.
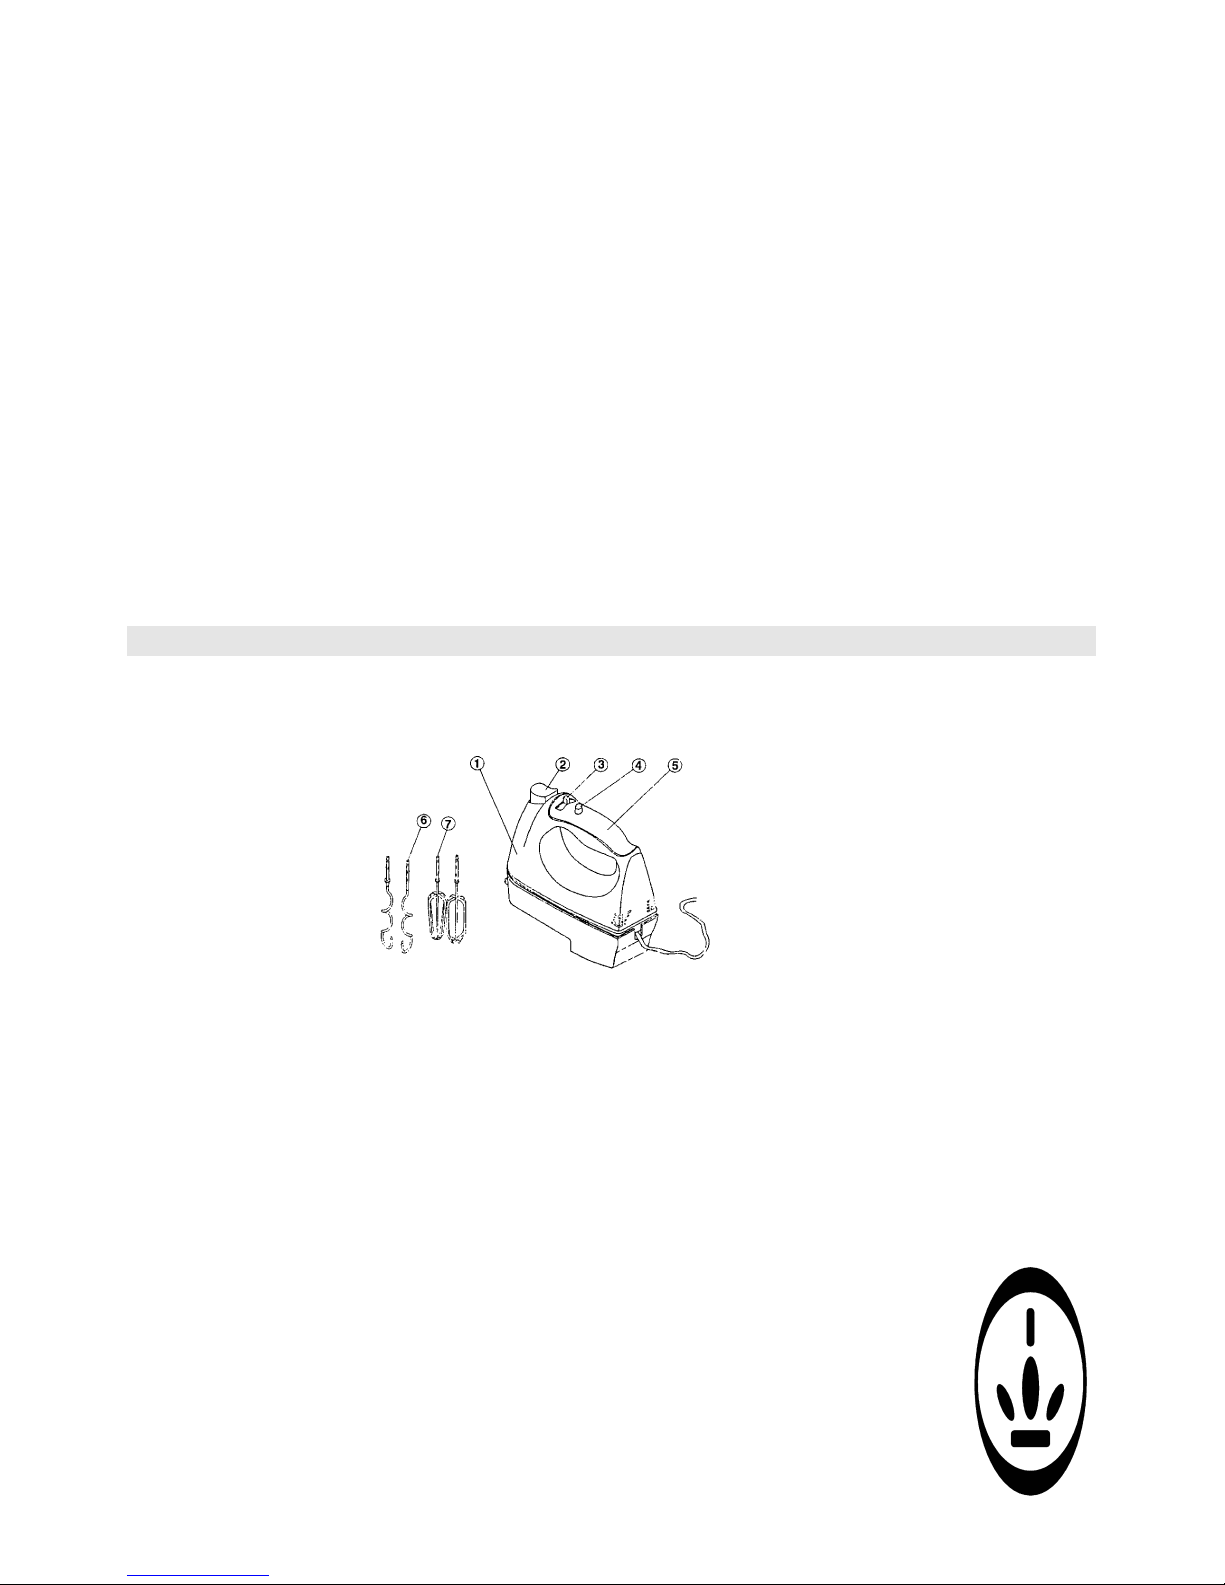
PRINCESS SILVER TURBO MIXER ART. 222021
Read these instructions carefully before you use the mixer, and keep them in a safe place for future
reference. Check that the voltage of your domestic electric supply conforms to the voltage indicated on
the appliance. This mixer has the following controls and components:
01. mixer
02. eject button
03. speed button
04. turbo button
05. handle
06. dough hooks
07. whisk attachments
ATTENTION:
When you use the mixer for the first time, the motor may smell somewhat strange. This is normal The
smell is caused by the motor's insulation warming up, and will disappear once the motor is run in.
PRODUCT FEATURES
1. Safe on/off switch:
You can switch the mixer completely on and off with a single switch.
2. 300 Watt power capacity:
Powerful enough for the heaviest cake dough or butter straight from the fridge.
3. Handy eject button:
You remove the whisks with one hand.
4. Sturdy, robust casing:
The strong construction gives extra stability and less vibration when mixing heavy dough.
5. Easy to clean:
The smooth, streamlined shape is easy to clean. Fewer corners in which ingredients can
accumulate.
6. Handy cable connection:
You can turn the cables through 180 degrees with a small movement.
PREPARATIONS
If you are using the mixer for the first time, wash the whisk attachments and the dough
hooks first in warm water and detergent. Rinse, and dry carefully afterwards.

7
FITTING THE WHISKS AND DOUGH HOOKS
Turn the on/off switch to "OFF" and remove the plug from the electric socket.
The whisk with the hexagonal collar only fits into the hexagonal opening, and the whisk with the round
collar only fits into the round opening. The symbols on the underside of the mixer indicate which whisk
should be fitted into which opening.
Fit the whisks by pushing the shaft into the opening and turning slightly if necessary until they click into
place. Do not mix the whisks up, as they only fit into one opening.
You attach the dough hooks in the same manner as described above for the whisks, but do always switch
the mixer off first and remove the plug from the socket.
MIXING
Always start mixing at the lowest speed. The speed will increase when you turn the speed switch from
Min. to Max. Select a speed that is suitable for the ingredients you are using. Consult the speed table to
make the right choice.
Add ingredients to your mixture gradually.
Never use the mixer with a combination of one dough hook and one whisk; this will damage the mixer.
Stop the mixer when you wish to scrape the sides and bottom of the mixing bowl clean with a plastic spatula.
USE
1. Always remove the plug from the socket and turn the speed button to "OFF" before you touch the
whisks / dough hooks. Attach the whisks by holding the mixer handle firmly with one hand, and the
shaft of the whisk with the other. Ensure that you can see the whisk apertures. Push the whisks one at a
time into the correct aperture and turn them carefully, if necessary, until they click into place.
2. Insert the plug into an electric socket
3. Select the correct mixing speed for your ingredients.
4. Never leave the mixer running for longer than 10 minutes at a time; always allow the mixer to cool off
for 15 minutes afterwards.
5. After mixing, turn the speed button to "OFF" and remove the plug from the electric socket.
6. Press the eject button to remove the whisks or dough hooks.
SELECTING THE SPEED
Speed Mixer function Example
1 KNEADING Kneading dough.
1 FOLDING Use this setting to mix dry ingredients or if the recipe states that you have to
mix two things together, such as beaten egg white with batter. Also,
whenever the recipe calls for mixing at LOW speed.
2 STIRRING For stirring liquids and for gradually adding dry ingredients to a liquid.
2 MIXING For instant dough mixtures: just fast enough to mix without creating a
completely smooth paste.
3 ADDING use this setting when the recipe states that ingredients must be added.
3 CAKE MIX For instant cake mix and whenever the recipe calls for mixing at MEDIUM speed.
4 CREAMY For beating butter and sugar to a creamy consistency.
4 ICING For beating light, fluffy icing and confectionery mixtures.
5 CREAM For beating cream or other ingredients to a fluffy consistency.
5 EGG WHITE Beating eggs and egg white. Also, whenever the recipe calls for mixing at
HIGH speed.
TURBO SETTING The mixer immediately runs at the highest speed.
hexagonal
round

8
AFTER USE
1. When you have finished mixing, turn the on/off switch to "OFF" and remove the plug from the electric
socket.
2. Hold the whisks or dough hooks and press the eject button to remove them from the mixer. Attention:
always handle the whisks and the dough hooks with due care!
CLEANING
NEVER IMMERSE THE MIXER IN WATER OR ANY OTHER LIQUID!
1. After use, remove the whisks or the dough hooks from the mixer and then wipe the mixer clean with a
damp cloth, then dry it with a teatowel.
2. Wash the whisks and dough hooks that have been used in warm soapy water; rinse, and dry. The
whisks and dough hooks are dishwasher-proof.
3. Avoid scratching the utensils. You should therefore never use the scouring side of kitchen sponges or
clean the whisks or dough hooks with abrasive cleaning materials. Also, the whisks and dough hooks
should not be left to soak in water for a long period (a number of hours or overnight), as this can
damage the metal finish.
PRINCESS TIPS
- This mixer is only intended for domestic use.
- Never immerse the mixer in water or any other liquid. Close supervision is required when children are
using the mixer or are in the area when it is in use.
- Remove the plug from the electric socket when the appliance is not in use, after use, when removing or
attaching the whisks or dough hooks, and when it is being cleaned.
- Avoid contact with the moving parts. Keep your hands, hair, clothing, kitchen utensils and such like
away from the mixer when it is running to avoid personal injury and damage to the mixer.
- If the plug or the power cable are damaged, or if the mixer has been dropped or damaged in any other
way, we would advise you not to continue using the appliance. Take it back to the shop or to a recognised
service centre for repair.
- Using accessories other than the original accessories supplied can cause fires, electric shocks and injury.
- Do not use this mixer outdoors.
- Do not let the power cable dangle over the edge of the table or the sink unit, and never allow the cable
to come into contact with hot surfaces such as the kitchen stove.
- Keep the mixer out of the vicinity of hotplates, gas burners and hot ovens.
- Only use the mixer for the purpose for which it is intended.
- Never leave the mixer running unsupervised.
- Remove the whisks and dough hooks from the mixer before you clean them.
- Before use, check that all parts have been properly attached.
- Children should be supervised to ensure that they do not play with the appliance.
- The use of this appliance by children or persons with a physical, sensory, mental or motorial disability,
or lack of experience and knowledge can give cause to hazards. Persons responsible for their safety
should give explicit instructions or supervise the use of the appliance.
U.K. WIRING INSTRUCTIONS
The wires in the mains lead are coloured in accordance with the following code:
BLUE NEUTRAL
BROWN LIVE
As the colours of the wire in the mains lead of this appliance may not correspond with the colour
markings identifying the terminals on your plug, proceed as follows:
The wire which is coloured BLUE must be connected to the terminal which is marked with
the letter N or coloured black.
The wire which is coloured BROWN must be connected to the terminal which is marked
with the letter L or coloured red.
WARNING: ON NO ACCOUNT SHOULD EITHER THE LIVE OR NEUTRAL
WIRES BE CONNECTED TO THE EARTH TERMINAL
9
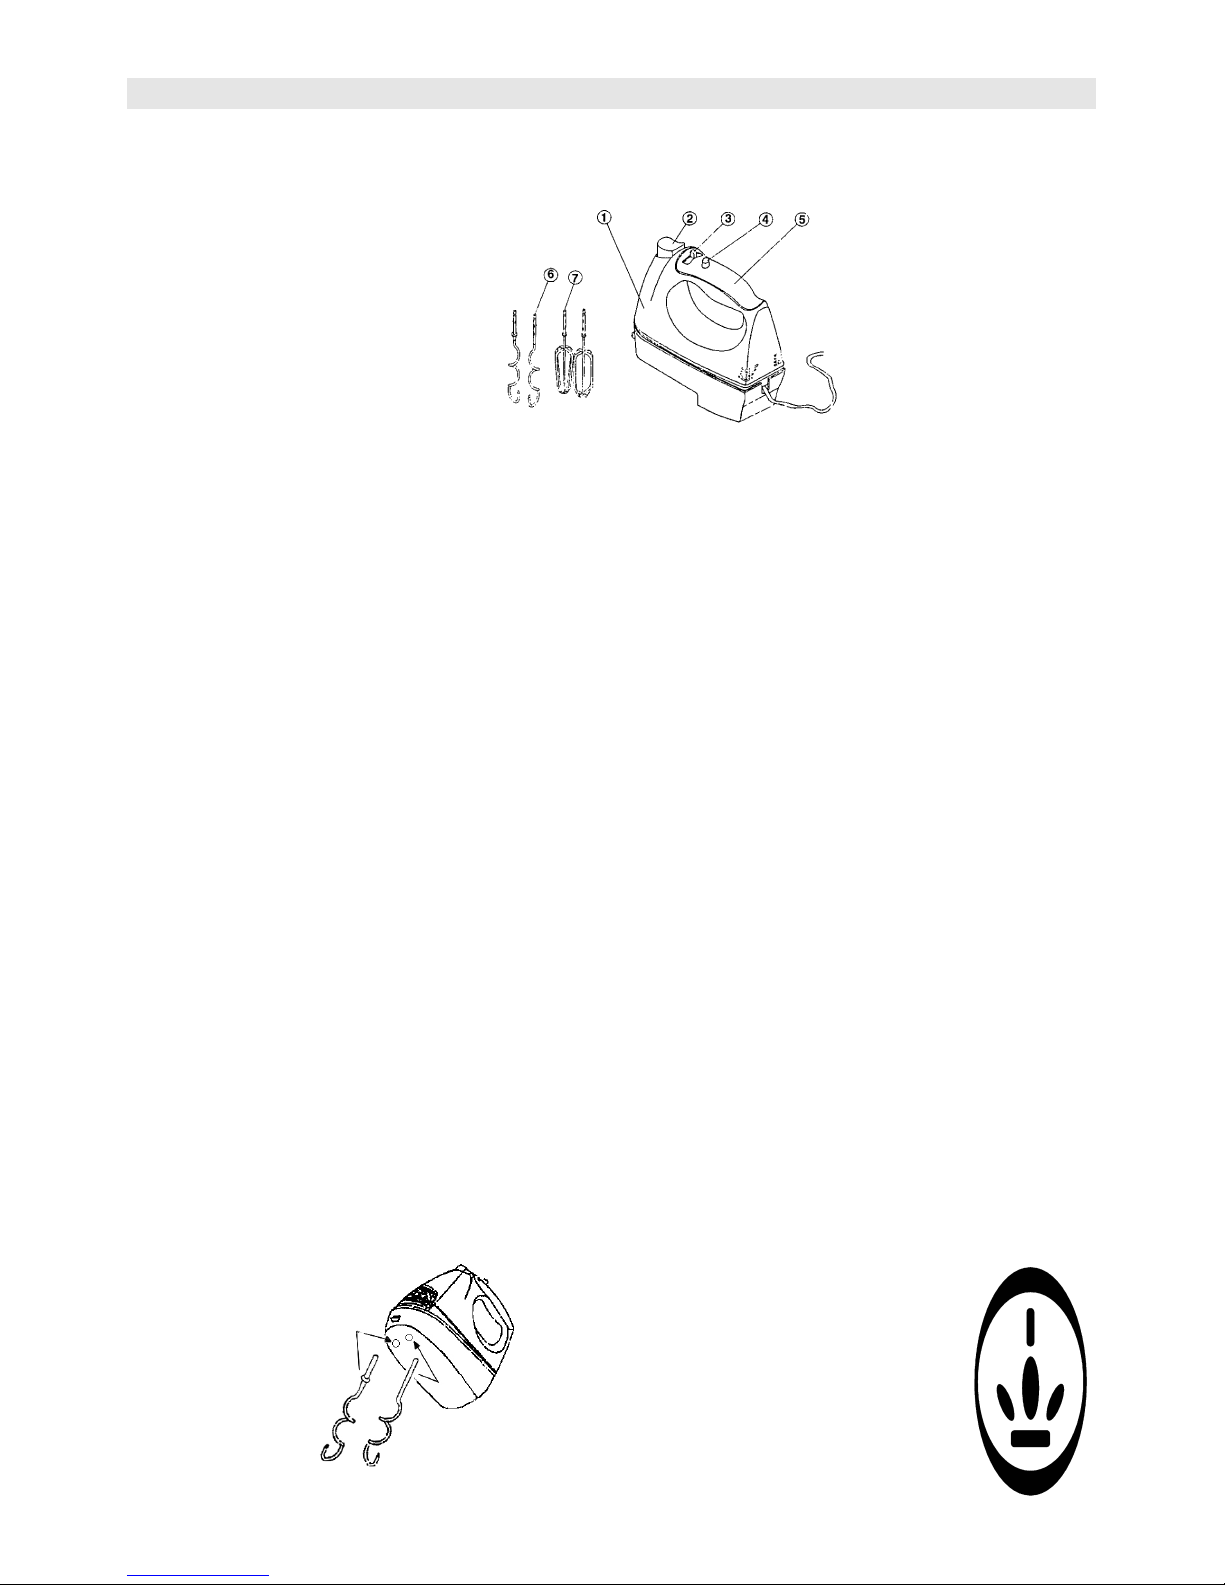
PRINCESS SILVER TURBO MIXER ART. 222021
Avant d’utiliser le mixer, veuillez lire attentivement ce mode d’emploi que vous conserverez soigneusement
afin de pouvoir vous y reporter en cas de besoin. Vérifiez que le voltage de l’appareil correspond à celui
de la tension de secteur dans votre logement. Ce mixer comporte les pièces et fonctions suivantes :
01. mixer
02. touche d’éjection
03. bouton de commande de la vitesse
04. bouton turbo
05. poignée
06. batteurs
07. fouets
ATTENTION :
Si vous utilisez le mixer pour la première fois, il se peut que le moteur dégage une odeur. Ce phénomène
normal, causé par l’échauffement de l’isolant du moteur, disparaît après le rodage de l’appareil.
CARACTÉRISTIQUES DU PRODUIT
1. Interrupteur marche/arrêt de sécurité :
Avec un seul interrupteur, vous allumez ou éteignez complètement le mixer.
2. Puissance 300 watts :
Puissance suffisante pour mélanger une lourde pâte à gâteau ou du beurre sortant du réfrigérateur.
3. Ejecteur pratique :
Grâce à ce bouton, vous enlevez les fouets d’une seule main.
4. Boîtier solide et résistant :
Sa solide construction assure une excellente stabilité et diminue les vibrations lorsque vous mélangez
une pâte lourde.
5. Facile à nettoyer :
Le mixer se nettoie aisément grâce à son design lisse aux formes arrondies, dépourvu d’angles pouvant
retenir les ingrédients.
6. Fiche de cordon très pratique :
Vous pouvez tourner facilement les cordons de 180 degrés.
AVANT L’UTILISATION
Avant d’utiliser le mixer pour la première fois, nettoyez les fouets et les batteurs dans de l’eau chaude
additionnée de liquide vaisselle. Rincez-les et séchez-les ensuite soigneusement
MISE EN PLACE DES FOUETS ET DES BATTEURS
Mettez l’interrupteur marche/arrêt sur "ARRET" et enlevez la fiche de la prise.
Le fouet à col hexagonal s’insère uniquement dans l’ouverture hexagonale, le fouet à col rond uniquement
dans l’ouverture ronde. Les symboles figurant sous le mixer vous indiquent quel est le point d’insertion
approprié des fouets.
Insérez les fouets en enfonçant l’axe dans l’ouverture et éventuellement en les tournant légèrement jusqu’à
ce qu’ils soient fixés (déclic). Chaque type de fouet ne peut s’insérer que dans une seule ouverture.
Les batteurs s’insèrent de la même manière que les fouets, comme décrit ci-dessus. Avant de les mettre en
place, veillez toujours à arrêter le mixer et à enlever la fiche de la prise.
hexagonal
rond

10
MÉLANGE D’INGRÉDIENTS
Commencez toujours une préparation en utilisant la vitesse la plus lente. Pour augmenter la vitesse,
tournez le bouton de commande des vitesses de Min. à Max. Sélectionnez la vitesse appropriée en
consultant le tableau.
Ajoutez lentement les ingrédients à votre préparation.
N’utilisez jamais un fouet en même temps qu’un batteur, car vous pourriez endommager l’appareil.
Arrêtez le mixer quand vous voulez racler les bords et le fond du bol avec une spatule en plastique.
UTILISATION
1. Enlevez toujours la fiche de la prise et mettez le bouton de commande des vitesses sur "ARRET" avant
de toucher les fouets/batteurs. Insérez les fouets en tenant d’une main la poignée du mixer et de l’autre
l’axe du fouet. Vous devez pouvoir voir les orifices d’insertion. Insérez les fouets l’un après l’autre dans
l’ouverture adéquate, éventuellement en les tournant légèrement jusqu’à ce que vous entendiez un déclic.
2. Introduisez la fiche dans la prise.
3. Sélectionnez la vitesse appropriée pour votre préparation.
4. Ne faites jamais fonctionner le mixer plus de 10 minutes sans interruption et laissez toujours refroidir
ensuite le mixer pendant 15 minutes.
5. Après avoir effectué le mélange, mettez le bouton de commande des vitesses sur "ARRET" et enlevez
la fiche de la prise.
6. Appuyez sur l’éjecteur pour enlever les fouets ou les batteurs.
CHOIX DE LA VITESSE
Vitesse Fonction Exemple
1 PETRIR Pétrir la pâte.
1 MELANGE Cette position est utilisée pour mélanger des ingrédients secs ou si la
GROSSIER recette indique que vous devez mélanger deux types d’ingrédients,
comme des blancs en neige dans une pâte. De même que si la recette
exige un mélange à vitesse LENTE (position LOW).
2 TOURNER Mélange de liquides et adjonction progressive d’ingrédients secs à un
liquide.
2 MELANGER Pâte à pain instantanée : vitesse juste suffisante pour mélanger, sans
formation d’une masse absolument lisse.
3 AJOUTER Cette position est utilisée lorsque la recette indique que vous devez
ajouter des ingrédients.
3 PATE A CAKE Pour la pâte à cake prête à l’emploi, et lorsque la recette exige un
mélange à vitesse MOYENNE (position MEDIUM).
4 MELANGE CREMEUX Pour battre le beurre et le sucre pour obtenir un mélange crémeux.
4 GLAÇAGE Préparation de mélanges légers pour un glaçage ou des sucreries.
5 CHANTILLY Pour battre la crème ou d’autres ingrédients.
5 ŒUFS Pour battre des blancs ou des jaunes d’œufs. De même que si la
recette exige une vitesse RAPIDE (position HIGH).
POSITION TURBO Le mixer passe immédiatement à la vitesse la plus élevée
APRÈS L’EMPLOI
1. Après avoir terminé votre préparation, mettez l’interrupteur marche/arrêt sur "ARRET" et enlevez la
fiche de la prise.
2. Tenez les fouets ou les batteurs et appuyez sur l’éjecteur pour les enlever du mixer.
Attention : manipulez toujours les fouets et les batteurs avec la plus grande précaution !
NETTOYAGE
NE PLONGEZ JAMAIS LE MIXER DANS L’EAU NI DANS TOUT AUTRE LIQUIDE !
1. Après l’emploi, enlevez les fouets ou les batteurs du mixer. Nettoyez ensuite le mixer
avec un chiffon humide, puis séchez-le avec un chiffon sec.
2. Nettoyez les fouets et les batteurs dans de l’eau chaude additionnée de liquide vaisselle,
rincez-les et séchez-les. Les fouets et les batteurs peuvent être nettoyés au lave-vaisselle.
3. Eviter de rayer l’appareil et les accessoires. N’utilisez jamais le côté abrasif des tampons
à récurer et ne nettoyez jamais les fouets et les batteurs avec des produits abrasifs. Les
fouets et les batteurs ne doivent PAS tremper (plusieurs heures ou une nuit) dans l’eau,
car cela pourrait attaquer la couche de finition du métal.
 Loading...