

Page 1
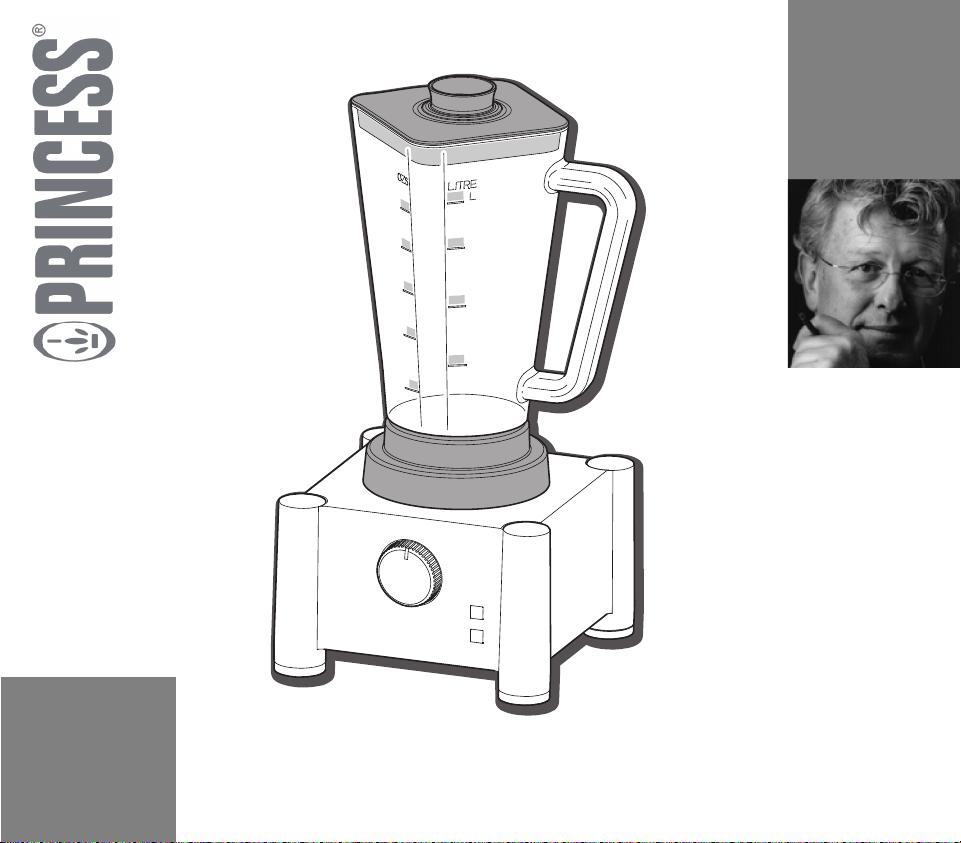
FFFFRRRROOOOMMMM TTTTHHHHEEEE
FFFFAAAAMMMMOOOOUUUUSSSS DDDDUUUUTTTTCCCCHHHH
DDDDEEEESSSSIIIIGGGGNNNNEEEERRRR
JJJJAAAANNNN
DDDDEEEESSSS
BBBBOOOOUUUUVVVVRRRRIIIIEEEE
0
1
2
P
ART 213100
COMPACT BLENDER & MILL (LET’S BLENDER)
© Princess 2008
Page 2

ΓΪΤΘϤϟ ΔϜϠϤϤϟ :ϥΎϤπϟ ρϭήη
ϡΪΨΘδϤϟ ϞϴϟΩ
0
1
2
P
0
1
2
P
0
1
2
P
0
1
2
P
0
1
2
P
7
8
1
2
3
4
5
6
0
1
2
P
9
10
Gebruiksaanwijzing
Nederlands 1
User's instructions
English 5
Mode d'emploi
Français 10
Bedienungsanleitung
Deutsch 15
Instrucciones de uso
Español 20
Istruzioni per l'uso
Italiano 25
Bruksanvisning
Svenska 30
Brugsanvisning
Dansk 34
Bruksanvisning
Norsk 38
Käyttöohje
Suomi 42
Instruções de uso
Português 46
Οδηγεσ χρσησ
Ελληνικά
50
55
Page 3
0
1
2
P
0
1
2
P
0
1
2
P
0
1
2
P
0
1
2
P
7
8
1
2
3
4
5
6
0
1
2
P
9
10
1
Page 4
0
1
2
P
0
1
2
P
0
1
2
P
0
1
2
P
0
1
2
P
2
3
Page 5
4
5
April 2008 V1
Page 6

Algemeen
Deze fraai vormgegeven blender is ontworpen door Jan des
Bouvrie. Met dit apparaat kunt u groenten en fruit fijnsnijden of
overheerlijke shakes en sappen maken. U kunt het apparaat
ook gebruiken voor het malen van noten of andere harde
etenswaar. Zowel de behuizing als de kannen hebben een strak
en luxueus design.
De Jan des Bouvrie Blender heeft een krachtige motor, die u op
twee snelheden of pulserend kunt laten draaien.
De kan is voorzien van een deksel met vulopening. Door deze
opening kunt u tijdens het blenden producten toevoegen
zonder te morsen. De blender heeft een kan met een inhoud
van 0,8 liter. In de kan zitten stalen messen geïntegreerd,
waarmee de blender moeiteloos zowel grote als kleine stukken
fruit en groente fijnsnijdt of pureert.
Dit model wordt geleverd met een extra universele molen voor
het malen van hardere etenswaar (zoals gepelde walnoten).
Deze hakmolen heeft een verwijderbare bodem met
geïntegreerde messen.
Het apparaat wordt aangesloten op het elektriciteitsnet.
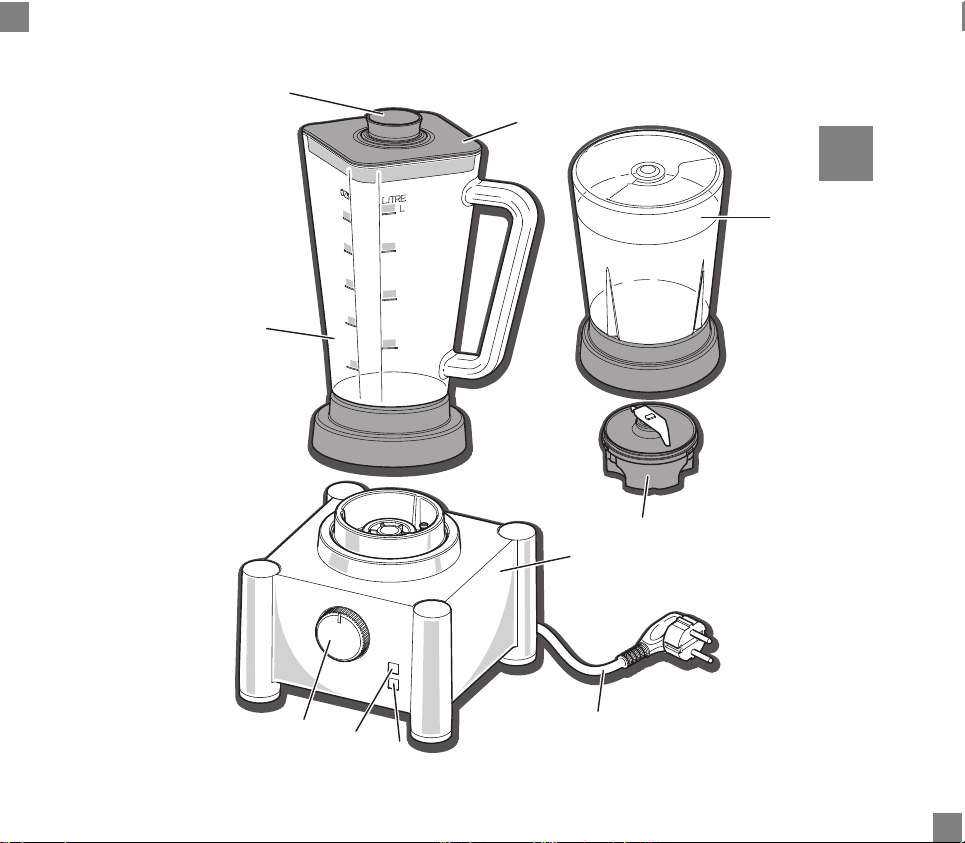
Werking en bediening
Zie figuur 1.
Het apparaat bestaat uit de volgende onderdelen:
1 Behuizing
2 Stekker en snoer
3 Indicatielampje in bedrijf (oranje)
4 Indicatielampje aan/uit (rood)
5 Draaiknop
6 Kan (inhoud 0,8 liter)
7 Vuldop
8 Deksel
9 Universele molen
10 Bodem hakmolen (verwijderbaar)
Voor het eerste gebruik
1 Verwijder alle verpakkingsmaterialen en stickers van het
apparaat.
2 Reinig het apparaat en alle toebehoren (zie ‘Onderhoud en
reinigen’) en droog ze vervolgens grondig af.
Producten blenden
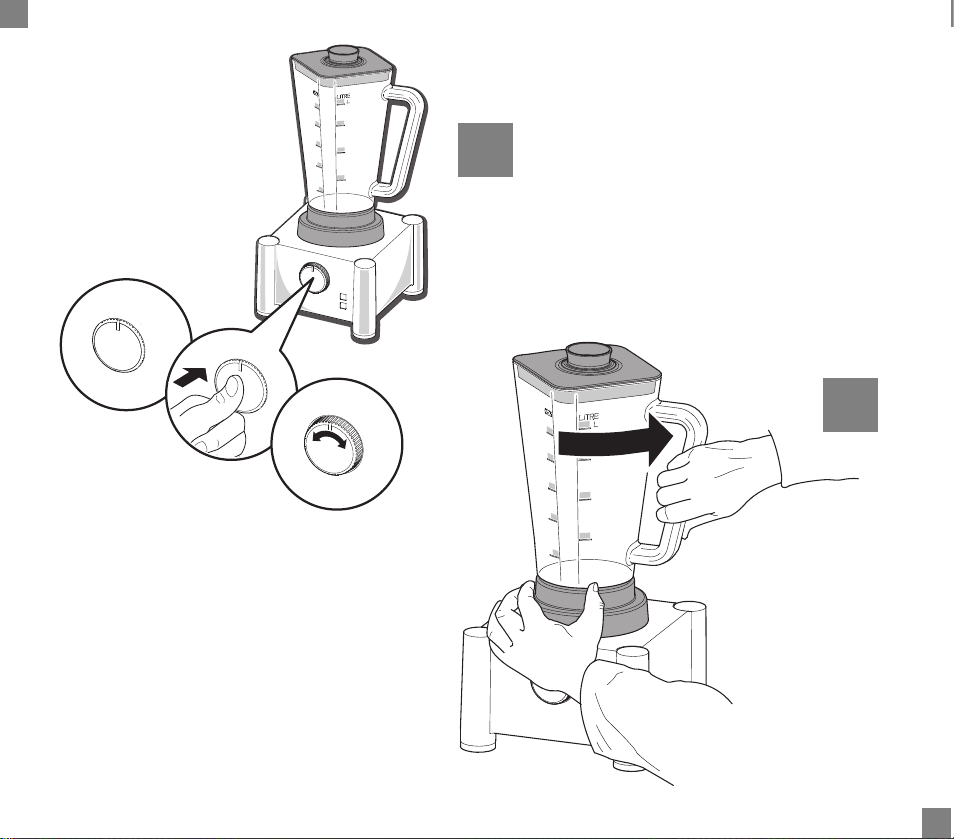
Zie figuur 2.
1 Plaats de behuizing op een stabiele ondergrond.
2 Plaats de kan op de behuizing. De drie vergrendelingen op
de behuizing moeten precies in de openingen aan de
onderzijde van de kan vallen.
3 Plaats het deksel op de kan.
4 Plaats de vuldop in het deksel en draai de vuldop vast door
deze een kwartslag te draaien.
5 Snijd het fruit en/of groenten in stukken. Maak de stukken
niet te groot. Ze moeten goed onderin de kan passen.
6 Open het deksel en doe de stukken in de kan.
7 Plaats het deksel op de kan om opspatten te voorkomen.
8 Als de draaiknop in stand 0 is ingedrukt, dan is hij
vergrendeld. Druk op de draaiknop om hem te ontgrendelen
(zie figuur 2).
9 Schakel de blender een paar seconden in op stand 1 of 2 of
in de pulsstand (P).
Deze blender werkt erg snel. In enkele seconden zullen de
producten al vermalen zijn. Hoe langer u de blender
ingeschakeld houdt, des te fijner de producten worden
vermalen.
Let op: gebruik de blender niet langer dan drie minuten
om oververhitting te voorkomen. Laat de blender
enkele minuten afkoelen voordat u deze weer gebruikt.
10 Vul de kan eventueel bij door alleen de vuldop een
kwartslag te draaien en van het deksel af te halen. Als de
stukken product niet door de vulopening passen, schakel de
blender dan uit, verwijder het deksel en doe de stukken in
de kan. Plaats het deksel terug op de kan voordat u de
blender weer inschakelt.
11 Zet de schakelaar uit (stand 0), wanneer u de gewenste
hoeveelheid vruchten en/of groenten hebt verwerkt.
12 Druk op de draaiknop om hem te vergrendelen (zie
figuur 2).
13 Trek de stekker uit het stopcontact.
COMPACT BLENDER & MILL (LET’S BLENDER) ART 213100
1
Page 7

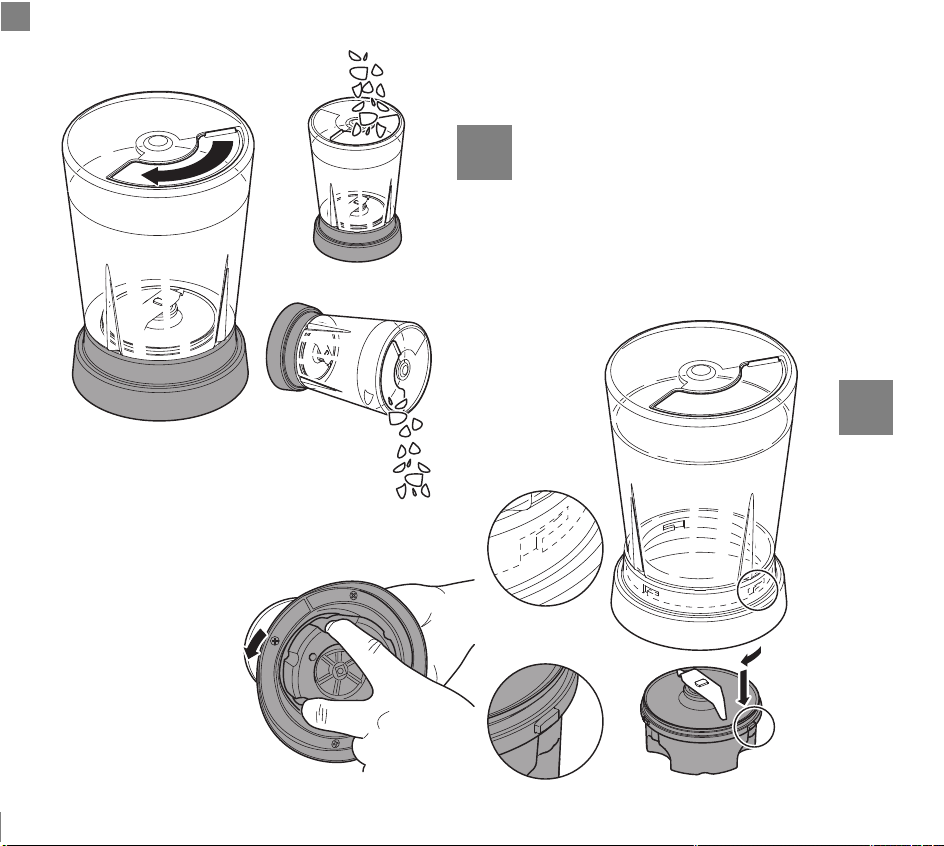
Producten malen
Zie figuur 4.
1 Plaats de behuizing op een stabiele ondergrond.
2 Plaats de hakmolen op de behuizing. De drie
vergrendelingen van de behuizing moeten precies in de
openingen aan de bodem van de hakmolen vallen.
3 Draai de deksel van de hakmolen met de wijzers van de
klok mee om de kan te openen.
4 Vul de molen met het product dat u wilt malen.
5 Draai de deksel van de hakmolen tegen de wijzers van de
klok om de kan te sluiten.
6 Als de draaiknop in stand 0 is ingedrukt, dan is hij
vergrendeld. Druk op de draaiknop om hem te ontgrendelen
(zie figuur 2).
7 Schakel de molen een paar seconden in op stand 1 of 2, of
in de pulsstand (P).
Deze molen werkt erg snel. In enkele seconden zullen de
producten al vermalen zijn. Hoe langer u de molen
ingeschakeld houdt, des te fijner de producten worden
vermalen.
Let op: gebruik de hakmolen niet langer dan 50
seconden met max. 150 gr. ingrediënten. Laat de
hakmolen ongeveer zeven minuten afkoelen voordat u
het apparaat weer gebruikt.
8 Zet de schakelaar uit (stand 0), wanneer u de gewenste
hoeveelheid producten hebt verwerkt.
9 Druk op de draaiknop om hem te vergrendelen (zie figuur 2).
10 Trek de stekker uit het stopcontact.
11 Wacht totdat de messen stilstaan en verwijder het vermalen
product.
Onderhoud en reinigen
• Zorg dat het apparaat niet is aangesloten op het
stopcontact als u het gaat schoonmaken.
• Zorg ervoor dat er geen vocht aan de binnenkant van de
behuizing komt.
• Dompel het apparaat nooit onder in water of een andere
vloeistof. Mocht dit wel gebeuren, gebruik het apparaat
dan niet meer en gooi het weg.
• Alleen de losse onderdelen kunnen in de vaatwasser
worden gereinigd.
• Gebruik geen schurende of agressieve middelen bij het
reinigen.
• Deze blender dankt zijn werking aan de scherp geslepen
messen onderin de kan. Neem daarom extra zorg in acht
bij het leeg- en schoonmaken van de blender. Voorkom
dat u zich verwondt aan de messen.
1 Reinig de buitenkant van de behuizing met een zachte,
vochtige doek.
2 Reinig de kannen en onderdelen met warm afwaswater.
3 Maak vooral de roterende messen onderin de kan grondig
schoon en zorg ervoor dat alle etensresten worden
verwijderd (zie 'Bodem met roterende messen verwijderen
en monteren').
4 Verwijder de bodem van de hakmolen (zie bodem van de
hakmolen van de molen demonteren).
5 Reinig de kan en onderdelen van de hakmolen met warm
afwaswater.
6 Maak vooral de roterende messen onderin de kan grondig
schoon en zorg ervoor dat alle etensresten worden
verwijderd.
7 Maak de onderdelen na het reinigen goed droog.
Bodem met roterende messen verwijderen en
monteren
Zie figuur 3.
1 Plaats de kan op de behuizing.
2 Houd de bodem vast.
3 Draai de kan tegen de klok in los.
4 Verwijder de kan van de bodem met de roterende messen.
5 Verwijder de bodem met de roterende messen uit de
behuizing.
6 Monteer de bodem met de roterende messen opnieuw in
omgekeerde volgorde.
2
COMPACT BLENDER & MILL (LET’S BLENDER) ART 213100
Page 8

Bodem van de hakmolen van de molen demonteren
Zie figuur 5.
1 Houd de molen vast en draai de bodem van de molen tegen
de wijzers van de klok in.
2 Verwijder de bodem van de kan.
3 Monteer de hakmolen in omgekeerde volgorde.
Veiligheid
Algemeen
• Lees de gebruiksaanwijzing goed door en bewaar deze
zorgvuldig.
• Gebruik dit apparaat alleen zoals beschreven in deze
gebruiksaanwijzing.
• Gebruik dit apparaat alleen voor huishoudelijke
doeleinden.
• Het gebruik van dit apparaat door kinderen of personen
met een fysieke, zintuiglijke, verstandelijke of motorische
handicap, of met gebrek aan ervaring en kennis kan
gevaarlijke situaties opleveren. Personen die
verantwoordelijk zijn voor de veiligheid van dergelijke
personen moeten duidelijke instructies geven of toezien
op het gebruik van het apparaat.
• Zorg ervoor dat kinderen niet spelen met het apparaat.
• Laat reparaties uitvoeren door een gekwalificeerde
monteur. Probeer nooit zelf het apparaat te repareren.
Warmte en elektriciteit
• Controleer voordat u het apparaat gebruikt of de
netspanning overeenkomt met de aangegeven
netspanning op het typeplaatje van het apparaat.
• Gebruik een geaard stopcontact.
• Haal altijd de stekker uit het stopcontact wanneer u het
apparaat niet gebruikt.
• Als u de stekker uit het stopcontact neemt, trek dan aan
de stekker, niet aan het snoer.
• Gebruik het apparaat niet als het apparaat of het snoer
beschadigd is. Stuur het naar onze servicedienst om
risico's te vermijden. Bij dit type apparaat kan een
beschadigd snoer alleen door onze servicedienst worden
vervangen met behulp van speciaal gereedschap.
• Zorg ervoor dat het apparaat en het snoer niet in
aanraking komen met hittebronnen, zoals een hete
kookplaat of open vuur.
• Zorg ervoor dat het apparaat, het snoer en de stekker niet
in aanraking komen met water.
• Pak het apparaat niet op wanneer het in het water is
gevallen. Neem direct de stekker uit het stopcontact.
Gebruik het apparaat niet meer.
Tijdens gebruik
• Wanneer u de blender langere tijd ononderbroken laat
draaien, zal de motor warm worden. Laat in dat geval de
motor afkoelen voordat u het apparaat weer gaat
gebruiken.
• Gebruik het apparaat nooit buiten.
• Gebruik het apparaat nooit in vochtige ruimten.
• Plaats het apparaat op een stabiele en vlakke
ondergrond, op een plaats waar het niet kan vallen.
• Laat het snoer niet over de rand van een aanrecht,
werkblad of tafel hangen.
• Zorg ervoor dat uw handen droog zijn als u het apparaat,
het snoer of de stekker aanraakt.
• Schakel het apparaat alleen in als een kan op de
behuizing gemonteerd is en er een deksel op de kan zit.
• Schakel het apparaat uit en verwijder de stekker uit het
stopcontact als u tijdens het gebruik storingen
ondervindt, het apparaat gaat reinigen, een accessoire
aanbrengt of verwijdert, of klaar bent met het gebruik.
• Laat het apparaat nooit onbeheerd achter als het in
gebruik is.
• Maak het apparaat na gebruik grondig schoon (zie
‘Onderhoud en reinigen’).
• Deze blender werkt erg snel. In enkele seconden zullen
de producten al vermalen zijn. Hoe langer u de blender
COMPACT BLENDER & MILL (LET’S BLENDER) ART 213100
3
Page 9

ingeschakeld houdt, des te fijner worden de producten
vermalen.
• Hete vloeistof in de blender kan tot gevolg hebben dat de
deksel er door het ontstaan van stoom en de druk van de
hete vloeistof af schiet. Voorkom dit door de deksel
gedurende het inschakelen vast te houden met een doek.
Milieu
Werp verpakkingsmateriaal zoals plastic en dozen in de
daarvoor bestemde containers.
Wilt u het apparaat weg doen terwijl het nog goed functioneert
of eenvoudig gerepareerd kan worden, zorg dan voor
hergebruik van het apparaat.
Aan het einde van de levensduur moet u het
apparaat op een verantwoorde wijze laten
verwerken, zodat het apparaat of onderdelen
daarvan kunnen worden hergebruikt. Zet het
apparaat niet bij het ongesorteerde afval, maar
inzamelpunt. Neem contact op met uw gemeente voor
informatie over de beschikbare inleverings- en
inzamelsystemen.
Geldende Europese richtlijn:
lever het in bij de winkelier of bij een erkend
• 2002/95/EC
• 2002/96/EC
Recepten
Kijk eens op het internet voor lekkere recepten die u met de
blender kunt maken. Hier alvast drie recepten die wij voor u
gevonden hebben.
Bananenmilkshake
Ingrediënten:
1 banaan
Vanille-ijs
Melk
Snijd de banaan in plakjes en doe deze in de blender. Doe daar
wat vanille-ijs en melk bij. Schakel de blender aan en laat deze
een paar seconden blenden. U heeft nu een heerlijke
bananenmilkshake!
Aardbeienontbijt
Ingrediënten:
2 kopjes ongezoete aardbeien
1 1/2 kopje melk
1/2 kopje yogurt
2 zakjes kant-en-klare ontbijtmix met vanillesmaak
2 theelepels honing
Doe de ingrediënten in de blender. Schakel de blender aan.
Stop de blender als een bijna gladde massa is ontstaan en roer
de inhoud van de kan, indien nodig. Schenk uit in drie of vier
glazen en serveer meteen.
Romige avocado-limoen dipsaus
Ingrediënten:
1 rijpe avocado
1 eetlepel verse limoensap
1/2 theelepel hete pepersaus
1 fijngehakt knoflookteentje
zout en vers gemalen zwarte peper
Doe het vruchtvlees van de avocado in de blender. Voeg het
limoensap, de pepersaus en de knoflook toe. Schakel de
blender aan. Stop de blender als een gladde massa is ontstaan.
Breng op smaak met zout en peper. Doe de dipsaus in een
schaal en bedek deze met plastic folie. Bewaar de schaal in de
koelkast totdat de dipsaus het serveert.
4
COMPACT BLENDER & MILL (LET’S BLENDER) ART 213100
Page 10

General information
This attractive blender has been designed by Jan des Bouvrie.
The appliance can be used to finely chop fruit and vegetables
or to make delicious shakes and juices. It can also be used to
grind pepper and herbs. Both the housing and the jugs are of a
modern and luxurious design.
The Jan des Bouvrie Blender has a powerful motor with two
speed settings and a pulse setting.
The jug has a lid with an opening through which it can be filled.
Products can be added through this opening whilst blending
without making a mess. The jug has a volume of 0.8 liters. Steel
knives are integrated in the jug, so that the blender can easily
chop and puree both large and small pieces of fruit and
vegetables.
This model comes with one extra universal mill for grinding the
harder sorts of food (such as peeled walnuts). This mill has a
removable blade stand with integrated knives.
The device must be connected to the mains power supply.
Operation and controls
See figure 1.
The appliance consists of the following components:
1 Housing
2 Power cord and plug
3 Operation indicator light (orange)
4 On/Off indicator light (red)
5 Rotary button
6 Jug (volume 0.8 liters)
7 Filler cap
8Lid
9 Universal mill
10 Mill blade stand (removable)
Before using for the first time
1 Remove all the packaging materials and stickers from the
appliance.
2 Clean the appliance and all the accessories (see ‘Cleaning
and maintenance’) and dry them thoroughly.
Blending products
See figure 2.
1 Place the housing on a stable surface.
2 Fit the jug to the housing. The three catches on the housing
must fit precisely into the slots in the base of the jug.
3 Place the lid on the jug.
4 Place the filler cap in the lid and tighten the filler cap by
rotating it a quarter of a turn.
5 Cut the fruit and/or vegetables into pieces. Do not make the
pieces too large. They must be small enough to fit into the
bottom of the jug.
6 Open the lid and put the pieces in the jug.
7 Place the lid back onto the jug to prevent splashing.
8 If the rotary button is in 0-position and pushed in, the button
is locked. Push the rotary button to unlock it (see figure 2).
9 Switch the blender a few seconds to setting 1 or 2 or the
pulse setting (P).
This blender works very fast. In seconds the product will be
chopped. The longer the blender is turned on, the finer the
products will be chopped.
Note: Do not operate the blender more then 3 minutes
to avoid overheating. Let the blender cool down for a
few minutes before starting again.
10 If necessary, you can top up the jug by opening the filler
cap. Unscrew it a quarter of a turn and remove it from the
lid. If the pieces to be added do not fit through the filler
opening, turn off the blender, remove the lid and place the
pieces in the jug. Place the lid back on the jug before
turning the blender back on.
11 Switch off the blender (position 0) once the required
quantity of fruit and/or vegetables have been chopped.
12 Push the rotary button to lock it (see figure 2).
13 Remove the plug from the plug socket.
COMPACT BLENDER & MILL (LET’S BLENDER) ART 213100
5
Page 11

Grinding
See figure 4.
1 Place the housing on a stable surface.
2 Fit the mill to the housing. The three catches on the housing
must fit precisely into the slots in the base of the mill.
3 Rotate the top plate of the mill clockwise to open the mill-
jug.
4 Fill the mill jug with the product that you wish to grind.
5 Rotate the top plate of the mill anti-clockwise to close the
mill-jug.
6 If the rotary button is in 0-position and pushed in, the button
is locked. Push the rotary button to unlock it (see figure 2).
7 Switch the mill a few seconds to setting 1 or 2 or the pulse
setting (P).
This mill works very fast. In seconds the product will be
ground. The longer the mill is turned on, the finer the
products will be ground.
Note: Do not operate the mill more than 50 seconds
with max. 150 g ingredients. Let the mill cool down for
around 7 minutes before starting again.
8 Switch off the mill (position 0) once the required quantity
has been ground.
9 Push the rotary button to lock it (see figure 2).
10 Remove the plug from the plug socket.
11 Wait until the blades stand still and remove the ground
product.
Cleaning and maintenance
• Make sure the plug has been removed from the plug
socket before cleaning the appliance.
• Make sure no moisture gets into the interior of the
housing.
• Do not immerse the appliance in water or in other liquids.
If this does happen, do not use the appliance again. For
safety reasons, dispose of the appliance.
• Only the separate components may be cleaned in a
dishwasher.
• Never use corrosive or scouring cleaning products.
• This blender uses sharp knives, which are located in the
bottom of the container. Therefore, be very careful when
emptying and cleaning the blender. Avoid cutting
yourself on the knives.
1 Clean the exterior of the housing with a soft, damp cloth.
2 Clean the jugs and the components with warm soapy water.
3 Thoroughly clean the rotating knives at the bottom of the
jug, in particular, and make sure you remove all the food
from them (see ‘Removing and fixing the base with the
rotating knives’).
4 Remove the base from the mill (see removing mill base from
mill).
5 Clean the mill-jug and the components of the mill with warm
soapy water.
6 Thoroughly clean the rotating blades at the bottom of the
jug, in particular, and make sure you remove all the food
from them.
7 Dry the components thoroughly after they have been
cleaned.
Removing and fixing the base with the rotating
knives
See figure 3.
1 Fit the jug to the housing.
2 Hold the housing.
3 Rotate the jug anti-clockwise.
4 Remove the jug from the base with the rotating knives.
5 Remove the base with the rotating knives from the housing.
6 Reassemble the base with the rotating knives and the jug in
the opposite order.
Removing the mill base from mill
See figure 5.
1 Hold the mil and rotate the mill base anti clockwise.
2 Remove the base from the mill-jug.
3 Reassemble the mill in the opposite order.
6
COMPACT BLENDER & MILL (LET’S BLENDER) ART 213100
Page 12

Safety
General information
• Please read these instructions carefully and keep them
for future reference.
• Only use this appliance in accordance with these
instructions.
• Only use this appliance for domestic purposes.
• The use of this appliance by children or persons with a
physical, sensory, mental or motor limitation or persons
who lack the necessary knowledge and experience may
result in a dangerous situation. Persons responsible for
their safety must give explicit instructions or supervise
the use of the appliance.
• Make sure children do not play with the appliance.
• Repairs may only be carried out by a qualified service
technician. Never try to repair the appliance yourself.
Heat and electricity
• Verify that the mains voltage is the same as that indicated
on the appliance’s type plate before use.
• Plug the appliance into an earthed plug socket.
• Always remove the plug from the plug socket when the
appliance is not in use.
• Always remove the plug from the plug socket by pulling
the plug, not the power cord.
• Do not use the appliance if the power cord or the
appliance is damaged. For your own safety, return the
appliance to our service department. A damaged power
cord may only be replaced by our service department
using the special tools required for the repair.
• Make sure the appliance and the power cord do not come
in contact with heat sources, such as a hot hob or a
naked flame.
• Make sure the appliance, the power cord and the plug do
not come into contact with water.
• Do not pick up the appliance if it falls into water. Remove
the plug from the plug socket immediately. Do not use the
appliance anymore.
During use
• When using the blender continuously during a longer
period, the electric motor will warm up. In this case, let
the motor cool down before further use of the appliance.
• Never use the appliance outdoors.
• Never use the appliance in a humid room.
• Place the appliance on a flat, stable surface where it
cannot fall.
• Never allow the power cord to hang over the edge of the
draining board, worktop or table.
• Make sure your hands are dry when you touch the
appliance, the power cord or the plug.
• Only turn on the appliance if a jug has been placed on the
housing and a lid has been placed on the jug.
• Switch off the appliance and remove the plug from the
plug socket in the event of a malfunction during use and
before cleaning the appliance, fitting or removing an
accessory, or storing the appliance after use.
• Never leave the appliance unattended when in use.
• After use, clean the appliance thoroughly (see 'Cleaning
and maintenance').
• The blender works very quickly. The ingredients are
ground within just a few seconds. The longer the blender
is turned on, the finer the products will be ground.
• Hot liquids in the blender may result in the lid flying off
due to the steam and pressure caused by the hot liquid.
Prevent this from happening by holding the lid down with
a cloth whilst the blender is in use.
COMPACT BLENDER & MILL (LET’S BLENDER) ART 213100
7
Page 13

U.K. WIRING INSTRUCTIONS
The wires in the mains lead are coloured in
accordance with the following code:
• BLUE NEUTRAL
• BROWN LIVE
• GREEN/YELLOW EARTH
As the colours of the wire in the mains lead of this
appliance may not correspond with the colour
markings identifying the terminals on your plug,
proceed as follows:
• The wire which is coloured BLUE must be
connected to the terminal which is marked with
the letter N or coloured black.
• The wire which is coloured BROWN must be
connected to the terminal which is marked with
the letter L or coloured red.
• The wire which is coloured GREEN/YELLOW must
be connected to the terminal which is marked with
the letter E or (earth symbol) and is coloured
GREEN or GREEN/YELLOW
WARNING: THIS APPLIANCE MUST BE EARTHED
The environment
Dispose of packaging materials, such as plastic and boxes, in
the appropriate containers.
If you wish to dispose of the appliance whilst it still works
properly or can be easily repaired, ensure that the appliance is
recycled.
When the appliance reaches the end of its useful
life, it must be disposed of in a responsible manner,
thereby ensuring the reuse of the appliance or its
parts. Do not dispose of the appliance with normal
household waste, but hand it over to a recycling
information about available disposal and collection systems in
your area.
Applicable European guidelines:
collection point. Contact your local authority for
• 2002/95/EC
• 2002/96/EC
Recipes
Browse the internet for delicious recipes to make with a blender.
Below you'll find three of the recipes we have found for you.
Banana milkshake
Ingredients:
1 Banana
Vanilla ice
Milk
Cut the banana into slices and put these in the jug of the
blender. Add some vanilla ice and some cold milk. Switch on
the blender and let it blend for a few seconds. The result is a
delicious banana milkshake!
Strawberry breakfast
Ingredients:
2 cups unsweetened whole strawberries
1 1/2 cup milk
1/2 cup plain yogurt
2 env. vanilla flavoured instant breakfast mix
2 tablespoon honey
Put the ingredients in the jug of the blender. Cover, blend until
almost smooth, stop the blender and stir if necessary. Pour into
3 or 4 glasses. Serve immediately.
8
COMPACT BLENDER & MILL (LET’S BLENDER) ART 213100
Page 14

Creamy avocado lime dip
Ingredients:
1 ripe avocado
1 tablespoon freshly squeezed lime juice
1/2 teaspoon hot pepper sauce
1 garlic clove, finely chopped
salt & freshly ground black pepper
Peel, dice and de-pit the avocado and place the remainder in
the blender. Add lime juice, hot pepper sauce and garlic.
Process until smooth and then season with salt and pepper.
Transfer to a bowl and cover by placing plastic wrap on top of
the avocado mixture. Keep refrigerated until served.
COMPACT BLENDER & MILL (LET’S BLENDER) ART 213100
9
Page 15

Généralités
Ce superbe bol Blender a été conçu par le célèbre designer
néerlandais Jan des Bouvrie. Il s'agit d'un bol mélangeur qui
vous permettra de hacher fruits et légumes ainsi que de
préparer des shakes et de presser des jus. L'appareil servira
aussi pour broyer des noix et autres aliments durs. Tant le
boîtier que les bols verseurs ont un design soigné et luxueux.
Le Jan des Bouvrie Blender a un moteur puissant que vous
faites tourner à volonté à l'une des deux vitesses continues, ou
par la fonction 'pulse'.
Le bol verseur est équipé d'un couvercle avec ouverture de
remplissage. Cette ouverture vous permet d'ajouter des
ingrédients pendant que l'appareil tourne, proprement et
commodément. Le bol verseur de cet appareil a d'une capacité
de 0,8 litres. Les lames en inox intégrées au bol verseur
hachent en réduisent en purée sans peine tant les grands que
les petits morceaux de fruits et légumes.
Ce modèle est équipé d'un broyeur universel supplémentaire
permettant de broyer les aliments durs (tels que les cerneaux
de noix). Ce moulin sont équipés d'un support démontable pour
lame avec lames intégrées.
L'appareil se connecte simplement sur le secteur.
Fonctionnement et utilisation
Voir la figure 1.
Les composants de l'appareil sont :
1 Corps de l'appareil
2 Fiche et cordon
3 Témoin lumineux de fonctionnement (orange)
4 Témoin lumineux marche/arrêt (rouge)
5 Bouton de réglage
6 Bol verseur (0,8 litres)
7 Bouchon de remplissage
8Couvercle
9 Broyeur universel
10 Support pour lame (démontable)
Avant la première utilisation
1 Enlevez tout l'emballage et les autocollants de l'appareil.
2 Nettoyez l'appareil et tous les accessoires (voir Nettoyage
et entretien) et séchez bien.
Hacher et mélanger
Voir figure 2.
1 Posez le boîtier sur une surface plane et stable.
2 Placez le bol verseur sur le corps de l'appareil. Les trois
verrouillages sur le boîtier doivent s'emboîter exactement
dans les encoches sous le dessous du bol verseur.
3 Fermez le couvercle du bol verseur.
4 Fermez le bouchon de remplissage du couvercle, et vissez-
le d'un quart de tour pour le fixer en place.
5 Coupez en morceaux les fruits et/ou légumes. Ne laissez
pas les morceaux trop gros. Ils doivent aller sans forcer au
fond du bol verseur.
6 Ouvrez le couvercle et placez les morceaux dans le bol
verseur.
7 Refermez le couvercle pour arrêter d'éventuelles
éclaboussures.
8 Lorsque le bouton est enfoncé en position 0, il est bloqué.
Appuyez sur le bouton pour le débloquer (voir la figure 2).
9 Mettez le bol mélangeur en marche pendant quelques
secondes, en position 1, 2 ou P (pulse).
Cet appareil tourne très vite. Vos ingrédients seront hachés
ou broyés en quelques secondes. Plus vous laissez le bol
mélangeur tourner longtemps, plus le contenu sera
finement haché.
Note: Ne faites pas fonctionner le mixeur pendant plus
de 3 minutes d'affilée, afin d'éviter la surchauffe.
Laissez-le refroidir pendant quelques minutes avant de
recommencer à vous en servir.
10 Pour ajouter quelque chose en cours de préparation, vous
dévissez le bouchon de remplissage d'un quart de tour et
vous le retirez. Si les morceaux sont trop gros pour
l'ouverture de remplissage, arrêtez d'abord l'appareil, puis
ouvrez le couvercle pour les mettre dans le bol mélangeur.
10
COMPACT BLENDER & MILL (LET’S BLENDER) ART 213100
Page 16

Refermez le couvercle du bol avant de remettre l'appareil en
marche.
11 Lorsque vous avez fini de préparer la quantité voulue de
fruits et/ou de légumes, vous arrêtez l'appareil en mettant
l'interrupteur sur la position 0.
12 Appuyez sur le bouton pour le bloquer (voir la figure 2).
13 Débranchez la fiche.
Broyage d'aliments
Voir figure 4.
1 Posez le boîtier sur une surface plane et stable.
2 Placez le moulin sur le boîtier. Les trois petits loquets sur le
boîtier doivent s'adapter exactement dans les espaces qui
se trouvent sur la base de l'appareil.
3 Faites tourner la plaque supérieure du moulin dans le sens
des aiguilles d'une montre pour ouvrir le réceptacle.
4 Mettez dans le broyeur l'aliment à broyer.
5 Faites tourner la plaque supérieure du moulin dans le sens
inverser des aiguilles d'une montre pour fermer le
réceptacle.
6 Lorsque le bouton est enfoncé en position 0, il est bloqué.
Appuyez sur le bouton pour le débloquer (voir la figure 2).
7 Mettez le broyeur en marche pendant quelques secondes,
en position 1, 2 ou P (pulse).
Cet appareil broie très vite. Vos ingrédients seront hachés
ou broyés en quelques secondes. Plus vous laissez le
broyeur tourner longtemps, plus le contenu sera finement
broyé.
Note: Ne faites pas fonctionner le moulin pendant plus
de 50 secondes avec au maximum 150 g d'ingrédients.
Laissez-le refroidir pendant à peu près 7 minutes avant
de recommencer à vous en servir.
8 Lorsque vous avez fini de préparer la quantité voulue, vous
arrêtez l'appareil en mettant l'interrupteur sur la position 0.
9 Appuyez sur le bouton pour le bloquer (voir la figure 2).
10 Débranchez la fiche.
11 Attendez que les pales soient arrêtées et retirez le produit
moulu.
Nettoyage et entretien
• L'appareil ne doit pas être branché sur le réseau
électrique pendant que vous le nettoyez.
• Ne laissez pas d'humidité pénétrer à l'intérieur du boîtier
de l'appareil.
• N'immergez jamais l'appareil dans l'eau ou dans un autre
liquide. Le cas échéant, cessez d'utiliser l'appareil et
mettez-le au rebut.
• Seules les pièces amovibles peuvent être mises au lavevaisselle.
• N'utilisez pas de détergents agressifs ou décapants pour
le nettoyage.
• Le fonctionnement du bol mélangeur dépend des lames
acérées au fond du bol verseur. La plus grande prudence
est donc nécessaire lorsque vous videz et nettoyez
l'appareil. Évitez de vous blesser avec les lames.
1 Nettoyez l'extérieur du boîtier avec un chiffon doux et
humide.
2 Nettoyez les réceptacles et les composants avec de l'eau
chaude savonneuse.
3 Nettoyez bien à fond les lames rotatives au fond du
réceptacle, en particulier assurez-vous de bien retirer tous
les restes de nourriture (voir " Retirez et fixez la base avec
les lames rotatives ").
4 Retirez la base du moulin (voir retirer la base du moulin du
moulin).
5 Nettoyez le réceptacle et les composants du moulin avec de
l'eau chaude savonneuse.
6 Nettoyez soigneusement les lames rotatives au fond du
réceptacle et assurez-vous en particulier de bien retirer tous
les restes de nourriture.
7 Séchez bien tous les composants après le nettoyage.
Démontage et nettoyages de la base supportant les
lames rotatives
Voir la figure 3.
1 Placez le bol verseur sur le corps de l'appareil.
2 Saisissez la base et maintenez-la.
3 Desserrez le bol verseur en le tournant vers la gauche.
COMPACT BLENDER & MILL (LET’S BLENDER) ART 213100
11
Page 17

4 Retirez le réceptacle de la base, avec les lames.
5 Retirez la base avec les lames rotatives du logement.
6 Réassemblez la base et les lames rotatives et le réceptacle
dans l'ordre opposé.
Pour retirer la base du moulin du moulin
Voir figure 5.
1 Maintenez le moulin et faites tourner sa base dans le sens
inverse des aiguilles d'une montre.
2 Retirez la base du réceptacle du moulin.
3 Réassemblez le moulin dans l'ordre opposé.
Sécurité
Généralités
• Lisez soigneusement le mode d'emploi et conservez-le
avec soin.
• Utilisez cet appareil uniquement suivant les indications
de ce mode d’emploi.
• L'appareil est destiné uniquement à l'utilisation
domestique.
• Si l'appareil est utilisé par des enfants, ou par des
personnes ayant un handicap physique, sensoriel,
mental ou moteur, ou par des personnes
inexpérimentées, ceci peut entraîner un danger. Les
responsables de la sécurité de telles personnes doivent
donner des instructions claires et suffisantes et/ou
surveiller l'utilisation de l'appareil.
• Ne laissez pas les enfants jouer avec l'appareil.
• Faites effectuer les réparations par un technicien qualifié.
Ne tentez jamais de réparer vous-même l'appareil.
Électricité et chaleur
• Avant d'utiliser cet appareil, assurez-vous que la tension
du réseau correspond à la tension du réseau indiquée
sur la plaquette type de l'appareil.
• Utilisez une prise raccordée à la terre.
• Débranchez toujours l'appareil lorsque vous ne l'utilisez
pas.
• Lorsque vous débranchez la fiche, saisissez la fiche ellemême; ne tirez pas sur le cordon.
• N'utilisez pas l'appareil si le cordon ou l'appareil luimême est endommagé. Éviter tout risque d'électrocution,
renvoyez-le à notre service de réparation. La réparation
du cordon sur ce type d'appareils nécessite des outils
spéciaux et ne peut donc être effectuée que par notre
service de réparation.
• Assurez-vous que ni l'appareil, ni le cordon n'entre en
contact avec une source de chaleur telle qu'une plaque
électrique chaude ou une flamme.
• Assurez-vous que ni l'appareil, ni le cordon, ni la fiche
n'entre en contact avec de l'eau.
• Si l'appareil est tombé à l'eau, ne le rattrapez pas.
Débranchez immédiatement la fiche. Cessez d'utiliser
l'appareil.
Pendant l'utilisation
• Lorsque vous faites tourner longtemps votre bol
mélangeur sans interruption, le moteur s'échauffe. Il faut
alors laisser le moteur se refroidir avant d'utiliser à
nouveau l'appareil.
• N'utilisez jamais l'appareil à l'extérieur.
• N'utilisez jamais l'appareil dans une pièce humide.
• Installez l'appareil sur une surface plane et stable, à un
endroit où il ne risque pas de tomber.
• Ne laissez pas le cordon pendre par-dessus le bord du
plan de travail ou de la table.
• Assurez-vous que vos mains sont sèches avant de
toucher l'appareil, le cordon ou la fiche.
• Mettez l'appareil en marche uniquement si le bol verseur
est monté sur le boîtier, et le couvercle en place sur le
bol.
• Éteignez l'appareil et débranchez la fiche en cas de
problème durant l'utilisation, pour le nettoyage, le
12
COMPACT BLENDER & MILL (LET’S BLENDER) ART 213100
Page 18

montage ou le démontage d'un accessoire, et dès que
vous avez fini de l'utiliser.
• Ne laissez jamais l'appareil sans surveillance pendant
qu'il est en marche.
• Nettoyez soigneusement l'appareil après l'utilisation (voir
'Nettoyage et entretien').
• Ce bol mélangeur tourne très vite. Vos ingrédients seront
hachés ou broyés en quelques secondes. Plus vous
laissez le bol mélangeur tourner longtemps, plus le
contenu sera fin.
• S'il y du liquide chaud dans le bol, il peut dégager de la
vapeur et celle-ci peut atteindre une pression suffisante
pour faire sauter le couvercle. Pour prévenir ceci,
maintenez le couvercle en place avec un torchon.
Recettes
Vous trouverez facilement sur Internet de nombreuses recettes
délicieuses pour votre bol mélangeur. Voici déjà trois recettes
que nous avons trouvées pour vous.
Milkshake à la banane
Ingrédients :
1 banane
Glace vanille
Lait
Coupez la banane en tronçons et mettez-le dans le bol
mélangeur. Ajoutez un peu de glace vanille et de lait. Faites
fonctionner le bol mélangeur pendant quelques secondes.
Votre délicieux milkshake à la banane est prêt à servir !
Environnement
Jetez le matériel d'emballage, tel que le plastique et les
cartons, dans les conteneurs prévus à cet effet.
Si vous désirez vous débarrasser de l'appareil alors qu'il
fonctionne encore bien, ou est facilement réparable, ne le
mettez pas au rebut mais recyclez-le.
Lorsque l'appareil ne peut plus servir, il doit être
retraité, de façon à pouvoir être recyclé au moins
partiellement. Ne le mettez pas aux ordures
ménagères, mais portez-le chez le vendeur ou dans
un centre de collecte agréé. Pour plus
contactez les autorités communales.
Directive européenne en vigueur :
• 2002/95/EC
• 2002/96/EC
d'informations sur les possibilités de retraitement,
Petit déjeuner aux fraises
Ingrédients :
2 tasses de fraises nature
1 1/2 tasse de lait
1/2 tasse de yaourt
2 sachets de mix petit déjeuner (goût vanille)
2 cuillerées à café de miel
Mettez les ingrédients dans le bol. Mettez le bol mélangeur en
marche. Arrêtez l'appareil quand la masse est presque lisse, et,
si nécessaire, remuez. Versez dans trois ou quatre verres et
servez tout de suite.
Sauce à l'avocat et au citron vert
Ingrédients :
1 avocat bien mûr
1 cuillerée à soupe de jus de citron vert
1/2 cuillerée à café de sauce au piment piquante
1 gousse d'ail hâchée
sel et poivre noir du moulin
COMPACT BLENDER & MILL (LET’S BLENDER) ART 213100
13
Page 19

Mettez la chair de l'avocat dans le bol mélangeur. Ajoutez le jus
de citron vert, la sauce au piment et l'ail. Mettez le bol
mélangeur en marche. Arrêtez l'appareil quand la masse est
lisse. Assaisonnez de sel et poivre à volonté. Mettez la sauce
dans un bol et couvrez de feuille plastique. Conservez au
réfrigérateur jusqu'au moment de servir.
14
COMPACT BLENDER & MILL (LET’S BLENDER) ART 213100
Page 20

Allgemein
Dieser attraktiv gestaltete Mixer wurde von Jan des Bouvrie
entworfen. Mit diesem Gerät können Sie Gemüse und Obst fein
hacken oder vorzügliche Shakes und Säfte herstellen. Sie
können das Gerät auch zum Mahlen von Nüssen oder anderer
harter Lebensmittel verwenden. Sowohl das Gehäuse als auch
die Behälter haben ein strenges und luxuriöses Design.
Der Jan des Bouvrie-Mixer hat einen kraftvollen Motor, den Sie
mit zwei Geschwindigkeiten oder mit dem Impulsmodus
arbeiten lassen können.
Zum Behälter gehört ein Deckel mit Füllöffnung. Durch diese
Öffnung können Sie während des Mixvorgangs Produkte
zufügen, ohne etwas zu verschütten. Zu dem Mixer gehört ein
Behälter mit einem Fassungsvermögen von 0,8 Litern. In dem
Behälter befinden sich Stahlmesser, mit denen der Mixer
mühelos sowohl große als auch kleine Obst- und
Gemüsestücke fein schneidet oder püriert.
Zum Lieferumfang dieses Modells gehört eine zusätzliche
Universalhackmühle zum Mahlen von härteren Lebensmittel
(wie geschälte Walnüsse). Dieser Mixer verfügt über eine
abnehmbare Messerhalterung mit integrierten Messern.
Das Gerät wird an das Elektrizitätsnetz angeschlossen.
Funktion und Bedienung
Siehe Abbildung 1.
Das Gerät besteht aus den folgenden Teilen:
1 Gehäuse
2 Stecker und Kabel
3 Kontrolllampe in Betrieb (orange)
4 Kontrolllampe ein/aus (rot)
5 Drehknopf
6 Behälter (Inhalt 0,8 Liter)
7Stopfen
8 Deckel
9 Universalhackmühle
10 Mixer-Messerhalterung (abnehmbar)
Vor der ersten Verwendung
1 Entfernen Sie sämtliches Verpackungsmaterial sowie alle
Aufkleber vom Gerät.
2 Reinigen Sie das Gerät und alle Zubehörteile (siehe
‘Wartung und Reinigung’) und trocknen Sie sie
anschließend gut ab.
Produkte mixen
Siehe Abbildung 2.
1 Stellen Sie das Gehäuse auf einen stabilen Untergrund.
2 Stellen Sie den Behälter auf das Gehäuse. Die drei
Arretierungen auf dem Gehäuse müssen genau in die
Öffnungen an der Unterseite des Behälters fallen.
3 Bringen Sie den Deckel auf dem Behälter an.
4 Bringen Sie den Stopfen im Deckel an und drehen Sie
diesen zum Feststellen um eine Vierteldrehung.
5 Schneiden Sie das Obst und/oder Gemüse in Stücke.
Schneiden Sie die Stücke nicht zu groß. Sie müssen gut in
den unteren Teil des Behälters passen.
6 Öffnen Sie den Deckel und geben Sie die Stücke in den
Behälter.
7 Legen Sie den Deckel auf den Behälter, um ein eventuelles
Spritzen zu verhindern.
8 Wenn der Drehknopf in der 0-Stellung gedrückt wird, ist er
arretiert. Drücken Sie auf den Drehknopf, um ihn zu
entriegeln (siehe Abbildung 2).
9 Stellen Sie den Mixer einige Sekunden auf Einstellung 1
oder 2 oder auf die Impulsstellung (P).
Dieser Mixer arbeitet sehr schnell. Die Produkte sind in
wenigen Sekunden bereits zermahlen. Je länger der Mixer
eingeschaltet ist, desto feiner werden die Produkte
zermahlen.
Hinweis: Zur Vermeidung einer Überhitzung sollten Sie
den Mixer nicht länger als 3 Minuten eingeschaltet
lassen. Lassen Sie den Mixer einige Minuten abkühlen,
bevor Sie erneut mit dem Mixen beginnen.
10 Füllen Sie den Behälter eventuell auf, indem Sie nur den
Stopfen eine Vierteldrehung drehen und vom Deckel
abnehmen. Falls Produktstücke nicht durch die Füllöffnung
COMPACT BLENDER & MILL (LET’S BLENDER) ART 213100
15
Page 21

passen, dann schalten Sie den Mixer aus, nehmen Sie den
Deckel ab und geben Sie die Stücke in den Behälter.
Bringen Sie den Deckel wieder auf dem Behälter an, bevor
Sie den Mixer wieder einschalten.
11 Stellen Sie den Schalter auf aus (Einstellung 0), wenn Sie
die gewünschte Menge an Obst und/oder Gemüse
verarbeitet haben.
12 Drücken Sie auf den Drehknopf, um ihn zu arretieren (siehe
Abbildung 2).
13 Ziehen Sie den Stecker aus der Steckdose.
Produkte mahlen
Siehe Abbildung 4.
1 Stellen Sie das Gehäuse auf einen stabilen Untergrund.
2 Bringen Sie den Mixer auf dem Gehäuse an. Die drei
Arretiervorrichtungen auf dem Gehäuse müssen genau in
die Aussparungen im Sockel des Mixers passen.
3 Drehen Sie zum Öffnen des Mixbehälters die obere
Abdeckung des Mixers im Uhrzeigersinn.
4 Füllen Sie die Hackmühle mit den Produkten, die Sie
mahlen wollen.
5 Drehen Sie zum Verschließen des Mixbehälters die obere
Abdeckung des Mixers gegen den Uhrzeigersinn.Setzen
Sie die Hackmühle auf das Gehäuse. Die drei Arretierungen
auf dem Gehäuse müssen genau in die Öffnungen an der
Unterseite der Hackmühle fallen.
6 Wenn der Drehknopf in der 0-Stellung gedrückt wird, ist er
arretiert. Drücken Sie auf den Drehknopf, um ihn zu
entriegeln (siehe Abbildung 2).
7 Stellen Sie die Hackmühle einige Sekunden auf Einstellung
1 oder 2 oder auf die Impulsstellung (P).
Diese Hackmühle arbeitet sehr schnell. Die Produkte sind in
wenigen Sekunden bereits zermahlen. Je länger die
Hackmühle eingeschaltet ist, desto feiner werden die
Produkte zermahlen.
Hinweis: Lassen Sie den Mixer höchstens 50 Sekunden
mit max. 150 g Zutaten laufen. Lassen Sie den Mixer ca.
7 Minuten abkühlen, bevor Sie erneut mit dem Mixen
beginnen.
8 Stellen Sie den Schalter auf aus (Einstellung 0), wenn Sie
die gewünschte Menge an Produkten verarbeitet haben.
9 Drücken Sie auf den Drehknopf, um ihn zu arretieren (siehe
Abbildung 2).
10 Ziehen Sie den Stecker aus der Steckdose.
11 Warten Sie, bis die Messer sich nicht mehr bewegen und
nehmen Sie das gemahlene Produkt heraus.
Wartung und Reinigung
• Sorgen Sie dafür, dass das Gerät bei der Reinigung nicht
an die Steckdose angeschlossen ist.
• Achten Sie darauf, dass keine Feuchtigkeit in die
Innenseite des Gehäuses gelangt.
• Tauchen Sie das Gerät nie ins Wasser oder in andere
Flüssigkeiten. Sollte dies trotzdem passieren, dann
verwenden Sie das Gerät nicht mehr und entsorgen Sie
es.
• Nur die losen Teile können im Geschirrspüler gereinigt
werden.
• Verwenden Sie keine aggressiven Reinigungs- oder
Scheuermittel.
• Dieser Mixer verdankt seine Funktion den scharf
geschliffenen Messern, die sich im unteren Teil des
Behälters befinden. Passen Sie daher beim Leeren oder
Reinigen des Mixers besonders gut auf. Vermeiden Sie
Verletzungen durch die Messer.
1 Reinigen Sie das Gerätegehäuse mit einem weichen,
feuchten Tuch.
2 Reinigen Sie die Behälter und die Teile mit warmem
Spülwasser.
3 Reinigen Sie die rotierenden Messer im Boden des
Behälters besonders gründlich und stellen Sie sicher, dass
sich keine Essensreste mehr daran befinden (siehe "Sockel
mit den rotierenden Messern abnehmen und befestigen").
4 Nehmen Sie den Sockel vom Mixer ab (siehe "Abnehmen
des Mixersockels vom Mixer").
5 Reinigen Sie den Mixbehälter und die Teile des Mixers mit
warmem Spülwasser.
6 Reinigen Sie die rotierenden Messer im Boden des
Behälters besonders gründlich und stellen Sie sicher, dass
sich keine Essensreste mehr daran befinden.
7 Trocknen Sie die Teile nach der Reinigung gründlich ab.
16
COMPACT BLENDER & MILL (LET’S BLENDER) ART 213100
Page 22

Basis mit rotierenden Messern abnehmen und
montieren
Siehe Abbildung 3.
1 Stellen Sie den Behälter auf das Gehäuse.
2 Halten Sie die Basis fest.
3 Drehen Sie den Behälter entgegen dem Uhrzeigersinn los.
4 Entfernen Sie den Behälter von dem Sockel mit den
rotierenden Messern.
5 Entfernen Sie den Sockel mit den rotierenden Messern vom
Gehäuse.
6 Setzen Sie den Sockel mit den rotierenden Messern und
dem Behälter in umgekehrter Reihenfolge wieder
zusammen.
Abnehmen des Mixersockels vom Mixer
Siehe Abbildung 5.
1 Halten Sie den Mixer fest und drehen Sie den Mixersockel
gegen den Uhrzeigersinn.
2 Nehmen Sie den Sockel vom Mixer-Behälter herunter.
3 Setzen Sie den Mixer in umgekehrter Reihenfolge wieder
zusammen.
Sicherheit
Allgemein
• Lesen Sie die Bedienungsanleitung gut durch und
bewahren Sie diese sorgfältig auf.
• Verwenden Sie dieses Gerät nur so wie in dieser
Bedienungsanleitung beschrieben.
• Verwenden Sie dieses Gerät nur für den Hausgebrauch.
• Die Verwendung dieses Geräts durch Kinder oder
Personen mit körperlichen, geistigen oder motorischen
Einschränk ungen, Wahrnehmungseins chränkungen oder
mangelnder Kenntnis und Erfahrung kann zu
gefährlichen Situationen führen. Für diesen
Personenkreis verantwortliche Personen müssen
deutliche Anweisungen erteilen oder diesen bei der
Verwendung des Geräts beaufsichtigen.
• Achten Sie darauf, dass Kinder nicht mit dem Gerät
spielen.
• Lassen Sie Reparaturen von einem qualifizierten
Mechaniker ausführen. Versuchen Sie nie, das Gerät
selbst zu reparieren.
Wärme und Elektrizität
• Bevor Sie das Gerät verwenden, prüfen Sie, ob die
Netzspannung mit der auf dem Typenschild des Geräts
angegebenen Stromstärke übereinstimmt.
• Verwenden Sie eine geerdete Steckdose.
• Ziehen Sie immer den Stecker aus der Steckdose, wenn
Sie das Gerät nicht benutzen.
• Ziehen Sie beim Entfernen des Steckers aus der
Steckdose am Stecker und nicht am Kabel.
• Beschädigte Geräte oder Geräte mit einem defekten
Kabel nicht mehr verwenden, Schicken Sie es an unseren
Kundendienst, um Gefahren zu vermeiden. Bei diesem
Gerätetyp darf ein defektes Kabel nur von unserem
Kundendienst und mit Spezialwerkzeug ausgetauscht
werden.
• Sorgen Sie dafür, dass das Gerät und das Kabel nicht mit
Hitzequellen wie heißen Kochplatten oder offenem Feuer
in Berührung kommen.
• Sorgen Sie dafür, dass das Gerät, das Kabel und der
Stecker nicht mit Wasser in Berührung kommen.
• Nehmen Sie das Gerät nicht auf, wenn es ins Wasser
gefallen ist. Ziehen Sie sofort den Stecker aus der
Steckdose. Benutzen Sie das Gerät nicht mehr.
COMPACT BLENDER & MILL (LET’S BLENDER) ART 213100
17
Page 23

Bei der Benutzung
• Wenn Sie den Mixer über längere Zeit ununterbrochen
verwenden, wird der Motor warm. Lassen Sie in diesem
Fall den Motor abkühlen, bevor Sie das Gerät wieder
verwenden.
• Benutzen Sie das Gerät niemals im Freien.
• Benutzen Sie das Gerät nie in feuchten Räumen.
• Stellen Sie das Gerät auf einen stabilen und ebenen
Untergrund und an eine Stelle, wo es nicht herunterfallen
kann.
• Lassen Sie das Kabel nicht über den Rand einer
Anrichte, Arbeitsplatte oder eines Tisches hängen.
• Sorgen Sie dafür, dass Ihre Hände trocken sind, wenn Sie
das Gerät, das Kabel oder den Stecker berühren.
• Schalten Sie das Gerät nur ein, wenn der Behälter auf
dem Gehäuse angebracht ist und sich der Deckel auf
dem Behälter befindet.
• Schalten Sie das Gerät aus und ziehen Sie den Stecker
aus der Steckdose, wenn bei der Benutzung Störungen
auftreten, Sie das Gerät reinigen, Zubehör anbringen
oder abnehmen oder Sie das Gerät nicht mehr benutzen.
• Lassen Sie das Gerät bei der Benutzung niemals
unbeaufsichtigt.
• Reinigen Sie das Gerät nach der Benutzung gründlich
(siehe Kapitel „Wartung und Reinigung“).
• Dieser Mixer arbeitet sehr schnell. Die Produkte sind in
wenigen Sekunden bereits zermahlen. Je länger der
Mixer eingeschaltet ist, desto feiner werden die Produkte
zermahlen.
• Heiße Flüssigkeit im Mixer kann dazu führen, dass der
Deckel durch den entstandenen Dampf und den Druck
der heißen Flüssigkeit abspringt. Sie können dies
verhindern, indem Sie den Deckel während des Betriebs
mit einem Tuch festhalten.
Umwelt
Werfen Sie Verpackungsmaterial wie Kunststoff und Kartons in
die dafür vorgesehenen Container.
Wollen Sie das Gerät entsorgen, obwohl es noch richtig
funktioniert und problemlos repariert werden kann, dann sorgen
Sie für eine Wiederverwendung des Geräts.
Am Ende der Nutzungsdauer müssen Sie das
Gerät auf verantwortungsvolle Weise aufbereiten
lassen, sodass das Gerät und dessen Teile
wiederverwendet werden können. Stellen Sie das
Gerät nicht zum unsortierten Abfall, sondern
anerkannten Sammelpunkt. Setzen Sie sich mit Ihrer Stadt in
Verbindung, um Informationen über die verfügbaren Abgabeund Sammelsysteme zu erhalten.
Geltende europäische Richtlinie:
bringen Sie es zum Händler oder zu einem
• 2002/95/EC
• 2002/96/EC
Rezepte
Informieren Sie sich auch einmal im Internet über leckere
Rezepte, die Sie mit dem Mixer zubereiten können. Hier sind
schon mal drei Rezepte, die wir für Sie gefunden haben.
Bananenmilchshake
Zutaten:
1 Banane
Vanilleeis
Milch
Die Banane in Scheiben schneiden und in den Mixer geben.
Das Vanilleeis und die Milch dazugeben. Den Mixer einschalten
und einige Sekunden mixen lassen. Jetzt haben Sie ein
leckeres Bananenmilchshake!
18
COMPACT BLENDER & MILL (LET’S BLENDER) ART 213100
Page 24

Erdbeerfrühstück
Zutaten:
2 Tassen ungesüßte Erdbeeren
1 ½ Tassen Milch
½ Tasse Joghurt
2 Beutel fertigen Frühstücksmix mit Vanillegeschmack
2 Teelöffel Honig
Die Zutaten in den Mixer geben. Den Mixer einschalten. Wenn
eine fast glatte Masse entstanden ist, den Mixer ausschalten
und falls erforderlich den Inhalt des Behälters umrühren. In drei
oder vier Gläser einschenken und sofort servieren.
Cremige Avocado-Limonen-Dipsoße
Zutaten:
1 reife Avocado
1 EL frischer Limonensaft
½ Teelöffel scharfe Chilisoße
1 fein gehackte Knoblauchzehe
Salz und frisch gemahlener schwarzer Pfeffer
Das Fruchtfleisch der Avocado in den Mixer geben. Den
Limonensaft, die Chilisoße und den Knoblauch zugeben. Den
Mixer einschalten. Wenn eine glatte Masse entstanden ist, den
Mixer ausschalten. Mit Salz und Pfeffer abschmecken. Die
Dipsoße in eine Schüssel geben und mit Klarsichtfolie
abdecken. Die Schüssel bis zum Servieren im Kühlschrank
aufbewahren.
COMPACT BLENDER & MILL (LET’S BLENDER) ART 213100
19
Page 25

Generalidades
Esta hermosa licuadora ha sido diseñada por el diseñador
holandés Jan des Bouvrie. Con este aparato puede usted
cortar legumbres y frutas en porciones pequeñas, o preparar
deliciosos zumos y batidos. También puede usar el aparato
para triturar nueces u otros alimentos de consistencia dura.
Tanto la carcasa como las jarras tienen un elegante y lujoso
diseño.
La licuadora Jan de Brouvrie tiene un potente motor que puede
ajustar en dos posiciones de funcionamiento continuo, o una
posición de pulsación.
La jarra está provista de una tapa con abertura que le permite
añadir productos, sin salpicar, mientras el aparato está en
funcionamiento. La jarra tiene una capacidad de 0,8 litros. La
jarra viene equipada con afiladas cuchillas de acero inoxidable
que permiten cortar fácilmente trozos grandes o pequeños de
fruta, y cortar legumbres finamente o triturarlas.
Este modelo se entrega acompañado de una procesadora de
alimentos universal para triturar alimentos de consistencia dura
(por ejemplo nueces peladas). Esta procesadora de alimentos
está provista de un fondo removible con cuchillas integradas.
El aparato se conecta a la red de suministro eléctrico.
Funcionamiento y manejo
Véase la figura 1.
El aparato consta de las siguientes partes:
1 Carcasa
2 Enchufe y cable
3 Testigo indicador de puesta en marcha (naranja)
4 Testigo indicador de encendido/apagado (rojo)
5 Botón
6 Jarra (contenido 0,8 litros)
7 Tapón de llenado
8 Tapa
9 Procesadora de alimentos universal
10 Fondo de la procesadora de alimentos (removible) con
cuchillas
Antes del primer uso
1 Retire todos los materiales de embalaje y las etiquetas del
aparato.
2 Limpie el aparato y todos sus accesorios (véase 'Limpieza y
mantenimiento') y séquelos muy bien.
Licuar productos
Véase la Figura 2
1 Coloque la base sobre una superficie estable.
2 Coloque la jarra en la base. Los tres acoples de
inmovilización deben ajustar precisamente en los orificios
de la parte inferior de la jarra.
3 Coloque la tapa en la jarra.
4 Coloque el tapón de llenado en la tapa y gírelo un cuarto de
vuelta para fijarlo.
5 Corte la fruta y/o las legumbres en trozos. No corte los
trozos demasiado grandes. Éstos deben poder caber en la
parte inferior.
6 Abra la tapa e introduzca los trozos en la jarra.
7 Coloque la tapa en la jarra para evitar las salpicaduras.
8 Si el botón está en la posición 0, el aparato estará
bloqueado. Gire el botón para liberarlo (ver figura 2).
9 Encienda la licuadora durante unos segundos en la
posición 1 o 2, o en la posición de pulsación (P).
Esta licuadora funciona a gran velocidad. Los productos se
licuan en unos cuantos segundos. Mientras más tiempo
deje funcionar la licuadora, más finamente se licuarán los
productos.
Nota: No haga funcionar la licuadora durante más de 3
minutos consecutivos para evitar el
sobrecalentamiento. Deje enfriar la licuadora durante
unos breves minutos antes de encenderla nuevamente.
10 Puede llenar más la jarra retirando únicamente el tapón de
llenado; para hacerlo, gire el tapón un cuarto de vuelta y
sáquelo de la tapa. Si los trozos no caben por la abertura
de llenado, apague la licuadora primero e introduzca los
trozos en la jarra retirando la tapa. Coloque nuevamente la
20
COMPACT BLENDER & MILL (LET’S BLENDER) ART 213100
Page 26

tapa en de la licuadora antes de volverla a poner en
marcha.
11 Apague el interruptor de encendido/apagado (posición 0)
cuando haya licuado la cantidad de fruta y/o legumbres
deseada.
12 Gire el botón para bloquear el aparato (ver figura 2).
13 Retire el enchufe de la toma de corriente.
Triturar productos
Véase la Figura 4.
1 Coloque la base sobre una superficie estable.
2 Fije la procesadora de alimentos a la carcasa. Los tres
acoples de inmovilización deben ajustar precisamente en
los orificios de la base de la procesadora de alimentos.
3 Gire la tapa de la procesadora de alimentos en la dirección
de las agujas del reloj para abrir la jarra.
4 Llene la procesadora de alimentos con el producto que
desea triturar.
5 Gire la tapa de la procesadora de alimentos en dirección
contraria a las agujas del reloj para cerrar la jarra.
6 Si el botón está en la posición 0, el aparato estará
bloqueado. Gire el botón para liberarlo (ver figura 2).
7 Encienda la procesadora de alimentos durante unos
segundos en la posición 1 o 2, o en la posición de pulsación
(P).
Esta procesadora de alimentos funciona a gran velocidad.
Los productos se licuan en unos cuantos segundos.
Mientras más tiempo deje funcionar la procesadora de
alimentos, más finamente se triturarán los productos.
Nota: No haga funcionar la procesadora de alimentos
durante más de 50 segundos con un máx. de 150 g de
ingredientes. Deje enfriar la procesadora de alimentos
durante aprox. 7 minutos antes de encenderla
nuevamente.
8 Apague el interruptor de encendido/apagado (posición 0)
cuando haya molido la cantidad de producto deseada.
9 Gire el botón para bloquear el aparato (ver figura 2).
10 Retire el enchufe de la toma de corriente.
11 Espere hasta que se hayan detenido las cuchillas y retire el
producto triturado.
Limpieza y mantenimiento
• Asegúrese de que el aparato no está conectado a la toma
de alimentación eléctrica cuando vaya a limpiarlo.
• Asegúrese de que ningún líquido pueda entrar al interior
del aparato.
• No sumerja nunca el aparato en agua ni en ningún otro
líquido. Si esto ocurre, no vuelva a usarlo más y
deshágase de él.
• Únicamente las partes sueltas se pueden lavar en el
lavaplatos eléctrico.
• No use productos abrasivos o agresivos para limpiarlo.
• La licuadora viene equipada con cuchillas afiladas,
colocadas en la parte inferior de la jarra. Por lo tanto,
tenga cuidado al vaciar y limpiar la licuadora. Evite
cortarse con las cuchillas.
1 Limpie la parte externa del aparato con un paño suave y
húmedo.
2 Limpie las jarras y los demás componentes con agua
caliente y jabón.
3 Limpie muy bien, especialmente, las cuchillas del fondo de
la procesadora y asegúrese de haber eliminado todos los
restos de alimentos (véase la sección "Desensamble y
ensamble del fondo con cuchillas giratorias".
4 Retire la procesadora de la base (véase la sección "Retirar
la procesadora de la base").
5 Limpie la jarra de la procesadora y los demás componentes
con agua caliente y jabón.
6 Limpie muy bien, especialmente, las cuchillas del fondo de
la jarra y asegúrese de haber eliminado todos los restos de
alimentos.
7 Después de lavar las partes, séquelas bien.
Desensamble y ensamble del fondo con cuchillas
giratorias
Véase la figura 3.
1 Coloque la jarra en la base.
2 Sostenga la base.
3 Gire la jarra en dirección contraria a las agujas del reloj
para soltarla.
COMPACT BLENDER & MILL (LET’S BLENDER) ART 213100
21
Page 27

4 Retire la jarra del fondo con las cuchillas giratorias.
5 Retire el fondo con las cuchillas giratorias de la carcasa.
6 Ensamble el fondo con las cuchillas giratorias y la jarra
siguiendo los pasos en orden inverso.
Retirar la procesadora de la base
Véase la Figura 5.
1 Sostenga la procesadora y gire base en dirección contraria
a las agujas del reloj.
2 Retire la base de la jarra de la procesadora.
3 Ensamble la procesadora siguiendo los pasos en orden
inverso.
Seguridad
Generalidades
• Lea las instrucciones de uso con detenimiento y
guárdelas cuidadosamente.
• Utilice este aparato únicamente en la forma que se
describe en las instrucciones.
• Use este aparato únicamente para fines domésticos.
• El uso de este aparato por niños o personas con
impedimentos físicos, sensoriales, mentales o motrices,
así como sin conocimientos y experiencia, puede
ocasionar situaciones peligrosas. Aquellos responsables
de la seguridad de tales personas deben impartir
instrucciones claras o vigilar el uso del aparato.
• No permita que los niños jueguen con el aparato.
• Haga reparar el aparato únicamente por personal
cualificado. No intente nunca repararlo usted mismo.
Electricidad y fuentes de calor
• Antes de utilizar el aparato, verifique que el voltaje de la
red corresponda al voltaje indicado en la placa.
• Use una toma de alimentación con conexión a tierra.
• Retire siempre el enchufe de la toma de alimentación
cuando no esté utilizando el aparato.
• Al retirar el enchufe de la toma, asegúrese de tirar del
enchufe y no del cable.
• No use el aparato si éste o el cable están averiados.
Llévelo a nuestro servicio técnico para evitar riesgos.
Los cables dañados de este tipo de aparatos sólo deben
ser reparados por nuestro servicio técnico usando
herramientas especiales.
• Asegúrese de que ni el aparato, ni el cable están en
contacto con fuentes de calor, por ejemplo, con una
placa caliente de la estufa o con una llama.
• Asegúrese de que ni el aparato, ni el cable, ni el enchufe
están en contacto con el agua.
• No recoja el aparato cuando haya caído en el agua. Retire
inmediatamente el enchufe de la toma de alimentación.
No vuelva a utilizar más el aparato.
Durante el uso
• El motor de la licuadora se calienta si se deja funcionar
durante mucho tiempo sin interrupciones. En este caso,
deje enfriar primero el motor antes de volver a usar el
aparato.
• No use nunca este aparato fuera del hogar.
• No use el aparato en lugares húmedos.
• Coloque el aparato sobre una superficie plana y estable,
en un lugar donde no pueda caerse.
• No deje que el cable quede colgando por el borde del
fregadero, la encimera o la mesa.
• Asegúrese de tener las manos secas cuando manipule el
aparato, el cable o el enchufe.
• Ponga en marcha el aparato únicamente si ha puesto la
jarra sobre la base y ésta tiene puesta la tapa.
• Apague el aparato y retire el enchufe de la toma de
alimentación si se presentan fallos durante el uso,
cuando quiera limpiarlo, cuando vaya a colocar o a retirar
un accesorio o cuando haya terminado de usarlo.
• No deje el aparato sin vigilancia mientras está en uso.
• Limpie muy bien el aparato después de usarlo (véase el
capítulo 'Mantenimiento y limpieza').
22
COMPACT BLENDER & MILL (LET’S BLENDER) ART 213100
Page 28

• Esta licuadora funciona a gran velocidad. Los productos
se licuan en unos cuantos segundos. Mientras más
tiempo deje funcionar la licuadora, más finamente se
licuarán los productos.
• El uso de líquidos calientes en la licuadora puede hacer
que la tapa se levante por efecto del vapor y la presión
que produce el líquido Evite que esto suceda
sosteniendo la tapa con un paño mientras el aparato está
en uso.
Medio ambiente
Tire el material de embalaje, como plástico y cajas, en los
contenedores destinados para ello.
Si desea desprenderse del aparato estando todavía en buen
estado, o si puede repararse fácilmente, por favor, asegúrese
de que pueda volver a utilizarse.
Al final de la vida útil debe hacer procesar el
aparato de forma responsable de manera que éste
o sus partes puedan ser reutilizadas. No tire el
aparato junto con los residuos domésticos no
clasificados; en su lugar llévelo a la tienda donde lo
Póngase en contacto con las autoridades municipales para
solicitar información acerca de los lugares de recolección
autorizados.
adquirió o a un lugar de recolección autorizado.
Recetas
Consulte en Internet las deliciosas recetas que puede preparar
con esta licuadora. A continuación enumeramos tres que
hemos encontrado para usted.
Batido de banano
Ingredientes:
1 banano
Helado de vainilla
Leche
Corte el banano en rodajas y póngalo en la licuadora. Añada el
helado de vainilla y la leche. Ponga en marcha la licuadora y
déjela batir unos cuantos segundos. ¡Aquí tiene un delicioso
batido de banano!
Desayuno con fresas
Ingredientes:
2 tazas de fresas sin azúcar
1 ½ taza de leche
½ tazar de yogurt
2 sobrecitos de mezcla para desayuno con sabor a vainilla
2 cucharaditas de miel de abeja
Vierta los ingredientes en la licuadora. Ponga en marcha la
licuadora. Detenga la licuadora cuando vea que se ha formado
una masa uniforme, y revuelva el contenido si es necesario.
Vierta la mezcla en tres o cuatro vasos y sirva inmediatamente.
Normativa europea vigente:
• 2002/95/EC
• 2002/96/EC
Dip de aguacate y limón
Ingredientes:
1 aguacate maduro
1 cucharada de zumo de limón natural
½ cucharadita de salsa de pimientos picante
1 diente de ajo picado finamente
sal y pimienta molida
COMPACT BLENDER & MILL (LET’S BLENDER) ART 213100
23
Page 29

Vierta la pulpa del aguacate en la licuadora. Añada el zumo de
limón, la salsa de pimientos y el ajo. Ponga en marcha la
licuadora. Detenga la licuadora cuando vea que se ha formado
una masa uniforme. Agregue sal y pimienta al gusto. Vierta la
salsa en una salsera y cúbrala con película plástica. Guarde la
salsera en la nevera hasta el momento de servir.
24
COMPACT BLENDER & MILL (LET’S BLENDER) ART 213100
Page 30

Introduzione
Questo frullatore, dal design moderno e accattivante, è stato
progettato da Jan des Bouvrie. Questo apparecchio consente di
frullare finemente frutta e verdura o di preparare gustosissimi
succhi e frappè. È anche possibile utilizzare l'apparecchio per
macinare frutta secca o altri cibi particolarmente duri. Il corpo e
i bicchieri sono contraddistinti da un design elegante e di lusso.
Il frullatore Jan des Bouvrie è dotato di un potente motore il cui
funzionamento può essere impostato su due velocità oppure su
una posizione a intermittenza (pulse).
Il bicchiere del frullatore è provvisto di un coperchio con una
comoda apertura di riempimento. L'apertura consente di
aggiungere altri cibi durante il funzionamento del frullatore
senza provocare una fuoriuscita dei prodotti. La capacità del
bicchiere del frullatore è di 0,8 litri. All'interno del bicchiere sono
inserite delle lame in acciaio che consentono al frullatore di
frullare o di passare pezzi di frutta e verdura di qualsiasi
dimensione senza la minima difficoltà.
Questo modello viene fornito con una macina universale
aggiuntiva per la triturazione dei cibi più duri, come ad esempio
le noci. Questo frullatore ha una lama rimuovibile con lame
integrate.
L'apparecchio funziona ad alimentazione elettrica.
Funzionamento e utilizzo del
prodotto
Vedere la figura 1.
Il prodotto è composto dai seguenti elementi:
1Base
2 Cavo e spina di alimentazione
3 Spia luminosa di funzionamento (arancione)
4 Spia luminosa di accensione/spegnimento (rossa)
5 Manopola di regolazione
6 Bicchiere (capacità: 0,8 litri)
7 Tappo di riempimento
8 Coperchio
9 Macina universale
10 Supporto lama frullatore (rimuovibile)
Operazioni preliminari al primo utilizzo
1 Rimuovere dal prodotto tutti i materiali d’imballaggio e tutte
le etichette e gli adesivi.
2 Pulire l’apparecchio e tutti gli accessori (vedere la sezione
“Manutenzione e pulizia”) e asciugarli quindi a fondo.
Utilizzo dell'apparecchio per frullare i cibi
Vedere figura 2.
1 Collocare la base di appoggio su una superficie stabile.
2 Inserire il bicchiere sulla base dell'apparecchio. I tre
dispositivi di blocco del corpo dell'apparecchio devono
inserirsi perfettamente nelle aperture della parte inferiore
del bicchiere.
3 Posizionare il coperchio sul bicchiere.
4 Collocare il tappo di riempimento sul coperchio e ruotare il
tappo di un quarto di giro per bloccarlo in posizione.
5 Tagliare la frutta e/o la verdura in pezzi. Le dimensioni dei
pezzi tagliati non devono risultare di dimensioni troppo
grandi, poiché devono potersi posizionare perfettamente sul
fondo del bicchiere.
6 Aprire il coperchio e introdurre i pezzi nel bicchiere.
7 Posizionare il coperchio sul bicchiere per evitare eventuali
schizzi.
8 Quando la manopola di regolazione è premuta in posizione
0, essa risulta bloccata. Premere la manopola di
regolazione per sbloccarla (vedere figura 2).
9 Accendere il frullatore e attivare per un paio di secondi la
velocità 1 o 2 oppure la posizione a intermittenza (P).
Il frullatore funziona a elevatissima velocità. I prodotti
saranno già frullati trascorsi alcuni secondi. Quanto più a
lungo il frullatore rimarrà in funzione, tanto più sottilmente
verranno triturati i cibi.
Nota: non usare il frullatore per oltre 3 minuti, al fine di
evitare il surriscaldamento. Lasciar raffreddare il
frullatore per alcuni minuti prima di riutilizzarlo.
COMPACT BLENDER & MILL (LET’S BLENDER) ART 213100
25
Page 31

10 Riempire ulteriormente il bicchiere ruotando il tappo di
riempimento di un quarto di giro ed estraendo il tappo dal
coperchio. Se alcuni pezzi tagliati non passano dall'apertura
di riempimento, spegnere il frullatore, rimuovere il coperchio
e inserire quindi il cibo nel bicchiere. Prima di accendere
nuovamente il frullatore, assicurarsi di avere riposizionato il
coperchio sul bicchiere.
11 Disattivare l'interruttore di funzionamento (posizione "0")
una volta frullata la quantità di frutta e/o di verdura
desiderata.
12 Premere la manopola di regolazione per bloccarla (vedere
figura 2).
13 Disinserire la spina dalla presa di rete.
Macinazione dei prodotti
Vedere figura 4.
1 Collocare la base di appoggio su una superficie stabile.
2 Montare il frullatore nell'alloggiamento. I tre agganci
sull'alloggiamento devono adattarsi perfettamente alle
aperture nella base del frullatore.
3 Ruotare la piastra superiore del frullatore in senso orario
per aprire il bricco.
4 Riempire il recipiente della macina con il prodotto da
macinare.
5 Ruotare la piastra superiore del frullatore in senso antiorario
per chiudere il bricco.
6 Quando la manopola di regolazione è premuta in posizione
0, essa risulta bloccata. Premere la manopola di
regolazione per sbloccarla (vedere figura 2).
7 Accendere la macina e attivare per un paio di secondi la
velocità 1 o 2 oppure la posizione a intermittenza (P).
La macina funziona a elevatissima velocità. I prodotti
saranno già frullati trascorsi alcuni secondi. Quanto più a
lungo la macina rimarrà in funzione, tanto più sottilmente
verranno triturati i cibi.
Nota: non usare il frullatore per oltre 50 secondi con
max 150 g di ingredienti. Lasciar raffreddare il
frullatore per circa 7 minuti prima di riutilizzarlo.
8 Disattivare l'interruttore di funzionamento (posizione "0")
una volta frullata la quantità di prodotto desiderata.
9 Premere la manopola di regolazione per bloccarla (vedere
figura 2).
10 Disinserire la spina dalla presa di rete.
11 Aspettare fino a che le lame si fermano e rimuovere il
prodotto tritato.
Manutenzione e pulizia
• Assicurarsi che l'apparecchio non sia collegato
all'alimentazione di rete mentre lo si pulisce.
• Assicurarsi che non penetrino liquidi all'interno della
base dell'apparecchio.
• Non immergere mai l'apparecchio in acqua o in altri
liquidi. Qualora ciò accadesse, non riutilizzare più
l'apparecchio e provvedere a smaltirlo.
• Assicurarsi di lavare in lavastoviglie solo i componenti
amovibili o staccabili.
• Non utilizzare prodotti aggressivi o abrasivi per la pulizia
dell’apparecchio.
• Questo frullatore utilizza lame rotanti affilate, situate
nella parte inferiore del bicchiere. Prestare quindi
particolare attenzione al momento dello svuotamento e
della pulizia del frullatore. Evitare di procurarsi lesioni a
causa delle lame.
1 Pulire l'esterno dell'alloggiamento con un panno umido e
morbido.
2 Pulire il bricco e le parti con acqua calda saponata.
3 Pulire a fondo le lame rotanti sul fondo del bricco, in
particolare, ed assicurarsi di rimuovere tutti i residui di cibo
da esse (vedere 'Rimozione e fissaggio della base con le
lame rotanti').
4 Rimuovere la base dal frullatore (vedere rimozione della
base del frullatore dal frullatore).
5 Pulire il bricco del frullatore e le parti dello stesso con acqua
calda saponata.
6 Pulire in modo perfetto le lame rotanti sul fondo del bricco,
in particolare, ed assicurarsi di rimuovere tutti i residui di
cibo da esse.
7 Dopo la pulizia o il lavaggio, asciugare a fondo tutti i
componenti.
26
COMPACT BLENDER & MILL (LET’S BLENDER) ART 213100
Page 32

Montaggio e smontaggio della parte inferiore con le
lame rotanti
Vedere la figura 3.
1 Inserire il bicchiere sulla base dell'apparecchio.
2 Tenere ferma la base dell'apparecchio.
3 Ruotare il bicchiere in senso antiorario per liberarlo.
4 Rimuovere il bricco dalla base con le lame rotanti.
5 Rimuovere la base con le lame rotanti dall'alloggiamento.
6 Rimontare la base con le lame rotanti e il bricco, seguendo
l'ordine inverso.
Rimozione della base del frullatore dal frullatore
Vedere figura 5.
1 Tenere il frullatore e ruotarne la base in senso antiorario.
2 Rimuovere la base dal bricco del frullatore.
3 Rimontare il frullatore in ordine inverso.
Informazioni sulla sicurezza
Avvertenze generali
• Leggere attentamente le presenti istruzioni per l’uso e
conservarle con cura.
• Utilizzare l'apparecchio unicamente secondo le modalità
descritte nelle presenti istruzioni.
• Questo apparecchio è stato concepito esclusivamente
per l'impiego domestico.
• L’utilizzo di questo elettrodomestico da parte di bambini
o di persone con limitazioni fisiche, sensoriali, cognitive
o motorie oppure che non dispongono di un adeguato
livello di esperienza o di conoscenza, potrebbe causare
l’insorgenza di situazioni di pericolo. I soggetti
responsabili della sicurezza di queste persone devono
impartire loro istruzioni chiare e univoche in ogni
circostanza o mantenere sempre la sorveglianza
sull’impiego dell’apparecchio.
• Assicurarsi che i bambini non giochino mai con
l’apparecchio.
• Fare eseguire le riparazioni da personale qualificato. Non
tentare mai di riparare da soli l'apparecchio.
Elettricità e calore
• Prima di utilizzare l'apparecchio, verificare che la
tensione di rete corrisponda alla tensione di esercizio
indicata sulla targhetta di identificazione
dell'apparecchio.
• Collegare l'apparecchio esclusivamente a prese di rete
provviste di messa a terra.
• Estrarre sempre la spina dalla presa di corrente quando
l'apparecchio non è in uso.
• Quando si procede a disinserire la spina dalla presa
elettrica, assicurarsi di esercitare la trazione sempre
sulla spina stessa e non sul cavo.
• Non utilizzare l'apparecchio qualora esso o il cavo di
alimentazione risultino danneggiati. Inviare l’apparecchio
al nostro servizio di assistenza per evitare ulteriori
eventuali rischi. Il cavo di alimentazione di questo tipo di
apparecchio può essere sostituito unicamente dal nostro
centro di assistenza mediante l'uso di utensili e
attrezzature speciali
• Assicurarsi che l'apparecchio e il cavo non entrino a
contatto con fonti di calore, quali per es. un piano di
cottura caldo o fiamme libere.
• Assicurarsi che l'apparecchio, il cavo e la spina non
entrino a contatto con acqua.
• Non tentare di recuperare l'apparecchio nel caso in cui
sia caduto in acqua. In tal caso, estrarre immediatamente
la spina dalla presa elettrica e non utilizzare più
l’apparecchio.
Precauzioni da osservare durante l'utilizzo
• Qualora si faccia funzionare il frullatore senza alcuna
interruzione per un periodo prolungato, il motore si
surriscalderà. In tal caso, assicurarsi di lasciare
raffreddare completamente il motore prima di rimettere in
funzione l'apparecchio.
COMPACT BLENDER & MILL (LET’S BLENDER) ART 213100
27
Page 33

• Non utilizzare mai l'apparecchio in ambienti esterni.
• Evitare di utilizzare l’apparecchio in ambienti umidi.
• Posizionare l'apparecchio su di una superficie piana e
stabile, in un punto in cui esso non possa cadere o
ribaltarsi.
• Assicurarsi che il cavo elettrico non penda dal bordo del
piano di lavoro, di mensole o di tavoli.
• Assicurarsi di avere le mani asciutte prima di toccare
l'apparecchio, il cavo o la spina.
• Azionare l'apparecchio soltanto se il bicchiere è stato
inserito sulla base e se il coperchio è stato posizionato
sul bicchiere.
• Spegnere l’apparecchio e disinserire la spina dalla presa
se durante l’uso si verificano malfunzionamenti e quando
si pulisce l’apparecchio, si monta o smonta un
accessorio o si è terminato di utilizzare l’apparecchio.
• Sorvegliare sempre l’apparecchio mentre questo è in
funzione.
• Dopo l'uso, pulire sempre a fondo l'apparecchio (vedere
"Manutenzione e pulizia").
• Il frullatore funziona a elevatissima velocità. I prodotti
saranno già frullati trascorsi alcuni secondi. Quanto più a
lungo il frullatore rimarrà in funzione, tanto più
sottilmente verranno triturati i cibi.
• L'utilizzo di liquidi a temperature elevate potrebbe
causare l'apertura del coperchio a causa del vapore e
della pressione elevata. Evitare questa eventualità
utilizzando un panno per tenere fermo il coperchio
durante l'uso.
Tutela dell’ambiente
Gettare i materiali d’imballaggio, come la plastica e le scatole,
negli appositi contenitori.
Se si desidera smaltire l'apparecchio, anche se funziona
ancora correttamente o può essere riparato facilmente,
assicurarsi che esso venga riutilizzato.
Alla fine della sua durata di vita economica,
l'apparecchio deve essere smaltito secondo le leggi
in vigore, in modo che l'apparecchio stesso o i suoi
componenti possano essere riutilizzati. Non
smaltire l'apparecchio deponendolo assieme ai
al negoziante o presso un punto di raccolta autorizzato.
Rivolgersi al proprio comune di residenza per ottenere
informazioni sulle possibilità e sui servizi di consegna e di
raccolta.
Direttiva europea vigente:
rifiuti comuni e non differenziati: consegnarlo invece
• 2002/95/CE
• 2002/96/CE
Ricettario
Per ottenere nuove idee e suggerimenti per gustose ricette da
eseguire con il frullatore, si consiglia di consultare anche
Internet. Qui di seguito vengono proposte 3 ricette da provare.
Frullato di banane
Ingredienti:
1 banana
Gelato alla vaniglia
Latte
Tagliare la banana in piccole fette e inserirle nel bicchiere del
frullatore. Aggiungervi del gelato alla vaniglia e del latte.
Azionare il frullatore per alcuni secondi. Si otterrà quindi un
delizioso frullato di banane.
Frullato di fragole e cereali per la prima colazione
Ingredienti:
28
COMPACT BLENDER & MILL (LET’S BLENDER) ART 213100
Page 34

2 tazze di fragole (non zuccherate)
1 1/2 tazzina di latte
1/2 tazzina di yogurt
2 bustine di mix di cereali per colazione pronti all'uso (anche
con gusti diversi)
2 cucchiaini di miele
Inserire gli ingredienti nel bicchiere del frullatore. Azionare il
frullatore. Spegnere il frullatore non appena il composto risulta
quasi omogeneo e provvedere all'occorrenza a mescolare il
contenuto del bicchiere. Distribuire il frullato in 3 o 4 bicchieri e
consumare immediatamente.
Crema di avocado e lime
Ingredienti:
1 avocado maturo
1 cucchiaio di succo di lime appena spremuto
1/2 cucchiaino di salsa di peperoncino
1 spicchio di aglio finemente tritato
Sale e pepe nero macinato fresco q.b.
Inserire la polpa dell'avocado nel bicchiere del frullatore.
Aggiungervi il succo di lime, la salsa di peperoncino e l'aglio.
Azionare il frullatore. Spegnere il frullatore non appena il
composto risulta omogeneo. Aggiungere sale e pepe a piacere.
Versare la salsa in un apposito recipiente e coprire con della
pellicola trasparente da cucina. Conservare il recipiente in
frigorifero fino alla consumazione della salsa.
COMPACT BLENDER & MILL (LET’S BLENDER) ART 213100
29
Page 35

Allmänt
Denna snyggt formgivna mixer har designats av Jan des
Bouvrie. Med denna apparat kan du finhacka frukt och
grönsaker eller göra underbart goda shaker och juicer. Du kan
även använda apparaten för att mala nötter eller andra hårda
livsmedel. Såväl höljet som kannorna har en stram och lyxig
design.
Jan des Bouvrie Blender har en kraftfull motor, som du kan
ställa in på två hastigheter eller ett pulsläge.
Kannan har ett lock med öppning. Genom denna öppning kan
du tillsätta ingredienser när du mixar utan att spilla. Mixern har
en kanna med ett innehåll på 0,8 liter. I kannan finns
integrerade stålknivar, med vilka kannan utan problem kan
finhacka eller göra puré av både stora och små bitar frukt och
grönt.
Denna modell levereras med en extra universell kvarn för att
mala hårdare livsmedel (till exempel skalade valnötter). Denna
kvarn har en avtagbar bladställning med integrerade knivar.
Apparaten ansluts till elnätet.
Funktion och användning
Se figur 1.
Apparaten består av följande delar:
1 Hölje
2 Kontakt och sladd
3 Indikatorlampa igång (orange)
4 Indikatorlampa på/av (röd)
5 Vridknapp
6 Kanna (innehåll 0,8 liter)
7 Kork till öppningen
8Lock
9 Universell kvarn
10 Kvarnbladställning (avtagbar)
Innan användning
1 Avlägsna allt förpackningsmaterial och alla dekaler från
apparaten.
2 Rengör apparaten och alla tillbehör (se ‘Underhåll och
rengöring’) och torka därefter av dem ordentligt.
Bereda produkter
Se figur 2.
1 Placera höljet på ett jämnt underlag.
2 Ställ kannan på höljet. De tre spärrarna på höljet måste
passa precis i öppningarna på kannans botten.
3 Sätt locket på kannan.
4 Placera öppningskorken i locket och vrid ett kvarts varv för
att sätta fast den.
5 Skär frukten och/eller grönsakerna i bitar. Gör inte bitarna
för stora. De måste kunna läggas i kannan ordentligt.
6 Öppna locket och lägg bitarna i kannan.
7 Placera locket på kannan för att förhindra att det stänker.
8 Om du trycker in vridknappen i läge 0, då är den låst. Tryck
på vridknappen för att låsa upp den (se figur 2).
9 Slå på matberedaren under några sekunder i läge 1 eller 2
eller på pulsläget (P).
Denna mixer arbetar mycket snabbt. Produkterna är malda
efter bara några sekunder. Ju längre du låter matberedaren
gå, desto finare mals produkterna.
Obs! Använd inte blandaren längre än 3 minuter för att
undvika överhettning. Låt blandaren kallna under ett
par minuter innan du startar den igen.
10 Fyll eventuellt på kannan genom att vrida korken ett kvarts
varv och avlägsna den från locket. Om ingredienserna inte
passar genom öppningen, stäng av mixern, avlägsna locket
och lägg bitarna direkt i kannan. Sätt tillbaka locket på
kannan innan du slår på mixern igen.
11 Flytta strömbrytaren till läge 0 när du är klar med önskad
mängd frukt och/eller grönsaker.
12 Tryck på vridknappen för att låsa den (se figur 2).
13 Drag ur kontakten ur vägguttaget.
30
COMPACT BLENDER & MILL (LET’S BLENDER) ART 213100
Page 36

Mala produkter
Se figur 4.
1 Placera höljet på ett jämnt underlag.
2 Montera kvarnen på höljet. Det finns tre spärranordningar
på höljet som måste passa i springorna på kvarnens botten.
3 Rotera kvarnens övre platta medurs för att öppna
kvarnbehållaren.
4 Fyll kvarnen med produkten som du vill mala.
5 Rotera kvarnens övre platta moturs för att stänga
kvarnbehållaren.
6 Om du trycker in vridknappen i läge 0, då är den låst. Tryck
på vridknappen för att låsa upp den (se figur 2).
7 Slå på kvarnen under några sekunder i läge 1 eller 2 eller
på pulsläget (P).
Denna kvarn arbetar mycket snabbt. Produkterna är malda
efter bara några sekunder. Ju längre du låter kvarnen gå,
desto finare mals produkterna.
Obs! Använd inte kvarnen mer än 50 sekunder med
max. 150 g ingredienser. Låt kvarnen kallna under
ungefär 7 minuter innan du startar den igen.
8 Flytta strömbrytaren till läge 0 när du är klar med önskad
mängd produkt.
9 Tryck på vridknappen för att låsa den (se figur 2).
10 Drag ur kontakten ur vägguttaget.
11 Vänta tills bladen står stilla och avlägsna den malda
produkten.
Underhåll och rengöring
• Kontrollera att apparaten inte är ansluten till vägguttaget
när du rengör den.
• Kontrollera att fukt inte tränger in på höljets insida.
• Sänk aldrig ned apparaten i vatten eller annan vätska. Om
den ändå skulle sänkas ned i vatten får apparaten inte
användas igen. Kassera den.
• Endast lösa delar kan rengöras i diskmaskinen.
• Använd inga aggressiva eller slipande medel vid
rengöring.
• Denna mixer fungerar tack vare de vassa knivarna i
kannan. Var därför extra försiktig när du tömmer och
rengör mixern. Förhindra att du skadar dig på knivarna.
1 Rengör höljets utsida med en mjuk, fuktig trasa.
2 Rengör behållarens insida och komponenterna med
diskmedel och varmt vatten.
3 Rengör i synnerhet de roterande knivarna ordentligt i
behållarens botten och se till att du avlägsnar alla rester
från dem (se "Avlägsna och montera bottnen med roterande
knivar").
4 Avlägsna bottnen från kvarnen (se "Avlägsna kvarnbotten
från kvarn").
5 Rengör kvarnbehållaren och kvarnens komponenter med
diskmedel och varmt vatten.
6 Rengör i synnerhet de roterande bladen ordentligt i
behållarens botten och se till att du avlägsnar alla rester
från dem.
7 Torka delarna ordentligt efter rengöring.
Avlägsna och montera botten med roterande knivar
Se figur 3.
1 Ställ kannan på höljet.
2 Håll fast bottnen.
3 Lossa kannan genom att vrida den moturs.
4 Avlägsna behållaren från bottnen med de roterande
knivarna.
5 Avlägsna bottnen med de roterande knivarna från höljet.
6 Sätt ihop bottnen med de roterande knivarna och
behållaren i omvänd ordning.
Avlägsna kvarnbottnen från kvarnen
Se figur 5.
1 Håll kvarnen och rotera kvarnbottnen moturs.
2 Avlägsna bottnen från kvarnbehållaren.
3 Sätt ihop kvarnen i omvänd ordning.
Säkerhet
COMPACT BLENDER & MILL (LET’S BLENDER) ART 213100
31
Page 37

Allmänt
• Läs igenom bruksanvisningen ordentligt och förvara den
på en säker plats.
• Använd endast denna apparat så som beskrivs i denna
bruksanvisning.
• Apparaten är endast avsedd för hushållsbruk.
• Användning av denna apparat av barn eller personer med
en fysisk, sensorisk, mental eller motorisk begränsning,
eller som saknar kunskap och erfarenhet kan leda till
farliga situationer. Personer som ansvarar för säkerheten
för dessa personer måste ge tydliga instruktioner eller
övervaka apparatens användning.
• Kontrollera att barn inte leker med apparaten.
• Reparationer skall utföras av en kvalificerad reparatör.
Reparera aldrig apparaten själv!
Värme och elektricitet
• Kontrollera att nätspänningen överensstämmer med
angiven nätspänning på apparatens märkplatta innan den
används.
• Använd ett jordat vägguttag.
• Drag alltid ur kontakten ur vägguttaget när apparaten inte
används.
• När du drar ur kontakten ur vägguttaget skall du dra i
själva kontakten och inte i sladden.
• Använd inte apparaten om apparaten eller sladden är
skadad. Skicka den till vår serviceavdelning för att
undvika fara. Skadade sladdar hos den här typen av
apparat får endast bytas av vår serviceavdelning med
hjälp av speciella verktyg.
• Kontrollera att apparaten och sladden inte kommer i
kontakt med värmekällor, t.ex. en varm kokplatta eller
öppen eld.
• Kontrollera att apparaten, sladden och kontakten inte
kommer i kontakt med vatten.
• Tag inte upp apparaten om den ramlat ned i vatten. Drag
ur kontakten ur vägguttaget direkt. Använd aldrig
apparaten mer.
Vid användning
• När du låter mixern gå under en längre tid utan avbrott
kommer motorn att bli het. Låt då motorn kallna innan du
använder apparaten igen.
• Använd aldrig apparaten utomhus.
• Använd aldrig apparaten i fuktiga utrymmen.
• Placera apparaten på ett stadigt och plant underlag, på
en plats där den inte kan ramla ner.
• Sladden får inte hänga över diskbänkens, arbetsytans
eller bordets kant.
• Kontrollera att dina händer är torra när du tar i apparaten,
sladden eller kontakten.
• Slå endast på apparaten när en kanna är monterad på
höljet och det sitter ett lock på kannan.
• Stäng av apparaten och avlägsna kontakten från
vägguttaget om fel uppstår under användning, om
apparaten skall rengöras, om ett tillbehör skall sättas på
eller avlägsnas eller när du är klar med den.
• Lämna aldrig apparaten utan tillsyn när den används.
• Rengör apparaten ordentligt efter användning (se
”Underhåll och rengöring”).
• Denna mixer arbetar mycket snabbt. Produkterna är
malda efter bara några sekunder. Ju längre du låter
matberedaren gå, desto finare mals produkterna.
• Het vätska i mixern kan leda till att locket på grund av
ångbildning och den heta vätskans tryck lossnar.
Förhindra detta genom att hela tiden hålla i locket med en
handduk när apparaten är igång.
Miljö
Kasta förpackningsmaterial som plast och kartong i containrar
avsedda för detta.
Om apparaten kasseras när den ännu är funktionsduglig skall
den återvinnas.
32
COMPACT BLENDER & MILL (LET’S BLENDER) ART 213100
Page 38

Apparaten ska kasseras på ett ansvarsfullt sätt, så
att apparaten eller delarna kan återanvändas.
Apparaten får inte kasseras som osorterat avfall.
Lämna in den hos återförsäljaren eller på en
miljöstation. Tag kontakt med kommunen för
återvinningssystem.
Gällande EU-direktiv:
information om tillgängliga inlämnings- och
• 2002/95/EC
• 2002/96/EC
Recept
Leta på Internet efter goda recept som du kan tillaga med
mixern. Här följer tre recept som vi har hittat till dig.
Bananmilkshake
Ingredienser:
1 banan
Vaniljglas
Mjölk
Skär bananen i skivor och lägg dem i mixern. Tillsätt lite
vaniljglass och mjölk. Slå på mixern och låt den gå ett par
sekunder. Du har nu en härlig bananmilkshake!
Jordgubbsfrukost
Ingredienser:
2 koppar osötade jordgubbar
1 ½ kopp mjölk
1 ½ kopp yoghurt
2 påsar färdig frukostmix med vaniljsmak
2 teskedar honung
Häll ingredienserna i mixern. Slå på mixern. Stoppa mixern när
en nästan slät massa uppstått och rör om nödvändigt om
kannans innehåll. Häll upp i tre eller fyra glas och servera
direkt.
Fyllig avokado-lime dipsås
Ingredienser:
1 mogen avokado
1 matsked färskpressad limejuice
½ tesked het pepparsås
1 finhackad vitlöksklyfta
salt och färskmald svartpeppar
Lägg avokadons fruktkött i mixern. Tillsätt limejuicen,
pepparsåsen och vitlöken. Slå på mixern. Stoppa mixern när en
jämn massa uppstått. Tillsätt eventuellt lite salt och peppar. Häll
dipsåsen i en skål och täck med plastfolie. Ställ skålen i
kylskåpet tills dipsåsen serveras.
COMPACT BLENDER & MILL (LET’S BLENDER) ART 213100
33
Page 39

Generelt
Denne smukt formgivede blender er designet af Jan des
Bouvrie. Med dette apparat kan De fintsnitte grønsager og frugt
eller lave superlækre shakes eller saft. De kan også bruge
apparatet til at male nødder og andre hårde madvarer. Såvel
selve apparatet som kanden har et stramt luksuriøst design.
Jan des Bouvrie Blenderen har en kraftig motor, som De kan
lade pulsere eller køre på to hastigheder.
Til kanden hører et låg med fyldeåbning. Herigennem kan De
tilsætte produkter, mens blenderen kører, uden at det sprøjter.
Blenderen har en kande med et indhold på 0,8 liter. I kanden
sidder integrerede stålknive, hvormed blenderen problemløst
snitter både store og små stykker frugt og grønsager fint eller
purerer dem.
Med denne model følger en ekstra universal-kværn til at male
hårde madvarer i (som fx knækkede valnødder). Denne kværn
har en løs bund med integrerede knive.
Apparatet sluttes til på lysnettet.
Funktion og betjening
Se afbild. 1.
Apparatet består af følgende dele:
1Huset
2 Stik og ledning
3 Kontrollampe i funktion (orange)
4 Kontrollampe tændt/slukket (rød)
5Drejeknap
6 Kande (indhold 0,8 liter)
7 Dæksel til fyldeåbning
8Låg
9 Universal-kværn
10 Kværnens bund (løs)
Før apparatet tages i brug
1 Fjern al indpakningsmateriale og klæbemærkater fra
apparatet.
2 Rengør apparatet og alt tilbehøret (se Vedligeholdelse og
rengøring) og tør det derefter grundigt af.
Blende madvarer
Se fig. 2.
1 Stil apparatet på en stabil undergrund.
2 Sæt kanden på huset. De tre låsenopper på huset skal gå
præcist ind i åbningerne på undersiden af kanden.
3 Sæt låget på kanden.
4 Læg dækslet til fyldeåbningen i låget og sæt det fast ved at
dreje det en kvart omgang.
5 Skær frugten og/eller grønsagerne i stykker. Lav ikke
stykkerne for store. De skal nemt kunne komme helt ned i
kanden.
6 Åben låget og læg stykkerne i kanden.
7 Læg låget på kanden for at undgå at det sprøjter.
8 Hvis knappen i stand 0 er trykket ind, er den låst. Tryk på
drejeknappen for at låse den op (se figur 2).
9 Tænd blenderen på hastighed 1 eller 2 nogle få sekunder
eller på pulsfunktionen (P).
Denne blender arbejder meget hurtig. Allerede efter nogle
få sekunder er produkterne purerede. Jo længere De holder
blenderen tændt, desto finere bliver pureringen af
madvarerne.
Bemærk: Lad ikke blenderen køre mere end tre
minutter ad gangen for at undgå overophedning. Lad
blenderen køle af i nogle minutter, før den startes igen.
10 De kan eventuelt efterfylde ved bare at dreje dækslet til
fyldeåbningen en kvart omgang og tage det af låget. Hvis
frugt- eller grønsagsstykkerne er for store til at gå gennem
fyldeåbningen, kan De slukke blenderen og tage låget af og
lægge stykkerne i kanden. Sæt låget tilbage på plads på
kanden, før De starter blenderen igen.
11 Sluk ved at sætte knappen på 0, når De har blendet den
ønskede mængde frugt og/eller grønsager.
12 Tryk på drejeknappen for at låse den (se figur 2).
13 Træk stikket ud at stikkontakten.
34
COMPACT BLENDER & MILL (LET’S BLENDER) ART 213100
Page 40

Maling af madvarer
Se fig. 4.
1 Stil apparatet på en stabil undergrund.
2 Sæt kværnen fast på huset. De tre låseknopper på huset
skal gå præcist ind i åbningerne på undersiden af kværnen.
3 Drej låget på kværnen med uret for at åbne kværnen
4 Fyld det produkt, De vil male, i kværnen.
5 Drej låget på kværnen mod uret for at lukke kværnen.
6 Hvis knappen i stand 0 er trykket ind, er den låst. Tryk på
drejeknappen for at låse den op (se figur 2).
7 Tænd kværnen på hastighed 1 eller 2 nogle få sekunder
eller på pulsfunktionen (P).
Denne kværn arbejder meget hurtigt. Allerede efter nogle få
sekunder er produkterne purerede. Jo længere De holder
kværnen tændt, desto finere bliver malingen af madvarerne.
Bemærk: Lad ikke kværnen i mere end 50 sekunder ad
gangen med ingredienser på maks, 150 g. Lad kværnen
køle af i ca. syv minutter, før den startes igen.
8 Sluk ved at sætte knappen på 0, når De har malet den
ønskede mængde.
9 Tryk på drejeknappen for at låse den (se figur 2).
10 Træk stikket ud at stikkontakten.
11 Vent, indtil knivene står helt stille, og tag det malede produkt
ud.
Vedligeholdelse og rengøring
• Sørg for at apparatet ikke er sat til i en stikkontakt, når De
gør det rent.
• Sørg for at der ikke kommer nogen fugtighed ind på
indersiden af huset.
• Sænk aldrig apparatet ned i vand eller nogen anden
væske. Skulle det alligevel ske, brug da ikke apparatet
mere, men kasser det.
• Kun de løse dele kan vaskes op i opvaskemaskine.
• Brug ingen skurende eller aggressive midler til
rengøringen.
• Denne blender arbejder med skarpt slebne knive i
bunden af kanden. Vær derfor ekstra omhyggelig ved
tømningen og rengøringen af blenderen. Sørg for, at De
ikke skærer Dem på knivene.
1 Rengør apparatet udvendigt med en blød, fugtig klud.
2 Rengør kanderne og de øvrige dele med varmt sæbevand.
3 Vær især omhyggelig med rengøringen af knivene i bunden
af kanden, og sørg for, at alle madrester fjernes (se
"Afmontering og montering af bund med de roterende
knive").
4 Afmonter kværnens bund af (se "Afmontering af kværnens
bund").
5 Rengør kværnens kande og de øvrige dele med varmt
sæbevand.
6 Vær især omhyggelig med rengøringen af knivene i bunden
af kanden, og sørg for, at alle madrester fjernes.
7 Tør delene grundigt af efter rengøringen.
Afmontering og montering af bund med roterende
knive
Se afbild. 3.
1 Sæt kanden på huset.
2 Hold bunden fast.
3 Drej kanden løs, venstre om (mod uret).
4 Afmonter kanden fra bunden med de roterende knive.
5 Afmonter bunden med de roterende knive fra huset.
6 Monter bunden med de roterende knive og kanden i
omvendt rækkefølge.
Afmontering af kværnens bund fra kværnen
Se fig. 5.
1 Hold i kværnen, og drej dens bund mod uret.
2 Tag bunden af kanden.
3 Saml kværnen i omvendt rækkefølge.
COMPACT BLENDER & MILL (LET’S BLENDER) ART 213100
35
Page 41

Sikkerhed
Generelt
• Læs brugsanvisningen grundigt igennem og opbevar
den omhyggeligt.
• Brug dette apparat kun således, som det er beskrevet i
denne brugsanvisning.
• Brug kun apparatet til husholdningsmæssige formål.
• Det kan medføre farlige situationer, hvis børn eller
mennesker med fysiske, sanselige, mentale eller
motoriske handikap eller med for lidt kendskab, bruger
dette apparat. Personer, som er ansvarlige for disse
personers sikkerhed, skal give tydelige instruktioner eller
føre tilsyn med brugen af apparatet.
• Sørg for at børn ikke leger med apparatet.
• Lad reparationer udføre af en kvalificeret montør. Prøv
aldrig selv at reparere apparatet.
Varme og elektricitet
• Kontroller, før De bruger apparatet, om strømstyrken i
lysnettet stemmer overens med den strømstyrke, der er
opgivet på apparatets typeskilt.
• Brug en stikkontakt med jordforbindelse.
• Træk altid stikket ud af stikkontakten, når De ikke bruger
apparatet.
• Når De trækker stikket ud af stikkontakten, træk da i
selve stikket og ikke i ledningen.
• Brug ikke apparatet, hvis apparatet eller ledningen er
beskadiget. Send det til vores serviceafdeling for at
undgå nogen risiko. På denne type apparater kan en
beskadiget ledning kun udskiftes af vores
serviceafdeling ved hjælp af specialværktøj.
• Sørg for at apparatet og ledningen ikke kommer i kontakt
med varmekilder, som fx en varm kogeplade eller åben
ild.
• Sørg for at apparatet, ledningen og stikket ikke kommer i
berøring med vand.
• Saml ikke apparatet op hvis det er faldet i vand. Træk
omgående stikket ud at stikkontakten. Brug aldrig
apparatet mere.
Under brugen
• Når blenderen har kørt i længere tid uden afbrydelse, vil
motoren blive varm. Lad i det tilfælde motor køle af, før
De bruger apparatet igen.
• Brug aldrig apparatet udendørs.
• Brug aldrig apparatet i fugtige rum.
• Stil apparatet på en stabil og flad undergrund på et sted,
hvor det ikke kan falde ned.
• Lad ikke ledningen hænge ud over kanten på bordet.
• Sørg for at Deres hænder er tørre, når De rører ved
apparatet, ledningen eller stikket.
• Tænd kun apparatet, når der er monteret en kande på
apparatet, og der ligger et låg på kanden.
• Sluk apparatet og træk stikket ud af stikkontakten når De
rengør apparatet, anbringer eller fjerner tilbehør, er
færdig med at bruge apparatet eller hvis De under brugen
opdager, at der er funktionsforstyrrelser.
• Efterlad aldrig apparatet uden opsyn mens det er i brug.
• Rengør apparatet grundigt efter brugen (se ’Vedligehold
og rengøring’)
• Denne blender arbejder meget hurtig. Allerede efter nogle
få sekunder er produkterne purerede. Jo længere De
holder blenderen tændt, desto finere bliver pureringen af
madvarerne.
• Hed væske i blenderen kan medføre, at låget springer af
på grund af det damptryk, der opstår fra den hede væske.
Forebyg dette, ved at holde fast på låget med en klud,
mens blenderen er tændt.
36
COMPACT BLENDER & MILL (LET’S BLENDER) ART 213100
Page 42

Miljø
Smid indpakningsmaterialet som fx plastik og æsker væk i de
dertil bestemte containere.
Vil De kassere apparatet, mens det stadig fungerer godt eller let
kan repareres, sørg da for at apparatet bliver genbrugt.
Ved afslutningen af apparatets levetid skal De
sørge for, at apparatet bliver behandlet på forsvarlig
måde, således at dele af apparatet kan genbruges.
Sæt aldrig apparatet ned sammen med restaffald,
men indlever det hos forhandleren eller til et
kommune og få informationer om de indleveringsindsamlingssteder, der er til rådighed.
Gældende europæisk direktiv:
godkendt indsamlingssted. Tag kontakt med Deres
• 2002/95/EØF
• 2002/96/EØF
Opskrifter
Find lækre opskrifter på Internettet, som De kan lave med
blenderen. Her er allerede tre opskrifter, som vi har fundet til
Dem.
Bananmilkshake
Ingredienser:
1 banan
Vaniljeis
Mælk
Skær bananen i skiver og læg den i blenderen. Tilsæt vaniljeis
og mælk. Tænd blenderen, og lad den køre et par sekunder. De
har nu en herlig bananmilkshake!
Jordbærmorgenmad
Ingredienser:
2 kopper usødede jordbær
1 1/2 kop mælk
1/2 kop yoghurt
2 poser færdig morgenmadsblanding med vaniljesmag
2 tesker honning
Fyld alle ingredienserne i blenderen. Tænd blenderen. Stop
blenderen når indholdet er en næsten glat masse. Rør rundt u
kanden om nødvendigt. Skænk op i tre eller fire glas og server
med det samme.
Flødeagtig avocado-lime dipsauce
Ingredienser:
1 moden avocado
1 spiseskefuld frisk limesaft
1/2 teske stærk pebersauce
1 finthakket fed hvidløg
Salt og friskmalet sort peber
Læg frugtkødet fra avocadoen i blenderen. Tilsæt limesaften,
pebersaucen og hvidløget. Tænd blenderen. Stop blenderen
når der er en glat masse. Smag til med salt og peber. Hæld
dipsaucen i en skål og dæk den til med plastfolie. Opbevar
skålen i køleskabet indtil dipsaucen skal serveres.
COMPACT BLENDER & MILL (LET’S BLENDER) ART 213100
37
Page 43

Generelt
Denne flott formgitte mikseren er designet av Jan des Bouvrie.
Med dette apparatet kan du finhakke grønnsaker og frukt eller
lage deilig shake eller juice. Apparatet kan også brukes til å
male nøtter eller andre harde matvarer. Både apparathuset og
beholderne har fått en stilig, luksuriøs design.
Jan des Bouvrie-mikseren har en kraftig motor som du kan stille
inn på to hastigheter, eller bruke med pulsfunksjon.
Beholderen er utstyrt med et lokk med påfyllingsåpning.
Gjennom denne åpningen kan du ha i produkter under
miksingen uten å søle. Mikseren har en beholder med volum på
0,8 liter. Med stålknivene, som er integrert i beholderen, kan du
uten problemer finhakke og purere både store og små biter
frukt og grønnsaker.
Denne modellen leveres med en ekstra universalkvern for å
male harde matvarer (som for eksempel valnøttkjerner). Denne
kverna har et avtakbart bladstativ med integrerte kniver.
Apparatet koples til strømnettet.
Virkemåte og betjening
Se figur 1.
Apparatet består av følgende deler:
1 Apparathus
2 Støpsel og ledning
3 Indikatorlampe for drift (oransje)
4 Indikatorlampe på/av (rød)
5 Vridebryter
6 Beholder (volum 0,8 liter)
7 Påfyllingsåpning
8 Deksel
9 Universalkvern
10 Kvernbladstativ (avtakbart)
Før første gangs bruk
1 Fjern all emballasje og alle klistremerker fra apparatet.
2 Rengjør apparatet og alt tilbehør (se ‘Vedlikehold og
rengjøring’) og tørk det deretter grundig.
Miksing av produkter
Se figur 2.
1 Plasser apparathuset på et stabilt underlag.
2 Plasser beholderen på apparatet. De tre sperrene på
apparatet må falle nøyaktig inn i åpningene på undersiden
av beholderen.
3 Sett lokket på beholderen.
4 Plasser påfyllingsåpningen i lokket og vri denne en kvart
omdreining for å feste den.
5 Skjær frukt og/eller grønnsaker i biter. Ikke kutt for store
biter. Bitene må lett kunne passe i bunnen av beholderen.
6 Åpne lokket og ha bitene i beholderen.
7 Plasser lokket på beholderen for å forhindre sprut.
8 Hvis vridebryteren trykkes inn i posisjon 0, sperres bryteren.
Trykk på vridebryteren for å oppheve sperringen (se figur
2).
9 Slå på mikseren i et par sekunder i stilling 1 eller 2, eller
bruk pulsfunksjonen (P).
Denne mikseren jobber meget raskt. På bare noen
sekunder vil produktene være finhakket. Jo lenger du lar
mikseren gå, jo finere blir produktene hakket eller purert.
Merk: For å unngå overoppheting bør ikke blenderen
brukes i mer enn 3 minutter. La blenderen avkjøle seg i
noen minutter før den startes igjen.
10 Etterfyll eventuelt beholderen underveis ved å dreie
påfyllingshetta en kvart omdreining og ta den av. Hvis
produktbitene ikke passer gjennom påfyllingsåpningen, må
du slå av mikseren, fjerne hele lokket og ha bitene i
beholderen. Sett lokket tilbake på beholderen før du igjen
slår på mikseren.
11 Slå av bryteren ved å sette den i stilling 0 når du har
behandlet ønsket mengde frukt eller grønnsaker.
12 Trykk på vridebryteren for å oppheve sperringen
(se figur 2).
13 Trekk støpslet ut av stikkontakten.
38
COMPACT BLENDER & MILL (LET’S BLENDER) ART 213100
Page 44

Maling av produkter
Se figur 4.
1 Plasser apparathuset på et stabilt underlag.
2 Fest kvernen til apparathuset. De tre sperrene på
apparathuset må passe nøyaktig inn i sporene nederst på
kvernen.
3 Roter topplaten på kvernen med klokka for å åpne
kvernmuggen.
4 Fyll kverna med det produktet du ønsker å male.
5 Roter topplaten på kvernen mot klokka for å lukke
kvernmuggen.
6 Hvis vridebryteren trykkes inn i posisjon 0, sperres bryteren.
Trykk på vridebryteren for å oppheve sperringen (se figur
2).
7 Slå på kverna i et par sekunder i stilling 1 eller 2, eller bruk
pulsfunksjonen (P).
Denne kverna jobber meget raskt. På bare noen sekunder
vil produktene være finhakket. Jo lenger du lar kverna gå, jo
mer finmalt blir produktene.
Merk: Ikke bruk kverna i mer enn 50 sekunder med
maks. 150 g ingredienser. La kverna avkjøle seg i om
lag 7 minutter før den startes igjen.
8 Slå av bryteren ved å sette den i stilling 0 når du har
behandlet ønsket mengde produkter.
9 Trykk på vridebryteren for å oppheve sperringen (se figur 2).
10 Trekk støpslet ut av stikkontakten.
11 Vent til bladene står stille og hell ut det kvernede eller moste
produktet.
Vedlikehold og rengjøring
• Se til at apparatet er koplet fra strømnettet før du
begynner med rengjøringen.
• Se til at det ikke kommer fuktighet inn i apparatet.
• Senk aldri apparatet ned i vann eller annen væske. Hvis
dette likevel skulle skje, må apparatet kasseres og ikke
brukes på nytt.
• Bare de løse delene kan vaskes i oppvaskmaskin.
• Ikke bruk skuremidler eller aggressive rengjøringsmidler.
• Denne mikseren virker ved hjelp av skarpslipte kniver
nede i beholderen. Vær derfor ekstra forsiktig når
mikseren tømmes og rengjøres. Unngå at du skader deg
på knivene.
1 Vask utsiden av apparathuset med en myk, fuktig klut.
2 Vask muggene og komponentene med varmt såpevann.
3 Rangjør alle de roterende knivene nederst i muggen
spesielt omhyggelig, og forsikre deg om at du har fjernet all
mat fra dem (se 'Ta av og feste basen med de roterende
knivene').
4 Ta basen av fra kverna (se ta basen av fra kverna).
5 Vask kvernmuggen og kvernkomponentene med varmt
såpevann.
6 Rengjør de roterende bladene i bunnen av muggen spesielt
omhyggelig, og sørg for at du fjerner all mat fra dem.
7 Tørk delene godt etter at de er rengjort.
Fjerning og påsetting av bunn med roterende
kniver
Se figur 3.
1 Plasser beholderen på apparatet.
2 Hold fast apparatbunnen.
3 Vri løs beholderen mot klokka.
4 Ta muggen va fra basen med de roterende knivene.
5 Ta basen med de roterende knivene av fra apparathuset.
6 Sett basen med de roterende knivene og muggen sammen
igjen i motsatt rekkefølge.
Ta kvernbasen av fra kverna
Se figur 5.
1 Hold i kverna og drei kvernbasen mot klokka.
2 Ta basen av fra kvernmuggen.
3 Sett kverna sammen i omvendt rekkefølge.
COMPACT BLENDER & MILL (LET’S BLENDER) ART 213100
39
Page 45

Sikkerhet
Generelt
• Les bruksanvisningen nøye og ta godt vare på den.
• Dette apparatet må bare brukes slik det beskrives i denne
bruksanvisningen.
• Apparatet må bare brukes til husholdningsformål.
• Hvis dette apparatet brukes av barn eller personer med
fysiske, sanselige, mentale eller motoriske
funksjonshemninger, eller personer uten erfaring og
kunnskap, kan det føre til farlige situasjoner. De som har
ansvaret for sikkerheten til slike personer, må gi tydelige
instruksjoner i eller holde øye med bruken av apparatet.
• Pass på så barn ikke leker med apparatet.
• Reparasjoner må bare utføres av kvalifisert montør.
Forsøk aldri å reparere apparatet selv.
Varme og elektrisitet
• Kontroller før bruk at nettspenningen på stedet stemmer
overens med den nettspenningen som oppgis på
apparatets typeskilt.
• Bruk jordet stikkontakt.
• Trekk alltid støpslet ut av stikkontakten når apparatet
ikke er i bruk.
• Trekk alltid i selve støpslet når du tar det ut av
stikkontakten, og aldri i ledningen.
• Ikke bruk apparatet hvis apparatet eller ledningen er
skadet. Send apparatet inn til vår servicetjeneste for å
unngå risiko. Ved denne type apparat kan en skadet
ledning bare byttes ut av vår servicetjeneste ved hjelp av
spesialverktøy.
• Se til at apparatet og ledningen ikke kommer i kontakt
med varmekilder, som for eksempel kokeplate eller åpen
ild.
• Se til at apparatet, ledningen og støpslet ikke kommer i
kontakt med vann.
• Ikke ta opp apparatet hvis det har falt ned i vann. Trekk
øyeblikkelig støpslet ut av stikkontakten. Apparatet må
ikke brukes mer.
Under bruk
• Hvis du lar mikseren gå uavbrutt i lengre tid, vil motoren
bli varm. La i så tilfelle motoren avkjøle seg før du igjen
slår på apparatet.
• Bruk aldri apparatet utendørs.
• Bruk aldri apparatet i våtrom.
• Plasser apparatet på et stabilt, jevnt underlag og på et
sted der det ikke kan falle.
• Ikke la ledningen henge over kanten på kjøkkenbenken,
bordet eller liknende.
• Pass på at du ikke har våte hender når du berører
apparatet, ledningen eller støpslet.
• Slå bare på apparatet hvis det er påsatt en beholder, og
lokket sitter på beholderen.
• Slå av apparatet og trekk støpslet ut av stikkontakten
hvis du oppdager feil under bruk, når du skal rengjøre
apparatet, når du skal sette på eller ta av et tilbehør eller
hvis du er ferdig med å bruke apparatet.
• Ikke la apparatet stå uten tilsyn når det er i bruk.
• Rengjør apparatet grundig etter bruk (se avsnittet
‘Vedlikehold og rengjøring’).
• Denne mikseren jobber meget raskt. På bare noen
sekunder vil produktene være finhakket. Jo lenger du lar
mikseren gå, jo finere blir produktene hakket eller purert.
• Varm væske i mikseren kan føre til at lokket spretter av
på grunn av at det dannes damp og trykket som
forårsakes av den varme væsken. Unngå dette ved å
holde fast lokket ved hjelp av en klut under bruk.
40
COMPACT BLENDER & MILL (LET’S BLENDER) ART 213100
Page 46

Miljø
Kast emballasjemateriell som plast og pappesker i containere
beregnet på slikt avfall.
Ønsker du å kvitte deg med apparatet selv om det fremdeles
virker som det skal, eller lett kan repareres, bør du sørge for
gjenbruk av apparatet.
Når apparatet har gjort sin nytte og skal kasseres,
må det håndteres på en ansvarlig måte slik at
apparatet eller deler av det kan gjenvinnes. Ikke
kast apparatet sammen med usortert
husholdningsavfall, men lever det til butikken der
kontakt med lokale myndigheter for informasjon om de
innleverings- eller innsamlingsmuligheter som finnes.
Gjeldende europeiske direktiver:
det ble kjøpt eller til en offentlig miljøstasjon. Ta
• 2002/95/EF
• 2002/96/EF
Oppskrifter
Forsøk en gang å lete etter deilige oppskrifter for mikseren på
Internett. Her får du allerede tre oppskrifter vi har funnet til deg.
Bananmilkshake
Ingredienser:
1 banan
Vaniljeis
Melk
Skjær bananen i skiver og ha dem i mikseren. Ha i litt vaniljeis
og melk. Slå på mikseren og la den gå i noen sekunder. Du kan
nå nyte en herlig bananmilkshake!
Jordbærfrokost
Ingredienser:
2 kopper usøtete jordbær
1 1/2 kopp melk
1/2 kopp jogurt
2 poser frokostblanding med vaniljesmak, ferdig til bruk
2 teskjeer honning
Ha alle ingrediensene i mikseren. Slå på mikseren. Stopp
mikseren når det har oppstått en nesten glatt masse, og rør
innholdet fra beholderen om nødvendig. Fordel på tre eller fire
glass og server med det samme.
Kremaktig avokado-lime dippsaus
Ingredienser:
1 moden avokado
1 spiseskje fersk limejuice
1/2 teskje het peppersaus
1 finhakket hvitløkbåt
Salt og nymalt, sort pepper
Ha fruktkjøttet fra avokadoen i mikseren. Tilføy limesaft,
peppersaus og hvitløk. Slå på mikseren. Stopp mikseren når
det har oppstått en glatt masse. Ha i salt og pepper etter smak.
Hell dippsausen i en skål og dekk til med plastfolie. Sett skålen
i kjøleskapet til dippsausen skal serveres.
COMPACT BLENDER & MILL (LET’S BLENDER) ART 213100
41
Page 47

Yleistä
Tämä viehättävä tehosekoitin on Jan des Bouvrien
suunnittelema. Laitetta voidaan käyttää hedelmien ja
vihannesten hienontamiseen tai herkullisten pirtelöiden ja
mehujen tekemiseen. Sitä voidaan käyttää myös pippurien ja
yrttien jauhamiseen. Sekä kotelo että kannut ovat modernia
luksusdesignia.
Jan des Bouvrie -tehosekoittimessa on voimakas moottori,
jossa on kaksi nopeusasetusta ja pulssiasetus.
Kannussa on kansi, jossa on avautuma täyttöä varten. Tuotteita
voidaan lisätä tästä avautumasta sekoituksen aikana ilman
sotkua. Kannun tilavuus on 0,8 litraa. Kannussa on teräksiset
terät, joten tehosekoitin voi helposti pilkkoa ja soseuttaa sekä
suuria että pieniä hedelmä- ja vihannespaloja.
Tämän mallin mukana tulee yksi yleismylly kovempien
ruokatyyppien jauhamiseen (esimerkiksi kuorittujen
saksanpähkinöiden). Tässä myllyssä on irrotettava teräalusta,
jossa on terät.
Laitteen tulee olla kiinnitetty sähköverkkoon.
Käyttö ja säätimet
Katso kuva 1.
Kaikki mallit sisältävät seuraavat osat:
1 Kotelo
2 Virtajohto ja -pistoke
3 Käytön merkkivalo (oranssi)
4 Päällä/Pois -merkkivalo (punainen)
5 Kiertopainike
6 Kannu (tilavuus 0,8 litraa)
7 Täyttökorkki
8Kansi
9 Yleismylly
10 Myllyteräalusta (irrotettava)
Ennen ensimmäistä käyttökertaa
1 Poista kaikki pakkausmateriaali ja tarrat.
2 Puhdista laite ja sen varusteet (katso "Huolto ja puhdistus")
ja kuivaa ne huolellisesti.
Tehosekoitintuotteet
Katso kuva 2.
1 Aseta kotelo tukevalle alustalle.
2 Aseta kannu koteloon. Kotelon kolme salpaa tulee asettua
tarkasti kannun pohjassa oleviin paikkoihin.
3 Aseta kansi kannuun.
4 Aseta täyttökorkki kanteen ja kiristä täyttökorkki
kääntämällä sitä neljänneskierros.
5 Leikkaa hedelmät tai vihannekset palasiksi. Älä tee liian
suuria paloja. Niiden pitää olla riittävän pieniä sopimaan
kannun pohjalle.
6 Avaa kansi ja laita palat kannuun.
7 Aseta kansi takaisin kannuun roiskumisen estämiseksi.
8 Jos kiertopainike on 0-asennossa ja sisään työnnettynä,
painike on lukittu. Avaa kiertopainike painamalla sitä (katso
kuva 2).
9 Kytke tehosekoitin muutamaksi sekunniksi asetukselle 1, 2
tai P (pulssiasetus).
Tämä tehosekoitin toimii erittäin nopeasti. Tuote pilkotaan
sekunneissa. Mitä pidempään tehosekoitin on päällä, sitä
hienommaksi tuotteet pilkotaan.
Huomautus: Älä pidä tehosekoitinta käynnissä yli 3
minuuttia, jotta se ei ylikuumentuisi. Anna
tehosekoittimen jäähtyä muutaman minuutin ajan
ennen jatkamista.
10 Jos tarpeen, voit täyttää kannun avaamalla täyttökorkin.
Ruuvaa sitä neljänneskierros ja irrota se kannesta. Jos
lisättävät palaset eivät sovi täyttöaukosta, sammuta
tehosekoitin, irrota kansi ja aseta palaset kannuun. Aseta
kansi takaisin kannuun ennen kuin kytket tehosekoittimen
takaisin päälle.
11 Kytke tehosekoitin pois päältä (asetus 0) kun riittävä määrä
hedelmiä tai vihanneksia on pilkottu.
12 Lukitse kiertopainike painamalla sitä (katso kuva 2).
13 Irrota pistoke pistorasiasta.
42
COMPACT BLENDER & MILL (LET’S BLENDER) ART 213100
Page 48

Jauhaminen
Katso kuva 4.
1 Aseta kotelo tukevalle alustalle.
2 Aseta mylly koteloon. Kotelon kolme salpaa tulee asettua
tarkasti myllyn pohjassa oleviin paikkoihin.
3 Voit avata myllykupin kääntämällä myllyn yläosaa
myötäpäivään.
4 Käytä myllykuppi tuotteella, jonka haluat jauhaa.
5 Voit sulkea myllykupin kääntämällä myllyn yläosaa
vastapäivään.
6 Jos kiertopainike on 0-asennossa ja sisään työnnettynä,
painike on lukittu. Avaa kiertopainike painamalla sitä (katso
kuva 2).
7 Kytke mylly muutamaksi sekunniksi asetukselle 1, 2 tai P
(pulssiasetus).
Tämä mylly toimii erittäin nopeasti. Tuote jauhetaan
sekunneissa. Mitä pidempään mylly on päällä, sitä
hienommaksi tuotteet jauhetaan.
Huomautus: Älä käytä myllyä pidempään kuin 50
sekuntia korkeintaan 150 g:lla aineksia. Anna myllyn
jäähtyä noin 7 minuutin ajan ennen jatkamista.
8 Kytke mylly poista päältä (asento 0), kun vaadittu määrä on
jauhettu.
9 Lukitse kiertopainike painamalla sitä (katso kuva 2).
10 Irrota pistoke pistorasiasta.
11 Odota, kunnes terät eivät liiku, ja poista jauhettu tuote.
Huolto ja puhdistus
• Varmista, että pistoke on irrotettu, ennen kuin puhdistat
laitetta.
• Varmista, että kosteutta ei pääse kotelon sisään.
• Älä koskaan upota laitetta veteen tai muihin nesteisiin.
Jos näin tapahtuu, älä käytä laitetta enää.
Turvallisuussyistä hävitä laite.
• Vain erilliset osat voidaan pestä astianpesukoneessa.
• Älä käytä syövyttäviä tai hankaavia puhdistusaineita.
• Tämä tehosekoitin käyttää teräviä teriä, jotka sijaitsevat
astian pohjalla. Ole sen vuoksi varovainen, kun tyhjennät
ja puhdistat tehosekoitinta. Vältä viiltämästä itseäsi
veitsillä.
1 Puhdista se ulkopuolelta pehmeällä, kostealla pyyhkeellä.
2 Puhdista kannut ja osat sisäpuolelta lämpimällä vedellä ja
astianpesuaineella.
3 Puhdista huolellisesti erityisesti kannun pohjan pyörivät
terät ja varmista, että poistat kaikki ruoantähteet niistä
(katso Pyörivien terien alustan irrottaminen ja
kiinnittäminen).
4 Irrota pohja myllystä (katso Myllypohjan irrottaminen
myllystä).
5 Puhdista myllykuppi ja myllyn osat sisäpuolelta lämpimällä
vedellä ja astianpesuaineella.
6 Puhdista huolellisesti erityisesti kannun pohjan pyörivät
terät ja varmista, että poistat kaikki ruoantähteet niistä.
7 Kuivata osat kokonaan kun ne on puhdistettu.
Pyörivien terien alustan irrottaminen ja
kiinnittäminen
Katso kuva 3.
1 Aseta kannu koteloon.
2 Pidä kotelosta kiinni.
3 Käännä kannua vastapäivään.
4 Irrota kannu pyörivien terien alustasta.
5 Irrota pyörivien terien alusta kotelosta.
6 Kokoa pyörivien terien alusta ja kannu päinvastaisessa
järjestyksessä.
Myllypohjan irrottaminen myllystä
Katso kuva 5.
1 Pidä myllyä ja käännä myllyn pohjaan vastapäivään.
2 Irrota pohja myllykupista.
3 Kokoa mylly päinvastaisessa järjestyksessä.
COMPACT BLENDER & MILL (LET’S BLENDER) ART 213100
43
Page 49

Turvallisuus
Yleistä
• Lue nämä ohjeet huolellisesti ja säilytä ne tulevaa
tarvetta varten.
• Käytä tätä laitetta vain näiden ohjeiden mukaisesti.
• Käytä tätä laitetta vain kotitalouskäytössä.
• Jos laitetta käyttää lapsi tai henkilö, jolla on fyysisiä,
aistimuksellisia, henkisiä tai motorisia rajoituksia tai jolla
ei ole tarvittavaa tietoa ja kokemusta, seurauksena voi
olla vaarallinen tilanne. Turvallisuudesta vastuussa
olevien henkilöiden täytyy antaa selkeät ohjeet tai valvoa
laitteen käyttöä.
• Varmista, että lapset eivät leiki laitteella.
• Korjauksen saa suorittaa vain pätevä huoltoteknikko. Älä
koskaan yritä korjata sitä itse.
Lämpö ja sähkö
• Varmista ennen käyttöä, että sähköverkon jännite on
sama kuin laitteen tyyppikilvessä.
• Aseta pistoke maadoitettuun pistorasiaan.
• Irrota pistoke pistorasiasta aina, kun laitetta ei käytetä.
• Irrota pistoke pistorasiasta vetämällä aina pistokkeesta,
ei virtajohdosta.
• Älä käytä laitetta, jos virtajohto tai laite on vahingoittunut.
Turvallisuutesi vuoksi toimita laite huoltopalveluumme.
Vaurioituneen virtajohdon saa vaihtaa vain
huoltokeskuksemme henkilökunta siihen tarvittavilla
erityistyövälineillä.
• Varmista, ettei laite tai virtajohto joudu kosketuksiin
lämmönlähteiden, esimerkiksi kuuman keittolevyn tai
avotulen kanssa.
• Varmista, ettei laite, virtajohto tai pistoke joudu
kosketuksiin veden kanssa.
• Älä nosta keitintä, jos se putoaa veteen. Irrota pistoke
pistorasiasta välittömästi. Älä käytä laitetta enää.
Käytön aikana
• Kun käytät tehosekoitinta kerralla pidemmän aikaa,
sähkömoottori lämpenee. Siinä tapauksessa anna
moottorin jäähtyä ennen kuin käytät enempää.
• Älä koskaan käytä laitetta ulkona.
• Älä koskaan käytä laitetta kosteissa tiloissa.
• Aseta laite vakaalle ja tasaiselle alustalle, jolla se ei voi
keikahtaa.
• Älä päästä johtoa roikkumaan tiskipöydän, työtason tai
pöydän kulman yli.
• Varmista, että kätesi ovat kuivat koskiessasi laitteeseen,
virtajohtoon tai pistokkeeseen.
• Kytke laite päälle vain jos kannu on asetettu koteloon ja
kansi kannuun.
• Kytke laite pois päältä ja irrota pistoke pistorasiasta
toimintahäiriön ilmetessä käytön aikana, ennen laitteen
puhdistamista, lisävarusteen asettamista tai poistamista
sekä laittaessasi laitteen säilytykseen käytön jälkeen.
• Valvo laitetta jatkuvasti kun se on käytössä.
• Käytön jälkeen puhdista laite huolellisesti (katso Huolto
ja puhdistaminen).
• Tehosekoitin toimii erittäin nopeasti. Ainesosat jauhetaan
sekunneissa. Mitä pidempään tehosekoitin on päällä, sitä
hienommaksi tuotteet jauhetaan.
• Tehosekoittimessa olevat kuumat nesteet voivat
aiheuttaa sen, että kansi lentää irti kuuman nesteen
aiheuttaman paineen ja höyryn takia. Estä tämä pitämällä
kantta paikallaan kankaalla, kun tehosekoitin on
käytössä.
44
COMPACT BLENDER & MILL (LET’S BLENDER) ART 213100
Page 50

Ympäristö
Vie pakkausmateriaalit, kuten muovi ja pahvirasiat,
asianmukaisiin jätteidenkeräyspisteisiin.
Jos haluat hävittää laitteen kun se vielä toimii tai on helposti
korjattavissa, varmista että laite kierrätetään.
Kun laite saavuttaa käyttöikänsä pään, se on
hävitettävä vastuullisesti varmistaen, että laite tai
sen osat kierrätetään. Älä hävitä laitetta tavallisen
talousjätteen mukana vaan vie se
kierrätyspisteeseen. Kysy paikallisilta viranomaisilta
keräysjärjestelmistä.
Soveltuvat EY-direktiivit:
lisätietoja alueellasi käytössä olevista hävitys- ja
• 2002/95/EC
• 2002/96/EC
Reseptejä
Selaamalla Internetiä löydät herkullisia reseptejä
tehosekoittimella tehtäväksi. Seuraavassa on kolme reseptiä,
jotka olemme löytäneet sinulle.
Banaanipirtelö
Ainesosat:
1 banaani
Vaniljajäätelöä
Maitoa
Leikkaa banaani siivuiksi ja laita ne tehosekoittimen kannuun.
Lisää hieman vaniljäjäätelöä ja kylmää maitoa. Kytke
tehosekoitin päälle ja anna sen sekoittaa muutama sekunti.
Tuloksena on herkullinen banaanipirtelö!
Mansikka-aamiainen
Ainesosat:
2 kuppia makeuttamattomia kokonaisia mansikoita
1 1/2 kuppia maitoa
1/2 kuppia maustamatonta jogurttia
2 pussia vaniljanmakuista pika-aamupalasekoitusta
2 ruokalusikallista hunajaa
Laita ainesosat tehosekoittimen kannuun. Peitä, sekoita kunnes
lähes pehmeää, lopeta tehosekoitus ja hämmennä tarvittaessa.
Kaada 3 tai 4 lasiin. Tarjoile heti.
Kermainen avokadolimedippi
Ainesosat:
1 kypsä avokado
1 ruokalusikallinen tuoretta puristettua limemehua
1/2 teelusikallista chilikastiketta
1 hienoksi paloiteltu valkosipulinkynsi
suolaa ja vastajauhettua mustapippuria
Kuori ja pilko avokado, poista kivi ja aseta loput
tehosekoittimeen. Lisää limemehu, chilikastike ja valkosipuli.
Sekoita tasaiseksi ja mausta suolalla ja pippurilla. Siirrä
kulhoon ja peitä tuorekelmulla. Pidä jääkaapissa tarjoiluun asti.
COMPACT BLENDER & MILL (LET’S BLENDER) ART 213100
45
Page 51

Geral
Este liquidificador de belo formato foi desenhado por Jan des
Bouvrie. Com este aparelho pode picar fino verduras e fruta ou
preparar deliciosos batidos e sumos. Também pode utilizar o
aparelho para moer frutos secos (nozes, amêndoas, avelãs,
etc.) ou outros produtos alimentares duros. Tanto o corpo do
aparelho como os jarros têm um design robusto e luxuoso.
O Jan des Bouvrie Blender tem um motor potente, que você
pode regular para duas velocidades ou deixar funcionar por
impulso.
O jarro está equipado com uma tampa com abertura de
enchimento. Através desta tampa pode durante o processo de
liquidificação adicionar produtos sem salpicar. O liquidificador
tem um jarro com uma capacidade de 0,8 litros. O jarro tem
lâminas em aço integradas, com as quais o liquidificador, sem
esforço, corta fino ou faz em puré grandes ou pequenas peças
de fruta ou verdura.
Este modelo é fornecido com um moinho universal extra para
moer produtos alimentares duros (como nozes). Este moinho
tem um fundo amovível com lâminas integradas.
O aparelho é ligado à rede eléctrica.
Funcionamento e
manuseamento
Veja a figura 1.
O aparelho é composto pelos seguintes componentes:
1 Corpo do aparelho
2 Ficha e cabo
3 Luz indicadora de funcionamento (cor-de-laranja)
4 Luz indicadora de ligar/desligar (vermelha)
5 Botão de rodar
6 Jarro (capacidade de 0,8 litros)
7 Tampa de enchimento
8 Tampa
9 Moinho universal
10 Fundo da lâmina do moinho (amovível)
Antes da primeira utilização
1 Remova todo o material de embalagem e autocolantes do
aparelho.
2 Limpe o aparelho e todos os acessórios (veja “Manutenção
e limpeza”) e seque-os bem.
Triturar produtos
Veja a figura 2.
1 Coloque o corpo do aparelho numa superfície estável.
2 Coloque o jarro no corpo do aparelho. Os três bloqueios no
corpo do aparelho terão que entrar com exactidão nas
aberturas no lado inferior do jarro.
3 Coloque a tampa no jarro.
4 Coloque a tampa de enchimento na tampa e rode a tampa
de enchimento um quarto de volta para a fixar.
5 Corte a fruta e/ou verdura em pedaços. Não corte em
bocados grandes demais. Os bocados devem caber bem
no fundo.
6 Abra a tampa e coloque os pedaços no jarro.
7 Coloque a tampa no jarro para evitar salpicar.
8 Se o botão rotativo estiver carregado na posição 0, este
está bloqueado. Carregue no botão rotativo para
desbloquear (veja a figura 2).
9 Ligue o liquidificador alguns segundos na posição 1 ou 2 ou
na posição de impulso (P).
Este liquidificador trabalha bastante depressa. Em poucos
segundos todos os produtos ficarão triturados. Quanto mais
tempo mantiver o liquidificador ligado, mais finos são os
produtos picados.
Nota: Não utilize o liquidificador mais de três minutos
para evitar sobreaquecimento. Deixe o liquidificador
arrefecer durante alguns minutos antes de reutilizar.
10 Eventualmente adicione produtos no jarro apenas rodando
a tampa de enchimento um quarto de volta e retirando-a da
tampa. Se os pedaços não couberem pela abertura de
enchimento, desligue o liquidificador, retire a tampa e
introduza os pedaços no jarro. Coloque novamente a tampa
no jarro antes de voltar a ligar o liquidificador.
46
COMPACT BLENDER & MILL (LET’S BLENDER) ART 213100
Page 52

11 Desligue o interruptor (posição 0), quando tiver triturado a
quantidade desejada de frutos e/ou verduras.
12 Carregue no botão rotativo para bloquear (veja a figura 2).
13 Tire a ficha da tomada.
Moer produtos
Veja a figura 4.
1 Coloque o corpo do aparelho numa superfície estável.
2 Encaixe o moinho no corpo do aparelho. Os três trincos no
corpo do aparelho devem encaixar perfeitamente nas
ranhuras no fundo do moinho.
3 Rode a chapa superior do moinho para a direita para abrir o
jarro do moinho.
4 Encha o moinho com o produto que pretende moer.
5 Rode a chapa superior do moinho para a esquerda para
fechar o jarro do moinho.
6 Se o botão rotativo estiver carregado na posição 0, este
está bloqueado. Carregue no botão rotativo para
desbloquear (veja a figura 2).
7 Ligue o moinho alguns segundos na posição 1 ou 2 ou na
posição de impulso (P).
Este moinho trabalha bastante depressa. Em poucos
segundos todos os produtos ficarão triturados. Quanto mais
tempo mantiver o moinho ligado, mais finos são os
produtos picados.
Nota: Não opere o moinho mais de 50 segundos com
um máx. de 150 gr de ingredientes. Deixe o moinho
arrefecer durante 7 minutos antes de reutilizar.
8 Desligue o interruptor (posição 0), quando tiver triturado a
quantidade desejada de produtos.
9 Carregue no botão rotativo para bloquear (veja a figura 2).
10 Tire a ficha da tomada.
11 Espere até as lâminas pararem e remova o produto.
Manutenção e limpeza
• Quando estiver para efectuar a limpeza, a ficha do
aparelho não pode estar na tomada da rede eléctrica.
• Não deixe que nenhuma humidade entre para o interior
do corpo do aparelho.
• Nunca mergulhe o aparelho em água ou noutro líquido.
Se isto acontecer, não utilize mais o aparelho e deite-o
fora.
• Apenas os componentes soltos podem ser limpos na
máquina de lavar loiça.
• Não utilize produtos ásperos ou agressivos quando
limpar.
• Este liquidificador obtém o seu funcionamento das
lâminas afiadas no fundo do jarro. Por isso, tenha muita
atenção quando esvaziar e limpar o liquidificador. Evite
ferir-se nas lâminas.
1 Limpe o exterior do aparelho com um pano suave
humedecido.
2 Limpe os jarros e os componentes com água morna com
detergente.
3 Limpe bem, em especial, as lâminas rotativas no fundo do
jarro e assegure-se de que remove toda a comida (veja
"Remover e montar o fundo com lâminas rotativas").
4 Remova o fundo do moinho (veja remover o fundo do
moinho do moinho).
5 Limpe o jarro do moinho e os componentes do moinho com
água morna com detergente.
6 Limpe bem, em especial, as lâminas rotativas no fundo do
jarro e assegure-se de que remove toda a comida.
7 Depois de limpar as peças seque-as bem.
Remover e montar o fundo com lâminas rotativas
Veja a figura 3.
1 Coloque o jarro no corpo do aparelho.
2 Segure o fundo.
3 Rode o jarro para a esquerda para o soltar.
4 Remova o jarro do fundo com as lâminas rotativas.
5 Remova o fundo com as lâminas rotativas do corpo do
aparelho.
6 Volte a montar o fundo com as lâminas rotativas e o jarro
pela ordem inversa.
COMPACT BLENDER & MILL (LET’S BLENDER) ART 213100
47
Page 53

Remover o fundo do moinho do moinho
Veja a figura 5.
1 Segure o moinho e rode para a esquerda o fundo do
moinho.
2 Remova o fundo do jarro do moinho.
3 Volte a montar o moinho pela ordem inversa.
Segurança
Geral
• Leia bem as instruções de uso e guarde-as
cuidadosamente.
• Utilize este aparelho apenas como descrito nestas
instruções de uso.
• Apenas utilize este aparelho para fins domésticos.
• A utilização deste aparelho por crianças ou pessoas com
uma deficiência física, sensorial, mental ou motora, ou
com falta de conhecimento e experiência pode levar a
situações perigosas. As pessoas responsáveis pela
segurança de tais pessoas têm que dar instruções claras
ou supervisionar o uso do aparelho.
• Tenha atenção para que crianças não brinquem com o
aparelho.
• No caso de reparações, mande efectuar as reparações a
um técnico qualificado. Nunca tente você próprio reparar
o aparelho.
Calor e electricidade
• Antes de ligar o aparelho à rede eléctrica verifique se a
voltagem indicada na chapa de tipo do aparelho
corresponde à voltagem da rede eléctrica.
• Use uma tomada com terra.
• Retire sempre a ficha da tomada quando não utilizar o
aparelho.
• Quando tirar a ficha da tomada, puxe pela ficha, não puxe
pelo cabo.
• Não utilize o aparelho se o aparelho ou o cabo estiver
danificado. Envie-o para os nossos serviços técnicos
para evitar perigo. Neste tipo de aparelho, um cabo de
alimentação danificado deve ser unicamente substituído
pelos nossos serviços de assistência que dispõem de
ferramentas adequadas.
• Tenha atenção para que o aparelho e o cabo não toquem
em fontes de calor como, por exemplo, uma placa ou
chamas.
• Tenha cuidado para que o aparelho, o cabo e a ficha não
entrem em contacto com água.
• Não pegue no aparelho se este caiu na água. Primeiro
retire a ficha da tomada. Não utilize mais o aparelho.
Durante a utilização
• Quando o liquidificador funcionar ininterruptamente
durante um longo período, o motor aquecerá. Neste
caso, deixe primeiro arrefecer o motor antes de voltar a
utilizar o aparelho.
• Nunca utilize o aparelho na rua.
• Nunca use o aparelho em áreas húmidas.
• Coloque o aparelho numa superfície plana e estável num
local de onde não possa cair.
• Não deixe o cabo ficar suspenso num forno, numa
bancada ou numa mesa.
• Tenha as mãos secas quando tocar no aparelho, no cabo
ou na ficha.
• Apenas ligue o aparelho quando o jarro estiver montado
no corpo do aparelho e quando estiver uma tampa
colocada no jarro.
• Desligue o aparelho e retire a ficha da tomada se detectar
alguma anomalia durante a utilização, quando limpar o
aparelho, quando aplicar um acessório ou quando
terminar a utilização.
• Nunca deixe o aparelho ligado sem vigilância.
• Depois da utilização limpe completamente o aparelho
(veja “Manutenção e limpeza”).
• Este liquidificador trabalha bastante depressa. Em
poucos segundos todos os produtos ficarão triturados.
48
COMPACT BLENDER & MILL (LET’S BLENDER) ART 213100
Page 54

Quanto mais tempo mantiver o liquidificador ligado, mais
finos ficam os produtos picados.
• Líquido quente no liquidificador pode, devido à formação
de vapor e à consequente pressão, fazer projectar a
tampa e o líquido. Evite isto segurando a tampa com um
pano quando liga o aparelho.
1 banana
Gelado de baunilha
Leite
Corte a banana em tiras e introduza-a no liquidificador. Junte
mais algum gelado de baunilha e leite. Ligue o liquidificador e
deixe-o triturar durante alguns segundos. Agora tem um batido
de banana delicioso!
Ambiente
Coloque o material de embalagem, como plástico e caixas, no
contentor de lixo apropriado.
Se pretender desfazer-se do aparelho, mesmo que este
funcione bem ou possa ser facilmente reparado, então arranje
maneira de este ser reutilizado.
No fim de vida do aparelho desfaça-se do aparelho
de modo responsável, para que o aparelho ou
componentes possam ser reutilizados. Não coloque
o aparelho no lixo doméstico mas entregue-o na
loja ou num ponto de recolha apropriado. Entre em
acerca dos sistemas de recolha e de recepção de lixo.
Directiva Europeia em vigor:
contacto com a sua câmara para obter informação
• 2002/95/CE
• 2002/96/CE
Receitas
Dê uma vista de olhos na Internet para procurar receitas
deliciosas que pode fazer com o liquidificador. Abaixo encontra
três receitas que descobrimos para si.
Ingredientes:
2 chávenas de morangos sem açúcar
1 1/2 chávena de leite
1 1/2 chávena de iogurte
2 saquinhos de mistura de pequneno-almoço pré-preparados
com sabor a baunilha
2 colheres de chá de mel
Introduza os ingredientes no liquidificador. Ligue o
liquidificador. Pare o liquidificador quando uma pasta lisa
aparecer e mexa o conteúdo do liquidificador, se necessário.
Deite em três ou quatro copos e sirva imediatamente.
Molho cremoso de abacate-limão
Ingredientes:
1 abacate maduro
1 colher de sopa de sumo de limão fresco
1/2 colher de chá de piri-piri
1 dente de alho cortado fino
sal e pimenta preta fresca moída
Coloque a parte da polpa do abacate no liquidificador. Adicione
o sumo de limão, o piri-piri e o alho. Ligue o liquidificador. Pare
o liquidificador se aparecer uma pasta lisa. Adicione sal e
pimenta a gosto. Coloque o molho numa taça e tape-a com
película de plástico. Guarde a taça no frigorífico até servir o
molho.
Batido de banana
Pequeno-almoço de morango
Ingredientes:
COMPACT BLENDER & MILL (LET’S BLENDER) ART 213100
49
Page 55

īİȞȚțȑȢ ʌȜȘȡȠijȠȡȓİȢ
ȉȠ İȜțȣıIJȚțȩ ĮȣIJȩ ȝʌȜȑȞIJİȡ ȑȤİȚ ıȤİįȚĮıșİȓ Įʌȩ IJȠȞ Jan des
Bouvrie. Ǿ ıȣıțİȣȒ ȝʌȠȡİȓ ȞĮ ȤȡȘıȚȝȠʌȠȚȘșİȓ ȖȚĮ ȥȚȜȠțȩȥȚȝȠ
ijȡȠȪIJȦȞ țĮȚ ȜĮȤĮȞȚțȫȞ, Ȓ ȖȚĮ IJȘȞ ʌĮȡĮıțİȣȒ ȞȩıIJȚȝȦȞ
ȝȚȜțıȑȚț țĮȚ ȤȣȝȫȞ. ȂʌȠȡİȓ İʌȓıȘȢ ȞĮ ȤȡȘıȚȝȠʌȠȚȘșİȓ ȖȚĮ IJȠ
ȐȜİıȝĮ Ȓ IJȠ IJȡȓȥȚȝȠ ʌȚʌİȡȚȠȪ țĮȚ ȕȠIJȐȞȦȞ. ȉȩı Ƞ IJȠ ıȫȝĮ, ȩıȠ
țĮȚ ȠȚ țĮȞȐIJİȢ ȑȤȠȣȞ ȝȠȞIJȑȡȞĮ țĮȚ ʌȠȜȣIJİȜȒ
ȉȠ Jan des Bouvrie Blender įȚĮșȑIJİȚ ȚıȤȣȡȩ ȝȠIJȑȡ ȝİ įȪȠ
ȡȣșȝȓıİȚȢ IJĮȤȪIJȘIJĮȢ țĮȚ ȝȓĮ ȡȪșȝȚıȘ ʌĮȜȝȚțȒȢ ȜİȚIJȠȣȡȖȓĮȢ.
Ǿ țĮȞȐIJĮ įȚĮșȑIJİȚ ȑȞĮ ʌȫȝĮ ȝİ ȐȞȠȚȖȝĮ, ȝȑıȦ IJȠȣ ȠʌȠȓȠȣ
ȝʌȠȡİȓIJİ ȞĮ IJȘ ȖİȝȓȗİIJİ. ȉĮ ȣȜȚțȐ ȝʌȠȡȠȪȞ ȞĮ ʌȡȠıIJȓșİȞIJĮȚ
ȝȑıȦ ĮȣIJȠȪ IJȠȣ ĮȞȠȓȖȝĮIJȠȢ ȤȦȡȓȢ ȞĮ ȜİȡȫȞİIJİ. Ǿ țĮȞȐIJĮ ȑȤİȚ
ȤȦȡȘIJȚțȩIJȘIJĮ 0,8 ȜȓIJȡĮ. ȈIJȘȞ țĮȞȐIJĮ İȓȞĮȚ İȞıȦȝĮIJȦȝȑȞİȢ
ĮIJıȐȜȚȞİȢ ȜİʌȓįİȢ
įȣȞĮIJȩIJȘIJĮ ȞĮ țȩȕİȚ țĮȚ ȞĮ ʌȠȜIJȠʌȠȚİȓ İȪțȠȜĮ ȝİȖȐȜĮ țĮȚ ȝȚțȡȐ
țȠȝȝȐIJȚĮ ijȡȠȪIJȦȞ țĮȚ ȜĮȤĮȞȚțȫȞ.
ǹȣIJȩ IJȠ ȝȠȞIJȑȜȠ ıȣȞȠįİȪİIJĮȚ Įʌȩ ȑȞĮ İʌȚʌȜȑȠȞ ȝȪȜȠ ȖİȞȚțȒȢ
ȤȡȒıȘȢ ȖȚĮ IJȠ ȐȜİıȝĮ ıțȜȘȡȩIJİȡȦȞ IJȡȠijȓȝȦȞ (ȩʌȦȢ ʌ.Ȥ.
țĮșĮȡȚıȝȑȞĮ țĮȡȪįȚĮ). ǹȣIJȩȢ Ƞ ȝȪȜȠȢ įȚĮșȑIJİȚ ȝȓĮ
ĮijĮȚȡȠȪȝİȞȘ ȕȐıȘ ȝİ ȜİʌȓįİȢ țĮȚ
İȟĮȡIJȒȝĮIJĮ.
Ǿ ıȣıțİȣȒ ʌȡȑʌİȚ ȞĮ ıȣȞįȑİIJĮȚ ıIJȠ įȓțIJȣȠ ȡİȪȝĮIJȠȢ.
, ȠȚ ȠʌȠȓİȢ įȓȞȠȣȞ ıIJȠ ȝʌȜȑȞIJİȡ IJȘ
İȞıȦȝĮIJȦȝȑȞĮ țȠʌIJȚțȐ
ıȤİįȓĮıȘ.
ȁİȚIJȠȣȡȖȓĮ țĮȚ ȤİȚȡȚıIJȒȡȚĮ
ǹȞĮIJȡȑȟIJİ ıIJȘȞ İȚțȩȞĮ 1.
ǵȜĮ IJĮ ȝȠȞIJȑȜĮ ȑȤȠȣȞ IJĮ ĮțȩȜȠȣșĮ ȝȑȡȘ țĮȚ İȟĮȡIJȒȝĮIJĮ:
1 ȈȫȝĮ
2 ȀĮȜȫįȚȠ țĮȚ ijȚȢ ȡİȪȝĮIJȠȢ
3 ĭȦIJİȚȞȒ ȑȞįİȚȟȘ ȜİȚIJȠȣȡȖȓĮȢ (ʌȠȡIJȠțĮȜȓ)
4 ȁȣȤȞȓĮ İȞİȡȖȠʌȠȓȘıȘȢ/ĮʌİȞİȡȖȠʌȠȓȘıȘȢ (țȩțțȚȞȘ)
5 ȆİȡȚıIJȡȠijȚțȩ țȠȣȝʌȓ
6 ȀĮȞȐIJĮ (ȤȦȡȘIJȚțȩIJȘIJĮȢ 0,8 ȜȓIJȡȦȞ)
7 ȆȫȝĮ ȖȚĮ ȖȑȝȚıȝĮ
8 ȀĮʌȐțȚ
9 ȂȪȜȠȢ ȖİȞȚțȒȢ ȤȡȒıȘȢ
10 ǺȐıȘ ȝȪȜȠȣ ȝİ ȜİʌȓįİȢ (ĮijĮȚȡȠȪȝİȞȘ)
ȆȡȚȞ Įʌȩ IJȘȞ ʌȡȫIJȘ ȤȡȒıȘ
1 ǹijĮȚȡȑıIJİ ȩȜĮ IJĮ ȣȜȚțȐ ıȣıțİȣĮıȓĮȢ țĮȚ IJĮ ĮȣIJȠțȩȜȜȘIJĮ
Įʌȩ IJȘ ıȣıțİȣȒ.
2 ȀĮșĮȡȓıIJİ IJȘ ıȣıțİȣȒ țĮȚ ȩȜĮ IJĮ İȟĮȡIJȒȝĮIJĮ (įİȓIJİ
‘ȈȣȞIJȒȡȘıȘ țĮȚ țĮșĮȡȚıȝȩȢ’) țĮȚ ıIJİȖȞȫıIJİ IJĮ İʌȚȝİȜȫȢ.
ǹȞȐȝİȚȟȘ ʌȡȠȧȩȞIJȦȞ
ǹȞĮIJȡȑȟIJİ ıIJȘȞ İȚțȩȞĮ 2.
1 ȉȠʌȠșİIJȒıIJİ IJȠ ıȫȝĮ ıİ ȝȚĮ İʌȓʌİįȘ İʌȚijȐȞİȚĮ.
2 ȉȠʌȠșİIJȒıIJİ IJȘȞ țĮȞȐIJĮ ıIJȠ ıȫȝĮ. ȅȚ IJȡİȚȢ ʌȡȠİȟȠȤȑȢ ıIJȠ
ıȫȝĮ ʌȡȑʌİȚ ȞĮ İijĮȡȝȩıȠȣȞ ȝİ ĮțȡȓȕİȚĮ ıIJȚȢ ȣʌȠįȠȤȑȢ
ʌȠȣ ȣʌȐȡȤȠȣȞ ıIJȘ ȕȐıȘ IJȘȢ țĮȞȐIJĮȢ.
3 ȉȠʌȠșİIJȒıIJİ IJȠ țĮʌȐțȚ ıIJȘȞ țĮȞȐIJĮ.
4 ȉȠʌ Ƞ ș İ IJ Ȓ ı IJ İ IJȠ ʌȫȝĮ ȖİȝȓıȝĮIJȠȢ ıIJȠ țĮʌȐțȚ țĮȚ ıijȓȟIJİ IJȠ
ʌȫȝĮ ȖİȝȓıȝĮIJȠȢ
ıIJȡȠijȒȢ.
5 ȀȩȥIJİ IJĮ ijȡȠȪIJĮ țĮȚ/Ȓ IJĮ ȜĮȤĮȞȚțȐ ıİ țȠȝȝȐIJȚĮ. ȂȘȞ țȩȕİIJİ
IJĮ țȠȝȝȐIJȚĮ ʌȠȜȪ ȝİȖȐȜĮ. ȆȡȑʌİȚ ȞĮ İȓȞĮȚ ĮȡțİIJȐ ȝȚțȡȐ
ȫıIJİ ȞĮ ȤȦȡȐȞİ ıIJȠ țȐIJȦ IJȝȒȝĮ IJȘȢ țĮȞȐIJĮȢ.
6 ǹȞȠȓȟIJİ IJȠ țĮʌȐțȚ țĮȚ IJȠʌȠșİIJȒıIJİ IJĮ țȠȝȝȐIJȚĮ ȝȑıĮ ıIJȘȞ
țĮȞȐIJĮ.
7 ȉȠʌȠșİIJȒıIJİ ȟĮȞȐ IJȠ țĮʌȐțȚ
IJȠ ʌȚIJıȓȜȚıȝĮ.
8 ǵIJĮȞ IJȠ ʌİȡȚıIJȡȠijȚțȩ țȠȣȝʌȓ ȕȡȓıțİIJĮȚ ıIJȘ șȑıȘ 0 țĮȚ İȓȞĮȚ
ʌĮIJȘȝȑȞȠ ȝȑıĮ, İȓȞĮȚ țȜİȚįȦȝȑȞȠ. ȆȚȑıIJİ IJȠ ʌİȡȚıIJȡȠijȚțȩ
țȠȣȝʌȓ ȖȚĮ ȞĮ ȟİțȜİȚįȫıİIJİ (ĮȞĮIJȡȑȟIJİ ıIJȘȞ İȚțȩȞĮ 2).
9 ǼȞİȡȖȠʌȠȚȒıIJİ IJȠ ȝʌȜȑȞIJİȡ ȖȚĮ ȝİȡȚțȐ įİȣIJİȡȩȜİʌIJĮ ıIJȘ
ȡȪșȝȚıȘ 1 Ȓ 2, Ȓ ıIJȘ ȡȪșȝȚıȘ ʌĮȜȝȚțȒȢ ȜİȚIJȠȣȡȖȓĮȢ (P).
ǹȣIJȩ IJȠ ȝʌȜȑȞIJİȡ ȜİȚIJȠȣȡȖİȓ ȝİ
ȣȜȚțȐ șĮ ȑȤȠȣȞ țȠʌİȓ ȝȑıĮ ıİ ȝİȡȚțȐ įİȣIJİȡȩȜİʌIJĮ. ǵıȠ
ʌİȡȚııȩIJİȡȠ ʌĮȡĮȝȑȞİȚ ıİ ȜİȚIJȠȣȡȖȓĮ IJȠ ȝʌȜȑȞIJİȡ, IJȩıȠ
ʌȚȠ ȥȚȜȠțȠȝȝȑȞĮ șĮ ȖȓȞȠȣȞ IJĮ ȣȜȚțȐ.
ȈȘȝİȓȦıȘ: īȚĮ ȞĮ ĮʌȠijȪȖİIJİ IJȘȞ ȣʌİȡșȑȡȝĮȞıȘ, ȝȘȞ
ȤȡȘıȚȝȠʌȠȚİȓIJİ IJȠ ȝʌȜȑȞIJİȡ ȖȚĮ ʌİȡȚııȩIJİȡĮ Įʌȩ 3
ȜİʌIJȐ ıȣȞİȤȩȝİȞĮ. ȆȡȚȞ ȟİțȚȞȒıİIJİ ȟĮȞȐ, ĮijȒıIJİ IJȠ
ȝʌȜȑȞIJİȡ ȞĮ țȡȣȫıİȚ ȖȚĮ ȝİȡȚțȐ
10 ǼȐȞ ȤȡİȚȐȗİIJĮȚ, ȝʌȠȡİȓIJİ ȞĮ ȖİȝȓıİIJİ IJȘȞ țĮȞȐIJĮ ĮȞȠȓȖȠȞIJĮȢ
IJȠ ʌȫȝĮ ȖİȝȓıȝĮIJȠȢ. ȄİȕȚįȫıIJİ IJȠ țĮIJȐ ȑȞĮ IJȑIJĮȡIJȠ IJȘȢ
ʌİȡȚıIJȡȑijȠȞIJȐȢ IJȠ țĮIJȐ ȑȞĮ IJȑIJĮȡIJȠ IJȘȢ
ıIJȘȞ țĮȞȐIJĮ ȖȚĮ ȞĮ ĮʌȠijȪȖİIJİ
ʌȠȜȪ ȝİȖȐȜȘ IJĮȤȪIJȘIJĮ. ȉĮ
ȜİʌIJȐ.
50
COMPACT BLENDER & MILL (LET’S BLENDER) ART 213100
Page 56

ıIJȡȠijȒȢ țĮȚ ĮijĮȚȡȑıIJİ IJȠ Įʌȩ IJȠ țĮʌȐțȚ. ǼȐȞ IJĮ țȠȝȝȐIJȚĮ
ʌȠȣ șȑȜİIJİ ȞĮ ʌȡȠıșȑıİIJİ įİȞ ȤȦȡȐȞİ ȝȑıĮ Įʌȩ IJȠ
ȐȞȠȚȖȝĮ IJȠȣ ʌȫȝĮIJȠȢ, ıȕȒıIJİ IJȠ ȝʌȜȑȞIJİȡ, ĮijĮȚȡȑıIJİ IJȠ
țĮʌȐțȚ țĮȚ IJȠʌȠșİIJȒıIJİ IJĮ țȠȝȝȐIJȚĮ ıIJȘȞ țĮȞȐIJĮ.
ȉȠʌȠș İ IJ Ȓ ı IJİ IJȠ țĮʌȐțȚ ıIJȘȞ țĮȞȐIJĮ ʌȡȚȞ șȑıİIJİ ȟĮȞȐ IJȠ
ȝʌȜȑȞIJİȡ ıİ ȜİȚIJȠȣȡȖȓĮ.
11 ȈȕȒıIJİ IJȠ ȝʌȜȑȞIJİȡ (șȑıȘ 0)
ȥȚȜȠțȩȥȚȝȠ IJȘȢ ĮʌĮȚIJȠȪȝİȞȘȢ ʌȠıȩIJȘIJĮȢ ijȡȠȪIJȦȞ țĮȚ/Ȓ
ȜĮȤĮȞȚțȫȞ.
12 ȆȚȑıIJİ IJȠ ʌİȡȚıIJȡȠijȚțȩ țȠȣȝʌȓ ȖȚĮ ȞĮ IJȠ țȜİȚįȫıİIJİ
(ĮȞĮIJȡȑȟIJİ ıIJȘȞ İȚțȩȞĮ 2).
13 ǹʌȠıȣȞįȑıIJİ IJȠ ijȚȢ Įʌȩ IJȘȞ ʌȡȓȗĮ ȡİȪȝĮIJȠȢ.
ĮijȠȪ ȠȜȠțȜȘȡȫıİIJİ IJȠ
DZȜİıȝĮ
ǹȞĮIJȡȑȟIJİ ıIJȘȞ İȚțȩȞĮ 4.
1 ȉȠʌȠș İ IJ Ȓ ı IJ İ IJȠ ıȫȝĮ ıİ ȝȚĮ İʌȓʌİįȘ İʌȚijȐȞİȚĮ.
2 ȉȠʌȠș İ IJ Ȓ ı IJ İ IJȠ ȝȪȜȠ ıIJȠ ıȫȝĮ. ȅȚ IJȡİȚȢ ʌȡȠİȟȠȤȑȢ ıIJȠ
ıȫȝĮ ʌȡȑʌİȚ ȞĮ İijĮȡȝȩıȠȣȞ ȝİ ĮțȡȓȕİȚĮ ıIJȚȢ ȣʌȠįȠȤȑȢ
ʌȠȣ ȣʌȐȡȤȠȣȞ ıIJȘ ȕȐıȘ IJȠȣ ȝȪȜȠȣ.
3 īȚĮ ȞĮ ĮȞȠȓȟİIJİ IJȘȞ țĮȞȐIJĮ IJȠȣ ȝȪȜȠȣ, ʌİȡȚıIJȡȑȥIJİ IJȘȞ
İʌȐȞȦ İʌȚijȐȞİȚĮ IJȠȣ ȝȪȜȠȣ ʌȡȠȢ IJĮ įİȟȚȐ.
4 īİȝȓıIJİ IJȘȞ țĮȞȐIJĮ IJȠȣ ȝȪȜȠȣ ȝİ IJȠ ʌȡȠȧȩȞ ʌȠȣ șȑȜİIJİ ȞĮ
ĮȜȑıİIJİ.
5 īȚĮ ȞĮ țȜİȓıİIJİ IJȘȞ țĮȞȐIJĮ IJȠȣ ȝȪȜȠȣ, ʌİȡȚıIJȡȑȥİIJİ IJȘȞ
İʌȐȞȦ İʌȚijȐȞİȚĮ ʌȡȠȢ IJ’ ĮȡȚıIJİȡȐ.
6 ǵIJĮȞ IJȠ ʌİȡȚıIJȡȠijȚțȩ țȠȣȝʌȓ ȕȡȓıțİIJĮȚ ıIJȘ șȑıȘ 0 țĮȚ İȓȞĮȚ
ʌĮIJȘȝȑȞȠ ȝȑıĮ, İȓȞĮȚ țȜİȚįȦȝȑȞȠ. ȆȚȑıIJİ IJȠ ʌİȡȚıIJȡȠijȚțȩ
țȠȣȝʌȓ ȖȚĮ ȞĮ ȟİțȜİȚįȫıİIJİ (ĮȞĮIJȡȑȟIJİ ıIJȘȞ İȚțȩȞĮ 2).
7 ǼȞİȡȖȠʌȠȚȒıIJİ IJȠ ȝȪȜȠ ȖȚĮ ȝİȡȚțȐ įİȣIJİȡȩȜİʌIJĮ ıIJȘ
ȡȪșȝȚıȘ 1 Ȓ 2, Ȓ ıIJȘ ȡȪșȝȚıȘ ʌĮȜȝȚțȒȢ ȜİȚIJȠȣȡȖȓĮȢ (P).
ǹȣIJȩȢ Ƞ ȝȪȜȠȢ ȜİȚIJȠȣȡȖİȓ ȝİ ʌȠȜȪ ȝİȖȐȜȘ IJĮȤȪIJȘIJĮ . ȉĮ
ȣȜȚțȐ șĮ ȑȤȠȣȞ ĮȜİıIJİȓ ȝȑıĮ ıİ ȝİȡȚțȐ įİȣIJİȡȩȜİʌIJĮ. ǵıȠ
ʌİȡȚııȩIJİȡȠ ʌĮȡĮȝȑȞİȚ ıİ ȜİȚIJȠȣȡȖȓĮ Ƞ ȝȪȜȠȢ, IJȩıȠ ʌȚȠ
ȥȚȜȠțȠȝȝȑȞĮ șĮ ȖȓȞȠȣȞ IJĮ ȣȜȚțȐ.
ȈȘȝİȓȦıȘ: ȂȘȞ ĮijȒȞİIJİ IJȠ ȝȪȜȠ
ʌİȡȚııȩIJİȡĮ Įʌȩ 50 įİȣIJİȡȩȜİʌIJĮ, ȝİ ȑȦȢ 150 Ȗȡ. ȣȜȚțȫȞ.
ȆȡȚȞ ȟİțȚȞȒıİIJİ ȟĮȞȐ, ĮijȒıIJİ IJȠ ȝȪȜȠ ȞĮ țȡȣȫıİȚ ȖȚĮ 7
ʌİȡȓʌȠȣ ȜİʌIJȐ.
8 ǹʌİȞİȡȖȠʌȠȚȒıIJİ IJȠ ȝȪȜȠ (șȑıȘ 0) ȝȩȜȚȢ ĮȜİıIJİȓ Ș
ĮʌĮȚIJȠȪȝİȞȘ ʌȠıȩIJȘIJĮ.
9 ȆȚȑıIJİ IJȠ ʌİȡȚıIJȡȠijȚțȩ țȠȣȝʌȓ ȖȚĮ ȞĮ IJȠ țȜİȚįȫıİIJİ
(ĮȞĮIJȡȑȟIJİ ıIJȘȞ İȚțȩȞĮ 2).
10 ǹʌȠıȣȞįȑıIJİ IJȠ ijȚȢ Įʌȩ IJȘȞ ʌȡȓȗĮ ȡİȪȝĮIJȠȢ.
ıİ ȜİȚIJȠȣȡȖȓĮ ȖȚĮ
ȆİȡȚȝȑȞİIJİ ȝȑȤȡȚ ȞĮ ĮțȚȞȘIJȠʌȠȚȘșȠȪȞ ȠȚ ȜİʌȓįİȢ țĮȚ țĮIJȩʌȚȞ
11
ĮijĮȚȡȑıIJİ IJȠ ĮȜİıȝȑȞȠ ʌȡȠȧȩȞ.
ȈȣȞIJȒȡȘıȘ țĮȚ țĮșĮȡȚıȝȩȢ
• ǺİȕĮȚȦșİȓIJİ ȩIJȚ IJȠ ijȚȢ ȑȤİȚ ĮʌȠıȣȞįİșİȓ Įʌȩ IJȘȞ ʌȡȓȗĮ
ʌȡȚȞ țĮșĮȡȓıİIJİ IJȘ ıȣıțİȣȒ.
• ǺİȕĮȚȦșİȓIJİ ȩIJȚ įİȞ ȤȪȞȠȞIJĮȚ ȣȖȡȐ ıIJȠ İıȦIJİȡȚțȩ IJȠȣ
ıȫȝĮIJȠȢ.
• ȂȘȞ ȕȣșȓȗİIJİ IJȘ ıȣıțİȣȒ ıİ Ȟİȡȩ Ȓ ȐȜȜĮ ȣȖȡȐ. ǼȐȞ
ıȣȝȕİȓ țȐIJȚ IJȑIJȠȚȠ, ȝȘȞ ȤȡȘıȚȝȠʌȠȚȒıİIJİ ȟĮȞ Ȑ IJȘ
ıȣıțİȣȒ. īȚĮ ȜȩȖȠȣȢ ĮıijȐȜİȚĮȢ, ʌİIJȐȟIJİ IJȘ ıȣıțİȣȒ.
• ȂȩȞȠ IJĮ ĮijĮȚȡȠȪȝİȞĮ
ıİ ʌȜȣȞ IJȒȡȚȠ ʌȚȐIJȦȞ.
• ȂȘȞ ȤȡȘıȚȝȠʌȠȚİȓIJİ ʌȠIJȑ įȚĮȕȡȦIJȚțȐ țĮșĮȡȚıIJȚțȐ Ȓ
ʌȡȠȧȩȞIJĮ ʌȠȣ ĮʌĮȚIJȠȪȞ IJȡȓȥȚȝȠ.
• ǹȣIJȩ IJȠ ȝʌȜȑȞIJİȡ ȤȡȘıȚȝȠʌȠȚİȓ țȠijIJİȡȑȢ ȜİʌȓįİȢ, ȠȚ
ȠʌȠȓİȢ ȕȡȓıțȠȞIJĮȚ ıIJȠ țȐIJȦ IJȝȒȝĮ IJȠȣ įȠȤİȓȠȣ. īȚ’ ĮȣIJȩ
IJȠ ȜȩȖȠ, ȞĮ İȓıIJİ ʌȠȜȪ ʌȡȠıİțIJȚțȠȓ ȩIJĮȞ ĮįİȚȐȗİIJİ țĮȚ
țĮșĮȡȓȗİIJİ IJȠ ȝʌȜȑȞIJİȡ. ȆȡȠıȑȟIJİ ȞĮ ȝȘȞ țȠʌİȓIJİ
ȜİʌȓįİȢ.
1 ȀĮșĮȡȓıIJİ IJȠ İȟȦIJİȡȚțȩ IJȠȣ ıȫȝĮIJȠȢ ȝ' ȑȞĮ ȝĮȜĮțȩ, ȣȖȡȩ
ʌĮȞȓ.
2 ȀĮșĮȡȓıIJİ IJȚȢ țĮȞȐIJİȢ țĮȚ IJĮ İȟĮȡIJȒȝĮIJĮ ȝİ ȗİıIJȒ
ıĮʌȠȣȞȐįĮ.
3 ǼȚįȚțȩIJİȡĮ, țĮșĮȡȓıIJİ ʌȡȠıİțIJȚțȐ IJȚȢ ʌİȡȚıIJȡİijȩȝİȞİȢ
ȜİʌȓįİȢ ıIJȠ țȐIJȦ IJȝȒȝĮ IJȘȢ țĮȞȐIJĮȢ țĮȚ ȕİȕĮȚȦșİȓIJİ ȩIJȚ
ĮijĮȚȡİȓIJİ ȩȜĮ IJĮ ȣʌȠȜİȓȝȝĮIJĮ IJȡȠijȫȞ Įʌȩ ĮȣIJȑȢ (įİȓIJİ
‘ǹijĮȓȡİıȘ țĮȚ IJȠʌȠșȑIJȘıȘ IJȘȢ ȕȐıȘȢ
ʌİȡȚıIJȡİijȩȝİȞİȢ ȜİʌȓįİȢ’).
4 ǹijĮȚȡȑıIJİ IJȘ ȕȐıȘ Įʌȩ IJȠ ȝȪȜȠ (įİȓIJİ ‘ĮijĮȓȡİıȘ IJȘȢ ȕȐıȘȢ
IJȠȣ ȝȪȜȠȣ Įʌȩ IJȠ ȝȪȜȠ’).
5 ȀĮșĮȡȓıIJİ IJȘ ȕȐıȘ IJȠȣ ȝȪȜȠȣ țĮȚ IJĮ İȟĮȡIJȒȝĮIJĮ IJȠȣ ȝȪȜȠȣ
ȝİ ȗİıIJȩ Ȟİȡȩ țĮȚ ıĮʌȠȪȞȚ.
6 ǼȚįȚțȩIJİȡĮ, țĮșĮȡȓıIJİ ʌȡȠıİțIJȚțȐ IJȚȢ ʌİȡȚıIJȡİijȩȝİȞİȢ
ȜİʌȓįİȢ ıIJȠ țȐIJȦ IJȝȒȝĮ IJȘȢ țĮȞȐIJĮȢ țĮȚ ȕİȕĮȚȦșİȓIJİ ȩIJȚ
ȩȜĮ IJĮ ȣʌȠȜİȓȝȝĮIJĮ IJȡȠijȫȞ Įʌȩ ĮȣIJȑȢ.
ĮijĮȚȡİȓIJİ
7 ȂİIJȐ Įʌȩ IJȠȞ țĮșĮȡȚıȝȩ, ıIJİȖȞȫıIJİ țĮȜȐ IJĮ İȟĮȡIJȒȝĮIJĮ.
İȟĮȡIJȒȝĮIJĮ ȝʌȠȡȠȪȞ ȞĮ ʌȜȑȞȠ ȞIJĮȚ
ȝİ IJȚȢ
ȝİ IJȚȢ
COMPACT BLENDER & MILL (LET’S BLENDER) ART 213100
51
Page 57

ǹijĮȓȡİıȘ țĮȚ IJȠʌȠșȑIJȘıȘ IJȘȢ ȕȐıȘȢ ȝİ IJȚȢ
ʌİȡȚıIJȡİijȩȝİȞİȢ ȜİʌȓįİȢ
ǹȞĮIJȡȑȟIJİ ıIJȘȞ İȚțȩȞĮ 3.
1 ȉȠʌ Ƞ ș İ IJ Ȓ ı IJ İ IJȘȞ țĮȞȐIJĮ ıIJȠ ıȫȝĮ.
2 ȀȡĮIJȒıIJİ IJȠ ıȫȝĮ.
3 ȆİȡȚıIJȡȑȥIJİ IJȘȞ țĮȞȐIJĮ ĮȡȚıIJİȡȩıIJȡȠijĮ.
4 ǹijĮȚȡȑıIJİ IJȘȞ țĮȞȐIJĮ Įʌȩ IJȘ ȕȐıȘ ȝİ IJȚȢ ʌİȡȚıIJȡİijȩȝİȞİȢ
ȜİʌȓįİȢ.
5 ǹijĮȚȡȑıIJİ IJȘ ȕȐıȘ ȝİ IJȚȢ ʌİȡȚıIJȡİijȩȝİȞİȢ ȜİʌȓįİȢ Įʌȩ IJȠ
ıȫȝĮ.
6 ȈȣȞĮȡȝȠȜȠȖȒıIJİ ȟĮȞȐ IJȘ ȕȐıȘ ȝİ IJȚȢ ʌİȡȚıIJȡİijȩȝİȞİȢ
ȜİʌȓįİȢ țĮȚ IJȘȞ țĮȞȐIJĮ, ĮțȠȜȠȣșȫȞIJĮȢ ĮȞIJȓıIJȡȠijȘ
ıİȚȡȐ.
ǹijĮȓȡİıȘ IJȘȢ ȕȐıȘȢ IJȠȣ ȝȪȜȠȣ Įʌȩ IJȠ ȝȪȜȠ
ǹȞĮIJȡȑȟIJİ ıIJȘȞ İȚțȩȞĮ 5.
1 ȀȡĮIJȒıIJİ IJȠ ȝȪȜȠ țĮȚ ʌİȡȚıIJȡȑȥIJİ IJȘ ȕȐıȘ IJȠȣ ȝȪȜȠȣ ʌȡȠȢ
IJ’ ĮȡȚıIJİȡȐ.
2 ǹijĮȚȡȑıIJİ IJȘ ȕȐıȘ Įʌȩ IJȘȞ țĮȞȐIJĮ IJȠȣ ȝȪȜȠȣ.
3 īȚĮ ȞĮ ıȣȞĮȡȝȠȜȠȖȒıİIJİ ȟĮȞȐ IJȠ ȝȪȜȠ, ĮțȠȜȠȣșȒıIJİ
ĮȞIJȓıIJȡȠijȘ ıİȚȡȐ.
ǹıijȐȜİȚĮ
īİȞȚțȑȢ ʌȜȘȡȠijȠȡȓİȢ
• ǻȚĮȕȐıIJİ ʌȡȠıİțIJȚțȐ ĮȣIJȑȢ IJȚȢ ȠįȘȖȓİȢ țĮȚ ijȣȜȐȟIJİ IJİȢ
ȖȚĮ ȝİȜȜȠȞIJȚțȒ ĮȞĮijȠȡȐ.
• Ǿ ȤȡȒıȘ ĮȣIJȒȢ IJȘȢ ıȣıțİȣȒȢ ʌȡȑʌİȚ ȞĮ ȖȓȞİIJĮȚ
ĮʌȠțȜİȚıIJȚțȐ ıȪȝijȦȞĮ ȝİ IJȚȢ ʌĮȡȠȪıİȢ ȠįȘȖȓİȢ.
• ȃĮ ȤȡȘıȚȝȠʌȠȚİȓIJİ ĮȣIJȒ IJȘ ıȣıțİȣȒ ȝȩȞȠ ȖȚĮ ȠȚțȚĮțȒ
ȤȡȒıȘ.
• Ǿ ȤȡȒıȘ ĮȣIJȒȢ IJȘȢ ıȣıțİȣȒȢ Įʌȩ ʌĮȚįȚȐ Ȓ ȐIJȠȝĮ ȝİ
ijȣıȚțȑȢ, ĮȚıșȘIJȒȡȚİȢ, ʌȞİȣȝĮIJȚțȑȢ, Ȓ țȚȞȘIJȚțȑȢ
ĮȞĮʌȘȡȓİȢ, Ȓ ȤȦȡȓȢ IJȘȞ ĮʌĮȡĮȓIJȘIJȘ ȖȞȫıȘ țĮȚ İȝʌİȚȡȓĮ,
ȝʌȠȡİȓ Ȟ' ĮʌȠIJİȜȑıİȚ ʌȘȖȒ țȚȞįȪȞȦȞ. ȉĮ ȐIJȠȝĮ ʌȠȣ İȓȞĮȚ
ȣʌİȪșȣȞĮ ȖȚĮ IJȘȞ ĮıijȐȜİȚȐ IJȠȣȢ șĮ ʌȡȑʌİȚ ȞĮ IJȠȣȢ
ʌĮȡȑȤȠȣ Ȟ ȡȘIJȑȢ ȠįȘȖȓİȢ Ȓ ȞĮ İʌȚȕȜȑʌȠȣȞ IJȘȞ ȤȡȒıȘ IJȘȢ
ıȣıțİȣȒȢ.
• ǺİȕĮȚȦșİȓIJİ ȩIJȚ IJĮ ʌĮȚįȚȐ įİȞ ʌĮȓ ȗȠȣȞ ȝİ IJȘ ıȣıțİȣȒ.
• īȚĮ ȠʌȠȚĮįȒʌȠIJİ İʌȚıțİȣȒ, ĮʌİȣșȣȞșİȓIJİ
İȚįȚțİȣȝȑȞȠ IJİȤȞȚțȩ. ȂȘȞ ʌȡȠıʌĮșȒıİIJİ ʌȠIJȑ ȞĮ
İʌȚıțİȣȐıİIJİ ȝȩȞȠȚ ıĮȢ IJȘ ıȣıțİȣȒ.
ȝȩȞȠ ıİ
ǾȜİțIJȡȚıȝȩȢ țĮȚ șİȡȝȩIJȘIJĮ
• ǼȜȑȖȟIJİ ȩIJȚ Ș IJȐıȘ ȡİȪȝĮIJȠȢ IJȠȣ įȚțIJȪȠȣ İȓȞĮȚ ȓįȚĮ ȝİ
ĮȣIJȒ ʌȠȣ ĮȞĮijȑȡİIJĮȚ ıIJȘȞ İIJȚțȑIJĮ IJȪʌȠȣ IJȘȢ ıȣıțİȣȒȢ.
• ȈȣȞįȑıIJİ IJȘ ıȣıțİȣȒ ıİ ȝȓĮ ʌȡȓȗĮ ȡİȪȝĮIJȠȢ ȝİ ȖİȓȦıȘ.
• ǵIJĮȞ įİȞ ȤȡȘıȚȝȠʌȠȚİȓIJİ IJȘ ıȣıțİȣȒ, șĮ ʌȡȑʌİȚ ʌȐȞIJĮ
ȞĮ ĮʌȠıȣȞįȑİIJİ IJȠ ijȚȢ Įʌȩ IJȘȞ ʌȡȓȗĮ ȡİȪȝĮIJȠȢ.
• īȚĮ Ȟ' ĮʌȠıȣȞįȑıİIJİ IJȠ ijȚȢ Įʌȩ
ʌȡȑʌİȚ ʌȐȞIJĮ ȞĮ ʌȚȐȞİIJİ IJȠ ijȚȢ – ȝȘȞ IJȡĮȕȐIJİ IJȠ
țĮȜȫįȚȠ ȡİȪȝĮIJȠȢ.
• ȂȘȞ ȤȡȘıȚȝȠʌȠȚİȓIJİ IJȘȞ ıȣıțİȣȒ İȐȞ IJȠ țĮȜȫ įȚ Ƞ
ȡİȪȝĮIJȠȢ Ȓ Ș ȓįȚĮ Ș ıȣıțİȣȒ ȑȤȠȣȞ ijșȠȡȑȢ Ȓ ȕȜȐȕİȢ. īȚĮ
IJȘȞ ĮıijȐȜİȚȐ ıĮȢ, İʌȚıIJȡȑȥIJİ IJȘ ıȣıțİȣȒ ıIJȘȞ IJİȤȞȚțȒ
ȣʌȘȡİıȓĮ IJȘȢ İIJĮȚȡİȓĮȢ ȝĮȢ. Ǿ ĮȞIJȚțĮIJȐıIJĮıȘ IJȠȣ
ijșĮȡȝȑȞȠȣ țĮȜȦįȓȠȣ
IJȘȞ IJİȤȞȚțȒ ȣʌȘȡİıȓĮ IJȘȢ İIJĮȚȡİȓĮȢ ȝĮȢ,
ȤȡȘıȚȝȠʌȠȚȫȞIJĮȢ IJĮ İȚįȚțȐ İȡȖĮȜİȓĮ ʌȠȣ ĮʌĮȚIJȠȪȞIJĮȚ ȖȚ'
ĮȣIJȒ IJȘȞ İʌȚıțİȣȒ.
• ȆȡȠıȑȟIJİ ȞĮ ȝȘȞ ȑȡșİȚ Ș ıȣıțİȣȒ Ȓ IJȠ țĮȜȫįȚȠ ȡİȪȝĮIJȠȢ
ıİ İʌĮijȒ ȝİ ʌȘȖȑȢ șİȡȝȩIJȘIJĮȢ, ȩʌȦȢ ʌ.Ȥ. ȑȞĮ țĮȣIJȩ
ıțİȪȠȢ Ȓ ijȜȩȖĮ.
• ĭȡȠȞIJȓıIJİ ȫıIJİ IJȠ țĮȜȫį ȚȠ
ȑȡșȠȣȞ ıİ İʌĮijȒ ȝİ Ȟİȡȩ.
• ǼȐȞ Ș ıȣıțİȣȒ ʌȑıİȚ ȝȑıĮ ıİ Ȟİȡȩ, ȝȘȞ IJȘȞ ĮȖȖȓȟİIJİ.
ǹʌȠıȣȞįȑıIJİ ĮȝȑıȦȢ IJȠ ijȚȢ Įʌȩ IJȘȞ ʌȡȓȗĮ ȡİȪȝĮIJȠȢ.
ȂȘȞ ȤȡȘıȚȝȠʌȠȚȒıİIJİ ȟĮȞȐ IJȘ ıȣıțİȣȒ.
ȡİȪȝĮIJȠȢ ȝʌȠȡİȓ ȞĮ ȖȓȞİȚ ȝȩȞȠ Įʌȩ
IJȘȞ ʌȡȓȗĮ ȡİȪȝĮIJȠȢ, șĮ
ȡİȪȝĮIJȠȢ Ȓ IJȠ ijȚȢ ȞĮ ȝȘȞ
ȀĮIJȐ IJȘȞ ȤȡȒıȘ
• ǵIJĮȞ ȤȡȘıȚȝȠʌȠȚİȓIJİ IJȠ ȝʌȜȑȞIJİȡ ıȣȞİȤȫȢ ȖȚĮ ȝİȖȐȜȠ
ȤȡȠȞȚțȩ įȚȐıIJȘȝĮ, IJȠ ȘȜİțIJȡȚțȩ ȝȠIJȑȡ șĮ ȗİıIJĮșİȓ. Ȉ’
ĮȣIJȒ IJȘȞ ʌİȡȓʌIJȦıȘ, ʌȡȚȞ ȤȡȘıȚȝȠʌȠȚȒıİIJİ ȐȜȜȠ IJȘ
ıȣıțİȣȒ ĮijȒıIJİ IJȠ ȝȠIJȑȡ ȞĮ țȡȣȫıİȚ.
52
COMPACT BLENDER & MILL (LET’S BLENDER) ART 213100
Page 58

• ȂȘȞ ȤȡȘıȚȝȠʌȠȚİȓIJİ ʌȠIJȑ IJȘ ıȣıțİȣȒ ıİ İȟȦIJİȡȚțȠȪȢ
ȤȫȡȠȣȢ.
• ȂȘ ȤȡȘıȚȝȠʌȠȚİȓIJİ ʌȠIJȑ IJȘ ıȣıțİȣȒ ıİ ȤȫȡȠȣȢ ȝİ
ʌȠȜȜȒ ȣȖȡĮıȓĮ.
• ȉȠʌȠ șİIJ Ȓ ı IJİ IJȘȞ ıȣıțİȣȒ ıİ ȝȓĮ İʌȓʌİįȘ, ıIJĮșİȡȒ
İʌȚijȐȞİȚĮ, ȑIJıȚ ȫıIJİ ȞĮ ȝȘȞ țȚȞįȣȞİȪİȚ ȞĮ ʌȑıİȚ.
• ȂȘȞ ĮijȒȞİIJİ ʌȠIJȑ IJȠ țĮȜȫįȚȠ ȡİȪȝĮIJȠȢ ȞĮ țȡȑȝİIJĮȚ
ʌȐȞȦ Įʌȩ IJȘȞ ĮțȝȒ IJȠȣ ȞİȡȠȤȪIJȘ, IJȠȣ ʌȐȖțȠȣ
IJȘȢ țȠȣȗȓȞ ĮȢ, Ȓ İȞȩȢ IJȡĮʌİȗȚȠȪ.
• ȆȡȚȞ ʌȚȐıİIJİ IJȘ ıȣıțİȣȒ, IJȠ țĮȜȫįȚȠ ȡİȪȝĮIJȠȢ, Ȓ IJȠ ijȚȢ,
ȕİȕĮȚȦșİȓIJİ ȩIJȚ IJĮ ȤȑȡȚĮ ıĮȢ İȓȞĮȚ ıIJİȖȞȐ.
• ȃĮ İȞİȡȖȠʌȠȚİȓIJİ IJȘ ıȣıțİȣȒ ȝȩȞȠ İȐȞ ȑȤİȚ IJȠʌȠșİIJȘșİ ȓ
ȝȓĮ țĮȞ ȐIJĮ ıIJȠ ıȫȝĮ, țĮȚ ȑȞĮ țĮʌȐ țȚ İʌȐȞȦ ıIJȘȞ
țĮȞȐIJĮ.
• ȈȕȒıIJİ IJȘȞ ıȣıțİȣȒ țĮȚ ĮʌȠıȣȞįȑıIJİ IJȠ țĮȜ ȫįȚȠ
ȡİȪȝĮIJȠȢ
ʌȡȩȕȜȘȝĮ Ȓ ȕȜȐȕȘ IJȘȢ ıȣıțİȣȒȢ țĮIJȐ IJȘȞ ȤȡȒıȘ, țĮșȫȢ
țĮȚ ʌȡȚȞ țĮșĮȡȓıİIJ İ IJȘȞ ıȣıțİȣȒ, IJȠʌȠșİIJȒıİIJİ Ȓ
ĮijĮȚȡȑıİIJİ ȑȞĮ ĮȟİıȠȣȐȡ, Ȓ ĮʌȠșȘțİȪıİIJİ IJȘȞ ıȣıțİȣȒ
ȝİIJȐ Įʌȩ IJȘȞ ȤȡȒıȘ.
• ȂȘȞ ĮijȒȞİIJİ ʌȠIJȑ IJȘ ıȣıțİȣȒ ȤȦȡȓȢ İʌȓȕȜİȥȘ ȩIJĮȞ IJȘȞ
ȤȡȘıȚȝȠʌȠȚİȓIJİ.
• ȀĮșĮȡȓıIJİ ʌȡȠıİțIJȚțȐ IJȘ ıȣıțİȣȒ ȝİIJȐ IJȘ
'ȀĮșĮȡȚı ȝȩȢ țĮȚ ıȣȞIJȒȡȘıȘ').
• ȉȠ ȝʌȜȑȞIJİȡ ȜİȚIJȠȣȡȖİȓ ʌȠȜȪ ȖȡȒȖȠȡĮ. ȉĮ ȣȜȚțȐ
ȥȚȜȠțȩȕȠȞIJĮȚ ȝȑıĮ ıİ ȝİȡȚțȐ įİȣIJİȡȩȜİʌIJĮ. ǵıȠ
ʌİȡȚııȩIJİȡȠ ʌĮȡĮȝȑȞİȚ ıİ ȜİȚIJȠȣȡȖȓĮ IJȠ ȝʌȜȑȞIJİȡ, IJȩıȠ
ʌȚȠ ȥȚȜȠțȠȝȝȑȞĮ șĮ ȖȓȞȠȣȞ IJĮ ȣȜȚțȐ.
• ǼȐȞ IJȠʌȠșİIJȒıİIJİ țĮȣIJȐ ȣȜȚțȐ ıIJȠ ȝʌȜȑȞIJİȡ, IJȠ țĮʌȐțȚ
ȝʌȠȡİȓ ȞĮ ʌİIJĮȤIJİȓ ȜȩȖȦ IJȠȣ ĮIJȝȠȪ țĮȚ IJȘȢ ʌȓİıȘȢ ʌȠȣ
ʌȡȠțĮȜȠȪȞ IJĮ ȗİıIJȐ ȣȜȚțȐ. īȚĮ ȞĮ ĮʌȠIJȡȑȥİIJİ ĮȣIJȩ IJȠ
ʌȡȩȕȜȘȝĮ, țȡĮIJȒıIJİ IJȠ țĮʌȐțȚ ʌĮIJȘȝ ȑȞȠ ȝİ ȑȞĮ ʌĮȞȓ ȖȚĮ
ȩıȠ ȤȡȩȞȠ ȤȡȘıȚȝȠʌȠȚİȓIJİ IJȠ ȝʌȜȑȞIJİȡ.
Įʌȩ IJȘȞ ʌȡȓȗĮ İȐȞ įȚĮʌȚıIJȫıİIJİ țȐʌȠȚ Ƞ
İȡȖĮıȓĮȢ
ȤȡȒıȘ (įİȓIJİ
ȆİȡȚȕȐȜȜȠȞ
ȆİIJȐȟIJİ IJĮ ȣȜȚțȐ ıȣıțİȣĮıȓĮȢ, ȩʌȦȢ ʌ.Ȥ. IJĮ ʌȜĮıIJȚțȐ țĮȚ IJĮ
țȚȕȫIJȚĮ, ıIJĮ țĮIJȐȜȜȘȜĮ ıȘȝİȓĮ ıȣȜȜȠȖȒȢ ĮʌȠȡȡȚȝȝȐIJȦȞ.
ǼȐȞ șȑȜİIJİ ȞĮ ʌİIJȐȟİIJİ IJȘ ıȣıțİȣȒ İȞȫ ȜİȚIJȠȣȡȖİȓ țĮȞȠȞȚțȐ Ȓ
ȤȡİȚȐȗİIJĮȚ ȝȩȞȠ ȝȚțȡȑȢ İʌȚıțİȣȑȢ, ıĮȢ ıȣȞȚıIJȠȪȝİ ȞĮ
ijȡȠȞIJȓıİIJİ ȖȚĮ IJȘȞ ĮȞĮțȪțȜȦıȒ IJȘȢ
ǵIJĮȞ Ș ıȣıțİȣȒ ijIJȐıİȚ ıIJȠ IJȑȜȠȢ IJȘȢ ȦijȑȜȚȝȘȢ
ȗȦȒ Ȣ IJȘȢ, Ș ĮʌȩȡȡȚȥȒ
ȣʌİȪșȣȞȠ IJȡȩʌȠ, ȑIJıȚ ȫıIJİ ȞĮ ȝʌȠȡȠȪȞ ȞĮ
ȤȡȘıȚȝȠʌȠȚȘșȠȪȞ ȟĮȞȐ IJĮ İȟĮȡIJȒȝĮIJȐ IJȘȢ (Ȓ
ȠȜȩțȜȘȡȘ Ș ıȣıțİȣȒ). ȂȘȞ ĮȞĮȝİȚȖȞȪİIJİ IJȘ
ĮȜȜȐ ʌĮȡĮįȫıIJİ IJȘȞ ı’ ȑȞĮ ıȘȝİȓȠ ıȣȜȜȠȖȒȢ ĮʌȠȡȡȚȝȝȐIJȦȞ
ȖȚĮ ĮȞĮțȪțȜȦıȘ. īȚĮ ʌȜȘȡȠijȠȡȓİȢ ıȤİIJȚțȐ ȝİ IJĮ įȚĮșȑıȚȝĮ
ıȣıIJȒȝĮIJĮ įȚȐșİıȘȢ țĮȚ ıȣȜȜȠȖȒȢ ĮʌȠȡȡȚȝȝȐIJȦȞ
İʌȚțȠȚȞȦȞȒıIJİ ȝİ IJȚȢ IJȠʌȚțȑȢ ĮȡȤȑȢ.
ȈȤİIJȚțȑȢ ǼȣȡȦʌĮȧțȑȢ ȅįȘȖȓİȢ:
ıȣıțİȣȒ ȝİ IJĮ ıȣȞȘșȚıȝȑȞĮ ȠȚțȚĮțȐ ĮʌȠȡȡȓȝȝĮIJĮ,
• 2002/95/EC
• 2002/96/EC
IJȘȢ ʌȡȑʌİȚ ȞĮ ȖȓȞİȚ ȝİ
,
COMPACT BLENDER & MILL (LET’S BLENDER) ART 213100
53
Page 59

ȈȣȞIJĮȖȑȢ
ȌȐȟIJ İ ıIJȠ Internet ȖȚĮ ȞȩıIJȚȝİȢ ıȣȞIJĮȖȑȢ ʌȠȣ ȝʌȠȡİȓIJİ ȞĮ
ijIJȚȐȟİIJİ ȝİ ȑȞĮ ȝʌȜȑȞIJİȡ. ȆĮȡĮțȐIJȦ șĮ ȕȡİȓIJİ IJȡİȚȢ ıȣȞIJĮȖȑȢ
ʌȠȣ ȕȡȒțĮȝİ ȖȚĮ İıȐȢ.
ȂȚȜțıȑȚț ȝʌĮȞȐȞĮ
ȈȣıIJĮIJȚțȐ:
1 ȂʌĮȞȐȞĮ
ȆĮȖȦIJȩ ȕĮȞȓȜȚĮ
īȐȜĮ
ȀȩȥIJİ IJȘ ȝʌĮȞȐȞĮ ıİ ijȑIJİȢ țĮȚ İȚıȐȖİIJȑ IJİȢ ıIJȘȞ țĮȞȐIJĮ IJȠȣ
ȝʌȜȑȞIJİȡ. ȆȡȠıșȑıIJİ ȜȓȖȠ ʌĮȖȦIJȩ ȕĮȞȓȜȚĮ țĮȚ ȜȓȖȠ țȡȪȠ ȖȐȜĮ.
ĬȑıIJİ IJȠ ȝʌȜȑȞIJİȡ ıİ ȜİȚIJȠȣȡȖȓĮ țĮȚ ĮijȒıIJİ IJȠ ȞĮ įȠȣȜȑȥİȚ ȖȚĮ
ȝİȡȚțȐ įİȣIJİȡȩȜİʌIJĮ. ȉȠ ĮʌȠIJȑȜİıȝĮ İȓȞĮȚ ȑȞĮ ȞȩıIJȚȝȠ ȝȚȜțıȑȚț
ȝʌĮȞȐȞĮ!
ȆȡȦȚȞȩ ȝİ ijȡȐȠȣȜİȢ
ȈȣıIJĮIJȚțȐ:
2 ijȜȚIJȗȐȞȚĮ ȠȜȩțȜȘȡİȢ ijȡȐȠȣȜİȢ ȤȦȡ ȓȢ ȖȜȣțĮȞIJȚțȑȢ ȠȣıȓİȢ
1 1/2 ijȜȚIJȗȐȞȚ ȖȐȜĮ
1/2 ijȜȚIJȗȐȞȚ ĮʌȜȩ ȖȚĮȠȪȡIJȚ
2 ijĮțİȜȐțȚĮ ȝİȓȖȝĮIJȠȢ ȖȚĮ ıIJȚȖȝȚĮȓȠ ʌȡȦȚȞȩ ȝİ ȐȡȦȝĮ ȕĮȞȓȜȚĮ
2 țȠȣIJĮȜȚȑȢ IJȘȢ ıȠȪʌĮȢ ȝȑȜȚ
ȉȠʌ Ƞș İ IJ Ȓ ı IJİ IJĮ ıȣıIJĮIJȚțȐ ıIJȘȞ țĮȞȐIJĮ IJȠȣ ȝʌȜȑȞIJİȡ. ȀȜİȓıIJİ
IJȘȞ, șȑıIJİ IJȠ ȝʌȜȑȞIJİȡ ıİ ȜİȚIJȠȣȡȖȓĮ ȝȑȤȡȚ IJȠ ȝİȓȖȝĮ ȞĮ ȖȓȞİȚ
ıȤİįȩȞ ȠȝȠȚȠȖİȞȑȢ, ıIJĮȝĮIJȒıIJİ IJȘ ȜİȚIJȠȣȡȖȓĮ IJȠȣ ȝʌȜȑȞIJİȡ țĮȚ
ĮȞĮțĮIJȑȥIJİ, İȐȞ ȤȡİȚȐȗİIJĮȚ. ǹįİȚȐıIJİ IJȠ ȝİȓȖȝĮ ıİ 3 Ȓ 4
ʌȠIJȒȡȚĮ. ȈİȡȕȓȡİIJİ ĮȝȑıȦȢ.
ȃIJȚʌ țȡȑȝĮȢ ĮȕȠțȐȞIJȠ ȝİ ȖȜȣțȠȜȑȝȠȞȠ
ȈȣıIJĮIJȚțȐ:
1 ȫȡȚȝȠ ĮȕȠțȐȞIJȠ
1 țȠȣIJĮȜȚȐ ijȡİıțȠıIJȣȝȑȞȠȣ ȤȣȝȠȪ ȖȜȣțȠȜȑȝȠȞȠȣ
1/2 țȠȣIJĮȜȐțȚ ıȐȜIJıĮ Įʌȩ țĮȣIJİȡȒ ʌȚʌİȡȚȐ
1 ıțİȜȓįĮ ıțȩȡįȠ, ȥȚȜȠțȠȝȝȑȞȘ
ĮȜȐIJȚ & ijȡİıțȠIJȡȚȝȝȑȞȠ ȝĮȪȡȠ ʌȚʌȑȡȚ
ȄİijȜȠȣįȓıIJİ IJȠ ĮȕȠțȐȞIJȠ, ĮijĮȚȡȑıIJİ IJȠ țȠȣțȠȪIJıȚ, țȩȥIJİ IJȠ ıİ
ȝȚțȡȠȪȢ țȪȕȠȣȢ țĮȚ IJȠʌȠșİIJȒıIJİ IJȠ ıIJȠ ȝʌȜȑȞIJİȡ. ȆȡȠıșȑıIJİ
IJȠ Ȥȣȝȩ ȖȜȣțȠȜȑȝȠȞȠȣ, IJȘ ıȐȜIJıĮ Įʌȩ țĮȣIJİȡȒ ʌȚʌİȡȚȐ țĮȚ IJȠ
ıțȩȡįȠ. ǻȠȣȜȑȥIJİ IJȠ ȝİȓȖȝĮ ȝȑȤȡȚ
țĮIJȩʌȚȞ ʌȡȠıșȑıIJİ ĮȜȐIJȚ țĮȚ ʌȚʌȑȡȚ. ǹįİȚȐıIJİ IJȠ ı’ ȑȞĮ ȝʌȠȜ
țĮȚ țĮȜȪȥIJİ IJȠ ȝİ įȚĮijĮȞȒ ȝİȝȕȡȐȞȘ (įİȞ ʌȡȑʌİȚ Ȟ’ ĮțȠȣȝʌȐİȚ
ıIJȠ ȝİȓȖȝĮ ȝİ IJȠ ĮȕȠțȐȞIJȠ). ǻȚĮIJȘȡȒıIJİ IJȠ ıIJȠ ȥȣȖİȓȠ ȝȑȤȡȚ ȞĮ
ıİȡȕȓȡİIJİ.
ȞĮ ȖȓȞİȚ ȠȝȠȚȠȖİȞȑȢ țĮȚ
54
COMPACT BLENDER & MILL (LET’S BLENDER) ART 213100
Page 60

.ȥƾƷƐȚ ǜž ȝƾƲƫƴƓȚȶ ǗƸƴưƄŽȚ ȢȚǞž ǕƸƵű ǙƱŮ ǛŻ
ǛŰ (ǗƸƮƶƄŽȚȶ ǀſƾƸƫŽȚ ǍƮſȚ) ȝƾƲƇƴƓȚ ǚżȶ ȥƾƷƐȚ ǗȿƮſ
.NjƸű ǚƳƪŮ ȝƾſǞƳƓȚ Ǚƴů ǗƱű
ǓƴƒȚ ȝƾƆƄƶž
.ȉ ǚƳƪŽȚ ǍƮſȚ
ǟŽȶLjȚ ȜǍƵƴŽ ȳȚNjƈƄŴǽȚ ǚƃŻ
ȜȢǞűǞƓȚ ǀŰǾƅŽȚ ȲƾƱŻǽȚ ȴȚ ƿƆƁ .ȥƾƷƐȚ ǟƴŸ ǓƴƒȚ ȔƾŸȶ ǁƃŰ
ȔƾŸȶ ȜNjŸƾŻ Ǡź ȜȢǞűǞƓȚ ȰǞƲƪŽȚ ǟƴŸ ǓƃƬŽƾŮ ǀƄƃƅž ȥƾƷƐƾŮ
.ȜǍǣȚȢ ǕŮȤ ǝſȚȤȶNjŮ ǝžƾƳŲƼŮ ǛŻȶ ȔƾƭưŽȚ Ǡź ȔǚƓȚ ȔƾƭŹ ǕǤ
ǕƭƲŽȚ ǚƯƏ ǽ .ǕƭƲŽ ȝȚȶǍƬƒȚ ȶȚ /
ǛǣǾů ǟƄŲ ǠƱƳƁ ƾƙ ȜǍƸưǧ ǕƭƲŽȚ ȴǞƳů ȴȚ ƿƆƁ .ȚNjű ȜǍƸƃż
.ǓƴƒȚ ȔƾŸȶ Ǡź ǕƭƲŽȚ ǕǤȶ ȔƾƭưŽȚ ljƄƱŮ ǛŻ
.ȣȚȣǍŽȚ ǕƶƓ ǓƴƒȚ ȔƾŸȶ ǟƴŸ ȔƾƭưŽȚ ǕǤǞŮ ǛŻ
ȠƾƄƱƓȚ ȴƾź ǚųȚNjƴŽ ȶ ȇ ǕǤǞŽȚ Ǡź ȴȚȤȶNjŽȚ ȠƾƄƱž ȴƾż ȚȣȚ
ǚƳƪŽȚ ǍƮſȖ) ǝŽƾƱŻȚ ȔƾưŽǽ ȴȚȤȶNjŽȚ ȠƾƄƱž
.(P) ǘƱƒȚ ȢȚNjŸȚ ȶȖ ȉ ȶȖ Ȉ ȢȚNjŸǾŽ ǀƴƸƴŻ ȴȚǞƅŽ ȪǾƒȚ ǚƸưƪƄŮ ǛŻ
ǃƄƶƓȚ ǟƴŸ ǚƫƎ ȴȚǞŰ Ǡź ȜNjƁNjŵ ǀŸǍƉŮ ǚƵƯƁ ȪǾƒȚ Țnjƀ
Ƌƾſ ǟƴŸ ǁƴƫŲ ƾƵƴż ȪǾƒȚ ǚƸưƪů ǁŻȶ ȢȚȥ ƾƵƴż .ǕƭƲž
ƿƶƆƄů Ǡż ǘǣƾŻȢ Ȋ ǜž ǍƅżȖ ǚƵƯƁ ȪǾƒȚ ǚƯƏ ǽ :ǀƮŲǾž
ȢǍƃƁ ǟƄŲ ǘǣƾŻȢ ȜNjƯŽ ȪǾƒȚ ȱǍůȚ .ǠưƃƶƁ ƾƛ ǍƅżȚ ǝƄſǞƈŴ
ȔƾƭŹ ljƄź ǀƭŴȚǞŮ ǓƴƒȚ
ȚȣȘ .ȔƾƭưŽȚ ǜž ǝƄŽȚȥȘ ǛŰ ȜǍǣȚȢ ǕŮȤ Ǡź ǝſȚȤȶNjŮ ǝƳƱŮ ǛŻ .ȔǚƓȚ
ȯƾƲƁƼŮ ǛŻ ȔǚƓȚ ǀƇƄź ǜž ȲǞųNjƴŽ ǀƵǣǾž ǍƸŹ ǕƭƲŽȚ ǁſƾż
ȔƾŸȶ ǚųȚȢ ǕƭƲŽȚ ǕǤȶ ȔƾƭưŽȚ ǀŽȚȥƼŮ ǛŻ ǛŰ ȪǾƒȚ ǚƸưƪů
ȪǾƒȚ ǚƸưƪů ǚƃŻ ǓƴƒȚ ȔƾŸȶ ǟŽȚ ȔƾƭưŽȚ ȜȢƾŸƾŮ ǛŻ .ǓƴƒȚ
.ƿƴǧ ljƭŴ ǟƴŸ ȥƾƷƐȚ ǕǤ
.ǓƴƒȚ ȔƾŸȶ ǟƴŸ ȔƾƭưŽȚ ǕǤǞŮ ǛŻ
ȶ ǀƷżƾƱŽȚ ǕƸƭƲƄŮ ǛŻ
ǕźȢȚ .ǚƱƲž ȴǞƳƁ
ȷǍųȖ ȜǍž ǝžȚNjƈƄŴȚ ǚƃŻ
ȔƾŸȶ ǕźȤ ǙƶƳƚ ȸȤȶǍǤ ȴƾż ȚȣȚ . Ȉȇ
.ǓƴƒȚ
.ǓƴƒȚ ȔƾŸȶ ȬƾŻ
.ƾƯƸƭƲů ǍƅżȚ
ȜǍž
.ȷǍųȚ
.Ȉ
.ȉ
.Ȉ
.ȉ
.Ȋ
.ȋ
.Ȍ
.ȍ
.Ȏ
.ȏ
.(ȉ
.Ȑ
ǀžƾŸ ȝƾžǞƴƯž
ǜƳƚ .ȸǍźǞŮ ȸȢ ȴƾű ǀƭŴȚǞŮ țȚnjƐȚ ȪǾƒȚ Țnjƀ ǛƸƵƫů Ɩ
ȶȖ ȝȚȶǍƬƒȚ ȶ ǀƷżƾƱŽȚ ȝƾƃƸƃŲ ǕƸƭƲƄŽ ȥƾƷƐȚ Țnjƀ ȳȚNjƈƄŴȚ
ȶ ǚƱƴƱŽȚ ǜƇƭŽ ƾƬƁȚ ǝžȚNjƈƄŴȚ ǜƳƚ ȜnjƁnjƴŽȚ ǍǣƾƫƯŽȚ ǕƶƫŽ
.Ǎųƾź ȶ ǂƁNjŲ ǛƸƵƫů ȝȚȣ ǓƴƒȚ ȔƾŸȶ ȶ ǀƃƴƯŽȚ ǜž Ǿż țƾƪŸǽȚ
.ǘƱƒȚ ǟƴŸ ȜȤNjŻȶ ȴƾƄŸǍƉŮ Ȣȶǎž ȶ ȸǞŻ ȤǞůǞž ȶȣ ȸǍźǞŮ ȸȢ ȴƾű ȪǾų
Ȕǚž ƾƷŽǾų ǜž ǜƳƚ ǀƇƄƱŮ Ȣȶǎž ȔƾƭŹ ǓƴƒȚ ȔƾŸǞŽ NjűǞƁ
ȔƾƶŰȖ ǀƇƄƱŽȚ ȵnjƀ ȲǾų ǜž ȝƾƆƄƶƓȚ ǀźƾǤȘ ǜƳƚ .ǓƸƴƒƾŮ ȔƾŸǞŽȚ
ȔƾŸȶ ȸǞƄƇƁ ȴȖ ǜƳƚ .ȝƾŮȚǍƭǤȚ ǀƁȖ ȞȶNjŲ ȴȶNjŮ ǓƴƒȚ ǀƸƴƵŸ
ǀƃżǍž ƿƴƫŽȚ ǜž ƞżƾƳŴ NjűǞƁ .ǍƄŽ ȇDŽȏ ȵȤȚNjƲž ǟƴŸ ǓƴƒȚ
ǀŽǞƷƉŮ ȦǍƷƁȶ ǕƭƲƁ ȴȚ ȪǾƈƴŽ ǜƳƚ ǙŽnjŽ ǓƴƒȚ ȔƾŸȶ Ǡź
ǀƷżƾƱŽȚ ȶ ȝȚȶǍƬƒȚ ǜž ȜǍƸƃƳŽȚ ȶ ȜǍƸưƫŽȚ ǕƭƲŽȚ
.
ȬȚǞſȚ ƿƯǧȚ ǜƇƭŽ ǀƸƓƾŸ ǀƸźƾǤȘ ǜƇŶ ȜNjŲǞŮ Ȕƾű ǚƁȢǞž Țnjƀ
ǀżǍƇƄž ȜNjŸƾƲŮ ȜȢȶǎž ǀƶƇƭƓȚ ȵnjƀ .(ȥǞƐȚ ǍƪƲž ǚƅž) ǝƁnjŹǽȚ
ȜNjŸƾƲŮ ȜȢȶǎž ǀƶƇƭƓȚ .ǀƆžNjž ƞżƾƳŴ Ǖž ǚƫƱƴŽ ǀƴŮƾŻ
.ǀƸƉƸǣǍŽȚ ǀƸŮǍƷƳŽȚ ǀŻƾƭŽȚ ȤȢƾƫƙ ȥƾƷƐȚ ǚǧǞƁ ȴȖ ƿƆƁ
.ǀƆžNjž ƞżƾƳŴ Ǖž ǚƫƱƴŽ ǀƴŮƾŻ ǀżǍƇƄž
ǛƳƇƄŽȚ ǍǧƾƶŸȶ ǚƸưƪƄŽȚ
.Ȉ ǚƳƪŽȚ ǍƮſȚ
:ǀƸŽƾƄŽȚ ȝƾſǞƳƓȚ ǟƴŸ ȥƾƷƐȚ ȸǞƄƇƁ
ǏŮƾƲŽȚȶ ȤƾƸƄŽȚ ǙƴŴ
(ǠŽƾƲůǍŮ) ȜȤȚǍƑȚ Ǎŵƻž ȔǞǤ
(ǍƵŲȖ) ȯƾƲƁȁȚ / ǚƸưƪƄŽȚ Ǎŵƻž ȔǞǤ
(ǍƄŽ ȇ,ȏ ȵȤȚNjƲž) ǓƴƒȚ ȔƾŸȶ
ȩȚǍŹLjȚ ǀžƾŸ ǀƶƇƭž
(ǙƱƴŽ ǀƴŮƾŻ) ǀƶƇƭƓƾŮ ǀǧƾƒȚ ȝȚǍƱƪŽȚ ǚžƾŲ . Ȉȇ
ǀƃƴƯŽȚ
ȴȚȤȶNjŽȚ ȠƾƄƱž
ȔǚƓȚ ǀƇƄź ȔƾƭŹ
ȔƾƭŹ
.Ȉ
.ȉ
.Ȋ
.ȋ
.Ȍ
.ȍ
.Ȏ
.ȏ
.Ȑ
COMPACT BLENDER (LET’S BLENDER) ART 213100
55
Page 61

ǀſƾƸƫŽȚȶ ǗƸƮƶƄŽȚ
.ȥƾƷƐȚ ǗƸƮƶů ǚƃŻ ǏƃƲƓȚ ǜž ǏŮƾƲŽȚ ǀŽȚȥȘ ǜž Njżƺů
ȞNjŲ ȚȣȘȶ .ȷǍųȖ ǚǣȚǞŴ ȸȖ Ǡź ȶȖ ȆȵƾƸƓȚ Ǡź ȥƾƷƐȚ ǍƵưů ǽ
.ȴǞƇƫŽȚ ǀƴƉưž Ǡź ǓƲź ȜǍƑȚ ȔȚǎűLjȚ ǗƸƮƶů ǜƳƚ
.ȪǾƒȚ ǗƸƮƶůȶ ǖƁǍƱů NjƶŸ ȚNjű ȤnjŲ ǜż ǙŽnjŽ .ȔƾŸǞŽȚ
.ǀƃŶȤȶ ǀƵŸƾſ ȧƾƵŻ ǀƯƭŻ ȳȚNjƈƄŴƾŮ ȟȤƾƒȚ ǜž ȥƾƷƐȚ ǗȿƮſ
ȨǍƇŮ ǓƴƒȚ ȔƾŸȶ ȬƾŻ Ǡź ȜȢǞűǞƓȚ ȜȤȚȶNjŽȚ ƞżƾƳƉŽȚ ǗƮſ
ǀŽȚȥȚ,ǍƮſȚ) ȥƾƷƐȚ ǜž ǝƴż ȳƾƯƭŽȚ ǀŽȚȥƼŮ ǁƵŻ ǙſȚ ǜž Njżƺůȶ
ǜž ǀƶƇƭƓȚ ȜNjŸƾŻ Ǚź ǍƮſȖ) ǀƶƇƭƓȚ ǜŸ ȜNjŸƾƲŽȚ ǙƱŮ ǛŻ
.ǚǣƾŴ ȴǞŮƾǧȶ ƽźȚȢ Ȕƾž ȳȚNjƈƄŴƾŮ ǀƶƇƭƓȚ
ȨǍƇŮ ǓƴƒȚ ȔƾŸȶ ȬƾŻ Ǡź ȜȢǞűǞƓȚ ȜȤȚȶNjŽȚ ƞżƾƳƉŽȚ ǗƮſ
ǓƴƒȚ ȔƾŸȶȶ ȜȤȚȶNjŽȚ ƞżƾƳƉŽƾŮ ȜNjŸƾƲŽȚ ǕƸƵƏ ȜȢƾŸƾŮ ǛŻ
.ȥƾƷƐȚ ǚųȚȢ ǟŽȘ Ȕƾž ǚųNjƁ ǛŽ ǝſȚ ǜž Njżƺů
ǛŻ ǀƸƶžȚ țƾƃŴǽ .ȷǍųȖ ȜǍž ȥƾƷƐȚ ȳNjƈƄƉů ǽ Țnjƀ
.ȥƾƷƐȚ ǜž ǑƴƈƄŽƾŮ
.ȹȚNjŮȖ ǀƴżȕ ȶȖ ǀƭŵƾż ȝƾƱƮƶž ȳȚNjƈƄŴƾŮ ǛƲů ǽ
ȬƾŻ Ǡź ȜȢǞűǞž ȜȢƾŲ ƞżƾƳŴ ȪǾƒȚ Țnjƀ Ǡź NjűǞƁ
.ƞżƾƳƉŽƾŮ ǙƉƱſ ȔȚnjƁȚ ƿƶƏ
.ȴǞŮƾǧȶ ƽźȚȢ Ȕƾž ȳȚNjƈƄŴƾŮ ǓƴƒȚ ȔƾŸȶ ǚųȚȢ ǗȿƮſ
.(ȜȤȚȶNjŽȚ ƞżƾƳƉŽƾŮ ȜNjŸƾƲŽȚ ǁƸƸƃƅůȶ
.(ǀƶƇƭƓȚ
ȔƾŸȶ ǚųȚȢ ǗȿƮſ
ȥƾƷƐȚ ǜž ǝƴż ȳƾƯƭŽȚ ǀŽȚȥƼŮ ǁƵŻ ǙſȚ ǜž Njżƺůȶ
.ǛƷƱƸƮƶů NjƯŮ ƾžƾƢ ȥƾƷƐȚ ȔȚǎűȚ ǗƱű
ȜȤȚȶNjŽȚ ƞżƾƳƉŽƾŮ ȜNjŸƾƲŽȚ ǁƸƃƅůȶ ǀŽȚȥȘ
.Ȋ ǚƳƪŽȚ ǍƮſȚ
.ȥƾƷƐȚ ǟƴŸ ǓƴƒȚ ȔƾŸȶ ǁƸƃƅƄŮ ǛŻ
.ǛƳƇž ǚƳƪŮ ȥƾƷƐȚ ȱƾƉžƼŮ ǛŻ
.ǀŸƾƉŽȚ țȤƾƲŸ ǏƳŸ ǓƴƒȚ ȔƾŸȶ ǗƴŮ ǛŻ
.ȜȤȚȶNjŽȚ ƞżƾƳƉŽȚ Ǖž ȜNjŸƾƲŽȚ ǜž ȔƾŸǞŽȚ ǀŽȚȥƾŮ ǛŻ
.ȥƾƷƐȚ ǜž ȜȤȚȶNjŽȚ ƞżƾƳƉŽȚ Ǖž ȜNjŸƾƲŽȚ ǀŽȚȥƾŮ ǛŻ
.ǙƱƴŽ ǏżƾƯž ǚƳƪŮ
ǀƸƵƳŽȚ ǕƸƭƲů ǛƄƁ ƾžNjƶŸ( 0 ǕǤǞŽȚ ) ȪǾƒȚ ȯƾƲƁƼŮ ǛŻ . ȈȈ
ǜƳƚ ȇ ǕǤǞŽȚ Ǡź .ȝȚȶǍƬƒȚ ȶȚ/ ȶ ǀƷżƾƱŽȚ ǜž ǀŮǞƴƭƓȚ
•
•
.ǚųȚNjƴŽ ȬǞźNjž ȴǞƳƁ ȴȚ ȴȚȤȶNjŽȚ ȠƾƄƱƓ
.( ȉ ǚƳƪŽȚ ǍƮſȖ ) ǝŽƾƱŻǽ ȴȚȤȶNjŽȚ ȠƾƄƱž ǕźȢȚ . Ȉȉ
.ȚȹȤǞź ǏƃƲƓȚ ǜž ǏŮƾƲŽȚ ǙƱŮ ǛŻ . ȈȊ
•
ǜƇƭŽȚ
•
•
•
.Ȉ
.ȉ
.Ȋ
.ȋ
.Ȍ
.ȍ
.Ȏ
.Ȉ
.ȉ
.Ȋ
.ȋ
.Ȍ
.ȍ
ȲƾƱŻLjȚ ȴǞƳů ȴȖ ƿƆƁ .ȥƾƷƐȚ ǟƴŸ ǀƶƇƭƓȚ ǁƸƸƃƅƄŮ ǛŻ
ȝƾƇƄƱŽȚ ǟƴŸ ǓƃƬŽƾŮ ǀƄƃƅž ȥƾƷƐƾŮ ȜȢǞűǞƓȚ ǀŰǾƅŽȚ
ǀŸƾƉŽȚ țȤƾƲŸ ȵƾƏƼŮ ǀƶƇƭƵƴŽ ȸǞƴƯŽȚ ȔƾƭưŽȚ ǍƁȶNjƄŮ ǛŻ
.ǝƶƇŶ NjƁǍů ȸnjŽȚ ǃƄƶƓƾŮ ǀƶƇƭƓȚ ȔƾŸȶ Ȕǚƙ ǛŻ
țȤƾƲŸ ǏƳŸ ȵƾƏƼŮ
ȴǞƳƁ ȠƾƄƱƓȚ ȴƾź ǚųȚNjƴŽ ȶ ȇ ǕǤǞŽȚ Ǡź ȴȚȤȶNjŽȚ ȠƾƄƱž ȴƾż ȚȣȚ
.(ȉ ǚƳƪŽȚ ǍƮſȖ) ǝŽƾƱŻȚ ȔƾưŽǽ ȴȚȤȶNjŽȚ ȠƾƄƱž ǕźȢȚ .ǚƱƲž
.(P) ǘƱƒȚ ǕǤǞŽ ȶȚ ȉ ȶȚ Ȉ ȢȚNjŸȂŽ ǀƴƸƴŻ ȴȚǞƅŽ ǀƶƇƭƓȚ ǚƸưƪƄŮ ǛŻ
ǟƴŸ ǚƫƎ ȴȚǞŰ Ǡź .ȚNjű ǀƸŽƾŸ ǀŸǍƉŮ ǚƵƯů ǀƶƇƭƓȚ ȵnjƀ
ǁƴƫŲ ƾƵƴż ǀƶƇƭƓȚ ǚƸưƪů ǁŻȶ ȢȚȥ ƾƵƴż .ȴǞƇƭž ǃƄƶƓȚ
Ǖž ǀƲƸŻȢ Ȍȇ ǜž ǍƅżȖ ǚƵƯů ǀƶƇƭƓȚ ǚƯƏ ǽ :ǀƮŲǾž
Ȏ ȜNjƓ ȢǍƃů ǟƄŲ ǀƶƇƭƓȚ ȱǍůȚ .ȳȚǍűȈȌȇ ǜž ǍƅżȖ ȝƾſǞƳž
ǟƴŸ ǚƫƎ ƾžNjƶŸ ( 0 ǕǤǞŽȚ ) ǀƶƇƭƓȚ ǚƸưƪů ȯƾƲƁƼŮ ǛŻ
.( ȉ ǚƳƪŽȚ ǍƮſȖ ) ǝŽƾƱŻǽ ȴȚȤȶNjŽȚ ȠƾƄƱž ǕźȢȚ
ȤƾƸƄŽȚ ǚƫƱŮ ǛŻ ǛŰ
.ƿƴǧ ljƭŴ ǟƴŸ ȥƾƷƐȚ ǕǤ
.ǀƶƇƭƓȚ ȜNjŸƾŻ Ǡź ȜȢǞűǞƓȚ
ǀƶƇƭƵƴŽ ȸǞƴƯŽȚ ȔƾƭưŽȚ ǍƁȶNjƄŮ ǛŻ
.ǀƶƇƭƓȚ ȔƾŸȶ ǘƴưŽ ǀŸƾƉŽȚ
.NjƸű ǚƳƪŮ ȴǞƇƭž Ƌƾſ ǟƴŸ
.ȷǍųȖ ȜǍž ƾƷƴƵŸ ȔNjŮ ǚƃŻ
.ǀŮǞƴƭƓȚ ǜƇƭŽȚ ǀűȤȢ
.ȚȹȤǞź ǏƃƲƓȚ ǜž ǏŮƾƲŽȚ ǙƱŮ ǛŻ . Ȉȇ
ȹ
ƾžƾƢ ȝȚǍƱƪŽȚ ǗŻǞƄů ǟƄŲ ǍƮƄſȖ . ȈȈ
.ȋ ǚƳƪŽȚ ǍƮſȚ
.ǀƶƇƭƓȚ ȔƾŸȶ ljƄƱŽ
ȹ
ǘǣƾŻȢ
ƾƃƁǍƲů
.ǠŮǍƷƳŽȚ
.Ȉ
.ȉ
.Ȋ
.ȋ
.Ȍ
.ȍ
.Ȏ
.ȏ
.Ȑ
56
COMPACT BLENDER (LET’S BLENDER) ART 213100
Page 62

ǏŮƾƲŽȚ ȱƾƉžƼŮ ǏƃƲƓȚ ǜž ȥƾƷƐȚ ǏŮƾŻ ǙƱŮ ǛŻ
ȶȖ ȤƾƸƄŽȚ ǙƴŴ ǜž ȸȖ ȩǍƯů ȚȣȘ ȥƾƷƐȚ ȳNjƈƄƉů ǽ
ƾƶƁNjŽ ǀſƾƸƫŽȚ ǛƉŻ ǟŽȘ ȥƾƷƐȚ ȜȢƾŸƾŮ ǛŻ .ȤǍƬŽ ȥƾƷƐȚ
ȤƾƸƄŽȚ ǙƴŴ ȲȚNjƃƄŴȚ ǜƳƚ .ǙƄžǾŴ ǟƴŸ ǀƮźƾƇƵƴŽ
ǍźǞƄů ǂƸŲ ȆƾƶƁNjŽ ǀſƾƸƫŽȚ ǛƉŻ ǀƭŴȚǞŮ ǓƲź ǗŽƾƄŽȚ
ȤȢƾƫƙ ȴǾƫƄƁ ǽ ǀŻƾƭŽȚ ǙƴŴȶ ȥƾƷƐȚ ȴȖ ǜž Njżƺů
ǜž ǏŮƾƲŽȚ ǙƱŮ ǛŻ .ȔƾƓȚ Ǡź ǓƲŴ ȚȣȘ ȥƾƷƐƾŮ ǙƉƢ ǽ
.ȤƾƸƄŽȚ ǙƴŴ ƿƇƉŮ ǏƸŽȶ ȆǝƃƇŴȶ
.ȠǾǧȁƾŮ ǀǧƾƒȚ ȝȚȶȢLjȚ
.ǍŵƾƃƓȚ ƿƷƴŽȚ ȶȖ ǀƶųƾƉŽȚ ȴȢƾƯƓȚ ǚƅž ȆȜȤȚǍƑȚ
.ȔƾƓȚ ȴƾƉžǾƁ ǽ ǏŮƾƲŽȚȶ ȤƾƸƄŽȚ ǙƴŴ ȴƺŮ Njżƺů
.ȴȃȚ NjƯŮ ȥƾƷƐȚ ȳNjƈƄƉů ǽ .ȚȹȤǞź ǏƃƲƓȚ
ȳȚNjƈƄŴǽȚ ȔƾƶŰȖ
ǀƴƁǞŶ ȜǍƄƱŽ ǍƵƄƉž ǚƳƪŮ ȪǾƒȚ ȳȚNjƈƄŴȚ NjƶŸ
ȥƾƷƐȚ ȱǍůȚ ǀŽƾƑȚ ȵnjƀ Ǡź .ǠŮǍƷƳŽȚ ȤǞůǞƓȚ ǜƈƉƸŴ
.ǝžȚNjƈƄŴȚ ȜȢƾŸȚ ǚƃŻ ȢǍƃƁ
.ǀźǞƪƳƓȚ ǜżƾžLjȚ Ǡź ȥƾƷƐȚ ȳȚNjƈƄŴƾŮ ǛƲů ǽ
.ǀƃŶȤ ǀźǍŹ Ǡź ȥƾƷƐȚ ȳȚNjƈƄŴƾŮ ǛƲů ǽ
ǝƶƳƚ ǽ ǂƸŲ ǁŮƾŰȶ ǞƄƉž ljƭŴ ǟƴŸ ȥƾƷƐȚ ǕǤǞŮ ǛŻ
.ȪǞƲƉŽȚ
ȶȖ ǗƁǍƫƄŽȚ ȠǞŽ ǀźƾŲ ǜž ȤƾƸƄŽȚ
ȶȖ ȤƾƸƄŽȚ ǙƴŴ ȶȖ ȥƾƷƐȚ ǏƓ NjƶŸ ƞƄźƾű ǙƁNjƁ ȴƺŮ Njżƺů
ǟƴŸ ǁƃƅž ǓƴƒȚ ȔƾŸȶ ȴƾż ȚȣȚ ǓƲź ȥƾƷƐȚ ǚƸưƪƄŮ ǛŻ
.ǓƴƒȚ ȔƾŸȶ ǟƴŸ ǁƃƅž ȔƾƭưŽȚȶ ȥƾƷƐȚ
ǏƃƲƓȚ ǜž ǏŮƾƲŽȚ ȲȥȖȶ ȥƾƷƐȚ ǚƸưƪů ȯƾƲƁƼŮ ǛŻ
ǗƸƮƶů ǚƃŻȶ ȆȳȚNjƈƄŴǽȚ ȔƾƶŰȖ ǚƭŸ ȞȶNjŲ ǀŽƾŲ Ǡź
NjƯŮ ȥƾƷƐȚ ǜƁǎƈů ȶȖ ȆǝƄŽȚȥȘ ȶȖ ǘƇƴž ƿƸżǍů ȶȖ ȥƾƷƐȚ
.ȳȚNjƈƄŴǽȚ ȔƾƶŰȖ ǀƃŻȚǍž ȴȶȢ ȥƾƷƐȚ ȱǍƄŮ ǛƲů ǽ
ǀſƾƸƫŽȚ" ǍƮſȚ)ȹȚNjƸű ȥƾƷƐȚ ǗƮſ ȆȳȚNjƈƄŴǽȚ NjƯŮ
ǙƴŴ ǠŽNjƄŮ ljƵƉů ǽ
.ǀŽȶƾƭŽȚ ȶȖ ȯǍŽȚ
.ǏŮƾƲŽȚ
.ȳȚNjƈƄŴǽȚ
.("ǗƸƮƶƄŽȚȶ
•
•
țȤƾƲŸ ǏƳŸ ǀƶƇƭƓȚ ȜNjŸƾƲŽȚ ȤȢȖ ǛŰ ǀƶƇƭƓȚ ǁƸƃƅƄŮ ǛŻ
.ǙƱƴŽ ǏżƾƯž ǚƳƪŮ ǀƶƇƭƓȚ ǕƸƵƏ ȜȢƾŸƼŮ ǛŻ
ǀƶƇƭƓȚ ǜž ǀƶƇƭŽȚ ȜNjŸƾŻ ǀŽȚȥȘ
.Ȍ ǚƳƪŽȚ ǍƮſȚ
.ǀŸƾƉŽȚ
.ǀƶƇƭƓȚ ȔƾŸȶ ǜž ȜNjŸƾƲŽȚ ǙƱŮ ǛŻ
.Ȉ
.ȉ
.Ȋ
•
•
•
ȬǞűǍƴŽ ƾƷŮ ȫƾƱƄŲǽȚȶ ȆȨǍƇŮ ȝȚȢƾŵȤȁȚ ȜȔȚǍŻ ȔƾűǍŽȚ
.ǓƲź ȝƾƵƸƴƯƄƴŽȹƾƲźȶ ȥƾƷƐȚ Țnjƀ ȳȚNjƈƄŴƾŮ ǛŻ
•
•
•
•
•
•
.ǓƲź ǀƸŽǎƶƓȚ ȩȚǍŹȀŽ ȥƾƷƐȚ Țnjƀ ȳȚNjƈƄŴƾŮ ǛŻ
Ɩ ȚȣȘ ȜǍƭų ǗŻȚǞƓ ȩǍƯƄŽȚ Ǡź ȥƾƷƐȚ Țnjƀ ƿƃƉƄƁ NjŻ
ǀƁNjƉű ǀŻƾŸȘ ȶȣ Ǒƈŵ ȶȖ ǚƱŶ ǀƭŴȚǞŮ ǝžȚNjƈƄŴȚ
ǝžȚNjƈƄŴȚ NjƶŸ ȶȖ ǀƸżǍŲ ȶȖ ǀƸƴƲŸ ȶȖ ǀƸƃƫŸ ȶȖ
.ǀžȥǾŽȚ ȜǍƃƒȚȶ ǀźǍƯƓȚ ȴǞƳƴƄƚ ǽ ȨƾƈŵȖ ǀƭŴȚǞŮ
ȔƾƭŸȘ ǀžǾƉŽȚ ǜŸ ȴǞŽȶƻƉƓȚ ȨƾƈŵLjȚ ǟƴŸ ǠưƃƶƁȶ
.ȥƾƷƐȚ ȳȚNjƈƄŴȚ ǟƴŸ ȯȚǍŵȁȚ ȶȖ ǀƇǤȚȶ ȝƾƵƸƴƯů
.ȥƾƷƐƾŮ ȲƾƱŶLjȚ ǂƃŸ ȳNjŸ ǜž Njżƺů
Ǡƶź ǀƭŴȚǞŮ ǓƲź ǀžȥǾŽȚ ȝƾƇƸƴƫƄŽƾŮ ȳƾƸƲŽȚ ƿƆƁ
.ǙƉƱƶŮ ȥƾƷƐȚ ȠǾǧȘ ȲȶƾƎ ǽ .ǚƀƻž ǀžNjų
•
ǀŲǞŽ Ǡź ljǤǞƓȚ ǝůȚȣ Ǟƀ ǠŮǍƷƳŽȚ NjƷƐȚ ȴƺŮ ǘƲƎ
•
.ȩȤƻž ȸȤȚNjű ǏƃƲž Ǡź ȥƾƷƐȚ ǏŮƾŻ ǕǤǞŮ ǛŻ
ȴǞƳƁ ǽ ƾžNjƶŸ
.ȳȚNjƈƄŴǽȚ ǚƃŻ ȥƾƷƐȚ ǟƴŸ ȬǞƶŽȚ
ȹ
ƾƵǣȚȢ ǏƃƲƓȚ ǜž ȥƾƷƐȚ ǏŮƾŻ ǙƱŮ ǛŻ
.ȳȚNjƈƄŴǽȚ NjƸŻ ȥƾƷƐȚ
ǀžǾƉŽȚ
ǀžƾŸ ȝƾžǞƴƯž
•
.ȹƾƲŲǽ ƾƷƸŽȘ
•
•
•
•
•
ȔƾŮǍƷƳŽȚȶ ȜȤȚǍƑȚ
•
•
•
•
•
COMPACT BLENDER (LET’S BLENDER) ART 213100
57
Page 63

ƟƴŽƾŮ ȥǞƓȚ ǍƸƫŸ
:ȝƾſǞƳƓȚ
ȥǞž.Ȉ
ƾƸƴƸſƾź ǃƴŰ
ƿƸƴŲ
ǒƯŮ ǕǤ .ǓƴƒȚ ȔƾŸȶ Ǡź ƾƷƯǤ ǛŰ ljǣȚǍŵ ǟŽȚ ȥǞƓȚ ǕƸƭƲƄŮ ǛŻ
ǝżǍůȚ ǛŰ ȪǾƒȚ ǚƸưƪƄŮ ǛŻ .ȢȤƾƃŽȚ ƿƸƴƑȚ ǜž ǒƯŮ ȶ ƾƸƴƸſƾƱŽȚ ǃƴŰ
!njƁnjŽ ƟƴŽƾŮ ȥǞž ǍƸƫŸ ǀƆƸƄƶŽȚ .ǀƴƸƴŻ ȴȚǞƅŽ ȝƾſǞƳƓȚ ǓƴƈŮ ȳǞƲƁ
ǀŽȶȚǍƱŽȚ ȤǞƭź
ȜǾƤȚ ǍƸŹ ǀŽȶȚǍƱŽȚ ǜž țǞż ȉ
ƿƸƴƑȚ ǜž Ǘƫſȶ țǞż
ȰǞƱƥȚ ȸȢƾŮǎŽȚ ǜž țǞż Ǘƫſ
ȜǎƀƾƐȚ ƾƸƴƸſƾƱŽȚ ǀƷƳſ ǜž ȤȚNjƲž ȉ
ǚƇƶŽȚ ǚƉŸ ǜž ȜǍƸƃż ǀƲƯƴž ȉ
ǟƄŲ ǓƴƒƾŮ ǛŻȶ ȔƾƭưŽȚ ǕǤǞŮ ǛŻ ǓƴƒȚ ȔƾŸȶ Ǡź ȝƾſǞƳƓȚ ǕǤ
.ǍžLjȚ ȳǎŽ ȚȣȘ ƿƴŻ ȶ ȪǾƒȚ ǚƸưƪů ȯƾƲƁƼŮ ǛŻ ǛŰ ƾƵŸƾſ ljƃƫƁ
ǝžNjŻ .țǞż ȋ ȶȖ Ȋ Ǡź ǓƸƴƒȚ ƿƳŴȚ
.ȲƾƑȚ Ǡź
:ȝƾſǞƳƓȚ
ȴǞƵƸƴŽȚ Ǡź ǀƉƵưƶƓȚ ȶȢƾżǞźLjȚ ǀƚǍż
:ȝƾſǞƳƓȚ
ȟȥƾƭŽȚ ȴǞƵƸƴŽȚ ǍƸƫŸ ǜž ȜǍƸƃż ǀƲƯƴž Ȉ
ȤƾƑȚ ǚƱƴƱŽȚ ǀƫƴǧ ǜž ȜǍƸưǧ ǀƲƯƴž Ǘƫſ
.ȟȥƾŶ ȴǞƇƭž ȢǞŴȚ ǚƱƴźȶ ljƴž
ǕǤ ȶ ȝƾƃƯƳž ƾƷƯƭŻȶ ȜȚǞƶŽȚ ȬǎſȚ ȶ ȶȢƾżǞƱŽȚ ȜǍƵŰ ǍƸƪƲƄŮ ǛŻ
ǚƱƴƱŽȚ ǀƫƴǧ ȶ ȴǞƵƸƴŽȚ ǍƸƫŸ ǀźƾǤƼŮ ǛŻ .ȪǾƒȚ Ǡź ǠƲƃƄƓȚ
ǛŰ ǛŸƾſ ǓƸƴų
ǟŽȘ ȶȢƾżǞźLjȚ ǓƸƴų ǚƲƶŮ ǛŻ .ǚƱƴƱŽȚ ȶ ljƴƓȚ ǕǤȶ ǁŻȶ ƞƇƁ
ǟƄŲ ȚȢǍƃž ǔƱƇƁ .ǠƳƸƄŴǾŮ ȯǾưŮ ǝƄƸƭưƄŮ ǛŻȶ ǀƸſƾƭƴŴ
ǟƴŸ ǚƫƎ ǟƄŲ ǓƴƒȚ ǀƸƴƵƯŮ ǛŻȶ .ȳǞƅŽȚ ȶ ȤƾƑȚ
ȶȢƾżǞźȚ ȜǍƵŰ Ȉ
ȚNjƸű ȳȶǍƱž ȆȳǞŰ Ǒź Ȉ
.ǝƚNjƲů ǛƄƁ
Ǡź ȝƾſǞƳƓȚ ǜƇŶ ǛƄƁ .ǀƲǣƾź ǀŸǍƉŮ ǚƵƯƁ ȪǾƒȚ Țnjƀ
ǁƴƫŲ ƾƵƴż ȪǾƒȚ ǚƸưƪů ǁŻȶ ȢȚȥ ƾƵƴż .ǀƴƸƴŻ ȴȚǞŰ
ǟŽȚ ȸȢƻů ȴȚ ǜƳƵƓȚ ǜž ȪǾƒȚ Ǡź ǀƶųƾƉŽȚ ǚǣȚǞƉŽȚ
ǝƃƃƉƁ ȸnjŽȚ ǓưƬŽȚȶ ȤƾƈƃŽȚ ǀƆƸƄſ ȔƾƭưŽȚ ȝƾƃŰ ȳNjŸ
ȱƾƉžƾŮ ǛŻ Țnjƀ ȞȶNjŲ ƿƶƆƄŽ .ǜųƾƉŽȚ ǚǣƾƉŽȚ
.NjƸű ǚƳƪŮ ǀſǞƇƭž ȝƾƆƄƶž ǟƴŸ
NjƸŻ ȪǾƒȚ ƾƓƾŶ
ȧƾƵŻ ǀƯƭƲŮ ǚƱŴǽ ȔƾƭưŽȚ
.ȳȚNjƈƄŴǽȚ
ǀƂƸƃŽȚ
ȝƾƁȶƾŲ Ǡź ȆƿƴƯŽȚȶ ǙƸƄŴǾƃŽȚ ǚƅž ȆǗƸƴưƄŽȚ ȢȚǞž ǜž Ǒƴƈů
ǝƶž ǑƴƈƄŽȚ ȝȢȤȖ ȚȣȘ ȥƾƷƐȚ ȳȚNjƈƄŴȚ ȜȢƾŸȘ ǜž NjżƺƄŽȚ ƿƆƁ
ȝƾŲǾǧȘ ǟŽȘ ȟƾƄƇƁ ȶȖ NjƸű ǚƳƪŮ ǚƵƯƁ ȲȚǎƁ ǽ ǝſȖ ƞŲ Ǡź
ƿƆƸź ǠǤȚǍƄźǽȚ ȵǍƵŸ ǀƁƾƷſ ǟŽȘ ȥƾƷƐȚ ǚƫƁ ƾžNjƶŸ
ȜȢƾŸȘ ǜž NjżƺƄŽƾŮ ǙŽȣȶ ȆǀŽǞƂƉž ǀƲƁǍƭŮ ǝƶž ǑƴƈƄŽȚ
Ǡź ȥƾƷƐȚ ǜž ǑƴƈƄů ǽ .ǝƶž ȔȚǎűȖ ȶȖ ȥƾƷƐȚ ȳȚNjƈƄŴȚ
ǕŻǞž ǟŽȘ ȶȖ ǚƤȚ ǟŽȘ ƾƷƵƴŴ ǚŮ ȑǀƱƶƫž ǍƸŹ ȝƾƁƾƱſ
ǟƴŸ ȲǞƫƇƴŽ ǠƴƤȚ ǏƴƣƾŮ ǚƫůȚ .ȯȶǍƯž ǕƸƵƏ
.ǙƄƲƭƶž Ǡź ǕƸƵƆƄŽȚȶ ǠƲƴƄŽȚ ǀƵƮſȖ ȲǞŲ ȝƾžǞƴƯž
.ǀƃŴƾƶƓȚ ȝƾƁƾƱƶŽȚ
.ǀƱƸƱŶ
:ǕƃƄƓȚ ǠŮȶȤȶLjȚ ȳǞŴǍƓȚ
2002/95/EC
2002/96/EC
ȝƾƱǧȶ
ƾƷƴƵŸ ǙƶƳƚ ȜnjƁnjŽ ȝƾƱǧȶ ǟƴŸ ȲǞƫƇƴŽ ǁſǍƄſǽȚ ljƱƫů
.ǙŽ ƾƀƾſNjűȶ ȝƾƱǧȶ ȞǾŰ NjƏ ȯǞŴ ǠƴƁ ƾƵƸź .ȪǾƒȚ ǀƭŴȚǞŮ
•
•
•
•
58
COMPACT BLENDER (LET’S BLENDER) ART 213100
Page 64

COMPACT BLENDER (LET’S BLENDER) ART 213100
59
Page 65

60
COMPACT BLENDER (LET’S BLENDER) ART 213100
 Loading...