

PRINCESS 212700 User Manual [fr]
Food Processor and Blender
Article 212700
ICE
P
© Princess 2008
• Gebruiksaanwijzing • User's instructions • Mode d'emploi
• Bedienungsanleitung • Instrucciones de uso • Istruzioni per l'uso
• Bruksanvisning • Brugsanvisning • Bruksanvisning • Käyttöohje
• Instruções de uso • ȅįȘȖȓİȢ ȤȡȒıȘȢ •
P
ICE
Nederlands 1
English 8
Français 15
Deutsch 23
Español 31
Italiano 39
Svenska 47
Dansk 54
Norsk 61
Suomi 68
Português 75
ǼȜȜȘȞȚțȐ 83
91
1
1
2
16
17
13
15
14
3
5
4
12
6
P
ICE
11
10
7
8
9
2
3
P
ICE
P
ICE
4

Algemeen
Met de Princess Food Processor and
Blender kunt u razendsnel voedsel
bereiden. U kunt er moeiteloos mee
snijden, hakken, raspen, schaven en zelfs
plakken snijden.
U heeft alle hulpstukken tot uw beschikking
om het voedsel precies zo te bereiden als
u dat wenst. De hulpstukken zijn
gemakkelijk op te bergen in de
ingebouwde opberglade.
Het apparaat is voorzien van een
elektrische aandrijving met twee
snelheden en een pulsfunctie.
De antislipvoetjes zorgen ervoor dat het
apparaat tijdens gebruik altijd stabiel staat.
De inhoud van de werkkom is 0,75 liter.
Met de blenderfunctie kunt u groenten en
fruit fijnsnijden of overheerlijke shakes en
sappen maken.
Met de scherpe roestvrijstalen messen
kunt u moeiteloos zowel grote als kleine
stukken fruit en groente fijnsnijden of
pureren.
Het apparaat heeft een speciale functie om
ijsklontjes te malen in de kan van de
blender. Met deze functie werkt de blender
met korte intervallen zodat het ijs kan
terugvallen naar de bodem van de kan.
Deze functie kan ook worden gebruikt voor
het bewerken van vast voedsel in de
werkkom.
De blenderkan heeft een afsluitbaar
deksel. Tijdens het blenden kunt u via de
vulopening in de deksel ingrediënten
toevoegen zonder te morsen. De inhoud
van de blenderkan is 1,2 liter.
Bediening en
onderdelen
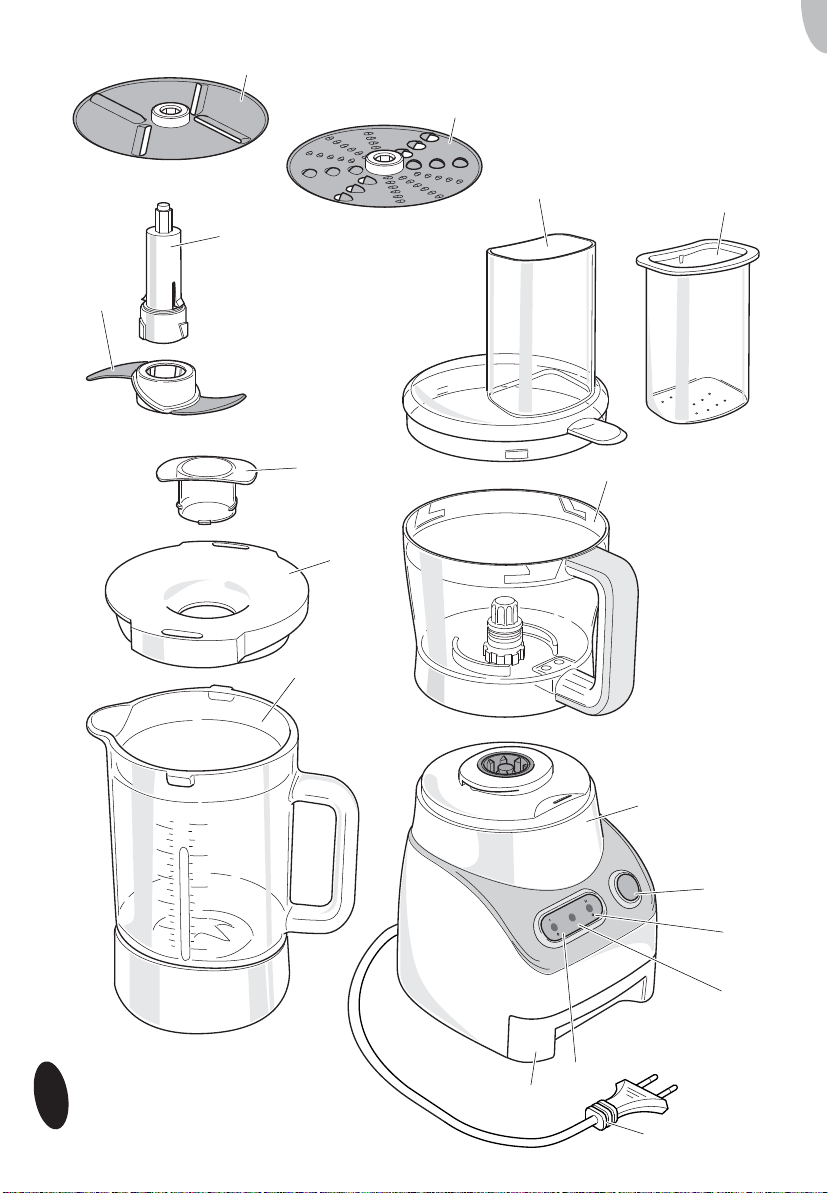
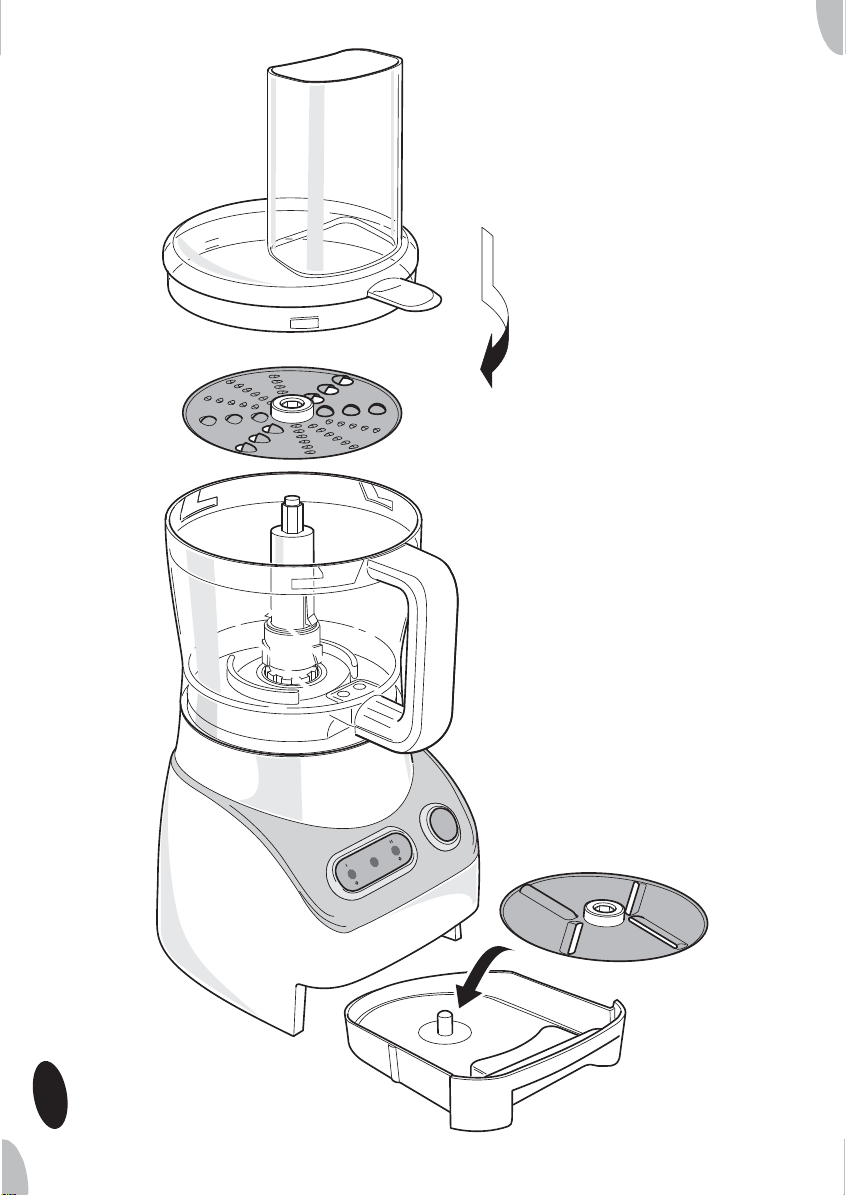
Zie ook figuur 1.
Het apparaat bestaat uit de volgende
onderdelen:
1Plaksnijder
2 Rasper/schaver
3 Deksel van werkkom
4 Stopper
5 Werkkom
6 Aandrijfeenheid
7 P-knop (Puls) met indicatielampje
8 II/ICE: knop voor continue hoge
snelheid, met indicatielampje/
intervalfunctie
9 Indicatielampje voor stand-by
10 Netsnoer met stekker
11 I: knop voor continue lage snelheid, met
indicatielampje
12 Opberglade voor hulpstukken
13 Blenderkan
14 Blenderdeksel
15 Vulopening van blenderdeksel
16 Mes
17 Opzetas
Voor het eerste gebruik
1 Verwijder de gehele verpakking.
2 Controleer of de netspanning
overeenkomt met de aangegeven
netspanning op het typeplaatje van het
apparaat.
3 Reinig het apparaat. Zie 'Onderhoud en
reiniging'.
Gebruik
Snijden en hakken
1 Plaats het apparaat op een vlak, stabiel
oppervlak zodat het niet kan omvallen.
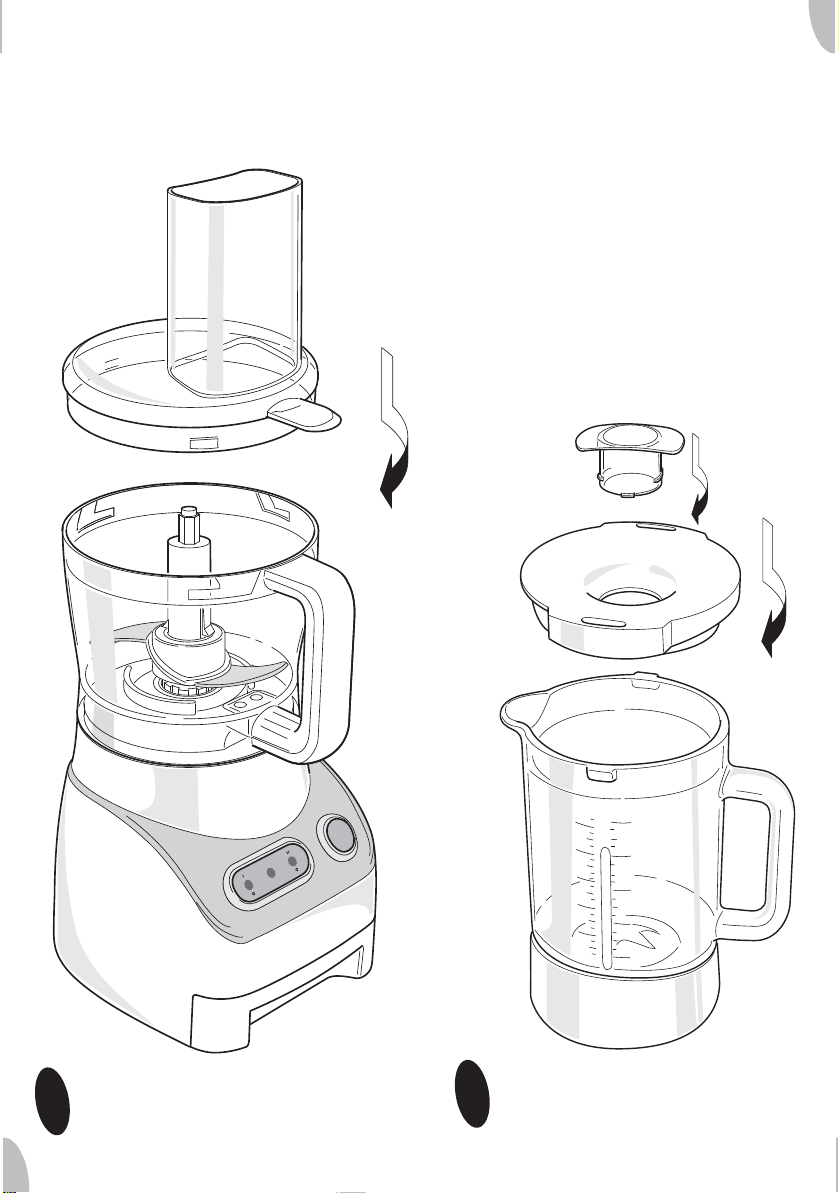
Zie figuur 2.
Article 212700 Princess Food Processor and Blender
1

2 Plaats de werkkom op de
aandrijfeenheid. Draai de werkkom met
de klok mee vast totdat deze niet meer
verder kan.
3 Schuif het mes op de opzetas en druk
deze omlaag totdat het mes vastklikt in
de vergrendelingen.
Wees voorzichtig bij het plaatsen en
verwijderen van de hulpstukken. Het
mes is scherp.
4 Plaats het mes met de opzetas over de
aandrijfas in de werkkom.
5 Doe de ingrediënten in de werkkom.
6 Plaats de deksel op de werkkom en
draai de deksel met de klok mee totdat
deze niet meer verder kan. Het
uitstekende lipje van de deksel moet
over de handgreep van de werkkom zijn
geschoven.
7 Plaats de stopper in de vulopening.
8 Trek het netsnoer uit de opbergruimte
aan de achterzijde van de
aandrijfeenheid.
9 Steek de stekker in het stopcontact.
Wanneer alle indicatielampjes
knipperen, zijn de werkkom en/of de
deksel niet correct geplaatst. Om
veiligheidsredenen is het in dit geval
niet mogelijk om het apparaat in te
schakelen. Controleer de plaatsing van
de kom en de deksel.
Wanneer de werkkom en deksel correct
geplaatst zijn, knippert alleen het standby-indicatielampje. Alleen dan kan het
apparaat worden gebruikt.
10 Druk op de knop P (Puls) om de
aandrijfeenheid korte tijd op hoge
snelheid te laten werken (pulsfunctie) of
druk op de knop I voor continue lage
snelheid of op de knop II/ICE voor
continue hoge snelheid. Het stand-by-
indicatielampje gaat uit en het blauwe
indicatielampje in de ingedrukte knop
gaat branden.
11 Voeg tijdens gebruik desgewenst
ingrediënten toe via de vulopening in de
deksel. Gebruik de stopper om de vaste
ingrediënten door de vulopening naar
beneden te drukken. Druk niet te hard.
• De maximale werktijd in de continue
hoge of lage snelheid is 2 minuten.
Vervolgens wordt de aandrijfeenheid
automatisch gedurende 2 minuten
uitgeschakeld. 15 Seconden voordat
het apparaat wordt uitgeschakeld,
begint het stand-by-indicatielampje te
knipperen. Het blauwe indicatielampje
blijft branden.
• Steek, om verwondingen of schade
aan het apparaat te voorkomen, nooit
een hand of ander voorwerp in de
werkkom terwijl deze in gebruik is.
• Gebruik altijd de stopper om
ingrediënten in de kom te drukken.
Druk de ingrediënten dus nooit aan
met uw vingers, een vork of ander
voorwerp.
12 Gebruik de stopper om de vulopening
te sluiten zodat tijdens gebruik niets in
de werkkom kan vallen of eruit kan
spatten.
13 Schakel het apparaat na gebruik uit
(druk op de knop waarvan het
indicatielampje brandt of laat de
pulsknop los).
14 Draai de werkkom los en verwijder deze
van de aandrijfeenheid.
Neem het mes met de opzetas uit de
kom voordat u deze leegmaakt.
Verwijder de deksel van de werkkom
niet voordat het mes volledig stilstaat.
Tips
• In de stand P (Puls) draait het mes op de
maximale snelheid zolang de knop
ingedrukt is.
• Indien de ingrediënten blijven plakken
aan het mes of aan de binnenkant van de
werkkom, schakelt u het apparaat uit en
2
Article 212700 Princess Food Processor and Blender

verwijdert u de deksel en het mes. U kunt
ingrediënten vervolgens afschrapen met
een spatel.
• Snijd de ingrediënten in kleine stukken
voordat u deze in de werkkom doet.
• Het apparaat hakt erg snel. Zorg ervoor
dat het apparaat niet te lang hakt. U kunt
beter meerdere malen kort hakken door
de stand P (Puls) te gebruiken.
• Gebruik de intervalfunctie (houd de knop
II/ICE langer dan 3 seconden ingedrukt)
wanneer u vast voedsel wilt verwerken.
• Hak in de werkkom geen harde
ingrediënten, zoals koffiebonen,
muskaatnoten en ijsklontjes.
Raspen, schaven of plakjes snijden
1 Plaats het apparaat op een vlak, stabiel
oppervlak zodat het niet kan omvallen.
Zie figuur 4.
2 Plaats de werkkom op de aandrijfeenheid.
Draai de werkkom met de klok mee
vast totdat deze niet meer verder kan.
3 Plaats de opzetas (zonder het mes)
over de aandrijfas in de werkkom.
4 Plaats de plakkensnijder of de rasper/
schaver op de opzetas en zorg ervoor
dat de zijde die wordt gebruikt omhoog
gericht is.
Wees voorzichtig bij het plaatsen en
verwijderen van de hulpstukken. De
rasper/schaver is scherp.
5 Plaats de deksel op de werkkom en
draai de deksel met de klok mee totdat
deze niet meer verder kan. Het
uitstekende lipje van de deksel moet
over de handgreep van de werkkom zijn
geschoven.
6 Trek het netsnoer uit de opbergruimte
aan de achterzijde van de
aandrijfeenheid.
7 Steek de stekker in het stopcontact.
Wanneer alle indicatielampjes
knipperen, zijn de werkkom en/of de
deksel niet correct geplaatst. Om
veiligheidsredenen is het in dit geval
niet mogelijk om het apparaat in te
schakelen. Controleer de plaatsing van
de kom en de deksel.
Wanneer de werkkom en deksel correct
geplaatst zijn, knippert alleen het standby-indicatielampje. Alleen dan kan het
apparaat worden gebruikt.
8 Druk op de knop I voor continue lage
snelheid. Het stand-by-indicatielampje
gaat uit en het blauwe indicatielampje in
knop I gaat branden.
9 Voeg tijdens gebruik desgewenst
ingrediënten toe via de vulopening in de
deksel. Gebruik de stopper om de vaste
ingrediënten door de vulopening naar
beneden te drukken. Druk niet te hard.
• De maximale werktijd in de continue
hoge of lage snelheid is 2 minuten.
Vervolgens wordt de aandrijfeenheid
automatisch gedurende 2 minuten
uitgeschakeld. 15 Seconden voordat
het apparaat wordt uitgeschakeld,
begint het stand-by-indicatielampje te
knipperen. Het blauwe indicatielampje
blijft branden.
• Steek, om verwondingen of schade
aan het apparaat te voorkomen, nooit
een hand of ander voorwerp in de
werkkom terwijl deze in gebruik is.
• Gebruik altijd de stopper om
ingrediënten in de kom te drukken.
Druk de ingrediënten dus nooit aan
met uw vingers, een vork of ander
voorwerp.
10 Schakel het apparaat na gebruik uit
(druk op de knop I waarvan het
indicatielampje brandt).
11 Draai de werkkom los en verwijder deze
van de aandrijfeenheid. Neem de
hulpstukken uit de kom voordat u deze
leegmaakt.
Blenden
1 Plaats het apparaat op een vlak, stabiel
oppervlak zodat het niet kan omvallen.
Article 212700 Princess Food Processor and Blender
3

2 Plaats de blenderkan op de
aandrijfeenheid. Draai de blenderkan
met de klok mee vast totdat deze niet
meer verder kan.
3 Snijd het fruit en/of de groente in
stukken die in de kan passen. Snijd het
voedsel niet in te grote stukken. De
stukken moeten klein genoeg zijn om
tot onder in de kan te vallen.
4 Open de deksel door deze tegen de klok
in te draaien en doe de stukken in de kan.
Zie figuur 3.
5 Plaats de deksel op de kan om
opspatten te voorkomen.
6 Steek de stekker in het stopcontact.
Wanneer alle indicatielampjes
knipperen, is de kan niet correct
geplaatst. Om veiligheidsredenen is het
in dit geval niet mogelijk om het
apparaat in te schakelen. Controleer de
plaatsing van de kan.
Wanneer de kan correct is geplaatst,
knippert alleen het stand-byindicatielampje. Alleen dan kan het
apparaat worden gebruikt.
7 Druk op de knop P (Puls) om de
aandrijfeenheid korte tijd op hoge
snelheid te laten werken (pulsfunctie) of
druk op de knop I voor continue lage
snelheid of op de knop II/ICE voor
continue hoge snelheid. Het stand-byindicatielampje gaat uit en het blauwe
indicatielampje in de ingedrukte knop
gaat branden.
Opmerking:de blender werkt erg snel.
Het voedsel is binnen enkele seconden
fijngesneden. Het gesneden voedsel
wordt fijner wanneer u de blender
langer laat werken.
8 U kunt desgewenst voedsel bijvullen
door de vuldop te openen: draai de
vuldop tegen de klok in en verwijder
deze uit de deksel. Als de stukken te
groot zijn voor de vulopening, schakelt
u de blender uit, verwijdert u de deksel
en voegt u het voedsel toe. Plaats de
deksel terug op de kan voordat u de
blender weer inschakelt.
9 Nadat u de gewenste hoeveelheid fruit
en/of groente hebt verwerkt, kunt u het
apparaat uitschakelen (druk op de knop
waarvan het indicatielampje brandt).
10 Draai de kan los en verwijder deze van
de aandrijfeenheid.
IJs malen
• Het apparaat heeft een speciale functie
om in de blenderkan ijsklontjes te malen.
Houd de knop II/ICE langer dan
3 seconden ingedrukt om deze functie te
starten. Het apparaat werkt gedurende
1,5 seconde en pauzeert vervolgens
gedurende 0,7 - 0,8 seconde. Deze
procedure wordt 10 keer herhaald en
duurt in totaal ongeveer 22 seconden.
Veiligheid tijdens gebruik
• Steek, om verwondingen of schade
aan het apparaat te voorkomen, nooit
een hand of ander voorwerp in de kan
terwijl deze in gebruik is.
• Laat het netsnoer nooit over de rand
van het aanrecht, het werkblad of de
tafel hangen.
• Zorg er altijd voor dat het snoer
volledig afgewikkeld is.
• Gebruik het apparaat nooit
buitenshuis.
• Gebruik het apparaat nooit in een
vochtige kamer.
• Haal na gebruik altijd de stekker uit
het stopcontact.
• Zorg ervoor dat uw handen droog zijn
als u het apparaat, het netsnoer of de
stekker aanraakt.
• Schakel het apparaat uit en haal de
stekker uit het stopcontact wanneer u
tijdens het gebruik storingen
ondervindt, wanneer u het apparaat
gaat reinigen, wanneer u een hulpstuk
aanbrengt of verwijdert, of wanneer u
klaar bent met het gebruik.
4
Article 212700 Princess Food Processor and Blender

• Laat het apparaat tijdens gebruik nooit
onbeheerd achter.
• Sluit de deksel voordat u het apparaat
inschakelt.
• Bij gebruik van hete vloeistof in de
blender kan de deksel eraf schieten
doordat er door de hete vloeistof
stoom en druk ontstaan. Voorkom dit
door de deksel gedurende het gebruik
vast te houden met een doek.
• De blender werkt erg snel. De
ingrediënten zullen in enkele
seconden al vermalen zijn. Hoe langer
u de blender ingeschakeld houdt, des
te fijner de producten worden
vermalen.
Onderhoud
en reiniging
1 Neem de stekker uit het stopcontact.
2 Druk op de opzetas op de twee
vergrendelingen boven het mes, schuif
het mes omhoog en neem het mes van
de opzetas.
3 Reinig de werkkom, de deksel, de
blenderkan met deksel en alle
hulpstukken behalve de aandrijfeenheid
met een warm sopje. U kunt deze
onderdelen ook in de vaatwasser
reinigen. Spoel alle onderdelen goed af
om eventueel zeep te verwijderen en
droog de onderdelen grondig.
Wees voorzichtig bij het plaatsen en
verwijderen van de hulpstukken. Het
mes, de plakkensnijder en de rasper/
schraper zijn scherp.
4 Reinig de aandrijfeenheid en het
netsnoer met een vochtige doek met
wat reinigingsmiddel.
Droog het apparaat en het netsnoer
grondig.
• Let op dat er geen vocht in contact
komt met de elektrische onderdelen
van het apparaat.
• Dompel het apparaat, het netsnoer of
de stekker nooit onder in water of
andere vloeistoffen.
• Reinig het apparaat nooit met agressieve of schurende reinigingsmiddelen of scherpe voorwerpen
(zoals messen of harde borstels).
• Alleen de losse onderdelen (werkkom
met deksel, de blenderkan met deksel
en alle hulpstukken) mogen in de
vaatwasser worden gereinigd. Het
apparaat zelf mag niet in de
vaatwasser worden gereinigd.
• Zorg ervoor dat alle onderdelen
volledig droog zijn voordat u het
apparaat gebruikt.
• Het apparaat gebruikt scherpe
messen. Voorkom dat u zich verwond
aan de messen.
Opbergen
1 Plaats hulpstukken in de opberglade
onder in het apparaat.
2 Doe het netsnoer in de opbergruimte
aan de achterzijde van het apparaat.
3 Bewaar het apparaat op een vorstvrije,
droge plek.
• Berg het apparaat op buiten het bereik
van kinderen.
Veiligheid
• Lees deze instructies aandachtig en
volg ze op. Bewaar deze handleiding
zodat u deze later nogmaals kunt
raadplegen.
Article 212700 Princess Food Processor and Blender
5

• Het apparaat mag alleen worden
gebruikt volgens deze instructies.
• Het apparaat is alleen bestemd voor
huishoudelijk gebruik.
• Het gebruik van dit apparaat kan
gevaarlijk zijn voor kinderen of voor
personen met een lichamelijke,
zintuiglijke, geestelijke, psychische of
motorische handicap of voor
personen met gebrek aan kennis en
ervaring. Personen die
verantwoordelijk zijn voor de
veiligheid van dergelijke personen
moeten duidelijke instructies geven of
toezien op het gebruik van het
apparaat.
• Houd het apparaat buiten het bereik
van kinderen en van personen die
mogelijk niet in staat zijn om het
apparaat veilig te gebruiken.
• Laat het apparaat alleen repareren
door een bevoegde elektromonteur.
Probeer het apparaat nooit zelf te
repareren.
• Gebruik alleen de hulpstukken die
worden aanbevolen door de
leverancier. Het gebruik van andere
hulpstukken kan leiden tot schade aan
het apparaat, wat gevaarlijk kan zijn
voor de gebruiker.
Elektriciteit
• Het apparaat mag niet worden
gebruikt met een externe tijdklok of
een apart afstandsbedieningsysteem.
• Haal altijd de stekker uit het
stopcontact wanneer u het apparaat
niet gebruikt.
• Als u de stekker uit het stopcontact
neemt, trek dan aan de stekker en niet
aan het netsnoer.
• Trek nooit aan het netsnoer om het
apparaat te verplaatsen.
• Gebruik het apparaat niet als het
apparaat of het netsnoer beschadigd
is. Laat een beschadigd netsnoer
vervangen door een bevoegde
elektromonteur.
• Zorg ervoor dat het apparaat, het
netsnoer en de stekker niet in
aanraking komen met hittebronnen,
zoals een hete bakplaat of open vuur.
• Zorg ervoor dat het apparaat, het
netsnoer en de stekker niet in
aanraking komen met water, andere
vloeistoffen of chemicaliën.
• Raap het apparaat niet op als het in
water is gevallen. Neem in dat geval
onmiddellijk de stekker uit het
stopcontact. Gebruik het apparaat
hierna niet meer.
Milieu
Werp het verpakkingsmateriaal, zoals
plastic en dozen, weg volgens de juiste
scheidingsmethode.
Indien u het apparaat wilt wegdoen terwijl
het nog steeds goed werkt, of eenvoudig
gerepareerd kan worden, zorg er dan voor
dat het apparaat wordt hergebruikt.
Aan het einde van de levensduur moet u
het apparaat op een verantwoorde wijze
laten verwerken, zodat het apparaat of de
onderdelen ervan kunnen worden
hergebruikt. Zet het apparaat niet bij het
ongesorteerde afval. Lever het in bij de
winkel of breng het naar een erkend
inzamelpunt. Neem voor informatie over
het inzamelsysteem in uw regio contact op
met de gemeente.
CE-conformiteit
Toepasselijke Europese richtlijnen:
2002/95/EG
2002/96/EG
6
Article 212700 Princess Food Processor and Blender
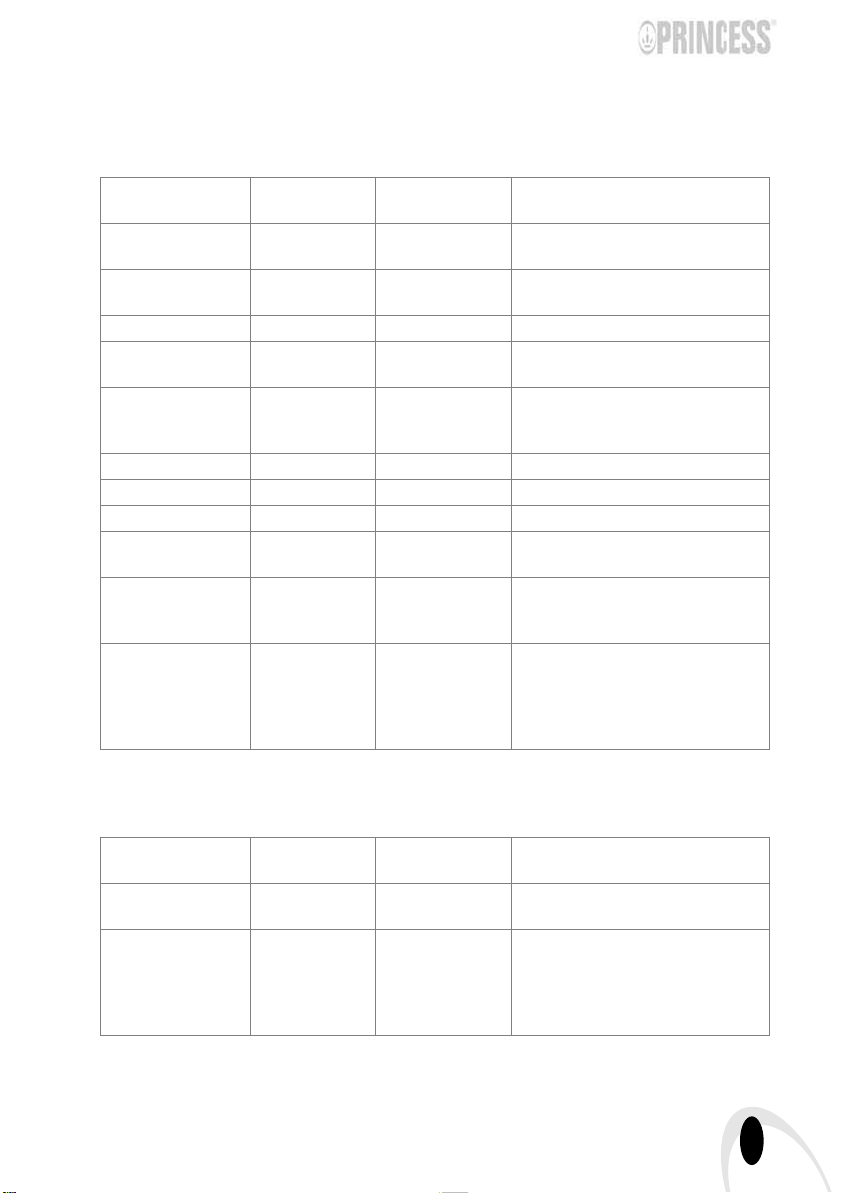
Recepten:
Mixen en snijden met werkkom en mes:
Voedingswaar Max. hoeveel-
heid
Wortel 250 g 15-20 sec. Schillen en in blokjes van 2 cm
Appel 250 g 15-20 sec. Schillen en klokhuis verwijderen, in
Kaas 150 g 15-20 sec. In blokjes van 2 cm snijden
Ei 6 stuks 5-10 sec. Kook de eieren, schil de eieren en
Vlees (vers of
gekookt)
Noten 150 g 10-15 sec. Gelijkmatig in de kom verdelen
Ui 200 g 10-15 sec. Schillen en in stukjes snijden
Bleekselderij klein 10 sec. Verwijder de stengels
Aardappelen 200 g 15-25 sec. Schillen en koken en vervolgens in
Bloem/meel 250 g bloem/
Bloem/meel+
glazuursuiker
200 g 15-20 sec. In blokjes van 2 cm snijden
meel + 150 g
water
360 g meel +
45 g glazuursuiker
+ 1 ei +
230 ml water
Bedieningstijd Voorbereiding
snijden
blokjes van 2 cm snijden
snijd deze in stukjes
Voor vers vlees is meer tijd nodig
dan voor gekookt vlees
stukjes van 3 cm snijden
20 sec. AAN
2 min. UIT
15 sec. AAN
2 min. UIT
Ei toevoegen (ongeveer 60 g)
Ei toevoegen (ongeveer 60 g)
Blenden in blenderkan:
Voedingswaar Max. hoeveel-
heid
Wortel 480 g wortelen
720 ml water
IJsklontjes 6 stuks 1,5 sec. AAN
Bedieningstijd Voorbereiding
15-20 sec. Wortelen schillen en in stukjes van
0,7 sec. UIT
10 cycli
(Intervalprocedure)
Article 212700 Princess Food Processor and Blender
2 cm snijden
Max. grootte van klontjes:
20 x 25 x 35 mm
7

General
With the Princess Food Processor and
Blender, you can prepare food in no time.
You can use it to cut, chop, grate, shred,
and cut slices.
You have all the accessories you need to
prepare food exactly as you wish. The
accessories can easily be stored in the
integrated storage tray.
The appliance is equipped with a two
speed electric drive unit and a pulse
function.
The anti-slip feet ensure that the appliance
is always stable during use.
The mixing bowl has a volume of
0.75 litres.
The blender function can be used to chop
vegetables and fruit, and to prepare
delicious shakes and juices.
The sharp stainless-steel knives enable
you to finely chop or puree both small and
large pieces of fruit and vegetables with
the greatest of ease.
A special function makes it possible to
grind ice cubes in the blender jug. This
function lets the blender run with short
intervals to give the ice the time to drop
back to the bottom of the jug.
This function can also be applied using the
mixing bowl with non liquid food.
The blender jug has a closable lid; during
blending the filling opening in the lid can be
used to add ingredients without spillage.
The blender jug has a volume of 1.2 litres.
Operation and
Controls
See Figure 1.
The appliance is equipped with the
following features:
1Slicer
2 Grater/shredder
3 Mixing bowl lid
4 Stopper
5 Mixing bowl
6 Drive unit
7 P(ulse) button with indicator light
8 II/ICE - Continuous high speed button
with indicator light / interval function
9 Stand-by indicator light
10 Power cord with plug
11 I - Continuous low speed button with
indicator light
12 Accessory storage tray
13 Blender jug
14 Blender lid
15 Blender lid insert
16 Knife
17 Accessory shaft
Before first use
1 Take the appliance out of the
packaging.
2 Make sure that the mains voltage is the
same as indicated on the type plate on
the appliance.
3 Clean the appliance. See ‘Maintenance
and cleaning’.
Use
Cutting and chopping
1 Place the appliance on a flat, stable
surface where it cannot fall.
See figure 2.
2 Place the mixing bowl on the drive unit.
Rotate the mixing bowl clockwise as far
as possible.
3 Slide the knife over the accessory shaft
and push it downwards till the locks
click the knife in a fixed position.
Be careful when attaching and
removing accessories. The knife is
sharp.
8
Article 212700 Princess Food Processor and Blender

4 Place the knife with the accessory shaft
over the drive shaft in the mixing bowl.
5 Put the ingredients in the mixing bowl.
6 Place the lid on the mixing bowl and
rotate the lid clockwise as far as
possible. The lid’s protruding lip must
be slid over the mixing bowl’s handle.
7 Place the stopper in the filling opening.
8 Pull the power cord out of the storage
space at the rear of the drive unit.
9 Insert the plug into the wall socket.
When all indicator lights are flashing,
the mixing bowl and/or the lid is not
fitted correctly. For safety reasons it is
not possible to switch on the appliance.
Check the position of the bowl and the
lid.
When the mixing bowl and the lid are
fitted correctly, only the stand-by
indicator light flashes. Only then the
appliance can be operated.
10 Press the P(ulse) button to have the
drive unit run for a short period at high
speed (pulse function) or press the
I button for continuous low speed or the
II/ICE button for continuous high speed.
The stand-by indicator light will dim and
the blue indicator light in applied button
will be lit.
11 Add ingredients during use via the filling
opening in the lid. Use the stopper to
push solid ingredients downwards
through the filling opening. Do not push
too hard.
• The maximum operating time in
continuous high or low speed is
2 minutes. Then the drive unit will be
switched off automatically for
2 minutes. 15 seconds before
switching off the stand-by indicator
light starts flashing. The blue indicator
light stays on.
• To avoid personal injury or damage to
the appliance, never insert a hand or
another object into the mixing bowl
whilst the appliance is being used.
• Always use the stopper to push
ingredients. Never use your fingers, a
fork or another object to push
ingredients.
12 Use the stopper to close the filling
opening during use so that nothing can
fall into or splash out of the mixing bowl.
13 Switch the appliance off after use
(press the button with the lit indicator
light or release the Pulse button).
14 Unscrew the mixing bowl and remove it
from the drive unit.
Remove the knife with the accessory
shaft from the bowl before emptying.
Do not remove the lid from the mixing
bowl before the knife has stopped
moving.
Tips
• In the P(ulse) mode, the knife rotates at
its maximum speed as long as the button
is pressed.
• If the ingredients stick to the knife or to
the inside of the mixing bowl, switch the
appliance off and remove the lid and the
knife. The ingredients can then be
scraped off using a spatula.
• Cut the ingredients into small pieces
before placing them in the mixing bowl.
• The machine chops very quickly. Make
sure the machine does not chop for too
long! It is better to chop briefly a number
of times using the P(ulse) mode.
• Use the interval function (press the II/ICE
button for more than 3 seconds) in case
you want to process non liquid food.
• Do not chop hard ingredients in the
mixing bowl, such as coffee beans,
nutmeg or ice cubes.
Grating, shredding or cutting slices
1 Place the appliance on a flat, stable
surface where it cannot fall.
See figure 4.
Article 212700 Princess Food Processor and Blender
9

2 Place the mixing bowl on the drive unit.
Rotate the mixing bowl clockwise as far
as possible.
3 Place the accessory shaft (without the
knife) over the drive shaft in the mixing
bowl.
4 Place the slicer or the grater/shredder
on the accessory shaft, making sure the
side to be used is facing upwards.
Be careful when attaching and
removing accessories. The grater/
shredder is sharp.
5 Place the lid on the mixing bowl and
rotate the lid clockwise as far as
possible. The lid’s protruding lip must
be slid over the mixing bowl’s handle.
6 Pull the power cord out of the storage
space at the rear of the drive unit.
7 Insert the plug into the wall socket.
When all indicator lights are flashing,
the mixing bowl and/or the lid is not
fitted correctly. For safety reasons it is
not possible to switch on the appliance.
Check the position of the bowl and the
lid.
When the mixing bowl and the lid are
fitted correctly, only the stand-by
indicator light flashes. Only then the
appliance can be operated.
8 Press the I button for continuous low
speed. The stand-by indicator light will
dim and the blue indicator light in the
I button will be lit.
9 Add ingredients during use via the filling
opening in the lid. Use the stopper to
push solid ingredients downwards
through the filling opening. Do not push
too hard.
• The maximum operating time in
continuous high or low speed is
2 minutes. Then the drive unit will be
switched off automatically for
2 minutes. 15 seconds before
switching off the stand-by indicator
light starts flashing. The blue indicator
light stays on.
• To avoid personal injury or damage to
the appliance, never insert a hand or
another object into the mixing bowl
whilst the appliance is being used.
• Always use the stopper to push
ingredients. Never use your fingers, a
fork or another object to push
ingredients.
10 Switch the appliance off after use
(press the I button with the lit indicator
light).
11 Unscrew the mixing bowl and remove it
from the drive unit. Remove the
accessories from the bowl before
emptying.
Blending
1 Place the appliance on a flat, stable
surface where it cannot fall.
2 Place the blender jug on the drive unit.
Rotate the blender jug clockwise as far
as possible.
3 Cut the fruit and/or vegetables into
pieces that fit in the jug. Do not cut into
pieces that are too large, since they will
need to be small enough to fall to the
base of the jug.
4 Open the lid by turning it anti-clockwise,
and put the pieces in the jug.
See figure 3.
5 Fit the lid back onto the jug to prevent
splashing.
6 Insert the plug into the wall socket.
When all indicator lights are flashing,
the jug is not fitted correctly. For safety
reasons it is not possible to switch on
the appliance. Check the position of the
jug.
When the jug is fitted correctly, only the
stand-by indicator light flashes. Only
then the appliance can be operated.
10
Article 212700 Princess Food Processor and Blender

7 Press the P(ulse) button to have the
drive unit run for a short period at high
speed (pulse function) or press the I
button for continuous low speed or the
II/ICE button for continuous high speed.
The stand-by indicator light will dim and
the blue indicator light in applied button
will be lit.
Note: the blender works very fast. In a
few seconds the product will be
chopped. The smoothness of the blend
increases with longer blending times.
8 If necessary, top up the contents by
opening the lid insert: turn the lid insert
anti-clockwise and remove it from the
lid. If the pieces are too large for the
filling opening then switch off the
blender, remove the lid, and add the
product. Put the lid back on the jug
before switching the blender on again.
9 Once you have processed the required
quantity of fruit and/or vegetables, you
can switch the appliance off (press the
button with the lit indicator light).
10 Unscrew the jug and remove it from the
drive unit.
Grinding ice
• The appliance is equipped with a special
procedure to grind ice cubes in the
blender jug. Press the II/ICE button for
more than 3 seconds to start up this
procedure.The appliance will start
running for 1,5 seconds and stop 0,7-0,8
seconds. This is repeated 10 times,
taking about 22 seconds.
• Always make sure the power cord has
been fully unwound.
• Never use the appliance outdoors.
• Never use the appliance in a humid
room.
• Always remove the plug from the wall
socket after use.
• Make sure your hands are dry when
you touch the appliance, the power
cord or the plug.
• Switch off the appliance and remove
the plug from the wall socket in the
event of a malfunction during use,
before cleaning the appliance, before
fitting or removing an accessory and
before storing the appliance after use.
• Never leave the appliance unattended
when in use.
• Always close the lid before switching
on the appliance.
• Hot liquids in the blender may result in
the lid flying off due to the steam and
pressure caused by the hot liquid.
Prevent this from happening by
holding the lid down with a cloth
whilst the blender is in use.
• The blender works very quickly. The
ingredients are ground within just a
few seconds. The longer the blender
is switched on, the finer the products
will be ground.
Safety during use
• To avoid personal injury or damage to
the appliance, never insert a hand or
another object into the jug whilst the
appliance is being used.
• Never allow the power cord to hang
over the edge of the draining board,
worktop or table.
Article 212700 Princess Food Processor and Blender
Maintenance
and Cleaning
1 Remove the plug from the plug socket.
2 Remove the knife from the accessory
shaft after pressing the two locks above
the knife and shift the knife up.
3 Clean the mixing bowl, the lid, the
blending jug with lid and all the
accessories, except the drive unit, with
11

warm water and a small amount of
washing-up liquid. You can also clean
these items in a dishwasher. Rinse all
the items well to remove any soap and
dry them thoroughly.
Be careful when attaching and
removing accessories. The knife, the
slicer and the grater/shredder are
sharp.
4 Clean the drive unit and the power cord
with a damp cloth and a small amount
of washing-up liquid.
Thoroughly dry the appliance and the
power cord.
• Make sure no moisture comes into
contact with the appliance’s electrical
parts.
• Never immerse the appliance, the
power cord or the plug in water or
other liquids.
• Never use aggressive or abrasive
cleaning products or sharp objects
(such as a knife or a hard brush) to
clean the appliance.
• Only the loose parts (mixing bowl with
the lid, the blending jug with lid and all
the accessories) may be cleaned in a
dishwasher. The appliance itself may
not be cleaned in the dishwasher.
• Make sure all parts are completely dry
before use.
• This appliance uses sharp knives.
Avoid cutting yourself on the knives.
• Store the appliance out of reach of
children.
Safety
• Read and follow these instructions
carefully. Keep this manual for future
reference.
• Use this appliance only in accordance
with these instructions.
• This appliance is intended solely for
domestic use.
• The use of this appliance by children
or persons with a physical, sensory,
mental or motor disability or who lack
the necessary knowledge and
experience may cause a hazard.
Persons responsible for the safety of
such people must give explicit
instructions or supervise the use of
the appliance.
• Keep the appliance out of the reach of
children, and of persons who may not
be able to operate it safely.
• Have the appliance repaired only by a
qualified electrician. Never try to
repair the appliance yourself.
• Only use accessories recommended
by the supplier. The use of other
accessories may result in damage to
the appliance, thereby creating
hazards for the user.
Storage
1 Place the accessories in the storage
tray at the bottom of the appliance.
2 Push the power cord into the storage
space at the back of the appliance.
3 Store the appliance in a frost free and
dry location.
12
Article 212700 Princess Food Processor and Blender
Electricity
• The appliance is not intended to be
operated by means of an external
timer or separate remote control
system.
• Always remove the plug from the wall
socket when the appliance is not in
use.

• Always remove the plug from the wall
socket by pulling on the plug not the
power cord.
• Never pull the power cord to move the
appliance.
• Do not use the appliance if the
appliance or the power cord is
damaged. Have a damaged power
cord replaced by a qualified
electrician.
• Make sure that the appliance, the
power cord and the plug do not come
into contact with sources of heat such
as a hot hob or naked flame.
• Make sure that the appliance, the
power cord and plug do not come into
contact with water, other fluids or
chemicals.
• Do not pick up the appliance if it falls
into water. Immediately remove the
plug from the wall socket. Do not use
the appliance anymore.
U.K. Wiring
Instructions
The wires in the mains lead are
coloured in accordance with the
following code:
•BLUE NEUTRAL
• BROWN LIVE
As the colours of the wires in the mains
lead of this appliance may not
correspond with the colour markings
identifying the terminals on your plug,
proceed as follows:
• The BLUE wire must be connected to
the terminal marked with the letter N
or coloured black.
• The BROWN wire must be connected
to the terminal marked with the letter L
or coloured red.
If a 13A plug (BS1363) is used a 5A fuse
(BS1362) should be fitted. If any other
type of plug is used, a 13A fuse must be
fitted either in the plug or adapter, or on
the distribution board.
This is a double insulated appliance
and does not deed an earth connection.
WARNING: ON NO ACCOUNT SHOULD
EITHER THE LIVE OR NEUTRAL WIRES
BE CONNECTED TO THE EARTH
TERMINAL
The Environment
Dispose of packaging material, such as
plastic and boxes, in the appropriate waste
containers.
If you wish to dispose of the appliance
whilst it still works properly or can be easily
repaired, then ensure that the appliance is
recycled.
When the appliance reaches the end of its
useful life, it should be disposed of in a
responsible manner, thereby ensuring the
reuse of the appliance or its parts. Do not
dispose of the appliance with unsorted
refuse; hand it in at the store, or take it to a
recognized collection point. Contact your
municipality for information about the
reception and collection systems in your
area.
CE Conformity
Applicable European guideline:
2002/95/EC
2002/96/EC
Article 212700 Princess Food Processor and Blender
13
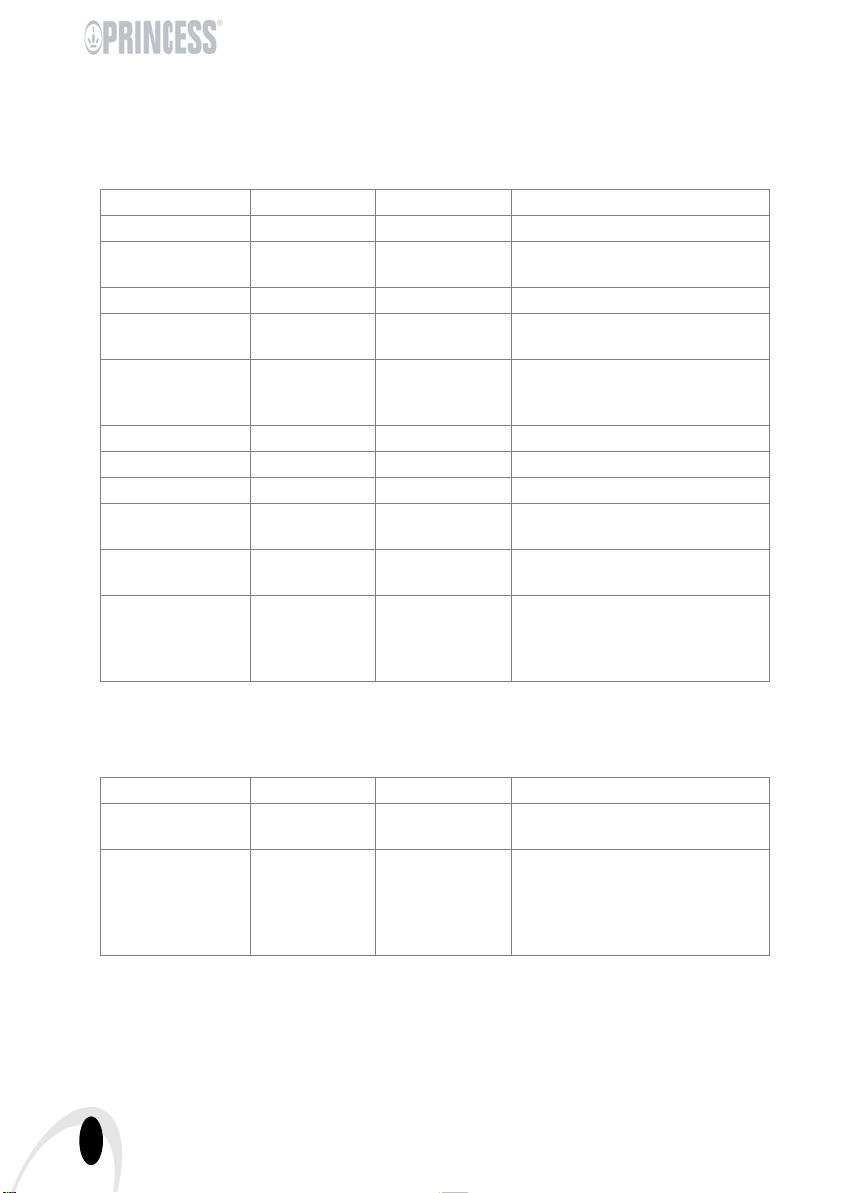
Recipes:
Mixing and cutting with mixing bowl and knife:
Food Max. quantity Operating time Preparation
Carrot 250 g 15-20 sec. Peel and cut into 2 cm blocks
Apple 250 g 15-20 sec. Peel and remove core, cut into
Cheese 150 g 15-20 sec. Cut into 2 cm blocks
Egg 6 pcs 5-10 sec. Boil the eggs, peel the eggs and
Meat (fresh or
cooked)
Nuts 150 g 10-15 sec. Divide evenly in bowl
Onion 200 g 10-15 sec. Peel and cut into several pieces
Celery little 10 sec. Remove the stems
Potatoes 200 g 15-25 sec. Peel and boil and cut into 3 cm
Flour 250 g flour +
Flour+icing sugar 360 g flour +
200 g 15-20 sec. Cut into 2 cm blocks
20 sec. ON
150 g water
45 g icing sugar
+ 1 egg +
230 ml water
2 min. OFF
15 sec. ON
2 min. OFF
2cm blocks
cut into several pieces
Fresh meat requires more time
than cooked meat
blocks
Add egg (approx. 60 g)
Add egg (approx. 60 g)
Blend in blender jug:
Food Max. quantity Operating time Preparation
Carrot 480 g carrots
Ice cubes 6 pcs 1,5 sec. ON
14
Article 212700 Princess Food Processor and Blender
720 ml water
15-20 sec. Peel carrots and cut into 2 cm
blocks
Max. size blocks: 20*25*35 mm
0,7 sec. OFF
10 cycles
(Interval
procedure)

Généralités
Votre Princess Food Processor and
Blender permet de préparer des aliments
en un rien de temps. Il sert à couper,
émincer, hacher, râper et trancher.
Vous disposez de tous les accessoires
nécessaires pour préparer les aliments
exactement comme vous le décidez. Ces
accessoires se rangent de façon simple et
pratique dans le tiroir de rangement
intégré.
L'appareil est équipé d'un moteur
électrique à deux vitesses et fonction
Pulse.
Les pieds en caoutchouc empêchent
l'appareil de bouger pendant l'utilisation.
Le bol du mélangeur a une capacité de
0.75 litres.
La verseuse du mélangeur servira à
hacher fruits et légumes, à préparer de
délicieux shakes, et à presser des jus frais.
Les lames acérées en inox permettent de
hacher menu ou de réduire en purée des
fruits et légumes en morceaux grands ou
petits, avec une aisance remarquable.
Une fonction spéciale lui permet
également de piller des glaçons. Cette
fonction fait tourner l'appareil à petits
coups, avec des intervalles permettant à la
glace de retomber au fond de la verseuse.
C'est une fonction qui peut également être
utilisée avec le bol mélangeur, pour des
aliments plus solides.
La verseuse du mélangeur est équipée
d'un couvercle avec une ouverture de
remplissage (refermable) qui permet
d'ajouter proprement des ingrédients
même pendant que l'appareil est en
marche. La verseuse du mélangeur a une
capacité de 1.2 litres.
Fonctionnement et
utilisation
Voir la figure 1.
L'appareil est équipé des fonctions
suivantes :
1 Trancheur
2Râpe
3 Couvercle du bol du mélangeur
4 Tube de bourrage
5 Bol du mélangeur
6Moteur
7 Bouton P (pulse) avec témoin lumineux
8 Bouton II/ICE - vitesse élevée continue
avec témoin / fonction intervalle
9 Témoin lumineux du mode d'attente
(Stand-by)
10 Cordon et fiche
11 Bouton I - faible vitesse continue ave
témoin
12 Tiroir de rangement des accessoires
13 Verseuse du mélangeur
14 Couvercle de la verseuse du mélangeur
15 Couvercle secondaire de la verseuse
du mélangeur
16 Lame
17 Axe à accessoire
Avant la première utilisation
1 Sortez l'appareil de son emballage.
2 Vérifiez que la tension d'alimentation du
réseau est identique à la tension
indiquée sur la plaquette type de
l'appareil.
3 Nettoyez l'appareil. Voir « Entretien et
nettoyage ».
Utilisation
Pour couper et hacher
1 Installez l'appareil sur une surface plane
et stable, où il ne risque pas de tomber.
Voir la figure 2.
Article 212700 Princess Food Processor and Blender
15

2 Placez le bol du mélangeur sur le
moteur. Faites pivoter le bol vers la
droite le plus loin possible.
3 Glissez la lame sur l'axe à accessoire
et enfoncez-la jusqu'à ce qu'elle passe
sur le verrouillage et se fixe avec un
petit déclic.
Faites attention en fixant et enlevant
des accessoires. La lame coupe.
4 Posez l'axe à accessoire équipé de la
lame sur l'axe d'entraînement dans le
bol du mélangeur.
5 Mettez les aliments dans le bol du
mélangeur.
6 Mettez le couvercle sur le bol du
mélangeur et faites-le pivoter vers la
droite le plus loin possible. La languette
du couvercle doit se trouver au niveau
de la poignée du bol du mélangeur.
7 Placez le tube de bourrage dans
l'ouverture de remplissage.
8 Sortez le cordon de l'espace de
rangement à l'arrière du moteur.
9 Branchez la fiche sur la prise.
Si les témoins lumineux clignotent tous
ensemble, le bol du mélangeur et/ou le
couvercle est mal fixé en place. Le
mécanisme de sécurité empêche alors
de mettre l'appareil en route. Corrigez la
position du bol et du couvercle.
Une fois que le bol du mélangeur et le
couvercle sont fixés correctement, seul
le témoin lumineux du mode d'attente
clignote. C'est seulement alors que
l'appareil peut être mis en marche.
10 Appuyez sur l'un des boutons : P pour
la fonction pulse, c'est à dire que
l'appareil tournera brièvement à haute
vitesse ; I pour le faire tourner en
continu à faible vitesse ; II/ICE pour le
faire tourner en continu à vitesse
élevée. Le témoin lumineux du mode
d'attente s'éteint et un témoin bleu
s'allume dans le bouton que vous avez
actionné.
11 Pendant que l'appareil tourne, vous
pouvez ajouter des ingrédients par
l'ouverture du couvercle. Le tube de
bourrage servira à enfoncer les
ingrédients solides dans l'ouverture. Ne
poussez pas trop fort.
• À vitesse continue (faible ou élevée),
la durée maximale de fonctionnement
est de 2 minutes. Le moteur s'éteint
alors automatiquement pendant
2 minutes. Le témoin lumineux du
mode d'attente se met à clignoter
15 secondes avant que l'appareil ne
s'éteigne. Le témoin lumineux bleu
reste allumé.
• Évitez de vous blesser ou
d'endommager l'appareil : n'enfoncez
jamais la main ni aucun objet dans le
bol du mélangeur pendant que
l'appareil tourne.
• Pour faire descendre les ingrédients,
utilisez toujours le tube de bourrage.
N'utilisez jamais les doigts, une
fourchette ou aucun autre objet pour
faire descendre les ingrédients.
12 Le tube de bourrage servira aussi à
fermer l'ouverture de remplissage
durant le fonctionnement pour que rien
ne puisse tomber dans le bol et pour
retenir les éclaboussures.
13 Éteignez l'appareil quand vous avez
fini, en appuyant sur le bouton dont le
témoin est allumé, ou, selon le cas, en
relâchant le bouton Pulse.
14 Dévissez le bol du mélangeur et retirez-
le du moteur.
Retirez la lame et l'axe sur lequel elle
est montée avant de vider le bol.
Ne retirez pas le couvercle du bol du
mélangeur avant que la lame ne soit
totalement immobile.
16
Article 212700 Princess Food Processor and Blender

Conseils
• En mode P (pulse), la lame tourne à la
vitesse maximale tant que vous
maintenez le bouton enfoncé.
• Si les ingrédients restent collés à la lame
ou à l'intérieur du bol, éteignez l'appareil,
enlevez le couvercle et sortez la lame.
Décollez les ingrédients avec une
spatule.
• Il faut couper les ingrédients en
morceaux suffisamment petits avant de
les mettre dans le bol du mélangeur.
• Ce bol mélangeur hache très vite. Ne
laissez pas l'appareil continuer de hacher
pendant trop longtemps ! Il vaut mieux le
faire tourner brièvement plusieurs fois en
actionnant le bouton P (pulse).
• Actionnez la fonction Intervalle, c'est à
dire maintenez enfoncé le bouton II/ICE
pendant plus de 3 secondes, si vous
voulez travailler des aliments non
liquides.
• Dans le bol du mélangeur, ne hachez
pas d'aliments durs tels que les grains
de café, la noix de muscade ou les
glaçons.
Pour râper ou trancher
1 Installez l'appareil sur une surface
plane et stable, où il ne risque pas de
tomber.
Voir la figure 4.
2 Placez le bol du mélangeur sur le
moteur. Faites pivoter le bol vers la
droite le plus loin possible.
3 Posez l'axe à accessoire (sans lame)
sur l'axe d'entraînement dans le bol du
mélangeur.
4 Montez le trancheur ou la râpe sur l'axe
à accessoire, en veillant à mettre la
face tranchante vers le haut.
Faites attention en fixant et enlevant
des accessoires. Le trancheur et la râpe
sont coupants.
5 Mettez le couvercle sur le bol du
mélangeur et faites-le pivoter vers la
droite le plus loin possible. La languette
du couvercle doit se trouver au niveau
de la poignée du bol du mélangeur.
6 Sortez le cordon de l'espace de
rangement à l'arrière du moteur.
7 Branchez la fiche sur la prise.
Si les témoins lumineux clignotent tous
ensemble, le bol du mélangeur et/ou le
couvercle est mal fixé en place. Le
mécanisme de sécurité empêche alors
de mettre l'appareil en route. Corrigez la
position du bol et du couvercle.
Une fois que le bol du mélangeur et le
couvercle sont fixés correctement, seul
le témoin lumineux du mode d'attente
clignote. C'est seulement alors que
l'appareil peut être mis en marche.
8 Appuyez sur le bouton I pour faire
tourner l'appareil en continu à faible
vitesse. Le témoin lumineux du mode
d'attente s'éteint et un témoin bleu
s'allume dans le bouton I.
9 Pendant que l'appareil tourne, vous
pouvez ajouter des ingrédients par
l'ouverture du couvercle. Le tube de
bourrage servira à enfoncer les
ingrédients solides dans l'ouverture. Ne
poussez pas trop fort.
• À vitesse continue (faible ou élevée),
la durée maximale de fonctionnement
est de 2 minutes. Le moteur s'éteint
alors automatiquement pendant
2 minutes. Le témoin lumineux du
mode d'attente se met à clignoter
15 secondes avant que l'appareil ne
s'éteigne. Le témoin lumineux bleu
reste allumé.
• Évitez de vous blesser ou
d'endommager l'appareil : n'enfoncez
jamais la main ni aucun objet dans le
bol du mélangeur pendant que
l'appareil tourne.
• Pour faire descendre les ingrédients,
utilisez toujours le tube de bourrage.
N'utilisez jamais les doigts, une
Article 212700 Princess Food Processor and Blender
17

fourchette ou aucun autre objet pour
faire descendre les ingrédients.
10 Éteignez l'appareil quand vous avez
fini, en appuyant sur le bouton I, dont le
témoin est allumé.
11 Dévissez le bol du mélangeur et retirez-
le du moteur. Détachez l'accessoire du
bol avant de vider ce dernier.
Pour mélanger
1 Installez l'appareil sur une surface
plane et stable, où il ne risque pas de
tomber.
2 Placez la verseuse du mélangeur sur le
moteur. Faites pivoter la verseuse vers
la droite le plus loin possible.
3 Coupez les fruits et/ou les légumes en
morceaux assez petits pour être mis
dans la verseuse. Ne laissez pas les
morceaux trop grands, sinon ils ne
rempliront pas fond de la verseuse.
4 Enlevez le couvercle en le faisant
pivoter vers la gauche et mettez les
morceaux dans la verseuse.
Voir la figure 3.
5 Pour prévenir les éclaboussures,
fermez le couvercle de la verseuse.
6 Branchez la fiche sur la prise.
Si les témoins lumineux clignotent tous
ensemble, la verseuse du mélangeur
est mal fixée en place. Le mécanisme
de sécurité empêche alors de mettre
l'appareil en route. Vérifiez la position
de la verseuse.
Une fois que la verseuse du mélangeur
est fixée correctement, seul le témoin
lumineux du mode d'attente clignote.
C'est seulement alors que l'appareil
peut être mis en marche.
7 Appuyez sur l'un des boutons : P pour
la fonction pulse, c'est à dire que
l'appareil tournera brièvement à haute
vitesse ; I pour le faire tourner en
continu à faible vitesse ; II/ICE pour le
faire tourner en continu à vitesse
élevée. Le témoin lumineux du mode
d'attente s'éteint et un témoin bleu
s'allume dans le bouton que vous avez
actionné.
Attention :ce bol mélangeur tourne
très vite. Le contenu sera haché en
quelques secondes seulement. Plus
vous le laissez tourner longtemps, plus
le mélange sera lisse.
8 Si nécessaire vous pouvez ajouter
d'autres ingrédients par l'ouverture du
couvercle : faites pivoter le couvercle
secondaire vers la gauche et vous
pourrez le retirer. Si les morceaux à
ajouter sont trop grands pour
l'ouverture de remplissage, il faut
éteindre l'appareil et enlever le
couvercle tout entier pour les ajouter.
Refermez le couvercle avant remettre
le bol mélangeur en marche.
9 Quand vous avez achevé votre
préparation de fruits et/de légumes,
éteignez l'appareil en appuyant sur le
bouton dont le témoin est allumé.
10 Dévissez la verseuse du mélangeur et
retirez-la du moteur.
Pour piller de la glace
• Une fonction spéciale permet à cet
appareil de piller des glaçons dans la
verseuse du mélangeur. Pour lancer
cette fonction, maintenez le bouton II/ICE
enfoncé pendant plus de 3 secondes.
L'appareil se met en marche pendant
1,5 secondes et s'arrête pendant
0,7-0,8 secondes. Il répète cette
procédure 10 fois, ce qui prend environ
22 secondes.
Sécurité durant l'utilisation
• Évitez de vous blesser ou
d'endommager l'appareil : n'enfoncez
jamais la main ni aucun objet dans la
verseuse du mélangeur pendant que
l'appareil tourne.
18
Article 212700 Princess Food Processor and Blender

• Ne laissez jamais le cordon pendre
par-dessus le bord du plan de travail
ou de la table.
• Assurez-vous toujours que le cordon
d'alimentation est complètement
déroulé.
• N'utilisez jamais l'appareil à
l'extérieur.
• N'utilisez jamais l'appareil dans une
pièce humide.
• Après l'utilisation, débranchez
immédiatement la fiche.
• Assurez-vous que vos mains sont
sèches quand vous touchez l'appareil,
le cordon ou la fiche.
• Éteignez l'appareil et débranchez la
fiche en cas de problème durant
l'utilisation, pour le nettoyage, pour le
montage ou démontage d'un
accessoire, et pour le rangement
quand vous avez fini de l'utiliser.
• Ne laissez pas l'appareil sans
surveillance pendant l'utilisation.
• Refermez toujours bien le couvercle
avant de mettre l'appareil en marche.
• Si le bol mélangeur contient des
liquides très chauds, la vapeur et la
pression peuvent faire sauter le
couvercle pendant l'utilisation.
Maintenez le couvercle en place avec
un torchon pendant qu'il tourne.
• Ce bol mélangeur tourne très vite. Le
contenu est haché en quelques
secondes seulement. Plus vous
laissez tourner longtemps le bol
mélangeur, plus le contenu sera
haché finement.
Entretien
et nettoyage
1 Débranchez la fiche.
2 Retirez la lame de l'axe à accessoire ;
pour ce faire, enfoncez les deux verrous
au dessus de la lame et glissez la lame
vers le haut.
3 Nettoyez le bol et la verseuse du
mélangeur, les couvercles et tous les
accessoires (mais pas le moteur) à
l'eau chaude additionnée d'un peu de
détergent pour la vaisselle. Ces pièces
vont également au lave-vaisselle.
Rincez bien toutes les pièces pour qu'il
n'y reste pas de savon et séchez-les à
fond.
Faites attention en fixant et enlevant
des accessoires. La lame, le trancheur
et la râpe sont coupants.
4 Essuyez le moteur et le cordon avec un
chiffon humide et un peu de détergent
pour la vaisselle.
Séchez à fond l'appareil et le cordon.
• Ne laissez pas d'humidité pénétrer
jusqu'aux connections électriques de
l'appareil.
• N'immergez jamais l'appareil, la fiche
ni le cordon dans l'eau ou tout autre
liquide.
• N'utilisez pas de détergent agressif ou
récurant, ni d'objets tranchants (tels
que couteaux ou brosses dures) pour
le nettoyage.
• Seuls les composants séparés (le bol
et la verseuse du mélangeur, les
couvercles et tous les accessoires)
vont au lave-vaisselle. L'appareil luimême ne doit pas être mis au lavevaisselle.
Article 212700 Princess Food Processor and Blender
19

• Avant d'utiliser l'appareil, vérifiez que
tous les composants sont
parfaitement secs.
• Les lames utilisées dans cet appareil
sont très acérées. Évitez de vous
blesser avec les lames.
Rangement
1 Rangez les accessoires dans le tiroir au
fond de l'appareil.
2 Rangez le cordon dans son espace de
rangement à l'arrière de l'appareil.
3 Rangez l'appareil dans un endroit sec
et protégé du gel.
• Gardez l'appareil hors de portée des
enfants.
Sécurité
• Lisez et suivez soigneusement ces
instructions. Conservez le manuel afin
de pouvoir vous y référer à l'avenir.
• Quand vous utilisez l'appareil,
respectez toujours les instructions.
• L'appareil est destiné uniquement à
l'utilisation domestique.
• Si l'appareil est utilisé par des enfants,
ou par des personnes ayant un
handicap physique, sensoriel, mental
ou moteur, ou par des personnes
n'ayant pas les connaissances et
l'expérience nécessaires, ceci peut
entraîner un danger. Les
responsables de la sécurité de telles
personnes doivent donner des
instructions claires et suffisantes et/
ou surveiller l'utilisation de l'appareil.
• Tenez l'appareil hors de la portée des
enfants ou des personnes incapables
de l'utiliser correctement.
• Faites effectuer les réparations
uniquement par un technicien qualifié.
Ne tentez jamais de réparer vousmême l'appareil.
• Utilisez uniquement des accessoires
que recommande le fabricant de
l'appareil. L'utilisation d'accessoires
non homologués peut endommager
l'appareil et entraîner des risques
pour l'utilisateur.
Électricité
• L'appareil n'est pas conçu pour être
commandé par une minuterie externe
ni par une télécommande séparée.
• Débranchez toujours la fiche de
l'appareil quand celui-ci n'est pas
utilisé.
• Lorsque vous débranchez la fiche,
saisissez la fiche elle-même ; ne tirez
pas sur le cordon.
• Ne tirez jamais sur le cordon pour
déplacer l'appareil.
• N'utilisez pas l'appareil si celui-ci ou
le cordon est endommagé. Faites
remplacer le cordon endommagé par
un technicien qualifié.
• Assurez-vous que ni l'appareil, ni le
cordon, ni la fiche n'entre en contact
avec une source de chaleur telle
qu'une plaque électrique chaude ou
une flamme.
• Assurez-vous que ni l'appareil, ni le
cordon d'alimentation, ni la fiche
n'entrent en contact avec de l'eau,
d'autres liquides ou des produits
chimiques.
• Si l'appareil est tombé à l'eau, ne le
rattrapez pas. Débranchez
immédiatement la fiche. Cessez
d'utiliser l'appareil.
20
Article 212700 Princess Food Processor and Blender

Environnement
Jetez le matériel d'emballage, tel que le
plastique et les cartons, dans les
conteneurs prévus à cet effet.
Si vous souhaitez vous débarrassez de
l'appareil alors qu'il fonctionne toujours ou
peut être réparé facilement, assurez-vous
qu'il sera recyclé.
Lorsque l'appareil ne peut plus servir, il
doit être retraité, de façon à pouvoir être
recyclé au moins partiellement. Ne mettez
pas l'appareil aux ordures ménagères,
mais portez-le chez le vendeur ou dans un
centre de collecte agréé. Les autorités de
votre commune vous renseigneront sur le
centre de collecte le plus proche.
Conformité CE
Directive européenne applicable :
2002/95/CE
2002/96/CE
Article 212700 Princess Food Processor and Blender
21
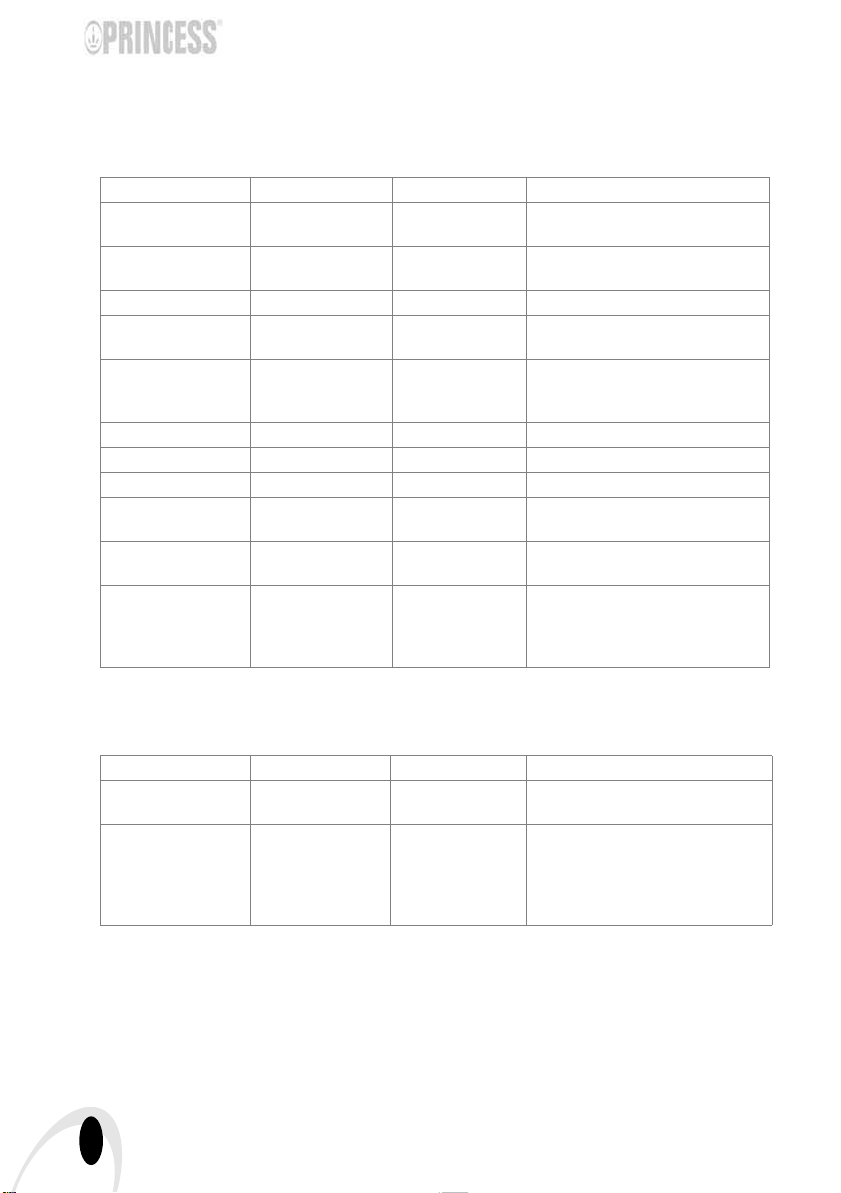
Recettes
Mélanger et hacher avec la lame dans le bol du mélangeur :
Aliment Quantité max. Durée Préparation
Carrottes 250 g 15-20 sec. Éplucher et couper en morceaux
Pomme 250 g 15-20 sec. Éplucher, étrogner et couper en
Fromage 150 g 15-20 sec. Couper en morceaux de 2 cm
Oeufs durs 6 pcs 5-10 sec. Peler les oeufs cuits durs et cou-
Viande (fraîche ou
cuite)
Noix 150 g 10-15 sec. Répartir de façon égale
Oignon 200 g 10-15 sec. Éplucher et couper en morceaux
Céleri peu 10 sec. Couper les tiges
Pommes de terre 200 g 15-25 sec. Éplucher, faire cuire et couper en
Farine 250 g de farine +
Farine et sucre glace 360 g de farine +
200 g 15-20 sec. Couper en morceaux de 2 cm
150 g d'eau
45 g de sucre glace
+ 1 oeuf +
230 ml d'eau
20 sec. MARCHE
2 min. ARRÊT
15 sec. MARCHE
2 min. ARRÊT
de 2 cm
morceaux de 2 cm.
per en morceaux
La viande fraîche demande plus
longtemps que la viande cuite
morceaux de 3 cm
Ajouter un oeuf (environ 60 g)
Ajouter un oeuf (environ 60 g)
Mélanger dans la verseuse du mélangeur\
Aliment Quantité max. Durée Préparation
Carrottes 480 g de carrottes
Glaçons 6 pcs 1,5 sec. MARCHE
22
Article 212700 Princess Food Processor and Blender
720 ml d'eau
15-20 sec. Éplucher les carottes et couper en
0,7 sec ARRÊT
10 cycles
(Fonction
Intervalle)
morceaux de 2 cm
Taille maximale des glaçons :
20*25*35 mm

Allgemein
Mit dem Princess Food Processor and
Blender bereiten Sie im Handumdrehen
Lebensmittel zu. Sie können damit
mühelos schneiden, hacken, reiben, raffeln
und Scheiben schneiden.
Ihnen stehen alle Zubehörteile zur
Verfügung, um die Lebensmittel genau
nach Wunsch zu verarbeiten. Das Zubehör
kann problemlos in der eingebauten
Zubehörschublade verstaut werden.
Das Gerät ist mit einem Motorblock mit
zwei Geschwindigkeitsstufen und einer
Momentschaltung ausgestattet.
Die Antirutschfüße sorgen dafür, dass das
Gerät während der Benutzung immer stabil
steht.
Die Arbeitsschüssel hat ein
Fassungsvermögen von 0,75 Litern.
Mit der Mixerfunktion können Sie Gemüse
und Obst fein hacken oder leckere
Milchshakes und Säfte zubereiten.
Mit den scharfen Edelstahlmessern
können Sie mühelos sowohl große als
auch kleine Obst-und Gemüsestücke
feinschneiden oder pürieren.
Es gibt auch eine spezielle Funktion zum
Zerkleinern von Eiswürfeln im Mixbehälter.
Mit dieser Funktion läuft der Mixer mit
kurzen Intervallen, sodass das Eis Zeit hat,
nach unten in den Behälter zu fallen.
Diese Funktion kann auch mit der
Arbeitsschüssel mit nicht flüssigen
Produkten verwendet werden.
Der Mixbehälter verfügt über einen
verschließbaren Deckel mit Füllöffnung,
damit Sie während des Mixvorgangs
Produkte zufügen können, ohne etwas zu
verschütten. Der Mixbehälter hat ein
Fassungsvermögen von 1,2 Litern.
Funktion und
Bedienung
Siehe Abbildung 1.
Das Gerät besteht aus den folgenden
Teilen:
1 Hobel
2 Reibe/Raffel
3 Deckel der Arbeitsschüssel
4 Anschlag
5 Arbeitsschüssel
6 Motorblock
7 Momentschaltung (P-Taste) mit
Betriebsanzeige
8 II/ICE - Dauerbetriebstaste niedrige
Geschwindigkeit mit Betriebsanzeige/
Intervallfunktion
9 Betriebsbereitschaftsanzeige
10 Netzkabel mit Stecker
11 I - Dauerbetriebstaste hohe
Geschwindigkeit mit Betriebsanzeige
12 Zubehörschublade für Zubehör
13 Mixbehälter
14 Deckel des Mixbehälters
15 Stopfen
16 Messer
17 Aufsatzachse
Vor der ersten Verwendung
1 Nehmen Sie das Gerät aus der
Verpackung.
2 Stellen Sie sicher, dass die
Netzspannung mit der auf dem Gerät
angegebenen Spannung
übereinstimmt.
3 Reinigen Sie das Gerät. Siehe „Pflege
und Reinigung“.
Gebrauch
Schneiden und hacken
1 Stellen Sie das Gerät auf einen stabilen
und ebenen Untergrund und an eine
Stelle, wo es nicht herunterfallen kann.
Article 212700 Princess Food Processor and Blender
23

Siehe Abbildung 2.
2 Setzen Sie die Arbeitsschüssel auf den
Motorblock. Drehen Sie die Schüssel
im Uhrzeigersinn bis zum Anschlag
fest.
3 Schieben Sie das Messer über die
Aufsatzachse und drücken Sie es nach
unten, bis es einrastet und fixiert ist.
Seien Sie vorsichtig beim Anbringen
und Abnehmen der Zubehörteile. Das
Messer ist scharf.
4 Setzen Sie das Messer mit der
Aufsatzachse auf die Antriebsachse in
der Arbeitsschüssel.
5 Geben Sie die Zutaten in die Schüssel.
6 Legen Sie den Deckel auf die Schüssel
und drehen Sie ihn so weit wie möglich
im Uhrzeigersinn fest. Die
hervorstehende Lippe am Deckel muss
über den Griff der Arbeitsschüssel
geschoben werden.
7 Stecken Sie den Stopfen in die
Füllöffnung.
8 Ziehen Sie das Kabel aus dem
Stauraum auf der Rückseite des
Motorblocks.
9 Stecken Sie den Stecker in die
Steckdose.
Wenn alle Leuchtanzeigen blinken,
wurde die Arbeitsschüssel und/oder der
Deckel nicht richtig angebracht. Aus
Sicherheitsgründen ist das Einschalten
des Geräts dann nicht möglich.
Überprüfen Sie den Sitz der Schüssel
und des Deckels.
Wenn die Arbeitsschüssel und der
Deckel richtig angebracht sind, blinkt
nur die Betriebsbereitschaftsanzeige.
Nur dann kann das Gerät gebraucht
werden.
10 Drücken Sie entweder auf die P-Taste,
um den Motor kurzzeitig mit hoher
Geschwindigkeit lauen zu lassen
(Momentschaltung), auf die I-Taste für
den Dauerbetrieb mit niedriger
Geschwindigkeit oder die II/ICE-Taste
für den Dauerbetrieb mit mit hoher
Geschwindigkeit. Die
Betriebsbereitschaftsanzeige erlischt
dann und das blaue Licht in der
betätigten Taste fängt an zu leuchten.
11 Geben Sie weitere Zutaten während
der Benutzung durch die Füllöffnung im
Deckel hinzu. Benutzen Sie den
Stopfen, um feste Zutaten durch die
Füllöffnung nach unten zu drücken.
Nicht zu fest drücken!
• Bei Dauerbetrieb mit hoher oder
niedriger Geschwindigkeit beträgt die
maximale Gebrauchszeit 2 Minuten.
Danach wird der Motor automatisch
für 2 Minuten ausgeschaltet.
15 Sekunden bevor er ausgeschaltet
wird fängt die
Betriebsbereitschaftsanzeige an zu
blinken. Die blaue Betriebsanzeige
leuchtet weiter.
• Stecken Sie nie Ihre Hand oder andere
Gegenstände in die Arbeitsschüssel,
wenn sie in Gebrauch ist, um
Verletzungen oder Schäden am Gerät
zu verhindern.
• Verwenden Sie für das Hineindrücken
von Zutaten nur den Stopfen und nie
die Finger, eine Gabel oder andere
Gegenstände.
12 Benutzen Sie den Stopfen auch zum
Verschließen der Füllöffnung während
des Gebrauchs. So kann nichts in die
Arbeitsschüssel fallen oder
herausspritzen.
13 Schalten Sie das Gerät nach der
Verwendung aus (dazu müssen Sie auf
die Taste mit der leuchtenden
Betriebsanzeige drücken oder die PTaste loslassen).
14 Drehen Sie die Arbeitsschüssel los und
nehmen Sie sie vom Motorblock herunter.
24
Article 212700 Princess Food Processor and Blender

Bevor Sie die Schüssel leeren, müssen
Sie das Messer mit der Aufsatzachse
entfernen.
Nehmen Sie den Deckel erst von der
Arbeitsschüssel herunter, wenn das
Messer vollständig zum Stillstand
gekommen ist.
Tipps
• Im Momentbetrieb dreht das Messer sich
mit der höchsten Geschwindigkeit
solange die Taste eingedrückt gehalten
wird.
• Wenn die Zutaten am Messer oder an
der Innenseite der Arbeitsschüssel
haften bleiben, dann schalten Sie die
Maschine aus und entfernen Sie den
Deckel und das Messer. Sie können die
Zutaten mit dem mitgelieferten Spatel
lösen.
• Schneiden Sie die Zutaten in kleine
Stücke, bevor Sie sie in die
Arbeitsschüssel geben.
• Das Gerät hackt sehr schnell. Achten Sie
darauf, dass der Hackvorgang nicht zu
lange dauert. Es ist besser, mehrere
Male kurz im Momentbetrieb zu hacken.
• Wenn Sie nicht flüssige Produkte
verarbeiten möchten, so verwenden Sie
die Intervallfunktion (halten Sie dazu die
II/ICE-Taste länger als 3 Sekunden
eingedrückt).
• Hacken Sie in der Arbeitsschüssel
keine harten Zutaten wie
Kaffeebohnen, Muskatnüsse und
Eiswürfel.
Reiben, raffeln oder hobeln
1 Stellen Sie das Gerät auf einen stabilen
und ebenen Untergrund und an eine
Stelle, wo es nicht herunterfallen kann.
Siehe Abbildung 4.
2 Setzen Sie die Arbeitsschüssel auf den
Motorblock. Drehen Sie die Schüssel
im Uhrzeigersinn bis zum Anschlag
fest.
3 Setzen Sie die Aufsatzachse (ohne
Messer) auf die Antriebsachse in der
Arbeitsschüssel.
4 Bringen Sie den Hobel oder die Reibe/
Raffel auf der Aufsatzachse an. Dabei
muss die zu verwendende Seite des
nach oben zeigen.
Seien Sie vorsichtig beim Anbringen
und Abnehmen der Zubehörteile. Die
Reibe/Raffel ist scharf.
5 Legen Sie den Deckel auf die Schüssel
und drehen Sie ihn so weit wie möglich
im Uhrzeigersinn fest. Die
hervorstehende Lippe am Deckel muss
über den Griff der Arbeitsschüssel
geschoben werden.
6 Ziehen Sie das Kabel aus dem
Stauraum auf der Rückseite des
Motorblocks.
7 Stecken Sie den Stecker in die
Steckdose.
Wenn alle Leuchtanzeigen blinken,
wurde die Arbeitsschüssel und/oder der
Deckel nicht richtig angebracht. Aus
Sicherheitsgründen ist das Einschalten
des Geräts dann nicht möglich.
Überprüfen Sie den Sitz der Schüssel
und des Deckels.
Wenn die Arbeitsschüssel und der
Deckel richtig angebracht sind, blinkt
nur die Betriebsbereitschaftsanzeige.
Nur dann kann das Gerät gebraucht
werden.
8 betätigen Sie die I-Taste für den
Dauerbetrieb mit niedriger
Geschwindigkeit. Die
Betriebsbereitschaftsanzeige erlischt
dann und das blaue Licht in der I-Taste
fängt an zu leuchten.
9 Geben Sie weitere Zutaten während
der Benutzung durch die Füllöffnung im
Deckel hinzu. Benutzen Sie den
Stopfen, um feste Zutaten durch die
Füllöffnung nach unten zu drücken.
Nicht zu fest drücken!
Article 212700 Princess Food Processor and Blender
25
 Loading...