

Princess 1945 Instructions For Use Manual

TYPE 1945
Gebruiksaanwijzing
Instructions for use
Mode d’emploi
Anleitung
Instrucciones de Uso
Istruzioni d’uso
Bruksanvisning
Brugsanvisning
Bruksanvisning
Käyttöohje
Instruções de utilização
CLASSIC PASTA MACHINE

2

Gebruiksaanwijzing . . . . . . . . . . . . . . . . . . . . . . . . . . . . . . . . . . 4
Instructions for use . . . . . . . . . . . . . . . . . . . . . . . . . . . . . . . . . . . 8
Mode d’emploi . . . . . . . . . . . . . . . . . . . . . . . . . . . . . . . . . . . . . . 12
Anleitung . . . . . . . . . . . . . . . . . . . . . . . . . . . . . . . . . . . . . . . . . . . . 15
Instrucciones de Uso . . . . . . . . . . . . . . . . . . . . . . . . . . . . . . . . 19
Istruzioni d’uso . . . . . . . . . . . . . . . . . . . . . . . . . . . . . . . . . . . . . . 23
Bruksanvisning . . . . . . . . . . . . . . . . . . . . . . . . . . . . . . . . . . . . . . 27
Brugsanvisning . . . . . . . . . . . . . . . . . . . . . . . . . . . . . . . . . . . . . . 30
Bruksanvisning . . . . . . . . . . . . . . . . . . . . . . . . . . . . . . . . . . . . . . 34
Käyttöohje . . . . . . . . . . . . . . . . . . . . . . . . . . . . . . . . . . . . . . . . . . . 37
Instruções de utilização . . . . . . . . . . . . . . . . . . . . . . . . . . . . 41
GARANTIEKAART/GUARANTEE CARD/CARTE DE GARANTIE/ GARANTIEKARTE
CERTIFICADO DI GARANTÍA/CARTOLINA DI GARANZIA/GARANTIKORT/
G
ARANTIBEVIS/GARANTIKORT/TAKUUTODISTUS . . . . . . . . . . . . . . . . . . . . . . 45-46
NOVEMBER 2005
NL
UK
F
D
E
I
S
DK
N
SF
P

4
PRINCESS CLASSIC PASTAMACHINE ART. 1945
Deze gebruiksaanwijzing eerst geheel doorlezen en bewaren om later nog eens te kunnen raadplegen.
Controleer of de netspanning in de woning overeenkomt met die van het apparaat (230 Volt).
De PRINCESS CLASSIC PASTAMACHINE is een prachtige, volautomatische pastamachine voor huisgemaakte pasta. De krachtige motor maakt in een handomdraai de mooiste pasta. Voorzien van 10 verschillende inzetstukken die het mogelijk maken om diverse soorten pasta te bereiden. Het apparaat is
bovendien gemakkelijk schoon te maken.
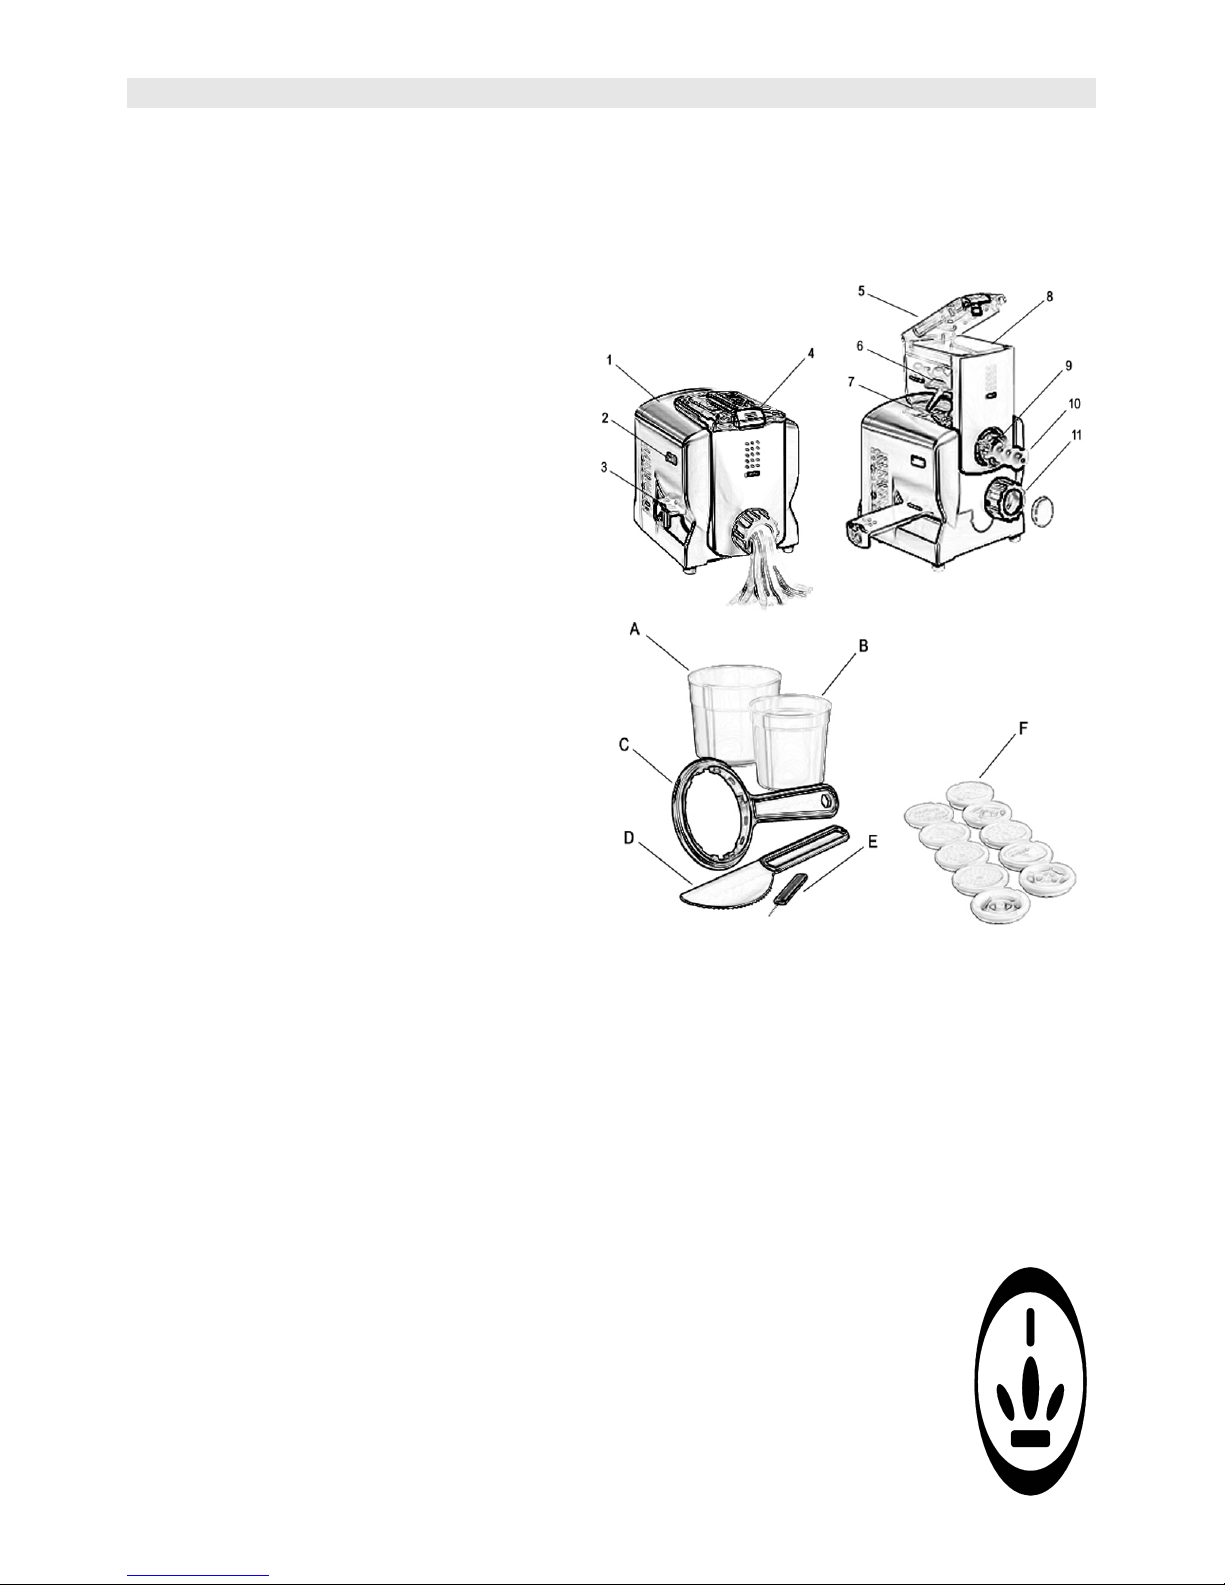
Beschrijving onderdelen pastamachine
1. Behuizing/ motorhuis
2. Aan/uit-schakelaar
3. Sluitschuif
4. Ontgrendelingsknop deksel
5. Deksel
6. Roermechanisme
7. Ontgrendelingsknop mengcontainer
8. Mengcontainer
9. Persdrukkamer
10.Deegtransport-spiraal
11.Sluitring
Wanneer u het apparaat voor het eerst uitpakt,
dient u verder nog onderstaande accessoires
aan te treffen:
- A: maatbeker voor het afmeten van de droge
ingrediënten
- B: maatbeker voor het afmeten van de
vloeistoffen
Attentie: Deze maatbekers worden speciaal
gemaakt voor de pastamachine en komen niet
overeen met standaardmaten.
Bovendien bevat de verpakking:
- C: een ringsleutel
- D: een kunststof mes, dat ook als schraper te gebruiken is
- E: een reinigingsattribuut
- F: tien verschillende pastavorm-inzetstukken
Uw pastamachine komt volledig gemonteerd van de fabrikant. Let op onderstaande aanwijzingen voor de
montage en demontage van het apparaat.
DEMONTAGEAANWIJZINGEN
1. Controleer of de pastamachine niet is aangesloten.
2. Verwijder de sluitring (11) samen met het pasta-inzetstuk (F). Gebruik indien nodig hiervoor de
ringsleutel (C).
3. De deegtransport-spiraal (10) voorzichtig verwijderen. Indien na gebruik de spiraal aan de achterkant
vol zit met kleverig deeg, deze eerst demonteren volgens onderstaande aanwijzingen. U kunt de
spiraal losmaken door zachtjes op het aseinde te tikken en hem dan verwijderen.
4. Trek de sluitschuif (3) helemaal uit het apparaat door zachtjes op de vastzetknop, die
zich bovenop de sluitschuif bevind, te drukken.
5. Druk de deksel-ontgrendelingsknop (4) aan de voorkant van het deksel (5) op de meng-
container (8) naar beneden door deze zachtjes naar voren te trekken en til het deksel
omhoog.
6. Aan de scharnierkant van het deksel, bij de behuizing (1) bevindt zich de mengcontai-
ner-ontgrendelingsknop (7) voor het verwijderen van de mengcontainer (8).
7. Druk op de ontgrendelingsknop en verwijder de mengcontainer.
8. De verchroomde aandrijfas van het roermechanisme (6) naar buiten trekken en deze uit
de mengcontainer verwijderen.

5
9. Reinig nu zorgvuldig alle onderdelen die met het deeg in aanraking komen, met de hand of in de
afwasmachine.
MONTAGEAANWIJZINGEN
1. Controleer eerst of de pastamachine niet is aangesloten.
2. Plaats het roermechanisme (6) in de mengcontainer (8) met de grootste opening naar de voorkant van
de mengcontainer.
3. Plaats het roermechanisme (6) zo, dat de openingen in de as van het roermechanisme aansluiten aan
de openingen in de container.
4. Steek de verschroomde aandrijfassen met de inkerving in de bovenste aandrijfopening van het motor-
huis (1).
5. Druk de ontgrendelingsknop (7) aan het motorhuis naar beneden en schuif de mengcontainer (8)
samen met het roermechanisme over de verchroomde aandrijfas in het motorhuis. Het kan noodzakelijk zijn enigszins aan het roermechanisme (6) te draaien zodat het alles goed op zijn plaats komt te
zitten. Dan laat u de ontgrendelingsknop (7) los en controleert u of de vergrendeling goed vastzit door
voorzichtig aan de mengcontainer te trekken.
6. Schuif de sluitschuif (3) in de gleuf van de behuizing (onder de aan/uit-schakelaar (2)) helemaal in de
mengstand. Dit is de stand waarbij de sluitschuif zover mogelijk in de behuizing wordt geschoven.
7. Schuif de deegtransport-spiraal (10) in de persdrukkamer (9) tot deze in de zeskantige opening van het
motorhuis (1) zit. Door de deegtransport-spiraal voorzichtig te draaien komt deze op de juiste plek
terecht, zodat hij niet boven het schroefgedeelte van de persdrukkamer uitsteekt.
8. Kies het gewenste pastavorm-inzetstuk (F) en plaats dit op de persdrukkamer (9), zodat de drie uitstul-
pingen van de persdrukkamer passen in de 3 inkervingen van het pastavorm-inzetstuk.
9. Houd het pasta-inzetstuk (F) met een vinger in de juiste positie en schuif, terwijl u gelijkertijd met de
wijzers van de klok meedraait, de sluitring (11) over de schroef van de persdrukkamer (9). De sluitring
enkel met de hand vastdraaien. Daartoe niet de ringsleutel (C) gebruiken, omdat anders het risico op
doldraaien bestaat.
10. Plaats nu het deksel (5) op de mengcontainer (8). De montage is gereed.
BEREIDING VAN DE PASTA
Onderaan deze gebruiksaanwijzing vindt u een paar recepten, zodat u meteen met de juiste bereiding in
uw pastamachine kunt beginnen. U kunt de meest bekende standaardrecepten met de pastamachine bereiden. Het verdient echter aanbeveling met de hier genoemde recepten te beginnen, zodat u vertrouwd raakt
met het gebruik van het apparaat en gevoel krijgt voor het soort deeg, dat u verwerkt.
Denk eraan: U kunt het deeg niet ‘bederven’/ laten mislukken. Er is óf meer vloeistof nodig (indien te
droog) óf meer meel (indien te vochtig).
Belangrijk: Controleer voordat u begint of de sluitschuif helemaal in het apparaat is geschoven (mengstand).
1. Kies het pastavorm-inzetstuk (F) voor de gewenste pastasoort.
2. Leg het pastavorm-inzetstuk in een kommetje met zeer heet water. Voeg enkele druppels olijf- of
plantenolie toe en let erop, dat het inzetstuk met water is bedekt. Laat het 1-2 minuten ondergedompeld liggen.
3. Plaats nu het pastavorm-inzetstuk zoals in de montageaanwijzingen in punt 8 en 9 is vermeld.
Controleer of het inzetstuk correct en stevig vastzit.
4. Doe overeenkomstig het uitgekozen recept de vereiste hoeveelheid meel in de mengcontainer (8).
5. Plaats het deksel (5) van de container (8) zo, dat u hoort dat het vastklikt.
6. Schakel het apparaat in met de aan/uit-schakelaar (2).
7. Voeg langzaam via de sleuf in de deksel de vloeistof toe. Bewaar ca. 15% van de vloei-
stof. Het zou kunnen, dat u deze hoeveelheid nog nodig heeft als het deeg te droog wordt.
8. Laat de motor ca. 3 minuten lopen.
9. Motor uitschakelen, deksel openen en controleren, of het deeg goed is. Dit is het geval
als het deeg uit klontjes zo groot als erwten bestaat. U moet van het deeg een klein
kogeltje met de vingers kunnen vormen. Als het deeg te korrelig is, lijkt het op zand of
maïsmeel. De motor weer aanzetten en de helft van de bewaarde vloeistof toevoegen en
het apparaat nog een minuut laten werken.
10. Het apparaat uitschakelen en het deeg controleren. Als zich grotere, kleverig aanvoe-
lende klontjes hebben gevormd, dan is het deeg te vochtig. Voeg een theelepel meel toe
en laat het apparaat nog een minuut lopen.

6
11. Zodra het deeg goed is, trekt u de sluitschuif langzaam uit het apparaat tot u een klik hoort. Hierdoor
heeft u de persdrukkamer geopend en begint de pastamachine met lopende motor binnen een minuut
met de bereiding van uw pasta. Hierbij zult u merken, dat het geluid van de motor verandert. Dat is
normaal.
ATTENTIE: Als u een hard ‘overbelast’ lijkend geluid hoort, het apparaat meteen uitschakelen en het
gedeelte ‘Storing‘ van deze gebruiksaanwijzing raadplegen.
12.Als er ca. 3 cm deeg uit het pastavorm-inzetstuk is geperst, snijdt u deze met het bijgeleverde kunst-
stof mes (D) af en legt u deze aan de kant.
13.Ga nu door met de bereiding van de pasta en snij deze op de gewenste lengte steeds direct bij de uit-
gang van het pastavorm-inzetstuk (F) af.
14.Indien u merkt, dat de pasta langzamer naar buiten komt, de sluitschuif volledig naar binnen schuiven
tot aan de mengstand. Daarna weer terugtrekken tot aan de klik en doorgaan met de normale bereiding.
15.Het kan gewenst zijn, het apparaat te stoppen om het deeg te kunnen verwerken, dat zich in de hoeken
van de mengcontainer (8) of aan het roermechanisme (6) heeft vastgehecht. Ook kan het zijn dat het
deeg zich verzamelt in de opening van de drukcompartiment (9). Gebruik dan het kunststof mes (D)
als schraper en schakel vervolgens het apparaat weer in, totdat alle deegresten volledig zijn verwerkt.
AANWIJZINGEN VOOR DE REINIGING
1. Apparaat van stroomnet halen door de stekker eruit te trekken.
2. Sluitring (11) en pasta-inzetstuk (F) verwijderen.
3. Alle deegresten uit de perskamer (9) verwijderen en de deegtransport-spiraal (10) eruit trekken.
4. Deeg verwijderen uit het pasta-inzetstuk met behulp van het schoonmaakattribuut (E) of met een tan-
denstoker.
Attentie: Laat het deeg eerst drogen, alvorens dit te verwijderen. Het werk wordt gemakkelijker als u
het inzetstuk in het diepvriesvak legt, zodat de deegresten bevriezen, en daarna pas met het verwijderen van het deeg begint.
5. Open het deksel (5) van de mengcontainer (8) en laat de deegresten enkele uren drogen, eventueel de
gehele nacht.
6. Nadat het deeg volledig droog is, kan het apparaat uitgeborsteld worden.
7. Demonteer de pastamachine volgen de demontageaanwijzingen.
8. Plaats de inzetstukken in de afwasmachine of was deze met de hand af in warm water met afwasmiddel.
ATTENTIE: Het motorhuis (1) nooit in water dompelen.
9. Veeg het motorhuis uitsluitend met een enigszins vochtige doek af.
10.Droog alle delen zorgvuldig en zet het apparaat weer in elkaar volgens de montageaanwijzingen.
WAT TE DOEN BIJ STORINGEN
• Wanneer de pasta langzamer naar buiten komt, ondanks het feit dat er voldoende deeg in de meng-
beker zit, kan het zijn dat er deeg is vastgekoekt aan de opening van de sluitschuif. Duw de schuif dan
in de mengstand en trek deze weer terug.
• Tijdens het maken van de pasta kan het zijn dat u het apparaat moet uitschakelen en eventueel aange-
koekt deeg van het roermechanisme en hoeken van de mengcontainer moet verwijderen voordat u het
apparaat weer in werking kunt zetten.
• Wanneer het apparaat tikkende geluiden maakt of wanneer u denkt dat de motor overbelast klinkt,
schakelt u het apparaat uit en sluit u de sluitschuif. Verwijder vervolgens de sluitring, het pasta-inzetstuk en het deeg uit de persdrukkamer. Voeg wat vloeistof toe, laat het deeg enkele minuten kneden en
begin opnieuw met pasta maken.
• Wanneer het deeg veel te droog is, kan er druk ontstaan die de motor niet aankan, waardoor het appa-
raat stilvalt en sterk beschadigt. Uw pastamachine is uitgerust met een antislipkoppeling die de motor
beschermt. Wanneer hier sprake van is, hoort u een luid ‘ploppend’ geluid en loopt de motor hoorbaar
langzamer. Daarom dient u er altijd voor te zorgen dat het deeg vochtig genoeg is.
• Let op: wanneer er abusievelijk droog meel in de persdrukkamer terecht is gekomen,
dient u onmiddellijk de sluitschuif in de mengpositie te zetten door deze volledig naar
binnen te schuiven. U dient vervolgens al het aangekoekte meel te verwijderen uit sluitring, pasta-inzetstuk, deegtransport-spiraal en persdrukkamer. Als u het apparaat weer
in elkaar heeft gezet, kunt u verdergaan met het maken van de pasta.

7
RECEPTEN
Voor de recepten die hieronder worden beschreven, heeft u olie nodig. U kunt plantaardige olie of olijfolie gebruiken. Wij raden olijfolie aan vanwege de authentieke smaak.
PASTABASISRECEPT (ZONDER EI)
Voor vier grote porties (voor twee porties de hoeveelheden halveren)
1. Zorg dat de sluitschuif volledig ingeschoven is.
2. Kies een pasta-inzetstuk en leg deze in een schaaltje met heet water, zodat het helemaal onder water
ligt. Voeg een theelepel olie toe en laat het inzetstuk een paar minuten in het schaaltje liggen.
3. Twee vullingen tarwemeel of ander witmeel met de maatbeker (A) in de mengcontainer doen en de
deksel sluiten.
4. Doe in de vloeistofmaatbeker (B) één theelepel olie en vul de beker verder met heet water. Kort door-
roeren.
5. Zet het apparaat aan en doe langzaam het water erin via de vloeistofopening in de deksel. Bewaar 15%
van het vocht als reserve voor het geval dat het deeg te droog blijft.
PASTABASISRECEPT (MET EI)
Volg het pastabasisrecept zonder ei van stap 1–3.
4. Doe twee grote eieren en één theelepel olie in de vloeistofmaatbeker. Klop de eieren en de olie kort
door elkaar en vul de beker tot de markering met heet water. Kort doorroeren.
PASTAVARIATIES
Semolinapasta : Gebruik een maatbeker met semolinameel in plaats van met bloem.
Tomatenpasta : Voeg twee theelepels tomatenpuree aan de vloeistof toe.
Spinaziepasta : 1/2 maatbeker vullen met gezeefde spinazie, die met een beetje water in de mixer is
fijngemaakt. De overgebleven vloeistof kunt u als water gebruiken.
Knoflookpasta: Twee tenen knoflook schillen en pureren en aan de vloeistof toevoegen.
Hou er rekening mee dat de kooktijd van zelfgemaakte pasta korter is dan dat van gekochte (droge) pasta.
PRINCESS-TIPS
- Plaats de pastamachine niet op plaatsen, waar het vochtig is of waar damp vrijkomt.
- Nooit het motorhuis of de netkabel in het water dompelen.
- Indien kinderen op de werkplek aanwezig zijn, is toezicht van volwassenen vereist.
- Bij reiniging, demontage of montage van onderdelen van het apparaat of indien de pastamachine niet
wordt gebruikt, altijd de stekker uit het stopcontact halen.
- Stroomkabel niet in aanraking brengen met hete oppervlakten.
- De pastamachine alleen gebruiken als het met het deksel is afgesloten.
- Het apparaat eerst uitschakelen en wachten tot de deegmenger gestopt is voordat het deksel eraf
genomen kan worden.
- Nooit draaiende delen aanraken.
- Niet gebruiken als het apparaat of het snoer beschadigd is. Stuur het naar onze servedienst om risico's
te vermijden. Bij dit type apparaat kan een beschadigd snoer alleen door onze servicedienst worden
vervangen met behulp van speciaal gereedschap.
- Alleen originele onderdelen en accessoires gebruiken.
- De pastamachine nooit buiten gebruiken.
- De pastamachine is een huishoudelijk apparaat en niet bedoeld voor professioneel gebruik.
8
PRINCESS CLASSIC PASTAMACHINE ART. 1945
First read through these instructions carefully and keep for future reference. Check whether the mains
voltage in your home is the same as that of the appliance (230 Volt).
The PRINCESS CLASSIC PASTAMACHINE is an excellent, fully automatic pasta machine for homemade
pasta. The powerful motor makes the most beautiful pasta within a short time. Equipped with 10 different
attachments that allow you to make different types of pasta. The appliance is also easy to clean.
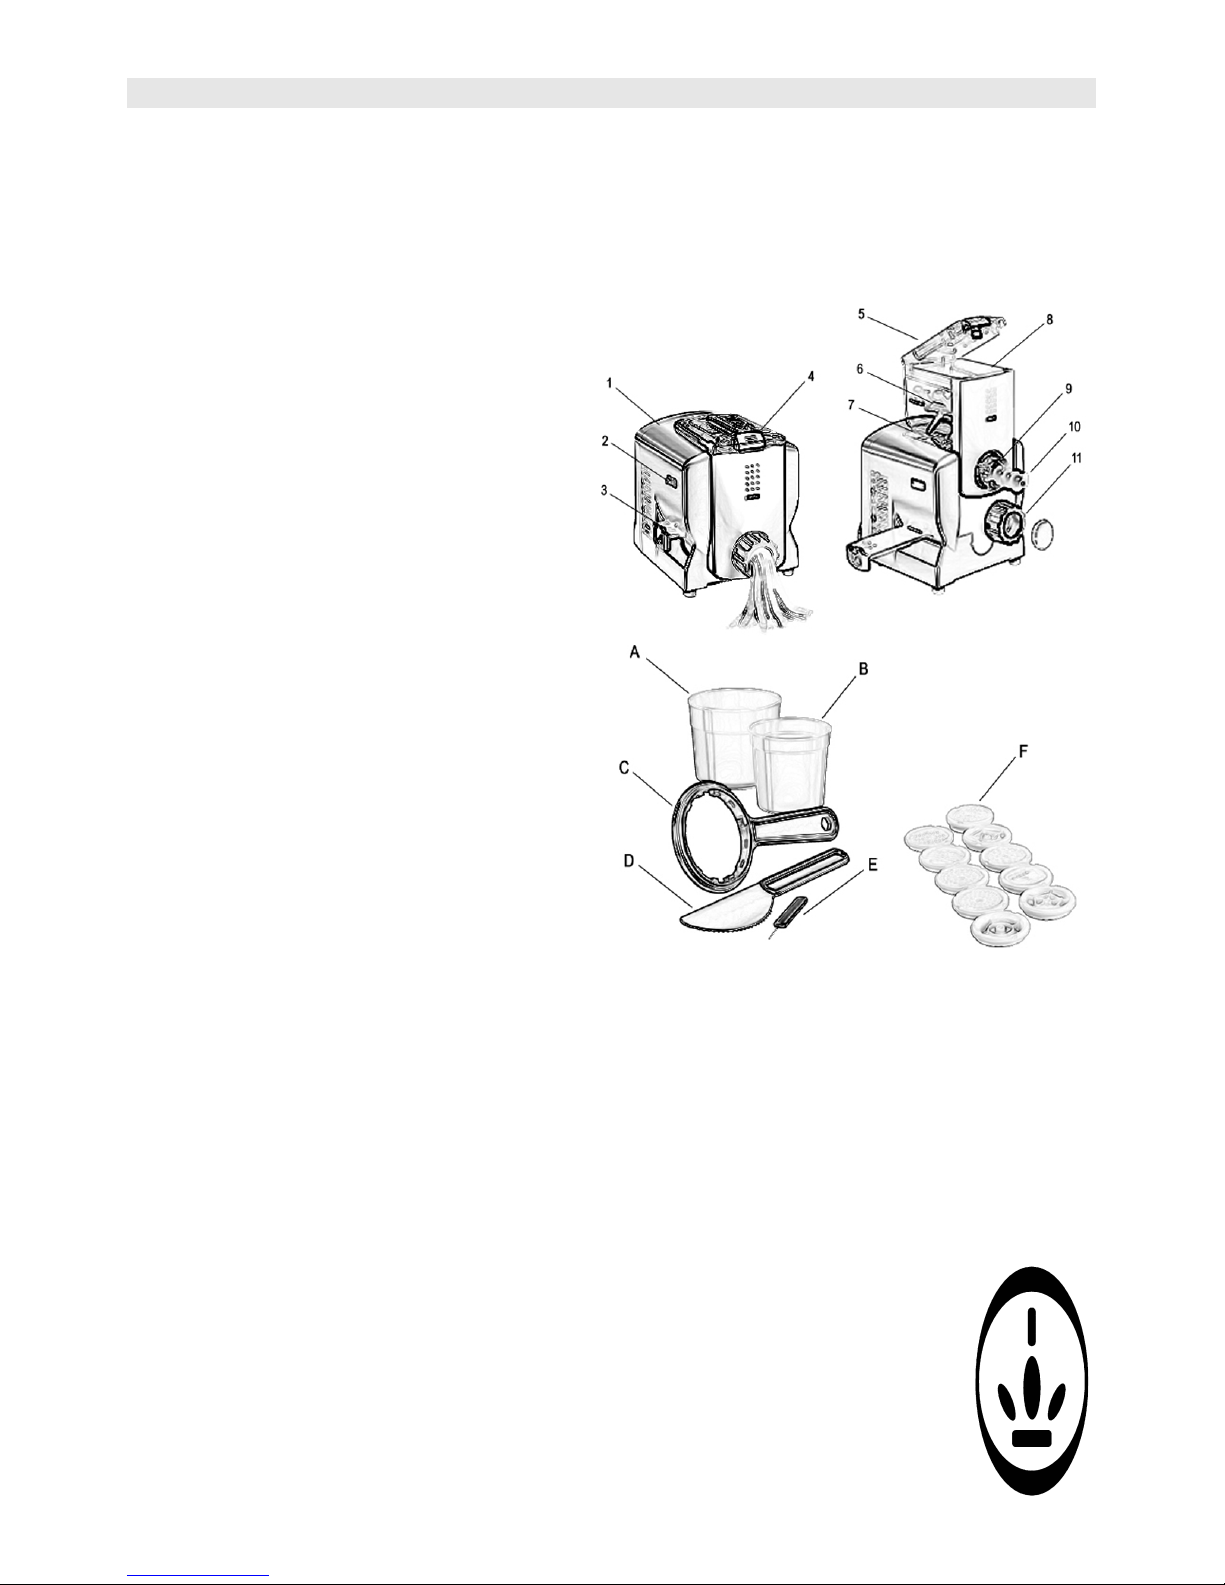
Description of the components of the pasta machine
1. Casing/motor casing
2. On/Off switch
3. Closing slide
4. Unlocking button for the cover
5. Cover
6. Stirring mechanism
7. Unlocking button for the mixing container
8. Mixing container
9. Extrusion chamber
10. Dough transport coil
11. Sealing washer
When you open the appliance for the first time, you
will find the following accessories:
- A: measuring cup for measuring out dry ingredients
- B: measuring cup for measuring out liquids
Attention: These measuring cups are specially
designed for the pasta machine and do not come in
standard sizes.
In addition, the packing also contains the following:
- C: a ring spanner
- D: a plastic knife that can also be used as a scraper
- E: a cleaning attachment
- F: ten different pasta-shaping attachments
Your pasta machine is supplied fully assembled by the
manufacturer. Carefully follow the instructions given below
for the installation and dismantling of the appliance.
DISMANTLING INSTRUCTIONS
1. Check to ensure that the pasta machine is not connected to the mains.
2. Remove the locking washer (11) together with the pasta attachment (F). If necessary, use the ring
spanner for this purpose (C).
3. Carefully remove the dough transport coil (10). If after use, the back of the coil is full of sticky dough,
first dismantle the coil according to the following instructions. You can remove the coil by lightly
tapping the end of the shaft and then removing the same.
4. Pull the closing slide (3) fully out of the appliance by gently pushing the locking button located above
the closing slide.
5. Press the unlocking button (4) for the cover, located on the front side of the cover (5) on the mixing
container (8) downwards by pulling it gently forward and lift the cover.
6. The unlocking button (7) for removing the mixing container (8) is located on the hin-
ging side of the cover near the casing (1).
7. Press the unlocking button and remove the mixing container.
8. Pull the chrome-plated drive shaft of the stirring mechanism (6) outward and remove it
from the mixing container.
9. Now carefully clean all the components that come into contact with the dough, either
by hand or in the dishwasher.

9
INSTALLATION INSTRUCTIONS
1. First check to ensure that the pasta machine is not connected to the mains.
2. Place the stirring mechanism (6) in the mixing container (8) with the largest opening facing the front
of the mixing container.
3. Place the stirring mechanism (6) in such a manner that the openings in the shaft of the stirring
mechanism coincide with the openings in the container.
4. Insert the chrome-plated drive shafts with the groove in the topmost drive opening of the motor casing (1).
5. Press the unlocking button (7) on the motor casing downwards and push the mixing container (8)
together with the stirring mechanism over the chrome-plated drive shaft into the motor casing. It may
be necessary to turn the stirring mechanism (6) to some extent, so that everything falls properly in
place. Now unscrew the unlocking button (7) and check whether the locking has taken place properly
by carefully pulling the mixing container.
6. Push the closing slide (3) in the groove of the casing (on/off switch (2)) fully into the mixing position.
This is the position in which the closing slide is pushed as far as possible into the casing.
7. Push the dough transport coil (10) into the extrusion chamber (9) until it is in the hexagonal opening
of the motor casing (1). By carefully rotating the dough transport coil, it will come to rest in the
proper place, so that it will not project outside the threaded part of the extrusion chamber.
8. Select the desired pasta-shaping attachment (F) and place it in the extrusion chamber (9), so that the
three projections of the extrusion chamber fit into the three grooves of the pasta-shaping attachment.
9. Hold the pasta-shaping attachment (F) in place with a finger and push the sealing washer (11) over the
screw of the extrusion chamber (9) with simultaneous rotation in the clockwise direction. Only tighten
the sealing washer by hand. For this, use the ring spanner (C), otherwise there is a risk of stripping the
thread of the screw.
10. Now place the cover (5) on the mixing container (8). The installation is now complete.
PREPARATION OF PASTA
At the end of these instructions, you will find a couple of recipes so that you can start immediately with
the correct preparation in your pasta machine. You can prepare most of the known standard recipes using
the pasta machine. However, it is recommended that you start with the recipes mentioned here, so that
you become familiar with the use of the equipment and acquire a feeling for the kind of dough that you
are processing.
Remember the following: It is not really possible to ‘spoil’ the dough. Either more liquid is required (if it
is too dry) or more flour is required (if it is too wet).
Important: Before you start, check whether the closing slide is fully pushed into the appliance (mixing
position).
1. Select the pasta-shaping attachment (F) for the desired type of pasta.
2. Place the pasta-shaping attachment in a bowl with extremely hot water. Add a few drops of olive or
vegetable oil and ensure that the attachment is covered with water. Allow it to lie immersed for 1-2
minutes.
3. Now place the pasta-shaping attachment as described in the installation instructions in point 8 and 9.
Check whether the attachment has been correctly and firmly installed.
4. Add the required quantity of flour into the mixing container (8) according to the recipe selected.
5. Place the cover (5) of the container (8) in such a manner that you can hear it click in place.
6. Switch on the appliance over the On/Off switch (2).
7. Slowly add the liquid via the slot in the cover. Keep around 15% of the liquid aside. It is possible that
you may require the same if the dough is too dry.
8. Run the motor for around 3 minutes.
9. Switch off the motor, open the cover and check whether the dough is of the right con-
sistency. The dough may be said to be suitable if it consists of pea-sized lumps. You
should be able to make a small ball of dough with your fingers. If the dough is too
gritty, it resembles sand or maize flour. Switch on the motor again and add half of the
liquid you have put by, and run the appliance for another minute.
10.Switch off the appliance and check the dough. If you find large, sticky lumps, it means
the dough is too wet. Add a teaspoonful of flour and run the appliance for another minute.
11. As soon as the dough is suitable, pull out the closing slide slowly out of the appliance
until you hear it click. This will open the extrusion chamber and the pasta machine will
start preparing your pasta within a minute, with the motor running. During this operation, you will notice a change in the sound of the motor. That is normal.

10
ATTENTION: If you hear a loud sound indicating ‘overload’, immediately switch off the appliance
and look up the ‘Troubleshooting’ section of this manual.
12.After around 3 cm of dough is extruded from the pasta-shaping attachment, cut it with the plastic
knife (D) provided and place it aside.
13.Now continue with the preparation of the pasta and always cut it to the desired length directly at the
outlet of the pasta-shaping attachment (F).
14.If you notice that the pasta comes out more slowly, push the closing slide fully inward up to the
mixing position. Thereafter pull it back until it clicks, and continue with the normal preparation.
15.It may be desirable to stop the appliance to enable the processing of dough that may be stuck in the
corners of the mixing container (8) or on the stirring mechanism (6). It may also happen that the
dough accumulates in the opening of the pressure compartment (9). Use the plastic knife (D) as a scraper and then switch on the appliance again until all the remaining dough is fully processed.
CLEANING INSTRUCTIONS
1. Disconnect the appliance from the mains network by pulling out the plug.
2. Remove the sealing washer (11) and the pasta-shaping attachment (F).
3. Remove all the remaining dough from the extrusion chamber (9) and pull out the dough transport coil
(10).
4. Remove the dough from the pasta-shaping attachment using the cleaning attachment (E) or with a
toothpick.
Attention: First allow the dough to dry before removing it. The work will be easier if you place the
attachment in the deep freezer to freeze the remaining dough before you start removing the dough.
5. Open the cover (5) of the mixing container (8) and allow the remaining dough to dry for a couple of
hours, if necessary, overnight.
6. After the dough is fully dry, you may brush out the appliance.
7. Dismantle the pasta machine in accordance with the dismantling instructions.
8. Place the attachments into the dishwasher or wash them by hand in hot water using a washing solution.
ATTENTION: Never immerse the motor casing (1) in water.
9. Wipe down the motor casing only with a slightly moist piece of cloth.
10.Carefully dry all the components and again switch on the appliance according to the installation
instructions.
TROUBLESHOOTING
• If the pasta is extruded more slowly, in spite of there being a sufficient amount of dough in the mixing
container, it may be that the dough has hardened around the opening of the closing slide. In such case,
push the slide into the mixing position and pull it back again.
• While making the pasta, you may have to switch off the appliance and remove the hardened dough out
of the stirring mechanism and the corners of the mixing container before you can start the appliance
again.
• If the appliance makes tapping sounds or if you think that the motor sounds as if it is overloaded,
switch off the appliance and close the closing slide. Then remove the locking washer, the pasta attachment and the dough from the extrusion chamber. Add a little liquid, allow the dough to be kneaded for
a few minutes and again commence preparing pasta.
• Excessively dry dough may generate such high pressure that the motor may fail and the appliance will
suffer heavy damage and come to a stop. Your pasta machine is equipped with an anti-slip coupling
that will protect the motor. In such case, you will hear a loud ‘plopping’ sound, and you will hear the
motor run more slowly. For this reason, you should always ensure that the dough is wet enough.
• Please note: If excessively dry flour finds its way into the extrusion chamber, you should immediately
place the closing slide in the mixing position by pushing it sufficiently inward. You should thereafter
remove all the hardened flour from the locking washer, pasta attachment, dough transport coil and extrusion chamber. After reassembling the equipment, you may continue
making pasta.
U.K. WIRING INSTRUCTIONS
The wires in the mains lead are coloured in accordance with the following code:
BLUE NEUTRAL
BROWN LIVE
GREEN/YELLOW EARTH

11
As the colours of the wire in the mains lead of this appliance may not correspond with the colour
markings identifying the terminals on your plug, proceed as follows:
The wire which is coloured BLUE must be connected to the terminal which is marked with the
letter N or coloured black.
The wire which is coloured BROWN must be connected to the terminal which is marked with the
letter L or coloured red.
The wire which is coloured GREEN/YELLOW must be connected to the terminal which is marked with
the letter E or and is coloured GREEN or GREEN/YELLOW
WARNING: THIS APPLIANCE MUST BE EARTHED
RECIPES
For the recipes described below, you will need oil. You may use either olive oil or
vegetable oil. We recommend olive oil due to its authentic taste.
BASIC PASTA RECIPE (WITHOUT EGGS)
For four large portions (for two portions, halve the quantities)
1. Ensure that the closing slide is fully pushed in.
2. Select a pasta attachment and place it in a bowl with hot water, so that it is fully under water. Add a
teaspoonful of oil and leave the attachment in the bowl for a couple of minutes.
3. With the measuring cup (A), measure out two portions of wheat flour or other white flour into the
mixing container and close the cover.
4. Put in a teaspoonful of oil into the liquid measuring cup (B) and fill the beaker further with hot water.
Stir the mixture briefly.
5. Switch on the equipment and carefully add the water via the opening in the cover for liquids. Keep
15% of the liquid aside in case the dough is too dry.
BASIC PASTA RECIPE (WITH EGGS)
Follow Steps 1-3 of the Basic Pasta Recipe without eggs.
4. Put in two large eggs and a teaspoonful of oil into the liquid measuring cup. Beat the eggs and the oil
together briefly and fill the cup with hot water up to the mark. Stir the mixture briefly.
PASTA VARIATIONS
Semolina pasta Use a measuring cup with semolina flour instead of normal flour.
Tomato pasta Add two teaspoonfuls of tomato puree to the liquid.
Spinach pasta Fill the measuring cup to the 1/2 mark with strained spinach, fine-ground in the mixer,
along with the drinking water. You may use the remaining liquid as water.
Garlic pasta Peel and mash two cloves of garlic and add it to the liquid.
Keep in mind that the cooking time for the homemade pasta is less than that of cooked (dry) pasta.
PRINCESS-TIPS
- Do not install the machine in wet locations or where there is exposure to steam.
- Never immerse the motor casing of the mains cable into the water.
- If there are children present at the workplace, the supervision of adults is necessary.
- Always remove the plug from the socket outlet during cleaning, dismantling or installing appliance
components, or if the pasta machine is not in use.
- Do not let the power cable touch hot surfaces.
- Only use the pasta machine when the cover is closed.
- First switch off the equipment and wait until the dough mixture has stopped before you
remove the cover.
- Never touch moving parts.
- Do not use the appliance if it is damaged or if the power cable is damaged. Send it to
our Service department to reduce risks. With this type of appliance, a damaged cable
should only be replaced by our service department using special tools.
- Only use original components and accessories.
- Never use the pasta machine outdoors.
- The pasta machine is intended for home use and not for professional use.
12
PRINCESS CLASSIC PASTAMACHINE ART. 1945
Lisez attentivement ce mode d'emploi et conservez-le afin de pouvoir le consulter ultérieurement si
nécessaire. Assurez-vous que la tension du secteur correspond à celle de l’appareil (230 volts).
La PRINCESS CLASSIC PASTAMACHINE est une superbe machine à faire les pâtes fraîches,
entièrement automatique, pour faire ses pâtes soi-même. Le moteur puissant permet d’obtenir les plus
belles pâtes fraîches en un tour de main. Pourvue de dix accessoires différents permettant de produire
toutes sortes de pâtes fraîches. La machine à pâtes fraîches se nettoie en outre très facilement.
Descriptif de la machine à pâtes fraîches
1. Corps de l’appareil / bloc-moteur
2. Interrupteur Marche/Arrêt
3. Glissière
4. Bouton de déblocage du couvercle
5. Couvercle
6. Mécanisme rotatif
7. Bouton de déblocage du récipient pétrisseur
8. Récipient pétrisseur
9. Chambre de compression
10.Spirale de transport de la pâte
11.Rondelle de blocage
Lorsque vous déballez l’appareil pour la première
fois, vous devez trouvez les accessoires ci-dessous :
- A : doseur pour mesurer les ingrédients secs
- B: doseur pour mesurer les liquides
Attention : Ces doseurs ont été conçus spécialement
pour la machine à pâtes fraîches et ne correspond
donc pas aux mesures standards.
Le carton contient également :
- C: une clé plate
- D: un couteau en plastique qui sert également de
grattoir
- E: un ustensile de nettoyage
- F: dix accessoires pour des formes de pâtes différentes
Votre machine à pâtes est entièrement assemblée d’usine.
Lors du démontage et de l’assemblage veillez à respecter les points suivants.
INSTRUCTIONS POUR LE DÉMONTAGE
1. Assurez-vous que la machine est débranchée.
2. Retirez la rondelle de blocage (11) ainsi que l’accessoire en place (F). Utilisez si nécessaire la clé (C)
à cet effet.
3. Retirez avec précaution la spirale de transport de la pâte (10). Si après l’emploi la spirale est toute
enduite de pâte qui attache, démontez-la d’abord en suivant les instructions suivantes. Détachez la
spirale en tapotant délicatement sur l’axe et la sortir ensuite de son axe.
4. Sortez entièrement la glissière (3) de l’appareil en la tirant tout en appuyant délicatement sur le bouton
de blocage qui se trouve au-dessus.
5. Enfoncez le bouton de déblocage du couvercle (4) qui se trouve à l’avant du couvercle
(5) sur le
récipient pétrisseur (8) en tirant celui-ci délicatement en avant et soulevez le couvercle.
6. Le bouton de déblocage du récipient pétrisseur (7) qui permet de sortir le récipient
pétrisseur (8) se trouve du côté des charnières du couvercle, sur le corps de l’appareil (1).
7. Appuyez sur le bouton de déblocage et sortez le récipient pétrisseur.
8. Tirez l’axe d’entraînement chromé du mécanisme rotatif (6) vers l’extérieur et sortez-le
du récipient pétrisseur.
9. Nettoyez soigneusement toutes les pièces qui sont en contact avec la pâte, à la main ou
au lave-vaisselle.

13
INSTRUCTIONS D’ASSEMBLAGE
1. Assurez-vous d’abord que la machine est débranchée.
2. Placez le mécanisme rotatif (6) dans le récipient pétrisseur (8) avec la plus grande ouverture vers
l’avant du récipient pétrisseur.
3. Positionnez le mécanisme rotatif (6) de façon à ce que les ouvertures de l’axe du mécanisme
s’adaptent dans les ouvertures du récipient pétrisseur.
4. Enfoncez les axes d’entraînement chromés en mettant l’encoche dans l’ouverture supérieure du
bloc-moteur (1).
5. Appuyez sur le bouton de déblocage (7) du bloc-moteur et faites glisser le récipient pétrisseur (8) ainsi
que le mécanisme rotatif par dessus l’axe d’entraînement chromé dans le bloc-moteur. Il peut être
nécessaire de tourner un peu le mécanisme rotatif (6) de façon à ce que tout se mette bien en place.
Relâchez ensuite le bouton de déblocage (7) et vérifiez que le récipient pétrisseur est bien fixé en
tirant légèrement dessus.
6. Insérez la glissière (3) entièrement dans la fente (située sous l’interrupteur général (2)) en position de
mélange. C’est la position dans laquelle la glissière est enfoncée le plus loin possible dans le boîtier.
7. Glissez la spirale de transport de la pâte (10) dans la chambre de compression (9) jusqu’à ce qu’elle
s’emboîte dans l’ouverture hexagonale du bloc-moteur (1).
Faites légèrement tourner la spirale de transport de la pâte de façon à ce qu’elle se mette bien en place
c’est à dire qu’elle ne dépasse pas du pas de vis de la chambre de compression.
8. Choisissez un accessoire pour pâtes (F) et le monter sur la chambre de compression (9) de façon à ce
que les trois parties en saillie de la chambre de compression s’adaptent dans les trois rainures de
l’accessoire pour pâtes.
9. Tenez l’accessoire (F) en le maintenant en position avec un doigt et faites glisser la bague de blocage
(11) sur la vis de la chambre de compression (9) tout en la faisant tourner dans le sens des aiguilles
d’une montre. Serrez la bague de blocage seulement à la main.
N’utilisez pas la clé (C) car cela risquerait d’endommager le pas de vis.
10. Remettez le couvercle (5) sur le récipient pétrisseur (8). L’appareil est assemblé.
PRÉPARATION DE LA PÂTE
Vous trouverez à la fin de ce mode d’emploi quelques recettes qui vous permettront de commencer tout
de suite à préparer des pâtes fraîches. La plupart des recettes pour pâtes fraîches peuvent être préparées
avec cette machine. Mais il est conseillé de commencer avec les recettes indiquées ici afin de se familiariser
avec le fonctionnement de la machine et d’apprendre à reconnaître les différents types de pâtes.
N’oubliez pas : Vous ne pouvez pas rater la pâte. Soit il faut ajouter du liquide (si la pâte est trop sèche)
soit de la farine (si la pâte est trop mouillée).
Important : Avant de commencer, vérifiez que la glissière est enfoncée à fond (en position de mélange)
dans l’appareil.
1. Sélectionnez l’accessoire (F) correspondant au type de pâtes que vous souhaitez.
2. Trempez l’accessoire dans un petit récipient contenant de l’eau très chaude. Ajoutez quelques gouttes
d’huile d’olive ou autre huile végétale et veillez à ce que l’accessoire trempe bien dans le liquide.
Laissez tremper pendant une à deux minutes.
3. Installez à présent l’accessoire comme indiqué aux points 8 et 9 des instructions d’assemblage.
Vérifiez que l’accessoire est fixé correctement et solidement.
4. Versez la quantité de farine correspondant à la recette choisie dans le récipient de pétrissage (8).
5. Placez le couvercle (5) sur le récipient de pétrissage (8) jusqu’au déclic.
6. Allumez l’appareil à l’aide de l’interrupteur général (2).
7. Versez lentement le liquide dans l’ouverture prévue sur le couvercle. Conservez 15%
environ du liquide. Vous en aurez peut-être encore besoin si la pâte est trop sèche.
8. Faites tourner le moteur pendant 3 minutes environ.
9. Coupez le moteur, ouvrez le couvercle et vérifiez l’état de la pâte. La pâte est correcte
lorsqu’elle forme des petits grumeaux de la taille de noisettes. Vous devez pouvoir
former des petites boulettes de pâte avec les doigts. Si la pâte est trop granuleuse, elle
ressemble à du sable ou de la maïzena. Rallumez alors le moteur et ajoutez la moitié du
liquide que vous avez conservé et remettez l’appareil en marche pendant une minute.
10.Eteignez l’appareil et contrôlez l’état de la pâte. Si la pâte forme des grumeaux plus
gros et colle aux doigts, c’est qu’elle est trop humide. Ajoutez une cuillérée à café de
farine et faites tourner l’appareil encore une minute.

14
11.Dès que la pâte est prête, retirez doucement la glissière de la machine jusqu’au déclic. Vous ouvrez
ainsi la chambre de compression et la machine à pâtes commencera à préparer vos pâtes d’ici une
minute. Vous remarquerez alors que le bruit du moteur change. Ceci est normal.
ATTENTION : Si le bruit vous paraît anormalement fort et donne l’impression que la machine est
“surchargée”. éteignez immédiatement la machine et consultez le chapitre “Pannes” de ce mode
d’emploi.
12.Dès qu’un morceau d’environ 3 cm de pâte est expulsé de l’accessoire pour pâtes, coupez-le à l’aide
du couteau fourni (D) et mettez-le de côté.
13.Poursuivez l’opération et coupez la pâte à la longueur désirée aussitôt qu’elle sort de l’accessoire (F).
14.Si vous constatez que la pâte sort plus lentement de la machine, poussez la glissière à fond jusqu’à la
position de mélange. Puis ressortez-la jusqu’au déclic et poursuivez normalement le processus de
fabrication de la pâte.
15.Il peut être souhaitable d’arrêter la machine pour enlever la pâte qui reste collée dans les coins du réci-
pient pétrisseur (8) ou sur le mécanisme rotatif (6). Il se peut également que de la pâte se soit agglutinée dans l’ouverture du compartiment de compression (9). Utilisez alors le couteau en plastique (D)
comme grattoir et rallumez la machine jusqu’à ce que les restes de pâte soient complètement éliminés.
INSTRUCTIONS POUR LE NETTOYAGE
1. Débrancher la fiche de la prise de courant.
2. Retirer la rondelle de blocage (11) et l’accessoire pour pâtes (F).
3. Eliminer tous les restants de pâte de la chambre de compression (9) et sortir la spirale de transport de
la pâte (10).
4. Enlever la pâte collée sur l’accessoire en utilisant l’ustensile de nettoyage (E) ou un bâtonnet dentaire.
Attention : Laisser sécher la pâte avant de l’enlever. Il sera plus facile d’enlever les restants de pâte si
vous mettez l’accessoire quelque temps au congélateur ; les restants de pâte gelés s’enlèveront alors
plus facilement.
5. Ouvrir le couvercle (5) du récipient pétrisseur (8) et laisser sécher les restants de pâte quelques heures,
ou toute la nuit si nécessaire.
6. Lorsque la pâte a complètement séché, il n’y a plus qu’à l’enlever en la brossant.
7. Démonter la machine à pâtes fraîches conformément aux instructions.
8. Laver les accessoires au lave-vaisselle ou à la main dans de l’eau chaude additionnée de liquide-vaisselle.
ATTENTION : Ne jamais plonger le bloc-moteur (1) dans l’eau.
9. Essuyer uniquement le bloc-moteur avec un chiffon légèrement humide.
10.Sécher soigneusement toutes les pièces et réassembler la machine conformément aux instructions.
QUE FAIRE EN CAS DE PANNES ?
• Si la pâte sort plus lentement de la machine alors qu’il reste suffisamment de pâte dans le récipient
pétrisseur, il se peut qu’il y ait de la pâte accrochée sur l’ouverture de la glissière. Dans ce cas,
poussez la glissière à fond en position de mélange puis retirez-la.
• Au cours du processus de fabrication de la pâte, il se peut que vous deviez éteindre la machine pour
enlever les restes de pâte qui attachent au mécanisme rotatif et aux parois du récipient pétrisseur avant
de la rallumer pour pouvoir continuer l’opération.
• Si la machine émet des bruits bizarres ou si vous avez l’impression que le moteur surchauffe, éteignez
la machine et fermez la glissière. Retirez ensuite la bague de blocage, l’accessoire et la pâte de la
chambre de décompression. Ajoutez un peu de liquide, laissez la pâte pétrir quelques minutes et
recommencez le processus de fabrication des pâtes.
• Si la pâte est trop sèche, la pression devient trop forte pour le moteur qui surchauffe et s’arrête. Votre
machine à pâtes fraîches est équipée d’un accouplement antidérapant qui protège le moteur. Dans ce
cas, le moteur émet un « plouf » caractéristique et vous l’entendez nettement ralentir. Veillez donc à ce
que la pâte soit toujours suffisamment humide.
• Attention : Si malencontreusement de la farine sèche pénétrait dans la chambre de com-
pression, mettez immédiatement la glissière en position de mélange en l’enfonçant à
fond. Enlevez ensuite toute la pâte qui a attaché à la rondelle de blocage, l’accessoire
pour pâtes, la spirale de transport et la chambre de compression. Remontez ensuite la
machine et vous pourrez continuer la fabrication des pâtes.
RECETTES
Pour réaliser les recettes ci-dessous, vous avez besoin d’huile. Vous pouvez prendre de
l’huile d’olive ou une autre huile végétale. Nous conseillons l’huile d’olive pour sa saveur
authentique.

15
RECETTE DE BASE POUR PATES FRAICHES (SANS OEUF)
Pour quatre grosses portions (pour deux portions diminuez les quantités de moitié)
1. Veillez à ce que la glissière soit enfoncée à fond.
2. Choisissez un accessoire pour pâtes et placez-le dans un récipient d’eau chaude de façon à ce qu’il soit
complètement recouvert d’eau. Ajoutez une cuillérée à café d’huile et laissez tremper l’accessoire
quelques minutes.
3. Versez deux doseurs (A) pleins de farine de froment ou d’une autre farine blanche dans le récipient
pétrisseur et fermez le couvercle.
4. Versez une cuillérée à café d’huile dans le doseur à liquides (B) et remplissez-le d’eau chaude.
Mélangez brièvement.
5. Allumez la machine et versez lentement le liquide par l’ouverture prévue sur le couvercle. Réservez
15% du liquide pour le cas où la pâte serait trop sèche.
RECETTE DE BASE POUR PATES FRAICHES (AUX OEUFS)
Suivez les points 1 à 3 de la recette de base pour pâtes fraîches sans oeuf.
4. Cassez deux gros oeufs dans le doseur à liquides et ajoutez-y une cuillérée à café d’huile. Battez briè-
vement les oeufs et l’huile et ajoutez de l’eau chaude jusqu’à la marque. Mélangez brièvement.
PATES FANTAISIE
Pâtes à la semoule de blé dur Remplissez le doseur avec de la semoule de blé dur au lieu de la farine.
Pâtes à la tomate Ajoutez deux cuillérées à café de purée de tomates dans le liquide.
Pâtes aux épinards Remplissez 1/2 du doseur d’épinards passés au tamis que vous aurez hachés
au mixeur en ajoutant un peu d’eau. Utilisez le jus restant à la place de l’eau.
Pâtes à l’ail Ajoutez deux gousses d’ail pelées et écrasées dans le liquide.
Tenez compte du fait que le temps de cuisson des pâtes fraîches maison est plus court que celui des
pâtes (sèches) vendues dans le commerce.
CONSEILS PRINCESS
- Ne pas placer la machine à pâtes fraîches dans des endroits humides ou ayant une forte concentration
de vapeur d’eau.
- Ne jamais plonger le bloc-moteur ni le cordon électrique dans l’eau.
- La surveillance par des adultes est indispensable en présence d’enfants.
- Toujours débrancher la fiche de la prise de courant lors du nettoyage, démontage ou assemblage de la
machine ou lorsque la machine n’est pas utilisée.
- Ne pas mettre le cordon d’alimentation électrique en contact avec des surfaces très chaudes.
- Utiliser uniquement la machine à pâtes fraîches avec le couvercle fermé.
- Débrancher la machine et attendre que le récipient pétrisseur ne tourne plus pour ouvrir le couvercle.
- Ne jamais toucher des pièces en mouvement.
- Ne pas utiliser l’appareil si son cordon est endommagé. Le renvoyer à notre service après-vente pour
éviter de l’endommager davantage. Sur ce type d’appareil, un cordon endommagé peut uniquement
être remplacé par notre service après-vente à l’aide d’outils spéciaux.
- Utiliser uniquement les pièces et accessoires d’origine.
- Ne jamais utiliser la machine à pâtes fraîches en plein air.
- Cette machine à pâtes fraîches est prévue pour un usage domestique et donc pas pour un usage
professionnel.
PRINCESS CLASSIC PASTAMACHINE ART. 1945
Diese Gebrauchsanweisung zuerst gründlich durchlesen und für eventuelle spätere Fragen
aufheben. Prüfen, ob die Netzspannung in der Wohnung der des Geräts entspricht (230 Volt).
Die PRINCESS CLASSIC PASTAMASCHINE ist eine formschöne, vollautomatische
Pastamaschine für hausgemachte Pasta. Der leistungsstarke Motor sorgt im Handumdrehen
für hervorragende Pasta. Mit 10 verschiedenen Einsätzen für die Herstellung diverser
Pastasorten. Das Gerät lässt sich außerdem einfach reinigen.
 Loading...