


Instructions for use PRIMEDIC™ Defi-Monitor ECO 1 / DM 1 / DM 3
Table of contents |
Page |
||
1. |
Safety instructions |
61 |
|
2. |
Device specification |
63 |
|
3. |
Preliminary measures |
71 |
|
|
3.1 |
Accumulator charging |
71 |
|
3.2 |
Configuration of the defibrillator / ECG monitor (set-up menu) |
72 |
4. |
Operation of the defibrillator |
73 |
|
|
4.1 |
Switching the defibrillator on and off / self-test |
73 |
|
4.2 |
Synchronous and asynchronous operation |
74 |
|
4.3 |
Energy selection |
75 |
|
4.4 |
Energy charging |
75 |
|
4.5 |
Positioning of paddles |
76 |
|
4.6 |
Discharging of energy (shock) |
76 |
|
4.7 |
Paediatric paddles |
77 |
5. |
Operation of the ECG monitor |
78 |
|
|
5.1 |
Selection of ECG leads |
78 |
|
5.2 |
Setting of signal amplification |
79 |
|
5.3 |
Volume of systole beep |
79 |
|
5.4 |
Activation of heartrate alarms |
79 |
|
5.5 |
Contrast-Settings (only for ECO 1) |
80 |
|
5.6 |
Filter |
80 |
|
5.7 |
Positioning of ECG electrodes |
81 |
6. |
Operation of SpO2 monitor (only model DM 3) |
82 |
|
|
6.1 |
Connection of SpO2 sensor |
82 |
|
6.2 |
Selection of correct SpO2 sensor |
83 |
|
6.3 |
Setting of alarms for SpO2 |
84 |
7. |
Operation of printer |
86 |
|
|
7.1 |
Protocol of the ECG signal |
86 |
|
7.2 |
Automatic printout after every shock (auto print) |
87 |
|
7.3 |
Printing of the event memory |
88 |
|
7.4 |
Insertion of printing paper |
89 |
8. |
Handling of the charging unit |
89 |
|
9. |
Handling of the changeable accumulator |
90 |
|
|
9.1 |
Changing of the accumulators |
91 |
|
9.2 |
Parallel accumulator charging in the charging unit |
91 |
10. |
Maintenance and care |
92 |
|
11. |
Waste Treatment |
93 |
|
12. |
Technical data, accessories, symbols |
94 |
|
|
12.1 |
Technical data PRIMEDIC™ Defi-Monitor ECO 1 / DM 1 / DM 3 |
94 |
|
12.2 |
Accessories |
96 |
|
12.3 |
Symbols |
97 |
19499 / 05.03 |
|
59 |
|

Instructions for use PRIMEDIC™ Defi-Monitor ECO 1 / DM 1 / DM 3
13. |
Conditions of Guarantee |
98 |
|
14. |
Appendix |
99 |
|
|
A1 |
General instructions and rules for the use of accumulators |
99 |
|
A2 |
General instructions and rules for the handling of defibrillators |
101 |
|
A3 |
General instructions for the use of pulsoximeters |
107 |
|
A4 |
Voltage - time graphs |
109 |
|
A5 |
Description of monitor screen and printouts |
111 |
|
A6 |
Safety control |
114 |
PRIMEDIC™ is registered trademark of METRAX GmbH, D-Rottweil
60 |
19499 / 05.03 |

Instructions for use PRIMEDIC™ Defi-Monitor ECO 1 / DM 1 / DM 3
1.Safety instructions
Your PRIMEDIC™ Defi-Monitor was designed in accordance with the high requirements of the use in emergency situations. Modern technology based on the many years of experience in the development and production of defibrillators together with new shock absorbing materials and new ideas offer the necessary support when every second counts.
The following has to be considered in order to ensure safe and perfect function of the PRIMEDIC™
Defi-Monitor and to avoid risk to human beings and other material property:
1.Any use of the PRIMEDIC™ Defi-Monitor requires the knowledge and strict compliance of these instructions for use.
2.The PRIMEDIC™ Defi-Monitor is designed and suitable exclusively for the applications set out or described in this manual. Using the device for purposes any other than those mentioned in this manual may constitute a risk and has to be omitted.
3.Operation of the PRIMEDIC™ Defi-Monitor, as well as basically all other defibrillators, in areas subject to explosion hazards is not allowed.
4.The PRIMEDIC™ Defi-Monitor may only be used by trained and authorised personnel.
Reading the instructions for use does not replace any training.
5.Improper use or excessive operating duration of the SpO2 sensor can cause tissue damages.
6.Strong light, movements and certain physical conditions of the patient, intravascular dye,
incorrect attaching of the SpO2 sensor could also result in wrong indications of oxygen saturation. Do not use the SpO2 measure as single method to monitor the vital functions.
The instructions for the use of pulsoximeters have to be complied with (appendix A3).
7.Any repair work, modifications, additions and installations of the PRIMEDIC™ Defi-Monitor may only be carried out by personnel authorised and trained by METRAX. The parts of the PRIMEDIC™ Defi-Monitor may not be repaired by the user.
8.The device may only be used with accessories, wearing parts and disposable parts the secure use of which is proofed by an inspection office authorised to tests of devices ready-to-use. Otherwise a safe and reliable function of PRIMEDIC™ Defi-Monitor is not guaranteed. The original PRIMEDIC™ accessories and wearing parts comply with this condition.
9.Before using the device the user has to check that the device is in a safe and reliable state.
If e.g. the pacer / defibrillator cable is damaged the defibrillator / pacer may not be used.
10.The instructions and rules set out in appendix A1, A2 and A3 have to be complied with when using the PRIMEDIC™ Defi-Monitor.
11.The unit must be under operating conditions before using. This is e.g. essential when storing the defibrillator in an ambulance car during winter.
12.Do not use the PRIMEDIC™ Defi-Monitor near devices (e.g. measuring devices) sensible to magnetic fields or disturbing sources, which could interfere with the functions of PRIMEDIC™Defi-Monitor. Keep sufficient distance.
For the other states of the European Union the national regulations for the use of medical devices are applicable.
Manufacturer: |
METRAX GmbH |
|
Rheinwaldstraße 22 |
|
D-78628 Rottweil |
|
Phone ++49 (0)741 / 257-0 |
19499 / 05.03 |
61 |

Instructions for use PRIMEDIC™ Defi-Monitor ECO 1 / DM 1 / DM 3
Fax |
++49 (0)741 / 257-235 |
62 |
19499 / 05.03 |
Instructions for use PRIMEDIC™ Defi-Monitor ECO 1 / DM 1 / DM 3
2.Device specification
7 |
15 |
17 |
16 |
1 |
2 |
3 |
4 |
5
6
7
8
8 |
14 |
13 |
12 |
11 |
10 |
9 |
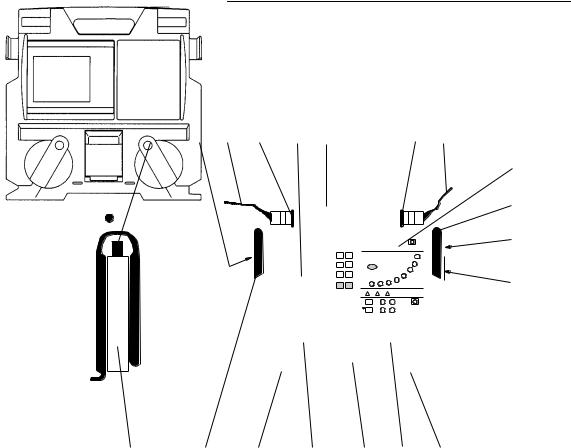
Fig.: 1 General view of the PRIMEDIC™ Defi-Monitor
1ECG-unit with monitor and operating elements
2Carrying handle
3Input socket for ECG patient cable
4ECG patient cable for recording the ECG
5Defibrillator unit with operating elements
6Paddle cable for APEX paddle
7Release button for accumulator
8Changeable accumulator
9Paddle for APEX position
10Release button
11Printer with cover and compartment for paper reel
12Release button
13Paddle for STERNUM position
14Paddle cable for sternum paddle
15PRIMEDIC™ modular plug to connect modules as e.g. pacer module, I/D module for internal defibrillation (only models DM 10 and DM 30)
16Input socket for SpO2 patient cable (only model DM 3)
17SpO2 patient cable to connect NELLCOR® sensors (connector plug) (only model DM 3)
19499 / 05.03 |
63 |
Instructions for use PRIMEDIC™ Defi-Monitor ECO 1 / DM 1 / DM 3
20 |
21 |
22 |
23
24
26
29
28 27
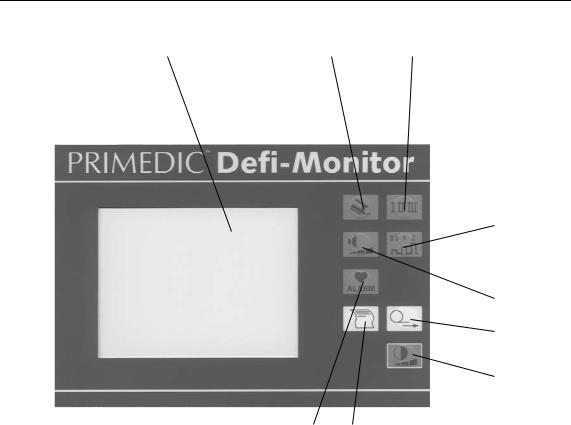
Fig.: 2 ECG-unit with operating elements and monitor ECO 1
20 |
ECG monitor |
high resolution EL monitor to show ECG signals and |
|
|
important device parameters. |
21 |
Key PADDLE LEAD |
To select the ECG signal of paddles. |
22 |
Key LEAD SELECTION |
To select standard leads. |
23 |
Key SIGNAL |
To set the amplification factors for the ECG signal. |
|
AMPLIFICATION |
|
24 |
Key VOLUME |
To control the volume of the systole beep. |
25 |
Key ALARM(SpO2) |
To activate alarm limits for low and high SpO2 values, |
|
|
presettable in the set-up menu. |
26 |
Key PAPER FEEDInsertion of printing paper |
|
27 |
Key PRINTER ON / OFF |
Switching ON / OFF the ECG on-line printing |
28 |
Key ALARM |
To activate alarm limits for low and high heartrates, |
|
(heartrate) |
presettable in the set-up menu. |
29 |
Key CONTRAST |
To change the monitor contrast, to adapt light and temperature |
64 |
19499 / 05.03 |
Instructions for use PRIMEDIC™ Defi-Monitor ECO 1 / DM 1 / DM 3
|
|
|
|
|
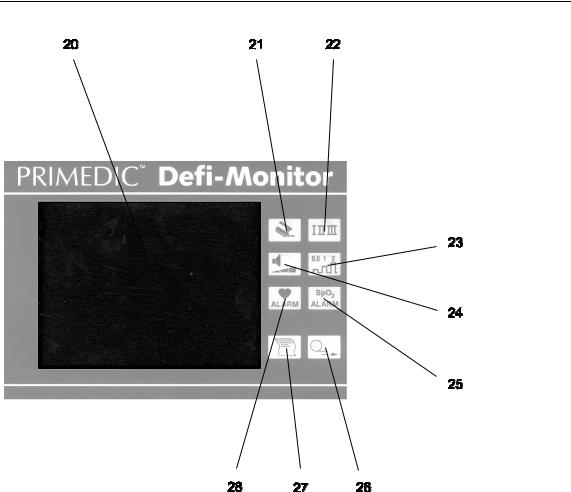
Fig.: 3 |
ECG-unit with operating elements and monitor DM 1 / DM 3 |
|||
20 |
|
ECG monitor |
high resolution EL monitor to show ECG signals and |
|
|
|
|
important device parameters. |
|
21 |
|
Key PADDLE LEAD |
To select the ECG signal of paddles. |
|
22 |
|
Key LEAD SELECTION |
To select standard leads. |
|
23 |
|
Key SIGNAL |
To set the amplification factors for the ECG signal. |
|
|
|
AMPLIFICATION |
|
|
24 |
|
Key VOLUME |
To control the volume of the systole beep. |
|
25 |
|
Key ALARM(SpO2) |
To activate alarm limits for low and high SpO2 values, |
|
|
|
|
presettable in the set-up menu. |
|
26 |
|
Key PAPER FEEDInsertion of printing paper |
||
27 |
|
Key PRINTER ON / OFF |
Switching ON / OFF the ECG on-line printing |
|
28 |
|
Key ALARM |
To activate alarm limits for low and high heartrates, |
|
|
|
(heartrate) |
presettable in the set-up menu. |
|
19499 / 05.03 |
65 |
Instructions for use PRIMEDIC™ Defi-Monitor ECO 1 / DM 1 / DM 3
|
30 |
|
31 |
33 |
32 |
|
|
34 |
|
|
35 |
45 |
|
|
36 |
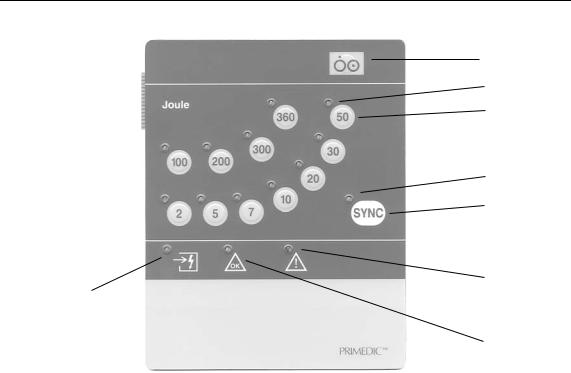
Fig.: 4 Defibrillator unit with operating elements and displays ECO 1
30 |
Key ON / STAND-BY |
To switch the complete device on or to stand-by mode |
31 |
LED |
To display the selected energy step |
32 |
Key ENERGY |
To select the defibrillation energy |
33 |
SYNC LED |
To indicate synchronous operating mode |
34 |
Key SYNC |
To switch to synchronous operating mode |
35 |
OK LED |
To signal that selected energy is charged and available for the shock |
|
|
(defibrillation / cardioversion). |
36 |
Attention LED |
To signal malfunction of the defibrillation unit |
45 |
LED |
To signal the charging of the defibrillation energy |
66 |
19499 / 05.03 |
Instructions for use PRIMEDIC™ Defi-Monitor ECO 1 / DM 1 / DM 3
30
31
32
33
34
36
45
35
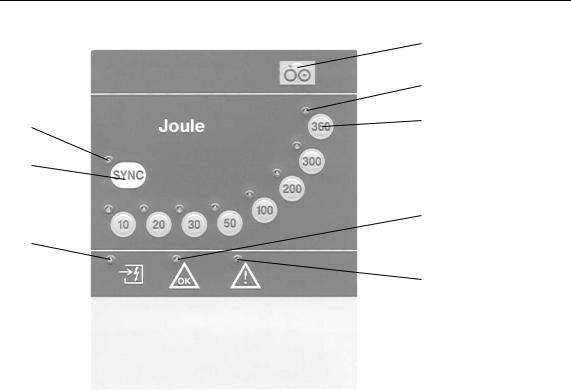
Fig.: 5 Defibrillator unit with operating elements and displays DM 1 / DM 3
30 |
Key ON / STAND-BY |
To switch the complete device on or to stand-by mode |
31 |
LED |
To display the selected energy step |
32 |
Key ENERGY |
To select the defibrillation energy |
33 |
SYNC LED |
To indicate synchronous operating mode |
34 |
Key SYNC |
To switch to synchronous operating mode |
35 |
OK LED |
To signal that selected energy is charged and available for the shock |
|
|
(defibrillation / cardioversion). |
36 |
Attention LED |
To signal malfunction of the defibrillation unit |
45 |
LED |
To signal the charging of the defibrillation energy |
19499 / 05.03 |
67 |

Instructions for use PRIMEDIC™ Defi-Monitor ECO 1 / DM 1 / DM 3
Fig.: 6 PRIMEDIC™ Defi-Charger Charging unit with connections and indicators
50 |
Changeable |
Inserted in the charging shaft |
|
|
accumulator (optional) |
51 |
Shaft |
To charge or to keep a second PRIMEDIC™ Accu |
52 |
Charging module (option)To charge a second accumulator |
|
53 |
LED green |
To signal that standby accumulator is being charged |
54 |
LED green |
To signal accumulator capacity 90 - 100 % |
55 |
LED yellow |
To signal accumulator capacity 50 - 90 % |
56 |
LED red |
To signal accumulator capacity 10 - 50 % or a accumulator fault |
|
|
while flashing |
57 |
LED yellow |
To signal that the accumulator is being charged at the defibrillator |
58 |
LED green |
To signal availability of energy to charge the defibrillator or the |
|
|
optional standby accumulator |
59 |
Contacts |
To transmit the charging current to the defibrillator |
60 |
Charging base |
To insert the defibrillator |
61 |
Fuse |
Circuit protection for 12 / 24 V on-board voltage |
62 |
Universal socket |
To connect to the mains |
63 |
Voltage selector |
To set voltage range 100 - 120 V or 200 - 240 V |
64 |
Lead through housing |
To connect 12 / 24 V on-board voltage |
65 |
Locking (optional) |
To lock the defibrillator in the charging unit |
66 |
Release button (optional) One-hand release of the defibrillator |
|
70 |
Plug |
To connect to universal socket (62) at the charging unit |
71 |
Mains plug |
To connect to the mains socket |
68 |
19499 / 05.03 |
Instructions for use PRIMEDIC™ Defi-Monitor ECO 1 / DM 1 / DM 3
The PRIMEDIC™ Defi-Monitor is an external defibrillator with integrated ECG monitor and on-line printer. The defibrillator can be synchronized with the ECG enabling synchronous cardioversions.
The device series is organised modularly. Several models are available:
PRIMEDIC™ |
Defi-Monitor |
ECO 1 |
low cost model |
DM 1 |
basic model |
DM 3 |
with pulsoximeter |
DM 10 |
with module slot |
DM 30 |
with pulsoximeter and module slot |
The modules Pacer, I/D (internal defibrillation) and R/D (free-handed defibrillation) can be connected to the module slots of DM 10 and DM 30.
The design of the PRIMEDIC™ Defi-Monitor allows quick and safe use in cases of emergency. All function units and operating elements are based on the following features:
•clear structure of the function units
•reduction to the essential functions
•logical user guidance
•clear, self-explaining operating elements
•ergonomical design
•retrofitable functions, due to the modular design
At the models DM 1, DM 3, DM 10 and DM 30 the ECG monitor has a high resolution graphic EL display ensuring clear screen contrast even under problematic lighting conditions.
The ECG monitor can be moved upwards and downwards allowing a perfect viewing angle towards the ECG shown, e.g.:
•in lying position outdoors
•in upright position with deep installation places in ambulances.
As for the device versions DM 3 and DM 30 a continuous non-invasive measure of the functional oxygen saturation of arterial haemoglobin (SpO2) is possible. The PRIMEDIC™ monitor is provided with a high-quality measuring module from NELLCOR PURITAN BENNETT Inc.
19499 / 05.03 |
69 |

Instructions for use PRIMEDIC™ Defi-Monitor ECO 1 / DM 1 / DM 3
Together with the in Capter 6.2 (Selection of correct SpO2 sensor) adviced sensors, a continuous monitoring of adult or paediatric patients is possible. Parallel to the measurement in % a continuous pulse curve is displayed in the monitor. This can be documented by the use of the high resolution printer.
During the measurement of the oxygen saturation, alarm thresholds can be activated to indicate changes in the patient’s condition.
The printer can be used to document the monitoring as well as to record the emergency situation (the 5 s before and 5 s after every shock).
The defibrillator allows safe and extremely quick use:
• |
Charging time for 100 joule |
approx. 1 s (*) |
• |
Charging time for 360 joule |
approx. 5 s (*) |
(*) = when accumulator capacity is 90 % of nominal value.
A module slot is provided at the sides of models DM 10 and DM 30, where e.g. a pacer module may be inserted, which is particularly operator-friendly. In contrast to common pacers the paddle does not have to be removed in order to connect the pacer- / defibrillation cable. With PRIMEDIC™ pacers the pacer- / defibrillation cable is simply attached to the module. If the pacer- / defibrillation cables are connected, the paddle electrodes are switched-off.
If during the pacer process a defibrillation is necessary, a shock may be released via cushion electrodes. The release buttons of the module control the charging of energy and the release of a shock. Also without the pacer being active freehanded defibrillation may be carried out with the cushion electrodes.
If the pacer is not needed and the user does not wish to apply the energy via paddle, the R/D module may be used. To this module the cushion electrodes for the free-handed defibrillation are connected.
By means of the I/D module for internal defibrillation the internal electrodes can be connected via a sterilised patient cable. In case of working at an open thorax a wide range of internal electrodes is available.
The power supply of the PRIMEDIC™ Defi-Monitor is provided by changeable accumulators with NiCd cells. The applied charging electronics corresponds to the latest technology thus assuring a maximum service life of the accumulators used.
70 |
19499 / 05.03 |

Instructions for use PRIMEDIC™ Defi-Monitor ECO 1 / DM 1 / DM 3
In rest position the PRIMEDIC™ Defi-Monitor can be inserted into a charging unit. Wall mounting or mounting into a vehicle is possible by means of various adapters (optional). In an emergency case the PRIMEDIC™ Defi-Monitor can be released easily and quickly with one hand.
The electric connections (mains voltage or DC on-board voltage) are fitted in the charging unit. The charging unit also supplies the power for the accumulator charging.
A comfort version of the unit is available as option allowing to charge a second changeable accumulator. When using the comfort version with Accu-Care function the accumulator receives best maintenance which prevents the problematic memory effect. Retrofitting of all standard charging units with the Accu-Care option is possible. The PRIMEDIC™ Defi-
Monitor can also be operated while sitting on the charging unit. For safety reasons the accumulator has to be connected during operation to avoid removing the defibrillator from the charging unit without accumulator in case of emergency.
A variety of accessories are available.
3.Preliminary measures
3.1 Accumulator charging
The changeable accumulator has to be charged before first use of the PRIMEDIC™ Defi-Monitor.
Lock the changeable accumulator at the provided and marked location from the side in its position (see also section 9.1).
Then insert the PRIMEDIC™ Defi-Monitor into the PRIMEDIC™ Defi-Charger. The green LED (58) lights up to indicate that power is supplied to the charging unit (mains or on-board voltage).
When the accumulator needs to be charged the charging electronics starts the charging process, this indicated by the charging LED (57) of the charging unit. At the end of the charging procedure the charging LED (57) goes off.
Caution:
A completely discharged battery has to be recharged for at least 45 minutes. A too short charging duration may lead to a wrong interpretation of the battery charge by the device due to the nature of the battery. The battery charge monitor in the display will falsely indicate a full battery. A safe operation of the device under certain circumstances will not be guarantied.
19499 / 05.03 |
71 |

Instructions for use PRIMEDIC™ Defi-Monitor ECO 1 / DM 1 / DM 3
3.2Configuration of the defibrillator / ECG monitor (set-up menu)
The PRIMEDIC™ Defi-Monitor was configured at the factory. Certain parameters can be changed in the set-up menu in order to realize individual settings. This configuration remains until it is changed regardless whether the defibrillator is switched off or the accumulator is changed.
The set-up menu is partitioned on two pages. On page 1 the following parameters can be changed.
The underlined parameters represent the factory setting.
1. |
Filter |
Off / 50 Hz / 60 Hz |
2. |
Date |
DD.MM.JJ |
3. |
Time |
hh.mm.ss |
4. |
Language |
deutsch / english / français / |
|
|
espanol / portugesh |
5.Automatic
|
printing |
On / Off |
6. |
1-lead / 3-lead * |
|
7. |
25 mm / 50 mm * |
|
8. |
Memo-Print |
activate |
*= with installed software option. *=only for DM 1 and DM 3 eligible.
The second page allows the following settings:
1. |
♥Alarm 1 |
30 |
/ 90 |
|
2. |
♥Alarm 2 |
40 |
/ 130 |
|
3. |
♥Alarm 3 |
50 |
/ 180 |
|
4. |
SpO2 |
Alarm 1 |
95 |
/ 100** |
5. |
SpO2 |
Alarm 2 |
90 |
/ 100** |
6 |
SpO2 |
Alarm 3 |
80 |
/ 100** |
*= only for DM 3 eligible
Press PADDLE-LEAD (21) and LEAD SELECTION (22) simultaneously during operation in order to start the set-up menu. The set-up menu is displayed.
During the configuration keys (21), (24) and (28) have special functions of which the symbols are displayed on the monitor.
Key (21) |
UP |
(σ) |
Key (24) |
DOWN |
(τ) |
Key (28) |
OK |
( ) |
Use these keys to control the configuration.
72 |
19499 / 05.03 |

Instructions for use PRIMEDIC™ Defi-Monitor ECO 1 / DM 1 / DM 3
When calling up the set-up menu the first menu item is marked. To change e. g. the time move the cursor downwards by actuating DOWN (24) one or several times until the menu item time is marked. Select the menu item time by actuating OK (28). Then the cursor moves to the hour which is changed by actuating UP (21) or DOWN (24). Confirm the correct setting with OK (28). The cursor then moves to the minutes which can be changed in the same way as described. When confirming with OK (28) the cursor returns to the menu item time. Now you can realize further changes in the same way as described in the example time.
To quit the set-up menu move the cursor to the menu item END by means of UP (21) or DOWN (24) and confirm with OK (28).
Then the PRIMEDIC™ Defi-Monitor returns to monitoring operation.
Note:
If during the setting of the menu parameters the defibrillator has to be used immediately because of an emergency the setup menu can be terminated immediately by pressing ENERGY (32).
4.Operation of the defibrillator
4.1Switching the defibrillator on and off / self-test
Press ON / STAND-BY (30) shortly to switch on the
PRIMEDIC™ Defi-Monitor.
To switch off, press ON / STAND-BY (30) for approx. 2 secs. During switch off procedure an acoustic signal is given. This time was chosen to prevent the device from being switched off accidentally. Energy that possibly has been charged for the defibrillation will automatically be discharged internally.
Note:
The complete device is switched on and off with ON/ STAND-BY (30). Thus the functions of all components can be used without loosing time.
When starting an internal self-test will be executed to check important functions and signal devices. All LEDs of the defibrillator light up for approx. 2 seconds. Be sure that all LEDs are active. During this time a warning buzzer has to be on as well. It is important that the buzzer functions.
19499 / 05.03 |
73 |

Instructions for use PRIMEDIC™ Defi-Monitor ECO 1 / DM 1 / DM 3
Attention:
If one or several LEDs or the warning buzzer do not function, the defect has to be eliminated immediately.
4.2Synchronous and asynchronous operation
When switching on the PRIMEDIC™ Defi-Monitor the defibrillator is automatically in asynchronous operation.
Press SYNC (34) to select synchronous operation of the defibrillator (cardioversion) if required by the emergency situation.
LED (33) signals the synchronous operation. In addition, the note "SYNC" is displayed on the ECG monitor.
After a synchronous discharge (cardioversion) the defibrillator switches back to asynchronous operation.
Note:
During synchronous operation ECG markings are shown on the monitor. For safe synchronous operation these cardioversion markers must appear in every QRS complex with a R-peak. A clear, artefactfree ECG signal with sufficient amplitude is essential.
If there are no markings shown on the ECG monitor, the amplitude probably has to be changed by means of SIGNAL AMPLIFICATION or a lead with improved signal quality has to be selected.
Note:
Do not use the paddles but the external ECG patient electrodes for the ECG recording during synchronous operation. Otherwise artefacts can be caused when moving the paddles which leads to faulty synchronization.
Note:
The delay time between the recognition of a QRS complex (synchronous pulse) and energy discharge is less than 60 ms.
Attention:
Before releasing the cardioversion check on the monitor whether the cardioversion markers are clearly related to the R-peaks and do not react e. g. to pacemaker pulses or artefacts.
74 |
19499 / 05.03 |

Instructions for use PRIMEDIC™ Defi-Monitor ECO 1 / DM 1 / DM 3
4.3 Energy selection
Press one of keys (32) to select the energy. LED (31) located directly above the key pressed lights up to acknowledge the energy setting. In addition the selected energy step is indicated on the monitor.
Note:
The energy step required for the defibrillation / cardioversion depends on the patient, its body height and weight and its condition. For information please refer to appendix A2.
An energy step selected by mistake can be changed by pressing the correct key with the required energy step. This is also possible if energy has already been charged for defibrillation. When increasing the energy step the missing energy is added. When decreasing the energy step the excessive energy is discharged in small steps.
4.4 Energy charging
The selected energy can be charged by pressing one of the release buttons (10) or (12) and thus made available for the shock.
Then the energy will be charged quickly. LED (45) flashing indicates the charging procedure. The charging time depends on the selected energy step and the available accumulator capacity. Charging the defibrillator up to 100 joule takes approx. 1 second, charging up to 360 joule takes about 5 second. In case of a partly discharged accumulator the charging time may slightly be longer. See also technical data.
After the charging the energy will be available for 15 seconds which is signalled by a permanent signal and the lighting up of the OK signal (35). The remaining time is simultaneously indicated on the monitor. If there is no defibrillation during this time, an internal safety discharge will be executed.
During this time the energy charged can be changed again if required (see section 4.3). After the change, the energy is available for another 15 seconds for defibrillation.
Should an error occur during energy charging, an intermittent warning signal and the Attention LED (36) will be on.
19499 / 05.03 |
75 |
Instructions for use PRIMEDIC™ Defi-Monitor ECO 1 / DM 1 / DM 3
Attention:
If the message „load accumulator“ appears at least 5 discharges with maximum energy are available, in this case the Defi-Monitor should be placed again as fast as possible on the charging unit.
Attention:
If the ATTENTION LED (36) lights up the function of the defibrillator can be tested by switching-off and then on again with the help of a self-test. When the signal goes out, the defibrillator is ready-to-use.
Attention:
If the ATTENTION LED (36) is still on after switching off and on again, the malfunction must be eliminated immediately.
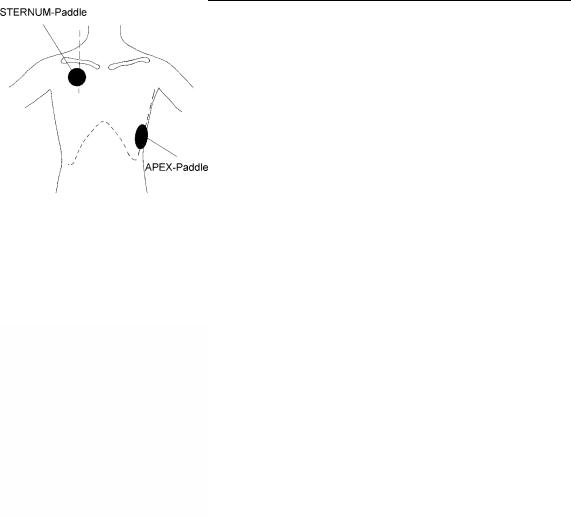
4.5 Positioning of paddles
The paddles must be positioned along the cardiac axis.
APEX paddle (9) hast to be positioned in the left chest area, on the axillary line above the apex of the heart.
STERNUM paddle (13) hat to be positioned in the right chest area, below the clavicle.
4.6 Discharging of energy (shock)
Press release buttons (10) and (12) at the paddles simultaneously to discharge the energy.
In case of asynchronous operation energy will be discharged immediately after simultaneous depression of buttons.
In case of synchronous operation both release buttons (10) and (12) have to be pressed down simultaneously until the moment for the cardioversion is reached. During this time an intermittent signal will be on.
No cardioversion will be released, if during discharging the release buttons are let go off.
The energy is discharged internally if no synchronization takes place within 3 seconds while keeping the release buttons pressed down. Thereafter, the PRIMEDIC™ Defi-Monitor returns to asynchronous mode.
During the shock the ECG input will generally be overloaded for a short time. The PRIMEDIC™ Defi-Monitor will supply a stable ECG baseline already after approx. 1 second after the shock so that the defibrillation success can be seen immediately.
76 |
19499 / 05.03 |
 Loading...