

Page 1

Instructions for use PRIMEDIC
™
Defi-Monitor ECO 1 / DM 1 / DM 3
Table of contents Page
1. Safety instructions 61
2. Device specification 63
3. Preliminary measures 71
3.1 Accumulator charging 71
3.2 Configuration of the defibrillator / ECG monitor (set-up menu) 72
4. Operation of the defibrillator 73
4.1 Switching the defibrillator on and off / self-test 73
4.2 Synchronous and asynchronous operation 74
4.3 Energy selection 75
4.4 Energy charging 75
4.5 Positioning of paddles 76
4.6 Discharging of energy (shock) 76
4.7 Paediatric paddles 77
5. Operation of the ECG monitor 78
5.1 Selection of ECG leads 78
5.2 Setting of signal amplification 79
5.3 Volume of systole beep 79
5.4 Activation of heartrate alarms 79
5.5 Contrast-Settings (only for ECO 1) 80
5.6 Filter 80
5.7 Positioning of ECG electrodes 81
6. Operation of SpO2 monitor (only model DM 3) 82
6.1 Connection of SpO2 sensor 82
6.2 Selection of correct SpO2 sensor 83
6.3 Setting of alarms for SpO2 84
7. Operation of printer 86
7.1 Protocol of the ECG signal 86
7.2 Automatic printout after every shock (auto print) 87
7.3 Printing of the event memory 88
7.4 Insertion of printing paper 89
8. Handling of the charging unit 89
9. Handling of the changeable accumulator 90
9.1 Changing of the accumulators 91
9.2 Parallel accumulator charging in the charging unit 91
10. Maintenance and care 92
11. Waste Treatment 93
12. Technical data, accessories, symbols 94
12.1 Technical data PRIMEDIC™ Defi-Monitor ECO 1 / DM 1 / DM 3 94
12.2 Accessories 96
12.3 Symbols 97
19499 / 05.03 59
Page 2

Instructions for use PRIMEDIC
™
Defi-Monitor ECO 1 / DM 1 / DM 3
Conditions of Guarantee 98
13.
14. Appendix 99
A1 General instructions and rules for the use of accumulators 99
A2 General instructions and rules for the handling of defibrillators 101
A3 General instructions for the use of pulsoximeters 107
A4 Voltage - time graphs 109
A5 Description of monitor screen and printouts 111
A6 Safety control 114
PRIMEDIC
™
is registered trademark of METRAX GmbH, D-Rottweil
60 19499 / 05.03
Page 3

Instructions for use PRIMEDIC
™
Defi-Monitor ECO 1 / DM 1 / DM 3
1. Safety instructions
Your PRIMEDIC™ Defi-Monitor was designed in accordance with the high requirements of the use
in emergency situations. Modern technology based on the many years of experience in the
development and production of defibrillators together with new shock absorbing materials and new
ideas offer the necessary support when every second counts.
The following has to be considered in order to ensure safe and perfect function of the PRIMEDIC
Defi-Monitor and to avoid risk to human beings and other material property:
™
1. Any use of the PRIMEDIC
Defi-Monitor requires the knowledge and strict compliance of
these instructions for use.
™
2. The PRIMEDIC
Defi-Monitor is designed and suitable exclusively for the applications set
out or described in this manual. Using the device for purposes any other than those mentioned
in this manual may constitute a risk and has to be omitted.
™
3. Operation of the PRIMEDIC
Defi-Monitor, as well as basically all other defibrillators, in
areas subject to explosion hazards is not allowed.
™
4. The PRIMEDIC
Defi-Monitor may only be used by trained and authorised personnel.
Reading the instructions for use does not replace any training.
™
5. Improper use or excessive operating duration of the SpO
sensor can cause tissue damages.
2
6. Strong light, movements and certain physical conditions of the patient, intravascular dye,
incorrect attaching of the SpO
saturation. Do not use the SpO
sensor could also result in wrong indications of oxygen
2
measure as single method to monitor the vital functions.
2
The instructions for the use of pulsoximeters have to be complied with (appendix A3).
™
7. Any repair work, modifications, additions and installations of the PRIMEDIC
Defi-Monitor
may only be carried out by personnel authorised and trained by METRAX. The parts of the
™
PRIMEDIC
Defi-Monitor may not be repaired by the user.
8. The device may only be used with accessories, wearing parts and disposable parts the secure
use of which is proofed by an inspection office authorised to tests of devices ready-to-use.
™
Otherwise a safe and reliable function of PRIMEDIC
™
original PRIMEDIC
accessories and wearing parts comply with this condition.
Defi-Monitor is not guaranteed. The
9. Before using the device the user has to check that the device is in a safe and reliable state.
If e.g. the pacer / defibrillator cable is damaged the defibrillator / pacer may not be used.
10. The instructions and rules set out in appendix A1, A2 and A3 have to be complied with when
using the PRIMEDIC
™
Defi-Monitor.
11. The unit must be under operating conditions before using. This is e.g. essential when storing
the defibrillator in an ambulance car during winter.
™
12. Do not use the PRIMEDIC
Defi-Monitor near devices (e.g. measuring devices) sensible to
magnetic fields or disturbing sources, which could interfere with the functions of
™
PRIMEDIC
Defi-Monitor. Keep sufficient distance.
For the other states of the European Union the national regulations for the use of medical devices are
applicable.
Manufacturer: METRAX GmbH
Rheinwaldstraße 22
D-78628 Rottweil
Phone ++49 (0)741 / 257-0
19499 / 05.03 61
Page 4

Instructions for use PRIMEDIC
™
Defi-Monitor ECO 1 / DM 1 / DM 3
Fax ++49 (0)741 / 257-235
62 19499 / 05.03
Page 5
Instructions for use PRIMEDIC
2. Device specification
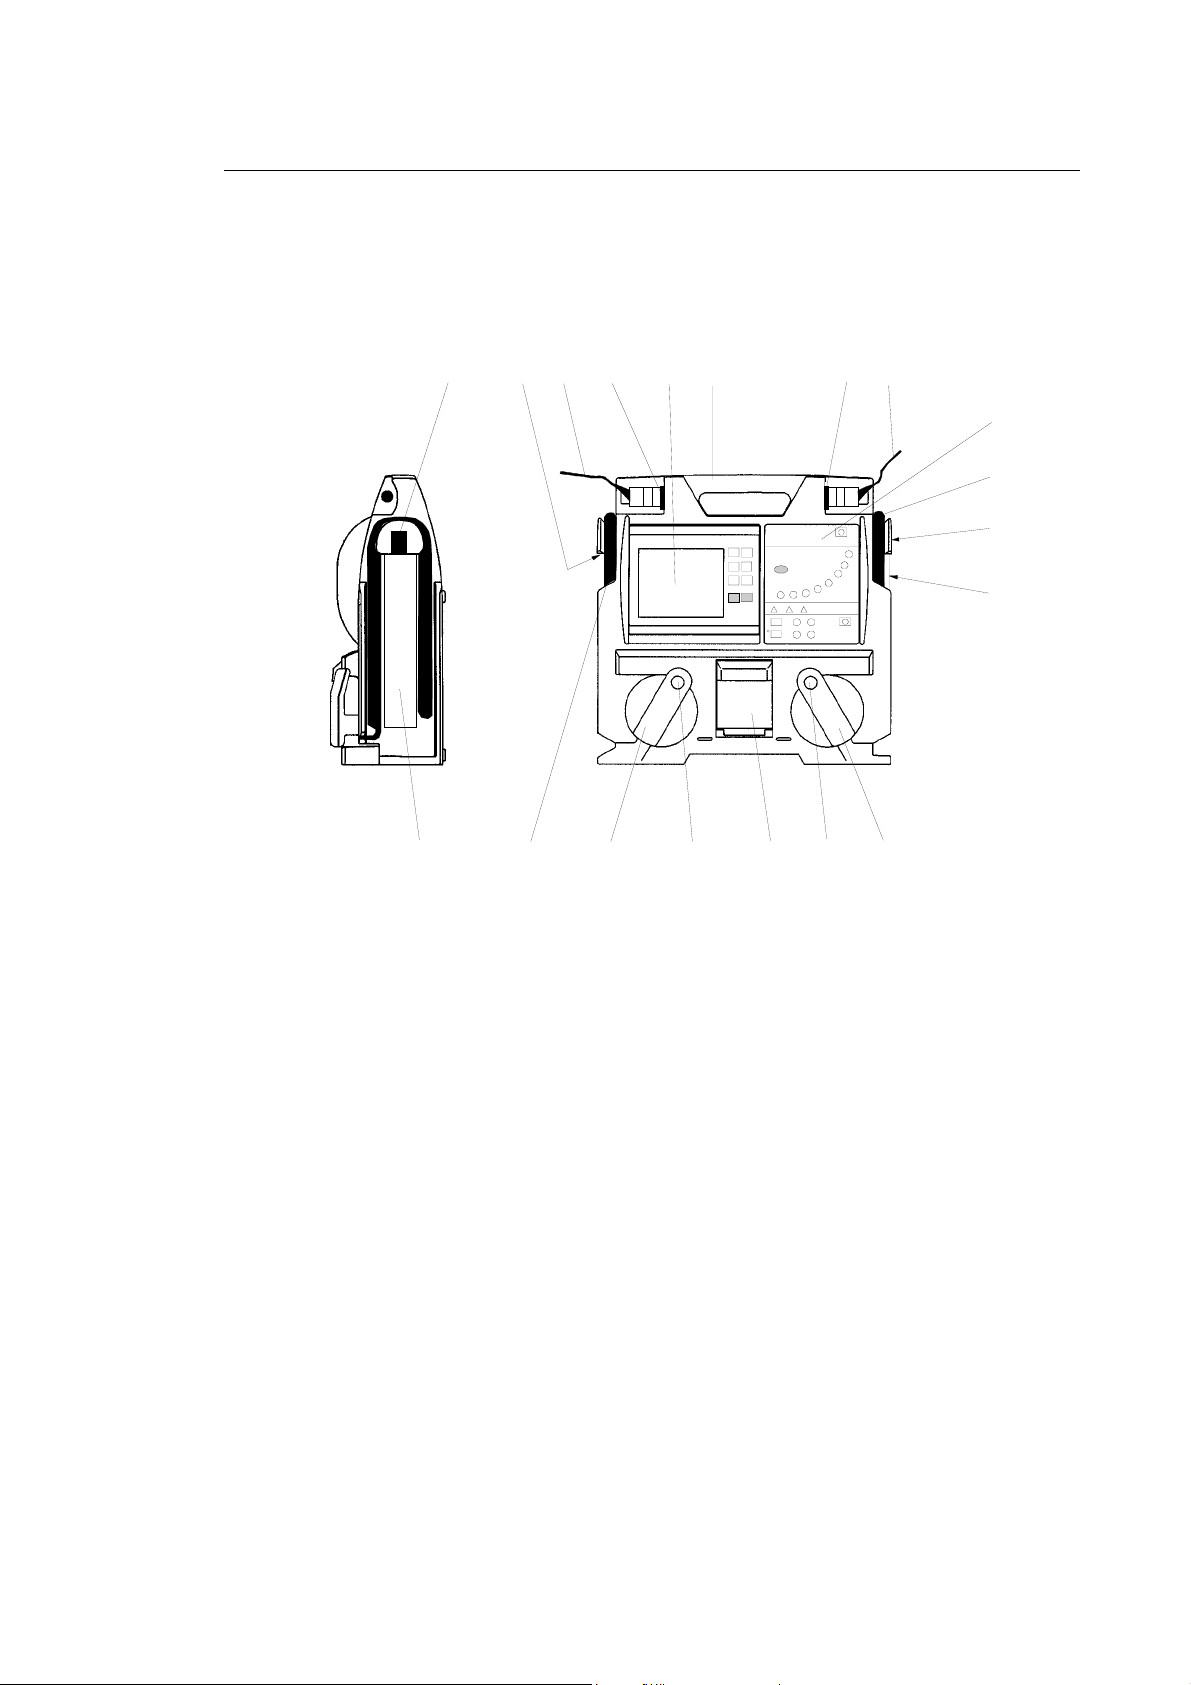
7
15 17
™
Defi-Monitor ECO 1 / DM 1 / DM 3
16
12
34
5
6
7
8
8
14
13
12
™
Fig.: 1 General view of the PRIMEDIC
Defi-Monitor
1 ECG-unit with monitor and operating elements
2 Carrying handle
3 Input socket for ECG patient cable
4 ECG patient cable for recording the ECG
5 Defibrillator unit with operating elements
6 Paddle cable for APEX paddle
7 Release button for accumulator
8 Changeable accumulator
9 Paddle for APEX position
10 Release button
11 Printer with cover and compartment for paper reel
12 Release button
13 Paddle for STERNUM position
14 Paddle cable for sternum paddle
15 PRIMEDIC
™
modular plug to connect modules as e.g. pacer module, I/D module for
internal defibrillation (only models DM 10 and DM 30)
16 Input socket for SpO
17 SpO
patient cable to connect NELLCOR® sensors (connector plug)
2
patient cable (only model DM 3)
2
(only model DM 3)
11
10
9
19499 / 05.03 63
Page 6
Instructions for use PRIMEDIC
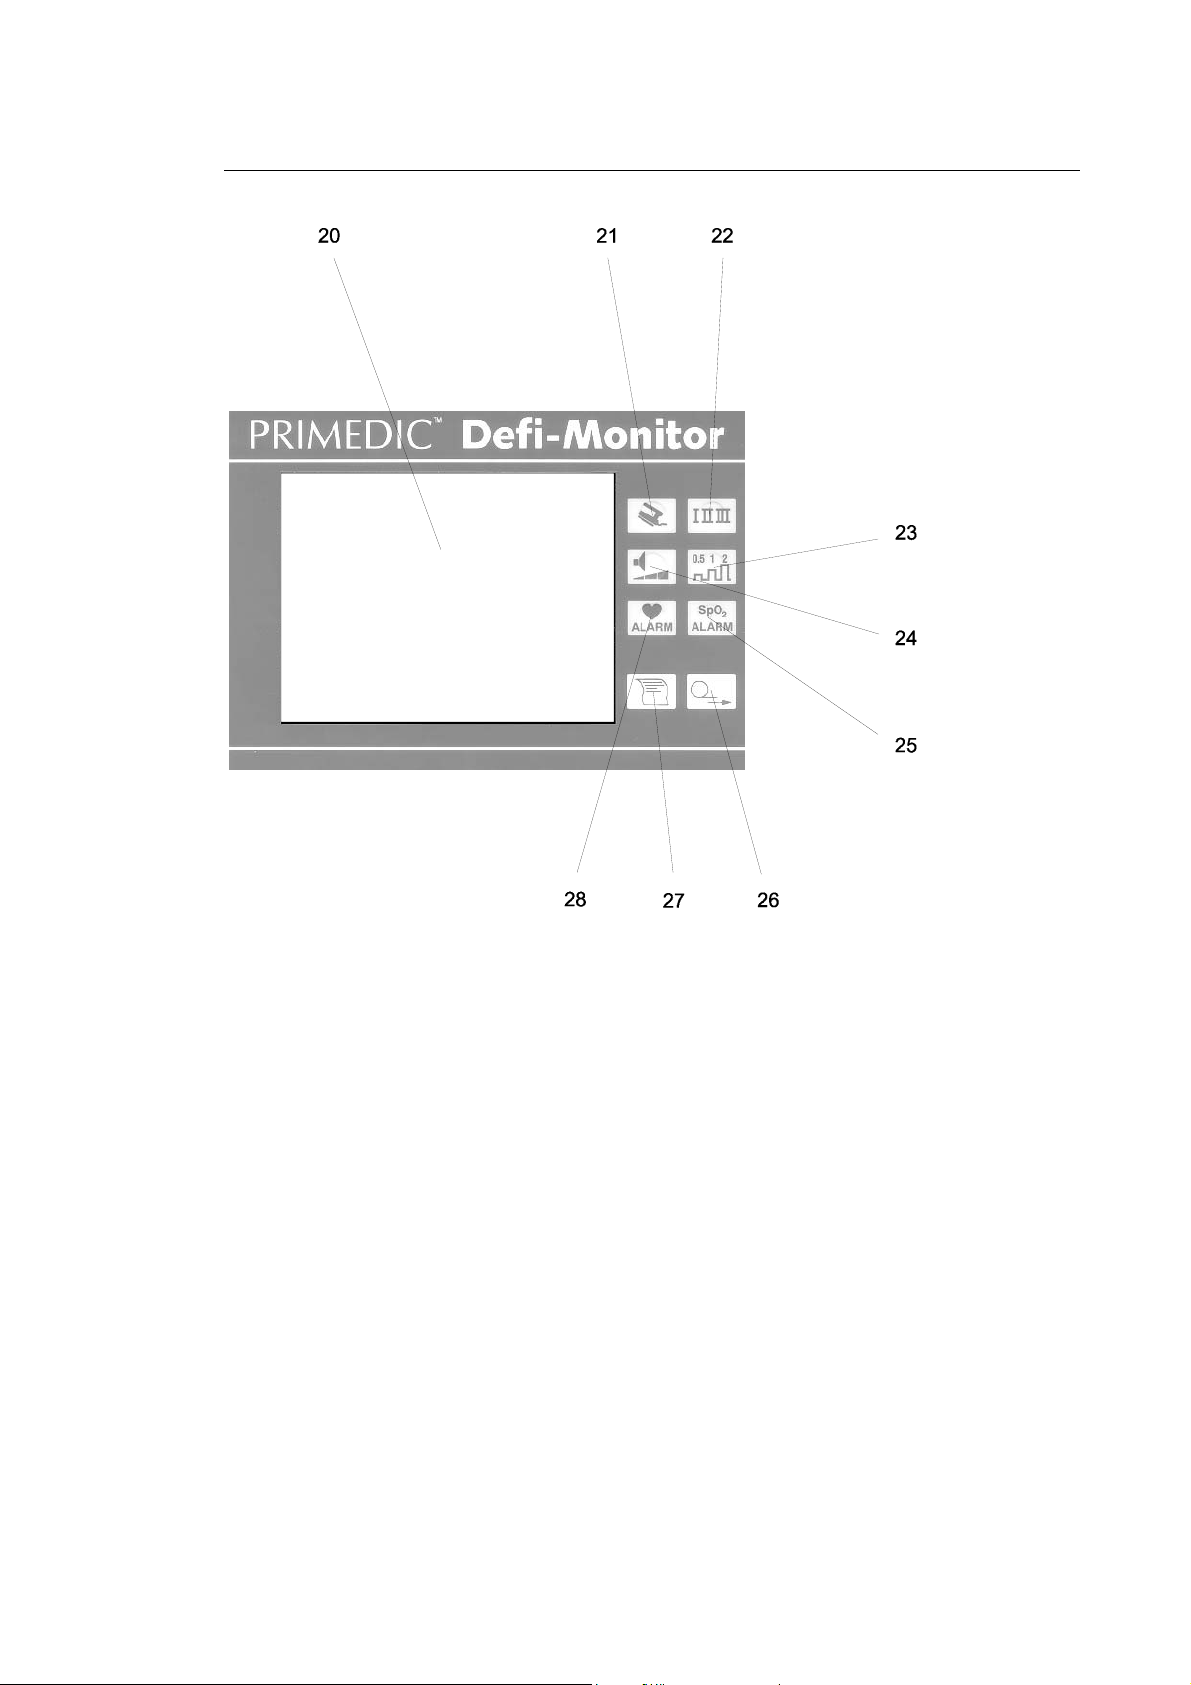
20 21 22
™
Defi-Monitor ECO 1 / DM 1 / DM 3
23
24
26
29
28
27
Fig.: 2 ECG-unit with operating elements and monitor ECO 1
20 ECG monitor high resolution EL monitor to show ECG signals and
important device parameters.
21 Key PADDLE LEAD To select the ECG signal of paddles.
22 Key LEAD SELECTION To select standard leads.
23 Key SIGNAL To set the amplification factors for the ECG signal.
AMPLIFICATION
24 Key VOLUME To control the volume of the systole beep.
25 Key ALARM(SpO
) To activate alarm limits for low and high SpO2 values,
2
presettable in the set-up menu.
26 Key PAPER FEED Insertion of printing paper
27 Key PRINTER ON / OFF Switching ON / OFF the ECG on-line printing
28 Key ALARM To activate alarm limits for low and high heartrates,
(heartrate) presettable in the set-up menu.
29 Key CONTRAST To change the monitor contrast, to adapt light and temperature
64 19499 / 05.03
Page 7
Instructions for use PRIMEDIC
™
Defi-Monitor ECO 1 / DM 1 / DM 3
Fig.: 3 ECG-unit with operating elements and monitor DM 1 / DM 3
20 ECG monitor high resolution EL monitor to show ECG signals and
important device parameters.
21 Key PADDLE LEAD To select the ECG signal of paddles.
22 Key LEAD SELECTION To select standard leads.
23 Key SIGNAL To set the amplification factors for the ECG signal.
AMPLIFICATION
24 Key VOLUME To control the volume of the systole beep.
25 Key ALARM(SpO
26 Key PAPER FEED Insertion of printing paper
27 Key PRINTER ON / OFF Switching ON / OFF the ECG on-line printing
28 Key ALARM To activate alarm limits for low and high heartrates,
(heartrate) presettable in the set-up menu.
) To activate alarm limits for low and high SpO2 values,
2
presettable in the set-up menu.
19499 / 05.03 65
Page 8
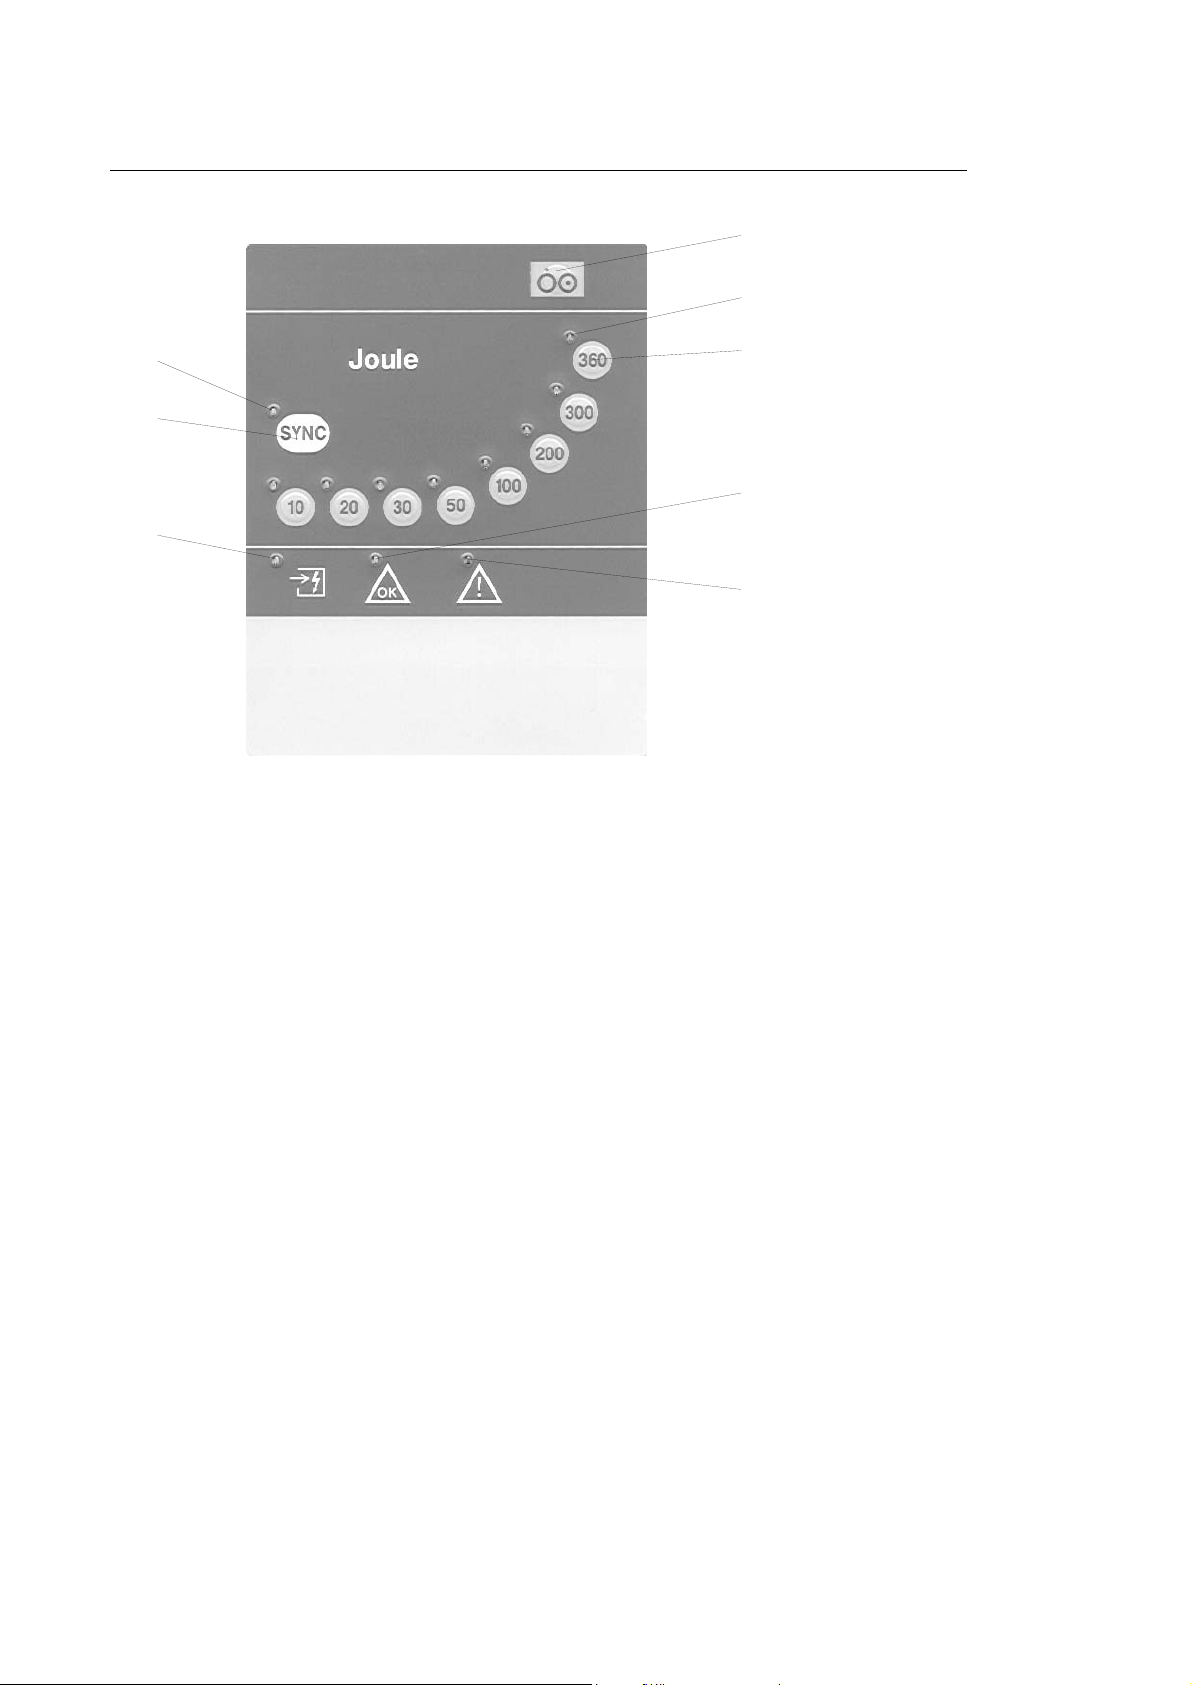
0
Instructions for use PRIMEDIC
™
Defi-Monitor ECO 1 / DM 1 / DM 3
3
31
33
34
45
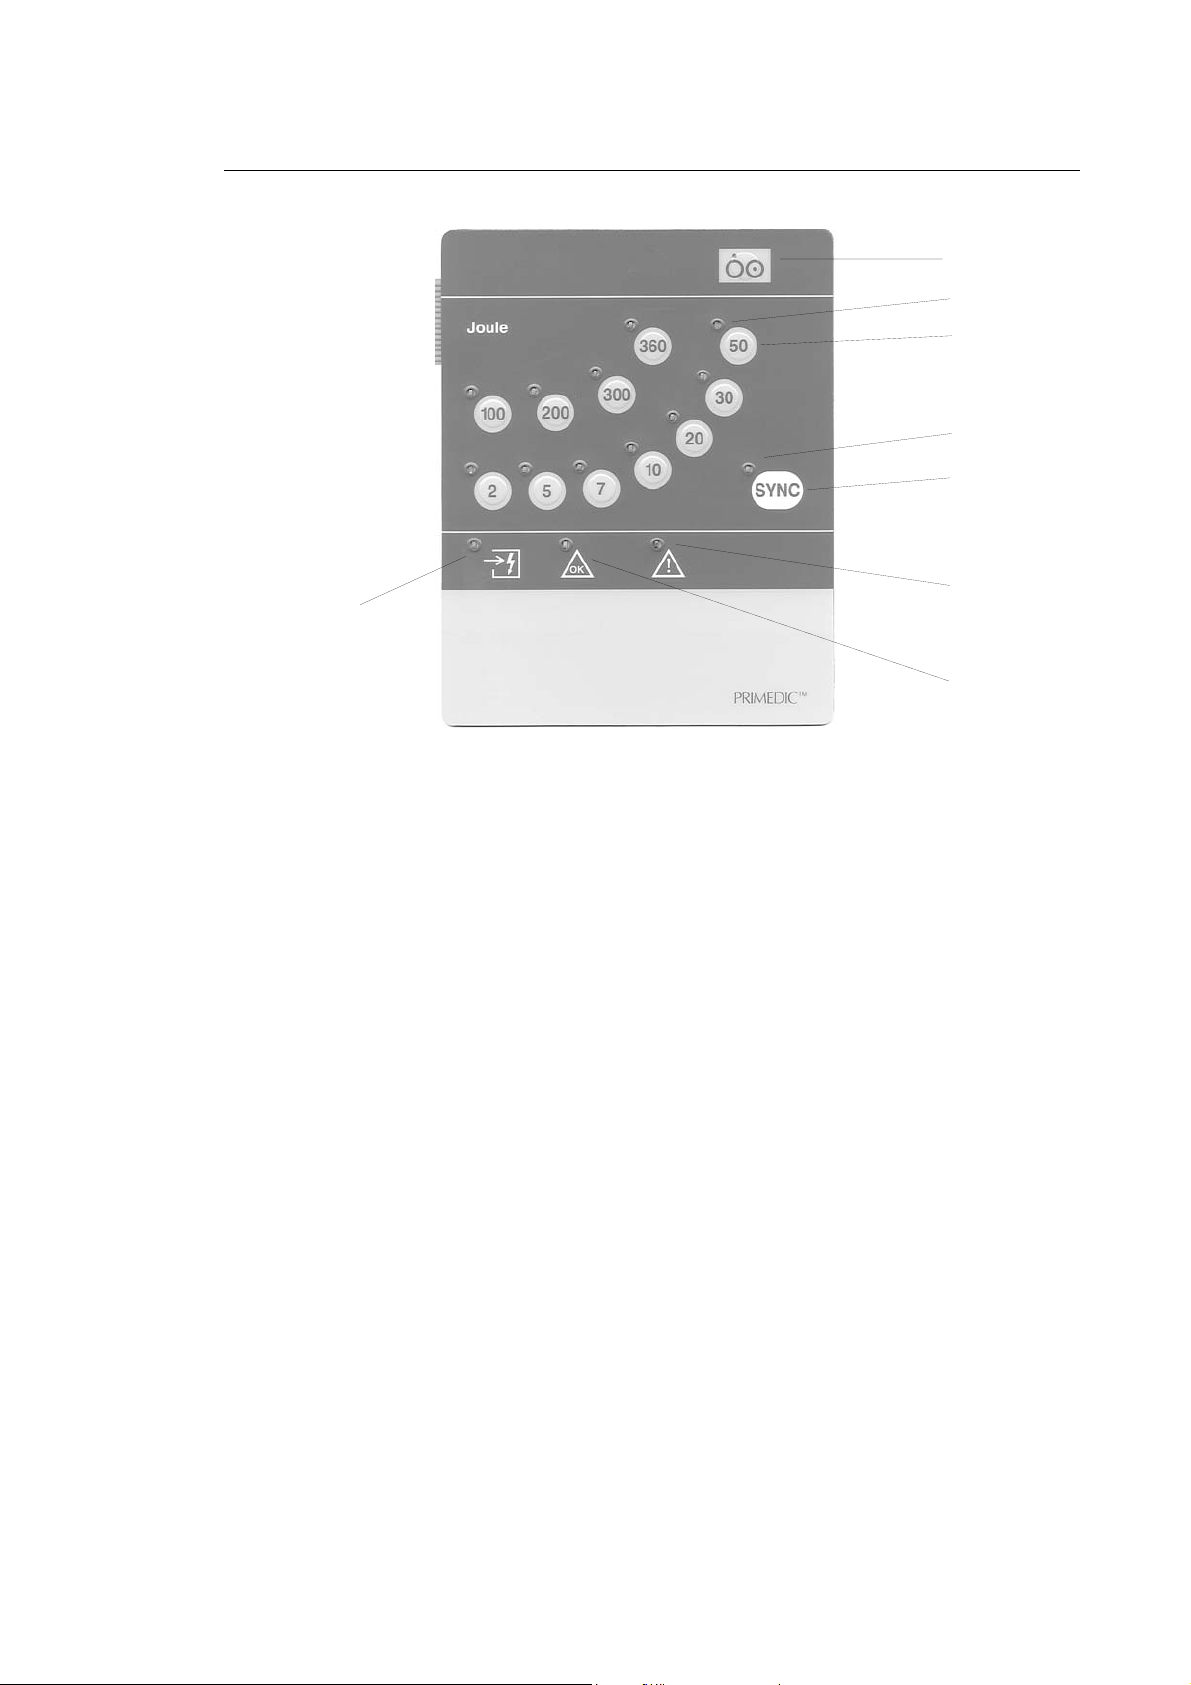
Fig.: 4 Defibrillator unit with operating elements and displays ECO 1
30 Key ON / STAND-BY To switch the complete device on or to stand-by mode
31 LED To display the selected energy step
32 Key ENERGY To select the defibrillation energy
33 SYNC LED To indicate synchronous operating mode
34 Key SYNC To switch to synchronous operating mode
35 OK LED To signal that selected energy is charged and available for the shock
(defibrillation / cardioversion).
36 Attention LED To signal malfunction of the defibrillation unit
45 LED To signal the charging of the defibrillation energy
32
35
36
66 19499 / 05.03
Page 9
0
2
5363334
Instructions for use PRIMEDIC
45
™
Defi-Monitor ECO 1 / DM 1 / DM 3
3
31
3
3
Fig.: 5 Defibrillator unit with operating elements and displays DM 1 / DM 3
30 Key ON / STAND-BY To switch the complete device on or to stand-by mode
31 LED To display the selected energy step
32 Key ENERGY To select the defibrillation energy
33 SYNC LED To indicate synchronous operating mode
34 Key SYNC To switch to synchronous operating mode
35 OK LED To signal that selected energy is charged and available for the shock
(defibrillation / cardioversion).
36 Attention LED To signal malfunction of the defibrillation unit
45 LED To signal the charging of the defibrillation energy
19499 / 05.03 67
Page 10
Instructions for use PRIMEDIC
™
Defi-Monitor ECO 1 / DM 1 / DM 3
™
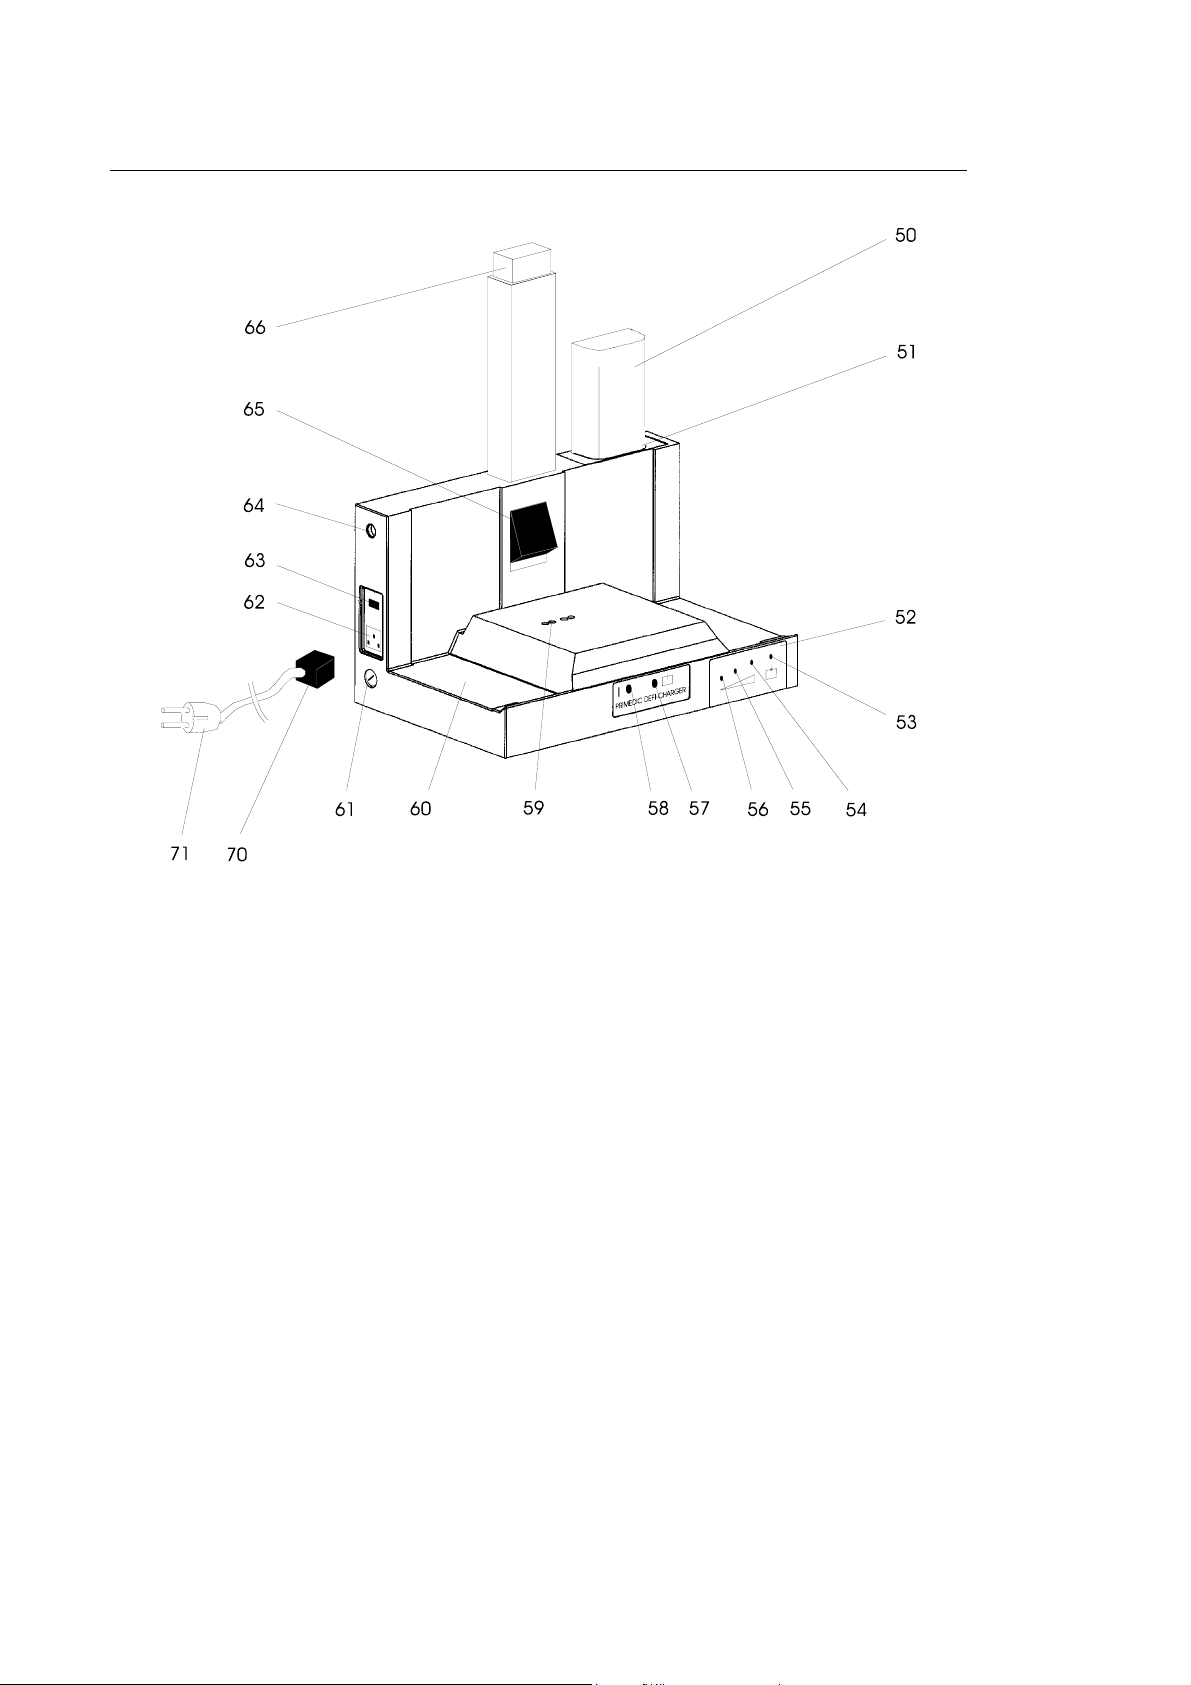
Fig.: 6 PRIMEDIC
Defi-Charger Charging unit with connections and indicators
50 Changeable Inserted in the charging shaft
accumulator (optional)
51 Shaft To charge or to keep a second PRIMEDIC
™
Accu
52 Charging module (option) To charge a second accumulator
53 LED green To signal that standby accumulator is being charged
54 LED green To signal accumulator capacity 90 - 100 %
55 LED yellow To signal accumulator capacity 50 - 90 %
56 LED red To signal accumulator capacity 10 - 50 % or a accumulator fault
while flashing
57 LED yellow To signal that the accumulator is being charged at the defibrillator
58 LED green To signal availability of energy to charge the defibrillator or the
optional standby accumulator
59 Contacts To transmit the charging current to the defibrillator
60 Charging base To insert the defibrillator
61 Fuse Circuit protection for 12 / 24 V on-board voltage
62 Universal socket To connect to the mains
63 Voltage selector To set voltage range 100 - 120 V or 200 - 240 V
64 Lead through housing To connect 12 / 24 V on-board voltage
65 Locking (optional) To lock the defibrillator in the charging unit
66 Release button (optional) One-hand release of the defibrillator
70 Plug To connect to universal socket (62) at the charging unit
71 Mains plug To connect to the mains socket
68 19499 / 05.03
Page 11

Instructions for use PRIMEDIC
The PRIMEDIC™ Defi-Monitor is an external defibrillator
with integrated ECG monitor and on-line printer. The
defibrillator can be synchronized with the ECG enabling
synchronous cardioversions.
The device series is organised modularly. Several models are
available:
PRIMEDIC
ECO 1 low cost model
DM 1 basic model
DM 3 with pulsoximeter
DM 10 with module slot
DM 30 with pulsoximeter and module slot
The modules Pacer, I/D (internal defibrillation) and R/D
(free-handed defibrillation) can be connected to the module
slots of DM 10 and DM 30.
The design of the PRIMEDIC
and safe use in cases of emergency. All function units and
operating elements are based on the following features:
• clear structure of the function units
• reduction to the essential functions
• logical user guidance
• clear, self-explaining operating elements
• ergonomical design
• retrofitable functions, due to the modular design
At the models DM 1, DM 3, DM 10 and DM 30 the
ECG monitor has a high resolution graphic EL display
ensuring clear screen contrast even under problematic
lighting conditions.
The ECG monitor can be moved upwards and downwards
allowing a perfect viewing angle towards the ECG shown,
e.g.:
• in lying position outdoors
• in upright position with deep installation places in
As for the device versions DM 3 and DM 30 a continuous
non-invasive measure of the functional oxygen saturation of
arterial haemoglobin (SpO
monitor is provided with a high-quality measuring module
from NELLCOR PURITAN BENNETT Inc.
™
Defi-Monitor ECO 1 / DM 1 / DM 3
™
Defi-Monitor
™
Defi-Monitor allows quick
ambulances.
) is possible. The PRIMEDIC
2
™
19499 / 05.03 69
Page 12

Instructions for use PRIMEDIC
Together with the in Capter 6.2 (Selection of correct SpO
sensor) adviced sensors, a continuous monitoring of adult or
paediatric patients is possible. Parallel to the measurement in
% a continuous pulse curve is displayed in the monitor. This
can be documented by the use of the high resolution printer.
During the measurement of the oxygen saturation, alarm
thresholds can be activated to indicate changes in the
patient’s condition.
The printer can be used to document the monitoring as well
as to record the emergency situation (the 5 s before and 5 s
after every shock).
The defibrillator allows safe and extremely quick use:
• Charging time for 100 joule approx. 1 s (*)
• Charging time for 360 joule approx. 5 s (*)
(*) = when accumulator capacity is 90 % of nominal value.
A module slot is provided at the sides of models DM 10 and
DM 30, where e.g. a pacer module may be inserted,
which is particularly operator-friendly. In contrast to common
pacers the paddle does not have to be removed in order to
connect the pacer- / defibrillation cable. With PRIMEDIC
pacers the pacer- / defibrillation cable is simply attached to
the module. If the pacer- / defibrillation cables are
connected, the paddle electrodes are switched-off.
If during the pacer process a defibrillation is necessary, a
shock may be released via cushion electrodes. The release
buttons of the module control the charging of energy and the
release of a shock. Also without the pacer being active freehanded defibrillation may be carried out with the cushion
electrodes.
If the pacer is not needed and the user does not wish to apply
the energy via paddle, the R/D module may be used. To this
module the cushion electrodes for the free-handed
defibrillation are connected.
By means of the I/D module for internal defibrillation the
internal electrodes can be connected via a sterilised patient
cable. In case of working at an open thorax a wide range of
internal electrodes is available.
The power supply of the PRIMEDIC
provided by changeable accumulators with NiCd cells. The
applied charging electronics corresponds to the latest
technology thus assuring a maximum service life of the
accumulators used.
™
Defi-Monitor ECO 1 / DM 1 / DM 3
™
Defi-Monitor is
2
™
70 19499 / 05.03
Page 13

Instructions for use PRIMEDIC
In rest position the PRIMEDIC™ Defi-Monitor can be
inserted into a charging unit. Wall mounting or mounting into
a vehicle is possible by means of various adapters (optional).
In an emergency case the PRIMEDIC
be released easily and quickly with one hand.
The electric connections (mains voltage or DC on-board
voltage) are fitted in the charging unit. The charging unit also
supplies the power for the accumulator charging.
A comfort version of the unit is available as option allowing to
charge a second changeable accumulator. When using the
comfort version with Accu-Care function the accumulator
receives best maintenance which prevents the problematic
memory effect. Retrofitting of all standard charging units with
the Accu-Care option is possible. The PRIMEDIC
Monitor can also be operated while sitting on the charging
unit. For safety reasons the accumulator has to be connected
during operation to avoid removing the defibrillator from the
charging unit without accumulator in case of emergency.
™
Defi-Monitor ECO 1 / DM 1 / DM 3
™
Defi-Monitor can
™
Defi-
A variety of accessories are available.
3. Preliminary measures
3.1 Accumulator charging
The changeable accumulator has to be charged before first
use of the PRIMEDIC
Lock the changeable accumulator at the provided and
marked location from the side in its position (see also section
9.1).
Then insert the PRIMEDIC
™
PRIMEDIC
Defi-Charger. The green LED (58) lights up to
indicate that power is supplied to the charging unit (mains or
on-board voltage).
When the accumulator needs to be charged the charging
electronics starts the charging process, this indicated by the
charging LED (57) of the charging unit. At the end of the
charging procedure the charging LED (57) goes off.
Caution:
A completely discharged battery has to be recharged for at
least 45 minutes. A too short charging duration may lead to a
wrong interpretation of the battery charge by the device due
to the nature of the battery. The battery charge monitor in the
display will falsely indicate a full battery. A safe operation of
the device under certain circumstances will not be
guarantied.
™
Defi-Monitor.
™
Defi-Monitor into the
19499 / 05.03 71
Page 14

Instructions for use PRIMEDIC
3.2 Configuration of the defibrillator / ECG
The PRIMEDIC™ Defi-Monitor was configured at the
factory. Certain parameters can be changed in the set-up
menu in order to realize individual settings. This configuration
remains until it is changed regardless whether the defibrillator
is switched off or the accumulator is changed.
The set-up menu is partitioned on two pages. On page 1 the
following parameters can be changed.
The underlined parameters represent the factory setting.
1. Filter Off / 50 Hz
2. Date DD.MM.JJ
3. Time hh.mm.ss
4. Language deutsch
5. Automatic
6. Print 1-lead
7. Print 25 mm
8. Memo-Print activate
*= with installed software option.
*=only for DM 1 and DM 3 eligible.
The second page allows the following settings:
1.
2.
3.
4. SpO
5. SpO
6 SpO
*= only for DM 3 eligible
Press PADDLE-LEAD (21) and LEAD SELECTION (22)
simultaneously during operation in order to start the set-up
menu. The set-up menu is displayed.
During the configuration keys (21), (24) and (28) have
special functions of which the symbols are displayed on the
monitor.
Key (21) UP (σ)
Key (24) DOWN (τ)
Key (28) OK (↵)
Use these keys to control the configuration.
™
Defi-Monitor ECO 1 / DM 1 / DM 3
monitor (set-up menu)
/ 60 Hz
/ english / français /
espanol / portugesh
printing On / Off
/ 3-lead *
/ 50 mm *
♥ Alarm 1 30 / 90
♥ Alarm 2 40 / 130
♥ Alarm 3 50 / 180
Alarm 1 95 / 100**
2
Alarm 2 90 / 100**
2
Alarm 3 80 / 100**
2
72 19499 / 05.03
Page 15

Instructions for use PRIMEDIC
When calling up the set-up menu the first menu item is
marked. To change e. g. the time move the cursor
downwards by actuating DOWN (24) one or several times
until the menu item time is marked. Select the menu item
time by actuating OK (28). Then the cursor moves to the
hour which is changed by actuating UP (21) or DOWN (24).
Confirm the correct setting with OK (28). The cursor then
moves to the minutes which can be changed in the same
way as described. When confirming with OK (28) the cursor
returns to the menu item time. Now you can realize further
changes in the same way as described in the example time.
To quit the set-up menu move the cursor to the menu item
END by means of UP (21) or DOWN (24) and confirm with
OK (28).
Then the PRIMEDIC
operation.
Note:
If during the setting of the menu parameters the defibrillator
has to be used immediately because of an emergency the setup menu can be terminated immediately by pressing ENERGY
(32).
4. Operation of the defibrillator
™
Defi-Monitor ECO 1 / DM 1 / DM 3
™
Defi-Monitor returns to monitoring
4.1 Switching the defibrillator on and off /
self-test
Press ON / STAND-BY (30) shortly to switch on the
PRIMEDIC
To switch off, press ON / STAND-BY (30) for approx. 2 secs.
During switch off procedure an acoustic signal is given. This
time was chosen to prevent the device from being switched
off accidentally. Energy that possibly has been charged for the
defibrillation will automatically be discharged internally.
Note:
The complete device is switched on and off with ON/
STAND-BY (30). Thus the functions of all components can be
used without loosing time.
When starting an internal self-test will be executed to check
important functions and signal devices. All LEDs of the
defibrillator light up for approx. 2 seconds. Be sure that all
LEDs are active. During this time a warning buzzer has to be
on as well. It is important that the buzzer functions.
™
Defi-Monitor.
19499 / 05.03 73
Page 16

Instructions for use PRIMEDIC
Attention:
If one or several LEDs or the warning buzzer do not function,
the defect has to be eliminated immediately.
4.2 Synchronous and asynchronous
When switching on the PRIMEDIC™ Defi-Monitor the
defibrillator is automatically in asynchronous operation.
Press SYNC (34) to select synchronous operation of the
defibrillator (cardioversion) if required by the emergency
situation.
LED (33) signals the synchronous operation. In addition, the
note "SYNC" is displayed on the ECG monitor.
After a synchronous discharge (cardioversion) the defibrillator
switches back to asynchronous operation.
Note:
During synchronous operation ECG markings are shown on
the monitor. For safe synchronous operation these
cardioversion markers must appear in every QRS complex
with a R-peak. A clear, artefactfree ECG signal with sufficient
amplitude is essential.
If there are no markings shown on the ECG monitor, the
amplitude probably has to be changed by means of SIGNAL
AMPLIFICATION or a lead with improved signal quality has to
be selected.
Note:
Do not use the paddles but the external ECG patient
electrodes for the ECG recording during synchronous
operation. Otherwise artefacts can be caused when moving
the paddles which leads to faulty synchronization.
Note:
The delay time between the recognition of a QRS complex
(synchronous pulse) and energy discharge is less than 60 ms.
Attention:
Before releasing the cardioversion check on the monitor
whether the cardioversion markers are clearly related to the
R-peaks and do not react e. g. to pacemaker pulses or
artefacts.
™
Defi-Monitor ECO 1 / DM 1 / DM 3
operation
74 19499 / 05.03
Page 17

Instructions for use PRIMEDIC
4.3 Energy selection
Press one of keys (32) to select the energy. LED (31) located
directly above the key pressed lights up to acknowledge the
energy setting. In addition the selected energy step is
indicated on the monitor.
Note:
The energy step required for the defibrillation / cardioversion
depends on the patient, its body height and weight and its
condition. For information please refer to appendix A2.
An energy step selected by mistake can be changed by
pressing the correct key with the required energy step. This is
also possible if energy has already been charged for
defibrillation. When increasing the energy step the missing
energy is added. When decreasing the energy step the
excessive energy is discharged in small steps.
4.4 Energy charging
™
Defi-Monitor ECO 1 / DM 1 / DM 3
The selected energy can be charged by pressing one of the
release buttons (10) or (12) and thus made available for the
shock.
Then the energy will be charged quickly. LED (45) flashing
indicates the charging procedure. The charging time depends
on the selected energy step and the available accumulator
capacity. Charging the defibrillator up to 100 joule takes
approx. 1 second, charging up to 360 joule takes about 5
second. In case of a partly discharged accumulator the
charging time may slightly be longer. See also technical data.
After the charging the energy will be available for 15 seconds
which is signalled by a permanent signal and the lighting up
of the OK signal (35). The remaining time is simultaneously
indicated on the monitor. If there is no defibrillation during
this time, an internal safety discharge will be executed.
During this time the energy charged can be changed again if
required (see section 4.3). After the change, the energy is
available for another 15 seconds for defibrillation.
Should an error occur during energy charging, an intermittent
warning signal and the Attention LED (36) will be on.
19499 / 05.03 75
Page 18
Instructions for use PRIMEDIC
Attention:
If the message „load accumulator“ appears at least 5
discharges with maximum energy are available, in this case
the Defi-Monitor should be placed again as fast as
possible on the charging unit.
Attention:
If the ATTENTION LED (36) lights up the function of the
defibrillator can be tested by switching-off and then on again
with the help of a self-test. When the signal goes out, the
defibrillator is ready-to-use.
Attention:
If the ATTENTION LED (36) is still on after switching off and
on again, the malfunction must be eliminated immediately.
4.5 Positioning of paddles
™
Defi-Monitor ECO 1 / DM 1 / DM 3
The paddles must be positioned along the cardiac axis.
APEX paddle (9) hast to be positioned in the left chest area,
on the axillary line above the apex of the heart.
STERNUM paddle (13) hat to be positioned in the right chest
area, below the clavicle.
4.6 Discharging of energy (shock)
Press release buttons (10) and (12) at the paddles
simultaneously to discharge the energy.
In case of asynchronous operation energy will be discharged
immediately after simultaneous depression of buttons.
In case of synchronous operation both release buttons (10)
and (12) have to be pressed down simultaneously until the
moment for the cardioversion is reached. During this time an
intermittent signal will be on.
No cardioversion will be released, if during discharging the
release buttons are let go off.
The energy is discharged internally if no synchronization takes
place within 3 seconds while keeping the release buttons
pressed down. Thereafter, the PRIMEDIC
returns to asynchronous mode.
During the shock the ECG input will generally be overloaded
for a short time. The PRIMEDIC
a stable ECG baseline already after approx. 1 second after the
shock so that the defibrillation success can be seen
immediately.
™
Defi-Monitor will supply
™
Defi-Monitor
76 19499 / 05.03
Page 19

Instructions for use PRIMEDIC
Attention:
Before releasing the cardioversion check on the monitor
whether the cardioversion markers on the monitor are clearly
related to the R-peaks and do not react e. g. to pacemaker
pulses or artefacts.
Attention:
Both paddles have to be pressed on the thorax by applying a
pressure of approx. 100 N in order to ensure safe energy
transmission and to avoid damaging the skin under the
paddles.
Attention:
Please insure that there is no contact or conducting gel
between the paddles.
Attention:
Before and during the discharging of energy all persons
attending to the resuscitation have to step back and any
contact with patients or conducting parts (e. g. stretcher) has
to be avoided. Remove all connected devices without
defibrillation protection from the patient before energy is
discharged.
4.7 Paediatric paddles
™
Defi-Monitor ECO 1 / DM 1 / DM 3
Electrodes with smaller electrode surface have to be used for
the defibrillation of children. The paediatric paddles are
integrated in the paddles for adults. Remove the large
electrodes from both paddles by turning counterclockwise.
Attach the paddles for adults to the paediatric electrodes by
turning clockwise.
Note:
Clean the paediatric paddles after use before attaching the
paddles for adults.
Attention:
Attach the paddles for adults firmly to ensure safe contact of
the paddles for adults.
19499 / 05.03 77
Page 20

Instructions for use PRIMEDIC
5. Operation of the ECG monitor
5.1 Selection of ECG leads
The ECG graph can be realized in two ways:
1. via paddles
2. via external ECG patient cables.
The paddle lead is automatically active after switching on the
PRIMEDIC
symbol on the monitor.
The monitor cannot be switched to the standard leads if no
external ECG patient cable is connected.
The standard leads can be used if an ECG patient cable is
connected. Press LEAD SELECTION (22). Lead II is
immediately active. Press LEAD SELECTION (22) to switch
between the possible leads I, II, III, aVR*, aVL* or aVF*. The
selected lead is shown on the monitor.
To switch back to lead via paddle electrodes press PADDLELEAD (21) regardless whether ECG signals are available via
the external patient cable.
The monitor automatically switches to paddle lead when
pulling out the ECG patient cable from the input socket of the
PRIMEDIC
Note:
The PRIMEDIC
when no ECG is shown or no key is pressed for 15 minutes
while the device is switched on. Approx. 30 seconds before
switching off an acoustic signal is given. By pressing any key,
the switching off routine is interrupted.
Note:
If the paddle lead is selected and the paddles are not
attached to the patient, an intermitting line with the message
„Electrodes open“ will be displayed in the monitor. As soon as
the paddles are attached to the patient, the recorded ECG
signal will be displayed in the monitor.
= only for DM 1 and DM 3 with installed software option.
™
Defi-Monitor ECO 1 / DM 1 / DM 3
™
Defi-Monitor which is indicated by a paddle
™
Defi-Monitor during the monitoring.
™
Defi-Monitor switches off automatically
78 19499 / 05.03
Page 21

Instructions for use PRIMEDIC
5.2 Setting of signal amplification
Five signal amplification steps are available:
1. 0.5 cm/mV
2. 0.8 cm/mV
3. 1.0 cm/mV
4. 1.5 cm/mV
5 2.0 cm/mV
Amplification step 1 cm/mV is automatically active after
switching on the PRIMEDIC
AMPLIFICATION (23) to switch between the amplification
steps in ring counting method. The 1mV reference is
constantly shown on the left of the monitor border. After
switching to a different value the reference marking is shown
for about 5 seconds in lower status line.
5.3 Volume of systole beep
™
Defi-Monitor ECO 1 / DM 1 / DM 3
™
Defi-Monitor. Press SIGNAL
Three volume steps are available for the systole beep: off, low,
high.
After switching on the volume step off is automatically
active. The volume symbol is shown on the monitor.
Press VOLUME (24) to switch between the three volume
steps. Each depression on key (24) causes the continuation
by one step.
5.4 Activation of heartrate alarms
Four steps are available:
1. — — —
2.
♥ ALARM 1 30 / 90
♥ ALARM 2 40 / 130
3.
♥ ALARM 3 50 / 180
4.
The above mentioned alarm limits are preset at delivery. The
values of the second and fourth alarm step can be changed
by means of the set-up menu (see section 3.2).
The alarm is not active after switching on the PRIMEDIC
Defi-Monitor which is indicated on the monitor. Press
ALARM (28) for activation. Every depression of this key
causes the continuation by one alarm step.
™
19499 / 05.03 79
Page 22

Instructions for use PRIMEDIC
The value indicated on the monitor (e. g.
SpO
be released when exceeding the heartrate of 90 beats/
minute or remaining under 30 beats / minute. You can
acknowledge (switch off) the alarm by pressing ALARM (28)
shortly. The acoustic alarm is switched off for about 1 minute
whereas the alarm limits remain. To change the alarm limits
or to switch off the alarm press ALARM (28) until the desired
selection (e. g.
After the defibrillation the heart alarms are set OFF
automatically.
Note:
Test possibility for alarm circuit.
Select alarm limits with no patient connected. The optical and
acoustical alarm has to be released immediately. After
acknowledging ALARM (press button 28) the acoustical
alarm is suppressed for about 1 minute. The optical alarm has
to remain active (intermittent alarm signal).
5.5 Contrast-Settings (only for ECO 1)
™
Defi-Monitor ECO 1 / DM 1 / DM 3
♥ ALARM 30 / 90,
90 / 100) means that a pulsating acoustic alarm will
2
♥ ALARM — — —) is shown on the monitor.
Five different contrast settings are available. Depending on
the ambient temperature or brightness it may be useful to
change the contrast for high-contrast monitoring. The most
suitable contrast step can be determined by repeated
actuation of CONTRAST (29). After switching off the
PRIMEDIC
saved and active again when switching on.
™
Defi - Monitor the current contrast setting is
5.6 Filter
The monitoring has the possibility to use high-quality line filter
with 50 or 60 Hz. This can be adjusted in set-up menu (see
section 3.2). It is recommendable to activate the 50 Hz filter.
80 19499 / 05.03
Page 23

Instructions for use PRIMEDIC
5.7 Positioning of ECG electrodes
The quality of the indicated ECG signal depends among
others on the safe contact and correct positioning of the ECG
electrodes.
Position the electrodes carefully in order to minimize the
movement artefacts.
Positioning of disposable electrodes:
1. Connect the plug of the patient cable (4) to the ECG plug-
2. Attach the patient electrode cable firmly to the electrode
3. Pull the lamination sheet off the electrodes.
4. Make sure that there is no electrolyte gel on the adherent
5. Stick the electrodes to the skin of the patient by pressing
Positioning of electrodes with four-wire cable (with
neutral electrode):
Electrode Position
™
Defi-Monitor ECO 1 / DM 1 / DM 3
in connection (3) so that it engages audibly.
by means of the clip connection.
surface.
the adherent surface firmly against the skin. Positioning
according to the table.
Red (R) directly below the right medioclavicle
Yellow (L) directly below the left medioclavicle
Green (F) directly below the left pectoral muscle on
the medioclavicle line
Black (N) right side of the body, e. g. lowest rib on the
medioclavicle line
After use remove the disposable electrodes by pressing
together the electrode bracket. Do not apply used disposable
electrodes!
Note:
Use silver / silver chloride electrodes (Ag / AgCI) in order to
minimize a polarization of the electrodes during defibrillation.
19499 / 05.03 81
Page 24

Instructions for use PRIMEDIC
Attention:
Only use the original- PRIMEDIC
cable has an integrated defibrillation protection protecting the
ECG monitor from dangerous high voltage. The use of
another patient cable may cause the destruction of the ECG
unit and may be hazardous to the user.
Attention:
The black ECG electrode (N) always has to be connected, to
guarantee the function of the identification of electrodes
open.
6. Operation of SpO2 monitor (only model
6.1 Connection of SpO2 sensor
The PRIMEDIC
pulsoximeter module is provided with a blue input socket
(16) at the upper left of the casing for the SpO
Proceed as follows:
1. Insert into slot (16) the blue plug (17) of the patient cable
2. Plug the NELLCOR
3. Test the perfect mechanical locking of the plug-in-
To dismount the NELLCOR
cable, push the release of the plug-in-connection and take out
the sensor without applying force.
If the NELLCOR
about 5 seconds of measuring time the value in % and the
pulse curve are shown on the monitor. A rhythmically
oscillating signal bar at the right fringe of the pulse curve
indicates when the module recognizes an evaluable oxygen
saturation value.
Note:
Do not kink sensor or patient cable to avoid defects or
malfunctions.
™
Defi-Monitor ECO 1 / DM 1 / DM 3
™
patient cable. This patient
DM 3)
™
Defi-Monitor with integrated NELLCOR ®
patient cable.
2
(about 1,4 m).
patient cable until the traction relief engages.
connection.
®
sensor into the other end of the SpO
®
sensor from the SpO2 patient
®
sensor is positioned on a patient, after
2
82 19499 / 05.03
Page 25

Instructions for use PRIMEDIC
Note:
Reusable sensors may remain at one measuring point for 4 h
maximally, provided that state of the skin, the correct and
secure positioning of the sensor at the measuring point are
controlled regularly. As the tolerance towards sensors at the
measuring point depends upon the individual condition of the
skin, it may be necessary to change the points of measure
with some patients.
Note:
Before using the sensor read the instructions for use.
Attention:
Do not use damaged sensors or sensors with unprotected
optical components.
Attention:
Only use original NELLCOR
sensores could cause measuring errors or damage the SpO
module.
Attention:
Always use original SpO
perfect connection of NELLCOR
Attention:
Avoid tensile load at the NELLCOR
cable.
6.2 Selection of correct SpO2 sensor
™
Defi-Monitor ECO 1 / DM 1 / DM 3
®
sensors for SpO2 measures. Other
patient cables which guarantee the
2
®
sensors to the Defi-Monitor.
®
sensor or the SpO2 patient
2
In order to select the correct sensor for the respective
application it is necessary taking into account the following
facts:
• weight of the patient
• activity of the patient
• duration of the measure
• blood circulation of the limbs
Also observe the instructions for the use of pulsoximeters in
appendix A3.
The following table summarizes the most important
NELLCOR
the PRIMEDIC
®
sensors with appropriate fields of applications for
™
Defi-Monitor.
19499 / 05.03 83
Page 26

Instructions for use PRIMEDIC
NELLCOR
Sensors
DS-100 A > 40 kg operator-friendly,
D-YS > 1 kg universal sensor,
RS-10 > 40 kg reflecting sensor,
OXI-A/N < 3 or > 40 kg reusable, insteril disposable
OXI-P/I 3 - 40 kg reusable, insteril disposable
More NELLCORE
detailed documentation.
Note:
Operating instructions for the above mentioned sensores are
provided in the instructions for use.
Attention:
Only use the sensores according to their determined purpose
(weight of the patient, measuring point .....). Exact notes and
instructions for the correct use can be seen in the instructions
for use of the corresponding sensors.
6.3 Setting of alarms for SpO2
™
Defi-Monitor ECO 1 / DM 1 / DM 3
®
-
Weight of
special features
the patient
reusable
reusable,
applicable with ear clip
attachable at forehead or
temple, especially for
patients with reduced
peripheral circulation,
reusable
adherend
adherend
®
sensors are available. Please ask for our
Four steps are available:
1. — — —
2. SpO
3. SpO
4. SpO
alarm 1 95 / 100
2
alarm 2 90 / 100
2
alarm 3 80 / 100
2
The above mentioned alarm limits are preset at delivery. The
values of alarm step 2 to 4 can be changed by means of the
set-up menu (see chapter 3.2). The setting range for the
lower alarm limit lies between 80 - 99 %, for the upper alarm
limit between 90 - 100 %.
84 19499 / 05.03
Page 27

Instructions for use PRIMEDIC
After switching on the PRIMEDIC™ Defi-Monitor the alarm
is not active. This is shown on the monitor. The alarm can be
activated by pressing the SpO
ALARM (25) operates in ring counting method, i.e. every
depression of the key causes a continuation by one alarm
step.
The message displayed on the monitor (e.g. SpO
/ 90) means that a rhythmic alarm is released when a SpO
value is falling below 80 % or passing 90%.
The alarm bell flashes. If the alarm is released it can be
acknowledged (switched off) by shortly pressing SpO
ALARM (25). The alarm audio signal is switched off for about
a minute. The alarm bell symbol is crossed out during muting.
If you want to change the alarm limits or switch of the alarm,
press SpO
ALARM
After a defibrillation the SpO
OFF.
Note:
Test possibility for alarm circuit.
Select alarm limits with no patient connected. The optical and
acoustical alarm has to be released immediately. After
acknowledging ALARM (press button 28) the acoustical
alarm is suppressed for about 1 minute. The optical alarm has
to remain active (intermittent alarm signal).
Note:
If no SpO
− no sensor or SpO
− sensor damaged
The alarm will be released in any of the above mentioned
cases with alarm limits activated.
™
Defi-Monitor ECO 1 / DM 1 / DM 3
ALARM (25). The SpO
2
ALARM 80
2
ALARM (25) until the desired message e.g. SpO2
2
— — —is displayed on the monitor.
ALARMs are automatically set
2
value is displayed, this can mean that:
2
patient cable is connected
2
2
2
2
19499 / 05.03 85
Page 28

Instructions for use PRIMEDIC
7. Operation of printer
7.1 Protocol of the ECG signal
The PRIMEDIC™ Defi-Monitor has a printer with high
resolution. ECG prints of 3 channels at a time are possible, at
printing speeds of 25 and 50 mm/s*.
To protocol the ECG graph during monitoring the on-line
printing has to be started by pressing PRINTER ON/OFF (27).
Repeated actuation of PRINTER ON/OFF (27) stops the
printing of the protocol. Printing is with 2 seconds delay. The
ECG is printed with the parameters chosen in the set-up
menu. The following set-up possibilities are available:
1-channel-print prints the ECG channel displayed on
3-channel-print * prints channel I, II, III or aVR, aVL, aVF
25 mm/s -printing
speed*
50 mm/s - printing
speed*
As for device version DM 3 it is possible to print the SpO
protocol printing quality, but only in the 1-channel-mode.
Printing is started 3 seconds after some information is
displayed on the monitor, i.e. events that happened before the
activation of the print can be represented.
The cutting edge integrated in the printer cover (11) allows to
cut off the ECG protocol tape. Cut off the tape by pulling
sideways to the top.
Note:
Well-thought and short-time printing saves energy and paper
and increases the mains-independent operating time of the
device, especially in case of printing at a speed of 50 mm
*= as for DM 1 only with installed software package.
* = only for DM 1 and DM 3.
™
Defi-Monitor ECO 1 / DM 1 / DM 3
the monitor. With SpO
active the SpO
pulse curve is
2
measure
2
displayed additionally.
simultaneously, depending upon the
lead displayed on the monitor.
The information is printed at 25
mm/s.
The information is printed at 50
mm/s.
in
2
86 19499 / 05.03
Page 29

Instructions for use PRIMEDIC
7.2 Automatic printout after every shock
With the PRIMEDIC™ Defi-Monitor it is possible to
protocol automatically the event after every shock
(defibrillation / cardioversion). The 5 seconds before and 5
seconds after every shock are documented. All important
parameters are printed in the beginning:
• Date, time
• Energy (joule)
• Synchronous / asynchronous operation
• Lead
• Heartrate
• Filter
• Signal intensification
• Lines for additional notes
• SpO
• Speed
The auto print function can be switched on and off in the setup menu. The function is switched off at delivery.
Use the cutting edge integrated in the printer cover (11) to
cut off the ECG protocol tape. Cut off the tape by pulling
sideways to the top.
Note:
The auto print function switched on in the set-up menu
remains active even after switching off the defibrillator or
changing the accumulator. The device configuration has to be
changed in the set-up menu in order to deactivate this
function.
™
Defi-Monitor ECO 1 / DM 1 / DM 3
(auto print)
value (only model DM 3)
2
19499 / 05.03 87
Page 30

Instructions for use PRIMEDIC
7.3 Printing of the event memory
The PRIMEDIC™ Defi-Monitor saves the last 10 shocks
(defibrillations/cardioversions) automatically in an event
memory. The 5 seconds before and 5 seconds after every
shock, as well as all important parameters are saved:
• Date, time
• Energy (joule)
• Synchronous / asynchronous operation
• Lead
• Heartrate
• Filter
• Signal intensification
• Lines for additional notes
• SpO
• Speed
Every new event pushes the oldest event out of the memory.
With the set-up menu the memory contents beginning with
the last event are printed, by using the just actual signal
intensification.
Call the set-up menu and move with cursor key to item
“Memo-Print“, acknowledge “activate“. The memo print starts.
To stop the printout press PRINTER ON / OFF (27). The print
speed is 25 mm/s.
Use the cutting edge integrated in the printer cover (11) to
cut off the ECG protocol tape. Cut off the tape by pulling
sideways to the top.
Note:
After printing the data remains in the event memory. The data
can be printed as often as necessary.
™
Defi-Monitor ECO 1 / DM 1 / DM 3
value (only with model DM 3)
2
88 19499 / 05.03
Page 31

Instructions for use PRIMEDIC
7.4 Insertion of printing paper
Fold down the printer cover (11) to the front to insert the
printing paper (paper reel). Prepare the paper reel provided
(remove the adhesive strip, uncoil approx. 10 cm of paper).
Insert the paper reel into the printer shaft so that the paper
runs as per the opposite drawing. Otherwise the paper would
be printed on the reverse. Hold the end of the paper against
the rubber cylinder and press PAPER FEED (26). The paper
now takes its starting position.
Close the cover (11) and press again PAPER FEED (26). The
paper will be fed automatically through the cover shaft up to
the cutting edge.
Note:
The cover is designed in such a way that it jumps out of its
position without being damaged when applying stronger
external pressure. Replace the cover by pushing back the
snap lockings by means of a screw driver until the cover
engages.
™
Defi-Monitor ECO 1 / DM 1 / DM 3
8. Handling of the charging unit
After every use the PRIMEDIC™ Defi-Monitor should be
inserted into the charging unit in order to recharge the
accumulator. Otherwise a second charged PRIMEDIC
has to be available or the accumulator has to be charged with
the external charging/regenerating table unit in order to be
prepared for a case of emergency.
When inserting the defibrillator into the charging unit the
springs have contact and the accumulator can be charged.
The fixing parts for wall mounting or mounting into a vehicle
ensure a safe position of the PRIMEDIC
™
Defi-Monitor
when inserting into the charging unit. Hold the handle of the
defibrillator and press down release button (66) with your
™
index to remove the PRIMEDIC
Defi-Monitor from the
charging unit. Now the defibrillator can be removed or tilted
downwards in order to reach the second accumulator.
Note:
After insertion check whether the defibrillator is locked firmly.
Caution:
A completely discharged battery has to be recharged for at
least 45 minutes. A too short charging duration may lead to a
wrong interpretation of the battery charge by the device due
to the nature of the battery. The battery charge monitor in the
display will falsely indicate a full battery. A safe operation of
the device under certain circumstances will not be
guarantied.
™
Accu
19499 / 05.03 89
Page 32

Instructions for use PRIMEDIC
9. Handling of the changeable
The changeable accumulator (PRIMEDIC™ Accu) is charged
automatically when inserting the defibrillator into the
charging unit. In case of permanent use of the PRIMEDIC
Defi-Monitor one or more charged accumulators have to
be kept available for use in case of emergency. The comfort
version (optional) of the charging unit (see section 9.2) allows
the charging of an additional accumulator.
All accumulators based on NiCd technics have to be
discharged completely before recharging in order to avoid a
"memory" effect (see appendix A1).
The comfort version of the charging unit ensures best
accumulator care. For the charging of a second accumulator
it is equipped with the so-called Accu-Care function that
checks the inserted accumulator and discharges it completely
before charging the maximum capacity.
The "memory" effect can be avoided effectively by regular
exchange of the accumulator connected to the PRIMEDIC
Defi-Monitor for the second accumulator of the charging
unit (approx. every second week).
Note:
Accumulators are subject to wear. Even best care does not
avoid a derating of capacity in the long run. Stop using the
accumulator if after approx. 2 years the accumulator capacity
only allows few shocks with maximum energy.
Note:
Accumulators have to be disposed of professionally. Return
the used PRIMEDIC
dispose of the accumulators in the household garbage!
Note:
Insertion of the defibrillator with discharged accumulator into
the charging unit allows monitoring operation immediately
after switching on.
Attention:
To operate the PRIMEDIC
has to be connected to the right side of the casing. This is
also necessary for safety reasons for the operation of the
defibrillator when it is inserted into the charging unit.
™
Defi-Monitor ECO 1 / DM 1 / DM 3
accumulator
™
Accus to us or to the dealer. Do not
™
Defi-Monitor the accumulator
™
™
90 19499 / 05.03
Page 33

Instructions for use PRIMEDIC
9.1 Changing of the accumulators
Connect the PRIMEDIC™ Accu to the defibrillator as follows:
1. Remove the right paddle cable (apex) from its rest position
2. Take the PRIMEDIC
3. Put the accumulator in the guide provided from the side.
4. Move the accumulator upwards until it engages audibly.
Note:
The PRIMEDIC
casing while moving upwards until it engages. Oblique
insertion of the accumulator is not possible.
Remove the PRIMEDIC
follows:
1. Remove the right paddle cable (apex) from its rest
2. Press down the marking on the release button (7) and
5. Move the accumulator downwards while it is sitting
4. Release the release button (7).
9.2 Parallel accumulator charging in the
™
Defi-Monitor ECO 1 / DM 1 / DM 3
to facilitate locking of the accumulator.
™
Accu with the connection contacts
showing to the top.
Ensure that it sits close to the defibrillator side and is
perfectly aligned in its lowest position.
™
Accu must sit close to the defibrillator
™
Accu from the defibrillator as
position to facilitate changing of the accumulator.
keep the button pressed down.
closely to the defibrillator until it disengages audibly.
charging unit
Charging of a second PRIMEDIC™ Accu is only possible with
the comfort version of the charging unit.
™
Insert the PRIMEDIC
Accu into shaft (51) of the charging
unit with the contacts showing downwards. Insert from top to
the bottom.
If the charging unit is mounted e. g. at the wall and the
defibrillator is inserted, you can still insert or remove the
second accumulator. To do so press release button (66) and
tilt the defibrillator to the front until access to the shaft is
possible.
19499 / 05.03 91
Page 34

Instructions for use PRIMEDIC
After insertion the accumulator capacity is indicated. All three
Accumulator LEDs (54-56) in the charging base (52) light up.
Then the accumulator is completely discharged which is
indicated by the flashing of LEDs (54-56).
At the end of the discharging the accumulator is charged
completely. LED (53) flashes to indicate the charging. When
charging of the PRIMEDIC
off and the 100 % LED (54) lights up. Remove the
accumulator. The charged capacity remains should the
accumulator sit on the charging unit for a longer period.
Note:
Do not remove the accumulator from the shaft during
charging or discharging.
10. Maintenance and care
™
Defi-Monitor ECO 1 / DM 1 / DM 3
™
Accu is finished LED (53) goes
For maintenance of the PRIMEDIC™ Defi-Monitor, all
accessory parts such as ECG patient cable and the charging
™
unit PRIMEDIC
Defi-Charger we recommend a
commercial domestic cleaner. Use a wet, clean cloth for
cleaning.
Use a commercial disinfectant (e. g. Gigasept FF) for
disinfection of the paddle electrodes.
Attention:
Do not use soaking wet clothes for cleaning. Do not pour any
liquids over the device and do not plunge it into water.
Regardless of the use of the device, we recommend visual
inspections / maintenance of the PRIMEDIC
™
Defi-Monitor
and the accessory parts to be carried out by the user.
Pay attention to the following:
1. Check whether the parts of the casing are damaged
(defibrillator, charging unit, accumulator).
2. Check whether the insulation of the ECG patient cable and
the paddle cable is damaged.
3. Remove remaining gel and impurities from the paddle
electrodes in order to ensure safe contact between
children's paddles and paddles for adults and to prevent
sparking voltage.
4. Remove dirt accumulated in the shaft.
Attention:
Damaged parts of the casing and insulations have to be
repaired immediately.
92 19499 / 05.03
Page 35

Instructions for use PRIMEDIC
11. Waste Treatment
At the end of its useful life, the unit must be recycled in
accordance with the relevant local regulations. In case of
doubt, please request details from the local recycling
company.
™
Defi-Monitor ECO 1 / DM 1 / DM 3
19499 / 05.03 93
Page 36

Instructions for use PRIMEDIC
™
Defi-Monitor ECO 1 / DM 1 / DM 3
12. Technical data, accessories, symbols
12.1 Technical data PRIMEDIC™ Defi-Monitor ECO 1 / DM 1 / DM 3
Defibrillation / cardioversion:
Operating modes: synchronous or asynchronous, external defibrillation
Energy steps: 10, 20, 30, 50, 100, 200, 300, 360 joule (50 Ω)
Discharges: 60 with 360 joule at 20 °C, 30 with 360 joule at 0 °C
Charging time, accumulator charged: 1 s (100 joule), 5 s (360 joule)
Charging time after 15 shocks: 1.5 s (100 joule), 5.5 s (360 joule)
Delay time: < 60 ms between synchronization pulse and energy
discharge
EKG-Monitoring Modell ECO 1:
Construction: ECG monitor movable by ± 30° for easy reading of ECG
Monitor type high resolution graphic EL monitor (electro-luminescence)
Monitor size: 120 x 90 mm (diagonal 5,7” or145 mm)
Resolution: 320 x 240 pixel (pixel size 0.36 x 0.36 mm)
Filter: connectable, 50 or 60 Hz
Functions: signal amplification, systole beep, heartrate, paddle lead, energy step,
accumulator capacity, heartalarm limits,
Alarm: variable for high and low heartrates
EKG-Monitoring DM 1 / DM 3:
Construction: ECG monitor movable by ± 30° for easy reading of ECG
Monitor type high resolution graphic EL monitor (electro-luminescence)
Monitor size: 115 x 86 mm (diagonal 143 mm)
Resolution: 320 x 240 pixel (pixel size 0.36 x 0.36 mm)
Filter: connectable 50 or 60 Hz
Functions: signal amplification, heartrate, lead, energy step, accumulator capacity,
heartalarm limits, SpO
Alarm: variable for high and low heartrates or SpO
NELLCOR®-pulsoximetry-module:
Indication range: 100 ... 0 %
Calibration range: 100 ... 50 %
Measurement precision: SpO
2
Adults 100 ... 70 % +/- 2 digits
69 ... 50 % +/- 3 digits
50 ... 0 % not specified
New-born 95 ... 70 % +/- 3 digits
For information about test procedures for the calibration ask manufacturer.
Wavelength: Red: 660 nm
Infrared: 920 nm
Light density: 0,5 lumen/cm
2
Operating mode: continuous
Actualisation time: < 2 sec.
Information related with toxicity of the materials getting into contact with the patients 18565
Fingersensor DS.100A for pulsoximeter EN10993-10, ISO 10993-5
value, SpO2 alarm limits (SpO2 only with DM 3)
2
(SpO2 only with DM 3)
2
94 19499 / 05.03
Page 37

Instructions for use PRIMEDIC
™
Defi-Monitor ECO 1 / DM 1 / DM 3
Printer:
Printer type: thermal transfer head, 1-channel
Resolution: 8 bit / 200dpi
Paper width: 58 mm
Operating modes: auto print (protocol printing showing the events of the 5 s before and 5 s
after defibrillation)
ECG print (EKG on-line protocol printing)
MEMO-print (printing of the saved events of the last 10 defibrillations with
5 s before and 5 s after defibrillation)
1/3-canal print
*only model DM1 and DM3
Safety:
Classification: Protection type II, Type BF, Medical device class 2b
Regulatory affairs:
0123
The product is a medical device according to EC guideline 93/42/EEC.
Other data:
Power supply: by changeable accumulator (PRIMEDIC
Changeable accumulator: 14.4 V / 1.5 Ah / NiCd
Operating conditions: 0 ... 50 °C, 30 ... 95 % rel. humidity, but without condensation
700 hPa ... 5000 hPa for 1 h,
700 hPa ... 1060 hPa continuous service
Storage environment: -20 ... 70 °C, 20 ... 95 % rel. humidity, but without condensation
500 hPa ... 1060 hPa
Dimensions: 42 x 12 x 42 cm (w x d x h)
Weight: 8 kg
Subject to alterations.
™
Accu)
19499 / 05.03 95
Page 38

Instructions for use PRIMEDIC
™
Defi-Monitor ECO 1 / DM 1 / DM 3
Delivery specification: Part no.
™
PRIMEDIC
Defi-Monitor ECO 1 96017
™
1 PRIMEDIC
Accu, 14,4 V / 1,5 Ah, NiCd 72264
1 ECG patient cable, 4-lead, neutral electrode (3+N) 72303
30 ECG-electrodes Ag/AgCl Ø 55 mm, with push button, single use 18155
1 conductive gel, 60 g 13026
1 Printer paper, 58 mm, 25 m 18122
1 Medical device protocol 13084
1 Instructions for use 19094
1 Briefing protocol 18514
PRIMEDIC
™
Defi-Monitor DM 1 96088
see ECO 1
PRIMEDIC
™
Defi-Monitor DM 3 90067
see DM 1, but additional
1 SpO
1 SpO
fingersensor DS-100 A (NELLCOR
2
patient cable (2.4m) 18783
2
®
) 18565
12.2 Accessories
Part no.
Bag with three transparent storage compartments 72310
Shoulder strap with fixation kits incl. shoulder pad 18578
conductive gel, 60 g 13026
ECG patient cable, 4-lead, neutral electrode (3+N) 72303
ECG-electrodes Ag/AgCl Ø 55 mm, with push button, single use 18155
PRIMEDIC
More accessories see separate accessories / price list.
™
Accu, 14.4 V / 1.5 Ah, NiCd 72264
96 19499 / 05.03
Page 39

Instructions for use PRIMEDIC
™
Defi-Monitor ECO 1 / DM 1 / DM 3
12.3 Symbols
The following symbols are used on the device:
Rating plate:
IPX1
Paddle:
Protection type
Splash-proof
Comply with instructions for use!
Degree of protection BF,
input with defibrillation protection
Hazardous electric voltage
(high voltage)
ECG input socket:
Degree of protection CF,
input with defibrillation protection
SP02 input socket:
(only model DM 3)
Degree of protection BF; input with defibrillation
protection. Comply with instructions for use!
19499 / 05.03 97
Page 40

Instructions for use PRIMEDIC
™
Defi-Monitor ECO 1 / DM 1 / DM 3
13. Conditions of Guarantee
As the manufacturer, METRAX grants a guarantee on this device for 2 years starting with the date of
purchase. During this period, METRAX will eliminate any defects in the device, resulting from material
faults or manufacturing faults, free-of-charge. Elimination of defects is made by METRAX either by
repair or by replacement. Any repair carried out during the guarantee period shall not extend the
original guarantee period.
The right to claim under guarantee and damage claims provided by law do not apply in case of only
immaterial impairment of usefulness, natural wear or damages, produced after liability transfer to the
buyer, as a result of wrong or negligent use, excessive stress or caused by extreme external influences
not covered by the terms of agreement. The same applies if the buyer or third parties perform
modifications or repair work in an unprofessional manner.
Further contractual and non-contractual claims against METRAX are excluded unless such claims are
based on intent or on severe negligence or on compelling liability regulations provided by law.
Claims for damages by the buyer against the seller (trader) remain unaffected by this guarantee.
In case of claims under guarantee, you are asked to send the device including a buyer’s certificate (e.g.
a bill), stating your name and address, to your dealer or to METRAX.
The METRAX-customer service will be glad to assist you even after the guarantee period has expired !
98 19499 / 05.03
Page 41

Instructions for use PRIMEDIC
™
Defi-Monitor ECO 1 / DM 1 / DM 3
14. Appendix
A1 General instructions and rules for the use of accumulators
What is an accumulator?
Accumulators are used for storing electric energy. During the charging procedure the charge current is
stored in the accumulator by a chemical process. When the accumulator is discharged (during
operation) the chemical energy is converted back into electric energy. This charging and discharging
process can be repeated several times.
Lead-acid or NiCd-accumulator?
Various accumulator designs with different and typical features proved in practice.
1. Lead-acid accumulator
2. NiCd-accumulator (nickel-cadmium)
3. metal-hybrid accumulator
The development of the PRIMEDIC
revealed advantages over other constructions.
The lead-acid accumulator, one of the first accumulator types, converts the energy to hazardous
oxyhydrogen gas (explosion hazard) when the charge is too strong. Compared to the lead-acid
accumulator the NiCd-accumulator has got a considerably higher energy density. This means that the
PRIMEDIC
™
Accu of the same size can release far more shocks (i. e. has a longer monitoring time)
than a comparable lead-acid accumulator.
The metal-hybrid accumulator has even got a higher energy density than the NiCd-accumulator but the
current level delivered by this accumulator is too low. This would cause a too long supply time of
energy required for the shock which contradicts the requirements of today's defibrillators.
The handling of the NiCd-accumulator is easy. State-of-the-art microprocessor-controlled charging
circuits, also used in the PRIMEDIC
longer service life of the accumulator.
Partial discharging and recharging of the NiCd-accumulator over a longer period lead to the typical
phenomenon, the "memory" effect. Due to the "memory" effect the accumulator operates like a small
accumulator with low capacity although it has got a nominally large accumulator capacity.
Example:
An accumulator has a capacity of 60 shocks with 360 joule each. Energy for 5 shocks will be released
and the accumulator recharged. This procedure, if continued over a longer period, can cause the
"memory" effect. This means that the accumulator capacity will be reduced to 5 to 6 shocks since the
accumulator is "trained" on 5 shocks.
It is very difficult to eliminate the "memory" effect, i. e. to get back to the full capacity, if the "remaining
capacity" remains under a practicable value.
™
Defi-Monitor is based on the NiCd-accumulator since practice
™
Defi-Monitor allow to realize very short charging times and a
19499 / 05.03 99
Page 42

Instructions for use PRIMEDIC
™
Defi-Monitor ECO 1 / DM 1 / DM 3
How to avoid the "memory" effect?
The "memory" effect can be avoided by discharging the accumulator completely from time to time so
that a complete charging can be carried out. There are various possibilities for the practice:
1. Do not immediately recharge the accumulator if it has only been discharged slightly. In most
cases sufficient energy is available for later applications. The PRIMEDIC
not always recharge the accumulator immediately. The accumulator is recharged only after
falling below a limit.
2. Before charging the accumulator use the remaining capacity for e. g. several shocks with high
energy or for monitoring. This is not necessary every time before charging but only from time to
time (every week or month, depending on the use).
3. Best accumulator care is obtained by means of the fully automatic discharging / charging unit
which carries out a defined discharging before every charging procedure. For safety reasons,
this charging process is not used with accumulators being charged directly in the defibrillator.
The worst case could be that the defibrillator is required just when the accumulator is
completely discharged. .
The fully automatic discharging / charging, i. e. the Accu-Care function is integrated in the
charging unit of the PRIMEDIC
charge a second PRIMEDIC
™
Defi-Monitor. This option (retrofitting possible) allows to
™
Accu and to avoid efficiently the "memory" effect by means of the
Accu-Care function.
Further effects of accumulators?
In daily practice, accumulators have two further features:
1. Self-discharge
2. Aging after a longer period of use.
In practice self-discharge means that a full accumulator is subject to a slow but continuous loss of
charge. After approx. 4 weeks 90 % of the capacity are available. This effect, however, is only
important if several charged accumulators are kept "on stock".
The PRIMEDIC
™
Defi-Monitor is equipped with a circuit for conservation of the charge.
Even best maintenance of the accumulator does not avoid an aging after approx. 2-3 years (depending
on the use). After approx. 500-1000 charging cycles (depending on the type) it is impossible for the
accumulator to transfer the electric energy charged to the chemical storage. Thus the accumulator
becomes unusable and has to be replaced for a new one.
™
Defi-Monitor does
100 19499 / 05.03
Page 43

Instructions for use PRIMEDIC
™
Defi-Monitor ECO 1 / DM 1 / DM 3
A2 General instructions and rules for the handling of defibrillators
What is a defibrillator?
During defibrillation current is delivered to the heart muscle. The contraction caused and the
depolarization of the heart muscle eliminate dangerous cardiac irregularity.
Cardiac irregularity means uncoordinated electric and mechanical activities of the heart muscle.
Dysrhythmia possible measures
partly uncoordinated activities of the heart muscle
(e. g. atrial fibrillation)
completely uncoordinated activities of the heart
muscle (ventricular flutter)
The a. m. table shows two general groups of cardiac irregularity and the possible counter-measures.
The procedure of the two cardioversions are different and described in the following:
1. Unsynchronized cardioversion (defibrillation):
With this procedure energy is released immediately as soon as the keys for "shock release" are
pressed. This procedure requires the clear and definite establishment of the diagnosis
"ventricular flutter or pulse missing".
Asynchronous supply of energy to the cardiac rhythm by the defibrillator can cause damages
to the heart. If the energy is supplied to the heart muscle during the ventricular refractory
period (approx. first half of the T-wave) the heart is susceptible to ventricular fibrillation.
2. Synchronized cardioversion:
For the application of this procedure it is essential that the patient has got a discernible heart
rhythm. A clear QRS complex in the ECG is required for the synchronous shock release.
Controlled by the synchronous mechanism of the ECG unit, the shock is released a few
milliseconds (about 10-30 ms) after detection of the R-peak.
The ECG unit marks the detected QRS complex with a "SYNC" marker serving as aid for the
doctor in charge.
The best "care" of the doctor releasing the shock is indispensable during this procedure. He
has to watch the ECG signal on the monitor continuously and ensure that every QRS complex
is detected and no artefacts or pacemaker pulses are synchronized.
synchronized cardioversion
unsynchronized cardioversion (defibrillation)
19499 / 05.03 101
Page 44

Instructions for use PRIMEDIC
™
Defi-Monitor ECO 1 / DM 1 / DM 3
Procedure for defibrillation (unsynchronized cardioversion):
The steps for defibrillation described in the following apply for the handling of the defibrillator only. The
area of the mechanical, cardiopulomary or pharmacological resuscitation is not described.
The procedure of the unsynchronized cardioversion must only be applied in case of ventricular
fibrillation, i. e. P- and T-waves as well as QRS-copmlexe missing in the ECG of the patient.
1. Switch on defibrillator and ECG unit.
With the PRIMEDIC
2. Make sure that the defibrillator is not in synchronous mode.
With the PRIMEDIC
Even after release of a shock in synchronous mode it switches back to asynchronous mode.
3. Apply electrode gel to paddle electrodes.
Apply sufficient electrode gel on the paddle electrodes to limit the contact resistance so that the
energy can be released completely to the patient. Insufficient contact gel may cause that the
skin under the electrodes gets burnt.
Do not spread the electrode gel on the handles of the paddles, otherwise energy may flash over
to the doctor in charge of the defibrillation.
4. Select energy.
The energy to be released depends on the patient's body height and weight. The following rule
of thumb applies: 2 joule per kg body weight. The most suitable energy is based on experience
and depends on the emergency situation.
5. Positioning of the paddles.
Stick the paddles firmly to the bare chest of the patient by applying a pressure of approx. 100 N
to ensure perfect energy transfer. Applying not enough pressure may cause that the skin under
the electrodes gets burnt. Applying correct pressure should be trained on devices provided for
that purpose.
The position of the paddles decides on the success of the resuscitation. The flow of current
between the paddles through the chest has to flow through a large part of the tissue of the
heart muscle. The chance to eliminate the ventricular fibrillation only exists when the "critical
mass" of about 80 % of the heart is perfused sufficiently.
In case of incorrect paddle position most of the current misses the heart and is thus ineffective.
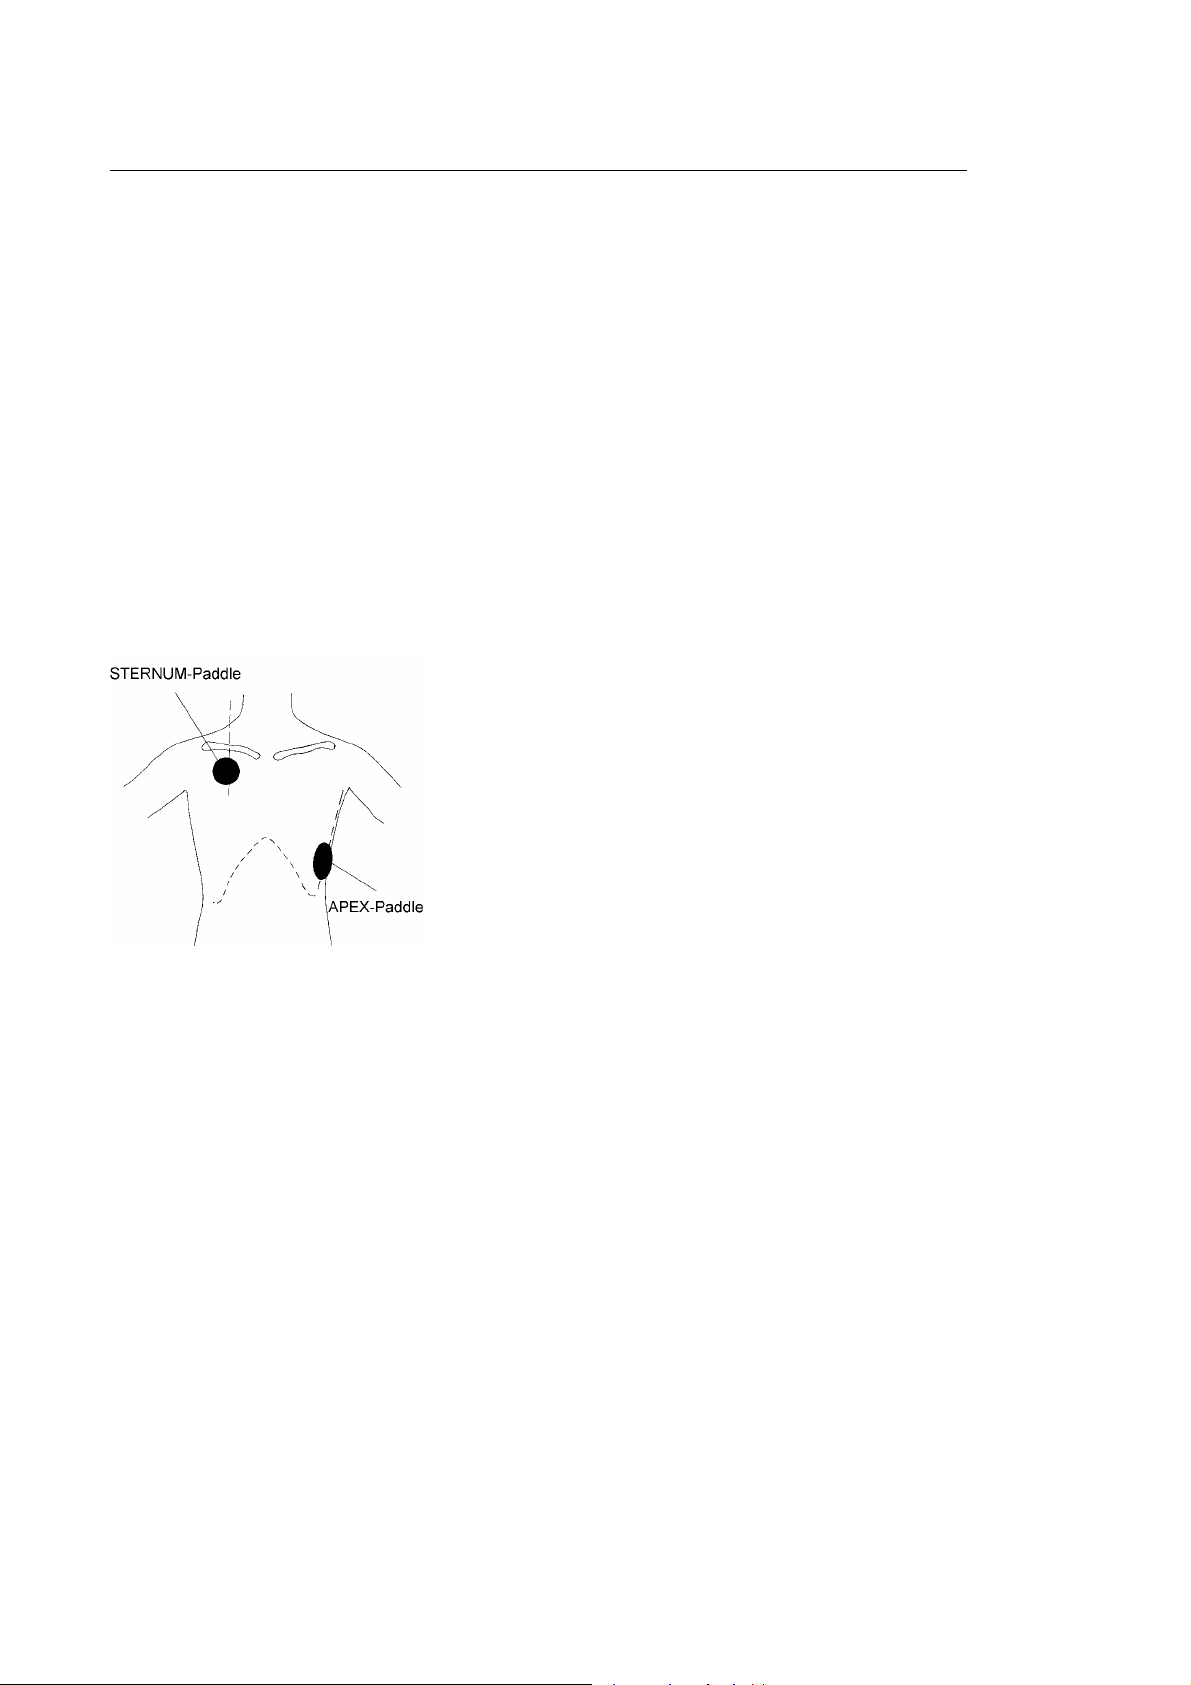
Position of the sternum paddle: - right chest area
- right close to sternum
- below the clavicle
Position of the apex paddle: - left, lower chest area
- above apex of the heart
- midaxillary line
Make sure that no electrode gel has been spread between the paddles on the patient's chest.
Otherwise the current flows on the surface between the paddles. Do not spread the electrode
gel on the handles of the paddles, otherwise energy may flash over to the doctor in charge.
™
Defi-Monitor the ECG unit is also switched on automatically.
™
Defi-Monitor the defibrillator always starts in asynchronous mode.
102 19499 / 05.03
Page 45

Instructions for use PRIMEDIC
™
Defi-Monitor ECO 1 / DM 1 / DM 3
6. Energy charging.
After charging the energy remains available for a limited time, i. e. 15 seconds with the
PRIMEDIC
of seconds. If no shock is released during this time the energy is discharged internally for safety
reasons and has to be recharged afterwards.
7. Protection against electric shock.
Before defibrillating the doctor releasing the shock has to ask all persons attending to the
resuscitation clearly and unmistakably to step back from the treatment location and to touch
neither the patient nor the bed nor the connected devices. Remove any devices without
defibrillation protection from the patient before releasing the shock. Otherwise energy may flash
over to persons in unfavourable situations.
8. Discharge energy (shock).
Discharge the defibrillator by pressing both release buttons on the paddles simultaneously.
9. Check the result.
Check the condition of the patient and the ECG monitor after defibrillation. Depending on the
result of the defibrillation further defibrillations in quick succession might be necessary (repeat
steps 4 - 9).
The emergency physician may ask for accompanying manual or pharmacological measures.
10. Keep the defibrillator ready for use.
Clean the paddles, cable and electrodes at the end of the resuscitation to ensure availability of
the defibrillator for the next application. Insert the defibrillator into the charging unit to charge
the accumulator in order to ensure that sufficient energy is available for the next use.
Functional disorders or faults have to be checked or if required rectified immediately by an
authorized service technician.
™
Defi-Monitor. This time is also shown on the monitor and counted down in steps
Procedure for synchronized cardioversion
The steps described in the following apply for the handling of the defibrillator only. Alternative or
supporting treatments are not described.
The synchronized cardioversion must only be applied if a clear QRS complex is available. The
synchronized cardioversion can be applied for treatments of cardiac irregularity such as atrial fibrillation
/ atrial flutter, ventricular tachycardia with pulse or supraventricular tachycardia.
1. Prepare the patient for synchronous cardioversion.
For most cardioversions sufficient time is available (selective treatment) which allows to prepare
the patient for the treatment:
a) ask the patient for written consent (and inform the patient),
b) no food intake (6-10 hours before beginning with the treatment),
c) light sedation of the patient (preparing for anesthesia),
d) sedation of the patient, perhaps intubation (controlled by an anesthetist)
Exception: The emergency cardioversion (e. g. supraventricular tachycardia) requires only the
sedation of the patient.
19499 / 05.03 103
Page 46

Instructions for use PRIMEDIC
™
Defi-Monitor ECO 1 / DM 1 / DM 3
2. Switch on defibrillator and ECG unit.
With the PRIMEDIC
3. Connect the ECG electrode cable, carry out the ECG.
Connect the external ECG electrode cable to the ECG defibrillator / unit and position the
patient's electrodes safely at the respective lead positions. Select the corresponding standard
leads at the monitor. Check whether "usable" signals from all standard leads are shown on the
monitor in order to verify the correct contact of all electrodes.
The most suitable lead for synchronized cardioversion is in most cases the standard lead II. Any
other lead showing a clear R-peak can be used as well.
A clear R-peak is important for a reliable synchronization. Watch the monitor and "optimize" the
ECG graph if required by changing the signal amplification. A weak ECG signal can generate a
good synchronous signal by amplifying it (e. g. 2 cm/mV). An overloaded ECG signal can reduce
the reliability, i. e. weaken the signal if required (o.5 cm/mV.
Use another lead if required or change the position of the patient's ECG electrodes slightly.
Never select the paddle lead since slight movements (artefacts) can misroute the synchronous
signal.
4. Switch the defibrillator to synchronous mode.
During synchronized cardioversion the defibrillator must work in synchronous mode.
Asynchronous operation may be life-threatening for the patient.
Verify several times that synchronous mode is activated by watching the monitor (plain text
display: "SYNC" and SYNC markings on the ECG) as well as the lighting up of the LED located
above the SYNC key (with PRIMEDIC
back to asynchronous mode after every synchronized cardioversion, i. e. that it definitely
switches on the SYNC mode before any further synchronous cardioversion.
5. Check ECG signals.
Every R-peak must supply a synchronous signal in order to obtain a reliable synchronized
cardioversion. Artefacts and pacemaker pulses must not show synchronous markings. Check the
ECG signal permanently and make sure that every R-peak shows a SYNC marker.
If not, change the amplification as described under item 3, select another lead or change the
position of the ECG electrodes.
In case of intensive tachycardia it is possible that only every second R-peak shows a SYNC
marker. That is no reason to be alarmed since not every R-peak must be marked but every SYNC
marker must be related to a R-peak. .
6. Apply electrode gel to paddle electrodes.
Apply sufficient electrode gel on the paddle electrodes to limit the contact resistance so that the
energy can be released completely to the patient. Insufficient contact gel may cause that the
skin under the electrodes gets burnt.
Do not spread the electrode gel on the handles of the paddles, otherwise energy may flash over
to the doctor in charge of the defibrillation.
™
Defi-Monitor the ECG unit is also switched on automatically.
™
Defi-Monitor). Consider that the defibrillator switches
104 19499 / 05.03
Page 47

Instructions for use PRIMEDIC
™
Defi-Monitor ECO 1 / DM 1 / DM 3
7. Select energy.
The energies required for synchronized cardioversion are in most cases lower than for
defibrillation (unsynchronized cardioversion) as it is not necessary to depolarize all heart
muscles.
The energy depends roughly on the patient's body height and weight. The indications, however,
determine the energy, i. e. the following empirical values are applicable:
Ventricular tachycardia with unstable pulse: 50 joule, further cardioversions to be increased by
approx. 50 joule each (100 j, 160 j, 200 j, ...)
Supraventricular tachycardia: 50-100 joule
Atrial flutter: 20-50 joule
Atrial fibrillation: 100 joule
If ventricular fibrillation arises from the treatment immediate defibrillation in asynchronous mode
at adjusted and higher energy is necessary.
8. Positioning of the paddles.
Stick the paddles firmly to the bare chest of the patient by applying a pressure of approx. 100 N
to ensure perfect energy transfer. Applying not enough pressure may cause that the skin under
the electrodes gets burnt.
The position of the paddles decides on the success of the resuscitation. The flow of current
between the paddles through the chest has to flow through a large part of the tissue of the
heart muscle. The change to eliminate the ventricular fibrillation only exists when the "critical
mass" of about 80 % of the heart is perfused sufficiently.
In case of incorrect paddle position most of the current misses the heart and is thus ineffective.
Position of the sternum paddle: - right chest area
- right close to sternum
- below the clavicle
Position of the apex paddle: - left, lower chest area
- above apex of the heart
- midaxillary line
Make sure that no electrode gel has been spread between the paddles on the patient's chest.
Otherwise the current flows on the surface between the paddles. Do not spread the electrode
gel on the handles of the paddles, otherwise energy may flash over to the doctor in charge.
9. Energy charging
After charging the energy remains available for a certain time, i. e. 15 seconds with the
PRIMEDIC
of seconds. If no shock is released during this time the energy is discharged internally for safety
reasons and has to be recharged afterwards.
10. Check ECG signal. See item 5.
™
Defi-Monitor. This time is also shown on the monitor and counted down in steps
19499 / 05.03 105
Page 48

Instructions for use PRIMEDIC
™
Defi-Monitor ECO 1 / DM 1 / DM 3
11. Protection against electric shock.
Before defibrillating the doctor releasing the shock has to ask all persons attending to the
resuscitation clearly and unmistakably to step back from the treatment location and to touch
neither the patient nor the bed nor the connected devices. Remove any devices without
defibrillation protection from the patient before releasing the shock. Otherwise energy may flash
over to persons in unfavourable situations.
12. Discharge energy (shock).
Prepare the defibrillator for the shock by pressing the release buttons on the paddles
simultaneously. Keep the buttons pressed down. The shock is released by the ECG as soon as
the next R-peak is recognized. In case of quick pulse the shock may follow shortly after pressing
the release buttons simultaneously. A slow pulse may cause an evident delay in time. In this
case do not reduce the pressure of the paddles on the patient's chest. Keep the release buttons
pressed down and check the ECG. If no shock follows after several seconds, release the release
buttons before taking the paddles off the chest.
With the PRIMEDIC
the release buttons pressed down for more than three seconds and no shock is released during
this time (no R-peak available / detected). After the internal safety discharge the PRIMEDIC
Defi-Monitor is available for the next defibrillation in asynchronous mode.
13. Check the result.
Check the patient's heart rhythm, breathing and condition after the synchronous cardioversion.
Check the ECG and decide whether a further trial is necessary. If yes, repeat steps 4 to 13.
Please consider that nearly all defibrillators on the market (PRIMEDIC
included) switch back to asynchronous mode automatically after a synchronous shock has been
released.
Control the heart rhythm over a certain time after successful cardioversion.
14. Keep the defibrillator ready for use.
Clean the paddles, cable and electrodes at the end of the resuscitation to ensure availability of
the defibrillator for the next application. Insert the defibrillator into the charging unit to charge
the accumulator in order to ensure that sufficient energy is available for the next use.
In case of malfunctions or faults have the defibrillator checked immediately and if necessary
repaired by an authorized service technician.
™
Defi-Monitor an internal safety discharge is carried out when keeping
™
Defi-Monitor
™
106 19499 / 05.03
Page 49

Instructions for use PRIMEDIC
™
Defi-Monitor ECO 1 / DM 1 / DM 3
A3 General instructions for the use of pulsoximeters
What is pulsoximetry?
A pulsoximeter determines the SpO
method is based on the penetration of light of different wavelengths through tissues and vessel.
The components of blood important for the SpO
deoxygenated (without oxygen) haemoglobin, i.e. exactly the components necessary for oxygen supply
of the organism.
The tissues and vessels are “penetrated by light“ with the help of transmitter-receiver elements.
Depending upon the oxygen saturation of the blood the quantity of light arriving on the receiver side of
the transmitter changes. Thanks to the application of precise modules and calibrated sensores, highly
exact SpO
measures are possible.
2
Usual measure points for the sensors are
• finger tips
• tows
• earlobes
• heel
Why are there different sensors?
As described in, among others, chapter 6.2 (selection of the correct SpO
have to be used for different patients to guarantee reliable and exact measures.
The following factors have to be taken into account:
• weight of the patient
• activity of the patient
• duration of the measure
• blood circulation in the limbs
• possible measuring point
• physical condition of the patient
• sterile measure necessary?
Evidently no single sensor can meet all the, to some extent contradictory, requirements. The different
SpO
sensors are designed for specific purposes.
2
As an example may serve the sensor DS-100 A or the D-YS respectively from NELLCOR
allows rapid handling and it is simple to be slipped on fingers of different thickness thanks to its
sophisticated mechanism. But it is not suitable for children because of its geometry. Using this sensor
for patients who move a lot is also not possible, as, due to the design of the casing the sensor might
slip off the patients finger. As the D-SY has no casing this sensor D-SY may be applied for higher
weight classes, moreover it might be positioned with more flexibility and can fixed with an adherent
strip, which reduces the rapid positioning of this sensor.
value (oxygen saturation) by optical measuring methods. This
2
measuring, are oxygenated (oxygen-enriched) or
2
sensor) different sensors
2
®
. DS-100 A
19499 / 05.03 107
Page 50

Instructions for use PRIMEDIC
™
Defi-Monitor ECO 1 / DM 1 / DM 3
Which factors influence the SpO2 measure?
As the measuring of the oxygen saturation is an optical method, the following influencing factors might
affect the results:
• direct sun light
• strong artificial light (e.g. operating room lighting)
• infrared lamps
• ultraviolet lamps (bilirubin lamps)
The influence of the above mentioned factors can be reduced positioning the sensor correctly and
using covers of the sensors.
More influencing factors are:
• dirty measuring point
• incorrect cleaning of the sensor
• opaqueness or colour distortion at the measuring point e.g. by nail-varnish
• highly active patient
• injected contrast media, (e.g. indiocyanide green or methylene blue)
• high proportions of dysfunctional haemoglobin (carboxy haemoglobin)
• wrong point of positioning (e.g. point with venous pulse)
• use of the pulsoximeter close to strong source of energy like e.g. nuclear spin tomograph
• sensor applied too rigidly
• arterial occlusion close to the sensor
• blood congestion e.g. by artery catheter or by sphygmomanometer
Some of these factors are easy to recognize (e.g. nail-varnish) and are removable; a repeatable result
can be obtained at a different measuring point.
Other factors (e.g. contrast media or blood serum disorder) are not as easy to be determined.
The SpO
multitude of influencing factors. More parameters must always be monitored (e.g. ECG, blood pressure,
respiration ...).
The SpO
used correctly, the specific warnings and hints on the use of the sensor are observed and the clinical
symptoms are taken into consideration.
measure should not be the only method applied to monitor the vital functions due to this
2
measure can be an important instrument for the diagnosis of patients, when the sensor is
2
108 19499 / 05.03
Page 51

Instructions for use PRIMEDIC
™
Defi-Monitor ECO 1 / DM 1 / DM 3
A4 Voltage - time graphs
Please find in the following the graph shapes of the defibrillation pulses depending on the terminal
resistance.
1. Graph shape with 25 Ω
U = 2.280 V 2 ms / div.
2. Graph shape with 50 Ω
U = 2.940 V 2 ms / div.
19499 / 05.03 109
Page 52

Instructions for use PRIMEDIC
3. Graph shape with 100 Ω
™
Defi-Monitor ECO 1 / DM 1 / DM 3
U = 3.180 V 2 ms / div.
4. Graph shape with 125 Ω
U = 2.800 V 2 ms / div.
110 19499 / 05.03
Page 53

Instructions for use PRIMEDIC
™
Defi-Monitor ECO 1 / DM 1 / DM 3
A5 Description of monitor screen and printouts
Reference:
operating mode: synchronous
lead: aVL
selected energy: 360 joule
heartrate: 92 / min
upper alarm limit: 150 / min
lower alarm limit: 30 / min
upper SpO
lower SpO
signal amplification: 2 cm/mV
accumulator capacity: 80 - 100 %
alarm 100 %
2
alarm 80 %
2
19499 / 05.03 111
Page 54

Instructions for use PRIMEDIC
™
Defi-Monitor ECO 1 / DM 1 / DM 3
Printout of the ECG in synchronous mode with synchronous markers, 1-channel, 25 mm/s printing
speed
Printout of the ECG in asynchronous mode, 3-channel, 50 mm/s printing speed
Printout of the ECG, 1-channel, 25 mm/s printing speed, with SpO
2
112 19499 / 05.03
Page 55

Instructions for use PRIMEDIC
™
Defi-Monitor ECO 1 / DM 1 / DM 3
Monitor screen during set-up with example settings
1. Page
Filter 50 Hz
Date (dd.mm.yy) 05 . 03 . 97
Time 13 : 20
Language English
Autoprint ON
Print 3-Channel
Print 25 mm/s
Memo Print activate
-> Alarms
End Setup
2. Page
ALARM
Alarm 1 30 150
Alarm 2 40 160
Alarm 3 50 180
SpO2 Alarm 1 85 100
ALARM
SpO2 Alarm 2 80 100
SpO2 Alarm 3 70 90
End Setup
19499 / 05.03 113
Page 56

Instructions for use PRIMEDIC
™
Defi-Monitor ECO 1 / DM 1 / DM 3
A6 Safety control
According to Medizinprodukte Betreiberverordnung (MPBetreibV) § 6 (safety controls) and § 11
(measurement controls) users of defibrillators are obliged to have the devices controlled. According to
MPBetreibV § 6 METRAX has prescribed controls in 12 months cycles.
The safety controls must be carried out only by persons qualified by their training, their knowledge and
experience gained in practice to execute controls professionally and not receiving any instructions for
the controls.
If the safety control reveals any defect that represents a hazard for patients, employees or third parties,
the responsible authority has to be informed immediately by the user according to MPBetreibV § 3.
In accordance with MPBetreibV § 7 the following data has to be entered in the medical devices
protocol accompanying the device:
• Time when the work was carried out
• Name of the person or company who/which carried out the work and
• the work carried out.
METRAX can be held responsible for the contents of the operating manual only. This especially applies
to new settings, commissioning and modifications to the device.
In the rotational control the following work and checks have to be undertaken by a service technician:
1. Check whether the device shows external damages
• Casing deformed?
• Paddle cable, ECG patient cable, SpO
• ECG input socket, SpO
input socket (*) damaged?
2
• Paddle damaged?
• Paddle for adults available and attached?
• Rating plate on the back of the device legible?
patient cable (*) damaged?
2
2. Check whether operating elements are damaged
• Membrane keyboard legible?
• Membrane keyboard damaged?
3. Check the indicating elements
• all LEDs are active for approx. 2 second after switching on the defibrillator?
• the LED allocated to the selected energy step lights up (check all energy steps once)
• LED (33) lights up after pressing "SYNC" (34)?
• the warning buzzer goes on for approx. 2 second after switching on the defibrillator?
4. Measure the charging time.
• Charging time for 360 joule when the accumulator is full less than 7 seconds?
Procedure for the test:
1. Press key for 360 joule.
2. Press paddle release (10) or (12).
3. Start stop watch simultaneously.
4. Energy charging finished when the green OK LED (41) lights up.
114 19499 / 05.03
Page 57

Instructions for use PRIMEDIC
™
Defi-Monitor ECO 1 / DM 1 / DM 3
5. Measure the output power.
the checking of the defibrillation energy with 50 Ω the following tolerances are allowed:
• at 20 joule ± 4 joule
• at 50 to 360 joule ± 15 %
All energy steps from 10 to 360 joule are measured.
6. Functioning of the ECG monitor.
• Is the selected energy displayed on the monitor?
Press one or several joule keys (32).
• Is the synchronous operation displayed on the monitor? Press SYNC (34).
• Is the SpO
socket (16).
Feed an ECG signal with known frequency coming from the ECG simulator via the patient cable.
• Systole beep can be switched on and off (key 24)?
• Heartrate indicated with a tolerance of ± 10 %?
• All leads can be selected and are displayed (key 22)?
• ECG signal can be represented with 0.5 cm/mV or 2 cm/mV (key 23)?
• After pressing SYNC (34) synchronous markers related to the R-peaks appear?
Activate one of the three heartrate alarms (key 28) and switch off the ECG simulator.
• Heartrate alarm goes on?
• After acknowledgement of the alarm (pressing of ALARM (28)) heartrate alarm goes on once
more for about 60 seconds?
value displayed? (*) Insert the NELLCORETM sensor and the SpO2 patient cable into
2
7. Functioning of the pulsoximeter (*)
Insert NELLXOR sensor DS-100 A and SpO
function put index finger into the sensor or connect a SpO
• Is a SpO
value displayed?
2
patient cable into the socket (16). To control the
2
test advice to the SpO2 patient cable.
2
• Is the pulse curve displayed?
• Is an error message displayed when the SpO
patient cable is pulled off?
2
8. Functioning of the printer.
Feed an ECG signal coming from the ECG simulator via the patient cable.
• On-line printing follows after pressing PRINTER ON / OFF (39).
• Choose a different printing speed in the set-up menu (except DM 1), check if the printing
speed is identical with the preset speed?
9. Functioning of the accumulator / charging unit.
Charging LED (57) flashes for at least 1minute after inserting the defibrillator into the charging
unit.
10. Measuring of the patient's lead current according to IEC 601-1.
1. Paddle lead selected (key 21) and measurements for type BF performed
2. Standard lead selected (key 22) and measurements for type CF performed
(*) = only if the corresponding option is installed in the device. Pulsoximeter is integrated in model
DM 3.
19499 / 05.03 115
 Loading...