

Page 1
Important Information about Lenovo® Optical Wireless Mouse
http://www.lenovo.com/safety
Note:
Note: Before installing the product, be sure to read the warranty information in Appendix B “Lenovo Limited
Note: Note:
Warranty”
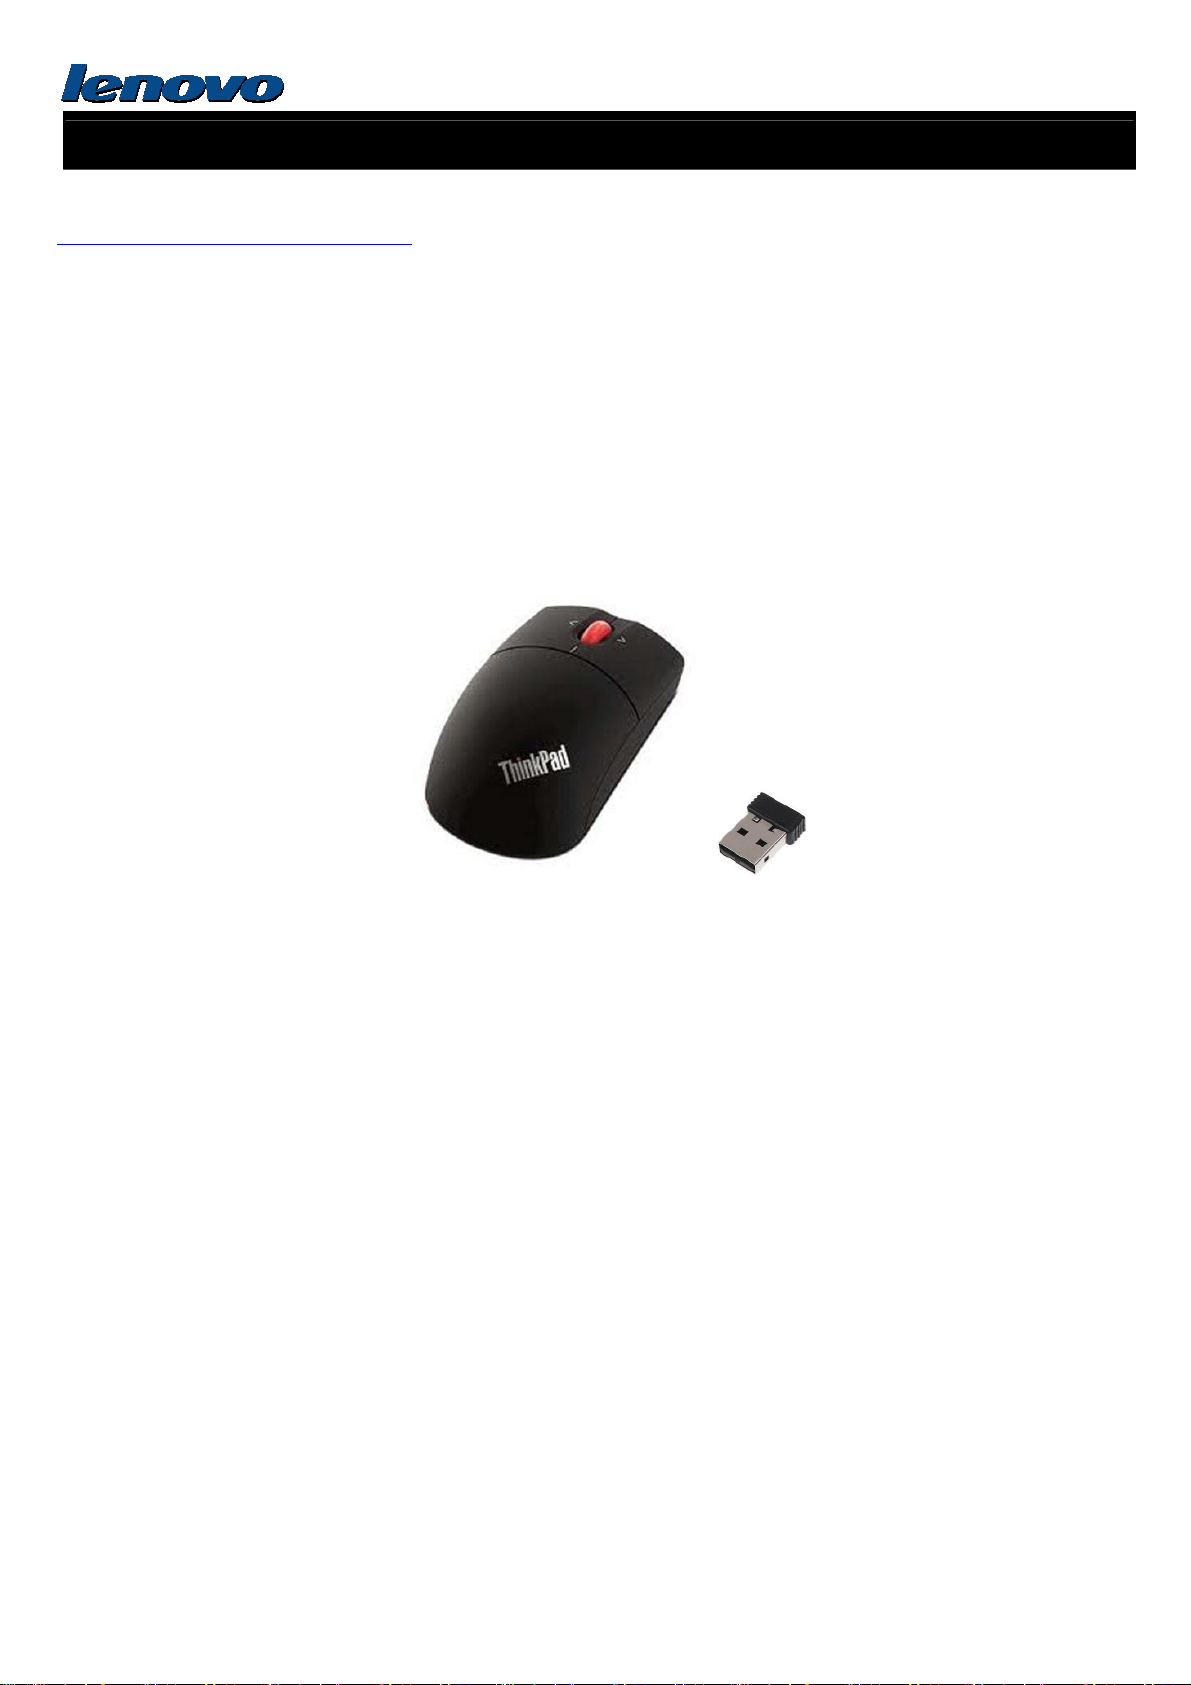
Lenovo Precision Wireless Mouse
无线蓝光鼠标
Mouse Model 鼠标型号: MORFFGOO
Dongle Model 接收器型号: MORFFHL-D
Eighth Edition (November 2011)
Eighth Edition (November 2011)
Eighth Edition (November 2011)Eighth Edition (November 2011)
© Copyright Lenovo 2005, 2011.
Copyright Lenovo 2005, 2011.
Copyright Lenovo 2005, 2011.Copyright Lenovo 2005, 2011.
LIMITED AND RESTRICTED RIGHTS NOTICE: If data or software is delivered pursuant a General Services Administration
Page 2

Important Information about Lenovo® Optical Wireless Mouse
“GSA” contract, use, reproduction, or disclosure is subject to restrictions set forth in Contract No. GS-35F-05925.
Page 3

Important Information about Lenovo® Optical Wireless Mouse
Product description
Product description
Product descriptionProduct description
The Lenovo Wireless Optical Mouse enable you to control vertical and horizontal scrolling using the tilt wheel. For the other
two mice, you can use the scrolling wheel to control vertical scrolling.
Note:
Note: You need to install the Lenovo Mouse Suite software before using the horizontal scrolling function.
Note: Note:
Each mouse can be connected to any enabled Universal Serial Bus (USB) connector on your computer.
Each mouse is supported on the following operating systems:
• Microsoft® Windows® XP (32-bit)
• Microsoft Windows Vista® (32-bit or 64-bit)
• Microsoft Windows 7 (32-bit or 64-bit)
Each option package includes a mouse and the following:
• Software and User Guide CD
• Laser Safety Manual
• Warranty poster
Installing the software
Installing the software
Installing the softwareInstalling the software
The Software and User Guide CD contains the Lenovo Mouse Suite software for the mouse. It is recommended that you
install the Lenovo Mouse Suite software to customize advanced settings before you use the mouse.
Note:
Note: It is recommended that you uninstall any previously installed mouse software before installing the Lenovo Mouse
Note: Note:
Suite software.
To install the Lenovo Mouse Suite software, do the following:
1. Save any open documents and exit all applications.
2. Insert the Software and User Guide CD and do one of the following:
• If the CD starts automatically, go to step 3.
• If the AutoPlay window opens, click Run start.bat
• If the CD does not start automatically, go into My Computer
Run start.bat. Then, go to step 3.
Run start.batRun start.bat
My Computer or Computer
My Computer My Computer
Computer, browse the CD/DVD drive, and double-click
ComputerComputer
Start.bat
Start.bat.
Start.batStart.bat
3. Follow the instructions on the screen.
Note:
Note: In the Hardware Interface Selection window, select USB (Universal Serial Bus) Interface
Note: Note:
4. When prompted, restart your computer.
Installing the mouse
Installing the mouse
Installing the mouseInstalling the mouse
This topic contains information about installing the mouse.
USB (Universal Serial Bus) Interface.
USB (Universal Serial Bus) InterfaceUSB (Universal Serial Bus) Interface
Page 4

Important Information about Lenovo® Optical Wireless Mouse
To install the mouse, connect the mouse to an available USB connector on your computer. The New Hardware Found
window opens, and the Windows operating system will automatically install the proper device driver for the mouse. Then,
the mouse is ready for use.
Using the software
Using the software
Using the softwareUsing the software
Each mouse has multiple functions and features such as zooming and auto-scrolling, which help you increase your
productivity. You also can assign frequently used functions or shortcuts to the mouse buttons using the Lenovo Mouse
Suite software.
To use the Lenovo Mouse Suite software, do the following:
1. Click Start
2. The main window opens with several tabs. Click each tab to view related settings. On each tab there are four buttons:
• OK
• Cancel
• Apply
Start ➙ All Programs
Start Start
OK: Save your settings and close the window.
OKOK
Cancel: Exit the window without saving.
CancelCancel
Apply: Have your changes take effect without closing the window.
ApplyApply
All Programs ➙ Lenovo Mouse Suite
All Programs All Programs
Lenovo Mouse Suite ➙ Mouse Suite
Lenovo Mouse Suite Lenovo Mouse Suite
Mouse Suite.
Mouse SuiteMouse Suite
• Help
Help: View the help information system.
HelpHelp
Note:
Note: The Lenovo USB Laser Mouse supports the mouse resolution from 400 dots per inch (DPI) to 2000 DPI. By default,
Note: Note:
the mouse resolution setting is 1600 DPI. The ThinkPad USB Laser Mouse supports the mouse resolution from 400 DPI to
1600 DPI. By default, the mouse resolution setting is 1200 DPI. To change the resolution setting, do the following:
1. Click Start
2. In the Mouse Properties window, click the Lenovo
3. In the Resolution Adjustment Setup
4. To confirm your setting, click Apply
Troubleshooting
Troubleshooting
TroubleshootingTroubleshooting
This topic contains troubleshooting information for the mice. If you encounter any of the following problems when using the
mice, refer to the corresponding answers.
Problem:
Problem: The mouse is not recognized by the operating system.
Problem: Problem:
Solution:
Solution: To solve the problem, perform one of the following procedures:
Solution: Solution:
Start ➙ All Programs
Start Start
Resolution Adjustment Setup area, select the corresponding radio button to set the preferred mouse resolution.
Resolution Adjustment Setup Resolution Adjustment Setup
All Programs ➙ Lenovo Mouse Suite
All Programs All Programs
Lenovo Mouse Suite ➙ Mouse Suite
Lenovo Mouse Suite Lenovo Mouse Suite
Lenovo tab. Then, click Advanced Properties
Lenovo Lenovo
Apply. For more information about the setting, click Help
ApplyApply
Mouse Suite.
Mouse SuiteMouse Suite
Advanced Properties.
Advanced PropertiesAdvanced Properties
Help.
HelpHelp
Procedure A:
Procedure A:
Procedure A:Procedure A:
Check the following:
• Install the mouse again.
• Access your computer Basic Input/Output System (BIOS) Setup Utility program during the startup process and make
sure that all the USB connectors on your computer are enabled.
Notes:
Notes:
Notes:Notes:
– For information about how to access or use the BIOS Setup Utility program on your computer, see the documentation
that came with your computer.
Page 5

Important Information about Lenovo® Optical Wireless Mouse
– If all USB connectors on your computer do not work, probably the computer BIOS does not support them. To solve this
problem, go to http://www.lenovo.com/support to download the latest BIOS updates, or go to
http://www.lenovo.com/support/phone to find the Lenovo technical support for your country or region.
Procedure B:
Procedure B:
Procedure B:Procedure B:
1. Click Start
2. Depending on your Control Panel mode, double-click System
3. Click the Hardware
4. Click Device Manager
5. Scroll down until you find Mice and other pointing devices
6. Right-click HID
going to remove a device from the operating system.
7. Click OK
8. Right-click Mice and other pointing devices
Note:
Note: You might be asked to insert the Windows installation CD.
Note: Note:
Start ➙ Control Panel
Start Start
Device Manager.
Device ManagerDevice Manager
OK.
OKOK
Control Panel.
Control PanelControl Panel
System or click Performance and Maintenance
System System
Hardware tab.
Hardware Hardware
Mice and other pointing devices. Then, expand the Mice and other
Mice and other pointing devicesMice and other pointing devices
HID----compliant mouse
compliant mouse, and then select Uninstall
HIDHID
compliant mousecompliant mouse
Mice and other pointing devices, and then select Scan for hardware changes
Mice and other pointing devicesMice and other pointing devices
Uninstall. A warning will be displayed, prompting you that you are
UninstallUninstall
Scan for hardware changes to re-detect the hardware.
Scan for hardware changes Scan for hardware changes
Performance and Maintenance ➙ System
Performance and MaintenancePerformance and Maintenance
Mice and other pointing devices
Mice and otherMice and other
pointing devices category.
pointing devices pointing devices
System.
SystemSystem
Problem:
Problem: The mouse pointer cannot move.
Problem: Problem:
Solution:
Solution: To solve the problem, do the following:
Solution: Solution:
• Ensure that you have followed all installation procedures.
• Reinstall the Lenovo Mouse Suite software.
• Clean the mouse lens with a soft cotton swab. Do not use any other liquid or solvent to clean the mouse lens as this
might cause damage to the lens.
• Put a mouse pad under the mouse. If the mouse is moving on a highly reflective surface, especially a glass or mirror
surface, the mouse might not be able to work.
Problem:
Problem: The horizontal scrolling speed cannot be changed on the Wheel
Problem: Problem:
Solution:
Solution: To solve the problem, customize the horizontal scrolling speed setting by doing the following:
Solution: Solution:
1. Click Start
2. In the Mouse Properties window, click the Lenovo
3. In the Advanced Properties window, click the Wheel
4. In the Horizontal Scrolling
Caring for the mouse
Caring for the mouse
Caring for the mouseCaring for the mouse
Start ➙ All Programs
Start Start
Horizontal Scrolling area, move the slider right to increase or left to decrease the horizontal scrolling speed.
Horizontal Scrolling Horizontal Scrolling
All Programs ➙ Lenovo Mouse Suite
All Programs All Programs
Lenovo Mouse Suite ➙ Mouse Suite
Lenovo Mouse Suite Lenovo Mouse Suite
Lenovo tab. Then, click Advanced Properties
Lenovo Lenovo
Wheel tab.
Wheel Wheel
Mouse Suite.
Mouse SuiteMouse Suite
Wheel tab in the Mouse Properties window.
Wheel Wheel
Advanced Properties.
Advanced PropertiesAdvanced Properties
Always disconnect the mouse before cleaning. Keep beverages away from the mouse working area and
avoid any spills. The maintenance of your mouse will ensure longer life and minimize the chances of causing
damage to your mouse and computer. There are no user serviceable parts.
Product description
Product description
Product descriptionProduct description
The ThinkPad Wireless Optical Mouse has a tilt wheel to control vertical and horizontal scrolling. It uses the Wireless
Page 6

Important Information about Lenovo® Optical Wireless Mouse
technology to connect to the operating system.
The following figure shows the front view and rear view of the ThinkPad Wireless Optical Mouse
Figure 1. Front view and rear view of the mouse
1. Right button
6. Battery compartment release button
2. Left button
3. Scrolling wheel
4. LED indicator
5. Battery compartment cover
The mouse is supported on the following operating systems:
• Microsoft Windows XP (32-bit)
• Microsoft Windows Vista (32-bit or 64-bit)
• Microsoft Windows 7 (32-bit or 64-bit)
Your option package includes the following:
• ThinkPad Bluetooth Laser Mouse
• Two AA batteries
• Software and User Guide CD
• Laser Safety Manual
• Warranty poster
7. Wireless connection button
8. Power switch
9. Optical output
Installing the software
The Software and User Guide CD contains the Lenovo Mouse Suite software for the mouse. It is recommended that you
install the Lenovo Mouse Suite software to customize advanced settings before you use the mouse.
Notes:
Notes:
Notes:Notes:
• It is recommended that you uninstall any previously installed mouse software before installing the Lenovo Mouse Suite
software.
• Turn on the Bluetooth radio in your computer before installing the Lenovo Mouse Suite software.
To install the Lenovo Mouse Suite software, do the following:
Page 7

Important Information about Lenovo® Optical Wireless Mouse
1. Save any open documents and exit all applications.
2. Insert the Software and User Guide CD and do one of the following:
• If the CD starts automatically, go to step 3.
• If the AutoPlay window opens, click Run start.bat
• If the CD does not start automatically, go into My Computer
Start.bat
Start.bat.
Start.batStart.bat
3. Follow the instructions on the screen.
Note:
Note: In the Hardware Interface Selection window, select Bluetooth Interface
Note: Note:
4. When prompted, restart your computer.
Run start.bat. Then, go to step 3.
Run start.batRun start.bat
My Computer or Computer
My Computer My Computer
Bluetooth Interface.
Bluetooth InterfaceBluetooth Interface
Computer, browse the CD/DVD drive, and double-click
ComputerComputer
Installing the batteries
Installing the batteries
Installing the batteriesInstalling the batteries
The ThinkPad Bluetooth Laser Mouse needs two AA batteries to work with your computer. For better performance, it is
recommended that you install alkaline batteries in your mouse.
To install the batteries, do the following:
1. Press the battery compartment release button to open the battery compartment cover.
2. Insert the two batteries according to the polarity indicators in the mouse.
3. Push down the battery compartment cover and slide it forward until it clicks into place.
Notes:
Notes:
Notes:Notes:
• The green light-emitting diode (LED) indicates that the batteries are charged and the mouse is ready for use.
• The flashing amber LED indicates a low battery power level. You need to install new batteries.
• Push the power switch on the mouse to the off position when you are not using the mouse. This extends the battery life.
Using the mouse and the software
Using the mouse and the software
Using the mouse and the softwareUsing the mouse and the software
The ThinkPad Bluetooth Laser Mouse has multiple functions and features such as zooming and auto-scrolling, which help
you increase your productivity. You also can assign frequently used functions or shortcuts to the mouse buttons using the
Lenovo Mouse Suite software. For more information about using the Lenovo Mouse Suite software, see “Using the
software” on page .
Troubleshooting
Troubleshooting
TroubleshootingTroubleshooting
This topic provides basic troubleshooting information when you encounter problems with your mouse.
Problem:
Problem: The ThinkPad Bluetooth Laser Mouse is not recognized by your computer.
Problem: Problem:
Solution:
Solution: To solve the problem, do the following:
Solution: Solution:
• Ensure that the Bluetooth radio is turned on and the Bluetooth works.
• Ensure that the Bluetooth connection button on the mouse is switched on.
• Log in to your notebook computer BIOS interface, and set all options related to mouse to default. For details about the
Page 8

Important Information about Lenovo® Optical Wireless Mouse
BIOS settings, refer to the user guide that came with your notebook computer.
• Ensure that your notebook computer is compatible with the mouse.
Problem:
Problem: The mouse pointer cannot move.
Problem: Problem:
Solution:
Solution: To solve the problem, do the following:
Solution: Solution:
• Ensure that you have followed all installation procedures.
• Reinstall the Lenovo Mouse Suite software.
• Clean the mouse lens with a soft cotton swab. Do not use any other liquid or solvent to clean the mouse lens as this
might cause damage to the lens.
• Put a mouse pad under the mouse. If the mouse is moving on a highly reflective surface, especially a glass or mirror
surface, the mouse might not be able to work.
Problem:
Problem: The horizontal scrolling speed cannot be changed on the Wheel
Problem: Problem:
Solution:
Solution: To solve the problem, customize the horizontal scrolling speed setting by doing the following:
Solution: Solution:
1. Click Start
2. In the Mouse Properties window, click the Lenovo
3. In the Advanced Properties window, click the Wheel
Start ➙ All Programs
Start Start
All Programs ➙ Lenovo Mouse Suite
All Programs All Programs
Lenovo Mouse Suite ➙ Mouse Suite
Lenovo Mouse Suite Lenovo Mouse Suite
Lenovo tab. Then, click Advanced Properties
Lenovo Lenovo
Wheel tab.
Wheel Wheel
Mouse Suite.
Mouse SuiteMouse Suite
Wheel tab in the Mouse Properties window.
Wheel Wheel
Advanced Properties.
Advanced PropertiesAdvanced Properties
4. In the Horizontal Scrolling
Horizontal Scrolling area, move the slider right to increase or left to decrease the horizontal scrolling speed.
Horizontal Scrolling Horizontal Scrolling
Installing the mouse
Installing the mouse
Installing the mouseInstalling the mouse
This topic provides information on how to install the mouse.
To install the mouse, do the following:
1. Open the battery compartment cover.
2.
Take out the dongle.
Connect the dongle to an available USB connector on the computer.
3.
Page 9

Important Information about Lenovo® Optical Wireless Mouse
4. Insert two AA batteries into the mouse compartment according to the polarity indicators.
CAUTION:
CAUTION:
CAUTION:CAUTION:
There is a risk of explosion if a battery is replaced by an incorrect type. Dispose of used batteries
There is a risk of explosion if a battery is replaced by an incorrect type. Dispose of used batteries according to the
There is a risk of explosion if a battery is replaced by an incorrect type. Dispose of used batteriesThere is a risk of explosion if a battery is replaced by an incorrect type. Dispose of used batteries
instructions.
instructions.
instructions.instructions.
5. Push the power switch on the mouse to the on position and the LED indicator is on.
Notes:
Notes:
Notes:Notes:
• The green LED indicates that the mouse is ready for use.
• The flashing red LED indicates a low battery power level.
The linked image cannot be displayed. The file may have been mov ed, renamed, or deleted. Verify that the link poin ts to the correct file and location.
according to the
according to the according to the
• Push the power switch on the mouse to the off position when you are not using the mouse. This extends the battery life.
Troubleshooting
Troubleshooting
TroubleshootingTroubleshooting
This topic provides basic troubleshooting information when you encounter problems with your mouse.
Problem:
Problem: The mouse pointer cannot move.
Problem: Problem:
Solution:
Solution: To solve the problem, do the following:
Solution: Solution:
Page 10

Important Information about Lenovo® Optical Wireless Mouse
• Ensure that you have followed all installation procedures.
• Reinstall the Lenovo Mouse Suite software.
• Clean the mouse lens with a soft cotton swab. Do not use any other liquid or solvent to clean the mouse lens as this
might cause damage to the lens.
• Put a mouse pad under the mouse. If the mouse is moving on a highly reflective surface, especially a glass or mirror
surface, the mouse might not be able to work.
Problem:
Problem: The horizontal scrolling speed cannot be changed on the Wheel
Problem: Problem:
Solution:
Solution: To solve the problem, customize the horizontal scrolling speed setting by doing the following:
Solution: Solution:
1. Click Start
2. In the Mouse Properties window, click the Lenovo
3. In the Advanced Properties window, click the Wheel
4. In the Horizontal Scrolling
Start ➙ All Programs
Start Start
Horizontal Scrolling area, move the slider right to increase or left to decrease the horizontal scrolling speed.
Horizontal Scrolling Horizontal Scrolling
All Programs ➙ Lenovo Mouse Suite
All Programs All Programs
Lenovo Mouse Suite ➙ Mouse Suite
Lenovo Mouse Suite Lenovo Mouse Suite
Lenovo tab. Then, click Advanced Properties
Lenovo Lenovo
Wheel tab.
Wheel Wheel
Mouse Suite.
Mouse SuiteMouse Suite
Wheel tab in the Mouse Properties window.
Wheel Wheel
Advanced Properties.
Advanced PropertiesAdvanced Properties
Page 11

Important Information about Lenovo® Optical Wireless Mouse
Notice:
The following information refers to
Lenovo wireless Optical Mouse MORFGOO and dongle MORFFHL-D
Certification index
Battery Install and Dispose Instruction
USA: FCC
Canada: IC
EU: Recycle
China: SRMC
Page 12

Important Information about Lenovo® Optical Wireless Mouse
Battery Install and Dispose Instruction
Risk of explosion if battery is replaced by an incorrect type.
Dispose of used batteries according to the Instructions.
FCC Statement
United States of America Certification Number
Mouse : MORFGOO Dongle: MORFFHL-D
FCC ID: EMJMMORFGOO FCC ID: EMJDMORFFHL-D
CAUTION:
Back
FCC Statement:
This equipment has been tested and found to comply with the limits for a Class B digital device, pursuant to part 15 of the
FCC Rules. These limits are designed to provide reasonable protection against harmful interference in a residential
installation. This equipment generates, uses and can radiate radio frequency energy and, if not installed and used in
accordance with the instructions, may cause harmful interference to radio communications. However, there is no
guarantee that interference will not occur in a particular installation. If this equipment does cause harmful interference to
radio or television reception, which can be determined by turning the equipment off and on, the user is encouraged to try to
correct the interference by one or more of the following measures:
• Reorient or relocate the receiving antenna.
• Increase the separation between the equipment and receiver.
• Connect the equipment into an outlet on a circuit different from that to which the receiver is connected.
• Consult the dealer or an experienced radio/TV technician for help."
FCC Caution:
Changes or modifications not expressly approved by the part responsible for compliance could void the user's authority to
operate the equipment.
This device complies with Part 15 of the FCC Rules. Operation is subject to the following two conditions: (1) this device
may not cause harmful interference, and (2) this device must accept any interference received, including interference that
may cause undesired operation.
Responsible Party:
Lenovo (United States) Incorporated
1009 Think Place-Building One
Morrisville, NC 27560
Page 13

Important Information about Lenovo® Optical Wireless Mouse
Telephone: 1-919-294-5900
Back
Page 14

Important Information about Lenovo® Optical Wireless Mouse
IC Statement
Canada Certification Number
Canada Numéro de Certification
Mouse / souris: MORFGOO Dongle: MORFFHL-D
IC: 4251A-MMORFGOO IC: 4251A-DMORFFHLD
Dongle
Industry Canada Class B emission compliance statement
Industry Canada, Class B "This Class "B" digital apparatus complies with Canadian ICES-003.
Cet appareil numérique de la classe "B" est conforme à la norme NMB-003 du Canada."
Mouse / Dongle
This device complies with RSS-210 of the Industry Canada Rules.
Operation is subject to the following two conditions: (1) This device may not cause harmful interference, and (2) this
device must accept any interference received, including interference that may cause undesired operation.
Ce dispositif est conforme à la norme CNR-210 d'Industrie Canada applicable aux appareils radio exempts de licence.
Son fonctionnement est sujet aux deux conditions suivantes:
1) le dispositif ne doit pas produire de brouillage préjudiciable, et
2) ce dispositif doit accepter tout brouillage reçu, y compris un brouillage susceptible de provoquer un fonctionnement
indésirable
Low Power License-Exempt Radio Communication Devices (RSS-210)
Operation is subject to the following two conditions: (1) this device may not cause interference, and (2) this device must
accept any interference, including interference that may cause undesired operation of the device.
Permis d’émission à faible puissance – Cas des appareils de communications radio
L’utilisation de ce dispositif est autorisée seulement aux conditions suivantes:
(1) il ne doit pas produire de brouillage, et (2) l’utilisateur du dispositif doit être prêt à accepter tout brouillage
radioélectrique reçu, même si ce brouillage est susceptible de compromettre le fonctionnement du dispositif.
Battery Install and Dispose Instruction
Back
Page 15

Important Information about Lenovo® Optical Wireless Mouse
Risk of explosion if battery is replaced by an incorrect type.
Dispose of used batteries according to the Instructions.
Mouse 鼠标: MORFGOO Dongle 接收器: MORFFHL-D
CMIIT ID: 2013DJXXXX CMIIT ID: 2011DJ0776
CAUTION:
中国无线电发射设备核准证号
Back
Page 16

Important Information about Lenovo® Optical Wireless Mouse
Products intended for sale within the European Union are marked with the Conformité Européenne (CE) Marking, which
indicates compliance with the applicable Directives and European Norms, and amendments, identified below.
Hereby, Lenovo (Singapore) Pte. Ltd., declares that this Lenovo Wireless Mouse is in compliance with the essential
requirements and other relevant provisions of Directive 1999/5/EC.
Česky [Czech]
Lenovo (Singapore) Pte. Ltd., tímto prohlašuje, že tento Lenovo Wireless Mouse je ve shodě se základními požadavky
a dalšími příslušnými ustanoveními směrnice 1999/5/ES.
Dansk [Danish]
Undertegnede Lenovo (Singapore) Pte. Ltd. erklærer herved, at følgende udstyr Lenovo Wireless Mouse overholder de
væsentlige krav og øvrige relevante krav i direktiv 1999/5/EF.
Eesti [Estonian]
Käesolevaga kinnitab Lenovo (Singapore) Pte. Ltd. seadme Lenovo Wireless Mouse vastavust direktiivi 1999/5/EÜ
põhinõuetele ja nimetatud direktiivist tulenevatele teistele asjakohastele sätetele.
Suomi [Finnish]
Lenovo (Singapore) Pte. Ltd. vakuuttaa täten että Lenovo Wireless Mouse tyyppinen laite on direktiivin 1999/5/EY
oleellisten vaatimusten ja sitä koskevien direktiivin muiden ehtojen mukainen.
Ελληνική [Greek]
ΜΕ ΤΗΝ ΠΑΡΟΥΣΑ Lenovo (Singapore) Pte. Ltd. ∆ΗΛΩΝΕΙ ΟΤΙ Lenovo Wireless Mouse ΣΥΜΜΟΡΦΩΝΕΤΑΙ ΠΡΟΣ
ΤΙΣ ΟΥΣΙΩ∆ΕΙΣ ΑΠΑΙΤΗΣΕΙΣ ΚΑΙ ΤΙΣ ΛΟΙΠΕΣ ΣΧΕΤΙΚΕΣ ∆ΙΑΤΑΞΕΙΣ ΤΗΣ Ο∆ΗΓΙΑΣ 1999/5/ΕΚ.
Deutsch [German]
Hiermit erklärt Lenovo (Singapore) Pte. Ltd. dass sich das Gerät Lenovo Wireless Mouse in Übereinstimmung mit den
grundlegenden Anforderungen und den übrigen einschlägigen Bestimmungen der Richtlinie 1999/5/EG befindet.
Magyar [Hungarian]
Alulírott, Lenovo (Singapore) Pte. Ltd. nyilatkozom, hogy a Lenovo Wireless Mouse megfelel a vonatkozó alapvetõ
követelményeknek és az 1999/5/EC irányelv egyéb elõírásainak.
Íslenska [Icelandic]
Hér með lýsir Lenovo (Singapore) Pte. Ltd. yfir því að Lenovo Wireless Mouse er í samræmi við grunnkröfur og aðrar
kröfur, sem gerðar eru í tilskipun 1999/5/EC
Lietuvių [Lithuanian]
Šiuo Lenovo (Singapore) Pte. Ltd. deklaruoja, kad šis Lenovo Wireless Mouse atitinka esminius reikalavimus ir kitas
1999/5/EB Direktyvos nuostatas.
Latviski [Latvian]
Ar šo Lenovo (Singapore) Pte. Ltd. deklarē, ka Lenovo Wireless Mouse atbilst Direktīvas 1999/5/EK būtiskajām
prasībām un citiem ar to saistītajiem noteikumiem.
Malti [Maltese]
Hawnhekk, Lenovo (Singapore) Pte. Ltd. jiddikjara li dan Lenovo Wireless Mouse jikkon-forma mal-ħtiġijiet essenzjali u
ma provvedimenti oħrajn relevanti li hemm fid-Dirrettiva 1999/5/EC.
Nederlands [Dutch]
Hierbij verklaart Lenovo (Singapore) Pte. Ltd. dat het toestel Lenovo Wireless Mouse in overeenstemming is met de
essentiële eisen en de andere relevante bepalingen van richtlijn 1999/5/EG.
Page 17

Important Information about Lenovo® Optical Wireless Mouse
Norway [Norwegian]
Lenovo (Singapore) Pte. Ltd. erklasrer herved at utstyret Lenovo wireless Mouse er I samsvar med de grunñleggende
kravog 0vrige relevante krav i d i rakti v 1999/5/EF.
Polski [Polish]
Niniejszym Lenovo (Singapore) Pte. Ltd. oświadcza, że Lenovo wireless Mouse jest zgodne z zasadniczymi
wymaganiami oraz innymi stosownymi postanowieniami Dyrektywy 1999/5/WE
Slovensky [Slovak]
Lenovo (Singapore) Pte. Ltd. týmto vyhlasuje, že Lenovo wireless Mouse spĺňa základné požiadavky a všetky
príslušné ustanovenia Smernice 1999/5/ES.
Slovensko [Slovenian]
Lenovo (Singapore) Pte. Ltd. izjavlja, da je ta Lenovo wireless Mouse v skladu z bistvenimi zahtevami in ostalimi
relevantnimi določili direktive 1999/5/ES.
Español [Spanish]
Por medio de la presente Lenovo (Singapore) Pte. Ltd. declara que el Lenovo wireless Mouse cumple con los
requisites esenciales y cualesquiera otras disposiciones aplicables o exigibles de la Directiva 1999/5/CE.
Svenska [Swedish]
Härmed intygar Lenovo (Singapore) Pte. Ltd. att denna Lenovo wireless Mouse står I överensstämmelse med de
väsentliga egenskapskrav och övriga relevanta bestämmelser som framgår av direktiv 1999/5/EG.
Português [Portuguese]
Lenovo (Singapore) Pte. Ltd. declara que este Lenovo wireless Mouse está conforme com os requisitos essenciais e
outras disposições da Directiva 1999/5/CE.
Français [French]
Par la présente Lenovo (Singapore) Pte. Ltd. déclare que l’appareil Lenovo wireless Mouse est conforme aux
exigencies essentielles et aux autres dispositions pertinentes de la directive 1999/5/CE.
Back
Page 18

Important Information about Lenovo® Optical Wireless Mouse
Page 19

Important Information about Lenovo® Optical Wireless Mouse
Printed in China
V1.0 2013.January
 Loading...