

Page 1

Deep Fat Fryer
MODEL: PDF006
Instruction Book
Visit our web site at: www.buyprima.com
Page 2

IMPORTANT SAFEGUARDS
WARNING!
DO NOT DRAPE CORD!
SERIOUS HOT-OIL BURNS MAY RESULT FROM A DEEP FAT-FRYER BEING
PULLED OFF OF A COUNTER TOP. DO NOT ALLOW THE CORD TO HANG OVE R THE
EDGE OF THE COUNTER WHERE IT MAY BE GRABBED BY CHILDREN OR BECOME
ENTANGLED WITH THE USER.
KEEP AWAY FROM CHILDREN!
Please keep these instructions
• ALWAYS MAINTAIN SAFETY WHEN WORKING WITH ANY APPLIANCE
• Check that the mains voltage corresponds with the rating of the appliance before
operating.
• Do not touch hot surfaces – Use handles or knobs
• To protect against electric shock, do not immerse cords, plugs or appliances in water or
any other liquid.
• Do not leave any appliance unattended while it is operating.
• Close supervision is necessary when any appliance is used by or near children or infirm
persons.
• Take care when opening the lid during or after cooking as hot steam will be omitted and
could scald.
• Steam is also omitted through the vents on the lid while cooking. Take care not to scald.
• Unplug from outlet when not in use or before cleaning. Allow to cool before putting on or
removing any parts.
• Do not operate the appliance with a damaged cord or plug, or after the appliance has
been damaged in any manner. If the supply cord or appliance is damaged, it must be
replaced by the manufacturer or its service agent or a similarly qualified person in order
to avoid a hazard.
• Do not let the cord hang over the edge of a table or counter or let it come into contact
with any hot surfaces.
• To disconnect – remove the plug from the outlet. Do not pull plug out by the cord.
• Do not use this product for anything other than its intended use. This appliance is for
household use only.
• No liability can be accepted for any damage caused by non-compliance with these
instructions or any other improper use or mishandling.
• Make sure that the temperature controller is on the position of “Off” before plugging in.
• After plugging into the power socket, the indicator “On” comes on, showing the appliance
is powered.
• Do not heat without cooking oil inside.
• The surface is hot when frying. To avoid scalding, never touch the fryer before it has
cooled.
• Before first use, please check carefully that all parts of the appliance are in good
condition. If not, please contact the supplier or manufacturer. Never use this appliance if
it is not in good condition.
• When in use the surface of the Deep Fat fr yer become hot. Always place the Deep Fat
Fryer on a heat resistant surface.
Page 3

Parts Description
Using the appliance
Before first use
• Read the instructions thoroughly before use
• Remove the Deep Fat fryer from it’s packaging
• Lift up the basket handle. You will hear a click when it is raised at its highest position. Press
the Lid Release Button to open the lid and lift the basket out of the fryer body.
• Remove all printed documents and accessories and store them away carefully.
• Clean the inside of the fryer and the outside with a soft damp cloth. DO NOT place any liquid
inside of the fryer body.
• Dry thoroughly before use.
Page 4

Introducing the oil
• Place the Deep Fat Fryer on a heat resistant, flat surface. Make sure it is switched OFF at
the socket.
• Open the top lid by pressing the Lid Release Button.
• Remove the basket by lifting the basket handle upwards 45 degrees until you hear a click.
• Place approximately 1.5 litres of cooking oil into the oil pot (the level must always be
between the minimum and maximum marks on the oil container w all ).
• Never mix two different types of oil.
Cooking
• Plug in the Fryer. The light indicator “Power” comes on.
• Set the temperature adjustment knob to the desired temperature depending on what you are
going to cook, the light indicator “Temp” comes on.
• When the light indicator “Temp” goes out (after approx. 5-7 minutes) the fryer has reached
the requested temperature. Lift up the basket handle 45 degrees until you hear a click and
press the Lid Release button. This will open the lid.
• Do not add water or wet foods to cooking oil. Even small amounts of water will cause the oil
to splatter. Always make sure that the food is dried thoroughly.
• Add the chosen food to be deep fried to the basket
• Close the lid lightly until a click is heard.
• Lower the basket into the oil slowly by pressing the handle lock button downwards and
lowering the handle. Ensure that the oil level does not rise above the maximum level.
• When the food is cooked, raise the basket handle to its horizontal position (until a click is
heard). This will raise the basket out of the oil. Leave for about 20 seconds until most of oil
has drained away from the food.
• Press the Lid Release Button and the lid will open by itself.
NOTE: the steam generated during frying will escape when the lid is opened. Be careful to
avoid this steam realise.
• Turn the temperature adjustment knob to the OFF position and unplug the fryer.
• Do not move the fryer until completely cooled.
Practical advice
Oils and fats
Always use oil that can withstand high temperatures.
• Do not mix different types of oil.
• Change the oil when it becomes brown after cooking (roughly after 20 frying sessions).
• Never fill the food basket more than half full.
Preparing the food
• Whatever the recipe used, the food must be perfectly dry: this will avoid overflowing; spitting
and will help the oil last longer.
• When preparing potato-based food (chips, crisps, etc.), cut them up and then wash them in
cold water to remove the starch. Dry them carefully. This will stop them sticking together.
Cooking
• Do not overfill the basket. This will cause the oil temperature to d rop a nd make the food
greasy. Only ever fill the basket half full.
• Do not keep the oil at a high temperature fo r long periods. This will make the oil lose its
properties.
Page 5
• Set the temperature controller to the lowest temperature while waiting between two batches.
• Do not leave the cooked food in the basket in the draining position too long. The vapours
could cause the food to lose its crispness and go soft.
After Cooking
• Oil can be left in the fryer to cool with its basket and lid on. The oil will not lose its properties.
• Change the oil regularly.
Cleaning and maintenance
• Switch off and unplug the appliance when cleaning and wait until cool before cleaning.
• Press the lid release button and the lid will open 90 degrees. Remove the lid from the body
for easy cleaning by gently lifting upwards.
• Remove the filter from the lid by gently lifting the filter fl ap and slidi ng towar ds the back of
the machine. Remove the two filters from the lid and soak the lid in warm soapy water. Rinse
with clean water and dry thoroughly. DO NOT wash the lid in the dishwasher.
• Lift up the auto raise handle to its highest horizontal position (until a click is heard) and
remove the basket from the oil by gently lifting upwards. Soak the basket in warm soapy
water and rinse with clean water and dry thoroughly. DO NOT wash the basket in the
dishwasher.
• Pour the cool oil out into the bin – never pour down a drain as this will result in a blockage.
Clean the oil pot with warm soapy water and dry thoroughly.
• Clean the housing of the fryer and the lid with a damp cloth.
• Never use abrasive pads or alcohol.
• Never immerse the appliance body in water as this contains the electrical parts.
Cooking Guide
This frying time given in this chart is only a guide and should be adjusted according to the
quantity fried.
Approximate
Oil T e mp
Food
Mushrooms
Crumbed Chicken
Whole Shrimp
Fish Cakes
Fillets
Onions
French Fries
Potato Chips
(C)
150
170
170
170
170
190
170
190
Weight (Grams)
300
500
250
400
400
150
550
150
Cooking Time
(Minutes)
3-5
12-14
2-4
3-5
5
2-4
8-10
2-4
*Oil should be warmed-up for 15-20 minutes prior to frying.
Page 6
Troubleshooting
PROBLEM POTENTIAL CAUSE SOLUTION
Release of unpleasant odors 1. The filter is saturated.
2. The oil has deteriorated.
3. This oil is un-suitable for
deep frying
Release of steam from under
edge of the lid
1. The lid is not closed
property.
Overflow of the oil 1. The oil volume is higher
than the maximum level.
2. The oil volume is higher
than the maximum level.
3. The food is too wet.
1. Replace the filter
2. Change the oil
3. Use a good quality
vegetable oil suitable for
deep frying
1. Make sure the lid is fully
closed
1. Decrease oil proper volume
2. Only ever fill the basket
half full
3. Dry the food before frying
Food is not crispy on outside 1. The frying temperature is
too low
2. Have overloaded the food
basket
Chips are sticking together The potato has not been
washed before frying
1. Adjust the temperature to
the proper level
2. Only ever fill the basket
half full
Wash and thoroughly dry
before frying
U.K. PLUG WIRING INSTRUCTIONS
The wires in the mains lead are coloured in accordance with the following code:
Page 7
BROWN - LIVE (L)
BLUE - NEUTRAL (N)
GREEN/YELLOW - EARTH (E)
As the colours of the wires in the mains lead of this appliance may not correspond with the
coloured markings identifying the terminals in your plug, proceed as follows:
• The BLUE wire is the NEUTRAL and must be connected to the terminal which is marked
with the letter N or coloured BLACK
• The BROWN wire is the LIVE and must be connected to the terminal that is marked with the
letter L or coloured RED.
• The wire which is coloured GREEN/YELLOW must be connected to the terminal which is
marked E or coloured GREEN or GREEN/YELLOW.
Always ensure that the cord grip is positioned and securely fastened.
WARNING: THIS APPLIANCE MUST BE EARTHED.
If a 13A (BS1363) fused plug is used it must be fitted with a 13A fuse. If in doubt consult a
qualified electrician.
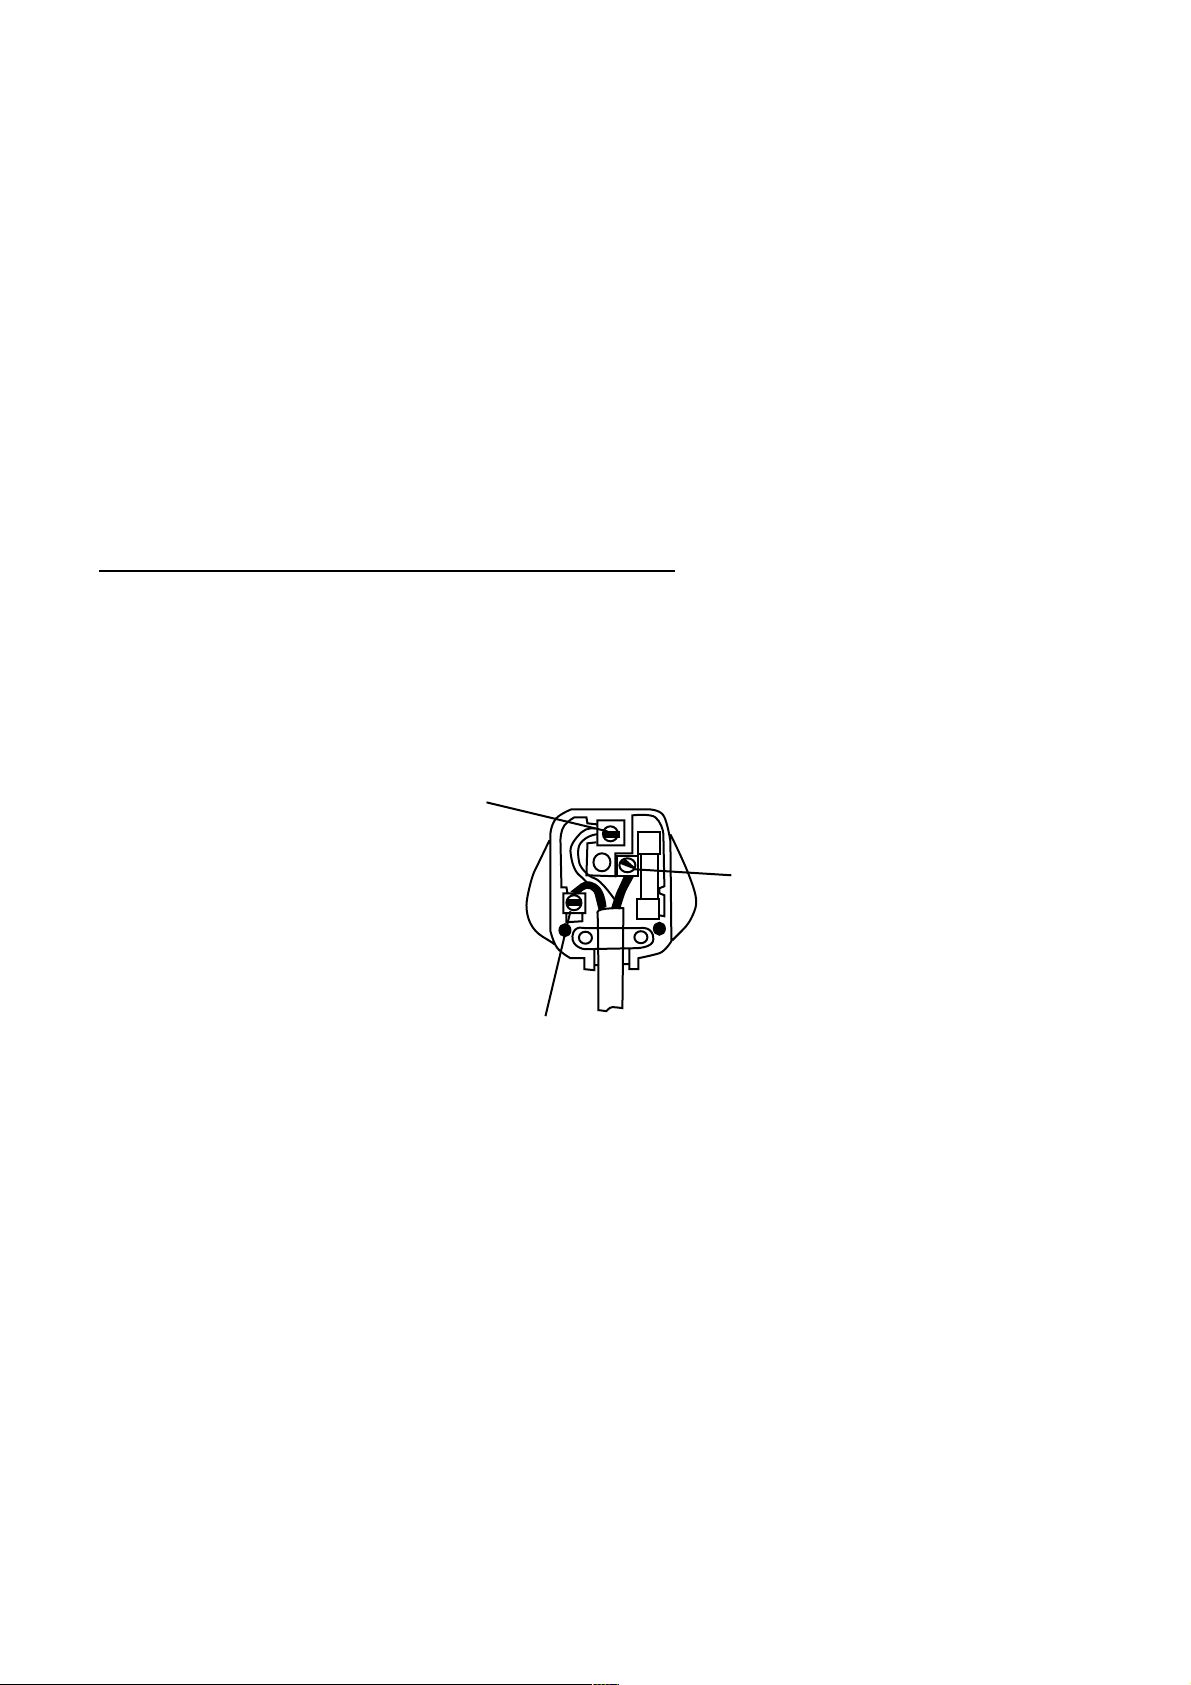
WIRING FOR A 13AMP PLUG
(GREEN & YELLOW)
EARTH
NEUTRAL
(BLUE)
13 AMP
LIVE
(BROWN)
~~~~~ Warranty ~~~~~
Page 8

This product is guaranteed for 12 months from the date of purchase when the appliance is used solely for
domestic purposes. For commercial use the product is guaranteed for 90 days from the date of purchase.
The guarantee is valid against mechanical or electrical defects if the product is used in accordance with the
instructions and provided that it is not connected to an unsuitable electricity supply or dismantled, interfered with or
damaged in any way.
IMPORTANT, PLEASE RETAIN THIS WARRANTY
Please ask your retailer to either stamp this warranty or simply attach your store receipt. Keep this warranty
somewhere safe. DO NOT SEND TO PRIMA.
This guarantee in no way affects your rights under statutory law.
IF THE PRODUCT MALFUNCTIONS DURING ITS WARRANTY PERIOD IT MUST BE RETURNED TO THE
RETAILER FROM WHOM IT WAS PURCHASED FOR REPLACEMENT. IF YOU BOUGHT THIS PRODUCT
VIA MAIL ORDER, PLEASE KEEP ALL THE DOCUMENTATION THAT CAME WHEN THE UNIT WAS
DELIVERED.
NAME___________________________________________________________________________________
ADDRESS________________________________________________________________________________
_________________________________________________________________________________________
PURCHASED FROM________________________________________________________________________
DATE OF PURCHASE ________________________________MODEL_______________________________
Please do not call us regarding warranties; your warranty exists with the retailer from which you purchased the
product. If the product malfunctions during its warranty period it must be returned to the retailer from which it was
purchased for replacement. If you bought this product via mail order, please keep all the documentation that came
when the unit was delivered.
Prima House, 15 (2) D Springfield Commercial Centre, Bagley Lane, Leeds. LS28 5LY United Kingdom
© Copyright 2005 Nu-World UK Ltd. All rights reserved.
 Loading...