

Page 1
Model: PCU1601
User Guide
Visit our Web Site
www.buyprima.com
Page 2

CONNECTION TO THE MAINS SUPPLY
The wires in the mains lead are coloured in accordance with the following code:
BROWN - LIVE (L)
BLUE - NEUTRAL (N)
GREEN/YELLOW - EARTH (E)
As the colours of the wires in the mains lead of this appl iance may not corres pond
with the coloured markings identifying the terminals in your plug, pr oc eed as foll o ws:
• The BLUE wire is th e N EUTRAL and mus t be c on nec t ed t o th e terminal which is
marked with the letter N or coloured BLACK
• The BROWN wire is the LI VE and must be connected to th e terminal which is
marked with the letter L or coloured RED.
• The wire which is c olour ed G REEN /YELLOW must be c onnected to the t erm inal
which is marked E or coloured GREEN or GREEN/YELLOW.
Always ensure that the cord grip is positioned and securely fastened.
WARNING: THIS APPLIANCE MUST BE EARTHED.
If a 13A (BS1363) fused p lug is used it must be fitted with a 13A fuse. If in doubt
consult a qualified electric ia n.
WIRING FOR A 13AMP PLUG
6
Important Safety Notes
• Always unplug the urn in the following situations:-
- Before cleaning
- After use
- Before emptying
• Never place the urn in a tilted position.
• Do not unplug the urn by pulling the cable cord.
• Close supervision is nec essary when the appliance is used by or near ch ildren
or infirm persons.
• Improper use of urn may result in serious scald.
• As there is boiling wat er inside the urn, always ensure th e lid is securely
fitted whenever urn is turned on or hot water is inside.
• Be careful of hot steam when removing the lid for refilling
• Never switch on the urn when th ere is less than 3 litres of water insi de or it is
below the minim um level or above the maximum level. O therwise, this will ca us e
water spillage and dam age to the heating e lement respec tively. Though ther e is
a cut-off device if the urn overheats, allowing the unit to boi l dry will eventually
damage the heating element.
• Avoid touching the exterior of the urn as it will be very hot.
• Never place the urn on a hot surface.
• If the supply cord of th is appliance is damaged, it m ust only be replaced by a
qualified electrician.
• Operate on a level sur f ac e. O perati ng on s i nks, drain boards or une ve n s urf ac es
must be avoided.
• Do not place any part of this applianc e on or near a hot gas or electric b urner in
a heated oven.
• Do not attempt to repair or disassemble the appliance. There are no user
serviceable parts.
• Do not let the cord hang over the edge of the table or counter, or touch hot
surfaces.
• Do not operate any appl iance with a dam aged cord or plug, after th e appliance
malfunctions, or is dropped or damaged in any manner.
• Do not operate the appliance when empty.
Page 3
3
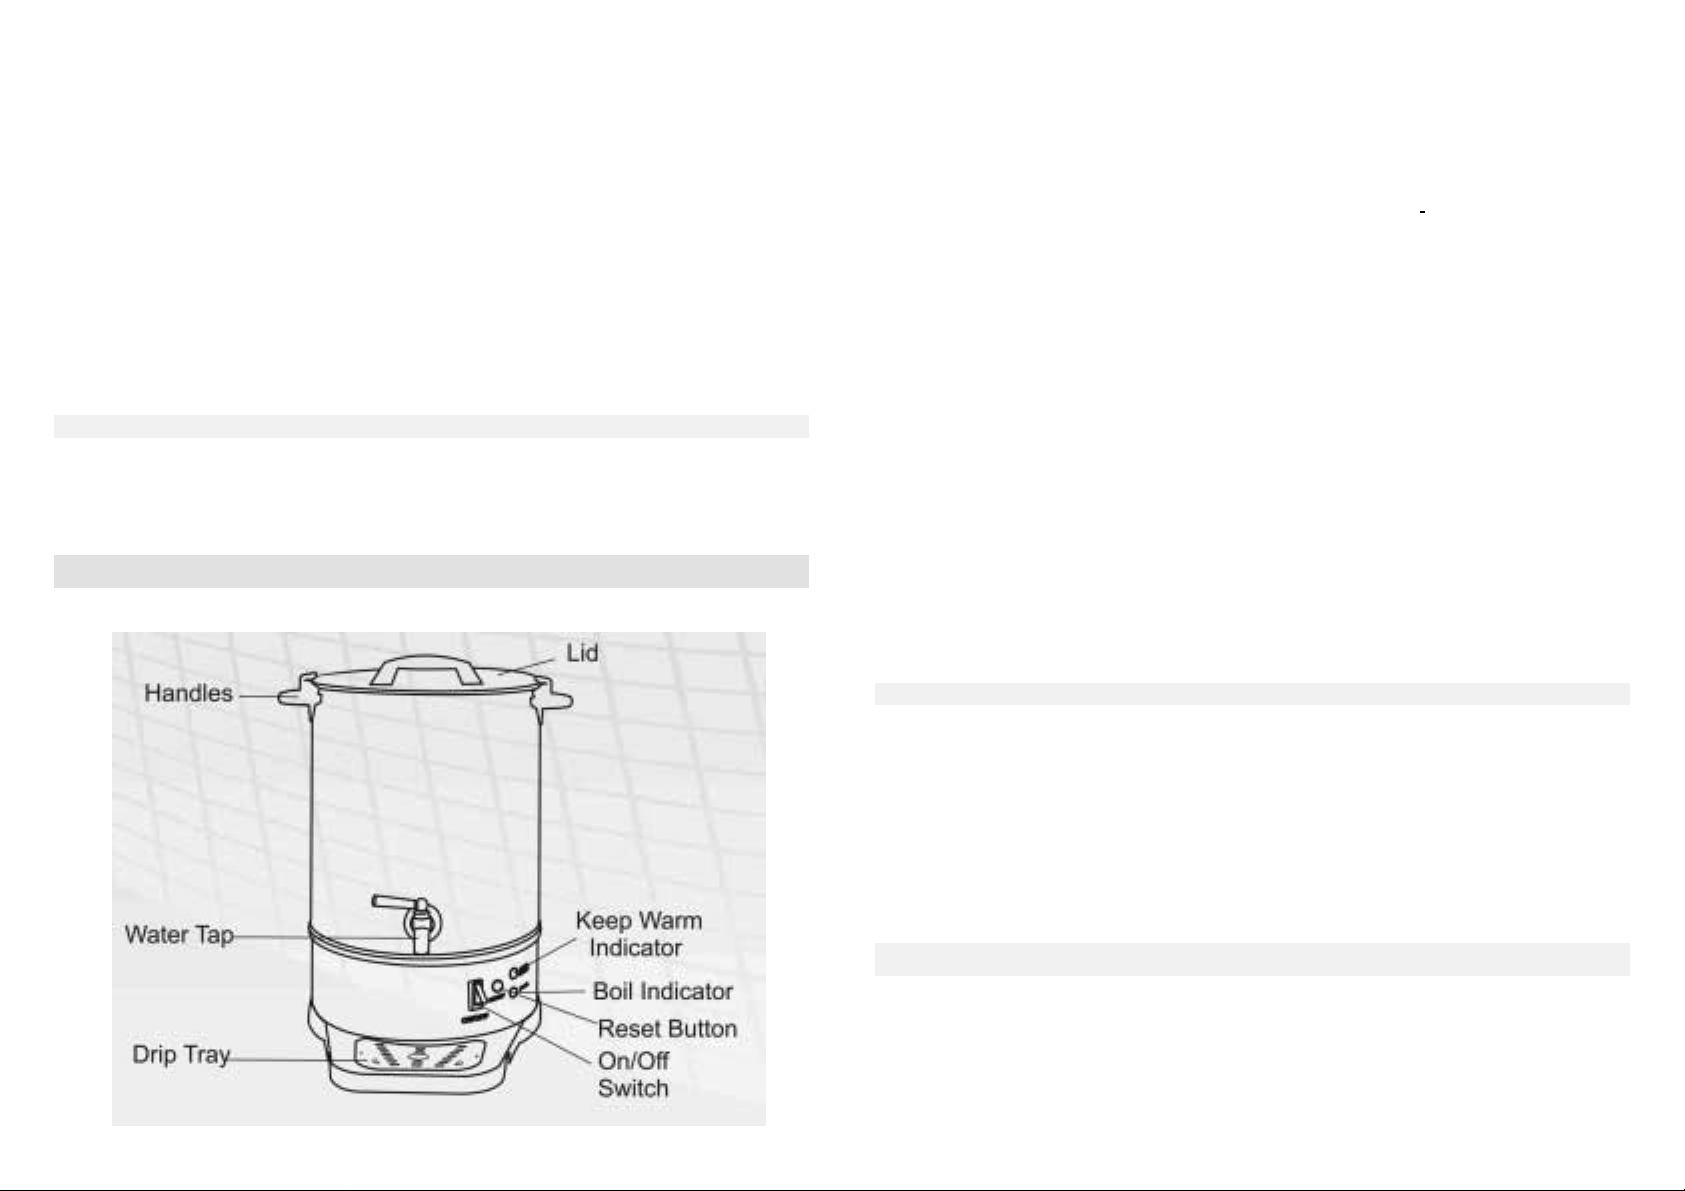
Hot Water Urn Model: PCU1601
Prior to First Use
• Remove all packing materials from the inside and outside of the urn
• BOIL FRESH WATER INSIDE T HE URN ONCE AND DISCARD THE BOILED
WATER BEFORE NORMAL USE . This is the best wa y to clean away any dust,
debris or manufacturing residue, which could affect the taste of the water.
How to Use
• Always use the appliance on a heat-resistant, flat surface.
• Open the lid by turning anti-clockwise.
• Fill the urn with t he desired qua ntity of water not above the Max . level or belo w
the Min. level. The minim um amount of water that should be added is 3 litres ,
anything below this level will cause the urn to boil dry.
• Replace the lid by turning it clockwise until it locks into place.
• Plug the urn into th e wall socket, press the On/O ff switch down to turn the urn
on. The BOIL indicator will then be illuminated.
4
• The water will reach boiling point at approximately 98c - 100c.
• When this temperature has been reached the Urn will then s witch onto KEEP
WARM mode autom atically and the keep war m light will be illum inated. On the
keep warm mode the water temperature will remain at 85c - 90c
• From cold it takes approximately 50-60 minutes to boil 16 litres of water.
• When dispensing water via the tap hold the cup/vessel as close to the
nozzle as possible to prevent splashing of hot water.
• If you need to top up the urn with more water it will automatically re-boil.
• If the urn boils dry refill with water and press the RESET button to reset the urn.
Cleaning
• It is extremely important to remember that cleaning of the urn can only be
performed when the plug has been removed from the supply.
• Never immerse any part of the urn into water.
• Cleaning should be performed when the urn has cooled down.
• Always ensure the electrical connections of the urn remain absolutely dry.
• Clean the urn with a damp cloth. Do not use cleaning products, which can
cause health hazard or discoloration of the urn.
• Ensure the outside and the electr ical connec tion parts of the urn are c ompletel y
dry before using.
De- scaling – IMPORTANT WARRANTY ISSUE
• It is VITAL to de-sc ale the urn at regular inter vals in order to m aintain its looks
and efficiency. Limescale build up severely inhibits the performance of
concealed element urns such as this on e. Your warran ty does NO T c over f aults,
which are a result of limescale build-up.
Page 4

• The frequency of de-scaling will depend upon the area in which you live
• There are many de-scaling powders and tablets available in supermarkets &
hardware stores. Jus t f ollo w t he i nst ruc tio ns on the pa cket. However, you should
bear in mind that most des caling powders or tablets are based on tre ating a 2
litre kettle. W here one tablet is spec ified you should us e 3 or 4 to allow for th e
much bigger capacity of the urn.
• Always rinse thoroughly after descaling.
5
Page 5

2
~~~~~ Warranty ~~~~~
This product is guaranteed for 12 months from the date of purchase when the
appliance is used solel y for domestic purposes. For comm ercial use the product is
guaranteed for 90 days from the date of purchase.
The guarantee is valid against mechanical or electrical defects if the product is
used in accordance with the ins truct ions a nd pr ovided that it is not c onnec ted to an
unsuitable electricit y supply or dismantled, interfered with or damaged in anyway.
IMPORTANT, PLEASE RETAIN THIS WARRANTY
Please ask your retailer t o either stamp this warranty or simply atta ch your
store receipt. Keep thi s warrant y somewhere saf e. DO NOT SEND TO PRIMA.
This guarantee in no way affects your rights under statutory law.
IF THE PRODUCT MALFUNCTIONS DURING ITS WARRANTY PERIOD IT
MUST BE RETURNED TO TH E RET AILER FROM WHOM IT WAS PURCH ASED
FOR REPLACEMENT. IF YOU BOUGHT THIS PRODUCT VIA MAIL ORDER,
PLEASE KEEP ALL THE DOCUMENTATION THAT CAME WHEN THE UNIT
WAS DELIVERED.
NAME____________________________________________________________
ADDRESS_________________________________________________________
__________________________________________________________________
PURCHASED FROM_________________________________________________
DATE OF PURCHASE ___________________MODEL_____________________
PLEASE REFER TO THE IMPORTANT WARRANTY ISSUE IN THE SECTION
PRIMA CONTACT DETAILS
For advice on Prima products call our Customer Services Department on 0844 581 5000.
Please do not call us regarding warranties - your warranty exists with the retailer from which
you purchased the product. If the product malfunctions during its warranty period it must be
ON DE-SCALING.
Page 6

returned to the retailer from which it was purchased for replacement. If you bought this
product via mail order, please keep all the documentation that came when the unit was
delivered.
Nu World UK Ltd, Prima House, 15 (2)D Springfield Commercial Centre, Bagley Lane,
Pudsey, LS28 5LY, United Kingdom.
7
 Loading...