

Prexiso XL2 User Manual
PREXISO XL2
Cross Line Laser
User Manual Prexiso XL2 ........................................... 5
Gebrauchsanweisung Prexiso XL2 .......................... 13
Manuel d'utilisation Prexiso XL2 ............................ 21
Manuale d'uso Prexiso XL2 ..................................... 29
Manual de empleo Prexiso XL2............................... 37
Manual de Operação - Prexiso XL2 ......................... 45
Руководство по эксплуатации Prexiso XL2
......... 53
Prexiso XL2 使用手册............................................... 61
Kullanım Kılavuzu Prexiso XL2 .............................. 69
Prexiso XL2 Felhasználói Kézikönyv ....................... 77
TR
H

5
783114a en
1User Manual Prexiso XL2
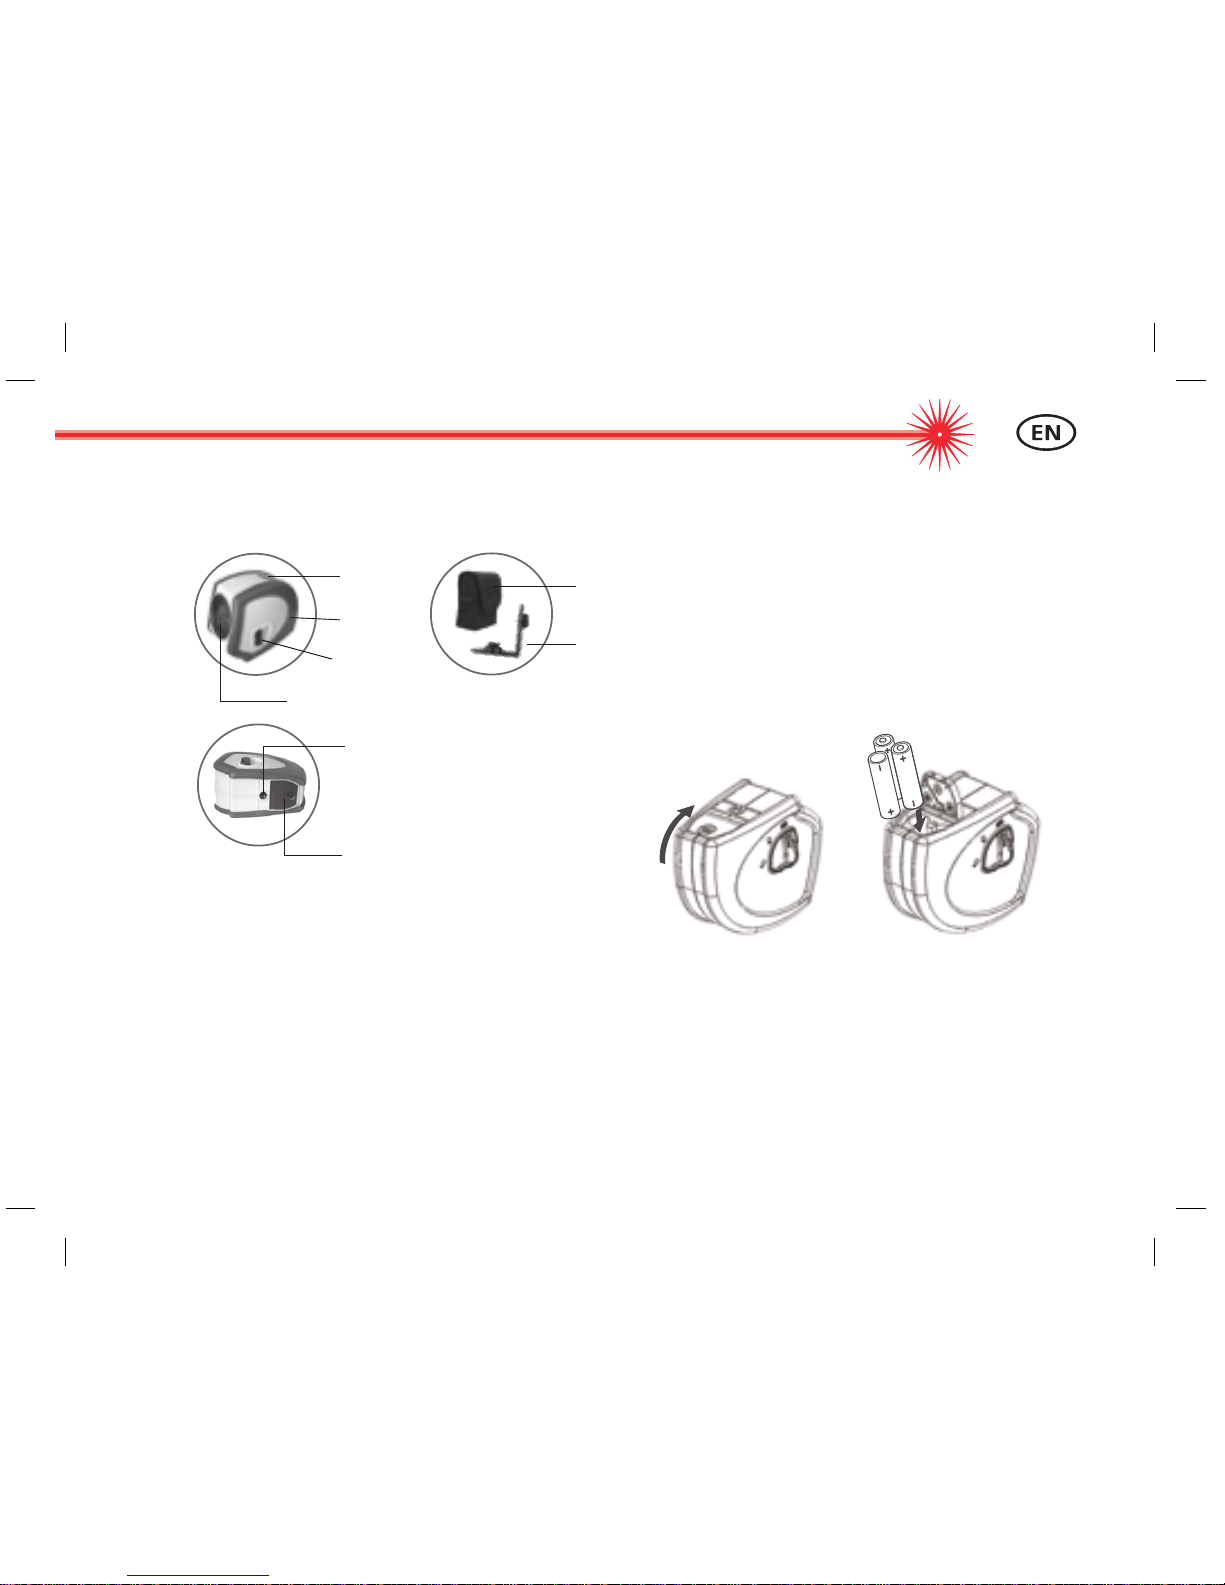
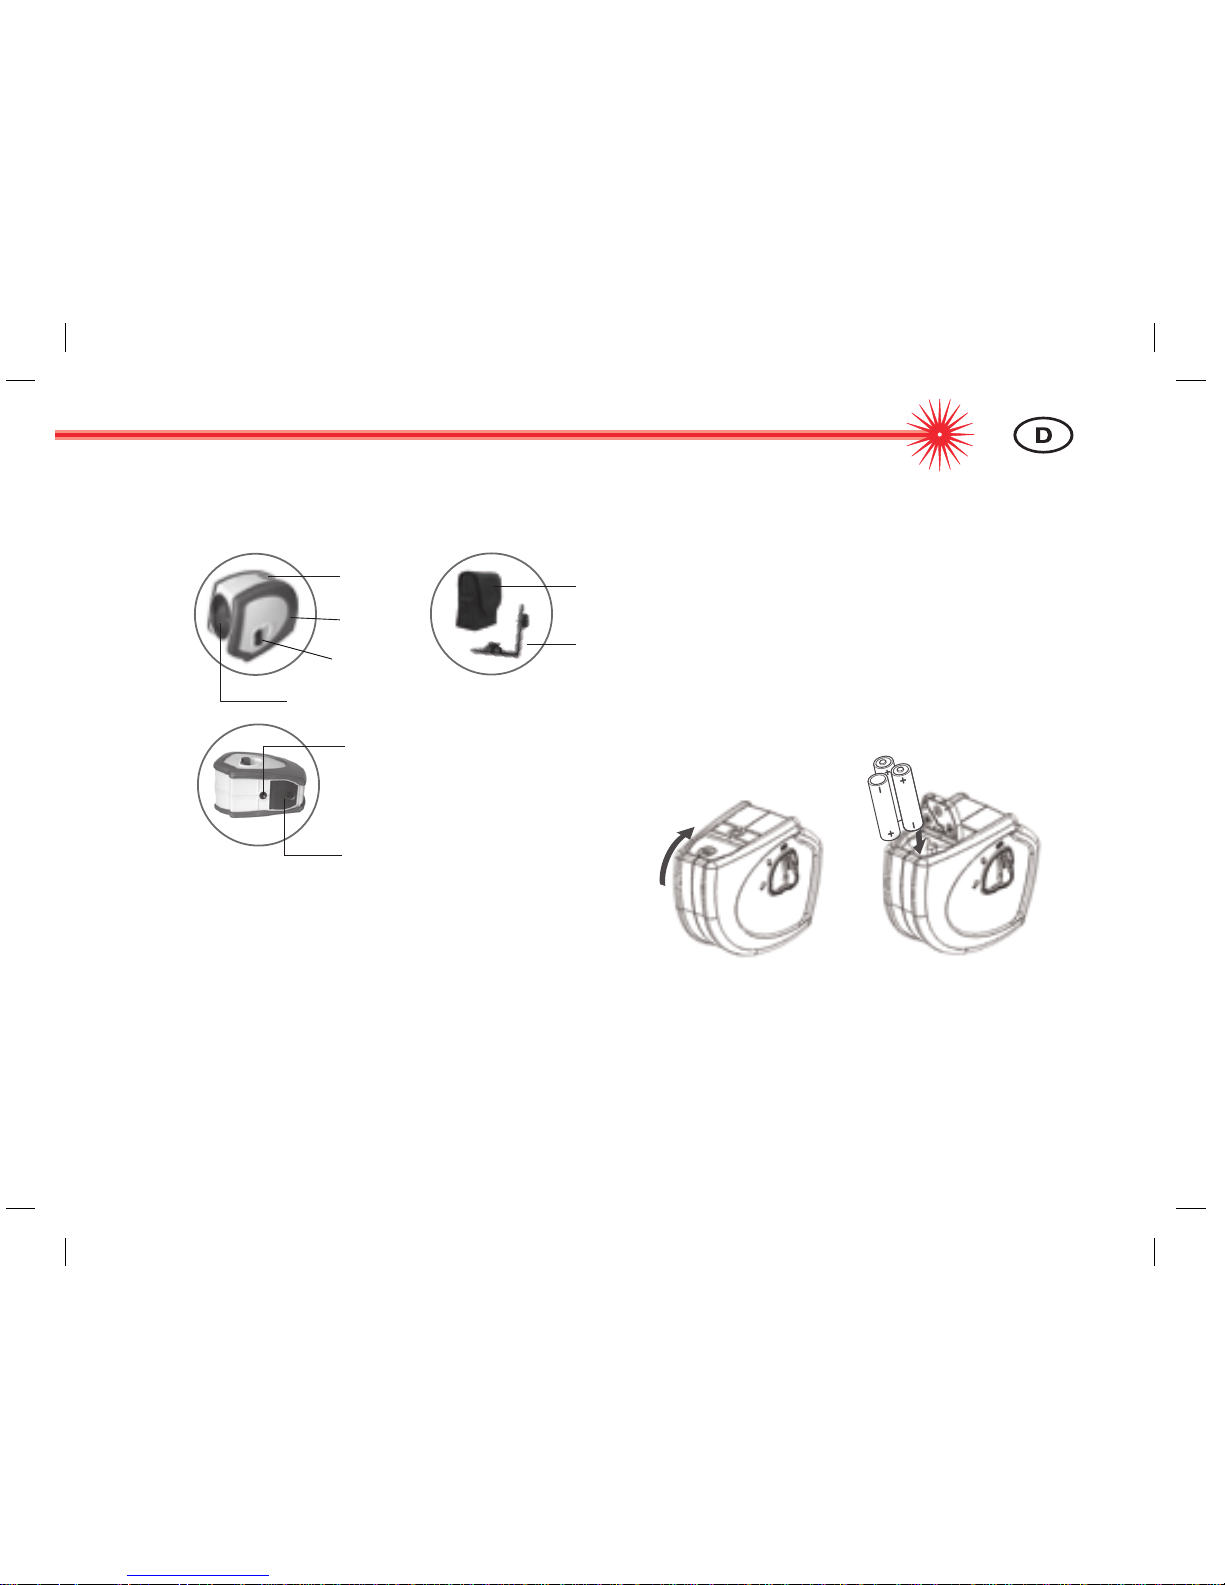
1.1 Features
1Keypad
2Rubber
3Locking knob
4Laser window
51/4’’ nut
6Battery box cover
Use 3 pieces of AA size 1.5 V alkaline or
rechargeable batteries
7Soft bag
8L-shaped mount
1.2 Insert and replace batteries
Refer to the sketch, open up its bottom battery cover,
and insert the batteries in accordance with the polarities.
Close up the cover till the click of closing is heard.
When battery is low with voltage, laser beams will get
dim, batteries should be timely replaced.
Use alkaline or rechargeable batteries only!
When the instrument is not used over a long period of
time, please remove the batteries to avoid corrosion of
the batteries.
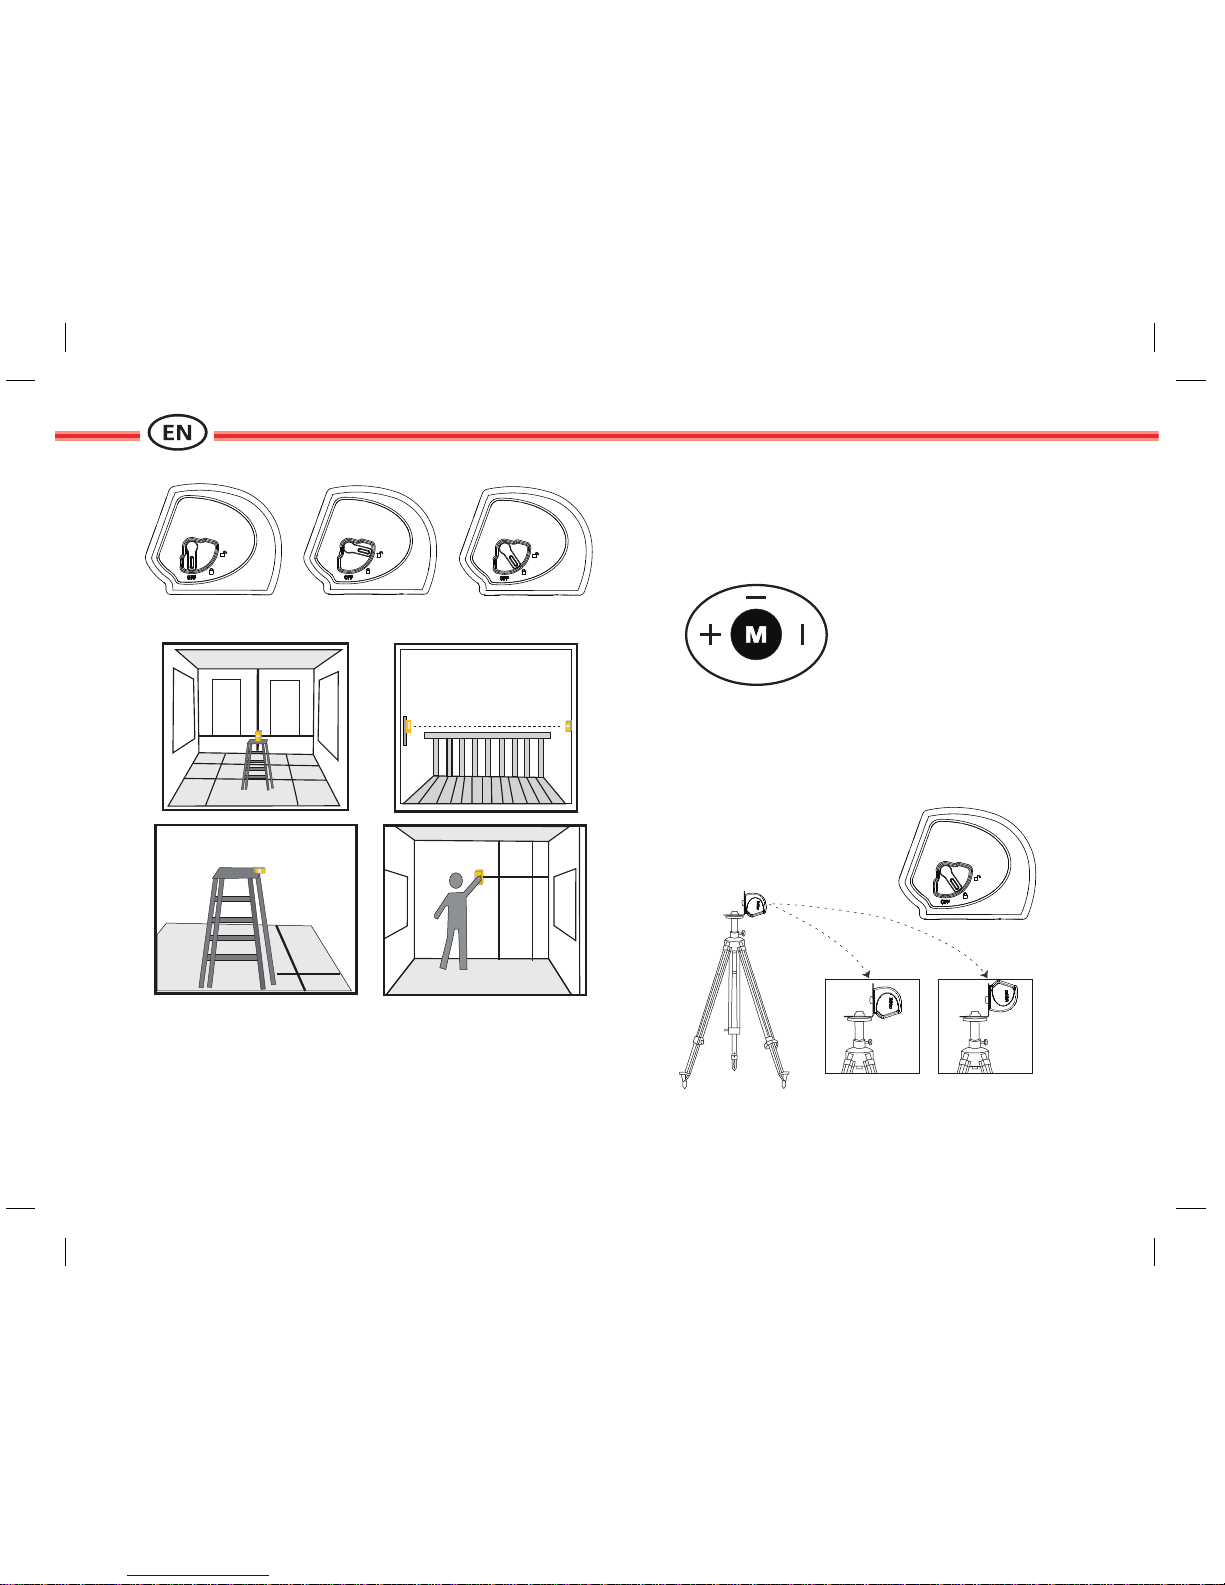
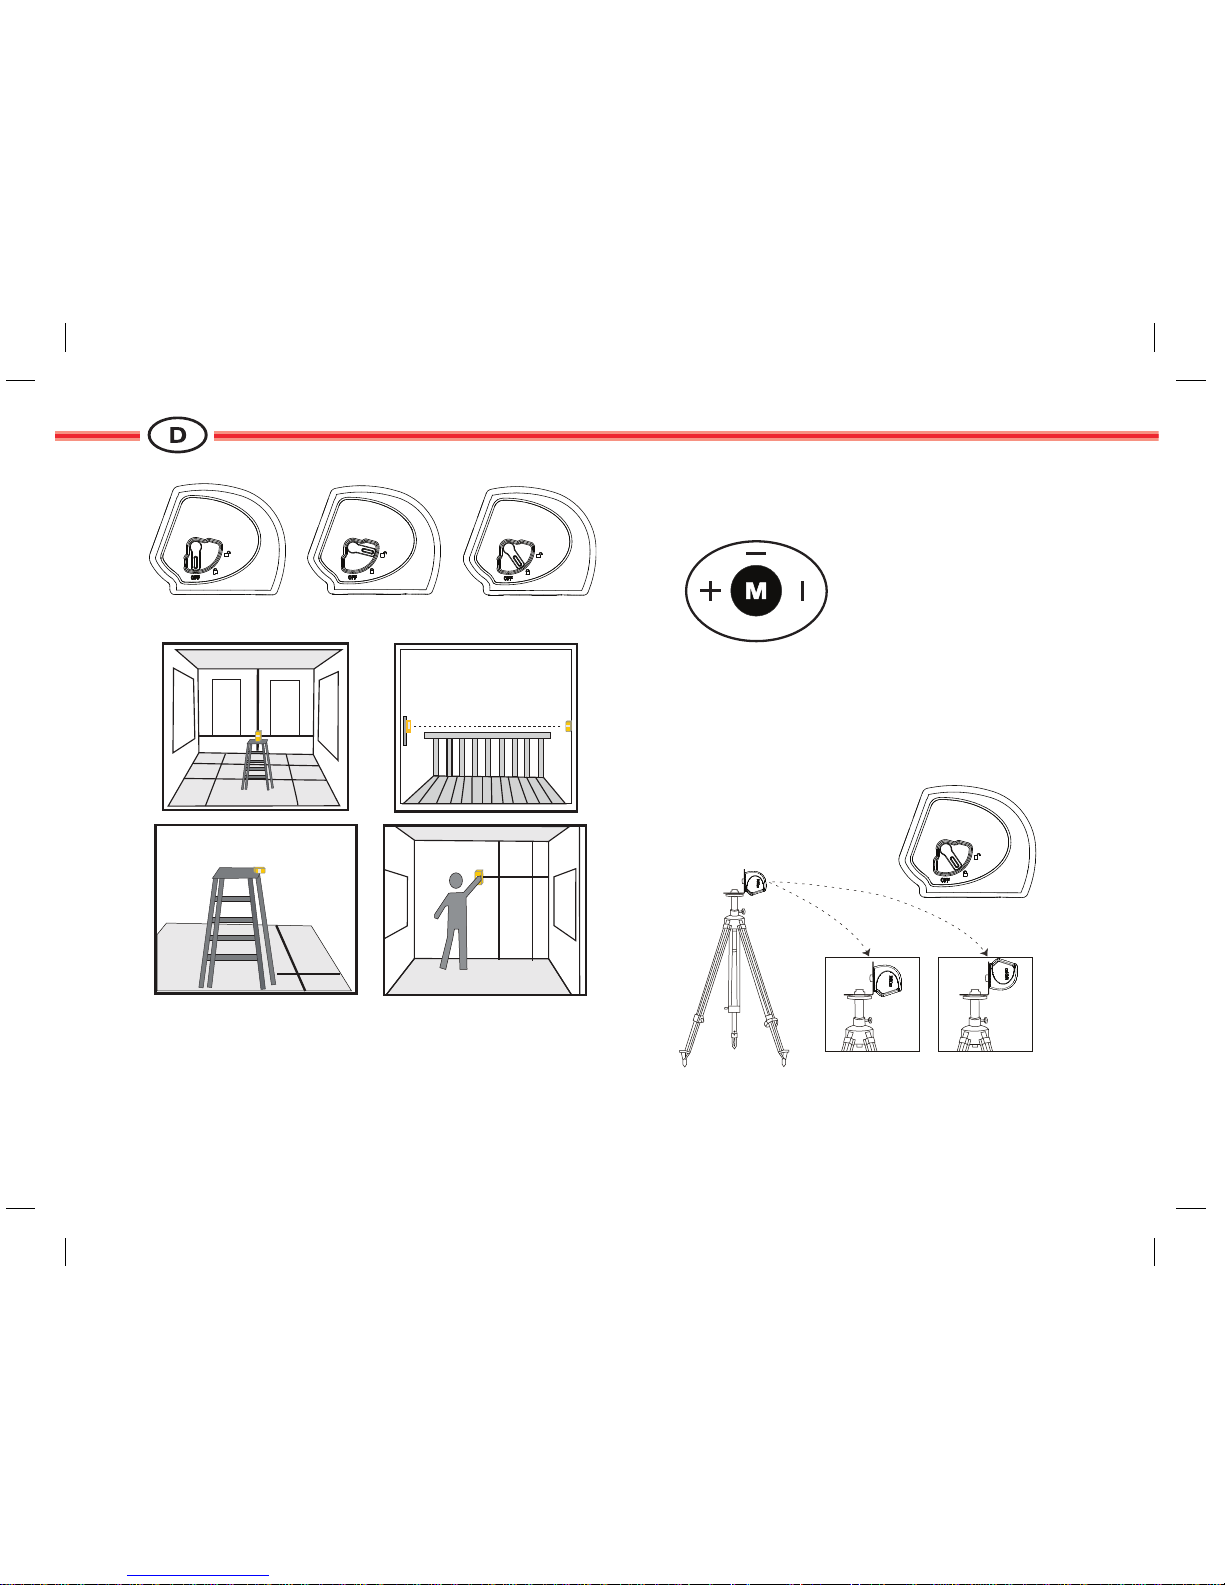
1.3 Operation
First, switch the locking mechanism to its unlock position, the horizontal and vertical beams are lit up at the
same time.
1
2
3
4
5
6
7
8
6
783114a en
How to use the "M" key
–The horizontal line is lit up when it's pressed once.
–The vertical line is lit up when it's pressed for the
second time.
–Both lines will be lit up when it's pressed for the
third time.
–Pressing the "M" key repeatedly will cycle the func-
tions.
Switch the locking mechanism to its lock position (refer
to the sketch), it can work with a tripod, see the sketch
for its mounting on a tripod.
It can be used for installing ceilings and floorings.

7
783114a en
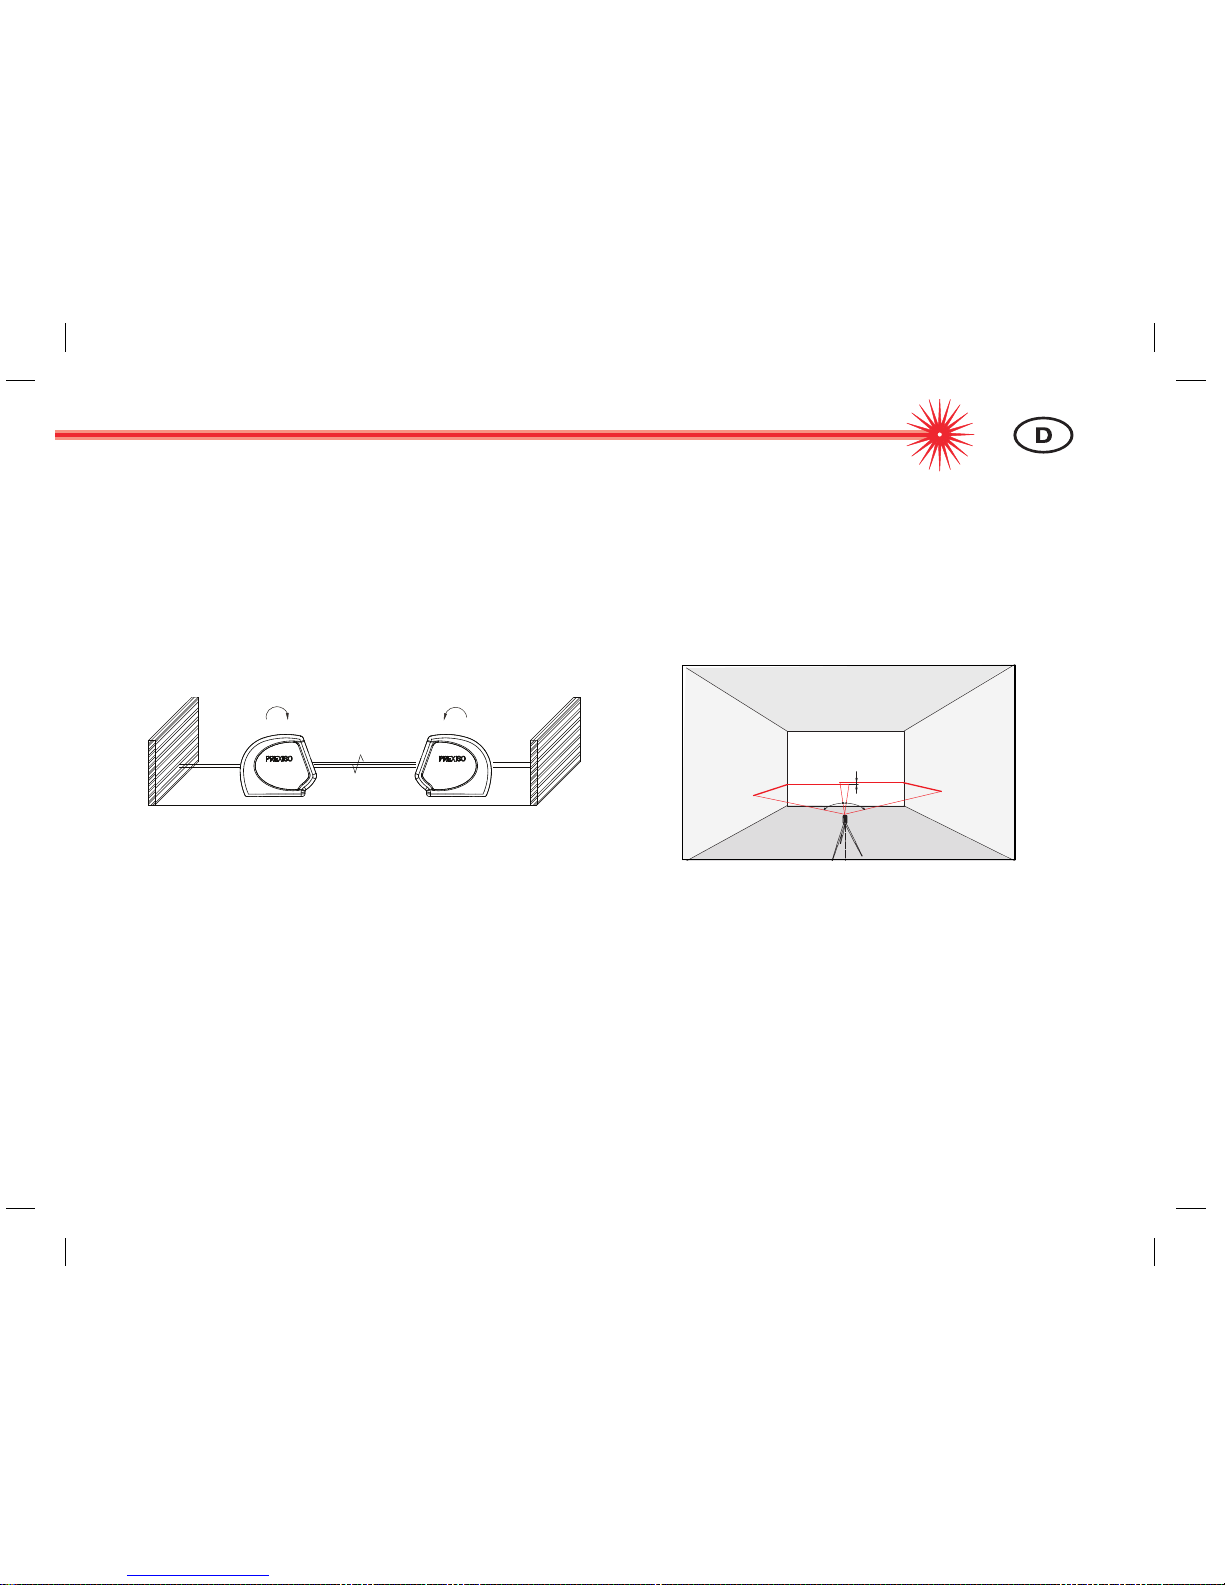
1.4 Accuracy check on auto leveling
In order to assure your cross line laser's accuracy use
our instructions to check it.
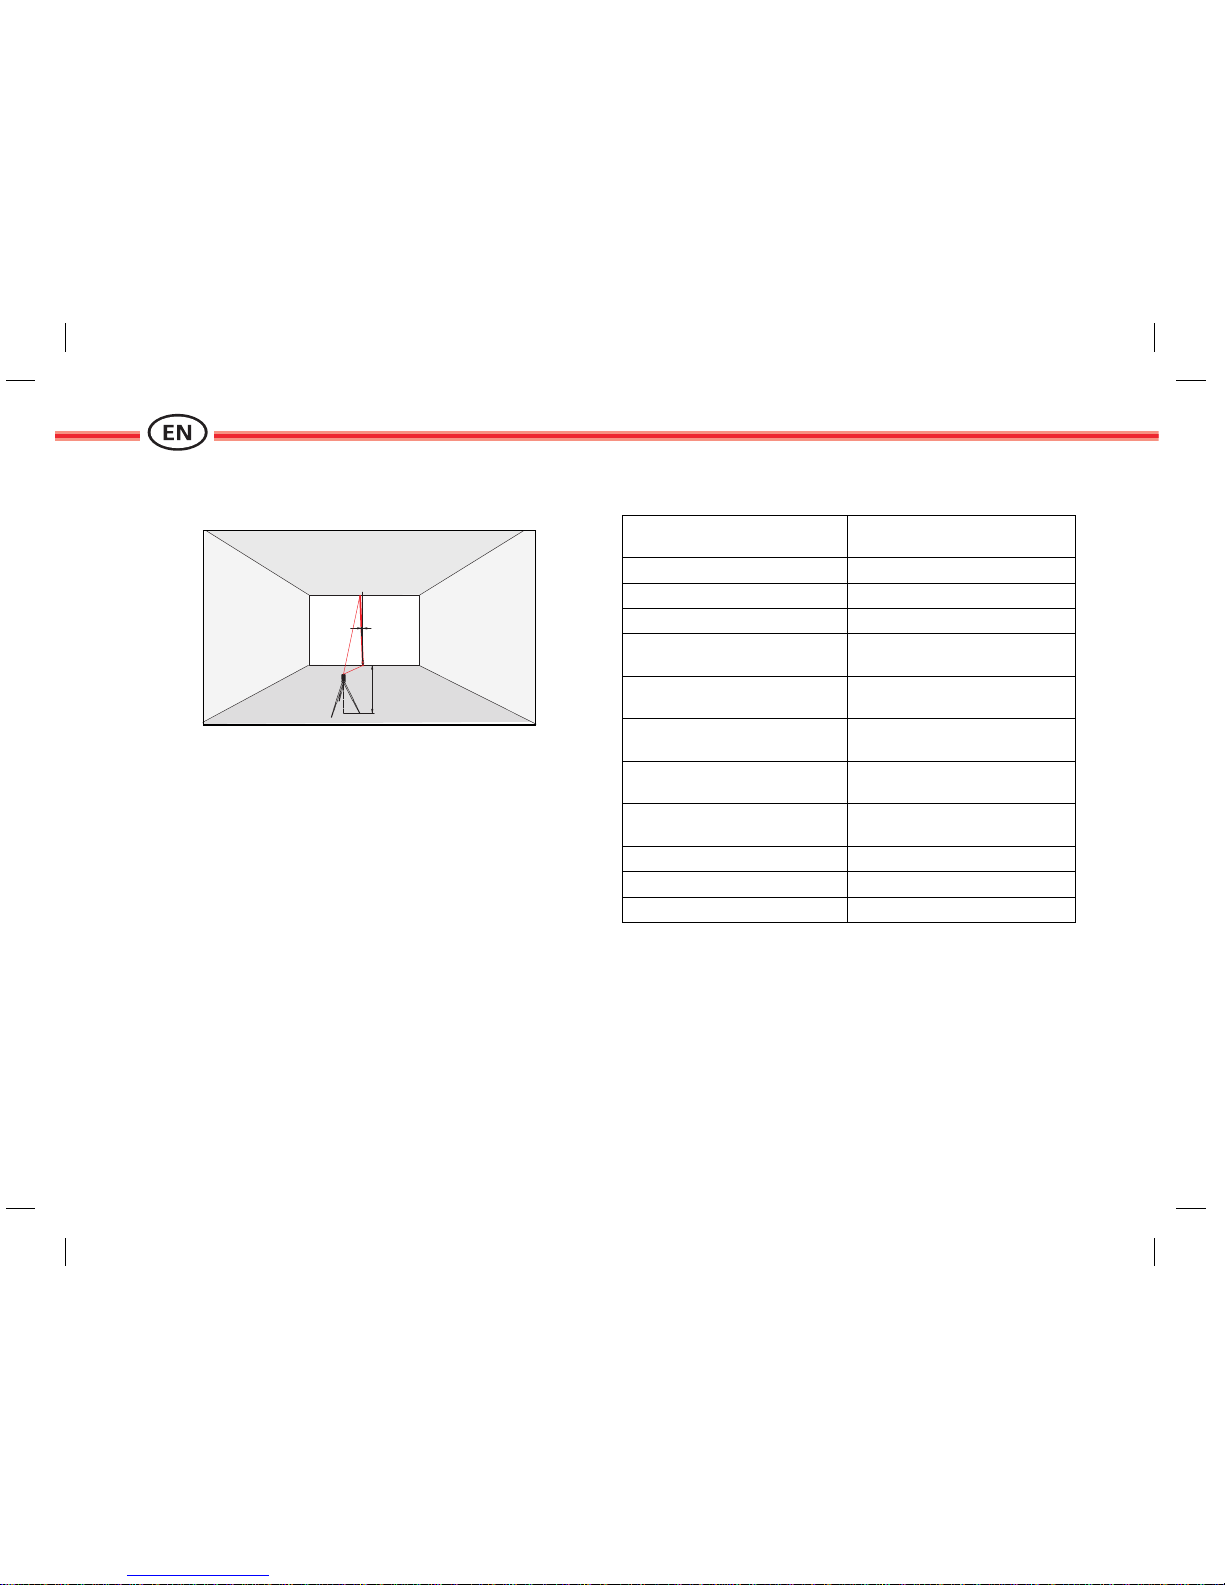
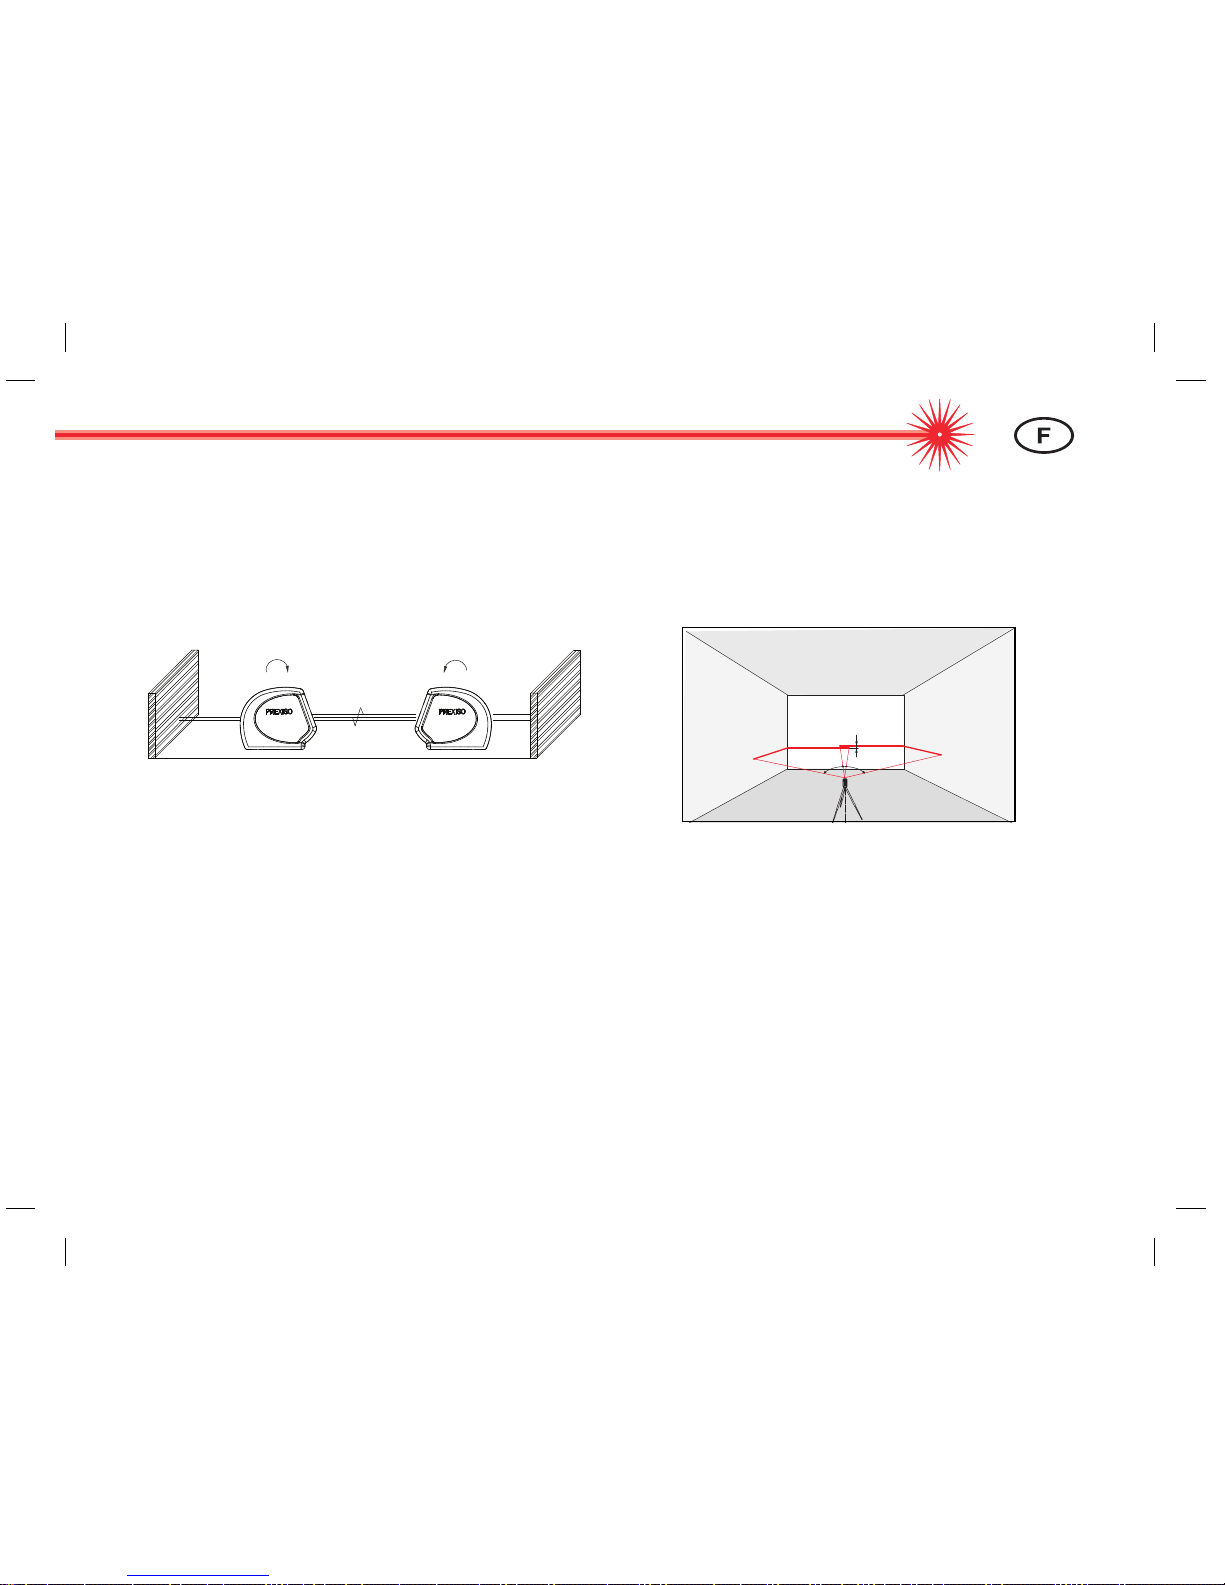
1.4.1 To check level
Choose two walls nearly 5 m apart.
Turn on the cross line laser to horizontal leveling in
unlocked mode. Set the instrument on a leveling halfway between two walls (A+B).
Direct the instrument at wall A and mark the position of
the line on wall A (-> A1).
Rotate the instrument by 180° and mark the horizontal
laser line in exactly the same way on wall B (-> B1).
Then place the instrument at the same elevation as close
as possible to wall A and again mark the horizontal laser
line on wall A (-> A2).
Rotate the instrument by 180° again and mark the laser
on wall B (-> B2). Measure the distances of the marked
points A1-A2 and B1-B2. Calculate the difference of the
two measurements. If the difference does not exceed
3mm, then the Prexiso XL2 is within tolerance.
| (A1 - A2) - (B1 - B2) | 3 mm
1.4.2 Horizontal line accuracy check
Place the instrument 5m away from the wall, turn it on,
move it from left to right or otherwise, compare the
beam ends of right side and left side to see the elevation
difference. If the difference does not exceed 4.5 mm,
your instrument is within tolerance.
A1
A
2
A
B
B1B2
180°
180°
max.
>4.5 mm
45° 45°
8
783114a en
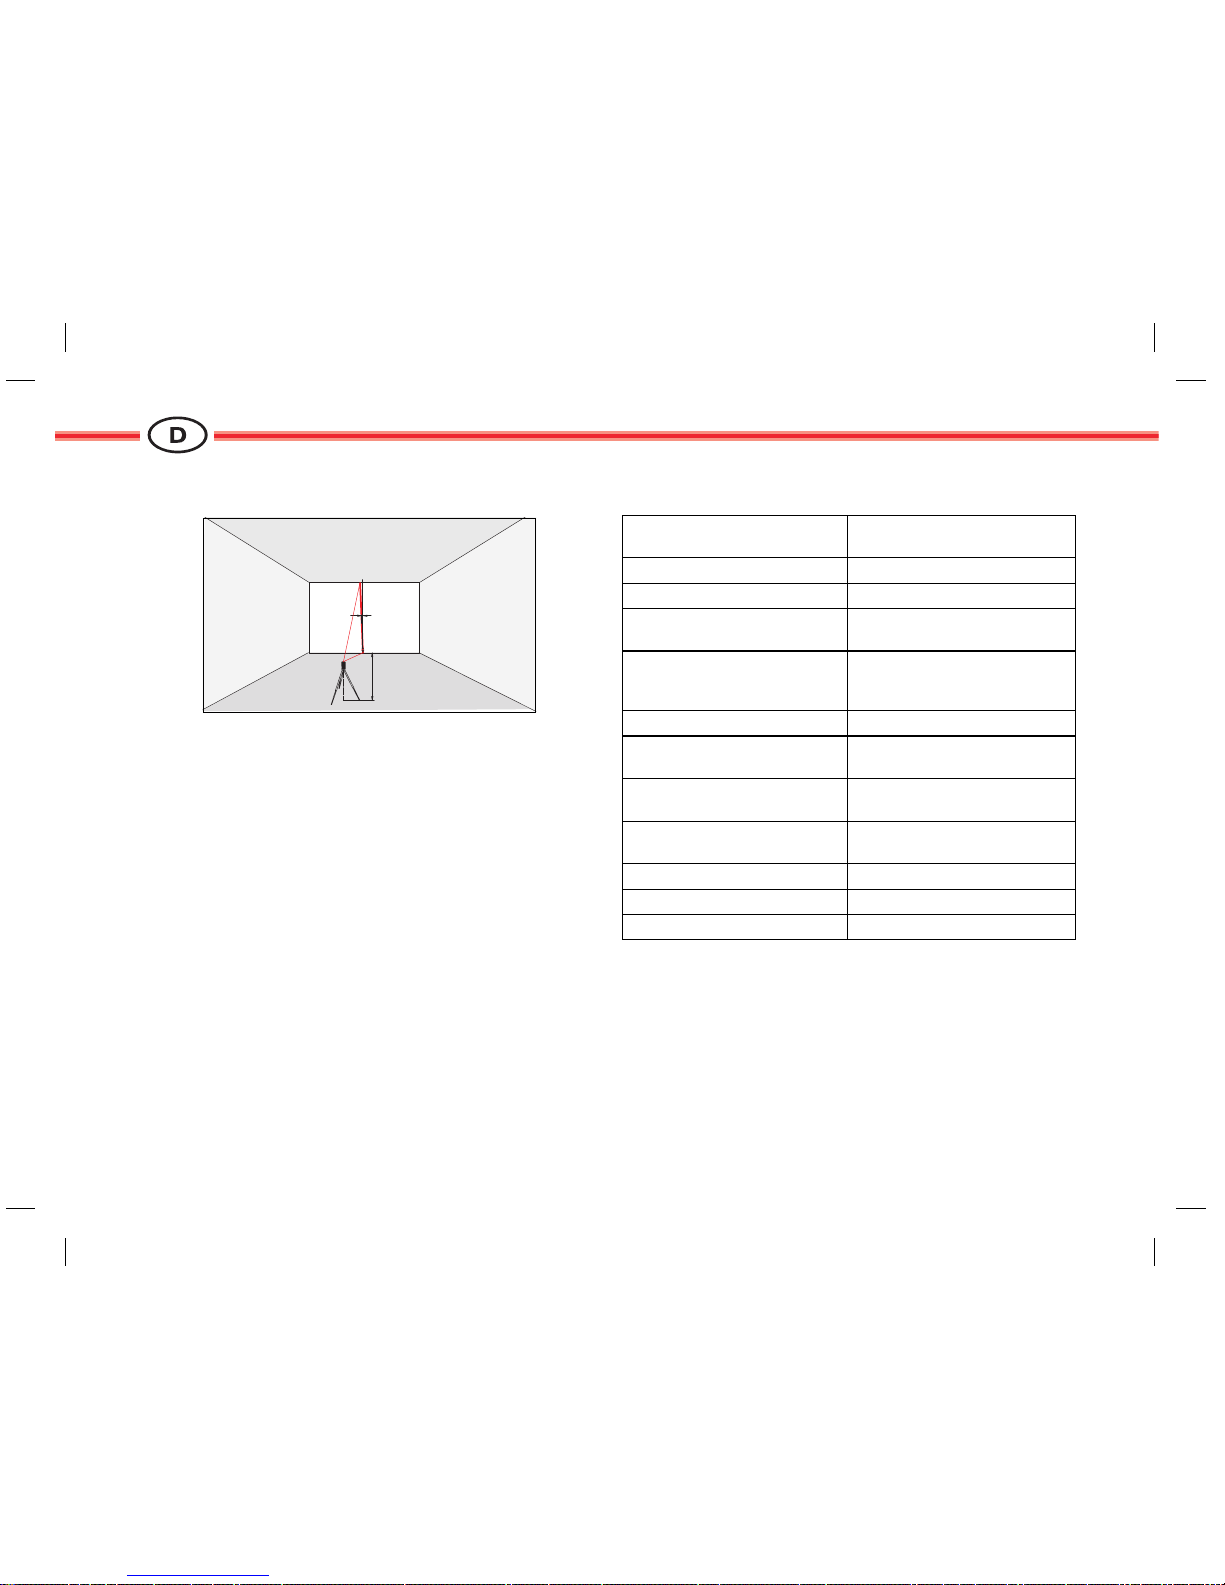
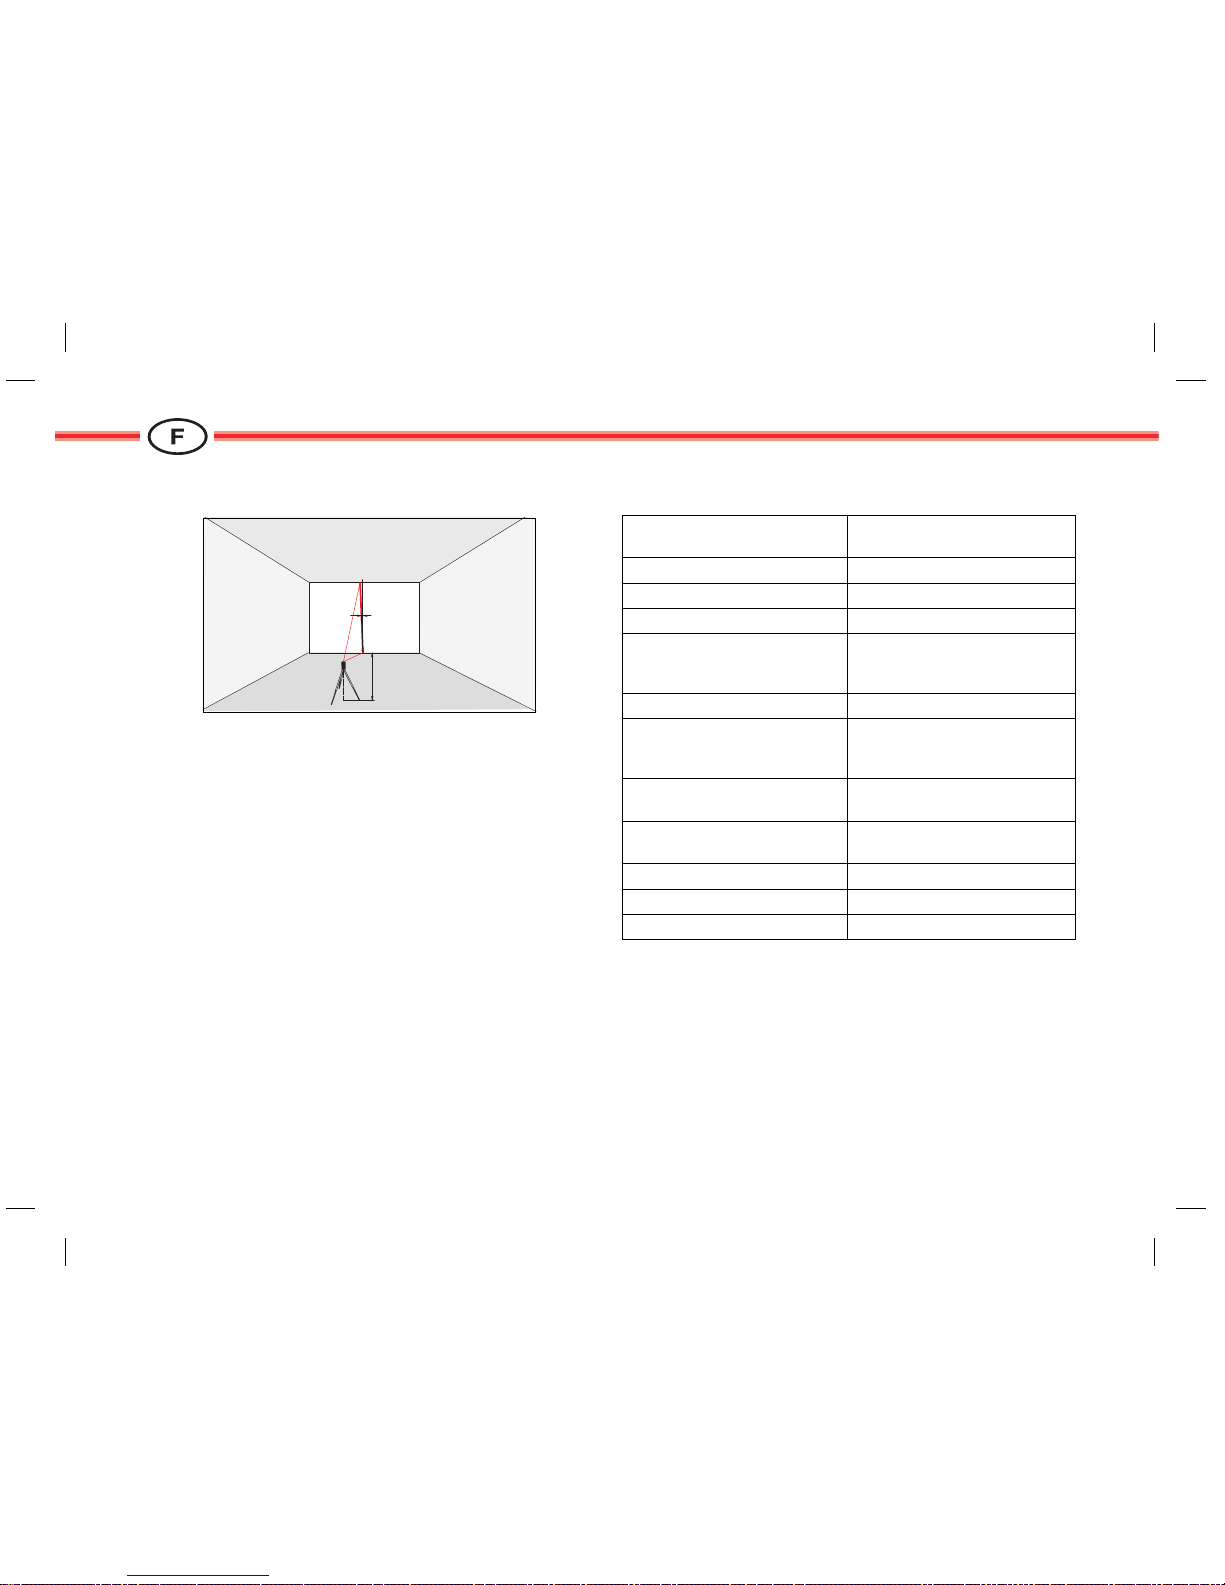
1.4.3 Vertical accuracy check
As reference, use a plumb-bob and attach it as close as
possible to an approx. 3 m high wall.
Position the instrument at a distance of approx. 1.5 m
from the wall at an elevation of approx. 1.5 m.
Direct the instrument at the wall and switch on. Rotate
the instrument and align it with the bottom of the plumb
line. Now read off the maximum deviation of the laser
line from the top of the plumb line. If the difference does
not exceed 3 mm your Prexiso XL2 is within spec.
2Technical parameters
1.5 m
max.
3 mm
Functionalities: 1 horizontal line plus 1
vertical line
Accuracy: ±2 mm/5 m
Working range: 10 m
Sensitivity range: auto leveling ±5
Fan angles of horizontal
and vertical directions: greater than 130
Battery: 3 pieces of AA size
batteries
Working hours: more than 16 hours (both
lines on)
Working temperature
range:
14°F to 104°F
(-10°C to 40°C)
Storage temperature
range:
-4°F to 158°F
(-20°C to 70°C)
Laser classification: Class 2 laser
Dimensions: 109*63*87 mm
Weight: 298 g (excluding batteries)
9
783114a en
3Safety instructions
The person responsible for the instrument must ensure
that all users understand these directions and adhere to
them.
3.1 Symbols used
The symbols used have the following meanings
!
WARNING:
Indicates a potentially hazardous situation or an unintended use which, if not avoided, will result in death or
serious injury.
!
CAUTION:
Indicates a potentially hazardous situation or an unintended use which, if not avoided, may result in minor
injury and/or appreciable material, financial and environmental damage.
Important paragraphs which must be
adhered to in practice as they enable the product to
be used in a technically correct and efficient manner.
3.2 Permitted use
•Projection of horizontal and vertical laser lines
3.3 Prohibited use
•Using the product without instruction
•Using outside the stated limits
•Deactivation of safety systems and removal of
explanatory and hazard labels
•Opening of the equipment by using tools (screwdrivers, etc.), as far as not specifically permitted for
certain cases
•Carrying out modification or conversion of the
product
•Deliberate dazzling of third parties; also in the dark
•Inadequate safeguards at the surveying site.
3.4 Limits of use
Refer to section "Technical data".
The Prexiso XL2 is designed for use in areas perma-
nently habitable by humans. Do not use the product in
explosion hazardous areas or in aggressive environments.
10
783114a en
3.5 Areas of responsibility
Responsibilities of the manufacturer of the original
equipment:
Prexiso AG
Europastrasse 27
CH-8152 Glattbrugg
Internet: www.prexiso.com
Prexiso AG is responsible for supplying the product,
including the User Manual in a completely safe condition.
Prexiso AG is not responsible for third party accessories.
Responsibilities of the person in charge of the instrument:
The person in charge of the instrument has the following
duties:
•To understand the safety instructions on the product
and the instructions in the User Manual.
•To be familiar with local safety regulations relating
to accident prevention.
3.6 Hazards in use
!
CAUTION:
Watch out for erroneous measurements if the instrument is defective or if it has been dropped or has been
misused or modified. Carry out periodic test measurements.
Particularly after the instrument has been subject to
abnormal use, and before, during and after important
measurements.
Refer to section "1.4 Accuracy check on auto
leveling".
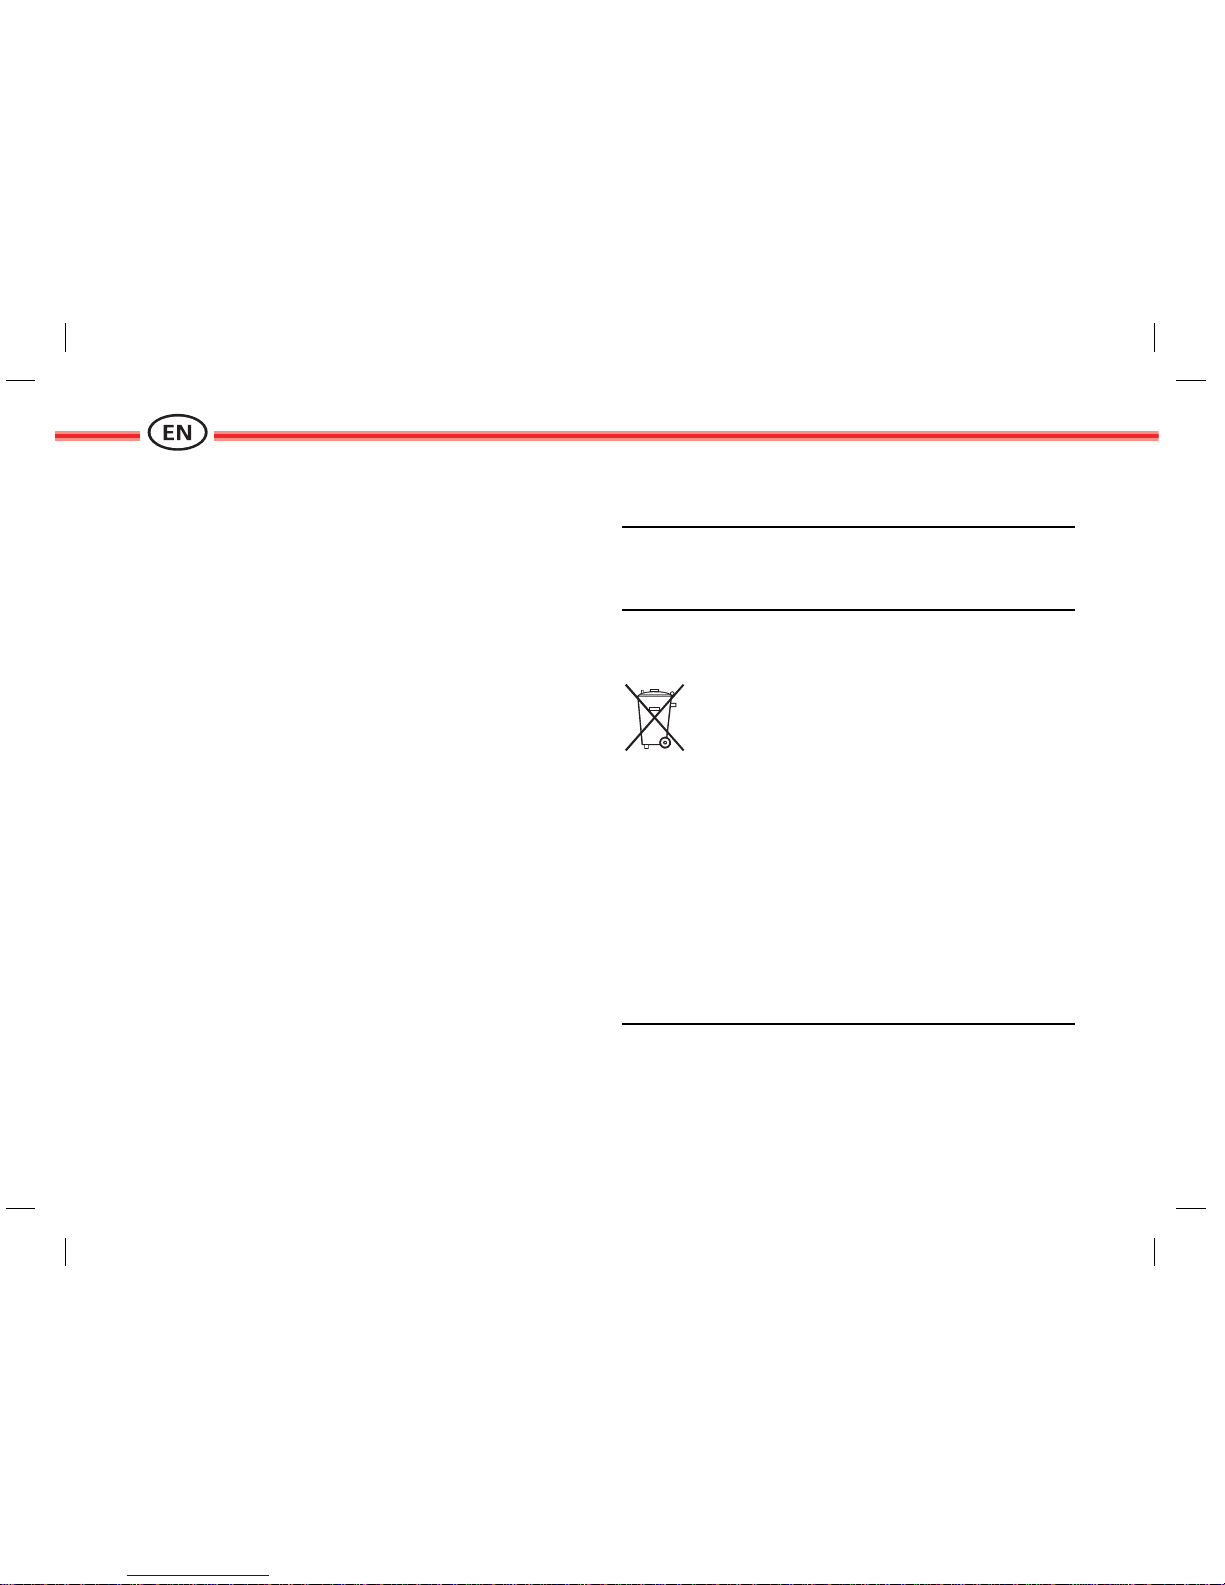
!
WARNING:
Flat batteries must not be disposed of with
household waste. Care for the environment
and take them to the collection points
provided in accordance with national or local
regulations.
The product must not be disposed of with the
household waste.
Dispose of the product appropriately in accordance with
the national regulations in force in your country.
Always prevent access to the product by unauthorised
personnel.
Product specific treatment and waste management
information can be downloaded from the Prexiso AG
home page at: http://www.Prexiso.com/ or received
from the Prexiso dealer.

11
783114a en
3.7 Electromagnetic Compatibility (EMC)
!
WARNING:
The Prexiso XL2 conforms to the most stringent requirements of the relevant standards and regulations.
Yet, the possibility of it causing interference in other
devices cannot be totally excluded.
!
CAUTION:
Never attempt to repair the product yourself. In case of
damage, contact the local dealership.
FCC statement (applic. in U.S.)
This equipment has been tested and found to comply
with the limits for a Class B digital device, pursuant to
part 15 of the FCC Rules. These limits are designed to
provide reasonable protection against harmful interference in a residential installation.
This equipment generates, uses and can radiate radio
frequency energy and, if not installed and used in accordance with the instructions, may cause harmful interference to radio communications.
However, there is no guarantee that interference will not
occur in a particular installation.
If this equipment does cause harmful interference to
radio or television reception, which can be determined
by turning the equipment off and on, the user is encouraged to try to correct the interference by one or more of
the following measures:
•Reorient or relocate the receiving antenna.
•Increase the separation between the equipment and
receiver.
• Connect the equipment into an outlet on a circuit
different from that to which the receiver is
connected.
•Consult the dealer or an experienced radio/TV technician for help
!
WARNING:
Changes or modifications not expressly approved by
Prexiso AG for compliance could void the user’s
authority to operate the equipment.
12
783114a en
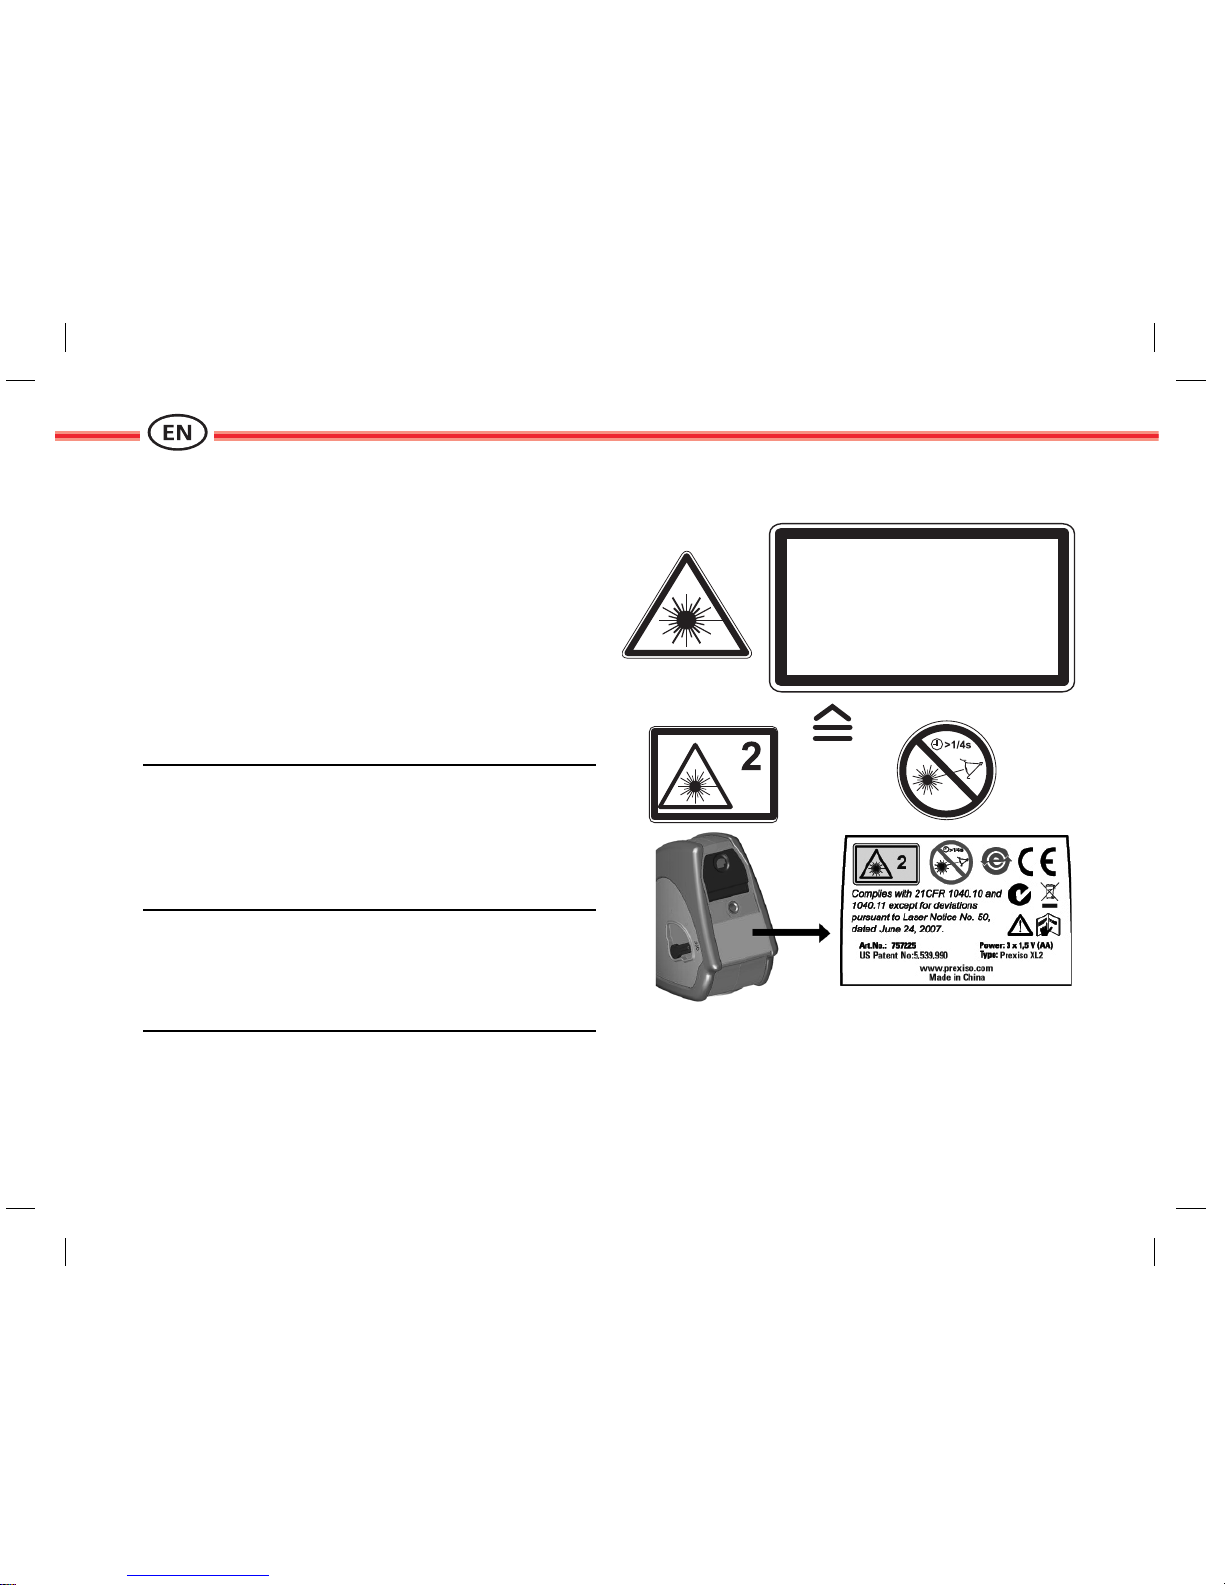
3.8 Laser classification
The Prexiso XL2 produces visible laser beams, which are
emitted from the instrument:
It is a Class 2 laser product in accordance with:
•IEC60825-1 : 2007 "Radiation safety of laser products"
Laser Class 2 products:
Do not stare into the laser beam or direct it towards
other people unnecessarily. Eye protection is normally
afforded by aversion responses including the blink
reflex.
!
WARNING:
Looking directly into the beam with optical aids
(e.g. binoculars, telescopes) can be hazardous.
!
CAUTION:
Looking into the laser beam may be hazardous to the
eyes.
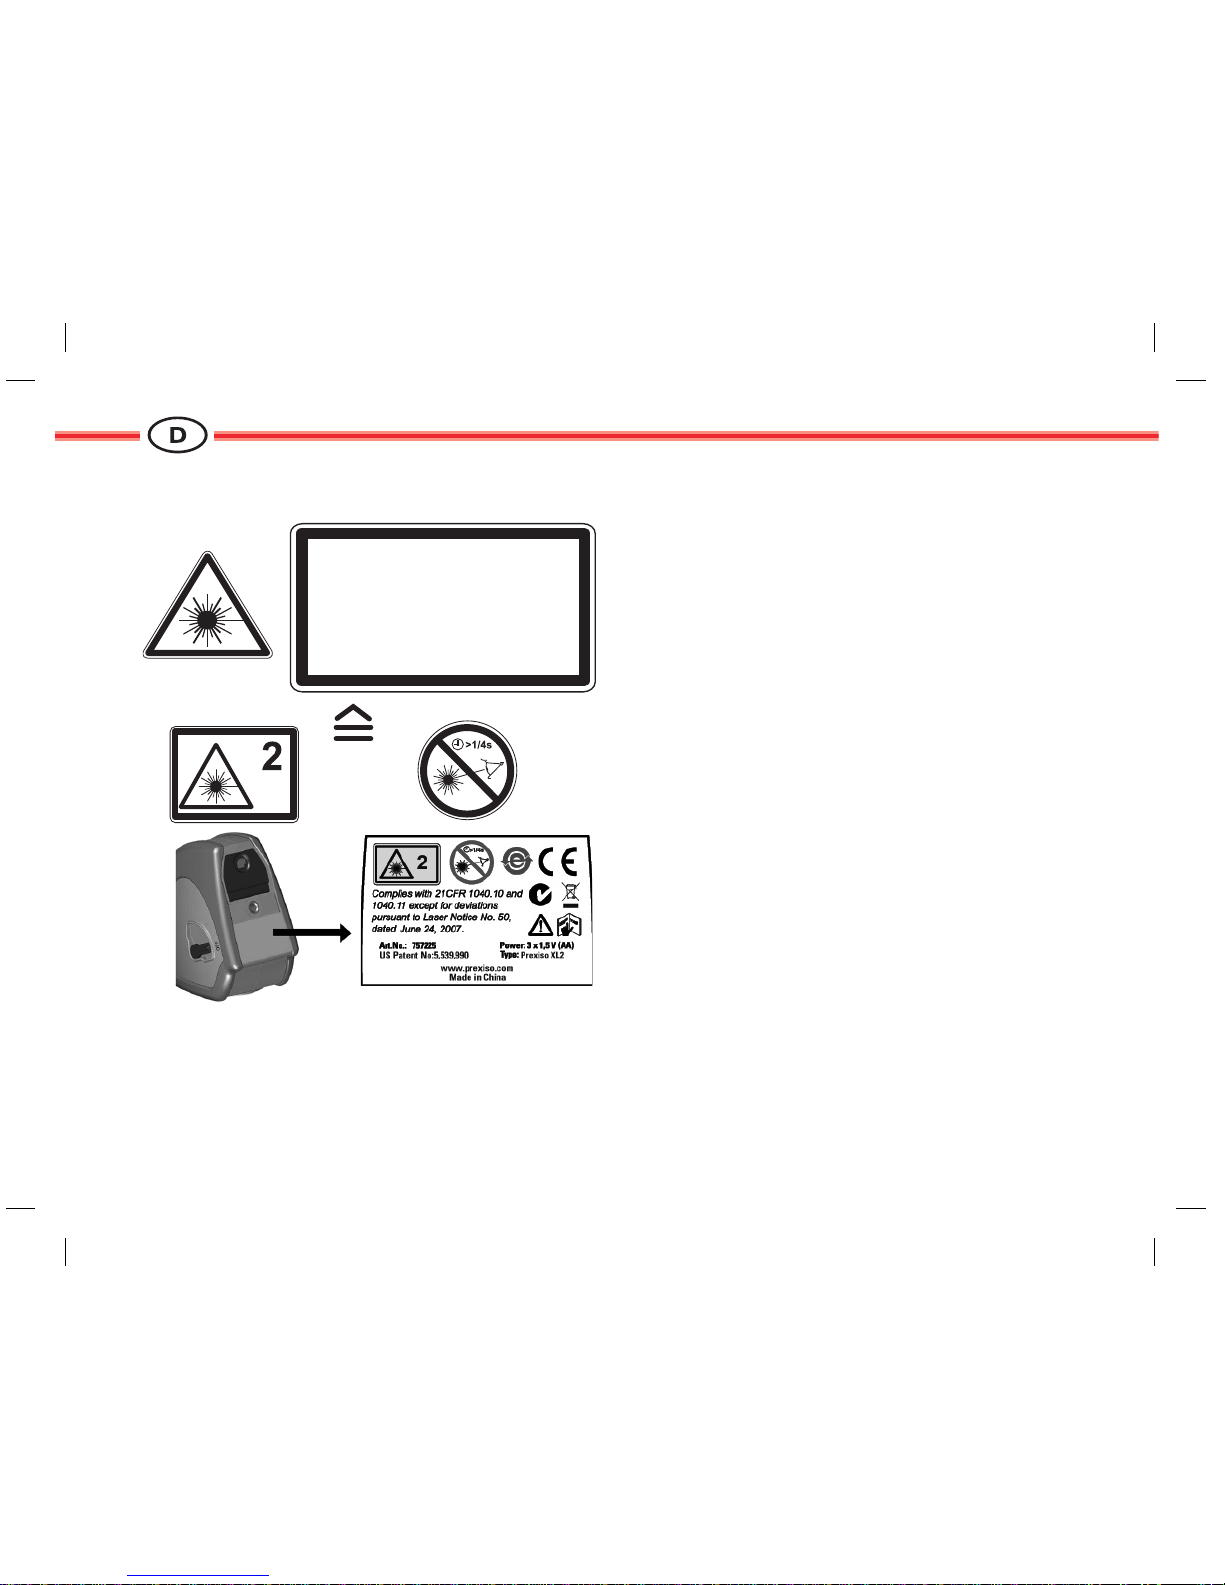
3.9 Labelling
Prexiso XL2
Laser Radiation
Do not stare into the beam
Laser class 2
in acc. with IEC 60825-1:2007
Maximum radiation power: <1.0mW c.w.
Emitted wavelength: 620-690 nm
Beam divergence <130°
13
783114a en
4Care
•Clean the device with a damp, soft cloth.
•Never immerse the device in water.
•Never use aggressive cleaning agents or solvents.
5 Warranty
The Prexiso XL2 has a one year warranty.
For further information on this, contact your dealer.
Subject to change (drawings, descriptions and technical
data).

14
783114a en
15
783114a de
1Gebrauchsanweisung Prexiso XL2
1.1 Bestandteile
1Tastenfeld
2Gummischutz
3Verriegelung
4Laserfenster
51/4’’ Gewinde
6Batteriefachabdeckung
3 AA 1.5 V Alkalibatterien oder Akkus
verwenden
7Transporttasche
8L-Halterung
1.2 Batterien einlegen und wechseln
Batteriefachdeckel an der Unterseite des Geräts öffnen,
wie in der Abbildung gezeigt, und Batterien polrichtig
einlegen. Batteriefachdeckel schliessen. Der Deckel ist
richtig geschlossen, wenn ein Klickgeräusch ertönt.
Bei niedrigem Batterieladezustand verlieren die Laserstrahlen an Helligkeit. Die Batterien sollten daher zeitgerecht ersetzt werden.
Nur Alkalibatterien oder Akkus verwenden!
Wird das Gerät länger nicht benutzt, Batterien entnehmen, um eine Korrosion zu vermeiden.
1.3 Betrieb
Als erstes den Verriegelungsmechanismus in die
entriegelte Position bewegen. Der horizontale und der
vertikale Strahl leuchten gleichzeitig.
1
2
3
4
5
6
7
8
16
783114a de
Verwendung der "M"-Taste
–Beim erstmaligen Drücken leuchtet die horizontale
Linie.
–Beim zweiten Drücken leuchtet die vertikale Linie.
–Beim dritten Drücken leuchten beide Linien.
–Durch mehrmaliges Drücken der "M"-Taste wird
zwischen den Funktionen gewechselt.
Verriegelungsmechanismus in die verriegelte Position
bewegen (siehe Abbildung). Das Gerät kann auf einem
Stativ betrieben werden. Zur Anbringung auf einem
Stativ siehe die Abbildung unten.
Das Gerät dient zur Montage von Decken und Böden.
17
783114a de
1.4 Genauigkeitsprüfung bei der
automatischen Nivellierung
Prüfen Sie die Genauigkeit Ihres Kreuzlinienlasers
anhand der nachstehenden Anleitung.
1.4.1 Nivelliergenauigkeit prüfen
Zur Prüfung werden zwei Wände im Abstand von ca.
5m benötigt.
Kreuzlinienlaser einschalten und im entriegelten Modus
die horizontale Nivellierung aktivieren. Das Gerät auf
einem Stativ mittig zwischen den beiden Wänden (A+B)
aufstellen.
Das Gerät auf Wand A ausrichten und die Position der
Linie auf Wand A markieren A (-> A1).
Das Gerät um 180° drehen und die horizontale Linie auf
Wand B ebenso markieren (-> B1).
Anschliessend das Gerät auf derselben Höhe so nah wie
möglich an Wand A aufstellen und die horizontale Linie
erneut an Wand A markieren (-> A2).
Das Gerät nun wieder um 180° drehen und die horizontale Linie an Wand B markieren (-> B2). Jetzt die
Abstände zwischen den markierten Punkten A1-A2 und
B1-B2 messen und die Differenz zwischen den beiden
Messungen errechnen. Beträgt die Differenz nicht mehr
als 3 mm, liegt der Prexiso XL2 innerhalb seiner
Genauigkeitstoleranz.
| (A1 - A2) - (B1 - B2) | 3 mm
1.4.2 Genauigkeit der horizontalen Linie prüfen
Das Gerät in 5 m Entfernung von der Wand aufstellen,
einschalten und von links nach rechts oder von rechts
nach links bewegen. Dabei die Höhendifferenz der
Strahlenden auf der rechten und auf der linken Seite
vergleichen. Beträgt die Differenz nicht mehr als 4.5 mm,
liegt das Gerät innerhalb seiner Genauigkeitstoleranz.
A1
A
2
A
B
B1B2
180°
180°
max.
>4.5 mm
45° 45°
18
783114a de
1.4.3 Genauigkeit der vertikalen Linie prüfen
Als Hilfsmittel ein Schnurlot verwenden, das so nahe
wie möglich an einer ca. 3 m hohen Wand angebracht
wird.
Das Gerät in ca. 1.5 m Entfernung von der Wand auf
einer Höhe von ca. 1.5 m aufstellen.
Nun das Gerät auf die Wand richten und einschalten.
Das Gerät drehen, am unteren Ende der Lotschnur
ausrichten und die Maximalabweichung der Laserlinie
vom oberen Ende der Lotschnur messen. Beträgt die
Differenz nicht mehr als 3 mm, liegt der Prexiso XL2
innerhalb seiner Genauigkeitstoleranz.
2Technische Daten
1.5 m
max.
3 mm
Funktionen: 1 horizontale Linie plus 1
vertikale Linie
Genauigkeit: ±2 mm/5 m
Arbeitsbereich: 10 m
Empfindlichkeitsbereich: Automatische Nivellierung
±5
Fächerwinkel der horizon-
talen und vertikalen Richtung:
über 130
Batterie: 3 AA-Zellen
Arbeitsstunden: mehr als 16 (mit beiden
Linien)
Arbeitstemperaturbe-
reich:
14°F bis 104°F
(-10°C bis 40°C)
Lagertemperaturbereich: -4°F bis 158°F
(-20°C bis 70°C)
Laserklassifizierung: Laser der Klasse 2
Abmessungen: 109*63*87 mm
Gewicht: 298 g (ohne Batterien)
19
783114a de
3Sicherheitshinweise
Der Betreiber hat sicherzustellen, dass alle Benutzer
diese Hinweise verstehen und befolgen.
3.1 Verwendete Symbole
Die verwendeten Symbole besitzen folgende Bedeutung:
!
WARNUNG:
Gebrauchsgefahr oder sachwidrige Verwendung, die wenn nicht vermieden - schwere Personenschäden oder
den Tod bewirkt.
!
VORSICHT:
Gebrauchsgefahr oder sachwidrige Verwendung, die wenn nicht vermieden - nur geringe oder mässige
Personenschäden, aber erhebliche Sach-, Vermögensoder Umweltschäden bewirken kann.
Nutzungsinformationen, die dem Benutzer
helfen, das Gerät technisch richtig und effizient
einzusetzen.
3.2 Bestimmungsgemässe Verwendung
•Projektion von horizontalen und vertikalen Laserlinien
3.3 Sachwidrige Verwendung
•Verwendung des Geräts ohne Anweisungen
•Verwendung des Geräts ausserhalb der genannten
Grenzwerte
•Deaktivierung von Sicherheitssystemen und Entfernung von Informations- und Gefahrenaufklebern
•Öffnen des Geräts mit Hilfe von Werkzeugen
(Schraubendreher usw.), sofern dies nicht in bestimmten Fällen ausdrücklich zulässig ist
•Durchführen von Modifikationen oder Umbauten
des Geräts
•Absichtliches Blenden Dritter, auch in der Dunkelheit
•Unzulängliche Sicherheitsvorkehrungen am
Messort
3.4 Einsatzgrenzen
Siehe Abschnitt "Technische Daten".
Der Prexiso XL2 ist für den Einsatz in ständig von
Menschen bewohnbaren Gebieten ausgelegt. Das Gerät
darf nicht in einer explosionsgefährdeten oder aggressiven Umgebung eingesetzt werden.

20
783114a de
3.5 Verantwortungsbereiche
Verpflichtungen des Herstellers der Originalausrüstung:
Prexiso AG
Europastrasse 27
CH-8152 Glattbrugg
Internet: www.prexiso.com
Die Prexiso AG ist verantwortlich für die sicherheitstechnisch einwandfreie Lieferung des Geräts inklusive Gebrauchsanweisung.
Die Prexiso AG übernimmt keine Verantwortung für
Fremdzubehör.
Verpflichtungen des Betreibers:
Für den Betreiber gelten folgende Pflichten:
•Er versteht die Sicherheitshinweise auf dem Gerät
und die Instruktionen in der Gebrauchsanweisung.
•Er kennt die ortsüblichen Sicherheitsvorschriften.
3.6 Gebrauchsgefahren
!
VORSICHT:
Vorsicht vor fehlerhaften Messungen beim Verwenden
eines defekten Geräts, nach einem Sturz oder sonstigen
unzulässigen Anwendungen bzw. Veränderungen am
Gerät. Regelmässige Kontrollmessungen durchführen,
besonders nach übermässiger Beanspruchung des
Geräts sowie vor und nach wichtigen Messaufgaben.
Siehe Abschnitt "1.4 Genauigkeitsprüfung bei der
automatischen Nivellierung".
!
WARNUNG:
Leere Batterien dürfen nicht im Hausmüll
entsorgt werden. Geben Sie gebrauchte
Batterien aus Umweltschutzgründen an den
dafür vorgesehenen Sammelstellen ab.
Das Gerät darf nicht im Hausmüll entsorgt
werden.
Entsorgen Sie das Gerät sachgemäss.
Befolgen Sie die länderspezifischen Entsorgungsvorschriften.
Schützen Sie das Gerät jederzeit vor dem Zugriff
unberechtigter Personen.
Informationen zur produktspezifischen Behandlung und
Entsorgung stehen auf der Homepage der Prexiso AG
unter http://www.prexiso.com/ zum Download bereit
oder können bei Ihrer Prexiso-Vertretung angefordert
werden.
21
783114a de
3.7 Elektromagnetische Verträglichkeit
(EMV)
!
WARNUNG:
Der Prexiso XL2 erfüllt die strengen Anforderungen der
einschlägigen Normen und Richtlinien.
Trotzdem kann die Möglichkeit einer Störung anderer
Geräte nicht ganz ausgeschlossen werden.
!
VORSICHT:
Führen Sie keine Reparaturen am Produkt durch.
Wenden Sie sich im Fall eines Defekts an Ihren Händler.
3.8 Laserklassifizierung
Der Prexiso XL2 erzeugt sichtbare Laserstrahlen, die
vom Gerät abgestrahlt werden:
Das Gerät entspricht der Laserklasse 2 gemäss:
•IEC60825-1:2007 "Sicherheit von Lasereinrichtungen"
Produkte der Laserklasse 2:
Nicht in den Laserstrahl blicken und Strahl nicht
unnötigerweise auf andere Personen richten. Der Schutz
des Auges wird üblicherweise durch Abwendungsreaktionen einschliesslich des Lidschlussreflexes bewirkt.
!
WARNUNG:
Der direkte Blick in den Strahl mit optischen Hilfsmitteln
(z.B. Ferngläser, Fernrohre) kann gefährlich sein.
!
VORSICHT:
Der Blick in den Laserstrahl kann für die Augen
gefährlich sein.
22
783114a de
3.9 Kennzeichnung
Prexiso XL2
4Pflege
•Gerät mit einem weichen, feuchten Tuch reinigen.
•Gerät niemals in Wasser eintauchen.
•Gerät niemals mit aggressiven Reinigungs- oder
Lösungsmitteln reinigen.
5Garantie
Auf den Prexiso XL2 wird ein Jahr Garantie gewährt.
Weitere Informationen zu diesem Thema erhalten Sie
bei Ihrem Händler.
Änderungen vorbehalten (Abbildungen, Beschreibungen und technische Daten).
Laserstrahlung
Nicht in den Strahl blicken
Laserklasse 2
gemäss IEC 60825-1:2007
Maximale Strahlungsleistung: <1.0 mW c.w.
Abgestrahlte Wellenlänge: 620-690 nm
Strahldivergenz <130°

23
783114a fr
1Manuel d'utilisation Prexiso XL2
1.1 Eléments
1Clavier
2Caoutchouc
3Bouton de verrouillage
4Fenêtre de sortie laser
5Ecrou 1/4"
6Couvercle du compartiment des batteries
Utilisez 3 batteries AA de 1.5 V ou
rechargeables.
7Sacoche
8Fixation en L
1.2 Insertion et remplacement des batteries
Reportez-vous à l'illustration. Ouvrez le couvercle du
compartiment des batteries et insérez les batteries en
faisant attention à la polarité. Remettez le couvercle en
place jusqu'à ce que vous entendiez un clic.
Quand la charge de la batterie devient faible, l'intensité
du faisceau laser diminue. Remplacez les batteries à
temps.
Utilisez uniquement des batteries alcalines
ou rechargeables !
En cas de non-utilisation prolongée de l'instrument,
enlevez les batteries pour éviter une corrosion.
1.3 Mise en œuvre
Mettez d'abord le mécanisme de verrouillage en position ouverte. Les faisceaux horizontal et vertical sont
activés en même temps.
1
2
3
4
5
6
7
8

24
783114a fr
Utilisation du bouton "M"
–La ligne horizontale est active après une pression du
bouton.
–La ligne verticale est active après une deuxième
pression du bouton.
–Les deux lignes sont actives après une troisième
pression du bouton.
–Une pression répétée du bouton "M" active ces états
en boucle.
Mettez le mécanisme de verrouillage en position fermée
(en vous référant à l'illustration). Vous pouvez fixer
l'instrument sur un trépied. Cf. l'illustration pour le
montage sur un trépied.
Vous avez la possibilité d'utiliser l'instrument pour
installer des plafonds et des sols.
25
783114a fr
1.4 Contrôle de précision avec l'autocalage
Référez-vous à nos instructions pour contrôler la précision du laser à lignes croisées.
1.4.1 Contrôle du niveau
Choisissez deux murs distants d'environ 5 m.
Allumez le laser à lignes croisées pour un calage à l'horizontale en mode déverrouillé. Installez l'instrument sur
un trépied à mi-chemin des murs (A+B).
Dirigez l'instrument vers le mur A et marquez la position
de la ligne sur le mur A (-> A1).
Tournez l'instrument de 180° et marquez la position de
la ligne laser horizontale de la même façon sur le mur B
(-> B1).
Installez alors l'instrument à la même hauteur aussi près
que possible du mur A et marquez de nouveau la position de la ligne laser horizontale sur le mur A (-> A2).
Tournez encore une fois l'instrument de 180° et marquez
la position du laser sur le mur B (-> B2). Mesurez les
distances des points marqués A1-A2 et B1-B2. Calculez
la différence des deux mesures. Si la différence ne
dépasse pas 3 mm, l'instrument Prexiso XL2 se trouve
dans la plage de tolérance.
| (A1 - A2) - (B1 - B2) | 3 mm
1.4.2 Contrôle de précision de la ligne horizontale
Installez l'instrument à 5 m du mur, allu mez -le , dép lac ezle de gauche à droite ou l'inverse, comparez les
extrémités du faisceau laser du côté droit et du côté
gauche pour repérer une différence de hauteur. Si la
différence ne dépasse pas 4,5 mm, l'instrument se
trouve dans la plage de tolérance.
A1
A
2
A
B
B1B2
180°
180°
max.
>4.5 mm
45° 45°
26
783114a fr
1.4.3 Contrôle de précision de la ligne verticale
Utilisez comme référence un fil à plomb et accrochez-le
aussi près que possible d'un mur d'env. 3 m de haut.
Placez l'instrument à une distance d'env. 1,5 m du mur
à une hauteur d'env. 1.5 m.
Dirigez l'instrument vers le mur et allumez-le. Tournez
l'instrument et alignez-le sur la partie inférieure du fil à
plomb. Notez la déviation maximale de la ligne laser au
niveau de la partie supérieure du fil à plomb. Si la
différence ne dépasse pas 3 mm, l'instrument Prexiso
XL2 se trouve dans la plage de tolérance.
2Caractéristiques techniques
1.5 m
max.
3 mm
Fonctionnalité : 1 ligne horizontale + 1
ligne verticale
Précision : ±2 mm/5 m
Portée : 10 m
Plage de sensibilité : Autocalage ±5
Angles de cône des direc-
tions horizontale et verticale : Supérieurs à 130
Batterie : 3 batteries AA
Autonomie : Plus de 16 heures (quand
les deux lignes sont
actives)
Plage de température de
travail :
-10 °C à +40 °C
(14 °F à 104 °F)
Plage de température de
stockage :
-20 °C à +70 °C
(-4 °F à 158 °F)
Classification laser : Classe laser 2
Dimensions : 109*63*87 mm
Poids : 298 g (sans batteries)

27
783114a fr
3Consignes de sécurité
Le responsable de l'instrument doit s'assurer que tous
les utilisateurs comprennent et respectent les consignes
qui suivent.
3.1 Symboles utilisés
Les symboles utilisés ont la signification suivante :
!
ATTENTION :
Signale une situation potentiellement périlleuse ou une
utilisation non conforme qui, si elle n'est pas évitée,
peut entraîner de graves blessures voire la mort.
!
PRUDENCE :
Signale une situation potentiellement périlleuse qui, si
elle n'est pas évitée, peut entraîner des blessures
légères ou causer des dommages matériels
conséquents, des atteintes sensibles à l'environnement
ou un préjudice financier important.
Paragraphes importants auxquels il convient
de se référer dans la pratique car ils permettent
d'utiliser le produit de manière efficace et techniquement correcte.
3.2 Utilisation autorisée
•Projections de lignes laser horizontale et verticale
3.3 Utilisation non autorisée
• Mise en œuvre de l'instrument sans instructions
•Utilisation de l'instrument en dehors des limites
spécifiées
•Désactivation des dispositifs de sécurité et retrait
des avertissements et étiquettes explicatives
•Ouverture de l'instrument avec des outils (tournevis, etc.) dans les cas non expressément autorisés
• Modification ou transformation de l'instrument
•Eblouissement intentionnel d'autres personnes,
même dans l'obscurité
• Mesures de sécurité inappropriées sur le chantier
3.4 Limites d'utilisation
Reportez-vous à la section "Caractéristiques techniques".
Le Prexiso XL2 est conçu pour être utilisé dans des
zones habitables en permanence par les êtres humains.
N'utilisez pas l'instrument dans une zone à risque
d'explosion ou dans un environnement agressif.
28
783114a fr
3.5 Responsabilité
Responsabilité du fabricant de l'équipement d'origine :
Prexiso AG
Europastrasse 27
CH-8152 Glattbrugg
Internet : www.prexiso.com
Prexiso AG est responsable de la fourniture de l'instrument, y compris du manuel d'utilisation, dans un état
impeccable.
Prexiso AG n'est pas responsable des accessoires
d'autres fabricants.
Responsabilité de la personne en charge de l'instrument :
Obligations incombant au responsable de l'instrument :
•Comprendre les consignes de sécurité sur l'instrument et les instructions du manuel d'utilisation.
•Etre familiarisé avec la législation locale en matière
de sécurité et de prévention des accidents.
3.6 Risques liés à l'utilisation
!
PRUDENCE :
Un instrument défectueux ou qui a subi une chute, ou
des modifications, ou a fait l'objet d'une utilisation inappropriée risque de produire des mesuresincorrectes.
Effectuez des mesures de contrôle périodiques.
En particulier après avoir utilisé l'instrument dans des
conditions anormales, de même qu'avant, pendant et
après des mesures importantes.
Reportez-vous à la section "1.4 Contrôle de précision
avec l'autocalage".
!
ATTENTION :
Ne jetez pas les batteries déchargées avec les
ordures ménagères. Respectez l'environnement et déposez-les aux points de
collecte prescrits par la réglementation nationale ou locale.
Ne jetez pas l'instrument avec les ordures
ménagères.
Eliminez l'instrument selon la réglementation nationale
en vigueur dans le pays concerné.
Rendez l'instrument toujours inaccessible au personnel
non autorisé à l'utiliser.
Vous pouvez télécharger des informations spécifiques à
l'instrument (traitement, gestion des déchets) sur le site
de Prexiso AG, à l'adresse http://www.Prexiso.com/, ou
les obtenir auprès de la représentation locale de Prexiso.
 Loading...