

Page 1
LeverEdge
cutting center
• Gives you extra leverage to easily cut through the
hardest vegetables.
• Blade lock holds knife tip in place for fast and
precise chopping and slicing.
• Pivot post doubles as a slicing guide to
assure evenly sliced bread, meat and more.
• Bonus ripple cut knife included for making
crinkle cut fries and fancy cut vegetables.
Visit us on the web at www.GoPresto.com
InstructIons
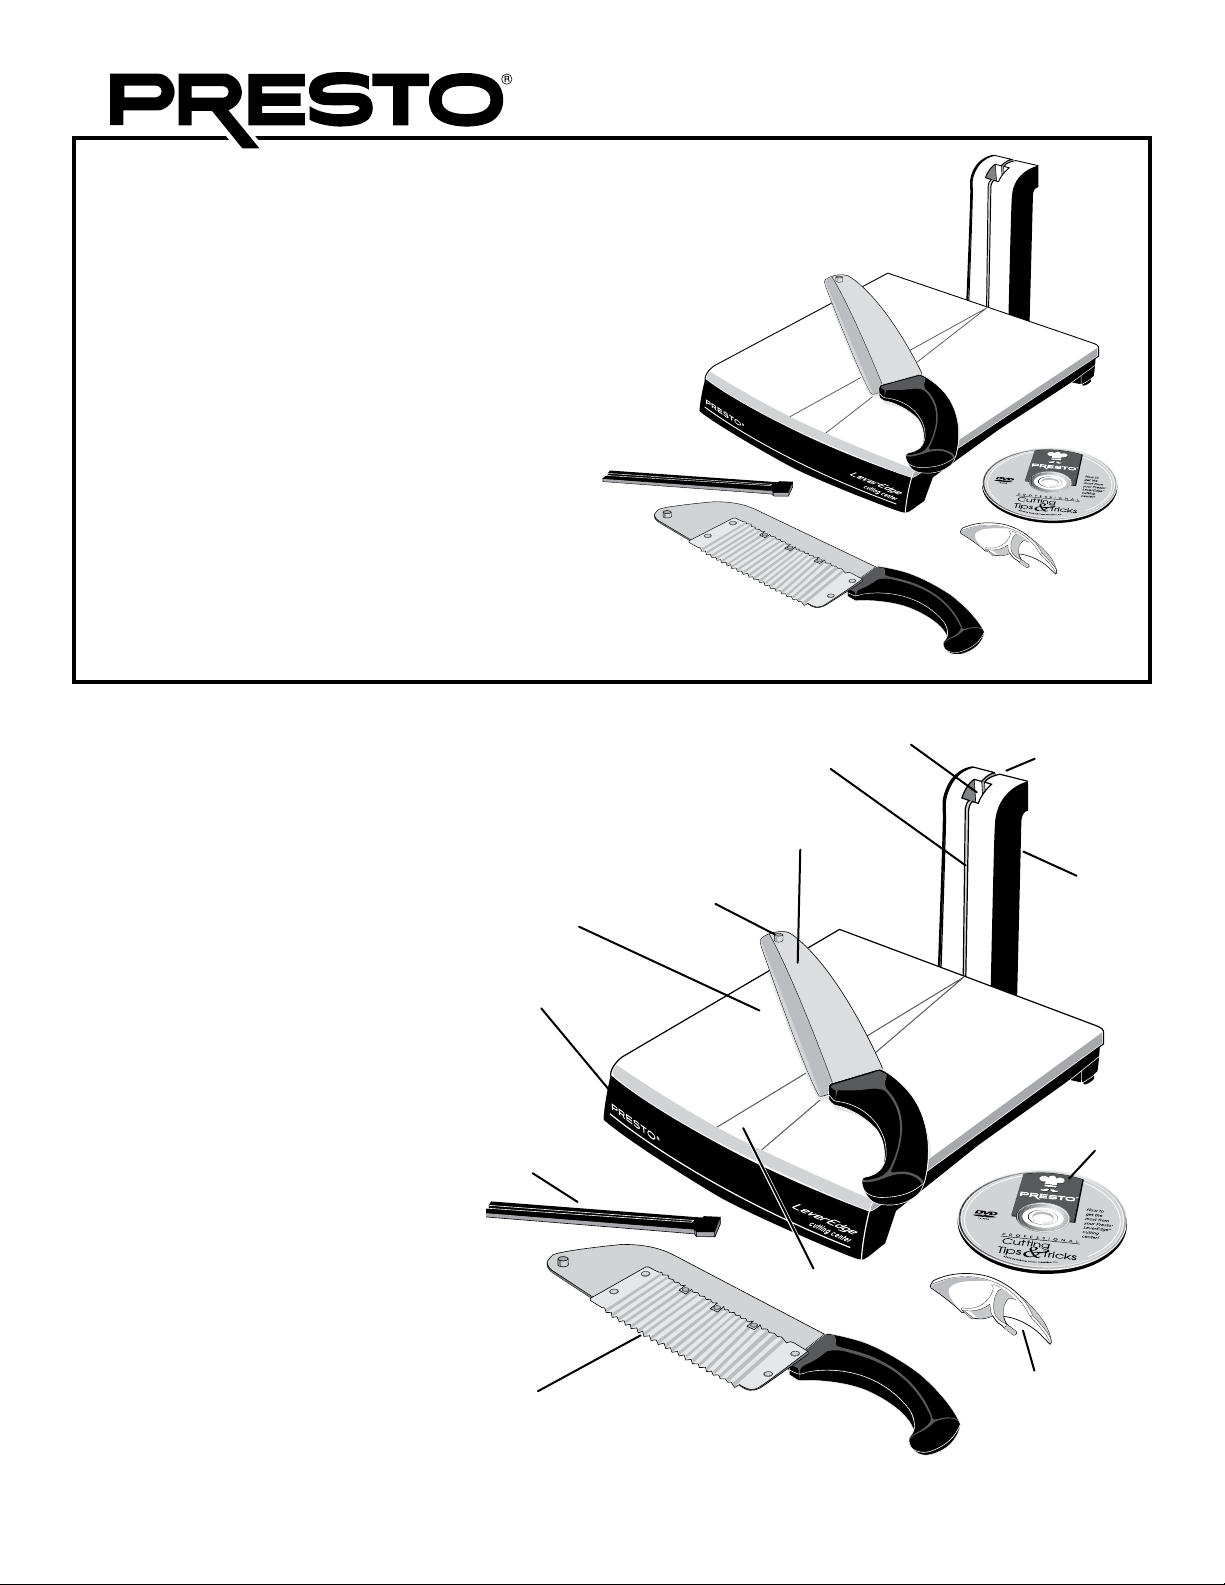
The Presto LeverEdge cutting center comes complete
with the LeverEdge knife, a ripple cut knife, a blade
lock, a blade guide which doubles as a finger shield, and
a Professional Cutting Tips & Tricks DVD.
In addition, the cutting center includes
two cutting surfaces, the removable
white cutting board and the surface of
the cutting board base. You may cut
on both surfaces using your regular
kitchen knives, but you should always
use the white cutting board with the
LeverEdge knife and the ripple cut
knife.
Each cutting surface has a cutting zone
which is a triangular area defined by
two lines (Fig. A). Caution: Knives
are very sharp; to avoid injury always use extra caution when fingers
are within or near the cutting zone.
Removable white
cutting board
Cutting board base
Blade lock
2005 by National Presto Ind., Inc.
Slicing guide
Stainless steel
LeverEdge knife
Pivot pin
Slot
Locking latch
Pivot post
Professional
Cutting Tips
DVD
Prior to using the Presto LeverEdge
cutting center, become familiar with
the various parts of the unit (Fig. A),
read the instructions carefully, and
view the Professional Cutting Tips
DVD. Before initial use, wash all parts
in warm, sudsy water; rinse and dry.
Ripple cut knife
Cutting zone
Blade guide/
finger shield
Fig. A
1
Page 2
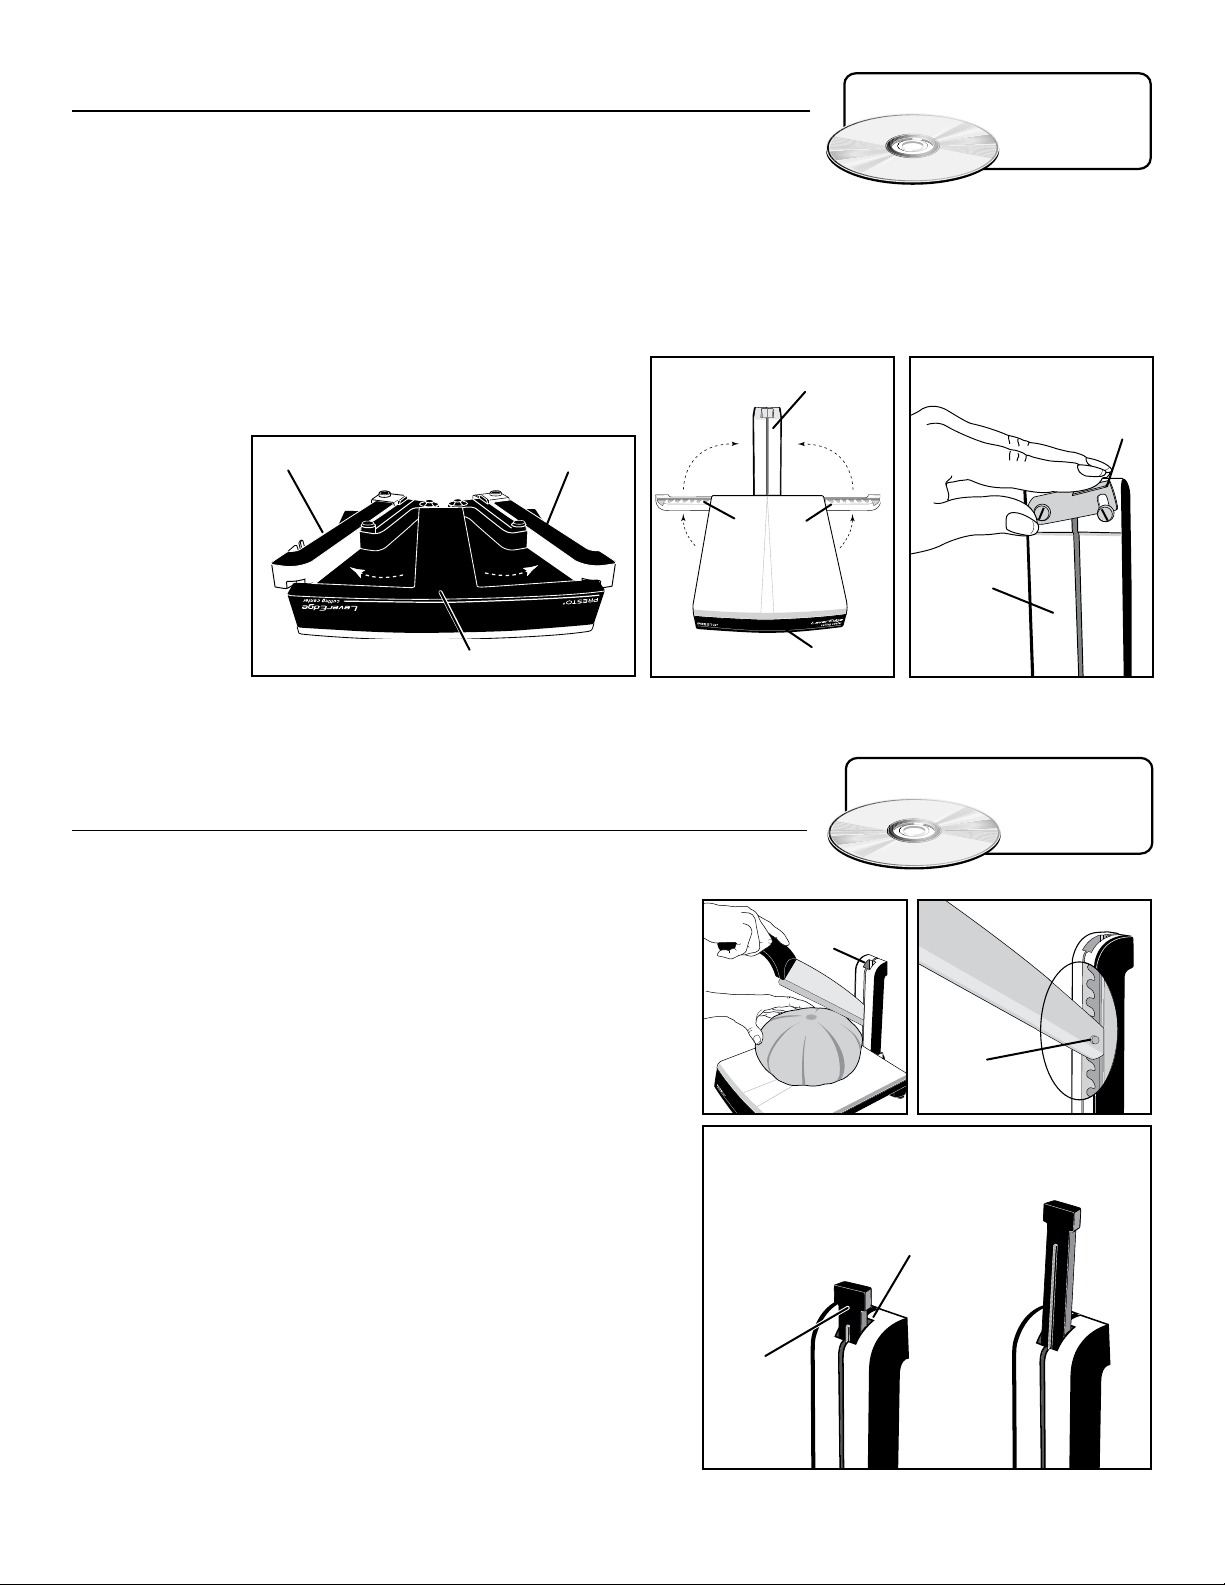
Assembling the Cutting Center
The cutting center will be in the storage position when you take it out of the
box. In order to use the unit, you will need to unfold the pivot post to its cutting
position. Follow these easy steps:
1. Begin with the cutting board base turned upside down on the counter. Note the location of the two sections of the
pivot post. Swivel the two sections of the pivot post outward as shown in Fig. B.
2. Turn the cutting board base over and continue to move the posts until they completely clear the base. Then rotate
them upward until they come together in a vertical
position (Fig. C).
3. Lock the two sections together with the latch on the
back of the
post (Fig. D).
Rotate the
latch until
the notch fits
securely over
the screw. You
are now ready
to begin using
the cutting
center.
Fig. B
Cutting board base
Pivot postPivot post
Fig. C
Pivot posts
clear of
base
Cutting board base
See
Professional Cutting
Tips
Pivot post
vertical
position
Fig. D
Pivot post
DVD,
Chapter
1
Latch
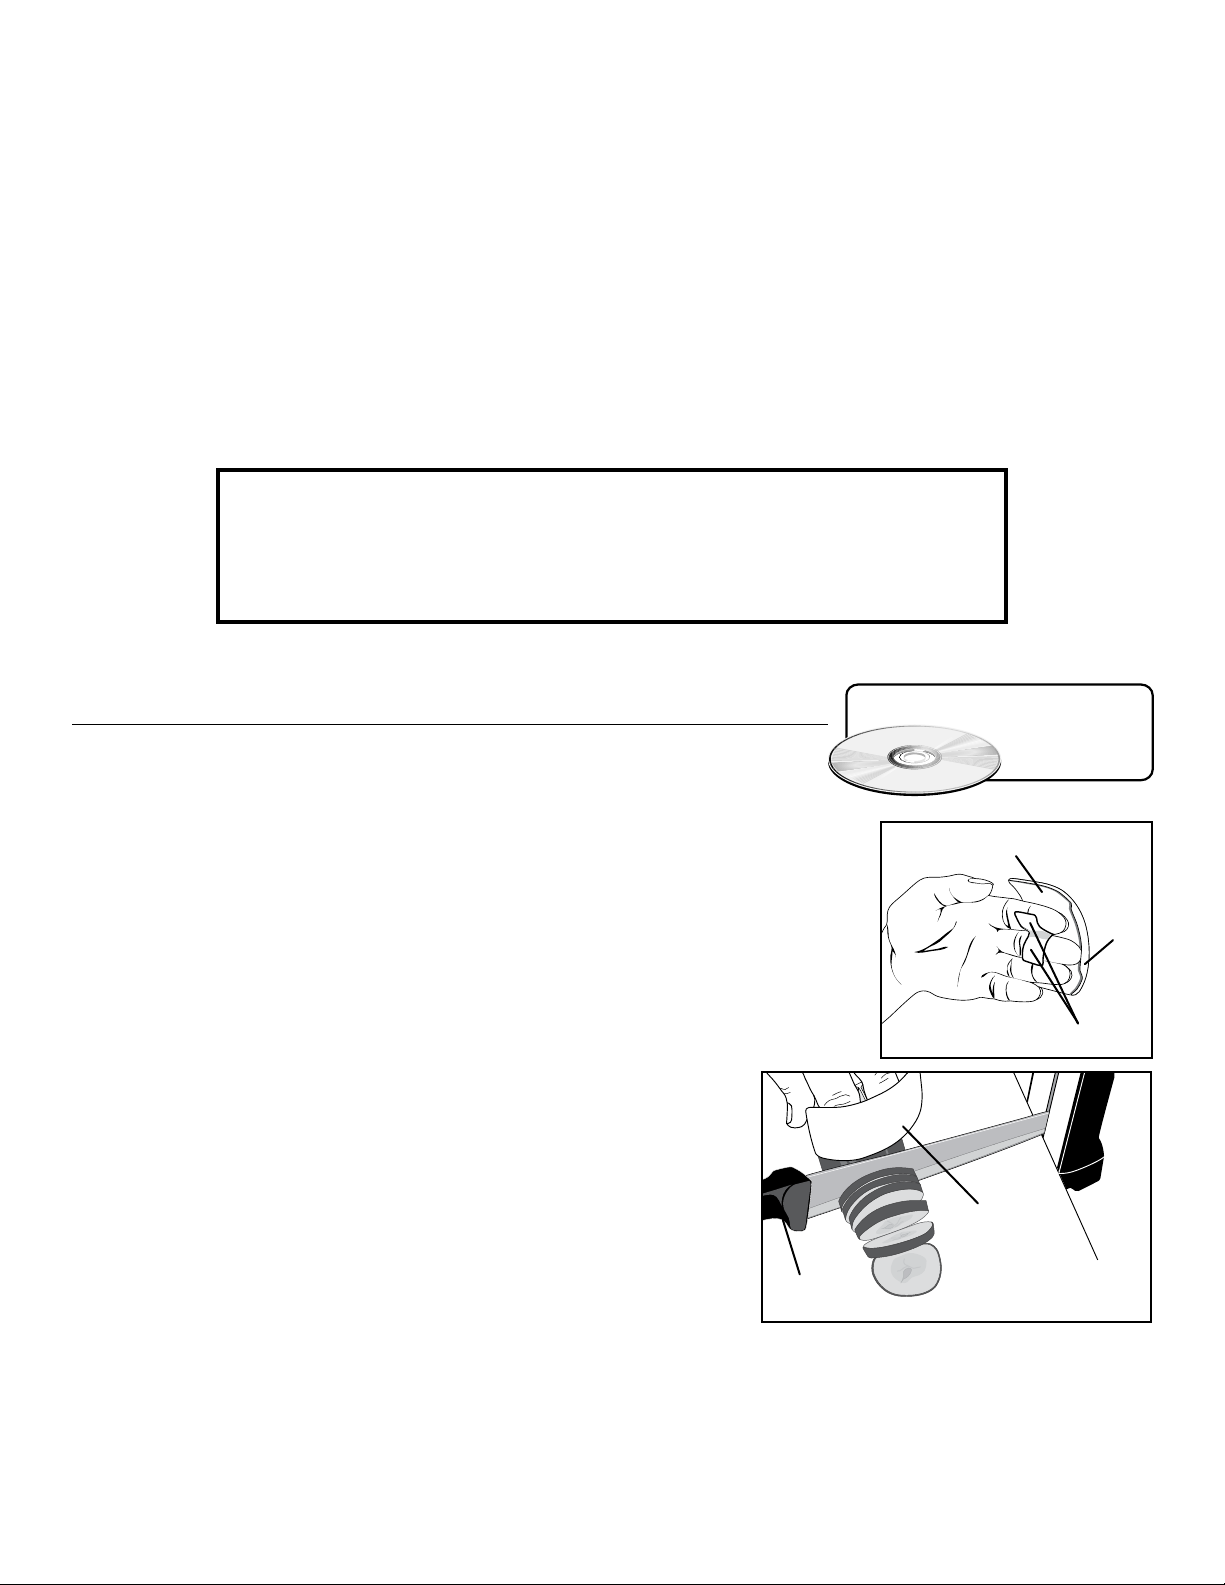
Cutting Hard Foods
with the LeverEdge cutting center
Remember to always use the white cutting board when cutting
with the LeverEdge knife.
1. Place the food to be cut on the cutting center approximately
one inch from the pivot post.
2. Put the tip of the LeverEdge
the pivot post. Slide the knife down until the tip of the knife is
lower than the top of the food, a portion of the blade rests on
the top of the food, and the knife handle is in a comfortable
position (Fig. E).
3. Pull the knife toward you slightly until the pivot pin on the end
of the blade engages in one of the pivot points in the pivot post
(Fig. F). Engaging the pin in the pivot point is what gives you
the extra leverage you need to cut hard foods.
4. Slide the blade lock down into the slot
in the pivot post (Fig. G). This will lock the knife in position,
so it stays in place while you make your cut. You will know the
blade is engaged when only the top of the lock is visible.
5. Once the knife is locked in position, push down on the knife
handle to make the first cut. Extra pressure may be needed for
especially hard foods.
knife into the slot at the top of
Fig. G
Blade
lock
Slot
RIGHT
See
Professional Cutting
Tips
Fig. E
Pin in pivot
point
Fig. F
Slot
DVD,
Chapter
WRONG
2
2
Page 3
6. To cut completely it may be necessary to make two to three additional cuts. The number of cuts depends on the
size and hardness of the food being cut. Generally the larger the food, the more cuts it will take.
To make additional cuts, leaving the blade in the food being cut, remove the blade lock and push the knife away
from you slightly so it disengages from the pivot point. Then slide the tip of the knife farther down the slot to a
pivot point below the one previously used. Select a pivot point where the tip of the knife is lower than the portion
of the knife that is in the food and the knife handle is in a comfortable position.
7. Pull the knife toward you until the pivot pin engages in the lower pivot point, slide the blade lock back in place,
and continue your cut.
8. Repeat steps 6 and 7 until the pivot pin is in the lowest pivot point. That way the blade will end up flat against the
cutting surface so the knife can cut all the way through the food.
9. When you’re done, remove the blade lock. Then push the knife away from you slightly to disengage the pin from
the pivot point and lift the knife back up through the slot in the pivot post.
Remember:
PULLING
PUSHING
pivot point.
the knife toward you ENGAGES the pivot pin in the pivot point.
the knife away from you DISENGAGES the pivot pin from the
Chopping and Slicing
with the LeverEdge cutting center
Always use the white cutting board when chopping and slicing with the
LeverEdge knife.
1. Place the tip of the LeverEdge
and slide the knife down to the lowest pivot point.
2. Pull the knife toward you slightly until the pivot pin on the end of the blade en
gages in the pivot point.
3. Slide the blade lock down into the slot in the post (Fig. G). This will lock the tip
of the blade in place while you move the knife. Locking the tip in place is the key
to cutting with speed and precision. You will know the blade is engaged when only
the top of the lock is visible.
4. Put the blade guide/finger shield on by positioning your index finger
and center finger in the tabs that are located on the back of the guide.
Keep those fingers behind the finger stop (Fig. H). Your thumb and
other fingers are still free to hold and move the food that is being cut.
knife into the slot at the top of the pivot post
-
See
Professional Cutting
Tips
Blade guide/finger shield
Fig. H
DVD,
Chapter
Tabs
3
Finger
stop
5. Place the food you want to chop or slice on the white cutting board.
For more control when slicing, position food closer to the knife
handle (Fig. I). Operate the knife with one hand and slide the food
towards the blade with the other. Use the blade guide/finger shield to
guide the knife blade as you slice.
Warning: Always keep your thumb and other fingers away from
the knife blades. They are very sharp.
6. If smaller diced pieces are desired, simply reposition slices by turning them 90 degrees and repeat step 5.
3
Knife handle
Blade guide/
finger shield
Fig. I
Page 4

Making Ripple Cuts
with the LeverEdge cutting center
Always use the white cutting board when using the ripple cut knife.
1. Using the ripple cut knife, follow steps 1 through 4 for Chopping and
Slicing, on page 3.
See
Professional Cutting
Tips
DVD,
Chapter
4
2. Center the food you want to cut under the ripple portion of the blade
(Fig. J) and begin cutting. Operate the knife with one hand and slide the
food towards the blade with the other. Use the blade guide/finger shield to
guide the blade as you slice.
Note: When using the ripple cut knife, be sure the food that is to be cut is
shorter than the ripple portion of the blade.
For crinkle cut fries or carrot sticks, begin by making lengthwise cuts.
Then rotate the vegetable a quarter turn and while holding the slices together cut again until you have crinkle cut potatoes or carrot sticks.
Using the LeverEdge cutting center
as a slicing guide
The pivot post on your LeverEdge cutting center doubles as a slicing guide
to assure evenly sliced bread, meat and more. For best results when using
the cutting center as a slicing guide, use knives with an 8- to 10-inch blade.
A serrated bread knife works best when slicing bread or other bakery items
and a well sharpened meat knife works best for slicing meat.
1. Position food to be sliced on the cutting board as close to the pivot post
as possible and put the tip of the knife into the slot in the pivot post
(Fig. K).
Fig. J
See
Professional Cutting
Tips
DVD,
Chapter
5
2. Cut the food using a slicing motion. The pivot post will help keep the
knife straight, so you’ll have perfect, even slices.
Fig. K
Tips and Tricks
uFor more control when chopping and slicing, place the food closer to the
knife handle.
u Cut an entire stalk of celery quickly and easily. Simply lock the LeverEdge
knife in the lowest pivot point and begin cutting.
u Cut up an onion the way a chef does by making partial cuts. Instead of placing the LeverEdge knife in the lowest
pivot point, place it in a pivot point about a half-inch above the cutting surface when the knife is in a horizontal
position. Then take the onion and make a series of slices in one direction. Rotate the onion a quarter turn and slice
again. Then, remove the blade lock and move the tip of the knife down to the lowest pivot point and reinsert the
blade lock. Now, just tip the onion sideways and slice some more and you’ll have diced onion.
uMake fancy vegetable platters using the ripple cut knife. Cut a variety of vegetables like carrots, cucumbers, rad-
ishes, and zucchini. Garnish with pieces of fresh lettuce, parsley, and colorful olives.
For more tips and tricks, see
Cutting Tips
DVD
Professional
4
Page 5
uTo make ripple carrot sticks, start with the largest carrots you can find. Then, trim each end so the carrot is shorter
than the cutting part of the ripple cut blade. Slice off one side and turn the carrot so the flat side is down. That way
the carrot will lie flat instead of rolling. Then make a few more slices. Hold the slices together and turn them onto
another flat side. Make a few more slices and you’ll have ripple cut carrot sticks.
Care and Cleaning
Knives: The LeverEdge knife and ripple cut knife are dishwasher safe. However, like other manufacturers of fine,
high quality knives, we recommend washing by hand in hot, soapy water after each use. Dry immediately. Soaking
may result in staining due to mineral content in some water supplies.
If the knives are cleaned in the dishwasher, observe the following: avoid contact with other knives, metal utensils, or
cookware and lay knives flat on a rack positioned so they cannot fall through the rack.
Like any stainless steel utensil, residue from foods, particularly squash, may remain on the knife after rinsing. You
can remove this residue by using a cleaning pad, such as Scotch-Brite* Multi-Purpose Scrub Sponge. If desired, use
a non-abrasive compound such as Bon ami** polishing cleanser. Apply the product with a damp sponge and wipe
stains off quickly. When cleaning, be sure to hold the handle with the blade edge away from you. Polish carefully
and slowly, with a motion directed away from you. Do not use steel wool or cleaners with chlorine bleach to clean
the LeverEdge knife or ripple cut knife.
When necessary, sharpen the LeverEdge knife using a sharpening steel or stone, or have the knife professionally
sharpened. Use of an electric knife sharpener to sharpen the LeverEdge knife is not recommended. Do not sharpen
the ripple cut knife.
Cutting boards and base: Unlatch pivot post and wash cutting board base and removable cutting board in hot,
soapy water, or wash it in the top rack of your dishwasher. Position cutting board base in the dishwasher with pivot
post unfolded so pivot points can be cleaned thoroughly.
If raw meat, fish, or poultry has been cut on the cutting surfaces disinfect with a sanitizing solution of 1 teaspoon of
chlorine bleach to 1 quart of water after washing. Pour or spray the solution over the cutting surface, allow the solution to remain for a few minutes, and then rinse with clean water.
Note: Like all cutting boards, the removable cutting board may become stained after cutting foods such as carrots or
squash. If you wish to remove the stain, spray or wash with the sanitizing solution.
Blade lock and blade guide/finger shield: Place in the utility basket of your dishwasher or wash in hot, soapy water.
The pivot post sections may be unlatched and folded back under the base for easy storage.
*Scotch-Brite is a registered trademark of 3M.
**Bon ami polishing cleanser is a registered trademark of Faultness Starch/Bon Ami Co.
Questions and Answers
Do I need to use the blade lock when cutting hard foods?
Once you become adept at using the LeverEdge cutting center for cutting hard
If you have any questions, see
Cutting Tips
DVD
Professional
foods, you may find that it isn’t necessary to use the blade lock for cutting these
foods. The purpose of the blade lock is to lock the knife tip in position while you make your cut, so it doesn’t slip out
of the pivot point. If you prefer to cut your foods without the blade lock in place, you must pull the knife towards you
as you make your cuts.
My knife keeps slipping out of the pivot point as I am trying to cut hard foods. What am I doing wrong?
If you are using the blade lock, it may not be properly positioned in the pivot post. When correctly positioned, only
the top is visible (See Fig. G, page 2).
If you are not using the blade lock, it is because you are not pulling the knife forward far enough to be engaged in
a pivot point. Pull the knife handle toward you to engage the knife in the pivot post. Use the blade lock to hold it in
place.
5
Page 6

I am having a hard time moving the knife to a lower pivot point when cutting hard foods. What am I doing
wrong?
You probably are not pushing the knife away from you to disengage the pin from the pivot point.
Or, the food you are cutting may be too close to the pivot post making it impossible for the tip of the knife to be lowered to a different pivot point. When placing food on the cutting board, place it approximately one inch from the pivot
post.
When cutting hard foods is it okay to leave the knife blade in the food after each cut?
Yes. The blade should remain in the food being cut. After making the first cut, remove the blade lock and push the
knife blade away from you slightly so it disengages from the pivot point. Then, simply lift up on the knife handle, with
the food attached, and move the knife to a lower pivot point. Reinsert blade lock and continue to cut the food.
My food isn’t totally cut through. Why?
You are not using the white cutting board. You should always use the white cutting board with the LeverEdge knife
and ripple cut knife.
Or, when you make your last cut you do not have the knife in the lowest pivot point. This is necessary so the blade
ends up flat against the cutting surface so the knife can cut all the way through the food.
Can I cut bones or coconut with the cutting center?
Bones and coconut are too hard even for the cutting center. Using the cutting center for these types of items may
damage the unit and/or cause injury.
Consumer Service Information
If you have any questions regarding the operation of your Presto appliance or need parts for your appliance, call our
Consumer Service Department weekdays 8:00 AM to 4:30 PM (Central Time) at 1-800-877-0441 or write:
NATIONAL PRESTO INDUSTRIES, INC.
Consumer Service Department
3925 North Hastings Way, Eau Claire, WI 54703-3703
You may also contact us at our web site www.GoPresto.com. Inquiries will be answered promptly by telephone,
letter, or e-mail. When writing, please include a phone number and a time when you can be reached during weekdays
if possible.
Any maintenance required for this product, other than normal household care and cleaning, should be performed by
our Factory Service Department or any Presto Authorized Service Station. Be sure to indicate date of purchase and a
description of defect when sending an appliance for repair. Send appliances for repair to:
CANTON SALES AND STORAGE COMPANY
Presto Factory Service Department
555 Matthews Dr., Canton, MS 39046-0529
Appliances may also be repaired at any Presto Authorized Service Station. Check your yellow pages for Service Stations
near you.
The Presto Factory Service Department and Presto Authorized Service Stations are equipped to service all PRESTO
appliances and supply genuine PRESTO parts. Genuine PRESTO replacement parts are manufactured to the same
exacting quality standards as PRESTO appliances and are engineered specifically to function properly with its appliances.
Presto can only guarantee the quality and performance of genuine PRESTO parts. “Look-alikes” might not be of the
same quality or function in the same manner. To ensure that you are buying genuine PRESTO replacement parts, look
for the PRESTO trademark.
6
Page 7

PRESTO Limited Warranty
This quality PRESTO appliance is designed and built to provide many
years of satisfactory performance under normal household use. Presto
pledges to the original owner that should there be any defects in material or workmanship during the first year after purchase, we will repair
or replace it at our option. Our pledge does not apply to damage caused
by shipping. To obtain service under the warranty, return this PRESTO
appliance, shipping prepaid, to the Presto Factory Service Department
or to the nearest Presto Authorized Service Station. When returning a
product, please include a description of the defect and indicate the date
the appliance was purchased.
We want you to obtain maximum enjoyment from using this PRESTO
appliance and ask that you read and follow the instructions enclosed.
Failure to follow instructions, damage caused by improper replacement
parts, abuse or misuse will void this pledge. This warranty gives you
specific legal rights, and you may also have other rights which vary from
state to state. This is Presto’s personal pledge to you and is being made
in place of all other express warranties.
NATIONAL PRESTO INDUSTRIES, INC.
Eau Claire, WI 54703-3703
Patent Pending Form 72-673A
7
 Loading...