

Presto Kitchen Kettle XL Instructions Manual
10-quart
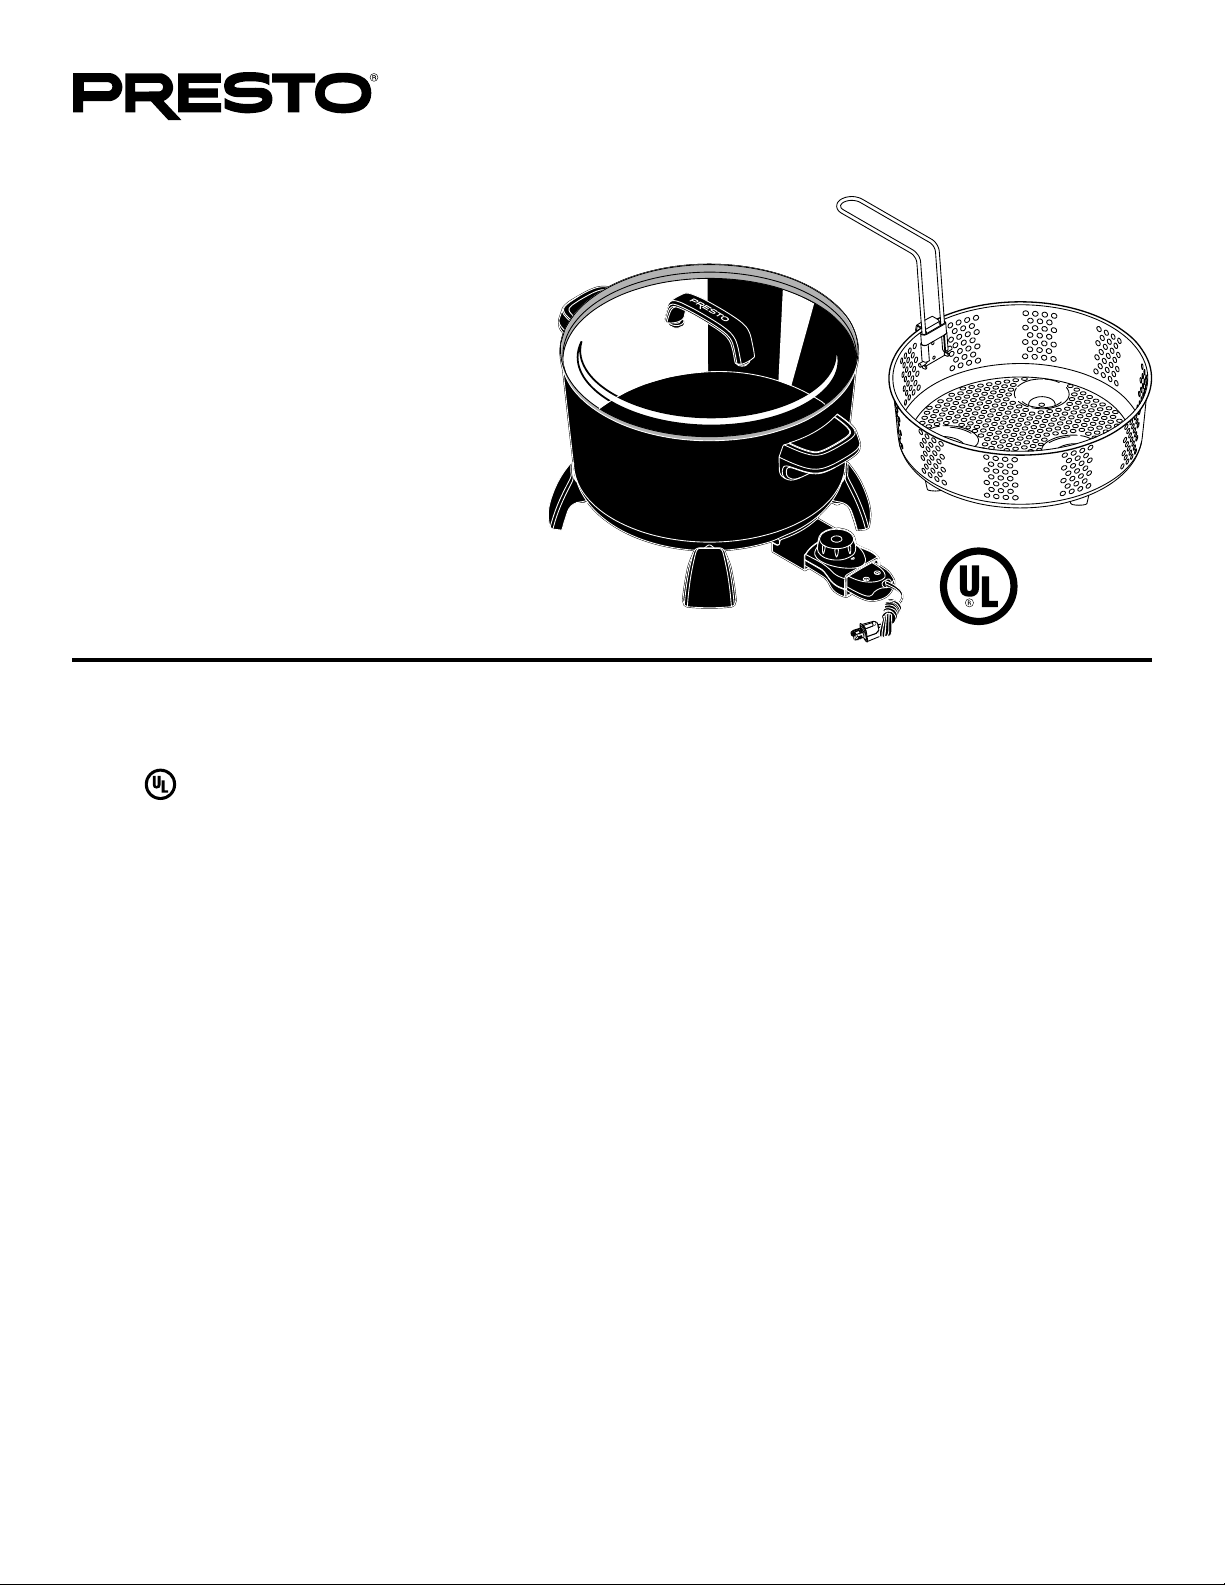
Kitchen Kettle XL™
multi-cooker/steamer
• Steams, stews, roasts, boils, deep fries and more.
• Large cooking surface for convenient browning.
• Nonstick nish, inside and out, for stick-free
cooking and easy cleaning.
• Fully immersible and dishwasher safe with the
heat control removed.
• Descargue en formato PDF en www.GoPresto.com/espanol.
• Envíe un correo electrónico a contact@GoPresto.com.
• Llame al 1-800-877-0441, oprima 2 y deje un mensaje.
INSTRUCTIONS
Visit www.GoPresto.com
This is a Listed appliance. The following important safeguards are recommended by most portable appliance manufacturers.
IMPORTANT SAFEGUARDS
To reduce the risk of personal injury or property damage when using electrical appliances, basic safety precautions should always be
followed, including the following:
1. Read all instructions.
2. To protect against electrical shock or burns, do not immerse heat control or magnetic cord in water or other liquid.
3. Be sure that handles and legs are assembled and fastened properly before using this appliance. See detailed assembly instructions on
page 2.
4. Be sure that handle is properly attached to basket and locked in place. See detailed assembly instructions on pages 2 and 3. Failure to
securely attach basket handle can result in release of basket during use which may result in severe burns.
5. Do not touch hot surfaces. Use handles or knobs.
6. Do not let children handle or put electrical cords or plugs in their mouths.
7. Close supervision is necessary when any appliance is used by or near children.
8. It is recommended that this appliance not be moved when it contains hot oil or other hot liquid. If it must be moved when it contains
hot oil or other hot liquid, use extreme caution.
9. Always attach heat control and magnetic cord to appliance first, then plug cord into the wall outlet. To disconnect heat control and
magnetic cord, turn control to OFF, remove plug from wall outlet, and then remove magnetic plug end from heat control. Allow
appliance to cool, then remove heat control from appliance.
10. Unplug from outlet and remove heat control from appliance when not in use and before cleaning. Allow appliance to cool before
putting on or taking off parts and before cleaning.
11. Do not operate any appliance with a damaged cord or plug or in the event the appliance malfunctions or has been damaged in any
manner. Return the appliance to the Presto Factory Service Department for examination, repair, or electrical or mechanical adjustment.
12. The use of accessory attachments not recommended or sold by the appliance manufacturer may cause injuries. Use only genuine
Presto® accessories and replacement parts.
13. Do not let cord hang over edge of table or counter or touch hot surfaces.
14. Do not place on or near a hot gas or electric burner or in a heated oven.
©2019 National Presto Industries, Inc. Form 4037-018A
1
15. Do not use outdoors.
16. Do not use appliance for other than intended use.
SAVE THESE INSTRUCTIONS
THIS APPLIANCE IS FOR HOUSEHOLD USE ONLY.
Important Cord Information
This appliance has a polarized plug (one blade is wider than the other). To reduce the risk of electric shock, this plug is intended to fit
into a polarized outlet only one way. If the plug does not fit fully into the outlet, reverse the plug. If it still does not fit, contact a qualified
electrician. Do not attempt to modify the plug in any way.
A short detachable power supply cord is provided to reduce the risk of becoming entangled in or tripping over a longer cord. DO NOT
USE WITH AN EXTENSION CORD. Do not allow the cord to run underneath or around the unit. The magnetic cord may not detach
easily if the cord is positioned in this fashion.
Connect the power supply cord to a 120VAC electrical outlet only.
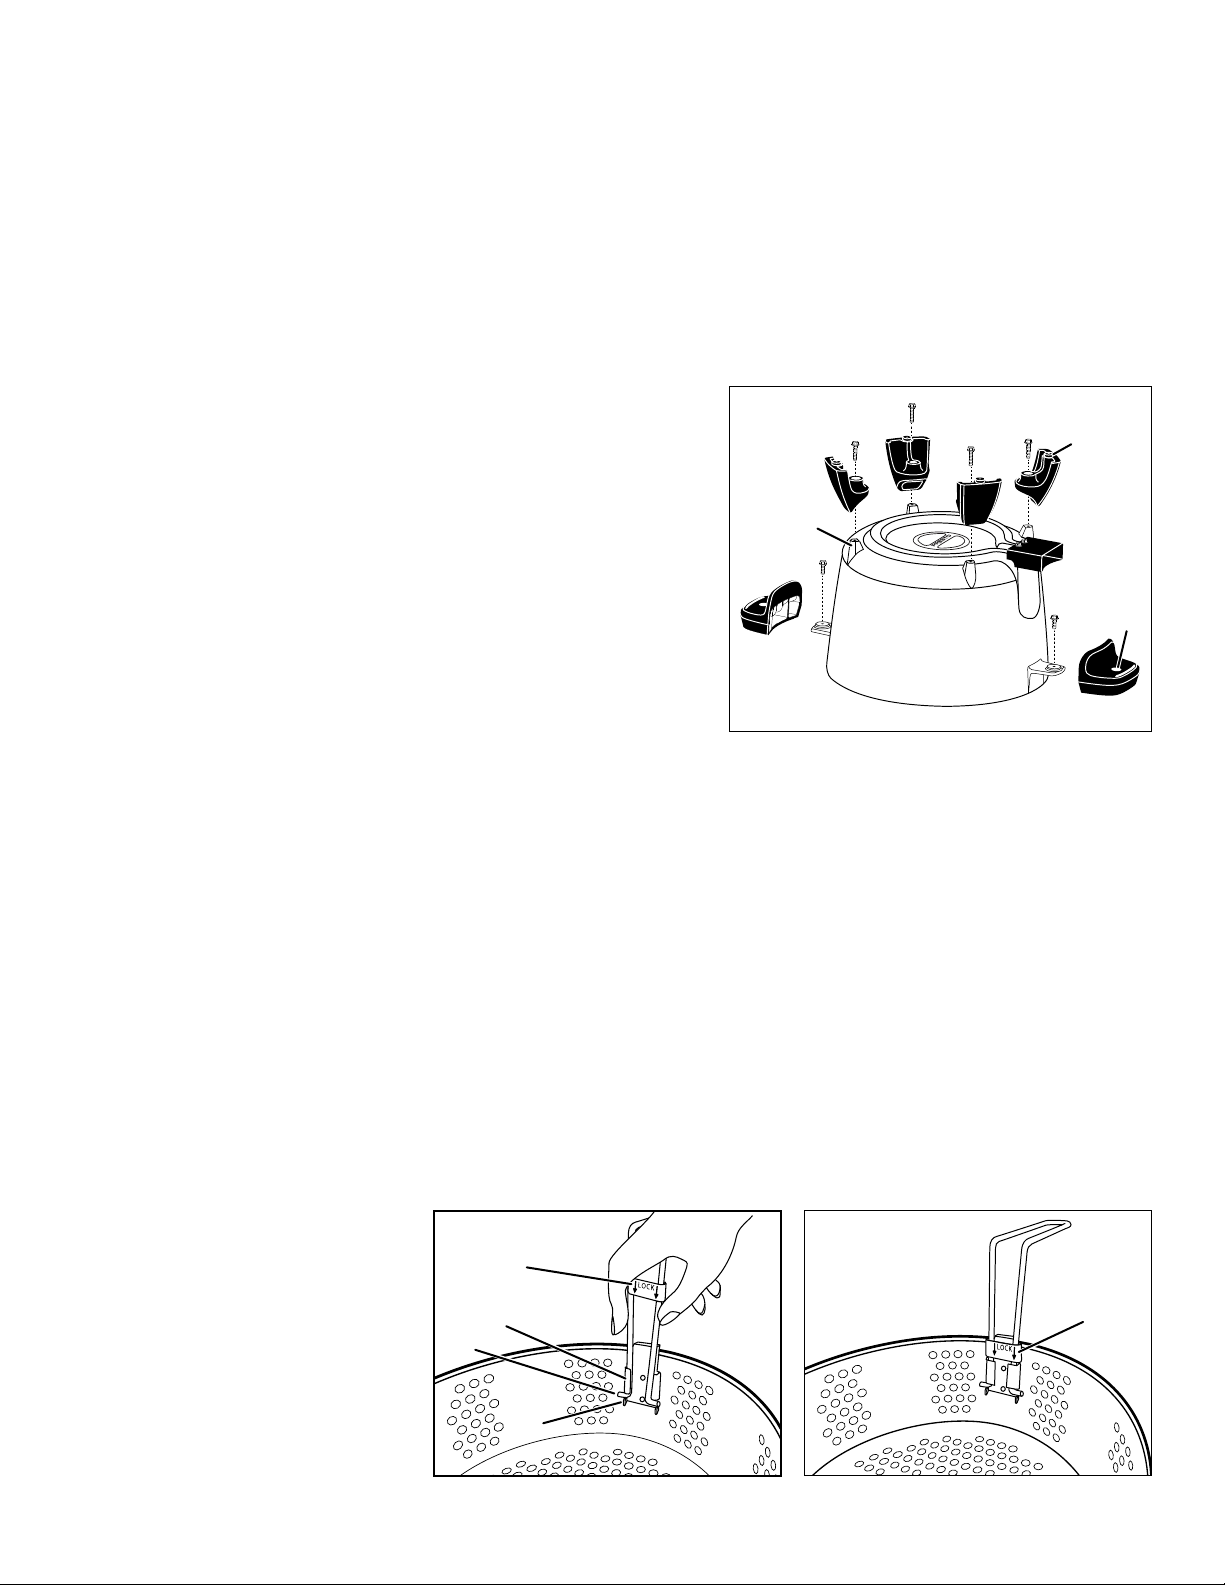
How to Attach Legs and Handles
Tools Required: #2 Phillips screwdriver
Parts Included: 4 legs, 2 handles
To Attach Legs to Base
1. Place the multi-cooker upside down on the table or counter.
2. Using the screwdriver, remove the screws from the four mounting projections
on the bottom of the multi-cooker and set aside. Use these screws to attach
the legs to the base.
3. Position one of the legs, rubber foot facing up, over one of the mounting
projections (Fig. A). Align the hole in the leg with the hole in the mounting
projection and fasten securely with the screw. The leg should not rock or
move if twisted.
NOTICE: Continuing to tighten, once secure, can result in the stripping of screws or the cracking of legs.
4. Repeat step 3 for the other three legs. When properly assembled, the multi-cooker should sit level with no leg rock.
Fig. A
Mounting
projection
Leg
Tab
Screw
Rubber foot
Plug guard
Screw
hole
Handle
To Attach Handles to Base
1. Place the multi-cooker upside down on the table or counter.
2. Using the screwdriver, remove the screws from the tabs on each side of the base and set aside. Use these screws to attach the
handles to the base.
HINT: When removing the screw under the plug guard, hold the screwdriver at a slight angle or use a short screwdriver or a screwdriver
with a long shank.
3. Slide one of the handles, with the screw hole facing up, onto the tab so the hole on the tab aligns with the hole on the handle (Fig. A).
Fasten securely with the screw. The handle should not wobble, but slight movement from side to side is normal.
NOTICE: Continuing to tighten, once secure, can result in the stripping of screws or the cracking of handles.
4. Repeat step 2 for the other handle. When properly installed, the handles should be parallel with the table or counter.
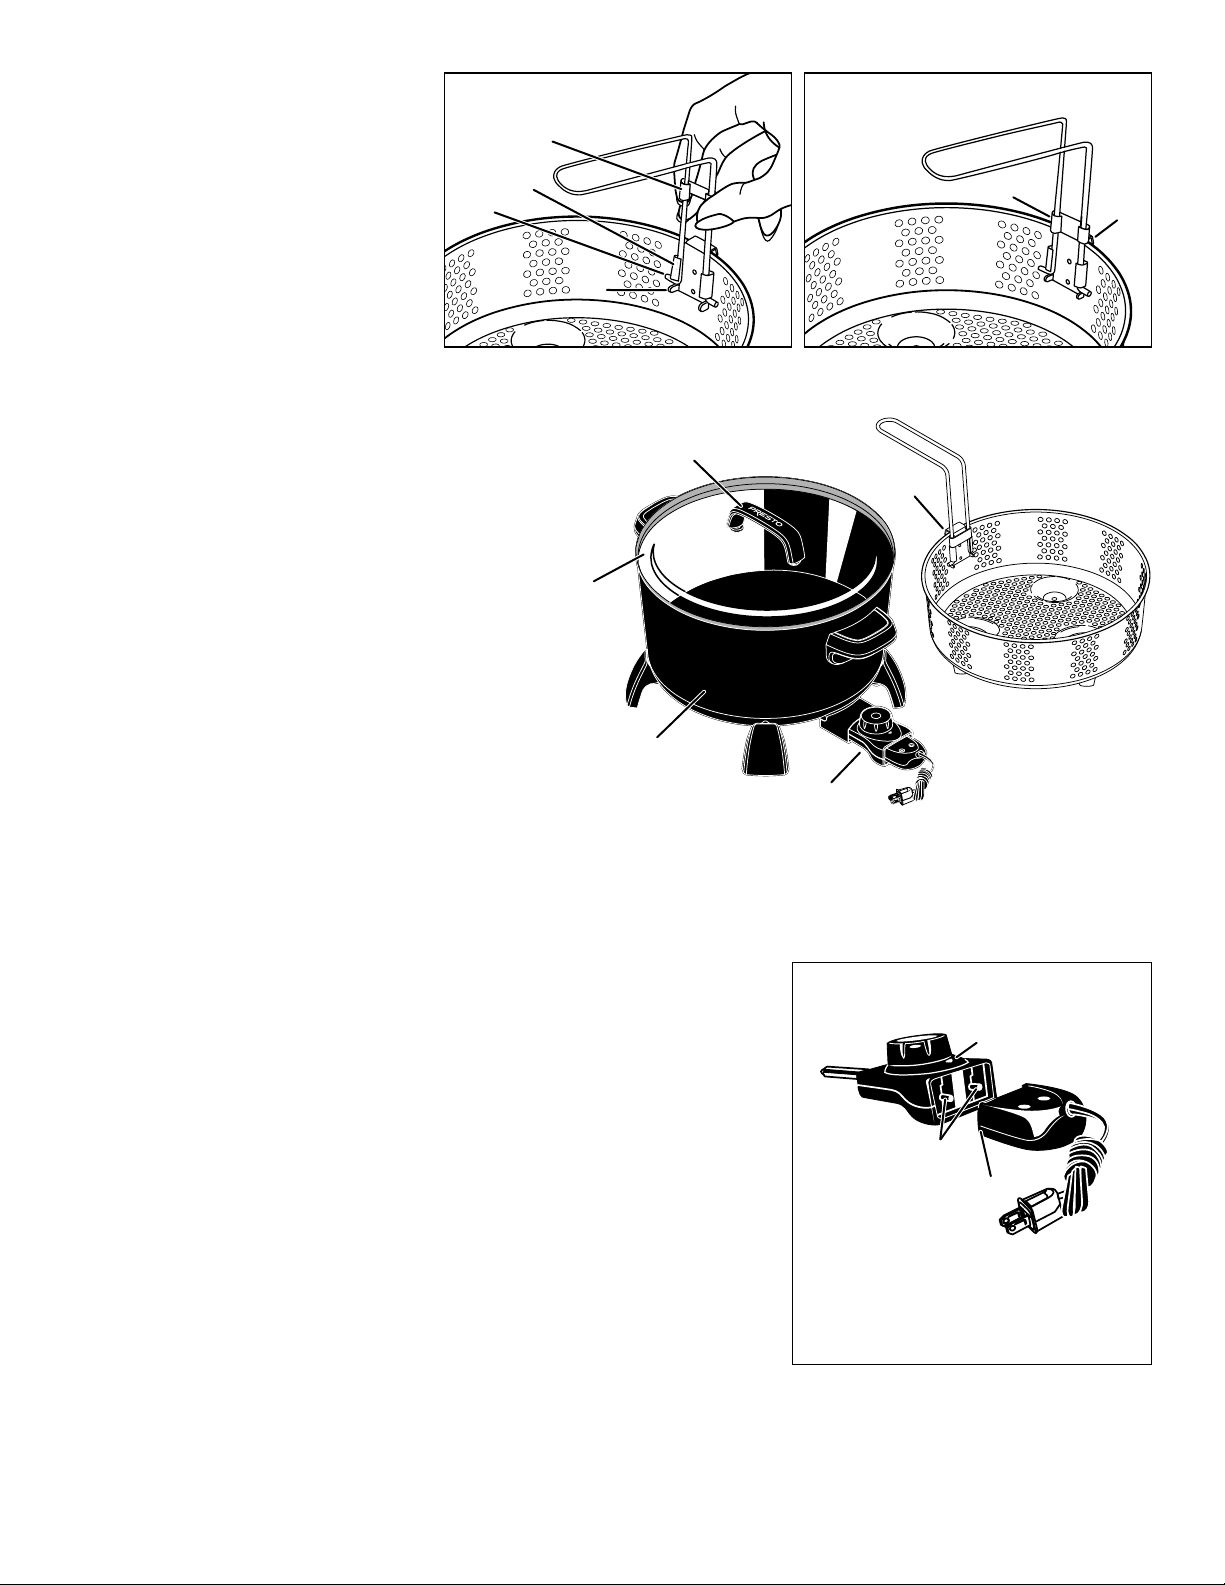
How to Attach Basket Handle for Deep Frying and Blanching
NOTE: When using the basket for deep frying and blanching foods, position the basket handle outside of the basket.
1. Slide the lock bar up on the handle
(Fig. B). Then squeeze the handle bars
together and fit them into the bracket
guides. The pegs should rest on the
bracket tabs below the bracket guides
(Fig. B).
2. After attaching the handle to the basket,
slide the lock bar down (Fig. C) to
the locked position to ensure against
accidental detachment of the handle
from the basket.
Fig. B
Lock bar
Bracket
guide
Peg
Fig. C
Lock bar
Bracket
tab
2
How to Attach Basket Handle for
Fig. D
Fig. E
Steaming
NOTE: When using the basket for steaming
foods, position basket handle towards the
inside of the basket.
1. Slide the lock bar up on the handle.
With the handle facing the inside of the
basket, squeeze the handle bars together
and fit them into the bracket guides. The
pegs should rest on the bracket tabs below
the bracket guides (Fig. D).
2. After attaching the handle to the basket, slide the lock bar down until it touches the top
of the drain hook (Fig. E). This is the locked position and will ensure against accidental detachment of the handle from the basket.
Lock bar
Bracket guide
Peg
Bracket
tab
Lock bar
Drain
hook
Before First Use
Fig. F
Cover handle
Basket handle
This versatile electric multi-cooker braises, steams,
boils, blanches, deep fries and more. It is also great for
Drain hook
Steam/fry basket
making soups, stews, and desserts. Before using the
multi-cooker for the first time, become familiar with the
various parts (Fig. F), read the instructions carefully, and
wash it according to the Care and Cleaning instructions
on page 4.
Tempered
glass cover
CAUTION! This appliance is not intended to melt wax,
gels, plastics, or other materials for making candles or for
other hobbyist activities or in any commercial or business
application. Using this appliance for purposes different
from those specified in the instruction manual may cause
damage to the appliance and will void the warranty.
How to Use
Nonstick surface
inside and out
Control Master®
heat control
Magnetic
cord
NOTICE: Avoid using no-stick cooking sprays as they
may cause the cooking surface to become tacky. In addition, use heat-resistant nylon, plastic, wooden, or rubber utensils to turn, stir, or
remove food when not using the steam/fry basket. Do not use metal utensils as they may scratch the nonstick surface.
1. Place the multi-cooker on a dry, level, heat-resistant surface away from the wall and the edge of the surface. Do not let the cord hang
or drape over the edge of the counter or table within reach of children. Remove the cover from the multi-cooker.
NOTICE: To prevent possible heat damage to your countertop, place a heat-resistant
counter protector, such as aluminum foil, under the multi-cooker, taking care not to
place the foil under the legs.
2. Insert the heat control probe into the multi-cooker so the two electrical pins on the
appliance are fully inserted into the heat control.
Then attach the magnetic cord to the heat control by aligning the magnetic plug end
with the two electrical pins located on the back of the heat control (Fig. G).
Due to the fact the magnetic plug end is polarized, it is intended to be attached to the
heat control only one way. The printed patent information on the plug end should
Fig. G: Control Master® heat control
Heat selector
Probe
Heat control
Electrical pins
Magnetic plug end
Pilot light
Magnetic
cord
be facing up. The cautionary language should be facing the counter. When properly
aligned and positioned correctly, the cord end will magnetically attach itself to the
heat control.
IMPORTANT: The magnetic cord was designed to detach easily from the heat
control. As a result, if bumped or touched during use, it could detach and cause the
multi-cooker to stop heating. Avoid contact with the magnetic cord during operation. If
To assure the continued accuracy of the Control
Master® heat control, avoid rough handling during
use and storage. Store it in a clean, dry location away
from metal objects. Always check the magnetic plug
end of the cord before use to assure metal items have
not become attached.
contact occurs, verify the magnetic cord is still properly connected to the heat control.
3. Using the cooking method index below, determine the type of cooking method desired and turn to the referenced page.
4. Plug the multi-cooker into a 120VAC electrical outlet only. Preheat the multi-cooker as indicated by the cooking method and follow
the cooking instructions. During cooking, the pilot light will go on and off indicating the temperature is being maintained.
3
 Loading...