

Page 1
Car Video Recorder
RoadScanner 700GPS
User Manual
Page 2

About this user manual
This user manual is specially designed to detail the device’s functions and features.
1. Please read this manual before using the device to ensure safe and properuse.
2. Descriptions are based on the device’s default settings.
3. Prestigio continuously strives to improve its products. Due to software upgrading,some
contents in this user manual may be different from your product. Prestigio reserves the rights
to revise this user manual or withdraw it at any time without prior notice. Please take your
product as standard.
Conventions used in this manual
In this user manual, we use the following symbols to indicate useful and important information:
Caution: provides safety precaution and important information.
Note: gives additional information.
Tips: usage tips.
> The order of options or menus you must select to perform a step.
© Copyright 2018 Prestigio. All rights reserved.
Page 3
1. Unboxing
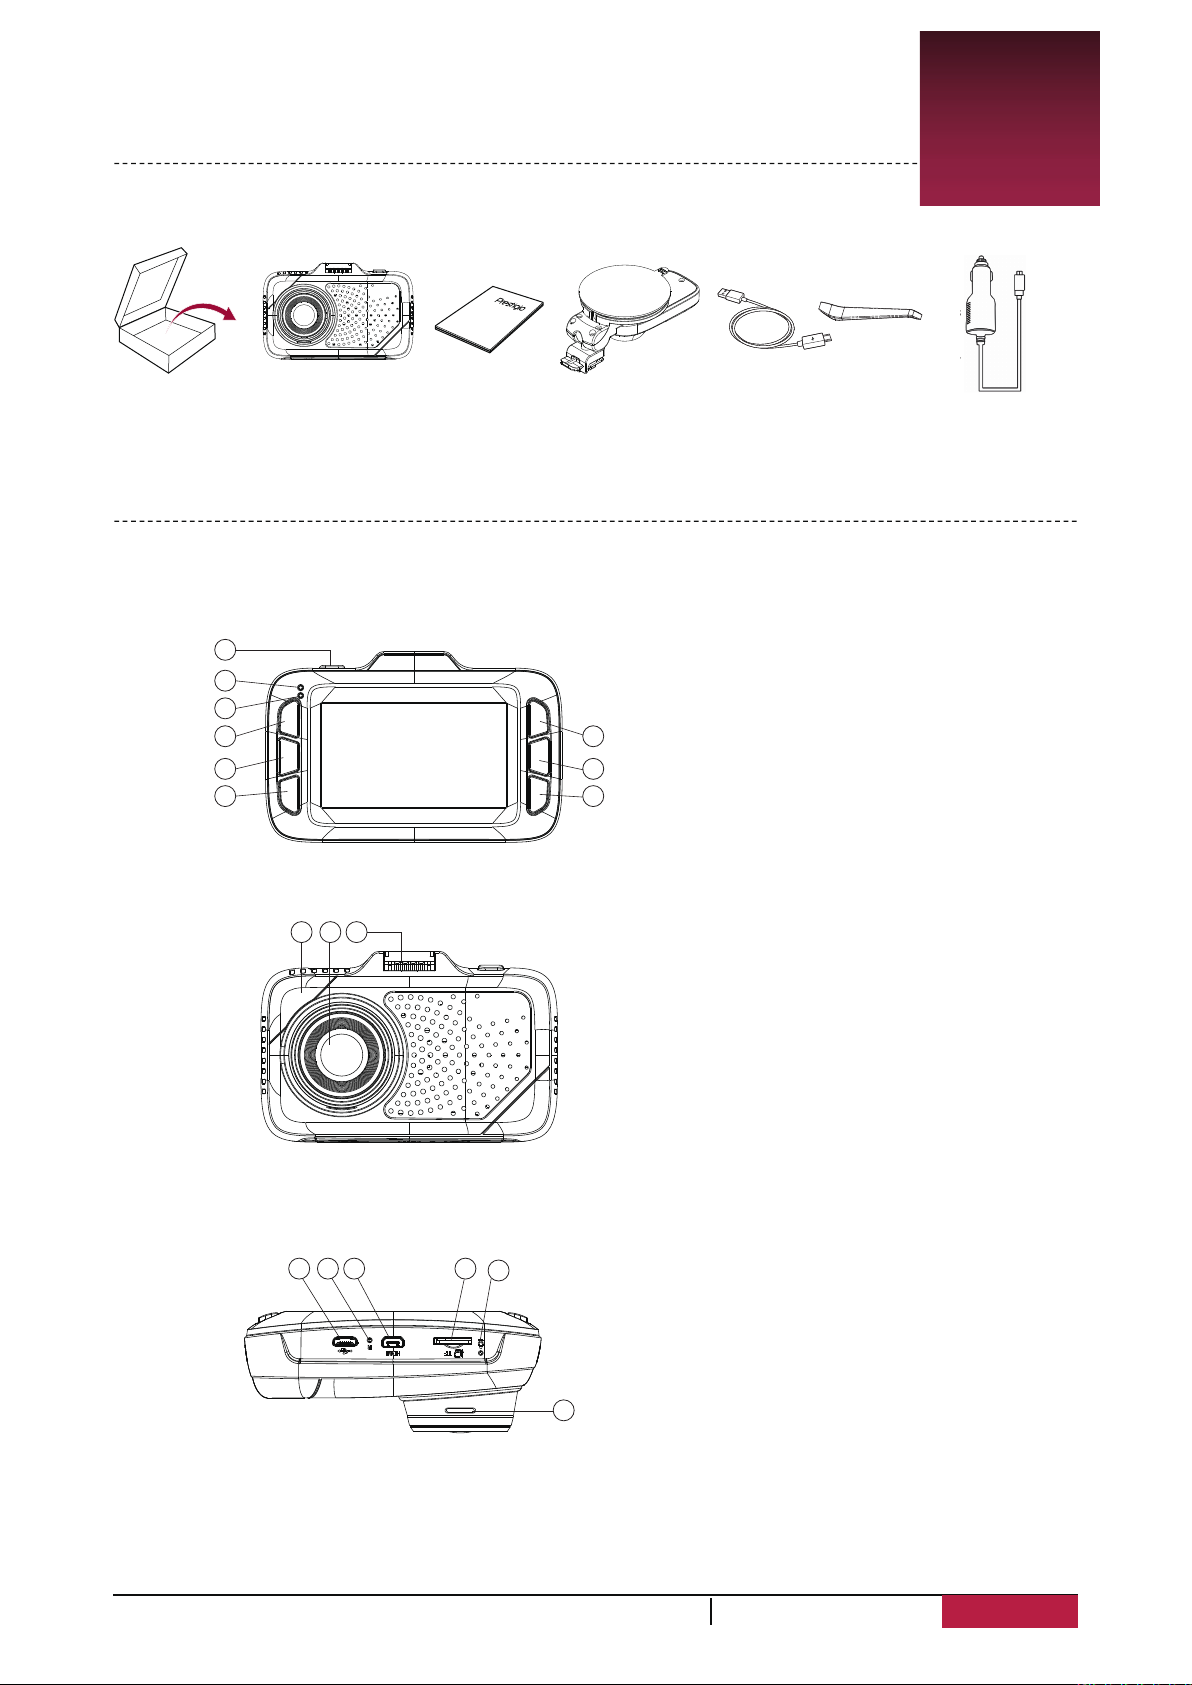
Inside your package
• Car video recorder • Car charger ••Quick start guide
• Suction mount • USB cable
Device overviewe
1
2
3
4
5
6
10 11 12
13 14 15 16
17
7
8
9
1.Power Buon
2.Charging Indicator
3.Recording Indicator
4.UP/Volume Key
5.OK:Confirm Buon
6.Down/Sound record buon
7.MENU: Menu/Return
8.MUTE: Mute
9.MODE: Mode/Photo taking
10.Radar Guided Panel
11.Lens
12.Chargeable GPS holder contact
13.USB Slot
14.Reset Buon
15.HD-Port
16.microSD Slot
17.MIC
18.Speaker
Crowbar
1
18
RoadScanner 700GPSUser Manual
1
Page 4

2.
Geting
Insert a micro SD card
Before starting video recording, please insert a micro SD card (not included)
into the slot until it locks in place.
The device will automatically recognize it as default storage and all the data will besaved
on this card.
Install suction mount
started
2
• Follow the arrow pointing direction to insert the suction mount and lock the device into
its holder.
• Remove the protection paper from the suction mount, and position the device on the
clean windshield or dashboard.
RoadScanner 700GPSUser Manual
2
Page 5

Charge the battery
Before using the device for the first time, please fully charge the Li-ion battery. The battery will
be completely charged in 1-2 hours.
• Using the car charger: charge the device through cigarette lighter. The device will start charging
after the car engine is turned on.
• Using micro USB cable:connect the device to AC 5V adapter or the USB port of a computer/laptop.
RoadScanner 700GPSUser Manual
3
Page 6

3. Settings
Before recording, you can set up the device according to your requirements.
3
Radar Settings
I
n recording mode p
Radar mode: Select
Highway Speed Limit: Select 10-160km/h or cancel limit
City1 Speed Limit: Select 10-160km/h or cancel limit
City2 Speed Limit: Select 10-160km/h or cancel limit
Automute: on/off
X band: on/off
K band: on/off
Laser: on/off
Strelka: on/off
Radar mute speed: Set the maximum speed. After driving over that limit, the device will
alert with the sign on display and without sound.
Radar off speed: Set the maximum speed. After driving over that limit, the device will not
alert.
Radar Warning: Off/Voice/Dee. Voice – the device alerts with icon and voice. Dee – the
device alerts with icon and beep sound. Off – the device will not alert. By default is “Voice”
mode.
ress [MENU] to switch to radar setting menu.
the radar mode:
Highway, City1, City2, Auto
GPS-informer Settings
In Radar mode press [MENU] to switch to GPS-informer setting menu.
Alarm warning: voice/dee. Voice –
alerts with icon and beep sound.
GPS Speed Display: on/off
Overspeed: Set the maximum overspeed. Select 10-40km/h or off.
Maximal speed control: Select 10~160km/h.
Distance to the speedcam: Select the distance to the speedcam 400-1000m or auto.
Delete All POI: yes/no, Please note that all coordinates settled manually will be also deleted.
the device alerts with icon and voice. Dee – the device
Video Settings
In GPS-informer mode press [MENU] to switch to Video setting menu.
Video Resolution:
1920×1080 30P, 1280×720 60P, 1280X720 30P
Video Recycle: Set the video duration (1, 3, 5, 20 minutes or off) for loop recording. When
the micro SD card is full, the device will delete the oldest unlocked video files automatically.
Select the resolution of recorded video: 2560×1080 30P, 2304×1296 30P,
RoadScanner 700GPSUser Manual
4
Page 7

WDR: on/off
WB: Select the Auto; Sunny; Cloudy; Fluorescent1; Incandescent. Select an appropriate white
balance, so images have a true-to-life color range. It is for specific lighting situations.
AE bias: Exposure Parameters Setting, adjusting Brightness, select from -2.0EV
-1.7EV-1.3EV、-1.0EV、-0.7EV、-0.3EV、0.0EV、+0.3EV、+0.7EV、+1.0EV、
+1.3EV+1.7EV+2.0EV. Set exposure value to determine how much light the camera’s sensor
receives. For lowlight situations, use a higher exposure.
AE Meter: Metering Mode Setting - select from Spot ;Center; Average.
Motion Detection: Turn on or off motion detection. If there is any motion detected while car
DVR has power but not recording, your car DVR will start recording automatically.
Microphone: on/off. Set to record sound or not.
Date/Time Stamp: Select watermark for Date; Time; Driver ID; Coordinates; Speed; Azimuth
Plate Stamp: off/enter plate. Stamp the car plate numbers into the videos.
Time lapse: Select off, 1sec, 5sec, 10sec, 30sec
、
General Settings
Language: Choose your language
Time Setup:
Time Zone: Set the time zone on device
Auto sync time: on/off
Auto power off: Set automatic power off when the device is not in use: 5min, 3min, 1min or off
Volume: Select 1-7 or off
Anti-flicker: Select auto, 50Hz, 60Hz
G-sensor setting: Select Off; Low; Medium; High. Select the sensitivity of the G-sensor. The smaller
the number is, the higher the sensitivity is. When reaching the sensitive value (such as collision), the
recording file will be automatically protected.
Driver time warning: Select Off; 1hour; 2hours; 3hours; 4hours
Auto backlight off: Select Off; 30sec.; 1min.; 3min.; 5min.
Card Volume: Select Total, Used, Remaining
Delay Power Off: Select Off; 10sec.; 20sec.; 30sec.; 1min.; 3min
Image rotation: on/off
Front vehicle moving system: on/ off. Alerting the driver to movement detected in front of the car.
Low light warning system: on/off. The function warns you when it detects low light.
Format: format SD card
Default Setting: on/off
Version: Software version
Set time on device
Playback Settings
In general setting mode press [MENU] to switch to replay setting menu.
Recycle Video: Press OK to play video. Press [MENU] to delete file.
Emergency Video: Emergency recording videos, under replay mode, press MENU button to
open and delete file.
RoadScanner 700GPSUser Manual
5
Page 8

4.
Recording
4
Record a video
Auto video recording
Connect the device to car charger, when the car engine launches, the devicewill
automatically turn on and start loop video recording. When shut off the car engine, the devicewill
save the last file and turnoff.
Manual video recording
Press [OK] button to start and stop videorecording.
Record the sound
In recording mode, press [MUTE] to record or not the sound.
5. File management
Browse �iles
1.
In video preview mode, press [ MENU ] 5 times to enter the playbackmode.
2. Press [OK] to play the videos.
3. Press [ ] / [ ] to scroll through the files.
Delete a �ile
In playback mode, press [MENU] button
to open ‘Delete file’, select to delete this file or all files.
5
RoadScanner 700GPSUser Manual
6
Page 9

6. Playback
Play video on DVR
In video preview mode, press [ MENU ] 5 times to enter the playbackmode.
-
- Press [OK] to start/Pause playback.
- Press [MENU] again to exit playbackmode.
Playback on PC
1.Remove memory card from DVR and insert it into computer’s cardreader.
(DVR’s USB port data transmission OFF: for charging purpose only)
2. Connect DVR to PC
( DVR’s USB port data transmission ON: for charging and data transmission )
There are two versions for DVR’s port, please choose a method according real function
6
Playback on GPS video player
1.
Install the “Player.exe” stored on
.
http://www.prestigio.ru/catalogue/DVRs/RoadScanner_700GPS#/product-support/software
2.. Connect the car DVR to the PC by the included micro USB cable
3.. Open the player, select the file and start playback
It will show your video and tracks.
- choose your language
- choose speed units
- choose map
- track location via map or
coordinates
- see the speed and time
To update POI (speedcam) database
Download database and isntruction:
http://www.prestigio.com/catalogue/DVRs/RoadScanner_700GPS#/product-support/firmware
RoadScanner 700GPSUser Manual
7
Page 10

7. Specifications
7
Display
Solution
Image Sensor
Viewing Angle
Video Resolution
Video Format
Picture Format
Memory
Microphone
Motion Detection
GPS
G-sensor
2.7”
Ambarella A7LA50
OV4689
170°
2560×1080@30fps, 2304×1296@30fps
1920×1080@45fps, 1280×720@60fps
1920×1080@30fps, 1920×1080@30fps HDR
1280×720@30fps, 1280×720@30fps HDR
MP4
JPEG
Micro SD/SDHC up to 128 GB (class 10)
Built-in
Yes
Yes
Yes
Power Source
Interface
Operating Temperature
Dimension
Weight
Bands
Built-in battery 250 mAh, car charger
Micro USB 2.0, HD-port
0°C - 50°C
61×95×38mm (H×W×D)
111g
X-BAND (10.525GHz, ±100m), K-BAND
(23.3 to 24.4GHz),LASER (904 NM),
CT BAND (24.150+-0.1GHZ)
RoadScanner 700GPSUser Manual
8
 Loading...