

Page 1

1PRESTIGIO P260MW / P260DVD-X - PRESTIGIO P320MW / P320DVD-X
ENG
Prestigio P260MW / P260DVD-X
Prestigio P320MW / P320DVD-X
User’s Manual
Before using this product, please read the security instructions first and bear them in mind when using the product.
Page 2
2 PRESTIGIO P260MW / P260DVD-X - PRESTIGIO P320MW / P320DVD-X
ENG
Safety Instruction
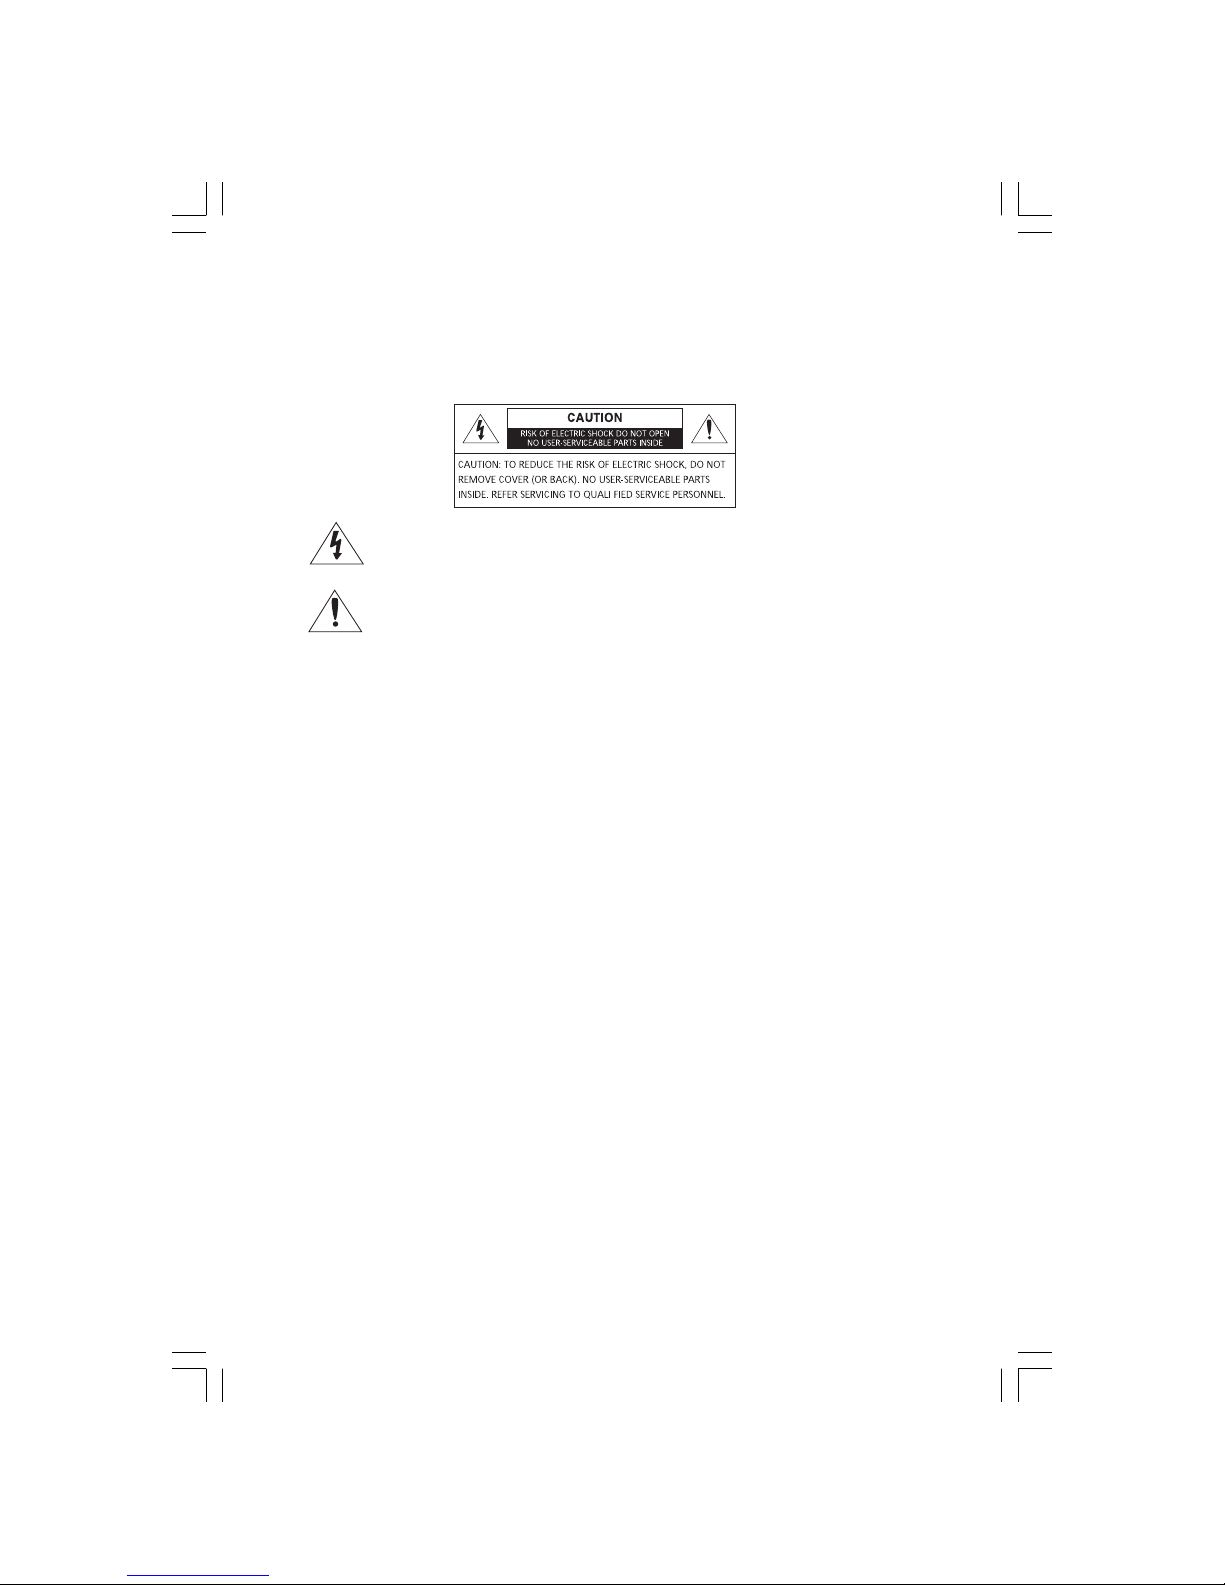
Warning
TO PREVENT FIRE OR SHOCK HAZARD. DO NOT EXPOSE THIS APPLIANCE TO RAIN OR MOISTURE.
THIS SYMBOL IS INTENDED TO ALERT THE USER TO THE PRESENCE OF UNINSULATED. DANGEROUS VOLTAGE.
WITHIN THE PRODUCTS ENCLOSURE THAT MAY BE OF SUFFICIENT MAGNITUDE TO CONSTITUTE A RISK OF
ELECTRIC SHOCK TO PERSONS.
THIS SYMBOL IS INTENDED TO ALERT THE USER TO THE PRESENCE OF IMPORTANT OPERATING AND
MAINTENANCE (SERVICING) INSTRUCTIONS IN THE LITERATURE ACCOMPANYING THE APPLIANCE.
Important Safety Instructions
This equipment has been designed and manufactured to meet international safety standards but, like any electrical equipment, care must
be taken if you are to obtain the best results and safety is to be assured. So, please read the points below for your own safety. They are
of a general nature, intended to help you with all your electronic consumer products and some points may not apply to the goods you have
just purchased.
• Read these instructions.
• Keep these instructions.
• Heed all warnings.
• Follow all instructions.
• Do not use this apparatus near water.
• Clean only with a dry cloth.
• Do not block any ventilation openings. Install in accordance with the manufacturer’s instructions.
• Do not install near any heat sources such as radiators, heat registers, stoves, or other apparatus (including amplifiers) that produce heat.
• This TV is not completely disconnected from a power supply line, as minute current is consumed even when the POWER switch is turned
off.
• Do not place hot objects or naked flame sources, such as lighted candles or nighlights on, or close to the TV. High temperatures can melt
plastic and lead to fires.
• Do not set on top of the TV any object or container that might spill liquids or small objects into the TV.
• Protect the power cord from being walked on or pinched, particularly at plugs, convenience receptacles, and the point where it exits the
apparatus.
• Only use attachments/accessories specified by the manufacturer.
• Use only with the cart, stand, tripod, bracket, or table specified by the manufacturer, or sold with the apparatus. When a cart is used, use
caution when moving the cart/apparatus combination to avoid injury from tip-over.
• Unplug this apparatus during lightning storms or when unused for long periods of time.
• Refer all servicing to qualified service personnel. Servicing is required when the apparatus has been damaged in any way, such as power
supply cord or plug is damaged, liquid has been spilled or objects have fallen into the apparatus, the apparatus has been exposed to rain
or moisture, does not operate normally, or has been dropped.
• The apparatus shall not be exposed to dripping or splashing and no objects filled with liquids, such as vases, shall be placed on the apparatus.
Page 3
3PRESTIGIO P260MW / P260DVD-X - PRESTIGIO P320MW / P320DVD-X
ENG
CAUTION: Danger of explosion if battery is incorrectly replaced. Replace only with the same or
equivalent type.
Overview
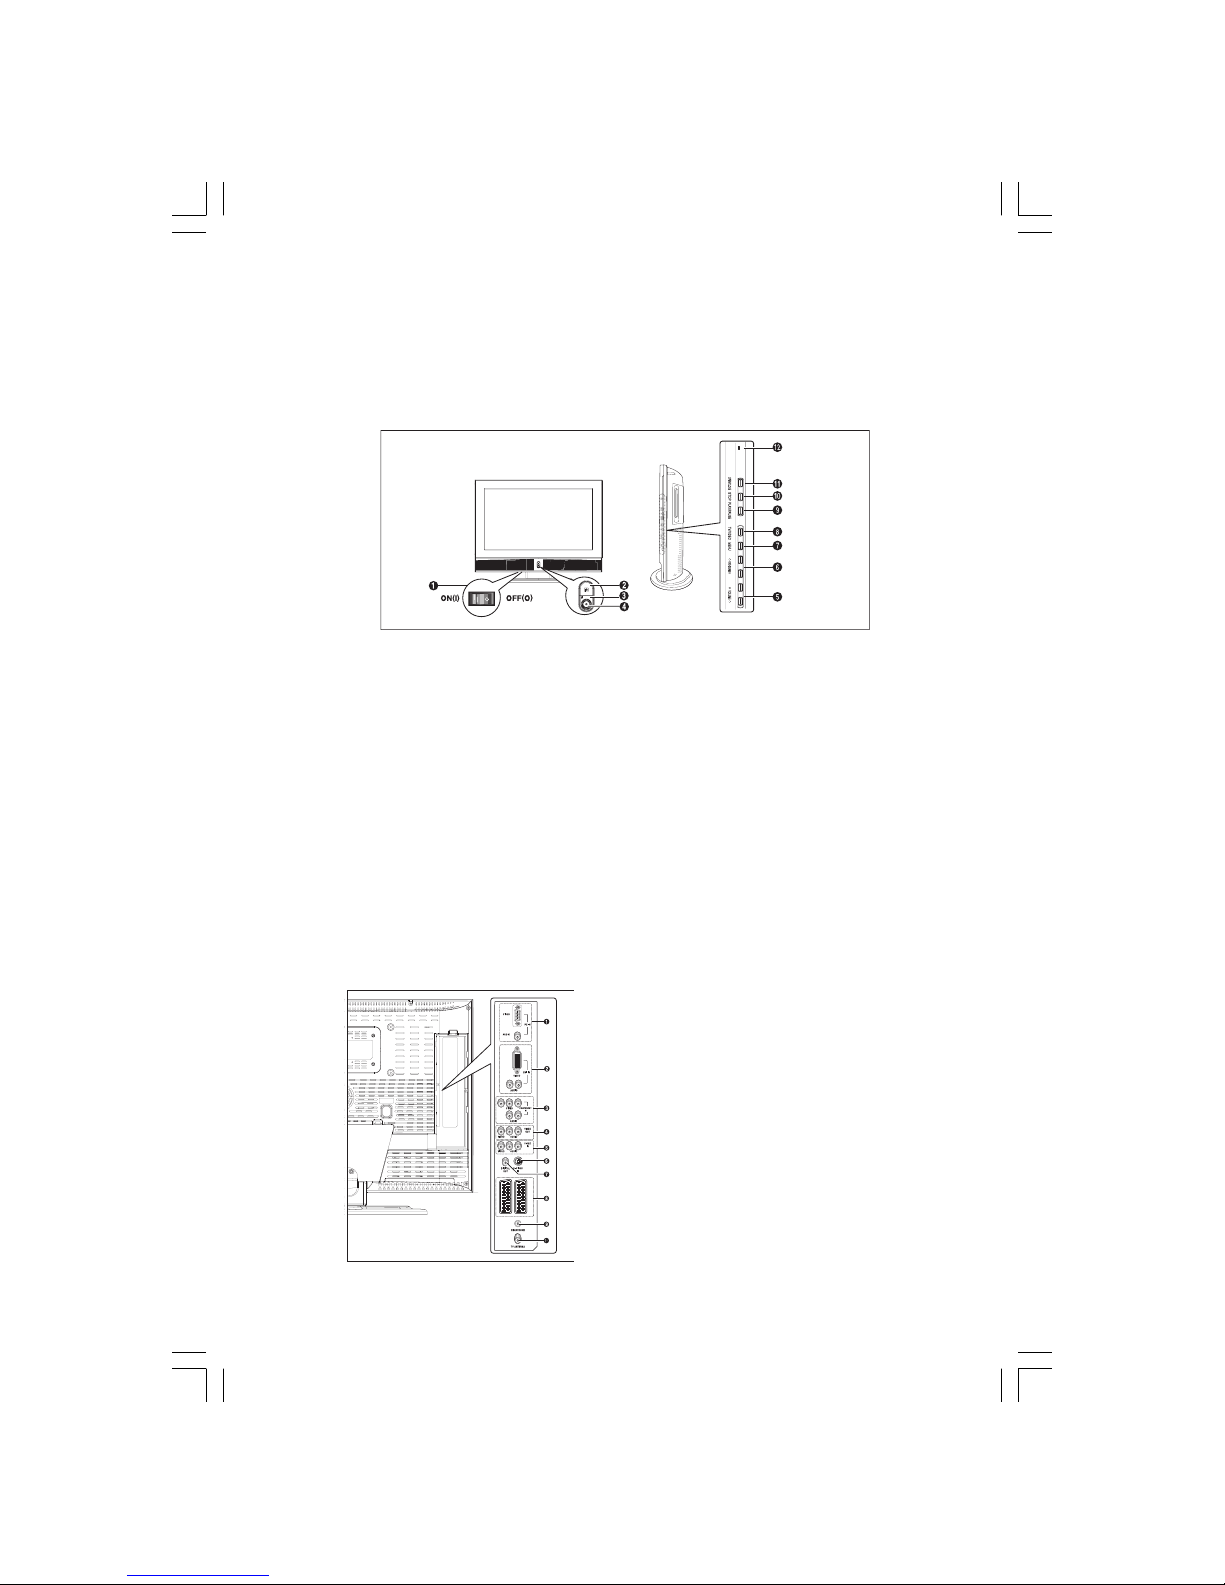
Front View
1 MASTER SWITCH
2 Remote Control Sensor
3 POWER: Turns the TV on and off.
4 LED Lights
5 VOLUME: Increases or decreases the volume. This is also used to select the “MOVE&ADJUST” item on the on-screen menu.
6 PROGRAM: Changes channels or “MOVE&ADJUST” to items on the on-screen menu.
7 MENU: To access or close menus, simultaneously.
8 TV/VIDEO: Selects an external device connected to the TV.
<DVD> - Depend on the model
9 PLAY/PAUSE: Play the DVD or temporarily stop playback.
10 STOP: Stop the DVD playback.
11 OPEN/CLOSE: OPEN/CLOSE the DVD.
12 ON/DISC LED
Rear Panel Jacks
1 PC INPUT (VIDEO/AUDIO) JACKS
2 DVI INPUT (VIDEO/AUDIO : L/R) JACKS : DVI-D Only (Depend on the
model)
3 COMPONENT JACKS (VIDEO : Y, Pb, Pr/AUDIO : L/R)
4 LINE (VIDEO/AUDIO) OUTPUT JACKS
5 VIDEO3 (VIDEO/AUDIO) INPUT JACKS
6 S-VIDEO INPUT JACK
7 DIGITAL AUDIO OUTPUT JACK (Depend on the model)
8 SCART JACKS (BOTTOM : SCART1, TOP : SCART2)
9 HEADPHONE JACK. Used for headphones that can be purchased
additionally.
10 TV ANTENNA INPUT JACK
Page 4

4 PRESTIGIO P260MW / P260DVD-X - PRESTIGIO P320MW / P320DVD-X
ENG
Remote Control
1 LINE: External input selection. (TV > RGB > Video1 > Video2 > Video3
> S-Video > Component > DVI (Option) > PC)
2 POWER: Turns the TV on and off.
3 TV: Switches to TV mode.
4 SWAP: Exchanges the video signal source of the main screen and the PIP
window.
5 ON/OFF: Turns PIP on or off.
6 NUMBER BUTTONS: Selects channels directly on the TV.
7 -/—: Selects channels over 10. For example, to select channel 21, press
“-/—” then press “2”, “1”.
8 STILL: Freezes a moving picture on the screen.
9 M/S: Sound mode selection.
10 P.STD: Configures various video settings.
11 ARROW/ENTER: Select an item of menu/Change confirmation.
12 P.SIZE: Changes the screen size.
13 DISPLAY: Displays the current channel and the audio video settings.
14 MUTE: Temporarily mute the sound.
15 TTX: Switches to Teletext mode.
16 SOURCE: Selects the signal source for the PIP window.
17 SOUND: Changes the audio signal source between the main screen and
the PIP window.
18 VOL: Increases or decreases the volume.
19 PRE: Moves to the previous channel.
20 PROG: Changes channels.
21 SLEEP: Selects a preset time interval for automatic shutoff.
22 TV.MENU: Displays the OSD menu.
23 S.STD: Configures various audio settings.
24 EXIT/CANCEL: Exit the current configuration or the teletext display.
<DVD> - Depend on the model
25 DVD: Displays the DVD.
26 OPEN/CLOSE: OPEN/CLOSE the DVD tray.
27 SCAN/SLOW: For fast and slow playback.
28 TITLE: For selecting a title on the disc.
29 SETUP: For initial DVD player settings.
30 STOP: Stop the DVD playback.
31 PLAY/PAUSE: Play the DVD or temporarily stop playback.
32 SKIP/STEP: For skipping to the next chapter/For playing one frame at a time.
33 MENU: For displaying the menu contained in the disc.
<DVD & TTX> - Depend on the model
34 COLOR KEY: Fasttext topic selection.
35 INDEX/REPEAT: Programme selection by name/ For specifying and repeating playback of a segment.
36 MIX/A-B: Video & TTX MIX/For repeated playback of disc titles, chapters or sound.
37 HOLD/PROGRAM: Teletext page/For playback in a specified order.
38 PRE PAGE/ANGLE: Teletext previous page/ For viewing scenes from different.
39 L/F/AUDIO: Switching the LIST or FLOF mode./ For selecting the audio language.
40 REVEAL/GOTO: Teletext reveal/For jumping to a specified location.
41 SIZE/SUBTITLE: Teletext size selection/For selecting the SUBTITLE language.
42 STORE/CLEAR: To store the teletext in the LIST mode/To erase a program content.
43 SUB PAGE/ZOOM: Teletext SUB-PAGE/For magnifying the screen.
44 NEXT PAGE/SURROUND: Teletext NEXTPAGE/For stereophonic sound effect.
Page 5

5PRESTIGIO P260MW / P260DVD-X - PRESTIGIO P320MW / P320DVD-X
ENG
Connecting Your TV
Connecting an Antenna or Cable without a Decoder box
Connecting the Scart Jack
Connection Procedures
1 SCART1 is used for the equipment with an RGB output, such
as video game devices or video disc players. This end can be
fitted with:
- A SCART connector
- Three RCA connectors(VIDEO+AUDIO_L+AUDIO_R)
Procedures for watching a Video over a VCR
1 Turn the TV on, and select ‘VIDEO1’ using the LINE button on
the remote control.
2 If you have a second VCR and wish to copy cassette tape,
connect the source VCR to SCART1 and the target VCR to
SCART2 so that you can redirect the signal from SCART1 to
SCART2.
Connecting a Digital Audio System (Depend on the model)
Connection Procedures
1 Connect the DIGITAL OUT (black) jack on the back of your
TV to the DIGITAL IN jack of the Decoder or AV amplifier.
To use the digital out
1 Turn the TV on, and select ‘DVD’ using the DVD button on the
remote control.
2 Turn the digital amp on and select the external input mode.
Page 6
6 PRESTIGIO P260MW / P260DVD-X - PRESTIGIO P320MW / P320DVD-X
ENG
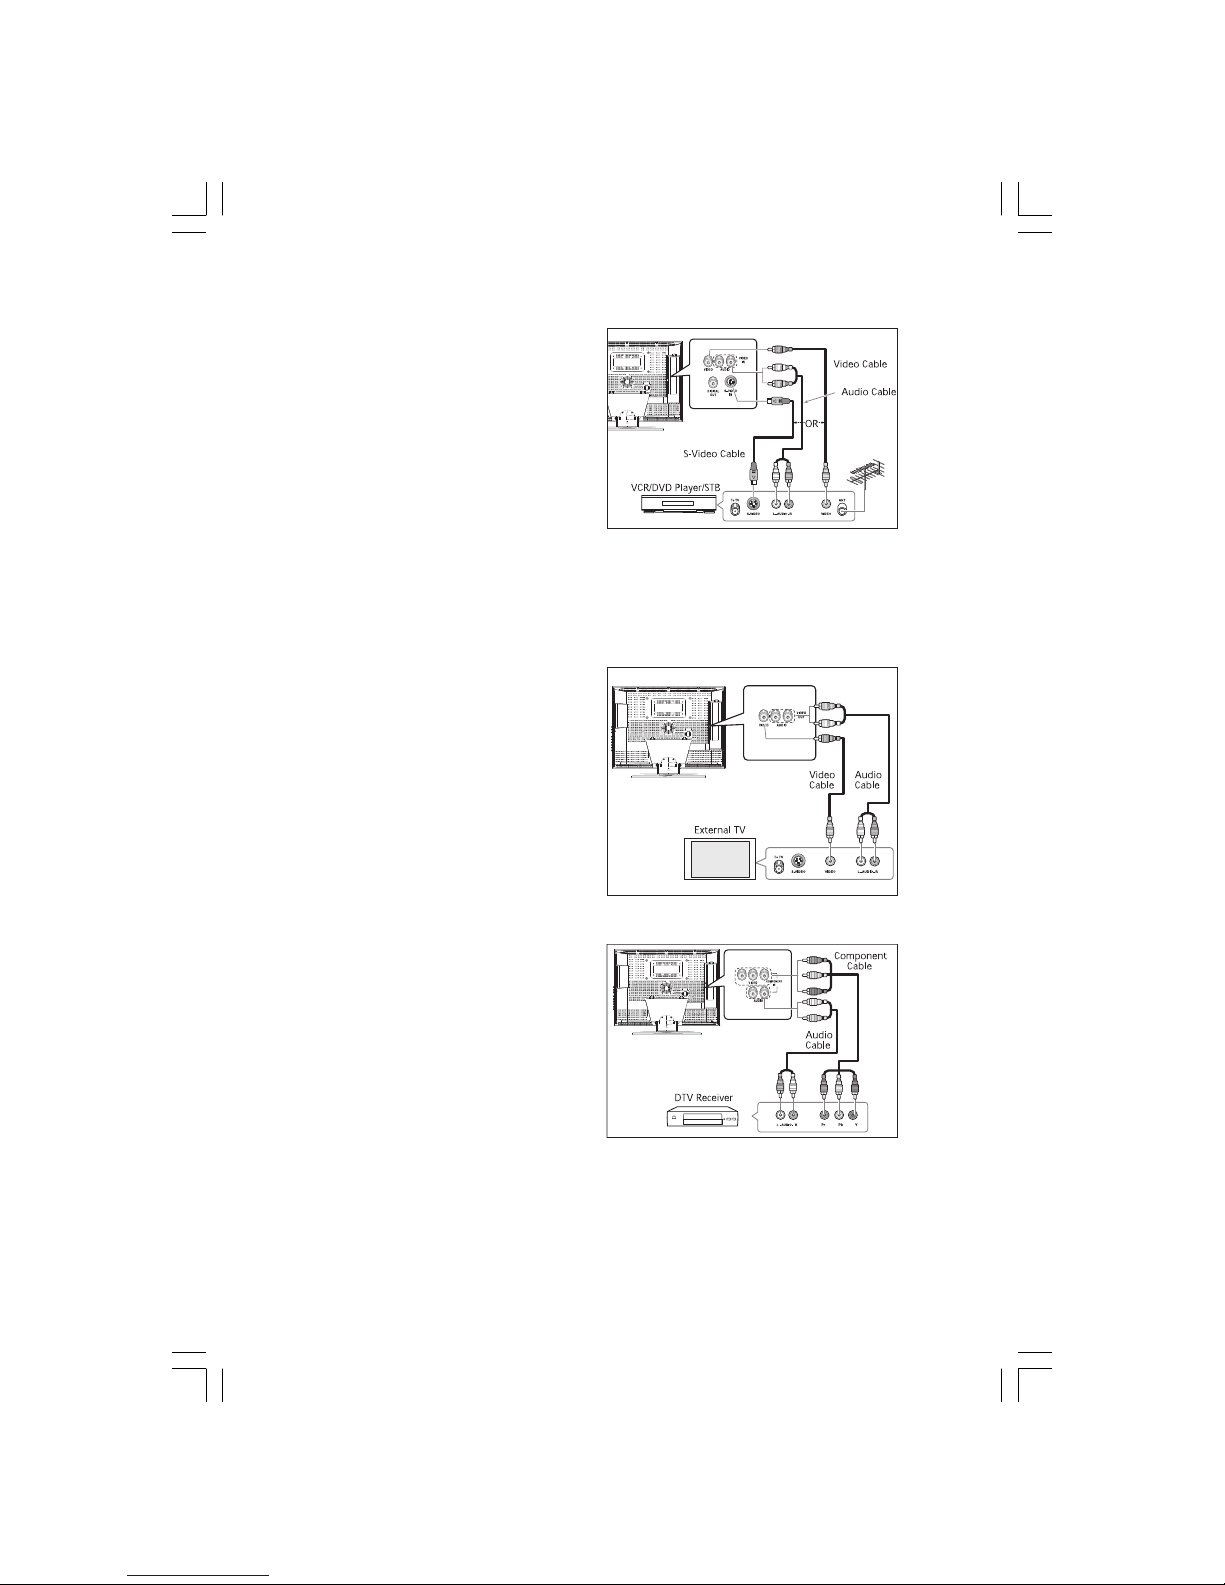
Connecting the Video or S-Video/Audio Jacks
Connection Procedures
1 Connect the antenna cable to the ANTENNA IN terminal on
the back of your VCR.
2 Connect the VIDEO/AUDIO INPUT jacks of the TV and the
video/audio output jacks of your VCR with the video/audio
cables. (Connect the cable to the terminal of the same color)
- You can use the S-Video cable to connect a VCR or a DVD
player for better video quality.
- If your VCR does not support stereo sound, connect the
mono audio out jack to the AUDIO INPUT (left) jack.
Procedures for watching a video over a VCR
Turn the TV on, and select ‘VIDEO 3’ using the LINE button on the remote control.
- If you have connected a S-Video cable, select ‘S-VIDEO’.
Connecting a External TV
Connection Procedures
1 Connect the AUDIO CABLES between the AUDIO OUT L and
R jacks on the back of your TV and the corresponding AUDIO
INPUT jacks on external TV.
2 Connect the VIDEO CABLE between the VIDEO OUT jack on
the back of your TV and the corresponding VIDEO INPUT jack
on external TV.
To watch the external TV
1 Turn the external TV on and select ‘VIDEO’ using the
external input button.
2 Turn the your TV on.
Connecting the DTV Receiver
Connection Procedures
1 The COMPONENT VIDEO IN and COMPONENT AUDIO IN
connectors are used for equipment with a DVD or DTV receiver out. (480i/60Hz, 480p/60Hz, 576i/50Hz, 576p/50Hz,
720p/50Hz, 720p/60Hz, 1080i/50Hz,1080i/60Hz)
To watch the DTV
1 Turn the TV on, and select ‘COMPONENT’ using the LINE
button on the remote control.
2 Turn the DTV Receiver on.
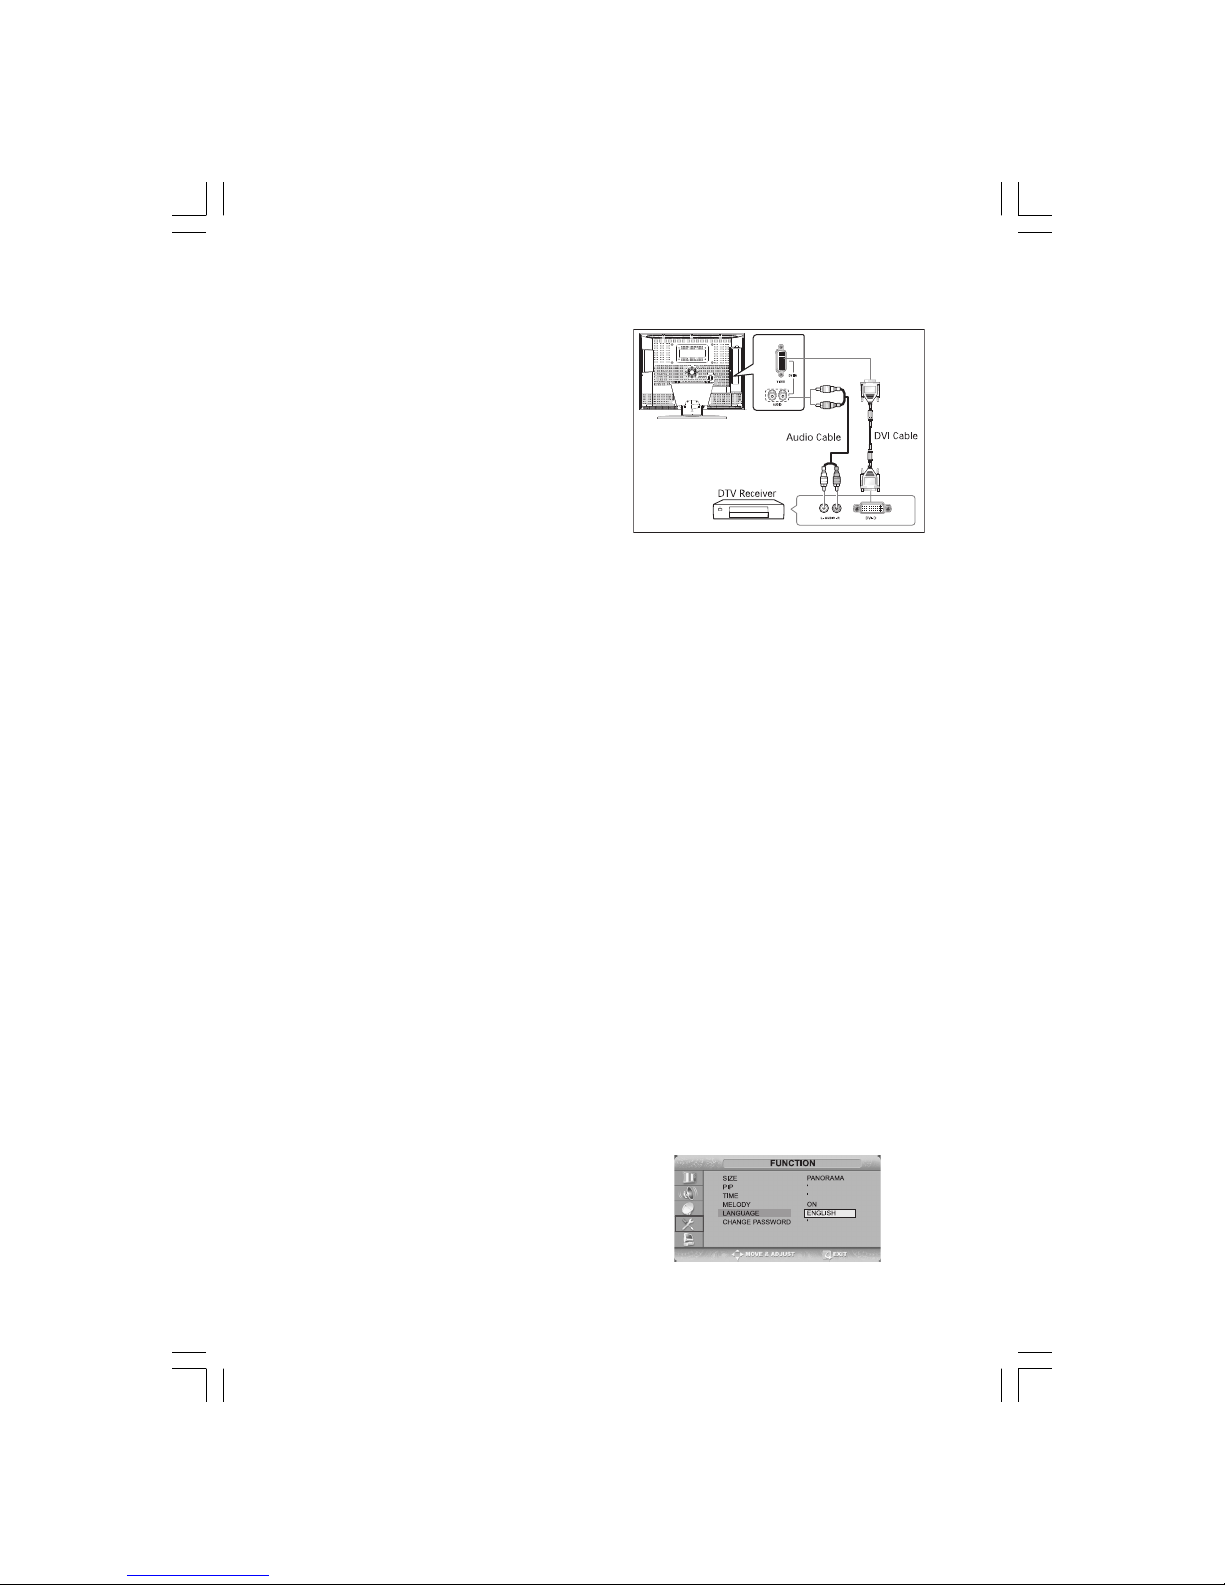
Connecting the DVI JACK (DVI-D
Page 7
7PRESTIGIO P260MW / P260DVD-X - PRESTIGIO P320MW / P320DVD-X
ENG
Only: Depend on the model)
Connection Procedures
1 Connect the DVI input jack of the TV and the DVI output jack
of your DTV Receiver.
2 Connect the DVI audio input jacks of the TV and the DVI
audio output jacks of your DTV Receiver with the audio cable.
Check Before Using
Please check the following check list before using the TV.
1 Is the antenna cable connected properly?
2 Are the remote control batteries installed properly?
- Install two AAA size batteries according to the correct polarity.
- The remote control works up to about 7~10m from the TV, 3m to the left or right of the TV, and to within 30 degrees from
the remote control sensor of the TV.
3 Have the receive channels been configured?
4 Are the cables connected to any external devices connected properly?
TV Function
Watching TV
Turning the TV On and OFF
1 Plug the mains lead into an appropriate socket.
2 Press the POWER switch on the bottom of the television toward “ON”(I).
3 Press the POWER button on the remote control (or on the front panel of the unit.)
You can also switch on by pressing the PROG \/ /\ buttons.
• When you turn the power ON, the screen appears and the POWER/STANDBY light is turned off.
• When you turn the power OFF, the screen goes blank, and the POWER/STANDBY light turns red.
• Do not leave your television in Standby mode for long periods of time (when you are away on holiday, for example). Turn
your television off by pressing the POWER switch toward “OFF”(O). It is best to unplug the set from the mains and aerial.
Selecting the Menu Language
1 Press the TV.MENU button. The OSD MENU will be displayed.
2 Select FUNCTION using the /\ \/ button and then press the > button.
3 LANGUAGE using the /\ \/ button and then press the > button.
4 Select the desired menu language using the /\ \/ button.
5 Press the EXIT/CANCEL button to exit the menu.
Page 8

8 PRESTIGIO P260MW / P260DVD-X - PRESTIGIO P320MW / P320DVD-X
ENG
Viewing the Status Information
Press the DISPLAY button on the remote control. The TV will display the input source, the picture mode, the sound mode, the
STEREO mode, the sleep time, the current time, and the pip mode.
Adjusting the Volume
Adjust the volume using the VOL /\ \/ button.
Muting the Sound
Press the MUTE button. You can conveniently use the MUTE button when a telephone or a door bell rings. To cancel, press the
MUTE button again.
Viewing a Video, DVD or COMPONENT
Press the LINE button.
Storing Channels Automatically
1 Press the TV.MENU button. The OSD MENU will be displayed.
2 Select SETUP using the /\ \/ button and then press the > button.
3 Select AUTO PROGRAMMING using the /\ \/ button and then press the >
button.
4 Select COUNTRY using the /\ \/ button and then press the > button.
5 Select your COUNTRY using the /\ \/ button and then press the > button. The
countries are displayed in the following order.
6 Select SEARCH using the /\ \/ button and then press the > button.
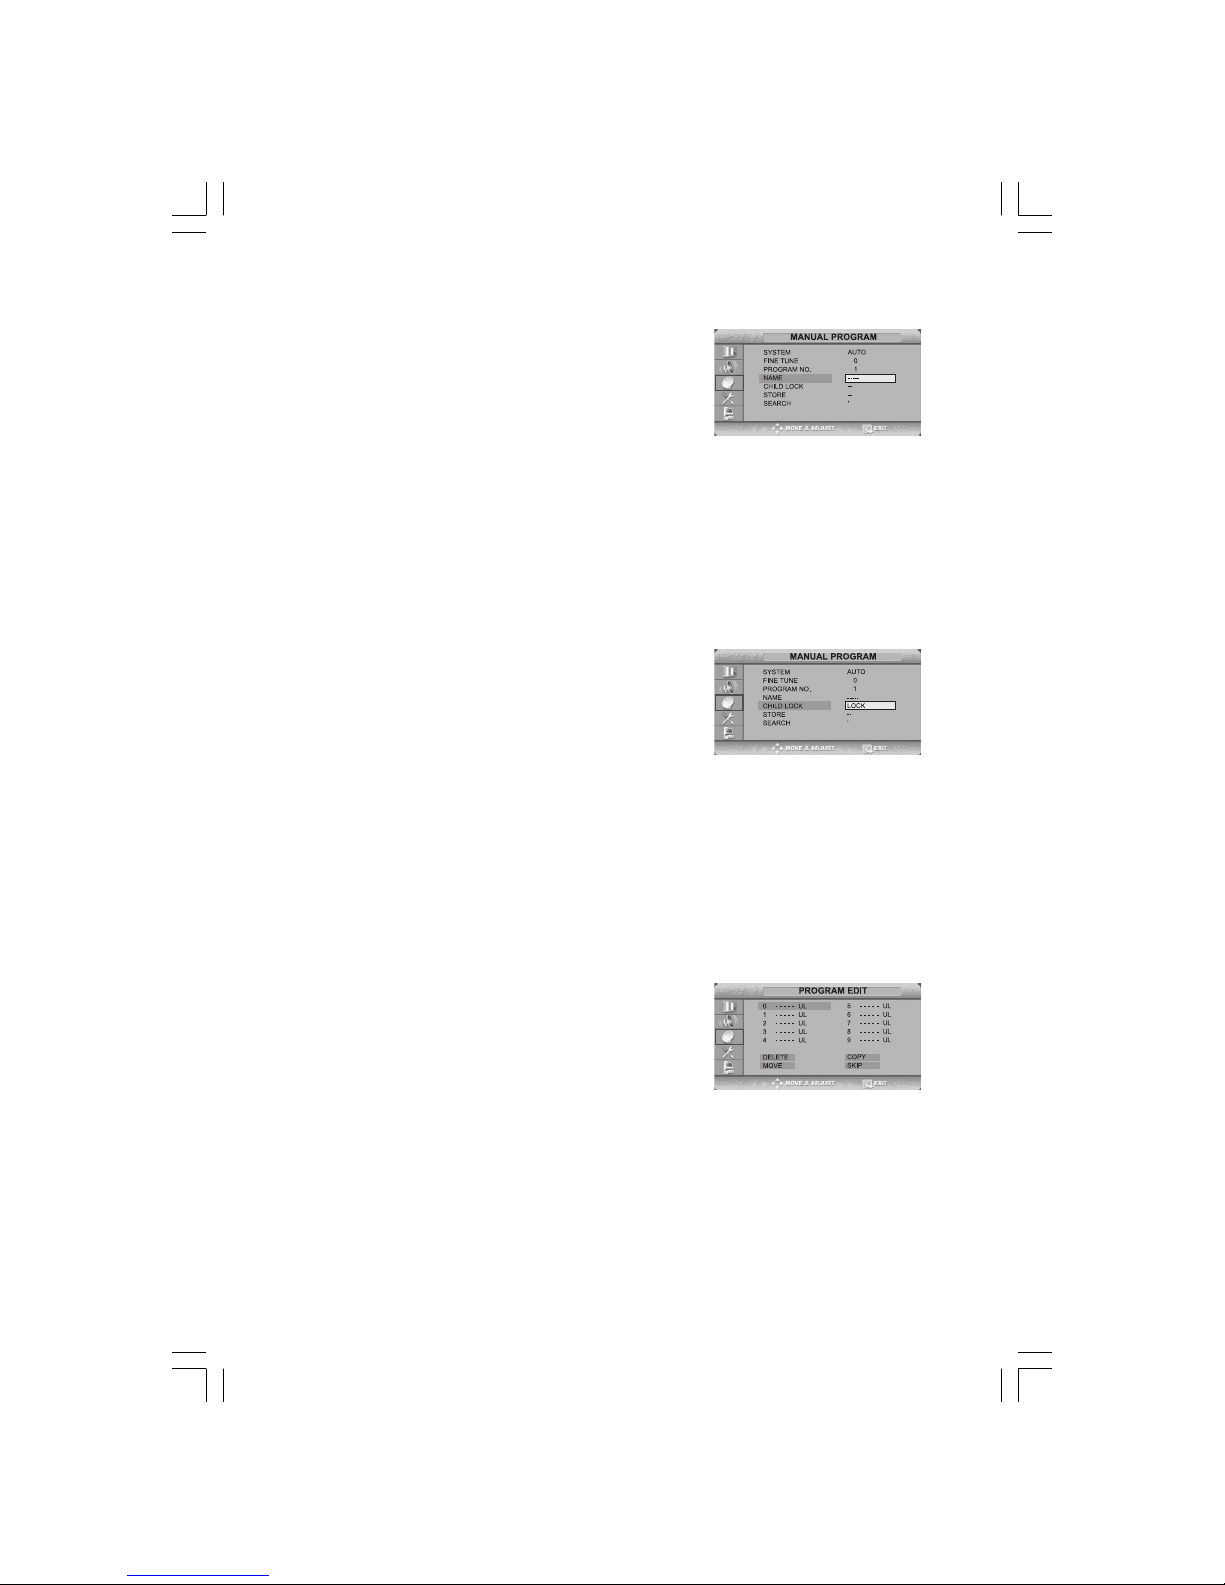
Manual Storing of Channels
When storing channels manually, you can choose:
- Whether or not to store each of the channels found.
- The programme number by which you wish to identify each stored channel.
1 Press the TV.MENU button. The OSD MENU will be displayed.
2 Select SETUP using the \/ /\ button and then press the > button.
3 Select MANUAL PROGRAM using the \/ /\ button and then press the >
button.
4 Select SYSTEM using the \/ /\ button and then press the > button.
AUTO > BG > DK > I > L > LP > AUTO
5 Select PROGRAM NO. using the \/ /\ button and then press the > button. And
press the \/ /\ button to select the required channel number.
6 Select SEARCH using the \/ /\ button and then press the > button.
The tune scans the frequency range until the first channel on the channel that you selected is received on your screen.
7 Select STORE using the \/ /\ button and then press the > button. And press the \/ /\ button to select the OK.
8 Repeat Step 5 to 7 for each channel to be stored.
Page 9
9PRESTIGIO P260MW / P260DVD-X - PRESTIGIO P320MW / P320DVD-X
ENG
Channel Name
1 Press the TV.MENU button. The OSD MENU will be displayed.
2 Select SETUP using the /\ \/ button and then press the > button.
3 Select NAME using the /\ \/ button and then press the > button. And press
the /\ \/ < > buttons to edit the name.
/\ \/: Select the characters (A~ Z, 0~9, -, +).
< > : move on the previous or next letter.
4 Select STORE using the /\ \/ button and then press the > button. And press
the /\ \/ button to select the OK.
5 Press the EXIT/CANCEL button to exit the menu.
Activating the Child Lock
This feature allows you to prevent unauthorized users, such as children, from watching unsuitable programmers by muting
out video and audio. Child Lock cannot be released using front panel buttons. Only remote control can release the Child Lock
setting, so keep the remote control away from children.
1 Press the TV.MENU button. The OSD MENU will be displayed.
2 Select SETUP using the /\ \/ button and then press the > button.
3 Select MANUAL PROGRAM using the /\ \/ button and then press the >
button.
4 Select CHILD LOCK using the /\ \/ button and then press the > button.
5 To lock the channel, select LOCK by pressing the /\ \/ button.
Activating the Child Unlock
1-4 STEP1~STEP4 is the same as that of Activating the Child Lock.
5 When a login dialog box appears, enter the password to deactivate the CHILD LOCK.
Note
• When child lock is activated, only entering the correct password will proceed to the operation
before you can do auto or manual searches. Everything previously locked will be unlocked.
Program Edit
This function enables you to delete, copy, move or
skip the stored programs.
1 Select the channel to tune using the numeric or channel buttons.
2 Press the TV.MENU button. The OSD MENU will be displayed.
3 Select SETUP using the /\ \/ button and then press the > button.
4 Select PROGRAM EDIT using the /\ \/ button and then press the > button.
Delete a Program
1 Select a program to the deleted with the \/ /\ < > buttons.
2 Press the RED button. The selected program is deleted. All the following programs are shifted up one position.
Moving a Program
1 Select a program to the moved with the \/ /\ < > buttons.
2 Press the GREEN button.
3 Move the program to the desired program number with the \/ /\ < > buttons.
4 Press the GREEN button again to release this function.
Page 10

10 PRESTIGIO P260MW / P260DVD-X - PRESTIGIO P320MW / P320DVD-X
ENG
Copy a Program
1 Select a program to the copied with the \/ /\ < > buttons.
2 Press the YELLOW button. All the following programs are shifted down one position.
Skipping a Program Number
1 Select a program to the skipped with the /\ \/ < > buttons.
2 Press the BLUE button. The skipped program turns to Magenta.
3 Press the BLUE button again to release this function.
When a program number is skipped it means that you will be unable to select it using the /\ \/ button during normal TV
viewing. If you want to select the skipped program, directly enter program number with the number buttons or select it in
the program edit or table menu.
Changing Channel
1 Using the CHANNEL buttons
Press the PROG \/ /\ buttons to change channels.
You will see all the channels that the TV has memorized.(The TV must have memorized at least three channels.)
2 Using the NUMBER buttons
- To change to single-digit channels(0~9) faster, press “0” before the single digit.
Example: For channel 4, press “0”, then “4”.
- To select a channel over 10, press the -/— button first.
Example: For channel 42, press “-/—”, then “4”, then “2”.
3 Using the Previous Channel
Press the PRE button on the remote control.
The TV changed to the last channels to the last channel you were watching.
When the Picture Quality is Poor or Unstable
Use fine tuning to adjust a particular channel for better picture quality when noise interferes, color quality is poor, or the
screen is unstable.
1 Select the channel to tune using the numeric or channel buttons.
2 Press the TV.MENU button. The OSD MENU will be displayed.
3 Select SETUP using the /\ \/ button and then press the > button.
4 Select MANUAL PROGRAM using the /\ \/ button and then press the >
button.
5 Select FINE TUNE using the /\ \/ button and then press the > button.
6 Press the /\ \/ button to fine tune and then press the > button.
If you are unable to fine-tune a channel, check that the SYSTEM settings are correct.
7 Select STORE using the /\ \/ button and then press the > button. And press the /\ \/ button to select OK.
8 Press the EXIT/CANCEL button to exit the menu.
Selecting the Picture Status
You can select a video mode from among USER, STANDARD, DYNAMIC, or MILD mode according to your personal preference.
QUICK! Press the P.STD button.
Whenever you press this button, PICTURE STATUS changes to USER > STANDARD > DYNAMIC > MILD mode, in this order.
1 Press the TV.MENU button. The OSD MENU will be displayed.
2 Select PICTURE using the /\ \/ button and then press the v button.
Page 11

11PRESTIGIO P260MW / P260DVD-X - PRESTIGIO P320MW / P320DVD-X
ENG
3 Select the desired PICTURE STATUS using the /\ \/ button. Whenever you
press this button, PICTURE STATUS changes to USER > STANDARD > DYNAMIC > MILD mode, in this order.
4 Press the EXIT/CANCEL button to exit the menu.
Picture Status
• STANDARD: Select this mode when the surrounding illumination is bright.
• DYNAMIC: Select this mode to increase picture clarity and sharpness.
• MILD: Select this mode when viewing the TV when the light is low.
• USER: Select this mode if you want to adjust the settings according to your personal preferences.
Adjusting the Picture Settings
1 Press the TV.MENU button. The OSD MENU will be displayed.
2 Select PICTURE using the /\ \/ button and then press the > button.
3 Select the desired item to adjust using the /\ \/ button and then press the
> button.
4 Select the desired status using the < > button.
During the adjustment, an additional adjustment window will be displayed.
In addition, PICTURE STATUS is automatically changed to USER mode.
5 Press the EXIT/CANCEL button to exit the menu.
Picture
• CONTRAST: Determines the difference in brightness between an object and the background.
• BRIGHTNESS: Determines the brightness of the screen.
• SHARPNESS: Determines the sharpness of an object image.
• COLOR: Determines the color density.
Selecting the Sound Mode
You can select a sound mode from among USER, STANDARD, MUSIC, or SPEECH mode according to your personal preference.
QUICK! Press the S.STD button.
Whenever you press this button, SOUND STATUS changes to USER > STANDARD > MUSIC > SPEECH mode, in this order.
1 Press the TV.MENU button. The OSD MENU will be displayed.
2 Select SOUND using the /\ \/ button and then press the > button.
3 Select the desired SOUND STATUS using the /\ \/ button. Whenever you press
this button, SOUND STATUS changes to USER > STANDARD > MUSIC > SPEECH
mode, in this order.
4 Press the EXIT/CANCEL button to exit the menu.
Sound Status
• STANDARD: Select this to listen to sound normally.
• MUSIC: Select this to listen to the original sound.
• SPEECH: Select this to listen to clear voice sound.
• USER: Select this if you want to adjust the settings according to your personal preferences.
Page 12

12 PRESTIGIO P260MW / P260DVD-X - PRESTIGIO P320MW / P320DVD-X
ENG
Adjusting the BALANCE
Determines the volume ratio between the left and right speakers.
1 Press the TV.MENU button. The OSD MENU will be displayed.
2 Select SOUND using the /\ \/ button and then press the > button.
3 Select BALANCE using the /\ \/ button and then press the > button.
4 Select the desired status using the < > button.
During the adjustment, an additional adjustment window will be displayed.
Also, the Sound Status is automatically changed to USER mode.
5 Press the EXIT/CANCEL button to exit the menu.
Adjusting the Headphone Volume
You can listen to the sound of the main or sub PIP using the headphones. You
can also adjust the volume of the headphones.
1 Press the TV.MENU button. The OSD MENU will be displayed.
2 Select SOUND using the /\ \/ button and then press the > button.
3 Select HEADPHONE VOLUME using the /\ \/ button and then press the >
button.
4 Select the desired volume level using the /\ \/ button.
Prolonged use of headphones at a high volume may damage your hearing.
Adjusting the EQUALIZER
Determines the volume of the frequency range (low to high tones).
1 Press the TV.MENU button. The OSD MENU will be displayed.
2 Select SOUND using the /\ \/ button and then press the > button.
3 Move to the EQUALIZER item using the /\ \/ button.
4 Move to the desired frequency using the > button. 120(Low Tone) > 1K(Mid
Tone) > 10K(High Tone).
5 Select the desired status using the /\ \/ button.
When you have adjusted the EQUALIZER, the SOUND STATUS is automatically
changed to USER MODE.
Choosing a Soundtrack
The M/S button displays/controls the processing and output of the audio signal. When power is switched ON, the mode is
automatically preset to either DUAL or STEREO, depending on the current transmission.
Quick! Pressing the M/S button.
Whenever you press this button, the mode changes to STEREO/MONO mode,
in this order.
1 Press the TV.MENU button. The OSD MENU will be displayed.
2 Select SOUND using the /\ \/ button and then press the > button.
3 Select STEREO or DUAL using the /\ \/ button and then press the > button.
4 Select the desired status using the /\ \/ button.
5 Press the EXIT/CANCEL button to exit the menu.
- If the receiving conditions deteriorate, listening will be easier if the mode
Page 13

13PRESTIGIO P260MW / P260DVD-X - PRESTIGIO P320MW / P320DVD-X
ENG
is set to the MONO position using the M/S button.
- If the stereo signal is weak( or if intermittent StereoMono) and automatic switching occurs, then switch to the
MONO mode.
- When receiving mono sound in the AV mode, connect to
the ‘L’ input jack on the panels.
- If the mono sound comes out only from the left speaker,
then press the M/S button.
Changing the Screen Size
You can select a desired screen size for each video.
Press the P.SIZE button.
Whenever you press the P.SIZE button, the screen size changes to WIDE > NORMAL > ZOOM1 > ZOOM2 > PANORAMA, in
this order. (Note that you can select either WIDE or NORMAL mode in PC input mode.)
Screen Size Menu
• WIDE: Set the picture to 16:9 wide mode.
• NORMAL: Sets the picture to 4:3 normal mode. This is a
standard TV screen size.
• ZOOM1: Magnifies the size of the picture on the screen.
• ZOOM2: Magnifies the size of the picture on the screen
leaving the subtitles visible.
• PANORAMA: Use this mode for the wide aspect ratio of
a panoramic picture.
Note
• You can select only WIDE, NORMAL(4:3) screen size in the PC Mode.
Freezing the Picture
You can freeze a moving picture on the screen.
Quick! Press the STILL button.
Whenever you press this button, the freezing function is turned on or off.
Note
• Even if the picture has been frozen, the audio sound continues normally.
• The freezing function will not work for the PIP window in PIP mode.
Viewing Picture-in-Picture
You can watch two videos on the screen simultaneously.
Quick! Pressing the ON/OFF button.
Pressing the button turns the PIP screen on or off.
1 Press the TV.MENU button. The OSD MENU will be displayed.
2 Select FUNCTION using the /\ \/ button and then press the > button.
3 Select PIP using the /\ \/ button and then press the > button.
Page 14

14 PRESTIGIO P260MW / P260DVD-X - PRESTIGIO P320MW / P320DVD-X
ENG
4 Press the > button again. Select PIP using the /\ \/ button and press the > button.
The PIP menu will be displayed.
Whenever you press the \/ button, PIP mode is turned PIP, DW or OFF. Selecting OFF turns off PIP mode.
You can switch between DW1 and DW2 by pressing the Picture button on the remote control when you are in DW mode. When
entering DW mode by pressing the PIP button, the last mode will be memorized to display DW1 or DW2 as previously
selected.
5 Press the EXIT/CANCEL button to exit the menu.
Note
• Since this product has a single tuner, you cannot watch two TV channels simultaneously in PIP
mode.
• You can only listen to one sound output from either the main screen or the PIP window.
• Refer to the PIP configuration table
Changing the Source of the PIP Window
You can change the video source of the PIP window from any externally connected devices.
Quick! Pressing the SOURCE button.
Whenever you press this button, the source of the PIP window is changed to the next video signal of an externally connected
device, in that order.
1-4 STEP1~STEP4 is the same as that of Viewing Picture-in-Picture.
5 Select SOURCE using the /\ \/ button and then press the > button.
6 Select the desired external input signal using the /\ \/ button and then press
the > button.
Since this product has a single tuner, you cannot watch two TV channels simultaneously when in PIP mode.
7 Press the EXIT/CANCEL button to exit the menu.
Changing the PIP Window Channel
When the PIP window shows normal broadcasting (TV and CATV) channels, you can change the PIP window channel.
Quick! Press the PROG /\ \/ button.
Whenever you press this button, the channel is changed.
1-4 STEP1~STEP4 is the same as that of Viewing Picture-in-Picture.
5 Select CHANNEL using the /\ \/ button and then press the > button.
6 Select the desired channel using the /\ \/ button and then press the > button.
Since this product has a single tuner, you cannot watch two TV channels simultaneously when in PIP mode.
7 Press the EXIT/CANCEL button to exit the menu.
Page 15

15PRESTIGIO P260MW / P260DVD-X - PRESTIGIO P320MW / P320DVD-X
ENG
Changing the POSITION of the PIP Window
You can select the location of the PIP window from among the corners of the TV screen.
1-4 STEP1~STEP4 is the same as that of Viewing Picture-in-Picture.
5 Select POSITION using the /\ \/ button and then press the > button.
6 Select the desired position using the /\ \/ button.
Whenever you press this button, the PIP window moves from one corner to
the next of the TV screen.
7 Press the EXIT/CANCEL button to exit the menu.
Selecting the Speaker Output in the PIP Screen Mode
You can select the desired audio source from either the main screen or the PIP window.
Quick! Pressing the SOUND button.
Whenever you press this button, the mode is changed to MAIN > SUB/PIP.
When MAIN is selected: Audio of the main screen is heard.
When SUB is selected: Audio of the DW screen is heard.
When PIP is selected: Audio of the PIP screen is heard.
1-4 STEP1~STEP4 is the same as that of Viewing Picture-in-Picture.
5 Select SPEAKER OUTPUT using the /\ \/ button and then press the > button.
6 Select a desired status (MAIN or SUB/PIP) by pressing the /\ \/ button.
Swapping the Main and the PIP Window
You can swap the video source of the main screen and the PIP window.
Quick! Pressing the SWAP button.
Whenever you press this button, the video source of the main screen and PIP window are swapped.
Selecting the Headphone Output in the PIP Screen Mode
You can simultaneously listen to the sound of the main picture using the
internal speaker as well as listen to the sound of the sub-picture using the
headphones, by setting up the headphone output configuration or vice versa.
1-4 STEP1~STEP4 is the same as that of Viewing Picture-in-Picture.
5 Select HEADPHONE OUTPUT using the /\ \/ button and then press the >
button.
6 Select a desired status (MAIN or SUB/PIP) by pressing the /\ \/ button.
Setting the Clock
1 Press the TV.MENU button. The OSD MENU will be displayed.
2 Select FUNCTION using the /\ \/ button and then press the > button.
3 Select TIME using the /\ \/ button and then press the > button.
4 Move to the Hour using the > button and then set the Hour to the correct
time using the /\ \/ button.
5 Move to the Minute using the > button and then set the Minutes to the
Page 16

16 PRESTIGIO P260MW / P260DVD-X - PRESTIGIO P320MW / P320DVD-X
ENG
correct time using the /\ \/ button.
6 Press the EXIT/CANCEL button to exit the menu.
Setting the On/Off Timer
You can set the On/Off Timer to automatically turn the TV on and off at a desired time. The current time has to be configured
first to set the On/Off Timer.
1-3 STEP1~STEP3 is the same as that of Setting the clock.
4 Select TIMER using the /\ \/ button and then press the > button. Select ON
using the /\ \/ button.
5 The ON/OFF TIMER works only when the timer is configured to ON.
Example : Turning On At 6:10 AM
6 Move to ON TIME using the /\ \/ button.
7 Move to the Hours using the > button and then set the Hour to AM 6 using
the /\ \/ button.
8 Move to the Minute using the > button and then set the Minutes to 10 using the /\ \/ button.
9 Press the > button to finish the ON TIME configuration.
10 Press the EXIT/CANCEL button to exit the menu.
For Off timer setting, select OFF TIME instead of ON TIME.
Selecting the ON Timer Channel/Adjusting the ON Timer Volume
You can configure the channel and volume to play when the TV is turned on by the Timer.
1-3 STEP1~STEP3 is the same as that of Setting the clock.
4 Select PROGRAM NO. using the /\ \/ button and then press the > button.
5 Select the desired channel to watch when the TV is turned on using the /\
\/ button.
6 Press the > button to finish the configuration.
7 Select VOLUME using the /\ \/ button and then press the > button.
8 Select the volume level for when the TV turns on using the /\ \/ button.
9 Press the EXIT/CANCEL button to exit the menu.
Setting the Sleep Timer
You can shut off the TV after a desired period of time.
Quick! Press the SLEEP button.
Whenever you press this button, the mode is changed to SLEEP OFF > SLEEP 10 > SLEEP 30 > SLEEP 60 > SLEEP 90,... >
SLEEP 180 > SLEEP OFF, in this order.
1-3 STEP1~STEP3 is the same as that of Setting the clock.
4 Select SLEEP using the /\ \/ button and then press the > button.
5 Configure the SLEEP time using the /\ \/ button.
6 Press the > button to finish the configuration.
7 Press the EXIT/CANCEL button to exit the menu.
Page 17

17PRESTIGIO P260MW / P260DVD-X - PRESTIGIO P320MW / P320DVD-X
ENG
MELODY Function
If the MELODY function is turned on, a melody plays whenever the TV is turned on or off.
1 Press the TV.MENU button. The OSD MENU will be displayed.
2 Select FUNCTION using the /\ \/ button and then press the > button.
3 Select MELODY using the /\ \/ button and then press the > button.
4 Select ON using the /\ \/ button. Whenever you press this button, the Melody
function is either on or off.
5 Press the EXIT/CANCEL button to exit the menu.
Change Password
To play or unlock a locked channel in CHILD LOCK channel mode requires password.
1 Press the TV.MENU button. The OSD MENU will be displayed.
2 Select FUNCTION using the /\ \/ button and then press the > button.
3 Select CHANGE PASSWORD using the /\ \/ button and then press the >
button.
4 Enter the password using the numeric button. Initial password is 0000.
5 Enter the change password using the numeric button.
6 To confirm, enter the confirm new password using the numeric button.
Please remember the password should be a 4 digit numeric value.
Note
• For security you may wish to cut this note from your.
• If you forget your password, the universal code is 2-4-8-6.
TTX Function
Teletext
Most television channels provide written information services via teletext. Information provided includes:
- Television programme times
- News bulletins and weather forecasts
- Sports results
- Travel information initialized with the factory defaults.
This information is divided into numbered pages (see diagram).
Part Contents
A Selected page number.
B Broadcasting channel identity.
C Current page number or search indications.
D Date and time.
EText.
F Status information.
Page 18

18 PRESTIGIO P260MW / P260DVD-X - PRESTIGIO P320MW / P320DVD-X
ENG
Displaying the Teletext Information
You can display Teletext information at any time on your television.
For Teletext information to be displayed correctly, channel reception must be stable; otherwise:
- Information may be missing
- Some pages may not be displayed
1 Select the channel providing the Teletext service using the PREPAGE or NEXTPAGE button.
2 Press the TTX button to activate the teletext mode.
Result: The contents page is displayed. It can be redisplayed at any time by pressing the INDEX button.
3 If you wish to display the actual broadcast at the same time as the teletext page, press the MIX button again.
4 Press the CANCEL button to exit from the teletext display.
Selecting a Page by Number
You can enter the page number directly by pressing the numeric buttons on the remote control.
1 Enter the three-digit page number given in the content by pressing the corresponding numeric buttons.
Result: The current page counter is incremented and the page is then displayed.
2 If the selected page is linked with several secondary pages, the secondary pages are displayed in sequence. To freeze the
display on a given page, press the HOLD. Press the HOLD again to resume.
Using the various display options:
To display... Press the...
Both teletext information and TTX/MIX
the normal broadcast twice
Hidden text REVEAL
(answers to quiz games, for example)
The normal screen REVEAL again
A secondary page, SUBPAGE
by entering its 4-digit number
The next page NEXTPAGE
The previous page PREPAGE
Double-size letters in the: SIZE
• Upper half of the screen • Once
• Lower half of the screen • Twice
Normal screen • Three times
Using FLOF to Select a Page
The various topics included in the teletext pages are color-coded, and can be selected by pressing the colored buttons on the
remote control.
1 Display the teletext contents page by pressing the MIX button.
2 Press the coloured button corresponding to the topic that you wish to select; the available topics are given on the status
line.
Result: The page is displayed with other coloured information that can be selected in the same way.
3 To display the previous or next page, press the corresponding coloured button.
4 To display the subpage, see the following steps.
• Press the SUBPAGE button.
Page 19

19PRESTIGIO P260MW / P260DVD-X - PRESTIGIO P320MW / P320DVD-X
ENG
Result: The available subpages appear.
• Select the required sub-page. Sub-pages can be scrolled by using the PREPAGE or NEXTPAGE button.
Storing Teletext Pages
You can store up to four teletext pages to display them later at leisure.
1 Select the LIST mode using the L/F button.
Result: Four 3-digit numbers are displayed in different colours. The button is used to switch between the LIST and FLOF
modes.
2 Press the coloured button corresponding to the page that will be replaced.
3 Enter the new page number using the numeric buttons.
4 Repeat steps 2 and 3 for each page to be stored, using a different coloured button each time.
5 Press the STORE button until the corresponding blocks blink.
PC Function
Connecting to a PC
Connection Procedures
1 Connect the PC D-SUB INPUT jack of the TV and the monitor output jack of the PC using the D-Sub cable.
2 Connect the PC AUDIO jack of the TV and the audio output jack of the PC with the audio cable.
(This can only be applied when the PC actually has an audio output jack.)
Procedures for viewing the PC screen through the TV
1 Turn the PC on and check that the PC settings are correct.
• If the PC settings are incorrect, the screen may display a duplicated or distorted picture.
2 Press the LINE button and select PC INPUT mode.
• Else you can press the PC button on the remote control instead.
3 Adjust the PC screen.
Page 20

20 PRESTIGIO P260MW / P260DVD-X - PRESTIGIO P320MW / P320DVD-X
ENG
Adjusting the PC
1 Press the TV.MENU button. The OSD MENU will be displayed.
2 Select PC using the /\ \/ button and then press the > button.
Adjusting the Horizontal Position
3 Select H POSITION using the /\ \/ button and adjust the horizontal position
using the > button.
Adjusting the Vertical Position
4 Select V POSITION using the /\ \/ button and adjust the vertical position using
the > button.
Initializing Settings (RESET)
5 Select RESET using the /\ \/ buttons and then select using the > button.
This returns you to the factory default screen.
6 Press the EXIT/CANCEL button to exit the menu.
Auto Adjust
You can adjust the frequency and the phase of the PC screen automatically.
7 Select AUTO ADJUST using the /\ \/ button and then select using the > button.
The PC screen is adjusted automatically.
DVD Function (Depend on the model)
Playing DVD’s
Turn on the power of the TV and external audio system. Ensure that the local code of the TV set is matched to that of the
disc. (If not matched, your disc cannot be played.)
1 Press the DVD button.
2 Insert the DVD.
Ensure that the labeled surface is at the front when placing it.
3 DVD Playback.
Your DVD will be automatically played depending on the current program mode.
- To STOP PLAYBACK, press the STOP button.
- To temporarily STOP PLAYBACK, press the PLAY/PAUSE button.
- To resume PLAYBACK, press the PLAY/PAUSE button once again.
Displaying the Playback Status
Select the language on discs that contain more than one language by following the instructions below.
1 Press the DISPLAY button
For DVD Playback
• The title, chapter number and the time elapsed is shown.
• Pressing the button again shows the remaining time.
• Pressing the button again shows the time elapsed for the chapter.
• Pressing the button again shows the remaining time for the chapter.
• Pressing the button again exits the status display.
For CD Playback
• The elapsed time for the track is shown.
• Pressing the button again shows the remaining time for the track.
Page 21

21PRESTIGIO P260MW / P260DVD-X - PRESTIGIO P320MW / P320DVD-X
ENG
• Pressing the button again shows the total playback elapsed time.
• Pressing the button again shows the total remaining time.
• Pressing the button again exits the status display.
Searching for a Specific Screen/Song
You can use one of the functions listed below to jump to a specific chapter or track during playback.
Fast Forward/Reverse
Use this function to play the DISC contents in fast forward or fast reverse. During searching audio will be muted (except CD
or MP3).
1 Press the << or >> button.
. For DVD playback, pressing the button executes the function in the following order: X2 > X4 > X8 > X16 > X32 > X64 >
normal.
. For VCD playback, X2 > X4 > X8 > X16 > X32 > normal
. For CD/MP3 playback, X2 > X4 > X8 > normal.
Skip Forward/Reverse
Use this function to move to the next or previous chapter for DVD, track for CD and MP3.
1 Press the >> or << button.
. When the >> button is pressed, playback skips to the next chapter or track during DVD or CD playback.
. When the << button is pressed, playback skips to the beginning of the current chapter during DVD playback and to the
previous chapter when it is pressed again.
Slow Forward/Reverse
1 Press the PLAY/PAUSE button to resume normal playback.
2 Press the >> or << button.
. For disc playback, pressing the button executes the function in the following order: X1/2 > X1/4 > X1/8 > X1/16 > normal.
. Press the PLAY/PAUSE button to resume normal playback.
STEP(Frame-by-Frame) Playback
1 Press the PLAY/PAUSE button.
2 Press the << or >> button.
. Each time you press the >> button, one frame forward is displayed at a time.
. Each time you press the << button, one frame backward is displayed at a time.
. Press the PLAY/PAUSE button to resume normal playback.
Note
. Reverse step and reverse slow are not supported on VCD.
Repeating a Title, Chapter(DVD), Track(CD)
Repeat Playback
This function repeats the playback of a chapter, title or track.
1 Press the REPEAT button.
• Each press of the button changes the repeat mode in the following order:
For DVD playback, Chapter > Title > All > Repeat Off.
For CD playback, Track > All Þ Repeat Off.
2 To resume normal playback, press the REPEAT button repeatedly until the repeat mode indicator disappears on screen.
Repeating a Specific Section
1 During playback, press the A-B button at the beginning of the desired section.
2 Press the A-B button again at the end of the section. “AB” will be displayed on the screen then the A-B section is continually
repeated.
Page 22

22 PRESTIGIO P260MW / P260DVD-X - PRESTIGIO P320MW / P320DVD-X
ENG
3 To resume normal playback, press the A-B button repeatedly until the repeat mode indicator disappears on screen.
• Chapter repeat: Repeats playback of a single chapter.
• Title repeat: Repeats playback of a single title.
• Repeat disc: Repeats playback of the whole disc.
• Repeat track: Repeats playback of a single track.
• Repeat off: Exits repeat mode.
Changing the Audio Language/Changing the Subtitle Language
Select the language on discs that contain more than one language by following the instructions below.
Changing the Audio Language
It is possible to change the audio soundtrack language to a different language from the one selected at the initial settings.
This operation works only with discs on which multiple audio soundtrack languages are recorded. If the loaded disc supports
multiple languages, you can select the audio language.
1 Press the AUDIO button
• For DVD playback, Each time you press the AUDIO button, the language is changed.
• For CD playback, Mono Left > Mono Right > Mix-Mono > Stereo.
Changing the Subtitle Language
It is possible to change the subtitle language to a different language from the one selected at the initial settings. This
operation works only with discs on which multiple subtitle languages are recorded.
1 Press the SUBTITLE button
2 Press the SUBTITLE button repeatedly until the desired subtitle language is displayed.
3 To turn the subtitles off, press the SUBTITLE button until Subtitle of displayed.
Changing the Size and Angle of the Screen
Changing the Size of the Screen
1 Press the ZOOM button
• Each press of the button changes the zoom mode in the following order: 2 > 3 > 4 > 1/2 > 1/3 > 1/4.
• If you press the direction button during the zoom mode, the zoom point will shift.
• To resume normal playback, press ZOOM button repeatedly until the repeat mode indicator disappears on screen.
• This function is activated for only DVD playback.
Viewing from another Angle
Some DVDs contain scenes that have been shot simultaneously from multiple angles.
1 Press the ANGLE button.
• Pressing the button successively changes the viewing angle which is displayed on the screen.
• The CAMERA icon appears. If no additional camera angle are recorded, the NO CAMERA icon will be displayed.
• If multiple camera angles are recorded, the CAMERA icon displays the current angle, number and the number of angles
available.
• This function is activated only for discs having scenes recorded at different angles.
Additional Function
To create stereophonic sound effect
This function lets you enjoy surround effects in stereo mode.
1 Press the SURROUND button.
• You can see the ‘Surround: Rock, Pop, Dance, Techno, Classic, Soft or Off’ message.
Muting the sound
1 Press the MUTE button.
Page 23

23PRESTIGIO P260MW / P260DVD-X - PRESTIGIO P320MW / P320DVD-X
ENG
• Pressing the button toggles the mute function on and off. If no sound is heard with mute turned on, turn it off to hear sound.
Basic Disc Menu Controls
Some DVD’s contain menus. Sometimes these are displayed automatically when you start playback; others only appear when
you press MENU or TITLE remote control.
1 Press the MENU button.
• The menu contained on the disc will appear on the screen. The menu appears differently with different disc.
2 Press the TITLE button.
• The title contained on the disc will appear on the screen. The title menu appears differently with different disc.
Programming in a Specific Order
Program play
This function is used to play the Title, Chapter and Tracks on the disc in the order you program.
1 Press the PROGRAM button.
• Program menu is displayed on screen.
2 Select the Title, Chapter (DVD) and Track NO.(CD) is displayed on the TV screen.
3 Select other NO. to program. You can add desired racks up
to 20 programs. Repeat step 2 until the programming is
finished.
4 Using the /\ \/ button to select “Start”, play now begins in
the programmed sequence.
5 Stop all the programmed title, chapter and tracks. Using the /\ \/ button to select “Exit”.
Setting a Specific DVD Title or Chapter
This function is used to go to the Chapter, Track or Song of the disc you want.
Program play DIRECT Search (GO TO) for DVD
1 Press the GOTO button.
2 Select the item using the /\ \/ button and press the ENTER
button.
• Title: Press the Track number using the numeric button.
• Chapter: Press the chapter number using the numeric button.
• Audio: Select one of the audio languages by pressing the
/\ \/ button.
• Angle: Select one of the camera angle using the numeric button.
• Subtitle: Select one of the subtitle languages by pressing the /\ \/ button.
• TT: Press the number of the desired time in title using the numeric button.
• CH: Press the number of the desired time in chapter using the numeric button.
• Repeat: Repeat the playback of a chapter, title by pressing the /\ \/ button.
• Time Disp: Select one of the playback status on the GOTO
window by pressing the /\ \/ button.
3 Press the ENTER button to confirm.
DIRECT Search (GO TO) for CD
1 Press the GOTO button and select the desired item.
• Each press of the GOTO button changes the repeat mode
in the following order: Disc Go To - - : - - > Track Go to - -
Page 24

24 PRESTIGIO P260MW / P260DVD-X - PRESTIGIO P320MW / P320DVD-X
ENG
: - - > Select Track:.
2 Enter the number using the numeric button.
• Disc Go To: Press the number of the desired time in disc using the numeric button.
• Track Go to: Press the number of the desired time in track using the numeric button.
• Select Track: press the track number using the numeric button.
Playing MP3 Discs
Playback of a CD/CD-RW disc that contain a MP3 files.
To Play a MP3 File
1 Insert the MP3 disc.
Make sure that the disc’s label is facing up.
2 Using the /\ \/ button to find the desired folder.
3 Using the /\ \/ button to select the desired a mp3 files.
4 Press the ENTER button to start playback a file.
To Program play an MP3 File
1 Press the PROGRAM button repeatedly in STOP mode. Each time you press, the PROGRAM mode will be changed repeatedly.
(Folder and Playlist)
• If you press the CANCEL button on desired file, you can add the file to the playlist.
To create surround effect
1 Press the SURROUND button.
• You can see the ‘Surround: Concert, Living Room, Hall, Bathroom, Cave, Arena, Church or Off’ message.
Repeat Playback
Playback of a CD/CD-RW disc that contain a MP3 files.
1 Press the REPEAT button.
• Each press of the REPEAT button changes the repeat mode in the following order:
Shuffle > Single > Repeat One > Repeat Folder.
Note
• The file name is only displayed in English.
• This player is compatible with the “MPEG-1 Audio Layer 3” standard. It is not compatible with
other standards, such as “MPEG-2 Audio Layer 3”, “MPEG-2.5 Audio Layer 3”, MP1, MP2, etc.
• Do not play CD-R/RW discs containing any files other than music CD files, MP3 and JPEG files.
• Programmed playback is not possible with MP3 discs.
• When writing MP3 files on CD-R/RW discs, select “ISO9660 level 1” as the writing software
format.
Playing Kodak Picture CD and JPEG File
To play Kodak Picture CD and JPEG File
When a Kodak Picture CD is inserted, an automated slide show is launched. When a JPEG file is loaded the table of contents
is displayed on TV screen.
1 Insert the Kodak Picture CD or JPEG file disc.
• An automated slide show is launched.
• If you press the PLAY/PAUSE button, File menu screen will
be appeared.
2 Select the picture.
• Select the picture, you want to see, by pressing the /\ \/
button.
Page 25

25PRESTIGIO P260MW / P260DVD-X - PRESTIGIO P320MW / P320DVD-X
ENG
• The selected item is displayed as a small size picture on the right side of File Menu Screen.
3 Press the ENTER button.
• The selected item is displayed as a full size picture.
Changing the Size of the Screen
1 Press the ZOOM button.
• Each press of the ZOOM button changes the zoom mode in the following order: (<<) 50% > 75% > 100%(default) >
125% > 150% > 200%(>>).
Image Rotation
1 Press the /\ \/ < > button. There are 4 modes to rotate a picture:
• /\ button : invert
• \/ button : mirror
• < button : Turn left
• > button : Turn right
Changing Slideshow Transition Mode
1 Press the PROGRAM button.
• 16 slideshow transition modes are provided.
• Each press of the PROGRAM button changes the slideshow transition mode in the following order: Wipe Top(default) > Wipe
Bottom > Wipe Left > Wipe Right > Diagonal Wipe Left Top > Diagonal Wipe Right Top > Diagonal Wipe Left Bottom
> Diagonal Wipe Right Bottom > Extend From Center H > Extend From Center V > Compress To Center H > Compress
To Center V > Window H > Window V > Wipe From Edge To Center > Move In From Top > None.
Using the Setup Menu
Once the initial settings have been completed, the player can always be operated under the same conditions whenever the
power is switched on.
These settings are called SETUP data, and are easily modified and stored using the SETUP menu. The SETUP menu includes
the information for GENERAL, VIDEO, AUDIO and PREFERENCES system controls.
Language Setup
1 Press the SETUP button during stop mode and
Press the < > button to move to Language Setup.
2 Press the /\ \/ button to move to desired item.
And press the ENTER button.
3 Press the /\ \/ button to select desired language.
• AUDIO: Use the audio language menu to select the subtitle language that you prefer. If the disc you are playing has that
language available, it will display subtitles in that language.
• SUBTITLE: Use the subtitle language menu to select the
subtitle language that you prefer. If the disc you are playing
has that language available, it will display subtitles in that.
• DISC MENU: Use the Disc Menu option to select the language you want a DVD’s disc menu to be displayed in(not
the same as the player menu).
Page 26

26 PRESTIGIO P260MW / P260DVD-X - PRESTIGIO P320MW / P320DVD-X
ENG
Video Setup
For selecting TV screen ratio.
1 Press the SETUP button during stop mode and Press the
oe/?a button to move to Video Setup.
2 Press the \/ /\ button and press the ENTER button.
. Press the \/ /\ button to select desired item.
. NORMAL/PS: Choose this setting if you want the movie to
fill the entire screen of your TV. This might mean that the
left and right edges won’t be seen.
. SUBTITLE: Choose this setting if you want to see movies in their original aspect ratio. The movie might appear with black
bars at top and bottom of the screen.
. WIDE: Choose this setting if you want the movie to a widescreen.
Audio Setup
1 Press the SETUP button during stop mode and Press the
< > button to move to Audio Setup.
2 Press the /\ \/ button to move to desired item. And press
the ENTER button.
3 Press the /\ \/ button to select desired item.
• Downmix
- LT/RT: Choose this setting if you want to select the surround sound for the front speaker.
- Stereo: Choose this setting if you want to select the stereo output through the front speaker.
- V Surr: Choose this setting if you want to enjoy surround effect in stereo mode.
• HDCD
- For selecting the bit rate of HDCD.
Preference
1 Press the SETUP button during stop mode and Press the
< > button to move to Preference Setup.
2 Press the /\ \/ button to move to desired item.
And press the ENTER button.
3 Press the /\ \/ button to select desired item.
• Angle Mark
You can set up so that the angle mark appears on scenes. If
no additional camera angle are recorded, the NO CAMERA icon will be displayed.
- On: When selected, the screen will show angle mark during disc play.
- Off: When selected, no angle mark is shown on the screen.
- You decide which ratings require a password and which ones don’t.
• Screen Saver
- You can select the screen protection function ‘On’ and ‘Off’.
• Last Memory
- Adjusts last memory selections.
• Parental
- The Parental feature is a rating limit system, like movie ratings.
- It works with DVD’s that have been assigned a rating.
- This option lets you determine how your player will react to discs that contain movies that are rated (in the U.S.A., the
Motion Pictures Association of America rates movies as G, PG, PG-13, etc.).
• Default
Page 27

27PRESTIGIO P260MW / P260DVD-X - PRESTIGIO P320MW / P320DVD-X
ENG
- If user selects reset from the setup menu, all the value of setup menu will be initialized by factory setting value. (Exception:
Parental level and Password values will not be changed.)
Password Setup
1 Press the SETUP button during stop mode and Press the
< > button to move to Password Setup.
2 Press the /\ \/ button and press the ENTER button.
3 Press the ENTER button again.
4 Enter your old password, and new password in 4 digits.
5 Re-enter new password for confirmation then press the
ENTER button.
Playing DIVX Discs (Option)
Playback of a CD/CD-RW disc that contain a DIVX files.
CAUTION: This subtitle is selectable only when it’s name is same with the title’s.
To Play a DIVX File
1 Insert the DIVX disc.
Make sure that the disc’s label is facing up.
2 Using the /\ \/ button to find the desired folder.
3 Using the /\ \/ button to select the desired a divx files.
4 Press the ENTER button to start playback a file.
Press the SUBTITLE button to delete the subtitle display
while playback.
Note
• AVI file used to contain the audio and video data : these must be stored on CD in the ISO 9660
format.
• Press STOP button when file do not appear on the screen.
• When playing the Divx disk, you can play the file with extension of AVI only.
• DTS Audio is not supported.
• WMA is not supported.
• When burning a subtitle file to a CD-ROM in your PC, be sure to burn it as an SMI file.
• Reverse of slow playback does not work Dvix.
• Supported format : VIDEO - Divx3. 11, 4. x, 5. x AUDIO - AC3, MP3(80kbps ~ 320kbps)
Using ARM on the Outer Wall
This LCD TV is available for installing Wall Mount Rack. When you install Wall mount rack to this product, please make sure
to use the same manufacturer’s Wall mount rack as LCD TV.
Regarding purchasing Wall mount Rack, please contact the shop you purchased LCD TV. Detailed installing procedure of Wall
mount rack, please referring to “Wall Mount Rack Installing Guide”.
Page 28

28 PRESTIGIO P260MW / P260DVD-X - PRESTIGIO P320MW / P320DVD-X
ENG
Troubleshooting
If the TV seems to have a problem, first try the following list of possible problems and solutions before contacting a service
center. If none of these troubleshooting tips apply, do not attempt to repair the product yourself. Call your nearest service
center.
• Symptoms that may appear to be a problem
The following symptoms may happen even if the TV has no problem. First try the following list of possible problems and
solutions before contacting a service center. First try the following list of possible problems and solutions. If the symptom
continues, turn the TV off, and call your nearest service center.
Symptom Possible Problem Possible Solution
No picture on the screen, and Power connection problem. Check the power cable connectivity to the power
the power LED does not turn on. con-nector. Press the powers witch again.
The TV is turned on, but there The brightnes s is adjus ted Adjust the brightness and the contrast so that
is no picture on the screen. too low. The fluores cent a picture is displayed brightly. The fluores cent tube
tube is out of order. of a LCD TV has a lifetime of about 50,000 hours .
To replace the fluores cent tube, contact as ervice
center.
An afterimage is generated This is caused by an inherent property of LCD panels. Depending on the number of
when continuously watching valid pixels, there may be black or bright pixels. These will be less than 0.005% of
a still image. the sum of all pixels. This is not a problem.
No picture on the screen. No audio. Discordance between Adjust the input switch location.
the external device jack
and the input switch
button location.
A picture is displayed on the screen, The volume is adjus ted to 0. Turn up the Volume button.
but there is no audio. Mute is active. Pres s the Mute button again.
The audio cable is Check the audio cable connectivity.
disconnected.
Remote control malfunctions. The polarity of the batteries Reins tall the batteries properly.
installed in the remote
control is wrong.
The batteries ins talled in Replace the batteries with new ones.
the remote control have not
been dis charged completely.
Noise is heard on the radio. This may happen when you Keep some distance between any radios and
use a radio near the TV. the LCD TV.
No color in a color picture. The Color density is Adjust the Color density to 100 or less.
adjusted to 0 or almost 0.
Duplicated pictures on the screen. This may be caused by Check if there are any tall objects such as
reflected broadcasting signals skyscrapers near your house.
when there is are mountains, Check that the direction of the antenna
buildings, or trees near is adjus ted correctly.
your house.
Blurred or snowy picture. The direction of the antenna Check that the direction of the antenna
is not optimal. is correct.
The antenna cable is Check that the antenna cable is connected to
disconnected. the ANTENNA jack on the back of the LCD TV.
Page 29

29PRESTIGIO P260MW / P260DVD-X - PRESTIGIO P320MW / P320DVD-X
ENG
The remote control does not work properly!
• Are the polarities of the installed batteries correct?
• Has the battery discharged completely?
• Is the power cord plugged in properly or is there a power failure?
• Is fluorescent lighting or a neonsign near the unit?
Warning
If a problem has been detected, unplug the power cable from the wall outlet first.
Using the product when it has a fault may cause electric shocks or fire.
Do not place objects near the wall outlet so that you can unplug the power cable if necessary.
Page 30

30 PRESTIGIO P260MW / P260DVD-X - PRESTIGIO P320MW / P320DVD-X
ENG
Specifications
The exterior design and the product specifications are subject to be changed without prior notice due to improvements in
performance. This product is manufactured for domestic use. This product may not be used in countries whose television
system type or power voltage is different.
LCD Panel
Screen Size
26 inch WIDE, 32inch WIDE
Type
Color Active Matrix TFT LCD
Display Color
8-bit, 16.7M
DVD loader (Option)
Applicable disc
DVD-Video / DVD-R /-RW /+R /+RW Super VCD / VCD / CD
/ CD-R / RW / MP3 files / Picture CD Disc Compatible
MPEG4 ASP Video (OPTION)
Support Divx 3.11 / 4.x / 5.x
Aspect Ration
16:9, 4:3 Letter Box, PAN&SCAN
Language
Audio(9), Subtitle(9) (+others)
Audio Outputs
Digital Coaxial out: Dolby digital, DTS digital Output
Analog Audio out : Down Mix 2 CH Stereo, Lt/Rt, V SURR
TV / VIDEO
Receiver/Channels
VHF: Channel E2 ~ Channel E12
UHF: Channel E21 ~ Channel E69
CATV: Channel S1 ~ Channel S41
Television Broadcasting System: PAL, SECAM: B/G, D/K, I, L, L’
Antenna Interface
VHF, UHF: 75ohm
Video Signal
PAL, SECAM, NTSC(3.58/4.43)
PC
Synchronization Horizontal F
30 ~ 60KHz
Synchronization Vertical F
56 ~ 75Hz
Color Quality
16,772,216 colors
Maximum Resolution
1024 X 768
Separation Signal
TTL, Anode or Cathode
Display Color
8-bit, 16.7M
Interface
D-sub
DVI (Depend on the model)
DVI-D Only
Audio Output
8W x 2
Power Consumption
Maximum 140 W Maximum 160 W
Power Consumption When Power
Saving
Less than 3.5 W
Input Voltage
AC 100-240V~, 50/60Hz
Dimension
Monitor+Stand
694.4(W) X 597.2(H) X 270(D), 819(W) X 663(H) X 314(D)
Monitor Alone
694.4(W) X 529(H) X 122(D), 819(W) X 594(H) X 131.5(D)
Weight
16 Kg, 26 Kg
Accessories
Remote control, Battery (AAA), User’s Guide, Power Cord, RF
Cable, SCART Cable.
Page 31

31PRESTIGIO P260MW / P260DVD-X - PRESTIGIO P320MW / P320DVD-X
ENG
• This device has been registered in regards to EMI for residential use. It may be used in all areas.
Appendix
Standard Signal Mode Table
A TFT LCD TV is configured to support the following 10 signal modes. A user can register up to 10 modes. Configure the PC
display mode referring to the following table. For configuration procedures, refer to the Appendix of the PC manual.
PIP Screen Configuration Table
Page 32

32 PRESTIGIO P260MW / P260DVD-X - PRESTIGIO P320MW / P320DVD-X
ENG
Notes
 Loading...