

Page 1

1PRESTIGIO P199
ENG
Prestigio P199
User’s Manual
Page 2

2 PRESTIGIO P199
ENG
Safety Instructions
1. Please read these safety instructions carefully.
2. Please keep this User‘s Manual for later reference.
3. Please disconnect this equipment from connecter before cleaning. Don‘t use liquid or sprayed detergent for cleaning.
Use moisture sheet or cloth for cleaning.
4. Make sure the voltage of the power source when you try to connect the equipment to the power outlet.
5. All cautions and warnings on the equipment should be noted.
6. Never pour any liquid into opening, this could cause fire or electrical shock.
7. Never open the equipment. For safety reason, the equipment should only be opened by qualified service personnel.
8. If one of the following situations arises, get the equipment checked by a service personnel :
a. Liquid has penetrated into the equipment.
b. The equipment has been exposed to moisture.
c. The equipment has not work well or you can not get it work according to user‘s manual.
d. The equipment has dropped and damaged.
e. If the equipment has obvious sign of breakage.
9. DO NOT LEAVE THIS EQUIPMENT IN AN ENVIRONMENT UNCONDITIONED, STORAGE TEMPERATURE ABOVE 40?C, IT MAY
DAMAGE THE EQUIPMENT.
Page 3
3PRESTIG IO P199
ENG
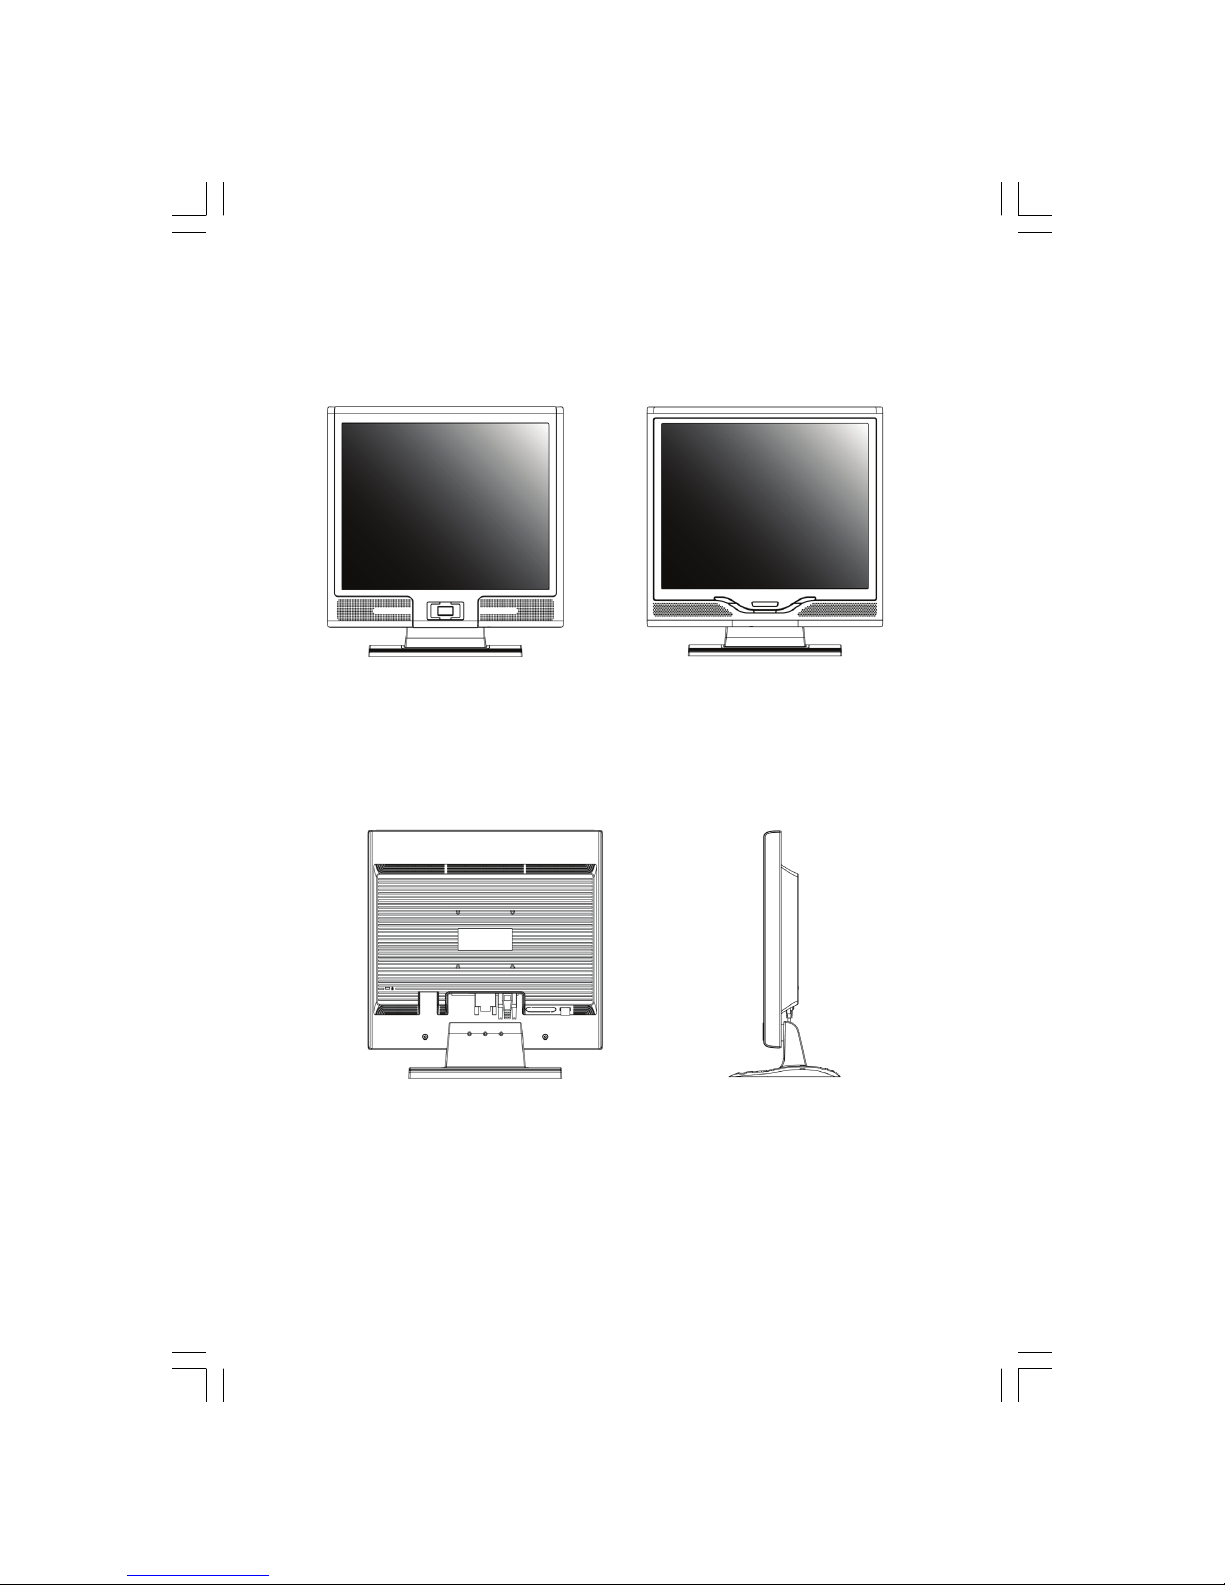
View of Monitor
Front View (1) Front View (2)
Back View (3) Side View (4)
Page 4
991P OIGITSERP4
ENG
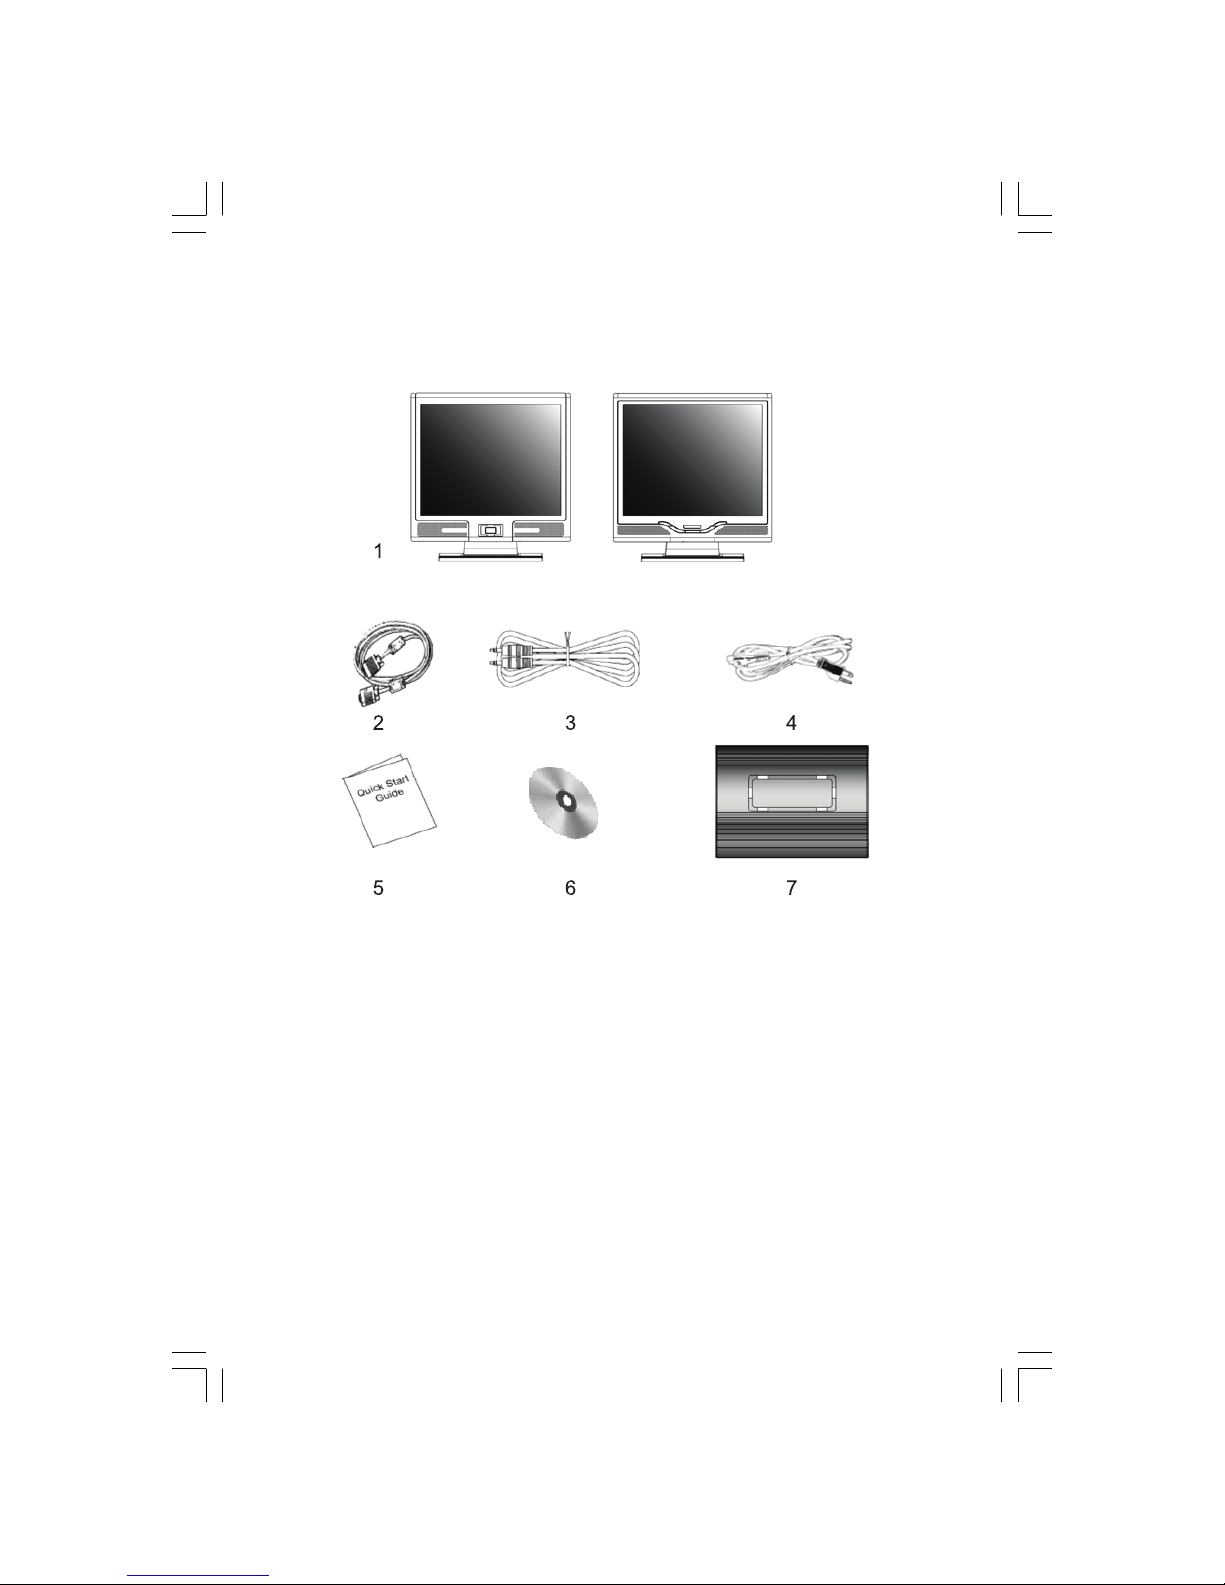
Unpacking
Thank you for your purchase. Please first check the following package content of the 19” LCD monitor. Contact your
dealer or store where you purchased the LCD monitor if anything is missing.
1. 19” TFT LCD Monitor
2. External Univ15 pin D-sub (RGB Analog) input signal cable *DVI. and Video are optional*
3. Audio Cable with Stereo Phone Jack
4. Power Cord
5. Quick Start Guide
6. CD User’s Manual
7. Quick Stand
Page 5

5PRESTIGIO P199
ENG
Warning
1. Make sure that the system power is turned off.
2. Plug the signal cable to the signal connector at the rear of PC.
3. Plug adapter output cable to the jack at the rear of LCD monitor and the power cord to the adapter.
4. Connect the power cord to power source.
5. Turn on the computer and the monitor.
6. For the best display quality, we suggest that you set the resolution as shown page Display Mode.
Cleaning Notes
1. Be gentle to clean the screen.
2. Never use any kind of corrosiveness chemical dissolvent to clean the screen, it may hurt your screen surface.
3. We suggest that a camel hair brush or a soft, lint-free cloth be used to clean the screen.
4. Don’t exert any pressure directly to the LCD screen.
Precaution
1. Do not expose the monitor to direct sunlight or heat.
2. Do not spill liquid on the monitor.
3. Do not attempt to open the monitor. You may be hurt by electric shock. For service, call your place of purchase.
4. Do not use your monitor when magnets or electronic products are operating nearby.
5. Do not use harsh chemicals or strong cleaning solvents to clean the monitor screen. Wipe it with clean, soft clothes
applied with mild solution.
6. Do not place anything on your monitor. Bad ventilation may elevate temperature in the monitor.
7. Don’t use your fingers to touch the LCD screen, directly. Fingerprint contains oil and may be difficult to clean.
Page 6

6 PRESTIGIO P199
ENG
Features
Power Saving:
The power management complies with VESA DPMS standard. When the system is idle (Off Mode), the monitor automatically cut its power consumption to a level less than 5w.
Auto Adjustment Key Function:
With “AUTO” key, you can automatically adjust the display for your best view.
Wide Viewing Angle:
The horizontal 160°and vertical 150° offer you great screen view.
Plug and play compatibility:
With DDC1/DDC2B compliance, the monitor is plug and plays compatible to Windows 95/98/me/2000/XP.
Space Saving:
The monitor is designed with 220 mm in-depth to provide you with more hand room for desk working space.
Side-by-Side :
The monitor comes with 26.59 mm trimmed down frame to offer side-by-side operation
Page 7
7PRESTIG IO P199
ENG
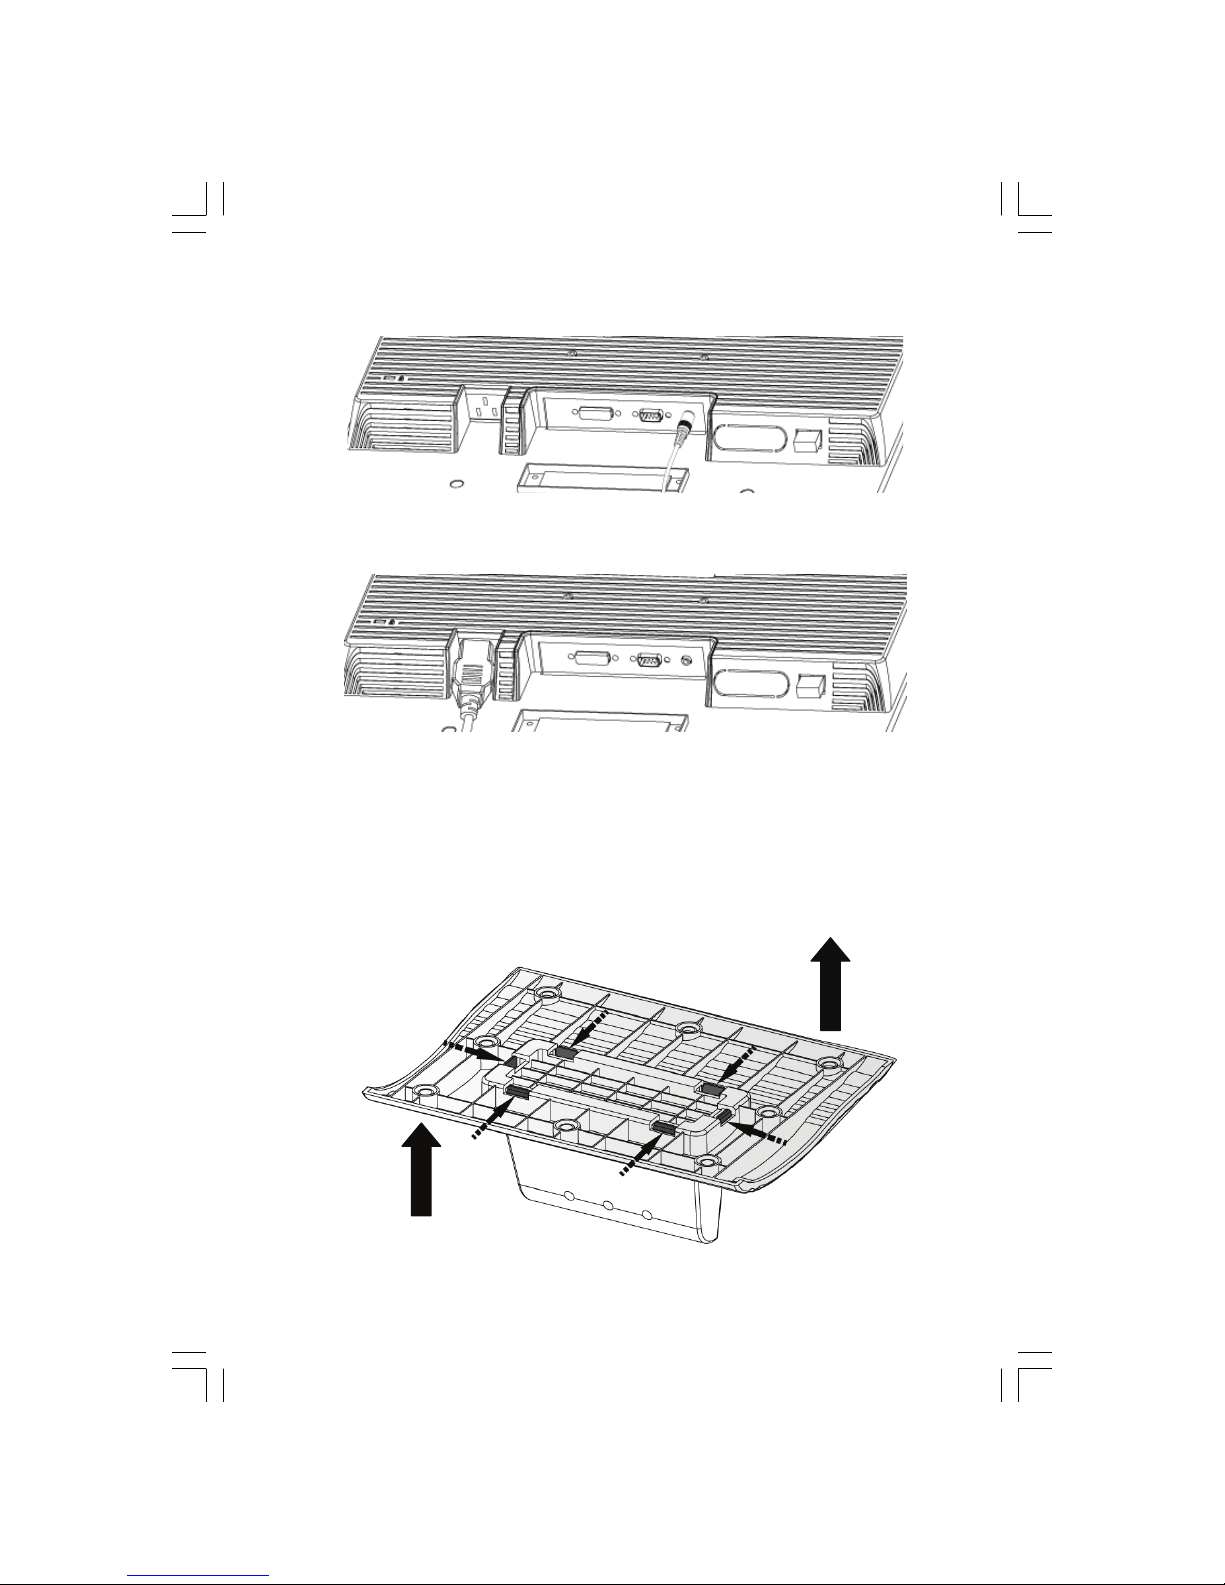
Hardware Installation
Be careful to your LCD monitor. It’s very delicate and easy to break. Turn off LCD’s and PC’s power before installation. Follow
the installation step by step described below.
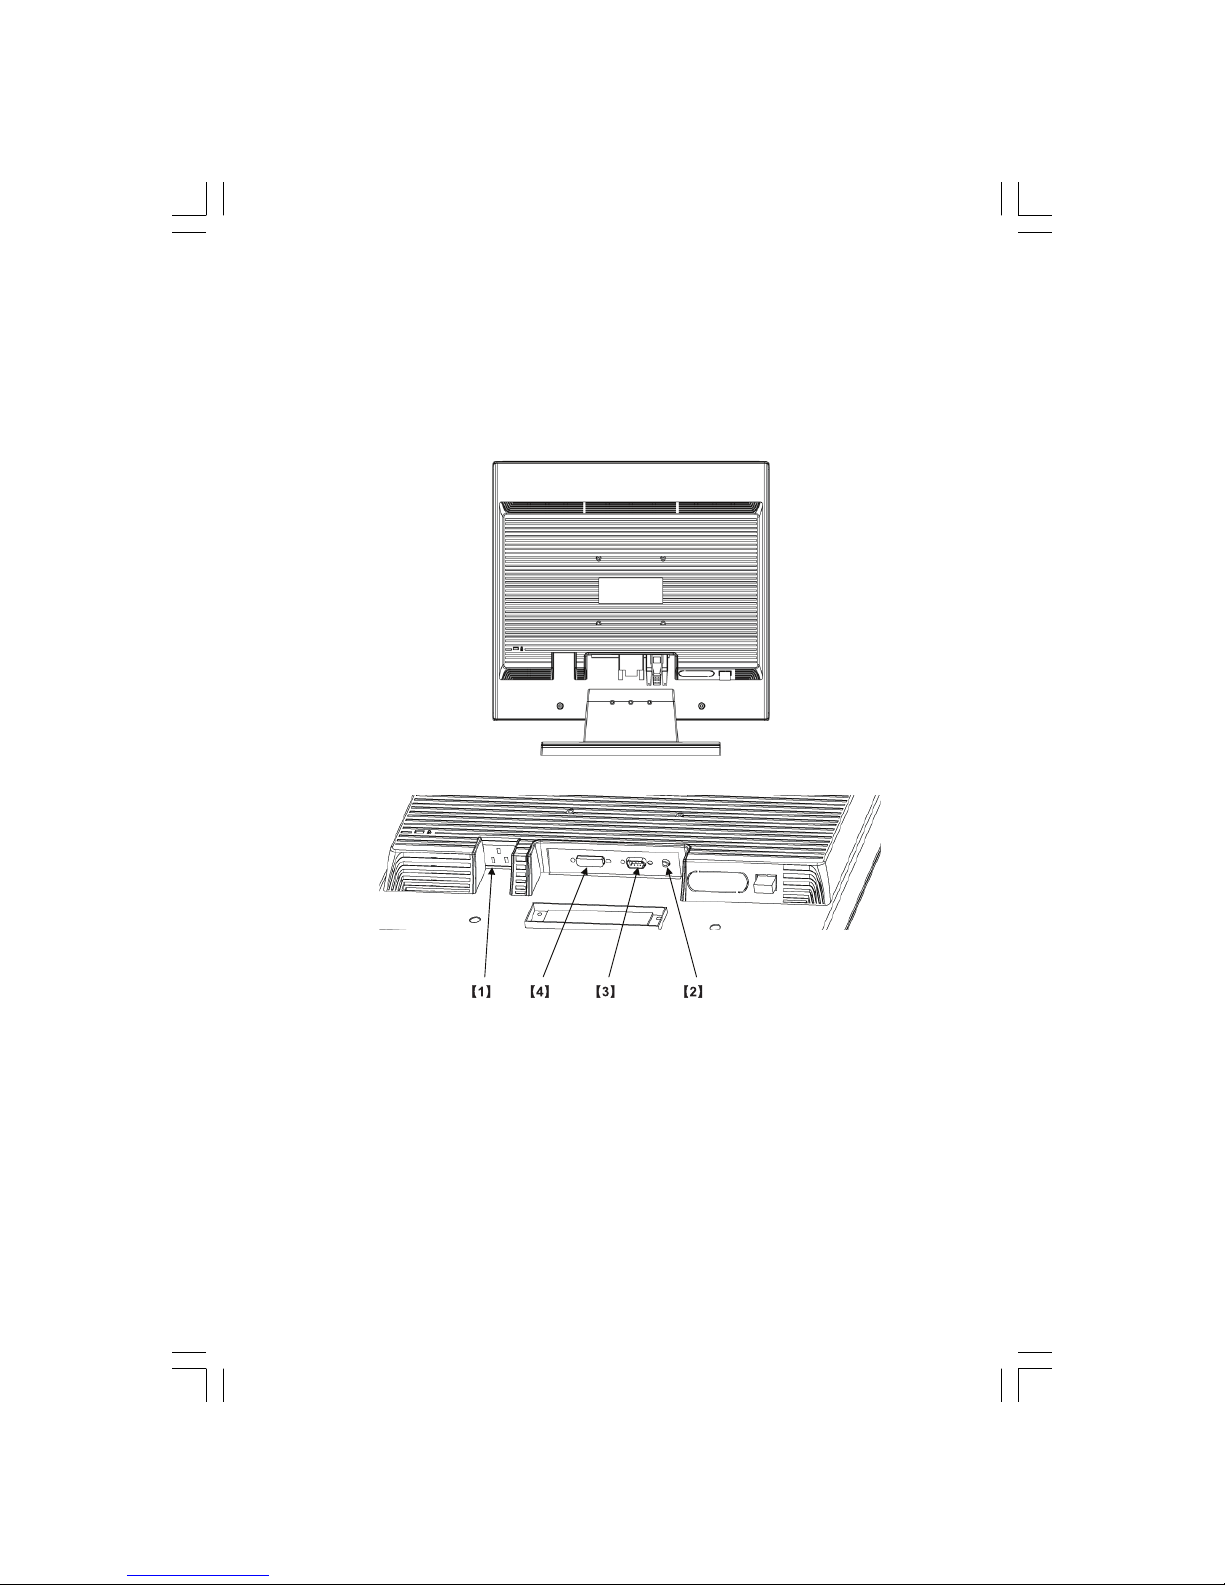
Input
1. DC-IN: This is for connecting the power cable
2. AUDIO-IN: This can be connected to the audio-out connector of any sound resource.
3. VGA-IN : This can be connected with the D-Sub 15 pin signal cable.
4. DVI-I input: This is the connector for digital video signal inputs (option)
Page 8
991P OIGITSERP8
ENG
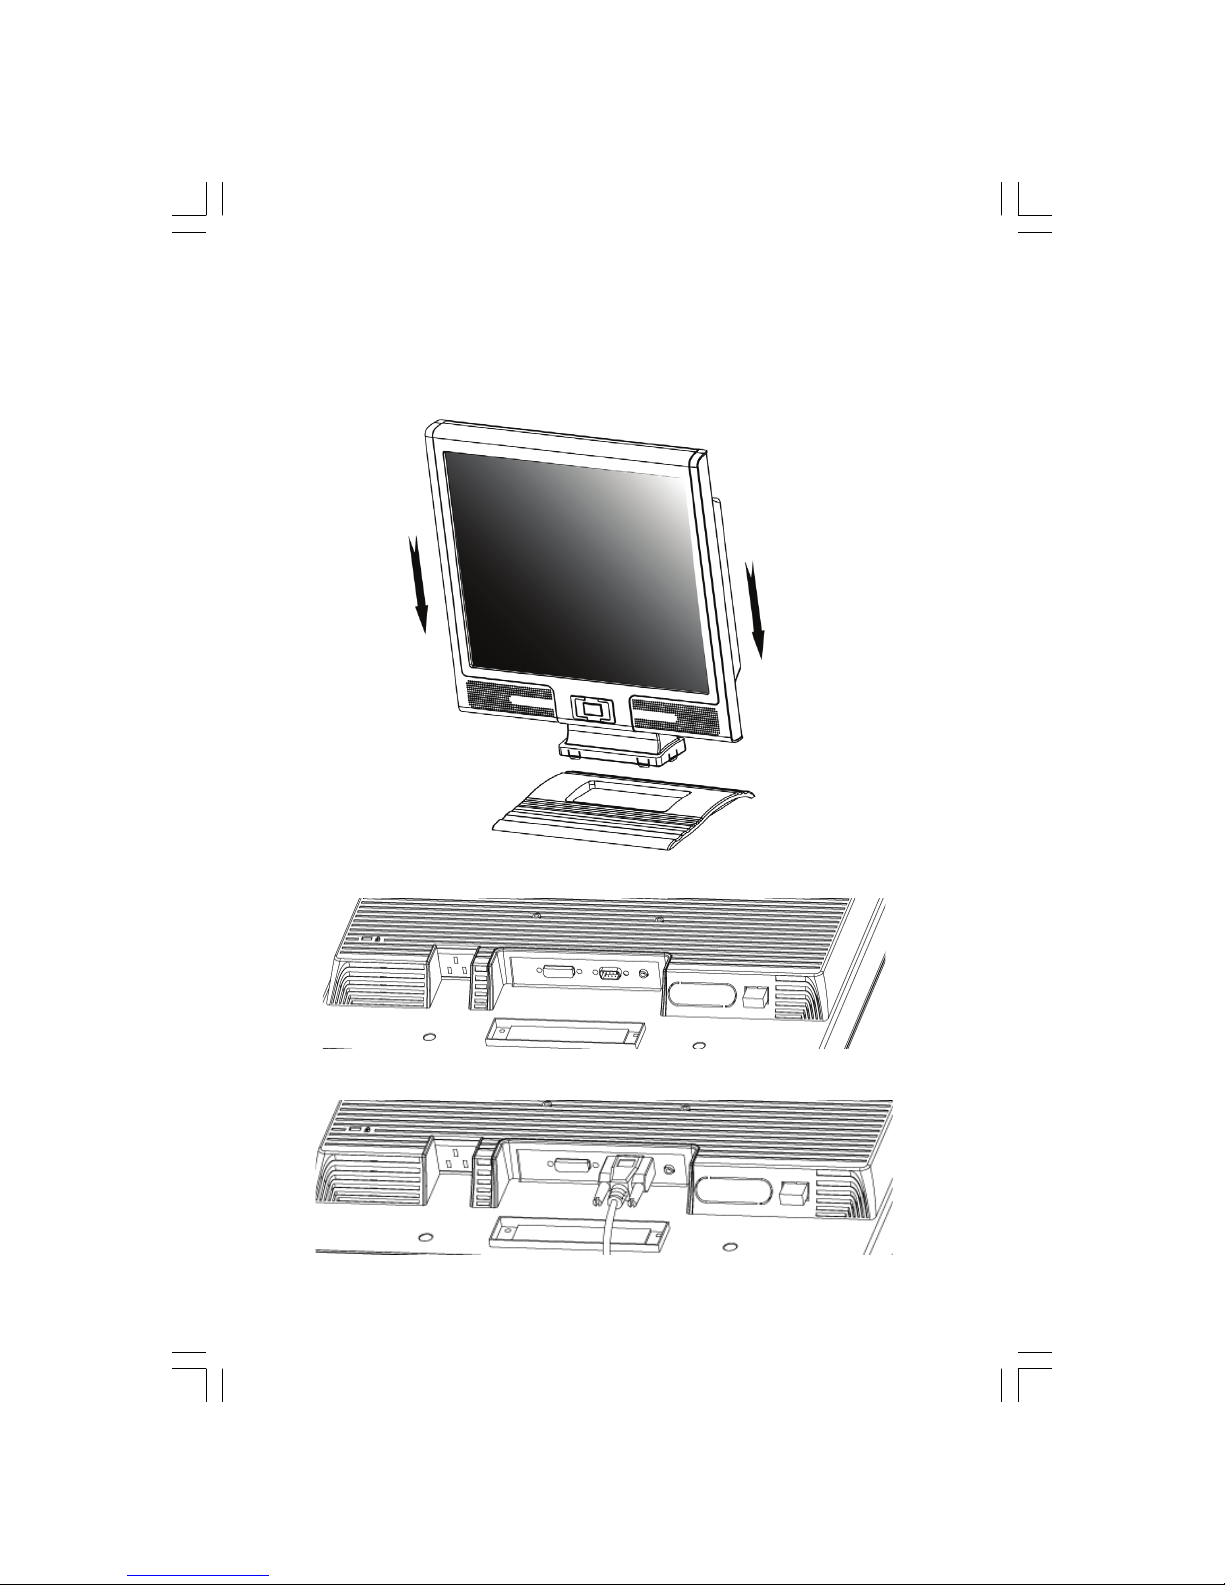
Hardware Installation Step by Step
1. Get ready with your Quick-Stand and hold your monitor firmly but gentle with your hands and let the panel
facing you to pedestal the monitor on the Quick-stand. When you hear the “Click” that means you have set up your
monitor in the first place successfully.
2. Turn your monitor upside down carefully with panel facing you to locate all connector port.
3.Plug in signal cable to VGA-IN of the monitor and the other side of the cable to the computer.
Page 9
9PRESTIG IO P199
ENG
4.Connect the audio cable to AUDIO-IN on the monitor, and the other side to computer line out.
5. Plug power cord onto the Power jack of the monitor.
6. Congratulations! You have just completed the hardware installation.
How to Remove Quick-Stand of Monitor
Remove Quick-Stand of the monitor by unlocking the six hooks as the illustration shows below when you need
to deliver the monitor for any reason.
Page 10
991P OIGITSERP01
ENG
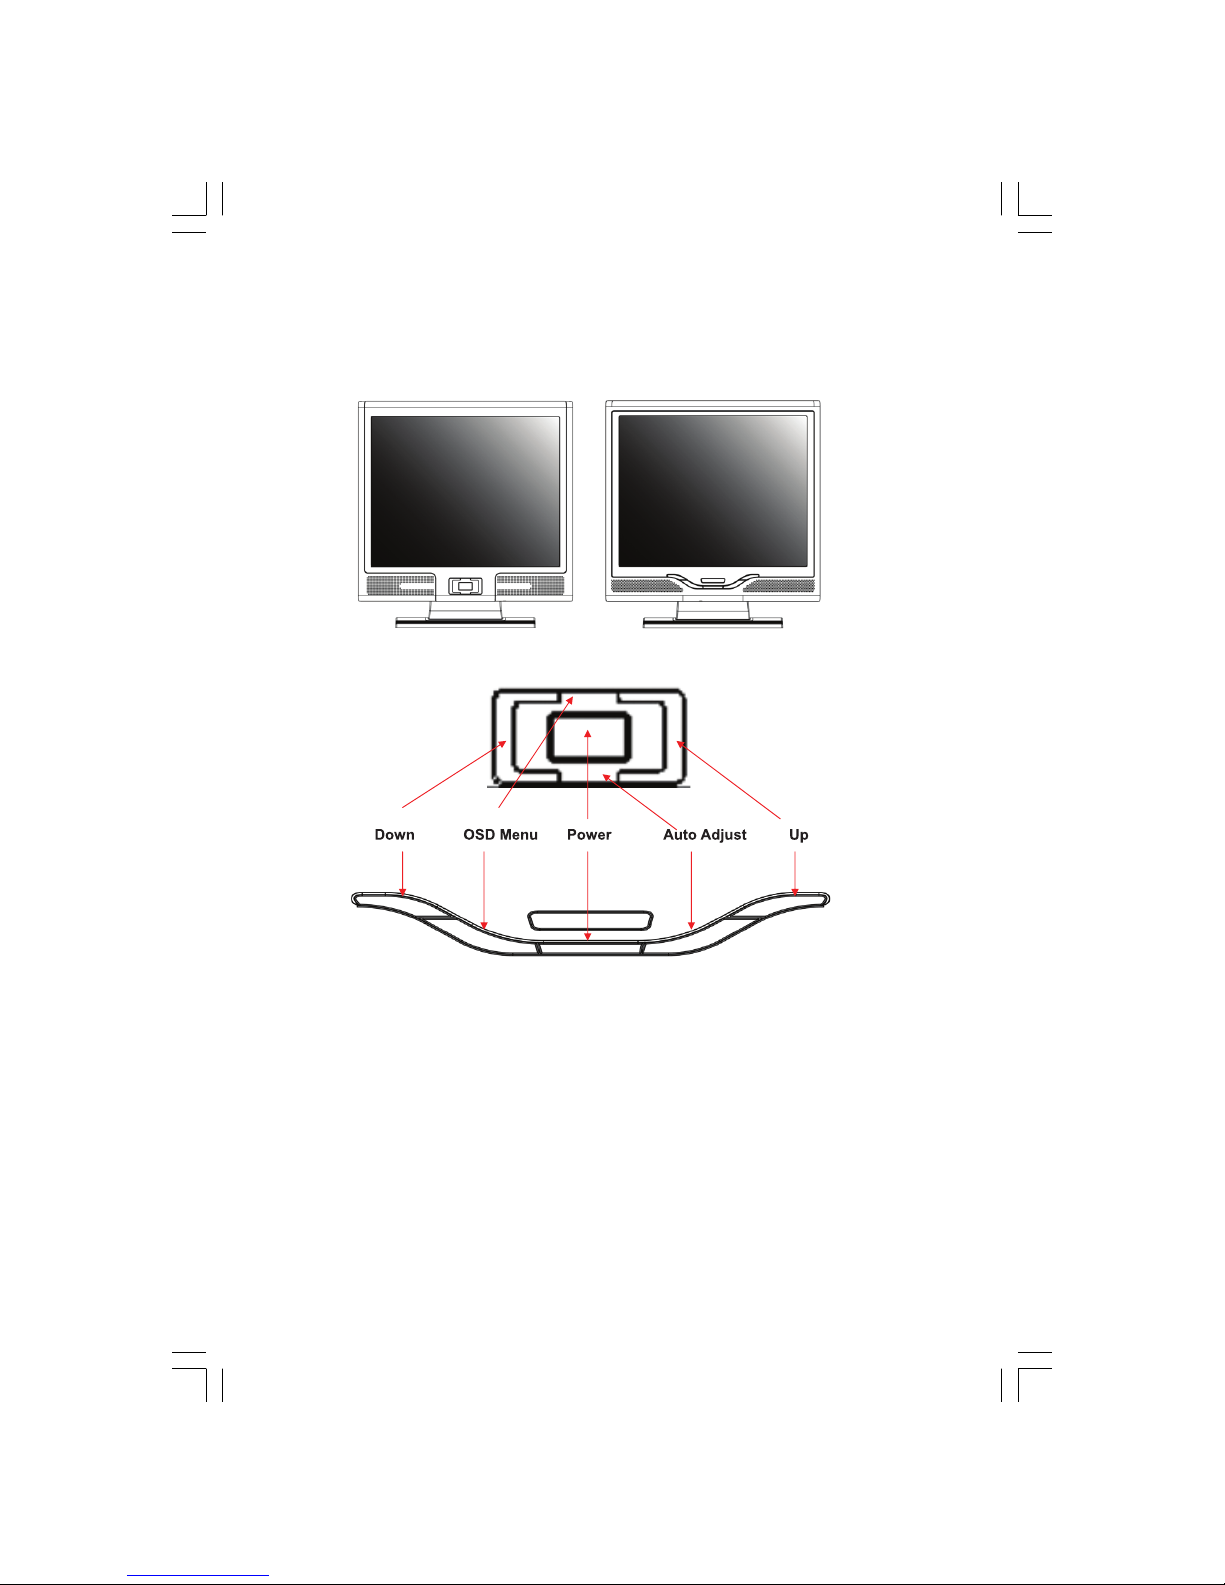
Monitor Setup Button
Menu control button
There 5 keys for user to set up the monitor, including “Power”, “MENU “, “AUTO”, ” <-> Down”, ” <+> Up”. Please refer
to the introduction below.
1. “Power”: Turn the LCD power on and off. When the power is on, the light turns green, and standby in the color of
orange.
2. “AUTO”: Exit and save the setting. Hot key for auto adjustment.
3. “MENU”: Press the button to display OSD main menu and select OSD Option.
4. “ Up”: Increase the value in the OSD option. Hot key for PC / Video / S-Video / TV mode. You can use the button to switch
between PC, Video, S-Video, and TV mode screen.
5. “ Down”: Decrease the value in the OSD option. Hot key for volume adjustment.
Page 11

11PRESTIGIO P199
ENG
Troubleshooting
If you encounter any trouble in using the monitor, make sure your monitor is properly installed according to the
following steps before you call for service.
There is no picture on the screen.
Check:
1. Power saving mode. Press any key and move the mouse to deactivate the mode.
2. Signal Cable Connector Pins. If there are bent or missing pins, consult your dealer or store where you purchased the
monitor.
Characters look too dark or too bright
Check:
1.Using OSD Menu to adjust the Contrast.
When shall your monitor be adjusted?
Check:
1. After “ reset”
2. If the resolution of frequency is being changed.
The text on the screen is unclear.
Check
1. Make sure the resolution matches with the display mode.
Page 12

12 PRESTIGIO P199
ENG
OSD (On-Screen Display) Menu (PC Mode)
Option select
1. Press the MENU button to access menu.
2. Using MENU again for advanced adjustment selection.
3. Press Down and Up for choosing different OSD function.
Press MENU as enter to select the function you want.
Main Menu Setting
Contrast
Adjust the contrast ratio of the display.
BRIGHTNESS:
Adjust the difference between light and dark area.
Page 13

13PRESTIGIO P199
ENG
COLOR ADJUST:
Adjust the RED, GREEN, and BLUE colors of the display. Click
“ENTER” to adjust the R.G.B. color separately.
RED:
Adjust the RED color of the display.
BLUE:
Adjust the BLUE color of the display.
COLOR TEMP:
Adjust the color temperature of the display.
BACK :
Return to the Main Menu Screen
COLOCK:
Adjust the re-flash ratio of the vertical scanning area.
Page 14

14 PRESTIGIO P199
ENG
PHASE:
Adjust the re-flash ratio of the horizontal scanning area.
AUTO ADJUST:
Automatically adjust the re-flash ratio of both vertical and
horizontal scanning areas of the display.
H. POSITION:
Adjust the horizontal viewing area of the display.
V. POSITION:
Adjust the Vertical viewing area of the display.
BACK :
Return to the Main Menu Screen
OSD H. POS:
Adjust the Horizontal position of the OSD.
Page 15

15PRESTIGIO P199
ENG
OSD V. POS:
Adjust the Vertical position of the OSD.
OSD TIME:
Adjust the displaying time of the OSD.
OSD COLOR:
Change the displaying color of the OSD.
OSD ALPHA:
Adjust the Alpha volume of the OSD displaying.
BACK:
Return to the Main Menu Screen.
LANGUAGE:
Change the language support to the language displaying
of the OSD.
Page 16

16 PRESTIGIO P199
ENG
RESET:
Reload the factory default setting of the display.
VOLUME:
Adjust the sound volume of the embedded speaker of the
display.
MUTE:
Silence the embedded speaker of the display.
BACK :
Return to the Main Menu Screen
VGA / DVI:
Switch to the VGA / DVI Signal inputs of the display.
Page 17

17PRESTIGIO P199
ENG
Display Mode
Incoming Display Mode
Resolution Horizontal Frequency (KHz) Vertical Frequency (Hz)
640X480 (50Hz) 31.5KHz 50.0Hz
640X480 (60Hz) 31.5KHz 59.9Hz
640X480 (66Hz) 35.0KHz 66.7Hz
640X480 (72Hz) 37.9KHz 72.8Hz
640X480 (75Hz) 37.5KHz 75.0Hz
720X480 (60Hz) 15.7KHz 59.9Hz
720X576 (50Hz) 15.6KHz 50.0Hz
800X600 (56Hz) 35.2KHz 56.3Hz
800X600 (60Hz) 37.9KHz 60.3Hz
800X600 (72Hz) 48.1KHz 72.2Hz
800X600 (75Hz) 46.9KHz 75.0Hz
832X624 (75Hz) 49.7KHz 75.0Hz
1024X768 (60Hz) 48.3KHz 60.0Hz
1024X768 (70Hz) 56.5KHz 70.1Hz
1024X768 (72Hz) 57.7KHz 72.1Hz
1024X768 (75Hz) 60.0KHz 75.0Hz
1280X960 (60Hz) 60.0KHz 60.0Hz
1152X864 (75Hz) 67.5KHz 75.0Hz
1280X1024 (60Hz) 64.0KHz 60.0Hz
1280X1024 (75Hz) 80.0KHz 75.0Hz
1. We offer you 20 Windows compatible modes.
2. If any interference occurs on your screen while you modulating your PC or OSD. It is normal.
3. To obtain best display quality, remember to upgrade your video card driver. We strongly recommended you choose
a mode listed in the above-mentioned table.
4. The modes not listed on the table above may be supported.
5. You may use the power management on your computer. It’s good for extending the service life of the product.
Page 18

18 PRESTIGIO P199
ENG
Specification
LCD Panel
Type
19.0” TFT Active Matrix LCD Display
Viewing Angle
H:160° , V:150°
Contrast Ratio
700:1(MAX), 500 : 1(Typical)
Brightness
250 cd/m2(Typical)
Response Time
8 ms(Typical)
Display Colors
16.2M colors
Max Resolution
1280X1024(SXGA)
Pixel Pitch
0.294mm(H)x0.294mm(V)
Input Signals
RGB Analog
VGA Level:0.7Vp-p(75Ohm)
Sync TTL with 75Ohm internal pull-up resistors
Frequency FH:30~79KHz / FV:56~75Hz
Compatibility
PC
Up to 1280X1024@75Hz(Non-interlaced)
Connector
RGB Analog
D-sub 15-pins
Audio IN
Stereo Phone Jack
DVI-D
D-sub 24-pin DVI-D connector(optional)
Power
AC input Voltage
100-240V, 50/60Hz(universal)
Consumption
Active < 48Watt Max
Power saving mode
Standby < 5Watt
Internal Speaker
3Wx2(Stereo)
User Interface
LED Indicator
Active - Green
Off - Turn off
Standby - Orange
Operating Condition
Temperature
0°C~45°C
Air Humidity
10% ~ 80% R.H.
Dimensions
Physical
460mm(H) x 430mm(W) x 210mm(D)
Net Weight
4.8kg
Gw Weight
5.5kg
DDC
DDC1/DDC2B Compliant
Power Management
VESA DPMS, EPA Energy Star
Regulation (Certifications)
CE , FC C, C B, T UV, U L
Page 19

1PRESTIGIO P199
CZ
Prestigio P199
Návod k použití
Page 20

2 PRESTIGIO P199
CZ
Bezpečnostní instrukce
1. Prosíme, přečtěte si pečlivě tyto bezpečnostní instrukce.
2. Uschovejte si tento návod k použití pro možnost pozdějšího nahlédnutí do něj.
3. Před čištěním výrobku jej odpojte od elektrické sítě. Nepoužívejte pro jeho čištění tekuté čistící prostředky nebo sprejové čističe.
Používejte pouze navlhčenou utěrku.
4. Před připojením monitoru do elektrické sítě se ujistěte o tom, zda odpovídá napětí ve vaší zásuvce pracovnímu napětí monitoru.
5. Všemi bezpečnostními upozorněními a varováními byste se měli řídit.
6. Dbejte, aby se do větracích otvorů monitoru nikdy nedostala žádná tekutina, neboť může dojít k požáru nebo k úrazu elektrickým
proudem.
7. Monitor nikdy nerozebírejte. Z bezpečnostních důvodů by měl být monitor opravován pouze kvalifikovanou osobou.
8. Pokud nastane některá z těchto níže popsaných situací, nechte monitor zkontrolovat v odborném servisu:
a. Do monitoru se dostala tekutina.
b. Monitor byl vystaven vlhkosti.
c. Monitor nepracuje správně nebo je jeho chování odlišné od chování popsaného v tomto návodu k obsluze.
d. Monitor vám spadl a byl poškozen.
e. Monitor nese známky poškození.
9. NEPONECHÁVEJTE MONITOR V PROSTŘEDÍ S TEPLOTOU VYŠŠÍ NEŽ 40°C, NEBOŤ VYŠŠÍ TEPLOTA JEJ MŮŽE POŠKODIT.
Page 21

3PRESTIG IO P199
CZ
Pohled na monitor
Pohled zepředu /1/ Pohled ze zadu /2/
Pohled /3/ Pohled z boku /4/
Page 22

991P OIGITSERP4
CZ
Vybalení monitoru
Děkujeme Vám za zakoupení tohoto výrobku. Nejprve zkontrolujte úplnost balení tohoto 19" monitoru. Pokud některá položka chybí,
kontaktujte prodejce nebo obchod, ve kterém jste monitor zakoupili.
1. Monitor 19" TFT LCD
2. Vstupní signálový kabel Univ 15pin D-sub /RGB analog/. DVI a Video kabel jsou volitelnými
položkami.
3. Audio kabel se sluchátkovým stereo jackem
4. Napájecí kabel
5. Rychlá příručka pro použití monitoru
6. CD disk s návodem k obsluze
7. Quick Stand
Page 23

5PRESTIGIO P199
CZ
Varování
1. Ujistěte se, že napájení systému je vypnuto.
2. Připojte signálový kabel do odpovídajícího signálového konektoru na zadní straně počítače.
3. Připojte výstupní kabel adaptéru do zdířky na zadní straně monitoru a napájecí síťový kabel do odpovídající zásuvky na adaptéru.
4. Zasuňte vidlici napájecího kabelu do elektrické zásuvky.
5. Zapněte počítač a monitor.
6. Pro dosažení nejlepší kvality zobrazení doporučujeme nastavit rozlišení monitoru tak, jak je popsáno na straně 15 /Režim
zobrazení/.
Rady pro čištění monitoru
1. Buďte obzvláště opatrní při čištění obrazovky monitoru.
2. Nikdy nepoužívejte žádná chemická rozpouštědla, neboť může dojít k poškození povrchu obrazovky - panelu LCD.
3. Pro čištění obrazovky doporučujeme používat kartáček z velbloudích chlupů /neelektrizuje/ nebo jemnou utěrku, která nepouští
vlákna.
4. Na zobrazovací plochu LCD panelu monitoru nikdy netlačte v jednom bodě, může tak dojit k jeho poškození.
Doporučení pro používání monitoru
1. Nevystavujte monitor přímému slunečnímu záření nebo sálavým zdrojům tepla.
2. Dbejte, aby se do monitoru nedostala žádná tekutina.
3. Nezkoušejte monitor rozebírat. Můžete při tom utrpět úraz elektrickým proudem. V případě potřeby opravy kontaktujte odborný
servis.
4. Neprovozujte monitor v místech, kde je silné magnetické pole nebo v těsné blízkosti jiných elektronických zařízení.
5. Pro čištění monitoru nepoužívejte agresivní chemikálie nebo silné čistící prostředky. Čistěte jej čistou a jemnou, lehce navlhčenou
utěrkou.
6. Nikdy nestavte žádné předměty na horní plochu monitoru. Zhoršení ventilace může způsobit přehřátí monitoru.
7. Nedotýkejte se prsty povrchu LCD zobrazovacího panelu. Mastné otisky prstů se z panelu obtížně ods traňují.
Page 24

6 PRESTIGIO P199
CZ
Charakteristické vlastnosti monitoru
Úsporný režim:
Systém řízení spotřeby odpovídá standardu VESA DPMS. Pokud je systém neaktivní, monitor automaticky omezí svojí spotřebu na méně
než 5W.
Tlačítko s funkcí automatického nastavení monitoru:
Pomocí tlačítka AUTO můžete automaticky nastavit zobrazení monitoru na nejlepší úroveň.
Široký pozorovací úhel:
Horizontální pozorovací úhel 160°a vertikální 150° poskytují perfektní možnosti sledování obrazovky monitoru.
Kompatibilita s technologií Plug and Play:
Podle standardu DDC1/DDC2B je tento monitor kompatibilní s technologií Plug and Play v operačních systémech Windows 95/98/
ME/2000/XP.
Úspora místa:
Monitor je celkově pouze 220 mm hluboký, což přináší značnou úsporu místa na vašem pracovním stole.
Side-by-Side :
Monitor je vybaven 26.59 mm zkoseným rámem, který umožňuje side-by-side činnost
Page 25

7PRESTIG IO P199
CZ
Instalace hardwaru
Buďte na váš LCD monitor opatrní, neboť je to velice citlivé zařízení a může snadno dojít při neopatrné manipulaci k jeho poškození.
Vstup
1. DC-IN - místo pro připojení napájecího kabelu
2. AUDIO-IN - konektor zvukového vstupu pro připojení k audio výstupům nejrůznějších zvukových
zařízení.
3. VGA-IN - konektor pro připojení signálového kabelu D-Sub 15 pin.
4. DVI-IN - konektor pro vstup digitálního video signálu /volitelné/.
Page 26

991P OIGITSERP8
CZ
Hardwarová instalace krok za krokem
1. Otevřete kryt konektorů na monitoru.
2. Opatrně otočte monitor tak, aby jste získali snadný přístup ke všem přípojným místům - konektorům.
3. Připojte signálový kabel do konektoru VGA-IN na monitoru a druhý konec kabelu připojte do odpovídajícího konektoru na počíta
či.
Page 27

9PRESTIG IO P199
CZ
4. Připojte zvukový kabel od počítače do konektoru AUDIO-IN na monitoru.
5. Připojte signálový kabel DVI-I do konektoru DVI-I na monitoru a jeho druhý konec připojte k počítači /volitelné/.
6. Připojte napájecí kabel do DC-IN konektoru na monitoru.
How to Remove Quick-Stand of Monitor
Remove Quick-Stand of the monitor by unlocking the six hooks as the illustration shows below when you need
to deliver the monitor for any reason.
Page 28

991P OIGITSERP01
CZ
Tlačítka pro nastavení monitoru
Menu ovládacích tlačítek
Uživatel monitoru má k dispozici 5 tlačítek pro nastavení monitoru, kterými jsou : “Power” - napájení, “MENU” - vyvolání menu,
“AUTO” - automatické nastavení, “ <-> Down” - snížení hodnoty a “ <+> Up” - zvýšení hodnoty.
1. Tlačítko “Power”: zapíná a vypíná monitor. Pokud je monitor zapnut, kontrolka svítí zeleně, pokud je v režimu “Standby”, svítí
oranžově.
2. Tlačítko “AUTO”: opuštění a uložení nastavených hodnot. Slouží také jako tlačítko pro automatické nastavení monitoru.
3. Tlačítko “MENU”: stiskem tohoto tlačítka se otevře OSD menu /menu pro nastavování hodnot a funkcí monitoru přímo na obrazovce/
a také slouží pro výběr voleb z OSD menu.
4. Tlačítko “UP”: stiskem se zvyšuje hodnota, která je zvolena pomocí OSD menu. Toto tlačítko slouží také jako “horká klávesa” pro
přepínání mezi režimy zobrazení PC, Video, S-Video a TV.
5. Tlačítko “DOWN”: stiskem se snižuje hodnota, která je zvolena pomocí OSD menu. Slouží také jako “horká klávesa” pro nastavení
hlasitosti zvuku.
Page 29

11PRESTIGIO P199
CZ
Řešení případných problémů
Pokud dojde při provozu a používání monitoru k problémům, ujistěte se před kontaktováním odborného servisu, zda je monitor
správně nainstalován.
Není na obrazovce žádný obraz?
Zkontrolujte:
1. Zdali se monitor nenachází v úsporném režimu. Stiskem kterékoliv klávesy na klávesnici nebo pohybem myši tento režim zrušíte.
2. Stav jehliček konektoru signálového kabelu. Pokud jsou některé jehličky ohnuty nebo dokonce chybí, kontaktujte svého prodavače
nebo obchod, kde jste monitor zakoupili.
Znaky na obrazovce jsou příliš tmavé nebo příliš světlé?
Zkontrolujte:
1. Pomocí OSD menu zkontrolujte hodnotu nastavení kontrastu.
Kdy by měl být monitor nastaven?
Zkontrolujte:
1. Nastavení po celkovém resetování všech nastavitelných hodnot.
2. Pokud došlo ke změně rozlišení frekvence.
Je text na monitoru špatně čitelný ?
Zkontrolujte:
1. Zdali nastavené rozlišení odpovídá režimu zobrazení.
Page 30

12 PRESTIGIO P199
CZ
Režim menu OSD /On-Screen-Display/ - VGA
Volba výběru
1. Pro přístup k OSD menu stiskněte tlačítko “MENU”.
2. Dalším stiskem tohoto tlačítka se dostanete do výběru rozšířeného nastavení.
3. Stiskem tlačítek “UP” a “DOWN” můžete vybírat různé funkce OSD menu.
Opětovným stiskem tlačítka “MENU” potvrdíte vybrání žádané funkce.
Nastavení Hlavního Menu
Kontrast:
Nastavení rozdílů mezi světlými a tmavými oblastmi obrazu.
Jas:
Nastavení jasu zobrazení.
Page 31

13PRESTIGIO P199
CZ
Nasatvení Barev:
Nastavení červené, zelené a modré barvy na displeji. Klikněte
“ENTER” k nastavení R.G.B. barev jednotlivě.
Červená:
Nastaví ČERVENOU barvu na displeji.
Modrá:
Nastaví MODROU barvu na displeji.
Teplota barev:
Nastaveni teploty barev na displeji.
Návrat:
Návrat na Obrazovku Hlavního Menu
Takt:
Nastavení re-flesh hodnoty verticální scanovací plochy.
Page 32

14 PRESTIGIO P199
CZ
Fáze:
Nastavení re-flesh hodnoty horizontální scanovací plochy.
Auto nastavení:
Automatické nastavení obou hodnot scanovací plochy na displeji.
H Pozice:
Nastavení horizontálního zobrazení na displeji.
V Pozice:
Nastavení vertikálního zobrazení na displeji.
Návrat:
Návrat na Obrazovku Hlavního Menu
OSD H. POS:
Nastavení Horizontální pozice v OSD.
Page 33

15PRESTIGIO P199
CZ
OSD H. POS:
Nastavení Vertikální pozice v OSD.
OSD Čas:
Nastavení zobrazování času v OSD.
OSD Barva:
Změna zobrazování barev v OSD.
OSD ALPHA:
Nastavení Alpha hlasitosti v OSD.
Návrat:
Návrat na Obrazovku Hlavního Menu
Jazyk:
Změna podpory jazyka na jazyk zobrazující v OSD.
Page 34

16 PRESTIGIO P199
CZ
Reset:
Návrat k výrobnímu nastavení na displeji.
Hlasitost:
Nastavení hlasitosti zvuku reproduktoru displeje.
Ztlumení:
Ztlumení reproduktoru na displeji.
Návrat:
Návrat na Obrazovku Hlavního Menu
VGA / DVI:
Přepnutí na VGA / DVI Signal vstupy na displeji.
Page 35

17PRESTIGIO P199
CZ
Režim zobrazení
Vstupní režim zobrazení
Rozlišení Horizontální frekvence /khz/ Vertikální frekvence /Hz/
640X480 (50Hz) 31.5KHz 50.0Hz
640X480 (60Hz) 31.5KHz 59.9Hz
640X480 (66Hz) 35.0KHz 66.7Hz
640X480 (72Hz) 37.9KHz 72.8Hz
640X480 (75Hz) 37.5KHz 75.0Hz
720X480 (60Hz) 15.7KHz 59.9Hz
720X576 (50Hz) 15.6KHz 50.0Hz
800X600 (56Hz) 35.2KHz 56.3Hz
800X600 (60Hz) 37.9KHz 60.3Hz
800X600 (72Hz) 48.1KHz 72.2Hz
800X600 (75Hz) 46.9KHz 75.0Hz
832X624 (75Hz) 49.7KHz 75.0Hz
1024X768 (60Hz) 48.3KHz 60.0Hz
1024X768 (70Hz) 56.5KHz 70.1Hz
1024X768 (72Hz) 57.7KHz 72.1Hz
1024X768 (75Hz) 60.0KHz 75.0Hz
1280X960 (60Hz) 60.0KHz 60.0Hz
1152X864 (75Hz) 67.5KHz 75.0Hz
1280X1024 (60Hz) 64.0KHz 60.0Hz
1280X1024 (75Hz) 80.0KHz 75.0Hz
1. Nabízíme vám 20 režimů, které jsou kompatibilní se systémem Windows.
2. Přítomnost interferencí na obrazovce při nastavování PC nebo OSD menu je normálním jevem.
3. Pro zajištění nejvyšší možné kvality zobrazení vám doporučujeme aktualizovat ovladač vaší videokarty v PC. Doporučujeme výběr
režimu, který je uveden ve výše uvedené tabulce.
4. Režimy zobrazení, které nejsou v tabulce uvedeny, nemusí být tímto monitorem podporovány.
5. Pro zvýšení životnosti monitoru vám doporučujeme využívat systém řízení spotřeby na vašem PC.
Page 36

18 PRESTIGIO P199
CZ
Technické údaje
Zobrazovací LCD panel
Typ panelu:
19.0" TFT aktivní maticový LCD displej
Pozorovací úhel
H:160° , V:150°
Kontrastní poměr
700:1 /max/, 500:1 /typická hodnota/
Jas
250 cd/m2 /typická hodnota/
Čas odezvy
8 ms /typická hodnota/
Zobrazení barev
16.2 milionu barev
Maximální rozlišení
1280 x 1024 /SXGA/
Rozteč pixelů
0.294mm /H/ x 0.294mm /V/
Vstupní signály
Analogový RGB
Úroveň VGA: 0.7Vp-p /75 Ohm/
Sync TTL pomocí 75 Ohm vnitřních výsuvných odporů
Frekvence FH:30~79KHz / FV:56~75Hz
Kompatibilita
PC
Do 1280 x 1024@75Hz /neprokládané/
Konektor
Analogový RGB
D-sub 15-pins
Audio IN
Stereofonní jack
DVI-D
Konektor D-sub 24-pin DVI-D /volitelné/
Napájení
Vstupní AC napětí
100-240V, 50/60Hz, 1.2-0.7A
Příkon
V aktivním stavu méně než 48 W max.
V úsporném režimu
Standby méně než 5 W
Vestavěné reproduktory
2 x 3W stereo
Uživatelské rozhraní
Indikační LED svítivá dioda
Aktivní stav - zelená
Vypnuto - nesvítí
Úsporný režim - oranžová
Provozní podmínky
Teplota
0°C~45°C
Vzdušná vlhkost
10% ~ 80% R.H.
Rozměry
Fyzické
460 mm (Š) x 430mm (V) x 210mm (H)
Čistá hmotnost
4.8 kg
Hrubá hmotnost
5.5 kg
DDC
Odpovídá DDC1/DDC2B
Řízení spotřeby
VESA DPMS, EPA Energy Star
Směrnice /certifikace/
CE, FCC, CB, TUV, UL
 Loading...