

Page 1

3PRESTIGIO P198
ENG
Federal Communications Commission (FCC) Statement
This Equipment has been tested and found to comply with the limits for a class B digital device, pursuant to Part 15 of
the FCC rules. These limits are designed to provide reasonable protection against harmful interference in a residential
installation. This equipment generates, uses and can radiate radio frequency energy and, if not installed and used in
accordance with the instructions, may cause harmful int erference t o radio communica tions. Howev er, ther e is no guarantee that interference will not occur in a particular installation. If this equipment does cause harmful interference to
radio or television reception, which can be determined by turning the equipment off and on, the user is encouraged t o
try to correct the interference by one or more of the following measures:
• Reorient or relocate the receiving antenna.
• Increase the separation between the equipment and receiver.
• Connect the equipment into an outlet on a circuit different from tha t t o which the r eceiv er is c onnected .
• Consult the dealer or an experienced radio/TV technician for help.
Warning:
A shielded-type power cord is required in or der meet FC C emission limits and also to pr eve nt interference to the nearb y
radio and television reception. It is essential that only the supplied power cord be used.
Use only shielded cables to connect I/O devices to this equipment.
You ar e cautioned tha t changes or modifica tions not expr essly approved by the party responsible for compliance could
void your authority to operate the equipment.
IMPORTANT SAFEGUARDS
Warning:
1. Read all of these instructions.
2. Save these instructions for later use.
3. Unplug this monitor from the wall outlet before cleaning. Do not use liquid cleaners or aerosol cleaners. Use a damp
cloth for cleaning.
4. Do not use attachments not recommended by the monitor manufacturer as they may cause hazards.
5. Do not use this monitor near water. For example near a bathtub, washbowl, kitchen sink, or laundry tub, in a wet
basement, or near a swimming pool, etc..
6. Do not place this monitor on an unstable cart, stand, or table. T he monitor may fall, causing serious injury to a child or
adult, and serious damage to the appliance. Use only with a cart or stand recommended by the manufacturer or
sold with monitor. W all or shelf mounting should follo w the manufacturer’s instructions, and should use a mounting kit approved by the manufacturer.
7. Slots and openings in the cabinet and the back or bottom are provided for ventilation, and to insure r eli-able operation of the television receiver and to protect it from overheating, these openings must not be blocked or covered.
The openings should never be blocked by placing the monitor on a bed, sofa, rug, or other similar surface. This
monitor should never be placed near or over a radiat or or heat r egist er. This monit or should not be placed in builtin installation such as a bookcase unless proper ventilation is provided.
8. This monitor should be operated only from the type of power source indicated on the marking label. If you are not
sure of the type of power supplied in your home, consult your monitor dealer or local power company
9. This monitor is equipped with a three-wire grounding type plug, a plug having a third (grounding) pin.
Page 2

4 PRESTIGIO P198
ENG
This plug will only fit into a grounding-type power outlet. This is a safety feature. If you are unable to insert the plug
into the outlet, contact your electrician to replace your obsolete outlet. Do not defeat the safety purpose of the
grounding- type plug.
10. Do not allow anything to rest on the power cord. Do not locate this monitor where the cord will be abused by
persons working on it.
11. Follow all warnings and instructions marked on the monitor.
12. F or added prot ection for this monitor, when it is left una ttended and unused for long periods of time , unplug it from
the wall outlet. This will prevent damage to the monitor due to power-line surges.
13. Do not overload wall outlets and extension cords as this can result into fire or electric shock.
14. Nev er push objects of an y kind int o this monit or thr ough cabinet slots as they ma y t ouch danger ous v oltage points
or short out parts that could result in a fire or electric shock. Never spill liquid of any kind on the monitor.
15. Do not attempt to service this monitor yourself since opening or removing covers may expose you to dangerous
voltage or other hazards. Refer all servicing to qualified service personnel.
16. Unplug this monitor from the wall outlet and refer servicing to qualified service personnel under the following
conditions:
a. When the power cord or plug is damaged or frayed.
b. If liquid has been spilled into the monitor.
c. If the monitor has been exposed to rain or water.
d. If the monitor does not operate normally by following the operating instructions. Adjust only those controls
that are covered b y the operating instructions as improper adjustment of other c ontrols may r esult in damage and
will often require extensive work by a qualified technician to restore the monitor to normal operation.
e. If the monitor has been dropped or the cabinet has been damaged.
f. When the monitor exhibits a distinct change in performance- this indicated a need for service.
17. When replacement parts are required, be sure the service technician has used replacement parts specified by the
manufacturer that has the same characteristics as the original parts. Unauthorized substitutions may result in
fire, electric shock, or other hazards.
18. Upon completion of any service or repairs to this monitor, ask the service technician to perform routine safety
checks to determine that the monitor is in safe operating condition.
Page 3
5PRESTIGIO P198
ENG
19" TFT COLOR MONITOR
1. Installing the Monitor
Unpacking
Open the shipping cartons and check the contents.
If any items are missing or damaged, contact your dealer immediately.
The package should include the following items:
• TFT color monitor
• User’s guide
• Power cord
• Signal cable
• DC power adapter
• Audio cable
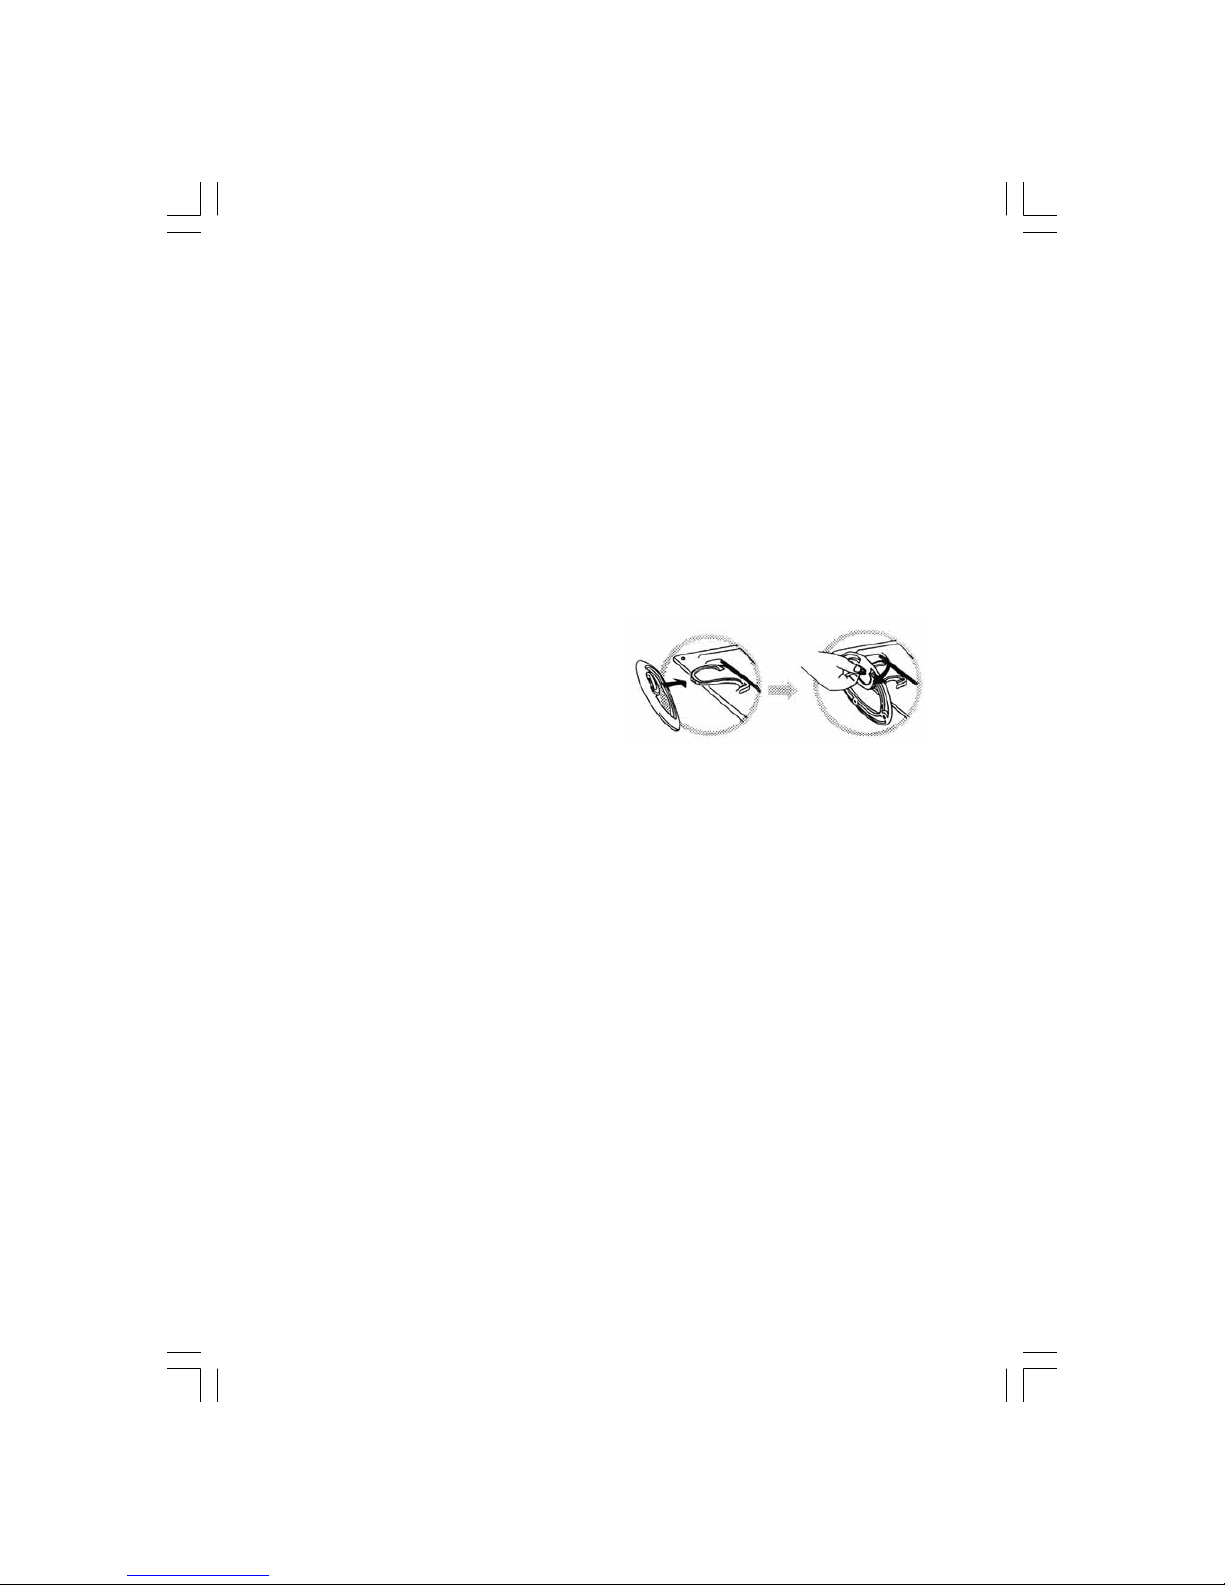
Installing the Base
Follow these steps to install the base:
1. Turn the monitor down.
2. Assembly the base to the arm with screw.
3. Tie the screw with a coin.
Installing the Monitor
This monitor is equipped with an auto sensing DC power adapter for v oltage ranges 100-240V A C, 60/50Hz. Confirm the
line voltage designation on the rear panel of the monitor. Follow these steps to install the monitor:
1. Before you connect the cables, made sure that the monitor and the system unit power switches are off.
2. Plug one end of the 15pin-signal cable to the monitor and the other end to the video signal connector at the rear of
the system. Tighten the two screws on the cable connector.
3. Connect the DC power cord to the DC jack.
4. Connect the power cable.
Page 4

6 PRESTIGIO P198
ENG
2. Control F unctions
The monitor digital control functions are located on the front panel. They are shown in the figure below
and described in the following paragraphs.
1.Power Switch with Indicator LED
2.Function Keys
3. Function Select
With the /\ and \/ knobs, you can adjust the speakers volume.
Press the 1 knob to show the OSD menu. Than use the /\ and \/ knobs to select a function.
Press the 2 knob to close the OSD menu.
You can hold the 2 knob for more than 3 second to adjust the image quality automatically.
The OSD menu will close automatically after 3-10 seconds without operation and saves any changes you have made.
4. Function Adjustment
1.Signal Select
VGA - Select the image signal coming from the VGA cable.
DVI - Select the image signal coming from the DVI cable.(option)
Exit - Close the Signal Select OSD menu.
2.Video
Brightness - Adjust the luminance level in the image.
Contrast - Adjust the difference in luminance between light and dark areas of the image.
Black Level - Adjust the black Level in the image.
Exit - Close the Video OSD menu.
3.Audio
Volume - Adjust the volume of speakers.
Balance - Adjust the speaker’s volume to right side or left side.
Exit - Exit the Audio OSD menu.
Page 5

7PRESTIGIO P198
ENG
4.Color
Color Temper ature
User - Adjust the R.G.B. gain level.
6500K - Select color temperature to 6500°K.
9300K - Select color temperature to 9300°K.
Exit - Close the Color Temperature OSD menu.
Flesh Tone - Adjust the flesh tone of the image.
Hue - Adjust the shade of the image color.
Saturation - Adjust the saturation of the image color.
Exit - Close the Color OSD menu.
5.Image
Auto Tune - Adjust geometry of the image automatically.
H. Width - Adjust the horizontal sync size of signal.
H. Phase - Adjust the horizontal sync phase of signal.
H. Position - Adjust the horizontal position of the image.
V. Position - Adjust the vertical position of the image.
Exit - Close the Image OSD menu.
6.Language
Sets the language of the OSD windows.
7.Tools
OSD Control
OSD Timer - Setting the OSD menu display time.
OSD H. Position- Adjust the horizontal position of the OSD menu.
OSD V. Position- Adjust the vertical position of the OSD menu.
Exit - Close the OSD Control OSD menu.
Recall - Recall the factory default setting.
Sharpness - Adjust the picture display more clear.
Exit - Close the Tools OSD menu.
8.Exit
Close the OSD menu.
5. Micro-controller Features
The micro-controller automatically det ects the video board installed in your system. When y ou turn on the monitor, the
micro-controller first checks the display mode memory stored in the user setting area of the video board, and then the
factory presetting area. It then adjusts to the proper display mode.
Page 6

8 PRESTIGIO P198
ENG
6. Display Modes Memory
The micro-controller has the memory capacity to store different display modes, including timing formats and displaysettings. This memory capacity is divided into two parts: the user setting area and the factory presetting area.
User Setting Area
The user setting area on the micro-controller maintains in its memory the last display modes set by the user. You can
change the settings, or add a nonstandar d mode . The micr o-contr oller always det ects and displays the last mode stor ed
in the user setting area first when the monitor is turned on.
Factory Presetting Area
There are some preferred display modes preset in the micro-controller. These display modes are preset at the factory
and include the most popular display modes currently available. The micro-controller searches for a proper display
mode in this area if it fails to find a proper display mode in the user setting area.
7. Signal Connector Pin-outs
To connect VGA, 8514A or IBM-compatible graphics adapters, use a 15 pin mini D-type male connector.
Page 7

9PRESTIGIO P198
ENG
8. Power Saving Feature
When the power saving active them the power indicator LED will be from Green Light to Amber, and power saving
feature complies with these VESA power saving modes:
The monitor uses the H. Sync and V. Sync signals to determine the operation mode to enter.
The monitor power-saving feature aut omatically turns off H. Sync and V. Sync if there is no input from the system for a
certain period of time. To use this fea ture, you need a gr een PC tha t is complian t with the VESA power saving feature or
a software utility to detect system input such as keyboard or mouse.
Time Settings
Time settings are adjusted from the system unit by software. To fulfill the requirements in the NUTEK specification
803299/94 the total time from indicated inactivity to Pow er Saving position A2 (VESA OFF) must not be set more than
70 minutes. We recommend you switch off the monitor when you do not intend to use it for awhile.
Page 8

10 PRESTIGIO P198
ENG
9. Specifications - Model P198
LCD Panel Size 19”
Pixel Pitch: 0.294mm
Brightness: 250 cd/m2
Contrast Ratio: 600 : 1
Response Time: 12 ms(max.)
Maximum viewable size 19 inch (48.3cm)
Video Input Analog 15-pin, D-sub connector
Digital DVI connector(option)
Display area 376mmx301mm(H×V)
Power supply (Universal) Input voltage 100-240V /60-50Hz
Consumption 60watts maximum
External controls Power-switch, VGA, DVI(option), Brigh tness , Contrast, Black level, Volume , Balance,
Color tempeture (User, 6500°K, 9300°K), Flech t one, Hue, Saturation, H-width, H-phase,
H-position, V-position, OSD control, Recall, Sharpness, Exit
Horizontal frequency 30-82KHz
Vertical frequency 50-75Hz
Dimensions (with carton) 490mm×155mm×500mm (W×D×H)
Max. Resolution 1280×1024@75Hz (Non-Interlaced)
Power Saving With EPA standard
Plug & Play DDC 1/2B
Weight N.W. 6.0Kgs
G.W. 7.5Kgs
Ambient temperature Operation 5°C – 35°C
Non-operating -20°C – 60°C
Humidity Operating20%-80%
Storage 10%-90%
*Specifications are subject to change without notice.
 Loading...