

Page 1
Prestigio P190T
Page 2
Eng
2 www.prestigio.biz
U.S.A.
U.S.FEDERAL COMMUNICATIONS COMMISSION
RADIO FREQUENCY INTERFERENCE STATEMENT
INFORMATION TO THE USER
NOTE : This equipment has been tested and found to comply with the limitsfor a Class B
digital device pursuant to Part 15 of the FCC Rules.
These limits are designed to provide reasonable protection against harmful interference
in a residential installation.
This equipment generates, uses, and can radiate radio frequency energy and, if not
installed and used in accordance with the instructions, may cause harm ful interference to
radio communications.
However, there is no guarantee that interference will not occur in a particular installa-
tion.
If this equipment does cause harmful interference to radio or television re ception, which
can be determined by turning the equipment off and on, the user is encouraged to try to
correct the interference by one or more of the
following measures:
• Reorient or relocate the receiving antenna.
• Increase the separation between the equipment and receiver.
• Connect the equipment into an outlet of a circuit different from that to which the receiver
is connected.
• Consult the dealer or an experienced radio/TV technician for assistance. Changes or
modication not expressly approved by the party responsible for compliance could void the
user’s authority to operate the equipment.
Connecting of peripherals requires the use of grounded shielded signal cables.
Page 3

Eng
3www.prestigio.biz
CONTENTS
1. INTRODUCTION.............................................................................................4
2. SAFETY INFORMATION ...............................................................................4
3. INSTALLING THE MONITOR ........................................................................5
3-1. PACKING LIST ............................................................................................5
3-2. SELECTING A SUITABLE LOCATION.......................................................6
3-3. CONNECTING THE MONITOR ..................................................................7
3-4. SETTING THE REFRESH RATE ................................................................8
PRESET TIMING TABLE ...................................................................................8
3-5. USER’S ENVIRONMENT ...........................................................................9
4. ADJUSTING THE PICTURE ........................................................................ 11
4-1. USING THE ON SCREEN DISPLAY .........................................................11
4-2. DIRECT ACCESS BUTTONS ...................................................................11
4-3. OSD ADJUSTMENTS ............................................................................... 12
5. DISPLAY POWER MANAGEMENT..............................................................14
REDUCING POWER CONSUMPTION ............................................................ 14
6. TROUBLESHOOTING ................................................................................. 15
7. SPECIFICATIONS......................................................................................... 17
Page 4
Eng
4 www.prestigio.biz
1. Introduction
This manual contains instructions for installing and operating Prestigio P190T.
Prestigio P190T is a highly ergonomic color display unit.
• High quality screen re-scaling capability
• 100-240V AC input voltage
• VESA DPMS (Display Power Management Signaling)
• VESA DDC1/2B compatibility
• Advanced digital On-Screen-Display controls
• Fast and accurate auto adjustment
• Most advanced image scaling
• Supporting VESA Flat Panel Monitor Physical Mounting Interface
2. Safety Information
This Monitor has been engineered and manufactured to assure your safety. You can prevent
serious electrical shock and other hazards by keeping in mind the following:
Do not place anything wet on the monitor or the power cord. Never
cover the ventilation openings with any material and never touch them
with metallic or inflammable materials.
Avoid operating the monitor in extreme heat, humidity or areas af-
fected by dust.
• Temperature : 5~35°C • Humidity : 30~80RH
Be sure to turn the monitor off before plugging the power cord into
the socket. Make sure that the power cord and the other cords are
securely and rightly connected.
Overloaded AC outlets and extension cords are dangerous, as are
frayed power cords and broken plugs, which may cause electric shock
or fire. Call your service technician for replacement.
Do not use sharp tools such as a pin or a pencil near the monitor, as
they may scratch the LCD surface.
Do not use a solvent, such as benzene, to clean the monitor, as it will
damage the LCD surface.
Page 5
Eng
5www.prestigio.biz
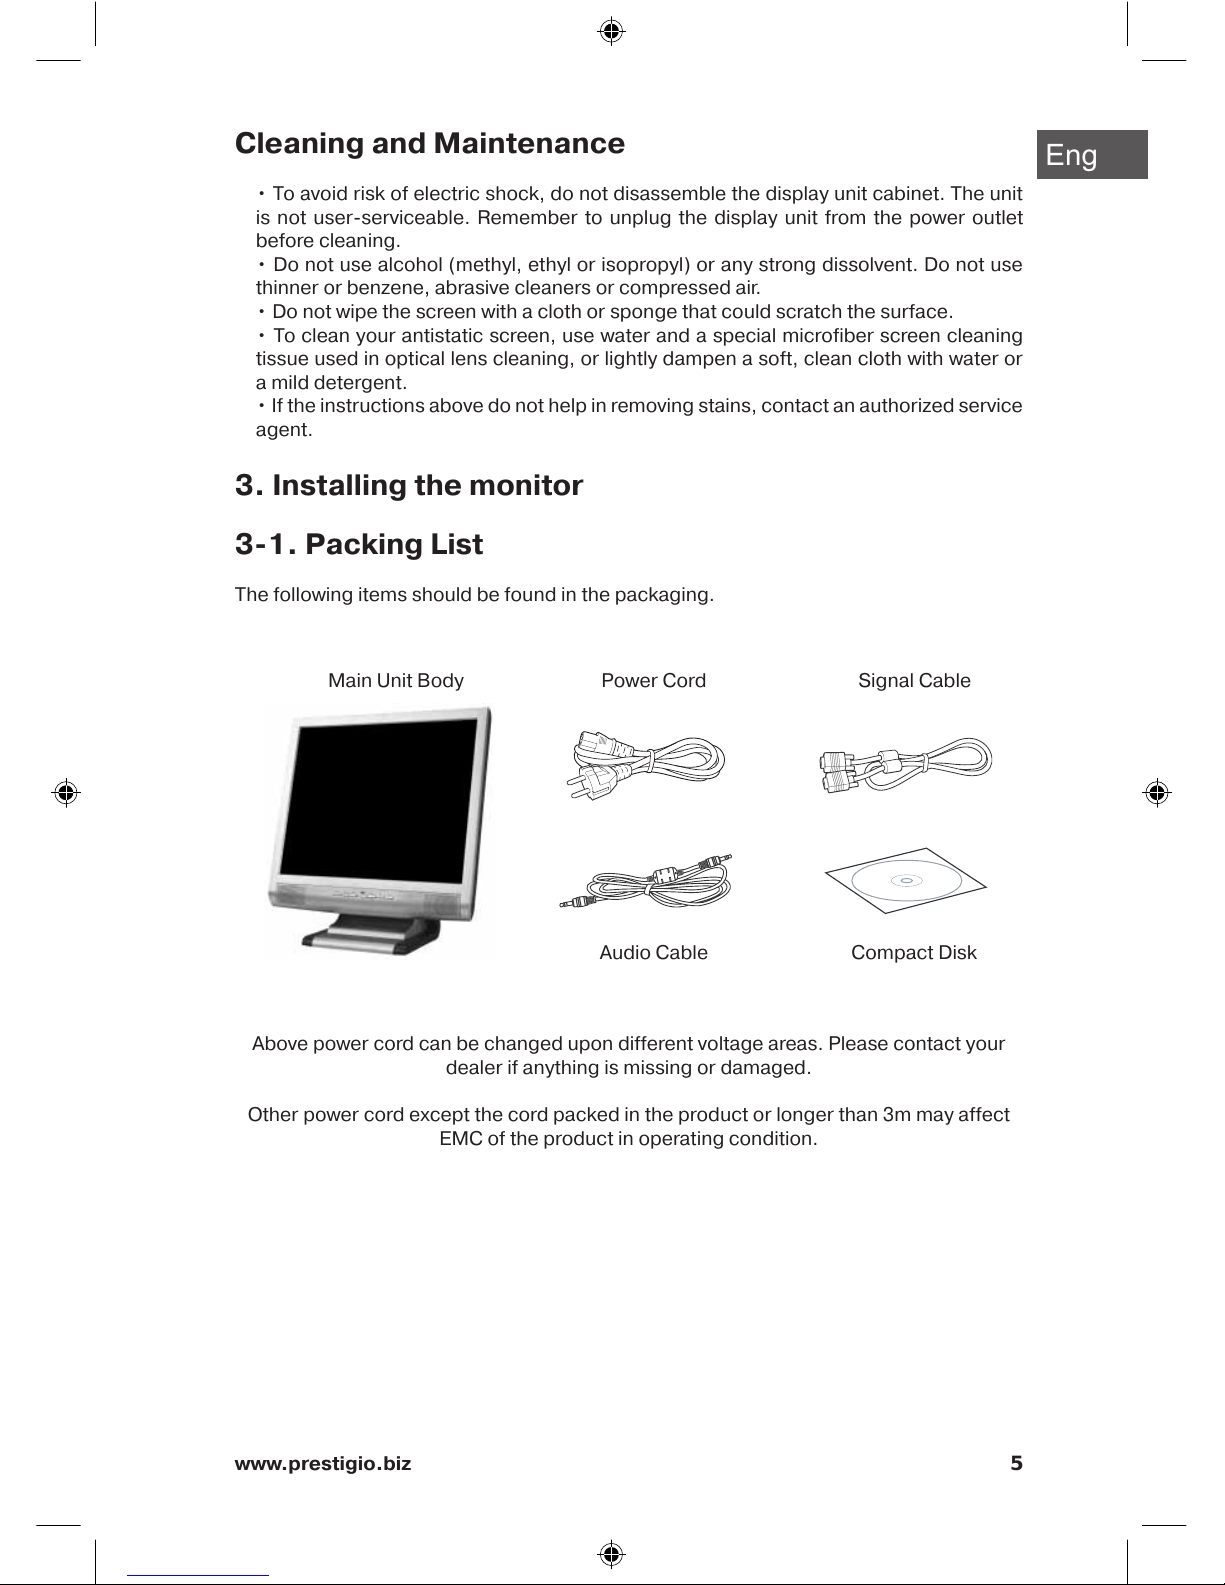
Cleaning and Maintenance
• To avoid risk of electric shock, do not disassemble the display unit cabinet. The unit
is not user-serviceable. Remember to unplug the display unit from the power outlet
before cleaning.
• Do not use alcohol (methyl, ethyl or isopropyl) or any strong dissolvent. Do not use
thinner or benzene, abrasive cleaners or compressed air.
• Do not wipe the screen with a cloth or sponge that could scratch the surface.
• To clean your antistatic screen, use water and a special microfiber screen cleaning
tissue used in optical lens cleaning, or lightly dampen a soft, clean cloth with water or
a mild detergent.
• If the instructions above do not help in removing stains, contact an authorized service
agent.
3. Installing the monitor
3-1. Packing List
The following items should be found in the packaging.
Above power cord can be changed upon different voltage areas. Please contact your
dealer if anything is missing or damaged.
Other power cord except the cord packed in the product or longer than 3m may affect
EMC of the product in operating condition.
Signal CableMain Unit Body
Compact Disk
Power Cord
Audio Cable
Page 6
Eng
6 www.prestigio.biz
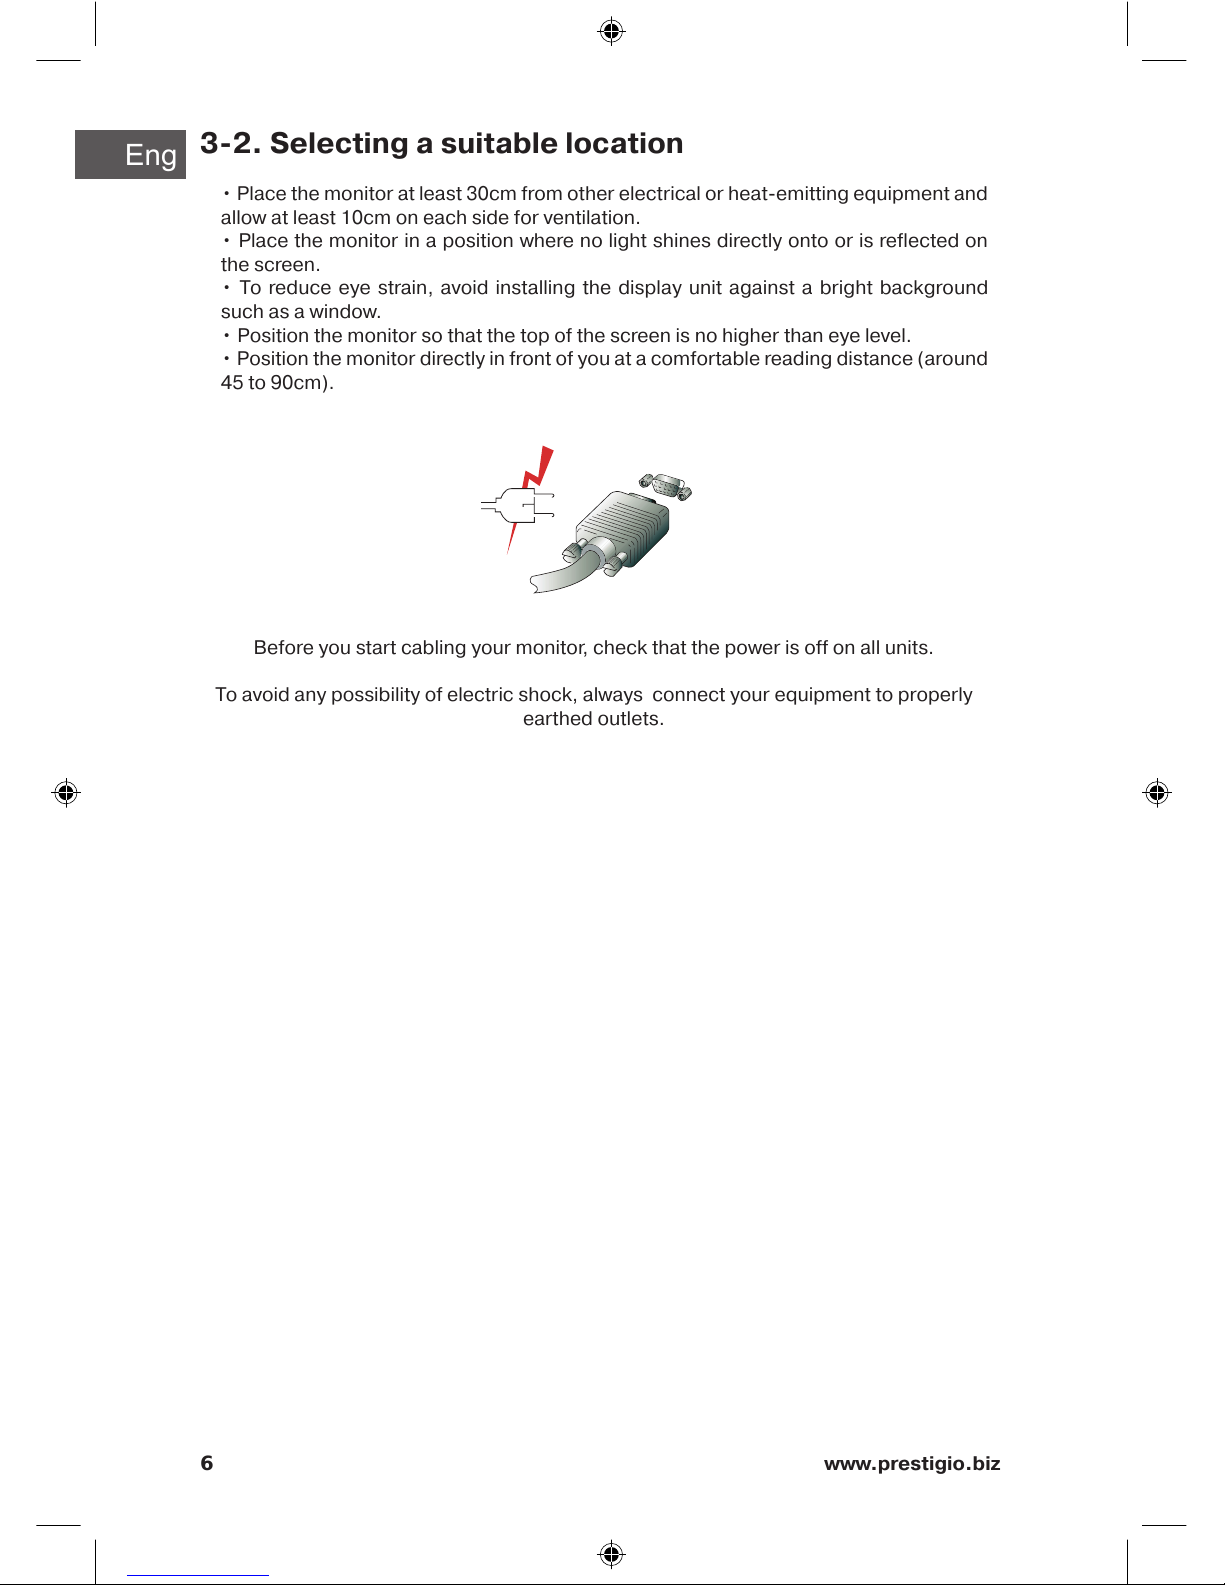
3-2. Selecting a suitable location
• Place the monitor at least 30cm from other electrical or heat-emitting equipment and
allow at least 10cm on each side for ventilation.
• Place the monitor in a position where no light shines directly onto or is reflected on
the screen.
• To reduce eye strain, avoid installing the display unit against a bright background
such as a window.
• Position the monitor so that the top of the screen is no higher than eye level.
• Position the monitor directly in front of you at a comfortable reading distance (around
45 to 90cm).
Before you start cabling your monitor, check that the power is off on all units.
To avoid any possibility of electric shock, always connect your equipment to properly
earthed outlets.
Page 7

Eng
7www.prestigio.biz
3-3. Connecting the monitor
1. Insert the 15-pin signal cable connector into the 15-pin VGA connection on your
computer and screw it down.
2. Plug the power cord connection to connection on the monitor.
3. Plug the other end of the power cord to your computer's main supply or to a 100V-
240V earthed electrical outlet.
4. Turn on the monitor using the power switch and check that the power LED is on. If not,
repeat steps 1,2,3 and 4 or refer to the Troubleshooting section of this guide.
5. Turn on the power to the computer. The picture will appear within about 10 seconds.
Adjust the picture to obtain optimum picture quality. See section Adjusting the picture
in this guide for more information.
Audio system
This monitor has an audio system including two micro loudspeakers. Each of two micro
loudspeakers has an 2Wrms (max.) output power. This system also supports a headphone
output jack.
When this monitor is turned on, audio is always set up as off mode.
Please use AUDIO direct access button on the front cover or On Screen Display to put
audio on.
Speaker
Page 8

Eng
8 www.prestigio.biz
3-4. Setting the refresh rate
Follow the instructions below to set your refresh rate in Windows 98/ME/XP/2000.
1. Go to the configuration window (Start-Settings-Configuration window).
2. Double click on the ‘Display’ icon.
3. Click on the ‘Settings’ tab.
4. Click on the ‘Advanced’ button.
5. Click on ‘Adapter’ and select 60Hz from the list.
6. Click on ’Apply’ to accept the selected value.
Preset Timing Table
If the signal from the system isn't equal to the preset timing mode, adjust the mode with
reference to the user guide of videocard because the screen may not be displayed.
The recommended setting is a resolution of 1024x768 and a refresh rate of 60Hz.
Horizontal
Frequency
31.5 KHz
31.5 KHz
37.5 KHz
37.9 KHz
46.9 KHz
48.4 KHz
56.5 KHz
60.0 KHz
63.9 KHz
80.0 KHz
Refresh Rate
70 Hz
60 Hz
75 Hz
60 Hz
75 Hz
60 Hz
70 Hz
75 Hz
60 Hz
75 Hz
No.
1
2
3
4
5
6
7
8
9
10
Resolution
720 x 400
640 x 480
640 x 480
800 x 600
800 x 600
800 x 600
800 x 600
832 x 624
1024 x 768
31.5 KHz
31.5 KHz
37.5 KHz
35.2 KHz
37.9 KHz
48.1 KHz
46.9 KHz
49.7 KHz
48.4 KHz
56.5 KHz
60.0 KHz
67.5 KHz
63.9 KHz *
80.0 KHz
70 Hz
60 Hz
75 Hz
56 Hz
60 Hz
72 Hz
75 Hz
75 Hz
60 Hz
70 Hz
75 Hz
75 Hz
60 Hz *
75 Hz
1
2
3
4
5
6
7
8
9
10
11
12
13
14
720 x 400
640 x 480
640 x 480
800 x 600
800 x 600
800 x 600
800 x 600
832 x 624
1024 x 768
1024 x 768
1024 x 768
1152 x 864
1280 x 1024 *
1280 x 1024
Page 9
Eng
9www.prestigio.biz
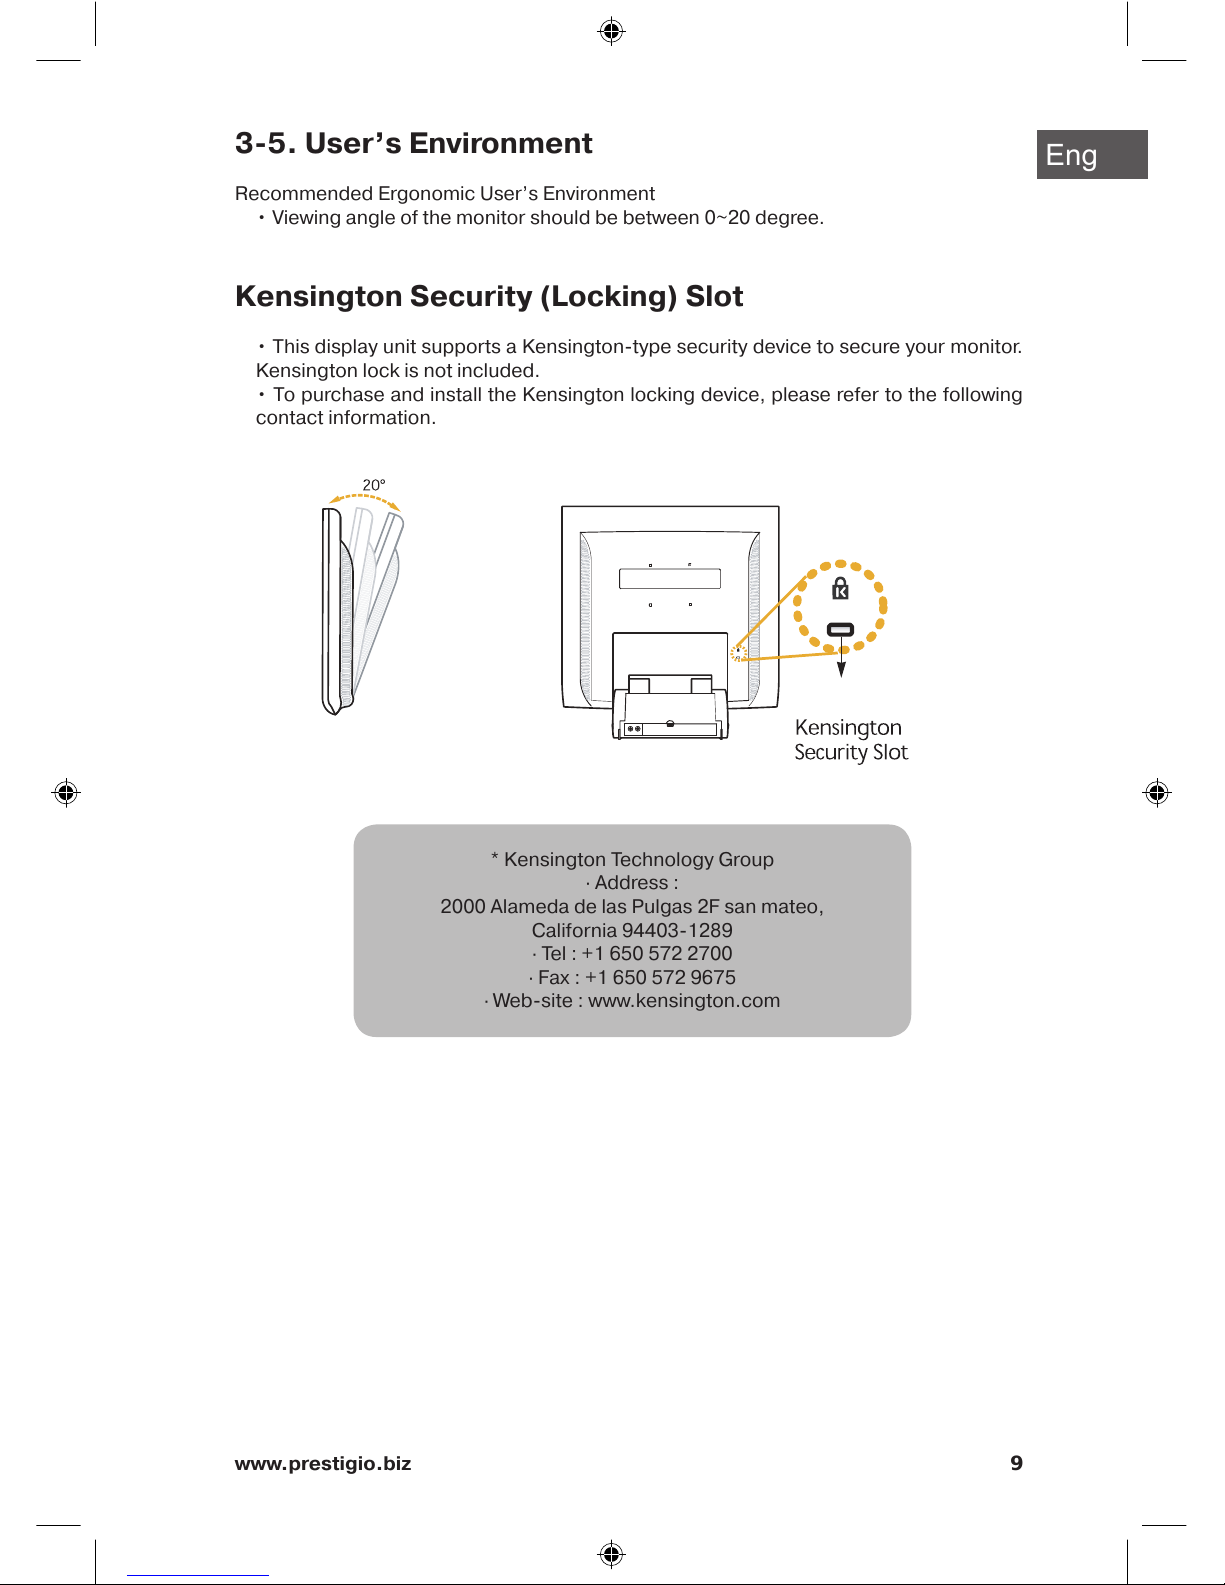
3-5. User’s Environment
Recommended Ergonomic User’s Environment
• Viewing angle of the monitor should be between 0~20 degree.
Kensington Security (Locking) Slot
• This display unit supports a Kensington-type security device to secure your monitor.
Kensington lock is not included.
• To purchase and install the Kensington locking device, please refer to the following
contact information.
* Kensington Technology Group
· Address :
2000 Alameda de las Pulgas 2F san mateo,
California 94403-1289
· Tel : +1 650 572 2700
· Fax : +1 650 572 9675
· Web-site : www.kensington.com
Page 10
Eng
10 www.prestigio.biz
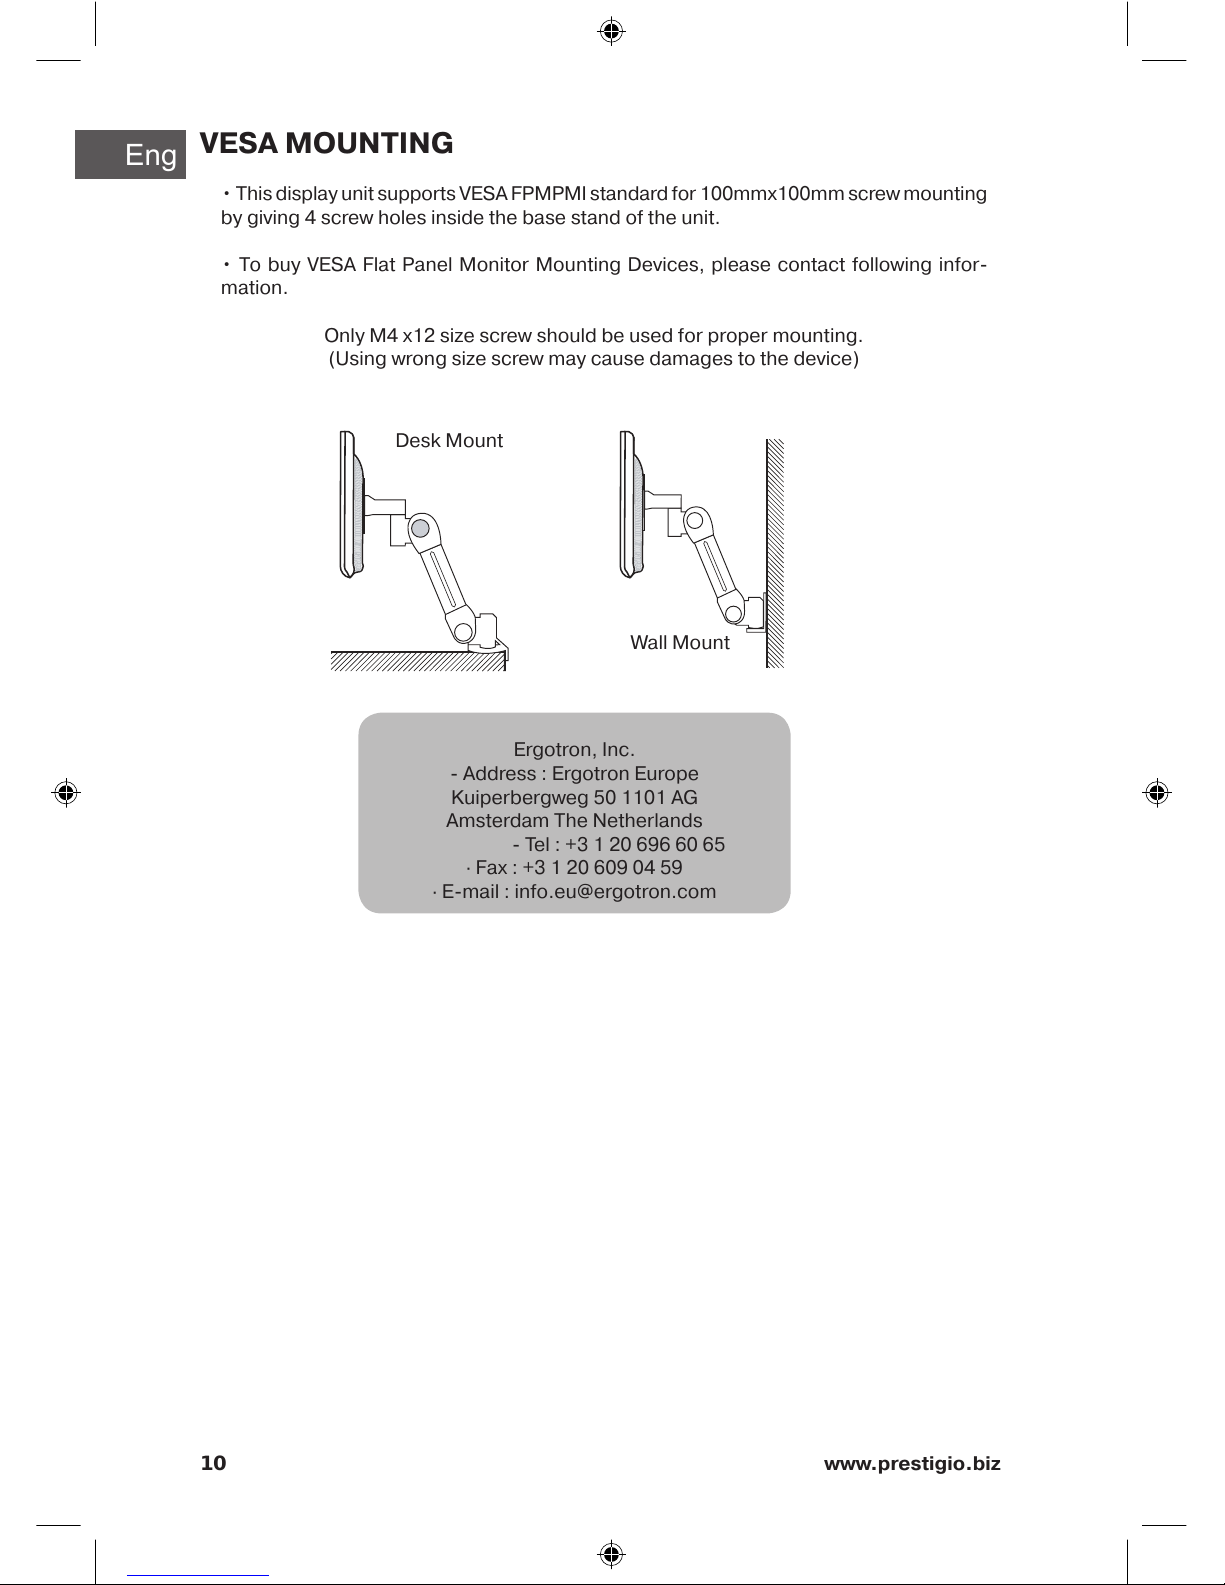
Ergotron, Inc.
- Address : Ergotron Europe
Kuiperbergweg 50 1101 AG
Amsterdam The Netherlands
- Tel : +3 1 20 696 60 65
· Fax : +3 1 20 609 04 59
· E-mail : info.eu@ergotron.com
VESA MOUNTING
• This display unit supports VESA FPMPMI standard for 100mmx100mm screw mounting
by giving 4 screw holes inside the base stand of the unit.
• To buy VESA Flat Panel Monitor Mounting Devices, please contact following infor-
mation.
Only M4 x12 size screw should be used for proper mounting.
(Using wrong size screw may cause damages to the device)
Desk Mount
Wall Mount
Page 11
Eng
11www.prestigio.biz
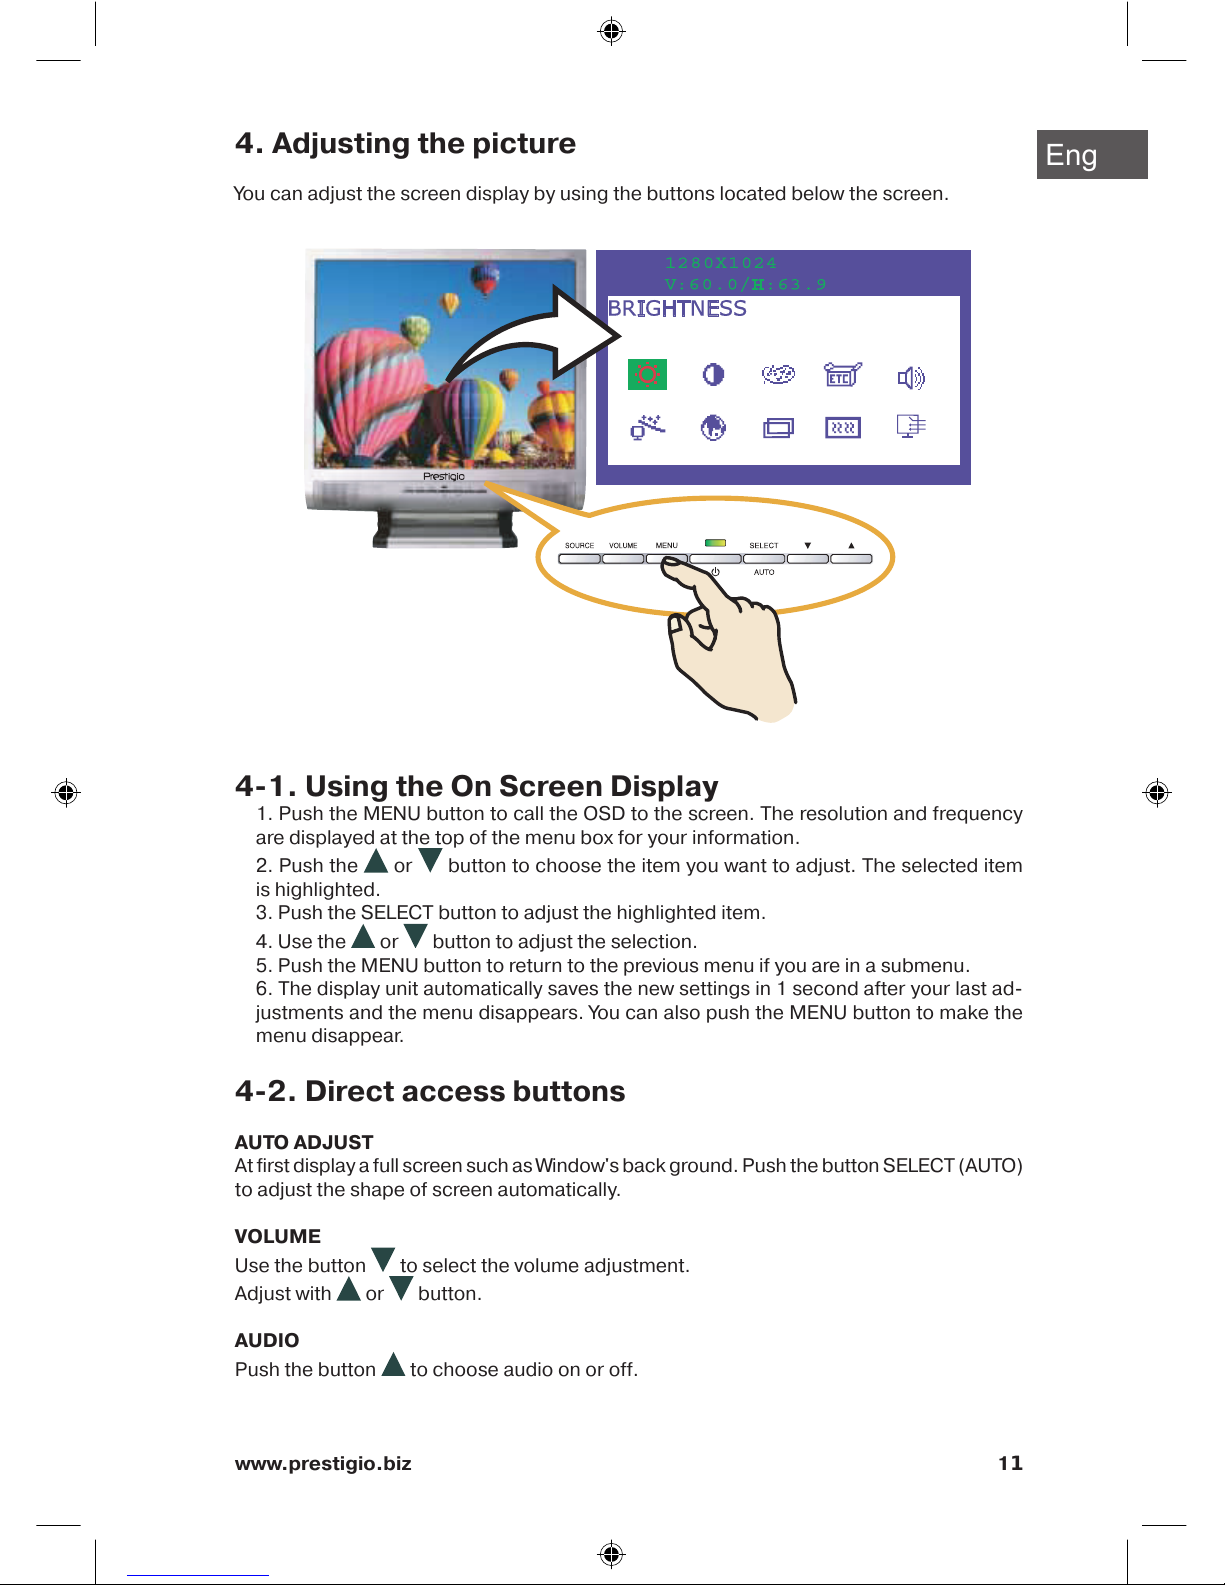
4. Adjusting the picture
You can adjust the screen display by using the buttons located below the screen.
4-1. Using the On Screen Display
1. Push the MENU button to call the OSD to the screen. The resolution and frequency
are displayed at the top of the menu box for your information.
2. Push the or button to choose the item you want to adjust. The selected item
is highlighted.
3. Push the SELECT button to adjust the highlighted item.
4. Use the or button to adjust the selection.
5. Push the MENU button to return to the previous menu if you are in a submenu.
6. The display unit automatically saves the new settings in 1 second after your last ad-
justments and the menu disappears. You can also push the MENU button to make the
menu disappear.
4-2. Direct access buttons
AUTO ADJUST
At first display a full screen such as Window's back ground. Push the button SELECT (AUTO)
to adjust the shape of screen automatically.
VOLUME
Use the button to select the volume adjustment.
Adjust with or button.
AUDIO
Push the button to choose audio on or off.
Page 12

Eng
12 www.prestigio.biz
4-3. OSD Adjustments
The OSD adjustments available to you are listed below.
BRIGHTNESS
Adjust the brightness of the screen.
CONTRAST
Adjust the contrast of the screen.
COLOR CONTROL
Color temperature affects the tint of the image. With lower color temperatures the image
turns reddish and with higher temperatures bluish.
There are three color settings available: Mode 1(9300K), Mode 2(6500K) or USER. With
the USER setting you can set individual values for red, green and blue.
MISCELLANEOUS
RECALL
Recall the saved color data.
OSD TIMER
You can set the displayed time of OSD Menu window on the screen by using this ad-
justment.
OSD POSITION
Adjust the OSD menu's horizontal or vertical position on the screen.
AUDIO
VOLUME
Adjust the audio volume level.
AUDIO
This menu is used to choose audio on or off.
AUTO ADJUCT
You can adjust the shape of screen automatically at the full screen pattern.
LANGUAGE
You can select the language in which adjustment menus are displayed. The following lan-
guages are available : English, French, German, Italian, Spanish, Swedish, Finnish, Danish,
Portuguese, Dutch and Japanese or Chinese.
Page 13
Eng
13www.prestigio.biz
H/V POSITION
H-POSITION
Adjusts the horizontal position of the entire screen image.
V-POSITION
Adjusts the vertical position of the entire screen image.
CLOCK PHASE
PHASE
Adjust the noise of the screen image.
CLOCK
Adjust the horizontal size of the entire screen image.
SOURCE
No function. (Only supportable by the optional appliance.)
Page 14
Eng
14 www.prestigio.biz
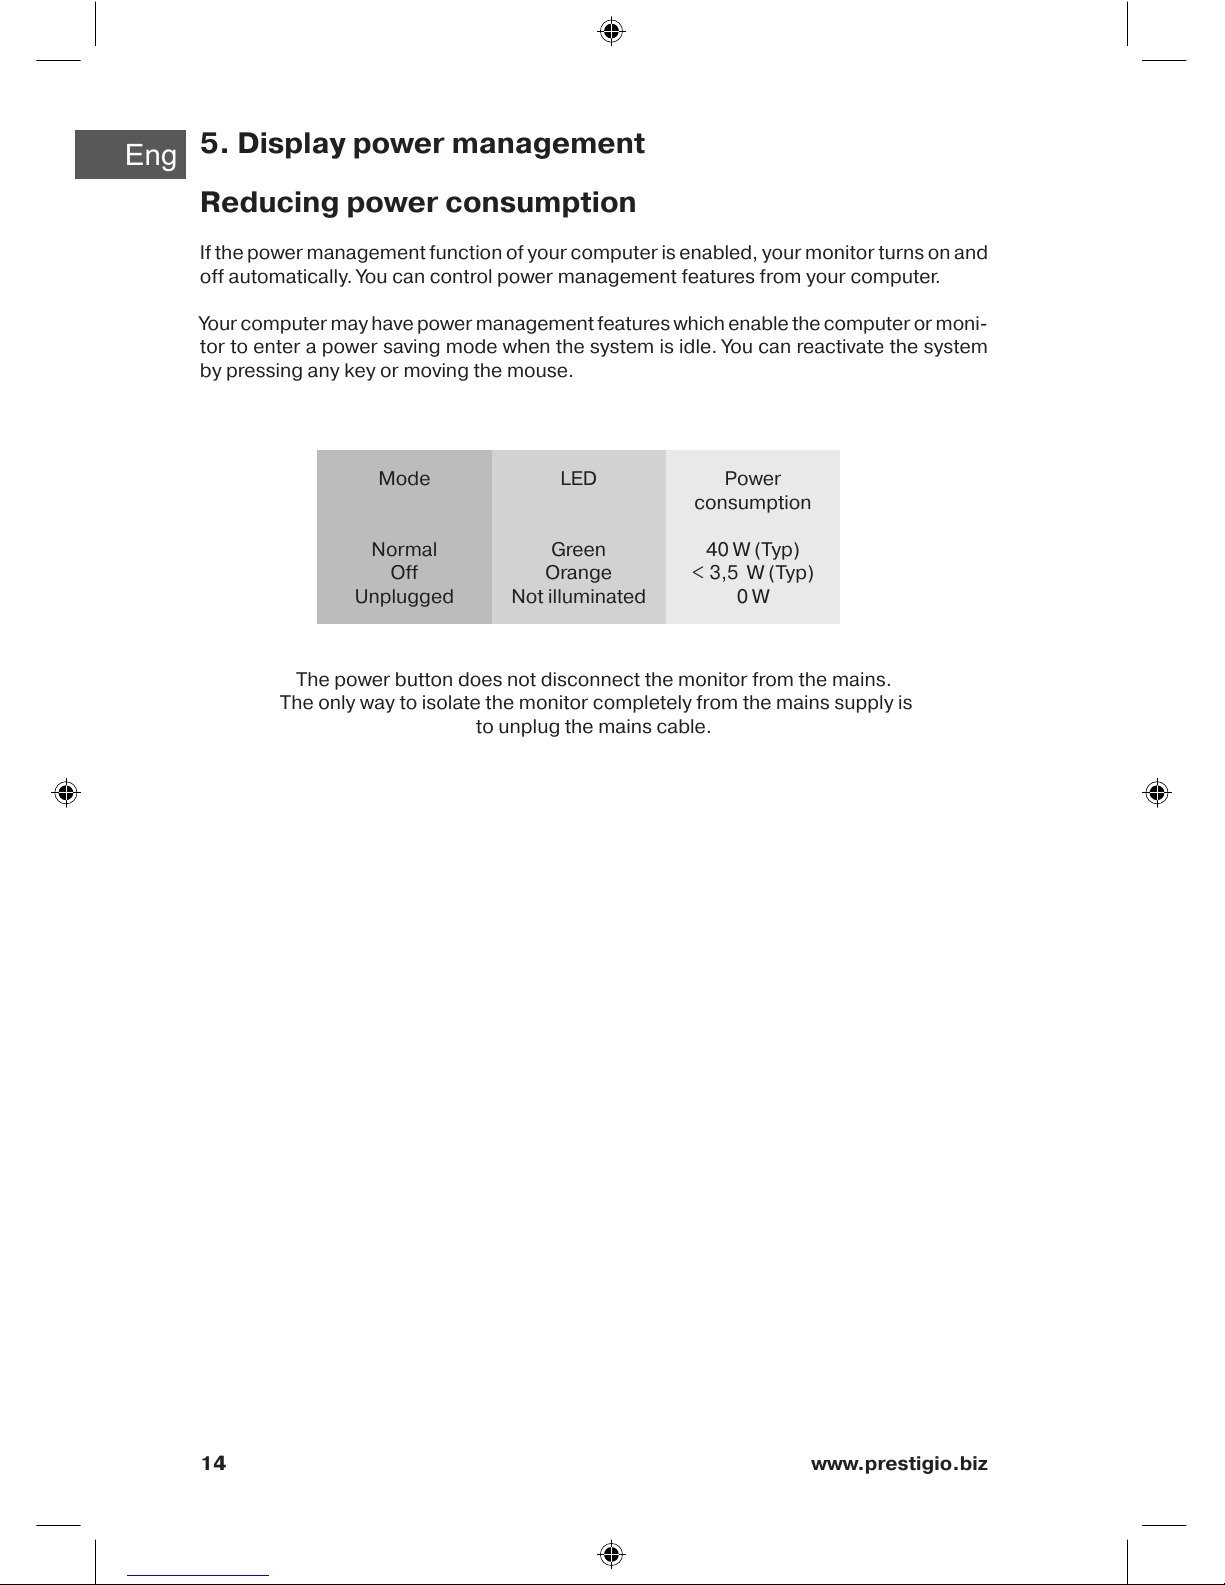
5. Display power management
Reducing power consumption
If the power management function of your computer is enabled, your monitor turns on and
off automatically. You can control power management features from your computer.
Your computer may have power management features which enable the computer or moni-
tor to enter a power saving mode when the system is idle. You can reactivate the system
by pressing any key or moving the mouse.
The power button does not disconnect the monitor from the mains.
The only way to isolate the monitor completely from the mains supply is
to unplug the mains cable.
Power
consumption
40 W (Typ)
< 3,5 W (Typ)
0 W
Mode
Normal
Off
Unplugged
LED
Green
Orange
Not illuminated
Page 15
Eng
15www.prestigio.biz
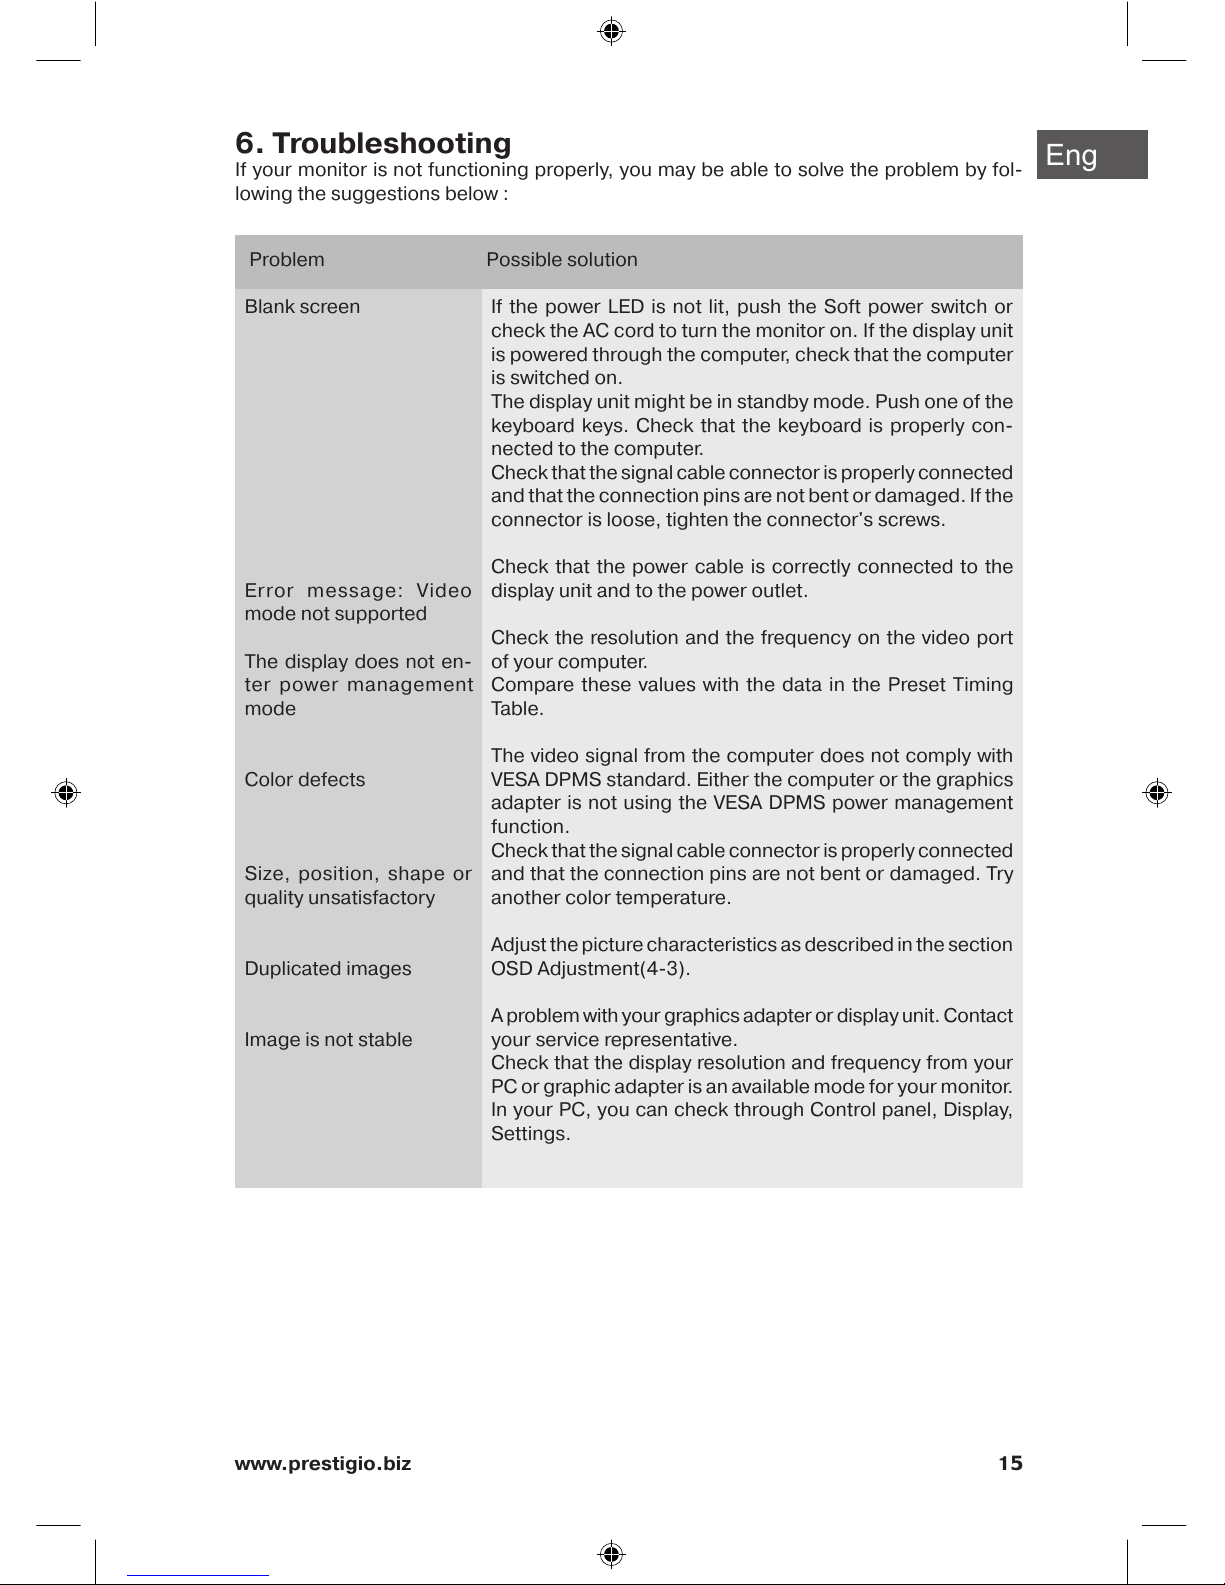
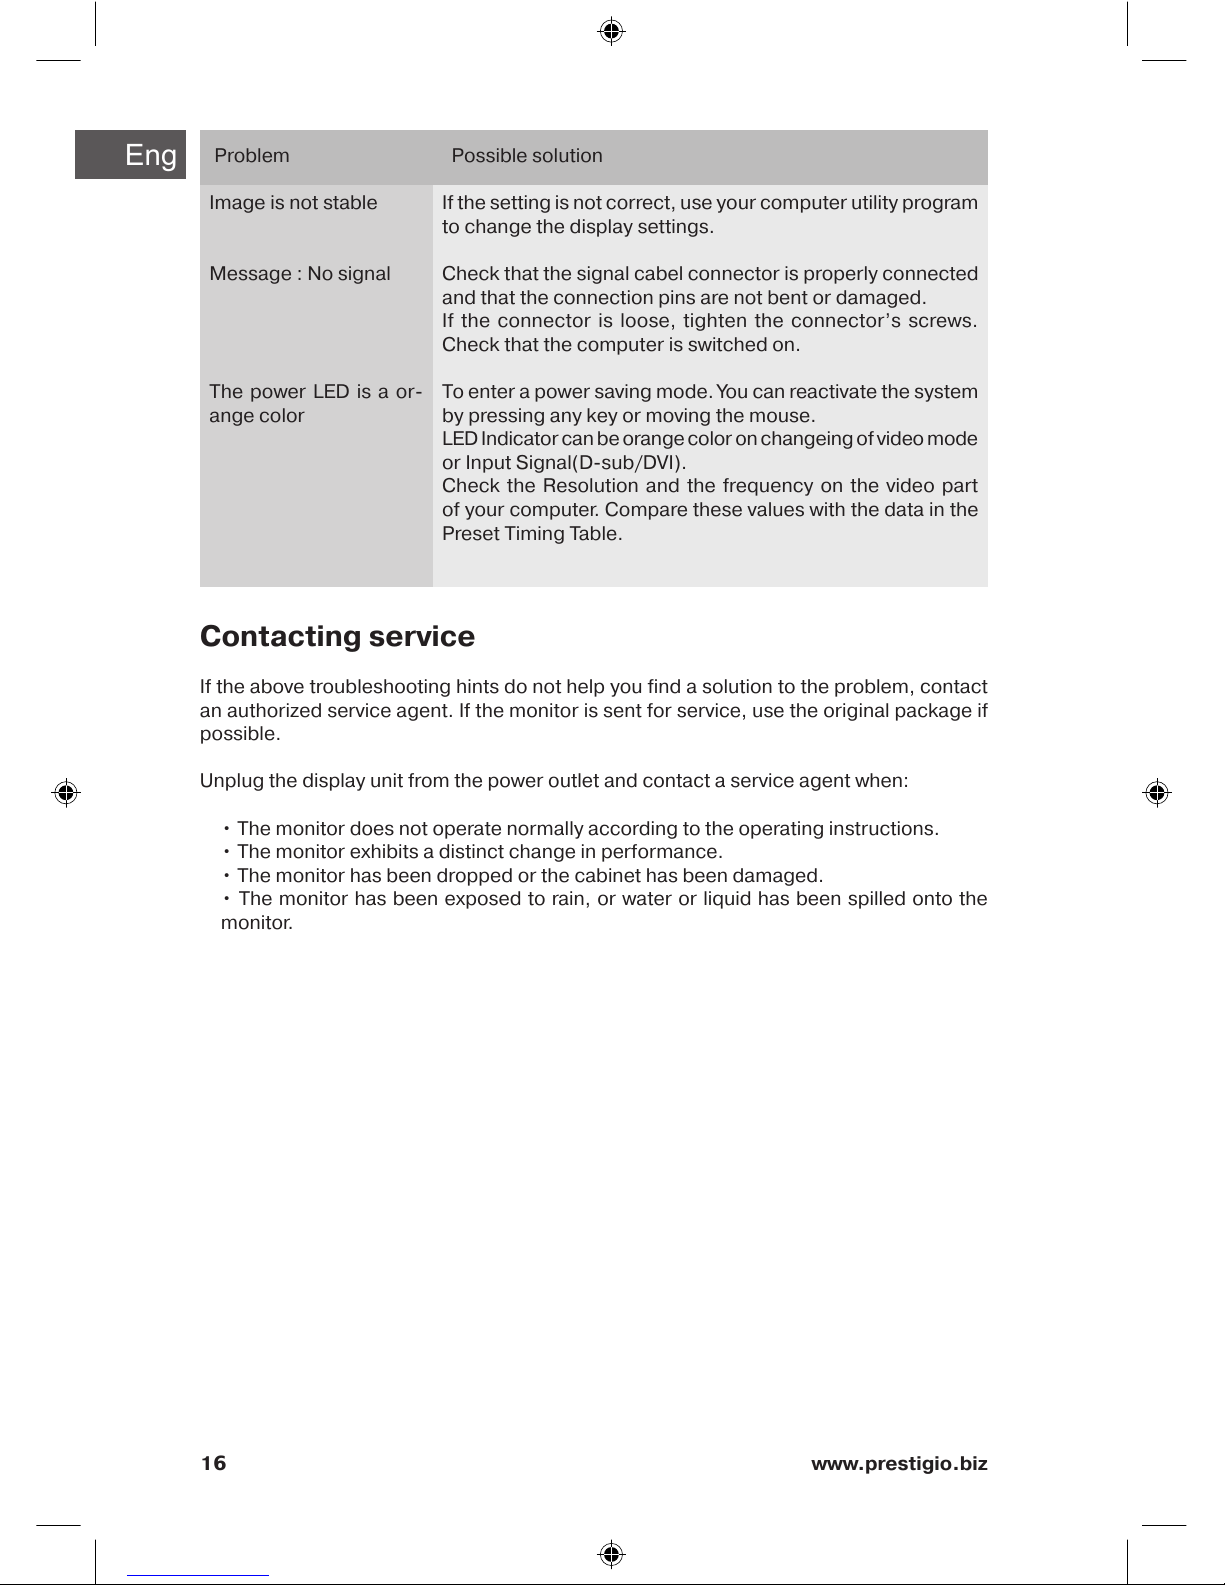
6. Troubleshooting
If your monitor is not functioning properly, you may be able to solve the problem by fol-
lowing the suggestions below :
Blank screen
Er ror me ssage: Video
mode not supported
The display does not en-
ter power management
mode
Color defects
Size, position, shape or
quality unsatisfactory
Duplicated images
Image is not stable
If the power LED is not lit, push the Soft power switch or
check the AC cord to turn the monitor on. If the display unit
is powered through the computer, check that the computer
is switched on.
The display unit might be in standby mode. Push one of the
keyboard keys. Check that the keyboard is properly con-
nected to the computer.
Check that the signal cable connector is properly connected
and that the connection pins are not bent or damaged. If the
connector is loose, tighten the connector's screws.
Check that the power cable is correctly connected to the
display unit and to the power outlet.
Check the resolution and the frequency on the video port
of your computer.
Compare these values with the data in the Preset Timing
Table.
The video signal from the computer does not comply with
VESA DPMS standard. Either the computer or the graphics
adapter is not using the VESA DPMS power management
function.
Check that the signal cable connector is properly connected
and that the connection pins are not bent or damaged. Try
another color temperature.
Adjust the picture characteristics as described in the section
OSD Adjustment(4-3).
A problem with your graphics adapter or display unit. Contact
your service representative.
Check that the display resolution and frequency from your
PC or graphic adapter is an available mode for your monitor.
In your PC, you can check through Control panel, Display,
Settings.
Problem Possible solution
Page 16
Eng
16 www.prestigio.biz
Contacting service
If the above troubleshooting hints do not help you find a solution to the problem, contact
an authorized service agent. If the monitor is sent for service, use the original package if
possible.
Unplug the display unit from the power outlet and contact a service agent when:
• The monitor does not operate normally according to the operating instructions.
• The monitor exhibits a distinct change in performance.
• The monitor has been dropped or the cabinet has been damaged.
• The monitor has been exposed to rain, or water or liquid has been spilled onto the
monitor.
Image is not stable
Message : No signal
The power LED is a or-
ange color
If the setting is not correct, use your computer utility program
to change the display settings.
Check that the signal cabel connector is properly connected
and that the connection pins are not bent or damaged.
If the connector is loose, tighten the connector’s screws.
Check that the computer is switched on.
To enter a power saving mode. You can reactivate the system
by pressing any key or moving the mouse.
LED Indicator can be orange color on changeing of video mode
or Input Signal(D-sub/DVI).
Check the Resolution and the frequency on the video part
of your computer. Compare these values with the data in the
Preset Timing Table.
Problem Possible solution
Page 17
Eng
17www.prestigio.biz
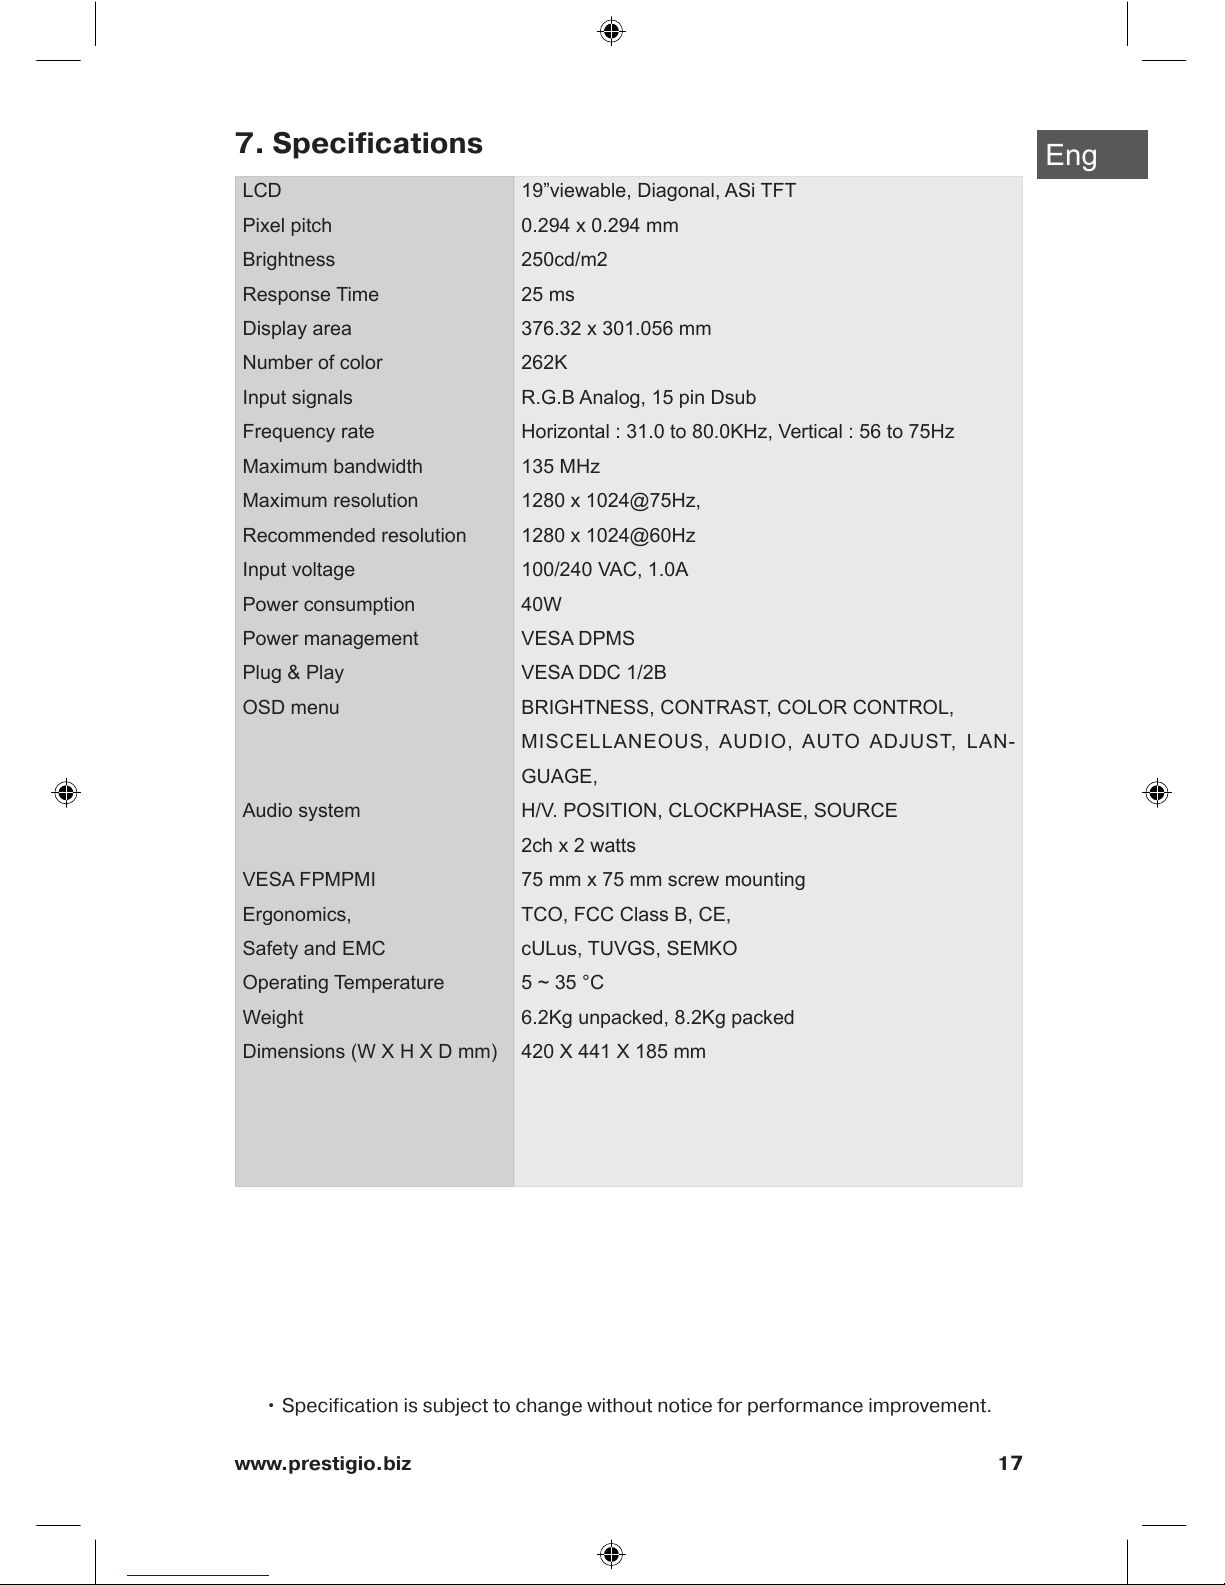
7. Specifications
• Specification is subject to change without notice for performance improvement.
LCD
Pixel pitch
Brightness
Response Time
Display area
Number of color
Input signals
Frequency rate
Maximum bandwidth
Maximum resolution
Recommended resolution
Input voltage
Power consumption
Power management
Plug & Play
OSD menu
Audio system
VESA FPMPMI
Ergonomics,
Safety and EMC
Operating Temperature
Weight
Dimensions (W X H X D mm)
19”viewable, Diagonal, ASi TFT
0.294 x 0.294 mm
250cd/m2
25 ms
376.32 x 301.056 mm
262K
R.G.B Analog, 15 pin Dsub
Horizontal : 31.0 to 80.0KHz, Vertical : 56 to 75Hz
135 MHz
1280 x 1024@75Hz,
1280 x 1024@60Hz
100/240 VAC, 1.0A
40W
VESA DPMS
VESA DDC 1/2B
BRIGHTNESS, CONTRAST, COLOR CONTROL,
MISCELLANEOUS, AUDIO, AUTO ADJUST, LAN-
GUAGE,
H/V. POSITION, CLOCKPHASE, SOURCE
2ch x 2 watts
75 mm x 75 mm screw mounting
TCO, FCC Class B, CE,
cULus, TUVGS, SEMKO
5 ~ 35 °C
6.2Kg unpacked, 8.2Kg packed
420 X 441 X 185 mm
Page 18
Hu
18 www.prestigio.biz
U.S.A.
U.S.FEDERAL COMMUNICATIONS COMMISSION
RADIO FREQUENCY INTERFERENCE STATEMENT
INFORMATION TO THE USER
NOTE : This equipment has been tested and found to comply with the limitsfor a Class B
digital device pursuant to Part 15 of the FCC Rules.
These limits are designed to provide reasonable protection against harmful interference
in a residential installation.
This equipment generates, uses, and can radiate radio frequency energy and, if not
installed and used in accordance with the instructions, may cause harm ful interference to
radio communications.
However, there is no guarantee that interference will not occur in a particular installa-
tion.
If this equipment does cause harmful interference to radio or television re ception, which
can be determined by turning the equipment off and on, the user is encouraged to try to
correct the interference by one or more of the
following measures:
• Reorient or relocate the receiving antenna.
• Increase the separation between the equipment and receiver.
• Connect the equipment into an outlet of a circuit different from that to which the receiver
is connected.
• Consult the dealer or an experienced radio/TV technician for assistance. Changes or
modication not expressly approved by the party responsible for compliance could void the
user’s authority to operate the equipment.
Connecting of peripherals requires the use of grounded shielded signal cables.
Page 19
Hu
19www.prestigio.biz
TARTALOMJEGYZÉK
1. BEVEZETÉS ................................................................................................. 20
2. BIZTONSÁGI INFORMÁCIÓ ........................................................................ 20
3. A MONITOR BEÁLLÍTÁSA ..........................................................................21
3-1. ÖSSZETÉTEL ........................................................................................... 21
3-3. MEGFELELŐ HELY KIVÁLASZTÁSA ..................................................... 22
3-4. A MONITOR CSATLAKOZTATÁSA ......................................................... 23
3-5. A FRISSÍTÉSI FREKVENCIA BEÁLLÍTÁSA ........................................... 24
FRISSÍTÉSI FREKVENCIA TÁBLÁZAT .......................................................... 24
3-6. A MONITOR ELHELYEZÉSE ...................................................................25
4. AZ ÁBRÁZOLÁS BEÁLLÍTÁSA .................................................................. 27
4-1. A KÉPERNYŐMENÜ (OSD) HASZNÁLATA ............................................27
4-2. A KÖZVETLEN ELÉRÉSI GOMBOK HASZNÁLATA .............................. 27
4-3. A KÉPERNYŐMENÜ BEÁLLÍTÁSAI .......................................................28
5. AZ ENERGIAELLÁTÁS VEZÉRLÉSE
AZ ENERGIAFELHASZNÁLÁS CSÖKKENTÉSE .......................................... 30
6. HIBAELHÁRÍTÁS ........................................................................................31
7. MŰSZAKI ADATOK .....................................................................................33
Page 20

Hu
20 www.prestigio.biz
1. Bevezetés
A jelen kézikönyv tartalmazza a Prestigio P190P monitor beállítási és használati
utasításait.
A Prestigio P190P a következő adatokkal rendelkező ergonomikus színes monitor.
• Látható terület 19”
• Jóminőségű ábrázolás a becsillanásvédő bevonatnak köszönhetően
• Jóminőségű képernyő-nagyítás
• A paraméterek képernyőmenüről történő vezérlése
• 100-240 V váltóáramú bemenő feszültség
• VESA DPMS (Monitor energiaellátás vezérlés)
• VESA DDC1/2B szabvánnyal való kompatibilitás
• Gyors és pontos automatikus beállítás
• VESA készülék felszerelési lehetősége
2. Biztonsági információ
A monitor fejlesztése és gyártása a nemzetközi biztonsági szabványoknak megfelelően történt.
Az elektromos áramütések elkerülése végett kérjük, tartsák be az alábbi szabályokat:
Semmilyen nedves tárgyat ne helyezzen a monitorra és a kábelre. Szigorúan tilos a monitor
házán található szellőzőnyílásokat elzárni és a monitor alkatrészeihez fém vagy könnyen
gyulladó tárgyakkal hozzáérni.
A monitor használata során kerülje a magas környezeti hőmérsékletet,
pára- és portartalmat.
• Működtetési hőmérséklet: 5~35°C, Viszonylagos páratartalom:
30~80%
Mielőtt a tápkábelt a hálózati csatlakozóaljzatba köti, győződjön meg
arról, hogy a monitor ki van kapcsolva. Ellenőrizze, hogy a tápkábel
és a jelkábelek helyesen vannak csatlakoztatva.
Ne kössön túl sok hosszabbítót vagy villásdugót egy
csatlakozóaljzatba, ne használjon sérült vagy rosszul rögzített
csatlakozóaljzatot, mert ez áramütéshez vagy tűzesethez vezethet. A
meghibásodott alkatrészek cseréjét szakszervizzel végeztesse el.
Ne használjon a képernyő felületének közelében olyan hegyes
tárgyakat, pl. tűt vagy tollat, amelyek a folyákonykristályos felületet
felsérthetik.
Ne használjon a monitor tisztítására oldószereket, pl. benzint - ez
megrongálhatja a folyékonykristályos felületet.
Page 21
Hu
21www.prestigio.biz
Tisztítás és karbantartás
• Elektromos áramütés elkerülése végett ne szerelje le a monitor fedelét vagy hátlapját.
A monitorban belül található alkatrészek nem igényelnek felhasználó altali karbantartást.
Tisztítás előtt győződjék meg arról, hogy a monitor nincsen a hálózatra csatlakoztatva.
• Ne használjon alkoholtartalmú anyagokat (metil- vagy etilalkohol), vagy erős oldószereket.
Ne használjon oldószert vagy benzin, csiszolóanyagokat és sűrített levegőt.
• Ne törötlje le a képernyőt olyan textilanyaggal vagy szivaccsal, amelyek felsérhetik a
felületet.
• Az antisztatikus képernyő tisztításához használjon vizet és egy speciális mikroszálas
képernyőtisztító rongyot, vagy javasolt tisztítószerrel vagy lágy vízzel benedvesített puha
anyagot.
• Amennyiben a fent leírt utasítások segítségével nem lehet a felületről a foltokat eltávolítani,
forduljon a megbízott szakszervizbe.
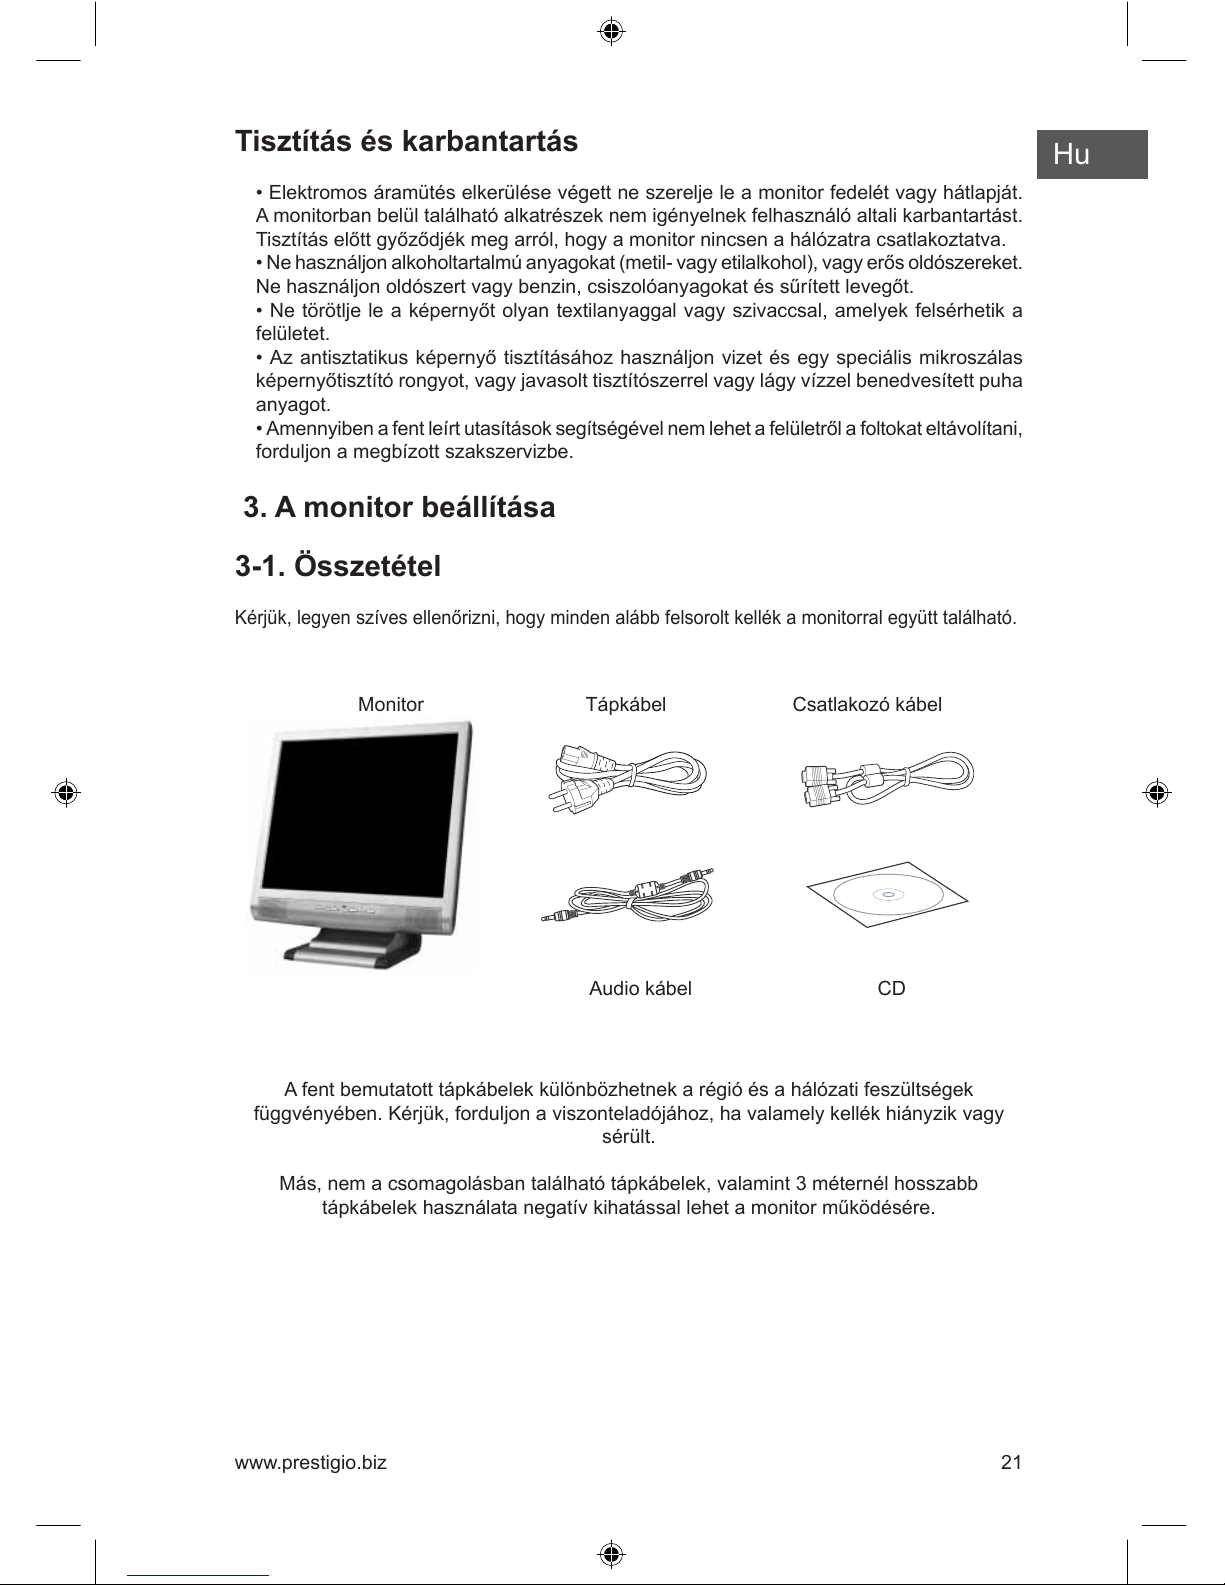
3. A monitor beállítása
3-1. Összetétel
Kérjük, legyen szíves ellenőrizni, hogy minden alább felsorolt kellék a monitorral együtt található.
A fent bemutatott tápkábelek különbözhetnek a régió és a hálózati feszültségek
függvényében. Kérjük, forduljon a viszonteladójához, ha valamely kellék hiányzik vagy
sérült.
Más, nem a csomagolásban található tápkábelek, valamint 3 méternél hosszabb
tápkábelek használata negatív kihatással lehet a monitor működésére.
Csatlakozó kábelMonitor
CDAudio kábel
Tápkábel
Page 22
Hu
22 www.prestigio.biz
3-2. A monitor helyének megválasztása
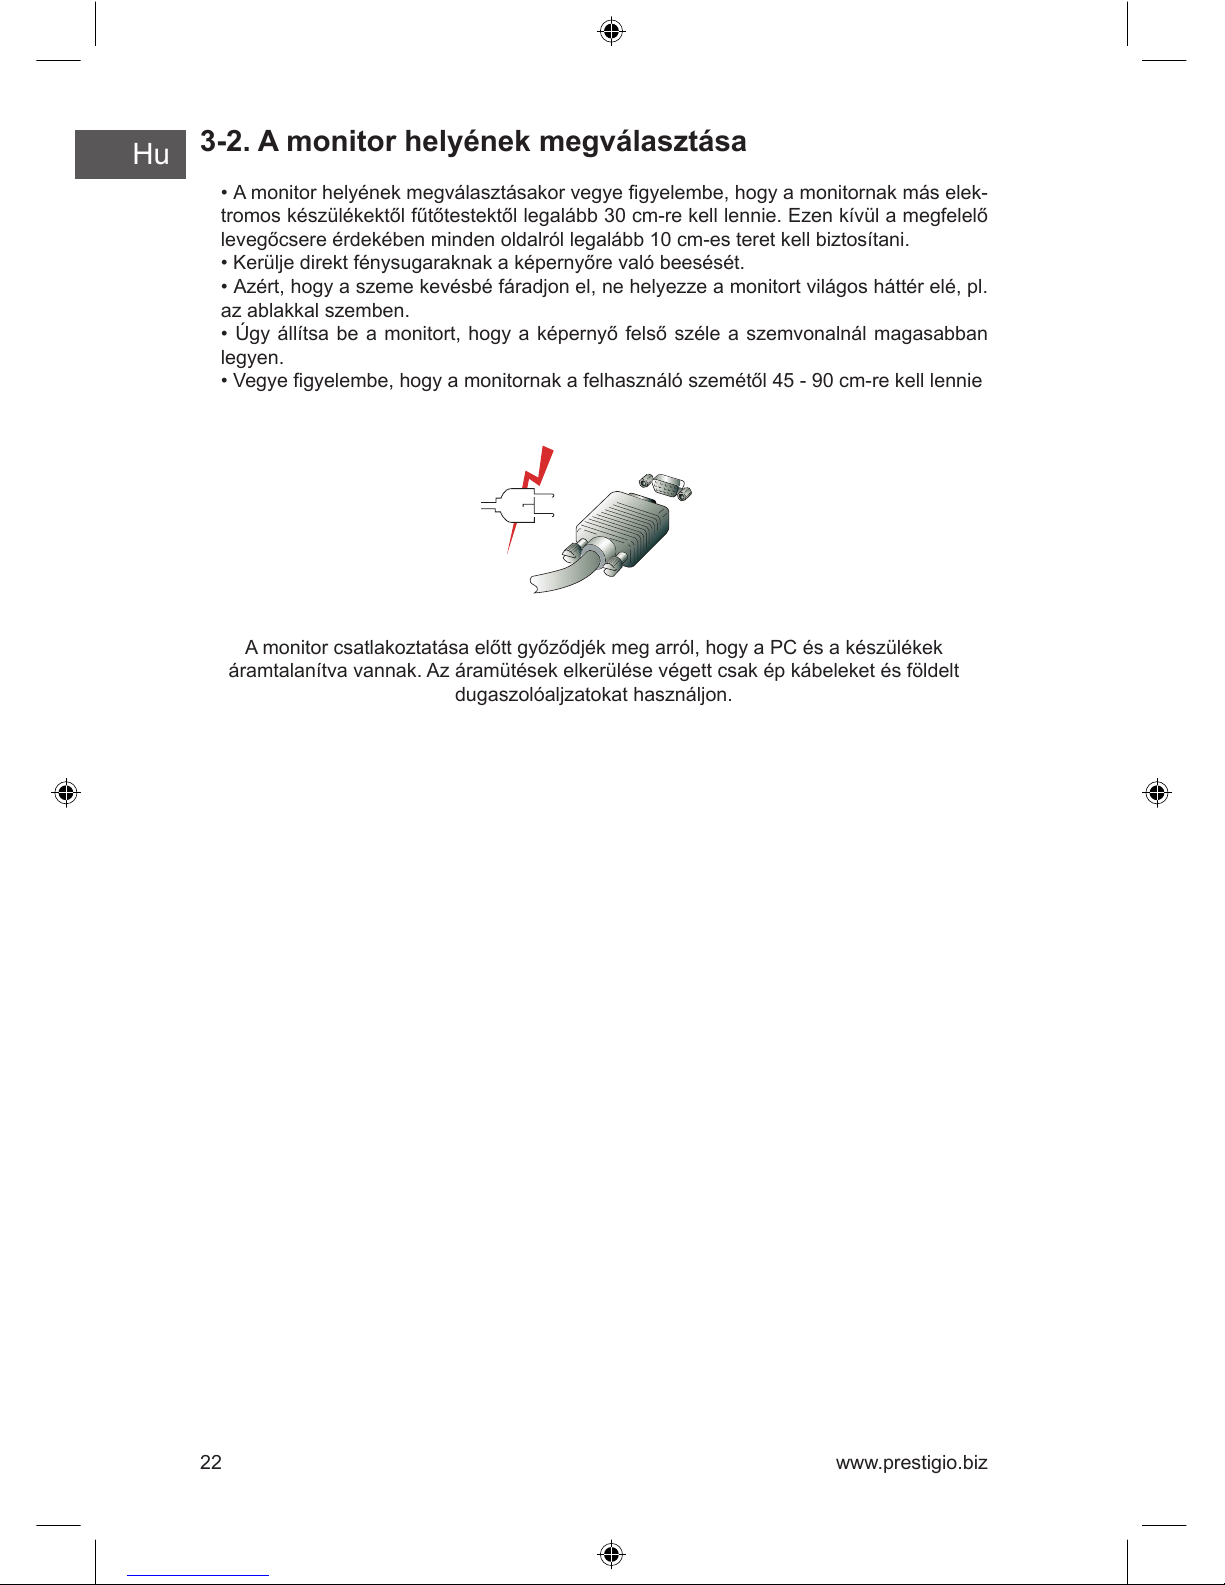
• A monitor helyének megválasztásakor vegye gyelembe, hogy a monitornak más elek-
tromos készülékektől fűtőtestektől legalább 30 cm-re kell lennie. Ezen kívül a megfelelő
levegőcsere érdekében minden oldalról legalább 10 cm-es teret kell biztosítani.
• Kerülje direkt fénysugaraknak a képernyőre való beesését.
• Azért, hogy a szeme kevésbé fáradjon el, ne helyezze a monitort világos háttér elé, pl.
az ablakkal szemben.
• Úgy állítsa be a monitort, hogy a képernyő felső széle a szemvonalnál magasabban
legyen.
• Vegye gyelembe, hogy a monitornak a felhasználó szemétől 45 - 90 cm-re kell lennie
A monitor csatlakoztatása előtt győződjék meg arról, hogy a PC és a készülékek
áramtalanítva vannak. Az áramütések elkerülése végett csak ép kábeleket és földelt
dugaszolóaljzatokat használjon.
Page 23
Hu
23www.prestigio.biz
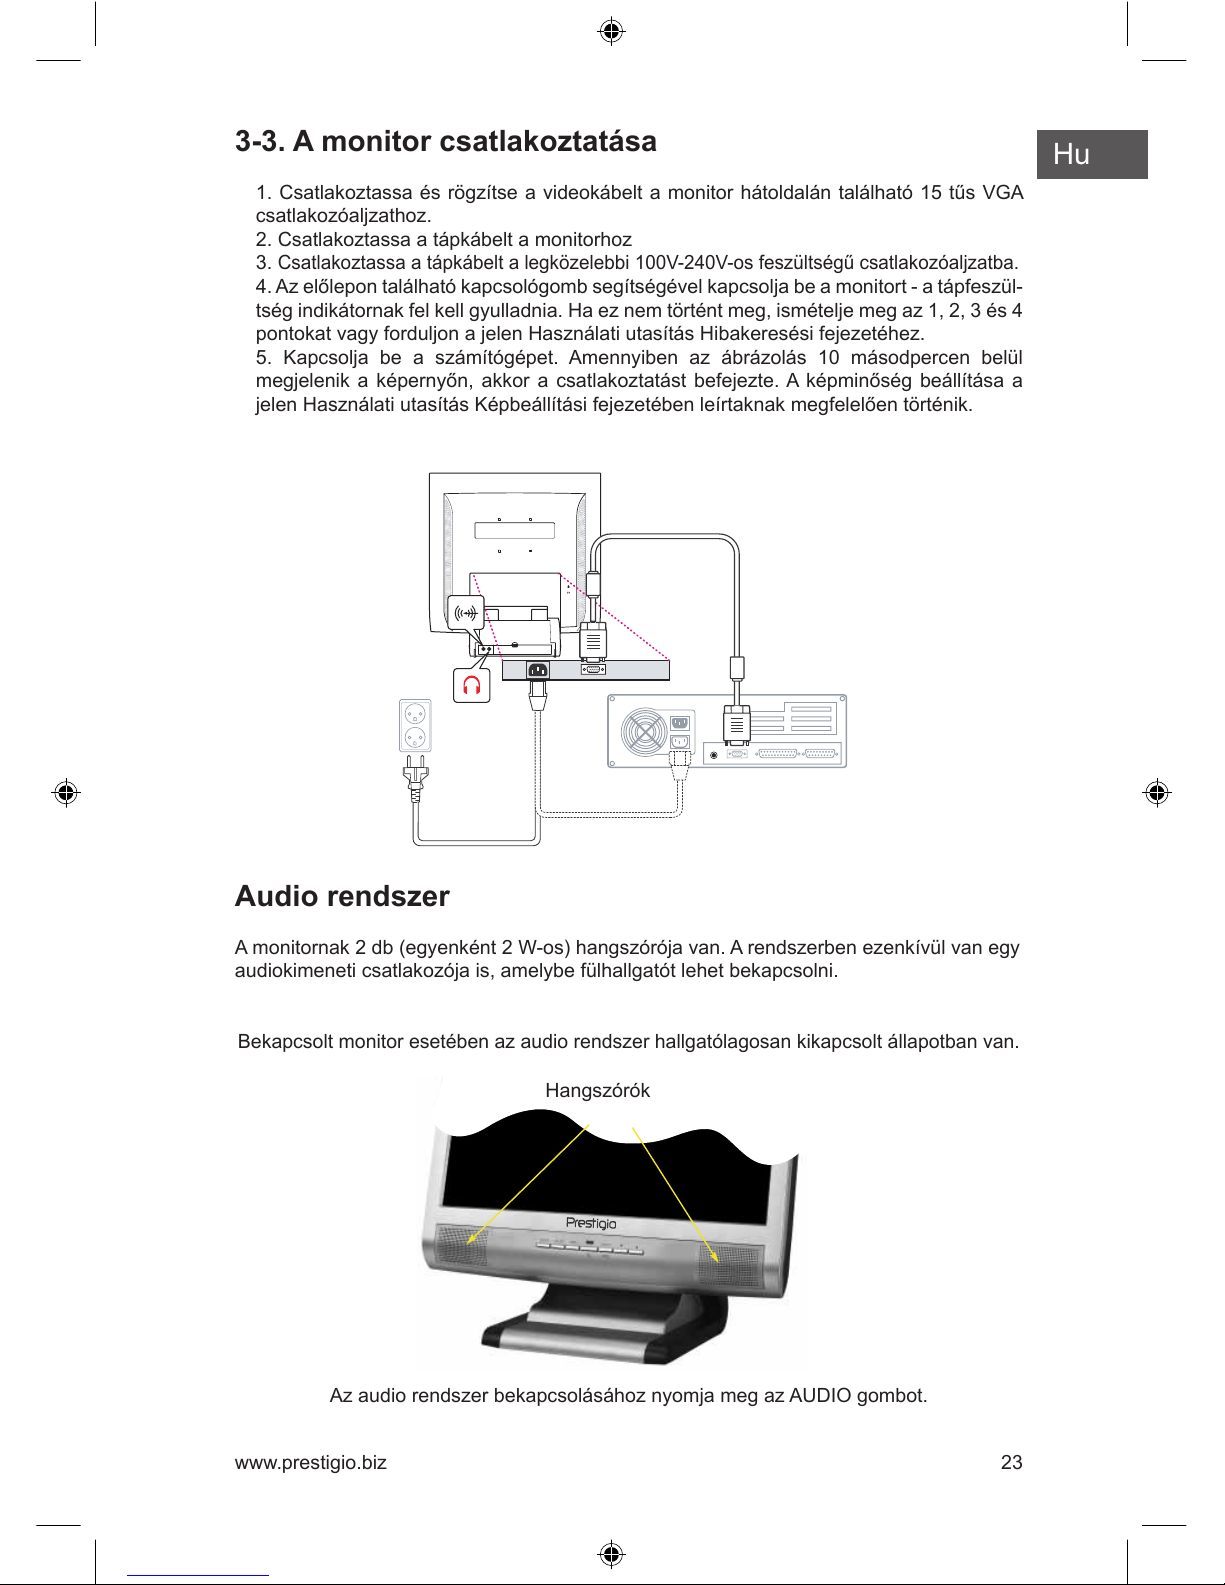
3-3. A monitor csatlakoztatása
1. Csatlakoztassa és rögzítse a videokábelt a monitor hátoldalán található 15 tűs VGA
csatlakozóaljzathoz.
2. Csatlakoztassa a tápkábelt a monitorhoz
3.
Csatlakoztassa a tápkábelt a legközelebbi 100V-240V-os feszültségű csatlakozóaljzatba.
4. Az előlepon található kapcsológomb segítségével kapcsolja be a monitort - a tápfeszül-
tség indikátornak fel kell gyulladnia. Ha ez nem történt meg, ismételje meg az 1, 2, 3 és 4
pontokat vagy forduljon a jelen Használati utasítás Hibakeresési fejezetéhez.
5. Kapcsolja be a számítógépet. Amennyiben az ábrázolás 10 másodpercen belül
megjelenik a képernyőn, akkor a csatlakoztatást befejezte. A képminőség beállítása a
jelen Használati utasítás Képbeállítási fejezetében leírtaknak megfelelően történik.
Audio rendszer
A monitornak 2 db (egyenként 2 W-os) hangszórója van. A rendszerben ezenkívül van egy
audiokimeneti csatlakozója is, amelybe fülhallgatót lehet bekapcsolni.
Bekapcsolt monitor esetében az audio rendszer hallgatólagosan kikapcsolt állapotban van.
Az audio rendszer bekapcsolásához nyomja meg az AUDIO gombot.
Hangszórók
Page 24

Hu
24 www.prestigio.biz
3-4. A frissítési frekvencia beállítása
Windows 98/ME/XP/2000 esetén a képernyő-frissítési frekvencia beállításához kérjük,
kövesse az alábbi utasításokat.
1. Nyissa meg a Vezérlőpult ablakát (Start-Beállítások-Vezérlőpult).
2. Az egér dupla kattintásával nyissa meg a “Megjelenítés” ikont.
3. Nyissa meg a “Beállítások” fület.
4. Nyissa meg a “Speciális” fület.
5. Nyissa meg az “Adapter” fület és jelölje ki a 60Hz-et.
6. Nyomja meg az “Alkalmaz” gombot a módosítások mentéséhez.
Frissítési frekvencia táblázat
Amennyiben az Ön videokártyája nem támogatja a tábláaztban megadott frissítési
frekvenciát, akkor a frekvencia meghatározásához használja a videokártya használati
utasítását. Ellenkező esetben előfordulhat, hogy a képek torzítottak lesznek.
Az ajánlott felbontás 1024x768, 60Hz frissítési frekvencia mellett.
Vízszintes
frekvencia
31.5 KHz
31.5 KHz
37.5 KHz
37.9 KHz
46.9 KHz
48.4 KHz
56.5 KHz
60.0 KHz
63.9 KHz
80.0 KHz
Frissítési
frekvencia
70 Hz
60 Hz
75 Hz
60 Hz
75 Hz
60 Hz
70 Hz
75 Hz
60 Hz
75 Hz
No.
1
2
3
4
5
6
7
8
9
10
Felbontás
720 x 400
640 x 480
640 x 480
800 x 600
800 x 600
1024 x 768
1024 x 768
1024 x 768
1280 x 1024
1280 x 1024
31.5 KHz
31.5 KHz
37.5 KHz
35.2 KHz
37.9 KHz
48.1 KHz
46.9 KHz
49.7 KHz
48.4 KHz
56.5 KHz
60.0 KHz
67.5 KHz
63.9 KHz *
80.0 KHz
70 Hz
60 Hz
75 Hz
56 Hz
60 Hz
72 Hz
75 Hz
75 Hz
60 Hz
70 Hz
75 Hz
75 Hz
60 Hz *
75 Hz
1
2
3
4
5
6
7
8
9
10
11
12
13
14
720 x 400
640 x 480
640 x 480
800 x 600
800 x 600
800 x 600
800 x 600
832 x 624
1024 x 768
1024 x 768
1024 x 768
1152 x 864
1280 x 1024 *
1280 x 1024
Page 25

Hu
25www.prestigio.biz
3-5. A monitor elhelyezése
A monitort a következőképpen lehet felállítani ergonomikus környezetben
• Felállításkor a képernyő dőlésszögét 0° és 20° között lehet beállítani.
Kensington Security (Locking) Slot
• A monitor támogatja a Kensington blokkoló eszközök használatát (Kensington-type
security device), amelyek a monitor biztonságát biztosítják. Az eszköz nem tartozik a
standard szállítmány összetételébe.
• Kensington blokkoló készülék beszerzési kérdéseivel, kérjük forduljon
* Kensington Technology Group
· Address :
2000 Alameda de las Pulgas 2F san mateo,
California 94403-1289
· Tel : +1 650 572 2700
· Fax : +1 650 572 9675
· Web-site : www.kensington.com
Page 26
Hu
26 www.prestigio.biz
Ergotron, Inc.
- Address : Ergotron Europe
Kuiperbergweg 50 1101 AG
Amsterdam The Netherlands
- Tel : +3 1 20 696 60 65
· Fax : +3 1 20 609 04 59
· E-mail : info.eu@ergotron.com
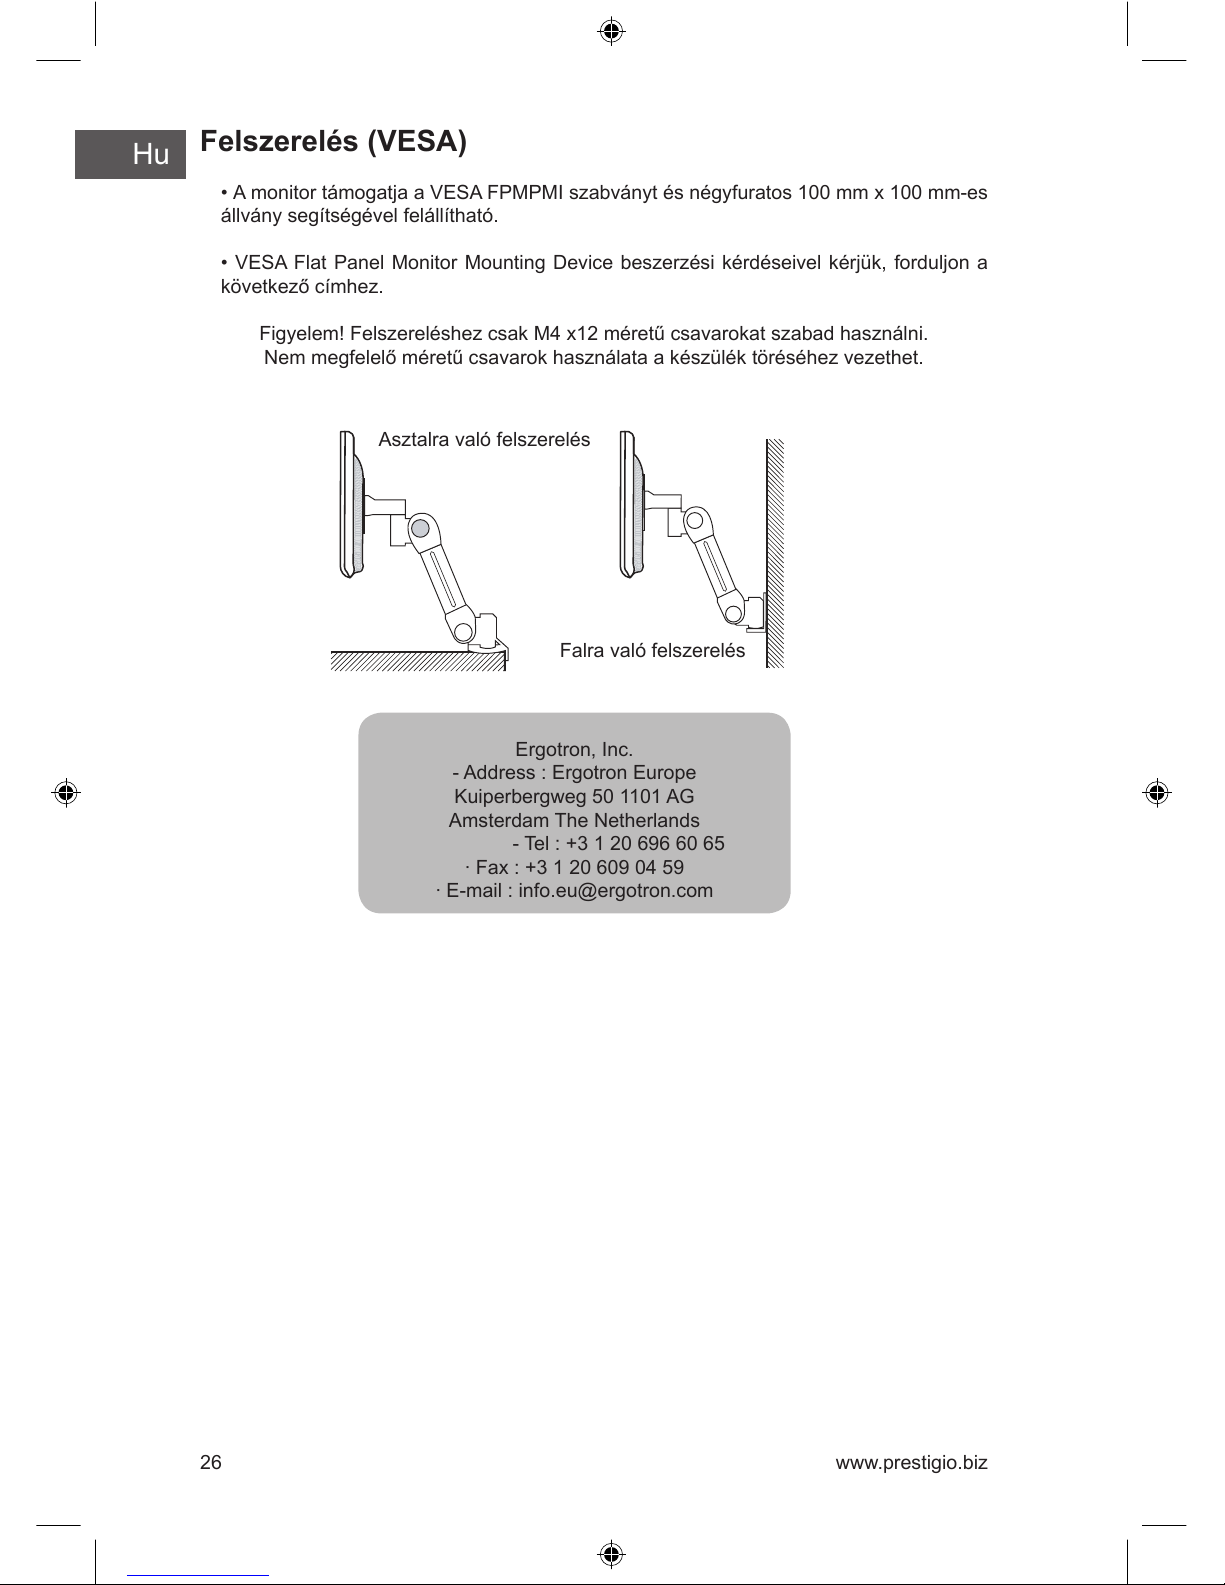
Felszerelés (VESA)
• A monitor támogatja a VESA FPMPMI szabványt és négyfuratos 100 mm x 100 mm-es
állvány segítségével felállítható.
• VESA Flat Panel Monitor Mounting Device beszerzési kérdéseivel kérjük, forduljon a
következő címhez.
Figyelem! Felszereléshez csak M4 x12 méretű csavarokat szabad használni.
Nem megfelelő méretű csavarok használata a készülék töréséhez vezethet.
Asztalra való felszerelés
Falra való felszerelés
Page 27

Hu
27www.prestigio.biz
4. Az ábrázolás beállítása
Az ábrázolás beállítása a képernyő alatt található gombok segítségével történik.
4-1. A képernyőmenü használata
1. A képernyőmenü megnyitásához nyomja meg a MENU gombot. A felbontás és a
frissítési frekvencia a menü felső mezejében jelennek meg.
2. A menüpont kiválasztásához használja a gombokat.
3. A menüpont aktivizáláshoz nyomja meg a SELECT gombot.
4. A menüpont beállításához használja a gombot vagy.
5. A menü előző szintjére való visszatéréshez nyomja meg a MENU gombot.
6. A monitor automatikusan megjegyzi az új paraméteeket az utolsó módosítás után
1 másodperccel, majd a menü eltűnik. A képernyőmenü azonnali eltűntetéséhez
megnyomhatja a MENU gombot.
4-2. A közvetlen hozzáférési gombok használata
AUTO ADJUST
A képernyőméretek automatikus beállításához használja a SELECT (AUTO) gombot.
VOLUME
Használja a gombot a hangerőbeállítások megválasztásához
A beállításokhoz használja a gombokat vagy
AUDIO
Az audio be- és kikapcsolásához használja a gombot.
Page 28
Hu
28 www.prestigio.biz
4-3. A képernyőmenü beállításai
A képernyőmenü tartalmazza
BRIGHTNESS
A kép fényerejének szabályozása.
CONTRAST
A kép kontrasztjának szabályozása.
COLOR CONTROL
A színhőmérséklet kihaz a kép telítettségére. Hidegebb színhőmérséklet a kép
elvörösödéséhez vezet, a melegebb pedig kékséget ad a képhez
A monitor három színbeállítást támogat: Mode 1 (meleg fehér), Mode 2 (hideg fehér) vagy
USER. A USER beállításokat a felhasználó önállóan választja meg a vörös, zöld és kék
lehetséges értékeiből.
MISCELLANEOUS
RECALL
A mentett színparaméterek lehívása.
OSD TIMER
A képernyőmenü megjelenítési idejének beállítása.
OSD POSITION
A képernyőmenü függőleges és vízszintes mozgatása.
AUDIO
Ez a menü a hang be- és kikapcsolására szolgál.
TREBLE
A magas frekvenciájú hangok beállítása.
BASE
Az alacsony frekvenciájú hangok beállítása
AUTO ADJUCT
Automatikusan beállíthatja a képet úgy, hogy maximálisan kihasználja a képernyő szabad
területét.
LANGUAGE
A képernyőmenü nyelvének megválasztása. Választható nyelvek: angol, francia, német,
olasz, spanyol, svéd, nn, dán, portugál, holland, japán és kínai.
Page 29
Hu
29www.prestigio.biz
H/V POSITION
H-POSITION
Az ábrázolás képernyőn elfoglalt vízszintes helyének megválasztása.
V-POSITION
Az ábrázolás képernyőn elfoglalt vízszintes helyének megválasztása.
CLOCK PHASE
PHASE
Az ábtázolás zajainak beállítása.
CLOCK
A kép vízszintes méretének beállítása.
SOURCE
Nincs funkciója. (Csak opcionális készülékek támogatják.)
Page 30
Hu
30 www.prestigio.biz
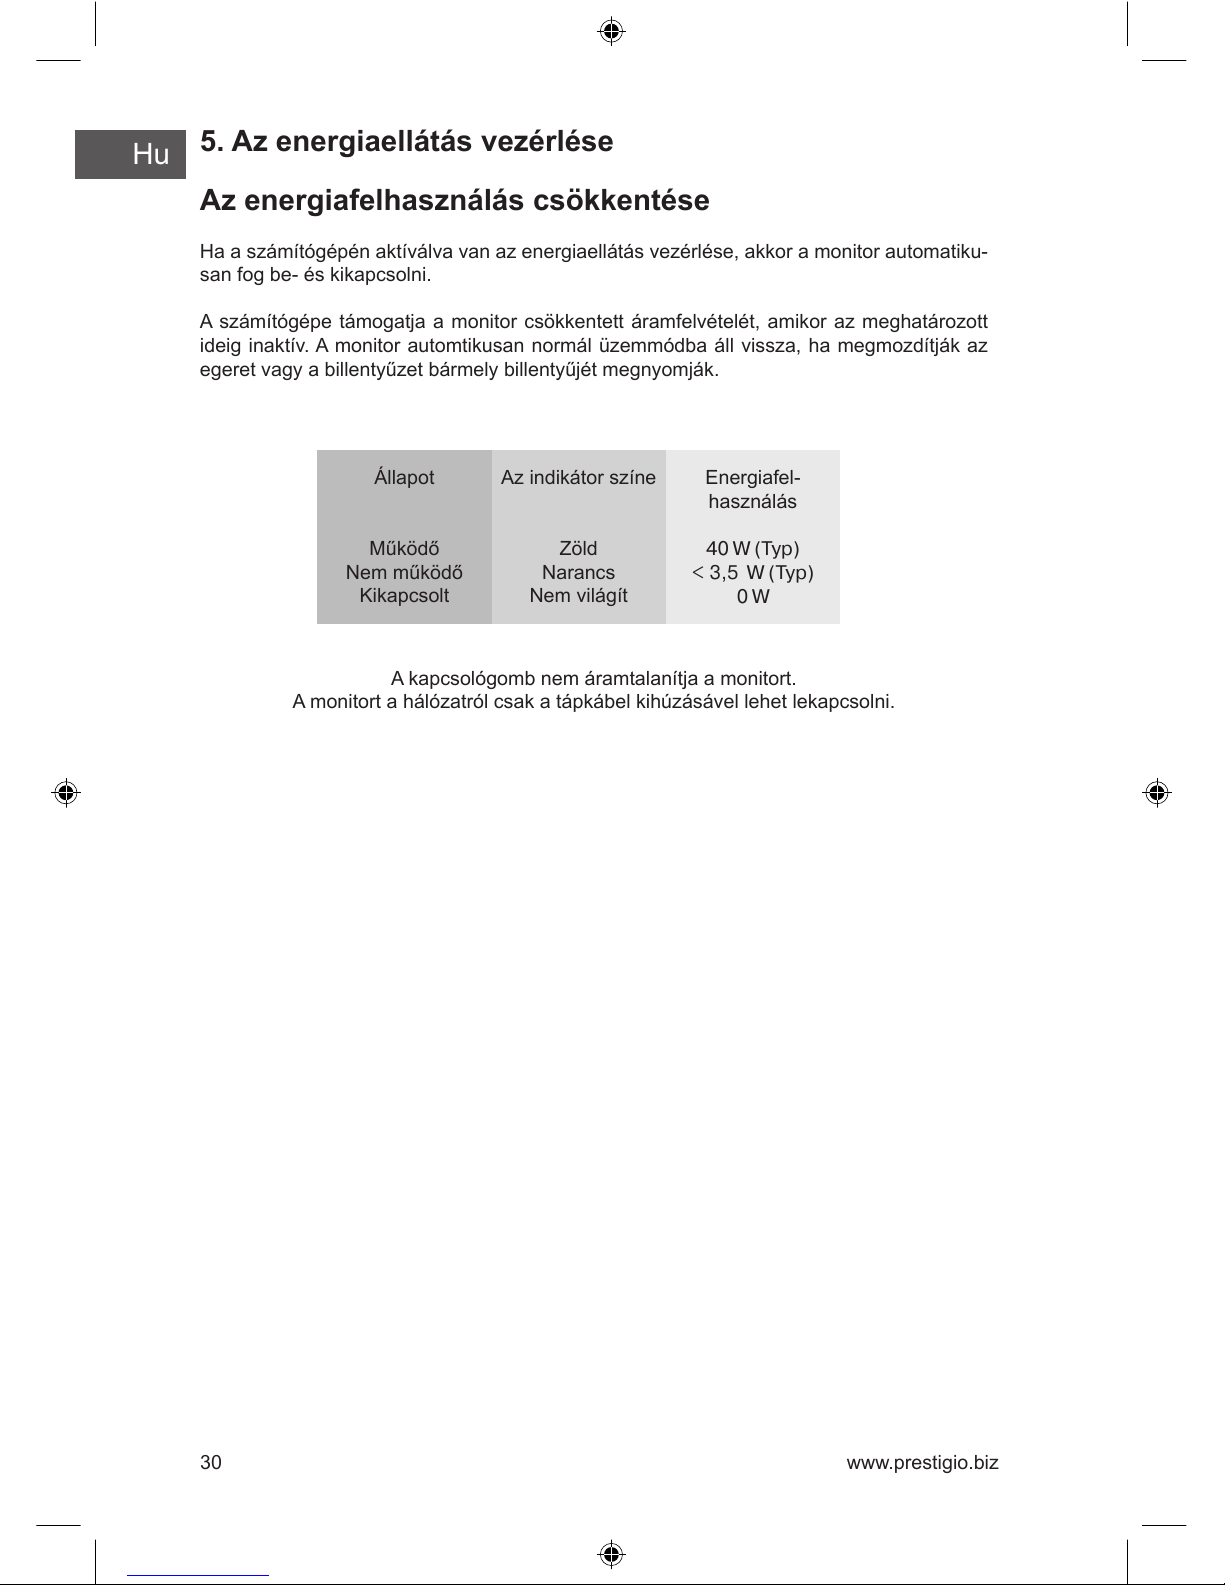
5. Az energiaellátás vezérlése
Az energiafelhasználás csökkentése
Ha a számítógépén aktíválva van az energiaellátás vezérlése, akkor a monitor automatiku-
san fog be- és kikapcsolni.
A számítógépe támogatja a monitor csökkentett áramfelvételét, amikor az meghatározott
ideig inaktív. A monitor automtikusan normál üzemmódba áll vissza, ha megmozdítják az
egeret vagy a billentyűzet bármely billentyűjét megnyomják.
A kapcsológomb nem áramtalanítja a monitort.
A monitort a hálózatról csak a tápkábel kihúzásável lehet lekapcsolni.
Energiafel-
használás
40 W (Typ)
< 3,5 W (Typ)
0 W
Állapot
Működő
Nem működő
Kikapcsolt
Az indikátor színe
Zöld
Narancs
Nem világít
Page 31

Hu
31www.prestigio.biz
6. Hibakeresés
Mielőtt a szervizhálózathoz fordul segítségért, olvassa el a használati utasításnak ezt a
fejezetét és próbálja meg a problémát önállóan megoldani.
Nincs ábrázolás a
képernyőn.
Üzenet
Video mode not
supported
A monitor nem
támogatja a csökkentett
energiafelhasználási
módot.
Színhibák
Az ábrázolás mérete,
elhelyezkedése, alakja
vagy minősége nem
megfelelő
A képernyőn remeg az
ábrázolás
Instabil ábrázolás
Lehet, hogy a monitor csökkentett energiafelhasználási mód-
ban van. Nyomja meg a billentyűzet bármelyik billentyűjét
vagy mozdítsa meg az egeret, hogy evvel aktivizálja a moni-
tort és állítsa helyre az ábrázolást a képernyőn.
Az állapotkijelző a monitorbeállítások megváltoztatása köz-
ben lehet narancsszínű.
Ellenőrizze a PC videoadapterének felbontását és frekven-
ciáját a frissitési frekvencia táblázatnak megfelelően.
Ellenőrizze a videokábel csatlakoztatását.
Ellenőrizze a felbontást és a frekvenciát a videoadapteren
Ellenőrizze a PC videoadapterének felbontását és frekven-
ciáját a frissitási frekvencia táblázatnak megfelelően.
A PC videojele nem felel meg a VESA DPMS szabván-
yoknak. A videokártya vagy a PC nem támogatja a VESA
DPMS csökkentett energiafelhasználási mód funkcióját.
Ellenőrizze a videokábel csatlakoztatását. Próbálja meg
megváltoztatni a színhőmérsékletet.
A képernyőbeállítási menü 4-3. pontjának megfelelően ál-
lítsa be az ábrázolást.
Az ábrázolás vibrálhat vagy rezeghet ha bármilyen probléma
van a számítógép alaplapjával vagy videokártyájával. Segít-
ségért forduljon a szervizhálózathoz.
Ellenőrizze a PC videoadapterének felbontását és frekven-
ciáját a frissitési frekvencia táblázatnak megfelelően.
Hiba Lehetséges megoldás
Page 32

Hu
32 www.prestigio.biz
Forduljon a szervizhálózathoz
Amennyiben valóban segítségre van szüksége, kérjük, forduljon a szervizhálózathoz. A
monitor karbantartásra történő átadásakor használja az eredeti csomagolást.
Kapcsolja ki a monitort a hálózatból és forduljon a szervizhálózathoz, amennyiben:
• A monitor nem működik
• A monitor működése lényegesen eltér a meghirdetettől.
• A monitor leesett vagy a háza sérült.
• A monitort víz vagy más folyadék érte.
Instabil ábrázolás
No Signal - üzenet
Az állapotkijelző
narancsszínű
A beállítások módosítását a PC szoftverének segítségével kell
elvégeznie.
Ellenőrizze a videokábel csatlakoztatását.
Ellenőrizze a tápfeszültség cstlakoztatását és bekapcsolását.
Ellenőrizze a tápfeszültség cstlakoztatását és bekapcsolását.
Lehet, hogy a monitor csökkentett energiafelhasználási mód-
ban van. Nyomja meg a billentyűzet bármelyik billentyűjét
vagy mozgassa eg az egeret, hogy evvel aktivizálja a monitort
és állítsa helyre az ábrázolást a képernyőn.
Az állapotkijelző a monitorbeállítások megváltoztatása közben
lehet narancsszínű.
Ellenőrizze a PC videoadapterének felbontását és frekven-
ciáját a frissitési frekvencia táblázatnak megfelelően.
Problem Possible solution
Page 33

Hu
33www.prestigio.biz
7. Műszaki adatok
• Az adatokat a gyártó előzetes értesítés nélkül módosíthatja
Folyékonykristályos képernyő
Szemcseméret
Fényerő
Reakcióidő
Ábrázolási terület
Színek száma
Bemenő jel
Frissítési frekvencia
Maximális frelvencia
Maximális felbontás
Ajánlott felbontás
Bemenő feszültség
Felvett teljesítmény
Az energiafelhasználás vezér-
lése
Plug & Play kompatibilitás
Képernyőmenü
Audio rendszer
VESA FPMPMI
Ergonomika
Biztonság
Munkahőmérséklet
Súly
Méretek
Látható átló 19”, A-Si TFT
0.294 х 0.294 mm
250 Cd/m2 (eredeti)
25 ms
376.32 x 301.056 mm
16 M
R(vörös)G(zöld)B(kék), analóg, 15-pin D-sub
Vízszintesen: 31-től 80 KHz-ig, függőlegesen: 56-tól 75 Hz-ig
135 MHz
1280 х 1024, 75 Hz mellett
1280 х 1024, 60 Hz mellett
100-240 V, 1.0 A váltóáram
40 W
VESA DPMS
VESA DDC 1/2B
BRIGHTNESS, CONTRAST, COLOR CONTROL,
MISCELLANEOUS, AUDIO, AUTO ADJUST, LAN-
GUAGE,
H/V. POSITION, CLOCKPHASE, SOURCE
2 cs. х 2 W / fülhallgató kimenet
Rögzítés 75 mm х 75 mm-es állványhoz
TCO 99, FCC Class B, CE,
cULus, TÜV-GS, SEMKO
5 ~ 35 °C
6.2 kg kicsomagolva, 8.2 kg becsomagolva
420 X 441 X 185 mm
Page 34

Cz
34 www.prestigio.biz
U.S.A.
U.S.FEDERAL COMMUNICATIONS COMMISSION
RADIO FREQUENCY INTERFERENCE STATEMENT
INFORMATION TO THE USER
NOTE : This equipment has been tested and found to comply with the limitsfor a Class
B digital device pursuant to Part 15 of the FCC Rules.
These limits are designed to provide reasonable protection against harmful interference
in a residential installation.
This equipment generates, uses, and can radiate radio frequency energy and, if not
installed and used in accordance with the instructions, may cause harm ful interference
to radio communications.
However, there is no guarantee that interference will not occur in a particular installa-
tion.
If this equipment does cause harmful interference to radio or television re ception, which
can be determined by turning the equipment off and on, the user is encouraged to try to
correct the interference by one or more of the
following measures:
• Reorient or relocate the receiving antenna.
• Increase the separation between the equipment and receiver.
• Connect the equipment into an outlet of a circuit different from that to which the re-
ceiver is connected.
• Consult the dealer or an experienced radio/TV technician for assistance. Changes or
modification not expressly approved by the party responsible for compliance could void
the user’s authority to operate the equipment.
Connecting of peripherals requires the use of grounded shielded signal cables.
Page 35

Cz
35www.prestigio.biz
OBSAH
1. ÚVOD ............................................................................................................36
2. INFORMACE O BEZPEČNOSTI ..................................................................36
3. INSTALACE DISPLEJE................................................................................ 37
3-1. KOMPLETNOST........................................................................................ 37
3-2. VÝBĚR VHODNÉHO MÍSTA ..................................................................... 38
3-3. ZAPOJENÍ DISPLEJE............................................................................... 39
3-4. NASTAVENÍ FREKVENCE OBNOVENÍ.................................................... 40
TABULKA FREKVENCÍ OBNOVENÍ................................................................ 40
3-5. UMÍSTĚNÍ DISPLEJE................................................................................ 41
4. SEŘÍZENÍ OBRAZU......................................................................................43
4-1. VYUŽITÍ MENU OBRAZOVKY.................................................................. 43
4-2. VYUŽITÍ KLÁVES PŘÍMÉHO PŘÍSTUPU................................................. 43
4-3. NASTAVENÍ MENU OBRAZOVKY............................................................ 44
5. ŘÍZENÍ NAPÁJENÍ ELEKTRICKÝM PROUDEM ......................................... 46
SNÍŽENÍ SROTŘEBY ELEKTRICKÉ ENERGIE
6. ODSTRANĚNÍ ZÁVAD.................................................................................. 47
7. HLAVNÍ TECHNICKÉ ÚDAJE ...................................................................... 49
Page 36

Cz
36 www.prestigio.biz
1. ÚVOD
Tato příručka obsahuje návod k instalaci a využívaní displeje Prestigio P190P
Prestigio P190P je vysokoergonomický barevný displej s následujícími charakteristikami
• Vysoká kvalita obrazu díky protizábleskovému nátěru
• Vysokokvalitní upravení měřítka
• Obrazovkové menu řízení údajů
• Vstupní střídavé elektrické napětí 100-240 V
• VESA DPMS (Řízení elektrického napájení displeje)
• Je slučitelný s normou VESA DDC1/2B
• Rychlé a přesné samočinné nastavení
• Možnost instalace zařízení (VESA)
2. INFORMACE O BEZPEČNOSTI
Tento displej je vypracován a vyroben v souladu s mezinárodními bezpečnostními normami.
Aby se zamezilo úrazu elektrickým proudem, držte se, prosím, následujících pravidel:
Nerozmísťujte nic vlhkého na displeji anebo šňůře. V žádném případě nezavírejte ventilační
otvory na krytu displeje a nedotýkejte se součástí displeje kovovými anebo lehce zápalnými
předměty.
Vyhýbejte se vysoké teploty, vlhkosti anebo zaprášení okolního
prostředí během využívaní displeje.
• Pracovní teplota: 5…35 0C. • Relatívní vlhkost: 30…80 %.
Přesvědčte se, že displej je vypnut před zapojováním kabelu do zásu-
vky. Přesvědčte se, že napájecí šňůra a signální kabely jsou zapnuté
správně.
Nepřipojujte příliš hodně prodlužovačů a vidlic do jedné zásuvky a
neužívejte vadnou anebo špatně upevněnou zásuvku, protože to může
vyvolat elektrický úraz anebo vznícení. Obraťte se na servisní středisko
pro výměnu vadných součástek.
Nikdy neužívejte blízko povrchu displeje ostrých předmětů, například
jehel anebo psacích pér, které mohou poškodit povrch LCD.
Neužívejte rozpouštědla, například benzínu, pro čištění displeje,
protože to může vyvolat poškození povrchu LCD.
Page 37

Cz
37www.prestigio.biz
Čištění a obsluha
• Aby se zamezilo úrazu elektrickým proudem, neodstraňujte kryt anebo zadní panel.
Součásti displeje, které se nacházejí uvnitř, nepodléhají obsluze užívatelů. Před čištěním
se přesvědčte, že displej je odpojen od elektrické sítě.
• Neužívejte hmot, které obsahují lih (dřevný nebo vinný) anebo silná rozpouštědla.
Neužívejte ředidel nebo benzínu, abrazívních hmot nebo ztlačeného vzduchu.
• Neotírejte displej látkou nebo mycí houbou, které mohou odřít povrch.
• Pro čištění displeje navlhčete doporučeným mycým prostředkem anebo měkkou čistou
vodou měkkou látku.
• Jestli výše uvedené pokyny nepomáhají odstranit skvrny z povrchu, obraťte se na
servisní středisko.
3. Instalace monitoru
3-1. Kompletnost
Prosím, ověřte, jsou-li všechny níže uvedené součásti přibalené spolu s displejem.
Výše uvedené napájecí šňůry se líší podle regionů a napětí sítě. Jestli něco chybí, spojte
se s Vaším dealerem.
Užití jiných napájecích šňůr, nežli těch, které se nacházejí v obale, a také těch, které jsou
delší než 3 metry, mohou ovlivnit špatnou práci displeje.
Signální kabelDisplej
Audio kabel
CD
Napájecí kabel
Page 38

Cz
38 www.prestigio.biz
3-2. Výběr místa pro displej
• Při výběru místa pro displej pamatujte na to, že se musí nacházet ve vzdálenosti
minimálně 30 cm od jiných elektrických anebo ohřívacích přístrojů. Je také nutné zabezpečit
minimálně 10 cm volného prostoru z každé strany pro dobrou ventilaci.
• Vyhýbejte se míst přímého dosahu slunečných paprsků na obrazovku.
• Pro zmenšení únavy očí neinstalujte monitor na světlém pozadí, například proti oknu.
• Rozmístěte displej tak, aby vrchní okraj obrazovky byl nad úrovní očí.
• Pamatujte si, že displej musí být ve vzdálenosti 45-90 cm od očí užívatele.
Před napojením Vašeho displeje se přesvědčte, že PC a přístroje jsou vypnuté ze sítě.
Pro pozběhnutí úrazu elektrickým proudem užívejte kabelů v dobrém stavu a zásuvek s
ochranným uzemněním..
Page 39

Cz
39www.prestigio.biz
3-3. Napojení monitoru
1. Připojte a upevněte signální kabel k 15-pin VGA konektoru na zadním panelu
displeje.
2. Připojte elektrickou šňůru ke konektoru displeje.
3. Připojte šňůru k nejbližší zásuvce 100-240 V.
4. Zapněte displej, užijte k tomu vypínací klávesu na čelním panelu – indikátor režimu
napájení se musí rozsvítit. Jestli se nerozsvítil, pak zopakujte kroky 1, 2, 3 a 4 anebo se
obraťte na oddíl «Odstranění závad» této Příručky.
5. Zapněte počítač a displej. Jestli se na displeji objevil obraz, pak tím je instalace
ukončena. Seřiďte kvalitu zobrazení – viz oddíl «Seřízení obrazu» této Příručky.
Audio systém
Tento displej má též dva reproduktory (po 2 W). Systém kromě toho má svírku audio
výstupu pro náhlavní telefonní soupravy.
Při zapnutém displeji je audio systém při umlčení v vypnutém stavu Pro zapnutí audio
využívejte klavesy AUDIO
Elektrodynamické reproduktory
Page 40

Cz4
40 www.prestigio.biz
3-4. Nastavení frekvence obnovení
Řiďte se, prosím, níže uvedenými pokyny pro nastavení frekvence obnovení obrazovky pro
Windows 98/ME/XP/2000
1. Otevřete okno Ovládací panel (Spouštění-Nastavení-Ovládací panel)
2. Pomocí dvojitého stisknutí myši otevřete ikonu «Obrazovka»
3. Otevřete záložku «Nastavení»
4. Otevřete záložku «Dodatečně»
5. Otevřete záložku «Adaptér» a zvolte 60 Hz
6. Stiskněte «Použít» pro zachování změn
Tabulka frekvencí obnovení
Jestli Vaše videomapa nepodporuje frekvence obnovení uvedenou v této tabulce, pak
použijte příručku užívatele Vaší videomapy pro stanovení frekvence. V opačném případě
je možné zkreslování obrazu.
Doporučené rozlišení činí 1024x768 při frekvenci obnovení 60 Hz.
Frekvence po
horizontále
31.5 KHz
31.5 KHz
37.5 KHz
37.9 KHz
46.9 KHz
48.4 KHz
56.5 KHz
60.0 KHz
63.9 KHz
80.0 KHz
Frekvence
obnovení
70 Hz
60 Hz
75 Hz
60 Hz
75 Hz
60 Hz
70 Hz
75 Hz
60 Hz
75 Hz
No.
1
2
3
4
5
6
7
8
9
10
Rozlišení
720 x 400
640 x 480
640 x 480
800 x 600
800 x 600
1024 x 768
1024 x 768
1024 x 768
1280 x 1024
1280 x 1024
31.5 KHz
31.5 KHz
37.5 KHz
35.2 KHz
37.9 KHz
48.1 KHz
46.9 KHz
49.7 KHz
48.4 KHz
56.5 KHz
60.0 KHz
67.5 KHz
63.9 KHz *
80.0 KHz
70 Hz
60 Hz
75 Hz
56 Hz
60 Hz
72 Hz
75 Hz
75 Hz
60 Hz
70 Hz
75 Hz
75 Hz
60 Hz *
75 Hz
1
2
3
4
5
6
7
8
9
10
11
12
13
14
720 x 400
640 x 480
640 x 480
800 x 600
800 x 600
800 x 600
800 x 600
832 x 624
1024 x 768
1024 x 768
1024 x 768
1152 x 864
1280 x 1024 *
1280 x 1024
Page 41

Cz
41www.prestigio.biz
3-5. Umístění displeje
Tento displey může být umístěn následujícím způsobem
• Můžete nastavovat úhel sklonu displeje během instalace 0 až 20 stupňů.
Kensington Security (Locking) Slot
• Tento displej také podporuje blokovací zařízení Kensington (Kensington – type security
device) pro zabezpečení bezpečnosti Vašeho displeje. Toto zařízení neni částí standardní
komplektace.
• Pro vyřešení otázky nabytí blokovacího zařízení Kensington obracejte se, prosím,
* Kensington Technology Group
· Address :
2000 Alameda de las Pulgas 2F san mateo,
California 94403-1289
· Tel : +1 650 572 2700
· Fax : +1 650 572 9675
· Web-site : www.kensington.com
Page 42

Cz
42 www.prestigio.biz
Ergotron, Inc.
- Address : Ergotron Europe
Kuiperbergweg 50 1101 AG
Amsterdam The Netherlands
- Tel : +3 1 20 696 60 65
· Fax : +3 1 20 609 04 59
· E-mail : info.eu@ergotron.com
Montáž (VESA)
• Tento displej podporuje normu VESA FPMPMI pro montáž pomocí 100 mm x 100 mm
stojanu, který má 4 otvory.
• Pro vyřešení otázky nabytí VESA Flat Panel Monitor Mounting Devices obracejte se,
prosím, na adresu
Pozor! Pouze šrouby M4 x 12 se mohou používát pro montaž.
(Použití šroubů chybného rozměru může vést ke zlomení výrobku.)
Montáž na stůl
Montáž na stěnu
Page 43

Cz
43www.prestigio.biz
4. Seřízení obrazu
Seřízení obrazu se uskutečňuje pomocí kláves, umístěných zdola obrazovky.
4-1. Využití menu obrazovky
1. Stiskněte klávesu MENU pro otevření menu obrazovky. Rozlišení a frekvence obno-
vení se objeví ve vrchním poli menu.
2. Používejte kláves anebo pro výběr oddílu menu.
3. Stiskněte klávesu SELECT pro aktivaci oddílu menu.
4. Používejte kláves anebo pro seřízení vyčleněného oddílu.
5. Stiskněte klávesu MENU pro návrat na předchozí úroveň menu.
6. Displej automaticky zachovává nové údaje po uplynutí 1 vteřiny po posledních
změnách, potom menu zmizí. Můžete též stisknout klávesu MENU, aby menu obrazovky
zmizelo okamžitě.
4-2. Využití kláves přímého přístupu
AUTO ADJUST
Použijte klávesy SELECT (AUTO) pro automatické dolaďování tvaru obrazovky.
VOLUME
Použijte klávesy pro výběr nastavení hlasitosti.
Používejte kláves anebo pro seřizování.
AUDIO
Použijte klávesy pro zapnutí anebo vypnutí audio.
Page 44

Cz
44 www.prestigio.biz
4-3. Nastavení menu obrazovky
Menu obrazovky obsahuje
BRIGHTNESS
Seřízení jasu obrazu.
CONTRAST
Seřízení kontrastu obrazu.
COLOR CONTROL
Teplota chromatičnosti ovlivňuje sytost obrazu. Nižší teplota chromatičnosti vede k
zčervenalosti obrazu, zatímco vyšší dodává obrazu modrý odstín.
Tento displej má tři nastavení chromatičnosti: Mode 1 (teplý bílý), Mode 2 (studený
bílý), anebo USER. Nastavení USER si užívatel volí samostatně z možných součinitelů
červeného, zeleného a modrého.
MISCELLANEOUS
RECALL
Zrušení zachovaných parametrů.
OSD TIMER
Dovoluje nastavit čas pro ukázání menu obrazovky.
OSD POSITION
Přemístění menu obrazovky ve vodorovném a svislém směru.
AUDIO
Menu se používá pro zapínání/vypínání audio.
TREBLE
Seřizování vysokých frekvencí audio.
BASE
Seřizování nízkých frekvencí audio.
AUTO ADJUCT
Můžete automaticky seřídit obraz, maximálně využívaje dostupnou plochu obrazovky.
LANGUAGE
Výběr jazyku menu obrazovky. Dostupné jazyky: anglický, francouzský, německý, italský,
španělský, švédský, nský, dánský, portugalský a holandský.
Page 45

Cz
45www.prestigio.biz
H/V POSITION
H-POSITION
Seřizování vodorovné polohy obrazu na obrazovce.
V-POSITION
Seřizování svislé polohy obrazu na obrazovce.
CLOCK PHASE
PHASE
Seřizování šumu obrazu.
CLOCK
Seřizování rozměru obrazu po horizontále.
SOURCE
Bez funkcí. (Podpora pouze opčními zařízení).
Page 46

Cz
46 www.prestigio.biz
5. Řízení napájení elektrickým proudem
Snížení srotřeby elektrické energie
Jestli na Vašem PC je aktivována funkce řízení napájení elektrickým proudem, displej se
bude automaticky zapínat a vypínat.
Váš PC může podporovat režím snížené spotřeby elektrické energie displeje, když během
úrčité doby tento je mimo provoz. Displej se automaticky vrací k normální práci, když
stiskněte libovolnou klávesu na klávesnici anebo posunete myš.
Vypínací klávesa neodpojuje displej od elektrické sítě.
Teprve když odpojíte napájecí kábel, displej se vypne.
Spotřeba
elektrické energie
40 W (Typ)
< 3,5 W (Typ)
0 W
Stav
Provozní
Mimo provoz
Vypnutý
Barva indikátoru
Zelená
Oranžová
Není
Page 47

Cz
47www.prestigio.biz
6. Odstranění závad
Před obracením na servisní službu přečtěte tento oddíl Příručky a pokuste se vyřešit pro-
blém samostatně.
Chybí obraz na
obrazovce.
Hlášení Video mode not
supported
Displej nepodporuje
režim snížené spotřeby
elektrické energie
Defekty barvy
Nevyhovujicí rozměr,
poloha, tvar anebo kvalita
obrazu
Obraz na obrazovce se
chvěje
Nestabilita obrazu
Displej může fungovat v režimu snížené spotřeby elektrické
energie. Stiskněte libovolnou klávesu na klávesnici anebo
posuňte myš pro aktivaci displeje a obnovení obrazu na
obrazovce.
Indikator stavu může mít oranžovou barvu během změn
nastavení displeje.
Zkontrolujte rozlišení a frekvenci na videoadaptéru Vašeho
PC ve shodě s Tabulkou frekvencí obnovení.
Zkontrolujte spojení signálního kabelu.
Ověřte rozlišení a frekvenci na videoadaptéru
Ověřte rozlišení a frekvenci na videoadaptéru Vašeho PC ve
shodě s Tabulkou frekvencí obnovení.
Videosignál PC neodpovídá normám VESA DPMS.
Videomapa anebo PC nepodporuje funkci snížené spotřeby
elektrické energie VESA DPMS.
Zkontrolujte spojení signálního kabelu. Pokuste se změnit
teplotu chromatičnosti.
Seřiďte nastavení obrazu dle pokynů oddílu 4.3. Nastavení
menu obrazovky.
Obraz se může chvět anebo třást v případě nějakého prob-
lému s videomapou anebo s mateřskou deskou počítače.
Obraťte se na servisní službu.
Toto hlášení se vyskytuje, když signál od videomapy překračuje
maximální rozlišení a frekvenci. Seřiďte maximální rozlišení a
frekvenci v souladu s parametry Vašeho displeje.
Zkontrolujte, zda-li rozlišení a frekvence Vašeho PC anebo
grackého adaptéra odpovídají parametrům displeje.
Závada Možné řešení
Page 48

Cz
48 www.prestigio.biz
Obraťte se na servisní službu
Jestli skutečně potřebujete pomoc, pak se obraťte, prosím, na servisní službu. Pro
odevzdání displeje do servisní služby použijte originální balení.
Odpojte displej ze sítě a obraťte se na servisní službu v případě jestli:
• Displej nefunguje.
• Výkonnost displeje značně se liší od prohlášené.
• Displej padal anebo jeho skříň je poškozena.
• Displej byl namočen vodou anebo tekutými látkami.
Nestabilita obrazu
Hlášení: No Signal
Indikátor stavu má
oranžovou barvu
Pro korekci nastavení používejte programové vybavení
Vašeho PC.
Zkontrolujte spojení signálního kabelu.
Zkontrolujte spojení a zapnutí elektrického napájení.
Zkontrolujte spojení a zapnutí elektrického napájení.
Displej může fungovat v režimu snížené spotřeby elektrické
energie. Stiskněte libovolnou klávesu na klávesnici anebo
posuňte myš pro aktivaci displeje a obnovení obrazu na ob-
razovce.
Indikátor stavu může mít oranžovou barvu během změny
nastavení displeje.
Ověřte rozlišení a frekvenci na videoadaptéru Vašeho PC ve
shodě s Tabulkou frekvencí obnovení.
Závada Možné řešení
Page 49

Cz
49www.prestigio.biz
7. Hlavní technické údaje
• Charakteristiky mohou být změněny bez předběžného oznámení.
Displej s kapalnými krystaly
Rozměr zrna
Jas
Doba odezvy
Množství barev
Vstup signálu
Frekvence obnovení
Maximální frekvence
Maximální rozlišení
Doporučené rozlišení
Vstupní napětí
Příkon
Ovládaní elektrického
napájení
Kompatibilita s Plug&Play
Menu obrazovky
Audio systém
VESA FPMPMI
Ergonomika
Bezbečnost
Pracovní teplota
Váha
Rozměry
Dimensions (W X H X D mm)
19” viditelná diagonála, Asi TFT
0.294 х 0.294 mm
250 Kd/m2
25 ms
376.32 x 301.056 mm
16 M
R (červená)G(zelená)B(modrá), Analogový, 15pinDsub
Po horizontále: 31 až 81 KHz, po vertikále: 56 až 75 Hz
135 MHz
1280 x 1024 při 75 Hz
1280 x 1024 při 60 Hz
Střídavý proud 100□240 V, 1.0A
40 W
VESA DPMS
VESA DDC 1/2B
BRIGHTNESS, CONTRAST, COLOR CONTROL,
MISCELLANEOUS, AUDIO, AUTO ADJUST, LAN-
GUAGE,
H/V. POSITION, CKOCK □ PHASE, SOURCE
2 k x 2W
Uchycení pro 75 mm x 75 mm podstavec
TCO 99, FCC Class B, CE,
CULus, TUV□ GS, SEMKO
5~35 °C
6.2 kg rozbalený, 8.2 kg v balení
420 X 441 X 185 mm
Page 50

Sk
50 www.prestigio.biz
U.S.A.
U.S.FEDERAL COMMUNICATIONS COMMISSION
RADIO FREQUENCY INTERFERENCE STATEMENT
INFORMATION TO THE USER
NOTE : This equipment has been tested and found to comply with the limitsfor a Class B
digital device pursuant to Part 15 of the FCC Rules.
These limits are designed to provide reasonable protection against harmful interference
in a residential installation.
This equipment generates, uses, and can radiate radio frequency energy and, if not
installed and used in accordance with the instructions, may cause harm ful interference to
radio communications.
However, there is no guarantee that interference will not occur in a particular installa-
tion.
If this equipment does cause harmful interference to radio or television re ception, which
can be determined by turning the equipment off and on, the user is encouraged to try to
correct the interference by one or more of the
following measures:
• Reorient or relocate the receiving antenna.
• Increase the separation between the equipment and receiver.
• Connect the equipment into an outlet of a circuit different from that to which the receiver
is connected.
• Consult the dealer or an experienced radio/TV technician for assistance. Changes or
modication not expressly approved by the party responsible for compliance could void the
user’s authority to operate the equipment.
Connecting of peripherals requires the use of grounded shielded signal cables.
Page 51

Sk
51www.prestigio.biz
Obsah
1. ÚVOD ...........................................................................................................52
2. INFORMÁCIE O BEZPEČNOSTI ................................................................52
3. INŠTALOVANIE MONITORA .......................................................................53
3-1. BALIACI LIST ........................................................................................... 53
3-2. VÝBER VHODNÉHO UMIESTNENIA ......................................................54
3-3. ZAPOJENIE MONITORA ..........................................................................55
3-4. NASTAVENIE OBNOVOVACEJ FREKVENCIE ....................................... 56
PRESET ČASOVEJ TABUĽKY .......................................................................56
3-5. UŽÍVATEĽSKÉ PROSTREDIE ................................................................. 57
4. NASTAVENIE OBRAZU .............................................................................. 59
4-1. POUŽÍVANIE ON SCREEN DISPLEJA .................................................... 59
4-2. TLAČIDLÁ PRIAMEHO PRÍSTUPU ......................................................... 59
4-3. NASTAVENIA OSD .................................................................................. 60
5. DISPLAY POWER MANAGEMENT /RIADENIE NAPÁJANIA DISPLEJA/
ZNIŽOVANIE SPOTREBY ENERGIE ..............................................................62
6. ODSTRAŇOVANIE PROBLÉMOV ..............................................................63
7. ŠPECIFIKÁCIE .............................................................................................65
Page 52

Sk
52 www.prestigio.biz
1. Úvod
Táto príručka obsahuje inštrukcie pre inštalovanie a prevádzku Prestigio P190T monitora.
Prestigio P190T monitor je vysoko ergonomická farebná displejová jednotka.
• Vysoko-kvalitná spôsoibilosť obsarovky na zmenu mierky /re-scaling/
• 100-240V AC napájacie napätie
• VESA DPMS (signalizácia riadenia spotreby /Display Power Management Signaling)/
• VESA DDC1/2B kompabilita
• Pokročilá digitálna kontrola On-Screen-Display
• Rýchle a presné automatické nastavovanie
• Najpokročilejšie menenie mierky obrazu
• Podpora rozhrania VESA Flat Panel Monitor Physical Mounting
2. Informácie o bezpečnosti
Tento monitor bol vyvinutý a vyrobený tak, aby zabezpečil vašu bezpečnosť. Pokiaľ bu-
dete mať na pamäti nasledovné, môžete predísť závažnému elektrickému šoku a iným
nebezpečenstvám:
Neumiestňujte nič mokré na monitor alebo na napájaciu šnúru. Nikdy
nezakrývajte vetracie otvory a nikdy na ich nedotýkajte kovovými alebo
horľavými materiálmi.
Predchádzajte prevádzkovaniu monitora v extrémnych teplotách,
vlhkosti, alebo v prašných oblastiach.
• Teplota: 5~35°C • Vlhkosť: 30~80RH
Pred zapojením napájacieho kábla do zástrčky sa presvedčte, či je
monitor vypnutý. Zabezpečte, aby bol napájací kábel a iné káble
bezpečne a správne zapojené.
Preťažené výstupy striedavého napätia a predlžovacie káble sú
nebezpečné, ako aj prerezané, alebo zničené zástrčky, ktoré môžu
spôsobiť elektrický šok alebo oheň. Zavolajte svojho servisného tech-
nika, aby ich vymenil.
V blízkosti monitora nepoužívajte ostré nástroje, ako napr. špendlíky
alebo ceruzky, nakoľko môžu poškodiť povrch LCD.
Na čistenie monitora nepoužívajte rozpúšťadlá, ako benzín, nakoľko
tieto môžu zničiť povrch LCD.
Page 53

Sk
53www.prestigio.biz
Čistenie a údržba
• Aby ste predišli elektrickému šoku, nerozoberajte skriňu displeja. Servis zariadenia
nemôže robiť užívateľ. Majte na pamäti, že zariadenie je potrebné pred čistením vypnúť
zo zdroja napätia.
• Nepoužívajte alkohol /metyl, etyl alebo izopropyl/, alebo akékoľvek silné rozpúšťadlo.
Nepoužívajte riedidlá alebo bezén, abrazívne čističe alebo stlačený vzduch.
• Obrazovku neutierajte látkou alebo špongiou, ktoré môžu poškrabať povrch.
• Pre očistenie vašej antistatickej obrazovky používajte vodu a špeciálnu mikrovláknovú
latku na čistenie obrazoviek, ktorá sa používa na čistenie optických šošoviek, alebo zľahka
navlhčite mäkkú, čistú látku vodou, alebo jemným detergentom.
• Pokiaľ horeuvedené inštrukcie nepomáhajú pri odstraňovaní škvŕn, kontaktujte
oprávneného servisného agenta.
3. Inštalovanie monitora
3-1. Baliaci list
V balení nájdete nasledovné položky.
Horeuvedený napájací kábel môže byť vymenený podľa rôznych oblastí napätia.
Prosím, pokiaľ niečo chýba, alebo je poškodené, skontaktujte svojho predajcu.
Iné napájacie káble, s výnimkou kábla, pribaleného k výrobku, alebo dlhšie ako 3 m môžu
ovplyvniť EMC výrobku, alebo prevádzkové podmienky.
Signálny kábel
Telo jednotky
Audio kábel
CD
Napájací kábel
Page 54

Sk
54 www.prestigio.biz
3-2. Výber vhodného umiestnenia
• Monitor umiestnite najmenej 30 cm od iných elektrických, alebo teplo vyžarujúcich
zariadení a na každej strane nechajte minimálne 10 cm na vetranie.
• Monitor postavte do polohy, v ktorej na obrazovku nesvieti priame svetlo, alebo sa
neodráža.
• Aby sa znížilo namáhanie očí, predíďte inštalovaniu displeja proti jasnému pozadiu,
ako napríklad okno.
• Monitor umiestnite tak, aby vrch obrazovky nebol vyššie, ako je úroveň očí.
• Monitor umiestnite priamo pred seba do pohodlnej vzdialenosti na čítanie (približne
45 až 90cm).
Pred začatím zapájania káblov vášho monitora skontrolujte, či sú všetky jednotky vypnuté.
Aby sa predišlo akejkoľvek možnosti elektrického šoku, stále zapájajte vaše zariadenie do
riadne uzemnených zásuviek.
Page 55

Sk
55www.prestigio.biz
3-3. Zapojenie monitora
1. 15 kolíkový konektor signálneho kábla do 15 kolíkového VGA konektora /zdierky/ na
vašom počítači a zaskrutkujte ho.
2. Napájací kábel zapojte do zdierky na monitore.
3. Druhý koniec napájacieho kábla zapojte do hlavného zdroja vášho počítača, alebo do
100V-240V zemnenej elektrickej zásuvky.
4. Monitor zapnite pomocou vypínača a skontrolujte, či sa rozsvietila LEDka napájania.
Pokiaľ nie, opakujte kroky 1,2,3 a 4, alebo sa obráťte na časť tejto príručky, ktorá popisuje
odstraňovanie problémov.
5. Zapnite počítač. V priebehu približne 10 sekúnd sa objaví obraz. Nastavte obraz tak,
aby ste dosiahli jeho najlepšiu kvalitu. Viac informácií nájdete v časti “Nastavenie obrazu”
tejto príručky.
Audio systém
Tento monitor má audio systém, vrátane dvoch mikro reproduktorov. Každý z týchto mikro
reproduktorov má výstupný výkon 2Wrms (max.). Tento systém taktiež obsahuje výstupný
kolík slúchadiel.
Keď sa tento monitor zapne, audio je stále nastavené do režimu off /vypnuté/. Aby ste
zapli audio, použite prosím tlačidlo priameho prístupu AUDIO na prednom kryte, alebo
displej na obrazovke /On Screen Display/.
Reproduktor
Page 56

Sk
56 www.prestigio.biz
3-4. Nastavenie obnovovacej frekvencie
Pri nastavovaní obnovovacieho frekvencie vo Windows 98/ME/XP/2000 sa riaďte doleuve-
denými inštrukciami:
1. Choďte do okna kongurácie(Start-Settings-Conguration okno).
2. Kliknite dvakrát na ikonu ‘Display’.
3. Kliknite na lištu ‘Settings’.
4. Kliknite na tlačidlo ‘Advanced’.
5. Kliknite na ‘Adapter’ a zo zoznamu vyberte 60Hz.
6. Kliknite na ’Apply’ aby bola akceptovaná zvolená hodnota.
Preset časovej tabuľky
Pokiaľ signál zo systému nie je rovnaký ako vopred nastavený časovací režim, nastavte
režim podľa užívateľského návodu k videokarte, pretože pretože obrazovka nemusí byť
zobrazená.
Odporúčané nastavenie je rozlišovacia schopnosť 1024x768 a obnovovací kmitočet 60Hz.
Horizontálna
frekvencia
31.5 KHz
31.5 KHz
37.5 KHz
37.9 KHz
46.9 KHz
48.4 KHz
56.5 KHz
60.0 KHz
56.5 KHz
60.0 KHz
Obnovovací
kmitočet
70 Hz
60 Hz
75 Hz
60 Hz
75 Hz
60 Hz
70 Hz
75 Hz
60 Hz
75 Hz
Č.
1
2
3
4
5
6
7
8
9
10
Rozlišovacia
schopnosť
720 x 400
640 x 480
640 x 480
800 x 600
800 x 600
1024 x 768
1024 x 768
1024 x 768
1280 x 1024
1280 x 1024
31.5 KHz
31.5 KHz
37.5 KHz
35.2 KHz
37.9 KHz
48.1 KHz
46.9 KHz
49.7 KHz
48.4 KHz
56.5 KHz
60.0 KHz
67.5 KHz
63.9 KHz *
80.0 KHz
70 Hz
60 Hz
75 Hz
56 Hz
60 Hz
72 Hz
75 Hz
75 Hz
60 Hz
70 Hz
75 Hz
75 Hz
60 Hz *
75 Hz
1
2
3
4
5
6
7
8
9
10
11
12
13
14
720 x 400
640 x 480
640 x 480
800 x 600
800 x 600
800 x 600
800 x 600
832 x 624
1024 x 768
1024 x 768
1024 x 768
1152 x 864
1280 x 1024 *
1280 x 1024
Page 57

Sk
57www.prestigio.biz
3-5. Užívateľské prostredie
Odporúčané ergonomické užívateľské prostredie
• Uhol pohľadu na monitor by mal byť medzi 0~20 stupňov.
Kensington Security /Kensingtonská bezpečnosť/
(Zaisťovacia) zdierka
• Tento displej obsahuje bezpečnostné zariadenie typu Kensington pre zabezpečenie
vášhomonitora. Kensingtonský zámok nie je súčasťou.
• Pre zakúpenie a inštalovanie kensingtonského zaisťovacieho zariadenia viď nasledovné
kontaktné informácie.
* Kensington Technology Group
· Address :
2000 Alameda de las Pulgas 2F san mateo,
California 94403-1289
· Tel : +1 650 572 2700
· Fax : +1 650 572 9675
· Web-site : www.kensington.com
Page 58

Sk
58 www.prestigio.biz
Ergotron, Inc.
- Address : Ergotron Europe
Kuiperbergweg 50 1101 AG
Amsterdam The Netherlands
- Tel : +3 1 20 696 60 65
· Fax : +3 1 20 609 04 59
· E-mail : info.eu@ergotron.com
VESA MOUNTING
• Tento displej obsahuje normu VESA FPMPMI pre namontovanie 100mmx100mm skrutiek,
pričom v podstavci jednotky sú zabezpečené 4 otvory na skrutky.
• Pre zakúpenie VESA Flat Panel Monitor Mounting Devices /montážne zariadenie na
plochý monitor/ viď nasledovné kontaktné informácie.
Pre správnu montáž by mali byť používané iba skrutky veľkosti M4 x12.
(Použitie skrutiek nesprávnej veľkosti môže spôsobiť poškodenie zariadenia)
Montáž na stole
Montáž na stene
Page 59

Sk
59www.prestigio.biz
4. Nastavenie obrazu
Obraz na obrazovke môžete nastaviť použitím tlačidiel, umiestnených pod obrazovkou.
4-1. Používanie On Screen displeja
1. Aby ste vyvolali na obrazovku OSD, stlačte tlačidlo MENU. ROzlišovacia schopnosť a
frekvencia sú pre vašu informáciu zobrazené vo vrchnej časti okna menu.
2. Pre zvolenie položky, ktorú chcete nastaviť stlačte tlačidlo alebo . Zvolená
položka sa vysvieti.
3. Pre nastavenie vysvietenej položky stlačte SELECT.
4. Pre nastavenie voľby používajte tlačidlá alebo .
5. Pokiaľ ste v podmenu a chcete sa vrátiť do predchádzajúceho menu, stlačte tlačidlo
MENU.
6. Displejová jednotka automaticky ukladá nové nastavenia do pamäti po 1 sekunde po
vašom poslednom nastavení a menu sa stratí. Ak chcete aby sa menu stratilo, môžete
taktiež stlačiť tlačidlo MENU.
4-2. Direct access buttons
AUTO ADJUST /AUTOMATICKÉ NASTAVENIE/
Najprv zobrazte plnú obrazovku, ako napríklad pozadie Windows. Stlačte tlačidlo SELECT
/AUTO/ pre automatické nastavenie obrazu.
HLASITOSŤ
Pre voľbu nastavenia hlasitosti používajte tlačidlo .
Nastavte tlačidlom alebo .
AUDIO
Pre voľbu zapnutia alebo vypnutia audia stlačte tlačidlo .
Page 60

Sk
69 www.prestigio.biz
4-3. Nastavenia OSD
Nastavenia OSD ktoré sú vám k dispozícii sú uvedené v nasledovnom zozname.
JAS
Nastavte jas na obrazovke.
KONTRAST
Nastavte kontrast obrazovky.Adjust the contrast of the screen.
KONTROLA FARBY
Teplota farby ovplyvňuje odtieň obrazu. Pri nižších teplotách farby je obraz červenkastý, a
pri vyšších teplotách modrastý.
K dispozícii sú tri farebné nastavenia. Režim 1(9300K), Režim 2(6500K) alebo UŽÍVATEĽ.
Pri nastavení UŽIVATEĽA môžete nastaviť individuálne hodnoty pre červenú, zelenú a
moodrú.
RÔZNE
VYVOLAŤ
Vyvolať uložené údaje o farbe.
OSD TIMER
Pomocou tohoto nastavenia môžete zadať zobrazený čas okna menu OSD.
POZÍCIA OSD
Nastaviť horizontálnu alebo vertikálnu pozíciu OSD menu na obrazovke.
AUDIO
HLASITOSŤ
Nastav úroveň hlasitosti audio.
SOUND OFF
Toto menu sa používa na voľbu vypnutia alebo zapnutia audio.
TREBLE
Audio so zdôraznenými vysokými frekvenciami.
BASE
Audio so zdôraznenými nízkymi frekvenciami.
AUTOMATICKÉ NASTAVENIE
Pri plnom vzore obrazovky môžete automaticky nastaviť tvar /formát/ obrazovky.
Page 61

Sk
61www.prestigio.biz
JAZYK
Môžete si zvoliť jazyk, v ktorom sú zobrazené nastavovacie menu. K dispozícii sú nasledovné
jayky : anglický, francúzsky, nemecký, španielsky, švédsky, fínsky, dánsky, portugalský, ho-
landský a japonský alebo čínsky.
POZÍCIA
H POZÍCIA
Nastavuje horizontálnu pozíciu celého obrazu na obrazovke.
V POZÍCIA
Nastavuje vertikálnu pozíciu celého obrazu na obrazovke.
FÁZA HODÍN
FÁZA
Nastaviť šum obrazu na obrazovke.
HODINY
Nastaviť horizontálnu veľkosť celého obrazu.
ZDROJ
Nefunkčnosť
Page 62

Sk
62 www.prestigio.biz
5. Display power management /riadenie napájania
displeja/
Znižovanie spotreby energie
Pokiaľ je aktivovaná funkcia riadenia napájania na vašom počítači, váš monitor sa bude
automaticky zapínať a vypínať. Vlastnosti riadenia napájania môžete riadiť z vášho
počítača.
Váš počítač môže mať vlastnosti riadenia napájania, ktoré umožňujú aby počítač, alebo
monitor prešli do úsporného režimu pokiaľ je systém nečinný. Systém môžete opätovne
aktivovať stlačením ktorejkoľvek klávesy, alebo pohnutím myši.
Tlačidlo napájania neodpojí monitor od zdroja.
Jediný spôsob ako úplne izolovať monitor od hlavného zdroja je odpojiť napájací kábel.
Spotreba
prúdu
40 W (Typ)
< 3,5 W (Typ)
0 W
Režim
Normál
Vypnutý
Odpojený
LED
Zelená
Oranžová
Nevysvietená
Page 63

Sk
63www.prestigio.biz
6. Odstraňovanie problémov
Pokiaľ váš monitor nefunguje riadne, je možné, že problém vyriešite niektorým z nasle-
dovných odporúčaní:
Prázdna /čistá/ obrazovka
Chybové hlásenie: Video
režim nie je podporovaný
Displej neprechádza do
režimu riadenia napájania
Chyby vo farbe
Veľkosť, poloha, tvar alebo
kvalita sú nedostatočné
Zdvojené obrazy
Obraz nie je stabilný
Pokiaľ LEDka napájania nie je rozsvietená, stlačte prepínač
napájania Soft, alebo skontrolujte kábel striedavého prúdu,
aby sa monitor zapol. Pokiaľ je monitor napájaný cez
počítač, skontrolujte, či je počítač zapnutý.
Displej môže byť v pohotovostnom režime. Stlačte jednu z
kláves na klávesnici. Skontrolujte, či je klávesnica správne
pripojená k počítaču.
Skontrolujte, či je konektor kábla riadne zapojený a či
spojovacie kolíky neboli ohnuté, alebo zničené. Pokiaľ je
konektor uvoľnený, dotiahnite skrutky konektora.
Skontrolujte, či je kábel napájania správne pripojený k
displeju a do zástrčky.
Skontrolujte rozlišovaciu schopnosť a frekvenciu na video
porte vášho počítača.
Porovnajte tieto údaje s údajmi v tabuľke nastavenia časov.
Video signál z počítača nie je v zhode s normou VESA DPMS.
Alebo počítač, alebo adaptér graky nepoužíva funkciu riad-
enia napájania VESA DPMS.
Skontrolujte, či je konektor signálového kábla riadne zapo-
jený a či kolíky konektora neboli ohnuté alebo zničené.
Nastavte charakteristiky obrazu tak, ako je popísané v v
časti Nastavenie OSD (4-3).
Problém s vašim adaptérom graky alebo s displejom.
Kontaktujte zástupcu servisu.
Skontrolujte, či rozlišovacia schopnosť monitora a frekvencia
z vášho PC alebo gracký adaptér sú v režime, vhodnom pre
váš monitor.
Vo vašom počítači môžete skntrolovať cez: Kontrolný panel,
displej, nastavenia /Control panel, Display, Settings.
Problém Možné riešenie
Page 64

Sk
64 www.prestigio.biz
Skontaktujte sa so servisným agentom
Pokiaľ horeuvedené rady na odstránenie problémov nepomáhajú, pre riešenie problému,
kontaktujte oprávneného zástupcu servisu. Pokiaľ bol monitor poslaný do opravy, pokiaľ je
to možné, použite originálne balenie.
Odpojte displej od zdroja a skontaktujte sa so servisným agentom keď:
• monitor nefunguje normálne v súlade s prevádzkovými návodmi.
• Monitor ukazuje zvláštnu zmenu pri zmene výkonu. Monitor vykazuje výraznú zmenu
vo výkonnosti.
• Monitor spadol aleb bola poškodená skriňa..
• Monitor bol vystavený dažďu, vode alebo bola na neho vyliata kvapalina.
Obraz nie je stabilný
Hlásenie: Žiadny signál
LEDka napájania je
oranžovej farby
Pokiaľ nastavenie nie je správne, použite obslužný program
počítača pre zmenu nastavenia displeja .
Skontrolujte, či je konektor signálového kábla riadne zapojený
a či spojovacie kolíky nie sú ohnuté a či neboli poškodené.
Pokiaľ je konektor uvoľnený, dotiahnite skrutky konektora.
Pre zadanie režimu šetrenia prúdu. Systém môžete opätovne
aktivovať stlačením ktorejkoľvek klávesy, alebo pohnutím
myši.
Pri zmene video režimu alebo vstupného signálu (D-sub/DVI)
môže byť LEDka oranžová.
Viď. údaje s tabuľkou nastavenia času.
Problém Možné riešenie
Page 65

Sk
65www.prestigio.biz
7. Špecikácie
• Parametre sa môžu meniť pre ich vylepšenie bez predchádzajúceho oznámenia.
LCD
Pixel pitch
Jas
Reakčný čas
Plocha displeja
Počet farieb
Vstupné signály
Rýchlosť frekvencie
Maximálna šírka pásu
Maximálna rozlišovacia
chopnosť
Odporúčaná rozlišovacia
schopnosť
Vstupné napätie
Spotreba energie
Riadenie napájania
Zapoj & Hraj
OSD menu
Audio system
VESA FPMPMI
Ergonómia,
Bezpečnosť a EMC
Prevádzková teplota
Hmotnosť
Rozmery (Š X V X H mm)
19””viewable, Diagonal, A-Si TFT
0.294 x 0.294mm
250cd/m2
25 ms (Typ.)
376.32 x 301.056 mm
16 M
R.G.B Analog, 15 pin D-sub
Horizontal : 31.0 to 80.0KHz, Vertical : 56 to 75Hz
135 MHz
1024 x 768@75Hz,
1024 x 768@60Hz
100-240 VAC, 1.0A
40W
VESA DPMS
VESA DDC 1/2B
JAS, KONTRAST, KONTROLA FARBY, POLOHA,
FÁZA HODÍN, ROZNE, AUTOMATICKÁ FARBA,
JAZYK, AUDIO, AUTOMATICKÉ NASTAVENIE
2ch x 2 watts
75 mm x 75 mm stúpanie skrutiek
TCO, FCC Class B, CE,
cULus, TÜV-GS, SEMKO
5 ~ 35 °C
6.2Kg bez balenia, 8.2Kg s balením
420 X 441 X 185 mm
Page 66

PL
66 www.prestigio.biz
U.S.A.
U.S.FEDERAL COMMUNICATIONS COMMISSION
RADIO FREQUENCY INTERFERENCE STATEMENT
INFORMATION TO THE USER
NOTE : This equipment has been tested and found to comply with the limitsfor a Class B
digital device pursuant to Part 15 of the FCC Rules.
These limits are designed to provide reasonable protection against harmful interference
in a residential installation.
This equipment generates, uses, and can radiate radio frequency energy and, if not
installed and used in accordance with the instructions, may cause harm ful interference to
radio communications.
However, there is no guarantee that interference will not occur in a particular installa-
tion.
If this equipment does cause harmful interference to radio or television re ception, which
can be determined by turning the equipment off and on, the user is encouraged to try to
correct the interference by one or more of the
following measures:
• Reorient or relocate the receiving antenna.
• Increase the separation between the equipment and receiver.
• Connect the equipment into an outlet of a circuit different from that to which the receiver
is connected.
• Consult the dealer or an experienced radio/TV technician for assistance. Changes or
modication not expressly approved by the party responsible for compliance could void the
user’s authority to operate the equipment.
Connecting of peripherals requires the use of grounded shielded signal cables.
Page 67

PL
67www.prestigio.biz
SPIS TREŚCI
1. WSTĘP.......................................................................................................... 68
2. INFORMACJA O WYMOGACH BEZPIECZEŃSTWA..................................68
3. INSTALACJA MONITORA............................................................................69
3-1. SPIS ELEMENTÓW PAKIETU .................................................................. 69
3-2. WYBÓR WŁAŚCIWEGO MIEJSCA..........................................................70
3-3. PODŁĄCZENIE MONITORA..................................................................... 71
3-4. USTAWIENIA I CZĘSTOTLIWOŚĆ ODŚWIEŻANIA.................................72
TABELE ZAINSTALOWANYCH USTAWIEŃ CZASOWYCH........................... 72
3-5. OTOCZENIE UŻYTKOWNIKA...................................................................73
4. REGULOWANIE OBRAZU........................................................................... 75
4-1. POSŁUGIWANIE SIĘ MENU EKRANOWYM (OSD) ................................ 75
4-2. KLAWISZE BEZPOŚREDNIEGO DOSTĘPU ........................................... 75
4-3. REGULOWANIE MENU EKRANOWEGO (OSD) ..................................... 76
5. ZARZĄDZANIE ZUŻYCIEM ENERGII PRZEZ MONITOR
REDUKCJA ZUŻYCIA ENERGII ......................................................................78
6. ROZWIĄZYWANIE PROBLEMÓW ..............................................................80
7. SPECYFIKACJA PRODUKTU .....................................................................81
Page 68

PL
68 www.prestigio.biz
1. Wstęp
Niniejszy podręcznik zawiera instrukcję obsługi i użytkowania Prestigio P190T monitora z
ekranem ciekłokrystalicznym
Prestigio P190T
monitor z ekranem ciekłokrystalicznym jest wysoce ergonomiczną jednostką
wyświetlającą barwny obraz
• Wysokiej jakości ekran z możliwością zmiany skali
• Wejście AC 100-240 V
• VESA DPMS (Display Power Management Signaling)
• Zgodność z systemem VESA DDC1/2B
• Zaawansowany system kontroli menu ekranowegho OSD
• Szybkie i dokładne samodostrajanie
• Najbardziej zaawansowane skalowanie obrazu
• Interface wspomagający VESA Flat Panel Monitor Physical Mounting
2. Informacja o wymogach bezpieczeństwa
Ten monitor został zaprojektowany i wyprodukowany dla zapewnienia ci bezpieczeństwa.
Możesz zapobiec poważnym porażeniom prądem i innym zagrożeniom, pamiętając zawsze
o następujących zaleceniach:
Nie umieszczaj mokrych przedmiotów na monitorze i sznurze zasilania
Nigdy nie zakrywaj otworów wentylacyjnych żadnymi materiałami ani
nie dotykaj ich metalowymi i łatwopalnymi przedmiotami.
Unikaj używania monitora w warunkach skrajnie wysokiej temperatury,
wysokiej wilgotności powietrza i w miejscach szczególnie silnie
zakurzonych.
• Temperatura: 5-35°C • Wilgotność powietrza: 30~80RH
Upewnij się, że monitor jest wyłączony, zanim włożysz wtyczkę
sznura zasilania do gniazdka elektrycznego. Upewnij się, że zarówno
przewód zasilania, jak i inne przewody są bezpiecznie i prawidłowo
połączone.
Przeciążone gniazda prądu zmiennego i przedłużacze są niebezpieczne,
tak samo, jak stare, zużyte przewody i uszkodzone wtyczki, które moga
spowodować porażenie prądem lub pożar. Skontaktuj się z technikiem
z twojego punktu serwisowego, żeby je wymienić.
Nie używaj ostrych narzędzi, takich jak szpilki i ołówki, w pobliżu
monitora, ponieważ mogą one zarysować powierzchnię ekranu
ciekłokrystalicznego.
NIe używaj rozpuszczalników, np. benzenu, do czyszczenia monitora
- doprowadzi to do zniszczenia powierzchni ciekłokrystalicznego
ekranu.
Page 69

PL
69www.prestigio.biz
Konserwacja
• Aby uniknąć porażenia prądem, nie rozkładaj na części skrzyni monitora. Jednostka
monitora nie jest przeznaczona do napraw przez użytkownika. Pamiętaj o odłączeniu
monitora od gniazda zasilania przez rozpoczęciem czyszczenia.
• Nie używaj alkoholu (metylowego, etylowego, izopropylowego) ani żadnych mocnych
rozpuszczalników. Nie używaj rozcieńczalników ani benzenu, materiałów ściernych ani
sprężonego powietrza.
• Nie przecieraj monitora tkaniną czy gąbką, które mogą zarysować powierzchnię.
• Do czyszczenia ekranu antystatycznego używaj wody i specjalnych chusteczek
mikrobrowych do czyszczenia ekranów i soczewek optycznych, lub też lekko zwilżonej
czystej tkaniny z delikatnym detergentem.
• Jeśli powyższe instrukcje nie pomogły usunąć zabrudzeń, skontaktuj się z
przedstawicielem autoryzowanego serwisu.
3. Instalacja monitora
3-1. Spis elementów pakietu
W pakiecie powinny się znajdować następujące elementy.
Powyższy sznur zasilania może być zastąpiony innym, w zależności od napięcia w danym
regionie. Skontaktuj się ze sprzedawcą, jeśli jakiegokolwiek elementu brakuje lub jest
uszkodzony.
Inne niż umieszczony w pakiecie sznury zasilania lub przewody dłuższe niż 3 m mogą
wpływać na kompatybilność elektromagnetyczną podczas pracy produktu.
Kabel sygnałowy
Główny korpus jednostki
Kabel audio
CD
Sznur zasilania
Page 70

PL
70 www.prestigio.biz
3-2. Wybór właściwego miejsca
• Ustaw monitor w odległości co najmniej 30 cm od innych elektrycznych lub emitujących
ciepło sprzętów, pozostawiając po 10 cm z każdej strony dla potrzeb wentylacji.
• Ustaw monitor w takim miejscu, żeby światło nie padało bezpośrednio ani nie odbijało
się na powierzchni ekranu.
• Aby zmniejszyć wytężanie wzroku, unikaj instalowania monitora na jasnym tle, takim
jak np. okno.
• Ustaw monitor tak, aby górna krawędź ekranu była powyżej linii oczu.
• Ustaw monitor prosto przed sobą, zachowując komfortową odległość dla czytania - od
45 do 90 cm.
Przed przystąpieniem do podłączania przewodów upewnij się, że wszystkie jednostki
zestawu są odłączone od prądu. Aby wykluczyć możliwość porażenia prądem, zawsze
podłączaj swój sprzęt do gniazd z prawidłowym uziemieniem.
Page 71

PL
71www.prestigio.biz
3-3. Podłączenie monitora
1. Włóż 15-stykowy łącznik kabla sygnałowego do 15-stykowego gniazda VGA w twoim
komputerze i przykręć go.
2. Podłącz sznur zasilania do kontaktu w monitorze.
3. Podłącz drugi koniec sznura zasilania do zasilacza twojego komputera lub do gniazda
elektrycznego z uziemieniem o napięciu 100-240 V.
4. Włącz monitor, używając włącznika zasilania, i sprawdź, czy świeci się dioda LED.
Jeśli nie, powtórz krok po kroku instalację wg punktór 1, 2, 3 i 4 lub zajrzyj do rozdziału
“”Rozwiązywanie problemów”” w tej instrukcji obsługi.
5. Włącz komputer. Obraz na monitorze pojawi się w ciągu 10 sekund. Dostrój monitor,
aby uzyskać optymalną jakość obrazu. Więcej informacji znajdziesz w rozdziale
“Regulowanie obrazu” tej instrukcji.
System audio
Niniejszy monitor posiada system audio oraz dwa mikro-głośniki. Każdy z głośników
wyposażóny jest we wtyczkę max. 2 Wrms. System ten współpracuje także z wejściem
słuchawkowym typu “”jack””.
Kiedy monitor jest włączony, audio ustawione jest zawsze w trybie wyłączonym. Aby
włączyć audio, użyj bezpośredniego klawisza dostępu AUDIO na przedniej części
obudowy monitora lub w menu ekranowym (OSD).
Głośnik
Page 72

PL
72 www.prestigio.biz
3-4. Ustawienia i częstotliwość odświeżania
Postępuj zgodnie z poniższą instrukcją, aby ustawić częstotliwość odświeżania w Windows
98/ME/XP/2000.
1. Otwórz okno konguracji (Start-Settings-Conguration window).
2. Kliknij dwa razy w ikonę ‘Display’.
3. Wejdź w zakładkę ‘Settings’.
4. Kliknij w klawisz ‘Advanced’.
5. Kliknij w ‘Adapter’ i wybierz z listy wartość 60 Hz.
6. Kliknij w ‘Apply’, aby zastosować wybraną wartość.
Tabele zainstalowanych ustawień czasowych
Jeśli sygnał z systemu operacyjnego nie jest równy zainstalowanym ustawieniom
czasowym, dostrój ustawienia, korzystając z instrukcji obsługi karty video, ponieważ obraz
może nie być wyświetlany.
The recommended setting is a resolution of 1024x768 and a refresh rate of 60Hz.
Częstotliwość
odchylenia
poziomego
31.5 KHz
31.5 KHz
37.5 KHz
37.9 KHz
46.9 KHz
48.4 KHz
56.5 KHz
60.0 KHz
63.9 KHz
80.0 KHz
Częstotliwość
odświeżania
70 Hz
60 Hz
75 Hz
60 Hz
75 Hz
60 Hz
70 Hz
75 Hz
60 Hz
75 Hz
Nr
1
2
3
4
5
6
7
8
9
10
Rozdzielczość
720 x 400
640 x 480
640 x 480
800 x 600
800 x 600
1024 x 768
1024 x 768
1024 x 768
1280 x 1024
1280 x 1024
31.5 KHz
31.5 KHz
37.5 KHz
35.2 KHz
37.9 KHz
48.1 KHz
46.9 KHz
49.7 KHz
48.4 KHz
56.5 KHz
60.0 KHz
67.5 KHz
63.9 KHz *
80.0 KHz
70 Hz
60 Hz
75 Hz
56 Hz
60 Hz
72 Hz
75 Hz
75 Hz
60 Hz
70 Hz
75 Hz
75 Hz
60 Hz *
75 Hz
1
2
3
4
5
6
7
8
9
10
11
12
13
14
720 x 400
640 x 480
640 x 480
800 x 600
800 x 600
800 x 600
800 x 600
832 x 624
1024 x 768
1024 x 768
1024 x 768
1152 x 864
1280 x 1024 *
1280 x 1024
Page 73

PL
73www.prestigio.biz
3-5. Otoczenie użytkownika
Zalecana ergonomia otoczenia użytkownika
• Kąt patrzenia na monitor powinien zawierać się pomiędzy 0 a 20 stopni.
Kensington Security (Blokada) Otwór
• Niniejsza jednostka współdziała z urządzeniem zabezpieczającym typu Kensington dla
ochrony twojego monitora. Blokada Kensington nie jest dołączona.
• Aby nabyć i zainstalować mechanizm blokujący Kensington, skorzystaj z informacji
kontaktowej podanej niżej.
* Kensington Technology Group
· Address :
2000 Alameda de las Pulgas 2F san mateo,
California 944031289
· Tel : +1 650 572 2700
· Fax : +1 650 572 9675
· Website : www.kensington.com
Page 74

PL
74 www.prestigio.biz
Ergotron, Inc.
Address : Ergotron Europe
Kuiperbergweg 50 1101 AG
Amsterdam The Netherlands
Tel : +3 1 20 696 60 65
· Fax : +3 1 20 609 04 59
· Email : info.eu@ergotron.com
VESA MOUNTING
• Jednostka ekranowa współpracuje ze standardem VEGA FPMPMI dla montażu
śrubowego 100 mm x 100 mm, wyposażona jest w 4 otwory wewnątrz podstawy stojącej
jednostki.
• Aby nabyć narzędzia VESA Flat Panel Monitor Mounting, zwróć się do dystrybutora,
korzystając z następującej informacji.
Do prawidłowego montażu można używać wyłącznie śrub o rozmiarach M4 x 12
(użycie śrub nieprawidłowego rozmiaru może spowodować uszkodzenie urządzenia).
Montaż na stole
Montaż na ścianie.
Page 75

PL
75www.prestigio.biz
4. Regulowanie obrazu
Możesz regulować obraz na ekranie, używając przycisków umieszczonych poniżej ekranu.
4-1. Posługiwanie się menu ekranowym (OSD)
1. Naciśnij przycisk MENU, aby wywołać menu ekranowe OSD. Rozdzielczość i
częstotliwość wyświetlone są u góry okna menu do Twojej informacji.
2. Naciśnij klawisz lub , żeby wybrać kategorię, którą chcesz dostroić. Wybrana
kategoria zostanie podświetlona.
3. Naciśnij klawisz SELECT, żeby regulować podświetloną kategorię.
4. Używając przycisków i , reguluj wartości wybranej kategorii.
5. Aby powrócić do poprzedniego menu, naciśnij klawisz MENU.
6. Ekran automatycznie zachowuje nowe ustawienia w ciągu 1 sekundy po twoim
ostatnim dostrajaniu, a okno menu znika. Możesz też ponownie nacisnąć klawisz MENU,
żeby znikło ono z ekranu.
4-2. Klawisze bezpośredniego dostępu
SAMODOSTRAJANIE
Na początku wyświetl pełen ekran taki, jak np. tło Windows. Naciśnij klawisz SELECT
(AUTO), żeby automatycznie wyregulować kształt ekranu.
GŁOS
Używając klawisza , dostrój barwę głosu.
Reguluj ją z pomocą przycisków i .
AUDIO
Naciśnij klawisz , aby włączyć lub wyłączyć dźwięk
Page 76

PL
76 www.prestigio.biz
4-3. Regulowanie menu ekranowego (OSD)
Dostępne dla ciebie kategorie regulowania OSD wymienione są poniżej.
JASNOŚĆ
Reguluje jasność ekranu.
KONTRAST
Reguluje kontrast ekranu.
KONTROLA KOLORU
Tzw. temperatura koloru wpływa na odcień obrazu. Przy niższej temperaturze barw odcień
oscyluje ku czerwieni, a przy wyższej temperaturze - ku błękitowi.
Dostępne są trzy ustawienia koloru: tryb 1 (9300 K), tryb 2 (6500 K) oraz tryb użytkownika
(USER). Korzystając z trybu użytkownika, możesz ustawić własne wartości dla czerwieni,
zieleni i błękitu.
RÓŻNE (MISCELLANEOUS)
KASOWANIE (RECALL)
Kasuje zachowane dane dot. koloru.
OSD TIMER
Możesz ustawić czas pokazywania menu ekranowego OSD
POŁOŻENIE OSD (OSD POSITION)
Reguluje pionowe i poziome położenie menu OSD.
AUDIO
GŁOS
Reguluje poziom barwy głosu.
AUDIO
To menu służy do włączania i wyłączania dźwięku.
SAMODOSTRAJANIE (AUTO ADJUST)
Możesz automatycznie dostroić kształt ekranu, posługując się wzorem na cały ekran.
Page 77

PL
77www.prestigio.biz
JĘZYK (LANGUAGE)
Możesz wybrać język, w którym ukazywać się będą menu, służące do regulowania obrazu.
Dostępne są następujące języki: angielski, francuski, niemiecki, włoski, hiszpański,
szwedzki, ński, duński, portugalski, holenderski oraz japoński lub chiński.
H/V POŁOŻENIE
POŁOŻENIE H (H POSITION)
Reguluje horyzontalne położenie obrazu na ekranie.
POŁOŻENIE V (V POSITION)
Reguluje wertykalne położenie obrazu na ekranie.
FAZA SYNCHRONIZAJI
FAZA (PHASE)
Reguluje szumy i zakłócenia obrazu na ekranie.
SYNCHRONIZACJA
Reguluje poziomy rozmiar obrazu na ekranie.
ŹRÓDŁO
Brak (dostepne tylko w opcji)
Page 78

PL
78 www.prestigio.biz
5. Zarządzanie zużyciem energii przez monitor
Redukcja zużycia energii
Jeśli zarządzanie zasilaniem twojego komputera jest włączone, twój monitor włącza się
i wyłącza automatycznie. Możesz kontrolować cechy zarządzania zasilaniem za pomocą
komputera.
Twój komputer może posiadać możliwość zarządzania energią w taki sposób, aby komputer
i monitor wchodziły w tryb oszczędzania energii, kiedy system jest bezczynny. Możesz
ponownie aktywować system, naciskając dowolny klawisz lub poruszając myszą.
Włącznik zasilania nie odłącza monitora od sieci zasilania elektrycznego. Jedynym
sposobem całkowitego odłączenia monitora od sieci jest wyjęcie wtyczki głównego kabla
z gniazda.
Zużycie energii
40 W (Typ)
< 3,5 W (Typ)
0 W
Tryb
Zwykły
Wyłączony
Nie podłączony
LED
Zielony
Pomarańczowy
Nie oświetlony
Page 79

PL
79www.prestigio.biz
6. Rozwiązywanie problemów
Jeśli twój monitor nie działa prawidłowo, być może umiesz rozwiązać problem samodzielnie,
posługując się poniższymi wskazówkami:
Pusty ekran
Komunikat o błędzie: tryb
video bez wspomagania
Monitor nie wchodzi w tryb
zarządzania energią
Defekty koloru
Rozmiar, położenie,
kształt lub jakość są
niezadowalające
Podwójny obraz
Obraz jest niestabilny
Jeśli dioda LED nie świeci się, naciśnij włącznik ‘Soft power’
lub sprawdź przewód prądu zmiennego, aby uruchomić
monitor. Jeśli monitor jest zasilany przez komputer, upewnij
się, że komputer jest włączony.
Monitor może pracować w trybie spoczynku. Naciśnij
dowolny klawisz na klawiaturze. Sprawdź, czy klawiatura
jest prawidłowo podłączona do komputera.
Upewnij się, czy wtyczka kabla sygnałowego jest prawidłowo
podłączony, a styki kontaktowe nie są pogięte lub
uszkodzone. Jeśli wtyczka jest luźno umocowana, dokręć
śruby kontaktu.
Sprawdź, czy sznur zasilania jest prawidłowo podłączony
do monitora i gniazda zasilania.
Sprawdź rozdzielczość i częstotliwośc elementów video
twojego komputera. Porównaj te dane z Tabelą Ustawień
Synchronizacji.
Sygnał video z komputera nie spełnia standardu VESA
DPMS. Albo komputer, albo adapter urządzeń gracznych
nie posiadają funkcji zarządzania energią VESA DPMS.
Sprawdź, czy wtyczka kabla sygnałowego jest prawidłowo
podłączona i czy styki kontaktowe nie są pogięte lub uszkod-
zone. Spóbuj ustawić inną temperaturę barw.
Dostrój cechy charakterystyczne obrazu wg wskazówek z
rozdziału “”Regulowanie OSD”” (4-3).
Problem z adapterem urządzeń gracznych lub monitorem.
Skontaktuj się z przedstawicielem twojego serwisu.
Upewnij się, że rozdzielczość i częstotliwość, ustawiona w
twoim komputerze i adapterze urządzeń gracznych, jest
dopuszczalna dla twojego monitora. W twoim PC możesz to
sprawdzić w menu ‘Control panel’ > ‘Display’ > ‘Settings’.
Problem Ewentualne rozwiązanie
Page 80

PL
80 www.prestigio.biz
Skontakruj się z autoryzowanym serwisem
Jeśli powyższe wskazówki nie pomogły ci rozwiązać problem, skontakruj się z
autoryzowanym serwisem. Jeśli zajdzie potrzeba odesłania monitora do punktu
serwisowego, w miarę możłiwości użyj oryginalnego opakowania.
Odłącz monitor od gniazda zasilania i skontaktuj się z serwisem, gdy:
• Monitor nie działa normalnie, zgodnie z instrukcją użytkowania.
• Monitor prezentuje rażące zmiany w funkcjonowaniu.
• Monitor został upuszczony lub obudowa została uszkodzona.
• Monitor był wystawiony na deszcz lub woda albo inna ciecz zostały rozlane na
monitor.
Obraz jest niestabilny
Komunikat: brak
sygnału
Dioda LED
świeci w kolorze
pomarańczowym
Jeśli ustawienia sa niepoprawne, skorzystaj z programu
użytkowania twojego komputera, aby zmienić ustawienia.
Sprawdź, czy wtyczka kabla sygnałowego jest prawidłowo
podłączona i czy styki kontaktowe nie są pogięte lub
uszkodzone.
Jeśli wtyczka jest obluzowana, dokręć śruby kontaktu. Sprawdź,
czy komputer jest włączony.
Wejść w tryb oszczędzania energii (tryb spoczynku). Możesz
ponownie uruchomić system, naciskając dowolny klawisz na
klawiaturze lub poruszając myszą.
Wkaźnik LED może być koloru pomarańczowego przy zmianie
trybu video lub wejścia sygnału (D-sub/DVI).
Sprawdź rozdzielczość i częstotliwośc elementów video
twojego komputera. Porównaj te dane z Tabelą Ustawień
Synchronizacji.
Problem Ewentualne rozwiązanie
Page 81

PL
81www.prestigio.biz
7. Specykacja produktu
• Specication is subject to change without notice for performance improvement.
LCD
Stopień pixelizacji
Jasność
Czas reakcji
Obszar wyświetlany
Kolory
Sygnał wejściowy
Częstototliwość
Maksymalna przepustowość
łącza
Maksymalna rozdzielczość
Zalecana rozdzielczość
Napięcie wejściowe
Zużycie energii
Zarządzaie energią
Plug & Play (włącz i działaj)
Menu ekranowe (OSD)
System audio
VESA FPMPMI
Ergonomia,
Bezpieczeństwo i
kompatybilność elektromag-
netyczna
Temperatura działania
Waga
Wymiary (szer. x wys. x głęb.
mm)
17 ‘’ vieable, Przekątna, A-Si TFT
0.294 x 0.294mm
250 cd/m2
25 ms (śred.)
376.32 x 301.056 mm
16 M
RGB analogowy, 15-stykowy D-sub
Poziom: 31, 0 do 80, 0 Hz, Pion: 56 do 75 Hz
136 MHz
1024 x 768@75Hz,
1024 x 768@60Hz
100-240 VAC, 1.0A
40W
VESA DPMS
VESA DDC 1/2B
BRIGHTNESS, CONTRAST, COLOR CONTROL,
MISCELLANEOUS, AUDIO, AUTO ADJUST, LAN-
GUAGE,
H/V. POSITION, CLOCK-PHASE, SOURCE
2 ch x 2 WATT / wejście słuchawek typu ‘jack’
śruby 75 mm x 75 mm
TCO, FCC Class B, CE,
cULus, TÜV-GS, SEMKO
5 ~ 35 °C
6.2 kg bez opakowania, 8.2 kg zapakowany
420 X 441 X 185 mm
Page 82

BG
82 www.prestigio.biz
САЩ
ФЕДЕРАЛНА КОМИСИЯ ПО КОМУНИКАЦИИ НА САЩ - ДЕКЛАРАЦИЯ ЗА
СМУЩЕНИЯ НА РАДИО ЧЕСТОТИ
ИНФОРМАЦИЯ ЗА ПОТРЕБИТЕЛЯ
ЗАБЕЛЕЖКА; Това устройство е тествано и се намира в ограниченията Клас В
цифрови устройства, съгласно Част 15 на Правилника на FCC
Тези ограничения са предвидени за да осигурят разумна защита срещу вредни
излъчвания в жилищни райони.
Това оборудване генерира, използва и може да излъчва радиочестотна енергия
и, ако не е инсталирано и използвано според инструкциите, може да причини вредни
смущения в радио комуникациите.
Независимо от това, не съществуват гаранции, че смущенията няма да възникнат
при конкретна инсталация.
Ако оборудването причини вредни смущения в приемането на радио и телевизионни
програми, което може да се наблюдава при включване и изключването му, потребителят
може да вземе следните мерки за да отстрани тези смущения:
Да премести или пренасочи приемащата антена.
Да увеличи разстоянието между оборудването и приемника.
Да свърже оборудването в контакта на верига на захранване различна от тази,
където е включен съответния приемник.
Да се консултира с дилър или опитен радио/ТВ техник за помощ.
Промени или модификации, които не са явно одобрени от страната отговорна за
съвместимостта, правят нищожно правото на потребителя да работи с оборудването.
Свързването на периферни устройства изисква да се използват заземени
екранирани сигнални кабели.
Page 83

BG
83www.prestigio.biz
СЪДЪРЖАНИЕ
1. УВОД ...........................................................................................................84
2. ИНФОРМАЦИЯ ЗА БЕЗОПАСНА РАБОТА ............................................. 84
3. ИНСТАЛИРАНЕ НА МОНИТОРА ............................................................... 85
3-1. СЪДЪРЖАНИЕ НА ОПАКОВКАТА ....................................................... 85
3-2. ИЗБОР НА ПОДХОДЯЩО РАЗПОЛОЖЕНИЕ ...................................... 86
3-3. СВЪРЗВАНЕ НА МОНИТОРА ................................................................ 87
3-4. УСТАНОВЯВАНЕ НА ЧЕСТОТА НА ОПРЕСНЯВАНЕ ......................... 88
ПРЕДВАРИТЕЛНО УСТАНОВЕНА ВРЕМЕВА ТАБЛИЦА .......................... 88
3-5. ПОТРЕБИТЕЛСКА СРЕДА ..................................................................... 89
4. НАСТРОЙКА НА ИЗОБРАЖЕНИЕТО ....................................................... 91
4-1. ИЗПОЛЗУВАНЕ НА ЕКРАННОТО МЕНЮ ............................................. 91
4-2. БУТОНИ ЗА ДИРЕКТЕН ДОСТЪП ........................................................ 91
4-3. НАСТРОЙКИ НА ЕКРАННОТО МЕНЮ .................................................. 92
5. УПРАВЛЕНИЕ НА ЗАХРАНВАНЕТО
НАМАЛЯВАНЕ НА КОНСУМИРАНАТА ЕНЕРГИЯ ...................................... 94
6. ОТСТРАНЯВАНЕ НА ПОВРЕДИ ............................................................... 95
7. СПЕЦИФИКАЦИИ ......................................................................................97
Page 84

BG
84 www.prestigio.biz
1. Увод
Това ръководство съдържа инструкции за инсталиране и работа с Prestigio P190T
Монитор.
Prestigio P190T Монитор е високо ергономичен цветен дисплей
• Висококачествено премащабиране на екрана
• 100-240 V променливо напрежение
• VESA DPMS (Сигнализация за управление на захранването на дисплея)
• VESA DDC 1/2В съвместимост
• Усъвършенствано цифрово управление с екранно меню
• Бързи и точни авто-настройки
• Усъвършенствано мащабиране на изображението
• Поддържа VESA Интерфейс за физически монтаж на плоски екрани
2. Информация са безопасна работа
Този монитор е проектиран и произведен, зада гарантира Вашата безопасна работа.
Вие можете да предотвратите сериозен електрически удар или други опастности
като внимавате за следното:
Не поставяйте нищо мокро върху монитора или захранващия
кабел.Никога не покривайте вентилационните отвори и не ги
докосвайте с метални или възпламеними материали.
Избягвайте работа с монитора в екстремна горещина, влажност
или запрашение помещения.
• Температура : 5~35°C • Влажност : 30~80RH
Монито рът тряб ва да бъде изк лючен преди да включите
захранващия кабел в контакта. Убедете се, че захранващият
кабел, както и всички други кабели, са правилно свързани.
Претоварените АС изводи и удължителни кабели са опасни,
както и нарушени захранващи кабели или счупени контакти,
които могат да причинят електрически шок или пожар.Повикайте
Вашия сервизен техник, за да ги замени.
Не използувайте остри предмети като игли или моливи в близост
до монитора, тъй като те могат да издраскат повърхността на
екрана.
Не използувайте разтворители като бензин за почистване на
монитора, тъй като той ще повреди повърхността на дисплея.
Page 85

BG
85www.prestigio.biz
Почистване и поддръжка
• За да избегнете опастността от електрически шок, не разглобявайте корпуса на
дисплея. Устройството не се сервизира от потребителя. Не забравяйте да изключите
захранващия кабел от контакта преди почистване на монитора.
• Не използувайте алкохол ( метилов, етилов или изопропилен) или някакъв друг
силен разтворител. Не използувайте разредител или бензин, абразивни почистващи
препарати или сгъстен въздух.
• Не бършете екрана с плат или гъба, които биха надраскали повърхността.
• За да почистите Вашия антистатичен екран, използувайте вода и специална
изчистваща кърпичка, която се използува за оптични уреди, или леко навлажнете
мек чист плат с вода или неагресивен перилен препарат.
• Ако горните инструкции не Ви помогнат да отстраните петна, обадете се на
упълномощен сервизен агент.
3. Инсталиране на монитора
3-1. Съдържание на опаковката
В пакета трябва да намерите следното:
Кабелът за захранване може да бъде различен за различни области.Моля обадете
се на Вашия дилър, ако нещо липсва или е повредено.
Други захранващи кабели, освен този, опакован с продукта, или по-дълъг от 3
метра, могат да повлияят на електромагнитните излъчвания на продукта в работно
състояние.
Кабел за видеосигнал
Монитор
Аудиокабел CD
Захранващ кабел
Page 86

BG
86 www.prestigio.biz
3-2. Избор на подходящо разположение
• Поставете монитора на разстояние най-малко 30 см. от други електрически или
топлоизлъчващи устройства, като оставите поне 10 см. отстрани за вентилация.
• Поставете монитора в такова положение, че върху него да няма пряка или отразена
светлина.
• За да намалите напрежението за очите, избягвайте да инсталирате монитора срещу
ярък фон като прозорец.
• Разположете монитора така, че горната част на екрана да не е по високо от нивото
на очите.
• Разположете монитора директно пред Вас на удобно разстояние за четене - около
45-90 см.
Преди да започнете да свързвате Вашия монитор убедете се, че захранването е
изключено във всички уреди. За да избегнете възможността от електрически шок,
винаги свързвайте вашето оборудване към подходящо занулени изводи.
Page 87

BG
87www.prestigio.biz
3-3. Свързване на монитора
1. Поставете 15-пиновият сигнален кабел в 15-пиновия VGA порт на компютъра, и
го закрепете с винтовете.
2. Включете захранващия кабел в извода на монитора.
3. Включете другия край на захранващия кабел към извода в захранването на
компютъра или в 100-240 V занулен контакт.
4. Включете монитора като използувате бутона за захранване ипроверете дали светва
светодиода. Ако не - повторете стъпки 1,2,3 и 4 или вижте раздел "Отстраняване на
повреди" в това ръководство.
5. Включете захранването на компютъра. Картината ще се появи след около 10
секунди. Настройте картината, зада получите оптимално качество. Вижте раздел
"Настройка на изображението" в това ръководство за повече информация.
Аудио система
Този монитор има аудио система, включваща два микроговорителя. Всеки от тях има
2 Wrms изходна мощност. Системата също поддържа извод за слушалки.
Когато мониторът е включен, звукът винаги се установява в режим "изключено".
Моля използувайте бутона "AUDIO" на предния панел или екранното меню, за да
включите звука.
Говорител
Page 88

BG
88 www.prestigio.biz
3-4. Установяване честотата на опресняване
Следвайте долните инструкции, за да установите Вашата честота на опресняване в
Windows 98/ME/XP/2000.
1. Влезте в конфигурационния прозорец ( (Start-Settings-Configuration).
2. Два пъти кликнете върху иконата ‘Display’.
3. Кликнете ‘Settings’.
4. Кликнете бутона ‘Advanced’.
5. Клинкете върху ‘Adapter’ и изберете 60Hz от списъка.
6. Кликнете ’Apply’ за да потвърдите избраната стойност.
Предварително установена времева таблица
Ако сигналът от системата не е равен на предварително установения времеви режим,
настройте режима според ръководството на видеоплатката, тъй като екранът може
да не се покаже.
Препоръчваната настойка е резолюция 1024х768 и честота на опресняване 60Hz.
Хоризонтална
честота
31.5 KHz
31.5 KHz
37.5 KHz
37.9 KHz
46.9 KHz
48.4 KHz
56.5 KHz
60.0 KHz
63.9 KHz
80.0 KHz
Честота на
опресняване
70 Hz
60 Hz
75 Hz
60 Hz
75 Hz
60 Hz
70 Hz
75 Hz
60 Hz
75 Hz
No.
1
2
3
4
5
6
7
8
9
10
Резолюция
720 x 400
640 x 480
640 x 480
800 x 600
800 x 600
1024 x 768
1024 x 768
1024 x 768
1280 x 1024
1280 x 1024
31.5 KHz
31.5 KHz
37.5 KHz
35.2 KHz
37.9 KHz
48.1 KHz
46.9 KHz
49.7 KHz
48.4 KHz
56.5 KHz
60.0 KHz
67.5 KHz
63.9 KHz *
80.0 KHz
70 Hz
60 Hz
75 Hz
56 Hz
60 Hz
72 Hz
75 Hz
75 Hz
60 Hz
70 Hz
75 Hz
75 Hz
60 Hz *
75 Hz
1
2
3
4
5
6
7
8
9
10
11
12
13
14
720 x 400
640 x 480
640 x 480
800 x 600
800 x 600
800 x 600
800 x 600
832 x 624
1024 x 768
1024 x 768
1024 x 768
1152 x 864
1280 x 1024 *
1280 x 1024
Page 89

BG
89www.prestigio.biz
3-5. Потребителска среда
Препоръчваа ергономична потребителска среда
• Зрителният ъгъл към монитора трябва да бъде между 0 - 20 градуса.
Кенсингтън слот за защита (заключване)
• Този монитор поддържа Kensington-тип защитно устойство за сигурността на
Вашия монитор. Кенсингтън ключалката не е включена.
• За закупуване и инсталиране на Кенсингтън заключващо устройство, моля вижте
следната информация за контакти.
* Kensington Technology Group
· Адрес:
2000 Alameda de las Pulgas 2F san mateo, California 94403-
1289
· Tel : +1 650 572 2700
· Fax : +1 650 572 9675
· Web-site : www.kensington.com
Page 90

BG9
90 www.prestigio.biz
Ergotron, Inc.
· Адрес : Ergotron Europe
Kuiperbergweg 50 1101 AG
Amsterdam The Netherlands
- Tel : +3 1 20 696 60 65
· Fax : +3 1 20 609 04 59
· E-mail : info.eu@ergotron.com
VESA МОНТАЖ
• Този дисплей поддържа стандарта VESA FPMPMI за 100x100мм монтаж с винтове,
предлагайки 4 отвора за винтове на основата на стойката на монитора.
• За да закупите VESA монтажни устройства за плоски панели, моля вижте следната
информация.
Само винтове с размер М4х12 могат да се използват за правилен монтаж.
(използването на винтове с неправилния размер може да повреди устройството)
Монтаж на бюро
Монтаж на стена
Page 91

BG
91www.prestigio.biz
4. Настройка на изображението
Можете да настроите дисплея посредством бутоните под екрана.
4-1. Използуване на екранното меню
1. Натиснете бутона MENU за да извикате екранното меню. Резолюцията и честотата
се показват в горния край на прозореца с менюто за Ваша информация.
2. Натиснете бутона OR , за да изберете това, което искате да настроите.
Избраният параметър се осветява.
3. Натиснете бутона SELECT, за да настроите осветения параметър.
4. Използувайте бутона OR , за да установите настройката.
5. Натиснете бутона MENU, за да се върнете към предишно меню, ако сте в
подменю.
6. Дисплеят автоматично запомня новите настройки една секунда след Вашите
последни промени, а менюто изчезва. Можете да натиснете бутона MENU, за да
изчезне.
4-2. Бутони за директен достъп
AUTO ADJUST
Първоначално показване на пълен екран като фона на Windows . Натиснете бутона
SELECT ( AUTO) за да настроите автоматично формата на екрана.
VOLUME
Използувайте бутона , за да настроите силата на звука.
Настройте с бутона or .
AUDIO
Натиснете бутона , за да изберете включен или изключен звук.
Page 92

BG
92 www.prestigio.biz
4-3. Настройки на екранното меню
Настройките на екранното меню, които можете да правите, са изредени по-долу.
BRIGHTNESS
Настройка на яркостта на екрана.
CONTRAST
Настройка на контраста на екрана.
COLOR CONTROL
Цветовата температура влияе на оттенъка на изображението. С по-ниски цветови
температури изображението става червеникаво, а с по-високи - синкаво.
Има три възможни цветови настройки: Mode 1(9300K), Mode 2(6500K) или USER.
С настройката USER можете да поставите отделни стойности за червено, зелено
и синьо.
MISCELLANEOUS
RECALL
Възстановява запомнените данни за цвета.
OSD TIMER
Можете да настроите времето за показване на екранното меню с този параметър.
OSD POSITION
Настройка на хоризонталното или вертикално разположение на екранното меню
върху дисплея.
AUDIO
VOLUME
Настройка на нивото на звука.
SOUND OFF
Това меню се използува за включване или изключване на звука.
TREBLE
Подчертава високите в звуковата картина
BASE
Подчертава ниските в звуковата картина
AUTO ADJUCT
You can adjust the shape of screen automatically at the full screen pattern.
Можете да настроите формата на екрана автоматично по образеца на пълен
екран.
Page 93

BG
93www.prestigio.biz
LANGUAGE
Можете да изберете езика на който се показват менютата за настройка. Достъпни
са следните езици: английски, френски, немски, италиански, испански, шведски,
фински, датски, португалски, холандски и японски или китайски.
H/V POSITION
H-POSITION
Настройва хоризонталното положение на цялото екранно изображение.
V-POSITION
Настройва вертикалното положение на цялото екранно изображение.
CLOCK PHASE
PHASE
Настройва нивото на смущения в екранното изображение.
CLOCK
Настройва хоризонталния размер на цялото екранно изображение
SOURCE
Не функционира. (поддържа се само опционално).
Page 94

BG
94 www.prestigio.biz
5. Управление на захранването на монитора
Намаляване на консумацията на енергия
Ако функцията за управление на захранването на Вашия компютър е включена,
Вашият монитор автоматично се включва или изключва. Можете да контролирате
захранването на монитора от Вашия компютър.
Вашият компютър може да има функции за управление на захранването, които дават
възможност на компютъра или монитора да влязат в режим на пестене на енергия,
когато системата бездейства. Можете да реактивирате системата с натискане на
някой клавиш или преместване на мишката.
Бутонът за захранване не изключва монитора от захранващата мрежа.
Единственият начин напълно да изолирате монитора от захранващата мрежа е да
откачите захранващия кабел.
Консумация на
енергия
40 W (Typ)
< 3,5 W (Typ)
0 W
Режим
Нормален
Изключен
Изключен от
мрежата
Светодиод
Зелен
Оранжев
Неосветен
Page 95

BG
95www.prestigio.biz
6. Отстраняване на повреди
Ако Ващият монитор не функционира нормално, Вие можете да решите проблема
следвайки предложенията по-долу:
Празен екран
Съобщение за грешка:
: Video mode not sup-
ported
Мониторът не влиза в
режим. Управление на
захранването.
Цветови дефекти
Р а з м е р ъ т , р а з п о -
ло жението, формат а
ил и качес твото са
незадоволителни.
Д у б л и р а н и
изображения
Из ображението не е
стабилно
Ако светодиодът на захранването не свети, натиснете
Soft ключа, или проверете кабела за захранването, за
да включите монитора. Ако дисплеят се захранва от
компютъра, проверете дали компютъра е включен.
Мониторът може да е в режим стендбай. Натиснете някой
клавиш на клавиатурата. Проверете дали клавиатурата
е правилно включена към компютъра.
Проверете дали кабелът за видеосигнала е правилно
включен, дали свързващите пинове не са изкривени
или повредени. Ако конекторът е разхлабен, закрепете
го с винтовете.
Проверете дали кабелът за захранване е правилно
включен към дисплея и към контакта за захранване.
Проверете резолюцията и честотата на видео-порта на
Вашия компютър.
Сравнете тези стойности с данните за предварително
узтановената Времева Таблица.
Видеосигналът от компютъра не е съвместим със
стандарта VESA DPMS. Или компютърът, или графичната
карта не поддържат VESA DPMS функцията за управление
на захранването.
Пр оверете дали коне ктора на си гнални я кабел е
правилно свързан и дали конекторните пинове не са
изкривени или повредени. Опитайте друга цветова
температура.
Настройте параметрите на изображението, както е
описано в раздела "Настройка на екранното меню" (
4-3).
Има проблем с графичната карта или монитора. Обадете
се на оторизиран сервизен техник.
Проверете дали резолюцията и честотата за дисплея от
Вашето PC или графичен адаптер са в достъпен режим
за Вашия монитор.Във Вашето PC можете да проверите
чрезControl panel, Display, Settings.
Проблем Възможно решение
Page 96

BG
96 www.prestigio.biz
Извикване на сервизно обслужване
Ако горните съвети за отстраняване на повреди не Ви помогнат да намерите решение
на проблема, обадете се на оторизиран сервизен агент. Ако мониторът трябва да се
изпрати на сервиз, използувайте по възможност оригиналната опаковка.
Разкачете монитора от контакта за захранване и се обадете на сервизен агент,
когато:
• Мониторът не работи нормално, според инструкциите за работа.
• Мониторът покаже доловима промяна в производителността.
• Мониторът е бил изпуснат или неговият корпус е повреден.
• Мониторът е бил изложен на дъжд, или вода или течност са разляни върху
него.
Изображението не е
стабилно
Съобщение: No signal
Св етодиодът на
захранването свети в
оранжево
Ако настройката не е правилна използувайте компютърната
програма, за да промените настройките на дисплея.
Проверете дали конектора на сигналния кабел е правилно
свързан и дали неговите пинове не са изкривени или
повредени.
Ако конекторът е разхлабен, затегнете конекторните
винтове. Проверете дали компютърът е включен.
За влизане в режим пестене на енергия. Можете да
реактивирате системата с натискане на клавиш или
преместване на мишката.
Светодиодът може да бъде в оранжево при промяна на
видеорежима или входния сигнал (D-sub/DVI).
Пр оверете резолюци ята и честотата на ви део
подсист емата на Вашия компютър. Срав нете те зи
стойности с данните в предварително установената
времева таблица.
Проблем Възможно решение
Page 97

BG
97www.prestigio.biz
7. Спецификации
• Спецификацията подлежи на промяна без уведомление за подобрение в
производителността.
LCD
Размер на точката
Яркост
Време на реакция
Екранна площ (диагонал)
Брой цветове
Входни сигнали
Честота на опресняване
Максимална честотна лента
Максимална резолюция
Препоръчвана резолюция
Входно напрежение
Консумирана мощност
Управление на
захранването
Plug & Play
Екранно меню
Вграден високоговорител
VESA FPMPMI
Ергономика
Безопасност и
електромагнитни емисии
Работна температура
Тегло
Размери (Ширина х
Височина х Дълбочина)
19” видими, диагонал, A-Si TFT
0.294 x 0.294mm
250cd/m2
25 ms
376.32 x 301.056 mm
16 M
R.G.B аналогов, 15 пинов D-sub
Хоризонтална : 31.0 to 80.0KHz, вертикална : 56 to 75Hz
135 MHz
1280 x 1024@75Hz
1280 x 1024@60Hz
100-240 VAC, 1.0A
40W
VESA DPMS
VESA DDC 1/2B
ЯРКОСТ, КОНТРАСТ, ЦВЕТОВИ КОНТРОЛ,
РАЗНИ, АУДИО, АВТОМАТИЧНА НАСТРОЙКА, ЕЗИК
ХОР./ВЕРТ.ПОЗИЦИЯ, ЧЕСТ. ФАЗА, ИЗТОЧНИК
2кан. x 2 вата / жак за слушалки
75 mm x 75 mm монтаж с винтове
TCO, FCC Class B, CE,
cULus, TÜV-GS, SEMKO
5 ~ 35 °C
6.2Kg без опаковка, 8.2Kg с опаковка
420 X 441 X 185 mm
Page 98

RO
98 www.prestigio.biz
U.S.A.
U.S.FEDERAL COMMUNICATIONS COMMISSION
RADIO FREQUENCY INTERFERENCE STATEMENT
INFORMATION TO THE USER
NOTE : This equipment has been tested and found to comply with the limitsfor a Class B
digital device pursuant to Part 15 of the FCC Rules.
These limits are designed to provide reasonable protection against harmful interference
in a residential installation.
This equipment generates, uses, and can radiate radio frequency energy and, if not
installed and used in accordance with the instructions, may cause harm ful interference to
radio communications.
However, there is no guarantee that interference will not occur in a particular installa-
tion.
If this equipment does cause harmful interference to radio or television re ception, which
can be determined by turning the equipment off and on, the user is encouraged to try to
correct the interference by one or more of the
following measures:
• Reorient or relocate the receiving antenna.
• Increase the separation between the equipment and receiver.
• Connect the equipment into an outlet of a circuit different from that to which the receiver
is connected.
• Consult the dealer or an experienced radio/TV technician for assistance. Changes or
modication not expressly approved by the party responsible for compliance could void the
user’s authority to operate the equipment.
Connecting of peripherals requires the use of grounded shielded signal cables.
Page 99

RO
99www.prestigio.biz
CONTENTS
1. INTRODUCERE ...........................................................................................100
2. INFORMATII PRIVIND PROTECTIA............................................................100
3. INSTALAREA MONITORULUI ................................................................... 101
3-1. LISTA INVENTAR .................................................................................... 101
3-2. SELECTAREA UNEI LOCATII ADECVATE ............................................102
3-3. CONECTAREA MONITORULUI.............................................................. 103
3-4. SETAREA RATEI DE REIMPROSPATARE............................................. 104
TABELA DE SINCRONIZARE PRESETATA.................................................. 105
3-5. MEDIUL UTILIZATORULUI .....................................................................106
4. AJUSTAREA IMAGINII ............................................................................... 107
4-1. FOLOSIREA AFISARII PE ECRAN ........................................................ 107
4-2. BUTOANE DE ACCES DIRECT .............................................................107
4-3. AJUSTARI OSD .......................................................................................108
5. MANAGEMENTUL ALIMENTARII AFISAJULUI
REDUCEREA CONSUMULUI DE PUTERE................................................... 110
6. PROBLEME TEHNICE ...............................................................................111
7. SPECIFICATII ............................................................................................. 113
Page 100

RO
100 www.prestigio.biz
1. Introducere
Acest manual contine instructiuni de instalare si operare a monitorului Prestigio P190T.
Monitorul Prestigio P190T este o unitate de afisare color foarte ergonomica.
• Afisare de calitate a imaginii
• Tensiune de intrare 100-240V CA
• VESA DPMS (Display Power Management Signaling)
• Compatibilitate VESA DDC1/2B
• Control digital al afisarii pe ecran
• Ajustare auto rapida si precisa
• Cea mai moderna scalare a imaginii
• Suporta Interfata de Montare Fizica a Monitorului cu Ecran Plat VESA
2. Informatii privind protectia
Acest Monitor a fost proiectat si fabricat pentru a asigura protectia dvs. Puteti preveni
socurile electrice periculoase si alte incidente respectand urmatoarele:
Nu plasati nimic umed pe monitor sau pe cordonul de alimentare.Nu acoperiti nicio-
data orificiile de ventilatie cu nici un material si nu le atingeti niciodata cu materiale
metalice sau inflamabile.
Evitati utilizarea monitorului la temperatura sau umiditate extrema,
sau in zone afectate de praf.
• Temperatura: 5~35°C • Umiditatea: 30~80RH
Asigurati-va ca ati stins monitorul inainte de a introduce cordonul de
alimentare in priza. Asigurati-va ca atat cordonul de alimentare cat si
alte cordoane sunt conectate corect si in siguranta.
Prizele si cordoanele de extensie suprasolicitate sunt periculoase, asa
cum sunt si cordoanele de alimentare uzate si prizele sparte, care pot
cauza socuri electrice sau incendii. Chemati tehnicianul de intretinere
pentru a le inlocui.
Nu folositi unelte ascutite (ace sau penite) aproape de suprafata
LCD-ului intrucat acesta se poate zgaria.
Nu folositi solventi, precum benzenul, pentru a curata monitorul,
intrucat va distruge suprafata LCD.
 Loading...