

Page 1
Prestigio P179
Page 2

3PRESTIGIO P179
ENG
All Information in this manual may change from time to time without prior notice.
Safety Instructions
1. Please read these safety instructions carefully.
2. Please keep this User‘s Manual for later reference.
3. Please disconnect this equipment from connecter before cleaning. Don‘t use liquid or sprayed detergent for cleaning.
Use moisture sheet or cloth for cleaning.
4. Make sure the voltage of the power source when you try to connect the equipment to the power outlet.
5. All cautions and warnings on the equipment should be noted.
6. Never pour any liquid into opening, this could cause fire or electrical shock.
7. Never open the equipment. For safety reason, the equipment should only be opened by qualified service personnel.
8. If one of the following situations arises, get the equipment checked by a service personnel :
a. Liquid has penetrated into the equipment.
b. The equipment has been exposed to moisture.
c. The equipment has not work well or you can not get it work according to user‘s manual.
d. The equipment has dropped and damaged.
e. If the equipment has obvious sign of breakage.
9. DO NOT LEAVE THIS EQUIPMENT IN AN ENVIRONMENT UNCONDITIONED, STORAGE TEMPERATURE ABOVE 40°C, IT MAY
DAMAGE THE EQUIPMENT.
10. Adaptor source :
a. Channel Well Technology, MODEL PAA050F.
b. Linearity Electronics co. LTD,MODEL LAD6019AB4
Page 3

4 PRESTIGIO P179
ENG
View of Monitor
Front View (1)
Back View (2)
Page 4
5PRESTIGIO P179
ENG
View of Monitor
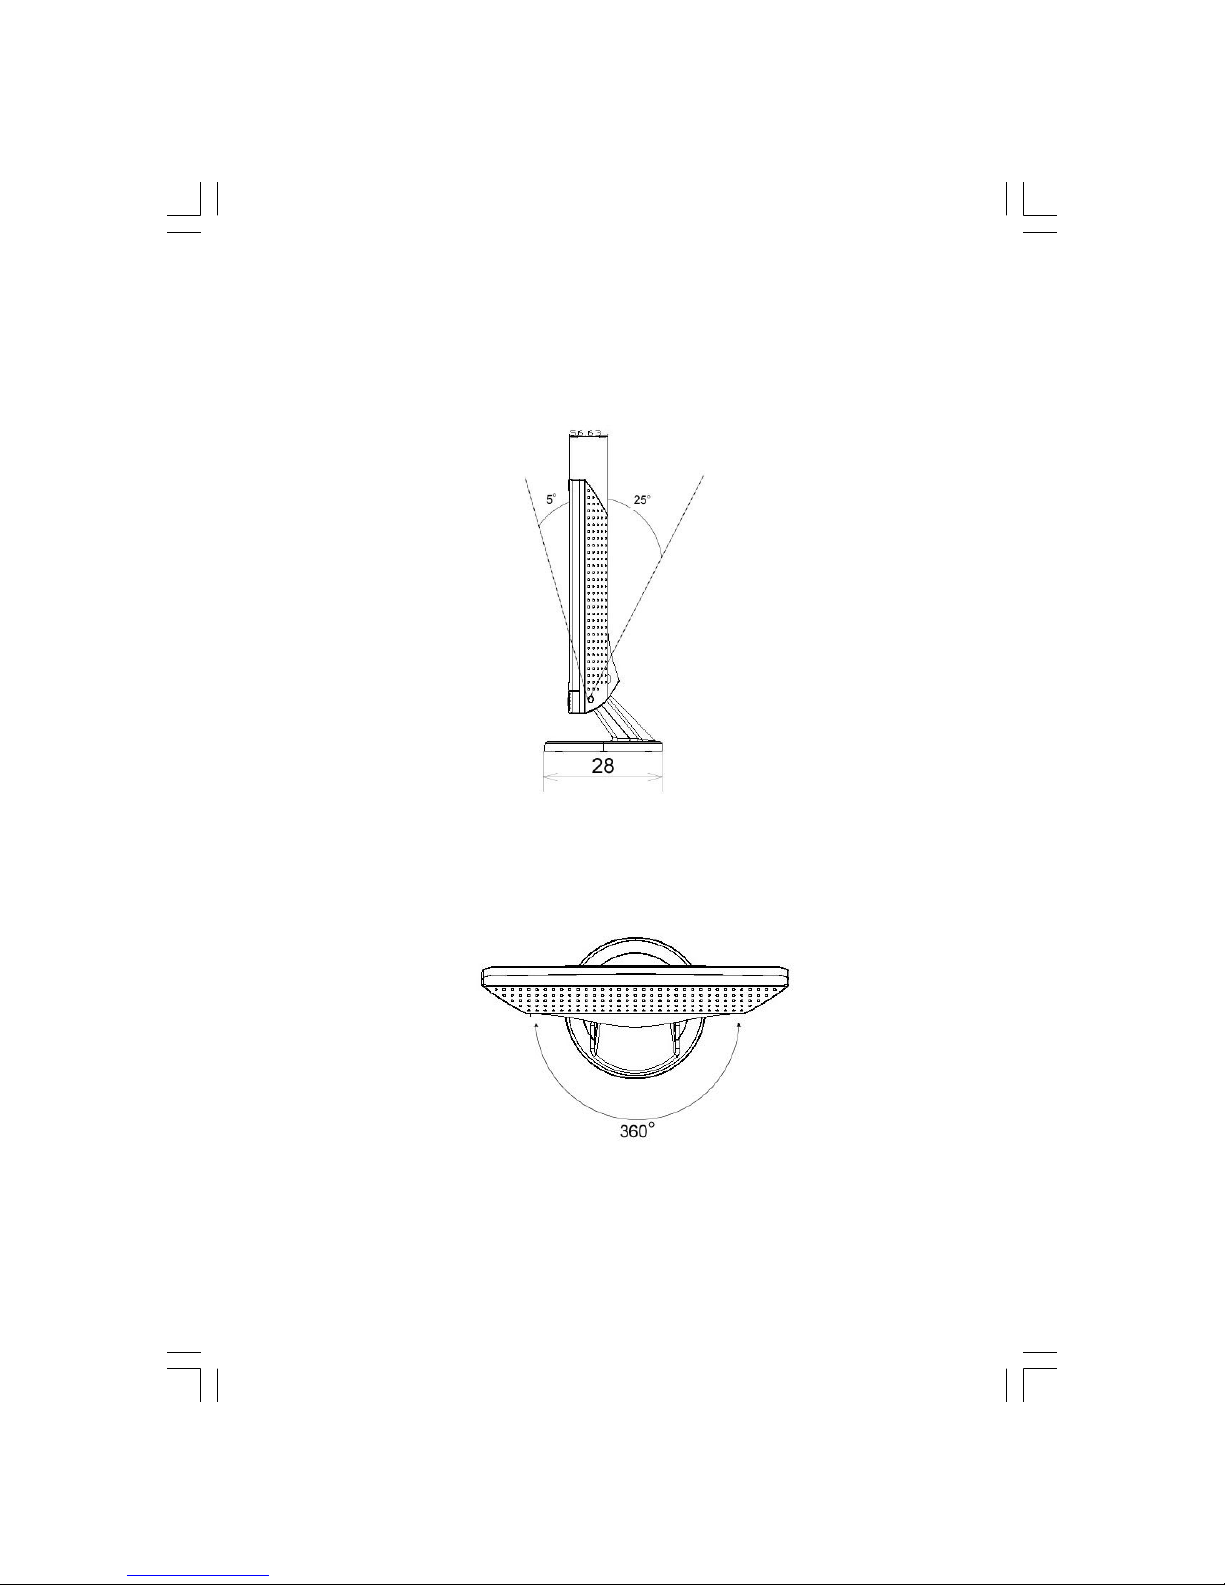
Side View (3)
Top View (4)
Page 5
6 PRESTIGIO P179
ENG
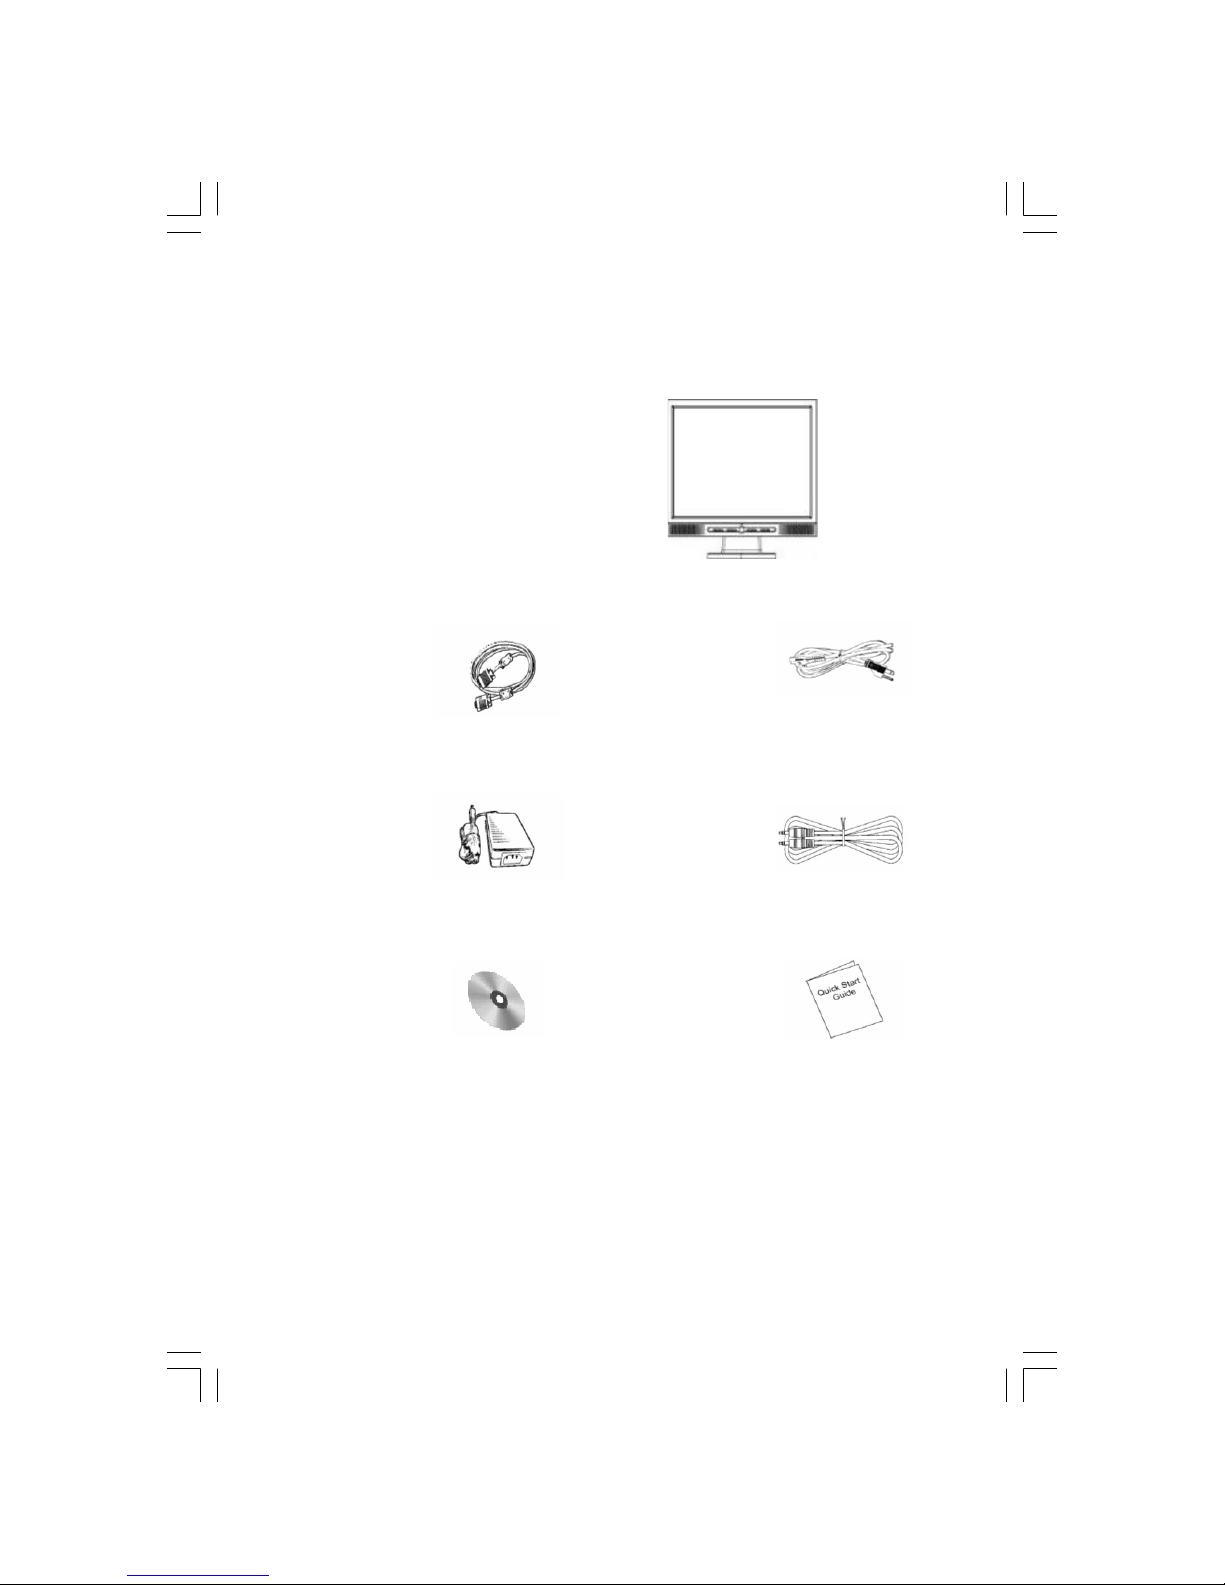
Unpacking
Thank you for your purchase. Please first check the following package content of the 17” LCD monitor. Contact your
dealer or store where you purchased the LCD monitor if anything is missing.
17” TFT LCD Monitor
External Univ15 pin
D-sub (RGB Analog) Power Cord
input signal cable
*DVI. and Video are optional*
AD / DC Adpter External Audio Cable with
Universal (DC 12V, 50 / 60Hz) Stereo Phone Jack
(AC 100-240V)
CD User’s Manual Quick Start Guide
Warning
1. Make sure that the system power is turned off.
2. Plug the signal cable to the signal connector at the rear of PC.
3. Plug adapter output cable to the jack at the rear of LCD monitor and the power cord to the adapter.
4. Connect the power cord to power source.
5. Turn on the computer and the monitor.
6. For the best display quality, we suggest that you set the resolution as shown on page Display Mode.
Page 6
7PRESTIGIO P179
ENG
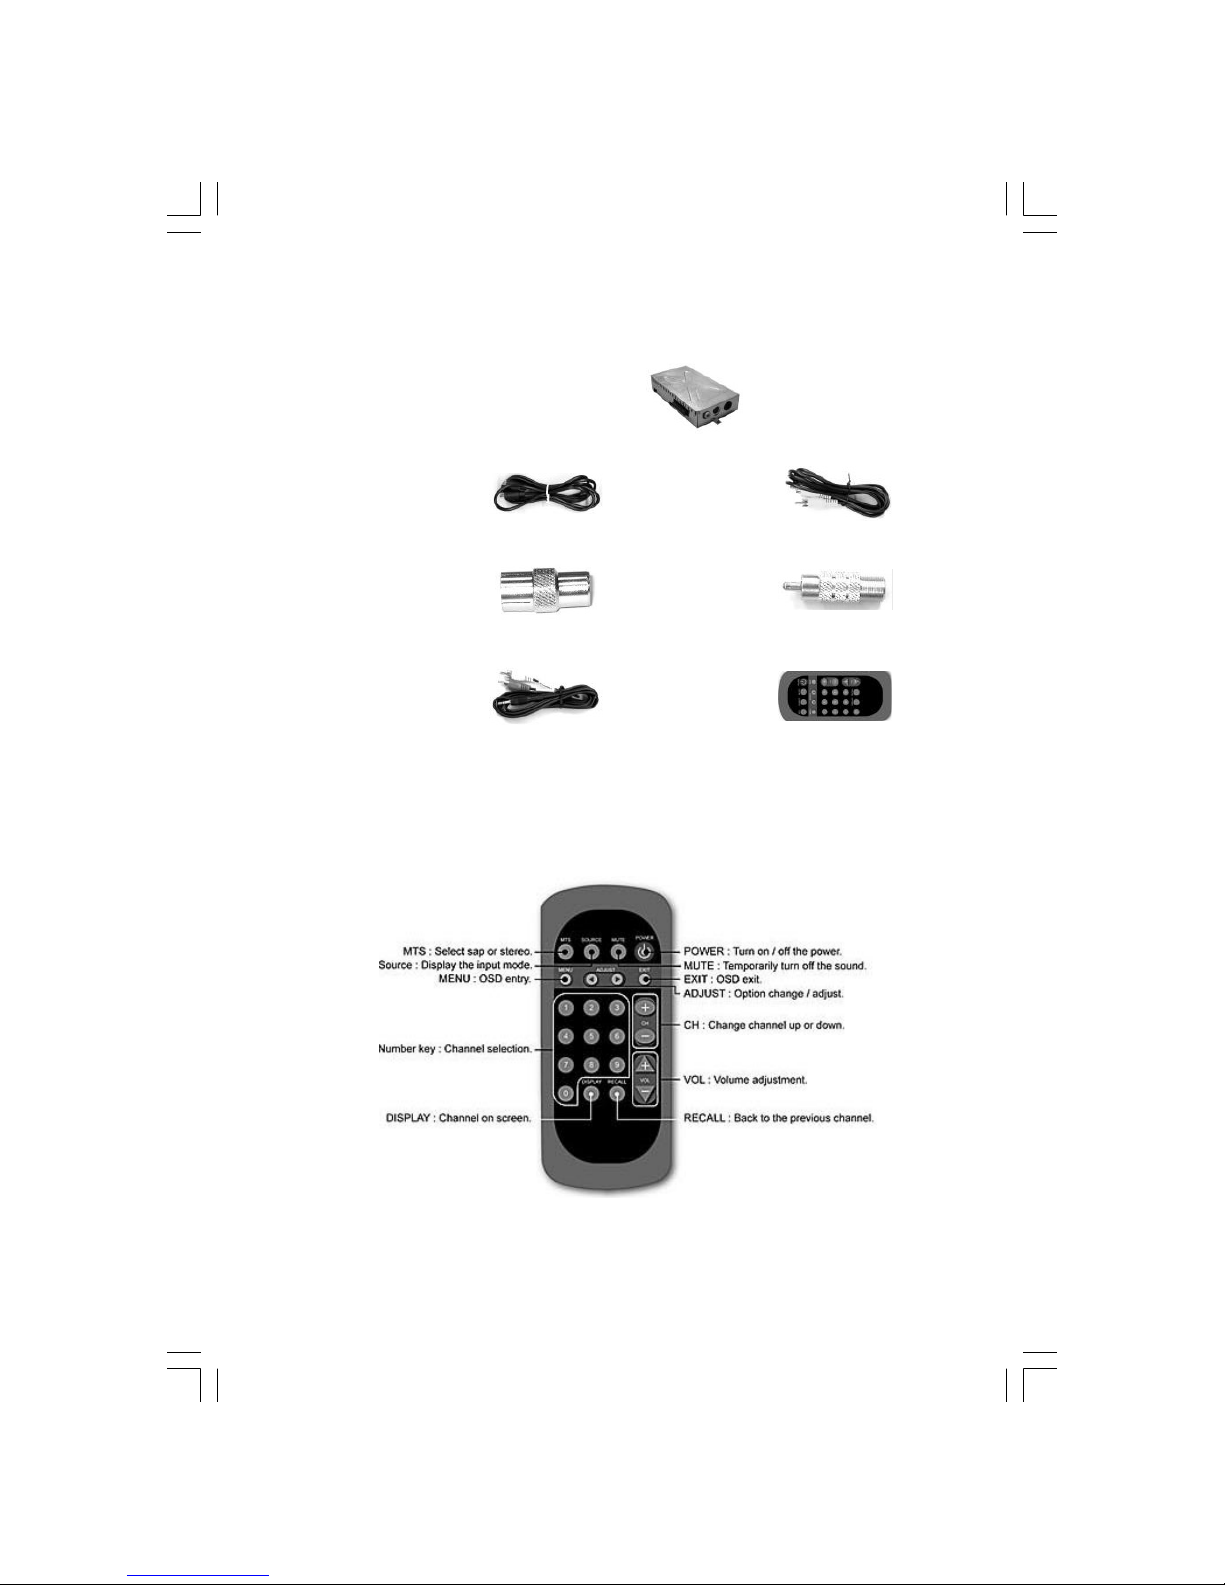
Optional TV Tuner
The 17” LCD monitor optionally supports TV tuner function with the following accessories. It can be purchased separately. Contact your dealer for detail.
Optional TV Tuner
S-Video Cable Composite Cable
Europ PAL System I to I Dungle U.S. NTSC System PH
to F Dungle
RCA to Phone Jack Cable Remote Control
Remote Control
Use the remote control by point toward the IR sensor window.
Notice: 1. The remote may not work properly during the low battery condition.
2. Do not place the remote under direct sunlight or area with high humidity.
If the remote control fails to operation, replace the battery in the remote control.
Notice: Insert battery (Lithium battery) with its terminals corresponding to the <+> and <-> indications in the
battery compartment.
Page 7

8 PRESTIGIO P179
ENG
Cleaning Notes
1. Be gentle to clean the screen.
2. Never use any kind of corrosiveness chemical dissolvent to clean the screen, it may hurt your screen surface.
3. We suggest that a camel hair brush or a soft, lint-free cloth be used to clean the screen.
4. Don’t exert any pressure directly to the LCD screen.
Precaution
1. Do not expose the monitor to direct sunlight or heat.
2. Do not spill liquid on the monitor.
3. Do not attempt to open the monitor. You may be hurt by electric shock. For service, call your place of purchase.
4. Do not use your monitor when magnets or electronic products are operating nearby.
5. Do not use harsh chemicals or strong cleaning solvents to clean the monitor screen. Wipe it with clean, soft clothes
applied with mild solution.
6. Do not place anything on your monitor. Bad ventilation may elevate temperature in the monitor.
7. Don’t use your fingers to touch the LCD screen, directly. Fingerprint contains oil and may be difficult to clean.
Features
Power Saving:
The power management complies with VESA DPMS standard. When the system is idle (Off Mode), the monitor
automatically cut its power consumption to a level less than 5w.
Auto Adjustment Key Function:
With “AUTO” key, you can automatically adjust the display for your best view.
Wide Viewing Angle:
The horizontal 150°and vertical 125° offer you great screen view.
Plug and play compatibility:
With DDC1/DDC2B compliance, the monitor is plug and play compatible to Windows 95/98/me/2000/XP.
Space Saving:
The monitor is designed with 280 mm indepth to provide you with more hand room for desk working space.
Side-by-Side :
The monitor comes with 17.7 mm trimmed down frame to offer side-by-side operation
Page 8

9PRESTIGIO P179
ENG
Hardware Installation
Be careful to your LCD monitor. It’s very delicate and easy to break. Turn off LCD’s and PC’s power before installation.
Follow the installation step by step described below.
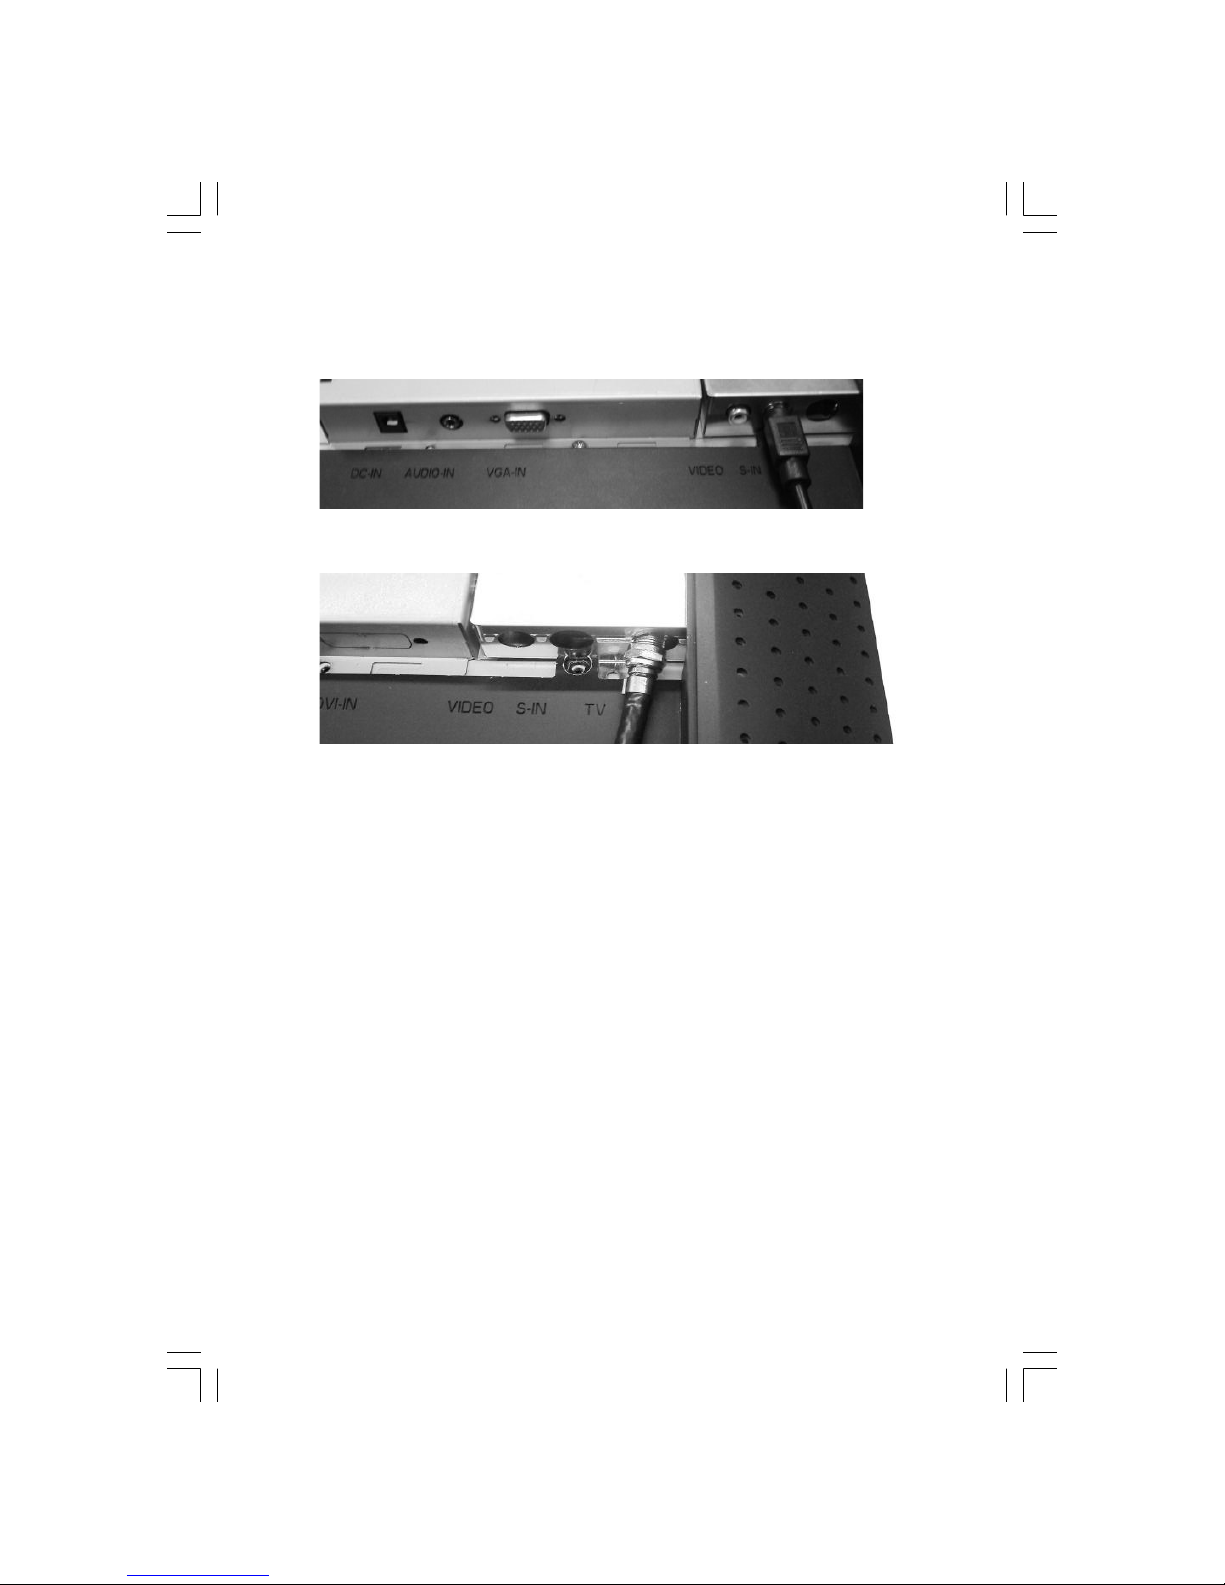
Input
[1] DC-IN : This is for connecting the power cable
[2] AUDIO-IN : This can be connected to the audio-out connector of any sound resource.
[3] VGA-IN : This can be connected with the D-Sub 15 pin signal cable.
[4] VIDEO : This is for (RCA) composite video in from video source . *(option)
[5] S-IN : This can be connected with the S-Video signal cable. * (option)
[6] TV : This can be connec ted with the TV signal cable. *(option)
[7] Audio Out : This is for connection of headphone or external speaker.
[8] DVI In-Put : Support DVI-D 24pin In-Put signal. *(option)
[1] [2]
[3] [8]
[4] [7] [5] [6]
[3]
Page 9
10 PRESTIGIO P179
ENG
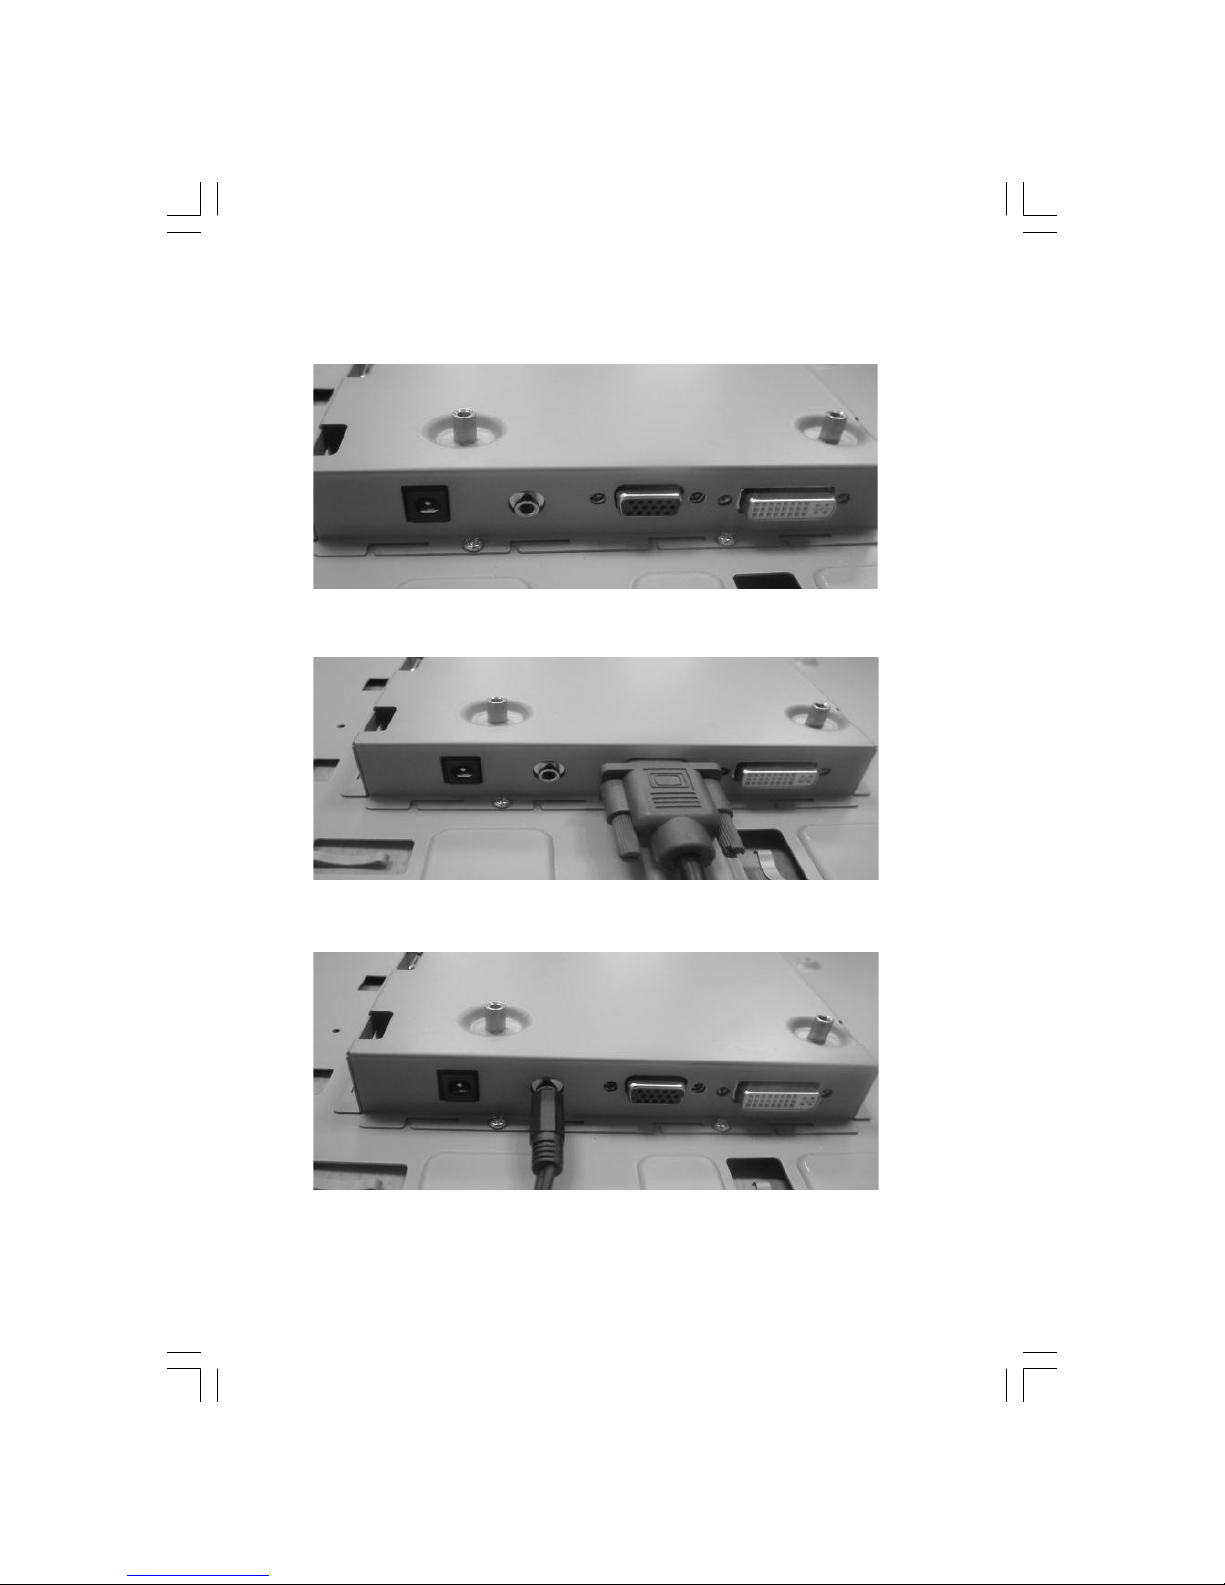
Hardware Installation Step by Step
1. Turn your monitor upside down carefully with panel facing you to locate all connector port.
2. Plug in signal cable to VGA-IN of the monitor and the other side of the cable to the computer.
3. Connect the audio cable to AUDIO-IN on the monitor, and the other side to computer line out.
Page 10
11PRESTIGIO P179
ENG
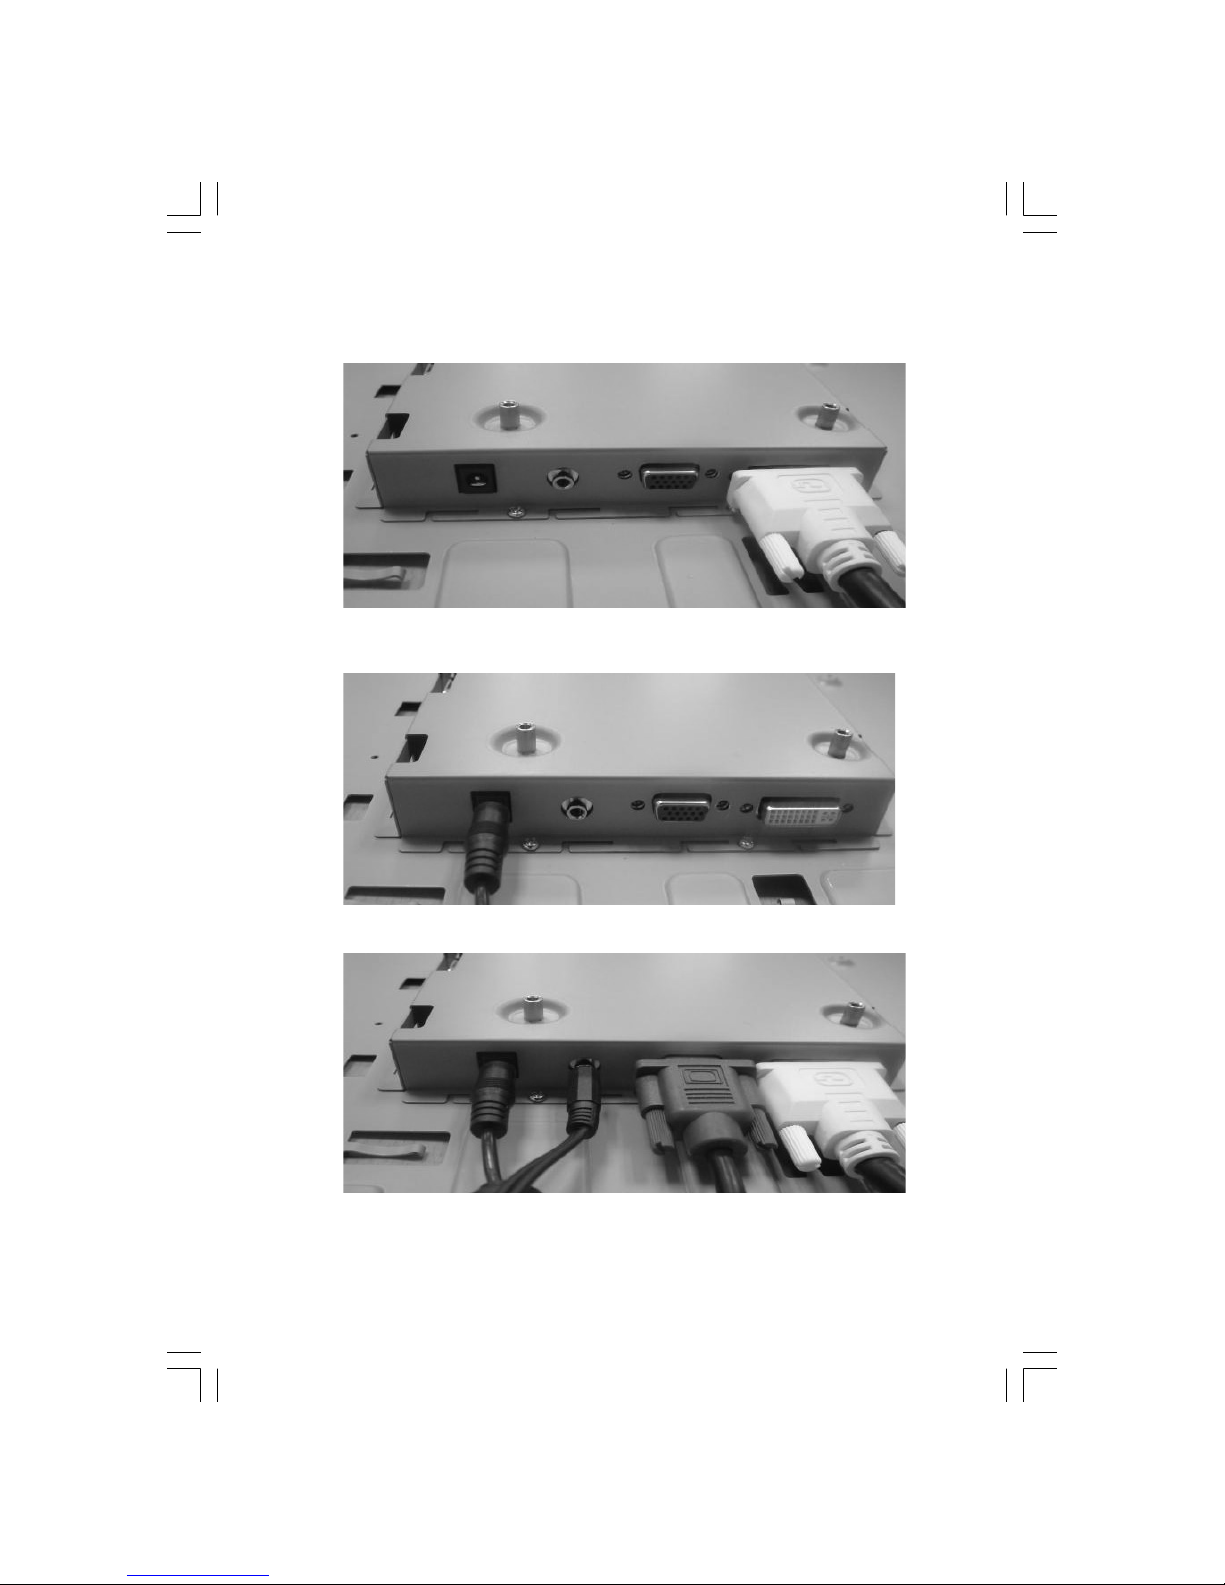
3. Plug in signal cable to DVI-IN 24-pin of the monitor and the other side of the cable to the computer.
4. Plug the DC cable from power adapter onto the DC-IN on monitor.
5. Congratulations! You have just completed the hardware installation.
Page 11
12 PRESTIGIO P179
ENG
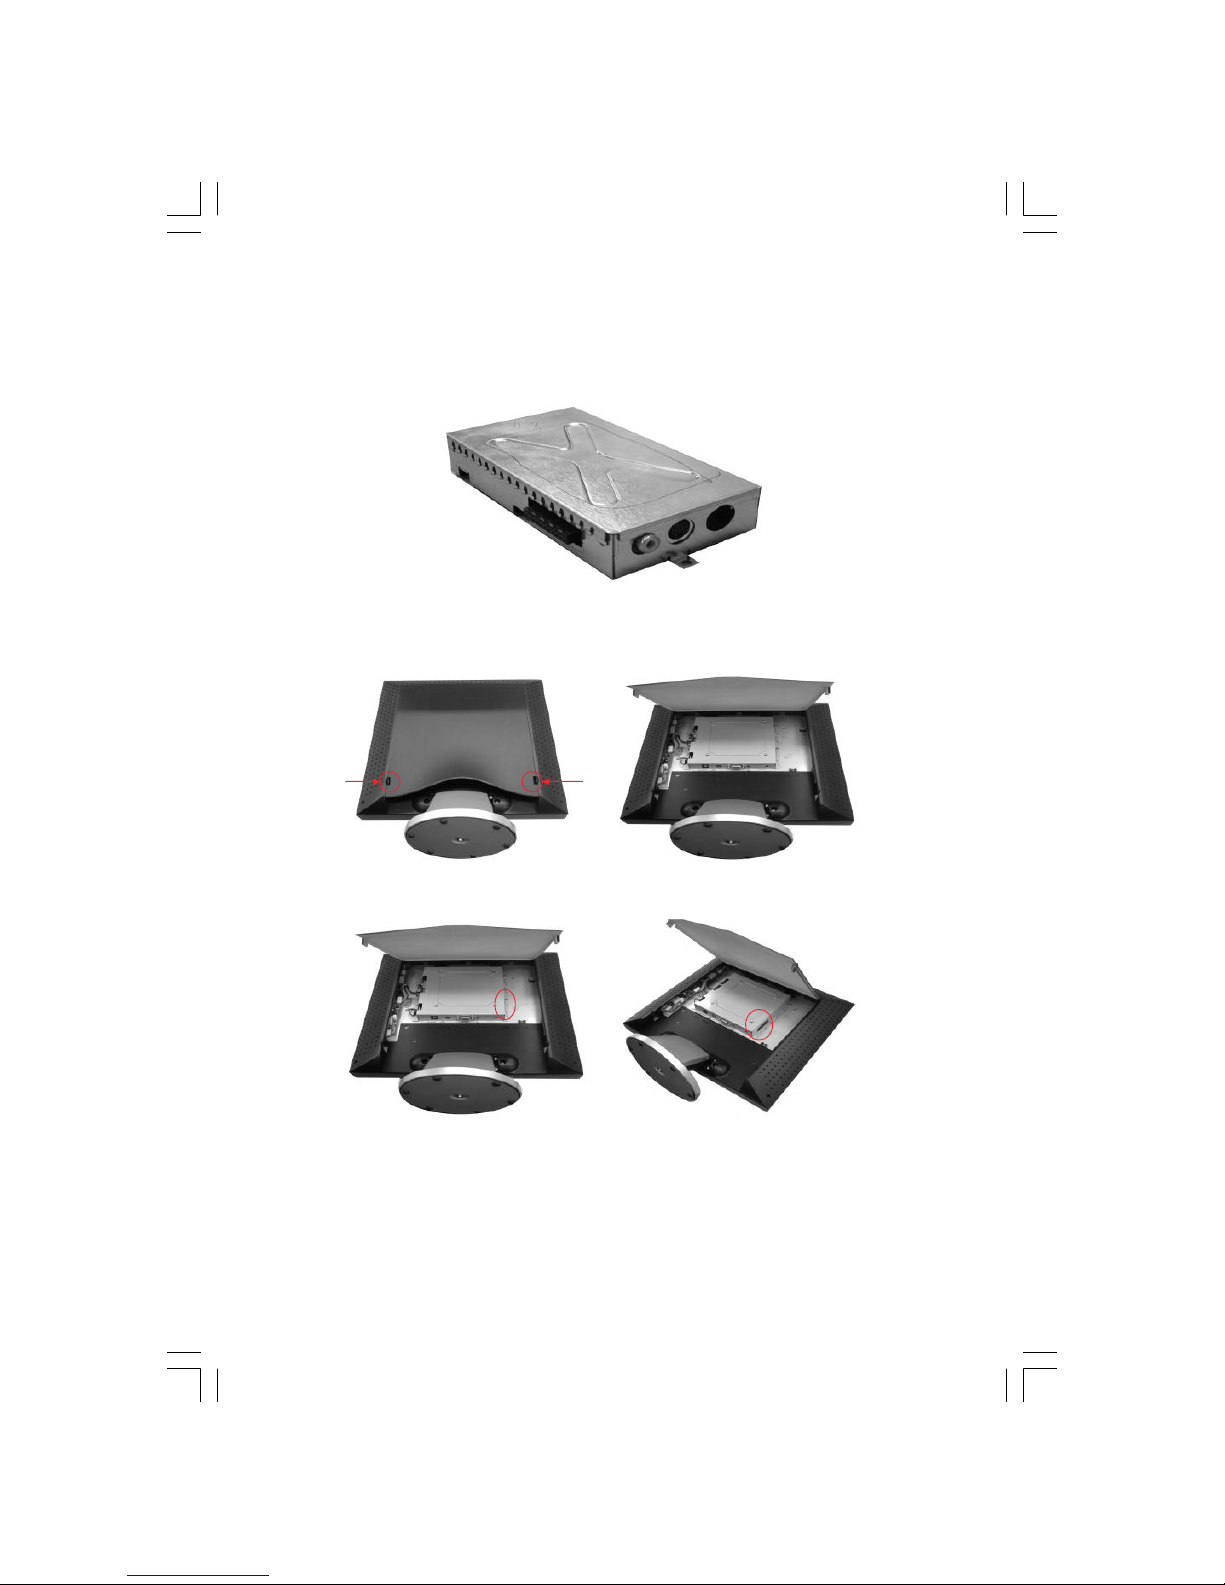
Hardware Installation TV Tuner (Option)
1. Hardware installation for optional TV tuner of the 17” TFT LCD monitor is described below.
2. First, remove the plastic back cover by pushing clips in two sides .
3. Locate pin connector on the TV tuner and the pin connector on monitor indicated.
Page 12
13PRESTIGIO P179
ENG
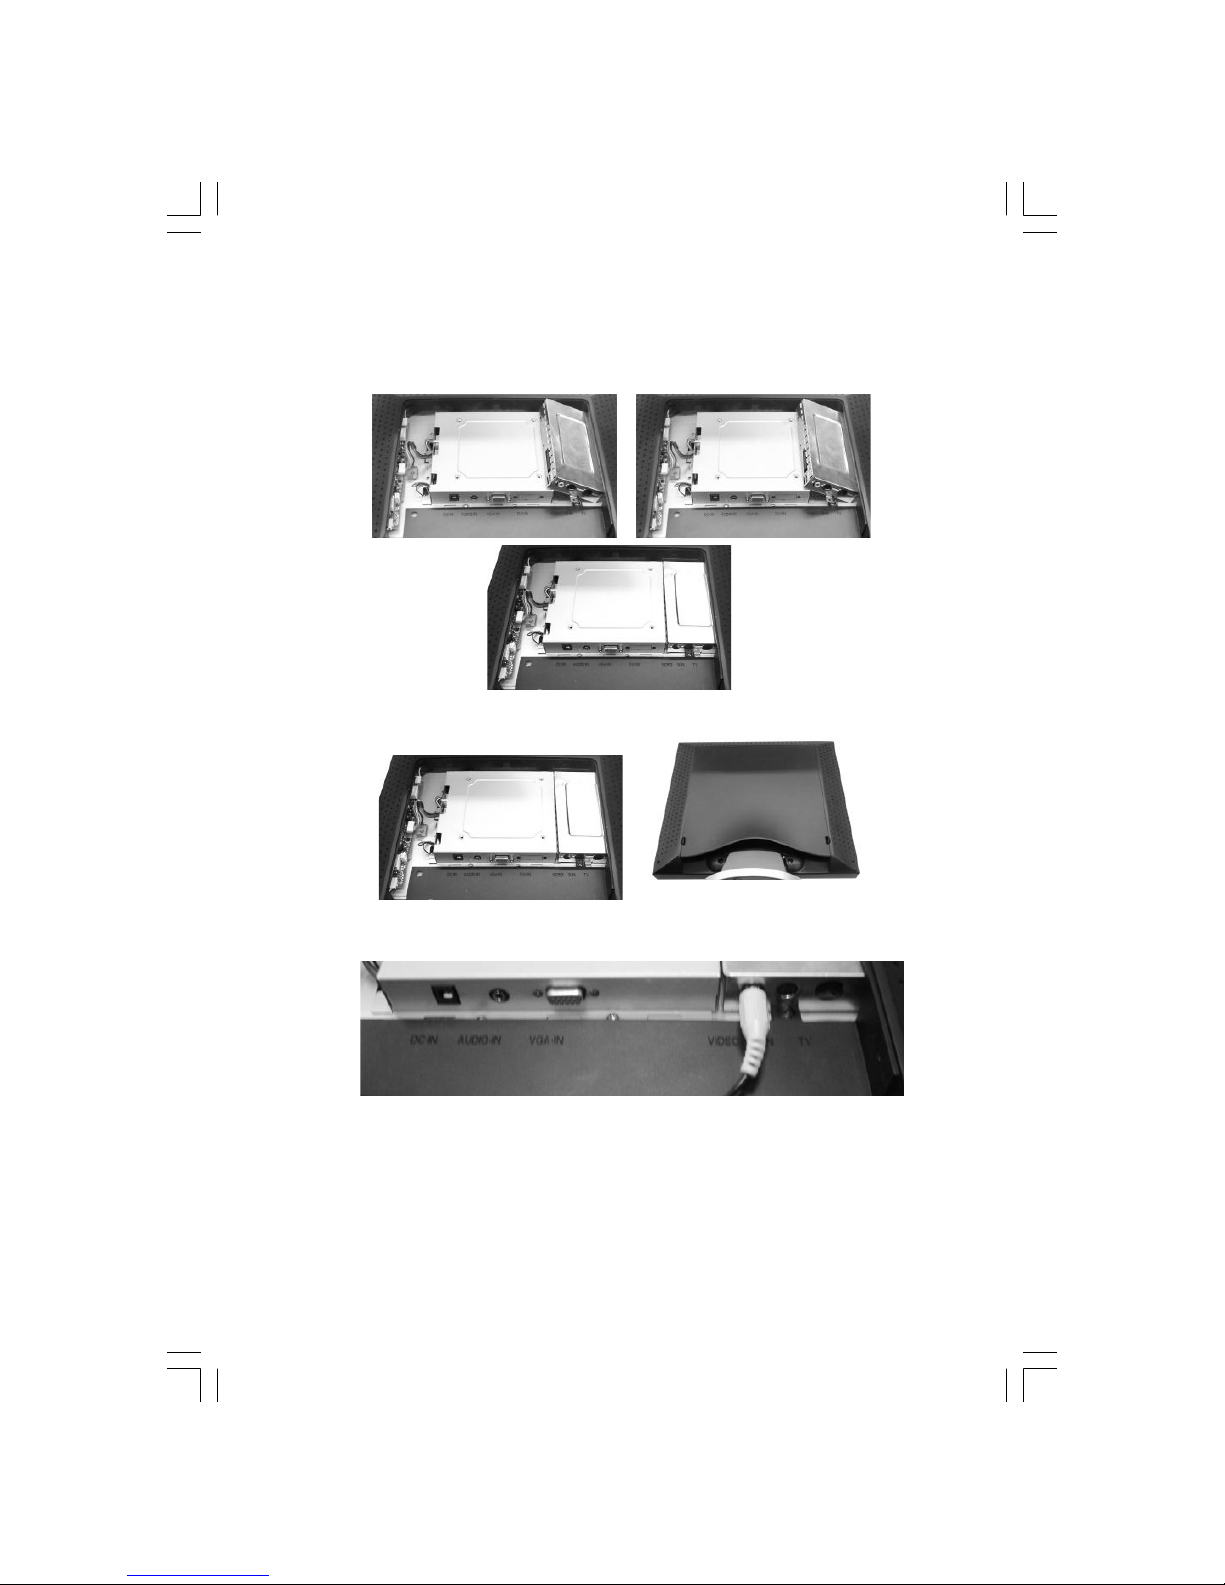
4. Slide the TV tuner module into the right side of the spare space of the back of monitor, and gently plug the optional
TV tuner into the connector mentioned at Step 3.
5. Screw to fix TV tuner module on the supporting sheet metal and re-install the color back panel.
6. Insert the RCA video signal cable into VIDEO port, and the other side to RCA Video output on sources such as DVD
player.
Page 13
14 PRESTIGIO P179
ENG
7. Insert the S-Video signal cable into S-IN port, and the other side to S-Video output on sources such as DVD player.
8. Insert the TV signal cable into TV port, from the local cable TV system provider.
9. Congratulations again! You’ve done an incredible job and can start to enjoy it.
Page 14

15PRESTIGIO P179
ENG
Angle of Inclination
In normal condition
LCD lay back 0° ~ 25° (positive and negative 2°)
Page 15

16 PRESTIGIO P179
ENG
Monitor Setup Button
Menu control button
There 5 keys for user to set up the monitor, including “Power”, “MENU“, “AUTO”, ”<\/> Down/Left”, ”</\> Up/Right”.
Please refer to the introduction below.
1. “ Power”: Turn the LCD power on and off. When the power is on, the light turns green, and standby in the color of
orange.
2. “AUTO”: Exit and save the setting. Hot key for auto adjustment.
3. “MENU”: Press the button to display OSD main menu and select OSD Option.
4. “</\> Up/Right”: Increase the value in the OSD option. Hot key for PC / Video / S- Video / TV mode. You can use the
button to switch between PC,Video, S-Video, and TV mode screen.
5. “<\/> Down/Left”: Decrease the value in the OSD option. Hot key for volume adjustment.
Auto Adjust OSD Menu Power Down Up
Page 16
17PRESTIGIO P179
ENG
Troubleshooting
If you encounter any trouble in using the monitor, make sure your monitor is properly installed according to the following steps before you call for service.
? There is no picture on the screen.
Check:
1. Power saving mode. Press any key and move the mouse to deactivate the mode.
2. Signal Cable Connector Pins. If there are bent or missing pins, consult your dealer or store where you purchased the
monitor.
? Characters look too dark or too bright
Check:
1. Using OSD Menu to adjust the Contrast.
? When shall your monitor be adjusted?
Check:
1. After “ reset”
2. If the resolution of frequency is being changed.
? The text on the screen is unclear.
Check
1. Make sure the resolution matches with the display mode.
? If the Display color too red or another color too heavy
1. Using OSD Menu to adjust the “Color Temperature”
OSD (On-Screen Display) Menu Mode (VGA/DVI Mode)
Option select
1. Press the MENU button to access menu.
2. Using MENU again for advanced adjustment selection.
3. Press Down and Up for choosing different OSD function.
4. Press MENU as enter to select the function you want.
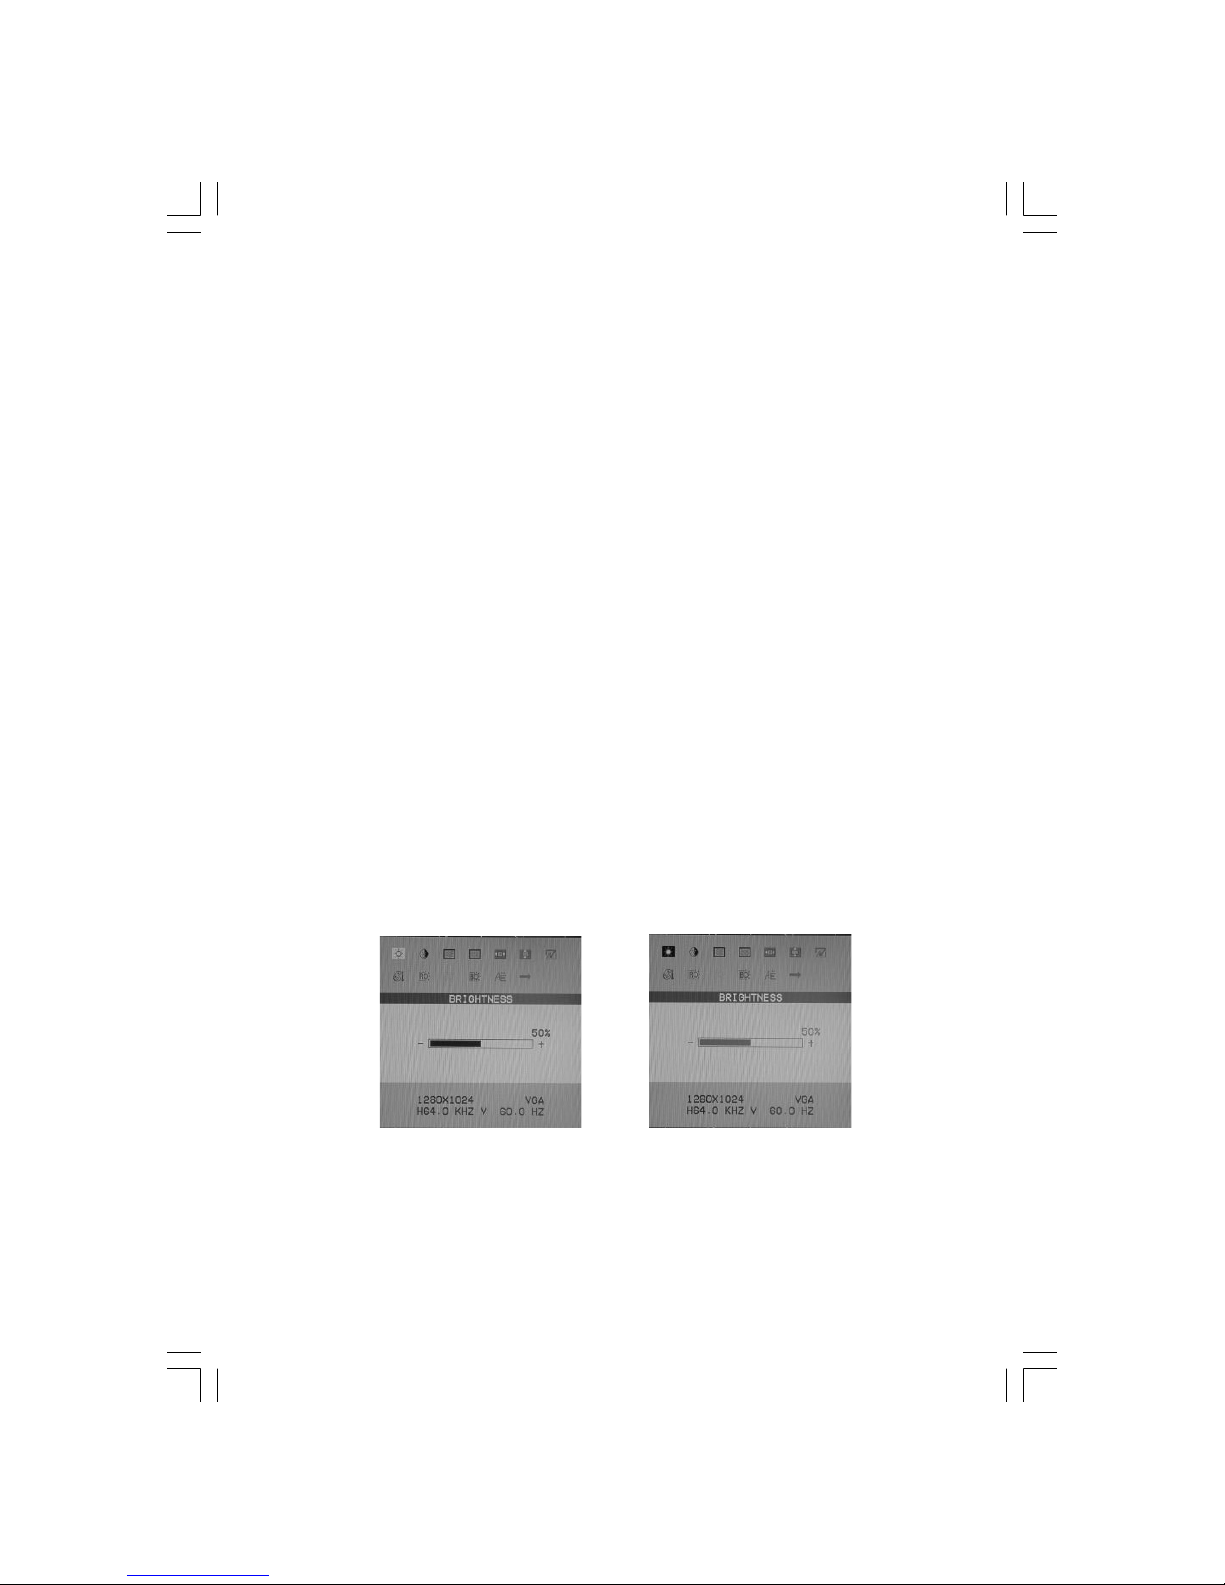
BRIGHTNESS
Adjust the brightness of the display
Page 17
18 PRESTIGIO P179
ENG
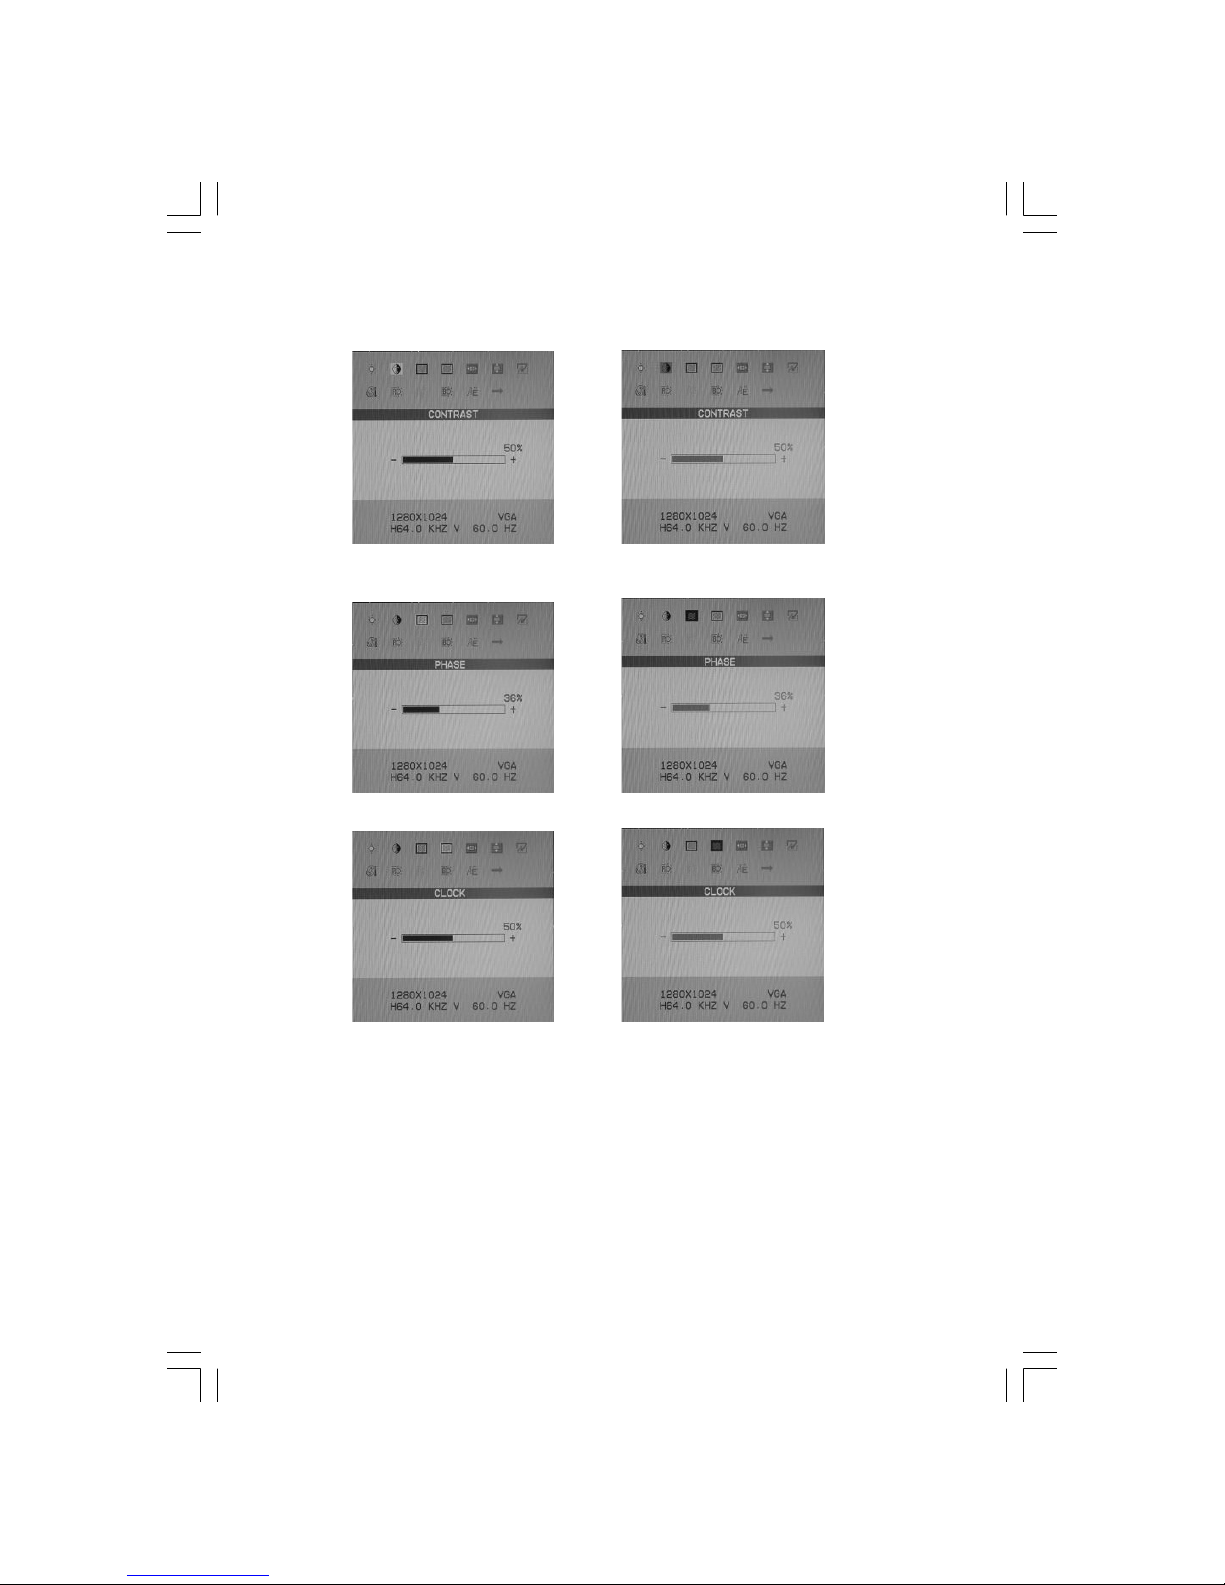
CONTRAST
Adjust the difference between light and dark area
PHASE
Adjust the phase of pixel clock (no support in DVI mode)
CLOCK
Adjust the frequency of the pixel. (no support in DVI mode)
Page 18
19PRESTIGIO P179
ENG
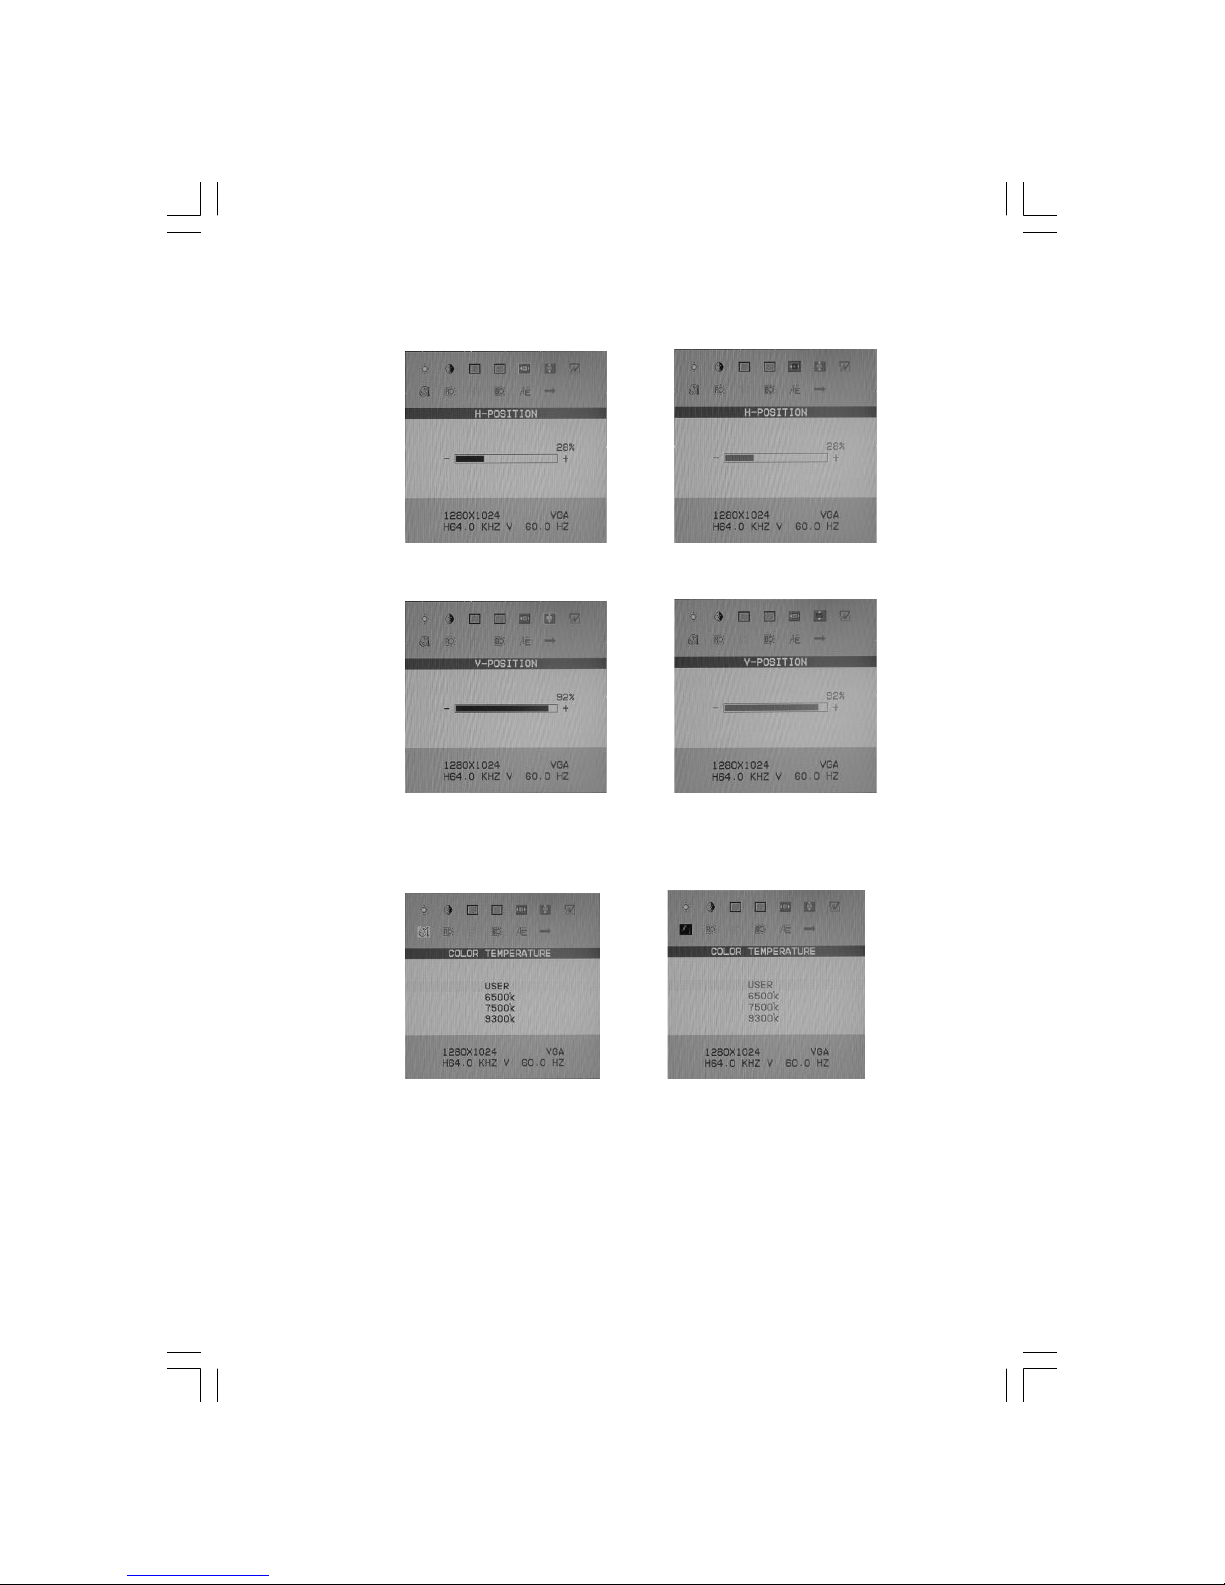
H-POSITION
Adjust the horizontal position of the display (no support in DVI mode)
V-POSITION
Adjust the vertical position of the display (no support in DVI mode)
COLOR TEMP
Adjust the color temperature of display temperature
Page 19
20 PRESTIGIO P179
ENG
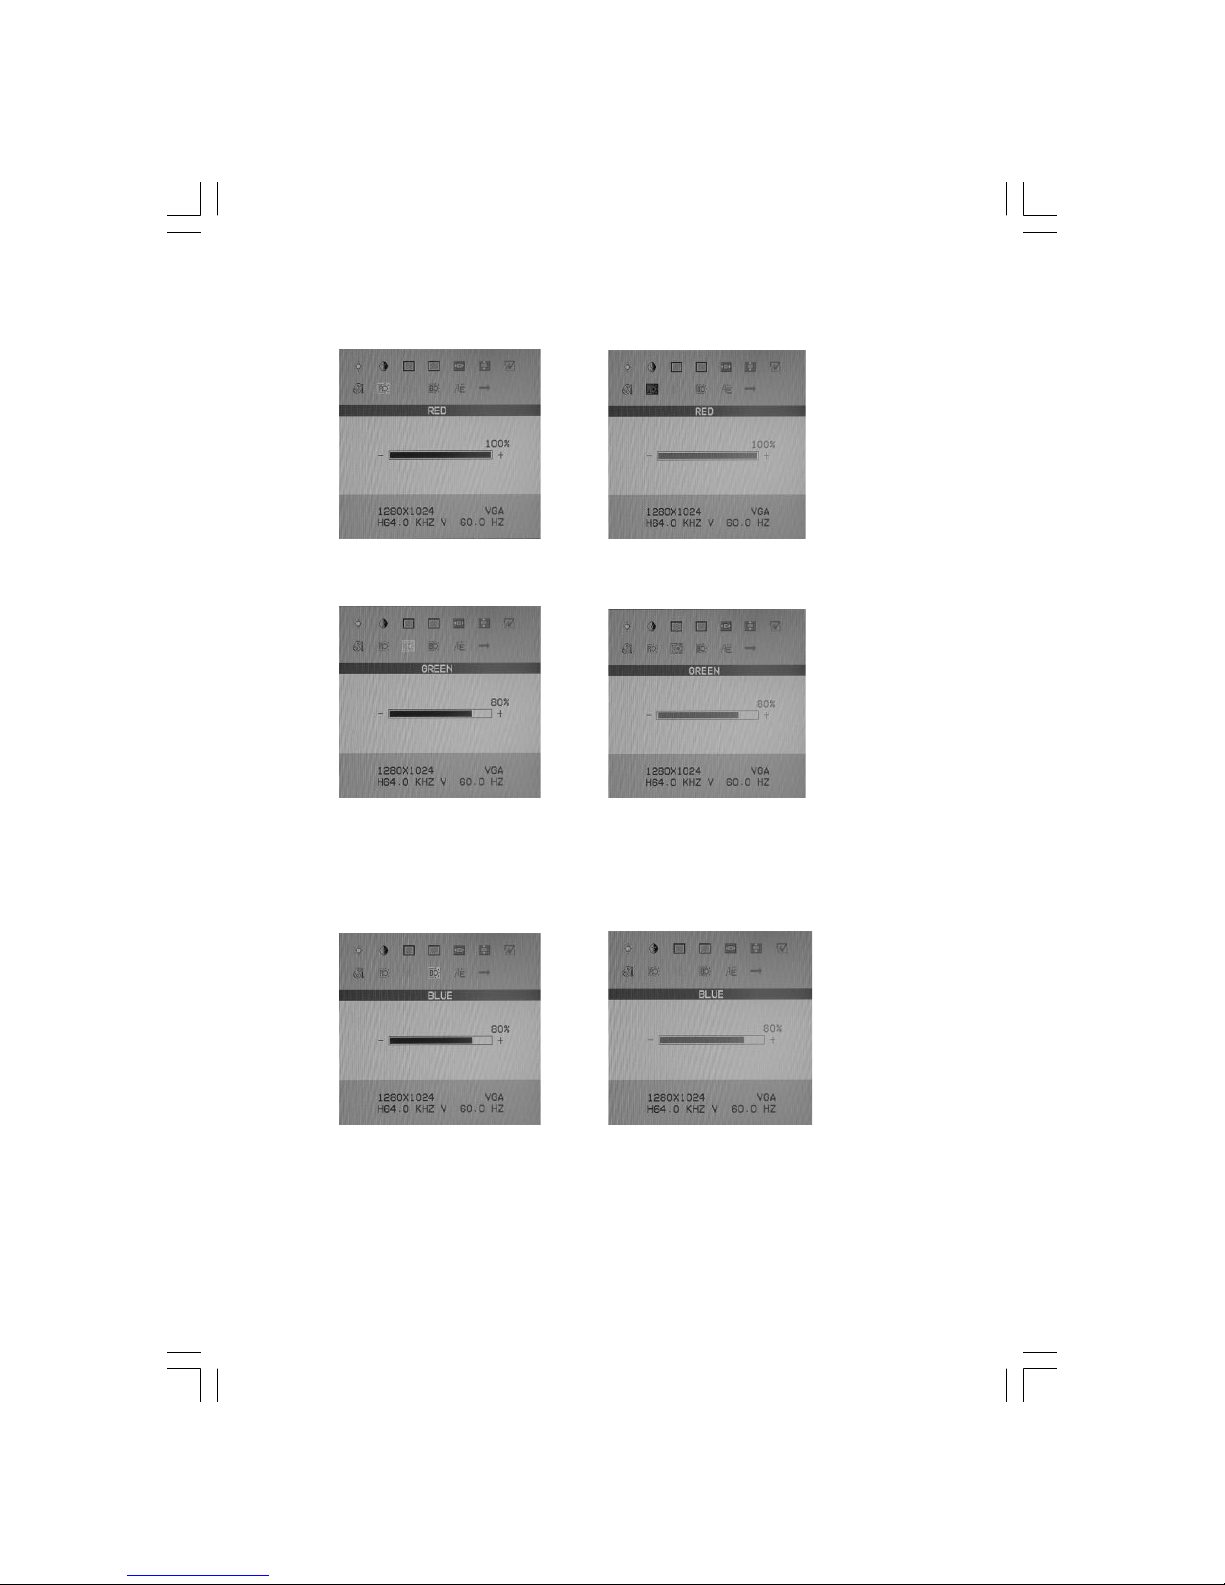
RED
Adjust the RED color (must setting USER mode in color temperature select item)
GREEN
Adjust the GREEN color (must setting USER mode in color temperature select item)
BLUE
Adjust the BLUE color (must setting USER mode in color temperature select item)
Page 20
21PRESTIGIO P179
ENG
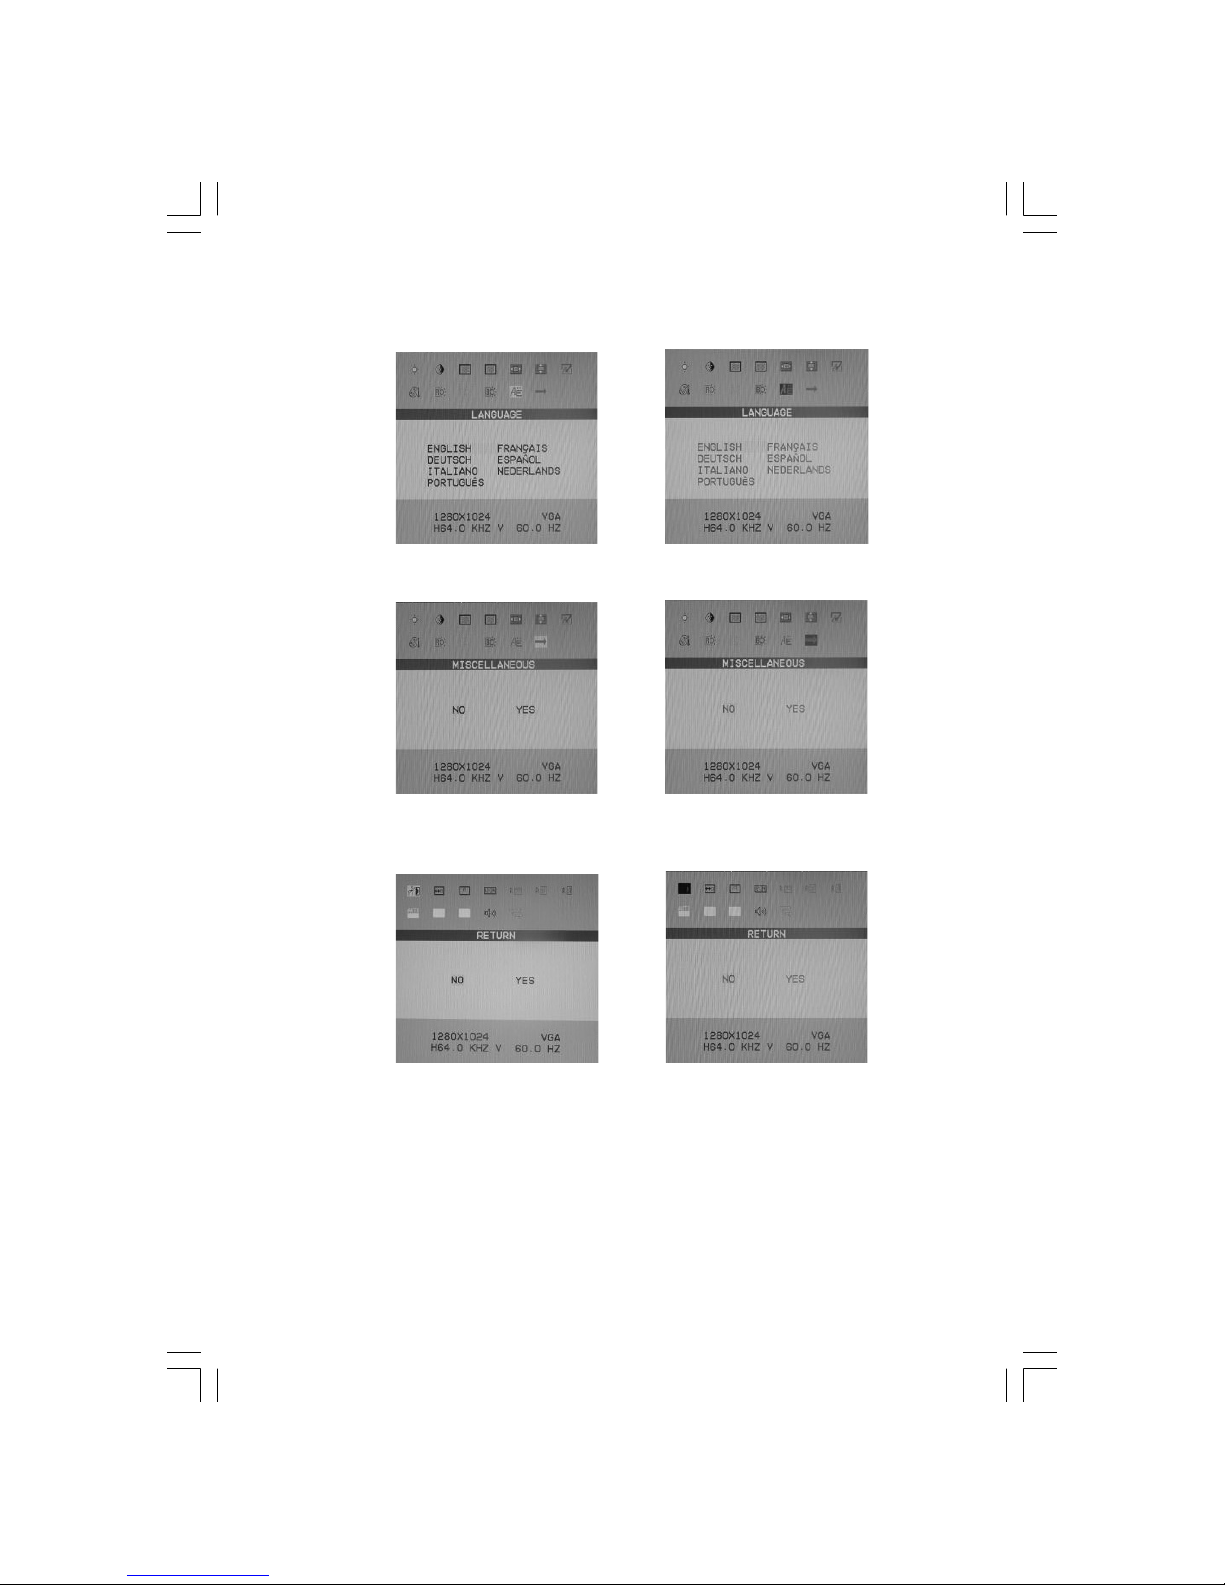
LANGUAGE
LANGUAGE Support Setting
MISCELLANEOUS
Enter to Next page for others setting
RETURN
Return to Previous page for adjust
Page 21
22 PRESTIGIO P179
ENG
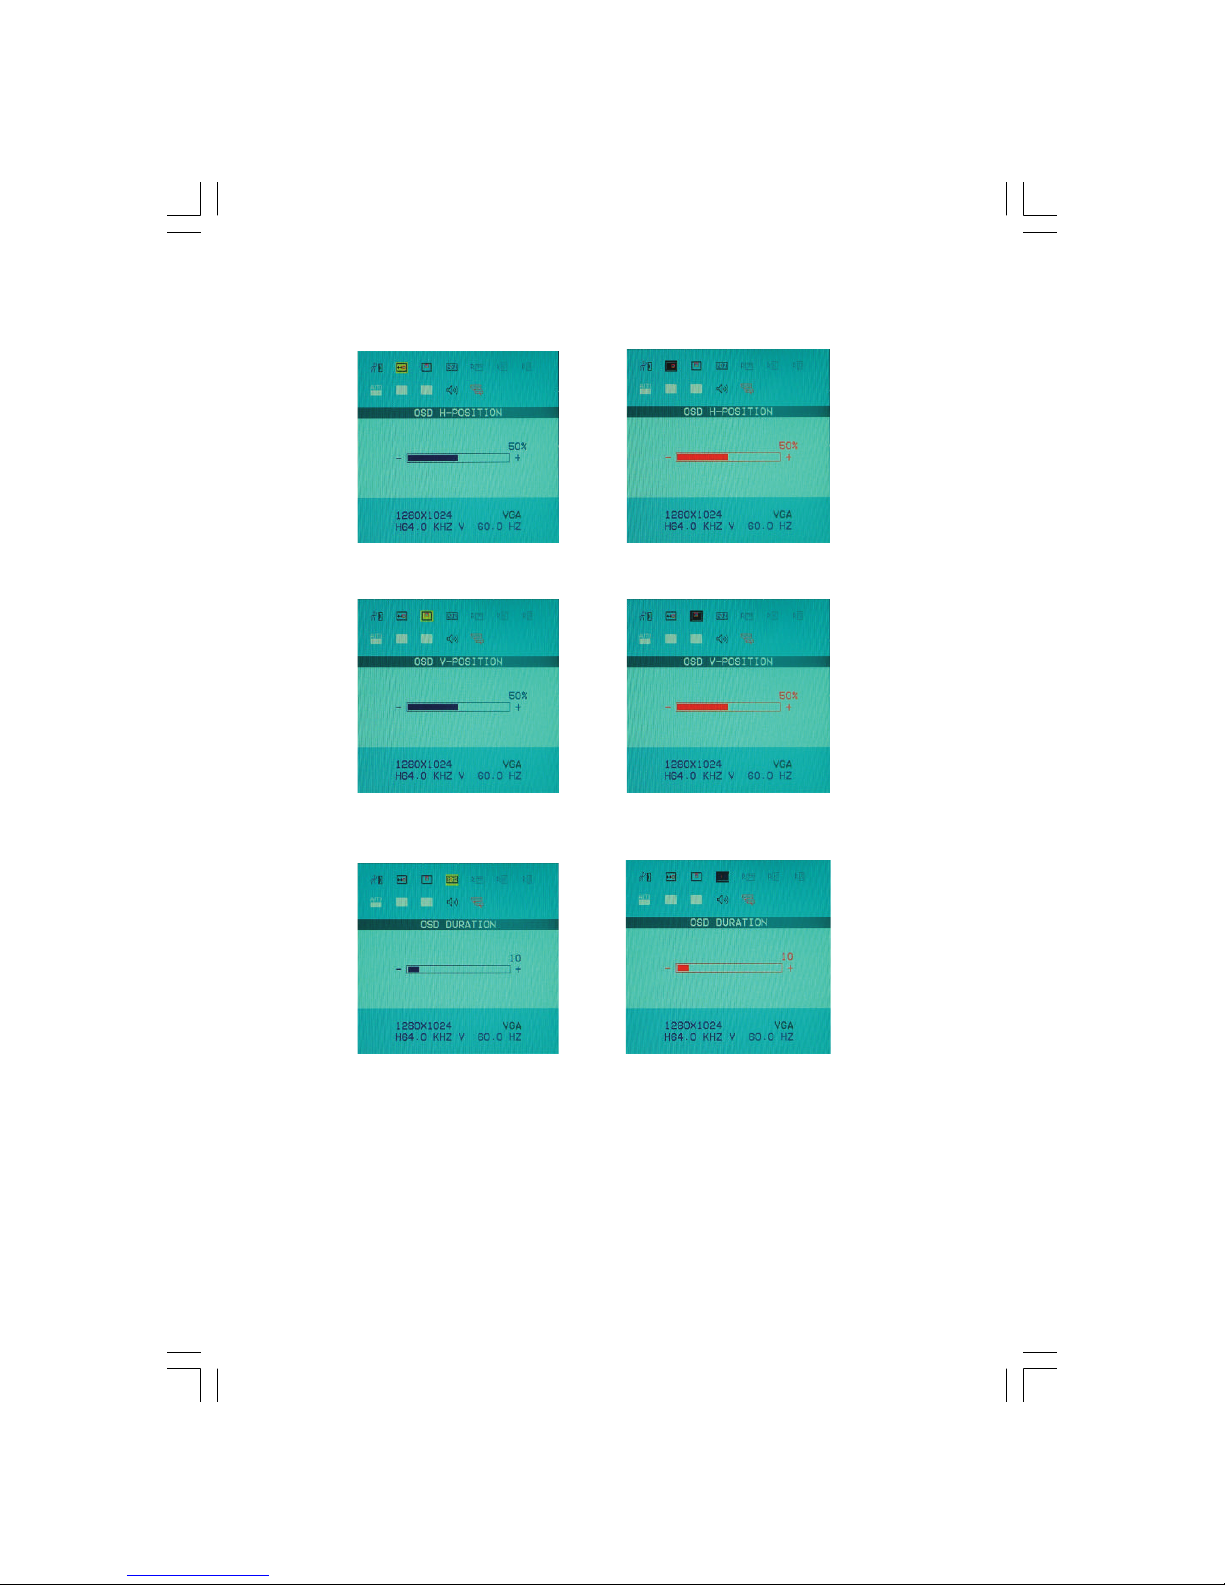
OSD H-POSITION
Adjust the horizontal position of the OSD
OSD V-POSITION
Adjust the vertical position of the OSD
OSD DURATION
OSD lasting time
Page 22
23PRESTIGIO P179
ENG
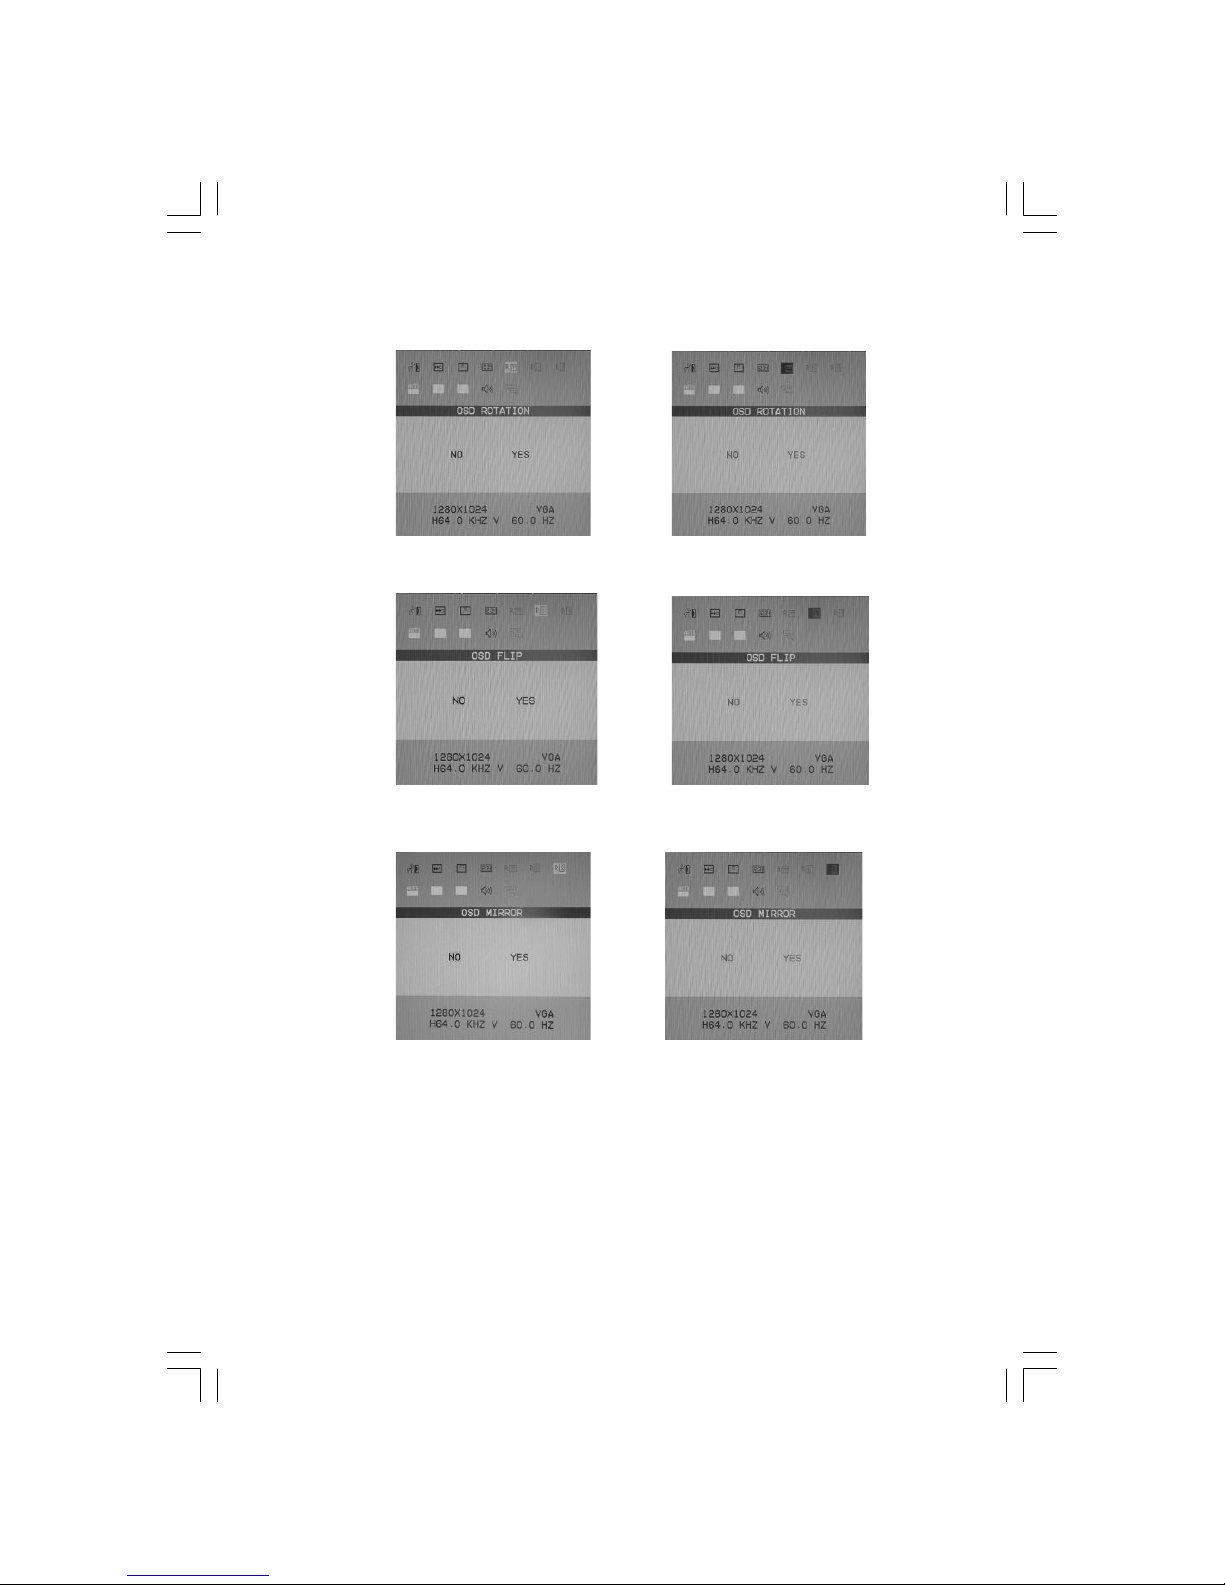
OSD ROTATION
OSD Rotation Setting
OSD FLIP
OSD Flip Setting
OSD MIRROR
OSD Mirror Setting
Page 23
24 PRESTIGIO P179
ENG
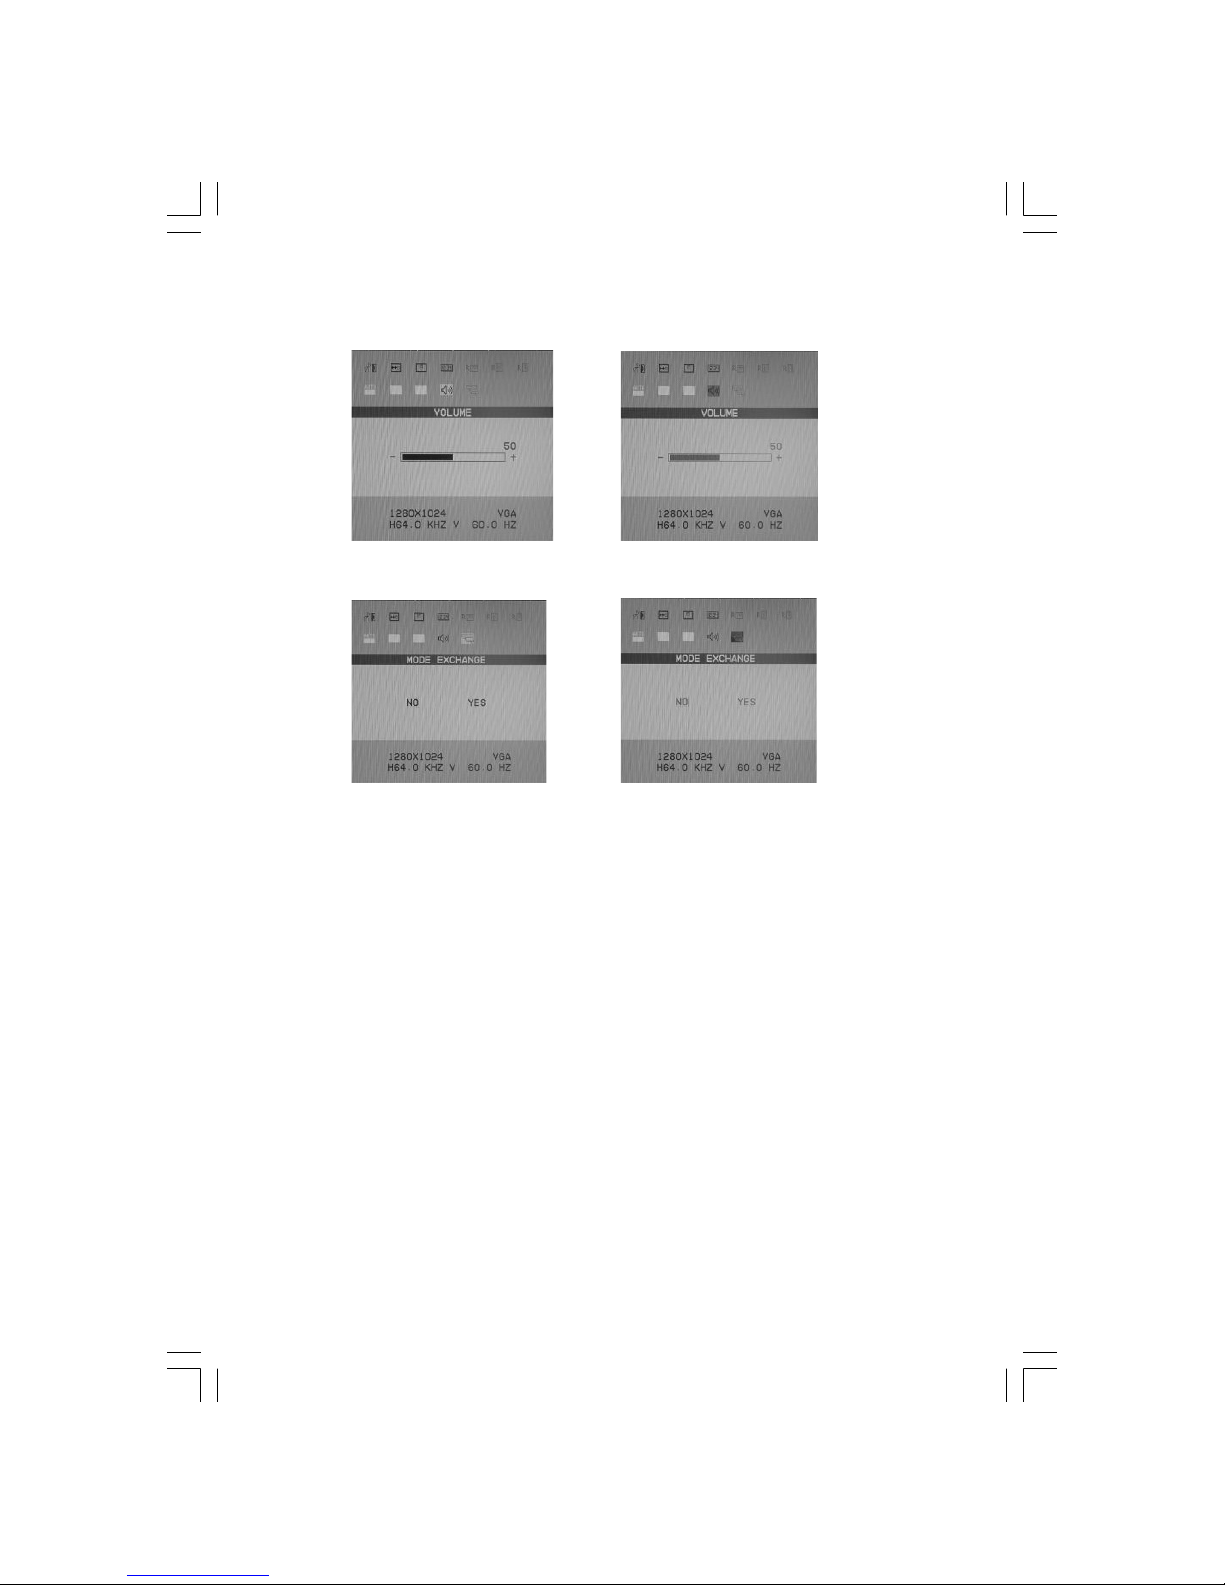
VOLUME
Adjust the Speaker volume
MODE EXCHANGE
VGA/DVI mode change Setting
Page 24
25PRESTIGIO P179
ENG
OSD (On-Screen Display) Menu Mode (VIDEO/S-VIDEO Option)
Option Select
1. Press the “MENU “ button to enter the Menu
2.Press the “MENU “again for advanced adjustment selection (channel selection is included)
3.Press”<\/> Down/Lift”, ” </\> Up/Right” for choose different OSD function
4.Press“MENU “ as enter to select the function you want
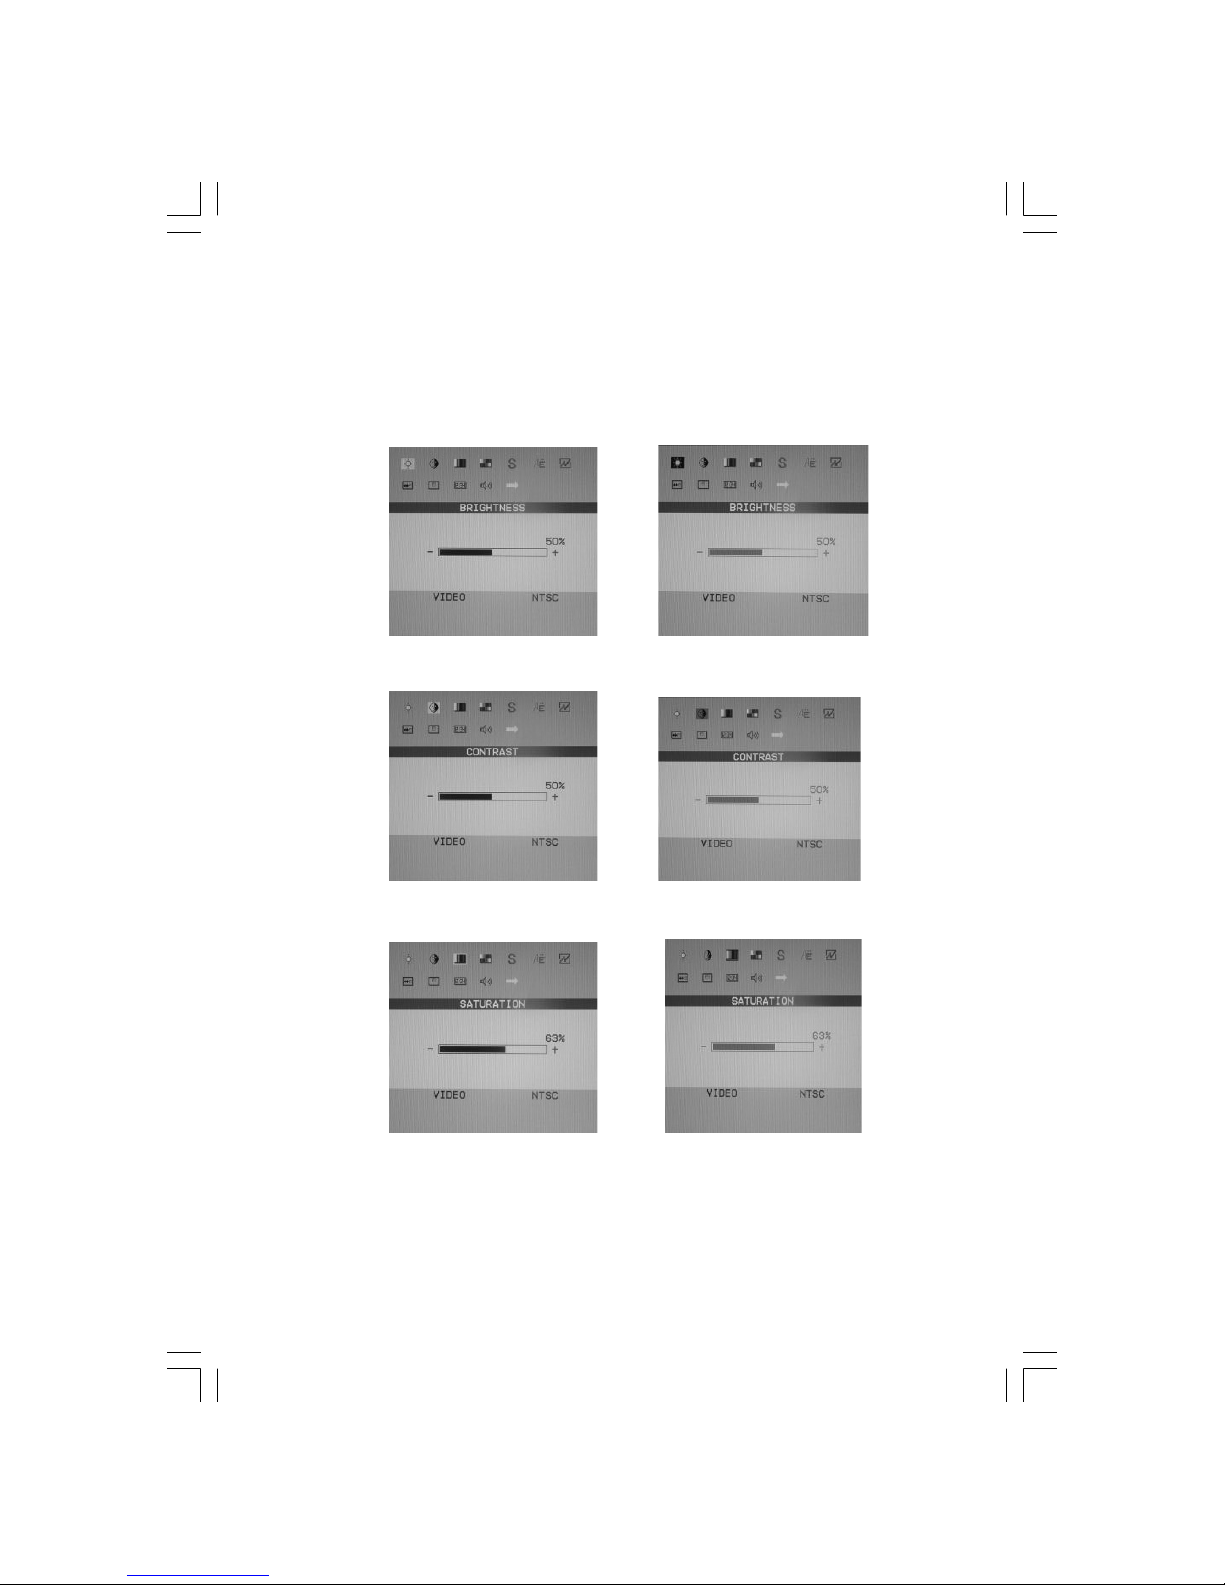
BRIGHTNESS
Adjust the brightness of the display
CONTRAST
Adjust the difference between light and dark area
SATURATION
Adjust the color saturation
Page 25
26 PRESTIGIO P179
ENG
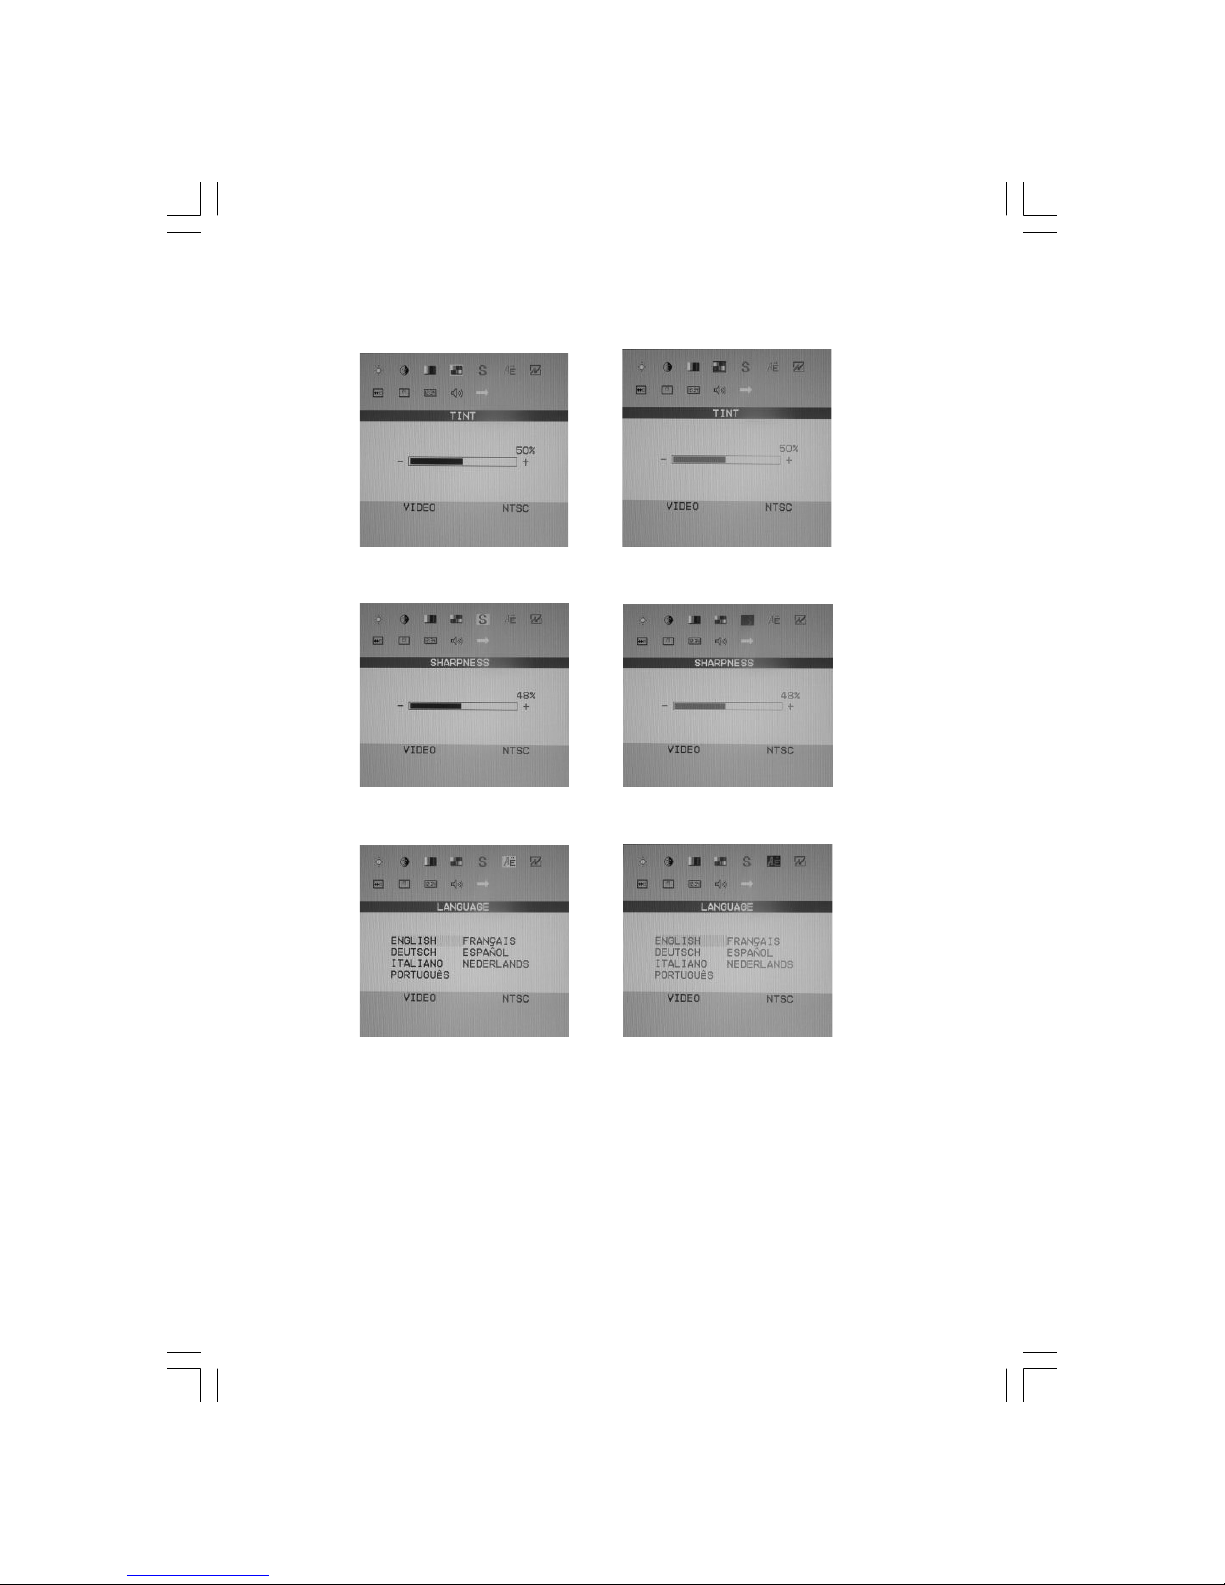
TINT
Adjust the Tint
SHARPNESS
Adjust the Sharpness
LANGUAGE
Language Setting
Page 26
27PRESTIGIO P179
ENG
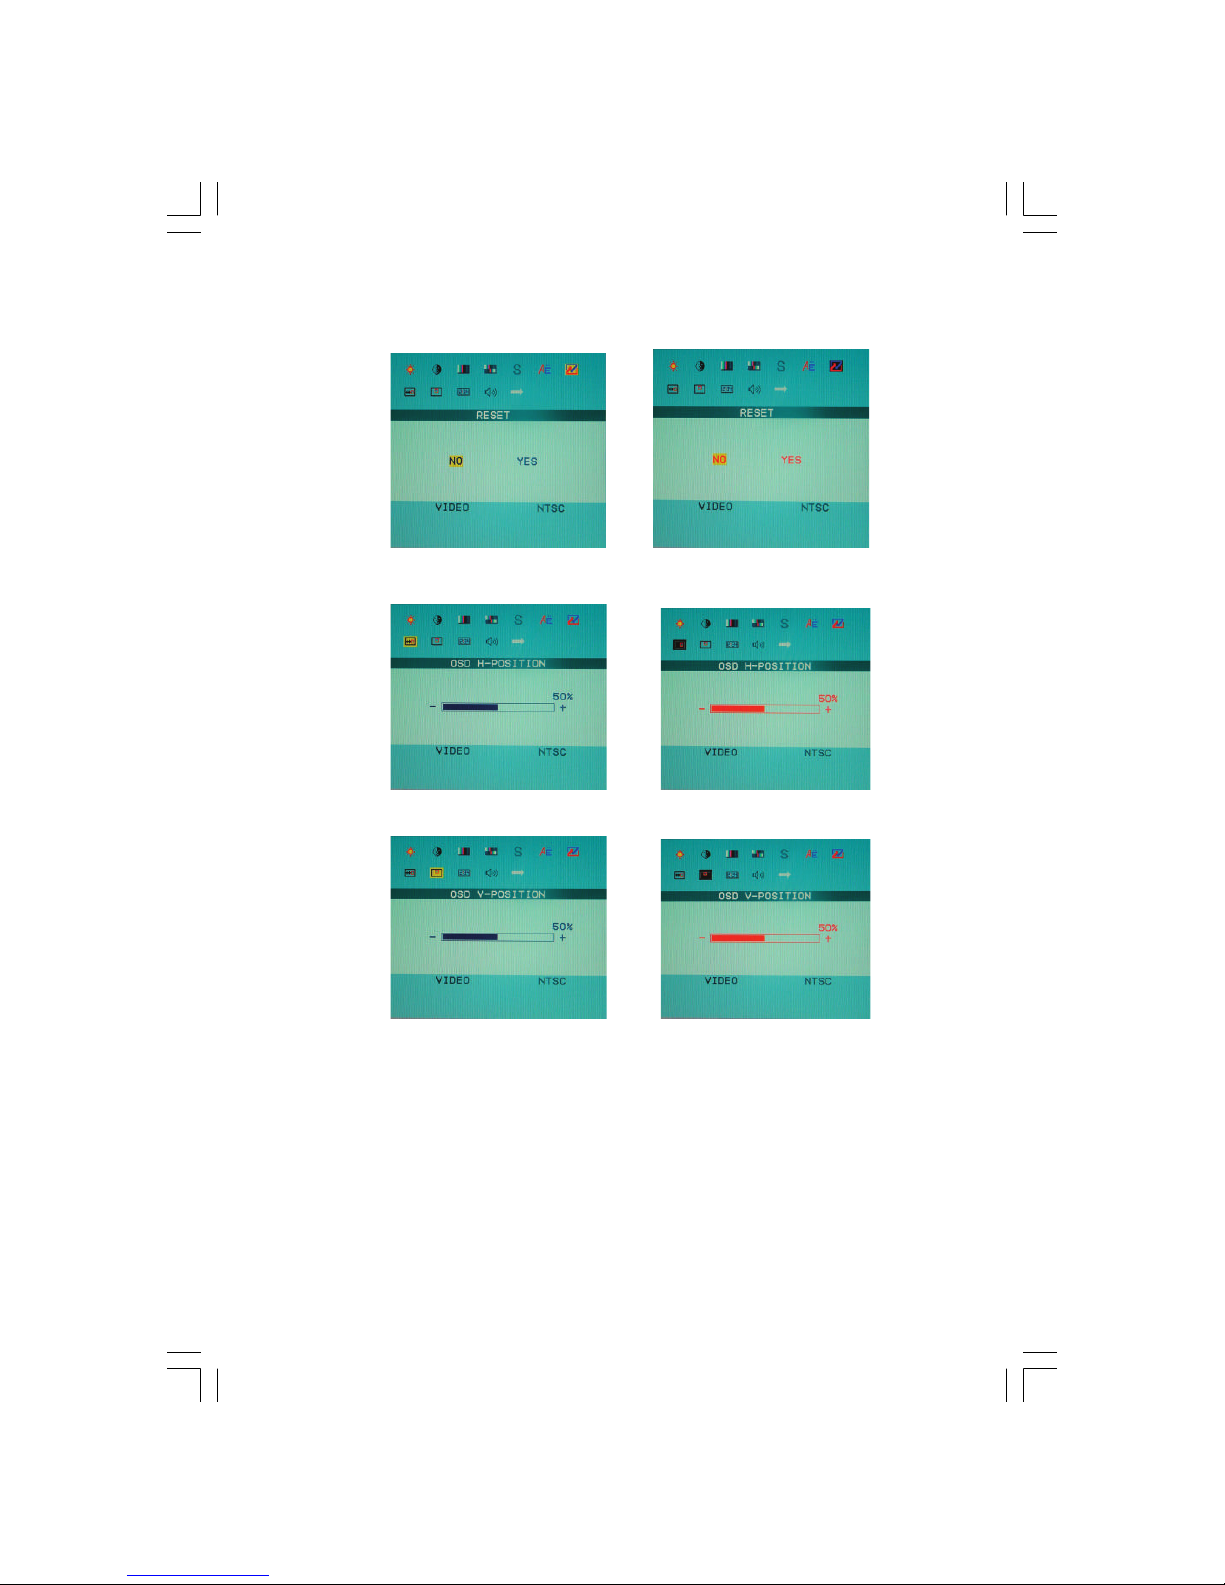
RESET
Recall the factory-setting
OSD H-POSITION
Adjust the horizontal position of OSD
OSD V-POSITION
Adjust the vertical position of the OSD
Page 27
28 PRESTIGIO P179
ENG
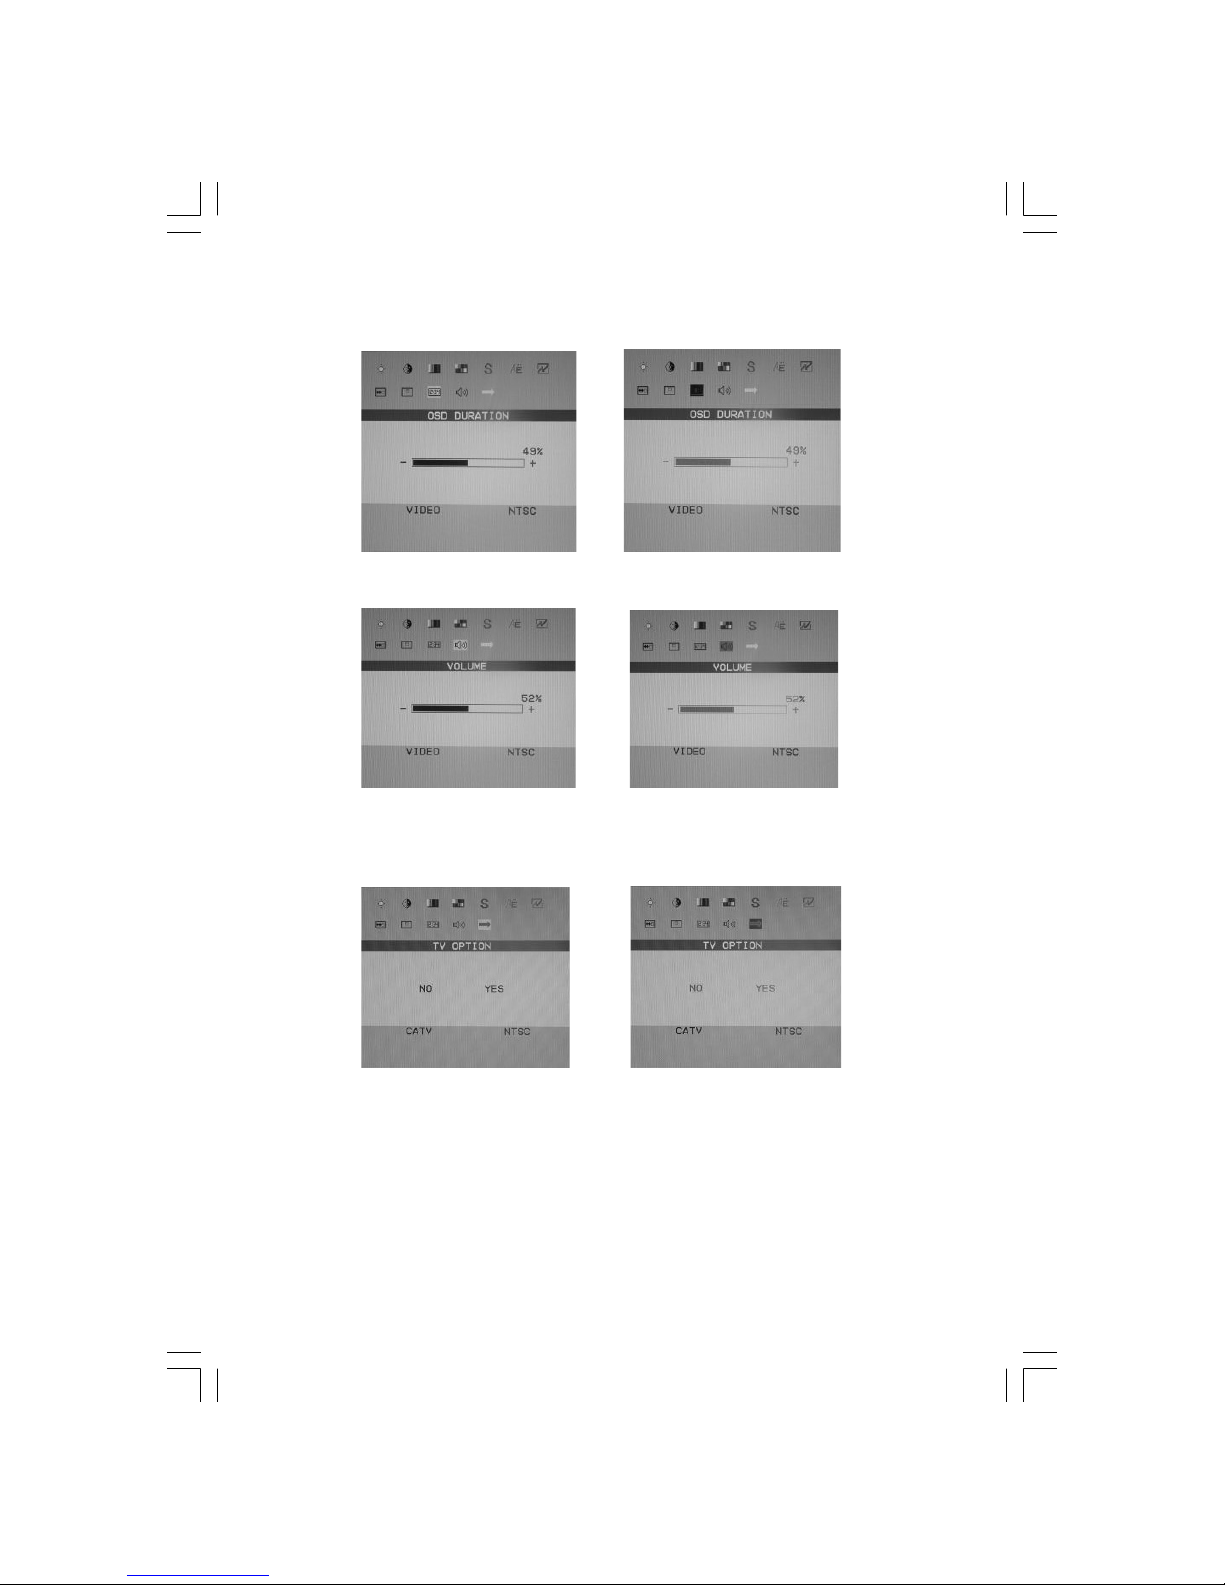
OSD DURATION
OSD lasting time
VOLUME
Adjust the volume (VIDEO/TV)
TV OPTION
Advanced adjustment for TV func tion(only for TV mode)
Page 28
29PRESTIGIO P179
ENG
OSD (On-Screen Display) Menu Mode (TV / CATV Option)
TV/CAT OSD Adjustment are almost same as VIDEO, except some TV/CATV adjustment
Function Select
1. Press “MENU “button to enter the Menu
2. Press “MENU “button again for advanced adjustment (included channel select)
3. Use”<\/> Down/Lift”, ” </\> Up/R ight” button to select different OSD function
4. Press “MENU “button to select the function you want
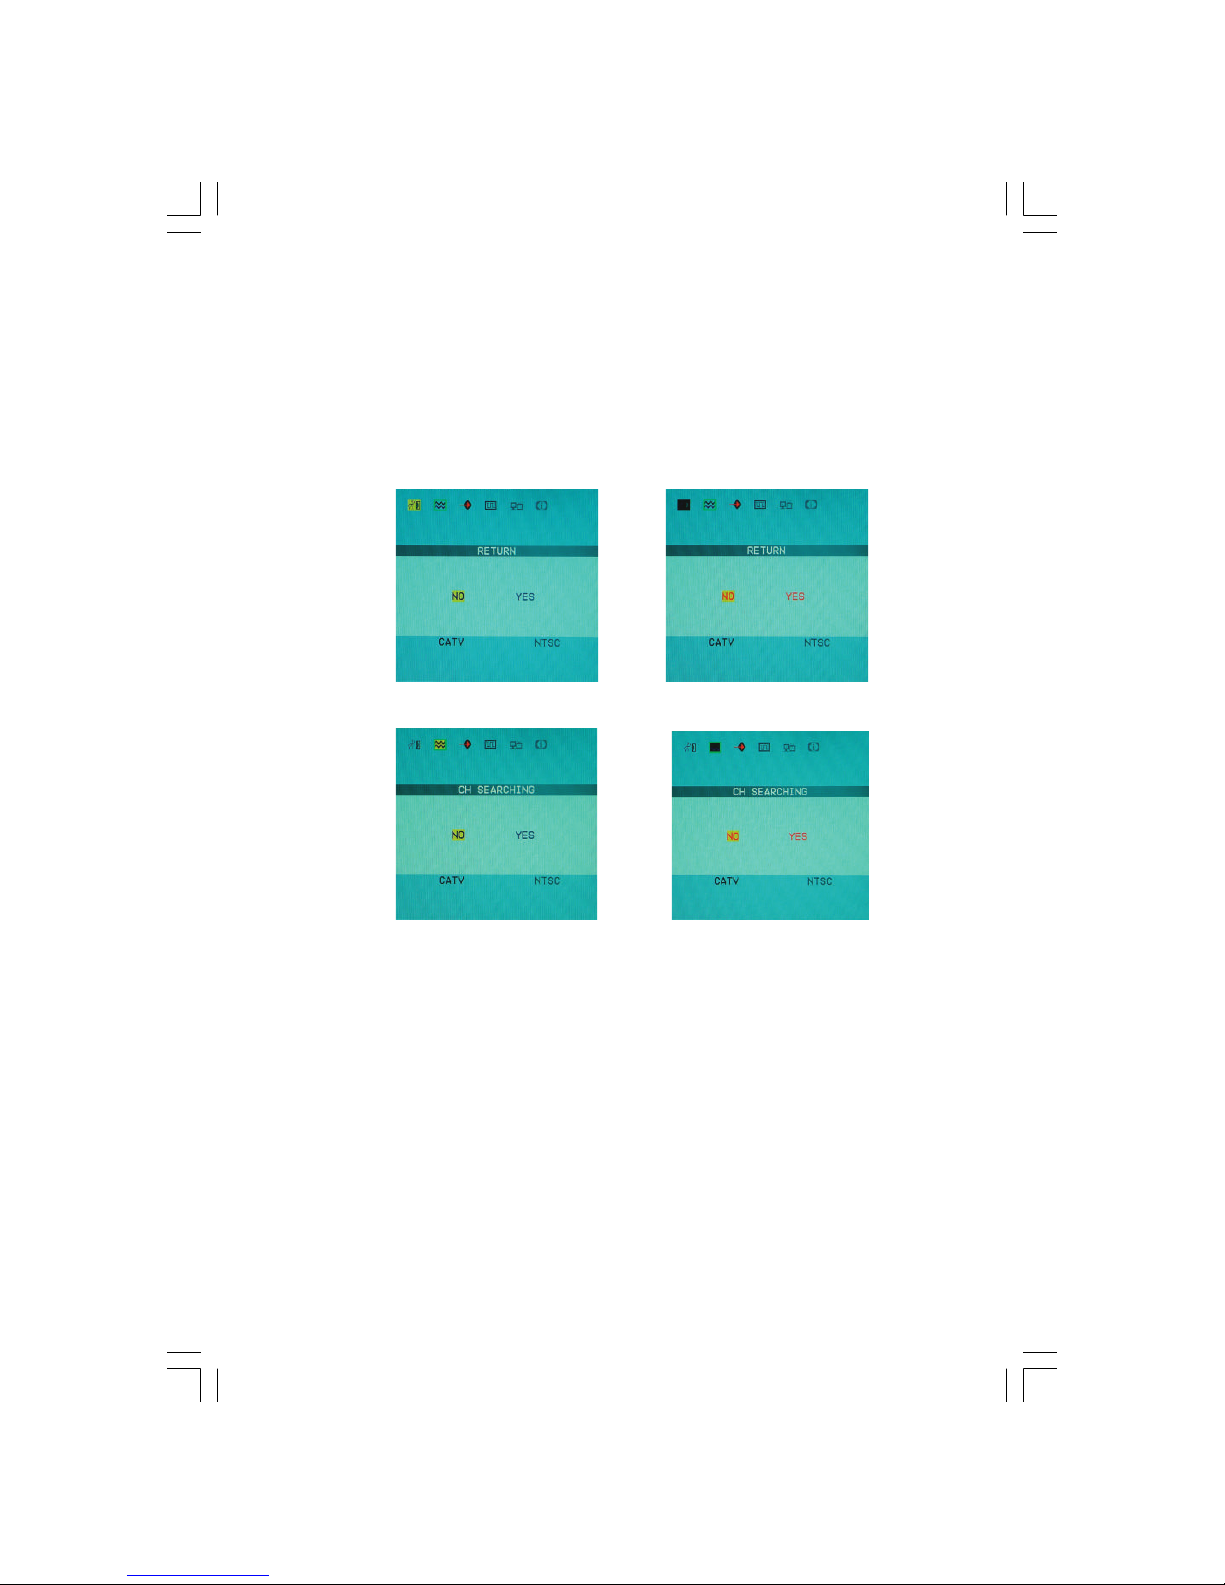
RETURN
Return to Previous page
CH SEARCHING
The TV Channel searching
Page 29
30 PRESTIGIO P179
ENG
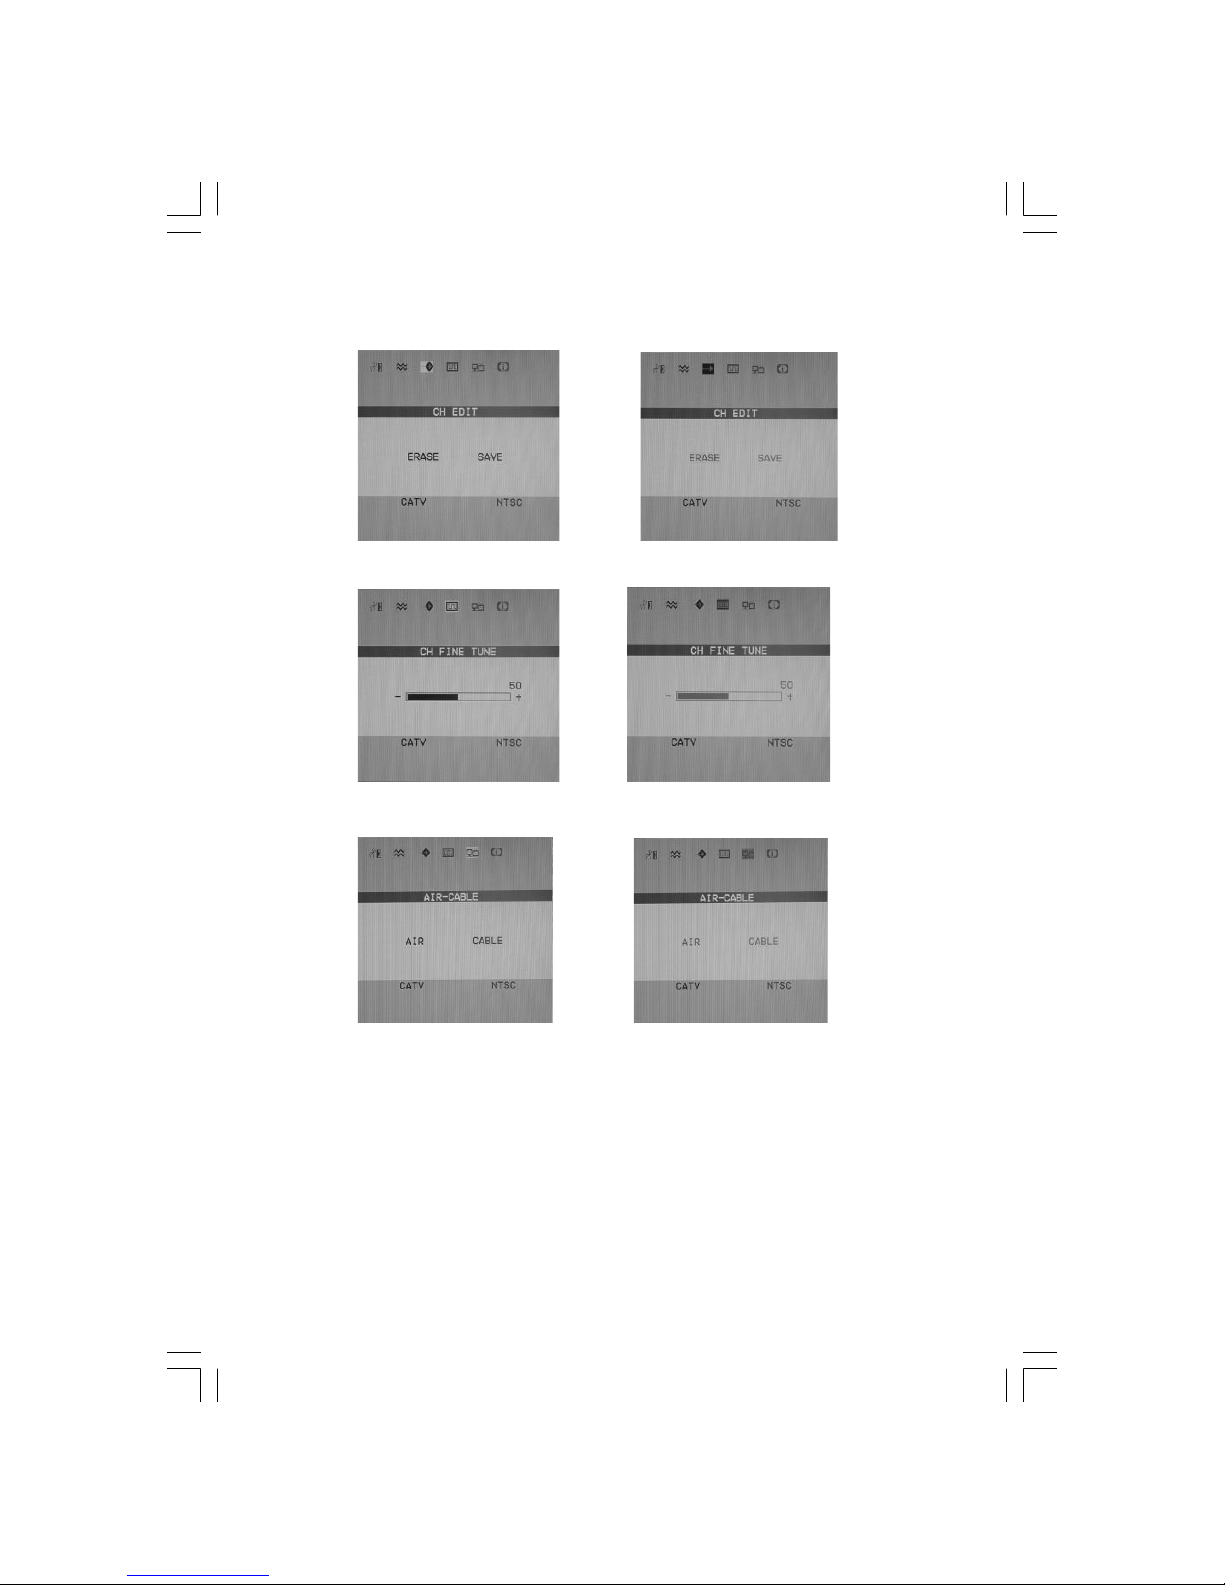
CH EDIT
Select TV channel edition
CH FINE TUNE
TV channel fine tune
AIR-CABLE
TV signal AIR/ Cable Select
Page 30

31PRESTIGIO P179
ENG
COUNTRY
Users country select
PS: For detail description of TV function and adjustment please refer your TV manual
OSD display select item description
VIDEO : Display the In-Put Signal is VIDEO or S-VIDEO
NTSC : Display the VIDEO In-Put signal format is NTSC(or PAL)
1280X1024 : In-Put signal resolution is1280X1024
VGA : In-Put signal Mode is VGA Mode
DVI : In-Put signal Mode is DVI Mode
CATV : In-Put TV signal is Cable-TV system (CATV - TV)
NTSC : In-Put TV system is NTSC system (NTSC - PAL - SEC AM)
Page 31

32 PRESTIGIO P179
ENG
Display Mode
1. We offer you 26 Windows compatible modes.
2. If any interference occurs on your screen while you modulating your PC or OSD. It is normal.
3. To obtain best display quality, remember to upgrade your video card driver. We strongly recommended you choose a
mode listed in the above-mentioned table.
4. The modes not listed on the table above may be supported.
5. You may use the power management on your computer. It’s good for extending the service life of the product.
Page 32

33PRESTIGIO P179
ENG
Specification
LCD Panel Type 17.0” TFT Active Matrix LCD Display
Viewing Angle H:140°, V:130°
Contrast Ratio 500 : 1 (Max), 400 : 1(Typical)
Brightness 300 cd/m2 (Max)
Response Time 16 ms(Typical)
Display Colors 16.2M colors
Max Resolution 1280X1024(SXGA)
Pixel Pitch 0.264mm(H)x0.264mm(V)
Input Signals RGB Analog Video Level:0.7Vp-p(75O)
Sync TTL with 75O internal pull-up resistors
Frequency FH:30~79KHz / FV:56~75Hz
Video In** Auto Detect NTSC/PAL interlaced video with input format of
DVI ** Digital Input Composite video(AV) and S-video
Compatibility PC Up to 1280X1024@75Hz(Non-interlaced)
Connector RGB Analog D-sub 15-pins
Audio In Stereo Phone Jack, RCA-Jack(L/R)*
Audio Out Stereo Phone Jack, RCA-Jack(L/R)*
DVI-D Input** DVI-D 24-pins Connector
Power 12V/DC Power Jack
Power AC input Voltage 100-240V, 50/60Hz(universal) via external AC Adapter
DC input Voltage 12VDC 4A Max
Consumption Active < 48Watt Max
Power saving mode Standby < 5Watt
Internal Speaker 2Wx2(Stereo)
User Interface LED Indicator Active - Green Off - Turn off
Standby - Orange
Operating Condition Temperature 0°C~40°C
Air Humidity 20% ~ 80% R.H.
Dimensions Physical 438mm(H) x 436mm(W) x 59mm(D)
Net Weight 5.5Kg
DDC DDC1/DDC2B Compliant
Power
Management VESA DPMS, EPA Energy Star
Regulation CE, FCC, BSMI, CB, TUV, UL
(Certifications)
**Option Function
Page 33

34 PRESTIGIO P179
CZ
Všechny informace obsažené v tomto návodu mohou být předmětem změn bez jakéhokoliv dalšího upozornění.
Bezpečnostní upozornění
1. Pozorně čtěte tento návod.
2. Uschovejte si jej pro možnost pozdějšího nahlédnutí do něj.
3. Před čistěním monitor vždy odpojte od el. sítě. Nepoužívejte tekutá čistidla ani čistidla ve spreji. Používejte pouze navlhčenou utěrku.
4. Před připojením monitoru do sítě se vždy ujistěte o správné hodnotě el. napětí.
5. Řiďte se všemi upozorněními, které jsou uvedeny na výrobku.
6. Nikdy do monitoru nelijte žádnou tekutinu, můžete tím způsobit požár či si přivodit úraz el. proudem.
7. Monitor nikdy nerozebírejte. Z bezpečnostních důvodu by monitor měl být rozebírán pouze kvalifikovaným mechanikem.
8. Pokud nastane některá z následujících okolností, nechte monitor zkontrolovat v odborném servisu:
a. Do monitoru se dostala nějaká tekutina.
b. Monitor byl vystaven vysoké vlhkosti.
c. Monitor nepracuje správně nebo nereaguje na ovládání podle návodu k obsluze.
d. Monitor spadl a poškodil se.
e. Monitor vykazuje známky fyzického poškození.
9. NENECHÁVEJTE MONITOR V PROSTŘEDÍ S TEPLOTOU VYŠŠÍ NEŽ 40°C, MŮŽE DOJÍT K JEHO POŠKOZENÍ.
10. Napájecí adaptér
a. Channel Well Technology, MODEL PAA050F.
b. Linearity Electronics co. LTD,MODEL LAD6019AB4
Page 34

35PRESTIGIO P179
CZ
Pohled na monitor
Pohled zpředu /1/
Pohled zezadu /2/
Page 35

36 PRESTIGIO P179
CZ
Pohled na monitor
Pohled ze strany /3/
Pohled ze shora /4/
Page 36

37PRESTIGIO P179
CZ
Vybalení monitoru
Děkujeme Vám za zakoupení tohoto monitoru. Nejprve prosím zkontrolujte úplnost balení monitoru včetně všech součástí dodávky.
Pokud některá z následujících položek chybí, kontaktujte svého prodejce.
17" TFT LCD Monitor
Externí univerzální signálový kabel
15 pin D-sub kabel pro Napájecí přívodní kabel
analogový RGB signál
* DVI a Video kabel jsou volitelné*
Síťový adaptér DC 12 V/50-60 Audio kabel se stereofonním
Hz pro vstupní napětí AC 100-240 V sluchátkovým konektorem
Návod k obsluze na CD Rychlý průvodce instalací monitoru
Varování:
1. Ujistěte se, že vaše PC je vypnuto.
2. Zapojte signálový kabel do konektoru videokarty na zadní straně PC.
3. Připojte konektor výstupního kabelu ze síťového adaptéru do zdířky na zadní straně monitoru a napájecí síťový kabel adaptéru.
4. Připojte síťový napájecí kabel do el. zásuvky.
5. Zapněte PC i monitor.
6. Pro dosažení nejlepší kvality zobrazení doporučujeme nastavit rozlišení tak, jak je popsáno na stránce Režim zobrazení.
Page 37

38 PRESTIGIO P179
CZ
Volitelný televizní tuner
Tento 17" monitor volitelně podporuje funkci TV tuneru s následujícím příslušenstvím, které lze odděleně zakoupit. Ohledně detailů
kontaktujte vašeho prodejce.
Volitelný TV tuner
S-Video kabel Sdružený kabel
Evropský PAL systém U.S. NTSC systém
RCA sluchátkový kabel Dálkové ovládání
Dálkové ovládání
Dálkové ovládání používejte tak, že jej nasměrujete na okénko senzoru dálkového ovládání na monitoru.
Upozornění: 1. Dálkové ovládání nemusí pracovat správně, pokud jsou slabé baterie.
2. Neumísťujte dálkový ovladač do prostředí s vysokou vlhkostí nebo tam, kde by na něj mohly přímo dopadat sluneční paprsky.
Pokud dálkové ovládání nefunguje správně, vyměňte jeho baterie.
Upozornění: Vložte baterie /lithiové baterie/ tak, aby odpovídaly svými póly + a - značkám v bateriovém prostoru.
Page 38

39PRESTIGIO P179
CZ
Rady k čištění monitoru
1. Dbejte vždy opatrnosti při čištění obrazovky.
2. Nikdy nepoužívejte žádná chemická rozpouštědla k čištění obrazovky.
3. Pro čištění obrazovky doporučujeme používat kartáček z velbloudích chlupů nebo měkké utěrky, které nepouští chloupky.
4. Vyhněte se při čištění obrazovky přílišnému tlaku na její povrch.
Upozornění:
1. Nevystavujte monitor přímému slunečnímu svitu nebo tepelnému záření.
2. Nestříkejte na monitor žádné tekutiny.
3. Nezkoušejte monitor rozebírat. Můžete si tím způsobit úraz el. proudem. Pro zjištění místa opravny kontaktujte svého prodejce
monitoru.
4. Nepoužívejte monitor v prostředí, kde jsou předměty vytvářející silné magnetické pole.
5. Na čištění obrazovky nepoužívejte žádné chemikálie nebo jiné silné čistící prostředky. Používejte pouze čistou měkkou navlhčenou
utěrku.
6. Na monitor nepokládejte žádné předměty. Snížená ventilace vzduchu může způsobit přehřátí monitoru.
7. Nedotýkejte se prsty povrchu LCD panelu. Otisky prstů obsahují mastnotu a ta se z povrchu LCD panelu špatně odstraňuje.
Vlastnosti monitoru
Úsporný režim
Úsporný režim odpovídá standardu VESA DPMS. Pokud je PC vypnuto nebo je v režimu spánku, monitor automaticky sníží spotřebu
na méně než 5 W.
Funkce tlačítka automatického nastavení:
S tlačítkem “AUTO” můžete automaticky nastavit zobrazení displeje na optimální zobrazení.
Široký zobrazovací úhel
Zobrazovací úhel 150° horizontálně a 125° vertikálně poskytuje výborné podmínky pro sledování zobrazení na tomto monitoru.
Kompatibilita s technologií Plug and Play
Ve shodě s předpisy DDC1/DDC2B je tento monitor plně kompatibilní s technologií Plug and Play sytému Windows 95/98/ME/
2000/XP.
Úspora místa
Monitor je svojí pracovní šířkou 280 mm koncipován k šetření prostorem na vašem pracovním stole.
Možnost využití několika monitorů vedle sebe - panel
Tento monitor je možno díky 17 mm šířce jeho rámu okolo displeje používat v plošné sestavě několika monitorů vedle sebe.
Page 39

40 PRESTIGIO P179
CZ
Instalace monitoru
Buďte na tento monitor opatrní, neboť hrubým zacházením se může snadno poškodit. Před jeho instalací vypněte PC a postupujte podle
níže popsaných kroků.
Vstup
/1/ DC-IN : Vstup pro napájecí napětí
/2/ AUDIO-IN : Vstupní konektor pro jakýkoliv zdroj audio signálu
/3/ VGA-IN : Vstupní konektor pro signálový kabel typu D-sub 15 pin
/4/ VIDEO : Vstup pro RCA Video /volitelné/
/5/ : S-IN : Vstup pro S-Video signál /volitelné/
/6/ TV : Konektor pro TV signál /volitelné/
/7/ : AUDIO-OUT : Výstup pro sluchátka nebo externí reproduktory
8/8 : DVI In-Put : Podporuje vstup DVI-D 24 pin /volitelné/
[1] [2]
[3] [8]
[4] [7] [5] [6]
[3]
Page 40

41PRESTIGIO P179
CZ
Instalace monitoru krok za krokem
1. Otočte opatrně monitor, abyste získali přístup k připojovacím konektorům.
2. Připojte signálový kabel VGA-IN do odpovídajícího konektoru na monitoru a jeho druhý konec připojte to PC.
3. Připojte audio kabel do zdířky AUDIO-IN na monitoru a jeho druhý konec do zvukového výstupu PC.
Page 41

42 PRESTIGIO P179
CZ
4. Připojte signálový kabel do konektoru DVI-IN 24 pin na monitoru a jeho druhý konec do PC.
5. Připojte napájecí DC kabel od napájecího adaptéru do zdířky DC-IN na monitoru.
6. Gratulujeme Vám ! Právě jste dokončili instalaci monitoru.
Page 42

43PRESTIGIO P179
CZ
Instalace TV tuneru /volitelná/
1. Instalace pro volitelný TV tuner tohoto LCD monitoru je popsána v následujících krocích.
2. Nejprve sejměte plastový kryt na zadní straně monitoru stisknutím příchytek na obou stranách.
3. Přesvědčete se o umístění pin konektoru na monitoru a pin konektoru na TV tuneru.
Page 43

44 PRESTIGIO P179
CZ
4. Zasuňte modul TV tuneru na pravou stranu volného prost oru na zadní straně monitoru a opatrně spojte konektor tuneru s konektorem
monitoru.
5. Zafixujte tuner šroubky a nainstalujte zpět plastový kryt.
6. Připojte RCA video kabel do vstupu VIDEO a jeho druhý konec do RCA Video výstupu video zařízení, jako je např. DVD přehrávač.
Page 44

45PRESTIGIO P179
CZ
7. Připojte S-Video signálový video kabel do vstupu S-IN a jeho druhý konec do S-Video výstupu video zařízení, jako je např. DVD
přehrávač.
8. Připojte TV signálový kabel od zásuvky poskytovatele kabelové televize do TV konektoru na monitoru.
9. Gratulujeme k připojení TV tuneru a nyní se můžete potěšit výsledkem svého snažení.
Page 45

46 PRESTIGIO P179
CZ
Úhel náklonu
V normálních podmínkách
Náklon LCD 0° - 25° /pozitivně a negativně 2°/
Page 46

47PRESTIGIO P179
CZ
Tlačítko nastavení monitoru
Tlačítko ovládání menu
Na monitoru je umístěno 5 tlačítek pro jeho nastavení - POWER - Zapnout, MENU, AUTO, <\/> Down/Left”, ”</\> Up/Right”.
Postupujte podle níže uvedených instrukcí.
1. POWER - Toto tlačítko zapíná a vypíná monitor. Pokud je monitor zapnutý, tlačítko svítí zeleně, pokud je v pohotovostní stavu, svítí
oranžově.
2. AUTO - uložení a opuštění nastavení. Jeho stiskem je také možno provést automatické nastavení monitoru.
3. MENU - stiskem tohoto tlačítka se aktivuje OSD menu na obrazovce a také se vybírá volba OSD menu.
4. “</\> Up/Right”: Zvyšuje hodnotu při zvolené položce v OSD menu. Pokud není OSD menu aktivní, pak toto tlačítko slouží k
přepínání mezi vstupy PC / Video / S- Video / TV.
5. “<\/> Down/Left”: Snižuje hodnotu při zvolené položce v OSD menu. Pokud není OSD menu aktivní, pak můžete tímto tlačítkem
nastavovat hlasitost.
Auto Adjust OSD Menu Power Down Up
Page 47

48 PRESTIGIO P179
CZ
Možné problémy
Pokud dojde k jakýmkoliv problémům při provozu monitoru, ujistěte se, že monitor je správně instalován, než budete kontaktovat
autorizovanou opravnu.
? Na dis? Na dis
? Na dis? Na dis
? Na dis
pleple
pleple
ple
ji není žádný obrji není žádný obr
ji není žádný obrji není žádný obr
ji není žádný obr
az.az.
az.az.
az.
Kontrola:
1. Zda není monitor v úsporném režimu - stiskněte nějakou klávesu na klávesnici nebo pohněte myší.
2. Signálový konektor - pokud jsou poškozeny jeho jehličky, kontaktujte svého prodejce monitoru.
? Obr? Obr
? Obr? Obr
? Obr
az se jeaz se je
az se jeaz se je
az se je
ví přví př
ví přví př
ví př
íliš tmaíliš tma
íliš tmaíliš tma
íliš tma
vý nebo přvý nebo př
vý nebo přvý nebo př
vý nebo př
íliš jasnýíliš jasný
íliš jasnýíliš jasný
íliš jasný
..
..
.
Kontrola:
1. Použijte OSD menu pro nastavení odpovídajícího kontrastu.
? Je tř? Je tř
? Je tř? Je tř
? Je tř
eba opěteba opět
eba opěteba opět
eba opět
oo
oo
o
vného nasvného nas
vného nasvného nas
vného nas
tt
tt
t
aa
aa
a
vv
vv
v
ení monitení monit
ení monitení monit
ení monit
oror
oror
or
u.u.
u.u.
u.
Kontrola:
1. Po resetování monitoru
2. Pokud byla měněna frekvence nebo rozlišení.
? T? T
? T? T
? T
ee
ee
e
xt na obrxt na obr
xt na obrxt na obr
xt na obr
azaz
azaz
az
oo
oo
o
vv
vv
v
ce není dobřce není dobř
ce není dobřce není dobř
ce není dobř
e čite čit
e čite čit
e čit
elnýelný
elnýelný
elný
Kontrola:
1. Ujistěte se, že rozlišení odpovídá režimu zobrazení.
? Jes? Jes
? Jes? Jes
? Jes
tližtliž
tližtliž
tliž
e jsou bare jsou bar
e jsou bare jsou bar
e jsou bar
vy přvy př
vy přvy př
vy př
íliš do číliš do č
íliš do číliš do č
íliš do č
erer
erer
er
vv
vv
v
ena nebo jsou přena nebo jsou př
ena nebo jsou přena nebo jsou př
ena nebo jsou př
íliš sytéíliš syté
íliš sytéíliš syté
íliš syté
1. Použitím OSD MENU nastavte teplotu barev - Color Temperature
OSD /On Screen Display/ Menu - menu nastavení funkcí monitoru na obrazovce v
režimu VGA/DVI
Volba výběru
1. Stiskněte tlačítko MENU, kterým menu vyvoláte.
2. Dalším stiskem tlačítka MENU je možno vybrat rozšířené nastavení.
3. Stiskem tlačítek Down nebo UP vyberete jednotlivé funkce OSD menu
4. Dalším stiskem tlačítka MENU vstoupíte do vybrané funkce.
JAS - BRIGHTNESS
Nastavuje jas obrazu.
Page 48

49PRESTIGIO P179
CZ
KONTRAST - CONTRAST
Nastavuje rozdíly /kontrast/ mezi světlými a tmavými oblastmi obrazu.
FÁZE - PHASE
Nastavuje fázi taktu pixelů /není podporováno v režimu DVI/
FREKVENCE - CLOCK
Nastavuje frekvenci pixelů /není podporováno v režimu DVI/
Page 49

50 PRESTIGIO P179
CZ
HORIZONTÁLNÍ POZICE OBRAZU
Nastavuje horizontální pozici obrazu na obrazovce /není podporováno v režimu DVI/
VERTIKÁLNÍ POZICE OBRAZU
Nastavuje vertikální pozici obrazu na obrazovce /není podporováno v režimu DVI/
TEPLOTA BAREV - COLOR TEMP
Nastavuje teplotu barev
Page 50

51PRESTIGIO P179
CZ
ČERVENÁ - RED
Nastavuje červenou barvu /musí být zvolen režim uživatelského nastavení - USER pro změnu této položky/
ZELENÁ - GREEN
Nastavuje zelenou barvu /musí být zvolen režim uživatelského nastavení - USER pro změnu této položky/
MODRÁ - BLUE
Nastavuje modrou barvu /musí být zvolen režim uživatelského nastavení - USER pro změnu této položky/
Page 51

52 PRESTIGIO P179
CZ
JAZYK KOMUNIKACE - LANGUAGE
Nastavení podpory jazyka komunikace OSD menu.
RŮZNÉ - MISCELLANEOUS
Vstup na další stranu pro ostatní nastavení
NÁVRAT - RETURN
Návrat na předchozí stranu pro nastavení
Page 52

53PRESTIGIO P179
CZ
HORIZONTÁLNÍ POZICE OSD MENU - OSD H-POSITION
Nastavuje horizontální pozici OSD menu na obrazovce
VERTIKÁLNÍ POZICE OSD MENU - OSD V-POSITION
Nastavuje vertikální pozici OSD menu na obrazovce
DOBA TRVÁNÍ ZOBRAZENÍ OSD MENU - OSD - DURATION
Nastavuje dobu, po kterou se menu OSD objevuje na obrazovce.
Page 53

54 PRESTIGIO P179
CZ
ROTACE OSD MENU - OSD ROTATION
Nastavuje rotaci menu OSD na obrazovce.
PŘEKLOPENÍ OSD MENU - OSD FLIP
Nastavuje překlopení OSD menu na obrazovce
ZRCADLOVÉ ZOBRAZENÍ OSD MENU - OSD MIRROR
Nastavuje zrcadlové zobrazení OSD menu.
Page 54

55PRESTIGIO P179
CZ
HLASITOST - VOLUME
Nastavuje hlasitost reproduktorů.
REŽIM ZMĚNY
Nastavuje změny režimu VGA/DVI.
Page 55

56 PRESTIGIO P179
CZ
OSD /On Screen Display/ Menu - menu nastavení funkcí monitoru na obrazovce v
režimu VIDEO-S
Volba výběru
1. Ke vstupu do menu stiskněte tlačítko MENU
2. Dalším stiskem tlačítka MENU se dostanete do výběru rozšířeného nastavování / výběr kanálu je zahrnut/.
3. Stiskem tlačítka “<\/> Down/Lift”, ” </\> Up/Right” vyberte požadovanou OSD funkci.
4. Stiskem tlačítka MENU výběr potvrďte.
JAS - BRIGHTNESS
Nastavuje jas obrazu na obrazovce
KONTRAST - CONTRAST
Nastavuje rozdíly mezi světlými a tmavými oblastmi obrazu
NASYCENÍ BAREV - SATURATION
Nastavuje nasycení barev v obrazu
Page 56

57PRESTIGIO P179
CZ
BAREVNÝ ODSTÍN - TINT
Nastavuje barevný odstín
OSTROST - SHARPNESS
Nastavuje ostrost obrazu
JAZYK - LANGUAGE
Výběr jazyka komunikace s OSD menu
Page 57

58 PRESTIGIO P179
CZ
RESETOVÁNÍ - RESET
Resetování nastavení - nastavení funkcí monitoru tak, jak byl nastaven od výrobce.
HORIZONTÁLNÍ POZICE OSD MENU NA OBRAZOVCE - OSD H-POSITION
Nastavuje horizontální pozici OSD menu na obrazovce
VERTIKÁLNÍ POZICE OSD MENU NA OBRAZOVCE - OSD V-POSITION
Nastavuje vertikální pozici OSD menu na obrazovce
Page 58

59PRESTIGIO P179
CZ
DOBA TRVÁNÍ ZOBRAZENÍ OSD MENU - OSD - DURATION
Nastavuje dobu, po kterou se menu OSD objevuje na obrazovce.
HLASITOST - VOLUME
Nastavuje hlasitost /VIDEO-TV/
MOŽNOSTI NASTAVENÍ TV TUNERU
Rozšířené nastavení pro funkce TV tuneru /pouze v režimu TV/
Page 59

60 PRESTIGIO P179
CZ
OSD /On Screen Display/ Menu - menu nastavení funkcí monitoru na obrazovce v
režimu TV/CATV
Možnosti nastavení funkcí OSD menu v režimu TV/CATV jsou téměř stejné jako v režimu VIDEO, kromě několika specifických možností
nastavení TV/CATV
Výběr funkce
1. Stiskem tlačítka MENU vstoupíte do menu
2. Dalším stiskem tlačítka MENU se dostanete do rozšířeného nastavení /zahrnuje nastavení kanálu/
3. Stiskem tlačítka”<\/> Down/Lift”, nebo </\> Up/Right” vybíráte různé funkce z OSD menu
4. Stiskem tlačítka MENU výběr potvrďte.
NÁVRAT - RETURN
Návrat na předchozí stránku
VYHLEDÁVÁNÍ KANÁLU - CH SEARCHING
Hledání požadovaného televizního kanálu
Page 60

61PRESTIGIO P179
CZ
EDITACE KANÁLU - CH EDIT
Vybere možnost editace vlastností televizního kanálu
VYLEPŠENÉ NALADĚNÍ KANÁLU CH FINE TUNE
Spustí funkci vylepšeného naladění televizního kanálu
ANTÉNA/KABEL - AIR-CABLE
Výběr televizního signálu z antény nebo z kabelového rozvodu
Page 61

62 PRESTIGIO P179
CZ
ZEMĚ - COUNTRY
Výběr země, ve které se uživatel nachází
Pozn.: Pro detailní popis funkcí TV tuneru a jeho nastavení použijte návod k obsluze TV tuneru.
Popis zobrazovaných položek OSD k výběru
VIDEO: zobrazuje vstupní signál typu VIDEO nebo S-VIDEO
NTSC: zobrazuje VIDEO vstupní signál ve formátu NTSC nebo PAL
1280 x 1024: rozlišení vstupního signálu je 1280 x 1024 pixelů
VGA: režim vstupního signálu je VGA
DVI: režim vstupního signálu je DVI
CATV: vstupní televizní signál je z kabelové televize
NTSC: vstupní TV systém je systém NTSC /NTSC-PAL-SECAM/
Page 62

63PRESTIGIO P179
CZ
Režim zobrazení
1. Nabízíme vám celkem 26 režimů zobrazení, kompatibilních se systémem Windows.
2. Pokud se v obraze na monitoru objeví rušení při nastavování vašeho PC nebo při OSD menu, považujte to za normální jev.
3. K zajištění co nejvyšší kvality zobrazování na tomto monitoru je důležité, aby váš PC byl vybaven co možno nejmodernější verzí
ovladače video karty. Doporučujeme používat režimy zobrazení, které jsou uvedené v tomto návodu.
4. Režimy zobrazení, které zde nejsou uvedeny mohou být i tak monitorem podporovány.
5.Monitor podporuje úsporný režim a řízení spotřeby na vašem PC. Jeho používáním zvýšíte životnost monitoru.
Page 63

64 PRESTIGIO P179
CZ
Technické údaje
LCD panel Typ 17" aktivní maticový TFT LCD displej
Pozorovací úhel Horizontálně 140°, vertikálně 130°
Kontrastní poměr 500:1 maximálně, 400:1 typicky
Jas 300 cd/m2 /max./
Čas odezvy 16 ms /typicky/
Zobrazování barev 16,2 milionu barev
Maximální rozlišení 1280 x 1024 /SXGA/
Rozteč pixelů 0,264 mm horizontálně x 0,264 mm ver tikálně
Vstupní signály Analogový RGB Úroveň video signálu 0,7 Vp-p /750/
Synchronizace TTL s 750 vnitřními odpory
Frekvence horizontální 30-79 kHz, vertikální 56-75 Hz
Video ** Automatická detekce NTSC/PAL videosignálu s prokládaným
DVI ** digitální vstup řádkováním ve vstupním formátu AV a S-VIDEO
Kompatibilita PC Do 1280 x 1024/75 Hz /neprokládaně/
Konektor Analogového signálu RGB D-sub 15-ti pinový
Vstup Audio Stereofonní sluchátkový konektor /jack/ RCA /L-P/
Výstup Audio Stereofonní sluchátkový konektor /jack/ RC A /L-P/
Vstup DVI-D ** DVI-D 24 pinový konektor
Zdroj 12V/DC s napájecím konektorem
Zdroj Vstupní /AC/ síťové napětí 100-240 V, 50-60 Hz /univerzální/ přes externí
Výstupní /DC/ stejnosměrné napětí síťový AC adapté 12 V DC 4 A /max./r
Spotřeba V aktivním stavu méně než 48 W /max./
Úsporný režim V pohotovostním režimu méně než 5 W
Vestavěný reproduktor 2 x 2 W /s tereo/
Uživatelské rozhraní Indikační LED dioda Zapnuto - zelená, vypnuto - nesvítí
V pohotovostním stavu - oranžová
Provozní podmínky Teplota 0°C - 40°C
Vzdušná vlhkost 20% - 80% relativní vlhkosti
Rozměry monitoru 438 mm /V/ x 436mm /Š/ x 59 mm /H/
Hmotnost 5,5, kg
DDC Odpovídá DDC1/DDC2B
Řízení spotřeby VES A DPMS, EPA Energy Star
Předpisy /Certifikace/ CE, FCC, BSMI, CB, TUV, UL
** volitelná funkce
Page 64

65PRESTIGIO P179
SK
Všetky informácie obsiahnuté v tomto manuáli podliehajú zmenám bez predchádzajúceho upozornenia.
Bezpečnostné pokyny
1. Dôkladne si prosím preštudujte tieto bezpečnostné pokyny.
2. Manuál odložte pre prípad jeho potreby v budúcnosti.
3. Pred čistením odpojte monitor od všetkých zariadení a vytiahnite ho z elektrickej zásuvky. Na čistenie nepoužívajte tekuté čistiace
prostriedky alebo prostriedky v spreji. Na čistenie použite navlhčenú tkaninu.
4. Pred pripojením monitora do elektrickej siete sa uistite, či napätie v nej vyhovuje požiadavkám na napájanie monitora.
5. Dodržujte všetky výstrahy a upozornenia.
6. Dávajte pozor, aby do otvorov nevnikli žiadne kvapaliny, mohli by byť príčinou úrazu elektrickým prúdom.
7. Zariadenie nikdy neotvárajte. Z bezpečnostných dôvodov ho môže rozoberať iba kvalifikovaná osoba.
8. Ak sa vyskytla nasledujúca situácia, nechajte zariadenie skontrolovať kvalifikovanou osobou:
a. Do zariadenia vnikla tekutina.
b. Zariadenie bolo vystavené zvýšenej vlhkosti.
c. Zariadenie nepracuje správne alebo nepracuje podľa užívateľského manuálu.
d. Zariadenie spadlo a poškodilo sa.
e. Zariadenie javí známky poškodenia.
9. ZARIADENIE NENECHÁVAJTE V PROSTREDÍ S TEPLOTOU VYŠŠOU, AKO 40°C, MOHLO BY SA POŠKODIŤ.
10. Adaptér:
a. Channel Well Technology, MODEL PAA050F.
b. Linearity Electronics co. LTD,MODEL LAD6019AB4
Page 65

66 PRESTIGIO P179
SK
Pohľad na monitor
Pohľad spredu (1)
Pohľad zozadu (2)
Page 66

67PRESTIGIO P179
SK
Pohľad na monitor
Pohľad zboku (3)
Pohľad zhora (4)
Page 67

68 PRESTIGIO P179
SK
Rozbalenie
Ďakujeme Vám za zakúpenie tohto monitora. Na začiatok skontrolujte obsah jeho balenia. Ak niektorá jeho časť chýba, kontaktujte
svojho predajcu.
17” TFT LCD monitor
Externý univerzálny 15-pinový
D-sub (analógový RGB) Napájací kábel
vstupný signálny kábel
*DVI a Video sú voliteľné*
Univerzálny externý AC/
DC adaptér (DC 12V, 50 / 60Hz) Audio kábel so
(AC 100-240V) slúchadlovou stereo koncovkou
Užívateľský manuál na CD Príručka rýchlej inštalácie
Výstraha
1. Skontrolujte, či je systém vypnutý.
2. Signálny kábel pripojte k signálnemu konektoru na zadnej strane PC.
3. Výstupný kábel adaptéra pripojte ku konektoru na zadnej strane LCD monitora a napájací kábel pripojte k adaptéru.
4. Napájací kábel pripojte do elektrickej siete.
5. Zapnite počítač a monitor.
6. Na zaistenie najlepšej kvality obrazu Vám odporúčame nastaviť také rozlíšenie, ako je zobrazené na stránke Režim zobrazenia.
Page 68

69PRESTIGIO P179
SK
Voliteľný TV tuner
17" LCD monitor podporuje s nasledujúcim voliteľným príslušenstvom funkciu TV tunera. Príslušenstvo sa predáva samostatne. Viac
informácií získate u svojho distribútora.
Voliteľný TV tuner
S-Video kábel Kompozitný kábel
Redukcia pre európsky PAL systém I - I Redukcia pre U.S.
NTSC systém PH - F
Kábel RCA - slúchadlový konektor Diaľkový ovládač
Diaľkový ovládač
Pri používaní nasmerujte diaľkový ovládač na IR snímač.
Poznámka: 1. Diaľkový ovládač nemusí fungovať správne, ak je batéria takmer vybitá.
2. Diaľkový ovládač nepokladajte na priame slnečné svetlo alebo na miesta s vysokou vlhkosťou.
Ak diaľkový ovládač nefunguje správne, vymeňte v ňom batériu.
Poznámka: Batériu (lítiovú) vložte do priestoru na batériu podľa predznačenej polarity.
Page 69

70 PRESTIGIO P179
SK
Poznámky k čisteniu
1. Pri čistení obrazovky buďte mimoriadne opatrní.
2. Nikdy nepoužívajte žiadny druh leptavých materiálov, mohli by poškodiť povrch obrazovky.
3. Na čistenie Vám odporúčame použiť štetec z ťavej srsti alebo mikrovláknovú utierku.
4. Na LCD obrazovku netlačte.
Upozornenia
1. Monitor nevystavujte priamemu slnečnému svetlu alebo zvýšenej teplote.
2. Dávajte pozor, aby do monitora nevnikli tekutiny.
3. Nepokúšajte sa monitor otvárať. Môžete si zapríčiniť úraz elektrickým prúdom. V prípade potreby opravy kontaktujte svojho predajcu.
4. Nepoužívajte monitor v blízkosti zariadení pracujúcich s elektromagnetickým poľom.
5. Na čistenie obrazovky monitora nepoužívajte agresívne chemikálie alebo čistiace prostriedky. Monitor čistite jemnou tkaninou,
mierne navlhčenou.
6. Na monitor nič nepokladajte. Nedostatočné vetranie môže zvýšiť teplotu monitora.
7. Nedotýkajte sa LCD obrazovky prstami. Odtlačky prstov obsahujú olej a ťažko sa čistia.
Vlastnosti
Šetrenie energiou:
Správa napájania vyhovuje štandardu VESA DPMS. Ak je systém nečinný (vypnutý), monitor zníži spotrebu na menej, ako 5W.
Funkcia automatického nastavenia:
Pomocou tlačidla “AUTO” je možné nastaviť optimálne parametre displeja.
Široký pozorovací uhol:
Výborný výhľad na obrazovku v 150° horizontálnom a 125° vertikálnom uhle.
Kompatibilné s plug and play:
Monitor vyhovuje DDC1/DDC2B, je kompatibilný s plug and play pre Windows 95/98/ME/2000/XP.
Šetrenie miestom:
Hĺbka monitora iba 280 mm zaistí väčší voľný priestor na Vašom pracovnom stole.
Mozaiková montáž:
Monitor je vybavený tenkým, 17,7 mm rámom, vďaka čomu je vhodný na zapojenie viacerých monitorov do mozaiky.
Page 70

71PRESTIGIO P179
SK
Hardvérová inštalácia
Pri používaní monitora buďte mimoriadne opatrní. Je veľmi citlivý a náchylný na poškodenie. Pred inštaláciou vypnite monitor aj
počítač. Pri inštalácii postupujte presne podľa nasledujúcich krokov.
Vstup
[1] DC-IN : Pripojenie napájacieho kábla
[2] AUDIO-IN : Pripojenie k audio výstupu hocijakého zvukového zdroja.
[3] VGA-IN : Pripojenie 15-pinového D-Sub kábla.
[4] VIDEO : Pripojenie (RCA) kompozitného video vstupu zo zdroja video signálu. *(voliteľne)
[5] S-IN : Pripojenie signálneho S-Video kábla. * (voliteľne)
[6] TV : Pripojenie signálneho TV kábla. *(voliteľne)
[7] Audio Out : Pripojenie slúchadiel alebo externých reproduktorov.
[8] DVI In-Put : Podpora 24-pinového DVI-D vstupného signálu. *(voliteľne)
[1] [2]
[3] [8]
[4] [7] [5] [6]
[3]
Page 71

72 PRESTIGIO P179
SK
Hardvérová inštalácia krok po kroku
1. Na sprístupnenie všetkých portov otočte monitor opatrne dolu hlavou obrazovkou smerom k Vám.
2. Signálny kábel pripojte do konektora VGA-IN na monitore a jeho druhý koniec k počítaču.
3. Audio kábel pripojte ku konektoru AUDIO-IN na monitore a jeho druhý koniec do linkového audio výstupu na počítači.
Page 72

73PRESTIGIO P179
SK
3. Signálny kábel pripojte k 24-pinovému konektoru DVI-IN na monitore a jeho druhý koniec k počítaču.
4. DC kábel napájacieho adaptéra pripojte do konektora DC-IN na monitore.
5. Gratulujeme! Práve ste ukončili hardvérovú inštaláciu.
Page 73

74 PRESTIGIO P179
SK
Hardvérová inštalácia TV tunera (voliteľné príslušenstvo)
1. Hardvérová inštalácia voliteľného TV tunera 17" TFT LCD monitora je popísaná nižšie.
2. Odsunutím klapiek na oboch stranách najprv odnímte plastikový zadný kryt.
3. Vyhľadajte konektor na TV tuneri a na monitore.
Page 74

75PRESTIGIO P179
SK
4. Modul TV tunera zatlačte na pravú stranu voľného priestoru na zadnej strane monitora a opatrne pripojte TV tuner ku konektoru
spomínanému v kroku 3.
5. TV tuner uchyťte skrutkou na kovovú podložku a zadný panel vráťte na pôvodné miesto.
6. Do portu VIDEO zasuňte RCA video kábel, jeho opačný koniec pripojte k RCA Video výstupu na zdroji signálu, ako je napr. DVD
prehrávač.
Page 75

76 PRESTIGIO P179
SK
7. S-Video kábel pripojte k portu S-IN a jeho opačný koniec k S-Video výstupu na zdroji signálu, ako je napr. DVD prehrávač.
8. Signálny TV kábel pripojte k TV portu a jeho opačný koniec do zásuvky káblovej televízie.
9. Gratulujeme! Monitor je nainštalovaný, môžete ho začať používať.
Page 76

77PRESTIGIO P179
SK
Uhol sklonu
Za normálnych podmienok
0°~ 25° v kladnom smere a 2° v zápornom smere
Page 77

78 PRESTIGIO P179
SK
Auto Adjust OSD Menu Power Down Up
Tlačidlo Monitor Setup
Tlačidlo Menu Control
Na nastavenie monitora je možné použiť 5 tlačidiel: “Power”, “MENU“, “AUTO”, ”<\/> Dole/vľavo”, ”</\> Hore/vpravo”. Popis
nájdete nižšie.
1. “ Power”: Zapnutie a vypnutie LCD monitora. Ak je monitor zapnutý, rozsvieti sa zelené svetlo; v pohotovostnom režime svieti
oranžové svetlo.
2. “AUTO”: Ukončenie a uloženie nastavení. Horúce tlačidlo na automatické nastavenie.
3. “MENU”: Zobrazenie hlavného OSD menu a výber možností OSD.
4. “</\> Hore/vpravo”: Zväčšenie hodnoty zobrazenej položky OSD menu. Horúce tlačidlo pre režim PC / Video / S-Video / TV. Toto
tlačidlo je možné použiť na prepínanie medzi PC, Video, S-Video a TV režimom.
5. “<\/> Dole/vľavo”: Zmenšenie hodnoty zobrazenej položky OSD menu. Horúce tlačidlo na nastavenie hlasitosti.
Page 78

79PRESTIGIO P179
SK
Odstraňovanie porúch
Ak pri používaní monitora príde k nejakému problému, predtým, ako navštívite servis, najprv podľa nasledujúcich krokov skontrolujte, či
je monitor nainštalovaný správne.
? Na monit? Na monit
? Na monit? Na monit
? Na monit
oror
oror
or
e nie je žiadne nie je žiadn
e nie je žiadne nie je žiadn
e nie je žiadn
y obry obr
y obry obr
y obr
az.az.
az.az.
az.
Skontrolujte:
1. Režim šetrenia energiou. Na deaktiváciu stlačte nejakú klávesu alebo pohýbte myšou.
2. Vývody konektora signálneho kábla. Ak sú zahnuté alebo chýbajú, kontaktujte Vášho predajcu alebo obchod, kde ste monitor zakúpili.
? Znaky na dis? Znaky na dis
? Znaky na dis? Znaky na dis
? Znaky na dis
pleple
pleple
ple
ji sú príliš tmaji sú príliš tma
ji sú príliš tmaji sú príliš tma
ji sú príliš tma
vv
vv
v
é alebo príliš jasnéé alebo príliš jasné
é alebo príliš jasnéé alebo príliš jasné
é alebo príliš jasné
Riešenie:
1. Pomocou OSD menu nastavte kontrast.
? K? K
? K? K
? K
edy bedy b
edy bedy b
edy b
y mali by mali b
y mali by mali b
y mali b
yť upryť upr
yť upryť upr
yť upr
aa
aa
a
vv
vv
v
ené nasené nas
ené nasené nas
ené nas
tt
tt
t
aa
aa
a
vv
vv
v
enia monitenia monit
enia monitenia monit
enia monit
oror
oror
or
a?a?
a?a?
a?
Riešenie:
1. Po zresetovaní.
2. Pri zmene rozlíšenia alebo obnovovacej frekvencie.
? T? T
? T? T
? T
ee
ee
e
xt na obrxt na obr
xt na obrxt na obr
xt na obr
azaz
azaz
az
oo
oo
o
vkvk
vkvk
vk
e je nečite je nečit
e je nečite je nečit
e je nečit
atat
atat
at
eľnýeľný
eľnýeľný
eľný
..
..
.
Riešenie:
1. Skontrolujte, či nastavené rozlíšenie zodpovedá zobrazovaciemu režimu.
? F? F
? F? F
? F
arar
arar
ar
bb
bb
b
y na disy na dis
y na disy na dis
y na dis
pleple
pleple
ple
ji sa zji sa z
ji sa zji sa z
ji sa z
obrobr
obrobr
obr
azuazu
azuazu
azu
jú v nešjú v neš
jú v nešjú v neš
jú v neš
tt
tt
t
andarandar
andarandar
andar
dnom odtieni.dnom odtieni.
dnom odtieni.dnom odtieni.
dnom odtieni.
1. Pomocou OSD menu nastavte farebnú teplotu (Color Temperature).
Režim OSD menu (režim VGA/DVI)
Výber položky
1. Na sprístupnenie menu stlačte tlačidlo MENU.
2. Opätovným stlačením MENU sprístupníte podrobnejšie nastavenia.
3. Stlačením tlačidla dole/hore vyberte v OSD menu požadovanú funkciu.
4. Na potvrdenie vybranej funkcie stlačte tlačidlo MENU.
BRIGHTNESS
Nastavenie jasu displeja
Page 79

80 PRESTIGIO P179
SK
CONTRAST
Nastavenie rozdielu medzi jasnými a tmavými oblasťami
PHASE
Nastavenie fázy (nie je podporované v režim DVI)
CLOCK
Nastavenie obnovovacej frekvencie (nie je podporované v režime DVI)
Page 80

81PRESTIGIO P179
SK
H-POSITION
Nastavenie horizontálnej pozície obrazu (nie je podporované v režime DVI)
V-POSITION
Nastavenie vertikálnej pozície obrazu (nie je podporované v režime DVI)
COLOR TEMP
Nastavenie farebnej teploty obrazu.
Page 81

82 PRESTIGIO P179
SK
RED
Nastavenie červenej zložky (v možnostiach výberu farebnej teploty musí byť vybraný režim USER)
GREEN
Nastavenie zelenej zložky (v možnostiach výberu farebnej teploty musí byť vybraný režim USER)
BLUE
Nastavenie modrej zložky (v možnostiach výberu farebnej teploty musí byť vybraný režim USER)
Page 82

83PRESTIGIO P179
SK
LANGUAGE
Nastavenie jazyka
MISCELLANEOUS
Vstup na nasledujúcu stránku s ďalšími nastaveniami
RETURN
Návrat na predchádzajúcu stránku
Page 83

84 PRESTIGIO P179
SK
OSD H-POSITION
Nastavenie horizontálnej pozície OSD
OSD V-POSITION
Nastavenie vertikálnej pozície OSD
OSD DURATION
Doba zobrazovania OSD menu
Page 84

85PRESTIGIO P179
SK
OSD ROTATION
Nastavenie otočenia OSD
OSD FLIP
Nastavenie preklopenia OSD
OSD MIRROR
Nastavenie zrkadlenia OSD
Page 85

86 PRESTIGIO P179
SK
VOLUME
Nastavenie hlasitosti reproduktorov
MODE EXCHANGE
Prepnutie VGA/DVI režimu
Page 86

87PRESTIGIO P179
SK
Režim OSD menu (položka VIDEO/S-VIDEO)
Výber položky
1. Na vstup do menu stlačte tlačidlo “MENU“
2. Opätovným stlačením tlačidla “MENU “ sprístupníte podrobnejšie nastavenia (vrátane výberu programov)
3. Tlačidlami ”<\/> Dole/vľavo”, ” </\> Hore/vpravo” vyberte požadovanú funkciu v OSD menu
4. Na potvrdenie vybranej funkcie stlačte tlačidlo “MENU “
BRIGHTNESS
Nastavenie jasu displeja
CONTRAST
Nastavenie rozdielu medzi svetlými a tmavými oblasťami
SATURATION
Nastavenie sýtosti farieb
Page 87

88 PRESTIGIO P179
SK
TINT
Nastavenie odtieňa
SHARPNESS
Nastavenie ostrosti
LANGUAGE
Nastavenie jazyka
Page 88

89PRESTIGIO P179
SK
RESET
Vyvolanie výrobných nastavení
OSD H-POSITION
Nastavenie horizontálnej pozície OSD
OSD V-POSITION
Nastavenie vertikálnej pozície OSD
Page 89

90 PRESTIGIO P179
SK
OSD DURATION
Nastavenie doby zobrazenia OSD
VOLUME
Nastavenie hlasitosti (VIDEO/TV)
TV OPTION
Rozšírené nastavenia funkcie TV (iba pre režim TV)
Page 90

91PRESTIGIO P179
SK
Režim OSD menu (položka TV/CATV)
Nastavenia OSD TV/CAT sú takmer také isté, ako pri VIDEO, okrem niektorých položiek TV/CATV
Výber funkcie
1.Na vstup do menu stlačte tlačidlo “MENU”
2. Opätovným stlačením tlačidla “MENU “ sprístupníte podrobnejšie nastavenia (vrátane výberu programov)
3. Tlačidlami ”<\/> Dole/vľavo”, ” </\> Hore/vpravo” vyberte požadovanú funkciu v OSD menu
4. Na potvrdenie vybranej funkcie stlačte tlačidlo “MENU “
RETURN
Návrat na predchádzajúcu stránku
CH SEARCHING
Vyhľadávanie TV kanálov
Page 91

92 PRESTIGIO P179
SK
CH EDIT
Editácia TV kanála
CH FINE TUNE
Jemné doladenie TV kanála
AIR-CABLE
Výber pôvodu signálu - anténa/kábel
Page 92

93PRESTIGIO P179
SK
COUNTRY
Výber krajiny
PS: Detailný popis TV funkcií a ich nastavenia nájdete v manuáli k TV
Popis položiek OSD displeja
VIDEO : Zobrazovaný vstupný signál je VIDEO alebo S-VIDEO
NTSC : Zobrazovaný vstupný VIDEO signál je NTSC (alebo PAL)
1280x1024 : Rozlíšenie vstupného signálu je 1280x1024
VGA : Režim vstupného signálu je VGA
DVI : Režim vstupného signálu je DVI
CATV : Vstupný TV signál je z káblového systému (CATV - TV)
NTSC : Vstupný TV systém je NTSC (NTSC - PAL - SECAM)
Page 93

94 PRESTIGIO P179
SK
Režim zobrazovania
1. Ponúkame Vám 26 režimov kompatibilných s Windows.
2. Ak pri obsluhe PC alebo OSD dochádza k rušeniu, nie je to porucha.
3. Aby ste zaistili čo najlepšiu kvalitu obrazu, nezabudnite zaktualizovať ovládač grafickej karty. Navyše Vám odporúčame používať
niektorý z vyobrazených režimov.
4. Podporované môžu byť aj režimy, ktoré nie sú v nasledujúcej tabuľke zobrazené.
5. Pri použití správy napájania na počítači môžete predĺžiť životnosť tohto produktu.
Page 94

95PRESTIGIO P179
SK
Špecifikácia
LCD panel Typ 17.0" TFT LCD displej s aktívnou matricou
Pozorovací uhol H: 140°, V: 130°
Kontrast 500 : 1 (max.), 400 : 1 (typicky)
Jas 300 cd/m2 (max.)
Doba odozvy 16 ms (typicky)
Zobraziteľné farby 16,2M farieb
Maximálne rozlíšenie 1280x1024 (SXGA)
Rozostup pixelov 0,264mm (h) x 0,264mm (v)
Vstupné signály Analógový RGB Úroveň video signálu: 0,7Vp-p (75O)
TTL synchronizácia s 75O internými zdvíhacími odpormi
Frekvencia FH: 30~79 kHz / FV: 56~75 Hz
Video In** Auto detekcia NTSC/PAL prekladaného video signálu so
DVI ** digitálny vstup vstupným formátom kompozitné video (AV) a S-video
Kompatibilita PC Až 1280x1024 pri 75Hz (neprekladane)
Analógový RGB konektor D-sub 15-pinov
Audio vstup Slúchadlový stereo konektor, RCA konektor (L/R)*
Audio výstup Slúchadlový stereo konektor, RCA konektor (L/R)*
DVI-D vstup** 24 pinový DVI-D konektor
Napájanie Napájací konektor 12V/DC
Napájanie Vstupné striedavé napätie 100-240V, 50/60Hz (univerzálne) externe
Vstupné jednosmerné napätie AC adaptér Max. 12 V DC 4A
Spotreba Aktívny max. < 48 W
Režim šetrenia energiou Pohotovostný < 5 W
Interné reproduktory 2x2 W (stereo)
Užívateľské rozhranie LED indikátor Aktívny - zelený Vypnutý - zhasnutý
Pohotovostný režim - oranžový
Prevádzka podmienky Teplota 0°C~40°C
Vlhkosť vzduchu 20% ~ 80% R.H.
Rozmery Fyzické 438mm (v) x 436mm (š) x 59mm (h)
Čistá váha 5,5 kg
DDC Vyhovuje DDC1/DDC2B
Správa napájania VES A DPMS, EPA Energy Star
Vyhlášky (Certifikáty) CE, FCC, BSMI, CB, TUV, UL
**Voliteľná funkcia
Page 95

www.prestigio.biz
 Loading...