

Page 1

Page 2

FCC Compliance Statement
This equipment has been tested and found to comply with the limits for a Class B digital device, pursuant to Part 15 of
the FCC Rules. These limits are designed to provide resonable protection against radio frequency interference in a residential installation. This equipment generates, uses, and can radiate radio frequency energy. If not installed and used in
accordance with the instructions, it may cause interference to radio communications. However, there is no guarantee
that intereference will not occur in a particular installation. If this equipment does cause interference to radio or television reception (this can be determined by turning this equipment off and on), the user is encouraged to try to correct
the interference by one or more of the following measures:
· Reorient or relocate the receiving antenna.
· Increase the separation between this equipment and the receiver.
· Connect this equipment to an outlet on a circuit different from which the receiver is connected to.
· Consult the dealer or an experienced radio/TV technician for help.
Caution:
To comply with the limits for an FCC Class B computing device, always use the shielded signal cord supplied with this
unit.
Caution to the user:
The Federal Communications Commission warns the user that changes or modifications to the unit not expressly approved by the party responsible for compliance could void the user’s authority to operate the equipment.
ENG
3PRESTIGIO P177
Page 3

INTRODUCTION
Congratulations for purchasing model Prestigio P177, a high performance 17-inch color TFT LCD monitor. The P177
monitor provides flicker-free and color images at optional resolutions. Through this user guide, we will introduce you
step-by-step all the features, functions and technical specifications of the LCD monitor. Surely you will have a refreshing
experience working with the monitor.
ENG
FEATURES
The P177 is a 17-inch TFT LCD monitor that is intelligent, microprocessor-based and ergonomically designed display,
compatible with most analog RGB (Red, Green, Blue) display standards, including PS/V, PS/2, optional for Apple Macintosh
Centris, Quadra, and Macintosh II family signals. The LCD monitor is capable of displaying crisp and vibrant color graphics with VGA, SVGA, SXGA, XGA (non-interlaced), and most Macintosh compatible color video cards.
· The monitor is able to properly function even in case of upgrade video cards or software because of the wide autoscanning compatibility range without requiring to buy a new monitor.
· The internal microprocessor digitally controls auto-scanning. For horizontal scan frequencies between 30 KHz and 81
KHz, and vertical scan frequencies between 55 Hz and 76 Hz. In each frequency mode, the microprocessor-based
circuitry allows the monitor to function at the precision-of a fixed frequency.
· The resident memory allows for storing factory default settings and also additional user adjustment parameters.
· The maximum resolution achievable is SXGA (1280 x 1024), best suited for Windows applications
· The compact and sleek cabinet design saves lot of your desk space and makes your desk look neat and tidy.
· The monitor is also compliant with the most stringent environmental scheme of TCO 99. In this scheme, no environmental harmful substances are used during the entire manufacturing process.
4 PRESTIGIO P177
Page 4
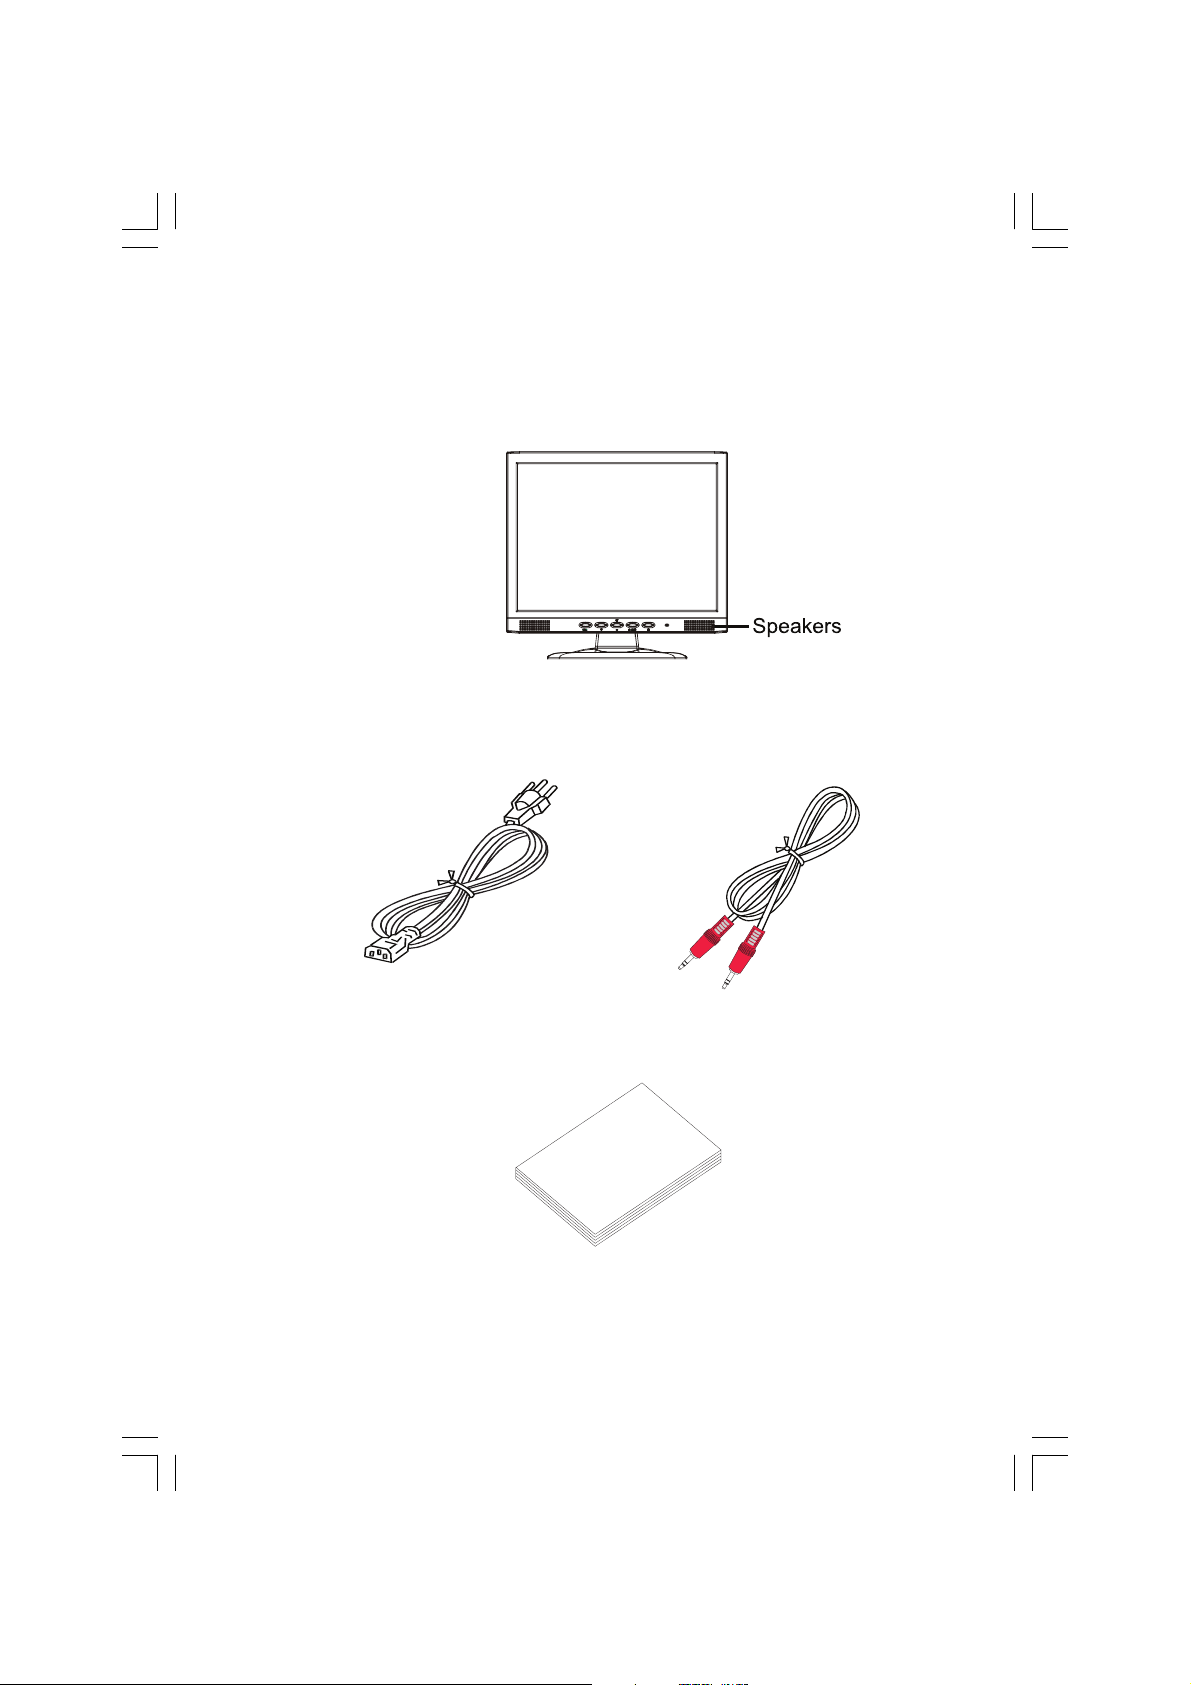
UNPACKING
Please check the following items are present when you unpack the box, and save the packing materials in case you will
need to ship or transport the monitor in future.
· LCD Monitor
· AC Power Cord · Audio Cable
ENG
· User Manual
5PRESTIGIO P177
Page 5
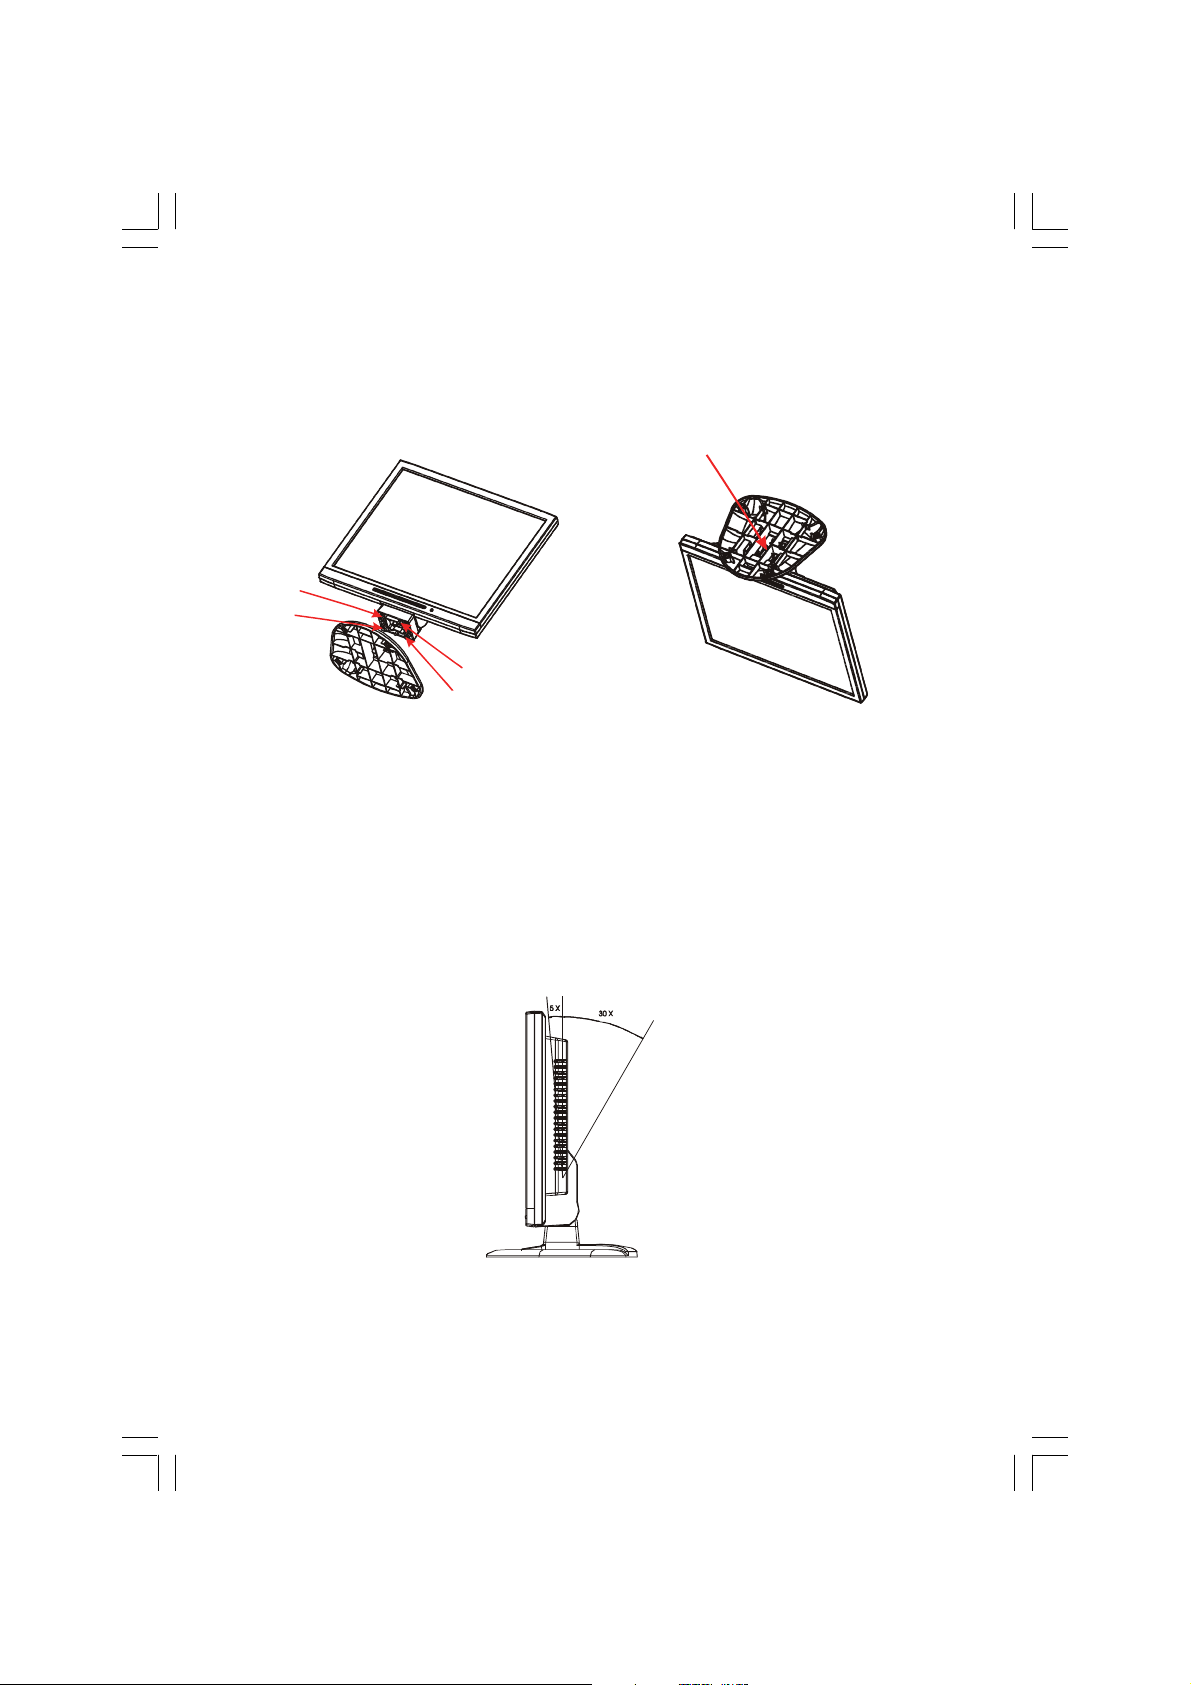
Attaching / Removing the Base
Install:
Align the four hooks on the bottom of the monitor with
the corresponding slots on the bottom of the base.
Remove:
Depress the hook as indicated first before removing the
base and follow the arrow direction to remove it.
ENG
SCREEN POSITION ADJUSTMENT
In oder to optimize the best viewing position, you can adjust the tilt of the monitor by using both of your hands to hold
the edges of the monitor as shown in the figure below. The monitor can be adjusted to 30 degrees up or 5 degrees down
as indicated by arrow below.
6 PRESTIGIO P177
Page 6

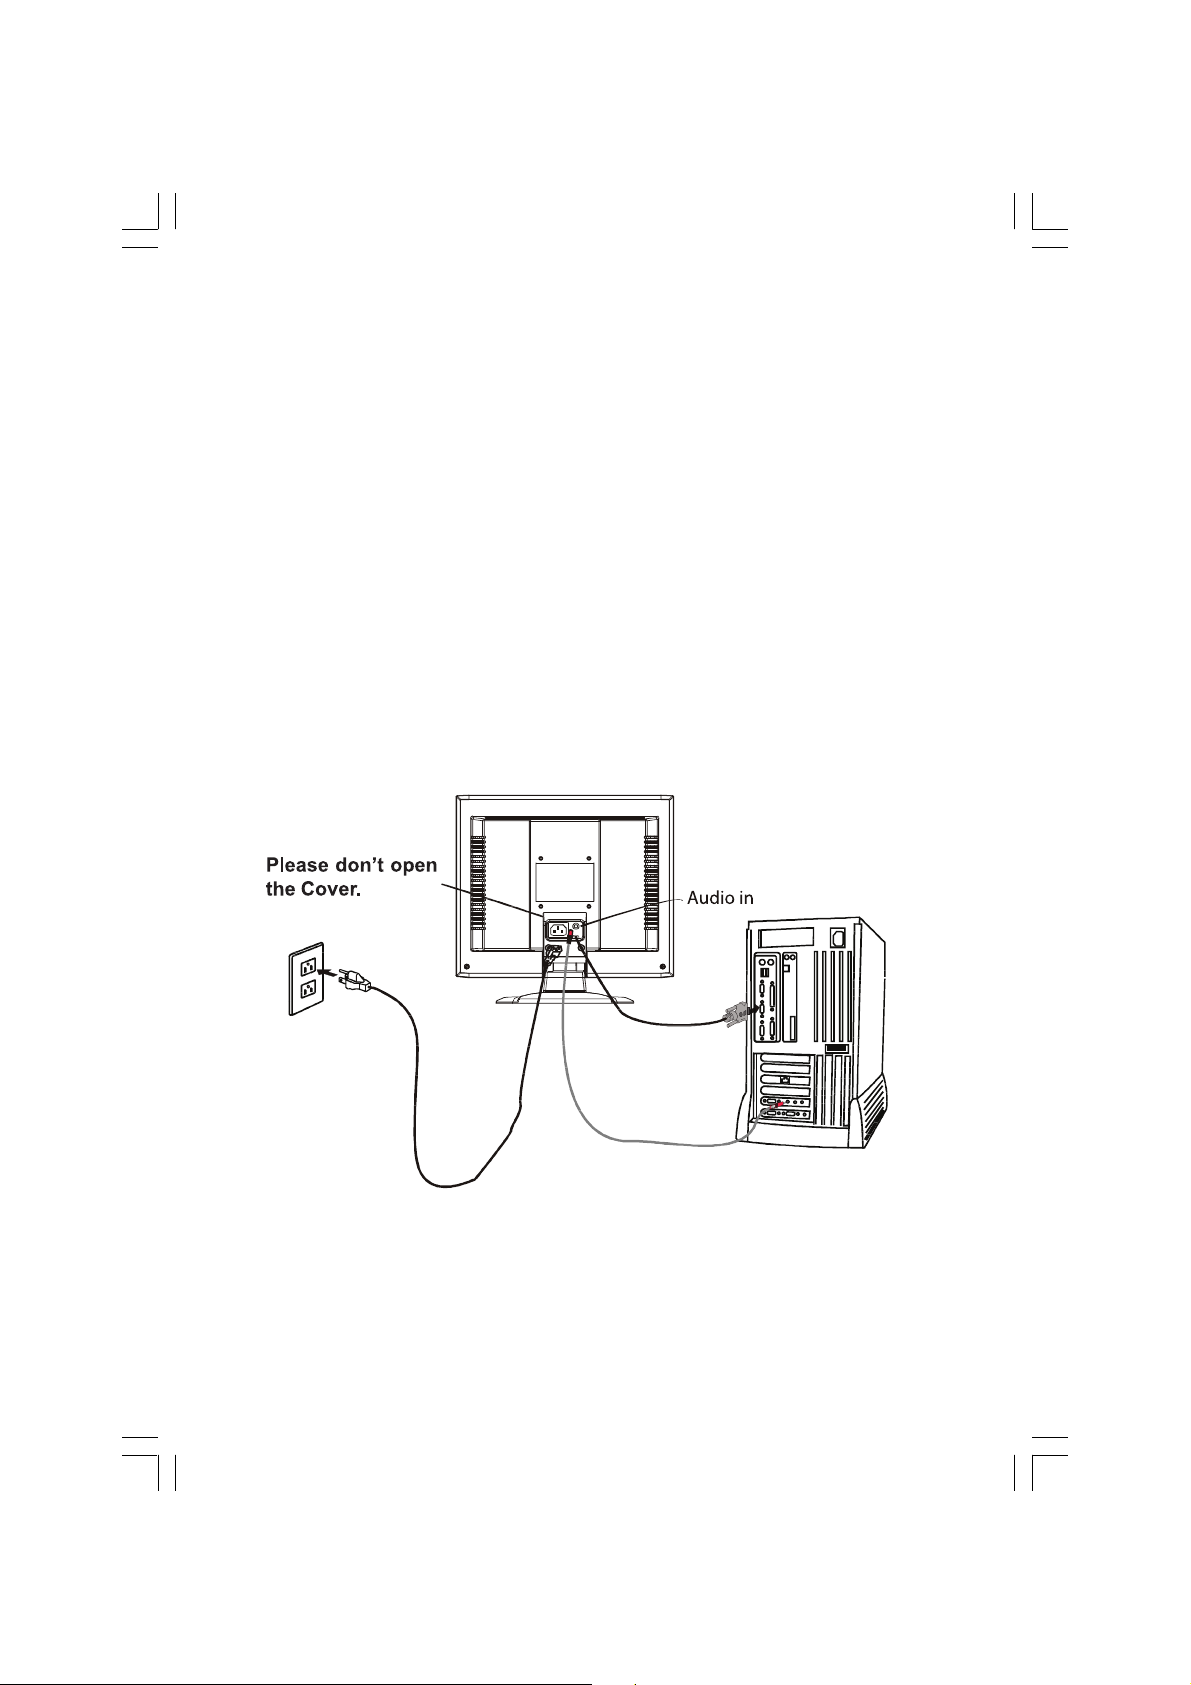
CONNECTING THE POWER CORD
· Check first to make sure that the power cord you use is the correct type required for your area.
· This monitor has a universal power supply that allows operation in either 100/120V AC or 220/240 V AC voltage area.
No user-adjustment is required.
· Plug one end of the power cord to the AC Inlet, plug another end to a proper AC outlet.
· For unit using at 220/240 V AC (outside of U.S.):
Use a Cord Set consisting of H05VV-F cord and plug rated 10 A, 250 V. The cord set should have the appropriate safety
approvals for the country in which the equipment will be installed.
SAFETY PRECAUTION
· Avoid placing the monitor, or any other heavy object, on the power cord to prevent it from fire or electrical shock.
· Do not expose the monitor to rain, excessive moisture, or dust to avoid fire or shock hazard.
· Do not cover the slots or openings of the monitor for proper heat dissipation. Always put the monitor in a place where
there is adequate ventilation.
· Avoid placing the monitor against a bright background or where sunlight or other light sources may reflect on the face
of the monitor. Place the monitor just below eye level.
· Handle with care when transporting the monitor.
· Refrain from giving shock or scratch to the screen, as screen is fragile.
CLEANING YOUR MONITOR
Please carefully follow the below guidelines when cleaning the monitor.
· Always unplug the monitor before cleaning.
· Use a soft cloth to wipe the screen and cabinet front and sides.
· Apply a small quantity of alcohol to a soft cloth to clean the monitor screen, if requires more than dusting.
ENG
7PRESTIGIO P177
Page 7
PRESET MODES
To reduce the need for adjustment for different modes, the monitor has default setting modes that are most commonly
used as given in the table below. For optimum adjustment, the user is suggested to perform the Auto Setup under
Windows “Full Screen” pattern. When none of the mode is matched, the user can store their preferred modes in the user
modes. The monitor is capable of storing up to 9 user modes. The only condition to store as a user mode is the new
display information must have 1 KHz difference for horizontal frequency or 1 Hz for vertical frequency or the sync signal
ENG
polarities are different from the default modes.
Mode Resolution H. Freq. (KHz) Band Width (MHz) Polarity
HV
1 VGA 720 x 400 70 Hz 31.47 28.322 - +
2 VGA 640 x 480 60 Hz 31.47 25.175 - -
3 MAC 640 x 480 66 Hz 35.00 32.24 - -
4 VESA 640 x 480 72 Hz 37.86 31.5 - -
5 VESA 640 x 480 75 Hz 37.50 31.5 - -
6 VESA 800 x 600 56 Hz 35.16 36 + +
7 VESA 800 x 600 60 Hz 37.88 40 + +
8 VESA 800 x 600 75 Hz 46.88 49.5 + +
9 VESA 800 x 600 72 Hz 48.08 50 + +
10 MAC 832 x 624 75 Hz 49.72 57.283 - -
11 VESA 1024 x 768 60 Hz 48.36 65 - -
12 VESA 1024 x 768 70 Hz 56.48 75 - -
13 VESA 1024 x 768 75 Hz 60.02 78.75 + +
14 VESA 1280 x 1024 60 Hz 64 108 + +
15 VESA 1280 x 1024 75 Hz 80 135 + +
16 VESA 1152 x 864 75 Hz 67.5 108 + +
17 VESA 1280 x 960 60 Hz 60 108 + +
8 PRESTIGIO P177
Page 8

POWER SAVING
The monitor will be driven into “Power Saving” mode by the control signal from the display controller, as indicated by
the amber-color power LED.
State Power Consumption LED Light
ON Normal Green
ActiveOFF <3 W Amber
The power saving states will be kept until a control signal has been detected or the keyboard or mouse is activated. The
recovery time from Active OFF state back to ON state is around 5 seconds.
DDC
To make your installation easier, the monitor is able to Plug and Play with your system if your system also supports DDC
protocol. The DDC (Display Data Channel) is a communication protocol through which the monitor automatically informs the host system about its capabilities, for example, supported resolutions and corresponding timing. The monitor
supports DDC2B standard.
ENG
9PRESTIGIO P177
Page 9
INSTALLATION
To install the monitor to your host system, please follow the steps as given below:
Steps
1. Connect Video Cable
ENG
a. Make sure both the monitor and computer are powered-OFF.
b. Connect the video cable to the computer.
2. Connect power cord
Connect the power cord to the monitor, then to a properly grounded AC outlet.
3. Connect the Audio cable.
4. Power-ON Monitor and Computer
Power-ON the monitor first, then power-ON the computer.
This sequence is very important.
5. If the monitor still does not function properly, please refer to the troubleshooting section to diagnose the problem.
10 PRESTIGIO P177
Page 10
USER CONTROLS
Front Panel Controls
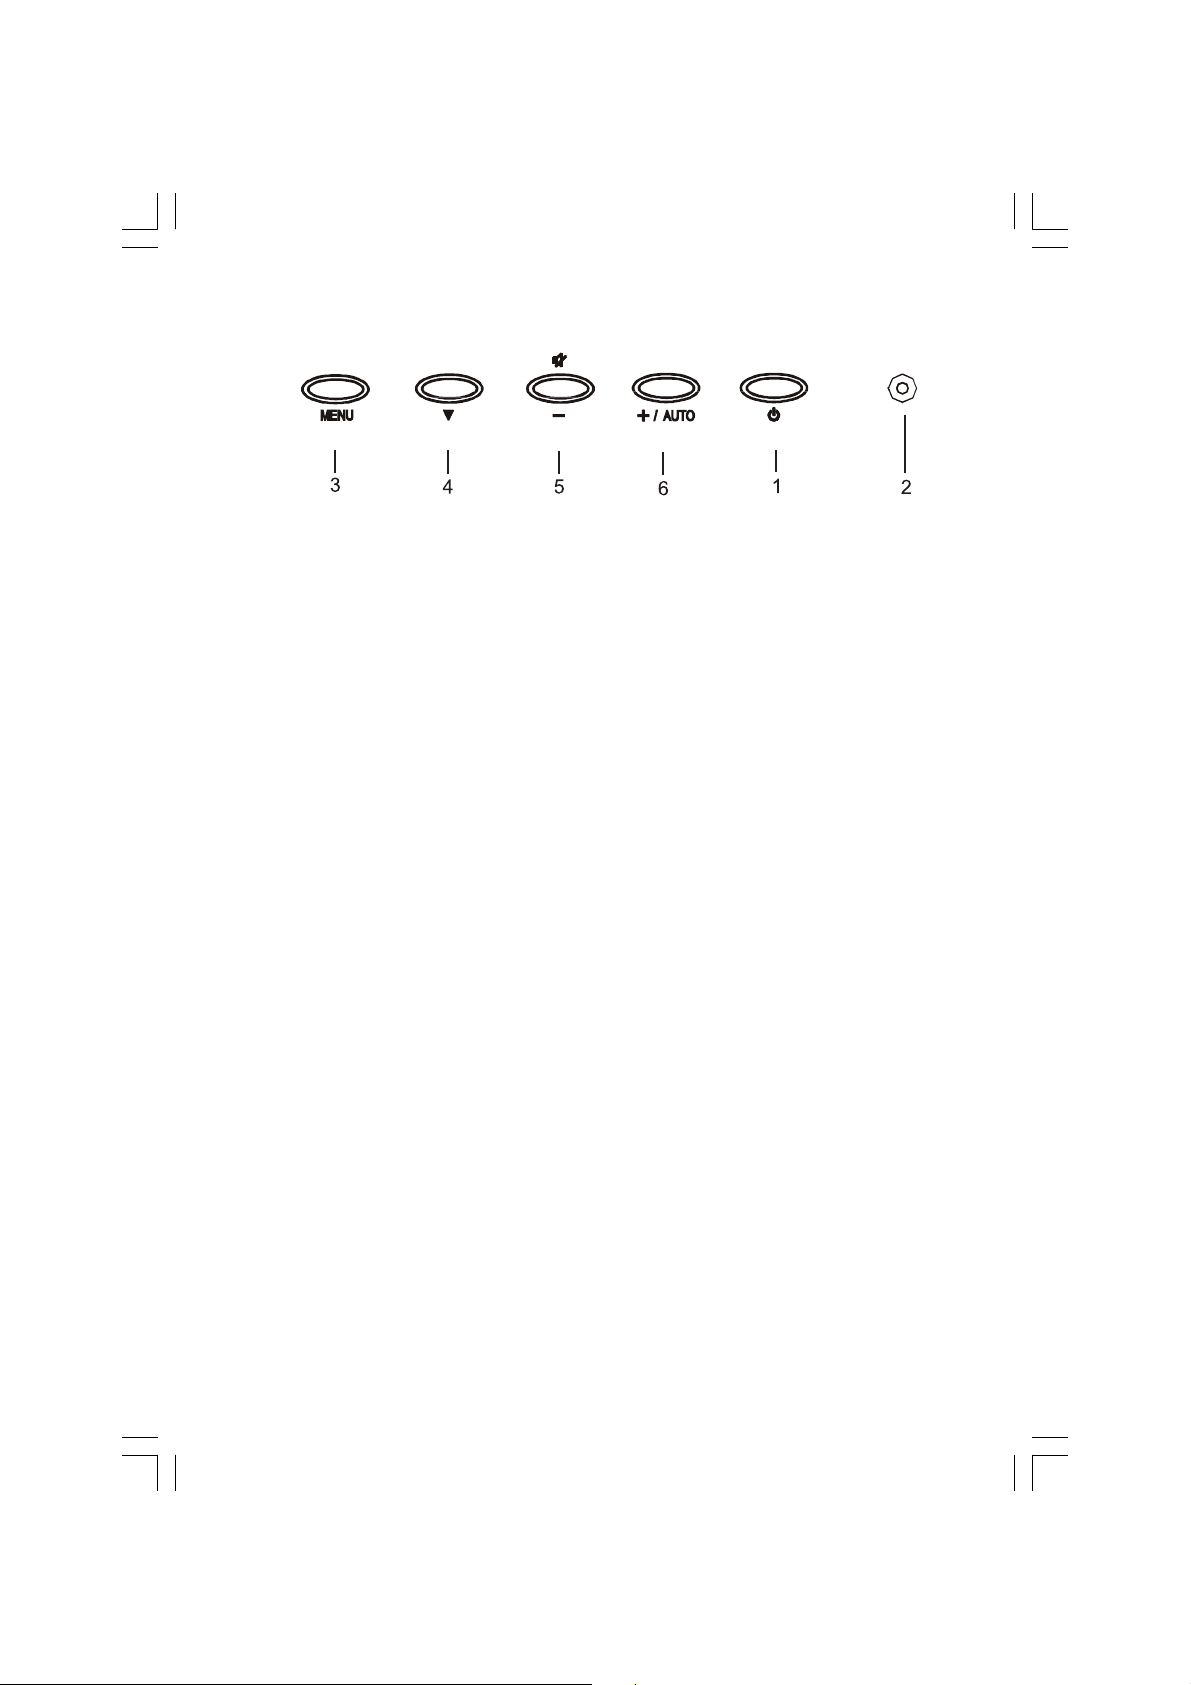
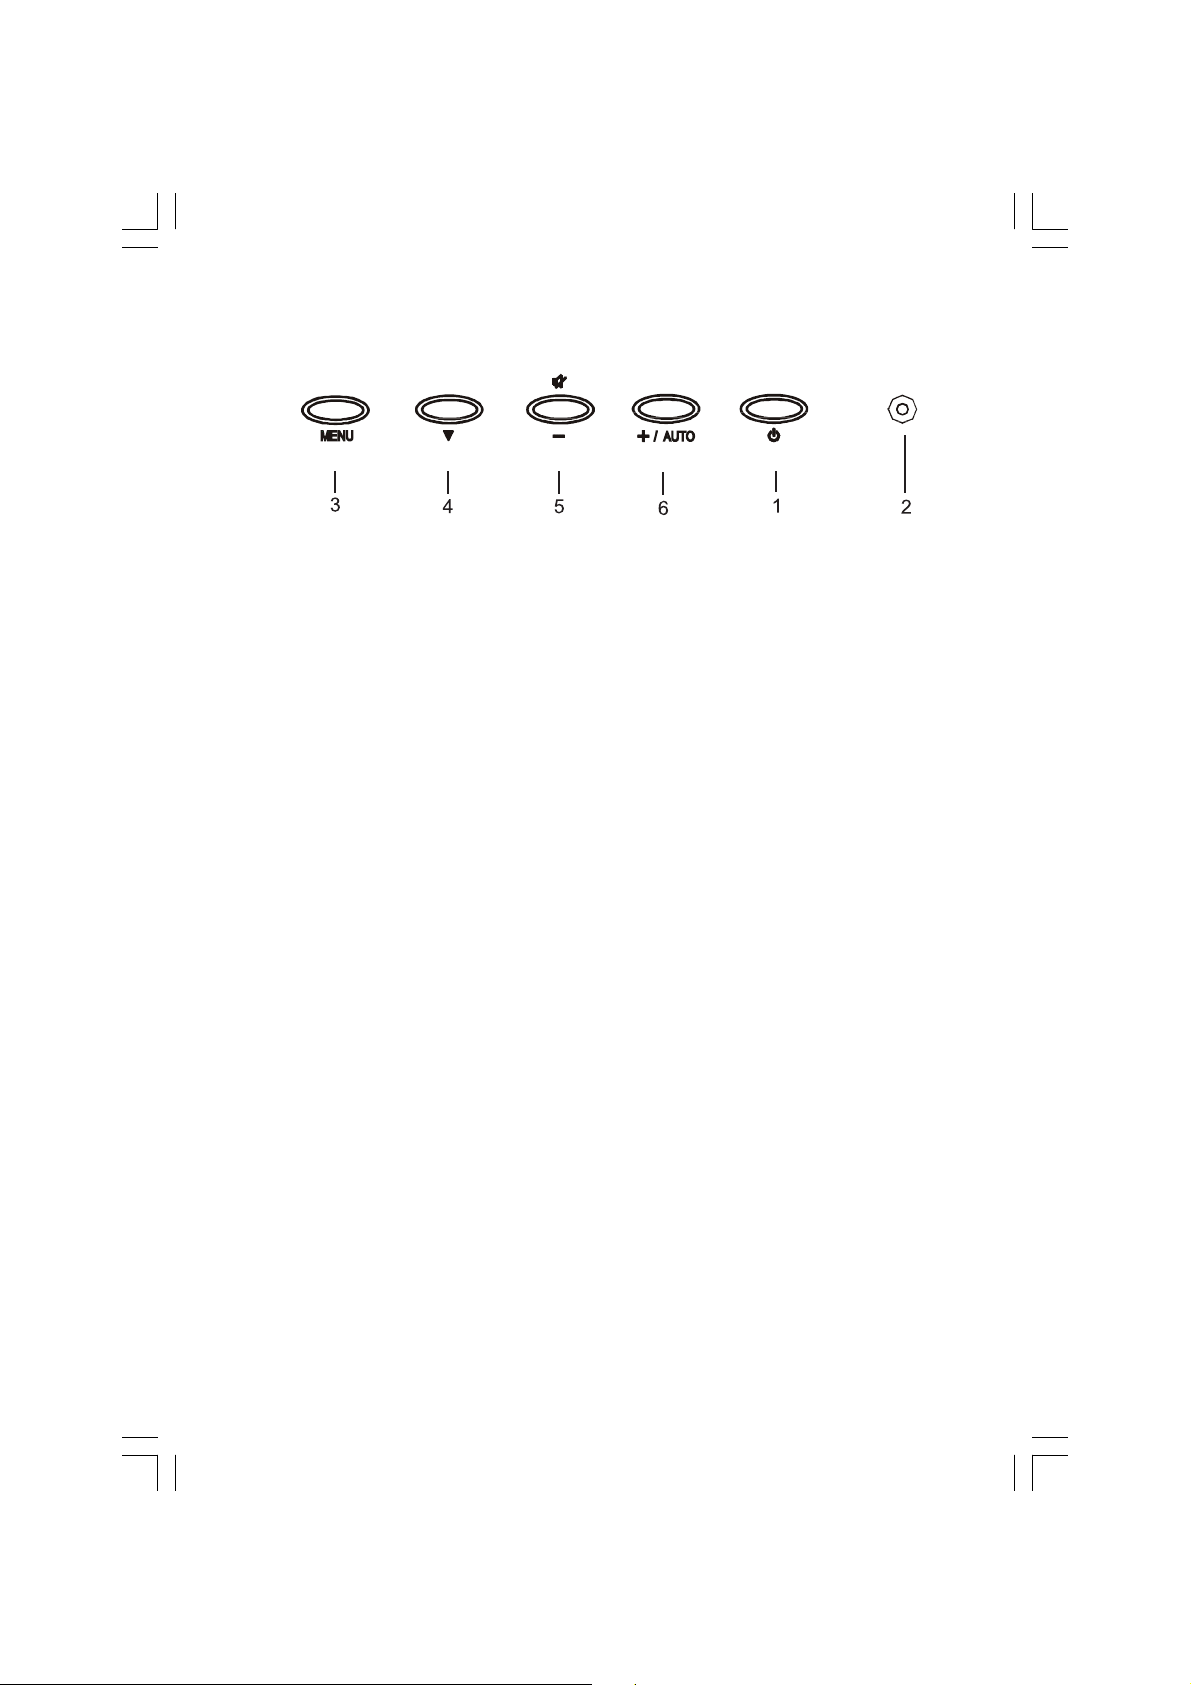
1. Power Switch: To turn ON or OFF the power.
2. Power LED: Lights up to indicate the power is turned ON.
3. Select MENU: To exit and enter OSD menu.
4. Select DOWN: To move downward in the OSD Item.
5. -: To decrease the value of the parameter in the OSD, which has been selected for adjustment.
-: Choose the previous OSD MENU page.
MUTE: Act as Audio Mute hot key when OSD is not displayed.
6. +: To increase the value of the parameter in the OSD, which has been selected for adjustment.
+: Choose the next OSD MENU page.
AUTO: Act as AUTO adjustment hot key when OSD is not displayed.
ENG
11PRESTIGIO P177
Page 11

Basic Sections of a OSD Screen
ENG
12 PRESTIGIO P177
Page 12

Standard OSD Operation
1. Press MENU key to activate the OSD menu, when OSD is not displayed.
2. Use Select DOWN key to move down through the menu cyclically. The parameter will be highlighted when se-
lected.
3. Then use + or - to increase or decrease the value of the parameter, or make selection between different options.
4. To quit the OSD screen at any time during the operation, press MENU key. If no keys are pressed for a time period,
the OSD automatically disappears.
5. When OSD is not displayed, press + key to start Auto-Adjust.
6. When OSD is not displayed, press - key to turn speaker ON/ OFF.
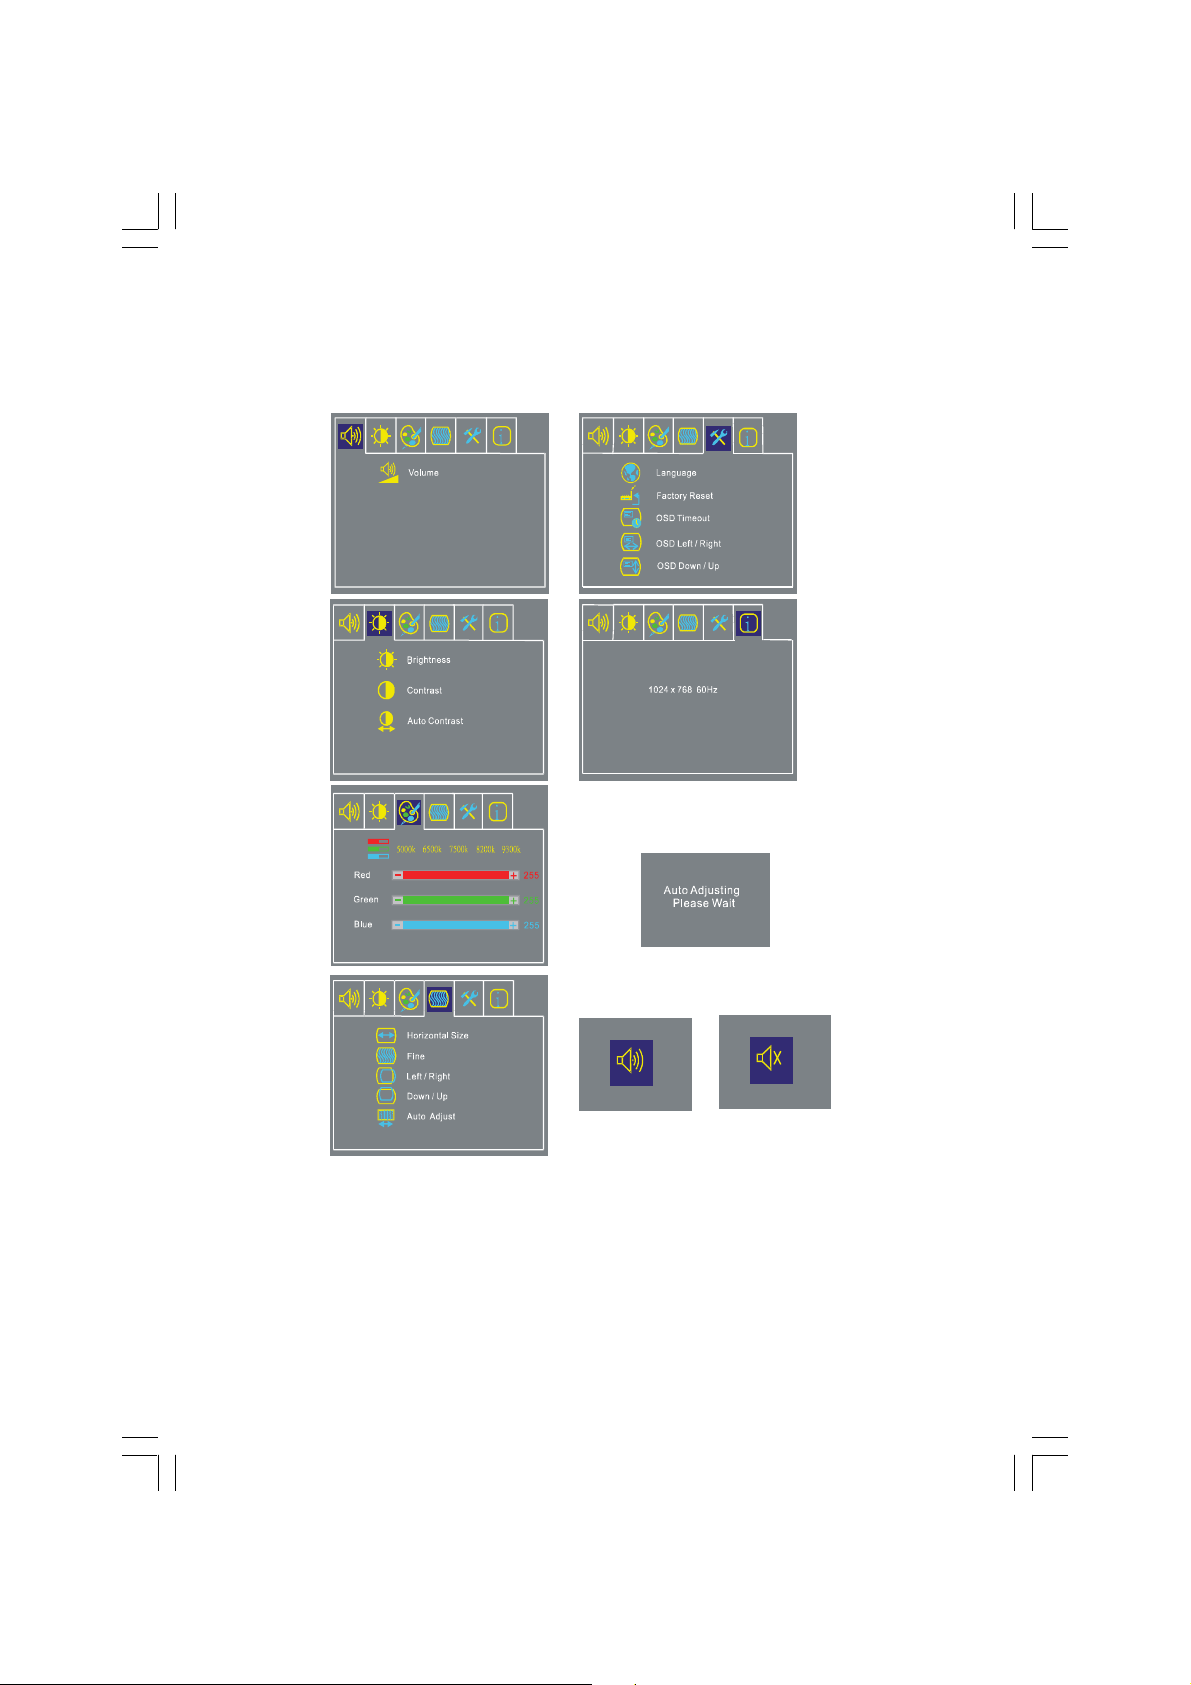
OSD Function Description
· Volume
To increase or decrease the sound level.
· Brightness
To increase or decrease the brightness.
· Contras t
To increase or decrease the contrast.
· Auto Contrast
Press “+” key to star t auto analog contrast.
· Color Temperature
Press “-” or “+” to select 5000, 6500, 7500, 8200, 9300 and USER. Only when selecting USER, you can make adjustments to the R/G/B content, otherwise not.
ENG
· Horizontal Size
To increase or decrease the size of image.
· Fine
To increase or decrease the snow noise of the image.
· Left/Right
To move the screen toward left or right.
· Up/Down
To move the screen upward or downward.
· Auto-Adjust
Press “+” to turn on this function. The Auto-Adjust will automatically adjust V-Position, H-Position, Clock, and
Clock-Phase, the whole process takes about 5 seconds.
13PRESTIGIO P177
Page 13

· Language
Select among English, French, Italian, German and Spanish (Chinese for serial model).
· Factory Preset
To return the monitor to its default settings.
· OSD Time Out
To adjust the period of OSD auto turn-off time.
· OSD Left/Right
ENG
To move the OSD position horizontally on the screen. When the “+” key is pressed, the OSD control menu will move
to the right side of the screen. Likewise when the “-” key is pressed, the OSD control menu will move to the left
side.
· OSD Up/Down
To move the OSD position vertically on the screen. When the “+” key is pressed, the OSD control menu will move to
the up side of the screen. Likewise when the “-” key is pressed, the OSD control menu will move to the lower side.
· Information
Indicates the current resolution, H-Frequency, and V-Frequency.
14 PRESTIGIO P177
Page 14

TROUBLESHOOTING
Before sending your LCD monitor for servicing, please check the troubleshooting list below to see if you can self-diagnose the problem.
Problems Current Status Remedy
No Picture LED ON · Using OSD, adjust brightness and contrast to maximum or reset to their
default settings.
LED OFF · Check the power switch.
· Check if AC power cord is properly connected to the monitor.
LED displays amber color · Check if video signal cable is properly connected at the back of monitor.
· Check if the power of computer system is ON.
Abnormal Picture Unstable Picture · Check if the specification of graphics adapter and monitor is in compliance
which may be causing the input signal frequency mismatch.
Display is missing, · Using OSD, adjust RESOLUTION, CLOCK, CLOCK-PHASE, H-POSITION and
center shift, or too small or V-POSITION with non-standard signals.
too large in display size · Using OSD, in case of missing full-screen image, please select other resolution
or other vertical refresh timing.
· Wait for a few seconds after adjusting the size of the image before changing
or disconnecting the signal cable or powering OFF the monitor.
Abnormal Sound No sound, or sound · Check the audio cable with the host PC is connected.
level is too low · Check if the volume setup of the host PC is in minimum position and try
to raise the volume level.
ENG
15PRESTIGIO P177
Page 15
SPECIFICATION
ENG
Model Name P177
Type No. P177
LCD Display
Display Type 17" TFT LCD
Display Area (H x W) 337.9 x 270.3 mm
Contrast Ratio 350:1 (Typ.)
Viewing Angle 120oH 100oV (Min.)
Power Input
Voltage 100-240Vac
Frequency 50-60Hz
Current Rating 0.9A
Operational Features
Display Colors 16.2M
Resolution SXGA (1280 x 1024) at 75 Hz maximum.
Brightness 300 cd/m² (Typ.)
Response Time 25 ms
Interface Analog RGB
Input Connector 15-pin D-sub
Users Controls
Front Panel Controls Power On/Off, MENU, Select DOWN, Value (+/ -), AUTO,
speaker on/off
OSD Controls Brightness, Contrast, Auto Contrast, Color Temperature,
Horizontal Size, Fine, Left/Right, Up/Down, Auto-Adjust, Language,
Factory Preset, OSD Time Out, OSD Left/Right, OSD Up/Down ,
Information
Physical Specification
Dimension (H x W x D) 365 x 374 x 200.5 (mm)
Net Weight 4.6 Kg
Power
Power Saving Yes
Power Consumption 35 W
Regulation
Safety & EMI UL, CUL, TUV-GS, TUV-Ergonomics, FCC-B, CE, TCO99 (optional)
* All specifications are subject to change without notice.
16 PRESTIGIO P177
Page 16

FCC prohlášení o shodě
Tento přístroj byl testován a shledán v souladu s limity pro třídu B digitálních přístrojů, na základě Části 15 FCC Pravidel. Tyto limity jsou
designovány tak, aby poskytly dostatečnou ochranu proti radio frekvenčnímu rušení v domácí instalaci. Toto zařízení generuje, používá
a může rozšiřovat radio frekvenční energii. Pokud není instalováno a používáno v souladu s instrukcemi, může způsobit rušení radio
komunikacím. Nicméně, není zde záruka, že rušení nevznikne v konkrétní instalaci. V případě, že toto zařízení způsobí rušení radio či
televizní frekvence (může být znemožněno vypnutím a zapnutím přístroje), je uživatel vyzván ke zkoušce korekce rušení jednou nebo
více následujících opatření:
· Přeorientujte nebo přesuňte přijímací anténu.
· Zvětšte odstup mezi tímto zařízením a přijímačem.
· Zapojte toto zařízení do jiného obvodu než kam je zapojen přijímač.
· Požádejte Vašeho prodejce nebo zkušeného radio/TV technika o pomoc.
Upozornění:
K dodržení předpisů pro počítačové přístroje FCC Třídy B vždy používejte stíněného signálního kabelu, který se dodává s tímto přístrojem.
Upozornění pro uživatele:
FCC upozoňuje uživatele, že jakékoli změny nebo úpravy na tomto zařízení úmyslně potvrzené stranou odpovědnou za shodu mohou
zneplatnit práva uživatele k používání tohoto přístroje.
CZ
17PRESTIGIO P177
Page 17

ÚVOD
Blahopřejeme k zakoupení modelu Prestigio P177, vysoce-výkonného 17-ti palcového barevného TFT LCD monitoru. P177 monitor poskytuje
neblikající a barevný obraz ve volitelných rozlišeních. Pomocí této příručky Vám krok za krokem představíme veškeré vlastnosti, funkce
a technické specifikace LCD monitoru.
CZ
VLASTNOSTI
P177, 17-ti palcový monitor je inteligentní, na bázi mikroprocesoru a ergonomicky designovaný display, kompatibilní s analogovým RGB
zobrazovacím standartem, zahrnujícím PS/V, PS/2, volitelně pro Apple Macintosh Centris, Quadra a Macintosh řady II signály. LCD
monitor je schopen zobrazit ostrou a pohyblivou barevnou grafiku s VGA, SVGA, XGA, SXGA a s většinou Macintosh kompatibilních
barevných gravických karet.
· Monitor je schopen řádného fungování i v případě, že dojde k updgradu video karet nebo softwaru, z důvodu širokého auto-scanningu
kompatibilního spektra bez nutnosti zakoupení nového monitoru.
· Interní microprocesor digitálně kontroluje controls auto-scanning. Pro horizontální scanové frekvence mezi 30 KHz a 81 KHz, a vertikálníl
scanové frekvence mezi 55 Hz a 76 Hz. V jednotlivých stupních frekvence, obvody založené na mikroprocesoru dovolují monitoru
funkci přesnosti.
· Zabudovaná paměť umožňuje defaultní nastavení a také další parametry nastavované uživatelem.
· Maximální dosažitelné rozlišení je SXGA (1280 x 1024), nejvhodnější pro aplikace Windows.
· Kompaktní a úhledný design monitoru šetří místo na Vašem stole.
· Monitor je také shodný s nejpřísnějšími schématy prostředí TCO 99. V tomto schématu nejsou používány žádné závadné substance
během výrobního procesu.
18 PRESTIGIO P177
Page 18

ROZBALENÍ
Prosíme zkontrolujte, zda-li jsou následující díly přítomny v momentě rozbalování krabice. Obalové materiály uschovejte v případě další
potřeby manipulace s monitorem.
· LCD Monitor
AC Síťový Kabel Audio Kabel
CZ
· Uživatelská příručka
19PRESTIGIO P177
Page 19

Připevňování/Odtraňování zákadny
Instalace:
Vyrovnejte čtyři háčky na spodní straně monitoru s příslušnými
drážkami na spodní straně základny.
Odstraňování:
Stlačte háčky a sledujte značení šipek k odstranění základny.
CZ
NASTAVENÍ POLOHY OBRAZOVKY
K nastavení optimální zobrazovací pozici můžete pohybem obou rukou přizpůsobit sklon monitoru, jako popsáno na obrázku. Monitor
může být nastaven až o 30 stupňů nahoru a 5 stupňů dolů, jako je šipkami vyznačeno dole.
20 PRESTIGIO P177
Page 20

PŘIPOJENÍ SÍŤOVÉHO KABELU
· Nejdříve zkontrolujte, zda-li je síťový kabel, který používáte správný typ pro použití ve Vaší oblasti.
· Tento monitor má univerzální nápajecí zdroj, který umožňuje provoz v 100/120V AC nebo 220/240 V AC elektrické napětí. Není
požadováno nastavení uživatelem.
· Zapojte jeden konec síťového kabelu do AC Vstupu, zapojte druhý konec do příslušného AC Vstupu.
· Pro použití 220/240 V AC (mimo U.S.):
Používejte sady kabelů složených z H05VV-F kabelů a zástrček označovaných 10 A, 250 V. Sada kabelů by měla mít příslušná bezpečnostní
schválení pro zemi, kde bude zařízení instalováno.
BEZPEČNOSTNÍ OPATŘENÍ
· Vyvarujte se pokládání monitoru nebo jiného těžkého objektu na síťový kabel. Mohlo by dojít k vzplanutí či úrazu elektrickým proudem.
· Nevystavujte monitor dešti , přílišné vlhkosti nebo prachu.Mohlo by dojít k vzplanutí či úrazu elektrickým proudem.
· Nezakrývejte drážky nebo otvory monitoru. Vždy umístěte monitor na místo, kde je zaručena dostatečná ventilace.
· Zamezte umístění monitoru proti jasnému pozadí nebo kde by mohlo sluneční záření či jiné zdroje světla odrážet světlo na obrazovku.
Monitor umístěte do výše očí.
· Při přepravě monitoru postupujte velice opatrně.
· S monitorem nepohybujte prudce a zabraňte poškrábání obrazovky, je velice křehká.
ČIŠTĚNÍ MONITORU
Pozorně prosím dodržujte níže uvedený postup při čištění monitoru.
Vždy před čistěním odstraňte monitor z elektické zásuvky
K čístění displeye a zadní části monitoru používejte jemného hadříku
V případě, že je obrazovka jinak znečištěná než zaprášená, použijte k čištění malé množství líhu.
CZ
21PRESTIGIO P177
Page 21

PŘEDVOLENÉ REŽIMY
Ke snížení potřeby nastavení v rozdílných režimech, monitor má nastaveny níže uvedené hodnoty, které jsou nejčastěji používány. K
optimálnímu nastavení se uživateli doporučuje provést Audio Setup pod Windows “Full Screen” formátem. Pokud se žádný z režimů
nespojí, může uživatel uchovat preferované režimy v uživatelských režimech. Monitor je schopen úschovy až 9 uživatelských režimů.
Jedinou podmínkou k úschově uživatelských režimů je, že nová zobrazovací informace musí mít 1 KHz rozdíl pro horizontální frekvenci a
CZ
1 Hz pro vertikální nebo synchronizované signální polarity jsou jiné než defaultní nastavení.
Režim Rozlišení H. Freq. (KHz) Rozsah (MHz) Polarita
HV
1 VGA 720 x 400 70 Hz 31.47 28.322 - +
2 VGA 640 x 480 60 Hz 31.47 25.175 - 3 MAC 640 x 480 66 Hz 35.00 32.24 - 4 VESA 640 x 480 72 Hz 37.86 31.5 - 5 VESA 640 x 480 75 Hz 37.50 31.5 - 6 VESA 800 x 600 56 Hz 35.16 36 + +
7 VESA 800 x 600 60 Hz 37.88 40 + +
8 VESA 800 x 600 75 Hz 46.88 49.5 + +
9 VESA 800 x 600 72 Hz 48.08 50 + +
10 MAC 832 x 624 75 Hz 49.72 57.283 - 11 VESA 1024 x 768 60 Hz 48.36 65 - 12 VESA 1024 x 768 70 Hz 56.48 75 - 13 VESA 1024 x 768 75 Hz 60.02 78.75 + +
14 VESA 1280 x 1024 60 Hz 64 108 + +
15 VESA 1280 x 1024 75 Hz 80 135 + +
16 VESA 1152 x 864 75 Hz 67.5 108 + +
17 VESA 1280 x 960 60 Hz 60 108 + +
22 PRESTIGIO P177
Page 22

ÚSPORA ENERGIE
Monitor bude přesunut do “Úsporného režimu” pomocí kontrolního signálu z ovladače displaye, jako indikováno as indicated by the
amber-color power LED.
Hodnota Spotřeba Energie LED Světlo
ZAPNUTO Normal Zelená
ActiveOFF <3 W Žlutá
Nastavení úspory energie bude dodrženo do té doby, kdy je kontrolní signál detekován nebo je aktivována klávesnice nebo myš. Obnova
od Vypnutého stavu do Zapnutého stavu trvá kolem 5 sekund.
DDC
Ke zjednodušení instalace je Váš monitor připraven k funkci Plug and Play, v případě, že Váš systém podporuje DDC protokol. DDC
(Display Data Channel) je komunikační protokol, který automaticky informuje hos titelský systém o jeho kapacitě, například, podporované
rozlišení a odpovídající timing. Monitor podporuje DDC2B Standart.
CZ
23PRESTIGIO P177
Page 23

INSTALACE
K instalaci monitoru do systému prosíme dodržujte následující postup:
Postup
CZ
1. Připojte Video Kabel
a. Ujistěte se, že je monitor i počítač vypnutý
b. Připojte video kabel k počítači
2. Připojte Síťový Kabel
Připojte síťový kabel k monitoru a poté k řádně uzemněné AC zásuvky
3. Připojte Audio Kabel
4. Zapněte Monitor a Počítač
Nejprve zapněte monitor a poté počítač
Toto pořadí je velice důležité
5. V případě, že monitor stále správně nefunguje, přejdětě prosím do sekce Lokalizace poruch k určení problému
24 PRESTIGIO P177
Page 24
UŽIVATELSKÉ OVLÁDÁNÍ
Ovládání Předního Panelu
1. Power Switch (Vypínač): K zapnutí a vypnutí proudu.
2. Power LED (LED): Rozsvítí se v případě, že je proud zapnutý.
3. Select MENU (Výběr MENU): Ke vstupu a výstupu do/z OSD menu.
4. Select DOWN (Výběr DOWN): K pohybu dolu v OSD menu.
5. -: Ke snížení hodnoty parametru v OSD, která byla vybrána k nastavení.
-: Vyberte předchozí stranu OSD MENU.
MUTE: Chová se jako Audio Mute horká klávesa v případě, kdy se OSD nezobrazuje.
6. +: Ke zvýšení hodnoty parametru v OSD, která byla vybrána k nastavení.
: Zvolte další stranu OSD MENU
AUTO: Chová se jako AUTO horká klávesa v případě, kdy se OSD nezobrazuje.
CZ
25PRESTIGIO P177
Page 25
Základní oblasti OSD Obrazovky
CZ
26 PRESTIGIO P177
Page 26

Standartní OSD výkon
1. Zmáčkněte MENU klávesu k aktivaci OSD menuv případě, kdy se OSD nezobrazuje.
2. Vyberte Select DOWN klávesu k pohybu v menu dolů. Parametr se v případě výběru zvýrazní.
3. Dále použijte + nebo - ke zvýšení nebo snížení hodnoty parametru, nebo vyberte mezi různými možnostmi.
4. K opuštění OSD obrazovky kdykoli během chodu, zmáčkněte MENU klávesu. V případě, že nejsou stlačeny žádné klávesy, OSD
automaticky zmizí.
5. V případě že není OSD zobrazeno, zmáčknete + klávesu ke startu Auto-Nastavení.
6. V případě že není OSD zobrazeno, zmáčkněte - klávesu k zapnutí/vypnutí speakerů.
Popis Funkce OSD
Hlasitost
Ke zvýšení nebo snížení stupně hlasitosti.
Jas
Ke zvýšení nebo snížení stupně jasu.
Kontrast
Ke zvýšení nebo snížení stupně kontrastu.
Auto Kontrast
Ztlačte “+” klávesu ke spuštění auto analogového kontrastu.
Teplota Barev
Zmáčkněte “-” nebo “+” k výběru 5000, 6500, 7500, 8200, 9300 a USER. Pouze v případě výběru USERmůžete nastavovat R/
G/B obsah, jinak nelze.
Horizontální Velikost
Ke zvýšení nebo snížení velikosti obrazu.
Jemnost
Ke zvýšení nebo snížení
Doleva/Doprava
K pohybu obrazovky doleva nebo doprava.
Nahoru/Dolu
K pohybu obrazovky nahoru nebo dolů.
Auto-Nastavení
Zmáčkněte “+” ke spuštění této funkce.Auto-Nastavení automaticky nastaví V-Pozici, H-Pozici, Takt, a Taktovací Fáze. Celý proces
trvá cca 5 sekund.
CZ
27PRESTIGIO P177
Page 27

· Jazyk
Vyberte mezi English, French, Italian, German a Spanish.
· Tovární přednastavení
K navrácení monitoru do výchozího nastavení.
· OSD Time Out
K nastavení period OSD auto-vypnutí času.
· OSD Doleva/Doprava
CZ
K pohybu OSD pozice horizontálně na obrazovce. Když je “+” klávesa ztlačena, OSD kontrolní menu se posune na pravou stranu
obrazovky. Podobně, když je “-” klávesa ztlačena, OSD kontrolní menu se posune na levou stranu.
· OSD Nahoru/Dolu
K pohybu OSD pozice vertikálně na obrazovce. Když je “+” klávesa ztlačena, OSD kontrolní menu se posune na horní stranu
obrazovky. Podobně, když je “-” klávesa ztlačena, OSD kontrolní menu se posune na dolní stranu.
· Informace
Vyznačuje aktuální rozlišení, H-Frekvence a V-Frekvence.
28 PRESTIGIO P177
Page 28

LOKALIZACE PORUCH
Dříve než odešlete LCD monitor do servisu, zkontrolujte prosím níže seznam lokalizací poruch, které můžete autodiagnostikovat sami.
Problémy
Aktuální stav Náprava
Není obraz LED ZAPNUTO · Použitím OSD, nastavte jas a kontrast na maximum nebo resetujte do původního nastavení.
LED VYPNUTO · Zkontrolujte vypínač
· Zkontrolujte, zda-li je AC síťový kabel správně připojen k monitoru.
LED zobrazuje žlutou barvu · Zkontrolujte, zda-li je signální kabel správně připojen k monitoru.
· Zkontrolujte, zda-li je systém počítače zapnutý.
Abnormální Obraz Ne stabilní Obraz · Zkontrolujte, zda jsou specifikace grafického adaptéru a monitoru v souladu, která může
způsobovat špatné spojení ve vstupní frekvenci signálu.
Chybí displey, středové řazení, · Použitím OSD nastavte rozlišení, takt, taktovací fázi, H-Pozici, V-Pozici s nestandartním
nebo příliš malé nebo signálem.
příliš velké ve velikosti displaye · Použitím OSD, v případě chybějícího full-sreen obrazu, vyberte jiné rozlišení nebo jiný vertikální
taktování.
· Počkejte několik sekund po nastavení velikosti obrazu před samotnou změnou nebo odpojením
signálního kabelu nebo odpojení monitoru.
Abnormální Zvuk Bez zvuku nebo · Zkontrolujte audio kabel s propojením k PC
zvuk je příliš slabý · Zkontrolujte, zda-li je nastavení hlasitosti na minimu, potom zvyšte stupeň hlasitosti.
CZ
29PRESTIGIO P177
Page 29

SPECIFIKACE
CZ
Název Modelu P177
Typ č. P177
LCD Display
Display Typ 17" TFT LCD
Display Area (H x W) 337.9 x 270.3 mm
Stupeň Kontrastu 350:1 (Typ.)
Úhel Pohledu 120oH 100oV (Min.)
Vstup
Napětí 100-240Vac
Frekvence 50-60Hz
Stupeň Proudění 0.9A
Operační Vlastnosti
Display Barvy 16.2M
Rozlišení SXGA (1280 x 1024) at 75 Hz maximum.
Jas 300 cd/m2 (Typ.)
Doba Odezvy 25 ms
Rozhraní Analog RGB
Vstupní Konektor 15-pin D-sub
Uživatelské Ovládání
Přední Panel Ovládání Power On/Off, MENU, Výběr DOWN, Value (+/ -), AUTO, Speaker on/off
OSD Ovládání Jas, Kontrast, Auto Kontrast, Teplota Barev, Horizontální Velikost, Jemný,
Doleva/Doprava, Nahoru/Dolů, Auto-Nastavení, Jazyk, Přednastavení, OSD Time
Out, OSD Doleva/Doprava, OSD Nahoru/Dolů , Informace
Fyzická Specifikace
Rozměry (V x Š x H) 365 x 374 x 200.5 (mm)
Net Hmotnost 4.6 Kg
Kapacita
Úspora Energie Ano
Spotřeba Energie 35 W
Směrnice
Bezpečnost & EMI UL, CUL, TUV-GS, TUV-Ergonomics, FCC-B, CE, TCO99 (optimálníl)
* Veškeré specifikace se mohou měnit bez předchozího upozornění.
30 PRESTIGIO P177
Page 30

Zhoda s FCC
Testovaním tohoto zariadenia bolo zistené, že spĺňa požiadavky kladené na výpočtové zariadenia triedy B podľa časti 15 predpisov FCC.
Tieto predpisy sú navrhnuté tak, aby bola zaručená primeraná ochrana proti nežiadúcemu rušeniu v bytových priestoroch. Toto zariadenie
generuje, používa a môže vyžarovať rádiový signál, a ak nie je nainštalované a používané v súlade s predpismi, môže rušiť rádiové
spojenia. Neexistuje žiadna záruka, že k rušeniu nepríde ani po správnej inštalácii. Ak toto zariadenie ruší príjem rozhlasu alebo televízie
(môžete to zistiť zapnutím a vypnutím zariadenia), mali by ste sa rušenie pokúsiť odstrániť jedným z nasledujúcich spôsobov:
· Otočením alebo premiestnením antény.
· Zväčšením vzdialenosti medzi týmto zariadením a prijímačom.
· Pripojením zariadenia do elektrickej zásuvky iného okruhu, ako je ten, ku ktorému je pripojený tento prijímač.
· Viac informácií získate u kvalifikovaných osôb.
Upozornenie:
Aby boli splnené limity pre zariadenie FCC triedy B, vždy používajte dodávaný tienený signálny kábel.
Upozornenie pre užívateľa:
Federálna komisia pre telekomunikácie upozorňuje, že užívateľovi, ktorý pozmení jednotku bez výslovného súhlasu strany zodpovedajúcej
za zhodu s predpismi, môže byť odobraté právo obsluhovať zariadenie.
SK
31PRESTIGIO P177
Page 31

ÚVOD
Gratulujeme Vám ku kúpe monitora Prestigio P177, vysokovýkonného 17-palcového farebného TFT LCD monitora. Monitor P177 Vám
prináša farebný obraz bez blikania, s optimálnym rozlíšením. V tomto užívateľskom manuále nájdete krok po kroku vysvetlené všetky
jeho vlastnosti, funkcie a technické parametre.
SK
VLASTNOSTI
P177 je 17-palcový inteligentný a ergonomicky navrhnutý TFT LCD monitor založený na mikroprocesore, kompatibilný s väčšinou
analógových RGB zobrazovacích štandardov, vrátane PS/V, PS/2 a voliteľne so signálmi Apple Macintosh Centris, Quadra a Macintosh
II. LCD monitor dokáže zobraziť ostrú a sýtu farebnú grafiku z VGA, SVGA, XGA, SXGA (neprekladane) videokariet a z väčšiny farebných
videokariet kompatibilných so systémom Macintosh.
· Vďaka kompatibilite s mnohými režimami zobrazovania je monitor schopný fungovať aj po výmene video karty alebo softvéru, .
· Obnovovacia frekvencia je nastavovaná automaticky interným mikroprocesorom. Horizontálna frekvencia v rozsahu 30 kHz - 81 kHz a
vertikálna frekvencia v rozsahu 55 Hz - 76 Hz. Vďaka mikroprocesoru je zaručená veľmi presná obnovovacia frekvencia v každom
režime.
· Interná pamäť umožňuje uložiť výrobné nastavenia, ale aj ďalšie užívateľské parametre.
· Maximálne možné rozlíšenie je SXGA (1280 x 1024), ktoré je vhodné pre aplikácie vo Windows.
· Kompaktný a štíhly kryt ušetrí kopec miesta na Vašom pracovnom stole.
· Monitor vyhovuje prísnej ekologickej norme TCO 99. Pri výrobe nie sú používané žiadne látky poškodzujúce životné prostredie.
32 PRESTIGIO P177
Page 32

VYBALENIE
Pri otvorení balenia skontrolujte, či sa v ňom nachádzajú nasledujúce položky. Baliaci materiál odložte pre prípad, že budete monitor
niekedy v budúcnosti prepravovať.
· LCD monitor
· Napájací AC kábel Audio kábel
SK
· Užívateľský manuál
33PRESTIGIO P177
Page 33

Pripojenie/odpojenie základne
Inštalácia:
Štyri háčiky v spodnej časti monitora zarovnajte so
zodpovedajúcimi otvormi na spodnej časti základne.
Odpojenie:
Pred odpájaním základne háčik najprv stlačte podľa obrázku a
pri jej odpájaní postupujte podľa šípky.
SK
NASTAVENIE POZÍCIE OBRAZOVKY
Aby ste zabezpečili čo najlepšiu pozíciu na sledovanie, musíte nastaviť sklon monitora. Pri nastavovaní držte monitor oboma rukami za
okraje, ako je zobrazené na nasledujúcom obrázku. Monitor je možné nastaviť v 30 stupňovom uhle smerom dozadu a v 5 stupňovom
uhle smerom dopredu.
34 PRESTIGIO P177
Page 34

PRIPOJENIE NAPÁJACIEHO KÁBLA
· Najprv skontrolujte, či je napájací kábel vhodný pre krajinu, v ktorej budete monitor používať.
· Tento monitor je vybavený univerzálnym napájacím zdrojom, ktorý umožňuje napájanie 100/120 V AC alebo 220/240 V AC. Nie je
potrebné ďalšie nastavovanie.
· Jeden koniec napájacieho kábla pripojte do vstupu AC IN na monitore a druhý do elektrickej zásuvky.
· Pre jednotky používajúce napájanie 220/240 V AC (mimo USA):
Použite napájací kábel H05VV-F s koncovkou, 10 A, 250 V. Kábel by mal byť schválený v krajine, kde budete monitor používať.
BEZPEČNOSTNÉ UPOZORNENIA
· Na nápajací kábel nepokladajte monitor, ani iné ťažké predmety, v opačnom prípade môže prísť k požiaru alebo k úrazu elektrickým
prúdom.
· Monitor nevystavujte dažďu, zvýšenej vlhkosti alebo prachu. V opačnom prípade môže prísť k požiaru alebo k úrazu elektrickým
prúdom.
· Aby mohlo byť prebytočné teplo vyžarované do priestoru, otvory na monitore ničím neprikrývajte. Monitor umiestnite na takú pozíciu,
kde bude zabezpečené jeho dostatočné vetranie.
· Monitor nepokladajte pred svetlé pozadie alebo na miesto, kde sa od jeho obrazovky môže odrážať slnko alebo iné zdroje svetla.
Monitor umiestnite pod úroveň očí.
· Pri prenášaní monitora buďte mimoriadne opatrní.
· Keďže je obrazovka veľmi krehká, nevystavujte ju nárazom a dávajte pozor, aby ste ju nepoškrabali.
ČISTENIE MONITORA
Pri čistení monitora postupujte podľa nasledujúcich odporúčaní.
· Pred začatím čistenia vytiahnite monitor z elektrickej zásuvky.
· Na vyčistenie monitora a prednej a bočnej strany krytu použite jemnú tkaninu.
· Ak je obrazovka veľmi zaprášená, navlhčite tkaninu menším množstvom alkoholu.
SK
35PRESTIGIO P177
Page 35

PREDVOĽBY
Na zredukovanie potreby nastavovania rozličných režimov monitor podporuje štandardné, najčastejšie používané zobrazovacie režimy
uvedené v nasledujúcej tabuľke. Pre optimálne nastavenie sa odporúča užívateľovi spustiť automatické nastavenie vo Windows. Ak Vám
nevyhovuje žiadny z ponúkaných režimov, je možné uložiť až 9 vlastných nastavení. Jedinou podmienkou pri ukladaní užívateľských
nastavení je, že novo uložené nastavenie sa musí líšiť oproti štandardnému režimu aspoň o 1 kHz od horizontálnej frekvencie alebo 1
SK
Hz od vertikálnej frekvencie, prípadne sa musí líšiť polarita synchronizačného signálu .
Režim Rozlíšenie H. frekv. Pásmo Polarita
HV
1 VGA 720 x 400 70 Hz 31.47 28.322 - +
2 VGA 640 x 480 60 Hz 31.47 25.175 - 3 MAC 640 x 480 66 Hz 35.00 32.24 - 4 VESA 640 x 480 72 Hz 37.86 31.5 - 5 VESA 640 x 480 75 Hz 37.50 31.5 - 6 VESA 800 x 600 56 Hz 35.16 36 + +
7 VESA 800 x 600 60 Hz 37.88 40 + +
8 VESA 800 x 600 75 Hz 46.88 49.5 + +
9 VESA 800 x 600 72 Hz 48.08 50 + +
10 MAC 832 x 624 75 Hz 49.72 57.283 - 11 VESA 1024 x 768 60 Hz 48.36 65 - 12 VESA 1024 x 768 70 Hz 56.48 75 - 13 VESA 1024 x 768 75 Hz 60.02 78.75 + +
14 VESA 1280 x 1024 60 Hz 64 108 + +
15 VESA 1280 x 1024 75 Hz 80 135 + +
16 VESA 1152 x 864 75 Hz 67.5 108 + +
17 VESA 1280 x 960 60 Hz 60 108 + +
36 PRESTIGIO P177
Page 36

ŠETRENIE ENERGIOU
Monitor bude uvedený do režimu šetrenia energiou ovládacím signálom z grafickej karty, čo bude indikované rozsvietením napájacej LED
v jantárovej farbe.
Stav Spotreba Farba LED
Zapnutý Normálna Zelená
Aktívne vypnutý <3 W Jantárová
Režim šetrenia energiou bude aktívny, pokiaľ nebude rozpoznaný ovládací signál alebo nebude použitá klávesnica či myš. Doba prepnutia
z aktívne vypnutého do zapnutého stavu je asi 5 sekúnd.
DDC
Ak Váš systém podporuje protokol DDC, prebehne inštalácia monitora veľmi jednoducho - ako Plug and Play. DDC je komunikačný
protokol, prostredníctvom ktorého monitor automaticky informuje hostiteľský systém o svojich schopnostiach, napr. o podporovanom
rozlíšení a obnovovacej frekvencii. Monitor podporuje štandard DDC2B.
SK
37PRESTIGIO P177
Page 37

INŠTALÁCIA
Pri inštalácii monitora postupujte prosím podľa nasledujúcich krokov:
Postup
SK
1. Pripojenie video kábla.
a. Monitor aj počítač musia byť vypnuté.
b. K počítaču pripojte video kábel.
2. Pripojenie napájacieho kábla.
Napájací kábel pripojte k monitoru a potom k správne zemnenej AC zásuvke.
3. Pripojenie audio kábla.
4. Zapnutie monitora a počítača.
Najprv zapnite monitor, potom počítač.
Toto poradie je veľmi dôležité.
5. Ak monitor nefunguje správne, postupujte podľa časti Odstraňovanie porúch.
38 PRESTIGIO P177
Page 38

UŽÍVATEĽSKÉ OVLÁDANIE
Ovládanie na prednom paneli
1. Vypínač: Zapnutie a vypnutie napájania.
2. Indikačná LED: Svieti, ak je zapnuté napájanie.
3. Výber MENU: Zobrazenie a opustenie OSD menu.
4. Výber smerom dole: Pohyb položkami OSD menu smerom dole.
5. -: Zníženie hodnoty parametra OSD menu, ktorý bol vybraný.
-: Výber predchádzajúcej stránky v OSD menu.
MUTE: Ak nie je zobrazené OSD menu, slúži na vypnutie zvuku.
6. +: Zvýšenie hodnoty parametra OSD menu, ktorý bol vybraný.
+: Výber nasledujúcej stránky v OSD menu.
AUTO: Slúži na automatické nastavenie parametrov, ak nie je zobrazené menu.
SK
39PRESTIGIO P177
Page 39

Základné časti OSD obrazovky
SK
40 PRESTIGIO P177
Page 40

Štandardné ovládanie OSD
1. Ak nie je zobrazené OSD, na aktiváciu OSD menu stlačte tlačidlo MENU.
2. Na cyklický pohyb po menu použite tlačidlo na výber smerom dole. Vybraný parameter bude vysvietený.
3. Na zvýšenie alebo zníženie hodnoty parametra (alebo výber rôznych jeho možností) použite tlačidlá + alebo -.
4. Na opustenie OSD menu hocikedy počas jeho ovládania stlačte tlačidlo MENU. Ak niekoľko sekúnd nestlačíte žiadne tlačidlo, OSD
menu automaticky zmizne.
5. Ak OSD menu nie je zobrazené, na spustenie automatického nastavenia stlačte tlačidlo +.
6. Ak OSD menu nie je zobrazené, na zapnutie/vypnutie reproduktorov stlačte tlačidlo -.
Popis funkcií OSD
· Hlasitosť
Zvýšenie alebo zníženie úrovne hlasitosti.
· Jas
Zvýšenie alebo zníženie jasu.
· Kontrast
Zvýšenie alebo zníženie kontrastu.
· Auto Kontrast
Stlačením tlačidla “+” sa automaticky nastaví analógový kontrast.
· Farebná teplota
Tlačidlami “-” alebo “+” nastavte 5000, 6500, 7500, 8200, 9300 a USER. Nastavenia hodnôt R/G/B je možné robiť iba v
prípade, ak je vybrané USER.
SK
· Horizontálna veľkosť
Zväčšenie alebo zmenšenie veľkosti obrazu.
· Zjemnenie
Zvýšenie alebo zníženie úrovne šumu obrazu.
· Vľavo/vpravo
Pohyb obrazom smerom doľava alebo doprava.
· Hore/dole
Pohyb obrazom smerom hore alebo dole
· Automatické nastavenie
Na zapnutie tejto funkcie stlačte “+”. Funkcia automaticky nastaví vertikálnu pozíciu, horizontálnu pozíciu, obnovovaciu frekvenciu,
fázu. Celé nastavenie trvá asi 5 sekúnd.
41PRESTIGIO P177
Page 41

· Jazyk
Výber spomedzi angličtiny, francúzštiny, taliančiny, nemčiny a španielčiny (čínštiny pre sériové modely).
· Továrenské predvoľby
Návrat monitora na štandardné nastavenia.
· Čas zobrazenia OSD
Nastavenie času, po ktorom sa OSD menu vypne.
· Pozícia OSD vľavo/vpravo
SK
Horizontálny pohyb OSD po obrazovke. Po stlačení tlačidla “+” sa začne OSD menu pohybovať po obrazovke smerom doprava.
Podobne po stlačení tlačidla “-” sa začne OSD menu pohybovať po obrazovke smerom doľava.
· Pozícia OSD hore/dole
Vertikálny pohyb OSD po obrazovke. Po stlačení tlačidla “+” sa začne OSD menu pohybovať po obrazovke smerom hore. Podobne
po stlačení tlačidla “-” sa začne OSD menu pohybovať po obrazovke smerom dole.
· Informácie
Zobrazenie aktuálneho rozlíšenia, horizontálnej frekvencie a vertikálnej frekvencie.
42 PRESTIGIO P177
Page 42

ODSTRAŇOVANIE PORÚCH
Pred odoslaním LCD monitora do servisu sa pokúste problém najprv odstrániť svojpomocne podľa nasledujúceho návodu.
Problémy
Aktuálny stav Riešenie
Žiadny obraz LED zapnutá · Pomocou OSD nastavte jas a kontrast na maximálne hodnoty alebo ich zresetujte na
tandardné hodnoty.
LED vypnutá · Skontrolujte vypínač.
· Skontrolujte, či je napájací kábel správne pripojený k monitoru.
LED svieti jantárovo · Skontrolujte, či je signálový kábel pripojený k monitoru správne.
· Skontrolujte, či je počítač zapnutý.
Nezvyčajný obraz Nestabilný obraz · Skontrolujte vzájomnú kompatibilitu grafického adaptéra a monitora (podľa špecifikácie).
Nie je vidieť žiadny obraz, · U neštandardných signálov nastavte rozlíšenie, obnovovaciu frekvenciu, fázu, horizontálnu a
je centrálne posunutý, vertikálnu pozíciu pomocou OSD.
príliš malý alebo príliš · V prípade, že obraz úplne chýba, nastavte pomocou OSD iné rozlíšenie alebo inú vertikálnu
veľký. frekvenciu.
· Po nastavení veľkosti obrazu vyčkajte pred výmenou alebo odpojením signálneho kábla, či
vypnutím monitora, niekoľko sekúnd.
Nezvyčajný zvuk Žiadny zvuk alebo · Skontrolujte, či je audio kábel pripojený k počítaču.
príliš nízka hlasitosť. · Skontrolujte, či na počítači nie je nastavená minimálna hlasitosť a skúste ju zvýšiť.
SK
43PRESTIGIO P177
Page 43

ŠPECIFIKÁCIA
SK
Názov modelu P177
Typové číslo P177
LCD displej
Typ displeja 17" TFT LCD
Zobrazovaná oblasť (v x š) 337.9 x 270.3 mm
Kontrast 350:1 (typ.)
Sledovací uhol 120° h 100° v (min.)
Napájanie
Napätie 100 - 240 V AC
Frekvencia 50 - 60 Hz
Prúdový odber 0,9 A
Vlastnosti
Zobraziteľné farby 16.2M
Rozlíšenie Maximálne SXGA (1280 x 1024) pri 75 Hz
Jas 300 cd/m2 (typ.)
Doba odozvy 25 ms
Rozhranie Analógové RGB
Vstupy 15-pinový D-sub
Užívateľské ovládanie
Ovládanie na prednom paneli Zapnutie/vypnutie, MENU, Výber smerom dole, Hodnota (+/ -), AUTO
Ovládanie pomocou OSD Jas, Kontrast, Auto Kontrast, Farebná teplota, Horizontálna veľkosť,
Zjemnenie, Vľavo/vpravo, Hore/dole, Automatické nastavenie, Pleťový odtieň,
Farebný odtieň, Nasýtenie, Jazyk, Továrenské predvoľby, Čas zobrazenia OSD,
Pozícia OSD vľavo/vpravo, Pozícia OSD hore/dole, Informácie
Fyzická špecifikácia
Rozmery (v x š x h) 365 x 374 x 200.5 (mm)
Čistá váha 4,6 kg
Napájanie
Šetrenie energiou Áno
Spotreba 35 W
Smernice
Bezpečnosť a EMI UL, CUL, TUV-GS, TUV-ergonómia, FCC-B, CE, TCO99 (voliteľne)
* Špecifikácia sa môže meniť bez predchádzajúceho upozornenia.
44 PRESTIGIO P177
Page 44

Monitor spełnia normy FCC
Monitor spełnia normy klasy B.
Zmień orientację lub położenie anteny
Zwiększ odległość między tym sprzętem a odbiornikiem
Podłącz urządzenie do innego obwodu elektrycznego niż odbiornik
Skonsultuj się ze sprzedawcą lub technikiem RTV
Ostrzeżenie
Należy uzywać kabla sygnałowego dołaczonego do monitora
Ostrzeżenie dla użytkownika
Wszelkie naprawy powinny być dokonywane przez specjalizowany serwis
PL
45PRESTIGIO P177
Page 45

Wstęp
Opis
Monitor jest wyposażony w mikroprocesor, ergonimiczny wyświetlacz współdziałający z wiekszością systemów komputerowych z kartą
VGA, SVGA, XGA, SXGA
PL
Monitor będzie działał poprawnie w przypadku instalacji odpowiednich kart grafiki i oprogramowania
Mikroprcesor sterujacy obrazem pracuje w częstotliwoścaich - poziomo 30 KHz and 81 KHz; pionowo - 55 Hz and 76 Hz.
Wewnetrzna pamięc umozliwia zachowanie parametrów obrazu podczas odłączenia od zasilania.
Maxymalna rozdzielczośc ekranu 1280x1024
Monitor spełnia normy TCO 99
46 PRESTIGIO P177
Page 46

Rozpakowanie
Po rozpakowaniu sprawdź listę rzeczy które powinny znajdować się w pudełku. Zachowaj także opakowanie na wypadek koneczności
wysyłania lub transportu urządzenia.
Monitor LCD
Przewód zasilający Audio Kabel
PL
Instrukcja użytkownika
47PRESTIGIO P177
Page 47

Podłączanie/Odłączanie bazy
Instalacja Usunięcie
PL
Korekcja pozycji ekranu
W celu ustawienia optymalnego kąta pracy monitora, można go ręcznie dopasować do indywudualnych potrzeb. (przechylenie do 30
stopni od pionu w tył i do 5 stopni od pionu w przód)
48 PRESTIGIO P177
Page 48

Podłączanie przewodu zasilającego
Upewnij się że przewód zasilający którego używasz jest odpowiedni dla regionu w którym przebywasz
Ten monitor posiada uniwersalny zasilacz, który pozwala na zasilanie napięciami: 100/120V AC lub 220/240 V AC. Nie wymaga on
ingerencji użytkownika.
Podłącz odpowiednie końce przewodu do monitora i gniazdka zasilającego
dla jednostek zasilanych napięciem 220/240 V (poza U.S.A.)
Używaj przewodu przeznaczonego do pracy z napięciem 250 V i natężeniem 10A. Przewowinien spełniać normy bezpieczeństwa twojego
kraju
Zalecenia bezpieczeństwa.
Unikaj stawiania monitora lub ciężkich przedmiotów na przewodzie zasilającym. Może to spowodować pożar lub porażenie prądem
elektrycznym.
nie narażaj monitora na działanie deszczu, wysokiej wilgotności i kurzu, aby uniknąć ryzyka pożaru lub porażenia.
nie zakrywaj otworów wentylacyjnych w monitorze aby nie doprowadzić do przegrzania. Monitor ustaw w miejscu o odpowiedniej
wentylacji.
Unikaj stawiania monitora naprzeciw jasnego tła, lub w miejscu gdzie światło słoneczne lub inne źródło światła padałoby na jego front.
Ustaw monitor nieco poniżej lini wzroku.
ostrożne przenoś monitor
unikaj uderzeń i zarysowań w ekran monitora. Ekran jest wrażliwy na uszkodzenia mechaniczne.
Czyszczenie monitora
Zapoznaj się z poniższymi wskazówkami przed czyszczeniem monitora
zawsze odłącz przewów zasilający przed czyszczeniem monitora
używaj miękkiej ściereczki do czyszczenia ekranu i obudowy
Jeśli ekran wymaga dokładniejszego czyszczenia użyj miękkiej ściereczki nawilżonej alkoholem o niedużym stężeniu.
PL
49PRESTIGIO P177
Page 49

Tryby pracy
Optymalne parametry pracy monitora są ustawione fabrycznie.
Tryb Rozdzielczość Częśtotliwość pozioma Szerokość pasma Polaryzacja
PL
1 VGA 720 x 400 70 Hz 31.47 28.322 - +
2 VGA 640 x 480 60 Hz 31.47 25.175 - 3 MAC 640 x 480 66 Hz 35.00 32.24 - 4 VESA 640 x 480 72 Hz 37.86 31.5 - 5 VESA 640 x 480 75 Hz 37.50 31.5 - 6 VESA 800 x 600 56 Hz 35.16 36 + +
7 VESA 800 x 600 60 Hz 37.88 40 + +
8 VESA 800 x 600 75 Hz 46.88 49.5 + +
9 VESA 800 x 600 72 Hz 48.08 50 + +
10 MAC 832 x 624 75 Hz 49.72 57.283 - 11 VESA 1024 x 768 60 Hz 48.36 65 - 12 VESA 1024 x 768 70 Hz 56.48 75 - 13 VESA 1024 x 768 75 Hz 60.02 78.75 + +
14 VESA 1280 x 1024 60 Hz 64 108 + +
15 VESA 1280 x 1024 75 Hz 80 135 + +
16 VESA 1152 x 864 75 Hz 67.5 108 + +
17 VESA 1280 x 960 60 Hz 60 108 + +
H (poziomy) V (pionowy)
50 PRESTIGIO P177
Page 50

Oszczędzanie energii
Bursztynowy kolor diody LED oznacza że monitor został wprowadzony w stan oszczędzania energii poprzez sygnał z komputera do
którego jest podłączony.
Stan Zużycie energii Dioda LED
Włączony Normalny Zielony
Wyłączony <3W Bursztynowy
Stan oszczędzania energii będzie trwał do momentu utrzymania sygnału kontrolnego z komputera lub do użycia myszy lub klawiatury.
Powrót do stanu “włączony” zajmuje około 5 sekund.
DDC
Monitor wyposażony jest w funcję Plug and Play, w standardzie DDC 2B.
PL
51PRESTIGIO P177
Page 51

Instalacja
Aby zaistalować monitor w systemi e wykonaj następujące kroki
Kroki
PL
1. Podłącz przewód video
a. Upewnij się że monitor i komputer są wyłączone.
b. Podłącz przewód video do komputera
2. Podłącz przewód zasilający
Podłącz przewód zasilający do monitora a następnie do prawidłowo uziemionego gniazda zasilającego.
3. Podłącz przewód audio
4. Włącz monitor i komputer
Najpierw włącz monitor a następnie komputer
Ta kolejność jest bardzo ważna
5. Jeśli monitor wciąż nie działa poprawnie. Sprawdź dział “usuwanie problemów” aby zdiagnozować problem.
52 PRESTIGIO P177
Page 52

Regulacja użytkownika
regulacja na panelu przednim
1. Włącznik: Do włączania i wyłączania urządzenia
2. Dioda Power: jej świecenie oznacza że monitor jest włączony
3. Wybierz Menu: aby wejść/wyjść do menu OSD
4. Wybierz DOWN: aby przesunąc się w dół w menu OSD
5. -:zmniejsza wartość parametru wybranego w menu OSD
“-:”wybiera poprzednią stronę w menu OSD
MUTE: wycisza głośniki gdy menu OSD nie jest wyświetlane
6. +: zwiększa wartość parametru wybranego w menu OSD
“+:” wybiera następną stronę w menu OSD
AUTO: wykonuje autokorekcję gdy menu OSD nie jest wyświetlane
PL
53PRESTIGIO P177
Page 53

Podstawowe sekcje Menu OSD
PL
54 PRESTIGIO P177
Page 54

Standardowe operacje OSD
Wciśnij Menu aby włączyć Menu OSD
2. Użyj Select DOWN aby poruszać się po menu OSD. Wybrany element będzie podświetlony.
Następnie użyj + lub - aby zwiększyć lub zmniejszyć wartość parametru. Parametr będzie podświetlony gdy będzie wybrany.
Aby wyść z menu OSD w dowolnym monencie naciścij MENU. Jeśli przez dłuższy czas żaden przycisk nie zostanie wciśnięty Menu OSD
wyłączy się samoczynnie.
Gdy Menu OSD nie jest wyświetlone, wciśnij + ady dokonać autoregulacji
Gdy Menu OSD nie jest wyświetlone, wciśnij - aby włączyć/wyłączyć głośniki
Opis funkcj Menu OSD
głośność
zwiększa/zmniejsza poziom głośności
jasność
zwiększa/zmniejsza jasność
kontrast
zwiększa/zmniejsza kontrast
Autokontrast
Wciśnij “+” aby automatycznie dobrać kontrast
Temperatura kolorów
Wciśnij “+” lub “-” aby wybrać 5000, 6500, 7500, 8200, 9300 lub USER. Tylko w trybie USER możesz zmieniać wartości
poszczególnych składowych RGB.
rozmiar poziomy
zwiększa/zmniejsza rozmiar obrazu
dobrze
zwiększa/zmniejsza szum na obrazie
lewo/prawo
przesuwa obraz w lewo/prawo
góra/dół
przesuwa obraz w górę/dół
autokrekcja
Wciśnij “+” aby włączyć tę funkcję. Autokorekcja automatycznie dostroi pozycję w pionie, poziomie, oraz odświeżanie. Zajmie to
około 5 sekund.
PL
55PRESTIGIO P177
Page 55

Język
wybierz spośród następujących języków: angielski, francuski, niemiecki, hiszpański, chiński
ustawienia fabryczne
ustawia parametry fabryczne wszystkich opcji monitora
czas wyłączenia Menu OSD
zmienia czas po jakim Menu OSD wyłącza się samoczynnie
OSD lewo/prawo
PL
Zmienia pozycję poziomą Menu OSD. Wciśnięcie + spowoduje przesunięcie Menu OSD w prawo, zaś wciśnięcie - spowoduje
przesunięcie Menu OSD w lewo.
OSD góra/dół
Zmienia pozycję pionową Menu OSD. Wciśnięcie + spowoduje przesunięcie Menu OSD w górę, zaś wciśnięcie - spowoduje przesunięcie
Menu OSD w dół.
informacje
Podaje aktualną rozdzielczość oraz odświeżanie pionowe i poziome
56 PRESTIGIO P177
Page 56

usuwanie usterek
Przed wysłaniem monitora LCD do serwisu poniższą listę us terek i zobacz czy sam nie możesz usunąć przyczyny wadliwej pracy urządzenia.
Problemy Obecny status Co należy zrobić
brak obrazu dioda LED się świeci używając Menu OSD zwiększ jasność do maksimum lub wróc do ustawień fabrycznych
monitora
dioda LED się nie świeci sprawdź włącznik
sprawdź czy przewód zasilający jest prawidłowo podłączony do monitora
dioda LED świeci sprawdź czy przewód video jest prawidłowo podłączony do monitora
na bursztynowo sprawdź czy komputer jest włączony
znieksztacony obraz niestabilny obraz sprawdź specyfikację karty graficznej czy obsluguje tryby graficzne oraz częstotliwości
odświeżania obsługiwane przez monitor
brak obrazu, uniesiony używając Menu OSD zmień rozdzielczość, odświeżanie, pozycję w pionie oraz w poziomie
środek, zbyt mały lub w przypadku całkowitego braku obrazu, używająć Menu OSD, wybierz:other resolution or
zbyt duży obraz other vertical refresh timing.
Po zmianie wielkości obrazu odczekaj kilka sekund przed odłączenie przewodu
ygnałowego lub wyłączeniem monitora
zniekształcony dźwięk brak dźwięku lub poziom sprawdź przewód audio łączący monitor z komputerem
dźwięku zbyt niski sprawdź poziom głośności ustawiony w systemie operacyjnym komputera, w razie
potrzeby spróbuj zwiększyć poziom głośności
PL
57PRESTIGIO P177
Page 57

Specyfikacja
PL
Nazwa modelu P177
Nr. Typu P177
Wyświetlacz LCD
Typ wyświetlacza 17" TFT LCD
Rozmiar obszaru wyświetlanego (W x Sz) 337.9 x 270.3 mm
Kontrast 350:1 (Typ.)
Kąt widzenia 120oH 100oV (Min.)
Wejście zasilania
Napięcie 100 - 240 V
Częstotliwość 50-60Hz
Natężenie prądu 0,9 A
Opis
Wyświetlane kolory 16,2 M
Rozdzielczość SXGA (1280 x 1024) @ 75Hz maxymalnie.
jasność 300 cd/m2 (Typowo)
Czas odpowiedzi 25 ms
Interface Analogowe RGB
wejścia 15-pin D-sub
Regulacja użytkownika
Panel przedni Włącznik/Wyłącznik, Menu, Wybierz DOWN, Wartość (+,-), AUTO, speaker on/off
Ustawienia OSD Jasność, kontrast, autokontrast, temperatura kolorów, rozmiar poziomy,
dobrze, lewo/prawo, góra/dół, autokorekcja, język,
ustawienia fabryczne, czas wyłączenia OSD, OSD lewo/prawo, OSD góra/dół,
informacje
Opis fizyczny
Wymiar (W x Sz x D) 365 x 374 x 200.5 (mm)
Waga netto 4.6 Kg
Zasilanie
Oszczędzanie energii Tak
Zużycie energii 35 W
Regulacje
Safety & EMI UL, CUL, TUV-GS, TUV-Ergonomics, FCC-B, CE, TCO99 (opcjonalnie)
*dane mogą ulec zmianie bez powiadomienia
58 PRESTIGIO P177
Page 58

Izjava o FCC skladnosti
Ta oprema je bila testirana in ustreza pogojem razreda B za digitalne naprave, je v skladu s 15. členom FCC pravil. Ti pogoji so oblikovani
z namenom zagotoviti razumsko zaščito pred radijskimi valovi pri inštalaciji. Ta naprava proizvaja, uporablja in lahko izžareva radijske
valove. Če ni pravilno inštalirana in uporabljena v skladu z navodili, lahko povzroča motnje pri radio komunikacijah. Kljub vsemu se
lahko motnje vseeno pojavijo. Če naprava povzroča motnje pri radijskem ali televizijskem sprejemu (to lahko ugotovite, če to napravo
vključite in izključite), predlagamo, da poskušate motnje odpraviti z pomočjo enega od naslednjih predlogov:
Premaknite ali prestavite sprejemno anteno.
Povečajte razdaljo med napravo in sprejemnikom.
Povežite to napravo preko druge vtičnice kot je povezan sprejemnik.
Posvetujte se z distributerjem ali izkušenim radio/TV serviserjem za pomoč.
Pozor:
Da bi se ravnali po določilih FCC razreda B za računalniške naprave, vedno uporabljajte zaščitni signalni kabel, priložen temu monitorju.
Opozorilo uporabnikom:
The Federal Communications Commission opozarja uporabnike, da imajo lahko spremembe, ki niso izrecno odobrene s strani proizvajalca
ali distributerja, lahko za posledico zavrnitev garancije.
SLO
59PRESTIGIO P177
Page 59

PREDSTAVITEV
Čestitamo za nakup modela Prestigio P177, 17-palčnega visoko zmogljivega barvnega TFT LCD monitorja. P177 zagotavlja optimalno
resolucijo. V teh navodilih za uporabo vam bomo predstavili vse značilnosti, funkcije in tehnične specifikacije LCD monitorja. Zagotovo
boste imeli z monitorjem čudovite izkušnje.
SLO
ZNAČILNOSTI
Model P177 je inteligenten 17" TFT LCD monitor, ki bazira na mikroprocesorjih in je ergonomsko oblikovan, združljiv z večino RGB
standardi, vključujoč PS/V, PS/2, opcijsko za Apple Macintosh Centris, Quadra in Macintosh II family signale. LCD monitor je sposoben
prikazovanja “crisp and vibrant” barv z VGA, SVGA, XGA, SXGA in večino Macintosh združljivih grafičnih kartic.
Monitor je sposoben pravilnega delovanja tudi ob nadgradnji video kartic ali programske opreme zaradi širokega razpona funkcije “auto-
scanning compatibility”.
Notranji mikroprocesor opravlja digitalno kontrolo nad funkcijo “auto-scanning compatibility”. Pri horizontalnih frekvencah med 30 KHz
in 81 KHz in pri vertikalnih frekvencah med 55 Hz in 76 Hz. Pri vsaki frekvenci mikroprocesor omogoča delovanje na točno določeni
frekvenci.
Spomin monitorja omogoča shranjevanje tovarniških nastavitev in dodatne uporabnikove nastavitve.
Maksimalna dosegljiva resolucija je SXGA (1280 x 1024), ki najbolj ustreza Windows aplikacijam.
Zaradi tanke oblike vam monitor zavzame na mizi malo prostora in daje vaši delovni mizi videz urejenosti.
Monitor prav tako ustreza najbolj strogim pravilom TCO 99. V skladu s temi pravili ni med celotno proizvodnjo monitorja uporabljena
nobena škodljiva sestavina.
60 PRESTIGIO P177
Page 60

ODSTRANITEV EMBALAŽE
Preverite, če so v embalaži vsi sestavni deli in shranite embalažo, če boste v prihodnosti prevažali monitor.
· LCD Monitor
AC napajalni kabel Audio kabel
SLO
Navodila za uporabo
61PRESTIGIO P177
Page 61

Montaža /Demontaža zaslona iz stojala
Postavitev:
Nastavite štiri vtiče na spodnji strani monitorja na ustrezne reže
na spodnji strani baze.
Odstranitev:
Pritisnite vtiče kot je prikazano preden odstranite bazo in sledite
smeri puščice za odstranitev.
SLO
NASTAVITVE POZICIJE ZASLONA
Na najboljšo možno pozicijo monitorja z obema rokama hkrati primite za vogale monitorja in ga nastavite, kot želite, prikazano spodaj.
Monitor je nastavljiv do 30 stopinj navzgor in do 5 stopinj navzdol, kot prikazuje puščica spodaj.
62 PRESTIGIO P177
Page 62

PRIKLJUČITEV NAPAJALNEGA KABLA
Najprej preverite, da napajalni kabel ustreza tipu, zahtevanem za vaše območje.
Ta monitor ima univerzalno napajanje, ki omogoča delovanje pri napetostih 100/120V AC ali 220/240 V AC. Ni potrebna posebna
nastavitev.
Vključite napajalni kabel v AC vhod in drugi konec v ustrezen AC izhod.
Za enoto uporabite 220/240 V AC.
Uporabite komplet, ki je sestavljen iz H05VV-F kabla in vtičnice 10 A, 250 V. Komplet mora imeti ustrezna dovoljenja države, v kateri je
monitor inštaliran.
VARNOSTNA OPOZORILA
Ne postavljajte monitorja ali drugega težjega predmeta na napajalni kabel, da bi se izognili požaru ali udaru električnega toka.
Ne izpostavljajte monitorja dežju, pretirani vlagi in prahu, da bi se izognili požaru ali udaru električnega toka.
Ne pokrivajte oziroma ne postavljajte predmetov na monitor, da bi zagotovili pravilno hlajenje monitorja. Monitor postavite na mesto,
kjer je zagotovljeno ustrezno prezračevanje.
Ne postavljajte monitorja nasproti svetlega ozadja ali na mesta, kjer direktna sončna svetloba ali druga svetloba direktno sije v ekran.
Postavite monitor pod nivo oči.
Pri transportu bodite previdni.
Bodite pozorni, da se zaslon ne opraska ali drugače poškoduje, ker je zelo občutljiv.
ČIŠČENJE MONITORJA
Natančno preberite navodila.
Pred čiščenjem izključite napravo.
Za čiščenje uporabite mehko krpo.
Na mehko krpo nanesite majhno količino alkohola in očistite zaslon, če je to potrebno.
SLO
63PRESTIGIO P177
Page 63

NASTAVLJENI NAČINI
Da bi zmanjšali potrebo po nastavitvah, ima monitor že nastavljene najbolj pogoste nastavitve, ki so navedene v spodnji tabeli. Za
najbolj optimalno nastavitev predlagamo, da uporabnik zažene “Auto Setup” v Windowsih pod “Full Screen”. Kadar vam ne ustrezajo
tovarniške nastavitve, lahko shranite svoje. Monitor lahko shrani do 9 uporabniških načinov. Edini pogoj, da se nastavitev shrani kot nov
uporabniški način, je to, da se mora horizontalna ali vertikalna frekvenca razlikovati za 1 KHz ali je polariteta spremenjena.
SLO
Način Resolucija H. Fre. (KHz) Valovna dolžina (MHz) Polariteta
HV
1 VGA 720 x 400 70 Hz 31.47 28.322 - +
2 VGA 640 x 480 60 Hz 31.47 25.175 - 3 MAC 640 x 480 66 Hz 35.00 32.24 - 4 VESA 640 x 480 72 Hz 37.86 31.5 - 5 VESA 640 x 480 75 Hz 37.50 31.5 - 6 VESA 800 x 600 56 Hz 35.16 36 + +
7 VESA 800 x 600 60 Hz 37.88 40 + +
8 VESA 800 x 600 75 Hz 46.88 49.5 + +
9 VESA 800 x 600 72 Hz 48.08 50 + +
10 MAC 832 x 624 75 Hz 49.72 57.283 - 11 VESA 1024 x 768 60 Hz 48.36 65 - 12 VESA 1024 x 768 70 Hz 56.48 75 - 13 VESA 1024 x 768 75 Hz 60.02 78.75 + +
14 VESA 1280 x 1024 60 Hz 64 108 + +
15 VESA 1280 x 1024 75 Hz 80 135 + +
16 VESA 1152 x 864 75 Hz 67.5 108 + +
17 VESA 1280 x 960 60 Hz 60 108 + +
64 PRESTIGIO P177
Page 64

VARČEVANJE Z ENERGIJO
Zaradi varčevanja z energijo se način spremeni v “Power Saving”, kar nakazuje tudi LED indikator jantarjeve barve.
Stanje Poraba energije LED indikator
Vključeno Normalno Zeleno
Vključeno varčevanje z energijo <3 W Jantarjeva barva
Monitor bo v stanju varčevanja z energijo, dokler ne aktivirate monitorja z miško ali tipkovnico. Čas, ko se stanje spremeni iz varčevanja
z energijo v normalno, je približno 5 sekund.
DDC
Za lažjo inštalacijo monitor omogoča “Plug and Play”, če sistem podpira DDC protokol. DDC (Display Data Channel) je komunikacijski
protokol, preko katerega monitor avtomatično obvesti sistem o svojih kapacitetah, npr., o resolucijah, ki jih podpira. Monitor podpira
DDC2B standard.
SLO
65PRESTIGIO P177
Page 65

INŠTALACIJA
Za inštalacijo monitorja upoštevajte spodnje korake:
Koraki
1. Priključite video kabel
SLO
a. Prepričajte se, da sta računalnik in monitor izključena.
b. Povežite video kabel z računalnikom.
2. Priključite napajalni kabel.
Vključite napajalni kabel v monitor, nato v primerno ozemljen AC izhod.
3. Priključite avdio kabel.
4. Vključite monitor in računalnik.
Najprej vključite monitor, nato računalnik.
Zaporedje je zalo pomembno.
5. Če monitor ne deluje pravilno, preberite poglavje Odpravljanje težav in poskušajte odpraviti problem.
66 PRESTIGIO P177
Page 66

MOŽNOSTI NASTAVITVE
Kontrolni gumbi na sprednji strani monitorja
1. Gumb za vklop / izklop: Za vklop ali izklop monitorja.
2. LED indikator: Kadar gori, pomeni, da je monitor vključen.
3. Gumb za izbiro MENIJA: S pritiskom na gumb vključite ali izključite OSD meni.
4. Gumb za pomikanje navzdol DOWN: Za pomikanje navzdol v OSD meniju.
5. - : Za zmanjšanje vrednosti parametra v OSD meniju, ki je bil izbran za nastavitev.
- : Za izbiro prejšnje strani OSD menija.
ZVOK IZKLOPLJEN: Kadar je OSD meni izključen, ta gumb omogoča hitro tipko za izklop zvoka.
6. + : Za povečanje vrednosti parametra v OSD meniju, ki je izbran za nastavitev.
+ : Izbira naslednje strani v OSD meniju.
AUTO: Kadar je OSD meni izključen, ta gumb predstavlja hitro tipko za AVTO nastavitev.
SLO
67PRESTIGIO P177
Page 67

Osnovne funkcije OSD menija
SLO
68 PRESTIGIO P177
Page 68

Standardne OSD operacije
1. OSD meni aktivirate s pritiskom na MENU gumb.
2. Z gumbom za pomikanje navzdol DOWN se krožno pomikate po OSD meniju. Parameter oz. operacija, na kateri se trenutno nahajate,
je osvetljena.
3. Z uporabo + ali - spreminjate vrednost izbranega parametra.
4. Za izhod iz OSD menija kadarkoli lahko pritisnete MENU gumb. Če nekaj časa ne pritisnete nobenega gumba, se OSD avtomatično
izključi.
5. Ko OSD meni ni prikazan na zaslonu, pritisnite + gumb za AVTO nastavitev.
6. Ko OSD meni ni prikazan na zaslonu, pritisnite - gumb za vklop ali izklop zvočnikov.
Opis OSD funkcij
Jakost
Za povečanje ali zmanjšanje jakosti zvoka.
Svetlost
Za povečanje ali zmanjšanje svetlosti.
Kontrast
Za povečanje ali zmanjšanje kontrasta.
Avto kontrast
Pritisnite + gumb za avto analogni kontrast.
Temperatura barve
Pritisnite + ali - gumb za izbiro 5000, 6500, 7500, 8200, 9300 ali USER. Samo kadar izberete USER lahko prilagajate R/G/B
vsebino, drugače to ni mogoče.
SLO
Horizontalna velikost
Za povečanje ali zmanjšanje velikosti vsebin na zaslonu.
Čistost
Za povečanje ali zmanjšanje čistosti slike.
Levo / Desno
Za pomikanje zaslona desno ali levo.
Gor / Dol
Za pomikanje zaslona gor ali dol.
Avto nastavitev
Pritisnite + za vklop te funkcije. Funkcija Auto-Adjust bo avtomatično prilagodila V-pozicijo, H-pozicijo, čas, fazo; celoten proces
traja približno 5 sekund.
69PRESTIGIO P177
Page 69

Jezik
Izbirate lahko med angleškim, francoskim, italijanskim, nemškim in španskim jezikom. (kitajski jezik za serijske modele)
Tovarniška nastavitev
Za vrnitev na tovarniško nastavitev.
Čas izklopa OSD menija
Za nastavitev časa, po katerem se OSD meni avtomatično izklopi.
OSD Levo / Desno
SLO
Za premikanje OSD menija horizontalno po zaslonu. S pritiskom na + gumb boste OSD kontrolni meni premaknili levo. S pritiskom
- gumba pa ga boste premaknili levo.
OSD Gor / Dol
Za premikanje OSD menija vertikalno po zaslonu. S pritiskom na + gumb boste OSD meni premaknili navzgor, s pritiskom na gumb pa navzdol.
Informacija
Prikaže trenutno resolucijo, H-frekvenco in V-frekvenco.
70 PRESTIGIO P177
Page 70

ODPRAVLJANJE TEŽAV
Preden pošljete monitor v servisiranje, preverite, če lahko težave odpravite sami.
Problem Trenutni status Pomoč oz. možna rešitev težave
Ni slike LED indikator vključen Z uporabo OSD menija nastavite svetlost in kontrast na maksimum ali vračilo tovarniške
nastavitve.
LED indikator izklopljen Preverite gumb za vklop monitorja.
Preverite, če je AC napajalni kabel pravilno priključen na monitor.
LED indikator sveti Preverite, če je video signalni kabel pravilno priključen na zadnji strani monitorja.
v barvi jantarja Preverite, če je računalniški sistem vključen.
Neobičajna slika Nemirna slika Preverite specifikacijo grafičnega vmesnika in monitorja, če sta združljiva, ker lahko to povzroči
motnje.
Prikaz manjka, center je Z uporabo OSD menija nastavite resolucijo, čas, fazo, H in V pozicijo z nestandardnim signalom.
zamaknjen, prevelik V primeru, da na zaslonu ni prikazana celotna slika, z uporabo OSD menija izberite drugo
ali premajhen prikaz resolucijo ali drug vertikalni osveževalni čas.
Po nastavitvi velikosti slike počakajte nekaj sekund preden spremenite ali izključite signalni kabel
ali izključite monitor.
Neobičajen zvok Ni zvoka ali je Preverite avdio kabel, ki je priključen na računalnik.
jakost zvoka prenizka Preverite, če so nastavitve jakosti računalnika na minimumu in poskušajte povečati jakost.
SLO
71PRESTIGIO P177
Page 71

SPECIFIKACIJA
SLO
Model P177
Tip št. P177
LCD zaslon
Tip zaslona 17" TFT LCD
Območje prikaza (H x W) 337.9 x 270.3 mm
Kontrast 350:1 (Typ.)
Kot 120oH 100oV (min.)
Vhodna moč
Napetost 100-240Vac
Frekvenca 50-60Hz
Trenutna stopnja 0.9A
Značilnosti
Barve 16.2M
Resolucija SXGA (1280 x 1024) pri 75 Hz max.
Svetlost 300 cd/m
Odzivni čas 25 ms
Vmesnik Analog RGB
Vhodni priključek 15-pin D-sub
Možnosti nastavitev
Na sprednji strani monitorja Power On/Off, MENU, Select DOWN, Value (+/ -), AUTO, speaker on/off
OSD meni Svetlost, kontrast, avto-kontrast, temperatura barve, horizontalna v elikost,
Fizična specifikacija
Dimenzija (V x Š x G) 365 x 374 x 200.5 (mm)
Neto teža 4.6 Kg
Energija
Varčevanje z energijo Omogočeno
Poraba energije 35 W
Predpisi
Safety & EMI UL, CUL, TUV-GS, TUV-Ergonomics, FCC-B, CE, TCO99 (optional)
2
čistost, levo / desno, gor / dol, avto-nastavitev, jezik, tovarniška nastavitev, čas za
avtomatični izklop OSD menija, OSD meni levo / desno, OSD gor / dol, informacija
* Specifikacija se lahko spremeni brez predhodnega obvestila.
72 PRESTIGIO P177
Page 72

Соответствие техническим стандартам
Федеральной комиссии связи США
Настоящее устройство было проверено и по результатам проверки соответствует ограничениям
для цифровых устройств класса B согласно части 15 Правил FCC. Эти ограничения предназначены
для создания достаточной защиты от электронных помех в жилых помещениях. Это устройство
генерирует, использует и может излучать радиоволны и при нарушении инструкций по установке
и эксплуатации может создать помехи радиосвязи.
Однако нет гарантии того, что подобные помехи не возникнут в условиях конкретного здания.
Если это устройство создает помехи приему радио или телепрограмм, которые можно определить,
выключив устройство и снова включив его, пользователю следует попытаться устранить помехи
самостоятельно, выполнив одно или несколько следующих действий:
• Переместить или переориентировать приемную антенну.
• Увеличить расстояние между данным устройством и приемником.
• Подключить устройство к розетке сети, отличной от сети, к которой подключен приемник.
• Обратиться за помощью к авторизованному дилеру или в сервисное представительство.
Предупреждение:
Для того, чтобы излучение устройства не превышало ограничений FCC, необходимо использовать
правильно экранированные и заземленные кабели и соединители, которые входят в комплект
поставки.
Предупреждение для пользователя:
Внесение в устройство конструкционных изменений или дополнений, не согласованных с
производителем, может повлечь за собой потерю для пользователя права на работу с устройством.
RU
73PRESTIGIO P177
Page 73

Введение
Поздравляем Вас с приобретением высокоэффективного цветного 17дюймового ЖКИмонитора,
произведенного по тонкопленочной технологии TFT, модели Prestigio P177. Данная модель
монитора обеспечивает высокую цветопередачу и отсутствие мерцания изображения при
определенных настройках меню. Данное руководство пользователя подробно расскажет Вам об
основных особенностях, функциях и технических спецификациях данного ЖКИмонитора. Вы
RU
получите безусловное удовлетворение от работы с этим монитором.
Особенности модели
Модель P177 представляет собой высокоэффективный цветной 17дюймовый ЖКИмонитор,
произведенный по тонкопленочной технологии TFT, отличающийся использованием
высокоинтеллектуальных технологий и эргономическим дизайном. Монитор P177 совместим с
большинством аналоговых стандартов изображения RGB, включая PS/V, PS/2, а также Apple
Macintosh Centris, Quadra, и семейство Macintosh II. Данный ЖКИмонитор обладает возможностью
передачи динамической графики стандартов VGA, SVGA, SXGA, XGA (с прогрессивной разверткой),
а также при использовании большинства видеокарт, совместимых со стандартами Macintosh.
Монитор обеспечивает устойчивую и бесперебойную работу системы даже в случае замены старых
видеокарт и программного обеспечения компьютера на более новое, благодаря своим
уникальным возможностям автоматического определения сочетаемости, что избавляет от
необходимости заменять монитор в случае усовершенствования самого компьютера.
Встроенный микропроцессор монитора обеспечивает контроль автоматического цифрового
определения. Для горизонтального сканирования диапазон частот колеблется от 30 KHz до
81 KHz, а для вертикального – от 55 Hz до 76 Hz. В каждом режиме частот схема
микропроцессора позволяет монитору функционировать с максимальной точностью
дискретной частоты.
Встроенная память монитора позволяет сохранять предустановленные производителем настройки,
а также позволяет пользователю устанавливать свои настройки.
Максимальное разрешение монитора SXGA (1280 x 1024), являющееся наиболее подходящим
для работы в системе Windows
Компактный и элегантный дизайн корпуса монитора позволяет экономить пространство на Вашем
рабочем месте, делая его аккуратным и высокоорганизованным.
Данный монитор также совместим со стандартами охраны окружающей среды TCO 99. В
соответствии с этими стандартами при производстве монитора не используются вещества,
которые могут нанести вред окружающей среде.
74 PRESTIGIO P177
Page 74

Распаковка
Проверьте комплектность поставки Вашего монитора и сохраните оригинальную упаковочную
тару, чтобы иметь возможность осуществлять транспортировку данного изделия в будущем.
ЖКИмонитор
Шнур питания Аудио кабель
RU
Руководство пользователя
75PRESTIGIO P177
Page 75

Установка/снятие подставки
Установка
Совместите четыре штыря на нижней
поверхности монитора с соответствующими
отверстиями подставки
Снятие с подставки
Отогните штыри как указано на рисунке, прежде
чем осуществить снятие с подставки, затем
снимите монитор с подставки в направлении,
указанном стрелкой.
RU
Регулировка положения экрана
Чтобы установить монитор в наиболее удобное для Вас положение, Вы можете регулировать угол
наклона монитора, как указано на рисунке. Угол наклона монитора может регулироваться на 30
градусов вверх и на 5 градусов вниз, как указано на иллюстрации.
76 PRESTIGIO P177
Page 76

Подсоединение шнура питания
Убедитесь, что поставляемый шнур питания соответствует типу электрических сетей в Вашей
стране.
Данный монитор может работать в диапазоне 100/120V AC или 220/240 V AC. Определение типа
сетей происходит автоматически.
Подключите один конец шнура питания у гнезду на задней поверхности монитора, а второй его
конец подключите к розетке электропитания.
При использовании монитора в странах, где используется стандарт 220/240 V AC:
Используйте сетевой шнур питания H05VVF и вилку 10 A, 250 V. Данное оборудование должно
соответствовать стандартам безопасности страны, где оно используется.
Инструкции по технике безопасности
Не помещайте сам монитор или иной тяжелый предмет на шнур питания, чтобы избежать риска
поражения электрическим током.
Не подвергайте монитор воздействию влаги или пыли, чтобы избежать возможности возникновения
пожара и поражения электрическим током.
Не закрывайте вентиляционные отверстия монитора, чтобы обеспечить режим эффективного
охлаждения. Размещайте монитор в хорошо вентилируемых помещениях.
Не размещайте монитор в местах, где на него может падать прямой естественный или
искусственный свет. Это может привести к появлению бликов на экране. Размещайте монитор
на уровне глаз.
Избегайте ударов при перемещении монитора.
Не подвергайте поверхность экрана монитора механическому воздействию. Это может привести
к ее повреждению.
RU
Чистка монитора
При чистке монитора соблюдайте следующие рекомендации:
Всегда предварительно отключайте монитор от электрической сети
Используйте только мягкую тканевую салфетку при чистке поверхности экрана и его корпуса.
При значительном загрязнении на салфетку можно нанести небольшое количество
спиртосодержащей жидкости.
77PRESTIGIO P177
Page 77

Предустановленные режимы
Данный монитор уже имеет целый ряд предустановленных настроек для различных режимов. Для
оптимальной настройки пользователю рекомендуется произвести процедуру автоматической
установки (Auto Setup) в системе Windows с использованием полноэкранного режима (“Full Screen”).
У случае, если ни один из предложенных вариантов не удовлетворяет, пользователь может
сохранить свои собственные настройки. Данный монитор может сохранять в своей памяти до 9
RU
различных режимов настроек пользователя. Единственным условием для успешного сохранения
настроек является то, что разница между предустановленными и выбранными пользователем
установками должна составлять 1 KHz по горизонтали и 1 Hz по вертикали или иметь отличную
полярность сигнала синхронизации.
Режим Разрешение Частота (KHz) Ширина полосы (MHz) Полярность
(гор) (верт)
1 VGA 720 x 400 70 Hz 31.47 28.322 +
2 VGA 640 x 480 60 Hz 31.47 25.175
3 MAC 640 x 480 66 Hz 35.00 32.24
4 VESA 640 x 480 72 Hz 37.86 31.5
5 VESA 640 x 480 75 Hz 37.50 31.5
6 VESA 800 x 600 56 Hz 35.16 36 + +
7 VESA 800 x 600 60 Hz 37.88 40 + +
8 VESA 800 x 600 75 Hz 46.88 49.5 + +
9 VESA 800 x 600 72 Hz 48.08 50 + +
10 MAC 832 x 624 75 Hz 49.72 57.283
11 VESA 1024 x 768 60 Hz 48.36 65
12 VESA 1024 x 768 70 Hz 56.48 75
13 VESA 1024 x 768 75 Hz 60.02 78.75 + +
14 VESA 1280 x 1024 60 Hz 64 108 + +
15 VESA 1280 x 1024 75 Hz 80 135 + +
16 VESA 1152 x 864 75 Hz 67.5 108 + +
17 VESA 1280 x 960 60 Hz 60 108 + +
78 PRESTIGIO P177
Page 78

Режим экономии электроэнергии
В целях экономии электроэнергии в случае длительного отсутствия деятельности пользователя
монитор автоматически перейдет в режим экономии энергии. Показателем перехода в данный
режим служит янтарный цвет индикатора питания на передней панели монитора.
Состояние Потребление энергии Цвет индикатора
Включен Нормальный режим работы Зеленый
Режим Active OFF Потребление энергии < 3 Вт Янтарный
Режим экономии электропитания будет активен до того момента, пока не будет зафиксирована
активность клавиатуры, мыши или иной сигнал системы. Время восстановления монитора после
отключения режима экономии питания составляет около 5 сек.
Предустановленные режимы
Чтобы облегчить процесс установки (инсталляции), монитор снабжен функцией “Plug&Play”, которая
будет функционировать, если Ваш компьютер поддерживает протокол DDC (канал отображения
данных), который позволяет монитору автоматически информировать систему о некоторых своих
возможностях, таких как поддерживаемые разрешения и соответствующая синхронизация. Этот
монитор также поддерживает стандарт DDC2B.
RU
79PRESTIGIO P177
Page 79

Установка программного обеспечения
Чтобы установить поддержку данного монитора Вашим компьютером, необходимо предпринять
следующие шаги:
Порядок установки
RU
1. Подключите видеокабель
а. Убедитесь, что и монитор и компьютер выключены
б. Подсоедините видеокабель к компьютеру
2. Подключение шнура питания
Подсоедините шнур питания к монитору, а затем включите его в розетку электропитания.
3. Подключите аудиокабель
4. Включите монитор и компьютер
Вначале включите монитор, а затем компьютер.
Строго соблюдайте указанный порядок.
5. Если монитор не работает, обратитесь к разделу “Технические неполадки и пути их устранения”.
80 PRESTIGIO P177
Page 80

Настройки пользователя
Настройки передней панели
1. Выключатель электропитания для включения и выключения монитора.
2. Индикаторы состояния для обозначения режима работы монитора.
3. Кнопка MENU (“Меню”) для входа в режим меню.
4. Кнопка DOWN (“Вниз”) для перемещения вниз по меню.
5. Кнопка для уменьшения значения выбранного параметра меню выбор предыдущего режима
меню
Кнопка MUTE (“Звук”) действует как “горячая клавиша” для выключения звука, если меню
не отображено на экране.
6. Кнопка + для увеличения значения выбранного параметра меню выбор следующего режима
меню
Кнопка AUTO (“Авто”) действует как “горячая клавиша” для автоматического регулирования
настроек, если меню не отображено на экране.
RU
81PRESTIGIO P177
Page 81

Основные разделы меню
RU
82 PRESTIGIO P177
Page 82

Стандартные операции с меню
1. Нажмите кнопку MENU, чтобы активировать меню, если оно еще не отображается на экране.
2. Используйте кнопку DOWN, чтобы перемещаться по меню. При выборе параметра меню, он
будет графически подсвечиваться.
3. Используйте + или , чтобы увеличить/уменьшить значение параметра или произвести выбор
между различными опциями.
4. Чтобы выйти из меню, нажмите кнопку MENU. Меню также автоматически исчезнет с экрана
при отсутствии обращений к нему.
5. Если меню не отображается на экране, нажмите кнопку +, чтобы начать процедуру
автоматического регулирования настроек.
6. Если меню не отображается на экране, нажмите кнопку , чтобы включить/выключить колонки.
Описание функций меню
Громкость
Для увеличения/уменьшения громкости звука
Яркость
Для увеличения/уменьшения уровня яркости
Контраст
Для увеличения/уменьшения контраста
Автоконтраст
Нажмите кнопку “+”, чтобы начать процедуру автоматического регулирования настроек
контраста
RU
Температура цвета
Нажмите кнопку “+” или “”, чтобы выбрать режим 5000, 6500, 7500, 8200, 9300 и USER.
Только в последнем режиме Вы можете вносить изменения в значения параметров R/G/B.
Размер по горизонтали
Для увеличения/уменьшения размера изображения
Улучшение
Для увеличения/уменьшения помех изображения
Сдвиг изображения влево/вправо
Для сдвига изображения влево/вправо
Сдвиг изображения вверх/вниз
Для сдвига изображения вверх/вниз
Автоматическое регулирование настроек
Нажмите “+”, чтобы включить эту функцию. Произойдет автоматическое определение настроек
VPosition, HPosition, Clock, и ClockPhase. Весь процесс займет около 5 сек.
83PRESTIGIO P177
Page 83

Язык
Выбор из нескольких языков (английский, французский, итальянский, немецкий и испанский
+ китайский для серийных моделей)
Предустановленные производителем настройки
Для возврата к предустановленным производителем настройкам
Время автоматического выхода из меню
Для установки времени автоматического выхода из меню
RU
Перемещение меню влево/вправо
Для горизонтального перемещения положения меню на экране. При нажатии “+” меню будет
сдвигаться вправо, при нажатии “” влево.
Перемещение меню вверх/вниз
Для вертикального перемещения положения меню на экране. При нажатии “+” меню будет
сдвигаться вверх при нажатии “” вниз.
Информация
Отображает информацию об используемом разрешении, частоте по вертикали и горизонтали.
84 PRESTIGIO P177
Page 84

Технические неполадки и пути их устранения
Прежде чем обратиться в службу сервиса, проверьте список возможных неисправностей и путей
их устранения.
Проблема Состояние Решение проблемы
Отсутствие Индикатор питания горит Используя меню, установите яркость и контраст до
изображения максимальных значений или используйте
предустановленные значения.
Индикатор питания не горит Проверьте, включено ли питание.
Проверьте, правильно ли подключен шнур питания.
Индикатор питания горит Проверьте, подключен ли видеокабель к монитору.
янтарным цветом. Проверьте, включен ли компьютер.
Ненормальное Нестабильное изображение. Проверьте, совместимы ли графический адаптер
изображение компьютера и Ваш монитор.
на экране. Ненормальное положение Используя опции меню, установите необходимое значение
изображения на экране параметров RESOLUTION, CLOCK, CLOCKPHASE,
монитора. HPOSITION и VPOSITION.
Используя меню, в случае исчезновения полноэкранного
изображения, выберите иное разрешение или иной режим
вертикальной регенерации.
Подождите несколько секунд после изменения размера
изображения, прежде чем отсоединять кабель или
выключать монитор.
Ненормальный Отсутствие звука или Проверьте, подключен ли аудиокабель к монитору.
звук слишком низкий Попробуйте увеличить уровень громкости звука.
уровень громкости.
RU
85PRESTIGIO P177
Page 85

Спецификации
Наименование модели P177
RU
Область дисплея (В x Ш) 337.9 x 270.3 mm
Физические характеристики
Габариты (В x Ш x Г) 365 x 374 x 200.5 (mm)
Экономия электроэнергии Да
Потребление энергии 35 W
Стандарты безопасности UL, CUL, TUVGS, TUVErgonomics, FCCB, CE, TCO99
Тип No. P177
ЖКИ дисплей
Тип дисплея 17" TFT LCD
Контрастность 350:1 (Typ.)
Угол обзора 120oH 100oV (Min.)
Электропитание
Вольтаж 100240Vac
Частота 5060Hz
Номинальный ток 0.9A
Особенности
Цветность дисплея 16.2M
Разрешение SXGA (1280 x 1024) при 75 Hz максимум.
Яркость 300 cd/m2 (Typ.)
Время отклика 25 ms
Интерфейс Аналоговый RGB
Входной разъем 15pin Dsub
Настройки
Передняя панель Кнопки включения/выключения питания, меню (MENU),
выбора (DOWN), значения параметров (+/ ), режима AUTO,
speaker on/off.
Функции меню Brightness, Contrast, Auto Contrast, Color
Temperature, Horizontal Size, Fine, Left/Right, Up/Down, Auto
Adjust, Language, Factory Preset, OSD Time Out,
OSD Left/Right, OSD Up/Down, Information
Масса нетто 4.6 кг
Питание
Безопасность
(optional)
* Все технические спецификации могут быть изменены без внесения соответствующих изменений в данное
руководство.
86 PRESTIGIO P177
Page 86

www.prestigio.biz
 Loading...