

Page 1

Prestigio TV-Tuner
User’s Manual
Instrukcja użytkownika
Příručka uživatele
Návod na použitie
Руководство пользователя
Navodila za uporabnike
Page 2

2 PRESTIGIO TV-TUNER
ENG
FEDERAL COMMUNICATIONS COMMISSION (FCC) WARNING
Instruction to Users
This equipment has been tested and found to comply with the limits for a Class B digital device, pursuant to part 15 of the FCC
rules.
These limits are designed to provide reasonable protection against harmful interference in a residential installation. This equipment generates, uses and can radiate radio frequency energy and, if not installed and used in accordance with the instructions, may
cause harmful interference to radio communications. However, there is no guarantee that interference will not occur in a particular
installation.
If this equipment does cause harmful interference to radio and television reception, which can be determined by turning the
equipment off and on, the user is encouraged to try to correct the interference by one or more of the following measures.
- Reorient or relocate the receiving antenna.
- Increase the separation between the equipment and the receiver.
- Connect the equipment into an outlet on a circuit different from that to which the receiver is connected.
- Consult the dealer or an experienced radio/TV technician for help.
This equipment has been certified to comply with the limits for a Class B computing device, pursuant to part 15 of the FCC rules.
Only peripherals (computer input / output devices, terminals, printers etc.) certified to comply to the Class B limits may be attached
to this computer. Operation with noncertified peripherals is likely to result in interference to radio and TV reception.
Remarks
To meet FCC requirement, shielded cables are required to connect the device to a personal computer or other Class B certified device.
Information to Users
The unit is for office equipment used. Any change or modifications expressly approved by the party responsible for compliance could
void the user’s authority to operate this equipment.
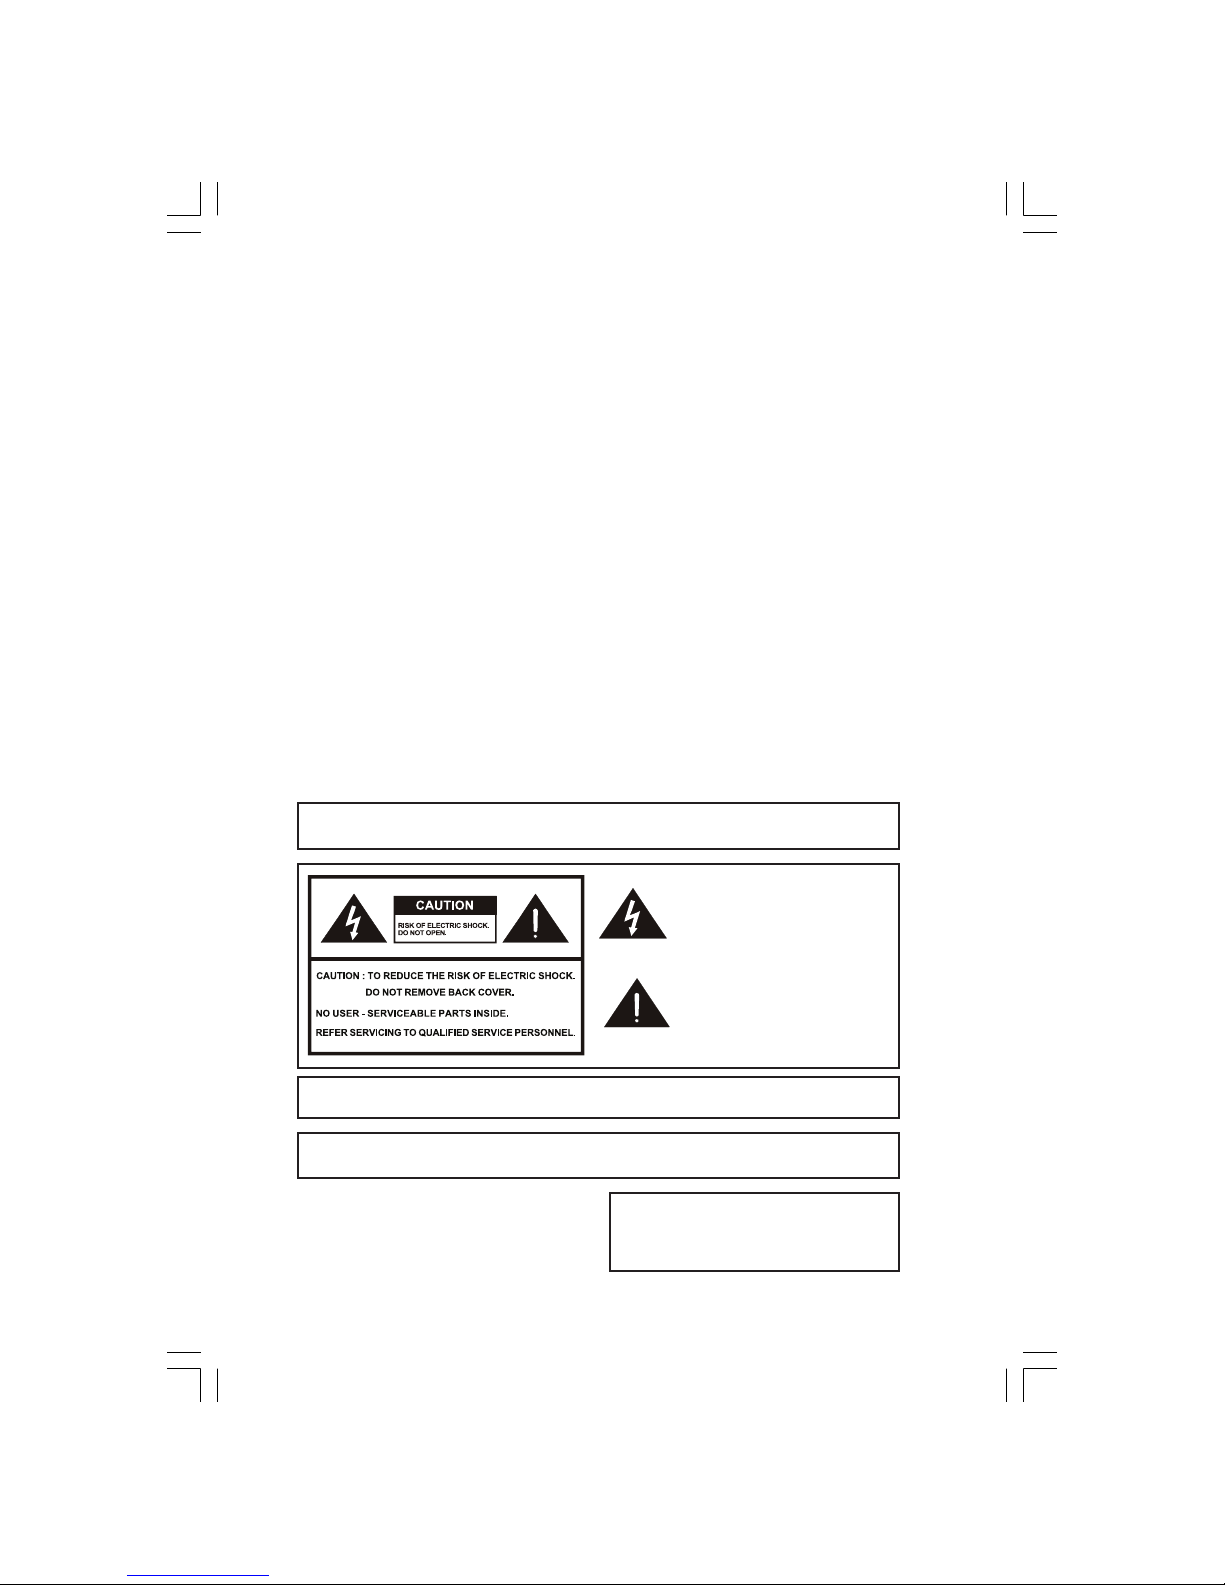
IMPORTANT INFORMATION
WARNING: TO REDUCE THE RISK OF FIRE OR ELECTRIC SHOCK, DO
NOT EXPOSE THIS PRODUCT TO RAIN OR MOISTURE.
WARNING: FCC Requlations state that any unauthorized changes or modifications to this equipment
not expressly approved by the manufacturer could void the user’s authority to operate this equipment.
CAUTION: TO PREVENT ELECTRIC SHOCK, MATCH WIDE BLADE OF
PLUG TO WIDE SLOT, FULLY INSERT.
The lightning flash with arrowhead symbol,
within an equilateral triangle,is intended to
alert the user to the presence of uninsulated
”dangerous voltage” within the product enclosure that may be of sufficient level to constitute a risk of electric shock to persons.
The exclamation point within a triangle is intended to alert the user to the presence of important operating and maintenance (servicing)
instructions in the literature accompanying the
product.
IMPORTANT:
To aid reporting in case of loss or theft, please
record the TV’s model and serial numbers in the
space provided. The numbers are located at the
rear of the TV.
Model no.:
Serial No.:
Page 3

3PRESTIGIO TV-TUNER
ENG
IMPORTANT SAFETY PRECAUTIONS
Electricity is used to perform many useful functions, but it can also cause personal injuries and property damage if improperly
handled. This product has been engineered and manufactured with the highest priority on safety. However, improper use can
result in electric shock and /or fire. In order to prevent potential danger, please observe the following instructions when
installing , operating and cleaning the product. To ensure your safety and prolong the service life of your product, please read
the following precautions carefully before using the product.
• Read instructions - All operating instructions must be read and understood before the product is operated.
• Keep this manual in a safe place - These safety and operating instructions must be kept in a safe place for future reference.
• Observe warnings - All warnings on the product and in the instructions must be observed closely
• Follow instructions - All operating instructions must be followed.
• Attachments - Do not use attachments that are not recommended by the manufacturer. Use of inadequate attachments
can result in accidents.
• Entering of objects and liquids - Never insert an object into the product through vents or openings. High voltage exists
in the product, inserting an object can cause electric shock and / or short internal parts. For the same reason, do not spill
water or liquid on the product.
• Servicing - Do not attempt to service the product by yourself. Removing covers can expose you to high voltage and other
dangerous conditions. Request a qualified service person to perform servicing.
• Repair - If any of the following conditions, unplug the power cord from the AC outlet, and request a qualified service person
to perform repairs.
a. When a liquid was spilled on the product or when objects have fallen into the product.
b. When the product has been exposed to rain or water.
• Cleaning - Unplug the power cord from the Ac outlet before cleaning the product. Use a damp cloth to clean the product.
Do not use liquid cleaners or aerosol cleaners.
• Water and moisture - Do not use the product near water, such as bathtub, washbasin, kitchen sink and laundry tub,
swimming pool and in a wet basement.
• Stand - Do not place the product on an unstable cart, stand, tripod or table. Placing the product on an unstable base can
cause the product to fall, resulting in serious personal injuries as well as damage to the product. Use only a cart, stand,
tripod, bracket or table recommended by the manufacturer or sold with the product. When mounting the product on a
wall, be sure to follow the manufacturer’s instructions. Use only the mounting hardware recommended by the manufacturer.
• When relocating the product placed on a cart, it must be moved with utmost care. Sudden stops, excessive force and
uneven floor surface can cause the product to fall from the cart.
• Ventilation - The vents and other openings in the cabinet are designed for ventilation. Do not cover or block these vents
and openings since insufficient ventilation can cause overheating and / or shorten the life of the product. Do not place the
product on a bed, sofa, rug or other similar surface since they can block ventilation openings. This product is not designed
for built-in installation; do not place the product in an enclosed place such as a bookcase or rack, unless proper ventilation
is provided or the manufacturer’s instructions are followed.
• If an outside antenna is connected to the television equipment, be sure the antenna system is grounded so as to provide
enough protection against voltage surges and built-up static charges. Section 810 of the National Electrical Code provides
information with respect to proper grounding of the mast and supporting structure, grounding of the lead-in wire to an
antenna discharge unit, size of grounding conductors, location of antenna-discharge unit, connection to grounding electrodes, and requirements for the grounding electrode.
• For added protection to this television equipment during a lightning storm, or when it is left unattended and unused for
long periods of time, unplug it from the wall outlet and disconnect the antenna. This will prevent damage to the
equipment due to lightning and power-line surges.
Page 4

4 PRESTIGIO TV-TUNER
ENG
• An outside antenna system should not be located in the vicinity of overhead power lines or other electric light or power
circuits, or where it can fall into such power lines or circuits. When installing an outside antenna system, extreme care
should be taken to keep from touching such power lines or circuits as contact with them might be fatal.
PACKING CONTENTS (FIG. 1)
The package contains:
1. TV tuner
2. User manual
USING THE REMOTE CONTROL
• Use the remote control by pointing it towards the remote sensor window. Objects between the remote control and sensor
window may prevent proper operation.
Cautions regarding use of remote control
• Do not expose the remote control to shock.
In addition, do not expose the remote control to liquids,and do not place in an area with high humidity.
• Do not install or place the remote control under direct sunlight. The heat may cause deformation of the unit.
• The remote control may not work properly if the remote sensor window of the main unit is under direct sunlight or strong
lighting. In such a case, change the angle of the lighting or LCD TV set, or operate the remote control closer to the remote
sensor window.
Battery for the Remote Control (fig. 2)
If the remote control fails to to operate the LCD color TV functions, replace the batteries in the remote control.
1. Open the battery bracket.
• Press the hook to release the lock before pulling out the battery bracket.
• While the bracket lock is released, pull the battery bracket out of the remote control.
2. Insert battery.
• Place the battery onto the bracket.
3. Push the bracket inside the remote control with the battery on it.
Caution !
Cautions regarding batteries
Improper use of batteries can result in a leakage of chemicals and / or explosion. Be sure to follow the instructions below.
• Place battery with their terminals corresponding to the (+) and (-) indications.
• Different types of batteries have different characteristics. Do not mix batteries of different types.
• Remove batteries when they become weak.
• The battery supplied with the product may have a shorter life expectancy due to storage conditions.
• If the remote control is not used for an extended period of time, remove the batteries from the remote control.
Page 5

5PRESTIGIO TV-TUNER
ENG
Rear Connectors (fig. 3)
A. AC Inlet
B. Video
C. Audio(R)(L)
D. S-Video
E. Audio(R)(L)
F. YCbCr
G. Audio(R)(L)
H. D-Sub Connector
I. RF Connector (TV tuner)
J. Earphone
K. Line-out
ANTENNA CONNECTION
ANTENNAS
• The antenns requirements for good color television reception are more important than those for black & white television
reception. For this reason, a good quality outdoor antenna is strongly recommended.
The following is a brief explanation of the type of connections that are provided whith the various antenna systems. See
Fig. 4
1. A 75-ohm system is generally a round cable with F-type connector that can easily be attached to a terminal without tools
(not supplied).
2. A 300-ohm system is a flat “twin-lead” cable that can be attached to a 75-ohm terminal through a 300-75-ohm adapter
(not supplied).
OUTDOOR ANTENNA CONNECTION (Fig. 5)
• Use one of the following two diagrams if you connect an outdoor antenna.
A: Using a VHF/UHF combination outdoor antenna.
B: Using separate VHF and / or UHF outdoor antennas.
• Connect the outdoor antenna cable lead-in to the ANT.terminal on the rear of the TV set.
CONTROL OPTIONS (FIG. 6)
Note:
• Input Select, Exit, CH( )UP / ( )DOWN, VOL( ) - / ( ) + , and MENU on the main unit have the same functions
as the same buttons on the remote control. Fundamentally, this operation manual provides a description based on
operation with the remote control.
Page 6

6 PRESTIGIO TV-TUNER
ENG
OSD FUNCTION KEYS OPERATION:
Use the “INPUT” function key to change the display setting mode. There are five display setting modes of PC, TV, AV, SV &
YCbCr available in this product.
On any four of the following display mode (PC, AV, SV or YCbCr), it will automatically return to TV mode if user press CH+( )
or CH-( ) key.
For PC Setting Mode:
Some direct function keys are as follows:
Press the “AUTO” key to auto adjust the picture quality to default setting. It will take few seconds to adjust the screen setting
when “Auto Adjusting…” message displays on the screen.
Press the “+” or “-” keys to increase or decrease the audio volume.
OSD operation: (Image Page) (fig. 7)
Press the “MENU” key ,the “Image Page” will be available for adjustment. There are six items such as Brightness, Contrast, Clock,
Phase, H-Position & V-position available for adjustment. (Press the “EXIT” key to return one level up of the OSD menu.)
Press the “MENU” key again to enter (highlight) the item and use “+” or “-” keys to adjust the value.
Use the “UP” or “DOWN” keys to select the desired items and use “+” or “-” keys again to adjust the value.
Use the “EXIT” key to return one level up of the OSD menu.
In the PC Setting Mode, press the “DOWN” key to select “Color Temperature Page”, “OSD Page”, “Audio page”, “Factory Page” & “PIP/
POP Page.”
Color Temperature Page (fig. 8):
There are three modes available: 6500K, 7500K, 9300K.
Use the “MENU” Key to highlight the first item and use the “UP” or “DOWN” keys to select the color temperature or further down
to “R”, “G” or “B” items and use “+” or “-” keys to adjust the setting value.
OSD Page (fig. 9):
Use the “MENU” Key to highlight the first item and use the “UP” or “DOWN” keys to select the desired items.
After the desired item has been selected, use the “+” or “-” keys to adjust the value.
Audio Page (fig. 10):
Use the “MENU” Key to highlight the first item and use the “UP” or “DOWN” keys to select the desired items.
After the desired item has been selected, use the “+” or “-” keys to adjust the value.
Factory Page (fig. 11):
Use the “MENU” Key to highlight the first item and use the “UP” or “DOWN” keys to select the desired items.
After the desired item has been selected, use the “+” or “-” keys to execute the function.
PIP/POP Page (fig. 12):
Use the “MENU” Key to highlight the first item and use the “UP” or “DOWN” keys to select the desired items.
After the desired item has been selected, use the “+” or “-” keys to execute the function or adjust the value.
Page 7

7PRESTIGIO TV-TUNER
ENG
For TV Setting Mode:
Some direct function keys are as follows:
Press the “+” or “-” keys to increase or decrease the audio volume.
Press the “UP” or “DOWN” keys to select the Channel.
OSD operation:
Press the “MENU” key, the “System Page” will be available for adjustment. There are five items such as TV System, Auto Search,
MTS, Channel Edit & Clean Memory for adjustment. (Press the “EXIT” key to return one level up of the OSD menu.)
Press the “MENU” key again to enter (highlight) the first item and use “+” or “-” keys to adjust the value.
Use the “UP” or “DOWN” keys to select the desired items and use “+” or “-” keys again to adjust the value.
Use the “EXIT” key to return one level up of the OSD menu.
In the TV Setting Mode, press the “DOWN” key to select “Image Page”, “OSD Page”, “Audio page” & “Display Page.”
TV System Page (fig. 13):
Use the “MENU” Key to highlight the first item and use the “UP” or “DOWN” keys to select the desired items.
After the desired item has been selected, use the “+” or “-” keys to execute the function.
OSD Page (fig. 14):
Use the “MENU” Key to highlight the first item and use the “UP” or “DOWN” keys to select the desired items.
After the desired item has been selected, use the “+” or “-” keys to adjust the value or execute the function.
Image Page (fig. 15):
Use the “MENU” Key to highlight the first item and use the “UP” or “DOWN” keys to select the desired items.
After the desired item has been selected, use the “+” or “-” keys to adjust the value.
There are three modes available for selection: Standard, ViVid or Favorite.
Audio Page (fig. 16):
Use the “MENU” Key to highlight the first item and use the “UP ” or “DOWN” keys to select the desired
items.
After the desired item has been selected, use the “+” or “-” keys to adjust the value or execute the
function.
Display Page (fig. 17):
There are six items such as “Close Caption”, “V-Chip Setting”, “Timer”, “Aspect”, “Noise Reduce” & “Recall Default” available f or
adjustment.
Use the “MENU” Key to highlight the first item and use the “UP” or “DOWN” keys to select the desired items.
After the desired item has been selected, use the “+” or “-” keys to adjust the value or execute the function.
Close Caption item selections : CC1, CC2, TT1, TT2.
Timer item selections : 30, 60, 90, Mins .
Aspect item selections : Normal, 1:1, 4:3.
Noise Reduce item selections : Weak, Medium, Strong.
Page 8

8 PRESTIGIO TV-TUNER
ENG
For AV Setting Mode:
Some direct function keys are follows:
Press the “+” or “-” keys to increase or decrease the audio volume.
OSD operation:
Press the “MENU” key, the “Image Page” will be available for adjustment. There are five items such as
Brightness, Contrast, Sharpness, Color & Tint available for adjustment. (Press the “EXIT” key to exit or return one level up of
the OSD menu.)
Image Page (fiG. 18):
Press the “MENU” key again to enter (highlight) the item and use “+” or “-” keys to adjust the value.
Use the “UP” or “DOWN” keys to select the desired items and use “+” or “-” keys again to adjust the value.
Use the “EXIT” key to return one level up of the OSD menu.
In the AV Setting Mode, press the “DOWN” key to select “OSD Page”, “Audio page” & “Display Page.”
There are three modes available for selection: Standard , ViVid or Favorite.
OSD Page (fiG. 19):
Use the “MENU” Key to highlight the first item and use the “UP” or “DOWN” keys to select the desired items.
After the desired item has been selected, use the “+” or “-” keys to adjust the value or execute the function.
Audio Page (fiG. 20):
Use the “MENU” Key to highlight the first item and use the “UP” or “DOWN” keys to select the desired items.
After the desired item has been selected, use the “+” or “-” keys to adjust the value or execute the function.
Display Page (fiG. 21):
There are six items such as “Close Caption”, “V-Chip Setting”, “Timer”, “Aspect”, “Noise Reduce” & “Recall Default” available for
adjustment.
Use the “MENU” Key to highlight the first item and use the “UP” or “DOWN” keys to select the desired items.
After the desired item has been selected, use the “+” or “-” keys to adjust the value or execute the function.
Close Caption item selections : CC1, CC2, TT1, TT2.
Timer item selections : 30, 60, 90, Mins .
Aspect item selections : Normal, 1:1, 4:3.
Noise Reduce item selections : Weak, Medium, Strong.
For SV Setting Mode:
Some direct function keys are as follows:
Press the “+” or “-” keys to increase or decrease the audio volume.
OSD operation:
Press the “MENU” key, the “Image Page” will be available for adjustment. There are five items such as Brightness, Contrast,
Sharpness, Color & Tint available for adjustment. (Press the “EXIT” key to exit or return one level up of the OSD menu.)
Page 9

9PRESTIGIO TV-TUNER
ENG
Image Page (fig. 22):
Press the “MENU” key again to enter (highlight) the item and use “+” or “-” keys to adjust the value.
Use the “UP” or “DOWN” keys to select the desired items and use “+” or “-” keys again to adjust the value.
Use the “EXIT” key to return one level up of the OSD menu.
In the SV Setting Mode, press the “DOWN” key to select “OSD Page”, “Audio page” & “Display Page.” There are three modes
available for selection: Standard , ViVid or Favorite.
OSD Page (fig. 23):
Use the “MENU” Key to highlight the first item and use the “UP” or “DOWN” keys to select the desired items.
After the desired item has been selected, use the “+” or “-” keys to adjust the value or execute the function.
Audio Page (fig. 24):
Use the “MENU” Key to highlight the first item and use the “UP” or “DOWN” keys to select the desired items.
After the desired item has been selected, use the “+” or “-” keys to adjust the value or execute the function.
Display Page (fig. 25):
There are six items such as “Close Caption”, “V-Chip Setting”, “Timer”, “Aspect”, “Noise Reduce” & “Recall Default” available f or
adjustment.
Use the “MENU” Key to highlight the first item and use the “UP” or “DOWN” keys to select the desired items.
After the desired item has been selected, use the “+” or “-” keys to adjust the value or execute the function.
Close Caption item selections : CC1, CC2, TT1, TT2.
Timer item selections : 30, 60, 90, Mins .
Aspect item selections : Normal, 1:1, 4:3.
Noise Reduce item selections : Weak, Medium, Strong.
For YCbCr Setting Mode:
Some direct function keys are as follows:
Press the “+” or “-” keys to increase or decrease the audio volume.
OSD operation:
Press the “MENU” key, the “Image Page” will be available for adjustment. There are five items such as Brightness, Contrast,
Sharpness, Color & Tint available for adjustment. (Press the “EXIT” key to exit or return one level up of the OSD menu.)
Image Page (fig. 26):
Press the “MENU” key again to enter (highlight) the item and use “+” or “-” keys to adjust the value.
Use the “UP” or “DOWN” keys to select the desired items and use “+” or “-” keys again to adjust the value.
Use the “EXIT” key to return one level up of the OSD menu.
In the YCbCr Setting Mode, press the “DOWN” key to select “OSD Page”, “Audio page” & “Display Page.” There are three modes
available for selection: Standard , ViVid or Favorite.
Page 10

10 PRESTIGIO TV-TUNER
ENG
OSD Page (fig. 27):
Use the “MENU” Key to highlight the first item and use the “UP” or “DOWN” keys to select the desired items.
After the desired item has been selected, use the “+” or “-” keys to adjust the value or execute the function.
Audio Page (fig. 28):
Use the “MENU” Key to highlight the first item and use the “UP” or “DOWN” keys to select the desired items.
After the desired item has been selected, use the “+” or “-” keys to adjust the value or execute the function.
Display Page (fig. 29):
There are six items such as “Close Caption”, “V-Chip Setting”, “Timer”, “Aspect”, “Noise Reduce” & “Recall Default” available for
adjustment.
Use the “MENU” Key to highlight the first item and use the “UP” or “DOWN” keys to select the desired items.
After the desired item has been selected, use the “+” or “-” keys to adjust the value or execute the function.
Close Caption item selections : CC1, CC2, TT1, TT2.
Timer item selections : 30, 60, 90, Mins .
Aspect item selections : Normal, 1:1, 4:3.
Noise Reduce item selections : Weak, Medium, Strong.
BASIC OPERATION
Volume (Direct control) or control (fig. 30)
1. Press to increase the sound volume. The control bar of the indicator increases.
2. Press to decrease the sound volume. The control bar of the indicator decreases.
To mute the sound
1. Press MUTE to temporarily turn off the sound.
2. Press MUTE to sound back to the previous level.
ON / OFF Control (fig. 31)
To turn off the LCD TV
Press on the remote control. The Power indicator will turn off.
To turn the LCD TV back on
Press again. The Power indicator will turn green.
Changing the channels on TV (fig. 32)
On any four of the following display mode (PC, AV, SV or YCbCr), it will automatically return to TV mode if user press CH+(
) or CH-( ) key.
Changing channels by using Channel Select on the remote control
Page 11

11PRESTIGIO TV-TUNER
ENG
• This LCD TV set allows you to select up to 125 channels (1 to 125). To select a channel,enter a 1- or 2- or 3 -digt number
or use channel up and channel down.
To select a 1- or 2-digit channel number (e.g., channel 5):
1. Press the 0 button.
2. Press the 5 button.
* or press 5 button only.
To select a 3-digit channel number (e.g., channel 115):
Complete the following procedure within 4 seconds.
1. Press the 10+ button.
2. Press the 1 button.
3. Press the 5 button.
Note:
• The 3-digit channel number can be selected only when the receiving mode is set to CABLE in CH-SETTING. (For details on
setting the receiving mode.)
EXIT:
• Function key : After entering the OSD menu, press EXIT function key to return one level up of the directory. Pressing EXIT
function when initial OSD displayed, you can close the OSD menu.
Adjusting the PICTURE MODE Settings (fig. 33)
Press “PICTURE MODE” Selects Brightness settings in circulate sequence, The “PICTURE MODE” includes three different brghtness
choice “ STANDARD / VIVID / FAVORITE “.
Standard: A fixed brightness for normal viewing condition.
Vivid: For higher ambient light viewing condition.
Favorite: User’s setting, allow user adjust the setting to personal preference.
Adjusting the LANGUAGE Settings (fig. 34)
The language for the On-Screen Display can be ENGLISH, SPANISH, FRENCH, ITALY or DUTCH.
1. Press
to display the MENU screen.
2. Press key to select OSD page.
3. Press
to enter Language selection.
4. Press or to select LANGUAGE.
SET UP ON TV (fig. 34)
It is necessary to set the receiving mode to AIR or CABLE channels to receive locally broadcast TV programs.
1. Press
to display the MENU screen.
2. Press
key again to highlight the item of TV system.
3. Press or to select TV system. (air or cable)
Page 12

12 PRESTIGIO TV-TUNER
ENG
CHANNEL EDIT ON TV (fig. 34)
• Adding weak or additional channels or erasing unwanted channels from TV memory.
1. Press or keys to select each desired channel.
2. Press
key again to highlight the first item.
3. Press key to highlight channel edit item.
4. USE or to set this item to yes.
5. Press
key again to bring up Add / Erase page.
6. Press key to erase the selected channel or press key to add the selected channel.
INPUT SELECT (fig. 35)
1. Press INPUT SELECT key to bring up “Select Source” dialog.
2. Press INPUT SELECT key again (or to use or keys) to select desired input source.
3. Press MENU(ENTER) key to enter the selected mode.
* If MENU(ENTER) key has not been pressed, it will automatically enter the selected mode after few seconds.
ADJUSTING THE V-CHIP SETTINGS
V-CHIP
• This function allows TV programs to be restricted and TV usage to be controlled based on FCC data. It prevents children
from watching violent or sexual scenes that may be harmful.
• Restriction of TV programs includes two ratings that contain information about the program: the MOVIE rating and the
TV rating, The MOVIE rating is restricted by age. TV rating is restricted by age and content.
• Since a TV program may use either the MOVIE rating or the TV rating, both should be adjusted for complete control.
MOVIE RATING
RATING
G GENERAL AUDIENCES. All ages admitted.
PG PARENTAL GUIDANCE SUGGESTED. Some material may not be suitable for children.
PG-13 PARENTAL STRONGLY CAUTIONED. Some material may be inappropriate for children under 13.
R RESTRICTED. Under 17 requires accompanying parent or adult guardian.
NC-17 NO ONE 17 AND UNDER ADMITTED.
X X is an older rating that is unified with NC-17 but may be encoded in the data of older movies.
MOVIE RATING (examples)
Example 1: PG-13 in the age-based rating is selected, this will also automatically block the higher ratings R, NC-17 and X.
Example 2: R in the age-based rating is selected, this will also automatically block the higher ratings NC-17 and X.
Note: The MOVIE rating is only age-based.
Page 13

13PRESTIGIO TV-TUNER
ENG
TROUBLESHOOTING
Problem Check item
There is no picture or sound · Make sure the Power cord is properly inserted in the power outlet.
· Reception other than those of broadcasting stations can be considered.
· Make sure the input mode is correctly set by your selected input.
· Make sure the main power switch of the main unit is on.
There is no sound. · Make sure the volume is not set to minimum.
· Make sure the sound is not set to mute.
· Make sure that headphones are not connected.
· Make sure source input by setting are not connected.
There is no picture or sound, · Make sure the antenna cable is properly connected.
just noise. · Consider whether TV/PC/AV/S-V/Y,Cb,Cr signals are being properly received.
Picture is not clear. · Make sure the antenna cable is properly connected.
· Consider whether TV signals are being properly received.
Picture is light or improperly · Check color adjustment.
tinted. · Check tint setting.
The picture is too dark. · Check the Brightness setting.
· Fluorescent lamp may have reached the end of service life.
Remote control does not work. · Check the battery of the remote controller.
· Make sure the remote sensor window is not under strong fluorescent lighting.
The picture is not sharp. · The reception may be weak.
· Make sure the antenna is facing the right direction.
· Check the sharpness function.
The picture is doubled or tripled. · Make sure the antenna is facing the right direction.
· There may be reflected electric waves from mountains or buildings.
The picture is spotted. · There may be interference from automobiles, trains, high voltage lines, neon
lights, etc.
· There may be interference between the antenna cable and power cable. Try
positioning them further apart.
There are stripes on the · Is the unit receiving interference from other devices?
screen or colors fade. Transmission antennas of radio broadcasting stations and transmission antennas of
amateur radios and cellular phones may also cause interference.
· Use the unit as far apart as possible from devices that may cause possible
interference.
Page 14
14 PRESTIGIO TV-TUNER
PL
OSTRZEŻENIE: W CELU ZMNIEJSZENIA RYZYKA POŻARU LUB PORAŻENIA PRĄDEM ELEKTRYCZNYM
NIE WOLNO NARAŻAĆ PRODUKTU NA WILGOĆ LUB DESZCZ
OSTRZEŻENIE: Zgodnie z przepisami FCC wszelkie niesankcjonowane zmiany lub modyfikacje danego sprzętu, nie zatwierdzone
przez producenta, mogą doprowadzić do pozbawienia użytkownika prawa do gwarancji.
UWAGA: W CELU ZAPOBIEGANIA PORAŻENIU PRĄDEM ELEKTRYCZNYM NALEŻY WŁOŻYĆ WTYCZKE
ZASILANIA MONITORA DO GNIAZDA Z BOLCEM UZIEMNIAJACYM DO KOŃCA
Znak błyskawicy wewnątrz trójkąta
równostronnego uprzedza użytkownika o
obecności „niebezpiecznego napięcia”
nieizolowanego wewnątrz korpusu produktu,
mogącego spowodować ryzyko porażenia
prądem elektrycznym.
Wykrzyknik w trójkącie uprzedza użytkownika
o tym, że w dokumentacji towarzyszącej
produktowi są ważne instrukcje dotyczące
użytkowania czy naprawy sprzętu.
WAŻNE: żeby ułatwić opis produktu w przypadku straty
czy kradzieży zapiszcie Państwo nazwę modelu i numer
seryjny w odpowiednim miejscu.Numery są rozmieszczone
na tylnej części Wyświetlacza.
Model #:
Numer serii:
OSTRZEŻENIE KOMISJI FEDERALNEJ OD KOMUNIKACJI (FCC)
INSTRUKCJA UŻYTKOWNIKA
Sprzęt został przebadany i jest zgodny z charakteryst ykami urządzeń cyfrowych Klasy B wg części 15 przepisów FCC
Poniższe instrukcje są ustalone dla zapewnienia prawidłowego sposobu instalowania i użytkowania sprzętu w pomieszczeniu. Ten sprzęt
wytwarza fale radiowe, więc jeśli instalacja oraz wykorzystanie sprzętu nie są zgodne z niniejszą instrukcją, może to spowodować
niedopuszczalne zakłócenia radiokomunikacyjne. Jednak nie można zagwarantować całkowitego usunięcia takich zakłóceń.
Jeśli sprzęt wywołuje niedopuszczalne zakłócenia sygnału radiowego lub zdalnego, które ujawnia się przez włączenie/ wyłączenie sprzętu,
można próbować usunąć zakłócenia za pomocą jednego lub kilku niżej wymienionych sposobów.
- Przekręcić lub przesunąć antenę odbiorczą
- Powiększyć długość między urządzeniem a odbiornikiem.
- Podłączyć sprzęt do gniazda obwodu, innego niż gniazdo, do którego jest ppodłączony odbiornik
Dany sprzęt został przebadany i jest zgodny z charakteryst ykami urządzeń cyfrowych Klasy B zgodnie z częścią 15 przepisów FCC. Urządzenia
zewnętrzne (urządzenia wprowadzenia/ wyprowadzenia komputera, terminale, drukarki itd.) odpowiadające tylko klasie B mogą być
wykorzystywane z komputerem. Wykorzystanie urządzeń zewnętrznych nie posiadających atestu może spowodować zakłócenia odbioru
sygnałów radiowych .
UWAGI
Zgodnie z wymaganiami FCC przy podłączeniu urządzenia do komputera PC czy innych urządzeń posiadających atest Klasy B należy
stosować kable ekranowane.
INFORMACJA DLA UŻYTKOWNIKA
Urządzenie należy wykorzystywać zgodnie z przeznaczeniem. W przypadku innych zastosowań nie przewidzianych przez producenta może
to grozić utratą gwarancji.
WAŻNE INFORMACJE
Page 15

15PRESTIGIO TV-TUNER
PL
POWAŻNE ŚRODKI ZAPOBEGAWCZE
Energia elektyczna może doprowadzić do urazów oraz uszkodzenia sprzętu w razie nieprawidłowego wykorzystania. Dany produkt opracowano
i wytworzono z uwzględnieniem wysokiego poziomu bezpieczeństwa. Jednak nieprawidłowe użytkowanie może spowodować porażenie
elektryczne i/ lub pożar. Aby uniknąć ewentualnego niebezpieczeństwa proszę przestrzegać następujących instrukcji podczas instalowania,
wykorzystania oraz czyszczenia produktu. W celu zapewnienia bezpieczeństwa oraz przedłużenia terminu ważności wyświetlacza LCD
proszę dokładnie się zapoznać z następującymi środkami ostrożności przed użytkowaniem produktu.
• Przeczytać instrukcje – Wszystkie instrukcje dotyczące użytkowania należy przeczytać przed rozpoczęciem użytkowania.
• Przechowawać tę instrukcję w bezpiecznym miejscu.
• Zachowywać środki ostrożności – Należy dokładnie przestrzegać wszystkich ostrzeżeń co do danego produktu podanych w instrukcji.
• Przestrzegać instrukcji – Trzeba zachowywać wszystkie przepisy dotyczące użytkowania
• Załączniki – Nie wolno stosować urządzeń, które nie są zalecane przez producenta. Wykorzystanie niezaleconych urządzeń może
spowodować zniszczenie sprzętu.
• Wkładanie przedmiotów i płynów do sprzętu – Kategorycznie nie wolno wkładać przedmiotów do otworów sprzętu. W produkcie jest
wysokie napięcie, więc wkładanie przedmiotów może spowodować porażenie elektryczne i/ lub zwarcie. Z tego samego powodu nie
wolno dopuszczać, do kontaktu produktu z wodą lub innymi płynami.
• Obsługa – Nie wolno samodzielnie naprawiać produktu. Otwierając pokrywkę można się narazić na działanie wysokiego napięcia.
Po naprawę należy się zwrócić do autoryzowanego serwisu.
• Naprawa – W przypadku zaistnienia poniższych sytuacji, należy odłączyć przewód zasilania od gniazda i zwrócić się do autoryzowanego
serwisu po dokonanie naprawy.
a. Jeśli na monitor wylano płyn lub wpadł do środka jakokolwiek przedmiot.
b. Jeśli produkt poddano oddziaływaniu deszczu lub wody
• Czyszczenie – Odłączyć przewód zasilania od gniazda przed czyszczeniem produktu. Do czyszczenia produktu należy stosować
wilgotną szmatke. Nie stosować do czyszczenia środków w płynie lub aerosolu.
• Woda i wilgoć – Nie korzystać z monitora blisko wody, na przykład przy kąpieli, umywalce, zlewozmywaku, pralce, basenie lub w
wilgotnej piwnicy.
• Ustawienie – Nie należy umieszczać monitora na ruchomej podstawce, stojaku, statywie lub stole. Ustawienie monitora na ruchomej
podstawie może doprowadzić do jego upadku, co może spowodować poważne uszkodzenie produktu. Należy stosować podstawkę,
stojak, statyw, trzymak czy stół, polecone przez producenta lub sprzedawane się razem z sprzętem. Przy mocowaniu produktu na
ścianie koniecznie należy stosować się do instrukcji producenta. Prosze stosować tylko sprzęt montażowy zalecany przez producenta.
• Przy przesuwaniu ustawionego na podstawce monitora należy przesuwać go z maksymalną ostrożnością. Nagłe zatrzymanie się,
lub/ i nierówna powierzchnia mogą doprowadzić do wysunięcia produktu z podstawki.
• Wentylacja – Otwory wentylacyjne i inne w korpusie są przewidziane do wentylacji. Nie wolno ich zamykać oraz blokować o ile
niedostateczna wentylacja może doprowadzić do przegrzania i/ lub utraty praw do gwarancji. Nie wolno ustawiać produktu na
łóżku, kanapie, dywanie i innych analogicznych powierzchniach, ponieważ mogą one zablokować otwory wentylacyjne. Dany
produkt nie jest przewidziany do instalowania wbudowanego; nie wolno umieszczać produktu w zamkniętej przestrzeni, na przykład
szafce do książek lub na półce, jeśli nie ma dostatecznej wentylacji zgodnie z zaleceniami producenta.
• Jeśli zewnetrzna antena jest podłączona do tunera, prosze sprawdzić czy przewód anteny został uziemniony tak aby zabezpieczyc
sprzet przed wahaniami prądu i ładunkami elektrostatycznymi.
• Dla dodatkowej ochrony wyposażenia telewizyjnego w czasie burzy lub w czasie dluższego okresu niewykorzystania, wyłączajcie
sprzet i odłączajcie antene telwizyjną. Zapobiega to uszkodzeniu sprzętu przez uderzenie pioruna i wahania prądu.
• Antena zewnętrzna musi być ustalona zdala od lini elektrycznych. Przy ustawianiu anteny zewnętrznej należy zachowywać ostrożność,
tak aby nie dotknąc anteną linii elektrycznej. Taki kontakt może być śmiertelnie niebezpieczny!
Page 16

16 PRESTIGIO TV-TUNER
PL
ZAWARTOŚĆ OPAKOWANIA (RYS. 1)
Pakowanie zawiera:
1. TV tuner
2. Instrukcje użytkowania.
KORZYSTANIE Z PILOTA
• Korzystając prosze kierować go w strone okienka sensoru. Przedmioty znajdujace sie miedzy sensorem a pilotem moga zakłócać prace
pilota.
UWAGI DOTYCZĄCE UŻYTKOWANIA PILOTA
• Chronić pilota przed wstrząsami (upadki,uderzenia).
Nie narażać pilota na działanie jakiejkolwiek cieczy oraz nie przechowywać w miejscach o podwyższonej wilgoci.
• Nie narażać pilota na bezpośrednie promienie słoneczne.Wysoka temperatura może spowodować odkształcenia urzadzenia.
• Pilot może żle działać jezeli okienko sensoru monitora znajduje sie wpolu oświetlenia promieniami słonecznymi lub pod wpływem
mocnego oświetlenia. W takim przypadlu należy zmienić kąt oświetlenia lub kąt nachylenia wyświetlacza albo też zmniejszyć
odległość miedzy pilotem a monitorem.
BATERIA DO PILOTA (RYS. 2)
Jeśli sterowanie zdalne nie działa, należy wymienić baterie w pilocie.
1. Otworzyć miejsce na baterie.
• Nacisnąć na haczyk, aby otworzyć zamek pokrywki baterii.
• Kiedy zamknięcie baterii jest otworzone, zdjąć pokrywke baterii z pilota.
2. Wstawić baterię.
• Wstawić baterię na miejsce w pilocie.
3. Zabezpieczyć baterie przykrywka wstawiająć ja do pilota
UWAGA!
OSTRZEŻENIA CO DO BATERII
Nieprawidłowe użytkowanie baterii może spowodować przeciekanie chemikalii i/ lub wybuch. Prosze przestrzegaćponiższych przepisów.
• Umieszczać bieguny baterii odpowiednio do znaków (+) i (-).
• Różne typy baterii mają różne charakterystyki. Nie można stosować jednocześnie baterii różnych typów.
• Należy wymieniać baterie gdy są zużyte.
• Baterie dostarczone razem z produktem mogą mieć krótszy okres użytkowania z powodu czasu przechowywania u dostawcy.
• Jeśli pilot nie jest używany przez dłuższy okres czasu , prosze z niego wyjmować baterie.
GNIAZDA WEJŚCIA NA TYLNEJ ŚCIANCE (RYS. 3)
A. Wejście do prądu zmiennego
B. Video
C. Audio (R) (prawy) (L) (lewy)
D. S-Video
E. Audio (R) (prawy) (L) (lewy)
F. YCbCr
Page 17

17PRESTIGIO TV-TUNER
PL
G. Audio (R) (prawy) (L) (lewy)
H. D-Sub
I. Connector RF (TV tuner)
J. Sluchawki
K. Wyjscie liniowe
PODŁĄCZENIE ANTENY
ANTENY
• Zmieszczamy krótki opis typów połączeń, które wykorzystuje się z rozmaitymi systemami antenowymi. (RYS 4)
1. System 75 Îm jest okrąglym kablem z connectorem F-typu, jest prosty w podlączeniu bez wyposażeń specjalnych. (nie wlączone w
komplet).
2. System 300 Îm – płaski podwójny kabel, który podlącza się do wejscia na 75 Om przez adapter 300-75 Îm (nie wlączony w komplet).
PODLĄCZENIE ANTENY ZEWNĘTRZNEJ (RYS. 5)
• przy podłączaniu anteny zewnętrznej prosze się kierować jednym z podanych schematów.
Ŕ: Podłączanie kombinowanej VHF/UHF anteny zewnętrznej.
B: Podłączanie oddzielnych anten zewnętrznych VHF i UHF.
•Podłączanie końcówki anteny zewnętrznej do wejścia ANT na tylniej ściance monitora(do tunera).
OPCJE KONTROLI (RYS. 6)
UWAGA:
• Wybór sygnalu wejściowego, Wyjście, CH( )UP / ( )DOWN (do góry/w dól), VOL( ) - / ( ) +(dźwięk), i MENU na bloku glównym mają
identyczne funkcje z guzikami na pulpicie kierowania.
KLAWISZ FUNKCJI MENU:
Klawisz INPUT jest wykorzystywany do zmiany rodzaju ustawienia monitora.Jest 6 rodzajów ustawienia monitora odpowiednio dla: PK,
TV, AV, SV i YCbCr.
Z każdego z następujących 4 rodzajów ustawienia monitora (PC, AV, SV lub YCbCr)produkt automatycznie przywraca ustawienie TV jeśli
zostaną naciśniete przyciski CH (+) lub CH (-).
Ustawienie trybu PC
Przyciski funkcyjne:
Proszę nacisnać przycisk “AUTO” po włączeniu monitora. Instalacja może trwać kilka chwil, prosze poczkać aż na monitorze pojawi sie
napis “Autoinstalacja».
Dźwięk. Proszę nacisnac przycisk “+” lub “-”, aby zmniejszyć lub zwiększyć głośność.
MENU EKRANU (RYS. 7)
Po naciśnięciu przycisku “MENU”pojawi sie strona z ikonami do ustawienia parametrów monitora. Jest 6 parametrów do ustawienia:
Brightness, Contrast, Clock, Phase, H-Position (pozycja wertykalna) i V-Position (pozycja horyzontalna). (Aby wrócić do poprzedniej
funkcji prosze nacisnąć przycisk “EXIT”).
Page 18

18 PRESTIGIO TV-TUNER
PL
Aby ustawić dany parametr prosze nacisnąć przycisk “MENU”, natomiast do regulacji poziomu parametru prosze naciskac przyciski “+”
lub “-” .
Aby wybrać odpowiedni parametr prosze używać przycisków “UP” i “DOWN”, natomiast “+” i “-” używać do regulacji poziomu.
Aby wrócić do poprzedniej funkcji prosze nacisnąć przycisk “EXIT”.
W trybie ustawienia PC, prosze nacisnąć przycisk “DOWN”, aby wybrać “Color Temperature Page”(strona temperatury kolorów) “OSD
Page” (“stronę menu ekranu”), “Audio Page” (“Stronę dźwięku”), “Factory Page” (“Stronę producenta”) i “PIP/POP Page” (“Stronę
PIP/POP”).
USTAWIENIE TEMPERATURY KOLORÓW (RYS. 8)
Są dostępne trzy rodzaje pracy: 6500Ę, 7500Ę, 9300Ę.
Nacisnąć przycisk “MENU”, żeby wyróżnić pierwszy punkt, potem klawisze “UP” (“W GÓRĘ”) lub “DOWN” (“W DÓŁ”), żeby wybrać
temperaturę kolorową i dalej punkty “R” (czerwony), “G” (zielony) lub “B” (granatowy) oraz stosować klawisze “+” lub “-” do
wyregulowania poziomu.
STRONA MENU EKRANU (RYS. 9)
Nacisnąć przycisk „MENU”, aby wybrać pierwszy punkt oraz stosować klawisze “UP” (“W GÓRĘ”) lub “DOWN” (“W DÓŁ”) do wyboru
potrzebnych punktów.
Po dokonaniu wyboru potrzebnego punktu wyregulować poziom stosując klawisze „+” i „-”.
STRONA DŹWIĘKU (RYS. 10)
Nacisnąć przycisk „MENU”, aby wybrać pierwszy punkt oraz stosować klawisze “UP” (“W GÓRĘ”) lub “DOWN” (“W DÓŁ”) do wyboru
potrzebnych punktów.
Po dokonaniu wyboru potrzebnego punktu wyregulować poziom stosując klawisze „+” i „-”.
STRONA PRODUCENTA (RYS. 11)
Nacisnąć przycisk “MENU”, aby wybrać potrzebny punkt oraz stosować klawisze klawisze “UP” (“W GÓRĘ”) lub “DOWN” (“W DÓŁ”) do
wyboru potrzebnych punktów.
Po dokonaniu wyboru potrzebnego punktu wyregulować poziom stosując klawisze „+” i „-”.
STRONA PIP/POP (RYS. 12):
Nacisnąć przycisk “MENU”, aby wybrać potrzebny punkt oraz stosować klawisze klawisze “UP” (“W GÓRĘ”) lub “DOWN” (“W DÓŁ”) do
wyboru potrzebnych punktów.
Po dokonaniu wyboru potrzebnego punktu wyregulować poziom stosując klawisze „+” i „-”.
Ustawienie trybu TV:
Klawisze funkcyjne:
Dźwięk. Proszę nacisnac przycisk “+” lub “-”, aby zmniejszyć lub zwiększyć głośność.
Prosze nacisnąć przycisk “UP” lub “DOWN” , aby wybrać kanał.
MENU EKRANU:
Po naciśnieciu przycisku “MENU” , pojawi się “System Page” (“systemowa strona”). Jest 5 parametrów do ustawienia – TV System, Auto
Search, MTS, Channel Edit i Clean Memory. (Aby wrócić do poprzedniej funkcji prosze nacisnąć przycisk “EXIT”).
Aby ustawić dany parametr prosze nacisnąć przycisk “MENU”, natomiast do regulacji poziomu parametru prosze naciskac przyciski “+”
lub “-” .
Page 19

19PRESTIGIO TV-TUNER
PL
Aby wybrać odpowiedni parametr prosze używać przycisków “UP” i “DOWN”, natomiast “+” i “-” używać do regulacji poziomu.
Aby wrócić do poprzedniej funkcji prosze nacisnąć przycisk “EXIT”.
W trybie ustawienia TV prosze nacisnac przycisk “DOWN”, aby wybrać “Image Page” (“Stronę obrazków”), “OSD Page”, “Audio Page”
lub “Display Page” .
SYSTEMOWA STRONA TV (RYS. 13):
Aby ustawić dany parametr prosze nacisnąć przycisk “MENU”, natomiast do regulacji poziomu parametru prosze naciskac przyciski “+”
lub “-” .
Aby wybrać odpowiedni parametr prosze używać przycisków “UP” i “DOWN”, natomiast “+” i “-” używać do regulacji poziomu.
STRONA MENU MONITORA (RYS. 14):
Aby ustawić dany parametr prosze nacisnąć przycisk “MENU”, natomiast do regulacji poziomu parametru prosze naciskac przyciski “+”
lub “-” .
Aby wybrać odpowiedni parametr prosze używać przycisków “UP” i “DOWN”, natomiast “+” i “-” używać do regulacji poziomu.
STRONA OBRAZKóW (RYS. 15):
Aby ustawić dany parametr prosze nacisnąć przycisk “MENU”, natomiast do regulacji poziomu parametru prosze naciskac przyciski “+”
lub “-” .
Aby wybrać odpowiedni parametr prosze używać przycisków “UP” i “DOWN”, natomiast “+” i “-” używać do regulacji poziomu.
Dostępne Sa 3 opcje do wyboru: Standard, ViVid (jaskrawy) lub Favourite.
STRONA DŹWIĘKU (RYS. 16):
Aby ustawić dany parametr prosze nacisnąć przycisk “MENU”, natomiast do regulacji poziomu parametru prosze naciskac przyciski “+”
lub “-” .
Aby wybrać odpowiedni parametr prosze używać przycisków “UP” i “DOWN”, natomiast “+” i “-” używać do regulacji poziomu.
STRONA MONITORA (RYS. 17):
Dostępne jest 6 funkcji: “Close Caption”, “V-Chip Setting”, “Timer”, “Aspect” (“Proporcje”), “Noise Reduce” (“Stłumienie szumu”) i
Recall Default (“Odtworzenie ustawień po wyłączeniu”).
Aby ustawić dany parametr prosze nacisnąć przycisk “MENU”, natomiast do regulacji poziomu parametru prosze naciskac przyciski “+”
lub “-” .
Aby wybrać odpowiedni parametr prosze używać przycisków “UP” i “DOWN”, natomiast “+” i “-” używać do regulacji poziomu.
Modyfikacje ustawień zastawki finalnej (Close Caption): ŃŃ1, ŃŃ2, ŇŇ1, ŇŇ2.
Modyfikacje ustawień timera: 30, 60, 90 minut.
Modyfikacje ustawień proporcji: Normal, 1:1, 4:3.
Modyfikacje ustawień stłumienia szumu: Słaby, średni, silny.
Ustawienia trybu AV:
Klawisze funkcyjne:
Dźwięk. Proszę nacisnac przycisk “+” lub “-”, aby zmniejszyć lub zwiększyć głośność.
MENU EKRANU:
Po naciśnieciu przycisku “MENU” , pojawi się “System Page” (“systemowa strona”). Jest 5 parametrów do ustawienia: Brightness
(jasność), Contrast , Sharpness (Ostrość), Color i Tint (Intensywność). (Aby wrócić do poprzedniej funkcji prosze nacisnąć przycisk “EXIT”).
Page 20

20 PRESTIGIO TV-TUNER
PL
STRONA OBRAZKÓW (RYS. 18):
Aby ustawić dany parametr prosze nacisnąć przycisk “MENU”, natomiast do regulacji poziomu parametru prosze naciskac przyciski “+”
lub “-” .
Aby wybrać odpowiedni parametr prosze używać przycisków “UP” i “DOWN”, natomiast “+” i “-” używać do regulacji poziomu.
Aby wrócić do poprzedniej funkcji prosze nacisnąć przycisk “EXIT”.
W trybie ustawienia AV prosze nacisnąc przycisk”DOWN” , aby wybrać “OSD Page” (“Stronę menu monitora”), “Audio Page” (“Stronę
dźwięku”) lub “Display Page” (“Stronę monitora”).
Dostępne Sa 3 opcje do wyboru: Standard, ViVid (jaskrawy) lub Favourite.
STRONA MENU MONITORA (RYS. 19):
Aby ustawić dany parametr prosze nacisnąć przycisk “MENU”, natomiast do regulacji poziomu parametru prosze naciskac przyciski “+”
lub “-” .
Aby wybrać odpowiedni parametr prosze używać przycisków “UP” i “DOWN”, natomiast “+” i “-” używać do regulacji poziomu.
STRONA DŹWIĘKU (RYS. 20):
Aby ustawić dany parametr prosze nacisnąć przycisk “MENU”, natomiast do regulacji poziomu parametru prosze naciskac przyciski “+”
lub “-” .
Aby wybrać odpowiedni parametr prosze używać przycisków “UP” i “DOWN”, natomiast “+” i “-” używać do regulacji poziomu.
STRONA MONITORA (RYS. 21):
Dostępne jest 6 funkcji: “Close Caption”, “V-Chip Setting”, “Timer”, “Aspect” (“Proporcje”), “Noise Reduce” (“Stłumienie szumu”) i
Recall Default (“Odtworzenie ustawień po wyłączeniu”).
Aby ustawić dany parametr prosze nacisnąć przycisk “MENU”, natomiast do regulacji poziomu parametru prosze naciskac przyciski “+”
lub “-” .
Aby wybrać odpowiedni parametr prosze używać przycisków “UP” i “DOWN”, natomiast “+” i “-” używać do regulacji poziomu.
Modyfikacje ustawień zastawki finalnej (Close Caption): ŃŃ1, ŃŃ2, ŇŇ1, ŇŇ2.
Modyfikacje ustawień timera: 30, 60, 90 minut.
Modyfikacje ustawień proporcji: Normal, 1:1, 4:3.
Modyfikacje ustawień stłumienia szumu: Słaby, średni, silny.
Ustawienia trybu SV:
Klawisze funkcyjne:
Dźwięk. Proszę nacisnac przycisk “+” lub “-”, aby zmniejszyć lub zwiększyć głośność.
MENU EKRANU:
Po naciśnieciu przycisku “MENU” , pojawi się “System Page” (“systemowa strona”). Jest 5 parametrów do ustawienia: Brightness
(jasność), Contrast , Sharpness (Ostrość), Color i Tint (Intensywność). (Aby wrócić do poprzedniej funkcji prosze nacisnąć przycisk “EXIT”).
STRONA OBRAZKÓW (RYS. 22):
Aby ustawić dany parametr prosze nacisnąć przycisk “MENU”, natomiast do regulacji poziomu parametru prosze naciskac przyciski “+”
lub “-” .
Aby wybrać odpowiedni parametr prosze używać przycisków “UP” i “DOWN”, natomiast “+” i “-” używać do regulacji poziomu.
Aby wrócić do poprzedniej funkcji prosze nacisnąć przycisk “EXIT”.
W trybie ustawienia AV prosze nacisnąc przycisk”DOWN” , aby wybrać “OSD Page” (“Stronę menu monitora”), “Audio Page” (“Stronę
dźwięku”) lub “Display Page” (“Stronę monitora”).
Page 21

21PRESTIGIO TV-TUNER
PL
Dostępne Sa 3 opcje do wyboru: Standard, ViVid (jaskrawy) lub Favourite.
STRONA MENU MONITORA (RYS. 23):
Aby ustawić dany parametr prosze nacisnąć przycisk “MENU”, natomiast do regulacji poziomu parametru prosze naciskac przyciski “+”
lub “-” .
Aby wybrać odpowiedni parametr prosze używać przycisków “UP” i “DOWN”, natomiast “+” i “-” używać do regulacji poziomu.
STRONA DŹWIĘKU (RYS. 24):
Aby ustawić dany parametr prosze nacisnąć przycisk “MENU”, natomiast do regulacji poziomu parametru prosze naciskac przyciski “+”
lub “-” .
Aby wybrać odpowiedni parametr prosze używać przycisków “UP” i “DOWN”, natomiast “+” i “-” używać do regulacji poziomu.
STRONA MONITORA (RYS. 25):
Dostępne jest 6 funkcji: “Close Caption”, “V-Chip Setting”, “Timer”, “Aspect” (“Proporcje”), “Noise Reduce” (“Stłumienie szumu”) i
Recall Default (“Odtworzenie ustawień po wyłączeniu”).
Aby ustawić dany parametr prosze nacisnąć przycisk “MENU”, natomiast do regulacji poziomu parametru prosze naciskac przyciski “+”
lub “-” .
Aby wybrać odpowiedni parametr prosze używać przycisków “UP” i “DOWN”, natomiast “+” i “-” używać do regulacji poziomu.
Modyfikacje ustawień zastawki finalnej (Close Caption): ŃŃ1, ŃŃ2, ŇŇ1, ŇŇ2.
Modyfikacje ustawień timera: 30, 60, 90 minut.
Modyfikacje ustawień proporcji: Normal, 1:1, 4:3.
Modyfikacje ustawień stłumienia szumu: Słaby, średni, silny.
Ustawienie trybu YCbCr:
Klawisze funkcyjne:
Dźwięk. Proszę nacisnac przycisk “+” lub “-”, aby zmniejszyć lub zwiększyć głośność.
MENU EKRANU:
Po naciśnieciu przycisku “MENU” , pojawi się “System Page” (“systemowa strona”). Jest 5 parametrów do ustawienia: Brightness
(jasność), Contrast , Sharpness (Ostrość), Color i Tint (Intensywność). (Aby wrócić do poprzedniej funkcji prosze nacisnąć przycisk “EXIT”).
STRONA OBRAZKÓW (RYS. 26):
Aby ustawić dany parametr prosze nacisnąć przycisk “MENU”, natomiast do regulacji poziomu parametru prosze naciskac przyciski “+”
lub “-” .
Aby wybrać odpowiedni parametr prosze używać przycisków “UP” i “DOWN”, natomiast “+” i “-” używać do regulacji poziomu.
Aby wrócić do poprzedniej funkcji prosze nacisnąć przycisk “EXIT”.
W trybie ustawienia AV prosze nacisnąc przycisk”DOWN” , aby wybrać “OSD Page” (“Stronę menu monitora”), “Audio Page” (“Stronę
dźwięku”) lub “Display Page” (“Stronę monitora”).
Dostępne Sa 3 opcje do wyboru: Standard, ViVid (jaskrawy) lub Favourite.
STRONA MENU MONITORA (RYS. 27):
Aby ustawić dany parametr prosze nacisnąć przycisk “MENU”, natomiast do regulacji poziomu parametru prosze naciskac przyciski “+”
lub “-” .
Aby wybrać odpowiedni parametr prosze używać przycisków “UP” i “DOWN”, natomiast “+” i “-” używać do regulacji poziomu.
Page 22

22 PRESTIGIO TV-TUNER
PL
STRONA DŹWIĘKU (RYS. 28):
Aby ustawić dany parametr prosze nacisnąć przycisk “MENU”, natomiast do regulacji poziomu parametru prosze naciskac przyciski “+”
lub “-” .
Aby wybrać odpowiedni parametr prosze używać przycisków “UP” i “DOWN”, natomiast “+” i “-” używać do regulacji poziomu.
STRONA MONITORA (RYS. 29):
Dostępne jest 6 funkcji: “Close Caption”, “V-Chip Setting”, “Timer”, “Aspect” (“Proporcje”), “Noise Reduce” (“Stłumienie szumu”) i
Recall Default (“Odtworzenie ustawień po wyłączeniu”).
Aby ustawić dany parametr prosze nacisnąć przycisk “MENU”, natomiast do regulacji poziomu parametru prosze naciskac przyciski “+”
lub “-” .
Aby wybrać odpowiedni parametr prosze używać przycisków “UP” i “DOWN”, natomiast “+” i “-” używać do regulacji poziomu.
Modyfikacje ustawień zastawki finalnej (Close Caption): ŃŃ1, ŃŃ2, ŇŇ1, ŇŇ2.
Modyfikacje ustawień timera: 30, 60, 90 minut.
Modyfikacje ustawień proporcji: Normal, 1:1, 4:3.
Modyfikacje ustawień stłumienia szumu: Słaby, średni, silny.
Modyfikacje wyboru proporcji: Normal, 1:1, 4:3.
Modyfikacje wyboru stłumienia szumu: Słaby, średni, silny.
OPERACJE PODSTAWOWE
KONTROLA DŹWIĘKU (RYS 30)
1. Zwiększenie głośności. Kontrolna linijka indykatora wzrasta.
2. Zmniejszenie głośności. Kontrolna linijka indykatora spada.
Wyłączenie dźwieku.
1. Naciśnijcie MUTE, aby wyłączyć dźwięk.
2. Naciśnijcie MUTE, aby włączyć dźwięk .
Włącznie/Wyłączanie (RYS. 31):
Aby wyłączyć TV
Naciśnijcie na panelu sterowania. Zasilacz wyłączy się.
Aby włączyć TV
Naciśnijcie znowu. Zasilacz zapali się na zielono.
PRZELĄCZENIE KANAŁÓW TV (RYS. 32)
Z każdego z następujących 4 rodzajów ustawienia monitora (PC, AV, SV lub YCbCr)produkt automatycznie przywraca ustawienie TV jeśli
zostaną naciśniete przyciski CH (+) lub CH (-).
Przełączenie kanałów przez Channel Select (wybór kanału) na panelu sterowania.
• Ten typ TV pozwala wybrać od 1 do 125 kanałów. Aby wybrać kanał, wprowadźcie odpowiednią liczbę (1-125) lub wykorzystajcie
przełączenie kanałow.
Żeby wybrać 1 lub 2 cyfrowy numer kanału, np. kanał 5
1. Przycisk 0.
2. Przycisk 5.
* lub Przycisk 5.
Page 23

23PRESTIGIO TV-TUNER
PL
Żeby wybrać trzy cyfrowy numer kanału, np. kanał 115
prosze nacisnać w ciągu 4 sek. :
1. Przycisk 10+.
2. Przycisk 1.
3. Przycisk 5.
UWAGA:
• Trzy cyfrowy numer może być wybrany dopiero w trybie CABLE w ŃH-SETTING ( ZAINSTALOWANIE KANAŁU).
EXIT: •Aby wrócić do poprzedniej funkcji prosze nacisnąć przycisk “EXIT”.
Naciśnięcie przycisku EXIT przy początkowej winecie menu zamyka menu.
TRYB USTAWIENIA OBRAZÓW (RYS. 33):
Naciśnijcie “PICTURE MODE” (“tryb ustawienia obrazów). Prosze wybrać Brightness (jasność).”PICTURE MODE” ma 3 modyfikację do
wyboru “STANDARD / VIVID / FAVOURITE”
Standard: Jasność dla normalnych warunków oświetleniowych.
VIVID: Jasność w warunkach ostrego oświetlenia.
Favourite: tryb pozwalajacy na inwidualne ustawienie jasności.
WYBÓR JĘZYKA (RYS. 34)
Wybór języka: ENGLISH, SPANISH, FRENCH, ITALY lub DUTCH.
1. Naciśnijcie przycisk MENU.
2.Wybierzcie stronę MENU.
3. Wybierzcie pozycje Language selection.
4. Wybierzcie LANGUAGE.
USTAWIENIE TRYBU TV (RYS. 34)
Należy ustawić tryb AIR lub CABLE, by odbierać programy.
1. Naciśnijcie przycisk MENU.
2.Naciśnijcie potrzebny przycisk.
3. Wybierzcie TV-system (AIR lub CABLE).
USTAWIENIE TRYBU KANAŁÓW NA TV (RYS. 34)
•Dodawanie słabych sygnałowo lub dodatkowych kanałów i kasowanie niepotrzebnych kanałów.
1. Wybierzcie potrzebny kanał.
2. Zaznaczcie pierwszą pozycje.
3. Wybierzcie numer kanału.
4. Wybierzcie pozytywną odpowiedź po tej pozycji.
5. Wejdźcie na stronę Add/Erase (Dodać/Odrzucić)
6. Dodajcie pożądany kanał lub wyrzućcie niepotrzebny.
WYBÓR KANAŁU WEJŚCIOWEGO (RYS.35):
1.Naciśnijcie przycisk INPUT SELECT (wybór sygnału wejściowego), aby wybraćfunkcje”Select Source” (“Wybór źródła”).
2. Znowu naciśnijcie guzik INPUT SELECT, żeby wybrać potrzebne źródło sygnalu wejsciowego.
3. Naciśnijcie przycisk MENU , aby wybrać tryb.
* Jeśli przycisk MENU nie będzie wciśnięty wybrany tryb włączy się za kilka sekund.
Page 24

24 PRESTIGIO TV-TUNER
PL
TRYB V-CHIP
V-CHIP (warunkiem działania jest nadawanie przez telewizje kodów cyfrowych)
• Ta funkcja pozwala na blokowanie programów telewizyjnych. Uniemożliwia przegląd wybranych filmów (np.nieodpowiednich dla
dzieci.)
• Ograniczenie dostępu do TV włącza 2 funkcje ,które informują o programie: kategoria FILM lub kategoria TV. FILM -kategoria wiekowa.
TV -kategoria wiekowa i treść.
• Trzeba nastroić oddzielnie obydwie funkcje poniewaz ten sam film moze sie roznic kategoriami.
KATEGORIA FILMU
OCENA
G AUDYTORIA. Dozwolony dla wszystkich.
PG ZALECA SIĘ PRZEGLĄD RAZEM Z DOROSŁYMI. Niektóre materiały mogą być niestosowne dla dzieci
PG-13 ZALEC A SIĘ PRZEGLĄD RAZEM Z DOROSŁYMI. Kategoria wiekowa od lat 13 lub t ylko razem z dorosłymi.
R PRZEGLĄD OGRANICZONY. Od 17 lat lub tylko z dorosłymi.
NC-17 Przegląd wzbroniony dla osób do 17 lat.
X X – ocena przestar zała, połączona z oceną NC-17, ale może być zakodowana w starych filmach.
KATEGORIA FILMU (PRZYKŁADY)
Przykład 1: została wybrana opcja PG-13 po wieku – to zablokuje również kategorie powyższe R, NC-17 i X.
Przyklad 2: została wybrana R po wieku – to zablokuje również kategorie powyższe NC-17 i X.
UWAGA: • Kategorie filmowe dzielą się ze względu na wiek widza.
Page 25

25PRESTIGIO TV-TUNER
PL
USUNIĘCIE USTEREK
Problem Sprawdzenie
Nie ma obrazu lub dźwięku · Sprawdzić, czy przewód zasilający w należyty sposób jest włożony do gniazda zasilania.
· Mogą być problemy z odbiorem niektórych kanałów.
· Sprawdzić, czy jest prawidłowo ustawiony stan wejścia.
· Sprawdzić, czy jest włączone zasilanie na bloku głównym.
Nie ma dźwięku. · Sprawdzić, czy poziom głośności nie jest ustawiony na położeniu minimalnym.
· Sprawdzić, czy dźwięk nie jest wyłączony.
· Sprawdzić, czy słuchawki są podłączone.
· Sprawdzić, czy źródła wprowadzenia nie są scalone.
Nie ma obrazu ani dźwięku, jest tylko szum. · Sprawdzić, czy przewód anteny jest włączony w należyty sposób.
· Sprawdzić, czy sygnały PK/FV/S-V/Y,Cb,Cr są odbierane prawidłowo.
Obraz nie jest dokładny. · Sprawdzić, czy przewód anteny jest włączony jak należy.
· Sprawdzić, czy TV sygnał jest dobrze odbierany.
Obraz jest jasny czy kolory nie są · Sprawdzić ustawienie kolorów.
odpowiednie. · Sprawdzić ustawienie odcieni.
Obraz za ciemny. · Sprawdzić ustawienie Jasności.
· Możliwe, że termin ważności lampy fluorescencyjnej jest skończony.
Sterowanie zdalne nie działa. · Sprawdzić baterię w pulpicie sterowniczym.
· Sprawdzić, czy okienko sensoru nie znajduje się pod wpływem mocnego oświetlenia fluorescencyjnego.
Obraz nie jest ostry. · Możliwie jest słaby odbiór sygnału.
· Sprawdzić, czy antena skierowana jest w dobrą stronę.
· Sprawdzić funkcję ostrości.
Obraz podwaja się czy potraja. · Sprawdzić, czy antena skierowana jest w dobrą stronę.
· Możliwość odbitych fali elektrycznych od gór lub budynków.
Na obrazie są plamy. · Są możliwe zakłócenia powodowane przez samochody, pociągi, linie wysokiego napięcia, oświetlenie
neonowe itd.
· Mogą zaistnieć zakłócenia z powodu zbyt bliskiego położenia przewodu anteny i przewodu zasilania.
Prosze spróbować umieścić je dalej od siebie.
Na ekranie pasy lub kolory bladną. · Możliwie, że są zakłócenia od innych urządzeń. Anteny nadające radiostacji i odbiorników radiowych
oraz komórek też mogą powodować zakłócenia.
· Stosować urządzenie maksymalnie daleko od urządzeń mogących powodować zakłócenia.
Page 26

26 PRESTIGIO TV-TUNER
CZ
UPOZORNĚNĺ FEDERÁLNĺ KOMISE PRO KOMUNIKACE (FCC)
Přĺručka Uživatele
Zařízení bylo otestováno a odpovídá charakteristikam číslicových zařízení třídy B dle části 15 předpisů FCC
Tyto charakteristiky byly určeny pro zabezpečení přijatelné hladiny ochrany před nepřípustnými poruchami při instalaci v místnostech. Toto
zařízení generuje, používá a může vyzařovat radiovlny, a nesoulad instalace a použití s touto příručkou může vést ke vzniku nepřípustných
poruch radiokomunikace. Záruka úplného odstranění takových poruch není.
Jestliže zařízení způsobuje nepřípustné poruchy radio- a televizního signálu, které se odhalují prostřednictvím zapnutí a vypnutí zařízení,
pak se doporučuje pokusit se odstranit poruchy pomocí jednoho anebo několika nížepopsaných způsobů.
- Otočte anebo posuňte přijímací anténu
- Zvětšete vzdálenost mezi zařízením a sběračem
- Zapněte zařízení do zásuvky obvodu, jiné než ta, do které je zapnut sběrač
- Poraďte se s dodavatelem anebo zkušeným radio/televizním technikem.
Toto zařízení bylo otestováno a odpovídá charakteristikam číslicových zařízení třídy B dle části 15 směrnic FCC. Jenom periferní zařízení
(vstupní-výstupní jednotka počítače, terminály, tiskárny atd.), které odpovídají třídě B, se mohou používát s tímto počítačem. Použití
necertifikované periférie může vést ke vzniku rádiových a televizních poruch.
POZNÁMKY
Pro dosažení shody s požadavky FCC při připojení zařízení k počítači anebo jiným certifikovaným zařízením třidy B se musí používat stíněné
kabely.
INFORMACE PRO UŽIVATELE
Zařízení se musí používat s kancelářským vybavením. Jakékoliv změny anebo modifikace, schválené osobou odpovědnou za shodu, můžou
zbavit uživatele práva používat toto zařízení.
DŮLEŽITÁ INFORMACE
UPOZORNĚNÍ: PRO ZMENŠENĺ RIZIKA VZNIKU POŽÁRU ANEBO ÚRAZU ELEKTRICKĚM PROUDEM
NEVYSTAVUJTE TENTO VÝROBEK DEŠTI ANEBO VLHKOSTI.
UPOZORNĚNĺ: v souladu s Předpisy FCC jakékoliv neschválené změny anebo modifikace tohoto zařízení můžou přivést k pozbavení
uživatele práv na použití tohoto zařízení.
POZOR: PRO ZAMEZENĺ ÚRAZU ELEKTRICKĚM PROUDEM ZASAZUJTE ŠIROKÝ KONTAKT
ZÁSTRČKY DO ŠIROKÉ ZDÍŘKY AŽ DO KONCE.
Značka blesku uvnitř rovnostranného
trojúhelníku je určena pro upozornění uživatele
na přítomnost neizolovaného „nebezbečného napětí“ uvnitř skříně výrobku, které vystačí
pro existenci rizika úrazu elektrickým proudem.
Vykřičník v trojúhelníku upozorňuje uživatele na
existenci důležitých návodů pro provoz anebo
opravy v dokumentaci k výrobku.
JE DŮLEŽITÉ:
Pro usnadnění popisu v případě ztráty anebo krádeže,
prosím, napište si název modelu a sériové číslo v příslušném
místě. Čísla jsou na zadní části Monitoru.
Model č.:
Sériové číslo:
Page 27

27PRESTIGIO TV-TUNER
CZ
DŮLEŽITÁ BEZPEČNOSTNĺ OPATŘENĺ
Elektřina se využívá pro realizaci mnoha užitečných funkcí, ale také může vést k úrazům a poškození majetku při nesprávném použití. Tento
výrobek byl vypracován a vyroben za předpokladu vysoké úrovně bezpečnosti. Nesprávné použití může vést k elektrickému úrazu a/anebo
požáru. Pro zamezení možného nebezpečí, prosím dodržujte následující pokyny při instalaci, použití a čištění výrobku. Pro zabezpečení
Vaší bezpečnosti a prodloužení životnosti Vašeho LCD monitoru, prosím pečlivě prostudujte následující bezpečnostní opatření před
použitím výrobku.
• Přečtěte si pokyny – Veškeré pokyny pro provoz musí být přečtěny a pochopeny před začátkem použití
• Uchovávejte tuto příručku na bezpečném místě – Tyto návody pro bezpečnost a provoz se musí uchovávat na bezpečném místě pro
další použití.
• Dodržujte bezpečnostní opatření – Všechna upozornění, týkající se tohoto výrobku, a které obsahuje tato příručka, se musí přísně
dodržovat.
• Dodržujte pokyny – Je nutné dodržovat všechny pokyny pro provoz.
• Přílohy – Nepoužívejte zařízení, nedoporučené výrobcem. Použití nevhodných přístrojů může vést k poruchám.
• Pronikání předmětů a kapalin – Nikdy nezasazujte předměty do výrobku přes otvory. Ve výrobku je vysoké napětí, a zasazení předmětu
může způsobit úraz elektrickým proudem a/anebo zkrat. Proto také nedovolte namočení výrobku vodou anebo jinou kapalinou.
• Servisní obsluha – Nepokoušejte se samostatně opravit výrobek. Při sejmutí víka se můžete vystavit vysokému napětí anebo jiným
nebezpečným vlivům. Pro opravu se obracejte na kvalifikovaného odborníka.
• Oprava – Při vzniku následujících okolností vyndejte napájecí vodič ze zásuvky a obraťte se na kvalifikovaného odborníka pro opravu.
a. V případě, že na výrobek byla vylita kapalina anebo pokud se do výrobku dostal nějaký předmět.
b. V případě výrobek byl vystaven působení deště anebo vody.
• Čištění – Vyndejte napájecí vodič ze zásuvky před čištěním výrobku. Pro čištění výrobku používejte vlhké látky. Nepoužívejte tekutých
čisticích prostředků nebo aerosolů.
• Voda a vlhkost – Nepoužívejte výrobku poblíž vody, například vedle vany, umývadla, kuchyňské výlevky, pračky, bazénu anebo ve
vlhkém sklepě.
• Umístění – Neupevňujte výrobek na vratkém podstavci, stojanu anebo stole. Instalace výrobku na vratkém základě může způsobit pád
a tím k vážným úrazům a též k poškození výrobku. Používejte jenom podstavce, stojanu anebo stolu, které se doporučují výrobcem
anebo se prodávají spolu s výrobkem. V případě upevnění výrobku na stěnu je nutné dodržovat pokyny výrobce. Používejte pouze
doporučené výrobcem montažní zařízení.
• Přesouvat výrobek instalovaný na podstavci se musí s maximální pozorností. Náhlé zastavení, příliš velké namáhání a nerovný povrch
podlahy můžou vést k pádu výrobku z podstavce.
• Ventilace – Ventilační a jiné otvory ve skříni jsou určeny pro ventilaci. Nezavírejte a neblokujte tyto otvory, protože nedostatečná
ventilace může vést k přehřátí a/anebo zmenšení životnosti výrobku. Neinstalujte výrobek na postel, pohovku, koberec a jiné podobné
povrchy, protože mohou zablokovat ventilační otvory. Tento výrobek není určen pro zabudování; neumísťujte výrobek do uzavřeného
prostoru, jako jsou knihovna anebo police, v případě, že není zabezpečena dostatečná ventilace dle pokynů od výrobce.
• Jestliže je vnější anténa napojena na televizní zařízení, přesvědčte se, že anténový systém je uzemněn pro zabezpečení dostatečné
ochrany před napěťovými nárazy a elektrostatickými náboji. Oddíl 810 Státního Zákoníku o Elektrické energii obsahuje informaci
ohledně správného uzemnění stožáru a podepírajících konstrukcí, uzemnění vstupního vodiče do výbojové jednotky antény, rozměru
zemnicích vodičů, polohy výbojové jednotky antény, napojení na zemniče a požadavků k zemničům.
• Pro dodatečnou ochranu tohoto televizního zařízení během bouřky anebo delší doby nevyužití vypínejte ze zásuvky a odpojte anténu.
To zabrání poškození zařízení bleskem a napěťovými nárazy.
• Systém vnější antény se nesmí rozmísťovat poblíž venkovního elektrického vedení nebo jinými elektrickými obvody, anebo tam, kde
může spadnout na takové vedení obvody. Během instalace systému vnější antény se musí dávat maximalní pozor na zamezení dotyku
s elektrickými vedeními anebo obvody, protože takový kontakt může být životu nebezpečný.
Page 28

28 PRESTIGIO TV-TUNER
CZ
OBSAH BALENÍ (OBR. 1)
Balení obsahuje:
1. TV tuner
2. Příručka uživatele
POUŽITÍ OVLÁDACÍHO PULTU
• Používejte dálkové ovládání, zaměřte ve směru okénka sensoru. Předměty mezi dálkovým ovládáním a sensorem mohou překážet
normálnímu provozu.
UPOZORNĚNÍ PŘI POUŽÍVÁNÍ DÁLKOVÉHO OVLÁDÁNÍ
• Nepodrobujte dálkové ovládání úderům.
Nepodrobujte dálkové ovládání působení kapalin a neskladujte v místě se zvýšenou vlhkostí.
• Chraňte dálkové ovládání před působením prudkého slunečního světla. Horko může vyvolat deformaci zařízení.
• Dálkové ovládání může fungovat nesprávně, v případě že se okénko sensoru hlavní jednotky nachází pod působením prudkého
slunečního světla anebo prudkého osvětlení. V takovém případě změňte úhel osvětlení anebo úhel sklonu monitoru, anebo použijte
dálkové ovládaní blíž k okénku sensoru.
BATERIE K DÁLKOVÉMU OVLÁDÁNÍ (OBR. 2)
Jestliže dálkové ovládání nefunguje, vyměňte baterie.
1. Otevřete držák baterií
• Stiskněte háček pro uvolnění zámku před vyjmutím držáku baterií.
• Potom, co je zámek baterií uvolněn, vyjměte držák baterií z pultu.
2. Zasaďte baterii.
• Umístěte baterii do držáku.
3. Zasaďte držák do dálkového ovládání s baterií, umístěné uvnitř.
POZOR!
UPOZORNĚNÍ PŘI POUŽITÍ BATERIÍ
Nesprávné použití baterií může vést k vytékaní chemikálií a/anebo k výbuchu. Dodržujte níže uvedené pokyny.
• Póly baterie umísťujte dle značek (+) ŕ (-).
• Různé typy baterií mají různé charakteristiky. Nepoužívejte současně baterie různých typů.
• Vyměňte baterie, když se vybíjí.
• Baterie, dodávané s výrobkem, mohou mít kratší životnost kvůli podmínkám skladování. Jestli se dálkové ovládání nepoužívá delší
dobu, vyndejte baterie.
KONEKTORY NA ZADNÍM PANELU (OBR. 3)
A. Vstup pro střídavé napětí
B. Video
C. Audio (R) (pravý) (L) (levý)
D. S-Video
E. Audio (R) (pravý) (L) (levý)
F. YcbCr
Page 29

29PRESTIGIO TV-TUNER
CZ
G. Audio (R) (pravý) (L) (levý)
H. Konektor D-Sub
I. Konektor RF (TF tuner)
J. Sluchátka
K. Lineární výstup
ZAPOJENÍ ANTÉNY
ANTÉNY
• Nároky na antény pro kvalitní příjem barevné televize jsou mnohem přísnější, než pro příjem černobílé televize. Proto se silně
doporučuje použití kvalitní venkovní antény.
Níže je krátký popis typů spojení, využívaných s různými anténovými systémy. Viz obr. 4.
1. Systém 75 Ohm je obvykle kulatý kabel s konektorem F-typu, který se lehce připojuje bez zvláštních zařízení (nejsou zařazené do
soupravy).
2. Systém 300 Ohm – plochý «dvojitý» kabel, který se může napojovat k výstupu na 75 Ohm přes adaptér 300-75 Ohm (není zařazen
do soupravy).
ZAPOJENĺ VENKOVNĺ ANTÉNY (OBR. 5)
• Při zapojení venkovní antény se řiďte jednou z následujících dvou schémat.
A: Zapojení kombinované VHF/UHF venkovní antény.
B: Zapojení rozdílných venkovních antén VHF a UHF.
• Napojte svod venkovní antény na vstup ANT. na zadním panelu televizoru.
MOŽNOSTI KONTROLY (OBR. 6)
Poznámka:
• Výběr vstupního signálu, Výstup, CH( )UP / ( ) DOWN (nahoru/dolů), VOL ( ) -/( ) + (hlasitost) a MENU na hlavní jednotce
mají stejné funkce, jako tlačítka na dálkovém ovládání.
FUNKČNÍ KLÁVESY MENU OBRAZOVKY:
Používejte funkční klávesy «INPUT» («VSTUP») pro změnu režimu nastavení displeje. Je pět režimů nastavení displeje, dostupných v daném
výrobku pro PC, TV, AV, SV a YCbCr.
Z libovolného z následujících čtyř režimů displeje (PC, AV, SV anebo YcbCr) se automaticky vrací do režimu TV po stisknutí uživatelem tlačítka
CH (+) anebo CH (-).
Pro režim nastavení PC:
Některé z funkčních kláves:
Stiskněte tlačítko “AUTO” pro nastavení výchozí kvality zobrazení dle. Nastavení obrazovky může trvat několik minut, na obrazovce se
zobrazuje nápis «Automatické nastavení…»
Stiskněte tlačítka «+» anebo «-« pro zvýšení anebo snížení hlasitosti.
Page 30

30 PRESTIGIO TV-TUNER
CZ
MENU OBRAZOVKY: (STRÁNKA OBRÁZKŮ) (OBR. 7)
Stiskněte «MENU», objeví se stránka pro nastavení. Pro nastavení je dostupných šest bodů, jako jsou Brightness (Jas), Contrast, Clock
(Hodiny), Phase (Fáze), H-Position (Poloha ve svislém směru) a V-Position (Poloha ve vodorovném směru). (Stiskněte tlačítko «EXIT»
(«VÝSTUP») pro návrat o jednu úroveň nahoru).
Stiskněte tlačítko «MENU» ještě jednou, aby se vyčlenil bod, a používejte tlačítek «+» anebo «-« pro nastavení úrovně.
Stiskněte tlačítka «UP» («NAHORU») ŕ «DOWN» («DOLŮ») pro výběr potřebného bodu a tlačítka «+» anebo «-« pro nastavení úrovně.
Stiskněte tlačítko «EXIT» («VÝSTUP») pro návrat o jednu úroveň nahoru.
V režimu nastavení PC stiskněte tlačítko «DOWN» («DOLŮ») pro výběr «Color Temperature Page» («Stránky teploty chromatičnosti»), «OSD
Page» («Stránky menu obrazovky»), «Audio Page» («Stránky hlasitosti»), «Factory Page» («Stránky výrobce») a «PIP/POP Page»
(«Stránky PIP/POP»).
STRÁNKA TEPLOTY CHROMATIČNOSTI (OBR. 8):
Jsou přístupné tři režimy: 6500K, 7500K, 9300K.
Stiskněte tlačítko «MENU», aby se vyčlenil první bod, potom tlačítka «UP» («NAHORU») ŕnebo «DOWN» («DOLŮ») pro výběr teploty
chromatičnosti, a dále body «R» (červený), «G» (zelený) anebo «Â» (modrý) a stiskněte «+» anebo «-« pro nastavení úrovně.
STRÁNKA MENU OBRAZOVKY (OBR. 9):
Stiskněte tlačítko «MENU», aby se vybral první bod a používejte tlačítek «UP» («NAHORU») ŕ «DOWN» («DOLŮ») pro výběr potřebných bodů.
Po výběru potřebného bodu stiskněte tlačítka «+» anebo «-« pro nastavení úrovně.
STRÁNKA ZVUKU (OBR. 10):
Stiskněte tlačítko «MENU», aby se vybral první bod a používejte tlačítek «UP» («NAHORU») ŕ «DOWN» («DOLŮ») pro výběr potřebných bodů.
Po výběru potřebného bodu stiskněte tlačítka «+» anebo «-« pro nastavení úrovně.
STRÁNKA VÝROBCE (OBR. 11):
Stiskněte tlačítko «MENU», aby se vybral první bod a používejte tlačítek «UP» («NAHORU») ŕ «DOWN» («DOLŮ») pro výběr potřebných bodů.
Po výběru potřebného bodu stiskněte tlačítka «+» anebo «-« pro nastavení úrovně.
STRÁNKA PIP/POP (OBR. 12):
Stiskněte tlačítko «MENU», aby se vybral první bod a používejte tlačítek «UP» («NAHORU») ŕ «DOWN» («DOLŮ») pro výběr potřebných bodů.
Po výběru potřebného bodu stiskněte tlačítka «+» anebo «-« pro nastavení úrovně.
Pro režim nastavení TV:
Některé z funkčních kláves:
Stiskněte tlačítka «+» anebo «-« pro zvýšení anebo snížení hlasitosti.
Stiskněte tlačítka «UP» («NAHORU») ŕ «DOWN» («DOLŮ») pro výběr Kanálu.
MENU OBRAZOVKY:
Stiskněte tlačítko «MENU», pro nastavení se objeví «System Page» («Systémová stránka»). Pro nastavení je přístupných pět bodů: TV System
(Systém TV), Auto Search (Automatické vyhledávání), MTS, Channel Edit (Nastavení kanálu), a Clean Memory (Vymazání z paměti).
(Stiskněte tlačítko «EXIT» («VÝSTUP») pro návrat o jednu úroveň nahoru).
Stiskněte tlačítko «MENU» ještě jednou pro výběr bodu a použijte tlačítka «+» anebo «-« pro nastavení úrovně.
Použijte tlačítek «UP» («NAHORU») ŕ «DOWN» («DOLŮ») pro výběr potřebného bodu a znovu tlačítek «+» anebo «-« pro nastavení úrovně.
Page 31

31PRESTIGIO TV-TUNER
CZ
Použijte tlačítka «EXIT» («VÝSTUP») pro návrat o jednu úroveň nahoru.
V režimu nastavení TV stiskněte tlačítko «DOWN» («DOLŮ») pro výběr «Image Page» («Stránky obrázků»), «OSD PAGE» («Stránky menu
obrazovky»), «AUDIO PAGE» («Stránky hlasitosti») anebo «Display Page» («Stránky displeje»).
SYSTÉMOVÁ STRÁNKA (OBR. 13):
Stiskněte tlačítko «MENU», aby se vybral první bod a používejte tlačítek «UP» («NAHORU») ŕ «DOWN» («DOLŮ») pro výběr potřebného bodu.
Po výběru potřebného bodu stiskněte tlačítka «+» anebo «-« pro nastavení anebo vykonávání funkce.
STRÁNKA MENU OBRAZOVKY (OBR. 14):
Stiskněte tlačítko «MENU», aby se vybral první bod a používejte tlačítek «UP» («NAHORU») ŕ «DOWN» («DOLŮ») pro výběr potřebného bodu.
Po výběru potřebného bodu stiskněte tlačítka «+» anebo «-« pro nastavení anebo vykonávání funkce.
STRÁNKA OBRÁZKŮ (OBR. 15):
Použijte tlačítka «MENU» pro výběr prvního bodu a tlačítek «UP» («NAHORU») anebo «DOWN« («DOLŮ») pro výběr potřebného bodu.
Po výběru potřebného bodu stiskněte tlačítka «+» anebo «-« pro nastavení anebo vykonávání funkce.
Pro volbu jsou přístupné tři režimy: Standard (Standardní), ViVid (Jasný) anebo Favourite (Uživatelský).
STRÁNKA ZVUKU (OBR. 16):
Stiskněte tlačítko «MENU», aby se vybral první bod a používejte tlačítek «UP» («NAHORU») ŕ «DOWN» («DOLŮ») pro výběr potřebného bodu.
Po výběru potřebného bodu stiskněte tlačítka «+» anebo «-« pro nastavení anebo vykonávání funkce.
STRÁNKA DISPLEJE (OBR. 17):
Jsou přístupné šest bodů: «Close Caption» («Závěrečné záhlaví»), «V-Chip Setting» («Nastavení V-Chip»), «Timer» («Časovací jednotka»),
«Aspect» («Proporce»), «Noise Reduce» («Potlačení šumu») ŕ «Recall Default» («Obnovení hodnot dle zamlčení»).
Stiskněte tlačítko «MENU» pro výběr prvního bodu a používejte tlačítek «UP» («NAHORU») ŕ «DOWN» («DOLŮ») pro výběr potřebného bodu.
Po výběru potřebného bodu stiskněte tlačítka «+» anebo «-« pro nastavení anebo vykonávání funkce.
Varianty výběru závěrečného záhlaví: ŃŃ1, ŃŃ2, ŇŇ1, ŇŇ2.
Varianty výběru časovací jednotky: 30, 60, 90 minut
Varianty výběru proporcí: Normální, 1:1, 4:3.
Varianty výběru potlačení šumu: Slabé, Střední, Silné.
Pro režim AV:
Některé z funkčních kláves:
Stiskněte tlačítka «+» anebo «-« pro zvětšení anebo zmenšení hlasitosti.
MENU OBRAZOVKY:
Stiskněte tlačítko «MENU», pro nastavení se objeví «Image Page» («Stránka obrázků»). Pro nastavení je přístupných pět bodů: Brightness
(Jas), Contrast, Sharpness (Ostrost zobrazení), Color (Barva) a Tint (Intenzita). (Stiskněte tlačítko «EXIT» («VÝSTUP») pro výstup anebo
návrat o jednu úroveň nahoru).
STRÁNKA OBRÁZKŮ (OBR. 18):
Stiskněte tlačítko «MENU» pro výběr bodu a použijte tlačítka «+» anebo «-« pro nastavení úrovně.
Page 32

32 PRESTIGIO TV-TUNER
CZ
Použijte tlačítka «EXIT» («VÝSTUP») pro návrat o jednu úroveň nahoru.
V režimu nastavení AV stiskněte tlačítko «DOWN» («DOLŮ») pro výběr «OSD PAGE» («Stránky menu obrazovky»), «AUDIO PAGE» («Stránky
hlasitosti») anebo «Display Page» («Stránky displeje»).
Pro výběr jsou přístupné tři režimy: Standard (Standardní), ViVid (Jasný) anebo Favourite (Uživatelský).
STRÁNKA MENU OBRAZOVKY (OBR. 19):
Stiskněte tlačítko «MENU» pro výběr prvního bodu a používejte tlačítek «UP» («NAHORU») ŕ «DOWN» («DOLŮ») pro výběr potřebného bodu.
Po výběru potřebného bodu stiskněte tlačítka «+» anebo «-« pro nastavení anebo vykonávání funkce.
STRÁNKA ZVUKU (OBR. 20):
Stiskněte tlačítko «MENU» pro výběr prvního bodu a používejte tlačítek «UP» («NAHORU») ŕ «DOWN» («DOLŮ») pro výběr potřebného bodu.
Po výběru potřebného bodu stiskněte tlačítka «+» anebo «-« pro nastavení anebo vykonávání funkce.
STRÁNKA DISPLEJE (OBR. 21):
Je přístupných šest bodů: «Close Caption» («Závěrečné záhlaví»), «V-Chip Setting» («Nastavení V-Chip»), «Timer» («Časovací jednotka»),
«Aspect» («Proporce»), «Noise Reduce» («Potlačení šumu») ŕ «Recall Default» («Obnovení hodnot dle zamlčení»).
Stiskněte tlačítko «MENU» pro výběr prvního bodu a používejte tlačítek «UP» («NAHORU») ŕ «DOWN» («DOLŮ») pro výběr potřebného bodu.
Po výběru potřebného bodu stiskněte tlačítka «+» anebo «-« pro nastavení anebo vykonávání funkce.
Varianty výběru závěrečného záhlaví: ŃŃ1, ŃŃ2, ŇŇ1, ŇŇ2.
Varianty výběru časovací jednotky: 30, 60, 90 minut
Varianty výběru proporcí: Normální, 1:1, 4:3.
Varianty výběru potlačení šumu: Slabé, Střední, Silné.
Pro režim SV:
Některé z funkčních kláves:
Stiskněte tlačítka «+» anebo «-« pro zvětšení anebo zmenšení hlasitosti.
MENU OBRAZOVKY:
Stiskněte tlačítko «MENU», pro nastavení se objeví «Image Page» («Stránka obrázků»). Pro nastavení je přístupných pět bodů: Brightness
(Jas), Contrast, Sharpness (Ostrost zobrazení), Color (Barva) a Tint (Intenzita). (Stiskněte tlačítko «EXIT» («VÝSTUP») pro výstup anebo
návrat o jednu úroveň nahoru).
STRÁNKA OBRÁZKŮ (OBR. 22):
Stiskněte tlačítko «MENU» pro výběr bodu a použijte tlačítka «+» anebo «-« pro nastavení úrovně.
“Stiskněte tlačítka «UP» («NAHORU») ŕnebo «DOWN» («DOLŮ») pro výběr potřebného bodu a Tlačítka «+» anebo «-« pro nastavení úrovně.
Použijte tlačítka «EXIT» («VÝSTUP») pro návrat o jednu úroveň nahoru.
V režimu nastavení AV stiskněte tlačítko «DOWN» («DOLŮ») pro výběr «OSD PAGE» («Stránky menu obrazovky»), «AUDIO PAGE» («Stránky
hlasitosti») anebo «Display Page» («Stránky displeje»). Pro výběr jsou přístupné tři režimy: Standard (Standardní), ViVid (Jasný) anebo
Favourite (Uživatelský).
Page 33

33PRESTIGIO TV-TUNER
CZ
STRÁNKA MENU OBRAZOVKY (OBR. 23):
Stiskněte tlačítko «MENU» pro výběr prvního bodu a používejte tlačítek «UP» («NAHORU») ŕ «DOWN» («DOLŮ») pro výběr potřebného bodu.
Po výběru potřebného bodu stiskněte tlačítka «+» anebo «-« pro nastavení anebo vykonávání funkce.
STRÁNKA HLASITOSTI (OBR. 24):
Stiskněte tlačítko «MENU» pro výběr prvního bodu a používejte tlačítek «UP» («NAHORU») ŕ «DOWN» («DOLŮ») pro výběr potřebného bodu.
Po výběru potřebného bodu stiskněte tlačítka «+» anebo «-« pro nastavení anebo vykonávání funkce.
STRÁNKA DISPLEJE (OBR. 25):
Jsou přístupné šest bodů: «Close Caption» («Závěrečné záhlaví»), «V-Chip Setting» («Nastavení V-Chip»), «Timer» («Časovací jednotka»),
«Aspect» («Proporce»), «Noise Reduce» («Potlačení šumu») ŕ «Recall Default» («Obnovení hodnot dle zamlčení»).
Stiskněte tlačítko «MENU» pro výběr prvního bodu a používejte tlačítek «UP» («NAHORU») ŕ «DOWN» («DOLŮ») pro výběr potřebného bodu.
Po výběru potřebného bodu stiskněte tlačítka «+» anebo «-« pro nastavení anebo vykonávání funkce.
Varianty výběru závěrečného záhlaví: ŃŃ1, ŃŃ2, ŇŇ1, ŇŇ2.
Varianty výběru časovací jednotky: 30, 60, 90 minut
Varianty výběru proporcí: Normální, 1:1, 4:3.
Varianty výběru potlačení šumu: Slabé, Střední, Silné.
Pro režim nastavení YcbCr:
Některé z funkčních kláves:
Stiskněte tlačítka «+» anebo «-« pro zvětšení anebo zmenšení hlasitosti.
MENU OBRAZOVKY:
Stiskněte tlačítko «MENU», pro nastavení se objeví «Image Page» («Stránka obrázků»). Pro nastavení jsou přístupné pět bodů: Brightness
(Jas), Contrast, Sharpness (Ostrost zobrazení), Color (Barva) a Tint (Intenzita). (Stiskněte tlačítko «EXIT» («VÝSTUP») pro výstup anebo
návrat o jednu úroveň nahoru).
STRÁNKA OBRÁZKŮ (OBR. 26):
Stiskněte tlačítko «MENU» pro výběr bodu a použijte tlačítka «+» anebo «-« pro nastavení úrovně.
Stiskněte tlačítka «UP» («NAHORU») ŕnebo «DOWN» («DOLŮ») pro výběr potřebného bodu a Tlačítka «+» anebo «-« pro nastavení úrovně.
Použijte tlačítka «EXIT» («VÝSTUP») pro návrat o jednu úroveň nahoru.
V režimu nastavení YcbCr stiskněte tlačítko «DOWN» («DOLŮ») pro výběr «OSD PAGE» («Stránky menu obrazovky»), «AUDIO PAGE» («Stránky
hlasitosti») anebo «Display Page» («Stránky displeje»). Pro výběr jsou přístupné tři režimy: Standard (Standardní), ViVid (Jasný) anebo
Favourite (Uživatelský).
STRÁNKA MENU OBRAZOVKY (OBR. 27):
Stiskněte tlačítko «MENU» pro výběr prvního bodu a používejte tlačítek «UP» («NAHORU») ŕ «DOWN» («DOLŮ») pro výběr potřebného bodu.
Po výběru potřebného bodu stiskněte tlačítka «+» anebo «-« pro nastavení anebo vykonávání funkce.
STRÁNKA HLASITOSTI (OBR. 28):
Stiskněte tlačítko «MENU» pro výběr prvního bodu a používejte tlačítek «UP» («NAHORU») ŕ «DOWN» («DOLŮ») pro výběr potřebného bodu.
Po výběru potřebného bodu stiskněte tlačítka «+» anebo «-« pro nastavení anebo vykonávání funkce.
Page 34

34 PRESTIGIO TV-TUNER
CZ
STRÁNKA DISPLEJE (OBR. 29):
Je přístupných šest bodů: «Close Caption» («Závěrečné záhlaví»), «V-Chip Setting» («Nastavení V-Chip»), «Timer» («Časovací jednotka»),
«Aspect» («Proporce»), «Noise Reduce» («Potlačení šumu») ŕ «Recall Default» («Obnovení hodnot dle zamlčení»).
Stiskněte tlačítko «MENU» pro výběr prvního bodu a používejte tlačítek «UP» («NAHORU») ŕ «DOWN» («DOLŮ») pro výběr potřebného bodu.
Po výběru potřebného bodu stiskněte tlačítka «+» anebo «-« pro nastavení anebo vykonávání funkce.
Varianty výběru závěrečného záhlaví: ŃŃ1, ŃŃ2, ŇŇ1, ŇŇ2.
Varianty výběru časovací jednotky: 30, 60, 90 minut
Varianty výběru proporcí: Normální, 1:1, 4:3.
Varianty výběru potlačení šumu: Slabé, Střední, Silné.
ZÁKLADNÍ OPERACE
Kontrola zvuku (přímá) (OBR. 30):
1. Zvyšte hlasitost. Kontrolní indikační linka se zvedá.
1. Snižte hlasitost. Kontrolní indikační linka se snižuje.
Pro vypnutí zvuku
1. Stiskněte MUTE (VYP. ZVUK) pro dočasné vypnutí zvuku.
2. Stiskněte MUTE (VYP. ZVUK) pro návrat hlasitosti na dřívější úroveň.
Ovládání ON/OFF (zapnutí/vypnutí) (OBR. 31):
Pro vypnutí monitoru LCD
Stiskněte na pultu ovládání. Indikace napájení se vypíná.
Pro zapnutí monitoru LCD
Stiskněte ještě jednou. Indikace napájení začne svítit zelenou barvou.
PŘEPĺNÁNĺ KANÁLŮ (OBR. 32):
Z jakéhokoliv z následujících čtyř režimů displeje (PC, AV, SV anebo YcbCr) se automaticky vrací do režimu TV, jestliže uživatel tiskne tlačítka
CH (+) anebo CH (-).
Přepínání kanálů se uskutečňuje pomocí Channel Select (Výběr kanálu) na pultě ovládání.
• Tento LCD TV dovoluje zvolit až 125 kanálů (1 až 125). Pro výběr kanálu zaveďte jedno-, dvou- nebo třímístné číslo anebo použijte
přepínání kanálů dopředu a dozadu.
Pro výběr jedno- anebo dvoumístného čísla kanálu (např. Kanál 5):
1. Stiskněte tlačítko 0.
2. Stiskněte tlačítko 5.
* anebo jednoduše stiskněte tlačítko 5.
Pro výběr třímístného čísla kanálu (např. Kanál 115):
Proveďte následující operace během 4 vteřin:
1. Stiskněte tlačítko 10+.
2. Stiskněte tlačítko 1.
3. Stiskněte tlačítko 5.
Poznámka:
• Třímístné číslo kanálu je možné zvolit pouze v režimu příjmu CABLE (KABELOVÉ) v CH-SETTING (NASTAVENÍ KANÁLU). (Podrobnosti jsou
v popisu nastavení režimu příjmu).
Page 35

35PRESTIGIO TV-TUNER
CZ
“EXIT (VÝSTUP):
Funkční tlačítko: po vstupu do menu obrazovky stiskněte funkční tlačítko EXIT (VÝSTUP) pro návrat o jednu úroveň nahoru.
Stisknutím tlačítka EXIT (VÝSTUP) při záhlaví menu obrazovky toto se vypíná
Nastavení REŽIMU ZOBRAZENÍ (OBR. 33):
Stiskněte «PICTURE MODE» («REŽIM ZOBRAZENÍ»). Zvolte nastavení Brightness (Jas) v kruhovém sledu. «PICTURE MODE» («REŽIM ZOBRAZENÍ»)
obsahuje tři různé varianty výběru «STANDARD / VIVID / FAVOURITE» («STANDARDNÍ / JASNÝ / UŽIVATELSKÝ»).
Standardní: Stálý jas pro normální podmínky zobrazení.
Jasný: Pro podmínky prudkého osvětlení.
Uživatelský: Nastavení uživatele, umožňují uživateli nastavit zobrazení podle vlastního uvážení.
Nastavení JAZYKU (OBR. 34):
Jazyk menu obrazovky podle výběru: ENGLISH (ANGLICKÝ), SPANISH (ŠPANĚLSKÝ), FRENCH (FRANCOUZSKÝ), ITALY (ITALSKÝ) anebo DUTCH
(HOLANDSKÝ).
1. Stiskněte tlačítko
pro zobrazení MENU.
2. Zvolte stránku menu obrazovky.
3. Zvolte bod Language selektion (Výběr jazyku).
4. Zvolte LANGUAGE (jazyk).
NASTAVENÍ TV (OBR. 34):
Je nutné nastavit režim příjmu na AIR (ÉTER) anebo CABLE (KABELOVÉ) pro příjem programů, které se převádějí TV v dané oblasti.
1. Stiskněte tlačítko
pro zobrazení MENU.
2. Vyčleňte potřebný bod TV systému.
3. Zvolte TV systém (éter anebo kabelovou televizi)
NASTAVENĺ KANÁLŮ NA TV (OBR. 34):
• Doplnění slabě přijímaných buď dodatečných kanálů anebo vymazání z paměti TV nepotřebných kanálů.
1. Zvolte potřebný kanál.
2. Vyčleňte první bod.
3. Zvolte bod seřízení kanálu.
4. Zvolte kladnou odpověď na daný bod.
5. Zajděte na stránku Add/Erase (Doplnit/Odstranit).
6. Odstraňte nepotřebný kanál anebo dodejte potřebný.
VÝBĚR VSTUPNÍHO SIGNÁLU (OBR. 35):
1. Stiskněte tlačítko INPUT SELECT (VÝBĚR VSTUPNÍHO SIGNÁLU) pro vyvolání dialogového okénka «Select Source» («Výběr zdroje»).
2. Znovu stiskněte tlačítko INPUT SELECT (VÝBĚR VSTUPNÍHO SIGNÁLU) (anebo použijte tlačítek výběru) pro výběr potřebného zdroje vstupního
signálu.
3. Stiskněte tlačítko MENU pro výběr potřebného režimu.
*Jestliže tlačítko MENU nebude stisknuto, pak se zvolený režim automaticky zapne za několik vteřin.
Page 36

36 PRESTIGIO TV-TUNER
CZ
NASTAVENÍ V-CHIP
V-CHIP
• Tato funkce dovoluje zamezovat přístup k TV programům a použití TV, opírajích se o údaje FCC. Tato funkce zamezuje prohlížení
sexuálních scén anebo scén násilí dětmi.
• Omezení přístupu k TV programům obsahuje dvě kategorie, které obsahují informaci o programu: kategorie FILM anebo kategorie TV.
FILM se omezuje věkem. TV se omezuje věkem a obsahem.
• Protože v kategorii TV programu se může používát jak kategorie FILMU, tak i kategorie TV, pak je zapotřebí seřídit obě pro uskutečnění
plné kontroly.
KATEGORIE FILMU
KATEGORIE
G CELKOVÉ AUDITORIUM. Je povoleno pro všechny věkové kategorie.
PG DOPORUČUJE SE ZHLÉDNUTÍ ZA DOPROVODU DOSPĚLÉHO. Některé materiály mohou být nevhodnými pro děti.
PG-13 ZHLÉDNUTÍ VÝHRADNĚ ZA DOPROVODU DOSPĚLÉHO. Některé materiály mohou být nevhodnými pro děti do 13 let.
R ZHLÉDNUTÍ JE OMEZENÉ Do 17 let zhlédnutí výhradně za doprovodu dospělých.
NC-17 ZHLÉDNUTÍ JE ZAKÁZÁNO PRO OSOBY MLADŠĺ NEŽ 17 LET.
X X – je zastaralá kategorie, kte rá je spojena s kategorii NC-17, ale může být zakódována v údajích u starších filmů.
KATEGORIE FILMU (PŘÍKLADY)
Příklad 1: je zvolena PG-13 podle věku – to také automaticky zablokuje vyšší kategorie R, NC-17 a X.
Příklad 2: je zvolena kategorie R-13 podle věku – to také automaticky zablokuje vyšší kategorie NC-17 a X.
Poznámka: Kategorie FILMU se rozlišují pouze podle věku.
Page 37

37PRESTIGIO TV-TUNER
CZ
ODSTRANĚNÍ ZÁVAD
Problém Kontrola
Chybí zobrazení anebo zvuk • Přesvědčte se, že napájecí vodič je řádně zasazen do napájecího konektoru.
• Jsou možné problémy s příjmem některých kanálů.
• Přesvědčte se, že je správně nastaven režim zavedení.
• Přesvědčte se, že je zapnuté napájení na hlavní jednotce.
Chybí zvuk • Přesvědčte se, že hladina hlasitosti zvuku není nastavena na minimum.
• Přesvědčte se, že zvuk není vypnut.
• Přesvědčte se, že nejsou zapojena sluchátka.
• Přesvědčte se, že zdroje zavedení nejsou sdružené.
Chybí zobrazení a zvuk, je pouze šum. • Přesvědčte se, že vodič antény je řádně napojen.
• Přesvědčte se, že signály PC/FV/S-V/Y, Cb, Cr se správně přijímají.
Zobrazení není přesně vyobrazeno. • Přesvědčte se, že vodič antény je řádně zapojen.
• Přesvědčte se, že TV signál se přijímá normálně.
Zobrazení je světlé anebo barvy • Zkontrolujte nastavení barev.
nejsou korektní. • Zkontrolujte nastavení odstínů
Zobrazení je příliš tmavé. • Zkontrolujte nastavení Jasu
• Je možné, že končí doba činnosti fluorescenční zářivky.
Dálkové ovládání nefunguje. • Zkontrolujte baterii v dálkovém ovládání.
• Přesvědčte se, že okénko sensoru se neozařuje prudkým fluorescenčním světlem.
Zobrazení není ostré. • Je možný slabý příjem signálu.
• Přesvědčte se, že anténa je otočena ve správném směru.
• Zkontrolujte funkci ostrosti.
Zobrazení je vidět dvakrát anebo třikrát. • Přesvědčte se, že anténa je otočena ve správném směru.
• Je možná přítomnost odražených elektrických vln od hor anebo budov.
Na zobrazení jsou skvrny. • Jsou možné poruchy od aut, vlaků, primárních vedení, neonového osvětlení atd.
• Jsou možné poruchy mezi vodičem antény a napájecím vodičem. Pokuste se je rozmístit dál od sebe.
Na obrazovce jsou pruhy anebo barvy • Jsou možné poruchy od jiných zařízení. Vysílací antény radiostanic a radiopřijímačů, a také mobilní
jsou bledé. telefony rovněž mohou vyvolávat poruchy.
• Používejte zařízení maximálně daleko od zařízení, které mohou vyvolat poruchy.
Page 38

38 PRESTIGIO TV-TUNER
SK
UPOZORNENIE: PRE ZNÍŽENIE RIZIKA VZNIKU POŽIARU ALEBO ÚRAZU ELEKTRICKÝM PRÚDOM,
CHRÁŇTE VÝROBOK PRED DAŽĎOM A VLHKOM.
UPOZORNENIE: V súlade s Pravidlami FCC ľubovolné úpravy alebo modifikácie uvedeného zariadenia, neschválené výrobcom, môžu
pozbaviť užívateľa práva používať uvedené zariadenie.
POZOR: PRE ZABRÁNENIE ÚRAZU ELEKTRICKÝM PRÚDOM ZASUŇTE ŠIROKÝ KONEKTOR DO
ŠIROKÉHO HNIEZDA NA DORAZ.
Symbol blesku vo vnútri rovnostranného
trojuholníka je určený pre upozornenie užívateľa
o prítomnosti neizolovaného „nebezpečného
napätia“ vo vnútri korpusu výrobku, ktoré je
dostatočné pre riziko úderu elektrickým prúdom.
Výkričník v trojuholníku upozorňuje užívateľa na
dôležité inštrukcie o použití alebo o oprave v
dokumentácii k výrobku.
DÔLEŽITE: Pre uľahčenie popisu výrobku pre prípad straty
alebo krádeže, zapíšte si názov modelu a sériové číslo na
príslušnom mieste. Čísla sú uvedené na zadnej časti
monitora.
Model č.:
Sériové číslo:
UPOZORNENIE FEDERÁLNEJ KOMISIE PRE KOMUNIKÁCIE (FCC)
Návod na použitie
Zariadenie bolo testované a zodpovedá vlastnostiam digitálnych zariadení Triedy B v súlade s č. 15 pravidiel FCC
Uvedené charakteristiky boli stanovené pre zabezpečenie prijatelnej úrovne ochrany od neprípustných porúch pri inštalácii v miestnosti.
Uvedené zariadenie produkuje, využíva a môže vyžarovať rádiové vlny, aj keď inštalácia a využívanie nezodpovedá tomuto návodu, môže
spôsobovať vznik neprípustných porúch rádiového spojenia. Nie je garantované celkové odstránenie takýchto porúch.
Ak zariadenie spôsobuje neprípustné poruchy pre rádiový a televízny signál, ktoré sa zisťujú zapnutím a vypnutím zariadenia, odporúča
sa skúsiť odstrániť poruchy jedným alebo niekoľkými spôsobmi uvedenými nižšie.
– Pootočte alebo premiestite príjmovú anténu
– Zväčšite vzdialenosť medzi zariadením a prijímačom
– Zapnite zariadenie do zásuvky obvodu, inej, než do ktorej je zapojený prijímač
– Prekonzultujte s dodávateľom alebo skúseným rádio/televíznym špecialistom.
Uvedené zariadenie bolo testované a zodpovedá vlastnostiam digitálnych zariadení Triedy B v súlade s č. 15 pravidiel FCC. S týmto
počítačom sa môžu používať iba periférie (vstupno-výstupné zariadenia počítača, terminály, tlačiarne a pod.) zodpovedajúce triede B.
Využívanie necertifikovanej periférie môže spôsobovať poruchy príjmu rádiových a televíznych signálov.
POZNÁMKY
Pre zabezpečenie súladu s požiadavkami FCC pri pripojení zariadenia k počítaču alebo iným certifikovaným zariadeniam Triedy B majú
byť použité tienené káble.
INFORMÁCIA PRE UŽÍVATEĽA
Zariadenie má byť používané s kancelárskym vybavením. Ľubovolné úpravy alebo modifikácie, schválené stranou, zodpovedajúcou za
zabezpečenie zhody, môžu pozbaviť užívateľa práva používať uvedené zariadenie.
DÔLEŽITÁ INFORMÁCIA
Page 39

39PRESTIGIO TV-TUNER
SK
DÔLEŽITÉ BEZPEČNOSTNÉ OPATRENIA
Elektrický prúd sa používa pre mnohé užitočné účely, ale môže taktiež spôsobiť úraz a poškodenie majetku pri nesprávnom používaní. Tento
výrobok bol rozpracovaný a vyrobený s ohľadom na vysokú úroveň bezpečnosti. Nesprávne použitie môže spôsobiť elektrický šok alebo
požiar. Pre odvrátenie potenciálneho nebezpečenstva, prosím, dodržiavajte nasledovné inštrukcie pri inštalácii, používaní a čistení výrobku.
Pre zabezpečenie Vašej bezpečnosti a predĺženie životnosti Vašej LCD obrazovky, prosím, dôkladne si preštudujte nasledovné bezpečnostné
opatrenia pred použitím výrobku.
• Prečítajte inštrukcie – Tento prevádzkový predpis musí byť prečítaný a pochopený pred uvedením výrobku do prevádzky.
• Uschovávajte tento návod na bezpečnom mieste – Tieto bezpečnostné a prevádzkové predpisy musia byť uschované na bezpečnom
mieste pre ďalšie použitie.
• Dodržiavajte bezpečnostné opatrenia – Všetky upozornenia, týkajúce sa tohto výrobku a uvedené v tomto predpise sa musia dodr žiavať.
• Dodržiavajte predpisy – Je nevyhnutné dodržiavať všetky prevádzkové predpisy.
• Prílohy – Nepoužívajte prístroje, ktoré neodporúča výrobca. Použitie nevhodných prístrojov môže spôsobiť poškodenie výrobku.
• Vniknutie predmetov a tekutín – Nikdy nevsúvajte predmety do výrobku cez otvory. Výrobok je pod vysokým napätím, a vsúvanie
predmetov môže spôsobiť elektrický šok alebo skrat. Z toho istého dôvodu zabráňte vniknutiu vody alebo inej tekutiny do výrobku.
• Servisná údržba – Nepokúšajte sa samostatne opraviť výrobok. Pri odstránení krytu sa vystavujete nebezpečnému účinku vysokého
napätia alebo iným nebezpečným účinkom. Opravy zverte kvalifikovanému odborníkovi.
• Oprava – Pri vzniknutí nižšie uvedených okolností vytiahnite prípojnú šnúru zo zásuvky a opravy zverte kvalifikovanému odborníkovi.
a. Ak sa na výrobok dostala tekutina alebo do výrobku vnikol nejaký predmet.
b. Ak na výrobok pôsobil dážď alebo voda
• Čistenie – Vytiahnite prípojnú šnúru zo zásuvky pred čistením výrobku. Na čistenie výrobku používajte vlhkú handričku. Nepoužívajte
tekuté čistiace prostriedky alebo aerosóly.
• Voda a vlhkosť – Nepoužívajte výrobok v blízkosti vody, napríklad, vedľa vane, umývadla, kuchynskej výlevky, pračky, bazénu alebo
vo vlhkej pivnici.
• Umiestnenie – Neumiestňujte výrobok na nestabilný podstavec, stojan, statív alebo stôl. Umiestnenie výrobku na labilnom podstavci
môže viesť k jeho spadnutiu, čo spôsobí vážne úrazy a súčastne aj poškodenie výrobku. Používajte iba podstavec, stojan, statív, držiak
alebo stôl, ktorý odporúča výrobca alebo sa ktorý predáva spolu s výrobkom. Pri upevňovaní výrobku na stene dôkladné dodržiavajte
predpisy výrobcu. Používajte iba montážne zariadenie, ktoré odporúča výrobca.
• Pri presúvaní výrobku umiestneného na podstavci je nevyhnutné presúvať ho maximálne opatrne. Náhle zastavenia, nadmerné úsilie
a nerovný povrch môžu viesť k spadnutiu výrobku z podstavca.
• Ventilácia – Ventilačné a iné otvory v korpuse sú určené pre vetranie. Nezakrývajte a neblokujte tieto otvory, pretože nedostatočná
ventilácia môže spôsobiť nadmerné zohrievanie alebo skrátenie doby životnosti výrobku. Neumiestňujte výrobok na postel, gauč,
koberec alebo podobný povrch, pretože môžu zablokovať ventilačné otvory. Uvedený výrobok nie je určený pre zabudovanú inštaláciu;
neumiestňujte výrobok do uzamknutých priestorov, takých ako skriňa alebo knižnica, ak nie je zabezpečená dostatočná ventilácia
podľa predpisov výrobcu.
• Ak vonkajšia anténa je pripojená k televíznemu zariadeniu musíte sa presvedčiť, že anténový systém je uzemnený, aby zabezpečoval
dostatočnú ochranu pred skokmi napätia a elektrickými nábojmi. Článok 810 Národného zákonníka pre Elektrickú energiu obsahuje
informáciu, týkajúcu sa správneho uzemnenia stožiara a podporných konštrukcií, uzemnenia vodiča vstupného do výbojového bloku
antény, rozmerov uzemňovacích vodičov, umiestnenia výbojového bloku antény, pripojenia k uzemňovacím elektródam a požiadavok
na uzemňovacie elektródy.
• Pre dodatočnú ochranu tohto televízneho zariadenia počas búrky alebo dlhodobého nepoužívania, odpojte výrobok od el. siete a
odpojte anténu. Toto odvráti nebezpečenstvo poškodenia zariadenia bleskom a výkyvmi napätia.
• Systém vonkajšej antény sa nesmie umiestňovať v bezprostrednej blízkosti nadzemného (vzdušného) prenosového vedenia alebo
iných elektrických obvodov, alebo tam, kde anténa môže spadnúť na také vedenia alebo obvody. Pri inštalácii systému vonkajšej
antény sa musí dodržiavať maximálna opatrnosť, aby nedošlo k dotyku s takým prenosovým vedením alebo obvodmi, pretože taký
kontakt môže byť smrteľne nebezpečný.
Page 40

40 PRESTIGIO TV-TUNER
SK
OBSAH BALENIA (OBR. 1)
Balenie obsahuje:
1. TV tuner
2. Používateľská príručka
POUŽITIE DIAĹKOVÉHO OVLÁDAČA
• Používajte diaľkový ovládač nasmerovaný na okienko senzoru. Prednety, ktoré sa nachádzajú medzi ovládačom a senzorom, môžu
prekážať normálnej prevádzke.
UPOZORNENIA, TÝKAJÚCE SA DIAĽKOVÉHO OVLÁDANIA
• Chráňte diaľkový ovládač pred údermi.
Chráňte diaľkový ovládač pred vniknutím tekutín a neodkladajte ho na vlhkých miestach.
• Chráňte diaľkový ovládač pred priamymi slnečnými lúčmi. Vysoká teplota môže spôsobiť deformáciu zariadenia.
• Diaľkový ovládač môže nesprávne fungovať, ak senzorové okienko základného bloku je ovplyvnené priamymi slnečnými lúčmi alebo
príliš silným osvetlením. V takom prípade zmeňte uhol osvetlenia alebo uhol náklonu obrazovky alebo prisuňte ovládač blížšie do
senzorového okienka.
BATÉRIA PRE DIAĽKOVÝ OVLÁDAČ (OBR.2)
Ak diaľkové ovládanie zle funguje, vymeňte baterky v diaľkovom ovládači.
1. Otvorte držiak bateriek.
• Zatlačte na háčik, aby sa uvoľnil zámok pred vybratím držiaka bateriek.
• Keď zámok bateriek je uvoľnený, vytiahnite držiak bateriek z ovládača.
2. Vložte baterku.
• Uložte baterku na držiak.
3. Vložte držiak s baterkou do ovládača.
POZOR!
UPOZORNENIA, TÝKAJÚCE SA BATÉRIÍ
Nesprávne použítie batérií môže spôsobiť uniknutie chemických látok alebo výbuch. Dôkladne dodržujte doluuvedené predpisy.
• Ukladajte batériu v súlade s označením pólov (+) a (-).
• Rôzne druhy batérií majú rôzne charakteristiky. Nepoužívajte spolu batérie rôznych druhov.
• Vymieňajte vybité batérie.
• Batérie dodávané spolu s výrobkom môžu mať kratšiu dobu životnosti v závislosti od podmienok uschovávania. Ak diaľkový ovládač
sa nepoužíva dlhší čas, vyberte batérie z ovládača.
ROZHRANIA NA ZADNOM PANELY (OBR.3)
A. Vstup striedavého prúdu
B. Video
C. Audio (R) (pravý) (L) (ľavý)
D. S-Video
E. Audio (R) (pravý) (L) (ľavý)
F. YcbCr
Page 41

41PRESTIGIO TV-TUNER
SK
G. Audio (R) (pravý) (L) (ľavý)
H. Rozhranie D-Sub
I. Konektor RF (TV tuner)
J. Sluchádlá
K. Lineárny výstup
NAPOJENIE ANTÉNY
ANTÉNY
• Požiadavky na antény pre dosiahnutie dobrého príjmu farebného televízneho obrazu sú oveľa prísnejšie, ako pre príjem čierno-bieleho
obrazu. Preto nástojčivo odporúčame používať kvalitnú vonkajšiu anténu.
Dolu je uvedený krátky popis typov spojenia, ktoré sa používajú s rôznymi anténovými systémami. Pozr. Obr. 4
1. Systém 75 Ohm je obvykle okrúhly kábel s konektorom F-t ypu, ktorý sa ľahko pripája bez špeciálnych zariadení (nie je vo výbave).
2. Systém 300 Ohm je plochý „dvojitý“ kábel, ktorý sa môže pripájať k výstupu na 75 Ohm cez adapter 300-75 Ohm (nie je vo výbave).
PRIPOJENIE VONKAJŠEJ ANTÉNY (OBR.5)
• Pri pripojení vonkajšej antény používajte jednu z dvoch následovných schém.
A: Pripojenie kombinovanej VHF/UHF vonkajšej antény.
B: Pripojenie rozdelených vonkajších antén VHF a UHF.
• Pripojte kábel vonkajšej antény k vstupu ATN na zadnom panely televízora.
FUNKCIE KONTROLY (OBR: 6)
Poznámka:
• Voľba vstupného signálu, Výstup, CH( )UP / ( )DOWN (hore/dolu), VOL( )-/( ) + (hlasitosť), a MENU na základnom bloku majú
také isté funkcie ako i tlačidlá na ovládači. V podstate, ténto návod ponúka popis opierajúci sa o diaľkové ovládanie.
FUNKČNÉ TLAČIDLÁ OBRAZOVKOVÉHO (OSD) MENU:
Používajte funkčné tlačidlo „INPUT“ (VSTUP) pre zmenu režimu nastavenia obrazovky. Je päť režimov nastavenia obrazovky, ktoré umožňuje
tento výrobok pre PC, TV, AV, SV a YcbCr
Z každého z týchto štyroch režimov (PC, AV, SV alebo YcbCr) sa obrazovka automaticky vráti do režimu TV, ak uživateľ stlačí tlačidlá CH(+)
alebo CH(-).
Pre režim nastavovania PC:
Niektoré funkčné tlačidlá:
Stlačte tlačidlo „AUTO“ pre štandardné nastavenie kvality obrazu. Nastavenie obrazovky môže trvať niekoľko minut, kým na obrazovke
´visí´ nápis „Automatické nastavovanie…)
Stlačte tlačidlá „+“ alebo „-„ pre zvýšenie alebo zníženie hlasitosti zvuku.
Page 42

42 PRESTIGIO TV-TUNER
SK
OSD MENU: (STRÁNKA OBRÁZKOV) (OBR.7)
Stlačte „MENU“, objaví sa stránka obrázkov na nastavovanie. Pre nastavovanie je dostupných šesť nasledovných parametrov: Brightness
(Jas), Contrast (Kontrast), Clock (Hodiny), Phase (Fáza), H-Position (Poloha vertikálna) a V-Position (Poloha horizontálna). (Stlačte
tlačidlo „EXIT“ („Východ“) pre návrat o jednu úroveň obrazovkového menu vyššie).
Stlačte tlačidlo „MENU“ ešte ráz pre zvýraznenie parametra a použíte tlačidlá „+“ alebo „-„ na regulovanie úrovne.
Tlačte tlačidlá „UP“ („HORE“) a „DOWN“ („DOLU“) pre výber potrebného parametra a tlačidlá „+“ a „-„ na regulovanie úrovne.
Stlačte tlačidlo „EXIT“ („Východ“) pre návrat o jednu úroveň obrazovkového menu vyššie).
V režime nastavovania PC stlačte tlačidlo „DOWN“ („DOLU“) pre výber „Color Temperature Page“ (Stránky teploty farby”), „OSD Page”
(Stránky obrazovkového menu”), „Audio Page” („Stránky zvuku”), „Factory Page” („Stránky výrobcu”) a „PIP/POP Page” (“Stránky
PIP/POP”).
STRÁNKA TEPLOTY FARBY (OBR. 8):
Sú dostupné tri režimy: 6500K, 7500K, 9300K.
Stlačte tlačidlo „MENU“ pre zvýraznenie prvého parametra a potom tlačidla „UP“ („HORE“) alebo „DOWN“ („DOLU“) pre výber teploty farby,
a potom parametre „R“ (červená), „G“ (zelená) alebo „B“ (modrá) a tlačte „+“ alebo „-„ na regulovanie úrovne.
STRÁNKA OSD MENU (OBR. 9):
Stlačte tlačidlo „MENU“ pre výber prvého parametra a používajte tlačidlá „UP“ („HORE“) alebo „DOWN“ („DOLU“) pre výber potrebných
parametrov.
Po zvolení potrebného parametra používajte tlačidlá „+“ a „-„ na regulovanie úrovne.
STRÁNKA ZVUKU (OBR. 10):
Stlačte tlačidlo „MENU“ pre výber prvého parametra a používajte tlačidlá „UP“ („HORE“) alebo „DOWN“ („DOLU“) pre výber potrebných
parametrov.
Po zvolení potrebného parametra používajte tlačidlá „+“ a „-„ na regulovanie úrovne.
STRÁNKA VÝROBCU (OBR. 11):
Stlačte tlačidlo „MENU“ pre výber prvého parametra a používajte tlačidlá „UP“ („HORE“) alebo „DOWN“ („DOLU“) pre výber potrebných
parametrov.
Po zvolení potrebného parametra používajte tlačidlá „+“ a „-„ na regulovanie úrovne.
STRÁNKA PIP/POP (OBR.12):
Stlačte tlačidlo „MENU“ pre výber prvého parametra a používajte tlačidlá „UP“ („HORE“) alebo „DOWN“ („DOLU“) pre výber potrebných
parametrov.
Po zvolení potrebného parametra používajte tlačidlá „+“ a „-„ na regulovanie úrovne.
Pre režimz nastavovania TV:
Niektoré funkčné tlačidlá:
Tlačte tlačidlá „+“ alebo „-„ pre zvýšenie alebo zníženie hlasitosti.
Tlačte tlačidlá „UP“ („HORE“) alebo „DOWN“ („DOLU“), aby ste vybrali Kanál.
OSD MENU:
Stlačte tlačidlo „MENU“ pre nastavenie, na obrazovke sa objaví „System Page“ („Systémová stránka“). Pre nastavenie je dostupných päť
parametrov – TV System (Systém T V), Audio Search (Automatické hľadanie), MTS, Channel Edit (Nas tavovanie kanála) a Clean Memory
Page 43

43PRESTIGIO TV-TUNER
SK
(Očistenie pamäti). (Stlačte tlačidlo „EXIT“ („Východ“) pre návrat o jednu úroveň obrazovkového menu vyššie).
Stlačte tlačidlo „MENU“ ešte raz pre zvýraznenie prvého parametra a použite tlačidlá „+“ alebo „-„ na regulovanie úrovne.
Použíte tlačidlá „UP“ („HORE“) a „DOWN“ („DOLU“) pre výber potrebného parametra a zase tlačidlá „+” a „-„ na regulovanie úrovne.
Použíte tlačidlo „EXIT“ („Východ“) pre návrat o jednu úroveň obrazovkového menu vyššie.
V režime nastavovania TV stlačte tlačidlo „DOWN“ („DOLU“) pre výber „Image Page“ („Stránky obrázkov“), „OSD Page“ (“Stránky
obrazovkového menu”), „Audio Page” („Stránky zvuku”) alebo”Display Page” („Stránky obrazovky”).
SYSTÉMOVÁ STRÁNKA (OBR. 13):
Stlačte tlačidlo „MENU“ pre výber prvého parametra a použíte tlačidlá „UP“ („HORE“) alebo „DOWN“ („DOLU“) pre výber potrebného
parametra.
Po zvolení potrebného parametra použite tlačidlá „+“ alebo „-„ na regulovanie alebo vykonávanie funkcie.
STRÁNKA OSD MENU (OBR. 14):
Stlačte tlačidlo „MENU“ pre výber prvého parametra a použíte tlačidlá „UP“ („HORE“) alebo „DOWN“ („DOLU“) pre výber potrebného
parametra.
Po zvolení potrebného parametra použíte tlačidlá „+“ alebo „-„ na regulovanie alebo vykonávanie funkcie.
STRÁNKA OBRÁZKOV (OBR. 15):
Stlačte tlačidlo „MENU“ pre výber prvého parametra a použíte tlačidlá „UP“ („HORE“) a „DOWN“ („DOLU“) pre výber potrebného parametra.
Po zvolení potrebného parametra použíte tlačidla „+“ alebo „-„ na regulovanie alebo vykonávanie funkcie.
Pre výber sú dostupné tri režimy: Standard (Štandard), ViVid (Jasný) alebo Favourite (Uživateľský).
STRÁNKA ZVUKU (OBR. 16):
Stlačte tlačidlo „MENU“ pre výber prvého parametra a použíte tlačidlá „UP“ („HORE“) alebo „DOWN“ („DOLU“) pre výber potrebného
parametra.
Po zvolení potrebného parametra použíte tlačidla „+“ alebo „-„ na regulovanie alebo vykonávanie funkcie.
STRÁNKA OBRAZOVKY (OBR.17)
Je dostupných šesť parametrov :“Close Caption“ („Finálny titulok“), „V-Chip Setting“ („Nastavenie V-Chip“), „Timer“ („Časovač“),
„Aspect“ („Proporcie“), Noise Reduce“ („Potlačenie šumu“)
a „Recall Default” („Obnovenie štandardných hodnôt”).
Stlačte tlačidlo „MENU“ pre výber prvého parametra a použíte tlačidlá „UP“ („HORE“) alebo „DOWN“ („DOLU“) pre výber potrebného
parametra.
Po zvolení potrebného parametra použíte tlačidlá „+“ alebo „-„ na regulovanie alebo vykonávanie funkcie.
Varianty výberu finálneho titulku: CC1, CC2, TT1, TT2.
Varianty výberu časovača: 30, 60, 90 minút.
Varianty výberu proporcií: Normálne, 1:1, 4:3.
Varianty výberu Potlačenia šumu: Slabé, Stredné, Silné.
Pre režim AV:
Niektoré funkčné tlačidlá:
Tlačte tlačidlá „+“ alebo „-„ pre zvýšenie alebo zníženie hlasitosti zvuku.
Page 44

44 PRESTIGIO TV-TUNER
SK
OBRAZOVKOVÉ MENU:
Stlačte tlačidlo „MENU“, pre nastavovanie sa objaví „Image Page“ („Stránka obrázkov“). Pre nastavovanie je dostupných päť parametrov:
Brightness (Jas), Contrast (Kontrast), Sharpness (Ostrosť), Color (Farba) a Tint (Intenzita). (Stlačte tlačidlo „EXIT“ („Východ“) pre návrat
o jednu úroveň obrazovkového menu vyššie).
STRÁNKA OBRÁZKOV (OBR. 18):
Stlačte tlačidlo „MENU“ ešte ráz pre zvýraznenie prvého parametra a použíte tlačidlá „+“ alebo „-„ na regulovanie úrovne.
Použíte tlačidlá „UP“ („HORE“) alebo „DOWN“ („DOLU“) pre výber potrebného parametra a zase tlačidlá „+“ a „-„ na regulovanie úrovne.
Použíte tlačidlo „EXIT“ („Východ“) pre návrat o jednu úroveň obrazovkového menu vyššie.
V režime nastavovania AV stlačte tlačidlo „DOWN“ („DOLU“) pre výber „OSD Page“ (“Stránky OSD menu“), „Audio Page“ („Stránky
zvuku“) alebo“Display Page“ („Stránky obrazovky“).
Pre výber sú dostupné tri režimy: Standard (Štandard), ViVid (Jasný) alebo Favourite (Uživateľský).
STRÁNKA OSD MENU (OBR. 19):
Stlačte tlačidlo „MENU“ pre výber prvého parametra a použíte tlačidlá „UP“ („HORE“) a „DOWN“ („DOLU“) pre výber potrebného parametra.
Po zvolení potrebného parametra použite tlačidlá „+“ alebo „-„ na regulovanie alebo vykonávanie funkcie.
STRÁNKA ZVUKU (OBR. 20):
Stlačte tlačidlo „MENU“ pre výber prvého parametra a použite tlačidlá „UP“ („HORE“) alebo „DOWN“ („DOLU“) pre výber potrebného
parametra.
Po zvolení potrebného parametra použite tlačidlá „+“ alebo „-„ na regulovanie alebo vykonávanie funkcie.
STRÁNKA OBRAZOVKY (OBR.21)
Je dostupných šesť parametrov :“Close Caption“ („Finálny titulok“), „V-Chip Setting“ („Nastavenie V-Chip“), „Timer“ („Časovač“),
„Aspect“ („Proporcie“), Noise Reduce“ („Potlačanie šumu“) a
„Recall Default” („Obnovenie štandardných hodnôt”).
Stlačte tlačidlo „MENU“ pre výber prvého parametra a použite tlačidlá „UP“ („HORE“) alebo „DOWN“ („DOLU“) pre výber potrebného
parametra.
Po zvolení potrebného parametra použite tlačidlá „+“ alebo „-„ na regulovanie alebo vykonávanie funkcie.
Varianty výberu finálneho titulku : CC1, CC2, TT1, TT2.
Varianty výberu časovača: 30, 60, 90 minút.
Varianty výberu proporcií: Normálne, 1:1, 4:3.
Varianty výberu Potlačenia šumu: Slabé, Stredné, Silné.
Pre režim SV:
Niektoré funkčné tlačidlá:
Tlačte tlačidlá „+“ alebo „-„ pre zvýšenie alebo zníženie hlasitosti zvuku.
OSD MENU:
Stlačte tlačidlo „MENU“, pre nastavenie sa objaví „Image Page“ („Stránka obrázkov“). Pre nastavenie je dostupných päť bodov:
Brightness (Jas), Contrast (Kontrast), Sharpness (Ostrosť), Color (Farba) a Tint (Intenzita). (Stlačte tlačidlo „EXIT“ („Východ“) pre návrat
o jednu úroveň obrazovkového menu vyššie).
Page 45

45PRESTIGIO TV-TUNER
SK
STRÁNKA OBRÁZKOV (OBR. 22):
Stlačte tlačidlo „MENU“ pre výber parametra a použite tlačidlá „+“ alebo „-„ na regulovanie úrovne.
Tlačte tlačidlá „UP“ („HORE“) a „DOWN“ („DOLU“) pre výber potrebného parametra a tlačidlá „+“ a „-„ na regulovanie úrovne.
Použite tlačidlo „EXIT“ („Východ“) pre návrat o jednu úroveň obrazovkového menu vyššie.
V režime nastavovania SV stlačte tlačidlo „DOWN“ („DOLU“), aby ste vybrali „OSD Page“ (“Stránku obrazovkového menu“), „Audio Page“
(„Stránku zvuku“) alebo“Display Page“ („Stránku obrazovky“). Pre výber je dostupných tri režimy: Standard (Štandard), ViVid (Jasný)
alebo Favourite (Uživateľský).
STRÁNKA OSD MENU (OBR. 23):
Stlačte tlačidlo „MENU“ pre výber prvého parametra a použite tlačidlá „UP“ („HORE“) alebo „DOWN“ („DOLU“) pre výber potrebného
parametra .
Po zvolení potrebného parametra použite tlačidlá „+“ alebo „-„ na regulovanie alebo vykonávanie funkcie.
STRÁNKA ZVUKU (OBR. 24):
Stlačte tlačidlo „MENU“ pre výber prvého parametra a použite tlačidlá „UP“ („HORE“) alebo „DOWN“ („DOLU“) pre výber potrebného
parametra.
Po zvolení potrebného parametra použite tlačidlá „+“ alebo „-„ na regulovanie alebo vykonávanie funkcie.
STRÁNKA OBRAZOVKY (OBR.25)
Je dostupných šesť parametrov: “Close Caption“ („Finálny titulok“), „V-Chip Setting“ („Nastavenie V-Chip“), „Timer“ („Časovač“),
„Aspect“ („Proporcie“), Noise Reduce“ („Potlačenie šumu“) a
„Recall Default” („Obnovenie štandardných hodnôt”).
Stlačte tlačidlo „MENU“ pre výber prvého parametra a použite tlačidlá „UP“ („HORE“) alebo „DOWN“ („DOLU“) pre výber potrebného
parametra.
Po zvolení potrebného parametra použite tlačidla „+“ alebo „-„ na regulovanie alebo vykonávanie funkcie.
Varianty výberu finálneho titulku: CC1, CC2, TT1, TT2.
Varianty výberu časovača: 30, 60, 90 minút.
Varianty výberu proporcií: Normálne, 1:1, 4:3.
Varianty výberu Potlačenia šumu: Slabé, Stredné, Silné.
Pre režim nastavovania YcbCr:
Niektoré funkčné tlačidlá:
Tlačte tlačidlá „+“ alebo „-„ pre zvýšenie alebo zníženie hlasitosti zvuku.
OSD MENU:
Stlačte tlačidlo „MENU“, pre nastavenie sa objaví „Image Page“ („Stránka obrázkov“). Pre nastavenie je dostupných päť bodov:
Brightness (Jas), Contrast (Kontrast), Sharpness (Ostrosť), Color (Farba) a Tint (Intenzita). (Stlačte tlačidlo „EXIT“ („Východ“) pre návrat
o jednu úroveň obrazovkového menu vyššie).
STRÁNKA OBRÁZKOV (OBR. 26):
Stlačte tlačidlo „MENU“ pre výber parametra a použite tlačidlá „+“ alebo „-„ na regulovanie úrovne.
Používajte tlačidlá „UP“ („HORE“) a „DOWN“ („DOLU“), aby ste vybrali potrebný parameter a tlačidlá „+“ a „-„ na regulovanie úrovne.
Používajte tlačidlo „EXIT“ („Východ“) pre návrat o jednu úroveň obrazovkového menu vyššie.
V režime nastavovania YCbCr stlačte tlačidlo „DOWN“ („DOLU“), aby ste vybrali „OSD Page“ (“Stránku obrazovkového menu”), „Audio
Page 46

46 PRESTIGIO TV-TUNER
SK
Page” („Stránku zvuku”) alebo”Display Page” („Stránku obrazovky”).
Pre výber sú dostupné tri režimy: Standard (Štandard), ViVid (Jasný) alebo Favourite (Uživateľský).
STRÁNKA OSD MENU (OBR. 27):
Stlačte tlačidlo „MENU“ pre výber prvého parametra a používajte tlačidlá „UP“ („HORE“) alebo „DOWN“ („DOLU“) pre výber potrebného
parametra.
Po zvolení potrebného parametra použite tlačidlá „+“ alebo „-„ na regulovanie alebo vykonávanie funkcie.
STRÁNKA ZVUKU (OBR. 28):
Stlačte tlačidlo „MENU“ pre výber prvého parametra a použíte tlačidlá „UP“ („HORE“) alebo „DOWN“ („DOLU“) pre výber potrebného
parametra.
Po zvolení potrebného parametra použite tlačidlá „+“ alebo „-„ na regulovanie alebo vykonávanie funkcie.
STRÁNKA OBRAZOVKY (OBR.29)
Je dostupných šesť parametrov: “Close Caption“ („Finálny titulok“), „V-Chip Setting“ („Nastavenie V-Chip“), „Timer“ („Časovač“),
„Aspect“ („Proporcie“), Noise Reduce“ („Potlačenie šumu“) a
„Recall Default” („Obnovenie štandardných hodnôt”).
Stlačte tlačidlo „MENU“ pre výber prvého parametra a použite tlačidlá „UP“ („HORE“) alebo „DOWN“ („DOLU“) pre výber potrebného
parametra.
Po zvolení potrebného parametra použite tlačidla „+“ alebo „-„ na regulovanie alebo vykonávanie funkcie.
Varianty výberu finálneho titulku: CC1, CC2, TT1, TT2.
Varianty výberu časovača: 30, 60, 90 minút.
Varianty výberu proporcií: Normálne, 1:1, 4:3.
Varianty výberu Potlačenia šumu: Slabé, Stredné, Silné.
ZÁKLADNÉ OPERÁCIE
KONTROLA ZVUKU (PRIAMA) (OBR. 30)
1. Zvýšte hlasitosť zvuku. Kontrolná línia indikátora narastá.
2. Znížte hlasitosť zvuku. Kontrolná línia indikátora sa zmenšuje.
Ak treba vypnúť zvuk
1. Stlačte MUTE (VYPN. ZVUK) pre dočasné vypínanie zvuku.
2. Stlačte MUTE (VYPN. ZVUK) pre návrat zvuku na pôvodnú úroveň.
Režim ON/OF (zapínanie /vypínanie) (obr. 31):
Vypínanie LSD TV
Stlačte na ovládači. Indikátor zhasne.
Zapínanie TV
Stlačte znovu. Indikátor sa rozsvieti na zeleno.
PREPÍNANIE TV KANÁLOV (OBR. 32)
Z hociktorého zo štyroch režimov (PC, AV, SV alebo YcbCr) sa obrazovka autonaticky vráti do režimu TV, ak použivateľ stlačí tlačidlá CH(+)
alebo CH(-).
Prepínanie kanálov s použitím Channel Selekt (Výber kanála) na ovládači
Page 47

47PRESTIGIO TV-TUNER
SK
• Tento LSD TV (na báze kvapalných kryštálov) dovoľuje vybrať do 125 kanálov (od 1 do 125). Pre výber kanálu stlačte jednu, dve alebo
tri cifry alebo používajte tlačidlo prepínania kanálov dopredu a späť
Pre výber jedno- alebo dvojmiestneho čísla kanálu (napr. Kanál 5):
1. Stlačte tlačidlo 0.
2. Stlačte tlačidlo 5.
alebo len stlačte tlačidlo 5.
Pre výber trojmiestného čísla kanálu (napr. Kanál 115):
Postupujte následovne v priebehu 4 sekúnd.
1. Stlačte tlačidlo 10+.
2. Stlačte tlačidlo 1.
3. Stlačte tlačidlo 5.
• Poznámka: Trojmiestné číslo kanálu je možne zvoliť len v režime príjmu CABLE (KÁBLOVÉ) v CH-SETTING (NASTAVOVANIE KANÁLU).
(Detaily pri popise nastavovania režimu príjmu).
EXIT (VÝCHOD):
* Funkčné tlačidlo: Po zapnúti OSD menu, stlačte EXIT (VÝCHOD) pre návrat o jednu úroveň vyššie.
Stlačením tlačidla EXIT (VÝCHOD) pri počiatočnom titulku obrazovkového (OSD) menu sa obrazovkové menu vypína.
NASTAVOVANIE REŽIMU ZOBRAZENIA (OBR. 33):
Stlačte „PICTURE MODE“ (REŽIM ZOBRAZENIA). Zvoľte nastavenie Brightness (Jasu) v ciklickom slede. „PICTURE MODE“ (REŽIM ZOBRAZENIA)
zahrňuje tri rôzne varianty výberu „STANDARD/VIVID/FAVOURITE“ („ŠTANDARD/JASNÝ/UŽIVATEĹSKÝ“).
Štandard: Stabilný jas pri normálnych podmienkach zobrazenia.
Jasný: Pri silnom osvetlení.
Užívateľský: Nastavenia užívateľa – dovoľujú užívateľovi nastaviť zobrazenie podľa vlastnej potreby.
NASTAVOVANIE JAZYKA (OBR: 34)
Jazyk OSD menu na výber: ENGLISH (ANGLICKÝ), SPANISH (ŠPANIELSKY), FRENCH (FRANCÚZSKY), ITALY (TALIANSKY) alebo DUTCH (HOLANDSKÝ).
1. Stlačte tlačidlo
pre zobrazenie MENU.
2. Vyberte stránku OSD menu.
3. Vyberte bod Language selection (Výber jazyka).
4. Vyberte LANGUAGE (jazyk).
NASTAVENIE TV (OBR.34)
Je potrebne nastaviť režim príjmu na AIR (EFÍR) alebo CABLE (KÁBLOVÉ) pre príjem TV programov vysielaných v tomto regióne.
1. Stlačte tlačidlo
pre zobrazenie MENU.
2. Zvýraznite potrebný bod TV systému.
3. Vyberte TV systém (vzduch alebo káblová televízia)
NASTAVENIE KANÁLOV NA TV (OBR. 34)
• Pridávanie slabo prijímaných kanálov alebo dodatočných kanálov alebo anulovanie kanálov z pamäti TV.
1. Vyberte potrebný kanál.
2. Zvýraznite prvú položku.
3. Vyberte parameter Nastavenie kanálu.
4. Vyberte kladnú odpoveď pre tento parameter.
5. Poďte na stranu Add/Erase (Pridať/Anulovať)
Page 48

48 PRESTIGIO TV-TUNER
SK
6. Anulujte nepotrebný kanál alebo pridajte žiadaný kanál.
VÝBER VSTUPNÉHO SIGNÁLU (OBR. 35):
1. Stlačte tlačidlo INPUT SELECT (VÝBER VSTUPNÉHO SIGNÁLU), aby ste vyvolali dialógové okno „Select Source“ („Výber zdroja“).
2. Znovu stlačte tlačidlo INPUT SELECT (VÝBER VSTUPNÉHO SIGNÁLU) (alebo použite tlačidlá výberu) pre výber potrebného zdroja vstupného
signálu.
3. Stlačte tlačidlo MENU pre výber potrebného režimu.
* Ak tlačidlo MENU nestlačíte, vybraný režim sa automaticky zapne po niekoľkých sekundách.
NASTAVENIE V-CHIP
V-CHIP
• Táto funkcia znemožňuje prístup do TV programov a používanie TV podľa údajov FCC. Táto funkcia znemožňuje deťom sledovanie
sexuálnych programov alebo aktov násilia, ktoré im môžu škodiť.
• Obmedzenie prístupu do TV programov zahrňuje dva druhy hodnotenia, ktoré obsahujú informáciu o programe: kategória FILMU alebo
kategória TV programov. FILM sa obmedzuje vekom divakov. TV sa obmedzuje vekom a obsahom.
• Pretože v kategórii TV PROGRAMY súčasne môžu byť využité kategórie FILMU a TV je potrebné nastaviť obidve pre uskutočnenie plnej
kontroly.
KATEGÓRIA FILMU
HODNOTENIE
G VŠEOBECNÉ OBECENSTVO. Je povolené pre všetky vekové kategórie.
PG ODPORÚČA SA PREDVÁDZANIE ZA PRÍTOMNOSTI DOSPELÝCH. Niektoré materiály môžu byť nevhodné pre deti.
PG-13 PREDVÁDZANIE LEN ZA PRÍTOMNOSTI DOSPELÝCH Niektoré materiály môžu byť nevhodné pre deti do 13 rokov.
R PREDVÁDZANIE JE OBMEDZENÉ. Do 17 rokov predvádzanie len za prítomnosti dospelých.
NC-17 PREDVÁDZANIE JE ZÁKAZANÉ OSOBAM MLADŠÍM AKO 17 ROKOV.
X X – je to zostarelé hodnotenie, ktoré je spojené s kategóriou NC-17 ale môže byť zakódované v údajoch starých filmov.
KATEGÓRIA FILMU (PRÍKLADY)
Príklad 1: zvolená PG-13 podľa veku – t oto taktiež automaticky zablokuje vyššie kategórie R, NC-17 a X.
Príklad 2: zvolená kategória R podľa veku – toto taktiež automaticky zablokuje vyššie kategórie NC-17 a X.
Poznámka: * Kategórie FILMU sa rozlišujú len podľa vekového príznaku.
Page 49

49PRESTIGIO TV-TUNER
SK
ODSTRAŇOVANIE PORÚCH
Problém Previerka
Chýba obraz alebo zvuk • Skontrolujte, že napájovací kábel je správne zapojený do napájacieho konektora..
•Možné problémy s príjmom niektorých kanálov.
•Skontrolujte, že vstupný režim je správne nastavený.
•Skontrolujte, že napájanie na základnom bloku je zapnuté.
Chýba zvuk. •Skontrolujte, že hladina zvuku nie je nastavená na minimum.
•Skontrolujte, že zvuk nie je vypnutý.
•Skontrolujte, že nie sú pripojené slúchadlá.
•Skontrolujte, že nie sú prepojené vstupné zdroje.
Chýba obraz a zvuk, je iba hluk. •Skontrolujte, že anténový kábel je správne pripojený.
•Skontrolujte, že sa signály PK/FV/S-V/Y, Cb, Cr správne prijímajú.
Obraz nie je jasný. •Skontrolujte, že anténový kábel je správne pripojený.
•Skontrolujte, že sa signál normálne prijíma.
Obraz je bledý alebo farby nie sú korektné. •Skontrolujte nastavenie farieb.
•Skontrolujte nastavenie odtieňov.
Obraz je príliš tmavý. •Skontrolujte nastavenie Jasu.
•Je možné, že životnosť fluorescenčnej lampy sa priblížila ku koncu.
Diaľkové ovládanie nefunguje. •Preverte baterku v ovládači.
•Skontrolujte, že okienko senzora nie je ovplyvnené fluorescenčným osvetlením.
Obraz nie je ostrý. •Pravdepodobne je slabý príjem signálu.
•Skontrolujte, že anténa je správne nasmerovaná.
•Overte funkciu ostrosti
Obraz sa rozdvojúje alebo roztrojúje. •Skontrolujte, že anténa je správne nasmerovaná.
•Pravdepodobne sú prítomné elektrické vlny odrazené od hôr alebo budov.
V obraze sú škvrny. •Pravdepodobne je prítomné rušenie, ktoré spôsobujú automobily, vlaky, veľkoprúdové prenosové
vedenie, neónové osvetlenie atď.
• Pravdepodobne je vzájomné rušenie anténového kábla a napájacieho vodiča. Skúste umiestniť
ich ďalej jeden od druhého.
Na obrazovke sú pruhy alebo je farba bledá. •Pravdepodobne je prítomné rušenie, ktoré spôsobuje iné zariadenie.
Vysielajúce antény rádiových staníc a rádioprijímačov a taktiež mobilné telefóny môžu vyvolať poruchy.
•Používajte zariadenie maximálne vzdialené od zariadení, ktoré môžu vyvolávať poruchy.
Page 50

50 PRESTIGIO TV-TUNER
RU
ПРЕДУПРЕЖДЕНИЕ: ДЛЯ УМЕНЬШЕНИЯ РИСКА ВОЗНИКНОВЕНИЯ ПОЖАРА ИЛИ ПОРАЖЕНИЯ ЭЛЕКТРИЧЕСКИМ
ТОКОМ, НЕ ПОДВЕРГАТЬ ДАННЫЙ ПРОДУКТ ВОЗДЕЙСТВИЮ ДОЖДЯ ИЛИ ВЛАГИ.
ПРЕДУПРЕЖДЕНИЕ: Согласно Правилам FCC любые несанкционированные изменения или модификации данного оборудования, не
утвержденные производителем, могут привести к лишению пользователя прав на использование данного оборудования.
ОСТОРОЖНО: ДЛЯ ПРЕДОТВРАЩЕНИЯ ПОРАЖЕНИЯ ЭЛЕКТРИЧЕСКИМ ТОКОМ ВСТАВЛЯЙТЕ ШИРОКИЙ
КОНТАКТ ШТЕКЕРА В ШИРОКОЕ ГНЕЗДО ДО КОНЦА.
Значок вспышки молнии внутри
равностороннего треугольника предусмотрен
для предупреждения пользователя о
присутствии неизолированного “опасного
напряжения” внутри корпуса продукта,
которого достаточно для существования риска
поражения электрическим током.
Восклицательный знак в треугольнике
предупреждает пользователя о наличии
важных инструкций по эксплуатации или
ремонту в документации к продукту.
ВАЖНО:
Для облегчения описания в случае потери или кражи,
пожалуйста, запишите название модели и серийный номер
в надлежащем месте. Номера расположены на задней части
Монитора.
Модель №:
Серийный номер:
ПРЕДУПРЕЖДЕНИЕ ФЕДЕРАЛЬНОЙ КОМИССИИ ПО КОММУНИКАЦИЯМ (FCC)
РУКОВОДСТВО ПОЛЬЗОВАТЕЛЯ
Оборудование было протестировано и соответствует характеристикам цифровых устройств Класса Б согласно части
15 правил FCC
Данные характеристики были определены для обеспечения приемлемого уровня защиты от недопустимых помех при
установке в помещении. Это оборудование вырабатывает, использует и может излучать радиоволны, и если установка
и использование не соответствуют данному руководству, это может привести к возникновению недопустимых помех
радиосвязи. Однако нет гарантии полного устранения таких помех.
Если оборудование вызывает недопустимые помехи радио и телесигнала, которые выявляются посредством включения
и выключения оборудования, рекомендуется попробовать устранить помехи одним или несколькими данными ниже
способами.
Поверните или переместите приемную антенну
Увеличьте расстояние между оборудованием и ресивером
Включите оборудование в розетку цепи, отличной от той, в которую включен ресивер
Проконсультируйтесь с поставщиком или опытным радио/телемастером.
Данное оборудование было протестировано и соответствует характеристикам цифровых устройств Класса Б согласно
части 15 правил FCC. Только периферийные устройства (устройства ввода/вывода компьютера, терминалы, принтеры
и т.д.), соответствующие классу Б могут использоваться с данным компьютером. Использование несертифицированной
периферии может привести к возникновению помех приема радио и телесигналов.
ПРИМЕЧАНИЯ
Для соответствия требованиям FCC при подключении устройства к персональному компьютеру или другим
сертифицированным устройствам Класса Б должны использоваться экранированные кабели.
ИНФОРМАЦИЯ ДЛЯ ПОЛЬЗОВАТЕЛЯ
Устройство должно использоваться с офисным оборудованием. Любые изменения или модификации, одобренные
стороной, ответственной за соответствие, могут лишить пользователя права на использование данного оборудования.
ВАЖНАЯ ИНФОРМАЦИЯ
Page 51

51PRESTIGIO TV-TUNER
RU
ВАЖНЫЕ МЕРЫ ПРЕДОСТОРОЖНОСТИ
Электричество используется для осуществления многих полезных функций, но может также привести к травмам
и порче собственности при неправильном использовании. Данный продукт был разработан и произведен с расчетом
на высокий уровень безопасности.
Однако неправильное использование может привести к электрошоку и/или пожару. Для предотвращения
потенциальной опасности, пожалуйста, соблюдайте следующие инструкции при установке, использовании и
чистке продукта. Для обеспечения вашей безопасности и продления срока службы вашего LCD монитора,
пожалуйста, внимательно изучите следующие меры предосторожности перед использованием продукта.
• Прочитайте инструкции Все инструкции по эксплуатации должны быть прочитаны и поняты перед началом
эксплуатации.
• Храните это руководство в безопасном месте Эти инструкции по безопасности и эксплуатации должны
храниться в безопасном месте для последующего использования.
• Соблюдайте меры предосторожности Все предупреждения по данному продукту, данные в инструкции,
должны точно соблюдаться
• Следуйте инструкциям Необходимо следовать всем инструкциям по эксплуатации.
• Приложения Не используйте приспособления, не рекомендованные производителем. Использование
неподходящих приспособлений может привести к поломкам.
• Проникновение предметов и жидкостей Никогда не вставляйте предметы в продукт через отверстия. В
продукте высокое напряжение, а вставка предмета может вызвать электрошок и/или короткое замыкание. По
той же причине не допускайте попадания воды или иной жидкости на продукт.
• Сервисное обслуживание Не пытайтесь сами отремонтировать продукт. Сняв крышку, вы можете
подвергнуться действию высокого напряжения или другим опасным воздействиям. Для ремонта обращайтесь
к квалифицированному специалисту.
• Ремонт При возникновении следующих обстоятельств достаньте провод питания из розетки и обратитесь
к квалифицированному специалисту для выполнения ремонта.
а. Если на продукт была пролита жидкость или в продукт попал какойлибо предмет.
б. Если продукт подвергся воздействию дождя или воды.
• Чистка Достаньте провод питания из розетки перед чисткой продукта. Для очистки продукта используйте
влажную ткань. Не применяйте жидкие чистящие средства или аэрозоли.
• Вода и влажность Не используйте продукт вблизи воды, например, около ванны, умывальника, кухонной
раковины, стиральной машины, бассейна или в сыром подвале.
• Расположение Не помещайте продукт на неустойчивую подставку, стойку, штатив или стол. Установка
продукта на неустойчивую основу может привести к его падению, что приведет к серьезным травмам, а
также повреждению продукта. Используйте только подставку, стойку, штатив, держатель или стол,
рекомендованный производителем или продающийся вместе с продуктом. При креплении продукта на
стене обязательно следуйте инструкциям производителя. Используйте только монтажное оборудование,
рекомендуемое производителем.
• При перемещении продукта, установленного на подставку, следует двигать его с максимальной
осторожностью. Внезапные остановки, чрезмерные усилия и неровная поверхность пола могут привести к
падению продукта с подставки.
• Вентиляция Вентиляционные и другие отверстия в корпусе предусмотрены для вентиляции. Не закрывайте
и не блокируйте эти отверстия, поскольку недостаточная вентиляция может привести к перегреву и/или
уменьшению срока службы продукта. Не устанавливайте продукт на кровати, диване, ковре и других
аналогичных поверхностях, поскольку они могут блокировать вентиляционные отверстия. Данный продукт не
предусмотрен для встроенной установки; не помещайте продукт в закрытое пространство, такое как книжный
шкаф или полка, если не обеспечивается достаточная вентиляция согласно инструкциям производителя.
• Если внешняя антенна подключена к телевизионному оборудованию, убедитесь в том, что антенная система
заземлена, чтобы обеспечить достаточную защиту от бросков напряжения и электростатических зарядов.
Раздел 810 Национального Кодекса по Электроэнергии содержит информацию относительно правильного
заземления мачты и поддерживающих конструкций, заземления входного провода к разрядному блоку
антенны, размера проводников заземления, расположения разрядного блока антенны, подключения к
электродам заземления и требований к электродам заземления.
Page 52

52 PRESTIGIO TV-TUNER
RU
• Для дополнительной защиты данного телевизионного оборудования во время грозы или длинного периода
неиспользования, выключайте его из розетки и отключайте антенну. Это предотвратит нанесение вреда
оборудованию молнией и бросков электропитания.
• Система внешней антенны не должна располагаться по соседству с воздушными линиями передач или другими
электроцепями, или там, где она может упасть на такие линии или цепи. При установке системы внешней
антенны должна соблюдаться максимальная осторожность, чтобы не допустить соприкосновения с такими
линиями передач или цепями, поскольку такой контакт может быть смертельно опасен.
СОДЕРЖИМОЕ УПАКОВКИ (РИС. 1)
Упаковка содержит:
1. ТВ тюнер
2. Руководство пользователя
ИСПОЛЬЗОВАНИЕ ПУЛЬТА УПРАВЛЕНИЯ
• Используйте пульт управления, направляя его в сторону окошка сенсора. Нахождение предметов между
пультом управления и сенсором может мешать нормальной работе.
ПРЕДОСТЕРЕЖЕНИЯ КАСАТЕЛЬНО ДИСТАНЦИОННОГО
УПРАВЛЕНИЯ
• Не подвергайте пульт управления ударам.
Не подвергайте пульт управления воздействию жидкостей и не храните его в месте с повышенного влажностью.
• Не храните пульт управления под воздействием прямых солнечный лучей. Жара может вызвать деформацию
устройства.
• Пульт управления может не работать как следует, если окошко сенсора основного блока находится под
воздействием прямых солнечных лучей или сильного освещения. В этом случае измените угол освещения
или угол наклона монитора, или используйте пульт управления ближе к окошку сенсора.
БАТАРЕЯ ДЛЯ ПУЛЬТА УПРАВЛЕНИЯ (РИС. 2)
Если дистанционное управление не работает, замените батарейки в пульте управления.
1. Откройте держатель батарей.
• Нажмите на крючок, чтобы освободить замок перед тем, как вытащить держатель батарей.
• Когда замок батарей освобожден, вытащите держатель батарей из пульта.
2. Вставьте батарею.
• Поместите батарею на держатель.
3. Вставьте держатель в пульт управления с батареей в нем.
ВНИМАНИЕ!
ПРЕДОСТЕРЕЖЕНИЯ КАСАТЕЛЬНО БАТАРЕЙ
Неправильное использование батарей может привести к протеканию химикатов и/или взрыву. Обязательно
следуйте инструкциям, данным ниже. • Располагайте батарею полюсами соответственно значкам (+) и ().
• Разные типы батарей имеют разные характеристики. Не используйте вместе батареи разных типов.
• Заменяйте батареи, когда они садятся.
• Батареи, поставляемые с продуктом, могут иметь более короткий срок службы изза условия хранения.
• Если пульт управления не используется длительный период времени, вынимайте батареи из пульта.
Page 53

53PRESTIGIO TV-TUNER
RU
РАЗЪЕМЫ НА ЗАДНЕЙ ПАНЕЛИ (РИС. 3)
А. Вход для переменного тока
Б. Видео
В. Аудио (R) (правый) (L) (левый)
Г. SВидео
Д. Аудио (R) (правый) (L) (левый)
Е. YCbCr
Ж. Аудио (R) (правый) (L) (левый)
З. Разъем DSub
И. Коннектор RF (ТВ тюнер)
К. Наушники
Л. Линейный выход
ПОДКЛЮЧЕНИЕ АНТЕННЫ
АНТЕННЫ
• Требования, предъявляемые к антеннам для хорошего приема цветного телевидения гораздо более жесткие,
чем для приема чернобелого изображения. Поэтому настоятельно рекомендуется использование
качественной внешней антенны.
Ниже следует краткое описание типов соединения, которые используются с различными антенными
системами. См. Рис.4.
1. Система 75 Ом является обычно круглым кабелем с коннектором Fтипа, который легко подключается без
специальных устройств (в комплект не включены).
2. Система 300 Ом плоский “двойной” кабель, который может подключаться к выходу на 75 Ом через адаптер
30075 Ом (в комплект не включен).
ПОДКЛЮЧЕНИЕ ВНЕШНЕЙ АНТЕННЫ (РИС. 5)
• При подключении внешней антенны руководствуйтесь одной из следующих двух схем.
А: Подключение комбинированной VHF/UHF внешней антенны.
Б: Подключение раздельных внешних антенн VHF и UHF.
• Подключите спуск внешней антенны к входу ANT. на задней панели телевизора.
ОПЦИИ КОНТРОЛЯ (РИС. 6)
Примечание:
• Выбор входного сигнала, Выход, CH( )UP / ( )DOWN (вверх/вниз), VOL( ) / ( ) +(громкость), и МЕНЮ на
основном блоке имеют те же функции, что и кнопки на пульте управления. По сути, данное руководство по
эксплуатации предлагает описание, основанное на дистанционном управлении.
ФУНКЦИОНАЛЬНЫЕ КЛАВИШИ ЭКРАННОГО МЕНЮ:
Используйте функциональную клавишу “INPUT” (“ВВОД”) для изменения режима настроек дисплея. Есть пять
режимов настроек дисплея,
доступных в данном продукте для ПК, ТВ, AV, SV и YCbCr
Из любого из следующих четырех режимов дисплея (ПК, AV, SV или YCbCr) он автоматически возвращается в
режим ТВ, если пользователь нажимает кнопки CH (+) или CH ().
Page 54

54 PRESTIGIO TV-TUNER
RU
Для режима установки ПК:
Вот некоторые из функциональных клавиш:
Нажмите кнопку “AUTO” (“АВТО”) для установки качества картинки по умолчанию. Настройка экрана может занять
несколько минут, пока на экране висит надпись “Автонастройка...”
Нажмите кнопки “+” или “”, чтобы увеличить или уменьшить громкость звука.
ЭКРАННОЕ МЕНЮ: (СТРАНИЦА ПИКТОГРАММ) (РИС. 7)
Нажмите “MENU” (“МЕНЮ”), появится страница картинок для настройки. Для настройки доступны шесть пунктов,
такие как Brightness (Яркость), Contrast (Контрастность), Clock (Часы), Phase (Фаза), HPosition (Положение по
вертикали) и VPosition (Положение по горизонтали). (Нажмите кнопку “EXIT” (“ВЫХОД”) для того, чтобы вернуться
на один уровень экранного меню вверх).
Нажмите кнопку “MENU” (“МЕНЮ”) еще раз, чтобы выделить пункт и используйте кнопки “+” или “” для
регулировки уровня.
Нажимайте кнопки “UP” (“ВВЕРХ”) и “DOWN” (“ВНИЗ”), чтобы выбрать нужный пункт и кнопки “+” и “” для
регулировки уровня.
Нажмите кнопку “EXIT” (“ВЫХОД”), чтобы вернуться на один уровень экранного меню вверх.
В режиме настройки ПК, нажмите кнопку “DOWN” (“ВНИЗ”), чтобы выбрать “Color Temperature Page” (“Страницу
цветовой температуры”), “OSD Page” (“Страницу экранного меню”), “Audio Page” (“Страницу звука”), “Factory
Page” (“Страницу производителя”) и “PIP/POP Page” (“Страницу PIP/POP”).
СТРАНИЦА ЦВЕТОВОЙ ТЕМПЕРАТУРЫ (РИС. 8):
Доступны три режима: 6500К, 7500К, 9300К.
Нажмите кнопку “MENU” (“МЕНЮ”), чтобы выделить первый пункт, а затем кнопки “UP” (“ВВЕРХ”) или “DOWN”
(“ВНИЗ”), чтобы выбрать цветовую температуру,
и далее пункты “R” (красный), “G” (зеленый) или “B” (синий) и нажимайте “+” или “” для регулировки уровня.
СТРАНИЦА ЭКРАННОГО МЕНЮ (РИС. 9):
Нажмите кнопку “MENU” (“МЕНЮ”), чтобы выбрать первый пункт и используйте кнопки “UP” (“ВВЕРХ”) или
“DOWN” (“ВНИЗ”), чтобы выбирать нужные пункты.
После выбора нужного пункта нажимайте кнопки “+” и “” для регулировки уровня.
СТРАНИЦА ЗВУКА (РИС. 10):
Нажмите кнопку “MENU” (“МЕНЮ”), чтобы выбрать первый пункт и используйте кнопки “UP” (“ВВЕРХ”) или
“DOWN” (“ВНИЗ”), чтобы выбирать нужные пункты.
После выбора нужного пункта нажимайте кнопки “+” и “” для регулировки уровня.
СТРАНИЦА ПРОИЗВОДИТЕЛЯ (РИС. 11):
Нажмите кнопку “MENU” (“МЕНЮ”), чтобы выбрать первый пункт и используйте кнопки “UP” (“ВВЕРХ”) или
“DOWN” (“ВНИЗ”), чтобы выбирать нужные пункты.
После выбора нужного пункта нажимайте кнопки “+” и “” для регулировки уровня.
СТРАНИЦА PIP/POP (РИС. 12):
Нажмите кнопку “MENU” (“МЕНЮ”), чтобы выбрать первый пункт и используйте кнопки “UP” (“ВВЕРХ”) или
“DOWN” (“ВНИЗ”), чтобы выбирать нужные пункты.
После выбора нужного пункта нажимайте кнопки “+” и “” для регулировки уровня.
Для режима установки ТВ:
Вот некоторые функциональные клавиши:
Page 55

55PRESTIGIO TV-TUNER
RU
Нажимайте кнопки “+” или “”, чтобы увеличить или уменьшить громкость звука.
Нажимайте кнопки “UP” (“ВВЕРХ”) или “DOWN” (“ВНИЗ”), чтобы выбрать Канал.
ЭКРАННОЕ МЕНЮ:
Нажмите кнопку “MENU” (“МЕНЮ”), для настройки появится “System Page” (“Системная страница”). Для настройки
доступны пять пунктов TV System (Система ТВ), Auto Search (Автопоиск), MTS, Channel Edit (Настройка канала)
и Clean Memory (Очистка памяти). (Нажмите кнопку “EXIT” (“ВЫХОД”) для возврата на один уровень экранного
меню вверх).
Нажмите кнопку “MENU” (“МЕНЮ”) еще раз, чтобы выбрать пункт и используйте кнопки “+” или “” для регулировки
уровня.
Используйте кнопки “UP” (“ВВЕРХ”) или “DOWN” (“ВНИЗ”), чтобы выбрать нужный пункт и снова кнопки “+” и “
” для регулировки уровня.
Используйте кнопку “EXIT” (“ВЫХОД”) для возврата на один уровень экранного меню вврех.
В режиме настройки ТВ нажмите кнопку “DOWN” (“ВНИЗ”), чтобы выбрать “Image Page” (“Страницу картинок”),
“OSD Page” (“Страницу экранного меню”), “Audio Page” (“Страницу звука”) или “Display Page” (“Страницу дисплея”).
СИСТЕМНАЯ СТРАНИЦА ТВ (РИС. 13):
Нажмите кнопку “MENU” (“МЕНЮ”), чтобы выбрать первый пункт и используйте кнопки “UP” (“ВВЕРХ”) или
“DOWN” (“ВНИЗ”), чтобы выбрать нужный пункт.
После выбора нужного пункта используйте кнопки “+” или “” для регулировки или выполнения функции.
СТРАНИЦА ЭКРАННОГО МЕНЮ (РИС. 14):
Нажмите кнопку “MENU” (“МЕНЮ”), чтобы выбрать первый пункт и используйте кнопки “UP” (“ВВЕРХ”) или
“DOWN” (“ВНИЗ”), чтобы выбрать нужный пункт.
После выбора нужного пункта используйте кнопки “+” или “” для регулировки или выполнения функции.
СТРАНИЦА ПИКТОГРАММ (РИС. 15):
Нажмите кнопку “MENU” (“МЕНЮ”), чтобы выбрать первый пункт и используйте кнопки “UP” (“ВВЕРХ”) или
“DOWN” (“ВНИЗ”), чтобы выбрать нужный пункт.
После выбора нужного пункта используйте кнопки “+” или “” для регулировки или выполнения функции.
Для выбора доступны три режима: Standard (Стандартный), ViVid (Яркий) или Favourite (Пользовательский).
СТРАНИЦА ЗВУКА (РИС. 16):
Нажмите кнопку “MENU” (“МЕНЮ”), чтобы выбрать первый пункт и используйте кнопки “UP” (“ВВЕРХ”) или
“DOWN” (“ВНИЗ”), чтобы выбрать нужный пункт.
После выбора нужного пункта используйте кнопки “+” или “” для регулировки или выполнения функции.
СТРАНИЦА ДИСПЛЕЯ (РИС. 17):
Доступны шесть пунктов: “Close Caption” (“Финальная заставка”), “VChip Setting” (“Настройка VChip”), “Timer”
(“Таймер”), “Aspect” (“Пропорции”), “Noise Reduce” (“Подавление шума”) и
“Recall Default” (“Восстановление значений по умолчанию”).
Нажмите кнопку “MENU” (“МЕНЮ”), чтобы выбрать первый пункт и используйте кнопки “UP” (“ВВЕРХ”) или
“DOWN” (“ВНИЗ”), чтобы выбрать нужный пункт.
После выбора нужного пункта используйте кнопки “+” или “” для регулировки или выполнения функции.
Варианты выбора финальной заставки: СС1, СС2, ТТ1, ТТ2.
Варианты выбора таймера: 30, 60, 90 минут.
Варианты выбора пропорций: Нормальные, 1:1, 4:3.
Варианты выбора Подавления шума: Слабое, Среднее, Сильное.
Page 56

56 PRESTIGIO TV-TUNER
RU
Для режима AV:
Вот некоторые функциональные клавиши:
Нажимайте кнопки “+” или “”, чтобы увеличить или уменьшить громкость звука.
ЭКРАННОЕ МЕНЮ:
Нажмите кнопку “MENU” (“МЕНЮ”), для настройки появится “Image Page” (“Страница картинок”). Для настройки
доступны пять пунктов: Brightness (Яркость), Contrast (Контрастность), Sharpness (Резкость), Color (Цвет) и Tint
(Интенсивность). (Нажмите кнопку “EXIT” (“ВЫХОД”) для выходы или возврата на один уровень экранного меню
вверх).
СТРАНИЦА ПИКТОГРАММ (РИС. 18):
Нажмите кнопку “MENU” (“МЕНЮ”) еще раз, чтобы выбрать пункт и используйте кнопки “+” или “” для регулировки
уровня.
Используйте кнопки “UP” (“ВВЕРХ”) или “DOWN” (“ВНИЗ”), чтобы выбрать нужный пункт и снова кнопки “+” и “
” для регулировки уровня.
Используйте кнопку “EXIT” (“ВЫХОД”) для возврата на один уровень экранного меню вверх.
В режиме настройки AV нажмите кнопку “DOWN” (“ВНИЗ”), чтобы выбрать “OSD Page” (“Страницу экранного
меню”), “Audio Page” (“Страницу звука”) или “Display Page” (“Страницу дисплея”).
Для выбора доступны три режима: Standard (Стандартный), ViVid (Яркий) или Favourite (Пользовательский).
СТРАНИЦА ЭКРАННОГО МЕНЮ (РИС. 19):
Нажмите кнопку “MENU” (“МЕНЮ”), чтобы выбрать первый пункт и используйте кнопки “UP” (“ВВЕРХ”) или
“DOWN” (“ВНИЗ”), чтобы выбрать нужный пункт.
После выбора нужного пункта используйте кнопки “+” или “” для регулировки или выполнения функции.
СТРАНИЦА ЗВУКА (РИС. 20):
Нажмите кнопку “MENU” (“МЕНЮ”), чтобы выбрать первый пункт и используйте кнопки “UP” (“ВВЕРХ”) или
“DOWN” (“ВНИЗ”), чтобы выбрать нужный пункт.
После выбора нужного пункта используйте кнопки “+” или “” для регулировки или выполнения функции.
СТРАНИЦА ДИСПЛЕЯ (РИС. 21):
Доступны шесть пунктов: “Close Caption” (“Финальная заставка”), “VChip Setting” (“Настройка VChip”), “Timer”
(“Таймер”), “Aspect” (“Пропорции”), “Noise Reduce” (“Подавление шума”) и
“Recall Default” (“Восстановление значений по умолчанию”).
Нажмите кнопку “MENU” (“МЕНЮ”), чтобы выбрать первый пункт и используйте кнопки “UP” (“ВВЕРХ”) или
“DOWN” (“ВНИЗ”), чтобы выбрать нужный пункт.
После выбора нужного пункта используйте кнопки “+” или “” для регулировки или выполнения функции.
Варианты выбора финальной заставки: СС1, СС2, ТТ1, ТТ2.
Варианты выбора таймера: 30, 60, 90 минут.
Варианты выбора пропорций: Нормальные, 1:1, 4:3.
Варианты выбора Подавления шума: Слабое, Среднее, Сильное.
Для режима SV:
Вот некоторые функциональные клавиши:
Нажимайте кнопки “+” или “”, чтобы увеличить или уменьшить громкость звука.
ЭКРАННОЕ МЕНЮ:
Нажмите кнопку “MENU” (“МЕНЮ”), для настройки появится “Image Page” (“Страница картинок”). Для настройки
доступны пять пунктов: Brightness (Яркость), Contrast (Контрастность), Sharpness (Резкость), Color (Цвет) и Tint
Page 57

57PRESTIGIO TV-TUNER
RU
(Интенсивность). (Нажмите кнопку “EXIT” (“ВЫХОД”) для выходы или возврата на один уровень экранного меню
вверх).
СТРАНИЦА ПИКТОГРАММ (РИС. 22):
Нажмите кнопку “MENU” (“МЕНЮ”), чтобы выбрать пункт и используйте кнопки “+” или “” для регулировки
уровня.
Нажимайте кнопки “UP” (“ВВЕРХ”) и “DOWN” (“ВНИЗ”), чтобы выбрать нужный пункт и кнопки “+” и “” для
регулировки уровня.
Используйте кнопку “EXIT” (“ВЫХОД”) для возврата на один уровень экранного меню вверх.
В режиме настройки SV нажмите кнопку “DOWN” (“ВНИЗ”), чтобы выбрать “OSD Page” (“Страницу экранного
меню”), “Audio Page” (“Страницу звука”) или “Display Page” (“Страницу дисплея”). Для выбора доступны три
режима: Standard (Стандартный), ViVid (Яркий) или Favourite (Пользовательский).
СТРАНИЦА ЭКРАННОГО МЕНЮ (РИС. 23):
Нажмите кнопку “MENU” (“МЕНЮ”), чтобы выбрать первый пункт и используйте кнопки “UP” (“ВВЕРХ”) или
“DOWN” (“ВНИЗ”), чтобы выбрать нужный пункт.
После выбора нужного пункта используйте кнопки “+” или “” для регулировки или выполнения функции.
СТРАНИЦА ЗВУКА (РИС.24):
Нажмите кнопку “MENU” (“МЕНЮ”), чтобы выбрать первый пункт и используйте кнопки “UP” (“ВВЕРХ”) или
“DOWN” (“ВНИЗ”), чтобы выбрать нужный пункт.
После выбора нужного пункта используйте кнопки “+” или “” для регулировки или выполнения функции.
СТРАНИЦА ДИСПЛЕЯ (РИС. 25):
Доступны шесть пунктов: “Close Caption” (“Финальная заставка”), “VChip Setting” (“Настройка VChip”), “Timer”
(“Таймер”), “Aspect” (“Пропорции”), “Noise Reduce” (“Подавление шума”) и
“Recall Default” (“Восстановление значений по умолчанию”).
Нажмите кнопку “MENU” (“МЕНЮ”), чтобы выбрать первый пункт и используйте кнопки “UP” (“ВВЕРХ”) или
“DOWN” (“ВНИЗ”), чтобы выбрать нужный пункт.
После выбора нужного пункта используйте кнопки “+” или “” для регулировки или выполнения функции.
Варианты выбора финальной заставки: СС1, СС2, ТТ1, ТТ2.
Варианты выбора таймера: 30, 60, 90 минут.
Варианты выбора пропорций: Нормальные, 1:1, 4:3.
Варианты выбора Подавления шума: Слабое, Среднее, Сильное.
Для режима настройки YCbCr:
Вот некоторые функциональные клавиши:
Нажимайте кнопки “+” или “”, чтобы увеличить или уменьшить громкость звука.
ЭКРАННОЕ МЕНЮ:
Нажмите кнопку “MENU” (“МЕНЮ”), для настройки появится “Image Page” (“Страница картинок”). Для настройки
доступны пять пунктов: Brightness (Яркость),
Contrast (Контрастность), Sharpness (Резкость), Color (Цвет) и Tint (Интенсивность). (Нажмите кнопку “EXIT”
(“ВЫХОД”) для выходы или возврата на один уровень
экранного меню вверх).
СТРАНИЦА ПИКТОГРАММ (РИС. 26):
Нажмите кнопку “MENU” (“МЕНЮ”), чтобы выбрать пункт и используйте кнопки “+” или “” для регулировки
уровня.
Page 58

58 PRESTIGIO TV-TUNER
RU
Нажимайте кнопки “UP” (“ВВЕРХ”) и “DOWN” (“ВНИЗ”), чтобы выбрать нужный пункт и кнопки “+” и “” для
регулировки уровня.
Используйте кнопку “EXIT” (“ВЫХОД”) для возврата на один уровень экранного меню вверх.
В режиме настройки YCbCr нажмите кнопку “DOWN” (“ВНИЗ”), чтобы выбрать “OSD Page” (“Страницу экранного
меню”), “Audio Page” (“Страницу звука”) или “Display Page” (“Страницу дисплея”). Для выбора доступны
три режима: Standard (Стандартный), ViVid (Яркий) или Favourite (Пользовательский).
СТРАНИЦА ЭКРАННОГО МЕНЮ (РИС. 27):
Нажмите кнопку “MENU” (“МЕНЮ”), чтобы выбрать первый пункт и используйте кнопки “UP” (“ВВЕРХ”) или
“DOWN” (“ВНИЗ”), чтобы выбрать нужный пункт.
После выбора нужного пункта используйте кнопки “+” или “” для регулировки или выполнения функции.
СТРАНИЦА ЗВУКА (РИС.28):
Нажмите кнопку “MENU” (“МЕНЮ”), чтобы выбрать первый пункт и используйте кнопки “UP” (“ВВЕРХ”) или
“DOWN” (“ВНИЗ”), чтобы выбрать нужный пункт.
После выбора нужного пункта используйте кнопки “+” или “” для регулировки или выполнения функции.
СТРАНИЦА ДИСПЛЕЯ (РИС. 29):
Доступны шесть пунктов: “Close Caption” (“Финальная заставка”), “VChip Setting” (“Настройка VChip”), “Timer”
(“Таймер”), “Aspect” (“Пропорции”), “Noise Reduce” (“Подавление шума”) и
“Recall Default” (“Восстановление значений по умолчанию”).
Нажмите кнопку “MENU” (“МЕНЮ”), чтобы выбрать первый пункт и используйте кнопки “UP” (“ВВЕРХ”) или
“DOWN” (“ВНИЗ”), чтобы выбрать нужный пункт.
После выбора нужного пункта используйте кнопки “+” или “” для регулировки или выполнения функции.
Варианты выбора финальной заставки: СС1, СС2, ТТ1, ТТ2.
Варианты выбора таймера: 30, 60, 90 минут.
Варианты выбора пропорций: Нормальные, 1:1, 4:3.
Варианты выбора Подавления шума: Слабое, Среднее, Сильное.
ОСНОВНЫЕ ОПЕРАЦИИ
КОНТРОЛЬ ЗВУКА (ПРЯМОЙ) (РИС. 30)
1. Увеличьте громкость звука. Контрольная линейка индикатора возрастает.
2. Уменьшите громкость звука. Контрольная линейка индикатора понижается.
Чтобы отключить звук
1. Нажмите MUTE (ОТКЛ. ЗВУК), чтобы временно выключить звук.
2. Нажмите MUTE (ОТКЛ. ЗВУК), чтобы звук вернулся на прежний уровень.
Включение/выключение (РИС. 31):
Чтобы выключить жидкокристаллический ТВ
Нажмите на пульте управления. Индикатор питания выключится.
Чтобы включить ТВ
Нажмите снова. Индикатор питания зажжется зеленым цветом.
Page 59

59PRESTIGIO TV-TUNER
RU
ПЕРЕКЛЮЧЕНИЕ КАНАЛОВ В ТВ (РИС. 32)
Из любого из следующих четырех режимов дисплея (ПК, AV, SV или YCbCr) он автоматически возвращается в
режим ТВ, если пользователь нажимает кнопки CH (+) или CH ().
Переключение каналов используя Channel Select (Выбор канала) на пульте управления
• Данный жидкокристаллический ТВ позволяет выбрать до 125 каналов (с 1 до 125). Чтобы выбрать канал,
введите одно, двух, или трехзначную цифру или используйте переключение каналов вперед и назад.
Чтобы выбрать одно или двухзначный номер канала (напр. Канал 5):
1. Нажмите кнопку 0.
2. Нажмите кнопку 5.
* или просто нажмите кнопку 5.
Чтобы выбрать трехзначный номер канала (напр. Канал 115):
Выполните следующие действия в течение 4 секунд.
1. Нажмите кнопку 10+.
2. Нажмите кнопку 1.
3. Нажмите кнопку 5.
Примечание:
• Трехзначный номер канала можно выбрать только в режиме приема CABLE (КАБЕЛЬНОЕ) в СHSETTING
(УСТАНОВКА КАНАЛА). (Детали в описании установки режима приема).
EXIT (ВЫХОД):
• Функциональная кнопка: После включения экранного меню, нажмите EXIT (ВЫХОД), чтобы вернуться на один
уровень вверх. Нажатие кнопки EXIT (ВЫХОД) при начальной заставке экранного меню закрывает экранное меню.
НАСТРОЙКА РЕЖИМА ИЗОБРАЖЕНИЯ (РИС. 33):
Нажмите “PICTURE MODE” (“РЕЖИМ ИЗОБРАЖЕНИЯ”). Выберите настройку Brightness (Яркости) в круговой
последовательности, “PICTURE MODE” (“РЕЖИМ ИЗОБРАЖЕНИЯ”) включает в себя три
различных варианта выбора “STANDARD / VIVID / FAVOURITE” (“СТАНДАРТНЫЙ/ЯРКИЙ/ПОЛЬЗОВАТЕЛЬСКИЙ”).
Стандартный: Постоянная яркость для нормальных условий изображения.
Яркое: Для условий яркого освещения.
Пользовательское: Настройки пользователя, позволяют пользователю настроить изображение на свое усмотрение.
НАСТРОЙКА ЯЗЫКА (РИС. 34)
Язык экранного меню на выбор: ENGLISH (АНГЛИЙСКИЙ), SPANISH (ИСПАНСКИЙ), FRENCH (ФРАНЦУЗСКИЙ),
ITALY (ИТАЛЬЯНСКИЙ) или DUTCH (ГОЛЛАНДСКИЙ).
1. Нажмите кнопку для отображения MENU (МЕНЮ).
2. Выберите страницу экранного меню.
3. Выберите пункт Language selection (Выбора языка).
4. Выберите LANGUAGE (язык).
НАСТРОЙКА ТВ (РИС.34)
Необходимо установить режим приема на AIR (ЭФИР) или CABLE (КАБЕЛЬНОЕ), чтобы принимать транслируемые
в данной местности ТВ программы.
1. Нажмите кнопку для отображения MENU (МЕНЮ).
2. Выделите нужный пункт ТВ системы.
Page 60

60 PRESTIGIO TV-TUNER
RU
3. Выберите ТВ систему (эфир или кабельное телевидение)
НАСТРОЙКА КАНАЛОВ НА ТВ (РИС. 34)
• Добавление слабо принимаемых ил дополнительных каналов или удаление ненужных каналов из памяти ТВ.
1. Выберите нужный канал.
2. Выделите первый пункт.
3. Выберите пункт настройка канала.
4. Выберите положительный ответ по данному пункту.
5. Зайдите на страницу Add/Erase (Добавить/Удалить)
6. Удалите ненужный канал или добавьте желаемый канал.
ВЫБОР ВХОДНОГО СИГНАЛА (РИС.35):
1.Нажмите кнопку INPUT SELECT (ВЫБОР ВХОДНОГО СИГНАЛА), чтобы вызвать диалоговое окно “Select Source”
(“Выбор источника”).
2. Снова нажмите кнопку INPUT SELECT (ВЫБОР ВХОДНОГО СИГНАЛА) (или используйте кнопки выбора), чтобы
выбрать нужный источник входного сигнала.
3. Нажмите кнопку MENU (МЕНЮ), чтобы выбрать нужный режим.
* Если кнопка MENU (МЕНЮ) не будет нажата, выбранный режим автоматически включится через несколько
секунд.
НАСТРОЙКА V2CHIP
VCHIP
• Данная функция позволяет запрещать доступ к ТВ программам и использованию ТВ, основываясь на данных
FCC. Эта функция предотвращает просмотр детьми сексуальных сцен или сцен насилия, которые могут
навредить им.
• Ограничение доступа к ТВ программам включает в себя две оценки, которые содержат информацию о
программе: категория ФИЛЬМА или категория ТВ. ФИЛЬМ ограничивается возрастом просмотра. ТВ
ограничивается по возрасту и содержанию.
• Поскольку в категории ТВ программы может использоваться как категория ФИЛЬМА, так и категория ТВ,
следует настроить обе для осуществления полного контроля.
КАТЕГОРИЯ ФИЛЬМА
ОЦЕНКА
G ОБЩАЯ АУДИТОРИЯ. Разрешено для всех возрастов.
PG РЕКОМЕНДУЕТСЯ ПРОСМОТР В СОПРОВОЖДЕНИИ ВЗРОСЛЫХ.
Некоторые материалы могут быть неподходящими для детей.
PG13 ПРОСМОТР ТОЛЬКО В СОПРОВОЖДЕНИИ ВЗРОСЛЫХ.
Некоторые материалы могут являться неподходящими для детей до 13 лет.
R ПРОСМОТР ОГРАНИЧЕН. До 17 лет просмотр только в сопровождении взрослых.
NC17 ПРОСМОТР ЗАПРЕЩЕН ДЛЯ ЛИЦ, МЛАДШЕ 17 ЛЕТ.
X Х это устаревшая оценка, которая объединена с категорией NC17, но может быть закодирована в данных
старых фильмов.
КАТЕГОРИЯ ФИЛЬМА (ПРИМЕРЫ)
Пример 1: выбрана PG13 по возрасту это также автоматически заблокирует более высокие категории R, NC17 и Х.
Пример 2: выбрана категория R по возрасту это также автоматически заблокирует более высокие категории NC17 и Х.
Примечание: • Категории ФИЛЬМА различаются только по возрастному признаку.
Page 61

61PRESTIGIO TV-TUNER
RU
УСТРАНЕНИЕ НЕПОЛАДОК
Проблема Проверка
Нет изображения или звука · Убедитесь, что провод питания как следует вставлен в разъем питания.
· Возможны проблемы с приемом некоторых каналов.
· Убедитесь, что режим ввода правильно установлен.
· Убедитесь, что питание на основном блоке включено.
Нет звука. · Убедитесь, что уровень громкости звука не установлен на минимум.
· Убедитесь, что звук не выключен.
· Убедитесь, что не подключены наушники.
· Убедитесь, что источники ввода не объединены.
Нет изображения и звука, · Убедитесь, что антенный провод включен как следует.
только шум. · Убедитесь, что сигналы ПК/FV/SV/Y,Cb,Cr принимаются правильно.
Изображение не четкое. · Убедитесь, что антенный провод включен как следует.
· Убедитесь, что ТВ сигнал принимается нормально.
Изображение светлое или · Проверьте настройку цветов.
цвета не корректны. · Проверьте настройку оттенков.
Изображение слишком темное. · Проверьте настройки Яркости.
· Возможно срок службы флуоресцентной лампы подошел к концу.
Дистанционное управление · Проверьте батарею в пульте управления.
не работает. · Убедитесь, что окошко сенсора не находится под воздействием
сильного флуоресцентного освещения.
Изображение не резкое. · Возможен слабый прием сигнала.
· Убедитесь, что антенна повернута в правильном направлении.
· Проверьте функцию резкости.
Изображение двоится или · Убедитесь, что антенна повернута в правильном направлении.
троится. · Возможно наличие отраженных электрических волн от гор или зданий.
На изображении пятна. · Возможны помехи от автомобилей, поездов, линий высоковольтных
передач, неонового освещения, и т.д.
· Возможны помехи между проводом антенны и проводом питания.
Попробуйте расположить их дальше друг от друга.
На экране полосы или · Возможно наличие помех от других устройств.
цвета бледнеют. Передающие антенны радиостанций и радиоприемников, а также
мобильные телефоны также могут вызывать помехи.
· Используйте устройство максимально далеко от устройств, которые
могут вызывать помехи.
Page 62

62 PRESTIGIO TV-TUNER
SLO
OPOZORILO: ZA ZMANJŠANJE TVEGANJA POŽARA ALI ELEKTRIČNEGA UDARA NAPRAVE NE
IZPOSTAVLJAJTE DEŽJU ALI VLAGI.
OPOZORILO: V določilih FCC je zapisano, da kakršnekoli nepooblaščene spremembe ali modifikacije opreme, ki niso eksplicitno
odobrene s strani proizvajalca, lahko povzročijo odvzem pravic uporabniku za uporabo opreme.
POZOR: ZA PREPREČITEV ELEKTRIČNEGA UDARA JE POTREBNO VTIKAČ DO KONCA
POTISNITI V VTIČNICO.
Simbol strele znotraj enakostraničnega
trikotnika je namenjen za opozorilo uporabniku
o prisotnosti neizoliranih vodov nevarne
napetosti znotraj ohišja naprave, ki je dovolj
močna, da povzroči električni udar.
Klicaj v trikotniku je namenjen temu, da
pozornost uporabnika usmeri na pomembna
navodila v zvezi z upravljanjem in vzdrževanjem
(servisiranjem) naprave.
POMEMBNO:
Za pomoč prijavi v primeru izgube ali kraje si zapišite model
in serijsko številko v predviden prostor. Podatki se nahajajo
na hrbtni strani zaslona.
Št. modela:
Serijska številka:
OPOZORILO
NAVODILA ZA UPORABNIKE
Naprava je bila preizkušena in ustreza karakteristikam digitalnih naprav kategorije B v skladu z določili 15. dela predpisov FCC (Federal
Communications Commission).
Te omejitve so postavljene za zagotovitev optimalne zaščite pred škodljivimi vplivi pri montaži opreme v bivalnem prostoru. Ta oprema
proizvaja, uporablja in lahko seva radijske valove ter kot taka povzroči motnje v telekomunikacijah v primeru, da ni montirana in
uporabljena v skladu z navodili. Kljub vsemu ni mogoče jamčiti, da se motnje v posameznih primerih ne bodo pojavile.
Če oprema kljub vsemu povzroča motnje v sprejemu radijskega in televizijskega signala, kar lahko ugotovimo z vključitvijo in izključitvijo
opreme, uporabniku priporočamo, da poskuša motnje odpraviti s pomočjo spodaj navedenih ukrepov.
-Obrnite ali premestite sprejemno anteno
-Povečajte razdaljo med napravo in sprejemnikom
-Priključite opremo in sprejemnik na vtičnice različnih vodov.
-Posvetujte se z dobaviteljem ali izkušenim serviserjem radia/televizije
Oprema je bila preizkušena in ustreza karakteristikam računalniških naprav kategorije B v skladu z določili 15. dela predpisov FCC. Na
računalnik se lahko priključijo samo periferne naprave (vhodne in izhodne enote računalnika, terminali, tiskalniki itd.), ki ustrezajo
omejitvam kategorije B. Uporaba necertificirane periferne opreme lahko povzroči motnje v sprejemu radijskih in televizijskih signalov.
OPOMBE
Za priključitev naprave na osebni računalnik ali na druge naprave je potrebno uporabiti magnetno zaščitene kable.
INFORMACIJA UPORABNIKOM
Naprava je namenjena za pisarniško oz. domačo uporabo. Kakršnekoli spremembe ali modifikacije odobrene s strani odgovorne za
ustreznost lahko odvzamejo pravico do uporabe naprave.
POMEMBNO
Page 63

63PRESTIGIO TV-TUNER
SLO
POMEMBNI VARNOSTNI UKREPI
Električno napetost izkoriščamo za opravljanje številnih pomembnih funkcij, vendar pa lahko povzroči tudi osebne poškodbe in poškodbe
lastnine, v primeru, da z njo ravnamo nepravilno. Ta naprava je bila izdelana ob upoštevanju najstrožjih varnostnih meril.
Ne glede na to, nepravilna uporaba naprave lahko povzroči električni udar in/ali požar. Za preprečitev potencialne nevarnosti priporočamo,
da upoštevate navodila, ki zadevajo montažo, uporabo in čiščenje naprave. Preden začnete uporabljati napravo natančno preberite in
upoštevajte nadaljnja navodila. S tem boste zagotovili večjo varnost in podaljšali življenjsko dobo vaše naprave.
• Pred prvo uporabo natančno preberite navodila.
• Varno shranite ta navodila, da jih boste lahko uporabili tudi v prihodnosti.
• Natančno se seznanite in upoštevajte vsa opozorila locirana na napravi in zapisana v navodilih.
• Sledite navodilom za uporabo.
• Priključki - ne uporabljajte priključkov, ki jih ne priporoča proizvajalec. Uporaba neprimernih priključkov lahko povzroči nesrečo.
• V odprtine na napravi ne vstavljate nikakršnih predmetov, Na ta način namreč lahko povzročite električni udar, saj je v napravi visoka
napetost. Iz istega razloga pazite, da naprava ne pride v stik s kakršnokoli tekočino.
• Servisiranje – ne poskušajte naprave popravljati sami. Pri odstranitvi pokrova ste lahko izpostavljeni visoki napetosti in drugim
nevarnim pogojem. Napravo naj servisira samo kvalificirano osebje.
• Popravilo - v primeru ene od sledečih situacij izključite napajalni kabel iz vtičnice in za popravilo pokličite kvalificiranega serviserja.
a. Naprava je bila polita ali so vanjo skozi reže padli predmeti.
b. Naprava je bila izpostavljena dežju, vodi.
• Čiščenje – pred čiščenjem naprave izvlecite napajalni kabel iz vtičnice. Za čiščenje uporabite vlažno krpo. Ne uporabljajte tekočih čistil
oz. razpršilcev.
• Voda in vlažnost – ne uporabljajte naprave v bližini vode (npr. kopalna kad, umivalnik, pomivalno korito, bazen) ali v vlažni kleti.
• Namestitev - ne nameščajte naprave na nestabilno podlago, podstavek ali mizo.To lahko povzroči padec naprave, kar ima lahko za
posledico vaše osebne poškodbe oz. poškodbe naprave. Pri namestitvi naprave na steno upoštevajte navodila proizvajalca. Priporočamo,
da za namestitev naprave uporabite opremo, ki jo priporoča proizvajalec.
• Pri prevozu naprave z vozičkom bodite zelo previdni. Nenadno ustavljanje, premočan potisk ali celo neravna površina tal lahko
povzročijo padec naprave.
• Prezračevanje – odprtine na napravi so predvidene za prezračevanje. Ne prekrivajte teh odprtin, sicer lahko nezadostno prezračevanje
povzroči pregrevanje naprave in s tem skrajšanje njene življenjske dobe. Naprave ne nameščajte na posteljo, kavč, preproga ali na
podobno podlago, saj lahko s tem blokirate odprtine za prezračevanje. Naprava ni primerna za namestitev na mesta, ki ne omogočajo
prezračevanja (npr. omara, knjižni regali).
• Če je na TV opremo priključena zunanja antena se prepričajte, da je ta pravilno ozemljena in da zagotavlja dovolj zaščite pred
nihanjem napetosti in elektrostatičnimi naboji.
• Za dodatno zaščito TV opreme med nevihto ali ko je oprema dlje časa brez nadzora oz. ni v uporabi, opremo izključite iz električne
napetosti in izključite anteno. To bo preprečilo škodo na opremi, ki bi nastala zaradi udara strele ali nihanj napetosti.
• Zunanji antenski sistem naj ne bo nameščen v bližini daljnovodov oz. drugih visokonapetostnih vodov ali tam, kjer bi lahko padel
oz prišel v stik s takšnimi vodi. Med montažo zunanjega antenskega sistema bodite skrajno previdni, da se ne dotaknete visokonapetostnih
vodov saj je to smrtno nevarno.
Page 64

64 PRESTIGIO TV-TUNER
SLO
VSEBINA PAKETA (Slika 1)
Paket vsebuje:
1. TV sprejemnik
2. Navodila za uporabo
UPORABA DALJINSKEGA UPRAVLJALNIKA
• Daljinski upravljalnik uporabite tako, da ga usmerite proti senzorju na napravi. Predmeti med daljinskim upravljalnikom in senzorjem
na napravi lahko motijo pravilno upravljanje naprave.
OPOZORILA PRI UPORABI DALJINSKEGA UPRAVLJANJA
• Daljinski upravljalnik naj ne bo izpostavljen udarcem. Daljinski upravljalnik ne sme priti v stik s tekočinami in ne hranite ga v prostoru
z visoko vlažnostjo.
• Daljinski upravljalnik naj ne bo neposredno izpostavljen soncu - visoka temperatura lahko poškoduje upravljalnik.
• Motnje v delovanju daljinskega upravljanja se lahko pojavijo tudi, če je senzor na napravi neposredno izpostavljen soncu ali močni
svetlobi. V takem primeru spremenite kot osvetlitve ali LCD TV naprave oz. približajte daljinski upravljalnik senzorju na napravi.
BATERIJE DALJINSKEGA UPRAVLJALNIKA (Slika 2)
V primeru, da daljinski upravljalnik ne deluje pravilno, zamenjajte baterije.
1. Odprite držalo baterij.
• S pritiskom na kaveljček sprostite zaporo in nato izvlecite držalo baterij.
• Ko je držalo sproščeno, ga izvlecite iz daljinskega upravljalnika.
2. Vstavite baterijo.
• Namestite baterijo na držalo.
3. Potisnite držalo z baterijo v daljinski upravljalnik.
POZOR!
OPOZORILA OB UPORABI BATERIJ
Nepravilna uporaba baterij lahko povzroči iztek kemikalij in/ali eksplozijo. Obvezno upoštevajte sledeča navodila: • Baterije namestite
v skladu z oznakami (+) in (-).
• Različni tipi baterij imajo različne karakteristike. Ne uporabljajte istočasno različne vrste baterij.
• Ko baterije oslabijo, jih nadomestite z novimi.
• Priložene baterije imajo lahko zaradi skladiščenja krajšo življenjsko dobo. • Če daljinskega upravljalnika dlje časa ne uporabljate,
odstranite baterije.
• Če daljinskega upravljalnika dlje časa ne uporabljate, odstranite baterije.
PRIKLJUČKI NA HRBTNI STRANI (Slika 3)
A. Napajanje
B. Video
C. Avdio (R) [desni] (L) [levi]
D. S-Video
E. Avdio (R) [desni] (L) [levi]
F. YCbCr
Page 65

65PRESTIGIO TV-TUNER
SLO
G. Avdio (R) [desni] (L) [levi]
H. D-Sub priključek
I. RF Antenski priključek (TV sprejemnik)
J. Slušalke
K. Direktni izhod (line-out)
PRIKLOP ANTENE
ANTENE
• Za dober sprejem slike na barvnem televizorju so boljše lastnosti antene bolj pomembne kot za sprejem črno-bele slike. Zato je
priporočljivo, da na napravo priključite dobro zunanjo anteno.
V nadaljevanju je kratka predstavitev tipov priključitev, ki so na razpolago pri različnih antenskih sistemih. Glej sliko 4
1. 75-ohmski sistem običajno predstavlja okrogel kabel z F-Tip konektorjem, ki ga je brez pomoči orodja enostavno priključiti na
sprejemnik (ni priložen).
2. 300-ohmski sistem predstavlja ploščati dvožilni kabel, ki ga na 75-ohmski sprejemnik priključimo s pomočjo 300-75 ohmski adapter
(ni priložen).
PRIKLJUČITEV ZUNANJE ANTENE (Slika 5)
• Pri priključitvi zunanje antene si pomagajte z enim od sledečih diagramov.
A: Pri uporabi kombinirane VHF/UHF zunanje antene.
B: Pri uporabi ločene VHF in/ali UHF zunanje antene.
• Priključek kabla zunanje antene priključite na sprejemnik, ki se nahaja na zadnji strani TV naprave.
UPRAVLJANJE NAPRAVE (Slika 6)
Opomba:
• Tipke Input Select [izbira vhodnega signala], Exit [izhod], CH( )UP / ( )DOWN [izbira kanala (naprej/nazaj)], VOL( ) - / ( ) + [glasnost
(-,+)], in MENU na napravi imajo enake funkcije kot tipke z enakim opisom na daljinskem upravljalniku.
FUNKCIJSKE TIPKE ZA UPRAVLJANJE MENIJA PRIKAZANEGA NA ZASLONU [OSD]:
Za spremembo nastavitev zaslona uporabite “INPUT” [vnos] funkcijsko tipko. Za ta monitor lahko nastavite pet načinov delovanja zaslona
za PC, TV, AV, SV & YCbCr.
Ne glede na trenutni način prikazovanja (PC, AV, SV or YCbCr) se bo način prikazovanja nastavil na TV način, če pritisnete tipki CH+ / CH.
Za nastavitve v PC načinu delovanja:
Nekatere funkcijske tipke:
Za privzete nastavitve kakovosti slike pritisnite tipko AUTO [samodejno]. Ko se na zaslonu pojavi napis “Auto Adjusting...” [samodejno
nastavljanje], traja nekaj sekund, da se funkcija izvrši.
Za nastavljanje glasnosti pritisnite tipki “+” ali “-”.
Page 66

66 PRESTIGIO TV-TUNER
SLO
UPRAVLJANJE MENIJA PRIKAZANEGA NA ZASLONU [OSD] (STRAN ZA NASTAVITEV
POGLEDA [Image Page]) (Slika 7)
Pritisnite tipko “MENU” [meni] in pojavila se bo stran za nastavitev pogleda [Image Page]. Nastavite lahko svetlost [Brightness], kontrast
[Contrast], čas [Clock], fazo [Phaze], horizontalni položaj [H-Position] in vertikalni položaj [V-Position]. (Za vrnitev na predhodni nivo
menija prikazanega na zaslonu [OSD] pritisnite tipko EXIT [izhod].)
Ponovno pritisnite tipko “MENU” [meni] za izbiro predmeta in nastavite vrednost s tipkama “+” ali “-”.
Za izbiro željenega predmeta uporabite tipki “UP” [gor] in “DOWN” [dol] in s tipkama “+” ali “-” nastavite vrednost.
Za vrnitev na predhodni nivo menija prikazanega na zaslonu [OSD] pritisnite tipko EXIT [izhod].
V načinu PC nastavitev pritisnite tipko “DOWN” [dol] za izbiro “Color Temperature Page” [stran nastavitve jakosti barv], “OSD Page” [stran
menija prikazanega na zaslonu], “Audio page” [stran nastavitve zvoka], “Factory Page” [stran tovarniških nastavitev] in “PIP/POP
Page” [stran nastavitev ‘slike v sliki’ in ‘slike na sliki’]
STRAN NASTAVITVE JAKOSTI BARV (Slika 8):
Na voljo so trije načini: 6500K, 7500K in 9300K.
Uporabite tipko “MENU” [meni] za izbiro prvega predmeta in nastavite jakost barv s tipkama “UP” [gor] ali “DOWN” [dol]
ali še natančneje s tipkami “R”, “G” ali “B”, katerim spreminjate vrednost s tipkama “+” ali “-”.
STRAN MENIJA PRIKAZANEGA NA ZASLONU (Slika 9):
Uporabite tipko “MENU” [meni] za izbiro prvega predmeta in izberite željeni predmet s tipkama “UP” [gor] ali “DOWN” [dol].
Potem, ko ste izbrali željeni predmet, uporabite tipki “+” ali “-” za nastavitev vrednosti.
STRAN NASTAVITVE ZVOKA (Slika 10):
Uporabite tipko “MENU” [meni] za izbiro prvega predmeta in izberite željeni predmet s tipkama “UP” [gor] ali “DOWN” [dol].
Potem, ko ste izbrali željeni predmet, uporabite tipki “+” ali “-” za nastavitev vrednosti.
STRAN TOVARNIŠKIH NASTAVITEV (Slika 11):
Uporabite tipko “MENU” [meni] za izbiro prvega predmeta in izberite željeni predmet s tipkama “UP” [gor] ali “DOWN” [dol].
Potem, ko ste izbrali željeni predmet, uporabite tipki “+” ali “-” za nastavitev vrednosti.
STRAN NASTAVITEV ‘SLIKE V SLIKI’ [PIP] in ‘SLIKE NA SLIKI’ [POP] (Slika 12):
Uporabite tipko “MENU” [meni] za izbiro prvega predmeta in izberite željeni predmet s tipkama “UP” [gor] ali “DOWN” [dol].
Potem, ko ste izbrali željeni predmet, uporabite tipki “+” ali “-” za vključitev funkcije ali nastavitev vrednosti.
Za nastavitve v TV načinu delovanja:
Nekatere funkcijske tipke:
Za nastavljanje glasnosti pritisnite tipki “+” ali “-”.
Za izbiro kanalov pritisnite tipki UP [gor] ali “DOWN” [dol].
UPRAVLJANJE MENIJA PRIKAZANEGA NA ZASLONU [OSD]:
Pritisnite tipko “MENU” [Meni] in odprla se bo stran za nastavitev sistema [System Page]. Za nastavljanje je na voljo pet predmetov: TV
sistem [TV System], samodejno iskanje [Auto Search], MTS [MTS], nastavitev kanalov [Channel Edit] in izbris spomina [Clean Memory].
(Za vrnitev na predhodni nivo menija prikazanega na zaslonu [OSD] pritisnite tipko EXIT [izhod].)
Ponovno pritisnite tipko “MENU” [meni] za izbiro predmeta in nastavite vrednost s tipkama “+” ali “-”.
Page 67

67PRESTIGIO TV-TUNER
SLO
Za izbiro željenega predmeta uporabite tipki “UP” [gor] in “DOWN” [dol] in s tipkama “+” ali “-” nastavite vrednost.
Za vrnitev na predhodni nivo menija prikazanega na zaslonu [OSD] pritisnite tipko EXIT [izhod].
V načinu TV nastavitev s pritiskom na tipko “DOWN” [dol] izberite “Image Page” [stran za nastavitev pogleda], “OSD Page” [stran menija
prikazanega na zaslonu], “Audio Page” [stran za nastavitev zvoka] in “Display Page” [stran za nastavitev slike].
STRAN TV SISTEMA (Slika 13):
Uporabite tipko “MENU” [meni] za izbiro prvega predmeta in izberite željeni predmet s tipkama “UP” [gor] ali “DOWN” [dol].
Potem, ko ste izbrali željeni predmet, uporabite tipki “+” ali “-” za vključitev funkcije.
STRAN MENIJA PRIKAZANEGA NA ZASLONU [OSD] (Slika 14):
Uporabite tipko “MENU” [meni] za izbiro prvega predmeta in izberite željeni predmet s tipkama “UP” [gor] ali “DOWN” [dol].
Potem, ko ste izbrali željeni predmet, uporabite tipki “+” ali “-” za vključitev funkcije ali nastavitev vrednosti.
STRAN ZA NASTAVITEV POGLEDA [Image Page] (Slika 15)
Uporabite tipko “MENU” [meni] za izbiro prvega predmeta in izberite željeni predmet s tipkama “UP” [gor] ali “DOWN” [dol].
Potem, ko ste izbrali željeni predmet, uporabite tipki “+” ali “-” za nastavitev vrednosti.
Na voljo so trije načini: Standard [standardni], Vivid [sijoči] in Favorite [priljubljen]
STRAN ZA NASTAVITEV ZVOKA [Audio Page] (Slika 16):
Uporabite tipko “MENU” [meni] za izbiro prvega predmeta in izberite željeni predmet s tipkama “UP” [gor] ali “DOWN” [dol].
Potem, ko ste izbrali željeni predmet, uporabite tipki “+” ali “-” za vključitev funkcije ali nastavitev vrednosti.
STRAN ZA NASTAVITEV SLIKE [Display Page] (Slika 17):
Nastavite lahko: “Close Caption” [finalna obdelava], “V-Chip Setting” [nastavitve V-Chipa], “Timer” [odštevalnik časa], “Aspect”
[razmerje], “Noise Reduce” [dušenje šuma] in “Recall
Default” [povrnitev privzetih nastavitev].
Uporabite tipko “MENU” [meni] za izbiro prvega predmeta in izberite željeni predmet s tipkama “UP” [gor] ali “DOWN” [dol].
Potem, ko ste izbrali željeni predmet, uporabite tipki “+” ali “-” za vključitev funkcije ali nastavitev vrednosti.
Možnosti izbire finalne obdelave: CC1, CC2, TT1, TT2.
Odštevalnik časa - izberete lahko 30, 60, 90 min.
Izbira razmerja: normal, 1:1, 4:3
Izbira dušenja šuma: šibko, srednje, močno
Način AV [avdio/video] nastavitev:
Sledijo nekatere funkcijske tipke:
Za nastavljanje glasnosti pritisnite tipki “+” ali “-”.
UPRAVLJANJE MENIJA PRIKAZANEGA NA ZASLONU [OSD]:
Pritisnite tipko “MENU” [meni] in pojavila se bo stran za nastavitev pogleda [Image Page]. Nastavite lahko svetlost [Brightness], kontrast
[Contrast], ostrino [Sharpness], barvo [Color] in barvni ton [Tint]. (Za izhod ali vrnitev na predhodni nivo menija prikazanega na zaslonu
[OSD] pritisnite tipko EXIT [izhod].)
Page 68

68 PRESTIGIO TV-TUNER
SLO
STRAN ZA NASTAVITEV POGLEDA [Image Page] (Slika 18)
Ponovno pritisnite tipko “MENU” [meni] za izbiro predmeta in nastavite vrednost s tipkama “+” ali “-”.
Za izbiro željenega predmeta uporabite tipki “UP” [gor] in “DOWN” [dol] in s tipkama “+” ali “-” nastavite vrednost.
Za vrnitev na predhodni nivo menija prikazanega na zaslonu [OSD] pritisnite tipko EXIT [izhod].
V načinu AV [avdio/video] nastavitev s pritiskom na tipko “DOWN” [dol] izberite “OSD Page” [stran menija prikazanega na zaslonu],
“Audio Page” [stran za nastavitev zvoka] in “Display Page” [stran za nastavitev slike].
Na voljo so trije načini: Standard [standardni], Vivid [sijoči] in Favorite [priljubljen]
STRAN MENIJA PRIKAZANEGA NA ZASLONU [OSD Page] (Slika 19):
Uporabite tipko “MENU” [meni] za izbiro prvega predmeta in izberite željeni predmet s tipkama “UP” [gor] ali “DOWN” [dol].
Potem, ko ste izbrali željeni predmet, uporabite tipki “+” ali “-” za vključitev funkcije ali nastavitev vrednosti.
STRAN ZA NASTAVITEV ZVOKA [Audio Page] (Slika 20):
Uporabite tipko “MENU” [meni] za izbiro prvega predmeta in izberite željeni predmet s tipkama “UP” [gor] ali “DOWN” [dol].
Potem, ko ste izbrali željeni predmet, uporabite tipki “+” ali “-” za vključitev funkcije ali nastavitev vrednosti.
STRAN ZA NASTAVITEV SLIKE [Display Page] (Slika 21):
Nastavite lahko: “Close Caption” [finalna obdelava], “V-Chip Setting” [nastavitve V-Chipa], “Timer” [odštevalnik časa], “Aspect”
[razmerje], “Noise Reduce” [dušenje šuma] in “Recall
Default” [povrnitev privzetih nastavitev].
Uporabite tipko “MENU” [meni] za izbiro prvega predmeta in izberite željeni predmet s tipkama “UP” [gor] ali “DOWN” [dol].
Potem, ko ste izbrali željeni predmet, uporabite tipki “+” ali “-” za vključitev funkcije ali nastavitev vrednosti.
Možnosti izbire finalne obdelave: CC1, CC2, TT1, TT2.
Odštevalnik časa - izberete lahko 30, 60, 90 min.
Izbira razmerja: normal, 1:1, 4:3
Izbira dušenja šuma: šibko, srednje, močno
Način SV nastavitve:
Sledijo nekatere funkcijske tipke:
Za nastavljanje glasnosti pritisnite tipki “+” ali “-”.
UPRAVLJANJE MENIJA PRIKAZANEGA NA ZASLONU [OSD]:
Pritisnite tipko “MENU” [meni] in pojavila se bo stran za nastavitev pogleda [Image Page]. Nastavite lahko svetlost [Brightness], kontrast
[Contrast], ostrino [Sharpness], barvo [Color] in barvni ton [Tint]. (Za izhod ali vrnitev na predhodni nivo menija prikazanega na zaslonu
[OSD] pritisnite tipko EXIT [izhod].)
STRAN ZA NASTAVITEV POGLEDA [Image Page] (Slika 22)
Ponovno pritisnite tipko “MENU” [meni] za izbiro predmeta in nastavite vrednost s tipkama “+” ali “-”.
Za izbiro željenega predmeta uporabite tipki “UP” [gor] in “DOWN” [dol] in s tipkama “+” ali “-” nastavite vrednost.
Za vrnitev na predhodni nivo menija prikazanega na zaslonu [OSD] pritisnite tipko EXIT [izhod].
V načinu SV nastavitev s pritiskom na tipko “DOWN” [dol] izberite “OSD Page” [stran menija prikazanega na zaslonu], “Audio Page”
[stran za nastavitev zvoka] in “Display Page” [stran za nastavitev slike]. Na voljo so trije načini: Standard [standardni], Vivid [sijoči]
in Favorite [priljubljen].
Page 69

69PRESTIGIO TV-TUNER
SLO
STRAN MENIJA PRIKAZANEGA NA ZASLONU [OSD Page] (Slika 23):
Uporabite tipko “MENU” [meni] za izbiro prvega predmeta in izberite željeni predmet s tipkama “UP” [gor] ali “DOWN” [dol].
Potem, ko ste izbrali željeni predmet, uporabite tipki “+” ali “-” za vključitev funkcije ali nastavitev vrednosti.
STRAN ZA NASTAVITEV ZVOKA [Audio Page] (Slika 24):
Uporabite tipko “MENU” [meni] za izbiro prvega predmeta in izberite željeni predmet s tipkama “UP” [gor] ali “DOWN” [dol].
Potem, ko ste izbrali željeni predmet, uporabite tipki “+” ali “-” za vključitev funkcije ali nastavitev vrednosti.
STRAN ZA NASTAVITEV SLIKE [Display Page] (Slika 25):
Nastavite lahko: “Close Caption” [finalna obdelava], “V-Chip Setting” [nastavitve V-Chipa], “Timer” [odštevalnik časa], “Aspect”
[razmerje], “Noise Reduce” [dušenje šuma] in “Recall
Default” [povrnitev privzetih nastavitev].
Uporabite tipko “MENU” [meni] za izbiro prvega predmeta in izberite željeni predmet s tipkama “UP” [gor] ali “DOWN” [dol].
Potem, ko ste izbrali željeni predmet, uporabite tipki “+” ali “-” za vključitev funkcije ali nastavitev vrednosti.
Možnosti izbire finalne obdelave: CC1, CC2, TT1, TT2.
Odštevalnik časa - izberete lahko 30, 60, 90 min.
Izbira razmerja: normal, 1:1, 4:3
Izbira dušenja šuma: šibko, srednje, močno
Način YCbCr nastavitve:
Sledijo nekatere funkcijske tipke:
Za nastavljanje glasnosti pritisnite tipki “+” ali “-”.
UPRAVLJANJE MENIJA PRIKAZANEGA NA ZASLONU [OSD]:
Pritisnite tipko “MENU” [meni] in pojavila se bo stran za nastavitev pogleda [Image Page]. Nastavite lahko svetlost [Brightness],
kontrast [Contrast], ostrino [Sharpness], barvo [Color] in barvni ton [Tint]. (Za izhod ali vrnitev na predhodni nivo menija prikazanega
na zaslonu [OSD] pritisnite tipko EXIT [izhod].)
STRAN ZA NASTAVITEV POGLEDA [Image Page] (Slika 26)
Ponovno pritisnite tipko “MENU” [meni] za izbiro predmeta in nastavite vrednost s tipkama “+” ali “-”.
Za izbiro željenega predmeta uporabite tipki “UP” [gor] in “DOWN” [dol] in s tipkama “+” ali “-” nastavite vrednost.
Za vrnitev na predhodni nivo menija prikazanega na zaslonu [OSD] pritisnite tipko EXIT [izhod].
V načinu YCbCr nastavitev s pritiskom na tipko “DOWN” [dol] izberite “OSD Page” [stran menija prikazanega na zaslonu], “Audio Page”
[stran za nastavitev zvoka] in “Display Page” [stran za nastavitev slike].
Na voljo so trije načini: Standard [standardni], Vivid [sijoči] in Favorite [priljubljen].
STRAN MENIJA PRIKAZANEGA NA ZASLONU [OSD Page] (Slika 27):
Uporabite tipko “MENU” [meni] za izbiro prvega predmeta in izberite željeni predmet s tipkama “UP” [gor] ali “DOWN” [dol].
Potem, ko ste izbrali željeni predmet, uporabite tipki “+” ali “-” za vključitev funkcije ali nastavitev vrednosti.
STRAN ZA NASTAVITEV ZVOKA [Audio Page] (Slika 28):
Uporabite tipko “MENU” [meni] za izbiro prvega predmeta in izberite željeni predmet s tipkama “UP” [gor] ali “DOWN” [dol].
Potem, ko ste izbrali željeni predmet, uporabite tipki “+” ali “-” za vključitev funkcije ali nastavitev vrednosti.
Page 70

70 PRESTIGIO TV-TUNER
SLO
STRAN ZA NASTAVITEV SLIKE [Display Page] (Slika 29):
Nastavite lahko: “Close Caption” [finalna obdelava], “V-Chip Setting” [nastavitve V-Chipa], “Timer” [odštevalnik časa], “Aspect”
[razmerje], “Noise Reduce” [dušenje šuma] in “Recall
Default” [povrnitev privzetih nastavitev].
Uporabite tipko “MENU” [meni] za izbiro prvega predmeta in izberite željeni predmet s tipkama “UP” [gor] ali “DOWN” [dol].
Potem, ko ste izbrali željeni predmet, uporabite tipki “+” ali “-” za vključitev funkcije ali nastavitev vrednosti.
Možnosti izbire finalne obdelave: CC1, CC2, TT1, TT2.
Odštevalnik časa - izberete lahko 30, 60, 90 min.
Izbira razmerja: normal, 1:1, 4:3
Izbira dušenja šuma: šibko, srednje, močno
OSNOVNE OPERACIJE
UPRAVLJANJE GLASNOSTI (Slika 30):
1. Pritisnite za ojačanje glasnosti zvoka. Indikator jakosti zvoka narašča.
2. Pritisnite za znižanje glasnosti zvoka. Indikator jakosti zvoka upada.
Za izključitev zvoka
1. Pritisnite tipko MUTE za začasno izključitev zvoka.
2. Pritisnite tipko MUTE za ponovno vključitev zvoka na raven pred izključitvijo..
VKLOP/IZKLOP NAPRAVE (Slika 31)
Za izključitev LCD TV.
Pritisnite na daljinskem upravljalniku. Lučka, ki nakazuje, da je naprava vključena, bo ugasnila.
Za ponovni vklop LCD TV
Ponovno pritisnite. Lučka, ki nakazuje, da je naprava vključena, bo svetila v zeleni barvi.
IZBIRA KANALOV NA TV (Slika 32)
Ne glede na trenutni način prikazovanja (PC, AV, SV or YCbCr) se bo način prikazovanja nastavil na TV način, če pritisnete tipki CH+( )
or CH-( ).
Izbira kanalov z uporabo določitve kanalov [Channel Select] na daljinskem upravljalniku
• Ta LCD TV naprava omogoča določitev do 125 kanalov (1 do 125). Za določitev kanala vnesite enomestno, dvomestno ali trimestno
število ali uporabite tipki “kanal gor” ali “kanal dol”.
Za določitev enomestnega ali dvomestnega števila (npr. kanal 5):
1. Pritisnite tipko 0.
2. Pritisnite tipko 5.
* ali pritisnite samo tipko 5.
Za določitev trimestnega števila (npr. kanal 115):
Naslednji postopek zaključite v štirih sekundah.
1. Pritisnite tipko 10+.
2. Pritisnite tipko 1.
2. Pritisnite tipko 5.
Page 71

71PRESTIGIO TV-TUNER
SLO
Opomba:
• Določitev trimestne številke kanala je možna samo v primeru, da je način sprejema v nastavitvah kanalov [CH-SETTING] nastavljen na
CABLE [kabelski].
(Za podrobnosti o nastavitvah načina sprejema.)
EXIT [Izhod]: • Funkcijska tipka: potem, ko ste izbrali meni prikazan na zaslonu [OSD], za vrnitev na prejšnji nivo izbire pritisnite tipko
EXIT [izhod].
S pritiskom na funkcijsko tipko EXIT [izhod] lahko zapustite meni prikazan na zaslonu [OSD] med prikazom le-tega.
NASTAVITEV NAČINA PRIKAZOVANJA SLIKE [PICTURE MODE] (Slika 33)
Pritisnite „PICTURE MODE“ in določite svetlost [brightness]. Izberete lahko med
tremi možnostmi: STANDARD [standardno] / VIVID [sijoče] / FAVORITE [priljubljeno].
Standard [standardno]: stalna svetlost za normalne pogoje prikazovanja.
Vivid [sijoče]: ob prikazovanju v močneje osvetljenem prostoru.
Favorite [priljubljeno]: uporabnikova nastavitev - uporabnik lahko po lastni izbiri sam nastavi svetlost.
NASTAVITEV JEZIKA [LANGUAGE] (Slika 34)
Jezik menija prikazanega na zaslonu lahko poljubno izberete. Na voljo so sledeči jeziki: angleški [English], španski [Spanish], francoski
[French], italijanski [Italian] in nizozemski [Dutch].
1. Pritisnite tipko za prikaz menija [MENU]
2. Pritisnite tipko za izbiro OSD strani.
3. Pritisnite tipko za vstop v meni za izbiro jezika.
4. Izberite jezik.
NASTAVITVE TV (Slika 34)
Za sprejem TV programov morate določiti kanale AIR [sprejem s pomočjo antene] ali CABLE [kabelska TV].
1. Pritisnite tipko za prikaz menija [MENU]
2. Ponovno pritisnite tipko za izbiro predmeta TV sistema.
3. Pritisnite za izbiro TV sistema (antena ali kabel).
UREJANJE KANALOV NA TV (Slika 34)
• Dodajanje kanalov s slabim sprejemom ali dodatnih kanalov oz. brisanje nezaželjenih kanalov iz TV spomina.
1. Pritisnite ali tipke za določitev željenega kanala.
2. Ponovno pritisnite tipko za izbiro prvega predmeta.
3. Pritisnite tipko za izbiro kanala, ki ga želite urediti.
4. Uporabite [USE] ali za nastavitev predmeta na “da” [yes].
5. Ponovno pritisnite tipko za priklic strani dodaj/izbriši [Add/Erase].
6. Pritisnite tipko za izbris izbranega kanala ali pritisnite tipko za dodajanje izbranega kanala.
IZBIRA VHODNEGA SIGNALA [INPUT SELECT] (Slika 35)
1. Pritisnite tipko INPUT SELECT za priklic menija “Select Source” [določi izvor].
2. Ponovno pritisnite tipko INPUT SELECT za določitev željenega izvora.
3. pritisnite tipko MENU (ENTER) za potrditev izbranega izvora.
* Če tipke MENU(ENTER) ne pritisnete, se bo izbrani izvor po preteku nekaj sekund samodejno nastavil.
Page 72

72 PRESTIGIO TV-TUNER
SLO
PRILAGODITEV V-CHIP NASTAVITEV
V-CHIP
• Ta funkcija omogoča omejeno izbiranje TV programov in nadzorovano uporabo TV, ki temelji na podatkih FCC (Federal Communications Commission). Otrokom preprečuje gledanje nasilnih ali pornografskih vsebin.
• Omejevanje gledanja TV programov vključuje dve kategoriji, ki zajemata informacije o določenem programu: “kategorija film” [MOVIE
rating] in “kategorija TV” [TV rating], Omejitev kategorije film temelji na starosti, omejitev kategorije TV pa temelji na starosti in vsebini.
• TV programi so lahko uvrščeni v kategorijo film ali TV, zato je za popolni nadzor nad izbiro programov priporočljivo, da sta nastavljeni
obe kategoriji.
KATEGORIJA FILM [MOVIE RATING]
KATEGORIJA
G GENERAL AUDIENCES [primerno za vse] Za vse starosti.
PG PARENTAL GUIDANCE SUGGESTED [primerno za otroke ob prisotnosti starejših oseb] Nekatere vsebine niso primerne za otroke.
PG-13 PARENTAL STRONGLY CAUTIONED [prisotnost starejših oseb močno priporočljiva]. Nekatere vsebine so neprimerne za otroke mlajše od 13 let.
R RESTRICTED [omejeno]. Osebe mlajše od 17 lahko spremljajo program samo ob prisotnosti staršev ali odraslih skrbnikov.
NC-17 NO ONE 17 AND UNDER ADMITTED [prepovedano za osebe stare 17 let ali manj]
X X je starejša kategorizacija kategorije NC-17 in je lahko kodirana v starejše filme.
MOVIE RATING [kategorija film] (primeri)
Primer 1: posameznemu kanalu je možno določiti samo eno kategorijo.
Primer 2: posameznemu kanalu je možno določiti samo eno kategorijo.
Opomba: * kategorija film bazira samo na starosti
Page 73

73PRESTIGIO TV-TUNER
SLO
POMOČ PRI ODPRAVI NAPAK
Napaka Preveri predmet
Ni slike ali zvoka · Prepričajte se, da je napajalni kabel pravilno vstavljen v vtičnico
· Preverite vhodni signal.
· Prepričajte se, da ste ustrezno priključitvi naprave izbrali izvor signala.
· Prepričajte se, da je naprava vključena.
Ni zvoka. · Prepričajte se, da ni glasnost zvoka nastavljena na minimum.
· Prepričajte se, da ni vključena funkcija za začasen izklop zvoka.
· Prepričajte se, da niso na napravo priključene slušalke.
· Prepričajte se, da ste ustrezno priključitvi naprave izbrali izvor signala.
Ni slike ali zvoka - je samo šum. · Prepričajte se, da je antenski kabel pravilno priključen.
· Prepričajte se, da imajo PC/AV/S-V/Y,Cb,Cr signali pravilen sprejem.
Slika ni čista. · Prepričajte se, da je antenski kabel pravilno priključen.
· Prepričajte se, da imajo TV signali pravilen sprejem.
Slika je svetla in ima nepravilen barvni ton. · Preverite nastavitve barv.
· Preverite nastavitve barvnega tona.
Slika je pretemna. · Preverite nastavitve svetlosti.
· Fluorescentni žarnici je pošla moč.
Daljinski upravljalnik ne dela. · Preverite baterije v daljinskem upravljalniku.
· Prepričajte se, da IR senzor ni izpostavljen močni fluorescentni svetlobi.
Slika ni ostra. · Sprejem je šibek.
· Prepričajte se, da je antena pravilno usmerjena.
· Preverite funkcijo ostrine.
Dvojna ali trojna slika. · Prepričajte se, da je antena pravilno usmerjena.
· Obstaja možnost, da se električni valovi odbijajo od gora ali zgradb.
Pikčasta slika. · Lahko prihaja do motenj zaradi avtomobilov, vlakov, visoko-napetostnih vodov, neonskih luči itd.
· Lahko se pojavijo motnje zaradi bližine antenskega in napajalnega kabla. Med njima naj bo
večja razdalja.
Na zaslonu so črte ali pa so barve blede. · Ali prihaja do motenj zaradi drugih naprav?
Oddajne antene radijskih postaj, radioamaterjev in mobilne telefonije tudi lahko povzročajo motnje.
· Napravo uporabljajte kar najdlje od naprav, ki lahko povzročijo motnje.
Page 74

74 www.prestigio.biz
Fig. 1
Fig. 3
Fig. 4
Fig. 5
Fig. 6
Fig. 2
Page 75

75www.prestigio.biz
Fig. 9
Fig. 10
Fig. 11
Fig. 12
Fig. 7 Fig. 8
Page 76

76 www.prestigio.biz
Fig. 15
Fig. 16
Fig. 17
Fig. 18
Fig. 13 Fig. 14
Page 77

77www.prestigio.biz
Fig. 21
Fig. 22
Fig. 23
Fig. 24
Fig. 19 Fig. 20
Page 78

78 www.prestigio.biz
Fig. 27
Fig. 28
Fig. 29
Fig. 30
Fig. 25 Fig. 26
Page 79

79www.prestigio.biz
Fig. 33 Fig. 34
Fig. 35
Fig. 31
Fig. 32
 Loading...