

Page 1

1
PRESTIGIO NOBILE 1520
ENG
Prestigio Nobile 1520
User’s Manual
(October 2005)
TRADEMARKS
All brand and product names are trademarks or registered trademarks of their respective companies.
NOTE
The information in this manual is subject to change without notice.
Page 2
2
PRESTIGIO NOBILE 1520
ENG
Getting Started
Congratulations on purchasing this computer.
Your computer incorporates desktop computer capabilities into a compact notebook-sized package. It can greatly
enhance your productivity either in the office or at home. And, of course, wherever you need it, the computer is ready
and easy “to go.”
Then, you will find a section briefly introducing the external components of the computer. And the last section navigates
you to the information you may need after the computer is ready for use.
Getting the Computer Running
This section guides you through the procedures for getting the computer ready for operation.
Unpacking
After unpacking the shipping carton, you should find these standard items:
Notebook computer
Accessories:
AC adapter
AC power cord
Driver CD
Ferrite core(s) - option
Inspect all the items. If any item is damaged or missing, notify your dealer immediately.
Keep the shipping carton and packing materials in case you need to ship or store the computer in the future.
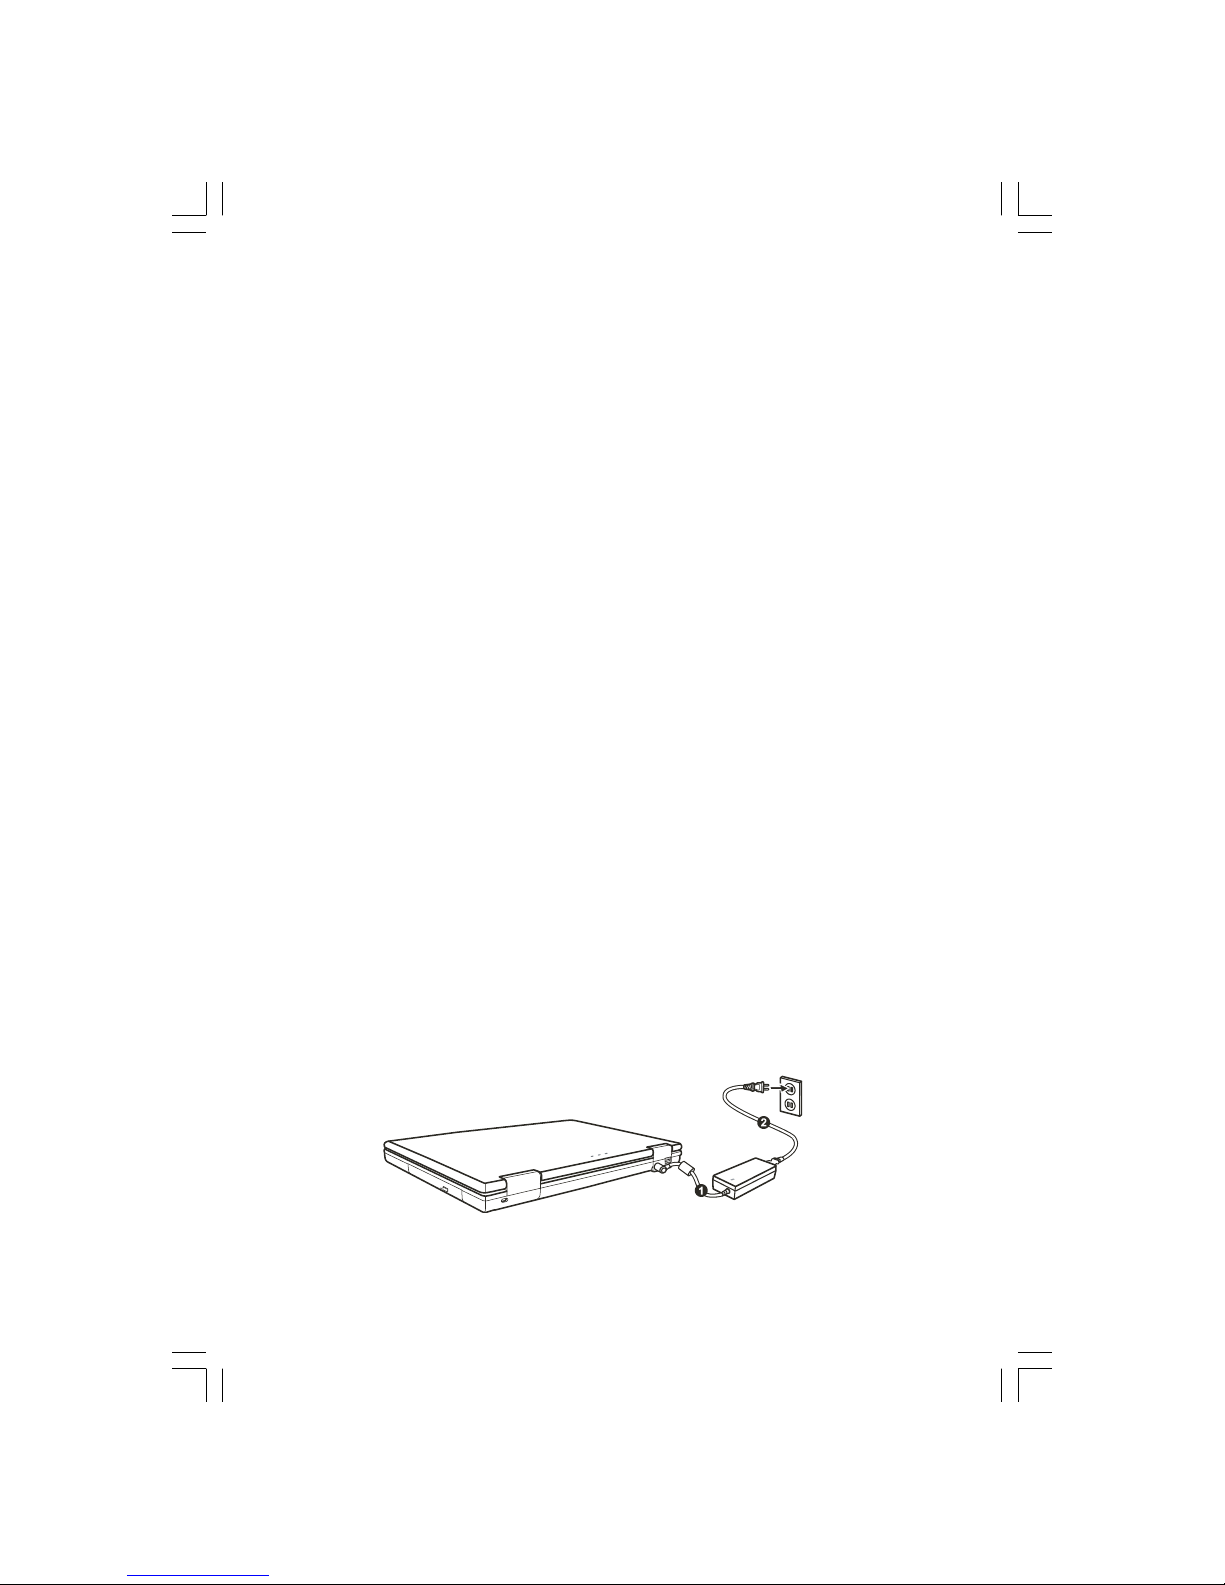
Connecting to AC Power
The computer operates either on the external AC power or internal battery power. It is suggested that you use AC power
when you start up the computer for the very first time.
CAUTION: Use only the AC adapter included with your computer. Using other AC adapters may
damage the computer.
1. Make sure that the computer is turned off.
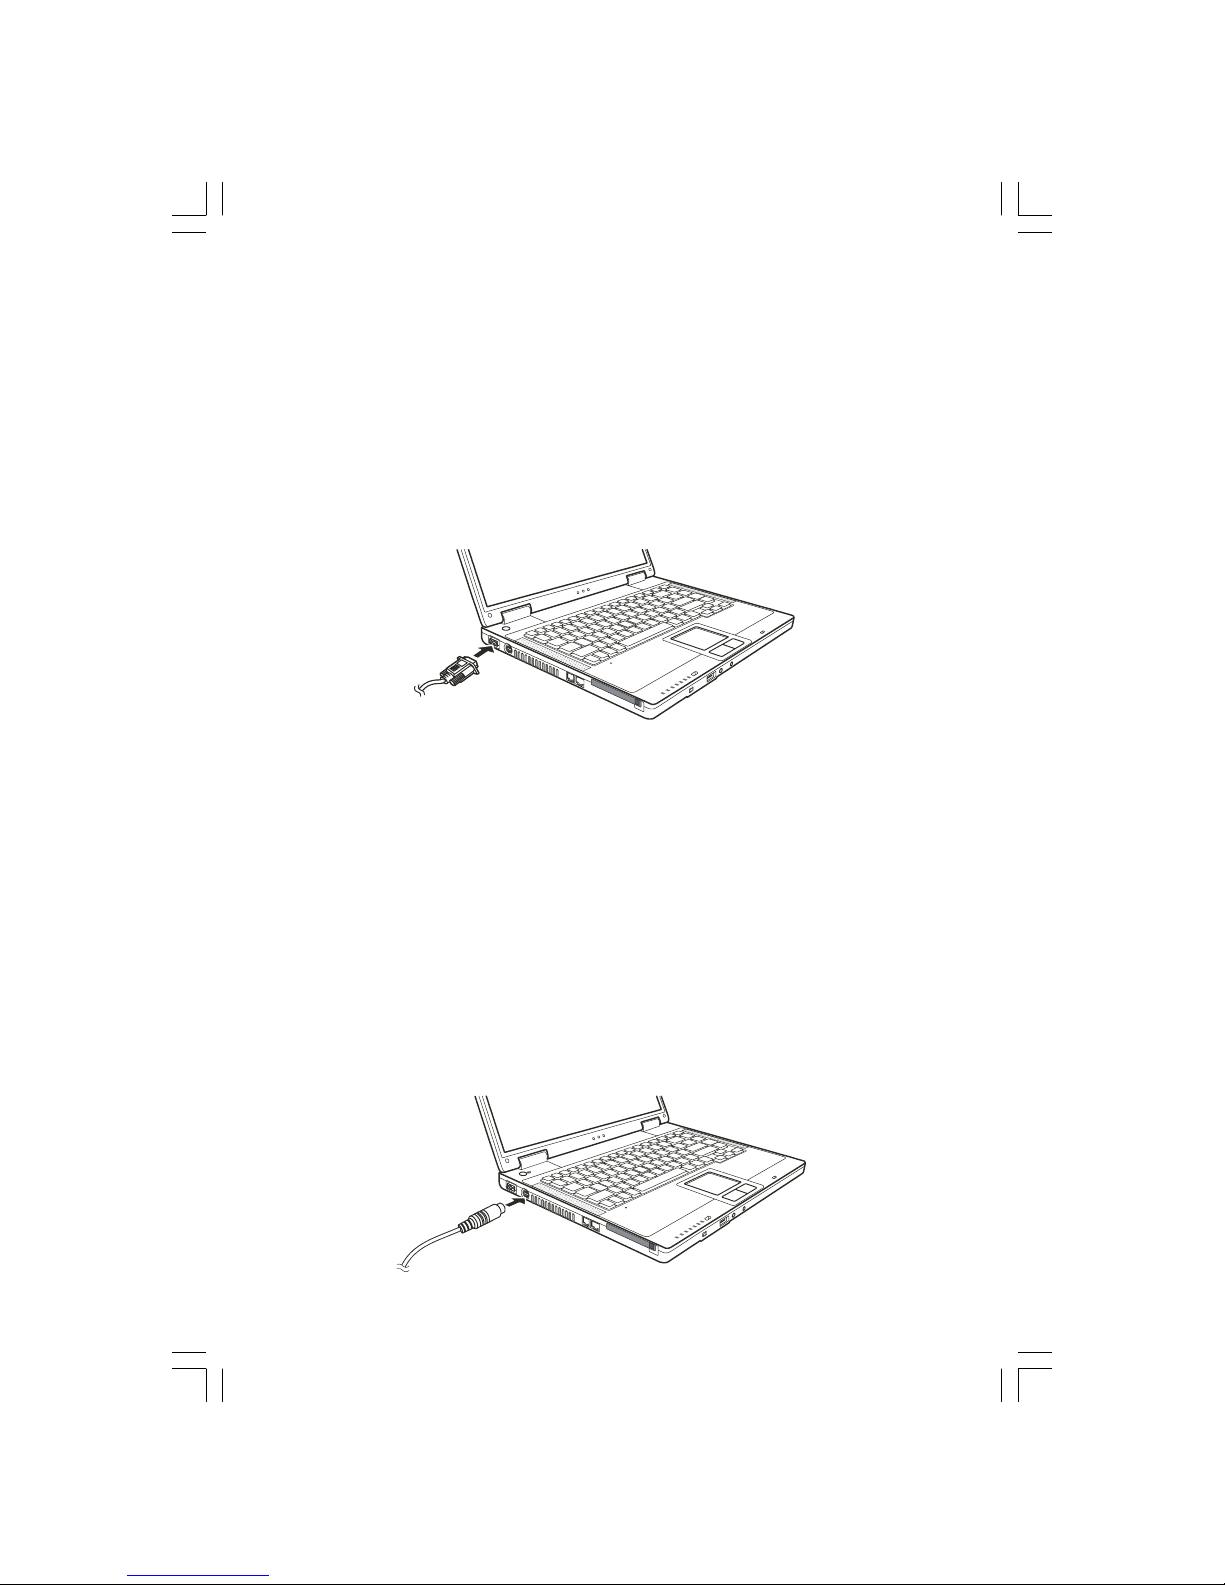
2. Plug the DC cord of the AC adapter to the power connector on the rear of the computer (1).
3. Plug the female end of the AC power cord to the AC adapter and the male end to an electrical outlet (2).
4. When the AC adapter is connected, power is being supplied from the electrical outlet to the AC adapter and onto your
computer. Now, you are ready to turn on the computer.
Page 3

3
PRESTIGIO NOBILE 1520
ENG
CAUTION:
When you disconnect the AC adapter, disconnect from the electrical outlet first and then from
the computer. A reverse procedure may damage the AC adapter or the computer.
When unplugging the connector, always hold the plug head. Never pull on the cord.
NOTE: When the AC adapter is connected, it also charges the battery pack.
Opening the Cover
CAUTION: Be gentle when opening and closing the cover. Opening it vigorously or slamming it
shut could damage the computer.
Open the top cover by sliding the cover latch toward the right (1) and lifting up the cover (2). You can tilt the cover
forward or backward for optimal viewing clarity.
Turning On and Off the Computer
Turning On
1. Make sure that the computer is connected to AC power.
2. Press the power button.
3. Each time the computer is turned on, it performs a Power-On Self Test (POST), and the operating system such as
Windows should start.
Turning Off
To turn off the computer power, use the “Shut Down” command of your operating system.
NOTE: There are other ways you can stop the computer so that you will be back to where you
left off when you next turn on the computer.
Page 4
4
PRESTIGIO NOBILE 1520
ENG
CAUTION: If you have to turn the computer on again immediately after turning it off, wait for at
least five seconds. Turning the computer off and on rapidly can damage it.
Taking a Look at the Computer
This section identifies the external components of the computer and briefly describes the function of each component.
NOTE: Depending on the model you purchased, the appearance of your computer may not be
exactly the same as those shown in this manual.
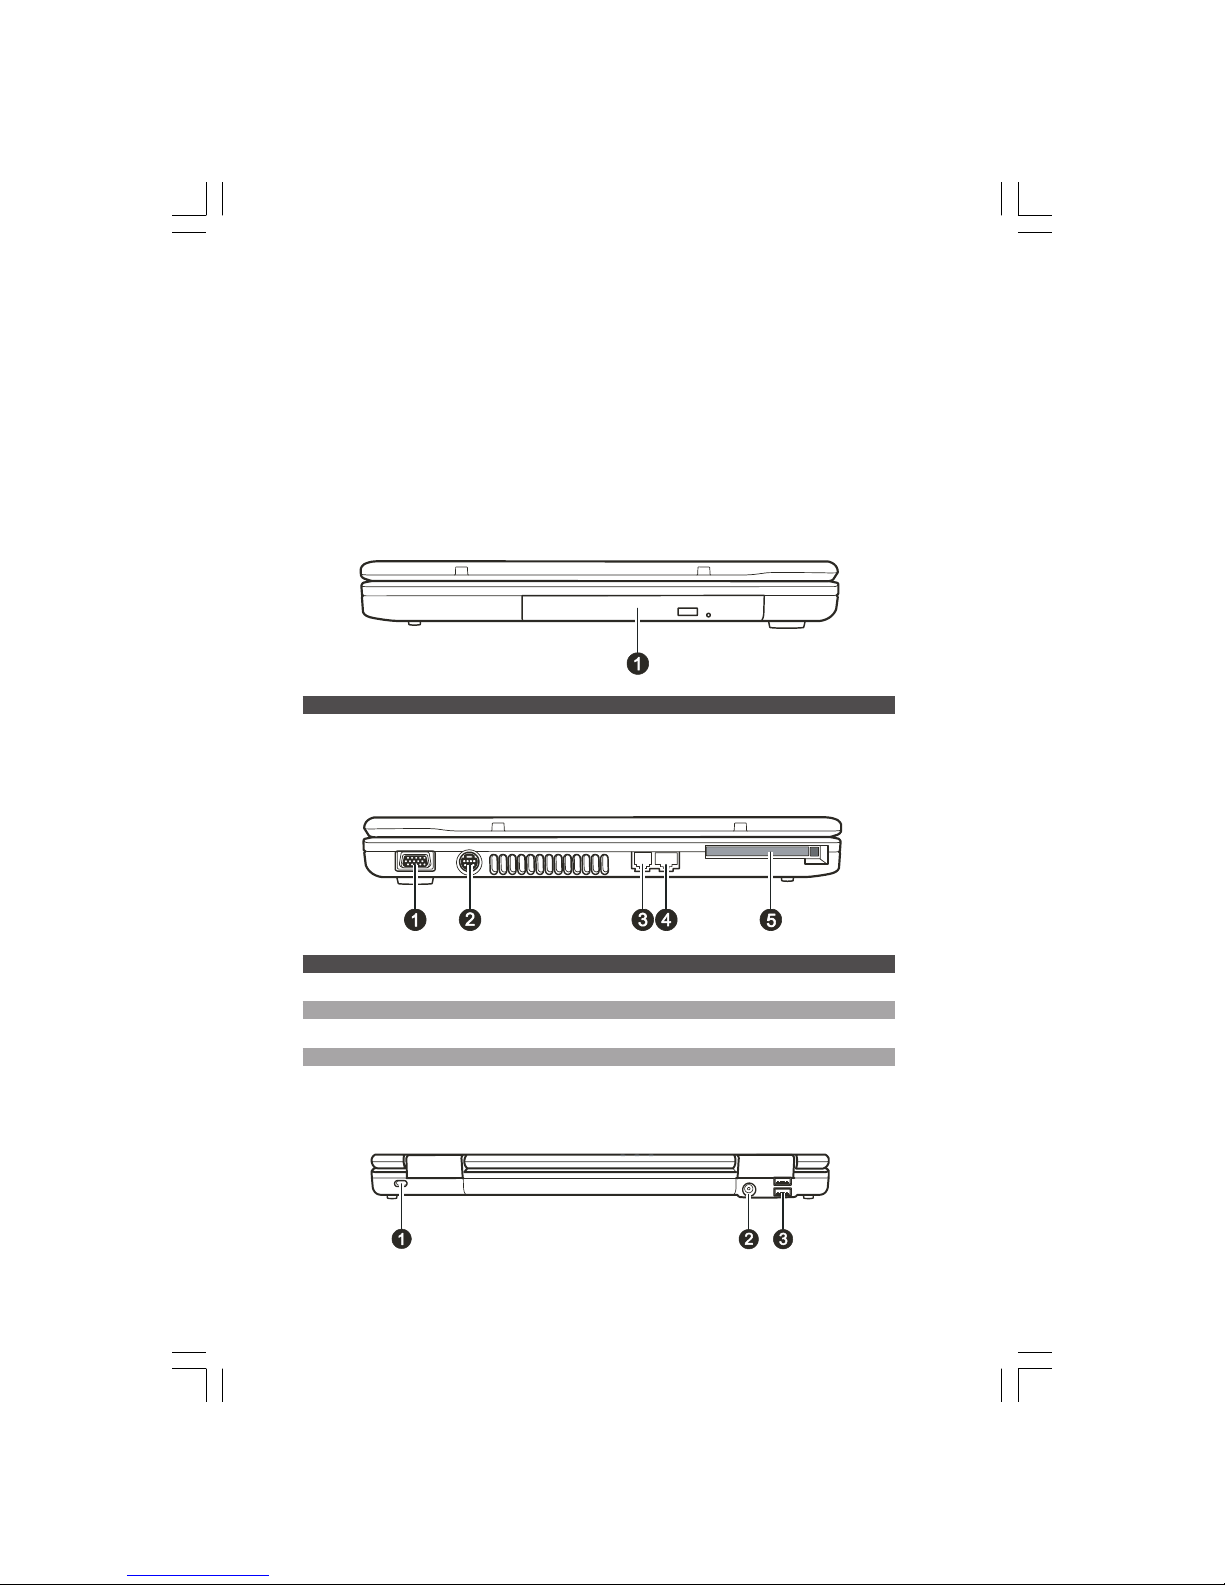
Right-Side Components
Ref Component Description
1 Combo/ DVD Dual Drive Accepts CD/DVD for installing or loading software, accessing data, playing music/
video, and writing data (select models only).
Left-Side Components
Ref Component Description
1 VGA Port Connects an external CRT monitor.
2 S-video Connector Connects an external video device, such as a TV, supporting S-video input.
3 RJ-11 Connector Connects the telephone line.
4 RJ-45 Connector Connects the LAN cable.
5 PC Card Slot Accepts a PC card for additional functions.
Rear Components
Page 5
5
PRESTIGIO NOBILE 1520
ENG
Ref Component Description
1 Kensington Lock Locks the computer to a stationery object for security.
2 Power Connector Connects the AC adapter.
3 USB Ports Each of the two ports connects a USB device, such as a USB disk, floppy disk drive,
printer, digital camera, joystick, and more.
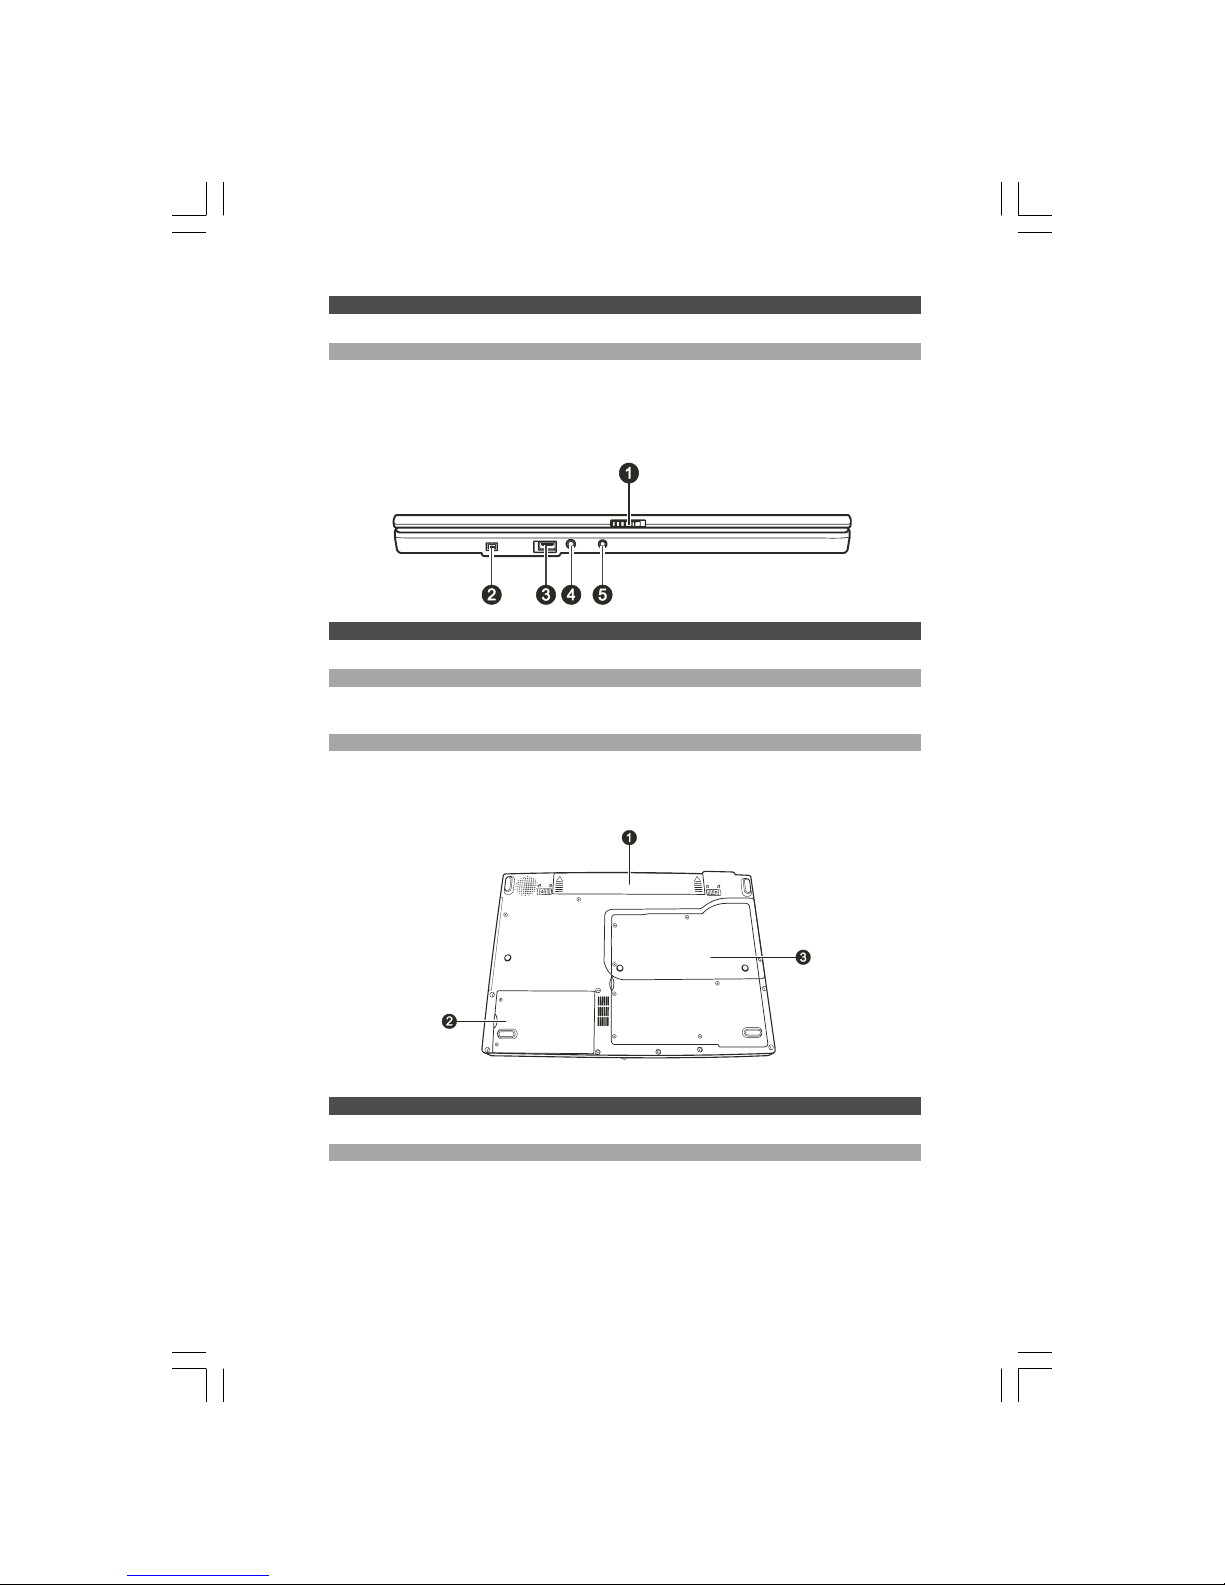
Front Components
Ref Component Description
1 Top Cover Latch Locks the top cover.
2 Mini IEEE 1394a Port Connects an IEEE 1394 device such as a scanner, printer, DVCAM, VCR, and more.
3 USB Port Connects a USB device, such as a USB disk, floppy disk drive, printer, digital camera,
joystick, and more.
4 Microphone Connector Connects an external microphone.
5 S/PDIF Connector S/PDIF Connects a S/PDIF device such as a digital speaker set for digital audio output.
Bottom Components
Ref Component Description
1 Battery Pack Supplies power to your computer when external power is not connected.
2 Hard Disk Drive CompartmentInside is the hard disk drive of your computer.
3 Components Cover Inside are:
Mini PCI slot for using an optional Mini PCI card. Depending on your model, an
internal Mini PCI wireless LAN card may have been pre-installed.
Memory slot for expanding the memory size of your computer.
CPU of your computer.
Page 6
6
PRESTIGIO NOBILE 1520
ENG
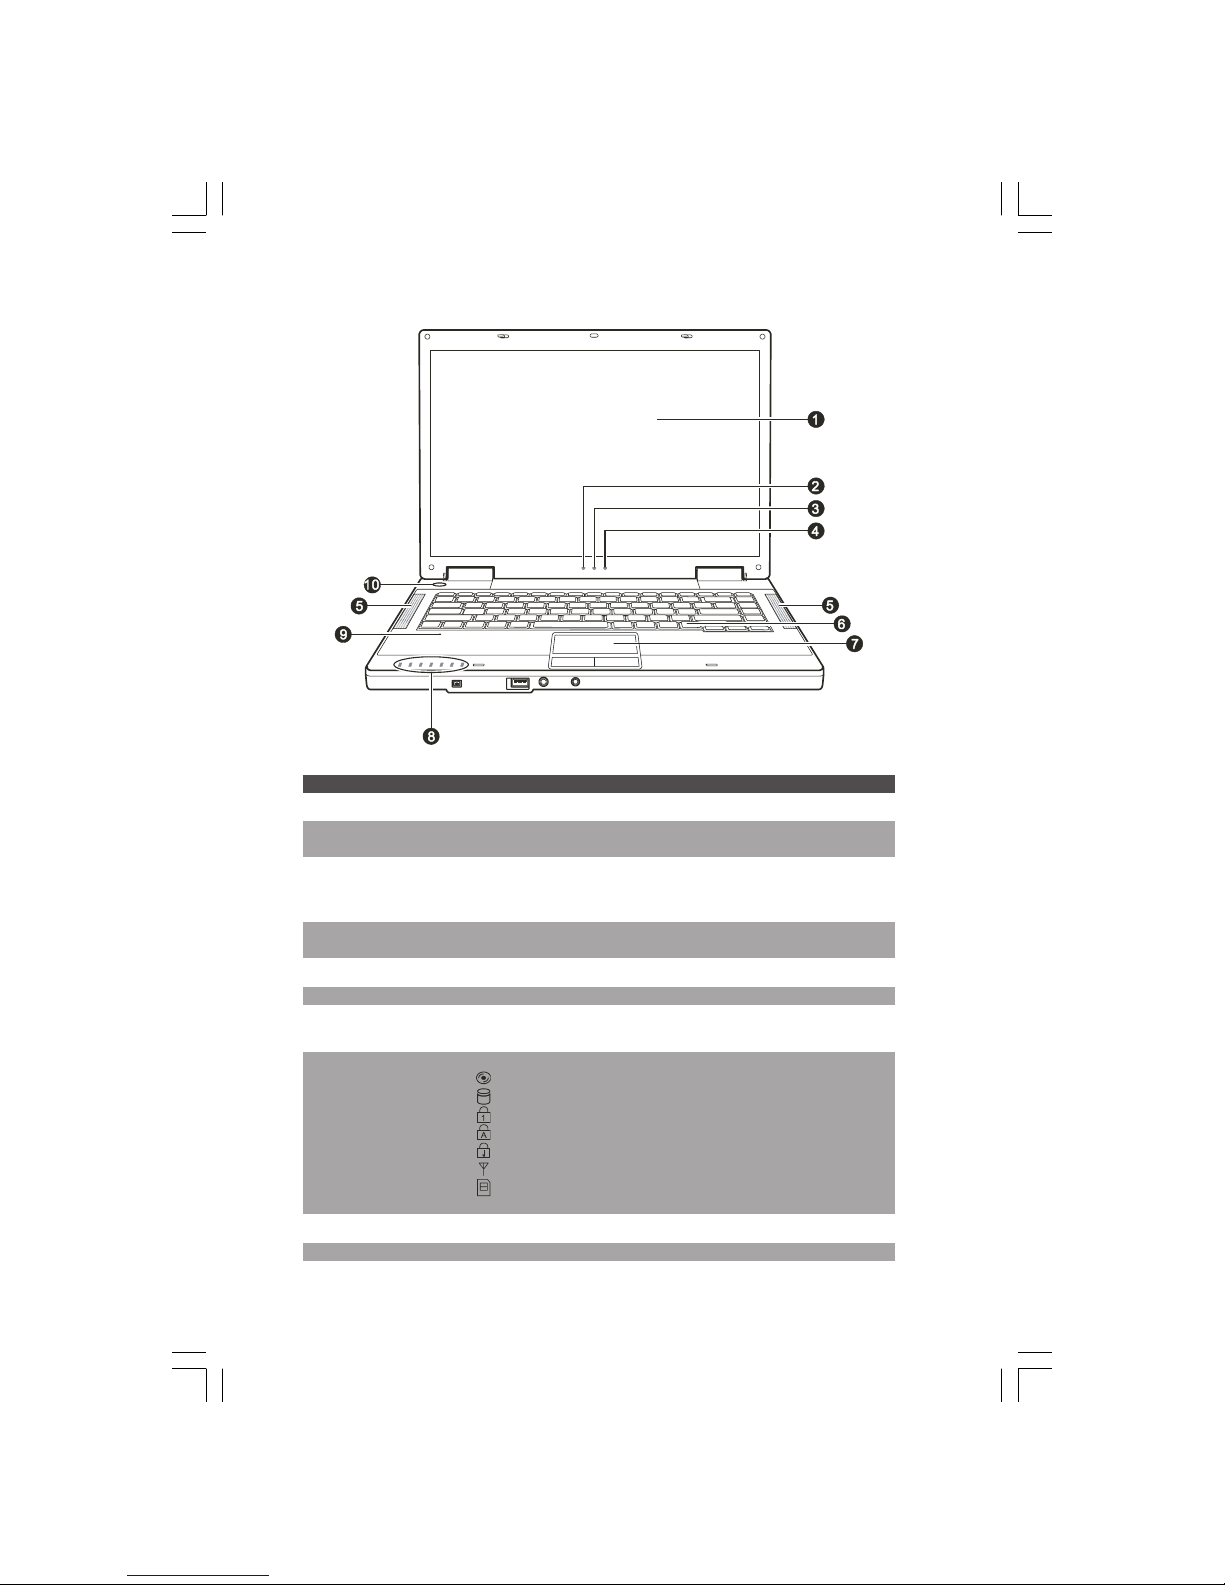
Top-open Components
Ref Component Description
1 LCD Screen Displays the output of the computer.
2 Battery Power Indicator Glows green when the computer is using battery power.
Blinks green when the computer, using battery power, is in Standby mode.
3 Battery Charge Indicator Glows green when the battery is fully charged and connected to AC power.
Glows amber when the battery is being charged.
Blinks red when the battery is almost completely discharged.
4 AC Power Indicator Glows green when the computer is turned ON.
Blinks green when the computer is in Standby mode.
5 Stereo Speaker Set Sends out sound and voice from the computer.
6 Keyboard Serves as the data input device of the computer.
7 Touchpad Serves as the pointing device of the computer. It consists of a rectangular pad as
well as left and right buttons.
8 Device Indicators Show the current status of the computer’s devices.
DVD drive in-use indicator
Hard disk drive in-use indicator
Num Lock indicator
Caps Lock indicator
Scroll Lock indicator
Wireless LAN indicator
Card Reader indicator (reserved for future model, your computer does not support
this function)
9 Microphone Reserved for future model, your computer does not support this function.
10 Power Button Turns the computer power ON and OFF.
Page 7

7
PRESTIGIO NOBILE 1520
ENG
Operating Your Computer
This chapter provides information about the use of the computer.
If you are new to computers, reading this chapter will help you learn the operating basics. If you are already a computer
user but are new to notebook computers, you may choose to read only the parts containing information unique to your
computer.
Starting and Stopping the Computer
There are a number of ways to start and stop the computer.
Starting the Computer
You always start the computer using the power button.
A computer starts up with an operating system (OS) existing on the storage device such as the hard disk and CD disc. The
computer will automatically load the OS after you turn it on. This process is called booting.
NOTE: An operating system is the platform for all your software application programs to run
on. The most widely used operating system today is Microsoft Windows.
Stopping the Computer
When you finish a working session, you can stop the computer by turning off the power or leaving the computer in
Standby or Hibernation mode:
To stop in this mode... Do this... To start up or resume again
Of f Follow the shutdown procedure of your operating Press the power button.
system. This can prevent loss of unsaved data or
damage to your software programs. If the system
is locked up because of hardware or software problems,
press the power button to turn off the computer.
Standby Depending on your settings in Windows, you can place Press any key.
the computer in Standby mode by:
• Closing the display cover
• Pressing the Fn+F12 hot key
• Pressing the power button
Hibernation Depending on your settings in Windows, you can place Press the power button.
the computer in Hibernation mode by:
• Closing the display cover
• Pressing the Fn+F12 hot key
• Pressing the power button
If you choose to stop in Standby or Hibernation mode, you can return to where you left off the next time you start up
the computer.
Page 8
8
PRESTIGIO NOBILE 1520
ENG
Using the Keyboard
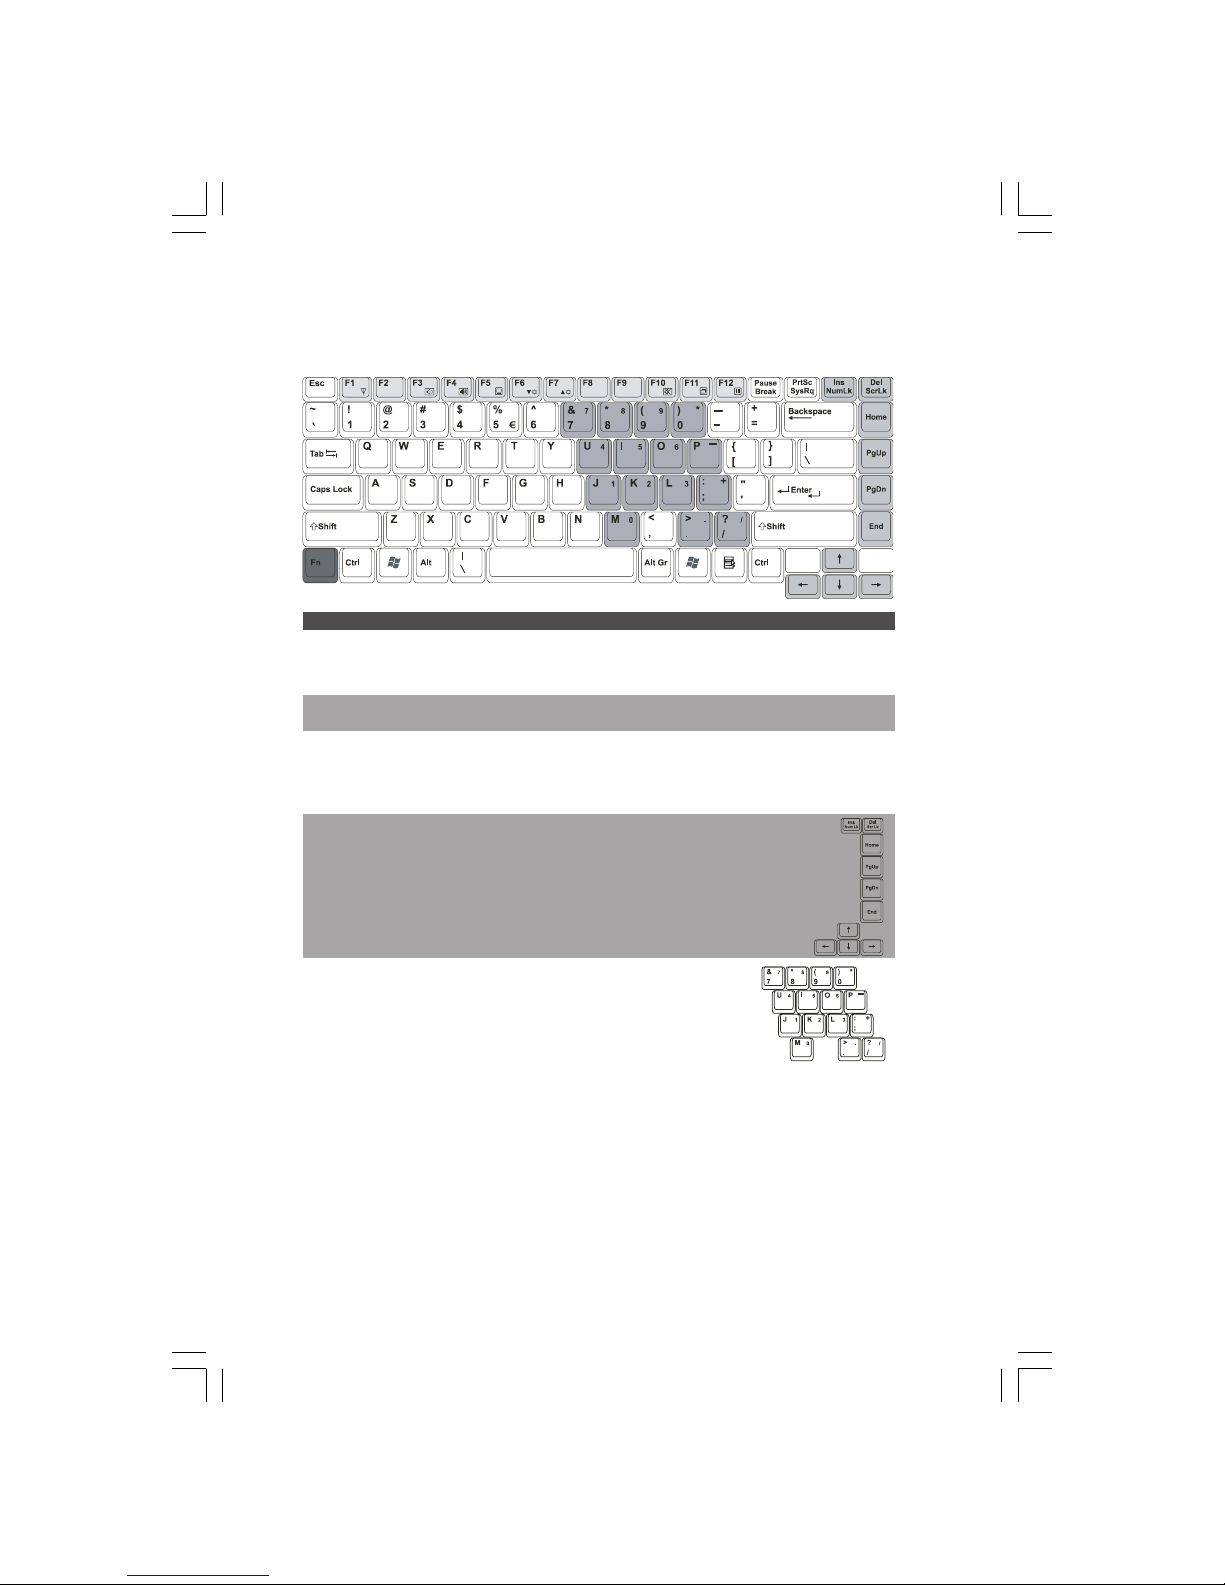
The keyboard keys consist of four major categories plus an Fn key.
Keys Description
Typewriter Keys Typewriter keys are similar to the keys on a typewriter. Several keys are added, such as the Ctrl, Alt, Esc
and lock keys, for special purposes. When the lock keys are pressed, their corresponding indicators light
up.
Function Keys Function keys (F1 to F12) are multi-purpose keys that perform functions defined by individual
programs.
Fn The Fn key, at the lower left corner of the keyboard, is used with another key to perform the
alternative function of a key. The letter “Fn” and the alternative functions are identified by the color of
blue on the keytop. To perform a desired function, first press and hold Fn, then press the other key. (See
“Hot Keys” for more information).
Cursor-Control Cursor-control keys are generally used for editing purposes. They are Insert, Delete, Home,
Keys End, Page Up, Page Down, Left, Right, Up, and Down arrow keys.
Numeric Keypad A 15-key numeric keypad is embedded in the typewriter keys. When
Num Lock is on, the numeric keys are activated, which means you can
use these keys to enter numerals.
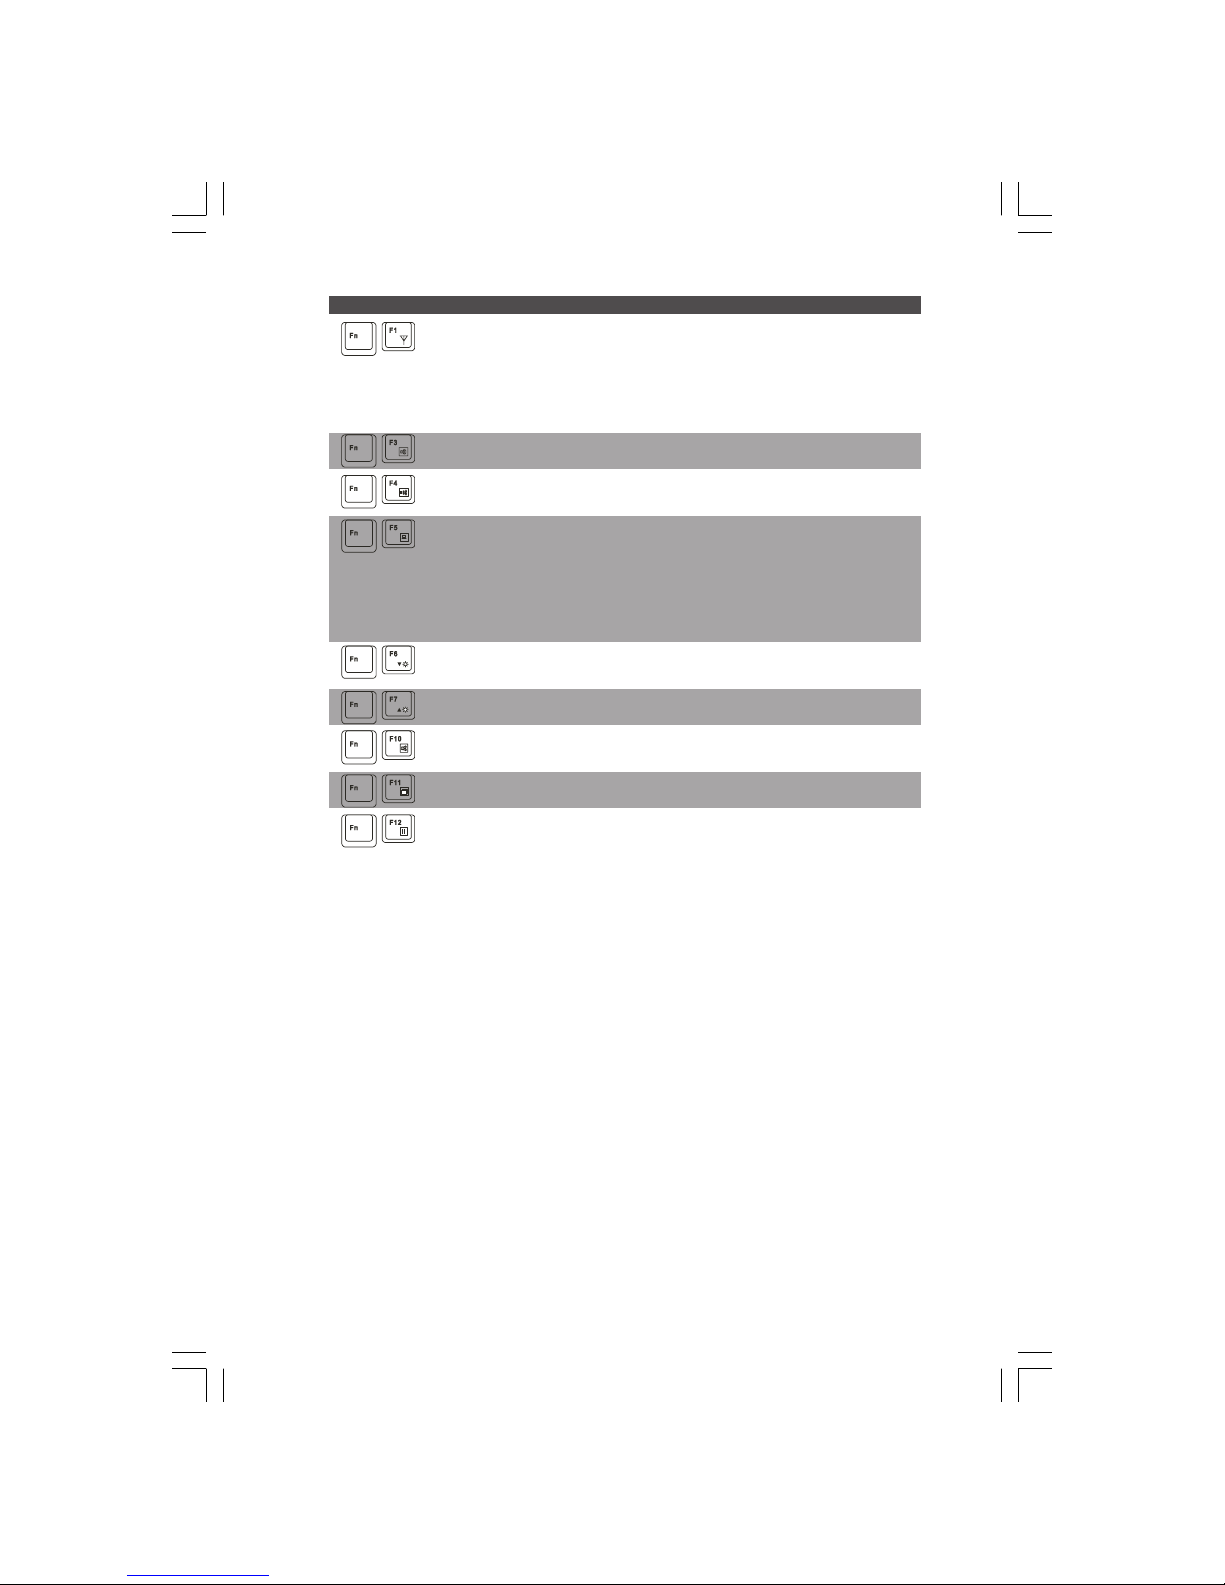
Hot Keys
Hot keys refer to a combination of keys that can be pressed any time to activate special functions of the computer. Most
hot keys operate in a cyclic way. Each time a hot key combination is pressed, it shifts the corresponding function to the
other or next choice.
You can easily identify the hot keys with the icons imprinted on the keytop. The hot keys are described next.
Page 9
9
PRESTIGIO NOBILE 1520
ENG
Key Description
Switches the wireless LAN radio on and off.
NOTE:
This function works only if an optional Mini PCI wireless LAN card is installed.
The FAA (Federal Aviation Agency) has deemed it unsafe to operate wireless devices in aircraft as this
may interfere with flight safety. Remember to turn off wireless LAN when using your computer in the
airplane.
Decreases the sound volume.
Increases the sound volume.
Switches the display output to one of the following when an external device is connected.
Upon booting the system with CRT:
LCD > CRT > LCD & CRT > LCD
NOTE:
When in the full screen DOS mode, or when playing DVD or MPEG file display switching is not allowed.
Also, you cannot use “Graphics Properties” in VGA utility to switch.
This function only applies to Plug & Play display devices.
Decreases the LCD brightness.
Increases the LCD brightness.
Switches the system sound output off (mute) and on.
Switches LCD on and off.
Serves as the sleep button that you can define with Windows’ Power Options.
Euro Symbol
Windows supports the Euro dollar sign, you can press the sign on the US and UK keyboards.
To press the Euro sign on a United States-International keyboard, hold down either of the Alt Gr keys and press 5 (which
has an Euro sign on it).
To press the Euro sign on a United States 101 keyboard, hold down either of the Alt keys and type 0128 on the numeric
keypad of your keyboard.
To press the Euro sign on an UK keyboard, hold down the Alt Gr key and press 4 (which has an Euro sign on it).
Windows Keys
The keyboard has two keys that perform Windows-specific functions: Windows Logo key and Application key.
The Windows Logo key opens the Start menu and performs software-specific functions when used in combination
with other keys. The Application key usually has the same effect as a right mouse click. (See your Windows manual for
more information.)
Page 10
10
PRESTIGIO NOBILE 1520
ENG
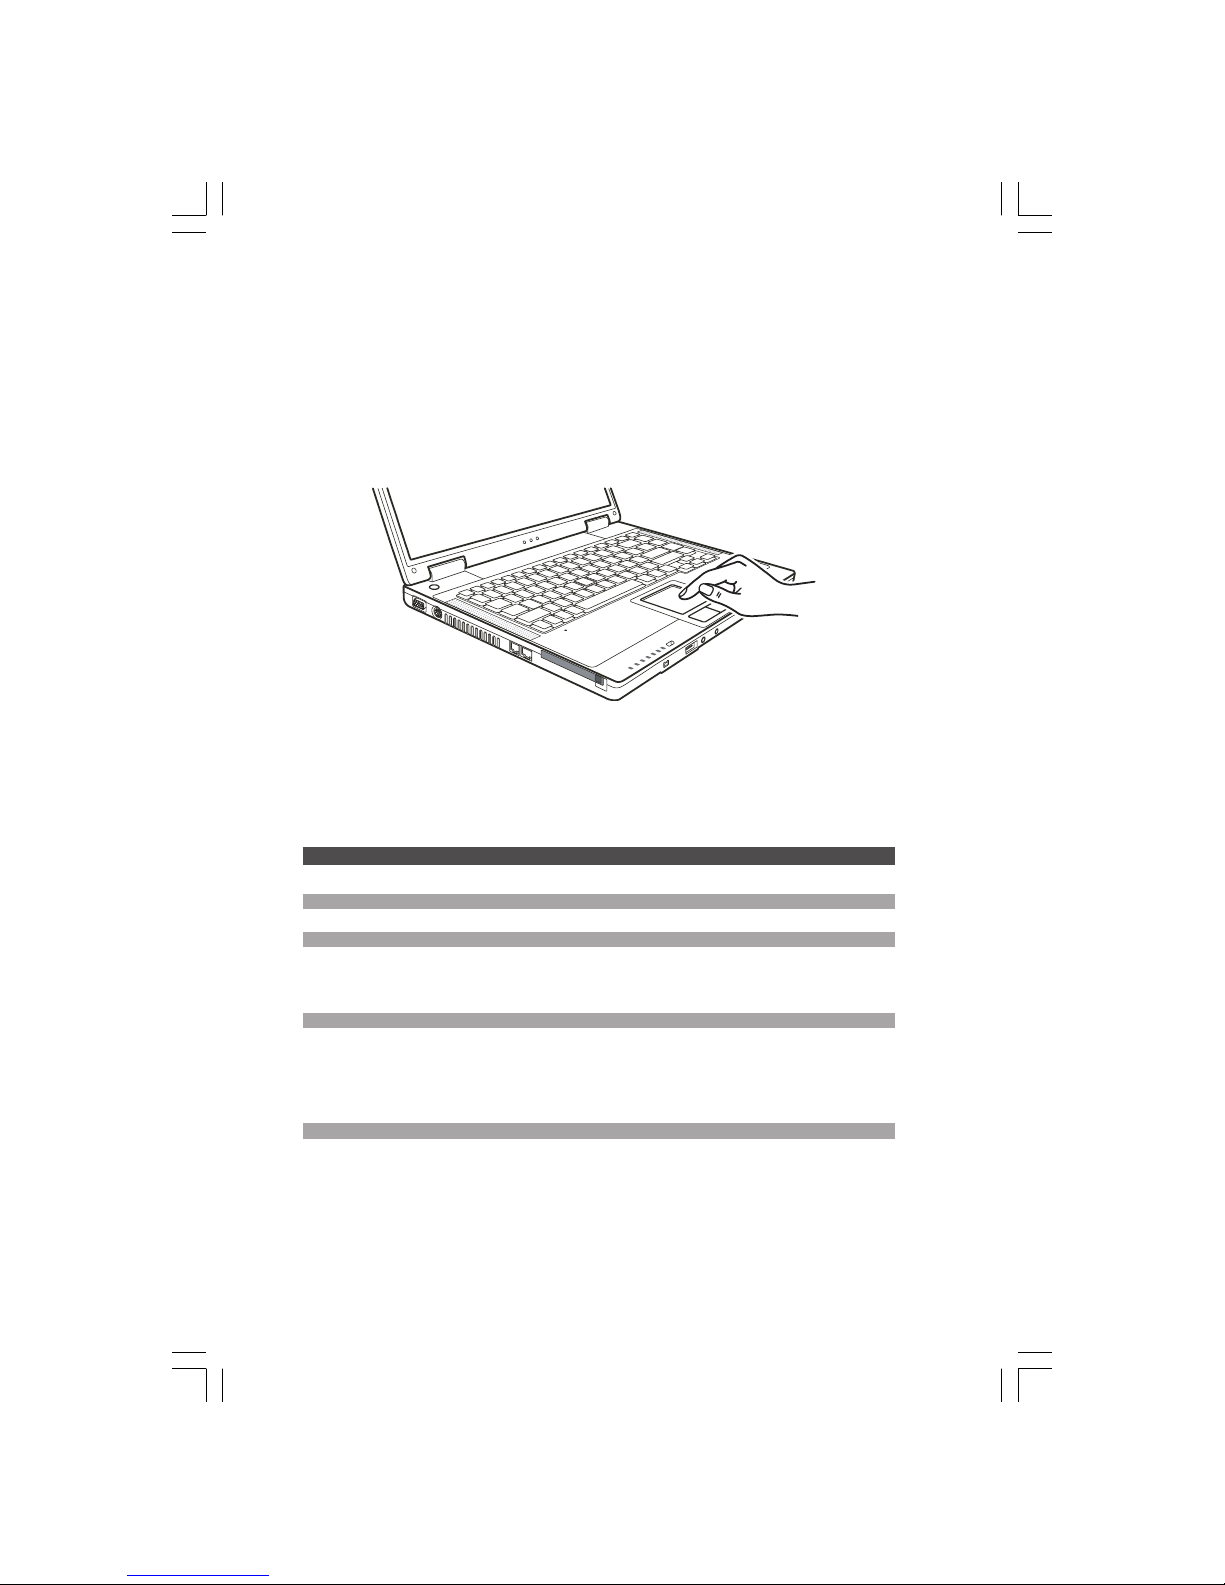
Using the Touchpad
CAUTION: Do not use a sharp object such as a pen on the touchpad. Doing so may damage the
touchpad surface.
NOTE: For optimal performance of the touchpad, keep your fingers and the pads clean and dry.
When tapping on the pad, tap lightly. Do not use excessive force.
The touchpad is a pointing device that allows you to communicate with the computer by controlling the location of
the pointer on the screen and making selection with the buttons.
The touchpad consists of a rectangular pad and a left and right buttons. To use the touchpad, place your forefinger or
thumb on the pad. The rectangular pad acts like a miniature duplicate of your display. As you slide your fingertip across
the pad, the pointer (also called cursor) on the screen moves accordingly. When your finger reaches the edge of the pad,
simply relocate yourself by lifting the finger and placing it on the other side of the pad.
Here are some common terms that you should know when using the touchpad:
Term Action
Point Move your finger on the pad until the cursor points to the selection on the screen.
Click Press and release the left button.
–or–
Tap gently anywhere on the pad.
Double-click Press and release the left button twice in quick succession.
–or–
Tap twice on the pad rapidly.
Drag and drop Press and hold the left button, then move your finger until you reach your destination (drag). Finally,
release the button (drop) when you finish dragging your selection to the destination. The object will
drop into the new location.
–or–
Gently tap twice on the pad and on the second tap, keep your finger in contact with the pad. Then, move
your finger across the pad to drag the selected object to your destination. When you lift your finger
from the pad, the selected object will drop into place.
Scroll To scroll is to move up and down or left and right in the working area on the screen.
To move vertically, place your finger on the right or left edge of the pad and slide your finger up and
down along the edge. To move horizontally, place your finger on the top or bottom edge of the pad and
slide your finger left and right.
This function works only after you install the touchpad driver supplied with the computer and it may
not work for all applications.
Page 11
11
PRESTIGIO NOBILE 1520
ENG
TABLE NOTE: If you swap the left and right buttons, “tapping” on the touchpad as an
alternative method of pressing the left button will no longer be valid.
Configuring the Touchpad
You may want to configure the touchpad to suit your needs. For example, if you are a left-handed user, you can swap
the two buttons so that you can use the right button as the left button and vise versa. You can also change the size of
the on-screen pointer, the speed of the pointer, and so on.
To configure the touchpad, you can use the standard Microsoft or IBM PS/2 driver if you are using Windows. However,
you can install the touchpad driver supplied with your computer to take advantage of more powerful features.
Using the DVD Drive
Your computer comes with a DVD drive, usually configured as drive D. Depending on the model, your drive is one of the
following:
Combo drive can work both as a DVD-ROM drive (for reading CD, CD–R, CD–RW, DVD, DVD-R, DVD+R, DVD–RW, and
DVD+RW discs) and as a CD–RW drive (for writing to CD–R/–RW discs).
DVD Dual drive aside from the Combo drive function, can write to DVD+R/+RW/–R/–RW discs.
CAUTION:
When inserting a disc, do not use force.
Make sure that the disc is correctly inserted into the tray, and then close the tray.
Do not leave the DVD tray open. Also, avoid touching the lens in the tray with your hand. If the
lens becomes dirty, the DVD drive may malfunction.
Do not wipe the lens using materials with rough surface (such as paper towel). Instead, use a
cotton swab to gently wipe the lens.
FDA regulations require the following statement for all laser-based devices: “Caution, Use of
controls or adjustments or performance of procedures other than those specified herein may
result in hazardous radiation exposure.”
NOTE: The DVD drive is classified as a Class 1 laser product. This label is located on the DVD drive.
NOTE: For DVD and Combo drives only. This product incorporates copyright protection
technology that is protected by method claims of certain U.S. patents and other intellectual
property rights owned by Macrovision Corporation and other rights owners. Use of this
copyright protection technology must be authorized by Macrovision Corporation, and is
intended for home and other limited viewing uses only unless otherwise authorized by
Macrovision Corporation. Reverse engineering or disassembly is prohibited.
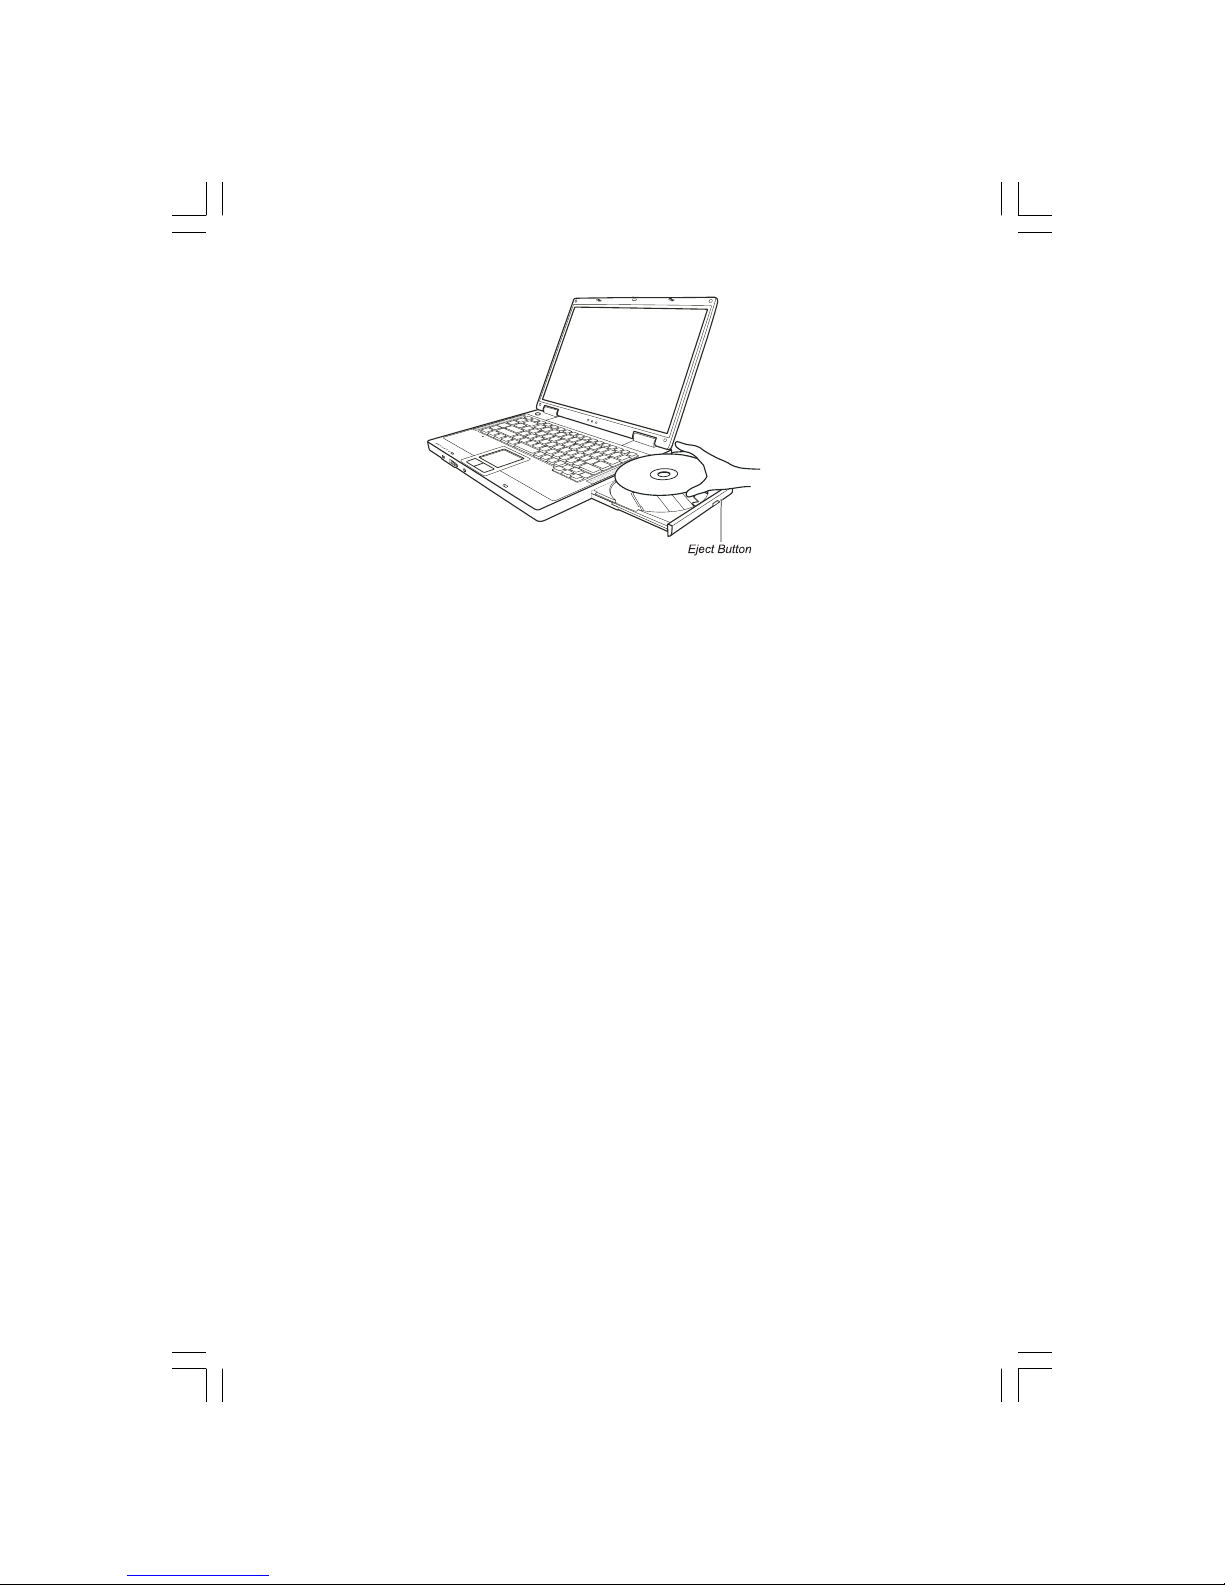
Inserting and Removing a Disc
Follow this procedure to insert or remove a disc:
1. Turn on the computer.
2. Press the eject button and the DVD tray will slide out partially. Gently pull on it until it is fully extended.
3. To insert a disc, place down the disc in the tray with its label facing up. Slightly press the center of the disc until it clicks
into place.
Page 12
12
PRESTIGIO NOBILE 1520
ENG
To remove a disc, hold the disc by its outer edge and lift it up from the tray.
4. Gently push the tray back into the drive.
NOTE: In the unlikely event that you are unable to release the DVD tray by pressing the eject
button, you can manually release the disc.
Using the Video Features
The video subsystem of your computer features:
15.4-inch TFT (Thin-Film Transistor) color LCD display with 1280.800 WXGA resolution
Simultaneous display on LCD and external monitor, which is useful when you have a presentation as you can control
the screen from your computer and face the audience at the same time.
S-video support allows the connection of a TV set, and simultaneous display on TV and external monitor.
Multi-display capability, which allows you to expand your desktop on the screen to another display device so that you
have more desktop space to work on.
Power Management
NOTE:
Before using the multi-display capability, the video driver supplied with your computer must be
installed.
The computer enters the Standby or Hibernation mode when the LCD is closed. If you want to
use the computer with the LCD closed, set Do Nothing to the “When I close the lid of my
portable computer” option in the Power Options Properties. Thus the computer does not enter
the Standby or Hibernation mode when the LCD is closed.
Configuring the Display Modes
NOTE:
To take advantage of the enhanced video capabilities, the video driver supplied with your
computer must be installed.
When using an external CRT monitor, the resolution depends on the CRT monitor’s supported
resolution.
Page 13
13
PRESTIGIO NOBILE 1520
ENG
Your computer has been set to a default resolution and number of colors before shipment. You can view and change
display settings through your operating system. See your operating system documentation or online help for specific
information.
For displaying in higher resolutions, you can connect an external monitor that supports higher resolutions.
Using the Audio Features
NOTE:
To take advantage of the enhanced audio capabilities, the audio driver supplied with your
computer must be installed.
If you experience interference while recording, try lowering the microphone recording volume.
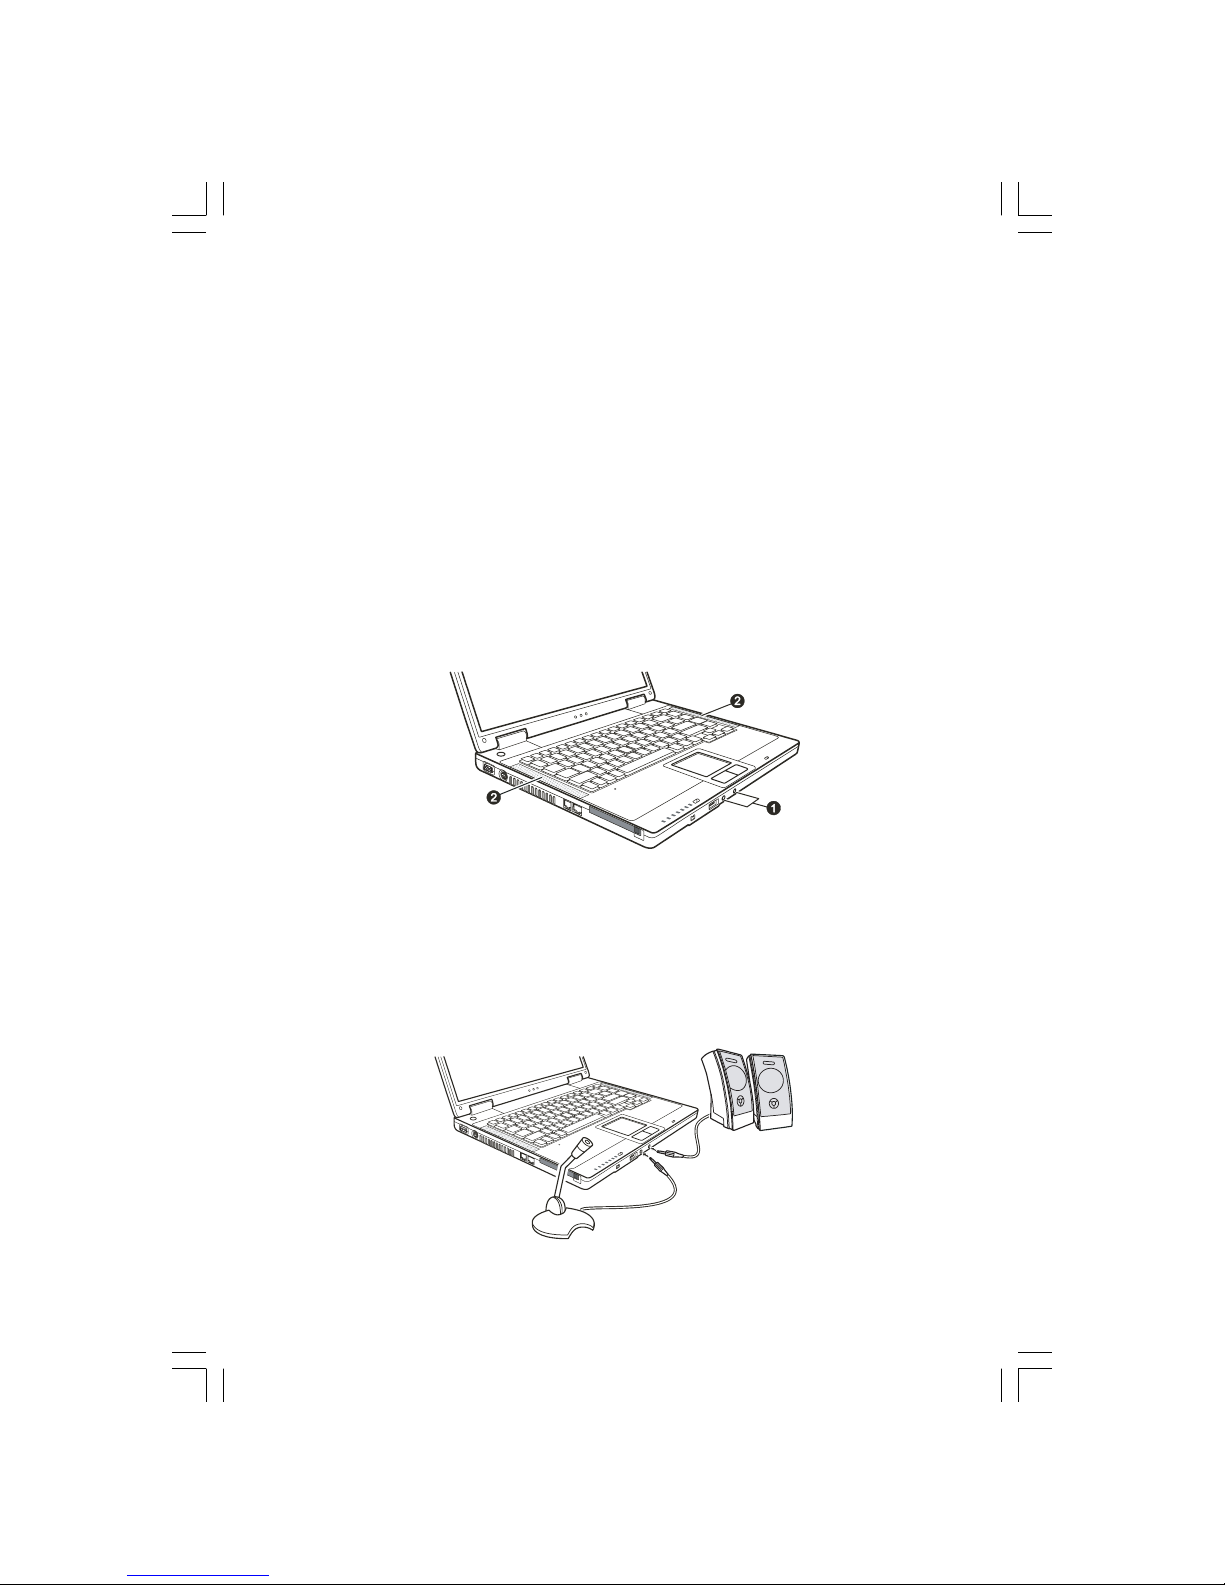
The audio subsystem of your computer features:
Digital audio and analog mixing functions required for recording and playing sound on your computer
Sound Blaster Pro compatibility
External audio connectors (1) and
A set of speakers (2)
Ways of playing and recording sound vary with the operating system used. See your operating system documentation
or online help for specific information.
Connecting Audio Devices
For higher audio quality, you can send or receive sound through external audio devices.
NOTE: After connecting an external audio device, make sure that you specify the use of the
correct audio device in Windows.
Page 14
14
PRESTIGIO NOBILE 1520
ENG
Microphone Connector can be connected to an external microphone for recording voice or sound.
S/PDIF Connector can be connected to the line-in connector of S/PDIF (Sony/Philips Digital InterFace) compliant as well
as ordinary powered speakers with built-in amplifiers, headphones, or earphone set. S/PDIF is a new audio transfer file
format that ensures a high quality digital audio output through optical fibers.
NOTE:
When using the external speakers/headphones or microphone, you cannot use the internal
one.
The audio output connector is classified as a Class 1 laser product.
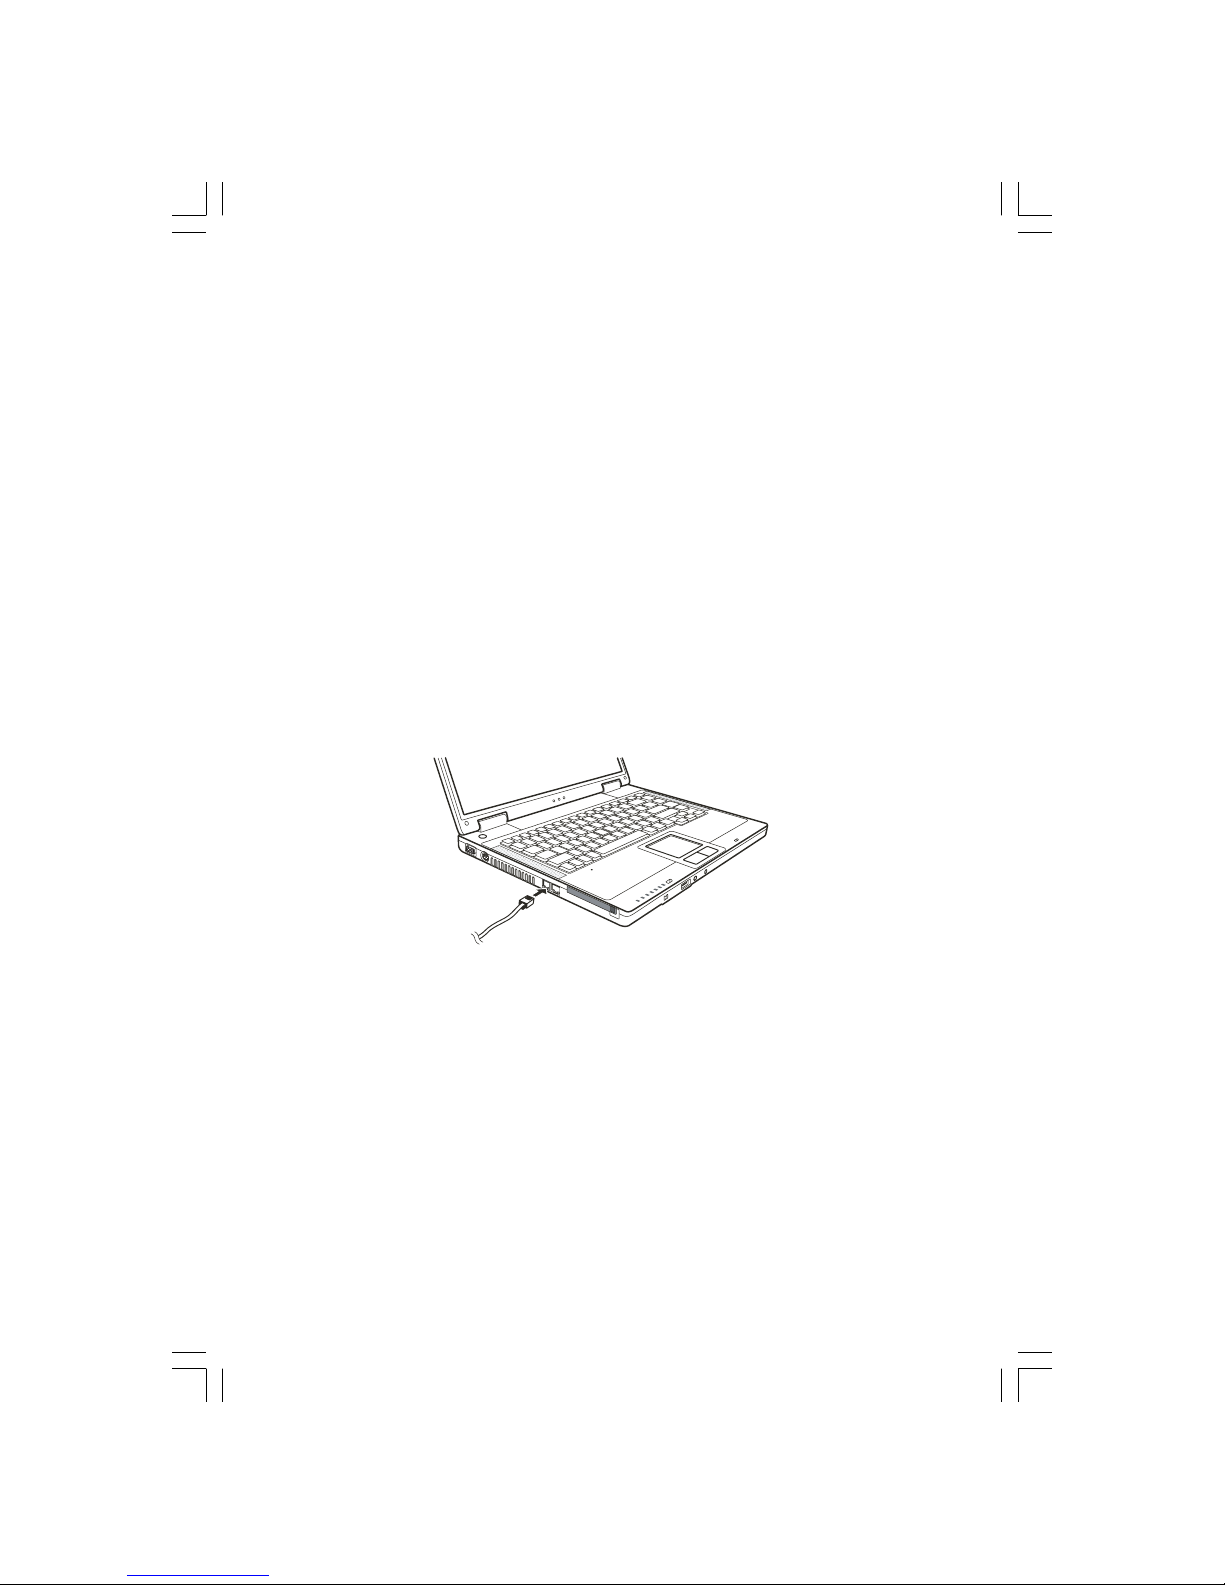
Using the Communication Features
Using the Modem
NOTE: To take advantage of the modem feature, the modem driver supplied with your
computer must be installed.
The internal 56 K fax/data modem allows you to use the telephone line to communicate with others by fax, email, or
connect to an online service or bulletin board.
To connect the telephone line to the modem, connect one end of the modem cable to the RJ-11 connector on the
computer and the other end to the phone line.
NOTE:
When using the communication software, you may have to disable power management.
Set the COM port of the modem to COM3.
Set parameters such as modem speed (baud rate) and line type (pulse dialing or tone dialing).
Do not enter the Standby mode when using the communication software.
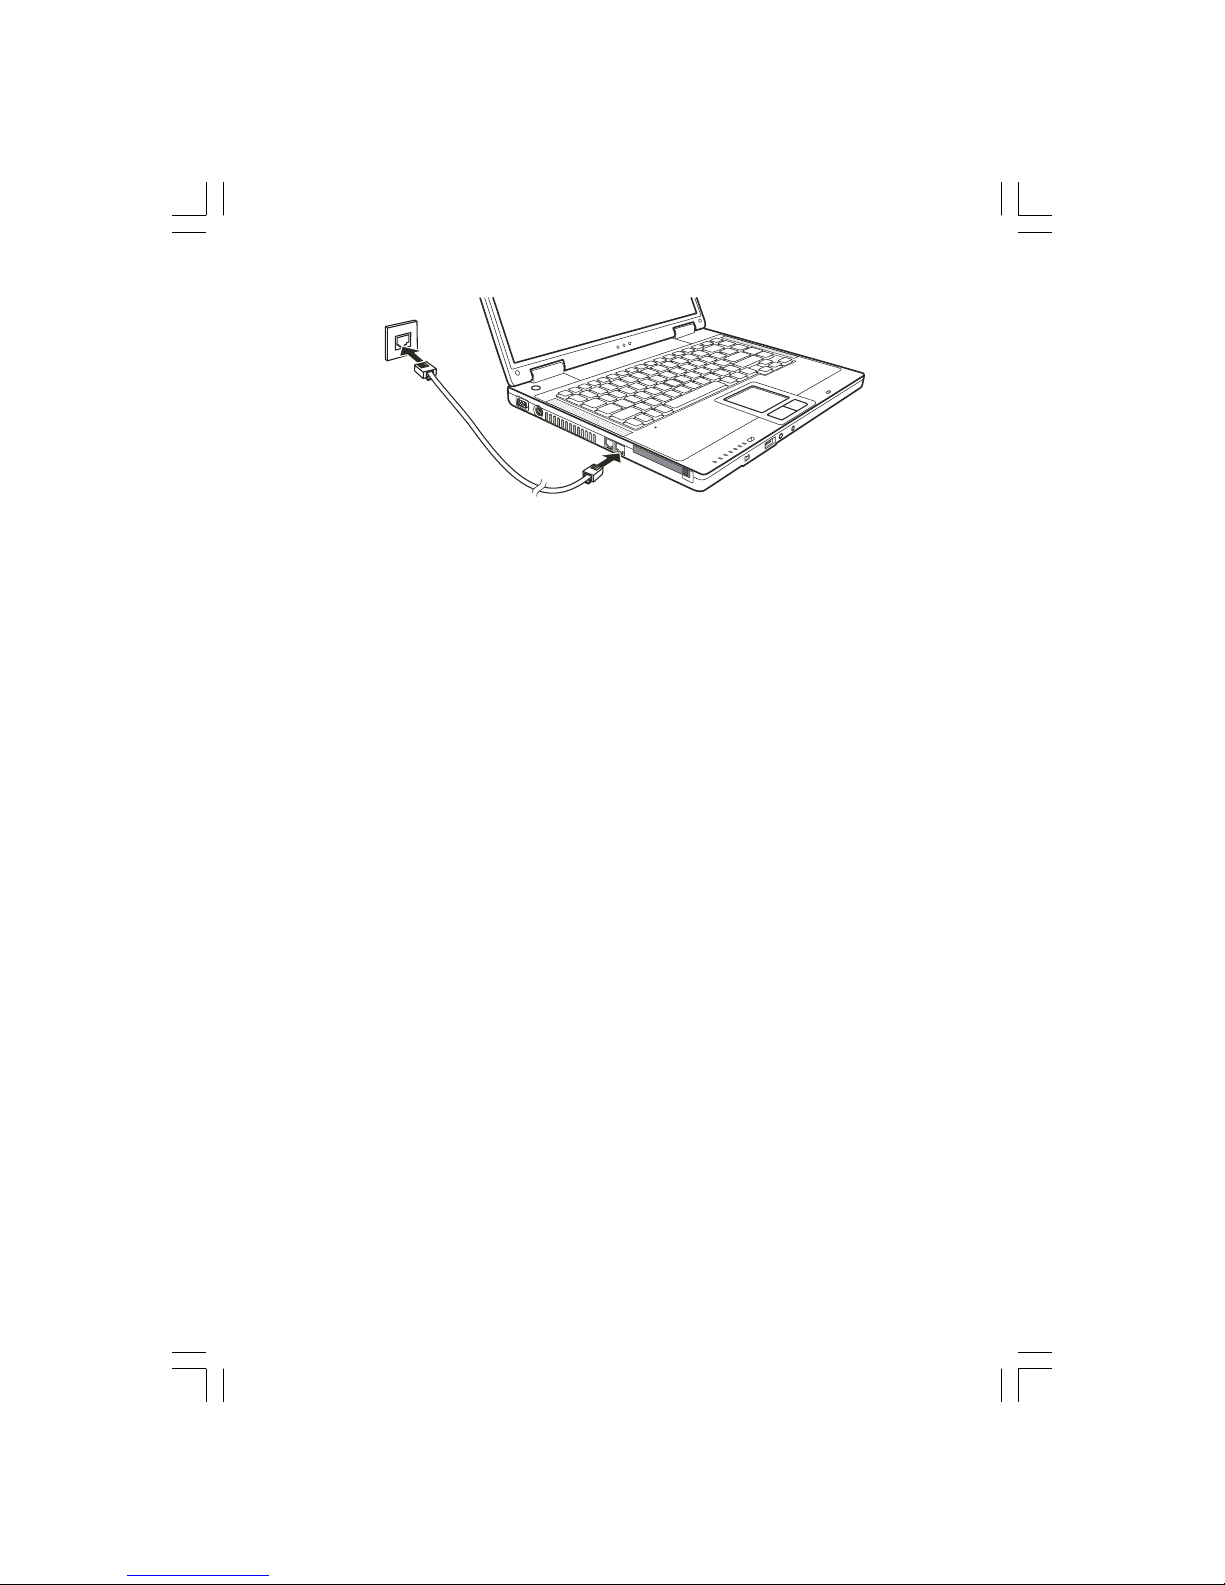
Using the LAN
NOTE: To take advantage of the LAN feature, the LAN driver supplied with your computer must
be installed.
The internal 10/100Base-TX LAN (Local Area Network) module allows you to connect your computer to a network. It
supports data transfer rate up to 100 Mbps.
To connect the network cable to the LAN module, connect one end of the LAN cable to the RJ-45 connector on the
computer and the other end to the network hub.
Page 15
15
PRESTIGIO NOBILE 1520
ENG
Using the Wireless LAN
Depending on your model, an internal Mini PCI wireless LAN (WLAN) card may have been pre-installed by your computer
manufacturer at the factory. This card allows you to access corporate networks or the Internet in a wireless environment.
The WLAN features include:
IEEE 802.11b/g standard compliance
2.4 GHz DSSS (Direct Sequence Spread Spectrum) technology
Peer-to-Peer (Ad-Hoc) and Access Point (Infrastructure) modes support
WEP (Wired Equivalent Privacy) 64/128-bit data encryption
Transmission rate at 9 / 18 / 36 / 54 Mbps (802.11g mode), with automatic data rating at 1 / 2 / 11 Mbps (802.11b
mode)
To take advantage of the WLAN feature, make sure that the WLAN driver is installed correctly. If your WLAN card was
provided by your dealer instead of the computer manufacturer, contact your dealer for the correct driver to use.
Configuring the WLAN
After driver installation, you can use the WLAN utility to configure and monitor your WLAN connection. If you are using
Windows XP, you can also use its built-in WLAN utility. Follow this procedure to launch the WLAN utility in Windows
XP:
1. Select Control Panel from the Start menu.
2. Click Network and Internet Connections.
3. Click Network Connections, and then double-click the Wireless Network Connection icon.
4. Click Properties in the Wireless Network Connection Status dialog box.
5. You can configure your WLAN settings in the Wireless Network Connection Properties dialog box.
Connecting to a Wireless Network
By default, Windows XP automatically detects available wireless networks. To connect to a wireless network:
1. Make sure that the wireless LAN radio is on (controlled by Fn+F1.) The WLAN indicator should glow.
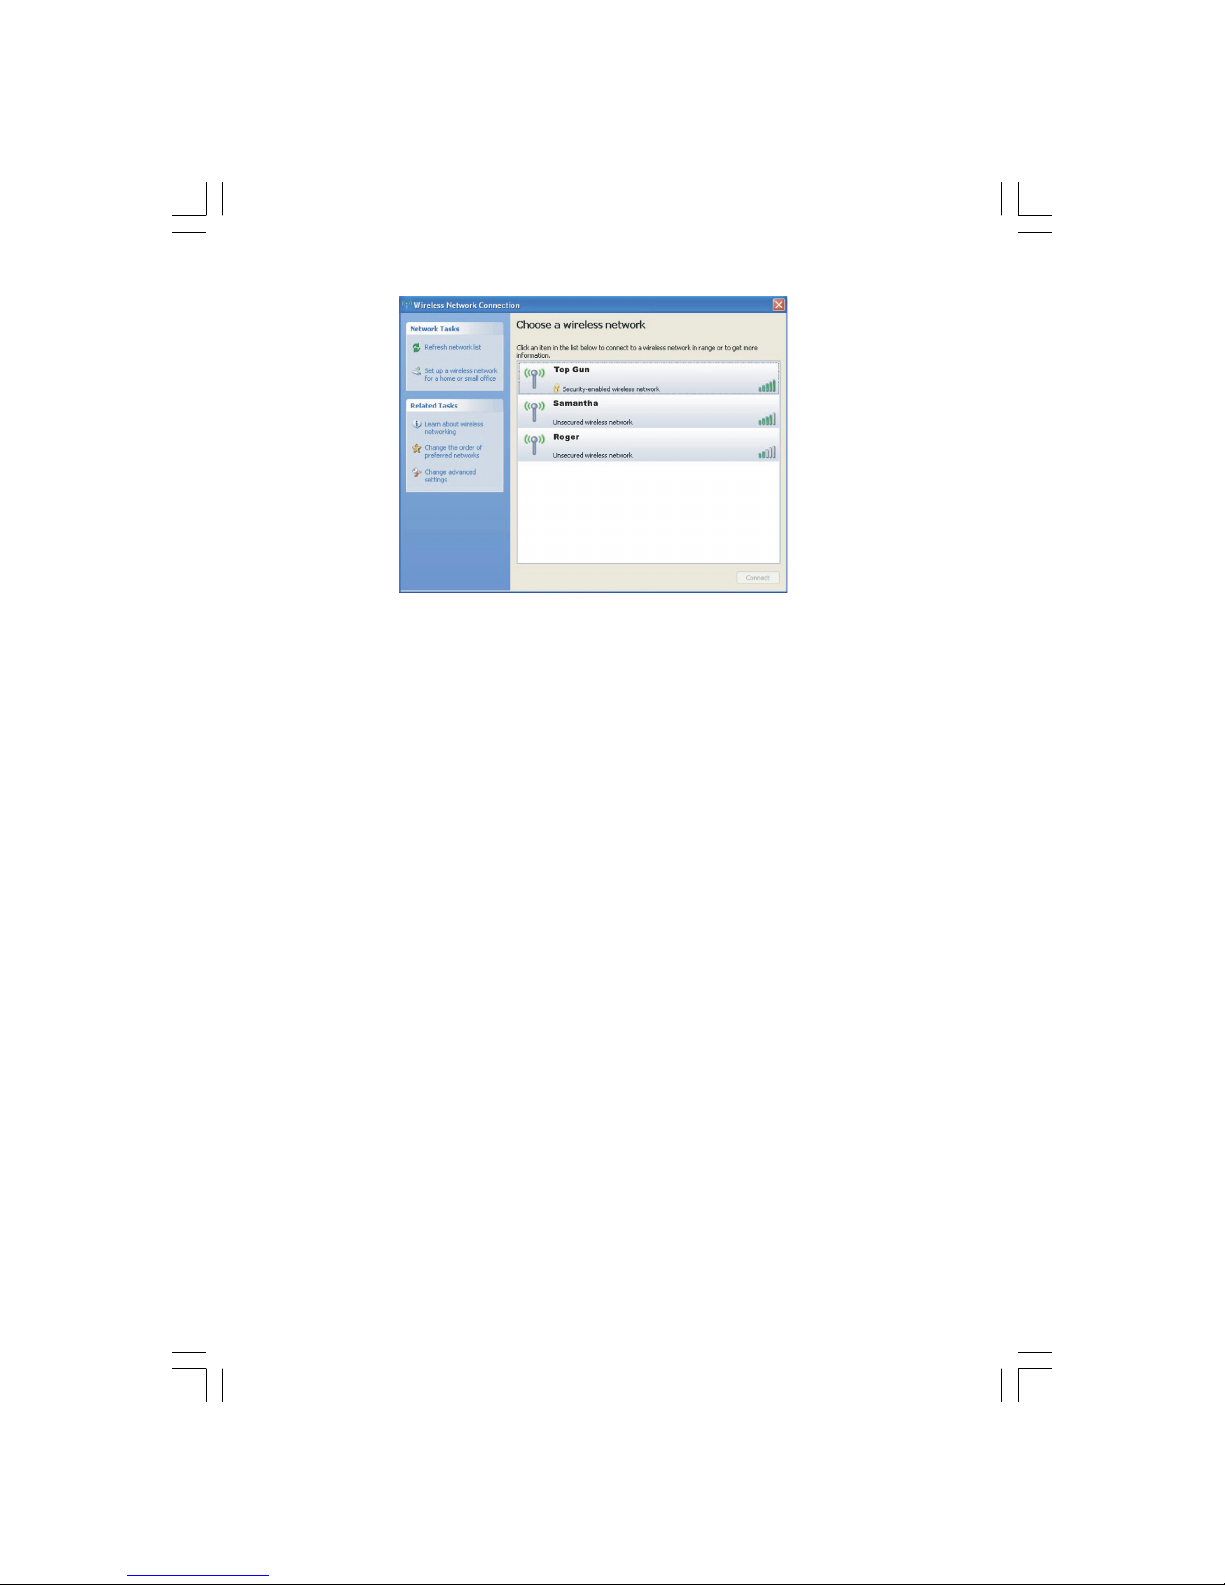
2. Double-click the Wireless Network Connection icon located on your Windows system tray. If any wireless network is
detected, the following window appears on screen.
Page 16
16
PRESTIGIO NOBILE 1520
ENG
3. Select a wireless network to connect to by clicking on a selection, then click on Connect.
4. Depending on the settings, you may be asked to enter a WEP key.
Turning Off/On the WLAN Radio
NOTE:
The FAA (Federal Aviation Agency) has deemed it unsafe to operate wireless devices in aircraft
as this may interfere with flight safety. Remember to turn off wireless LAN radio when using
your computer in the airplane.
The information in this section applies to models with the wireless LAN module only.
Turning the wireless LAN radio off is not the same as turning off the Windows WLAN utility.
Your computer has a built-in Fn+F1 WLAN hot key to switch the WLAN radio on/off.
If you need to temporarily turn off the WLAN radio, press Fn+F1. The WLAN indicator will turn off. To resume network
connection, press Fn+F1 again. The WLAN indicator will glow.
After starting up your computer, the wireless LAN radio’s on/off state depends on the last state when you turned off the
system.
It takes approximately 30 seconds for your computer to make a successful WLAN connection and approximately 10
seconds to disconnect.
Managing Power
Your computer operates either on external AC power or on internal battery power.
AC Adapter
CAUTION:
The AC adapter is designed for use with your computer only. Connecting the AC adapter to
another device can damage the adapter.
Page 17

17
PRESTIGIO NOBILE 1520
ENG
The AC power cord supplied with your computer is for use in the country where you
purchased your computer. If you plan to go overseas with the computer, consult your dealer for
the appropriate power cord.
When you disconnect the AC adapter, disconnect from the electrical outlet first and then from
the computer. A reverse procedure may damage the AC adapter or computer.
When unplugging the connector, always hold the plug head. Never pull on the cord.
The AC adapter serves as a converter from AC (Alternating Current) to DC (Direct Current) power because your computer
runs on DC power, but an electrical outlet usually provides AC power. It also charges the battery pack when connected
to AC power.
The adapter operates on any voltage in the range of 100~240 V AC.
Battery Pack
The battery pack is the internal power source for the computer. It is rechargeable using the AC adapter.
The operating time of a fully charged battery pack depends on how you are using the computer. When your applications
often access peripherals, you will experience a shorter operating time.
NOTE: Care and maintenance information for the battery is provided in the “Battery Pack
Guidelines” section.
Charging the Battery Pack
NOTE:
Charging will not start if the battery’s temperature is below 0 °C (32 °F) or above 50 °C (122 °F).
The charging process will stop and the Battery Charge Indicator flashes amber when the
battery’s temperature gets above 60 °C (140 °F). If this happens, the battery pack may be
damaged. Please contact your dealer.
During charging, do not disconnect the AC adapter before the battery has been fully charged;
otherwise you will get a prematurely charged battery.
To charge the battery pack, connect the AC adapter to the computer and an electrical outlet. The Battery Charge Indicator
on the computer glows amber to indicate that charging is in progress. You are advised to keep the computer power off
while the battery is being charged. When the battery is fully charged, the Battery Charge Indicator glows green.
The charging times are as follows:
Batter y Type Charging Time when Computer is Off Charging Time when Computer is On and in Idle State
6-cell (2200 mAH) 2~3 hours 4~6 hours
9-cell (2200 mAH) 3~4 hours 6~8 hours
Page 18

18
PRESTIGIO NOBILE 1520
ENG
CAUTION: After the computer has been fully recharged, do not immediately disconnect and
reconnect the AC adapter to charge it again. Doing so may damage the battery.
NOTE: The battery level may automatically lessen due to the self-discharge process (0.21 % per
day), even when the battery pack is fully charged (100 %). This happens no matter if the battery
pack is installed in the computer.
Initializing the Battery Pack
You need to initialize a new battery pack before using it for the first time or when the actual operating time of a battery
pack is much less than expected.
Initializing is the process of fully charging, discharging, and then charging. It can take several hours.
1. Make sure that the computer power is turned off. Connect the AC adapter to fully charge the battery pack.
2. After the battery pack is fully charged, turn on the computer. When the message “Press <F2> to enter System
Configuration Utility” appears, press the F2 key to invoke the program.
3. Disconnect the AC adapter and leave the computer on until the battery is fully discharged. The computer will shut
down automatically.
4. Connect the AC adapter to fully charge the battery pack.
Checking the Battery Level
NOTE: Any battery level indication is an estimated result. The actual operating time can be
different from the estimated time, depending on how you are using the computer.
You can check the approximate battery level using the battery meter function of the operating system. To read the
battery level in Windows, click the battery icon on the taskbar.
Battery Low Signals and Actions
Battery Low occurs when the battery has approximately 10 % (Windows default setting) of its charge remaining. The
computer gives warning beeps or messages and the Battery Charge Indicator blinks red to alert you to take actions.
NOTE: You can set up your threshold and signals of Battery Low under Windows.
Immediately save your data upon Battery Low. The remaining operating time depends on how you are using the
computer. If you are using the audio subsystem, PC card, hard or optical drives, the battery might run out of charge very
quickly.
Always respond to Battery Low by placing your computer on the Standby or Hibernation mode, turning off the
computer, or connecting the AC adapter.
If you do not take any action, the computer will automatically hibernate and turn off.
CAUTION:
If you are using a flash PC card, do not access the card during battery low periods. This is
because the access may take longer than the time it takes the battery to run out of charge, thus
making your access to the card unsuccessful.
If you fail to save your data when the battery completely runs out of charge, then you lose
your data.
Page 19

19
PRESTIGIO NOBILE 1520
ENG
Power Management
Your computer supports ACPI (Advanced Configuration and Power Interface) for power management. The power
management feature allows you to reduce the power consumption for energy saving.
With an ACPI-compliant operating system such as Windows XP, power supply to different computer components is
controlled on an as-needed basis. This allows maximum power conservation and performance at the same time.
In general, Windows’ power management works in this way:
What... When...
Power to the hard disk is turned off When the hard disk has been idle for a set period.
Power to the display is turned off When the display has been idle for a set period.
The computer enters the Standby mode. When the entire system has been idle for a set period.
The hard disk and display are turned When you press the Fn+F12 hot key. *
off and the entire system consumes When you close the cover. *
less power. When you press the power button. *
The computer enters the Hibernation When you press the Fn+F12 hot key. *
mode. (See the next subsection When you close the cover. *
for more information.) When you press the power button. *
* Depends on your settings in Windows.
For detailed information on power management, see Windows’ Help.
Hibernation
NOTE: Make sure that the hibernation feature is enabled in the Hibernate tab of the Power
Options Properties from the Control Panel in Windows XP.
Hibernation is a very useful feature. People frequently open many applications when they use computers. It takes some
time to get all these applications open and running, and normally they all have to be closed before the computer can
be turned off.
When you use the hibernation feature, you do not have to close the applications. The computer stores the state of your
computer to a file on the hard disk and then shuts down. The next time you turn on your computer, you return to exactly
where you left off.
Power-Saving Tips
In addition to your computer’s automatic power management, you can do your part to maximize the battery’s operating
time by following these suggestions.
Do not disable Power Management.
Decrease the LCD brightness to the lowest comfortable level.
If you work with an application that uses a PC card, exit the application when you finish using it.
If you have a PC card installed, remove it when not in use. Some PC cards drain power even while they are inactive.
Deactivate the WLAN function if you are not using it.
Turn off the computer when you are not using it.
Page 20
20
PRESTIGIO NOBILE 1520
ENG
Expanding Your Computer
You can expand the capabilities of your computer by connecting other peripheral devices. When using a device, be sure
to read the instructions accompanying the device together with the relevant section in this chapter.
Connecting an External Monitor
If you want the benefits of a larger display screen with higher resolution, you can connect an external CRT monitor to
your computer.
Follow this procedure to connect an external monitor:
1. Make sure that the computer is not turned on.
2. Plug the CRT monitor’s D-type signal connector to the computer’s VGA port.
3. Plug one end of the CRT monitor’s power cord into the power socket on the monitor and the other end to an electrical
outlet.
4. To use the CRT monitor, turn on the CRT monitor before turning on the computer.
5. The CRT monitor should respond by default. If not, you can switch the display to the CRT monitor, or to multi-display
by pressing Fn+F5. In Windows, you can also change the display through the settings in Display Properties.
6. You can change display settings through your operating system. See your operating system documentation or online
help for specific information.
CAUTION: Do not disconnect the external display while the computer is in Standby mode or
Hibernation mode. If no external display is connected when the computer resumes, the
computer’s LCD might not display properly.
Connecting a TV
For entertainment, conferences, or presentations, you can connect a TV to your computer.
Follow this procedure to connect a TV:
1. Make sure that the computer is not turned on.
2. Prepare a S-video cable. Plug the appropriate end of the S-video cable to the computer’s S-video connector and the
other end to the TV’s S-video input connector.
Page 21
21
PRESTIGIO NOBILE 1520
ENG
3. Since your computer cannot output sound to a TV, you can connect external speakers to the computer for audio
output.
4. Turn on the power of the TV and switch to the video mode.
5. Turn on the power of the computer and switch the display to TV by changing the settings in Display Properties in
Windows.
CAUTION:
Do not set the display to both LCD and TV. This may cause unstable display on the LCD.
Do not disconnect the TV while the computer is in the Standby or Hibernation mode. If the TV
is not connected when the computer resumes, the LCD might not display properly.
NOTE: Make sure that the VGA driver is installed correctly.
Connecting a USB Device
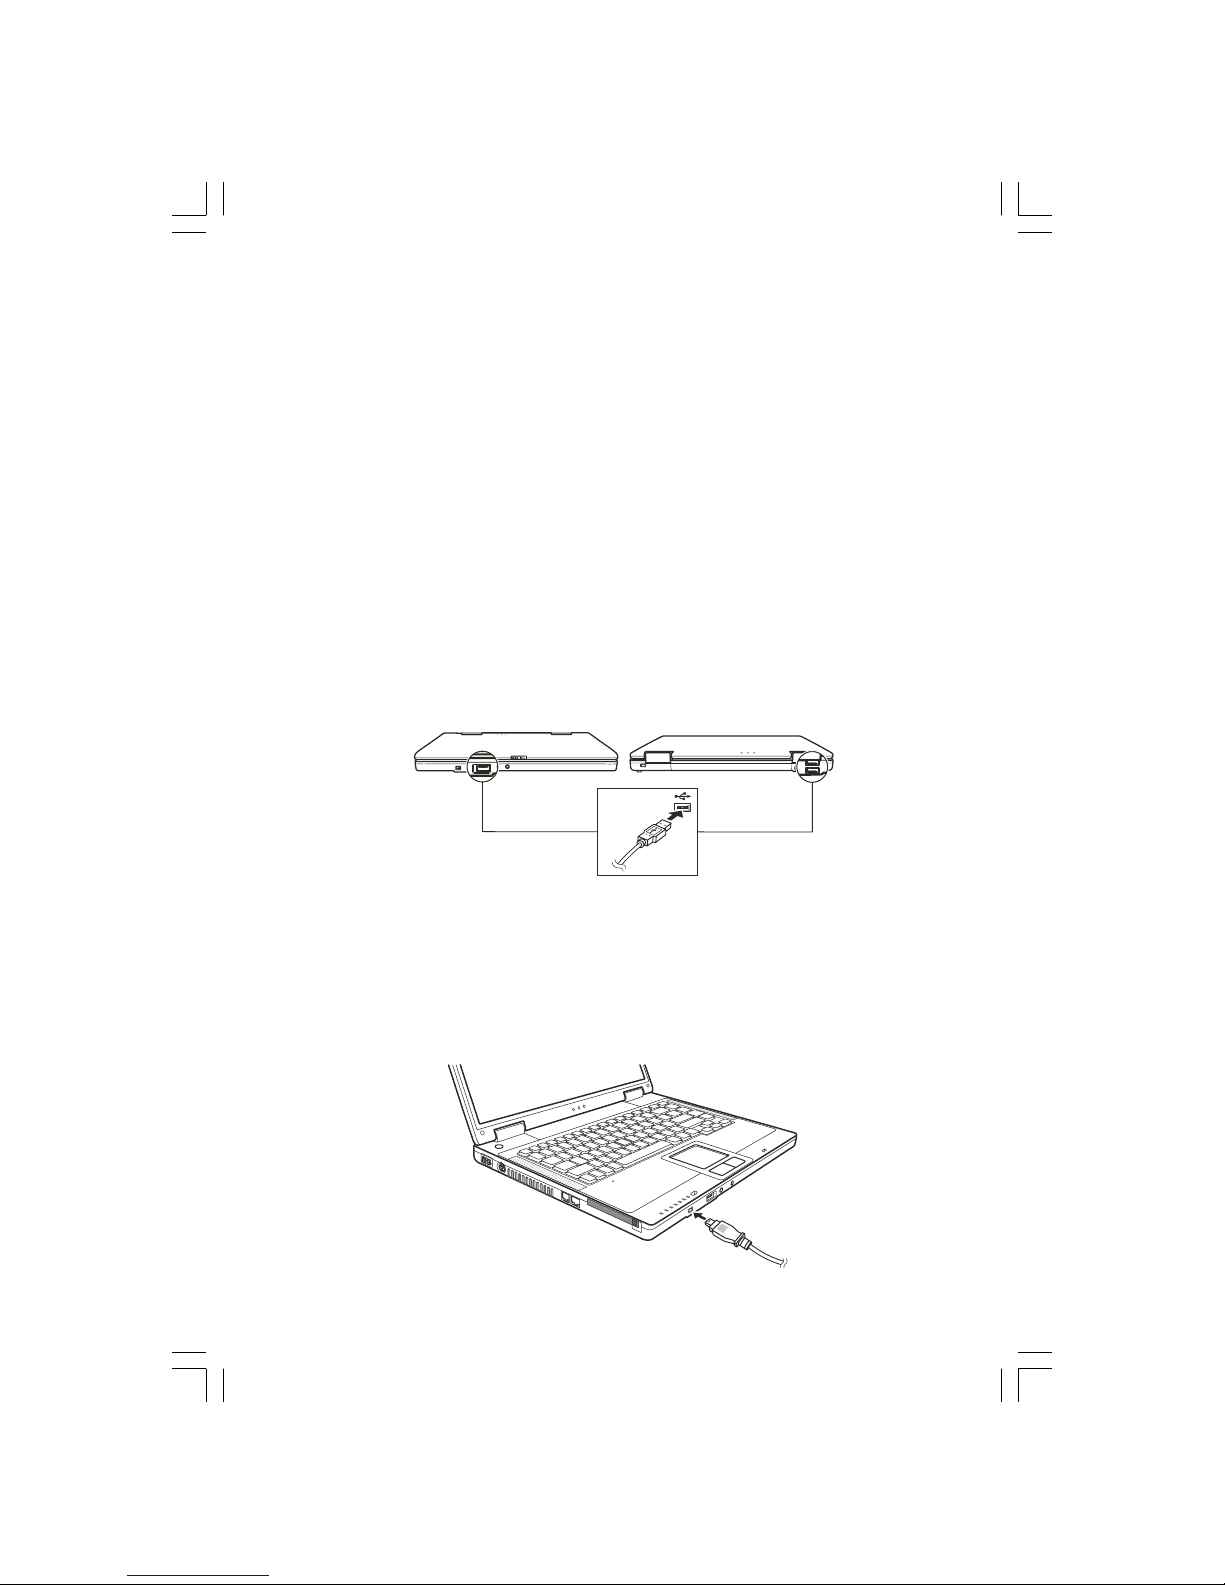
Your computer has three USB ports for connecting USB devices, such as a digital camera, scanner, printer, modem, and
mouse.
USB (Universal Serial Bus) is specified to be an industry standard extension to the PC architecture. It supports “Plug-andPlay” technology so you can install and remove USB devices without turning off the computer. With its multiple
connection capability, up to 127 devices can be connected in a daisy-chain configuration. In addition, you can use a USB
hub that converts a single USB connector into multiple ports where USB devices can be connected.
The USB ports support transfer rates up to 12 MB/s for USB 1.1 devices and 480 MB/s for USB 2.0 devices.
To connect a USB device, simply plug the device cable to one of the USB ports.
Connecting an IEEE 1394a Device
Your computer has a mini IEEE 1394a port for connecting IEEE 1394 devices.
IEEE 1394a is the next-generation serial bus standard, featuring high-speed data transfer, multi-channel communication
link, and “Hot Plug” connectivity. It allows connection of up to 63 devices. The applications include not only computer
peripheral devices such as scanner, printer and high-quality CCD, but also consumer electronic equipment such as DVCAM
and VCR.
To connect an IEEE 1394a device, prepare an IEEE 1394a cable. Plug the appropriate end of the cable to the computer’s
mini IEEE 1394a connector and the other end to the device’s corresponding connector.
Page 22

22
PRESTIGIO NOBILE 1520
ENG
Using PC Cards
Your computer has a PC card slot.
PC cards are credit card-sized peripheral products based on the standards developed by PCMCIA (Personal Computer
Memory Card International Association). PCMCIA is a non-profit association for promoting the interchangeability among
mobile computers where ruggedness, low power, and small size are critical. Ever since its foundation, the association has
been continuing their efforts to add new specifications to the PC card standard as new needs arise in the market.
PC Card Type
Your computer’s PC card slot can accommodate a type II card. Typical type II cards are flash memory, SRAM, modem, LAN,
and SCSI cards.
CardBus Support
Your computer’s PC card slot supports CardBus specifications. CardBus is the 32-bit version of PC card technology. It
allows speeds of up to 133 Mbps at 33 MHz. Typical applications are SCSI host bus and high-speed network cards.
Inserting and Removing a PC Card
NOTE:
Some PC cards require additional system resources. Before using such PC card, you may have to
free other system resources for the PC card.
Although some PC cards can be inserted and removed without turning off the computer, you
cannot remove or install PC cards in the Standby mode.
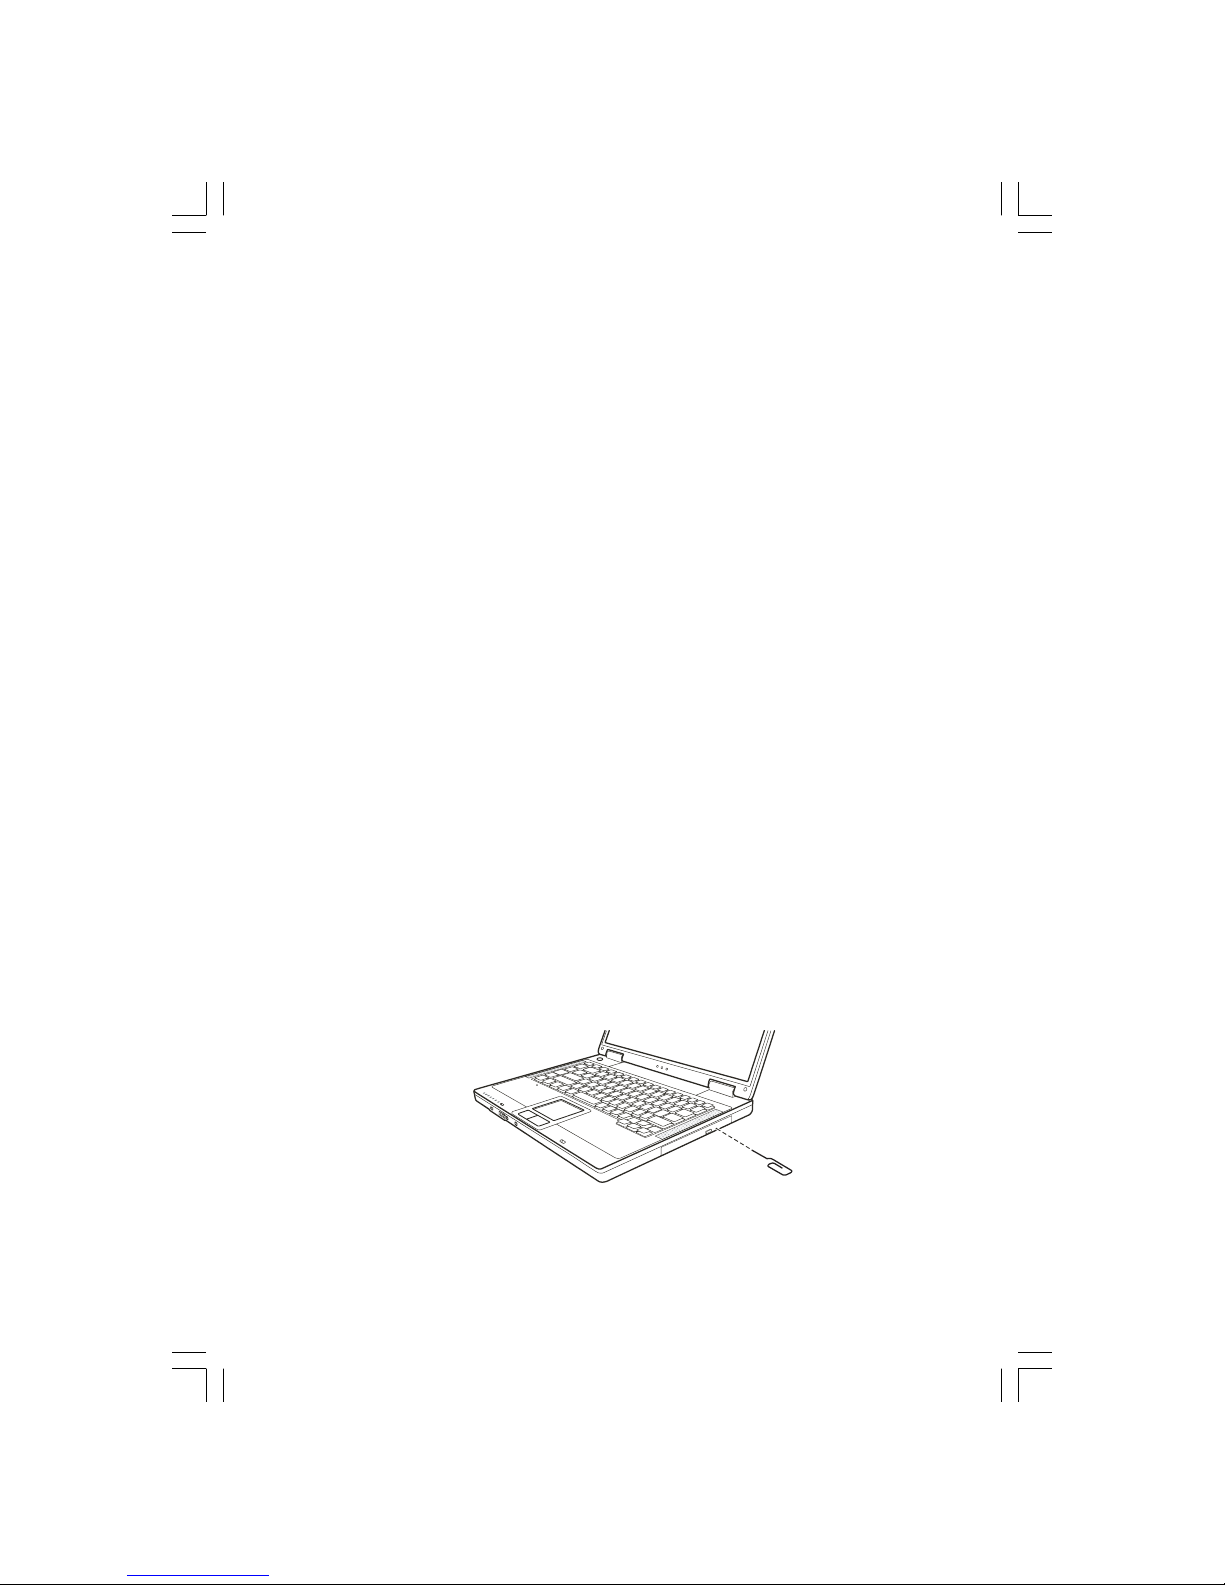
To insert a PC card:
1. Locate the PC card slot on the left side of the computer.
2. Slide the PC card, with its label facing up, into the slot until the eject button pops out.
3. When a new card is seated, the computer will detect it and try to install the appropriate driver. Follow the on-screen
instructions to complete the process.
To remove a PC card:
1. Double-click the Safely Remove Hardware icon on the taskbar and the Safely Remove Hardware window appears on
screen.
2. Select the PC card you want to disable from the list and click the Stop button.
Page 23
23
PRESTIGIO NOBILE 1520
ENG
3. Push the eject button and the card will slide out slightly.
4. Pull the card out of the slot.
Internal Components Upgrade
You can upgrade your computer by changing the CPU or adding memory. However, to avoid damage during the
installation procedure, please ask your dealer for help. Do not install an internal component by yourself.
Installing Software Drivers
To take full advantage of the unique features of your computer, some operating systems require custom software,
known as drivers, to be installed.
If you purchased the computer with Windows pre-installed, your dealer may have already installed the drivers. If not,
you need to install the drivers using the CD supplied with your computer.
How to Use the Driver CD
NOTE:
The drivers may have been updated after this manual was published. For driver upgrade, please
contact your dealer.
This CD supports Windows XP only. You are recommended to install Windows XP Service Pack 2.
The available items may differ according to your computer model.
Do not remove the driver CD when installing the driver.
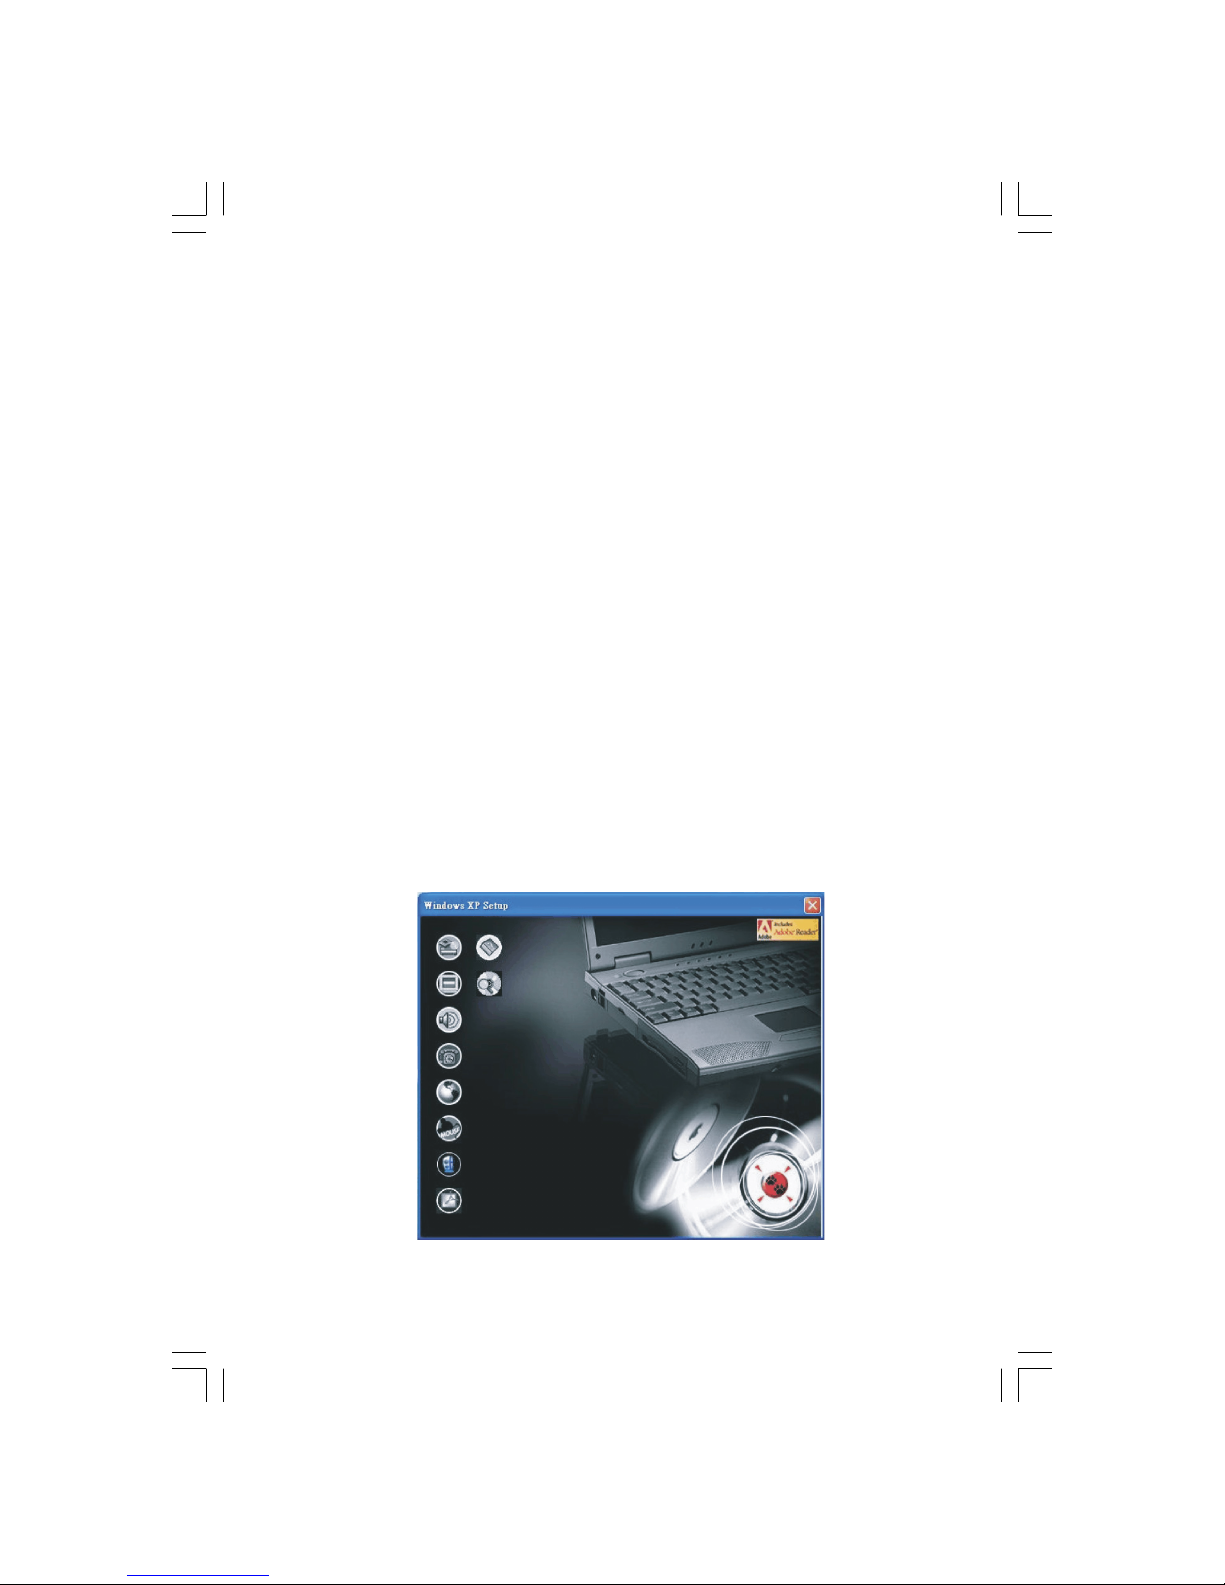
An autorun program is provided on the driver CD to help you easily install the drivers. As you insert the CD, the autorun
program automatically starts. If you need to start the program manually, run the Setup.exe program from the WSetup
directory of the CD.
The main screen appears as shown next:
Page 24
24
PRESTIGIO NOBILE 1520
ENG
To install the intended driver, just click on the corresponding icon on the left side and installation will start. The icons
and drivers are described next:
Icon Name Description
Chipset driver Ensures the full function of the following drivers. Install this driver before installing
the other device drivers.
Video driver Installs the video driver that allows you to select high-resolution displays with richer
colors.
Audio driver Installs the audio driver that allows you to take full advantage of the audio
subsystem.
NOTE: Make sure to install this driver before installing the modem driver.
Modem driver Installs the modem driver that allows you to use the modem function of the
computer.
LAN driver Installs the LAN driver that allows you to use the network function of the computer.
Touchpad driver Installs the touchpad driver that allows you to take full advantage of the touchpad
features.
WLAN driver (option) Installs the WLAN driver that allows you to use the computer’s internal Mini-PCI
Type-IIIB WLAN card’s net work function.
NOTE: The Windows Plug-and-Play capability may automatically detect the new
device (Mini-PCI WLAN card) and display the wizard requesting for drivers. Click
Cancel to bypass the wizard screen(s).
Adobe Acrobat Reader Installs the Adobe Acrobat Reader program if you do not have it on your computer.
You need Adobe Acrobat Reader to open the manual files supplied on this driver CD.
User’s Manual Allows you to select the manual in a particular language to view.
Browse CD Browses the contents of this CD.
Caring for the Computer
Taking good care of your computer will ensure a trouble-free operation and reduce the risk of damage to your computer.
Protecting the Computer
To safeguard the integrity of your computer data as well as the computer itself, you can protect the computer in several
ways as described in this section.
Using the Password
The power-on password protects your computer against unauthorized use. If the password is set, the prompt requesting for the password appears on the screen whenever the computer is turned on.
The password is set via the BIOS Setup program.
Page 25
25
PRESTIGIO NOBILE 1520
ENG
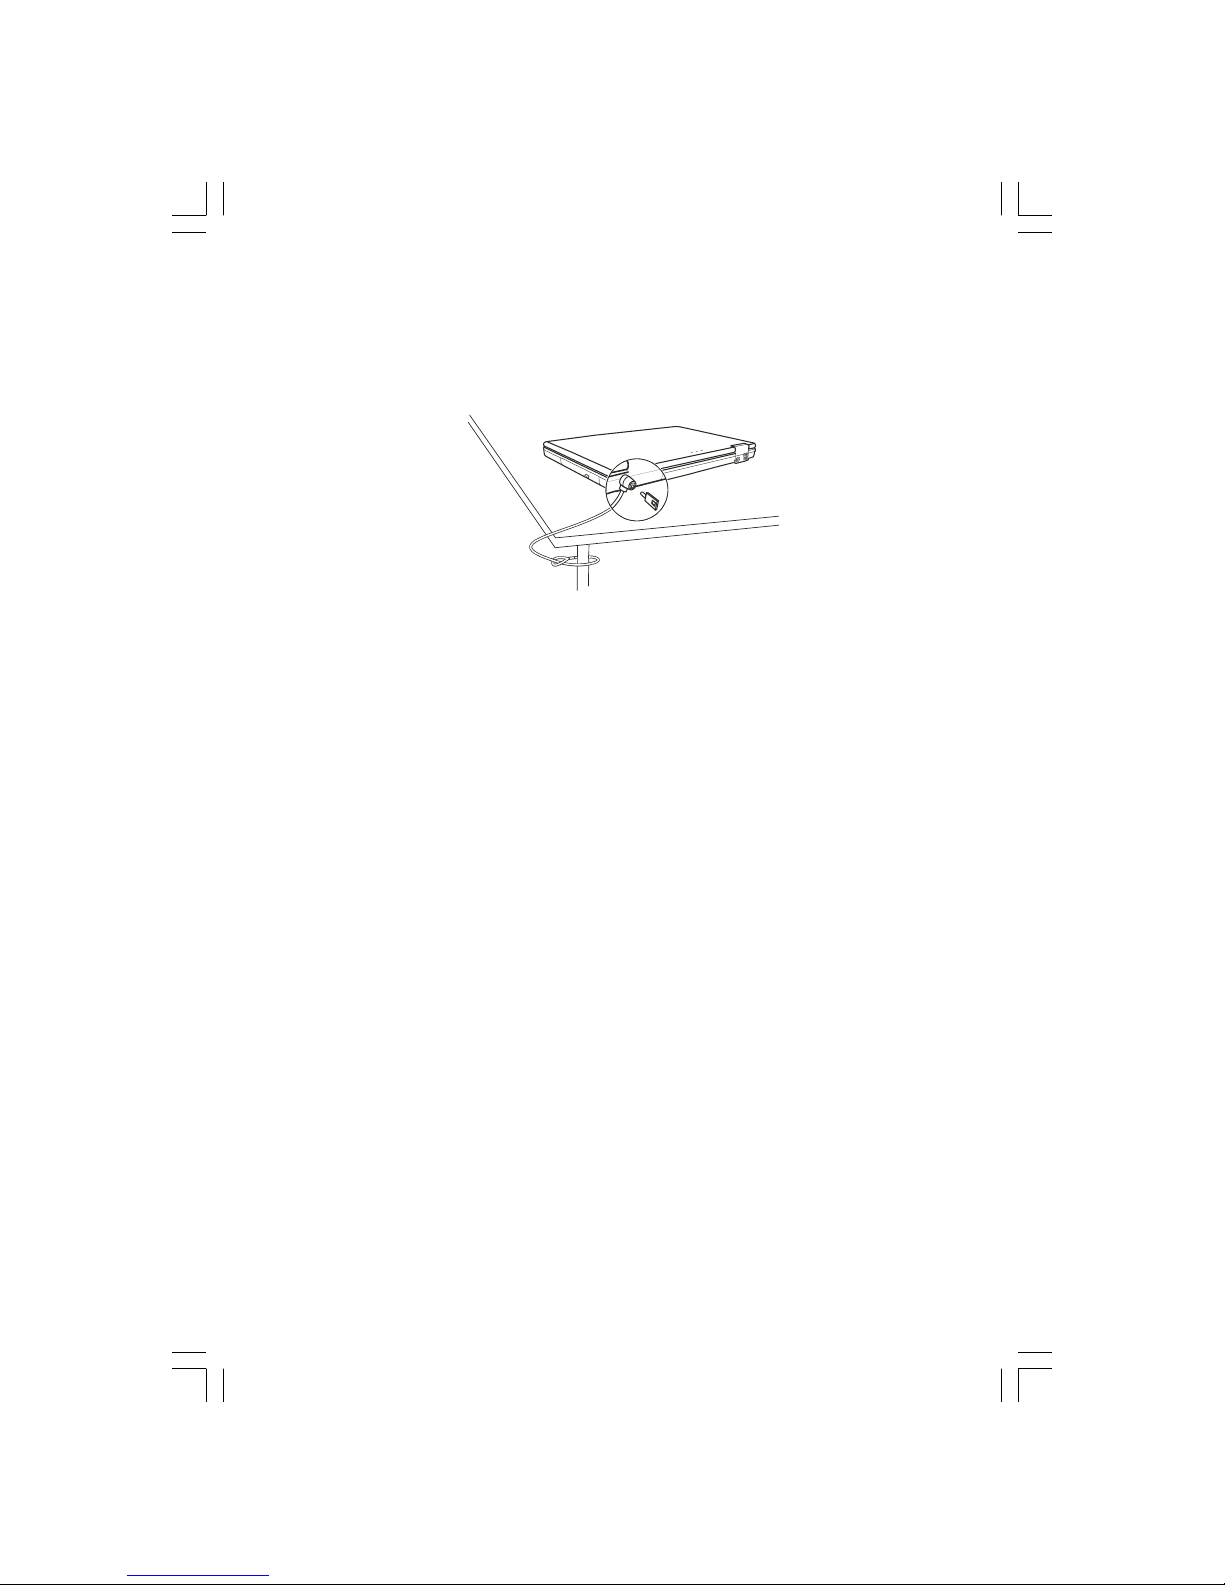
Using the Cable Lock
You can use a Kensington-type cable lock to protect your computer against theft. The cable lock is available in most
computer stores.
To use the lock, loop the lock cable around a stationary object such as a table. Insert the lock to the Kensington lock hole
and turn the key to secure the lock. Store the key in a safe place.
Using an Anti-Virus Strategy
New viruses are always being developed nowadays and they are attacking computers even more easily with emails so
commonly used worldwide.
You can also install a virus-detecting program to monitor potential viruses that could damage your files.
Taking Care of the Computer
Location Guidelines
Use the computer where the temperature is between 10 °C (50 °F) and 35 °C (95 °F).
Avoid placing the computer in a location subject to high humidity, extreme temperatures, mechanical vibration, direct
sunlight, or heavy dust.
Do not cover or block any ventilation openings on the computer. For example, do not place the computer on a bed, sofa,
rug, or other similar surface. Otherwise, overheating may occur that results in damage to the computer.
Keep the computer at least 13 cm (5 inches) away from electrical appliances that can generate a strong magnetic field
such as a TV, refrigerator, motor, or a large audio speaker.
Do not move the computer abruptly from a cold to a warm place. A temperature difference of more than 10 °C (18 °F)
will cause condensation inside the unit, which may damage the storage media.
Do not place the computer on an unsteady surface.
General Guidelines
Do not place heavy objects on top of the computer when it is closed as this may damage the display.
The screen surface is easily scratched. Do not use paper towels to clean the display. Avoid touching it with your fingers,
pen, or pencil.
To maximize the life of the backlight in the display, allow the backlight to automatically turn off as a result of power
management. Avoid using a screen saver or other software that prevents the power management from working.
Cleaning Guidelines
Never clean the computer with its power on.
Use a soft cloth moistened with water or a non-alkaline detergent to wipe the exterior of the computer.
Page 26

26
PRESTIGIO NOBILE 1520
ENG
Gently wipe the display with a soft, lint-free cloth. Do not use alcohol or detergent on the display.
Dust or grease on the touchpad can affect its sensitivity. Clean the pad by using adhesive tape to remove the dust and
grease on its surface.
Battery Pack Guidelines
Recharge the battery pack when it is nearly discharged. When recharging, make sure that the battery pack is fully
charged. Doing so may avoid harm to the battery pack.
Operate the computer with the battery pack installed even when using external power. This ensures that the battery is
fully charged.
If you will not be using the computer for a long period of time (more than two weeks), remove the battery pack from
the computer.
If you remove the battery pack, make sure that the battery terminals do not contact any conductors such as metal
objects or water. Otherwise, the battery may become unusable as a result of a short circuit.
If you need to store the battery pack, store it in a cool, dry place. Never allow the temperature to exceed 60 °C (140 °F).
Do not leave the battery pack in storage for more than 6 months without recharging it.
When Traveling
Before traveling with your computer, make a backup of your hard disk data into USB disks or other storage devices. As
an added precaution, bring along an extra copy of your important data.
Make sure that the battery pack is fully charged.
Make sure that the computer is turned off and the top cover is securely closed.
Do not leave objects in between the keyboard and closed display.
Disconnect the AC adapter from the computer and take it with you. Use the AC adapter as the power source and as a
battery-charger.
Hand-carry the computer. Do not check it in as luggage.
If you need to leave the computer in the car, put it in the trunk of the car to avoid exposing the computer to excessive
heat.
When going through airport security, it is recommended that you send the computer and USB disk through the X-ray
machine (the device you set your bags on). Avoid the magnetic detector (the device you walk through) or the magnetic
wand (the handheld device used by security personnel).
If you plan to travel abroad with your computer, consult your dealer for the appropriate AC power cord for use in your
country of destination.
Troubleshooting
Computer problems can be caused by hardware, software, or both. When you encounter any problem, it might be a
typical problem that can easily be solved.
Preliminary Checklist
Here are helpful hints to follow before you take further actions when you encounter any problem:
Try to isolate which part of the computer is causing the problem.
Make sure that you turn on all peripheral devices before turning on the computer.
If an external device has a problem, make sure that the cable connections are correct and secure.
Make sure that the configuration information is properly set in the BIOS Setup program.
Page 27
27
PRESTIGIO NOBILE 1520
ENG
Make sure that all the device drivers are correctly installed.
Make notes of your observations. Are there any messages on the screen? Do any indicators light? Do you hear any beeps?
Detailed descriptions are useful to the service personnel when you need to consult one for assistance.
If any problem persists after you follow the instructions in this chapter, contact an authorized dealer for help.
Solving Common Problems
Battery Problems
The battery does not charge (Battery Charge indicator does not light amber).
Make sure that the AC adapter is properly connected.
Make sure that the battery is not too hot or cold. Allow time for the battery pack to return to room temperature.
Make sure that the battery pack is installed correctly.
Make sure that the battery terminals are clean.
The operating time of a fully charged battery becomes shorter.
If you often partially recharge and discharge, the battery might not be charged to its full potential. Initialize the battery
to solve the problem.
The battery operating time indicated by the battery meter does not match the actual operating time.
The actual operating time can be different from the estimated time, depending on how you are using the computer.
If the actual operating time is much less than the estimated time, initialize the battery.
DVD Drive Problems
The DVD drive cannot read a disc.
Make sure that the disc is correctly seated in the tray, with the label facing up.
Make sure that the disc is not dirty. Clean the disc with a disc cleaning kit, available in most computer stores.
Make sure that the DVD drive driver is installed correctly.
Make sure that the computer supports the disc or the files contained.
You cannot eject a disc.
The disc is not properly seated in the drive. Manually release the disc following the method described next:
1. Turn off the computer.
2. Insert a small rod, such as a straightened paperclip, into the drive’s manual eject hole and push firmly to release the tray.
3. Pull the tray out until fully extended, and then remove the disc.
Page 28

28
PRESTIGIO NOBILE 1520
ENG
Display Problems
Nothing appears on the screen.
During operation, the screen may automatically turn off as a result of power management. Press any key to see if the
screen comes back.
The brightness level might be too low. Increase brightness by pressing the Fn+F7 hot key.
The display output might be set to an external device. To switch the display back to the LCD, press the Fn+F5 hot key or
change the display through the settings in Display Properties.
The characters on the screen are dim.
Adjust the brightness and/or contrast.
Bad dots appear on the display at all times.
A small number of missing, discolored, or bright dots on the screen are an intrinsic characteristic of TFT LCD technology.
It is not regarded as a LCD defect.
Resolution cannot be adjusted to desired setting.
Make sure that the video driver is installed correctly.
The external monitor displays nothing.
Make sure that the monitor is turned on.
Make sure that the monitor’s signal cable is properly connected.
Switch the display to the monitor by pressing the Fn+F5 hot key or change the display through the settings in Display
Properties.
The TV displays nothing.
Make sure that the TV is turned on and switched to the video mode.
Make sure that the TV’s signal cable is properly connected.
Switch the display to the TV by changing the settings in Display Properties in Windows.
Simultaneous display/multi-display does not work.
Make sure that you turn on the external monitor before turning on the computer.
Press the Fn+F5 hot key to toggle through the display options or change the settings in Display Properties in Windows.
Hardware Device Problems
The computer does not recognize a newly installed device.
The device may not be correctly configured in the BIOS Setup program. Run the BIOS Setup program to identify the new
type.
Make sure if any device driver needs to be installed. (Refer to the documentation that came with the device.)
Make sure if the device needs any jumper or switch settings. (Refer to the documentation that came with the device.)
Check the cables or power cords for correct connections.
For an external device that has its own power switch, make sure that the power is turned on.
Hard Disk Drive Problems
The hard disk drive error message appears on the screen.
The hard disk drive has defects. Ask your dealer for help.
Page 29

29
PRESTIGIO NOBILE 1520
ENG
The hard disk drive operations seem slow.
The data files stored on the hard disk drive may be fragmented. Use a tool such as Window’s Disk Defragmenter to
defragment the files.
The hard disk drive in-use indicator glows without blinking.
The data files stored on the hard disk drive may be fragmented. Use a tool such as Window’s Disk Defragmenter to
defragment the files.
Keyboard, Mouse, and Touchpad Problems
The keyboard does not respond.
Try connecting an ex ternal keyboard. If it works, contact an authorized dealer, as the internal keyboard cable might be
loose.
The numeric keypad is disabled.
Make sure that Num Lock is switched on. (Check if the Num Lock Indicator glows or not.)
The external keyboard does not work.
Make sure that the keyboard cable is properly connected.
The USB mouse does not work.
Make sure that the mouse cable is properly connected.
The touchpad does not work, or the pointer is difficult to control with the touchpad.
Make sure that the touchpad is clean.
LAN Problems
I cannot access the network.
Make sure that the LAN driver is correctly installed.
Make sure that the LAN cable is properly connected to the RJ-45 connector and the network hub.
Make sure that the network configuration is appropriate.
Make sure that the user name or password is correct.
WLAN Problems
I cannot use the WLAN feature.
Make sure that the Mini PCI WLAN card is correctly installed.
Make sure that the necessary driver(s) is correctly installed.
Make sure that the WLAN feature is turned on.
Transmission quality is poor.
Your computer may be in an out-of-range situation. Move your computer closer to the Access Point or another WLAN
device it is associated with.
Check if there is high interference around the environment and solve the problem as described next.
Radio interference exists.
Move your computer away from the device causing the radio interference such as microwave oven and large metal
objects.
Page 30

30
PRESTIGIO NOBILE 1520
ENG
Plug your computer into an outlet on a different branch circuit from that used by the affecting device.
Consult your dealer or an experienced radio technician for help.
I cannot connect to another WLAN device.
Make sure that the WLAN feature is turned on.
Make sure that the SSID setting is the same for every WLAN device in the network.
Your computer is not recognizing changes. Restart the computer.
Make sure that the IP address or subnet mask setting is correct.
I cannot communicate with the computer in the network when Infrastructure mode is configured.
Make sure that the Access Point your computer is associated with is powered on and all the LEDs are working properly.
If the operating radio channel is in poor quality, change the Access Point and all the wireless station(s) within the BSSID
to another radio channel.
Your computer may be in an out-of-range situation. Move your computer closer to the Access Point it is associated with.
Make sure that your computer is configured with the same security option (encryption) to the Access Point.
Use the Web Manager/Telnet of the Access Point to check whether it is connected to the network.
Reconfigure and reset the Access Point.
I cannot access the network.
Make sure that the necessary driver(s) is correctly installed.
Make sure that the network configuration is appropriate.
Make sure that the user name or password is correct.
You have moved out of range of the network.
Turn off power management.
Modem Problems
The modem does not work.
Make sure that the modem driver is correctly installed.
Make sure that the telephone line is properly connected.
Make sure that the COM port in the communication software is correctly set.
Turn off power management.
PC Card Problems
The PC card does not work.
Make sure that the PC card is correctly seated.
If the card requires an IRQ (Interrupt ReQuest), make sure that there is one available.
The PC card stops communicating properly.
The application may have been reset when the computer is turned off or in Standby mode. Exit and restart the application.
Power Management Problems
The computer does not enter Standby or Hibernation mode automatically.
If you have a connection to another computer, the computer does not enter Standby or Hibernation mode if the
connection is actively in use.
Make sure that the Standby or Hibernation time-out is enabled.
Page 31

31
PRESTIGIO NOBILE 1520
ENG
The computer does not enter Standby or Hibernation mode immediately.
If the computer is performing an operation, it normally waits for the operation to finish.
The computer does not resume from Standby or Hibernation mode.
The computer automatically enters Standby or Hibernation mode when the battery pack is empty. Do any one of the
following: . Connect the AC adapter to the computer. . Replace the empty battery pack with a fully charged one.
The computer does not enter Hibernation mode with the Fn+F12 hot keys.
Make sure that the Hibernation function is specified for the sleep button.
You might be using a PC card that prevents the computer from entering Hibernation mode. To enter the mode, stop
the communication program and then remove the card or stop the card.
Software Problems
An application program does not work correctly.
Make sure that the software is correctly installed.
If an error message appears on the screen, consult the software program’s documentation for further information.
If you are sure the operation has stop, reset the computer.
Sound Problems
No sound is produced.
Make sure that the volume control is not set too low.
Make sure that the audio driver is correctly installed.
Make sure that the computer is not in Standby mode.
If using an external speaker, make sure that the speaker is properly connected.
Distorted sound is produced.
Make sure that the volume control is not set too high or too low. In most cases, a high setting can cause the audio
electronics to distort the sound.
The sound system does not record.
Adjust the playback or recording sound levels.
The external microphone or audio device does not work.
Make sure that the microphone is connected to the proper connector on the computer.
Make sure that your computer is equipped with the driver needed.
Click the speaker symbol on the taskbar and check the Windows volume control.
Check the volume control of your computer.
Startup Problems
When you turn on the computer, it does not respond and the Power Indicator does not light green.
If you are using an external AC power, make sure that the AC adapter is correctly and securely connected. If so, make sure
that the electrical outlet works properly.
If you are using the battery power, make sure that the battery is not discharged.
When you turn on the computer, it stops after POST.
Restart your computer.
Page 32

32
PRESTIGIO NOBILE 1520
ENG
The message “Operating system not found” appears on the screen after you turn on the computer.
Make sure that there is no floppy disk in the floppy disk drive. If there is, remove it and restart the computer.
If this message appears when you are booting from the hard disk, insert a bootable disk in the floppy disk drive and check
the condition of the hard disk.
The message “Invalid system disk” or “Disk error” appears on the screen after you turn on the
computer.
If you are deliberately trying to boot from a floppy disk, replace the disk with a bootable one and press any key to
continue booting.
If you are booting from the hard disk, make sure that there is no floppy disk in the floppy disk drive. If there is, remove
it and restart the computer.
If this message appears when you are booting from the hard disk, insert a bootable disk in the floppy disk drive and check
the condition of the hard disk.
Other Problems
The date/time is incorrect.
Correct the date and time via the operating system or BIOS Setup program.
After you have performed everything as described above and still have the incorrect date and time every time you turn
on the computer, the RTC (Real-Time Clock) battery is at the end of its life. Call an authorized dealer to replace the RTC
battery.
Resetting the Computer
You may have to reset (reboot) your computer on some occasions when an error occurs and the
program you are using hangs up.
If the computer operation seems to hang up, first wait. It is possible that the computer is processing data. Periodically
check the hard disk drive in-use indicator, if it flashes irregularly, the program may be accessing data and preventing you
from using the keyboard. If you are sure the operation has stopped and you cannot use the “restart” function of the
operating system, reset the computer.
Reset the computer by any one of these methods:
Press Ctrl+Alt+Del.
If the above action does not work, turn off the computer. Wait for at least five seconds and turn it on again.
CAUTION: Resetting will cause any unsaved data to be lost.
Page 33

33
PRESTIGIO NOBILE 1520
ENG
Specifications
NOTE: Specifications are subject to change without any prior notice.
CPU
Intel Pentium-M Dothan processor with 533 MHz FSB, or Intel Celeron-M Dothan processor with 400 MHz FSB
Cache Memory
2 MB for Intel Pentium-M Dothan processor 1 MB for Intel Celeron-M Dothan processor
ROM BIOS
512 KB Flash EEPROM (includes system BIOS)
RAM
System
2 x 200-pin SO-DIMM socket for expansion up to 2 GB, DDRII 400/533 1.25-inch height memory module support
Display
Panel
15.4-inch wide TFT, resolution up to 1280.800 WXGA
Video controller
Integrated in NorthBridge
Video ports
VGA port, S-video connector
Keyboard
Standard keys, numeric keypad, 12 function keys, a special Fn (Function) key and Windows keys
Pointing device
PS/2-compatible touchpad
Storage device
Floppy disk drive (external)
3.5-inch, 1.44 MB, USB (optional)
Hard disk drive
2.5-inch, 9.5 mm high, PATA and SATA support, 4200/5400 rpm
Optical drive
12.7 mm Combo drive or DVD Dual drive
Page 34

34
PRESTIGIO NOBILE 1520
ENG
Audio ports
Two audio ports for Line-out (S/PDIF) / Mic-in
PC card
Type II x 1, CardBus support
I/O ports
Three USB ports (USB 2.0 support), one mini IEEE 1394a port
Modem
56 Kbps V.90 MDC internal fax modem
LAN
10/100Base-TX
Wireless LAN (option)
One Mini PCI slot for wireless LAN card, compliant with IEEE 802.11b/g (pre-installed in selected models)
Power
AC adapter
Universal AC adapter 65 W; input: 100.240 V
Battery
6/9-cell (2200 mAH) Li-ion battery
Dimension (W.D.H)
13.9x9.8x0.98~1.32 inch (353.8x250x25~33.5 mm)
Weight
6.4 lb (2.9 kg)
Environment
Temperature
Operating: 0 °C (32 °F) to 35 °C (95 °F) Storage: –20 °C (–4 °F) to 60 °C (140 °F)
Humidity
Operating: 10 % to 90 % non-condensing Storage: 5 % to 95 % non-condensing
Page 35

35
PRESTIGIO NOBILE 1520
ENG
Regulatory Information
NOTE: Marking labels located on the exterior of your computer indicate the regulations that
your model complies with. Please check the marking labels and refer to the corresponding
statements in this appendix. Some notices apply to specific models only.
Federal Communications Commission Radio Frequency Interference
Statement
NOTE:
This equipment has been tested and found to comply with the limits for a Class B digital device pursuant to Part 15 of
the FCC Rules. These limits are designed to provide reasonable protection against harmful interference in a residential
installation. This equipment generates, uses, and can radiate radio frequency energy and, if not installed and used in
accordance with the instructions, may cause harmful interference to radio communications. However, there is no
guarantee that interference will not occur in a particular installation. If this equipment does cause harmful interference
to radio or television reception, which can be determined by turning the equipment off and on, the user is encouraged
to try to correct the interference by one or more of the following measures:
Reorient or relocate the receiving antenna.
Increase the separation between the equipment and receiver.
Connect the equipment into an outlet on a circuit different from that to which the receiver is connected.
Consult the dealer or an experienced radio/TV technician for help.
Any changes or modifications not expressly approved by the manufacturer could void the user’s authority
to operate the equipment.
Please note:
The use of a non-shielded interface cable with this equipment is prohibited.
European Union CE Marking and Compliance Notices
Statements of Compliance
This product follows the provisions of the European Directive 1999/5/EC.
Page 36

36
PRESTIGIO NOBILE 1520
ENG
WEEE Logo Description
Disposal of Old Electrical & Electronic Equipment
(Applicable in the European Union and other
European countries with separate collection
systems)
This symbol on the product or on its packaging indicates that this product shall not
be treated as household waste. Instead it shall be handed over to the applicable
collection point for the recycling of electrical and electronic equipment. By ensuring
this product is consequences for the environment and human health, which could
otherwise be caused by inappropriate waste handling of this product. The recycling
of materials will help to conserve natural resources. For more details information
about recycling of this product, please contact your local city office, your household
waste disposal service or the shop where you purchased the product.
Page 37

1
PRESTIGIO NOBILE 1520
RU
Prestigio Nobile 1520
Руководство пользователя
(Октябрь 2005)
ТОРГОВЫЕ МАРКИ
Все торговые марки, упомянутые в данном руководстве пользователя, являются собственностью соответствующих
владельцев.
ПРИМЕЧАНИЕ
Изменения в данное руководство пользователя могут быть внесены без предварительного уведомления пользователя.
Page 38

2
PRESTIGIO NOBILE 1520
RU
Начало работы
Поздравляем Вас с приобретением этой модели компьютера.
Данный портативный компьютер сочетает в себе все возможности настольной рабочей станции и компактный дизайн.
С его помощью Вы можете организовать свое личное рабочее место как в офисе, так и дома, а также в любое время
взять компьютер с собой в дорогу.
Помимо этого в данной главе Вы найдете краткое описание компонентов компьютера, а в последнем разделе главы
“ информацию, которая может быть полезна после окончательной подготовки компьютера к работе.
Начало работы с компьютером
Данный раздел руководства пользователя призван ознакомить Вас с необходимыми процедурами для подключения
компьютера.
Распаковка
После распаковки картонной упаковки проверьте комплектность поставки:
портативный компьютер
дополнительные компоненты (аксессуары):
адаптер сети переменного тока
шнур питания
компактдиск с программным обеспечением (драйверами устройств)
ферритовый сердечник (сердечники) – опционально
Убедитесь в наличии всех вышеперечисленных компонентов. Если один из них поврежден или отсутствует,
незамедлительно уведомьте об этом Вашего дилера.
Сохраните картонную упаковку и упаковочные материалы на тот случай, если Вам понадобится перевезти компьютер
на длительные расстояния или долгое время хранить его в нерабочем состоянии.
Подключение компьютера к сети переменного тока
Компьютер работает или от внешней сети переменного тока, или при помощи внутренней батареи. Рекомендуется
при первом использовании пользоваться сетью переменного тока в качестве источника питания.
ПРЕДОСТЕРЕЖЕНИЕ: Используйте исключительно поставляемый в комплекте
адаптер сети переменного тока. Использование других адаптеров сети
переменного тока может повредить компьютер.
1. Удостоверьтесь, что компьютер выключен.
2. Подсоедините электрический кабель адаптера сети переменного тока к разъему питания на задней панели компьютера
(1).
3. Подключите один конец шнура питания к сетевому адаптеру, а второй его конец к электрической розетке (2).
4. При правильном подключении питание должно поступать к адаптеру сети переменного тока, и лишь затем к
компьютеру. Теперь Вы можете включить питание Вашего компьютера.
Page 39

3
PRESTIGIO NOBILE 1520
RU
ПРЕДОСТЕРЕЖЕНИЕ:
При отключении компьютера от сети вначале необходимо отключить шнур
питания от электрической розетки, и лишь затем отсоединить шнур от
компьютера. Обратный порядок выполнения данной процедуры может привести
к повреждению сетевого адаптера.
При отключении от сети всегда держитесь за вилку шнура. Никогда не тяните
непосредственно за шнур питания.
ОБРАТИТЕ ВНИМАНИЕ: При подключенном адаптере сетевого питания
происходит одновременная зарядка встроенной батареи.
Открытие крышки дисплея
ПРЕДОСТЕРЕЖЕНИЕ: Не применяйте излишней силы при открытии крышки
дисплея, так как это может привести к ее механическому повреждению.
Чтобы открыть крышку дисплея, сдвиньте защелку крышки дисплея вправо (1) и приподнимите крышку (2). Вы
можете установить панель дисплея в наиболее удобное для Вас положение.
Включение и выключение компьютера
Включение компьютера
1. Убедитесь, что компьютер подключен к внешнему источнику электроэнергии.
2. Нажмите на кнопку включения питания.
3. При каждом включении компьютер начинает выполнение процедуры POST (poweron selftest) и приступает к загрузке
ОС Windows.
Выключение компьютера
Чтобы выключить компьютер, используйте функцию “Выключить” (“Shut Down”) Вашей операционной системы.
ВНИМАНИЕ: Существуют и другие способы выключения компьютера, которые
позволяют Вам вернуться к работе с теми же приложениями, с которыми Вы
работали во время предыдущего сеанса.
ПРЕДОСТЕРЕЖЕНИЕ: При необходимости выключить компьютер сразу после его
включения, подождите по меньшей мере 5 секунд. Моментальное отключение
может привести к повреждению внутренних компонентов.
Page 40

4
PRESTIGIO NOBILE 1520
RU
Обзор компьютера
Данный раздел руководства описывает внешние компоненты компьютера и содержит краткую информацию о функциях
каждого компонента.
ОБРАТИТЕ ВНИМАНИЕ: В зависимости от приобретенной модели внешний вид
компьютера может отличаться от приведенного в данном руководстве.
Компоненты правой панели
№ Компонент Описание
1 Комбинированный Служит для проигрывания аудио/видео компактдисков, установки программ,
привод Combo/ DVD Dual получения данных, а также для записи данных на диск (в некоторых моделях в
зависимости от комплекта поставки).
Компоненты левой панели
№ Компонент Описание
1 Порт VGA Служит для подключения внешнего ЭЛТ монитора.
2 Разъем Sвидео Служит для подключения внешних видеоустройств, таких как телевизор с
наличием входа Sвидео.
3 Разъем RJ11 Служит для подключения к телефонной линии.
4 Разъем RJ45 Служит для подключения к локальной сети LAN.
5 Разъем для PCкарты Служит для подключения PCкарты.
Компоненты задней панели
№ Компонент Описание
1 Разъем замка безопасности Служит для обеспечения безопасности компьютера путем прикрепления к
типа Kensington неподвижному объекту.
2 Разъем питания Служит для подключения адаптера сети переменного тока (сетевого адаптера).
3 USBпорт Служит для подключения различных USBустройств, таких как привод гибких
дисков, принтер, цифровая камера, джойстик и т.д.
Page 41

5
PRESTIGIO NOBILE 1520
RU
Front Components
№ Компонент Описание
1 Защелка верхней панели Служит для фиксирования крышки верхней панели в закрытом положении.
2 Порт miniIEEE 1394a Служит для подключения устройств типа сканера, принтера, цифровой
видеокамеры, видеомагнитофона и т.д.
3 USBпорт Служит для подключения различных USBустройств, таких как привод гибких
дисков, принтер, цифровая камера, джойстик и т.д.
4 Разъем микрофона Служит для подключения внешнего микрофона.
5 Разъем S/PDIF (цифровой Служит для подключения цифровых устройств типа цифровых колонок для
аудиовыход) воспроизведения аудио сигнала в цифровом виде.
Компоненты нижней панели
№ Компонент Описание
1 Отсек батареи Батарея служит источником энергии компьютера при отсутствии подключения
к внешней электрической сети.
2 Отсек жесткого диска Содержит жесткий диск компьютера.
3 Крышка отсека Внутри располагаются:
внутренних компонентов Отсек модуля Mini PCI, предназначенный для установки дополнительного модуля
Mini PCI. В зависимости от модели компьютера в комплект его поставки может
входить Mini PCI карта для подключения к беспроводным локальным сетям.
Гнездо для подключения карт памяти для расширения возможностей Вашего
компьютера.
Центральный процессор Вашего компьютера.
Page 42

6
PRESTIGIO NOBILE 1520
RU
Компоненты компьютера (при открытой верхней панели)
№ Компонент Описание
1 ЖКИэкран Устройство вывода компьютерной информации.
2 Индикатор работы батареи Горит зеленым цветом при работе компьютера от батареи.
Мигает зеленым, если компьютер находится в режиме ожидания, используя при
этом питание от батареи.
3 Индикатор зарядки батареи Горит зеленым цветом при полной зарядке батареи и подключении к внешнему
источнику питания.
Горит янтарным цветом при зарядке батареи.
Мигает красным цветом при практически полной разрядке батареи.
4 Индикатор питания Горит зеленым цветом, когда компьютер включен.
Мигает зеленым цветом, когда компьютер находится в режиме ожидания.
5 Встроенные стерео Служат для воспроизведения звуковой информации.
динамики
6 Клавиатура Устройство ввода данных компьютера.
7 Сенсорная панель Устройство указания компьютера. Выполнено в виде прямоугольной панели с
двумя кнопками
8 Индикаторы работы Отображают текущее состояние работы устройств компьютера.
устройств Индикатор работы привода DVD
Индикатор работы жесткого диска
Индикатор режима Num Lock
Индикатор режима Caps Lock
Индикатор режима Scroll Lock
Индикатор беспроводной локальной сети
Индикатор устройства для чтения карт памяти (Card Reader) (данная опция будет
реализована в более поздних моделях и не поддерживается Вашим компьютером)
9 Микрофон Данная опция будет реализована в более поздних моделях и не поддерживается
Вашим компьютером.
10 Кнопка вкл./выкл. питания Служит для включения и выключения питания компьютера.
Page 43

7
PRESTIGIO NOBILE 1520
RU
Использование компьютера
Данная глава содержит информацию об использовании основных функций компьютера.
Если Вы не являетесь опытным пользователем, информация, содержащаяся в данном разделе, будет Вам полезна для
изучения основных функций компьютера. Если Вы являетесь опытным пользователем, но еще не имели опыта работы
с портативными компьютерами, Вы можете ограничиться чтением информации, относящейся к специфике работы
с такого рода компьютерами.
Включение и выключение компьютера
Существует несколько способов включения и выключения компьютера.
Включение компьютера
Включение компьютера производится при помощи нажатия кнопки включения питания.
Компьютер начинает производить загрузку операционной системы (ОС), которая содержится на жестком диске или
гибком магнитном диске. Загрузка ОС производится автоматически.
ВНИМАНИЕ: ОС служит платформой для всех остальных программных
приложений. Наиболее распространенной ОС в настоящее время является ОС
Microsoft Windows.
Выключение компьютера
После завершения сеанса работы Вы можете выключить компьютер посредством соответствующей функции Вашей
ОС, полностью отключив питание или переведя компьютер в режим ожидания или “спящий режим”:
Для перевода в данный режим... Выполните… Для возобновления работы
Выключено Следуйте процедуре выключения компьютера в Нажмите кнопку включения/
Вашей ОС. Это поможет предотвратить потерю выключения питания.
данных или повреждение программного
обеспечения. Если система “зависла” в
результате сбоя программных или аппаратных
средств, нажмите кнопку выключения питания
для отключения компьютера.
Режим ожидания В зависимости от настроек ОС Windows Вы Нажмите любую клавишу.
можете перевести компьютер в данный режим
при помощи:
• закрытия крышки дисплея
• нажатия комбинации клавиш Fn+F12
• нажатия кнопки выключения питания
“Спящий” режим В зависимости от настроек ОС Windows Вы Нажмите кнопку включения
можете перевести компьютер в данный режим питания.
при помощи:
• закрытия крышки дисплея
• нажатия комбинации клавиш Fn+F12
• нажатия кнопки выключения питания
При использовании данных режимов Вы можете вернуться к тому же состоянию компьютера, при котором Вы в
прошлый раз завершили работу.
Page 44

8
PRESTIGIO NOBILE 1520
RU
Использование клавиатуры
Клавиши клавиатуры состоят из четырех основных категорий и клавиши Fn.
Клавиши Описание
Клавиши набора текста Клавиши набора текста соответствуют клавишам на пишущей машинке. Несколько
клавиш являются уникальными, например, Ctrl, Alt, Esc и клавиши переключения
регистра, используемые для специальных целей. Когда клавиши переключения
регистра находятся во включенном состоянии, загораются индикаторы,
соответствующие этим клавишам.
Функциональные клавиши Функциональные клавиши “ от F1 до F12, “ обладают многочисленными
функциями, предопределяемыми конкретными программными приложениями.
Клавиша Fn Клавиша Fn, расположенная в нижнем левом углу клавиатуры, используется в
комбинации с другой клавишей для выполнения альтернативной функции этой
клавиши. Клавиша “Fn” и альтернативные функции клавиш обозначены синим
цветом в верхней части клавиши. Чтобы осуществить намеченную операцию,
нажмите и удерживайте клавишу Fn, одновременно нажимая другую клавишу. (См.
раздел “Горячие клавиши” для получения дополнительной информации).
Клавиши управления курсора Клавиши управления курсора используются для осуществления
редактирования текста. Это клавиши Insert (Вставить), Delete
(Удалить), Home (Домой), End (В конец), Page Up (На страницу
вверх), Page Down (На страницу вниз), а также клавиши со
стрелками Left (Влево), Right (Вправо), Up (Вверх), и Down (Вниз).
Цифровая клавиатура Цифровая клавиатура с 15 встроенными клавишами
расположена на клавиатуре Вашего портативного
компьютера. При включении режима Num Lock
происходит активация клавиш цифровой клавиатуры.
Это означает, что Вы можете использовать эти
клавиши, чтобы вводить цифры.
“Горячие” клавиши
“Горячие” клавиши являются комбинацией нескольких клавиш, при нажатии которых происходит активация
определенных функций компьютера. Большинство “горячих” клавиш работают в так называемом циклическом режиме.
При каждом нажатии комбинации “горячих” клавиш происходит выбор той или иной их функции.
Вы можете с легкостью определить предназначение “горячих” клавиш при помощи размещенных на них пиктограмм.
См. таблицу ниже:
Page 45

9
PRESTIGIO NOBILE 1520
RU
Клавиша Описание
Включение и выключение подключения к беспроводной локальной сети.
ВНИМАНИЕ:
Данная функция возможна только при наличии дополнительного модуля Mini PCI для подключения
к беспроводным сетям.
Не рекомендуется пользоваться функцией беспроводного соединения на борту летательных
аппаратов, так как это может привести к возникновению помех оборудования самолета.
Не забывайте отключать данный тип соединения находясь на борту самолета.
Уменьшение уровня громкости.
Увеличение уровня громкости.
Переключение между режимами ЖКИмонитора “ ЭЛТмонитора и режимом совмещенного
использования ЖКИ и ЭЛТмониторов при их подключении.
При подключении к компьютеру ЭЛТмонитора:
LCD > CRT > LCD & CRT > LCD
ВНИМАНИЕ:
При работе в полноэкранном режиме DOS либо при просмотре файлов в формате DVD or MPEG
переключение дисплеев невозможно. Вы также не сможете пользоваться функцией “Свойства
графики” (Graphics Properties) в VGAутилите для переключения.
Эта функция доступна только для мониторов с функцией Plug & Play.
Уменьшение уровня яркости ЖКдисплея.
Увеличение уровня яркости ЖКдисплея.
Включение/выключение звукового сопровождения.
Включение и выключение дисплея.
Служит для ввода компьютера в “спящий” режим (определяется настройками ОС Windows).
Символ “Евро”
Если ваша версия ОС Windows поддерживает набор символа “Евро”, Вы можете осуществить его набор на американском
и британском варианте раскладки клавиатуры.
Чтобы произвести набор символа “Евро” на клавиатуре (американский и международный вариант раскладки), нажмите
и удерживайте одну из клавиш Alt Gr и нажмите клавишу 5 (на которой имеется символ “Евро”).
Чтобы произвести набор символа “Евро” на клавиатуре (вариант раскладки американский 101), нажмите и
удерживайте одну из клавиш Alt и напечатайте 0128 на цифровой клавиатуре.
Чтобы произвести набор символа “Евро” на клавиатуре (британский вариант раскладки), нажмите и удерживайте
клавишу Alt Gr и нажмите клавишу 4 (на которой имеется символ “Евро”).
Клавиши Windows
Клавиатура имеет две клавиши, которые исполняют определенные Windows функции: клавиша с эмблемой Windows
(Windows Logo ) и клавиша прикладных программ (Application key).
Клавиша с эмблемой Windows используется для открытия меню Пуск (Start); в комбинации с другими клавишами
обладает некоторыми функциями, определяемыми программным приложением.
Клавиша прикладных программ в большинстве случаев аналогична по функциям нажатию правой кнопки мыши. (См.
руководство пользователя ОС Windows для получения дополнительной информации.)
Page 46

10
PRESTIGIO NOBILE 1520
RU
Использование сенсорной панели
ПРЕДОСТЕРЕЖЕНИЕ: Не прикасайтесь острыми предметами (напр. ручкой) к
поверхности сенсорной панели, так как это может привести к ее повреждению.
ПРИМЕЧАНИЯ: Для обеспечения легкой и бесперебойной работы следите за тем,
чтобы Ваши пальцы и поверхность панели были сухими и чистыми. При нажатии
на панель не применяйте излишней силы.
Сенсорная панель является устройством указания, позволяющим Вам управлять положением курсора на экране и
производить функции выбора при помощи кнопок панели.
Сенсорная панель состоит из собственно панели, левой и правой кнопок. Для использования панели поместите свой
указательный или большой палец на поверхность панели, которая служит в качестве миниатюрного отображения
поверхности экрана. При перемещении пальца по панели происходит соответствующее перемещение курсора по
экрану. Когда Ваш палец достиг края панели, приподнимите его и вновь поместите на противоположный край панели.
Операции при работе с сенсорной панелью:
Операция Действие
Указание Перемещайте палец по панели до тех пор, пока курсор не укажет на необходимый объект на экране.
Нажатие Нажмите и отпустите левую кнопку.
или
Произведите легкое нажатие на поверхности панели.
Двойное нажатие Быстро нажмите и отпустите левую кнопку дважды.
или
Произведите быстрое двойное нажатие на поверхности панели.
Перетаскивание Нажмите и удерживайте левую кнопку, затем перемещайте палец по панели до тех пор, пока
перетаскиваемый объект не окажется в нужном месте (перетаскивание) и потом отпустите кнопку.
или
Произведите быстрое двойное нажатие на поверхности панели, не отпуская палец после второго
нажатия. Затем перемещайте палец по панели до тех пор, пока перетаскиваемый объект не окажется
в нужном месте (перетаскивание) и потом приподнимите палец.
Прокрутка Прокрутка горизонтальное или вертикальное перемещение в рамках рабочей области экрана.
Для осуществления вертикальной прокрутки – поместите палец на правый или левый край панели и
сдвиньте его вверх или вниз вдоль края панели. Для осуществления горизонтальной прокрутки –
поместите палец на верхний или нижний край панели и сдвиньте его влево или вправо.
Для использования данной функции необходимо установить соответствующий драйвер. Данная
функция доступна не во всех приложениях.
ПРИМЕЧАНИЕ: При изменении функций левой и правой кнопки, “нажатие” на
поверхности панели в качестве альтернативного способа осуществления
нажатия левой кнопки функционировать не будет.
Page 47

11
PRESTIGIO NOBILE 1520
RU
Конфигурирование сенсорной панели
Вы можете настроить функции сенсорной панели в зависимости от Ваших потребностей. Например, если Вы левша,
Вы можете изменить функции левой и правой кнопок, “поменяв” их местами. Вы также можете изменить размер
экранного курсора, его скорость и т.д.
Для осуществления конфигурирования функций сенсорной панели Вы можете использовать стандартный драйвер
Microsoft или IBM PS/2 при использовании ОС Windows. Тем не менее, при использовании поставляемого в комплекте
драйвера Вы получите доступ к дополнительным функциям и возможностям.
Использование привода DVD
Ваш портативный компьютер поставляется с приводом DVD, обычно обозначаемым как диск D. В зависимости от
модели Ваш привод может поставляться в одной из следующих модификаций:
Привод Combo может работать и как привод DVDROM (для чтения дисков CD, CD–R, CD–RW, DVD, DVDR, DVD+R,
DVD–RW и DVD+RW), и как привод CDRW (для записи дисков CD–R/–RW).
Привод DVD Dual помимо функций привода Combo может также производить запись на диски DVD+R/+RW/–R/–
RW.
ПРЕДОСТЕРЕЖЕНИЕ:
При установке оптического диска не используйте излишнюю силу.
Удостоверьтесь, что диск правильно вставлен в лоток, и лишь затем закройте
лоток.
Не оставляйте лоток DVD<диска открытым. Также не прикасайтесь к внутренним
частям лотка. Если линза загрязняется, DVD<диск может работать со сбоями.
Не протирайте линзу, используя материалы с грубой поверхностью (типа
бумажного полотенца). Вместо этого, воспользуйтесь мягкой тканевой
салфеткой.
Инструкции FDA относительно устройств на основе лазерных технологий:
“Предостережение: Внесение несанкционированных изменений в конструкцию
устройства или использование нестандартных настроек оборудования, за
исключением описанных здесь, может привести к поражению радиационным
излучением”.
ОБРАТИТЕ ВНИМАНИЕ: Привод DVD относится к изделиям на основе лазерных
технологий (Class 1). Данный ярлык расположен на приводе DVD.
ОБРАТИТЕ ВНИМАНИЕ: Только для приводов DVD и Combo. Данное изделие
включает технологию защиты авторских прав, которая охраняется в
соответствии с требованиями патентов США, а также другие права на
интеллектуальную собственность, принадлежащие Корпорации Macrovision и
другим правообладателям. Использование этой технологии защиты авторских
прав должно быть авторизированно Корпорацией Macrovision, и предназначено
для домашнего использования и в других ограниченных целях, если иначе не
разрешено Корпорацией Macrovision. Перепроектирование или разборка данного
устройства также строго запрещены производителем.
Установка и извлечение диска
Следуйте данным инструкциям, чтобы вставить или извлечь диск:
1. Включите компьютер.
2. Нажмите кнопку извлечения диска; лоток DVDдиска частично выдвинется из корпуса компьютера. Мягко потяните
за него до тех пор, пока он не выдвинется до конца.
3. Чтобы вставить диск, разместите диск в лотке зеркальной стороной вниз. Немного прижмите центр компакт
диска (до щелчка), чтобы обеспечить надежное крепление диска.
Page 48

12
PRESTIGIO NOBILE 1520
RU
Чтобы извлечь диск, возьмите диск за его внешний край и снимите его с лотка.
4. Слегка подтолкните лоток для его закрытия.
ОБРАТИТЕ ВНИМАНИЕ: Существует небольшая вероятность того, что в некоторых
случаях Вам не удастся извлечь диск при помощи кнопки извлечения. В таком
случае Вы сможете извлечь диск вручную.
Использование видео возможностей
Ваш компьютер обладает следующими видео возможностями:
15.4дюймовый цветной ЖКмонитор, выполненный по тонкопленочной технологии TFT с разрешением 1280.800
WXGA.
Одновременное отображение изображения на ЖКдисплее и внешнем мониторе. Данная функция особенно важна во
время проведения презентаций, поскольку Вы одновременно можете наблюдать за экраном Вашего компьютера и
контролировать аудиторию.
Поддержку режима Svideo для подключения телевизора, а также для возможности одновременного просмотра на
экране телевизора и на экране монитора.
Возможность расширения экрана, которая позволяет Вам расширять изображение рабочего стола на экран другого
монитора, предоставляя дополнительное рабочее пространство.
Управление электропитанием.
ПРИМЕЧАНИЯ:
Для использования функции расширения экрана необходимо иметь
установленный видео драйвер.
Компьютер автоматически входим в режим ожидания или в “спящий” режим
после закрытия крышки дисплея. Если Вы хотите использовать компьютер при
закрытой крышке дисплея, Вам необходимо отказаться от включения режима
ожидания или “спящего” режима в опциях “Когда я закрываю крышку моего
портативного компьютера” (“When I close the lid of my portable computer”) в
диалоговом окне свойств управления питанием (Power Management Properties).
В результате включения данной опции компьютер не входит в режим ожидания
или в “спящий” режим после закрытия крышки дисплея.
Настройка режимов изображения
ПРИМЕЧАНИЯ:
Чтобы использовать дополнительные видео возможности, необходимо
предварительно установить поставляемый видео драйвер.
Page 49

13
PRESTIGIO NOBILE 1520
RU
При использовании ЭЛТ<монитора в качестве единственного устройства вывода
графических данных разрешение экрана зависит от значений, которые может
поддерживать сам ЭЛТ<монитор.
В заводских условиях в Вашем компьютере были по умолчанию выставлены значения поддерживаемого разрешения
и количества цветов изображения. Вы можете уточнить и/или изменить параметры изображения при помощи настроек
ОС. См. документацию Вашей ОС или справочные разделы для получения дополнительной информации.
Для отображения изображения при более высоких значениях разрешения необходимо использовать внешний ЭЛТ
монитор, который поддерживает более высокие решения.
Использование аудио возможностей
ПРИМЕЧАНИЯ:
Чтобы использовать дополнительные аудио возможности, необходимо
предварительно установить поставляемый аудио драйвер.
Если Вы отмечаете наличие посторонних шумов при записи звука, попробуйте
уменьшить уровень громкости записи микрофона.
Ваш компьютер обладает следующими аудио возможностями:
Цифровой и аналоговый формат аудио, необходимый для записи и воспроизведения звука на Вашем компьютере
Поддержка функции Sound Blaster Pro
Разъемы для подключения внешних аудио устройств (1)
Колонки (2)
Способы воспроизведения и записи звука изменяются в зависимости от типа используемой операционной системы.
См. документацию Вашей операционной системы или справочную литературу для получения дополнительной
информации.
Подключение аудио устройств
Для получения более высокого качества звука, Вы можете использовать внешние аудио устройства.
ПРИМЕЧАНИЕ: После подключения внешнего аудио устройства не забудьте
изменить настройки ОС Windows для корректной работы устройства.
Page 50

14
PRESTIGIO NOBILE 1520
RU
Разъем для подключения микрофона используется для подключения внешнего микрофона с целью записи голоса или
звука.
Разъем S/PDIF служит для подключения устройств стандарта S/PDIF (Sony/Philips Digital InterFace), а также обычных
колонок со встроенными усилителями, наушников и т.д. Стандарт S/PDIF является новым форматом передачи данных,
обеспечивающим высокое качество передачи цифрового аудио сигнала при помощи оптических волокон.
ОБРАТИТЕ ВНИМАНИЕ:
При использовании внешних колонок / наушников или микрофона, Вы не можете
использовать встроенные колонки/микрофон.
Разъем звукового выхода относится к изделиям на основе лазерных технологий
(Class 1).
Использование коммуникационных возможностей
Использование модема
ОБРАТИТЕ ВНИМАНИЕ: Чтобы использовать дополнительные возможности
модема, необходимо предварительно установить поставляемый драйвер для
модема.
Встроенный 56 K факсмодем позволяет Вам использовать телефонную линию для связи при помощи факса,
электронной почты, в режиме online или для получения доступа к электронным доскам объявлений.
Чтобы подключить модем к телефонной линии необходимо подсоединить конец шнура к разъему RJ11 на компьютере,
а другой конец к телефонной розетке.
ПРИМЕЧАНИЯ:
При использовании программного обеспечения для связи, Вам, вероятно,
придется отключить функции экономии электропитания.
Назначить COM портом модема порт COM3.
Установить такие параметры как скорость модема (скорость двоичной передачи)
и тип линии (вызов номера: пульсовый или тоновый).
Не вводите компьютер в режим ожидания при использовании программного
обеспечения связи (при работе с модемом, факс<модемом, электронной почтой
и пр.).
Использование локальной сети (LAN)
ОБРАТИТЕ ВНИМАНИЕ: Чтобы использовать возможность подключения к
локальной сети, необходимо предварительно установить поставляемый драйвер
для локальной сети.
Встроенный 10/100BaseT LAN модуль локальной сети позволяет Вам устанавливать соединения с локальной сетью.
Модуль поддерживает скорость передачи данных до 100 Мб/сек.
Page 51

15
PRESTIGIO NOBILE 1520
RU
Чтобы подключить кабель локальной сети к модулю необходимо подсоединить конец шнура к разъему RJ45 на
компьютере, а другой конец к сетевому концентратору.
Использование беспроводной локальной сети (WLAN)
В зависимости от модели компьютер может быть укомплектован модулем для соединения с беспроводной локальной
сетью Mini PCI wireless LAN (WLAN). Данный модуль позволяет Вам осуществлять доступ к корпоративным сетям или
сети Интернет в беспроводном режиме.
Особенности беспроводной локальной сети WLAN:
Совместимость со стандартом IEEE 802.11b/g
Технология 2.4 ГГц DSSS (Direct Sequence Spread Spectrum)
Поддержка режимов PeertoPeer (AdHoc) и Access Point (Infrastructure)
Шифрование данных WEP (Wired Equivalent Privacy) 64/128bit
Скорость передачи данных 9 / 18 / 36 / 54 Mб/сек (режим 802.11g), с автоматическим перераспределением данных
в 1 / 2 / 11 Mб/сек (режим 802.11b)
Чтобы использовать возможность подключения к беспроводной локальной сети, необходимо предварительно
установить поставляемый драйвер для беспроводной локальной сети. Если модуль для подключения к беспроводной
локальной сети не входил в комплект поставки, а был приобретен Вами у дилера, обратитесь к нему для получения
последней версии драйвера для беспроводной локальной сети.
Настройка беспроводной локальной сети WLAN
После установки необходимого драйвера Вы можете использовать утилиту WLAN для настройки и мониторинга
беспроводного соединения. Если Вы используете ОС Windows XP, Вы также можете использовать встроенную в ОС
утилиту WLAN. Следуйте данной инструкции для запуска утилиты WLAN в ОС Windows XP:
1. Выбрать пункт меню Панель управления (Control Panel ) из меню Пуск (Start).
2. Выбрать Сетевые и Интернетсоединения (Network and Internet Connections).
3. Выбрать Сетевые соединения (Network Connections), затем щелкните два раза по пиктограмме Подключение к
беспроводной сети (Wireless Network Connection).
4. Выбрать Свойства (Properties) в диалоговом окне Состояние подключения к беспроводной локальной сети (Wireless
Network Connection Status).
5. Вы можете установить свои собственные настройки беспроводной локальной сети диалоговом окне Свойства
(Properties).
Подключение к беспроводной локальной сети
По умолчанию ОС Windows XP автоматически определяет доступные беспроводные сети. Чтобы подключиться к
беспроводной сети:
1. Убедитесь, что функция беспроводной локальной сети включена, нажав комбинацию клавиш Fn+F1. Индикатор
беспроводной локальной сети должен загореться.
2. Произведите двойное нажатие левой кнопкой мыши на пиктограмме беспроводного локального соединения (Wire
less Network Connection) в правом нижнем углу экрана. При обнаружении какоголибо беспроводного устройства на
экране появится следующее изображение.
Page 52

16
PRESTIGIO NOBILE 1520
RU
3. Выберите необходимую сеть, затем нажмите «Подключиться»(Connect).
4. В зависимости от настроек сети, возможно, Вам потребуется ввести особый пароль WEP.
Включение и выключение беспроводного соединения (WLAN
Radio)
ОБРАТИТЕ ВНИМАНИЕ:
Согласно международным правилам авиационных перелетов, установленных
FAA (Федеральное авиационное агентство), использование беспроводных
устройств на борту самолета является крайне небезопасным, поскольку может
нарушить работу устройств самолета. Не забудьте выключить беспроводное
соединение при использовании Вашего компьютера в самолете.
Информация, содержащаяся в данном разделе, относится к моделям
компьютера с установленным модулем беспроводной локальной сети.
Выключение функции беспроводного локального соединения не является
аналогом выключения соответствующей утилиты Windows WLAN.
Ваш компьютер имеет встроенную комбинацию “горячих” клавиш Fn+F1 для включения/выключения соединения с
беспроводной локальной сетью.
Чтобы временно отключить функцию беспроводной локальной сети, нажмите Fn+F1. Индикатор беспроводной
локальной сети погаснет. Для повторного включения соединения необходимо снова нажать Fn+F 1. Индикатор
беспроводной локальной сети снова включиться.
При повторной загрузке компьютера настройки беспроводной локальной сети сохраняются. Если перед перезагрузкой
компьютера функция беспроводной локальной сети была выключена, после перезагрузки она также будет выключена
и наоборот.
Вашему компьютеру потребуется приблизительно 30 секунд для установления успешного беспроводного соединения
и приблизительно 10 секунд для разъединения с сетью.
Управление электропитанием
Ваш компьютер может работать как от встроенной батареи, так и от внешнего источника питания.
Адаптер сети переменного тока (сетевой адаптер)
ПРЕДОСТЕРЕЖЕНИЕ:
Данный сетевой адаптер предназначен исключительно для Вашего компьютера.
Page 53

17
PRESTIGIO NOBILE 1520
RU
Подключение адаптера к другим устройствам может привести к его
повреждению.
Шнур питания от сети переменного тока рассчитан на использование в стране
приобретения компьютера. Если Вы планируете зарубежную поездку,
проконсультируйтесь у Вашего дилера о возможности использования данного
шнура в электросетях других стран.
При отключении компьютера от сети сначала отключите адаптер от сети и лишь
затем от компьютера. Обратный порядок выполнения данной процедуры может
привести к повреждению адаптера или компьютера.
При отключении адаптера всегда держитесь за вилку, никогда не тяните за шнур.
Сетевой адаптер служит для преобразования переменного тока (AC) в постоянный (DC), используемый в работе
компьютера. Он также служит для зарядки батареи при подключении к источнику переменного тока. Адаптер использует
напряжение в диапазоне 100~240 В AC (постоянный ток).
Батарея
Батарея служит в качестве источника энергии для автономной работы компьютера. При подключении сетевого адаптера
происходит зарядка батареи. Время автономной работы при полностью заряженной батарее зависит от интенсивности
использования компьютера. При использовании периферийных устройств время работы сокращается.
ОБРАТИТЕ ВНИМАНИЕ: Информация об уходе и обслуживании батареи
содержится в разделе “Уход за батареей компьютера”.
Зарядка батареи питания
ОБРАТИТЕ ВНИМАНИЕ:
Процесс зарядки батареи не начнется, если температура батареи будет ниже 0 °C
(32 °F) или выше 50 °C (122 °F).
Процесс зарядки батареи будет остановлен, о чем будет свидетельствовать
мигающий янтарным цветом индикатор зарядки батареи, если температура
батареи превышает 60 °C (140 °F). В этом случае существует риск повреждения
батареи. Обратитесь к своему дилеру.
Во время зарядки не отключайте адаптер сети переменного тока до полной
зарядки батареи, так как это может оказать негативное влияние на сокращение
срока работы батареи.
Чтобы зарядить батарею, вставьте батарею в компьютер и подключите сетевой адаптер компьютера к сети переменного
тока. Индикатор зарядки батареи будет гореть янтарным цветом, свидетельствуя о процессе зарядки батареи.
Рекомендуется производить зарядку батареи при выключенном компьютере. После полной зарядки батареи индикатор
будет гореть зеленым цветом.
Время зарядки батареи:
Тип батареи Время зарядки Время зарядки Компьютер включен и находится
Компьютер выключен в режиме покоя
6ячеечная (2200 mAH) 2~3 часа 4~6 часов
9 ячеечная (2200 mAH) 3~4 часа 6~8 часов
Page 54

18
PRESTIGIO NOBILE 1520
RU
ПРЕДОСТЕРЕЖЕНИЕ: После полной зарядки батареи не следует сразу отключать
сетевой адаптер и затем снова его подключать, так как начнется новый цикл
зарядки батареи, что может негативно сказаться на ее работоспособности.
ОБРАТИТЕ ВНИМАНИЕ: Уровень зарядки батареи может автоматически
понизится вследствие процесса саморазрядки (0.21% в день), даже при полной
зарядке батареи (100 %). Это происходит вне зависимости от того, установлена
или нет батарея в компьютер.
Первичное использование батареи (инициализация)
При использовании батареи в первый раз либо при постоянном снижении уровня заряда необходимо произвести так
называемую процедуру “инициализации” батареи.
Инициализация – процесс полной зарядки, полной разрядки и снова полной зарядки батареи. Полный цикл может
занять несколько часов.
1. Убедитесь, что питание компьютера отключено. Подключите сетевой адаптер и произведите полную зарядку
батареи.
2. После полной зарядки батареи включите компьютер. При появлении на экране сообщения “Press <F2> to enter
System Configuration Utility” (Нажмите <F2> для входа в утилиту системной конфигурации), нажмите клавишу F2 для
входа в программу.
3. Отсоедините сетевой адаптер и оставьте компьютер в работающем состоянии до полной разрядки батареи.
Компьютер выключится автоматически.
4. Подключите сетевой адаптер и снова зарядите батарею.
Проверка уровня заряда батареи
ОБРАТИТЕ ВНИМАНИЕ: Любая оценка уровня заряда батареи является
приблизительной. Реальное время работы может отличаться от ожидаемого в
зависимости от интенсивности использования компьютера.
Вы можете проверить приблизительный уровень зарядки батареи, воспользовавшись программойсчетчиком Вашей
ОС. Просто наведите курсор на пиктограмму уровня заряда батареи на панели задач Windows, чтобы узнать настоящий
уровень заряда батареи.
Предупреждение о разрядке батареи
ОС Windows предупреждает о разрядке батареи, когда уровень ее зарядки составляет менее 10% (по умолчанию в ОС
Windows). Компьютер начинает издавать звуковые предупреждения и выводить на экран текстовые сообщения, а
индикатор зарядки батареи начинает мигать красным цветом.
ОБРАТИТЕ ВНИМАНИЕ: Вы можете самостоятельно установить порог разряда
батареи и типы подаваемых сигналов в ОС Windows.
Незамедлительно сохраните все данные после первого же предупреждения. Время оставшейся работы зависит от
интенсивности использования компьютера. Если Вы используете звуковое сопровождение, PCкарту, приводы жестких
и оптических дисков батарея может разрядиться очень быстро.
Вы также можете ввести свой компьютер в режим ожидания или “спящий” режим, выключить его или подключить
сетевой адаптер.
Если Вы не предпримете никаких действий, компьютер автоматически войдет в “спящий” режим и выключится.
ПРЕДОСТЕРЕЖЕНИЕ:
Если Вы используете PC<карту, не пытайтесь обратиться к ней посредством
программных средств компьютера после получения предупреждения о разрядке
батареи, поскольку время осуществления доступа к карте может оказаться
меньше времени, оставшегося для работы компьютера от батареи.
Если Вам не удалось сохранить свою информацию до момента полной разрядки
батареи, данные будут утеряны.
Page 55

19
PRESTIGIO NOBILE 1520
RU
Рекомендации по экономии электропитания
Данный ноутбук оборудован схемой управления электропитанием, которая поддерживает стандарт ACPI (Advanced
Configuration and Power Interface), позволяющий обеспечивать максимальное сохранение энергии и максимальную
производительность одновременно.
ACPI позволяет ОС Windows контролировать количество энергии, выделяемой каждому из устройств, подключенных
к компьютеру. При помощи ACPI, ОС Windows может выключать периферийные устройства при их не использовании
в целях экономии энергии.
Функции экономии электропитания Windows работают следующим образом:
Что... Когда...
Питание жесткого диска отключается Когда жесткий диск не используется в течение определенного периода
времени.
Питание дисплея отключается Когда дисплей не используется в течение определенного периода времени.
Компьютер входит в режим ожидания. Когда вся система не используется в течение определенного периода
Жесткий диск и дисплей отключаются, времени.
вся система потребляет меньше Когда Вы нажимаете комбинацию “горячих” клавиш Fn+F12. *
энергии. Когда Вы закрываете крышку дисплея. *
Когда Вы нажимаете на кнопку выключения питания. *
Компьютер входит в “спящий” режим. Когда Вы нажимаете комбинацию “горячих” клавиш Fn+F12. *
(См. соответствующий раздел для Когда Вы закрываете крышку дисплея. *
получения дополнительной информации.)Когда Вы нажимаете на кнопку выключения питания. *
* Зависит от установленных настроек ОС Windows.
Для получения дополнительной информации о функциях экономии электропитания см. руководство пользователя ОС
Windows.
“Спящий” режим
ОБРАТИТЕ ВНИМАНИЕ: Убедитесь, что возможность включения данного режима
разрешена настройками на закладке Hibernate в разделе Свойства
электропитания (Power Options Properties) в меню Панель управления (Control
Panel) в ОС Windows XP.
“Спящий” режим является ценной функцией для пользователей, которые запускают большое количество различных
приложений при работе с компьютером. Для их запуска обычно требуется достаточно много времени, а при выключении
компьютера их обычно приходится закрывать.
При использовании “спящего” режима Вам не придется закрывать все свои приложения. Компьютер автоматически
сохранит все особенности текущего сеанса работы в виде файла на жестком диске и лишь затем выключится. При
следующей загрузке компьютера Ваш сеанс работы будет возобновлен в исходном виде.
Советы по экономии электропитания
В дополнение к автоматическим функциям экономии электропитания Вашего компьютера Вы можете использовать
следующие рекомендации для продления времени автономной работы от батареи.
Не отключайте функции экономии электропитания.
Уменьшите уровень яркости экрана до минимально приемлемого уровня.
При работе с приложениями, использующими доступ к PCкарте, всегда закрывайте эти приложения после окончания
работы с картой.
При установленной в компьютер PCкарте всегда извлекайте ее, если она не используется. Некоторые PCкарты
потребляют энергию даже в деактивированном состоянии.
Отключайте функцию беспроводной локальной сети, если она не используется.
Выключайте компьютер, если не планируете его использовать в течение некоторого времени.
Page 56

20
PRESTIGIO NOBILE 1520
RU
Расширение возможностей Вашего компьютера
Вы можете расширять возможности своего компьютера, подключая различные периферийные устройства. При
использовании какоголибо устройства прочитайте руководство по его применению, а также обратитесь к
соответствующим разделам данного руководства.
Подключение внешнего монитора
Если Вы хотите добиться получения изображения с более высоким разрешением, Вы можете подсоединить внешний
ЭЛТ или ЖКИ монитор к Вашему компьютеру.
Следуйте данным рекомендациям, чтобы подсоединить внешний монитор:
1. Удостоверьтесь, что компьютер выключен.
2. Подключите шнур монитора (Dтипа) к VGAпорту компьютера.
3. Подключите один конец шнура питания монитора в разъем питания на мониторе, а другой конец “ к электрической
розетке.
4. Чтобы использовать внешний монитор, включите его до включения компьютера.
5. Внешний монитор должен подключиться по умолчанию. В противном случае Вы можете переключить показ
изображения на ЭЛТмонитор или на оба дисплея (одновременный показ), а также использовать возможность
множественного изображения, нажимая комбинацию клавиш Fn+F5. В ОС Windows, Вы можете также изменить
режим показа изображения путем изменения настроек в меню Свойства дисплея (Display Properties).
6. Вы можете изменить значения настроек при помощи Вашей операционной системы. См. документацию Вашей
операционной системы или справочную документацию для получения дополнительной информации.
ПРЕДОСТЕРЕЖЕНИЕ: Не отсоединяйте внешний монитор в то время, когда
компьютер находится в “спящем” режиме или режиме ожидания. Если будет
отсутствовать подключение к внешнему монитору при возобновлении работы
компьютера, изображение на ЖК<дисплее может отсутствовать.
Подключение телевизора
При проведении конференций, презентаций или других мероприятий Вы можете подключить телевизор к своему
компьютеру.
Следуйте данным рекомендациям, чтобы подсоединить телевизор:
1. Удостоверьтесь, что компьютер не включен.
2. Для подключения Вам потребуется видеокабель. Подсоедините кабель к разъему Sвидео на компьютере, а второй
конец – к видеовходу на телевизоре.
Page 57

21
PRESTIGIO NOBILE 1520
RU
3. Поскольку Ваш компьютер не может передавать звуковое сопровождение на телевизор, Вы можете подключить к
компьютеру внешние колонки для получения качественного звукового сопровождения.
4. Включите телевизор и переключите его в режим отображения видео.
5. Включите компьютер и переключите режим отображения на внешний телевизор путем изменения настроек в меню
Свойства дисплея (Display Properties).
ПРЕДОСТЕРЕЖЕНИЕ:
Не устанавливайте режим одновременного отображения информации на ЖК<
дисплее и телевизоре. Это может привести к нестабильному изображению на
экране монитора.
Не отсоединяйте телевизор в то время, когда компьютер находится в “спящем”
режиме или режиме ожидания. При отсутствии подключения к телевизору при
возобновлении работы компьютера, изображение на ЖК<дисплее будет
отсутствовать.
ОБРАТИТЕ ВНИМАНИЕ: Убедитесь, что установлен необходимый VGA<драйвер.
Подключение USB устройств
Ваш компьютер имеет три USB порта, которые служат для подключения таких устройств как цифровая камера,
сканер, принтер, модем и мышь.
USB является промышленным стандартом, применяемым при создании персональных компьютеров. Данный стандарт
поддерживает технологию “PlugandPlay”, так что Вы можете устанавливать и удалять USB устройства, не выключая
компьютер. Благодаря его способности ко множественным подключениям до 127 последовательно соединенных
устройств могут быть подключены одновременно. Кроме того, Вы можете использовать USB концентратор, который
преобразует один USB порт в порты для подключения большого количества USB устройств.
USB порты поддерживают скорость передачи данных до 12 Mб/сек для USB 1.1 устройств и 480 Mб/сек для USB 2.0
устройств.
Чтобы подключить USB устройство, просто подключите кабель устройства к одному из USB портов.
Подключение устройств стандарта IEEE 1394a
Ваш компьютер укомплектован портом miniIEEE 1394a для подключения устройств стандарта IEEE 1394a, который
является стандартом нового поколения, предоставляя возможности высокоскоростной передачи данных,
многоканальной связи и функции подключения во время работы (“Hot Plug”). При помощи данного порта Вы можете
подключить до 63 различных устройств, таких как сканер, принтер и CCD, а также цифровую видеокамеру и
видеомагнитофон.
Для подключения устройств 1394 просто подсоедините кабель устройства к порту IEEE 1394a Вашего компьютера.
Page 58

22
PRESTIGIO NOBILE 1520
RU
Использование PCкарт
Ваш компьютер имеет отсек для подключения PCкарты.
PCкарты периферийные устройства размером с кредитную карту, основанные на стандартах PCMCIA (Международная
ассоциация производителей плат памяти для персональных компьютеров IBM PC). PCMCIA некоммерческая
ассоциация, созданная для облегчения взаимозаменяемости в производстве мобильных компьютеров, где
производительность, низкое энергопотребление и небольшой размер являются особенно важными.
Тип PCкарты
Разъем для PCкарты Вашего компьютера предназначен для подключения PCкарт II типа. Типичные представители
PCкарт II типа флэшпамять, статическое ОЗУ (SRAM), модем, модуль локальной сети, и SCSI карты (интерфейс
малых компьютерных систем).
Поддержка CardBus
Разъем для PCкарты Вашего компьютера поддерживает стандарт CardBus. CardBus 32 битная версия технологии
PCкарт. Данный стандарт позволяет осуществлять передачу данных на скорости до 133 Mб/сек при 33 МГЦ. Типичными
представителями периферийных устройств, использующих данный стандарт, являются шина главного процессора
SCSI и карты для быстродействующих сетей.
Установка и извлечение PCкарты
ПРИМЕЧАНИЯ:
Некоторые PC<карты требуют дополнительных ресурсов системы. Перед
использованием такой PC<карты Вам, вероятно, придется освободить другие
ресурсы системы для работы PC<карты .
Хотя некоторые PC<карты могут быть установлены и извлечены, не выключая
компьютер, Вы не можете извлечь или установить PC<карты в момент, когда
компьютер находится в режиме ожидания.
Установка PCкарты:
1. Определите местонахождение разъема для PCкарты на левой панели компьютера.
2. Вставьте PCкарту этикеткой вверх и протолкните ее в разъем до щелчка кнопки извлечения.
3. Когда новая карта помещена в отсек, компьютер обнаружит ее и инициирует процесс установки нового драйвера.
Следуйте инструкциям на экране для завершения процесса установки.
Извлечение PCкарты:
1. Щелкните мышью два раза на пиктограмме Безопасного удаления периферийных устройств (Safely Remove Hard
ware) в Панели задач Windows XP. На экране появится диалоговое окно Безопасного удаления периферийных устройств
(Safely Remove Hardware) .
2. Выберите (выделите строку) PCкарту, которую Вы хотите удалить из списка и щелкните на кнопке Стоп (Stop) для
отключения карты.
Page 59

23
PRESTIGIO NOBILE 1520
RU
3. Нажмите на кнопку извлечения, и карта выскользнет из отсека.
4. Вытяните карту из отсека.
Модернизация внутренних компонентов
Вы можете модернизировать Ваш компьютер, сменив центральный процессор или добавив память. Однако, чтобы
избежать повреждения системы во время процедуры инсталляции, обратитесь за помощью к Вашему дилеру. Не
устанавливайте внутренние компоненты системы самостоятельно.
Установка программных драйверов
Для получения доступа ко всем возможностям Вашего компьютера Вам, возможно, придется установить дополнительное
программное обеспечение (драйверы), необходимое для правильной работы ОС с различными устройствами.
Если Вы приобрели компьютер с уже установленной ОС Windows, возможно, что и необходимые драйверы также были
установлены. В противном случае Вам необходимо будет установить драйверы самостоятельно при помощи диска
с программным обеспечением, входящим в комплект поставки.
Как использовать диск с программным обеспечением
ВНИМАНИЕ:
Драйверы, возможно, были обновлены после того, как данное руководство было
опубликовано. Для получения модернизированной версии драйвера,
пожалуйста, обратитесь к Вашему дилеру.
Данный компакт<диск поддерживает только Windows XP. Мы также рекомендуем
установить сервисный пакет Windows XP Service Pack 2.
Содержимое диска может отличаться в зависимости от модели Вашего
компьютера.
Пожалуйста, не извлекайте компакт<диск во время установки драйвера.
Программа автоматического запуска, содержащаяся на компактдиске, предназначена для облегчения процедуры
установки драйверов. Как только Вы вставляете компактдиск, программа автоматического запуска начинает свою
работу. Если Вам необходимо произвести ручной запуск программы, запустите файл Setup.exe в директории WSetup
компактдиска.
На экране появится следующее изображение:
Page 60

24
PRESTIGIO NOBILE 1520
RU
Чтобы установить необходимый драйвер, щелкните левой кнопкой мыши на соответствующей пиктограмме на левой
стороне. Начнется процесс установки. Пиктограммы и соответствующие драйверы описаны ниже:
Пиктограмма Название Описание
Драйвер микропроцессорного Обеспечивает функционирование остальных драйверов. Установите
комплекта (Chipset driver) данный драйвер до установки других драйверов устройств.
Видеодрайвер Служит для установки видеодрайвера, который позволяет Вам
выбирать режимы изображения с более высоким разрешением и
более полной цветопередачей.
Аудиодрайвер Служит для установки аудиодрайвера, который позволяет Вам
использовать все функции звуковых систем Вашего компьютера.
Драйвер модема Служит для установки драйвера модема, который позволяет Вам
использовать функции модема компьютера.
Драйвер локальной сети Служит для установки драйвера локальной сети, который позволяет
Вам использовать функцию доступа к локальной сети.
Драйвер для сенсорной панели Служит для установки драйвера сенсорной панели, который
позволяет Вам использовать все функции сенсорной панели.
Драйвер беспроводной сети Служит для установки драйвера беспроводной сети WLAN, который
WLAN (опционально) позволяет Вам использовать функции внутреннего модуля MiniPCI
(ТипIIIB) WLAN.
ВНИМАНИЕ: Функция PlugandPlay в ОС Windows может
автоматически обнаружить новое устройство (карту MiniPCI WLAN)
и отобразить окно мастера установки, попросив при этом
установить необходимые драйверы. Нажмите Отмена (Cancel) для
отказа от установки драйверов.
Программа Adobe Служит для установки программы Adobe Acrobat Reader при
Acrobat Reader отсутствии таковой на Вашем компьютере. Данная программа
необходима для открытия и прочтения электронного руководства
пользователя, содержащегося на компактдиске.
Руководство пользователя Позволяет Вам выбрать для просмотра руководство пользователя
на требуемом языке.
Просмотр CD Просмотр содержимого данного компактдиска.
Уход за компьютером
Уход за компьютером гарантирует Вам надежную работу компьютера и поможет снизить риск какихлибо повреждений
Вашего ноутбука.
Защита Вашего компьютера
Чтобы обеспечит сохранность хранимых в компьютере данных, а также и самого компьютера, Вы можете защитить
свой компьютер несколькими нижеописанными способами.
Использование пароля
Использование пароля при загрузке системы защищает Ваш компьютер от несанкционированного использования.
Если пароль установлен, требование ввода пароля появляется на экране всякий раз, когда компьютер включается.
Пароль можно установить при помощи программы установок BIOS.
Page 61

25
PRESTIGIO NOBILE 1520
RU
Использование замка безопасности
Вы можете использовать замок безопасности типа Kensington для защиты Вашего компьютера от кражи. Замок
безопасности можно приобрести в большинстве компьютерных магазинов.
Чтобы использовать замок безопасности, закрепите петлей кабель замка безопасности вокруг стационарного объекта,
например, стола. Вставьте замок безопасности в отверстие замка Kensington и поверните ключ, чтобы закрыть
замок. Храните ключ в безопасном месте.
Использование антивирусного программного обеспечения
Новые вирусы появляются постоянно и атакуют компьютеры (чаще всего посредством часто используемой электронной
почты).
Вы можете также установить обнаруживающую вирусы программу, чтобы контролировать потенциальные вирусы,
которые могли повредить ваши файлы.
Уход за компьютером
Руководство по установке компьютера
Используйте компьютер в диапазоне температур окружающей среды от 10 °C (50 °F) до 35 °C (95 °F).
Не устанавливайте компьютер в местах, где он может подвергнуться воздействию повышенной влажности, высоких
температур, вибрации, прямого солнечного света и пыли.
Не закрывайте вентиляционные отверстия компьютера. Не размещайте его на кровати, диване, ковре и других мягких
поверхностях. Это может привести к блокировке вентиляционных отверстий, перегреву и выходу компьютера из
строя.
Не располагайте электрические устройства (телевизор, холодильник, большие колонки и т.д.), которые могут
генерировать сильные электромагнитные поля, на расстоянии менее 13 см от компьютера.
Не перемещайте компьютер из холодного в теплое помещение, так как перепад температур в 10 °C и более может
привести к конденсации влаги внутри устройства и выходу его из строя.
Не размещайте компьютер на неустойчивой поверхности.
Общие рекомендации
Не размещайте тяжелые предметы на корпусе компьютера, так как это может привести к повреждению дисплея.
Экран дисплея является очень чувствительным к механическим воздействиям. Не используйте бумажные полотенца
для чистки экрана, не прикасайтесь к нему пальцами, ручкой или карандашом.
Чтобы продлить срок службы дисплея, включите функцию автоматического выключения подсветки дисплея. Не
рекомендуется использовать экранные заставки, препятствующие автоматическому выключению дисплея.
Рекомендации по чистке компьютера
Не проводите чистку компьютера во включенном состоянии.
Используйте мягкую влажную тканевую салфетку для чистки компьютера.
Дисплей рекомендуется протирать сухой салфеткой, нежелательно использовать чистящие средства на основе алкоголя
или растворителей.
Page 62

26
PRESTIGIO NOBILE 1520
RU
Чувствительность сенсорной панели заметно снижается при ее загрязненности. Чистку сенсорной панели можно
проводить при помощи наклеивания клейкой ленты.
Уход за батареей компьютера
Производите зарядку батареи при ее практически полном разряде. При перезарядке убедитесь, что зарядка
произведена полностью. Эта процедура продлевает срок службы батареи.
Не извлекайте батарею даже при использовании внешнего источника энергии, что гарантирует ее полную зарядку.
Если Вы не планируете использовать компьютер в течение длительного периода времени (более двух недель),
извлеките батарею из компьютера.
Если Вы извлекаете батарею из компьютера, убедитесь, что контакты батареи не соприкасаются с металлическими
предметами или водой. В противном случае батарея может выйти из строя вследствие короткого замыкания.
Осуществляйте хранение батареи в сухом прохладном месте. Не допускайте превышения температуры хранения
выше 60 °C (140 °F).
Не храните батарею в течение более 6 месяцев без ее перезарядки.
Использование компьютера в поездках
Перед началом путешествия сделайте резервные копии важной информации с Вашего жесткого диска на сменные
носители информации. В качестве дополнительной меры предосторожности возьмите с собой копии самых важных
данных.
Убедитесь, что батарея полностью заряжена.
Убедитесь, что компьютер выключен и его крышка надежно закрыта.
Не помещайте никакие объекты между клавиатурой и крышкой дисплея.
Отключите сетевой адаптер и возьмите его с собой. Используйте его для подключения к источнику питания и для
зарядки батареи.
Перевозите компьютер в ручной клади. Не сдавайте его в багаж.
Если Вам необходимо оставить компьютер в автомобиле, поместите его в багажник, чтобы избежать воздействия
прямых солнечных лучей.
При прохождении через рамку металлодетектора не проносите компьютер с собой. Проведите компьютер через
рентгенустановку (вместе с остальным багажом). Избегайте воздействия полей металлодетектора или полей других
магнитных устройств (ручной детектор службы охраны аэропорта).
При планировании зарубежной поездки проконсультируйтесь у Вашего дилера по поводу использования сетевого
адаптера и совместимости электросетей в стране назначения.
Поиск и устранение неисправностей
Некоторые проблемы в работе компьютера могут быть вызваны сбоями в программном обеспечении, неисправностями
внутренних компонентов компьютера. Если Вы столкнулись с какойлибо проблемой, проверьте способы ее решения
при помощи данного раздела.
Первоочередные действия при обнаружении неисправности
Внимательно изучите данный список первоочередных действий при обнаружении неисправности:
Пробуйте определить, какой из компонентов компьютера является причиной неисправности.
Удостоверьтесь, что Вы включили все периферийные устройства перед включением компьютера.
Если проблема заключается в работе внешнего устройства, удостоверьтесь, что все кабели правильно подключены.
Удостоверьтесь, что информация о конфигурации системы должным образом установлена в настройках BIOS.
Удостоверьтесь, что все драйверы устройств правильно установлены.
Запишите Ваши замечания к работе компьютера. Обратите внимание, есть ли какиелибо сообщения на экране?
Горят ли какиелибо индикаторы? Вы слышите какиелибо звуковые сигналы? Ваши детальные записи могут оказаться
полезными для обслуживающего персонала при Вашем обращении в сервисный центр.
Если какаялибо проблема сохраняется после того, как Вы выполнили все инструкции в этом разделе, обратитесь за
помощью к уполномоченному дилеру.
Page 63

27
PRESTIGIO NOBILE 1520
RU
Наиболее общие проблемы
Проблемы в работе батареи
Батарея не заряжается (индикатор зарядки батареи не горит янтарным цветом).
Удостоверьтесь, что сетевой адаптер должным образом подключен.
Удостоверьтесь, что батарея не слишком горячая или холодная. Дождитесь пока батарея охладится / нагреется до
комнатной температуры.
Удостоверьтесь, что батарея установлена правильно.
Удостоверьтесь, что контакты аккумулятора чистые.
Время работы полностью заряженной батареи снизилось.
Если Вы часто частично заряжаете и перезаряжаете аккумулятор, батарея может не заряжаться на полную мощность.
Произведите процедуру начальной зарядки батареи.
Время работы батареи, обозначенное счетчиком батареи, не соответствует фактическому
времени ее работы.
Фактическое время работы может отличаться от ожидаемого времени в зависимости от того, как Вы используете
компьютер. Если фактическое время работы намного меньше, чем ожидаемое время, произведите процедуру начальной
зарядки батареи.
Проблемы привода DVD
Привод DVD не может прочитать оптический диск.
Удостоверьтесь, что оптический диск правильно помещен в лотке, зеркальной стороной вниз.
Удостоверьтесь, что оптический диск не загрязнен. Очистите диск при помощи специального чистящего комплекта,
которые можно приобрести в большинстве компьютерных магазинов.
Удостоверьтесь, что драйвер привода DVD установлен.
Удостоверьтесь, что компьютер поддерживает данный формат оптического диска или содержавшиеся на нем файлы.
Вы не можете извлечь оптический диск.
Оптический диск неверно помещен в привод. Вручную извлеките диск, следуя данной процедуре:
1. Выключите систему.
2. Вставьте маленький штырь, например, разогнутую скрепку, в отверстие для ручного извлечения диска и с усилием
надавите для извлечения лотка.
3. Полностью вытяните лоток и затем удалите диск.
Проблемы в работе дисплея
Изображение на экране отсутствует.
В ходе работы экран может автоматически выключиться в результате срабатывания функций управления
электропитанием. Нажмите на любую клавишу, чтобы добиться возвращения изображения.
Уровень яркости может быть слишком низким. Увеличьте яркость, нажимая комбинацию Fn+F7.
В качестве устройства вывода может использоваться внешнее устройство. Чтобы переключить отображение
изображения в режим ЖКдисплея, нажмите Fn+F5 или измените параметры в Свойствах дисплея (Display Proper
ties).
Page 64

28
PRESTIGIO NOBILE 1520
RU
Символы на экране тусклые.
Отрегулируйте уровень яркости и/или контраста.
На экране появляются точки.
Небольшое количество отсутствующих, изменивших цвет или ярких точек на экране является характерной чертой TFT
технологии ЖКИ. Это не может быть расценено как дефект ЖКИ.
Необходимое разрешение экрана не может быть установлено.
Убедитесь, что видео драйвер установлен правильно.
Отсутствует изображение на внешнем мониторе.
Удостоверьтесь, что монитор включен.
Удостоверьтесь, что сигнальный кабель монитора должным образом подсоединен.
Переключите изображение на монитор, нажимая комбинацию Fn+F5, или измените параметры в Свойствах дисплея
(Display Properties).
Отсутствует изображение на экране телевизора.
Удостоверьтесь, что телевизор включен.
Удостоверьтесь, что сигнальный кабель телевизора должным образом подсоединен.
Переключите изображение на телевизор, изменив параметры в Свойствах дисплея (Display Properties).
Режим одновременного изображения и расширения изображения не работает.
Удостоверьтесь, что Вы включили внешний монитор перед включением компьютера.
Нажмите комбинацию Fn+F5 для переключения режимов отображения изображения или измените параметры в
Свойствах дисплея (Display Properties).
Проблемы аппаратных средств
Компьютер не распознает недавно установленное устройство.
Устройство не может быть правильно распознано утилитой конфигурирования BIOS. Запустите BIOS Setup, чтобы
идентифицировать новый тип оборудования.
Удостоверьтесь, что все необходимые драйверы установлены. (Обратитесь к технической документации устройства.)
Удостоверьтесь, что устройство не нуждается в установке перемычек или переключении выключателей. (Обратитесь
к технической документации устройства.)
Проверьте кабели и/или шнуры питания на предмет правильности подключения.
Удостоверьтесь, что включено питание для внешнего устройства, которое имеет свой собственный выключатель
питания.
Проблемы накопителя на жестких дисках
Сообщение об ошибке накопителя на жестких дисках появляется на экране.
Накопитель на жестких дисках имеет дефекты. Проконсультируйтесь у вашего дилера.
Работа накопителя на жестких дисках кажется медленной.
Файлы данных, сохраненные на жестком диске, могут быть фрагментированы. Используйте специальную программу
Windows для осуществления дефрагментации файлов (Window’s Disk Defragmenter).
Индикатор работы жесткого диска горит не мигая.
Файлы данных, сохраненные на жестком диске, могут быть фрагментированы. Используйте специальную программу
Windows для осуществления дефрагментации файлов (Window’s Disk Defragmenter).
Проблемы в работе клавиатура, мыши, и сенсорной панели
Клавиатура не реагирует на действия пользователя.
Попробуйте подсоединить внешнюю клавиатуру. Если она работает, проконсультируйтесь с уполномоченным дилером,
поскольку кабель внутренней клавиатуры может быть поврежден.
Page 65

29
PRESTIGIO NOBILE 1520
RU
Цифровая клавиатура не работает.
Удостоверьтесь, что включен режим Num Lock. (Проверьте, горит ли индикатор режима Num Lock).
Внешняя клавиатура не работает.
Удостоверьтесь, что кабель клавиатуры должным образом подключен.
USB мышь не работает.
Удостоверьтесь, что кабель мыши должным образом подключен.
Сенсорная панель не работает, или управление курсором вызывает трудности.
Удостоверьтесь, что сенсорная панель не загрязнена.
Проблемы при работе в локальной сети
Невозможно получить доступ к сети.
Удостоверьтесь, что драйвер для доступа к локальной сети правильно установлен.
Удостоверьтесь, что кабель локальной сети должным образом подключен к разъему RJ45 и сетевому концентратору.
Удостоверьтесь, что конфигурация сети является соответствующей.
Удостоверьтесь, что имя пользователя или пароль верны.
Проблемы при работе в беспроводной локальной сети WLAN
Невозможно использовать WLAN.
Удостоверьтесь, что модуль Mini PCI WLAN правильно установлен.
Удостоверьтесь, что необходимый драйвер(ы) правильно установлен(ы).
Удостоверьтесь, что функция WLAN включена.
Скорость передачи данных крайне низкая.
Ваш компьютер может находиться вне зоны действия сети. Разместите Ваш компьютер ближе к устройству WLAN.
Проверьте, имеются ли внешние помехи. При их обнаружении, см. инструкции ниже.
Имеются радиопомехи.
Отодвиньте Ваш компьютер от устройства, являющегося причиной радиопомех (например, микроволновой печи и
больших металлических объектов).
Включите Ваш компьютер в другую электрическую розетку, к которой не подключены устройства, способные вызывать
помехи.
Проконсультируйтесь с Вашим дилером или опытным радиотехником.
Невозможно соединиться с другим WLAN устройством.
Удостоверьтесь, что функция WLAN включена.
Удостоверьтесь, что настройки SSID одинаковы для каждого WLAN устройства в сети.
Ваш компьютер не реагирует на изменения параметров. Перезагрузите компьютер.
Удостоверьтесь, что IP адрес или маска подсети правильны.
Невозможно связаться с компьютером в сети при настроенном режиме инфраструктуры
(Infrastructure mode).
Удостоверьтесь, что устройство Access Point (порт доступа), совмещенное с Вашим компьютером, находится во
включенном состоянии и все светодиодные индикаторы работают должным образом.
Если задействованный радиоканал обладает низким качеством связи, измените параметры канала в устройстве
Access Point и всех беспроводных устройствах в пределах BSSID на другой радиоканал.
Ваш компьютер может находиться вне зоны действия сети. Разместите Ваш компьютер ближе к устройству WLAN.
Удостоверьтесь, что ваш компьютер имеет те же настройки безопасности (шифрования), что и Access Point.
Используйте опцию Web Manager/Telnet устройства Access Point, чтобы проверить правильность подключения к сети.
Перенастройте и перезагрузите устройство Access Point.
Невозможно получить доступ к сети.
Удостоверьтесь, что необходимый драйвер(ы) правильно установлен(ы).
Удостоверьтесь, что конфигурация сети является соответствующей.
Page 66

30
PRESTIGIO NOBILE 1520
RU
Удостоверьтесь, что имя пользователя или пароль верны.
Возможно, Вы вышли за пределы зоны действия сети.
Выключите функции управления электропитанием.
Проблемы в работе модема
Модем не работает.
Удостоверьтесь, что драйвер модема правильно установлен.
Удостоверьтесь, что телефонная линия подсоединена должным образом.
Удостоверьтесь, что COM порт в программном обеспечении правильно установлен.
Выключите функции управления электропитанием.
Проблемы в работе PCкарты
PC<карта не работает.
Удостоверьтесь, что PCкарта правильно установлена в отсек.
Если карта требует IRQ (Interrupt ReQuest), удостоверьтесь, что он доступен.
PC<карта прекращает функционировать должным образом.
Приложение могло перезагрузиться вследствие выключения компьютера или вхождения его в режим ожидания.
Выйдите и перезагрузите приложение.
Проблемы настроек управления электропитанием (для ОС Windows)
Компьютер автоматически не входит в режим ожидания и “спящий” режим.
Если Ваш компьютер подсоединен к другому компьютеру, компьютер не входит в режим ожидания и “спящий”
режим, если активно осуществляется связь между компьютерами.
Удостоверьтесь, что время активации режима ожидания и “спящего” режима установлено.
Компьютер не входит в режим ожидания и “спящий” режим немедленно после получения
соответствующей команды.
Если компьютер выполняет какоелибо действие, обычно требуется некоторое количество времени, необходимое
для завершения этого действия.
Компьютер не возобновляет работу после режима ожидания и “спящего” режима.
Компьютер автоматически входит в режим ожидания и “спящий” режим , когда батарея разряжена. Проделайте
следующие операции:
Подключите сетевой адаптер к компьютеру.
Замените пустую батарею полностью заряженной.
Компьютер не входит в “спящий” режим посредством нажатия комбинации “горячих” клавиш
Fn+F12.
Удостоверьтесь, что функция “спящего” режима назначена кнопке режима ожидания.
Возможно, Вы используете PCкарту, которая препятствует вхождению компьютера в “спящий” режим. Чтобы войти
в “спящий” режим, остановите программу связи и затем извлеките карту или остановите ее работу.
Проблемы программного обеспечения
Программа<приложение работает неправильно.
Удостоверьтесь, что программное обеспечение правильно установлено.
Если сообщение об ошибке появляется на экране, сверьтесь с документацией программы для получения
дополнительной информации.
Если Вы уверены, что работа программы прекращена, перезагрузите компьютер. (См. раздел “Перезагрузка
компьютера”)
Проблемы со звуком
Звук отсутствует.
Удостоверьтесь, что уровень громкости достаточно велик.
Удостоверьтесь, что аудио драйвер правильно установлен.
Page 67

31
PRESTIGIO NOBILE 1520
RU
Удостоверьтесь, что компьютер не находится в режиме ожидания.
При использовании внешних колонок удостоверьтесь, что колонки подключены должным образом.
Происходит воспроизведение искаженного звука.
Удостоверьтесь, что уровень громкости не слишком велик и не слишком мал. В большинстве случаев слишком высокий
уровень громкости приводит к искажению звука.
Запись звука не осуществляется.
Отрегулируйте уровень громкости записи и/или воспроизведения.
Внешний микрофон или аудио устройство не работают.
Удостоверьтесь, что микрофон подключен к правильному гнезду на панели компьютере.
Удостоверьтесь, что на Вашем компьютере установлен необходимый драйвер.
Щелкнуть мышью по пиктограмме динамика на Панели задач (taskbar) и проверьте уровень громкости Windows.
Проверьте уровень громкости Вашего компьютера.
Проблемы при запуске компьютера
Когда Вы включаете компьютер, он не реагирует на команды пользователя, а индикатор
питания не горит зеленым цветом.
Если Вы используете внешний источник энергии, удостоверьтесь, что сетевой адаптер правильно и надежно подключен.
Если это так, удостоверьтесь, что электрическая розетка работает должным образом.
Если Вы используете питание от батареи, удостоверьтесь, что батарея не разряжена.
Когда Вы включаете компьютер, процесс загрузки останавливается после завершения
процедуры POST (процедура самотестирования при запуске).
Перезагрузите компьютер.
После того, как Вы включаете компьютер, на экране появляется сообщение “Операционная
система не найдена” (“Operating system not found”).
Удостоверьтесь, что в дисководе нет дискеты. Если она есть, извлеките ее и перезагрузите систему.
Если это сообщение появляется, когда Вы производите загрузку с жесткого диска, вставляете самозагружаемый диск
в дисковод и проверьте состояние жесткого диска.
После того, как Вы включаете компьютер, на экране появляется сообщение “Неверный
системный диск системы” (“Invalid system disk”) или “Ошибка диска” (“Disk error”).
Если Вы преднамеренно пытаетесь осуществить загрузку с дискеты, замените диск на самозагружаемый и нажмите
на любую клавишу, чтобы продолжить загрузку.
Если Вы производите загрузку с жесткого диска, удостоверьтесь, что в дисководе нет дискеты. Если она есть,
извлеките ее и перезагрузите систему.
Если это сообщение появляется, когда Вы производите загрузку с жесткого диска, вставьте самозагружаемый диск
в дисковод и проверьте состояние жесткого диска.
Другие проблемы
Дата/время неверно установлены.
Исправить дату и время можно посредством операционной системы или утилиты SCU.
Выполнение всех вышеописанных процедур, в результате которого параметры даты и времени при каждой новой
загрузке компьютера все еще неверны, означает, что батарея RTC завершила срок своей службы. Обратитесь к
уполномоченному дилеру для замены RTC батареи.
Перезагрузка компьютера
Вам, вероятно, придется перезагружать Ваш компьютер в некоторых случаях, когда происходят системные ошибки
и происходит “подвисание” используемых Вами программ.
Если система, как Вам кажется, работает нестабильно, “подвисает”, подождите некоторое время. Возможно, что
система обрабатывает данные. Периодически проверяйте состояние индикатора работы жесткого диска. Если
индикатор периодически загорается, значит, программа обращается к данным и препятствует Вам использовать
Page 68

32
PRESTIGIO NOBILE 1520
RU
клавиатуру. Если Вы уверены, что действие системы остановилось, и Вы не можете использовать функцию
“возобновления” работы операционной системы, перезагрузите компьютер.
Перезагрузка компьютера возможна любым из этих способов:
Нажмите комбинацию клавиш Ctrl+Alt+Del.
Если вышеупомянутое действие не работает, выключите систему. Подождите в течение как минимум пяти секунд,
и включите ее снова.
ПРЕДОСТЕРЕЖЕНИЕ: Перезагрузка системы приведет к потере всех
несохраненных данных.
Page 69

33
PRESTIGIO NOBILE 1520
RU
Технические характеристики
ОБРАТИТЕ ВНИМАНИЕ: Спецификации модели могут изменяться без
предварительного уведомления
Центральный процессор
Intel PentiumM Dothan с 533 MHz FSB, или Intel CeleronM Dothan с 400 MHz FSB
Кэшпамять
2 MB для процессора Intel PentiumM Dothan или 1 MB для процессора Intel CeleronM Dothan
ПЗУ BIOS
512 KB Flash EEPROM (включая BIOS)
ОЗУ
Системное
2 x 200pin SODIMM с возможностью наращивания до 2 Гб, с поддержкой модулей DDRII 400/533 1.25inch
Дисплей
Панель
15.4дюймовая TFTматрица, с разрешением до 1280.800 WXGA
Видео контроллер
Встроенный в “северный мост” (NorthBridge)
Видео порты
Порт VGA, разъем Svideo
Клавиатура
Стандартная клавиатура, цифровая клавиатура, 12 функциональных клавиш, особая функциональная клавиша (Fn)
и клавиши Windows
Устройство указания
PS/2совместимая сенсорная панель
Хранение данных
Привод гибких дисков (внешн.)
3.5дюймовый, 1.44 MB, USB (опционально)
Жесткий диск
2.5дюймовый, 9.5 мм, с поддержкой PATA и SATA, 4200/5400 об./мин.
Привод оптических дисков
12.7 мм “ Combo или DVD Dual
Аудио порты
Два аудио порта для Lineout (S/PDIF) / Micin
PC карта
Тип II x 1, с поддержкой CardBus
Порты ввода/вывода
Три USB порта (поддержка USB 2.0), порт mini IEEE 1394a
Page 70

34
PRESTIGIO NOBILE 1520
RU
Модем
Встроенный 56 Kbps V.90 MDC факсмодем
Локальная сеть LAN
10/100BaseTX
Беспроводная локальная сеть LAN (опционально)
Один разъем Mini PCI для карты беспроводной локальной сети LAN, совместимая со стандартом 802.11b/g (в некоторых
моделях входит в комплект поставки)
Питание
Сетевой адаптер
Универсальный адаптер сети переменного тока 65 W; вход: 100~240 V
Батарея
6/9ячеек (2200 mAH) Liion
Габариты (ШхГхВ)
13.9x9.8x0.98~1.32 дюймов (353.8x250x25~33.5 мм)
Вес
6.4 унций (2.9 кг)
Условия работы и хранения
Температура
При работе: от 0 °C (32 °F) до 35 °C (95 °F) При хранении: от –20 °C (–4 °F) до 60 °C (140 °F)
Влажность
При работе: от 10% до 90% при отсутствии конденсации При хранении: от 5% до 95% при отсутствии конденсации
Page 71

35
PRESTIGIO NOBILE 1520
RU
Примечания
ОБРАТИТЕ ВНИМАНИЕ: Маркирующие наклейки на корпусе Вашего компьютера
указывают на те или иные стандарты, которым соответствует Ваш портативный
компьютер. Изучите данные наклейки и при необходимости обратитесь к данному
разделу для получения дополнительной информации. Некоторые из примечаний
относятся только к определенным моделям.
Заявление Федеральной комиссии связи о радиочастотных
помехах устройств класса B
ВНИМАНИЕ:
Настоящее устройство было проверено и по результатам проверки соответствует ограничениям для цифровых устройств
класса B согласно части 15 Правил FCC, предназначенным для создания необходимой защиты от электронных помех
в жилых помещениях. Это устройство генерирует, использует и может излучать радиоволны и при нарушении
инструкций по установке и эксплуатации может создать помехи радиосвязи. Однако нет гарантии того, что подобные
помехи не возникнут в условиях конкретного здания. Если это устройство создает помехи приему радио или
телепрограмм, которые выявляются при включении устройства и последующем его выключении, пользователю следует
попытаться устранить помехи самостоятельно, выполнив одно или несколько следующих действий:
Переместить или переориентировать приемную антенну.
Увеличить расстояние между данным устройством и приемником.
Подключить устройство к розетке сети, отличной от сети, к которой подключен приемник.
Обратиться за помощью к авторизованному дилеру или в сервисное представительство.
Любые изменения, внесенные в конструкцию данного устройства и не одобренные производителем, могут стать
причиной лишения права пользователя на использование данного оборудования.
Обратите внимание:
Использование неэкранированного интерфейсного кабеля при его подключении к данному устройству запрещено.
Соответствие стандартам ЕС
Заявление о соответствии стандартам
Данное изделие соответствует всем требованиям директивы Европейского Союза 1999/5/EC.
Page 72

36
PRESTIGIO NOBILE 1520
RU
Описание логотипа WEEE
Утилизация старого электрического и
электронного оборудования (применяется в
странах Европейского Союза и других
европейских странах, где налажен раздельный
сбор отходов).
Данный символ на продукте или устройстве означает, что данное устройство не
должно утилизироваться в качестве бытового отхода. Необходимо утилизировать
его в местах, где ведется целенаправленный сбор старого электрического и
электронного оборудования. Это необходимо в целях устранения вредного
воздействия на окружающую среду и здоровье человека, которое может быть
вызвано неправильной утилизацией данного устройства. Вторичная переработка
материалов помогает сохранить природные ресурсы. Для получения дополнительной
информации о методах и способах утилизации обратитесь в городскую
администрацию, службу утилизации или магазин, где Вы приобрели данное устройство.
Page 73

1
PRESTIGIO NOBILE 1520
CZ
Prestigio Nobile 1520
Návod k obsluze
(Říjen 2005)
OBCHODNÍ ZNAČKY
Všechny názvy výrobků a jejich značky jsou obchodními známkami nebo registrovanými obchodními známkami příslušných společností.
POZNÁMKA
Informace, které jsou obsažené v tomto návodu, jsou předmětem změn bez dalšího upozornění.
Page 74

2
PRESTIGIO NOBILE 1520
CZ
Začínáme…
Gratulujeme vám ke koupi tohoto počítače.
Váš počítač v sobě spojuje možnosti a schopnosti stolního počítače v kombinaci s rozměry kompaktního přenosného počítače - notebooku.
Tyto možnosti vám umožní zvýšit produktivitu vaší práce nejen v kanceláři ale i doma, neboť kdekoliv budete potřebovat na počítači
pracovat, stačí jej jednoduše vzít s sebou.
Tento oddíl návodu k obsluze vás provede krok za krokem přípravou počítače k prvnímu použití. Naleznete zde instrukce, týkající se:
vybalení počítače, připojení k napájení , odklopení horního panelu počítače, zapnutí počítače, vypnutí počítače
Dále následuje oddíl, ve kterém se seznámíte s vnějšími součástmi počítače. V posledním oddíle pak naleznete informace, které vám
mohou být užitečné ve chvíli, kdy je počítač připraven k použití.
Příprava počítače k prvnímu použití
V tomto oddíle naleznete postup, jak připravit počítač pro první použití.
Vybalení
Po vybalení počítače a jeho příslušenství z přepravního obalu byste měli nalézt tyto standardní položky:
Vlastní počítač
Příslušenství:
AC síťový adaptér
AC síťový kabel
CD disk s ovladači
Feritové jádro /jádra/ - volitelné
Všechny vybalené položky a součásti pozorně prohlédněte, zdali nejsou poškozeny, nebo zdali některá nechybí. Při zjištění nedostatků
kontaktujte okamžitě svého prodejce počítače.
Přepravní obal a balící materiál si uschovejte pro případnou pozdější možnost ochrany počítače při přepravě či při jeho případném zaslání
do servisu.
Připojení počítače ke zdroji napájení
Počítač může být napájen buď pomocí externího síťového AC adaptéru, nebo pomocí své vnitřní vestavěné baterie. Pro první použití počítače
je doporučeno použití síťového AC adaptéru.
UPOZORNĚNÍ: Používejte pouze AC síťový adaptér, který byl dodán spolu s počítačem. Použití jiného
AC síťového adaptéru může váš počítač poškodit.
1. Ujistěte se, že je počítač vypnut.
2. Zasuňte výstupní DC kabel od adaptéru do konektoru na zadní straně počítače /1/.
3. Zasuňte jeden konec síťového AC kabelu do adaptéru a jeho druhý konec do síťové zásuvky na zdi /2/.
Page 75

3
PRESTIGIO NOBILE 1520
CZ
4. Když je AC adaptér připojen k el. síti, prochází adaptérem do počítače napájecí proud. Tímto je počítač připraven k zapnutí.
UPOZORNĚNÍ:
Pokud odpojujete AC adaptér, odpojte jej nejprve od el. sítě vytažením vidlice síťového kabelu ze
zásuvky na zdi a teprve potom od počítače. Opačný postup může poškodit AC adaptér nebo počítač.
Při odpojování konektoru jej vždy vytahujte ze zdířky tahem za tělo konektoru, nikdy ne tahem za
přívodní kabel.
POZNÁMKA: Pokud je AC adaptér připojen, dochází také k dobíjení baterie počítače.
Odklopení panelu LCD displeje počítače
UPOZORNĚNÍ: Při otevírání panelu displeje postupujte s citem. Hrubé zacházení s panelem displeje
může počítač poškodit. Nikdy panel neuzavírejte přibouchnutím.
Pro otevření panelu počítače je nutno odjistit západku směrem doprava /1/ a pak panel /2/ zvednout směrem nahoru. Panel pak můžete
nastavit na úhel, který vám poskytuje nejpohodlnější sledování displeje.
Zapnutí a vypnutí počítače
Zapnutí počítače
1. Ujistěte se, že je počítač připojen k napájecímu napětí.
2. Stiskněte tlačítko napájení.
3. Při každém zapnutí počítače provede počítač nejprve inicializační test svých jednotlivých hardwarových komponentů /POST/ a poté
dojde k zahájení načítání operačního systému, např. Windows.
Vypnutí počítače
Pro vypínání počítače používejte příkaz “Vypnout počítač”, který je obsažen ve vašem operačním systému.
POZNÁMKA: Existují i jiné možností vypnutí vašeho počítače, při kterých se počítač po opětovném
zapnutí dostane do stejného stavu, v jakém se nacházel před vypnutím - “spánek” počítače.
UPOZORNĚNÍ: Pokud potřebujete zapnout počítač okamžitě po jeho předchozím vypnutí, vyčkejte s
jeho zapnutím alespoň 5 sekund. Okamžité zapnutí počítače po jeho vypnutí může mít za následek jeho
poškození.
Page 76

4
PRESTIGIO NOBILE 1520
CZ
Pohled na počítač
Tento oddíl návodu k obsluze vám podává přehled o vnějších součástech počítače a ve zkratce popisuje funkci každé jeho součásti.
POZNÁMKA: V závislosti na modelu, který jste zakoupili, nemusí být vzhled počítače přesně totožný s
popisem v tomto návodu.
Součásti na pravé straně počítače
Položka Součást Popis
1 Mechanika Combo/DVD Dual Drive podporuje kompaktní disky typu CD/DVD, ze kterých můžete instalovat nebo otevírat
software, přistupovat k různým datům, přehrávat hudební či video soubory, či na která
můžete data zapisovat /pouze u vybraných modelů/.
Součásti na levé straně počítače
Položka Součást Popis
1 Port VGA Slouží pro připojení externího CRT monitoru.
2 Konektor vstupu S-Video Pomocí S-Video konektoru můžete k počítači připojit externí video zařízení, podporující
výstup S-Video, jako je například televizní přijímač.
3 Konektor RJ-11 Slouží pro připojení počítače k telefonní lince.
4 Konektor RJ-45 Slouží pro připojení počítače k počítačové síti LAN.
5 Slot pro PC kartu Slouží pro zasunutí PC karty, která může mít různé funkce, rozšiřující možnosti vašeho
počítače.
Součásti na zadní straně počítače
Page 77

5
PRESTIGIO NOBILE 1520
CZ
Položka Součást Popis
1 Otvor pro vložení Pojistný Kensington zámek umožňuje uzamknout počítač ke stabilnímu objektu a slouží
pojistného zámku jako pojistka proti jeho odcizení.
2 Napájecí zdířka Do této zdířky se připojuje konektor napájecího kabelu od AC síťového adaptéru.
3 USB porty Do každého ze dvou USB portů můžete připojovat různá USB zařízení, jako je disketová
mechanika 3,5", tiskárna, digitální kamera či fotoaparát, joystick pro hraní her a další USB
zařízení.
Součásti na přední straně počítače
Položka Součást Popis
1 Západky horního panelu Aretují horní panel LCD displeje v uzavřené /sklopené/ poloze.
2 Port Mini IEEE 1394a Tento port slouží pro připojení zařízení standardu 1394, jako je např. skener, tiskárna,
DVCAM, VCR a některá další zařízení.
3 Port USB Do USB portu můžete připojovat různá USB zařízení, jako je disketová mechanika 3,5",
tiskárna, digitální kamera či fotoaparát, joystick pro hraní her a další USB zařízení.
4 Mikrofonní konektor Slouží pro připojení externího mikrofonu.
5 Konektor S/PDIF Pomocí S/PDIF konektoru můžete k počítači připojovat různá zařízení, vyžadující digitální
audio výstup, jako jsou např. digitální reproduktorové soustavy.
Součásti umístěné na spodní straně počítače
Položka Součást Popis
1 Baterie počítače Slouží k napájení počítače v případě, že není připojen do el. sítě.
2 Místo pro pevný disk počítače Na tomto místě je uložen pevný disk /HDD/ vašeho počítače.
3 Kryt dalších součástí počítače Pod tímto krytem jsou uloženy:
Slot Mini PCI pro volitelné Mini PCI karty. V závislosti na modelu počítače zde může být
předinstalována Mini PCI Wireless LAN karta.
Slot pro paměťové moduly počítače, umožňující rozšíření jeho paměti.
Procesor /CPU/ vašeho počítače.
Page 78

6
PRESTIGIO NOBILE 1520
CZ
Součásti na horní straně počítače
Položka Součást Popis
1 LCD monitor Tento LCD displej slouží jako obrazový výstup počítače.
2 Indikátor napájení z baterie Tento indikátor svítí zeleně, pokud je počítač napájen z baterie.
Pokud je počítač v pohotovostním režimu “standby” a je napájen z baterie, tento indikátor
zeleně bliká.
3 Indikátor nabíjení baterie Svítí zeleně, když je baterie plně nabita a počítač je napájen ze sítě pomocí AC adaptéru.
Svítí žlutě, když je baterie nabíjena.
Bliká červeně, když je baterie téměř plně vybitá.
4 Indikátor napájení pomocí Svítí zeleně, když je počítač zapnut.
AC adaptéru Bliká zeleně, když je počítač v pohotovostním “standby” režimu.
5 Stereo reproduktory Reprodukují zvuky a hudbu z počítače
6 Klávesnice Slouží jako zařízení pro zadávání dat do počítače.
7 Polohovací zařízení - touchpad Touchpad je zařízení, které svojí funkcí nahrazuje myš. Skládá se z obdélníkové podložky a
z levého a pravého tlačítka.
8 Indikátory zařízení Indikují stav různých zařízení počítače.
Indikátor činnosti DVD mechaniky
Indikátor činnosti pevného disku
Indikátor zařazení funkce Num Lock
Indikátor zařazení funkce Caps Lock
Indikátor zařazení funkce Scroll Lock
Indikátor činnosti bezdrátové sítě Wireless LAN
Indikátor činnosti čtečky paměťových karet /tento indikátor je vyhrazen pro pozdější modely
a u vašeho počítače není jeho funkce podporována/
9 Mikrofon /vestavěný mikrofon bude dostupný u pozdějších modelů, u vašeho počítače není jeho
funkce podporována/
10 Tlačítko napájení Uvádí počítač do stavu “Zapnuto” a “Vypnuto”.
Page 79

7
PRESTIGIO NOBILE 1520
CZ
Používání vašeho počítače
V této kapitole naleznete informace o tom, jak používat váš počítač.
Pokud jste při používání počítače začátečníky, přečtení následující kapitoly vám pomůže si osvojit základní postupy ovládání počítače.
Pokud již základy práce s počítačem ovládáte, ale ještě jste nikdy nepracovali s notebookem, můžete si z následujících rad vybrat pouze
ty, které jsou specifické právě pro práci na notebooku.
Zapnutí a vypnutí počítače
Pro zapnutí a vypnutí počítače existuje více způsobů.
Zapnutí počítače
Zapnutí počítače můžete vždy provést stisknutím tlačítka napájení.
Po zapnutí začne počítač načítat operační systém /OS/, který je uložen na pevném disku nebo na CD disku. Tento proces načtení
operačního systému provede počítač automaticky po jeho zapnutí a tento proces načítání se nazývá “bootování”.
POZNÁMKA: Operační systém je základní platformou, na které pracují všechny vaše softwarové
aplikační programy, které používáte při práci s počítačem. V současnosti je nejpoužívanějším operačním
systémem některá z verzí OS Microsoft Windows.
Vypnutí počítače
Po dokončení práce na počítači jej můžete buď vypnout, nebo jej uvést do pohotovostního stavu “standby” nebo do stavu “spánku”:
Pro vypnutí v tomto režimu... Proveďte toto… Pro zapnutí nebo pokračování v práci
Vypnutí Řiďte se postupem platným pro váš operační systém. Tento Stiskněte tlačítko napájení.
postup předchází ztrátě neuložených dat nebo poškození
vašeho softwaru. Pokud z důvodu softwarových nebo
hardwarových problémů počítač nereaguje, stiskněte pro
vypnutí počítače tlačítko napájení.
Pohotovostní režim - “standby” V závislosti na vašem konkrétním nastavení v OS Windows je Stiskněte jakoukoliv klávesu.
možno uvést počítač do pohotovostního stavu těmito kroky:
• Sklopením a uzavřením panelu displeje
• Stiskem kombinace horkých kláves Fn + F12
• Stiskem tlačítka napájení
Spánek V závislosti na vašem konkrétním nastavení v OS Windows Stiskněte tlačítko napájení.
je možno uvést počítač do režimu “spánku” těmito kroky:
• Sklopením a uzavřením panelu displeje
• Stiskem kombinace horkých kláves Fn + F12
• Stiskem tlačítka napájení
Pokud vyberete jako možnost zastavení počítače “pohotovostní” režim nebo v režim “spánku”, můžete se jeho dalším zapnutím navrátit
do stavu, ve kterém jste zanechali počítač před jeho vypnutím.
Page 80

8
PRESTIGIO NOBILE 1520
CZ
Použití klávesnice
Klávesnice vašeho počítače má všechny standardní funkce jako klávesnice stolního počítače a dále funkční klávesy Fn pro některé
specifické funkce.
Klávesa Popis
Klávesy pro psaní Tyto klávesy mají podobnou funkci, jako klávesy na psacím stroji. Je zde přidáno několik kláves pro speciální
účely, jako např. Ctrl, Alt, Esc a klávesy Lock. Po stisku kláves Lock /Num Lock atd./ se rozsvítí odpovídající
indikátor zapnutí této funkce.
Funkční klávesy Funkční klávesy /F1 - F12/ jsou víceúčelové klávesy, které mají v jednotlivých programech své definované funkce.
Klávesa Fn Klávesa Fn, kterou naleznete v levém spodním rohu klávesnice, se používá spolu s dalšími klávesami k vyvolání
jejich alternativní funkce. Tyto funkce a klávesa Fn jsou na klávesnici vyznačeny modře. K vyvolání těchto
alternativních funkcí stiskněte nejprve klávesu Fn a držte jí stisknutou a pak stiskněte klávesu s požadovanou
alternativní funkcí. Více informací naleznete v oddíle “horké klávesy”.
Ovládací klávesy Ovládací klávesy a klávesy kurzoru jsou všeobecně používány pro editační účely.
a klávesy kurzoru K těmto klávesám náleží klávesy Insert, Delete, Home, End, Page Up, Page Down a
klávesy s šipkami vlevo, vpravo, nahoru a dolů.
Numerická klávesnice 15-ti tlačítková numerická klávesnice je integrována v klávesnici pro psaní.
Tato klávesnice je aktivní pokud je zařazena funkce Num Lock a v tomto
režimu můžete používat klávesy, které jinak slouží pro psaní, ke vkládání čísel.
Page 81

9
PRESTIGIO NOBILE 1520
CZ
Horké klávesy
Horké klávesy odkazují na kombinace kláves, jejichž stisknutím lze aktivovat speciální funkce počítače. Většina “horkých kláves” pracuje
v cyklické režimu. Každým stiskem kombinace “horkých kláves” se odpovídající funkce přepne na jiný nebo na další výběr.
Horké klávesy můžete snadno identifikovat pomocí ikon, které jsou vytištěny na horní straně klávesnice. Následuje popis “horkých
kláves”.
Klávesa Popis
Zapíná a vypíná připojení k bezdrátové síti LAN /wireless LAN/.
POZNÁMKA:
Tato funkce je dostupná pouze tehdy, jestliže je instalována volitelná Mini PCI Wireless LAN karta.
Letecké společnosti zakazují, vzhledem k bezpečnosti leteckého provozu, používání bezdrátové síťové karty v
letadlech. Pokud chcete pracovat na svém počítači v letadle, nezapomeňte bezdrátovou Wireless LAN kartu
vypnout.
Snížení hlasitosti zvuku
Zvýšení hlasitosti zvuku
Přepíná výstupní signál displeje na jedno z následujících zařízení, pokud je externí zařízení připojeno.
V případě, že OS načetl při “bootování” CRT monitor:
LCD > CRT > LCD & CRT > LCD
POZNÁMKA:
V režimu zobrazení celé obrazovky v DOS nebo při přehrávání DVD nebo MPEG souborů není přepínání výstupního
signálu možné. Také není možno využívat pro přepnutí funkci “Vlastnosti zobrazení” v utilitě VGA.
Tato funkce je dostupná pouze v případě použití zařízení standardu Plug and Play.
Snižuje jas monitoru LCD.
Zvyšuje jas monitoru LCD.
Vypíná a zapíná zvukový výstup /funkce MUTE/.
Vypíná a zapíná LCD displej počítače.
Slouží jako tlačítko pro “uspání” počítače, funkci kterého je možno definovat v systému Windows, a to v
možnostech řízení spotřeby počítače.
Euro symbol
Systém Windows podporuje značku Euro a můžete tedy vkládat tuto značku pomocí americké nebo anglické klávesnice.
Stiskněte klávesu s Euro značkou na americké-mezinárodní klávesnici, nebo stiskněte klávesu Alt a klávesu 5 /která nese symbol Euro/.
Stiskněte klávesu s Euro značkou na americké klávesnici se 101klávesami, nebo stiskněte klávesu Alt a zadejte na numerické klávesnici
postupně číslice 0128.
Stiskněte klávesu s Euro značkou na anglické klávesnici, držte stisknutou klávesu Alt Gr a stiskněte klávesu 4, která má na sobě Euro
značku.
Page 82

10
PRESTIGIO NOBILE 1520
CZ
Klávesy Windows
Klávesnice obsahuje dvě klávesy, které mají speciální funkce v systému Windows. Jedna z nich je označena logem Windows, druhá je
aplikační klávesa Windows.
Klávesa s logem Windows otevírá menu “Start” a v kombinaci s dalšími klávesami vykonává další specifické softwarové funkce. Stisknutí
aplikační klávesy má obvykle stejný efekt jako kliknutí pravým tlačítkem myši. /Více naleznete v příručce k systému Windows/.
Použití polohovacího zařízení - “touchpad” /tačped/
UPOZORNĚNÍ: Po povrchu touchpadu nikdy nepřejíždějte ostrými předměty, např. tužkou, neboť tím
můžete povrch touchpadu poškodit.
POZNÁMKA: Pro optimální fungování touchpadu je nutné, aby vaše prsty a podložka touchpadu byly
čisté a suché. Při poklepání na povrch touchpadu nepoužívejte sílu, klepejte jen lehce.
Touchpad je vestavěné dotykové polohovací zařízení, které snímá pohyby prstů na svém povrchu. Tyto pohyby převádí na pohyb kurzoru
na obrazovce a svými tlačítky umožňuje provádět výběr. Svojí funkcí tak nahrazuje myš.
Zařízení touchpad se skládá z obdélníkové podložky a levého a pravého tlačítka. Při používání touchpadu umístěte váš prostředník nebo
palec na podložku zařízení.Tato podložka je vlastně zmenšeninou vašeho displeje. Tak, jak pohybujete prstem po povrchu touchpadu,
pohybuje se současně a odpovídajícím směrem i kurzor na displeji. Pokud váš prst dosáhne okraje touchpadu, jednoduše jej zvedněte
a přesuňte ke druhé straně podložky touchpadu.
Zde jsou uvedeny obvyklé výrazy, které byste měli znát, když používáte touchpad:
Výraz Akce
Polohování Pohybujte prstem na podložce touchpadu, dokud kurzor neukáže na požadované vybrané místo na obrazovce.
Kliknutí Stiskněte a uvolněte levé tlačítko
nebo
lehce klepněte kdekoliv na podložku touchpadu.
Dvojité kliknutí Stiskněte a uvolněte levé tlačítko dvakrát rychle po sobě.
nebo
2 x rychle klepněte na podložku touchpadu.
Přetažení a uvolnění Stiskněte a držte stisknuté levé tlačítko, pak pohybujte prstem tak, aby byl objekt přenesen na cílové místo /
přetažení/. Když je objekt přenesen, pro dokončení operace tlačítko uvolněte /uvolnění/. Objekt je tím přenesen na
nové místo.
nebo
Jemně 2 x poklepejte na podložku touchpadu a při druhém poklepání držte prst v kontaktu s podložkou. Pak
pohybem prstu přeneste vybraný objekt na cílové místo. Po zvednutí prstu z podložky se objekt uvolní a uloží se
na nové cílové místo.
Page 83

11
PRESTIGIO NOBILE 1520
CZ
Výraz Akce
Rolování Rolováním je nazýváno pohybování se na pracovní ploše na obrazovce směrem nahoru a dolů, případně vpravo
a vlevo.
Pro pohyb ve vertikálním směru umístěte váš prst na pravý nebo levý okraj plochy touchpadu a přesunujte prst
nahoru a dolů podél okraje.
Pro pohyb v horizontálním směru umístěte váš prst na horní nebo spodní okraj podložky touchpadu a pohybujte
prstem vlevo a vpravo po podložce.
Tato funkce je dostupná pouze tehdy, pokud je nainstalován ovladač pro touchpad, který je dodán spolu s
počítačem. Tato funkce i po instalaci ovladače nemusí být dostupná ve všech aplikacích.
POZNÁMKA: Pokud prohodíte funkce levého a pravého tlačítka, klepání na povrch touchpadu, jako
alternativní metoda pro tisknutí levého tlačítka, nebude fungovat.
Konfigurace touchpadu
Touchpad je možno určitým způsobem konfigurovat podle vašeho přání a podle vašich zvyklostí. Je například možné, pokud jste levák,
prohodit navzájem funkci dvou tlačítek, takže je pak možné používat k funkcím pravého tlačítka levé a naopak. Je možno také měnit
velikost kurzoru, jeho rychlost a některé jeho další vlastnosti.
Pro konfiguraci touchpadu v systému Windows můžete použít standardní ovladač Microsoft nebo ovladač IBM PS/2. Můžete také instalovat
ovladač, který je dodáván spolu s vaším počítačem, a využít tak výhod výběru z více funkcí.
Používání DVD mechaniky
Váš počítač je vybaven mechanikou DVD, obvykle v systému označovanou jako D. V závislosti na konkrétním modelu počítače může být
optická mechanika jednou z následujících:
Combo mechanika může pracovat jako DVD-ROM mechanika /pro čtení CD, CD–R, CD–RW, DVD, DVD-R, DVD+R, DVD–RW a DVD+RW disků/
a také jako CD-RW mechanika /pro zápis na CD–R/–RW disky/.
Mechanika DVD Dual Drive může, kromě funkcí jako má Combo mechanika, také zapisovat na DVD+R/+RW/–R/–RW disky .
UPOZORNĚNÍ:
Při vkládání disků nikdy nepoužívejte sílu.
Ujistěte se nejprve, že disk je správně vložen do vodících sáněk, a pak teprve mechaniku zavřete.
Nenechávejte CD mechaniku otevřenou a vyhněte se doteku prstů s čtecí čočkou mechaniky. Pokud je
čtecí čočka znečištěná, mohou nastat problémy se čtením a zápisem dat.
Čtecí čočku nikdy nečistěte materiálem s drsným povrchem, např. papírovým kapesníkem. Používejte
pouze bavlněný tampon a čočku čistěte velmi jemně.
Předpisy FDA vyžadují uvedení následujících ustanovení pro všechna zařízení založená na využití
laseru. Upozornění: Ovládání, nastavování a používání tohoto zařízení jiným způsobem, nežli který je
popsaný v návodu, může způsobit vaše vystavení se nebezpečnému laserovému záření.
POZNÁMKA: Tato DVD mechanika je klasifikována jako laserový produkt třídy 1. Výstražný štítek “
Class 1 Laser Product” je umístěn na mechanice.
Tento výrobek v sobě zahrnuje technologii na ochranu autorských práv , která je chráněna U.S. patenty
a dalšími právy na ochranu intelektuálního vlastnictví, vlastněnými společností Macrovision Corporation
a dalšími vlastnickými právy. Užití této technologie na ochranu autorských práv musí být autorizováno
společností Macrovision Corporation a je určeno pouze pro domácí a ostatní omezené použití, pokud
jiný způsob použití nestanoví společnost Macrovision Corporation. Zpětná demontáž výrobku a využití
technologických postupů, na kterých je založen, je zakázáno.
Page 84

12
PRESTIGIO NOBILE 1520
CZ
Vkládání a vyjímání disků
Pro vložení nebo vyjmutí disku se řiďte tímto postupem:
1. Zapněte počítač.
2. Stiskněte vysunovací tlačítko, které je umístěno na DVD mechanice a vodící sáňky pro disk se částečně vysunou z mechaniky. Jemně
je ručně vytáhněte až do polohy jejich úplného vysunutí.
3. Vložte disk do vodících sáněk potištěnou stranou nahoru a mírně na něj uprostřed zatlačte, aby střed disku zapadl do středového unášeče
mechaniky.
Při manipulaci s diskem a jeho vyjímaní z mechaniky jej držte pouze za jeho hrany a z vodících sáněk jej zvedejte přímo vzhůru. .
4. Jemně zasuňte vodící sáňky zpět do mechaniky.
POZNÁMKA: Vyjímečně může dojít k případu, že disk nelze z mechaniky vyjmout stisknutím
vysunovacího tlačítka, a je nutno jej vyjmout manuálně.
Používání video funkcí počítače
Video systém vašeho počítače zahrnuje:
15,4" TFT /Thin-Film Transistor/ barevný LCD display s rozlišením 1280 x 800 WXGA
Možnost simultánního zobrazení jak na LCD panelu počítače, tak i na externím CRT monitoru, které je užitečné zejména v případě provádění
prezentací, kdy nemusíte být k posluchačům otočeni zády.
Podpora výstupu S-Video umožňuje připojení TV přijímače a simultánní zobrazení na TV a externím monitoru.
Schopnost multi zobrazení, které vám umožňuje rozšířit pracovní plochu obrazovky na další zobrazovací zařízení, takže získáte více prostoru
pro vaší práci.
Řízení spotřeby
POZNÁMKA:
Před použitím funkce multi zobrazení musí být nejprve nainstalován ovladač, který je dodávaný spolu s
vaším počítačem.
Pokud je kryt LCD displeje sklopen-uzavřen, počítač vstoupí do pohotovostního stavu “standby” nebo
do režimu “spánku”. Pokud chcete používat počítač i v případě, že je panel sklopen, musíte v
“Možnosti napájení” vybrat položku “Nic”, která odpovídá akci “Když sklopím panel přenosného
počítače”. Tímto krokem zajistíte, že počítač po sklopení panelu do nevstoupí do pohotovostního
režimu “standby”, ani do režimu “spánku”.
Page 85

13
PRESTIGIO NOBILE 1520
CZ
Konfigurace režimů zobrazení
POZNÁMKA:
Pro využití výhod rozšířených video možností počítače je nutné nainstalovat s počítačem dodávaný
ovladač.
Pokud používáte pouze externí CRT monitor, pak rozlišení závisí na podporovaném rozlišení tohoto
monitoru.
Váš počítač byl z výroby nastaven na určité /výchozí/ rozlišení a na určitý počet zobrazovaných barev. Toto nastavení můžete si můžete
prohlédnout a můžete jej také měnit pomocí funkcí vašeho operačního systému. Pro zjištění těchto možnosti nahlédněte do návodu k
obsluze vašeho operačního systému.
Pokud vznikne potřeba použít zobrazení ve vyšším rozlišení, je možno připojit k počítači externí CRT monitor, který toto vyšší rozlišení
podporuje.
Používání audio systému počítače
POZNÁMKA:
Pro využití všech výhod rozšířených audio možností počítače je nutné nainstalovat s počítačem
dodávaný ovladač.
Pokud se při nahrávání zvuků pomocí mikrofonu objevuje rušení, zkuste snížit nastavenou úroveň
signálu mikrofonního vstupu.
Vlastnosti audio systému vašeho počítače:
Digitální a analogové směšovací funkce, které jsou zapotřebí při nahrávání a přehrávání zvuků na vašem počítači.
Kompatibilita se Sound Blaster Pro
Externí audio konektory /1/ a
Vestavěné reproduktory /2/
Možnosti přehrávání a nahrávání zvuků závisí na použitém operačním systému. Pro specifické informace nahlédněte do návodu k použití
pro váš operační systém nebo do “on-line” pomoci.
Připojení audio zařízení
Pro lepší kvalitu reprodukce audio signálů můžete k počítači připojit externí audio zařízení.
POZNÁMKA: Po připojení externího audio zařízení se ujistěte, že je v OS Windows specifikováno
použití odpovídajícího audio zařízení.
Page 86

14
PRESTIGIO NOBILE 1520
CZ
Mikrofon Konektor mikrofonu můžete připojit do vstupu pro externí mikrofon a využít tak možnosti záznamu hlasu nebo zvuku.
Konektor standardu S/PDIF může být propojen s konektorem line-in zařízení, které podporuje standard S/PDIF /Sony/Philips Digital
InterFace/, stejně tak jako s reproduktory, vybavenými vestavěným zesilovačem nebo se sluchátky. Standard S/PDIF je novým formátem
přenosu zvukových souborů. který zajišťuje vysokou kvalitu digitálního audio výstupu s využitím optických vláken.
POZNÁMKA:
Při použití externích reproduktorů, sluchátek nebo mikrofonu nelze současně používat vestavěné
reproduktory či vestavěný mikrofon.
Výstupní audio konektor je klasifikován jako laserový výrobek třídy 1.
Používání komunikačních prostředků počítače
Používání modemu
POZNÁMKA: Pro využití výhod vestavěného modemu je nutné nainstalovat s počítačem dodávaný
ovladač.
Interní fax/data 56K modem vám dovoluje používat ke komunikaci běžnou telefonní linku formou posílání faxů a e-mailů, nebo se
případně můžete připojit pomocí tohoto modemu k internetu či k různým jiným on-line službám.
Pro připojení telefonní linky k modemu je třeba připojit jeden konec modemového kabelu RJ-11 do odpovídající zásuvky vašeho počítače
a jeho druhý konec zasunout do zásuvky telefonní linky.
POZNÁMKA:
Při použití komunikačního softwaru je někdy nutné vypnout funkce řízení spotřeby počítače.
COM port modemu nastavte na COM 3.
Nastavte další parametry modemu, jako je rychlost modemu /v baudech/ a typ telefonní linky /pulsní
nebo tónové vytáčení/.
Při používání komunikačního softwaru nepoužívejte pohotovostní režim “standby”
Page 87

15
PRESTIGIO NOBILE 1520
CZ
Používání počítače v síti LAN
POZNÁMKA: Pro využití výhod vestavěných funkcí pro připojení k sítím LAN je nutné nainstalovat s
počítačem dodávaný ovladač.
Vnitřní vestavěný modul 10/100 Base-TX LAN (Local Area Network) vám dovoluje počítač připojit k místní počítačové síti. Modul podporuje
přenos dat rychlostí do 100 MB/s.
Pro připojení vašeho počítače k místní síti LAN je třeba připojit jeden konec síťového kabelu RJ-45 do odpovídající zásuvky vašeho počítače
a jeho druhý konec zasunout do zásuvky síťového rozbočovače nebo do zásuvky sítě LAN.
Používání počítače v bezdrátové síti LAN /Wireless LAN, WLAN/
V závislosti na modelu vašeho počítače může váš počítač obsahovat předinstalovanou kartu Mini PCI WLAN přímo z výroby. Tato karta vám
umožňuje v bezdrátovém prostředí bezdrátový přístup k internetu nebo k místní síti.
Funkce modulu WLAN zahrnují:
soulad se standardem IEEE 802.11b/g
technologii 2.4 GHz DSSS /Direct Sequence Spread Spectrum/
podporu režimů Peer to Peer /Ad-Hoc/ a Access Point /Infrastructure/.
šifrování dat WEP /Wired Equivalent Privacy/ 64/128 bit
přenosový poměr na 9 / 18 / 36 / 54 MB/s /režim 802.11g / s automatickou volbou rychlosti přenosu dat na 1 / 2 / 11 MB/s /režim
802.11b/
Pro využití všech výhod funkce bezdrátového připojení k síti WLAN se ujistěte, že ovladač WLAN je správně nainstalován. Pokud vám byla
karta WLAN dodána prodejcem a nikoliv výrobcem počítače, kontaktujte prodejce pro poskytnutí správného ovladače pro tuto kartu.
Konfigurace WLAN
Po instalaci ovladačů můžete pro konfiguraci a monitorování stavu připojení použít utilitu WLAN. Pokud používáte operační systém
Windows XP, můžete pro tyto funkce využít utilitu, která je vestavěna přímo v tomto operačním systému. Pro otevření WLAN utility ve
Windows XP postupujte podle těchto kroků:
1. Vyberte z menu “Start” položku “Nastavení” a dále “Ovládací panely”.
2. Klikněte na “Síťová připojení”.
3. Klikněte na “Síťová připojení” a dvakrát klikněte na ikonu bezdrátového připojení k síti.
4. V dialogovém okně klikněte na “Vlastnosti”.
5. Nyní můžete konfigurovat nastavení vaší bezdrátové sítě WLAN.
Připojení k bezdrátové síti.
Ve svém výchozím nastavení OS Windows XP automaticky detekuje všechny dostupné bezdrátové sítě WLAN. Pro připojení se k bezdrátové
síti postupujte podle těchto kroků:
Page 88

16
PRESTIGIO NOBILE 1520
CZ
1. Ujistěte se, že je vysílání radiového signálu sítě WLAN zapnuto stisknutím kombinace kláves Fn + F1. Rozsvítí se také indikátor provozu
WLAN.
2. Dvojitě klikněte na ikonu “připojení bezdrátové sítě”, která je zobrazena na hlavním panelu Windows. Pokud je detekováno nějaké
bezdrátové spojení se sítí, objeví se na obrazovce následující okno.
3. Vyberte bezdrátovou síť, ke které se chcete připojit, a pak klikněte na položku “připojit”.
4. V závislosti na nastavení můžete být požádáni o vložení klíče WEP.
Vypnutí a zapnutí radiového signálu WLAN
POZNÁMKA:
Letecké společnosti zakazují, vzhledem k bezpečnosti leteckého provozu, používání bezdrátové síťové
karty v letadlech. Pokud chcete pracovat na svém počítači i v letadle, nezapomeňte bezdrátovou kartu
vypnout.
Informace v této kapitole jsou určeny pouze pro modely, které jsou vybaveny modulem pro
bezdrátovou síť LAN.
Vypnutí radiového vysílání modulu LAN není totožné s vypnutím utility WLAN v operačním systému
Windows.
Váš počítač má vestavěnou funkci “horkých kláves” Fn+F1, kterými je možno vysílání radiového signálu WLAN rychle a pohodlně zapínat
a vypínat.
Pro dočasné vypnutí vysílání radiového signálu WLAN stiskněte klávesy Fn + F1. Indikátor provozu WLAN zhasne. Pokud chcete síťové
připojení obnovit, stiskněte opět kombinaci kláves Fn + F1. Indikátor provozu WLAN se rozsvítí.
Stav vysílání radiového WLAN signálu po zapnutí počítače závisí na tom, zdali byl signál před jeho vypnutím zapnut či vypnut.
Sestavení spojení se sítí WLAN trvá počítači přibližně 30 sekund, odpojení pak asi 10 sekund.
Page 89

17
PRESTIGIO NOBILE 1520
CZ
Napájení počítače
Váš počítač může být napájen jednak pomocí externího AC adaptéru, nebo pomocí své vnitřní baterie.
AC síťový adaptér
UPOZORNĚNÍ:
Síťový AC adaptér je určen pouze pro použití s vaším počítačem. Připojení adaptéru k jiným zařízením
může způsobit jeho poškození.
Napájecí síťový kabel, který je dodáván spolu s počítačem, je určen pro použití v zemi, kde byl počítač
zakoupen. Pokud plánujete cestovat s vaším počítačem do jiných zemí, prokonzultujte možnost
zakoupení odpovídajícího kabelu s prodejcem vašeho počítače.
Při odpojování síťového AC adaptéru jej nejprve odpojte od elektrické zásuvky a teprve poté od
počítače. Opačný postup může vést k poškození adaptéru nebo počítače.
Při odpojování konektoru jej nikdy neodpojujte tahem za kabel, ale vytažením konektoru za jeho tělo z
jeho zásuvky.
Funkce AC síťového adaptéru spočívá v přeměně střídavého síťového proudu /AC/, který je k dispozici ve vaší elektrické zásuvce, na proud
stejnosměrný /DC/, který váš počítač využívá ke svému provozu. AC adaptér slouží také k nabíjení vnitřní baterie počítače.
Pracovní napětí adaptéru je v rozsahu 100 - 240 V AC /střídavého proudu/.
Baterie /soubor článků - battery pack/
Baterie je vnitřním napájecím zdrojem vašeho počítače. Baterii je možno nabíjet pomocí AC adaptéru.
Provozní čas počítače s plně nabitou baterií závisí na četnosti používání počítače. Pokud vámi používané aplikační programy vyžadují častý
přístup k periferiím počítače, pracovní čas počítače bude při provozu na baterii kratší.
POZNÁMKA: Informace o péči a údržbě baterie naleznete v oddíle “Pokyny pro zacházení s baterií”.
Nabíjení baterie
POZNÁMKA:
Nabíjení baterie nezačne, pokud je teplota baterie nižší než 0°C nebo vyšší než 50 °C.
Nabíjecí proces se zastaví a indikátor nabíjení baterie začne žlutě blikat, jestliže teplota baterie
stoupne nad 60 °C. Pokud dojde k této situaci, je možné, že je baterie poškozena. Kontaktujte
vašeho prodejce počítače.
Během nabíjení neodpojujte AC síťový adaptér až do té doby, nežli je baterie plně nabita. V opačném
případě bude baterie nabita neúplně.
Pokud chcete nabít baterii počítače, připojte k počítači nejprve síťový AC adaptér a jeho výstupní kabel připojte do el. zásuvky. Indikátor
nabíjení baterie, který je umístěn na počítači, se rozsvítí žlutě a indikuje tak průběh procesu nabíjení baterie. Je doporučeno, aby při
nabíjení baterie byl počítač vypnut. V okamžiku, kdy je baterie plně nabita, se barva indikátoru nabíjení změní ze žluté na zelenou.
Page 90

18
PRESTIGIO NOBILE 1520
CZ
Nabíjecí časy:
Typ baterie Nabíjecí čas - počítač je vypnut Nabíjecí čas -očítač je zapnut, ale není používán
6 článků /2200 mAh/ 2 - 3 hodiny 4 - 6 hodin
9 článků /2200 mAh/ 3 - 4 hodiny 6 - 8 hodin
UPOZORNĚNÍ: Po úplném dobytí baterie počítače okamžitě neodpojujte a opět znovu nepřipojujte AC
adaptér pro opětovné nabíjení. Tento postup může vést k poškození baterie.
POZNÁMKA: Úroveň nabití baterie se každým dnem, vzhledem k samovybíjení, snižuje /0,21%
denně/, a to i v případě, že je baterie nabita na 100% své kapacity. Samovybíjení nezávisí na to,
zdali je baterie vložena do počítače.
Inicializace baterie
Inicializaci baterie je třeba provést případě nové baterie před jejím prvním použitím, nebo v případě, že je skutečný pracovní čas baterie
mnohem kratší, nežli je čas předpokládaný.
Inicializační proces spočívá v plném nabití baterie, jejím úplném vybití a v opětovném plném nabití. Tento proces vám zabere několik hodin.
1. Ujistěte se, že je počítač vypnut. Připojte AC síťový adaptér a baterii plně nabijte.
2. Poté, co je baterie plně nabita, počítač zapněte. Při jeho nabíhání, v okamžiku, kdy se objeví hlášení “Press <F2> to enter System
Configuration Utility - Stiskněte klávesu F2 pro spuštění konfigurační utility” stiskněte klávesu F2, aby došlo k otevření této utility.
3. Odpojte od počítače AC adaptér a ponechte počítač v provozu tak dlouho, dokud se baterie úplně nevybije. Počítač se poté automaticky
vypne.
4. Připojte k počítači znovu AC adaptér a baterii opět plně nabijte.
Kontrola úrovně nabití baterie
POZNÁMKA: Každá indikace stavu nabití baterie je pouze předpokládaným údajem. Skutečný
pracovní čas se může od předpokládaného údaje lišit v závislosti na způsobu využití počítače.
Přibližnou úroveň nabití baterie můžete zjistit pomocí měřiče nabití baterie /měřič napájení/. Tato funkce je dostupná v operačním
systému. Pokud chcete zjistit stav nabití baterie v OS Windows, klikněte na ikonku baterie, která je zobrazena vpravo dole na hlavním
panelu.
Signály pro vybitou baterii a odpovídající činnosti
Signál pro vybitou baterii se objeví v okamžiku, kdy v baterii zbývá pouze asi okolo 10% její kapacity /výchozí nastavení ve Windows/
. Počítač vás na tento stav upozorní varovným pípáním nebo zobrazením varovného hlášení a indikátor nabíjení baterie začne blikat
červeně.
POZNÁMKA: V OS Windows je možno nastavit signály a hranice varovných hlášení podle vašich
požadavků.
Při hlášení o vybité baterii uložte okamžitě všechny soubory, na kterých pracujete. Zbývající čas, po který bude ještě počítač pracovat, závisí
na způsobu využití počítače. Pokud používáte audio systém počítače, PC kartu, pevný disk nebo optickou mechaniku, může dojít k
úplnému vybití baterie velice rychle.
Pokud je baterie již téměř vybitá, uveďte počítač do pohotovostního stavu “standby”, do stavu “spánku”, vypněte jej, nebo připojte AC
adaptér.
Pokud neprovedete žádnou akci, počítač se automaticky uvede do stavu “spánku” a poté se vypne.
Page 91

19
PRESTIGIO NOBILE 1520
CZ
UPOZORNĚNÍ:
Pokud používáte flash PC kartu, nepřistupujte k této kartě v době, kdy je baterie téměř vybitá a to
proto, protože přístup ke kartě může trvat delší dobu nežli je počítač schopen ještě pracovat.
Pokud se vám nepodaří uložit data, na kterých pracujete, ještě před tím, nežli se baterie totálně
vybije, tato data nenávratně ztratíte.
Systém řízení spotřeby
Váš počítač podporuje systém řízení spotřeby podle standardu ACPI /Advanced Configuration and Power Interface/. Funkce řízení spotřeby
dovoluje snížit spotřebu energie a tím dochází k její úspoře.
S operačním systémem, který je kompatibilní se standardem ACPI - např. Windows XP, je napájení jednotlivých komponentů počítače
kontrolováno na základě požadavku tohoto komponentu na okamžitou potřebu napájení. Tento způsob napájení umožňuje kombinaci
maximálního výkonu spolu s maximální úsporou el. energie ve stejném okamžiku.
Všeobecně pracuje systém řízení spotřeby tímto způsobem:
Co… Když...
Napájení pevného disku je vypnuto Když pevný disk není aktivní po určitý nastavitelný časový interval.
Napájení displeje je vypnuto Když displej není aktivní po určitý nastavitelný časový interval.
Počítač vstupuje do pohotovostního režim Když byl systém po určitý nastavitelný časový interval neaktivní.
“standby”. Pevný disk a displej jsou Když stisknete kombinaci horkých kláves Fn+F12. *
vypnuty a systém tak spotřebovává Když sklopíte panel displeje. *
méně el. energie. Když stisknete tlačítko napájení. *
Počítač vstoupí do režimu spánku - viz Když stisknete kombinaci horkých kláves Fn+F12. *
další oddíl, kde naleznete více informací. Když sklopíte panel displeje. *
Když stisknete tlačítko napájení. *
* Závisí na vašem nastavení ve Windows.
Pro detailní informace o systému řízení spotřeby nahlédněte do příručky k OS Windows nebo do nápovědy.
Spánek
POZNÁMKA: Ujistěte se, že funkce “spánku” je zaškrtnuta v “Možnosti napájení - vlastnosti” na
kartě “Režim spánku” v “Ovládacích panelech”.
Spánek počítače je velice užitečnou funkcí. Uživatelé obvykle často otevírají při své práci na počítači mnoho aplikací, což zabírá nejen čas
při jejich otevírání a jejich běhu ale po ukončení práce na počítači je třeba je všechny opět pozavírat.
Pokud využíváte funkci režimu “spánku”, není třeba po ukončení práce na počítači tyto aplikace uzavírat. Počítač uloží při vstupu do režimu
spánku svůj stav, včetně otevřených aplikací, do souboru na pevný disk, a poté se vypne. Při příštím zapnutí počítače jej naleznete ve
stejném stavu, včetně otevřených aplikací, ve kterém se nacházel před vstupem do režimu spánku.
Rady pro šetření elektrickou energií.
Kromě automatického řízení spotřeby vašeho počítače můžete maximalizovat čas, po který je počítač schopen pracovat na baterii, pokud
se budete řídit následujícími doporučeními.
Nevypínejte systém řízení spotřeby počítače.
Snižte jas LCD monitoru na nejnižší možnou přijatelnou úroveň.
Pokud pracujete s aplikací, která využívá PC kartu, zavřete aplikaci, pokud ji již nepotřebujete k práci.
Page 92

20
PRESTIGIO NOBILE 1520
CZ
Pokud máte nainstalovánu PC kartu, vyjměte jí, pokud jí nepoužíváte. Některé PC karty spotřebovávají elektrickou energii dokonce i ve
stavu, kdy nejsou aktivní.
Deaktivujte funkci WLAN pokud jí nepoužíváte.
Pokud počítač nepoužíváte, vypněte jej.
Možnosti rozšíření vašeho počítače
Připojením různých periferních zařízení můžete rozšířit možnosti a funkce vašeho počítače. Při použití těchto periferních zařízení se pečlivě
seznamte s jejich návodem k obsluze a pročtěte si také odpovídající oddíl této kapitoly.
Připojení externího monitoru
Pokud chcete využívat výhod větší zobrazované plochy a vyššího rozlišení, můžete k tomuto počítači připojit externí CRT monitor.
Při jeho připojování postupujte podle následujících instrukcí:
1. Ujistěte se, že počítač není zapnut.
2. Připojte signálový konektor CRT monitoru typu D do VGA portu počítače.
3. K CRT monitoru připojte napájecí kabel a zasuňte jej do el. zásuvky na zdi.
4. Pokud chcete tento CRT monitor hned používat, zapněte jej dříve, než zapnete počítač.
5. CRT monitor by měl fungovat hned po zapnutí počítače na základní nastavení. Pokud tomu tak není, přepněte zobrazení na tento CRT
monitor nebo na oba monitory /simultánní zobrazení/ a nebo zapněte funkci multi zobrazení pomocí kláves Fn+F5. V systému Windows
můžete také měnit vlastnosti zobrazení pomocí nastavení ve “Vlastnostech monitoru”.
6. Nastavení monitoru lze měnit pomocí funkcí v operačním systému. Nahlédněte do návodu k obsluze operačního systému nebo
vyhledejte pomoc “on-line”.
UPOZORNĚNÍ: Neodpojujte externí monitor, pokud se počítač nachází v pohotovostním režimu
“standby” nebo v režimu “spánku”. Pokud není externí monitor připojen po znovuzahájení činnosti
počítače po “probuzení”, LCD monitor počítače nemusí poskytovat odpovídající obrazový výstup .
Připojení TV /televizního přijímače/
Pro využití počítače při prezentacích, konferencích nebo pro sledování filmů či obrázků je možno připojit k vašemu počítači televizní
přijímač.
Pro připojení TV přijímače k počítači se řiďte tímto postupem:
1. Ujistěte se, že je počítač vypnut.
2. K propojení budete potřebovat S-Video kabel. Připojte odpovídající konektor S-Video kabelu do S-Video konektoru vašeho počítače a
jeho druhý konec připojte do výstupního S-Video konektoru vašeho TV přijímače.
Page 93

21
PRESTIGIO NOBILE 1520
CZ
3. Vzhledem ke skutečnosti, že výstupní zvukový doprovod sledovaných programů nemůže být z počítače převeden do TV přijímače, vám
doporučujeme pro lepší kvalitu zvuku připojit k počítači externí reproduktory.
4. Zapněte TV přijímač a přepněte jej do video režimu.
5. Zapněte počítač a přepněte zobrazení na TV přijímač pomocí změny zobrazení v nastavení vlastností zobrazení v systému Windows.
UPOZORNĚNÍ:
Nastavení zobrazení současně na LCD displeji počítače a zároveň na TV přijímači může způsobit
nestabilní obraz na LCD displeji.
Neodpojujte TV přijímač od počítače, pokud se tento nachází v pohotovostním režimu “standby” nebo
ve stavu “spánku”. Pokud není TV přijímač připojen po opětovném “probuzení” počítače, a před jeho
uspáním připojen byl, může docházet k nesprávnému zobrazení na LCD displeji.
POZNÁMKA: Ujistěte se o správnosti instalace VGA ovladače.
Připojení USB zařízení
Váš počítač je vybaven třemi porty USB, které podporují připojení USB zařízení, jako jsou např. digitální fotoaparáty, skenery, tiskárny,
modemy a myši.
Systém USB je specifikován jako průmyslový standard možnosti rozšíření počítačové architektury PC. Tyto porty podporují technologii
“Plug and Play”, takže je možno připojovat a odpojovat USB zařízení bez nutnosti vypnutí počítače. Díky schopnosti mnohonásobného
připojení je možno přes USB porty připojit najednou až 127 zařízení, které mohou být spojeny do řetězce. Pro tato mnohonásobná spojení
se používají USB rozbočovače, které převádějí jednotlivý USB konektor do více USB konektorů, do kterých mohou být pak připojena
jednotlivá zařízení.
USB porty podporují přenos dat až do r ychlosti 12 MB/s pro zařízení typu USB 1.1 a rychlostí 480 MB/s pro zařízení typu USB 2.0.
Pro připojení USB zařízení zasuňte jednoduše konektor od kabelu tohoto zařízení do jednoho z USB portů počítače.
Připojení zařízení standardu IEEE 1394a
Váš počítač je vybaven mini portem standardu IEEE 1394a, do kterého je možno připojit zařízení standardu 1394.
IEEE 1394a je další generací standardu sériových řadičů, které poskytují vysokorychlostní transfer dat, vícekanálové připojení a konektivitu
“Hot Plug”. Tyto porty dovolují připojit až 63 zařízení, mezi která mohou patřit například skenery, tiskárny a CCD obrazové snímače, ale
také spotřební elektronika jako např. DVCAM nebo VCR.
Pro připojení zařízení standardu 1394a si nejprve obstarejte odpovídající kabel typu 1394a. Pak zasuňte jeden konektor kabelu do mini
Page 94

22
PRESTIGIO NOBILE 1520
CZ
konektoru IEEE 1394a počítače a jeho druhý konec do odpovídajícího konektoru připojovaného zařízení.
Používání PC karet
Váš počítač je vybaven slotem pro PC kartu.
PC karty jsou periferními produkty o velikosti kreditní karty, založené na standardu PCMCIA /Personal Computer Memory Card International Association/. Tato nezisková asociace slouží pro podporu kompatibility modulů mezi přenosnými počítači, kde jsou nejdůležitějšími
kritérii odolnost zařízení, jeho malá spotřeba elektrické energie a malé rozměry.
Typ PC karet
Váš počítač je vybaven slotem pro PC karty typu II. Mezi nejobvyklejší karty typu II. patří zejména flash paměti, paměti SRAM, modemy,
síťové LAN karty a karty SCSI.
Podpora CardBus
Slot pro PC karty vašeho počítače podporuje specifikace CardBus. CardBus je 32-bitová verze technologie PC karet, a dovoluje přenos
rychlostí do 133 MB/s na 33 MHz. Typickými aplikacemi této specifikace jsou karty SCSI host bus a vysokorychlostní síťové karty.
Vkládání a vyjímání PC karet ze slotu
POZNÁMKA:
Některé PC karty vyžadují přídavné systémové prostředky. Před použitím takové PC karty je nutné
uvolnit ostatní systémové prostředky pro tuto kartu.
Ačkoliv některé PC karty mohou být vloženy a vyjmuty z počítače bez nutnosti jeho vypnutí, nemůžete
instalovat ani vyjímat PC karty během pohotovostního režimu počítače /režim standby/.
Vložení PC karty
1. Nejprve se seznamte s umístěním slotu pro PC karty, který naleznete na levé straně počítače.
2. Pak zasuňte kartu nálepkou nahoru do slotu, dokud nevyskočí vysunovací tlačítko.
Page 95

23
PRESTIGIO NOBILE 1520
CZ
3. Když je nová karta vložena, počítač jí začne detekovat a zkusí nainstalovat odpovídající ovladač pro tuto kartu. Pro dokončení procesu
instalace karty sledujte instrukce na monitoru počítače.
Vyjmutí PC karty
1. Dvojitě klikněte na ikonu “Bezpečné odebrání hardwaru”, kterou naleznete vpravo dole na hlavním panelu Windows a na obrazovce
se vám otevře okno s bezpečným odebráním hardwaru.
2. Vyberte PC kartu, kterou chcete odebrat a klikněte na tlačítko “Stop” aby byl provoz karty zastaven.
3. Stiskněte vysunovací tlačítko karty a ta se uvolní a částečně povysune ze svého slotu.
4. Pak kartu ze slotu vyjměte.
Upgrade /rozšíření/ vnitřních komponentů počítače
Váš počítač můžete rozšířit výměnou procesoru /CPU/ nebo přidáním paměti. Tuto operaci byste ale neměli provádět svépomocí a proto
raději kontaktujte svého prodejce, abyste předešli případnému poškození počítače. Nesnažte se instalovat vnitřní komponenty počítače
svépomocí !
Instalace softwarových ovladačů
Abyste mohli plně využívat všech jedinečných funkcí vašeho počítače, může být některými operačními systémy vyžadováno nainstalování
zákaznického softwaru, známého pod názvem ovladače.
Pokud jste zakoupili váš počítač s předinstalovaným systémem Windows, váš prodejce již možná všechny potřebné ovladače nainstaloval.
Pokud tomu tak není, nainstalujte si ovladače sami pomocí CD disku, který je dodáván spolu s počítačem.
Jak používat CD disk s ovladači
POZNÁMKA:
Je možné, že ovladače byly od vydání tohoto návodu aktualizovány. Pro aktuální verze ovladačů
kontaktujte prodejce vašeho počítače.
Tento CD disk je podporován pouze systémem Windows XP. Je doporučeno nejprve nainst alovat
software Windows XP Service Pack 2.
Dostupné položky mohou být odlišné podle konkrétního modelu vašeho počítače.
Při instalaci ovladačů nevyjímejte CD disk z mechaniky.
Pro snadnou instalaci ovladačů obsahuje CD disk program “autorun”. Jakmile vložíte CD disk do mechaniky počítače, program “autorun”
se automaticky spustí. Pokud je zapotřebí spustit program manuálně, spusťte program “Setup.exe”, který je uložen na CD disku v adresáři
Wsetup.
Objeví se hlavní obrazovka, jak je ukázáno dále:
Page 96

24
PRESTIGIO NOBILE 1520
CZ
Pro instalaci potřebného ovladače jednoduše klikněte na odpovídající ikonu na levé straně a tím dojde ke spuštění instalace vybraného
ovladače. Ikony a ovladače jsou popsány dále:
Ikon a Název P opis
Ovladač Chipset Tento ovladač zajišťuje plnou funkčnost následujících ovladačů. Instalujte tento ovladač
před instalováním ovladačů pro ostatní zařízení.
Video ovladač Instalace tohoto ovladače vám dovoluje používat vysoké rozlišení zobrazení spolu s větším
počtem zobrazovaných barev.
Audio ovladač Instalací audio ovladače získáte možnost využívat všech výhod a funkcí audio systému
počítače.
Ovladač modemu Instalace ovladače modemu vám dovoluje využívat funkce modemu vašeho počítače.
Ovladač LAN Instalace ovladače LAN vám dovolí využívat možnosti síťového propojení vašeho počítače.
Ovladač polohovacího Instalací tohoto ovladače získáte možnost plně využívat všech funkcí polohovacího zařízení.
zařízení - touchpadu
Ovladač WLAN /volitelné/ Instalací ovladače WLAN získáte možnost využívat připojení k bezdrátové síti pomocí
vestavěné karty Mini-PCI Typ-IIIB WLAN.
POZNÁMKA: Funkce Plug and Play systému Windows může automaticky detekovat nové
hardwarové zařízení /kartu Mini-PCI WLAN/ a zobrazit průvodce se žádostí o instalaci
ovladače. Pro ignorování tohoto průvodce klikněte na tlačítko “Zrušit”.
Program Adobe Acrobat Reader Pokud ve vašem počítači není nainstalován program Adobe Acrobat Reader, nainstalujte si
jej. Budete jej potřebovat pro otevírání souborů s návody na instalaci ovladačů z tohoto CD
disku.
Návod k obsluze Dovoluje vám výběr prohlížení návodu k obsluze v požadované jazyce.
Procházení CD disku Procházení obsahem tohoto CD disku.
Page 97

25
PRESTIGIO NOBILE 1520
CZ
Péče o váš počítač
Odpovídající péče o váš počítač vám zajistí jeho bezproblémový provoz a sníží riziko jeho poškození.
Ochrana počítače
Pro zajištění ochrany integrity dat ve vašem počítači, ale i počítače samotného, můžete využívat různé způsoby ochrany, jak je dále
popsáno v tomto oddíle.
Použití hesla
Požadavek na heslo po zapnutí napájení chrání počítač před neoprávněným použitím. Pokud je tato funkce zapnuta a heslo nastaveno,
bude systém po každém zapnutí vyžadovat heslo.
Toto heslo můžete nastavit v utilitě BIOS Setup.
Použití kabelového zámku
V kombinaci s vaším počítačem je možno používat kabelový zámek typu Kensington, který chrání počítač proti jeho krádeži. Tento zámek
je možno zakoupit v obchodech s příslušenstvím pro počítače.
Pro použití zámku omotejte jeho kabel okolo nějakého pevného objektu, například okolo nohy stolu. Pak vložte zámek do otvoru pro
Kensington zámek na těle počítače a otočením klíče zámek zajistěte. Klíč uschovejte na bezpečném místě.
Strategie ochrany proti počítačovým virům
Nové počítačové viry se objevují každý den a snadno infikují počítače, zvláště v poslední době v souvislosti s masovým využíváním e-mailů,
kterými se šíří.
Pro monitorování potenciálních virů, které mohou poškodit vaše soubory, si můžete nainstalovat některý z mnoha dostupných antivirových
programů.
Page 98

26
PRESTIGIO NOBILE 1520
CZ
Péče o váš počítač
Doporučení pro umístění počítače
Teplota pracovního prostředí počítače je doporučena v rozmezí 10 až 35°C.
Neumísťujte počítač v prostředí s vysokou vzdušnou vlhkostí, s extrémními teplotami, mechanickými vibracemi, vysokou prašností a v
místech vystavených přímému slunečnímu záření.
Neblokujte ventilační otvory na těle počítače. Nepracujte s počítačem na měkkém povrchu, například na pohovce, na posteli atd., neboť
může dojít vlivem měkké podložky k ucpání ventilačních otvorů a následné přehřátí může způsobit poškození počítače.
Mezi zařízeními, které produkují magnetické pole, jako jsou TV přijímače, lednice, motory, reproduktory atd. a počítačem udržujte
vzdálenost alespoň 13 cm.
Nevystavujte počítač prudkým změnám teploty při přenášení z chladného do teplého prostředí. Rozdíl teplot větší než 10°C může způsobit
kondenzaci vlhkosti uvnitř počítače, která může poškodit pevný disk nebo jiné elektronické obvody.
Neumísťujte počítač na nestabilní povrch.
Všeobecná doporučení
Pokud je panel počítače uzavřen, nestavte na povrch počítače žádné těžké předměty, neboť mohou poškodit LCD displej, který se v panelu
nachází.
Povrch monitoru je snadno poškrábatelný. Na jeho čištění nepoužívejte papírové kapesníky ani utěrky. Povrchu displeje se nedotýkejte
prsty nebo tužkou.
Pro maximalizaci životnosti podsvícení displeje používejte funkci řízení spotřeby počítače, která, pokud je zařazena, displej automaticky
po několika minutách nečinnosti vypne. Nepoužívejte různé spořiče obrazovky nebo podobný software, který funkci řízení spotřeby a
vypínání displeje blokuje.
Doporučení pro čištění počítače
Nikdy nečistěte počítač, pokud se nachází v zapnutém stavu.
Pro čistění vnějšího povrchu počítače používejte měkkou utěrku navlhčenou vodou nebo nealkalickým čistícím prostředkem.
Displej počítače otírejte pouze měkkou utěrkou, která nepouští chloupky a nepoužívejte alkoholové ani jiné čistící prostředky.
Nečistota, prach nebo mastnota na touchpadu může mít vliv na jeho citlivost. Povrch touchpadu čistěte speciálním adhesivním páskem,
který odstraňuje mastnotu a nečistoty.
Pokyny pro zacházení s baterií
Baterii nabíjejte tehdy, pokud je skoro úplně vybitá. Při nabíjení se ujistěte, že baterie je nabíjena a nabijte jí vždy do stavu plného nabití.
Nedodržení těchto zásad může baterii poškodit.
Počítač vždy provozujte i při jeho připojení k elektrické síti s nainstalovanou baterií. Toto doporučení zajistí, že baterie bude vždy plně
nabita.
Pokud nebudete počítač používat déle než 2 týdny, vyjměte z něj baterii.
Dbejte, aby kontakty baterie nebyly ve styku s vodivými objekty, kovy /klíče v zavazadle atd./ nebo s vodou. Vzniklé krátké spojení může
baterii zničit.
Baterii skladujte na suchém a chladném místě. Dbejte, aby teplota při skladování nikdy nepřekročila 60 °C.
Baterii nenechávejte uskladněnou bez nabíjení déle než 6 měsíců.
Když cestujete s počítačem
Nežli se rozhodnete cestovat s počítačem, zazálohujte si data, která máte uložena na pevném disku na diskety nebo na jiná paměťová
média. Nejdůležitější data si zazálohujte ještě jednou a tuto druhou kopii si vezměte s sebou.
Page 99

27
PRESTIGIO NOBILE 1520
CZ
Ujistěte se, že baterie je plně nabitá.
Ujistěte se, že je počítač vypnut a kryt displeje je bezpečně uzavřen a zajištěn západkami.
Neponechávejte žádné objekty mezi klávesnicí počítače a uzavřeným krytem displeje.
Odpojte od počítače síťový AC adaptér a přibalte jej k počítači. Používejte jej pro napájení počítače a pro nabíjení jeho baterie.
Počítač noste jako palubní příruční zavazadlo s sebou, nepodávejte jej k odbavení jako ostatní zavazadla.
Pokud potřebujete zanechat počítač v automobilu, nenechávejte jej v prostoru pro cestující, kde může dojít k extrémnímu zvýšení teploty,
zvláště, když je automobil zaparkován na slunci. Umístěte jej raději do zavazadlového prostoru.
Při průchodu letištní bezpečnostní kontrolou je doporučeno nechat projít počítač a diskety raději rentgenovým přístrojem /zařízením, přes
které procházejí příruční zavazadla/, nežli magnetickým detektorem /rám, skrze který procházíte/. Také je doporučeno se vyhnout
kontaktu s ručními magnetickými detektory, používanými bezpečnostním personálem letiště pro osobní kontroly osob.
Pokud plánujete používat váš počítač v cizích zemích, konzultujte se svým prodejcem možnost zakoupení odpovídajícího napájecího
kabelu, kterého koncovka odpovídá elektrickým zásuvkám v zamýšlené zemi vašeho pobytu.
Řešení problému s počítačem
Problémy s počítačem mohou být způsobeny jednak jeho hardwarovým zařízením, softwarem nebo kombinací obou těchto možností.
Některé typické problémy lze vyřešit velice snadno.
Předběžné ujasnění problému
Zde naleznete užitečné rady, podle kterých byste měli postupovat v případě objevení se problému ještě před tím, nežli jej začnete řešit.
Zkuste zjistit a izolovat, která část počítače problém způsobuje.
Ujistěte se, že jste zapnuli všechna periferní zařízení ještě před tím, nežli jste zapnuli počítač.
Pokud je problém v externím zařízení, ujistěte se, že všechny kabely a konektory jsou správně a pevně připojeny.
Ujistěte se, že konfigurační informace jsou v programu BIOS Setup správně nastaveny.
Ujistěte se, že všechny ovladače zařízení jsou správně instalovány.
Udělejte si poznámky o vašem pozorování chodu systému. Nejsou na obrazovce nějaká varovná hlášení? Svítí správně všechny indikační
LED diody? Nedává počítač najevo nějakou závadu pípáním? Detailní popisy všech těchto okolností jsou velice užitečné v případě, když
budete muset vyhledat odbornou konzultaci nebo pomoc.
Pokud problém nadále přetrvává a nejste schopni jej vyřešit ani s využitím níže uvedených rad, kontaktujte pro další postup vašeho
prodejce počítače.
Příklady řešení nejobvyklejších problémů
Problémy s baterií
Baterie se nenabíjí /Indikátor nabíjení baterie nesvítí žlutě/.
Ujistěte se, že je AC síťový adaptér správně připojen.
Ujistěte se, že baterie není příliš chladná ani horká. Dovolte baterii, aby se ohřála na pokojovou teplotu.
Ujistěte se, že je baterie správně založena do počítače.
Ujistěte se, že výstupní kontakty baterie nejsou znečištěny.
Čas, po který je plně nabitá baterie schopna dodávat energii počítači, se zkracuje.
Pokud baterii často vybíjíte a nabíjíte jen částečně, baterie nemusí být schopna využívat své celé kapacity. V tomto případě je nutno baterii
zinicializovat.
Page 100

28
PRESTIGIO NOBILE 1520
CZ
Provozní čas baterie, který je indikován měřičem baterie neodpovídá skutečnému provoznímu času, po který je počítač schopen fungovat
na baterii.
Skutečný provozní čas baterie se od odhadovaného provozního času může lišit v závislosti na způsobu používání počítače. Pokud je rozdíl
příliš veliký, zinicializujte baterii.
Problémy s DVD mechanikou
Mechanika nečte disky.
Ujistěte se, že disk je správně uložen ve vodících sáňkách mechaniky, potištěnou stranou nahoru.
Ujistěte se, že disk není znečistěný. Pokud tomu tak je, očistěte jej pomocí speciální soupravy na čištění CD, kterou zakoupíte v obchodech
s příslušenstvím pro počítače.
Ujistěte se, že je ovladač DVD mechaniky správně nainstalován.
Ujistěte se, že počítač podporuje přístup k typu souborů, které jsou na tomto disku uloženy.
Disk nelze vysunout z mechaniky vysunovacím tlačítkem
Disk není správně usazen v mechanice. Zkuste disk manuálně vyjmout podle níže uvedené rady:
1. Počítač vypněte.
2. Vložte malou tenkou tyčinku, např. narovnanou kancelářskou sponku, do otvoru v mechanice, který je určen pro manuální vysouvání
disku a jemně zatlačte, aby se pootevřela dvířka mechaniky.
3. Manuálně plně vysuňte vodící sáňky z mechaniky a disk vyjměte.
Problémy se zobrazením na displeji
Na displeji se nic neobjevuje.
Displej se mohl automaticky vypnout v důsledku sytému řízení spotřeby počítače. Stiskem libovolné klávesy by měl systém přejít opět
do normálního režimu.
Je nastavena příliš nízká úroveň jasu displeje. Zkuste jí zvýšit pomocí kombinace kláves Fn+F7.
Výstupní signál displeje může být přesměrován na externí zařízení. Pro přepnutí signálu zpět na vestavěný LCD displej stiskněte kombinaci
kláves Fn+F5 nebo změňte nastavení ve “Vlastnosti zobrazení” pod ikonou “Zobrazení” v ovládacích panelech.
Znaky na displeji jsou nejasné.
Nastavte úroveň jasu nebo kontrastu displeje.
Na displeji se trvale objevují malé odlišné body.
Malé množství chybějících, odbarvených nebo jasných bodů na displeji je dáno technologií výroby TFT LCD displejů a není bráno jako
defekt displeje.
Nelze nastavit rozlišení na požadovanou úroveň.
Ujistěte se o správnosti instalace video ovladače.
 Loading...