

Page 1

Nobile 1440W
Page 2

Prestigio Nobile 1440W 1
ENG
Prestigio Nobile 1440W
User’s Manual
Notice
The information in this user’s manual is subject to change without notice.
THE MANUFACTURER OR RESELLER SHALL NOT BE LIABLE FOR ERRORS OR OMISSIONS CONTAINED IN THIS MANUAL
AND SHALL NOT BE LIABLE FOR ANY CONSEQUENTIAL DAMAGES, WHICH MAY RESULT FROM THE PERFORMANCE OR
USE OF THIS MANUAL.
The information in this user’s manual is protected by copyright laws. No part of this manual may be photocopied or
reproduced in any form without prior written authorization from the copyright owners.
Copyright 4/2006
All rights reserved.
Microsoft and Windows are registered trademarks of Microsoft Corporation. DOS, Windows 95/98/ME/2000/NT/XP
are trademarks of Microsoft Corporation.
Product names mentioned herein may be trademarks and/or registered trademarks of their respective
owners/companies.
The software described in this manual is delivered under a license agreement. The software may be used or copied
only in accordance with the terms of the agreement.
This product incorporates copyright protection technology that is protected by U.S. patents and other intellectual
property rights. Use of this copyright protection technology must be authorized by Macrovision, and is intended for
home and other limited viewing uses only unless otherwise authorized by Macrovision. Reverse engineering or
disassembly is prohibited.
Rev 1.0
Page 3

2 Prestigio Nobile 1440W
ENG
Preface
Using This Manual
This User’s Manual contains general information about the hardware and software setup, troubleshooting, and
technical specifications of the notebook computer.
Symbols and Conventions
The following conventions and symbols are used in this manual:
When keys are to be pressed at the same time, a plus (+) symbol is used. For instance, Fn+F7 means holding Fn
and F7 keys at the same time.
When a series of clicking actions is needed in Windows O/S, [ ] and > symbols are used. For instance, [Start >
Settings > Control Panel > Display] means clicking the Start icon first, then the Settings, then the Control Panel,
then the Display icon.
When you need to make a selection with the touch pad (or mouse), you will be asked to ’select’ or ‘click’ or
‘double-click’, ‘right-click’ the item.
Note: Text in this format and symbol means specific instructions, commentary, sidelights, or any additional
information or notes that you should be aware of.
Warning: Text in this format and symbol means that failures to comply with the given instructions or
information could result in damage to your computer or could cause bodily harm or loss of life.
Protecting Your Computer - Avoid Abusive Handling and Adverse
Environment
Follow the advice below will help ensure that you get the most out of your Investment.
Your computer will serve you well if you take good care of it.
Do not expose the computer to direct sunlight or place it near sources of heat.
Do not subject it to temperatures below 0
°C (32°F) or above 35°C (95°F).
Do not expose the computer to magnetic fields.
Do not expose the computer to moisture or rain.
Do not spill water or liquid on the computer.
Do not subject the computer to adverse shock and vibration.
Do not expose the computer to dust and dirt.
Do not place objects on top of the computer to avoid damaging the computer.
Do not place the computer on rocky surfaces.
Page 4

Prestigio Nobile 1440W 3
ENG
Here are some ways of taking care of your AC adapter.
Do not connect the adapter to any devices other than your computer.
Do not let water get into the adapter.
Do not block the ventilation airway of the adapter.
Keep the adapter in a cool and ventilated place.
Do not step on the power cord or place heavy objects on top of it.
Carefully tuck away the power cord and any cables away from pedestrian traffic.
When unplugging the power cord, do not pull on the cord itself but pull on the plug.
Keep the adapter away from children.
The total ampere ratings of the equipment plugged in should not exceed the ampere rating of the cord if you
are using an extension cord.
The total current rating of all equipment plugged into a single wall outlet should not exceed the fuse rating.
Do not connect other AC adapter to your notebook. This Notebook uses exclusively the AC adapter: Lishin
0335A2065 (65W), Lishin 0335C2065 (65W), Liteon PA-1650-01 (65W), Liteon PA-1650-02(65W), EPS
F10653-A(65W)
When cleaning the computer, observe these steps:
1. Power off the computer and remove the battery pack.
2. Disconnect the AC adapter.
3. Use a soft cloth dampened with water. Do not use liquid or aerosol cleaners.
Contact your dealer or see your service technician if any of the following occurs:
Computer has been dropped or the body has been damaged.
Liquid has been spilled into the product.
The computer does not operate normally.
Cleaning the Ventilation Grills:
It is suggested that you clean the ventilation grills regularly to maintain optimal thermal regulation of the notebook.
To do this, you may use a soft brush or a vacuum cleaner (with appropriate head adapter) to remove the dust buildup
on the ventilation grills.
Page 5

4 Prestigio Nobile 1440W
ENG
GETTING TO KNOW THE BASICS
This chapter introduces the features and components of the computer.
Performance Features
High Performance Processor with Napa Chipset
The notebook PC is equipped with a powerful Mobile Intel Pentium M Yonah dual-core (Core Duo) or Mobile Intel
Pentium M Yonah single-core (Core Solo). Together with the latest Intel Napa chipset and integrated graphic
technologies, the system offers very advanced PC performances.
Advanced Graphic Engine
The Intel 945GM Express chipset is integrated with the next-generation Intel Graphics Media Accelerator GMA950.
Wide-Screen LCD Display
The computer is equipped with a wide-screen 14.1-inch TFT high-resolution display panel for the best cinematic
viewing experience.
Digital TV Receiver (Optional DVB-T module)
The optional DVB-T (Digital Video Broadcast – Terrestrial) module allows you to watch high-quality digital broadcast
TV on your notebook computer.
Instant-On Multimedia Player (Optional)
With a touch of the button, you can quickly launch the unique Instant-On multimedia player that allows you to play
video, view pictures, and listen to music without having to boot to Windows.
Mobile 3G Telecom Module (Optional Device)
The optional 3G communication module allows you to receive digital entertainment services on your notebook
computer via the 3G telecom networks.
ExpressCard Technology
ExpressCard (type I, 34mm) is the next-generation of the PC Card standard. The bus interface is based on the two
standards: PCI Express for high-performance I/O and USB2.0 for variety of devices.
Expandability
The system offers upgradeable hard disk drive and 2 DDRII SDRAM sockets for expansion, allowing the user to easily
increase the storage and system capacities as the need arises.
Built-in Multiple Card Reader
There is built-in 4-in-1 card reader to access many of the portable media formats (SD Card, MS Card, MMC Card, and
MS-Pro Card).
Page 6

Prestigio Nobile 1440W 5
ENG
Gigabit Ethernet Port
The system provides built-in 10/100/1000Mbps Ethernet network adapter for high bandwidth network connection.
Firewire (IEEE1394 / 1394a) and USB2.0 ports
In addition to a full array of built-in I/O ports, the computer offers IEEE1394 for ultra high-speed connection to high
bandwidth digital video devices and USB2.0 ports to connect to any USB-based peripheral devices.
Wireless LAN
The internal Wireless LAN module allows your notebook to connect wirelessly to other 802.11-enabled systems,
devices, or network.
Page 7
6 Prestigio Nobile 1440W
ENG
System At A Glance
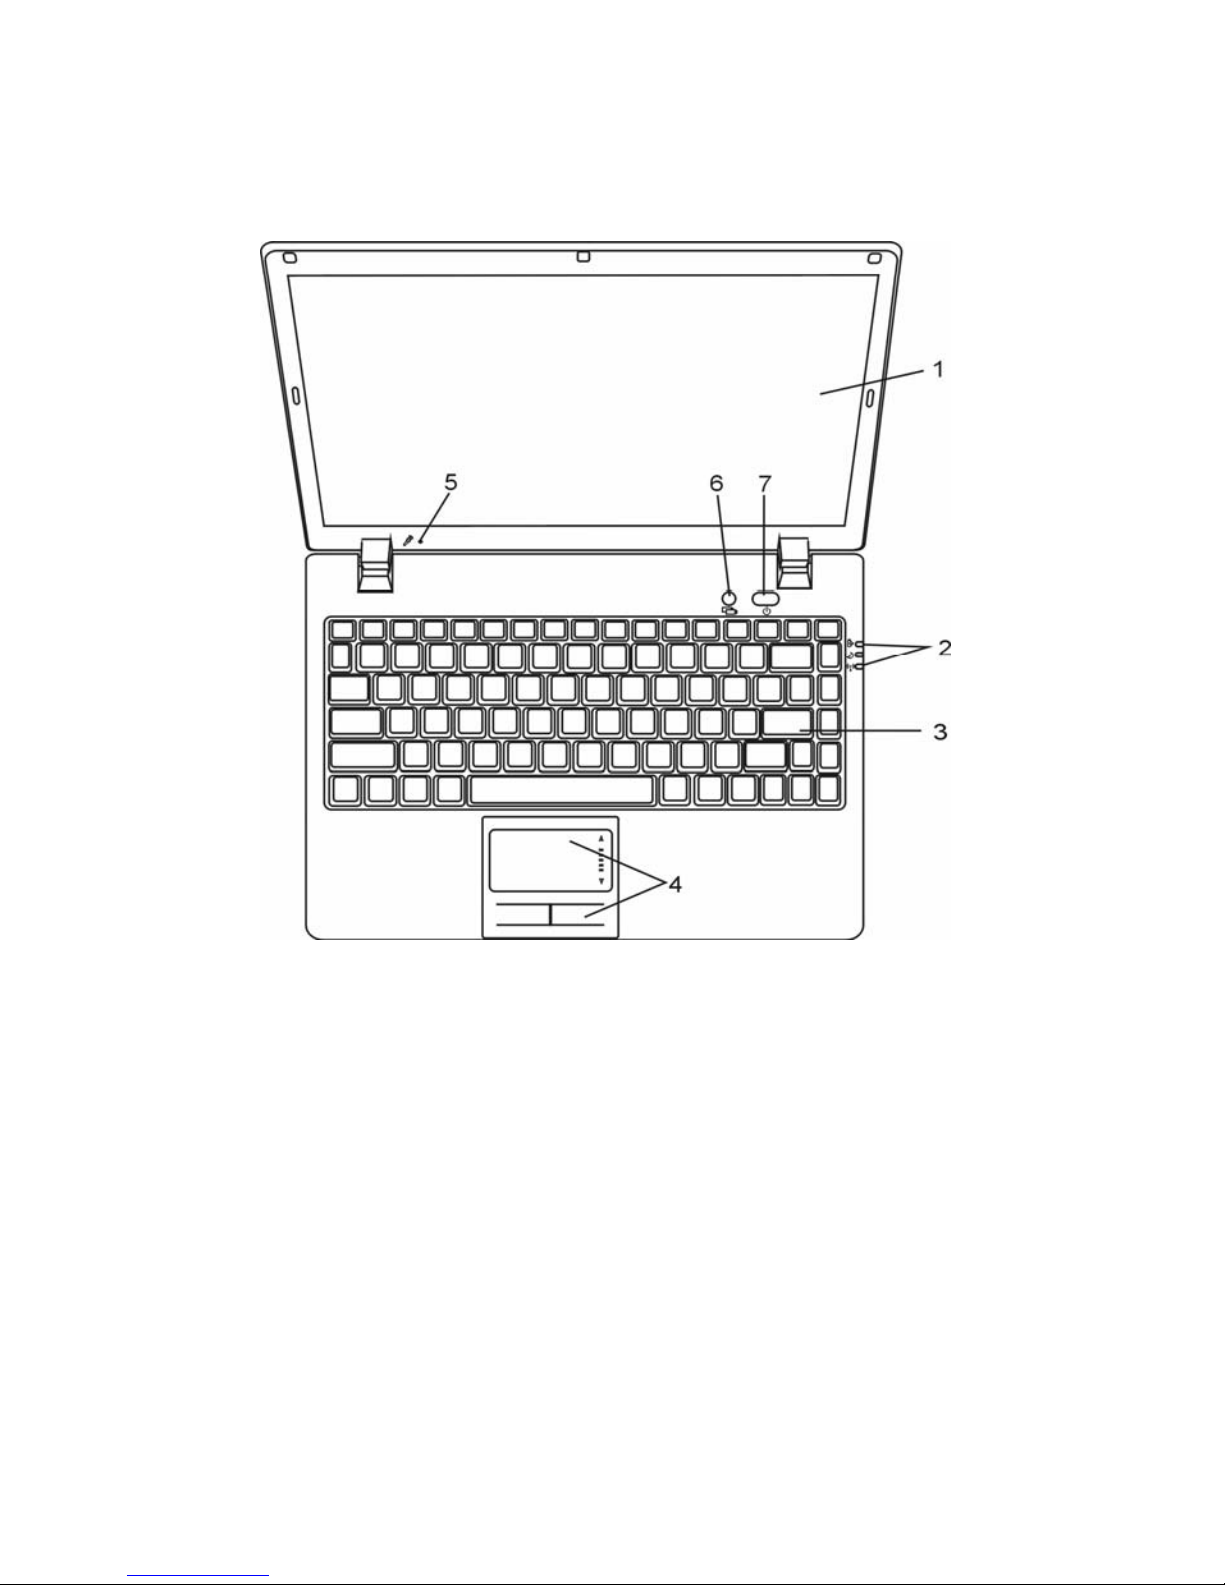
Top View
1. LCD Display
The panel is where the system content is displayed.
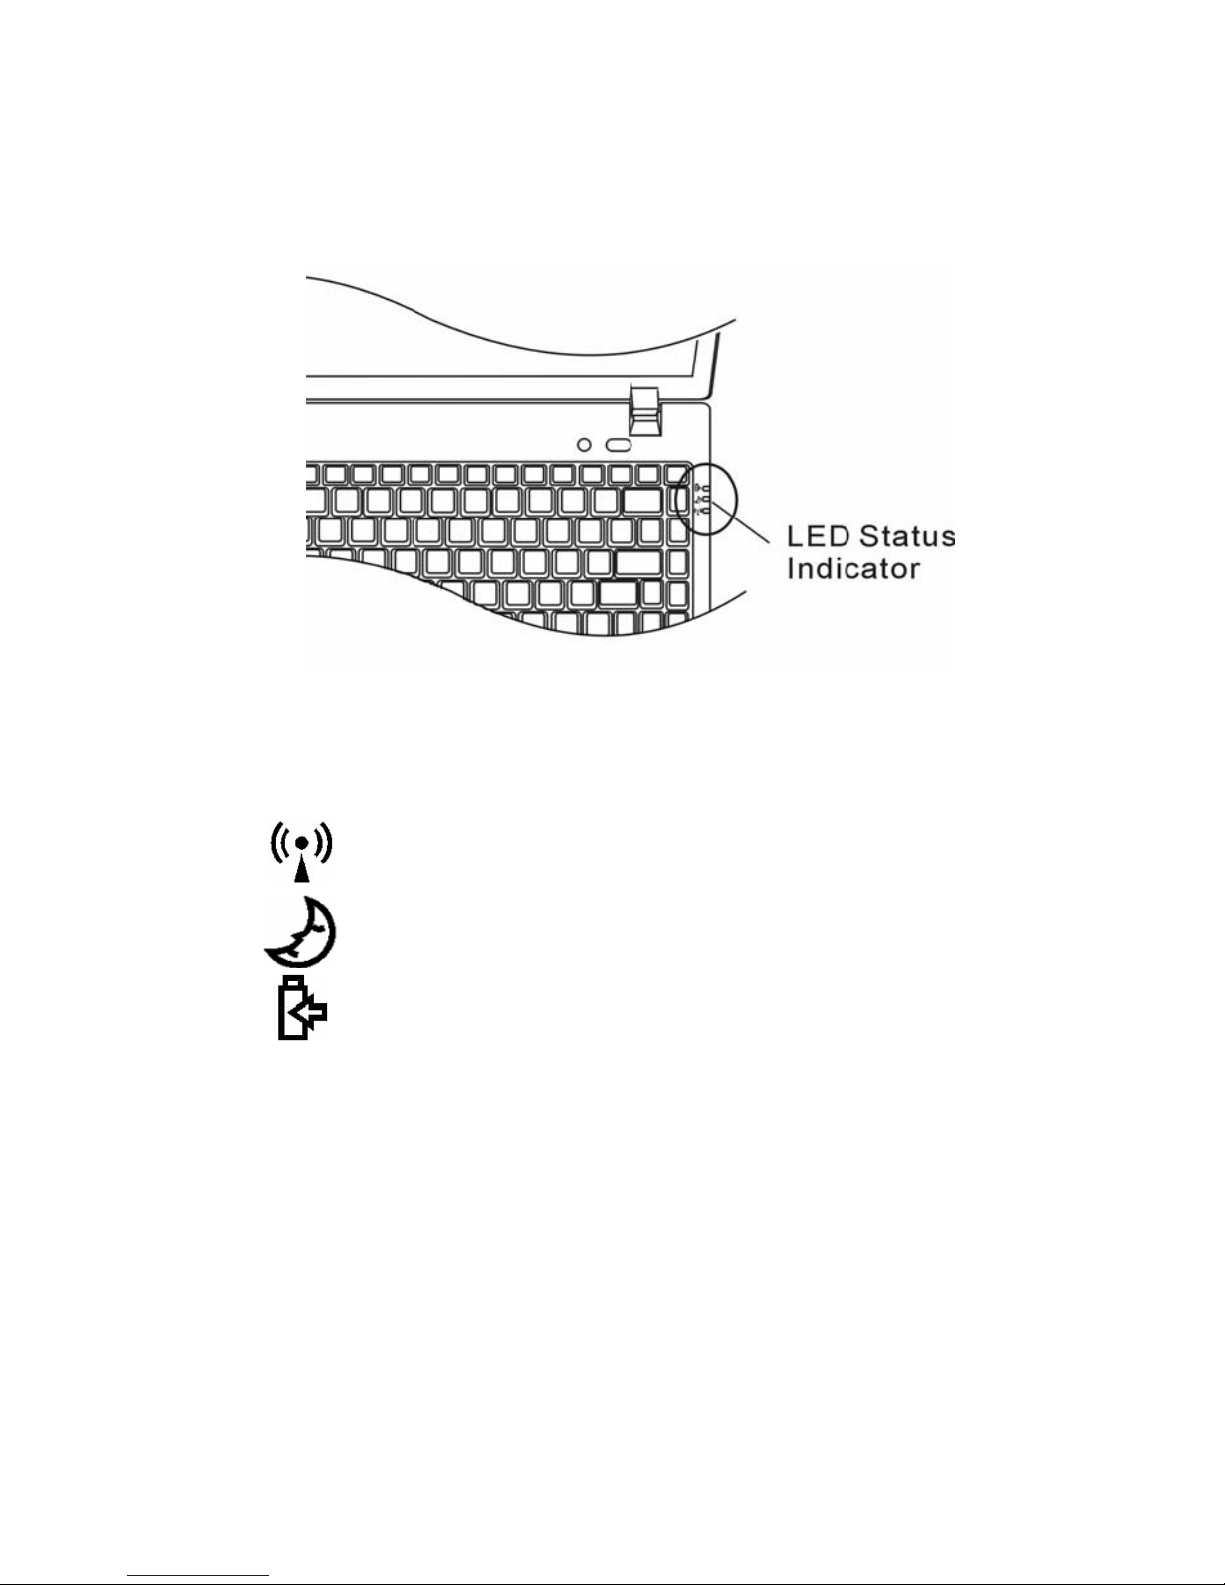
2. LED Status Indicator
The LED Status indicators reveal the status of the system power state, battery-charging state, Instant-On/Suspend
state, and the WLAN switch enabling and disabling. See the LED Status Indicator Section for details.
3. Keyboard
The keyboard is used to enter data. (See Keyboard Section for details.)
4. Touch Pad
The touch pad is a built-in pointing device with functions similar to a mouse.
5. Built-in Microphone
The built-in microphone records sound.
Page 8

Prestigio Nobile 1440W 7
ENG
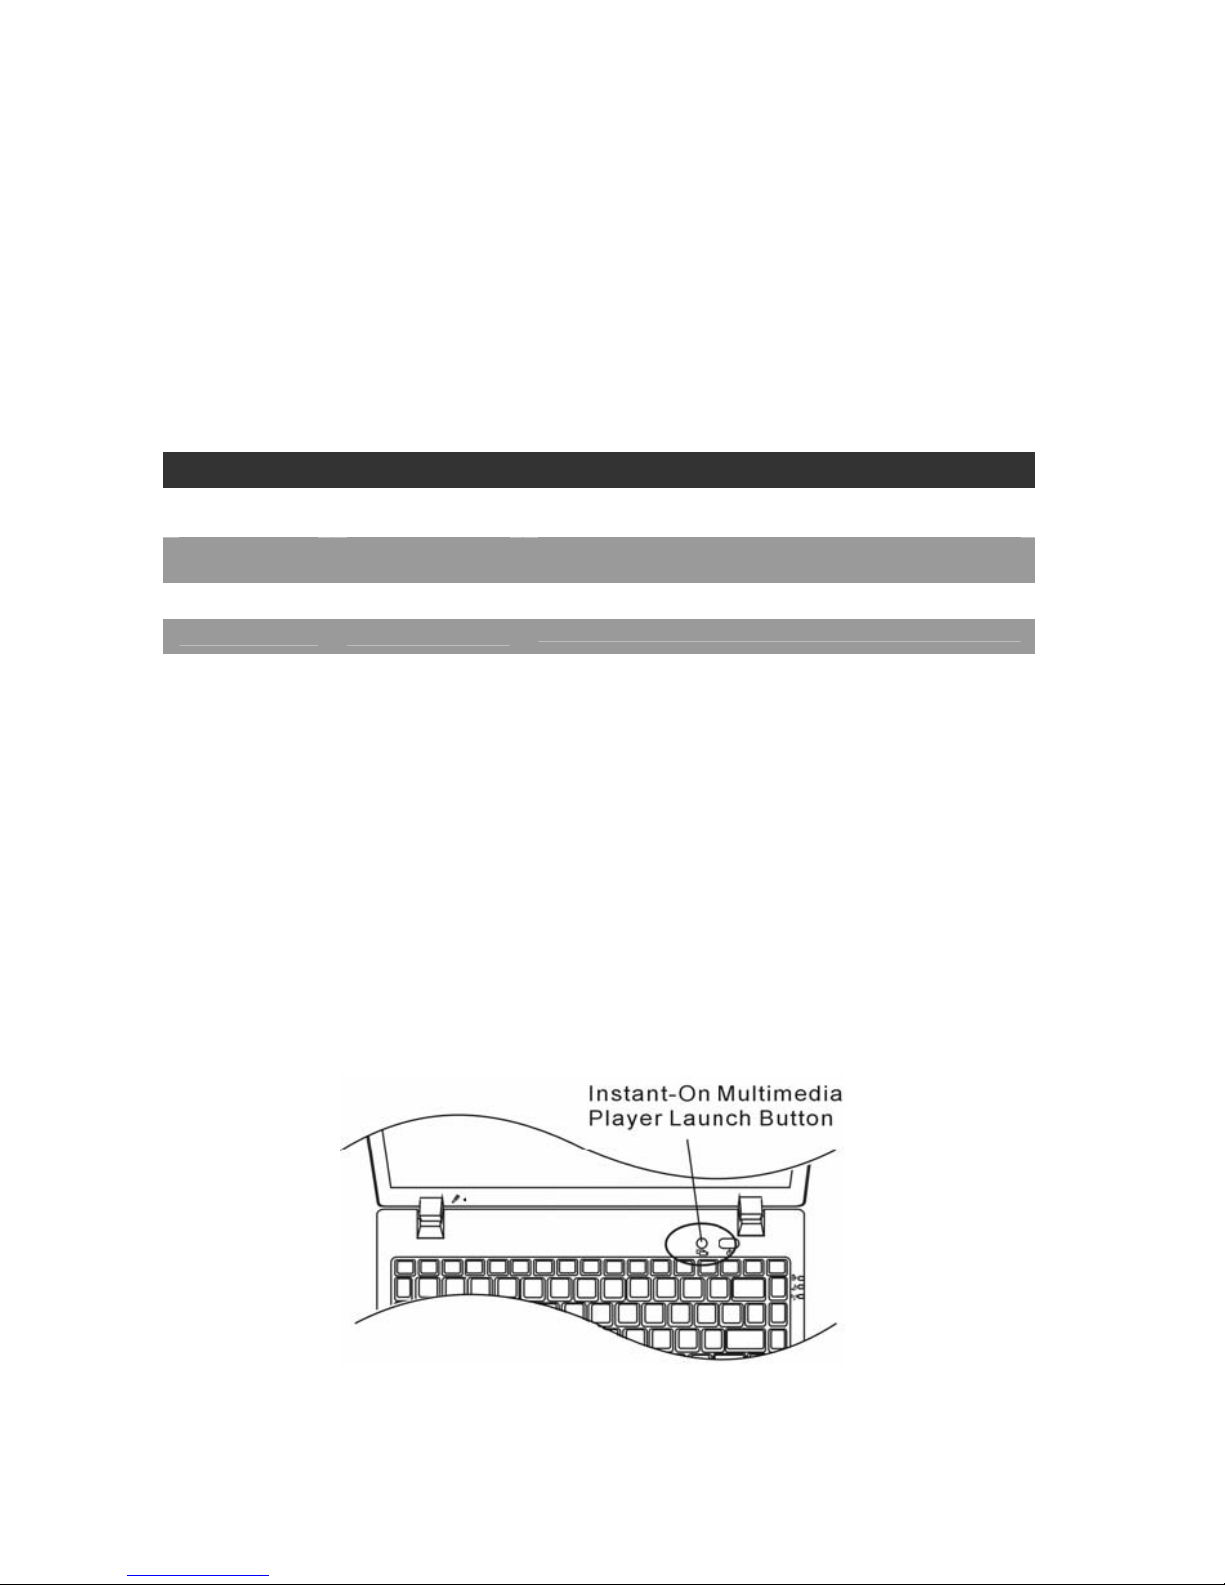
6. Instant-On Multimedia Player Launch Button (Optional) /
Silent Mode Button
When the system is powered off, pressing the key launches Instant-On multimedia application that allows you to
watch movies files, listen to music, or view photos in the optical drive, hard disk drive, or external storage without
having to boot to Windows. Press the key again to turn off the notebook. Please go to Instant-On Multimedia Player
Application section in this chapter for more information.
When the system is in Windows, pressing the key enables the system to lower its power usage; therefore the fan
speed is reduced to achieve lowest operating noise.
When Silent Mode is enabled, the
LED status indicator shows steady green light.
7. Power / Suspend Button
The power/suspend button turns the notebook on and off and it also acts as a system suspend key. Press
momentarily to turn on the system. Press and hold for at least 4 seconds to turn off the system. How this key behaves
can be defined in [Start > Settings > Control Panel > Power Options > Advanced] menu. Press the power / suspend
button again to return from the suspend mode. When the system is in Suspend Mode, the LED status indicator
shows blinking green light.
Page 9

8 Prestigio Nobile 1440W
ENG
Front View
Warning: Do not place any heavy objects on the top of notebook. This may damage the display
1. Wireless On/Off Switch
Use the Switch to disable or enable the Wireless function.
When Wireless LAN function is enabled, the LED status indicator shows steady green light.
2. Ventilation Grill
The fan grill is where air is exchanged to dissipate the internal heat. Do not block this airway completely.
Page 10
Prestigio Nobile 1440W 9
ENG
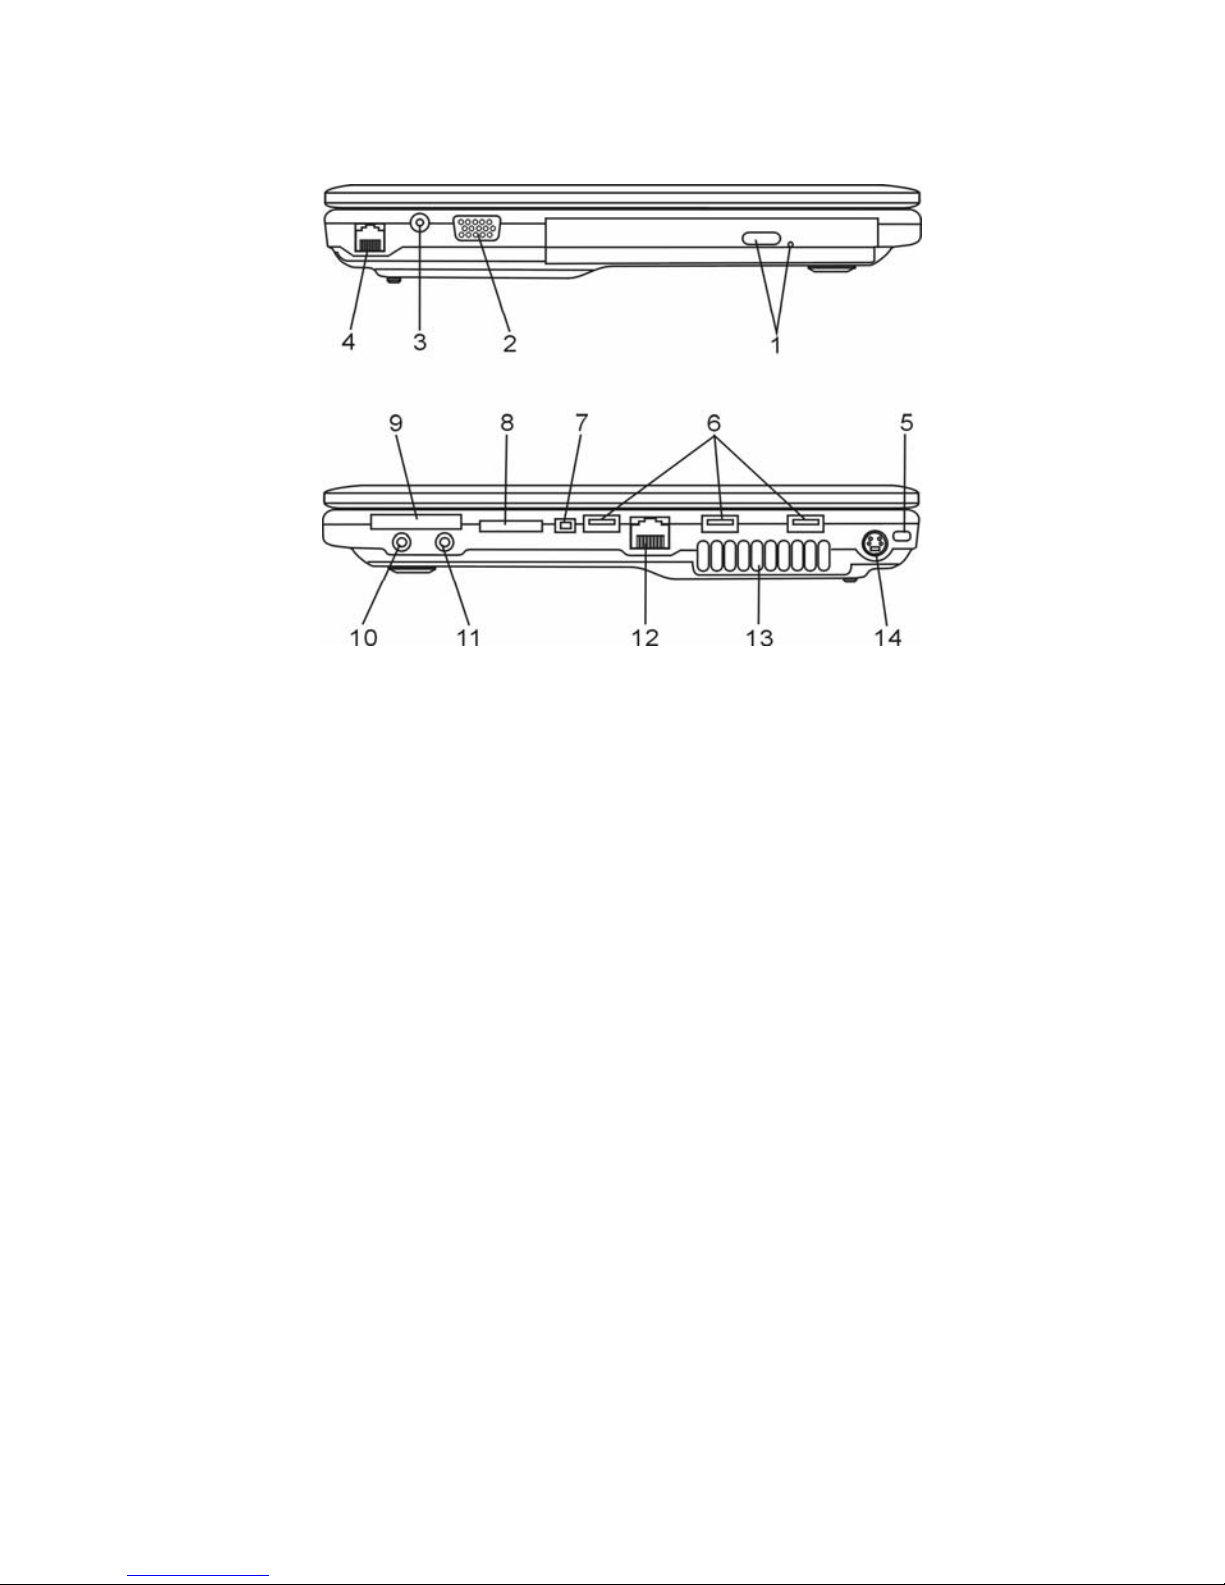
Side Views
Warning: Do not place any heavy objects on the top of notebook. This may damage the display
1. Optical Drive and Disk Eject Button and Manual Eject Key Hole
If your computer comes with the Combo drive, DVD-Dual, or Super-Multi drive, you may save data onto a CD-R /
CD-RW or DVD RW disc. Press the eject button to eject the disk tray. The manual eject keyhole allows you to manually
eject a jammed disk.
2. External VGA Port
The VGA video output port is for connecting the external LCD monitor or projector.
3. Power Jack (DC-in)
The DC-out jack of the AC Adapter connects here and powers the computer.
4. Modem Port / Port or Antenna Connector for DVB-T Digital
Broadcast TV (Optional Device)
This is where you plug the phone jack (RJ-11) for fax/modem functions. For certain configuration, your computer
may be installed with the optional DVB-T module. In stead of the Modem Port, this is an antenna connector. If your
system has the DVB-T option, you should plug the antenna into the connector. Please see DVB-T Digital Video
Broadcast TV section later in this chapter for more information. Please see the corresponding chapter of this manual
if you are installing the DVB-T module by yourself.
5. Kensington Lock Key Hole
A Kensington-type security lock latches to this keyhole for anti-theft purpose.
Page 11

10 Prestigio Nobile 1440W
ENG
6. USB2.0 Port (x3)
The Universal Serial Bus (USB2.0-compliant) port allows you to connect a wide variety of devices to your computer at
a rate of up to 480 Mbps. This port conforms to the latest USB2.0 plug-and-play standards.
7. Firewire / IEEE1394 / 1394a Port
This is a high-speed serial data port. You may connect any Fire-wire-ready device to this port.
8. 4-in-1 Card Reader
The 4-in-1 Card Reader supports SD Card, MS Card, MMC Card, and MS-Pro Card.
9. ExpressCard Slot
The slot is where Express Card (Type I, 34mm) is inserted. ExpressCard integrates both the PCI-Express bus
technology and USB2.0 interface.
Press the card into the slot to insert. Press the card again to eject.
10. Stereo Headphone / SPDIF-out Jack
The stereo headphone jack (3.5-mm diameter) is where you connect the headphones or external speakers.
Alternatively, you may connect the S/PDIF output to an external DTS, AC3, or PCM sound processor / decoder in your
home stereo system.
11. Microphone/Audio Line-in Jack
The microphone/Audio Line-in jack (3.5-mm diameter) is where you connect a microphone or an external audio
input source such as a CD Player.
12. Ethernet / LAN Port
The port connects to a network hub via the RJ-45 cable and also conforms to 10/100Base-TX transmission protocol.
13. Ventilation Grill
The fan grill is where air is exchanged to dissipate the internal heat. Do not block this airway completely.
14. TV (S-Video) Port
The S-Video port permits you to redirect the screen output to a television set or any analog video playback device.
This TV Port is copyright protected; when DVD movie is played, the output is scrambled to prevent analog recording.
For certain configuration, this port does not exist or does not function.
Page 12
Prestigio Nobile 1440W 11
ENG
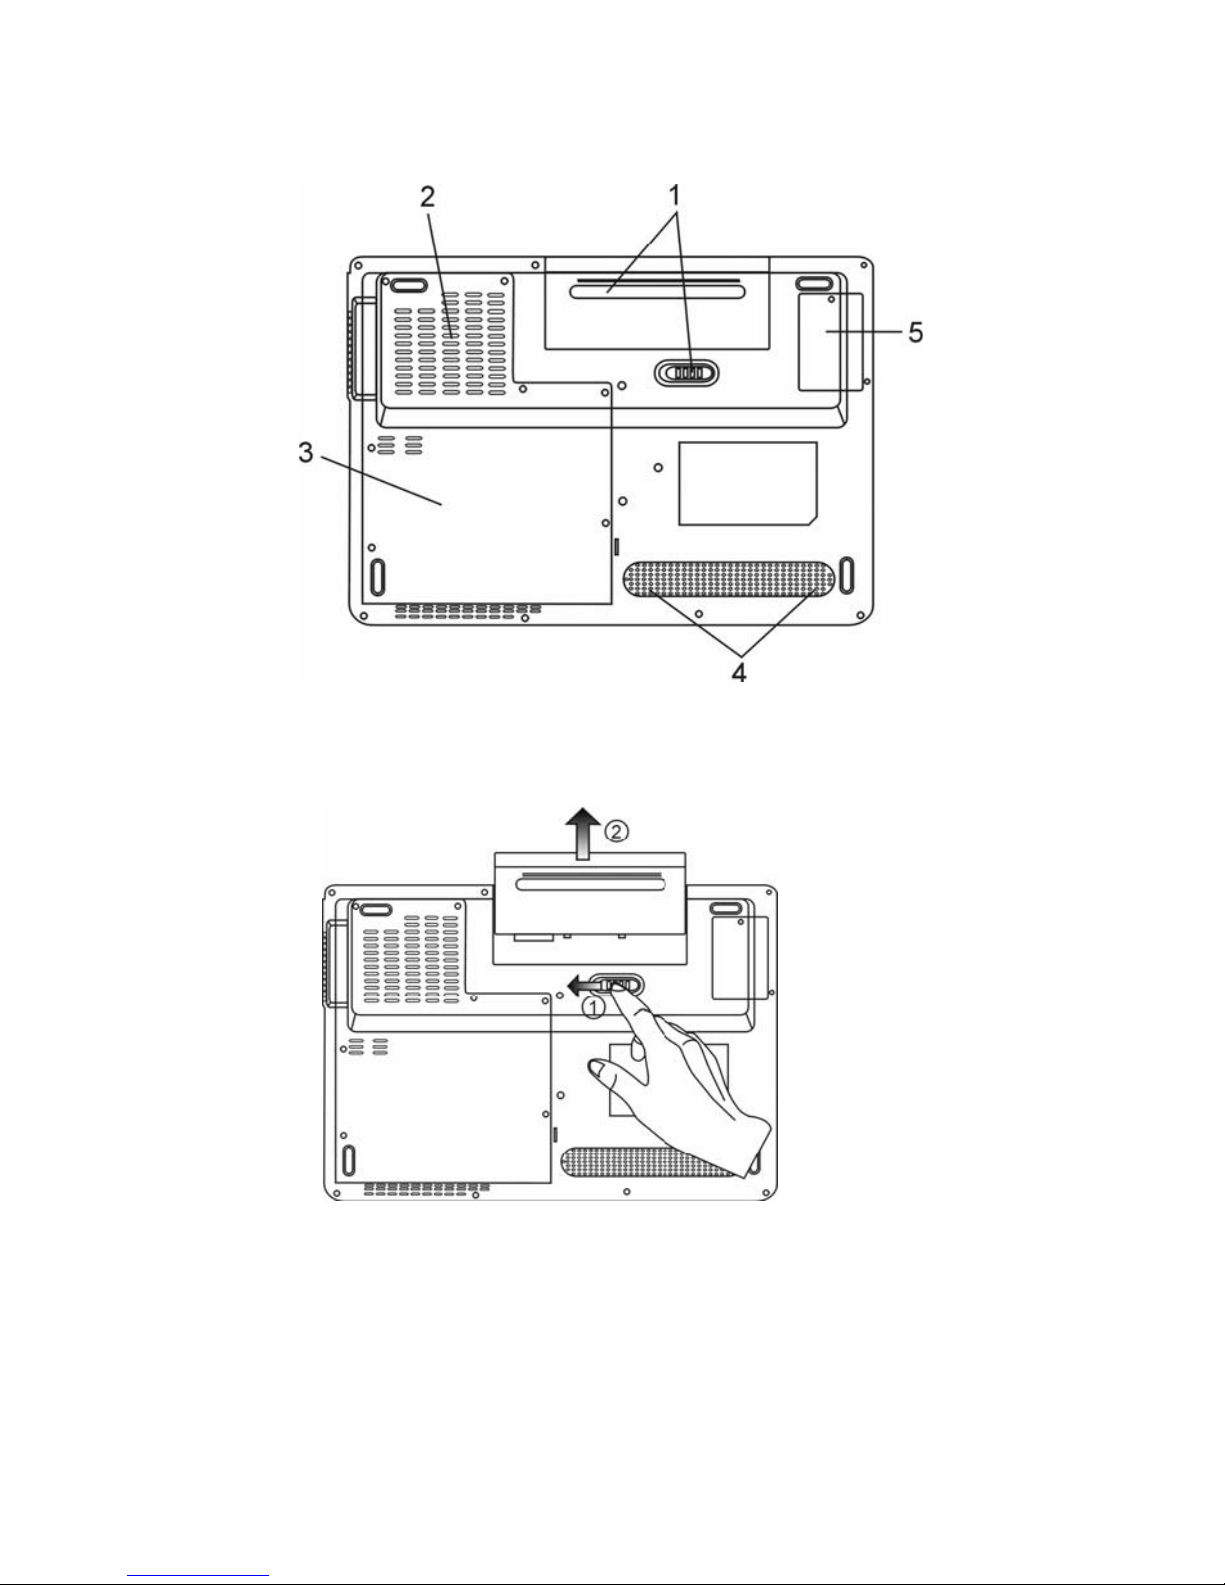
Bottom View
1. Battery Pack and Battery Latch
The battery pack is a built-in power source for the notebook. Slide the battery latch to release the battery pack.
2. Ventilation Grill
The fan grill is where air is exchanged to dissipate the internal heat. Do not block this airway completely.
Warning: Do not block the Fan Grill outlet. Place the machine on hard surface only. The bottom case may
get very hot.
Page 13
12 Prestigio Nobile 1440W
ENG
3. System Device Cover
The system’s processor with cooler assembly, Wireless LAN module, HDD, and DDR memory module are located
under the case cover. The system memory can be upgraded to a larger capacity.
4. Built-in Stereo Speakers
The built-in speakers output the sound in stereo.
5. DVB-T Receiver Module Cover
The optional DVB-T Receiver module is installed under the cover. Please see the corresponding chapter if you are
installing the DVB-T module by yourself.
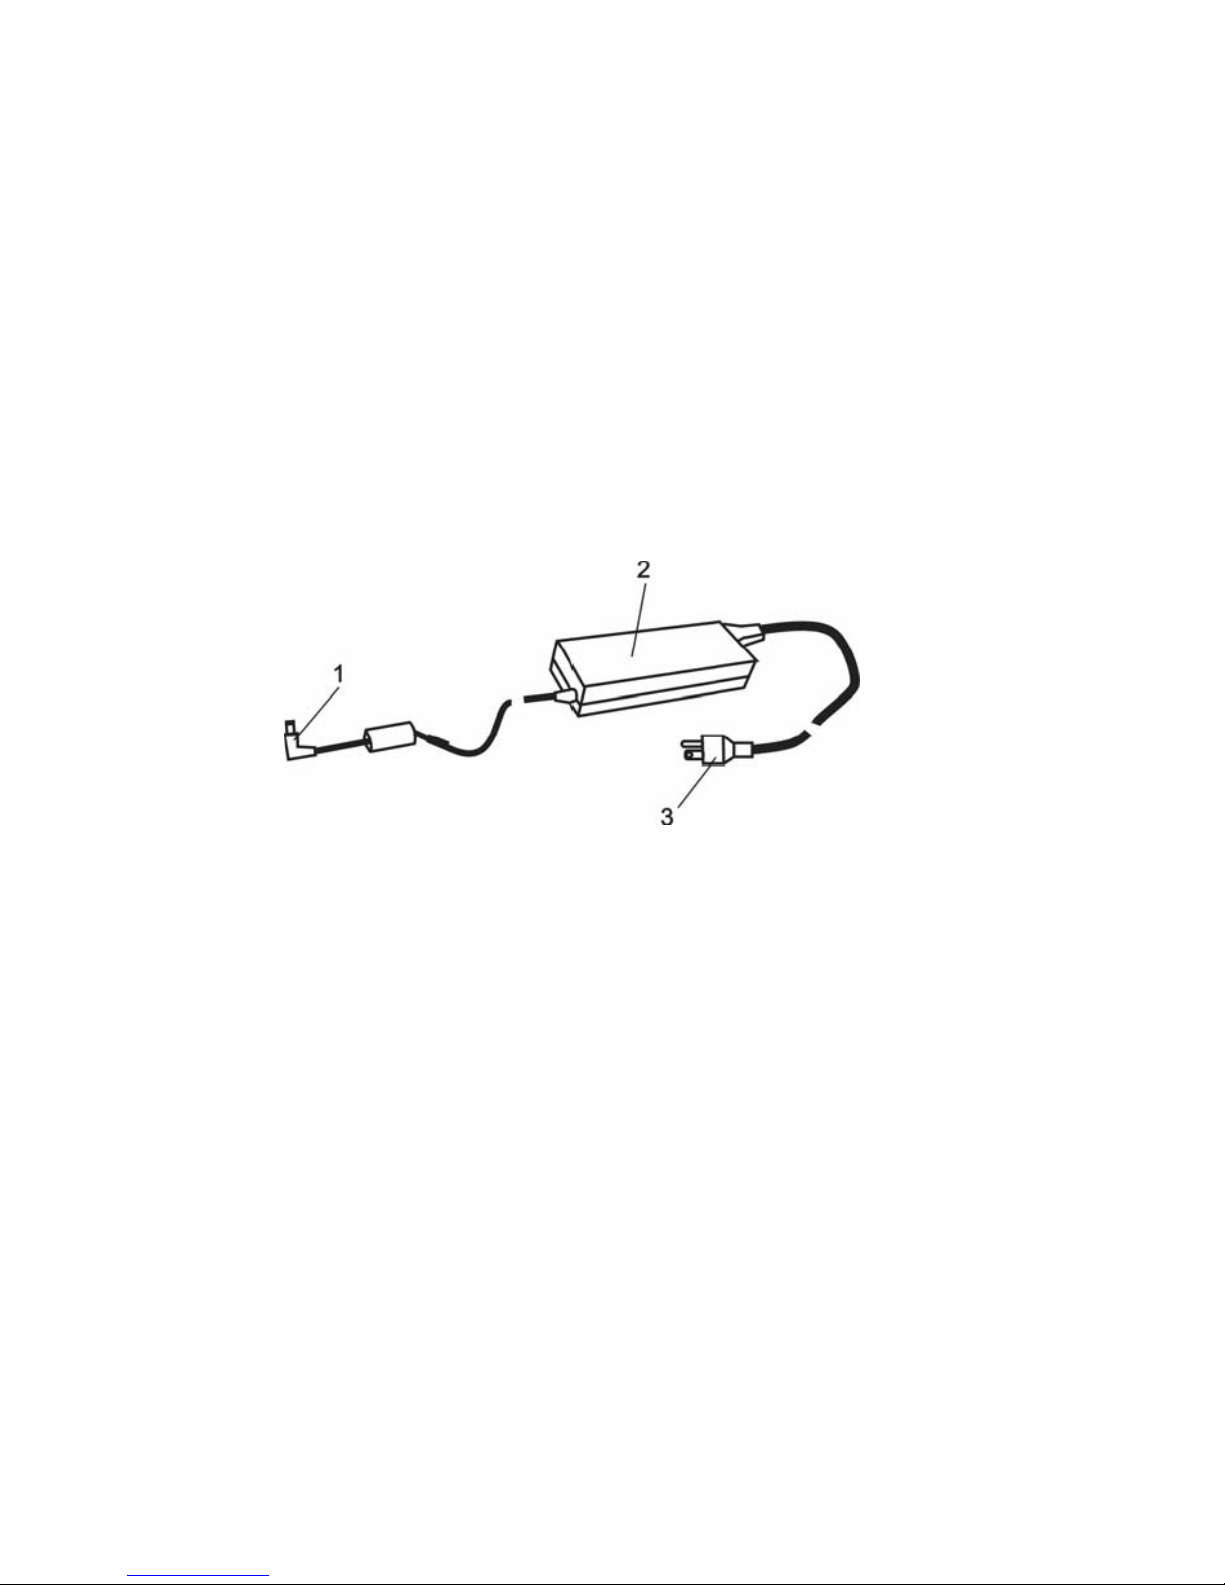
AC Adapter
1. DC-out Connector
The DC-out connector docks to the power jack (DC-in) on the computer.
2. Adapter
The adapter converts alternating current into constant DC voltage for the computer.
3. AC Plug
The AC plug plugs to the AC wall outlet.
Page 14
Prestigio Nobile 1440W 13
ENG
LED Status Indicator
The LED Status Indicator displays the operating status of your notebook. When a certain function is enabled, an LED
will light up. The following section describes its indication.
System & Power Status Indicators
LED Graphic Symbol Indication
Blue light indicates the WLAN module is active.
Persistent green light indicates the Silent Mode is enabled.
Blinking green light indicates the notebook is in the suspend mode.
Blinking orange light indicates the battery is being charged.
Blinking green light indicates the battery power is low when the system is turned ON.
Persistent green light indicates the system is ON.
Page 15

14 Prestigio Nobile 1440W
ENG
OSD Status Indicator
The On-screen Status Display Indicator displays the operating status of your notebook. When a certain function is
enabled, the symbol will show up on windows. The following section describes its indication.
OSD Status Indicators
Action Graphic Symbol
Fn + F3: Audio Mute
Fn + F5: Audio Volume Up
Fn + F6: Audio Volume Down
Fn + F7: Display Brightness Up
Fn+ F8: Display Brightness Down
Fn + Num Lock:
Numeric Keypad Is On
Caps Lock:
Capitalization is On
Scroll Lock:
Scroll Lock is On
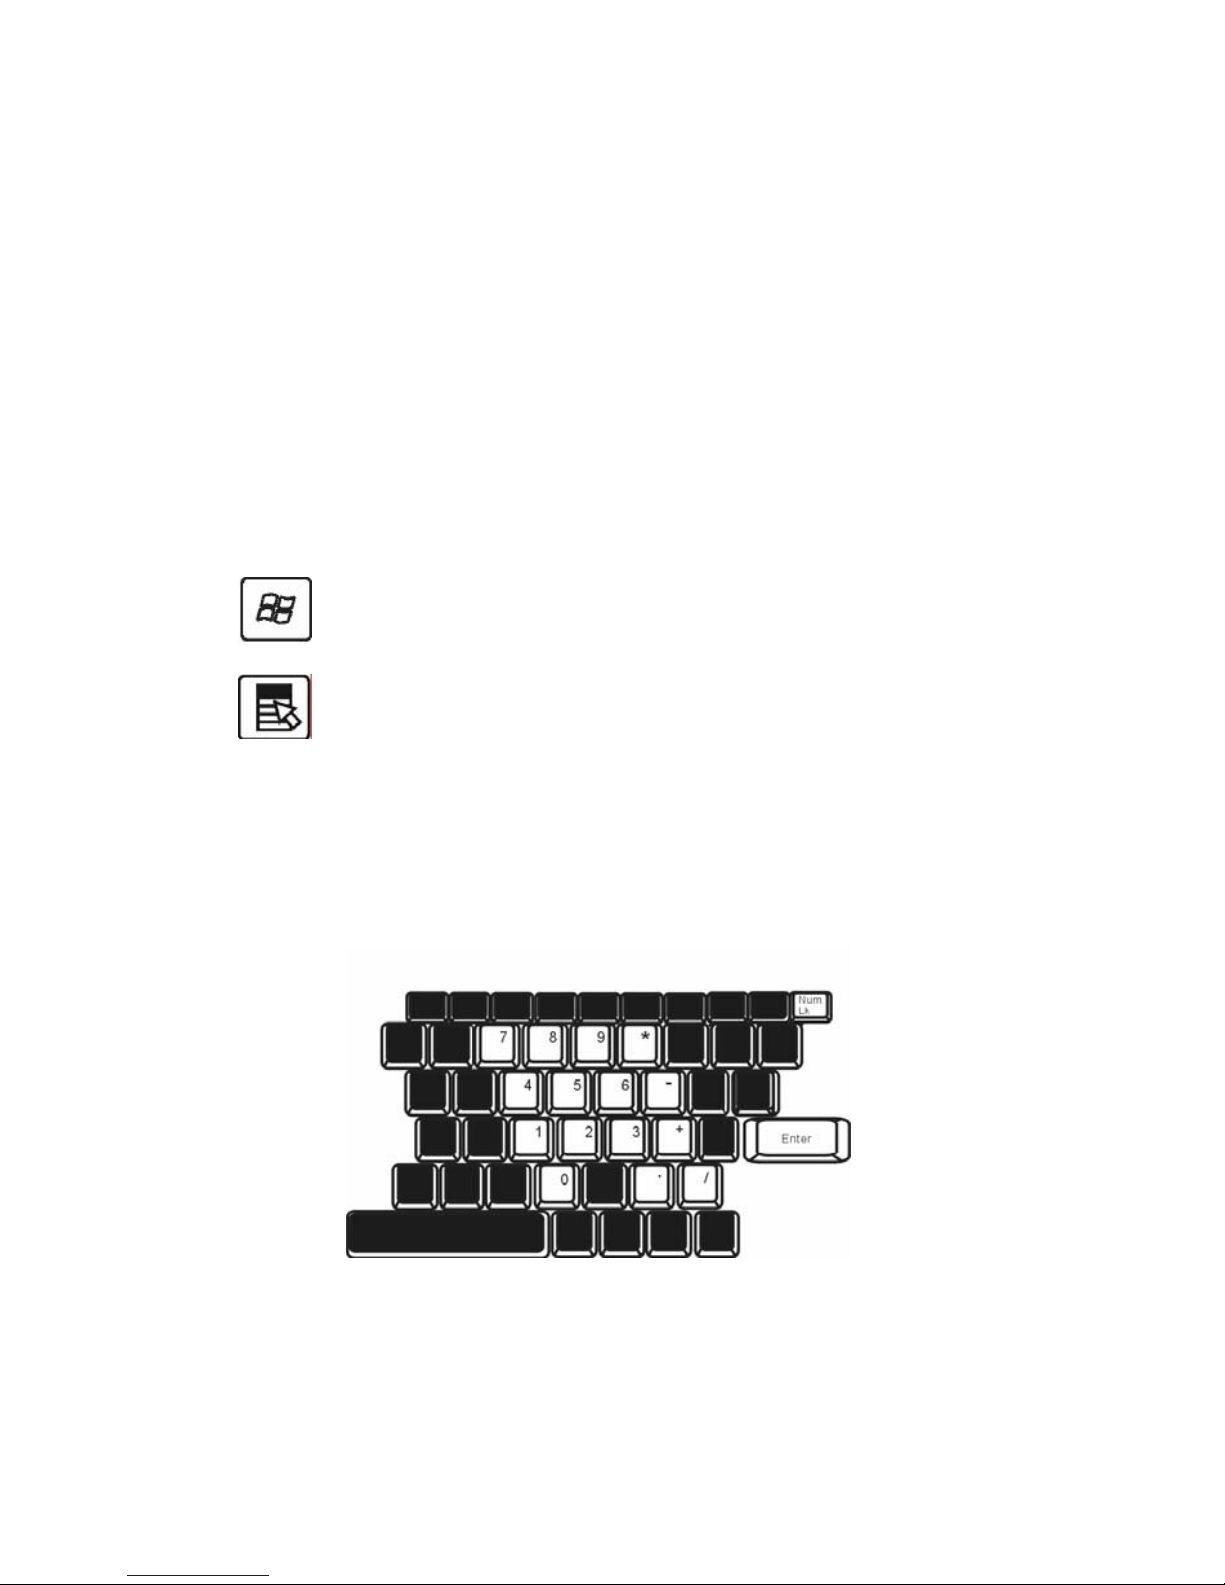
Keyboard Features
Function Keys (Quick Keys)
Graphic Symbol Action System Control
Fn + F1 Enters Suspend Mode.
Fn + F3 Turns the battery warning beep off or on.
Fn + F4 Changes Display Mode: LCD-only, CRT-only and LCD&CRT.
Fn + F5 Turns Speaker Volume up.
Fn + F6 Turns Speaker Volume down.
Fn + F7 Increases Display Brightness.
Fn + F8 Decreases Display Brightness.
Page 16
Prestigio Nobile 1440W 15
ENG
Fn+Num Lock Enables the embedded keypad to work in numeric mode. The
keys act like numeric keypads in a calculator. Use this mode
when you need to do a lot of numeric data entry. An alternative
would be to connect an external numeric keypad.
Caps Lock When Caps lock is enabled, all the characters you enter become
capitalized.
Scroll Lock Press the Scroll Lock key and then press •or •to move oneline up
or down.
For various system controls, press the Fn (Function) key and the Fx key simultaneously.
Windows Keys
Your keyboard also has two Windows keys:
1. Start Key
This key allows you to pull up the Windows Start Menu at the bottom of the taskbar.
2. Application Menu Key
This key brings up the popup menu for the application, similar to a click of the right mouse button.
Embedded Numeric Keypad
Press Fn+Num Lock to enable the embedded numeric keypad. The numbers are printed in upper right corner of a key,
in a color different from the alphabets. This key pad is complete with arithmetic operators (+, -, * , /).
Press Fn+Num Lock to revert to normal character keys.
Page 17

16 Prestigio Nobile 1440W
ENG
Touch Pad
The built-in touch pad, which is a PS/2-compatible pointing device, senses movement on its surface. As you move
your fingertip on the surface of the pad, the cursor responds accordingly.
The following items teach you how to use the touch pad:
1. Move your finger across the touch pad to move the cursor.
2. Press buttons to select or execute functions. These two buttons are similar to the left and right buttons on a mouse.
Tapping on the touch pad twice produces is similar to clicking the left button of a mouse.
Function Left Button Right Button Equivalent Tapping Action
Execution Click twice quickly Tap twice (at the same speed as
double-clicking the mouse
button)
Selection Click once Tap once
Drag Click and hold to drag the
cursor
Tap twice quickly and on the
second tap hold finger to the
touchpad to drag the cursor
Access Context Menu Click once
Move One Page Up or Down
Tips on Using the Touch Pad:
1. The double-click speed is timed. If you double-click too slowly, your notebook responds as if you single-clicked
twice.
2. Keep your fingers dry and clean when using the touch pad. Also keep the surface of touch pad clean and dry to
prolong its life.
3. The touch pad is sensitive to finger movements. Hence, the lighter the touch, the better the response. Heavy touch
does not produce better response.
Page 18
Prestigio Nobile 1440W 17
ENG
Graphic Subsystem
Your computer uses a high performance 14.1-inch active matrix TFT panel with high resolution and multi-million
colors for comfortable viewing. The Intel integrated GMA950 video graphics accelerator, which is Microsoft DirectX 9
compatible, performs graphic rendering at a lighting-fast speed.
Adjusting the Display Brightness
The notebook uses special key combinations, called hot keys, to control brightness.
Press Fn+F7 to increase the brightness.
Press Fn+F8 to decrease the brightness.
Note: To maximize your battery operating time, set the brightness to the lowest comfortable setting, so
that the internal backlight uses less power.
Extending the Life of the TFT Display Device
Observe the following guidelines to maximize the life of the backlight in the display.
1. Set the brightness to the lowest comfortable setting (Fn+F8).
2. When working at your desk, connect your notebook to an external monitor and disable the internal display Fn+ F4.
3. Do not disable the suspend time-outs.
4. If you are using AC power and have no external monitor attached, change to suspend mode when not in use.
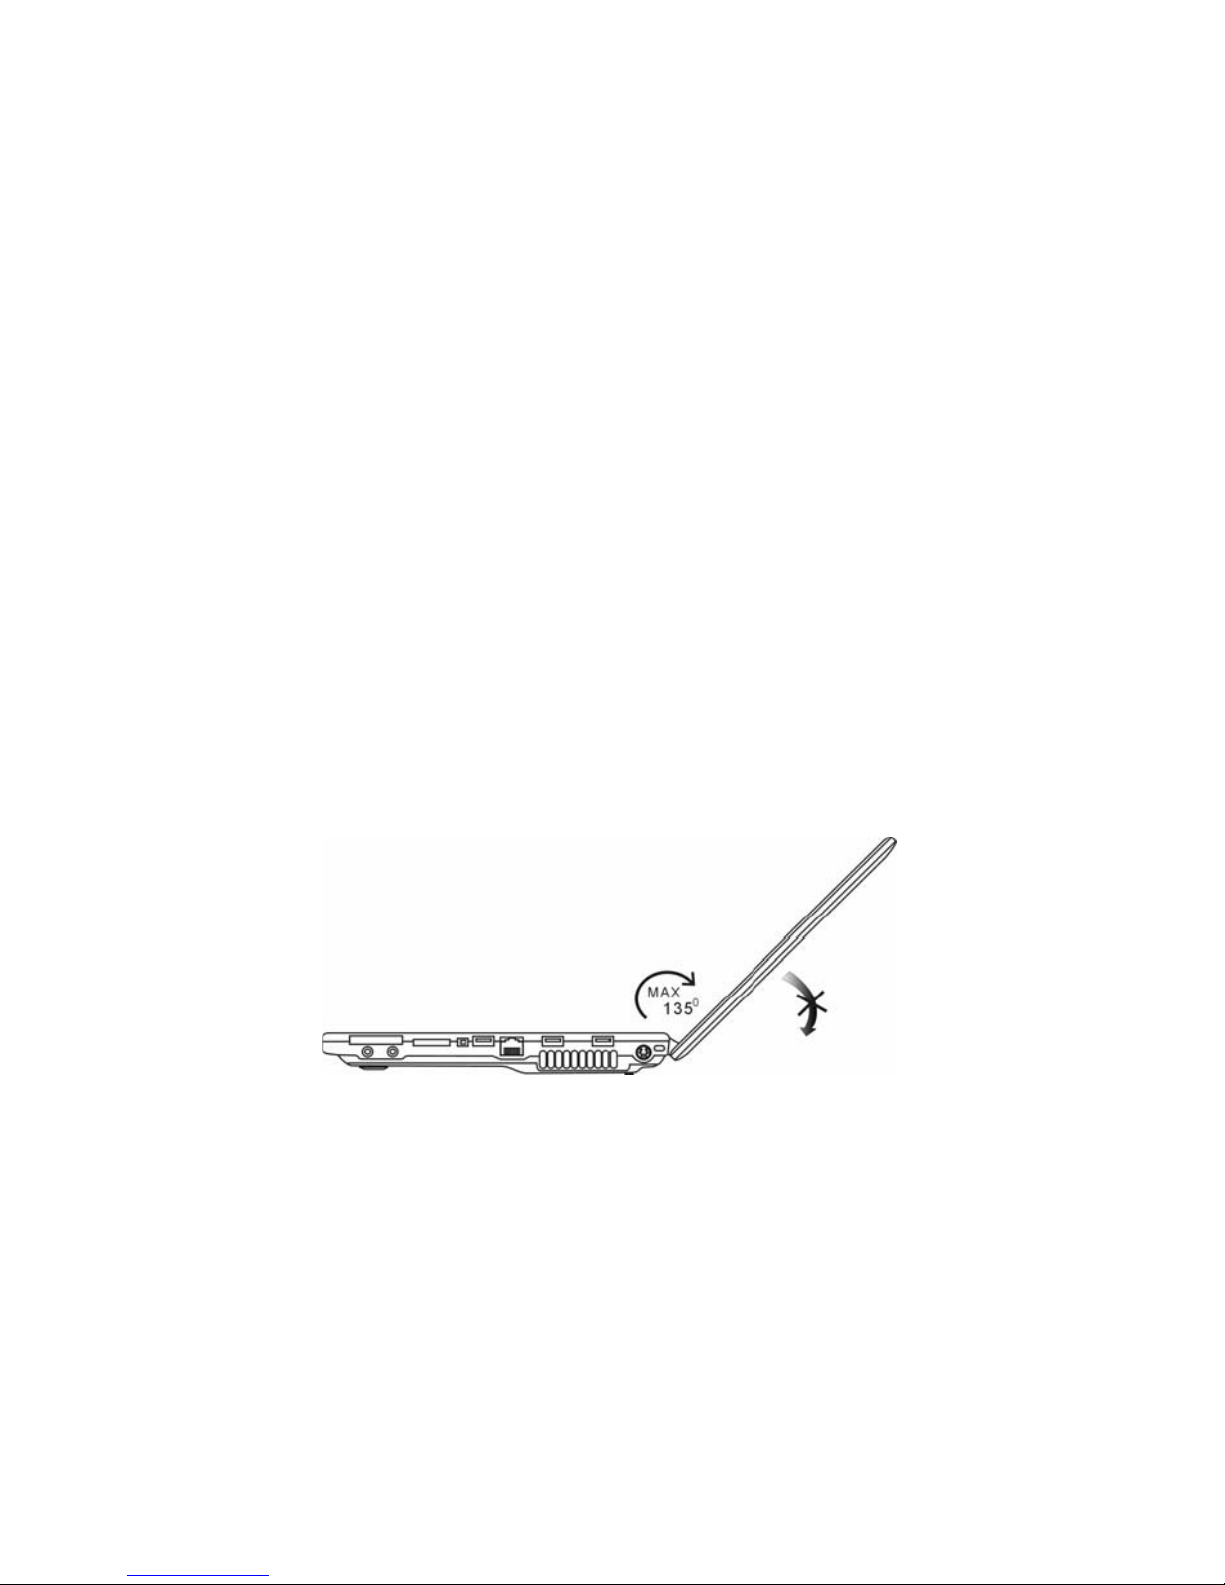
Opening and Closing the Display Panel
To open the display, push the LCD latch to the right and lift up the lid. Then tilt it to a comfortable viewing position.
The LCD panel has a maximum opening of 135 degrees. Do not push it down forcibly.
To close the display cover, fold it down gently.
Warning: To avoid damaging the display, do not slam it when closing. Do not place any object on top of the
computer when the display is closed
Page 19
18 Prestigio Nobile 1440W
ENG
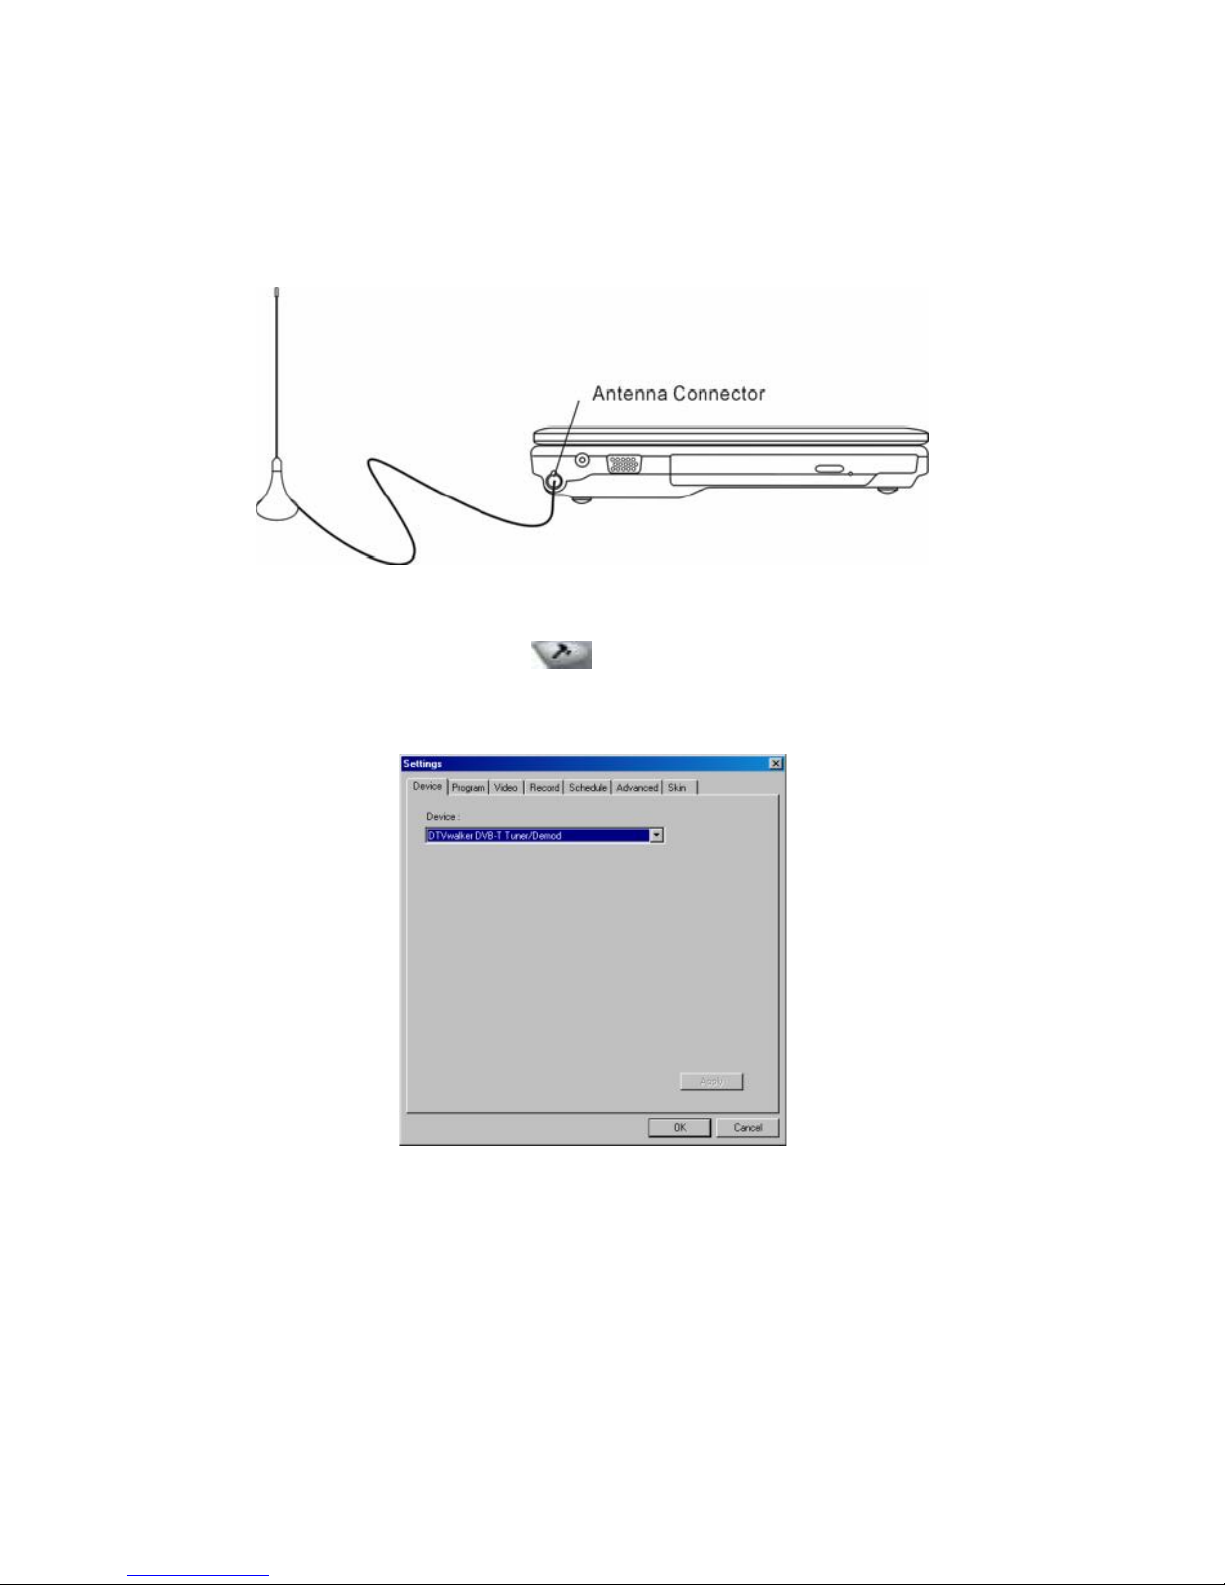
DVB-T Digital Video Broadcast TV (Optional Device)
The optional DVB-T (Digital Video Broadcast – Terrestrial) module allows you to watch high-quality digital video
broadcast TV on your notebook computer.
If your system has the DVB-T option, you should plug the antenna into the connector.
You may have to move the antenna close to the window and away from the building for best reception.
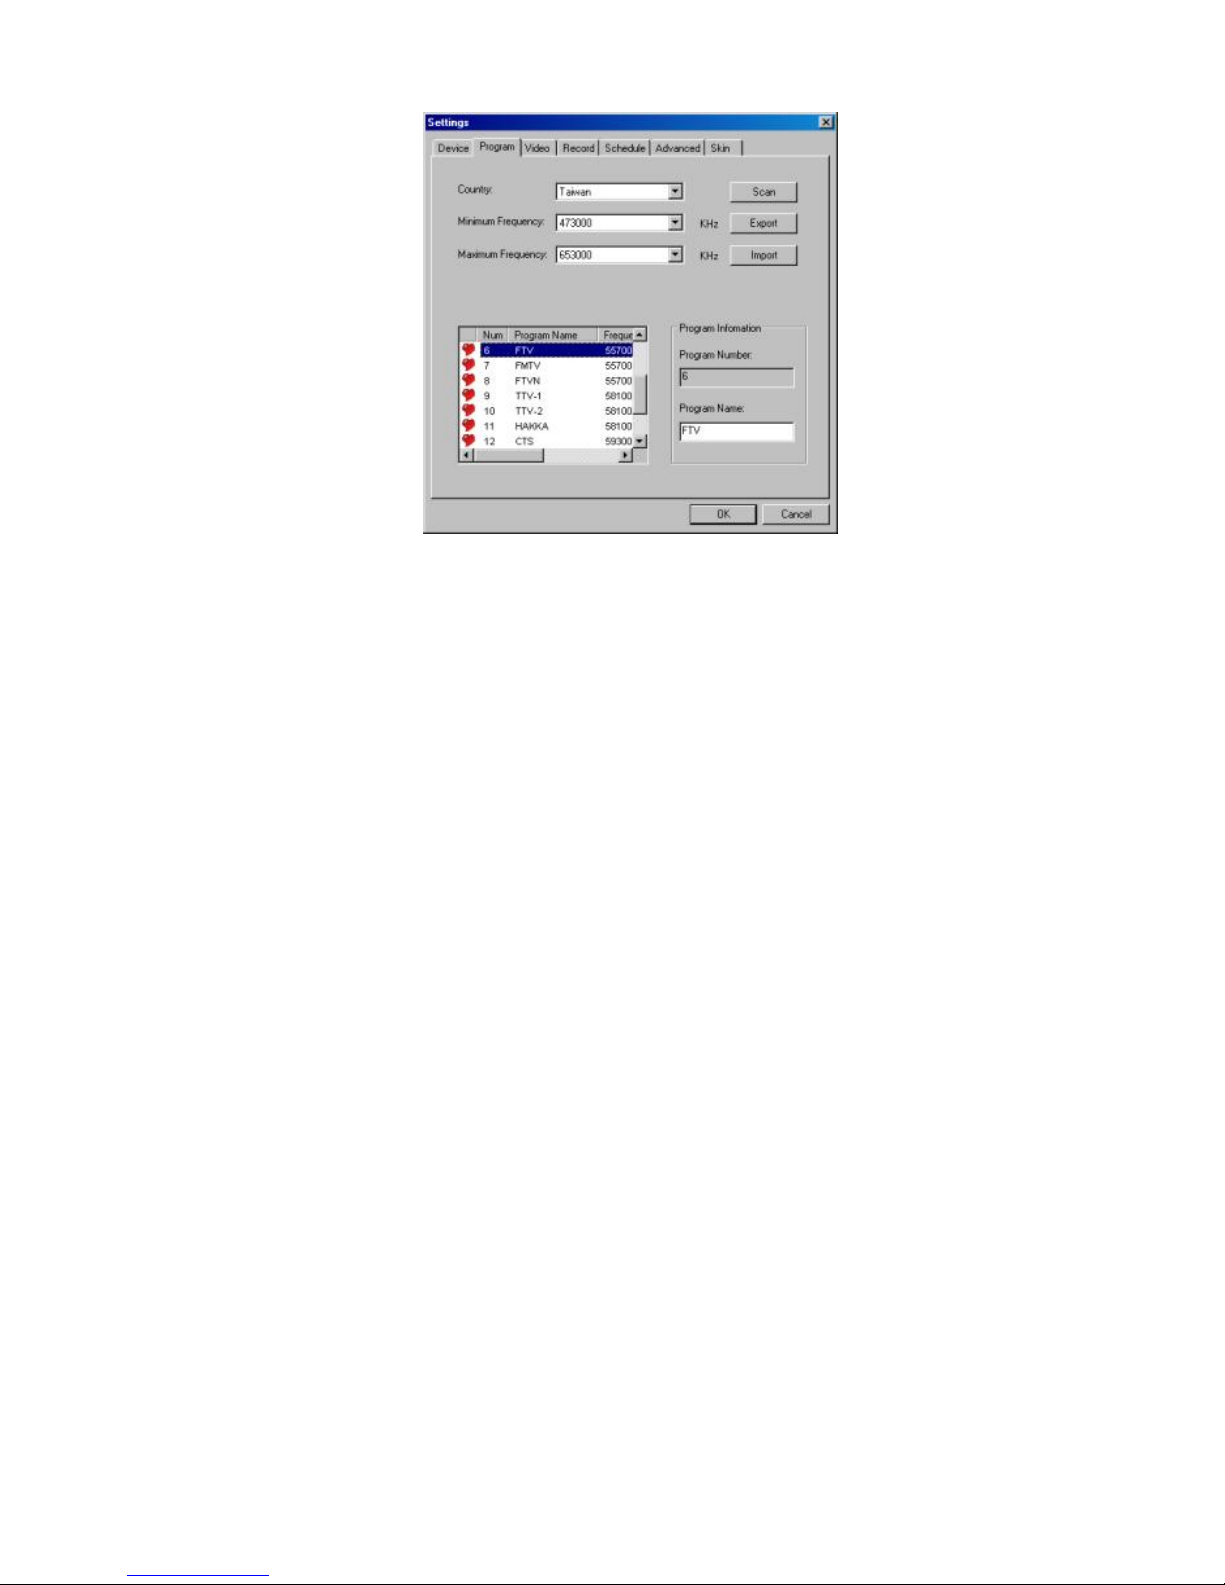
If this is the first time you use the DVB-T module to watch TV, you need to scan the available channels first. Follow
the steps below to scan the channels.
1. Launch NewSoft Presto!PVR application. Click
to open the Settings dialog box, and then click the Device
tab.
2. Choose the DVB-T tuner on the Device list.
3. Click the Program tab on the Settings dialog box and click Scan to scan for available channels. If a program
(channel) is found, it will be included in the program list. When finished, you can choose a program and edit its
name.
Page 20
Prestigio Nobile 1440W 19
ENG
4. Press Ok and close the Settings dialog box.
5. You are ready to watch TV.
If you system comes with the DVB-T Module already installed, you may use NewSoft Presto!PVR to watch and record
the TV programs.
Please see the corresponding chapter if you are installing the DVB-T module by yourself. You also need to install the
NewSoft Presto!PVR application from the CD to watch and record TV programs.
Audio Subsystem
Your computer’s audio subsystem is Sound Blaster Pro-compatible.
Adjusting the Volume Manually
To increase the volume, press Fn+F5.
To decrease the volume, press Fn+F6.
Adjusting the Audio Volume in Windows
1. Click the speaker symbol in the task tray in Windows.
2. Drag the volume control bar up or down to adjust the volume.
3. To temporarily silence the speaker without changing the volume setting, click Mute.
Voice Recording
A built-in microphone allows you to record sound. You will need to use audio processing software to enable the
built-in microphone. For example, you may use Microsoft Sound Recorder.
Page 21
20 Prestigio Nobile 1440W
ENG
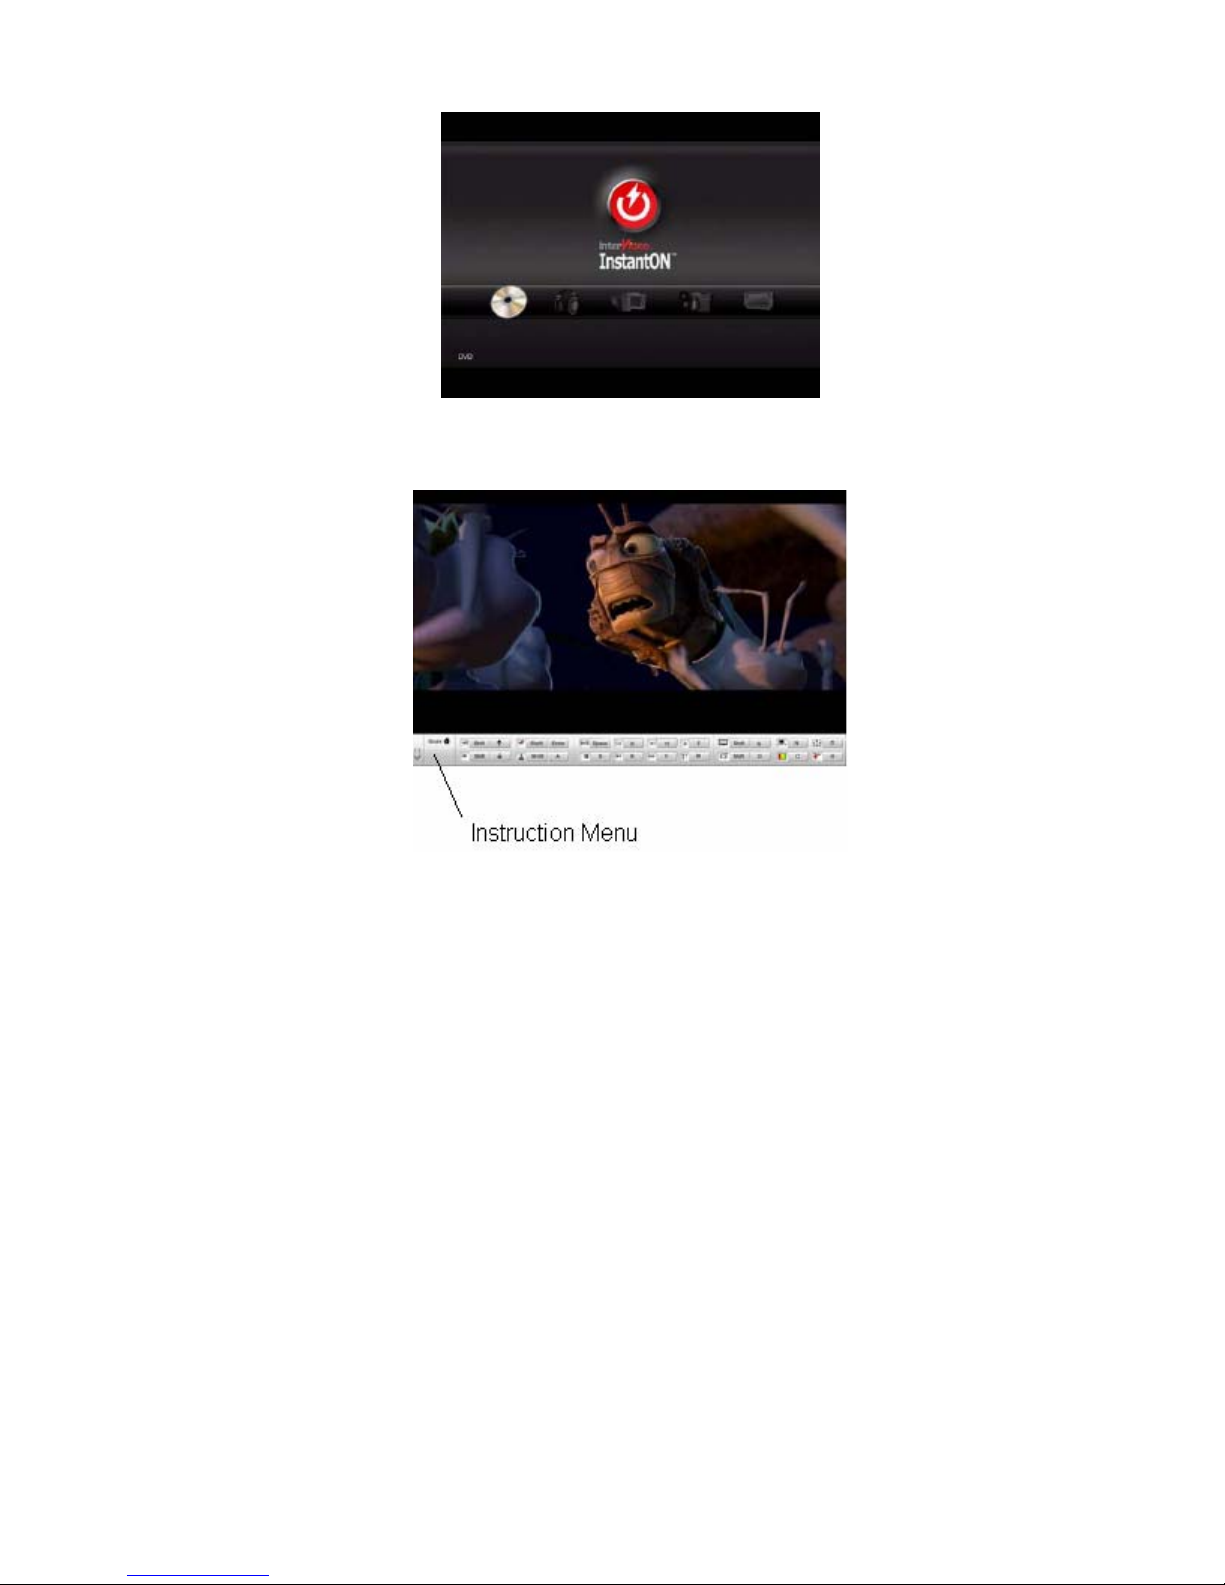
Instant-On Multimedia Player (Optional)
Instant-On Multimedia Player is an easy way to play DVD disc or video clips, view pictures, listen to music, and watch
digital broadcast TV (if the optional DVB-T Module is installed). Instant-On does not work under Windows.
Note: The following is an easy guide for Instant-On Player. For more information, please refer to its user
guide or Help screen.
Note: Instant-On supports most of the popular media formats; however, it does not support Animated GIF.
Instant-On Action Keys
Use the following keys to move through the Menu items.
Key Command Description
M Menu
Press to show the General Setup Menu.
Press again to exit the Menu.
F1 Instruction Menu
Press to show the Instruction Menu and function keys.
Press again to exit the Menu.
↑↓←→
Movement
Moves through the Menu
Enter Selection
Makes a selection
Note: Because Instant-On does not support touch pad movement, you need to use the keys on the keyboard
to navigate to desired function. In media mode, always use F1 to display the function keys.
Media File Storage:
Using Instant-On to playback files, you need to store them in: C:\Documents and Settings\All Users(and every created
users)\Documents\My XXX (Example: Photo files under \My Photo, Music files under\My Music and Video files under
\My Video).
For example, the first time you are in the Video Mode, the system will ask to scan the files stored under the specified
file directory and then create a playlist for future use.
Launching the Instant-On Player:
When the computer is powered off and the Instant-On Multimedia Player Launch Button is pressed, the system
launches the Player application in a few seconds.
Note: When the computer is already in Windows and the Player Button is pressed, the system enables the
Silent Mode to reduce fan noise.
Page 22
Prestigio Nobile 1440W 21
ENG
Use the
←→ keys to select the Media Mode.
Use F1 to show the Instruction Menu for that Media Mode.
Shutting Down the Instant-On Player:
Press the Instant-On Player button to shut down the computer.
Page 23
22 Prestigio Nobile 1440W
ENG
Modem
Your computer comes with a 56K V.92 internal fax/modem and a phone jack (RJ-11), which is located on the left side
of your computer.
Use a telephone cable to connect the computer to the telephone wall outlet.
Note: For certain configuration, there is no Modem Port or Function.
Connecting the Modem
1. Plug one end of the phone line into the modem port located on the rear side of the computer. (For EMI compliance,
you need to clip the included EMI CORE to the phone line.)
2. Plug the other end of the line into the analog phone wall outlet.
Depending on where your computer is used, you may need to change settings in the modem. Correct setting will
allow you to maintain a stable connection in a country where its telecommunication system may be different to
others.
To change the modem setting, do the following:
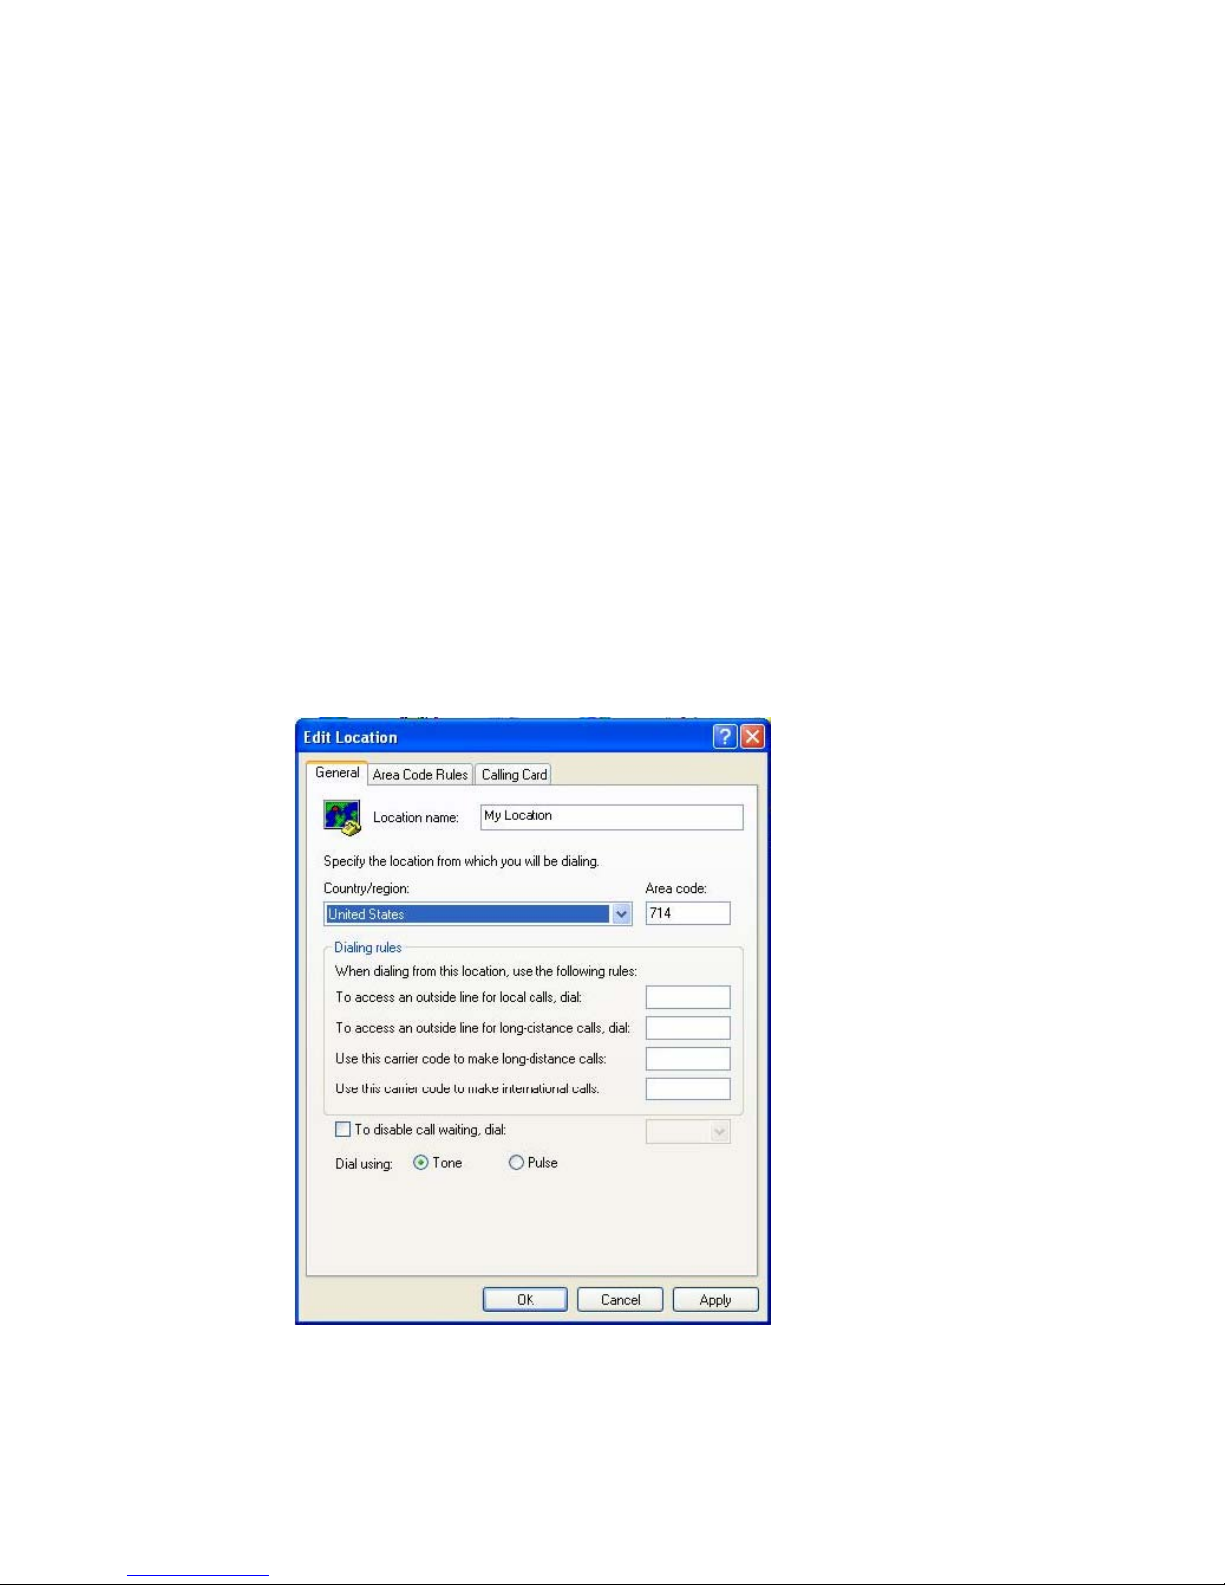
1. Go to [Start > Settings > Control Panel > Phone and Modem Options]. Go to Dialing Rules and Edit My Location. In
the Country/Region pull-down menu, select the appropriate country setting. You will see a similar dialog box.
2. Click on the pull-down menu and select the country where it is applicable. Click on OK to exit.
Page 24

Prestigio Nobile 1440W 23
ENG
Ethernet
Your computer is equipped with a 10/100/1000Base-TX Fast Ethernet network adapter. Connect the active LAN cable
to the RJ-45 LAN port located on the right side of the computer. This allows you to access and transmit data in the
local area network.
Connecting to the Network
Use Unshielded Twisted Pair (UTP) Ethernet cable only.
1. Insert one end of the UTP cable into the network connector until the connector snaps securely into the receptacle.
2. Either connect the other end of the cable to an RJ-45 jack wall outlet or to an RJ-45 port on a UTP concentrator or
hub in the network.
Cabling Restriction for Networks
The following restrictions should be observed for 10/100/1000BASE-TX networks:
The maximum cable run length is 100 meters(m) (328 feet[ft]).
For 100Mbps or 1000Mbps operations, use Category 5 wiring and connections.
Note: Consult Windows manual and / or Novell Netware user’s guide for the software installation,
configuration, operation of the network.
Page 25

24 Prestigio Nobile 1440W
ENG
BIOS SETUP AND SECURITY FEATURE
In this chapter, you will learn how to enter the BIOS Setup Menu and manipulate various hardware control settings.
You will also learn how to use the built-in security features.
The Setup Utility is a hardware configuration program built into your computer’s BIOS (Basic Input/Output System).
It runs and maintains a variety of hardware functions. It is a menu-driven software, which allows you to easily
configure and change the settings.
The BIOS contains manufacture’s default settings for the computer’s standard operations. However, there are
occasions when you may be required to modify the default settings in the BIOS.
The BIOS allows you to set up passwords to limit access to users. This is an important feature because a great deal of
vital information is carried within the computer nowadays. Unauthorized access can be prevented. Later in this
chapter, you will learn how to use this security feature.
Entering the BIOS Setup Screen
First turn on the power. When the BIOS performs the POST (Power-On Self Test), press F2 key quickly to activate the
AMI BIOS Setup Utility.
Note: You may need to press F2 key fairly quickly. Once the system begins to load Windows, you may have
to retry by cycle-power on again
Leaving the BIOS Setup Screen
When you have finished modifying the BIOS settings, exit the BIOS. It takes a few seconds to record changes in the
CMOS.
BIOS Action Keys
Function Key Command Description
ESC Exit Leaves a sub-menu to return to the previous menu OR exits the BIOS
setup while saving changes.
Enter Go to Sub Screen Shows the Sub Menu
F1 General Help Shows the Help Screen
F9 Setup Defaults Load default values
F10 Save and Exit Saves changes and reboots the computer.
<Tab> Select a field Selects the next field.
↑
Select an item Selects the next upper item.
↓
Select an item Selects the next lower item.
- Lower value Selects the next value within a field.
+ Higher value Selects the next value within a field.
Modifying the BIOS Settings
The AMI BIOS setup main menu is subdivided into sub-menus.
Each menu item is described in this section.
Page 26

Prestigio Nobile 1440W 25
ENG
Main Setup
Under this menu, you may change time/date and view basic processor and system memory information.
Item Selection / Sub-menu Description
Date N/A Type in the current date, in MM/DD/YY format.
Time N/A Type in the current time, in HH:MM:SS format.
Advanced Setup
IDE Configuration
Item Selection / Sub-menu Description
Primary
IDE
Master
Hard Disk Primary Master is where BIOS tries to boot from first. The primary master
controls the hard drive.
Secondary
IDE
Master
ATAPI CDROM The secondary master controls the ATAPI CD-ROM drive.
TouchPad
Support
Enabled
Disabled
Enable or disable the built-in touchpad.
LCD Auto
DIMM
Function
Enabled
Disabled
[Enable]: The system automatically reduces the LCD brightness when AC power
is removed to save power.
[Disable]: The LCD brightness remains the same whether or not AC power is
present.
Note: The sub-menu is not selectable. Press enter to view information of the storage device.
Security Setup
Boot Settings Configuration
Item Selection / Sub-menu Description
Change Supervisor
Password
N/A Install or Change the Password
Change User Password N/A Install or Change the Password
Using Password Protection
Two Levels of Password Protection are available. The BIOS provides both a Supervisor and a User password. If you try
to activate both passwords, the Supervisor password must be set first.
The passwords activate two different levels of protection:
1. System always asks for password every time it is powered on.
2. System asks for password only when you attempt to enter BIOS utility.
The passwords are encrypted and stored in NVRAM. Make sure you write them down or memorize them. If you lost
the passwords, the computer may need to be sent back to the factory or to an authorized service dealer to reset the
passwords.
Page 27

26 Prestigio Nobile 1440W
ENG
Power Setup
Item Selection / Sub-menu Description
Power Button Mode ON/OFF / Suspend [On/Off]: When the power button is pressed, the system is turned off
[Suspend]: When the power button is pressed, the system enters the
suspend mode.
High Performance
Mode
Enable / Disable When Enabled, maximum processor performance can be achieved.
The battery life is lowered.
Long Battery Life
Mode
Enabled / Disabled When Enabled, maximum battery life can be achieved. The processor
performance is lowered.
Note: In Windows XP, suspend mode and settings are determined by settings in the Power Options
Properties (Start > Control Panel > Power Options).
Boot Setup
Boot Settings Configuration
Item Selection / Sub-menu Description
Quiet Boot
Enabled / Disabled When Enabled, the system will display OEM logo instead of the POST
messages.
When Disabled, the system will display POST messages (i.e. devices
information.)
Boot Device Priority
Item Selection / Sub-menu Description
1st Boot
Device
Set the type of device for the 1st drive BIOS attempts to boot from. If
Network is selected, system will attempt to load boot sector from
the Ethernet port.
2nd Boot
Device
Set the type of device for the 2nd drive BIOS attempts to boot from.
3rd Boot
Device
Removable Dev.
CD/DVD
Hard Drive
Network
Disabled
Set the type of device for the 3rd driveBIOS attempts to boot from.
Note: If you select Network, the system will attempt to boot from the network.
Note: When the BIOS performs POST, you may also press F12 Key to enable the Boot Device selection menu.
You may choose CD/DVD, Hard Drive, or Network as the first storage device to boot from. If you have already
connected a USB Floppy Disk Drive before powering up, it will appear as a Removable Disk in the Boot Device
selection menu
Exit Setup
Item Selection / Sub-menu Description
Saves Changes and Exit N/A After you have completed the BIOS settings, select this item to
save all settings, exit BIOS Setup utility, and reboot. New
system settings will take effect on next power-up. F10 key can
be used for this operation.
Discard Changes and
Exit
N/A Discards changes done so far to any of the setup questions and
exit.
Discard Changes N/A Discards changes done so far to any of the setup questions.
Load Optimal Defaults N/A Load Optimal Default value for all the setup questions. F9 key
can be used for this operation.
Page 28

Prestigio Nobile 1440W 27
ENG
BATTERY POWER & POWER MANAGEMENT
In this chapter, you will learn the fundamentals of power management and how to use it to achieve longer battery
life.
In this chapter, you will learn how to operate your notebook on battery power, how to handle and maintain the
battery pack, and learn about the system’s power saving features.
TFT display, central processor, hard disk drive are the major hardware subsystems that consume the most power.
Power management deals how these key components should behave to conserve power. For example, you can have
the system turn off its display after 2 minutes of inactivity to save power. Efficient power management can help you
work longer sessions before having to recharge the battery.
The Battery Pack
Lithium-Ion Battery
Your notebook uses a six-cell Lithium-Ion battery pack that provides power when you don’t have access to an AC
outlet.
Note: It is necessary that you charge the battery pack for at least 6 hours before using it for the first time.
Note: In the Standby Suspend mode, a fully charged battery loses its power in roughly 1/2 day or less. When
not being used, the battery’s power will deplete in 1-2 month.
Battery Low-Power Warning
1. Low Battery Warning
Low battery condition occurs when battery power is reduced to 6%. The red battery status LED indicator blinks and
the system beeps once every 16 seconds or so.
2. Very Low Battery Warning
Very Low battery condition occurs at 3 % power remaining. The red battery status LED indicator blinks and the
system beeps at 4-second interval.
When the notebook warns you of its low battery condition, you will have about 3-5 minutes to save your current
work.
Warning: Do not expose battery packs to temperatures below 0 degree Celsius (32 degree F) or above 60
degree C (140F). This may adversely affect the battery pack.
Note: Press Fn+F3 to turn off the battery warning beep.
Page 29
28 Prestigio Nobile 1440W
ENG
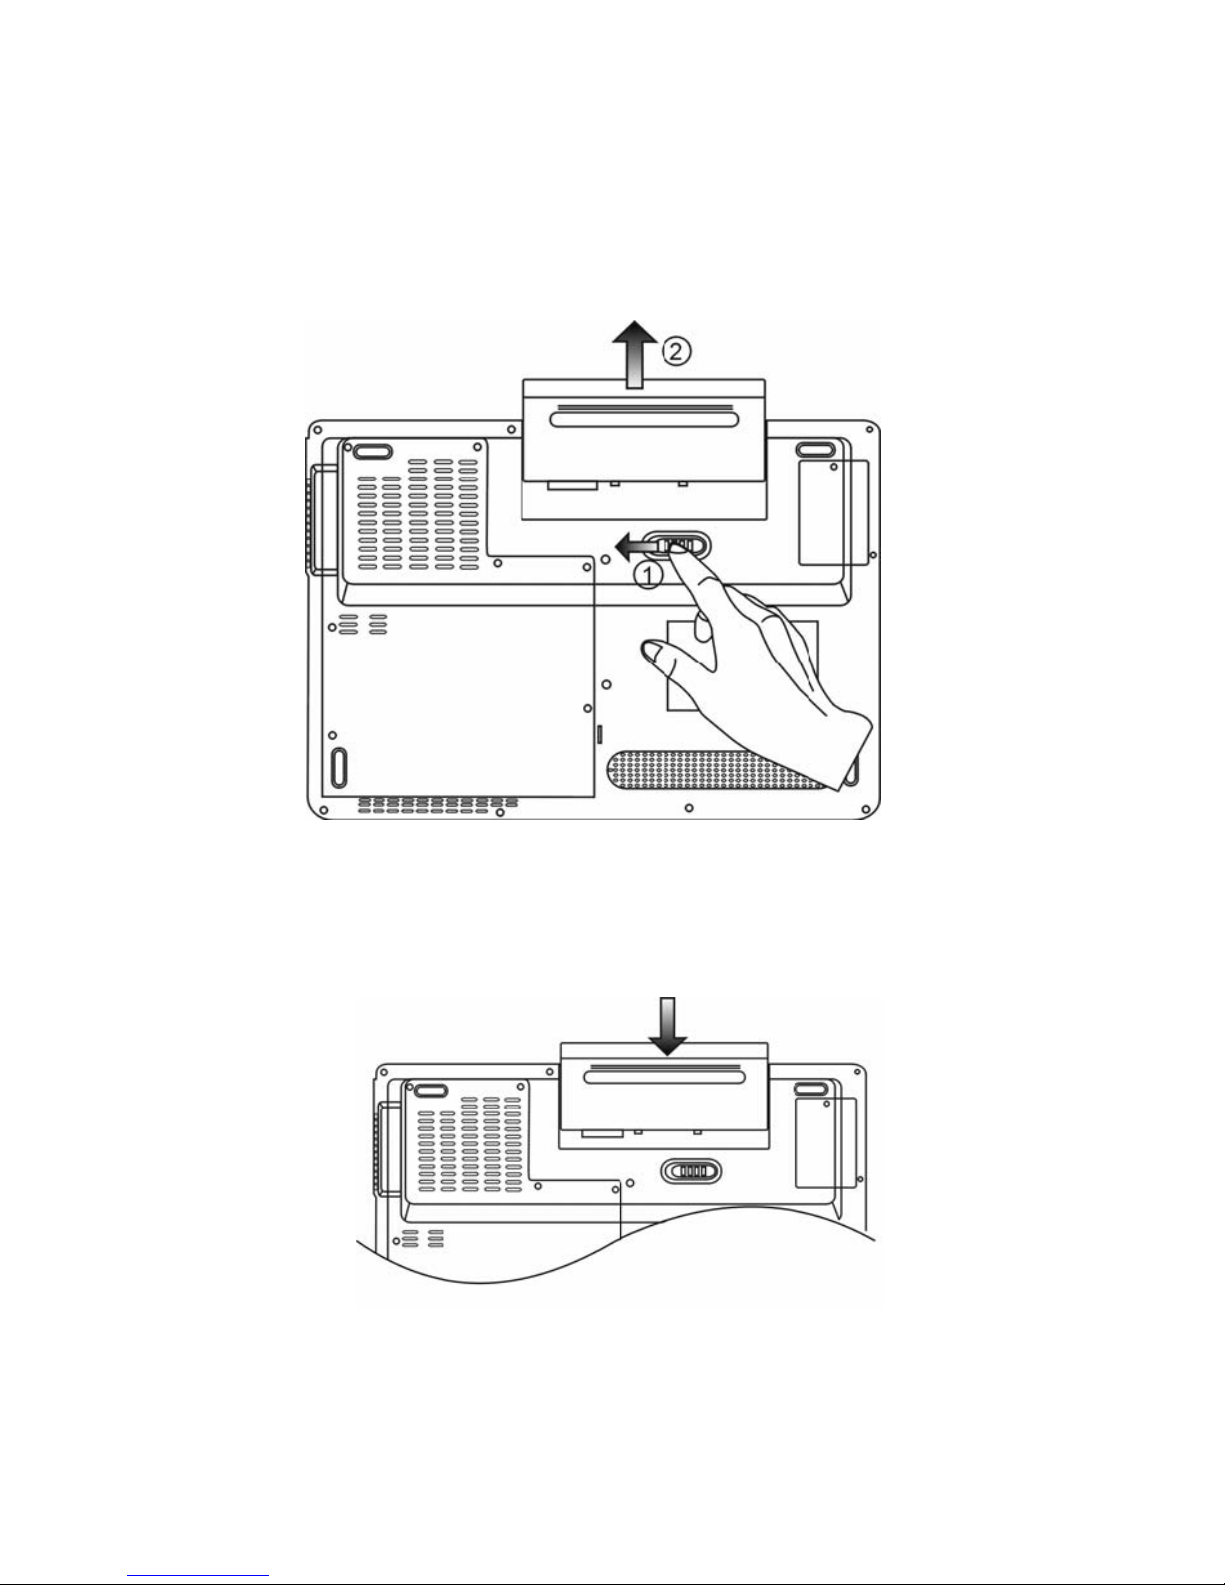
Installing and Removing the Battery Pack
To Remove the Battery Pack:
1. Place the notebook bottom-side up on a flat and secured surface.
2. Push the latch and pull the battery’s hard case away from the notebook.
To Install the Battery Pack:
1. Place the notebook bottom-side up on a flat and secured surface.
2. Carefully insert the battery pack into the battery compartment of the notebook.
Page 30

Prestigio Nobile 1440W 29
ENG
Charging the Battery and Charging Time
To charge the battery, while the battery pack is in the notebook, plug the AC adapter into the notebook and an
electrical outlet.
The charging time is approximately 4-6 hours when the notebook is turned off and approximately 6-10 hours when
the notebook is turned on.
When the battery is fully charged, the battery charge indicator becomes green.
Note: If system runs at heavy loading or in a high temperature environment, the battery may not be fully
charged. You need to continue to charge it with the AC adapter plugged in until the charging LED turns
green.
Checking the Battery Level
You can check the remaining battery power in the Windows battery status indicator, which is located at the lower
right-hand corner of the task bar. (If you do not see a battery or AC-in icon on the task tray, go to Power Options
Properties box and click on the Advanced tab. Check off ``Always show icon on the task bar``.)
Alternatively, you can access the power meter by clicking the Power Options icon in the Windows Control Panel.
Prolonging the Battery’s Life and Usage Cycles
There are ways you can do to prolong the use of battery.
Use the AC adapter wherever AC wall outlet is available. This will ensure uninterrupted computing.
Purchase additional battery pack.
Store the battery pack in room temperature. Higher temperature tends to deplete the battery’s power faster.
Make good use of the power management function. Save To Disk (Hibernate) saves the most energy by storing
current system contents in a hard disk space reserved for this function.
The life expectancy of the battery is approximately 300 recharges.
See the notices section in the beginning of the user manual on how to care for the battery pack.
Note: Read Section Protecting Your Notebook in the beginning of this manual for tips about how to
maintain the battery pack.
Note: To achieve optimal battery performance, you may need to do a battery calibration at a 3-month
interval. To do this:
1. Fully charge the battery.
2. Then discharge the battery by entering the BIOS setup screen. (Press F2 key as soon as you turn on the
computer. And let it remain at the setup screen until the battery runs out.
3. Fully charge the battery again.
Using Windows Power Options
Windows Power Management provides basic power saving features. In the Windows Power Options Properties [Start
> Settings > Control Panel > Power Options] dialogue box, you may enter time-out values for display and hard disk
drive. Windows power manager saves power by turning off hard drive after 1 minute of inactivity, for example.
Page 31

30 Prestigio Nobile 1440W
ENG
Windows’ Power Schemes
The power management control panel in Windows XP, known as Power Schemes, is designed to provide the user
with an easy-to-use interface. The Power Schemes tab can be found in the Power Options Properties panel that is
accessible via the control panel window.
Schemes are easy to understand, based on notebook usage scenarios, and control not only processor power usage
but other system peripherals as well.
Go to [Start > Settings > Control Panel] and double-click the Power Options icon.
Always on mode puts the processor into maximum performance mode, which provides no power saving. The other
schemes control processor performance based on demand. For example, Max Battery mode lowers the processor’s
speed and voltage to conserve power as much as possible.
In this dialog box, you can manually set the LCD and hard drive’s time-out values in the Plugged in column and in the
Running on batteries column. Lower time-out values will save more battery power.
Note: Also consult Windows user guide for more information on how to use Windows power management
functions.
Note: Actual dialogue box shown above may appear slightly different.
Suspend Mode
Standby Suspend
The system automatically enters this mode after a period of inactivity, which is set in the Power Schemes dialog box.
In Standby mode, hardware devices, such as display panel and hard disk, are turned off to conserve energy.
Page 32

Prestigio Nobile 1440W 31
ENG
Hibernate Suspend
In this mode, all system data are saved in the hard disk before powering down. When this mode is activated, all
system state and contents are saved to the hard disk drive after a period of inactivity defined by the user. No power
or very little power is drawn from the battery module under this mode.
However, depending on how much RAM that have been installed on your computer, the amount of time the system
requires to restore all its previous contents can range from 5 to 20 seconds.
For Windows XP users, hibernation is handled by the operating system; therefore, no special disk partition or disk file
is necessary.
If you wish to activate Hibernate mode, you need enable Hibernate Support in the Hibernate tab of the Power
Options menu.
Note: Do not install or remove the memory module when the system is in the suspend mode.
Note: Actual dialogue box shown above may appear slightly different.
Page 33

32 Prestigio Nobile 1440W
ENG
Power Button Action
The notebook PC’s power button can be set to turn off the system or activate the suspend mode.
Go to [Start > Settings > Control Panel > Power Options] and click on the Advanced tab. In the pull-down menu,
select how you wish the power button to work as.
Note: Actual dialogue box shown above may appear slightly different.
Warning: In the When I close the lid of my portable computer pull-down menu, DO NOT select Do nothing –
otherwise the system will still run at high speed while the processor’s fan grill is fully blocked by the closed
LCD panel. The heat will damage the LCD panel.
Page 34

Prestigio Nobile 1440W 33
ENG
Low Battery Warning
You can define when and how the system warns you of its battery-low condition.
Go to the Alarms tab in the Power Options Properties box. If you wish to hear audible beeps, click on the Alarm Action
button and put a check on Sound Alarm.
Note: Consult Windows user guide for more information on how to use Windows power management
functions.
Note: Actual dialogue box shown above may appear slightly different.
Power Menu Quick Access
Instead of making specific selections in the Power Options Properties box, you can quickly and easily specify which
pre-set power saving function you desire by clicking on the Battery icon at the lower right-hand corner of the task
bar. (If you do not see a battery or AC-in icon, go to Power Options Properties box and click on the Advanced tab.
Check off ``Always show icon on the task bar``). Select Max Battery if you want the system to enter suspend mode
more often. Or, select Always On if your notebook PC is plugged into an AC power source.
Note:
Actual dialogue box shown above may appear slightly different.
Page 35

34 Prestigio Nobile 1440W
ENG
UPGRADING YOUR COMPUTER
In this chapter, you will learn how to upgrade the DRAM, hard disk drive, and to install the optional wireless LAN
mini-Card and DVB-T Module.
Warning: We strongly recommend that you return the notebook to the dealer or the shop for the hardware
upgrade.
Before you perform the hardware upgrade, please turn off the system, unplug the AC adapter, remove the
battery pack and also disconnect the LAN and Modem cables first for your safety.
When the hardware upgrade is completed, please be sure to fasten all the screws before turning on the
notebook.
Upgrading the Hard Disk Drive
Replacing the original drive with one of larger capacity can increase the hard drive capacity of your computer. The
computer uses a 9.5 mm (height), 2.5-inch Serial ATA type hard disk.
Be sure to make a backup copy of all your data before attempting this operation.
Warning: Hard drive upgrade is a delicate process. Please observe the following instructions carefully or
have a qualified technician install it for you. Damages due to mishandling of this procedure are NOT covered
by the manufacture’s warranty.
Warning: Apply care when handling the hard disk.
Do not drop or apply any shock.
Do not press on the cover.
Do not touch the connector with your fingertips.
Mishandling of the hard drive can result in permanent loss of data. Make a backup copy of the drive s
content before you remove it.
Note: Certain models that come with the IBM-brand hard drive emit a clattering sound when it is being
rattled. This is a normal condition.
Page 36

Prestigio Nobile 1440W 35
ENG
Upgrading the Hard Disk Drive
To replace the hard disk drive, do the following:
1. Turn OFF the computer. Unhook the AC cord and all cables/devices attached to the notebook. Remove the battery.
2. Place your hand on a large metal object momentarily to discharge any static electricity.
3. Locate and remove 7 Screw A’s.
4. Remove the System Device Cover.
5. Locate and remove 1 Screw B.
Page 37

36 Prestigio Nobile 1440W
ENG
6. Push the HDD module to the right and separate it from the connector. Lift the module away from the bay.
7. Locate and remove 4 Screw C’s from the HDD module. Remove the metal case.
Page 38

Prestigio Nobile 1440W 37
ENG
8. Re-attach the metal cover to the new hard drive and tighten 4 Screw C’s.
9. Re-attach the HDD module to the HDD connector. And re-attach Screw B.
10. Put the System Device Cover back and re-attach 7 Screw A’s.
Congratulations! You have now completed the hard drive upgrade. When you boot up the PC, you may need to
create a primary HDD partition and reformat the new drive and re-install O/S, drivers, and all the necessary
applications.
Page 39

38 Prestigio Nobile 1440W
ENG
Upgrading the System Memory
Many applications will generally run faster when the computer’s dynamic memory capacity is increased. The
computer provides two DDR2 memory sockets. There is one located underneath the System Device Cover and
another one located underneath the keyboard. You can increase the amount of memory by replacing the existing
one with a dual inline memory module (commonly known as SO-DIMM) of a higher capacity. The SO-DIMM can be
256MB, 512MB, or 1024MB in capacity. The SO-DIMM is of type DDR2 SDRAM, has 200 pins and runs on 1.8V.
Warning: Memory upgrade is a delicate process. Please observe the following instructions carefully or have
a qualified technician install it for you. Damages due to mishandling of this procedure are NOT covered by
the manufacture’s warranty.
Warning: Changing memory while your computer is in suspend or power-saving mode may cause
permanent damage to the hardware. Make sure you turn off the power and unplug the AC cord before
proceeding with a memory upgrade.
Warning: You should only use the DIMM module that is approved by the reseller or the manufacturer;
otherwise the system may become unstable.
Installing a memory module (DIMM) into the system
To install the DIMM under the System Device Cover, do the following:
1. Power OFF the notebook. Unplug the AC cord and all cables/devices attached to the notebook. Remove the
battery.
2. Place your hand on a large metal object momentarily to discharge any static electricity. Place the notebook on a
flat surface and fully close the LCD lid.
3. Locate and remove 7 Screw A’s on the System Device Cover.
4. Remove the System Device Cover. The DIMM socket is now seen as shown below.
Page 40

Prestigio Nobile 1440W 39
ENG
5. If you need to remove an old DIMM from the socket, press out on the latches located on both edges of the socket at
the same time. The DIMM should pop up to an angle of 30 degree (see diagram below). Pull the DIMM module out of
the memory socket. Store away the DIMM for the future use.
6. Install the new DIMM module into the memory socket. The DIMM will only fit in one orientation. Insert the DIMM
at an angle of approximately 30 degrees into the empty memory socket. Then press it firmly so that the contact edge
is driven into the receiving socket.
7. Pivot the DIMM until the latches on both sides of the socket snap into place.
Note: Notice the notch on the DIMM. The notches should fit nicely with the socket.
Page 41

40 Prestigio Nobile 1440W
ENG
8. Put the System Device Cover back and tighten 7 Screw A’s.
To install the DIMM under the keyboard, do the following:
1. Remove Screw D.
2. Find the keyboard latches near the edges of the keyboard. The latch is spring-loaded. It will retract when pressed
and revert back to its original position when released. Use a small blade to press the latch inward. The keyboard tray
should pop up slightly over the latch. If the keyboard tray does not pop up, try to gently lift it up slightly above the
latch. Repeat this step for the other keyboard latches.
Page 42

Prestigio Nobile 1440W 41
ENG
3. Carefully lift up the top edge and position the keyboard out of the way and the following is revealed.
Page 43

42 Prestigio Nobile 1440W
ENG
4. Carefully remove the Metal Cover and the DDR Socket is shown. See the illustration below.
5. If you need to remove an old DIMM from the socket, press out on the latches located on both edges of the socket at
the same time. The DIMM should pop up to an angle of 30 degree (see diagram below). Pull the DIMM module out of
the memory socket. Store away the DIMM for the future use.
6. Install the new DIMM module into the memory socket. The DIMM will only fit in one orientation. Insert the DIMM
at an angle of approximately 30 degrees into the empty memory socket. Then press it firmly so that the contact edge
is driven into the receiving socket.
7. Pivot the DIMM until the latches on both sides of the socket snap into place.
Note: Notice the notch on the DIMM. The notches should fit nicely with the socket.
Page 44

Prestigio Nobile 1440W 43
ENG
8. Put the Metal Cover back. Put the keyboard back to its original position. Make sure the edge of the keyboard now
resides under the spring-loaded latches.
9. Re-attached Screw D.
Congratulations! You have just completed the memory upgrade. When you boot up the computer, you should expect
to see an increase in DRAM capacity.
Note: Your computer has been tested with a wide range of DIMM on the market. However, not all memory
modules are compatible. Check with your system vendor for a list of compatible DIMM for your computer.
Adding a Mini-Card Wireless LAN Card (Optional Device)
Your computer comes with a unique Mini-Card socket, which is located underneath the System Device Cover. The
socket allows the computer to add unique features such as wireless LAN (IEEE802.11x). Ask your dealer on the
availability of the mini-card.
Warning: Installing a mini-card is a delicate process. Please observe the following instructions carefully or
have a qualified technician install it for you. Damages due to mishandling of this procedure are NOT covered
by the manufacture’s warranty.
Warning: Installing the mini-card while your computer is in suspend or power-saving mode may cause
Page 45

44 Prestigio Nobile 1440W
ENG
permanent damage to the hardware. Make sure you turn off the power and unplug the AC cord before
proceeding with a card upgrade.
Installing a Mini-Card into the System
To install a new Mini-card, do the following:
1. Follow steps in the previous section, Installing a memory module (DIMM) into the system, to access the Mini-card
Socket underneath the System Device Cover.
.
2. The mini-card will only fit in one direction. Align the small notch in the module with the socket on the connector
and insert the card at an angle of approximately 30 degrees into the empty socket. Then press it firmly so that the
contact edge is driven into the receiving socket. Pivot the mini-card and fasten 2 Screw-F’s to hold the card down.
Note: If you want to remove a mini-card from the socket, remove 2 Screw-F's. The card should pop up to an
angle of 30 degree.
3. Locate 2 antenna cables with connectors. Snap the cable onto the golden connector on the Wireless mini-card.
(Note: The connector is fairly small! This may take some maneuvering. You may want to connect the antenna cable
before inserting the wireless card into the socket).
Page 46

Prestigio Nobile 1440W 45
ENG
4. Put the System Device Cover back and tighten 7 Screw A’s.
Congratulations! You have now completed the mini-card installation. During the next time the system boots to
Windows, the system will prompt for driver location. Insert the Factory CD-ROM and point to the directory where the
Wireless LAN driver can be found. In addition to installing the driver, you may also need to run a Setup.exe program
to install the card’s utility applications before it is fully operational.
Adding the DVB-T Module (Optional Device)
This section explains how to install the optional DVB-T Module to your computer.
Warning: Installing the DVB-T Module is a delicate process. Please observe the following instructions
carefully or have a qualified technician install it for you. Damages due to mishandling of this procedure are
NOT covered by the manufacture’s warranty.
Warning: Installing the DVB-T Module while your computer is in suspend or power-saving mode may cause
permanent damage to the hardware. Make sure you turn off the power and unplug the AC cord before
proceeding with the upgrade.
Installing the DVB-T Module into the System
To install a new DVB-T Module, do the following:
1. Power OFF the notebook. Unplug the AC cord and all cables/devices attached to the notebook. Remove the
battery.
2. Place your hand on a large metal object momentarily to discharge any static electricity. Place the notebook on a
flat surface and fully close the LCD lid.
3. Remove Screw G and remove the DVB-T Device Cover.
4. The DVB-T Module will only fit in one direction. Align the small notch in the module with the socket on the
connector and insert the card at an angle of approximately 30 degrees into the empty socket. Then press it firmly so
that the contact edge is driven into the receiving socket. Pivot the mini-card and fasten 2 Screw-H’s to hold the card
down.
Note: If you want to remove the DVB-T Module from the socket, remove 2 Screw-H’s. The card should pop
up to an angle of 30 degree.
5. Locate the antenna cable with connector. Snap the cable onto the golden connector on the DVB-T Module. (Note:
The connector is fairly small! This may take some maneuvering. You may want to connect the antenna cables before
inserting the card into the socket.)
Page 47

46 Prestigio Nobile 1440W
ENG
6. Replace the DVB-T Device Cover and re-attach Screw G.
7. Connect the Antenna to DVB-T Antenna Connector on the left side of the computer.
Note: You also need to install the NewSoft Presto!PVR application from the CD to watch and record TV
programs.
Page 48

Prestigio Nobile 1440W 47
ENG
TROUBLE SHOOTING
In this chapter, you will learn how to solve common hardware and software problems.
Your computer has been fully tested and complies with the system specifications before shipping. However, incorrect
operations and/or mishandling may cause problems.
This chapter provides a reference for identifying and correcting common hardware and software problems that you
may encounter.
When you encounter a problem, you should first try to go through the recommendations in this chapter. Instead of
returning the computer and waiting for repair, you may easily solve the problems by considering the following
scenarios and possible solutions. If the error continues, contact your reseller for service information.
Before taking further actions, consider the following suggestions:
Check to see if the problem persists when all the external devices are removed.
Check to see that the green light indicator on the AC adapter is lit.
Check to see the power cord is properly plugged to the wall outlet and to the computer.
Check to see the power indicator of the computer is on.
Check to see if your keyboard is operational by pressing and holding any key.
Check for any incorrect or loose cable connections. Make sure the latches on the connectors latch securely on to
the receptor end.
Be sure you have not performed an incorrect setting on the hardware devices in the BIOS Setup utility. A faulty
setting may cause the system to misbehave. If you are not sure of the changes you made, try to restore all the
settings to factory defaults.
Be sure all the device drivers are installed properly. For example, without the audio driver properly installed, the
speakers and microphone will not work.
If external devices such as USB camera, scanner, printer do not function correctly when connected to the system,
it is usually the device’s own problem. Consult the device’s manufacturer first.
Some software programs, which have not gone through rigorous coding and testing, may cause problems
during your routine use. Consult the software vendor for problem solving.
Legacy peripheral are not plug-and-play capable. You need to restart the system with these devices powered up
and connected first.
Be sure to go to BIOS SETUP and load DEFAULT SETTING after BIOS re-flash.
Be sure the Quick Key Lockout Switch on the bottom of the computer is not engaged; otherwise the quick keys
will not work.
Audio Problems
No speaker output -
Software volume control is turned down in Microsoft Sound System or is muted. Double-click the speaker icon
on the lower right corner of the taskbar to see if the speaker has been muted or turned down all the way.
Most audio problems are software-related. If your computer worked before, chances are software may have
been set incorrectly.
Go to [Start > Settings > Control Panel] and double-click the Sounds and Audio Devices icon. In the Audio page,
make sure that Realtek HD Audio is the default playback device.
Sound cannot be recorded -
You will need to plug-in an external microphone to the microphone connector to record sound.
Double-click the speaker icon on the lower right corner of the taskbar to see if the microphone has been muted.
Page 49

48 Prestigio Nobile 1440W
ENG
1. Click Options and select Properties.
2. Select Recording and click the OK button.
3. After Click OK button, the recording volume control panel will appear.
Go to [Start > Settings > Control Panel] and double-click the Multimedia icon (or Sounds and Audio Devices
icon). In the Volume or Audio page, make sure that Realtek HD Audio is the default recording device.
Hard Disk Problems
The hard disk drive does not work or is not recognizable -
If you had just performed a hard disk upgrade, make sure the hard drive connector is not loose and the hard disk
drive is also correctly seated. Remove it and reinsert it firmly, and restart your PC.
The new HDD may need to be partitioned and reformatted. O/S and drivers will need to be re-installed as well.
Check the hard disk indicator LED. When you access a file, the LED lamp should light up momentarily.
The new HDD may be defective or is not compatible.
If your computer has been subjected to static electricity or physical shock, you may have damaged the disk
drive.
The hard drive is making abnormal whining noises -
You should back up your files as soon as possible.
Make sure the source of noise is indeed from the hard drive and not the fan or other devices.
The hard disk drive has reached its capacity -
Run Disk Cleanup utility in Windows. [Start > All Programs > Accessories > System Tools > Disk Cleanup] The
system will prompt you for what to do.
Archive files or programs that you had no longer used by moving them to an alternative storage medium
(floppy disk, optical record-able disk, etc.) or uninstall programs that no longer use.
Many browsers store files in the hard drive as a cache to speed up the performance. Check the program’s Online
Help for instructions on decreasing the cache size or on removing temporary Internet files.
Empty the Recycle Bin to create more disk space. When you delete files, Windows saves them to the Recycle Bin.
The hard disk takes longer to read a file -
If you have been using the drive for a period, the files may be fragmented. Go to [Start > Programs >
Accessories > System Tools > Disk Defragmenter] to perform a disk defragmentation. This operation may take a
while.
Interrupt requests or problems with other hardware devices may have occupied the CPU and therefore slows
down the system performance.
The files are corrupted -
Run the Error-checking utility in Windows to check the HDD. Double-click My Computer. Right-click C: and select
Properties. Click Check Now in Error-checking in Tools.
Optical Drive Problems
The optical drive does not work -
Try rebooting the system.
The disk is damaged or files are not readable.
After you have inserted a CD-ROM disk, it may take a moment before you can access its content.
The drive dose not read any disks -
The CD may not be properly seated in the tray. Make sure the disk is firmly seated onto the spindle.
Page 50

Prestigio Nobile 1440W 49
ENG
The disk is damaged or not readable.
The disk cannot be ejected -
Normally, it takes a few seconds to eject the disk.
If the disk cannot be ejected, it may be mechanically jammed. Straighten out a paper clip and insert it to a tiny
hole next to the eject button. This should reject the disk tray. If not, return the unit for repair. Do not forcefully
pull on the disk tray.
The Combo or DVD Dual or Supermulti drive (optional device) cannot record -
You need to purchase and install a burner utility program to record files to a blank media.
Display Problems
The display panel is blank when the system is turned on -
Make sure the computer is not in the Standby or Hibernate suspend modes. The display is turned off to conserve
energy in these modes.
The screen is difficult to read -
The display resolution should at least be set to at least1024x768 for optimal viewing.
1. Go to [Start > Settings > Control Panel] and double-click the Display icon.
2. Under the Settings page, set screen resolution to at least 1024x768 and choose at least 256 colors.
The screen flickers -
It is normal if the display flickers a few times during shutting down or powering up.
Keyboard and Mouse Problems
The built-in touch pad performs erratically -
Make sure there is no excess perspiration or humidity on your hand when using the touch pad. Keep the surface
of the touch pad clean and dry.
Do not rest your palm or wrist on the surface of the touch pad while typing or using the touch pad.
The built-in keyboard accepts no input -
If you are connecting an external keyboard to the system, the built-in keyboard may not work.
Try restarting the system.
The characters on the screen repeat while I type.
You may be holding the keys down too long while you’re typing.
Keep the keyboard clean. Dust and dirt under the keys could cause them to stick.
Configure the keyboard to wait longer before the auto repeat feature starts. To adjust this feature, Go to [Start
> Settings > Control Panel], and double-click the Keyboard icon. A dialogue box shows up with the adjustable
settings for the keyboard.
CMOS Battery Problem
A message “CMOS Checksum Failure” displays during the booting process or the time (clock) resets when booting -
Try to reboot the system.
If the message “CMOS Checksum Failure” appears during the booting procedure even after rebooting, it may
indicate failure of the CMOS battery. If so, you need to replace the battery. This battery normally lasts two to five
years. The battery is of type CR2032 (3V). You may replace it by yourself. The battery is located under the
System Device Cover on the bottom of the notebook.
Page 51

50 Prestigio Nobile 1440W
ENG
Memory Problems
The POST does not show an increased memory capacity when you have already installed additional memory -
Certain brands of memory module may not be compatible with your system. You should ask your vendor for a
list of compatible DIMM.
The memory module may not be installed properly.
The memory module may be defective.
The O/S issues an insufficient memory error message during operation -
This is often a software or Windows-related problem. A program is draining the memory resources.
Close the application programs you’re not using and restart the system.
You need to install additional memory module.
Modem Problems
The built-in modem does not respond -
Make sure the modem driver is loaded properly.
Go to [Start > Settings > Control Panel > Phone and Modem Options] and go to Modems tab. Make sure
Motorola SM56 Data Fax Modem is listed. Otherwise, click the Add button to add the modem drive, which is
located in the factory CD-ROM (or floppy diskette).
Go to [Start > Settings > Control Panel > System] and click Device Manager button in the Hardware page to
check for possible resource or driver conflict. See Windows on-line help or manual for how to handle such
problems.
Make sure the phone line, which the computer is connected to, is working.
Connection difficulties -
Be sure to disable Call Waiting on the phone line.
Be sure to have the correct country setting where your computer is used. Go to [Start > Settings > Control Panel
> Phone and Modem Options]. Go to Dialing Rules and Edit My Location. In the Country/Region pull-down menu,
select the appropriate country setting.
Excessive line noise might cause the connection to be dropped. To check this, put the regular phone handset on
the line and placing a phone call. If you do hear abnormal noise, try to make the modem connection with a
different line or contact your local telephony company for service.
Make sure the cable connection is firm.
Try a different receiver number and see if the problem persists.
Network Adapter / Ethernet Problems
The Ethernet adapter does not work -
Go to [Start > Settings > Control Panel > System > Hardware > Device Manager]. Double-click on Network
Adapters and check if Generic Marvell Yukon Chipset based Gigabit Ethernet Controller appears as one of the
adapters. If it does not exist, Windows has not detected the Generic Marvell Yukon Chipset based Gigabit
Ethernet Controller or the device driver has not been installed properly. If there is a yellow mark or red-cross on
the network adapter, it may be a device or resource conflict. Replace or update the device driver from the
factory CD-ROM disk or consult Windows manual on how to solve the resource conflict problem.
Make sure the physical connections on both ends of the cable are good.
The hub or concentrator may not be working properly. Check to see if other workstations connected to the same
hub or concentrator is working.
The Ethernet adapter does not appear to operate in the 1000Mbps transmission mode -
Make sure the hub you are using supports 1000Mbps operation.
Make sure that your RJ-45 cable meets the 1000Base-TX requirements.
Page 52

Prestigio Nobile 1440W 51
ENG
Make sure the Ethernet cable is connected to the hub socket that supports 1000Base-TX mode. The hub may
have both 100Base-TX and 1000Base-T sockets.
Performance Problems
The computer becomes hot -
In a 35
o
C environment, the certain areas of the computer’s back case are expected to reach 50 degrees.
Make sure the air vents are not blocked.
If the fan does not seem to be working at high temperature (50 degrees Celsius and up), contact the service
center.
Certain programs that are processor-intensive may increase the computer temperature to a degree where the
computer automatically slows down its CPU clock to protect itself from thermal damage.
The program appears stopped or runs very slowly -
Press CTRL+ALT+DEL to see if an application is still responding.
Restart the computer.
This may be normal for Windows when it is processing other CPU-intensive programs in the background or
when the system is accessing slow-speed devices such the floppy disk drive.
You may be running too many applications. Try to close some applications or increase system memory for
higher performance.
The processor may have been overheated due to the system’s inability to regulate its internal heat. Make sure
the computer’s ventilation grills are not blocked.
Firewire (IEEE1394) and USB2.0 Problems
The USB device does not work -
Windows NT 4.0 does not support USB protocols
Check the settings in the Windows Control Panel.
Make sure you have installed the necessary device drivers.
Contact the device vendor for additional support.
The IEEE1394 port does not work -
Go to [Start > Settings > Control Panel > System > Hardware > Device Manager]. You should see an entry
which reads “OHCI Compliant IEEE 1394 Host Controllers”. If it does not exist, Windows has not detected the
host controller or the device driver has not been installed properly. If there is a yellow mark or red-cross on the
1394 host controller, it may be a device or resource conflict. Replace or update the device driver from the factory
CD-ROM disk or consult Windows manual on how to solve the resource conflict problem.
Make sure the cable is fully connected.
Make sure you have installed the necessary device drivers.
Contact the device vendor for additional support.
Page 53

52 Prestigio Nobile 1522E
ENG
PRODUCT SPECIFICATION
Processor and Core Logic
Processor
Mobile Intel Pentium M Duo Dual-Core Processor
(Yonah), up to 2.16GHz, 2 MB L2 cache or
Mobile Intel Pentium M Solo Single-Core
Processor (Yonah), up to 1.66GHz, 2MB L2 cache
Core Logic
Intel Calistoga 945GM + ICH7-M chipset with
audio, modem, and USB2.0 controllers integrated
667MHz Front Side Bus
533 / 667MHz DDR2 interface
System Memory
Memory Type
DDR2 SDRAM 533 / 667MHz
Default
256 / 512 / 1024MB
Memory Expansion
Two 200-pin DIMM sockets, Max 2 GB
Display
LCD Panel
14.1-inch Wide-Viewing-Angle WXGA TFT LCD
Graphic Accelerator
Intel Integrated GMA950 Graphic Engine
Motion Playback
Hardware Motion Compensation and IDCT
Supported for MPEG1/2 Playback
Other Features
DirectX compatible
Audio
Chipset
Intel ICH7 integrated audio controller
Audio Codec
Realtek Audio Codec
Sound Capabilities
DirectSound 3D, EAX 1.0 & 2.0 compatible
A3D, I3DL2 compatible
AC97 V2.3 compatible
Azalia compatible
2 Stereo Speakers
Modem (Optional)
Chipset
Intel ICH7 integrated Modem Controller with MDC
card, support 56K MDC Modem Card with Azalia
standard
Transmission Rate
V.92 / V.90 / K56flex for download data speed up to
56Kbps.
V.34, V.17, V.29 protocol supported
Wireless LAN
Module
Intel PRO/Wireless 3945ABG Card
Transmission Protocol
Mini-Card Interface IEEE802.11 B&G
LAN / Ethernet
Chipset
Marvell Ethernet function for 10/100/1000Base-TX
network standards
PnP Function
Windows XP Plug and Play compatible
Flow Control
Automatic Jam and auto-negotiation for flow
control
Speed Selection
Auto Negotiation and Parallel detection for
automatic speed selection (IEEE 802.3u)
Other Features
High performance 32-bit PCI bus master
architecture with integrated DMA controller for low
CPU and bus utilization
Remote Wake-up Scheme supported
Hot Insertion supported
Firewire IEEE1394(a)
Chipset
O2 Micro OZ128 IEEE1394 OHCI Host Controller
Capabilities
Up to 400 Mbps
Expandable up to 63 devices in chains
Storage
Hard Drive
S-ATA 2.5-inch format hard disk drive
Combo Drive
5.25-inch format (12.7mm height) fixed module
(Optional Purchase)
DVD-Dual or DVD-Multi Standards
5.25-inch format (12.7mm height) fixed module
Page 54

Prestigio Nobile 1522E 53
ENG
(Optional Purchase)
Keyboard & Touch pad
Keyboard
86/87-key QWERTY keyboard with numeric
keypad and Windows keys, 19.05mm Pitch
Touch pad
Built-in Touch Pad
ExpressCard (NewCard) &
Multiple Card Reader
Chipset
O2 Micro OZ128 (Card Reader)
Express Card / New Card
Single Slot, 34mm type I supported
4-in-1 Card Reader Format Support
Multimedia Card (MMC), Secure Digital Card (SD),
Memory Stick (MS), and MS Pro Card
Ports and Connectors
Mic-In/Audio- in Port
One Microphone-in / Line-in jack
Audio-Out / SPDIF
One Headphone / SPDIF-out jack
Firewire
One Firewire (IEEE1394) host connector
USB2.0 Port
Three USB2.0-compliant connectors
Ethernet
One standard network Ethernet connector
(RJ-45)
Modem
One modem / phone connector (RJ11)
S-Video
One S-video (TV-out) output connector
DVB-T Connector (option)
One DVB-T Antenna connector (Optional)
Power-In
One DC-in connector
VGA Port
One 15-pin VGA connector
Card Reader
One 4-in-1 Card Reader slot
NewCard Slot
One NewCard Slot (type I)
Battery Pack / AC Adapter
Primary Battery Pack
Li-ion 6-Cell pack, 10.8V / 11.1 V x 4000 mAH or
Li-ion 6-Cell pack, 10.8V / 11.1V x 4400 mAH
Feature
Low battery state with low battery warning beep
Uniwill SmartPower Power Management
Long Battery Life Mode and Silent Mode
Low battery warning beep
Adapter AC-Input / DC-Output
Autosensing AC-in 100~240V, DC-out 20V, 65W
BIOS
PnP Function
AMI PnP BIOS
Self Test
Power On Self Test
Auto Detection
DRAM auto-detection, auto-sizing
L2 Cache auto-detection
Hard disk type auto-detection
Power Management
APM 1.2 (Advanced Power Management) &
ACPI 2.0 (Advanced Configuration Power Interface)
Security
Two Level Password Protections
Other Features
32bit access, Ultra DMA, PIO5 Mode support
Multi-boot capability
Operating System
Compatible with Microsoft Windows XP Home
Edition / Professional SP2
Physical Specification
Dimension
332 (W) x 232 (D) x 23,5~33,8 (H) mm
Weight
2.4KG / 5.28lbs (with 14.1” LCD, DVD-ROM Drive
and 6-cell battery pack)
Environmental Limits
Operating Temperature: 5 to 35oC (41 to 95oF)
Operating Humidity: 20 to 80 percent RH (5 to 35oC)
Storage Temperature: -15 to 50oC (-5 to 122oF)
Page 55

54 Prestigio Nobile 1440W
ENG
AGENCY REGULATORY NOTICES
Federal Communications Commission Notice
This equipment has been tested and found to comply with the limits for a Class B digital device, pursuant to Part 15
of the FCC Rules. These limits are designed to provide reasonable protection against harmful interference in a
residential installation. This equipment generates, uses, and can radiate radio frequency energy and, if not installed
and used in accordance with the instructions, may cause harmful interference to radio communications. However,
there is no guarantee that interference will not occur in a particular installation. If this equipment does cause
harmful interference to radio or television reception, which can be determined by turning the equipment off and on,
the user is encouraged to try to correct the interference by one or more of the following measures:
Reorient or relocate the receiving antenna.
Increase the separation between the equipment and the receiver.
Connect the equipment into an outlet on a circuit different from that to which the receiver is connected.
Consult the dealer or an experienced radio or television technician for help.
Modifications
The FCC requires the user to be notified that any changes or modifications made to this device that are not expressly
approved by the Manufacture may void the user’s authority to operate the equipment.
Connections to Peripheral Devices
Connections to this device must be made with shielded cables with metallic RFI/EMI connector hoods to maintain
compliance with FCC Rules and Regulations.
Declaration of Conformity
This device complies with Part 15( CLASS B)/68 the FCC Rules. Operation is subject to the following two conditions: (1)
this device may not cause harmful interference, and (2) this device must accept any interference received, including
interference that may cause undesired operation.
European Notice
Products with the CE Marking comply with both the EMC Directive (89/336/EEC) and the Low Voltage Directive
(73/23/EEC) and R&TTE Directive (1999/5/EC) issued by the Commission of the European Community.
Compliance with these directives implies conformity to the following European Norms:
EN55022 : 1998+A1: 2000+A2: 2003, CLASS B
EN61000-3-2 : 2000
EN61000-3-3 : 1995+A1: 2001
EN55024 : 1998+A1 : 2001+A1: 2003
IEC61000-4-2: 2001
IEC61000-4-3:2002+A1:2002
IEC61000-4-4:1995+A1:2000+A2:2001
IEC61000-4-5:2001
IEC61000-4-6:2001
IEC61000-4-8:2001
IEC61000-4-11:2001
EN50082 (IEC801-2, IEC801-3, IEC801-4) Electro-magnetic Immunity
EN 300 328-2, EN 300 328-1, EN 301 489-1, EN 301 489-17 (ETSI 300 328, ETSI 301 489) Electro-magnetic
Compatibility and Radio Spectrum Matter.
Page 56

Prestigio Nobile 1440W 55
ENG
TBR21 ( ETSI TBR21) Terminal Equipment.
EN60950 (IEC60950) I.T.E. Product Safety
Canadian Notice
This digital apparatus does not exceed the Class B limits for radio noise emissions from digital apparatus as set out in
the radio interference regulations of the Canadian Department of Communications.
Le present appareil numerique nemet pas de bruits radioelectriques depassant les limites applicables aux appareils
numeriques de Classe B prescrites dans le reglement sur le brouillage radioelectrique edicte par le Ministere des
Communications du Canada.
REN (Ringer Equivalent Numbers) Statement
''NOTICE: The Ringer Equivalence Number (REN) assigned to each terminal device provides an indication
of the maximum number of terminals allowed to be connected to a telephone interface. The termination on
an interface may consist of any combination of devices subject only to the requirement that the sum of the
Ringer Equivalence Numbers of all the devices does not exceed 5.''
IC ID: 3409A-M30EI0
Attachment Limitations Statement
''Notice: This equipment meets telecommunications network protective, operational and safety
requirements as prescribed in the appropriate Terminal Equipment Technical Requirements document(s).
This is confirmed by marking the equipment with the Industry Canada certification number. The
Department does not guarantee the equipment will operate to the user's satisfaction.
Before installing this equipment, users should ensure that it is permissible to be connected to the facilities of the
local telecommunications company. The equipment must also be installed using an acceptable method of connection.
The customer should be aware that compliance with the above conditions may not prevent degradation of service in
some situations.
Repairs to certified equipment should be coordinated by a representative designated by the supplier. Any repairs or
alterations made by the user to this equipment, or equipment malfunctions, may give the telecommunications
company cause to request the user to disconnect the equipment.
Users should ensure for their own protection that the electrical ground connections of the power utility, telephone
lines and internal metallic water pipe system, if present, are connected together. This precaution may be particularly
important in rural areas.
Caution: Users should not attempt to make such connections themselves, but should contact the
appropriate electric inspection authority, or electrician, as appropriate.''
Power Cord Requirement
The power cord supplied with the AC adapter should match the plug and voltage requirements for your local area.
Regulatory approval for the AC adapter has been obtained using the power cord for the local area. However, if you
travel to a different area and need to connect to a different outlet or voltage, you should use one of the power cords
listed below. To purchase a power cord (including one for a country not listed below) or a replacement ac adapter,
contact your local dealer.
U.S. and Canada
The cord set must be UL-Listed and CSA-Certified or C-UL Listed.
Page 57

56 Prestigio Nobile 1440W
ENG
The minimum specifications for the flexible cord are (1) No. 18 AWG, (2) Type SJ, and (3) 3-conductor.
The cord set must have a rated current capacity of at least 10 A.
The attachment plug must be an earth-grounding type with a NEMA 5-15P (15A, 125V) or NEMA 6-15P (15 A,
250V) configuration.
Japan
All components of the cord set (cord, connector, and plug) must bear a `PSE` mark and registration number in
accordance with the Japanese Dentori Law.
The minimum specification for the flexible cord are: (1) 0.75 mm
2
conductors, (2) Type VCT or VCTF, and (3)
3-conductor.
The cord set must have minimum rated current capacity of 7 A.
The attachment plug must be a two-pole, grounded type with a Japanese Industrial Standard C8303 (15 A, 125
VAC) configuration.
Other Countries
The cord set fittings must bear the certification mark of the agency responsible for evaluation in a specific
country. Acceptable agencies are:
BSI (UK)
OVE (Australia)
CEBEC (Belgium)
SEMKO (Sweden)
FIMKO (Finland)
DEMKO (Denmark)
NEMKO (Norway)
SETI (Finland)
EANSW (Australia)
SEV (Switzerland)
IMQ (Italy)
UTE (France)
CCC (China)
PSB (Singapore)
PSE (Japan)
BSMI (Taiwan)
B (Polish)
VDE (Germany)
SASO (Saudi Arabia)
The flexible cord must be of a HAR (harmonized) type HO5VV-F 3-conductor cord with a minimum conductor
size of 0.03 square inches.
The minimum specification for the flexible cord for Class II product are: (1) 2X0.75 mm
2
conductors, (2)
2-conductor cord.
The cord set must have a current capacity of at least 10 A and a nominal voltage rating of 125 / 250 VAC.
CAUTION: MODEL X40IIx IS DESIGNED TO USE WITH THE FOLLOWING AC ADAPTER MODEL ONLY
Manufacture: LITE-ON ELECTRONICS, INC.
Model: P PA-1650-02 (65W), PA-1650-01 (65W)
Manufacture: LI SHIN INTERNATIONAL ENTERPRISE CORP.
Model: 0335A2065 (65W), 0335C2065 (65W)
Manufacture: EPSF
Model: 10653-A (65W)
Page 58

Prestigio Nobile 1440W 57
ENG
Telephone lines requirement
The appropriate utilization of 26AWG telephone line cord on unit.
CAUTION: Always disconnect all telephone lines from the wall outlet before servicing or disassembling this
equipment.
CAUTION: To reduce the risk of fire, use only No. 26AWG or larger telecommunication line cord.
Battery Pack Safety
The battery pack is intended to use only with this notebook.
Do not disassemble the pack.
Do not dispose of the battery pack in fire or water.
To avoid risk of fire, burns, or damage to your battery pack, do not allow a metal object to touch the battery
contacts.
Handle a damaged or leaking battery with extreme care. If you come in contact with the electrolyte, wash the
exposed area with soap and water. If it contacts the eye, flush the eye with water for 15 minutes and seek
medical attention.
Do not charge the battery pack if the ambient temperature exceeds 45• (113•).
To obtain a replacement battery, contact your local dealer.
Do not expose the battery pack to high storage temperatures (above 60•, 140•).
When discarding a battery pack, contact your local waste disposal provider regarding local restrictions on the
disposal or recycling of batteries.
Use only supplied AC Adapter for charging.
CAUTION: Danger of explosion if battery is incorrectly replaced. Replace only with same or equivalent type
recommended by the manufacturer. Discard used batteries according to the manufacturer’s instructions or
local laws.
VORSICHT! Explisionsgefahr bei unsachgernazen Austausch der Batterie. Ersatz nur durch denselben oder
einem vom Hersteller empfohlenem ahnlichen Typ. Entsorgung gebrauchter Batterien navh Angaben des
Herstellers.
Laser Safety
The optical drive used with this computer is certified as a Class 1 laser device according to the U.S. Department of
Health and Human Services (DHHS) Radiation Performance Standard and International Standards IEC 825 / IEC 825-1
(EN60825 / EN60825-1). The device is not considered harmful, but the following precautions are recommended:
Do not open the unit.
Avoid direct exposure to the laser beam.
If the unit requires service, contact an authorized service center.
Ensure proper use by reading and following the instructions carefully.
Do not attempt to make any adjustment of the unit.
CLASS 1 LASER PRODUCT
APPAREIL A LASER DE CLASSE 1
LASERSCHUTZKLASSE 1 PRODUKT
Warning!
Do not attempt to disassemble the cabinet containing the laser. The laser beam used in this product is
harmful to the eyes. The use of optical instruments, such as magnifying lenses, with this product increase
the potential hazard to your eyes. For your safety, have this equipment serviced only by an authorized
service provider.
Page 59

58 Prestigio Nobile 1440W
ENG
Lithium battery warning / Bridge battery warning
This computer contains a lithium battery to power the clock and calendar circuitry.
CAUTION: Danger of explosion if battery is replaced incorrectly. Replace only with the same or equivalent
type recommended by the manufacturer. Discard used batteries according to the manufacturer’s
instructions.
ATTENTION: Il y a danger d’xplosion s’il y a remplacement incorrect de la batterie. Remplacer uniquement
avcc unc batterie du meme type ou d’un type recommande par le constructer. Mettre au rebut les batteries
usagees conformement aux instructions du fabricant.
VORSICHT! Explosionsgefahr bei unsachgemBen Austausch der Batterie Ersatz nur durch denselben oder
einem vom Hersteller empfohlenem ahnlichen Typ. Entsorgung gebrauchter Batterien nach Angaben des
Herstellers.
Der Arbeitsplatzbezogene Schalldruckpegel nach DIN 45 635 betragt 70dB (A) oder weniger.
Zum Netzanschlua dieses Gerates ist eine geprufte Leitung zu verwenden. Fur einen Nennstrom bis 6A und einem
Gerategewicht groBer 3kg ist eine Leitung nicht leichter als (1)H05VV-F, 3G, 0.75mm2 (2)2X0.75 mm2 conductors
einzusetzen.
Die Steckdose muB nahe dem Gerat angebracht und leicht zuganglich sein.
CAUTION!
T his pa rt is hot. B e C areful.
VORSICHT!
Di ese Flach e wird sehr heiss.
When you see this symbol, be careful as this spot may be very hot. The heat is generated from the CPU.
Page 60

Prestigio Nobile 1440W 1
РУС
Prestigio Nobile 1440W
Руководство пользователя
Примечание
Компания производитель оставляет за собой право вносить изменения в данное руководство пользователя без
предварительного уведомления.
ПРИВЕДЕННАЯ НИЖЕ ИНФОРМАЦИЯ ЯВЛЯЕТСЯ СПРАВОЧНОЙ И НЕ ВОЗЛАГАЕТ ОТВЕТСТВЕННОСТЬ НА ПРОИЗВОДИТЕЛЯ
ИЛИ ПРОДАВЦА ДАННОГО ИЗДЕЛИЯ. ПРОИЗВОДИТЕЛЬ И ПРОДАВЕЦ ИЗДЕЛИЯ НЕ НЕСУТ ОТВЕТСТВЕННОСТЬ ЗА
ОШИБКИ, КОТОРЫЕ МОГУТ СОДЕРЖАТЬСЯ В ДАННОМ РУКОВОДСТВЕ. ОТВЕТСТВЕННОСТЬ ПРОИЗВОДИТЕЛЯ И
ПРОДАВЦА ТАКЖЕ НЕ РАСПРОСТРАНЯЕТСЯ НА КАКОЙЛИБО УЩЕРБ ИЛИ ПОТЕРЮ ВАЖНОЙ ИНФОРМАЦИИ, КОТОРЫЕ
СТАЛИ РЕЗУЛЬТАТОМ НЕПРАВИЛЬНОЙ ТРАКТОВКИ ДАННОГО РУКОВОДСТВА.
Изложенная в руководстве информация защищена в соответствии с законами об авторском праве. Данное руководство
частично или полностью не может быть скопировано или воспроизведено в любой иной форме без предшествующего
письменного разрешения, полученного от владельцев авторских прав.
Copyright 4/2006
Все права защищены.
Microsoft и Windows являются зарегистрированными торговыми марками компании Microsoft Corporation. DOS, Windows
95/98/ME/2000/NT/XP являются торговыми марками компании Microsoft Corporation.
Торговые марки и названия программных продуктов, упомянутые в этой публикации, могут быть защищены (не защищены)
авторскими правами и/или являться зарегистрированными торговыми марками их соответствующих владельцев.
Программное обеспечение, описанное в данном руководстве, поставляется на условиях лицензионного соглашения.
Данное программное обеспечение может быть использовано (скопировано) только при соблюдении условий лицензионного
соглашения.
Данное изделие находится под защитой авторских прав в соответствии с требованиями патентов США, а также других прав
на интеллектуальную собственность, принадлежащих корпорации Macrovision и другим правообладателям. Использование
такой системы защиты авторских прав должно быть авторизовано корпорацией Macrovision: предлагаемое изделие
предназначено для домашнего использования и в других ограниченных целях, если они предусмотрены Корпорацией
Macrovision. Перепроектирование или разборка данного устройства также строго запрещены производителем
Версия 1.0
Page 61

2 Prestigio Nobile 1440W
РУС
Введение
Использование данного руководства
Данное руководство содержит общую информацию о подключении устройства и установке программных продуктов,
разрешении возможных проблем в работе устройства, а также технические характеристики Вашего портативного
компьютера.
Символы и условные обозначения
В данном руководстве используются следующие символы и условные обозначения:
Когда для выполнения того или иного действия необходимо нажать несколько клавиш одновременно, используется
символ (+). Например, Fn+F7 означает одновременное нажатие клавиш Fn и F7.
При использовании операционной системы Windows может потребоваться совершение определенной
последовательности действий, в этом случае используются символы [ ] и >. Например, [Start > Settings > Control
Panel > Display] означает, что пользователю необходимо войти в меню Пуск (Start), выбрать пункт Настройки (Settings),
затем войти в Панель управления (Control Panel) и, наконец, войти в подменю Дисплей (Display).
При осуществлении операции выбора при помощи сенсорной панели (или мыши) используются следующие термины:
‘выбор’, ‘нажатие’, ‘двойное нажатие’, ‘нажатие правой кнопки мыши’.
Внимание: Данный формат текста с соответствующим символом используется для изложения
некоторой технической информации, комментариев, дополнительных пояснений или примечаний, с
которыми пользователю следует ознакомиться.
Предупреждение: Данный формат текста с соответствующим символом используется для
изложения важной информации или инструкций, пренебрежение которыми может стать причиной
повреждения Вашего портативного компьютера или привести к травме самого пользователя.
Защита Вашего компьютера Избегайте небрежного обращения с
данным устройством и не подвергайте его воздействию внешней среды
Следуйте изложенным рекомендациям, чтобы обеспечить сохранность и долговечность Вашего компьютера.
Следуйте
приведенным инструкциям для обеспечения надежной работы Вашего компьютера.
Не подвергайте компьютер воздействию прямых солнечных лучей. Не располагайте его в местах воздействия высоких
температур.
Не подвергайте компьютер воздействию температур ниже 0oC (32oF) или выше 35oC (95oF).
Не подвергайте компьютер воздействию магнитных полей.
Не подвергайте компьютер воздействию дождя или влаги.
Не допускайте попадания воды или других жидкостей на компьютер.
Не подвергайте компьютер воздействию вибрации и не допускайте сильных ударов.
Не подвергайте компьютер воздействию пыли и грязи.
Не размещайте никаких предметов на крышке компьютера во избежание его повреждения.
Не размещайте компьютер на неровных поверхностях.
Соблюдайте указанные условия обслуживания Вашего ACадаптера (адаптера сети переменного тока):
Не подключайте адаптер к любым другим устройствам.
Не допускайте попадания воды на адаптер сети переменного тока.
Не блокируйте вентиляционные отверстия адаптера.
Подключайте адаптер в хорошо проветриваемых прохладных помещениях.
Не наступайте на шнур питания и не размещайте на нем тяжелые объекты.
Постарайтесь ограничить доступ к шнуру питания и другим кабелям так, чтобы на них нельзя было случайно
наступить.
При отсоединении шнура питания держитесь за вилку шнура, а не за сам шнур.
Храните адаптер в местах, недоступных для детей.
Page 62

Prestigio Nobile 1440W 3
РУС
При пользовании удлинителем общее напряжение оборудования не должно превышать его максимальную расчетную
суммарную нагрузку.
При пользовании электрической розеткой общее напряжение оборудования не должно превышать ее максимальную
расчетную суммарную нагрузку.
Не подключайте другие сетевые адаптеры к Вашему компьютеру. Для подключения Вашего портативного компьютера
к сети переменного тока могут быть использованы только следующие типы сетевых адаптеров: Lishin 0335A2065
(65W), Lishin 0335C2065 (65W), Liteon PA165001 (65W), Liteon PA165002(65W), EPS F10653A(65W)
При очистке компьютера следуйте следующим рекомендациям:
1. Выключите компьютер и извлеките батарею.
2. Отсоедините сетевой адаптер.
3. Пользуйтесь увлажненной тканевой салфеткой. Не используйте жидкостные и аэрозольные средства.
Обратитесь к Вашему дилеру или в службу сервиса в следующих случаях:
Компьютер упал и/или его корпус оказался поврежден.
Внутрь компьютера попала жидкость.
Компьютер не работает в нормальном режиме.
Чистка вентиляционных отверстий:
Настоятельно рекомендуется производить регулярную очистку вентиляционных отверстий для поддержания нормального
режима охлаждения компьютера. Чтобы произвести очистку, используйте мягкую щетку или пылесос (с соответствующей
насадкой) для удаления пыли с лопастей и решеток вентиляторов.
Page 63

4 Prestigio Nobile 1440W
РУС
УСТРОЙСТВО КОМПЬЮТЕРА
В данном разделе приведена информация об основных функциях и возможностях Вашего компьютера, а также содержится
краткий обзор частей и компонентов Вашего компьютера.
Производительность
Высокопроизводительный процессор с материнской платой Napa
Ваш портативный компьютер оборудован мощным двуядерным процессором Mobile Intel Pentium M Yonah (Core Duo) или
одноядерным Mobile Intel Pentium M Yonah (Core Solo), что в сочетании с новейшей материнской платой Intel Napa со
встроенным графическим акселератором обеспечивает высокую надежность и производительность всей системы.
Эффективный графический процессор
Графический процессор Intel 945GM Express с интегрированным графическим акселератором нового поколения Intel
Graphics Media Accelerator GMA950.
Широкоэкранный жидкокристаллический дисплей
Ваш компьютер оборудован 14.1дюймовым ЖКдисплеем, созданным по тонкопленочной технологии TFT. Применение
новейших технологий обеспечивает высокое разрешение экрана, позволяющее добиться отчетливого отображения
текстовой информации и миллионов ярких цветов.
Приемник цифрового ТВ (DTV) (дополнительный модуль DVBT)
Дополнительный модуль DVBT (Digital Video Broadcast – Terrestrial) позволяет осуществлять прием высококачественного
цифрового телевизионного сигнала на Вашем компьютере.
Мультимедийный проигрыватель InstantOn (опционально)
При помощи одного нажатия кнопки Вы можете быстро произвести запуск уникальной программы мультимедийного
проигрывателя InstantOn для воспроизведения видео файлов, просмотра изображений и прослушивания музыкальных
композиций без необходимости производить запуск операционной системы Windows.
Модуль Mobile 3G Telecom (опционально)
Дополнительный телекоммуникационный модуль 3G используется для получения доступа к различным цифровым
информационным и развлекательным услугам посредством телефонных сетей нового поколения 3G.
Технология ExpressCard
ExpressCard (тип I, 34 мм) является новейшим стандартом PCкарт следующего поколения. Используемый интерфейс
выполнен в двух вариантах: PCI Express для подключения высокопроизводительных устройств ввода/вывода и USB2.0 для
целого ряда периферийных устройств.
Возможность наращивания системы
Ваш компьютер укомплектован жестким диском, который впоследствии может быть заменен более вместительным, а также
двумя разъемами для памяти DDRII SDRAM, позволяющими пользователю по мере необходимости расширять объем
памяти и ресурсов компьютера.
Встроенное многофункциональное устройство для чтения карт
Ваш компьютер укомплектован встроенным устройством для чтения различных форматов носителей данных типа "4в1"
( поддерживаются карты: SD Card, MS Card, MMC Card и MSPro Card).
Page 64

Prestigio Nobile 1440W 5
РУС
Гигабитный порт Ethernet
Ваш компьютер оборудован встроенным сетевым адаптером (10/100/1000 Мб/сек) для осуществления высокоскоростного
подключения к сети Ethernet.
Порты Firewire (IEEE1394 / 1394a) и USB2.0
В дополнение к большому количеству встроенных портов ввода вывода данных, Ваш компьютер также снабжен портом
IEEE1394 для высокоскоростного подключения цифровых видео устройств и портами USB2.0, предназначенными для
подсоединения любых периферийных устройств на основе интерфейса USB.
Беспроводная локальная сеть Wireless LAN
Дополнительный внутренний модуль беспроводной локальной сети Wireless LAN позволяет Вам подключать свой
портативный компьютер к другим системам, устройствам или сетям с поддержкой стандарта 802.11.
Page 65

6 Prestigio Nobile 1440W
РУС
ОБЗОР СИСТЕМЫ
Вид сверху
1. Жидкокристаллический дисплей
Служит для отображения графической информации.
2. Светодиодный индикатор состояния
Светодиодные индикаторы отражают состояние зарядки батареи компьютера и тип электропитания компьютера, режим
работы мультимедийного проигрывателя InstantOn, включение и отключение модуля беспроводной сети WLAN. (См.
соответствующий раздел данного руководства).
3. Клавиатура
Клавиатура используется для ввода данных в систему. (См. соответствующий раздел данного руководства).
4. Сенсорная панель
Сенсорная панель встроенное устройство управления позицией курсора с функциями, аналогичными функциям
компьютерной мыши.
5. Встроенный микрофон
Page 66

Prestigio Nobile 1440W 7
РУС
Встроенный микрофон служит для записи звуковой информации.
6. Кнопка запуска мультимедийного проигрывателя InstantOn
(опционально) / кнопка "тихого" режима
Когда питание системы отключено, нажатие на данную кнопку приведет к запуску программы мультимедийного
проигрывателя InstantOn, который предназначен для просмотра фильмов, изображений или прослушивания музыкальных
композиций с жесткого диска, оптических дисков или внешних устройств (при этом нет необходимости производить
загрузку операционной системы Windows). Повторное нажатие данной кнопки приведет к выключению компьютера. (Для
получения дополнительной информации см. соответствующий раздел данного руководства).
Нажатие данной кнопки при включенном компьютере и загруженной ОС Windows позволяет системе снизить
энергопотребление и выключить вентиляторы, снижая, таким образом, шум всего компьютера.
При включении "тихого" режима индикатор
постоянно горит зеленым цветом.
7. Кнопка включения питания / остановки работы компьютера
Кнопка включения питания / остановки работы компьютера служит для включения и выключения компьютера, а также
действует в качестве кнопки для временной остановки работы компьютера. Осуществите однократное нажатие для
включения системы. Нажмите и удерживайте кнопку в течение 4 секунд, чтобы выключить систему. Чтобы назначить
данной кнопке дополнительные функции, войдите в меню [Пуск > Настройки > Панель управления > Управление
электропитанием > Дополнительно] (Start > Settings > Control Panel > Power Options > Advanced). Нажмите кнопку
включения питания / остановки работы компьютера снова, чтобы возвратиться из режима временной остановки работы
компьютера.
Когда система находится в режиме временной остановки работы, индикатор
мигает зеленым цветом.
Page 67

8 Prestigio Nobile 1440W
РУС
Вид спереди
Предупреждение: не размещайте никакие тяжелые объекты на Вашем портативном компьютере.
Это может привести к повреждению дисплея.
1. Переключатель модуля беспроводной сети
Данный переключатель используется для включения/отключения функции беспроводной сети.
При включении функции беспроводной сети соответствующий индикатор
горит зеленым цветом.
2. Отверстие вентилятора
Вентилятор служит для осуществления воздухообмена и отвода излишнего тепла из компьютера. Не блокируйте
вентиляционные отверстия.
Page 68

Prestigio Nobile 1440W 9
РУС
Вид сбоку
Предупреждение
: не размещайте никакие тяжелые объекты на Вашем портативном компьютере.
Это может привести к повреждению дисплея.
1. Привод оптических дисков, кнопка извлечения диска, отверстие для
ручного извлечения диска
Если Ваш компьютер укомплектован приводом оптических дисков Combo, DVDDual или SuperMulti, Вы можете сохранять
свои данные на дисках CDR / CDRW или DVD RW. Нажмите выступающую кнопку на корпусе компьютера, чтобы выдвинуть
лоток с диском. Отверстие для ручного извлечения диска предназначено для извлечения дисков в случае их "застревания"
в приводе оптических дисков.
2. Порт VGA
Порт видео выхода VGA служит для подключения внешнего ЖКмонитора или проектора.
3. Разъем для подключения питания (DCin)
Разъем для подключения питания (DCin) служит для подключения сетевого адаптера и работы от сети переменного тока.
4. Порт модема / антенный разъем для модуля цифрового телевидения
DVBT (опционально)
Данный порт служит для подключения кабеля телефонной линии (RJ11) для использования функции факса/модема. В
зависимости от модели Ваш компьютер может быть укомплектован дополнительным модулем цифрового телевидения
DVBT. В таком случае, вместо порта модема в Вашем компьютере будет установлен антенный разъем. При наличии
функции DVBT к данному разъему необходимо подключить телевизионную антенну. См. соответствующий раздел данного
руководства для получения дополнительной информации о функционировании модуля. См. также соответствующий раздел
данного руководства для получения дополнительной информации о порядке самостоятельной установки модуля DVBT.
5. Отверстие для подключения замка типа Kensington
Отверстие служит для подключения замка безопасности типа Kensington, чтобы исключить возможность кражи компьютера.
Page 69

10 Prestigio Nobile 1440W
РУС
6. Порты USB2.0 (3 шт.)
Порт USB2.0 (USB 2.0совместимый) позволяет подключать широкий спектр разнообразных устройств к Вашему
компьютеру со скоростью передачи данных до 480 Мб/сек. Этот порт соответствует современным стандартам для
подключения устройств типа "plugandplay".
7. Порт Firewire / IEEE1394 / 1394а
Данный порт представляет собой высокоскоростной последовательный порт для передачи данных. Вы можете подключить
любое Firewireустройство к этому порту.
8. Устройство для чтения карт типа "4в1"
Ваш компьютер укомплектован встроенным "4в1" устройством для чтения различных форматов носителей данных (SD
Card, MS Card, MMC Card и MSPro Card).
9. Разъем ExpressCard
Данный разъем служит для подключения карт типа ExpressCard (тип I, 34 мм). ExpressCard объединяет в себе технологию
PCIExpress и интерфейс USB2.0. Вставьте карту в разъем до щелчка. Для ее извлечения, нажмите на карту.
10. Разъем для подключения стерео наушников / цифровой выход
SPDIFout
Разъем для подключения стерео наушников (3.5мм в диаметре) служит для подключения наушников или внешних колонок.
Кроме того, при помощи выхода S/PDIF Вы можете подключить внешние звуковые стерео устройства типа DTS, AC3 или
PCM.
11. Разъем для подключения микрофона / разъем линейного входа
Разъем для подключения микрофона / разъем линейного входа (3.5мм в диаметре) служит для подключения микрофона
или внешнего аудио устройства (например, проигрывателя компактдисков).
12. Порт Ethernet / локальной сети
Порт соединяется с сетевым концентратором посредством кабеля RJ45 (в соответствии с протоколом передачи 10/100
BaseTX).
13. Отверстие вентилятора
Вентилятор служит для осуществления воздухообмена и отвода излишнего тепла из компьютера. Не блокируйте
вентиляционные отверстия.
14. Порт TV (SVideo)
Порт SVideo позволяет Вам перенаправлять вывод данных на телевизор или любое аналоговое видео устройство
воспроизведения. Порт TV произведен с учетом технологии защиты авторских прав, поэтому, когда происходит
воспроизведение фильма в формате DVD, вывод данных происходит в зашифрованном формате, чтобы исключить
возможность записи сигнала в аналоговом виде. Обратите внимание, что в некоторых моделях компьютера данная функция
недоступна.
Page 70

Prestigio Nobile 1440W 11
РУС
Вид снизу
1. Аккумуляторная батарея и защелка батареи
Аккумуляторная батарея встроенный источник энергии Вашего портативного компьютера. Сдвиньте защелку, чтобы
извлечь аккумуляторную батарею.
2. Отверстие вентилятора
Вентилятор служит для осуществления воздухообмена и отвода излишнего тепла из компьютера. Не блокируйте
вентиляционные отверстия.
Предупреждение: Не блокируйте вентиляционные отверстия. Размещайте Ваш компьютер
только на твердых устойчивых поверхностях. Нижняя панель компьютера в процессе работы может
Page 71

12 Prestigio Nobile 1440W
РУС
сильно нагреваться.
3. Крышка системного блока
В состав системного блока входят процессор с устройством охлаждения, модуль беспроводной локальной сети, жесткий
диск и модуль памяти DDR, расположенные под крышкой системного блока. Объем системной памяти может
наращиваться.
4. Встроенные стерео динамики
Стерео динамики служат для воспроизведения звуковой информации в формате стереозвука.
5. Крышка модуля приемника DVBT
В данном отсеке расположен дополнительный модуль приемника цифрового телевидения DVBT. См. также
соответствующий раздел данного руководства для получения дополнительной информации о порядке самостоятельной
установки модуля DVBT.
Сетевой адаптер
1. DCout коннектор
DCout коннектор служит для подключения к разъему питания DCin на корпусе компьютера.
2. Сетевой адаптер
Адаптер преобразовывает переменный ток в ток постоянного напряжения, необходимый для работы компьютера.
3. Штепсельная вилка
Штепсельная вилка служит для подключения к электрической розетке.
Page 72

Prestigio Nobile 1440W 13
РУС
Светодиодные индикаторы состояния
Светодиодные индикаторы состояния отображают состояние работы Вашего портативного компьютера. При включении
определенной функции горит соответствующий ей индикатор. Ниже описаны функции и соответствующий цвет индикатора.
Светодиодные индикаторы состояния системы и питания
Графический
символ
индикатора
Индикация
Синий цвет индикатора указывает на работу модуля беспроводной локальной сети (WLAN).
Постоянный зеленый цвет указывает на то, что включен "тихий"режим.
Мигающий зеленый цвет указывает на то, что компьютер находится в режиме временной
остановки работы.
Мигающий оранжевый цвет индикатора указывает, что батарея находится в процессе
перезарядки.
Мигающий зеленый цвет указывает, что уровень заряда батареи крайне низок (при
включенном компьютере).
Постоянный зеленый свет индикатора указывает, что система компьютера включена.
Page 73

14 Prestigio Nobile 1440W
РУС
Экранные индикаторы состояния
Экранные индикаторы состояния отображают состояние работы Вашего портативного компьютера. При включении
соответствующей функции на экране появится соответствующая индикационная панель. Ниже приведено описание
функций и соответствующих индикаторов.
Экранные индикаторы состояния
Комбинация клавиш Графическая индикация
Fn + F3: отключение звука
Fn + F5: увеличение громкости
Fn + F6: уменьшение громкости
Fn + F7: увеличение яркости
Fn+ F8: уменьшение яркости
Fn + Num Lock:
Включение режима цифровой
клавиатуры
Caps Lock:
Включение режима ПРОПИСНЫХ букв
Scroll Lock:
Включение режима прокрутки
Функции клавиатуры
Функциональные клавиши (клавиши быстрого запуска)
Графический
символ
Комбинация
клавиш
Функция
Fn + F1 Вход в режим временной остановки работы.
Fn + F3 Включение или выключение звукового предупреждения о
разрядке батареи.
Fn + F4 Переключение режимов визуального отображения: только
ЖКД, только ЭЛТ, ЖКД и ЭЛТ.
Fn + F5 Увеличение уровня громкости колонок.
Fn + F6 Уменьшение уровня громкости колонок.
Fn + F7 Увеличение уровня яркости дисплея.
Fn + F8 Уменьшение уровня яркости дисплея.
Page 74

Prestigio Nobile 1440W 15
РУС
Fn+Num Lock Дает возможность встроенной вспомогательной клавиатуре
работать в цифровой режиме. Клавиши клавиатуры
действуют подобно кнопкам на калькуляторе. Используйте
этот режим, когда Вам необходимо произвести ввод
большого количества данных в виде цифр. В качестве
альтернативы возможно подключение внешней цифровой
клавиатуры.
Caps Lock При включении режима Caps lock, все вводимые символы
печатаются в режиме ПРОПИСНЫХ букв.
Scroll Lock
Нажмите клавишу Scroll Lock и затем
↑ или ↓ для
перемещения вверх или вниз.
Для доступа к настройкам системы нажмите клавишу Fn (Function) и клавишу Fx одновременно.
Клавиши Windows
Ваша клавиатура также имеет две клавиши Windows:
1. Клавиша меню Пуск (Start)
Эта клавиша позволяет Вам вызывать на экран меню Пуск (Start) Windows внизу
панели задач.
2. Клавиша меню приложения
Эта клавиша вызывает всплывающее меню для приложения, подобного щелчку правой кнопки мыши.
Встроенная цифровая клавиатура
Нажмите комбинацию клавиш Fn+NumLk, чтобы включить встроенную цифровую клавиатуру. Цифры располагаются в
верхнем правом углу клавиши и прорисованы цветом, отличном от цвета букв алфавита. Данная цифровая клавиатура
также снабжена знаками арифметических операций (+,, *,/).
Нажмите Fn+Num Lock, чтобы вернуться к набору текста.
Сенсорная панель
Page 75

16 Prestigio Nobile 1440W
РУС
Встроенная сенсорная панель является PS/2совместимым устройством управления позицией курсора, считывающим
движения на своей поверхности. Это означает, что курсор следует движениям Вашего пальца на поверхности сенсорной
панели.
Следуйте указанным рекомендациям для осуществления операций при помощи сенсорной панели:
1. Двигайте Ваш палец вдоль панели, чтобы переместить курсор.
2. Нажмите на кнопки панели, чтобы получить доступ к функциям выбора и исполнения. Эти две клавиши являются
аналогичными по функциям левой и правой клавишам мыши. Двойное нажатие на самой сенсорной панели аналогично
щелчку левой кнопки мыши.
Функция
Левая кнопка
Правая
кнопка
Нажатие на панель
Выполнение
Быстрое двойное
нажатие
Нажмите дважды (со
скоростью, соответствующей
скорости двойного нажатия
мыши)
Выбор Нажмите один раз Нажмите один раз
Перетягивание Нажмите и удерживайте,
затем используйте палец
для перетягивания
курсора по панели
Нажмите дважды (со
скоростью, соответствующей
скорости двойного нажатия
мыши) и, удерживая палец на
панели после второго нажатия,
перетаскивайте курсор
Доступ к контекстному меню Нажмите один
раз
Прокрутка на одну страницу
вверх или вниз
Рекомендации по использованию сенсорной панели:
1. Скорость двойного щелчка установлена на определенном уровне. Если Вы производите двойное нажатие слишком
медленно, Ваш портативный компьютер реагирует как на однократное нажатие.
2. При использовании сенсорной панели следите, чтобы Ваши пальцы были сухими и чистыми. Поддерживайте панель в
сухом и чистом виде.
3. Сенсорная панель весьма чувствительна к движениям пальцев. Следовательно, чем легче прикосновение, тем лучше
реакция панели. Слишком сильное нажатие не приведет к лучшей ответной реакции панели.
Графическая подсистема
Ваш компьютер укомплектован высокоэффективным 14.1дюймовым дисплеем, созданным по тонкопленочной технологии
TFT. Применение новейших технологий обеспечивает высокое разрешение экрана, позволяющее добиться отчетливого
отображения текстовой информации и миллионов ярких цветов. Интегрированный графический акселератор Intel GMA 950,
совместимый со стандартами Microsoft DirectX 9, осуществляет моментальную визуализацию изображения.
Регулирование уровня яркости дисплея
В Вашем портативном компьютере имеются специальные комбинации клавиш, названные "горячими клавишами",
предназначенные для управления уровнем яркости.
Нажмите Fn+F7, чтобы увеличить яркость.
Нажмите Fn+F8, чтобы уменьшить яркость.
Обратите внимание: Чтобы увеличить время автономной работы от батареи, установите
яркость на минимально возможный уровень, чтобы обеспечить наименьшее потребление энергии
подсветкой экрана.
Продление срока службы ЖКдисплея
Page 76

Prestigio Nobile 1440W 17
РУС
Соблюдайте следующие рекомендации для продления срока службы ЖКдисплея.
1. Установите яркость на минимально возможный уровень (Fn+F8).
2. При работе с компьютером за столом по возможности подключайте к нему внешний монитор и отключите внутренний
дисплей Fn + F4.
3. Не отменяйте режим отключения монитора по времени простоя.
4. Если Вы используете внешний источник энергии и не используете внешний монитор, всегда переводите компьютер в
режим временной остановки работы системы, когда не планируете им пользоваться некоторое время.
Открытие и закрытие панели дисплея
Чтобы открыть дисплей, сдвиньте защелку крышки дисплея вправо и приподнимите крышку. Затем установите дисплей в
наиболее удобное положение. Максимальный угол открытия крышки составляет 135 градусов. Не применяйте излишней
силы при открытии крышки дисплея.
Чтобы закрыть крышку дисплея, мягко опустите ее вниз до щелчка защелки.
Предупреждение: Чтобы избежать повреждения дисплея, не хлопайте крышкой при закрытии.
Не размещайте никакие предметы на Вашем ноутбуке даже при закрытой крышке дисплея.
Page 77

18 Prestigio Nobile 1440W
РУС
Модуль приема сигналов цифрового телевидения DVB9T
(опционально)
Опциональный модуль DVBT (Digital Video Broadcast – Terrestrial) для приема сигналов эфирного цифрового телевидения
позволяет осуществлять высококачественный прием сигналов эфирного цифрового телевидения при помощи портативного
компьютера.
При наличии опционального модуля DVBT подключите антенну к разъему модуля.
Для обеспечения более высокого уровня приема сигнала переместите антенну ближе к окну и расположите ее в месте, где
приему сигнала не будут мешать близко расположенные здания.
При первом использовании модуля DVBT для просмотра телевизионных программ необходимо произвести
предварительный поиск доступных каналов. Следуйте приведенным инструкциям для поиска каналов.
1. Запустите приложение NewSoft Presto!PVR. Нажмите кнопку
для открытия окна настроек (Settings) и выберите
закладку Устройства (Device).
2. Выберите пункт DVBT tuner из списка устройств.
3. Выберите вкладку Программы (Program) в диалоговом окне Настроек (Settings) и нажмите Сканировать (Scan) для поиска
доступных каналов. При обнаружении канала он будет добавлен в список программ. По завершении поиска выберите
программу и отредактируйте ее название.
Page 78

Prestigio Nobile 1440W 19
РУС
4. Нажмите OK и закройте окно Настроек (Settings).
5. Ваш компьютер готов к просмотру телевизионных программ.
Если в Вашем компьютере уже установлен модуль DVBT, Вы можете использовать программное приложение NewSoft
Presto!PVR для просмотра и запуска телевизионных программ.
При самостоятельной установке модуля DVBT обратитесь к соответствующему разделу данного руководства. Для
просмотра и записи телевизионных программ Вам также понадобиться установить программное приложение NewSoft
Presto!PVR с компактдиска, входящего в комплект модуля.
Звуковая подсистема
Звуковая подсистема Вашего компьютера представлена Sound Blaster Proсовместимым устройством.
Регулирование уровня громкости вручную
Чтобы увеличить уровень громкости, нажмите Fn + F5.
Чтобы уменьшить уровень громкости, нажмите Fn + F6.
Регулирование уровня громкости в Windows
1. Нажмите на пиктограмму динамика в правом нижнем углу панели задач Windows.
2. Переместите регулятор громкости вверх или вниз, чтобы установить необходимый уровень громкости.
3. Чтобы временно отключить звуковое сопровождение, нажмите Mute (выключение звука).
Звукозапись
Запись звука может быть осуществлена при помощи встроенного микрофона. Для осуществления звукозаписи необходимо
воспользоваться специальным программным обеспечением, например, Microsoft Sound Recorder.
Page 79

20 Prestigio Nobile 1440W
РУС
Мультимедийный проигрыватель Instant9On (опционально)
Мультимедийный проигрыватель InstantOn является наиболее простым способом для воспроизведения дисков DVD или
проигрывания видеоклипов, музыкальных файлов, просмотра изображений или программ цифрового телевидения (при
наличии дополнительного модуля DVBT). Мультимедийный проигрыватель InstantOn не работает в ОС Windows.
Внимание
: Ниже приведены инструкции по использованию мультимедийного проигрывателя
InstantOn. Для получения дополнительной информации обратитесь к справочной информации самого
проигрывателя или разделу помощи.
Внимание: Мультимедийный проигрыватель InstantOn поддерживает большинство
распространенных форматов; тем не менее, просмотр анимированных GIFизображений не
поддерживается.
Горячие клавиши приложения InstantOn
Используйте клавиши клавиатуры для перемещения по меню.
Клавиша Команда Описание
M Меню Нажмите данную клавишу для входа в меню Общих настроек
(General Setup).
Нажмите снова для выхода из меню.
F1 Меню инструкций Нажмите данную клавишу для входа в меню Инструкций
(Instruction) и функций клавиш.
Нажмите снова для выхода из меню.
↑↓←→
Перемещение Перемещение по меню
Enter (Ввод) Выбор Осуществление выбора
Внимание: Поскольку в режиме InstantOn сенсорная панель не работает, для перемещения по
меню необходимо воспользоваться клавишами клавиатуры. В этом режиме воспользуйтесь клавишей
F1 для отображения функций клавиш.
Сохранение файлов для воспроизведения:
При использовании проигрывателя InstantOn для воспроизведения файлов необходимо сохранить их на жестком диске:
C:\Documents and Settings\All Users (а также все пользователи компьютера)\Documents\My XXX (Пример: фото изображения
в каталоге \My Photo; музыкальные файлы в каталоге \My Music и видео файлы в каталоге \My Video).
Например, при первом использовании в режиме воспроизведения видео файлов система произведет поиск файлов в
указанной директории и сформирует список воспроизведения для последующего использования.
Page 80

Prestigio Nobile 1440W 21
РУС
Запуск мультимедийного проигрывателя InstantOn:
При выключенном компьютере после нажатия кнопки включения мультимедийного проигрывателя InstantOn система
произведет запуск программыприложения проигрывателя.
Внимание: Если на компьютере загружена ОС Windows, после нажатия кнопки включения
мультимедийного проигрывателя система перейдет в тихий режим.
Воспользуйтесь клавишами со стрелками ←→ для выбора режима воспроизведения.
Воспользуйтесь клавишей F1 для отображения меню инструкций в режиме воспроизведения.
Выключение мультимедийного проигрывателя InstantOn:
Нажмите кнопку выключения мультимедийного проигрывателя InstantOn для выключения
компьютера.
Page 81

22 Prestigio Nobile 1440W
РУС
Модем
Ваш компьютер укомплектован 56 КБ V.92 внутренним факс/модемом и разъемом RJ11 для подключения к телефонной
линии, который расположен на левой панели Вашего компьютера.
Используйте телефонный кабель, чтобы подключить компьютер к телефонной сети.
Внимание: В некоторых моделях порт модема и функция модема отсутствуют.
Подключение модема к телефонной сети
1. Подключите один конец телефонного кабеля в порт модема, расположенный на задней панели компьютера. (Для
исключения возможности появления помех и электромагнитных шумов, Вам необходимо воспользоваться специальным
устройством EMI CORE, устанавливаемым на телефонную линию.)
2. Подключите другой конец кабеля к телефонной розетке.
В зависимости от того, где используется Ваш компьютер, Вам, возможно, потребуется изменить настройки модема.
Правильная установка позволит Вам установить надежное подключение в различных странах мира.
Чтобы изменить настройки модема, следуйте инструкциям:
1. Войдите в меню [Пуск > Настройки > Панель управления > Телефон и модем] (Start > Settings > Control Panel > Phone
and Modem Options). После этого войдите в меню Набор номера (Dialing Rules) и произведите настройку своего
месторасположения (My Location). В выпадающем меню страны/региона (Country/Region) выберите соответствующую
страну. Вашему вниманию будет предложено диалоговое окно.
2. Нажмите на выпадающее меню и выберите соответствующую страну. Нажмите на OK, чтобы выйти из меню.
Page 82

Prestigio Nobile 1440W 23
РУС
Локальная сеть Ethernet
Ваш компьютер оборудован адаптером сети 10/100/1000 BaseTX Fast Ethernet. Подключите кабель локальной сети к RJ45
порту локальной сети, расположенному на правой панели компьютера. Такого рода подключение позволит Вам получить
доступ и передавать данные в локальной сети.
Соединение с локальной сетью
Используйте только кабель типа UTP Ethernet ("витая пара").
1. Вставьте один конец кабеля UTP в разъем локальной сети, удостоверьтесь в надежности его подключения.
2. Затем подключите другой конец кабеля к выходу локальной сети RJ45 или к RJ45порту на UTP концентраторе или
сетевом концентраторе.
Ограничения при работе в локальной сети
Следующие ограничения должны быть соблюдены для 10/100/1000BASETX сетей:
Максимальная длина кабеля 100 метров (328 футов).
Для операций со скоростью передачи данных в 100 Мб/сек или 1000 Мб/сек используйте соединительные кабели и
коннекторы 5ой категории.
Обратите внимание: Обратитесь к руководству пользователя Windows и / или Novell Netware
для получения информации об инсталляции программного обеспечения, конфигурировании и
использовании сети.
Page 83

24 Prestigio Nobile 1440W
РУС
ПРОГРАММА НАСТРОЙКИ ПАРАМЕТРОВ BIOS И ФУНКЦИИ
БЕЗОПАСНОСТИ СИСТЕМЫ
В данном разделе содержится информация о входе в меню BIOS и настройке параметров работы устройств. Вы также
сможете ознакомиться со встроенными функциями обеспечения безопасности компьютера.
Программа настройки (Setup Utility) является встроенным в систему BIOS (базовая система ввода/вывода) механизмом
управления аппаратными средствами. С ее помощью Вы можете производить настройку параметров работы аппаратных
средств Вашего компьютера. Данная программа основана на диалоговом меню, которое позволяет Вам с легкостью
производить настройку параметров.
В BIOS содержатся установленные по умолчанию стандартные настройки работы системы. Тем не менее, иногда может
возникнуть необходимость изменить установленные по умолчанию настройки BIOS.
BIOS также позволяет производить установку пароля для ограничения доступа пользователей к компьютеру, что является
особенно важным в эпоху развития компьютерных технологий. Эти функции позволят предотвратить несанкционированный
доступ к компьютеру. См. соответствующий раздел данного руководства.
Вход в программу настройки BIOS
Включите питание компьютера. Во время начала процедуры самотестирования при запуске (POST) незамедлительно
нажмите кнопку F2 для активации приложения программы настройки AMI BIOS Setup Utility.
Внимание: Нажатие кнопки F2 следует произвести незамедлительно после начала загрузки. Если
система успеет перейти к запуску Windows, Вам придется повторно произвести перезапуск
компьютера.
Выход из программы настройки BIOS
После окончания работы в программе, выйдите из BIOS. Запись произведенных изменений в ПЗУ произойдет в течение
нескольких секунд.
Функции клавиш в BIOS
Функциональная
клавиша
Команда Описание
ESC
Выход
Выход из подменю для возврата к предыдущему меню ИЛИ
выход из BIOS с сохранением изменений.
Enter
Вход в подменю
Вход в подменю
F1
Общая справка
Отображение экрана справки
F9
Загрузка
параметров по
умолчанию.
Загрузка параметров по умолчанию.
F10
Сохранение и выход
Сохранение изменений и перезагрузка компьютера.
<Tab>
Выбор поля
Переход к следующему полю.
↑
Выбор пункта
Выбор пункта (перемещение вверх).
↓
Выбор пункта
Выбор пункта (перемещение вниз).
-
Уменьшение
значения
Выбор значения в пределах поля.
+
Увеличение
значения
Выбор значения в пределах поля.
Page 84

Prestigio Nobile 1440W 25
РУС
Настройка параметров BIOS
Меню настройки параметров AMI BIOS разделено на несколько подменю. В следующем разделе приводится описание всех
разделов меню.
Главное меню (Main Setup)
В данном меню Вы можете произвести изменения даты/времени, просмотреть информацию о типе жесткого диска и
системной памяти.
Пункт Выбор/ подменю Описание
Дата (Date) н/д Введите текущую дату в формате MM/ДД/ГГ.
Время
(Time)
н/д Введите текущее время в формате ЧЧ:MM:СС.
Меню дополнительных настроек (Advanced Setup)
Конфигурация IDE (встроенный интерфейс накопителей)
Пункт Выбор/ подменю Описание
Primary IDE
Master
(первичный)
Hard Disk
(жесткий диск)
Первичный накопитель является первым устройством в списке загрузки
системы. Данный пункт соответствует жесткому диску.
Secondary
IDE Master
(вторичный)
ATAPI CDROM Вторичный накопитель соответствует приводу оптических дисков ATAPI
CDROM.
TouchPad
Support
(поддержка
сенсорной
панели)
Enabled (ВКЛ.) /
Disabled (ОТКЛ.)
Включение или отключение встроенной сенсорной панели.
LCD Auto
DIMM
Function
(функция
уменьшения
яркости
панели)
Enabled (ВКЛ.) /
Disabled (ОТКЛ.)
[ВКЛ.]: Система автоматически снижает яркость ЖКпанели при
отключении сетевого адаптера для сохранения энергии батареи.
[ВЫКЛ.]: Яркость ЖКпанели остается неизменной вне зависимости от
типа питания.
Внимание
: Подменю не доступно. Нажмите Ввод для просмотра информации.
Меню безопасности (Security Setup)
Настройка параметров загрузки
Пункт Выбор/ подменю Описание
Change Supervisor
Password
(Установка пароля
администратора)
н/д Установка или изменение пароля администратора.
Change User Password
(Установка пароля
пользователя)
н/д Установка или изменение пароля пользователя.
Установка защиты паролем
Существуют два вида паролей. BIOS предоставляет возможность использовать как пароль администратора (Supervisor), так
Page 85

26 Prestigio Nobile 1440W
РУС
и пароль пользователя (User). При необходимости установить оба пароля, сначала требуется установить пароль
администратора.
Пароли активируют два различных типа защиты:
1. Система всегда требует ввод пароля при загрузке.
2. Система требует ввод пароля только при попытке входа в утилиту BIOS.
Пароли закодированы и сохраняются в NVRAM (энергонезависимое ОЗУ). Убедитесь, что Вы хорошо запомнили или
записали пароли. При их утрате, возможно, компьютер придется возвратить на завод компаниипроизводителя или
отправить в авторизованный сервисный центр для восстановления паролей.
Настройки питания (Power Setup)
Пункт Выбор/ подменю Описание
Power Button Mode
(Режим кнопки
питания)
ON/OFF / Suspend
(Вкл./Выкл./
Остановка)
[On/Off] (ВКЛ./ВЫКЛ.): При нажатии кнопки питания система
отключится. [Suspend] (Остановка): При нажатии кнопки питания
система войдет в режим временной остановки работы.
High Performance
Mode (Режим
высокой произво
дительности)
Enabled / Disabled
(Вкл. / откл.)
При выборе режима Вкл. (Enabled) срок работы от батареи
будет продлен за счет увеличения производительности
процессора.
Long Battery Life
Mode (Длительная
работа от батареи)
Enabled / Disabled
(Вкл. / откл.)
При выборе режима Вкл. (Enabled) срок работы от батареи
будет продлен за счет снижения производительности
процессора.
Внимание
: В Windows XP функции режима временной остановки работы определяются
настройками в меню управления электропитания (Start (Пуск)> Control Panel (Панель управления)>
Power Options (Управление питанием)).
Настройки загрузки (Boot Setup)
Настройка параметров загрузки
Пункт Выбор/ подменю Описание
Quiet Boot (Тихая
загрузка)
Enabled / Disabled
(Вкл. / откл.)
При выборе режима ВКЛ. (Enabled) система будет отображать
логотип OEM вместо обычных сообщений программы POST.
При выборе режима ОТКЛ. (Disabled) система будет отображать
сообщения программы POST (например, информацию об
устройствах.)
Приоритет устройств загрузки
Пункт Выбор/ подменю Описание
1st Boot
Device (первое
устройство
загрузки)
Установка типа устройства для первоочередной загрузки BIOS.
При выборе Network (Сеть) система попытается произвести
загрузку посредством порта Ethernet.
2nd Boot
Device (второе
устройство
загрузки)
Установка типа устройства для второго устройства загрузки
BIOS.
3rd Boot
Device (третье
устройство
загрузки)
Removable
Dev.(Извлекаемое
устройство)
CD/DVD
Hard Drive (Жесткий
диск)
Network (Сеть)
Disabled (Откл.)
Установка типа устройства для третьего устройства загрузки
BIOS.
Внимание
: При выборе пункта Network (Сеть) система попытается произвести загрузку из
Page 86

Prestigio Nobile 1440W 27
РУС
локальной сети.
Внимание
: При выполнении системой BIOS процедуры POST Вы также можете нажать кнопку F12
для вызова на экран меню устройств загрузки. Вы можете выбрать пункты CD/DVD, Hard Drive
(жесткий диск) или Network (Сеть) в качестве первого устройства для загрузки. При подключении
съемного USBпривода гибких магнитных дисков он появится в качестве извлекаемого устройства
(Removable Disk) в списке устройств для загрузки.
Page 87

28 Prestigio Nobile 1440W
РУС
Выход из меню (Exit Setup)
Пункт Выбор/ подменю Описание
Saves Changes and Exit
(Сохранить изменения
и выйти)
н/д После окончания изменения настроек BIOS выбор данного
пункта приведет к сохранению всех изменений и выходу из
программы настройки BIOS с последующей перезагрузкой
системы. Новые настройки системы вступят в силу после
перезагрузки. Для данной процедуры можно
воспользоваться клавишей F10.
Discard Changes and
Exit (Отклонить
изменения и выйти)
н/д Все внесенные изменения будут отклонены перед выходом
из программы.
Discard Changes
(Отклонить изменения)
н/д Все внесенные изменения будут отклонены.
Load Optimal Defaults
(Загрузка параметров
по умолчанию)
н/д Все параметры будут восстановлены по умолчанию и
заменены оптимальными настройками. Для данной
процедуры можно воспользоваться клавишей F9.
Page 88

Prestigio Nobile 1440W 29
РУС
ПИТАНИЕ ОТ БАТАРЕИ и УПРАВЛЕНИЕ ПИТАНИЕМ
В данном разделе приведена информация об использовании функции экономии электроэнергии, позволяющей продлить
срок службы батареи.
Данный раздел также содержит информацию об использовании батареи в качестве источника питания, правилах
использования батареи, ее обслуживании, а также основную информацию о функциях экономии электроэнергии Вашей
операционной системы.
ЖКдисплей, центральный процессор, жесткий диск основные аппаратные подсистемы, которые потребляют наибольшее
количество энергии. Управление питанием позволяет изменять режимы их работы для обеспечения сохранения энергии
компьютера. Например, Вы можете установить автоматическое отключение дисплея после 2 минут бездействия, обеспечив,
таким образом, дополнительное сохранение энергии батареи. Эффективное управление питанием может помочь Вам
продлить время непрерывной работы за компьютером без необходимости перезарядки батареи.
Аккумуляторная батарея
Литиевоионная батарея
Ваш портативный компьютер укомплектован литиевоионной аккумуляторной батареей с шестью ячейками, которая
обеспечивает работу системы при отсутствии доступа к внешнему источнику электроэнергии.
Обратите внимание: необходимо производить первичную зарядку аккумуляторной батареи в
течение не менее 6 часов.
Обратите внимание: В "спящем" режиме полностью заряженная батарея теряет свой заряд в
течение 12 часов (или даже раньше). При полном отключении компьютера заряд батареи
оказывается полностью исчерпанным по истечении 12 месяцев.
Предупреждение о разрядке батареи
1. Предупреждение о разрядке батареи
Первое предупреждение о разрядке батареи поступает, когда уровень заряда батареи уменьшается до 6 %. Красный
индикатор состояния батареи мигает, а система издает предупреждающие сигналы каждые 16 секунд.
2. Предупреждение о предельной разрядке батареи
Предупреждение о предельной разрядке батареи поступает, когда уровень заряда батареи уменьшается до 3%. Красный
индикатор состояния батареи мигает, а система издает предупреждающие сигналы каждые 4 секунды. Когда Ваш
портативный компьютер предупреждает Вас о предельной разрядке батареи, у Вас есть около 35 минут, чтобы сохранить
все свои документы и изменения.
Предупреждение: не подвергайте аккумуляторную батарею воздействию температур ниже 0
градусов Цельсия (32 F) или выше 60 градусов Цельсия (140F). Это может неблагоприятно сказаться
на работе аккумуляторной батареи.
Обратите внимание: Нажмите комбинацию клавиш Fn+F3, чтобы выключить предупреждающий
звуковой сигнал о разряде батареи.
Установка и извлечение аккумуляторной батареи
Извлечение аккумуляторной батареи:
1. Переверните компьютер и поместите его на плоскую устойчивую поверхность.
2. Сдвиньте защелку и извлеките батарею из компьютера.
Page 89

30 Prestigio Nobile 1440W
РУС
Установка аккумуляторной батареи:
1. Переверните компьютер и поместите его на плоскую устойчивую поверхность.
2. Вставьте аккумуляторную батарею в отсек батареи портативного компьютера.
Page 90

Prestigio Nobile 1440W 31
РУС
Зарядка батареи и время зарядки
Чтобы осуществить зарядку батареи в то время, как она находится в компьютере, подключите сетевой адаптер к
компьютеру и к сети переменного тока.
Время зарядки колеблется от 46 часов (при выключенном компьютере) до 610 часов (когда портативный компьютер
включен).
Когда батарея полностью заряжена, индикатор зарядки батареи загорается зеленым цветом.
Обратите внимание: Если система работает при высоком уровне нагрузки или в условиях
высокой температуры окружающей среды, полная зарядка батареи невозможна. Зарядку необходимо
продолжать до тех пор, пока светодиодный индикатор не загорится зеленым цветом.
Проверка уровня заряда батареи
Вы можете проверить уровень заряда батареи, обратив внимание на индикатор состояния батареи в ОС Windows,
расположенный в нижнем правом углу панели задач. (Если Вы не видите пиктограмму батареи или внешнего
электропитания на панели задач, зайдите в меню Свойства электропитания (Power Options Properties) и щелкните на кнопке
Дополнительно (Advanced)). Отметьте галочкой пункт "Всегда показывать значок на панели задач" (Always show icon on the
task bar).
Помимо этого, Вы можете получить доступ к индикатору заряда батареи, войдя в пункт меню Управление электропитанием
(Power Options) на Панели управления (Control Panel) Windows.
Продление срока службы батареи и циклы использования
Существует несколько способов продления срока службы батареи.
Всегда используйте сетевой адаптер, когда у Вас есть доступ к электрической розетке. Это сможет гарантировать
непрерывную работу компьютера в течение длительного времени.
Приобретите дополнительную аккумуляторную батарею.
Храните батарею при комнатной температуре. При повышении температуры происходит быстрая разрядка батареи.
Используйте функции управления питанием. Использование "спящего" режима (текущее состояние системы сохраняется на
специально зарезервированном для этого секторе жесткого диска) позволяет сохранить наибольшее количество энергии.
Срок службы батареи составляет приблизительно 300 перезарядок.
См. раздел примечаний в начале данного руководства для получения информации об уходе за аккумуляторной батареей.
Обратите внимание: Внимательно изучите раздел об инструкциях по безопасности в начале
данного руководства для получения информации об уходе за аккумуляторной батареей.
Обратите внимание: Чтобы обеспечить оптимальную работу батареи, Вы, возможно, сочтете
необходимым производить ее калибровку с 3месячным интервалом. Следуйте инструкциям:
1. Полностью зарядите батарею.
2. Добейтесь полной разрядки батареи, войдя в меню BIOS. (Нажмите клавишу F2 в момент
начальной стадии загрузки системы). Оставьте компьютер в данном режиме до полной разрядки
батареи.
3. Полностью зарядите батарею снова.
Использование функции управления электропитания Windows
Управление питанием Windows предоставляет основные возможности для сохранения энергии. В диалоговом окне свойств
электропитания (Power Options Properties) [Пуск > Параметры настройки > Панель управления > Электропитание] ([Start
> Settings > Control Panel > Power Options]) Вы можете установить время отключения дисплея и жесткого диска. Например,
ОС Windows автоматически отключает жесткий диск после 1 минуты бездействия.
Схемы управления электропитанием Windows
Раздел Windows XP Схемы управления питанием обеспечивает пользователя удобным в работе интерфейсом. Меню
Схемы управления питанием (Power Schemes) находится на панели Свойств управления питанием (Power Options Properties),
доступ к которой можно получить, войдя в Панель управления Windows.
Схемы просты для понимания и отражают основные режимы использования портативного компьютера. С их помощью
можно контролировать не только работу процессора, но и других системных периферийных устройств.
Войдите в меню [Пуск > Настройки > Панель управления] (Start > Settings > Control Panel) и произведите двойной щелчок
мышью на значке Управление электропитанием (Power Options).
Page 91

32 Prestigio Nobile 1440W
РУС
Режим "
Always on
" (постоянная работа) позволяет процессору работать в режиме максимальной производительности, что
не способствует сохранению энергии. Другие схемы позволяют установить более экономные режимы работы процессора.
Например, режим "Max Battery" (максимальное сохранение энергии батареи) понижает производительность и напряжение
процессора, чтобы в максимально возможной степени добиться сохранения энергии батареи.
В этом диалоговом окне Вы также можете вручную установить время отключения ЖКдисплея и жесткого диска. Чем
меньшее время Вы устанавливаете для отключения, тем больше энергии будет сохранено.
Обратите внимание: Обратитесь к руководству пользователя Windows для получения подробной
информации относительно того, как использовать функции управления питанием Windows.
Обратите внимание: Фактическое диалоговое окно может отличаться от приведенного.
Page 92

Prestigio Nobile 1440W 33
РУС
Режим временной остановки работы системы
Режим ожидания
Система автоматически входит в этот режим после определенного периода бездействия, временные рамки которого могут
быть установлены в диалоговом окне Схем управления питанием (Power Schemes). В режиме ожидания (Standby)
аппаратные устройства, такие как ЖКдисплей и жесткий диск, выключены, чтобы сохранить энергию.
"Спящий" режим (Hibernate)
В этом режиме все системные данные сохранены на жестком диске перед выключением. Когда этот режим активизирован,
все состояние системы и содержание документов сохраняется на жестком диске после периода бездействия,
определенного пользователем. В этом режиме батарея вообще не потребляет энергию.
Однако в зависимости от объема оперативной памяти, установленного на Вашем компьютере, системе может
потребоваться от 5 до 20 секунд, чтобы восстановить свое предыдущее состояние.
ОС Windows XP осуществляет автоматическое применение "спящего" режима, в связи с чем отпадает необходимость
создания специального сектора диска или файла.
Если Вы желаете активизировать "спящий" режим (Hibernate), Вы должны разрешить поддержку "спящего" режима в
соответствующем разделе меню Управления электропитанием.
Обратите внимание: не устанавливайте и не извлекайте модуль памяти, когда система
находится в режиме временной остановки работы.
Обратите внимание: фактическое диалоговое окно может отличаться от приведенного.
Действия кнопки включения/выключения питания
Кнопка включения/выключения питания может служить для выключения системы или активации режимов временной ее
остановки.
Войдите в меню [Пуск > Настройки> Панель управления> Электропитание] (Start > Settings > Control Panel > Power
Options) и произведите двойное нажатие на закладке Дополнительно (Advanced). В выпадающем меню определите функции
кнопки включения/выключения питания.
Page 93

34 Prestigio Nobile 1440W
РУС
Обратите внимание: Фактическое диалоговое окно может отличаться от приведенного.
Предупреждение: В пункте меню
"При закрытии крышки переносного компьютера "
(When I close the lid of my portable computer)
НЕ выбирайте пункт
"Действие не требуется"
(Do nothing)
. В противном случае система будет продолжать работать, а отверстие вентилятора
окажется полностью блокировано закрытой панелью дисплея. Выделяемое тепло может повредить
панель дисплея.
Page 94

Prestigio Nobile 1440W 35
РУС
Предупреждение о разряде батареи
Вы можете определить, когда и как система будет предупреждать Вас относительно разряда батареи.
Откройте закладку Сигнализация (Alarms) в меню Свойств управления питанием (Power Options Properties). Если Вы
желаете слышать звуковые сигналы, нажмите на кнопку "Действия при предупреждении" (Alarm Action) и отметьте галочкой
пункт "Звуковой сигнал" (Sound Alarm).
Обратите внимание: Обратитесь к руководству пользователя Windows для получения подробной
информации относительно того, как использовать функции управления питанием Windows.
Обратите внимание: Фактическое диалоговое окно может отличаться от приведенного.
Page 95

36 Prestigio Nobile 1440W
РУС
Быстрый доступ к меню управления электропитанием
Вместо создания определенных установок в меню Свойств управления питанием, Вы можете быстро и легко задать
параметры функций сохранения энергии, нажав на пиктограмму батареи в нижнем правом углу панели задач. (Если Вы не
видите пиктограмму батареи или внешнего электропитания на панели задач, зайдите в меню Свойств питания (Power
Options Properties) и щелкните на кнопке Дополнительно (Advanced)). Отметьте галочкой пункт "Всегда отображать значок
на панели задач" (Always show icon on the task bar). Выберите режим максимальной экономии энергии батареи (Max Battery)
в том случае, если Вы хотите, чтобы система чаще входила в режим временной остановки работы. Вы также можете
выбрать режим постоянного включения системы (Always On), если Ваш портативный компьютер подключен к внешнему
источнику энергии.
Обратите внимание: Фактическое диалоговое окно может отличаться от приведенного.
Page 96

Prestigio Nobile 1440W 37
РУС
Модернизация Вашего компьютера
В данном разделе руководство содержится информация о модернизации памяти DRAM, жесткого диска и установке
опционального модуля беспроводной локальной сети (wireless LAN miniCard) и модуля DVBT.
Предупреждение: все работы по модернизации компонентов компьютера рекомендуется
предоставлять квалифицированному персоналу сервисного центра или обратиться к продавцу
данного устройства.
Прежде, чем предпринимать любые шаги по обновлению компьютера, удостоверьтесь, что Вы
отключили его от всех источников питания и отсоединили все периферийные устройства и кабели
(включая кабели модема и локальной сети). Необходимо также извлечь батарею, чтобы
предотвратить случайно включение компьютера.
После завершения модернизации и до включения компьютера убедитесь в надежности крепления
всех винтов на его корпусе.
Модернизация жесткого диска
Вы можете увеличить объем хранимой на компьютере информации, заменив жесткий диск на более вместительный. В
данной модели используется накопитель на жестких магнитных дисках типа 9.5 mm (выс.), 2.5дюймовый Serial ATA.
Убедитесь в наличии резервной копии всех данных, прежде чем приступать к замене жесткого диска.
Предупреждение: Модернизация жесткого диска достаточно сложный процесс. Следуйте
приведенным инструкциям или обратитесь в сервисный центр. На любые неполадки, вызванные
неверными действиями в ходе замены диска, гарантийные обязательства производителя не
распространяются.
Предупреждение: При обращении с жестким диском проявите предельную аккуратность.
Не допускайте его падения и не подвергайте его вибрации.
Не применяйте излишнюю физическую силу к корпусу диска.
Не прикасайтесь к разъемам накопителя пальцами.
Небрежное обращение с диском может привести к потере данных. Убедитесь в наличии резервной
копии всех данных, прежде чем приступать к замене жесткого диска.
Внимание: В некоторых моделях установлен фирменный накопитель IBM, работа которого
характеризуется наличием специфических шумов. Это не является неполадкой.
Page 97

38 Prestigio Nobile 1440W
РУС
Модернизация жесткого диска
Для замены жесткого диска следуйте приведенным инструкциям:
1. Выключите компьютер. Отключите шнур питания и все кабели. Извлеките батарею.
2. Поместите свою руку на любой крупный металлический объект для снятия статического заряда.
3. Отвинтите 7 винтов A.
4. Снимите крышку отсека.
5. Отвинтите винт B.
Page 98

Prestigio Nobile 1440W 39
РУС
6. Сдвиньте модуль жесткого диска вправо и отсоедините его контакты. Извлеките модуль из отсека.
7. Отвинтите 4 винта C модуля жесткого диска. Снимите металлический корпус.
Page 99

40 Prestigio Nobile 1440W
РУС
8. Поместите металлический корпус на новый накопитель и закрепите его при помощи 4 винтов C. Обратите внимание на
правильность размещения накопителя в корпусе.
9. Снова подключите контакты жесткого диска. Закрепите накопитель при помощи винта B.
10. Закройте крышку отсека и закрепите 7 винтов A.
Примите наши поздравления! Модернизация Вашего жесткого диска завершена. При загрузке компьютера Вам
необходимо создать первичный раздел жесткого диска, произвести его форматирование, переустановить операционную
систему, драйверы и все необходимые программные приложения.
Page 100

Prestigio Nobile 1440W 41
РУС
Модернизация системной памяти
При увеличении объема динамической памяти компьютера многие программные приложения смогут «работать» гораздо
быстрее. В Вашем компьютере имеются два разъема для памяти DDR2, расположенные под крышкой системного блока.
Вы можете увеличить объем памяти, заменив имеющийся модуль модулем нового поколения (например, SODIMM)
большей емкости. Модуль SODIMM может иметь объем в 256MB, 512MB или 1024MB. SODIMM является модулем типа
DDR2 SDRAM с 200 контактами и напряжением в 2.5V. Модуль SODIMM должен соответствовать типу DDR2 SDRAM, иметь
200 контактов и питание 1.8V.
Предупреждение: Модернизация модулей памяти достаточно сложный процесс. Следуйте
приведенным инструкциям или обратитесь в сервисный центр. На любые неполадки, вызванные
неверными действиями в ходе замены, гарантийные обязательства производителя не
распространяются.
Предупреждение: Замена модуля памяти в момент, когда компьютер находится в режиме
ожидания или режиме экономии электропитания может привести к повреждению его компонентов.
Убедитесь, что питание компьютера отключено, а шнур питания отсоединен от розетки.
Предупреждение: При модернизации необходимо использовать только те модули, которые
одобрены производителем или рекомендованы дилером. В противном случае могут иметь место
сбои в работе системы.
Установка модуля памяти (DIMM) в компьютер
Для установки модуля памяти DIMM в системный блок следуйте приведенным инструкциям:
1. Выключите компьютер. Отключите шнур питания и все кабели. Извлеките батарею.
2. Поместите свою руку на любой крупный металлический объект для снятия статического заряда. Поместите ноутбук на
устойчивую поверхность и полностью закройте крышку дисплея.
3. Отвинтите 7 винтов А на крышке системного блока.
4. Снимите крышку системного блока. Разъемы памяти DIMM изображены на иллюстрации.
 Loading...